
This document will continue to evolve as existing sections change and new information is added. All updates appear in the following table:
| Date | Product | Feature | Notes |
|---|---|---|---|
| 13 NOV 2020 | Created initial document. |
This guide outlines the information you need to know about new or improved functionality in this update.
We are announcing the general availability of the 20D update of the Oracle Taleo Cloud for Midsize (TBE) on November 20, 2020.
Column Definitions:
Features Delivered Enabled
Report = New or modified, Oracle-delivered, ready to run reports.
UI or Process-Based: Small Scale = These UI or process-based features are typically comprised of minor field, validation, or program changes. Therefore, the potential impact to users is minimal.
UI or Process-Based: Larger Scale* = These UI or process-based features have more complex designs. Therefore, the potential impact to users is higher.
Features Delivered Disabled = Action is needed BEFORE these features can be used by END USERS. These features are delivered disabled and you choose if and when to enable them. For example, a) new or expanded BI subject areas need to first be incorporated into reports, b) Integration is required to utilize new web services, or c) features must be assigned to user roles before they can be accessed.
| Ready for Use by End Users Reports plus Small Scale UI or Process-Based new features will have minimal user impact after an update. Therefore, customer acceptance testing should focus on the Larger Scale UI or Process-Based* new features. |
Action is Needed BEFORE Use by End Users Not disruptive as action is required to make these features ready to use. As you selectively choose to leverage, you set your test and roll out timing. |
|||||
|---|---|---|---|---|---|---|
| Feature |
Report |
UI or |
UI or |
|
||
TBE 20D simplifies the setup and self-service of the existing eQuest job distribution service that posts requisitions for free in its US-only BLAST! Network. Improvements include:
- Customers can follow simple steps (below) to expose the (initially hidden) eQuest fields, without requesting assistant from Oracle or eQuest Support
- Customers will have their company and service authentication details pre-loaded in eQuest's access systems
- Customers will be redirected to a new, on-demand job distribution tool called eQuestXpress, which offers the same job posting for free in the US-only BLAST! Networ, but also other discounted, pay-as-you-go job boards
NOTE: Customers who already enabled eQuest postings before (with assistance from Oracle or eQuest Support) will not be affected by this update.
Steps to Enable
Requisition fields specific to the eQuest functionality have been added to your View Requisition and Add/Edit Requisition page layouts, and all versions of these page layouts. Before following the steps below, you should determine which users you would like to be able to post requisitions to eQuest, and then make the following changes on the page layouts assigned to these user roles. For example, if only Administrators should be able to post, then be sure you have a version of the View Requisition and Add/Edit Requisition page layout that is assigned only to Administrators. If you do not already have multiple versions, simply add a new version and then assign it to the user role.
Steps to Unhide the eQuest fields:
- Select Administration, then select Customize Recruit.
- In the Customize Pages section, click Page Layouts.
- Locate the Add/Edit Requisition page layout. If you have multiple versions of this page layout, edit the version that is assigned to the user role that should be allowed to post to eQuest job boards.
- Click Proceed if you see a warning about editing the page layout.
- Scroll down to a section containing hidden fields starting with a section heading of 'eQuest.' This section should be located under your Approvers section.
- Click Unhide next to each of the three fields, as well as the section title. Once you unhide these fields. the section should resemble the following:

- Save the page layout and repeat for any Add/Edit Requisition page layouts as needed.
- Repeat the above for the View Requisition page layout. This page layout will have an additional field containing three buttons. Save your changes after unhiding the section.

Steps to Post/Update/Delete jobs:
- Edit your requisitions that you would like to post to eQuest, and select values for the eQuest Job Function, Job Type and Job Industry fields. Save the requisitions with this information.
- View a requisition that you would like to post to eQuest.
- In the eQuest section, click the Post button.
- If any of the fields required by eQuest are missing, you will be prompted to enter the information at this time. Click Next after filling in these fields.
- Select from many different boards by clicking Add Site below their tile. If you post to the US-only BLAST! Network, you will see that the charge is removed from the subtotal on the right. Posting to other boards gives you the discount mentioned on each tile.
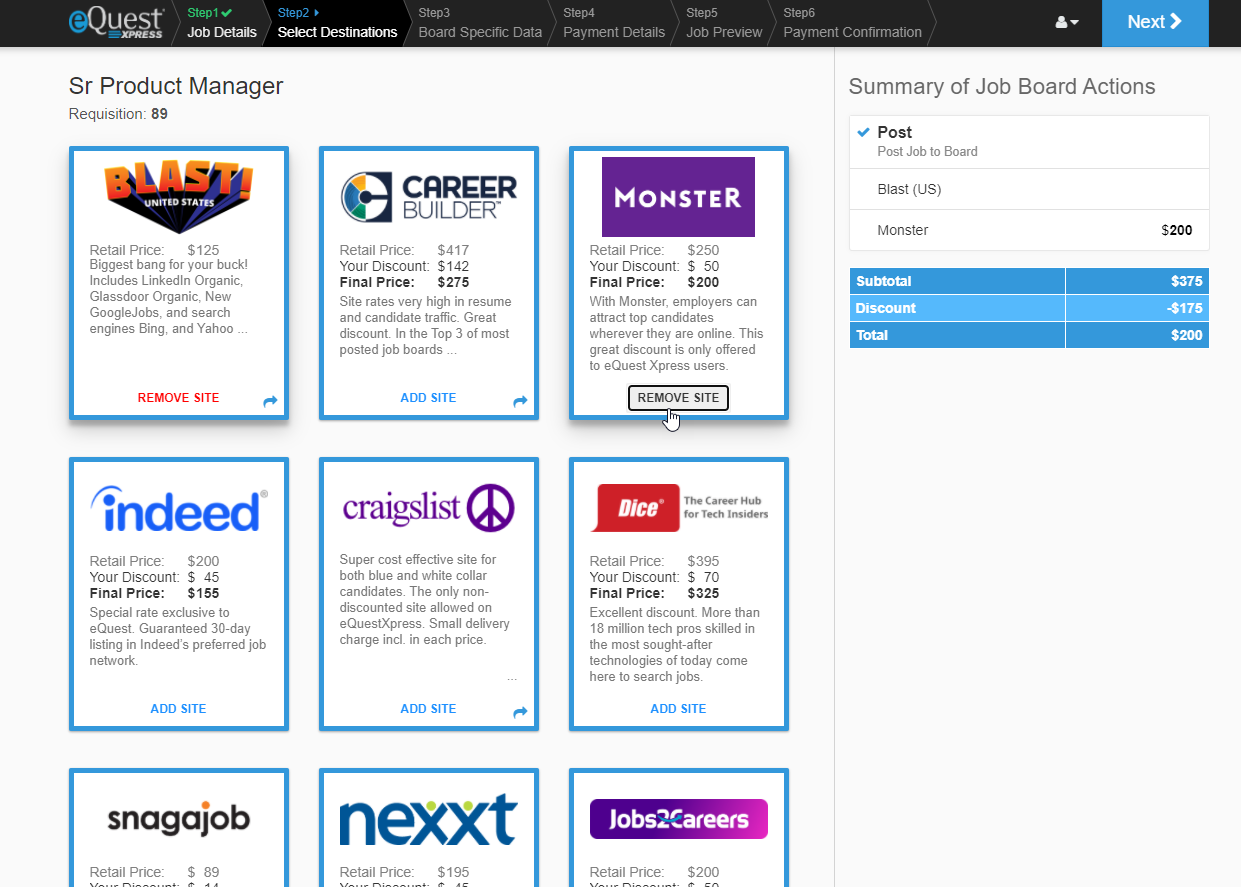
- Click Next to enter in your credit card information for the paid boards.
- Click Next, and select a posting date for the specific job.
- Click Submit and you should return to the TBE requisition.
If you make any changes to the requisition that affect your posting, you can use the Update button to send over the latest requisition information. Click the Delete button to remove the posting. These two buttons do not take you to the eQuest setup page.
Tips And Considerations
eQuest uses a format for the State field with "US-" before each two-letter abbreviation. For example, US-CA, US-NY, US-FL. If your State field is not set up in this manner, you can still post jobs, but you will need to manually choose the state each time you post. You can edit the State field to follow this format if you will be posting frequently.
Out of the box, the eQuest feature refers to your career site that is selected as your default Career Site set on the System & Email Setting page as the site to which candidates are referred. If for some reason you wish to use a different site, please contact Customer Service so that they can make this change in the script for you.
In previous releases, your TBE instance may have included the various eQuest fields in the Requisitions Custom Fields list, even if you were not using the eQuest integration. These fields are now listed for all customers in the Requisition Application Integration Fields list. They cannot be deleted, but if you do not unhide the relevant sections on the page layouts as described above, the fields will have no affect on your requisitions.
Key Resources
For more information on the BLAST! network, refer to https://www.equest.com/blast-network/.
For details on additional values you can add to the eQuest fields, refer to https://support.equest.com/index.php?pg=kb.chapter&id=35.
Selecting Rejection Email Template
Recruiters can now select a specific email template when rejecting a candidate. As part of this feature, system email templates can now be designated as "Rejection" emails, and only those templates will be available to select when rejecting a candidate. This feature is available both when using the 'Next Step' to reject a candidate, and when selecting one or more candidates from the list of candidates for a specific requisition and then changing their requisition-specific candidate status.
With this feature, recruiters and hiring managers can deliver more specific content to different types of candidates, for example internal versus external candidates, or those who made it further along in the selection process.
Steps to Enable
- Select Administration, then select Customize Recruit.
- Click System Email Templates.
- For any custom templates which you have already created that you use for the purpose of rejecting a candidate, click the Edit button for the template.
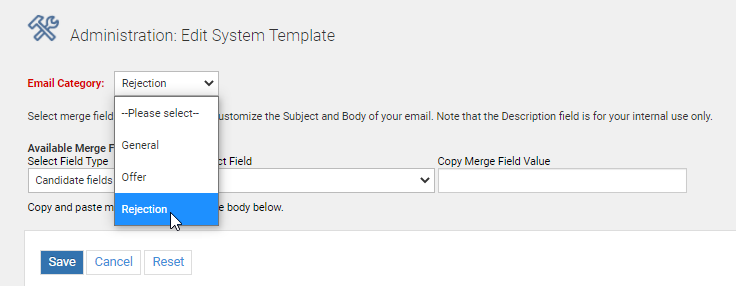
- In the Email Category drop-down at the top of the page, select Rejection and then save the template.
- If needed, create other email templates for the purpose of rejecting a candidate. You may wish to have a different email template for internal versus external candidates; or different templates for a candidate who has been interviewed than one who was rejected earlier in the process. Each of these templates should be marked as 'Rejection' for the Email Category.
- Confirm that the template you currently have set as the default on the Assign System Templates page for the action of 'Candidate rejection email' is the one you want as the default template.
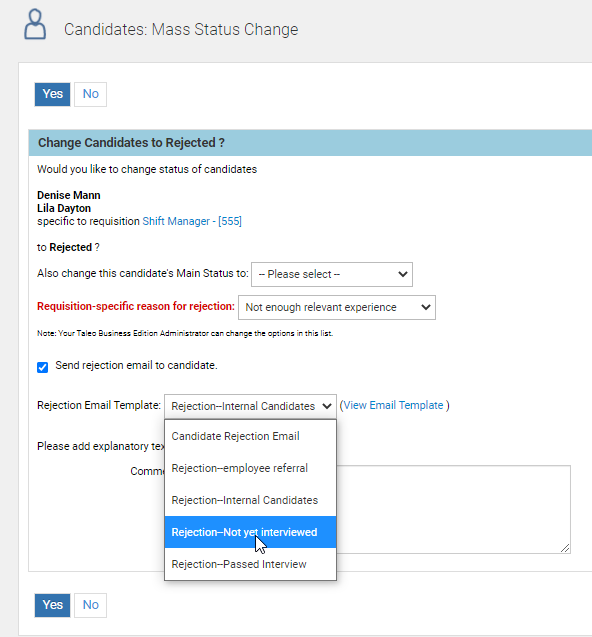
When rejecting a candidate, either by the Next Step action on a Candidate record, or by changing the requisition-specific candidates status in the list of candidates for a particular requisition, recruiters can choose an email template from a drop-down list. The list includes the system default 'Candidate Rejection Email' as well as any templates with the Email Category of 'Rejection.' The assigned template for the Candidate Rejection action will always be the pre-selected choice in the drop-down list.
Tips And Considerations
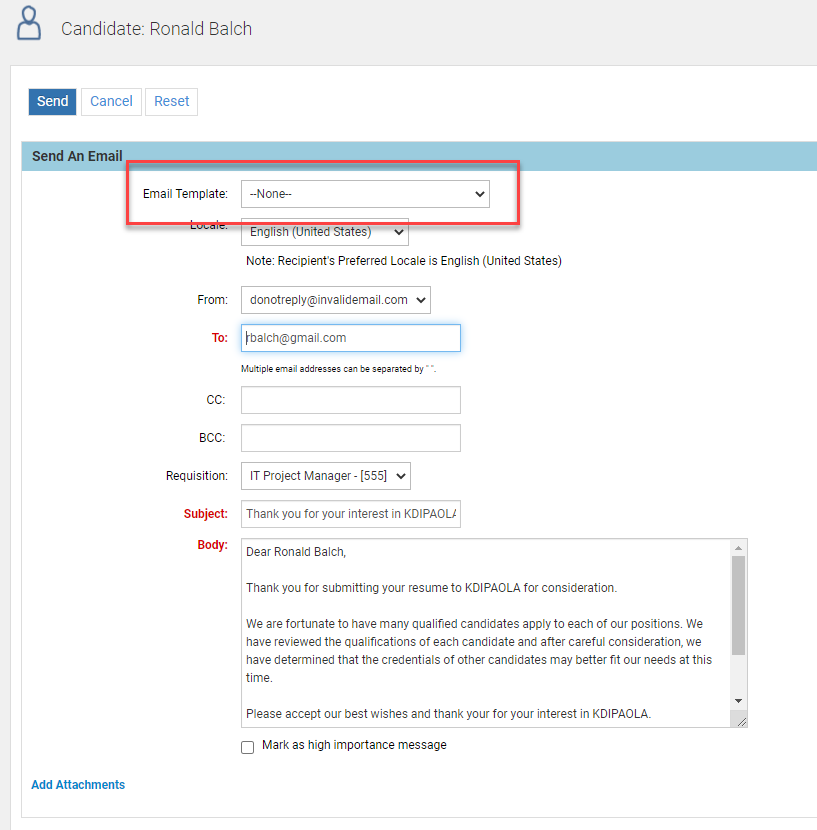
In previous releases, if you rejected a candidate from the Candidate record via the Next Step action and chose to email the candidate, on the second page you were presented with a list of email templates that reside under the Candidates>Email Templates menu option (unless you have a delay set on manual rejection emails, in which case you do not see this second page). This list includes all candidate templates you have created, and not just those that deal with rejecting candidates. With this release, the drop-down showing the list of templates with the email category of 'Rejection' appears on the first page, as seen above. When you select one of these templates and move to the second page, the selected template appears and users can edit the body of the email before sending. However, there is still an option at the top to select the templates added under Candidates>Email Templates, as seen in the image below.
Therefore, it is suggested that any rejection templates you have created under Candidates>Email templates be added to the System Email Templates list and given the 'Rejection' email category. Once you have done so, you can simply ignore the Email drop-down at the top of the second page. It is recommended that you select the rejection template on the first page.
This update introduces a new option for the Career Center, which displays a simple, one-line banner offering the job seeker an opportunity to consent to all first-party, strictly necessary cookies set by the Career Center, while searching and applying for open jobs.
This feature covers one of the EU GDPR personal data protection requirements for external web sites, such as the Career Center.
Steps to Enable
- Select Administration, then select Customize Recruit.
- In the Manage Career Centers section, click Edit Settings for the Career Center for which you want to enable this feature.
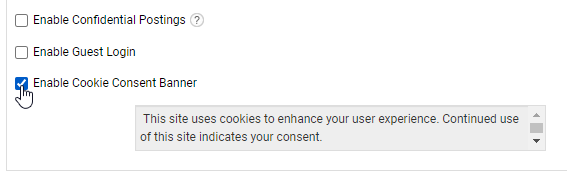
- At the bottom of the Settings section, check the option 'Enable Cookie Consent Banner.' A box will appear with the text that will appear on your Career Center. This text is not configurable.
- Click Save.
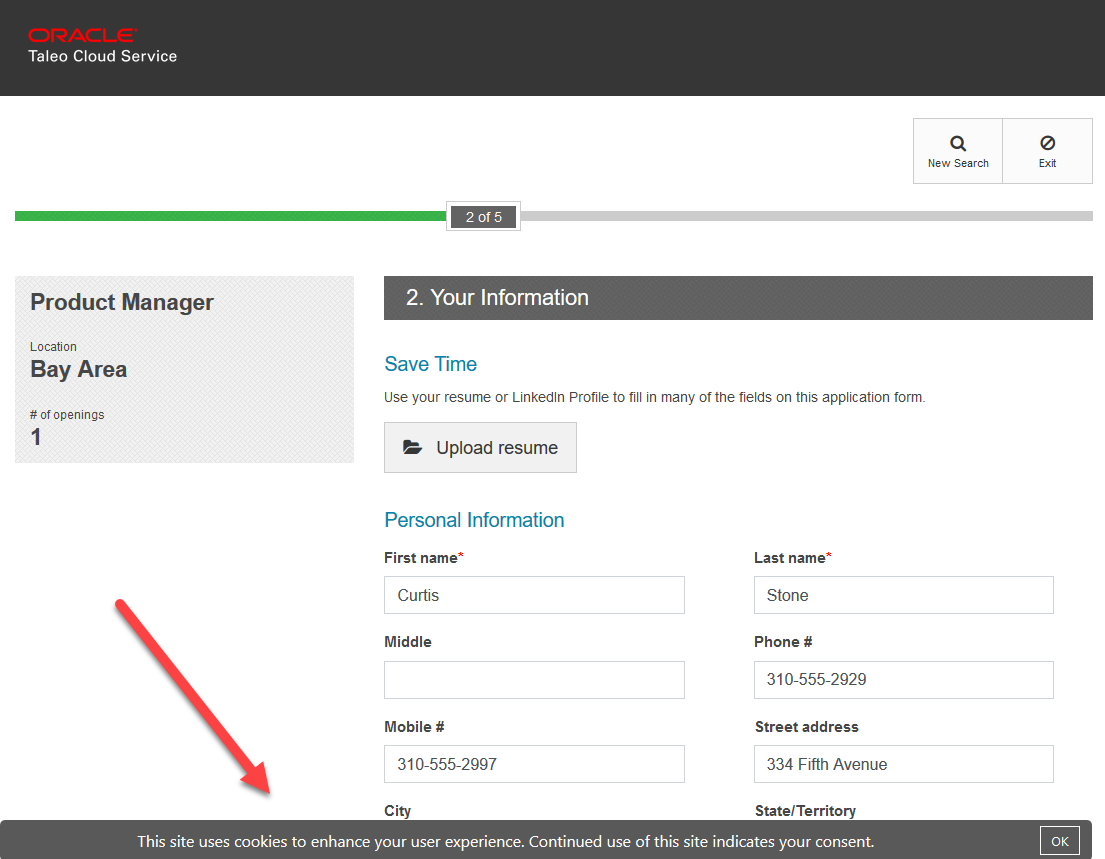
When this options is checked, job seekers visiting the Career Center will now see a small banner at the bottom of the page. It will remain visible throughout the session until they accept the consent statement by clicking the OK button, at which point the banner disappears unless the cookies are deleted from the browser.
Review Page Layout Competency Update
In this update, administrators can customize a Review page layout to hide specific sections of competency factors in the Talent CEnter. Before this update, the Competencies widget on a Review page layout automatically displayed all sections enabled by the Review template (up to three).
This feature addresses the use case where employees should see (and rate) fewer or different competency sections than review managers. Therefore, administrators can simply hide the sections for each Review page layout that are not relevant to employees, resulting in a cleaner and more flexible user experience.
Steps to Enable
- Select Administration, then select Customize Perform.
- In the Manage Talent Centers section, click Edit Pages for one of your Talent Centers (because Talent Centers share page layouts, you can make this change from any Talent Center).
- Once in the Talent Center, locate the 'My Reviews' widget and click on it to place it in edit mode.
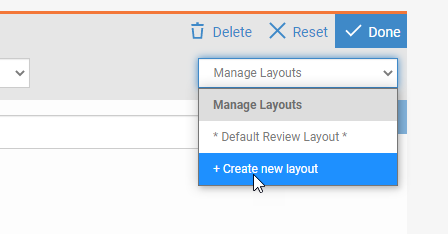
- It is recommended that you create a new page layout for the situation where you want to hide certain sections. From the Manage Layouts drop down, choose Create new layout.
- Edit the default name for the page layout at the top of the page to clarify that this page layout displays only certain sections to the employee by clicking the Pencil icon.
- Scroll down to the Competencies widget on the page layout and click on it to edit.
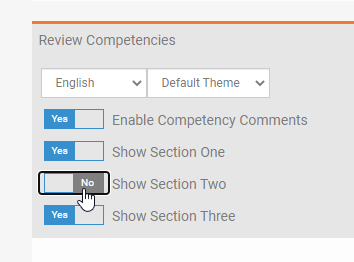
- There are Yes/No options for all three competency sections. Click the option to change the value to No for any section you want to hide from Employees.
- Click Done to save the widget.
- Click Save & Publish to save the page layout.
- Click Exit to leave the Talent Center and go back to TBE Perform.
- From the Reviews menu, select Review Templates.
- Edit the template you will use to assign reviews to your employees that will only show certain competency sections.
- At the bottom of the template, select the page layout you named above in the drop-down that says 'When edited or viewed by an Employee on a Talent Center.'
- Click Save.
- Assign reviews as you normally would assign them.
Tips And Considerations
Please note that when you hide certain competencies from either the employee or the manager, the system treats this as a score of zero rather than a 'not applicable' value. This behavior is consistent with the legacy Employee Website (EWS), which also had the ability to only expose certain sections to the employee. This feature therefore works best when the manager scores all the competencies, and the employee scores a subset, and the manager's calculated score is considered the true score of the review.
If you use this feature, you will want all parties to understand that the employee's calculated score is lower because the employee didn't rate all factors, and you may wish to hide this employee calculated score from the final review.
As with previous versions, if you want to hide certain sections from the manager's portion of the review, you can do this by editing the page layout called 'Edit Performance Review.' However, it is recommended that you create a version of this page layout for this purpose and make the changes in this version. You can then hide any of the sections on this page layout. Be sure to assign this page layout to the review template as well.