
This document will continue to evolve as existing sections change and new information is added. All updates appear in the following table:
| Date | Module | Feature | Notes |
|---|---|---|---|
| 11 MAY 2023 | Created initial document. |
 HAVE AN IDEA?
We’re here and we’re listening. If you have a suggestion on how to make our cloud services even better then go ahead and tell us. There are several ways to submit your ideas, for example, through the Ideas Lab on Oracle Customer Connect. Wherever you see this icon after the feature name it means we delivered one of your ideas.
GIVE US FEEDBACK
We welcome your comments and suggestions to improve the content. Please send us your feedback at oracle_fusion_applications_help_ww_grp@oracle.com.
DISCLAIMER
The information contained in this document may include statements about Oracle’s product development plans. Many factors can materially affect Oracle’s product development plans and the nature and timing of future product releases. Accordingly, this Information is provided to you solely for information only, is not a commitment to deliver any material, code, or functionality, and should not be relied upon in making purchasing decisions. The development, release, and timing of any features or functionality described remains at the sole discretion of Oracle.
This information may not be incorporated into any contractual agreement with Oracle or its subsidiaries or affiliates. Oracle specifically disclaims any liability with respect to this information. Refer to the Legal Notices and Terms of Use for further information.
Column Definitions:
Report = New or modified, Oracle-delivered, ready to run reports.
UI or Process-Based: Small Scale = These UI or process-based features are typically comprised of minor field, validation, or program changes. Therefore, the potential impact to users is minimal.
UI or Process-Based: Larger Scale* = These UI or process-based features have more complex designs. Therefore, the potential impact to users is higher.
Features Delivered Disabled = Action is needed BEFORE these features can be used by END USERS. These features are delivered disabled and you choose if and when to enable them. For example, a) new or expanded BI subject areas need to first be incorporated into reports, b) Integration is required to utilize new web services, or c) features must be assigned to user roles before they can be accessed.
| Ready for Use by End Users Reports plus Small Scale UI or Process-Based new features will have minimal user impact after an update. Therefore, customer acceptance testing should focus on the Larger Scale UI or Process-Based* new features. |
Customer Must Take Action before Use by End Users Not disruptive as action is required to make these features ready to use. As you selectively choose to leverage, you set your test and roll out timing. |
|||||
|---|---|---|---|---|---|---|
| Feature |
Report |
UI or |
UI or |
|
||
This feature allows customers to assign a pay range to a requisition based on the location of the requisition. Administrators define pay ranges and assign them to one or more locations. The pay range can include salary information as well as additional information that you would like job seekers to know. Once the list of pay ranges is available, recruiters and hiring managers can select the pay range on a given requisition, based on the pay range title, and the details will populate. These details will then appear on the Career Center as well.
This feature allows customers who may be required to display pay information in job postings to maintain a list of pay ranges based on location, and easily associate the requisition to the correct information.
Steps to Enable
Creating the Requisition Pay Ranges
- As an administrator, select Administration, then select Customize Recruit.
- In the Customize Processes section, click Define Requisition Pay Ranges.
- Click Add Range.
- Enter the title, minimum and maximum salary range, and the pay basis (hourly, annually, etc). The Pay Basis is a new keyword which is customizable in the Requisition Pay Range field types.
NOTE: The pay range title will show on your requisitions, but it will not show on the job postings, so you are free to use an internal title.
- Optionally, enter information in the Additional Information section that you wish to display to job seekers.
- In the Assign Locations section, select one or more locations for which this pay range applies. You can choose to include all active locations as well.
- Save the pay range.
- Continue setting up pay ranges based on location. You can clone an existing pay range to make a copy for a different location, or to easily create a pay range for a similar position.
Enabling the Pay Range for Requisitions and Career Centers
Once the pay ranges have been defined, you can unhide the new field on your page layouts so that your users can select the pay range on requisitions.
- Select Administration, then select Customize Recruit.
- In the Customize Pages section, click Page Layouts.
- Edit the Add/Edit Requisition page layout, or any version of this page layout assigned to users who will be adding pay ranges. If you get a warning, you should proceed.
- Scroll down to the new hidden section, below the first section of basic requisition details, where you see both a title of Pay Range and a field called Pay Range Details.
- Unhide both of these, and save the page layout.
- Repeat this for the View Requisition page layout and/or any versions.
- Optionally, you may do the same for your Add/Edit Requisition Template and View Requisition Template page layouts, if you wish to select the pay ranges on your templates as well.
- Go back to the Customize Recruit page, and in the Customize Pages section, click Career Center Pages.
- Scroll down to the Navigation section, and edit the Requisition View page.
- Unhide the Pay Range Details. Optionally, you can drag this section above or below the other sections by clicking on the handles on the right.
- Click Edit if you wish to rename the section, or remove the title entirely.
- Save the Requisition View page.
Now your users are ready to select pay ranges on the requisitions.
Selecting a Pay Range on a Requisition
- In the Pay Range section, click Select Pay Range.

- In the selector, you can search by a title, or filter by location.
- Select the correct pay range for the requisition. The Pay Range Details field populates.

- Upon saving, if the pay range isn't valid for the requisition's location, a warning appears near the field. Correct the pay range before saving.
- If the requisition is posted on the Career Center and the Pay Range field has been unhidden, the job postings are automatically updated with this information.
Tips And Considerations
- If an administrator updates the details of the pay range, those changes are automatically reflected in all requisitions, including Closed requisitions, as well as existing job postings. If a pay range is in use, the administrator will receive a warning upon edit so that the administrator is aware of the impact, and therefore the administrator can instead clone the pay range to use moving forward, if that is a preferred option.
- Changes to the pay range details are shown in the requisition's history log so that it is clear when the salary was changed. This information may be needed if the pay range details are changed after candidates have applied or after the requisition status changes.
- Pay ranges that are in use cannot be deleted, but they can be deactivated. Unused pay ranges can be deleted.
- If you have TBE Compensation, there is a pay range feature as well. These pay ranges are separate from the ones you create in TBE Recruit.
- There is a Requisition standard field called Pay Range that is a simple text field. If you want to define the pay ranges by location and use on your requisition, you may wish to hide the text field, if it is on your page layouts, and no longer use the text field.
EEO Fields on Onboarding Forms
A new access control setting determines which user roles can view and download forms with EEO fields on them. You can set up binding for fields on Onboard forms to map to Employee fields. Mapping fields to any of the following Employee fields marks the form as containing EEO data, with restricted access:
Race, Gender, Veteran/Disability, Individuals with disabilities
This new setting allows you to better control who can view and download these forms, at the User Role level. Only Administrator users who are also security managers can change this setting. By default, all users with the Administrator role can view and download these forms, but a security manager can add or remove access.
The setting appears under Users>Roles>Assign Access Control:
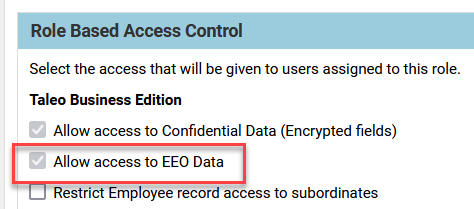
This setting functions similar to the one controlling access to encrypted fields.
Steps to Enable
You don't need to do anything to enable this feature.
Tips And Considerations
While you don't need to edit any settings unless you want to give access to another User Role, you will need to edit any forms containing any of these fields, and verify that the mapping is still correct, and then save the forms in order for this setting to take affect, even if you didn't change the binding.
If a user without access attempts to view or download a completed Onboard form with one or more EEO fields, the following warning appears, just as it does with encrypted fields:
