
- Revision History
- Overview
- Feature Summary
-
- Functional Enhancements
- User Experience and Usability Enhancements
-
- Skip OB LPN Scan While Performing RF Full LPN Picking
- User Directed Multiple LPN Putaway Enhancements
- View and Resolve Serial Number Discrepancies from Serial Number Discrepancy View UI
- Extra Item Property Display Parameter in RF Pick IBLPN and RF Distribute LPN
- Wave Template Search Selection by Item’s Pack or Case Quantity
-
- Integration Enhancements
This document will continue to evolve as existing sections change and new information is added. All updates appear in the following table:
| Date | Feature | Notes |
|---|---|---|
| 24 JUN 2020 | Functional Enhancements, User Experience and Usability Enhancements | Updated document. Revised key resources section. |
| 11 MAY 2020 | User Directed Multiple LPN Putaway Enhancements | Updated document. Revised feature information. |
| 07 MAY 2020 | Get Inventory History Details Using a REST API |
Removed feature from update 20B. |
| 10 APR 2020 | Created initial document. |
This guide outlines the information you need to know about new or improved functionality in this update, and describes any tasks you might need to perform for the update. Each section includes a brief description of the feature, the steps you need to take to enable or begin using the feature, any tips or considerations that you should keep in mind, and the resources available to help you.
Give Us Feedback
We welcome your comments and suggestions to improve the content. Please send us your feedback at owms-cloud-comms_us@oracle.com.
Column Definitions:
Features Delivered Enabled
Report = New or modified, Oracle-delivered, ready to run reports.
UI or Process-Based: Small Scale = These UI or process-based features are typically comprised of minor field, validation, or program changes. Therefore, the potential impact to users is minimal.
UI or Process-Based: Larger Scale* = These UI or process-based features have more complex designs. Therefore, the potential impact to users is higher.
Features Delivered Disabled = Action is needed BEFORE these features can be used by END USERS. These features are delivered disabled and you choose if and when to enable them. For example, a) new or expanded BI subject areas need to first be incorporated into reports, b) Integration is required to utilize new web services, or c) features must be assigned to user roles before they can be accessed.
| Ready for Use by End Users Reports plus Small Scale UI or Process-Based new features will have minimal user impact after an update. Therefore, customer acceptance testing should focus on the Larger Scale UI or Process-Based* new features. |
Action is Needed BEFORE Use by End Users Not disruptive as action is required to make these features ready to use. As you selectively choose to leverage, you set your test and roll out timing. |
|||||
|---|---|---|---|---|---|---|
| Feature |
Report |
UI or |
UI or |
|
||
View and Resolve Serial Number Discrepancies from Serial Number Discrepancy View UI |
||||||
Extra Item Property Display Parameter in RF Pick IBLPN and RF Distribute LPN |
||||||
Wave Template Search Selection by Item’s Pack or Case Quantity |
||||||
A new module, Web Reports Gen 2 has been added, taking advantage of new technical features in the Oracle WMS Cloud Web Reports module. This module exposes a completely new set of categories that are more closely aligned with the database table structure. This results in database queries that are a lot more efficient and should perform better when more categories are joined together or when there is a lot of data in the underlying tables. The previous version (Web Reports Gen1) continues to exist for convenience and allows you to execute the existing reports.
Existing reports will not automatically be migrated to the new Gen2 version as its not technically feasible to do so. We recommend that users use the new module for creating new reports and over time, recreate any old reports using the new module. The old module will be available for approximately the next year before being deprecated. In situations where an old web report is not performing well, after addressing the usual recommendations such as adding appropriate filters to reduce the amount of data etc, the next recommendation we make will be to rewrite the report using Gen2, which should generate better performing reports.
A new alias option allows you to include the same category multiple times in a report but with different names. This is similar to using aliases in SQL statements. For example, the allocation table has two fields from_inventory_id and to_inventory_id that both refer to the same inventory table (allocations map inbound inventory to outbound). To create a report that shows both inbound and outbound inventory information related to allocations, the inventory table can be joined twice with the allocation table using these two columns and using an alias for the inventory table such as inbound_inventory and outbound_inventory.
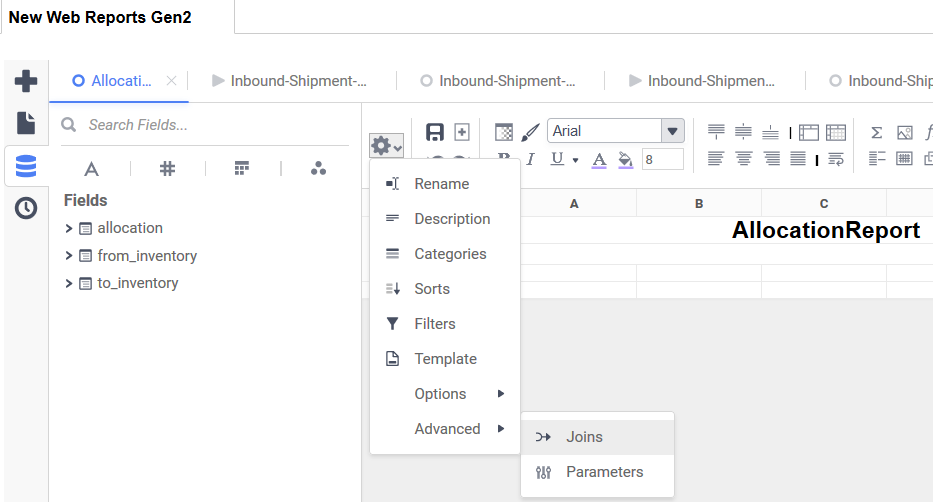
Joins Option in Web Reports Gen 2
A new dashboard module DashboardView Gen2 has been added to allow dashboards created using Web Reports Gen2 to be displayed in a tab. A new scheduled job type “Run Web Report Gen2” has been added to allow new web reports to be scheduled.
For web reports that are integrated to existing report action buttons, such as Bill of Lading (BOL), OBLPN Packing and several others, a new report subtype has been added “WebReportsGen2” to allow Gen2 reports to be linked to these buttons.
NOTE: The previous versions of the above features such as the existing module “Web Reports Gen1”, the existing “DashboardView” module, the existing “Run Web Reports” scheduled job etc will continue to be available for approximately a year to allow customers time to migrate to the new versions. We recommend using the new options for any new reports that you create.
Steps to Enable
- Create new screens using the new modules Web Reports Gen2 or DashboardView, and add the new screen to any existing menu.
- For a quick way of doing the above, go to the modules tab, select the new module, and click “Add to current group menu”.
Key Resources
Renamed RF Pack OBLPN Screen Parameter Option for "Mode"
Additionally, the value in the “Mode” screen parameter option in RF Pack OBLPN has been renamed from “Auto Substitute” to “In Line Substitution.” This will more accurately describe the action of in line scanning to support substitution and make this parameter option clearer to the user.
Steps to Enable
- In the RF, go to the RF Pack OBLPN rf.outbound.cwrfpacklpn screen parameter.
- From the mode parameter choice, select “In Line Substitution” to enable in line scanning.
Key Resources
Allow Scanning of 40 Characters in Serial Number Scan UI
Prior to 20B, the RF allowed users to scan serial numbers that have a maximum of 30 characters. However, even though Oracle WMS Cloud allowed the external system to send the serial numbers with a length 40 characters, during the RF scan, the system considered only the first 30 characters.
Now, in 20B, the system accepts scanning inventory with serial numbers up to 40 characters. The scan limit is also extended to 40 characters for the "Remove serial entry" field when a user presses the CTRL+R hotkey.
Steps to Enable
You don't need to do anything to enable this feature.
Key Resources
User Experience and Usability Enhancements
Skip OB LPN Scan While Performing RF Full LPN Picking
To save time for warehouse users during full LPN Picking, a new screen parameter, Skip OBLPN Scan has been added to the RF Pack OBLPN module, This will allow the user to skip scanning of OBLPN numbers when executed from tasking mode.
NOTE: before the user confirms the IBLPN, they can press CTRL+W to go back to the Scan OBLPN screen. This prevents the user from having to keep accepting OBLPNs that the system has selected.
Steps to Enable
- In the RF, go to the RF Pack OBLPN (rf.outbound.cwrfpacklpn) screen parameter.
- Set the skip-oblpn-scan-task-mode parameter to yes to enable Skip OBLPN Scan.
Key Resources
User Directed Multiple LPN Putaway Enhancements
Prior to 20B, while performing user-directed putaway from the rf.inbound.cwrflocatelpnpallet module, users needed to scan the LPN followed by the location barcode every time. However, if multiple LPN's are planned for a single location, the user will have to scan LPN and Location. The Location scan is repeated for all the LPN's planned for putaway to the location.
This enhancement allows multiple LPN's to be putaway to a single location without a location scan being prompted repeatedly. A new screen parameter "allow-multiple-scan" is available in the "Locate lpn /Pallet" (rf.inbound.cwrflocatelpnpallet) transaction which allows users to scan multiple LPNs at a time and locate them to a particular location. This helps to reduce overall required effort and increases efficiency in floor productivity.
NOTE: The supported location types for putaway LPNs remain the same whether the "allow-multiple-scan" parameter is set or not.
Highlighted features include:
The new parameter "allow-multiple-scan" is a selection type (Yes/No) option where the system allows scanning of multiple LPNs one after the other when set to Yes. By default, the value is set to No or Blank.
When the allow-multiple-scan = Yes:
- The system scans both IBLPN and OBLPNs individually. If the users scan IBLPN/OBLPN in a pallet, or LPN as a pallet or pallet scan, the system displays an error.
NOTE: The system allows users to scan only IBLPNs or OBLPNs individually until the location scan is complete. Users cannot scan IBLPN and OBLPNs simultaneously. If so, the system displays an Invalid error message
- A new screen parameter "max-scan-count" is introduced and available in "rf.inbound.cwrflocatelpnpallet" module that helps users to define and limit the number of LPN scans. For example, if the user configures the Default Value as 5, the user can scan up to 5 LPNs at one-go after which, the location screen prompts automatically.
- A new hotkey, End Scan (CTRL+E) is introduced where the system provides an ability for users to end the scanning of LPNs and proceed with scanning the targeted location barcode screen.
NOTE: If the parameter value is not defined for the max-scan-count, then the user can invoke the CTRL+E hotkey to end the scan. Also, upon invoking CTRL+E without scanning any LPN, the system displays an appropriate message; "LPN/Pallet required".
- A new hotkey, Scanned List (CTRL+P) is introduced where the system provides an ability for users to view the list of scanned LPNs.
- When locating multiple LPNs to the targeted location, the system undergoes location validation. During this process, even if one of the LPNs fails the location validation, then the system fails scanning of all the LPNs.
NOTE: Currently, the system does not display the LPN that causes failure.
When the allow-multiple-scan = No/Blank:
The system behavior remains unchanged and the above enhancement is not applicable.
Steps to Enable
Go to RF Locate LPN Pallet (rf.inbound.cwrflocatelpnpallet), allow-multiple-can and set to Yes:
- To enable the max scan count > Go to Locate lpn/Pallet (rf.inbound.cwrflocatelpnpallet)> max-scan-count.
- Define the parameter value and click Save.
Key Resources
View and Resolve Serial Number Discrepancies from Serial Number Discrepancy View UI
Currently, in update 19D, warehouse users can view records with serial number discrepancies by filtering the IB Container View and the OB Container View UI screens with the 'Has serial number discrepancy' filter option. As a part of update 20B, you can view all of the records with serial number discrepancies from the Serial Number Repository View UI.
A new action button Serial Number Discrepancy View is available on the Serial Number Repository View UI. When you click this button, all of the records with serial number discrepancies within the logged in facility are displayed on a new UI screen. The Serial Number Discrepancy View UI displays serial discrepancy records from IB Container, OB Container, and Active inventories.
You can create 'CC-LOCATION-DTL' type cycle count tasks from the new 'Create CC task' button on the new Serial Number Discrepancy View UI. You can select multiple serial discrepancy records and then create tasks from the 'Create CC task' button.
Clicking the 'Create CC task' button opens up a drop-down highlighting the task creation templates having only CC-LOCATION-DTL type defined in the template details. It is important to mention, that task templates having multiple task types defined will not appear under the Create CC task drop-down even if they have one detail with CC-LOCATION-DTL type defined.
The 'Create CC task' button stays disabled in the following scenarios:
- If no record is selected (default state)
- If a selected record does not have any location assigned (If an LPN does not have any associated location such as received LPNs which are yet to be located)
- If the user selects an OBLPN record
You will be notified with the number of tasks created out of the number of unique locations selected from the records. All the tasks thus created can be viewed from the CC Logs action button placed on the CCRunView UI screen.
Additionally, as the the 'Serial nbr Discrepancy View' action button on the SerialNbrRepoView UI displays all the serial discrepancy records from IB Container, OB Container, and Active inventories, the 'Has serial number discrepancy' filter option is now removed from the IbContainerView and the ObContainerView UI screens.
NOTE:
The Serial Number Discrepancy View screen only fetches records with serial discrepancies. As a result, even if there are multiple SKUs, only the Inventories with the discrepancy appear on the Serial Number Discrepancy View Screen.
All the cycle count tasks created are at the location level. Additionally, the task creation templates selected from the Create CC Task drop down, to create the cycle count tasks give precedence to the selection criteria configured in the template over the selected location records.
Steps to Enable
You don't need to do anything to enable this feature.
Key Resources
Extra Item Property Display Parameter in RF Pick IBLPN and RF Distribute LPN
Prior to 20B, few RF screens had the ability to display additional item attributes based on-screen parameters. Now in 20B, Oracle WMS Cloud has expanded this option to other RF screens that are actively used on the floor. This helps for better identification of SKUs handled in the operation.
A new parameter "extra-item-property-disp" allows users to add additional properties of the SKUs. This new parameter is now available in the following transactions:
- Pick IBLPN for Consolidate and Replenishment (rf.inbound.cwrfpickiblpnreplen).
- Distribute Replenishment (rf.inbound.cwrfdistlpnreplen).
- Pick IBLPN (rf.outbound.cwrfpickiblpn).
NOTE: The Distribute OBLPN transaction (item-property-display - rf.outbound.cwrfdistributelpn) module is an already existing parameter that is enhanced to support the additional item property.
The parameter “extra-item-property-disp” is a selection type and contains the following additional parameter choices:
- None - Display Item Description. By default, the parameter is set to None or Blank value.
- Item Code - Displays information from "item.calculated_code"
- Item Alternate Code - Displays Item Alternate Code.
- Item Part A - Displays Item Part A
- Item External Style - Displays Item External Style
- Item Description - Displays Item Description
- Item Facility Description - Displays Item facility Description. If the item facility description is blank, then the respective item description is displayed
- Item Short Description - Displays Items Short Description
- Item Code - Displays concatenating item code with item_facility description. If the item facility description is not populated on the item, then the system displays concatenate item code with the item description.
- Item Description 2 - Displays Item Description 2
- Item Description 3 - Displays Item Description 3
- Season Code - Displays Season Code from the Item detail
The parameter “item-property-display” is a selection type and contains the following additional parameter choices:
- Item Code - Displays information from "item.calculated_code"
- Item Alternate Code - Displays Item Alternate Code.
- External Style - Displays Item External Style
- Style – Displays item style
- Item Description - Displays Item Description
- Item Facility Description - Displays Item facility Description. If the item facility description is blank, then the respective item description is displayed
- Item Code - Displays concatenating item code with item_facility description. If the item facility description is not populated on the item, then the system displays concatenate item code with the item description.
- Item Description 2 - Displays Item Description 2
- Item Description 3 - Displays Item Description 3
- Season Code - Displays Season Code from the Item detail
Steps to Enable
- Go to Modules and choose the following respective transaction:
- Pick IBLPN for Consolidate and Replenishment (rf.inbound.cwrfpickiblpnreplen)
- Distribute Replenishment (rf.inbound.cwrfdistlpnreplen)
- Pick IBLPN (rf.outbound.cwrfpickiblpn)
- Distribute OBLPN (rf.outbound.cwrfdistributelpn)
NOTE: If you are configuring the Distribute OBLPN (rf.outbound.cwrfdistributelpn) transaction, select "item-property-display" parameter.
- Add the transaction to your groups
- Configure the extra-item-property-disp parameter for the transaction.
- Click Edit and select the property from the parameter drop-down list.
Key Resources
Wave Template Search Selection by Item’s Pack or Case Quantity
A new drop-down, “Order Detail Selection Uom” has been added to the Wave Template Searches UI. This gives you the option for the wave to specifically select order details whose items have a chance of getting full LPN allocations. In turn, this reduces the total number of wave details (allocation run details) that the Wave has to evaluate to do the allocation.
The “Order Detail Selection Uom” drop-down allows empty cases or packs. If this field is set to empty, there will be no change in the order selection process. The following table shows the behavior for the Order Detail Search with the field set to cases or packs:
| “Order Detail Selection Uom” Set To |
Behavior |
| Cases |
Order Detail Search will select only those order details whose ordered_qty is >= Standard Case Quantity for the lect only those order details whose ordered_qty is >= Standard Case Quantity for the corresponding item. A 0 / undefined value in the Standard Case Quantity implies that all order details will be selected. |
| Packs |
The behavior is just like CASES except the wave refers to the Standard Pack Quantity for the comparison. |
NOTE: This feature will be useful to all users where the following conditions apply:
They are able to run separate waves for full LPN allocations versus other types of allocations
Their business flow guarantees that the FULL LPN quantities match with their standard case (or pack) quantity.
For example:
Wave Template Search configuration is: item_codes = SCH_B11 order_detail_selection_uom = Cases Item SCH_B11 with std_pack_qty = 6 and std_case_qty = 12
- Order detail with Order Qty = 1
- Order detail with Order Qty = 0
- Order detail with Order Qty = 2
- Order detail with Order Qty = 6
- Order detail with Order Qty = 5
- Order detail with Order Qty = 7
- Order detail with Order Qty = 10
- Order detail with Order Qty = 12
- Order detail with Order Qty = 13
- Order detail with Order Qty = 11
- Order detail with Order Qty = 24
- Order detail with Order Qty = 36
The Wave is run and the order details 8, 9, 11 and 12 get selected.
Steps to Enable
- To enable searching of order lines based on matched standard Pack or Case quantity, navigate to the Wave Template, Wave Template Searches UI.
- From your Wave Template Search, select Cases or Packs from the Order Detail Selection UOM drop-down.
Key Resources
Manage Appointments Using a REST API
IoT creates appointments in Oracle WMS Cloud for outbound shipments that are planned by Oracle Transportation and Global Trade Management Cloud using Init_Stage_Interface API. If an existing appointment in WMS needs an update, IoT could use Init_Stage_Interface with UPDATE action_code. However since this API expects the complete payload to be resent even for UDATE, IoT has to first get information about the Appointment entity from WMS using the lgfapi GET entity. The results returned by lgfapi GET are in a different structure compared to Init Stage Interface payload.
In order to simplify the UPDATE process for external systems, a PATCH verb for the Appointment entity is now available. This PATCH request provides the key to identify the Appointment and the attribute that needs to updated for the Appointment entity. The attributes that need to be updated will be passed in the body of the request using the "fields" section.
The following fields will be updated on the appointment after passing all of the validations:
- Preferred Dock
- Planned Start Ts
- Arrived Ts
- Duration
- Estimated Units
- Carrier Info
- cust_reference_text
The following is an example URL for patch appointment entity:
PATCH .../wms/lgfapi/v10/entity/appointment/123/
where 123 is the id of the appointment that needs to be updated
JSON sample of the request body:
{ "fields": {
"preferred_dock_id" : null,
"planned_start_ts" : "2020-04-20T06:00:00",
"arrived_ts" : null,
"duration" : 37,
"estimated_units" : "0",
"carrier_info" : "Schneider",
"cust_reference_text" : ""
}}
Steps to Enable
Review the REST service definition in the REST API guides, available from the Oracle Help Center > your apps service area of interest > REST API. If you're new to Oracle's REST services you may want to begin with the Quick Start section.
Delink Serial Numbers Using a REST API
The Delink Serial Numbers API allows users to delink a list of serial numbers from an existing inventory in order for the system to write appropriate serial number records.
NOTE: Every serial number that is delinked from the targeted inventory should have corresponding serial Number History records. The Serial Number History UI should display the serial number with delinked action codes for IBLPN, OBLPN, and Active inventories.
You can delink a serial number using the following POST request:
POST .../{version}/entity/inventory/{id}/delink_serial_nbrs/
Additional details for this API include:
- The delinking is successful for IBLPN and OBLPNs when the 'SERIAL_NUMBER_TRACKING_LEVEL' company parameter is set to 2.
- The delinking is successful for only OBLPNs when the 'SERIAL_NUMBER_TRACKING_LEVEL' company parameter is set to 1.
- The delink process is successful if the targeted inventory is non-decimal tracked.
- The system returns an error message if the targeted inventory is not linked with any serial number.
- The delink process is unsuccessful if the inventory associated with any LPN is either in Consumed, Shipped, Delivered, Cancelled, or Lost status.
- The corresponding serial number history for delinking is recorded in the SerialNbrHistoryView UI screen for serial numbers that are delinked from IBLPNs/OBLPNs/Active inventories.
Steps to Enable
Review the REST service definition in the REST API guides, available from the Oracle Help Center > your apps service area of interest > REST API. If you're new to Oracle's REST services you may want to begin with the Quick Start section.
Expansion of Customer Purchase Order Number Field on Order
To support integration in Oracle WMS Cloud and Fusion Inventory Management Cloud, the column size for the Customer Purchase Order Number column has been increased to 50 characters.
Now, users can create an order using up to 50 characters from the Order Header View UI and Interfaces. This increased width in the Customer Purchase Order Number column is also now available in the Wave Template Search screen.
NOTE: Users who have added the order header Customer Purchase Order Number column to web reports or labels will not be impacted if the number of characters used is still 30. However, if they anticipate to use up to 50 digits, then users will have to review the reports to see if the increased size has any impact.
Steps to Enable
You don't need to do anything to enable this feature.
Key Resources
Get Next Pick Using a REST API
The Get Next Pick REST API allows you to pick inventory based on the location pick sequence during picking from the Oracle WMS Cloud Mobile App or an external system using WMS APIs. This API follows the same underlying logic used in the text based Mobile RF picking transaction.
NOTE: The Oracle WMS Cloud Mobile App is one example of where this API will be leveraged. However, this API can be used in other scenarios.
The Get Next Pick API should give one pick from allocation records based on the location pick sequence when there are multiple allocation records that exist for a given Order/OBLPN.
The following is a sample GET request for Get Next Pick:
- GET .../entity/allocation/get_next_pick
Sample request for get next pick based on OBLPN:
- GET .../entity/allocation/get_next_pick?container_nbr=
Sample request for get next pick based on Order Number:
- GET .../entity/allocation/get_next_pick?order_nbr=
Get Reponse:
- Get next pick should give information associated with the inventory that is getting picked including:
- Order Number : Order number against which the inventory is getting picked
- Destination Facility: For Store Order Destination facility associated with the order
- Customer Name: For Customer Order Customer name associated with the order
- IBLPN: IBLPN number from which the inventory that needs to picked
- OBLPN: OBLPN number in which the respective inventory is getting picked
- Location: Location from which the inventory is getting picked (Active/ Reserve)
- Item Code : Respective Item Code
- Item Alternate Code: Respective Alternate Item Code
- Inventory Attributes (A-O) : Attributes associated with the inventory.
- Batch Number: Batch number associated with the inventory.
- Expiry Date: Expiry date associated with the inventory.
- Quantity : Pending quantity that needs to be picked for respective allocation record (Allocated Qty - Packed Qty)
Steps to Enable
Review the REST service definition in the REST API guides, available from the Oracle Help Center > your apps service area of interest > REST API. If you're new to Oracle's REST services you may want to begin with the Quick Start section.