
- Revision History
- Overview
- Feature Summary
-
- Functional Enhancements
-
- Drive Putaway Rules to Search for Locations with Same Item
- Support Overshipment and Undershipment Tolerances with Back Ordering
- Enhanced Purchase Order Based Receiving
- Scheduled Job to Verify Shipment
- Allow Receiving of QC Rejected LPNs and Return to Vendor
- New Parameter for Non-Multi-Field Barcodes
- Enhanced Configurability on Post-Pick Order Consolidation and Loading
- New Facility Parameter to Associate Blind ASNs
- Support for Legacy Company Parameter LEGACY_ACTUAL_WEIGHT_OVERRIDES_WT_VOL_CALC_IN_SHIPPING
- Backorder Processing Handling in WMS
- Allocation in Terms of Packs or Cases from Active Locations
-
- User Experience and Usability Enhancements
- Integration Enhancements
-
- WMS Cloud Lock Code to ERP Inventory Summary Alignment
- GET Available Warehouse Location for Putaway Using a REST API
- Additional Categories in Web Reports Gen 2
- Web Reports Optimization for Date/Time Functions
- Support ISO-8601 Format Date/Time Values
- Update Active Inventory for Serialized Product Using a REST API
- Update Location Counted to Be Counted Flag Using a REST API
- Locate LPN or Pallet to Location Using a REST API
- Update Orders with Ship Via and Shipment Number Using a REST API
- Expand Custom Fields in Inbound Shipment Interface and Inbound Shipment Verification Output
-
- Updates to WMS Cloud to SCM Cloud Integrator
-
- Support for WMS Cloud Lock Code to ERP Inventory Summary Bucket Alignment on Purchase Order Receipt Confirmation and Inventory Transactions
- Support Shipping Tolerances for Sales Orders
- Communicate Backordering for Sales Orders
- Provide Transaction Reference on Purchase Order Receipt Confirmation, Inventory Transactions, and Sales Order Shipment Confirmation
- Integration Properties Support in SCM Cloud Integrator
-
- Functional Enhancements
This document will continue to evolve as existing sections change and new information is added. All updates appear in the following table:
| Date | Product | Feature | Notes |
|---|---|---|---|
| 06 JUL 2021 | Functional Enhancements | Allow Receiving of QC Rejected LPNs and Return to Vendor | Updated document. Revised feature information. |
| 27 JAN 2021 | Functional Enhancements | Allow Receiving of QC Rejected LPNs and Return to Vendor | Updated document. Revised feature information. |
| 21 DEC 2020 | Functional Enhancements | WMS Cloud Lock Code to ERP Inventory Summary Alignment | Updated document. Revised feature information. |
| 11 DEC 2020 | Functional Enhancements | Allocation in terms of Packs or Cases from Active Location | Updated document. Delivered feature in update 20D. |
| 11 DEC 2020 | Integration Enhancements |
Backorder Processing Handling in WMS | Updated document. Delivered feature in update 20D. |
| 11 DEC 2020 | Functional Enhancements | Support for Legacy Company Parameter LEGACY_ACTUAL_WEIGHT_OVERRIDES_WT_VOL_CALC_IN_SHIPPING | Updated document. Delivered feature in update 20D. |
| 11 DEC 2020 | Updates to WMS Cloud to SCM Cloud Integrator |
Communicate Backordering for Sales Orders | Updated document. Delivered feature in update 20D. |
| 11 DEC 2020 | Updates to WMS Cloud to SCM Cloud Integrator |
Support Shipping Tolerances for Sales Orders | Updated document. Delivered feature in update 20D. |
| 11 DEC 2020 | Updates to WMS Cloud to SCM Cloud Integrator |
Support for WMS Cloud Lock Code to ERP Inventory Summary Bucket Alignment on Purchase Order Receipt Confirmation and Inventory Transactions | Updated document. Delivered feature in update 20D. |
| 11 DEC 2020 | User Experience and Usability Enhancements | Link to WMS Cloud Application Pages Using Deep Links | Updated document. Revised feature information. |
| 11 DEC 2020 | Updates to WMS Cloud to SCM Cloud Integrator |
Integration Properties Support in SCM Cloud Integrator | Updated document. Delivered feature in update 20D. |
| 11 DEC 2020 | Updates to WMS Cloud to SCM Cloud Integrator |
Provide Transaction Reference on Purchase Order Receipt Confirmation, Inventory Transactions, and Sales Order Shipment Confirmation | Updated document. Delivered feature in update 20D. |
| 11 DEC 2020 | Functional Enhancements | Allow Receiving of QC Rejected LPNs and Return to Vendor | Updated document. Revised feature information. |
| 11 DEC 2020 | Integration Enhancements |
Web Reports Optimization for Date/Time Functions | Updated document. Delivered feature in update 20D. |
| 11 DEC 2020 | Functional Enhancements | Enhanced Purchase Order Based Receiving | Updated document. Revised feature information. |
| 11 DEC 2020 | Integration Enhancements | Update Orders with Ship Via and Shipment Number using a REST API | Updated document. Delivered feature in update 20D. |
| 11 DEC 2020 | Integration Enhancements | Additional Categories in Web Reports Gen 2 | Updated document. Delivered feature in update 20D. |
| 11 DEC 2020 | Integration Enhancements | WMS Cloud Lock Code to ERP Inventory Summary Alignment | Updated document. Revised feature information. |
| 09 OCT 2020 | Created initial document. |
This guide outlines the information you need to know about new or improved functionality in this update, and describes any tasks you might need to perform for the update. Each section includes a brief description of the feature, the steps you need to take to enable or begin using the feature, any tips or considerations that you should keep in mind, and the resources available to help you.
Give Us Feedback
We welcome your comments and suggestions to improve the content. Please send us your feedback at owms-cloud-comms_us@oracle.com.
Column Definitions:
Features Delivered Enabled
Report = New or modified, Oracle-delivered, ready to run reports.
UI or Process-Based: Small Scale = These UI or process-based features are typically comprised of minor field, validation, or program changes. Therefore, the potential impact to users is minimal.
UI or Process-Based: Larger Scale* = These UI or process-based features have more complex designs. Therefore, the potential impact to users is higher.
Features Delivered Disabled = Action is needed BEFORE these features can be used by END USERS. These features are delivered disabled and you choose if and when to enable them. For example, a) new or expanded BI subject areas need to first be incorporated into reports, b) Integration is required to utilize new web services, or c) features must be assigned to user roles before they can be accessed.
| Ready for Use by End Users Reports plus Small Scale UI or Process-Based new features will have minimal user impact after an update. Therefore, customer acceptance testing should focus on the Larger Scale UI or Process-Based* new features. |
Action is Needed BEFORE Use by End Users Not disruptive as action is required to make these features ready to use. As you selectively choose to leverage, you set your test and roll out timing. |
|||||
|---|---|---|---|---|---|---|
| Feature |
Report |
UI or |
UI or |
|
||
Support Overshipment and Undershipment Tolerances with Back Ordering |
||||||
Enhanced Configurability on Post-Pick Order Consolidation and Loading |
||||||
Support for Legacy Company Parameter LEGACY_ACTUAL_WEIGHT_OVERRIDES_WT_VOL_CALC_IN_SHIPPING |
||||||
Default Redwood Theme for WMS Application Pages and Mobile App |
||||||
GET Available Warehouse Location for Putaway Using a REST API |
||||||
Update Active Inventory for Serialized Product Using a REST API |
||||||
Update Orders with Ship Via and Shipment Number Using a REST API |
||||||
Expand Custom Fields in Inbound Shipment Interface and Inbound Shipment Verification Output |
||||||
Drive Putaway Rules to Search for Locations with Same Item
In 20D, a new flag “Search Location with matching SKU” is available in the Putaway Priority View UI. After you enable this flag on putaway method priority, the system directs you to the location that already has a matching SKU required to be putaway. This new mechanism helps to optimize the location with identical SKU’s instead of having the same SKU spread across the different locations. This also helps to achieve a smooth picking transaction and thereby reduces accessing any further location.
Let's say, you have an IBLPN with a single SKU or pallets having IBLPN single SKU during directed putaway, all the eligible locations (satisfying capacity check), and putaway method priority. The system now further narrows down and prompts the location that already has the SKU (Physical Inventory not In-transit) similar to the SKU targeted for putaway.
ADDITIONAL KEY POINTS:
- By default, this new flag is disabled on the Putaway Method Priority UI. Users need to check the flag explicitly to enable.
- This function is applicable to both Active & Reserve Locations.
- This new flag honors during Split Putaway to Active Location and Putaway Method Location Sequence/ Radial.
- On scanning an LPN, if there are multiple locations that have matching SKUs, then the system will apply putaway search mode to the eligible location (i.e locations that have matching SKUs).
NOTE: After scanning an IBLPN with multiple SKUs or pallets having an IB container containing multiple SKU, the system does not consider the Matching SKU criteria even though the flag on the Putaway method priority is enabled. If there are no locations with matching SKUs for the given putaway method priority, then the system will prompt location based on the putaway search mode from the respective putaway method priority.
Steps to Enable
- Go to PutawayPriorityView UI
- Click Create to create or Select the Putaway Type > Click edit icon.
- Check or un-check the Search Location with matching SKU checkbox to enable or disable the functionality.
- Click Save.
Key Resources
Support Overshipment and Undershipment Tolerances with Back Ordering
INTRODUCING SHIPPING TOLERANCE PERCENTAGE IN THE ORDER DETAIL UI AND INTERFACE
Previously, the system did not allow packing of more than the ordered quantity. Also, warehouses deal with a variety of items (such as produce or wires for example) where shipping an exact quantity or weight might not always be practical. To give users more flexibility in shipping item quantities, Shipping tolerance percentage is now available in Oracle WMS Cloud in 20D. You can now view and edit Shipping Tolerance Fields in the Order Header / Order Detail screen. You can also view Shipping Tolerance Fields in the Manual Wave and Order Detail screens.
You can also create/modify Shipping Tolerance Fields via:
- the Order Input Interface (through ORR, OHD, or ORD)
- the Order API
NOTE: The system will not allow tolerance% equal to 100% or more than 100% for the Minimum Shipping Tolerance% field.
WAVE ALLOCATION
In Order Type, if Partial allocated is enabled, the system will partially allocate the order. If the quantity allocated is within the tolerance threshold in the quantity to be allocated in the Order Detail, the order detail will be in a status of Allocated.
NOTE: During a wave, when the "Cancel Partially Unallocated" flag is enabled the system will not cancel the unallocated quantity from the order detail if the allocated quantity on the order detail is greater than or equal to minimum shipping tolerance% threshold value.
If allocated quantity is less than the minimum tolerance %, the order detail status will be partially allocated.
| Order | Order Quantity | Min % | Max % | Allocated Quantity | Order Detail Status |
|---|---|---|---|---|---|
| Order1 - Dtl1 | 100 | 10 | 10 | 92 | Allocated |
| Order2 - Dtl1 | 100 | 10 | 10 | 80 | Partly Allocated |
NOTE: Even though the max tolerance% is defined, the system will never over allocate during allocation from the wave.
HONORING TOLERANCE PERCENTAGE WHILE PACKING AGAINST ALLOCATED QUANTITY
In the following transactions, the system now allows you to pick more than the allocated quantity, when the respective allocated order is defined with a maximum shipping tolerance percentage as greater than zero. Oracle WMS Cloud also updates the respective order detail status based on the inventory picked honoring the shipping tolerance percentage.
- RF Pack NC Active Order
- Pick {iblpn}
- Pick Cart
- Pick Confirm API
- Distribute OBLPN for Allocation mode "Distribution residuals OK"
NOTE: When distribution mode is Distribution residuals OK, LPNs allocated by the system may have more inventory than the allocated quantity. In this mode, you can pickup extra inventory available to over pack within the tolerance%.
You can now pick excess quantity against the allocated quantity and tolerance% is considered with respect to the allocated quantity:
Example 1: Let's say you have an order with 100 units with a max% of 10. If there are 2 allocations of 50 and 50, you can pick a max of 55 (subject to inventory availability) against each allocation.
While picking against allocated quantity if you pick in a single instance, then the overall max quantity that can be packed against an order detail may vary.
Example 2: Let's say you have an order with 100 units with max% of 10. If there is one allocation of 100 units against the order, you can pick up to 110 (subject to inventory availability) if the picking is done in a single instance.
But if you pick 60 in the fist instance, then the system asks you to pack the remaining 40. You can pick up to a max of 44 (subject to inventory availability.) In this case, the total packed quantity against the order detail will be 104.
ALLOW OVER PACKING
Oracle WMS Cloud now allows over packing based on the maximum shipping tolerance defined on the order detail during picking using the MHE API.
- When the maximum tolerance on the order detail is defined with greater than a zero value, then during MHE picking, the system calculates the maximum quantity that can be picked against the order detail by applying the maximum tolerance % on the allocated quantity against the respective allocation detail.
- When the maximum tolerance on the order detail is not defined or zero, then the system doesn’t allow over packing of inventory. Upon over packing, the error message "Only (Available Quantity) units available for packing" displays.
NOTE: Over Packing is allowed only when respective inventory is available (not allocated to any order) in the source location.
HONORING TOLERANCE PERCENTAGE DURING SUBSTITUTION
During the following RF Pack {oblpn}, the system now allows you to substitute inventory within the min/max threshold percentage, as long as the substituted LPN is allocated for an order that the original LPN can fulfill.
Example 1:
The Location has 2 LPNs:
| LPN | LPN Quantity | LPN Status | Order Allocated |
|---|---|---|---|
| LPN1 | 100 | Allocated | order 1 |
| LPN2 | 90 | Allocated | - |
User substitutes LPN1 with LPN2. Because LPN2 meets the tolerance limit and it is not allocated to an order, the user can substitute.
| Order | Order Quantity | Min % | Max % |
|---|---|---|---|
| order 1 | 100 | 10 | 10 |
Example 2:
The Location has 2 LPNs:
| LPN | LPN Quantity | LPN Status | Order Allocated |
|---|---|---|---|
| LPN1 | 100 | Allocated | order 1 |
| LPN2 | 90 | Allocated | order 2 |
| Order | Order Quantity | Min % | Max % |
|---|---|---|---|
| order 1 | 100 | 10 | 10 |
| order 2 | 100 | 10 | 10 |
The Location has 2 LPNs: User substitutes LPN1 with LPN2. Because LPN2 meets the tolerance limit for order 1 and LPN1 meets the tolerance limit for order 2, the allocation can be exchanged and the user is allowed to substitute.
Example 3:
| LPN | LPN Quantity | LPN Status | Order Allocated |
|---|---|---|---|
| LPN1 | 100 | Allocated | order 1 |
| LPN2 | 90 | Allocated | order 2 |
| Order | Order Quantity | Min % | Max % |
|---|---|---|---|
| order 1 | 100 | 10 | 10 |
| order 2 | 90 | 10 | 10 |
User tries to substitute LPN1 with LPN2. Even thought LPN 2 is within the percentage tolerance for Order 1, LPN 1 is NOT with in the percentage tolerance for order 2. Therefore, Substitution is not allowed.
DIRECT ALLOCATION WHEN LPN QUANTITY IS WITHIN THE SHIPPING TOLERANCE LIMIT OF THE ORDERED QUANTITY
Users can now allocate LPNs with a higher quantity than the ordered quantity. Also, allocating LPNs with a quantity within the shipping tolerance limit of the ordered quantity will mark the order detail as Allocated.
The following table is an example of the resulting Order Detail and LPN status during RF Direct Allocation based on the minimum and maximum shipping tolerance set:
| Ordered Qty | LPN Qty | Min ToI % | Max ToI % | Rem Ord Qty | Order Detail Status | LPN Status |
|---|---|---|---|---|---|---|
| 100 |
80 |
10 |
10 |
20 |
Partly Allocated |
Consumed |
| 100 |
90 |
10 |
10 |
10 |
Allocated |
Consumed |
| 100 |
90 |
0 |
10 |
10 |
Partly Allocated |
Consumed |
| 100 |
110 |
0 |
10 |
0 |
Allocated |
Consumed |
| 100 |
110 |
10 |
0 |
0 |
Allocated |
Consumed |
| 100 |
111 |
10 |
10 |
100 |
Error message- system should restrict |
Received |
PICK AND ALLOCATE WITH RESPECT TO THE SHIPPING TOLERANCE LIMIT
Users can now over pick quantity greater than the ordered quantity within the shipping tolerance limit applied. During Pick and Allocate, when LPNs with a higher quantity than the ordered quantity are packed based on the shipping tolerance%, the original allocated quantity will not be more than the original order quantity on the allocation record.
The following table is an example of the resulting Order Detail and Order Header status during RF Pick and Allocate based on the minimum and maximum shipping tolerance set:
| Ordered QTY | Allocated QTY | Packed Qty | Min ToI % | Max ToI % | Mode | Ord Detail Status | Ord Header Status |
|---|---|---|---|---|---|---|---|
| 100 |
100 |
50 |
10 |
10 |
System Directed |
Allocated |
In Packing |
| 100 |
100 |
90 |
10 |
10 |
System Directed |
Allocated |
Packed |
| 100 |
100 |
110 |
10 |
10 |
System Directed |
Allocated |
Packed |
| 100 |
50 |
50 |
10 |
10 |
User Directed |
Created |
Partly Allocated |
| 100 |
90 |
90 |
10 |
0 |
User Directed |
Allocated |
Packed |
| 100 |
90 |
90 |
0 |
10 |
User Directed |
Created |
Partly Allocated |
| 100 |
110 |
100 |
0 |
10 |
User Directed |
Allocated |
Packed |
COMPUTE ORDER DETAIL STATUS BY HONORING SHIPPING TOLERANCE PERCENTAGE ON THE ORDER
Previously, Oracle WMS Cloud computed Order Detail status based on the ordered, allocated and packed quantity for each order detail under it. With the introduction of shipping tolerance, the order detail status might get changed even if the allocated/packed quantity is more or less than the ordered detail quantity but within the tolerance. Now, the system computes the Order Detail status by honoring the shipping tolerance percentage defined on the respective order.
The following listed statuses are supported for order detail based on shipping tolerance percentages:
| Order Detail Status | Order Detail Data Condition |
|---|---|
| Created |
Allocated Quantity = 0 |
| Partly Allocated |
Allocated Quantity > 0 Allocated Quantity < Minimum Shipping Tolerance% threshold value |
| Allocated |
Allocated Quantity >= Minimum Shipping Tolerance% threshold value |
| In Picking |
Allocated Quantity >= Minimum Shipping Tolerance% threshold value and order detail has container which is in "In Picking" status |
| Picked |
Packed Quantity >= Minimum Shipping Tolerance% threshold value && If Any associated container status is Picked && there should not be any pending allocation against the order detail |
| In Packing |
Allocated Quantity >= Minimum Shipping Tolerance% threshold value & order detail has container which is in "In Packing" status |
| Packed |
Packed Quantity >= Minimum Shipping Tolerance% threshold value && If all the associated container status are packed && there should not be any pending allocation against the order detail |
| Loaded |
Loaded quantity against the order detail is > = Minimum Shipping Tolerance% threshold value && there should not be any pending inventory against the order detail |
| Shipped |
Shipped quantity against the order detail is > = Minimum Shipping Tolerance% threshold value && there should not be any pending inventory against the order detail |
CHANGES IN THE SHIPPED LOAD INTERFACE
Oracle WMS Cloud can now derive order detail status whenever the order detail is shipped. Order Quantity Consume is meant to be used by integration to consume quantity against the shipped quantity.The ability to derive the status on the order detail will help the end user to know about order status, so that user can plan further activity during shipping and manifest.
After loading all of an order’s packed OBLPNs, the user will perform shipping. If the shipped quantity is within the maximum/minimum shipping tolerance percentage defined on the order detail and the order detail doesn't have any pending allocation/picks, then the order detail status will be derived as "Shipped".
- Order detail status is shipped when shipping is performed via the RF or UI Ship Load transaction.
- Order header status is marked as shipped when all the order details against the order are shipped.
When inventory is shipped against the order detail, the order detail will be updated with:
- Shipped Quantity: Total inventory shipped against the order detail.
- Order Quantity to consume: Total order quantity to consume sent against the order detail.
NOTE: During Ship Load, the system generates the Outbound Load Export (SLS) file which has information associated with the order detail including:
- Maximum Shipping Tolerance%
- Minimum Shipping Tolerance%
- Order Quantity to Consume
DETERMINE BACK ORDER QUANTITY AS ORDER DETAILS ARE SHIPPED/CANCELLED
In the warehouse when orders are received, the warehouse tries to fulfill the order up to the ordered quantity. But sometimes, due to the unavailability of inventory, orders cannot be fulfilled completely. To handle these scenarios, Oracle WMS Cloud communicates to the host system how much quantity was not fulfilled, and based on that information, the host system creates back orders for further processing.
The system will now determine the Back Order quantity when an order detail is Shipped. It will then populate the back order quantity on the reference field for Order Detail Status change Inventory History Transaction (IHT) (ref value 4.)
When the system cancels the Order Detail, Back Order Quantity against the Order detail is now computed and displays in the Ref Code 4 (Back Order Quantity) of the Order Detail Status change Inventory History Transaction (IHT- 85). When order detail is cancelled, Back Order Quantity will be equal to the Original Order Quantity.
The following are the some of trigger points associated when the order detail is cancelled:
- Wave (when Cancel Fully Unallocated flag is enabled)
- IB Shipment UI ("Unallocated order details to cancel on ASN verify" mode on the IB Shipment Type)
- Interface
- Order Interface
The following RF Transactions are triggered (when allocated inventory against the order detail is shorted and the Only deallocate on short flag is disabled on the Order Type)
- RF Pack NC Active Order
- Modify Cancel {oblpn}
- Pick {iblpn}
- Distribute {oblpn}
- Pack {oblpn}
- Pick Cart
- Outbound Audit
- Repack OBLPN
- RF Move LPN
The following APIs are triggered (when allocated inventory against the order detail is shorted and the Deallocate on Short flag is disabled on the Order Type)
- Pick_Confirm API
- Legacy Pick_Confirm API
PROCESSING BACK ORDER IN ORACLE WMS CLOUD
When an order is not fulfilled, the Oracle Inventory Fusion Management Cloud sends the backorder back with the same order number to Oracle WMS Cloud. To address this instance, the Oracle WMS Cloud is enhanced to suffix the original order number in the order interface. This suffixed order number interface payload is processed to the external system. However, when the Oracle Inventory Fusion Management Cloud system downloads the payload, the generated payload will carry the original order number WITHOUT the suffix.
The system calculates the back order quantity against each order detail only when the respective order's order type has the Require Back Order flag set to true in conjunction with Deallocate on Short flag set to false on the Order Type UI.
NOTE: Adding a suffix for an order number is applicable for Oracle Inventory Fusion Management Cloud only. Other ERP systems are recommended to send a new order number to process the backorder and avoid sending the same order numbers. For more information, refer to the Back Order Processing Handling feature.
Steps to Enable
In order for the system to derive back order quantity, you must enable the Require Back Order flag from the Order Type UI.
Key Resources
Enhanced Purchase Order Based Receiving
PURCHASE ORDER AND PO SEQUENCE PROMPT
Prior to 20D, Purchase Order (PO)-based receiving updates were happening for a single detail even if a PO had multiple details, leading to reconciliation issues. In order to support reconciliation of Purchase Order (PO) lines under receipt, a new RF Parameter (prompt_po-seq-line) is now available in RF Receive (LPN) Shipment (rf.inbound.cwrfrecvlpnshpmt) and RF Receive Load (rf.inbound.cwrfrecvlpnload) modules which supports prompting for the PO sequence number or the PO line schedule number based on the configuration.
PARAMETER DETAILS
The prompt_po-seq-line parameter has the following options under the drop-down:
- PO Sequence
- PO line schedule
NOTE: The default value of the prompt_po-seq-line parameter is Blank. When the parameter is set to Blank, the system exhibits the existing behavior and should not prompt for the PO sequence or line schedule number.
Companies using Oracle WMS Cloud together with Oracle SCM Cloud should set the parameter "prompt_po-seq-link" screen parameter to be "PO Line Schedule."
This parameter can be used in the following flows:
- PO Based Receiving
- RF Receiving Flow
- RF Receive by Load
The following table provides details about the parameter behavior for these flows when the prompt_po-seq-line parameter is set to PO Sequence or PO line schedule:
| Flow | prompt_po-seq-line set to: Purchase Order (PO) Sequence | prompt_po-seq-line set to: Purchase Order (PO) Line Schedule |
|---|---|---|
| PO Based Receiving |
|
|
| RF Receive Shipment |
|
|
| RF Receive by Load |
|
|
QUANTITY DISTRIBUTION FOR PO AND SHIPMENT BASED RECIPT
Prior to 20D, if a purchase order had multiple lines for the same SKU, Purchase Order (PO)-based receiving updates were happening for a single detail even if a PO had multiple details, leading to reconciliation issues. Oracle WMS Cloud has been updated so that when the prompt_po-seq-line screen parameter is set to blank, the system evenly distributes the received SKU quantity across multiple Purchase Orders or purchase order lines, which resolves purchase order line reconciliation issues. Quantity distribution is only supported for IB shipments details carrying multiple purchase orders for the same SKU or a purchase order with multiple lines for the same SKU.
The following table provides details about the system behavior for these flows when the prompt_po-seq-line parameter is set to blank:
| Flow | Behavior |
|---|---|
| PO Based Receiving |
|
| RF Receive Shipment (Shipment is carrying multiple PO numbers or PO details of the same SKU) |
|
| RF Receive Load (Shipment is carrying multiple PO numbers or PO details of the same SKU) |
|
PREVENT CONSUMING ENTIRE PURCHASE ORDER DURING PO-BASED RECEIVING
Prior to 20D, during PO based receiving the entire PO was getting converted to a shipment right after scanning the PO number. As a result, the host system could not reduce the purchase order quantity or delete a PO line (a shipment against the purchase order quantity was already being created.) A new screen parameter prevent-entire-po-to-asn-conversion-flg, in the RF Receive Shipment (rf.inbound.cwrfrecvlpnshpmt) module allows you to restrict the system from converting the entire PO to a shipment right after the PO scan during PO based receiving. The screen parameter receiving mode should be set to PO based receiving.
PARAMETER DETAILS
The prevent-entire-po-to-asn-conversion-flg parameter has the following options under the drop-down:
- No (default behavior)
- Yes
When the prevent-entire-po-to-asn-conversion-flg is set to Blank or No,
- The system converts the entire PO to an ASN during PO based receiving. However, the system converts the entire PO to an ASN only after you scan or skip the trailer scan during PO based receiving.
- In case multiple shipments are created prior to PO based receiving, the system will throw the following error message right after the PO scan.
“Cannot receive PO linked to Multiple ASNs”
- Vendor QC will be supported for this mode and the quality check will happen based on the shipped quantity and the vendor QC configuration.
- Users will not be able to reduce the purchase order quantity once the entire PO is converted to a shipment during PO based receiving.
When the prevent-entire-po-to-asn-conversion-flg is set to Yes:
During PO Based Receiving, the system can now create the ASN details based on the PO quantity a user is receiving from PO-based receiving mode, so that the whole PO does not get converted to an ASN and its respective details. This allows purchase orders that have been partially received to be updated. For example, supply chain planning may send a recommended change for a purchase order when the supplier was not able to ship the full expected quantity.
NOTE: The purchase order quantity can’t be updated for less than the received quantity.
- The system now prevents consuming the entire PO to the respective IB shipment details when you scan a PO in PO-based receiving mode. After scanning the PO number, the system creates only the IB shipment header based on the PO and the trailer number combination (if no IB shipment with status less than Verification in progress is found for the same PO and trailer number combination.)
- After you scan the trailer number, if no open ASN is found, then the system creates a new ASN associating the trailer number to proceed with PO based receiving. The ASN header won't be created until you scan or skip the trailer number.
- You can press the Ctrl-E hot key to end receiving on the PO based receiving transaction and the shipment details created will have 0 as the shipped quantity if no prior shipment is created for the PO from the UI or the interface.
- Vendor QC is not supported in this mode of PO based receiving as the shipped quantity for the shipments created during this mode of PO based receiving will be 0.
- The shipment verification files generated upon ASN verification of the ASNs created during PO-based receiving will also have a shipped quantity as 0.
- The system will create a new trailer number record if you scan a trailer number which is not present in the system and the system latches the trailer number to a Shipment with ‘In transit’ status and which does not have a trailer number populated. If no eligible shipment is found for the PO trailer combination, the system then creates a new Shipment with the PO trailer combination.
- Users can receive the remaining PO order in different trailers. The system creates a new Shipment with 0 as shipped quantity with the PO and trailer combination and allow users to receive the outstanding PO quantity against the shipment.
- In case the system finds multiple shipments created prior to PO based receiving, and if it cannot identify the shipment even after you scan the trailer number, the system will throw the following error message:
“PO linked to Multiple ASNs created prior to receipt, cannot perform PO based receipt”
However, the system will allow you to proceed with PO based receiving if multiple shipments are created with 0 as shipped quantity in this mode of PO based receiving. The shipments will be identified and picked based on the PO trailer combination.
BEHAVIOR FOR PO BASED RECEIVING BASED ON FLAG
| Transaction | prevent-entire-po-to-asn-conversion-flg = Blank /NO |
prevent-entire-po-to-asn-conversion-flg = Yes |
|---|---|---|
| Entire PO gets converted to shipment |
YES | NO |
| Shipped qty is more than zero |
YES |
NO |
| PO order qty can be reduced after users starts receiving partially |
NO |
YES |
| PO Seq /Line prompt is supported |
YES |
YES |
| Attribute Prompt is based on shipment dtl |
YES |
NO |
| Vendor QC is supported |
YES |
NO (based on PO details -if PO has Attribute) |
| Shipment is created/Identified After trailer scan |
YES |
YES (Only if shipment is created Prior to PO receiving) |
| verification file has 0 as Shipped qty |
NO |
YES |
| Allow PO recv when Multiple Shipments are found |
NO |
YES (If system can identify shipments after trailer scan) |
| Additional PO qty or PO details gets latched to the same ASN |
YES |
NO |
INTRODUCTION OF NEW MESSAGES
| Parameter status | Use case | Error message |
|---|---|---|
| prevent-entire-po-to-asn-conversion-flg= Yes |
Multiple IB shipments are found with more than 0 as shipped qty in less than verification in progress |
PO linked to Multiple ASNs created prior to receipt, cannot perform PO based receipt |
| prevent-entire-po-to-asn-conversion-flg= Yes |
Shipment is attached to an appointment and the scanned trailer does not match with the shipment |
Trailer and shipment do not match |
Marking the Reference Purchase Order column as '*' when an LPN is Received With Multiple POs
Prior to 20D, when you receive an IBLPN from RF Recv Shipment or RF Recv load or from the IB Shipment header or detail UI, with multiple purchase orders, the IB container UI gets populated with only one PO number on the REF PO column. With the 20 D enhancement, the system now will mark the REF PO number column on the IB container UI as "*" for the IBLPNs received with multiple purchase orders. This will indicate that the LPN is carrying multiple purchase orders.
NOTE: The IHT-1 LPN received inventory history will continue to get split based on the PO numbers getting received in the IBLPN. Additionally, The REF PO number column on the IB container UI will show the PO number if the IBLPN is being received with only a single purchase order.
Steps to Enable
- To prompt for PO-sequence number or the PO-line schedule number during Inbound Receiving, from the prompt_po-seq-line parameter drop-down, select the PO Sequence or PO line schedule option.
- In order to evenly distribute SKU quantity received across multiple Purchase Order or IB Shipment details, set the prompt_po-seq-line parameter to blank.
Key Resources
Scheduled Job to Verify Shipment
A new scheduled job type Auto Verify IB Shipment will mark shipments that are received and due for verification for a specified duration (or 72 hours from the last LPN received time) as verified depending on the configuration of the scheduled job. Auto Verify IB Shipment will not only mark shipments as verified, it will also generate the shipment verification output file. This feature is beneficial because users now don't have to verify the shipment, if they are not interested in tracking the shipment.
The following table describes the Auto Verify IB Shipment job type parameters:
| Field Name | Description |
|---|---|
| Username |
|
| Shipment Type |
|
| Time since last receipt (hrs) |
NOTE: When configuring lesser values, make sure to provide the right shipment type and time since last shipment, otherwise the system could update the status while receiving is still in process. |
NOTE: Shipments with Receiving Started and Receiving Complete status are eligible for verification. Also, shipments will not be verified if they have QC pending LPNs even if the shipments match the job parameter criteria for auto-verify through the scheduler.
Steps to Enable
To mark shipments that are received and due for verification, go to the Scheduled Jobs UI, and create a Scheduled Job with Job Type Auto Verify IB Shipment.
Key Resources
Allow Receiving of QC Rejected LPNs and Return to Vendor
Generally, inventory is subjected to Quality Check (QC) at the dock station. During QC, when inventories are rejected, the system marks these IB containers to Cancelled status and are physically left behind at the QC location. This may create certain difficulties for the warehouse users to differentiate between the actual containers received to put away and the QC rejected container.
In 20D, Oracle WMS Cloud has taken an efficient approach in handling such inventories, where operations can now allow the QC rejected containers inside four walls of the warehouse, track and monitor, and ship out to the faulty or defect inventories to the respective vendors.
ALLOW QC REJECTED INVENTORY INTO THE WAREHOUSE
New parameters are added in the RF QC Complete (rf.inbound.cwrfqccomplete) module that prompts users to provide a lock code (un-allocatable) on completing for the RF QC Complete transaction. On applying the lock code, the QC rejected status remains in Rejected status but the LPN status now moves to Received, thus allowing rejected inventories to be brought inside the warehouse.
The benefit of applying lock code is to avoid QC rejected inventories to be merged with the mainstream inventories during any movement of inventory.
NOTE: All the lock code prompts that are displayed are based upon the parameter configuration only on LPN that is QC rejected and do not prompt any lock code if the LPN is QC accepted.
- rejected-inventory-handling
Selections Description Blank (default)
Does not track any QC rejected inventory and the system falls back to existing behavior where LPNs are marked to Cancelled status upon QC rejection.
Lock rejected inventory
Prompts for lock code during the RF QC complete transaction to apply an un-allocatable lock code for the rejected LPNs.
- rejected-lock-code
Parameter Choice Description Blank (default)
Prompt for the lock code if the Rejected inventory handling is set to Lock rejected inventory.
NOTE: The system will not Prompt for the lock code if the Rejected inventory handling is set to Blank.
Text Field Users can explicitly define the parameter to set the lock code.
NOTE: If the rejected-lock-code has defaulted with a valid and un-allocatable lock code, then the system will not Prompt for the lock code. The LPNs will be marked as Received and QC status as QC rejected.
The following table depicts the behavior of the parameter:
| QC Status | Rejected Inventory Handling | Rejected Inv LC | LPN Status | LPN Lock Code |
|---|---|---|---|---|
| QC rejected |
Blank |
Blank |
Canceled |
N/A |
| QC rejected |
Lock rejected inventory |
Blank |
Received |
Users need to provide an un-allocatable lock code (if not defaulted) when prompted. |
| QC rejected |
Blank |
Lock code provided |
Canceled |
The lock code is not honored. |
| QC rejected |
Lock rejected inventory |
Lock code provided |
Received |
Lock code defaults and the system does not show any prompt to users. |
- When the parameter rejected-lock-code is set to Blank and if the Rejected inventory handling is set to Lock rejected inventory, then the system prompts users for the lock code. The system displays un-allocatable lock codes available in the system during the QC complete transacting for users to select a lock code from the list.
- If the Rejected inventory handling is set to Lock rejected inventory and the rejected lock code screen parameter is configured with an un-allocatable lock code, the system will default the lock code from the rejected lock code screen parameter upon QC rejection and will not prompt for lock code.
NOTE: If the lock code is provided in the rejected lock code text field, the system will not prompt for lock code in RF.
- If the defaulted lock code is invalid, the system displays the following message, “Invalid lock code for facility or company" (Message code 2013). Upon accepting the message, the un-allocatable lock codes are displayed for users to choose from.
- The system updates the shipment and associated PO quantity (if any) considering the QC rejected inventories.
IMPORTANT NOTE: If an un-allocatable lock code is removed from the QC rejected LPN, then the rejected inventories will be at risk of getting allocated and picked by the wave or non-wave transactions.
- A new error message "Cannot QC reject with an allocatable lock code" is introduced and displayed when the user applies an allocatable lock code on the QC rejected LPN or configured from the rejected lock code parameter, and is by default enabled for all respective facilities.
- A new column “Lock Code” is added in the Verification History view UI screen to displays the un-allocatable lock code applied on the QC rejected LPNs from the RF QC Complete transaction.
APPLY LOCK CODE VIA IB CONTAINER AND IB SHIPMENT UI
A new pop-up window is introduced and displayed in the IB Container (IbContainerView) and IB Shipment (IBShipmentView) UI when users click the Reject button on the respective UI. This pop-up window lists only an un-allocatable lock code for users to select from the drop-down. On applying the lock code, the QC rejected LPN status moves to Received and thus allowing users to bring the LPN within the four walls.
NOTE: Applying a lock code upon rejecting an LPN is not mandatory. However, if users do not select a lock code, the system retains the original behavior where the LPN status moves to Cancelled upon performing QC reject.
- Users can select multiple records for the Quality Check from the IB Container (IbContainerView) and IB Shipment header (IBShipmentView) UI. The applied lock code will be applicable to all the selected LPNs subjected to QC.
- When multiple QC rejected LPNs are pending, and the user proceeds to apply an un-allocatable lock code to reject the LPNs, the system will only process those LPNs which do not have the same lock code. Thus, marks such LPN as Received with QC status as QC rejected. But, for some LPNs which already has the same lock code, the system displays an error “Successfully completed:<LPN> Some of the LPNs are not rejected with lock code as the same lock is already applied to them <LPN>”, and retains the same LPN status and do not get QC rejected.
ORDER CREATION FOR QC REJECTED LPNS
You can now create an order manually to ship out rejected inventories from designated locations.
A new “Lock Code for QC Reject Allocation” text field is introduced in the Order Type UI where:
- You can define both allocatable and un-allocatable lock codes that allow IBLPNs to be allocated and shipped to the vendors via RF Direct Allocation and RF Pick and Allocate transactions.
- When you define the lock code in the “Lock Code for QC Reject Allocation”, the system tries to match the lock code on the IBLPN against the lock code on the order type. If the lock code on the IBLPN matches with the order type lock code, only then the QC rejected IBLPN is allocated.
- Supports configuring one or more valid lock codes separated by a comma only. The system will display an error if any other characters are used to add more than one lock code.
- The system erases any leading and trailing spaces between two consecutive commas provided in the “Lock Code for QC Reject Allocation” field when saving the record.
The following table depicts the allocation of IBLPNs via RF Direct Allocation and RF Pick and Allocate:
| IBLPN |
Lock Code | Lock Code Type | Lock Code for Order type | Description |
|---|---|---|---|---|
| LPN01 | LC01 |
Allocatable |
Not required. Do not provide any lock code. |
|
| LPN01 |
LC01 |
Allocatable |
LC02 (un-allocatable) |
Users will be prompted "Lock code mismatch". |
| LPN01 |
LC02 (un-allocatable) |
Users will be prompted "Lock code mismatch". |
||
| LPN01 |
LC02 |
Un-allocatable |
LC02, LC03 (both un-allocatable) |
IBLPN gets allocated. |
| LPN01 |
LC02, LC03 |
Un-allocatable |
LC02, LC03 (both un-allocatable) |
IBLPN gets allocated, if you are using lock code priority, then LC02 should have lesser priority than LC03. |
ALLOCATING FOR QC REJECTED LPNS
Oracle WMS Cloud also allows you to ship out of QC rejected LPN to vendors via RF Pick and Allocate and RF Direct Allocation transactions.
NOTE: The allocation of QC Rejected inventory is supported only through User directed mode in the RF Pick and allocate transaction.
- Allocation for QC rejected inventories is supported only if the LPNs are in Reserve/Drop locations, LPNS that are not located are in Received status, and LPNs that have matching Allocatable/ un-allocatable lock code defined in the Lock Code for QC Reject Allocation on Order type UI.
- If the scanned LPN has multiple un-allocatable lock codes, but only one of them matches with the Lock Code for QC Reject Allocation in the Order Type, then the lock code with higher priority will take precedence.
- In case a QC rejected LPN has two un-allocatable lock codes and the matching lock code defined on the order type has a higher priority than the other un-allocatable lock code present on the LPN, the system successfully performs allocation of the rejected LPN.
- In case a QC rejected LPN has two un-allocatable lock codes and the matching lock code defined on the order type has a lower priority than the other un-allocatable lock code present on the LPN, the system displays the newly introduced error message “Scanned LPN has another un-allocatable lock code with a higher priority" and does not perform allocation of the rejected LPN.
- During the Pick and Allocate transaction to allocate a QC Rejected LPN, when the user scans the active location, the system displays a newly introduced error “Order Type has lock code for QC Reject. <%> location is not supported for allocation.”
- If the allocated Order Type does not have 'Lock Code for QC Reject Allocation' configured and upon scanning a reserve location and IBLPN with an un-allocatable lock code, then the system displays an error “Scanned LPN has un allocatable lock.”
RESTRICT RF SPLIT IBLPN AND RF IB SORT DURING QC COMPLETE TRANSACTION
Users can now split, and sort similar QC rejected inventory via the RF Split IBLPN (rf.inbound.cwrfsplitcntr) transaction and thus restricting splitting of QC rejected inventory into non-rejected LPN when performing the split transaction.
When performing RF Split IBLPN (rf.inbound.cwrfsplitcntr), the system behaves in the following manner:
| Source LPN | Destination LPN | Behavior |
|---|---|---|
| QC rejected inventory |
With New LPN |
Inventory is split from the source LPN and moved to the destination LPN and therefore, the lock code and QC status will be transferred to the destination LPN. |
| QC rejected inventory |
An existing QC rejected LPN |
Allows the inventory to be split for source and destination LPN having the same or different lock code. NOTE: When the Required Validation parameter is set to All, and if the source LPN has an un-allocatable lock code present, the same lock code should be matched with the destination LPN as well. Otherwise, the system will say Lock code mismatch. Users can perform RF split transactions when the source and destination IBLPN has different lock codes and the Required Validation parameter is set to None. |
| QC rejected inventory |
Existing LPN without any reject inventory |
Displays a newly introduced error “QC Reject inventory cannot be mixed with non-reject inventory' should be displayed” message. |
| Existing LPN without any reject inventory | QC Reject LPN | Displays a newly introduced error “QC Reject inventory cannot be mixed with non-reject inventory' should be displayed” message. |
When performing RF IB Sort (rf.inbound.cwrfibsortlpn) transaction, the system behaves in the following manner:
| Source LPN | Destination LPN | Behavior |
|---|---|---|
| QC rejected inventory |
With New LPN |
Upon merging, inventory is fetched from the source LPN and moved to the destination LPN, and therefore, the lock code and QC status will be transferred to the destination LPN. |
| QC rejected inventory |
An existing QC rejected LPN |
Allows the inventory to be merge from source and destination LPN having the same or different lock code. |
| QC rejected inventory |
Existing LPN without any reject inventory |
Displays a newly introduced error “QC Reject inventory cannot be mixed with non-reject inventory' should be displayed” message. |
| Existing LPN without any reject inventory | QC Reject LPN | Displays a newly introduced error “QC Reject inventory cannot be mixed with non-reject inventory' should be displayed” message. |
NOTE: It is recommended that user users Container QC status as the sort criteria to sort the QC rejected IBLPNs. Otherwise, users are required to scan a different sort zone to sort the QC rejected LPNs if the sorting zone already has mainstream inventories. We will introduce skip location functionality or allow users to scan a different location within the sort zone at a later version release.
RESTRICT CREATING LPNS FROM ACTIVE LOCATION
When LPNs are created from active using the RF Create LPN module, WMS allows an existing IBLPN to be used, as long as the shipment associated with the IBLPN is verified. A new error “Invalid LPN status, LPN is QC rejected” is introduced in this module which is encountered when users scan an existing IBLPN that is QC Rejected and is in Received status.
NOTES:
- The new error is applicable only when LPNs are created with inventory out of an active location. This is because the WMS does not allow existing IBLPNs to be used by RF Create LPN if inventory is not from active location.
- The new error is applicable only for LPNs that are associated with a shipment that is verified. This is because WMS does not allow existing IBLPNs to be used by RF Create LPN if the associated shipment is not verified.
RESTRICT QC REJECTED LPNS DURING PALLETIZATION
Enhancements are made to prevent the combining of rejected inventory with regular inventory on the pallet. A newly introduced error “Pallet cannot have a mix of QC rejected and non-rejected inventory” message is displayed under the following conditions:
RF Palletization (rf.inbound.cwrfpalletizeplt) transaction:
- When the user scans an existing pallet during palletization containing QC rejected LPNs, and user scans a regular LPN.
RF putaway (rf.inbound.cwrfputaway) transaction:
- When the prompt-dest-pallet parameter is set to yes and the user scans a QC rejected LPN for putaway and pallet contains good LPN.
- When the prompt-dest-pallet parameter is set to yes and the user scans a regular LPN for putaway and pallet contains QC rejected LPN.
RF Locate LPN/pallet (rf.inbound.cwrflocatelpnpallet) transaction:
- When the prompt-dest-pallet parameter is set to yes and the user scans a QC rejected LPN to locate and pallet contains good LPN.
- When the prompt-dest-pallet parameter is set to yes and the user scans a regular LPN to locate and pallet contains QC rejected LPN.
Palletize via API:
- When performing palletization form the API where the user provides a QC rejected LPN and the destination pallet has a regular LPN.
- When performing palletization form the API where the user provides a regular LPN and the destination pallet has a QC rejected LPN.
This enhancement also focuses on improving screen flow during various transactions for QC rejected inventories.
Steps to Enable
You don't need to do anything to enable this feature.
Tips And Considerations
RECOMMENDATIONS:
- Users are advised not to remove the un-allocatable lock codes from the QC rejected inventories. If the un-allocatable lock codes are removed from the QC rejected yet LPNs are received, the system will consider the rejected LPNs as mainstream inventories and can be allocated through the wave or non-wave transactions.
- Users must ensure not to putaway QC rejected LPN's to an Active location. Currently, the system has no restriction to prevent the putaway of QC rejected LPNs to an Active location and can only be controlled by enabling the Prevent Putaway flag on the lock code applied.
- It is recommended to disable the Unlock on locating to Reserve flag so that the un-allocatable lock code is not removed from the QC rejected LPNs upon locating to a reserve location.
Key Resources
New Parameter for Non-Multi-Field Barcodes
Prior to update 20D, the barcode type “Count” only applied in Multi-Field Barcode (MFB) scenarios, and only when the Multi-Field Barcode was scanned in a non-quantity barcode field. Now with update 20D, you can use the Count barcode type for both MFB scenarios, and non-MFB scenarios. A new Company parameter “ENABLE_NON_MFB_COUNT_BARCODES” has been added to control this behavior. The default is No, but If set to Yes, it will allow:
- The count barcode type to be used in a non-MFB scenarios.
- Single barcodes for count (ie quantity) to be scanned into the quantity field.
- To validate against the barcode type rules as defined for the count type.
- All quantity entry fields will recognize this barcode type.
- The "numeric" flag on the barcode type detail should be ignored for Count and the behavior should be as if it was enabled.
- Any non-numeric (ie except numbers, decimal point) values other than the prefix will result in an error message.
NOTE: The quantity entry field currently accepts non-numeric characters and ignores them silently. This behavior will continue when the new parameter is disabled
3PL CONSIDERATIONS
Oracle WMS Cloud only looks up this value for the users default company. If a user at the parent company level logs in and starts receiving a shipment for a child company, the parameter value that gets used is the one for the user's default company which is the parent company. If a user that belongs to a child company logs in, the parameter at that level is what applies.
Steps to Enable
You don't need to do anything to enable this feature.
Enhanced Configurability on Post-Pick Order Consolidation and Loading
In order to streamline throughput in the warehouse, Oracle WMS Cloud has added a new feature to manage and control Outbound LPN movements after picking/packing using Outbound LPN/Pallet Putaway.
This makes your time to market faster and reduces user clicks and screen time – ultimately reducing bottlenecks within the warehouse.
CONFIGURATION
New Transaction - RF Module OBLPN Directed Putaway
Outbound LPN/Pallet Putaway is a new module (rf.outbound.cwrfputawayoblpn) that will be used for pushing picked or packed OBLPN's to relevant locations or to call other transactions like Loading or Dynamic Staging.
NOTE: The Outbound LPN/Pallet Putaway transaction can be called standalone or through tasking.
- Users should be able to scan single or multiple LPNs or a Pallet. If they are scanning multiple LPNs a counter will also be displayed.
- When scanning, OBLPN status must be "Picked or Packed”.
- When scanning, a Pallet status must be "In-use”.
- If user scans an LPN on the Pallet, the following message will appear -- "LPN will be depalletized, proceed further".
- We do not support multiple pallet scan with this transaction.
SCREEN PARAMETERS FOR THE NEW DISPATCH MODULE
putaway-type-determination-rule
This is a free form text box where you can add the rule name you configured in OBLPN Putaway type determination UI. Rule name provided will determine the putaway type by going through the individual rule sequences.
determine-patype-for-each-lpn
If _determine-patype-for-each-lpn is set to "No":
- Then when users scan multiple LPNs, the putaway type is not going to be calculated for each LPN. Instead the system is only going to calculate the putaway type according to the rules and inventory. Incompatible putaway types will not come into play as there will only be one putaway type determined for all LPNs on a pallet or all the LPNs scanned or passed through tasking mode.
If _determine-patype-for-each-lpn is set to "Yes":
- System will calculate the putaway type for each LPN scanned.
- If a common putaway type is determined for all LPNs on the pallet or all individual OB LPNs scanned in OBLPN Putaway or all LPNs passed through tasking mode. User will be prompt with the action configured in OBLPN Putaway Action UI.
- If Putaway types determined for all LPNs on the pallet or all LPNs passed through tasking is different and are incompatible then message will be displayed "Putaway types are different and not compatible for proceeding with next action," and user will be prompted with a drop location.
- If Putaway Type determined is not same(heterogeneous) and OBLPN Putaway is invoked Standalone. Putaway type determination to happen after each LPN scan, and if putaway type determined for next LPN scanned is not compatible with previously scanned LPNs display error message "Putaway type determined for %LPN% is not compatible with previously scanned LPNs, scan different LPN".
default-drop-location
This is a free form text box, which will allow users to configure the drop location.
NOTE: Drop Location configured should not be part of Inbound Sort Zone or Outbound Sort Zone.
Recalculate Putaway type
- If screen parameter recalculate Putaway type is set to "Yes", putaway type will be determined even though container has putaway type.
- If screen parameter recalculate Putaway type is set to "No", putaway type will not be determined if container has putaway type. Putaway type determination will be invoked only if container does not have Putaway type.
- If Pallet is subjected for Putaway type determination, and recalculate Putaway type is set to "Yes" Putaway type will be computed for each LPN on the Pallet, even though putaway type is populated on the LPN's.
- If Pallet is subjected for Putaway type determination, and recalculate Putaway type is set to "No" Putaway type will not be computed if all outbound LPN's have Putaway type populated. Determine Putaway type only for those LPN's which do not have PA type.
NOTE: Putaway type determination is based on the configuration of determine-patype-for-each-lpn screen parameter. The configuration of this parameter is very important as it drives the whole logic of how the putaway type is determined.
DETERMINING PUTAWAY TYPE
New UI - OBLPN Putaway Type Determination
OBLPN Dispatch assigns an OBLPN Putaway Type to OBLPNs or Pallet according to the rules configured in the new OBLPN Putaway Type Determination UI. The New RF OBLPN Direct Putaway will look into the rules and the selection criteria that the user has set up in the new UI – OBLPN Putaway Type Determination, and if the selection criteria matches the inventory in the OBLPN, it will assign the Putaway type configured in that rule. In the New OBLPN Putaway type Determination UI you can configure the rule name. This rule name is configured in the screen parameter "putaway-type-determination-rule" of the RF OBLPN Direct Putaway.
Putaway Type Determination Sequence
- In the OBLPN Putaway Type Determination UI, the user must configure a putaway-type-determination-rule. Each rule can have a set of Putaway type determination sequences that can be configured in the detail screen. The system will assign a putaway type by looking at the sequence and its corresponding selection criteria. If selection criteria configured matches against the container's attributes, then the system will assign the putaway type configured on that particular sequence. If selection criteria is not configured then Putaway type will be assigned as per that sequence.
- If LPN which is subjected for Putaway type determination contains multiple SKUs and if the underlying selection rule has item/item facility attributes used in the rule, then any one of the item's attributes can be considered, and if one matches the selection criteria then system will assign that putaway type.
- If LPN which is subjected for Putaway type determination contains multiple orders and if the underlying selection rule has order header attributes used in the rule, then any one of the order header's attributes can be considered.
- If LPN which is subjected for Putaway type determination contains multiple order details and if the underlying selection rule has order detail attributes used in the rule, then any one of the order details attributes can be considered.
- If LPN which is subjected for Putaway type determination contains multiple allocations and if the underlying selection rule has allocation attributes used in the rule, then any one of the allocation's attributes can be considered.
- If selection criteria does not pass based on the containers contents (items, orders, allocation), then proceed with next sequence.
- If Putaway type is not determined then a drop location will be prompted. If Putaway type determination fails for one or more LPN then the system will display the message "Putaway type determination failed for some of the LPN's, locate to drop location".
Selection Criteria
Selection Criteria can be assigned for each Putaway Type Determination Sequence. Selection criteria has fields from tables such as Container, Order, Allocation, and more. We have also added a list of additional functions. These new functions can be useful to assign a Putaway Type.
| Complex Function | Comments |
|---|---|
| Has All LPNs on Single Load. |
If all OBLPNs are assigned to same Load, then Loading Module could be called. If all OBLPNs are assigned to same Load, then operator can directly perform Loading. Typically useful when LPNs are called in tasking mode or while picking a Pallet or while picking multiple LPNs in standalone mode and Putaway type is not determined by LPN. LPNs without a load number are not evaluated. |
| Total Weight by LPN |
Will yield the summation of OBLPNs' weight on all the participating LPNs. Actual weight determined can be different than estimated weight. This function could be used in operations after capturing the actual weight. Typically useful when LPNs are called in tasking mode or while picking a Pallet or while picking multiple LPNs in standalone mode and Putaway type is not determined by LPN. |
| Total Volume by inventory |
Sum (curr_qty * unit_volume) across all inventory lines. |
| Has All_LPNs on Single Stop |
If all OBLPNs are assigned to the same Stop, then Loading Module could be called. If all OBLPNs are assigned to same Stop, then operator can directly perform Loading. Typically useful when LPNs are called in tasking mode or while picking a Pallet or while picking multiple LPNs in standalone mode and Putaway type is not determined by LPN. LPNs without a load stop are not evaluated. |
| Has All LPNs on Active Stop |
If all OBLPNs are assigned to the Active Stop (the first non-closed stop on the specified load), then Loading Module could be called. If all OBLPNs are assigned to the Active Stop, then operator can directly perform Loading. Typically useful when LPNs are called in tasking mode or while picking a Pallet or while picking multiple LPNs in standalone mode and Putaway type is not determined by LPN. LPNs without a load stop are not evaluated. |
| Has complete orders |
All underline orders must be present in the task, pallet or scan OBLPN, and they must be completely packed. |
| Has complete pick orders |
All underline orders in the task pallet or scanned OBLPN , and they must be completely in pick status for final packing to be started using RF Repack. |
| Has mix destination facilities |
Checks the selected inventory orders' DESTINATION facility, if there's more than one, true. |
| Has mix order type |
Checks orders' type, if there's more than one, true. |
| Has mixed shipto |
checks orders' SHIP TO facility, if there's more than one, true. |
| Is multi sku |
Returns true if there is more than one type of item in the selected inventory. |
| Number of orders |
Counts all the orders in the selected inventory. |
| Total weight by inventory |
Sum (curr_qty * unit_weight) across all inventory lines. |
| Inventory exceeds LPN type capacity |
Checks to see inventory uses any LPN types. If it does, it tests if LPN total volume or weight exceeds the LPN types capacity. It returns true if ANY of the LPNs exceed it's LPN type capacity. |
New OBLPN Putaway Action UI
Once your Putaway Type has been determined as per the configuration rules above, you may configure activity based on the determined Putaway type in a new web UI screen. The OBLPN Putaway Action configuration will decide if the LPNs or Pallet will be either “Locate,” “Stage,” or “Load.” This is going to save you time and you will not need to exit one transaction before logging in to the next transaction. This is crucial for warehouses that only have a single user who performs multiple steps from pick to load.
DISPATCH ACTIONS
OBLPN Putaway Action - Locate
After Putaway type is determined, the system will check the configuration for that putaway type. If the action is to Locate, the following will happen:
- If resultant action has destination location barcode configured, user will be prompted with location and will have to confirm location.
- If the resultant action has destination location type and destination zone configured, then user will be suggested a Task Zone and user will be free to put the OBLPN or Pallet in a location with that task zone.
- WMS activity records needs to be written as configured.
Let's say you have LPNs in a pallet with different putaway types and those putaway types have an OBLPN Putaway Type equal to Locate. However, those putaways are all set up to be located in different locations. The system will prompt you to depallatize the pallet, and to scan each LPN, so that they are located in the correct location.
NOTE: Customers will have to configure task zones for the locations like drop/packing station/Staging/Pack and Hold.
OBLPN Putaway Action - Stage
Currently, pickers have to drop picked LPNs in a drop location and the next operator has to pick the LPNs for staging. For small warehouses where staging locations are nearby, it will be beneficial to call a dynamic staging transaction right after picking is completed. Without this feature, users will have to come out of tasking and invoke the transaction standalone which can result in productivity issues.
With this new feature, customers will be able to configure staging transaction to be called upon completion of picking and users will be prompted for performing dynamic staging or invoke staging transaction for the LPN's or Pallets post packing based on Putaway type determination.
Please note that if Dynamic staging transaction is being called from Outbound LPN Putaway Module, the transaction will allow you to scan more than one LPN, and the system will ask the user to scan each LPN to be staged one by one.
OBLPN Putaway Action - Load
To facilitate loading, users are now able to load LPNs or single pallet right after picking. Now, you will be able to call Loading upon completion of picking, so the same user can be prompted to do the loading of the LPNs or Pallet packed using the new RF OBLPN Putaway Directed transaction. If user has configured loading as the putaway action, users will be able to easily load into the truck. Some examples of validations included:
- Prevent loading onto inactive stop
- Prevent loading if LPNs are assigned to multiple loads
- Prevent loading if some LPNs are NOT assigned to a load
- Prevent loading if order is blocked for shipping
The system will prompt for a message to perform Loading. Loading is completed by scanning a dock door/trailer/load number. You will not be Prompted to rescan the LPN or Pallet, after scanning in OBLPN/Pallet Putaway. To speed up the process, you will be prompted to either scan a dock number (if dock is assigned via appointment) or trailer number/load number.
NOTE: Users are only allowed to scan OBLPNs that have been passed thru OBLPN Directed Putaway transaction. If users scan an OBLPN which is not passed from OBLPN Directed Putaway transaction the system will display error message "Scanned LPN/Pallet not part of OBLPN Putaway".
LOCATE
If system is not able to determine a putaway type, then users will be prompted to scan a location or to confirm a location if default is set up in transaction. This location must be a “Drop” Location, and the type of the location should be ‘drop’ for the logged facility. Drop Location configured should not be part of Inbound Sort Zone or Outbound Sort Zone.
Once users confirm the location, if dealing with LPNs alone, the current location of the LPNs is updated. If dealing with pallets, ensure current location of the pallet is updated to the drop location scanned.
Change in Task Type detail UI to make System Call New Transaction
The following Allocation types have a new entry to task type detail screen. This new entry is Putaway OBLPN, and users will be able to add the new RF OBLPN Directed Putaway screen. The entry is not mandatory.
- Full LPN/FULL-LPN-PALLET or FULL-CONTAINER (Post full LPN picking)
- LPN Cases/LPNCases (Post Non cubed Active Picking)
- LPN Packs/LPNPacks (Post Non Cubed Active Picking)
- LPN Units/LPNUNITS (Post Non Cubed Active Picking)
- Full LPN/PLTMV_AUTOPK (Post Pack OBLPN, with Pallet being pulled)
- Active Pick/NC-ACTIVE-PICK (Post Non Cubed Active Picking)
Multiple Types/PICK_CART (Post Pick Cart)
In tasking flow, you can either get task zone movements (and then you can use oblpn putaway standalone) or you can get oblpn_putaway built in, but you cannot configure both.
OBLPN Inquiry and Item inventory by LPN Screens – Now Displays Putaway Type
- Putaway type column is exposed in Outbound LPN Inquiry.
- Putaway type column is exposed in Item Inventory by LPN.
- Not by default.
- You can search by putaway type.
Steps to Enable
You don't need to do anything to enable this feature.
Key Resources
New Facility Parameter to Associate Blind ASNs
The ability to associate a shipment type for blind shipments is now available in 20D. A new facility parameter SHIPMENT_TYPE_FOR_BLIND_IBSHIPMENT allows you to associate a Shipment Type to a blind ASN and also harness additional flags on the shipment type during receipt like the "allow receipt of expired inventory" flag.
The SHIPMENT_TYPE_FOR_BLIND_IBSHIPMENT parameter includes the following details:
- By default the Parameter Value is <Blank>.
- The parameter should be configured with a valid 'Shipment Type' configured in the system.
- When SHIPMENT_TYPE_FOR_BLIND_IBSHIPMENT is <blank>, during RF Recv Shipment (Blind ASN Receiving) - blind ASNs are created without a Shipment Type.
When SHIPMENT_TYPE_FOR_BLIND_IBSHIPMENT is configured with a valid value (Shipment Type configured in the logged in company), during Blind ASN Receiving:
- After receiving the first LPN, when the system displays the LPN prompt screen, the system displays the configured Shipment Type in the "Shipment Type" field.
- Blind ASNs are created with the configured Shipment Type.
- When a blind shipment is defined with a shipment type, the ASN should honor the Allow Expired Inventory field.
Steps to Enable
To facilitate auto-verification of blind ASNs, configure facility parameter SHIPMENT_TYPE_FOR_BLIND_IBSHIPMENT with a valid shipment type.
Key Resources
Support for Legacy Company Parameter LEGACY_ACTUAL_WEIGHT_OVERRIDES_WT_VOL_CALC_IN_SHIPPING
As part of 20D, a new company parameter LEGACY_ACTUAL_WEIGHT_OVERRIDES_WT_VOL_CALC_IN_SHIPPING is introduced in the system to re-compute the weight/volume for the OBLPN based on the Item's unit weight and quantity on the OBLPN when the OBLPN gets loaded and shipped. This company parameter is set to No, by default.
If the parameter is set to YES, the system does not re-compute the weight/volume on the OBLPN and OBLOAD and will retain the actual weight/volume captured either via UI/RF or API.
NOTE: If the actual weight and volume are recorded post packing and if the actual weight does not change, then it's recommended to set the parameter to Yes so that the actual weight recorded is not overwritten.
After performing Picking, the actual weight/volume/dimensions of the LPN can be recorded. Even though the actual weight and volume are recorded upon performing ship load, the OBLPN’s weight and volume were previously recomputed. As part of this change, the application will provide the ability to retain the actual weight and volume of the OBLPN recorded during ship load.
Steps to Enable
You don't need to do anything to enable this feature.
Key Resources
Backorder Processing Handling in WMS
The system allows the processing of orders with the same order number only when the "Require Back Order Flag" on the order's order type is enabled and the existing order with the same order number is in Shipped or Canceled status.
Users can process the order from:
- Order Interface
- Init stage API for order
- Order UI
NOTE: IF the "Require Back Order Flag" on the order's order type is disabled and the existing order with the same order number is in Shipped/Canceled status, then the system displays an error message.
A new column "Original Ord Number (original_order_ndr)" is introduced on the Order header. By default, the value in the column is set to Blank.
During backorder processing, the existing order present in the system with the same order number is renamed with timestamp suffix (YYYYMMDDHHMMSS) and the renamed order number is displayed in the order number field in the Order UI. On renaming the order number during backorder processing, the original order number (before renaming) is stored in the Original Order Number column in the Order Header UI. The Original Order Number column is also displayed in the Order Header category in Web Reports.
The system considers the order number from the Original Order Number column present on the order. If the value is blank, then the order number is considered from the Order Number column of the respective order for the following interfaces:
- Inventory History (IHT)
- Shipped Load (SLS)
- Order Outbound Load Export (PLS)
- Pallet Shipping Info (PLO)
- OBLPN Shipping Info (OLO)
- Container Outbound Load Export (LLS)
When Oracle Inventory Management Cloud sends an unfulfilled order back with the same order number to Oracle WMS Cloud, the system was not processed because of an already existing order number present in the system whose order status was greater than created.
Back Order Processing has been enhanced so that you can now process back orders with the same order number even if an earlier order with the same number is in Shipped/Cancelled status.
Steps to Enable
You don't need to do anything to enable this feature.
Key Resources
Allocation in Terms of Packs or Cases from Active Locations
In 20D, Oracle WMS Cloud is enhanced to support Picking allocations from the Wave in terms of Packs or Cases from active locations. Now, users who track inventory in terms of item’s standard pack or item’s standard case quantity can use the feature for allocating in terms of packs or cases from active.
Highlights of the enhancements include:
PICKING WAVE ALLOCATION
Previously, the allocation mode sequence in a wave template allowed users to define the Allocation UOM in terms of Units only when the location type is Active. Now, the allocation mode sequence allows the user to define the Allocation UOM in terms of Packs, Cases, and Units when the location type is Active. When performing the picking wave, if the allocation UOM is set to Pack or Cases and the Location type is Active, the system creates allocations with an allocation UOM of packs or cases. That is, if the allocation UOM is Packs, then the system considers the item's standard Pack quantity, and if the allocation UOM is Cases, then the system considers an item's standard case quantity. While allocating in terms of packs or cases, WMS falls back to an item's standard pack or item's standard case quantity given the active inventory pack and case quantity values of 0.
ALLOCATION MODE SEQUENCE
The Allocation Mode Sequence UI allows configuring UOM of Packs or Cases when the Location type is "Active".
NOTE: If the Location Type is "Active" and Allocation UOM is not Units or Packs or Cases, OR enabled with only Units/Packs/Cases, then an error is displayed.
NC ACTIVE PICKING
RF NC Active Picking is enhanced to displays quantity in terms of the number of Packs or number of Cases when users are picking from Active. The number of Units per pack or case is considered from the item's master.
- The system now allows you to pick per Packs or Cases when the wave has allocated Active Inventory with Allocation UOM of Packs or Cases while performing:
- Non-Cubed Active Picking.
- Cubed Picking.
- Non-Cubed Picking with Final OBLPN Status as Packed.
- The system will display the number of cases based on the item's standard pack or case quantity in Sku Scan Mode. Each Scan of Sku should correspond to 1 Case per pack to be Picked (The number of Units to be considered is an item master's standard case or pack quantity).
- The screen parameter auto-pack-one-uom works with allocation from active in Packs or Cases if allocation UOM is Packs or Cases and Wave has allocated with allocation UOM of Packs or Cases from the active location.
NOTE: While allocating in terms of Packs or Cases from Active, the underlying task type must populate is "NC-Active-Pick" and Allocation type of "Active Pick" for the allocations and tasks created.
RF PICK CART
The RF Pick Cart is now enhanced to display quantity in terms of Packs or Cases when your picking from an Active location.
- The system now allows you to pick in Packs or Cases when the wave has allocated Active Inventory with Allocation UOM of Packs or Cases while performing Cubed picking:
- The system will display the number of packs or cases based on the item's standard pack quantity or item's standard case quantity in Sku Qty Entry Mode.
- The system will display the number of packs or cases based on item's standard pack or case quantity in Sku Scan Mode. Each Scan of Sku corresponds to 1 Case or pack to be Picked (The number of Units to be considered is an item master's standard case or pack quantity).
RF PICK IBLPN
RF Pick IBLPN with Consolidate and Distribution is now enhanced to support picking into temporary inbound LPN and displaying the quantity in terms of Packs or Cases from Active Location.
- The system now allows you to Pick in Packs or case when the wave has allocated Active Inventory with Allocation UOM of Packs or Cases:
- The system will display the number of packs or cases based on the item's standard pack quantity or item's standard case quantity in Sku Qty Entry Mode.
- The system now allows you to Pick in Packs when the Wave has allocated Active Inventory with Allocation UOM of Cases while performing Cubed picking. The system will display the number of cases based on item's standard case or pack quantity in Sku Scan Mode.
- Displays correct Packs and Case Qty values during RF Distribute LPN transaction:
- If the initial Picks into temporary inbound is in terms of Packs (allocation UOM of Packs) and Pick IBLPN has screen parameter distribution-uom is set to "Use Source Inventory UOM", then the system displays quantity to be packed in Packs while performing RF Distribute LPN.
- If the initial Picks into temporary LPN is happening in terms of Cases (allocation UOM of Cases ) and Pick IBLPN has screen parameter distribution-uom is set to "Use Source Inventory UOM", then the system displays quantity to be packed in Cases while performing RF Distribute LPN.
PUTAWAY
To support allocate inventory in Packs or Cases from Active Location, Oracle WMS Cloud considers pack quantity and case quantity from the item master's pack and case quantity.
NOTE: The system does not support tracking of multiple packs or Case Qty in a single active location.
Putaway Type Determination Rules is now enhanced where you can control LPN's with non-standard Pack or Case quantities to be moved to different Active Locations. You can now move LPN's to different Reserve Locations if the incoming LPN's have a different Pack or Cases quantity other than the Item master's Pack or Case quantity. This will help in segregating items with a non-standard pack or case quantity from the active location.
The following two functions are introduced in the Putaway type determination Rule Selection Criteria:
- FUNC_INVN_PACK_QTY_MATCHES_ITEM: The system will compare the item's standard Pack quantity against the inventory's pack quantity. If the item's Pack quantity matches with the Inventory's Pack quantity, then the Function will evaluate to true.
- FUNC_INVN_CASE_QTY_MATCHES_ITEM: The system will compare the item's standard Case quantity against the inventory's Case quantity. If the item's Case quantity matches with the Inventory's Case quantity, then the function will evaluate to true.
MHE Pick Confirmation Changes
From Release 20D, you can use the MHE Pick Confirmation API to pick from active with allocation UOM of Packs or Cases. Currently, as allocation in terms of packs or cases is not supported through Picking Wave from active, users did not have ab ability to use MHE Pick Confirmation.
The MHE Pick Confirmation API is now enhanced to pick inventory in terms of Pack and Cases from an active location with Allocation of Packs or Cases. The MHE Pick Confirmation API has Allocation UOM and UOM quantity fields that convert Packs to Units or Cases to Units. These fields are used to perform picking updates if the original allocation is in Packs or Cases.
- If MHE Pick Confirmation payload has allocation UOM of Packs or Cases and the determined allocation is in Packs or Cases from "Active”, then the system determines the quantity be picked or packed by multiplying the item's std pack qty if allocation UOM is Packs or item's Standard Case quantity, if the allocation UOM is in Cases.
- The MHE Pick confirmation API throws an error in the following conditions:
- If "allocation_uom" is passed without "uom_qty".
- If the passed "allocation_uom" does not match the Wave Allocation UOM, the API errors "No open allocations for LPN".
- If the passed "uom_qty" does not match the item's-Standard Pack quantity/Standard Case quantity, then the API errors "Item std pack/case qty does not match with UOM qty, for pick from active use item std pack/case qty".
- MHE Pick Confirmation API errors on the quantity mismatch, if the quantity to be packed is < than the quantity to be picked.
- If the passed "qty"*"uom_qty" > ( Allocated quantity - Packed quantity) of the item, the API errors "Entered qty is greater than ordered qty, overpack not allowed", if the short_flg" = false during Packing.
- If the passed "qty"*"uom_qty"> ( Allocated quantity - Packed quantity) of the item, the API errors "Error: qty is too high", if the short_flg" = true during Packing.
NOTE: As we are not supporting active inventory with non-standard pack or case quantity values, the UOM_Qty field in MHE Pick Confirmation API payload will not be relevant when determining allocation is from active and allocation UOM is Cases or Packs
The Oracle WMS Cloud supported the allocation of inventory in terms of Units from the Active location. Due to non-availability of allocation in terms of Packs or Cases from active location, users had to allocate in terms of units from active even though the physical form of inventory is in Packs or Cases. This was a challenging factor, where the picking professionals had to break open the sealed box that led to tampering with the original LPN Label. Through this enhancement, users are no longer required to model the pick location to the active location for allocating in terms of Packs and Cases. Instead, users can now allocate in terms of an item’s standard packs or item’s standard cases from active locations and the floor users do not have to compute the number of Packs or Cases manually.
Steps to Enable
To Allocate Inventory quantity in terms of Packs or Cases:
- Go to Wave Template>>Inventory Allocation Mode>>Inventory Allocation Mode Sequence UI.
- Set Location type = Active and Allocation UOM = Packs or Cases.
To Apply configuration changes in Putaway:
- Go to Putaway Determination Rule.
- Select the Final Putaway Type > Click Selection Criteria.
- Go to Insert basic Operation > From Column name drop-box, select the function Function - Inventory Pack Qty matches Item or Function - Inventory Case Qty matches Item.
- Click Save.
Key Resources
User Experience and Usability Enhancements
When inventory arrives at the warehouse, the LPNs or Pallets are received at the receiving station. Generally, on completing the receiving process, users call for the putaway of the LPN or pallet to the location based on the putaway type. This two-way process of receiving and then performing a putaway results in consuming extra time. In order to simplify the process of receiving and moving the LPN/Pallet directly to its location as soon as the inventory is received, the Oracle WMS cloud introduces a new enhancement to the Receiving transaction (Receive by Shipment & Receive by Load).
HIGHLIGHT OF THE ENHANCEMENT
- Ability to perform Directed Putaway from Receive by Shipment / Receive by Load.
- Ability to perform Directed Putaway for Upfront Palletization from Receive by Shipment / Receive by Load.
- Improved Putaway screen flow on invoking Distributed LPN transactions.
DIRECTED PUTAWAY FROM RF RECEIVE BY SHIPMENT / RF RECEIVE BY LOAD
An existing screen parameter "next-screen-to-launch", available in the RF Receive by shipment (rf.inbound.cwrfrecvlpnshpmt)/ RF Receive by Load (rf.inbound.cwrfrecvlpnload) module is now extended to call directed putaway when the user receives an LPN/Pallet during Receiving transaction.
The following table lists the support of calling the Putaway screen when receiving of LPN/ Pallet by Shipment or by Load:
| Receive LPN/ Pallet by Shipment or by Load |
Supports Directed Putaway During Receiving |
|---|---|
| Cartonize and Non- Cartonize LPN (Single/ Multi SKU) |
Yes |
| LPN with Flow-Through Successful |
Yes |
| LPN as Physical Pallet |
Yes |
| LPN or Pallet receiving |
Yes |
| Palletize Up Front |
Yes |
| Received LPN is subjected to successful Xdock |
No |
| Received LPN is subjected to QC. |
No |
| Received LPN is subjected to VAS. |
No |
| When receiving mode is set to Palletize after receipt |
No |
| Received LPN having Lock code (if Prevent putaway flag enabled) |
No |
- When an LPN/Pallet/LPN as Pallet is received during Cartonize or Non-cartonized Shipment, the system displays the putaway location confirmation screen based on the Putaway method priority associated with the putaway type available on the LPN received. On completing the Putaway transaction, the system navigates back to the receiving screen.
- If the received LPN has a successful flow through, then the system performs Putaway of respective LPN.
NOTE: If received LPN/Pallet fails to Putaway, then the system prompts for drop location if the screen "prompt-location" is not set to "Do not prompt" in the receiving screen.
- If the configured Putaway screen is invalid or unavailable, then the system displays an error message "Cannot call next screen. Screen configured % screen name % is not valid".
DIRECTED PUTAWAY FOR UPFRONT PALLETIZATION FROM RECEIVE BY SHIPMENT / RECEIVE BY LOAD
- On performing Upfront palletization, after users receive LPN’s with respect to Pallet and on ending the Pallet (CTRL+E), the system invokes the Putaway screen (Putaway location confirmation) configured in the Receiving transaction.
NOTE: When the user ends the pallet (CTRL+E), the system displays a confirmation message. Upon accepting, the Putaway location is prompted. After completion of Putaway, the screen navigates back to the Receiving screen.
- An error "Cannot call next screen. Screen configured % screen name % is not valid" message is displayed when calling putaway fails due to invalid screen during END Pallet.
IMPROVE CALLING DISTRIBUTE LPN FROM PUTAWAY
Previously, when an LPN was scanned in the Putaway transaction (with Distribute LPN configured), the system reverted to putaway if the allocation during distribution failed. Now, users can scan LPNs after receipt in the Putaway transaction (when configured to call distribution.) The system will first try to allocate the LPN for Xdock or flow through allocations and if unsuccessful, then the system falls back to Location determination logic.
Oracle WMS Cloud has been updated so that when the system invokes Distribute LPN (rf.outbound.cwrfdistributelpn) from RF Directed Putaway (rf.inbound.cwrfputaway) if there are no eligible orders (for Xdock and flow-through) for distribution, the system will automatically proceed with putaway for the respective LPN.
NOTE: After the system performs putaway against the scanned LPN, the system will display a message for you to confirm that you want to proceed with the putaway. If the distribution allocation fails for any reason, the system will display a message and then proceed with the putaway.
ALLOW DISTRIBUTION OF ALLOCATED LPNS ON A PALLET FROM PUTAWAY
To help users move allocated LPNs from pallets for packing, the system now allows you to perform Distribute LPN for allocated LPNs present on the pallet when you scan a pallet in the RF Directed Putaway transaction.
As long as RF Directed Putaway is configured with the Distribute LPN transaction:
- The system performs Putaway of a Pallet when all the LPN's on the pallet are not in allocated status by displaying the message "LPN's on the pallet are not allocated proceeding with Putaway".
When all the LPNs on the pallet are in allocated status, the system performs distribute LPN for all the LPN's present on the pallet:
- When there are multiple LPNs on the pallet in allocated status, the system prompts for each allocated LPN (In descending order of each LPN’s last modified time) for performing distribution.
NOTE: It's not advised to modify LPNs after allocation as this may impact the sequence of LPNs getting prompted for distribution.
- The system prompts for the LPN, then on confirming, the system proceeds with the message to perform Depalletize and distribute the LPN.
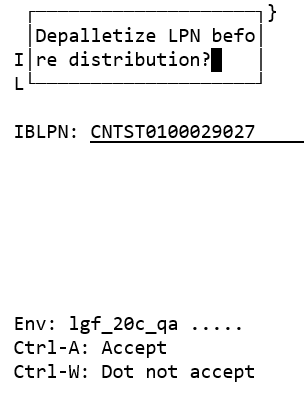
As part of 20D, users can now invoke Putaway transactions from RF Receiving and locate the inventory to the respective destination, if the putaway type is defined on the LPN/Pallet. This functionality is made available when performing the RF Receive by Shipment (rf.inbound.cwrfrecvlpnshpmt) /RF Receive by Load (rf.inbound.cwrfrecvlpnload) transaction.
Steps to Enable
You don't need to do anything to enable this feature.
Key Resources
Enhancements to Single Item LPN Receipt
Prior to 20D, users had to scan the LPN every time for a template-based receiving where the SKU's and quantity were defaulted when performing RF Single SKU receiving. Now in 20D, users can define the number of LPN scans or can auto-populate the LPN numbers without scanning any LPN.
BENEFITS OF THIS FUNCTIONALITY ARE:
- Single SKU receiving is an efficient way of receiving inventories when the fewer SKU's are involved.
- Template-based receiving provides an opportunity for users to scan the LPN without scanning the SKU and quantity for each LPN.
- Ability to cartonize the SKU's and then receive the inventory.
EXTENDED UOM SUPPORT
A new screen parameter “qty-uom” is available in the RF Single SKU (rf.inbound.cwrfrecvsinglesku) receiving module where users can receive inventory in cases and packs, and can define the current case or pack quantity.
| Parameter Values | Description |
|---|---|
| Blank (Default)/Units |
Receives the inventory in terms of Units. |
| Cases |
Receives the inventory in terms of Cases. |
| Packs |
Receives the inventory in terms of Packs. |
When the screen parameter “qty-uom” = Packs or Cases:
- The system considers the following logic to calculate the received quantity:
Total received quantity= (Pack/Case quantity/Units X Quantity provided X number of LPNs received).
- Users can override the defaulted pack or case quantity configured from the item detail. However, such overrides are limited to the received inventories alone, as an overriding standard pack or case qty will not update the item's standard pack or case quantity.
NOTE: If the standard pack or case quantity exceeds the totals shipped quantity, then the system displays an error message “Not enough shipped quantity”.
PRINT INBOUND LPN LABELS
A new screen parameter “print-labels" is available in the RF Single SKU receiving (rf.inbound.cwrfrecvsinglesku) module where users can print the labels for received LPNs.
| Parameter Values | Description |
|---|---|
| Blank (default) | Does not print IBLPN labels after LPN is scanned. |
| Inbound LPN Label | Prints the labels for the received LPNs. |
- The system fetches the appropriate label template from the Label Template View UI screen to print the IBLPN labels.
- A new message “No default printer found label printing will fail, proceed?” is available in the Message Code UI. The newly introduced warning message is displayed right after launching the transaction from RF when:
- If the default printer is not configured for a user.
- The user has configured an invalid printer name, as the default printer.
- The Print label parameter is set to Inbound LPN label.
- To update/modify the default printer, users can change form the Main RF menu option.
PROMPT BATCH NUMBER AND EXPIRY DATE
The RF Single SKU Receiving transaction honors the non-cartonized ASN type prompt control for batch and expiry tracked items. When performing a single SKU receiving, the system is now enhanced to prompt for the batch number or expiry date for the batch/expiry tracked items based on the item level or Shipment type-level configuration.
NOTE: The RF Single SKU receiving transaction does not support receiving of Inventory Attribute tracked SKU's having multiple details for the same SKU in an ASN, or have missing attribute values for the ASN details.
- When the screen parameter “rcv-sku-not-on-shpmnt” is set to Yes and the user scans an attribute tracked item that is not present on the ASN, a newly introduced error message “Sku not on shipment, the item is attribute tracked" will be displayed.
- Prompting of batch or the expiry date is based on the item level configuration and Shipment Type "Non-Cartonized receiving batch and expiry prompt control" config.
- When a user scans a batch number or the expiry date other than the batch number or expiry date populated on the shipment detail when the prompt is set to Always prompt, the system displays the following warning message respectively; "Batch number does not match the SKU-shipment combination"/ "Expiry date does not match the SKU-shipment combination".
- When the user scans an existing batch number from the batch master which is populated with an expiry date and overrides the defaulted expiry date on the RF single SKU receiving flow, the system displays the following error message: “Expiry date already exists on the batch master, cannot override".
- If an item is a batch or expiry tracked, the system displays the batch and expiry date fields based on the item or ASN type configurations.
LPN PROMPT BEHAVIOR
A new screen parameter “LPN prompt behavior” is available in the RF Single SKU receiving module that allows you to define the number of IBLPN's to generate when receiving an ASN detail for the same SKU.
This will help the users to cartonize and receive the ASN details simultaneously without scanning the LPNs multiple times.
| Parameter Values | Description |
|---|---|
| Blank (default) |
Prompts for the LPN number and can scan only one LPN at a time. |
| Auto-generate |
On enabling, the LPN number is populated automatically. Users can either scan an LPN or can hit the tab to generate the LPN number automatically. NOTE: Only a single LPN will be generated. The system prompts to scan the Shipment, the SKU, and the quantity. If a quantity has defaulted from the screen parameter, then the user is required to press the tab twice after scanning the SKU to receive the LPN. |
| Enter LPN count |
Prompts the number of LPNs to be received instead of the LPN prompt. |
- When the LPN prompt is set to Auto-generate, after pressing the tab button from the LPN prompt field, the system displays the following confirmation message indicating the LPN that is received., “LPN %s received” with the scanned or auto-generated LPN”.
NOTE: This message will appear only when the LPN prompt behavior is set to Auto generate.
- If the LPN count exceeds the total Shipped quantity of the ASN details for the SKU after multiplying with the default quantity, the system displays “Not enough shipped qty” error message.
- The system limits the maximum LPN count to 24. If users provide any count more than 24, the system displays the following error message; "Maximum LPN Count Limit Reached, Cannot Receive More than 24 LPNs".
UPFRONT PALLETIZE LPNs
A new screen parameter “palletize-upfront” is available in the RF Single SKU receiving module that allows you to palletize LPNs upfront. Palletizing the LPNs on the fly when the LPNs contain the same Inventory-quantity combination will increase floor productivity.
| Parameter Values | Description |
|---|---|
| Blank (default)/No |
Does not prompt for the Pallet. Users will not be able to palletize the received LPNs upfront. |
| Yes |
Prompts for the pallet number so that users can palletize the received LPNs upfront. |
- A new hotkey CTRL+E - End pallet is available in the RF Single SKU receiving transaction and visible only when the palletize-upfront = Yes.
NOTE: If the Palletize upfront parameter is set to blank or NO, the hotkey CTRL+E will not be visible on the screen.
- If the LPN prompt behavior = Enter LPN count and Palletize-upfront = Yes, then the system moves all the generated LPNs to the scanned pallet.
ASSIGN LOCK CODE FOR EXPIRED INVENTORY
A new screen parameter “expired-invn-lockcode” is available from the RF Single SKU receiving transaction. This parameter assigns a lock code automatically when the user receives an expired inventory. This will help users to differentiate expired inventories from the mainstream inventories with the help of the assigned lock code.
| Parameter Value | Description |
|---|---|
| Blank (default) |
Does not assign any lock code to the LPNs when the user receives an expired inventory. |
| Text field |
Allows users to define the parameter with a lock code (allocatable or un-allocatable) and thus the system assigns the defaulted lock code to the LPNs when the user receives an expired inventory. |
- When you provide an expiry date prior to the current date and the Allowed Expired Inventory flag on the Shipment type is enabled, the system will display the following warning message: “Inventory already expired, proceed?”.
- When you define the expired-invn-lockcode screen parameter with an invalid lock code, the system displays the following message, “Expired Inventory, but no valid lock code set in screen param - expired-invn-lockcode”.
- When you receive an LPN with an expired inventory, the Auto-assign lock code triggers IHT-22 - Lock Container - Before ASN Verification.
The Oracle WMS Cloud has enhanced the RF Single SKU Receiving flow wherein the template-based receiving, the system auto-populate LPNs, support batch number, and expiry date prompts.
Steps to Enable
- Go to rf.inbound.cwrfrecvsinglesku module
- Select the screen parameter and click on the module parameter you want to enable:
- For UoM, select the quantity-uom > Click Edit and choose from the drop-down.
- For pallet upfront, select palletize-upfront > Click Edit and choose from the drop-down.
- To print the LPN label, select print-label > Click Edit and choose from the drop-down.
- To configure LPN prompt behavior, select lpn-prompt-behavior > Click Edit and choose from the drop-down.
- To enable lock code for expiry inventory, click Edit and enter the value in the expired-invn-lockcode field.
- Click Save.
Key Resources
Alert User During LPN Substitution
When performing picking of allocated LPNs during the packing process, users may scan and pick an unanticipated LPN instead of the originally allocated LPN due to the close proximity of inventory placed in the warehouse. This leads to the de-allocation of LPNs and may also break the picking sequence during the transaction.
In 20D, the Oracle WMS Cloud has introduced a new messages or alert that triggers in the system when users perform LPN substitution. This provides an opportunity for floor users to control substitution from a different location.
NOTE: Users can accept and proceed with substitution only if these messages are configured as a warning message.
These new messages are applicable via the following transaction:
- Pack OBLPN (rf.outbound.cwrfpackncoblpn)
- Pack NC Active Order (rf.outbound.cwrfpackncactiveorder)
- RF Move LPN (rf.inbound.cwrfmovelpn)
HIGHLIGHTS OF THE ENHANCEMENT
- A new message "Do you want to substitute %LPN Number (User scanned LPN number) %" is displayed when the user scans an unintended IBLPN and substitutes with another LPN from the same location.
- A new message "Do you want to substitute %LPN Number (User scanned LPN number) % from different location" is displayed when the user scans an unintended IBLPN and substitutes with another LPN from a different location. Note: By default, these new messages are enabled and can be configured as Warning message & Error Message. If users do not wish the system to displays this message, can disable.
- By configuring these messages as an error, the system restricts and does not permit users to proceed with the substitution.
This enhancement also provides an ability for the user to restrict such substitution by configuring these messages as an error message.
Steps to Enable
You don't need to do anything to enable this feature.
Key Resources
Additional Filter Criteria on the User Interface
- The Origin Code is now exposed to the IB Shipment UI (IBShipmentView) and is available on the data grid on enabling the corresponding column flag from the data selector. This origin code is used to map supplier code from Inventory management and can be added/modified from the Add or Edit modes.
- The “From Expiry Date” and “To Expiry Date” columns are now exposed in the filter search criteria in the IB Shipment Detail UI for better usability purposes. You can now search for records using the calendar wizard provided in the filter search pane and select the date range for Expiry date using the “From Expiry Date” and “To Expiry Date” field.
Additional filter criteria is added in the IB Shipment (IBShipmentView) UI.
Steps to Enable
You don't need to do anything to enable this feature.
Key Resources
Default Redwood Theme for WMS Application Pages and Mobile App
Redwood is the new user experience design language that Oracle is rolling out across all of its applications.
- The Web UI will default to a new Redwood theme; although the earlier themes are also available for the user to change to:
- The UI also defaults to the Home springboard page with the user’s most commonly needed screens. The user can configure this home screen.
- The user has the option to go directly to the recent tabs for future logins.
- The mobile app on Android and iOS also gains the Redwood design language.
SPRINGBOARD AND RECENT TABS VIEW
- During login, you will be placed in the springboard home page which contains launch icons for frequently used screens. While the springboard home page was introduced last year, prior to 20D, users would not be placed on this page at login, unless they had manually setup the launch icons. If none were setup, the user would have been taken directly to the “Recent” tab view of the application.
- With the 20D release, this behavior changes slightly to improve the ease of use. If you have never setup the springboard home page before, it will be automatically pre-populated with the top most recently used transactions, or the top entries from your menu if this is the first time you’ve logged in. If you have already setup springboard launch icons, they will remain as is. As a reminder, these springboard launch icons can be manually edited using the settings gear icon to the right on this page.
- During subsequent logins, if you would like to go directly to the Recent tabs view (bypassing the springboard home page), a checkbox Go to recent tabs at login is available for you to select. Leaving it unselected means you will continue to be placed in the springboard home page upon login.
- The “star” icon to the right of the search field, in the top of the application page, will take you to the “Recent” tabs view and the “Home” icon to the left of search will take you back to the springboard home page.
Steps to Enable
If you disable the Go to recent tabs on login checkbox, you can click the Home icon to the left of the search bar to return to your Springboard page.
Link to WMS Cloud Application Pages Using Deep Links
Deep Linking in Oracle WMS Cloud provides the ability to launch specific WMS screens using a direct URL.
- If the external application and WMS are configured with single sign on against the same identity provider, the same user credentials can be used to access these screens.
- The URL is of the format https://<domain>/<customer-env-name>/direct/<product>/<module-name>/
- where module-name can match any module on the modules page where product = ‘wms’ or ‘wfm’.
- certain wms modules such as InputInterfaceView and ScheduledJobView are not exposed via this mechanism as well as modules belonging to the product ‘common’. These are considered administrative pages not suitable for embedding externally.
Steps to Enable
You don't need to do anything to enable this feature.
Key Resources
WMS Cloud Lock Code to ERP Inventory Summary Alignment
When integrating Oracle WMS Cloud to ERP systems, the ERP’s inventory system virtually tracks and has visibility to the the inventory in each Oracle WMS Cloud facility. The ERP System creates Inventory Summary Buckets to track on-hand and available inventory levels; the ERP System should not track the specific stock location of the material or the details of how the material is packed into containers (LPNs/Pallets).
As inventory in the warehouse is subjected for changes due to various operational (quality check, cycle count, etc.) flows, external ERP systems want to know the real time status of the inventory present in the warehouse. External ERP systems maintain ERP buckets at a high level, knowing the ERP bucket associated with the inventory present in the Warehouse allows external ERP systems to plan Order Fulfillment and Order Reservation accordingly.
Prior to 20D, external systems depended on the IHT’s generated by WMS, to determine which bucket to consider for change based on the information associated with the IHT.
In 20D, WMS is enhanced to define an ERP bucket on the lock code. When Lock Codes are added to or removed from inventory, then the corresponding ERP bucket on the inventory is updated. ERP bucket information associated with the inventory is then relayed back through IHT’s generated during inventory updates. External systems can consume these IHT’s to update the bucket change on the inventory information maintained by them. As Oracle WMS Cloud allows you to define multiple lock codes on the inventory, lock code prioritization logic has been added. You can define priority values on the lock code. Based on the highest priority value, the corresponding ERP bucket is considered.
The following are the major highlights of changes done as part of this enhancement:
LOCK CODE UI
The Inventory Lock Code screen now has an ability to associate an Inventory Bucket (ERP Bucket) and tag a lock code priority.
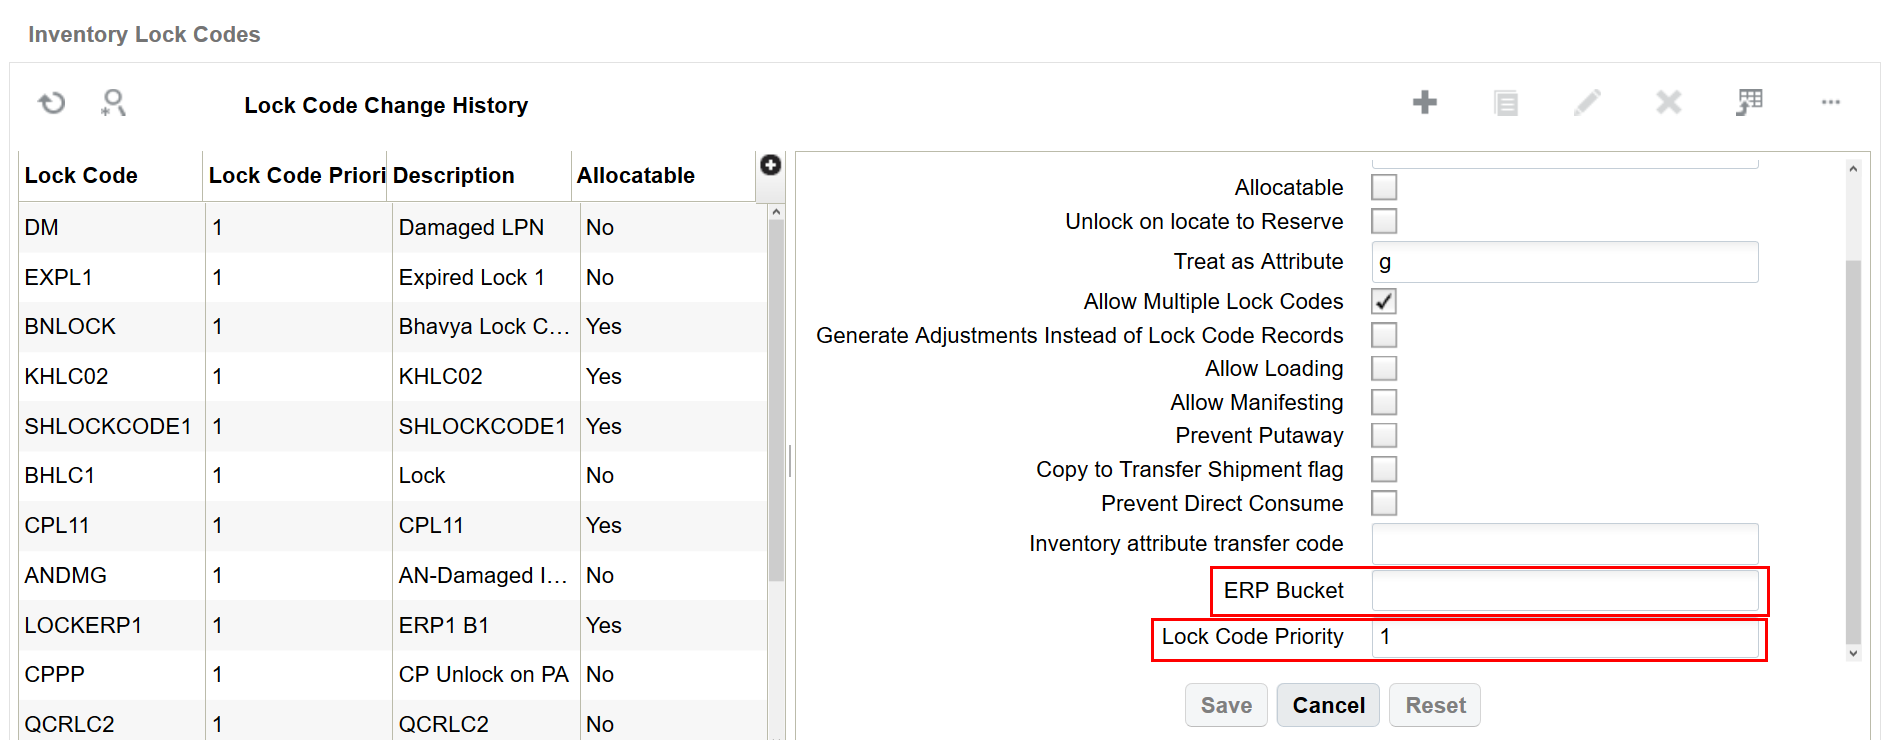
ERP Bucket: is a free form field where ERP buckets against the lock code can be defined. By default, this field is blank. You can track ERP buckets on the inventory by defining values in this field.
Lock Code Priority: is a numeric field where priority of the lock code can be defined, by default value in this fields is blank. It’s advised to define distinct lock code priority value, when inventory is associated with multiple lock codes then lock code having highest priority is considered for ERP bucket. Lower numeric value is considered as highest priority value. You should prioritize the lock codes from most restrictive (Priority 1) to least restrictive.
FACILITY AND COMPANY PARAMETERS
- Two new Facility and Company parameters are available. These parameters will provide ability for the customers to define default ERP buckets for Inbound Inventory and Default ERP bucket for Outbound Inventory, when inventory is not subjected to any lock code or inventory is having operational lock codes which are not defined with any ERP bucket.
- Facility parameters will take higher precedence over company parameter.
- Default Facility and Company Parameter for Inbound Inventory is “DEFAULT_ERP_BUCKET_FOR_INBOUND_INVENTORY”.
- User can define the default ERP bucket for inbound inventory in the above parameter. When inbound inventory does not have lock code or lock code present is not defined with ERP bucket, then system will populate the value from inbound facility parameter.
- If the facility parameter is set to blank, then the value in the ERP bucket is considered from the Inbound company parameter.
- Default Facility and Company Parameter for Outbound Inventory is “DEFAULT_ERP_BUCKET_FOR_OUTBOUND_INVENTORY”.
- User can define the default ERP bucket for outbound inventory in the above parameter. When inventory associated with outbound LPN does not have any lock code or lock code present is not defined with ERP bucket, then system will populate value from outbound facility parameter.
- If the facility parameter is set to blank, then value in the ERP bucket is considered from the Outbound company parameter.
- Customers who wants to maintain same default ERP bucket for both Inbound and Outbound inventory can define same value in the Inbound and Outbound Facility/Company parameters.
INVENTORY HISTORY
Inventory History is now enhanced to display Previous and Current ERP bucket of inventory.
- Previous ERP Bucket: Value in this field represents the previous ERP bucket associated with the inventory before the inventory is subjected for update (Lock, Unlock, Adjustments, Inventory transfer etc…).
- Current ERP Bucket: Value in this field represents the current ERP bucket associated with the inventory after the inventory is updated (Lock, Unlock, Adjustments, Inventory transfer etc…).
- Value in the Previous ERP Bucket can be blank and Current ERP bucket is populated or Current ERP bucket will have value and Previous ERP bucket is populated or Both Current and Previous ERP bucket will have value.
- Values in Previous and Current ERP bucket are derived based on the lock code associated with the inventory, if lock codes are not present then default value from Facility/Company parameter is considered.
- All the IHT’s are not subjected for ERP Bucket population, only IHT’s which impact inventory change are subjected for ERP Bucket value population. Refer the appendix section to know the IHT’s which are subjected for ERP bucket change.
- There are transactions which results in multiple IHT’s, user should consider all the generated IHT’s for ERP bucket processing to know the final state.
- Inventory History file that is generated will now have Previous ERP bucket, Current ERP bucket and the lock code priority fields.
- Lock Code Priority value on the IHT is populated only for Lock/ Unlock container IHT’s.
UPGRADE NOTES
- Customers who are updating to 20D, will have Previous and Current ERP bucket value as blank on IHT’s as ERP Bucket will not be present on the Lock Code and Default Facility/Company parameters.
LOCK CODE PRIORITY
When inventory is subjected for multiple lock codes, then there comes the question of ERP bucket from which lock code needs to be considered against the inventory. To overcome this scenario, WMS is enhanced to determine priority associated with the Lock Code and consider ERP bucket from highest priority lock code.
- New Company Parameter “HONOR_LOCK_CODE_PRIORITY” is available. To enable Lock Code Priority logic value should be set to Yes. Default value in this parameter is blank (No).
The following table describes the behavior for Company Parameter honor_lock_code_priority:
| Company Parameter honor_lock_code_priority set to: | Description |
|---|---|
| Yes |
|
| No |
|
OUTPUT INTERFACE
Shipment Verification:
- Shipment verification file has been enhanced to include the lock codes present on the LPN during shipment verification and the ERP bucket. If multiple lock codes are present on inbound LPN then corresponding lock codes are separated with a delimiter. ERP bucket is determined by considering the lock code priority or based on last lock code applied.
Ship Load (SLS):
- Ship Load (SLS) file has been enhanced to include the lock codes present on the OBLPN during Ship Load and the ERP bucket. If multiple lock codes are present on outbound LPN then the corresponding lock codes are separated with a delimiter. ERP bucket is determined by considering the lock code priority or based on last lock code applied.
Lock Code Configuration:
- Facility Parameter “DEFAULT_ERP_BUCKET_FOR_INBOUND_INVENTORY” is set to “AVAILABLE”
- Company Parameter “honor_lock_code_priority” is set to Yes
Lock Code Configuration is as defined below:
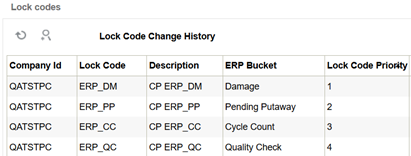
Scenario: the following example depicts the inventory flow from one bucket to other bucket when LPN is applied with multiple lock codes.
LPN is received in the warehouse with default Pending Putaway Lock Code, Inventory is moved to Pending Putaway bucket:

Inventory is located to reserve location in the warehouse, where pending putaway lock code is removed and inventory is moved to default available bucket.

Lock Code Cycle Count is applied, now inventory is moved to Cycle Count bucket.

Again, Lock Code Damage is applied, now inventory is moved to damage bucket as the Damage lock code has the highest priority.

FEATURE USAGE GUIDELINES
- Existing users who don’t want to track ERP bucket, then ERP bucket value should not be configured on the Lock Codes and Default Facility/Company parameter for ERP buckets.
- Customer must decide when inventory is subjected to multiple lock codes then ERP bucket should be considered based on lock code priority or lock code applied sequence, based on that Honor Lock Code Priority company parameter should be set.
- When company parameter Honor Lock Code Priority is enabled, then lock code priority should be populated with proper numeric value and care should be taken in setting up the value. Blank value on the lock code priority column will have lesser weightage compared to lock codes with numeric value.
- If Lock Codes are not defined with ERP Bucket, then system will consider default ERP bucket from Inbound Facility parameter for inbound inventory and default ERP bucket from Outbound Facility parameter for outbound inventory.
- If highest priority lock code is not defined with ERP bucket, then value is considered from default facility/company parameters
- Changing the ERP bucket and lock code priority once set might cause issues in regard to integration set up. Newly reflected ERP bucket value is considered for future Inventory History records that are written and not for previously created records.
- Default ERP bucket is considered when there is no outstanding lock code on the inventory being dealt with.
- It’s suggested not to have conflicting priority for lock codes, If multiple lock codes on the inventory have same priority then ERP bucket is picked up from the lock code that was applied last.
- Populating ERP Bucket with names such as (Prevent Loading, Unavailable for Allocation) alone will not prevent inventory for allocation or Loading. Corresponding Lock code properties should be set for WMS to achieve those operations.
- Considering Adjusted Quantity/ Original Quantity for ERP bucket are based on the IHT’s.
- For existing customers, who are using lock codes which are not defined with ERP bucket for them previous/current ERP bucket will not be populated.
The following are the list of transactions where ERP bucket value is considered from default Facility/Company parameters even though lock codes are populated on the IHT’s. During those transactions, the system writes Lock Inventory History Transactions, to avoid double dipping of the inventory in the ERP bucket this change is done.
| Activity | Inventory History Transaction |
|---|---|
| Container Received with default lock code |
System will populate the lock codes on the IHT with respect to receiving (IHT- 1 and IHT- 72), even though the receiving inventory is subjected to lock, but current ERP bucket is populated from facility parameter “DEFAULT_ERP_BUCKET_FOR_INBOUND_INVENTORY ". |
| Container Creation with default lock code: |
When you create a container with a default lock code, then system writes IHT for the container creation (IHT 29 -Create Allocatable Container / IHT 30 -Create Unallocatable Container) by populating a default lock code on it, but current ERP bucket value is populated from facility parameter " DEFAULT_ERP_BUCKET_FOR_INBOUND_INVENTORY " |
| Container Shipped IHT |
When a container with a lock code is shipped, then system populates the lock codes in the IHT-3 Container Shipped. |
| Inventory Movement to Active Location |
When inventory is moved to an active location which is having a lock code, then system will populate the lock code in the Inventory adjustment IHT (IHT- 4 / IHT- 17) for active location, but current ERP bucket value is populated from facility parameter " DEFAULT_ERP_BUCKET_FOR_INBOUND_INVENTORY " |
| Inventory Transfer from IB to OB |
The system now writes the Unlock Container IHT (24 or 25) when inbound inventory with a lock code is transferred to an outbound container.
It’s advised that:
|
Inventory History Transactions subjected for ERP Bucket
For more details on previous and current ERP bucket population for the following list if IHT’s, refer to the interface specification (IHT Trigger Point Document).
| Inventory History Transaction | Description |
|---|---|
| IHT 1 |
LPN Received |
| IHT 2 |
Container Consumed |
| IHT 3 |
Container Shipped |
| IHT 4 |
Inventory Adjusted pre verification |
| IHT 10 |
Container Detail Packed |
| IHT 11 |
Container Packed |
| IHT 14 |
Container Cancelled |
| IHT 16 |
Pre receive inventory Adjusted pre verification |
| IHT 17 |
Inventory Adjusted Post verification |
| IHT 19 |
Inventory Adjustment Cycle Count Active |
| IHT 22 |
Lock Container Before ASN Verification |
| IHT 23 |
Lock Container After ASN Verification |
| IHT 24 |
Unlock Container Before ASN Verification |
| IHT 25 |
Unlock Container After ASN Verification |
| IHT 29 |
Create Allocatable Container |
| IHT 30 |
Create Unallocatable Container |
| IHT 31 |
OB Container Modified |
| IHT 32 |
OB Container Cancelled |
| IHT 34 |
Split Container Before ASN Verification |
| IHT 35 |
Split Container After ASN Verification |
| IHT 36 |
Split Container Lock Acquired |
| IHT 49 |
Lock Active |
| IHT 50 |
Unlock Active |
| IHT 52 |
Audit Adjustment |
| IHT 53 |
Cycle Count Reserve SKU Counted |
| IHT 54 |
Container Detail Picked |
| IHT 62 |
POS Interface |
| IHT 63 |
Lock Update Pre verification |
| IHT 64 |
Lock Update Post verification |
| IHT 65 |
Lock OBLPN |
| IHT 66 |
Unlock OBLPN |
| IHT 69 |
Kitting Complete |
| IHT 70 |
Kitting Inventory Consumed |
| IHT 72 |
Container Received Subject to QC |
Steps to Enable
You need to configure the following:
- ERP Bucket in the Lock Code Field.
- Set Lock Code priority in the Lock Code Field to prioritize lock code based on lock code priority value. (Applicable when inventory has multiple lock codes.)
- Default ERP Bucket should be configured in Facility and Company parameters.
- Company Parameter Honor Lock Code Priority should be set to Yes (Applicable when inventory has multiple lock codes) to prioritize lock code based on lock code priority value.
Key Resources
GET Available Warehouse Location for Putaway Using a REST API
Previously, you were only able to perform putaway using RF Putaway. The Directed Putaway Location API now allows you to determine the putaway location for a given Inbound LPN or Pallet via a POST request, so that you can locate the LPN/Pallet to its respective destination.
You can determine the putaway location for an IBLPN using the following POST request:
POST .../entity/iblpn/directed_putaway_location/
You can determine the putaway location for a pallet using the following POST request:
POST .../entity/pallet/directed_putaway_location/
NOTE: Oracle WMS Cloud will check the putaway type associated with the IBLPN/ Pallet and check the respective putaway method priority configured for the putaway type. The system then determines the putaway location honoring the putaway method priority rule.
RECALCULATE PUTAWAY TYPE
Request Options Parameters
| Name | Required | Type | Default | Description |
|---|---|---|---|---|
| recalculate_putaway_type_flg |
Boolean |
False |
||
| validate_critical_dimensions_flg |
Boolean |
False |
NOTE: Parameter: validate_critical_dimensions is only applicable for the IBLPN entity.
In addition to determining the putaway location, the Directed Putaway Location API can perform the following tasks:
- As there may be chances that the putaway type rule or the putaway type on the container may be manually updated, when recalculate_putaway_type_flg is set to true, this API will recalculate the putaway type which allows you to get the correct putaway type for an IBLPN and therefore the exact/correct putaway location.
- When set to false/no, if the IBLPN has a putaway type, then the system will use the Putaway type from the IBLPN to determine location.
- When the Validate Critical Dimension value (optional parameter) is set to True, the system will perform critical dimension checks for the incoming IBLPN only (Not for Pallet) along with the location dimension.
PUTAWAY TYPE DETERMINATION
The system will determine the putaway type for a single sku IBLPN in the following sequence:
- Inbound LPN
- Putaway type from Putaway Type Determination Rule
- Item Facility
- Item
- Facility parameter "PUTAWAY_TYPE"
The system will determine the putaway type for a multi-sku IBLPN in the following sequence:
- When the Facility Parameter "TRIGGER_PATYPE_RULES_FOR_MSKULPN" is True then the Putaway type is determined from:
- Putaway Type Determination Rule
- Item facility
- Item
- When the Facility Parameter "TRIGGER_PATYPE_RULES_FOR_MSKULPN" is False then the Putaway type is determined from:
- Facility Parameter "DEFAULT_MULTI_SKU_LPN_PATYPE"
Steps to Enable
Review the REST service definition in the REST API guides, available from the Oracle Help Center > your apps service area of interest > REST API. If you're new to Oracle's REST services you may want to begin with the Quick Start section.
Additional Categories in Web Reports Gen 2
Some Web Reports users may need to build reports with various user access information including user change history. To support additional reporting capabilities in Web Reports Gen 2, the following two new entities have been added:
| Web Reports Entity |
Function |
| ENTITY_CHANGE_HISTORY |
Allows you to report changes to users in the system. |
| COMMON_LOG |
Allows you to report logins and logouts. |
NOTE:
-
For ENTITY_CHANGE_HISTORY, filter the records that have an "entity" field that contains 'USER'.
-
For COMMON_LOG, filter records that have a "module" field value of 'LOGIN' or 'LOGOUT'.

Filtering Web Reports
Steps to Enable
You don't need to do anything to enable this feature.
Key Resources
Web Reports Optimization for Date/Time Functions
An optional feature is available in Oracle WMS Cloud that optimizes the performance of Web Reports that use facility timestamps in its filters. This feature is controlled via a company parameter WR2_EVAL_FORMULAS_IN_DB. This parameter defaults to no.
However, if set to yes, the new feature is turned on and this pushes the evaluation of filters to the database that speed up the overall performance of the report.
Steps to Enable
To enable performance optimization for date/time functions, set the company parameter "WR2_EVAL_FORMULAS_IN_DB" to yes.
Key Resources
Support ISO-8601 Format Date/Time Values
A new company parameter ENABLE_ISO_8601_OUTPUT_DATE_TIME_FORMAT is available in Oracle WMS Cloud that gives users the ability to control the output format of date/time values in Inventory History and Shipped Load output. This will allow for all date/time output to be in the widely accepted and used ISO-8601 standard. This standard will not only give date, time, and date/time consistency across the output data, but it will provide the time zone offset from UTC as part of the date/time format. The addition of the time zone context into the date/time value will allow external systems to know the actual time zone value and will remove any ambiguity.
The ISO-8601 standard is a widely used and accepted format for exchanging date/time information between systems.
| Type | Format | Example |
|---|---|---|
| Date |
yyyy-mm-dd |
2020-08-01 |
| Time |
HH:MM:SS |
15:01:30 |
| Datetime |
yyyy-mm-ddTHH:MM:SSz |
2020-08-01T15:01:30-04:00 |
| Format | Definition |
|---|---|
| YYYY |
4 digit year |
| MM |
2 digit month |
| DD |
2 digit day |
| T |
The literal letter "T" used as a delimiter between the date and time components. |
| HH |
2 digit hour (24-hour clock) |
| MM |
2 digit minute |
| SS |
2 digit seconds |
| z |
Time zone offset from UTC in the format (+/-)HH:MM |
Steps to Enable
In order to enable control of the output format for date/time values, set the company parameter ENABLE_ISO_8601_OUTPUT_DATE_TIME_FORMAT parameter to "yes"/"true".
Key Resources
Update Active Inventory for Serialized Product Using a REST API
The Update Active Inventory API allows you to adjust the quantity in an active location for a specific item/inventory. Only a single location and item may be updated per request. In update 20D, this API has been enhanced to accept serial numbers to cater to serial number tracked inventories.
As part of this update, you can now adjust serial number tracked inventory for incremented/decremented adjustments. You can send adjustment or actual quantity in the request to update the location’s inventory. In either case, the number of serial numbers sent should be distinct to each unit of the inventory being updated.
For positive adjustments, the serial numbers sent can be:
- New serial numbers (or)
- Serial numbers existing in the warehouse that are delinked and not associated with any other inventory
For negative adjustments, the serial numbers sent should be the ones that are already present in the location where inventory is being updated.
The following is an example body for serial number adjustments:
{
"parameters": {
"facility_id__code": "FAC-1",
"barcode": "LOCN1"
},
"options": {
"item_barcode": "ITEM1234",
"adjustment_qty": -3,
"batch_nbr": "BATCH1234",
"invn_attr_a": "A",
"invn_attr_b": "B",
"reason_code": "RC",
"transaction_ref_nbr": "TX123457890",
"serial_nbr_list": [
"SrlNbr1",
"SrlNbr2",
"SrlNbr3"
]
}
}
NOTE: The serial number is required only if the item being adjusted is tracked for serial numbers.
Steps to Enable
Review the REST service definition in the REST API guides, available from the Oracle Help Center > your apps service area of interest > REST API. If you're new to Oracle's REST services you may want to begin with the Quick Start section.
Update Location Counted to Be Counted Flag Using a REST API
There are some warehouse scenarios where an external system such as a slotting or inventory management system can request counting for a certain location. To facilitate triggering of inventory count in a location by external systems, the PATCH Location API (.../lgfapi/v10/entity/location/) has been enhanced to update cycle count related fields.
Previously, you could only update some custom fields for the Location entity. Now, the 'to_be_counted_flg' and 'to_be_counted_ts' fields have been added as part of the PATCH request for the Location entity. Once these inputs are sent, the user can count locations in tasked/non-tasked mode. The following table shows the data types and formats for these fields:
| Field | Data Type | Valid Values/Formats |
|---|---|---|
| to_be_counted_flg |
boolean |
|
| to_be_counted_ts |
date and time |
All Date-time objects are assumed to be in the time zone of the user's facility context. JSON: {"field_ts": "2018-01-30T18:30:00"}} XML: <field_ts>2018-01-30T18:30:00</field_ts> |
The following is an example body for the To Be Counted flag:
{
"fields":
{
"cust_field_1": "Test1",
"cust_field_2": "Test2",
"cust_field_3": "Test3",
"cust_field_4": "Test4",
"cust_field_5": "Test5",
"to_be_counted_flg": "true",
"to_be_counted_ts": "2020-07-29T18:30:00"
}
}
NOTE: If a location was previously due for counting (To be counted flag = yes) and had a cycle count task and API updates result in the location being updated with the To be counted flag = no, then the cycle count task will NOT be cancelled automatically. You need to identify these tasks and cancel them if needed.
Create a Task Template with To be Counted TS
A new field, Location-To be counted TS has been added to the selection criteria in Task Creation Template where Task Type = CC. You can now create a task template with 'To be counted TS' configured as the search criteria option.
Steps to Enable
Review the REST service definition in the REST API guides, available from the Oracle Help Center > your apps service area of interest > REST API. If you're new to Oracle's REST services you may want to begin with the Quick Start section.
Locate LPN or Pallet to Location Using a REST API
In addition to the current option to locate an LPN or Pallet from the RF Locate LPN transaction, you can now locate an LPN/ Pallet to its respective destination location with the Locate LPN/Pallet API.
You can locate an Inbound or Outbound LPN to its respective destination using the following POST requests:
Inbound LPN
POST .../entity/iblpn/{id}/locate/
POST .../entity/iblpn/bulk_locate/
Outbound LPN
POST .../entity/oblpn/{id}/locate/
POST .../entity/oblpn/bulk_locate/
Example requests for Locate IBLPN and OBLPN:
POST .../entity/iblpn/bulk_locate/
{
"parameters": {
"id__in": [1, 2, 3]
},
"options": {
"location_barcode": "R1-R2-RB1-Rl1",
"depalletize_on_putaway": false
}
}
POST .../entity/oblpn/bulk_locate/
{
"parameters": {
"container_nbr__in": ["LPNPTW0102"]
},
"options": {
"location_barcode": "R1-R2-RB1-Rl1",
"depalletize_on_putaway": false
}
}
You can locate a Pallet to its respective destination using the following POST requests:
Pallet
POST .../entity/pallet/{id}/locate/
POST .../entity/pallet/bulk_locate/
Example Request for Locate Pallet:
POST .../entity/pallet/bulk_locate/
{
"parameters": {
"id__in": [1, 2, 3]
},
"options": {
"location_barcode": "R1-R2-RB1-Rl1",
"depalletize_on_putaway": false
}
}
Parameters
| Name | Required | Type | Default | Description |
|---|---|---|---|---|
| facility_id |
Integer |
Facility context by id. |
||
| facility_id__code |
String |
Facility context by code. |
||
| company_id |
Integer |
Company context by id. |
||
| company_id__code |
String |
Company context by code. |
||
| container_nbr |
String |
The allowed parameter filter conditions are "container_nbr" and "container_nbr__in" |
||
| id |
Integer |
The allowed parameter filter conditions are "id" and "id__in": |
Request Options Parameters
| Name | Required | Type | Default | Description |
|---|---|---|---|---|
| location_barcode |
X |
String |
||
| depalletize_on_putaway |
Boolean |
False |
Steps to Enable
Review the REST service definition in the REST API guides, available from the Oracle Help Center > your apps service area of interest > REST API. If you're new to Oracle's REST services you may want to begin with the Quick Start section.
Update Orders with Ship Via and Shipment Number Using a REST API
The Update Parcel Shipment Info API allows you to associate Oracle WMS Cloud (WMS) orders with the appropriate ship-via and Oracle Transportation and Global Trade Management (OTM’s) planned shipment number.
You can update Parcel Shipment Information using the following POST request:
POST ..lgfapi/v10/order_hdr/update_parcel_shipment_info/
NOTE: The order status must be LOADED.
FILTER FIELDS
You can update each of the following fields using the API for a specific order:
- facility_code (optional)
- company_code (optional)
- One of the following combinations is required:
- order nbr
- Also support "in" ("__in=")
- erp_source_hdr_ref, erp_source_system_ref, order_dtl.erp_source_line_ref, and order_dtl.erp_source_shipment_ref
- order_dtl.erp_fulfillment_line_ref
- Also support "in" ("__in=")
- tms_order_hdr_ref
- Also support "in" ("__in=")
PARAMETERS
You can update the following input field values on the matching order_hdr:
- ship_via_code
- Lookup ship via using the ship_via_code.
- tms_parcel_shipment_nbr
- tms_order_hdr_ref
TMS PARCEL SHIPMENT NUMBER ACTION BUTTON AND FIELD ADDED TO ORDER HEADER UI
The TMS Parcel Shipment Number field has been added to the WMS Order Header UI and it is accessible via an order_hdr entity GET request.
- You can edit the TMS Parcel Shipment Number field for orders in CREATED status.
A new action button Reset TMS Parcel Shipment Number is also now available from the Order Header UI. This button is enabled only if the TMS Parcel Shipment Number field has a value and the order status is in a status before LOADED.
Steps to Enable
Review the REST service definition in the REST API guides, available from the Oracle Help Center > your apps service area of interest > REST API. If you're new to Oracle's REST services you may want to begin with the Quick Start section.
Expand Custom Fields in Inbound Shipment Interface and Inbound Shipment Verification Output
The following fields are added to STAGE_IB_SHIPMENT and STAGE_IB_SHIPMENT_DTL tables and also available in the IB Shipment interface allowing users to create/update the IB Shipments with the values populated through CREATE, UPDATE, and DTLUPDATE action code.
| Table Name | Column Name |
|---|---|
| STAGE_IB_SHIPMENT |
CUST_DATE_1 |
| STAGE_IB_SHIPMENT |
CUST_DATE_2 |
| STAGE_IB_SHIPMENT |
CUST_DATE_3 |
| STAGE_IB_SHIPMENT |
CUST_DATE_4 |
| STAGE_IB_SHIPMENT |
CUST_DATE_5 |
| STAGE_IB_SHIPMENT |
CUST_DECIMAL_1 |
| STAGE_IB_SHIPMENT |
CUST_DECIMAL_2 |
| STAGE_IB_SHIPMENT |
CUST_DECIMAL_3 |
| STAGE_IB_SHIPMENT |
CUST_DECIMAL_4 |
| STAGE_IB_SHIPMENT |
CUST_DECIMAL_5 |
| STAGE_IB_SHIPMENT |
CUST_NUMBER_1 |
| STAGE_IB_SHIPMENT |
CUST_NUMBER_2 |
| STAGE_IB_SHIPMENT |
CUST_NUMBER_3 |
| STAGE_IB_SHIPMENT |
CUST_NUMBER_4 |
| STAGE_IB_SHIPMENT |
CUST_NUMBER_5 |
| STAGE_IB_SHIPMENT |
CUST_LONG_TEXT_1 |
| STAGE_IB_SHIPMENT |
CUST_LONG_TEXT_2 |
| STAGE_IB_SHIPMENT |
CUST_LONG_TEXT_3 |
| STAGE_IB_SHIPMENT |
CUST_SHORT_TEXT_1 |
| STAGE_IB_SHIPMENT |
CUST_SHORT_TEXT_2 |
| STAGE_IB_SHIPMENT |
CUST_SHORT_TEXT_3 |
| STAGE_IB_SHIPMENT |
CUST_SHORT_TEXT_4 |
| STAGE_IB_SHIPMENT |
CUST_SHORT_TEXT_5 |
| STAGE_IB_SHIPMENT |
CUST_SHORT_TEXT_6 |
| STAGE_IB_SHIPMENT |
CUST_SHORT_TEXT_7 |
| STAGE_IB_SHIPMENT |
CUST_SHORT_TEXT_8 |
| STAGE_IB_SHIPMENT |
CUST_SHORT_TEXT_9 |
| STAGE_IB_SHIPMENT |
CUST_SHORT_TEXT_10 |
| STAGE_IB_SHIPMENT |
CUST_SHORT_TEXT_11 |
| STAGE_IB_SHIPMENT |
CUST_SHORT_TEXT_12 |
| STAGE_IB_SHIPMENT_DTL |
CUST_DATE_1 |
| STAGE_IB_SHIPMENT_DTL |
CUST_DATE_2 |
| STAGE_IB_SHIPMENT_DTL |
CUST_DATE_3 |
| STAGE_IB_SHIPMENT_DTL |
CUST_DATE_4 |
| STAGE_IB_SHIPMENT_DTL |
CUST_DATE_5 |
| STAGE_IB_SHIPMENT_DTL |
CUST_DECIMAL_1 |
| STAGE_IB_SHIPMENT_DTL |
CUST_DECIMAL_2 |
| STAGE_IB_SHIPMENT_DTL |
CUST_DECIMAL_3 |
| STAGE_IB_SHIPMENT_DTL |
CUST_DECIMAL_4 |
| STAGE_IB_SHIPMENT_DTL |
CUST_DECIMAL_5 |
| STAGE_IB_SHIPMENT_DTL |
CUST_NUMBER_1 |
| STAGE_IB_SHIPMENT_DTL |
CUST_NUMBER_2 |
| STAGE_IB_SHIPMENT_DTL |
CUST_NUMBER_3 |
| STAGE_IB_SHIPMENT_DTL |
CUST_NUMBER_4 |
| STAGE_IB_SHIPMENT_DTL |
CUST_NUMBER_5 |
| STAGE_IB_SHIPMENT_DTL |
CUST_LONG_TEXT_1 |
| STAGE_IB_SHIPMENT_DTL |
CUST_LONG_TEXT_2 |
| STAGE_IB_SHIPMENT_DTL |
CUST_LONG_TEXT_3 |
| STAGE_IB_SHIPMENT_DTL |
CUST_SHORT_TEXT_1 |
| STAGE_IB_SHIPMENT_DTL |
CUST_SHORT_TEXT_2 |
| STAGE_IB_SHIPMENT_DTL |
CUST_SHORT_TEXT_3 |
| STAGE_IB_SHIPMENT_DTL |
CUST_SHORT_TEXT_4 |
| STAGE_IB_SHIPMENT_DTL |
CUST_SHORT_TEXT_5 |
| STAGE_IB_SHIPMENT_DTL |
CUST_SHORT_TEXT_6 |
| STAGE_IB_SHIPMENT_DTL |
CUST_SHORT_TEXT_7 |
| STAGE_IB_SHIPMENT_DTL |
CUST_SHORT_TEXT_8 |
| STAGE_IB_SHIPMENT_DTL |
CUST_SHORT_TEXT_9 |
| STAGE_IB_SHIPMENT_DTL |
CUST_SHORT_TEXT_10 |
| STAGE_IB_SHIPMENT_DTL |
CUST_SHORT_TEXT_11 |
| STAGE_IB_SHIPMENT_DTL |
CUST_SHORT_TEXT_12 |
Also, the following additional fields are added in the shipment verification output interface in order to enable host systems to validate the receipt.
| Interface section | XML Element |
|---|---|
| ib_shipment_hdr |
cust_date_1 |
| ib_shipment_hdr |
cust_date_2 |
| ib_shipment_hdr |
cust_date_3 |
| ib_shipment_hdr |
cust_date_4 |
| ib_shipment_hdr |
cust_date_5 |
| ib_shipment_hdr |
cust_decimal_1 |
| ib_shipment_hdr |
cust_decimal_2 |
| ib_shipment_hdr |
cust_decimal_3 |
| ib_shipment_hdr |
cust_decimal_4 |
| ib_shipment_hdr |
cust_decimal_5 |
| ib_shipment_hdr |
cust_number_1 |
| ib_shipment_hdr |
cust_number_2 |
| ib_shipment_hdr |
cust_number_3 |
| ib_shipment_hdr |
cust_number_4 |
| ib_shipment_hdr |
cust_number_5 |
| ib_shipment_hdr |
cust_long_text_1 |
| ib_shipment_hdr |
cust_long_text_2 |
| ib_shipment_hdr |
cust_long_text_3 |
| ib_shipment_hdr |
cust_short_text_1 |
| ib_shipment_hdr |
cust_short_text_2 |
| ib_shipment_hdr |
cust_short_text_3 |
| ib_shipment_hdr |
cust_short_text_4 |
| ib_shipment_hdr |
cust_short_text_5 |
| ib_shipment_hdr |
cust_short_text_6 |
| ib_shipment_hdr |
cust_short_text_7 |
| ib_shipment_hdr |
cust_short_text_8 |
| ib_shipment_hdr |
cust_short_text_9 |
| ib_shipment_hdr |
cust_short_text_10 |
| ib_shipment_hdr |
cust_short_text_11 |
| ib_shipment_hdr |
cust_short_text_12 |
| ib_shipment_dtl |
cust_date_1 |
| ib_shipment_dtl |
cust_date_2 |
| ib_shipment_dtl |
cust_date_3 |
| ib_shipment_dtl |
cust_date_4 |
| ib_shipment_dtl |
cust_date_5 |
| ib_shipment_dtl |
cust_decimal_1 |
| ib_shipment_dtl |
cust_decimal_2 |
| ib_shipment_dtl |
cust_decimal_3 |
| ib_shipment_dtl |
cust_decimal_4 |
| ib_shipment_dtl |
cust_decimal_5 |
| ib_shipment_dtl |
cust_number_1 |
| ib_shipment_dtl |
cust_number_2 |
| ib_shipment_dtl |
cust_number_3 |
| ib_shipment_dtl |
cust_number_4 |
| ib_shipment_dtl |
cust_number_5 |
| ib_shipment_dtl |
cust_long_text_1 |
| ib_shipment_dtl |
cust_long_text_2 |
| ib_shipment_dtl |
cust_long_text_3 |
| ib_shipment_dtl |
cust_short_text_1 |
| ib_shipment_dtl |
cust_short_text_2 |
| ib_shipment_dtl |
cust_short_text_3 |
| ib_shipment_dtl |
cust_short_text_4 |
| ib_shipment_dtl |
cust_short_text_5 |
| ib_shipment_dtl |
cust_short_text_6 |
| ib_shipment_dtl |
cust_short_text_7 |
| ib_shipment_dtl |
cust_short_text_8 |
| ib_shipment_dtl |
cust_short_text_9 |
| ib_shipment_dtl |
cust_short_text_10 |
| ib_shipment_dtl |
cust_short_text_11 |
| ib_shipment_dtl |
cust_short_text_12 |
New fields are added in IB Shipment and Shipment Verification Output interface files.
Steps to Enable
You don't need to do anything to enable this feature.
Key Resources
Updates to WMS Cloud to SCM Cloud Integrator
Support for WMS Cloud Lock Code to ERP Inventory Summary Bucket Alignment on Purchase Order Receipt Confirmation and Inventory Transactions
In order to ease the process of inventory transactions between the ERP system and Oracle WMS Cloud, enhancements are now available in 20D that allows customers to utilize the relevant services in SCM integration with respect to ERP bucket changes. For more details on the ERP Bucket enhancement, refer to the WMS Cloud Lock Code to ERP Inventory Summary Alignment section.
The following are highlights of the pre-build integration enhancement to support the configuration of Sub-Inventory:
- Previously, the pre-built integration was tied to the integration - Received and Stores. In 20D, the pre-built integration now supports a configurable Sub-Inventory that is dynamically accepted.
- Oracle Inventory Management Cloud Sub-Inventory is now mapped to Oracle WMS Cloud (Previous and Current ERP bucket) in the Inventory History Transaction (IHT) via SubinventoryCode (Previous) and TransferSubinventory (Current) field.
- Configuring inventory Lock Code priority to lock inventory during the receipt "pending putaway" with the code name "PP" is now removed. That is, the restriction of applying lock code with "PP" code is relaxed. Customers now have the flexibility to define their preferred lock code.
- Oracle WMS Cloud has the ability to send ERP buckets in the SLS payload. This SLS payload contains ERP Bucket which is used by the integration service to map with Sub-Inventory of the Oracle Inventory Management Cloud.
- You can perform post receipt corrections before Putaway including:
- Change of batch/ expiry/ serial number
- Transfer of inventory from 1 LPN to another
NOTE: Modification of attributes like Batch and Serial before Putaway are supported only under certain conditions.
- Additional IHTs are handled by the Oracle WMS Cloud and SCM Integration with respect to Oracle Inventory Management Cloud.
FEATURE GUIDELINES:
- Customers willing to utilize the Oracle Integration Cloud features must-have OIC Integration v20D with Oracle WMS Cloud v20D and later version installed.
- Lock Code Priority on Lock Code should be configured appropriately based on business needs.
- The ERP bucket value on lock code and ERP bucket value with corresponding facility and company parameter should match with appropriate Sub-Inventory name in Oracle Inventory Management Cloud.
- Changes to ERP bucket value in Oracle WMS Cloud will not change the Sub-Inventory name in Oracle Inventory Management Cloud or vice versa.
- Changing the priority value or ERP bucket on lock code in Oracle WMS Cloud with the pending transactions can cause discrepancies in the inventory bucket.
- It’s recommended to have a single Receiving Sub-Inventory in Oracle Inventory Management Cloud and Sub-Inventory for Integration to work.
NOTE: Multiple lock code should not carry Unlock on Locate (UOL) flag set to Yes in Oracle WMS Cloud.
- Output File Format Configuration for Inventory History and Ship Confirmation payload should be as per 20D.
- If an item is a serial number tracked and to share this serial number with Oracle Inventory Management Cloud, the customer should enable the corresponding Inventory History (relevant for integration) to break by Serial number.
SCM INTEGRATION – ERP BUCKET ENHANCEMENT
The following changes are applicable for customers running on the latest 20C OIC integration and current 20D OIC integration version build.
- The corresponding ERP bucket with the "PP" lock code should be populated with the "Received" value.
- The default company parameter for Inbound ("DEFAULT_ERP_BUCKET_FOR_INBOUND_INVENTORY") and Outbound ("DEFAULT_ERP_BUCKET_FOR_OUTBOUND_INVENTORY") should be configured with “Stores” value.
- All the lock codes applied post-Putaway with Unlock on Locate (UOL) set to No should have corresponding ERP bucket populated with "Stores" value.
SCM INTEGRATION SERVICE ENHANCEMENT
The following section describes the corresponding changes in integration services:
Receipt Confirmation for Purchase Orders Service
- Prior to 20D, updates to Receiving Sub-Inventory was achieved with one Sub-Inventory called "Received". In 20D, the requirement for a single Receiving Sub-Inventory still holds good but the Receiving Sub-Inventory name not associated with the keyword "Received". The Receiving Sub-Inventory is configured on a lock code via ERP bucket field in Oracle WMS Cloud. The corresponding lock code should have Unlock on Locate (UOL) flag set to Yes. The Oracle Inventory Management Cloud integration utilizes IHT 1 or 72 to update the corresponding Receiving Sub-Inventory through ref field -16 (REB).
- Change of Sub-Inventory from "Received" to "Stores" was happening through Putaway process based upon lock code called "PP". Dependency for a lock code tied to code name “PP” is removed. In 20D, customers can configure any lock code without depending on the keyword "PP" as long as Unlock on Locate (UOL) is set to Yes.
The SCM integrator utilizes the Unlock on Locate (UOL) flag value to determine whether the Receiving Sub-inventory needs to be updated or not. Then, Oracle WMS Cloud exposes the Unlock on Locate (UOL) value from the lock code in the ref field - 16 (UOL).
- If Receipt Confirmation for Purchase Order’s Unlock on Locate (UOL) value is set to "Yes", the service interprets as modification required for Receiving Sub-Inventory.
- If Receipt Confirmation for Purchase Order’s Unlock on Locate (UOL) value is set to "Removed", the service performs Putaway (movement of inventory from configurable Receiving Sub-inventory to Storage Sub-inventory).
NOTE: Prior to this change, integration service was dependent upon following IHT (24 or 25 along with 51) or IHT (24 or 25 along with 4) combination. Now, this dependency of the IHT combination is replaced by looking at the Unlock on Locate (UOL) value "Removed".
IMPORTANT: Receipt Confirmation for Purchase Order service will not process IHT with Unlock on Locate (UOL) value "No". It is advisable in Oracle WMS Cloud to have relevant Output Interface Configuration based upon ref field 16 that sends Unlock on Locate (UOL) value.
The following image depicts the output interface configuration for Receipt Adjustment endpoint processing:

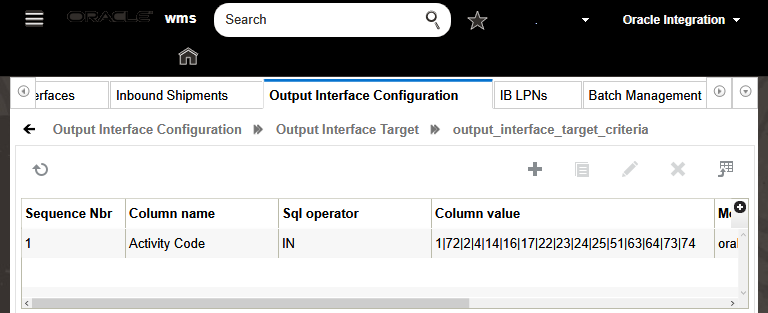
- Receipt Confirmation for Purchase Orders is enhanced to handle the following Receive-Adjustment scenarios:
- Modify batch/expiry date and serial number
- Partial and full Transfer of inventory from one LPN to another
To utilize this feature, the previous receiving transaction should be Cancelled, or Adjusted in Oracle Inventory Management Cloud and a new Receiving should be posted. Previously, the creation of a new Receipt was handled via IHT 1 or 72. Now, to handle fresh Receipt post Receiving, the IHT 34 and 35 is enhanced in Oracle WMS Cloud by populating in the following Ref Field:
- Ref Field 13 (VENDORID) and Ref Field 14 (SUPPLIERSITEID) are now supported in the following list of IHTs:
- IHT-4(Inv Adjusted Pre-Verification
- IHT-14(Container Cancelled)
- IHT-16 Pre receive inventory Adjusted pre-verification
- IHT-17 Inventory Adjusted post verification
- IHT-33 Split Container Cancelled
- IHT-34 Split Container Before ASN Verification
- IHT-35 Split Container After ASN Verification
- Ref field 8 (PO Detail Line Schedule Number) and ref Field (Inbound Shipment Receipt Advice Line) are now supported in the following IHTs:
- IHT-33 Split Container Cancelled
- IHT-34 Split Container Before ASN Verification
- IHT-35 Split Container After ASN Verification
NOTE:
-
RF Change SKU and Sort IBLPN transactions from Oracle WMS Cloud does not support the integration of ERP bucket to Oracle Inventory Management Cloud.
-
Prior to Putaway, it’s recommended to use a single lock code that has Unlock on Locate (UOL) flag value set to Yes. If the workflow demands an additional lock code to be applied prior to putaway, such lock code should be of lower priority value in comparison to pending putaway lock code.
The following table lists the supported Inventory History Transactions (IHTs) mapped to Integration Service - Receipt Confirmation to Purchase Order service in 20C and 20D:
| Inventory History Transaction | 20C | 20D |
|---|---|---|
| IHT-1 - LPN Received | Yes | Yes |
| IHT-2 - Container Consumed | ~ | Yes |
| IHT-4 - Inventory Adjusted Pre-Verification | Yes | Yes |
| IHT-14- Container Cancelled | Yes | Yes |
| IHT-16 - Pre-receive inventory Adjusted Pre-verification | ~ | Yes |
| IHT-17 - Inventory Adjusted Post Verification | ~ | Yes |
| IHT-22 - Lock Container Before ASN Verification | ~ | Yes |
| IHT-23 - Lock Container After ASN Verification | ~ | Yes |
| IHT-24 - Unlock Container Before ASN Verification | Yes | Yes |
| IHT-25 - Unlock Container After ASN Verification | Yes | Yes |
| IHT-34 - Split Container Before ASN Verification | ~ | Yes |
| IHT-35 - Split Container After ASN Verification | ~ | Yes |
| IHT-51 - Inventory Movement | Yes | Yes |
| IHT-63 - Lock Update Pre-Verification | Yes | Yes |
| IHT-64 - Lock Update Post- Verification | Yes | Yes |
| IHT-72 - Container Received Subject to QC | Yes | Yes |
| IHT-73 - QC Accepted | ~ | Yes |
| IHT-74 - QC Rejected | ~ | Yes |
Inventory Transactions Service
Inventory Transaction service posts Sub-Inventory transfer for Storage Sub-Inventory. Prior to 20D, integration between Oracle WMS Cloud and Oracle Inventory Management Cloud via Inventory Transaction service was mapped to a single Storage Sub-Inventory called "Stores". In 20D, the restriction for a single Storage Sub-inventory has been removed. The Sub-inventory transfer across other Sub-Inventory is accomplished by looking at the previous and current ERP buckets shared by Oracle WMS in the IHT.
Inventory Transaction service utilizes the Unlock on Locate (UOL) value "No" to process the IHT from Oracle WMS Cloud to perform Storage Sub-Inventory transfer. Customers can take advantage of defining multiple Storage Sub-Inventory, for example, different Storage Sub-Inventory for available and damaged inventory, or different Storage Sub-Inventory for Inbound and Outbound inventory.
NOTE: Lock code with Unlock on Locate (UOL) flag of “Yes” should not be applied for inventory post-Putaway. The Sub-Inventory transfer from Storage to Receiving is not supported.
The following image shows you the output interface configuration for Inventory Adjustment endpoint processing:
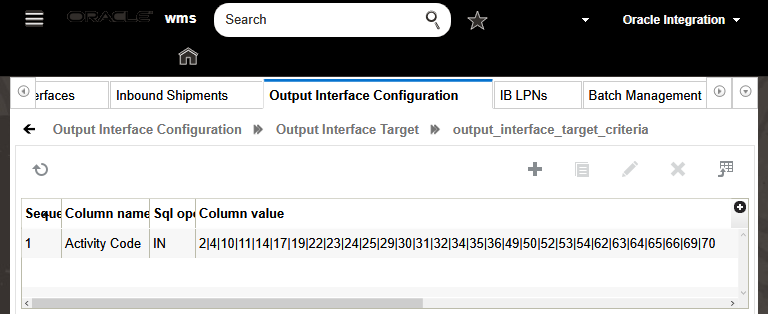
The following table lists the supported Inventory History Transactions (IHTs) mapped to Integration Service - Inventory Transactions service in 20C and 20D.
| Inventory History Transaction | 20C | 20D |
|---|---|---|
| IHT-2- Container Consumed | ~ | Yes |
| IHT-4 - Inventory Adjusted Pre-Verification | Yes | Yes |
| IHT-10 - Container Detail Packed | ~ | Yes |
| IHT-11 - Container Packed | ~ | Yes |
| IHT-14 - Container Cancelled | ~ | Yes |
| IHT-17 - Inventory Adjusted Post Verification | Yes | Yes |
| IHT-19 - Inventory Adjustment Cycle Count Active | Yes | Yes |
| IHT-22 - Lock Container Before ASN Verification | ~ | Yes |
| IHT-23 - Lock Container After ASN Verification | ~ | Yes |
| IHT-29- Create Allocatable Container | Yes | Yes |
| IHT-30 - Create Unallocatable Container | Yes | Yes |
| IHT-31 - OB Container Modified | ~ | Yes |
| IHT-32 - OB Container Cancelled | ~ | Yes |
| IHT-34 - Split Container Before ASN Verification | ~ | Yes |
| IHT-35 - Split Container After ASN Verification | ~ | Yes |
| IHT-36 - Split Container Lock Acquired | ~ | Yes |
| IHT-39 - Cycle Count - Lost IBLPN Counted | Yes | ~ |
| IHT-40 - IBLPN Lost | Yes | ~ |
| IHT-49 - Lock Active | Yes | Yes |
| IHT-50 - Unlock Active | Yes | Yes |
| IHT-52 - Audit Adjustment | Yes | Yes |
| IHT-53 - Cycle Count Reserve SKU Counted | Yes | Yes |
| IHT-54 - Container Detail Picked | ~ | Yes |
| IHT-62 - POS Interface | ~ | Yes |
| IHT-65 - Lock OBLPN | ~ | Yes |
| IHT-66 - Unlock OBLPN | ~ | Yes |
| IHT-69 - Kitting Complete | ~ | Yes |
| IHT-70 - Kitting Inventory Consumed | ~ | Yes |
Shipment Confirmation for Sales Orders
The storage sub-inventory upon shipping inventory from the warehouse or store was happening from “Stores” Sub-inventory.
The Shipment Confirmation for Sales Order service posts Sub-inventory transfer for Storage Sub-Inventory. Prior to 20D, integration between Oracle WMS Cloud and Oracle Inventory Management Cloud via Shipment Confirmation service was reducing inventory from a single Storage Sub-inventory called "Stores" when inventory was shipped from the warehouse.
As integration supports multiple sub-inventory in Stores bucket, Oracle WMS Cloud is enhanced to send the corresponding Storage Sub-inventory in Ship Confirmation (SLS) payload. The Shipment Confirmation integration utilizes ERP bucket value from SLS payload to reduce inventory from corresponding Storage Sub-inventory.
When integrating Oracle WMS Cloud to ERP systems, the ERP’s system virtually tracks to have visibility on the available inventory in every facility of the Oracle WMS Cloud system. The ERP system creates Inventory Summary Buckets to track availability of inventory levels; however, the system does not track the specific stock location of the material or the details of how the material is packed into containers (LPNs/Pallets).
As inventory in the warehouse is subjected for changes due to various operational (quality check, cycle count, etc.) flows, external ERP systems demand to know the real time status of the inventory present in the warehouse. These ERP systems maintain ERP buckets at a high level, knowing the ERP bucket are associated with the inventory present in the warehouse, allows these ERP systems to plan Order Fulfillment and Order Reservation accordingly.
Steps to Enable
You don't need to do anything to enable this feature.
Key Resources
Support Shipping Tolerances for Sales Orders
When orders are received in WMS, the system honors the order’s tolerance values for allocation and packing. An integration service - Shipment Requests for Sales Orders is enhanced to map order tolerance % value from Oracle Inventory Management Cloud to Oracle WMS Cloud. The below table depicts the mapping:
| Oracle Fusion Inventory Management Cloud Fields |
Corresponding Fields in Oracle WMS Cloud |
|---|---|
| "OverShipTolerancePercentage" |
Max Shipping Tolerance % |
| "UnderShipTolerancePercentage" |
Min Shipping Tolerance % |
Oracle Inventory Management Cloud now sends the tolerance behavior at the order detail level to define whether to ship equal to/or more than the order quantity, or less than/or more than the order quantity based on the behavior defined via the tolerance % field.
- Under tolerance – Orders can be marked as satisfied when quantity shipped is within the minimum and maximum of tolerance % for the order quantity.
- Requested Quantity – Orders can be marked as satisfied when the quantity shipped is equal to/or more than the tolerance % for order quantity.
Key Points:
- If the order details sent from the Oracle Inventory Management Cloud system have tolerance behavior defined with the value “Requested Quantity”, the integration considers the Minimum Shipping tolerance% as Zero against the respective order detail. On processing this file in WMS, the Minimum Shipping Tolerance% against the respective order detail is displayed as Zero in the WMS system.
- If the order details sent from the Oracle Inventory Fusion Management Cloud has tolerance behavior other than "Requested Quantity", the integration system does not update the Minimum Shipping Tolerance% and Maximum Shipping Tolerance%.
The integration service Shipment Request for Sales Order is based on the tolerance % which accepts the maximum % and ignores the minimum%.
For more information on the allocation of orders with minimum and maximum tolerance quantity, refer to Support Overshipment and Undershipment Tolerances with Back Ordering.
ORDER QUANTITY TO CONSUME TO ORACLE INVENTORY MANAGEMENT CLOUD
When inventory is shipped, Oracle WMS Cloud generates a Ship Confirmation (SLS) payload. This payload contains information pertaining to order detail and corresponding outbound LPN with qty information. The Oracle Inventory Fusion Management Cloud records the shipped qty for an order line via mapping through integration service - Shipment Confirmation for Sales Orders. Once the shipped qty reaches the order qty, the order is closed in the Oracle Inventory Fusion Management Cloud.
With shipping tolerance in Oracle WMS Cloud, the system can ship inventory more or less than the order qty which is sent in multiple loads which leads to marking the order as shipped based on the order’s minimum and maximum tolerance % value. Thereby, the dependency on shipped qty for closing order line becomes crucial where the order may be prematurely closed if same order line is Shipped in multiple loads (meeting the tolerance %) or because of various in shipped timestamp information.
To overcome such an instance, a new field called order_qty_to_consume is introduced in the ship confirmation payload which conveys the actual qty to be reduced from the order. The Oracle Inventory Fusion Management Cloud has introduced “RequestedQuantityToConsume” which is mapped to the “order_qty_to_consume” of the Oracle WMS Cloud. The integration service package - Shipment Requests for Sales Orders maps the field “order_qty_to_consume” value present in ship confirmation payload from Oracle WMS Cloud to "RequestedQuantityToConsume" in Oracle Inventory Fusion Management Cloud. When the summation of order_qty_to_consume becomes equal to order line qty, then the system marks the order as closed.
NOTE: If ship OBLPN does not generate the SLS file, then the order_qty_to_consume will not be sent to the Oracle Inventory Fusion Management Cloud system.
For example: Let’s say you have interfaced order with 100 units where the Minimum and Maximum tolerance % = 20.
- User packs Outbound LPN 1 = 15 units and Outbound LPN 2 = 90 units.
- Due to load restriction for various reasons like truck capacity and so on:
- Outbound LPN 1 is assigned to Load 1.
- Outbound LPN 2 is assigned to Load 2.
| Order Qty |
Packed qty |
Shipped qty |
Order Qty to Consume |
|
|---|---|---|---|---|
| Order Interfaced (100) units |
100 | 0 | 0 | |
| Information shared for Load 1 in SLS payload |
100 | 15 | 15 | 15 |
| Information shared for Load 2 in SLS payload |
100 | 90 | 90 | 85 – Summation of Order qty to consume will be equal to the order line. |
Case 1: Oracle Inventory Management Cloud system refers to the order_qty_to_consume value. In the above case, the summation of order_qty from Load 1 and Load 2 sums to 100 units which satisfies the order qty, and thereby system will not prematurely close the order.
Case 2: When the user ships Load 1 and Load 2, and if information for Load 2 reaches Oracle Inventory Fusion Management Cloud-first, the system can prematurely close the order because the shipped qty (90 units) is within the order tolerance limits. At this stage, information for Load 1 will get rejected if shipped qty is used for reconciliation.
NOTE: If shipped qty is > than order qty, then the summation of order_qty_to_consume will not go beyond the order qty.
Generally, warehouses deal with a variety of items (such as wires for example) where shipping an exact quantity or weight might not always be practical. To give flexibility in shipping item quantity, tolerance % on orders are introduced in Oracle WMS Cloud in 20D and Oracle Inventory Management Cloud is 20C.
NOTE: To use this functionality, the system must run on 20 D and above versions along with 20D integration package installed.
Steps to Enable
You don't need to do anything to enable this feature.
Key Resources
Communicate Backordering for Sales Orders
SCM Cloud Integrator now supports backorder functionality via the newly introduced integration API service BackOrder To shipmentLines. This integration service utilizes IHT 85 -Order detail status change to communicate backorder quantity to Oracle Fusion Inventory Management Cloud system. This integration service communicates the back order quantity when the status of order detail is Shipped or Cancelled. While IHT 85 -Order detail status change retains the previous status and the new status columns are exposed in the reference fields. When the new status of the order detail changes to Shipped or Cancelled, and if Backorder quantity is shared in the IHT, then SCM Cloud Integrator will make the relevant API call to the Fusion system. Refer to the IHT trigger point documentation for more information on Order Detail Status Change IHT.
NOTE: The system calculates the back order quantity against each order detail, only when the respective order's order type has Require Back Order flag set to true in conjunction with Deallocate on Short flag set to false on the Order Type UI.
Key Notes:
-
The Output Interface Configuration screen in Oracle WMS Cloud must be configured to call the relevant endpoint for Back Order a Shipment Line. That is, the endpoint URL of the backorder integration must be configured as the target URL of Inventory History export. Refer to the Integration Guide for more information.
-
When Oracle Inventory Management Cloud sends SO (this happens through Shipment Request integration) for backorder quantity, the system sends the original order number. Oracle WMS Cloud will fail the order interface as already the order is interfaced into WMS which has a status greater than created. To support the same order number sent from Oracle Fusion Inventory Management Cloud, the order interface is enhanced in Oracle WMS Cloud to suffix order numbers so that the backorder from fusion can be accepted and processed in WMS for processing.
NOTE: Adding a suffix for an order number is applicable for Oracle Fusion only. Other ERP systems are recommended to send a new order number to process the backorder and avoid sending the same order numbers. For more information, refer to the Back Order Processing Handling section.
In Oracle WMS Cloud, when order details go to Shipped or Cancelled status with shipped quantity less than the ordered quantity (after considering the order detail tolerance percentages), Oracle WMS Cloud now has an ability to signal Oracle Inventory Management Cloud on the quantity that was not fulfilled for respective order detail. The unfulfilled quantity is referred as backorder quantity. This backorder quantity is communicated to the Oracle Fusion Inventory Management cloud so that the Oracle Inventory Management system can create back order against the unfulfilled quantity.
Steps to Enable
You don't need to do anything to enable this feature.
Key Resources
Provide Transaction Reference on Purchase Order Receipt Confirmation, Inventory Transactions, and Sales Order Shipment Confirmation
The pre-built OIC-based integrations between Oracle WMS Cloud and Oracle Inventory Management Cloud now leverage Oracle Inventory Management Cloud’s ability to link transactions from an external WMS for reconciliation. To make identifying problem transactions more efficient, the pre-built OIC-based integrations to Oracle Inventory Management Cloud now includes a transaction reference identifier for every transaction that Oracle WMS Cloud sends to Oracle Inventory Management Cloud.
This enhancement incorporates the reference field mappings from all Oracle WMS Cloud transactions into the existing WMS to Inventory integrations, where available. Not all Oracle Inventory Management Cloud’s APIs support transaction references at the transaction level. Some are done at the header level and will have to represent a grouping of transactions. The end result is added traceability between these two systems that will help with inventory summary and error reconciliation.
FIELD MAPPINGS
Oracle Inventory Management Cloud APIs each expose a new field, "ExternalSystemTransactionReference", which are mapped to the following integrations:
| Integration | REST API | WMS Output Type |
WMS fields mapped to ExternalSystemTransactionReference |
|---|---|---|---|
| Receipt Confirmation | Receiving API (Receiving Receipt Requests) | Inventory History (IHT) | MessageId (Inventory History Export File name) |
| Receipt Confirmation |
Post receiving API (Receiving Receipt Transactions Requests) |
Inventory History (IHT) |
group_nbr-seq_nbr |
| Shipment Confirmation |
Shipment Transaction Requests |
Shipped Load (SLS) | load_manifest_nbr |
| Inventory Transaction |
Inventory Staged Transactions |
Inventory History (IHT) |
group_nbr-seq_nbr |
Steps to Enable
You don't need to do anything to enable this feature.
Key Resources
Integration Properties Support in SCM Cloud Integrator
You may need to add some configured values in the applications you are integrating into the prebuilt integration mappings so that the correct values for your operations are passed. Examples include WMS values like company codes and units of measure. The SCM Cloud Integrator's Integration Wizard makes the process seamless and prevents you from needing to manually update the field mappings yourself in Oracle Integration Cloud (OIC.)
To address these challenges, SCM Cloud Integrator and the prebuilt integrations now support OIC's new "Integration Property" functionality. This functionality allows the prebuilt integrations to define multiple properties per version with a default value that can be overridden by customers. This provides:
- a cleaner mechanism for dealing with field values that may change per customer
- a default value so that the recommended or base value is not compromised
Each OIC prebuilt integration (where applicable) is now enhanced to replace hard-coded field values with a configurable integration property.
SCM INTEGRATOR UI ENHANCEMENTS
A new dynamic tab "Integration Properties" now displays the integration property(s) for the given integration version, the current value, and default value in the deployed integration details. This can be used to update the integration property values for deployed integrations as long as the integration is not enabled in OIC.
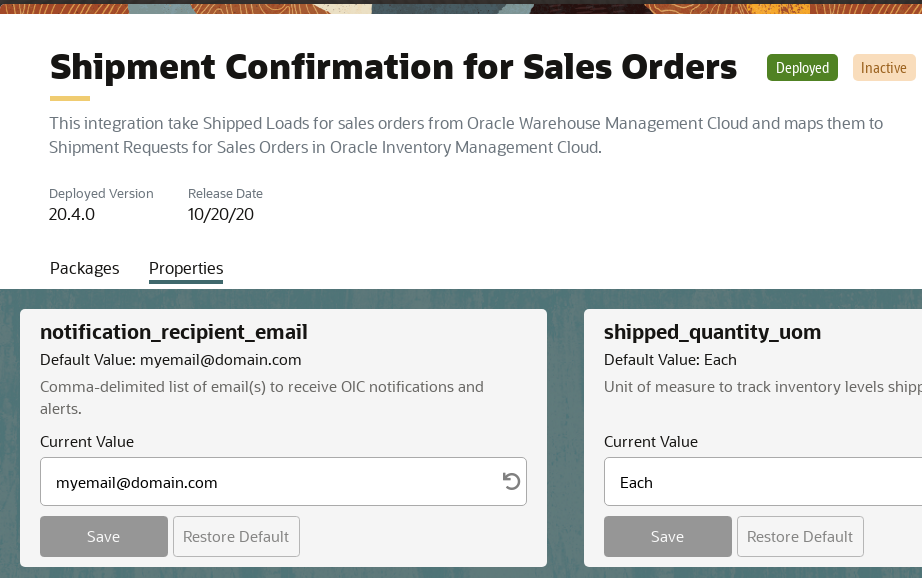
Integration Properties Tab
If the integration version has no integration properties, the message "Nothing to configure." will display.
NEW INTEGRATION WIZARD SETUP - CONFIGURE
A new step, "Configure", is now added to the Integration Wizard which allows you to override the default integration property values as part of the prebuilt integration process.
For each integration version that has at least one integration property, a card will be displayed. The default value will be displayed in the input box, which can be overridde with your configured values. Once deployed, these may still be updated from the respective deployed integration’s detail page in SCM Cloud Integrator, or from within OIC.
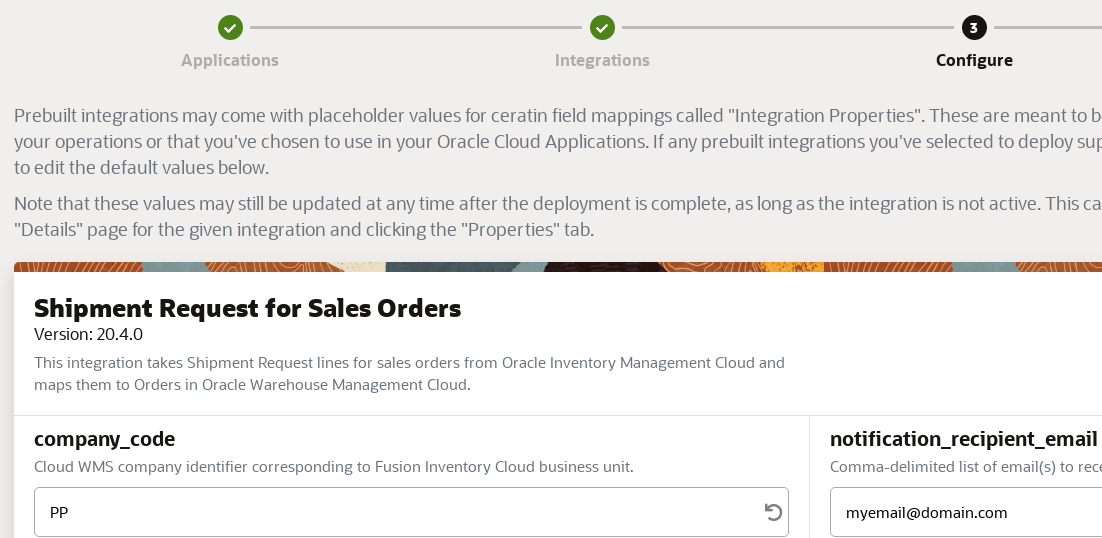
Configure
DEPLOYMENT PROCESS UPDATES
As part of the deployment process, any integration property values that are changed from their default are pushed to OIC. This happens as a final step after the integration has been deployed and the connection configured.
If the push to OIC fails, an error alert will display and all deployment changes are rolled back for that integration version.
Steps to Enable
You don't need to do anything to enable this feature.
Key Resources