
- Revision History
- Overview
- Feature Summary
-
- Functional Enhancements
- User Experience and Usability Enhancements
- Integration Enhancements
-
- Send Serial Numbers Support in Composite Create LPN API
- Initiate a Wave Using a REST API
- Introduction of Task Number and Wave Group Run Number in Wave Pick Info Output Interface
- Populate Ship to Details in Wave Pick Information for Customer Orders
- Increased Character Length in Stage Vendor Name UI
- Approve/Reject Quality Checked Inbound LPNs Using a REST API
- Manage Task Status, User Assignment, and Task Priority Using a REST API
-
This document will continue to evolve as existing sections change and new information is added. All updates appear in the following table:
| Date | Product | Feature | Notes |
|---|---|---|---|
| 20 JAN 2021 | Functional Enhancements | Replenishment of Multiple Skus to Dynamic Active Locations | Updated document. Revised feature information. |
| 20 JAN 2021 | Functional Enhancements | UOM View Screens | Updated document. Revised feature information. |
| 08 JAN 2021 | Created initial document. |
This guide outlines the information you need to know about new or improved functionality in this update, and describes any tasks you might need to perform for the update. Each section includes a brief description of the feature, the steps you need to take to enable or begin using the feature, any tips or considerations that you should keep in mind, and the resources available to help you.
Give Us Feedback
We welcome your comments and suggestions to improve the content. Please send us your feedback at owms-cloud-comms_us@oracle.com.
Column Definitions:
Report = New or modified, Oracle-delivered, ready to run reports.
UI or Process-Based: Small Scale = These UI or process-based features are typically comprised of minor field, validation, or program changes. Therefore, the potential impact to users is minimal.
UI or Process-Based: Larger Scale* = These UI or process-based features have more complex designs. Therefore, the potential impact to users is higher.
Features Delivered Disabled = Action is needed BEFORE these features can be used by END USERS. These features are delivered disabled and you choose if and when to enable them. For example, a) new or expanded BI subject areas need to first be incorporated into reports, b) Integration is required to utilize new web services, or c) features must be assigned to user roles before they can be accessed.
Prompt Users Before Overriding Inventory Attributes During Receiving
A new warning message is introduced that indicates the floor users on overriding an inventory attribute in scenarios where the attribute sent on the shipment is replaced by a newly scanned inventory attribute. Also, users are giving an option to make the message a hard error and thereby prevent unintentional scanning or replacing of different inventory attribute values.
Highlights of the enhancements:
The following messages are added in the RF Receive (LPN) Shipment (rf.inbound.cwrfrecvlpnshpmt) and RF Receive Load (rf.inbound.cwrfrecvlpnload) transactions for both Cartonized and Non-cartonized ASNs:
- For Cartonized ASN, the system displays "Scanned inv attr - SKU combination is not present in the LPN".
- For Non-Cartonized ASN, the system displays "Inventory attribute does not match the SKU-shipment combination".
NOTE: By default, these messages are enabled. You can disable these warning messages from the Edit Facility message configuration pop-up.
The warning message will appear only when the inventory attribute is mentioned in the ASN detail and the user scans a different inventory attribute, or if the user provides a new attribute that is not mentioned in the ASN detail (for example, during over-receiving). This message will not appear if the Inventory Attributes are not passed in the ASN detail and the users provide inventory attribute value from the RF receiving modules, then the system does not display the warning message.
The Oracle WMS Cloud is now enhanced to prompt warning messages when users override the inventory attribute of the SKU during RF Receive (LPN) Shipment (rf.inbound.cwrfrecvlpnshpmt) and RF Receive Load (rf.inbound.cwrfrecvlpnload) transaction.
Steps to Enable
You don't need to do anything to enable this feature.
Key Resources
Replenishment of Multiple Skus to Dynamic Active Locations 
You can now generate Replenishment allocations of multiple sku's to single dynamic Active Locations as part of a picking wave in Oracle WMS Cloud. Replenishments to dynamic active locations during a picking wave are created until the order need if the location has capacity. There is no limit enforced on the number of sku’s that can be replenished per location. Customers operating under space constraints can benefit from this feature. The feature is also available in the 20D release.
From 21A onwards, users will be able to run replenishments with a picking wave and be able to replenish more than one sku to single dynamic active locations. Replenishment of more than one sku to single dynamic active locations can happen in single waves or across waves. The capacity configured for the location will drive the incoming inventory to the location.
NOTE: It is recommended that you set the capacity of the location based on Weight or Volume as multiple sku’s can go to a single dynamic active location.
ASSUMPTIONS
- More than one sku can now be pushed to a single dynamic active location, and currently there is no cap on the number of sku’s per location. Location capacities have to be configured appropriately so that the same location is not always replenished.
NOTE: This feature will be available in the 21A 2A patch bundle.
Steps to Enable
The following are important things to be aware of for this feature to work:
- Ensure that the target dynamic active location has the “allow multi-sku” flag on the location set to “yes”. If the location does not support multi-sku, this feature will not be supported.
- Ensure that the Replenishment type is configured for the item under Item Facility and that replenishment zone to replenishment type mapping is configured appropriately through the Replenishment Type Zone Xref UI.
Key Resources
LPN Status Display Corrections in Inbound Shipment Inquiry When LPN Number is Reused
Previously, Oracle WMS Cloud allowed inbound LPN numbers to be reused when the LPN status changed to consumed or cancelled. If an LPN number was reused, users could view every instance of the LPN occurrence for the facility. In 21A, the system is enhanced to reflect the LPN status in the Inbound Shipment details for the previous instance.
Previously, when an LPN number was reused in Oracle WMS Cloud, the system displayed LPN status associated with the original shipment in the Inbound Shipment UI. The system has been enhanced so that now in the Inbound Shipment Detail UI, the LPN status displayed will reflect the latest LPN status associated with the shipment.
For example, when an LPN is received and consumed, the LPN status changes to Consumed. If the same LPN number is used on a different shipment and this LPN is Located, the LPN status in the Inbound Shipment Inquiry displays as Located only.
ENHANCEMENT HIGHLIGHTS
- You can view the LPN status when the LPN number is reused from the Shipment detail screen and via the LPN Number hyperlink.
- When users receive LPN on Shipment and putaway to active location, the LPN status changes to Consumed. The LPN status in Inbound Shipment Inquiry reflects correct status – Consumed. Upon reusing the same LPN on a different shipment (for example, shipment-1), the system would suffix the (original) previous instance of the LPN with a number (for example, LPN-001), and the LPN status changes to Located.
NOTE: The correction to the LPN Status display is reflected only for the LPN’s which are received and reused and the display of the LPN status feature is applicable only from the 21A upgrade onwards. The LPN status in the Shipment Detail screen will continue to display the latest status for users running prior to 21A.
Steps to Enable
You don't need to do anything to enable this feature.
Key Resources
Reload Literals in WEB UI When Company is Changed
Oracle WMS Cloud allows you to define literals by company. In some 3PL scenarios. each underlying company can have different literals.
For example: company-1 inventory attribute_a could refer to country of origin and company-2 might refer to product color or temperature. From 20D onwards, when users change the company via the Web UI, the respective literals for the relevant company will now be loaded.
NEW FLAG IN THE COMPANY UI
- Users will be able to see a new flag on the company UI “Reload Literals upon Changing Company”. If companies have different literals configured by company then set the corresponding flag for the company.
- Users will have to check this flag for the literals to be reloaded upon changing the company.
- After switching companies, literals from current company shows up in the UI if either the from/to company has Reload Literals upon Changing Company set to “yes”.
- A manual option to reload the literals is available in the settings menu associated with the user.
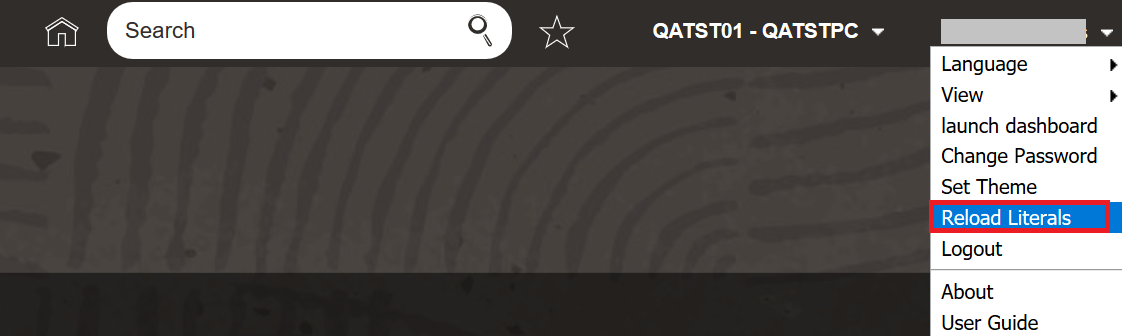
Reload Literals in Settings Menu
NOTE:
Users should log out of the session for the Reload Literals upon Changing Company flag to take affect if the flag is modified during an active session.
Feature is also made available in 20D Release.
Steps to Enable
Users should configure the “Reload Literals upon Changing Company" flag for the corresponding company.
Key Resources
NOTE: FOR FUTURE USE - New UI's are introduced for Unit of Measure (UOM) and UOM Class. UOM Class has a pre-seeded entry with a UOM Class Code of "System". Currently supported UOM's (for example: units, packs, cases, LPN, Pallet) are visible in the UOM UI.
Both these new UI's are intended for future usage and do not have any functional significance with respect to current release 21A. Its recommended not to add these screens to the users menu.
Also, New Permissions related to UOM and UOM Class are visible in the Group Permissions screen, which is not recommended to be used now.
Steps to Enable
You don't need to do anything to enable this feature.
Key Resources
User Experience and Usability Enhancements
Additional Filter Criteria in Waving
To enhance user experience during waving, additional filter criteria is now available in the Manual Wave UI, (Run Allocation module.)
ADDED FIELDS
The following fields are added as additional filter criteria in the Manual Wave UI (Run Allocation module.)
- Destination Dept
- Sales Channel
- Order Hdr – Custom Field 1
- Order Hdr – Custom Field 2
- Order Hdr – Custom Field 3
- Order Hdr – Custom Field 4
- Order Hdr – Custom Field 5
- Externally Planned Load (it is a drop-down having options ‘Yes’ or ‘No’)
- Externally Planned load Number
Steps to Enable
You don't need to do anything to enable this feature.
Key Resources
Extend “Task/Can Change to Hold” Permission and Rename to “Can Hold/Release Task”
As the decision to hold/release tasks can impact operational efficiency, all users should not be able to hold/release tasks. Users with specific permissions should only be allowed to hold/release tasks. This feature allows warehouse users to configure a single permission to both hold tasks that are in ready status and to release held tasks based on need.
Prior to 21A, Oracle WMS Cloud allowed you to define permissions to hold tasks using the "task/can change to hold" permission. In 21A, the "task/can change to hold" permission is extended to include a release task and is renamed as "Can hold/release task."
The following table shows you the feature behavior based on permission:
| Permission | Behavior |
|---|---|
| when the user belongs to a group with "Can hold/release task" permission |
|
| when the user belongs to a group without "Can hold/release task" permission |
|
NOTE:
Existing permission values configured in groups for "task/can change to hold" permission will not be affected by this change. The permission values will be copied and available in the new "task/can change to hold" permission.
Previously, all users could release tasks in the Tasks UI, but now users from groups with the “can hold/release task” permission enabled can only release tasks in the Tasks UI.
Steps to Enable
To use this feature, users need to enable the "Can hold/release task" permission.
Key Resources
Additional Filter Criteria Fields in Manual Wave, Order Header, and Outbound Orders UI
To enhance user experience during waving, additional filter criteria is now available in the Manual Wave UI, (RunAllocation module.)
Sales Order Number is now available as filter criteria in the Order Header UI (OrderHdrView module) and Outbound Orders UI (OBOrdersView_FW module). The Oracle Fusion Order Management Cloud Sales Order number is stored as Sales Order Number in Oracle WMS Cloud (provided that there is a standard pre-built integration between Oracle Fusion and Oracle WMS Cloud.) Users can now filter data in the Order Header and in Outbound Orders by using the Oracle Fusion sales order number.
ADDED FIELDS
- The following fields are added as additional filter criteria in the Manual Wave UI (RunAllocation module.)
-
- Destination Dept
- Sales Channel
- Order Hdr – Custom Field 1
- Order Hdr – Custom Field 2
- Order Hdr – Custom Field 3
- Order Hdr – Custom Field 4
- Order Hdr – Custom Field 5
- Externally Planned Load (it is a drop-down having options ‘Yes’ or ‘No’)
- Externally Planned load Number
- Sales Order Number is added as additional filter criteria in the Order Header UI (OrderHdrView module) and OB Orders UI (OBOrdersView_FW module).
Steps to Enable
You don't need to do anything to enable this feature.
Tips And Considerations
Additional Criteria Fields in Task Creation Template UI
To enhance user experience during waving, additional fields are now available for selection as selection criteria and ordering criteria in the Task Creation Template UI, (module name: Task Creation View.) Additional tasks can be defined using these fields available in the task creation template selection criteria and ordering criteria.
ADDED FIELDS
From 21A onwards, the following fields are available for selection as selection criteria/ordering criteria in the Task Creation Template UI:
- Order Hdr Special Instructions
- Order Hdr Gift Message
- Order Hdr Carrier Account Nbr
- Order Dtl Batch Nbr
- Order Dtl PO Nbr
- Order Dtl Required Pallet Number
- Order Dtl Shipment Nbr
- Order Dtl Destination Facility Attr A
- Order Dtl Destination Facility Attr B
- Order Dtl Destination Facility Attr C
Steps to Enable
You don't need to do anything to enable this feature.
Send Serial Numbers Support in Composite Create LPN API
Previously, the composite create action for the IBLPN entity did not support sending serial numbers for serial tracked items. Users who wanted to create an LPN with serial number tracked items needed to do it in multiple API calls:
- POST .../entity/iblpn/composite_create/
- POST .../entity/inventory/{id}/link_serial_nbrs/
Now, WMS is expanding support for sending serial number information in the IBLPN Composite Create API itself. This change avoids the requirement of making multiple API calls to complete the linking.
NOTE: Customers using composite_create for serial number tracked items should ensure that serial number information is shared in the composite create itself.
VALIDATE SERIAL NUMBERS FLAG
A new flag "validate_serial_nbrs_flg", is introduced in the "options" section of the request. The value of the flag is 'true' by default and the parameter is optional.
If the "validate_serial_nbrs_flg" is set to "false", and if the item is tracking serial numbers, users are not required to send the serial number list in the request body. In case the "validate_serial_nbrs_flg" parameter is set to 'false' and the users send the serial number list, the API will return an error.
NOTE: The composite create API writes IHT-4- Inventory Adjusted pre-verification. If the “Enable split by serial number flag” is checked for this IHT, it will be split by the respective serial numbers sent in the request.
Additionally, validations of serial numbers are applicable when any of the item has ‘requried_serial_number’ set to "Required, don’t validate" or Require, Validate Allow User Override" and the company parameter "serial_number_tracking_level" is set to "2".
Steps to Enable
Review the REST service definition in the REST API guides, available from the Oracle Help Center > your apps service area of interest > REST API. If you're new to Oracle's REST services you may want to begin with the Quick Start section.
Key Resources
Initiate a Wave Using a REST API
RUN MANUAL WAVE API
The new Run Manual API allows you to invoke a manual wave. The following are some potential scenarios and reasons for running the wave using a Rest API:
- External systems or PaaS Solutions can be built with the option to run a manual wave screen. These systems may have their own order entry or display screen and running an API will allow them to invoke waves.
- For use cases catering to Digital Assistant, APIs for running manual waves are helpful. For example, (voice command for selecting the order, and Oracle Digital assistant can be fine tuned to call a Manual Wave using the API.)
You can run a Manual Wave using the following POST request:
- POST .../entity/wave_template/run_manual/
The following are some ways for calling the Manual Wave:
Using the Wave Template ID:
- POST .../entity/wave_template/{id}/run_manual/
NOTE: ID corresponds to a valid Wave template ID. The API body should contain the list of corresponding Order detail IDs for which the wave is run.
Using the Wave Template Name:
- POST .../entity/wave_template/run_manual/
NOTE: The API body should include facility id/code, company id/code, wave template name, and corresponding Order Detail ID's, or Order Number and Sequence number combination.
- Mention the response with the run number and you can see the records in the Wave Inquiry screen. However, a successful wave run does not ensure allocation of inventories.
RUN WAVE TEMPLATE API
The new Run Template API allows you to invoke the wave template. The following are some ways to call the Wave Template API:
Using the Wave Template ID:
- POST .../entity/wave_template/{id}/run_template/
NOTE: No additional `parameters` data in the request body is required.
Using the Wave Template Name:
- POST .../entity/wave_template/run_template/
NOTE: The API body should include facility id/code and the wave template name.
- The wave template name provided in the body should correspond to the default facility code or to your eligible facility.
- If the company parameter "ONLY_ONE_WAVE_PER_FACCO" is configured to ‘No’ and if there is already a wave running, the system will not allow you to invoke the wave send in the API request.
- If the comp parameter is set to run one wave per facility, then the API will return an error.
- Mention the response with the run number and you can see the records in the Wave Inquiry screen. However, a successful wave run does not ensure allocation of inventories.
UNDO WAVE API
The new Undo Wave API allows you to invoke the wave template. With the introduction of this new API, external systems or PaaS solutions can be integrated which will allow you to undo a wave without accessing the web UI screen.
The following are some ways to call the Undo Wave API:
Using the Wave Template ID:
- POST .../entity/wave/{id}/undo
NOTE: No additional `parameters` data in the request body is required.
Using the Wave Run Number:
- POST .../entity/wave/undo/
NOTE: The API body should include facility id/code and the wave run number.
When the parameter UNDO_WAVE_EVEN_AFTER_PICKING is set to 'No,' the system will not undo a Wave if picking is started. If the parameter is set to 'Yes,' the application allows undo wave even after picking has started.
Steps to Enable
Review the REST service definition in the REST API guides, available from the Oracle Help Center > your apps service area of interest > REST API. If you're new to Oracle's REST services you may want to begin with the Quick Start section.
Key Resources
Introduction of Task Number and Wave Group Run Number in Wave Pick Info Output Interface
As part of 21A, Oracle WMS Cloud is enhanced to include Task Number and Wave Group Run Number fields on the Wave Pick Info output interface when respective values are generated during Wave or Wave group run.
Having Task Number and Wave Group Number in the wave pick info interface helps you to communicate this information with other external systems or MHE systems. This allows you to manage the task properly. Additionally, with the wave group run number, other systems can plan for releasing tasks incrementally without over loading the system during picking activities.
ADDED FIELDS
The following are the new fields added in Wave Pick Info output interface:
- task_nbr - Task Number associated with the respective allocation.
- wave_group_run_nbr - Wave Group Run Number generated during Wave Group run.
NOTE:
Task Number in the wave pick info will be generated, only when respective wave template is configured with Task Creation template having appropriate task type.
Wave Group Run Number will be generated only when user runs Wave Group.
Steps to Enable
To view the Task Number/Wave Group Run Number fields in the Wave Pick Info output interface, set the respective company parameter (OUTPUT_LGF_FINFO_WAVE_PICK_INFO) and facility parameter (WAVE_PICK_INFO) so that they point to the 21A release (lgf21a).
Key Resources
Populate Ship to Details in Wave Pick Information for Customer Orders
In 21A, the Ship-To information will be populated in the Wave Pick Info interface for MHE systems if an order is having the Ship to address populated. The MHE system consumes this information through Wave Pick Info will have Ship to Fields populated from order (Customer Order) and Labels can be printed with appropriate Ship-To values for Customer Orders (Non-Facility Orders).
The Ship to information in the Wave Pick Info interface file will be populated based on the following conditions:
- If the order is defined with Ship to Facility code, then Ship to information will be populated from the corresponding facility associated with the Ship to the facility.
- If the order is not defined with Ship to Facility code (Customer Order), then ship to information will be populated from the corresponding order.
NOTE: As Ship to fields in the Wave Pick Info interface were added in the 20C release, customers having Company Parameters (WAVE_PICK_INFO) & Facility Parameter (OUTPUT_LGF_FINFO_WAVE_PICK_INFO) pointing to release 20C(lgf20c) and above can refer to Ship To information in the Wave Pick info interface file.
In 20C, Oracle WMS Cloud sent Ship to information in the wave pick info interface for orders having facility code defined. Sometimes, warehouses can have customer orders without facility code defined but are defined with customer information and Ship to information. For such an order, Ship to information was missing in the wave pick info interface.
Steps to Enable
You don't need to do anything to enable this feature.
Key Resources
Increased Character Length in Stage Vendor Name UI
Previously, the Vendor UI supported the creation of vendor names with 250 characters but the creation of vendor from the interface was limited to support only 50 characters for vendor names. Due to these constraints, the vendor update from the interface was not processing if the vendor was created from the UI with a vendor name having more than 50 characters.
In 21A, the Vendor Interface is now enhanced to support 250 characters for vendor name. This provides users to create a vendor with a vendor name up to 250 characters from both the Vendor UI and Vendor Interface.
Steps to Enable
You don't need to do anything to enable this feature.
Key Resources
Approve/Reject Quality Checked Inbound LPNs Using a REST API
New REST APIs are added to approve and reject QC marked IBLPNs:
QC APPROVE API
The new QC Approve API will allow you to approve QC marked IBLPNs. The external system can use the lgfapi to approve the QC marked IBLPNs without accessing the Web UI or RF QC complete module in Oracle WMS Cloud.
The following are ways to call the QC Approve API:
Using the Wave Template ID:
- POST.../entity/iblpn/{id}/qc_approve/
NOTE: No additional parameter data in the request body is required. As an option, you can also send the Vendor Performance code in the API request body. However, the Vendor Performance code is not mandatory.
Using the Container Number:
- POST.../entity/iblpn/qc_approve/
NOTE: The API body should include facility id/code, company id/code, and container number. As an option, you can also send the Vendor Performance code in the API request body.
Using the Bulk QC Approve:
- POST.../entity/iblpn/bulk_qc_approve/
NOTE: The API body should either have the container IDs or container numbers. As an option, you can also send the Vendor Performance code in the API request body. However, the Vendor Performance code is not mandatory. Once the quality check is approved, the container status becomes Received with QC status as QC approved.
QC REJECT API
The new QC Reject API will allow you to approve one or more QC marked IBLPNs. The external system can use the lgfapi to reject the QC marked IBLPNs without accessing the Web UI or RF QC complete module in Oracle WMS Cloud.
The following are the ways for calling the QC Reject API:
Using the Wave Template ID:
- POST.../entity/iblpn/{id}/qc_reject/
NOTE: No additional `parameters` data in the request body is required. You can send the Vendor Performance code and Lock code in the API request body as options.
Using the Container Number:
- POST.../entity/iblpn/qc_reject/
NOTE: The API body should include facility id/code, company id/code, and container number. As an option, you can also send the Vendor Performance code and Lock code in the API request body.
Using the Bulk QC Approve:
- POST.../entity/iblpn/bulk_qc_reject/
NOTE: The API body should either have the container IDs or container numbers as parameters. You can also send the Vendor Performance code and Lock code in the API request body. However, neither the Vendor Performance code nor the Lock code is mandatory. If you do not send an unallocatable lock code, the rejected LPNs get Cancelled. If the lock code parameter is populated with an unallocatable lock code, the system marks the QC rejected LPNs as Received with QC status as QC Rejected. You cannot provide allocatable lock codes to reject an IBLPN.
If you do not send the unallocatable lock code, the rejected LPNs get canceled. If the lock code parameter is populated with an unallocatable lock code, the system marks the QC rejected LPNs as Received with QC status as QC Rejected. You cannot provide allocatable lock codes to reject an IBLPN.
See the REST API Guide for more details.
Steps to Enable
Review the REST service definition in the REST API guides, available from the Oracle Help Center > your apps service area of interest > REST API. If you're new to Oracle's REST services you may want to begin with the Quick Start section.
Key Resources
Manage Task Status, User Assignment, and Task Priority Using a REST API
HOLD TASK API
The new Hold Task API will allow you to hold a task that is in ready status. With the new lgfapi, an external system can change one or more task statuses from “Ready” to ‘Held’. Without accessing the web UI, you can now exclude such tasks that are currently not required to be executed by the assigned user. Users who have the Task/ Can hold/ Release task permission enabled can now put a task on ‘Held’ status.
The following are the ways for calling the Hold task API:
Using the Task ID:
- POST.../entity/task/{id}/hold/
NOTE: No additional parameter data in the request body is required.
Using Task Number:
- POST.../entity/task/hold/
NOTE: The API body should include facility id/code, company id/code, and task number.
Using the Bulk Task Hold:
- POST.../entity/task/bulk_hold/
NOTE: The API body should have a task id list. Users can also provide the commit frequency as an option. You are required to provide the commit frequency properly as options. If the commit frequency is set to 0, the API will not process the tasks if any error is returned. If the commit frequency is set to 1, the API will process only the eligible and valid tasks. The API response displays the tasks that are not processed along with the corresponding error.
You can hold a task only if the Task/ Can hold/ Release task permission is enabled.
RELEASE TASK API
The new Release Task API will allow you to release a task that is in 'Held’ status. With the new lgfapi, the external system can change one or more task status from ‘Held’ to ‘Ready’. Such tasks will be available to be executed by the assigned user without accessing the web UI. Users who have the Task/ Can hold/release task permission enabled can now put a task on ‘Held’ status.
The following are the ways for calling the Release task API:
Using the Task ID:
- POST.../entity/task/{id}/release/
NOTE: No additional parameter data in the request body is required.
Using Task Number:
- POST.../entity/task/release/
NOTE: The API body should include facility id/code, company id/code, and task number.
Using the Bulk Task Release:
- POST.../entity/task/bulk_release/
NOTE: The API body should have a task id list. Users can also provide the commit frequency as an option. You are required to provide the commit frequency properly as options. If the commit frequency is set to 0, the API will not process the tasks if any error is returned. If the commit frequency is set to 1, the API will process only the eligible and valid tasks. The API response will show the tasks that are not processed along with the corresponding errors.
The bulk request API allows releasing task ids that belong to the same company in a given request. The API will not support a request containing task ids that belong to multiple companies.
You can hold a task only if the Task/ Can hold/ Release task permission is enabled.
CHANGE TASK PRIORITY API
The new Change Task Priority API will allow you to change the priority of a task that is in Ready, Held, or Created status. The external system can use the lgfapi to change the task priority without accessing the Web UI.
The following are the ways for calling the Change task Priority API:
Using the Task ID:
- POST.../entity/task/{id}/change_priority/
NOTE: You need to provide the task priority in the request body as this is a post-operation of tasks to change the task priority.
Using Task Number:
- POST .../entity/task/change_priority/
NOTE: The API body should include facility id/code, company id/code, and task number. You are required to provide the task priority in the request body as this is a post-operation of tasks to change the task priority.
Using the Bulk Task Release:
- POST.../entity/task/bulk_change_priority/
NOTE: The API body should have a task id list as a parameter. Users can also provide the commit frequency and task priority as options, task priority being mandatory. You are required to provide the commit frequency properly as options. If the commit frequency is set to 0, the API will not process the tasks if any error is returned. If the commit frequency is set to 1, the API will process only the eligible and valid tasks. The API response will show the tasks that are not processed along with the corresponding errors.
You can change the task priority with this API only if the Task/ Change task priority permission is enabled.
ASSIGN TASK API
The new Assign Task API will allow you to assign a task to another user without accessing the Web UI. However, you can assign a task with this API only if the Task/ Assign User Permission is enabled.
The following are some ways for calling the Assign Task API:
Using the Task ID:
- POST.../entity/task/{id}/assign_user/
NOTE: You need to provide the ‘assigned_user’ in the request body as this is a post-operation of tasks to assign users.
Using Task Number:
- POST .../entity/task/assign_user/
NOTE: The API body should include facility id/code, company id/code, and task number. You are also required to provide the ‘assigned_user’ in the request body as this is a post-operation of tasks to assign users.
Using the Bulk Task Release:
- POST.../entity/task/bulk_assign_user/
NOTE: The API body should have the task number list. You are also required to provide the ‘assigned_user’ in the request body. You can send the commit frequency as an option as well. The commit frequency is by default set to 0. If it is set to 0, the system should roll back on the first error. If the commit frequency is set to 1, the system will commit per object.
If the status of one or more selected tasks changes to Processing Started, Completed, In Drop between Zones, or Cancelled, the return error will not assign any task to the user.
If task equipment and user equipment eligibility check fail for the assigned user, the API will return an error.
GET SUPPORT FOR VENDOR PERFORMANCE CODE
The Oracle WMS Cloud is enhanced to vendor Performance Code as an Entity. With the new lgfapi, you will be able to fetch the vendor performance code as an entity. Only the GET and HEAD HTTP methods are supported for this API.
The following are ways of calling the Vendor Performance Code API:
- GET....../entity/vendor_perf_code/
NOTE: The system will display paginated results when users use the above URL.
Using the Task ID:
GET....../entity/vendor_perf_code/{id}/
NOTE: The system will display non-paginated results when users use the above URL.
For more information, refer to the REST API Guide document.
New REST APIs are added to manage task status, users assignment, and task priority.
Steps to Enable
Review the REST service definition in the REST API guides, available from the Oracle Help Center > your apps service area of interest > REST API. If you're new to Oracle's REST services you may want to begin with the Quick Start section.
Key Resources