
- Revision History
- Overview
- Feature Summary
- Warehouse Management
-
- WMS Common
- Inventory Operations
-
- Display List of Values in Inventory Attribute in RF Screens
- Prompt Serial Numbers in RF Work Order Kit Processing
- Replenishment Based on Expiry Date Range Rule
- Locate Remainders in RF Distribute Replenishment Screen
- Reinitiate In-Progress Deferred Cycle Counts
- Summary Cycle Count Enhancements
- Cycle Count Using a REST API
- Location In-Transit Inventory Visibility
- Perform Calculations for Numeric Fields in Document Label Designer
-
- Inbound Logistics
- Outbound Logistics
- Web Reports and Dashboards
- WMS Mobile App
This document will continue to evolve as existing sections change and new information is added. All updates appear in the following table:
| Date | Product | Feature | Notes |
|---|---|---|---|
| 18 NOV 2021 | Inventory Operations | Perform Calculations for Numeric Fields in Document Label Designer | Updated document. Delivered feature in update 21D. |
| 02 NOV 2021 | WMS Mobile App | New Putaway Module in Mobile App | Updated document. Delivered feature in update 21D. |
| 02 NOV 2021 | WMS Mobile App | New Cycle Count Module in Mobile App | Updated document. Delivered feature in update 21D. |
| 02 NOV 2021 | Inventory Operations | Location In-Transit Inventory Visibility | Updated document. Delivered feature in update 21D. |
| 08 OCT 2021 | Created initial document. |
 HAVE AN IDEA?
We’re here and we’re listening. If you have a suggestion on how to make our cloud services even better then go ahead and tell us. There are several ways to submit your ideas, for example, through the Ideas Lab on Oracle Customer Connect. Wherever you see this icon after the feature name it means we delivered one of your ideas.
GIVE US FEEDBACK
We welcome your comments and suggestions to improve the content. Please send us your feedback at owms-cloud-comms_us@oracle.com.
DISCLAIMER
The information contained in this document may include statements about Oracle’s product development plans. Many factors can materially affect Oracle’s product development plans and the nature and timing of future product releases. Accordingly, this Information is provided to you solely for information only, is not a commitment to deliver any material, code, or functionality, and should not be relied upon in making purchasing decisions. The development, release, and timing of any features or functionality described remains at the sole discretion of Oracle.
This information may not be incorporated into any contractual agreement with Oracle or its subsidiaries or affiliates. Oracle specifically disclaims any liability with respect to this information. Refer to the Legal Notices and Terms of Use for further information.
Column Definitions:
Report = New or modified, Oracle-delivered, ready to run reports.
UI or Process-Based: Small Scale = These UI or process-based features are typically comprised of minor field, validation, or program changes. Therefore, the potential impact to users is minimal.
UI or Process-Based: Larger Scale* = These UI or process-based features have more complex designs. Therefore, the potential impact to users is higher.
Features Delivered Disabled = Action is needed BEFORE these features can be used by END USERS. These features are delivered disabled and you choose if and when to enable them. For example, a) new or expanded BI subject areas need to first be incorporated into reports, b) Integration is required to utilize new web services, or c) features must be assigned to user roles before they can be accessed.
| Ready for Use by End Users Reports plus Small Scale UI or Process-Based new features will have minimal user impact after an update. Therefore, customer acceptance testing should focus on the Larger Scale UI or Process-Based* new features. |
Customer Must Take Action before Use by End Users Not disruptive as action is required to make these features ready to use. As you selectively choose to leverage, you set your test and roll out timing. |
|||||
|---|---|---|---|---|---|---|
| Feature |
Report |
UI or |
UI or |
|
||
Query Multiple Entities in One GET Request Using values_list |
||||||
Perform Calculations for Numeric Fields in Document Label Designer |
||||||
New Item Search Fields Available in Multiple UIs
The following Search Fields are now available in the Active Inventory UI:
| Search Field |
Type |
|---|---|
| Item Description |
Text |
| Item Description 2 |
Text |
| Item Description 3 |
Text |
The following new Search Fields are now available in the Inbound Shipment UI:
| Search Field |
Type |
|---|---|
| Alternate Item Code |
Text |
| Item Barcode |
Text |
| Item Description |
Text |
Item Description 2 |
Text |
| Item Description 3 |
Text |
The following Search Fields are now available in the Purchase Order Header UI:
| Search Field |
Type |
|---|---|
| Alternate Item Code |
Text |
| Item Barcode |
Text |
| Item Description |
Text |
| Item Description 2 |
Text |
| Item Description 3 |
Text |
The following Search Fields are now available in the Purchase Order Detail UI:
| Search Field |
Type |
|---|---|
| Item Barcode |
Text |
| Item Description |
Text |
| Item Description 2 |
Text |
| Item Description 3 |
Text |
The following Search Fields are now available in the Order Header UI:
| Search Field |
Type |
|---|---|
| Orderdtl Alternate Item Code |
Text |
| Orderdtl Item Barcode |
Text |
| Orderdtl Item Description |
Text |
| Orderdtl Item Description 2 |
Text |
| Orderdtl Item Description 3 |
Text |
Steps to Enable
You don't need to do anything to enable this feature.
Key Resources
Query Multiple Entities in One GET Request Using values_list
Currently, lgfapi GET queries can retrieve data related to one entity, whether it fetches objects (all the fields of the entity) or a specific list of fields (using the fields parameter). With this new experimental feature called “values_list”, you can now fetch data from other related entities also without the need to do multiple GET requests for each entity separately.
The benefit that you will get from this feature is that you can very easily query related data across multiple entities which results in better performance as it fetches less data in the most efficient way possible. It is similar to running a database SQL query by joining multiple tables instead of executing multiple separate queries, one per table.
NOTE: You need to know the relationships between various entities to use this feature effectively. The entity relationships are described via the self-documenting nature of lgfapi as documented elsewhere in this guide. Another resource is the list of entities (categories) that are listed in the web reports gen2 documentation, along with the relationships.
Example 1: Order type code for a specific order
Let’s say that you wanted to look up the company type code for a specific Order with id 1, using lgfapi. In order to get the company type code you need to do the following request:
GET .../entity/order_hdr/1?values_list=company_id__company_type_id__code
{
"company_id__company_type_id__code": "R"
}
NOTE: The response field name will match the field names from the "values_list" parameter.
Lets break down the request which includes the following steps:

- Making a GET Request to the order_hdr entity.
- This is the order id value that we are filtering on.
- New feature values_list.
- Company_id is the foreign key between order hdr and company entities.
- Company_type_id is the foreign key between company and company_type entities.
- Code is what you are looking for (i.e. Order Type code.)
CREATING ALIASES
You also have the option to "rename" the fields in the output to reduce the field name complexity and the overall size of the response payload. It is important to have unique aliases. By default, fields names will match the value from the values_list.
You may override the default names by giving an alias delimited by a colon character ":" for the given field in the request URL query string.
DISTINCT PARAMETER
lgfapi will support the new "distinct" query parameter for GET requests when also doing a values_list style GET request. Values list requests are used for making more direct calls to fetch targeted relational table data without the structure of an entity serializer. Due to this, there may be instances where the resultant data is repeated. For example: An OBLPN may have multiple allocation records pointing back to multiple order details for the same order. A values list request for the order_nbr would have as many repeated results as allocation records. This follows the same principles as the underlying DB query.
RETRIEVE (SINGLE-OBJECT) RESPONSE
Flow where entity "id" is included as part of the URL.This is not supported. Since this GET request style will always return a single object representation, there is no meaning to "distinct" as values cannot be repeated. If the query parameter is included in this flow, it will be ignored.
Steps to Enable
Review the REST service definition in the REST API guides, available from the Oracle Help Center > your apps service area of interest > REST API. If you're new to Oracle's REST services you may want to begin with the Quick Start section.
Item Primary and Item Facility Unit of Measure (UOM)
NOTE: The following changes are added for future use and its recommended not to configure these fields or use the functionality until it is recommended in further official release announcements.
Item Primary UOM and Item Facility Primary UOM have been added to the Column name in the following UIs:
- Putaway Type Calculation Rule>> Selection Criteria
- Task Creation template>> details >> Selection Criteria
- Task Creation template>> Details >> Ordering Criteria>> Edit pane>> Order by column
- Cubing Rule >> Details >> Selection Criteria
- Cubing Rule >> Details >> Ordering Criteria>> Edit pane>> Order by column
- Wave Template >> Wave Template searches>> Dynamic Wave Search>> Selection Criteria
- Outbound Audit Rule>> Details >> Selection Criteria
- OBLPN Putaway Type Determination>> Details >> Selection Criteria
- Inbound Sorting >> Criteria 1 and Criteria 2
- Sort Receive >> Criteria 1 and Criteria 2
UPDATES IN PACK AND CASE QUANTITY DISPLAY
The Pack and Case Quantity display is now updated in several RF transactions. See the Unit of Measure Reference Document for details of how the screens look before and after these display changes.
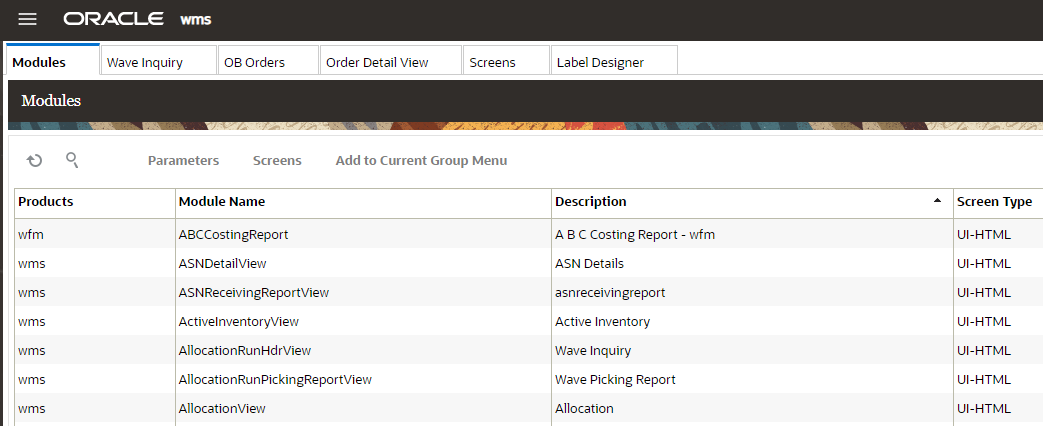
MODULES
- RF Receiving (rf.inbound.cwrfrecvlpnload & rf.inbound.cwrfrecvlpnshpmt)
- RF Receive Single SKU (rf.inbound.cwrfrecvsinglesku)
- RF Split IBLPN (rf.inbound.cwrfsplitcntr)
- RF Distribute LPN (rf.outbound.cwrfdistributelpn)
- RF Pick IBLPN (rf.outbound.cwrfpickiblpn)
- RF Pick IBLPN Replenishment (rf.inbound.cwrfpickiblpnreplen)
- RF Pack NC Active (rf.outbound.cwrfpackncactiveorder)
- RF Pick Cart (rf.outbound.cwrfpickcart)
- RF Audit OBLPN (rf.outbound.cwrfauditlpnplt)
- RF QC (rf.inbound.cwrfqccomplete)
- RF Modify/Cancel OBLPN (rf.outbound.cwrfmodcancelobcntr)
- RF Distribute Replenishment (rf.inbound.cwrfdistlpnreplen)
Steps to Enable
You don't need to do anything to enable this feature.
Key Resources
Updates to Redwood Look and Feel
All of the Oracle Fusion Cloud Warehouse Management UI screens have been enhanced with an updated look and feel to align with Oracle’s Redwood Design standards.
NOTE: the default theme is Redwood Sienna. However, you can choose and select other themes via the “Set Themes” option.
Steps to Enable
- To update the theme for your Warehouse Management screens, click the drop-down in the top right of the screen next to your username.
- Select Set Theme.
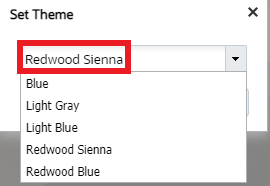
NOTE: The updated look and feel is only available for Redwood Sienna and Redwood Blue themes.
- Choose a theme and click OK.
Display List of Values in Inventory Attribute in RF Screens
In 21D, the List of Values is enhanced so that you now can get a list of the preconfigured LOVs for your specific inventory. A new hotkey (CTRL-V) is now available that will display the list of values from the inventory attributes screen in RF handheld devices. Upon selecting CTRL-V, you will be able to see all the configured LOVs for your inventory.
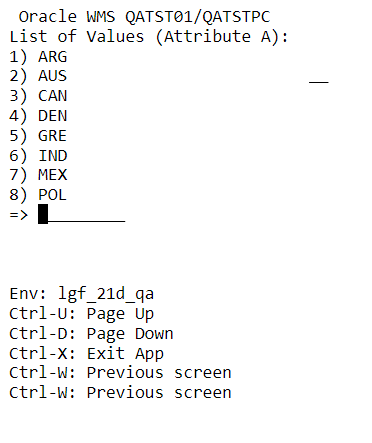
You will be able to make a selection, and the system will auto-populate the Inventory Attributes screen with the selected value.
In 21C, we introduced the List of Values (LOVs) feature. This feature allows you to validate the value entered against the preconfigured LOVs available for that specific inventory attribute.
Steps to Enable
You don't need to do anything to enable this feature.
Key Resources
Prompt Serial Numbers in RF Work Order Kit Processing
The RF Work Order Kit Processing transaction has been updated to support serial number scanning. After assembly operations, now you will be able to associate serial numbers to the Parent Item/Kit Item Assembled. Serial Numbers can be associated to Parent/Kit items after assembly. You no longer need to take the additional step of associating serial numbers through the UI.
The RF Work Order Kit Processing transaction now prompts serial numbers when the kit item is tracked and the appropriate serial tracking mode at the company level is enabled. And, when you scan the kit item, you are prompted for the serial numbers after entering the item quantity.
NOTE: Applicable only for Prompting of serial numbers for parent items. Detailed kitting is not supported in Oracle Warehouse Management.
Now, IHT - 69 Kitting Complete will be broken down by serial number.
If you are doing assembly of the kit, the flow is:
- Serial number prompt screen is displayed for Work Order of Make to Order type when:
- The parent item has the required_serial_number field set to ‘Required, don't validate’ or ‘Require, Validate Allow User Override’.
- The company parameter ‘serial_number_tracking_level’ set to value ‘1’ or ‘2’.
- Serial number prompt screen is displayed for Work Order of Make to Stock type when:
- The item has the requried_serial_number field ? set to ‘Required, don't validate’ or ‘Require, Validate Allow User Override’
- The company parameter ‘serial_number_tracking_level’ set to Mode "2".
If you are doing dis-assembly of the kit, the flow is:
- The floor user receives the serial number prompt and validation to make the Stock flow when:
- The parent item being disassembled has requried_serial_number prompt? set to ‘Required, don't validate’ or ‘Require, Validate Allow User Override’.
- The company parameter ‘serial_number_tracking_level’ set to Mode ‘2’.
NOTE: The scrap percentage will not have any impact on the serial prompt for the KIT items. Serial numbers are not prompted for the underlying child items/components consumed as part of kit operations and also serial numbers will not be prompted for child components created as part of the disassembly operation.
Steps to Enable
You don't need to do anything to enable this feature.
Key Resources
Replenishment Based on Expiry Date Range Rule
In 21D, expiry date range is enhanced so that it is now considered during Replenishment Allocation. In industries like Fast-Moving Consumer Goods (FMCGs), most of the SKUs are expiry date tracked and the objective is to make sure you are able to fulfill your orders based on the rules set up.
You can now configure expiry date range rules based on picking wave/standalone replenishment logic. The system will honor the expiry date range rule configured on the wave template or in the replenishment template respectively.
- If you have a picking wave with a replenishment rule configured, and your picking wave is also set up with an Expiry Date Range rule, then the system honors the expiry date range rule configured on the wave template while creating replenishment allocations.
- Expiry Date Range configured on the Picking Wave Template will be used while searching for the source Inventory and while determining the actual replenishment need.
- If you are doing standalone replenishment, a new button, Expiry Date Range, is available in the Replenishment Template UI.

Replenishment Template
You can see all the rules you have already configured and add more if you need to.
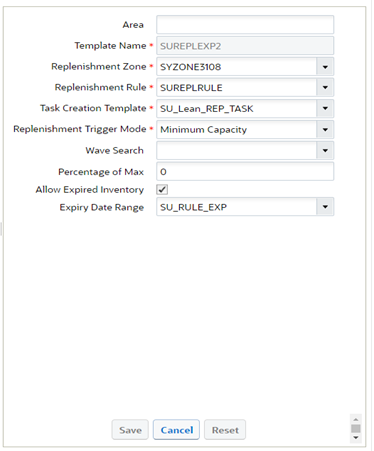
Expiry Date Range
You can now add an Expiry Date Range rule to your Replenishment Template.
Oracle Warehouse Management allows you to configure Expiry Date Range rules in your picking wave. This means that you can set up rules and tell the system what the expiry date range is that you want to allocate from.
Steps to Enable
- To enable an Expiry Date Range rule for Replenishment with a Picking Wave, add the rule to the Picking Wave Template.
- To enable an Expiry Date Range rule for Standalone Replenishment, add it to the Replenishment Template.
Key Resources
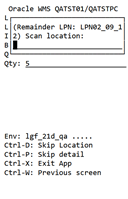
Locate Remainders in RF Distribute Replenishment Screen
During a work order picking flow or for a normal Replenishment completion flow with Task Type of “REPLEN-CASES”, you carry a full LPN to a destination location to drop the required inventory.
In scenarios where there is a remainder quantity, you need to let the system know via the RF Remainder LPN screen where you are locating your inventory back.
Now, the Remainder LPN popup screen has been changed to make location scans exclusive and more user friendly.
Steps to Enable
You don't need to do anything to enable this feature.
Key Resources
Reinitiate In-Progress Deferred Cycle Counts
This Reinitiate In-Progress Deferred Cycle Counts is available in RF (Cycle Count {locn}) and must have screen parameter ‘content-count’ set to by SKU qty’ and Facility/company parameters are configured to do deferred counting.
EXIT, CANCEL, OR CONTINUE IN-PROGRESS COUNTS
Now, if you are on a break and you need to exit the Cycle Count Location, you will not lose the count. Upon selecting CTRL-X, a prompt with a warning message appears. If you accept the warning message, you can retain the count.
The system allows you to exit the transaction, and cancel the In-Progress count. The following is the warning message you will see:
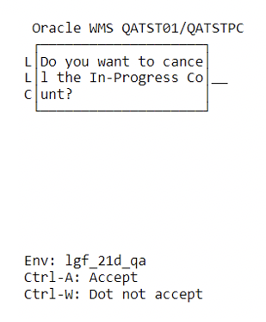
If you select Ctrl-A, you will cancel your task in progress and Ctrl-W allows you to return to your task in progress.
REINITIATE CYCLE COUNT
Now, when you restart the cycle count for the same reserve location, the counting is re-initiated and the system allows you to perform the count again from the last session. Prior to 21D, you would not be able to re-initiate the count if there is an In Progress Count for the location. The count had to be rejected or cancelled from Web UI. From 21D onwards, counting can be re-initiated for the reserve location as long as the count left In Progress is by the same user. You will have the flexibility of retaining the previous counts of already counted LPN.
A new message is displayed when you re-initiate a cycle count for reserve location in detailed cycle counting mode under the following conditions:
- When there is a Pending Cycle Count with the status "In-Progress" for the reserve location scanned with the different users; The message displayed is ‘Count In-Progress for the location initiated by user %user_name%’. You will not be able to perform a cycle count initiated by another user. This will be a new error message.
- When there is a Pending Cycle Count with the status "In-Progress" for the same user, the message displayed is ‘You left the count In Progress for the location, do you want to proceed further'.
- When there is no ‘In-Progress’ count, it does not display any warning message.
If you are doing Cycle Count Location (not detailed), and there is a task “In-Progress” for the location, you will get an error and you won’t be able to continue. You will need to complete the In Progress cycle count.
NOTE: The system does not allow counts performed by different users to be overwritten. If a different user has to initiate the count, then In-Progress counts will have to be cancelled via the Cycle Count Adjustment UI.
Cancelling the pending count via the Cycle Count UI cancels the corresponding cycle count task as well. If you have counted a portion of the Reserve location and if the RF session goes down cancelling the count through UI will make you count the whole location.
NEW COUNTER FIELD FOR NUMBER OF LPN's COUNTED
RF Cycle Counting Location (Cycle Cnt {locn}) has been enhanced to show a new counter field Counted LPNs when you are performing a cycle count for a Reserve location during detailed cycle counting. This is also applicable for Immediate Mode. While performing the count for reserve location, the number of LPN's counted is displayed for each LPN counted. You can press Ctrl-E to end the count.
NOTE: When the user re-initiates In progress cycle count, the counter will display the number of LPN’s counted previously for the particular location.
For example, Counted LPNs: XX
- New Literal introduced is configurable using literal screen.
- New Literal and Counter does not display while counting active location.
To allow flexibility for users performing Cycle Counting in scenarios where there may be interruptions (for example, employee scheduled breaks) on the warehouse floor, Cycle Counting users can now restart the count for reserve location without losing the count already performed.
Steps to Enable
- RF (Cycle Count {locn}) must have screen parameter set to ‘content-count set to by SKU qty’.
- Company parameter set to ‘INVN_ADJ_APPROVAL_REQUIRED = yes’.
Key Resources
Summary Cycle Count Enhancements
NEW SCREEN PARAMETER TO ALLOW PALLET SCAN AND SCREEN FLOW
A new screen parameter Allow Pallet Scan (allow-pallet-scan) is available in the Summary Cycle Count RF Module. This parameter allows you to capture discrepancies within a pallet when you scan a pallet and enter the corresponding LPN count.
The following table shows you the parameter behavior:
| Allow Pallet Scan |
Location is Palletized |
Behavior |
|---|---|---|
| Blank/No |
Partially/No |
Prompt for LPN count. |
| Blank/No |
Fully |
Prompt for the Pallet count |
| Yes |
Partially/No |
Prompt for LPN count. |
| Yes |
Fully |
Allow users to scan Pallet numbers in that location and upon pallet scan users should be able to enter the LPN count. |
NOTE: The parameter should work only for a reserve location when the location is entirely palletized.
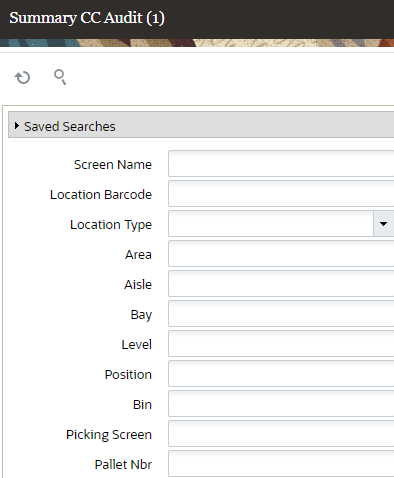
SUMMARY CYCLE COUNT AUDIT UI
In Cycle Count mode, the Summary CC Audit (module SummaryAuditView) UI is expanded to filter audit records using the following options:
- All SKU
- Picked SKU
- Single SKU
- LPN Count
- Pallet Count
- Pallet Scan
- Area, Aisle, Bay, Level, Position, Bin
- Picking Screen
- Pallet Number (useful for the Pallet scan mode records)
CAPTURE COUNT MODES FOR RESERVE LOCATIONS
Count modes for reserve locations are now available in the Count Mode column on the Summary CC Audit View UI. This allows you to identify and distinguish the audit records for reserve location summary cycle counts with respect to the count context.

NOTE: The existing summary count audit trail records for reserve locations will also be populated with the correct count mode values.
The Summary Cycle Count transaction (from stand alone or transactional) will capture the count mode from the location count context and populate this count mode to the respective summary audit trail.
The following table describes how the Reserve locations count mode will be populated in the Summary Cycle Count UI:
| Count Mode |
Description |
|---|---|
| Pallet count |
A fully palletized location where users count the number of pallets for the location. |
| LPN count |
A non-palletized /partial palletized location where users count the number of LPNs for the location. |
| Pallet scan |
A fully palletized location where users scan the pallets and enter the number of LPNs within the scanned pallet (Pallet scan mode.) |
CAPTURE AUDIT TRAIL AT THE PALLET LEVEL
The Summary Audit View UI module has been enhanced to capture the audit trail at the pallet level. This allows users to view user inputs in pallet scan mode performed from a picking transaction or in standalone mode.
The following columns have been added to the Summary Audit View UI:
| Column |
Description |
|---|---|
| Current Location |
Counted location (should be the current location of the pallet, may not be the same for the counted location - in case of an unanticipated pallet scan) |
| Pallet Nbr |
Anticipated or unanticipated Pallets scanned for the location |
CAPTURE DISCREPANCIES DURING SUMMARY CYCLE COUNT
Warehouse Management now allows you to capture the pallet number and the associated LPN count during summary cycle count when the reserve location where all LPNs are on a pallet, so that you can keep track of inventory discrepancies. The summary cycle count will create a cycle count task based on the Summary count discrepancy trigger.
The summary cycle count will capture discrepancies for the following cycle count scenarios:
- If an unanticipated Pallet number is scanned for the location
- If an anticipated Pallet is not scanned for the location
- If there is a count mismatch for the LPNs by pallet
NOTE: Summary Cycle Count will not update any inventory. It will only create a Cycle Count Task based on the Summary Count discrepancy trigger.
The system will not create a Cycle Count Task if:
-
- There is an existing cycle count task that has the same task type as the new cycle count task, or if the existing task has a more detailed cycle count task type when compared to a new cycle count.
- If the task type for the new cycle count task is more detailed when compared to the existing cycle count task, the system will replace the existing cycle count task and create the new cycle count task.
- For example, if there is a cycle count task with a task type of "CC-LOCATION", and the trigger creates a new task with task type of "CC-LOCATION-DTL", then the system will cancel the cycle count task with a task type of "CC-LOCATION.”
Inventory History Transaction (IHT) 38 will now capture the reference codes and appropriate values after performing summary cycle count.
Steps to Enable
- To enable Allow Pallet Scan, in the RF Inbound Cycle Count Summary Count parameter, from standalone mode, set the Allow Pallet Scan set to Yes.
- If the location is fully palletized, users can enter the pallet number followed by the LPN count.
Key Resources
Now you can perform Cycle Counts using an API. In 21D, we are introducing three different options for you to perform cycle count using an API:
- Confirm LPN Count
- Confirm Count LPN Scan
- Confirm Active Count
CONFIRM LPN COUNT
This API allows you to confirm the LPN count. This is if you need to confirm the number of LPNs available in a Reserve Location, so you just need to specify the number of LPNs you see in the location.
POST .../wms/lgfapi/v10/entity/location/{id}/cc_confirm_lpn_count
CONFIRM COUNT LPN SCAN
This API allows you to confirm the count of LPNs. This is if you to confirm the list of LPNs in the location.
POST .../wms/lgfapi/v10/entity/location/{id}/cc_confirm_count_lpn_scan
CONFIRM ACTIVE COUNT
This API allows you to confirm the units available in an active location.
POST .../wms/lgfapi/v10/entity/location/{id}/cc_confirm_active_count
Steps to Enable
Review the REST service definition in the REST API guides, available from the Oracle Help Center > your apps service area of interest > REST API. If you're new to Oracle's REST services you may want to begin with the Quick Start section.
Location In-Transit Inventory Visibility
With 21D the mechanism used to calculate in transit inventory for replenishment waves has been changed for improved performance. It's important to note that it will take a few waves to execute before this improvement becomes noticeable.
As part of this enhancement a new UI module In Transit Inventory View is available to be added as a screen to any UI menu. This shows more fine-grained details about in transit inventory (such as by batch number for example)
A company parameter, (previously named FUTURE_STORE_INTRANSIT_QTY_BY_INVN) has been renamed to STORE_INTRANSIT_QTY_BY_INVN in 21D and has been updated to yes.
NOTE: It is strongly recommended to keep this value unchanged. This parameter will eventually be removed in a future release.
Steps to Enable
- Configure the new UI screen In-Transit Inventory View and assign it to relevant menu.
- Go to Company parameter UI.
- Set the “STORE_INTRANSIT_QTY_BY_INVN” parameter to Yes and click Save.
Key Resources
Perform Calculations for Numeric Fields in Document Label Designer
Document Label Designer allows you to design customer specific label templates for various label types. Document Label Designer has been enhanced so that you can now sub-total a field in the details section of a label. This allows you to consolidate and display numeric fields while designing any label or document.
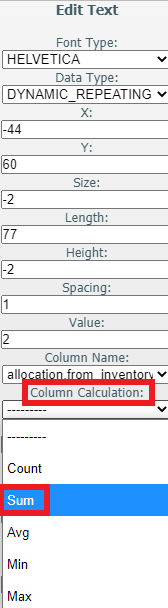
NEW COLUMN CALCULATION DROP-DOWN FOR TEXT ELEMENTS
A new Column Calculation drop-down for text elements is now available that allows you to consolidate quantities in numeric fields. An example of this would be consolidate quantities in field per SKU in a pallet, irrespective of the number of LPNs present on the pallet.
The following options have been added to the Column Calculation drop-down:
- Count
- Sum
- Avg
- Min
- Max
When you are populating the fields from the Edit Text menu, once the Column Name field is populated and the data type is populated with Dynamic Repeating, the Column Calculation drop-down will enable a list of options:
Once you have created your label with a column calculation option, you will be able to see the quantities by SKU:
For example: You can design the label and fetch the total quantity of a SKU for a pallet with multiple LPNs with the same SKU (Single SKU Pallet) or Multiple SKU LPNs with different SKUs. Column Calculation is supported for all templates and all labels and documents in Document Label Designer.
NOTE: The Column Calculation field is numeric only. And the data type must be a dynamic repeating field.
Some common business scenarios that Column Calculation could be useful for include the ability to calculate the following:
- current quantity / sub total units
- sub total cost for each item
- sub count (for example, how many containers have a particular item on the pallet)
EXAMPLE
The following scenario explains how quantities would display for a pallet label based on the option selected from the Column Calculation drop-down:
Let’s say you have a pallet label with 10 containers on a pallet. Each container has the same three items but each item has varying quantities. You also configure the item code to display on the pallet label along with the inventory current quantity as part of the same table name.
NOTE: Fields from other tables can be used for dynamic repeating elements. However, annotations can not be used by themselves and get good results. When no other fields are paired with the annotation, then all fields get selected and most likely nothing will get annotated in accordance with the requirements of the fields.
The following quantity would display based on the respective drop-down item:
| Column Calculation Drop-Down Selection |
Quantity Displayed in Pallet Label |
|---|---|
| Count |
Quantity of 10 displays for each of the three items. |
| Sum |
The sum of the quantities displays for each of the item’s current quantities across all of the containers per item code. So you will see the sum for each of the three item codes. |
| Average |
The average quantity displays for each of the item’s current quantity across all of the containers per item code. So you will see averages for each of the three item codes. |
Min |
The minimum quantity displays for each of the item’s current quantity across all of the containers per item code. So you will see a minimum value for each of the three item codes. |
Max |
The maximum quantity displays for each of the item’s current quantity across all of the containers per item code. So you will see a maximum value for each of the three item codes. |
NOTE: If you are setting up documents or labels using multiple template pages, each field has to be associated with the same table name, or the fields won’t be associated with the same fields on the different template pages. The fields that you put in dynamic repeating template pages affect the granularity of your calculations.
Steps to Enable
To enable the Column Calculation drop-down in Document Label Designer, make sure that you populate the Column Name field from the Edit Text menu.
Update LPN Type Through Input Interface
Now you are able to create or update the LPN Type in the IB Shipment interface file. This allows you to easily modify the LPN Type for cartonized IB Shipments when you don’t have access to the UI.
Warehouse Management will validate the LPN Type provided in cartonized shipments only. Therefore, the IB Shipment detail must have the LPN number populated. After the IB Shipment is interfaced successfully, you should be able to view the LPN Type on the respective IB Shipment detail for the LPN you have interfaced. This LPN type will be assigned after you receive the inventory.
Warehouse Management will validate the LPN Type provided in cartonized shipments only. Therefore, the IB Shipment detail must have the LPN number populated. After the IB Shipment is interfaced successfully, you should be able to view the LPN Type on the respective IB Shipment detail for the LPN you have interfaced. This LPN type will be assigned after you receive the inventory.
Steps to Enable
You don't need to do anything to enable this feature.
Key Resources
Now you don’t have to scan a pallet every time you receive a shipment in upfront palletization mode for the following receiving modules RF Recv {lpn} Load, RF Recv {lpn} Shipment, and RF Recv Single Sku.
A new behavior is available that allows you to skip the pallet scan. This is perfect for scenarios where the pallet label is not available. The system will auto populate the pallet number based on the blind pallet number sequence counter.
A new screen parameter pallet-auto-generate is available:
| Parameter name |
pallet-auto-generate |
|---|---|
| Parameter type |
Selection |
| Parameter options |
Blank, Yes, No |
| Default behavior |
Blank (acts as No) |
- The pallet-auto-generate only works if the pallet-handling screen parameter is set to palletize up front mode. If not the pallet prompt is mandatory.
- When the pallet-auto-generate parameter is set to Yes, users are not required to scan the pallet number. Instead they can tab and the system will generate a pallet number as per the BLIND_PALLET_NBR sequence counter. However, in this mode, users can scan the pallet number as well (this is optional).
RF PALLETIZE - AUTO GENERATE PALLET NUMBER
A new screen parameter has been added in the RF Inbound Palletize (rf.inbound.cwrfpalletizeplt) module that will auto generate a pallet number based on the Blind Pallet number sequence counter.
| Parameter name |
pallet-auto-generate |
|---|---|
| Parameter type |
Selection |
| Parameter options |
Blank, Yes, No |
| Default behavior |
Blank (acts as No) |
The pallet number is generated after the LPN scan when the pallet-auto-generate is set to Yes.
Steps to Enable
- To enable auto populate for pallet numbers in RF Receiving, set pallet-auto-generate to palletize up front mode.
- To enable auto populate for pallet numbers in RF Palletize, set pallet-auto-generate to Yes.
Key Resources
Print Pallet Labels in Receiving and Palletize Transactions
You have the option to print pallet labels via a new screen parameter from these additional RF screens:
RF Recv {lpn} Load, RF Recv {lpn} Shipment, and RF Recv Single Sku
| Parameter name |
print-pallet-labels |
|---|---|
| Parameter type |
Selection |
| Proposed Parameter options |
Blank | No | Yes |
| Default behavior |
Blank |
- If the parameter is set to Yes, upon 'Ctrl-E End Pallet', the system will start the pallet label printing.
- You will see a message - 'label print triggered for pallet% upon hitting the 'Ctrl-E End Pallet' hot key.
- CTRL-P hot key allows you to change the default printer. This hot key is only enabled if above parameter is set to Yes. However, users are required to add a printer if you don’t have a default printer.
PRINT PALLET LABELS IN RF PALLETIZE TRANSACTION
You can now print pallet labels via the Print Label screen parameter in the RF Palletize (rf.inbound.cwrfpalletizeplt) module.
| Parameter name |
Print Label |
|---|---|
| Parameter type |
Selection |
| Parameter options |
Blank, Yes, No |
| Default behavior |
Blank (acts as No) |
Steps to Enable
- To enable printing of pallet labels from RF Receiving, set the print-pallet-labels parameter to Yes.
- To enable printing of pallet labels from RF Palletize, set the print-pallet-labels parameter to Yes.
Key Resources
Updates in Pack and Case Quantity Display
The Pack and Case Quantity display is now updated in several RF transactions. See the Unit of Measure Reference Document for details of how the screens look before and after these display changes.
MODULES
- RF Receiving (rf.inbound.cwrfrecvlpnload & rf.inbound.cwrfrecvlpnshpmt)
- RF Receive Single SKU (rf.inbound.cwrfrecvsinglesku)
- RF Split IBLPN (rf.inbound.cwrfsplitcntr)
- RF Distribute LPN (rf.outbound.cwrfdistributelpn)
- RF Pick IBLPN (rf.outbound.cwrfpickiblpn)
- RF Pick IBLPN Replenishment (rf.inbound.cwrfpickiblpnreplen)
- RF Pack NC Active (rf.outbound.cwrfpackncactiveorder)
- RF Pick Cart (rf.outbound.cwrfpickcart)
- RF Audit OBLPN (rf.outbound.cwrfauditlpnplt)
- RF QC (rf.inbound.cwrfqccomplete)
- RF Modify/Cancel OBLPN (rf.outbound.cwrfmodcancelobcntr)
- RF Distribute Replenishment (rf.inbound.cwrfdistlpnreplen)
NOTE : If you use screen scrappers, please do changes accordingly.
Steps to Enable
You don't need to do anything to enable this feature.
Key Resources
Print Labels from RF Pack OBLPN
Now you can easily print OBLPN labels from the RF Pack OBLPN transaction. This increases productivity as floor users usually may not have easy access to a computer. Therefore, they have to take the time to print the label from the OBLPN inquiry UI, and later find the right label for the OBLPN.
The following screen parameters are introduced in the rf.outbound.cwrfpacklpn RF module:
| Parameter name |
print-label |
|---|---|
| Parameter type |
Selection |
| Parameter options |
Blank, OBLPN, OB Pallet, Both |
| Default behavior |
Blank (acts as No) |
| Parameter name |
print-column-order-descr |
|---|---|
| Parameter type |
Text |
| Parameter options |
N/A |
| Default behavior |
Blank |
PARAMETER BEHAVIOR
| print-column-order-descr |
print-label |
Expectation |
|---|---|---|
| Populated |
Blank |
Print OBLPN-related labels in sequence as created in the "Column ordering >> OBLPN Label Types" UI upon scanning each OBLPN |
| Populated |
OBLPN |
Print OBLPN related labels in sequence as created in the "Column ordering >> OBLPN Label types" UI upon scanning each OBLPN |
| Not Populated |
OBLPN |
Print Shipping label by default upon scanning each OBLPN |
| Populated |
OB Pallet |
For OBLPN- Print OBLPN related labels in Sequence as created in the "Column ordering >> OBLPN Label types" UI upon scanning each OBLPN |
| Not populated |
OB Pallet |
Initiate pallet label printing once users hit the CTRL-E hot key to close the pallet list, Print Pallet label as configured in Label Printing for OB Pallet |
| Populated |
Both |
For OBLPN- Print OBLPN related labels in Sequence as created in the "Column ordering >> OBLPN Label types" UI upon scanning each OBLPN |
| Not Populated |
Both |
For OBLPN- Print Shipping label by default upon scanning each OBLPN |
- If you do not have a default printer configured or a printer is not assigned, you should see an error message when label printing is initiated.
- Pallet print only works when the palletize-flag is set to “Palletize after Packing”
A new CTRL-Q key is available in the RF Pack OBLPN transaction. This key will be available under the following conditions:
- print-label has value set to "OBLPN, OB Pallet, Both"
or
- print-column-order-descr screen parameter is populated with a value.
This key is available in the following screens:
- OBLPN Scan screen
- Inbound LPN Confirmation screen
Steps to Enable
You don't need to do anything to enable this feature.
Shipping Method Enhancements to Input Interfaces
The following fields are added in the Order Header in the Order input interface file:
| Warehouse Management Field |
Mandatory |
Type |
Description |
|---|---|---|---|
| carrier_code |
No |
alphanumeric |
The carrier can be configured in Warehouse Management by the user. |
| carrier_type |
No |
alphanumeric |
The values currently available in Warehouse Management are: Rail, Air, Ocean, LTL/TL, and Parcel. |
| std_carrier_service_code |
No |
alphanumeric |
For more information about standard carrier service code values, see the Parcel Carrier Integration Document. |
The carrier_code, carrier_type, and std_carrier_service_code fields have also been added in the Order Header, Stage Record sub UI of the Input Interface UI.
Once the carrier_code, carrier_type, and std_carrier_service_code values pass the validations in the Order Interface, they can be used to determine the Ship via. The following table shows the validations and result that will happen based on the scenario in the Output Interface:
| If |
Then |
|---|---|
| You don’t provide the ship via code in the order interface and a unique ship via is found for the combination of carrier_code, carrier_type, std_carrier_service_code values… |
The system updates the ship via code for the interfaced order with the unique ship via found for the combination. |
| You don’t provide the ship via code in the order interface and a ship via record is not found for the combination of carrier_code, carrier_type, and std_carrier_service_code values… |
The system returns the error message: "ship via not found for carrier code: %carrier code%, carrier type: %carrier type% and std_carrier_service code: %service code%. |
| You don’t provide the ship via code in the order interface and multiple ship via records are found for the combination of carrier_code, carrier_type, std_carrier_service_code values… |
The system updates the ship via code for the interfaced order with the first ship via code returned by the system. |
| You provide both ship via code and values for carrier_code, carrier_type, std_carrier_service_code in the order interface… |
The ship via code provided will take precedence. The carrier_code, carrier_type, and std_carrier_service_code fields will not be used to determine the ship via. |
Steps to Enable
You don't need to do anything to enable this feature.
Key Resources
Shipping Method Enhancements to Outbound Interfaces
FIELDS ADDED TO OUTBOUND MANIFEST AND ORDER OUTBOUND LOAD INTERFACE
The following fields have been added and are available for export in the Outbound Load/ Outbound Manifest Interface:
- carrier_type at the OB load level
- std_carrier_service_code at the OB stop level
The following fields have been added to the Order Outbound Load Interface:
- carrier_type at the OB load level
- std_carrier_service_code at the OB stop level
ADDITIONS TO COLUMN NAME DROP-DOWN IN OUTPUT INTERFACE TARGET CRITERIA
"Carrier type" and "std carrier service code" are now available in the Column Name drop-down in Outbound Load/Outbound Manifest Output Interface Configuration >> Output Interface Target >> Output Interface Target Criteria UI.
This is useful for example, if you want to combine all parcels that are going to be carried through airways. Also, if you want a different file for FEDEX 1 DAY FREIGHT, FEDEX 2 DAY FREIGHT and FEDEX 3 DAY FREIGHT, you can configure the std carrier service code appropriately in the output interface target criteria.
NOTE: for the Outbound Load/Outbound Manifest Output Interface, carrier code is already available as a column to be used as target criteria.
“Carrier code”, "carrier type" and "std carrier service code" are also available in the Order Outbound Load Column Name drop-down, in Output Interface Configuration >> Output Interface Target >> Output Interface Target Criteria UI.
You can configure new criteria with column names as "carrier code"/"carrier type" /"std carrier service code" and the output interface should honor the target criteria configured.
UPDATES TO THE CONTAINER SHIP LOAD INTERFACE
The carrier_type, and std_carrier_service_code fields have been added to the Container Ship Load Interface.The carrier_type, and std_carrier_service_code fields have been added to the Container Ship Load Interface.
Steps to Enable
You don't need to do anything to enable this feature.
Key Resources
Resend Shipping Info from Update LPN Type RF Screen
Now you can regenerate the OBLPN Shipping info file from the RF Update LPN Type transaction. Customers use the OBLPN shipping information for multiple reasons. One of them is to communicate with external parcel shipments to obtain information. Having the correct LPN type is vital, as external systems need this to provide the right information. There could be exceptions, where you need to update the LPN type after the OBLPN Shipping info file has already been sent. Warehouse Management has streamlined this process, and now you don’t need to update the LPN type from the RF and resend the OBLPN Shipping info file from the UI.
The following screen parameters are available in the RF-Text: Update LPN Type/Weight/Dimensions module:
| Parameter name |
output_file_to_generate |
|---|---|
| Parameter type |
Selection |
| Parameter options |
Applicable only if user is handling container type of "pallet |
| Default behavior |
Blank (acts as No) |
Steps to Enable
You don't need to do anything to enable this feature.
Key Resources
Warehouse Management Cloud now allows you to repack Outbound LPNs (or temporary totes) that are in Picked status to destination OBLPNs and move them into Packed status using two REST APIs (Pack Inventory and Close LPN.). Customers with Automated packing solutions can use this API.
As a part of the new Repack API:
- Using repack/pack_inventory API, you can provide requests to pack inventory into destination OBLPN, by providing source OBLPN, item to be packed, qty to be packed, destination OBLPN etc.
- Using repack/close_lpn API, once the packing is complete for destination OBLPN, you can provide a request to close the LPN by providing destination OBLPN information
PACK INVENTORY API
The Pack Inventory API allows you to pack inventory based on the source OBLPN (from OBLPN), item, quantity and the destination OBLPN (to OBLPN) information you send. In repack pack inventory, the system currently allows sending only one packing detail per request.
The pack inventory API supports the following flows:
- Packing of OBLPNs from other picked OBLPNs/totes (where source OBLPNs were picked based on non-cubed picking or cubing mode-2 (calculate OBLPN and cube with wave)), here the system does not have prior information of the source OBLPN, destination OBLPN, item and quantity to be packed until the user provides them in the API request
- Where the wave is run with cubing mode set to "Calculate OBLPN type and cube at packing", the inventory is picked into temporary totes/OBLPNs during picking. In repack, the destination OBLPN is repacked from these temporary totes/OBLPNs, based on the final OBLPN suggested by system
NOTE: When repack is done for cubing mode is cube at packing flow, the user sent destination OBLPN values in the API request will be validated against the final OBLPN suggested by system. So, while sharing requests to repack, you should be aware of the source OBLPN and the respective destination final OBLPN suggested by the system.
Using repack API:
- You can provide requests for packing in terms of units, packs and cases by providing allocation_uom and uom_qty
NOTE: if you do not provide allocation_uom values in the request, the allocation UOM will be considered as Units and system will only look for allocations with Units as UOM
SUBSTITUTION
When repack is done for cubing mode during a cube at packing flow, the final OBLPN numbers are provided by the system. If you want to use your OBLPN numbers instead, you can provide the system final OBLPN numbers in the “orig_to_oblpn_nbr” field and your OBLPN numbers in the “to_oblpn_nbr” field.
URL:
POST.../lgfapi/v10/repack/pack_inventory
SERIAL NUMBER SUPPORT
Serial number is supported during packing through Repack API. This help to know which serial number inventory is packed in the respective request sent.In your request you can send a serial number list. Sending serial number during repack API should is not mandatory.
- "suppress_serial_warning_flg" - this flag helps users bypass warnings validations and improve speed of packing validations. The default of this flag is True, but if you want to be strict about these validations, you can set flag as 'False'.
- Note: New serial numbers are allowed irrespective of whether company parameter SERIAL_NUMBER_TRACKING_LEVEL is set to '1' and '2'
SHORTING DURING PACKING
You will be able to short when the short_flg is set to Yes. The source OBLPN provided is considered for shorting as long as you send the source OBLPN, item, and the quantity to be shorted in the request. If the inventory to be shorted has inventory attributes/batch number/expiry date, the respective values should also be provided during shorting, so that the system is aware of exact inventory to be shorted.
CLOSE LPN API
The Close LPN API allows you to close the destination OBLPN (to OBLPN), based on the OBLPN information you send.
URL:
POST.../lgfapi/v10/repack/close_lpn
The Close LPN API allows you to:
- Close the destination OBLPN (to OBLPN) once packing is complete and move the OBLPN to 'Packed' status
- Define an LPN type for destination OBLPN (to OBLPN), and update the volume based on the LPN type
- When you do a repack where cubing mode is set to cube at packing, the final OBLPN number are already decided by the system. But if you want to prematurely close the system suggested OBLPN, you can close the current OBLPN and mention the new OBLPN to be considered in place of current OBLPN in "new_to_oblpn_nbr" field
Steps to Enable
Review the REST service definition in the REST API guides, available from the Oracle Help Center > your apps service area of interest > REST API. If you're new to Oracle's REST services you may want to begin with the Quick Start section.
A new UI Repack Request View (module: "RepackRequestsView) has been introduced to display the API requests sent from the Repack API in the UI. A new record gets added in this UI every time that you sent a Repack API request (pack inventory or close.)
This UI serves as a point of reference for users to understand how Oracle Warehouse Management has responded to the requests provided for the repack API. In case of failed validations, users will be aware of why it failed and they can immediately validate it against data available in the system.
The following fields are available in the UI:
| Field |
Description |
Hidden by default (Yes/No) |
|---|---|---|
| Facility Code |
To be derived from facility_id or facility_id__code provided in request |
No |
| Company Code |
To be derived from company_id or company_id__code provided in request |
No |
| Action Code |
Action code can be "PACK", "SHORT", "CLOSE", explained in Population of Action Code field in UI section |
No |
| From OBLPN Nbr |
OBLPN/temporary tote that is going to be repacked |
No |
| Alternate Item Codes |
Item identifier sent in .../repack/pack_inventory request |
No |
| Item Barcode |
Item identifier sent in ../repack/pack_inventory request |
No |
| Qty |
Qty to be shorted/packed, depending on short_flg parameter sent in ../repack/pack_inventory request |
No |
| To OBLPN Nbr |
Destination OBLPN where contents are going to be packed into |
No |
| Packing Station |
Packing station location barcode sent in ../repack/pack_inventory request |
No |
| To OBLPN type |
LPN Type for the the destination OBLPN (to OBLPN). maps to "to_oblpn_lpn_type" field sent in API |
No |
| Status |
Status of the request, possible values: "Not Ready", "Ready", "Processing", "Processed", "Failed" |
No |
| Error |
the error message thrown by system based on validation defined |
No |
| Restrict Multiorder Combine Flag |
"restrict_multiorder_combine_flg" sent in ../repack/pack_inventory request |
No |
| New To OBLPN Nbr |
Used for substitution during close LPN. maps to "new_to_oblpn_nbr" sent in .../repack/close_lpn request |
No |
| Batch Nbr |
Inventory batch/lot sent in ../repack/pack_inventory request |
Yes |
| Allocation UOM |
"UNITS", "PACKS", "CASES" sent in ../repack/pack_inventory request |
Yes |
| UOM Qty |
the inventory/standard pack qty or case qty when allocation_uom is 'PACKS' or 'CASES' sent in ../repack/pack_inventory request |
Yes |
| Suppress Serial Warning Flag |
Suppress serial warning flag value sent in ../repack/pack_inventory request |
Yes |
| View Serial Number |
Hyperlink field that displays the # of serial numbers sent in request, detailed in story below |
Yes |
| Expiry Date |
Expiry date of inventory present in "From OBLPN" sent in ../repack/pack_inventory request |
Yes |
| Attribute A |
Inventory Attribute A sent in .../repack/pack_inventory request |
Yes |
| Attribute B |
Inventory Attribute B sent in .../repack/pack_inventory request |
Yes |
| Attribute C |
Inventory Attribute C sent in .../repack/pack_inventory request |
Yes |
| Attribute D |
Inventory Attribute D sent in .../repack/pack_inventory request |
Yes |
| Attribute E |
Inventory Attribute E sent in .../repack/pack_inventory request |
Yes |
| Attribute F |
Inventory Attribute F sent in .../repack/pack_inventory request |
Yes |
| Attribute G |
Inventory Attribute G sent in .../repack/pack_inventory request |
Yes |
| Attribute H |
Inventory Attribute H sent in .../repack/pack_inventory request |
Yes |
| Attribute I |
Inventory Attribute I sent in .../repack/pack_inventory request |
Yes |
| Attribute J |
Inventory Attribute J sent in .../repack/pack_inventory request |
Yes |
| Attribute K |
Inventory Attribute K sent in .../repack/pack_inventory request |
Yes |
| Attribute L |
Inventory Attribute L sent in .../repack/pack_inventory request |
Yes |
| Attribute M |
Inventory Attribute M sent in .../repack/pack_inventory request |
Yes |
| Attribute N |
Inventory Attribute N sent in .../repack/pack_inventory request |
Yes |
| Attribute O |
Inventory Attribute O sent in .../repack/pack_inventory request |
Yes |
| Create Timestamp |
timestamp populated based on sent request's date-time for both .../repack/pack_inventory request and in .../repack/close_lpn requests |
No |
| Mod Timestamp |
timestamp populated based on sent request's date-timefor both .../repack/pack_inventory request and in .../repack/close_lpn requests |
No |
| Mod User |
user info populated based on user who sent request for both .../repack/pack_inventory request and in .../repack/close_lpn requests |
No |
VIEW SERIAL NUMBER HYPERLINK FROM REPACK REQUESTS VIEW UI.
- This field displays the count of serial numbers that were sent in the API request (for example: the field will display 2, if two serial numbers were sent for the request.)
- The Repack Requests View is helpful because it serves as a single point of reference for users to understand how Warehouse Management has responded to the requests provided for repack API. In case of failed validations, users will be aware of why it failed and they can immediately validate it against data available in Warehouse Management (for example, the Outbound LPN UI.)
- once you click the hyperlink, it should lead to a sub screen where the following fields are displayed
REPROCESS SELECTED RECORDS ACTION BUTTON IN REPACK REQUESTS VIEW UI
This functionality allows you to reprocess messages in status “Failed”. You can select the record, and click on the action button “Reprocess Selected records”. This button is disabled for other statuses. Once the message is submitted for reprocess, the status would change to “Processing”. You can select multiple records, and submit them for processing. This would be allowed as long as the records have the same action code.
Steps to Enable
You don't need to do anything to enable this feature.
Key Resources
Improvements in Web Reports Gen2
To support additional reporting capabilities in Web Reports Gen 2, the following new entities have been added:
- cc_summary_adjustment_count_mode
- from_mhe_lpn_divert
- from_mhe_ob_lpn_dtl
- from_mhe_ob_lpn_hdr
- from_mhe_pick_confirmation
- from_mhe_pick_confirmation_serial_nbr
- from_mhe_zone_picked
- ibshipment_ibshipmentdtl_view
- to_mhe_distro_dtl
- to_mhe_distro_hdr
- to_mhe_ib_lpn_info
- to_mhe_item_locn_map
- to_mhe_lpn_pick_req
- to_mhe_lpn_route_dtl
- to_mhe_lpn_route_hdr
NEW VIEW CATEGORY
A new View Category "ibshipment_hdr_dtl_facility_view" allows you to use the following joins in Web Reports Gen2 with additional categories.
- ib_shipment and ib_shipment_hdr_dtl_view - inner join on ib_shipment.id = ib_shipment_hdr_dtl_view.ib_shipment_id
- ib_shipment_dtl and ib_shipment_hdr_dtl_view - inner join on ib_shipment_dtl.id = ib_shipment_hdr_dtl_view.ib_shipment_dtl_id
- item_facility and ib_shipment_hdr_dtl_view - left outer join on ib_shipment_hdr_dtl_view.item_id = item_facility.item_id
- ib_shipment_hdr_dtl_view.facility_id = item_facility.facility_id
This new view can also be used to create other joins if required to join with ib_shipment and ib_shipment_dtl to get the corresponding columns for these tables.See the WebReportsGen2_categories for a list of categories and fields exposed in Web Reports Gen2.
NOTE: Foreign keys are indicated as "join entity" in the excel document.
See the WebReportsGen2_categories for a list of categories and fields exposed in Web Reports Gen2. Note: Foreign keys are indicated as "join entity" in the excel document.
NOTE: The Web Reports Gen2 Categories excel document indicates "Yes" (in the index tab) if an entity was added or modified. This will help you to easily recognize what has changed.
Steps to Enable
You don't need to do anything to enable this feature.
Key Resources
New Cycle Count Module in Mobile App
A new module "Cycle Count" is added to the Oracle Warehouse Management Mobile App for you to do three different types of Cycle Count.
- Confirm LPN Count
- Confirm Count LPN Scan
- Confirm Active Count
NOTE: All the cycle counts done in the mobile app will be considered deferred counts. It will not matter if your configuration in Company Parameter “INVN_ADJ_APPROVAL_REQUIRED” is set to NO.
In the first screen, you will be able to scan a Reserve or Active location. This is the location that you will be doing the cycle count.
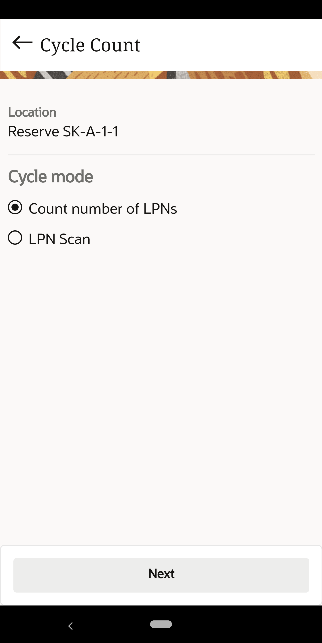
If you scan a reserve location, you have the options to:
- Count number of LPNs: you can just type the number of LPNs you see in the location. In the scenario where there is a mismatch, you will be asked if you want to just confirm the count or recount LPNs by scanning each of the LPN that you see in the location.
- LPN Scan: You can just scan each of the LPNs that you see in the location.
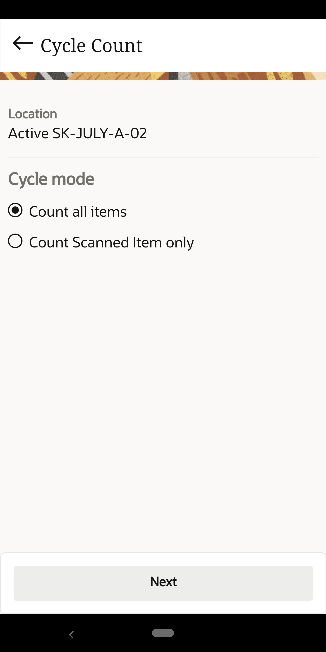
If you scan an active location, you will have the options to:
- Count all items: You can scan and count all the items in the location. If an item was expected and not counted, it will be considered not counted.
- Count Scanned items: You just scan the items you want to count. Your active location could have multiple SKUs, but you only want to count 1 SKU. This option will not do any updates on the other SKUs you didn’t count.
This new Cycle Count module utilizes the new Cycle Count API added in this enhancement.
Steps to Enable
You don't need to do anything to enable this feature.
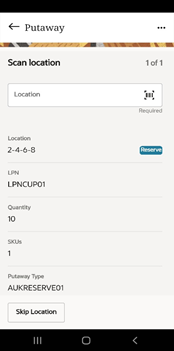
New Putaway Module in Mobile App
The benefit of this new Putaway option is that if you have the equipment (such as forklifts or carts) it allows you to scan multiple items and putaway more inventory allowing increased productivity and fewer trips to and from your receiving station. The transaction begins by prompting you to scan LPN(s) and thereby, puts away the LPNs to the right location.
This screen will display fields based on the values you configure in the screen parameter "max-lpns-to-putaway" in Putaway module. For example, in the following screen, you can see the user configured the max-lpns-to-putway as 5:
NOTE: The maximum number of LPNs we recommend configuring is up to 50. You can configure 5 fields, but you do not have to scan all of the fields to continue Putaway.
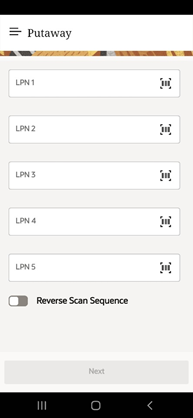
REVERSE PUTAWAY SEQUENCE TOGGLE
The Reverse Putaway Sequence Toggle allows you to put away inventory more efficiently by managing the sequence.
- When disabled (default): The system looks at the LPN type to determine the putaway sequence. The system will prompt you to putaway LPNs with the lowest assigned sequence first and the highest at the last.
- When enabled: The system will use the reverse sequence you scanned and will direct the LPNs to the location in the reverse order you scanned. This functionality is useful for organizing specific types of inventories (for example, fragile or heavy) on your equipment.
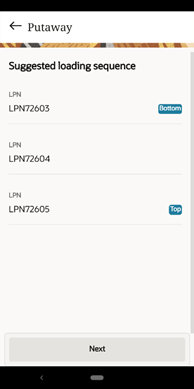
SUGGESTED LOADING SEQUENCE
The Suggested Loading Sequence screen provides a suggestion on how to load/stack LPNs in your putaway equipment based on the calculated Putaway Location Sequence. If the toggle is disabled, the system will do putaway based on the calculated Putaway Location sequence. This optimizes organization of your inventory and will save you time during loading.
Whereas if the toggle is enabled, in the Suggested Loading Sequence screen, you will see the reverse order of how you scanned your LPNs.
SKIP LOCATION
This button is available only on the Location screen. You can use this button to skip a particular location (for example, when there is a spill in front of the location.) Instead of waiting, you can continue to putaway other LPNs and then return back to this location. The system loops back to the skipped location and prompt you to scan the location again.
OVERFLOW MENU SCREEN
The (…) icon on the Scan location screen opens an overflow menu screen with Alternate Location and Manual Location Override options:
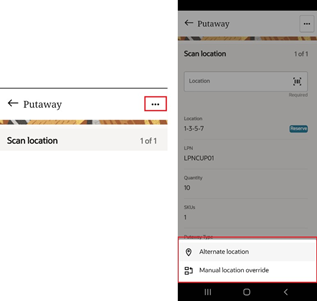
ALTERNATE LOCATION
In scenarios where you may need to putaway inventory to an alternate location when you select an Alternate location, the system will direct you to alternate locations based on the next putaway sequence.

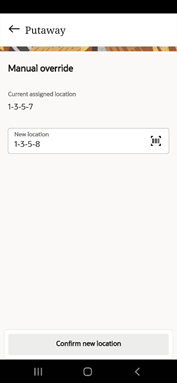
MANUAL LOCATION OVERRIDE
This option allows you to manually override and specify the location where you would like to putaway your inventory.
A new module "Putaway" is added to the Oracle Warehouse Management Mobile App for you to directly putaway one or more IB LPNs via Directed Putaway.
Steps to Enable
To configure the max-lpn value:
- Go to Putaway module > Screen Parameter
- Select the max-lpns-to-putaway and click the edit icon.
- Enter the integer value in the parameter value and click Save.
Key Resources