
This document will continue to evolve as existing sections change and new information is added. All updates appear in the following table:
| Date | Product | Feature | Notes |
|---|---|---|---|
| 19 MAY 2022 | Inventory Operations | Allow Lost LPNs to Be Consumed | Updated document. Revised feature information. |
| 19 MAY 2022 | Inventory Operations | Manage Movement Requests in New UI | Updated document. Revised feature information. |
| 08 APR 2022 | Created initial document. |
 HAVE AN IDEA?
We’re here and we’re listening. If you have a suggestion on how to make our cloud services even better then go ahead and tell us. There are several ways to submit your ideas, for example, through the Ideas Lab on Oracle Customer Connect. Wherever you see this icon after the feature name it means we delivered one of your ideas.
GIVE US FEEDBACK
We welcome your comments and suggestions to improve the content. Please send us your feedback at owms-cloud-comms_us@oracle.com.
DISCLAIMER
The information contained in this document may include statements about Oracle’s product development plans. Many factors can materially affect Oracle’s product development plans and the nature and timing of future product releases. Accordingly, this Information is provided to you solely for information only, is not a commitment to deliver any material, code, or functionality, and should not be relied upon in making purchasing decisions. The development, release, and timing of any features or functionality described remains at the sole discretion of Oracle.
This information may not be incorporated into any contractual agreement with Oracle or its subsidiaries or affiliates. Oracle specifically disclaims any liability with respect to this information. Refer to the Legal Notices and Terms of Use for further information.
Column Definitions:
Report = New or modified, Oracle-delivered, ready to run reports.
UI or Process-Based: Small Scale = These UI or process-based features are typically comprised of minor field, validation, or program changes. Therefore, the potential impact to users is minimal.
UI or Process-Based: Larger Scale* = These UI or process-based features have more complex designs. Therefore, the potential impact to users is higher.
Features Delivered Disabled = Action is needed BEFORE these features can be used by END USERS. These features are delivered disabled and you choose if and when to enable them. For example, a) new or expanded BI subject areas need to first be incorporated into reports, b) Integration is required to utilize new web services, or c) features must be assigned to user roles before they can be accessed.
| Ready for Use by End Users Reports plus Small Scale UI or Process-Based new features will have minimal user impact after an update. Therefore, customer acceptance testing should focus on the Larger Scale UI or Process-Based* new features. |
Customer Must Take Action before Use by End Users Not disruptive as action is required to make these features ready to use. As you selectively choose to leverage, you set your test and roll out timing. |
|||||
|---|---|---|---|---|---|---|
| Feature |
Report |
UI or |
UI or |
|
||
Key Changes in 22B for Artificial Intelligence / Machine Learning |
||||||
Prevent Creation of Multi-SKU LPNs During RF Split Inbound LPN |
||||||
Embed Serial Numbers in 2D Barcodes Using WMS Label Designer |
||||||
WMS Predefined Integration Mappings to Inventory Management for Transfer Orders |
||||||
Key Changes in 22B for Artificial Intelligence / Machine Learning
NOTE: The following changes are added for future use and it is not recommended to configure these fields or use the functionality until it is recommended in further official release announcements.
The Warehouse Management Cloud team is currently building infrastructure for Artificial Intelligence / Machine Learning and a dashboard to utilize this functionality.
Steps to Enable
You don't need to do anything to enable this feature.
Key Resources
Prevent Creation of Multi-SKU LPNs During RF Split Inbound LPN
You can now avoid creating multi-SKU LPN’s during inbound operations when performing RF Split Inbound LPN with an RF alert.
The new screen parameter “prevent-multi-SKU” has the following parameter values:
- No (default): Allows multiple SKU's in the same Inbound LPN and is by default value.
- Yes: Prevents combining different SKU's into the same Inbound LPN.
Steps to Enable
To prevent of creating multi-SKU LPNs, enable the following parameters:
- Go to RF-Text: Split Cntr (rf.inbound.cwrfsplitcntr).
- Set the screen parameter value to None, No, Yes.
- Save the setting.
Key Resources
Improvements in Init Stage Interface API
Two new parameters have been added to the legacy Init Stage Interface API. These new parameters give you better control to run certain interfaces in a specific order. For example, the Inbound Shipment serial number must be run after all the Inbound Shipment information is already in the system.
If there is an instance where you want to interface the inbound shipment serial number file first, you can run the interface with the only_load_stage_table set to Yes, and then run the Inbound Shipment interface with the only_load_stage_table parameter set to NO, and run_dependent_interface set to YES.
Steps to Enable
You don't need to do anything to enable this feature.
Tips And Considerations
As soon as the payload for the Advanced Shipment Notification (ASN) comes through with the serial number information:
- If the only_load_stage_tables parameter is set to "Yes", the system invokes init_stage_interface for the inbound shipment serial number interface.
- if the only_load_stage_tables parameter is set to "No" and the run_dependent_interface parameter is set to "yes" the system invokes init_stage_interface for the inbound shipment
Once the shipment interface is completed, the shipment serial number interface will be triggered as part of the Inbound Shipment interface.
Key Resources
Manage Movement Requests in New UI
Managing internal warehouse movements in Warehouse Management Cloud is now easier with the addition of a new Movement Request entity. Movement Request will make it simpler and easier to handle internal warehouse movements by tracking how you move materials around your warehouse. If you need to move materials from certain areas to assembly areas or from one area to another, Movement Request will tell you , how much inventory you need to move, and where you need to put your inventory
For Example: A big box retailer has stored clothing items next to cleaning solutions, and the solutions have spilled, ruining the inventory. With the new Movement Request Entity, you no longer have to manually relocate each LPN to another location. Movement Requests can be created to move inventory from the impacted area to another location based on the replenishment configuration.
Other useful examples include:
- Assists you in delivering required items to the assembly area when Work Orders are released by manufacturing.
- Handle internal warehouse movements like locked batches to the recall area.
- Handle slotting movements for moving LPNs/Skus from one location to another due to better positioning of the products to cater for changing demands.
The following sections will guide you through the setup of Movement Request.
MOVEMENT REQUEST HEADER
In the new UI module “Movement Request Header”, you will be able to track/view your Movement Request and perform CRUD Operations on Movement Request Entity.
The following permissions are now available to allow you to perform CRUD Operations
- movement_request/can create movement request
- movement_request/can edit movement request
- movement_request/can delete movement request
The header section of this UI contains the following information:
| UI Column | Required | Comments |
|---|---|---|
| movement_request_number |
Yes |
WMS Entered/Passed or Auto Generated number. Accepts letters or numbers |
| company_code |
Display the company code in the movement request UI |
|
| facility_code |
Display the facility code in the movement request UI |
|
| movement_type |
Yes |
Drop down list from available Movement Types. For more details look at the movement type section below. |
| status |
Yes |
Options:
|
| external_movement_request_nbr |
If Movement Request is initiated through Fusion Inventory or any other ERP System, erp_movement_request number will be passed |
|
| priority |
Numeric |
Useful for prioritizing across different movement requests. Can be defaulted to 0 if priority is not specified. |
| Custom fields 1 to 5 |
Related custom fields. |
|
| Custom decimal (1 to 5) |
Custom fields supporting decimals |
|
| Custom Date (1 to 5) |
Custom fields supporting Data time values |
|
| Cust short text(1 to 12) |
Short Text fields |
|
| create_user |
Create User |
|
| mod_user |
Mod User |
|
| create_ts |
Create Timestamp |
|
| mod_ts |
Mod Timestamp |
From the Movement Request Headers UI, you can manage the From/To Movement Request Status:
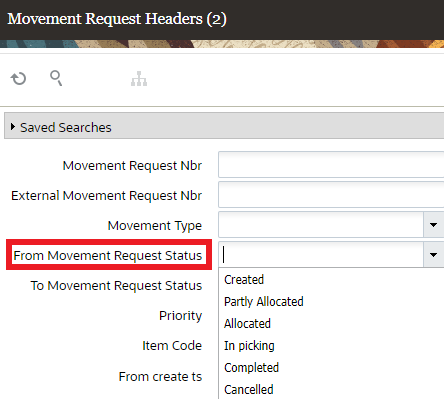
From Movement Request Status
When you are creating Movement Request Details:
- Movement request detail provides SKU and quantity information to be picked and delivered.
- Movement request detail can contain a destination zone or destination location. If the destination zone is provided, replenishment logic will pick the location within the specified destination zone.
MOVEMENT TYPE
In this new UI module, Movement Type UI, you will be able to configure Movement Types. This screen allows CRUD operations. Movement Types are a great way to differentiate between types of moves in the warehouse. This will help you to identify movements like some could be for component movements to assembly work stations or movements to handle recalls. Movement Type will help in segregating the needs and also gives a good selection criteria for filtering different kinds of movement while subjecting for Replenishment Wave Runs.
The detail section of the Movement Type UI will contain the following information:
| UI Column | Required | Comments |
|---|---|---|
| Movement Type |
Yes |
Movement Type |
| Description |
Yes |
Description |
| allow_partial_allocation_flag |
If enabled, it will allow partially allocating movement request |
|
| Only Deallocate on short |
If enabled, the system will decrement the movement request quantity upon performing shorting. NOTE: This is required for future usage. It will be used while shorting picks against relevant movement requests. |
FROM INPUT INTERFACE
Movement Request is now an option in the Input Interface UI. This will allow external systems to create bulk Movement Requests. The interface will accept XML format.
A new Movement Request Interface Stage sub-UI is now available, and it will show you all the movement requests that have been processed and their correct status. It provides another way for you to manage movement requests. You can view the interfaced movement request records that are in staging, view the status of the interfaced requests and details on errors (if any.)
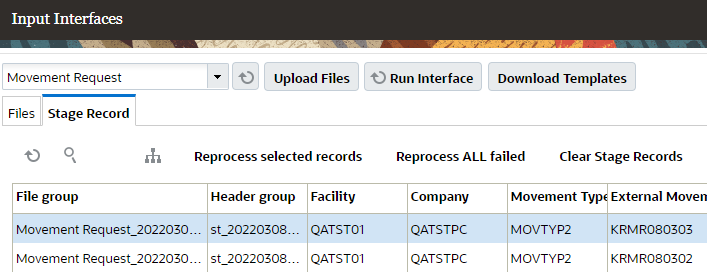
Interface Stage Sub-UI
In the Input Interface UI, you also have the option to create or delete a movement request with one or more details by uploading a movement request file (xml and flat files are supported.)
CREATE/DELETE MOVEMENT REQUEST THROUGH INIT STAGE INTERFACE API
You can also create or delete a Movement Request via the Init Stage Interface so that the movement requests created in Oracle Fusion/Manufacturing or any external manufacturing systems can be interfaced with Warehouse Management and the movement requests are created.
SAMPLE REQUEST URL:
https://intqa.wms.ocs.oraclecloud.com/lgf_21d_qa/wms/api/init_stage_interface/
Additional Details about Init Stage Interface
- The movement request entity will process in both synchronous and asynchronous mode (async can be true or false).
- Both xml and flat files are supported.
- The only action codes currently supported are CREATE and DELETE at the movement request header level.
- Multiple movement requests can be provided in a single payload.
NOTE: if there are errors with some of the movement requests in the passed data, only the movement requests with errors should not get processed. The rest of the movement requests should be created/deleted based on action code.
- If a single movement request has multiple details, the system will process the movement request only if all details successfully pass validations.
- Numbers are generated in Warehouse Management Cloud for the external movement request interfaced based on the movement request number interfaced from ERP/Manufacturing/any other external system.
GET REQUEST SUPPORT FOR MOVEMENT REQUESTS
NOTE: A new entity movement_request_hdr is now added for GET request Which allows you to fetch different movement request records.
Inventory History
FULFILLMENT OF MOVEMENT REQUEST
Movement Request are going to be fulfilled via Replenishment. The following sections will detail the different changes added to Replenishment Template.
CHANGES TO REPLENISHMENT TEMPLATE UI
The Replenishment Template UI now allows you to configure and manage movement requests via replenishment waves. The replenishment wave will create tasks and tell you where to move the materials associated with movement requests.
NEW REPLENISHMENT TRIGGER MODE FOR MOVEMENT REQUEST
In the Replenishment Template UI, you now have the option to configure a new Replenishment Trigger Mode for movement request. If Movement Request based replenishment is selected as the Trigger Mode, then the Replenishment logic will only search for eligible movement requests.
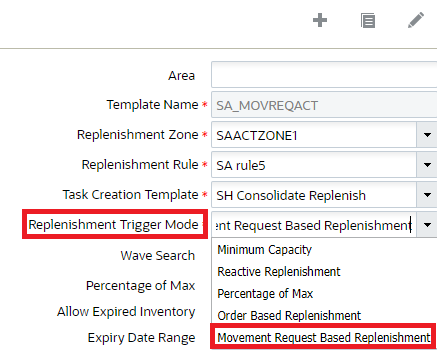
Replenishment Trigger Mode
Also, when you select Movement Request Based Replenishment as the Replenishment Trigger Mode, the option to select a “Movement Request Search Rule” and “Movement Request Sequence Rule” becomes enabled and allows you to select Movement Request Searches and Movement Request Sequence Rules you have previously created.
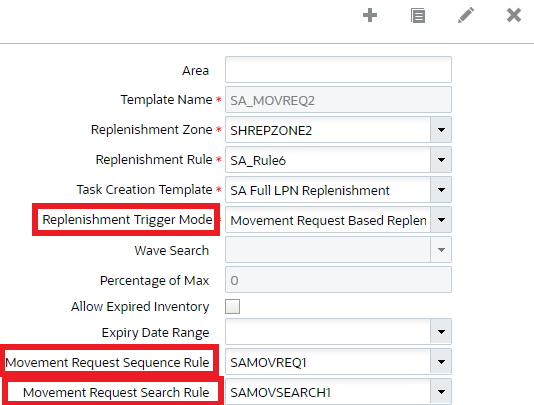
Movement Request Sequence Rule
MOVEMENT REQUEST SEARCH
When you are fulfilling movement requests through waves, you can now configure a search using the new action button Movement Request Search based on movement request related fields and filter based on a combination of fields. This allows you to filter any relevant movement requests to be processed at a given time.
In the Replenishment Template UI, you can now create movement requests using the Movement Request Search action button.
Movement request related fields added in Movement Request Search - Selection Criteria
- In the Replenishment Template >> Movement Request Search UI, selection criteria button is available
- In the selection criteria, movement request related fields are added and allow you to define criteria with them
- In the selection criteria, common fields related to item entity are available and can be used with movement request fields to configure selection criteria
MOVEMENT REQUEST SEQUENCE RULE ACTION BUTTON
A new Movement Request Sequence Rule button, now available in the Replenishment Template UI, allows you to configure rules in a pre-defined sequence, in order to prioritize fulfillment of movement requests. From the create/edit/copy pane of the Replenishment Template >> Sequence Rule, “Dynamic Movement Request Search” is added in the Template Type drop-down as an additional option to define sequence rules.
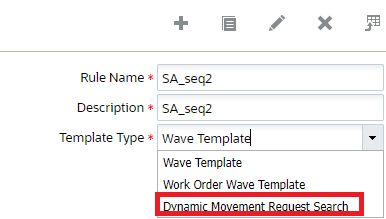
Dynamic Movement Request Search
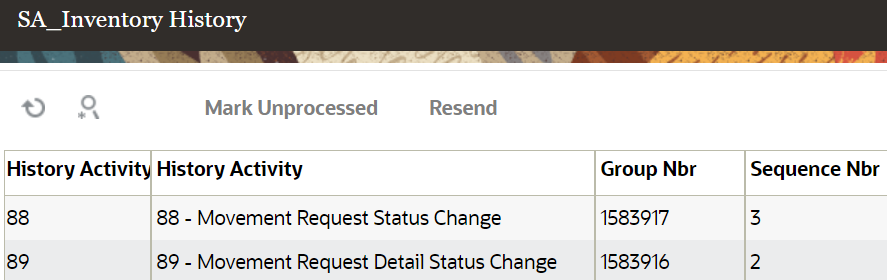
NEW INVENTORY HISTORY TRANSACTIONS (IHTs) FOR MOVEMENT REQUEST STATUS CHANGES
Whenever a movement request status changes, Warehouse Management Cloud creates an Inventory History Activity 88-Movement Request Status Change and IHT-89 Movement Request Detail Status Change. so that it can be picked up by external systems/ERP systems/slotting systems to make any necessary actions. You can view the history activity in the Inventory History Activity Parameters UI.
NOTE: Standalone replenishment always replenishes to a permanent location. If the Replenishment Trigger Mode is set to “Movement Request Based Replenishment” you can now replenish to dynamic locations also.
Warehouse Management can replenish to a particular location (has to be type active) via the Replenishment Trigger Mode field. In the Movement Request Detail UI detail, the destination replenishment zone can be permanent or dynamic.
In the Replenishment Template View ->Replenishment Rules action button, the following is also supported:
- round up one uom
- Consolidate and distribute replenishment
NOTE: Ignore capacity for last permanent location will not be supported for movement request replenishment.
In the Replenishment Rules ->Replenishment Rule Sequence, all allocation methods are supported (for example, First in First Out, Last in First Out.) Also, all types of Replenishment UOM (LPNs, Cases, Packs, and Units) and Consolidate and Replenishment are supported.
The corresponding replenishment related Task Types (for example, Consolidate-Replenish, Replenish-LPN, Replenish-Cases) can also be used for movement request.
If you want to run cancellation waves, you can do this in the Replenishment Template View UI via the following fields:
- Cancel Partially Allocated – will cancel partially allocated part of movement request line
- Cancel Fully Allocated – will cancel corresponding unallocated part of movement request line
MOVEMENT REQUEST STATUS UPDATES DURING STANDALONE REPLENISHMENT
Now, when movement requests are fulfilled through standalone replenishment, in the Movement Request Detail UI, the respective status of movement requests is updated to "Partly allocated" or "allocated", depending on the allocation done. The following table details the status changes that will happen depending on the scenario:
| UI | Status Changes To |
|---|---|
| Movement Request Detail |
|
| Movement Request Header |
|
Steps to Enable
- Configure a new screen from module: UI-HTML: Movement Request Headers
- To enable the Movement Request Header UI, add the following Group Permissions:
- movement_request/can create movement request
- movement_request/can edit movement request
- movement_request/can delete movement request
- To enable movement request status updates, make sure that the Replenishment Template UI has the replenishment trigger mode set as "Movement Request Based Replenishment."
Key Resources
Allow Lost LPNs to Be Consumed
CONSUMING A LOST LPN THROUGH API
Consuming a LOST LPN now got easier with the addition of new functionality in the IBLPN Direct Consume API and the Inbound LPN UI. Currently, when an Inbound LPN is marked as Lost, the system displays an error ‘Invalid Status’ when you try to consume the LPN through API IBLPN Direct Consume.
A new parameter (num-days-iblpnlost-for-consume) has been added which allows external PaaS applications to pass in ‘X’ days since the LPNs are marked as Lost, which makes them eligible for marking the LPNs and for consuming Lost Status LPNs beyond a certain date. Any LPNs which are marked Lost less than "X" days from today, will not be allowed to be marked as Consumed.
POST ../wms/lgfapi/v10/entity/iblpn/{id}/direct_consume/
| Category |
Parameter |
Type |
Required |
Default |
Description |
|---|---|---|---|---|---|
| Options |
num-days-iblpnlost-for-consume |
Integer |
X | Empty or 0 |
Considers LPNs in status Lost to be consumed according to the number of days that it has been lost. Based on the mod timestamp. |
CONSUMING A LOST LPN THROUGH INBOUND LPN INQUIRY
In the Inbound LPN Inquiry screen, a new action button Consume LPN has been introduced. You should configure the inventory/can edit inventory permission to the relevant group to enable the Consume LPN button. Once enabled, you can select from multiple options for LPNs.
Upon selecting LPNs:
- Click Consume LPN. The system displays a message box with the following details:
- "Number of LPNs Selected for Consume "X". X¿>Denoting number of LPNs.
- Text field to enter the number of days since Lost for Consumption. Value entered here is used to validate if selected Lost Status LPNs are eligible for consumption or not.
- Drop-down to select the reason code. Reason Code selected will be stamped on IHT-2 (Consume LPN).
- Option to proceed or cancel.
- Once accepted, the system displays a detailed message ‘X Number of LPNs selected and Y successfully Consumed". Upon clicking More Details, the system displays the LPN numbers which were not consumed.
- Expand Consume LPN to mark LPNs that are Lost as Consumed.
- Click Save.
You can consume LPNs that are in Located, Received or Lost Status for multiple LPNs. Inventory History Transaction (IHT) records will be written after performing Consume LPN with or without a lock code.
NOTE: If some of the LPNs you select do not pass validations, the system will display a message alerting you which LPN numbers were not consumed. Consume LPN updates will be made for LPNs that pass successful validations.
Steps to Enable
You don't need to do anything to enable this feature.
Key Resources
Apply/Remove Lock Codes for Multiple LPNs
There are certain scenarios where you may want to apply a lock code in order to prevent a group of LPNs from being locked so that they are not passed to downstream operations due to batch recall or quality check. Save time by assigning a Lock Code to groups of Inbound or Outbound LPNs based on search criteria. Two new action buttons Mass Add Lock Code and Mass Remove Lock Code are now available in the Item Inventory by LPN screen (module name: LpnItemInventoryView).
After selecting the inventory criteria using the search tool, you can either apply a lock code or remove a lock for the listed LPNs. The UI will confirm your selection informing you of the number of LPNs that are about to be locked or unlocked.
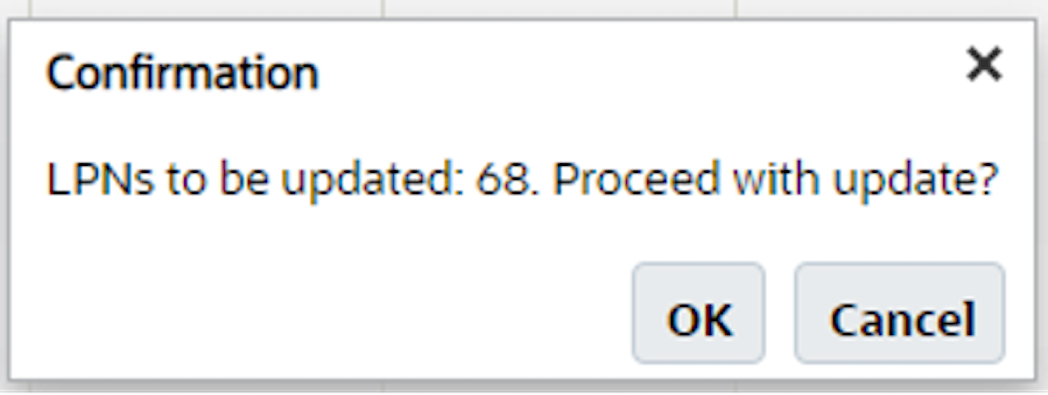
Mass Add Lock Code Confirmation
After you proceed, you will be provided with a list of available Lock Codes that you can apply.
In addition to the new buttons, this entire process is permission-based. You can only access these new buttons if the permission is configured.
NOTE: The administrator role will have all permissions which are included by default. So, the permissions for "container/Can mass add lock code" and "container/Can mass remove lock code" are included by default for the Administrator role.
Steps to Enable
You don't need to do anything to enable this feature.
Key Resources
Embed Serial Numbers in 2D Barcodes Using WMS Label Designer
You can now print multiple serial numbers using our new Label Designer Function, SERIAL_NBRS_FROM_OBLPN. This function allows multiple serial numbers for a SKU to be scanned in a single scan.
This new function is available for OBLPN Labels, OBLPN Content Labels, and Shipping Label, as well as all other labels. It works best in two-dimensional barcode labels such as QR Barcode Type, as it will embed a large number of characters allowing you to provide more information.
NOTE: You can also use this function on Multiple SKU items, but the system will only return serial numbers and not include the related SKU information.
Steps to Enable
To enable printing multiple serial numbers in Label Designer, set up the following function details:
- Data Type: Dynamic
- Function: SERIAL_NBRS_FROM_OBLPN
- Function Arguments example: {delimiter:",",max_chars:0}
Where,
- delimeter could be comma(,), pipe (|), collan (:)
- max chars: it’s the maximum number of characters you want to display in the label. 0 means unlimited or instead of the function you could use
- Expression : serial_nbrs_from_oblpn(get_qs(), args="{\"delimiter\":\",\", \"max_chars\":0}")
Key Resources
Pack Multiple Inbound LPNs Into an Outbound LPN
A new API (Pack Multiple Inbound LPNs into One OBLPN) is available which allows you to pack multiple IBLPNs with Full LPN allocation into a single cubed OBLPN, When you run a Wave template, the wave will allocate inventory (multiple IBLPNs with Full LPN allocations) against the sales order(s) (with the same destination), to be packed into a single cubed OBLPN. You can Cube multiple full LPN allocations into a single Outbound LPN. This kind of allocation is useful when there are smaller Inbound LPN’s being cubed into a single Outbound LPN. This simplifies and streamlines the packing process.
URL:
POST .../lgfapi/v10/pick_pack/pack_multiple_iblpns_into_one_oblpn
REQUEST PARAMETER – OPTIONS
| Name |
Type |
Required |
Default |
Description |
| facility_id |
integer |
C |
Context facility by id. |
|
| facility_id__code |
String |
C |
Context facility by code. |
|
| company_id |
integer |
C |
Context company by id. |
|
| company_id__code |
String |
C |
Context company by code. |
|
| async_flg |
Boolean |
|
true |
Signals that we received the request and it was successfully submitted for processing. |
REQUEST PARAMETER OPTIONS FOR pick_list:
| Name |
Type |
Required |
Default |
Description |
| to_container_nbr |
object |
X |
OBLPN number to be packed(which has multiple IBLPNs(full LPN allocs) linked to it) |
REQUEST JSON EXAMPLE:
{
"async_flg": true,
"pick_list": [{
"facility_id__code": "FAC1",
"company_id": "123",
"to_container_number": "OBLPN1"
}]
}
Steps to Enable
You don't need to do anything to enable this feature.
Key Resources
Display Last Printed Timestamp for Outbound LPN Labels
Label management and organization just got a little easier! There are now three new fields available in the Outbound LPN UI where you can easily view the date and time the label was printed. The following three new fields have been added in the OB LPN UI and will display the last printed timestamp for each type of label.
- Shipping Label - Last Printed Timestamp
- OBLPN Label - Last Printed Timestamp
- OBLPN Content Label - Last Printed Timestamp
When a label is printed, the above fields will be populated with the current facility timestamp indicating to users when the label was last printed for the selected OBLPN.
For example, let’s say you select multiple OBLPNs from the OBLPN view and click "Print Shipping Label." After sending the print request to the selected printer, Warehouse Management will update the "Shipping Label - Last Printed Timestamp" field for the selected OBLPNs with the current facility timestamp.
NOTE: The timestamp fields will be updated with the current timestamp even if the fields are already populated with a timestamp.
Steps to Enable
You don't need to do anything to enable this feature.
Key Resources
Print Labels from RF Sort and Receive
Now you can easily auto create an LPN from the RF Sort and Receive transaction. This increases productivity as floor users usually print blind labels from the UI prior to starting the transaction. Therefore, users no longer have to print labels close to a computer and then bring them to the receiving station.
The following screen parameters are introduced in the rf.outbound.cwrfpacklpn RF module:
| Parameter name |
print-labels |
| Parameter type |
Selection |
| Parameter options |
Inbound LPN Label |
| Default behavior |
Blank (acts as None) |
If you select “Inbound LPN Label” then IBLPN Labels will print upon ending the IBLPN. A new hot key has been added in RF Sort and Receive transaction. If the parameter “Print-Labels” is set to Inbound LPN Label, the new hot key “CTRL-P” is available. Upon selecting CTRL-P, you will be able to type the Label printer you would like the labels to print from. This gives you flexibility in case you need to change the printer as you may be closer to another printer.
Steps to Enable
Parameter “Print-Labels” must be set to Inbound LPN Label.
Key Resources
Capacity Check During RF Dynamic Staging
Oracle Cloud WMS now ensures capacity limits in staging locations with an error message. Your staging locations will never be overpopulated with the latest enhancements made to RF Dynamic Staging and RF Unloading OBLPN transactions.
When the following capacity limits are configured at the location level, RF Dynamic Staging and RF Unloading OBLPN transactions will now check the available capacity in the location to make sure the incoming inventory fits in the location.
- Max Units
- Max LPNs
- Max Volume
- Max Weight
- Dimensions - (Length, Width, Height)
Steps to Enable
You don't need to do anything to enable this feature.
Key Resources
JSON Support for Ship Outbound Load Output Interface
Warehouse Management Cloud has been enhanced to include JSON support for Ship Outbound Load in the Output Interface. JSON support will provide many benefits including:
- Overall payload size reduction and performance improvements
- A more compact yet hierarchical data format - JSON
- Reduction in redundant/repeated data
- For Example: Repeating all data per serial number
- User customizable field selections per output interface
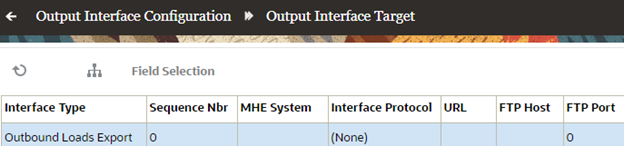
In the Output Interface Configuration UI, you can now configure the interface format as JSON, but only for interface type= Outbound Loads Export
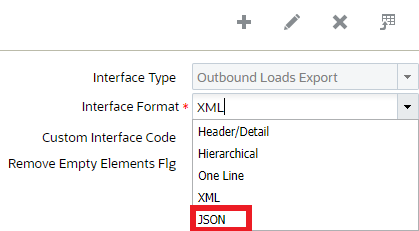
Outbound Loads Export
You also have the option to configure the field(s) output in the representation for interfaces using JSON. Selecting the fields that you want to send will reduce the payload size and ensure you only get the data you need. You can configure field output using the “Field Selection” button in the Output Interface Target UI:
Output Interface Target
The Field Selection access is controlled by the permission “can change output”.
NOTE: Since the field selection configuration is per target, you can customize the output to only provide exactly what is needed by each consuming system. This helps to keep payload sizes low and generation speed fast.
The Field Selection button will take you to a new child screen, Output Interface Target Field Selection View. Here the user will be presented with the entire hierarchy tree. The tree will always be collapsed upon entering the selection screen.

Field Selection
Any new target or existing target that has never been configured will start with an internally defined default set of fields for the given interface. From here you can select your criteria:
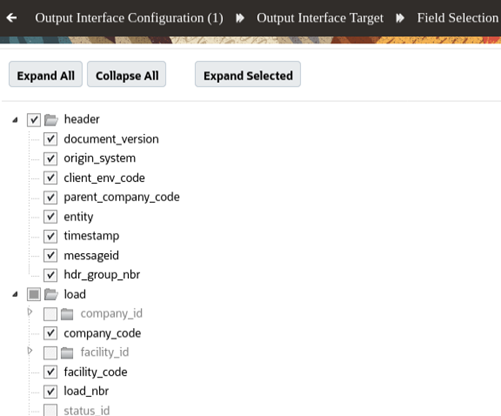
Field Selection Child Screen
Action Buttons on the Field Selection child screen:
- Expand All – Expands the entire tree
- Collapse All – Collapses the tree down to root node
- Expand Selected – Expand only the tree branches that contains a selected field. All others are collapsed
- Deselect All – Deselects all fields. However at least one field must be selected to save changes
- Reset – Restores the field selections to that of the last time it was saved
- Restore Default – Restores the field selections to the default defined by Warehouse Management.
Steps to Enable
You don't need to do anything to enable this feature.
Tips And Considerations
NOTE: Expand All and Collapse All could cause some screen lag. It is recommended to use Expand Selected and work from there. Expand Selected could also cause screen lag if all fields are selected. Also, depending on the Fields selected and saved for each target, the “Column Name” drop-down under the Output Interface Target Criteria will be filtered. Only the fields that are selected will be displayed in the drop-down.
Key Resources
Cross Dock LPNs During Receiving in Mobile App
You can now cross-dock LPNs during receiving to help speed up order fulfillment via the Oracle WMS Mobile App. A new “Cross dock” toggle is introduced in the Receiving main screen of the VBCS. After launching the receiving module, the Cross dock toggle will be disabled, by default.
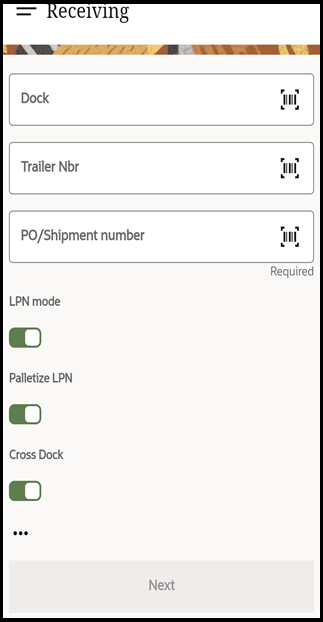
Cross Dock
NOTE: The Cross dock LPN functionally is only available after enabling the toggle and configuring a valid parameter value.
A new selection type screen parameter “X-dock mode” is introduced in the VBCS Receiving module with the following parameter choices:
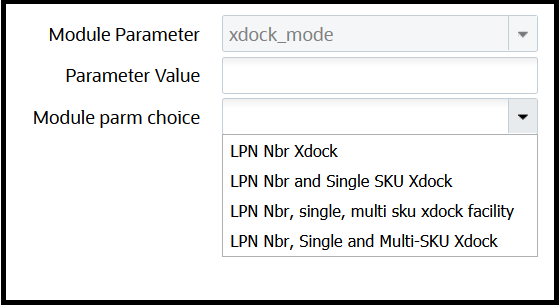
Xdock Parameter Values
- None: Cross dock functionality is disabled.
- LPN Nbr Xdock: Cross dock functionality is enabled for single and multi-SKU LPNs. It will only work if its cross-dock orders have the “Required Container Number” populated in the Order detail record.
NOTE: Auto creation of cross-dock orders is not possible with this option.
- LPN Nbr and Single SKU Xdock: Cross-dock functionality is enabled for single SKU LPNs. Cross dock orders do not need to populate the “Required Container Number” in the Order detail record.
- LPN Nbr, single, multi sku dock facility: Cross dock functionality is enabled for single and multi-sku LPNs. The system first matches the LPN with an order and if the LPN number does not match, then the system will Xdock single sku. If the LPN is a multi sku, then the system will Xdock facility, only if it is a facility order.
- LPN Nbr Single and Multi-SKU Xdock: Cross dock functionality is enabled for single and multi-SKU LPNs. Cross dock orders do not need to populate the “Required Container Number” in the Order detail record.
NOTE: If the screen parameter "xdock_mode" is configured with a valid value and the "Cross Dock" toggle is disabled in the VBCS Receiving main screen, on completing receiving and clicking on "Save all and end trailer", the system will display a warning message where you can Accept or Reject the message.
Steps to Enable
You don't need to do anything to enable this feature.
Key Resources
WMS Predefined Integration Mappings to Inventory Management for Transfer Orders
WMS TO INVENTORY TRANSFER ORDER FLOW
As a part of the Warehouse Management Cloud to Inventory Management predefined integrations, Warehouse Management Cloud now supports Transfer Orders (TO.) Support for Transfer Orders will allow Inventory Management to specify serial number information in the Inbound Shipment.
In this new flow for Transfer Orders, the Receipt Advice lines of Type TO will get created as a Cartonized Inbound Shipment in Warehouse Management Cloud Distribution Center 2 (DC2.)
NOTE: The Warehouse Management to Inventory Management predefined integration mappings currently only support serial numbers and lot numbers. Inventory Attributes are not currently supported.
The following figure shows the flow of Transfer Order Creation and Fulfillment by Warehouse Management Cloud from DC1 to DC2:
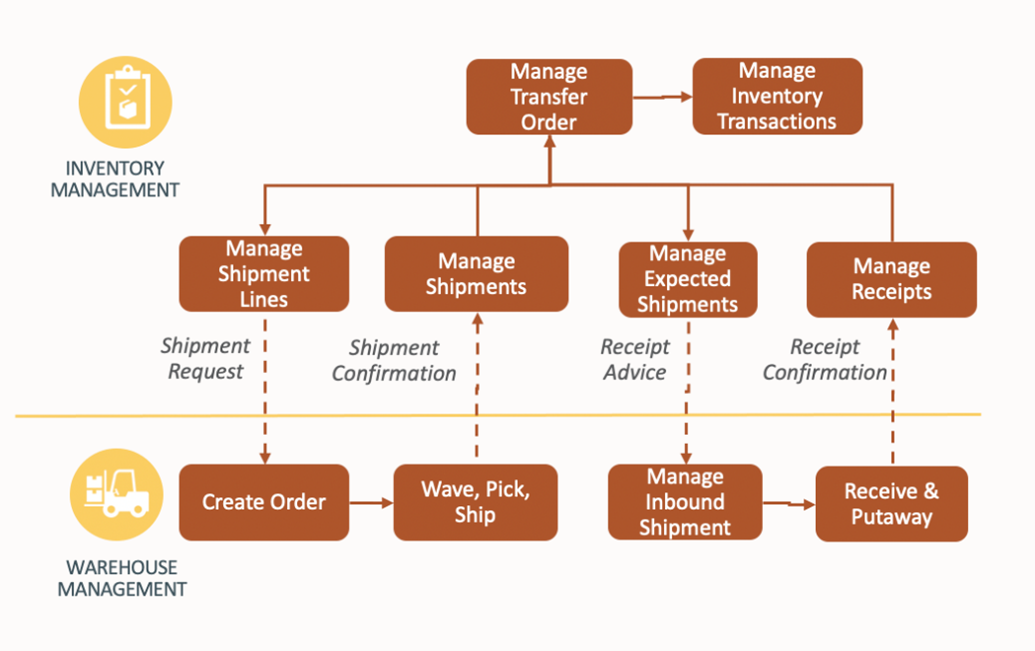
Transfer Order Creation and Fulfillment
- Step 1: Transfer Orders are created by Inventory Management. Optionally, an internal sales order gets created in Order Management (OM) Cloud.
- Step 2: Inventory Management creates a Shipment Request (Interface Order) to Warehouse Management at DC1 (Source Organization)
- Step 3: DC1 fulfills and ships the order, creates an SLS file, and sends a Shipment Confirmation to Inventory Management.
- Step 4: Inventory Management Generates Receipt Advice lines from the Ship Confirmation file and interfaces to Warehouse Management DC2 as an IB Shipment.
- Step 5: Warehouse Management DC2 will perform receiving and putaway. DC2 sends a Receipt Confirmation to Inventory Management.
- Step 6: The Transfer Order is closed and sent from Inventory Management back to Order Management.
Steps to Enable
You don't need to do anything to enable this feature.
Key Resources
Changes to WMS Predefined Integration Mappings to Inventory Management for Sales Orders for Serialized Items
When Warehouse Management Cloud ships sales orders, the WMS predefined integration mappings to Inventory Management now send multiple serial numbers packed in a LPN in a single shipment confirmation message (SLS). This streamlines the number of shipment confirmation messages sent for serialized items.
These changes to the shipment confirmation for serialized items have also been delivered in the new WMS predefined integration mappings to Inventory Management for transfer orders.
Steps to Enable
You don't need to do anything to enable this feature.
Key Resources
IMPORTANT Actions and Considerations
DEPRECATION OF GEN1 WEB REPORTS
The original Gen 1 WebReports deprecation announcement was communicated with the WMS Cloud 20B update announcement in April 2020, and subsequently reiterated with the scheduled date in several customer connect sessions and reminders since. It is very important for you to have migrated all of your business critical reports fully to Gen2 by this date.
For further information and tips on creating reports, please refer to MOS and the following Cloud Customer Connect training sessions:
- SCM – Oracle WMS Cloud Gen 2 Web Reports
- SCM – Oracle WMS Cloud Gen 2 Web Reports (Recording in Spanish)
- SCM – Warehouse Management Cloud Web Reports Generation 2 – Update and Sample Reports
Please contact Oracle Support if you have any questions.
DEPRECATION OF LEGACY APIS
Warehouse Management Cloud is deprecating several legacy APIs that no longer comply with the overall strategy to develop REST APIs. See the Deprecation of Legacy APIs document for more details about the legacy APIs that will be deprecated in the 22B release.