- Revision History
- Overview
- Feature Summary
- Warehouse Management
-
- WMS Common
-
- Display Reason Code List of Values in Additional RF and UI Screens
- Enable/Disable Reason Codes
- Enhancements to WMS Integration with Oracle Content Management (OCM)
- Allow Special Characters and Lowercase in Multiple UI Screens
- Additional Search Filters in Users UI
- Manage the Number of Labels to be Printed through UI
- OAuth 2.0 Support for Output Interfaces
-
- Inbound Logistics
- Inventory Operations
- Outbound Logistics
-
- Capture and Display Images in Outbound LPN Inquiry UI
- Enhancements to Full LPN Allocation to Support Multiple Batches/Inventory Attributes for Same SKU
- Enhance Outbound Audit Functionality in Handling of Multiple Batches/Inventory Attributes for Same SKU
- Auto-Send Shipping Documents to Dynamic Email
- Reset External Planned Load Number for Partially Shipped Order Detail
- Configure OBLPN Putaway and Task Zone Movements
- Improvements to RF Distribute LPN
- New RF Module for Post Packing Updates and Printing Options
-
- Warehouse Workforce Management
- WMS Common
- IMPORTANT Actions and Considerations
Update 23A
Revision History
This document will continue to evolve as existing sections change and new information is added. All updates appear in the following table:
| Date | Module | Feature | Notes |
|---|---|---|---|
| 12 MAY 2023 | Outbound Logistics | Enhance Outbound Audit Functionality in Handling of Multiple Batches/Inventory Attributes for Same SKU | Updated document. Added demo video. |
| 28 FEB 2023 | Web RF Application - Updating to HTML5 Canvas |
Updated document. Revised feature information. | |
| 09 FEB 2023 | Outbound Logistics | Enhance Outbound Audit Functionality in Handling of Multiple Batches/Inventory Attributes for Same SKU | Updated document. Revised feature information. |
| 09 FEB 2023 | WMS Common | OAuth 2.0 Support for Output Interfaces | Updated document. Revised feature information. |
| 27 JAN 2023 | Outbound Logistics | Enhance Outbound Audit Functionality in Handling of Multiple Batches/Inventory Attributes for Same SKU | Updated document. Revised feature information. |
| 27 JAN 2023 | WMS Common | Display Reason Code List of Values in Additional RF and UI Screens | Updated document. Revised feature information. |
| 13 JAN 2023 | Created initial document. |
Overview
 HAVE AN IDEA?
We’re here and we’re listening. If you have a suggestion on how to make our cloud services even better then go ahead and tell us. There are several ways to submit your ideas, for example, through the Ideas Lab on Oracle Customer Connect. Wherever you see this icon after the feature name it means we delivered one of your ideas.
GIVE US FEEDBACK
We welcome your comments and suggestions to improve the content. Please send us your feedback at oracle_fusion_applications_help_ww_grp@oracle.com.
DISCLAIMER
The information contained in this document may include statements about Oracle’s product development plans. Many factors can materially affect Oracle’s product development plans and the nature and timing of future product releases. Accordingly, this Information is provided to you solely for information only, is not a commitment to deliver any material, code, or functionality, and should not be relied upon in making purchasing decisions. The development, release, and timing of any features or functionality described remains at the sole discretion of Oracle.
This information may not be incorporated into any contractual agreement with Oracle or its subsidiaries or affiliates. Oracle specifically disclaims any liability with respect to this information. Refer to the Legal Notices and Terms of Use for further information.
Feature Summary
Column Definitions:
Report = New or modified, Oracle-delivered, ready to run reports.
UI or Process-Based: Small Scale = These UI or process-based features are typically comprised of minor field, validation, or program changes. Therefore, the potential impact to users is minimal.
UI or Process-Based: Larger Scale* = These UI or process-based features have more complex designs. Therefore, the potential impact to users is higher.
Features Delivered Disabled = Action is needed BEFORE these features can be used by END USERS. These features are delivered disabled and you choose if and when to enable them. For example, a) new or expanded BI subject areas need to first be incorporated into reports, b) Integration is required to utilize new web services, or c) features must be assigned to user roles before they can be accessed.
| Ready for Use by End Users Reports plus Small Scale UI or Process-Based new features will have minimal user impact after an update. Therefore, customer acceptance testing should focus on the Larger Scale UI or Process-Based* new features. |
Customer Must Take Action before Use by End Users Not disruptive as action is required to make these features ready to use. As you selectively choose to leverage, you set your test and roll out timing. |
|||||
|---|---|---|---|---|---|---|
| Feature |
Report |
UI or |
UI or |
|
||
Display Reason Code List of Values in Additional RF and UI Screens |
||||||
Enhancements to WMS Integration with Oracle Content Management (OCM) |
||||||
Allow Special Characters and Lowercase in Multiple UI Screens |
||||||
View Machine Learning-Driven Market Basket Analysis for Product Associations |
||||||
Improvements to Update Action Code for Movement Request Interface |
||||||
Enhancements to Full LPN Allocation to Support Multiple Batches/Inventory Attributes for Same SKU |
||||||
Reset External Planned Load Number for Partially Shipped Order Detail |
||||||
Warehouse Management
WMS Common
Display Reason Code List of Values in Additional RF and UI Screens
Reason Codes are an important component in tracking transaction activity in warehouse operations. Whether it's inventory adjustments, short picking or audit changes, having a consistent method of capturing these reason codes is very important. In an effort to bring a more consistent and unified method across our applications, Warehouse Management has made enhancements in multiple UI and RF transactions to assist in capturing those Reason Codes.
DISPLAY LIST OF REASON CODES IN RF
To provide consistency among existing RF screens that include a list of reason code values, the following RF screens have been enhanced to include a list of reason codes:
- Create LPN
- Modify IBLPN
- Mod/Cancel OBLPN
- Consume LPN
Now, you no longer will need to manually enter a reason code at the reason code prompt. Instead, the list of reason codes will appear like the following example:
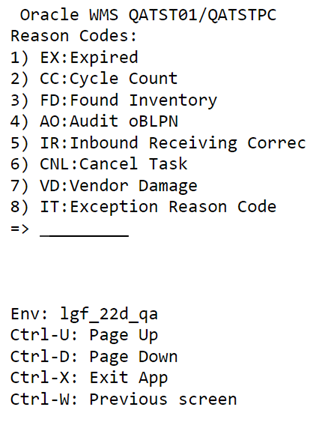
RF List of Reason Codes
CONFIGURE AND PROMPT REASON CODE
In the following screens, a new pop-up screen is now added which will prompt for a reason code when you are deleting records in the following associated transactions:
- Work Order UI
- Wave Template UI
- Replenishment Template UI
- Inbound Shipment UI
- Order Header UI
- Movement Request Header UI
When a reason code is selected, this reason code will also be reflected in Inventory History.
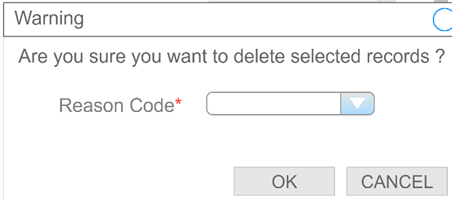
Reason Code Pop-Up
REASON CODE FOR FULLY UNALLOCATED ORDERS IN WAVE TEMPLATE UI
For some scenarios, there is a need to record a reason code for cancelled orders so that businesses can determine the causes and associated business impact of such cancellations. These reason codes can also be communicated if needed for integration with external systems.
In the Wave Template UI, a Reason Code drop-down has been added where you can now capture reason codes for orders that are “Cancel Fully Unallocated” or “Cancel Partially Allocated”. This same change will apply in the Replenishment Template UI for Movement Requests.
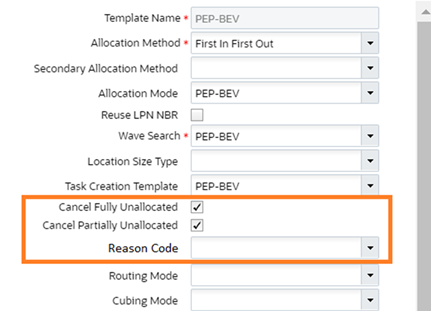
Reason Code Drop-Down
NOTE: The associated reason codes will also update in Inventory History. For example:
- IHT-85 Order detail status change
- IHT-12 Order detail shorted
- IHT-27 Order cancellation
- IHT-20 Order status change
INVENTORY HISTORY TRANSACTION (IHT) DETAIL
Picking/Packing Transactions - RF Modify Cancel OBLPN/Audit OBLPN - IHT-85
- The Reason code will come into play only during shorting
- The Reason Code will be populated on IHT-85 for the shorting instance whether the system completely shorts the order detail or partially shorts the order detail.
Picking/Packing Transactions - RF Modify Cancel OBLPN/Audit OBLPN - IHT-20
- The Reason code will come into play only during shorting
- The Reason Code will be populated on IHT-20 for any de-allocation that occurs.
NOTE: if there are multiple shorts being done with different reason codes, the latest reason code will be captured on IHT-20.
Wave De-allocation - IHT-20
-
When the order gets cancelled then the reason code captured on wave template will be passed on the IHT.
Wave De-allocation - IHT-85
- When the order detail gets fully cancelled then the reason code will be captured on IHT-85
- During Wave De-allocation, reason codes IHT-12 and IHT-27 will be written.
NOTE:
- During Picking/Packing/Cancel OBLPN IHT-12 and IHT-27 will be written.
- When the order type's de-allocate only on Short is set to "Y", the reason code captured will be written on respective IHTs.
For more details about the associated Inventory History Transactions (IHT), see the IHT Trigger Reference Document.
PROMPT REASON CODE CHANGES
A new parameter, prompt-reason-code is now available for the following RF transactions:
- RF Modify LPN
- RF Consume LPN
- Modify/Cancel OBLPN
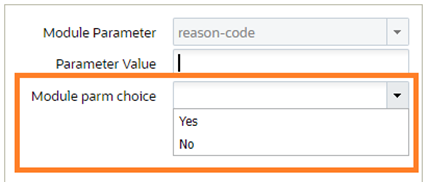
Module Parameter Choice
When the prompt-reason-code parameter is set to yes, then the system will enable the defined reason code value for the associated transaction.
RF CREATE LPN - ENHANCEMENT TO MODE SCREEN PARAMETER
NOTE: In RF Create LPN, the Mode screen parameter is enhanced so that you can enable or disable the prompt for reason codes. Based on screen parameter settings, the reason code will be prompted or will not be prompted while using the RF - Create LPN transaction.
DEFAULT REASON CODE ON SHORT
Your frequent Picking and Packing transactions on the floor should be much faster with the option to now default the reason code in your RF transactions! A new module parameter, default_reason code_on short is now available. When this parameter is set to yes, you can define a default value for your floor users so that they no longer have to manually enter a reason code for picking and packing transactions.
For the following transactions, if the default_reasoncode_onshort value is set to yes, then the system will enable the defined parameter value for the associated transaction.
- RF Pack OBLPN
- RF Pick IBLPN
- RF Pick Cart
- RF Pack NC Active
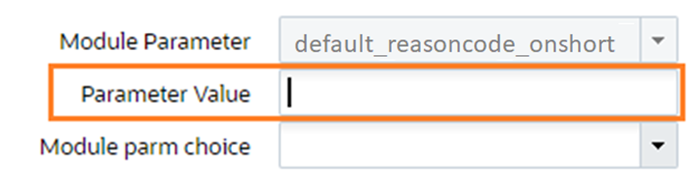
Default Reason Code on Short
VALIDATE ACTIVE REASON CODES THROUGH API
The following APIs contain a reason code field. Whenever the following APIs are interfaced with WMS, the system will now validate that the reason code value was received. If the value received is an inactive reason code, then the system will send an error 'Inactive reason code.'
The following APIs contain a Reason code field:
| API | URL |
|---|---|
| Update active inventory |
POST .../entity/location/{id}/update_active_inventory/ |
| Pick confirm/ pick list - Short |
POST ..lgfapi/v10/pick_pack/pick_confirm/ |
| Close LPN - Short |
POST ..lgfapi/v10/pick_pack/close_lpn/ |
| Direct Consume |
POST ¿/wms/lgfapi/v10/entity/iblpn/{id}/direct_consume/ |
| Wave Complete - short |
POST ..lgfapi/v10/pick_pack/wave_complete/ |
| Pack Full LPN - short |
POST.../lgfapi/v10/pick_pack/pack_full_lpn |
| Modify Item Quantity |
POST .../entity/iblpn/{id}/modify_item_qty/ |
| Composite Create |
POST ¿/wms/lgfapi/v10/entity/iblpn/composite_create/ |
Steps to Enable
To enable the prompt-reason-code parameter:
- From the Modules UI, search for the associated screen (for example, Modify LPN.)
- Click parameters and add prompt-reason-code.
To enable default reason code on short:
- From the Modules UI, search for the associated screen (for example, Modify LPN.)
- Click parameters and add default_reasoncode_onshort.
Key Resources
Enable/Disable Reason Codes
There are instances where all the reason codes configured in the Reason Code screen may not be used, so the user will need the ability to enable/disable the reason codes that are being used or not used, so that the list of reason codes will have codes which are currently in use.
In some cases, not all the reason codes configured in the Reason Code screen are needed. You may now enable the codes you use while disabling those you do not. This ensures that users only see a list of reason codes that are relevant to your warehouse activities.
In the Reason Code UI, A new flag “Enable Reason Codes” is now available where you can edit, enable, and disable reason codes.
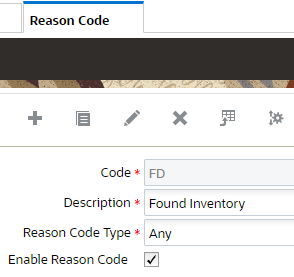
Enable Reason Codes
You can also search for reason codes that do and do not have reason codes enabled. This will help you to better identify and optimize the reason codes you are using most frequently.
Steps to Enable
You don't need to do anything to enable this feature.
Enhancements to WMS Integration with Oracle Content Management (OCM)
The integration between Oracle Warehouse Management (WMS) Cloud and Oracle Content Management (OCM) Cloud enables WMS users to:
- Upload images from WMS browser screens to OCM.
- View images stored on OCM through WMS browser screens.
- Visually indicate how many images are stored for a particular LPN.
When you upload images from WMS, WMS connects to OCM and stores the images on OCM. The uploaded images can be viewed as and when required in WMS. The Oracle Warehouse Management System opens OCM as an embedded UI within WMS browser screens, that enables you to view the images that you have uploaded.
Steps to Enable
You don't need to do anything to enable this feature.
Key Resources
Allow Special Characters and Lowercase in Multiple UI Screens
To ensure the smooth integration with external applications, Warehouse Management has enhanced the handling of special/lowercase characters. This upgrade curates easy and uninterrupted integration with third party applications and while uploading CSV files through the Interface UI. Support for special/lowercase characters already exists in the Warehouse Management application. As part of this enhancement request, we are making sure that there are no gaps with special/lowercase character handling.
A new Company Parameter ‘KEY_TEXT_VALID_CHARS’ is introduced in the Warehouse Management Application UI. With the company parameter configured you can create/edit/save using special and lowercase characters along with a space when interfacing the files. And if you keep the value of the company parameter ‘empty’, the text in the UI fields will be updated with uppercase and numeric characters per the current behavior.
NOTE: Warehouse Management does not allow you to create Order, Purchase Order, or IB Shipment numbers with a space at the start or end of these numbers.
The option to use special characters and lowercase is available in multiple Warehouse Management screens, including Inventory History, Purchase Order, and Inbound Shipments.
For the complete list of modules and associated fields that now allow special characters, see the Key Text Fields Reference document.
COMPANY PARAMETERS
If you would like to allow special characters, KEY_TEXT_VALID_CHARS must be configured with the characters you would like to use. The following table shows the behavior for this new parameter when the value is defined versus blank:
| Company Parameter Key |
Parameter Value |
Behavior |
|---|---|---|
| KEY_TEXT_VALID_CHARS |
Example: /^[ A-Z0-9_@./#&+-]*$!/()=.><:;“”,~`abcdefghijklmnopqrstuvwxyz |
Allows lowercase characters, uppercase characters, numbers and special characters. |
| KEY_TEXT_VALID_CHARS |
Empty/Blank |
Allows uppercase and numbers (current behavior - Default) and converts everything to uppercase. |
NOTE: By default, the value of the company parameter is empty. However, note that if you do enable the KEY_TEXT_VALID_CHARS Company Parameter Key, this will apply to all modules noted in the Key Text Fields Reference document.
Steps to Enable
To enable special characters and lower case, edit the Company Parameter Key and enter the list of valid characters such as - lowercase character, uppercase characters, special characters, and numbers as required in the ‘Parameter Value’ field in the edit pane.
Key Resources
Additional Search Filters in Users UI
Managing your users is a key component of running an efficient Warehouse Management operation. Search and filter features on the User UI have been enhanced to help you manage your users more easily.
Using these new parameters, you may search a list of individuals based on their active status, groups, hire dates, password expiration dates, and a variety of other factors.
The following fields are added to the User UI search pane:
| Field |
Behavior |
|---|---|
| Active |
|
| Default Group |
|
| Default Label Printer |
|
| Default Document Printer |
|
| From Hire Date |
|
| To Hire Date |
|
| Password expiry in (days) |
For Example: If the entered value is 100, the system filters the list of users whose password expires in less than 100 days from the present facility system date. |
| Password expiry after (days) |
For Example: If the provided value is 30, the system filters the list of users whose password expires after 30 days from the present facility system date. |
| Password Life in days |
For Example: If the provided value is 30, the system filters the list of users whose “password life in days” is configured as 30. |
Steps to Enable
You don't need to do anything to enable this feature.
Key Resources
Manage the Number of Labels to be Printed through UI
As a Receiving Manager, you know that printing labels is an important and essential task in your everyday warehouse operations. A speedy, error-free label-printing operation goes a long way in optimizing overall efficiency by reducing downtime and printing costs. To this end, Warehouse Management packs some helpful improvements to streamline your label-printing operations. This feature will help you avoid delays due to unforeseen or accidental high volumes of print requests and ensures your label printing requirements are honored.
Printing multiple copies of IB LPN Labels, Blind Labels, OB LPN Labels, Shipping Labels and OB LPN contents is possible via the Inbound LPN Inquiry and Outbound LPN Inquiry screens in Warehouse Management. As part of the changes in this release, you can print label copies with a batch size having an upper limit of 5 and blind labels with a batch size having an upper limit of 5000, as part of a single instance.
NOTE: There is no limitation on the total number of copies that can be printed in a given timeframe. If you have a need to print more label copies than the upper limit of the batch size, the enhancement offers you the flexibility of printing the remainder in multiple batches.
To guide you on the print batch sizes, all of the above-mentioned screens will display the following message: “Maximum number of copies: 5. Maximum number of blind labels : 5000”.
If the values entered in the field for printing copies exceed the batch size for:
- Label copies - a dialog box is displayed with the message: “Number of copies cannot be greater than 5”, and,
- Blind labels - a dialog box is displayed with the message: “Number of labels cannot be greater than 5000”.
Steps to Enable
You don't need to do anything to enable this feature.
Key Resources
OAuth 2.0 Support for Output Interfaces
When Warehouse Management receives information such as Purchase Orders, ASNs, etc., from external applications, we support the authentication protocols for OAuth 2.0. In 23A, we’ve also added support for authorization protocols for external systems for OAuth 2.0. To allow you to configure the requirements needed to validate and transfer data to external systems, the following fields have been added to the Output Interface Configuration (Detail) UI.:
| Field Name | Field Type | Mandatory | Values | Comments |
|---|---|---|---|---|
| Authentication Type | Drop-down | Yes |
|
New drop-down to select to determine the authentication type |
| Client Id | Text Field | Conditional Yes | Mandatory if the grant type is OAuth2.0- CC or OAuth2.0 - RPOC is YES | |
| Client Secret | Text Field | Conditional Yes | Mandatory if the grant type is OAuth2.0- CC or OAuth2.0 - RPOC is YES | |
| Token URL | Text Field | Conditional Yes | Mandatory if the grant type is OAuth2.0- CC or OAuth2.0 - RPOC is YES | |
| Scope | Text Field | Conditional Yes | Mandatory if the grant type is OAuth2.0- CC or OAuth2.0 - RPOC is YES |
These fields are available on the Create and Edit pane of the detail page for every interface type. The columns are hidden by default. You can add the fields to your UI view as needed.
NOTE: OAuth2.0 fields are not applicable for "Bill of Lading" and "Commercial Invoice" interface types as e-mail and printer are the only two protocols supported.
Steps to Enable
You don't need to do anything to enable this feature.
Inbound Logistics
Enhancements to Image Feature on Inbound LPN UI
Previously, as a part of the Warehouse Management-Oracle Content Management Cloud integration, two action buttons ‘Upload Images’ and ‘View Images’ were added to the IBLPN UI to enable uploading and viewing of images.
In 23A, the ‘View Images’ button has been removed from the IBLPN UI. Instead, a new column ‘Nbr Images’ has been introduced to the results grid in IBLPN UI. The value appears in this column as hyperlinks and contains the number of images uploaded to OCM for the selected IBLPN. This allows you to know how many images are linked to the IBLPN in OCM. And, once you select the hyperlink, the system will open the OCM embedded UI within a child view in the IBLPN UI.
The asset view dedicated for the current Company/Facility will also be displayed within the OCM embedded UI filtered by the IBLPN collection. And, all the images relevant to the selected IBLPN will be displayed in this view.
Steps to Enable
You don't need to do anything to enable this feature.
Key Resources
View Machine Learning-Driven Market Basket Analysis for Product Associations
We have now added the ability in Warehouse Management to analyze your inventory using Market Basket Analysis. By running this analysis, you will be able to generate a report that displays frequent items in your warehouse that are commonly ordered together. This information allows you to see what items may be beneficial to slot together during putaway.
Understanding your customer’s buying patterns can be extremely beneficial to your warehouse operations. Having the knowledge of what items are typically ordered together, you can potentially structure your inventory and slotting positions more efficiently. Leveraging Oracle’s AI Machine Learning algorithms, Cloud WMS now has the ability to perform a Market Basket Analysis on your inventory. This analysis looks at purchasing patterns, and groups items together based on how likely they are to be ordered together. The analysis will display a report showing you these “frequent itemssets”, how often they are ordered together and how probable it is to continue.
In the Scheduled Jobs UI, a new Job Type is now available which allows you to generate training data for Market Basket Analysis. Follow these steps to generate and view analysis specific to your data.
- Create a scheduled job to generate the training data for Market Basket Analysis in the Scheduled Jobs UI.
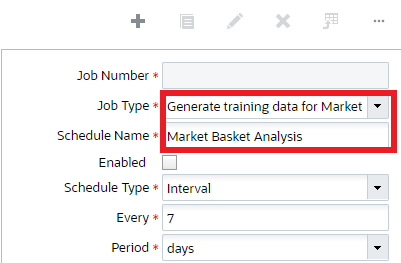
Generate Training Data Job Type
NOTE: You must enter a valid username, or else will be returned an error.
- Navigate to the AI/ML Training Data to verify that the training data contains the correct data.
- Create a Market Basket Analysis Training Template in the AI/ML Training Template UI
NOTE: To run the Market Basket Analysis, you must select the “Apirori” algorithm.
- After creating your Market Basket template with all of the mandatory fields completed, click Train Template.
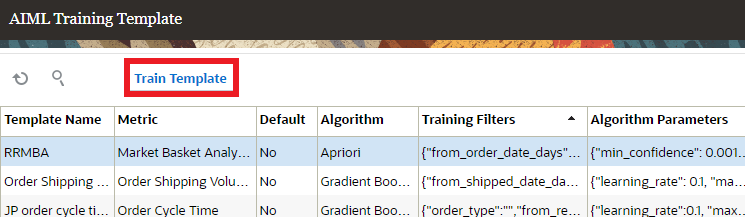
Train Template
- Navigate to the AI/ML Model UI and select the most recent Market Basket Analysis entry. In the “Model Reference” field, click on the hyperlink.
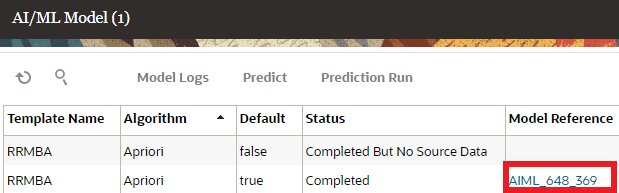
Model Reference Hyperlink
- You can now view the results of your successful Market Basket Analysis.
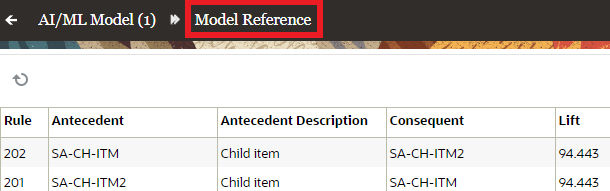
Analysis Results
NOTE: For this initial release, when viewing your analysis via the Model Reference hyperlink, it is recommended to download the results to save as a CSV.
The following table provides details about the different columns available in the Model Reference UI:
| Term | Description | Values |
|---|---|---|
| Antecedent | The indicator item. This is the item that we are finding associations to. We can call this Item A. |
Item |
| Consequent | This is the response item. It will be associated to item A. We can call this Item B. |
Item |
| Support | The represents the probability that an event will occur. For example, there is a 12% chance that an order will contain cereal. |
Will be between 0 and 1 |
| Confidence | The probability Item B will be ordered if Item A is ordered. For example, if we order milk, there is a 14% chance we will order cereal. |
Will be between 0 and 1 |
| Lift | Lift is the increase in expectation that a customer will order Item B when they have ordered Item A. For example, we see an increase in expectation of 50% that when a customer orders cereal, they will order milk. |
Will be greater than 0 |
Steps to Enable
You don't need to do anything to enable this feature.
Key Resources
Display Last Printed Timestamp on Inbound LPN UI
Print Label functionality has been enhanced to display a Last Printed Timestamp. This feature gives you the advantage of checking for the latest instance of printing Inbound LPN labels so that unintentional re-printing can be avoided. This can bring down your printing costs and act as a method to record last printed timestamp events.
In an effort to decrease your printing costs, Warehouse Management label printing has been enhanced to now display a Last Printed Timestamp. This feature will allow you see the last time your Inbound LPNs were printed by recording and displaying the printed timestamp. This field should help avoid any unintentional or unnecessary re-printing of labels.
The “IB LPN Label – Last Printed Timestamp” is displayed as a sortable field on the results pane of the IB LPN view. Whenever you select an IB LPN label for printing, the “IB LPN Label – Last Printed Timestamp” field will be populated with that timestamp event.
Steps to Enable
You don't need to do anything to enable this feature.
Key Resources
Inventory Operations
Additional Search Filters in Movement Request Header
Continuing on our enhancements to the Movement Request capabilities, we have added multiple features to improve the management of these requests. In 23A, you now have the ability to update an existing Movement Request via API, along with the ability to de-allocate and cancel Movement Request using the UI screens.
To assist in managing multiple movement requests against associated work orders, the option to search and filter movement request data by Manufacturing (Mfg) Work Order Number has been added. The following search field has been added to the Movement Request Header UI:
| Field | Field Type | Default | Details |
|---|---|---|---|
| Mfg Work Order Nbr |
Text field in Movement request header search filter |
Blank |
User can enter text value to filter data |
When you filter data with this field, the system will display the results in the Movement Request Detail UI.
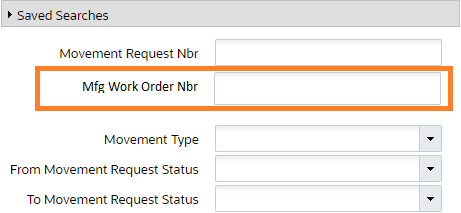
Manufacturing Work Order Number
When you filter data with this field, the system will display the results in the Movement Request Detail UI.
Steps to Enable
You don't need to do anything to enable this feature.
Key Resources
Deallocate/Short Quantity from Movement Request Detail
The following action buttons have been added to the Movement Request Detail UI:
| Action Button | Allows you to: |
|---|---|
| Deallocate |
|
| Short |
|
DEALLOCATION AND OTHER MOVEMENT REQUESTS
NOTE: There could be multiple movement requests which can be associated with Full LPN Replenishment, when one of the movement request detail is deallocated, other movement request details will be impacted, similarly the same scenario could happen for Replenishment with allocation UOM of cases or packs.
For Example:
- A single LPN-1 with 100 units could have been allocated against three movement request details, MR1, MR2, MR3, each one pointing to different Work Orders for full LPN Replenishment. Let's say MR1 is pointing to Work Order-1, MR2 is pointing to Work Order-2 and MR3 is pointing to Work Order-3. When the user wants to deallocate Movement Request MR-2, then movement requests MR-1 and MR-3 will also be de-allocated.
Steps to Enable
To enable access to both the Deallocate and Short Action buttons, add the group permission Movement Request/Can Manage Movement Request to the users group.
Key Resources
Cancel Movement Requests through UI
Fusion Manufacturing may cancel a work order due to underlying sales orders being cancelled, shop floor damages, production outages, or machine breakdown where there would be a need for movement requests to be cancelled in WMS. To support Integration between WMS/Fusion Inventory/Fusion Manufacturing, you can now cancel Movement Requests in WMS.
Now, when you search Movement Requests based on the Work Order number, you can then select multiple movement requests and click the Cancel button in the Movement Request Detail UI to cancel them.
You can Short/Cancel the whole movement request in the following scenarios:
- When all the movement request details are fully or partially allocated with no tasks being executed.
- When the Movement Request is associated with multiple work orders.
- When filtered movement request details are in Created Status.
NOTE: the system will deallocate and short/cancel the portion of the movement request detail when part of the movement request detail is delivered and the remaining portion of the detail is part of the task that is In Ready status.
Once you click Cancel, a message will display showing the number of movement request details successfully canceled. The message will also display the number of records subjected to cancel. This will include the count of filtered records.
Steps to Enable
You don't need to do anything to enable this feature.
Key Resources
Improvements to Update Action Code for Movement Request Interface
We’ve added additional functionality to the Movement Request Interface to enhance the Update Action Code. Now, If a user interfaces a file with action code UPDATE and there is no existing record found in the application for that Movement Request, the system will create the Movement Request considering all the existing validations.
The Movement Request Interface will consider both action codes Create and Update while updating or creating data into WMS. If the system sends UPDATE as an action but the records are not present in WMS, the system will create them with the data sent. Then, if the movement record is already present in WMS, the system will update the existing record.
Steps to Enable
You don't need to do anything to enable this feature.
Key Resources
Capture and Display Images in Item Inventory by LPN UI
To further align Warehouse Management support for Oracle Content Management Cloud (OCM), upload and view image support has been added to Item Inventory by LPN UI to provide flexibility to users to handle both IBLPN and OBLPN images from a single view.
A new action button ‘Upload Images’ has been introduced in the Item Inventory by LPN UI and is enabled only under the following conditions:
- If the logged-in WMS user has the Container/Upload Images permission.
- If the user selects a single LPN of Type ‘I’ (inbound) AND the LPN is not cancelled or consumed.
- If the user selects a single LPN of Type ‘O’ (outbound) AND the LPN is not cancelled, shipped or delivered.
- If the user does not select any LPN or selects multiple LPNs, the button will not be enabled.
The Upload Images action button allows you to upload single or multiple images associated with an LPN. The size of each image needs to be less than 1MB and should be in one of the supported formats (jpg, jpeg, or png).
A new column "Nbr Images" has been introduced in the Item Inventory by LPN grid view. The values in this column appear as hyperlinks and contain the number of images uploaded to OCM for the selected LPN. When you select the hyperlink, the system displays the OCM embedded UI within a child view in the Item Inventory by LPN UI.
The asset view dedicated for the current company/facility is displayed within the OCM embedded UI. And, depending on the type of LPN selected (inbound or outbound), the embedded UI is filtered by the IBLPN or OBLPN collection.
NOTE: All the images relevant to the selected LPN are displayed within this view.
Steps to Enable
You don't need to do anything to enable this feature.
Key Resources
Print Blind LPN Labels through RF
Printing blind labels is now easier in the RF. A new module has been added that allows you to generate and apply a Blind LPN to inbound cartons or pallets by simply entering the number of labels directly from the RF device.
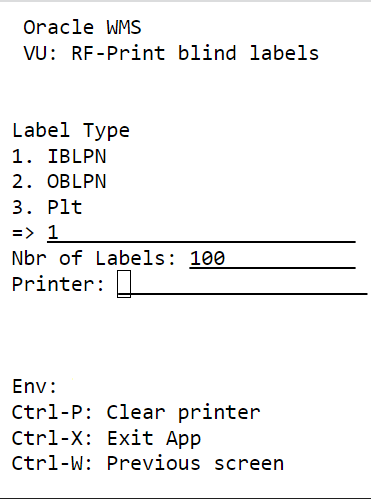
Print Blind Label
A new RF “Print Blind Labels” (rf.inbound.cwrfprintblindlabels) module is introduced to print blind IBLPN, OBLPN, and Pallet.
The new screen includes the following fields:
- Enter Label Type: Displays the following list of selections to print blind labels as per the sequence counter determined for the user's current facility and company context.
- IBLPN
- OBLPN
- PLT
-
Number of Labels: Allows you to enter the number of blind labels required.
NOTE: The maximum number of blind labels you can print is up to 5000. If the value is >5000, an error message stating “Value for max-number-of-labels-to-print should be 1 to 5000” is displayed.
- Printer: Displays default printer name.
- CTRL-P: Hotkey that allows you to change the printer via RF by scanning the printer barcode or entering the printer’s name.
NOTE: If the default printer is not available, then a system displays a pop-up window prompting the printer.
Steps to Enable
You don't need to do anything to enable this feature.
Key Resources
Outbound Logistics
Capture and Display Images in Outbound LPN Inquiry UI
With the image upload and view capability extended to the Outbound LPN Inquiry UI, you can now store OBLPN images in Oracle Content Management Cloud (OCM.)
A new action button ‘Upload Images’ is available in the OBLPN UI and is enabled only under the following conditions:
- If the logged-in WMS user has the Container/Upload Images permission.
- If the user selects a single OBLPN and the OBLPN is not cancelled, shipped or delivered.
- If the user does not select an OBLPN or selects multiple OBLPNs, the button will not be enabled.
The upload images button allows you to upload single or multiple images for an OBLPN. The size of each image needs to be less than 1MB and should be in one of the supported formats (jpg, jpeg, or png)
Also, a new column ‘Nbr Images’ has been introduced in the OBLPN grid view. The values in this column appears as hyperlinks and contain the number of images uploaded to OCM for the selected OBLPN. Once you select the hyperlink, the system displays the OCM embedded UI within a child view in the OBLPN UI.
The asset view dedicated for the current company/facility is displayed within the OCM embedded UI filtered by the OBLPN collection. And, all the images relevant to the selected OBLPN is displayed within this view.
Steps to Enable
You don't need to do anything to enable this feature.
Key Resources
Enhancements to Full LPN Allocation to Support Multiple Batches/Inventory Attributes for Same SKU
You can now allocate single SKU LPNs with multiple batches, expiry and/or attributes along with multi-SKU LPNs via Full LPN allocation. If you enable the "Include Multi SKU LPNs" flag in the Allocation mode sequence of the Wave template, Single SKU LPNs with multiple batch/expiry and/or attributes will now be considered for allocation along with multi-SKU LPNs.
NOTE: Single SKU LPNs with uniform batches and attributes will still be considered for allocation regardless of the Multi SKU flag setting..
Additionally, single SKU LPNs having uniform batches and attributes will always be considered for allocation before Multi-SKU LPNs. So, it is important to manage wave configuration in such a way as to prevent Single SKU LPNs from being considered if they may interfere with the allocation of Multi-SKU LPNs. You can achieve this by separating Single SKU, uniform LPNs from Multi-SKU LPNs and Single SKU LPNs having multiple batches and attributes into separate allocation zones.
If you have inventory with both Single SKU and Multi SKU inventory in same allocation zone or location, then you may encounter unexpected behavior. We recommend separating any Single SKU and Multi SKU inventory by Location/Allocation Zones.
NOTE: This change is not applicable to Full LPN_Cubed flow (i.e., Allocation UOM=LPNs and Cartonize UOM=Cubed in the Allocation Mode Sequence). The Full LPN cubed flow will continue to behave the same as before.
The allocation of orders for this allocation mode sequence with the flag enabled will honor order priority and all relevant flags on the Order Type.
The following are the allocation methods supported:
- First In First Out (FIFO) default
- Last In First Out (LIFO)
- Location pick seq ASC
- Location pick seq Desc
NOTE: If you select an unsupported method, the system will default the method to FIFO for multiple inventory or multi-SKU allocations.
Steps to Enable
- To enable support of Multiple Batches/Inventory Attributes for Same SKU, navigate to the Allocation Mode in the Wave Template and configure the allocation mode sequence.
- Set the Location type to Reserve.
- Configure the Allocation UOM to LPNs and Allocation Distribution Mode to ‘No Distribution’.
- Enable the Include Multi-SKU LPNs flag.
Key Resources
Enhance Outbound Audit Functionality in Handling of Multiple Batches/Inventory Attributes for Same SKU
To further assist in packing and post-packing operations, we have enhanced our capabilities of outbound audits when dealing with Batch, Lot, Expiration Date and attribute enabled items. As of 23A, when outbound audits are performed on these items, the user will be prompted for Batch/Expiry/Inventory attributes based on necessary conditions. And, when adjustments are made, Oracle WMS Cloud will deallocate that exact inventory pertaining to the specific batch/expiry. This enhancement will ensure any inventory adjustments done will adjust the correct inventory balances. New screen parameters have been introduced in RF Outbound Audit transaction that will allow you to:
- Skip or set additional prompts like expiry or other inventory attributes for verifying serial numbers and attributes respectively.
- Decrement orders by setting allocations ordering with your desired sequence in ascending or descending order.
- Confirm batch number, expiry date and inventory attributes if the scanned SKU is tracking batch number/expiry date/inventory attributes respectively.
- Record more inventory-level data capture in the Audit History Web UI.
Outbound Audit has been enhanced so you can enjoy a greater accuracy of cross-verifying warehouse picking operations and eliminate downstream discrepancies. Wouldn’t it be faster for you to audit OB LPNs when serial number-tracked items (with no quantity discrepancies) aren’t required to be scanned? Or, maybe on the other hand, you are concerned more about the item quantity than being prompted for additional attributes during the audit? In 23A, Warehouse Management brings two screen parameters that let you do exactly that!
The screen parameters "verify-serialnbrs-on-qty-mismatch-only" and "confirm_attributes" have been introduced to the Audit OB LPN Module that give you the provision to skip or set additional prompts like expiry or other inventory attributes for verifying serial numbers and attributes respectively. The feature has also been enriched to allow you to select the batch number when you do not have scannable batch numbers. This makes entry of batch numbers easier for you in such a scenario.
| Screen Parameter |
Behavior when value set =YES |
Behavior when value set =NO |
|---|---|---|
| verify-serialnbrs-on-qty-mismatch-only |
The serial number is prompted only when:
|
The serial number is prompted whether there is a quantity mismatch or not. NOTE: If you do not scan the SKU at all and end the audit, the system does not prompt for serial numbers. |
| confirm_attributes |
The batch numbers/expiry dates/inventory attributes are prompted when scanned SKU is either batch-tracked, or expiry-tracked, or tracked by any of the inventory attributes, even if there no conflicts. NOTE: Auto-populating of attributes from multi-field barcodes is currently unsupported. |
The batch numbers/expiry dates/inventory attributes are not prompted. |
NOTE: By default, the parameters are set to NO (value of screen parameter is blank).
If you scan a SKU or unanticipated inventory and that item is serial-tracked, then you won't be prompted for serial numbers. As audit will not create new inventory, serial number prompt screen is skipped to avoid any additional scans.
With the 23A release, Outbound Audit has been enhanced to give you the ability to audit SKUs that are batch-tracked, or expiry-tracked, or tracked by any of the other inventory attributes, along with the quantity at an inventory level. By setting the screen parameter "confirm_attributes" to YES, you will be prompted for Expiry Number during the OB Audit if the SKU is tracking Expiry Number and when there are multiple Expiry Numbers for the same SKU.
Let’s say, for example, you have an OB LPN with different expiry dates (Expiry-01 and Expiry-02) with a quantity of 10 units each. But during a physical audit, you have realized that the OB LPN with Expiry-02 has only 8 units. At this point, you may wish to record the discrepancy and update it against the relevant OB LPN in the Audit History Web UI. This is achieved thanks to the enhanced capability to record more inventory-level data capture on the Audit History Web UI. By capturing and recording the corresponding inventory attribute picked in the OBLPN being audited, you will enjoy a greater accuracy of cross-verifying warehouse picking operations and eliminate downstream discrepancies.
To this end, a total of sixteen additional columns have been introduced to the Audit History Web UI, namely, "priority_date" and "inventory_attribute_a" to "inventory_attribute_o". The scope of the search filter has also been expanded to include these columns. Even if unanticipated SKUs are scanned, the quantity is recorded in Audit History since there is a provision to prompt you for batch number/inventory attribute if the scanned SKU is batch-tracked or inventory attribute-tracked or expiry-tracked.
The following table shows you the system behavior with respect to inventory and audit history under different audit scenarios:
| Audit scenario |
Inventory Update |
Audit History Record |
|---|---|---|
| Anticipated SKU audited with lesser inventory |
Yes |
Yes |
| Anticipated SKU audited with more inventory |
No |
Yes |
| Anticipated SKU but unanticipated Batch/Expiry/Inventory Attribute audited |
No |
Yes |
But perhaps you would like to decrease the inventory for a particular SKU+Expiry, so that there are no issues during the shipping?
Well, the new screen parameter "column-ordering-rule" in the Audit Outbound LPN Module now provides you more control over decrementing relevant orders during your audit transactions. If the LPN being audited contains multiple orders and you enter a lesser quantity, you can set the allocations ordering with your desired sequence in ascending or descending order by configuring the Column Ordering Rule Name on the Column Ordering screen.
For example, if the audit is performed for a single inventory pointing to two different orders and you enter a lesser quantity and the Column Ordering Rule has the following configuration:
| Column Ordering Rule Name |
Column |
Sequence |
Ascending/Descending |
|---|---|---|---|
| RKRULE01 |
ORDER PRTY |
1 |
Descending |
| RKRULE01 |
ORDER CREATE_TS |
2 |
Descending |
Then, Audit OB LPN has the following data:
| OB LPN |
SKU |
Quantity |
Order Number |
Order Priority |
Order Create TS |
|---|---|---|---|---|---|
| OBLPN01 |
ABC |
10 |
ORDER001 |
1 |
6th January |
| OBLPN01 |
ABC |
10 |
ORDER002 |
2 |
6th January |
If you end the audit by entering quantity for the SKU as 15, then 5 units have to be deallocated. So, based on the Column Ordering Rule Configuration, the system will pick up ORDER002 for deallocation as the Order Priority is 2 for the same.
Steps to Enable
- To be prompted for serial numbers when there is a mismatch, set the "verify-serialnbrs-on-qty-mismatch-only" screen parameter to YES.
- To be prompted for batch/expiry/inventory attributes, set the "confirm-attributes-of-inventory" screen parameter to YES.
Key Resources
- For a DEMO VIDEO of this feature, see “Manage Multiple Batches and Inventory Attributes.”
Auto-Send Shipping Documents to Dynamic Email
Further enhancing the ability to auto-generate emails for Shipping Documents like Commercial Invoice or Bill of Lading (BOL), an additional feature has been introduced that allows for ‘sending shipping documents via email to different recipients at the time of Loading/Shipping’. In many cases, the users must provide these shipping documents, via email, to different parties (customers, logistics providers, freight forwarders, etc.)
This new enhancement allows just that by providing the ability to pull the required email addresses dynamically from the ‘email fields’ configured within the common entities like Outbound Load/Carrier modules in Warehouse Management. This new, dynamic feature also strengthens a company’s ability to move toward a more green, paperless initiative.
In addition to auto printing/auto emailing of BOL/Commercial Invoice documents we have also extended the same functionality for the documents: Export Shipment Packing List and Shippers Export Declaration.
AUTO PRINTING/AUTO EMAILING OF EXPORT SHIPMENT PACKING LIST AND SHIPPERS EXPORT DECLARATION DOCUMENTS
When an Outbound Load is shipped/loaded, the Auto-Printing of documents (for example., Export Shipment Packing List and Shippers Export Declaration) can be configured in the Output Interface Configuration UI. Auto Printing is completed via a printer, or the documents are sent via an email based on the event trigger that has been configured.
For more details, see the Automatic Document Generation During Shipping feature from 22D.
AUTO-SEND SHIPPING DOCUMENTS TO DYNAMIC EMAIL
You can setup multiple recipients for email through the Output Interface Target UI. A new field namely ‘Documentation Notification Email’ is added to the create/edit pane of Output Interface Target UI. Configuring this field, the system will auto-send emails to the ‘email address’ mentioned in the Outbound Load/Carrier entities. In this new field from the drop-down list, select either ‘Outbound Load Doc Notification Email’ or ‘Carrier Email’ to auto-send the email to the respective parties when the outbound load is either ‘shipped’ or ‘loaded’.
You can use a specific email address as well (static email) by adding the email address to the ‘Email’ field in the create/edit pane of the Output Interface Target UI. The system will auto-send the shipping documents as per your preference setup (dynamic email address or/and static email address).
NOTE: If static email is not configured and the ‘Documentation Notification Email’ field in the Output Target UI is blank, then by default the users email id will be used by the system (email configured in the Users UI). If the users email id field is not configured, then the system will throw an error for Auto-Sending of the Shipping Documents. The email sent will have a ‘subject line' as ‘Auto generated file received for <context_key> <context_value>’ where the ‘context key’ represents load number and ‘context value’ represents the numerical value of the load number. For example, ‘Auto generated file received for Load Nbr OSPMM00001501’
NEW DOCUMENT NOTIFICATION FIELD IN OUTBOUND LOAD AND PLANNED LOAD HEADER
A new text field 'document_notification_email' has been added to the Outbound Load header Input Interface and Planned Load header Input interface. The new field is not a mandatory field and can be blank by default.
NEW FIELD IN OUTBOUND LOAD/PLANNED LOAD PATCH API
A new field 'document_notification_email' has been introduced to the Outbound Load/Planned Load PATCH lgfapi. You can interface this field with different file formats (flat file format and xml).
The following is the request body for the new field:
PATCH URL:
.../wms/lgfapi/v10/entity/load/<id>
REQUEST BODY:
{
"fields": {
"document_notification_email": "xxx@gmail.com",
}
}
NOTE: Only a status less than shipped will be allowed.
Steps to Enable
- From the Interface Protocol 'Email' of Output Interface Target UI, select the drop-down field "Document Notification Email".
- Select ‘Outbound Load Doc Notification Email’ or ‘Carrier Email’ for the email to be pulled from the specific entity as required.
Key Resources
Reset External Planned Load Number for Partially Shipped Order Detail
As part of this enhancement we are extending the support of cargo planning from external applications like Oracle Transportation Management etc. In 23A, you will have the ability to process the inventory further for the order detail for which the inventory has been partially shipped in an externally planned load.
Warehouse Management now provides you an ability to reset the externally planned load number for partially shipped-out orders. And by nullifying the load number, the inventory for the remaining order detail is processed further or it can be shipped out as part of a new load.
In the Order Header Detail screen, for partially shipped out orders, you can nullify the load number, post which the inventory can be processed with further operations such as Picking / Packing, assign to a new load and ship out.
Also, the system allows you to select multiple order lines and reset the externally planned load number from the Order Detail screen.
You can follow these steps to reset the externally planned load number:
- In the Order Header screen, select the order and click Order Detail.
- In the Order Detail screen, select the order detail and click Reset Externally Planned Load Number to reset / remove the detail.
- A pop-up window will appear. Provide confirmation and proceed with resetting externally planned load detail.
Validation:
When resetting the load number, the WMS load associated to the Externally Planned Load Number should be shipped. If some of the order detail lines selected by you fails the validation, the system displays an error ‘Cannot reset Externally Planned Load Number’.
NOTE: Only the order lines which pass the validations is allowed when resetting the load number.
A new text field ‘Externally Planned Load Number’ has also been introduced in the Order Header and Order Detail Filter Criteria search pane. Once you enter a valid load number, the system filters all the orders with similar planned load numbers.
Steps to Enable
You don't need to do anything to enable this feature.
Key Resources
Configure OBLPN Putaway and Task Zone Movements
Restrictions for OBLPN Putaway have been lifted so that you can now configure and add both programs in a task type.The system allows both OBLPN Putaway and Task Zone Movements to be configured together for the following task types:
- FULL-CONTAINER
- LPNUNITS
- LPNPACKS
- LPNCASES
- NC-ACTIVE-PICK
- PICK_CART
- FULL-LPN-PALLET
- PLTMV_AUTOPK
Steps to Enable
You don't need to do anything to enable this feature.
Key Resources
Improvements to RF Distribute LPN
Sometimes you might want to pack an Outbound LPN quickly along with printing label with lesser scans/inputs. In certain flows, you would want to generate an Outbound LPN automatically, for each consolidation location destination combination. In a high volume environment where there is lesser dedicated space available for performing distribution of the inventory across stores, the below feature can be utilized.
A new module parameter choice ‘"consol-locn-sku’ is added to the "autopack- mode" of the RF: Distribution transaction. This new parameter choice will create one LPN per destination even if the oblpn is linked to multiple orders. This new autopack mode will result in the auto generation of the OBLPN and the user will be prompted to scan a printer, so the OBLPN printing label will be created. A pop-up message will be displayed per oblpn/sku combination.
This design should work on the following Distributions Modes:
- Receiving with Flow thru
- RF Distribute standalone
NOTE: If the IBLPN is distributed to multiple destinations, then you will need to confirm the quantity for each destination.
Steps to Enable
To enable the ‘quantity-confirmation’ parameter, go to Modules > RF: Distribute (OBLPN) > Screens > RF: Distribute > Screen Param > autopack-mode > edit pane > Module Parameter Choice (drop-down) > "consol-locn-sku".
Key Resources
New RF Module for Post Packing Updates and Printing Options
You now have an ability to update an OBLPN post packing through a common RF transaction.
The new module ‘Post Packing OBLPN updates and handling’ (rf.outbound.cwrfpostpackinglpnhandling) is available with the following screen parameters:
| Parameter | Type | Possible Values | Behavior |
|---|---|---|---|
| print-column-order-descr |
Text |
Rule name configured from column ordering description created in the UI. |
|
| prompt-label-printer |
Selection |
None | Yes | No |
|
| prompt-doc-printer |
Selection |
None | Yes | No |
|
| validate-critical-dims |
Selection |
None | Yes | No |
NOTE: The Items dimension value are compared for Length, Width and Height with respective LPN type dimension value. And, if any value for the item is greater, the LPN type will not be updated and error message will be displayed.
NOTE: Validate-critical-dims will not have any impact when container-type is 'Pallet'. |
| accept-container-dimensions |
Selection |
None | Yes | No |
|
| accept-container-weight |
Selection |
None | Yes | No |
|
| container-type |
Selection |
None(blank) | LPN | Pallet |
|
| output-file-to-generate |
Selection |
None | OBLPN Shipping Info | LPN Inventory | Pallet Shipping |
NOTE: You will not be able to generate any output:
|
Additionally,
- The OBLPN Type prompt is not mandatory.
- The printing parameters (that is, ‘print-column-order-descr’, ‘prompt-label-printer’, ‘prompt-doc-printer’) are not applicable for Pallet mode. And, the RF screen will display an error with an appropriate warning reflecting the same.
- The RF transaction now validates users input for critical dimensions(L/W/H), Weight, and Volume.
The following table describes the RF behavior when the respective values are set for the below parameters:
| print-column-order-descr | prompt-label-printer | prompt-doc-printer | Behavior |
|---|---|---|---|
| Not Populated |
No |
No |
|
| Not Populated |
Yes |
Yes |
|
| Populated |
No |
No |
|
| Populated |
Yes |
No |
|
| Populated |
Yes |
Yes |
|
| Populated |
Yes |
Yes |
|
| Populated |
Yes |
Yes |
|
| Populated |
Yes |
Yes |
|
Steps to Enable
You don't need to do anything to enable this feature.
Key Resources
Warehouse Workforce Management
GET Support for WMS ACTIVITY Using a REST API
The WMS Activity view captures all the operations performed by users on the warehouse floor using WMS RF transactions and the data is consolidated at regular intervals and available for WFM reports.
With the WMS Activity entities now exposed via REST API, you can now build additional labor management capabilities in external systems by getting the WMS activity information from WMS using REST APIs.
The following URLs are now supported for WMS_ACTIVITY:
HEAD .../lgfapi/v10/entity/wms_activity/{id}
Fetch paginated results when users use the following URL:
GET .../lgfapi/v10/entity/wms_activity/
Fetch non-paginated result by specific 'ID':
GET .../lgfapi/v10/entity/wms_activity/{id}
The following columns from WMS_ACTIVITY are fetched in the response of the API requests:
- ID
- FACILITY_ID
- TASK_NBR
- MODULE_NAME
- SCREEN_NAME
- USER_NAME
- BEGIN_TS
- END_TS
- STATUS_ID
- CREATE_TS
- MOD_TS
- VERSION_ID
- MOD_USER
- COMPANY_ID
- CREATE_USER
WMS ACTIVITY DETAIL
The following URLs are now supported for WMS_ACTIVITY_DETAIL:
HEAD .../lgfapi/v10/entity/wms_activity_dtl/{id}
Fetch paginated results when users use the following URL:
GET .../lgfapi/v10/entity/wms_activity_dtl/
Fetch non-paginated result by specific 'ID'
GET .../lgfapi/v10/entity/wms_activity_dtl/{id}
The following columns from WMS_ACTIVITY_DTL are fetched in the response of the API requests:
- IDACTIVITY_ID
- LPN_NBR
- UNITS
- PALLET_NBR
- LOCATION
- ITEM_CODE
- REF_FIELD_1
- REF_FIELD_2
- SKU_LINE
- ACTIVITY_CODE_ID
- CREATE_TS
- MOD_TS
- VERSIONID
- MOD_USER
- BEGIN_TS
- END_TS
- CREATE_USER
- UOM_CODE
- CONVERSION_FACTOR
- PRE_PACK_FLG
Steps to Enable
Review the REST service definition in the REST API guides to leverage (available from the Oracle Help Center > your apps service area of interest > APIs & Schema). If you are new to Oracle's REST services you may want to begin with the Quick Start section.
Key Resources
IMPORTANT Actions and Considerations
DEPRECATED FEATURES IN WORKFORCE MANAGEMENT
Note that the following features and reports in Workforce Management are no longer used, so they will be deprecated in 23A:
Features:
- WMS RF CiCo (Clock in-Clock out) User
- Work_AreaView Module
Reports:
- DailyProductionReport
- HoursByDayView
- HoursPerActivityReport
- ManPowerBudgetView
- ManPowerCumulativeReport
- ManPowerCumulativeReportByCostCenterView
- ManPowerJustifiedHourView
- ManPowerOperatorCumulativeReportView
- ManPowerOperatorView
- ManPowerProductivityBoard
- ManPowerReport
- ManPowerReportByuserPerCostCenterView
- ManPowerReportPerCostCenterView
- ManPowerReportPerMonthView
- ManPowerReportPerProcessTypeView
- ManPowerReportPerWorkAreaView
- ManPowerReportPerWorkGroupView
- ProductivityByProcess
- ProductivityPerHhMaterialHandlingView
- ProductivityPerHhProcessView
- ProductivityPerUOMProcess
NOTE: These items will be suffixed with "_OBSOLETE" in the modules view.
WEB RF APPLICATION - UPDATING TO HTML5 CANVAS
Many of you utilize our Web RF application to perform RF functional testing prior to getting your quarterly product updates and/or patch bundles. Web RF is changing technologies. Beginning with update 23A, Web RF will be rendered using HTML5 Canvas and will no longer use DOM elements. The change will not impact the functioning of Web RF as it pertains to testing of RF functions.
NOTE: As part of this update, the onscreen keyboard has been removed and it is recommended to use the OS keyboard. There is now a new inactivity timeout of 15 mins that is not configurable.
Users who have bookmarked the URL with the "/" at the end need to create a new bookmark with the "/" removed. The CTRL+N key is now reserved for new pages only. If you have mapped this key, you will need to update your mapping to reflect this.
NOTE: The Web RF application is for testing purposes only and not for production use. For more details, see the RF Devices section in the Technical Requirements Guide.
PRODUCTION-TO-TEST (P2T) AND TEST TO TEST (T2T) SERVICE REQUESTS
Oracle Fusion Warehouse Management Cloud wants to make you aware of an upcoming and important update for customers requesting database copies from production-to-test (P2T) and test-to-test (T2T). In order to better align with the Fusion product family, we are implementing the following procedural change:
- All P2T and T2T service requests must be submitted via MOS fourteen (14) business days prior to the requested update
- This change is effective February 1, 2023
You can find the full P2T/T2T database copy procedure on MOS here: