- Revision History
- Overview
- Feature Summary
- Warehouse Management
-
- WMS Common
-
- Improve Location Visibility Using Spatial Coordinates
- Access Online Help Button from Warehouse Management Home
- Enhancements to AI/ML Training Template for Market Basket Analysis
- Configuration Export/Import Tool
- Configure SSO and OAuth Based Authentication Using Self Service Feature
- Configurable Option for File Attributes
- Flexibility to Filter Repositories in OCM Standalone Embedded UI
- Update to STORE_INTRANSIT_QTY_BY_INVN Company Parameter
- Additional Columns Added to Label Designer Template
-
- Inbound Logistics
- Inventory Operations
-
- Receive Replenishment Confirmation for Full LPNs Using a REST API
- Perform Cycle Counts in Cases and Packs
- Create a New Lot in Batch Management UI
- Enhancement to Create Multiple Lots in Batch Management UI Using a REST API
- Update Lock Code/Expiry Date on an Existing Lot Using a REST API
- Enhancements to Movement Requests
- Populate Movement Request Details in Inventory History Transactions
- Enhancements to Reason Code Handling in Additional UI and RF Screens
- Set Max Retries for Sending of Inventory History Transaction (IHT) Records
- Send Replenishment Wave Pick Info Using Outbound Interface API
-
- Outbound Logistics
-
- Enhancements to Selection Criteria Rules Screen
- Perform Post Packing Transactions Through Tasking
- Enhancement to RF Pack OBLPN to Update Outbound LPN to Picked Status
- Enhancements to Pack Outbound LPN REST API to Support Picked Status
- Enhancements to Generation of OBLPN Shipping Info
- Capture and Display Additional File Types for Outbound LPN
- Capture and Display Files for Outbound LPN Types and Outbound Loads
- Enhancements to Planned Load Interface for Transportation Splits of Order Lines
- Update to Next LPN Pick Display for Pack NC Active
- Apply Discount Code for UPS Carriers
- Enhancements to Generation of Pallet Shipping Info
-
- WMS Mobile App
- Warehouse Automation
- WMS Common
Update 23B
Revision History
This document will continue to evolve as existing sections change and new information is added. All updates appear in the following table:
| Date | Module | Feature | Notes |
|---|---|---|---|
| 11 JUL 2023 | Inbound Logistics | Perform Inbound Receipts in Ordered UOM | Updated document. Revised feature information. |
| 08 MAY 2023 | Inbound Logistics | Increase Field Length of "origin_code" in Inbound Shipments UI | Updated document. Delivered new feature in update 23B. |
| 08 MAY 2023 | Inventory Operations | Send Replenishment Wave Pick Info Using Outbound Interface API | Updated document. Revised feature information. |
| 08 MAY 2023 | Inbound Logistics | Capture and Display Files for Inbound Shipments | Updated document. Delivered new feature in update 23B. |
| 27 APR 2023 | Inventory Operations | Enhancements to Reason Code Handling in Additional UI and RF Screens |
Updated document. Revised feature information. |
| 24 APR 2023 | WMS Common | Additional Columns Added to Label Designer Template | Updated document. Revised feature information. |
| 24 APR 2023 | WMS Mobile App | Migrate Mobile App to VB Progressive Web App (PWA) | Updated document. Revised feature information. |
| 14 APR 2023 | Created initial document. |
Overview
 HAVE AN IDEA?
We’re here and we’re listening. If you have a suggestion on how to make our cloud services even better then go ahead and tell us. There are several ways to submit your ideas, for example, through the Ideas Lab on Oracle Customer Connect. Wherever you see this icon after the feature name it means we delivered one of your ideas.
GIVE US FEEDBACK
We welcome your comments and suggestions to improve the content. Please send us your feedback at oracle_fusion_applications_help_ww_grp@oracle.com.
DISCLAIMER
The information contained in this document may include statements about Oracle’s product development plans. Many factors can materially affect Oracle’s product development plans and the nature and timing of future product releases. Accordingly, this Information is provided to you solely for information only, is not a commitment to deliver any material, code, or functionality, and should not be relied upon in making purchasing decisions. The development, release, and timing of any features or functionality described remains at the sole discretion of Oracle.
This information may not be incorporated into any contractual agreement with Oracle or its subsidiaries or affiliates. Oracle specifically disclaims any liability with respect to this information. Refer to the Legal Notices and Terms of Use for further information.
Feature Summary
Column Definitions:
Report = New or modified, Oracle-delivered, ready to run reports.
UI or Process-Based: Small Scale = These UI or process-based features are typically comprised of minor field, validation, or program changes. Therefore, the potential impact to users is minimal.
UI or Process-Based: Larger Scale* = These UI or process-based features have more complex designs. Therefore, the potential impact to users is higher.
Features Delivered Disabled = Action is needed BEFORE these features can be used by END USERS. These features are delivered disabled and you choose if and when to enable them. For example, a) new or expanded BI subject areas need to first be incorporated into reports, b) Integration is required to utilize new web services, or c) features must be assigned to user roles before they can be accessed.
Warehouse Management
WMS Common
Improve Location Visibility Using Spatial Coordinates
In addition to the six levels of location information (Area, Aisle, Bay, Level, Position and Bin) that WMS currently supports, additional capability has been added to store X, Y, and Z coordinates of a location with reference to an origin (0,0,0). At the facility level, place holders have been added to hold the latitude and longitude of a facility that can be used to define the origin (0,0,0) of the warehouse, store, or site.
If you consider a warehouse as a three-dimensional space having an origin fixed, the X, Y, and Z coordinates of a location denote the distance from the origin. The values depend on the selected quadrant for the space.
For example, if the origin is placed on the bottom left corner of a warehouse layout map, the X, Y, and Z values of all locations for such a warehouse would be positive. Else, X and Y could also have negative values depending on which quadrant the location would fall into.
LOCATION UI ENHANCEMENTS
The following coordinates fields have been added to the Location view:
-
X Coordinate - This field represents the X-axis value of the location in a three-dimensional space.
-
Y Coordinate - This field represents the Y-axis value of the location in a three-dimensional space.
-
Z Coordinate - This field represents the Z-axis value of the location in a three-dimensional space.
-
Coordinates UOM - This field holds the UOM of X, Y, and Z coordinates such as kilometers, meters, yards, feet, miles, and so on, that belong to the DIMENSION UOM class and is derived from the base UOM defined for location coordinates at facility level.
NOTE:
The data type of all three coordinate fields is same as the length field in location.
All three Coordinates are non-mandatory fields, but either all or none of the coordinate fields should be populated.
The system doesn’t allow you to clear a Coordinate field unless all 3 fields are cleared.
The data entry for the X, Y, and Z coordinates are restricted by the number of decimals specified in the max decimal precision set in the Decimal Settings for Location Coordinates at facility level.
LOCATION INTERFACE ENHANCEMENTS
-
The three coordinate fields and the coordinate UOM have also been added to the location interface in the XML, XLS, and PSV formats.
-
The number of decimals interfaced on the coordinate fields is rounded up to decimals allowed at the facility level for location coordinates.
-
Coordinate UOM is not mandatory. but if present in the file, it is used to convert X, Y, and Z coordinate values to the coordinates UOM set at the facility level.
For example:
X = 3, Y = 4, Z = 1, and Coordinates UOM = meters in the Location Interface file. The Location Coordinates Base UOM = centimeters (cms) at the Facility level. In this example, the values are displayed as X = 300, Y = 400, Z = 100, and Coordinates UOM = cms in the Location UI.
GEOSPATIAL AWARENESS OF A FACILITY
The following geographic coordinate fields have been added to the Facility to indicate the precise geographic position of a warehouse, distribution center, store, or site:
- Latitude - This field represents the latitude of the facility.
- Longitude - This field represents the longitude of the facility.
You can also use this position to represent the origin (0,0,0) of your facility and the X, Y, and Z coordinates of a location would then denote the distance from this origin.
NOTE:
- The data type of these geocode fields is same as the length field in the location.
- The geocodes are non-mandatory fields, but either both Latitude and Longitude fields or none should be populated.
- The value of the Latitude field needs to be between -90 to +90.
- >The value of the Longitude field needs to be between -180 to +180.
- The system doesn’t allow you to clear the geocodes unless both are cleared.
STORE OR SITE INTERFACE ENHANCEMENTS
- The Latitude, and Longitude fields have been added to the Store and Site Interfaces in the XML, XLS, and PSV formats.
- The number of decimals interfaced on the Longitude and Latitude fields are rounded up to 8 decimals.
FACILITY LEVEL ENHANCEMENTS TO SUPPORT LOCATION COORDINATES
The following enhancements have been added to the Facility UI to support location coordinates:
MAX DECIMALS FOR LOCATION COORDINATES
-
A new action button “Decimal Settings for Location Coordinates” has been added to the Facility UI that is enabled only if you are an administrator or if the “Change Facility” permission is added to your login ID.
-
This action button opens a pop-up where you are required to enter your admin password to change the decimal setting.
BASE UOM FOR LOCATION COORDINATES
-
A new action button “Location Coordinates UOM” has been added to the Facility UI that is enabled only if you are an administrator or if the “Change Facility” permission is added to your login ID.
-
This action button opens a pop-up where you are required to enter your admin password to change the Location Coordinates UOM. The UOM configured using this drop-down represent the UOM of the X, Y, and Z coordinates of location such as kms, meters, yard, feet, miles and so on, that belong to the DIMENSION UOM class.
Steps to Enable
You don't need to do anything to enable this feature.
Key Resources
Access Online Help Button from Warehouse Management Home
To assist you in accessing online help faster and easier, a new online help button has been added in the Warehouse Management Application.
You can access the help by clicking the ? button:

Online Help Button
LINK TO HELP CENTER GET STARTED PAGE
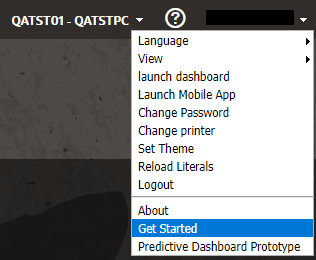
From the user drop-down menu in Warehouse Management, you can also access the Help Center Get Started page.
Get Started Link
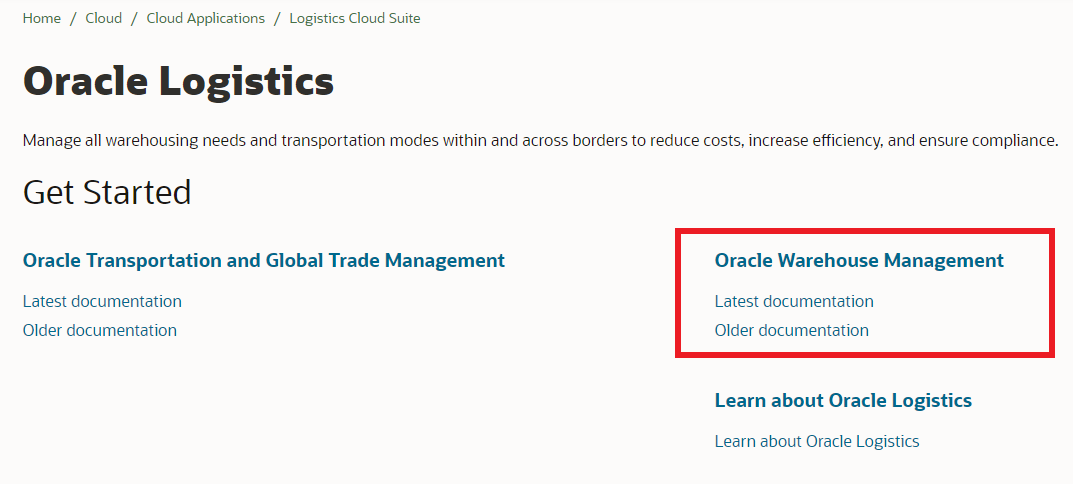
From Get Started, click Oracle Warehouse Management to access all of the latest documentation, including release notes, What’s New, integration guides, and other user guides.
Get Started Page
Steps to Enable
You don't need to do anything to enable this feature.
Key Resources
Enhancements to AI/ML Training Template for Market Basket Analysis
You now have the ability to create season-focused templates (for example, fall, Christmas, spring holiday) for seasonal putaway rules using targeted date ranges. You can automatically incorporate your Market Basket Analysis (MBA) analysis into your business flow without any drastic configurations.
In the AI/ML Training Date Rule Header (TrainingDateRuleHdrView), you can create a training template in order to run market basket analysis for putaway. Then you can enable the “Use for Market Basket Analysis based Putaway” flag to identify this specific template as the only "active" template for all of your MBA-based putaway.
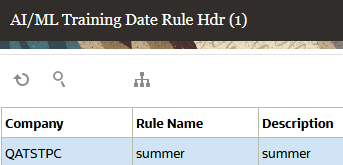
Training Date Rule Header
NOTE: The “Use for Market Basket Analysis based Putaway” flag is available via the AIML Training Template UI. You will only have the option to set this flag for Apriori algorithms.
You can input multiple date ranges in the training date rule and they will all be considered.
NOTE: Only one Market Basked Analysis template will be marked active at a time.
FILTER DATA IN MODEL REFERENCE SCREEN
To help further refine your data findings, In the Model Reference UI, you also now have the option to filter by Max/Min values using the search option.
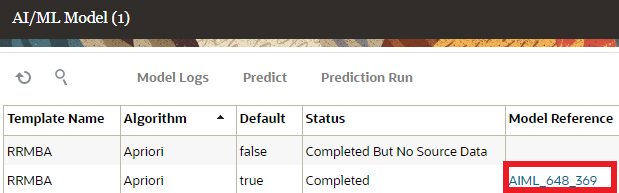
Model Reference
INCORRECT DATE RANGE ERROR MESSAGE IN ALL AIML TRAINING TEMPLATES
You will now see an error message upon saving an incorrect entry in the date range fields in all of your AIML Training Templates. This allows you to see the correct format based on which type of date input-type you prefer.
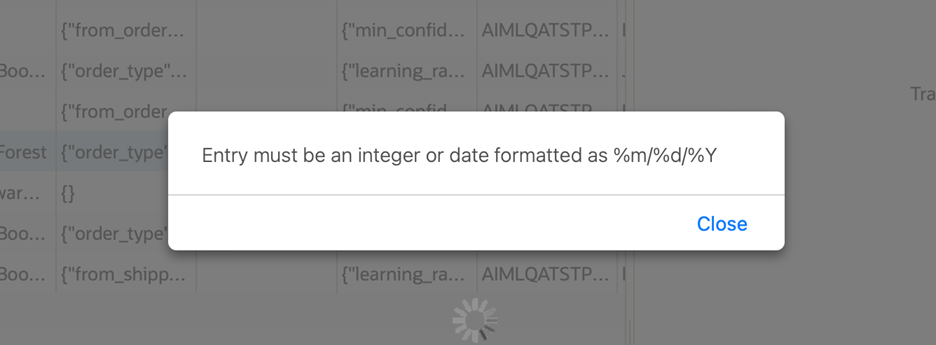
Date Format Message
Steps to Enable
You don't need to do anything to enable this feature.
Key Resources
- For more details, go to the Oracle WMS Cloud Information Center. From the top of the page, click on the Documentation tab at the top, then click the link under Current Documentation and refer to the AI/ML User Guide.
Configuration Export/Import Tool
In 23B, Oracle Warehouse Management brings you the flexibility to migrate users’ configuration screens with the Configuration Export/Import Tool. You can now easily migrate and replicate the UI configurations between facilities, companies and environments by importing and exporting them seamlessly. While saving you a lot of time, the Configuration Export/Import Tool also aids in daily operations for configuration migration by different users, QA testing and for troubleshooting with support.
The Configuration Export/Import Tool assists you in:
- Migrating tailor-made configurations from one environment to another within the same release.
- Extracting specific configurations and/or screens from a customer environment to QA to help replicate issues.
- Creating new Facilities with ease by copying the configurations from the Parent Company.
- Setting up new users who might need their default configurations.
Now, moving your personalized configurations in WMS Cloud is simple and easy!
This feature introduces a new action button “config”, which is available on any screens that support configuration. This action button allows users to export and import configurations that pertain to that specific screen or its details.

"Config" Action Button
The “config” action button is visible only if the following conditions are met:
The target environment for importing configurations can be:
The same Facility/Company in the same environment. This is useful for restoring from a backup.
A different Facility/Company but in the same environment. This is useful for replicating configurations done for one Facility in another Facility.
The same Facility/Company in a different environment.
A different Facility/Company in a different environment.
By using the Configuration Export/Import Tool, you can import and export configurations for the following screens/entities:
- "CCTriggerMgmtView" (CCTriggerMgmt)
- "InventoryLockCodeView" (InventoryLock)
- "LocationSizeTypeView" (LocationSizeType)
- "ObLpnTypeView" (LpnType)
- "OrderLockView" (OrderLock)
- "PurchaseOrderTypeView" (PurchaseOrderType)
- "PutawayTypeView" (PutawayType)
- "ReasonCodeView" (ReasonCode)
- "ReplenishmentTypeView" (ReplenishmentType)
- "ReplenishmentZoneView" (ReplenishmentZone)
- "TaskTypeView" (TaskType)
- "TaskZoneView" (TaskZone)
- "TrailerTypeView" (TrailerType)
- "WorkOrderTypeView" (WorkOrderType)
- "LgfProgramDataView" (FacilityParm)
- "BarcodeTypeView" (BarcodeType)
- "ScreenView" (ModuleInstance)
- "CompanyParmView" (CompanyParm)
- "EquipmentTypeView" (EquipmentType)
- "ContactView" (Contact)
Click on the "config" action button to open a drop-down with the options "export_configuration" and "import_configuration".
EXPORT CONFIGURATION
By clicking on the "export_configuration" option from the drop-down, you will be prompted to save a configuration file (.cfg file format) which needs to be downloaded in the local file system. You can export configurations for either selected rows or the entirety of the supported screen/entity.
NOTE:
Searching for a few rows and then exporting without selecting anything will still export all data (regardless of what was searched).
The configuration file that will be downloaded when you click on the "export_configuration" is an encrypted text file. So, any attempt to modify the file will corrupt and render it un-importable.
You may have to enable download permissions on your browser to download and save the export configuration file.
IMPORT CONFIGURATION
By clicking on the "import_configuration" option from the drop-down, you can choose the previously exported configuration file via the text box displayed on the screen. Importing configurations can either create new records or update existing records but it does not delete existing records. Importing configurations also depends on the unique field names of the screens.
For example, let's say you have a screen named "Pack LPN" in your source environment and your target environment.
You edit your source screen’s field name "Pack LPN" to "Pack LPN from Floor Location". When you import this configuration, the system does not find the "Pack LPN" screen anymore and will actually end up creating a new "Pack LPN from Floor Location" field name for the screen in the target environment. Likewise, if you edit a Task Type description, a new entry with the corresponding field name will get created in the target WMS environment.
NOTE:
- The exported configuration file (.cfg file format) must be unedited manually and it needs to be exported from an environment with a matching major release number (such as 23B or 23C).
- When importing configurations, it is always recommended to export configurations first for backup. Currently, there is no support for automatic backup of the current configuration when an import is done.
Steps to Enable
-
To use the Configuration Export/Import Tool, you will need group permissions for "config_import_export".
-
In each of the UI configuration screens (like Company Parameters, Facility Parameters and so on...), there is a "config" action button on the right corner of the table/UI. Clicking on the "config" action button will give you a drop-down containing the options "export_configuration" and "import_configuration".
Key Resources
Configure SSO and OAuth Based Authentication Using Self Service Feature
With the Single-Sign On (SSO) and OAuth-based Authentication features, you have been able to securely login to Warehouse Management. In addition to our tried-and-tested data security measures, new customers can now use the login features with self-service capabilities! This means you can add and modify SSO configurations without requiring to raise SRs and following up with related processes.
A new screen module SSO Configuration has been introduced in the 23B release that lets you update the SSO and custom authentications on the fly. By reducing process dependencies, this feature saves you time and energy spent on configuring SSO.
As a user with valid credentials, you can easily access the SSO Configuration screen by adding it to the relevant menu. The configuration is not Facility-specific but more at the top-level Parent Company.
NOTE: The self-service feature for SSO Configuration is available only for new customers.
MANAGE SSO CONFIGURATION
Adding, editing and deleting operations are managed by a new group permission "SSO Config / Manage-SSO-Configuration".
NOTE: Only new customers with relevant group permissions can perform CRUD operations.
You can configure the SSO configurations by editing the following fields in the data grid of the SSO-Configuration screen:
| Field Name | Description |
|---|---|
| SSO URL* |
This is where you would sign in to your Identity Provider (IdP). |
| Issuer* |
Unique Identifier of your IdP. |
| Service Provider Identifier* |
This is a unique identifier of the Service Provider. |
| SLO URL |
This is where you would land after signing out of a single session. |
| SLO Response URL |
This is where you can input an IdP Single Log Out Response URL |
| Response Signature Certificate* |
This is where you would upload a SAML Response Signature Certificate that is used to verify the response. |
- *indicates that they are required fields and cannot be left blank.
To help you configure Single-Sign On, two new action buttons have also been added to the Self-Service screen:
- Import IDP Metadata action button
- Domain for SSO
With the Import IDP Metadata action button on the Self-Service screen for SSO Configuration, you can now import the Identity Provider’s metadata files to create configurations for SSO.
The Domain for SSO action button, which is next to the Import IDP Metadata action button, gives you the option to enter the domain name in the Custom Authentication backend Configuration Screen. Clicking on the action button brings up a pop-up box, where you can enter the domain name and submit it to proceed with the SSO process.
Only new customers who have been provided group permissions for "manage-sso-configuration" can import the meta data XML files via the Import IDP Metadata action button or use different domain names using the Domain for SSO action button.
NOTE: For existing customers, the Import IDP Metadata action button and Domain for SSO action button will be disabled for current release. However, the self-service feature for SSO Configuration will be rolled out in future releases for all customers.
MANAGE CUSTOM AUTHENTICATION
To facilitate the creation of Custom Authentication configurations, you can add the new screen module "Custom-Authentication" to the relevant menu using valid credentials. This is managed by a new group permission "AuthenticationBackendMap / manage-custom-auth-configuration". The custom configuration self-service feature also lets you can configure your login using multiple domain names.
You can edit the following fields in the data grid of the custom configuration screen:
| Field Name | Description |
|---|---|
| Domain Name* |
Used to link WMS username / "Alternate username" with the OAuth2 username. |
| Endpoint URL* |
Specify endpoint URL to create a service instance. |
| Authentication Type |
OAuth2.0 for new customers in 23B; ADFS v2.0 and ADFS v3.0 for existing customers. |
| Client ID** |
Unique identifier that links your ID to the application via the authorization server. |
| Client Secret** |
A method of client authentication, this is a shared secret between client server and authorization server. |
| Scope** |
This can be used to limit your data exposure and identify the permissions you are granting to the application. |
| User Identity Domain Name** |
This is used for managing users and roles, federating and provisioning of users, secure application integration through Oracle Single Sign-On (SSO) configuration, and SAML/OAuth based Identity Provider administration. |
| Use HTTP Authentication** |
Used to control access and provide secure authentication for users. |
| Alternate Username Prefix Only** |
Sets Alternate Username prefix. |
| Resource** |
The resource server handles authenticated requests after the application has obtained an access token. |
| Relying Party Identifier*** |
Used to identify ADFS-federated applications so that your access is authenticated. |
| IDP_Initiated_Signon_URL*** |
This can be used to initiate sign on by IdP instead of Service Provider. |
- *indicates that they are required fields and cannot be left blank.
- **indicates that they are required fields for Authorization Type OAuth2.0
- ***indicates that these are required only when authentication type is ADFS v2.0 and ADFS v3.0
AUDIT CHANGE HISTORY
- SSO Configuration Change History action button - displays details like "env_name", "create_user", "mod_user", "mod_ts", "action" and "column_modified". You can also filter the criteria by "env_name", "mod_user" and "action" and selecting "Create"/"Update"/"Delete" from the dropdown.
- "Custom Authentication Change History" action button - displays details like "domain_name", "create_user", "mod_user", "mod_ts", "action" and "column_modified". You can also filter the criteria by "domain_name", "mod_user" and "action" and selecting "Create"/"Update"/"Delete" from the dropdown.
NOTE: For the "Create" and "Delete" actions, "column_modified" will be left blank on both screens. When there is an “Update” action, it will be reflected in the "column_modified" field.
Steps to Enable
- To manage SSO configurations and perform adding, editing and deleting operations, you will need the group permissions for "SSO Config / Manage-SSO-Configuration".
-
To manage custom configurations, you will need the group permissions for "AuthenticationBackendMap / manage-custom-auth-configuration".
Key Resources
Configurable Option for File Attributes
The max upload file size for file upload to OCM has been increased from 1 MB to 10 MB, which can be configured from the SAAS App Configuration UI.
From this UI, you can also configure which file types are allowed to be uploaded from a list of 8 allowed file types (doc, docx, xls, xlsx, pdf, png, jpg, jpeg).
Steps to Enable
You don't need to do anything to enable this feature.
Tips And Considerations
If you have not enabled OCM-WMS integration prior to 23B, refer OCM-WMS Integration Guide to enable this feature.
Key Resources
Flexibility to Filter Repositories in OCM Standalone Embedded UI
A repository filter has been added in the OCM Standalone UI enabling you to choose files from the specific repository as required.
The collections under Company repository now lists OBLPN TYPE and the collections under Company/Facility repository lists IBLPN, OBLPN, IB SHIPMENT and OB LOAD enabling better search capabilities.
Steps to Enable
You don't need to do anything to enable this feature.
Tips And Considerations
If you have not enabled OCM-WMS integration prior to 23B, refer OCM-WMS Integration Guide to enable this feature.
Key Resources
Update to STORE_INTRANSIT_QTY_BY_INVN Company Parameter
To improve the in-transit, allocation calculations and performance during wave release and replenishment, the default setting for the company parameter STORE_INTRANSIT_QTY_BY_INVN has been updated to Yes.
This update to the company parameter will help improve performance during wave release and replenishment.
Steps to Enable
You don't need to do anything to enable this feature.
Key Resources
Additional Columns Added to Label Designer Template
Enhancing existing Label Designer functionality in Warehouse Management, we’ve added some key Item Master-related fields to the Label Designer Template.
Now, for example, If you would like to pass a hazmat code incorporated in a UN class or UN number you can do this using the new fields available in the Label Designer template.
The following item master fields are available in the Label Designer Template:
- UN class
- UN number
- UN description
- Hazard statement
- Hazmat packaging description
- Harmonized Tarif Code (HTS) code
- Harmonized Tarif Description (HTS) description
In the Column Name drop-down, you should be able to populate these fields and they will be added in the Label Template.
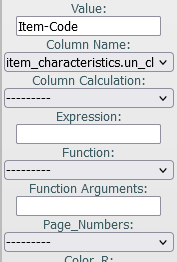
Column Name Drop-Down - UN Class
Steps to Enable
You don't need to do anything to enable this feature.
Key Resources
- See the Label Designer User Guide. To access the latest version, navigate to the WMS Get Started page -> then Warehouse Management - Latest Documentation -> Books.
Inbound Logistics
Perform Inbound Receipts in Ordered UOM
Strengthening your ability to transact in multiple Units of Measures, and increasing the efficiencies during your inbound operations, Oracle Cloud WMS now allows you to view and receive in the UOM contained in the Purchase Order or Inbound Shipment (ASN, etc).
In many instances, an item with a Primary UOM of “Units”, may be ordered and shipped to your warehouse in packs or case quantities, and operators may need to manually calculate and convert those quantities to the Primary UOM. To reduce these additional efforts, the Inbound Receiving module is enhanced to support Ordered UOM to speed operational efficiency with ease and maintain accuracy of the transaction.
A new option “Ordered UOM” is added to screen parameter “qty-uom” to display quantity entry with UOM code based on the uom_code passed from the corresponding shipment details or purchase order details. This new option is added to following modules values:
- RF Receive by Shipment (rf.inbound.cwrfrecvlpnshpmt)
- RF Receive by Load (rf.inbound.cwrfrecvlpnload)
NOTE: When using the “qty-uom” parameter, the "Ordered UOM" option must be in the same UOM Class as the Primary UOM. Also, when the "Ordered UOM" option is set, the system updates and displays the item’s quantity in terms of the item’s Primary or Facility Primary UOM.
DISPLAY ORDERED UOM IN SHIPMENT BASED RECEIPT THROUGH RF RECEIVE BY SHIPMENT AND RECEIVE BY LOAD
The RF transaction run both in Sku-Qty entry mode and Sku-Scan mode where the screen parameter “qty-uom” is set to ordered UOM, the system performs conversion and displays the ordered UOM in following fashion for shipment-based receipt:
- On scanning the SKU, the quantity screen fetches and displays the UOM values configured in the SHIPPED_UOM_CODE column from the shipment details. For example, when a vendor ships an ASN with primary UOM of eaches and the shipped UOM is Dozen, then system fetches the UOM from shipment details and displays UOM in Dozens.
NOTE: If SHIPPED_UOM_CODE = blank, then the qty screen displays in terms of the item_primary UOM from item_facility or from item.
- A warning message “Inventory qty entered/scanned will be in item's primary UOM, proceed further” is displayed if multiple shipment details are scanned for the same SKU with different shipped UOM.
On accepting the warning, the Receiving transaction proceeds displaying the quantity in terms of item's primary UOM. i.e., the system displays item’s primary UOM (eaches).
NOTE: On performing RF Receive by Load, if scanned SKU points to a different shipment associated to a single inbound Load, then system displays the shipment list for the user to select.
- If user scans an invalid SKU or the SKU which is not part of the shipment, then UOM is displayed in item's primary UOM.
- If there are two ASNs for same SKU with each ASN having different shipped UOMs, then the system picks appropriate shipped UOM from an Inbound Load. For example,
- ASN-Almonds-1 has Shipped UOM of KGS with item's primary UOM in grams.
- ASN-Almonds-2 has shipped UOM of decigrams with item's primary UOM in grams.
DISPLAY ORDERED UOM IN PURCHASE ORDER (PO) BASED RECEIPT THROUGH RF RECEIVE BY LOAD
The RF transaction run both in Sku-Qty entry mode and Sku-Scan mode where the screen parameter “qty-uom” is set to ordered UOM, the system performs conversion and displays the ordered UOM in following fashion for PO based receipt.
-
On scanning the SKU, the quantity screen displays the UOM configured in the ORDERED_UOM_CODE column from the purchase order details. For example, If the user performs PO based receiving of a SKU with primary UOM of eaches and the ordered UOM is in Dozen, then system fetches the UOM from purchase order details and displays UOM in dozens.
NOTE: If ORDERED_UOM_CODE = blank, then the qty screen displays in terms of the item_primary UOM from item_facility or from item.
- The ordered UOM is displayed on the quantity screen based on the parameter “prevent-entire-po-to-asn-conversion-flag”:
If set to Yes: On scanning the SKU, if multiple purchase order details are scanned for the same SKU with different ordered UOM. The system displays a warning message “Multiple details for scanned SKU with different UOM found, proceed with primary UOMs?”. On accepting the warning, the Receiving transaction proceeds displaying the quantity in terms of item's primary UOM. i.e., the system displays item’s primary UOM (eaches).
If set to No: On scanning the SKU, if multiple shipment details are scanned for the same SKU with different shipped UOM, the system displays a warning message “Inventory qty entered/scanned will be in item's primary UOM, proceed further”. As shipment details are created right after scanning the PO, the system looks for UOM to be displayed from the Inbound Shipment. is displayed
- If users perform receiving in blind shipment mode, the system displays the UOM in item’s primary UOM.
- IHT records are updated with the shipped_uom_code and shipped_uom_qty. The reference fields are also updated when receiving is performed with Qty_UOM of Cases or Packs.
IHT REF_CODE_17 REF_VALUE_17 REF_CODE_18 REF_VALUE_18 IHT-1 (Container Received) UOM Corresponding UOM used for Receiving VAL Value in terms of Shipped UOM or UOM used for Receiving. IHT-72 UOM Corresponding UOM used for Receiving VAL Value in terms of Shipped UOM or UOM used for Receiving.
NOTE: If Shipped_UOM_Code displayed on the Qty entry screen is different than Item's Primary UOM, then system performs conversions while arriving at whether received Qty has to be subjected for QC or not.
SUPPORT RECEIVING UOM IN RECEIVE API
The Receive API is now extended to receive inbound shipments with receiving UOM. We have added new capability to receive in terms of Purchase Order/ ASN UOM in the receiving API. Users can send a valid UOM code while carrying out shipment receipt transactions.
The new tag “receiving_uom” is added to API POST .../entity/iblpn/receive
Sample calls:
{
"facility_id_code": "John",
"company_id_code": "Rosh",
"shipment_nbr": "APIBS273645",
"container_nbr": "APCNTR272638",
"recv_dock_nbr_or_location_barcode": "BA-KK-22-01",
"trailer_nbr": "APTRL2701",
"lpn_type": "PEP-BEV",
"pallet_nbr": "APPLT-27012301",
"item_list": [{
"item_barcode": "AP004",
"qty": 10,
"receiving_uom": "LB"
}]
}
Steps to Enable
To enable ordered UOM during receiving transaction:
NOTE: This is applicable for Receive by Load (rf.inbound.cwrfrecvlpnload) and RF Single SKU Receiving (rf.inbound.cwrfrecvsinglesku)
- Go to RF Receive by Shipment (rf.inbound.cwrfrecvlpnshpmt)
- Go to the “qty-uom” parameter.
- Click edit and select Ordered UOM from the drop-down menu.
- Click Save.
Key Resources
Receive Entire Shipment Using a REST API
To build on receiving capabilities, we now have a REST API that allows the user to receive an entire shipment. This API has the same behavior that is available in the Receive Entire Shipment Button found in the IB Shipment UI. Where users just have to pass the IB Shipment information and the system will do the same validation.
An example of the REST API call is as follows:
API Signature
POST .../entity/ib_shipment/receive_entire_shipment
SAMPLE CALL
{
"parameters": {
"facility_id__code": "FAC_CODE",
"company_id__code": "COMP_CODE",
"shipment_nbr": "SHIPMENT_NBR"
}
}
Steps to Enable
You don't need to do anything to enable this feature.
Key Resources
Capture and Display Additional File Types for Inbound LPNs
In addition to images, you can now upload word documents, excel spreadsheets and pdf files for Inbound LPNs. The action button Upload Images on IBLPN UI has been renamed to Upload Files to reflect the additional capability. The Nbr Images column in the grid view has been renamed to Nbr Files.
The max upload file size has been increased from 1 MB to 10 MB and the uploaded file(s) should be in one of supported formats – doc, docx, xls, xlsx, pdf, jpg, jpeg, or png. Max upload file size and allowed file types can be configured in SAAS App Configuration UI.
Steps to Enable
If you have not enabled OCM-WMS integration prior to 23B, refer OCM-WMS Integration Guide to enable this feature.
If you have already setup OCM-WMS integration prior to 23B release, follow steps outlined below:
- If an IBLPN image has already been uploaded or if a company/facility record has been created in SAAS-APP-CONFIG view, it indicates that a repository for the current company/facility has been created in OCM.
- If bullet number 1 is true, login to OCM as an admin of the repository created for the current company/facility.
- On the left panel within OCM, select Content under “Administration”.
- Select “Repositories” from the dropdown on the “Content” page.
- Click on the repository named WMS_<CURRENTCOMPANY>_<CURRENTFACILITY>_REPO
- Under General > Asset Types > Add File from dropdown.
Tips And Considerations
If you have not enabled OCM-WMS integration prior to 23B, refer OCM-WMS Integration Guide to enable this feature.
Key Resources
Increase Field Length of "origin_code" in Inbound Shipments UI
To support integration with Retail Management and Inventory Management, the field length for Origin Code has been increased from 10 to 20 characters.
With this change in place, users can now interface an IB Shipment file with the Origin Code field in WMS with a character length that supports integration with Retail Management and Inventory Management..
NOTE: If you interface a file where the Origin Code field exceeds 20 characters, the system will display an error message.
Steps to Enable
You don't need to do anything to enable this feature.
Key Resources
Capture and Display Files for Inbound Shipments
You now have the ability to upload and view files for Inbound Shipments. The new action button "Upload Files" on this UI screen allows you to upload files.
The new column "Nbr Files" in the data grid allows you to view uploaded files.
Steps to Enable
You don't need to do anything to enable this feature.
Key Resources
Inventory Operations
Receive Replenishment Confirmation for Full LPNs Using a REST API
Once the Replenishment Pick info is shared with an external system, the external system processes and shares the Replenishment task status back to WMS through the newly introduced Replenishment - Full LPN API.
As a part of this release, the newly introduced API supports the allocation of Full LPN replenishment.
API URL:
POST .. /lgfapi/v10/replenishment/full_lpn
REQUEST PARAMETERS:
| Name | Required | Type | Default | Description |
|---|---|---|---|---|
| mhe_mode_flg | Boolean | Facility context by id. | ||
| async_flg | Boolean | Facility context by code. |
REPLENISHMENT LIST:
| Name | Required | Type | Default | Description |
|---|---|---|---|---|
| facility_id__code |
String | Facility context by code. | ||
| company_id___code |
String |
Company context by code. |
||
| replen_wave_nbr |
X | String | Associated replenishment wave. |
|
| from_container_nbr |
X | String |
From container number |
|
| sub_container_nbr |
Optional | String |
Substitution container number |
|
| mhe_system_code |
Optional | String |
MHE system. |
|
| short_flg |
Boolean | False | is this a short? |
REQUEST BODY EXAMPLE:
{
"mhe_mode_flg": true,
"async_flg": true,
"replenishment_list": [{
"facility_id__code": "QATST01",
"company_id__code": "QATSTPC",
"replen_wave_nbr": "WVQATSTPC072935",
"from_container_nbr:"CNTST0100031583",
"sub_container_nbr": "CPOBLPN0106",
"mhe_system_code": "picktolight",
"short_flg": false },
{ "facility_id__code": "QATST01",
"company_id__code": "QATSTPC",
"replen_wave_nbr": "WVQATSTPC072935",
"from_container_nbr":"CNTST0100031584",
"sub_container_nbr": "CPOBLPN0126",
"mhe_system_code": "picktolight",
"short_flg": false }]
}
NEW REPLENISHMENT PICK INFORMATION UI
Once the Replenishment Pick info is shared with an external system and the external system shares the Replenishment task status back to the WMS through Replenishment - Full LPN API.
A new UI Replen Pick Info is introduced, to view and verify the details of the Replenishment API requests that are shared from an external system.
Out of all the requests shared from the external system, there are some instances where the requests fail to pass the business validations. This UI will have all the requests along with the status. If the request has failed, it will populate appropriate business validation. You can check and reprocess the failed requests manually. To process the requests, select multiple failed records and click the "Reprocess Selected Records" button.
Steps to Enable
Review the REST service definition in the REST API guides to leverage (available from the Oracle Help Center > your apps service area of interest > APIs & Schema). If you are new to Oracle's REST services you may want to begin with the Quick Start section.
Key Resources
Perform Cycle Counts in Cases and Packs
Oracle WMS now provides greater flexibility when handling multiple UOMs while executing cycle count transactions. Users can not only count in terms of Units, but now have the option to count in Packs and Cases as well.
If the operation is handling inventory in terms of Packs, Cases, or Cases/Packs/Units, this enhancement helps floor users in reducing manual efforts of calculating the conversion values when entering the quantity in the corresponding Primary UOM, and thereby, increases the productivity on the floor.
A new screen parameter “qty-uom” has been added to the RF Cycle Counting screen. This parameter allows users to perform transaction in terms of Units (Pirmary UOM), Packs or Cases, as well as a combination of all 3. The following UOM values are added to the screen parameter to support RF Cycle Counting:
- Units (blank/default)
- Packs
- Cases
- Cases/Packs/Units
If qty-uom screen parameter is set to "Packs", “Cases”, or “Cases/Packs/Units”, the Cycle Counting captures the UOM quantity in terms of the Primary UOM of the item.
KEY NOTES OF THE ENHANCEMENT:
-
If the primary UOM of the scanned SKU does not have Units, Std Pack UOM, or Std Case UOM is defined, the system populates appropriate PACK_UoM or CASE_UoM in Qty entry screen.
NOTE: The system displays appropriate error “Pack Qty not configured for the sku” or “Case Qty not configured for the sku” message if std_pack or std_case quantity is not defined on the scanned SKU.
- When the quantity counted is in Packs, or Cases, the total quantity label and the total qty is displayed in Packs or Cases.
- If the user scans the SKU which is serial number tracked and when qty-uom is packs, cases, or Cases/Packs/Units and company UOM is not set to tracking serial numbers end to end, the system proceeds with counting without prompting for serial number.
NOTE: The system restricts user from counting if the user scans SKU which is serial number tracked when qty-uom is Packs, Cases, or Cases/Packs/Units and company UOM is set to tracking serial numbers end to end.
- The system captures batch number, expiry date, and inventory attributes while counting in terms of Packs, Cases, or Cases/Packs/Units.
- If an existing SKU/Qty information screen is retained when scanned LPN is of type LPN as Physical Pallet, the system captures the Packs or Cases Per Tier/Number of Tiers.
NOTE: The extra Packs, extra Cases and extra Units will not be displayed.
CYCLE COUNT IN TERMS OF CASES AND PACKS
Users can now perform cycle counting in terms of Packs or Cases either in Sku-Qty or Sku-scan mode.
CYCLE COUNT IN TERMS OF CASES
Let’s say, the qty-uom is set to "Cases" and the Cycle Counting entry mode is the Sku-qty where the std_cases_qty defined. Here, the item’s Primary_UOM is in Sheets and Case-UOM is box.
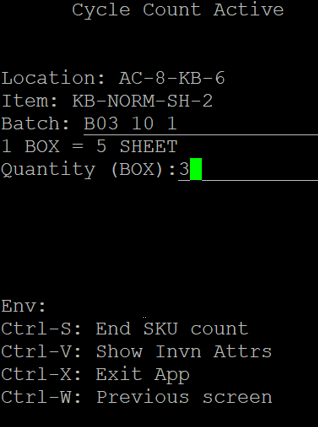
Cases
After scanning the SKU from active location, the system displays the conversion value, where 1 Box = 5 Sheets and the Quantity field in terms of corresponding Case UOM (i.e., Box) of the item as qty-uom is Cases. The quantity entered (i.e., 3) is now interpreted in terms of Cases and appropriate conversions takes place for updating inventory and cycle count adjustment tables are updated accordingly.
NOTE: If Cycle Counting is performed in deferred Mode, the quantity populated in Cycle Count Adjustment table will be in terms of Primary UOM of the item in regard to expected_Qty and adjusted_qty. The Cycle Count Adjustment also capture the number of cases counted.
CYCLE COUNT IN TERMS OF PACKS
Let’s says, the qty-uom is set to "Packs" and the Cycle Counting entry mode is the Sku-scan where the std_pack_qty defined. Here, the item’s Primary_UOM is in Units and Pack-UOM is in Pack.
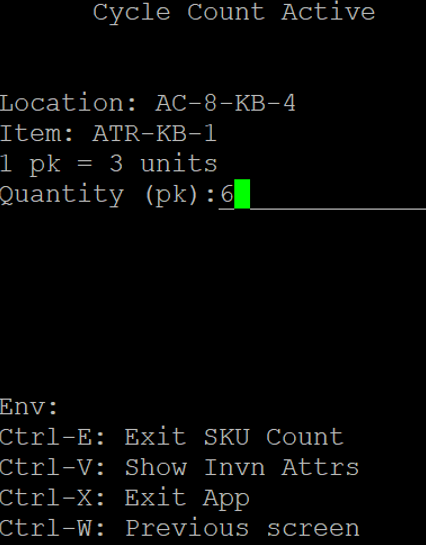
Packs
After scanning the SKU from active location, the system displays the conversion value, where 1 pack = 3 unit and the Quantity field in terms of corresponding Pack UOM (i.e., Pack) of the item as qty-uom is Packs. The quantity entered (i.e., 6) is now interpreted in terms of Packs and appropriate conversions takes place for updating inventory and cycle count adjustment tables are updated accordingly.
NOTE: If Cycle Counting is performed in deferred Mode, the quantity populated in the Cycle Count Adjustment table will be displayed in terms of Primary UOM of the item in regard to expected_Qty and adjusted_qty. The Cycle Count Adjustment also captures the number of packs counted.
CYCLE COUNT IN TERMS OF CASES/PACKS/UNITS
Users can perform cycle counting only in Sku-Qty entry mode if the qty_uom is configured in Pack/Cases/Units.
When the qty-uom is set to " Pack/Cases/Units" and the Cycle Counting entry mode is the Sku-Qty mode, the system determines if the count captured is in terms of Cases or Packs or Units based on whether the std_pack_qty or std_case_qty is configured.
NOTE: If user performs counting via Sku-scan mode, the system displays an error "Sku Scan Mode not supported in mixed uom counting" message
For example, let’s say you have your scanning a SKU from Reserve location:
-
If SKU has std_pack_qty defined and std_case_qty =0. After scanning the SKU, the system displays the quantity field only in terms of Packs (i.e., Tray) and Units in item's primary UOM (i.e., Eaches).
Standard Packs Quantity
NOTE: The number of cases entry field will not be displayed when scanned item's std_case_qty is 0.
Similarly, if the std_pack_qty is 0, the system displays the quantity field in terms of corresponding Case UOM and units in item's primary UOM
-
If the SKU has std_pack_qty and std_case_qty are defined. After scanning the SKU, the system displays both number of Cases (i.e., Box), Packs (i.e., Tray), and Units (i.e., EA) of item's primary UOM.
Cases, Packs, and Units
-
If the SKU does not have std_pack_qty and std_case_qty are defined, the system displays quantity field in terms of the item’s Primary_UOM, i.e., in Units (DZ).
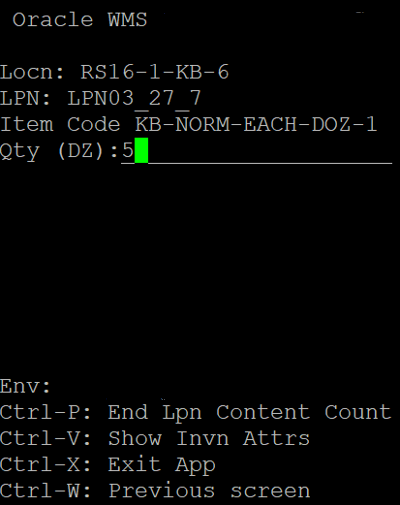
Units
CHANGES IN CYCLE COUNT ADJUSTMENT ENTITY
New fields are added to the Cycle Count Adjustment Entity UI that provide users with in-depth details about how the cycle count was performed, and the type of UOM. Users can utilize this information before proceeding with the approval:
| Field |
Description |
|---|---|
| Number of Cases Counted |
Number of Cases Counted. |
| Case Qty |
Case Qty from Item or from Corresponding Inventory Record. |
| Number of Packs Counted |
Number of Packs Counted. |
| Pack Qty |
Pack Qty from Item or from Corresponding Inventory Record. |
| loose_units_counted |
This is applicable while counting LPN as Physical Pallet and also when user counts in Cases/Packs or Units (when qty-uom is "Cases/Packs/Units"). The quantity displayed will be in corresponding item's primary UOM. |
| cc_uom_qty |
Potentially, this will display the counted qty in CC_UOM.
|
| cc_uom |
Captures the UOM used while performing the Count. NOTE: If multiple SKUs with Cases/Packs and Units are counted, then CC_UOM will display "*". |
NOTE: These fields are disabled from the datagrid view, by default. Users need to explicitly add the fields on the Cycle Count Adjustment Header UI to displays the columns on the data grid.
INVENTORY HISTORY TRANSACTION (IHT) UPDATES FOR RF CYCLE COUNT LOCATION TO HANDLE UOM
Based on the user’s UOM selection, the REF_CODE & REF_VALUE fields in the IHT records will be updated with the appropriate UOM code and quantity value for the CC Location transaction.
Steps to Enable
- Go to Cycle Count (rf.inbound.cwrfcyclecountlocn) module
- Select the module parameter “qty-uom” and click Edit.
- Select the parameter choice of Units/Packs/Cases or Cases/Packs/Units from the drop-down menu.
- Click Save.
Key Resources
Create a New Lot in Batch Management UI
In 23A we enhanced your ability to create multiple batch records in a single operation via APIs, including new lots/future lots/in-transit inventory lots which are In-Process status and yet to be received in the facility. The added functionality gave users greater ability to easily identify and recall problem Lots before receiving.
Now, in 23B, you can Create a new lot / future lot / in-transit lot record through Batch Management screen once the lot is /or yet to be received into the Facility.
A new (+) action button has been introduced in the Batch Management screen to create lot records. With this enhancement, you will be able to create/add new lot records for Item-lot combination even if it doesn't have an inventory in the facility (ability to create Future lots/In-transit lots). You can further verify the newly created lot records with the current search option.
The four new columns that are introduced in the current Batch management screen: Create User, Mod User, Create Timestamp, and Mod Timestamp. These new fields are now available in the search criteria to provide more flexibility for you to search with all the existing fields.
To create a new batch in Batch Management UI:
- Search and enter the Item code.
- Enter Lot Number in the field.
- Set the Expiry Date (if required).
- Select the Lock ID from the drop-down.
- Click Save.
For more details, see the REST API Guide. Navigate to the WMS Get Started page -> then Warehouse Management - Latest Documentation -> Books.
Steps to Enable
You don't need to do anything to enable this feature.
Key Resources
Enhancement to Create Multiple Lots in Batch Management UI Using a REST API
Previously in Warehouse Management, if you needed to create multiple lots in WMS, you had to make several API calls.
With this enhancement, you can now create multiple lots in WMS with a single REST API call, thereby simplifying the integration.
Steps to Enable
Review the REST service definition in the REST API guides to leverage (available from the Oracle Help Center > your apps service area of interest > APIs & Schema). If you are new to Oracle's REST services you may want to begin with the Quick Start section.
Update Lock Code/Expiry Date on an Existing Lot Using a REST API
We have further enhanced your ability to apply a Lock Code and/or update the Expiry Date for an existing Item batch using API to provide a more stable way to apply/remove Lock codes, and update Expiry dates using the interface transaction.
You can easily update existing batches through API (using external systems) even before it has been received into the facility.
Once a lock code is applied or expiry date is changed for an item-batch through API, the system will auto apply these attributes:
- Lock the inventory while receiving the batch into the warehouse.
- Update the required expiry date while receiving without any manual process.
Once you apply a Lock code on a particular batch, the entire inventory will be locked for that Item-batch in the Facility. Once the batch lock is applied through an API, the entire inventory existing in Reserve location, Active location, and OBLPNs will be updated with the proper lock code.
This is now available using PATCH update request. Here is an example:
{
"fields": {
"expiry_date": "EXPIRY_DATE_VALUE",
"lock_id": "LOCK_ID_VALUE"
}
}
If you would like to nullify a lock id for a specific batch, you can send an empty request. You will not be able to nullify the expiry date for a particular item that is expiry tracked.
Steps to Enable
To update Lock ID / Expiry Date in Batch Management UI:
- If the item is batch-expiry tracked, you can update the expiry date. You cannot nullify the field if its expiry tracked.
- Update the Lock ID.
- Click Save.
Key Resources
Enhancements to Movement Requests
MOVEMENT REQUEST INTERFACE IMPROVEMENTS
The following updates have been made to the Warehouse Management Movement Request Interface in 23B.
MOVEMENT REQUEST LINE ID ADDED IN MOVEMENT REQUEST DETAIL
To further align Warehouse Management and Fusion Inventory Integration, a new column (Movement Request Detail Line), is now available in the Movement Request Detail UI. This new column allows you to interface a new movement request line with the movement request line id populated.
Movement Request Detail Line
Now, upon performing Pick Confirmation after replenishment, Fusion Inventory can retrieve and utilize the corresponding movement request detail much faster.
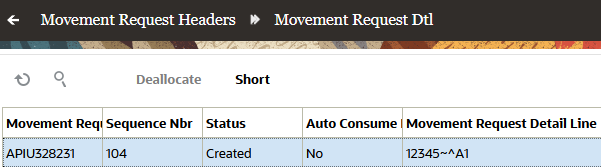
Movement Request Detail Line
When an existing movement request is interfaced with an action code of Update, the Movement Request Detail Line will be updated. You will then be able to see the Movement Request Line upon successful interface of each Movement Request.
NEW ACTION CODE SUPPORT IN MOVEMENT REQUEST DETAIL
To support accurate tracking of item quantities in Movement Requests between Warehouse Management, Oracle Integration Cloud (OIC), and Inventory Management, a new action code UPDATE_CREATE has been added in the Movement Request Detail UI.
The UPDATE_CREATE action code allows you to:
- Create a Movement Request Detail if the Movement Request detail does not exist
- Update the Movement Request Detail if the Movement Request Detail exist
NOTE: The UPDATE_CREATE action code is supported at the detail level only if the header action code is UPDATE.
Steps to Enable
You don't need to do anything to enable this feature.
Key Resources
Populate Movement Request Details in Inventory History Transactions
MOVEMENT REQUEST RELATED INVENTORY HISTORY IMPROVEMENTS
The following updates have been made to Warehouse Management Inventory History Transactions (IHT) to support Movement Requests in 23B.
POPULATE DESTINATION LOCATION IN PICK CONFIRMATION INVENTORY HISTORY TRANSACTIONS (IHT)
During Inventory Management integrations, when subinventory is configured as locators, Warehouse Management now provides visibility into which location inventory is getting delivered to (destination location information.)
The following example shows the IHT reference codes and values that will be populated during Pick and Move Flows:
| Replenishment Flow | Description | IHT Reference Detail |
|---|---|---|
| Pick and Move |
If subinventory is locator-controlled in Inventory Management, then the Pick Confirmation touchpoint needs to pass the destination location information. The location information needs to be passed so that Inventory Management can initiate appropriate issue transactions from corresponding locations. If the location information is not passed, then issue transactions could be initiated without location information, contributing to mismatches in inventory. WMS now passes the location in the location field of Inventory History (concatenation of all location components). |
The IHT-87 (Movement Request Detail Picked) reference field is populated as follows (Auto Consume value is set to "N" in Movement Request Detail):
This will pass on the destination location information in the corresponding Inventory History that is generated upon completing the replenishment flow. |
POPULATE MOVEMENT REQUEST LINE IN INVENTORY HISTORY UPON PICK CONFIRMATION
When Warehouse Management delivers material to corresponding supply subinventory locations (as part of replenishment for movement requests), the Movement Request Line ID will now be populated on the relevant Inventory History Records.
The following examples show the IHT reference codes and values that will be populated during Pick and Move/Pick and Issue Flows:
| Replenishment Flow | Description | IHT Reference Detail |
|---|---|---|
| Pick and Move |
The corresponding SKUs in the movement Request are delivered to supply subinventory locations. Upon delivery of material to these locations, Manufacturing will ask for material to be issued as a separate step. Upon delivery of the material to corresponding locations (supply subinventory), WMS will communicate the corresponding Movement Request Information so that Fusion Inventory can mark the Movement Request as Closed or update the received quantity. |
The IHT-87(Movement Request Detail Packed) reference field is populated as follows:
NOTE: IHT-87 is written for Movement Request details where the Auto_Consume flag is set to "No" |
| Pick and Issue |
The corresponding SKUs in Movement Requests are delivered to actual work center locations and the inventory is Auto Consumed. |
|
UPON MOVEMENT REQUEST CANCELLATION
The Movement Request Line ID will now also be populated on the relevant Inventory History Records when WMS cancels or shorts the movement request.
- Movement Request line can be cancelled through WMS when:
- A Cancellation Wave for Replenishment Template (tied to Movement Requests) is run.
- When a WMS Supervisor/Inventory Manager performs shorting of Movement Request detail in the Movement Request Detail UI.
Warehouse Management also populates the relevant movement request line ID value in the following reference fields for IHT-90 (Movement Request Detail Shorted):
- REF_CODE_6: MRL
- REF_VALUE_6: Movement Request Line ID value from the corresponding movement request line cancelled.
Steps to Enable
You don't need to do anything to enable this feature.
Key Resources
- See Manage Movement Requests in the Warehouse Management Online Help.
Enhancements to Reason Code Handling in Additional UI and RF Screens
Reason Codes are a crucial component in tracking transaction activities in warehouse operations. Whether it's inventory adjustments, short picking or audit changes, having a consistent method of capturing these reason codes is very important. In an effort to bring a more consistent and unified method across our applications, Warehouse Management has made enhancements in multiple UI and RF transactions to assist in capturing those Reason Codes.
For some scenarios, there is a need to record a reason code for shorting or cancelled orders so that businesses can determine the causes and associated business impact of such cancellations. These reason codes can also be communicated if needed for integration with external systems.
Boosting the existing functionality of Reason Code handling introduced in the previous release, the screen parameters "default _reason code_on short" and "prompt-reason-code" now support additional transactions in the 23B release.
With the parameter "default _reason code_on short" set to YES, your floor users won’t have to manually enter a reason code as the system will enable the defined parameter value. In addition to the existing supported transactions RF Pack OBLPN, RF Pick IBLPN, RF Pick Cart, and RF Pack NC Active, you can define a default value for the following transactions while performing a Short:
- RF Repack OBLPN
- RF Move LPN
NOTE: By setting the screen parameter "prompt-reason-code", you will be prompted for Reason Code at the transaction level.
You can choose from the list of Active Reason Codes and configure it as the default Reason Code for the Short performed for the RF transactions Repack OBLPN and Move LPN. However, if the value configured is invalid or not an Active Reason Code and the default Reason Code Prompt is set, then the Reason Code will be prompted at the transaction. The default Reason Code will be populated in the relevant column in the Inventory History screen.
The default Reason Code value configured on the screen parameter "default_reasoncode_onshort" value will be prioritized over company parameters "MOD_CANCEL_OBLPN_REASON_CODE" and "SHORT_REASON_CODE".
NOTE: Hard coding of Reason Code as 'IT' is no longer supported. The customer has to configure the screen parameter or company parameter with a valid and active reason code from the Reason Code master.
Now, you can also capture the Reason Codes for Orders Cancelled via the "Bulk Edit" action button on the Order Detail Line. For such orders, you will be prompted for confirmation by means of a pop-up and you can choose to select from the list of available Active Reason Codes via a drop-down. You can also proceed without selecting the reason code since this is a non-mandatory field.
While running a Work Order Wave, you can now capture the Reason Code for unallocated orders by enabling the “Cancel Unallocated” flag. A new drop-down field “Reason Code” is added in the Work Order Wave Template and is disabled by default.
On enabling the “Cancel Unallocated“ flag, the system allows you to choose an appropriate Reason Code against those canceled orders.
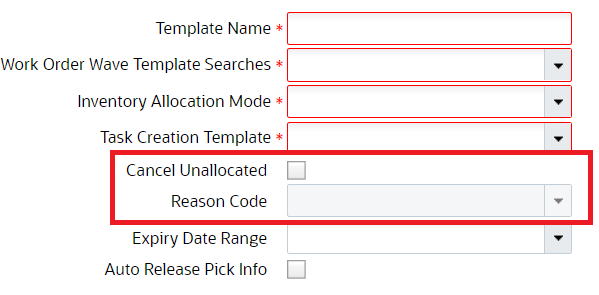
Reason Code drop-down on the Wave Order Template Screen
On capturing the Reason Code, the system updates IHT 67 - Work Order status change and IHT 82 - Work Order cancellation. The Reason Code column and IHT can be exported as a CSV file.
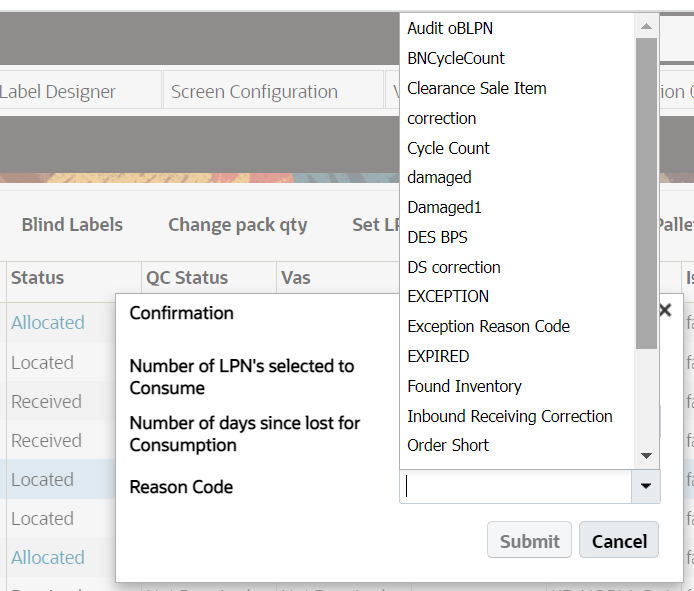
Reason Code Listed in Alphabetical Order on RF and UI Screen
The Reason code displayed in the drop-down list of all the RF and UI screens now displays in alphabetical order. This helps in the user's productivity to choose specific Reason code initial easier and faster.
- For RF screens: The Reason codes that are displayed in a dropdown list are ordered in alphabetical order with respect to the 'Code'.
- For Web UI: The Reason codes that are displayed in the drop-down list are ordered in alphabetical order with respect to the 'Description".
Steps to Enable
You can set the Reason Code with the following steps:
- By setting a valid parameter value in Screen Configuration > Screen Parameter > RF - Move LPN > Default Reason Code (on short), the system will pick the given parameter as default and will not prompt you to enter Reason Codes on shorting.
- By setting a valid parameter value in Screen Configuration > Screen Parameter > RF - Repack OBLPN > Default Reason Code (on short), the system will pick the given parameter as default and will not prompt you to enter Reason Codes on shorting.
- For RF Repack OBLPN transactions, the screen parameter "prompt-reasoncode-onshort" needs to be set as YES. This will prompt you for the appropriate Reason Code while performing a short.
- For RF Move LPN transactions, the screen parameter "prompt_rsncode_onshort" needs to be set as YES. This will prompt you for the appropriate Reason Code while performing a short.
- By setting the screen parameter "prompt-reason-code", you will be prompted for Reason Code at the transaction level.
Key Resources
Set Max Retries for Sending of Inventory History Transaction (IHT) Records
Giving you additional flexibility in management of your Inventory History Transaction (IHT) records, you can now configure the max number of retries (now happening in real time) for the system to send IHT records in the Output Interface Configuration -> Output Interface Target ->Inventory History Export.
In the Inventory History Activity Parameters UI, when the 'Enable auto send flag' is set to Yes, the value configured in the 'Max Retries' field on the Output Interface configuration/target for the Inventory History Export, will specify the number of times the system should retry sending the IHT records to the end point defined on the target.
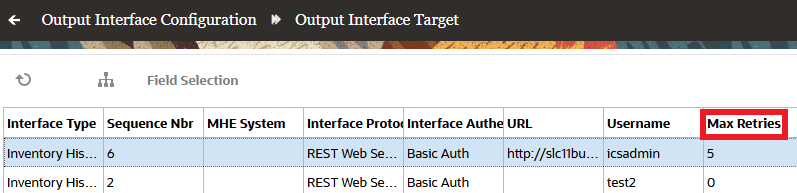
Output Interface Target
Steps to Enable
To update the “Max Retries” field, do the following:
- In the Inventory History Activity Parameters UI, set the Enable Auto Send Flag to Yes.
- Go to the Output Interface configuration UI.
- Select a record with Inventory History Export as the Interface type and click Output Interface Target.
- On the Create or Edit pane, add a number in the “Max Retries” field to specify how many times to retry sending IHT records.
Key Resources
- For more detailed information about Inventory History Transactions, go to the Oracle WMS Cloud Information Center. From the top of the page, click on the Documentation tab at the top, then click the link under Current Documentation and refer to the IHT Reference document.
Send Replenishment Wave Pick Info Using Outbound Interface API
SEND REPLENISHMENT PICKING INFORMATION VIA OUTPUT INTERFACE FOR FULL LPNS
To share the triggered Replenishment Pick info to an external or third-party application, a new output interface file namely “Replenishment Pick Info” is introduced. For this release, the Replenishment information can be shared only for Full LPN allocation.
Along with the output file, information (INFO) is added to the following company parameter:
| Parameter Key | Parameter Value |
|---|---|
| OUTPUT_LGF_FINFO_REPL_PICK_INFO |
Text Field that takes valid release values |
With this parameter, you can configure the Replenishment Pick Info output interface based on the release version.
Steps to Enable
You don't need to do anything to enable this feature.
Key Resources
- For more detailed information about Output Interfaces, go to the Oracle WMS Cloud Information Center. From the top of the page, click on the Documentation tab at the top, then click the link under Current Documentation and refer to the Interface Specifications document.
Outbound Logistics
Enhancements to Selection Criteria Rules Screen
INTRODUCE IS NULL OPERATOR TO SELECTION CRITERIA SCREENS
To further support management of selection criteria in Warehouse Management screens, you now have the ability to configure certain rules when a specific field is Null/Blank. This is useful when you need to filter records and identify tasks.
For example, you may want to run a wave for Orders that are not associated to any External Planned Loads. To do this, you can now configure Dynamic Wave searches to fetch orders where "Order Externally Planned Load" is Blank/Null.
A new SQL operator has been added in several Warehouse Management screens, which allows you to select all of the records that are null/blank:
| New/Existing | SQL Operator | Column Accepted Values |
|---|---|---|
| New | Is Blank or NULL | Boolean (True/False) |
The new SQL operator is available in the following screens:
- Putaway Rules --> Selection Criteria
- Task Creation Template --> Selection Criteria
- CC Adjustment Approval Rule --> Selection Criteria
- Wave Template --> Wave Template Search --> Dynamic Wave Search -> Selection Criteria
- Cubing Rules --> Selection Criteria
- Audit Rules --> Selection Criteria
Steps to Enable
You don't need to do anything to enable this feature.
Key Resources
Perform Post Packing Transactions Through Tasking
In 23B, we are further enhancing your experience by making the standalone transaction Post Packing OBLPN updates and handling (rf.outbound.cwrfpostpackinglpnhandling) available through a task. Users will be able to perform updates on the OBLPN like print labels, capture dimensions, capture weight, and update LPN Type. User no longer has the need to get out of the transaction, and performed this post packing actions. It also gives the user flexibility, so you can do the post packing operations before or after Task Zone Movements.
A new task type “POST_PACK_HNDL” is introduced which also includes the ability to perform task zone movements and OBLPN Putaway. This new Task Type is available in the following non-tasked RF transactions:
- RF Direct Allocation (rf.outbound.cwrfdirectallocation)
- RF Combine OBLPN (rf.outbound.cwrfcombineoblpn)
- RF Repack OBLPN (rf.outbound.cwrfrepackoblpn)
You have the ability to create and invoke a task of this task type through a control command (CTRL-T: Create Task) from inside of these RF transactions. When you use the control command, this indicates that you are done with packing and that you want to create a task for all the destination/to OBLPNs (one or more) scanned during the current session.
With this new enhancement in place, the system allows you to perform updates on the OBLPN (like capture weight/printing) based on the requirement, move the OBLPN between drop locations (through task zone movements) and finally putaway to loading/staging locations for shipping, all in one continuous tasked flow.
Configuration:
The following two screen parameters have been added to RF Direct Allocation, RF Combine LPN, and RF Repack transactions. These parameters allow you to trigger the task for the new task type:
| Parameter Name |
Type |
Values |
|---|---|---|
| post-pack-task-type-description |
Text | Task type description for the task type “POST-PACK-HNDL”. |
| dest-task-zone |
Text | Destination zone for the task zone move rules. |
- When you configure the above parameters with valid values and invoke the control command (CTRL+T) for the OBLPN(s) scanned in the transaction, a new task is created and executed which continues into the next program configured as part of the task type. This control command is visible in the RF only when the task type screen parameter is configured.
- Invalid value will result in RF displaying an error 'No Task Created'. In case, when there are no OBLPNs to be tasked and the control command is invoked, the RF displays an error "No eligible OBLPNs to be tasked".
- The RF transactions Direct Allocation/Combine/Repack also supports OBLPN updates, such as, Printing, Auto Loading, Movements or promoting Drop, LPN type, and so on, through their own screen parameters. When the mentioned transactions are configured for post packing, these screen parameters will be deliberately ignored.
NOTE: Once the post packing task type is configured, the screen parameters like printing/autoload/prompt drop will be ignored.
The screen parameters that may be ignored by the system are as follows:
- prompt-drop
- auto-load,
- print-labels,
- prompt-oblpn-type,
- print-extras,
- print-column-order-descr,
- prompt-lpn-type-on-packed,
- print-to-oblpn-label,etc.)
NOTE: Where 'column-ordering' is configured to print documents, the 'TASK_REPORT' report type does not apply for post packing updates and the associated allocations/task is completed and the OBLPN in question might be linked to allocations coming from multiple waves. In case you configure this, the application logs will be written to convey that the system will ignore it.
For RF Repack OBLPN:
- Both picked and packed OBLPNs is eligible for post packing updates.
- When you first scan the to-OBLPN in Repack and If Repack (or combine) is configured for post packing, RF validates to check if it is linked to any incomplete task (of any task type) or if any open allocations are left for this OBLPN. If linked, the RF throws a hard error and does not allow the user to proceed further.
NOTE:
- Not all programs are mandatory, but at least one program must be configured in the new task type for the task to be created.
- You may encounter noticeable delay if the count of OBLPNs tasked is more than a few.
- It is recommended for you to use Ctrl-E command for all the other closing updates to be successfully completed for each of the OBLPNs scanned in the session.
- Load assignment/Manifesting is explicitly completed after post packing updates have been done.
In 23B, we have renamed the task type FUTURE_POSTPACK to POST-PACK-HNDL. The terminology Future has been removed from the task type description and you are now allowed to configure and save the task type without any error.
Steps to Enable
You don't need to do anything to enable this feature.
Key Resources
Enhancement to RF Pack OBLPN to Update Outbound LPN to Picked Status
A new screen parameter “oblpn-status-post-picking” is now available in the RF Pack OBLPN screen. This new option allows you to choose the status that you want your Outbound LPN to be after picking has been completed. This gives you more flexibility, as you may not want your Full-LPN to be in Packed status. Now, allowing your LPNs to be in Picked status brings more flexibility with post-packing operations, labeling and others.
This new parameter with following parameters values providing you an option to set the LPN status during packing process:
| Values |
Description |
|---|---|
| Blank (default) |
Updates OBLPN to Packed Status |
| Packed |
Updates OBLPN's that are created to Packed Status |
| Picked |
Update OBLPN's that are created to Picked Status |
NOTE: This new screen parameter also applies even if:
- The OBLPN that is picked is pushed to a Pallet. Palletizing and picking of OBLPN's into Picked status is supported.
- A single IBLPN is broken into multiple OBLPN based on Split Allocations by Cases or Packs, the OBLPN is moved to Picked Status.
Steps to Enable
- Go to RF Pack OBLPN (rf.outbound.cwrfpacklpn)
- Click parameters and select oblpn-status-post-picking.
- Click edit and set the status to Blank/Packed/Picked.
- Click Save.
Key Resources
Enhancements to Pack Outbound LPN REST API to Support Picked Status
The Pack OBLPN API now has an additional parameter (oblpn_status_post_picking) providing you with an option to move the LPN status to Packed or Picked via API calls.
API URL:
POST../pick_pack/pack_full_lpn
If the parameter is set to:
- Packed/ Blank (Default): Update OBLPN's created to Packed Status.
- Picked: Update OBLPN's created to Picked Status.
NOTE: If the parameter is set, the oblpn_status_post_picking field in the API displays the value "Picked" or "Packed".
The following table lists the fields in the parameter:
| Name | Description |
|---|---|
| facility_id |
Facility context by id |
| facility_id__code |
Facility context by code |
| company_id |
Company context by id. |
| company_id_code |
Company context by code. |
| oblpn_number |
OBLPN which needs to be packed. |
| iblpn_number |
If IBLPN is not sent, then system will consider allocated IBLPN w.r.t given OBLPN for packing. |
| reason_code |
Reason for short. |
| short_flg |
short_flg = false; Allocated quantity against OBLPN will be Packed. |
| update_inventory_on_short_flg |
Short source allocated inventory |
| mhe_system_code |
MHE system. MHE System is not mandatory as this API can be called from MHE systems or through externally developed packing screens or in future our VBCS option to perform full LPN picking. |
| oblpn_status_post_picking |
Supported values "Picked" or "Packed". If the parameter is not sent or the value is left blank, then status "Packed" is displayed, as default. |
For more information, see the REST API Guide.
To access the latest document, navigate to the WMS Landing page > Warehouse Management > Latest Documentation >Books.
Steps to Enable
You don't need to do anything to enable this feature.
Key Resources
Enhancements to Generation of OBLPN Shipping Info
NEW OBLPN AND PALLET FIELDS - SHIPPING INFO
In order to introduce a common identifier (for externally planned load) to support Warehouse Management and Transportation Management Integration, new Outbound LPN fields have been added. These fields are added to support Ship Unit level planning (which will be added in future releases).
The following fields have been added to the OBLPN Shipping Info files and will act as a common identifier when the Pallet and OBLPN details are shared with WMS:
| Field Name | Field Type | Max Length |
|---|---|---|
| erp_source_hdr_ref |
Alphanumeric |
150 |
| erp_source_system_ref |
Alphanumeric |
150 |
| erp_source_line_ref |
Alphanumeric |
150 |
| erp_source_shipment_ref |
Alphanumeric |
150 |
| tms_order_hdr_ref |
Alphanumeric |
150 |
| tms_order_dtl_ref |
Alphanumeric |
150 |
The following fields have been added to OBLPN Shipping Info -> Selection Criteria:
| Field Name | Column Value Type |
|---|---|
| OBLPN - Actual Weight Flag | Boolean |
| Externally Planned Load Number | Text |
NOTE: Output interface filtering based on the IS_ACTUAL_WT FLAG and EXTERNAL_PLANNED_LOAD Number will not be supported for one line format. It will work for XML format only
Steps to Enable
You don't need to do anything to enable this feature.
Key Resources
Capture and Display Additional File Types for Outbound LPN
In addition to images, you can now upload word documents, excel spreadsheets and pdf files for Outbound LPNs. The action button Upload Images on OBLPN UI has been renamed to Upload Files to reflect the additional capability. The Nbr Images column in the grid view has been renamed to Nbr Files.
The maximum upload file size has been increased from 1 MB to 10 MB and the uploaded file(s) should be in one of supported formats – doc, docx, xls, xlsx, pdf, jpg, jpeg, or png. Maximum upload file size and allowed file types can be configured in SAAS App Configuration UI.
Steps to Enable
You don't need to do anything to enable this feature.
Tips And Considerations
If you have not enabled OCM-WMS integration prior to 23B, refer OCM-WMS Integration Guide to enable this feature.
Key Resources
Capture and Display Files for Outbound LPN Types and Outbound Loads
The file upload and view capability has been extended to the OBLPN Type and Outbound Loads UI, enabling you to store images for OBLPN Types and Outbound Loads. A new ‘Upload Files’ action button has been introduced in the OBLPN Type UI and is enabled only if a single record is selected and the logged-in WMS user has the OBLPN Type/Upload Images permission.
The upload file button allows you to upload a single or multiple files for an OBLPN Type.
A new column "Nbr Files" has been introduced in the OBLPN Type grid view. The values of this column will appear as hyperlinks and contain the number of files uploaded to OCM for the selected OBLPN Type. Selecting this hyperlink will open the OCM embedded UI within a child view in the OBLPN Type UI. The asset view dedicated for the current company will be displayed within the OCM embedded UI filtered by the OBLPN Type collection. All the files relevant to the selected OBLPN Type will be displayed in this view.
Steps to Enable
You don't need to do anything to enable this feature.
Tips And Considerations
If you have not enabled OCM-WMS integration prior to 23B, refer OCM-WMS Integration Guide to enable this feature.
Key Resources
Enhancements to Planned Load Interface for Transportation Splits of Order Lines
To further align integration between Warehouse Management and Transportation Management, several enhancements are being added including:
- Option to Plan multiple Loads for a Single Order Line
- Expansion of Planned Load Interface
- Mapping for Four Part Key to Planned Load Interfaces
TRANSPORTATION SPLIT CHANGES
Introduce Quantity and UOM Field in Planned Load Interface
In some industry scenarios, one order detail line cannot be planned in one load, and it needs to planned in multiple loads (otherwise known as Transportation Split)
To support the planning of multiple loads for one order detail line, the following two fields have been added to the Planned Load Interface:
- Qty – indicates how much inventory is planned in the load
- Qty UOM Code – provides the context of the quantity
Change to DELETE Action Code of Order Interface if Order Has Gone Through Transportation Split
When it comes to Transportation split, for each planned load, there will be a split and a new order line created from the source order line. If the Order line needs to be deleted, then all of the newly created order lines associated with the source order line need to be deleted.
To support this, Warehouse Management now provides you the option to:
- Delete Order Detail with Order and Sequence Number (if there is no Transportation split)
- When an Order is interfaced with DELETE action code for an Order detail that has gone through a Transportation split, all the lines originated for the source lines will be deleted
Order Detail Changes
In 22B, Warehouse Management is extending the external planning load functionality to support the planning of multiple loads for one order detail line.
For example:
Let’s say you have an order, ORD-001, with a quantity of 100. Via the Planned Load Interface, you now have the option to split two loads (each with a quantity of 50, and each with the same SKU) for this order in one order detail line.
Planned Load Interface
The following example shows that there are two loads planned for one order detail line:
| Order Nbr | Seq Nbr | SKU | Qty | erp_source_hdr_ref + erp_source_line_ref + erp_source_shipment_ref + erp_source_system_ref |
Planned Load Number |
|---|---|---|---|---|---|
| ORD-001 | - | SKU-1 | 50 | A1+B1+C1+D1 | EXT-001 |
| ORD-001 | - | SKU-1 | 50 | A1+B1+C1+D1 | EXT-002 |
ORDER UPDATE and DELETE
Now, after splitting one Order Detail into multiple new details in a planned Load, if the user updates any fields (with the exception of SKU, Qty, and UOM Code fields), then all the order detail lines originated from the source order detail will get updated as well.
This also applies to DELETE action code. When an Order is interfaced with DELETE action code for an Order detail that has gone through a Transportation split, then make all the lines originated for the source lines will also be deleted.
INTRODUCTION OF FOUR PART KEY IN CUBING/TASK CREATION RULES SELECTION CRITERIA
If Outbound LPNs have inventory that are pointing towards multiple loads, this can lead to errors during packing. To help prevent OBLPNs pointing towards multiple loads in one OBLPN, You can now configure rules using newly added selection criteria in the Cubing Rules and Task Creation Rules screens.
Additional fields are being added in the following screens:
Cubing Rules -> Selection Criteria
| Field Name | Column Value Type |
|---|---|
| Order Hdr - erp_source_hdr_ref | Text |
| Order Hdr - erp_source_system_ref | Text |
| Order Dtl - erp_source_line_ref | Text |
| Order Dtl - erp_source_shipment_ref | Text |
Task Creation Rules -> Selection Criteria
| Field Name | Column Value Type |
|---|---|
| Order Hdr - erp_source_hdr_ref | Text |
| Order Hdr - erp_source_system_ref | Text |
| Order Dtl - erp_source_line_ref | Text |
| Order Dtl - erp_source_shipment_ref | Text |
Steps to Enable
You don't need to do anything to enable this feature.
Key Resources
Update to Next LPN Pick Display for Pack NC Active
When a task has multi order picks associated with it which requires multiple OBLPNs to be picked for multi-orders, upon picking for the 1st order, the next pick gets generated for a new order and prompts the user for a new OBLPN. However, the RF screen message covers up the OBLPN information detailing the inventory that was packed for the previous order. This was causing the floor user to pick the inventory into previous OBLPN as the previous OBLPN has been clouded by the message.
In 23B, the RF Pack NC Active transaction is enhanced to display the previous OBLPN and prompt you to scan the OBLPN during picking via tasking mode. Therefore, the previous OBLPN is also displayed so that you don’t accidentally put the wrong item into OBLPNs.
NOTE: If the screen parameter "break-picks-by" is set as "Order", then the system allows you to pick only one order per OBLPN.
NOTE: If the screen parameter "break-picks-by" is set as "Destination", then the system allows you to pick inventory for multiple orders for one OBLPN for the single destination.
Steps to Enable
- From the RF Pack NC Active module, Set the screen parameter “break-picks-by” to Order.
- Click Save.
Key Resources
Apply Discount Code for UPS Carriers
In the ever-changing supply chain environment, it’s critical to minimize shipping costs whenever possible. In terms of fulfillment and logistics, any sort of savings on freight can help your business. To ensure that a UPS discount for freight costs (when available) is included, In 23B, the Carrier Facility UI has been enhanced with a Discount Code field.
Discount Code
NOTE: This field will be grayed out for all other carriers except UPS.
Steps to Enable
You don't need to do anything to enable this feature.
Key Resources
Enhancements to Generation of Pallet Shipping Info
NEW OBLPN AND PALLET FIELDS - SHIPPING INFO
In order to introduce a common identifier (for externally planned load) to support Warehouse Management and Transportation Management Integration, new Outbound LPN fields have been added. These fields are added to support Ship Unit level planning (which will be in future releases).
The following fields have been added to the Pallet Shipping Info Output files and will act as a common identifier when the Pallet and OBLPN details are shared with WMS:
| Field Name | Field Type | Max Length |
|---|---|---|
| erp_source_hdr_ref |
Alphanumeric |
150 |
| erp_source_system_ref |
Alphanumeric |
150 |
| erp_source_line_ref |
Alphanumeric |
150 |
| erp_source_shipment_ref |
Alphanumeric |
150 |
| tms_order_hdr_ref |
Alphanumeric |
150 |
| tms_order_dtl_ref |
Alphanumeric |
150 |
The following fields have been added to Pallet Shipping Info -> Selection Criteria:
OBLPN - Actual Weight Flag
| Field Name | Column Value Type |
|---|---|
| OBLPN - Actual Weight Flag | Boolean |
| Externally Planned Load Number | Text |
NOTE: Output interface filtering based on the IS_ACTUAL_WT FLAG and EXTERNAL_PLANNED_LOAD Number will not be supported for one line format. It will work for XML format only
Steps to Enable
You don't need to do anything to enable this feature.
Key Resources
WMS Mobile App
Migrate Mobile App to VB Progressive Web App (PWA)
The Oracle WMS Cloud is now ready for its first release of its Progression Web App (PWA). This application is delivered to you over the web; however, it can be installed as a native application available on Android or iOS mobile device. The PWA app is the replacement for the Android and iOS “Oracle WMS Cloud Mobile” app. The app store-based will not be updated, and all future enhancements will be delivered via the PWA.
With incredible advancements in web technology, the PWA now has the capability to match or even exceed the earlier native app in providing extensive flexibility and modern mobile experiences. The PWA is easy to download and install using a regular URL address. Users can benefit from more frequent updates to these apps compared to the apps hosted on App Stores. Therefore, Oracle has decided to move to PWA.
All the features that were available in the “Oracle WMS Cloud Mobile” app for iOS and Android have been migrated to PWA using the same advanced Oracle application building technology, Visual Builder (formerly VBCS). The Oracle WMS Cloud Mobile PWA app has similar access to native device capabilities such as the camera for pictures or barcode scanning.
The PWA app link is available in each Oracle WMS Cloud environment. Users can access the link under User’s Global settings dropdown on the top-right pane of the web application.
The “Mobile App Link” hyperlink will open the PWA app on desktop browsers. On desktop browsers like Chrome and Edge, you will get an option to install the PWA as a desktop app. To install the app on an Android or iOS mobile device, please use the QR barcode and scan it on the device. The app can then be installed on the device.
Steps to Enable
You don't need to do anything to enable this feature.
Key Resources
Warehouse Automation
Support Replenishments of Full LPNs to Warehouse Automation Systems
Various Material Handling Equipment (MHE) like ASRS, AGV, etc. are equipped in the warehouse for picking. This equipment is automated to help drive your replenishment process using WMS inputs, ensuring the availability of items at their picking locations, and thus increasing warehouse efficiency, transaction accuracy, and material availability.
With this 23B release, Replenishment information like LPN Source Location and LPN Destination Location can now be shared with the upstream so that the MHE system can consume the information and act on it.
The replenishment process can be initiated from Replenishment Template, Wave Template, and Work Order Template screens. A new configurable option is provided to initiate an output interface file upon running a wave successfully, which can be shared across the external system to automate the replenishment process.
Refer to the following new enhancements that are added to the UI.
To configure the trigger for the output interface file:
| Enhancements | Enhancement Type | Screen/Sub-screen Name | Behavior |
|---|---|---|---|
| Auto Release Pick Info Checkbox | Optional Checkbox |
|
|
| Release Replenishment Pick Info |
Button |
Wave Inquiry |
To manually generate the Replenishment Pick info output file, select a record (Wave status - Completed) click the Release Repl Pick Info button. |
To setup an MHE System Code per Replenishment Rule:
| Enhancement |
Enhancement Type |
Screen/Sub-screen Name |
Behavior |
|---|---|---|---|
| MHE System Code |
Optional dropdown field |
|
If an MHE system code is selected, the MHE system code information can be shared in the Replenishment Pick Info output file. |
To search and filter Auto Release Replenishment Pick Info records:
| Enhancement |
Enhancement Type |
Screen/Sub-screen Name |
Behavior |
|---|---|---|---|
| Auto Release Replenishment Pick Info |
Drop-down |
Wave Template Search Pane |
|
NEW INTERFACE TYPE IN THE OUTPUT INTERFACE CONFIGURATION HEADER
A new output interface type Replenishment Wave Pick Info is added in the Output Interface Configuration Header UI, to configure and validate the output entities before sharing the Replenishment Pick Info.
Replenishment Wave Pick Info Interface Type is supported with One Line and XML interface. You can select either of those formats to get the output file.
When configuring, you can select the “Remove Empty Elements Flg” check box, to remove empty fields in the output file.
If you have configured the header screen with the interface type "Replenishment Wave Pick info" the detail screen can have all the fields similar to Wave Pick info.
Steps to Enable
You don't need to do anything to enable this feature.
Key Resources