Open topic with navigation
Defining States
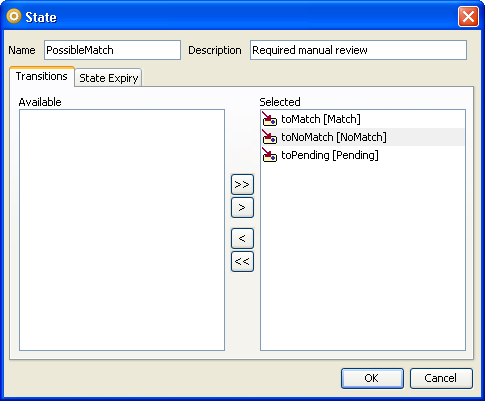
States are defined in the State dialog, which can be accessed from the States tab on the Workflow Editor, within Case Management Administration. Open the dialog by pressing the 'Add...' button under the States list to create a new state, or by double-clicking on an existing state to edit it.
The state dialog consists of two main areas:
- The upper part of the screen is used to set the basic attributes of the transition;
- The lower part of the screen contains two tabs: the Transitions tab, which allows you to assign transitions to the state, and the State Expiry tab, where you can define automatic expiry settings for the state.
Each of these sections is described in more detail below. When you have defined all the attributes of your state, press the 'OK' button to save your changes.
Basic configuration
This part of the screen defines the name and description of the state.
- The name is mandatory, and is used in other parts of the user interface to identify this state. It should be populated with a memorable and meaningful value.
- The description is optional. This field can be used to provide more verbose information detailing the state's use.
-
The Transitions tab
This tab is used to assign transitions to the state. The transitions which are assigned to a state define the valid ways in which a case or alert can leave that state, and the changes that will be made to the case or alert's attribute settings as it changes state.
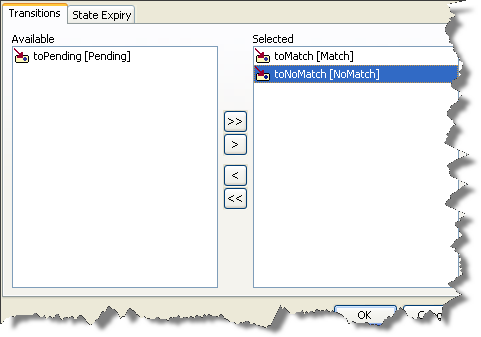
- The 'Available' list displays all the transitions that have been defined for the current workflow which transition into a different state, and which are not currently assigned to the state.
- The 'Selected' list displays all the transitions which are currently assigned to the state.
Move transitions from one list into the other by using one of the following methods:
- Double-click on a transition to move it from one list to the other.
- Select one or more transitions by clicking on them, and use the single arrow buttons to move them from one list to the other. To select multiple items in the list, hold down the <Ctrl> key on your keyboard as you click on them.
- Use the double arrow buttons to move all the items in one list into the other list.
The State Expiry tab
This tab is used to configure the expiry settings for the state. Expiry settings, which are optional, specify the actions to be taken when the state expires. Actions can include applying a transition to the case or alert, or changing the value of one of its attributes or extended attributes.
State expiry can be automatic, in which case a state will, by default, expire automatically after a specified interval. Alternatively, expiry intervals can be set manually for individual cases or alerts in Case Management. It is not possible to set an expiry interval for a case or alert unless the state it is in has state expiry enabled.
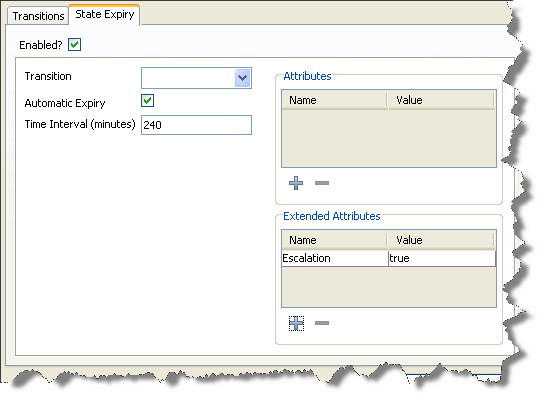
- The 'Enabled' checkbox specifies whether or not any state expiry is active for this state. If this box is not checked, it will not be possible to specify expiry settings for this state. Cases or alerts in this state will not expire automatically, and it will not be possible to enter manual expiry times for them.
- The 'Transition' drop-down box allows you to specify a transition to be applied to cases or alerts when the state expires. This allows you to configure a workflow where a case or alert will automatically move from one state to another after a specified period of time. Specifying a transition as part of state expiry is optional.
- The 'Automatic Expiry' checkbox allows you to specify whether or not a state will expire automatically after a given time interval. If it is not checked, you will not be able to specify a time interval. If expiry is enabled for a state, but not an automatic expiry time interval, cases and alerts in that state will not expire automatically, but can be expired automatically in Case Management.
- The 'Time Interval' field allows you to specify the expiry time, in minutes, for the state. It is only possible to specify a value here if automatic expiry is enabled.
- The 'Case Attributes' and 'Extended Attributes' lists display the changes that will be made to the attributes and extended attributes of the case or alert when the state expires. The upper box displays the changes that will be made to the case or alert attributes; the lower one displays those for the extended attributes.
The dialog above shows the expiry settings for a state which:
- will expire automatically after 240 minutes;
- does not specify a transition to apply when the state expires;
- makes no changes to any of the case attributes when the state expires;
- sets the value of the 'Escalation' flag to 'true' when the state expires.
Defining attribute and extended attribute actions
The changes that will be made to the attribute and extended attribute values when the state expires are displayed in the Attribute and Extended Attribute lists.
To add an action to either list, press on the '+' button below it. To edit an existing action, double-click on it. To delete an action, click on it in the list and press the '-' button under the list.
The dialog for adding or editing an action of either kind is requires only that the attribute, or extended attribute, and its new value is specified. The control used to enter the new value for the attribute will change, according to the attribute type:
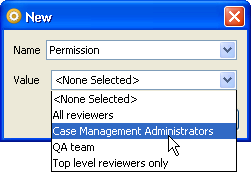
Press 'OK' when you have set the attribute and value you require.
Oracle ® Enterprise Data Quality Help version 9.0
Copyright ©
2006,2011 Oracle and/or its affiliates. All rights reserved.