Step 3. Create and Manage Entities
Time to complete this step: 30 minutes
The JPA ORM Generation wizard allows modification of existing O/R mappings and
the creation of new entity associations.
The tasks you will complete in this step are:
To Create a New One-to-One Association between CUSTOMER and CUSTOMERID
OEPE also supports the creation of new entity associations in case your
database lacks foreign key definitions (such as for performance reasons). It
can create Simple Associations (one to one, one to many, many to one) between
two tables and Many to Many Associations through an intermediate table.
- In the Project Explorer, right-click the project oepe-jpa-tutorial and select JPA > Generate Entities from Tables... ick Next.

- Select the database tables from the Select Tables dialog as shown below. Select all the database tables except CONTACT and click Next.

- In the Table Associations dialog, click the Create New Association button.

- In the Create New Association dialog, select
the CUSTOMER table for Table 1 and the CUSTOMERID table for Table 2 (as shown below) and click Next.
This creates a simple one-to-one association between the CUSTOMER and CUSTOMERID tables.

- In
the Join Columns dialog, specify the join columns between tables.
Select the CUSTOMERID column for the CUSTOMER table and the CUSTOMERID
column for the CUSTOMERID table.
Click Next.

- Select One-to-One to specify one customer per customerid.
Click Finish.

Since the new associations (shown in brown)
are not observed in the database schema, they will be annotated programmatically
in the respective entity beans.

- Click Finish.
To Review Generated Classes with Annotations
Review the following annotations in the class Customer and CustomerId.
- One-to-One Properties - A one-to-one property designates a relationship
in which an entity A references a single entity B, and no other As can
reference the same B. This is a one-to-one relationship between A and B.
The following shows the one-to-one mapping association between Customer
and CustomerId in the Customer class.
@OneToOne(fetch=FetchType.EAGER)
@JoinColumn(name="CUSTOMERID", referencedColumnName="CUSTOMERID",
nullable=false, insertable=false, updatable=false)
public Customerid getCustomeridBean() {
return this.customeridBean;
}
public void setCustomeridBean(Customerid customeridBean) {
this.customeridBean = customeridBean;
}
|
- The following shows the one-to-one mapping association between CustomerId
and Customer in the CustomerId class.
@OneToOne(mappedBy="customeridBean", fetch=FetchType.EAGER)
public Customer getCustomer() {
return this.customer;
}
public void setCustomer(Customer customer) {
this.customer = customer;
}
|
Note: The annotation attributes for one-to-one mappings are similar to
one-to-many and many-to-one annotation attributes as explained before in
within Step 2 of this tutorial: Review Generated Classes with
Annotations.
To Add Annotations to an Existing Java Class
In this step, you will create a Java class Contact
and use Workshop to annotate existing Java classes (POJOs) to make them into
JPA entity beans. This way, we will follow a "top-down"
development scenario.
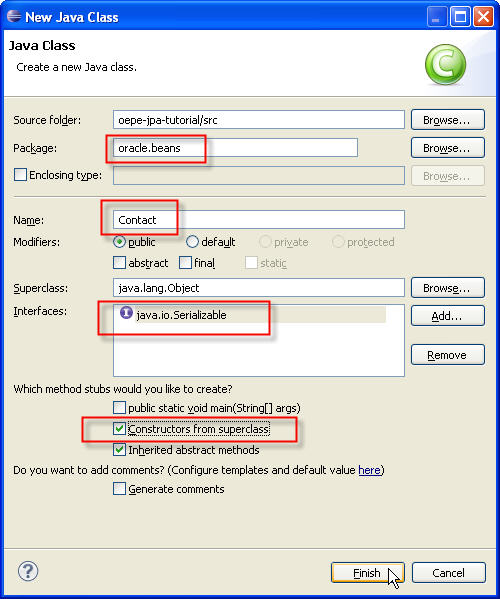
- Select File > New > Class.
- Under the package com.bea.beans, create a Java class Contact
which implements the java.io.Serializable interface. Select
Constructors from superclass to add a no argument constructor.
- Add the following set of private variables of type String
to the Contact class. Note: We are defining properties that
map to columns in the CONTACT database table.
private String contactId;
private String address;
private String city;
private String phone; |
- Add getter and setter methods for each property by right-clicking with
source view
and selecting Source > Generate Getters and Setters. In
the Generate Getters and Setters dialog, select all properties
and click OK.
- Add the following property.
private static final long serialVersionUID = 1L;
|
- Override the equals( ) and hashCode( ) methods
as we are going to use Contact instances in Set.
public boolean equals(Object other) {
if
( (this == other ) ) return true;
if ( !(other instanceof
Contact) ) return false;
Contact castOther = (Contact)
other;
if( this.getContactId( ).equals(castOther.getContactId(
)) ) {
return true;
} else
{
return false;
}
}
public int hashCode() {
return this.getContactId( ).hashCode(
);
}
|
- Save the Contact class. Now, we have the object representation
for CONTACT persistence data. Next, we will annotate the Contact
object.
- In the Project Explorer view, right-click on the project oepe-jpa-tutorial.
Choose JPA > Generate Entity from Java Class, then click Next.

- Click Browse to select a Java Class. Type contact to view and select the
com.bea.beans.Contact object to be mapped.
Click OK.

- When choosing Property, OEPE will annotate your class's accessor methods; if you choose field, OEPE annotate your class's fields. Set the Entity Access to Property and
click Next.

- In the Class Mapping Properties dialog, confirm that
the Database Table field has the value CONTACT and the Primary
Key Property field has the value contactId. If not, select it.
Then click Next.

-
In the Bean Properties Mapping dialog, you can verify the mappings
between fields and database columns that are being
annotated in the Contact java class. Note that you can select a property mapping and click Edit to modify a selected property
mapping. In this tutorial, we do not need to change any mapping information.
Click Finish.

- Edit the annotated class Contact to add a bi-directional many-to-one mapping
association with Customer.
- Import the following javax.persistence classes for adding a new many-to-one
column join.
import javax.persistence.JoinColumn;
import javax.persistence.ManyToOne; |
- Add a property customer of type Customer.
| private Customer customer; |
- Add the following annotation to the Contact entity for adding a many-to-one
association with Customer. The @JoinColumn annotation defines the attributes
Column Name which is the name of the column to which the property is bound
and the Referenced column which is the name of the primary key column
being joined to.
@ManyToOne()
@JoinColumn(name="CUSTOMERID", referencedColumnName="CUSTOMERID")
public Customer getCustomer() {
return this.customer;
}
public void setCustomer(Customer customer) {
this.customer = customer;
} |
- For the above many-to-one customer property in the Contact entity there
should be a one-to-many contact property in the Customer entity.
- Open the class Customer.
- Add a property contacts of type java.util.Set
| private java.util.Set<Contact> contacts;
|
- Add the following annotation to the Customer entity for adding a one-to-many
association with Contact. The @OnetoMany annotation defines the attribute
MappedBy which is the name of the many-to-one field in the Contact entity
that maps this bidirectional relation.
@OneToMany(mappedBy="customer")
public java.util.Set<Contact> getContacts() {
return this.contacts;
}
public void setContacts(java.util.Set<Contact> contacts) {
this.contacts = contacts;
} |
- Add the following parameters to the @JoinColumn annotation in the to the Customer entity to ensure that only one writable mapping exists for CUSTOMER.CUSTOMERID: unique=true, nullable=false, updatable=false, insertable=false. Only one may be defined as writable, all others must be specified read-only.
//bi-directional one-to-one association to Customerid
@OneToOne
@JoinColumn(name="CUSTOMERID", unique=true, nullable=false, updatable=false, insertable=false)
public Customerid getCustomeridBean() {
return this.customeridBean;
} |
- Save the class Customer.
Click one of the following arrows to navigate through the tutorial: