Before You Begin
Purpose
In this tutorial you learn how to create a simple REST service in Java using a Maven archetype, and how to generate the application archive to deploy your application on Oracle Application Container Cloud Service.
Time to Complete
Approximately 20 minutes
Background
Oracle Application Container Cloud Service includes Oracle Java SE Cloud Service, which lets you deploy Java applications to the Oracle Cloud.
For your application to run properly on Oracle Application Container Cloud Service, it must comply with the following requirements:
- The application must be self-contained. The application must include everything it needs to run independently.
- Your application
must listen to
requests on a port
provided by the
PORTenvironment variable. Oracle Application Container Cloud uses this port to redirect requests made to your application. - The
application
must include a
manifest.jsonfile. This file specifies information that Oracle Application Container Cloud Service requires to run your application properly. Optionally you can also specify additional information about instance scaling, environment variables, and service bindings in adeployment.jsonfile. - The application
must be bundled in a
.zip, .tgz, or
.tar.gz file. The
application archive
must include all the
project dependencies
and the
manifest.jsonfile at the root.
What Do You Need?
- An active Oracle Cloud account
- Java Development Kit 8 (JDK 8)
- Maven 3.0+
Creating the project
In this section, you
create a java project
using a Maven
archetype. The jersey-quickstart-grizzly2
archetype creates a
basic application of a
REST service using
Jersey that runs on
top of a Grizzly
container.
-
Open a command-line window (or Terminal in Linux).
-
Got to the directory where you want to store the project.
-
Generate the Maven artifacts:
mvn archetype:generate -DarchetypeArtifactId=jersey-quickstart-grizzly2 -DarchetypeGroupId=org.glassfish.jersey.archetypes -DinteractiveMode=false -DgroupId=com.example -DartifactId=simple-service -Dpackage=com.example -DarchetypeVersion=2.25.1
Preparing the Application for Cloud Deployment
Updating the Main Class to Read the PORT Environment Variable
Open the Main
class and update the BASE_URI
variable to use the PORT
environment variable
and the 0.0.0.0
host name.
private static final Optional<String> port = Optional.ofNullable(System.getenv("PORT"));
public static final String BASE_URI = "http://0.0.0.0:"+port.orElse("8080")+"/myapp/";
Note:
You should add the import
java.util.Optional;
Creating the manifest.json file
-
Create the
manifest.jsonfile in your root directory project and add the following content:{ "runtime":{ "majorVersion": "8" }, "command": "java -jar simple-service-1.0-SNAPSHOT-jar-with-dependencies.jar", "release": { "build": "20170113Build", "commit": "commitString", "version": "20170113Version" }, "notes": "REST app for testing" }
Creating the Maven Script to Package the Application
-
Create the
assemblydirectory into thesrcfolder. -
Create the
distribution.xmlfile in theassemblyfolder and add the following content:<assembly xmlns="http://maven.apache.org/plugins/maven-assembly-plugin/assembly/1.1.3" xmlns:xsi="http://www.w3.org/2001/XMLSchema-instance" xsi:schemaLocation="http://maven.apache.org/plugins/maven-assembly-plugin/assembly/1.1.3 http://maven.apache.org/xsd/assembly-1.1.3.xsd"> <id>dist</id> <formats> <format>zip</format> </formats> <includeBaseDirectory>false</includeBaseDirectory> <fileSets> <fileSet> <directory>${project.basedir}</directory> <outputDirectory>/</outputDirectory> <includes> <include>manifest.json</include> </includes> </fileSet> <fileSet> <directory>${project.build.directory}</directory> <includes> <include>*.jar</include> </includes> <excludes> <exclude>*.zip</exclude> </excludes> </fileSet> </fileSets> </assembly> -
Open the
pom.xmlfile in a text editor and add following code inside the<plugins>tags.<plugin> <groupId>org.apache.maven.plugins</groupId> <artifactId>maven-assembly-plugin</artifactId> <executions> <execution> <!-- Build Executable Jar with all Dependencies --> <id>build-jar</id> <phase>package</phase> <goals> <goal>single</goal> </goals> <configuration> <descriptorRefs> <descriptorRef>jar-with-dependencies</descriptorRef> </descriptorRefs> <finalName>${project.artifactId}-${project.version}</finalName> <archive> <manifest> <mainClass>com.example.Main</mainClass> </manifest> </archive> </configuration> </execution> <execution> <!-- Build Archive Zip File --> <id>build-zip</id> <phase>package</phase> <goals> <goal>single</goal> </goals> <configuration> <descriptors> <descriptor>src/assembly/distribution.xml</descriptor> </descriptors> </configuration> </execution> </executions> </plugin>
The distribution.xml
script generates the
simple-service-1.0-SNAPSHOT-dist.zip
file in the target
directory, that
includes the fat jar(simple-service-1.0-SNAPSHOT-jar-with-dependencies.jar)
and the manifest.json
file.
Creating the Project Archive
In the command line window, build and package your application using the maven command:
mvn clean packageDeploying the Application to Oracle Application Container Cloud Service
In this section, you learn how to deploy your application on Oracle Container Cloud service using the user interface console.
-
Log in to Oracle Cloud at http://cloud.oracle.com/. Enter the identity domain, user name, and password for your account.

Description of this image -
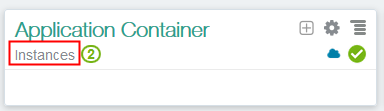
In the Dashboard, click Instances to open the Oracle Application Container Cloud Service console.
Description of this image -
In the Applications list view, click Create Application and select Java SE.

Description of this image -
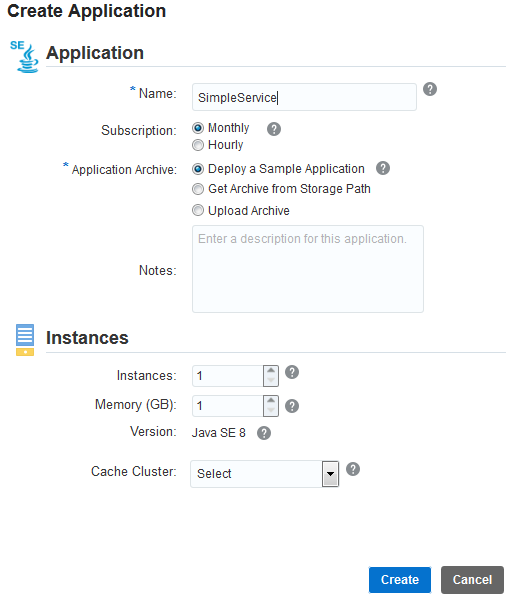
In the Application section, enter a name for your application, select Upload application archive, and click Browse.
Description of this image -
On the File Upload page, select the
simple-service-1.0-SNAPSHOT-dist.zipfile, and click Open.
Description of this image -
Click Create.

Description of this image -
When the confirmation dialog box is displayed, click OK.
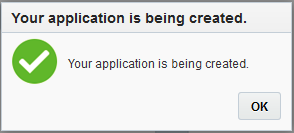
Description of this image Your application could take a few minutes to deploy.
Testing Your Application
In the Overview page, click the URL.

Description of this image Add to the end of the URL the service endpoint:
myapp/myresourceand press Enter.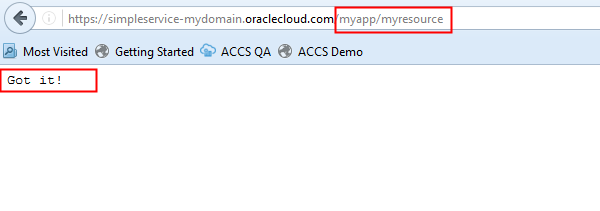
Description of this image
The Got it! message means your service is running successful.