Before You Begin
Purpose
This tutorial shows you how to create a Tomcat cluster using MySQL Persistence on the Oracle Application Container Cloud Service.
Time to Complete
90 minutes
Background
What is a Cluster?
A cluster, in this context, consists of several Tomcat servers that work together to appear as a single system. This is achieved by using load balancers to tie the servers together using each server's network port and IP address. Each node in the cluster shares session data in a MySQL database. The result is a cluster of Tomcat servers appears as a single server to client systems.
What are are the Benefits?
There are a number of benefits to using clusters that include:
-
Performance and Scaling: Since more than one server performs a task or unit of work, response time should be faster. In addition, a cluster can be scaled out to handle more and more work by adding servers to the cluster. This is made possible by load balancing.
-
Load Balancing: A load balancer is a special server that allocates work to servers in the cluster. When requests come into the cluster, the balancer takes the request and passes it off to an individual server. Load balancers can use anything from complex algorithms to route traffic, to a simple round robin approach.
-
High Availability: High availability refers to systems which provide a high uptime while being resistant to faults in the system. Highly available systems are designed to eliminate a single point of failure. For example in a cluster, if one of the servers crashes, the other servers in the cluster continue running and function normally. From outside the system, there appears to be no change in the way the cluster operates if a node goes down.
In this OBE, you will create a local cluster using the Apache HTTP server as a load balancer and two Tomcat servers as cluster nodes. After that system is setup, you will convert one of the Tomcat servers for deployment on the Oracle Application Container Cloud Service. Then, you deploy that Tomcat node so the cluster runs and can be managed in the cloud.
What Do You Need?
-
Apache on Windows Downloads (Apache Lounge)
Note: For the development of this, OBE the Windows binaries found on Apache Lounge were used since they included a download for mod_jk. However, any of the Apache builds referenced on apache.org may be used.
Detailed steps for installing these products are provided on their respective web sites. For brevity, those steps are not covered in this guide, except for Tomcat. The following sections assume the required software is installed.
Setting up Apache as a Load Balancer
Overview
In this section, we will configure an Apache 2.4 server to act as a load balancer for a Tomcat cluster. The steps outlined are for Windows, but tips related to Linux are included at the end of the section. It is assumed that you have installed or downloaded the required software listed above.
An Apache HTTP server can be used as the load balancing front end for a Tomcat cluster. This is accomplished using the mod_jk module. The mod_jk module serves as a redirector to servlet containers like Tomcat and can also be used to setup a cluster of Tomcat servers. The cluster uses AJP (Apache Jserv Protocol) to communicate between the Tomcat servers and Apache. AJP is a binary version of HTTP that is optimized for communication between Apache HTTPD server and Apache Tomcat over a TCP connection.
Configuring your Apache Server
Follow these steps to configure your server.
-
Install the
mod_jkApache module. This module allows Apache to function as load balancer for our Tomcat instances. -
Unzip the
mod_jkzip file into a directory. -
Copy the
mod_jk.soto theApacheHome/modulesdirectory. -
Create a configuration file to store the load balancing information.
-
Change into the
ApacheRoot/confdirectory. -
Create a
mod-jk.conffile. -
Edit the
mod-jk.conffile and add the following information.Apache Configuration File
# This file configures mod_jk for creating Tomcat clusters

# Load the module
LoadModule jk_module modules/mod_jk.so

# Set path to workers file
JkWorkersFile conf/workers.properties

# Shared Memory file - For Unix only. Comment out for Windows.
# JkShmFile logs/mod_jk.shm

# Path to Logs
JkLogFile logs/mod_jk.log

# Log level - Info is default. Should work for most situations.
JkLogLevel info

# Mount workers for mod_jk
JkMount /status/* status
JkMount /clusterjsp/* loadbalancer
Each configuration option is described with a comment in the
mod-jk.conffile. The last set of configuration options require further explanation.-
JkMount /status/* status- This creates an Apache status page with information about each node in the cluster. Going tohttp://hostname/statusin your browser displays detailed information about the cluster. -
JkMount /clusterjsp/* loadbalancer- This option indicates that any URLhttp://hostname/clusterjspwill be handled by the Tomcat cluster. If you wanted to have the cluster hand all HTTP traffic change the path to the root only/*.
-
-
Save the file.
-
Create the
workers.propertiesfile. Theworkers.propertiesfile identifies the Tomcat instances that will be included in the cluster. Each "worker" is identified by host name and port. This example has 2 workers for the load balancer and a status page. -
Edit the
workers.propertiesfile and add the following information.workers.properties
worker.list=loadbalancer,status

worker.worker1.port=8009
worker.worker1.host=localhost
worker.worker1.type=ajp13

worker.worker2.port=8010
worker.worker2.host=localhost
worker.worker2.type=ajp13

worker.loadbalancer.type=lb
worker.loadbalancer.balance_workers=worker1,worker2

worker.status.type=status
This indicates that two Tomcat servers are in the cluster on ports
8009and8010. -
Save the file.
-
Edit the
httpd.conffile. Add the following lines to the bottom of the file.httpd.conf Changes
# Enable mod_jk to create a load balancer Include conf/mod-jk.conf -
Save the file.
-
Start or restart your Apache server to load the new settings:
-
ApacheHome/bin/httpd.exe
Installing Apache and the mod_jk Module on Linux
If you wish to install and configure `mod_jk` on Linux there are a few configuration file variations depending upon the distribution.
Installing Apache on Oracle Linux
Here are some tips for installing Apache on Oracle Linux (RedHat). Perform the following commands as root or using sudo.
-
To install Apache Server on use the command:
yum install httpd -
To install
mod_jkuse the following command:yum install mod_jk
The Apache home directory is located in /etc/httpd. Other than that, the file names and locations are very similar to Windows. The Windows instructions can be followed with little variation.
Installing mod_jk on Ubuntu Linux
-
To install Apache HTTP server on Ubuntu use the following command:
sudo apt-get install apache2 -
To install
mod_jkon Ubuntu use the following command:sudo apt-get install libapache2-mod-jk
The locations of files on Ubuntu is different. When you install the libapache2-mod-jk package, that installs the module along with required configuration files, so there is no need to include a new mod-jk.conf file. Here is the location of the pertinent files.
-
Apache home:
/etc/apache2 -
mod_jkconfiguration file:/etc/apache2/mods-available/jk.conf -
worker.propertiesfile:/etc/libapache2-modjk/
Modify the files in these new locations to configure Apache on Ubuntu.
Note: When the mod_jk package is installed, symbolic links are placed in the /etc/apache2/mods-enabled directory for jk.conf and jk.load. This enables the module for Apache on Ubuntu.
Configuring MySQL for Tomcat Session Sharing
Make the the following changes to your MySQL system after installation. The steps assume that the MySQLHome\bin directory is in your path and your MySQL server is running.
Creating a User Account and Password for the Application
Add a new user to the MySQL server by performing the following steps.
-
Login as root.
mysql -u root -p -
Create a user for this application.
CREATE USER 'YourUser'@'localhost' IDENTIFIED BY 'YourPassword'; -
Give the user admin privileges.
GRANT ALL PRIVILEGES ON *.* TO 'YourUser'@'localhost' WITH GRANT OPTION; -
Log out.
Setting up MySQL for Session Sharing
Next, setup a database to store session data.
-
Login to MySQL using the account you created.
-
Create a database for you session data if one does not exist.
create database YourDatabaseName; -
Use the database.
use YourDatabaseName; -
Create a
tomcat_sessionstable to store session data.tomcat_sessions SQL
create table tomcat_sessions (
  session_id     varchar(100) not null primary key,
  valid_session  char(1) not null,
  max_inactive   int not null,
  last_access    bigint not null,
  app_name       varchar(255),
  session_data   mediumblob,
  KEY kapp_name(app_name)
);
MySQL is now configured for session sharing in a Tomcat cluster.
Configuring Tomcat to be used in a Cluster
Installing Tomcat
We will be installing two copies of Tomcat to create a local cluster. To begin with, one copy of Tomcat is installed and configured. Then a copy will be made of the first Tomcat installation and modified to be a second Tomcat instance.
To install Tomcat perform the following steps.
-
Download the Tomcat 8.5
.zipor.tar.gzfile. -
Uncompress Tomcat.
-
Copy or move the uncompressed Tomcat directory to where you want to install Tomcat, for example
c:\tom1.
Updating the Configuration Files
The next step in the process is to update the configuration files.
-
Open the
server.xmlfile in theTomcatHome/confdirectory and make the following changes:-
Remove all the comments from the file.
-
Change the
Engineelement about midway down the file. Add an attribute pairjvmRoute="worker1".This change helps identify which Tomcat server has been selected by the load balancer to process the current request. In this example, the server on port 8080 will be identified as worker1.
When complete, the
server.xmlfile should look like this.server.xml
<?xml version="1.0" encoding="UTF-8"?> <Server port="8005" shutdown="SHUTDOWN"> <Listener className="org.apache.catalina.startup.VersionLoggerListener" /> <Listener className="org.apache.catalina.core.AprLifecycleListener" SSLEngine="on" /> <Listener className="org.apache.catalina.core.JreMemoryLeakPreventionListener" /> <Listener className="org.apache.catalina.mbeans.GlobalResourcesLifecycleListener" /> <Listener className="org.apache.catalina.core.ThreadLocalLeakPreventionListener" /> <GlobalNamingResources> <Resource name="UserDatabase" auth="Container" type="org.apache.catalina.UserDatabase" description="User database that can be updated and saved" factory="org.apache.catalina.users.MemoryUserDatabaseFactory" pathname="conf/tomcat-users.xml" /> </GlobalNamingResources> <Service name="Catalina"> <Connector port="8080" protocol="HTTP/1.1" connectionTimeout="20000" redirectPort="8443" /> <Connector port="8009" protocol="AJP/1.3" redirectPort="8443" /> <Engine name="Catalina" defaultHost="localhost" jvmRoute="worker1"> <Realm className="org.apache.catalina.realm.LockOutRealm"> <Realm className="org.apache.catalina.realm.UserDatabaseRealm" resourceName="UserDatabase"/> </Realm> <Host name="localhost" appBase="webapps" unpackWARs="true" autoDeploy="true"> <Valve className="org.apache.catalina.valves.AccessLogValve" directory="logs" prefix="localhost_access_log" suffix=".txt" pattern="%h %l %u %t "%r" %s %b" /> </Host> </Engine> </Service> </Server> -
-
Open the
context.xmlfile in theTomcatHome/confdirectory and make the following changes:-
Add the
ManagerandStoreelements as shown in the following example. -
Notice the
connectionURLattribute in theStoreelement. This specifies your Java JDBC connection string. A typo here prevents the database from connecting. So check your logs if session data is not making it to the database. -
By default MySQL attempts to connect using SSL (HTTPS). This works when your application use Oracle Application Container Cloud Service. However, when testing locally append the
useSSL=falseoption to the connect string so HTTP is used. -
The example assumes the default port of 3306. If you use a nonstandard port for MySQL you need to append the port number to the host name, for example:
localhost:3306 -
Most of the attributes correspond to fields in the
tomcat_sessionstable.
context.xml
<Context> <WatchedResource>WEB-INF/web.xml</WatchedResource> <WatchedResource>${catalina.base}/conf/web.xml</WatchedResource> <Manager className="org.apache.catalina.session.PersistentManager" maxIdleBackup="10"> <Store className="org.apache.catalina.session.JDBCStore" connectionURL="jdbc:mysql://localhost/YourDatabaseName?user=UserName&password=UserPassword&useSSL=false" driverName="com.mysql.jdbc.Driver" sessionAppCol="app_name" sessionDataCol="session_data" sessionIdCol="session_id" sessionLastAccessedCol="last_access" sessionMaxInactiveCol="max_inactive" sessionTable="tomcat_sessions" sessionValidCol="valid_session" /> </Manager> </Context> -
-
Open the
catalina.propertiesfile in theTomcatHome/confdirectory and add the following two lines.catalina.properties Changes
org.apache.catalina.session.StandardSession.ACTIVITY_CHECK=true
org.apache.catalina.STRICT_SERVLET_COMPLIANCE=true
These settings are required to use a JDBC session store.
-
Save the file.
-
Copy the latest MySQL Java JDBC driver file into the
TomcatHome/libdirectory. For example, the following file was used in creating this OBE:mysql-connector-java-5.1.40-bin.jar
This completes the initial configuration for the Tomcat server.
Creating and Deploying the ClusterJSP Application
Reviewing the ClusterJSP Application
To ensure that session sharing is working, an application for testing sessions is required. ClusterJsp is an application composed of JavaServer Pages (JSP) pages that allows you to test sessions in a cluster. The application was originally included with the GlassFish application server.
The Maven project for ClusterJsp application is included in the zip file for this OBE in the maven directory. The application consists of two main files. To see the scripts navigate to the clusterjsp/maven/src/main/webapp directory. The files listed there are.
-
index.jsp: Included for test purposes. -
HaJsp.jsp: The main session testing script. Load this page to test and see session information. In addition, the page allows you to add session data to a session. -
ClearSession.jsp: This script is called fromHaJsp.jspto reset the session and its data.
The web.xml configuration file contains some important information. Navigate to clusterjsp/maven/src/main/webapp/WEB-INF to see the file. It should look like the following file.
web.xml
<?xml version="1.0" encoding="UTF-8"?>

<!DOCTYPE web-app PUBLIC "-//Sun Microsystems, Inc.//DTD Web Application 2.3//EN" "http://java.sun.com/dtd/web-app_2_3.dtd">

<web-app>
  <display-name>clusterjsp</display-name>
  <distributable/>
  <servlet>
    <servlet-name>HaJsp</servlet-name>
    <display-name>HaJsp</display-name>
    <jsp-file>/HaJsp.jsp</jsp-file>
  </servlet>
  <servlet>
    <servlet-name>ClearSession</servlet-name>
    <display-name>ClearSession</display-name>
    <jsp-file>/ClearSession.jsp</jsp-file>
  </servlet>
  <session-config>
    <session-timeout>30</session-timeout>
  </session-config>
  <welcome-file-list>
    <welcome-file>HaJsp.jsp</welcome-file>
  </welcome-file-list>
</web-app>
Note: Notice the <distributable/> tag. This indicates to Tomcat that this application can be distributed in a Tomcat cluster. This is required for session sharing.
Deploying and Testing the ClusterJsp Application
Building and Deploying the Application
Deploying a test application is the next step in the process. To deploy the ClusterJsp application perform the following steps.
-
Open a command prompt window.
-
Navigate to
mavendirectory. -
Run the Maven command to build the project:
mvn clean package -
Copy the
clusterjsp.warfile into yourTomcatHome\webappsdirectory.
Starting Tomcat and Testing the Application
When Tomcat starts, it will unzip and install the clusterjsp.war file into the clusterjsp directory. Perform the following steps to start Tomcat and test the ClusterJsp application.
-
Open a command prompt window.
-
Change into the
TomcatHome/bindirectory. -
Start Tomcat in the foreground with the following command:
catalina.bat runTomcat should start running after a few seconds.
-
Open a web browser and verify that Tomcat is running using the URL:
http://localhost:8080. -
Once you have confirmed Tomcat is running, open the
HaJsp.jsppage with the URL:http://localhost:8080/clusterjsp/HaJsp.jsp.When the page loads, it should look something like the following:
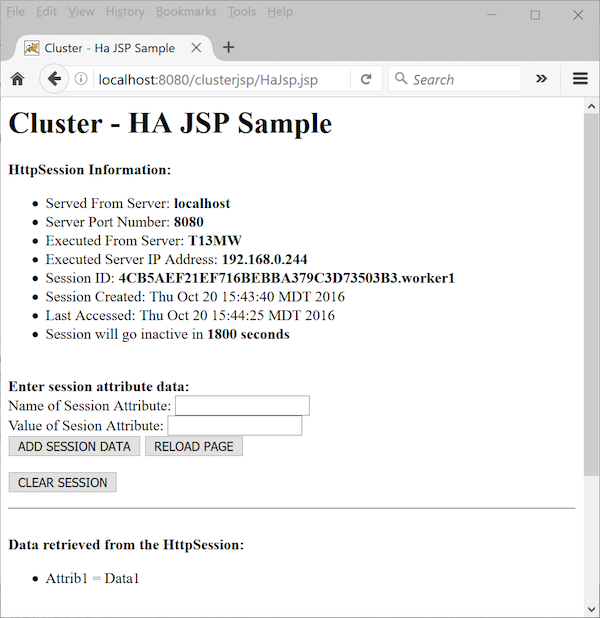
Description of this image You can fill out the form to add session name/value pairs into the session.
Once you have confirmed Tomcat is functioning properly, shutdown Tomcat by pressing Control-C in the command prompt window.
Adding a Second Tomcat Node to the Cluster
With the first Tomcat server setup and working, you can now make a copy of that server and then modify the configuration files to create a second server for the cluster. To setup a second server perform the following steps.
-
With the first Tomcat server in the cluster created, that Tomcat server can be copied and modified to create additional servers in the cluster. For example, copy the contents of
c:\tom1toc:\tom2. -
After copying the directory, you need to update the new Tomcat server so that it runs on different network ports from the first Tomcat server. You will need to make the following changes to the new
server.xmlfile, in order from top to bottom.-
For the
Servertag change theportattribute to8006. -
Under the
Servicetag, the firstConnectortag. Change theportattribute to8081. This is the port the server will listen on for connections. -
In the same tag, change the
redirectPortattribute to8444. -
In the second
Connectortag change theportattribute to8010and theredirectPortattribute to8444.Notice that the two
redirectPortattributes match match in the twoConnectortags. -
In the
Enginetag, change thejvmRouteattribute value to "worker2". This change allows you to see which worker was selected by the load balancer to serve your request in theHaJsp.jsppage.
Tom2 server.xml
<?xml version="1.0" encoding="UTF-8"?> <Server port="8006" shutdown="SHUTDOWN"> <Listener className="org.apache.catalina.startup.VersionLoggerListener" /> <Listener className="org.apache.catalina.core.AprLifecycleListener" SSLEngine="on" /> <Listener className="org.apache.catalina.core.JreMemoryLeakPreventionListener" /> <Listener className="org.apache.catalina.mbeans.GlobalResourcesLifecycleListener" /> <Listener className="org.apache.catalina.core.ThreadLocalLeakPreventionListener" /> <GlobalNamingResources> <Resource name="UserDatabase" auth="Container" type="org.apache.catalina.UserDatabase" description="User database that can be updated and saved" factory="org.apache.catalina.users.MemoryUserDatabaseFactory" pathname="conf/tomcat-users.xml" /> </GlobalNamingResources> <Service name="Catalina"> <Connector port="8081" protocol="HTTP/1.1" connectionTimeout="20000" redirectPort="8444" /> <Connector port="8010" protocol="AJP/1.3" redirectPort="8444" /> <Engine name="Catalina" defaultHost="localhost" jvmRoute="worker2"> <Realm className="org.apache.catalina.realm.LockOutRealm"> <Realm className="org.apache.catalina.realm.UserDatabaseRealm" resourceName="UserDatabase"/> </Realm> <Host name="localhost" appBase="webapps" unpackWARs="true" autoDeploy="true"> <Valve className="org.apache.catalina.valves.AccessLogValve" directory="logs" prefix="localhost_access_log" suffix=".txt" pattern="%h %l %u %t "%r" %s %b" /> </Host> </Engine> </Service> </Server> -
The completes the configuration updates for the second Tomcat node.
Starting and Testing your Local Tomcat Cluster
With the Apache server and two Tomcat servers configured, you are ready to test your cluster.
-
Change into the
TomcatHome/bindirectory for each Tomcat server and and start the server using the catalina script.catalina.bat run -
Change into the
ApacheHome/bin/directory and start Apache server.httpd.exeNow the Apache HTTP server is the front end load balancer for the two Tomcat servers.
-
Test your basic setup.
-
Open
http://localhostin a browser. If you have a default Apache setup, it should respond with "It Works!". -
To test your if your cluster is up, open
http://localhost/statusin your browser. This will display amod_jkstatus page about the nodes in the cluster. The following figure provides an example of what the page looks like.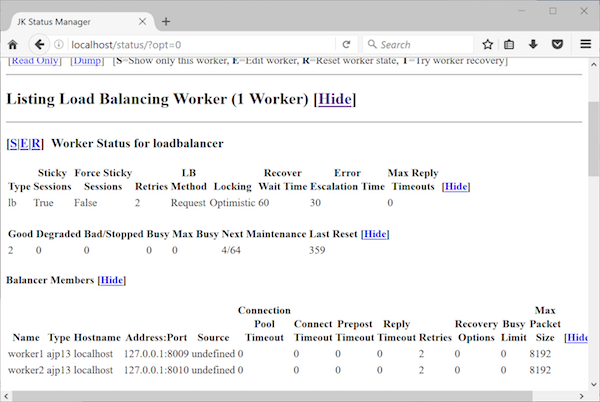
Description of this image
-
-
Test your cluster and session sharing.
-
Open a browser and connect to the
HaJsp.jsppage using this URL:http://localhost:8080/clusterjsp/HaJsp.jspThe session information should appear just like in the earlier example.
-
Open a second browser or private browsing window and the same URL:
http://localhost/clusterjsp/HaJsp.jsp>. -
Repeat the previous step until the page is served by worker 2. When that happens you should get data like the following:
Sample Worker 2 Session Data
HttpSession Information: Served From Server: localhost Server Port Number: 80 Executed From Server: Hostname Executed Server IP Address: 192.168.2.21 Session ID: 23BA587217DD06BD8E7D005E5E0A9A46.worker2 Session Created: Fri Oct 21 09:56:16 MDT 2016 Last Accessed: Fri Oct 21 09:57:38 MDT 2016 Session will go inactive in 1800 seconds -
Add session data to this session that identifies the worker and the session. Include information that identifies the session. For example:
Sample Worker 2 Session Data
HttpSession Information:
Served From Server: localhost
Server Port Number: 80
Executed From Server: Hostname
Executed Server IP Address: 192.168.2.21
Session ID: 23BA587217DD06BD8E7D005E5E0A9A46.worker2
Session Created: Fri Oct 21 09:56:16 MDT 2016
Last Accessed: Fri Oct 21 09:57:38 MDT 2016
Session will go inactive in 1800 seconds

Data retrieved from the HttpSession:
worker2: 23BA = Session 23BA
The session data appears at the bottom of the page. So if a cluster node fails, this data should still be stored in our database session store.
-
Stop the second Tomcat server.
Now the cluster failover kicks in.
-
Reload your page. If everything is working, the data you created on worker 2 is now served by by worker 1. Except for the time, the data should appear like it did before.
Sample Worker 2 Session Data
HttpSession Information:
Served From Server: localhost
Server Port Number: 80
Executed From Server: Hostname
Executed Server IP Address: 192.168.2.21
Session ID: 23BA587217DD06BD8E7D005E5E0A9A46.worker2
Session Created: Fri Oct 21 09:56:16 MDT 2016
Last Accessed: Fri Oct 21 09:57:38 MDT 2016
Session will go inactive in 1800 seconds

Data retrieved from the HttpSession:
worker2: 23BA = Session 23BA
-
If a server fails, the other servers in the cluster will still serve up the session data.
Preparing a Tomcat Instance for Deployment on Oracle Application Container Cloud Service
Overview
With a local Tomcat cluster setup and working, we can now look at setting up a Tomcat instance for deployment on Oracle Application Container Cloud Service. First, be aware that the Tomcat instance will run in an Oracle Linux (RedHat) environment inside of a container. Therefore, any modifications need to be made to the Unix versions of the Tomcat scripts, not the Windows versions. The following list is an overview of the steps that need to be done to a Tomcat instance to make it Cloud ready.
-
Make a copy of a working Tomcat cluster instance.
-
Create a launch script to set environment variables and then launch Tomcat.
-
Update the Tomcat configuration for the cloud.
-
Configure Oracle Application Container Cloud Service deployment files for your Tomcat application.
-
Compress you application into an application archive for Oracle Application Container Cloud Service.
-
Setup a MySQL Cloud Service instance to store session data.
Once these steps are complete, you can deploy a Tomcat cluster node to Oracle Application Container Cloud Service. That node can be scaled up or down to act as a single cluster system.
Setting up the Launch Script and Passing Environment Data to Tomcat
The first task to make Tomcat ready for the cloud is to make a new launch script. In a cloud environment, the application needs to read environment variables from the container so it can launch with assigned values for network port and other values. The script launches the application on Oracle Application Container Cloud Service using the system provided environment variables. If no environment variables are provided, the script provides default values for running the application locally. Thus, the script can be used to launch the application locally or in the cloud. The following steps provide details for creating the launch script.
Note: If you wish to test the steps from this point forward, you need to execute Tomcat inside a Linux virtual machine or on a Linux machine. The script you provide to the system execute in a Linux environment.
-
Copy the contents of
c:\tom1to a new directory, for exampletom-accs. This creates a Tomcat instance you can modify for the cloud. - You will use a new launch script,
start.sh, to launch Tomcat in a container. -
The
start.shscript checks for the existence of any required environment variables. Then, the script uses thesedstring processor to substitute configuration values with the environment variables. Theserver.template.xmlandcontext.template.xmlfiles are used as input. Aftersedprocessing,server.xmlandcontext.xmlare written to theconfdirectory. Then, thecatalina.shscript is called with therunoption to launch the application in the foreground. The sample script code for this is provided in thecloud-scriptdirectory for the project download.start.sh Script
#!/bin/bash

# Set defaults if env vars are not set

# Uncomment following if you need to troubleshoot
# env | sort

if [ -z "$PORT" ];
then
    PORT="8080"
    echo "PORT set to default $PORT"
fi

if [ -z "$MYSQLCS_USER_NAME" ];
then
  MYSQLCS_USER_NAME="LocalMySQLUser"
  echo "MYSQLCS_USER_NAME set to default $MYSQLCS_USER_NAME"
fi

if [ -z "$MYSQLCS_USER_PASSWORD" ];
then
  MYSQLCS_USER_PASSWORD="LocalMySQLPassword"
  echo "MYSQLCS_USER_PASSWORD set to default $MYSQLCS_USER_PASSWORD"
fi

if [ -z "$MYSQLCS_CONNECT_STRING" ];
then
  MYSQLCS_CONNECT_STRING="localhost:3306/localDbName"
  echo "MYSQLCS_CONNECT_STRING set to default $MYSQLCS_CONNECT_STRING"
fi


echo "======"
echo "Starting with the following values: "
echo "PORT set to $PORT"
echo "MYSQLCS_USER_NAME set to $MYSQLCS_USER_NAME"
echo "MYSQLCS_USER_PASSWORD set to $MYSQLCS_USER_PASSWORD"
echo "MYSQLCS_CONNECT_STRING set to $MYSQLCS_CONNECT_STRING"
echo "======"

# Update server.xml with env vars

sed "s/__PORT__/${PORT}/g" tom-accs/conf/server.template.xml > tom-accs/conf/server.xml


# Update context.xml with env vars

sed "s#__MYSQLCS_CONNECT_STRING__#${MYSQLCS_CONNECT_STRING}#g; s/__MYSQLCS_USER_NAME__/${MYSQLCS_USER_NAME}/g; s/__MYSQLCS_USER_PASSWORD__/${MYSQLCS_USER_PASSWORD}/g;" tom-accs/conf/context.template.xml > tom-accs/conf/context.xml

exec tom-accs/bin/catalina.sh run
Note: The
MySQLCS variables areare service bindings for the MySQL Cloud Service. The service bindings are setup using the cloud service GUI or by using adeployment.jsonfile. -
Modify the
start.shscript for your local environment if you wish to test the script locally.
Making Configuration Changes for ACCS
The launch script is set, now you need to update the Tomcat configuration files to use system properties for the values passed in to the application. The following steps detail the changes you need to make.
-
Copy the
TomcatHome/conf/context.xmlfile tocontext.template.xml. -
Edit the
context.template.xmlfile. -
For the
Storetag change theconnectionURLattribute value to:connectionURL="jdbc:mysql://__MYSQLCS_CONNECT_STRING__?user=__MYSQLCS_USER_NAME__&password=__MYSQLCS_USER_PASSWORD__&useSSL=false"The
sedscript will replace the values wrapped in underscores "__" before Tomcat is started.context.xml
<?xml version="1.0" encoding="UTF-8"?> <Context> <WatchedResource>WEB-INF/web.xml</WatchedResource> <WatchedResource>${catalina.base}/conf/web.xml</WatchedResource> <Manager className="org.apache.catalina.session.PersistentManager" maxIdleBackup="4"> <Store className="org.apache.catalina.session.JDBCStore" connectionURL="jdbc:mysql://__MYSQLCS_CONNECT_STRING__?user=__MYSQLCS_USER_NAME__&password=__MYSQLCS_USER_PASSWORD__&useSSL=false" driverName="com.mysql.jdbc.Driver" sessionAppCol="app_name" sessionDataCol="session_data" sessionIdCol="session_id" sessionLastAccessedCol="last_access" sessionMaxInactiveCol="max_inactive" sessionTable="tomcat_sessions" sessionValidCol="valid_session" /> </Manager> </Context> -
Save the file.
-
Copy the
server.xmlfile toserver.template.xml. -
Edit the
server.template.xmlfile. -
For the first
Connectortag under theServicetag change the value to"__PORT__". -
For the
Enginetag remove thejvmRouteattribute and value. This is no longer needed since Oracle Application Container Cloud Service uses Oracle Traffic Director for load balancing instead of the Apache server. So this value would no longer be relevant.Your
server.tempalte.xmlfile should now look like this.server.xml
<?xml version="1.0" encoding="UTF-8"?> <Server port="8005" shutdown="SHUTDOWN"> <Listener className="org.apache.catalina.startup.VersionLoggerListener" /> <Listener className="org.apache.catalina.core.AprLifecycleListener" SSLEngine="on" /> <Listener className="org.apache.catalina.core.JreMemoryLeakPreventionListener" /> <Listener className="org.apache.catalina.mbeans.GlobalResourcesLifecycleListener" /> <Listener className="org.apache.catalina.core.ThreadLocalLeakPreventionListener" /> <GlobalNamingResources> <Resource name="UserDatabase" auth="Container" type="org.apache.catalina.UserDatabase" description="User database that can be updated and saved" factory="org.apache.catalina.users.MemoryUserDatabaseFactory" pathname="conf/tomcat-users.xml" /> </GlobalNamingResources> <Service name="Catalina"> <Connector port="__PORT__" protocol="HTTP/1.1" connectionTimeout="20000" redirectPort="8443" /> <Connector port="8009" protocol="AJP/1.3" redirectPort="8443" /> <Engine name="Catalina" defaultHost="localhost"> <Realm className="org.apache.catalina.realm.LockOutRealm"> <Realm className="org.apache.catalina.realm.UserDatabaseRealm" resourceName="UserDatabase"/> </Realm> <Host name="localhost" appBase="webapps" unpackWARs="true" autoDeploy="true"> <Valve className="org.apache.catalina.valves.AccessLogValve" directory="logs" prefix="localhost_access_log" suffix=".txt" pattern="%h %l %u %t "%r" %s %b" /> </Host> </Engine> </Service> </Server> -
Save the file.
That completes the configuration changes for Tomcat server.
Updating the ClusterJsp Application
One change needs to be made to the ClusterJsp application for Oracle Application Container Cloud Service. We need to add a line to the HaJsp.jsp file that identifies the current container instance that has served the current page to you. Perform the following steps to make the change.
-
Change into the
clusterjsp/maven/src/main/webappdirectory of the ClusterJsp applicatoin. -
Edit the
HaJsp.jspfile. -
After the line that gets the server IP address, add this JSP code:
<LI>Executed ACCS Container Name: <b><%= System.getenv("APAAS_CONTAINER_NAME") %></b></LI>This will provide the system generated container name for the container that served the request for the current page.
-
Save the file.
-
Change into the
mavendirectory. -
Rebuild the application.
mvn clean package -
Delete the old
clusterjsp.warfile andclusterjspdirectory from thewebappdirectory for your Tomcat instance. -
Copy the newly generated
clusterjsp.warfile from the project'stargetdirectory to thewebappdirectory of the Tomcat instance. -
Start your test instance with the
start.shscript so the new version of the ClusterJsp application is deployed. -
Test the Tomcat instance to ensure the application is deployed and working.
Note: To test the session data persistence a local copy of MySQL needs to be running with the required database and table installed.
Setting up a MySQL Cloud Service Instance
Setting up a MySQL Cloud Service instance is not covered in this course. To see examples of how to configure the service, see the MySQL Cloud Service documentation. However, you still need to setup a MySQL database and table like that shown in the Configuring Tomcat forMySQL Session Sharing section of this OBE. The tomcat_sessions table need to be available in Oracle MySQL Cloud Service for the cluster application to work.
Creating Configuration Files for Deployment
Overview
The application is configured and ready for the cloud. Before it can be deployed to Oracle Application Container Cloud Service, a couple of configuration files are needed for deployment. The manifest.json is a required file that contains your launch command and metadata about your application. The deployment.json is an optional file that includes configuration information about your application. In addition, the configuration can be performed in the Oracle Application Container Cloud Service GUI.
Creating a manifest.json File
The mainfest.json file provides the launch command used for the application, Java version, and some metadata. In this example, the ./start.sh script is called to launch the application. Notice in the script that the tom-accs/bin/catalina.sh run command is used so that Tomcat executes in the foreground. The container expects an application to execute in the foreground until it completes. The following is a sample manifest.json for the Tomcat instance.
manifest.json
{
  "runtime":{"majorVersion":"8"},
  "command":"./start.sh",
  "notes":"Tomcat Cluster with MySQL Session Sharing"
}
This manifest file assumes that the Tomcat instance will be installed in the ~/tom-accs directory of the container.
Creating a deployment.json File
The deployment.json is an optional configuration file you can reference when deploying your application using the REST API.
deployment.json
{
  "memory": "1G",
  "instances": 2,
  "services": [
    {
      "id": "MySQL Service Info",
      "name": "YourServiceNameHere",
      "type": "mysqlcs",
      "username": "YourUserName",
      "password": "YourPassword"
    }
  ],
  "environment": {}
}
Here is a quick review of the fields in the deployment.json file.
-
memory:The size of each instance. One gigabyte in this example. -
instances:The initial number of instances to create. -
services: Information about services is included here. In this case, the environment variable data for the MySQL Cloud Service. -
identifier:Just a string to identify what these valu pairs are for. Any string value is ok here, but it should be descriptive. -
name:The actual name of the MySQL cloud service we are connecting to. The needs to match the name for the actual service instance. -
type:This identifies which kind of service these values are for. In this case, the values are for MySQL Cloud Service. -
username:The user name for the MySQL Cloud Service. This is used to log into the Cloud Service. -
password:The MySQL password for this user name.
Deploying your Tomcat Instance for Oracle Application Container Cloud Service
Creating the Application Archive
To deploy an application to Oracle Application Container Cloud Service your application must be bundled in a properly formatted archive. The archive can be in the zip or tar.gz formats. The basic requirements are pretty straightforward.
-
The
start.shlaunch script must be in the root directory of the archive. -
The
manifest.jsonfile must be in the root directory of the archive.
When the archive is decompressed, the start.sh script and manifest.json files are placed in the home directory of the container. For this Tomcat example, the Tomcat instance is placed in the ~/tom-accs directory.
Here are some sample commands to create the archive for this example.
zip -r tom-accs-app.zip tom-accs start.sh manifest.json
tar cvfz tom-accs-app.tgz tom-accs start.sh manifest.json
Where tom-accs is the directory containing the Tomcat instance.
Deploying to Oracle Application Container Cloud Service
To deploy to Oracle Application Container Cloud Service follow these steps.
-
Open the Oracle Application Container Cloud Service Service Console.
-
Click Create Application.
-
Select Java as the platform.
-
Enter a name for your application. Enter a Description as well if you wish.
-
Select the Upload Application Archive option.
-
Navigate to your application archive on your local machine and select your archive.
-
Click Create.
Your application is deployed to Oracle Application Container Cloud Service. You should now be able to scale the application up or down and sessions will be shared between each instance.
Deploying Your Application Using the REST API
Before you can deploy your application, you must copy it to the storage service. The REST URL for the Storage Cloud Service can be found on the details page for the service. You need your Oracle Cloud service credentials (username, password, identity domain) to use the REST API. With your credentials, you create cURL scripts to upload your application to the storage service.
-
Open a command-line window (or Terminal in Linux).
-
Create a storage container named
appsto store your applications using the following cURL command:Note: Replace the words in bold with your account credentials.
curl -i -X PUT \ -u <Username>:<Password> \ https://<Identity-Domain>.storage.oraclecloud.com/v1/Storage-<Identity-Domain>/apps -
Upload your application archive
(tom-accs-app.zip)to the storage container:curl -i -X PUT \ -u <Username:Password> \ https://<Identity-Domain>.storage.oraclecloud.com/v1/Storage-<Identity-Domain>/apps/tom-accs-app.zip -T <Path-to-local-file>/tom-accs-app.zip -
Deploy your application with the following script. The example script shows placeholders for the required information:
curl -i -X POST  \ -u <Username>:<Password> \
  -H "X-ID-TENANT-NAME:<Identity-Domain>" \
  -H "Content-Type: multipart/form-data" \
  -F "name=Tomcat-Cluster" \
  -F "runtime=java" \
  -F "subscription=Monthly" \
  -F "deployment=<Path-to-local-file>/deployment.json" \
  -F "archiveURL=apps/tom-accs-app.zip" \
  -F "notes=Tomcat Cluster application" \
  https://apaas.<region>.oraclecloud.com/paas/service/apaas/api/v1.1/apps/<Identity-Domain>
Here are a few key points about this example:
-Hspecifies headers that are added to the HTTP request.-Fallows cURL to submit data like it's coming from a form (so,POSTas the HTTP method).archiveURLspecifies where your archive file is located. The URL consists of your application's name, a slash, and the archive's file name.
That completes the setup of the cluster. You should now be able to deploy and test the application.
Want to Learn More
Credits
Curriculum Developer: Michael Williams