Before You Begin
Purpose
Use these instructions to create a Windows private image with the latest Windows updates. The PeopleTools Client components used with PeopleSoft Cloud Manager depend on the newer updates released by Microsoft, so it is necessary to create an updated private image from an existing Windows image obtained from Oracle Cloud Marketplace.
Time to Complete
One hour
Background
The Windows image that is available in Oracle Cloud Marketplace requires updates before it can be used with Cloud Manager. Certain features of PeopleSoft Cloud Manager require the use of Microsoft Windows-based tools, such as Change Assistant. You can obtain an image for Microsoft Windows Server 2012 R2 from Oracle Cloud Marketplace, create an updated Windows private image, and use it with Cloud Manager.
This is a requirement for the Cloud Manager configuration in the tutorial Installing PeopleSoft Cloud Manager on Oracle Cloud Infrastructure Compute Classic, on the Oracle Learning Library.
What Do You Need?
A subscription to Oracle Cloud Infrastructure
Compute Classic (Compute Classic) and a user ID with
the Compute_Operations role is
mandatory.
Process Overview
-
Provision a Windows instance using an existing Microsoft Windows Server 2012 R2 image from Oracle Cloud Marketplace.
- Create a security list and security rule for the instance created from the downloaded Microsoft Windows image.
-
Use Remote Desktop Connector to access the instance and apply Microsoft Windows updates.
-
From the Compute Classic service console, create a snapshot of the instance and associate it with a new private image.
Obtaining the Microsoft Windows Image from Oracle Cloud Marketplace
Locate the Microsoft Windows image and initiate deployment as follows:
-
Sign in to the Oracle Cloud Marketplace at http://cloud.oracle.com/marketplace.
-
In the Applications area, enter windows in the search text box, and click the Go button.

Description of this image -
In the search results, locate a Microsoft Windows Server 2012 R2 image, and click the name to begin the deployment.
-
Click the Get App button.

-
Review and accept the Oracle terms and conditions and click the Next button.
-
If necessary, select the name of the Oracle Cloud Identity Domain that is associated with your Compute Classic subscription from the Compute Account drop-down list, such as idendomain. Select the option indicating that you have reviewed and accept the terms of use, and then click the Install button.

Description of this image -
You see a message saying the application was successfully installed. The image is now available to the Compute Classic account you selected in step 6. Click Start Compute Console.

Description of this image -
On the Oracle Cloud sign in window, enter your identity domain, then your user name and password to sign in.
-
On the Oracle Cloud Dashboard, click the options icon (
 )
on the Compute card and select Open
Service Console.
)
on the Compute card and select Open
Service Console. -
Select Images.
-
On the Images page, select Personal from the Category drop-down list to see the Microsoft Windows Server 2012 R2 image that you obtained from Oracle Cloud Marketplace.
Provisioning the Microsoft Windows VM
Use the Compute Classic service console to configure the VM instance from the Microsoft Windows image that you obtained from Oracle Cloud Marketplace. This section assumes that you signed in to Compute Classic directly from the Oracle Cloud Marketplace installation.
Note. You can also choose to sign in to Compute Classic later to create the Microsoft Windows VM instance.
See Creating an Instance from the Instances Page in the Oracle Cloud Infrastructure Compute Classic (IaaS) documentation.
-
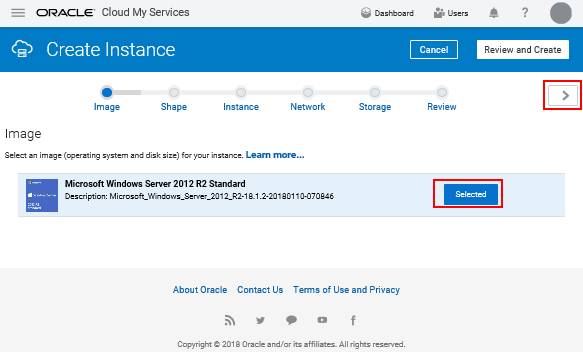
If you signed in to the Compute Classic service console directly from the Oracle Cloud Marketplace installation, the Create Instance page appears, with the Microsoft Windows image.
Click Select, and then click the right arrow (>) beside Review and Create on the top right.
Description of this image -
If you do not go directly to the console after installing from Oracle Cloud Marketplace, sign in to Compute Classic later and select the Images tab. The Microsoft Windows image is included in the list on the Images page.
Click the options button (
) for the
Microsoft Windows image and select Create
Instance. -
On the Shape page, select the shape that you want to use, and then click the right arrow (>) on the top right.
The shape specifies the OCPU and memory allocated, for example, oc3, with 1 OCPU and 7.5 GB.

Description of this image -
On the Instance page, specify the following information and then click the right arrow (>) on the top right.
- Enter a name and label for the instance, or accept the default name and label, Microsoft_Windows_Server_2012_R2, as in this example.
- Verify that Enabled is selected in the RDP drop-down list.
- Enter a password for the Administrator. Note that the password, which is masked in this example, appears as unmasked text in this field and in the Custom Attributes field.

Description of this image -
On the Network page, click in the Security Lists area, and select the default security list if necessary (required). Click the right arrow to continue.

Description of this image -
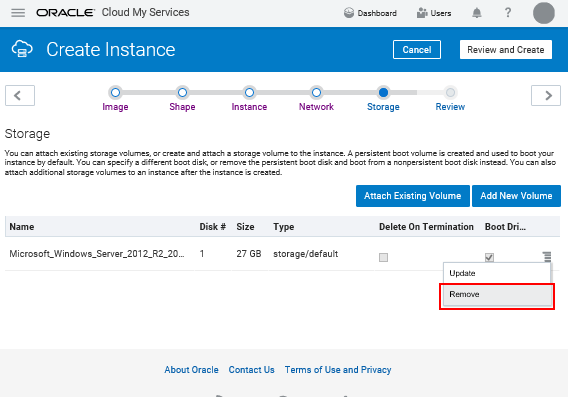
On the Storage page, click the options icon for the default storage, and select Remove. This creates a non-persistent boot drive for the instance.
Description of this image -
Click the right arrow to continue.

Description of this image -
Review the instance configuration and click the Create button to create the Compute Classic instance.

Description of this image -
Check the status of the Windows instance using the Instances tab. When the instance is ready to use, the status is set to Running.
Creating a Security List and Security Rule for the Microsoft Windows VM
Create a security list and security rule to enable access from a local Microsoft Windows host to the Windows VM using Remote Desktop Connection.
Creating a Security List and Adding it to the Instance
A security list is a group of Oracle Cloud Infrastructure Compute Classic instances that you can specify as the source or destination in one or more security rules. The instances in a security list can communicate fully, on all ports, with other instances in the same security list. In a subsequent step the Windows instance will be added to this security list.
To create a security list:
-
On the Compute Classic service console, click the Network tab.
-
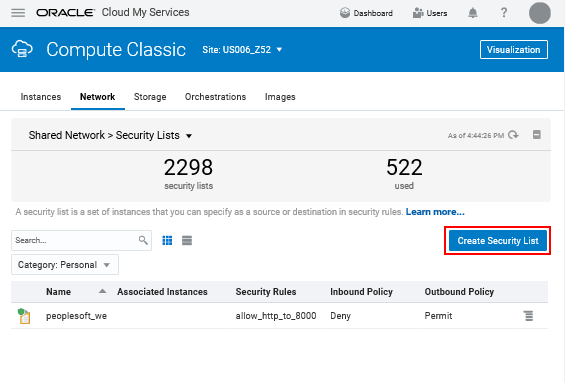
If necessary, expand the Security Rules drop-down list at the top of the page, and select Security Lists.

Description of this image -
Click Create Security List.
Description of this image -
In the Create Security List dialog box, select or enter the following information:
- Name: Enter a name for the new security list. For the purpose of this tutorial, enter cminfodev_win_seclist. Note this name. You'll use it later in this tutorial.
- Inbound Policy: Accept the default option, Deny (Drop packets, no reply).
- Outbound Policy: Select Permit (Allow packets).
- Description: Enter a description for the new security list if desired; for example, Enable RDP access.

Description of this image -
Click Create.
-
On the Instances page, click the options icon (
)
for the Windows image, and select View. -
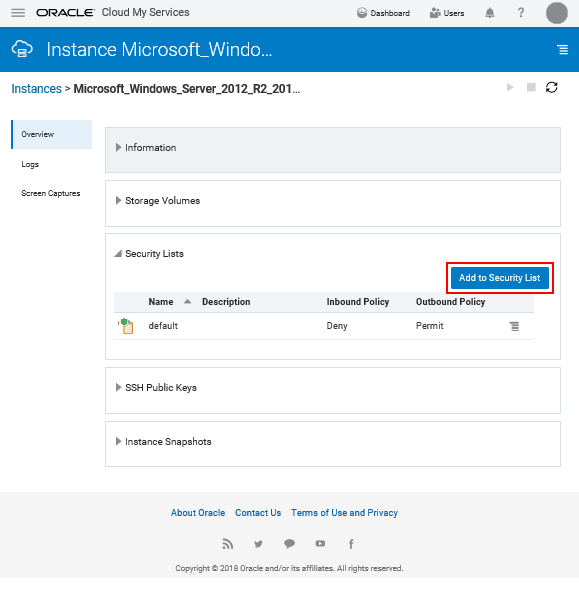
On the instance details page, click Add to Security List.
Description of this image -
In the Add to Security List dialog box, select the cminfodev_win_seclist list, and click Add.

Description of this image -
The added security list appears in the instance details page. Click the Instances link at the top to return to the Network page.

Description of this image
Creating a Security Rule
Create a security rule to allow RDP access.
-
Click the Network tab. If necessary, select Security Rules from the Shared Network drop-down list at the top of the page.
-
Click Create Security Rule.

Description of this image -
In the Create Security Rule dialog box, select or enter the following information:
- Name: Enter an appropriate name for the rule. For the purpose of this tutorial, enter cminfodev_win_secrule.
- Status: Select Enabled.
- Security Application: Select the default rdp security application.
- Source: Select the Security IP List radio button
- From the Security IP List
drop-down list, select public-internet
for the purposes of this tutorial.
Note that public-internet is a default security IP list that permits traffic from any host on the Internet. If you want to restrict access to a certain set of IPs, you must create a new Security IP List and use it here. - Destination: Select the cminfodev_win_seclist security list that you created earlier.
- Description: Enter a description for the rule (for example, Enable RDP access).

Description of this image -
Click Create.
-
Leave the Compute Classic service console open while you access the VM in the next section.
Applying Windows Updates
After you create the Windows instance, use Remote Desktop Connection to access it.
See Using Oracle Compute Cloud Service, Accessing a Windows Instance Using RDP.
-
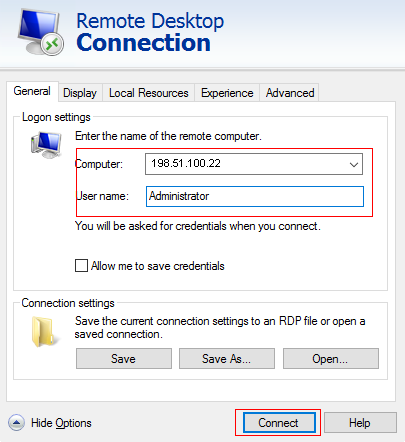
Launch Remote Desktop Connection, for example from the Start menu of a local Microsoft Windows host.
- If necessary, click Show Options to display the User name field
-
In the Computer field, enter the Public IP address, which is 198.51.100.22 in this example, of the Microsoft Windows VM that you want to connect to in Compute Classic. Enter Administrator in the User name field
Description of this image -
Click Connect.
-
Enter the administrator password that you supplied when you set up the VM in the section Provisioning the Microsoft Windows VM.
-
Click Yes on the security message, which mentions that the identity of the remote computer cannot be verified.
-
In the Windows VM, select Control Panel, Systems and Security, Windows Update.
-
Select Change Settings.
-
On the Choose your Windows Update settings window, select Install updates automatically (recommended) from the Important updates drop-down list. The other options include:
- Download updates but let me choose whether to install them
- Check for updates, but let me choose whether to download and install them
- Never check for updates (not recommended)

Description of this image -
Choose how to receive recommended options. The example shows that the option Give me recommended updates the same way I receive important updates is selected.
-
Click OK to begin checking for updates.
-
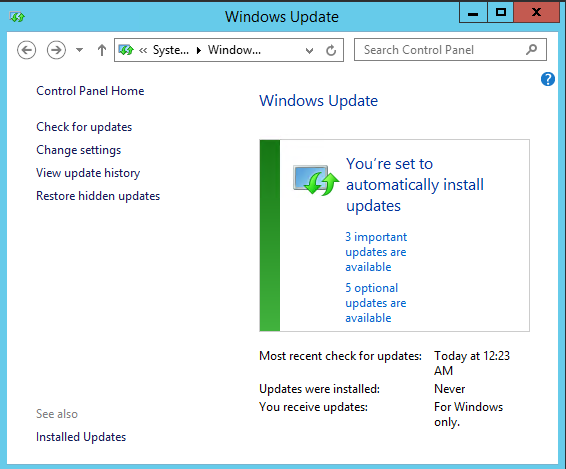
On the Windows Update window, click the link for the important updates.
Description of this image -
On the Select updates to install window, select all updates, and click Install.

Description of this image -
When the update is complete, sign out of the VM window without rebooting.
-
Go to the Compute Classic service console, and select the Instances tab.
-
Click the options icon (
) for the
Microsoft Windows instance, and select Reboot.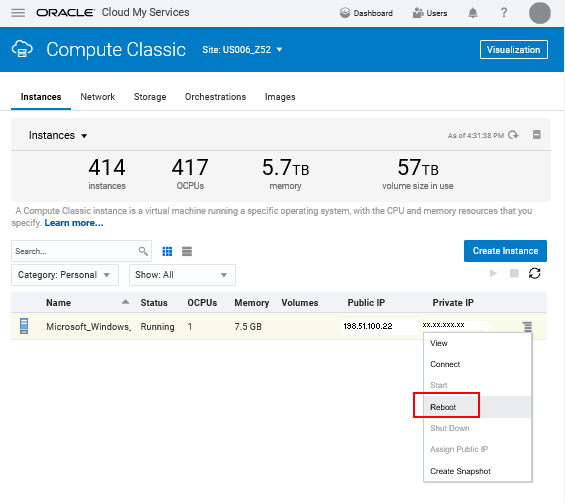
Description of this image -
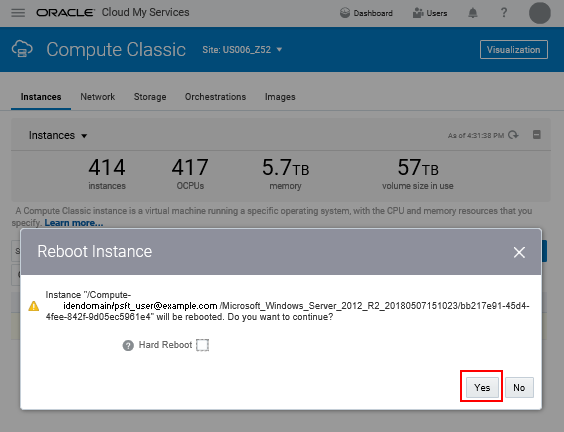
Click Yes to confirm that you want to continue with rebooting, on the Reboot Instance message box.
Description of this image
Creating and Associating a Snapshot of the Instance
After the instance has rebooted, you can create a snapshot and associate it to a new private image. Creating a snapshot of an instance creates a custom image, which will be used by the Cloud Manager for deploying PeopleTools Client instances.
-
On the Instances page of the Compute Classic service console, click the options icon (
)
for the Microsoft Windows instance, and select Create
Snapshot.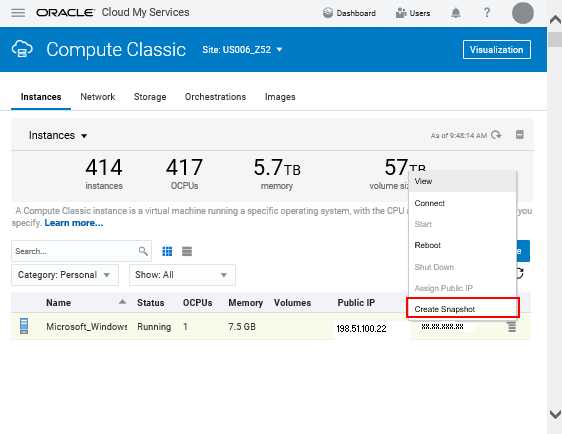
Description of this image -
Enter a name for the snapshot in the Create Instance Snapshot dialog box, for example cminfodev_winsnapshot.
Deferred snapshots remain active until you delete the instance or stop the instance orchestration. For the purposes of this tutorial, clear the Deferred Snapshot option.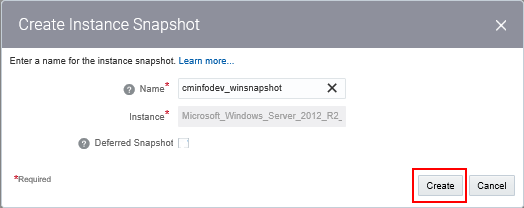
Description of this image -
Click Create.
-
Select Instance Snapshots from the Instances drop-down list at the top of the Instances page. When the snapshot is ready, the state changes from Active to Complete.

Description of this image -
Click the options icon for the snapshot, and select Associate Image.

Description of this image -
Enter a description on the Associate Image dialog box and click Ok.
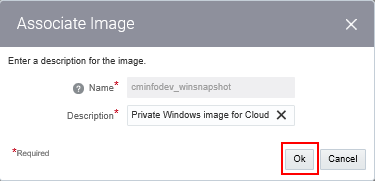
Description of this image -
Select the Images tab and locate the image created from the snapshot.
-
Hold the cursor over the image name and make a note of the full path and name. The fully-qualified name has the format /Compute-<identity_domain_name>/<user_name>/<image_name>; for example /Compute-idendomain/psft_user@example.com/cminfodev_winsnapshot.

Description of this image -
Enter the private image name in the Operating System Image section on the Cloud Manager Settings page.
See the tutorial Installing Cloud Manager, Using the Cloud Manager Settings Page.
Note. After you create the private image, you can delete the instance that you used to create the snapshot.
Want to Learn More?
-
Oracle Cloud Infrastructure Compute Classic Documentation in Oracle Help Center
-
PeopleSoft Cloud Manager concepts in the PeopleSoft Information Portal