Before You Begin
Purpose
This tutorial describes the process to deploy a complete PeopleSoft 9.2 application demo database environment from Oracle Cloud Infrastructure Marketplace on an Oracle Cloud Infrastructure Compute instance.
Time to Complete
Approximately 2 hours.
Background
Access a PeopleSoft Update Image from Oracle Cloud Infrastructure Marketplace and use it to deploy a complete PeopleSoft application environment in an Oracle Cloud Infrastructure Compute instance. The PeopleSoft application will be deployed to a single Linux virtual machine (VM) instance using a bootable machine image. The PeopleSoft application deployment includes the installation of Elasticsearch, Kibana, and Logstash. Use the deployed PeopleSoft application, which is a non-production, demo environment, for example to examine new features and functionality.
This tutorial covers PeopleSoft application images that are supported on Oracle Cloud Infrastructure. Note that the PeopleSoft Update Images are made available on independent schedules.
Use this tutorial for these PeopleSoft Update Images:
- PeopleSoft Customer Relationship Management (CRM)
- PeopleSoft Campus Solutions (CS)
- PeopleSoft Enterprise Learning Management (ELM)
- PeopleSoft Financial and Supply Chain Management (FSCM)
- PeopleSoft Human Capital Management (HCM)
- PeopleSoft Interaction Hub (IH)
Note. You may see subtle differences in the appearance of the Oracle Cloud Infrastructure Compute user interface as compared to the illustrations in this document. For example, the locations of pages, tabs, buttons, text boxes, links and so on may have changed since this document was published. Nevertheless, the concepts presented in this document are still valid and all steps are mandatory. The Oracle Cloud Infrastructure Compute documentation should have current information on using images and creating instances.
What Do You Need?
The following list includes the requirements for obtaining and installing a PeopleSoft Update Image on a Compute instance. For information on requirements for using the PeopleSoft application after installation, see the PeopleSoft documentation on Oracle Help Center.
- A subscription to Oracle Cloud Infrastructure
Compute is mandatory.
- Credentials for your account
If you don't have the following information about your Oracle Cloud Compute account, contact your Oracle Cloud administrator.
See Getting Started, Signing in to the Console.
- User name and password
- URL for the Compute Console
- Tenancy OCID
- User OCID
- Compartment name
- Policies for your account
To obtain the PeopleSoft Update Images from the Oracle Cloud Infrastructure Compute console, your user account must belong to a group with the following policies:
Allow group <group name> to manage
                                App-catalog-listing in tenancy
Allow group <group name> to read
                                all-resources in tenancy
For information on creating policies, see How Policies Work in the Oracle Cloud Infrastructure Documentation. - Compartment
- When deploying PeopleSoft Update Images
built on PeopleTools 8.58, do not create
instances in the root compartment, or
in a lower-level subcompartment.
You must use a compartment that is directly under the root compartment. Nested compartments, that is, lower-level subcompartments, are not supported for this deployment.
See Managing Compartments, Creating Compartments, in the Oracle Cloud Infrastructure Documentation. - When deploying PeopleSoft Update Images built on PeopleTools 8.59, this restriction does not apply. You can use any compartment level.
- When deploying PeopleSoft Update Images
built on PeopleTools 8.58, do not create
instances in the root compartment, or
in a lower-level subcompartment.
- SSH Keys
For the section Generating an SSH Key, you will need either an implementation of thessh-keygenutility (for Linux) or an application such as PuTTY (for Microsoft Windows), installed on a local computer.
- User IDs and passwords
When you create the instance, you supply several PeopleSoft user IDs and passwords. The PeopleSoft application image is delivered with default user IDs that are reset by the deployment. See the section Creating the PeopleSoft Application Instance in this tutorial. - Port numbers
The PeopleSoft Update Image is provided with default values for the HTTP, HTTPS, Jolt, and WSL ports. For security reasons Oracle recommends that you do not use the default HTTP or HTTPS port numbers. Before beginning this procedure, decide on your port numbers. If you choose to use non-default values, supply them when creating the instance and configuring the Virtual Cloud Network. - Virtual Cloud Network (VCN)
- Before deploying the PeopleSoft Update Image, the cloud administrator must configure a Virtual Cloud Network (VCN) with subnets and access to necessary ports.
- Security lists must have rules to allow SSH (port 22) access.
- Allow access for the HTTP, HTTPS, Jolt, and WSL ports that you select for the PeopleSoft application instance.
- Instance Metadata Service
- For PeopleSoft Update Images built on PeopleSoft PeopleTools 8.58: Do not disable requests to Instance Metadata Service Version 1 (IMDSv1) endpoints on the instance. You can specify the IMDS version on the instance details page. Be sure to accept the default setting, Version 1 and Version 2.
- PeopleSoft Update Images built on PeopleSoft PeopleTools 8.59 support Instance Metadata Service Version 2 (IMDSv2) endpoints.
- See Getting Instance Metadata in the Oracle Cloud Infrastructure documentation.
Process Overview
To deploy the PeopleSoft Update Image, execute the following steps:
-
Verify Oracle Cloud Infrastructure account information.
-
Generate an SSH key pair using an on-premises Linux or Microsoft Windows system.
-
In Compute Console, create a virtual cloud network (VCN), including the necessary security lists.
-
In Compute Console, obtain the PeopleSoft Update Image.
- In Compute Console, create the instance for the PeopleSoft demo environment.
-
Sign in to the PeopleSoft demo environment instance in a browser.
-
Complete post-installation steps.
Verifying Oracle Cloud Account Information
Verifying Access to Oracle Cloud Infrastructure Compute
-
Sign in to Compute using the URL provided by your administrator, for example:
https://console.us-ashburn-1.oraclecloud.com.
-
Enter the name of your tenancy if necessary, and enter your user name and password.
-
Click the navigation menu icon at the top left of the page, and select Compute and then Instances.

Description of this image -
On the Compute page, select your compartment from the drop-down list on the left.
If the Instances area does not display anything, as shown in this example, you may not have the appropriate permission to create instances. Contact your administrator.
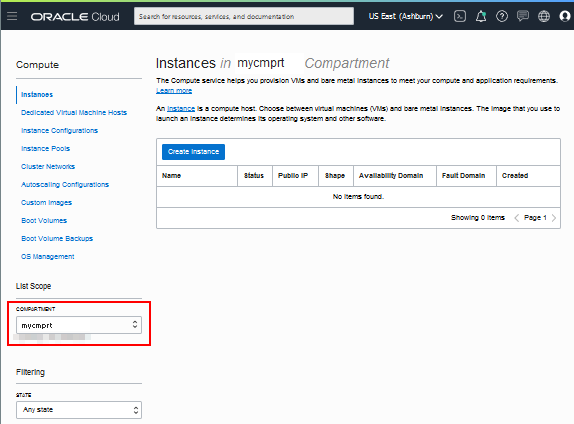
Description of this image
Reviewing Tenancy Service Limits
Before you begin installing the PeopleSoft Update Image, it is a good idea to review the available resources and service limits for your tenancy.
-
In Oracle Cloud Infrastructure, click the navigation menu icon, and select Governance, then Limits, Quotas and Usage.

Description of this image -
The page displays your resource limits, usage, and availability for the region. Use the drop-down lists to filter by service, scope, resource and compartments.
For example, for the Compute service, ensure that the Availability Domain and compartment where you plan to work has enough resources to create your instances.
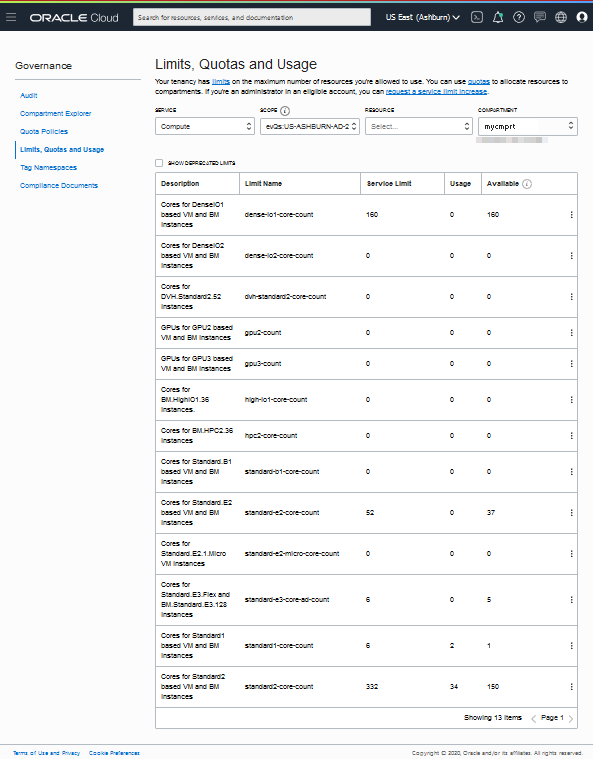
Description of this image
See Service Limits in the Oracle Cloud Infrastructure documentation.
Generating an SSH Key Pair
When you create your Compute instance, you must provide a secure shell (SSH) public key that will be used for authentication when you log in to the instance. Generate your SSH key pair and upload the SSH public key to Compute before you start to create your instance.
Generating an SSH Key Pair on UNIX or UNIX-Like Systems Using ssh-keygen
-
Run the
ssh-keygencommand.ssh-keygen -b 2048 -t rsa -
The command prompts you to enter the path to the file in which you want to save the key. A default path and file name are suggested in parentheses. For example:
/home/user_name/.ssh/id_rsa. To accept the default path and file name, press Enter. Otherwise, enter the required path and file name, and then press Enter. -
The command prompts you for a passphrase. Enter a passphrase.
Note that the passphrase isn't displayed when you type it in. Remember the passphrase. If you forget the passphrase, you can't recover it.
-
When prompted, enter the passphrase again to confirm it.
The command generates an SSH key pair consisting of a public key and a private key, and saves them in the specified path. The file name of the public key is created automatically by appending
.pubto the name of the private key file. For example, if the file name of the SSH private key isid_rsa, then the file name of the public key would beid_rsa.pub. -
Make a note of the path where you've saved the SSH key pair.
When you create instances, you must provide the SSH public key. When you log in to an instance, you must specify the corresponding SSH private key and enter the passphrase when prompted.
Generating an SSH Key Pair on Microsoft Windows
Generate a secure SSH key pair using an application such as PuTTY.
Make a note of the public and private key names and where they are saved. When you create instances, you must specify the SSH public key. When you log in to an instance, you must provide the path to the corresponding SSH private key and enter the passphrase when prompted.
See Creating a Key Pair, Oracle Cloud Infrastructure Documentation.
Creating a Virtual Cloud Network for the PeopleSoft Application Instance
Defining the VCN and Subnets
The PeopleSoft Update Image contains a web server installation configured to listen for requests on port 8000 (HTTP) and 9000 (HTTPS). Your security protocols may require you to use other port values. If you use other ports, configure them when setting up the VCN, and supply the same values when creating the instance.
See the Oracle Cloud Infrastructure Networking documentation for information on VCNs.
For security, Oracle recommends that you use a private subnet to deploy the PeopleSoft Update Image. If you use a private subnet, you cannot access the instance over the internet. There are various methods of accessing an instance in a private subnet, such as with a jump host or web proxy. The Oracle Cloud Infrastructure documentation describes methods for accessing instances on private subnets.
See Oracle Cloud Infrastructure Documentation, Networking.
Note. Oracle highly recommends that you use the HTTPS protocol in all deployments. Follow the instructions found in the PeopleTools: System and Server Administration product documentation to implement the encryption keys and certificates required for Secure Sockets Layer (SSL) encryption. To review the PeopleSoft PeopleTools documentation, go to the PeopleSoft PeopleTools page on the Oracle Help Center and select your release from the drop-down list at the top. Go to the Online Help and PeopleBooks section to view the latest documentation.
Creating a VCN with Related Resources
This example uses the Oracle Cloud Infrastructure VCN wizard, which creates a VCN, internet gateway, NAT gateway, regional public subnet, regional private subnet, and security rules. For other options, see Networking in the Oracle Cloud Infrastructure documentation.
-
In the Oracle Cloud Infrastructure Compute Console, select Networking and then Virtual Cloud Networks.
Note. Alternatively, you can start the VCN wizard by clicking the tile Set up a network with a wizard on the Oracle Cloud Infrastructure home page. In that case, skip the next two steps.
-
Click Start VCN Wizard.
-
Select VCN with Internet Connectivity (the default selection).
-
Click Start VCN Wizard.

Description of this image -
On the Create a VCN with Internet Connectivity page, enter a name for the VCN.
-
Select the compartment you want to work in from the drop-down list, and then click Next.
The name in this example is pscm_network, and the compartment is mycmprt.

Description of this image -
Review the networking resources, and then click Create.

Description of this image 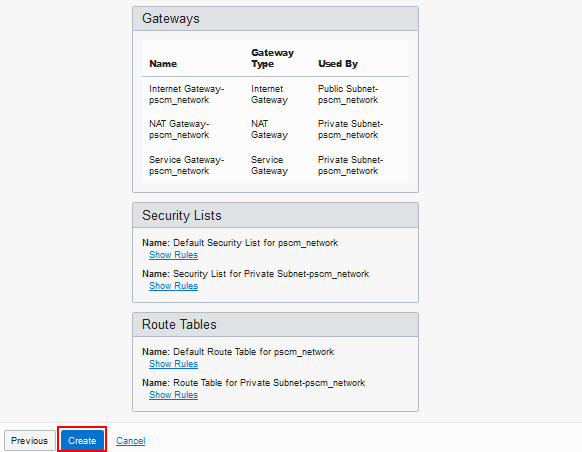
Description of this image - When the process is complete, click View
Virtual Cloud Network to go to the
Virtual Cloud Network details page.

Description of this image - Update the security lists to allow all necessary ports.
Updating the VCN Subnets
The subnets that you define in your VCN must allow access for the ports needed to access the PeopleSoft application in a browser, as well as SSH access for the instance. Edit the security lists in your VCN to include access for these destination ports:
- 22 (SSH)
- 8000 (default PIA HTTP port)
- 9000 (default PIA HTTPS port)
- 9033 (default Jolt port)
- 7000 (default WSL port)
- 9200 (default Elasticsearch HTTP port)
- 5601 (default Kibana HTTP port)
- 9800 (default Logstash HTTP port)
Obtaining the PeopleSoft Update Image
This section describes how to obtain the PeopleSoft Update Image. Choose one of these methods to obtain the update image, and then continue to create the instance for the PeopleSoft application.
Note. In addition to the two methods described here, you have the option of locating the latest PeopleSoft Update Image in Oracle Cloud Marketplace. Follow the instructions on the image page.
Obtaining the PeopleSoft Update Image Using the Marketplace Menu Selection
After completing these steps, skip the section Obtaining the PeopleSoft Update Image from the Oracle Images List, and continue with the steps in Creating the PeopleSoft Application Instance.
-
On the Oracle Cloud Infrastructure console home page, click the navigation menu icon at the top and select Marketplace, then All Applications.

Description of this image -
On the Marketplace page, locate the tile for the PeopleSoft Update Image.
You can use the filters on the left, or enter "PeopleSoft" in the search box.
-
On the Launch Instance page, accept the default Version, and select your compartment from the drop-down list.
The page includes details such as the software versions included in the image.
Note. For PeopleSoft Update Images built on PeopleTools 8.58, select a compartment directly under the root compartment.
-
Read the Oracle terms and restrictions, and select the option agreeing to the terms.
-
Click Launch Instance.
The Create Compute Instance page appears with the image you selected.
-
Enter a name for the instance. Ensure that the instance name is less than 30 characters.
-
Continue with the steps in the section Creating the PeopleSoft Application Instance.
Obtaining the Image from the Oracle Images List
If you used the steps in the previous section to obtain the image from the menu Marketplace listing, skip this section and go to Creating the PeopleSoft Application Instance.
To obtain the PeopleSoft Update Image from a list of Oracle images:
-
On the Oracle Cloud Infrastructure console home page, click Create a VM instance under Quick Actions.
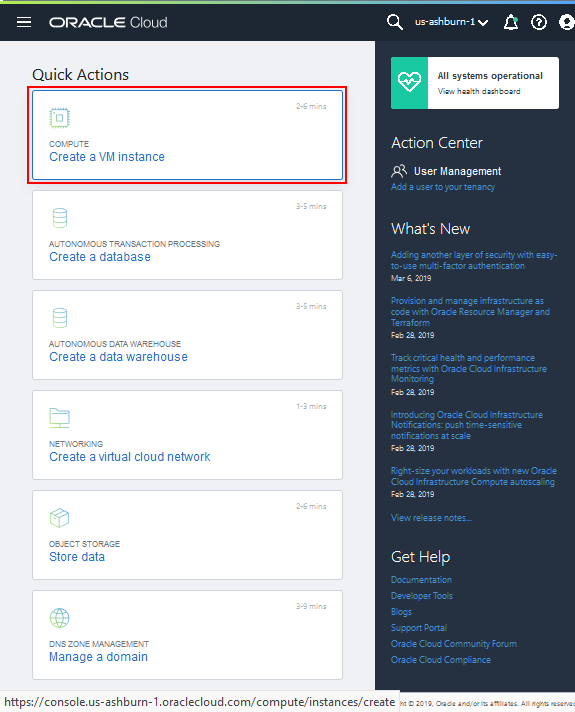
Description of this image -
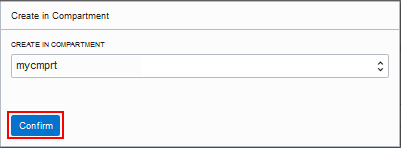
Choose a compartment on Create in Compartment dialog box, if necessary. Click Confirm.
Note. For PeopleSoft Update Images built on PeopleTools 8.58, select a compartment directly under the root compartment.
Description of this image -
Supply a name for the PeopleSoft application instance. Ensure that the instance name is less than 30 characters.
-
Select the Availability Domain where you want to create the instance. This example shows AD 3.

Description of this image -
Click Change Image.

Description of this image -
On the Browse All Images page, select the Oracle Images tab.
-
Select the PeopleSoft Update Image.
Note. To review details about the image, expand the row by clicking the down arrow.
-
Read the Oracle terms and restrictions, and select the option agreeing to the terms.
-
Click Select Image.
-
On the Create Compute Instance page, continue with the steps in the section Creating the PeopleSoft Application Instance.
Creating the PeopleSoft Application Instance
After you have obtained the PeopleSoft Update Image using one of the preceding methods, supply the necessary information to create the instance on the Create Compute Instance page.
Preparing the User Data
You specify the passwords for the PeopleSoft application in the Initialization Script area on the create instance page. You also have the option to change the default values for ports and users in the same script. This table lists the passwords, users, and ports that you can specify.
| # | Cloud-Init Script Parameter | Description | Requirements | Default Value |
|---|---|---|---|---|
| 1 |
connect_pwd* |
PeopleSoft Connect ID password See PeopleTools: System and Server Administration, Setting Application Server Domain Parameters, Startup Options, on the PeopleSoft PeopleTools page on the Oracle Help Center. |
Ensure the password is between 6 and 30 characters in length. It must not contain any space, percent sign (%), slash (/), single quotation mark ( '), or double quotation mark (") characters. |
None |
| 2 |
access_pwd* |
PeopleSoft Database Access ID password. See PeopleTools: Data Management, Administering PeopleSoft Databases on Oracle, Working with Oracle Security Features, on the PeopleSoft PeopleTools page on the Oracle Help Center. |
Ensure the password is no more than 8 characters in length. The first character must be a letter, and the remaining 7 characters may be a mixture of letters and numbers. |
None |
| 3 |
admin_pwd* |
Database Administrator password. The PeopleSoft Update Image is delivered with a default password for SYS and SYSTEM users. This will be reset using the value you supply in the cloud-init script. See Oracle Database Security Guide, Managing Security for Oracle Database Users, Changing the SYS User Password in Oracle Help Center. |
Ensure the password is between 8 and 30 characters in length. It must contain at least one lowercase letter, one uppercase letter, one number, and one special character, either underscore ( _ ), dash (-), or number sign (#). |
None |
| 4 |
weblogic_admin_pwd* |
Oracle WebLogic administrator password. The default Oracle WebLogic server administrator is system. See PeopleTools: System and Server Administration, Working with Oracle WebLogic, Changing WebLogic User Passwords, on the PeopleSoft PeopleTools page on the Oracle Help Center. |
Ensure that the password is between 8 and 30 characters in length with at least one lowercase letter and one uppercase letter. It must also contain one number or one special character (!@#$%^&). |
None |
| 5 |
webprofile_user_pwd* |
PeopleSoft Web Profile password. The default web profile user is PTWEBSERVER. See PeopleTools: Portal Technology, Configuring the Portal Environment, Configuring Web Profiles, on the PeopleSoft PeopleTools page on the Oracle Help Center. |
Ensure the password contains only alphanumeric characters and is between 8 and 30 characters in length. |
None |
| 6 |
gw_user_pwd* |
Integration Gateway password. The default user is administrator. See PeopleTools: Integration Broker Administration, Managing Integration Gateways, Accessing Gateway Setup Properties, on the PeopleSoft PeopleTools page on the Oracle Help Center. |
The password is not validated, but Oracle recommends that passwords include 8 or more characters. |
None |
| 7 |
domain_conn_pwd* |
Application Server Domain connection password |
Ensure the password contains only alphanumeric characters and is between 8 and 30 characters in length. |
None |
| 8 |
opr_pwd* |
PeopleSoft user ID password. See PeopleTools: Security Administration, Administering User Profiles, Working with Passwords, on the PeopleSoft PeopleTools page on the Oracle Help Center. |
Ensure the password contains only alphanumeric characters and is no more than 8 characters in length.
|
None |
| 9 |
connect_id |
PeopleSoft Connect ID |
NA |
people |
| 10 |
access_id |
PeopleSoft Database Access ID |
NA |
SYSADM |
| 11 |
db_listener_port |
Oracle database listener port |
NA |
1521 |
| 12 |
pia_http_port |
PeopleSoft Pure Internet Architecture HTTP port |
See the note on ports in the What Do You Need section. |
8000 |
| 13 |
pia_https_port |
PeopleSoft Pure Internet Architecture HTTPS port |
See the note on ports in the What Do You Need section. |
9000 |
| 14 |
jolt_port |
Jolt port
|
See the note on ports in the What Do You Need section. |
9033 |
| 15 |
wsl_port |
WSL port
|
See the note on ports in the What Do You Need section. |
7000 |
*Mandatory — You must include all of these parameters when creating the instance.
Completing the Instance Creation
-
Select an instance shape.
Accept the default, or click Change Shape to choose another shape on the Browse All Shapes page. The supported shapes are VM.Standard2.1 (1 OCPU, 15 GB RAM) and VM.Standard2.2 (2 OCPU, 30 GB RAM).
-
In the Networking section, select the option Select an existing virtual cloud network.
-
Select the VCN that you created earlier in this tutorial from the Virtual cloud network drop-down list.
-
Select the option Select existing subnet.
-
From the Subnet drop-down list, select the public or private subnet you want to use for the PeopleSoft application instance.
-
If you want the instance to be accessible from the Internet, select the option Assign a public IPv4 address, or select the option Do not assign a public IPv4 address.
-
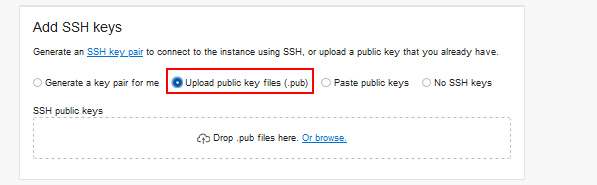
In the Add SSH keys area, select the option Upload public key files (.pub), and browse to the location where you saved the public SSH key.
Description of this image -
In the Boot Volume area, select Specify a custom boot volume size.
Enter a minimum size of 200 GB. The total size varies depending upon the PeopleSoft product used.
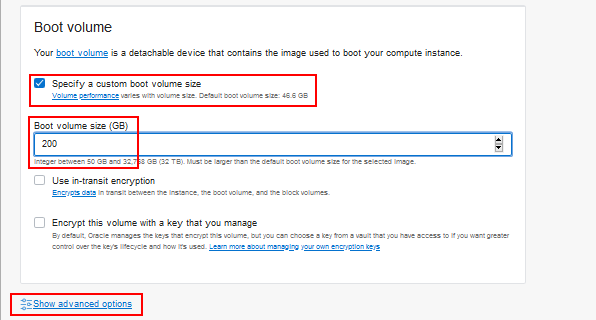
Description of this image - Select Show Advanced Options.
-
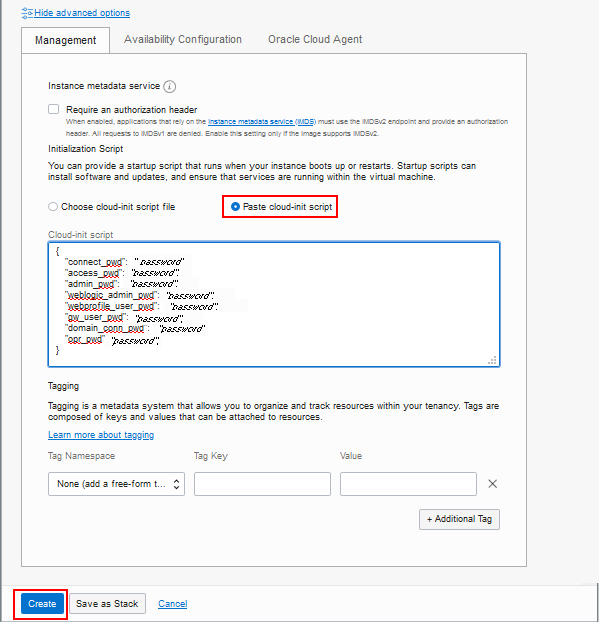
On the Management tab select the option Paste cloud-init script and enter the configuration information using the JSON format in these examples.
The instance creation requires these passwords.
{ "connect_pwd": "password", "access_pwd": "password", "admin_pwd": "password", "weblogic_admin_pwd": "password", "webprofile_user_pwd": "password", "gw_user_pwd": "password", "domain_conn_pwd": "password", "opr_pwd": "password" } -
If you want to specify additional parameters, include them in the same cloud-init script.
For example, this script specifies non-default values for the HTTP and HTTPS ports in addition to the mandatory parameters:
{ "connect_pwd": "password", "access_pwd": "password", "admin_pwd": "password", "weblogic_admin_pwd": "password", "webprofile_user_pwd": "password", "gw_user_pwd": "password", "domain_conn_pwd": "password", "opr_pwd": "password", "pia_http_port": "9100", "pia_https_port": "9150" } -
Click Create.
Description of this image -
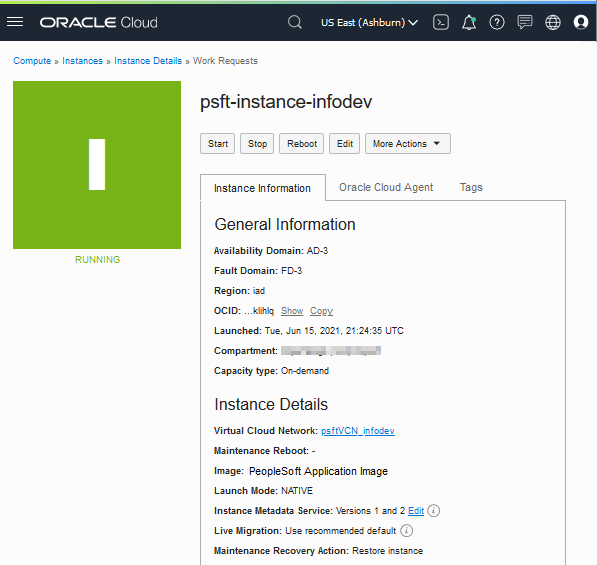
Monitor the instance creation on the Instances page.
If necessary, select the instance to see the details. When the instance creation is complete, as indicated by status Running, you can sign in to follow the progress.
If you specified a public subnet, make a note of the Public IP address for the instance in the section Instance Access.
Description of this image 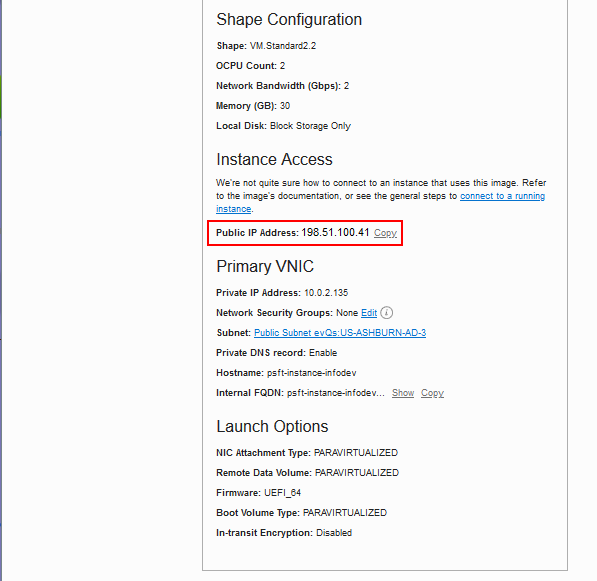
Description of this image
Logging in to the PeopleSoft Application Instance
The PeopleSoft application instance can be accessed from a Microsoft Windows machine using an SSH client such as PuTTY, or directly from a Linux machine.
Logging in to the PeopleSoft Application Instance VM from a Linux or UNIX System
-
Enter the following command:
ssh -i <path_to_private_key_file>/<private_key_name> -o ServerAliveInterval=5 -o ServerAliveCountMax=1 opc@<public_ip_address_of_instance>
-
If you don't know the public IP address of your instance, you can find it by going to the Compute console and selecting the Instances tab. Select your compartment, and view the instance details page. The Primary VNIC information section includes the Public IP Address.
-
If you entered a passphrase when creating your SSH key pair, enter the passphrase when prompted.
-
The first time you connect to your instance, the SSH utility prompts you to confirm the public key. In response to the prompt, enter yes.
Logging in to the PeopleSoft Application Instance VM from a Microsoft Windows System
-
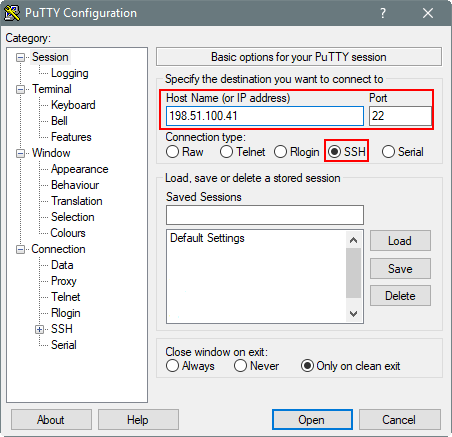
Start PuTTY. The PuTTY Configuration window is displayed, showing the Session panel.
-
In the Host Name (or IP address) field, enter the public IP address of your instance.
Note. If you don't know the public IP address of your instance, you can find it by going to the Compute console and selecting the Instances tab. Select your compartment, and view the instance details page. The Primary VNIC information section includes the Public IP Address.
-
In the Connection type field, select SSH if it is not already selected.
Description of this image -
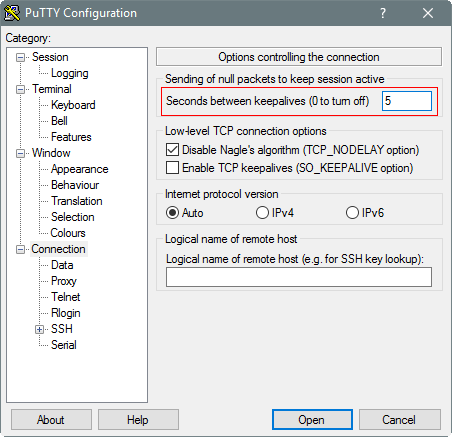
In the Category pane, click Connection. Enter 5 in the Seconds between keepalives (0 to turn off) text box.
Description of this image -
In the Category pane, expand SSH, and then click Auth. The Auth panel is displayed.
-
In the Private key file for authentication field, click Browse and select the private key file that you saved earlier, mykey.ppk in this example.
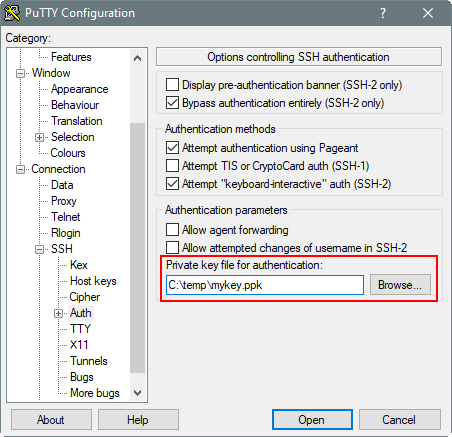
Description of this image -
In the Category tree, click Session.
The Session panel is displayed.
-
In the Saved Sessions field, enter a name for this connection configuration, and then click Save.
-
Click Open to open the connection.
The PuTTY Configuration window is closed and the PuTTY window is displayed.
-
Enter the passphrase you had provided for your SSH key pair.
-
The first time you connect to your instance, the PuTTY Security Alert window is displayed, prompting you to confirm the public key. Click Yes to continue.
Reviewing the PeopleSoft Application Instance Log Files
Monitor the configuration process status by reviewing the log file /home/opc/bootstrap/oci_status.log.
For example, to view the end of the log file, enter this command:
$ tail /home/opc/bootstrap/oci_status.log
The configuration process takes several minutes. When the process completes successfully, the same log file includes the URL to sign in to the PeopleSoft Pure Internet Architecture (PIA) in a browser.
Note. The term bootstrap is sometimes used to refer to the setup script used to deploy the image.
The PeopleSoft application instance configuration log files are found in these locations:
- /home/opc/bootstrap/oci_status.log — Configuration process log
- /home/opc/bootstrap/psft_oci_setup.log — Image provisioning log
- /opt/oracle/psft/dpks/setup/psft_dpk_setup.log — Detailed Puppet log for the image installation
If you want to copy the log files to a Microsoft Windows computer, use a secure copy or secure FTP utility such as those associated with Putty.
For example, to transfer the files using the PSCP utility in PuTTY:
-
Create a saved session in PuTTY to connect to the PeopleSoft application instance VM.
-
Make a note of the path to your Putty installation on your laptop (for example, C:\Program Files (x86)\PuTTY).
-
Make a note of the path on the instance VM with the files you want to copy, and the path on your laptop where you want to save them.
-
Open a command prompt and make a note of your PATH environment variable.
To list the environment variables, enter the command
set.Copy the contents of PATH to Notepad or elsewhere as a backup. -
In the command prompt, append the path to the PuTTY installation to the beginning of your PATH. For example:
set PATH=C:\Program Files (x86)\PuTTY;%PATH%
Note. This environment variable setting only lasts until the command window closes.
-
Use this command to connect to the session with user opc, and copy files from the source instance VM to the target Microsoft Windows computer:
pscp –l <user> <session name>:<source> <target>
-
Enter the passphrase for the SSH key at the prompt.
>pscp -l opc psft-infodev:/home/opc/bootstrap/psft_oci_setup.log C:\user\PeopleSoftImage\target
Passphrase for key "mykey":
psft_oci_setup.log | 1142 kB | 1142.5 kB/s | ETA: 00:00:00 | 100%
Accessing the PeopleSoft Application Instance in a Browser
-
To locate the URL for the PeopleSoft application, review the /home/opc/bootstrap/oci_status.log file created after the successful instance creation.
The URLs for the PeopleSoft Pure Internet Architecture (PIA) are included at the end of the file. For example:
OBI installed successfully
PIA URL: http://psft-instance-infodev.subnet1.pscmnetwork.oraclevcn.com:8000
PIA SSL URL: https://psft-instance-infodev.subnet1.pscmnetwork.oraclevcn.com:9000 -
To access the URL over the Internet, the DNS for the instance must be successfully resolved.
If you do not have a public DNS, edit the etc\hosts file (for example, C:\Windows\System32\drivers\etc\hosts on Microsoft Windows 10) on the machine from which you want to access the PeopleSoft application URL. To modify the file, add a line with the Public IP address and fully-qualified domain name for the PeopleSoft application instance, such as:
198.51.100.41 psft-instance-infodev.subnet1.pscmnetwork.oraclevcn.com
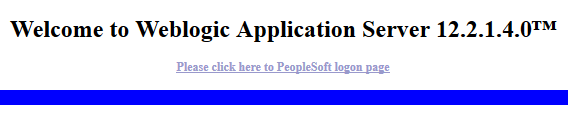
-
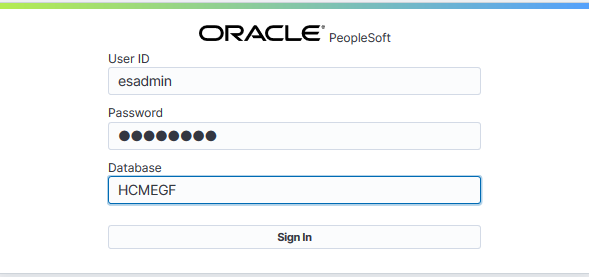
Enter the PeopleSoft application URL in a browser. You see a window for Weblogic Application Server 12.2.1.4.0.
Note. This example applies to images that are built on PeopleSoft PeopleTools 8.58. For PeopleSoft Update Images that are built on PeopleSoft PeopleTools 8.59, the WebLogic Application Server version is 14.1.1.0.0.
-
Click the link Please click here to PeopleSoft logon page to display the PeopleSoft application sign in window.
Select the default user ID that corresponds to the PeopleSoft Update Image that you deployed. The PeopleSoft Update Images are delivered with these user IDs:
- CRM: VP1
- CS: PS
- ELM: PS
- FSCM: VP1
- HCM: PS
- IH: VP1
The password is the opr_pwd you supplied in the cloud-init script in the section Completing the Instance Creation.

Description of this image
Note. For information on changing the PeopleSoft Pure Internet Architecture (PIA) user passwords, see PeopleTools: Security Administration, Administering User Profiles, Working with Passwords, on the PeopleSoft PeopleTools page on the Oracle Help Center.
For information on the file structure and default Linux users set up as part of the image deployment, see PeopleSoft Deployment Packages Installation, Using the PeopleSoft Installation, in the Install and Upgrade section on the PeopleSoft PeopleTools page on the Oracle Help Center.
Using Elasticsearch and Kibana for Update Images on PeopleTools 8.58
Use this information to verify the initialization of Elasticsearch and Kibana on PeopleSoft Update Images built on PeopleTools 8.58. If your update image was built on PeopleTools 8.59, skip this section and go to the next section.
Verifying the Elasticsearch Initialization for Update Images on PeopleTools 8.58
Elasticsearch was initiated as part of the instance creation. The Host Name for the search instance is based on the instance name.
To verify that Elasticsearch is installed and running, use these steps:
-
Sign in to the deployed PeopleSoft environment in a browser.
-
Click the NavBar icon at the top of the window, and then click Navigator.

Description of this image -
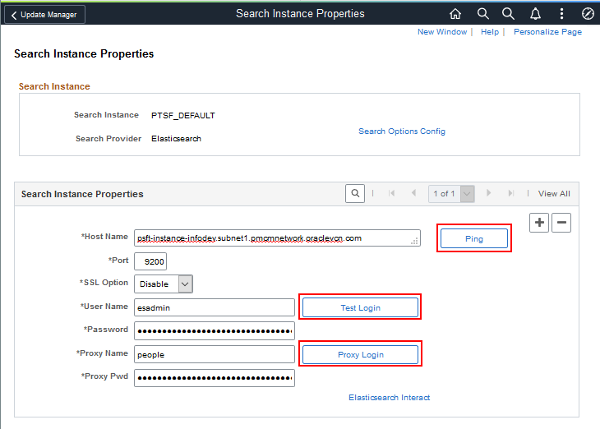
Select in sequence PeopleTools, Search Framework, Administration, Search Instance, and find the default Search Instance.
The Search Instance Properties page for the default search instance, PTSF_DEFAULT, appears, as shown in this example.
Description of this image -
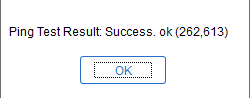
On the Search Instance Properties page, in the Search Instance Properties area, click Ping beside the Host Name field. You see the message "Ping Test Result: Success. Elasticsearch version 6.1.2 (262,613)". Click OK to close the box.
-
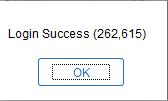
Click Test Login beside the User Name field. You see the message "Login Success (262,615)". Click OK to close the box.
-
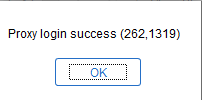
Click Proxy Login. You see the message "Proxy login success (262,1319)". Click OK to close the box.

-
Click Validate in the Call Back Properties area, beside Confirm Password. You see a page saying "All validations are successful." Select the Show All option for more details.
Click Return.
Description of this image -
Select the link Update Deployed Definitions. You see the message "Updated 6 deployed definitions. Failed to update 0 definitions. Refer to event log for more details (262,623)". Click OK to close the box.
Note. The number of deployed definitions that you see may vary.
-
Click the magnifying glass icon at the top of the window to display the Global Search bar, and click the arrow to select the search area.
Description of this image -
Enter a search term, such as manager, and press ENTER.
-
The page for the results appears.

Description of this image
The Elasticsearch parameters configured by the image deployment include the following default values:
-
Elasticsearch administrative user and password — esadmin/Esadmin1
-
Elasticsearch proxy user — people/peop1e
-
Callback user — PSAPPS
-
Port — 9200
There are several pages in the PeopleSoft application that you update to configure Elasticsearch and Integration Broker. If the verification tests for Elasticsearch fail, or if you cannot access the search results over the public Internet, verify that these pages have the correct information. For more information, see the PeopleTools: Search Technology product documentation on the PeopleSoft PeopleTools page on the Oracle Help Center.
See also the resources on the Elasticsearch Home Page, My Oracle Support, Doc ID 2205540.2.
Enabling Kibana for Update Images on PeopleTools 8.58
For PeopleSoft Update Images built on PeopleTools 8.58, Kibana is initiated as part of the instance creation. To determine whether Kibana is included with your image, as well as the PeopleTools patch release, see the PeopleSoft Update Image details on the Marketplace image page.
See the section Obtaining the PeopleSoft Update Image.
Note. If you are deploying a PeopleSoft Update Image that was built on PeopleTools 8.58.04 and later, you can use Kibana without performing the steps described here to open the firewall to port 5601. Skip steps 1 through 6.
For information on using Kibana, see PeopleTools: Search Technology on PeopleTools on the Oracle Help Center, Online Help and PeopleBooks.
Before you can sign in to Kibana, you must perform these steps to enable access to the necessary port.
-
Access the PeopleSoft application instance as described in the section Logging in to the PeopleSoft Application Instance.
-
Log on as the root user.
$ sudo su -
-
Enter the following commands to open the firewall to port 5601.
# firewall-cmd --permanent --zone=public --add-port=5601/tcp
# firewall-cmd --reload
-
Change directory to /opt/oracle/psft/pt/tools_client.
$ cd /opt/oracle/psft/pt/tools_client
-
View the contents of tnsnames.ora and make a note of the database name, which is HCMEGF in this example:
$ more tnsnames.ora
HCMEGF = (DESCRIPTION = (ADDRESS_LIST = (ADDRESS = (PROTOCOL = TCP)(HOST = 10.0.2.14)(PORT = 1521)) ) (CONNECT_DATA = (SERVER = DEDICATED) (SERVICE_NAME = HCMEGF) ) ) -
Add access to port 5601 in the subnet for the instance.
-
To access Kibana, use the fully-qualified domain name from the PIA URL. Replace the port number with port 5601. For example:
http://psft-instance-infodev.subnet1.pscmnetwork.oraclevcn.com:5601
-
On the sign in page, enter the Elasticsearch user name and password from the previous section, and the database name, and click Sign In.
Description of this image
Using Elasticsearch, Kibana, and Logstash for Update Images on PeopleTools 8.59
Use this information to verify the installation of Elasticsearch, Kibana, and Logstash on PeopleSoft Update Images built on PeopleTools 8.59. If your PeopleSoft Update Image was built on PeopleTools 8.58, see the previous section.
Verifying Elasticsearch for Update Images on PeopleTools 8.59
Elasticsearch was initiated as part of the instance creation. The Host Name for the search instance is based on the instance name.
To verify that Elasticsearch is installed and running, use these steps:
-
Sign in to the deployed PeopleSoft environment in a browser.
-
Click the NavBar icon at the top of the window, and then click Menu.

Description of this image -
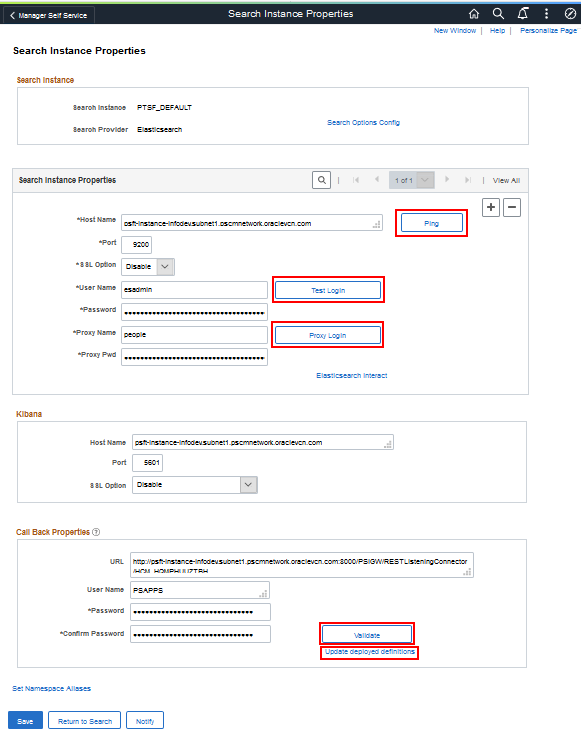
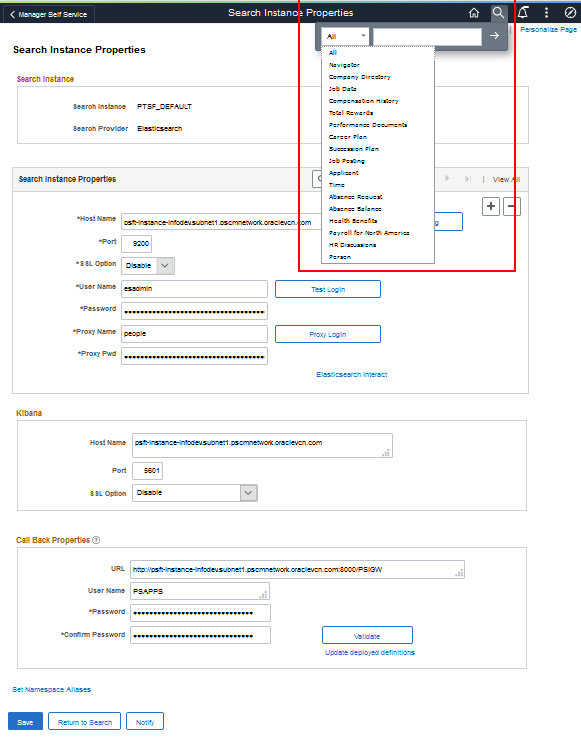
Select in sequence PeopleTools, Search Framework, Administration, Search Instance, and find the default Search Instance.
The Search Instance Properties page for the default search instance, PTSF_DEFAULT, appears. These examples show the top and bottom portions of the page.
Description of this image 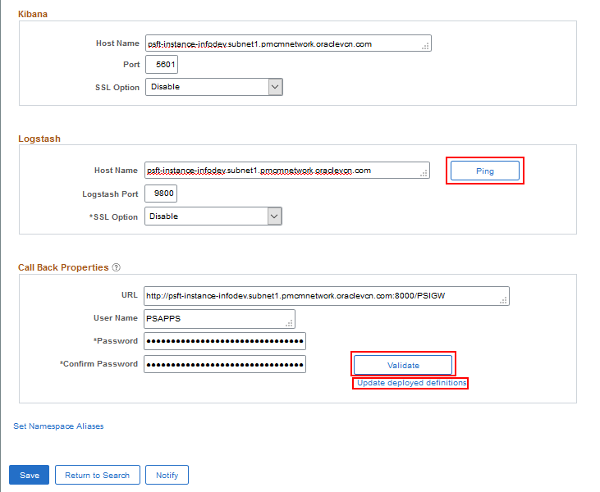
Description of this image -
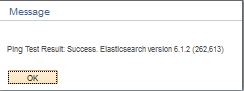
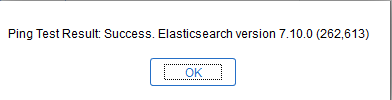
On the Search Instance Properties page, in the Search Instance Properties area, click Ping beside the Host Name field. You see the message "Ping Test Result: Success. Elasticsearch version 7.10.0 (262,613)". Click OK to close the box.
-
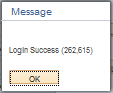
Click Test Login beside the User Name field. You see the message "Login Success (262,615)". Click OK to close the box.
-
Click Proxy Login. You see the message "Proxy login success (262,1319)". Click OK to close the box.
-
Click Ping beside the Host Name field in the Logstash area. You see the message "Ping Test Result: Success. ok (262, 613)".
-
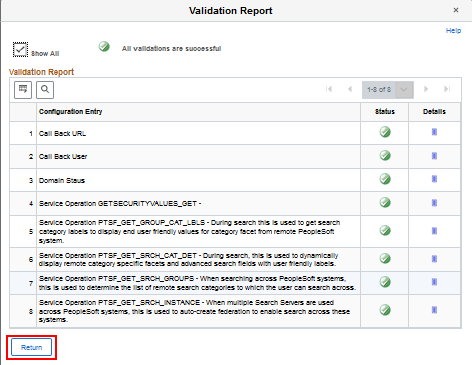
Click Validate in the Call Back Properties area, beside Confirm Password. You see a page saying "All validations are successful." Select the Show All option for more details.
Click Return.
Description of this image -
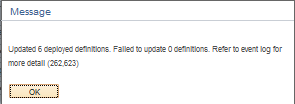
Select the link Update Deployed Definitions. You see the message "Updated 79 deployed definitions. Failed to update 0 definitions. Refer to event log for more details (262,623)". Click OK to close the box.
Note. The number of deployed definitions that you see may vary.

-
The Global Search bar is available at the top of any of the PeopleSoft demo environment pages. Select a search category and enter a search term.

Description of this image
The Elasticsearch parameters configured by the image deployment include the following default values:
- Installation directory — /opt/oracle/psft/pt/ES/pt/elasticsearch7.10.0
-
Elasticsearch administrative user and password — esadmin/Esadmin1
-
Elasticsearch proxy user — people/Esadmin2
-
Callback user — PSAPPS
-
Port — 9200
There are several pages in the PeopleSoft application that you update to configure Elasticsearch and Integration Broker. If the verification tests for Elasticsearch fail, or if you cannot access the search results over the public Internet, verify that these pages have the correct information. For more information, see the PeopleTools: Search Technology product documentation on the PeopleSoft PeopleTools page on the Oracle Help Center.
See also the resources on the Elasticsearch Home Page, My Oracle Support, Doc ID 2205540.2.
Verifying Kibana for Update Images on PeopleTools 8.59
For PeopleSoft Update Images built on PeopleTools 8.59, Kibana is installed and initiated as part of the instance creation. Use Kibana to visualize data for Elasticsearch server monitoring and application index monitoring, and to create dashboards to visualize application search indexes. To determine whether Kibana is included with your image, as well as the PeopleTools patch release, see the PeopleSoft Update Image details on the Cloud Marketplace image page.
The Kibana installation directory is /opt/oracle/psft/pt/ES/pt/Kibana7.10.0.
See the section Obtaining the PeopleSoft Update Image.
To verify that Kibana is installed and running:
-
Sign in to the PeopleSoft application in a browser.
-
Select in sequence PeopleTools, Security, and User Profile. Search for your user ID, and then select the Roles tab.
Verify that the Kibana Administrator role is included in the list of roles, and add it if necessary. This role is required to access the Kibana home page.
-
Select Reporting Tools and then Kibana.
-
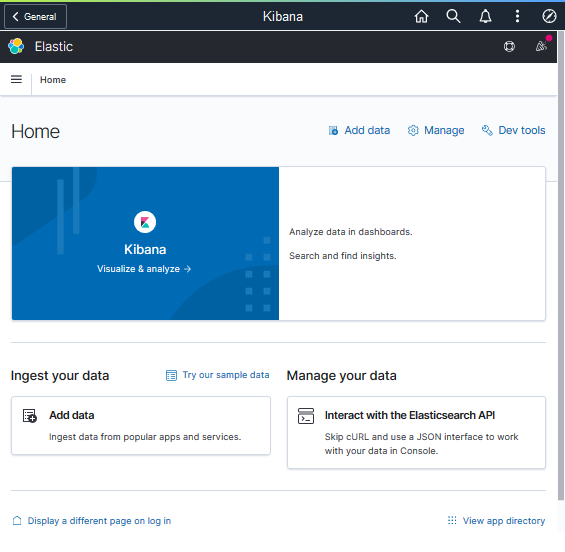
On the Welcome to Elastic page, select Explore on my own.
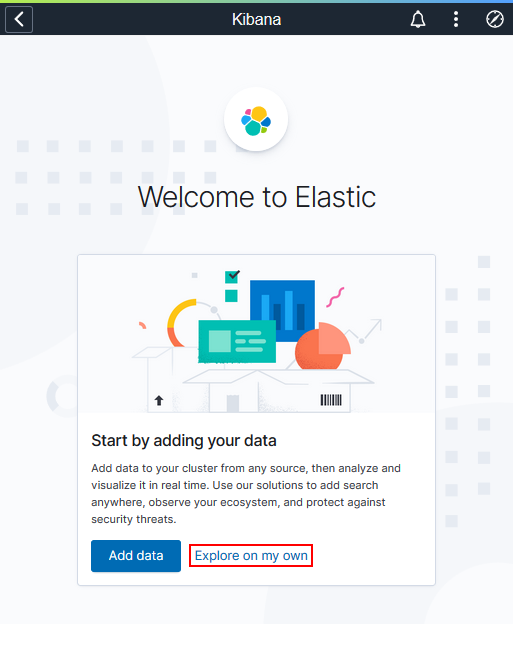
Description of this image This displays the Kibana home page.
Description of this image
For information on using Kibana, see PeopleTools: Search Technology on PeopleTools on the Oracle Help Center, Online Help and PeopleBooks.
Reviewing Logstash Information for Update Images on PeopleTools 8.59
Beginning with PeopleSoft Update Images that are built on PeopleSoft PeopleTools 8.59, Logstash is installed and initiated as part of the instance creation. Logstash is used for the PeopleSoft Health Center, which displays charts and data using Kibana. It is also used with external data integration.
The Logstash installation directory is /opt/oracle/psft/pt/ES/pt/Logstash7.10.0.
For information on working with the Logstash installation, see PeopleSoft Deployment Packages for Elasticsearch Installation, PeopleSoft PeopleTools 8.59, PeopleTools on the Oracle Help Center.
To use Logstash for PeopleSoft Health Center, see PeopleTools: Performance Monitor, "Configuring PeopleSoft Health Center," PeopleTools on the Oracle Help Center.
To use Elasticsearch, Kibana, and Logstash for external data integration, see PeopleTools: Search Technology, "Integrating External Data with PeopleSoft," PeopleTools on the Oracle Help Center.
Reviewing PeopleSoft Automated Updates Information for Update Images on PeopleTools 8.59
Beginning with PeopleSoft Update Images that are built on PeopleSoft PeopleTools 8.59, you can configure Update Manager to automatically download PRPs, and apply the PRPs to the installed demo environment. The process also includes defining and creating change packages, and applying the source-only steps.
For information on using the PeopleSoft Automated Updates process, see PeopleTools: Change Assistant and Update Manager, Understanding PeopleSoft Automated Updates.
Want to Learn More?
-
Oracle Cloud Documentation in Oracle Help Center
- Getting Started in Oracle Cloud Infrastructure online documentation
- PeopleSoft on the Oracle Help Center