Before You Begin
Purpose
In this tutorial, you will learn to use the Agile tab of Oracle Developer Cloud Service to develop your project using Agile methodology.
Time to Complete
Approximately 40 minutes
Background
Agile methodology involves developing the components and features of your product by organizing issues and tasks into short increments of work called sprints. For an overview of Agile development, see http://agilemethodology.org/. The key components of the Agile tab in Oracle Developer Cloud Service are Agile boards and sprints.
-
Agile boards let you display and update issues of the project. When you create a board, you associate it with an issue query. The board shows issues returned by that query. You can either use a board created by a team member or create your own board. You can create as many boards as you like. A board contains three views: the Backlog view, the Active Sprints view, and the Reports view.
-
Sprints are short durations, usually a week or two, during which your team members try to implement a product component or feature. You add to the sprint all the issues related to the product component. When you start working on a product component, you start or activate the related sprints. After you start a sprint, you can change the status of issues in the Active Sprints view.
Scenario
In this tutorial, you first create a project and some dummy issues that you assign to yourself. Then you create a board and two sprints and follow some Agile development steps.
If you wish, you can adapt the tutorial steps to use an existing project that already contains some issues assigned to you and other team members.
Context
This tutorial expects you to be somewhat familiar with creating a project and managing issues, so you should run the OBE tutorial Getting Started with Oracle Developer Cloud Service before you run this one.
What Do You Need?
-
A login to an Oracle Developer Cloud Service instance
-
One of the following supported browsers:
- Chrome 48 (also for Android)
- Firefox 38 or later
- Internet Explorer 11 or 12
- Safari 7 or 8 (Mac OS)
- Safari Mobile 5 (iOS)
Creating a Project and Some Issues
-
Launch your Oracle Developer Cloud Service, following the instructions in "Accessing Oracle Developer Cloud Service Using the Web Interface" in Using Oracle Developer Cloud Service.
You may see an empty environment with no projects. More likely, you will see a list of projects. Click New Project.

Description of this image -
The New Project wizard opens to the Project Details page. In the Name field, enter a name (for example,
Agile Project). In the Description field, enter a description (for example,Agile Methodology project). Select the Shared security type to make the project code, wiki documents, issues, and builds available to anyone inside your organization's Identity Domain. Finally, click Next.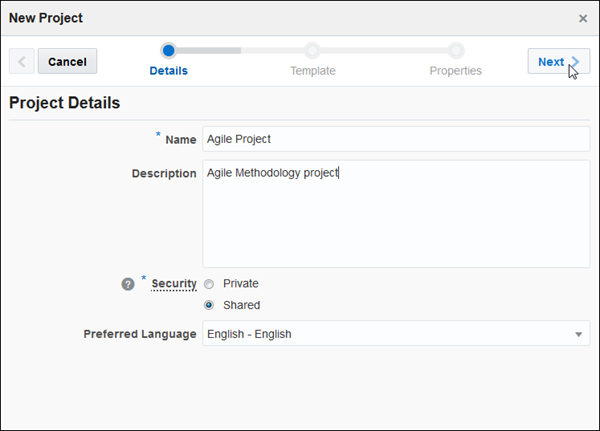
Description of this image -
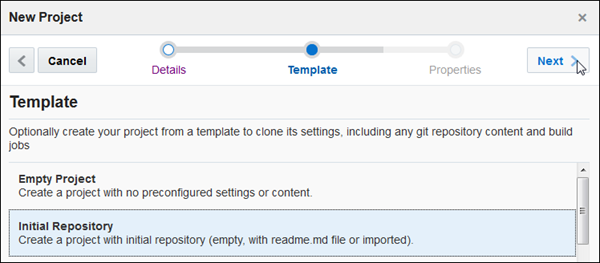
In the Template section, select Initial Repository and click Next.
Description of this image -
In the Project Properties section, select TEXTILE as the Wiki markup language, and select the Initialize repository with README file option. Then click Finish.

Description of this image -
Wait for project provisioning to complete.

Description of this image -
Once project provisioning is completed, you are automatically taken to your new project’s Project page. Click the Issues tab.

Description of this image -
On the Issues page, click New Issue and create six issues. Specify the Summary, Type, Priority, Severity, and Story Points for each issue as shown in the following table. You can find the Story Points in the Time area.
Make yourself the owner of each issue.
To create each issue, you can use the New Issue button on the top right of the created issue page instead of going back to the issue table.
Story points are an arbitrary estimate of the level of effort involved in completing a sprint. They have nothing to do with the actual amount of time to be expended. Often, a Fibonacci sequence is used to assign points. In this case, we're assigning points based on the Severity level of each issue, with the lowest (Trivial) set to 3 and the highest (Major) set to 13.
Summary Type Priority Severity Story Points Issue1 Task Normal Normal 8 Issue2 Defect Low Trivial 3 Issue3 Feature Low Minor 5 Issue4 Task Normal Normal 8 Issue5 Defect High Major 13 Issue6 Feature Normal Minor 5 -
When you have finished, click the Issues tab. The issue table should look something like this. If you find any errors or omissions, edit the issues to correct them.

Description of this image
Creating an Agile Board
-
Click the Agile tab. On the Find Board page, click New Board. (If you wish, you can collapse the side menu as shown in the image.)

Description of this image -
In the New Board dialog box, enter a name (for example,
My Board) in the Name field. Select All Issues from the Search drop-down list. Select Story Points from the Estimation drop-down list (the alternative is Estimated Days). Finally, click Create.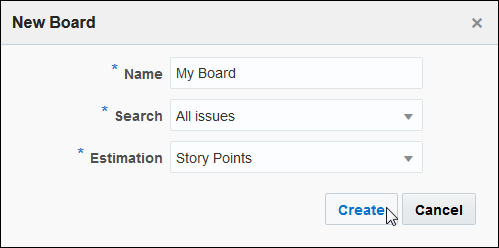
Description of this image Search queries available when you create a board are the standard issue searches and any searches you have created and saved. For this tutorial, all the standard searches will probably return the same result.
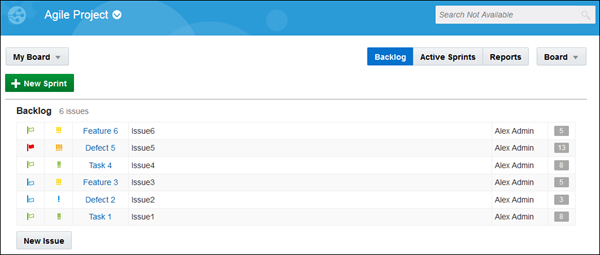
The board opens with the issue backlog displayed. The Backlog view of an Agile board is the default view. It displays the backlog, which contains all issues that are not assigned to any sprint. It also displays all the sprints that are part of the board, as well as sprints from other boards that match the board query. Since you have not created any sprints, all you see is the Backlog. The columns in the backlog list are Priority, Severity, Issue ID, Summary, Owner, and Story Points.
Description of this image
Creating Sprints
-
Click the New Sprint button below the board name. In the Name field of the New Sprint dialog box, enter
Sprint 1. We're going to assign the Backlog issues to two sprints, so in the Story Points field, enter25, roughly half the sum of the story points of the issues in the backlog. Then click OK.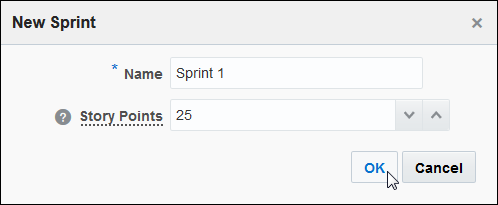
Description of this image The sprint appears above the Backlog.
-
Select Issue1 in the Backlog and drag it into the box below the sprint name.

Description of this image -
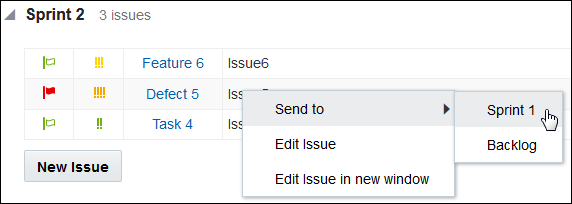
Right-click Issue2. From the menu, select Send To, and then select Sprint 1.
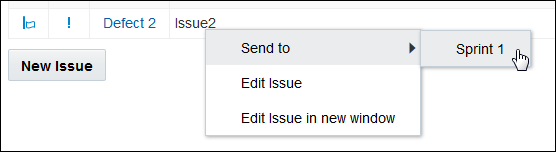
Description of this image -
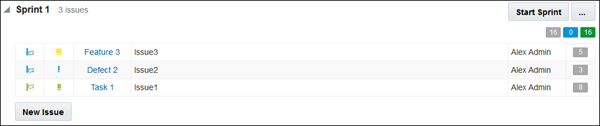
For Issue3, use either the drag-and-drop or right-click mechanism to move the issue to the sprint. The sprint now contains three issues, with a total of 16 story points.
Description of this image -
Click New Sprint in the Backlog area to create another sprint. Name it
Sprint 2. In the Story Points field, enter25again, then click OK.
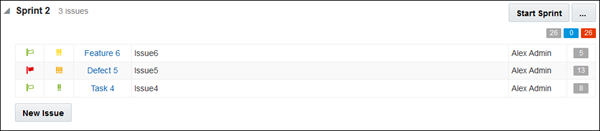
Description of this image -
Move the other three issues into Sprint 2. Notice that the story points have a greater total than the intended capacity. A warning appears at the top of the screen, "
Description of this image -
You can move issues between sprints once you have created them. Since Issue5 has a high priority and also pushes Sprint 2 above its capacity, it makes sense to move it to the first sprint, Sprint 1. Either drag it to Sprint 1, or right-click it and use the Send To menu selection.
Description of this image -
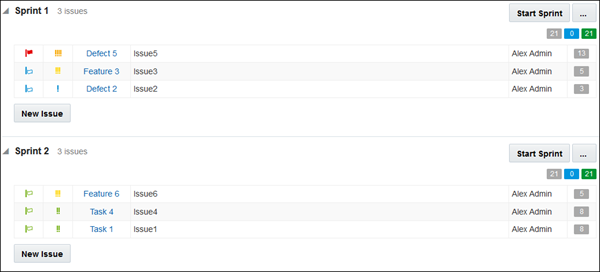
But now Sprint 1 is over its estimated capacity. To balance the sprints again, move the 8-point Issue1 from Sprint 1 to Sprint 2.
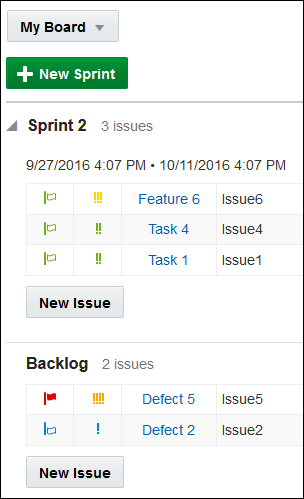
The modified sprints, each with 21 story points, now appear in the Backlog view.
Description of this image
Starting Sprints
-
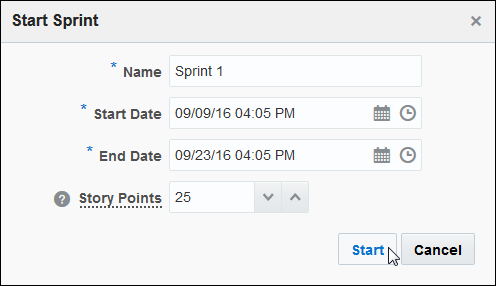
In order to make a sprint active, you must start it. Click the Start Sprint button next to Sprint 1.

Description of this image -
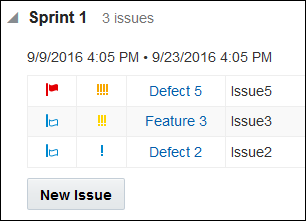
A sprint must have a start date and an end date. By default, a sprint is two weeks long, a typical sprint length in the Agile development process. For this sprint, accept the default values and click Start.
Description of this image A message appears briefly at the top of the page. The start and end dates and times now appear below the sprint name.
Description of this image -
Click the Start Sprint button next to Sprint 2. In the Start Sprint dialog box, specify the start date as the day after the previous sprint ends. The dialog box validates the start and end dates, so it displays an error message.

Description of this image -
Specify an end date two weeks later (or another duration or set of dates, if you prefer), and click Start.
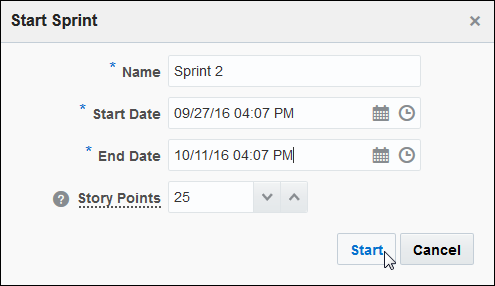
Description of this image The start and end dates and times now appear below the sprint name.
Working with Active Sprints
-
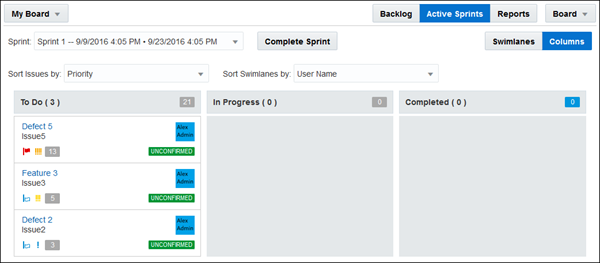
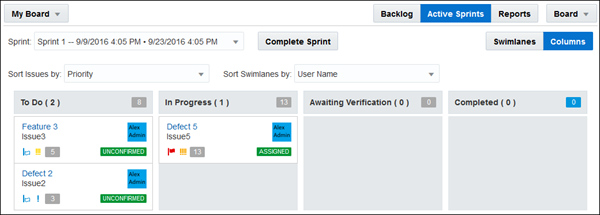
Click the Active Sprints button.

Description of this image Sprint 1 is displayed in the Active Sprints view, but you can select Sprint 2 from the Sprint drop-down list. By default, you see the Swimlanes view, in which the issues are sorted by the owner's user name. In each column head, the number of issues is in parentheses, and the number of story points is on the right.
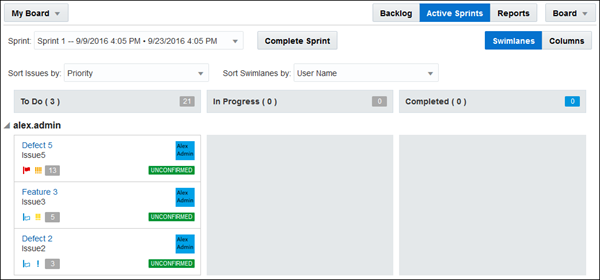
Description of this image Because all the issues have the Unconfirmed status, they are in the To Do column.
If the issues in a sprint are assigned to different users, the Swimlanes view by default sorts the issues by user name, as in the following example.
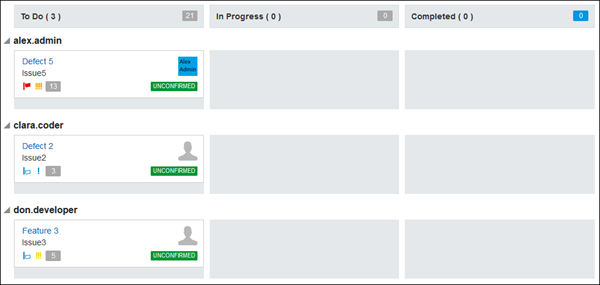
Description of this image -
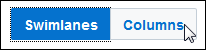
Click the Columns button to view the issues without regard to their ownership.
Description of this image Since you own all the issues, the view is very similar to the Swimlanes view. The only difference is that your name is missing from the issue list.
Description of this image -
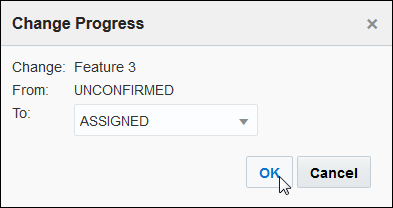
Select Issue5, your high-priority issue, and drag it to the In Progress column. The Change Progress dialog box asks you to select the appropriate status from a To drop-down list. Select ASSIGNED, then click OK.
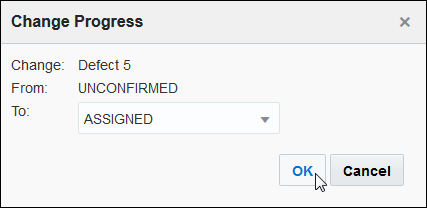
Description of this image The issues are now in different progress states.

Description of this image
Configuring a Board
-
You can modify attributes of your Agile board. In the top right corner, click Board and select Configure from the drop-down list.
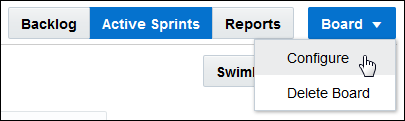
Description of this image The Configure My Board page opens. The General tab allows you to change the name, description, search query, and estimation criterion.

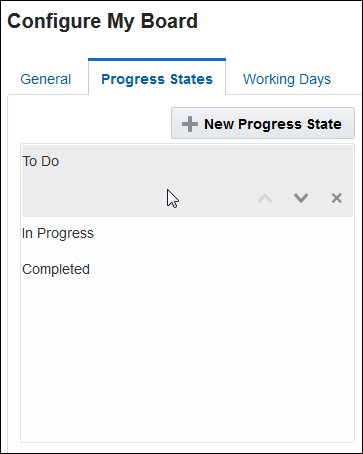
Description of this image The Progress States tab allows you to modify the progress states that appear in the columns for sprints in your board.
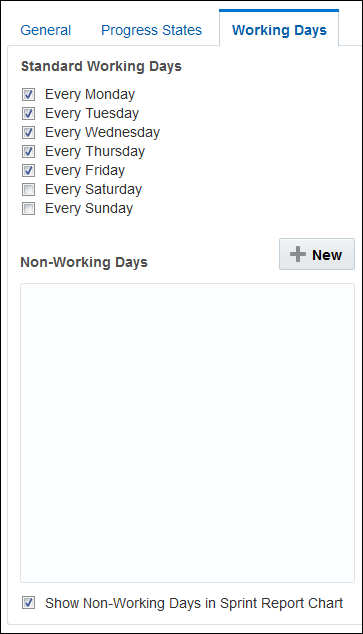
Description of this image The Working Days tab allows you to specify the days of the work week and to specify additional non-working days, such as holidays.
Description of this image -
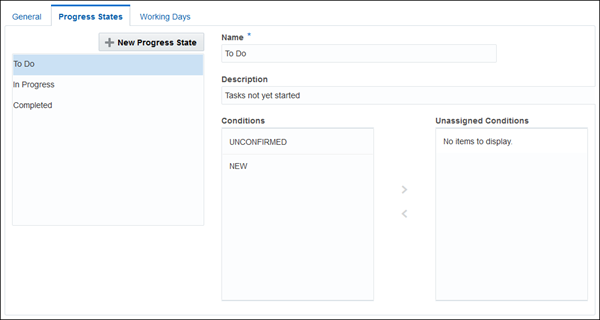
Click the Progress States tab and mouse over the states in the list. You can change the position of each state or remove it from the list.
Description of this image On the right side, you can change the name, description, or conditions of a progress state. The To Do state currently has two assigned conditions, UNCONFIRMED and NEW.
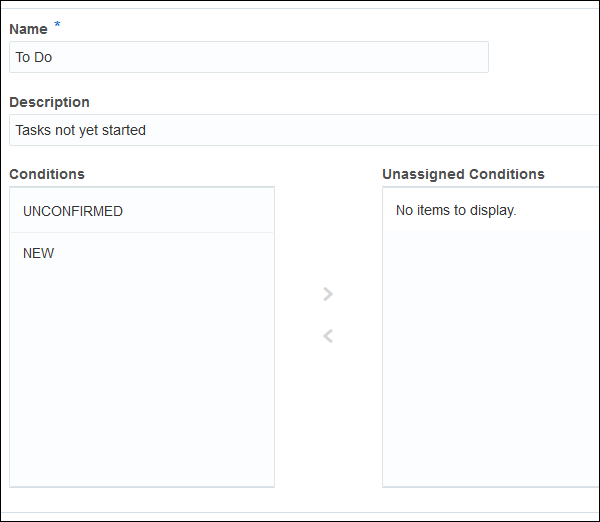
Description of this image Conditions are the statuses available to issues in Oracle Developer Cloud Service. You cannot add new conditions or remove conditions. You can, however, redefine progress states to suit your project's needs and move conditions from one state to another.
-
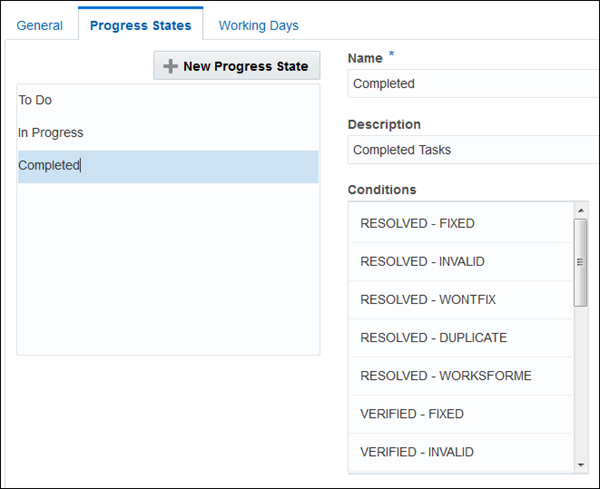
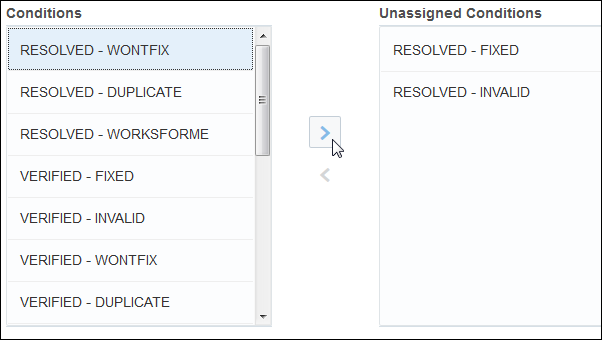
Click Completed in the list of progress states. Many conditions are assigned to the Completed state by default: five RESOLVED states, six VERIFIED states, and six CLOSED states. Scroll down the Conditions list to see them all.
Description of this image -
For your project, suppose you want to remove issues that have been resolved but not yet verified from the Completed state and place them in an Awaiting Verification state for your QA team to test. Move all the RESOLVED issues from the Conditions column to the Unassigned Conditions column by selecting each condition and clicking the right angle bracket (>).
Description of this image -
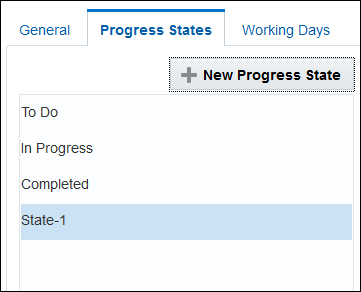
Click the New Progress State button.
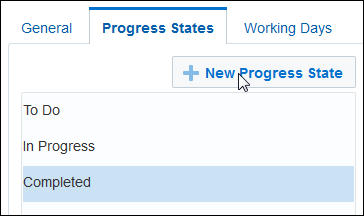
Description of this image A new state, State-1, is displayed at the end of the list.
Description of this image -
In the Name field, enter
Awaiting
                                  Verification
. As you enter the new name, it appears in the list.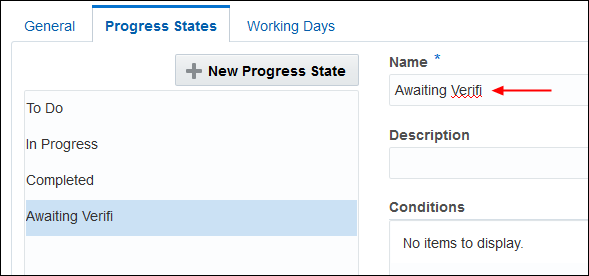
Description of this image -
In the Description field, enter
Resolved
                                  issues for QA to verify
.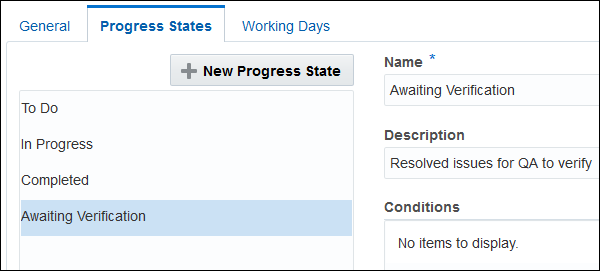
Description of this image -
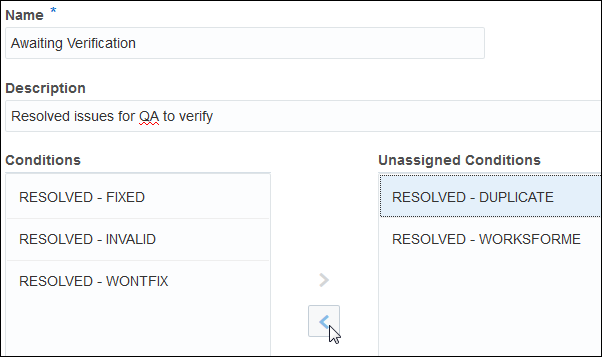
The conditions you removed from the Completed state are now in the Unassigned Conditions list. Move them all to the Conditions list by selecting each condition and clicking the left angle bracket (<).
Description of this image -
Since this new progress state belongs between the In Progress state and the Completed state, select it in the list and use the up arrow to move it up one level.
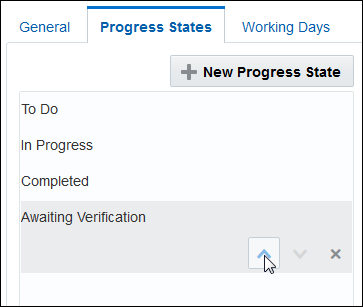
Description of this image The Awaiting Verification state is now third in the list.

Description of this image -
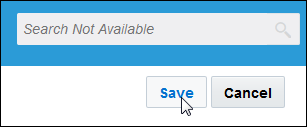
Click Save in the upper right corner to save your changes and return to the Active Sprints view.
Description of this image The Active Sprints view now has four columns.
Description of this image
Completing Issues and Completing a Sprint
-
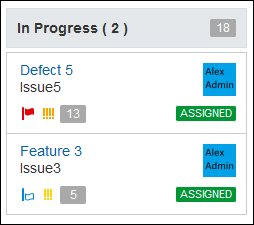
Suppose your team decides that the feature request Issue3, which is of low priority and trivial severity, is not important enough to implement. First move it to the In Progress column. The Change Progress dialog box is displayed. In the Change Progress dialog box, select ASSIGNED from the To drop-down list, then click OK.
Description of this image The In Progress column now has two issues.
Description of this image -
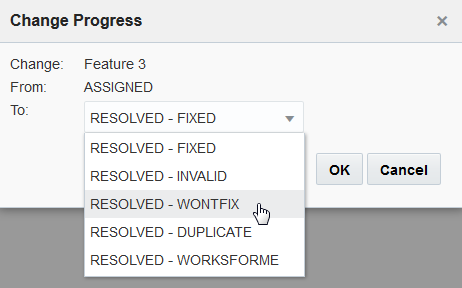
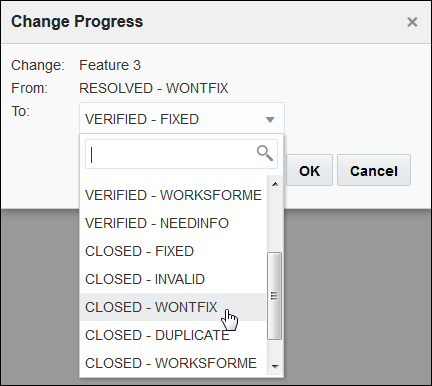
Now move Issue3 to the Awaiting Verification column. In the Change Progress dialog box, select RESOLVED - WONTFIX from the To drop-down list, then click OK.
Description of this image The sprint columns now look like this. Normally, you would then click the Feature 3 issue link to edit the issue and explain why you made the decision not to implement the feature.

Description of this image -
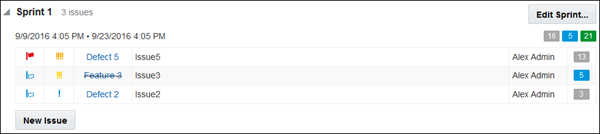
Move Issue3 to the Completed column and give it the status CLOSED - WONTFIX, then click OK.
Description of this image Issue3 is now displayed in the Completed column.

Description of this image -
Click the Backlog button. In the Backlog view, the issue name has a line through it, indicating that it is completed. On the right, the story points show the issue as completed.
Description of this image -
You can complete a sprint even if it has not reached the end date and time you specified. Click Active Sprints, then click the Complete Sprint button.

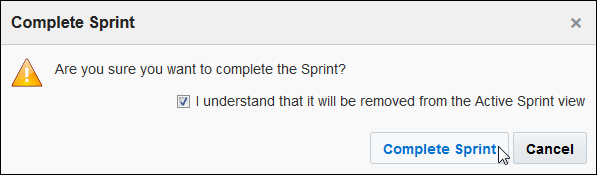
Description of this image -
In the Complete Sprint dialog box, select the I understand that it will be removed from the Active Sprint view check box, and then click Complete Sprint.
Description of this image Sprints are not completed automatically. You must click Complete Sprint to complete a sprint, even after it has reached its end date and time.
When you complete a sprint, you are immediately transferred to the Reports page, which provides information about the completed sprint. We'll cover the Reports page in the next section. Click the Active Sprints button to return to the Active Sprints page.

Description of this image -
Sprint 2, the only remaining active sprint, now appears in the Active Sprints view. Click the Backlog button.
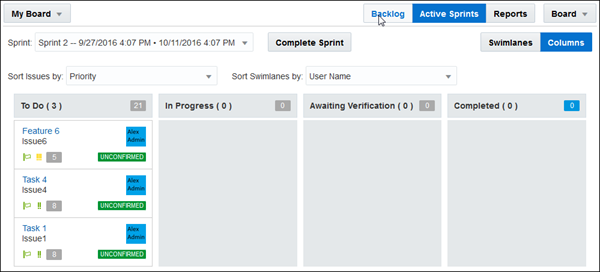
Description of this image Sprint 1 no longer appears in the Backlog view, and the remaining open issues from that sprint are returned to the Backlog list for distribution to other active sprints. (If there were any inactive sprints, the open issues would be assigned to the next inactive sprint instead of to the Backlog.)
Description of this image -
Move Issue5 and Issue2 from the Backlog to Sprint 2. Sprint 2 now contains all five open issues, and it is now far over its specified capacity of 25. Click the Edit Sprint button.
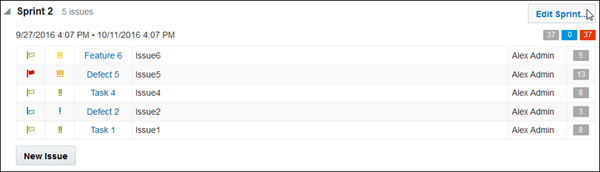
Description of this image -
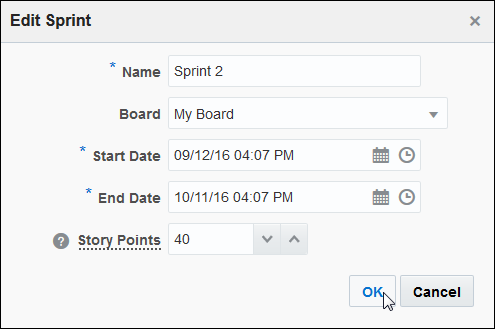
In the Edit Sprint dialog box, move the Start Date to your next working day, since you completed Sprint 1 early. Leave the End Date the same as before. With this additional time, you can increase your story points, so change the number to 40. Then click OK.
Description of this image
Working with Reports
-
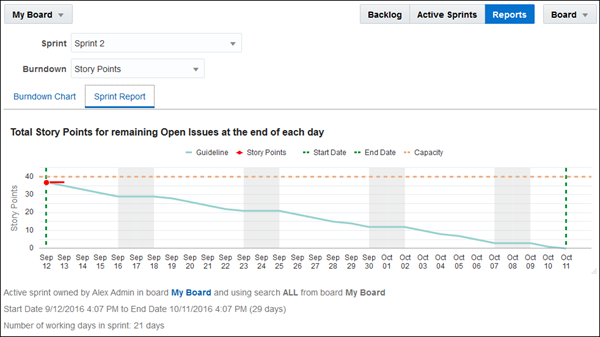
Your Agile board provides some automatically generated reports. Click the Reports button.

Description of this image At the top of the Reports page are drop-down lists that enable you to select the sprint and the burndown criterion. The Burndown Chart for the active sprint displays the story points, start date, end date, and capacity for the sprint, as well as a guideline for completing the sprint's story points.
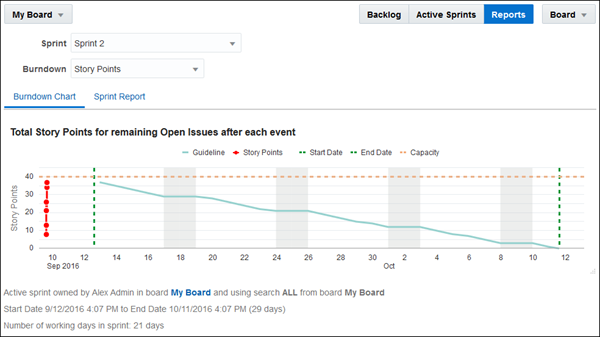
Description of this image At the bottom is a historical table of events associated with the sprint.
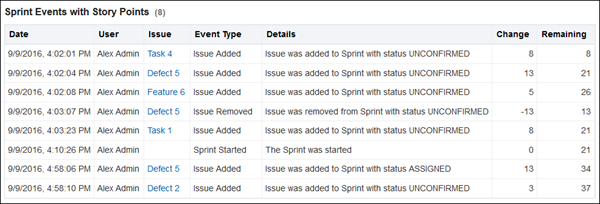
Description of this image -
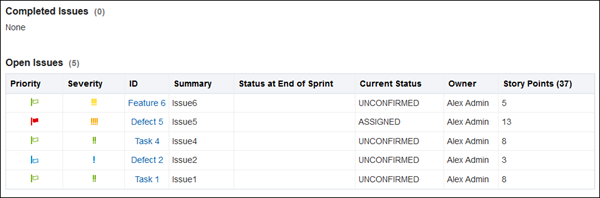
Click the Sprint Report tab. This report provides a day-by-day progress report in a slightly different format.
Description of this image At the bottom, this report displays tables of completed and open issues.
Description of this image -
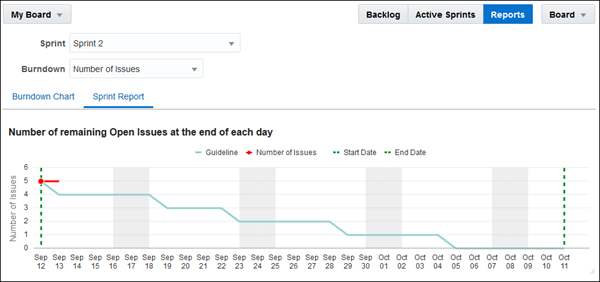
You can change the way the reports are displayed. Select Number of Issues from the Burndown drop-down list.
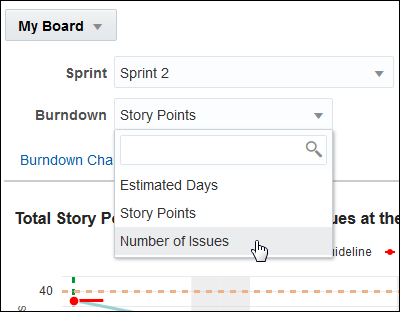
Description of this image The chart now provides a guideline in the form of an issue count rather than story points.
Description of this image You can also get reports for a completed sprint by selecting it from the Sprint drop-down list. For completed sprints, the charts do not show a guideline.
-
Select Sprint 1 from the Sprint drop-down list to see the report for the completed sprint. The Burndown chart shows the 16 story points for the remaining open issues. It also displays the story points as each issue was added to the sprint.

Description of this image The Sprint Report chart shows the story points for the remaining open issues, and the tables list the completed and open issues.

Description of this image
Want to Learn More?
- Getting Started with Oracle Developer Cloud Service OBE
- Managing Issues in Oracle Developer Cloud Service OBE
- Oracle Developer Cloud Service in the Oracle Help Center
- Using Oracle Developer Cloud Service in the Oracle Help Center
- Oracle Developer Cloud Service product page