Introduction to Building ODP.NET, Managed Driver Applications
Overview
Purpose
This tutorial describes how to build ODP.NET, Managed Driver applications. You will learn:
- How to develop a basic ODP.NET, Managed Driver application from start to finish
- How to deploy ODP.NET, Managed Driver applications, which have notable setup differences from ODP.NET, Unmanaged Driver applications
- How to use ODP.NET, Managed Driver from Oracle Developer Tools for Visual Studio
- How to convert an existing unmanaged ODP.NET application to a managed ODP.NET application
Time to Complete
Approximately 30 minutes
Introduction
Oracle Data Provider for .NET (ODP.NET) is an implementation of an ADO.NET data provider for Oracle Database. It was first released as a driver containing both managed and unmanaged code, also known as ODP.NET, Unmanaged Driver. To ease and simplify deployment, Oracle introduced an 100% .NET provider called ODP.NET, Managed Driver.
ODP.NET, Managed Driver's APIs are a subset of the unmanaged driver's APIs. This makes learning to use or migrate to the managed driver simple for existing unmanaged ODP.NET developers. Many developers will experience new benefits when deploying ODP.NET, Managed Driver. The deployment configuration options are different between the managed and unmanaged drivers, but they are easy to learn.
Prerequisites
Before starting this tutorial, you should:
-
Install Microsoft Visual Studio 2013 or later
-
Install Oracle Database 12c or higher. Review the tutorial Installing Oracle Database 12c on Windows if needed.
-
Install ODAC 12c Release 1 or higher
-
Extract these files into your working directory
Using this tutorial does not require previous experience with ODP.NET, Managed Driver, but familiarity with ODP.NET, Unmanaged Driver is recommended.
Many of the deployment differences between ODP.NET, Unmanaged Driver and ODP.NET, Managed Driver relate to the client and network configuration setting locations. The settings syntax and format remain the same. If you are not familiar with their syntax and format, it is recommended you quickly familiarize yourself with the basics of Oracle Easy Connect and TNS connect descriptor and alias configuration.
Note: Database connection information, including the connection string attribute, Easy Connect, and TNS descriptor and alias, are unique for every database client. In the OBE, the database connection setting values are merely examples and likely will not match your client specific values. To complete the OBE, replace the current values with the values for your specific database instance.
Getting Started with ODP.NET, Managed Driver
In this section, you will create an application from scratch in Microsoft Visual Studio 2013 and use ODP.NET, Managed Driver to connect to the Oracle Database.
-
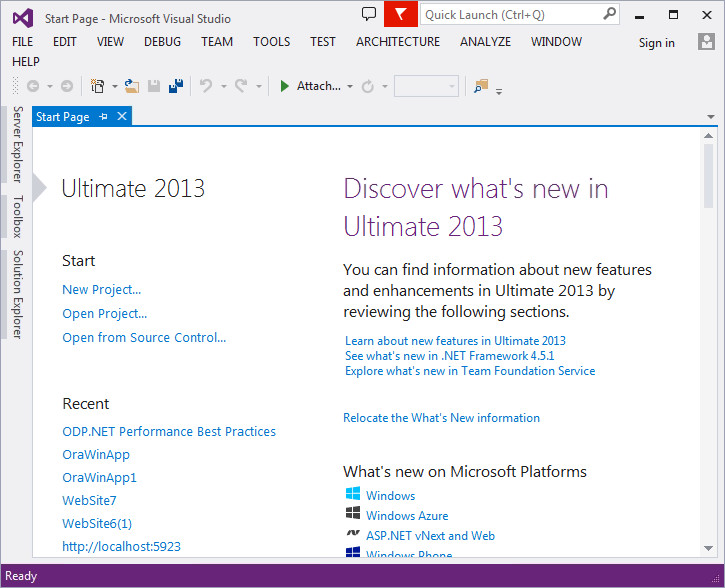
Open Microsoft Visual Studio 2013.

The interface looks as follows:
-
In the tool bar, click File and Select New > Project…
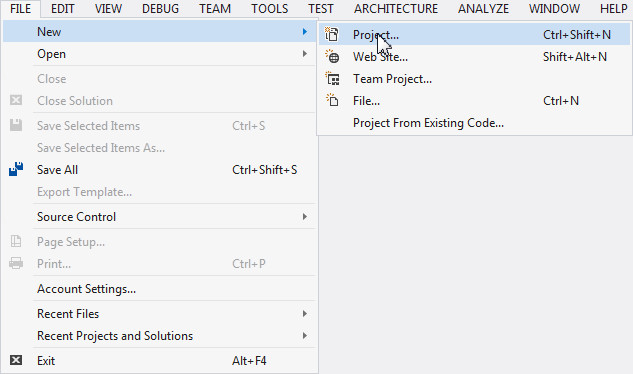
A New Project dialog box opens up.
-
Expand Installed > Templates > Visual C# and select Windows. From the list of applications, select Console Application and click OK.

You have successfully created a .NET Windows Console Application.
-
Let's add an assembly reference to ODP.NET, Managed Driver. Right click References in the Solution Explorer and select Add Reference...
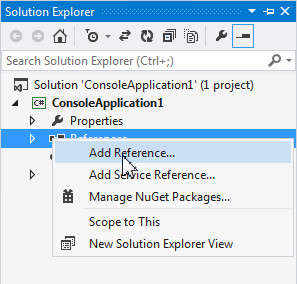
Note: If you do not see the Solution Explorer window by default, navigate to the tool bar and select View > Solution Explorer.
-
In the Reference Manager dialog box, Select Assemblies > Extensions tab and wait for the assembly component list to load completely. Navigate to the Oracle.ManagedDataAccess assembly. Select the assembly's check box and click OK.

-
Verify that the Oracle.ManagedDataAccess assembly is listed under the current project.

-
Add the following namespace into the Program.cs code page:
using Oracle.ManagedDataAccess.Client;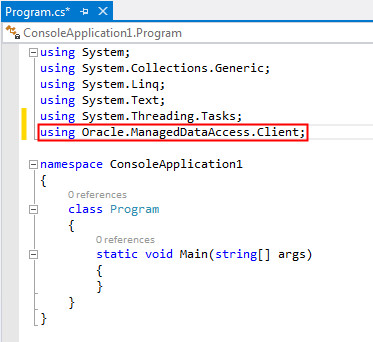
This namespace accesses the ODP.NET, Managed Driver to connect to the Oracle Database.
-
Open the Code_Snippet.txt file from the files folder. Copy the code into the Program.cs code page under Main.

-
After performing the previous step, the code looks as follows:
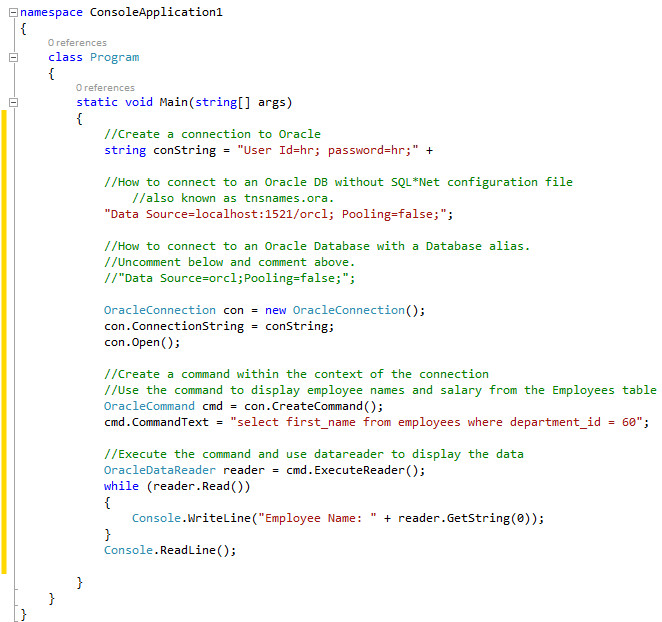
Note: This simple ODP.NET program uses the Easy Connect method to connect to the Oracle Database in the connection string Data Source attribute. The attribute's value may be different depending on how your database connectivity is configured. Once connected, the application queries the Oracle Database to retrieve the first_name of the employees who belong to department_id 60 from the Employees table in the HR schema.
-
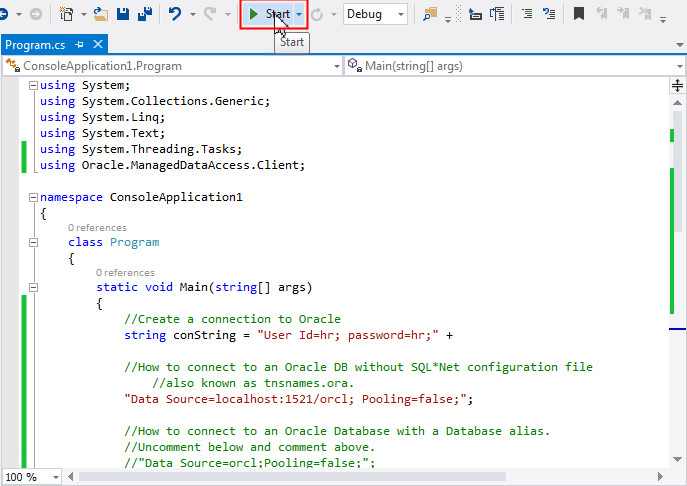
Press F5 or click the Start button to run the application.
-
The result set displays the list employees in department 60. Close the command prompt to stop debugging.

Deploying a ODP.NET, Managed Driver Application
In this section, we will look at three different ways of configuring an ODP.NET, Managed Driver application to connect to the Oracle Database. These configuration methods slightly differ from how ODP.NET, Unmanaged Driver applications are configured to connect.
Connect using the Local Naming Parameters file, tnsnames.ora:
One method to connect to the database is to use the local naming parameters file, tnsnames.ora, to resolve a database alias provided by the Data Source attribute in the connection string. The provider will look for tnsnames.ora in the application's current working directory. Thus, it is possible for each application to have its own customized set of database aliases.
-
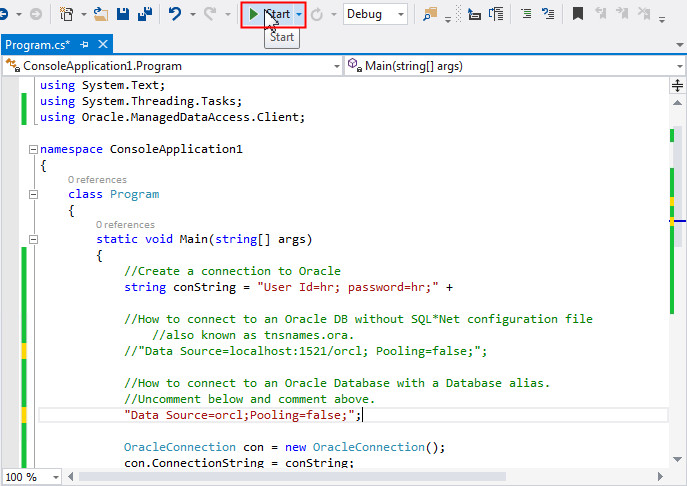
To begin, comment out the line containing “Data Source=localhost:1521/orcl; Pooling=false;”; in the code page.

-
Uncomment the line containing the database alias. This indicates the alias ODP.NET uses to connect to the Oracle Database instead of the previously used Easy Connect method.

-
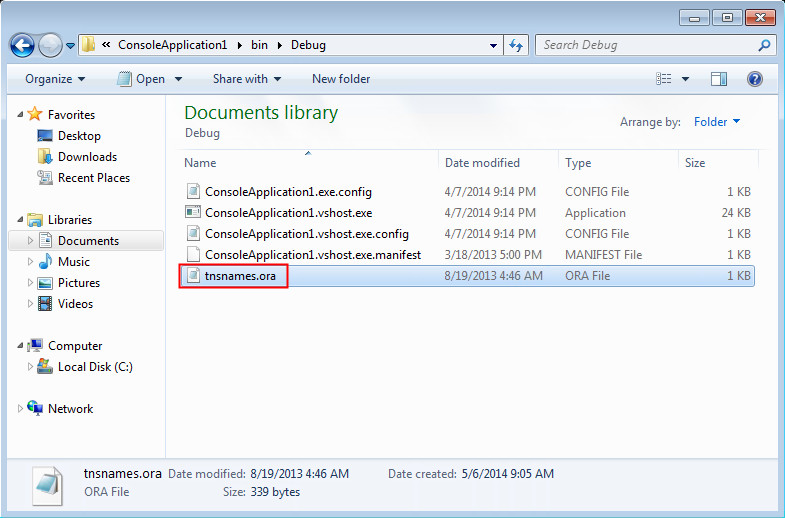
One of the locations ODP.NET, Managed Driver looks for the tnsnames.ora file is the application's working directory. Therefore, place the tnsnames.ora file under the current working application directory by copying it from the files folder. Navigate to the <.NET Project Directory>\bin\Debug folder and paste the file.
Note: You may need to customize the tnsnames.ora file with your database specific connectivity information.
The folder structure of the current working application directory should look similar to the following:
-
Run the Console Application. Click the Start icon.
-
The result is displayed in the Command Prompt. Close the command prompt to stop debugging.
Connect using the .NET Application Configuration File:
The second configuration method is to store the database connection information within a .NET configuration file. ODP.NET, Managed Driver searches the .NET application config file for the database connection information ahead of the local application directory. Therefore, it will no longer make use of the local tnsnames.ora file we setup previously.
Note: This option is preferred for developers who do not wish to deploy tnsnames.ora.
-
Delete the tnsnames.ora file from the current working application directory. Now, the directory structure should look similar to the following:

-
Navigate to Microsoft Visual Studio. Double click on App.config file under the Solution Explorer window.

-
The App.config page opens up.
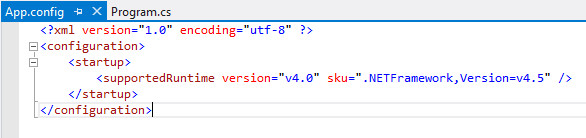
-
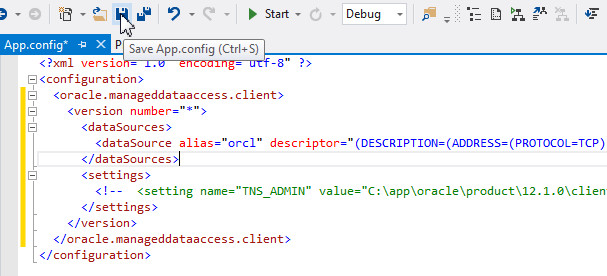
The config file will now be modified with the information required to establish a connection to the Oracle Database. Copy the code from Config_file.txt from the files folder and use it to replace the code between the <configuration> tags. Notice that the connect descriptor syntax and format match exactly to what is used in the tnsnames.ora file. There is no difference in those aspects compared to using ODP.NET, Unmanaged Driver. The code will look as follows:

Note:
- The <oracle.manageddataaccess.client> tag is used to specify the configuration information for ODP.NET, Managed Driver.
- The <version number=”*” > tag specifies that all ODP.NET, Managed Driver versions will use these configuration settings.
- The <dataSources> tag contains data source alias and connect descriptor information that were previously in the tnsnames.ora file, which you may need to customize for your own deployment.
-
Save the App.config file.
-
Press F5 to run the application. The result is displayed in the command prompt. Close the command prompt to stop debugging.
Connect using the TNS_ADMIN Property:
If you are working with many ODP.NET, Managed Driver deployments on the same machine and want them all to use the same connect descriptor and alias information/file, use the TNS_ADMIN property to specify a centralized location for tnsnames.ora.
-
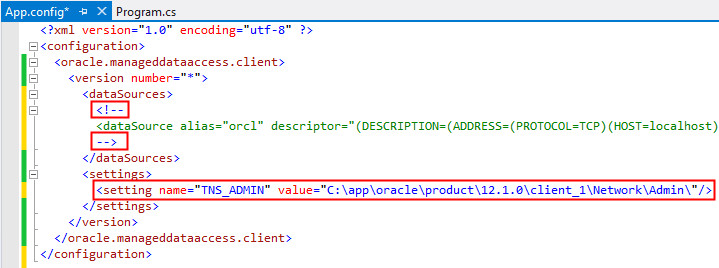
Comment out the <dataSource> tag and uncomment the <setting> tag in the App.config page. The code will look as follows:
Note:
- The "TNS_ADMIN" attribute value indicates a centralized location for ODP.NET, Managed Driver to find the tnsnames.ora file.
- The "value" attribute specifies the path where the tnsnames.ora file is located. Customize this setting to where you have placed tnsnames.ora on your machine.
-
Press F5 to run the application. The result is displayed in the command prompt. Close the command prompt to stop debugging.
Using ODP.NET, Managed Driver with Oracle Developer Tools for Visual Studio
In this section, you will use ODP.NET, Managed Driver to connect to the Oracle Database through a Server Explorer connection using Oracle Developer Tools for Visual Studio (ODT). To direct Visual Studio to auto-generate ADO.NET code that relies on the managed driver (such as TableAdapter code generation or Entity Framework Database First), use a ODP.NET, Managed Driver connection in Server Explorer.
The second part of this section will use the Oracle connection to setup a PL/SQL stored procedure in the database. The stored procedure will be used later in the OBE to demonstrate that complex features, such as array parameters, are available in ODP.NET, Managed Driver.
Creating an ODP.NET, Managed Driver Connection
-
Open the Unmanaged to Managed folder provided in files folder. Double click on ODP.NET Performance Best Practices.sln. The ODP.NET, Unmanaged Driver project opens up in Visual Studio.
-
Select View > Server Explorer.

-
Right-click Data Connections and select Add Connection...

-
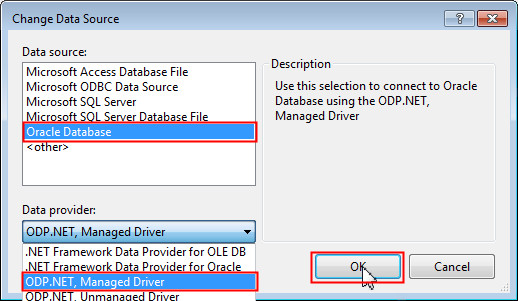
The Add Connection dialog box opens. If Data Source is not already set to Oracle Database (ODP.NET, Managed Driver), click Change...

-
In the Change Data Source dialog box, select Oracle Database as the Data Source and ODP.NET, Managed Driver as the Data Provider. Click OK.
-
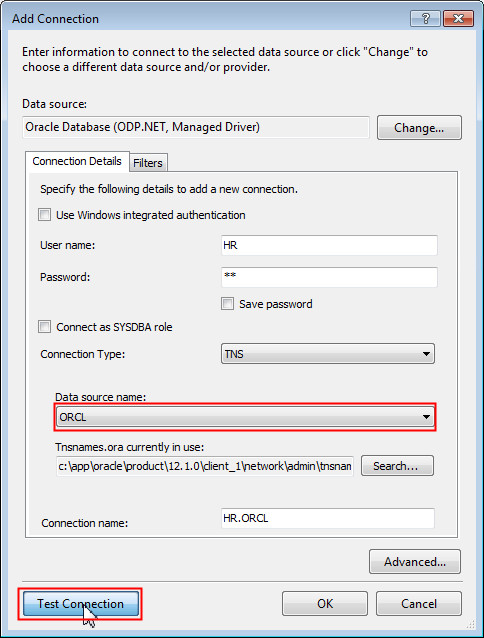
Enter HR for the User name and hr for Password. Ensure the Data source name is ORCL and click Test Connection. This connection information may be different for your specific database setup.
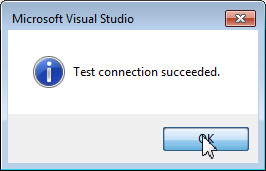
Test connection was successful. Click OK.
-
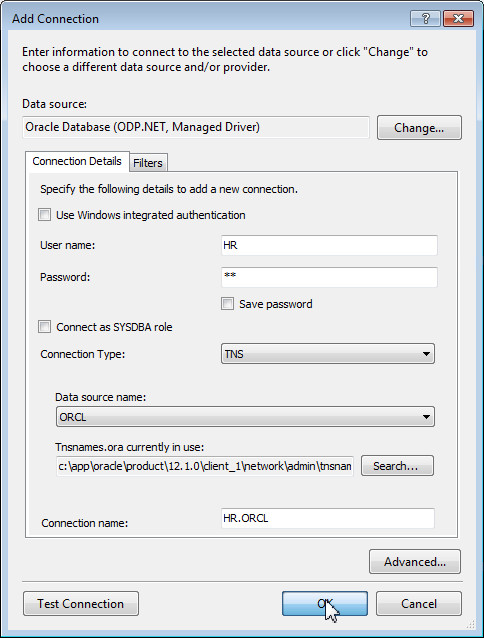
Click OK to confirm creating the new connection.
-
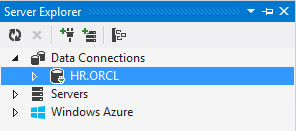
HR.ORCL is added under Data Connections.You can now use ODP.NET, Managed Driver to browse the HR schema and modify it.
-
Expand the connection.

Later on, if you close the connection and re-expand it, the Oracle Server Login Dialog box appears. Enter the password as hr and click OK. You can also select the Save password check box if you do not want to be prompted to enter the password again in the future.

Using the Connection
In this part of the OBE, we will setup a PL/SQL stored procedure that passes an array parameter with ODT. This stored procedure will be called in the final part of the OBE to demonstrate that advanced ODP.NET features are available with the managed provider.
-
In the Solution Explorer, right-click array.sql and select Open.

-
Review the script. Note that a PL/SQL package MYPACK is created with a PL/SQL stored procedure MYSP. The stored procedure has a PL/SQL associative array input parameter that just passes its values back as an output PL/SQL associative array. Select all the code in the file and select [Ctrl] + C to copy it to the clipboard.

-
Right-click the HR.ORCL connection in the Server Explorer and select Query Window.
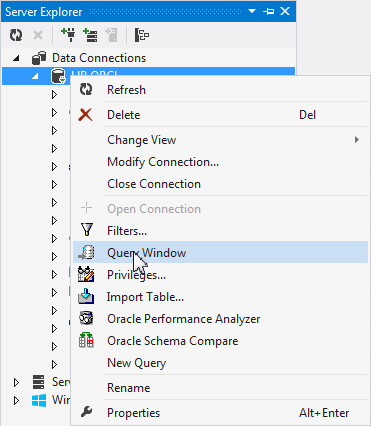
-
Press [Ctrl] + V to paste the code in the Query Window. Select all the text in the query window and click
 to Execute.
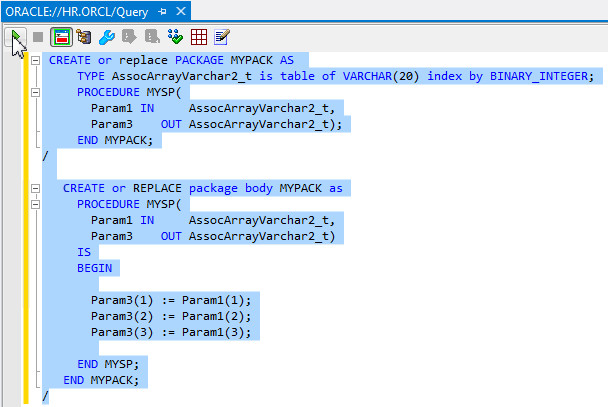
Note: Make sure to select all the code in the query builder before executing or else the script will not execute properly.
-
The stored procedure has executed successfully.

Migrating from ODP.NET, Unmanaged Driver to ODP.NET, Managed Driver
If you are an experienced ODP.NET developer, you will have existing ODP.NET, Unmanaged Driver applications. These can be migrated easily to ODP.NET, Managed Driver by performing a few simple steps. ODP.NET, Managed Driver shares the same APIs as ODP.NET, Unmanaged Driver. Thus, no significant coding changes are required. The only changes relate to configuration such as, ADO.NET assembly, namespaces, and Oracle Client settings.
In this part of the OBE, we will migrate an unmanaged ODP.NET application to a managed ODP.NET application. In a previous section, we explored the changes needed with respect to the database connect descriptor and alias settings. In this section, we will look at the changes required for the ADO.NET assembly and namespaces.
Note: While ODP.NET, Managed Driver has the same APIs as ODP.NET, Unmanaged Driver, the unmanaged driver APIs are currently a superset of the managed driver. In future releases, the managed driver will support more and more of ODP.NET, Unmanaged Driver's existing APIs.
-
From the query builder, switch back to ODP.NET Best Practices.cs code page. Note that it references the ODP.NET, Unmanaged Driver namespaces. We will first execute this application with the unmanaged driver, then migrate it to use the managed driver.

-
Review the connection string to allow the ODP.NET application to connect to Oracle's sample HR schema.
Note: The data source name mentioned in the connection string is pdborcl. You should change it to the data source name that you are using.

-
You may scroll down to the Demo section and review the code.

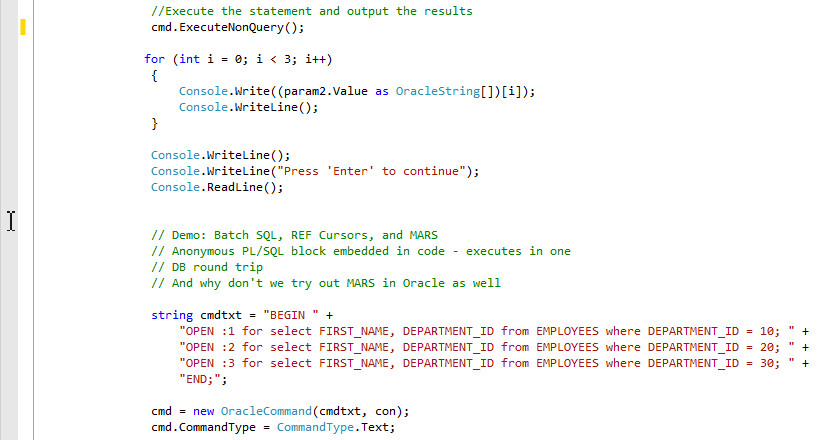
The first part of the demo uses the MYPACK.MYSP stored procedure we created previously. It first creates an input array parameter and an output array parameter before executing the stored procedure. Finally, it shows the output array's values in the console.
The second part of the demo shows how to use batch SQL, REF Cursors, and multiple active result sets from ODP.NET.
As you can see, the code uses advanced ODP.NET features. We will migrate this code to ODP.NET, Managed Driver to show that you can use these features from the managed driver.
-
Execute the application to demonstrate it runs successfully with the unmanaged driver. Click Start. The result is displayed in the command prompt.

-
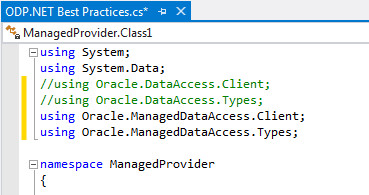
Scroll to the top of the application. Note the following two namespaces:
using Oracle.DataAccesss.Client;
using Oracle.DataAccess.Types;These namespaces specify that the application uses ODP.NET, Unmanaged Driver.
-
Let's now use ODP.NET, Managed Driver to run the same application. First, we will add the ODP.NET, Managed Driver assembly to the application. In Solution Explorer, right click References and select Add Reference...

-
The Reference Manager dialog box opens up. Select Assemblies > Extensions tab and wait for the assembly component list to load completely. Select the Oracle.ManagedDataAccess assembly check box. Click OK.

-
Verify the presence of Oracle.ManagedDataAccess under References.

-
Next, we will add the ODP.NET, Managed Driver namespaces and remove the ODP.NET, Unmananaged Driver namespaces. Uncomment the ODP.NET, Managed Driver namespaces and comment out the ODP.NET, Unmanaged Driver namespaces in the code page.
-
That's it! You have completed the application migration. Press F5 to run the application. The result is displayed in the command prompt.
Note: The results when running with ODP.NET, Managed Driver will be exactly the same as when you earlier ran with ODP.NET, Unmanaged Driver.
Summary
In this tutorial, you have learned how to:
- Use ODP.NET, Managed Driver to connect to the Oracle Database
- Configure and connect to ODP.NET, Managed Driver in multiple ways
- Use ODP.NET, Managed Driver from Visual Studio Server Explorer to connect to Oracle Database
- Migrate an ODP.NET, Unmanaged Driver application to an ODP.NET, Managed Driver application
Resources
- Oracle.NET Developer Center
- Oracle Data Access Components (ODAC) for Windows downloads
- Additional .NET OBEs in the Oracle Learning Library
Credits
- Lead Curriculum Developer: Ashwin Agarwal
- Other Contributors: Alex Keh, Christian Shay
To navigate this Oracle by Example tutorial, note the following:
- Topic List:
- Click a topic to navigate to that section.
- Expand All Topics:
- Click the button to show or hide the details for the sections. By default, all topics are collapsed.
- Hide All Images:
- Click the button to show or hide the screenshots. By default, all images are displayed.
- Print:
- Click the button to print the content. The content that is currently displayed or hidden is printed.
To navigate to a particular section in this tutorial, select the topic from the list.