Using Schema Compare in Visual Studio 2012
Overview
Purpose
This tutorial describes how to use the Schema Compare tool in
Visual Studio 2012.
Time to Complete
Approximately 45 minutes.
- Start with a development schema identical to the production
schema. We will create two schemas named DEVELOPMENT and
PRODUCTION and they will both contain a portion of the HR
schema.
- With the progress of the .NET application, the development
schema evolves to meet the needs of the application
- During development, use the Schema Compare tool to compare the development versus production schemas and view the differences
- On the completion of the development, use the Schema Compare tool to compare the development versus production schemas and generate the diff scripts and rollback scripts
- Deploy the diff script to bring the production database up to the required version of development schema
- Apply the rollback script to roll back the changes made to
the production database.
Introduction
Schema Compare is an integrated tool that is included with the
Oracle Developer Tools for Visual Studio (ODT). It is used to
visually inspect the differences between a source and a target
schema and to generate a diff script that modifies the target
schema to make it identical to the source. The source and target
schemas can reside on the same database or on two different
databases.
Developers will typically evolve their development schema as
they work on their .NET application, for example creating
or modifying tables or stored procedures that are used by their
.NET application. During development, they can use the Schema
Compare tool to visually inspect what changes have been made
thus far, and when development has completed, they can use the
tool to generate the deployment scripts for synchronizing the
development and production schemas.
Scenario
This OBE walks through a general use case scenario of a .NET
developer. It consists of the following steps:
We will use the Schema Compare tool to identify, synchronize and rollback the differences in the created instances.
- Install Microsoft Visual Studio 2012
- Review the tutorial Installing Oracle Database 12c on Windows
- Install or obtain SYSDBA access to Oracle Database 10g
Release 2 or higher
- Install Oracle Developer Tools for Visual Studio version 12.1 or higher
- Install the HR sample schema if you do not already have
access to it.
Prerequisites
Before starting this tutorial, you should:
Note: The database connection information are unique for every database client. In this OBE, the database connection alias used (ORCL) is merely an example and likely will not match your client connection alias. To complete the OBE, replace the current values with the values for your specific database instance.
Creating Database Connections
In this section, we will be creating two new schemas
namely, DEVELOPMENT and PRODUCTION. These two schemas will act
as development schema and production schema respectively.
Initially these two schemas are identical and are derived from
part of the HR schema.
Open Microsoft Visual Studio 2012.

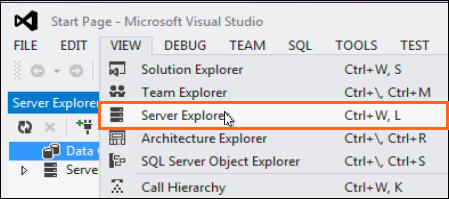
To create the HR connection, select View > Server Explorer.
Right click Data Connections and select Add Connection...

The Add Connection dialog box opens up. Enter HR for the User name and hr for the Password. Ensure the Data source name is ORCL and click Test Connection.

The Test connection is successful. Click OK.
Click OK to confirm creating the new connection.
Next, create a connection with the database administrator privileges. We will use this connection to create the DEVELOPMENT and PRODUCTION schemas. In the server explorer, right-click Data Connections and select Add Connection...
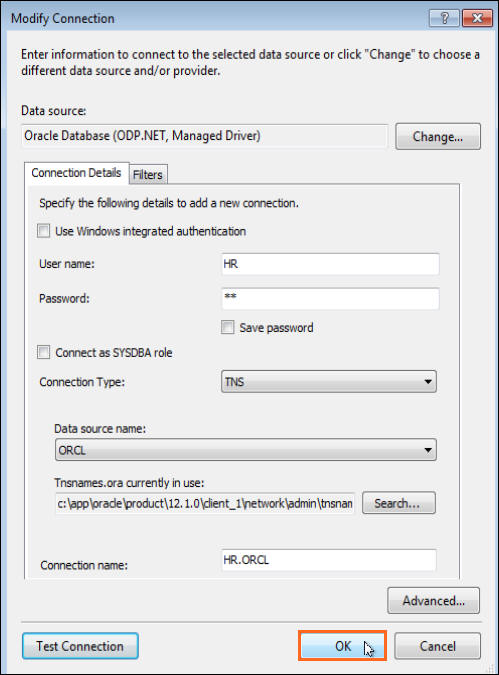
In the Add Connection dialog box, enter SYS for the User name and oracle for Password. Select the Connect as SYSDBA role check box. Ensure the Data source name is ORCL and click OK.

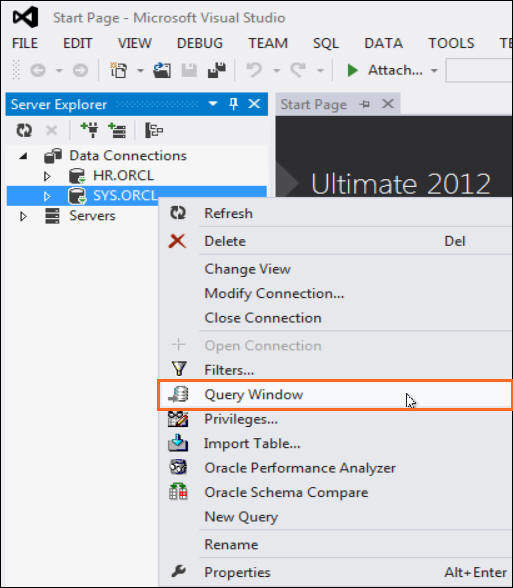
Once the connection is successful, right-click SYS.ORCL
data connection and select Query Window.
Copy the following code into the query window. Select the
complete code and click the Execute Query
button.
(Depending on your environment you may need to modify the
tablespace name and the profile name)
CREATE USER DEVELOPMENT
IDENTIFIED BY development
DEFAULT TABLESPACE "USERS"
PROFILE "DEFAULT";
grant
connect, resource, unlimited tablespace to DEVELOPMENT;
CREATE USER PRODUCTION
IDENTIFIED BY production
DEFAULT TABLESPACE "USERS"
PROFILE "DEFAULT";
grant connect, resource, unlimited tablespace to
PRODUCTION;
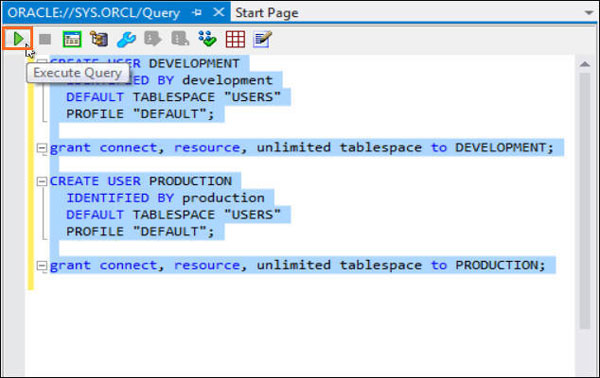
The code in the query window creates and grants resources to the DEVELOPMENT and PRODUCTION schemas.
The result is displayed in the query output window.

Repeat steps 2 to 5 to create connections in Server Explorer using the following information:
To create the DEVELOPMENT connection:
Username: DEVELOPMENT
Password: development
Data source name: ORCL
To create the PRODUCTION connection:
Username: PRODUCTION
Password: production
Data source name:ORCL
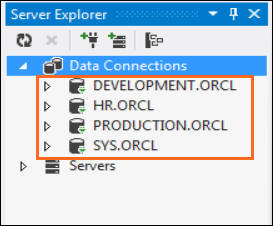
After completing this step, the Server Explorer should have
the following connections established successfully:
Creating a Console Application and Oracle Database
Projects
In this section, we will create a Solution that contains a
Console Application project as well as three database projects.
The first project will contain scripts for initially creating
tables and procedures in the DEVELOPMENT and PRODUCTION schemas.
The second database project will contain deployment
scripts to update the PRODUCTION schema to the level of the
DEVELOPMENT schema and the third database project will contain
rollback scripts to rollback the changes performed by the
deployment script.
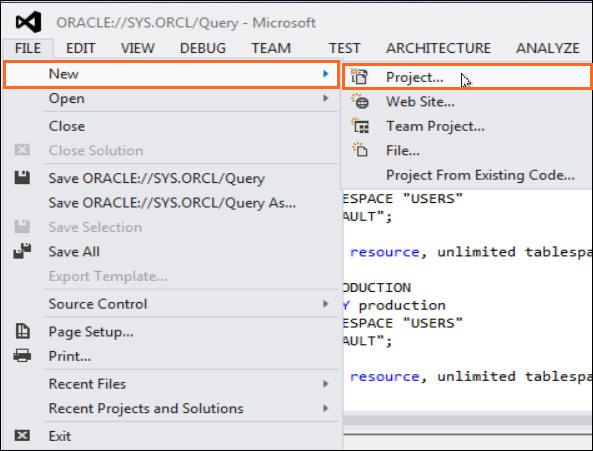
First, let us create a Console Application. Select
File > New > Project...
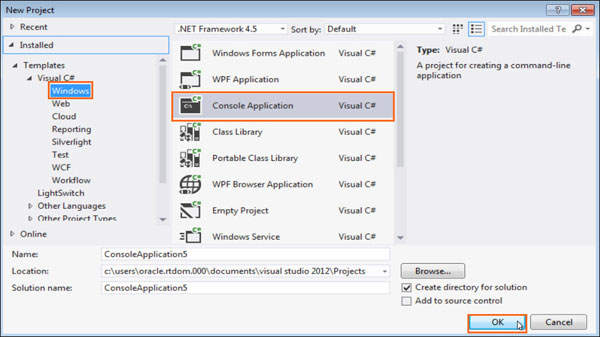
Expand Installed > Templates > Visual C# and select Windows. From the list of applications, select Console Application and click OK.
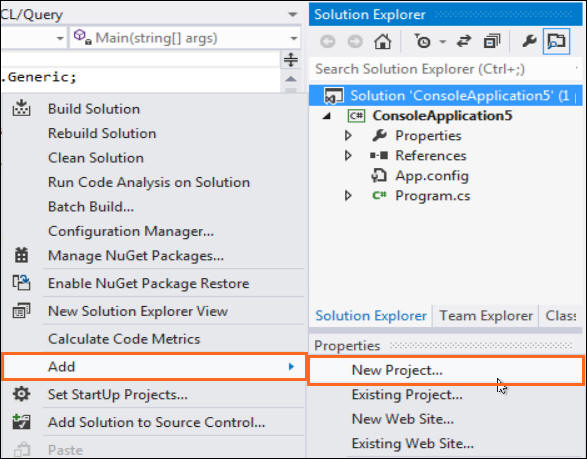
You have successfully created a .NET Windows Console
Application. In the Solution Explorer, right-click Solution
'Console Application#' and select Add
> New Project...
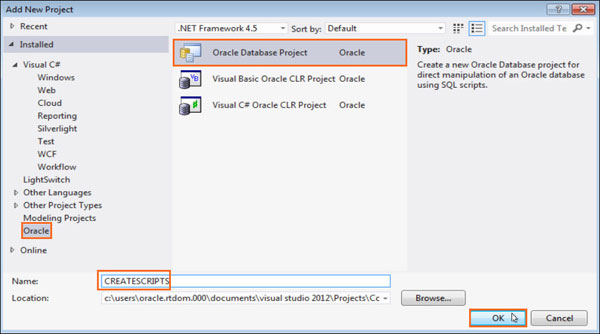
In the Add New Project window, expand Installed
and select Oracle. From the list of
projects, select Oracle Database Project.
Enter the name of the project as CREATESCRIPTS
and click OK.
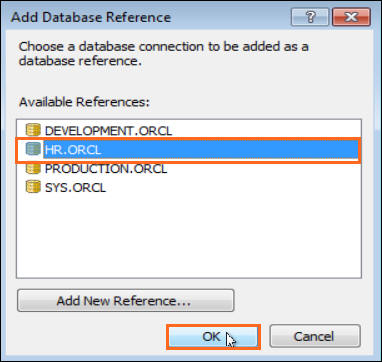
Add a reference to the HR.ORCL connection
and click OK.
Follow steps 3 and 4 to create the other two Oracle database projects namely DEPLOYSCRIPTS and ROLLBACKSCRIPTS. Select the PRODUCTION.ORCL connection in the Add Database Reference dialog box for both these projects. After completing this step, the solution explorer should contain the highlighted projects:

Generating the Create Script
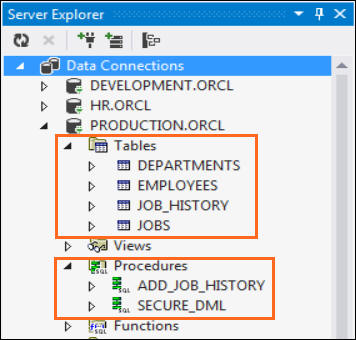
In this section, we will be generating the create scripts to create the following tables and procedures in the DEVELOPMENT and PRODUCTION schemas:
Tables: DEPARTMENTS,
EMPLOYEES, JOB_HISTORY, JOBS
Procedures: ADD_JOB_HISTORY, SECURE_DML
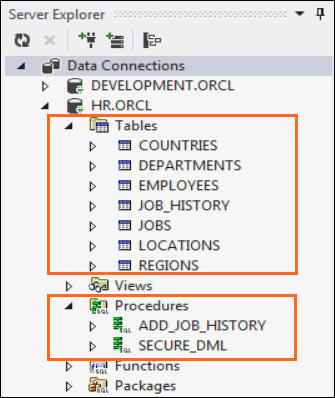
In the Server Explorer, expand the tables and procedures
under the HR.ORCL connection. The default
HR schema consists of the following tables
and procedures:
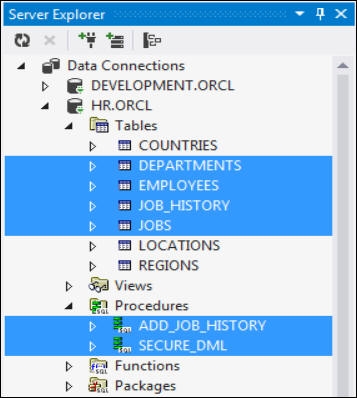
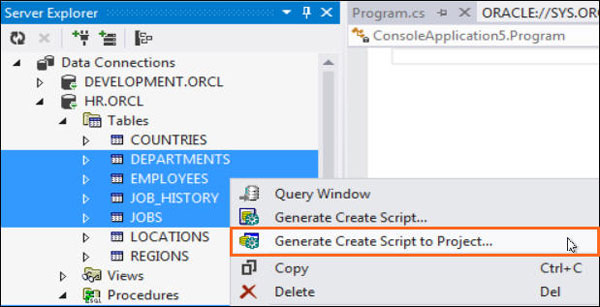
Select the DEPARTMENTS table.
Hold the Ctrl key and select the
EMPLOYEES, JOB_HISTORY and JOBS
tables. Further, select the ADD_JOB_HISTORY
and SECURE_DML procedures under
the Procedures node.
Right-click and select Generate Create Script to
Project...
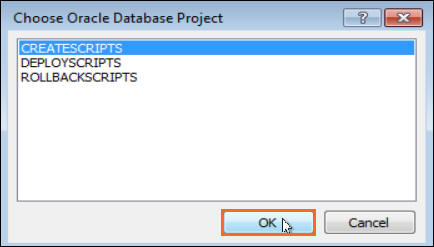
Select the CREATESCRIPTS project in the
Choose Oracle Database Project dialog box and click OK.
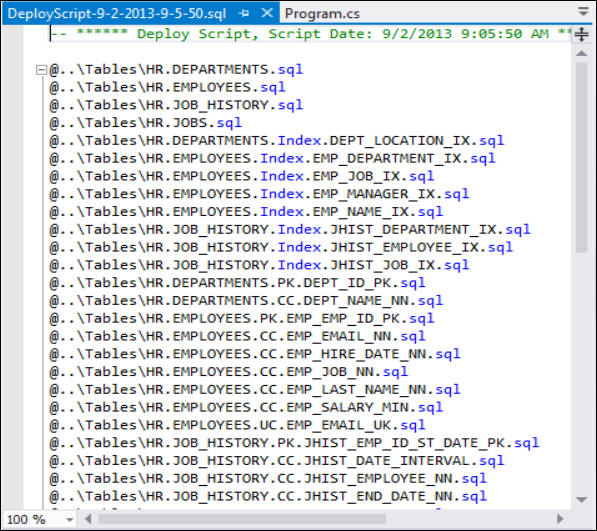
Wait for a few seconds. Once the script is available, you
see that the script has a reference to a bunch of other
scripts to create tables, dependencies, indexes, procedures
and triggers.
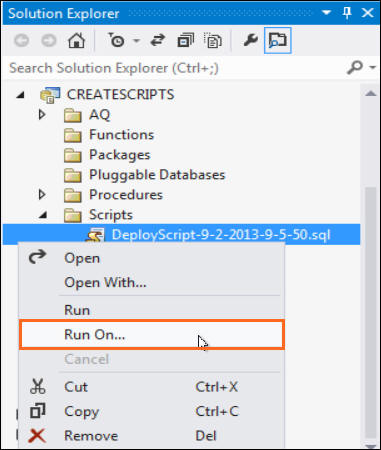
Let us run the above script against the DEVELOPMENT and
PRODUCTION schemas to create the tables and procedures. In
the Solution Explorer, Expand CREATESCRIPTS >
Scripts. Right-click on the SQL script located
there that starts with "DeployScript" and
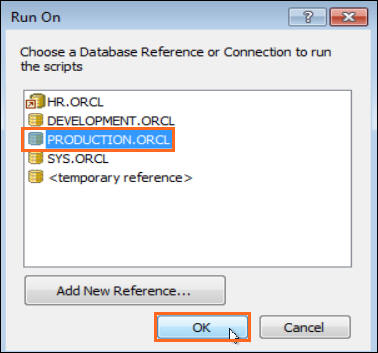
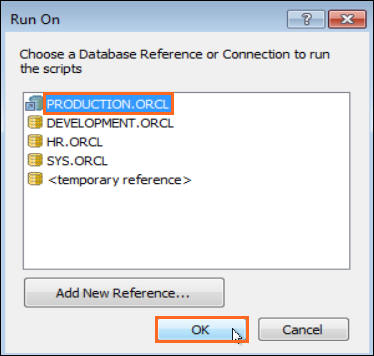
select Run On...
In the Run On dialog box, select PRODUCTION.ORCL
as the connection to run the scripts. Click OK.
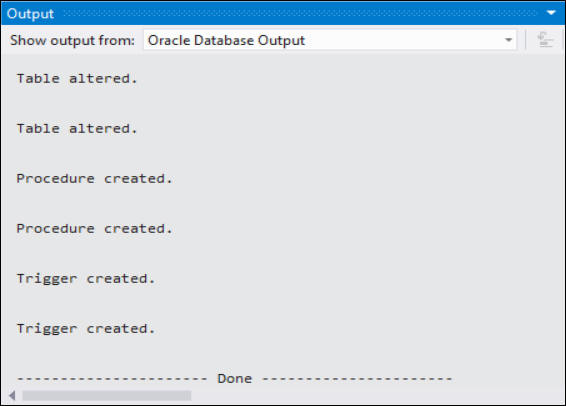
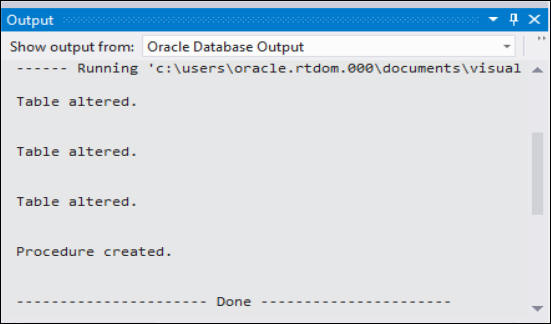
Check the output window for errors. You should have no errors in the output.
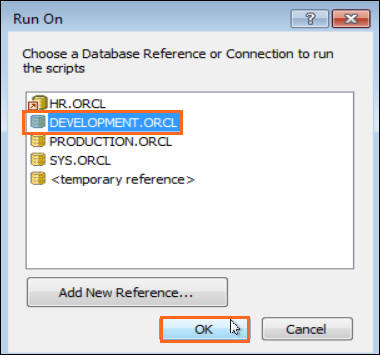
Repeat step 6 to run the deployment script on the
development schema. Right-click on the script that starts
with "DeployScript" and select Run
On...
Select DEVELOPMENT.ORCL in the Run On
dialog box and click OK.
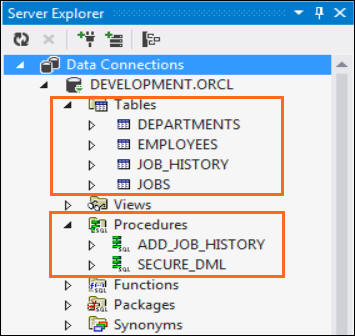
Refresh the DEPLOYMENT.ORCL and PRODUCTION.ORCL connections
in Server Explorer and then verify that the tables and
procedures were created under both the connections.
Modifying the DEVELOPMENT Schema
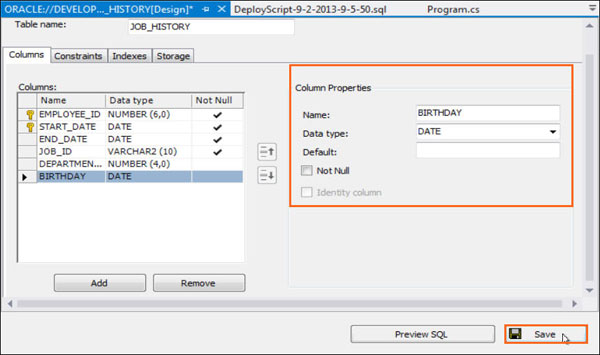
- Enter BIRTHDAY as the name of the column
- Select the data type of the column as DATE
- Uncheck the Not Null check box
- Click the Save button
In this section, we will modify tables and procedures in
the DEVELOPMENT schema. This creates a difference in the
DEVELOPMENT schema compared to the PRODUCTION schema.
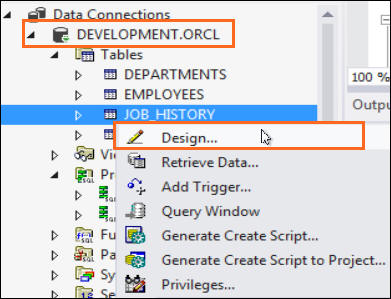
Let us update the JOB_HISTORY table in the DEVELOPMENT.ORCL connection by adding a new column called "BIRTHDAY". Right-click JOB_HISTORY and select Design...
Click the Add button. Perform the
following tasks under column properties to create the new
column:
Next, let us edit the ADD_JOB_HISTORY procedure. Right-click the procedure name under DEVELOPMENT.ORCL and select Edit...

Modify the procedure to accept the new column "BIRTHDAY" that we added in the previous steps. Replace the code with the following code:
PROCEDURE add_job_history
(
p_emp_id
job_history.employee_id%type
,
p_start_date
job_history.start_date%type
,
p_end_date
job_history.end_date%type
,
p_job_id
job_history.job_id%type
, p_department_id
job_history.department_id%type
,
p_birthday
job_history.birthday%type
)
IS
BEGIN
INSERT INTO job_history (employee_id, start_date,
end_date,
job_id, department_id, birthday)
VALUES(p_emp_id, p_start_date,
p_end_date, p_job_id, p_department_id, p_birthday);
END add_job_history;

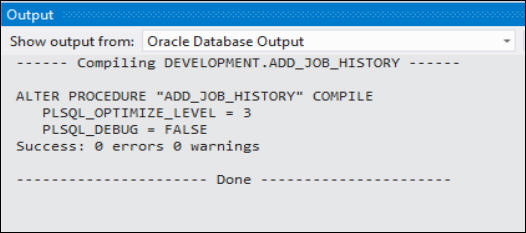
Right-click anywhere in the code window and select Compile.
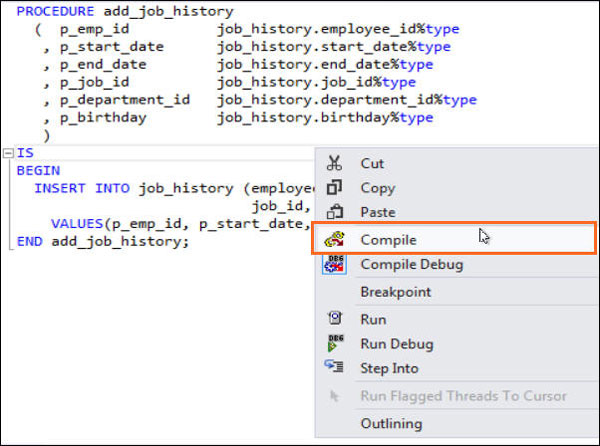
The code is compiled successfully.
Using the Schema Compare Tool
In this section, we will use the Schema Compare Tool to view
the differences in the schemas, and to create the diff and
rollback scripts.
Viewing Schema Differences and Generating Diff Scripts
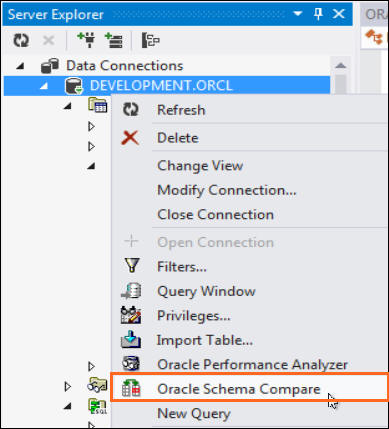
Right-click DEVELOPMENT.ORCL in the
Server Explorer and select Oracle Schema
Compare.
The Schema Compare dialog box opens up. Verify that DEVELOPMENT.ORCL is selected under Select Source. Select PRODUCTION.ORCL under Select Target and click OK.

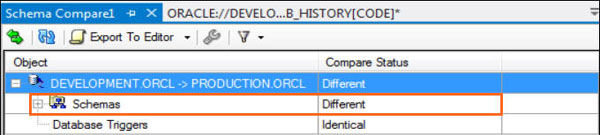
Wait for a few seconds. The Schema compare tool
displays the comparison between the DEVELOPMENT and
PRODUCTION schemas. The Compare Status column
indicates that the schemas are not identical.
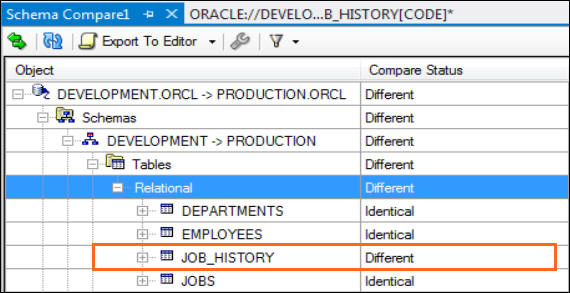
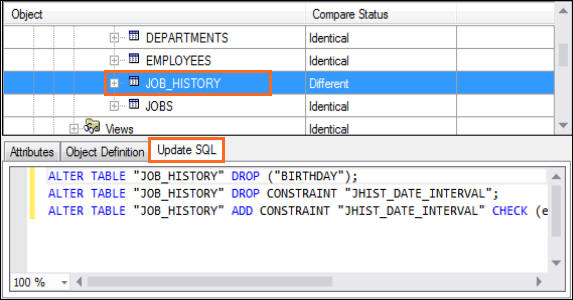
Expand Schemas > DEVELOPMENT ->
PRODUCTION > Tables > Relational to
see the difference in the tables between both the
schemas. Note the status of the JOB_HISTORY
table.
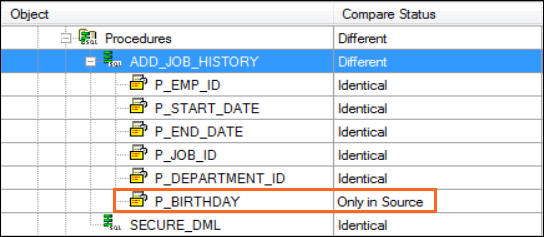
Drill down further to see the difference in columns
with in the JOB_HISTORY table. Notice that
the BIRTHDAY column is present only in the
DEVELOPMENT schema.

Select the JOB_HISTORY table and click on the Object Definition tab to view the difference in the object definition for the table.

Click on the UPDATE SQL tab. It gives a list of ALTER TABLE statements that can be executed to update the JOB_HISTORY table in the PRODUCTION instance to the level of the DEVELOPMENT instance.

Expand Procedures > ADD_JOB_HISTORY.
Notice that the P_BIRTHDAY parameter
is present only in the source schema.
Select the ADD_JOB_HISTORY procedure and click on the Object Definition tab to view the difference in the object definition for the procedure.

Click on the UPDATE SQL tab to view the CREATE statement that can be executed to replace the ADD_JOB_HISTORY procedure in the PRODUCTION instance with that of the DEVELOPMENT instance.

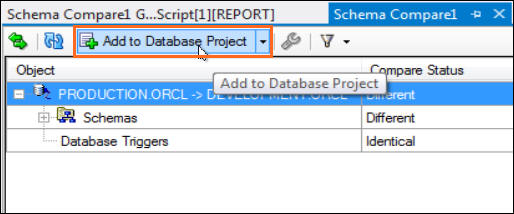
Navigate to the top of the window. Click on the down
arrow after the Export to Editor tab
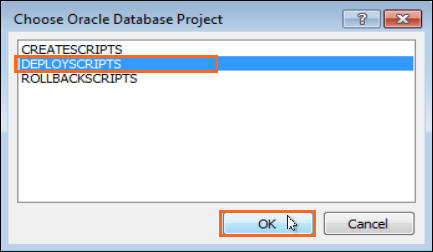
and select Add to Database Project.
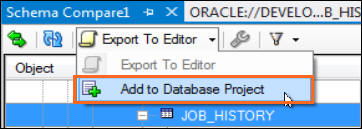
Select DEPLOYSCRIPTS and click OK.
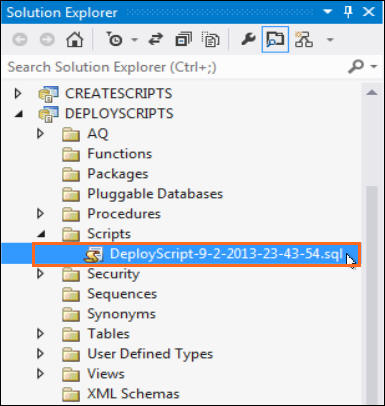
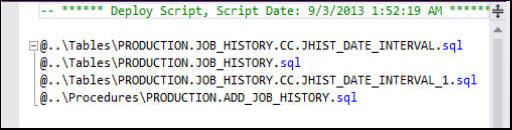
Navigate to DEPLOYSCRIPTS > Scripts
folder under the Solution Explorer window and select
the script that we added in the previous step. The
script opens up in the code window. Examine the
script. You see that the script acts as a master
script which in turn calls four SQL scripts to update
the JOB_HISTORY table and the ADD_JOB_HISTORY
procedure. You can navigate to each of these script to
look at the SQL code inside it.
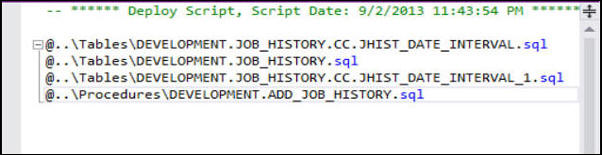
Examine the DEVELOPMENT_JOB_HISTORY.SQL script.
Navigate to the Tables folder under
DEPLOYSCRIPT and select the DEVELOPMENT_JOB_HISTORY.SQL
script. You see that the script contains SQL queries
to add the new BIRTHDAY column.

Note: The deployment scripts for the ADD_JOB_HISTORY procedure are available under the DEPLOYSCRIPTS > Procedures folder.
Generating Rollback Scripts
In this section, we will be creating the rollback script
which can be executed to roll back the changes performed
to the PRODUCTION schema using the deployment script.
In the code page, navigate to the Schema Compare
window and click on the Source to Target
button on the top-left corner. This button swaps the
source connection to PRODUCTION.ORCL and the target
connection to DEVELOPMENT.ORCL.
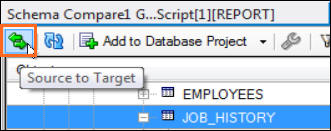
Expand the tree structure and select the JOB_HISTORY table. Click on the UPDATE SQL tab. The tab displays SQL statements to update the JOB_HISTORY table in the DEVELOPMENT schema to the level of the PRODUCTION schema.
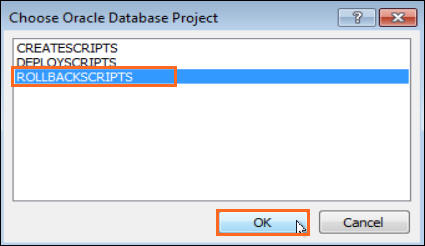
Click on Add to Database Project button
Choose the ROLLBACKSCRIPTS project and click OK.
The summary information is displayed in the code
window.

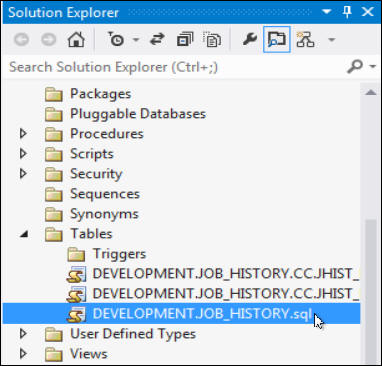
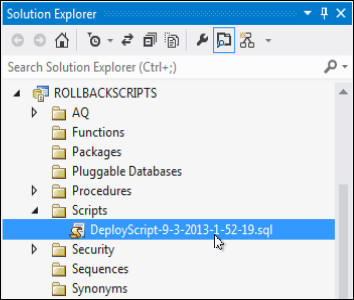
Navigate to the ROLLBACKSCRIPTS project under the Solution Explorer.

In the Scripts folder, double click the SQL script
that starts with "DeployScript". The
script opens up in the code window.
Note: By default, all the rollback scripts are saved under the Procedures and Tables folder.
Synchronizing the Schemas
In this section, we will execute the deployment scripts that we created in the previous section of this OBE.
Close all the tabs in the code window.
In the Solution Explorer, navigate to DEPLOYSCRIPTS
> Scripts folder. Select the deploy script
that we created in the previous section. Right-click and
select Run On...

Choose the PRODUCTION.ORCL connection and
click OK. This runs the deployment script
against the PRODUCTION instance.
The script executes successfully with no errors.
Run the Schema compare tool again. Right-click
DEVELOPMENT.ORCL connection in the Server
Explorer and select Oracle Schema Compare.
Ensure DEVELOPMENT.ORCL is selected under
Select Source and select PRODUCTION.ORCL
under Select Target and click OK.
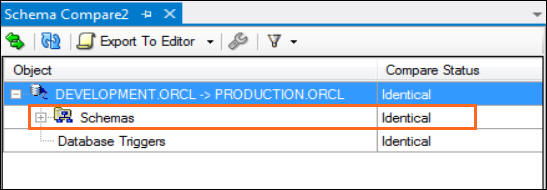
The Schema Compare tool indicates that both the schemas are
identical.
Note: You can rollback the changes made to the production version by using the rollback script under the ROLLBACKSCRIPTS > Scripts folder.
Summary
- Create database connections
- Create a Console Application
- Use the Schema Compare tool to compare schemas
- Use the Schema Compare tool to generate deployment scripts
- Use the Schema Compare tool to generate rollback scripts.
- Oracle
.NET Developer Center
- Additional .NET OBEs in the Oracle
Learning Library
- Lead Curriculum Developer: Supriya Ananth
- Other Contributors: Christian Shay
In this tutorial, you have learned how to:
Resources
Credits
To navigate this Oracle by Example tutorial, note the following:
- Hide Header Buttons:
- Click the title to hide the buttons in the header. To show the buttons again, click the title again.
- Topic List:
- Click a topic to navigate to that section.
- Expand All Topics:
- Click the button to show or hide the details for the sections. By default, all topics are collapsed.
- Hide All Images:
- Click the button to show or hide the screenshots. By default, all images are displayed.
- Print:
- Click the button to print the content. The content that is currently displayed or hidden is printed.
To navigate to a particular section in this tutorial, select the topic from the list.