Using Continuous Query Notification With ODP.NET and Oracle Database
Overview
Purpose
This tutorial introduces the Continuous Query Notification feature supported by the Oracle Data Provider for .NET and Oracle database.
Time to Complete
Approximately 30 minutes
Introduction
Oracle Data Provider for .NET provides a notification framework that supports Continuous Query Notification (CQN), previously called Database Change Notification, in the database server. CQN enables applications to receive notifications from a registered callback routine when there is a change in a query result set, schema objects, or the state of the database that could affect the results of a cached client result set.
Using this ODP.NET feature, an application can maintain the validity of the client-side cache (for example, the ADO.NET DataSet) in sync with the database. The client does not need to maintain a connection to the database. It will receive notifications even when no longer connected to the database.
This feature is intended for queries whose results change infrequently over time and for those who cannot maintain a large number of active database connections.
In this tutorial, an application will display a DataSet grid containing the values of the HR schema's EMPLOYEES table. After populating the grid, the application will disconnect from the database and await notification that data has changed. Once the change is detected, the application will reconnect to the database and refresh the data.
This tutorial demonstrates the flexibility of Database Change Notification feature, including persisting notification registrations even after numerous changes and distinguishing at the row level whether a change would affect the client's query results.
Prerequisites
Before starting this tutorial, you should:
-
Install Microsoft Visual Studio 2013
-
Install Oracle Database 12c or later
-
Install Oracle Data Access Components (ODAC) 12.1.0.1.2 or later from OTN. The ODAC download includes Oracle Developer Tools for Visual Studio and ODP.NET that will be used in this lab
-
Extract these files into your working directory
Granting Privileges to HR
A user or role must have CHANGE NOTIFICATION privileges prior to being able to register Change Notification callbacks.
-
From your windows program menu, start Visual Studio. In Visual Studio, from View menu select Server Explorer.

A Server Explorer panel opens.
-
Right click Data Connections and select Add Connection from the menu.

An Add Connection dialog box opens.
-
In the Add Connection dialog box, ensure the Data Source is set to Oracle Database (ODP.NET, Managed Driver).

Note: If the Data Source is not set to an ODP.NET data source, click "Change" to select this data source.
In the Change Data Source dialog box, select Oracle Database from the Data Source list and select ODP.NET, Managed Driver from the Data Provider drop down list. Click OK.

-
In the Add Connection dialog box, make sure the Connection Details tab is selected.
Enter user name as SYS, password as oracle and check the Connect as SYSDBA role check box. From the Data Source drop down list, select the Oracle Database instance you wish to connect to. Click Test Connection
Note: Your SYS password may not be oracle. Check with your database administrator for the SYS password.

You will receive a Test connection succeeded dialog box. Click OK.
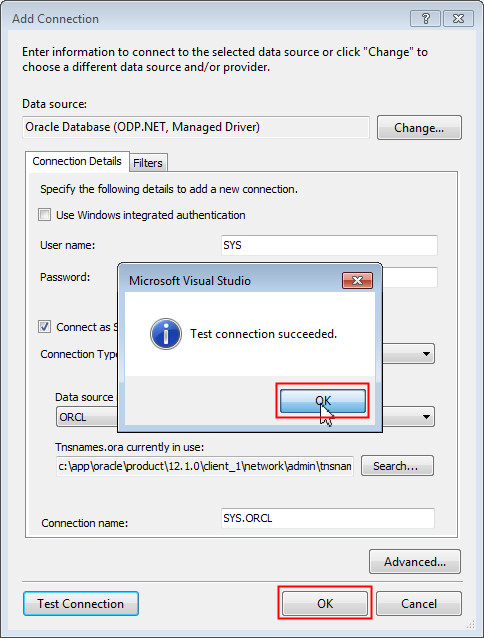
Click OK in the Add Connection dialog box.
-
Similarly, create a connection for HR schema. Right click Data Connections and select Add Connection.
In the Add Connection dialog box, the appropriate data source provider is already selected.
In the Connection Details tab, enter user name as HR and password as hr. Select the appropriate data source name. Click OK.
Note: Your HR schema's password may not be hr. Check with your database administrator for the HR schema's password.

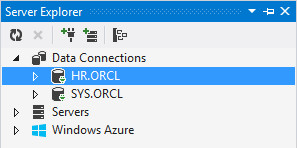
The Server Explorer shows the two connections.
-
Right click SYS.ORCL connection node in Server Explorer and select Query Window. This will open the Query Window.

-
In the Query Window, enter the following grant statement:
GRANT change notification to hrClick the Execute Query button.
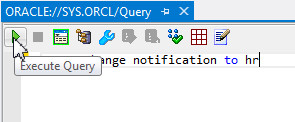
You get a successfully completed message in the query output window. Close the Query Editor.

Loading and Running the CQN Demo Application
A CQN Visual Studio solution has been precreated for you to load and run.
This program will select all records in the EMPLOYEES table in the HR schema where the EMPLOYEE_ID value is less than 200, then place the results in an ADO.NET DataSet. The DataSet does not maintain a connection to the database server, so it no longer holds onto any database resources, allowing for better scalability.
Before the query executes, an OracleDependency object is bound to an OracleCommand. When query executes, this OracleDependency will create a notification registration in the database server.
Even though the DataSet is disconnected, when another user modifies the EMPLOYEES table, the notification handler will inform the .NET application the source data has changed. On the client side, this will trigger an event handler that updates the DataSet by requerying the database for the changed data.
-
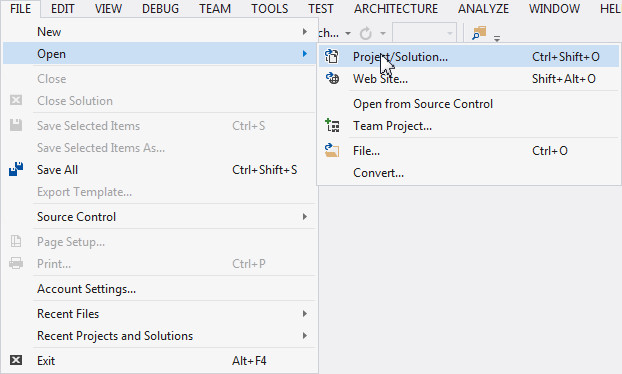
In Visual Studio, from the File menu, select Open > Project/Solution. In the Open project dialog box, navigate to the ChangeNotification file from the files downloaded in your working directory. Select DB Change Notification solution file. Click Open.

-
From View menu, select Solution Explorer. In the Solution Explorer, right click Form1.cs and select View Code.

The Form1.cs code window opens.
-
You may need to modify connection string attributes to connect to Oracle. You don't need to change the Data Source connection string attribute if your data source is a database with Net Service Name as orcl.
If you need to use a different data source alias, modify the Data Source value in the connection string variable, "constr".
Note: You will connect to the HR schema, so check that User Id is set to HR and Password is set correctly. In the example code, HR's password is "hr". If this is not your HR schema's password, check with your DBA for the correct password.

-
Add the following code under their respective comments. The comments explain what each line of code does.
cmd.AddRowid = true;
OracleDependency dep = new OracleDependency(cmd);
cmd.Notification.IsNotifiedOnce = false;
dep.OnChange += new OnChangeEventHandler(OnMyNotificaton);
-
In the Visual Studio, from Debug menu, select Start Without Debugging (or press Ctrl+F5). This will run the demo.

Note: When you run this program for the first time, you may receive the message as shown in the screenshot below from Windows Firewall. Click Allow access to allow the CQN to be sent from the database server to the client.

Do not exit the running demo.
Modifying the Employees Table and Watching a CQN Event Occur
Now the CQN application is running and ready to receive notifications that data in the HR.EMPLOYEES table has been changed. Let's modify the EMPLOYEES table data.
-
Click the (+) plus sign next to the HR.ORCL node in Server Explorer to expand it. Expand the Tables node.
Right click the EMPLOYEES table and select Retrieve Data... to show it's data in Visual Studio.

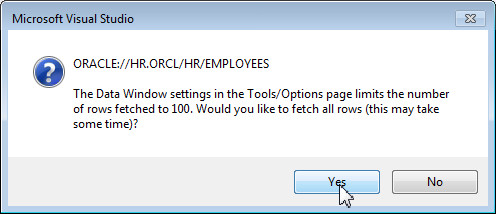
You may get a Microsoft Visual Studio dialog box asking you confirm whether you want to retrieve more number of rows than the set limit of 100. Click Yes.
A window opens showing the employees table data.

-
In the newly opened Data Window in Visual Studio (NOT in the CQN application grid), modify one of the SALARY values. Right-click the Data tab and select Save to cause the value to be committed to Oracle Database.

-
In a second or two, the CQN application opens a Notification Alert window, informing that the result set has changed.
Note: See the taskbar at the bottom of the desktop if you don't see the window. It may be hidden.

Click OK. Close the CQN demo.
Adding a Callback Routine to Update Client Data After a CQN
Right now, our application receives the CQN callback, but the event handler does nothing more than launch the dialog box you saw in the previous section. Let's add code to connect to the database and fetch the modified rows to sync up the client side results.
For single table queries, the CQN callback will return the ROWID information for all modified rows in the table. You will append the ROWIDs to the original query to retrieve only the rows that were changed, not the entire data set which would be less optimal. You will then refresh the DataSet with just the new data.
-
Click the Form1.cs tab. In the dropdown box select OnMyNotificaton(..
This will take you to the OnMyNotificaton callback routine.

-
Add following lines of code under their respective comments. The comments explain what each line of code does.
The following lines of code append ROWID(s) to the base query to retrieve just modified row(s).
DataRow detailRow = args.Details.Rows[0];
string rowid = detailRow["Rowid"].ToString();
string sqlUpdate = sqlSelect + "where rowid = \'"+ rowid +"\'";
Add the following lines of code to append on to the sqlUpdate statement if there are additional updated rows.
for (int i = 1; i < args.Details.Rows.Count; i++)
{
 detailRow = args.Details.Rows[i];
 rowid = detailRow["Rowid"].ToString();
 sqlUpdate = sqlUpdate + " or rowid = \'"+ rowid +"\'";
}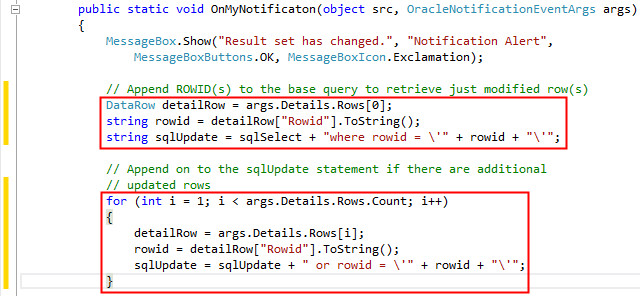
-
Add following lines of code to refresh the client data.
OracleConnection con2 = new OracleConnection(constr);
OracleCommand cmd2 = new OracleCommand(sqlUpdate,con2);
con2.Open();
OracleDataAdapter da2 = new OracleDataAdapter(cmd2);
da2.Fill(ds, tablename);
-
From Build menu, select Build Solution.

Ensure there are no errors or warnings reported.
-
From Debug menu, select Start Debugging (or press F5). A grid containing the values of the HR EMPLOYEES table appears.
-
You will now change multiple rows in the database and see ODP.NET update only those rows that were changed.
In the Solution Explorer, double click multiple_row_change.sql.
Note: Do not close the Oracle Database Change Notification Demo window or stop debugging.

-
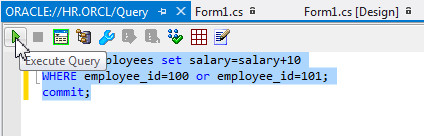
Select the following code from the multiple_row_change.sql. This is the first SQL statement in the file. Highlight and press CTRL+C to copy the code.
UPDATE employees set salary=salary+10
WHERE employee_id=100 or employee_id=101;
commit;In Server Explorer, right-click HR.ORCL and select Query Window. In the Query Window, paste the code and make sure both the statements are selected. Click Execute Query to run the query.
-
You get the Notification Alert. Click OK.
Check the modified rows refreshed in the application grid.
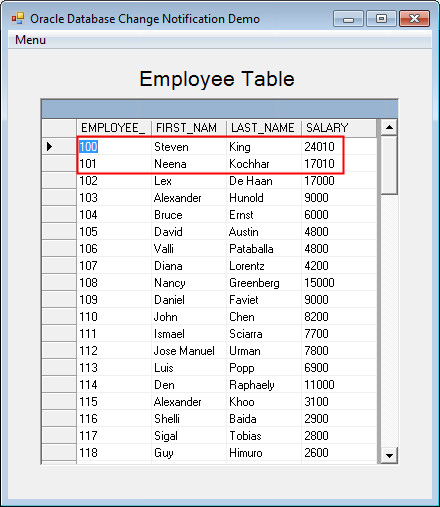
The Oracle database identifies the changed rows via their ROWIDs. The OracleNotificationEventArgs instance passes the ROWID information back to ODP.NET. Only the rows that have changed are retrieved, not the entire table. This saves the application from refreshing data that is still valid.
In addition, you will notice that for each distinct database change, you receive one notification. Even though two rows were modified, the modification occurred as one discrete event. As such, only one notification was delivered.
Close the Oracle Database Change Notification Demo window.
Using Query Result Change Notifications
ODP.NET can register its queries with the database and receive either object change notifications or query result change notifications.
An object change notification results from DML or DDL changes to the objects (e.g. tables) associated with the query. A query result change notification (default) results from DML or DDL changes to the specific result set rows associated with the query.
Query result change notifications provide better granularity for client applications by focusing only on the specific result set selected, while object-change notification handlers are more lightweight.
-
From the Visual Studio menu, select Debug > Start Debugging (or press F5). The Oracle Database Change Notification demo windows shows the Employees records.
Now, you change multiple rows in the database. ODP.NET will update only those rows that were changed.
If not already open, from the Solution Explorer, open multiple_row_change.sql.
-
Select the following code from the multiple_row_change.sql. This is the second SQL statement in the file. Highlight and press CTRL+C to copy the code.
UPDATE employees set salary=salary+10
WHERE employee_id=200 or employee_id=201;
commit;In Server Explorer, right-click HR.ORCL and select Query Window. In the Query Window, paste the code and make sure both the statements are selected. Click Execute Query to run the query.

When you have done that, you will notice that the Notification Alert window has not appeared.
That is because the update statement affects rows outside of the original query, so the database notification handler took no action.
Summary
In this tutorial, you have learned how to:
- Grant privileges to a database user for CQN
- Programatically register a CQN in the database in conjunction with a query execution
- Modify database table data, which initiated the CQN event handler
- Add callback application logic to sync up the client results with the database
- Use query result change notifications
Resources
- Visit the Oracle Technology Network Portal to learn the latest developments in Oracle .NET.
- To learn more about Oracle .NET with Visual Studio refer to additional OBEs in the Oracle Learning Library.
Credits
- Lead Curriculum Developer: Ashwin Agarwal
- Other Contributors: Alex Keh, Christian Shay
To navigate this Oracle by Example tutorial, note the following:
- Topic List:
- Click a topic to navigate to that section.
- Expand All Topics:
- Click the button to show or hide the details for the sections. By default, all topics are collapsed.
- Hide All Images:
- Click the button to show or hide the screenshots. By default, all images are displayed.
- Print:
- Click the button to print the content. The content that is currently displayed or hidden is printed.
To navigate to a particular section in this tutorial, select the topic from the list.