Debugging Oracle PL/SQL from Visual Studio
Overview
Purpose
This tutorial describes how you can debug Oracle PL/SQL from Visual Studio.
Time to Complete
Approximately 30 minutes.
Introduction
The integrated PL/SQL debugger in Oracle Developer Tools (ODT) allows you to remain inside of Visual Studio for end-to-end debugging of your .NET and Oracle solution. You can debug PL/SQL code such as procedures and functions (both stand-alone and packaged), object methods, and triggers from within the Visual Studio environment in the same way as you would debug your C# or VB.NET code. With the ODT integrated PL/SQL debugger, you can use traditional debugging features such as setting break points, viewing and modifying variable values, and examining the call stack.
You use the PL/SQL debugger in one of three modes:.
-
Direct Database Debugging
The Direct Database Debugging mode allows you to debug PL/SQL code directly from Server Explorer. When you use the Direct Database Debugging mode, you do not need a Visual Studio solution or .NET code. By right clicking on a procedure or function in Server Explorer, you can step into a PL/SQL procedure or function. Any arguments required by the procedure must be entered by hand. This limits the use of this feature to procedures or functions that have scalar parameter values.
-
External Application Debugging
External Application Debugging allows you to dedicate an instance of Visual Studio solely for waiting on a breakpoint to be called in a PL/SQL stored procedure or function, and then debug it with that instance of Visual Studio. This is particularly useful when the stored procedure is called by a middle tier web server. In the case of ASP.NET web applications, one Visual Studio instance can be dedicated to debugging the ASP.NET code and the other can debug the PL/SQL code. This mode is most heavily used by ASP.NET developers.
-
Multi-tier Application Debugging
This mode allows you to seamlessly debug both .NET and PL/SQL code from within a single Visual Studio instance. You can step directly from your .NET code into the PL/SQL code and back out again. This is most useful in client server applications (rather than ASP.NET web applications). This Oracle by Example walkthrough will demonstrate Multi-tier Application Debugging.
Prerequisites
Before starting this tutorial, you should:
-
Install Microsoft Visual Studio 2013
-
Install Oracle Database 10.2 or later
-
Install Oracle 12c Oracle Data Access Components (ODAC) with Oracle Developer Tools for Visual Studio version 12.1.0.1.2 or later from OTN
-
Extract these files into your working directory
Creating an Oracle Connection
Before you begin creating your application, you open Visual Studio and create a connection. Perform the following steps:
-
Open Visual Studio.
-
Select View > Server Explorer.

-
In the Server Explorer window, if you already have a HR and a SYS schema connection, expand it to connect to the database. As an example, the screen shot below identifies the HR schema as HR.ORCL and the SYS schema as SYS.ORCL. Enter the password for the HR user and click OK, then enter the password for SYS and click OK. Skip to Granting Privileges for Debugging.


-
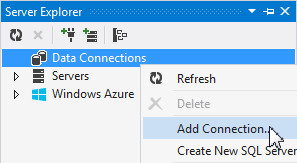
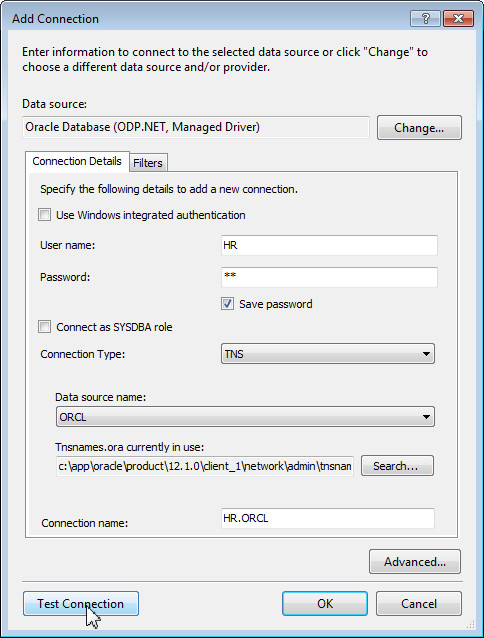
If you do not have a HR connection, then right-click on Data Connections in Server Explorer. Choose Add Connection. The Add Connection dialog box opens up. Make sure that Datasource field is showing "ODP.NET". If it is not, click the Change button to change it. Enter HR for the User name and the password in the Password field. Check Save password. Select Data source name with the HR schema, such as ORCL. Click Test Connection.
-
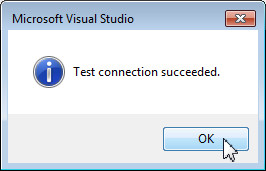
Click OK in the Test connection succeeded dialog box. Click OK in the Add Connection dialog box.

-
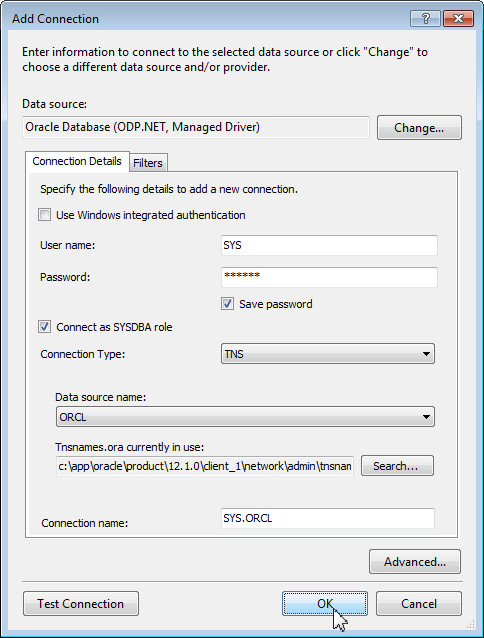
Your HR connection has been created. Similarly, you also need to create a SYS connection. Right-click on Data Connections in Server Explorer. Choose Add Connection. Enter SYS for User name and enter the SYS password in the Password field. Check Save password and Connect as SYSDBA role. Select Data source name with the SYS schema, such as ORCL. Click Test Connection.


-
Click OK in the Test connection succeeded dialog box. Click OK in the Add Connection dialog box.
Creating the PL/SQL Package and Package Body
In this topic, you create a PL/SQL Package and Package Body that determines whether each number in a PL/SQL array is a prime number and then create a new row in the JOBS table using a PL/SQL record. Perform the following steps:
-
In the Server Explorer panel, right-click HR.ORCL and select Query Window.

-
Copy the code in the PLSQL_Debug_Package.txt file, that you downloaded into your working directory, and paste it into the Query Window and click Execute.
CREATE OR REPLACE PACKAGE "HR"."OBE" IS
-- types for associative arrays that client will pass as arguments
TYPE "T_IN_VALUES" IS TABLE OF NUMBER INDEX BY BINARY_INTEGER;
TYPE "T_OUT_VALUES" IS TABLE OF NUMBER INDEX BY BINARY_INTEGER;

-- procedure that accepts two associative arrays
-- determines if an element is likely prime and
-- sets value in output array
PROCEDURE "DETERMINE_PRIMES" ("P_IN_VALUES" IN T_IN_VALUES,
"P_OUT_VALUES" OUT T_OUT_VALUES);

-- function that determines if a number is likely prime
FUNCTION "IS_PRIME" ("P_NUMBER" IN NUMBER) RETURN NUMBER;

-- constants used to return values from function
IS_NOT_A_PRIME CONSTANT NUMBER DEFAULT 0;
IS_A_PRIME CONSTANT NUMBER DEFAULT 1;

-- pl/sql record type for the jobs table
"JOBS_REC" jobs%rowtype;

-- pl/sql procedure to add new job to jobs table
PROCEDURE "ADD_NEW_JOB" ("P_JOB_ID" IN JOBS.JOB_ID%TYPE,
"P_JOB_TITLE" IN JOBS.JOB_TITLE%TYPE,
"P_MIN_SALARY" IN JOBS.MIN_SALARY%TYPE,
"P_MAX_SALARY" IN JOBS.MAX_SALARY%TYPE);

END "OBE";
-
The PL/SQL Package was executed successfully.

-
Copy the code in the PLSQL_Debug_Packagebody.txt file, that you downloaded into your working directory, and paste it into the Query Window and click Execute.
CREATE OR REPLACE PACKAGE BODY "HR"."OBE" IS
-- procedure that processes the incoming associative arrays
-- calls the method IS_PRIME to determine if element is likely prime
PROCEDURE "DETERMINE_PRIMES" ("P_IN_VALUES" IN T_IN_VALUES,
"P_OUT_VALUES" OUT T_OUT_VALUES) IS
BEGIN
-- loop through each element in the incoming array
-- and set the value for the corresponding element
-- in the out array
for i in p_in_values.first..p_in_values.last
loop
p_out_values(i) := is_prime(p_in_values(i));
end loop;
END "DETERMINE_PRIMES";
-- private function to determine if a number is likely prime
FUNCTION "IS_PRIME" ("P_NUMBER" IN NUMBER) RETURN NUMBER IS
l_sqrt number := 0;
l_sqrt_ceil number := 0;
l_divisor number := 0;
l_divisor_squared number := 0;
begin
-- prime numbers must be >= 2
if p_number < 2 then
return IS_NOT_A_PRIME;
end if;
-- only integers can be prime
if p_number != ceil(p_number) then
return IS_NOT_A_PRIME;
end if;
-- 2 is the only even prime, so it is a special case
if p_number = 2 then
return IS_A_PRIME;
end if;
-- eliminate all other even numbers
if mod(p_number,2) = 0 then
return IS_NOT_A_PRIME;
end if;
-- if the sqrt of the number is an integer, the number is not prime
l_sqrt := sqrt(p_number);
l_sqrt_ceil := ceil(l_sqrt);
if l_sqrt = l_sqrt_ceil then
return IS_NOT_A_PRIME;
end if;
-- the number has passed the basic elimination tests and may be prime
-- loop through set of odd divisors to determine if number is prime
l_divisor := 3;
for i in 1..l_sqrt_ceil
loop
l_divisor_squared := l_divisor * l_divisor;
-- if l_divisor is a factor of p_number, then not a prime
if mod(p_number,l_divisor) = 0 and l_divisor_squared < p_number then
return IS_NOT_A_PRIME;
end if;
-- no factor found, therefore number is likely a prime
if l_divisor_squared > p_number then
return IS_A_PRIME;
end if;
l_divisor := l_divisor + 2;
end loop;
END "IS_PRIME";
-- pl/sql procedure to add new job to jobs table
PROCEDURE "ADD_NEW_JOB" ("P_JOB_ID" IN JOBS.JOB_ID%TYPE,
"P_JOB_TITLE" IN JOBS.JOB_TITLE%TYPE,
"P_MIN_SALARY" IN JOBS.MIN_SALARY%TYPE,
"P_MAX_SALARY" IN JOBS.MAX_SALARY%TYPE) IS
BEGIN
-- use the package variable JOBS_REC to create new record
jobs_rec.job_id := p_job_id;
jobs_rec.job_title := p_job_title;
jobs_rec.min_salary := p_min_salary;
jobs_rec.max_salary := p_max_salary;
-- insert the job record into the table
insert into jobs (job_id, job_title, min_salary, max_salary)
values (jobs_rec.job_id, jobs_rec.job_title,
jobs_rec.min_salary, jobs_rec.max_salary);
END "ADD_NEW_JOB";
END "OBE";
-
The PL/SQL Package Body was executed successfully.

-
In the Server Explorer for the HR.ORCL Connection, expand Packages > OBE to see the list of objects that were created.

-
Right-click the OBE Package root node (not the Package Body node) and select Compile Debug. This action enables debugging of the package by adding debugging metadata.

Note that all of the package icons under the OBE root node change color to indicate that they have been compiled with debug metadata. This is to remind you to do a normal compile later.

-
The package compiles successfully and the result is displayed in the Output window.

Creating a Project in Visual Studio
The following steps will show you how to create a project in Visual Studio:
-
From the File menu, select New > Project.

-
Choose Project Type as Visual C# : Windows. Select the template Console Application and enter plsqldebugobe1 as the name of the project. Choose the location where you want the project file to be stored (Note: if the directory does not exist, it is created). Then click OK.

-
The project has been created. Now you can add a reference.

-
Select Project > Add Reference...

-
Select Extensions menu on the side bar. Scroll down the list of extensions and select Oracle.DataAccess and click OK.
Note: There may be several versions of ODP.NET listed. The first digit in the version number, (for example "4") represents the version of the .NET framework it is designed for. The rest of the digits represent the Oracle version number.


-
Copy the code in the PLSQL_Debug_csharpcode.txt that you downloaded into your working directory, and paste it into the Program.cs window in Visual Studio. Then right-click on the Program.cs tab and select Save Program.cs or use the shortcut key Ctrl + S.
using System; using System.Data; using Oracle.DataAccess.Client; using Oracle.DataAccess.Types; namespace plsqldebugobe1 { ////// Summary description for Class1. /// class Program { ////// The main entry point for the application. /// [STAThread] static void Main(string[] args) { // constants used to represent values returned // from the pl/sql procedure call const int IS_NOT_A_PRIME = 0; const int IS_A_PRIME = 1; // display progress message Console.WriteLine("Testing array for prime numbers...\n"); // connection string: adjust for your environment string constr = "User Id=hr; Password=hr; Data Source=ORCL; enlist=false; pooling=false"; // create and open connection object OracleConnection con = new OracleConnection(constr); con.Open(); // create command object for the function call OracleCommand cmd = new OracleCommand(); cmd.Connection = con; cmd.CommandText = "OBE.determine_primes"; // set the proper command type cmd.CommandType = CommandType.StoredProcedure; // parameter object for the input array OracleParameter p_in_values = new OracleParameter(); p_in_values.OracleDbType = OracleDbType.Decimal; p_in_values.CollectionType = OracleCollectionType.PLSQLAssociativeArray; p_in_values.Value = new decimal[10]{1, 2, 3, 4, 5, 6, 7, 8, 9, 10}; p_in_values.Size = 10; p_in_values.Direction = ParameterDirection.Input; // parameter object for the output array OracleParameter p_out_values = new OracleParameter(); p_out_values.OracleDbType = OracleDbType.Decimal; p_out_values.CollectionType = OracleCollectionType.PLSQLAssociativeArray; p_out_values.Value = null; p_out_values.Size = 10; p_out_values.Direction = ParameterDirection.Output; // add parameters to the collection // they must be added in the proper // order when using bind by position (the default) cmd.Parameters.Add(p_in_values); cmd.Parameters.Add(p_out_values); // execute the pl/sql procedure to populate output array cmd.ExecuteNonQuery(); // display results to console window for (int i = 0; i < p_in_values.Size; i++) { foreach (OracleParameter p in cmd.Parameters) { // the input array is treated as System.Decimal[] // within the .NET code if (p.Value is System.Decimal[]) { Console.Write("The Number {0} ", ((p.Value as System.Decimal[])[i]).ToString()); } // the output array is treated as OracleDecimal[] // within the .NET code if (p.Value is OracleDecimal[]) { if (((p.Value as OracleDecimal[])[i]).ToInt32() == IS_NOT_A_PRIME) { Console.WriteLine("is not a prime number!"); } else if (((p.Value as OracleDecimal[])[i]).ToInt32() == IS_A_PRIME) { Console.WriteLine("is a prime number!"); } } } } // display a separator line Console.WriteLine(); // display progress message Console.WriteLine("Using PL/SQL record...\n"); // remove parameters from command collection // and set new command text cmd.Parameters.Clear(); cmd.CommandText = "obe.add_new_job"; // parameter object for the job_id OracleParameter p_job_id = new OracleParameter(); p_job_id.Value = "IT_DBA"; // parameter object for the job_title OracleParameter p_job_title = new OracleParameter(); p_job_title.Value = "Database Administrator"; // parameter object for the min_salary OracleParameter p_min_salary = new OracleParameter(); p_min_salary.OracleDbType = OracleDbType.Decimal; p_min_salary.Value = 10000; // parameter object for the max_salary OracleParameter p_max_salary = new OracleParameter(); p_max_salary.OracleDbType = OracleDbType.Decimal; p_max_salary.Value = 15000; // add parameters to collection cmd.Parameters.Add(p_job_id); cmd.Parameters.Add(p_job_title); cmd.Parameters.Add(p_min_salary); cmd.Parameters.Add(p_max_salary); // execute the pl/sql procedure to add new job cmd.ExecuteNonQuery(); // display simple message to indicate procedure completed Console.WriteLine("New job successfully created!"); // display a separator line Console.WriteLine(); // Simple prompt to prevent the console from closing // when running from the IDE Console.WriteLine("Press ENTER to continue..."); Console.ReadLine(); // clean up objects p_max_salary.Dispose(); p_min_salary.Dispose(); p_job_title.Dispose(); p_job_id.Dispose(); p_out_values.Dispose(); p_in_values.Dispose(); cmd.Dispose(); con.Dispose(); } } }
Configuring the Debugging Environment
There are a few properties and options that need to be configured before you can use the debugging environment. Perform the following steps:
-
Click on the name of the project in solution explorer so that it is highlighted. Then in the Visual Studio menu select Project > plsqldebugobe1 Properties...

-
Select Debug.

-
Deselect Enable the Visual Studio hosting process. Right-click the plsqldebugobe1 tab and select Save Selected Items or use the shortcut key Ctrl + S.


-
Select Tools > Options....

-
Scroll down and expand Oracle Developer Tools. Select PL/SQL Debugging. In the available Database Connections, click the checkbox in front of the HR.ORCL connection. Notice that you see an IP address dropdown box and a TCP/IP port range. During PL/SQL debugging, the Oracle Database connects to Visual Studio via TCP/IP on an IP address and on a random port within this range. If your machine has multiple IP addresses make sure to choose one that the Oracle database can connect to. Make sure the port range specified represents open ports on your machine and that they are not blocked by a firewall. Click OK

-
Select Tools > Oracle Application Debugging.

If you select the Tools menu again, you should see a checkmark in front of the menu item.

Granting Privileges for Debugging
Before you can use the debugger, you need to grant DEBUG CONNECT SESSION and DEBUG ANY PROCEDURE permission to the HR user. And if your database is Oracle 12.1 or later, security ACLs must also be registered with the database to enable connections to your IP address and port range. Perform the following steps:
-
In the Server Explorer panel, expand SYS.ORCL > Schemas and right-click on HR and select Grant Debugging Privileges....

-
The Grant Debugging Privileges window appears. The values in the IP Address, Starting Port Number and Ending Port Number field are populated automatically because of the previous steps. If the values provided are not acceptable, change them. Click OK. Note: For Oracle databases earlier than version 12, IP address and port fields will not appear in this dialog.

-
The debugging privilege has been successfully granted. You will receive a success message in the Output window.

Setting Breakpoints
In this topic, you set some breakpoints in both your C# and PL/SQL code to stop the debugger during execution. Perform the following steps:
-
Click the Program.cs tab and locate the cmd.ExecuteNonQuery() statement.

-
In the Program.cs code, create a breakpoint at the cmd.Parameters.Add(p_out_values) statement. Click anywhere on the line, right-click and select Breakpoint, then select Insert Breakpoint.

-
The breakpoint indicator is shown.

-
Create another breakpoint after the cmd.ExecuteNonQuery() statement.

-
In the Server Explorer, expand HR.ORCL > Packages > OBE. Double-click DETERMINE_PRIMES to open the code.

-
Create a breakpoint at the first statement after the BEGIN statement in the DETERMINE_PRIMES procedure.


-
From the list of procedures, select ADD_NEW_JOB.

-
Create a breakpoint at the first statement after the BEGIN statement.


-
Click the Program.cs tab.

Debugging PL/SQL
In this topic, you will execute the program using the debugger. Perform the following steps:
-
Now you are ready to debug your program. Select Debug > Start Debugging.

-
The debugger stops at the first breakpoint. To see the variables and their values, click the Local tab at the bottom of the window. Have a look at the code leading up to this breakpoint to understand how an array bind parameter is set up.

-
To move to the next line, click the Step Into icon.

-
You are at the statement that executes the PL/SQL Procedure. Click the Step Into icon.

-
The next breakpoint is reached in the DETERMINE_PRIMES procedure. Notice that the P_IN_VALUES is an array of length 10 so the loop will be performed 10 times. Click the Continue icon to see the values in the Local window change.

-
Click on the + icon next to the P_IN_VALUES variable name in the Locals window to view the contents of the input array. This is the array of values that was passed into this stored procedure from the C# application. Continue stepping through the code for a while. You can also expand the P_OUT_VALUES array to watch as it gets filled with values that are eventually returned by this stored procedure.

-
Click the Call Stack tab in the lower right window. By examining the call stack, you can determine the code path to the current point in the execution of your program.

-
Disable this breakpoint so the program continues to the next breakpoint. Right-click the breakpoint and select Disable Breakpoint. You can also click directly on the red circle breakpoint icon to delete the breakpoint.

-
Click the Continue icon so that the program executes until the next Breakpoint.

-
The debugger has returned to the C# code. In the Locals window expand the p_out_values variable and look at the Value member to view the results of the call to the DETERMINE_PRIMES. Then click Step Into a few more times.

-
Click the Continue icon again to go to the next Breakpoint.

-
The ADD_NEW_JOB procedure breakpoint is reached.

-
If you want to view the JOBS_REC PL/SQL record global variable, you need to create a watch. Select JOBS_REC and right-click, then select Add Watch. Notice that the Watch tab at the bottom of the window is automatically selected.

-
The Watch window is a built-in window in Visual Studio that allows you to examine specific program variables. Expand the JOBS_REC Watch.

-
Click Step Into 4 times to see the Watch get populated. Then click Continue.

-
When the program finishes executing the results are shown.

-
Remember to uncheck the Oracle Application Debugging option in the Tools menu of Visual Studio. If you forget to uncheck this, you will get connection errors when you try to connect to Oracle later.

Summary
In this tutorial, you have learned how to:
- Add a connection to the database, set debugging options, and grant privileges for debugging
- Create a package and package body and compile them with debug metadata
- Create a project and configure the debug environment
- Debug .NET code, step into PL/SQL stored procedure code with live data, and stepping back into the .NET code again
Resources
- See the "PLSQL Debugging Checklist" in the "Oracle PL/SQL Debugger" section of the Oracle Developer Tools for Visual Studio online help.
- Visit the Oracle Technology Network Portal to learn the latest developments in Oracle .NET.
- To learn more about Oracle .NET with Visual Studio refer to additional OBEs in the Oracle Learning Library.
Credits
- Lead Curriculum Developer: Ashwin Agarwal
- Other Contributors: Alex Keh, Christian Shay
To navigate this Oracle by Example tutorial, note the following:
- Topic List:
- Click a topic to navigate to that section.
- Expand All Topics:
- Click the button to show or hide the details for the sections. By default, all topics are collapsed.
- Hide All Images:
- Click the button to show or hide the screenshots. By default, all images are displayed.
- Print:
- Click the button to print the content. The content that is currently displayed or hidden is printed.
To navigate to a particular section in this tutorial, select the topic from the list.