Last updated: 04/17/15 01:30 pm EDT
Before You Begin
Purpose
In this tutorial, you have learn how to:
- Create Database Application
- Make Some Changes to Items on Your Page
- Create an enable/disable standard dynamic action
- Create a Set Value dynamic action using a SQL Statement
- Create a Set Value dynamic action using PL/SQL
- Use a Plugin in a dynamic action
- Create a dynamic action on a button
Time to Complete
Approximately 60 minutes.
Introduction
What are Dynamic Actions?
In APEX, Dynamic Actions provide developers with a way to define client-side behavior declaratively without the need to know JavaScript. Using a simple wizard, developers can select a page item, a condition, enter a value, and select an action (for example, Show, Hide, Enable, and Disable). Previously, this involved hand crafting JavaScript and AJAX but now many Dynamic Actions require zero coding using the built-in wizards.
Prerequisites
Before starting this tutorial, you should have:
- Install Oracle Database 11g or later.
- Install Oracle Application Express Release 5.0.
- Download and unzip the files.zip file into a working directory to use during this tutorial.
- Create a workspace and user to perform this tutorial.
Creating a Database Application
To create a database application with a few initial pages, log into your application express workspace and perform the following steps:
-
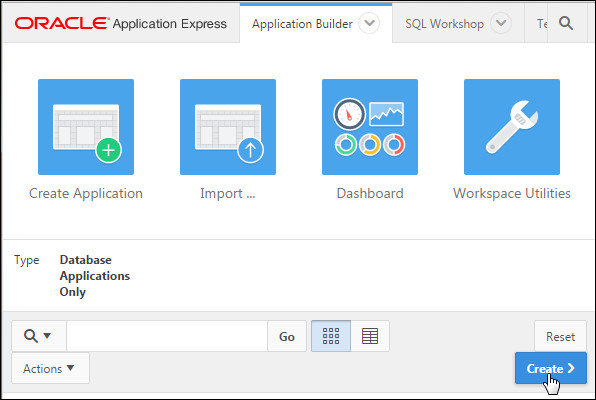
From the Oracle Application Express home page, click the down arrow next to the Application Builder tab and select Applications > Database Applications.

-
Click Create >.
- For Name, enter Human Resources
Application. Keep the default value of
Universal Theme(42) for the Theme and click Next
>.

- Click Next.
- Click Next.

- Select the DD-MON-YYYY Date Format for
your application and click Next.

- Click Create Application.

- On Application Page, click Create Page
button.
- You want to create an Interactive Report and a
Form on the OEHR_EMPLOYEES table. Click
Form for Page Type. Again click Form
on a Table with Report.


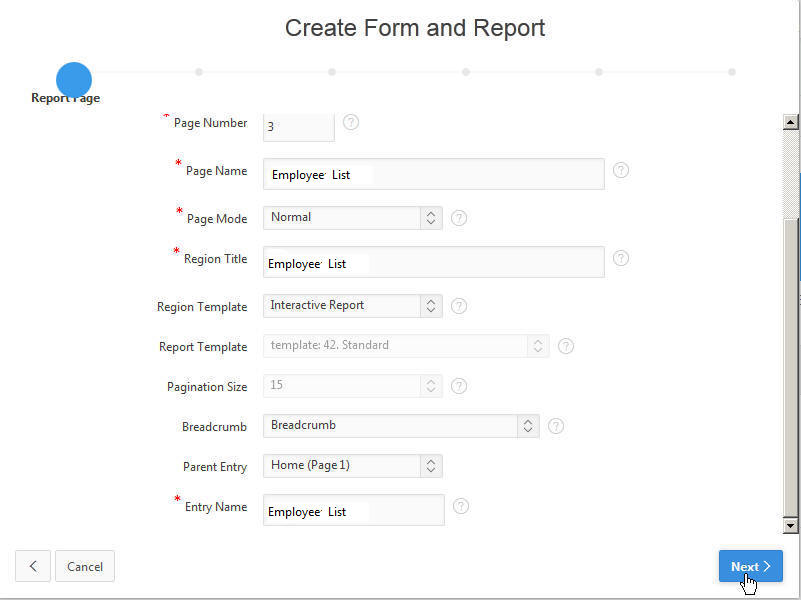
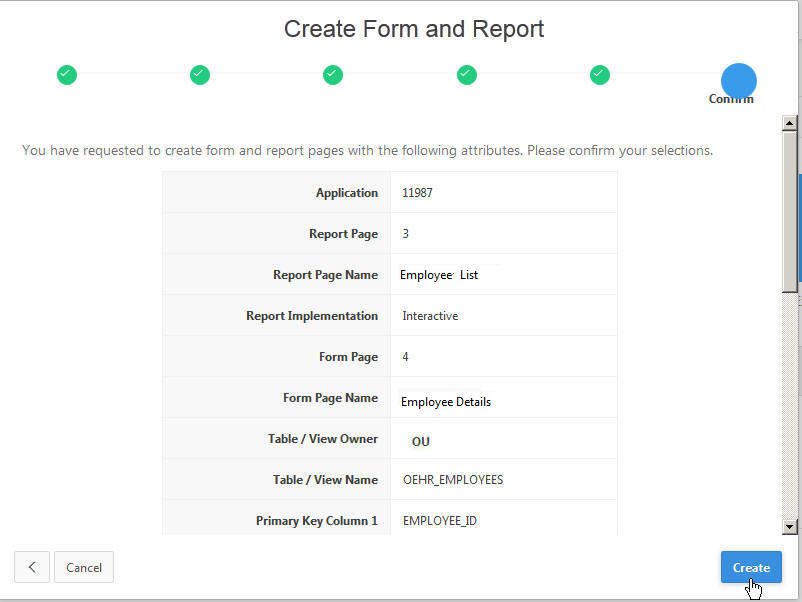
- On Create Form and Report, Enter Employee
List for Page Name and Region
title . For Breadcrumb select Breadcrumb.
For Parent Entry select Home.
Enter Employee List for Entry Name.
Click Next.
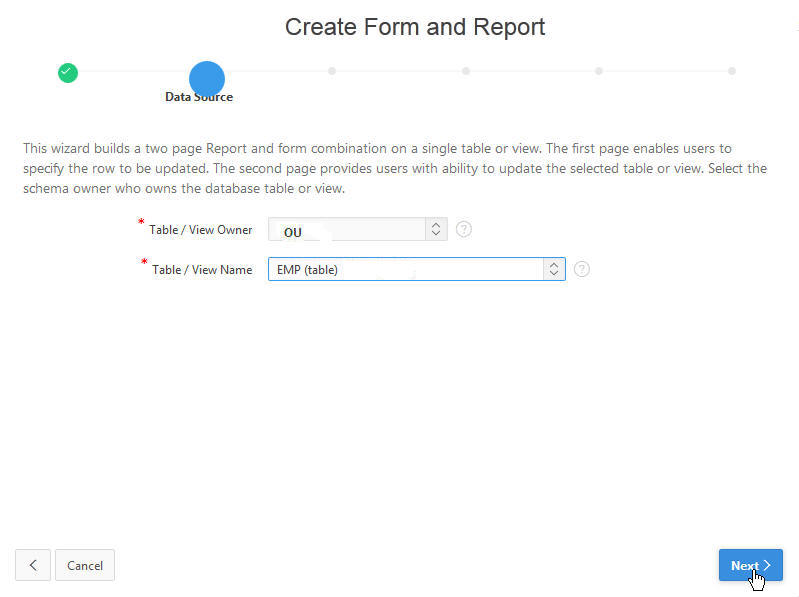
- For Table/View Name select EMP.Click
Next.
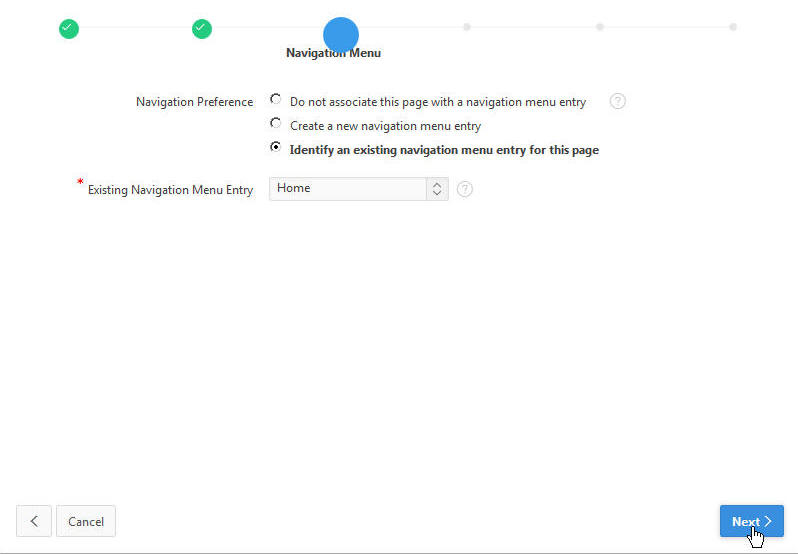
- For Navigation Preference
select Identify an existing navigation
menu entry for this page and for Existing
Navigation Menu Entry select Home.
Click Next.
- Click Next.
- Click Next.
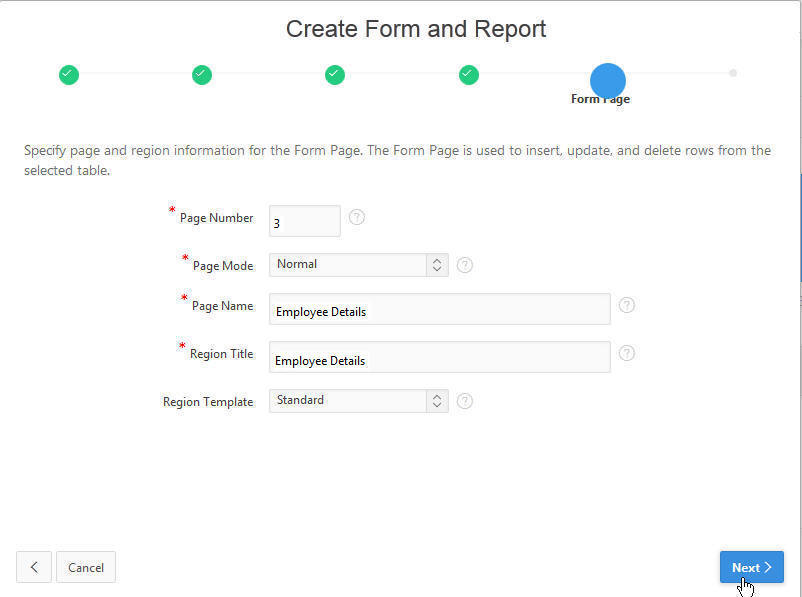
- Enter Employees Details for Page
Name and Region Title click Next
> .
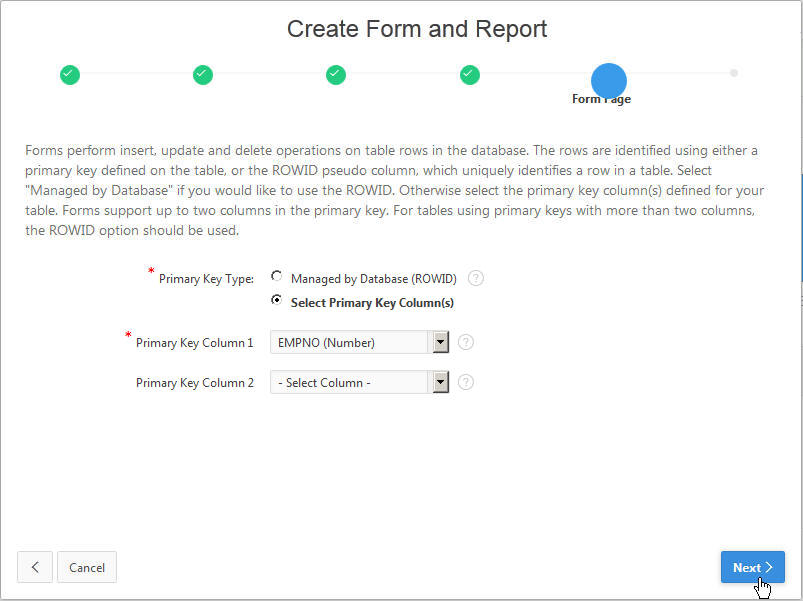
- For Primary Key Type choose Select
Primary key columns and click Next >.
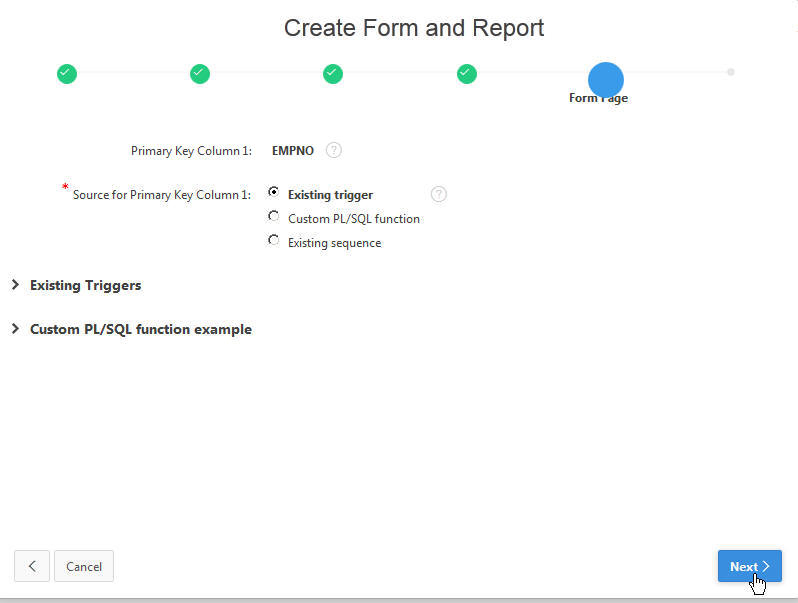
- Click Next >.
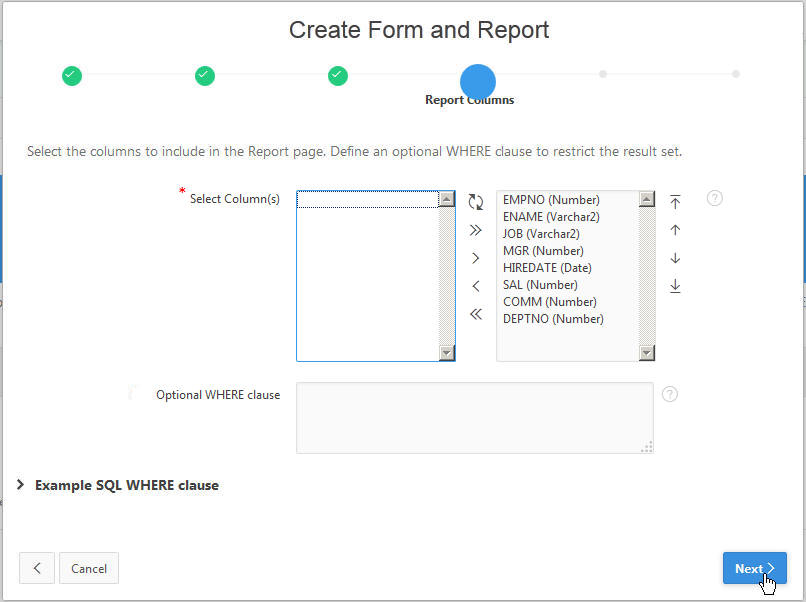
- Move the all the columns and Click Next >.
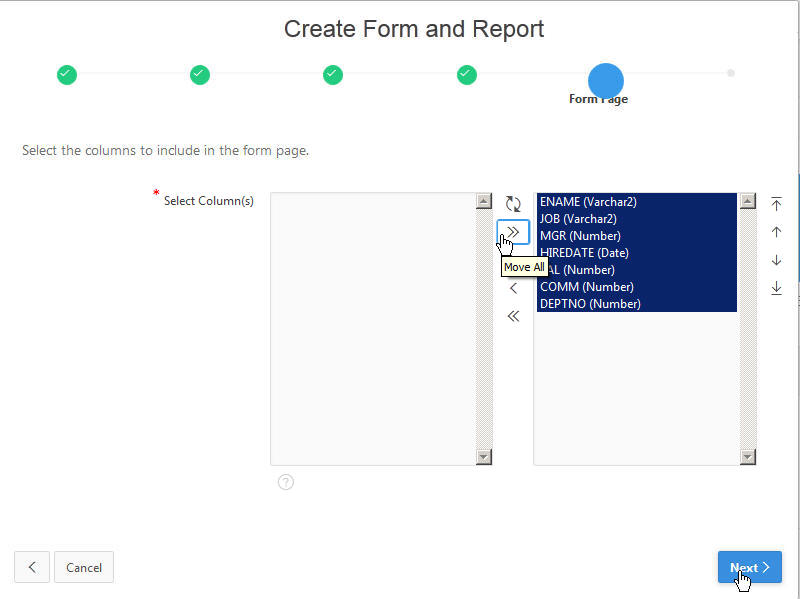
- Click Next >.

-
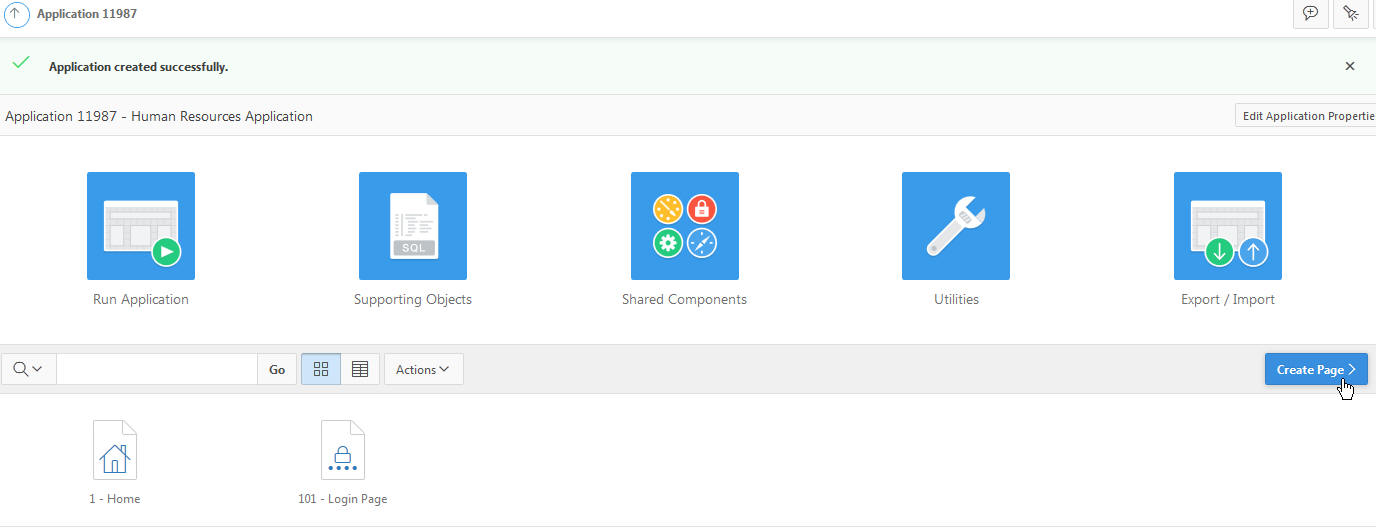
Click Create.
-
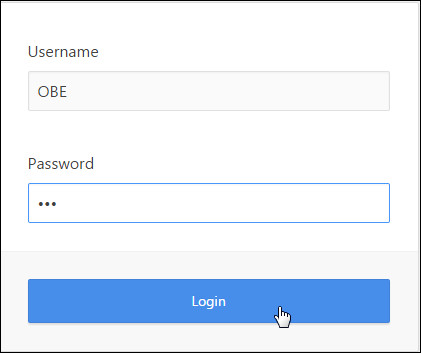
Click Save and Run button.

- Enter OBE as the Username and Password
and click Login.
-
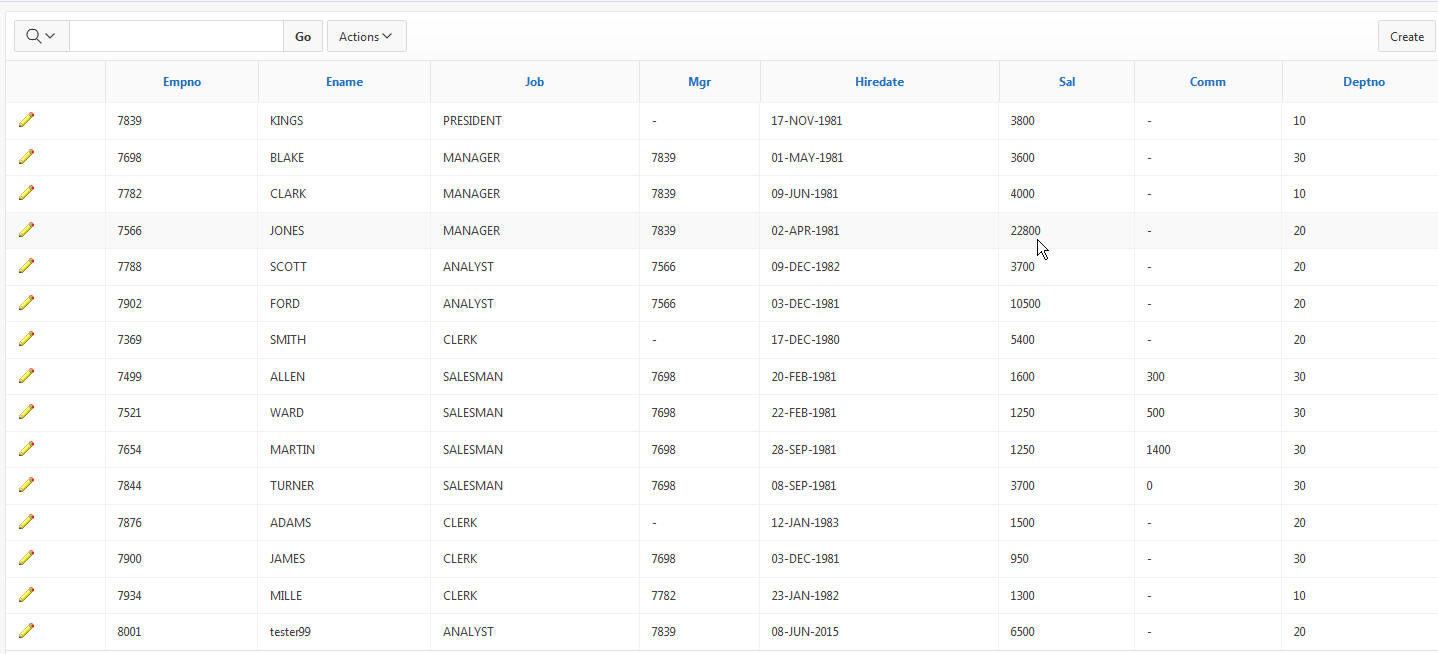
A report containing the list of employees is automatically created. Select the Edit (
 )icon next to one of
the employees to view the Form.
)icon next to one of
the employees to view the Form.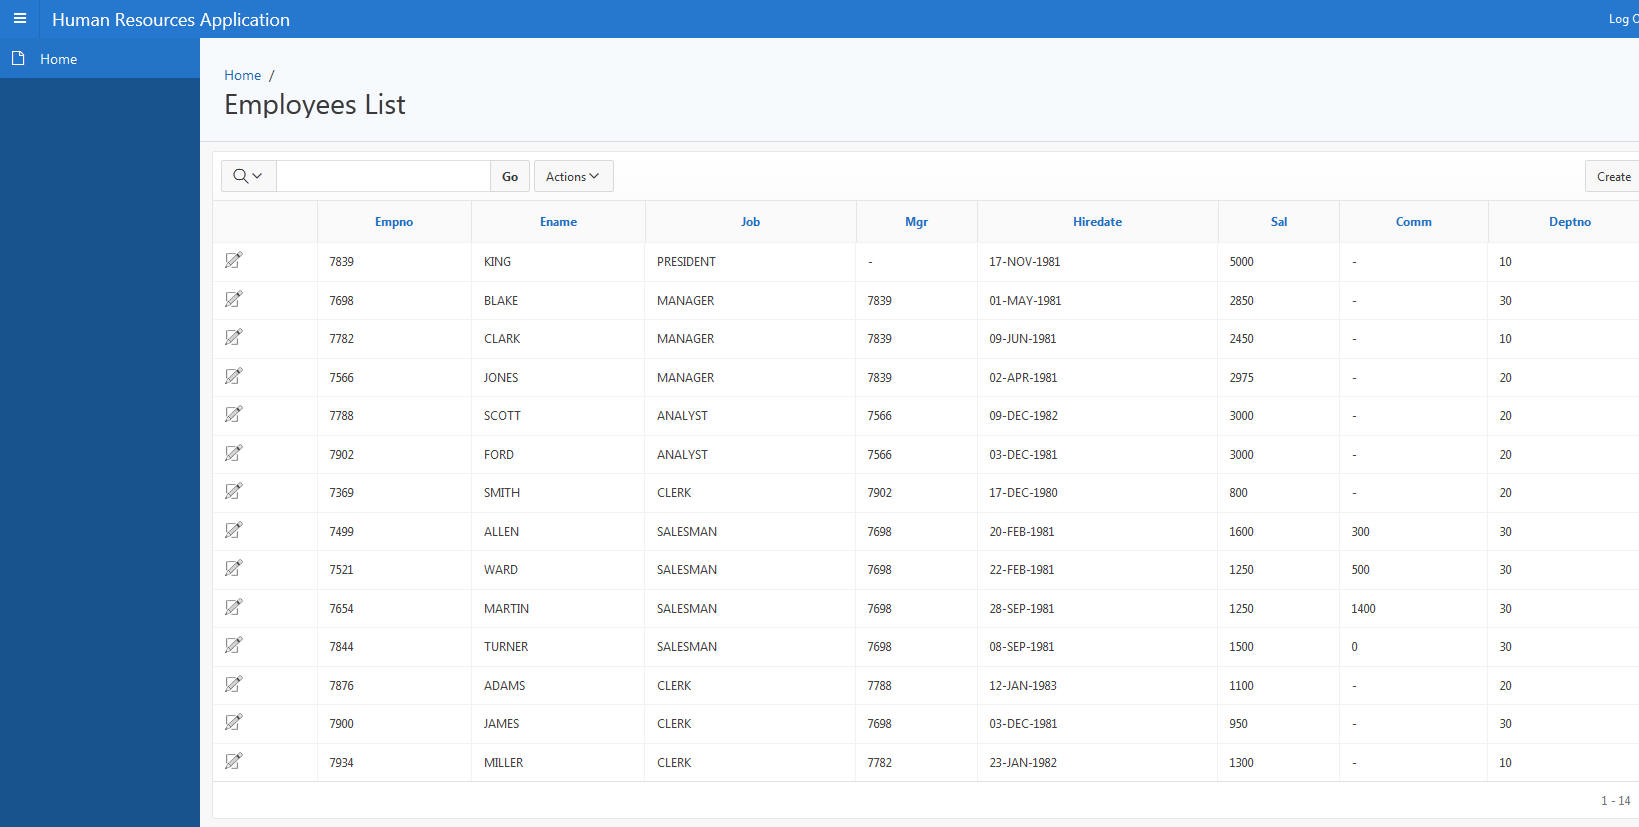
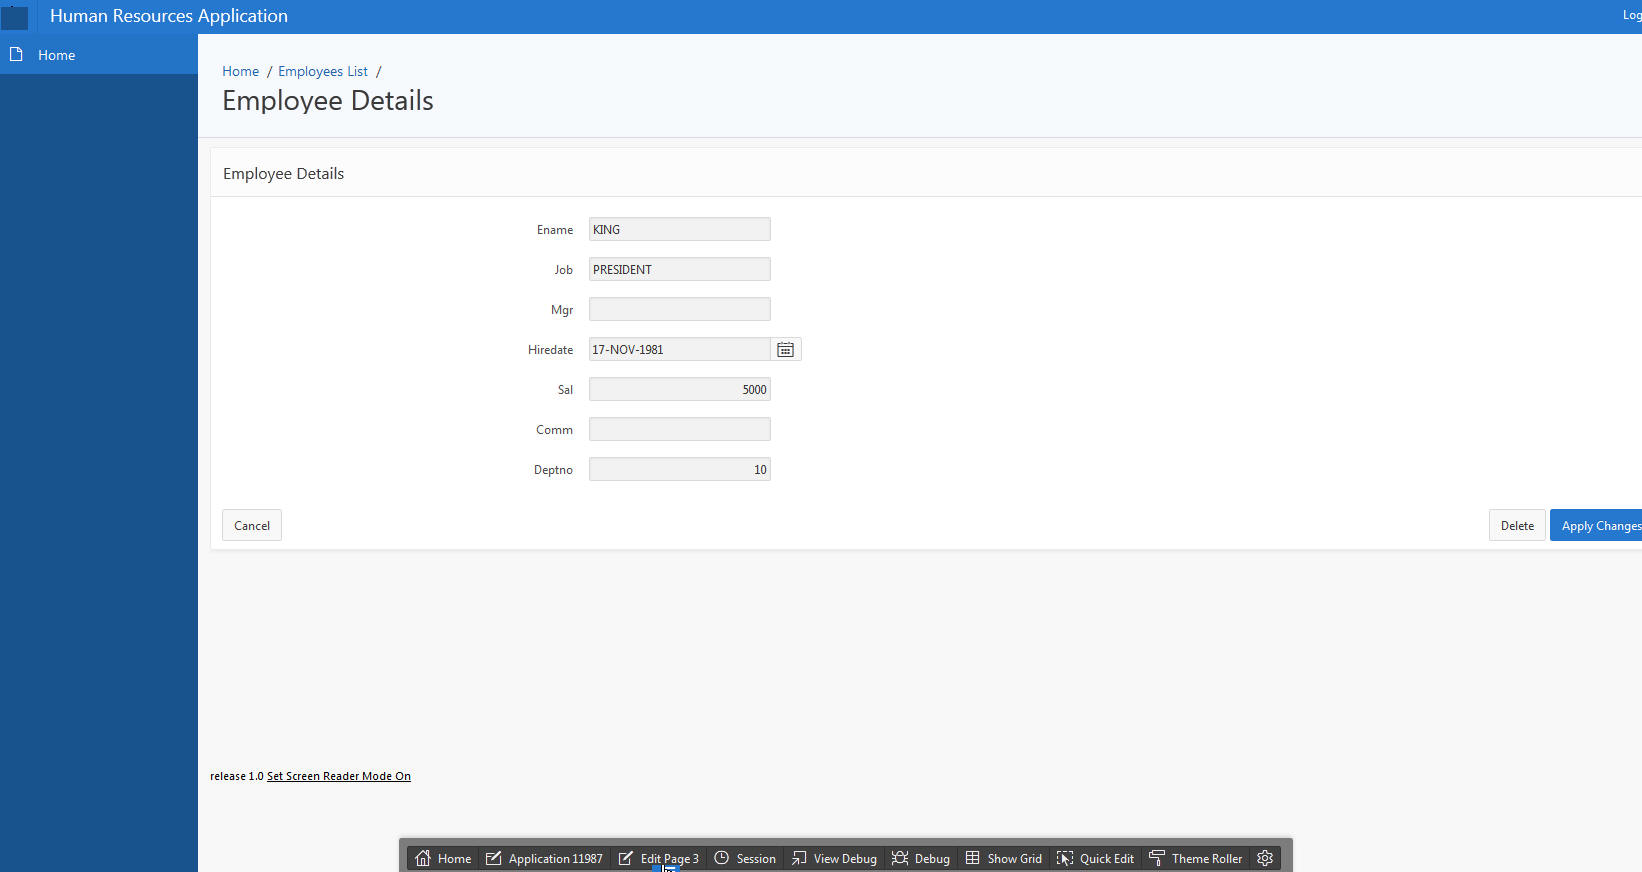
- The Form is displayed. In the next section, you
will make some changes to the items on this page.
Click Edit Page 3 in the developer
toolbar.
Making Some Changes to Items on Your Page
Before you create some Dynamic Actions, you want to make some changes to the Items on your page. Perform the following steps:
-
In the Page Item Region, locate the P3_JOB item under the Employee Details region. Click P3_JOB.

-
In the Page Item region, click the Select List quick link for Type.
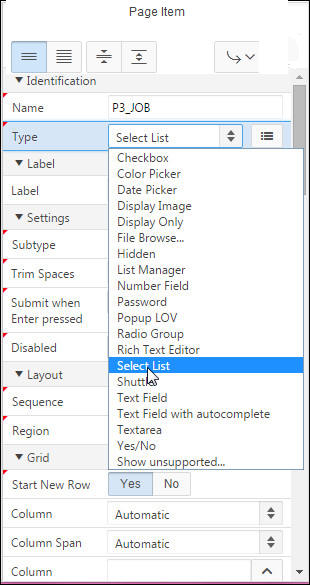
-
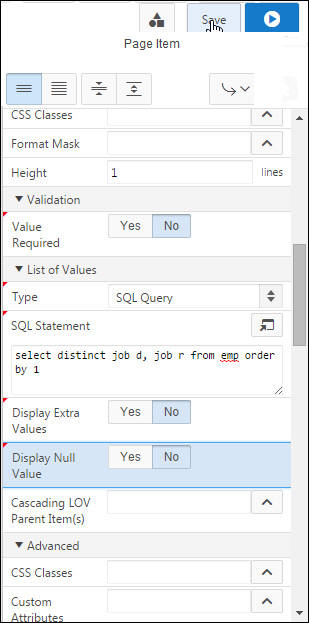
In the List of Values section, select SQL Query for Type. Select No for Display Extra Values and enter the following SQL statement in the List of values definition area.
select distinct job d, job r from emp order by 1
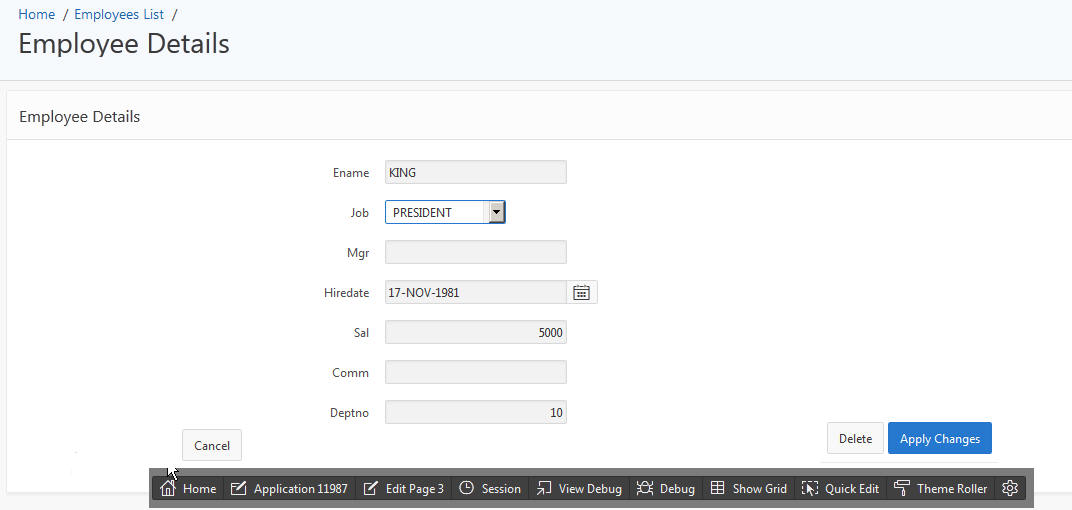
- To
test the change you just made, click
Save
and Run Page.
- Notice that Job is now a select list. You want
to make some additional changes. Click Edit
Page 3 from the developer toolbar.
-
You want to change many of the item labels. Click each item and edit the name in the Page Item section and click Save.
Item Prompt P3_ENAME Name P3_JOB Job P3_MGR Manager P3_HIREDATE Hire Date P3_SAL Salary P3_COMM Commission P3_DEPTNO Department 
- Click the Edit Page 3 icon.
You also want to change the P3_MGR (currently a
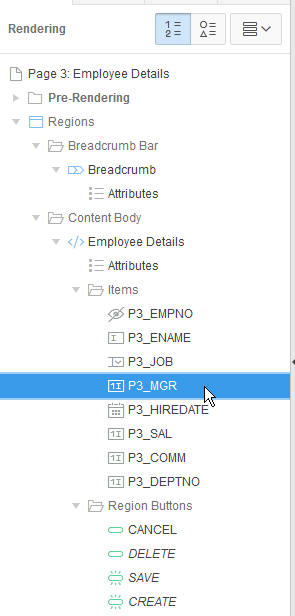
number) to a list of Manager Names. Right click P3_MGR
and select Edit.
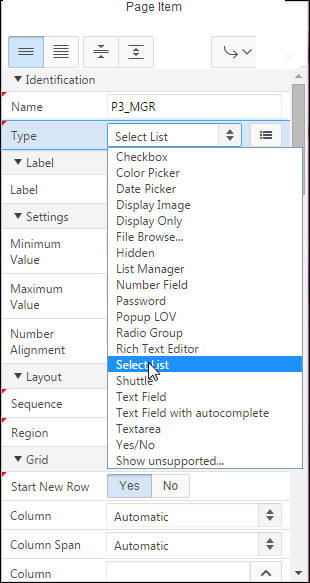
- In the Page Item, select Select
List for Type.
-
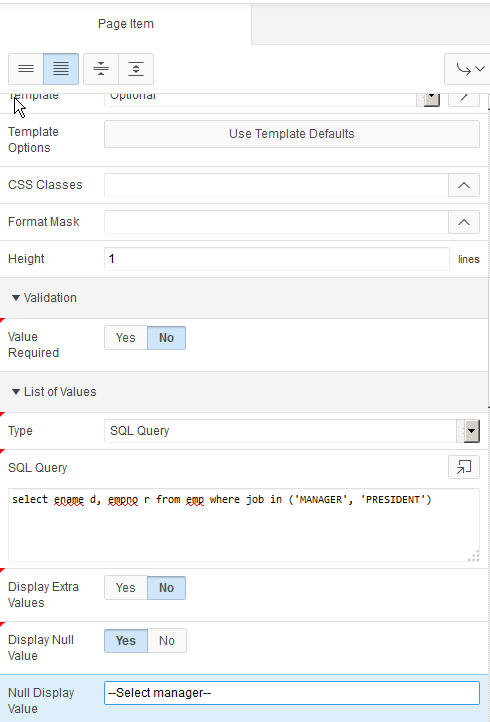
Select No for Display Extra Values, select Yes for Display Null Value, and enter -- Select Manager-- for Null Display Value. Enter the following SQL statement in the List of values definition area and click Save.
Select ename d, empno r from emp where job in ('MANAGER', 'PRESIDENT')
-
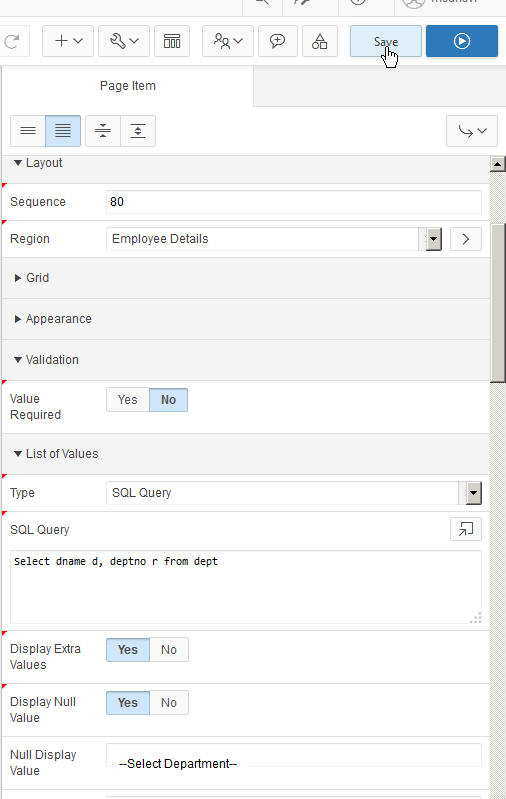
You want to change the Deptno to a list of Department Names. Click P3_DEPTNO.
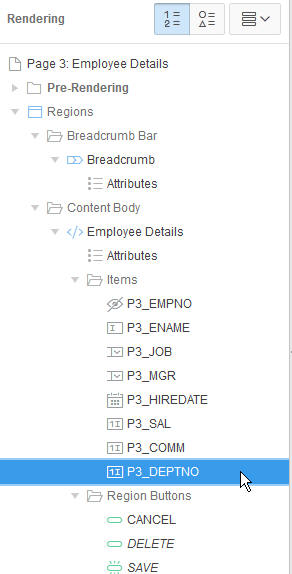
-
In the Page Item, select Select List for Type.

-
Select Yes for Display Extra Values, select Yes for Display Null Value, and enter -- Select Department -- for Null Display Value. Enter the following SQL statement in the List of values definition area and click Save.
Select dname d, deptno r from dept
-
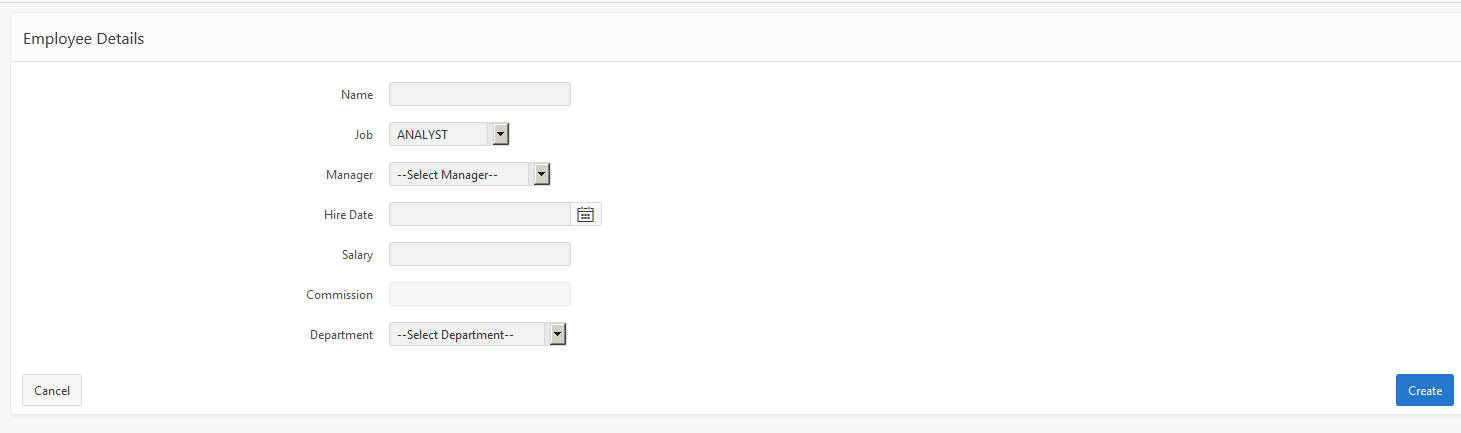
To see all the changes you made, click Save and Run Page.

-
Notice the changes to the labels, and the Job, Manager and Department fields are now select lists. In the next section, you will create a Dynamic Action to enable the Commission item only when the Job is equal to SALESMAN. Select the Edit Page 3 link in the developer toolbar.
Creating an Enable/Disable Declarative Dynamic Action
You want to create a Dynamic Action that will enable the Commission item when the Job equals SALESMAN. All other Jobs will set the Commission item to Disable. Perform the following steps:
-
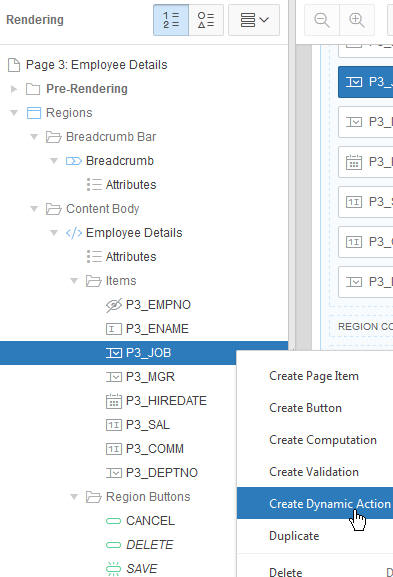
Right click P3_JOB and select Create Dynamic Action.
-
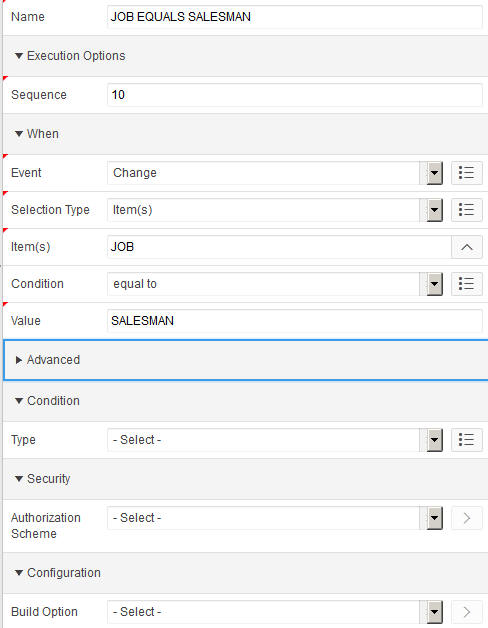
Enter JOB EQUALS SALESMAN for Name. You want the Dynamic Action to be fired when the P3_Job item is equal to SALESMAN. Because you created a dynamic action on the JOB item, the values for Selection Type, Item(s) and Condition should already be specified. Enter SALESMAN for Value.
-
Click Show in the Page Rendering section.
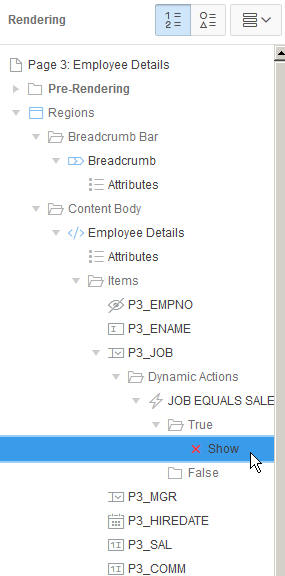
-
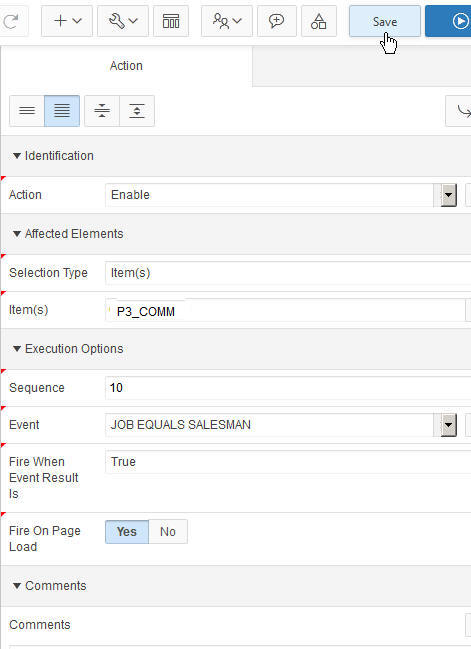
Select Enable for Specify the True Action. This action will be invoked when the value of JOB is equal to 'SALESMAN'.
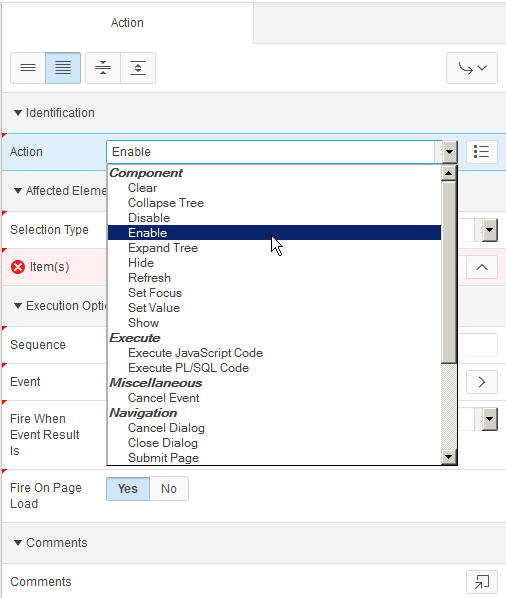
-
The item that will be enabled or disabled is Commission. Select Item(s) for Selection Type and select P3_COMM from the list of items and click Save.
-
Right-click False Action and select Create FALSE Action.
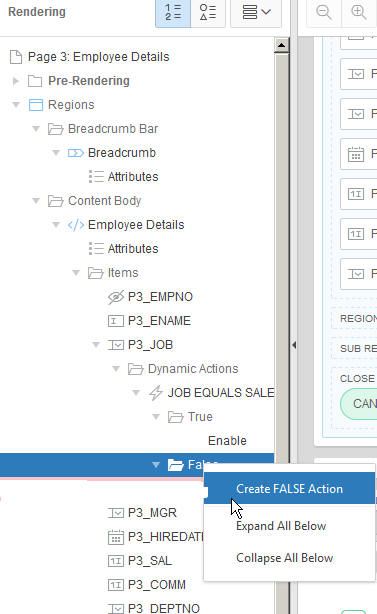
-
Select Disable for Specify the False Action. Select Item(s) for Selection Type and select P3_COMM from the list of items and click Save.
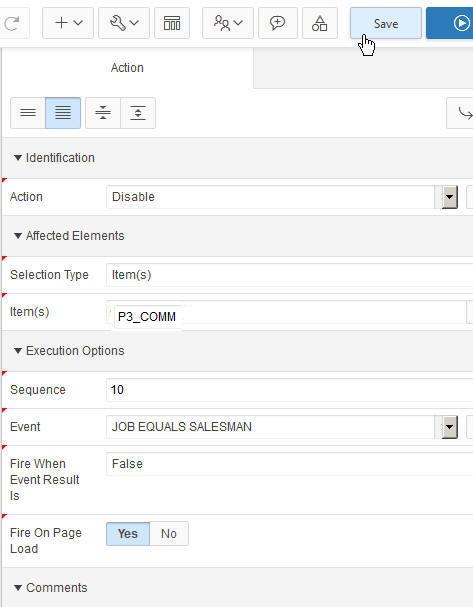
-
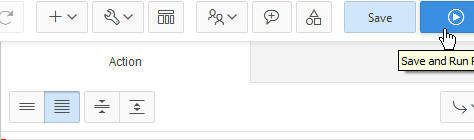
To run the page, click Run and Save Page.
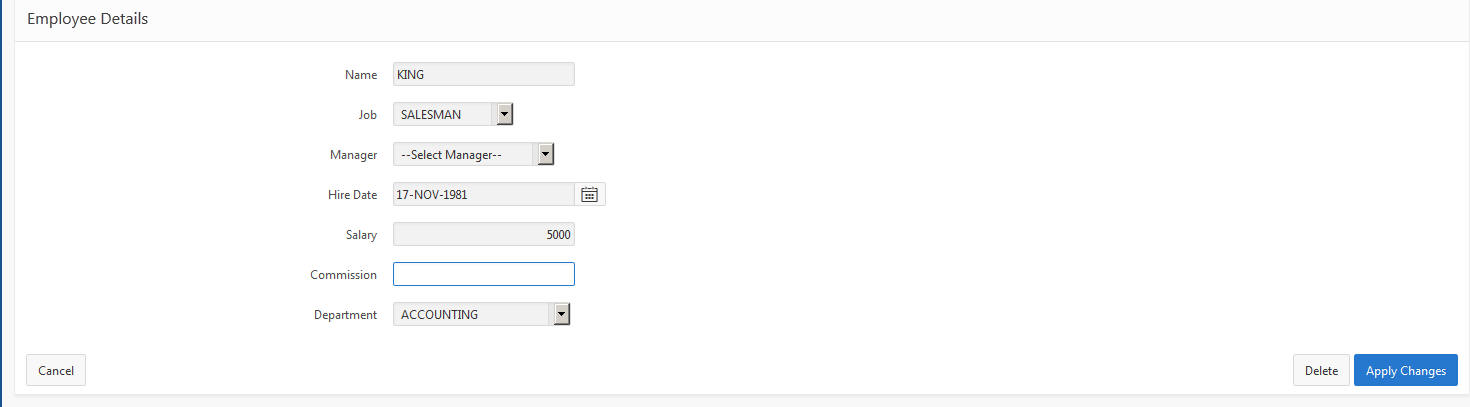
-
Notice that the Commission item is disabled because the Job is not equal to SALESMAN.
-
Change the Job to SALESMAN and notice that the Commission field gets enabled. Select the Edit Page 3 link in the developer toolbar.
Creating a Set Value Dynamic Action With a SQL Statement
In this section, you will create a set value Dynamic Action that will show the location of a Department and the number of employees when it is changed. Before you proceed, add LOCATION and NUM_EMPLOYEES columns to EMP table. Later perform the following steps:
-
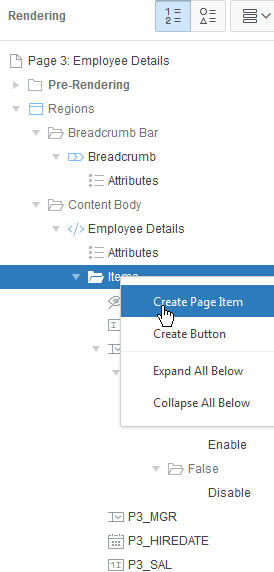
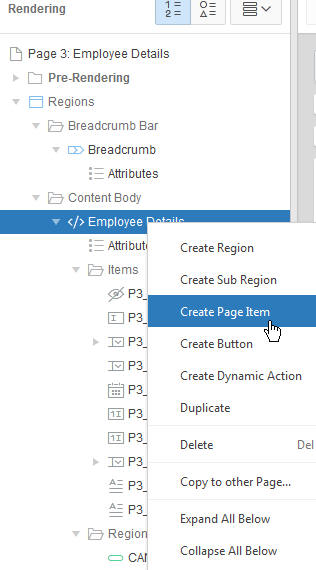
You first need to create a new item for Location. Under Employee Details, right click Items and select Create Page Item.
-
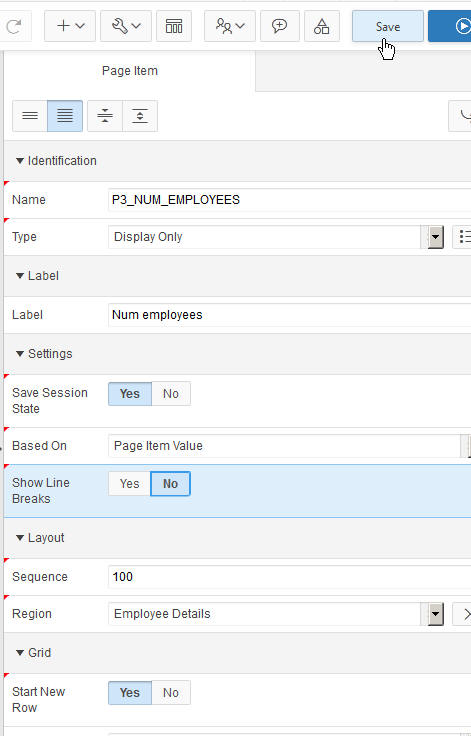
In the Page Item section, enter P3_LOCATION for the Item Name and select the Display Only Item Type. Select No for Show Line Breaks and click Save.

-
You need to create another new item for Number of Employees. Under Employee Details, right click Items and select Create Page Item.
-
In the Page Item section, enter P3_NUM_EMPLOYEES for the Item Name and select the Display Only Item Type. Select No for Show Line Breaks and click Save.
-
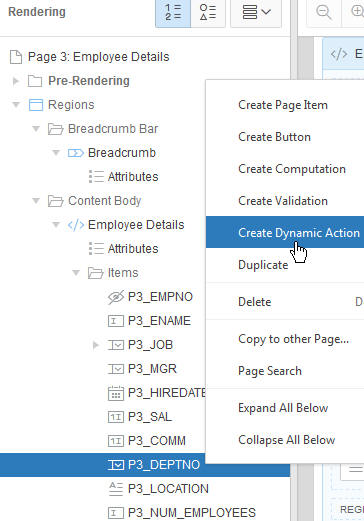
Now you can create the Dynamic Action to set the value of the new P3_LOCATION and P3_NUM_EMPLOYEES items. You want the department's location and the number of employees to be displayed when the value of the Department changes. Right click P3_DEPTNO and select Create Dynamic Action.
-
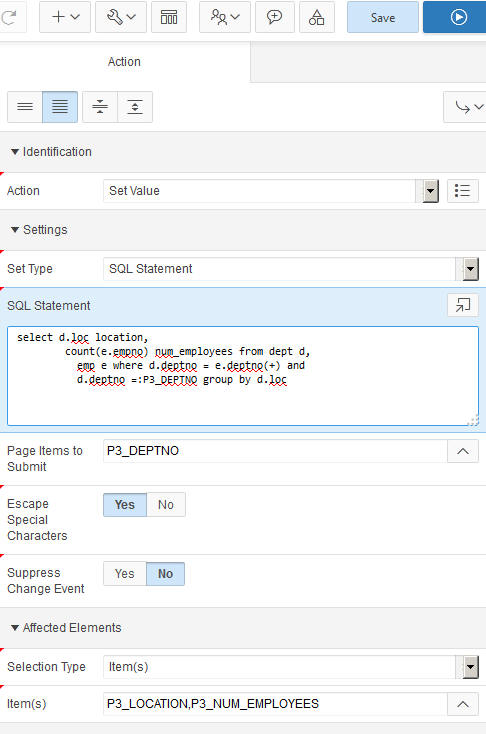
Select Set Value for Action, select SQL Statement for Set Type, enter the below SQL Statement in the area provided, and enter P3_DEPTNO for Page Items to Submit.
                                  select d.loc location,
                                  count(e.empno) num_employees from dept d, emp
                                  e where d.deptno = e.deptno(+) and d.deptno =
                                  :P3_DEPTNO group by d.loc
This page contains the page elements the dynamic action should control. In this case, you want to set the value of the P3_LOCATION, P3_NUM_EMPLOYEES items. Select Item(s) for Selection Type and select P3_LOCATION, P3_NUM_EMPLOYEES for Item(s).
-
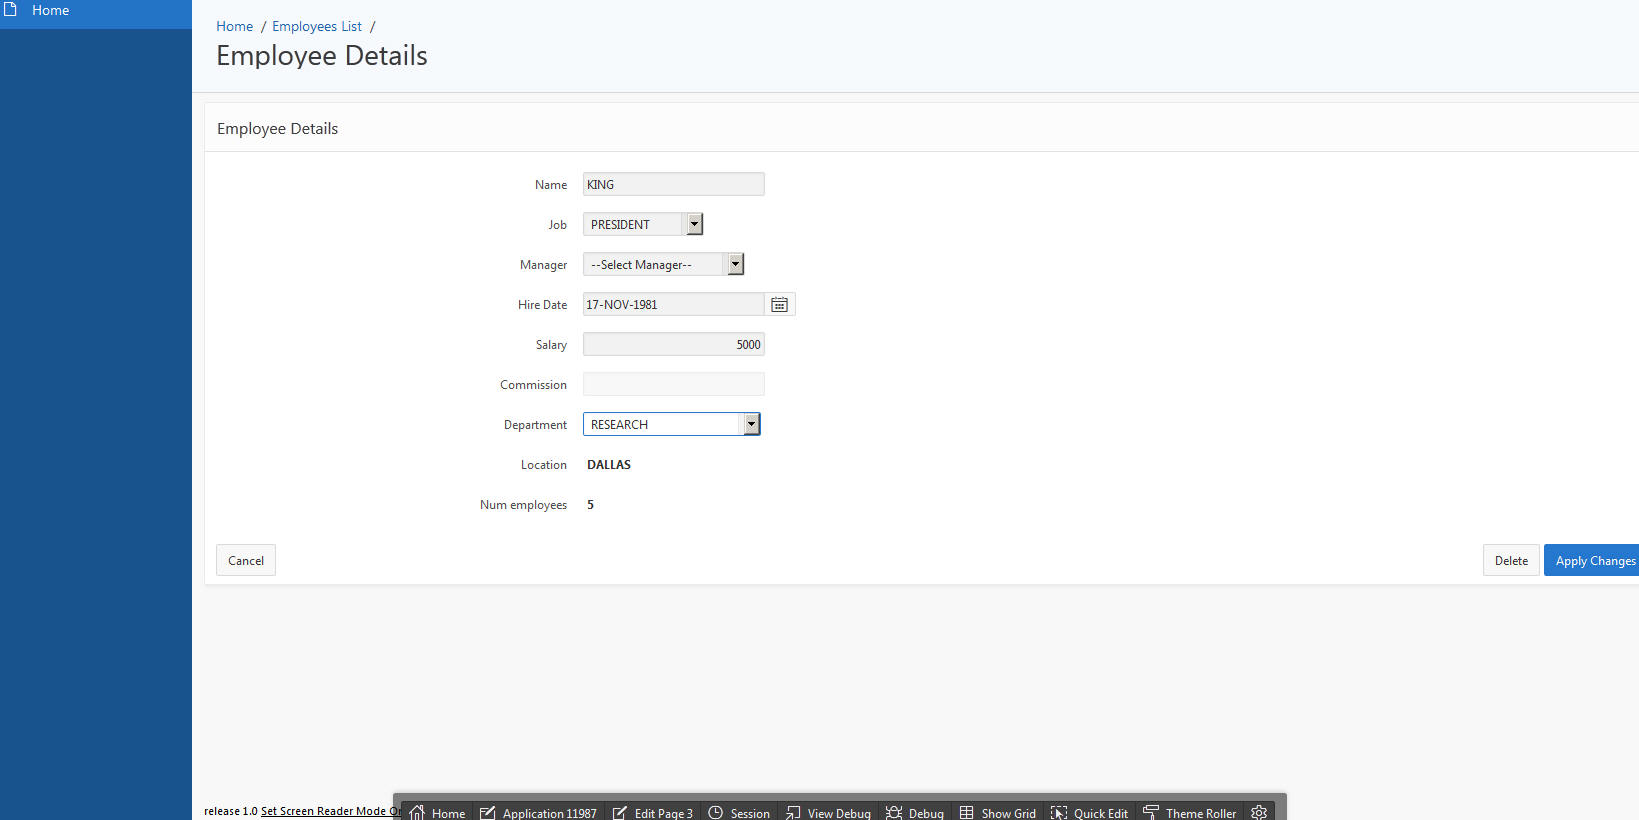
To run the page, click Save and Run Page.
-
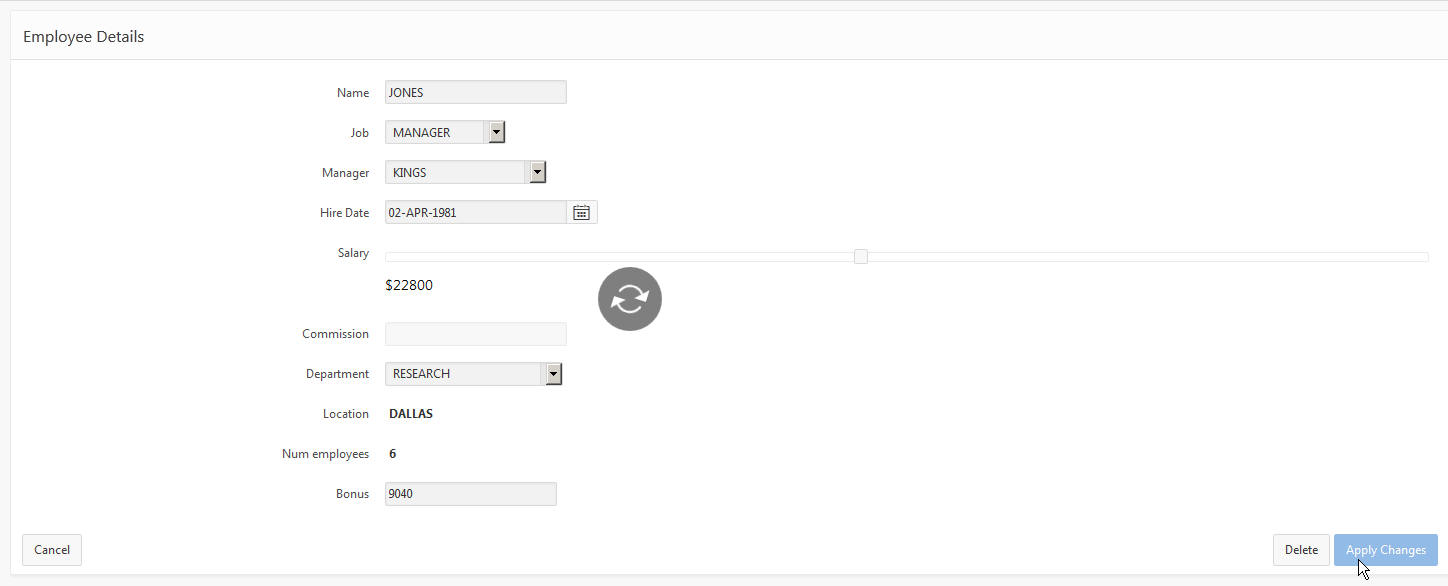
The location and number of employees is displayed based on the Department specified. Change the Department name. Notice that the location and number of employees changes automatically. In the next section, you will set a value using a dynamic action but this time you will use PL/SQL instead of a SQL statement. Select Edit Page 3 in the developer toolbar.
Create a Set Value Dynamic Action Using PL/SQL
-
You want to calculate the bonus that a particular employee gets based on their job and salary. In this section, you will create a new Bonus item and then a dynamic action that will calculate the bonus based on both the job and salary specified. Perform the following steps:
Note: Add BONUS column to EMP table (incase if it is not available).
You want to first create the Bonus item. Under the Employee Details region, right click Items and select Create Page Item.
-
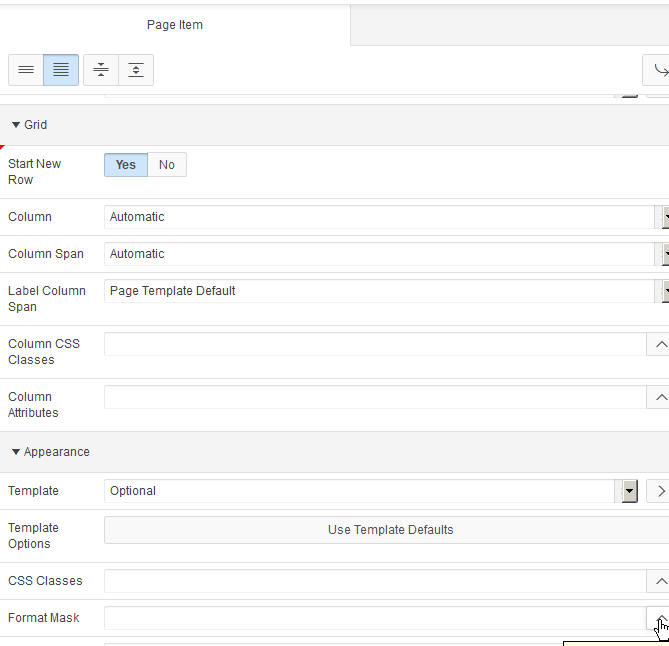
Enter P3_BONUS for Item Name and select Number Field for Type.

-
Select the up arrow next to the Format Mask field.
-
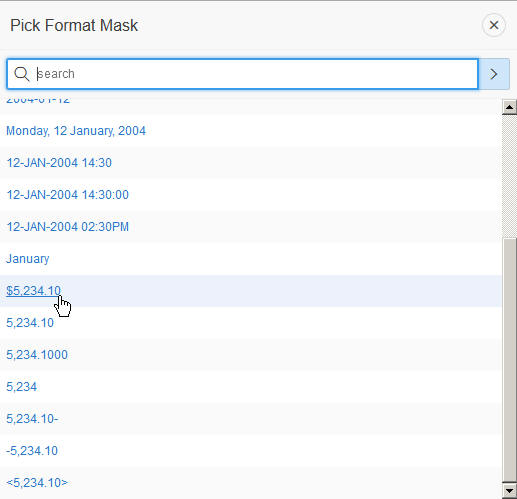
Select the $5,234.10 link.
-
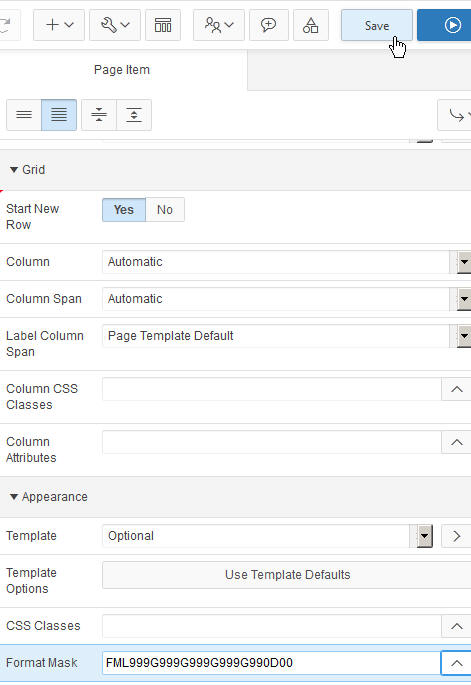
Click Save.
-
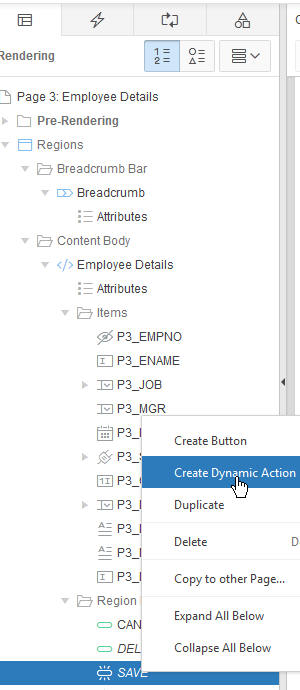
Now you are ready to create your dynamic action. Right click Dynamic Actions and select Create Dynamic Action.
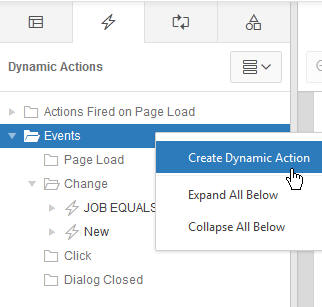
-
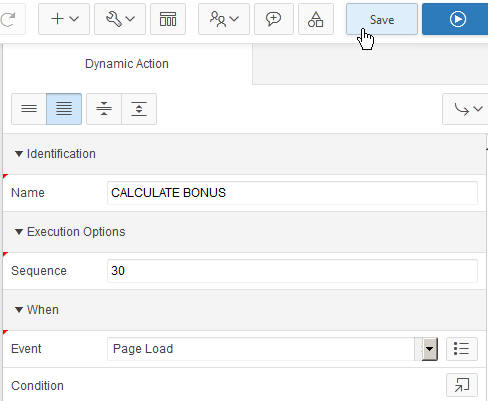
Enter CALCULATE BONUS for Name. Select Page Load for the Event Name and click Save.
-
In the Dynamic Actions page, click Show under the CALCULATE BONUS Dynamic Action.
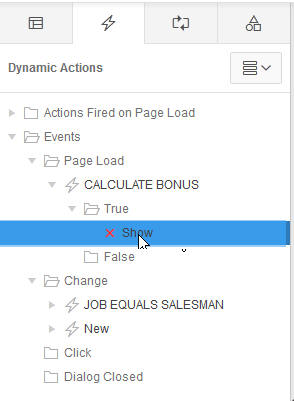
-
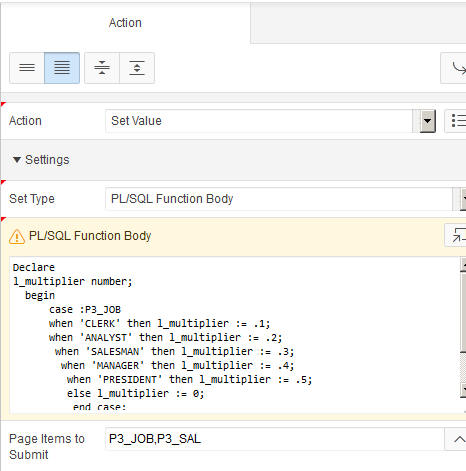
Select Set Value for Action, Selct No for Fire On Page Load, and select PL/SQL Function Body for Set Type.
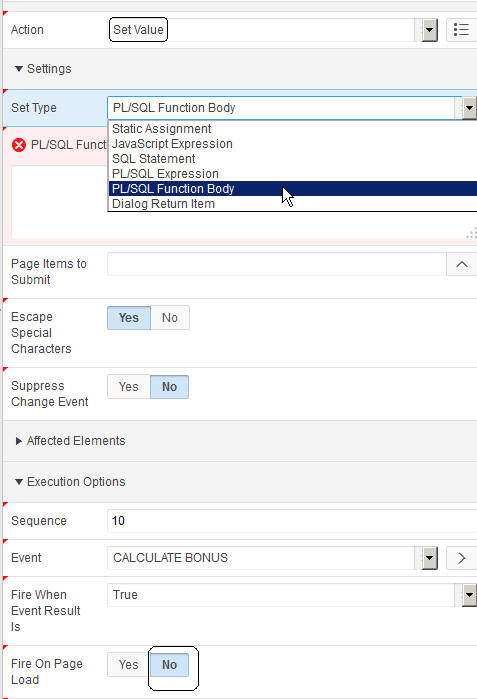
-
Enter the following PL/SQL code into the PL/SQL Function Body area, enter P3_JOB,P3_SAL in the Page Items to Submit field.
declare

                                  l_multiplier number;

                                  begin

                                  -- determine multiplier based on job

                                  case :P3_JOB

                                  when 'CLERK' then l_multiplier := .1;

                                  when 'ANALYST' then l_multiplier := .2;

                                  when 'SALESMAN' then l_multiplier := .3;

                                  when 'MANAGER' then l_multiplier := .4;

                                  when 'PRESIDENT' then l_multiplier := .5;

                                  else l_multiplier := 0;

                                  end case;

                                  -- return bonus which is calculated by
                                  multiplying salary my multiplier

                                  return :P3_SAL * l_multiplier;

                                  END;
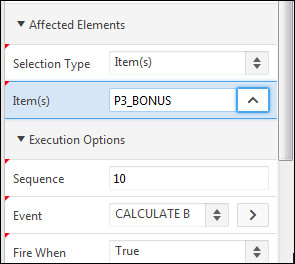
-
Select Item(s) for Select Type and enter P3_BONUS for Item(s).
-
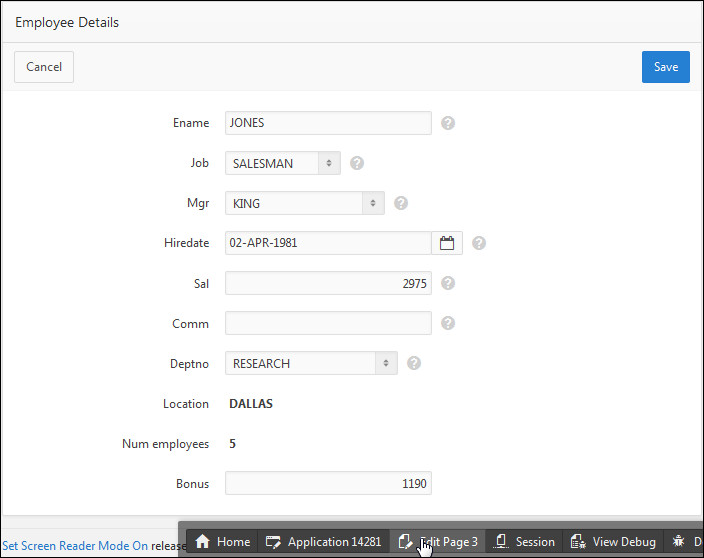
You can now run the page to test the dynamic action. Click Save and Run Page.
-
The bonus is calculated automatically. Select the Edit Page 3 link in the developer toolbar.
Using a Plug-in in a Dynamic Action
In this section, you will use a plug-in in a dynamic action. Perform the following steps:
-
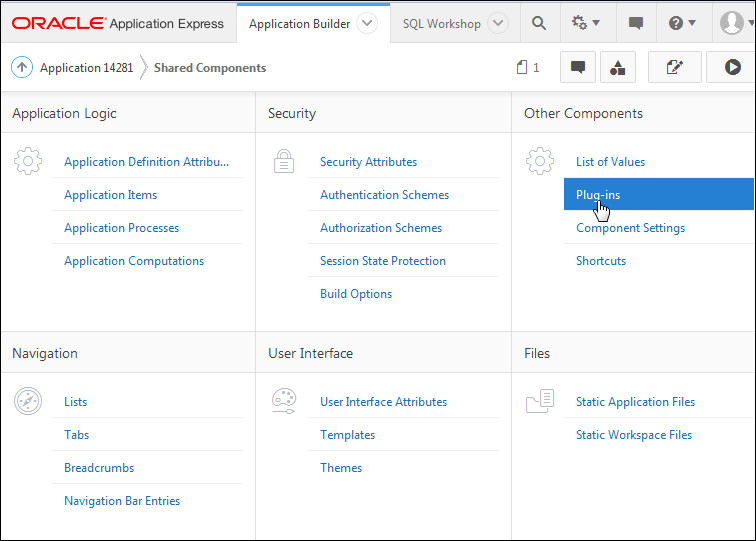
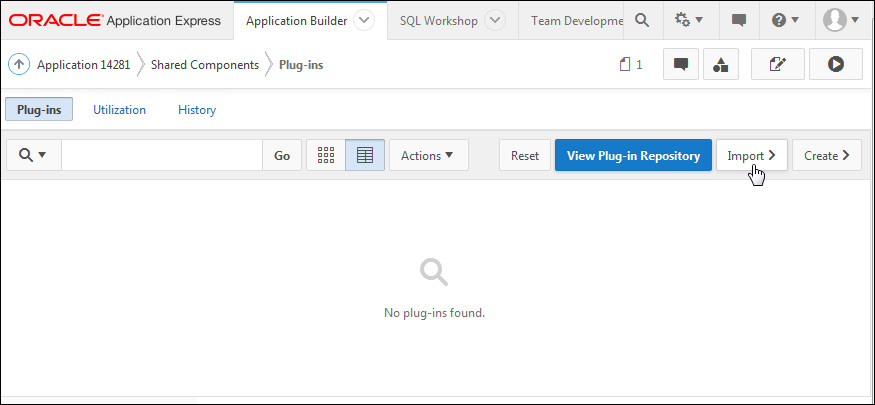
You want to import the slider plugin. Click the Shared Components icon.

-
Under Other Components, select Plug-ins.
-
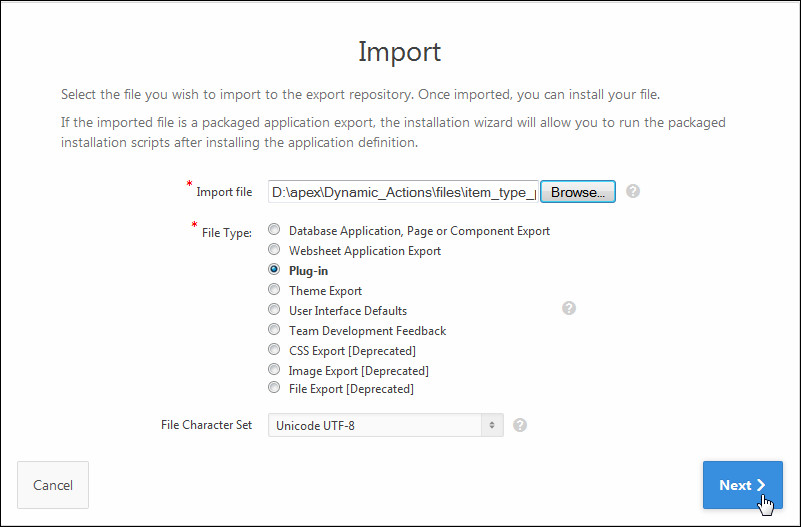
The slider plugin has been provided for you in the files directory. Click Import.
-
Click the Choose File button to locate the file. Select the item_type_plugin_com_oracle_slider.sql file in the files directory and click Next > Next.
-
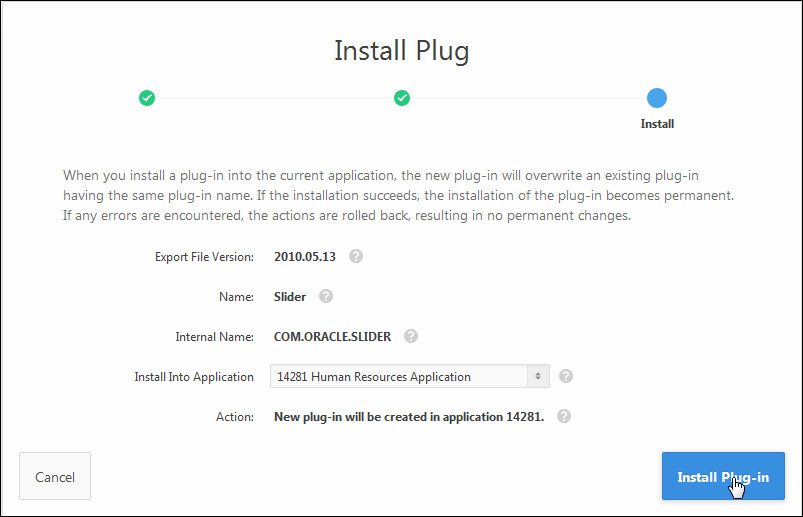
Make sure that your Application is selected from the drop-down list and click Install Plug-in.
-
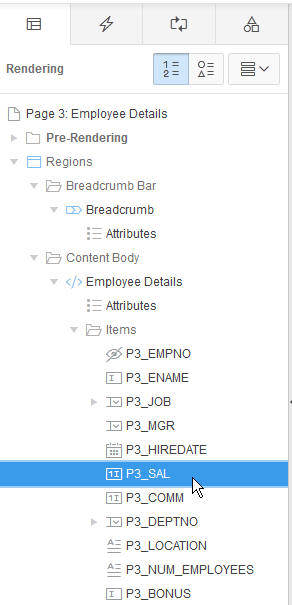
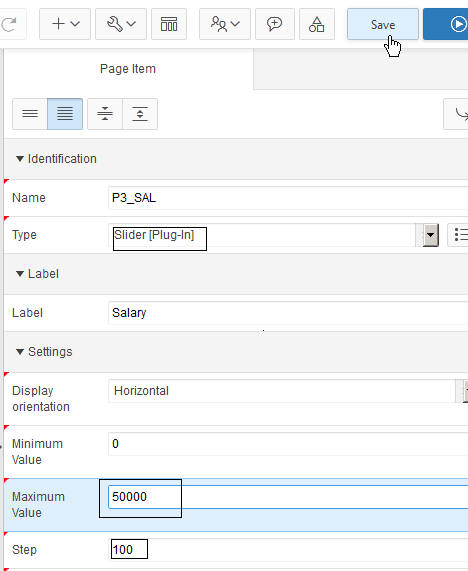
You want to use this Slider Plugin for the P3_SAL item. Click the Edit Page icon.

-
You want to change the P3_SAL item to use the slider plugin you just imported. Click the P3_SAL item.
-
In the Property Editor - Page Item section, select Slider [Plug-in] for Display As and enter 50000 for Maximum Value and 100 for Step. These settings configure the slider for this item. Then click Save.
-
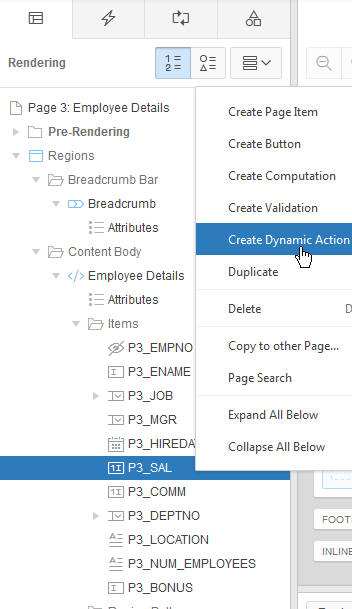
Now you are ready to create the dynamic action. Right-click the P3_SAL item and select Create Dynamic Action.
-
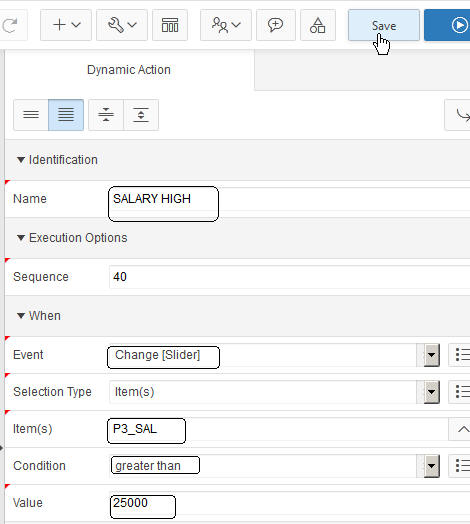
Enter SALARY HIGH for Name and select Change [Slider] for Event, make sure P3_SAL is selected for Item(s), select greater than for Condition and enter 25000 for Value. These settings will determine when the dynamic action's true and false action will fire.
-
Click Show.

-
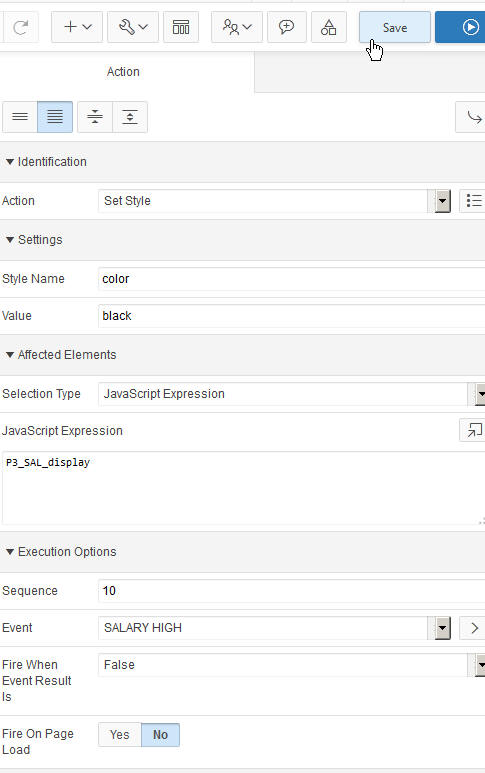
Select Set Style for Action and enter color for Style Name and red for Value. These 'True' action settings will be invoked when the salary value is greater than 25000. Select JavaScript Expression for Selection Type and enter P3_SAL_display for DOM Object and click Save. The DOM Object is case sensitive so make sure you enter it exactly as specified in the screenshot below.
Note: If you want to change the appearance of the displayed value of the Slider you have to access it using P3_SAL_display which is the ID for that object in the DOM object tree generated by the Slider plug-in. This naming convention is specific to the Slider plug-in and could be completely different for another plug-in.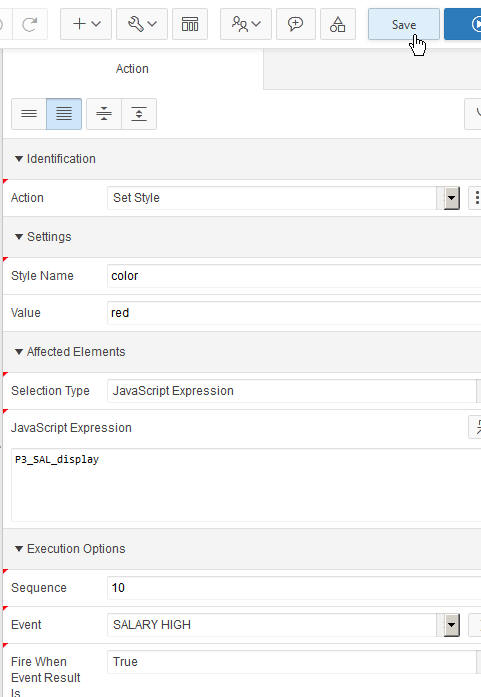
-
You also need to select the action that will take place when the action is false. Select Set Style for False Action and enter color for Style Name and black for Value. These 'False' action settings will be invoked when the salary value is not greater than 25000. Select JavaScript Expression for Selection Type and enter P3_SAL_display for DOM Object and click Create. The DOM Object is case sensitive so make sure you enter it exactly as specified in the screenshot below.
-
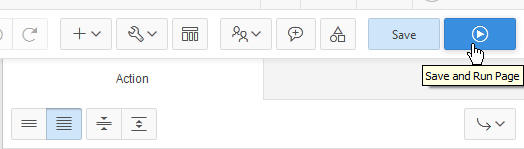
You are now ready to test the slider plug-in and dynamic action. Click Save and Run Page.
-
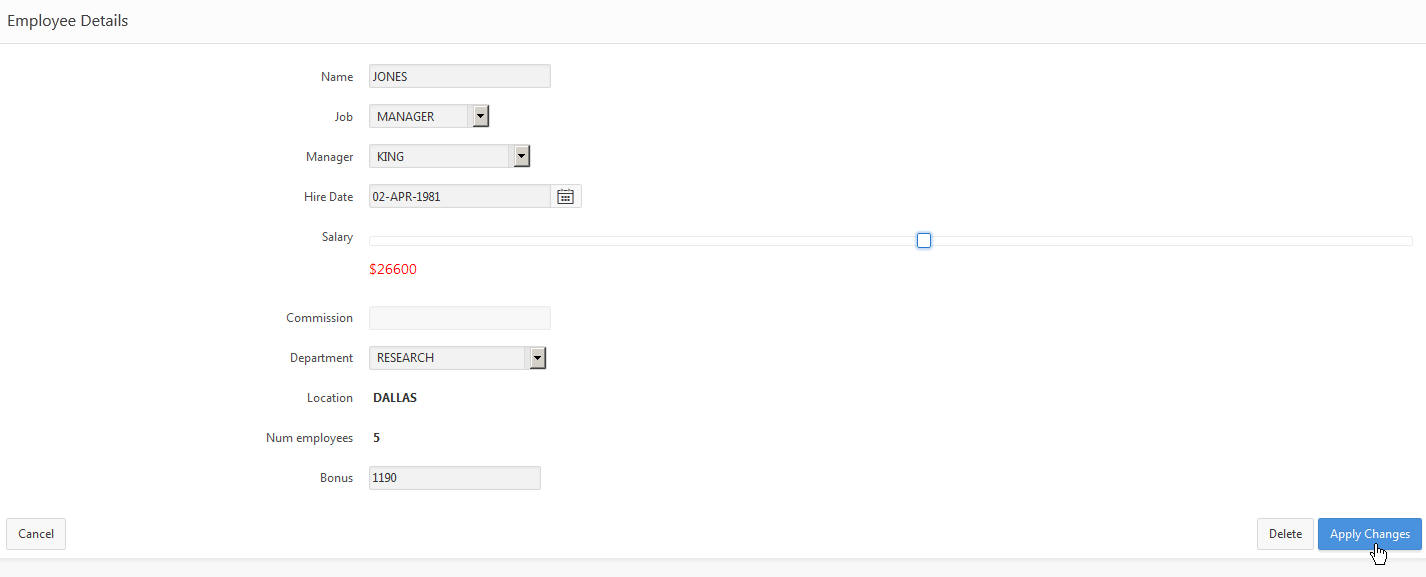
Notice that the Salary field is a slider type. Drag the bar to the right so that it is greater than 25000 and release your mouse.

-
Notice that the display value is now in red because the dynamic action was fired. You can also drag it to less than 25000 and release and you will see that it changes back to black.

Creating a Dynamic Action on a Button
In this section, you will create a dynamic action on the Apply Changes button. When this button is clicked, any changes to the form are saved. Also Save button is disabled while page refreshes. Perform the following steps:
-
Before creating the dynamic action on the button, you will view the current functionality of the Apply Changes button. To save the changes you made to the Salary value, click the Apply Changes button.
-
The changes are saved to the database and you are returned to the reports page. Notice that during the few seconds the SAVE action is being processed, it is possible to click the button again or make some other change to the form. To avoid this situation, you will create a dynamic action on the Apply Changes button. Click the edit icon of the employee you just edited.

-
Right-click the Save button and select Create Dynamic Action.
-
Enter SUBMIT PAGE for Name. The Event, Selection Type and Item(s) fields are prepopulated.

-
Select Submit Page for Action and enter SAVE for Request / Button Name. Setting this value to be the same as the button name will ensure that the button's 'Execute Validations' attribute is respected during page processing and also that any page processing components defined to fire when this button is pressed will also still fire when expected. Click Save.

-
In Dynamic actions region, select True action under Submit Page and Click Create TRUE action.
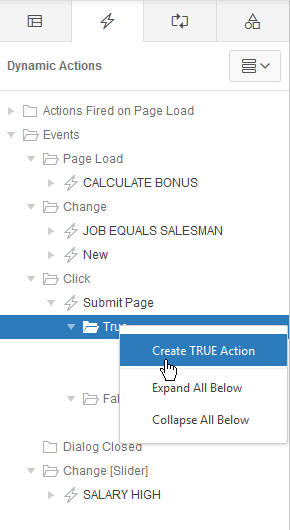
-
Select Disable for Action. For Selection Type select Button. Enter SAVE for Button. Select NO for Fire on Page Load Click Save.

-
Click Save and Run Page to see how the dynamic action works.
-
Make some changes to the form, for example change the salary value. Click Apply Changes button

-
Notice that the Apply Changes button is disabled and a process icon is also displayed, which you can turn off if you do not want that to display.
-
After the changes are saved to the database, you are returned to the reports page.
Want to Learn More?
In this tutorial, you have learned how to:
- Create Database Application
- Make Some Changes to Items on Your Page
- Create an enable/disable standard dynamic action
- Create a Set Value dynamic action using a SQL Statement
- Create a Set Value dynamic action using PL/SQL
- Use a Plugin in a dynamic action
- Create a dynamic action on a button
Resources
- Oracle Application Express homepage on OTN.
- To learn more about Application Express 5.0, refer to additional OBEs in the Oracle Learning Library
- Oracle Application Express: Workshop I
- Oracle University
Credits
-
Lead Curriculum Developer: Dimpi Sarmah