Integrating Oracle Data Integrator 12c (ODI) and Oracle GoldenGate 12c (OGG)
Overview
Purpose
This tutorial covers integrating Oracle Goldengate (OGG) with Oracle Data Integrator 12c (ODI). ODI knows about and can control OGG, OGG does not know about ODI.
Time to Complete
Approximately 2 hours, depending on whether you use the pre-built VM or not (see Software Requirements below).
Introduction
In this tutorial, you will create the sample database users and tables, configure the OGG manager and agents, configure the ODI data servers, models, datastores, maps, agents, and packages, and then start/stop/control the processes. There will be both OGG replication (capture and delivery) and ODI replication (Change Data Capture via Journaling). The OGG will run near-real-time, the ODI will run in micro-batches of one row of changed data polling once/second.
Scenario
Suppose the Example Corporation has an Orders Application system that has a Customer table. You want to keep an up-to-date copy of that information on the Sales administration system. As changes are made to the Orders Customer table, OGG in near-real-time replicates those changes to the Sales Customer table. However, the Sales system requires the format of the data to be transformed into a slightly different layout. ODI will do the transformation of only the rows that have changed.

When showing terminal sessions of the above scenario, the logical and physical E-LT flow will be as follows:
- Source will be the Orders Application
OGG_ODI_DEMO_SRC.OGG_CUSTOMERtable shown with a BLUE banner. - Staging will be the Sales Administration
ODI_DEMO.OGG_CUSTOMERtable shown with a RED banner. - Target will be the Sales Administration
ODI_DEMO.TRG_CUSTOMERtable shown with a GREEN banner.
Hardware and Software Requirements
There are two ways you can do this tutorial: either install all the software yourself on your own host(s), or use a virtual machine (VM) with most everything pre-installed. The advantage of the VM is, of course, that it is easier and faster, but it may not exactly represent your final environment, in which case you may want to go through the extra steps to install everything yourself. The tutorial will assume you are using the VM, but will include some of the extra steps for the recreating preinstalled bits.
The following is a list of hardware and software requirements:
- Hardware
- If you are using the VM, it requires 4 GB itself, usually hosted on a PC with 8 GB total. The VM assumes a host PC with 4 CPUs; you may need to adjust that down if you have fewer real CPUs. The VM works fine with 2 CPUs.
- If you are running the software on a real host(s), you need enough RAM to support the processes. If you have multiple hosts, the RAM can be distributed per host.
- Each DB requires at least 1 GB (Enterprise Edition (EE) may require 2 GB)
- Each OGG instance requires at least 1 GB
- ODI requires at least 1 GB
- The OS requires at least 1 GB. More is better.
- Enough disk to support the installs, including unzipping the images.
- Software
- If you are using the VM, you will need:
- The Oracle VirtualBox player
- The VM image (approx 9 GB)
- The demo VM Getting Started with ODI 12c guide.
- If you are installing the software yourself in Standalone mode, you will need:
- Three heterogeneous databases (ideally). For example, the source could be MySQL, the staging could be Oracle 11g XE, the target could be Oracle 12c EE version 12.1. In this VM, the single database is Oracle 11g EE version 11.2.0.4.
- Two identical copies of Oracle GoldenGate. In this example, the tutorial is using version is 12.1.2.0.0.
- One Oracle Data Integrator. In this example, the tutorial is using version is 12.1.3.
- Two copies of Java: the one that comes with OGG (for the JAgent), and JDK version 1.7.0_15 or higher for the ODI Agent.
- An OS. In this example, the tutorial is using Oracle Enterprise Linux (64-bit) 2.6.32-300.39.5
- Optional software to install in Java EE mode (not present in the VM):
- One Oracle WebLogic Server 12c. This affects how the ODI Agents are deployed. The VM is not using WLS.
Prerequisites
Before starting this tutorial, you should:
- Have access to or have installed Oracle Data Integrator 12c. The prerequisites for that are a FMW home with WLS installed, a database with RCU configured to create the ODI repositories.
- Have access to or have installed sample schemas and repositories. This example uses the
ODI_DEMOschema which is available online at: ODI Getting Started. If you are using the VM, then this schema is already included.
1. Prepare the Databases
Normally an ODI environment would have two or three hosts. The source database would be on one host (usually the smaller host) and the target database on another host (usually the larger host). The staging area would be on the more powerful of the two hosts, or possibly on a third host. The configuration used for this demonstration was done on one large host (rather unusual), so there are some issues with multiple $ORA_HOME definitions that would not normally surface in a "real" environment.
In order to prepare the databases for E-LT (Extract-Load-Transform), perform the following steps:
1.1 Prepare Source database
If you are using the pre-configured VM, skip to step 1.2.
Depending on your source database technology, the DDL commands will change slightly. To simplify things, the foreign key dependencies will not be enforced at the database level.
Create the users and source table.
E-LT Source (OGG Source) [myuser@myhost ~]$ sqlplus system/oracle SQL*Plus: Release 11.2.0.4.0 Production on Mon Jul 21 16:40:21 2014 Copyright (c) 1982, 2013, Oracle. All rights reserved. Connected to: Oracle Database 11g Enterprise Edition Release 11.2.0.4.0 - 64bit Production With the Partitioning, OLAP, Data Mining and Real Application Testing options SQL > create user odi_demo identified by oracle; User created. SQL > create user prod_odi_repo identified by oracle; User created. SQL > create user ogg_odi_demo_src identified by oracle; User created. SQL > grant DBA to odi_demo, prod_odi_repo, ogg_odi_demo_src; Grant succeeded. SQL > set prompt SQL_SOURCE; SQL_SOURCE > conn odi_demo/oracle Connected. SQL_SOURCE > create table SRC_CUSTOMER ( CUSTID NUMBER(10) not null, DEAR NUMBER(1), LAST_NAME VARCHAR2(50), FIRST_NAME VARCHAR2(50), ADDRESS VARCHAR2(100), CITY_ID NUMBER(10), PHONE VARCHAR2(50), AGE NUMBER(3), SALES_PERS_ID NUMBER(10), constraint PK_SRC_CUSTOMER primary key (CUSTID) ); Table created. SQL_SOURCE > conn ogg_odi_demo_src/oracle Connected. SQL_SOURCE > create table OGG_CUSTOMER ( CUSTID NUMBER(10,0) not null, DEAR NUMBER(1,0), LAST_NAME VARCHAR2(50), FIRST_NAME VARCHAR2(50), ADDRESS VARCHAR2(100), CITY_ID NUMBER(10,0), PHONE VARCHAR2(50), AGE NUMBER(3,0), SALES_PERS_ID NUMBER(10,0), constraint PK_OGG_CUSTOMER PRIMARY KEY (CUSTID) ); Table created. SQL_SOURCE >In real life you would also set up foreign key relationships to other tables.
Populate the source table. (There is a procedure supplied in the VM to do this any time later in the lab.)
E-LT Staging (ODI Source) SQL_SOURCE > conn odi_demo/oracle Connected. SQL_SOURCE > insert into SRC_CUSTOMER(CUSTID, LAST_NAME, FIRST_NAME, AGE, CITY_ID, SALES_PERS_ID, DEAR, ADDRESS, PHONE) values (101,'Brendt','Paul',19,107,10,0,'10 Jasper Blvd.','(212) 555 2146'); insert into SRC_CUSTOMER(CUSTID, LAST_NAME, FIRST_NAME, AGE, CITY_ID, SALES_PERS_ID, DEAR, ADDRESS, PHONE) values (102,'McCarthy','Robin',29,11,11,0,'27 Pasadena Drive','(214) 555 3075'); insert into SRC_CUSTOMER(CUSTID, LAST_NAME, FIRST_NAME, AGE, CITY_ID, SALES_PERS_ID, DEAR, ADDRESS, PHONE) values (103,'Travis','Peter',34,12,12,0,'7835 Hartford Drive','(510) 555 4448'); insert into SRC_CUSTOMER(CUSTID, LAST_NAME, FIRST_NAME, AGE, CITY_ID, SALES_PERS_ID, DEAR, ADDRESS, PHONE) values (104,'Larson','Joe',45,13,13,0,'87 Carmel Blvd.','(213) 555 5095'); insert into SRC_CUSTOMER(CUSTID, LAST_NAME, FIRST_NAME, AGE, CITY_ID, SALES_PERS_ID, DEAR, ADDRESS, PHONE) values (105,'Goldschmidt','Tony',55,14,20,0,'91 Torre drive','(619) 555 6529'); insert into SRC_CUSTOMER(CUSTID, LAST_NAME, FIRST_NAME, AGE, CITY_ID, SALES_PERS_ID, DEAR, ADDRESS, PHONE) values (106,'Baker','William',64,15,21,0,'2890 Grant Avenue','(312) 555 7040'); insert into SRC_CUSTOMER(CUSTID, LAST_NAME, FIRST_NAME, AGE, CITY_ID, SALES_PERS_ID, DEAR, ADDRESS, PHONE) values (107,'Swenson','Jack',74,19,22,0,'64 Imagination Drive','(202) 555 8125'); insert into SRC_CUSTOMER(CUSTID, LAST_NAME, FIRST_NAME, AGE, CITY_ID, SALES_PERS_ID, DEAR, ADDRESS, PHONE) values (201,'Sartois','Jean',19,25,30,0,'71 rue Rousseau','79 23 26 23'); insert into SRC_CUSTOMER(CUSTID, LAST_NAME, FIRST_NAME, AGE, CITY_ID, SALES_PERS_ID, DEAR, ADDRESS, PHONE) values (202,'Michaud','Philippe',22,23,31,0,'197 impasse Renoir','78 21 86 20'); insert into SRC_CUSTOMER(CUSTID, LAST_NAME, FIRST_NAME, AGE, CITY_ID, SALES_PERS_ID, DEAR, ADDRESS, PHONE) values (203,'Robert','Christian',38,208,32,0,'1rue Cezanne','42 25 27 29'); insert into SRC_CUSTOMER(CUSTID, LAST_NAME, FIRST_NAME, AGE, CITY_ID, SALES_PERS_ID, DEAR, ADDRESS, PHONE) values (204,'Martin','Christine',42,24,40,1,'12 allee Victor Hugo','25 26 46 26'); insert into SRC_CUSTOMER(CUSTID, LAST_NAME, FIRST_NAME, AGE, CITY_ID, SALES_PERS_ID, DEAR, ADDRESS, PHONE) values (205,'Piaget','Luc',56,29,41,0,'38 allee des Saules','53 42 24 28'); insert into SRC_CUSTOMER(CUSTID, LAST_NAME, FIRST_NAME, AGE, CITY_ID, SALES_PERS_ID, DEAR, ADDRESS, PHONE) values (206,'Gentil','Michele',67,25,11,1,'17montee des Chenes','65 62 26 13'); insert into SRC_CUSTOMER(CUSTID, LAST_NAME, FIRST_NAME, AGE, CITY_ID, SALES_PERS_ID, DEAR, ADDRESS, PHONE) values (207,'Dupont','Marie-Chantale',72,20,50,1,'37 rue Murat','46 72 23 53'); insert into SRC_CUSTOMER(CUSTID, LAST_NAME, FIRST_NAME, AGE, CITY_ID, SALES_PERS_ID, DEAR, ADDRESS, PHONE) values (301,'Edwards','Caroline',18,35,51,1,'68 Downing Street','243867945'); insert into SRC_CUSTOMER(CUSTID, LAST_NAME, FIRST_NAME, AGE, CITY_ID, SALES_PERS_ID, DEAR, ADDRESS, PHONE) values (302,'Marlow','Justin',29,32,52,0,'290 Yorkshire Drive','653643634'); insert into SRC_CUSTOMER(CUSTID, LAST_NAME, FIRST_NAME, AGE, CITY_ID, SALES_PERS_ID, DEAR, ADDRESS, PHONE) values (303,'Wilson','John',34,33,11,0,'28 Sutton Row','158746231'); insert into SRC_CUSTOMER(CUSTID, LAST_NAME, FIRST_NAME, AGE, CITY_ID, SALES_PERS_ID, DEAR, ADDRESS, PHONE) values (304,'McCartney','George',47,34,11,0,'45 Glenthorne Road','323768678'); insert into SRC_CUSTOMER(CUSTID, LAST_NAME, FIRST_NAME, AGE, CITY_ID, SALES_PERS_ID, DEAR, ADDRESS, PHONE) values (305,'Keegan','Hariett',56,35,11,1,'10 Hamilton Park','566344643'); insert into SRC_CUSTOMER(CUSTID, LAST_NAME, FIRST_NAME, AGE, CITY_ID, SALES_PERS_ID, DEAR, ADDRESS, PHONE) values (306,'Jones','Mary',68,36,31,1,'34 Apple Grove','143546456'); insert into SRC_CUSTOMER(CUSTID, LAST_NAME, FIRST_NAME, AGE, CITY_ID, SALES_PERS_ID, DEAR, ADDRESS, PHONE) values (307,'Hopkins','Priscilla',73,38,302,2,'The Gables','634634643'); insert into SRC_CUSTOMER(CUSTID, LAST_NAME, FIRST_NAME, AGE, CITY_ID, SALES_PERS_ID, DEAR, ADDRESS, PHONE) values (401,'Diemers','Erika',18,51,40,2,'Wiesenstrasse 40','235345'); insert into SRC_CUSTOMER(CUSTID, LAST_NAME, FIRST_NAME, AGE, CITY_ID, SALES_PERS_ID, DEAR, ADDRESS, PHONE) values (402,'Schiller','Jurgen',24,52,41,0,'Auf dem Rain 4','142352'); insert into SRC_CUSTOMER(CUSTID, LAST_NAME, FIRST_NAME, AGE, CITY_ID, SALES_PERS_ID, DEAR, ADDRESS, PHONE) values (403,'Durnstein','Adolph',36,53,101,0,'Thomashof 22','745464'); insert into SRC_CUSTOMER(CUSTID, LAST_NAME, FIRST_NAME, AGE, CITY_ID, SALES_PERS_ID, DEAR, ADDRESS, PHONE) values (404,'Weimar','Hans',45,54,50,0,'Goethering 33','346636'); insert into SRC_CUSTOMER(CUSTID, LAST_NAME, FIRST_NAME, AGE, CITY_ID, SALES_PERS_ID, DEAR, ADDRESS, PHONE) values (405,'Schultz','Herbert',59,55,51,0,'Am Holzbach 17','256346'); insert into SRC_CUSTOMER(CUSTID, LAST_NAME, FIRST_NAME, AGE, CITY_ID, SALES_PERS_ID, DEAR, ADDRESS, PHONE) values (406,'Titzman','Silke',63,56,52,0,'Berliner Ring 56','235463'); insert into SRC_CUSTOMER(CUSTID, LAST_NAME, FIRST_NAME, AGE, CITY_ID, SALES_PERS_ID, DEAR, ADDRESS, PHONE) values (407,'Reinman','Heineke',72,55,32,2,'Yorkstrasse 75','234646'); insert into SRC_CUSTOMER(CUSTID, LAST_NAME, FIRST_NAME, AGE, CITY_ID, SALES_PERS_ID, DEAR, ADDRESS, PHONE) values (501,'Arai','Toshihijo',18,70,40,0,'941 Toyota Ave','34784597'); insert into SRC_CUSTOMER(CUSTID, LAST_NAME, FIRST_NAME, AGE, CITY_ID, SALES_PERS_ID, DEAR, ADDRESS, PHONE) values (502,'Kamata','Mariko',24,71,41,0,'70 Kiroto Street','57687462'); insert into SRC_CUSTOMER(CUSTID, LAST_NAME, FIRST_NAME, AGE, CITY_ID, SALES_PERS_ID, DEAR, ADDRESS, PHONE) values (503,'Kamimura','Satoru',38,72,42,0,'34 Kawasaki Avenue','26475684'); insert into SRC_CUSTOMER(CUSTID, LAST_NAME, FIRST_NAME, AGE, CITY_ID, SALES_PERS_ID, DEAR, ADDRESS, PHONE) values (504,'Makino','Tatsuo',45,70,50,0,'2435 Toyota Ave','34413486'); insert into SRC_CUSTOMER(CUSTID, LAST_NAME, FIRST_NAME, AGE, CITY_ID, SALES_PERS_ID, DEAR, ADDRESS, PHONE) values (505,'Mukumoto','Masayuki',59,73,51,0,'59 Yamamoto Blvd','34827691'); insert into SRC_CUSTOMER(CUSTID, LAST_NAME, FIRST_NAME, AGE, CITY_ID, SALES_PERS_ID, DEAR, ADDRESS, PHONE) values (506,'Oneda','Kenji',68,70,52,0,'94 Toyota Blvd','51839463'); insert into SRC_CUSTOMER(CUSTID, LAST_NAME, FIRST_NAME, AGE, CITY_ID, SALES_PERS_ID, DEAR, ADDRESS, PHONE) values (507,'Okumura','Isao',74,74,21,0,'3 Toyota Ave','48928371'); COMMIT; 35 rows created. SQL_SOURCE > exitIf you want to make sure they worked, you can: SELECT * FROM SRC_CUSTOMER;
The source database is now prepared.
1.2 Prepare Staging database
Normally the source, staging, and target databases would be heterogenous (for example, Oracle and MySQL, Oracle and DB2, or even Oracle EE and Oracle XE, and so on). In this tutorial, they are all in one large database separated only by schema. Depending on your staging database technology, the DDL commands will change slightly. You cannot reverse engineer a schema for the database, only for ODI. So you need to redefine the tables here as well. The difference is you do not have to populate them from SQL, you can populate them from ODI as a simple map.
If you are using the pre-configured VM, skip to step 1.3.
Create the staging table. It will be exactly the same as the source table.
ODI Staging [myuser@myhost ~]$ sqlplus odi_demo/oracle SQL*Plus: Release xx.x.x.x.x Production on Mon dd hh:mm:ss yyyy SQL > set prompt SQL_STAGE; SQL_STAGE > create table OGG_CUSTOMER ( CUSTID NUMBER(10,0) not null, DEAR NUMBER(1,0), LAST_NAME VARCHAR2(50), FIRST_NAME VARCHAR2(50), ADDRESS VARCHAR2(100), CITY_ID NUMBER(10,0), PHONE VARCHAR2(50), AGE NUMBER(3,0), SALES_PERS_ID NUMBER(10,0), constraint PK_OGG_CUSTOMER PRIMARY KEY (CUSTID) ); Table created. SQL_STAGE > create user odi_staging identified by oracle; User created. SQL_STAGE > grant DBA to odi_staging; Grant succeeded. SQL_STAGE >In real life you would also set up foreign key relationships.
The staging database is now prepared.
1.3 Prepare Target database
For the same reason you needed to define the schema on the staging database, you need to define it on the target database as well. Depending on your staging database technology, the DDL commands will change slightly.
If you are using the pre-configured VM, skip to step 2.1.
Create one target table.
E-LT Target (ODI Target) [myuser@myhost ~]$ sqlplus odi_demo/oracle SQL*Plus: Release xx.x.x.x.x Production on Mon dd hh:mm:ss yyyy SQL > set prompt SQL_TARGET; SQL_TARGET > create table TRG_CUSTOMER ( CUST_ID NUMERIC(10) not null, DEAR VARCHAR(4), CUST_NAME VARCHAR(50), ADDRESS VARCHAR(100), CITY_ID NUMERIC(10) not null, PHONE VARCHAR(50), AGE NUMERIC(3), AGE_RANGE VARCHAR(50), SALES_PERS VARCHAR(50), CRE_DATE DATE, UPD_DATE DATE, constraint PK_TRG_CUSTOMER primary key (CUST_ID) ); Table created. SQL_TARGET >In real life you would also set up foreign key relationships.
The target database is now prepared.
The databases are all prepared.
2. Prepare the GoldenGate Instances
Normally an OGG environment would have two or more hosts. The source database would be on one host and the target database on another host. The configuration used for this demonstration was done on one large host (rather unusual), so there are some issues with multiple $OGG_HOME definitions that would not normally surface in a "real" environment. To solve this on one host, OGG must be completely installed twice, the two instances cannot share any code.
2.1 Prepare Source GoldenGate
How to install OGG is covered in other OBEs. For this demo, the OGG source is the ODI staging database. Configure the source MANAGER and JAGENT processes to talk with ODI.
If you are using the pre-configured VM, skip to step 2.2.
Configure (or verify) the source Global commands and
GLOBALSfile. Edit the file to look like the following view.OGG Source [myuser@myhost ~]$ cd /home/oracle/Oracle/Middleware/OGG_Source [myuser@myhost ogg_src]$ ./ggsci Oracle GoldenGate Command Interpreter for Oracle Version 12.1.2.0.0 17185003 OGGCORE_12.1.2.0.0_PLATFORMS_130924.1316_FBO Linux, x64, 64bit (optimized), Oracle 11g on Sep 25 2013 00:31:13 Operating system character set identified as UTF-8. Copyright (C) 1995, 2013, Oracle and/or its affiliates. All rights reserved. GGSCI (source) > sh gedit GLOBALS GGSCI (source) > sh more GLOBALS --GLOBALS on OGG Source --Configured by Joe Admin on 1/2/34 EnableMonitoring GGSCI (source) >It is a good convention to have comments with the double-dashes as the first few lines in a parameter file. The keywords (for example,
EnableMonitoring) are case-insensitive, soEnableMonitoringis the same asENABLEMONITORINGis the same asenablemonitoring. For readability, you may want to use MixedCase by word.Configure (or verify) the source Manager and
mgr.prmfile. Edit the file to look like the following view. (You may want to issue the GGSCI command set editor gedit if you don't like to usevi.)OGG Source GGSCI (source) > edit param mgr GGSCI (source) > view param mgr --mgr.prm on OGG Source --Configured by Joe Admin on 1/2/34 Port 7010 GGSCI (source) >The Port will match the ODI JAgent.
Configure (or verify) the source Java Agent and
jagent.prmfile. Edit the file to look like the following view.OGG Source GGSCI (source) > edit param jagent GGSCI (source) > view param jagent --jagent.prm on OGG Source --Configured by Joe Admin on 1/2/34 COMMAND java -Dlog4j.configuration=file:./cfg/log4j.properties -jar -Xms64m -Xmx512m dirjar/jagent.jar GGSCI (source) >The source and target
jagent.prmfiles are the same (except for the comments).Configure (or verify) the source JAgent configuration and
./cfg/Config.propertiesfile.OGG Source GGSCI (source) > sh gedit ./cfg/Config.properties GGSCI (source) > sh more ./cfg/Config.properties #################################################################### ## jagent.host: Host name of the machine where jAgent is running ### ## Note: This host name has to be reachable from Monitor Server ### #################################################################### jagent.host=localhost jagent.jmx.port=5555 interval.regular=60 interval.quick=30 monitor.host=localhost monitor.jmx.port=5502 monitor.jmx.username=cmroot jagent.ssl=false jagent.username=root reg.retry.interval=10 instance.query.initial.interval=5 incremental.registration.quiet.interval=5 maximum.message.retrieval=500 jagent.rmi.port=5559 agent.type.enabled=OEM status.polling.interval=5 message.polling.interval=5 jagent.backward.compatibility=true GGSCI (source) > exit [myuser@myhost ogg_src]$The reason you need to exit GGSCI is so that the new parameters can take effect the next time you start GGSCI.
You also need to DBLogin and then Add TranData for any tables that OGG will extract from. The source GoldenGate instance is now prepared.
2.2. Prepare Target GoldenGate
How to install OGG is covered in other OBEs. For this demo, the OGG target is the ODI target database. Configure the target MANAGER and JAGENT processes to communicate with ODI.
If you are using the pre-configured VM, skip to step 3.1.
Configure (or verify) the target Global commands and
GLOBALSfile. Edit the file to look like the following view.OGG Target [myuser@myhost ~]$ cd /home/oracle/Oracle/Middleware/OGG_Target [myuser@myhost ogg_trg]$ ./ggsci Oracle GoldenGate Command Interpreter for Oracle Version 12.1.2.0.0 17185003 OGGCORE_12.1.2.0.0_PLATFORMS_130924.1316_FBO Linux, x64, 64bit (optimized), Oracle 11g on Sep 25 2013 00:31:13 Operating system character set identified as UTF-8. Copyright (C) 1995, 2013, Oracle and/or its affiliates. All rights reserved. GGSCI (target) > sh gedit GLOBALS GGSCI (target) > sh more GLOBALS --GLOBALS on OGG Target --Configured by Joe Admin on 1/2/34 EnableMonitoring GGSCI (target) >The
GLOBALSfile is the same for OGG source and target.Configure (or verify) the target Manager and
mgr.prmfile. Edit the file to look like the following view. (You may want to issue the GGSCI command set editor gedit if you don't like to usevi.)OGG Target GGSCI (target) > edit param mgr GGSCI (target) > view param mgr --mgr.prm on OGG Target --Configured by Joe Admin on 1/2/34 Port 7020 GGSCI (target) >The Ports must be unique (if on the same host) for OGG source versus target in the
mgr.prmfiles.Configure (or verify) the target Java Agent and
jagent.prmfile. Edit the file to look like the following view.OGG Target GGSCI (target) > edit param jagent GGSCI (target) > view param jagent --jagent.prm on OGG Target --Configured by Joe Admin on 1/2/34 COMMAND java -Dlog4j.configuration=file:./cfg/log4j.properties -jar -Xms64m -Xmx512m dirjar/jagent.jar GGSCI (target) >The
jagent.prmfile is the same for OGG source and target.Configure (or verify) the target JAgent configuration and
./cfg/Config.propertiesfile.OGG Target GGSCI (target) > sh gedit ./cfg/Config.properties GGSCI (target) > sh more ./cfg/Config.properties #################################################################### ## jagent.host: Host name of the machine where jAgent is running ### ## Note: This host name has to be reachable from Monitor Server ### #################################################################### jagent.host=localhost jagent.jmx.port=5555 interval.regular=60 interval.quick=30 monitor.host=localhost monitor.jmx.port=5502 monitor.jmx.username=cmroot jagent.ssl=false jagent.username=root reg.retry.interval=10 instance.query.initial.interval=5 incremental.registration.quiet.interval=5 maximum.message.retrieval=500 jagent.rmi.port=5561 agent.type.enabled=OEM status.polling.interval=5 message.polling.interval=5 jagent.backward.compatibility=true GGSCI (target) > exit [myuser@myhost ogg_trg]$Note the only difference between source and target
Config.propertiesfile is thejagent.rmi.portvalues must be unique (if on the same host), all other values are the same.The reason you need to exit GGSCI is so that the new parameters can take effect the next time you start GGSCI.
The target GoldenGate instance is now prepared.
3. Prepare ODI Environment
ODI communicates with OGG through agents, so you need to create physical and logical entries for those. In addition, the models and datastores to be replicated need to be defined.
3.1 Prepare ODI Agents
If you are using the pre-configured VM, skip to step 3.1.6.
Start ODI Studio. If there is a dekstop icon, click it; otherwise do the following commands:
OGG Target [myuser@myhost ~]$ cd /home/oracle/Oracle/Middleware/Oracle_Home_1213/odi/studio [myuser@myhost studio]$ ./odi.shThe first time takes a while to load.
Click Connect to Repository, select ODI and OGG Getting Started. The user is
SUPERVISORand the Password iswelcome1. Click to continue.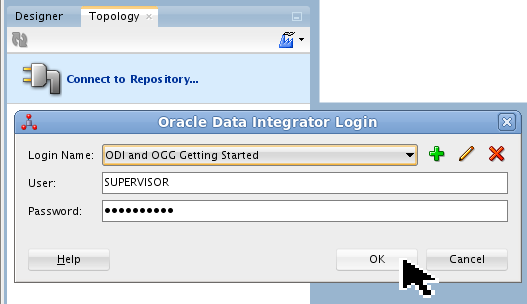
The User and Password should be pre-populated.
Go to the Topology Navigator tab, and expand
 Physical Architecture > Technologies > Oracle GoldenGate, right-click, then New Data Server.
If the OGG_Source and OGG_Target already exist, then open them to verify that they match the screens shown.
On the JAgent tab, create (or verify) the OGG_Source JAgent Server.

The RMI Port 5559 should match the value in OGG source
Config.properties, the Manager Port 7010 should match the value in OGG sourcemgr.prm. Save and close the New Data Server OGG_Source tab.
 On the JAgent tab, create (or verify) the OGG_Target JAgent Server.
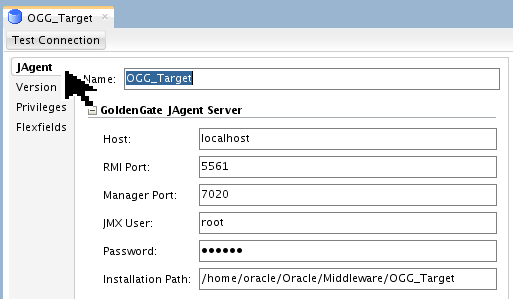
The RMI Port 5561 should match the value in OGG target
Config.properties, the Manager Port 7020 should match the value in OGG targetmgr.prm. Save and close the New Data Server OGG_Target tab. When you are done, it should look like this:
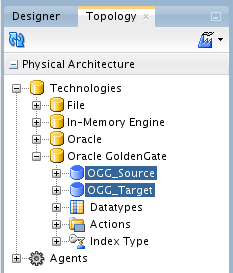
You will come back and test these agents shortly.
The OGG agents are ready from the ODI side.
3.2 Prepare ODI Data Servers
If you are using the pre-configured VM, skip to step 3.2.13.
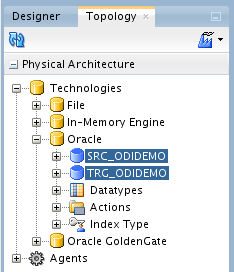
Go to the Topology Navigator tab, and expand
Physical Architecture > Technologies > Oracle, right-click, then New Data Server. 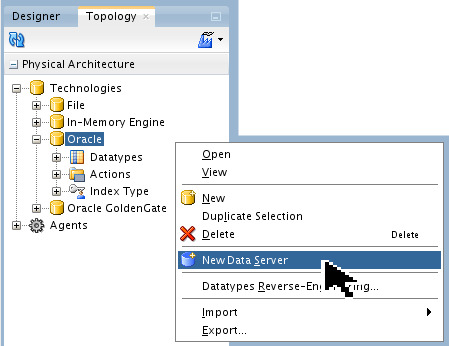
If
SRC_ODIDEMOandTRG_ODIDEMOalready exist, then open them to verify that they match the screens shown.On the Definition tab, create (or verify) the
SRC_ODIDEMOData Server.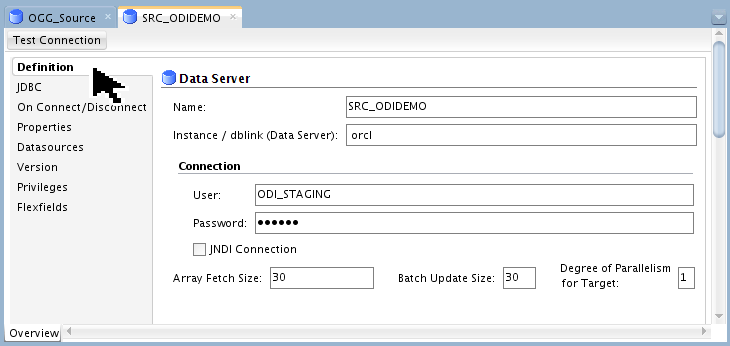
The Password is
welcome1.On the JDBC tab, create (or verify) the JDBC Driver and JDBC URL.
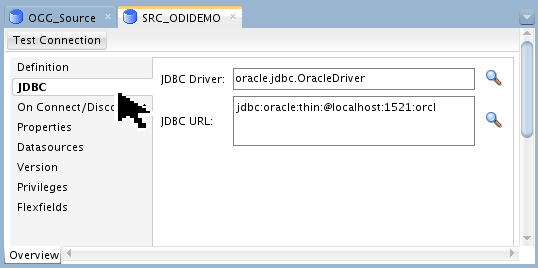
Be careful not to lose the colons between the parameters (they are hard to see...)
Test JDBC connectivity by clicking . You will see this pop-up:

Click to continue.
On the Definition tab, create (or verify) the
TRG_ODIDEMOData Server.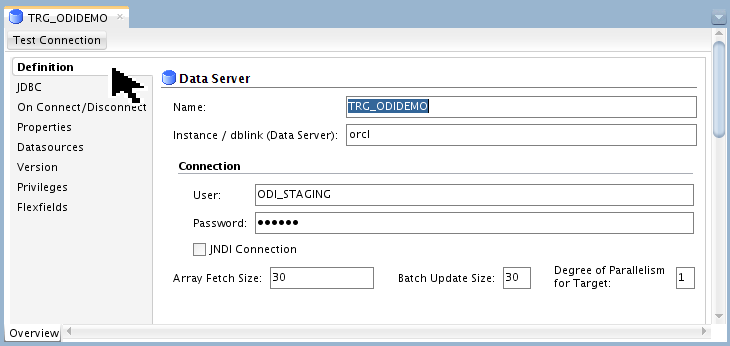
The Password is
welcome1.On the JDBC tab, create (or verify) the JDBC Driver and JDBC URL.
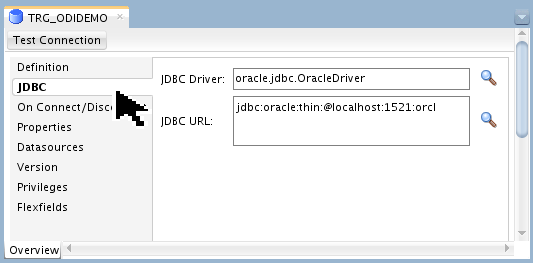
Be careful not to lose the colons between the parameters (they are hard to see...)
Test JDBC connectivity by clicking . You will see this pop-up:
Click to continue.
When you are done, it should look like this:
The Physical Architecture is only half of the Topology definition. You still have to do the Logical Architecture.
Go to the Topology Navigator tab, and expand
Logical Architecture > Technologies > Oracle, right-click, then New Logical Schema. 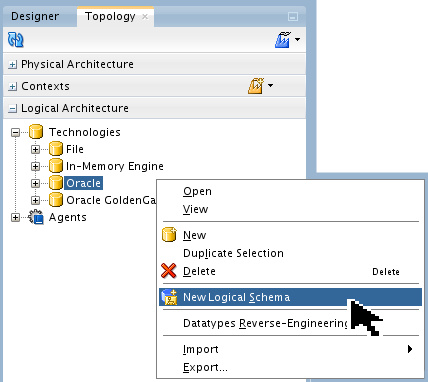
You are going to do this three times for three logical schemas.
Create a Logical Schema named ODI_DEMO_SRC with a Context of
Globaland a Physical Schema ofSRC_ODIDEMO.ODI_DEMOas shown.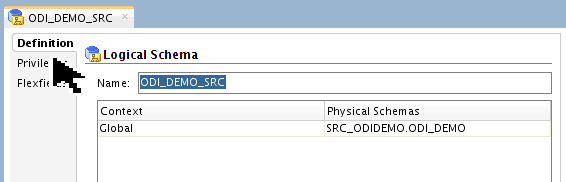
Save
your work. Close the Logical Schema tab. Create a Logical Schema named ODI_DEMO_TRG with a Context of
Globaland a Physical Schema ofTRG_ODIDEMO.ODI_DEMOas shown.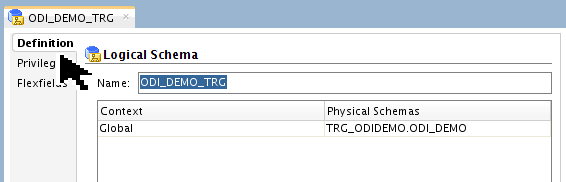
Save
your work. Close the Logical Schema tab. Create a Logical Schema named OGG_ODI_DEMO_SRC with a Context of
Globaland a Physical Schema ofSRC_ODIDEMO.OGG_ODI_DEMO_SRCas shown.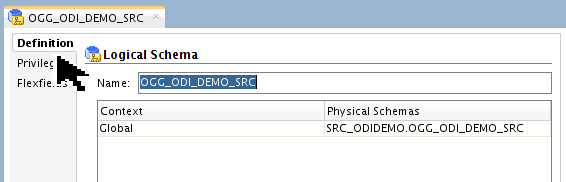
Save
your work. Close the Logical Schema tab. When you are all done, it should look like this:
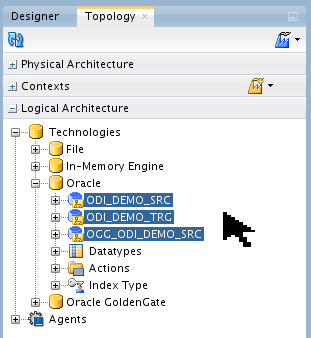
In the demo VM, all three of these Logical Schemas are on the same database on the same host in the same context. That is very unusual. In real life they would probably be on different hosts or at least different technologies.
The ODI Data Servers now have physical and logical definitions.
3.3 Prepare ODI Models
If you are using the pre-configured VM, skip to step 3.3.6.
Go to the Designer Navigator tab, and expand
Models, click the pull-down and select New Model Folder. 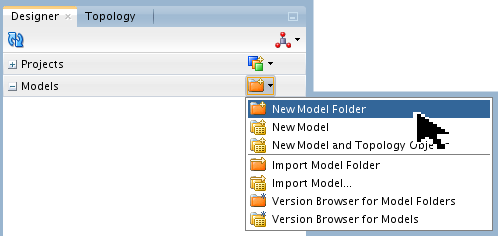
Techncially this is optional, but it is a good convention.
Name the folder ODI_DEMO.
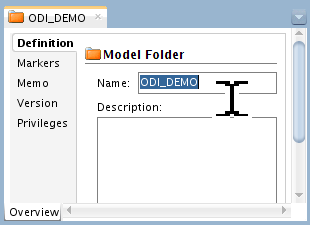
The Description is optional. It is a good convention to put the modification history in here. Save
your work. Close the Model Folder tab. Returning to the Designer tab, click the pull-down again and select New Model.
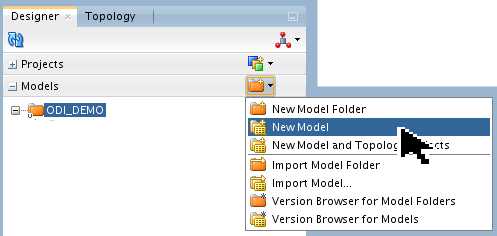
Note that new with ODI version 12.1.3 is the option to do all this on one screen: the New Model and Topology Objects screen.
Create the Orders Application model using the parameters shown.
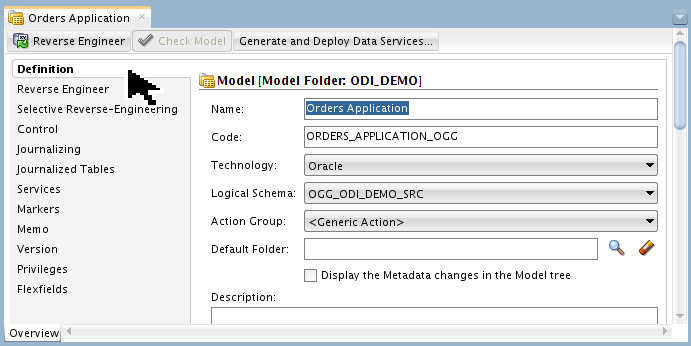
Save
your work. Click to read the table metadata. You will see the following pop-up briefly: 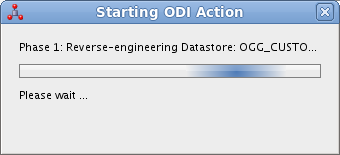
Create the Sales Administration model using the parameters shown.

Save
your work. Click to read the table metadata. You will see the following pop-up briefly:
The Models should now look like this.
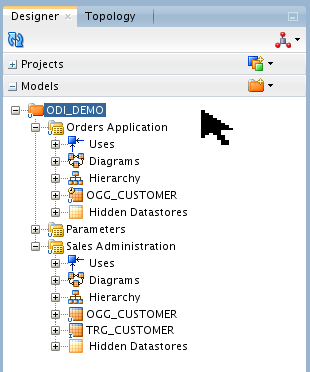
You may have additional datastores (tables) as well. The three datastores that you care about are:
- Source:
OGG_CUSTOMER(Orders App model) - Staging:
OGG_CUSTOMER(Sales Admin model) - Target:
TRG_CUSTOMER(Sales Admin model)
- Source:
The ODI Models and Datastores are now ready to be populated.
3.4 Initial Load of the Staging Table
Populating the Staging table can be done using either the OGG Initial Load or the ODI simple mapping. For simplicity, the tutorial will use the ODI method.
If you are using the pre-configured VM, skip to step 3.4.6. then 3.4.14.
Go to the Designer Navigator tab, and expand
Projects, click the pull-down and select New Project. 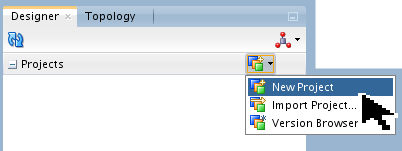
Name the project ODI and OGG Integration Demonstration.
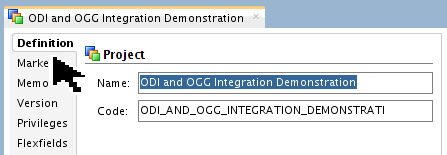
Save
your work. Close the Project folder. Click the pull-down and select New Folder.
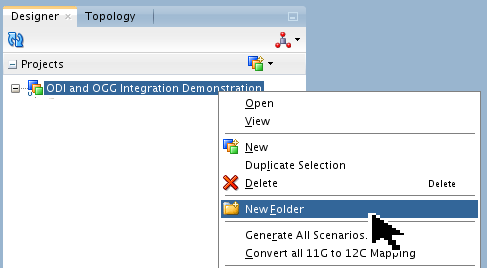
You are going to do this twice.
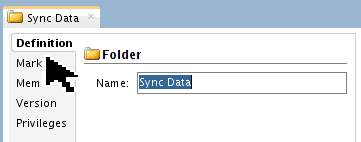
Name the folder Initial Load.
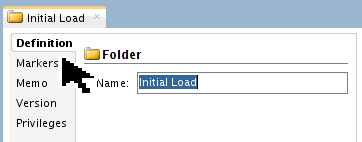
Save
your work. Close the folder. Click the pull-down and select New Folder again. Name the folder Sync data.
Save
your work. Close the folder. When you are done, it should look like this:
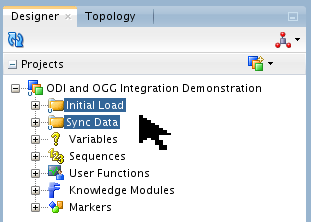
The VM already has these folders populated. But if you are just now creating them then all the folders in this project are empty, but have placeholders for mappings, packages, procedures, and so on.
Right-click Knowledge Modules, select Import Knowledge Modules.
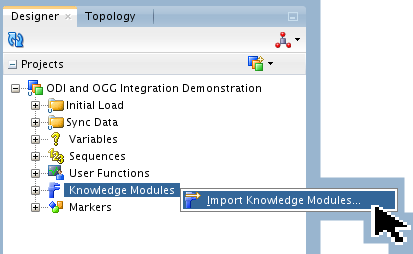
They may already be present. Check what is already there.
Import the following Knowledge Modules (KMs):
- CKM Oracle
- IKM Oracle Incremental Update
- IKM SQL Control Append
- JKM Oracle to Oracle Consistent (OGG Online)
You can find them on the VM at
/home/oracle/Oracle/Middleware/Oracle_Home_1213/odi/sdk/xml-reference.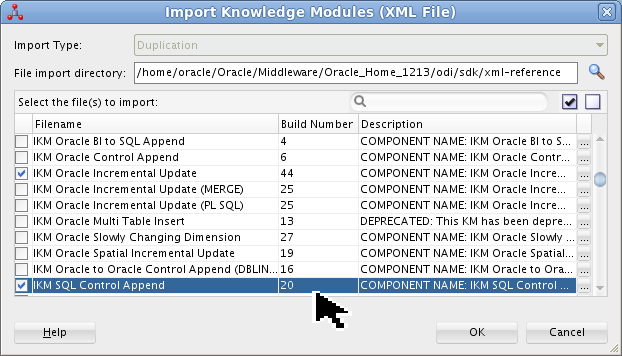
You may accidentally import CKM Hive (a known bug), you can safely ignore it.
Expand
all the Knowledge Modules, and it should look like this: 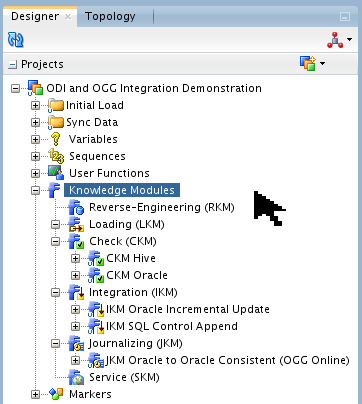
Next you will create a mapping to do the initial load of Sales Administration
OGG_CUSTOMERtable.Right-click Mappings, select
. 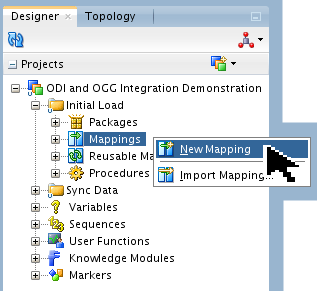
Name the mapping Initial Load Staging.
Still on the Designer Navigator tab, expand
Models > ODI_DEMO > Orders Application and also expand Sales Administration. - Drag both
OGG_CUSTOMERdatastores onto the workspace. Make sure the Orders one is on the left and the Sales one is on the right. - Hook the output of the source to the input of the target.
- Accept Auto Mapping of Attributes.
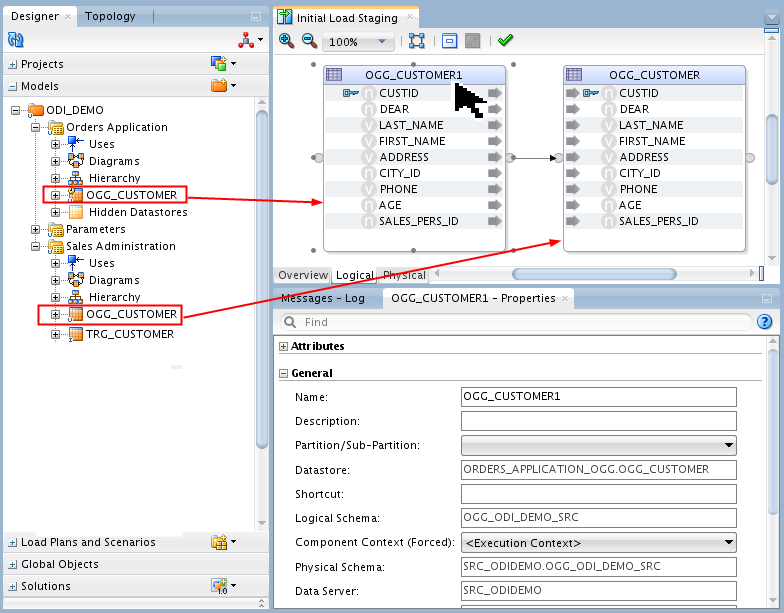
You can check which
OGG_CUSTOMERis which by clicking the title bar and looking at the Properties > General.- Drag both
Select the target
OGG_CUSTOMERtitle bar and change the Target > Integration Type to Control Append.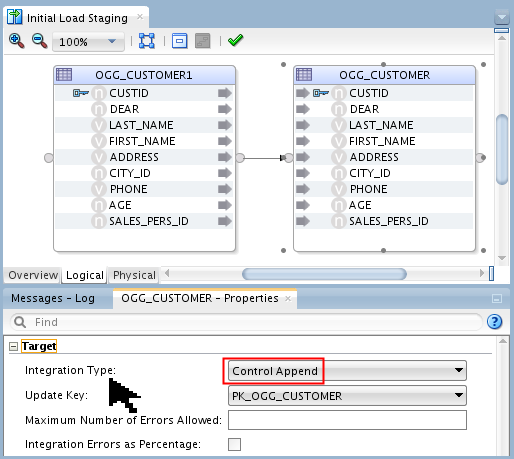
If it already is Control Append, then just confirm it.
Select the Physical tab, then select (indicated by six grey dots) target OGG_CUSTOMER_AP (AP=Access Point, indicated by the added red box). In Properties, change the Loading Knowledge Module to LKM Oracle to Oracle Pull (DB Link).GLOBAL.

If it already is LKM Oracle to Oracle Pull (DB Link).GLOBAL, then just confirm it. Save
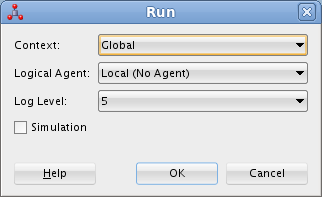
your work, but leave the tab open. Click Run
 in the top menu bar to run the mapping to populate the table.
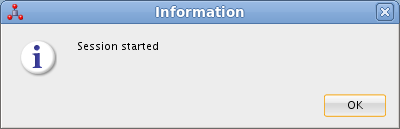
Click on the Run panel. Click on the Information panel to continue.
Go to the Operator Navigator tab, and expand
Session List > Agent > Local > ?? - Initial Load Staging. Make sure that the overall mapping was successful. The "??" on this example is 60, your number may be different. 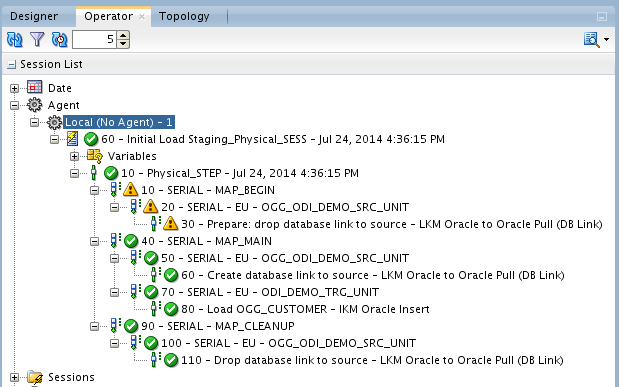
It is common for certain Drop functions to give a warning
 if the object to be dropped is already gone. You can ignore those warnings.
 In the Mapping panel, right click on the target datastore.

There are many ways to view the data in the table.
Make sure there are 35 rows in the table.
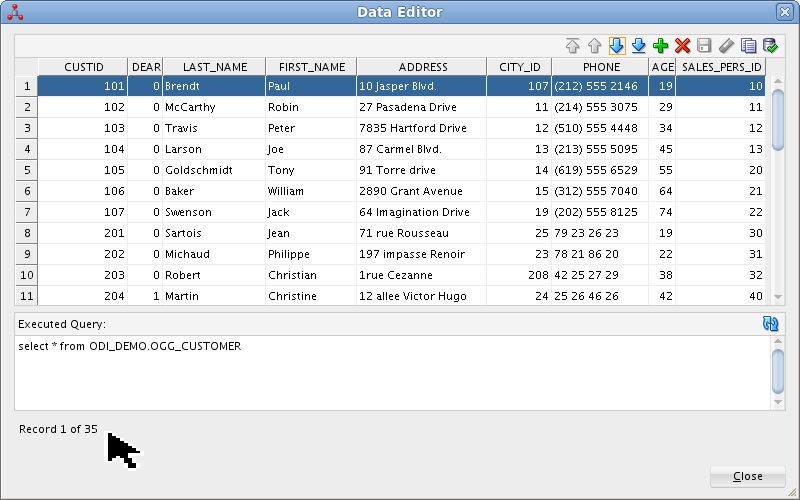
Click to continue.
If you are using the VM, you can use the enclosed ODI and OGG Demo Client to see that two of the three customer tables are populated.

Leave the client running to watch the OGG+ODI changes. Remember:
- Source:
OGG_CUSTOMER(Orders App model) - Staging:
OGG_CUSTOMER(Sales Admin model) - Target:
TRG_CUSTOMER(Sales Admin model)
- Source:
The initial load of the Staging table is complete.
3.5 Initial Load of the Target Table
Populating the Target table is more complex than the Staging table because it has a different structure: it has built-in foreign key (FK) references (e.g. CITY_ID) as well as column transformations (e.g. CUST_NAME=FIRST_NAME||LAST_NAME). For simplicity, the tutorial will assume you have the VM and can run the pre-existing mappings and procedures.
If you are not using the pre-configured VM, then your tables do not have the FK references and you can do a simple mapping of some of the attributes (and others will just have to go blank for this demo).
Go to the Designer Navigator tab, and expand
Load Plans and Scenarios, select LOAD_REFERENCE_DATA Version 001. Click Run in the top menu bar to run the mapping to populate the referenced tables such as TRG_CITY.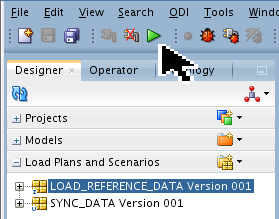
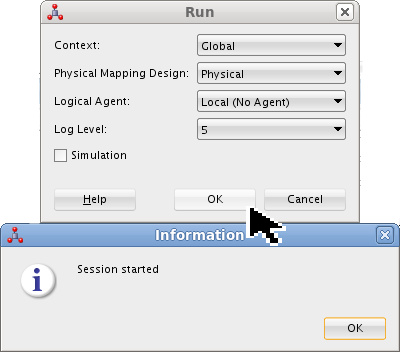
Click on the Run panel. Click on the Information panel to continue.
Go to the Operator Navigator tab, click Refresh
 . Expand Session List > Agent > Local > ?? - LOAD_REFERENCE_DATA. Make sure that the overall mapping was successful. The "??" on this example is 50, your number may be different.
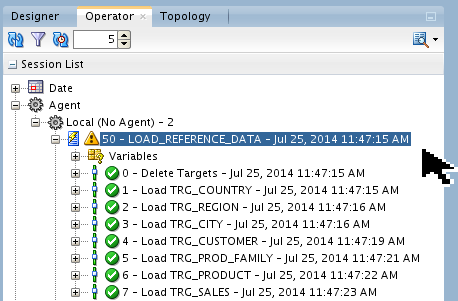
Even though the overall success was Warning
, the individual elements were all successful  .
. Go to the Designer Navigator tab, and expand
Projects > Sync Data > Mappings, then select Load TRG_CUSTOMER. Click Run in the top menu bar to run the mapping to populate the target table TRG_CUSTOMER.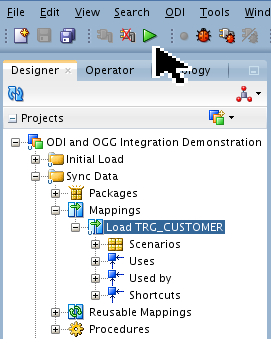
Click on the Run panel. Click on the Information panel to continue.
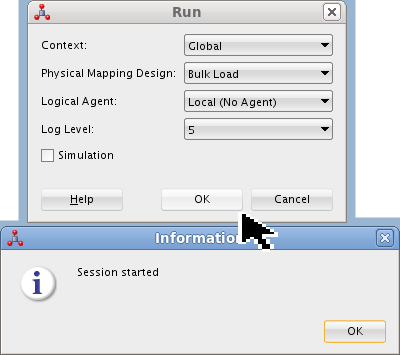
Notice this Physical Mapping Design: Bulk Load, whereas the previous one was Physical Mapping Design: Physical.
Go to the Operator Navigator tab, click Refresh
. Expand Session List > Agent > Local > ?? - Load TRG_CUSTOMER_Bulk Load. Make sure that the overall mapping was successful. The "??" on this example is 62, your number may be different. 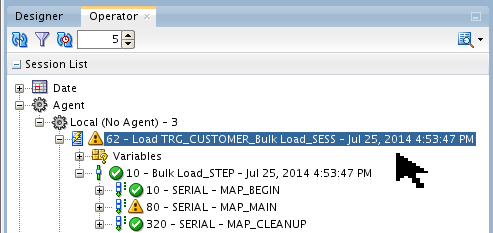
Even though the overall success was Warning
, the individual elements were all successful . Use SQL*Plus or the enclosed ODI and OGG Demo Client to see that all three customer tables are populated.

Note that
CUST_NAMEis concatenated fromFIRST_NAME||UPPER(LAST_NAME), andDEARis resolved into Mr., Mrs., and so on. Also, a few of the rows are missing from the target: 203, 207, and so on.
The initial load of the Target table is complete.
The ODI environment is prepared.
4. Configure GoldenGate Processes
ODI communicates with OGG via agents. The agents are defined by keywords in an ASCII text file. ODI configures an extract, datapump, and replicat via the Studio GUI. This creates the text files mentioned previously. ODI places the text files in their proper OGG directories.
4.1 Configure OGG Extract and Datapump via ODI
If you are using the pre-configured VM, skip to step 4.1.3.
Go to the Topology Navigator tab, and expand
Physical Architecture > Technologies Double-click Oracle GoldenGate. 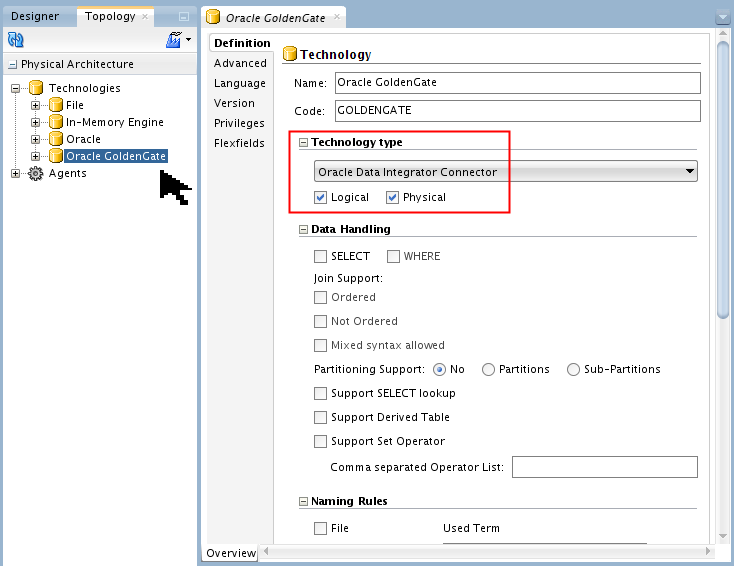
There are lots of options you can configure, but the most important is Technology Type: ODI Connector.
Expand
Oracle GoldenGate > OGG_Source, then open (double-click) CAP (capture, also known as extract). The difference between CAP and CAP_IL is the "_IL" suffix stands for "Initial Load." This demonstration uses an ODI mapping rather than OGG's _IL here to do the initial load. You can use either one. 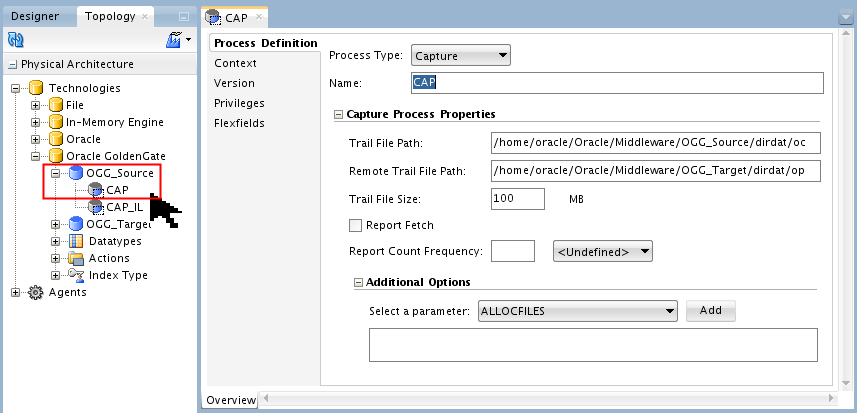
Note the Trail File Paths and file suffixes you pick, such as oc (odi capture) and op (odi pump).
Expand
Logical Architecture > Technologies > Oracle GoldenGate, and open (double-click) CAP_LS (abbreviation for CAPture Logical Schema). It should look ike this: 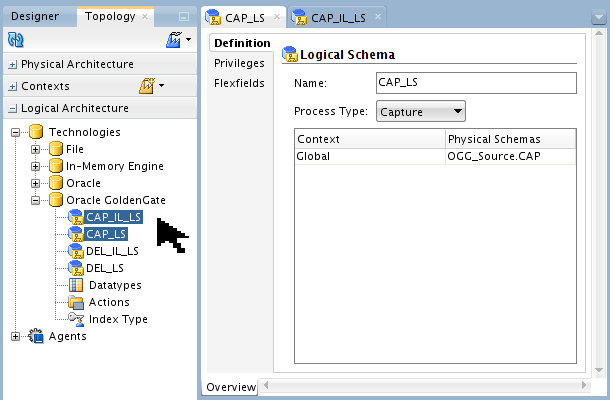
This matches the Physical Architecture.
The OGG extract (CAPture) and datapump (DELivery) are now configured as both physical and logical entities.
4.2 Configure OGG Replicat via ODI
Go to the Topology Navigator tab, and expand
Physical Architecture > Technologies > Oracle GoldenGate > OGG_Target, then open (double-click) DEL (Delivery, also known as replicat). The difference between DEL and DEL_IL is the "_IL" suffix stands for "Initial Load." 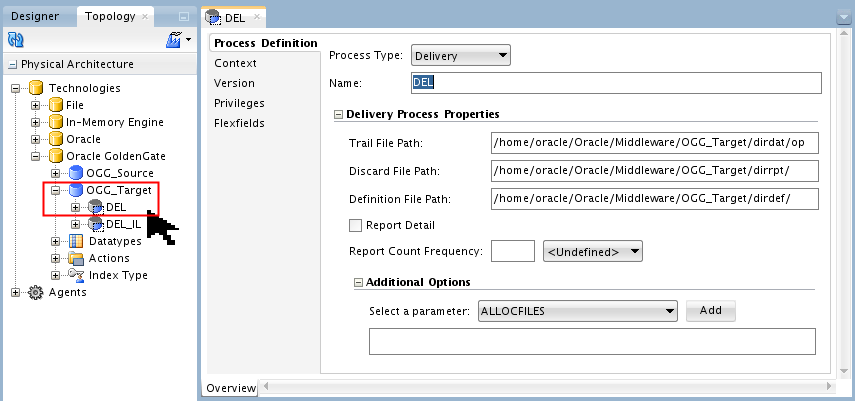
Note the Trail File Paths and file suffixes that match capture, such as op (odi pump).
Expand
Logical Architecture > Technologies > Oracle GoldenGate, and open (double-click) DEL_LS (abbreviation for DELivery Logical Schema). 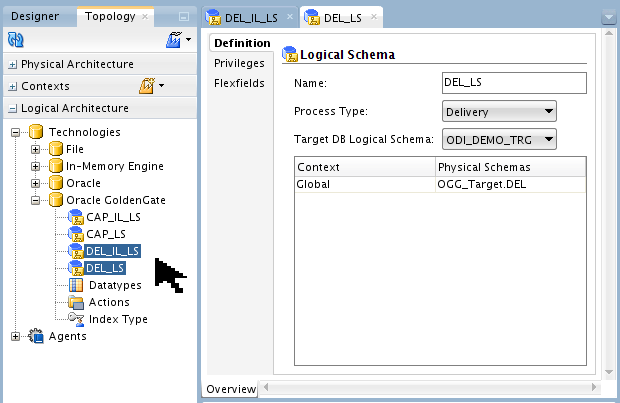
This matches the Physical Architecture.
The OGG replicat (DELivery) is now configured as both a physical and logical entity.
4.3 Start OGG Processes via GGSCI
Start source processes. In the future you can make them auto-start or auto-restart.
OGG Source [myuser@myhost ogg_src]$ ./ggsci Oracle GoldenGate Command Interpreter for Oracle GGSCI (source) > Info All Program Status Group Lag at Chkpt Time Since Chkpt MANAGER STOPPED JAGENT STOPPED GGSCI (source) > Start mgr Manager started. GGSCI (source) > Start jagent Sending START request to MANAGER ... GGCMD JAGENT starting GGSCI (source) > Info All Program Status Group Lag at Chkpt Time Since Chkpt MANAGER RUNNING JAGENT RUNNING GGSCI (source) >If you are curious, you could try
GGSCI >sh ps -ef | grep jagent to see what processes were started.Start target processes.
OGG Target [myuser@myhost ~]$ cd /home/oracle/Oracle/Middleware/OGG_Target [myuser@myhost ogg_trg]$ ./ggsci Oracle GoldenGate Command Interpreter for Oracle GGSCI (target) > Info All Program Status Group Lag at Chkpt Time Since Chkpt MANAGER STOPPED JAGENT STOPPED GGSCI (target) > Start mgr Manager started. GGSCI (target) > Start jagent Sending START request to MANAGER ... GGCMD JAGENT starting GGSCI (target) > Info All Program Status Group Lag at Chkpt Time Since Chkpt MANAGER RUNNING JAGENT RUNNING GGSCI (target) >This is running the OGG
.cfg/Config.propertiesfile.Go to ODI Studio, the Topology Navigator tab, and expand
Physical Architecture > Technologies > Oracle GoldenGate. Double-click OGG_Source, then to exercise the ODI to OGG source agent communication. 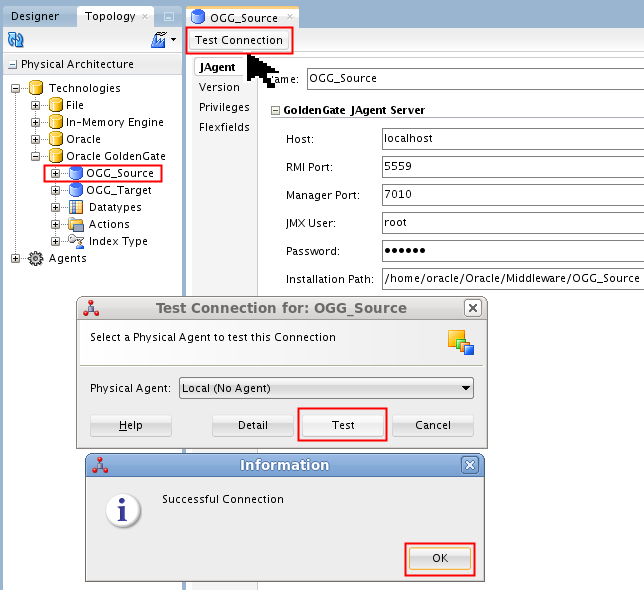
Click and to continue.
Double-click OGG_Target, then to exercise the ODI to OGG target agent communication.

Notice the RMI Port numbers and the Manager Port numbers are different for source and target. They match the values in the OGG
cfg/Config.propertiesfiles.
You have started the Manager and JAgent processes, and defined (but not started) the extract and delivery processes.
5. Configure ODI Designer
Change Data Capture (CDC) is configured with a Journalizing Knowledge Module (JKM). You define it for a model by adding subscribers, and then start it for a datastore. The transfer from the Journal to a mapping is handled by a package in a loop.
5.1 Configure ODI Change Data Capture (CDC)
If you are using the pre-configured VM, you still need to do this whole section.
Go to the Designer Navigator tab, and expand
Models > ODI_DEMO. open (double-click) Orders Application. 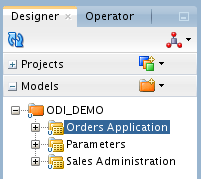
Select the Journalizing tab. Note that the JKM is at the Model level, not the datastore level.
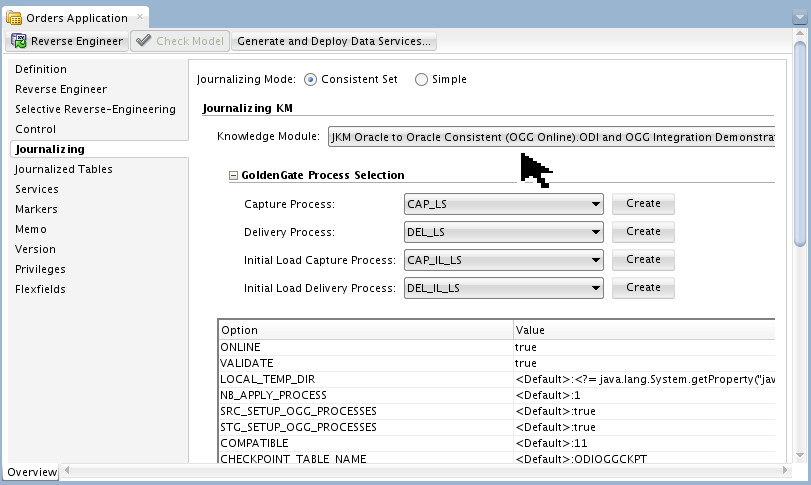
The Journalizing Mode: Consistent Set matches the JKM Oracle to Oracle Consistent. The (OGG Online) means that the ODI-created OGG parameter files are placed into the OGG directories automatically rather than having to be copied manually.
The difference between CAP and CAP_IL is the "_IL" suffix stands for "Initial Load." This demonstration uses an ODI mapping rather than OGG's _IL here to do the initial load. You can use either one.
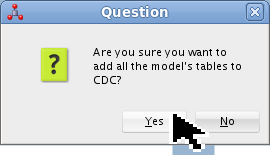
Back on the Designer Navigator tab, right-click Orders Application, and select Changed Data Capture > Add to CDC.

This will register all the datastores contained in that model into the ODI Changed Data Capture framework.
Click to close the Question window.
Right-click Orders Application, and select Changed Data Capture > Subscriber > Subscribe.
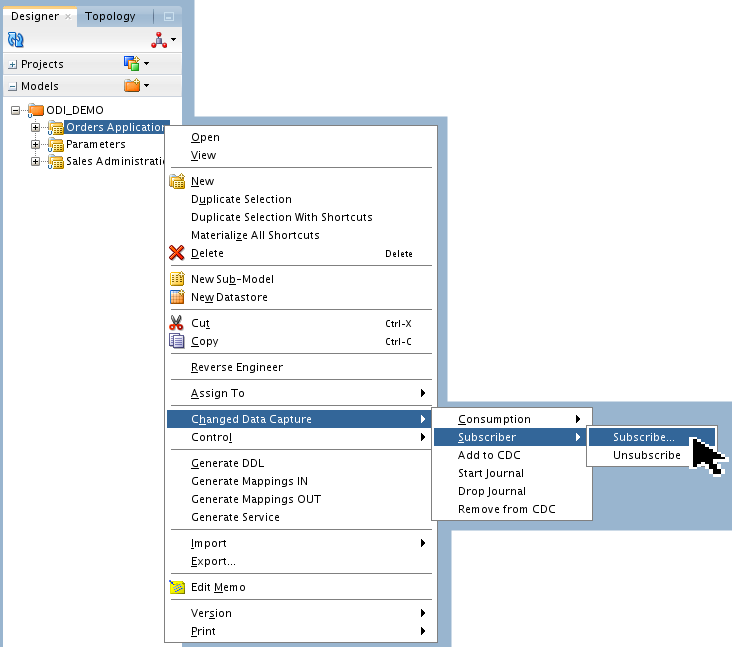
A subscriber is an alias representing a process that is interested in changed data. Since you can have multiple processes interested in the same changed data, you can define multiple subscribers. Each subscriber can move the changed data when needed without impacting the other ones.
In the List of Subscribers to Add, enter ODIDEMO.
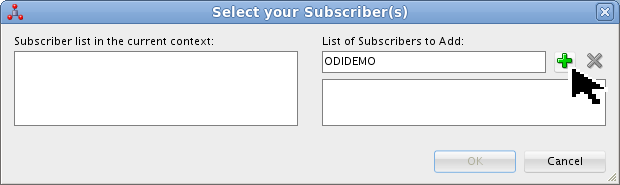
Click the green plus to add the name to the list.
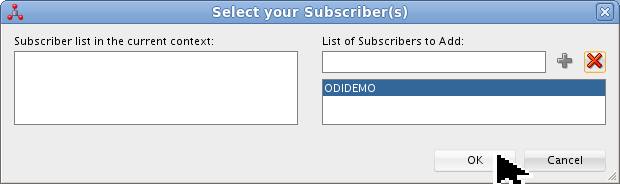
Click to continue.
This starts a session that creates the journalizing environment and adds the user.
Click to continue. This takes a few seconds to complete.
Click to continue.
Go to the Operator Navigator tab, and click Refresh
. Expand Session List > Agent > Local > ?? - Orders Application. Make sure that the overall mapping was successful. The "??" on this example is 63, your number may be different. 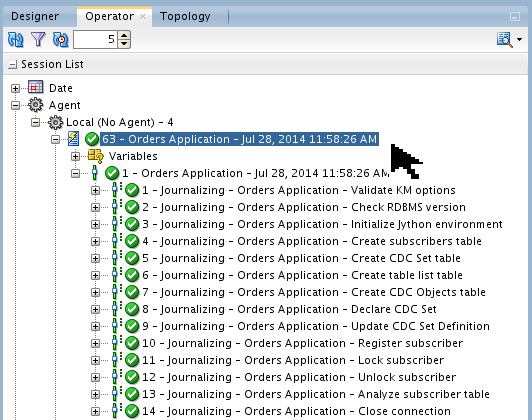
Back on the Designer Navigator tab, right-click Orders Application, and select Changed Data Capture > Start Journal.

This starts a session that starts the journalizing environment. This is where the OGG CAPture and DELivery processes and parameter files are actually run. Confirm the Run and Information pop-ups as you did in the previous step 7.
Go to the Operator Navigator tab, and click Refresh
. Expand Session List > Agent > Local > ?? - Orders Application. Make sure that the overall mapping was successful. The "??" on this example is 64, your number may be different. 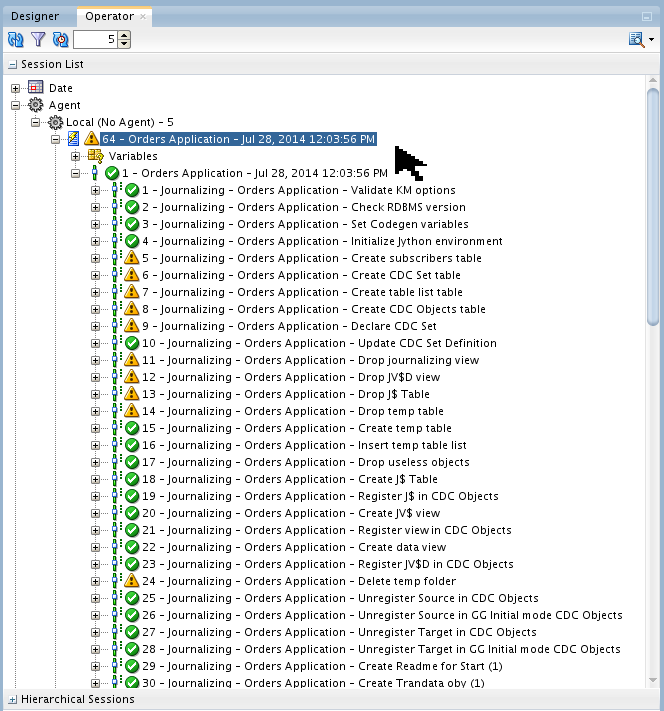
The warnings
you may see are the tasks that were already completed in the previous step 8. For example, the Operator is telling you on line 5 that you cannot "create" a subscribers table because there already is one. You can ignore all of the warnings here. Depending on how you have your preferences set, you may or may not see a change in the icon for the datastore. If you want to see the icon indicating CDC activity, go to the main (top) tool bar and click Tools > Preferences, then expand
ODI > User Interface > Designer. Select Show the CDC Modifications in the tree. 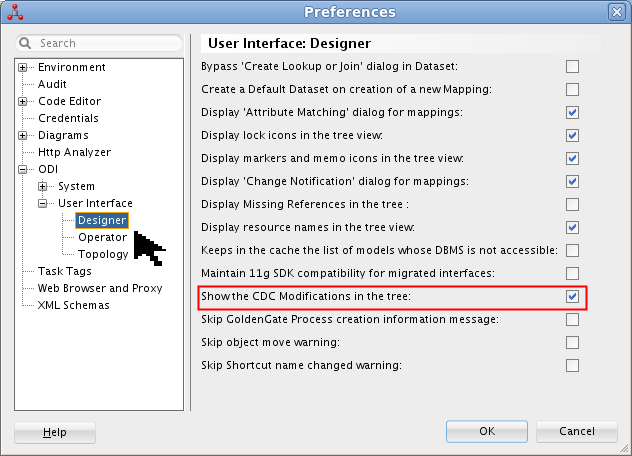
Click to continue.
If you go back to the Designer tab, and expand
Models > ODI_DEMO > Orders Application, you may see a very tiny change on the icon: a yellow clock face. 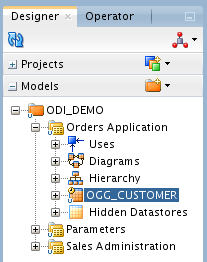
You can see the clock better when it is enlarged to four times its normal size:

If the clock is yellow, that indicates waiting; a green clock indicates something else.
ODI CDC is now configured and started.
5.2 Configure ODI Mappings
If you are using the pre-configured VM, you still need to do this whole section. It is mostly just looking at parameters.
Go to the Designer Navigator tab, and expand
Projects > Sync Data > Mappings, then open (double-click) Load TRG_CUSTOMER. Select OGG_CUSTOMERand notice that the Properties > Journalizing filter is for the subscriber you configured earlier:ODIDEMO.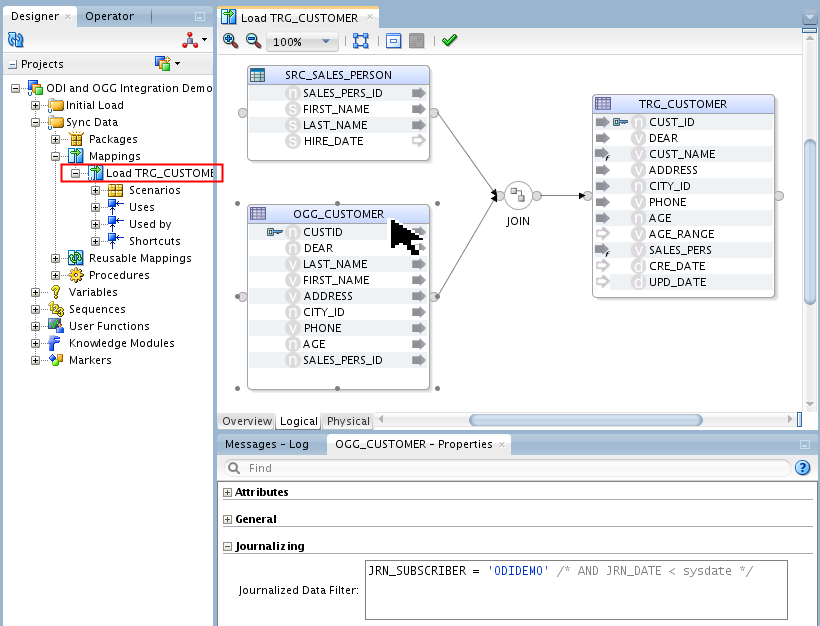
Note that
OGG_CUSTOMERused in this Mapping is coming from the Orders Applications source model. It is the actual source table and not the replicated copy used by OGG (located in the Sales Administration model). ODI will transparently know which table to use based on the Journalizing settings of the Mapping.Click the Physical tab. Click Trickle Feed to display the incremental load Physical Design.
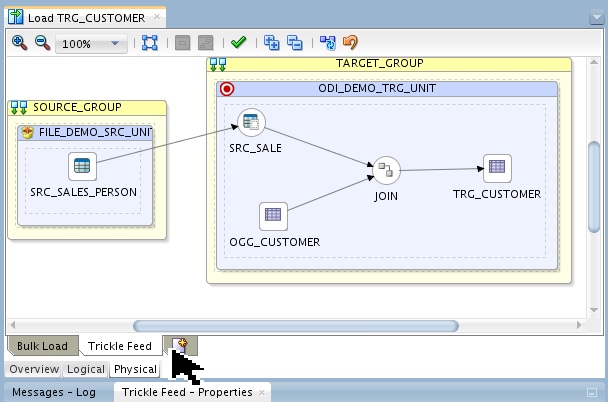
Two deployment specifications have been created in this environment:
- Bulk Load:
- Does a bulk insert into
TRG_CUSTOMERand was previously used to perform an initial load of the target table. - Trickle Feed:
- Performs an incremental load of
TRG_CUSTOMERusing the changed data coming from OGG.
Select
OGG_CUSTOMER. Notice that the Properties > General > Journalized Data Only is selected.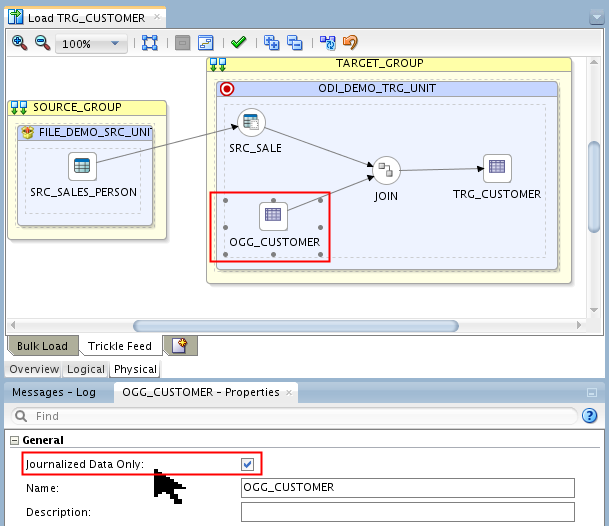
Even though the mapping says to use the source model, selecting Journalized Data Only causes ODI to use the target journal of only changed records.
The mapping has the power to do a transformation. That is why OGG alone is not a complete solution, you also need ODI.
5.3 Configure ODI Packages
Since ODI is inherently a batch system, to make it do a continuous delivery of changed records requires some kind of infinite loop. The way to do that is with a package.
Go to the Designer Navigator tab, and expand
Projects > Sync Data > Packages, then open Sync Data. 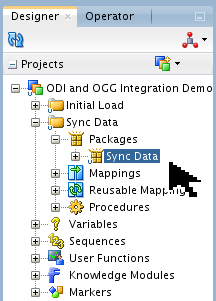
This package will run continuously. This package will wait for new changes to be replicated by OGG and upon detection it will move and transform the replicated data from the staging table into the target table using ODI.
The ODI Tool step Wait for Changes is doing the CDC detection using
OdiWaitForLogData. It is waiting for some changed records to be published by OGG.
Parameters of Note:
Global Row Count=1says to only wait for one row to be changed before proceeding to the next step (i.e., a "micro-batch").Polling Interval=1000milliseconds, i.e., 1 second (basically near-real-time).Logical Schema=ODI_DEMO_TRGandSubscriber=ODIDEMOmatch previous configuration values.
Once the detection of one changed row is successful, the next package step Extend and Lock will logically lock the records that will be moved for your
ODIDEMOsubscriber. "Locking" is what makes this a Consistent Journalizing set versus a Simple set.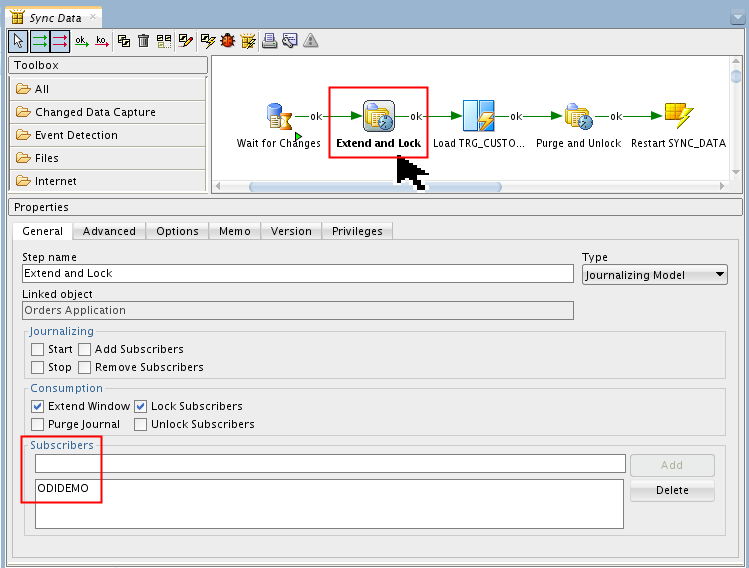
Parameters of Note:
Subscribers=ODIDEMOmatch previous configuration values.Consumption=Extend, Lock. This second step does the first two Consumption options; the fourth step does the last two Consumption options.
The Mapping Load TRG_CUSTOMER will load the changed data using the Trickle Feed physical design and the
ODIDEMOSubscriber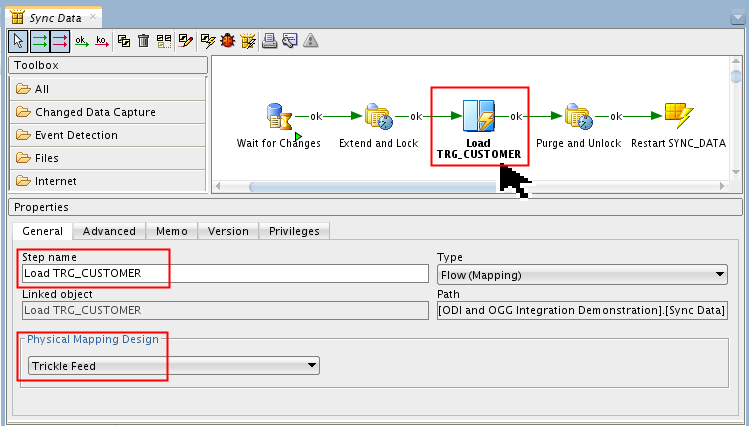
It would be a good practice to have an unsuccessful path ("ko" red arrow) to trap possible errors.
This is the opposite of package step 2, "Extend and Lock."
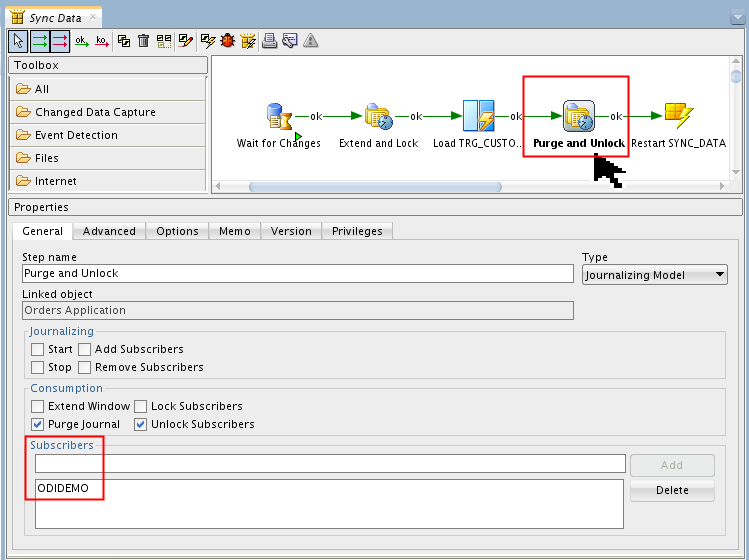
Parameters of Note:
Subscribers=ODIDEMOmatch previous configuration values.Consumption=Purge, Unlock. The second step does the first two Consumption options; this fourth step does the last two Consumption options.
The Package ends with a step executing a Scenario, the same scenario, recursively.
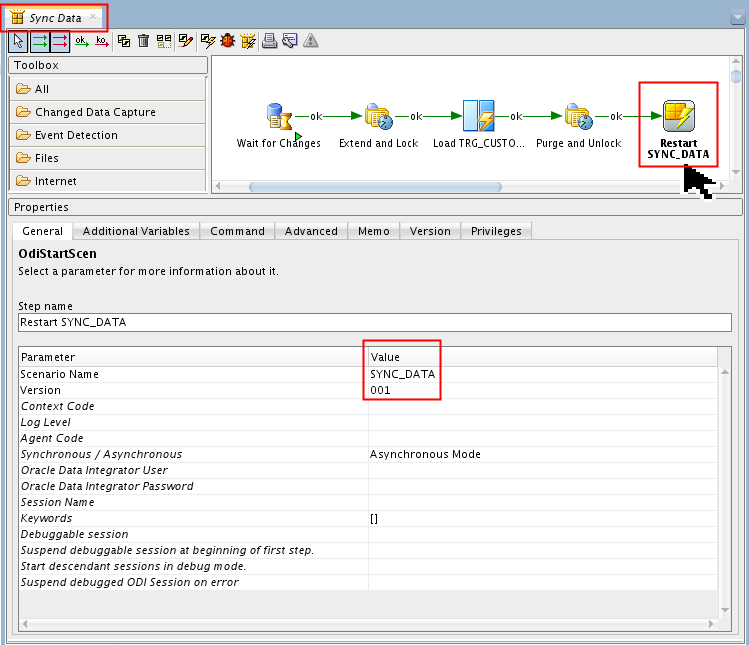
It allows essentially looping through the same Package creating a new Session for every execution. This is a best practice rather than creating the loop directly in the Package as this allows you to better control the overall execution.
Go to the Designer Navigator tab, and expand
Projects > Sync Data > Packages, then select Sync Data. Click Run in the top menu bar to run the package to move the CDC journaling data to the target table. 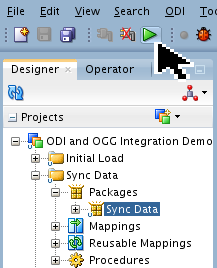
Click on the Run panel. Click on the Information panel to continue.
Go to the Operator Navigator tab, click Refresh
. Expand Session List > Agent > Local > ?? - Sync Data. Make sure that the package is running/waiting (green arrow  ). The "??" on this example is 65, your number may be different.
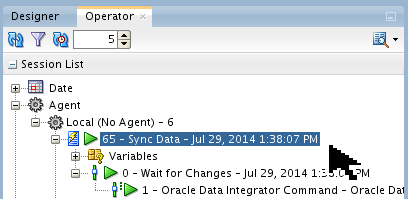
Since it is a continuous loop, it is not "finished" with this session.
The ODI package is now configured and running in an infinite loop, waiting for records to deliver.
6. Test Everything
Now all the pieces are in place. Check what the ODI and OGG status looks like before anything has changed, then start changing data, and observe what changes.
6.1 Check BEFORE views of OGG processes and the tables
Make sure the OGG Source Extract (CAPture) and Data Pump (DELivery) are created and
Status=RUNNING.OGG Source GGSCI (source) > Info All Program Status Group Lag at Chkpt Time Since Chkpt MANAGER RUNNING JAGENT RUNNING EXTRACT RUNNING CAP 00:00:00 00:00:00 EXTRACT RUNNING DELP 00:00:00 00:00:05 GGSCI (source) >These were created by ODI. If you are curious, you can do:
GGSCI >View Param CAPGGSCI >View Param DELP
to see what was created.Make sure the OGG Target Replicat (DELivery) is created and
Status=RUNNING.OGG Target GGSCI (target) > Info All Program Status Group Lag at Chkpt Time Since Chkpt MANAGER RUNNING JAGENT RUNNING REPLICAT RUNNING DEL1 00:00:00 00:00:01 GGSCI (target) >You can verify the contents of the tables with SQL*Plus, SQL Developer, or the Demo Client.
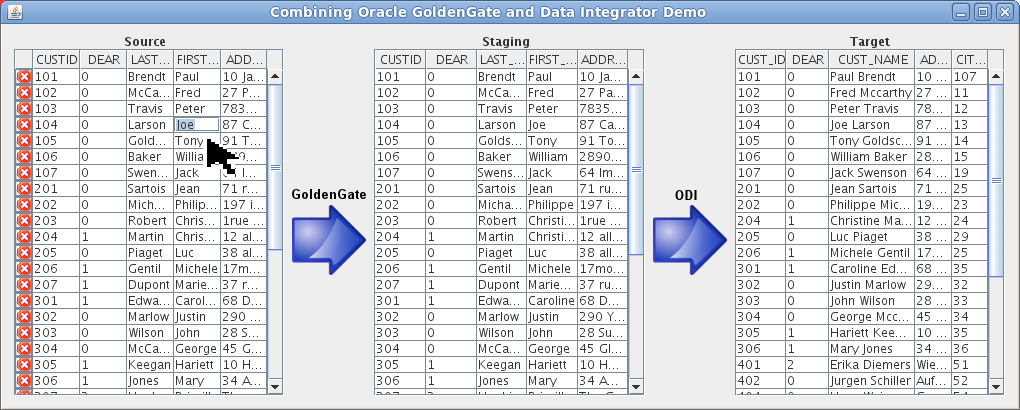
Note that customer 104 has a first name of
Joe. It says so in all three tables.
Now you have seen what the processes and data looks like before anything has changed.
6.2 Do DML on source data
Do inserts, updates, and deletes on the OGG_ODI_DEMO_SRC.OGG_CUSTOMER source data, and watch it propagate through the system.
Change the first name of customer 104 to Harry.
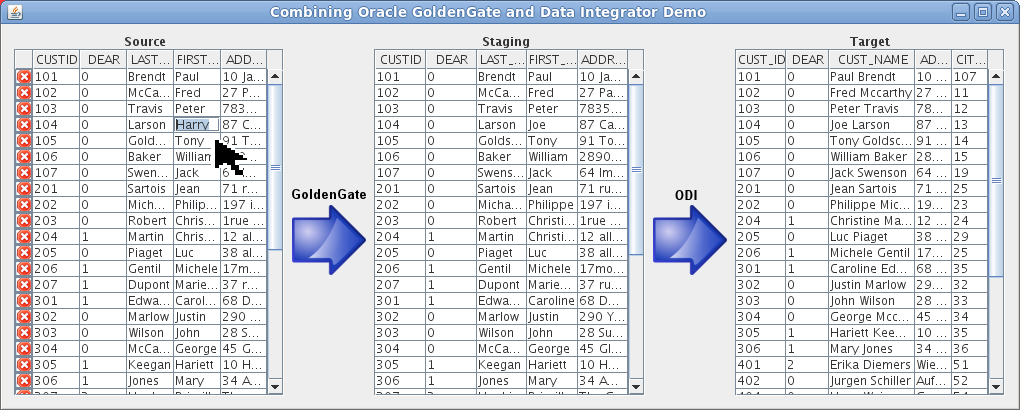
You can change the data with SQL*Plus, SQL Developer, or the Demo Client. You can change lots of values if you wish.
Nothing to do here, but watch carefully because it changes quickly!
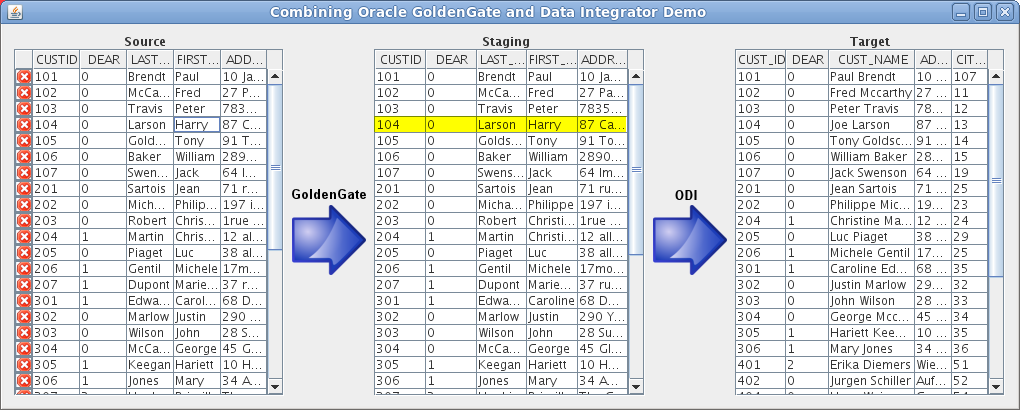
Now the Staging says
Harry.Nothing to do here, but watch carefully because it changes quickly!
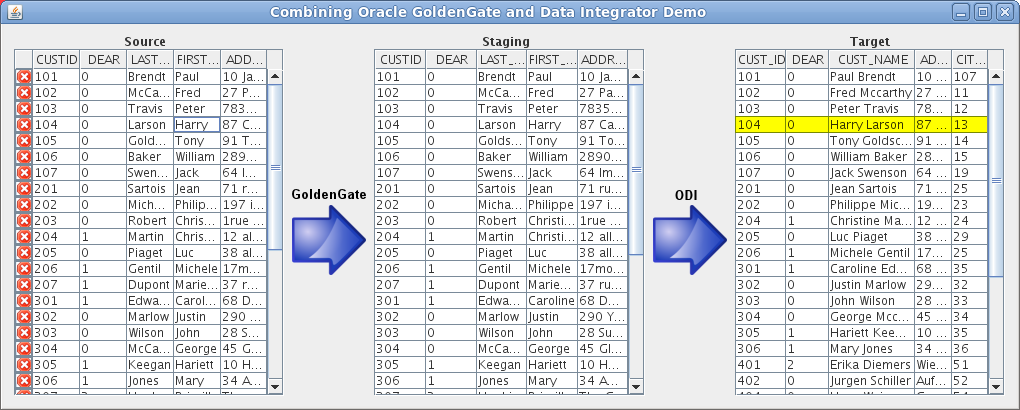
Now the Target says
Harry.
The changes have replicated through OGG and then ODI CDC.
6.3 Check OGG processes
Sometimes DML breaks the OGG processes if they were mis-configured. Check thier Status.
Make sure the OGG Source is still running.
OGG Source GGSCI (source) > ! info all Program Status Group Lag at Chkpt Time Since Chkpt MANAGER RUNNING JAGENT RUNNING EXTRACT RUNNING CAP 00:00:00 00:00:00 EXTRACT RUNNING DELP 00:00:00 00:00:06 GGSCI (ODIGettingStarted) 12> Stats cap Sending STATS request to EXTRACT CAP ... Start of Statistics at 2014-07-29 14:18:59. Output to /home/oracle/Oracle/Middleware/OGG_Source/dirdat/oc: Extracting from OGG_ODI_DEMO_SRC.OGG_CUSTOMER to OGG_ODI_DEMO_SRC.OGG_CUSTOMER: *** Total statistics since 2014-07-29 14:00:52 *** Total inserts 0.00 Total updates 3.00 Total deletes 0.00 Total discards 0.00 Total operations 3.00 (...many lines omitted for clarity...) GGSCI (source) >Updates of first name Joe to Harry is reflected in the statistics.
Make sure the OGG Target is still running.
OGG Target GGSCI (target) > ! info all Program Status Group Lag at Chkpt Time Since Chkpt MANAGER RUNNING JAGENT RUNNING REPLICAT RUNNING DEL1 00:00:00 00:00:07 GGSCI (ODIGettingStarted) 8> Stats del1 Sending STATS request to REPLICAT DEL1 ... Start of Statistics at 2014-07-29 14:19:32. Replicating from OGG_ODI_DEMO_SRC.OGG_CUSTOMER to ODI_DEMO.OGG_CUSTOMER: *** Total statistics since 2014-07-29 14:00:58 *** Total inserts 0.00 Total updates 3.00 Total deletes 0.00 Total discards 0.00 Total operations 3.00 (...many lines omitted for clarity...) GGSCI (target) >Even though the ODI CDC creates many sessions (micro-batches of 1 record each), OGG is just one big session.
The OGG processes are still running, waiting for more changes.
6.4 Check AFTER views of the tables
Note that EACH row changed in
OGG_CUSTOMERcreates a separate session (this behavior can be changed). The current session is always running/waiting, the previous sessions are completed.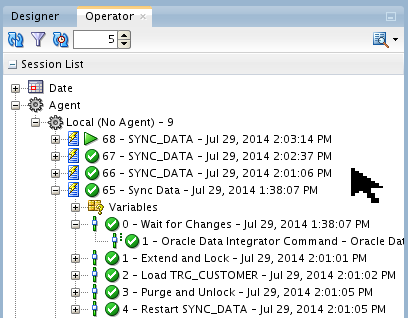
You can see the five steps (numbered 0-4) of the
SYNC_DATApackage for each session.If you want, you can check the OGG reports:
OGG Source GGSCI (source) > View Report CAP *********************************************************************** Oracle GoldenGate Capture for Oracle Version 12.1.2.0.0 17185003 OGGCORE_12.1.2.0.0_PLATFORMS_130924.1316_FBO Linux, x64, 64bit (optimized), Oracle 11g on Sep 25 2013 00:44:16 Copyright (C) 1995, 2013, Oracle and/or its affiliates. All rights reserved. Starting at 2014-07-28 12:04:06 *********************************************************************** Operating System Version: Linux Version #1 SMP Fri Feb 22 18:16:18 PST 2013, Release 2.6.39-400.17.1.el6uek.x86_64 Node: ODIGettingStarted Machine: x86_64 soft limit hard limit Address Space Size : unlimited unlimited Heap Size : unlimited unlimited File Size : unlimited unlimited CPU Time : unlimited unlimited Process id: 22568 Description: *********************************************************************** ** Running with the following parameters ** *********************************************************************** (...many lines omitted for clarity...) GGSCI (source) >The report is incomplete (missing final statistics) until the
CAPprocess is stopped.Go to the Designer Navigator tab, and expand
Models > ODI_DEMO > Orders Application. Right-click OGG_CUSTOMER and select Changed Data Capture > Journal Data. 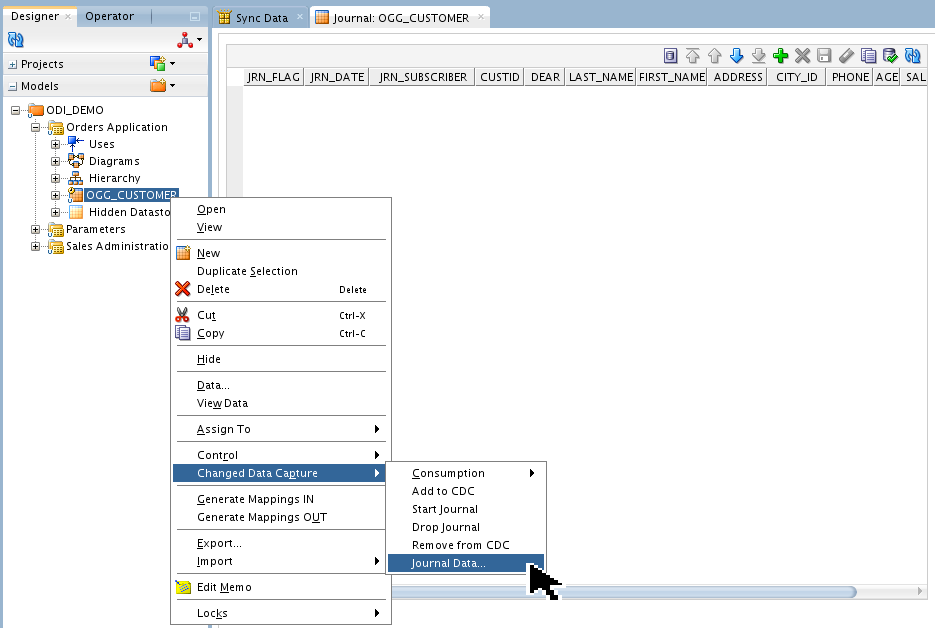
This is not very interesting because no data shows up at this time! Had there not been a consumer, then the Journal would have the three prepended fields of Journal Flag (Insert/Update/Delete), Date, and Subscriber, then the full row of new data for the table being captured. As it is, the data is in this journal for less than a second before being consumed.
If you want to inspect the data with SQL*Plus, do the following queries:
E-LT Source (OGG Source) [myuser@myhost ~]$ sqlplus system/oracle SQL*Plus: Release xx.x.x.x.x Production on Mon dd hh:mm:ss yyyy SQL_SOURCE > select custid, last_name, first_name from OGG_ODI_DEMO_SRC.OGG_CUSTOMER where custid=104; CUSTID LAST_NAME FIRST_NAME ---------- -------------------- -------------------- 104 Larson HarryThe above is for the source table.
E-LT Staging (OGG Target, ODI Source) [myuser@myhost ~]$ sqlplus system/oracle SQL*Plus: Release xx.x.x.x.x Production on Mon dd hh:mm:ss yyyy SQL_STAGING > select custid, last_name, first_name from ODI_DEMO.OGG_CUSTOMER where custid=104; CUSTID LAST_NAME FIRST_NAME ---------- -------------------- -------------------- 104 Larson HarryThe above is for the staging table.
E-LT Target (ODI Target) [myuser@myhost ~]$ sqlplus system/oracle SQL*Plus: Release xx.x.x.x.x Production on Mon dd hh:mm:ss yyyy SQL_TARGET > select custid, last_name, first_name from ODI_DEMO.TRG_CUSTOMER where custid=104; CUSTID LAST_NAME FIRST_NAME ---------- -------------------- -------------------- 104 Larson HarryThe above is for the target table. All three should be the same, with a first name of
Harry.
If the ODI side seems inefficient, you can always change the batch size to be increased from the current value of 1 to something larger, for example, 10.
7. Cleanup
At this point the OGG replication and the ODI CDC will continue to run/wait indefinitely (barring any error conditions). If you ever wish to stop it gracefully, perform the following steps:
7.1 Cleanup ODI
Go to the Operator Navigator tab, click Refresh
. Expand Session List > Agent > Local. Right-click the top-most ?? - Sync Data. Make sure that the package is running/waiting with a green arrow . (The "??" on this example is 68, your number may be different.) Click Stop Immediate.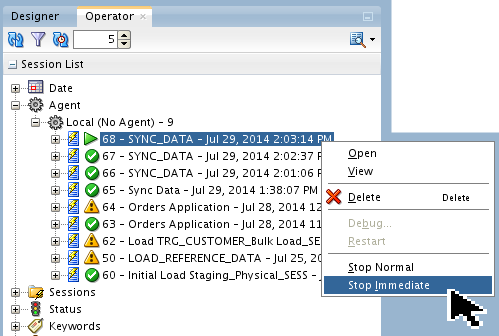
This stops the package abruptly, breaking out of the infinite loop.
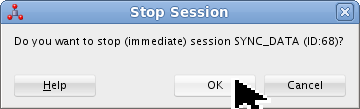
Click to continue. It will show the package session as failing
 . That is normal in this kind of a stop.
 You do not have to remove the objects from CDC, at this point they are stopped. if you did want to completely clean up, then you go through the same steps to remove from CDC as you did to add it, only in reverse order. The order is important. You can do it at the datastore level or the model level. For the datastore: First drop the journal.
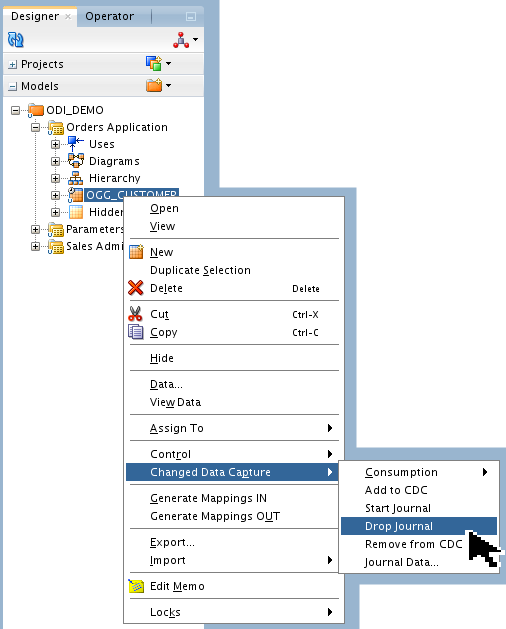
This causes a session to start. Confirm in the usual way.
Optionally you could have dropped the journals for all datastores in the model. Same process as for a datastore, only one level up.

This causes a session to start. Confirm in the usual way.
Like the journal, you can remove an object from CDC at the datastore level or at the model level. For the datastore, remove it from the CDC.
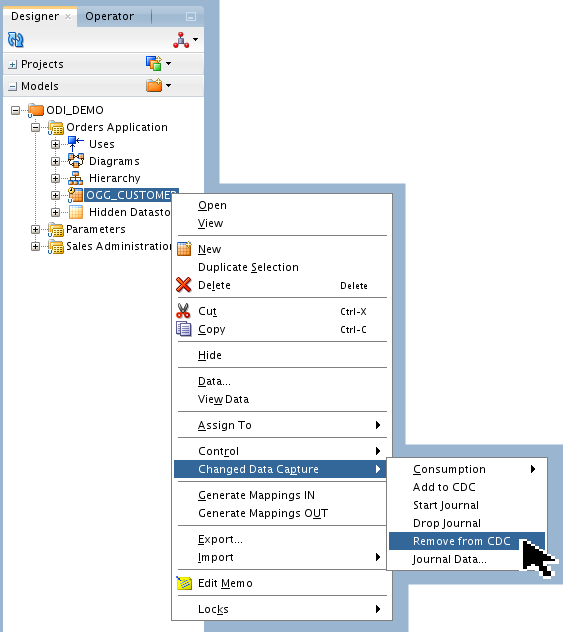
The question prompts you, "Are you sure?"
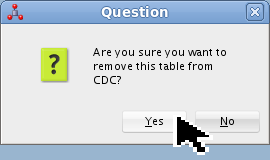
Click to continue.
Alternatively, you could have removed all datastores from CDC at the model level. Same process as for a datastore, only one level up.
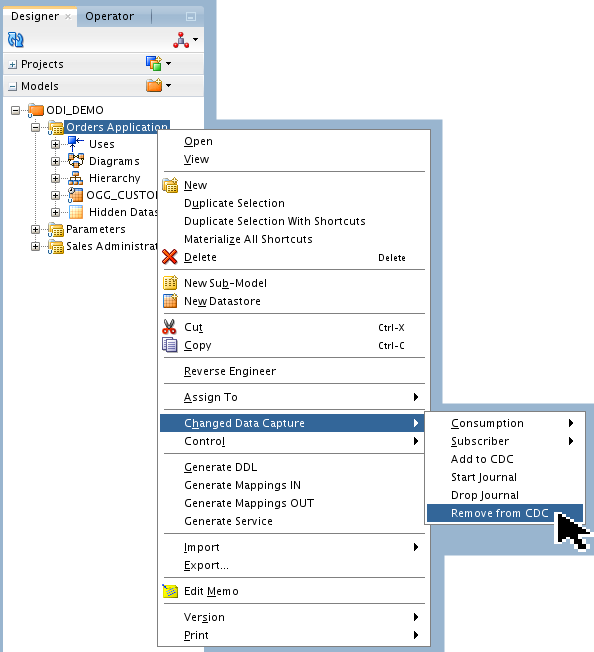
The question prompts you, "Are you sure?"
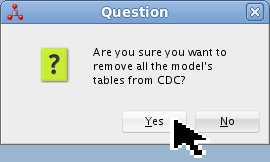
Click to continue.
All objects have been removed from CDC. The tiny yellow clock icon should have been removed as well from the OGG_CUSTOMER label in the Models list.
7.2 Cleanup OGG
Removing the models from the CDC on ODI will cause the OGG extract, datapump, and replicat processes to be stopped and removed. There is nothing more you need to do manually.
On the OGG source, note that the extract and datapump processes are stopped and removed (unregistered), but the parameter files persist. The manager and agents are left running.
OGG Source GGSCI (source) > Info All Program Status Group Lag at Chkpt Time Since Chkpt MANAGER RUNNING JAGENT RUNNING GGSCI (source) > View Param cap extract CAP userid ODI_STAGING, password oracle exttrail /home/oracle/Oracle/Middleware/OGG_Source/dirdat/oc TABLE OGG_ODI_DEMO_SRC.OGG_CUSTOMER; GGSCI (source) >Note that the password is in clear text. You may want to change that to an alias if you have OGG version 12.1.2 or higher.
On the OGG target, note that the replicat process is stopped and removed (unregistered), but the parameter file persists.
OGG Target GGSCI (target) > Info All Program Status Group Lag at Chkpt Time Since Chkpt MANAGER RUNNING JAGENT RUNNING GGSCI (target) > View Param del1 replicat DEL1 userid ODI_STAGING, password oracle discardfile , purge sourcedefs /home/oracle/Oracle/Middleware/OGG_Target/dirdef/CAP.def map OGG_ODI_DEMO_SRC.OGG_CUSTOMER, TARGET ODI_DEMO.OGG_CUSTOMER, KEYCOLS (CUSTID); map OGG_ODI_DEMO_SRC.OGG_CUSTOMER, target ODI_STAGING.J$OGG_CUSTOMER, KEYCOLS (CUSTID, WINDOW_ID), INSERTAL LRECORDS, OVERRIDEDUPS, COLMAP ( CUSTID = CUSTID, WINDOW_ID = @STRCAT(@GETENV('RECORD', 'FILESEQNO'), @STRNUM(@GETENV('RECORD', 'FILERBA'), RIGHTZERO, 10)) ); GGSCI (target) >Note that the password is in clear text. You may want to change that to an alias if you have OGG version 12.1.2 or higher.
It might be a good idea to View Report CAP (the completed report) just to make sure that nothing unusual is in there.
Summary
Following the business scenario posed in the Introduction section, you had three databases (actually one database with three schemas): a source, staging, and target database being used for E-LT. OGG was used to make an exact replicate of the OGG_CUSTOMER table, from schema OGG_ODI_DEMO_SRC on the source to schema ODI_DEMO on the staging database. Then ODI was used to make a transformation from OGG_CUSTOMER table to TRG_CUSTOMER table, changing some columns on the fly. ODI was copying only changed (inserted, updated, or deleted) rows in micro-batches of 1 every 1 second.
In this tutorial, you learned to:
- Prepare an Oracle Database for ODI and OGG replication
- Prepare ODI for CDC
- Prepare OGG for replication
- Start, Monitor, Stop ODI and OGG integration
Resources
Here is a list of conceptual or procedural Help topics relevant to this tutorial:
- ODI 12c full Documentation online (includes past versions).
- ODI 12c and OGG Integration Documentation .
- ODI 12c and OGG Webcast, specifically Integration.
- Specific courses where ODI is discussed in detail:
- [D82167GC10] "Oracle Data Integrator 12c: Integration and Administration"
- [D82171GC10] "Oracle Data Integrator 12c: New Features"
- [DxxxxxGC10] "Oracle Data Integrator 12c: Advanced Integration and Development"
- [D78191GC10] "Oracle Data Integrator 11g: Advanced Integration and Development"
- Specific courses where OGG is discussed in detail:
- [D84357GC10] "Oracle GoldenGate 12c: Fundamentals for Oracle"
- [D76689GC10] "Oracle GoldenGate 11g: Advanced Configuration for Oracle"
- External Web sites for related information: A-Team Blogs
- To learn more about ODI and OGG, refer to additional OBEs in the free Oracle Learning Library:
Credits
- Lead Curriculum Developer: Steve Friedberg
- Other Contributors: Julien Testut, Product Manager; Alex Kotopoulis, Product Manager, Tom Mangiacapre.
To navigate this Oracle by Example tutorial, note the following:
- Topic List:
- Click a topic to navigate to that section.
- Expand All Topics:
- Click the button to show or hide the details for the sections. By default, all topics are collapsed.
- Hide All Images:
- Click the button to show or hide the screenshots. By default, all images are displayed.
- Print:
- Click the button to print the content. The content that is currently displayed or hidden is printed.
To navigate to a particular section in this tutorial, select the topic from the list.