 How to Load Data using HCM Spreadsheet Data Loader (HSDL)
 Before You Begin
This 20-minute tutorial shows you how to generate HCM Spreadsheet Data Loader spreadsheets and use them to bulk-load data into the Oracle HCM Cloud.
Background
HCM Spreadsheet Data Loader (HSDL) enables you to upload data into the Oracle HCM Cloud from spreadsheets which are configured to support your use cases, such as New Hire or Bonus Payments.
You generate a spreadsheet for bulk-loading data from a spreadsheet template which may be preconfigured or may be unique to your company. Spreadsheet templates are shared with specific job roles, so your access to bulk-loading spreadsheets will depend upon the roles you have access to.
Spreadsheet templates are available from the Run Spreadsheet Data Loader task in the Data Exchange work area but some preconfigured templates are embedded in the application pages, such as Manage Jobs and Manage Locations.
What Do You Need?
- A user account that has access to HCM Spreadsheet Data Loader templates.
The Configure HCM Spreadsheet Data Loader Security tutorial explains how to configure a role with access to use HSDL.
- A Windows machine with the Desktop Integrator installed. Downloaded this from the Tools menu in the application. Desktop Integrator is not available on the Mac operating system.
 Generating a Spreadsheet
Spreadsheets Embedded in Application Pages
Some application pages embed preconfigured spreadsheet templates for bulk-loading new objects. In this step you will generate a spreadsheet to create jobs.
- On the home page, click My Client Groups > Workforce Structures
- Click Manage Jobs.
- On the table toolbar, click Manage in Spreadsheet
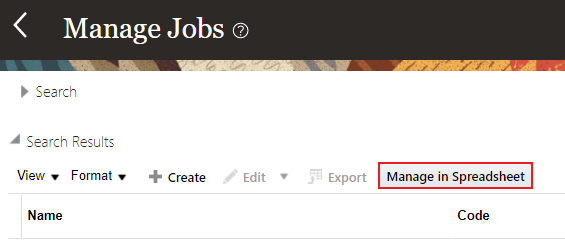
Note: You'll find the Manage in Spreadsheet button on a number of the Work Structure pages.
- A file named GenericHdlSpreadsheet.xlsx will be downloaded, open it.
Tip: This will normally be downloaded to your Downloads folder.
- You will be asked if you want to connect, click Yes.
- Enter your application username and password and click Sign In.
The Spreadsheet Loader tab will generate columns that are defined by the Job spreadsheet template.
- Save the spreadsheet locally with a meaningful name, such as Create Jobs.xlsx.
Tip: You'll use this spreadsheet in the Working with Data Sets section later in this tutorial.

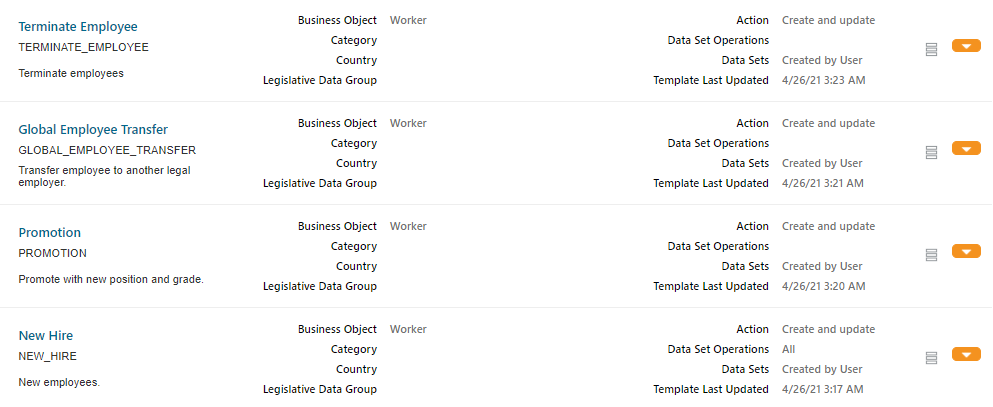
Accessing Other Spreadsheet Templates
You can access all templates available to the roles your user inherits from the Run Spreadsheet Data Loader task.
- On the home page, click My Client Groups > Data Exchange > Run Spreadsheet Data Loader
- Click the name of the template you want to generate a spreadsheet for.

- A file named GenericHdlSpreadsheet.xlsx will be downloaded, open it.
Tip: This will normally be downloaded to your Downloads folder.
- You will be asked if you want to connect, click Yes.
- Enter your application username and password and click Sign In.
The Spreadsheet Loader tab will generate columns that are defined by the Job spreadsheet template.
Follow the steps in Working with Data Sets to create data sets and upload data.
Finding a Template
If you have a number of templates available, you may need to search for the right one. These steps walk you through searching and understanding the template shape.
- On the Run Spreadsheet Data Loader page, click Show Filters.

- There are many search filters available, you can search by template name if it is known, or the business object you want to load data for. For example: If you want to upload employee data, specify a business object of Worker and click Search.
Tip: The business object filter provides a choice list of the objects.

The page will now list only templates that meet your search criteria.
Tip: Use the template description and other information to identify the correct template.
- Click the template columns icon to display a list of columns that the template will include when generating the spreadsheet.
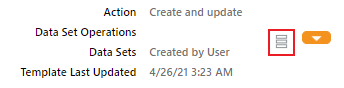
The template columns are listed in a dialog window:
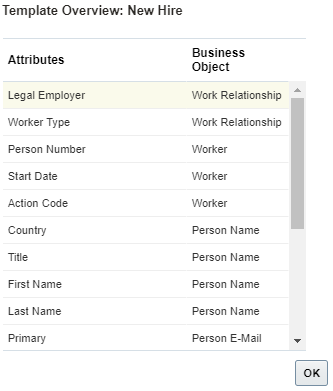
Click OK to close the Template Overview window.
- Once you've found your template you can follow the steps above to generate and log in to a spreadsheet.
 Working with Data Sets
Data to be uploaded into the application must be created within a data set. When you first generate a spreadsheet, you can choose to create a new data set or search for an existing one.
Creating a Data Set and Uploading Data
- If you have closed the spreadsheet for creating jobs, open it and log in with your application user details. Alternatively, follow the steps above for generating a Job spreadsheet.
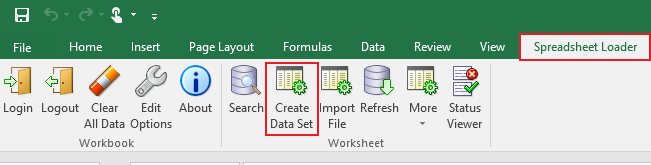
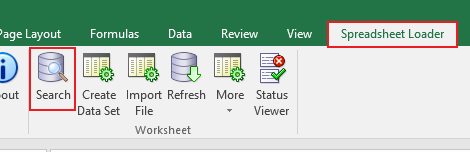
- On the Spreadsheet Loader toolbar, click Create Data Set.
- Click OK when asked if you want to continue.
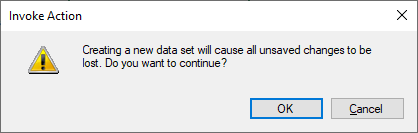
Click OK to close the confirmation popup.
A data set will be created with a name defaulted to the template name, appended with the timestamp.
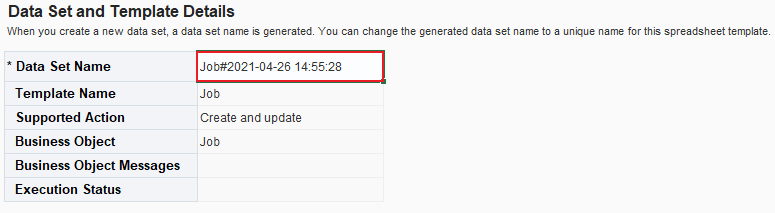
Tip: You can optionally update the data set name by editing the name in the Data Set Name field.
Note: Your data set name should be unique, so you can identify it later.
- The spreadsheet is generated with one enterable row, double click in any cell in that row to activate it.
- Specify a start date for your job. Dates are provided with a date-picker, use the date-picker on the Effective Start Date cell to select 1st Jan 2020.
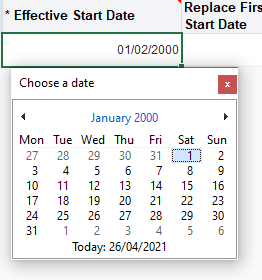
Tip: Click on the month and year at the top of the date picker to navigate by month and year.
Note: You can free-text enter dates but by using the date-picker the date will be entered in the correct format.
- Specify a unique code for your job code, such as your initials followed by IC1. For example, XX_IC1.
- The Set Code column provides a searchable list of values, identified by the [..] symbol after the column header.

Tip: Cells highlighted with a red frame indiciate that a value is required.
Double click the cell in this column to open the searchable list of values.
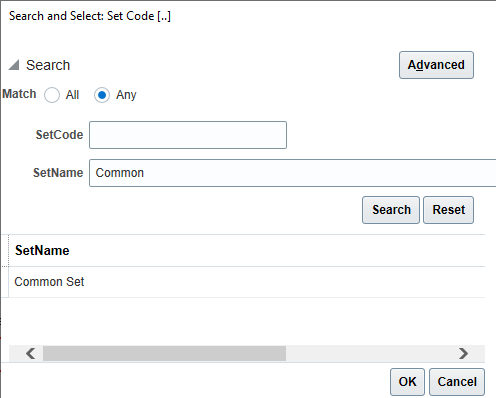
Enter a Set Name of 'Common' and click Search.
Select the Common Set and click OK.
- Specify a name for your job, such as 'XX Individual Contributor 1', replacing XX with your initials.
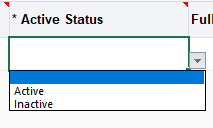
- The Active Status has a choice list, use the choice list to select 'Active'.
- Enter values for the other columns.
Tip: If you're not sure what you should supply in a particular column, hover over the column name for more information.
- To create additional rows, click on the row toolbar starting with the active row select the number of rows you want to add.
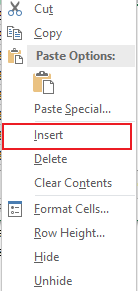
Right click on your mouse to access the Excel menu. Click Insert.
- Specify data on your new spreadsheet rows to define other jobs.
- On the Spreadsheet Loader toolbar, click More > Upload to initiate the upload of your rows into the Oracle HCM Cloud.
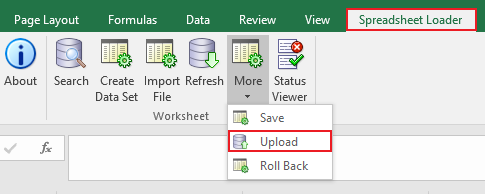
Tip: If you are loading large numbers of spreadsheet rows it is worth saving your progress, using the Save option. This stores your spreadsheet rows in the staging tables but doesn't upload the data to the Oracle HCM Cloud application tables.
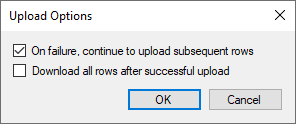
- Accept the default upload options by clicking OK.
Click OK on the upload confirmation window.
- Click Refresh on the Spreadsheet Loader toolbar to update the status of the data set and the spreadsheet rows within it.
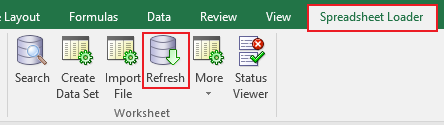
Tip: When multiple rows are being uploaded, you may need to refresh several times to get the latest status of all rows.
Any invalid rows will have an Upload Progress of Error and provide an error message in the Message column. Rows successfully uploaded will have a status of Success.

You can correct any rows that have errors and resubmit Upload.
- Close the spreadsheet.
Opening and Updating an Existing Data Set
You may want to open an existing data set to review the status of the spreadsheet rows within it, to add new rows or to correct failed rows.
Note: You can only retrieve data sets that were created before you logged into the spreadsheet.
- Open the spreadsheet for creating jobs, either by downloading it from the Manage Jobs page, or by opening a locally saved copy of the spreadsheet.
- Log in when prompted.
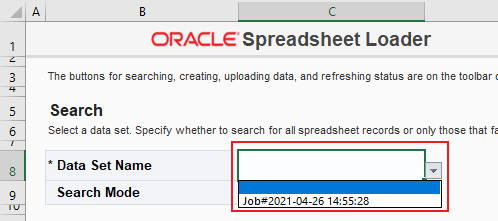
- In the Search section, use the Data Set Name choice list to view all data sets you are able to access with this spreadsheet.
If you followed the steps in the Creating a Data Set and Uploading Data section, the data set you created there should be listed.
Tip: You may see additional data sets if your role has access to view all data sets and not just those that you have created.
- Choose a data set from the choice list.
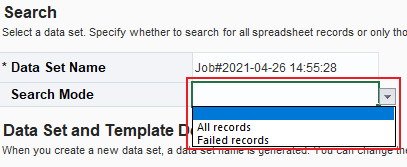
- In the Search Mode box use the choice list to select All records.
- On the Spreadsheet Loader toolbar, click Search.
- Your data set will be retrieved into the spreadsheet.
Tip: If you only want to see records that failed to load, change the Search Mode to Failed records and click Search.
You can add rows to an existing data set, and you can correct rows that failed to load successfully, edits to successfully loaded rows will be rejected.