Java EE7: Developing a Batch Processing Application
Overview
Purpose
This tutorial demonstrates how to develop a sample batch application and run the batch application in Oracle GlassFish Server.
Time to Complete
Approximately 1 hour
Introduction
JSR 352 (Batch Applications for the Java Platform) defines the programming model for batch applications and a run time to run and manage batch jobs. The programming model for batch applications caters to batch processing concerns, such as jobs, steps, repositories, reader processor writer patterns, chunks, checkpoints, parallel processing, flow, split, transactions, retries, sequencing, and partitioning.

As displayed in the diagram:
- A job represents a series of closely related steps that perform a discrete business process.
- Steps can be executed in sequence or in parallel.
- Steps can also be optional, with the decision to execute or skip them conditioned on the outcome of prior steps in the same workflow.
- Steps can be check-pointed and retried, if needed, and are generally transactional.
- A repository stores information about the current jobs.
- Jobs can be listed, started, stopped, paused, and cancelled through the operator.
- The operator is typically invoked in a scheduled or ad hoc fashion.
The entire batch process is put together through a Job Specification Language written in XML. Despite the robust concepts, the programming model is kept simple.
Scenario
A very simple scenario is considered for this tutorial. A batch
job reads new-hire data for HR processing from a comma-separated
values (CSV) file. Each line in the file contains a name and the
hiring date for one employee. The batch job stores each line in
the file to a NewHire object and then writes out the
new hire's data into a database table.
Hardware and Software Requirements
The following is a list of hardware and software requirements:
- Java Platform, Standard Edition 7 (Java SE 7; Java SE 7u11 recommended)
- NetBeans 7.3.1 IDE for Java Platform, Enterprise Edition 7 (Java EE 7)
- Oracle GlassFish Server
Prerequisites
Before starting this tutorial, you should:
- Have some experience writing and deploying web applications.
- Have some experience with Contexts and Dependency Injection beans and the Java Persistence API.
- Have installed NetBeans 7.3.1, Java EE 7, and GlassFish 4.
- Have started NetBeans.
- Have unzipped the
BatchExampleApp.zipfile. - Have opened the
BatchExampleAppproject in NetBeans.
Setting Up the Table and Its Entity Class for the Application
In this section, you create the NewHire table in
the sample database of the Java database (DB) server.
-
On the Services tab, perform the following steps:
- Expand Databases.
- Right-click
jdbc:derby://localhost:1527/sample
                        [app on APP]
. - Select Connect.

-
In the Connect dialog box, enter app for the password and click OK.

-
On the Projects tab, expand
BatchExampleApp
                      > Web Pages > resources > dbfiles
and then clickcreate.sqlto open it in the code editor window.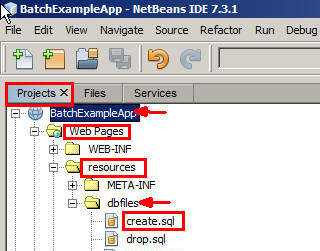
-
Select
jdbc:derby://localhost:1527/sample [app
                      on APP]
from the Connection list and then click the Run SQL icon to the right of the list.The SQL script is executed in the sample database.

-
On the Services tab, expand
Databases >
                      jdbc:derby://localhost:1527/sample [app on APP] > App
                      > Tables
and verify that theNEW_HIREtable was created.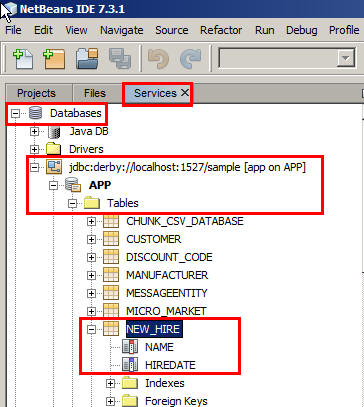
-
Perform the following steps:
- On the Projects tab, expand
BatchExampleApp
                        > Source Packages
. - Right-click
com.example.entity. - Select New.
- In the New File dialog box, select Persistence from Categories and Entity Classes from Database from File Types.
- Click Next.

- On the Projects tab, expand
-
In the New Entity Classes from Database dialog box, select
jdbc/samplein the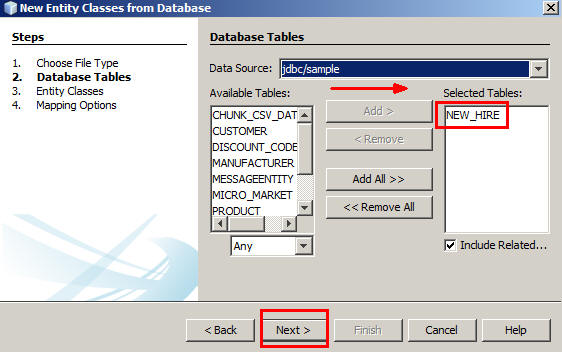
-
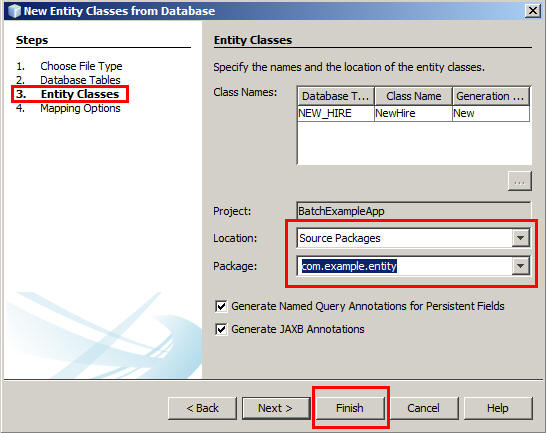
On the Entity Classes page, perform the following steps:
- Select Source Packages for Location.
- Select
com.example.entityfor Package. - Click Finish.
-
On the Projects tab, browse to
BatchExampleApp
                      > Source Packages > com.example.entity
and verify that theNewHire.javaentity class was created.
Creating the JSL File
A Job Specification Language (JSL) file specifies the order in which steps must be executed to accomplish the job. In this section, you create a JSL file.
-
On the Projects tab, expand
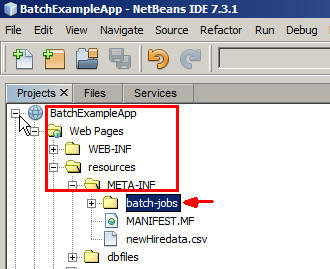
BatchExampleApp > Web Pages > resources > META-INF.A JSL file must be placed in the
META-INF/batch-jobsdirectory. -
In the META-INF folder, create a folder and name it batch-jobs.
-
In this batch job there is one step. It is a chunk-style step and has an
ItemReader, anItemProcessor, and anItemWriter. Perform the following steps to specify the step and the chunk:- Create an XML file in the
batch-jobsfolder and name it newHireJob. - Remove the
<root></root>tag from the file. - Add the following content to the
newHireJob.xmlfile:
<job id="newHireJob" xmlns="http://xmlns.jcp.org/xml/ns/javaee" version="1.0"> <step id="firstStep" > <chunk item-count="3"> <reader ref="newHireItemReader"/> <processor ref="newHireItemProcessor"/> <writer ref="newHireItemWriter"/> </chunk> </step> </job> - Create an XML file in the
Developing the ItemReader, ItemProcessor,
and ItemWriter Classes
The JSL file specifies that the newHireJob has a
step that uses an ItemReader named NewHireItemReader,
an ItemProcessor named NewHireItemProcessor,
and an ItemWriter named NewHireItemWriter.
In this section, you create these classes.
Writing the NewHireItemReader and NewHireItemProcessor
Classes
-
On the Projects tab, expand
BatchExampleApp
                          > Source Packages > com.example.batch
and then perform the following steps:- Create a Java class and name it NewHireItemReader.
This
ItemReaderimplementation extendsAbstractItemReader. - Override the
openmethod and thereadItemmethod. - Add code to read input data from a CSV file.
- Add the required import statements.
@Named public class NewHireItemReader extends AbstractItemReader { private BufferedReader reader; @Override public void open(Serializable checkpoint) throws Exception { reader = new BufferedReader( new InputStreamReader( this .getClass() .getClassLoader() .getResourceAsStream("/META-INF/newHiredata.csv"))); } @Override public String readItem() { try { return reader.readLine(); } catch (IOException ex) { Logger.getLogger(NewHireItemReader.class.getName()).log(Level.SEVERE, null, ex); } return null; } } - Create a Java class and name it NewHireItemReader.
This
-
On the Projects tab, expand
BatchExampleApp
                          > Source Packages > com.example.batch
and then perform the following steps:- Create a Java class and name it NewHireItemProcessor.
It should implement
ItemProcessor. - Override the
processItemmethod. - Use the
StringTokenizerclass to extract each comma-separated data of a record and store it in theNewHireobject. - Add the required import statements.
- Create a Java class and name it NewHireItemProcessor.
It should implement
@Named
public class NewHireItemProcessor implements ItemProcessor {

    SimpleDateFormat format = new SimpleDateFormat("M/dd/yy");

    @Override
    public NewHire processItem(Object t) {
        System.out.println("processItem: " + t);

        StringTokenizer tokens = new StringTokenizer((String) t, ",");

        String name = tokens.nextToken();
        String date;

        try {
            date = tokens.nextToken();
            format.setLenient(false);
            format.parse(date);
        } catch (ParseException e) {
            return null;
        }

        return new NewHire(name, date);
    }
}
Writing the NewHireItemWriter Class
-
On the Projects tab, expand
BatchExampleApp
                          > Source Packages > com.example.batch
and then perform the following steps:- Create a Java class and name it NewHireItemWriter.
This
ItemWriterimplementation should extendAbstarctItemWriter. - Override the
writeItemsmethod. - Add code to persist the object to the table in the database.
- Add the required import statements.
@Named public class NewHireItemWriter extends AbstractItemWriter { @PersistenceContext EntityManager em; @Override public void writeItems(List list) { System.out.println("writeItems: " + list); for (Object newhire : list) { em.persist(newhire); } } } - Create a Java class and name it NewHireItemWriter.
This
Creating a Servlet to Start a Batch Job
You must initiate a batch job explicitly. In this section, you create a servlet to start a batch job.
-
On the Projects tab, expand
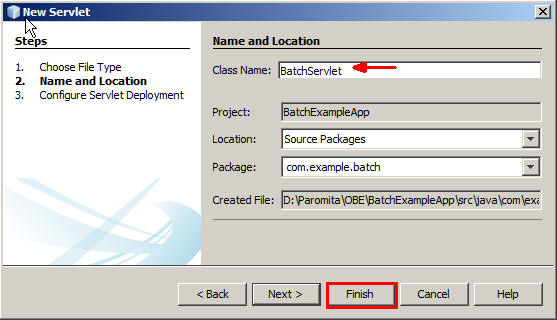
BatchExampleApp
                      > Source Packages
and then perform the following steps:- Right-click
com.example.batchand select New > Servlet to display the New Servlet dialog box. - Enter BatchServlet for Class Name.
- Click Finish.
- Right-click
-
Modify
Batchservlet.javato start theNewHireBatchjob.- Declare an instance of
EntityManagerFactory - Locate
processRequestMethod. - Modify the value of the
titletag andh1tag to CSV-to-Database Chunk Job. - Initialize an instance of
JobOperatorby invoking BatchRuntime.getJobOperator;. - Invoke the
startmethod ofJobOperatorby specifying the name of the job. - Handle the
JobStartExceptionandJobSecurityExceptionclasses. - Import the required classes.
- Declare an instance of
-
On the Projects tab, expand
BatchExampleApp > Web Pagesand openindex.jsp.- Modify
index.jspto create a hyperlink named Start the Job within<body>. - Refer the hyperlink to the
BatchServletservlet.
Start the <a href="${pageContext.request.contextPath}/BatchServlet"/>job</a> - Modify
public class BatchServlet extends HttpServlet {

    @PersistenceUnit
    EntityManagerFactory em;
    protected void processRequest(HttpServletRequest request, HttpServletResponse response)
            throws ServletException, IOException {
        response.setContentType("text/html;charset=UTF-8");
        try (PrintWriter out = response.getWriter()) {
            out.println("<html>");
            out.println("<head>");
            out.println("<title>CSV-to-Database Chunk Job</title>");
            out.println("</head>");
            out.println("<body>");
            out.println("<h1>CSV-to-Database Chunk Job</h1>");
            JobOperator jo = BatchRuntime.getJobOperator();
            long jid = jo.start("newHireJob", new Properties());
            out.println("Job submitted: " + jid + "<br>");
            out.println("<br><br>Check server.log for output, also look at \"newHireJob.xml\" for Job XML.");
            out.println("</body>");
            out.println("</html>");
        } catch (JobStartException | JobSecurityException ex) {
            Logger.getLogger(BatchServlet.class.getName()).log(Level.SEVERE, null, ex);
        }
    }
Packaging, Deploying, and Testing the Batch Processing Application
-
Perform the following steps:
- On the Projects tab, expand
BatchExampleApp > Web Pages > resourcesand copyMETA-INFfolder. - Paste the
META-INFfolder toBatchExampleApp > Source Packagesfolder. - Verify the contents of the
Source
                      Packages
folder.
- On the Projects tab, expand
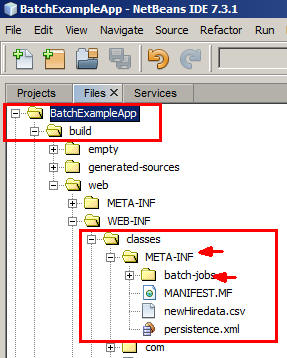
-
Package the JSL file under the
WEB-INF/classes/META-INF/batch-jobsdirectory.- On the Projects tab, right-click
BatchExampleAppand select Clean and Build. - On the Files tab, verify that a
buildfolder was created under theBatchExampleAppfolder. - Verify that the contents of
BatchExampleApp
                        > build > web >WEB-INF > classes >
                        META-INF
match the following screenshot: - Open and examine the
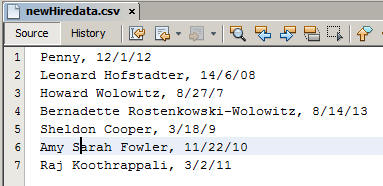
newHiredata.csvfile.
Each line contains comma-separated values of new hire data.
- On the Projects tab, right-click
-
On the Projects tab, right-click
BatchExampleAppand select Run.The home page opens in the web browser.
-
Click the job link.

The
BatchServletdisplays the job ID and a message in the web browser.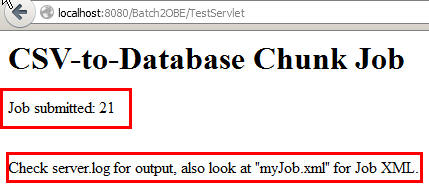
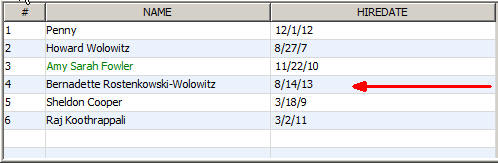
-
On the Services tab, expand
Databases >
                      jdbc:derby://localhost:1527/sample [app on APP] > App
                      > Tables
. -
Right-click NEW_HIRE and select View Data.
The six records that were in the CSV file appear in the table.
Summary
In this tutorial, you learned how to:
- Use a few batch processing APIs from JSR 352
- Create a JSL file
- Develop
ItemReader,ItemProcessor, andItemWriterclasses - Start a batch job
- Write, package, and run a simple batch application that uses chunk-style steps
Resources
To learn more about Java EE 7 and the batch processing API, see the following resources:
- JSR 352: Batch Applications for the Java Platform
- An Overview of Batch Processing in Java EE 7.0
- Introduction to Java Platform, Enterprise Edition 7
- To learn more about Java EE 7, visit other OBE tutorials in the Oracle Learning Library.
Credits
- Lead Curriculum Developer: Paromita Dutta
- QA: Anjulaponni Azhagulekshmi
- Editor: Susan Moxley
To navigate this Oracle by Example tutorial, note the following:
- Topic List:
- Click a topic to navigate to that section.
- Expand All Topics:
- Click the button to show or hide the details for the sections.
By default, all topics are collapsed.
- Hide All Images:
- Click the button to show or hide the screenshots. By default,
all images are displayed.
- Print:
- Click the button to print the content. The content that is
currently displayed or hidden is printed.
To navigate to a particular section in this tutorial, select the
topic from the list.