Java Platform, Enterprise Edition 7: Validating a Method with Bean Validation 1.1
Overview
- Create a Java EE 7 web application in NetBeans and add JavaServer Faces (JSF) components to the initial page
- Develop a managed bean, BidBean
- Develop a service class, BidService, that contains two methods, one method with constraints in its parameters and another method with a constraint in its return value
- Define a custom constraint, @MyConstraintForName, and implement MyConstraintForNameValidator to restrict the first letter of a word to uppercase
- Construct a ValidatorHelper class, which is injected via CDI in the MyConstraintForNameValidator class
- Create a ValidationMessages.properties file with the constraint violation messages
- Deploy the project to GlassFish Server 4.0 and run the application
- Download and install the latest JDK from this link (Java SE 7u25 recommended).
- Download and install NetBeans 7.3.1 with Java EE, which includes GlassFish Server 4.0 (Java EE download bundle) from this link. During installation, be sure to select the check box to install GlassFish. JUnit is an optional installation and is not required for this tutorial.
- Have installed the required software.
- Ensure that NetBeans is running.
Purpose
This tutorial covers how to use method and return value validations, which are new features in Bean Validation 1.1 of Java Platform, Enterprise Edition 7 (Java EE 7). It also covers how Contexts and Dependency Injection (CDI) is supported by the Bean Validation components, such as ConstraintValidator.
Time to Complete
Approximately 45 minutes
Introduction
Bean Validation 1.1 features validation of parameters and return values of a method. The constraints are defined as Bean Validation constraint annotations.
Bean Validation 1.1 also supports CDI in its components (MessageInterpolator, TraversableResolver, ParameterNameProvider, ConstraintValidatorFactory, and ConstraintValidator).
Expression Language is also supported in Bean Validation 1.1 around constraint violation messages.
In this tutorial, you perform the following to create a bid application form:
Hardware and Software Requirements
The following is a list of hardware and software requirements:
Prerequisites
Before starting this tutorial, you should:
Creating a Web Application
In this section, you create a Java EE 7 web application in the NetBeans IDE.
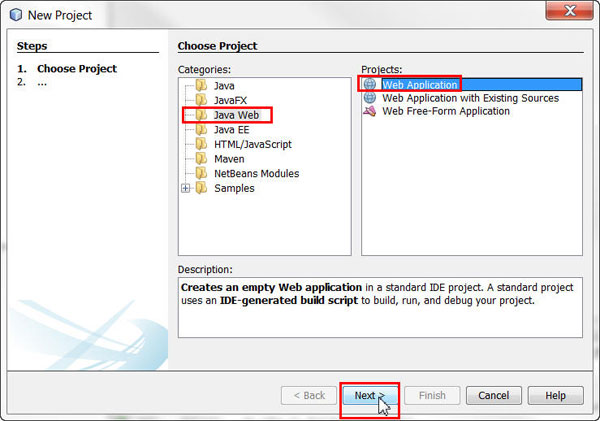
Select File > New Project.

In the New Project dialog box, perform the following steps on the Choose Project page:
a. Select Java Web from Categories.b. Select Web Application from Projects.
c. Click Next.
On
the Name and Location page, enter MethodValidationEE7 as
the project name and click Next.
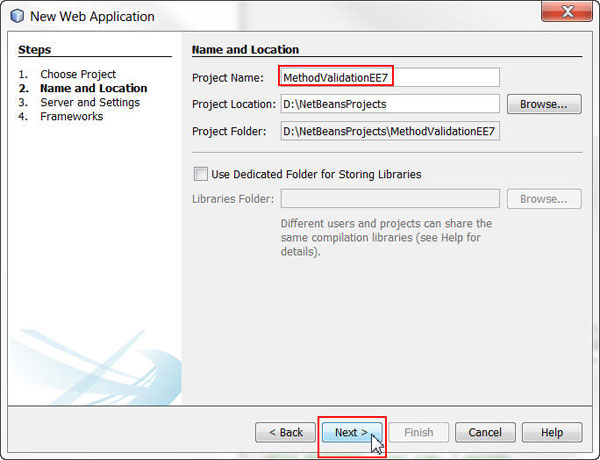
On the Server and Settings page, click Next.

On the Frameworks page, select JavaServer Faces and click Finish.
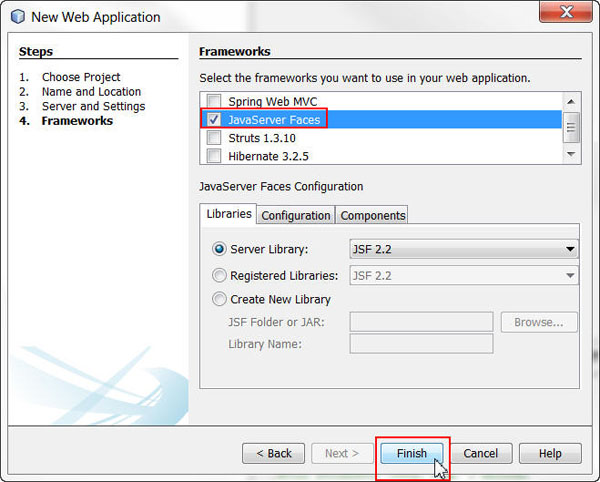
The MethodValidationEE7 project is created in NetBeans.
Developing the Components of the Bid Application Form
- The initial page
- A managed bean, BidBean
- A service class, BidService
- A custom constraint, @MyConstraintForName
- A constraint validator class, MyConstraintForNameValidator
- A ValidatorHelper class, which is injected via CDI in the MyConstraintForNameValidator class
- A ValidationMessages.properties file with the constraint violation messages
- Add xmlns:f="http://xmlns.jcp.org/jsf/core" to the html tag.
- Add the following code to the h:body section of the page:
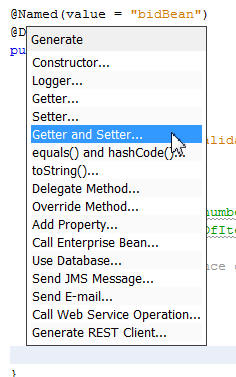
- Locate your cursor after the BidBean constructor and press Alt + Insert to show the Insert Code window.
- Select Getter and Setter.
- Enter the code in the areas displayed in the screenshot:
- Delete the default code:
In this section, you develop the following classes of the application:
Developing the Home Bid Page and the Related Managed Bean
In the index.xhtml file, perform the following steps:
<h:form>
<p>Fields below are constrained by
multiple validations with Bean Validation
1.1:</p>
<ol>
<li>Write the first letter
in Bidder Name field in uppercase</li>
<li>Price offered should be
greater than 5.0</li>
<li>Number of items should
be greater than 0</li>
</ol>
<h:panelGrid columns="3">
<h:outputLabel for="bidder"
value="Bidder Name"/>
<h:inputText id="bidder"
value="#{bidBean.name}"/>
<h:message for="bidder" />
<h:outputLabel for="price"
value="Price offered per item"/>
<h:inputText id="price"
value="#{bidBean.price}"/>
<h:message for="price" />
<h:outputLabel for="items"
value="Number of items in the bid"/>
<h:selectOneMenu id="items"
value="#{bidBean.numberOfItems}">
<f:selectItems
value="#{bidBean.numberList}"/>
</h:selectOneMenu>
</h:panelGrid>
<br/>
<h:commandButton id="sendButton"
value="Send bid"
action="#{bidBean.validateBidInfo()}">
<h:message
for="sendButton"/>
</h:commandButton>
</h:form>
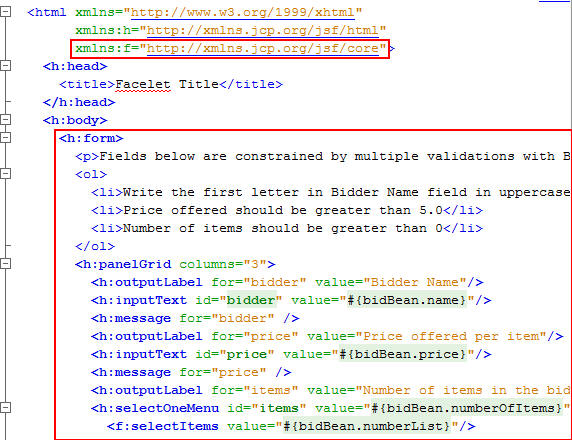
In this JSF view file, you have created three fields (Bidder Name, Price offered per item, and Number of items in the bid) and preliminary text indicating what the validations are. You have also added a button below these fields to call the validateBidInfo()method, which is in the bidBean managed bean that you create next.
Right-click the Source Packages folder and select Other.

Select JavaServer Faces from Categories and JSF Managed Bean from File Types and then click Next.

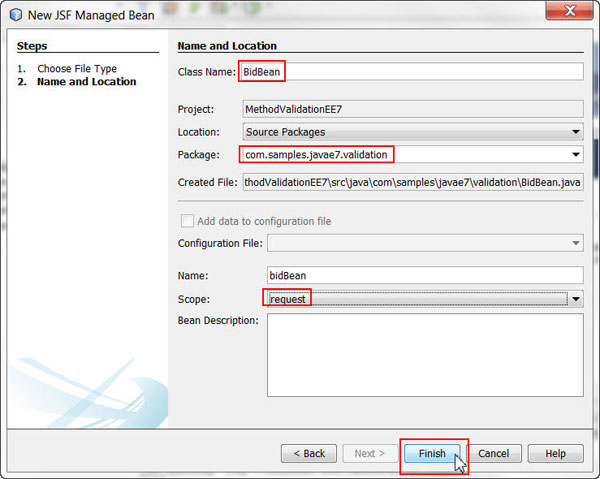
In the New JSF Managed Bean dialog box, perform the following steps on the Name and Location page:
a. Enter BidBean for class name.b. Enter com.samples.javaee7.validation for package.
c. Select request for scope.
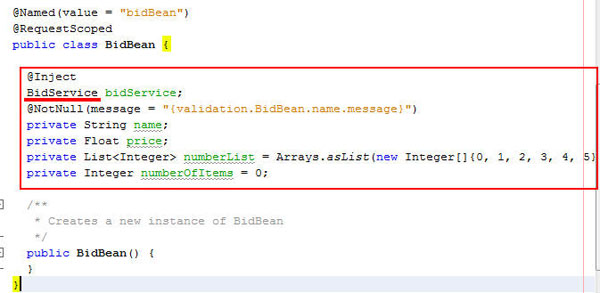
Enter the following code in the BidBean.java file:
@Inject
BidService bidService;
@NotNull(message =
"{validation.BidBean.name.message}")
private String name;
private Float price;
private List<Integer> numberList =
Arrays.asList(new Integer[]{0, 1, 2, 3, 4, 5});
private Integer numberOfItems = 0;
Press Ctrl + Shift + I to import the fix imports. The BidService class is not resolved until the class is created.
Perform the following steps:
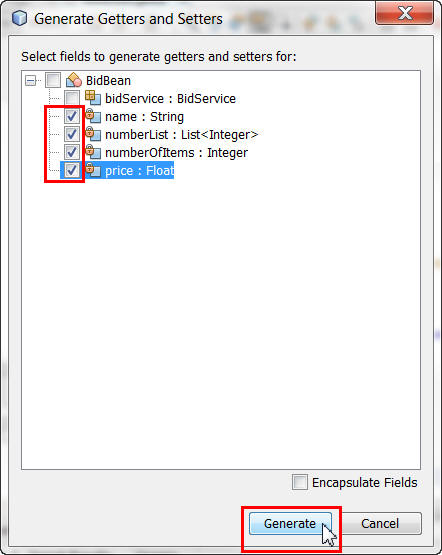
Select the last four fields and click Generate.
Save your file.
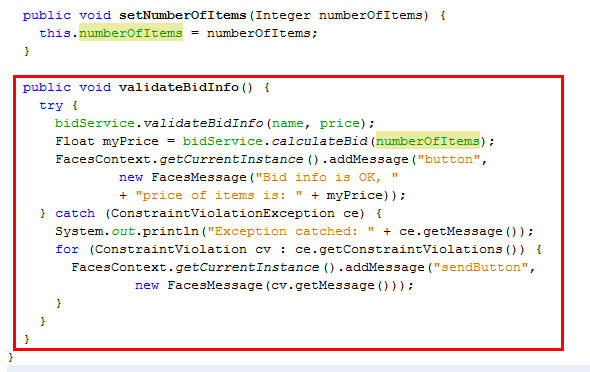
At the end of the recently inserted code, enter the following method code:
public void validateBidInfo()
{
try {
bidService.bid(name, price);
Float myPrice =
bidService.calculatePrice(numberOfItems);
FacesContext.getCurrentInstance().addMessage("button",
new FacesMessage("Bid info is OK, "
+ "price of items is: " + myPrice));
} catch (ConstraintViolationException ce) {
System.out.println("Exception
catched: " + ce.getMessage());
for (ConstraintViolation cv :
ce.getConstraintViolations()) {
FacesContext.getCurrentInstance().addMessage("sendButton",
new FacesMessage(cv.getMessage()));
}
}
}
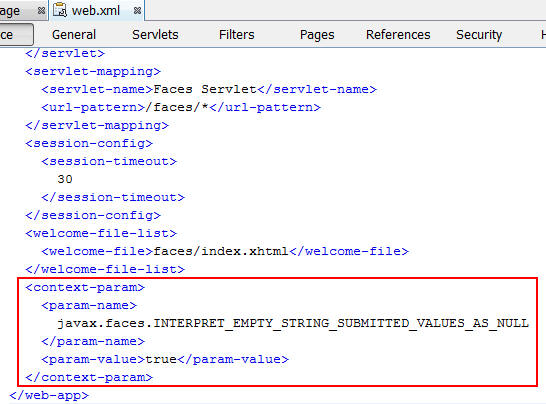
In the web.xml file, under the WEB-INF folder, add the following configuration to have this application interpret the empty strings as null:
<context-param>
<param-name>
javax.faces.INTERPRET_EMPTY_STRING_SUBMITTED_VALUES_AS_NULL
</param-name>
<param-value>true</param-value>
</context-param>
Creating the BidService Class
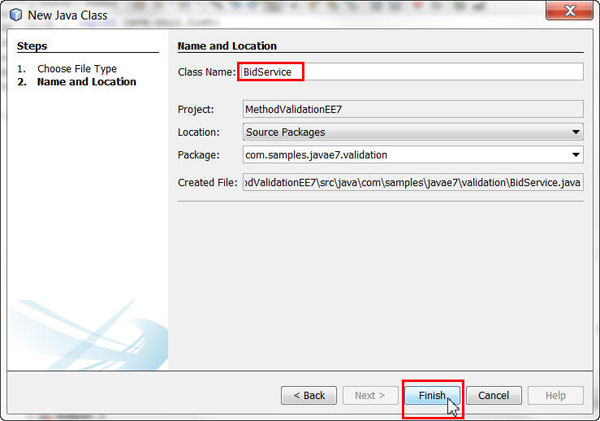
Right-click the com.samples.javaee7.validation package and select New > Java Class.

Enter BidService for Class Name and click Finish.
Annotate the class with @ApplicationScoped and add the following code in the BidService.java file:
public void bid(
@MyConstraintForName String name,
@NotNull(message =
"{validation.BidService.bid.price.notnull.message}")
@DecimalMin(value = "5.0",
message =
"{validation.BidService.bid.price.decimalmin.message}")
Float price)
{
}
@DecimalMin(value = "5.0", message =
"{validation.BidService.calculatePrice.decimalmin.message}")
public Float calculatePrice(int numberOfItems) {
return 5.0f * numberOfItems;
}
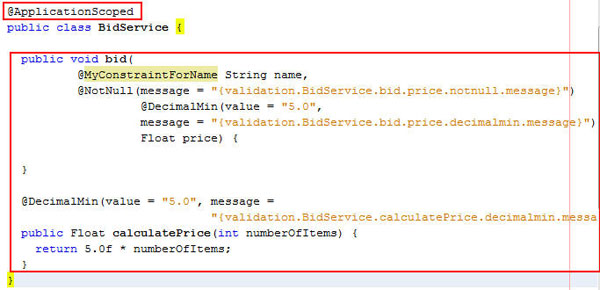
Press Crtl + Shift + I to fix imports. NetBeans does not recognize @MyConstraintForName. This constraint is created next.
Two methods are added to this class: bid, with method parameters constraints, and calculatePrice, with return value constraints.
Custom messages are also added for the constraints. They are configured in the ValidationMessages.properties file, under the WEB-INF/classes folder. This file is created next.
Creating the Constraint and ConstraintValidator Classes
Right-click the com.samples.javaee7.validation package and select New > Other.
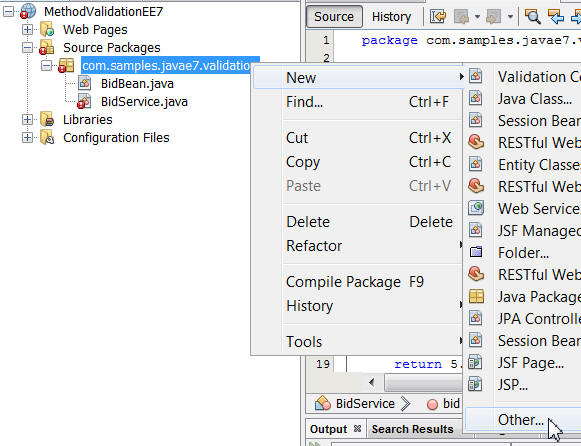
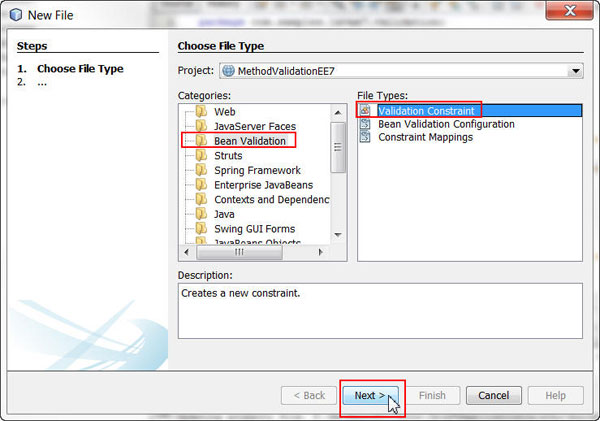
Select Bean Validation from Categories and Validation Constraint from File Types and then click Next.
In the New Validation Constraint dialog box, perform the following steps on the Name and Location page:
a. Enter MyConstraintForName for Class Name.b. Select the Generate Validator Class check box.
c. Enter String for Java Type to Validate.
d. Click Finish.
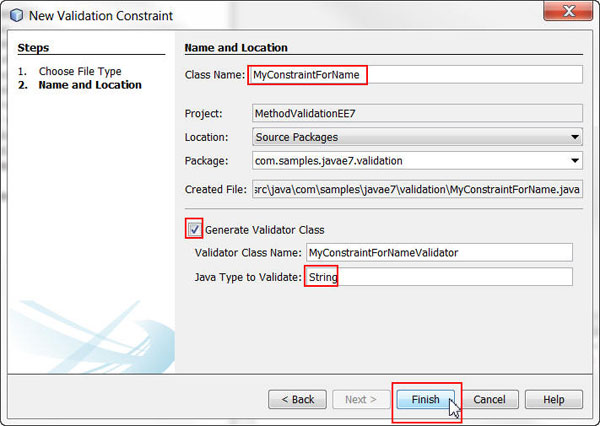
Two classes are created: MyConstraintForName and MyConstraintForNameValidator.
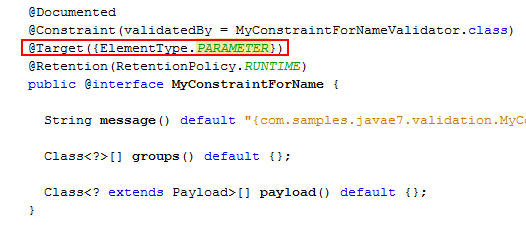
In the MyConstraintForName.java file, remove the current parameters in the @Target annotation and add ElementType.PARAMETER.
In the MyConstraintForNameValidator.java file, perform the following steps:
@SupportedValidationTarget(ValidationTarget.PARAMETERS)
@Inject
private ValidatorHelper helper;
return value == null || helper.isAllowed(value);
throw new UnsupportedOperationException("Not supported yet.");

With the @SupportedValidationTarget(ValidationTarget.PARAMETERS) annotation, this constraint is specified as a cross-parameter ConstraintValidator.
The ValidatorHelper class is not recognized at this point. You build this class in the next steps.
After pasting the code in NetBeans, press Ctrl + Shift + I to fix imports.
Right-click the com.samples.javaee7.validation package and select New > Java Class.
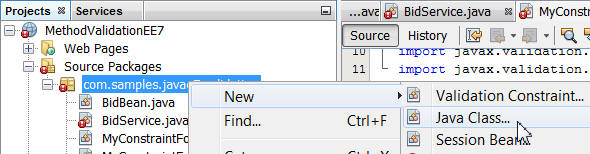
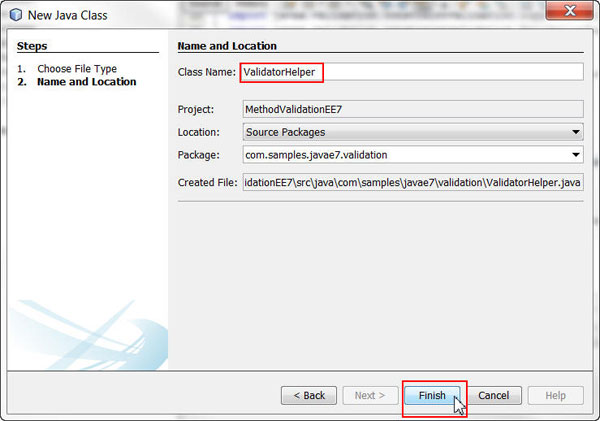
Enter ValidatorHelper for Class Name and click Finish.
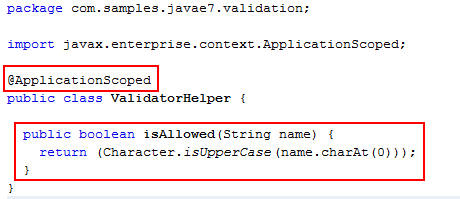
Annotate the class with @ApplicationScoped and enter the following code in the ValidatorHelper.java file:
public boolean
isAllowed(String name)
{
return (Character.isUpperCase(name.charAt(0)));
}
Press Crtl + Shift + I to fix imports and then save your file.
Creating the Messages Interpolation File
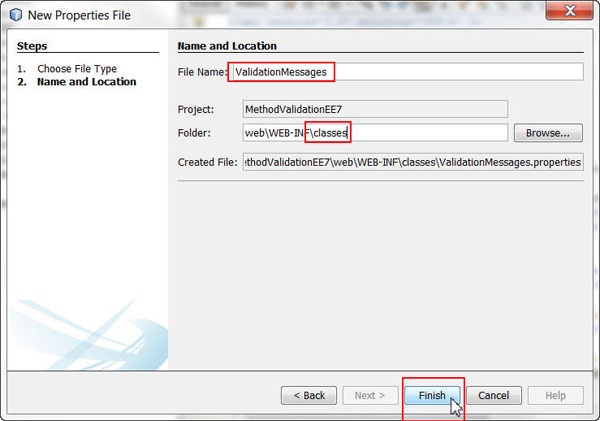
Right-click the WEB-INF folder and select New > Other.

Select Other from Categories and Properties File from File Types and then click Next.

In the New Properties File dialog box, perform the following steps on the Name and Location page:
a. Enter ValidationMessages for File Name.c. Click Finish.
In the ValidationMessages.properties file, add the following custom messages:
com.samples.javaee7.validation.MyConstraintForName
= First letter of name entered: ${validatedValue}
should be in uppercase
validation.BidBean.name.message = name should not be
null
validation.BidService.bid.price.notnull.message =
Price may not be null
validation.BidService.bid.price.decimalmin.message =
Price value too low: ${formatter.format('%05.2f',
validatedValue)}
validation.BidService.calculatePrice.decimalmin.message
= Select at least one item to reach the minimum bid
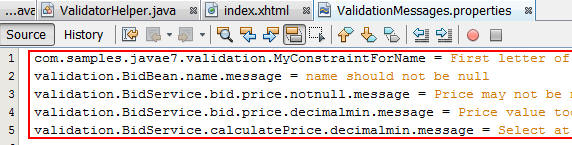
Note: These messages include the use of Expression Language, with ${validatedValue} and ${formatter.format('%05.2f', validatedValue)}.
Running the Application
Right-click the project and select Run.

The application opens in your browser, and the constraints are listed.
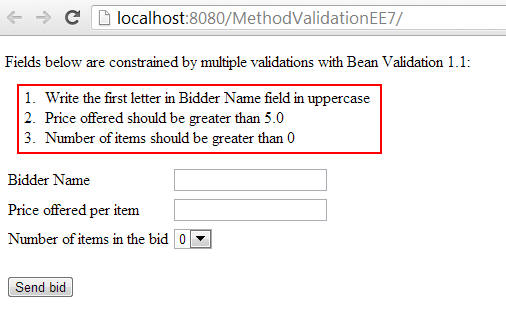
Input values in the form until you pass all validations:

Note: You perform each validation differently so that you can practice the new validations for method parameters and return values and so that you can see how to create custom constraints.
Summary
- Create a Java EE 7 web application in NetBeans and add JSF components to the initial page
- Develop a managed bean, BidBean
- Develop a service class, BidService, that contains two methods, one method with constraints in its parameters and another method with a constraint in its return value (Both method and return value validations are new in Bean Validation 1.1.)
- Define a custom constraint, @MyConstraintForName, and implement MyConstraintForNameValidator, to restrict the first letter of a word to uppercase
- Construct a ValidatorHelper class, which is injected via CDI in the MyConstraintForNameValidator class (The ability to use CDI in a Validator class is new in Bean Validation 1.1.)
- Create a ValidationMessages.properties file with the constraint violation messages (These messages include the use of Expression Language, a feature that is new in Bean Validation 1.1.)
- Deploy the project to GlassFish Server 4.0 and run the application
- Lead Curriculum Developer: Edgar Martinez
- Editor: Susan Moxley
- QA: Juan Quezada
In this tutorial, you learned how to:
Resources
Credits
To navigate this Oracle by Example tutorial, note the following:
- Hide Header Buttons:
- Click the title to hide the buttons in the header. To show the buttons again, click the title again.
- Topic List:
- Click a topic to navigate to that section.
- Expand All Topics:
- Click the button to show or hide the details for the sections. By default, all topics are collapsed.
- Hide All Images:
- Click the button to show or hide the screenshots. By default, all images are displayed.
- Print:
- Click the button to print the content. The content that is currently displayed or hidden is printed.
To navigate to a particular section in this tutorial, select the topic from the list.