
- Revision History
- Overview
- Feature Summary
- Oracle Me Employee Experience
-
- Celebrate
- HCM Communicate
- Grow
- Touchpoints
- HR Help Desk
-
- Help Desk Agent Global Capacity Override
- Personal Signatures for Agents
- Use an Action Plan to Draft a Knowledge Article From an Internal Service Request
- Copy Attachments when Copying Help Desk Requests
- View Audit Log of Child Objects
- Mass Update for Related Help Desk Requests and Cases
- Analyze Internal Conversations in HR Help Desk Requests
-
- Transactional Business Intelligence Enterprise for Oracle Me
This document will continue to evolve as existing sections change and new information is added. All updates appear in the following table:
| Date | Module | Feature | Notes |
|---|---|---|---|
| 22 NOV 2023 | Touchpoints | Accessing Performance Check-ins in Touchpoints | Updated document. Feature delivered in update 23D. |
| 22 NOV 2023 | HR Help Desk | Use an Action Plan to Draft a Knowledge Article From an Internal Service Request | Updated document. Revised feature information. |
| 22 NOV 2023 | HR Help Desk | Personal Signatures for Agents | Updated document. Revised feature information. |
| 22 NOV 2023 | HCM Communicate | OTBI Reporting | Updated document. Revised feature information. |
| 29 SEP 2023 | HCM Communicate | View Audience Details for Journey Campaigns | Updated document. Feature delivered in update 23D. |
| 29 SEP 2023 |
Touchpoints | Support for Multiple Assignments | Updated document. Feature delivered in update 23D. |
| 29 SEP 2023 |
Touchpoints | Check-In Enhancements | Updated document. Revised feature information. |
| 29 SEP 2023 |
Celebrate | Introducing Oracle Celebrate | Updated document. Revised feature information. |
| 01 SEP 2023 | Created initial document. |
HCM Cloud applications have two types of patches you can receive that are documented in this What’s New:
- Release Updates (23A, 23B, 23C, and 23D)
- Optional Monthly Maintenance Packs to each update
It is important for you to know what Release Update your environment is on. You can find this in your Cloud Portal.
____________________
 HAVE AN IDEA?
We’re here and we’re listening. If you have a suggestion on how to make our products better, please let us know. To enter an idea go to the Ideas Lab on Oracle Customer Connect. In this document wherever you see the light bulb icon after the feature name it means we delivered one of your ideas.
____________________
Suggested Reading for all HCM Products:
- HCM Common What's New - In this What's New you will find feature that are used across applications.
- Human Resources What’s New – In the Global Human Resources section you will find features on the base application in which other application are built upon.
NOTE: Not all Global Human Resource features are available for Talent and Compensation products.
- Oracle Human Capital Management Cloud Functional Known Issues and Maintenance Packs (Document ID 1554838.1). These documents identify bug fixes and possible known issues. You will also need to review these documents based in the release update version you are currently on or will be moving to.
- Oracle Help Center – Here you will find guides, videos and searchable help.
- Release Readiness – New Feature Summary, What’s New, Feature Listing Spreadsheet, Spotlights and Release Training
GIVE US FEEDBACK
We welcome your comments and suggestions to improve the content. Please send us your feedback at oracle_fusion_applications_help_ww_grp@oracle.com. Indicate you are inquiring or providing feedback regarding the HCM Cloud What’s New in the body or title of the email.
Column Definitions:
Report = New or modified, Oracle-delivered, ready to run reports.
UI or Process-Based: Small Scale = These UI or process-based features are typically comprised of minor field, validation, or program changes. Therefore, the potential impact to users is minimal.
UI or Process-Based: Larger Scale* = These UI or process-based features have more complex designs. Therefore, the potential impact to users is higher.
Features Delivered Disabled = Action is needed BEFORE these features can be used by END USERS. These features are delivered disabled and you choose if and when to enable them. For example, a) new or expanded BI subject areas need to first be incorporated into reports, b) Integration is required to utilize new web services, or c) features must be assigned to user roles before they can be accessed.
| Ready for Use by End Users Reports plus Small Scale UI or Process-Based new features will have minimal user impact after an update. Therefore, customer acceptance testing should focus on the Larger Scale UI or Process-Based* new features. |
Customer Must Take Action before Use by End Users Not disruptive as action is required to make these features ready to use. As you selectively choose to leverage, you set your test and roll out timing. |
|||||
|---|---|---|---|---|---|---|
| Feature |
Report |
UI or |
UI or |
|
||
Use an Action Plan to Draft a Knowledge Article From an Internal Service Request |
||||||
Transactional Business Intelligence Enterprise for Oracle Me |
||||||
Appreciate the outstanding efforts of your employees using Oracle Celebrate, a part of the Oracle ME employee experience platform. Create recognition programs based on core values, across your organization. Enable employees to participate in these programs, post congratulatory messages that others can see and react on their dashboards, and send reward points. To use this product, you need to be licensed for the Touchpoints product.
Use the all new Oracle Celebrate, a part of the Oracle ME employee experience platform to recognize your employees’ achievements. Create recognition programs based on core values, across your organization. Enable employees to participate in these programs, post congratulatory messages that others can see and react to on their dashboards, and send reward points.
Oracle Celebrate Work Area
The Oracle Celebrate work area enables you to view all the recognitions happening in your organization. Click Navigator > Me >Show More > Celebrate under the Celebrate category to access this work area.
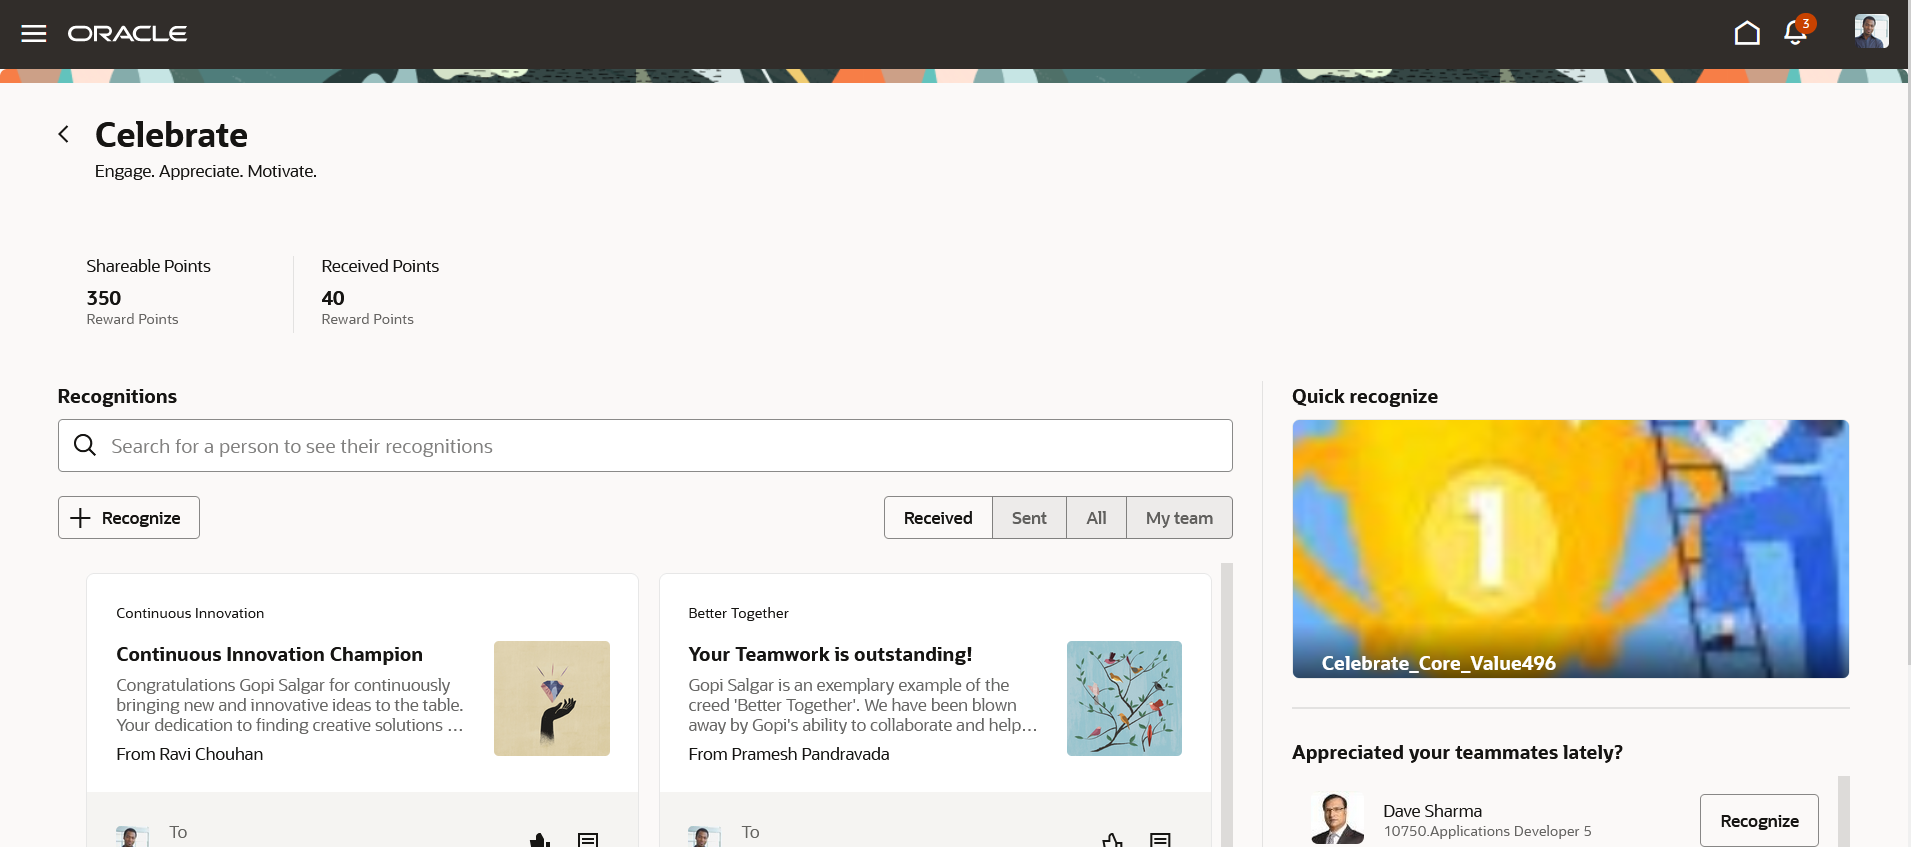
Oracle Celebrate Work Area
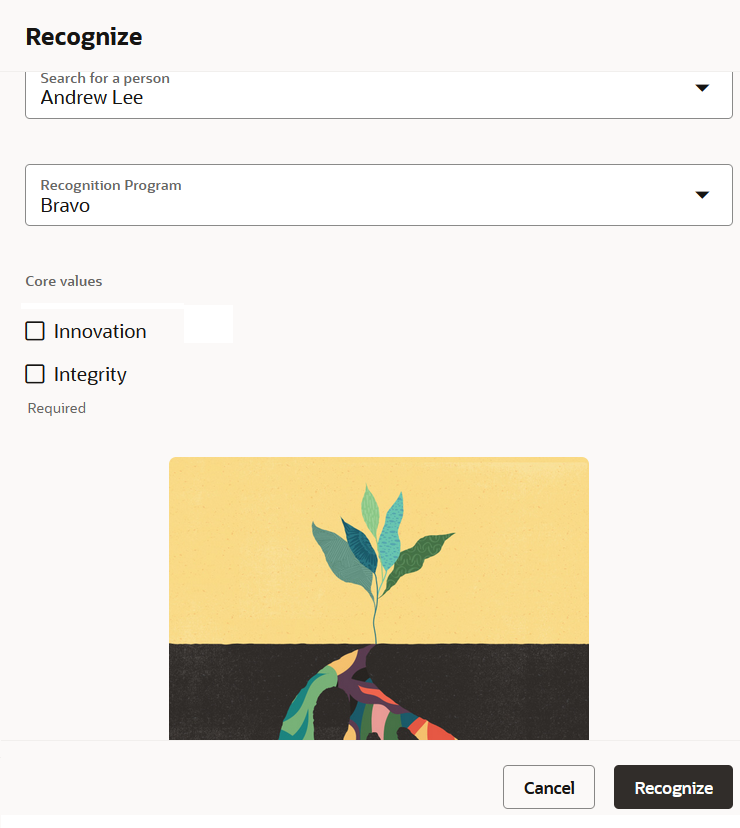
You can get started by clicking the Recognize button to appreciate someone you worked with. You select the person, the recognition program, and the core values you want to recognize them for. Based on the core values you select, you can write your own congratulatory message.

Recognize Button
Recognition Page
A recognition comes with reward points. When you send a recognition to a person, a specific number of reward points are awarded to them. The amount depends on how you configure the recognition program. See the Settings section.
By default, you are provided with 200 reward points per month. You can use up these points as you send recognitions. You can see your balance on your Oracle Celebrate page.
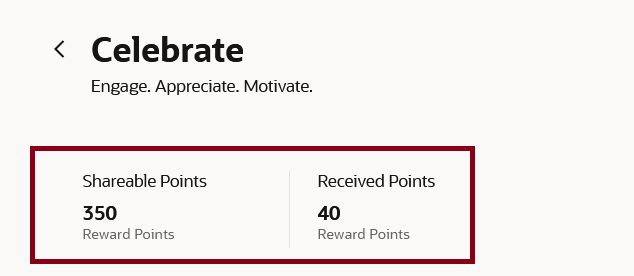
Points
When you open the Oracle Celebrate work area, you can see all the recognitions that you received. You can filter the recognitions to view only those that you received, or the ones you sent to others, or view just your team's recognitions. You can even use the search option. The My Team filter enables you to view recognitions within your organizational hierarchy. You can view recognitions received by all of the team that reports up to your manager's manager, including yourself and your peers.

Filters
You can react to the recognition by liking it. Select the recognition to see the complete details and others’ comments on the recognition. You can comment, like other comments, and reply.
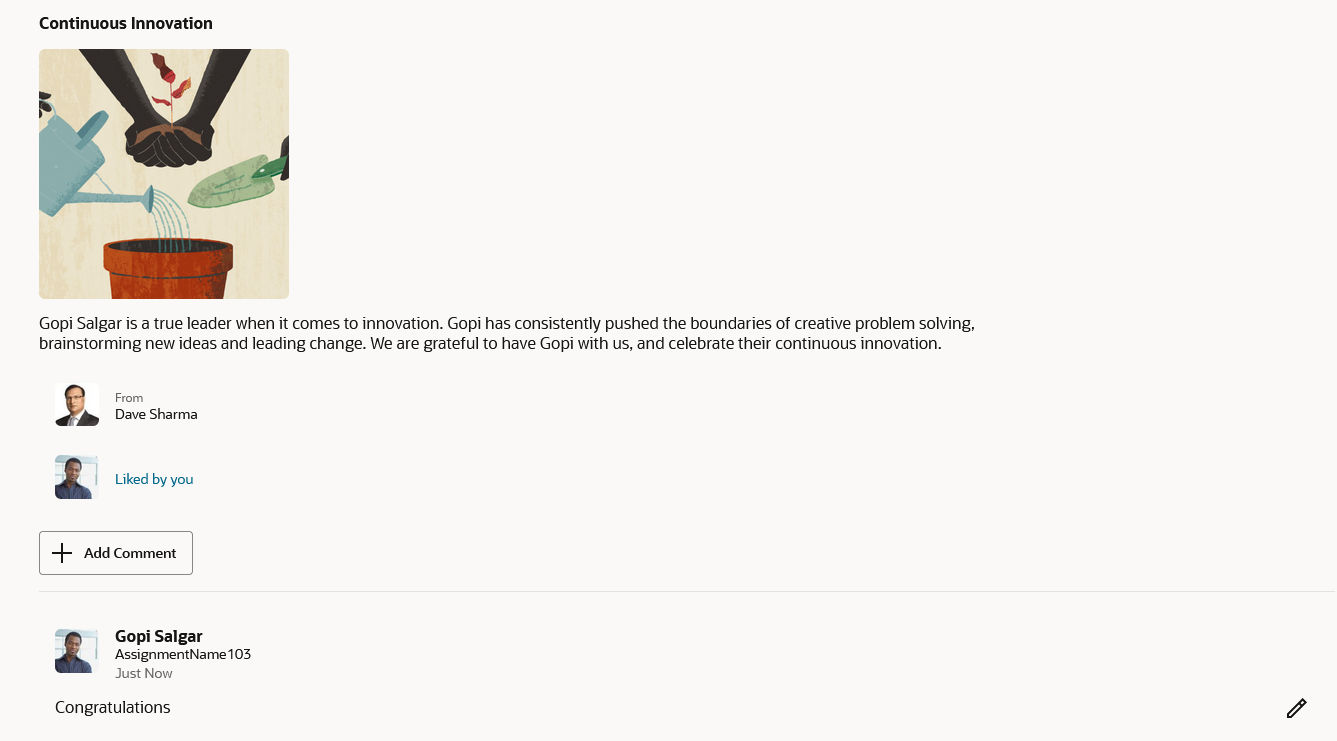
Comments
Oracle Celebrate allows you to foster a culture of appreciation and motivation within your organization. By enabling timely and personalized recognition, it boosts employee morale, engagement, and productivity, leading to increased retention rates, improved teamwork, and ultimately driving organizational success.
Steps to Enable
How You Configure Oracle Celebrate
Here's how you configure the application before your employees can use it:
- Configure global settings.
- Configure program.
1. Global Settings
You need the Workforce Recognition and Award Program Administrator job role to configure global settings.
Click Navigator > My Client Groups >Show More> Configure Global Settings under Celebrate to access the global settings page.
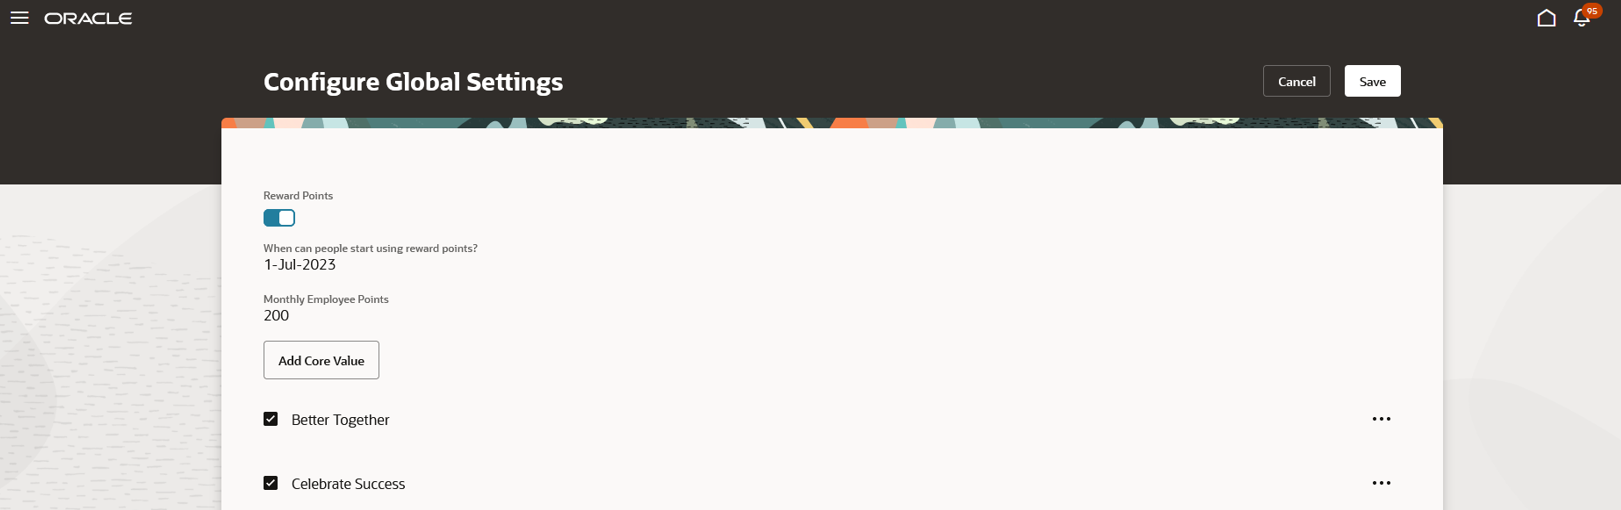
Global Settings Page
You define these building blocks of programs through the Global Settings page:
Reward Points
You can configure the recognition program to send rewards points along with each recognition. Currently, the points aren’t redeemable. If your organization doesn't want to allow reward points in recognitions, you can disable the option. If reward points are enabled for a program, each employee gets 200 points per month to recognize others.

Reward Points
Core Values
Core values are the fundamental principles and beliefs that guide the behavior, decisions, and interactions within an organization. These values serve as the foundation for how employees are acknowledged, rewarded, and appreciated for their contributions and achievements. When designing a recognition program, aligning the program with the organization's core values is important. This alignment helps create a meaningful and consistent approach in recognizing and reinforcing desired behaviors and outcomes.

Core Values
Program Images
These are the images that you can attach while you define programs. A program image provides visual appeal to a recognition message. Other than the images shipped along with the product, you can upload custom images.
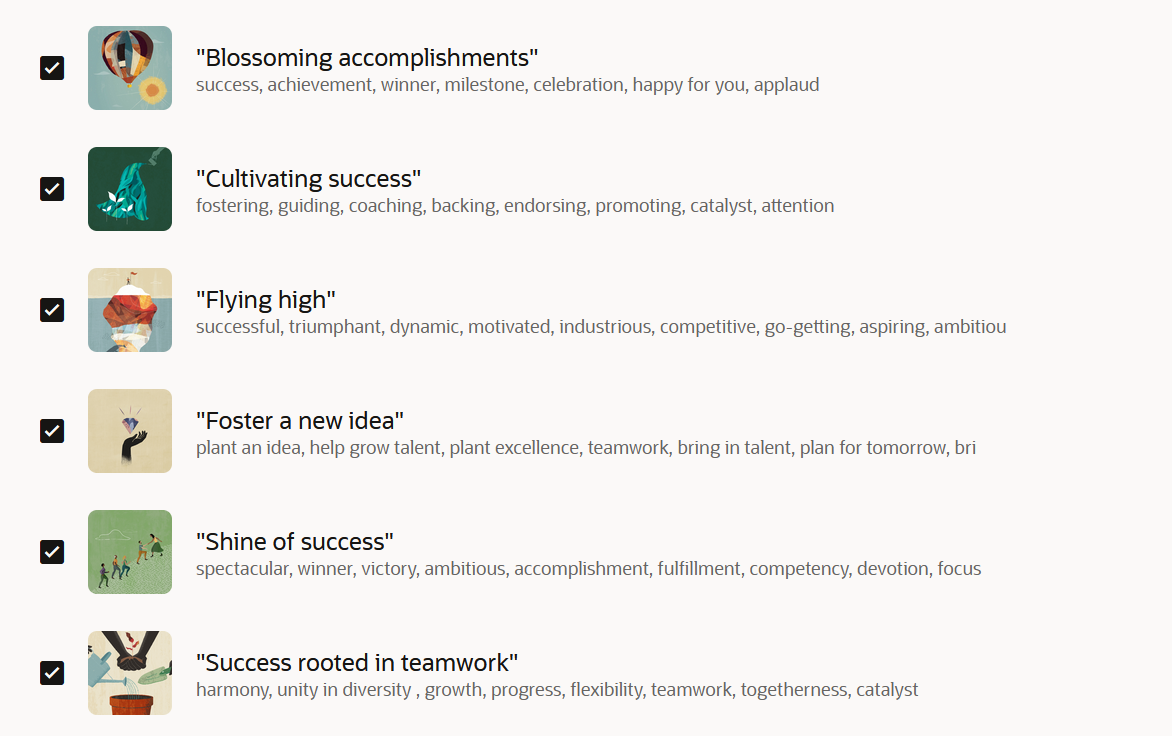
Program Images
2. Program Settings
You need the Workforce Recognition and Award Program Administrator job role to configure program settings.
To enable recognitions, you need to create at least one recognition program. Recognition programs are structured and intentional initiatives within your organization that are designed to acknowledge, reward, and celebrate the contributions, achievements, and positive behaviors of its workers. You use the Recognition Programs page to create and manage such programs.
Recognition programs have a start and an end date. These programs use points, core values, and a set of images. As part of the recognition program, you can also set up a Quick Recognition template. The quick recognition template allows employees to quickly recognize their colleagues through a pre-filled template. In the template, you include a specific core value, a specific image, and a default headline and message.
Click Navigator > My Client Groups >Show More> Configure Programs under Celebrate to access the program settings page.
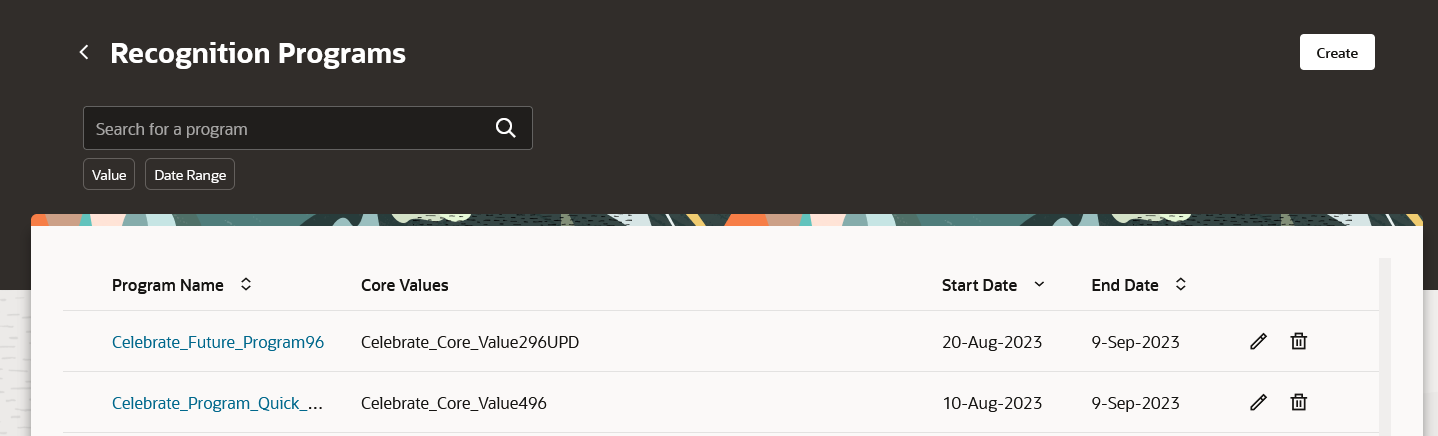
Program Settings
Here are some typical setup aspects that you might want to consider based on your organization’s requirements:
| Question |
Consideration |
|---|---|
| Do you want to use reward points for your program? |
If you want to use reward points, ensure that the Reward Point option is enabled. If you don't want to use reward points, disable the option. |
| Do you want to enable people to use the Quick Recognize feature? |
While recognizing people, employees can either fill in all the details for the recognition, or they can do a quick recognition where most of the details are prefilled. You need to select at least 1 core value and a relevant image to enable the quick recognition setup. Note that setting up quick recognition is optional. Once you select the core value and image for quick recognition, the quick recognition template appears. You need to add the default headline and default message. |

Core Value for Quick Recognition

Image for Quick Recognition
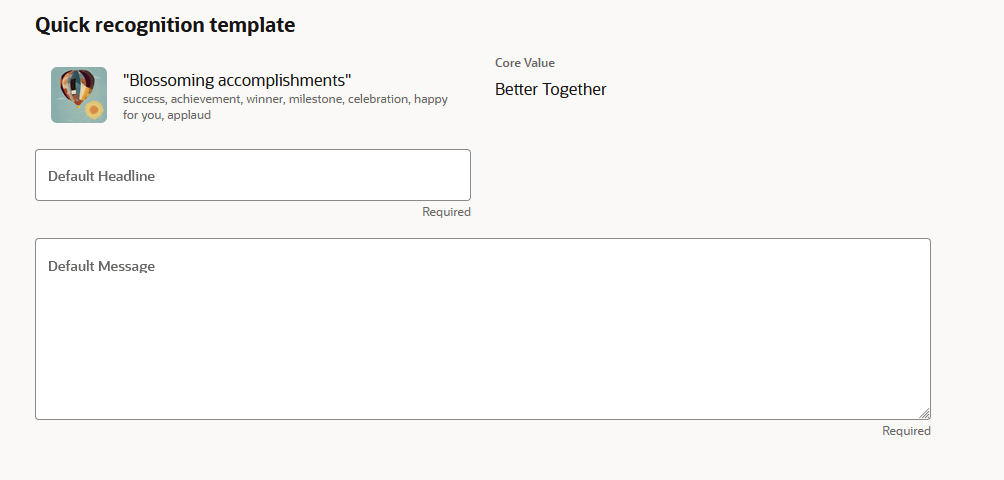
Quick Recognition Template
Access Requirements
Managers and employees need to have the following user roles, respectively, to access Oracle Celebrate:
| Job Roles | Available Features |
Navigation |
|---|---|---|
| Workforce Recognition and Award Program Administrator ORA_CEL_WORKFORCE_RECOGNITION_ AND_AWARD_PROGRAM_ADMINISTRATOR_JOB |
Configure global settings |
Navigator > My Client Groups >Show More> Configure Global Settings under Celebrate. |
| Workforce Recognition and Award Program Administrator ORA_CEL_WORKFORCE_RECOGNITION_ AND_AWARD_PROGRAM_ADMINISTRATOR_JOB |
Configure programs |
Navigator > My Client Groups >Show More> Configure Programs under Celebrate. |
| Employee ORA_PER_EMPLOYEE_ABSTRACT |
|
Navigator > Me > Show More> Celebrate under Celebrate. |
HCM Communicate provides communication teams a powerful way to create, target and track company communications sent to employees. The product allows teams to granularly target communications to their employees, as well as retarget future communications based on employee engagement. HCM Communicate provides an intuitive templated WYSWYG content creator that allows communication teams to quickly create engaging content. The system allows communication teams to send out communication on behalf of others in the organization. HCM Communicate provides a robust toolkit that allows organizations to engage effectively with their employees. HCM Communicate requires a subscription to Fusion HCM Communicate Cloud Service. Customers must first subscribe to this service prior to using HCM Communicate.
Create OTBI reports for HCM Communicate for the Number of Campaign and the Number of Responses measures. Use these measures in various ways to derive meaningful reports. For the Number of Campaigns measure, you could find out these details:
- What are all the campaigns in the application and what are their statuses?
- How many of my campaigns are one-time vs ongoing campaigns?
- How many campaigns of each purpose type are there?
For the Number of Responses measure, you could find out these details:
- Who are the recipients who submitted a response as part of the Get Response campaign?
- What’s the breakdown of responses on the campaign?
- How many responses were received on each Get Response campaign in the system?
Create OTBI reports for HCM Communicate.
Steps to Enable
For setup and more information, refer to these resources:
- New Subject Area Related to HCM Communicate feature in this 23D Oracle Me Employee Experience What's New.
View Audience Details for Journey Campaigns
Find out more information about the audience you targeted for a Journeys campaign. In a previous release, this feature was made available for General and Get Response campaigns. Access a detailed list by selecting the Preview button in the Audience Breakdown section of the Audience tab.
You can now look at these details:
- Employee names
- Business units
- Work locations
- Work email addresses
- Work mobile phone numbers
You can also search and filter on the details, as well as see a total count of employees. The application refreshes the audience preview daily and until it sends the first set of campaign communications.
Gain a deeper understanding of the audience by accessing a detailed list of employees you targeted in a campaign.
Steps to Enable
You don't need to do anything to enable this feature.
Oracle Grow, a part of the Oracle ME employee experience platform, combines learning, skill development, and career mobility to drive individual and organizational success. It brings together all the elements that your employees need to excel in their current roles and for career growth including learning, skill development, gigs to develop competence and expertise.
Discover More Learning Resources
You can now view more learning items related to your favorite gigs, jobs, and your current role.
To excel in your current role, these additional learning resources are available for you:
- Learning that’s relevant to the gigs you’ve identified as your favorites in Opportunity Marketplace.
- Learning that’s popular in your role across the organization. These learning items are part of a topic community in Oracle Learning. They appear in the Popular in your role section in Oracle Grow, just below the learning items that are popular with others in your role.
- Learning that’s popular in your peer group comprising your manager (both matrix and line) and their direct reports.
- Learning that’s newly added as featured learning to the learning topics that you follow.
To grow your career, you have these additional learning resources:
- Learning relevant to the favorite gigs and jobs that you’ve identified in Opportunity Marketplace.
These additional resources help you stay current with the trends in your peer group as well as in your role, while also enabling you to take up focused learning that’s relevant to the gigs and jobs you’re interested in.
Steps to Enable
You don't need to do anything to enable this feature.
Tips And Considerations
Here are the prerequisites to display these additional learning resources:
- The learning administrator must configure the learning items that are popular in your role, popular among your peer group, and featured as part of your learning community in Oracle Learning.
- You must choose gigs and jobs as your favorites in Opportunity Marketplace.
Key Resources
Oracle Touchpoints is a continuous listening and action channel between employees and managers to create meaningful interactions that build trust, boost retention, and foster growth. Touchpoints is a separately sold product.
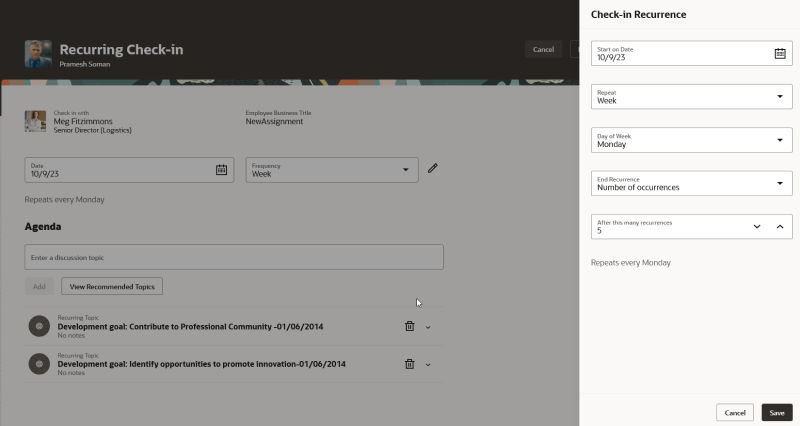
When editing a recurring check-in, you can now change the frequency and start date of the series, as well as the end date or number of occurrences. You can also add recurring discussion topics.
Here are a few things to consider when editing the series:
- You can edit the series only if you created it.
- You can’t edit a specific check-in in a series, if it contains discussion topics marked as discussed or has notes added by others. However, you can edit future check-ins, if they satisfy these criteria.
When creating a recurring check-in, you can select the assignment of the employee, if they have multiple assignments. However, while editing it, you can’t change the assignment.
Editing a Recurring Check-In
Other Enhancements
- You can change a one-time check-in to a recurring check-in.
- From the Events and Interactions timeline, you can also view performance check-ins that were created using Performance Management. You can also update them by adding discussion topics and notes.
These enhancements support your need for convenience and adaptability to your time management requirements when scheduling check-ins.
Steps to Enable
You don't need to do anything to enable this feature.
Key Resources
For more information, refer to these topics:
Request Feedback on Goals in Touchpoints
Employees and managers can now request feedback on performance goals from anyone in the organization. Employees can request feedback for themselves and managers can request feedback for themselves and their direct reports. They can request feedback from multiple employees in a single request.
They can choose as many performance goals as they want to request feedback on. A set of questions common to all performance goals are available by default. These questions are configured as part of the Performance Goal Feedback template in the Feedback Templates section. The questions from the most recent Performance Goal Feedback template are displayed. Requestors can also add their own questions, in addition to these.
NOTE: Respondents will receive a separate notification for every performance goal that’s included as part of the request. When providing feedback, they will be able to see all the questions that were included in the request for every performance goal.
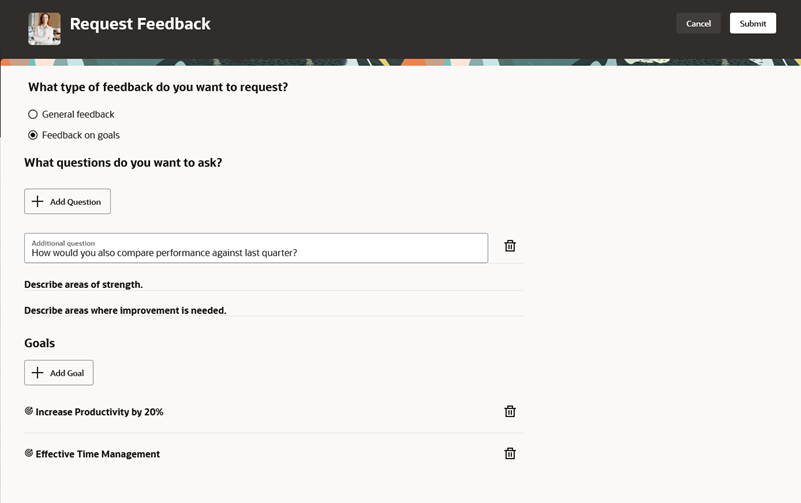
Requesting Feedback on Goals

Requesting Feedback from Multiple Participants
Requestors can determine who can view the feedback. A manager can choose to share the feedback with the employee that they are requesting feedback for. An employee can choose to share the feedback with their manager and with themselves.
They can also provide a due date by when the feedback must be provided.
The ability to request feedback from colleagues on performance goals enhances communication, promotes growth, and improves team dynamics. It provides a holistic perspective on an employee’s performance, leading to better decision-making, improved relationships, and overall organizational success.
Steps to Enable
You don't need to do anything to enable this feature.
Tips And Considerations
You need to configure a separate feedback template for general feedback requests, in addition to configuring a template for performance goal feedback.
Key Resources
For more information, refer to these topics:
Support for Multiple Assignments
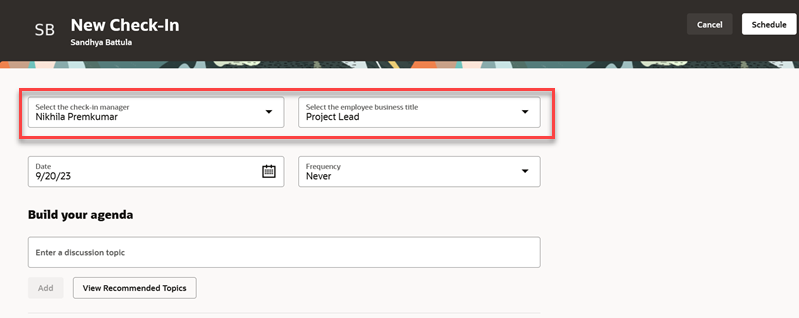
Employees and managers now have the ability select the assignment relevant to the check-in. Employees have the ability to select the manager with whom they want to schedule the check-in.
When a manager schedules a check-in:
- When an employee has multiple assignments, you can select the assignment that's relevant to the check-in.
This is applicable to both one-time and recurring check-ins.

Select the employee assignment for the check-in
When an employee schedules a check-in:
- If you have multiple assignments that report to a single manager, you can select the assignment relevant to the check-in.
- If you have multiple managers, you can select the manager with whom you want to schedule the check-in. Also when there is a matrix manager, they will appear as an additional manager to select for the check-in.
This is applicable to both one-time and recurring check-ins.
Select the manager and assignment relevant to the check-in
This feature provides the flexibility to choose the relevant assignment and manager when there are multiple assignments and matrix managers involved.
Steps to Enable
You don't need to do anything to enable this feature.
Tips And Considerations
When modifying an existing one-time or recurring check-in, you can't change the assignment or the manager.
Key Resources
For more information, refer to these topics:
Accessing Performance Check-ins in Touchpoints
Managers and employees can now access check-ins that are created in Performance Management and manage them from Touchpoints.
On the manager’s Touchpoints Summary page, Performance check-ins are included in all relevant analytics and listings such as:
- Team – Average Interactions
- Organization – Average Interactions
- Team – Average Check-ins
- Organization – Average Check-ins
- Completed and pending check-ins for the month
- Upcoming check-ins
- Overdue check-ins
These check-ins are included in addition to one-time and recurring Touchpoints check-ins.
When a manager navigates to an employee’s detail page from the Employees tab, they can view past and future Performance check-ins for the employee on the Events and Interactions timeline. The timeline includes check-ins held in the past three months and scheduled in the next three months. An employee can also view these check-ins from their Touchpoints page.
Managers and employees can update a Performance check-in from Touchpoints by:
- Changing the check-in date
- Adding or removing custom or recommended discussion topics
- Adding notes to discussion topics
- Marking topics as discussed
They can also delete a Performance check-in. These changes are reflected in Performance Management as well.
This feature allows greater integration between Performance Management and Touchpoints, enabling managers and employees to have a consolidated view of all check-ins and seamlessly manage Performance check-ins from within Touchpoints.
Steps to Enable
You don't need to do anything to enable this feature.
Key Resources
Oracle Human Resources Help Desk is a native engagement solution that provides robust HR case management capabilities, leading to a superior HR service experience. This application covers all aspects related to service request management for workers, managers, and HR Help Desk agents.
Help Desk Agent Global Capacity Override
Administrators can now modify an individual Help Desk Agent's capacity to allow override of the global capacity value that has been set for all agents.
This can be used to reduce the limit of work for new agents in training or to increase the capacity for a particular experienced agent, or other similar scenarios.
Steps to Enable
You don't need to do anything to enable this feature.
Tips And Considerations
When using automatic assignment for any channel, it is important to have a capacity limit that is reasonable in order to distribute work to the agents equitably.
Key Resources
You can find general information regarding capacities in the Implementing Help Desk Guide found here.
Access Requirements
HR Help Desk Administrators must have the privilege "Manage HR Help Desk Service Queues" (SVC_MANAGE_HR_HD_SERVICE_QUEUES). This privilege is granted to both HR Service Request Administration and HR Service Request Analysis duty roles by default.
Internal Service Request Help Desk Administrators must have the privilege "Manage Internal Help Desk Service Queues" (SVC_MANAGE_INTERNAL_HD_SERVICE_QUEUES). This privilege is granted to both Internal Service Request Administration and Internal Service Request Analysis duty roles by default.
Personal Signatures for Agents
Help Desk Agents utilizing the Redwood user experience can now construct a personal rich text signature that will be automatically inserted at the bottom of a help desk request email message when they begin composing the message.
This allows agents to manage their own signatures and add images such as a company logo. This feature also reduces the impact caused by defining signatures using SmartText, which some users may have previously used to achieve similar functionality.
Steps to Enable
As an administrator, you will need to configure the profile option ORA_SVC_ENABLE_PERSONAL SIGNATURE.
- Go to Setup and Maintenance.
- Click the Task icon on the right-hand side of the page.
- Click Search.
- Search for the Task Manage Global Search Profile Options.
- Search for the profile option code for the type of Help Desk that you are using:
- ORA_SVC_HRHD_ENABLE_PERSONAL_SIGNATURE for the HR Help Desk
- ORA_SVC_ISR_ENABLE_PERSONAL_SIGNATURE for the Internal Service Request Help Desk
- Set the site level profile value to Yes.
- Click Save and Close.
Individual agents will need to manage their own signatures.
Manage Signature
- Create a new signature or edit an existing one by navigating to the Help Desk menu on the home page and clicking on the My Signature Quick Action.
- The signature name is defaulted to "My Signature." Modify it to provide a user-friendly name. The signature name has a limit of 50 characters and cannot contain special characters.
- You can add rich text, including images. The images have a size limit of 100KB.
Compose a help desk request email message.
The signature will automatically be inserted when agents compose a help desk request email message.
Tips And Considerations
Those who've previously used SmartText as a way to define agent signatures may see a performance improvement.
The dedicated Signature creation page allows Help Desk agents to define a signature even if they lack the privilege to author SmartTexts.
My Signature Quick Action is displayed only when the following conditions are met:
- Redwood user experience is enabled.
- The value for the profile option to enable personal signatures is set to Yes (either "ORA_SVC_HRHD_ENABLE_PERSONAL_SIGNATURE" or "ORA_SVC_ISR_ENABLE_PERSONAL_SIGNATURE").
- The agent has the "Manage Signature" (SVC_MANAGE_SIGNATURE_PRIV) privilege.
The agent's signature will be included in the body of the email; hence you do not need to include an additional signature in the email template.
Key Resources
This is similar to what was included in the What's New for Service Center in 23C.
See a demo of this feature at Create a Personal Signature - WN 23D - Oracle Video Hub.
Access Requirements
Agents need the "Manage Signature" (SVC_MANAGE_SIGNATURE_PRIV) privilege to use this feature.
This privilege is included in the standard Job Roles:
- Next Gen Human Resources Help Desk Agent
- Next Gen Human Resources Help Desk Manager
- Next Gen Human Resources Help Desk Administrator
- Internal Help Desk Agent
- Internal Help Desk Manager
- Internal Help Desk Administrator
This privilege has also been granted to the following Duty Roles:
- HR Service Request Administration
- HR Service Request Analysis
- HR Service Request Management
- Internal Service Request Administration
- Internal Service Request Analysis
- Internal Service Request Management
Use an Action Plan to Draft a Knowledge Article From an Internal Service Request
Administrators can now configure an Action or Action Plan which can be used to draft a knowledge article for the Internal Help Desk. While this has been a possibility with the HR Help Desk previously, this functionality is now being added to the Internal Help Desk as well.
Configuring this feature allows agents to quickly draft knowledge articles using verbiage already created to explain or solve the situation.
Steps to Enable
Create a new Action:
-
Go to Setup and Maintenance.
-
Select Setup Help Desk from the top left drop-down.
-
Click on the Functional Area Action Plans.
-
Click on Manage Action Plan Actions.
-
Click Create Action.
-
Enter the action name as Create Knowledge.
-
Use the drop-down lists to select the stripe code of ISR and appropriate Business Units, if applicable.
-
Select Category.
-
Select Class.
-
Select the Action Type of Article.
-
Note: You can create an Action of type Article. You must select Stripe Code of the action and then select Sub Type of the action. The Attribute Mapping section must be populated as it's required for any other type of actions.
-
-
Select the Action Visibility as Internal Only.
-
Enter the context for the action as Internal Help Desk Request.
-
Enter a numeric value for the Duration of how long the task should take. Choosing five minutes should suffice for this action.
-
Select the Stripe Code Internal Service Request from the drop-down list.
- Type: ISR
- Stripe: ORA_SVC_ISR
-
Add the attribute mappings:
-
Click the Add icon.
-
Select the field to be populated from the Attribute choice list.
-
In the Mapped To column, select from where the fields must be populated.
- Create an action plan that contains your new Action, following the instructions on how to Manage Action Plan Templates.
-
Tips And Considerations
For agents to draft the knowledge article, in the action bar, they can type and select Add Action Create Knowledge.
Key Resources
Overview of Action Plans can help explain how to configure your action plan.
After this feature is generally available, a video showing the configuration and usage should be found on Oracle Video Hub (https://videohub.oracle.com/category/Cloud+Applications%3ECustomer+Experience%3ECX+Service%3EFusion+Service%3EHelp+Desk/298218042).
Access Requirements
For agents to use this feature, they will need the privilege CSO_KNOWLEDGE_AUTHORING_REDWOOD_USER_INTERFACE. It may be beneficial to also add the role of Knowledge Author Service (ORA_CSO_KNOWLEDGE_AUTHOR_SERVICE_JOB).
In order to configure this, you will need the privileges:
- Edit Action Plan (SVC_EDIT_ACTION_PLAN)
- Create Action Plan (SVC_CREATE_ACTION_PLAN)
- Setup Action Plan (SVC_SETUP_ACTION_PLAN)
In order to create an action plan, SVC_ENABLE_ACTION_PLAN must be set to Yes. This is found under Setup and Maintenance for Help Desk, within the Manage Action Plan Profile Options task.
Note that Knowledge Authors must also have Selected Locales.
Copy Attachments when Copying Help Desk Requests
When copying a help desk request, agents now have the ability to choose which attachments should be copied to the new cloned request. The option to copy attachments is given when the agent has chosen the "Copy Help Desk Request" option from the action bar.
This saves time for the agent when duplicating a request and is more secure since documents no longer need to be downloaded and then reattached.
Steps to Enable
You don't need to do anything to enable this feature.
Tips And Considerations
To restrict agents from being able to copy help desk requests in general, you can remove the option from the action bar.
Access Requirements
To copy attachments, the agent should have the privileges that allow viewing and adding of attachments:
- View Attachment (SVC_VIEW_ATTACHMENT)
- Add Attachment (SVC_ADD_ATTACHMENT)
View Audit Log of Child Objects
When viewing the Audit Log for a Help Desk request, agents now can choose to view the audited child objects such as contacts, messages, or milestones that have been changed.
Being able to audit child objects on the Help Desk Requests give a broader view of how the request has been handled.
Steps to Enable
If you have already been auditing child objects, there are no additional setup steps. However, with this new feature the administrator may wish to change what is being audited and will need to include any items that you may want to show in the Audit log.
To do this, the administrator should perform the following steps:
- Go to Setup and Maintenance.
- On the right-hand side, click on the Tasks document bar to expand the options and click the Search link.
- Enter 'Manage Audit%' and click the Search icon.
- Click Manage Audit Policies.
- On the Oracle Fusion Applications line, change the Audit Level to 'Auditing' if this is not already selected, and then click the Configure Business Object Attrib button.
- Select Service from the Product Drop-down.
- Check the items that you want to Audit.
- Click Save.
- On the left-hand side, under Objects, use the Action Drop-down to select Synchronize.
- Click Save and Close.
Tips And Considerations
To view the audit history, type “Show Audit History” in the action bar at the top of the page while viewing a help desk request.
By default, only certain fields of the Help Desk Request objects are audited. If you want more fields to be audited, you must add them through Setup and Maintenance.
Key Resources
For more information on configuring Help Desk, view the Implementing Help Desk Guide.
Access Requirements
The 'View Audit History' privilege was added to the standard agent roles in 23C. (FND_VIEW_AUDIT_HISTORY_PRIV)
If you have created custom agent roles, you will need to add this privilege.
Mass Update for Related Help Desk Requests and Cases
Agents using Help Desk in the Redwood experience can select which related cases or help desk requests should be updated with the same message.
This allows a mass update to multiple related requests/cases, saving time for the agent and ensuring consistent and timely communications to everyone vested in the resolution of the issue.
Steps to Enable
You don't need to do anything to enable this feature.
Tips And Considerations
While it is possible to add a message to a Help Desk Request and have that duplicated in other requests or a Case, it is not possible to do a mass update of the status from one request to a Case, as statuses for Help Desk requests are not always the same and do not necessarily have a one-to-one correspondence.
Key Resources
Refer to the Implementing Help Desk guide for more information.
Access Requirements
The following roles (or custom roles with the privileges required, such as 'View Object Relationship') can use this feature:
- Case Execution
- Case Supervision
- HR Help Desk Service Request Management
- HR Service Request Administration
- HR Service Request Analysis
- HR Service Request Management
- Internal Service Request Administration
- Internal Service Request Analysis
- Internal Service Request Management
Analyze Internal Conversations in HR Help Desk Requests
An agent can start an internal conversation with her fellow agents (or subject matter experts) to assist her in resolving a help desk request and communicate with those other users through various channels. Managers and agents can gain insights into the extent of collaboration happening via internal conversations during the course of resolving help desk requests. In-depth analysis supported by key metrics such as counts of incoming/outgoing conversation messages and conversation recipients are possible at the level of each help desk request, if required. A new subject area, "Help Desk - HR Service Request Conversation Messages Real Time" has been added.
Visibility into internal conversation recipient information, volumes and other aspects help you understand the extent of collaboration occurring within your organization. An analysis of resolution times of closed requests together with their categories, queues or business units and the nature and volume of conversation messages can help uncover opportunities for improvement.
Steps to Enable
Leverage new subject area(s) by adding to existing reports or using in new reports. For details about creating and editing reports, see the Creating and Administering Analytics and Reports book (available from the Oracle Help Center > your apps service area of interest > Books > Administration).
Key Resources
Subject Areas for Transactional Business Intelligence in Fusion Sales and Fusion Service guide.
Transactional Business Intelligence Enterprise for Oracle Me
Oracle Transactional Business Intelligence is a real time, self-service reporting solution offered to all Oracle® Cloud application users to create ad hoc reports and analyze them for daily decision-making. Oracle Transactional Business Intelligence provides human resources managers and specialists, business executives, and line managers the critical workforce information to analyze workforce costs, staffing, compensation, performance management, talent management, succession planning, and employee benefits. Don’t want to start from scratch building a report or analytics? Check out the library of sample reports for all products on Customer Connect on the Report Sharing Center.
New Subject Area Related to HCM Communicate
You can leverage the new subject area HCM Communicate - Campaigns Real Time to report on the details related to campaigns like the ID, Name, Purpose, Status and so on. Also you can report on the owners, the audience that are targeted in the campaigns and the responses received by the audience. The seeded metrics includes number of campaigns and the number of responses from the audience.
In addition to reporting on the campaign, you can also report on the journeys that are targeted by the campaign communications for the worker to complete.
Steps to Enable
Leverage new subject area(s) by adding to existing reports or using in new reports. For details about creating and editing reports, see the Creating and Administering Analytics and Reports book (available from the Oracle Help Center > your apps service area of interest > Books > Administration).
Access Requirements
The following duty role provides access to this subject area:
- ORA_FBI_HCM_COMMUNICATE_CAMPAIGNS_TRANSACTION_ANALYSIS_DUTY_HCM
The following Job role inherits the above duty role:
- ORA_IRC_EMPLOYEE_CAMPAIGN_MANAGER_JOB