
- Revision History
- Overview
- Feature Summary
- Global Trade Management
-
- Transportation and Global Trade Platform
- Global Trade Management (Base)
-
- Copy Formula Expression
- Prorate RPLS Empty Parameter Weight
- RPLS Adhoc Audit Purge
- New Fields Available on Item Classification
- Configure the Number of Lines Displayed Across Objects
- Trade Item Structure Values Added to XML Integration and REST API
- Display Quantity for Component on Trade Item Structure
- New Constraint Set Types Available
- Expand GTM Document Actions and Features to Additional Objects
- Archive and Purge Documents Associated with Business Objects
- Improvements to GTM Workbench
- Item Origin Values Replaced by Item Trade Values
-
- Trade Agreements
- Trade Compliance
- Global Trade Intelligence (GTI)
This document will continue to evolve as existing sections change and new information is added. All updates appear in the following table:
| Date | Module | Feature | Notes |
|---|---|---|---|
| 24 JAN 2023 | Global Trade Management (Base) | Prorate RPLS Empty Parameter Weight | Updated document. Revised feature description. |
| 17 DEC 2021 | Created initial document. |
This guide outlines the information you need to know about new or improved functionality in Oracle Global Trade Management Cloud Update 22A. Each section includes a brief description of the feature, the steps you need to take to enable or begin using the feature, any tips or considerations that you should keep in mind, and the resources available to help you.
 HAVE AN IDEA?
We’re here and we’re listening. If you have a suggestion on how to make our cloud services even better then go ahead and tell us. There are several ways to submit your ideas, for example, through the Ideas Lab on Oracle Customer Connect. Wherever you see this icon after the feature name it means we delivered one of your ideas.
GIVE US FEEDBACK
We welcome your comments and suggestions to improve the content. Please send us your feedback at otm-doc_us@oracle.com. Please indicate you are inquiring or providing feedback regarding the Oracle Global Trade Management What’s New in Update 22A.
DISCLAIMER
The information contained in this document may include statements about Oracle’s product development plans. Many factors can materially affect Oracle’s product development plans and the nature and timing of future product releases. Accordingly, this Information is provided to you solely for information only, is not a commitment to deliver any material, code, or functionality, and should not be relied upon in making purchasing decisions. The development, release, and timing of any features or functionality described remains at the sole discretion of Oracle.
This information may not be incorporated into any contractual agreement with Oracle or its subsidiaries or affiliates. Oracle specifically disclaims any liability with respect to this information. Refer to the Legal Notices and Terms of Use for further information.
Column Definitions:
Report = New or modified, Oracle-delivered, ready to run reports.
UI or Process-Based: Small Scale = These UI or process-based features are typically comprised of minor field, validation, or program changes. Therefore, the potential impact to users is minimal.
UI or Process-Based: Larger Scale* = These UI or process-based features have more complex designs. Therefore, the potential impact to users is higher.
Features Delivered Disabled = Action is needed BEFORE these features can be used by END USERS. These features are delivered disabled and you choose if and when to enable them. For example, a) new or expanded BI subject areas need to first be incorporated into reports, b) Integration is required to utilize new web services, or c) features must be assigned to user roles before they can be accessed.
Transportation and Global Trade Platform
Next Generation Enhanced Workbench
This feature provides you with the first release of the Oracle JET based Enhanced Workbench. This first release of the Enhanced Workbench (Layouts and Designer) provides you with many of the same or equivalent features and functionality as the original Workbench (developed using ADF technology) while providing you with a long list of usability, functionality and performance improvements.
NOTE: While the Enhanced Workbench has many of the features and functions of the current Workbench, it is not yet fully functionally equivalent and should only be used for review, testing and evaluation purposes. The Enhanced Workbench should not be rolled out into production.
Both the Enhanced Workbench and the original Workbench will continue to coexist for several update cycles in order to provide you with ample time to migrate from the older technology to the new Enhanced Workbench technology. Your migration to the Enhanced Workbench will be supported by migration tools that will allow you to easily move your existing Workbench Layouts into the new Enhanced Workbench infrastructure.
Some of the highlights of the Enhanced Workbench include:
- The Workbench Manager which supports migrating your existing Workbench Layouts to the Enhanced Workbench Format - and vice versa
- A collapsible menu for navigation that you can easily toggle on and off
- A new Analytics Dashboard Content Type which allows you to add BI content as a panel within the workbench
- A new Data Visualization Content Type which allows you to incorporate data visualization project content within the workbench
- A new Transactional Report Type which allows you to include an Oracle Analytics Publisher report within the workbench
- A new Shipment Gantt Content Type which provides you with a Gantt view of your shipments
- A new Overview Panel for your all your Gantts that provides you with an improved navigation experience within the available Gantts
- The ability to do multiple splits per region
- An enhanced type ahead with contains Workbench Layout ID dropdown search
- The ability to collapse tabs in a region to gain additional screen real estate
- Load Config Region now supports Edits within the Enhanced Workbench
- The ability to flip between the Region Content and the Region Details
- Improved Logging
- More Informative - Progress Bar – in-process Logging and error messages all improved
- Configurable “on the fly”
- Duration as a metric
Below you will find an example of just some of the changes provided by the new Enhanced Workbench.
The Workbench Manager allows you to easily find and select one or more of your Workbench layouts and convert the Workbenches between a Legacy or Enhanced Workbench view using the actions - Enhanced View Enabled - which moves the Legacy Workbench to an Enhanced Workbench - or Legacy View Enabled - which moves an Enhanced Workbench to a Legacy Workbench view.
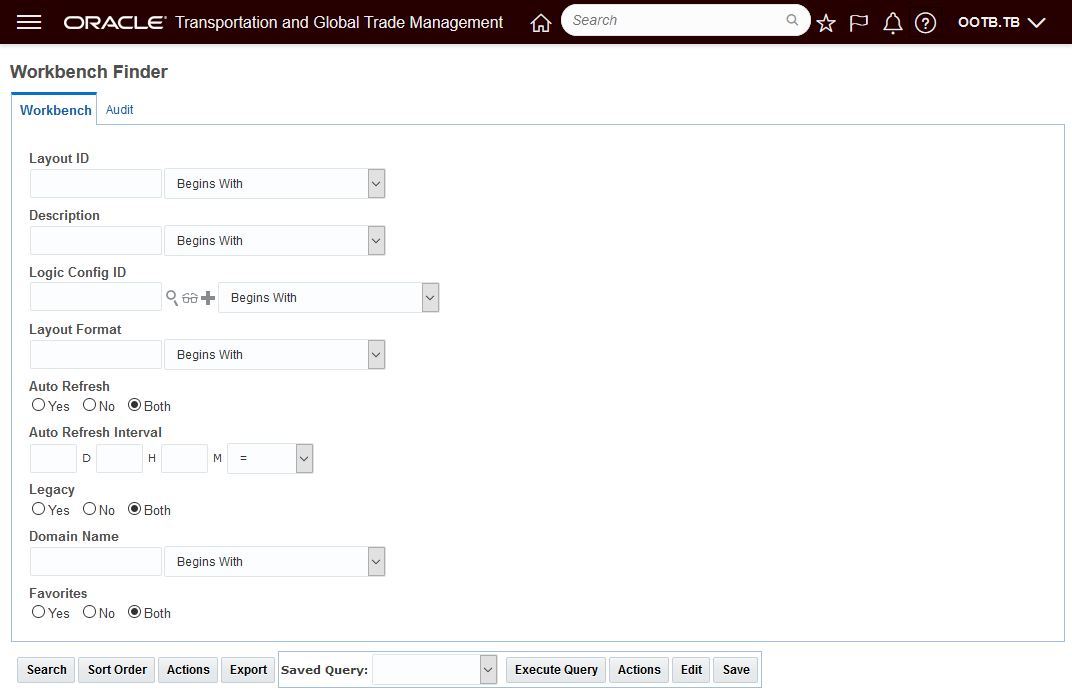
Workbench Manager Finder
Use the Workbench Manager to find all of your Legacy Workbenches.
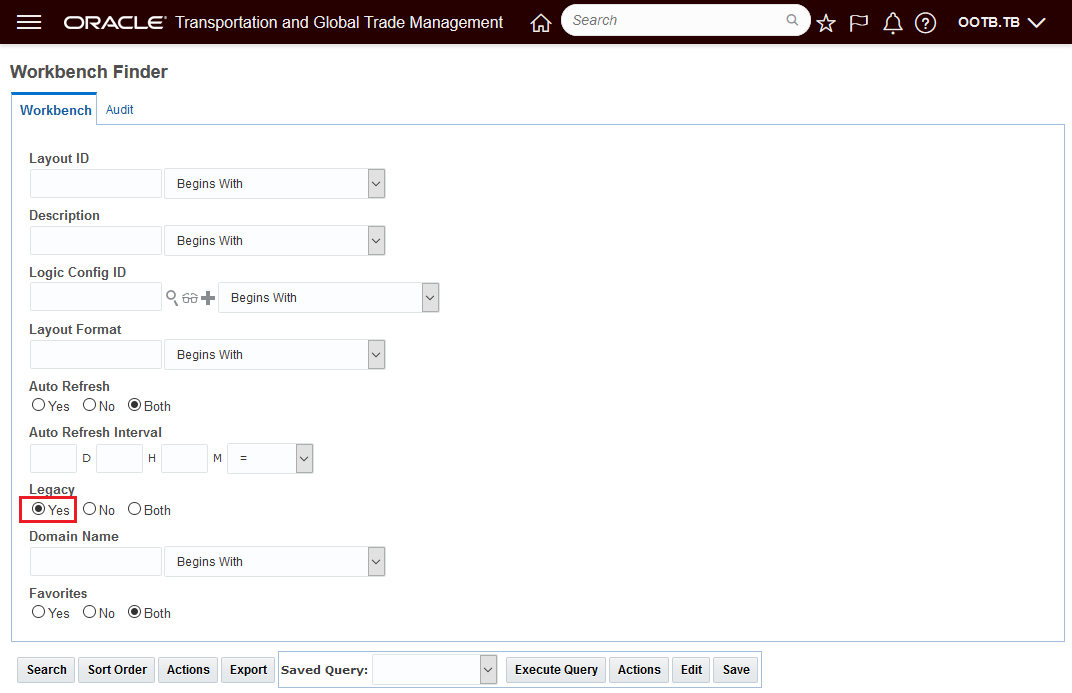
Workbench Manager Finder - Find Legacy Workbench Layouts
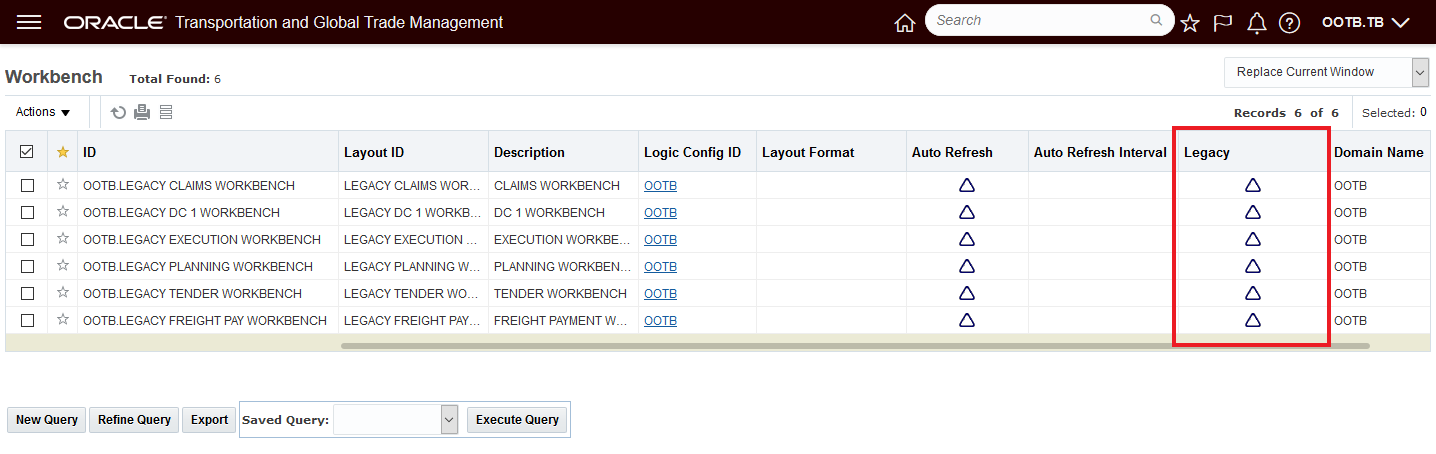
The results below show six Legacy Workbenches. Converting all six Workbenches from Legacy to Enhanced only requires you to select all six and run the action Enhanced View Enabled as shown below.
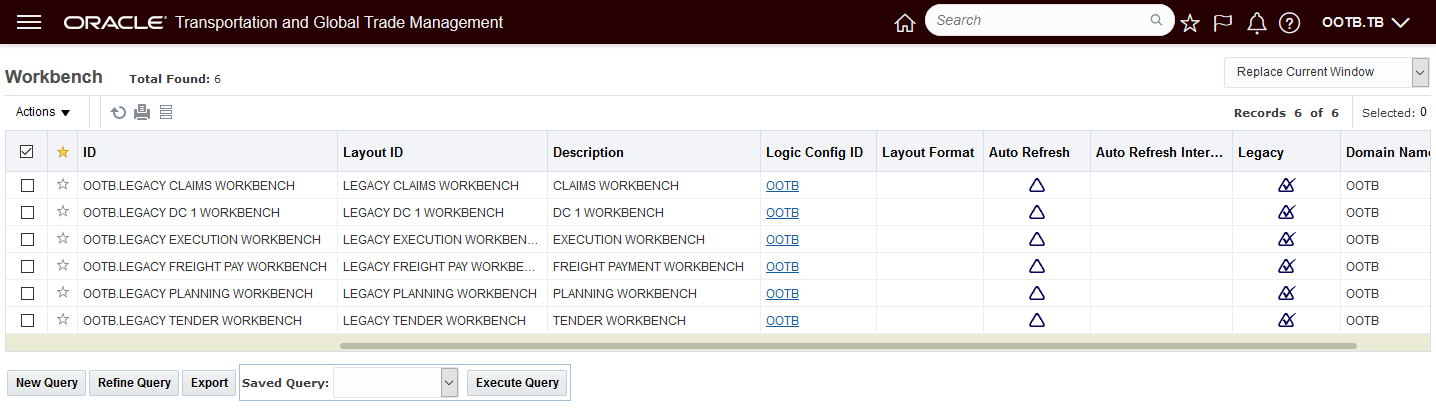
Legacy Workbench Finder Results
Select the set and convert them all to Enhanced using the action Enhanced View Enabled
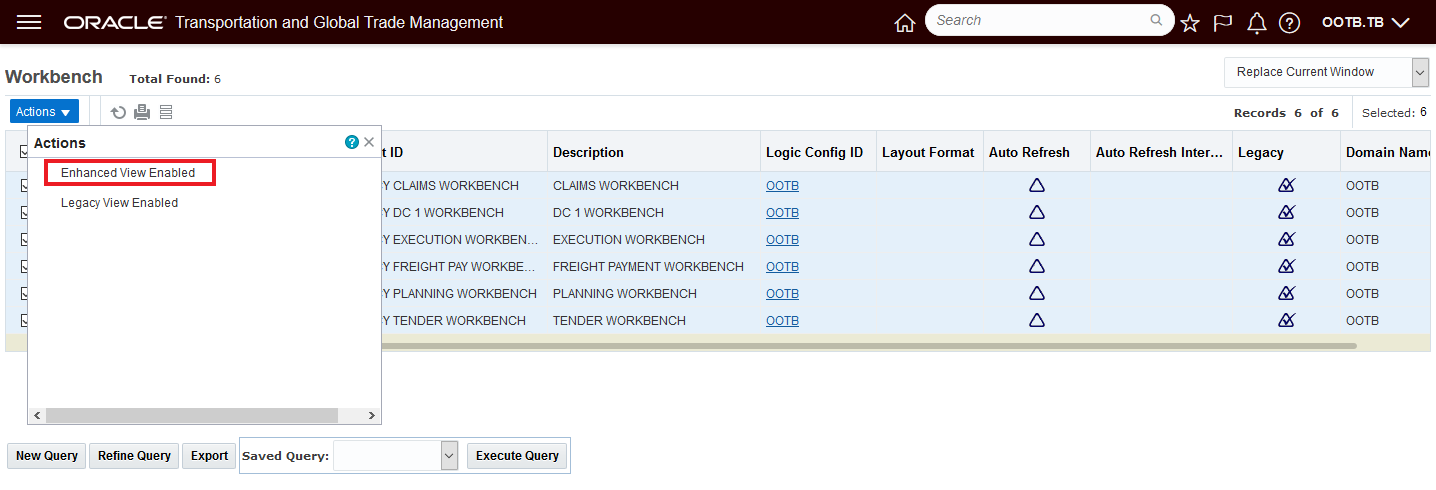
Enhanced View Enabled Action
Results of running the action - each workbench is converted
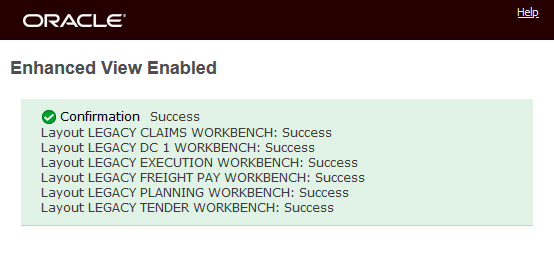
Enhanced View Enabled - Workbench Conversion Message
The six selected Workbenches that were in the Legacy format are no longer legacy workbenches. The converted Workbenches will now show up in the Enhanced Workbench designer and not in the Legacy Workbench Designer.
Legacy to Enhanced View Converted
If, for some reason you need to convert the Workbenches back to the Legacy format - that can be done very easily by selecting the Workbenches and running the Legacy View Enabled action as shown below.

Enhanced Back to Legacy
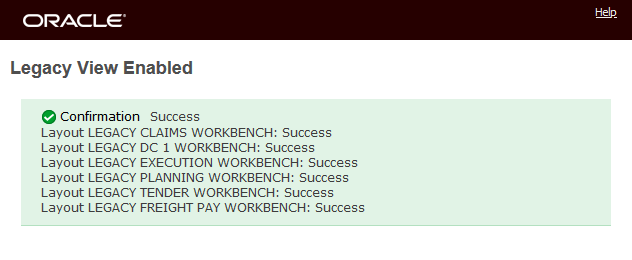
Convert Back to Legacy
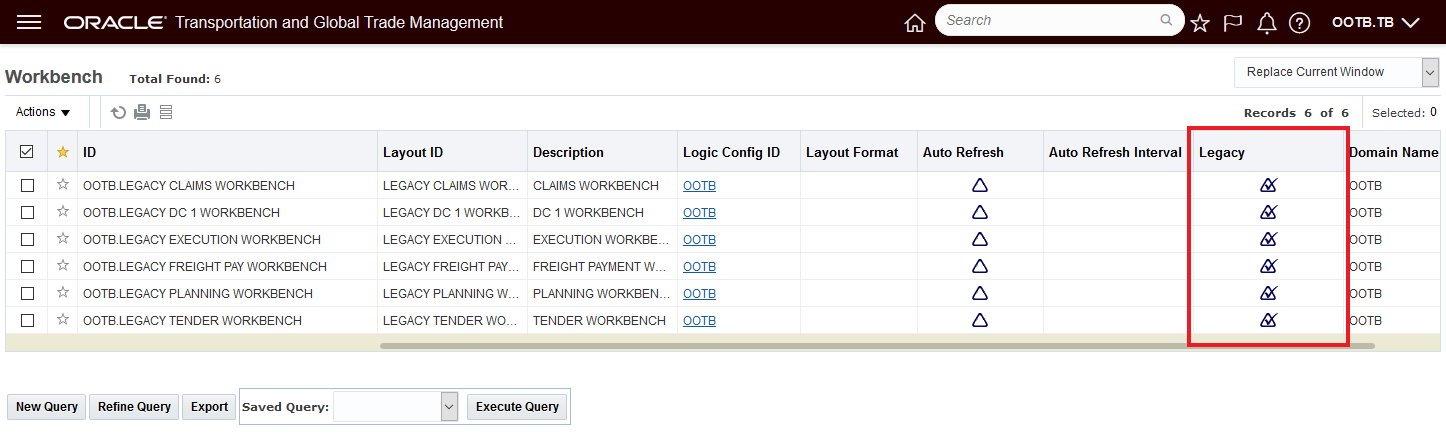
Legacy Flag Visible
The Enhanced Workbench Menu and Navigation options can be easily toggled on and Off.

Enhanced Workbench Menu
Additional Content Types
- New Analytics Dashboard Content Type which allows you to add BI content as a panel within the workbench
- New Data Visualization Content Type
- New Shipment Gantt Content Type which provides you with a Gantt view of your shipments over time
- New Transactional Report Type which allows you to include an Oracle Analytics Publisher report within the workbench
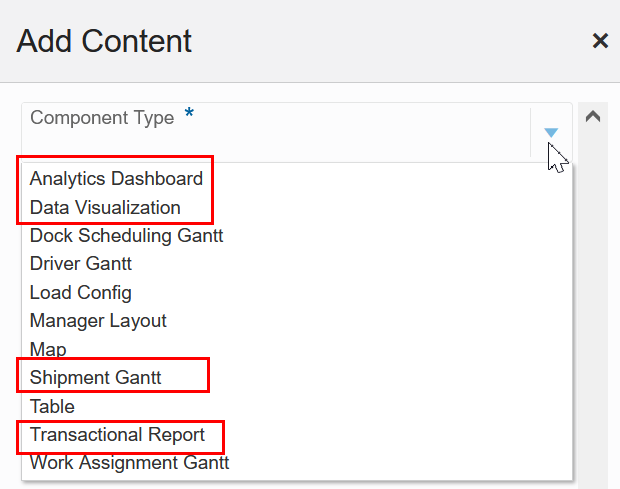
New Content Types Analytics and Shipment Gantt
Below is an example of the Analytics Dashboard Content Type incorporated into the Enhanced Workbench Layout. In this example, the Service Provider Metrics Dashboard is incorporated.
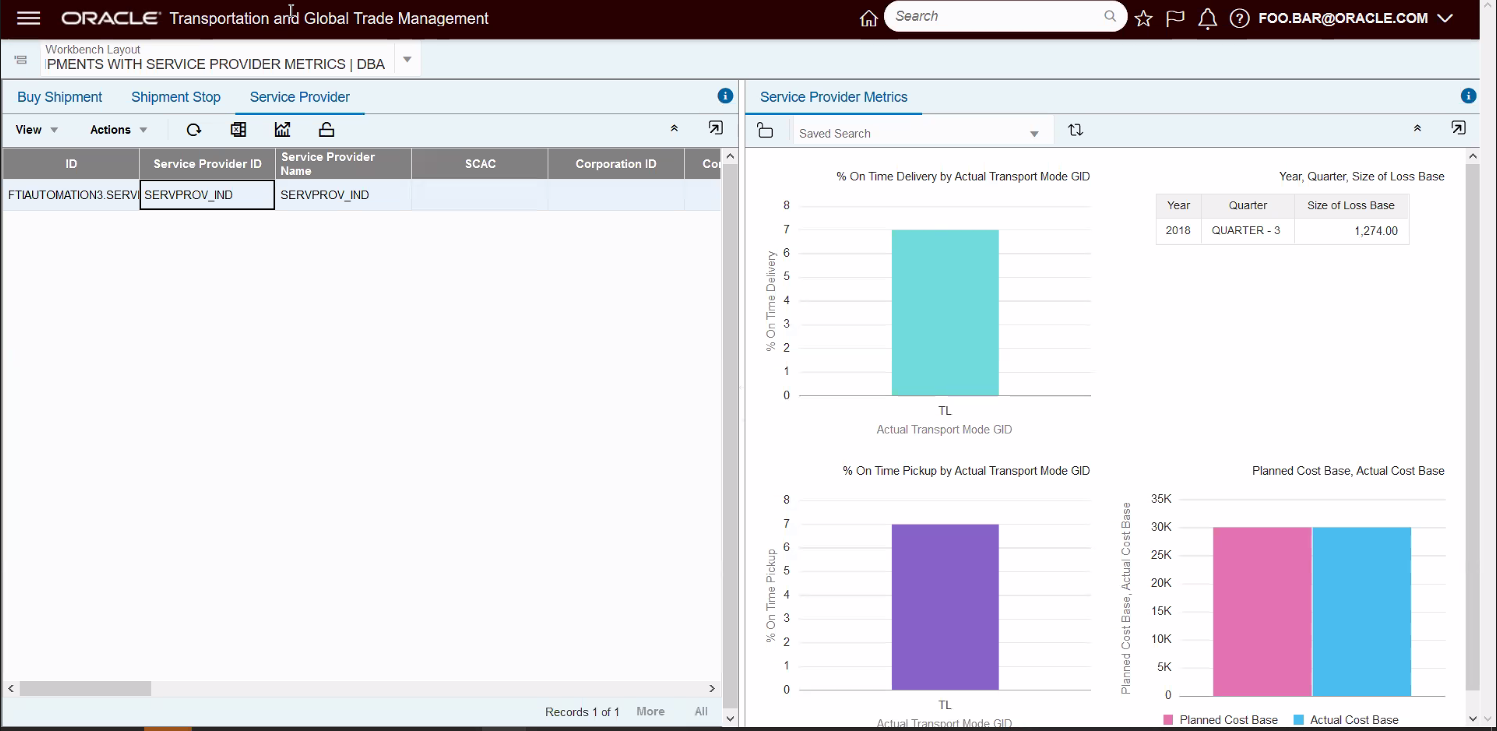
Analytics Dashboard Component - Service Provider Metrics
Below is an example of the new Data Visualization Content Type incorporated into the Enhanced Workbench Layout. In this example the analysis is for Logistics Machine Learning accuracy.

Data Visualization Content Type
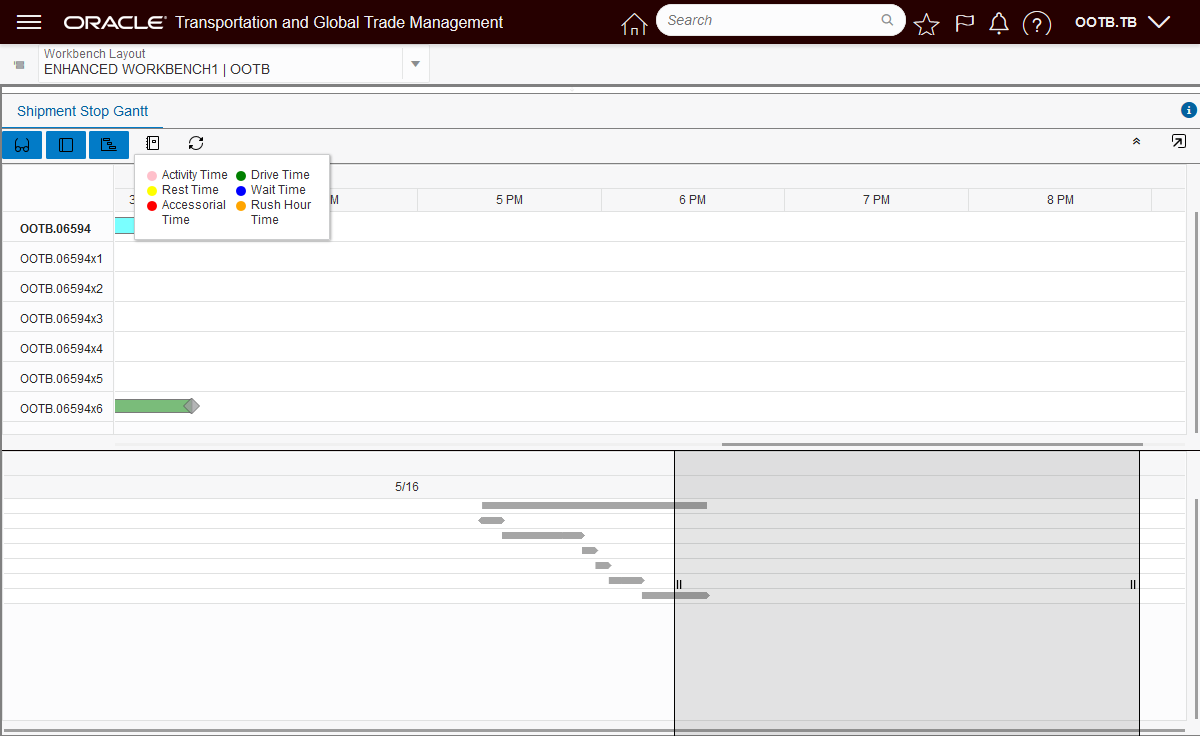
The example below shows the new Shipment Gantt which provides you with the opportunity to visualize your shipments in a Gantt format.

Shipment Stop Gantt
The Overview Panel has been added to all the Gantts (Dock Scheduling, Driver, Shipment, and Work Assignment) to allow for an improved Gantt navigation experience. The Overview allows you dynamically set the time window you wish to review the Gantt with, as well as allowing you to slide that window across time - either earlier or later.
In the example below, the Overview - by default - sets an overview window that covers the entire shipment timeline.
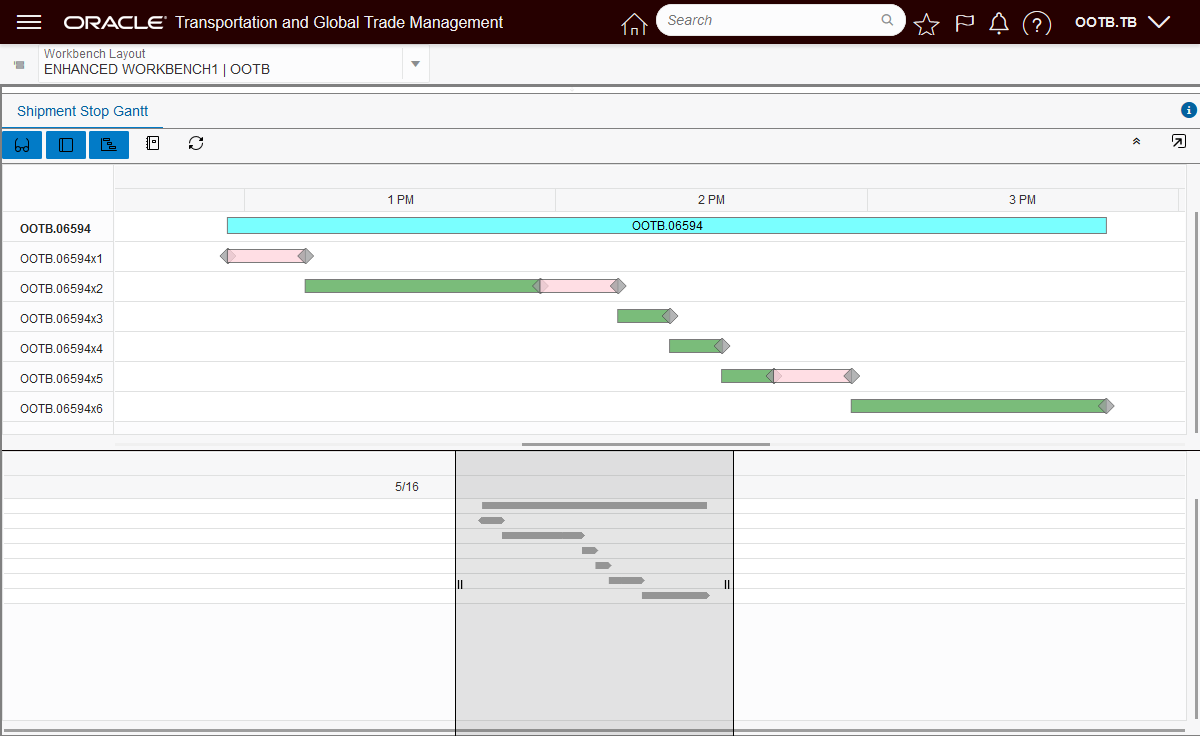
Gantt Overview
You can "zoom in" to a more specific time by simply reducing the size of the Overview window.

Narrow Overview Gantt Window
You can also use the Overview window to change your time frame - left (earlier), or right (later).
Overview Shifted to the Right
The new Work Assignment Gantt, below, has also been enhanced to provide a clean, modern and more information rich view into your work assignments..
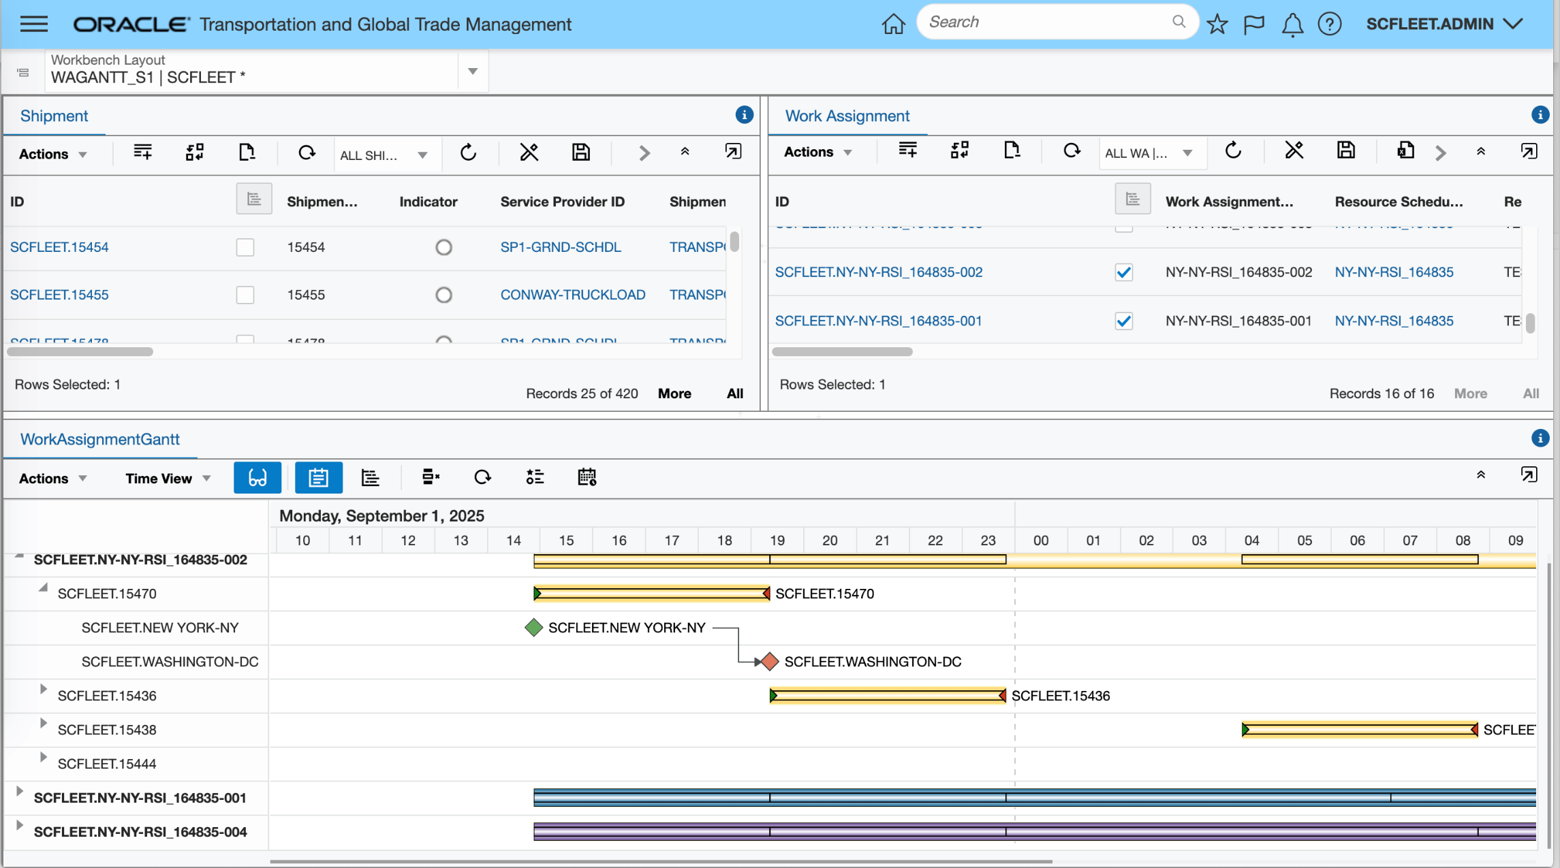
Work Assignment Gantt
The Enhanced Workbench Drop Down provides you with an improved typeahead Search capability looking for Workbench Layouts in the dropdowns using a contains search for text entered.

Improved Search - All Enhanced Workbenches with "leg" in the ID
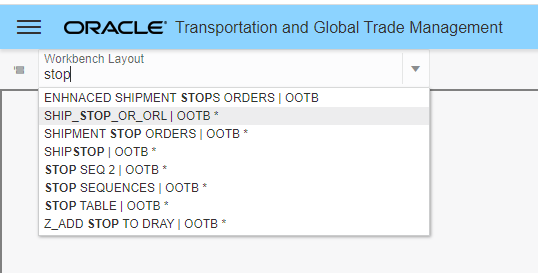
Improved Search - All Workbenches with "stop" in the ID
The example below shows the new capability available to you for collapsing your tabs.

Expanded Tabs View
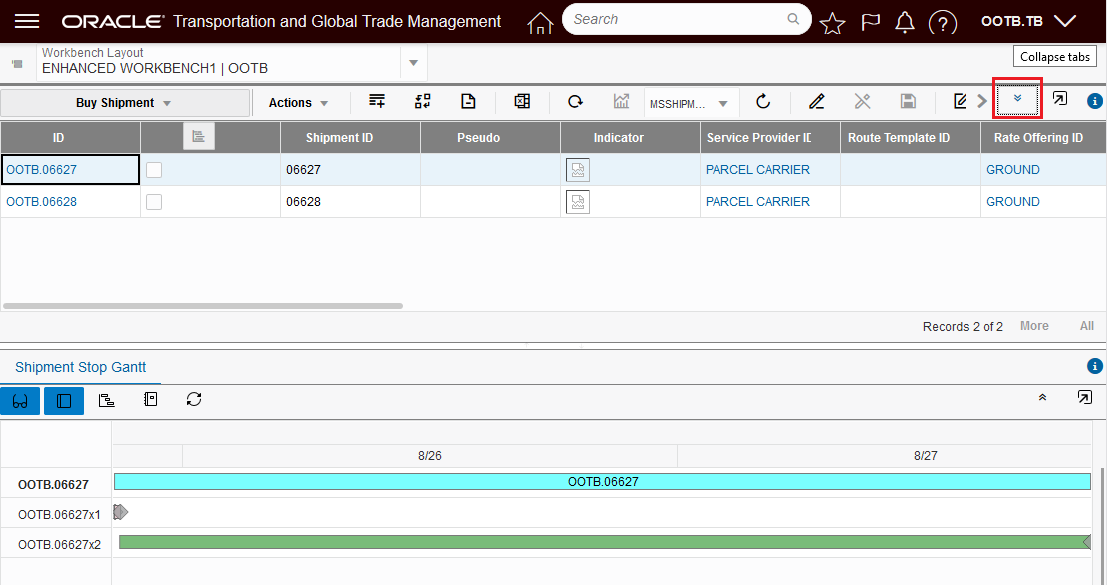
Collapsed Tabs View
The Load Config region now supports the Edit Load Config view and manipulations.
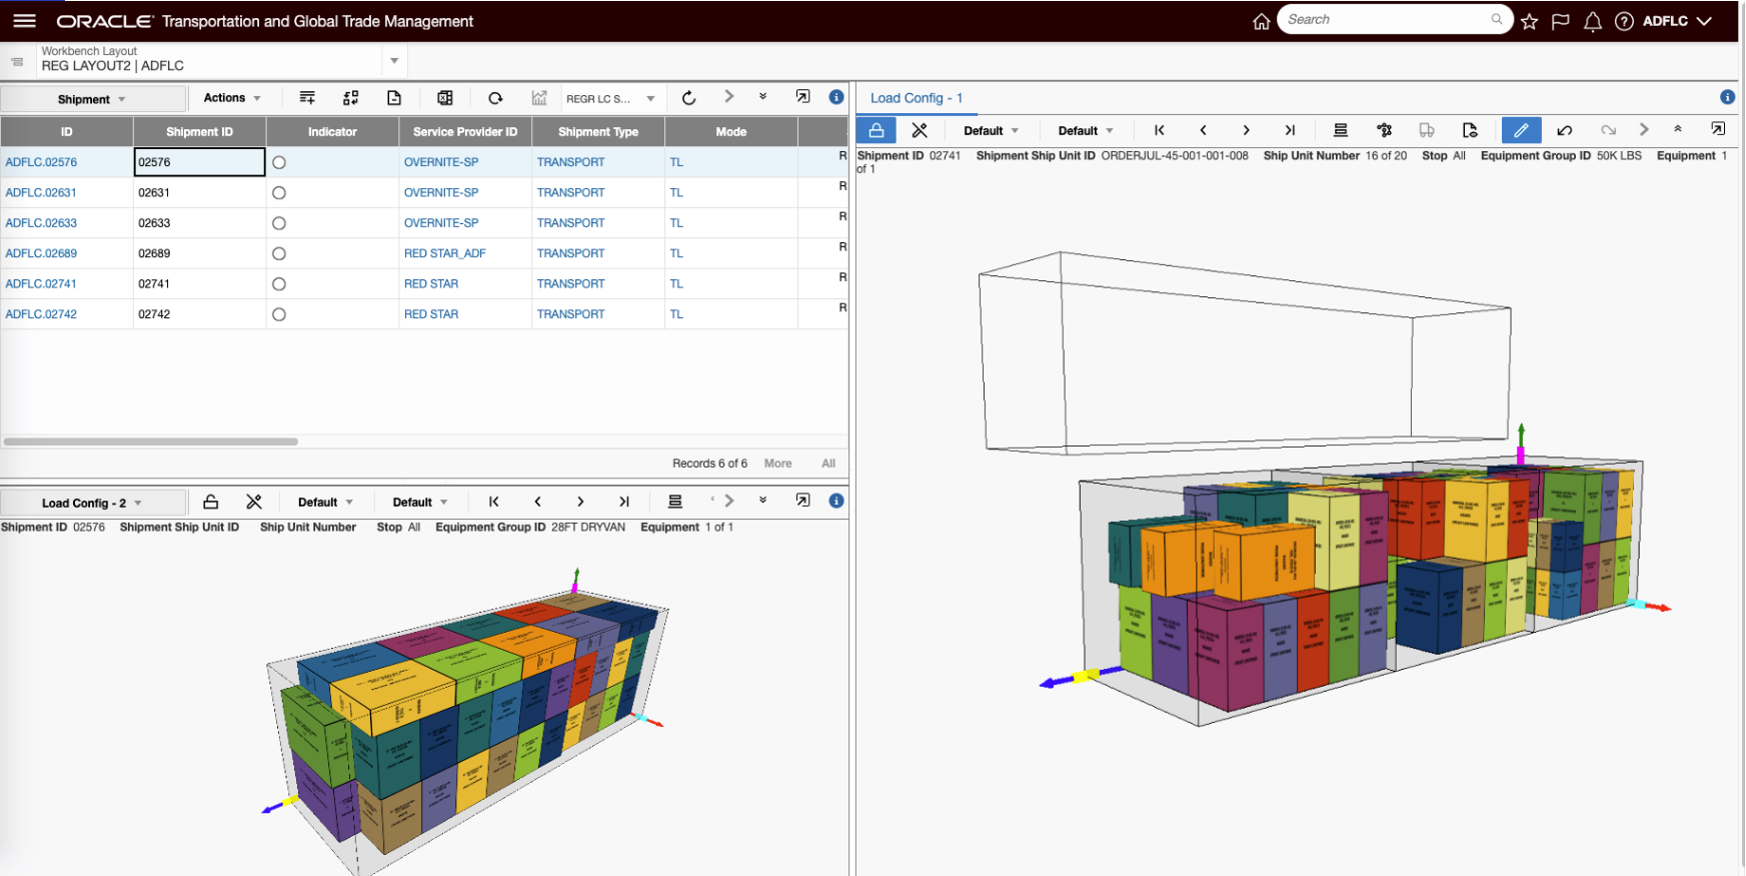
Edit Load Config Available in Enhanced Workbench
The Enhanced Workbench also provides you with greatly improved logging for trouble shooting workbench issues. In addition to improved and expanded Errors, Warnings and Info related messages, logging now uses colors to denote different levels of logging - Errors (red), Debug and Info messages (green).
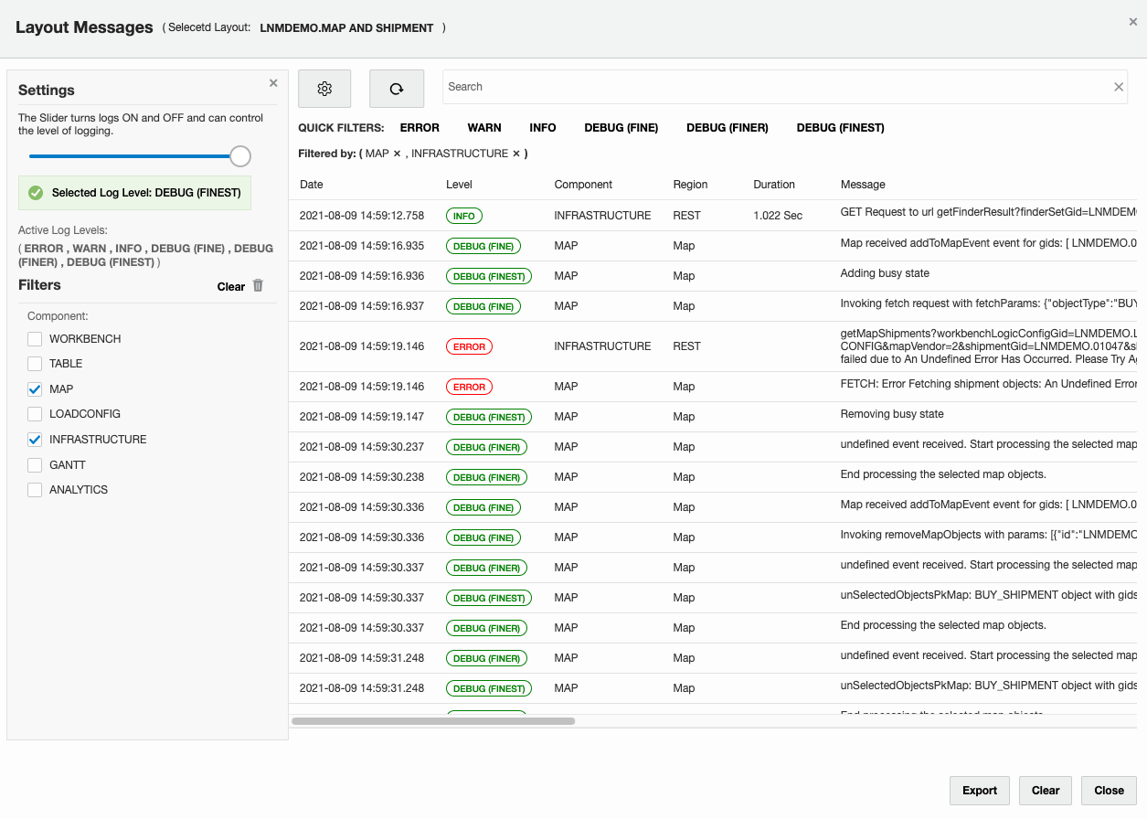
Improved Logging
Steps to Create a Basic Enhanced Workbench
The steps for creating a workbench using the new Enhanced Workbench Designer are equivalent to the steps you have used to create Workbenches previously. There are just a few differences in the navigation and icons displayed to access the functionality used to create and configure an Enhanced Workbench. The example below will be used to identify the steps required to create a simple Enhanced Workbench. The example will focus on the changes.
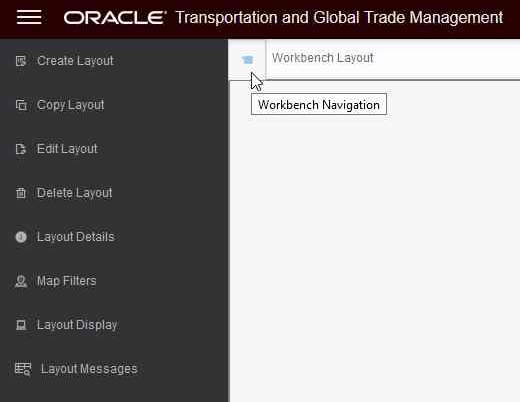
Step one is to navigate to the Enhanced Workbench Designer. Once there you will select the Create Layout option.

Bring up Enhanced Workbench Navigation menu.
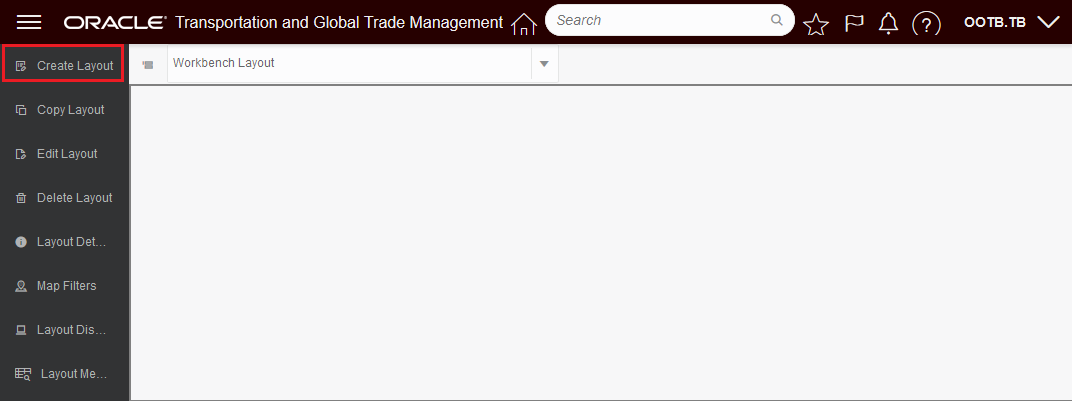
Select Create Layout
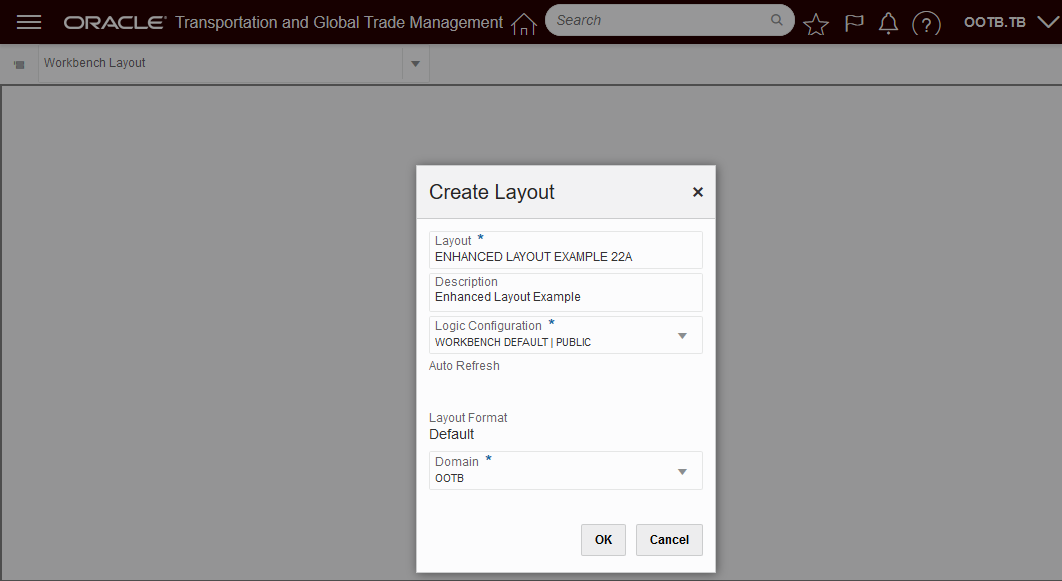
Enter info about your workbench.

Select the Tool Icon to add, delete, and edit content and split vertically or horizontally.
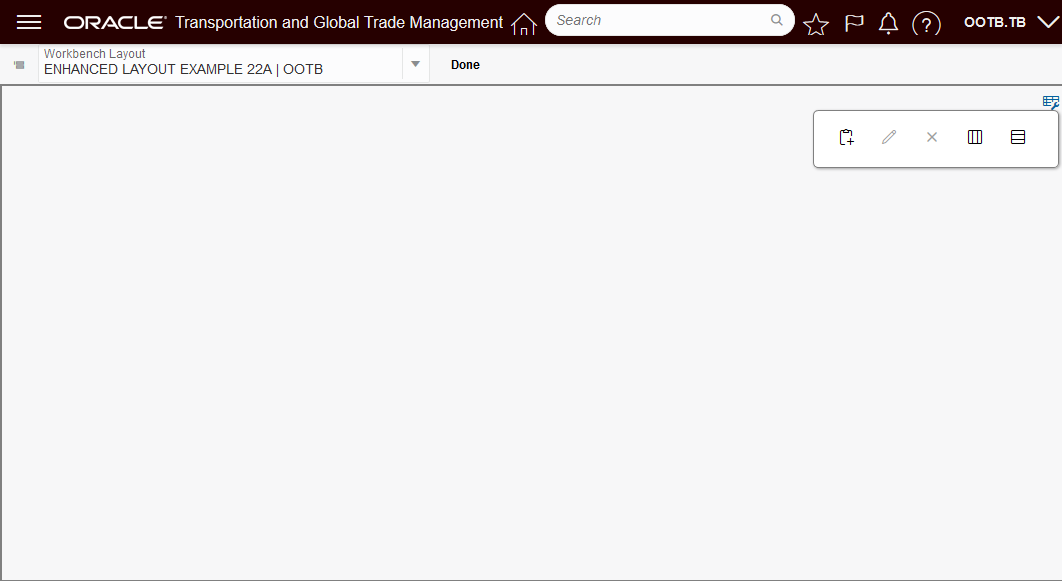
Tool Icon
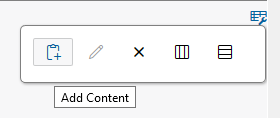
Add Content
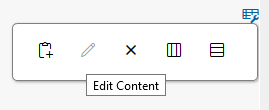
Edit Content
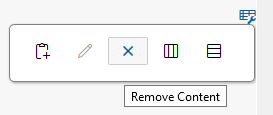
Remove Content
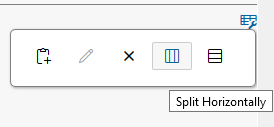
Split Horizontally
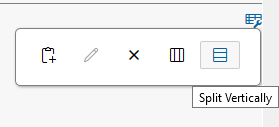
Split Vertically
This feature resets the development platform for the Workbench Designer and Workbench Layouts providing you with many usability, functionality and performance improvements.
Steps to Enable
The Enhanced Workbench Designer can be made visible on your menu by doing the following:
- Configuration and Administration > User Configuration > Manage User Access
- Select User Access Type of User Menu
- Fill in your user info - User ID, User Level, User Role etc.
- Select Edit User Access
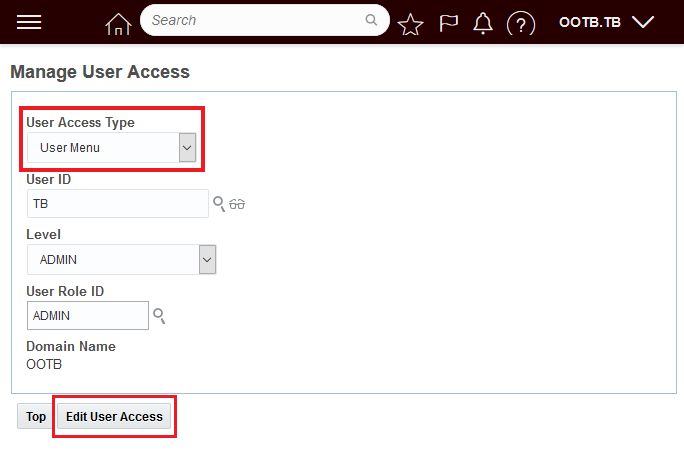
Manage User Access
- Add the ENHANCEDWORKBENCH_MENU to the User Menus you have access to
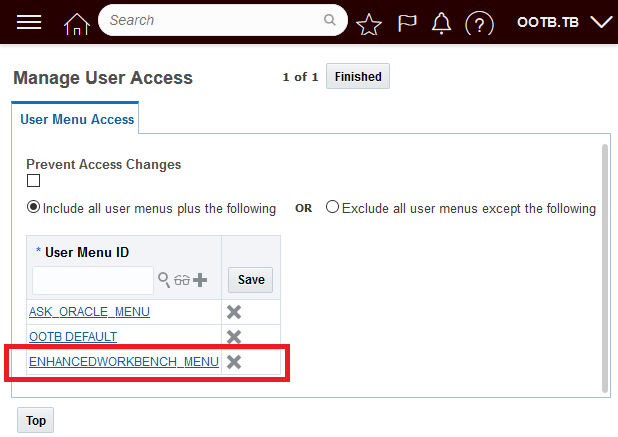
Add Enhanced Workbench Menu
- When completed the Icon for the Enhanced Workbench Prototype should be visible.
Enhanced Workbench Access Provided
Tips And Considerations
NOTE: Important! The 22A Enhanced Workbench Prototype is provided for testing and evaluation purposes ONLY. The Enhanced Workbench Prototype is NOT intended to be used in your production environment. The Enhanced Workbench Prototype provides significant improvements and additional features - but does not yet have full functional equivalence with the legacy Workbench.
The Enhanced Workbench will ONLY work if the JET APPLICATION SHELL Optional Feature is Opted In.
Display User Defined Image Description When Hovering
This feature uses the User Defined Image's Description field, when included in the screenset, as the hover text provided when you hover over your User Defined Image(s).
Previously - when you hovered over a User Defined Image in your finder results, the hover text provided was limited to the generic text "User Defined Image"..
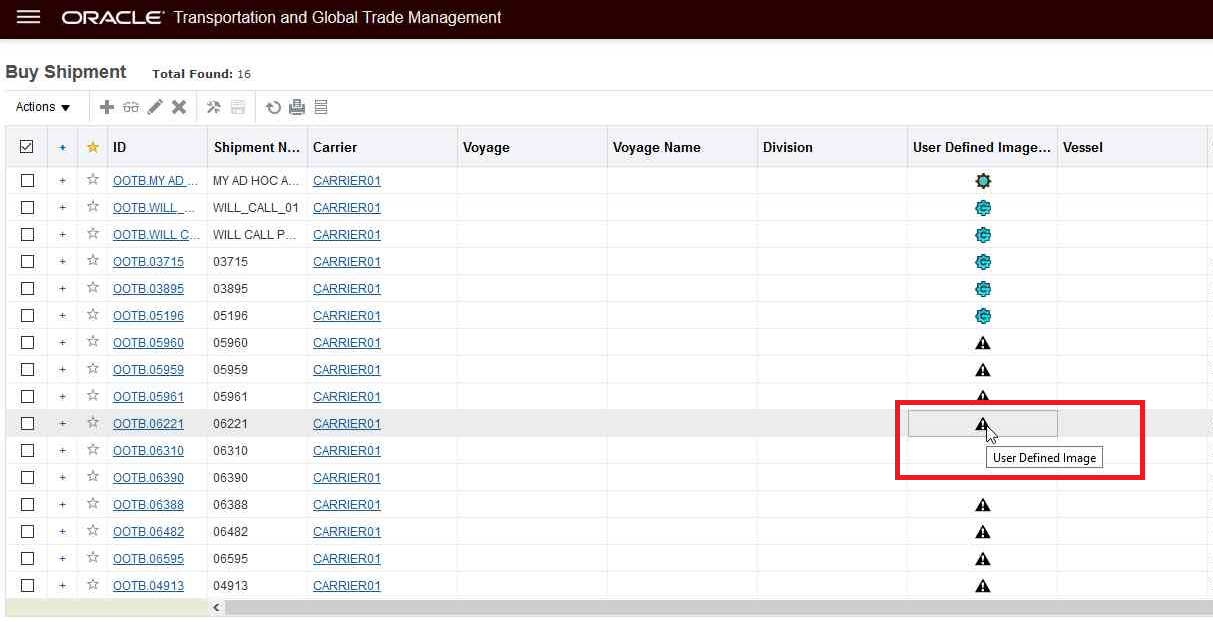
Original User Defined Image Hover Text
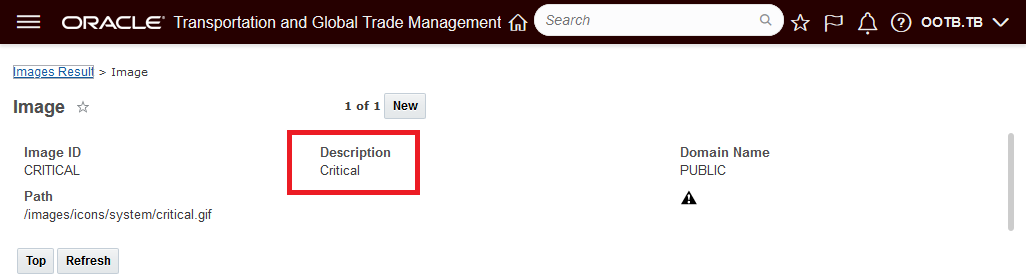
With this enhancement, you can configure your screen sets to include the User Defined Image Description fields and when this field is included the hover text provided for the related User Defined Image image will be the User Defined Image Description field.
. 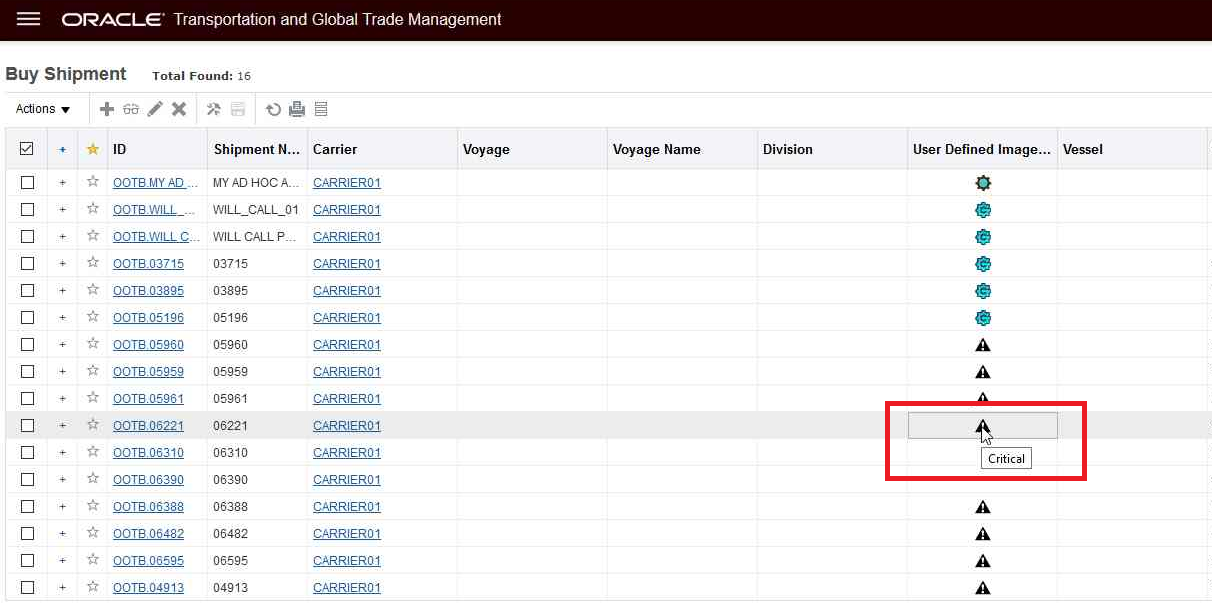
New Hover Text Behavior - User Defined Image Description Field Displayed
User Defined Image
This feature provides you with a quick way to confirm, via hover, what the various User Defined Image(s) represent on your finder results.
Steps to Enable
To enable this feature you will need to include the User Defined Image Description field in your finder results for all the User Defined Images included in your finder results. You can include the User Defined Description fields as a normal addition to the screen set - with a normal width so that the User Defined Description is fully displayed and visible - or - you have the option of adding the User Defined Description field with the width set to "0" which will enable the hover for the image, but will not add the description field to your finder results.
In the setup below - the User Defined Description field for the User Defined Image 1 was added to the screen set with the width set to "0". This enables the hover, without adding the Description field as a column in the finder results.
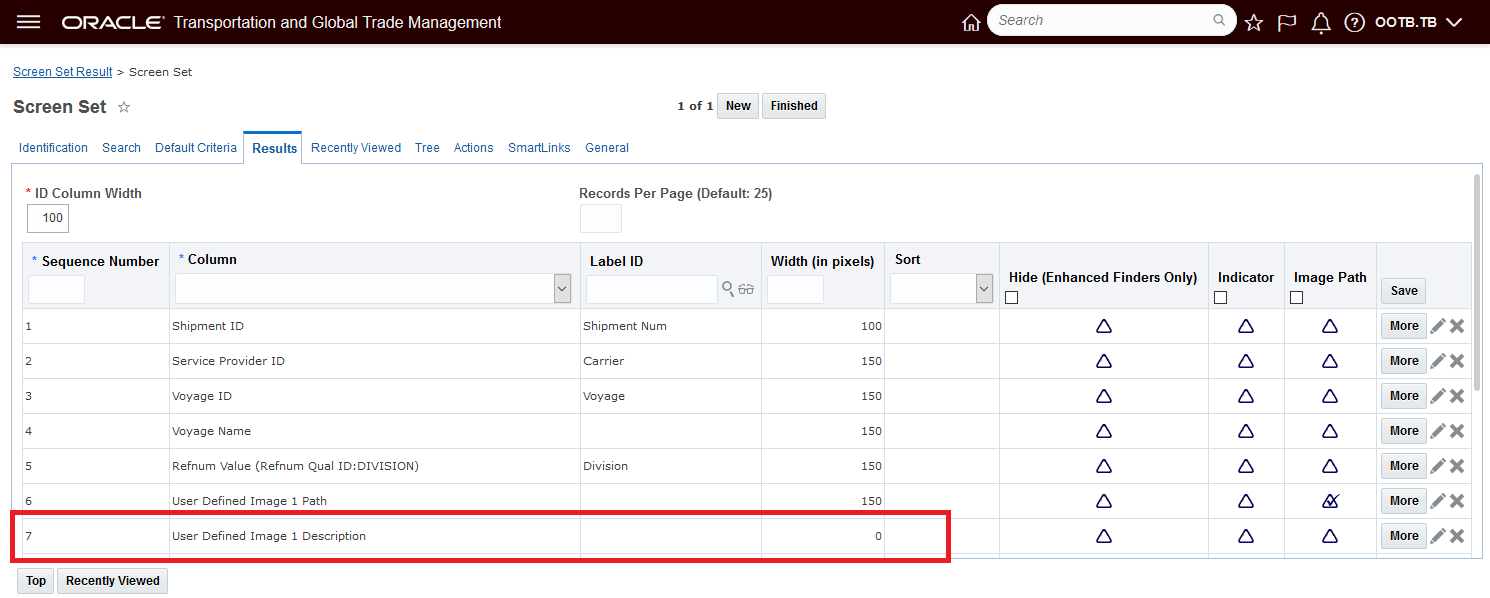
Setup - User Defined Image Description Field Added - Width = "0"
Screen Set Inline Edit and Mass Update Supports Flex Field Types
This feature provides Screen Set Inline Edit and Mass Update support for editing Flex Fields that have field types of:
- FlexPickList
- FlexDropList
- FixedDropList
Define a Flex Field with a field type of one of the above, add it as a column in the screen set results and set it as editable. When a user edits the field in the results they will be presented with the appropriate options.
This feature adds more editing capabilities in the screen set results.
Steps to Enable
You don't need to do anything to enable this feature.
New Property to Configure the Tables to Not Validate XID Characters
This feature provides you with a new property - glog.ui.validateXid.suppress.<table>=true - that you can use to select the table or tables you do not wish to have your XIDs validated for restricted characters: , x > < = / & ? ; # $ ' " \r \n ( ) when the Optional Feature Validate ID (released in 21A) is enabled.
The Validate ID feature, when enabled, will validate newly created records in OTM to insure that the external IDs (XIDs) entered do not contain restricted characters. The goal is to restrict the creation of XIDs to containing only numbers, upper-case letters, spaces, underscores and dashes. This feature allows you to select the tables you would like to have this logic suppressed.
If a potential XID for a new record contains a restricted character, and the Validate ID logic is enabled, the transaction will fail.
In the example below, the Validate ID logic is enabled and the attempt to enter the location with a location id that contains restricted characters fails.
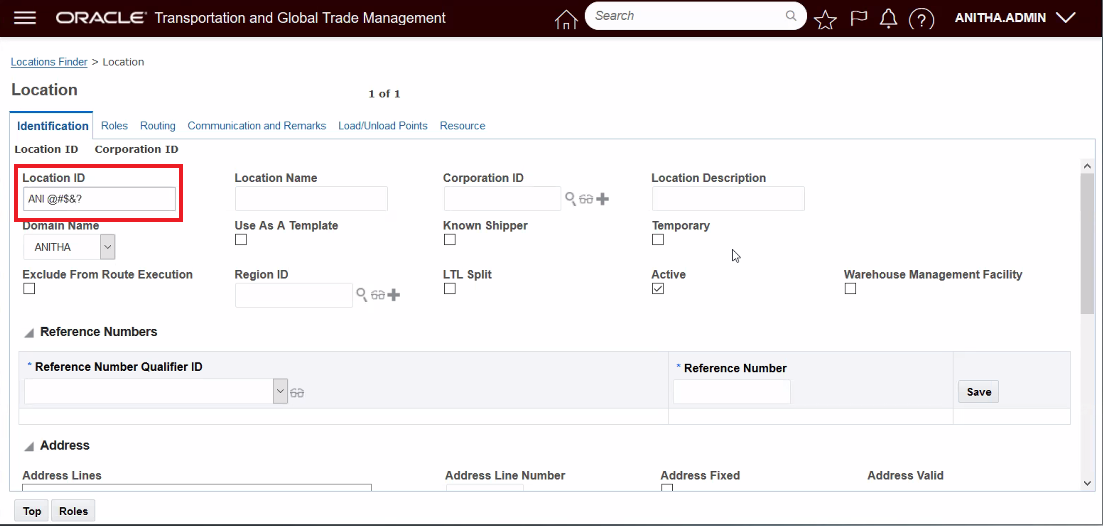
Location with Restricted Characters in the XID
When you attempt to save this location record with an ID that contains restricted characters you receive the following message.
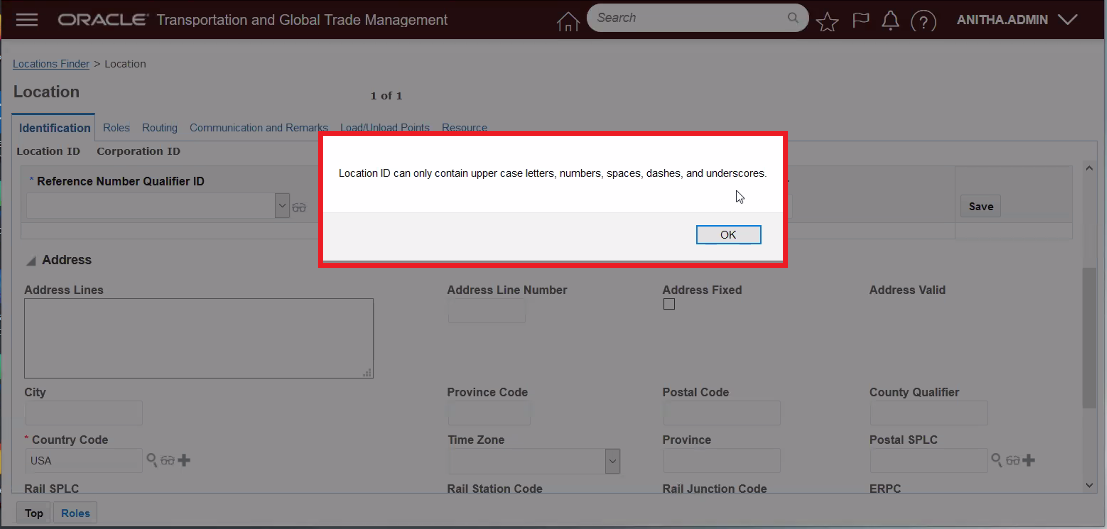
Error Message Received for Restricted Characters in an ID
Setting the property glog.ui.validateXid.suppress.location = true will suppress the Validate ID logic and will allow the location to be saved even with restricted characters in the ID.
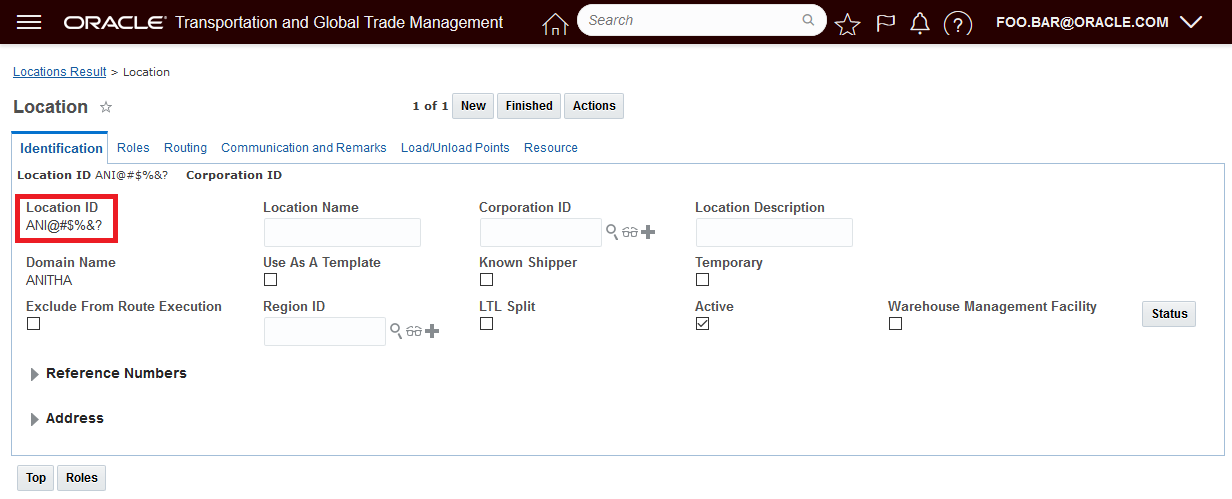
With Property Set to Allow Special Characters for the Location Table
The set of restricted characters is: , x > < = / & ? ; # $ ' " \r \n ( )
The Validate ID logic validates the XID if they are sent in via XML, REST or via the UI - the new property - glog.ui.validateXid.suppress - will suppress the XID validation logic for the same set of entry points i.e., XML, REST and UI.
Provides you with the option - if necessary - on a table by table basis to override the Validate ID features logic to disallow the entry of XIDs with restricted characters.
Steps to Enable
To use this feature, you will need to set the property for all the table(s) you wish to have the Validate ID restricted character logic ignored.
Either create or select the Property Set to configure. Configuration and Administration > Property Management > Property Sets.
NOTE: Only the DBA.ADMIN user can access and use the Property Sets page.
Set the property glog.ui.validateXid.suppress for the desired table or tables. The format is glog.ui.validateXid.suppress.<table name>= true
In the example below the Location table and Item table have been configured so that the Validate ID logic regarding restricted characters is suppressed.
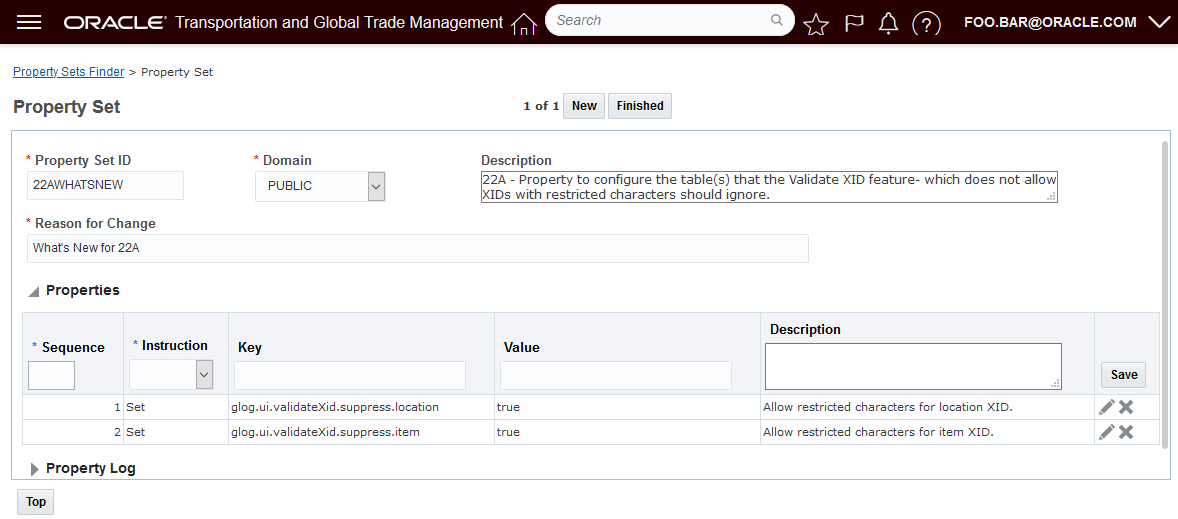
Property Set Example for Location and Item
UI Logic Configuration Parameter - Show Domain Name for Duplicate Values
This feature provides you with a new UI Logic Configuration parameter SHOW DOMAIN NAME FOR DUPLICATE VALUES that will, when configured, in situations where duplicate drop down values are found, display the domain name next to the drop down list value so you can select the right value based on the domain.
In the example below, the parameter Show Domain Name For Duplicates Values is set to True and drop downs, with duplicate values, show the domain names next to the duplicate values. In this case, the Reference Number Qualifiers ANI and AO are duplicates and the related domain names OOTB and PUBLIC are shown next to the duplicate values. For the Payment Method Codes dropdown the values of PP and PPD are also duplicates and are found in the OOTB and PUBLIC domains. Note that only the duplicate values have the | Domain Name addition provided - this makes it easy for you to identify the duplicate values.
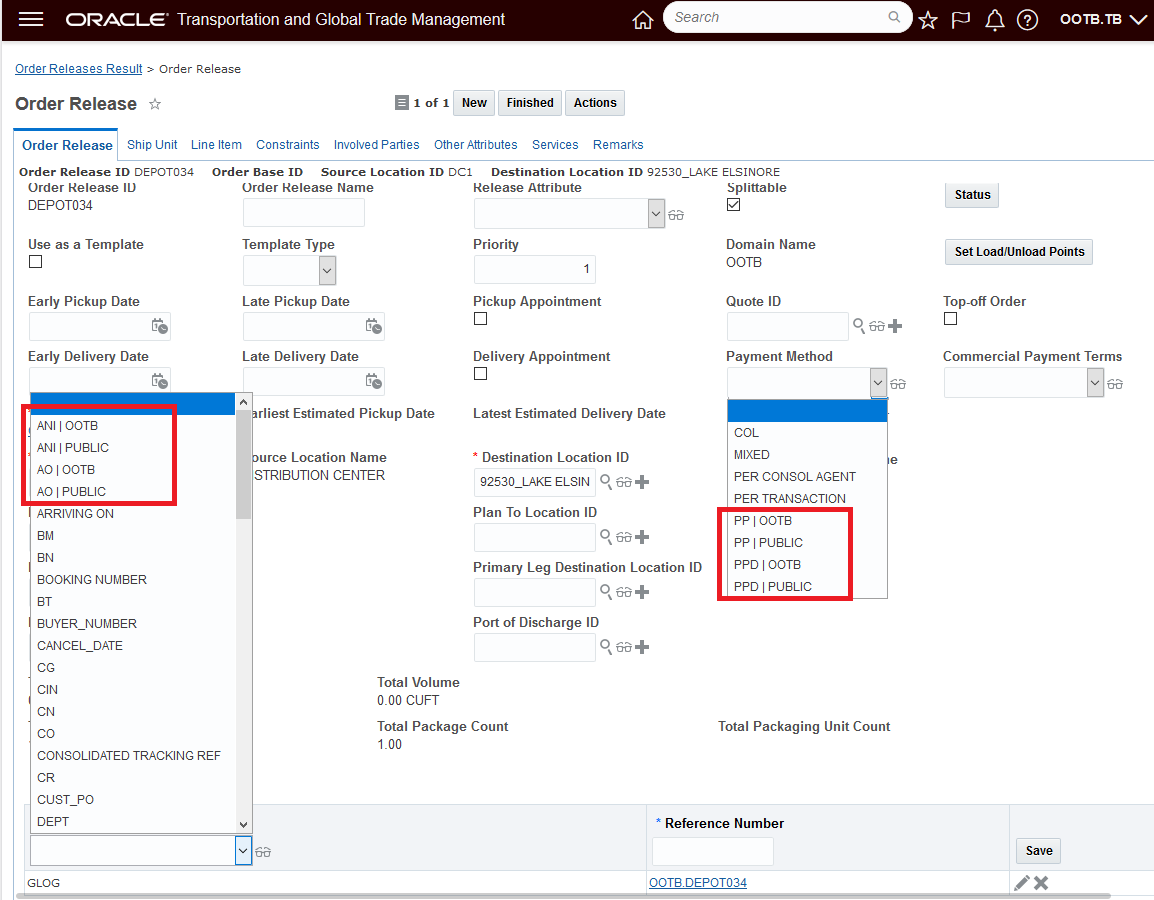
Example Drop Down with Duplicate Name with Domain Names Provided
Allows you - in situations where duplicate values for a drop down reside in multiple domains, to easily pick the correct value from the correct domain.
Steps to Enable
To enable the new Display Domain Name when Duplicates are found functionality, your UI Logic Configuration must be configured so that the Show Domain Name For Duplicate Values parameter is TRUE. Then the related logic config must be assigned so that it used in your User Preference.
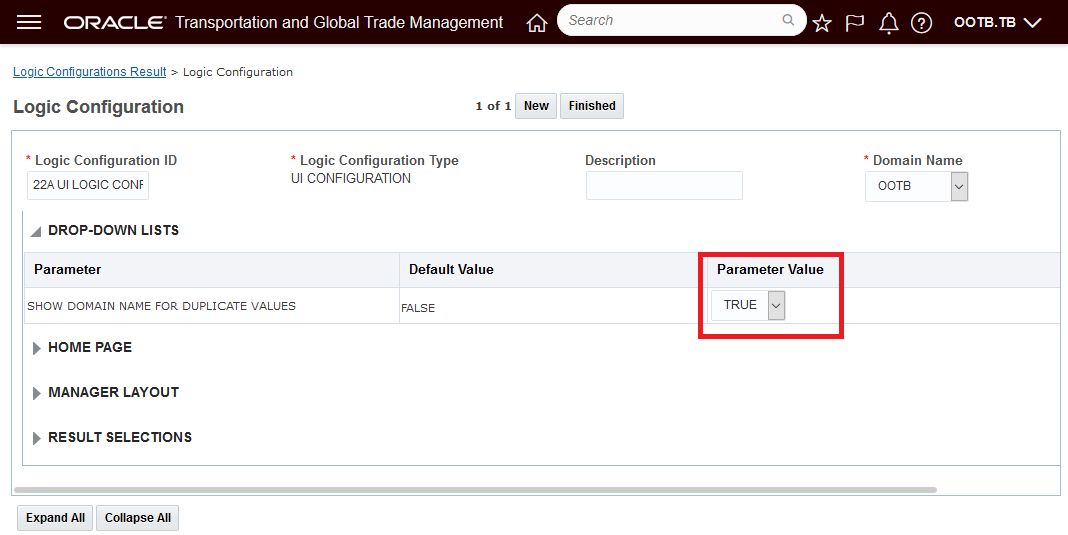
Display Domain Name When Duplicates Found Setup
Tips And Considerations
This doesn't include the finder Saved Query Droplist, Flex Field Droplists, Droplists on ADF screens, or Droplists on JET screens.
SharePoint Online Content Management System Integration Using MS Graph API
This feature extends the content management system options available for managing documents inside of OTM/GTM to include integration to SharePoint Online using the Microsoft Graph (MS Graph) API. Once configured, the integration provides the ability to add, view, modify and delete documents stored in the SharePoint Online content management system from within OTM/GTM.
In the example below - the document 20210818-0002 is saved to SharePoint online as OTM-ROHINI642.20210818-0002.
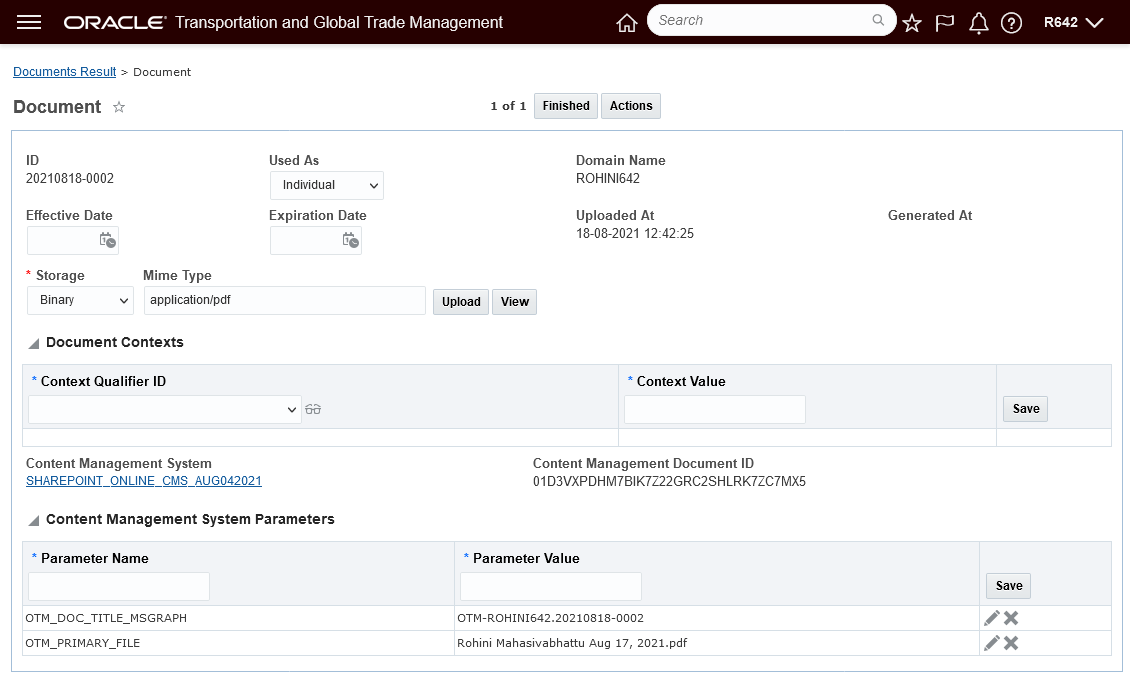
OTM Document Created - Storage In SharePoint Online
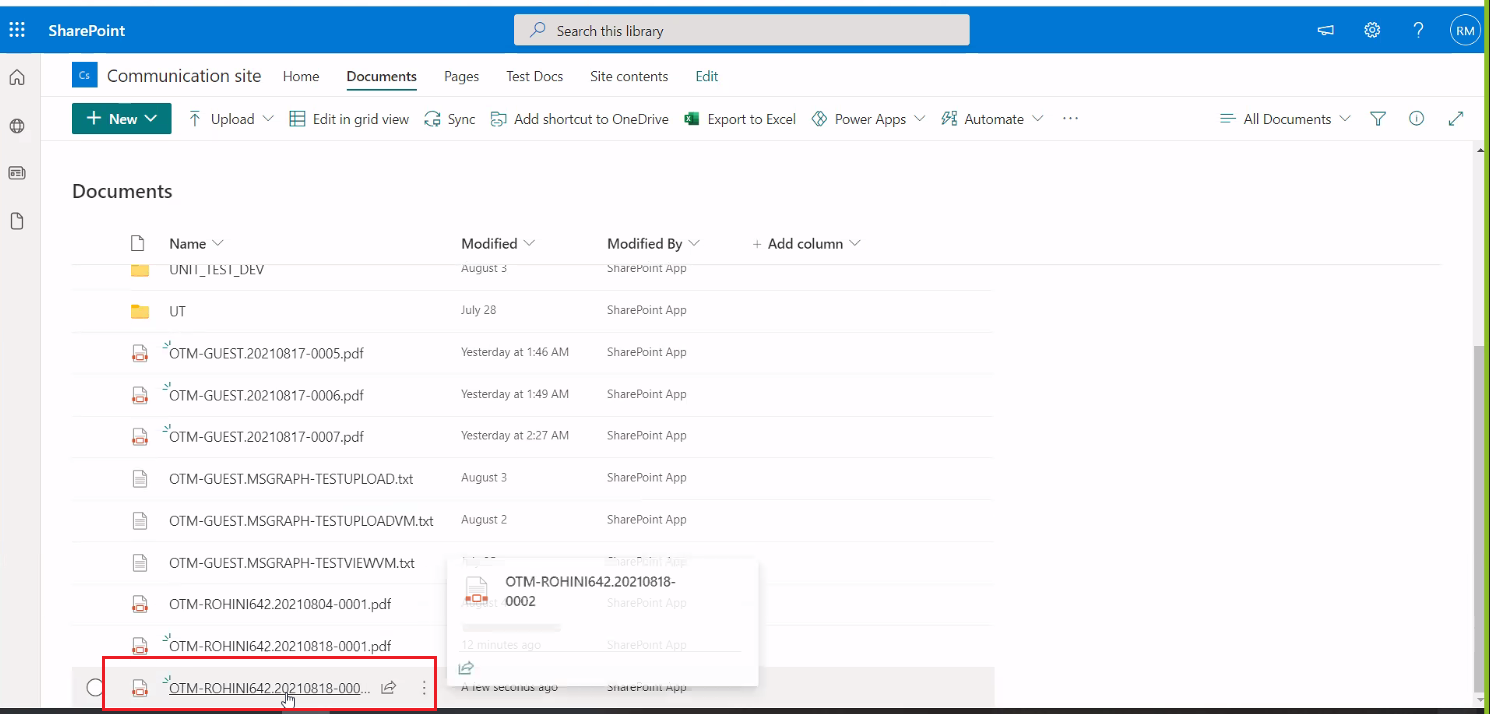
Document Stored in SharePoint Online
Extends the available CMS options in OTM/GTM to include the popular SharePoint Online content management system.
Steps to Enable
Setup for Using SharePoint with OTM/GTM
SharePoint Online Setup
SharePoint Online Setup
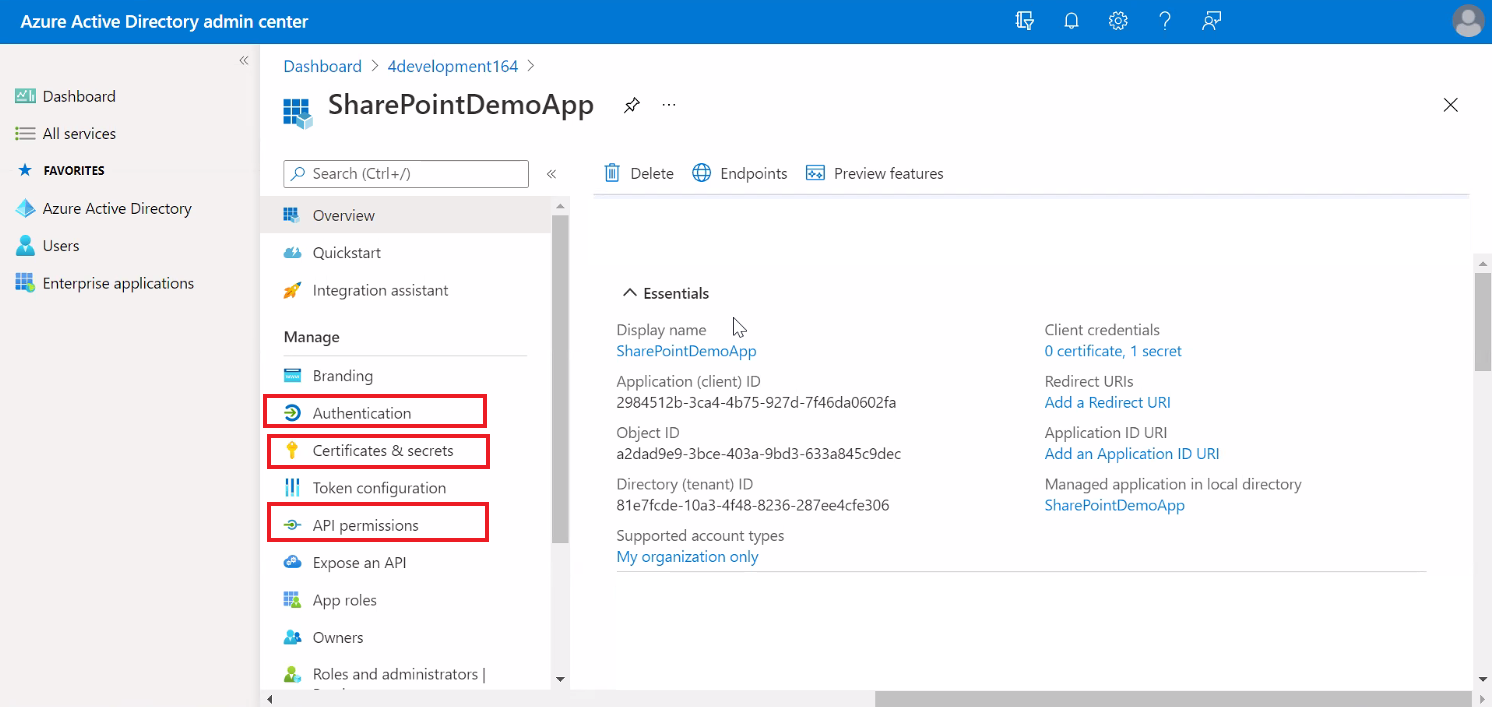
- Register the OTM/GTM application in the Azure Active Directory (AAD) portal. OTM will communicate with SharePoint by means of this application.
- Configure a Client Secret for the application which will be used for authentication purposes. This can be achieved by creating a new Client Secret under "Certificates and Secrets".
- Provide adequate permissions to the newly registered application so that the Microsoft Graph API calls work. This can be achieved by via API Permissions > Add a Permission > Microsoft Graph, and then selecting the required permissions from "Delegated Permissions" and "Application Permissions".
Once the permissions are granted, the application is ready for use. You will have the following details generated once the application is registered:
- Application (client) ID
- Directory (tenant) ID
- Secret Value (obtained while creating the Client Secret)
These will be required for the next steps where you will configure OTM to work with SharePoint.
Setting Up an External System In OTM
You will be required to configure an external system in OTM that will enable you to authenticate/interact with SharePoint.
The input fields should be set as follows:
- Authentication Type: OAuth 2.0 - Client Credentials
- Authorization Service Authentication Type: Microsoft Graph API
- Client ID: Provide the Application (client) ID value generated after registering the application
- Client Secret: Provide the Secret Value generated after registering the application
- Authorization Service URL: https://login.microsoftonline.com/{Directory (tenant) ID}/oauth2/v2.0/token (replace {Directory (tenant) ID} with the actual value)
- Application Scope: https://graph.microsoft.com/.default
- URL: https://graph.microsoft.com/v1.0/drives (acts as a base URL for all API requests)
Setting Up Content Management System In OTM
You have to configure a Content Management System (CMS) in OTM for SharePoint.
The input fields should be set as follows:
- System Type: SharePoint Online
- External System: Select the External System created in the above section
- Drive ID: This represents the location where the documents will be stored . The drive ID to be used can be obtained by means of an API call. Microsoft Graph provides certain ways to obtain the drive ID. You can refer to Microsoft documentation for Microsoft Graph APIs (Microsoft Graph > v1.0 reference > Files > Drives > Get drive) to check for the various ways to obtain the drive ID.
See On-Line Help Topic - Setup for Using SharePoint with OTM OTM/GTM - for more information.
Tips And Considerations
The integration to SharePoint requires that your SharePoint service must support the Microsoft Graph API.
Key Resources
- The Overview of Microsoft Graph API can be found here-> https://docs.microsoft.com/en-us/graph/overview?view=graph-rest-1.0
Upload Document Action with Document Type Assignment
This feature provides you with an easy way to specify your Document Types when you use the Upload Document Action. You can specify the Document Type in situations where you are uploading one or many documents.
In the example below - two document types (BOL and Packing List) are being uploaded in one multi-select run of the Upload Document Action and will be assigned to the desired Document Type.
In this case the Upload Document action is being run against a Buy Shipment.
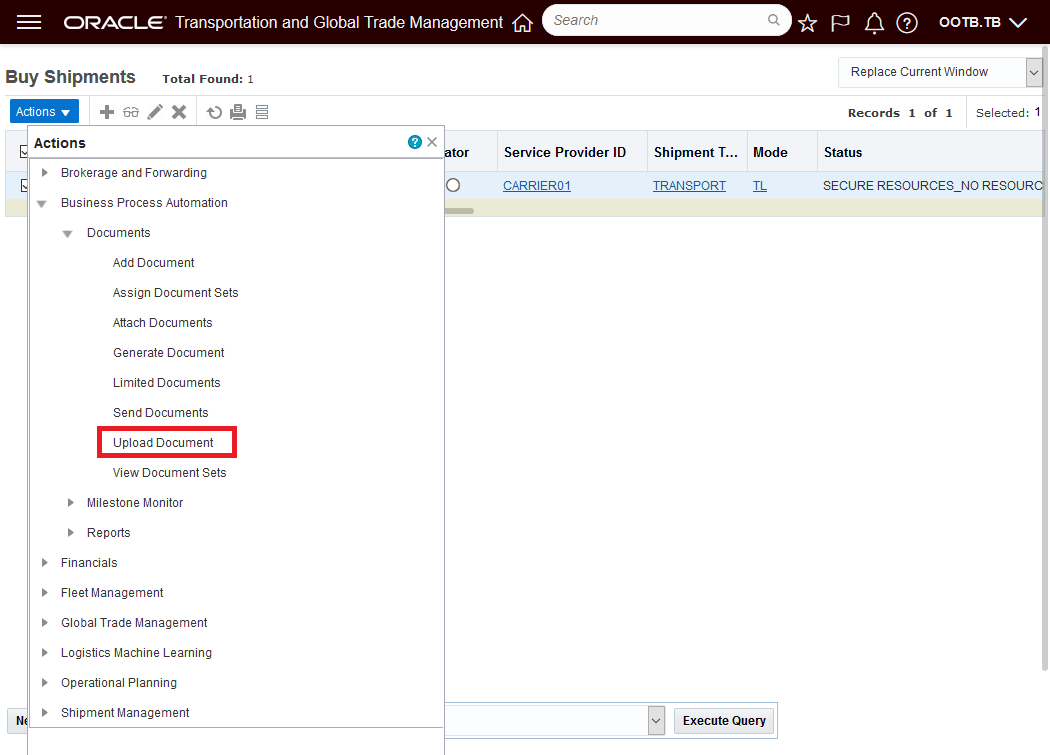
Run Upload Document Action
Browse and select the documents you wish to upload. In this case two documents are selected to be uploaded.
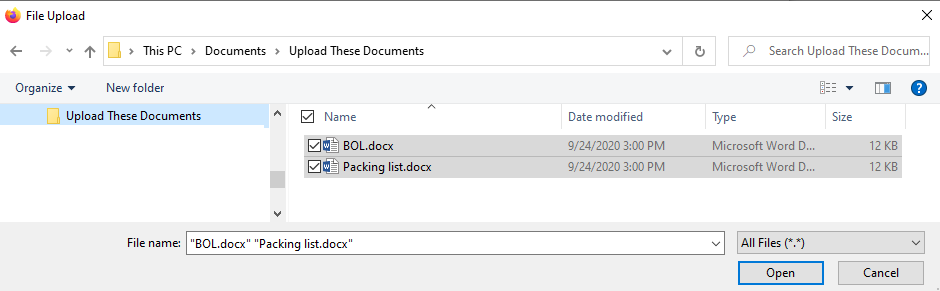
Browse and Select the Documents to Upload
Once the documents have been selected then select Upload.

Select Upload
In the dialog box below - after the Upload has been initiated - you are given the opportunity to specify the Document Type using the Document Type Dropdown next to each of the documents being uploaded.
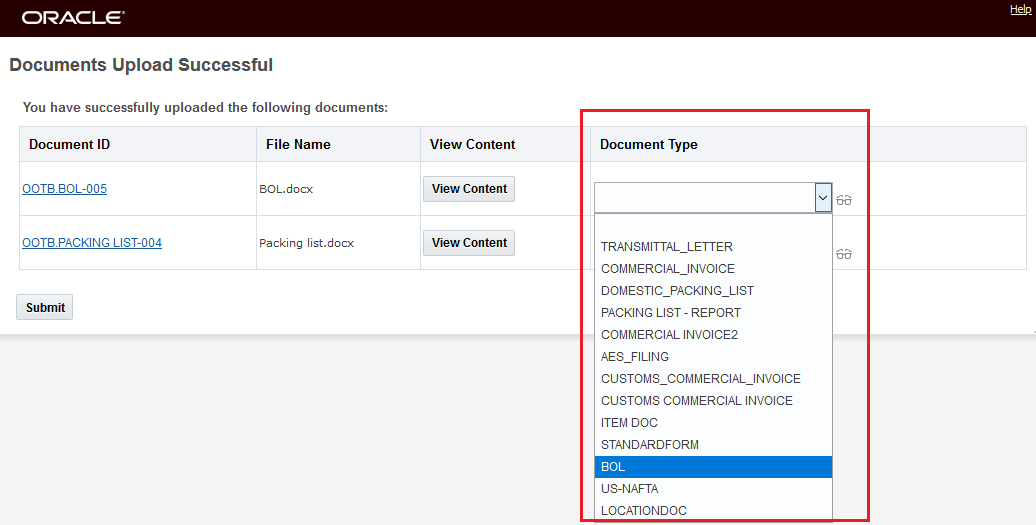
Select Document Type
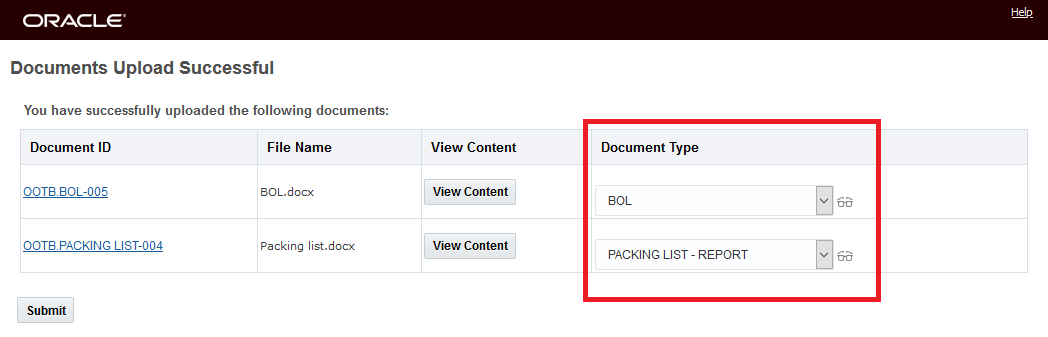
Selected Document Types
When you run Submit - after selecting your Document Types a verification is provided for the selections made.
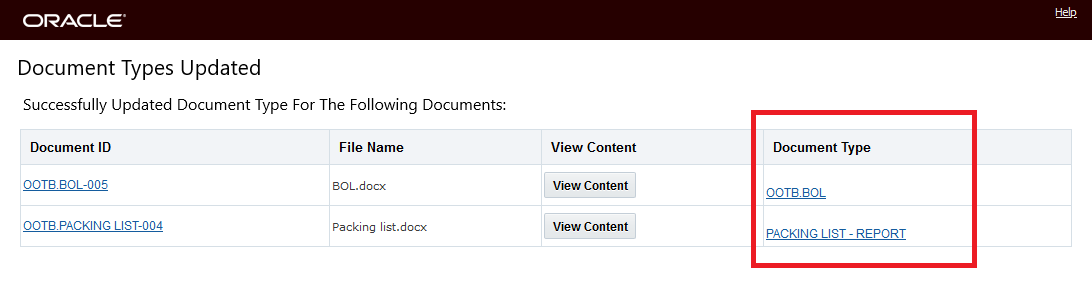
Document Type Update Verification
You will find this feature beneficial in any scenario where you wise to upload ad hoc documents - and as part of that upload - you wise to specify the uploaded documents Document Types.
Steps to Enable
You don't need to do anything to enable this feature.
Tips And Considerations
NOTE: Upload is used to Upload Ad Hoc documents.
This feature provides you with a consolidated XML Schema definition - OTMGTM.xsd - that consolidates all of the separate XML schema files into a single schema.
The OTMGTM.xsd file can be downloaded from Business Process Automation > Integration > Integration Manager > Retrieve Schemas.
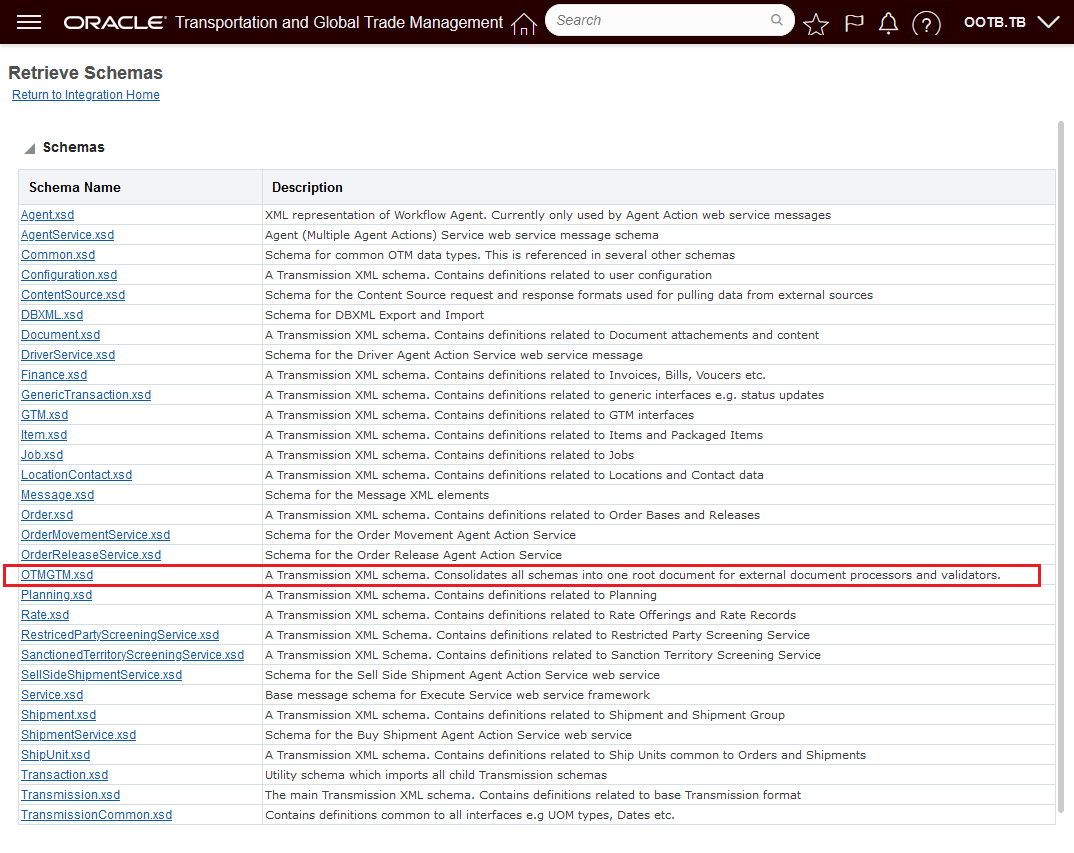
OTMGTM.xsd File
The OTMGTM.xsd consolidated schema provides you with more flexibility when using third party tools to do schema validation or the processing of messages.
Steps to Enable
You don't need to do anything to enable this feature.
DBXML Maximum Message Size Increased to 10MB
This feature increases the default DBXML export and import maximum message size from 5MB to 10 MB (mega bytes). The maximum message size was introduced in the 21A DBXML MAXIMUM EXPORT SIZE RESTRICTED optional feature. The maximum message size was originally set to 5MB, this feature doubles the maximum allowed.
Provides you with the option to import/export DBXML messages up to 10MB.
Steps to Enable
You don't need to do anything to enable this feature.
Tips And Considerations
Increase default DBXML export and import maximum message size to 10 MB (mega bytes).
Inbound Integration Acknowledgement Pre-Staging
This feature provides improvements in the processing of transmissions that contain a large number of transactions. This feature breaks the processing of these transmissions into two steps:
- Step 1 - Saves the transmission setting the status to New and then sends back the acknowledgment (ACK).
- Step 2 - Stages/parses the transactions in the transmission.
The default/current behavior is for all the transactions in an inbound transmissions to be staged/parsed first before sending back the transmission ACK - which, in some cases, can be longer than the time allowed by the sending system for receiving the transmission ACK. With this feature enabled, the ACK will be transmitted back before (pre) the staging/parsing of the transactions in the transmission.
This feature will reduce the time required to return an acknowledgement (ACK) to the sending system when the transmission being processed contains a large number of transactions.
Steps to Enable
To take advantage of the new processing behavior you will need to set the property- glog.integration.transmission.enableInboundPreStaging - to true.
To change the property:
- Navigate to Configuration and Administration > Property Management > Property Sets
- Select the Property set to modify.
- Set set the property glog.integration.transmission.enableInboundPreStaging to true.
NOTE: Only the DBA.ADMIN user can access and use the Property Sets page.
The optional feature, OVERRIDE DATAQUEUE PARAMETER - when enabled, overrides any parameter settings so that inbound transmissions always use integration data queues.
Extends you analysis and reporting abilities to include analysis of your Invoice Facts by Involved Party.
Steps to Enable
You don't need to do anything to enable this feature.
This feature provides you with the next set of enhancements to the Historical Metrics capabilities. The Historical Metrics platform allows you to proactively monitor the health and performance of your OTM/GTM instances. In this latest enhancement iteration you will find enhancements across the Historical Metric platform, including improvements in your ability to define and automate the collection of metrics and the ability to automatically send notifications when your performance metrics exceed defined thresholds.
Areas enhanced or added in this update include:
- How to Configure Metric Collection
- The new How To provides directions on metric collection, threshold definition, metric notification and viewing metrics
- Metric Cumulative Criterion
-
A cumulative criterion allows you to compare one or two historical bases to trigger a cumulative threshold. For example, you want to see if your bulk plans are taking longer to run now than they have historically, you can compare a recent value basis against an historical one. Cumulative criteria only trigger hourly, when they are recalculated based on the invocation of Persist Metrics, and they are used to trigger performance trends as opposed to critical events.
-
- Metric Current Criterion
-
A Metric Current Criterion provides a way to watch performance in real time and can generate notifications in real time. You would use a current criterion to capture diagnostic information as it happens.
-
- Metric Historical Basis
-
Metric Historical Basis is a definition of a historical value and is used by both the cumulate and current thresholds. You could use an historical basis to define the average value over the last 5 days, the maximum value over the last 3 weeks, the total count over the last two hours, or the average over the last four days of the week. The Metric Historical Bases used by cumulative and current thresholds are updated hourly when Persist Metrics is automatically run.
-
- Metric Threshold
-
You use a Metric Thresholds to establish when a metric notification will be triggered. You can create thresholds based on Metric Cumulative Criterion and Metric Current Criterion.
-
In a Cumulative threshold, you compare one historical value to another (or to a fixed value). Historical values are updated hourly by the Persist Metrics recurring process and all cumulative thresholds are checked.
-
In a Current threshold, you compare current values to a historical or fixed value. They hold the current hour's average, maximum, and count along with any new value to accumulate into statistics. When a current threshold compares to a historical value, it uses the historical calculations last calculated by Persist Metrics.
-
-
Provides improved monitoring and proactive notification regarding the performance of your OTM/GTM instances.
Steps to Enable
Depending on the area you wish to monitor, there are a number of setup steps required. See the Help Topic - How to Configure Metric Collection - for guidance.
Tips And Considerations
NOTE: You must be a DBA to access this page.
The optional feature, PROTECT SECURITY CACHE - when enabled, disallows any cache clears from impacting security caches. Clearing security caches via a Clear or Clear All can impact system performance and lead to race conditions and outages.
This feature improves up time and system performance by guarding against the clearing of security caches via a Clear or Clear All which can impact system performance and lead to outages.
Steps to Enable
You don't need to do anything to enable this feature.
The optional feature, TIMEOUT PROPERTY ACCESS - timeouts on property retrieval allow properties to be retrieved, even though the data may be out-of-date. Timeouts on property updates will force an error.
This feature provides a more graceful approach for managing timeouts on property retrieval.
Steps to Enable
You don't need to do anything to enable this feature.
DBXML Security Updates with Auto Cache Handling
The DBXML SECURITY UPDATES WITH AUTO CACHE HANDLING optional feature allows for the DBXML import of various security records without the need for any manual cache refresh. Specifically, this feature provides special handling for the following records to properly synchronize caches:
- GL_USER, USER_ROLE, USER_ROLE_ACR_ROLE,
- GL_USER_ACR_ROLE, ACR_ROLE,
- ACR_ROLE_ROLE, ACR_ENTRY_POINT,
- ACR_ROLE_ENTRY_POINT.
When this feature is enabled, data inserts, updates and deletes will be sent through custom security code, automatically updating security caches. No additional cache clears are necessary.
For the selected set of records, this feature eliminates the need to manually perform a cache refresh when these records are imported via DBXML.
Steps to Enable
You don't need to do anything to enable this feature.
Tips And Considerations
While the manager for these features refers to them as "optional" - each of these features will become mandatory when the Optional Until update is released. The optional aspect of these features refers to the period of time where there is an opportunity to Opt In/Opt Out of enabling the feature. During this "optional" period - the time between when the feature is released and the release prior to the Optional Until release - the request/desire/intention is for you to enable the feature(s) for testing purposes so that the transition to mandatory, as of the Optional Until release, is uneventful.
This page is accessed via Configuration and Administration > Property Management > Optional Features.
NOTE: Only the DBA.ADMIN user can access and use the Optional Features page.
Transportation and Global Trade Management UI Automation Sample Selenium Scripts
A set of sample Selenium scripts with documentation, is now available for you to review and consider using as a basis for creating your own Selenium scripts to help with your OTM/GTM UI testing efforts. The scripts and documentation are found under MOS Note 2822896.1.
Provides information to facilitate using a set of sample Selenium scripts as a basis for creating your own Selenium scripts to test Transportation and Global Trade Management. The objective of the samples is to facilitate your use of Selenium (Selenium web driver and Oracle JET web driver) for UI test automation.
Steps to Enable
You don't need to do anything to enable this feature.
Tips And Considerations
The scripts are provided "as-is" and will require configuration/customization to work in your instance of OTM/GTM.
Automatic Indexing Enabled for Archive Schema
This feature enables Automatic Indexing on the archive schema to facilitate queries on archived data to support your audit reporting requirements. Before this enhancement, attempts to run reports against the Archive Schema for specific date ranges could result in unacceptable amount of run-time. The enabled automatic indexing provided in this enhancement improves query retrieval run-time to support your archive reporting requirements.
Provides improved run-time for reports run against the Archive Schema.
Steps to Enable
You don't need to do anything to enable this feature.
This feature extends the REST API capabilities to include sending outbound business objects following the same REST resource formats available for processing your inbound messages.
Specifically this feature provides you with the option to select the REST notify communication method in the following actions:
Send Interface Transmission
Send Interface Transmission
Send Integration Agent Action
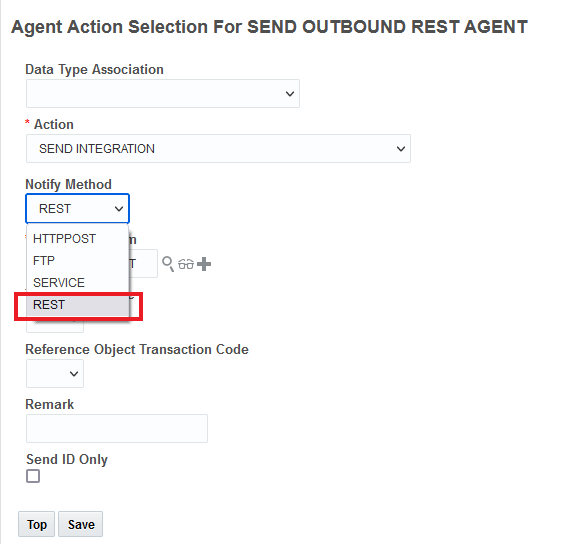
Send Integration Agent Action
Send Integration process
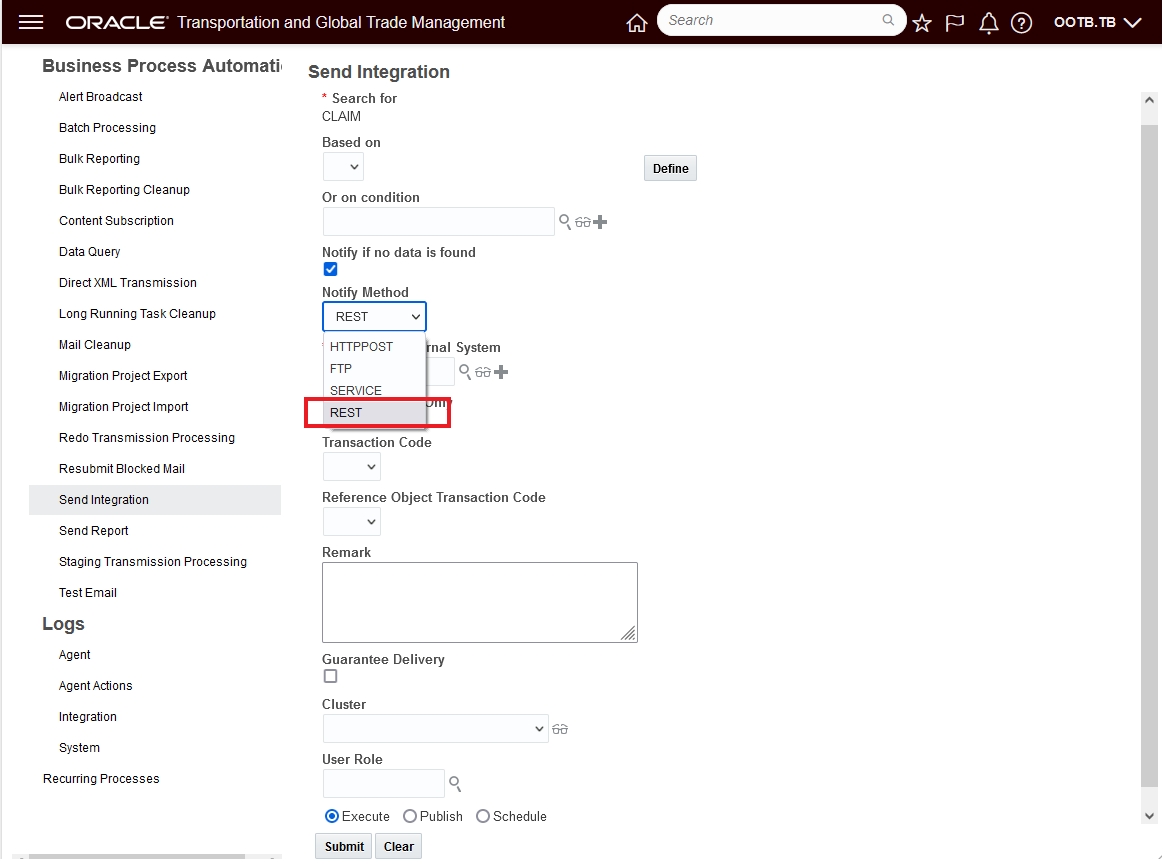
Send Integration
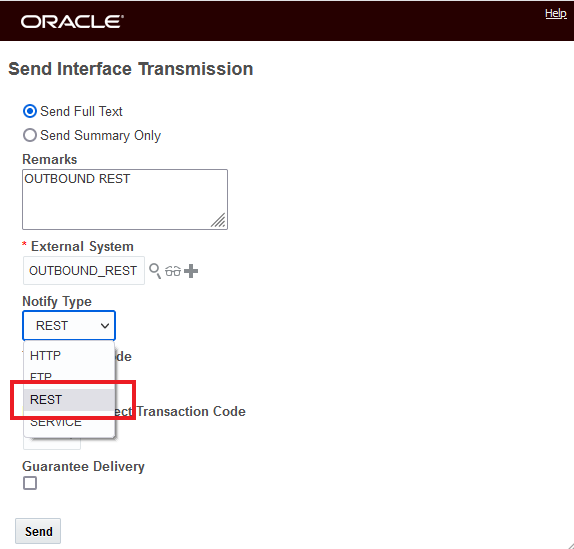
In the example below, the Send Interface Transmission action for an order release is demonstrated.
The Notify Type of REST needs to be selected and the External System Content Type must be 'applicationjson'.

Send Interface Transmission - Order Release
The transmission Result for this Transmission is below. One Transmission with one Transaction.
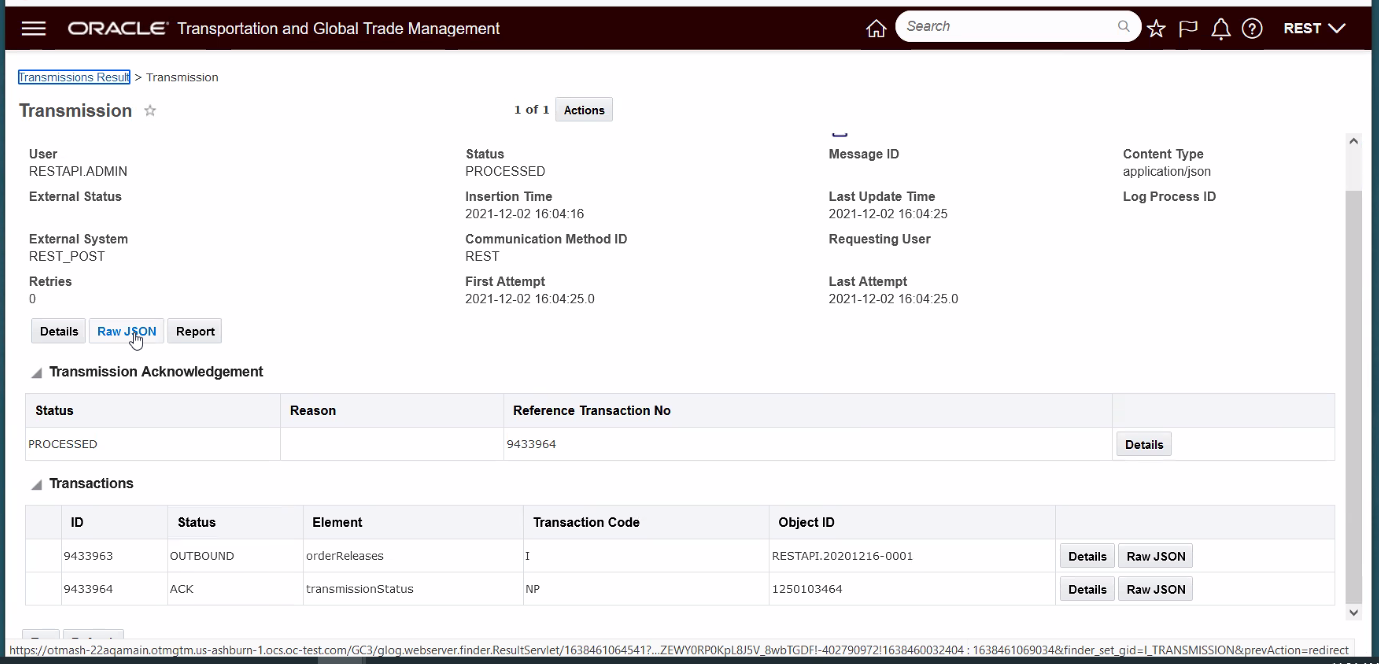
Transmission Result
And the outbound POST transmission for the Order Release is below.
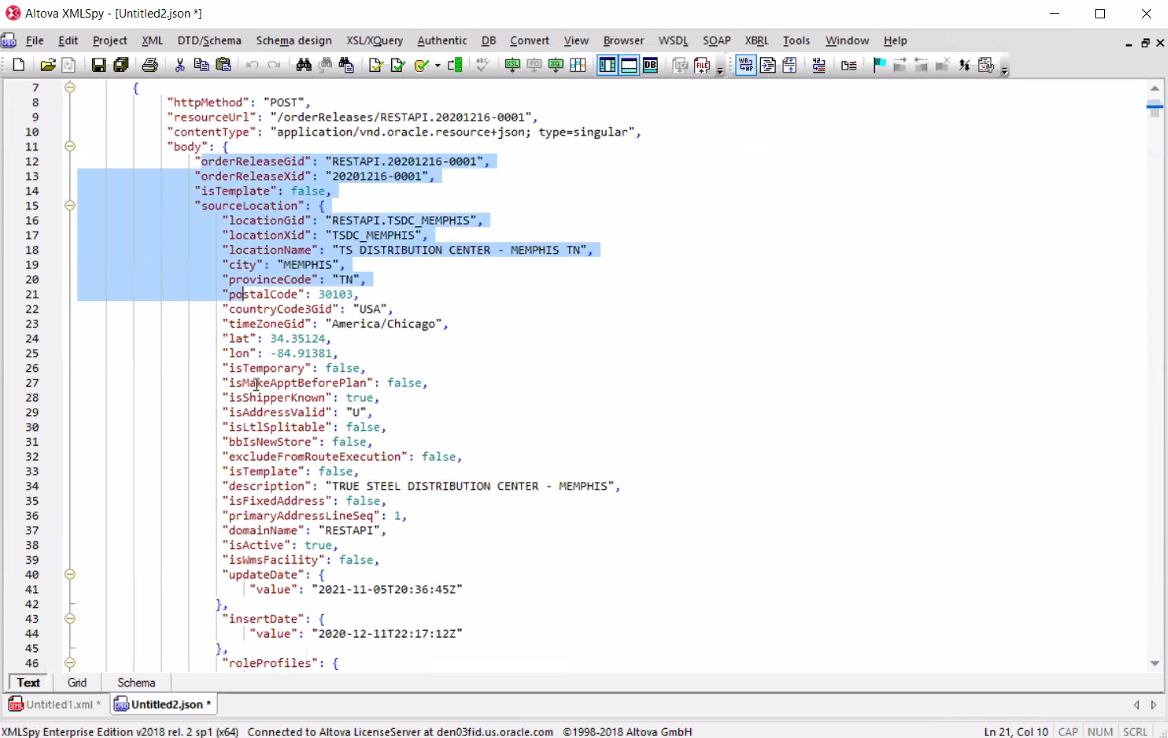
Outbound POST
You can send multiple outbound transactions in a transmission using REST by using Send Integration and specifying a saved query. In the example below, the specified saved query will create a transaction for six order releases.
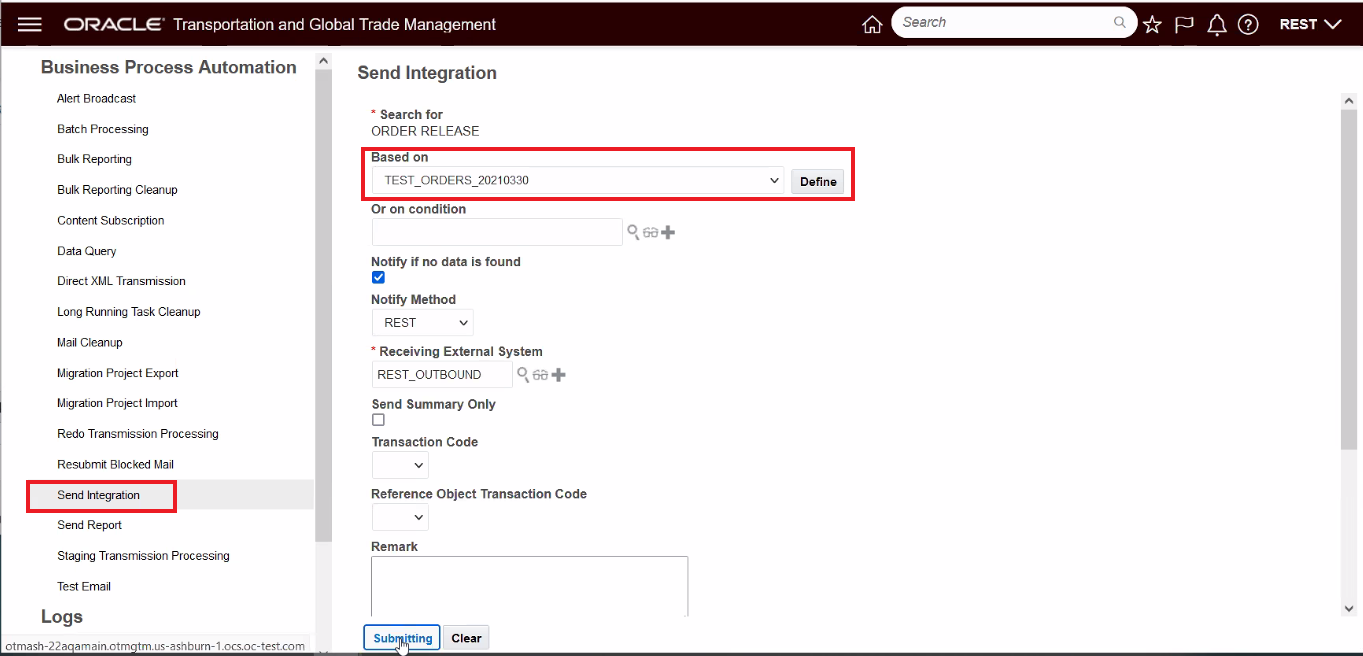
Send Integration with Saved Query
The Send Integration above results in the following Transmission Result - one Transmission with six Transactions - one for each of the order releases returned by the specified saved query.
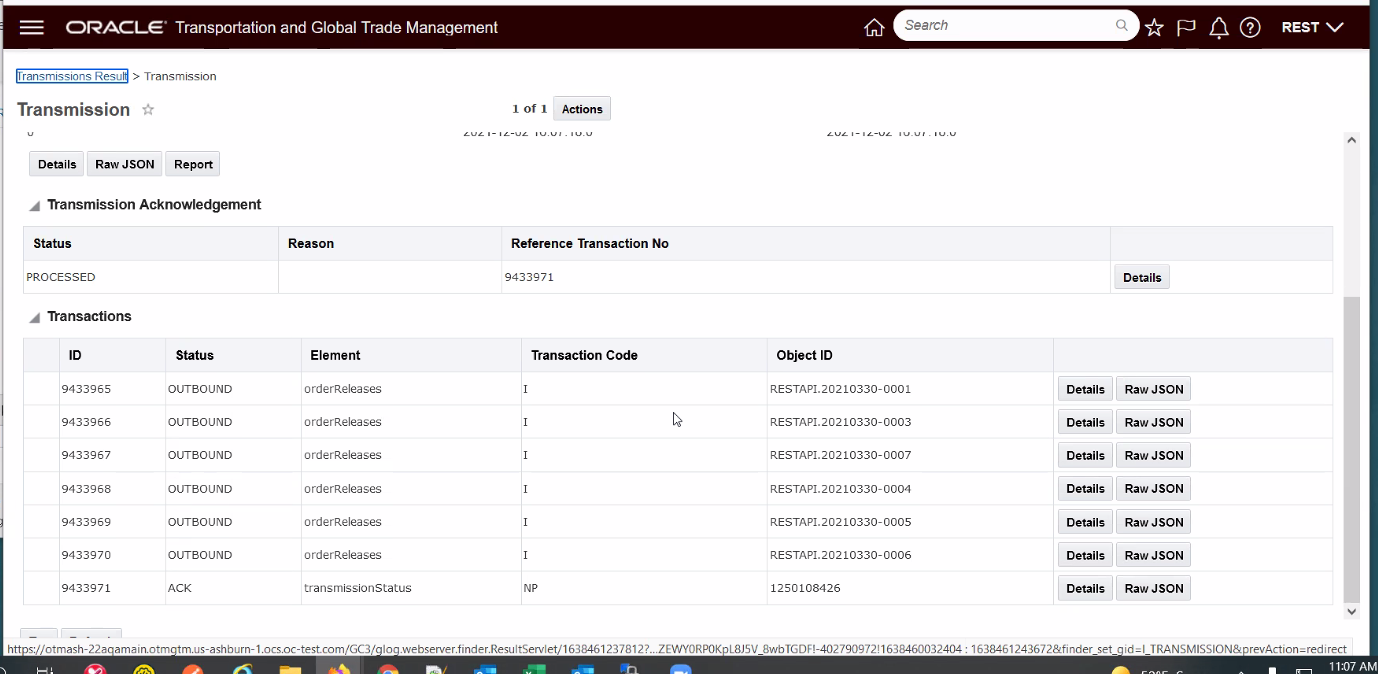
Transmission Result - Multiple Transactions
This feature provides you with the opportunity to take advantage of the lightweight, easier to work with REST JSON format to support your outbound integration requirements.
Steps to Enable
Review the REST service definition in the REST API guides, available from the Oracle Help Center > your apps service area of interest > REST API. If you're new to Oracle's REST services you may want to begin with the Quick Start section.
Tips And Considerations
- The target External System must have the Content Type specified as "application/json".
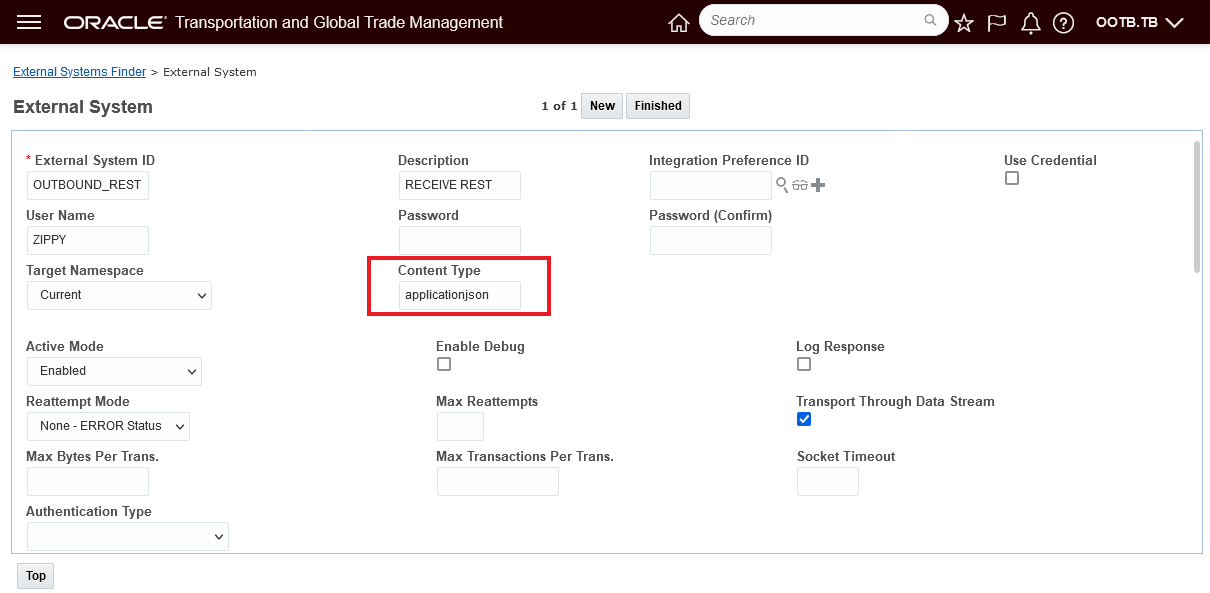
External System Content Type - 'applicationjson'
- This is the same Content Type and format used by inbound the BATCH API "transmissions" resource.
- Both messages will adhere to the Open API schema described by the OTM/GTM online REST API documentation on docs.oracle.com.
- Outbound REST is limited to sending the full resource content which is equivalent to the response for a 'GET' on the same resource with 'expand=all' query parameter.
- STAGING capability is not yet supported.
Send REST Event Notification Agent Action
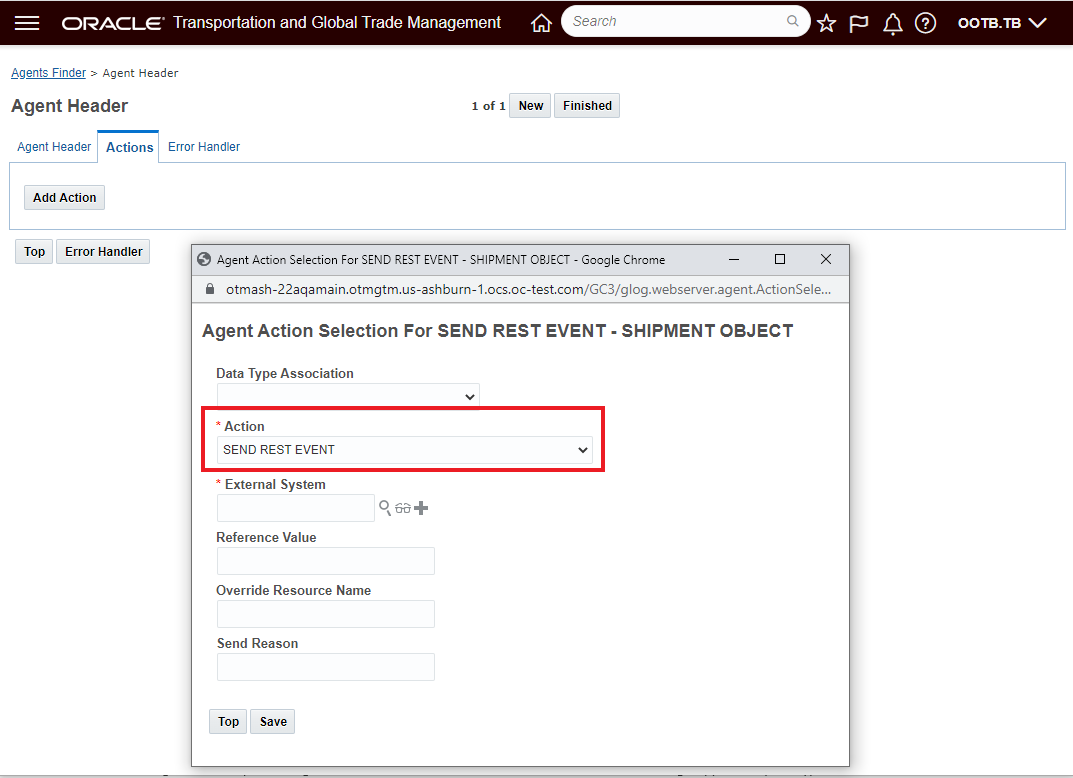
This feature provides you with the ability to configure an agent using using the new agent action - SEND REST EVENT, that, when configured, will send a small message notification to the specified external system that a lifetime event has occurred against the object. The event information received can then be used to initiate a GET for the related object. With the send event notify and GET approach, you have the option to either GET the complete object or parse down your GET request to just the elements of interests.
The SEND REST EVENT action will accepts the following parameters:
- External System - required
- Reference Value
- Should be the choice between a static value entered as an input field or as the result of a single valued Saved Query.
- Override Resource Name
- Send Reason
Sent REST Event
The outbound message will contain the following information:
- External Reference (from reference value above)
- Send Reason (from above)
- Triggering event (i.e. lifetime event)
- Root resource URL
The SEND REST EVENT agent action is available for these Agent Types:
| BILL |
| CONSOL |
| CONTACT |
| CLAIM |
| DOCUMENT |
| DRIVER |
| EQUIPMENT |
| INVOICE |
| ITEM |
| LOCATION |
| ORDER BASE |
| ORDER MOVEMENT |
| ORDER RELEASE LINE |
| ORDER RELEASE |
| PARTNER ITEM |
| POWER UNIT |
| QUOTE |
| RATE OFFERING |
| SELL SIDE SHIPMENT |
| SERVICE PROVIDER |
| SHIPMENT SHIP UNIT |
| SHIPMENT |
| TRACKING EVENT |
| VOUCHER |
| VOYAGE |
| WORK INVOICE |
| GTM CAMPAIGN |
Simplifies the setup required for notifying external systems that a lifetime event has occurred against an object and supports an integration pattern where the external system is notified of an event and then the GET for the object can be tailored to retuning just the elements of interest.
Steps to Enable
You will need to either create a new Automation Agent or modify an existing agent to use this feature.
Go to Business Process Automation > Agents and Milestones > Automation Agent.
The Agent Manager allows you to construct agents that are key components of configurable Oracle Transportation Management processing. An agent listens for an Oracle Transportation Management event, verifies a user-defined condition, and executes one or more actions that you choose from an action library.
Create an agent using the following tabs that you must follow sequentially:
- Agent Header defines basic information such as ID, agent type, and whether the agent is active as well as the events and event conditions that trigger the agent to process actions.
- Actions defines the actions that are executed when specific events are met - in this case you will want to select the SEND REST EVENT agent action for the selected object.
- Error Handling defines the actions to take when errors occur during the processing of an agent.
Batch Asynchronous Support for Power Data Resources
This feature enables the Power Data REST resources to use the batch framework for loading.
Provides you with the option to load Power Data in batch using REST Services.
Steps to Enable
Review the REST service definition in the REST API guides, available from the Oracle Help Center > your apps service area of interest > REST API. If you're new to Oracle's REST services you may want to begin with the Quick Start section.
Global Trade Management (Base)
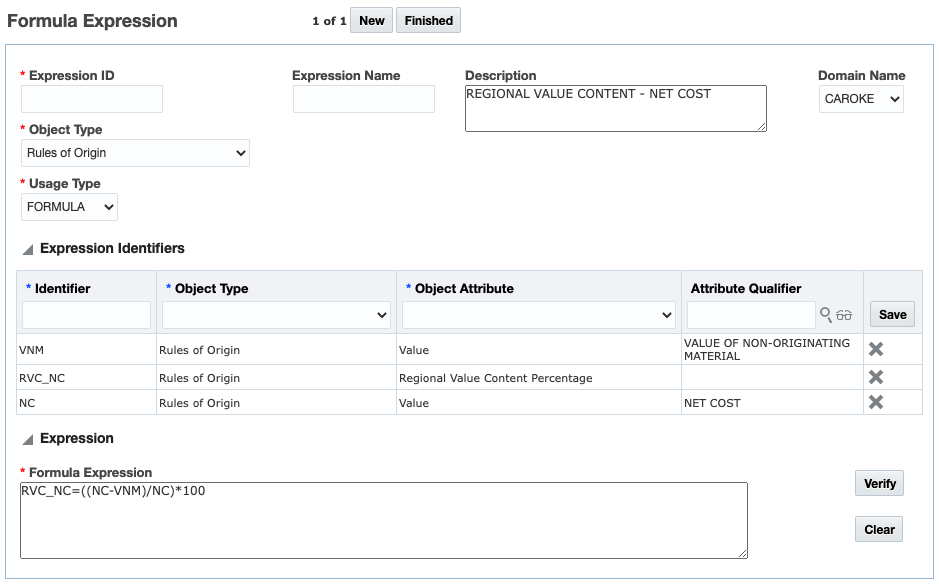
This feature provides you with the ability to copy existing formula expressions, modify them, and use them in other areas of GTM. This helps to make the setup of trade agreement qualification, and other processes, simpler.
To access formula expressions, navigate to Master Data > Power Data > Configurations > Formula Expressions. Select the formula expression you want to copy and click the 'Copy Formula Expression'. You can then make changes to the formula expression. Once complete, click Finished.
This feature provides you with the ability to copy existing formula expressions, modify them, and use them in other areas of GTM. This helps to make the setup of trade agreement qualification, and other processes, simpler and take less time for a user to complete.
Steps to Enable
You don't need to do anything to enable this feature.
Key Resources
- For more information on trade agreement qualification, please refer to the GTM How To/Configuration Topic in Help called Trade Agreement Qualification.
Prorate RPLS Empty Parameter Weight
This Optional Feature, when enabled, provides you with better support for situations where data is missing on either the party or the restricted party.
For example, if part of your matching criteria is City and your party record has this information but the restricted party record does not, GTM prorates the weight of the missing parameter across the other parameters being screened. This provides a higher quality of result from the DICE engine during restricted party screening.
The DICE engine works generally the same as in previous releases. However, when using the prorating logic, GTM performs the following calculation with the result being that the weight of any empty parameters is prorated across the non-empty parameters.
Overall Match Factor = Sum of Adjusted Match Factor for Non-Empty Parameters / Sum of Weight of Non-Empty Parameters
For example, you have a service preference using the Match Engine = DICE and the overall Threshold = 0.85 (85%). Within the service preference, you have the following service parameter:
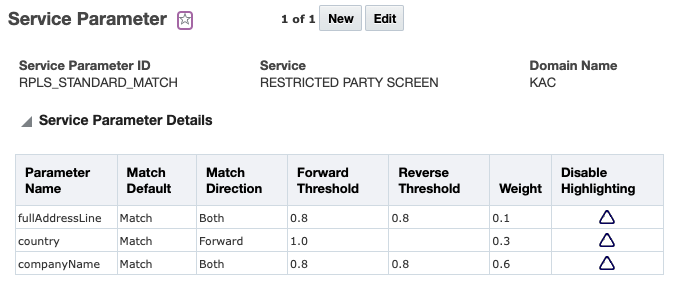
When you set this optional feature to TRUE and perform restricted party screening, the results are:
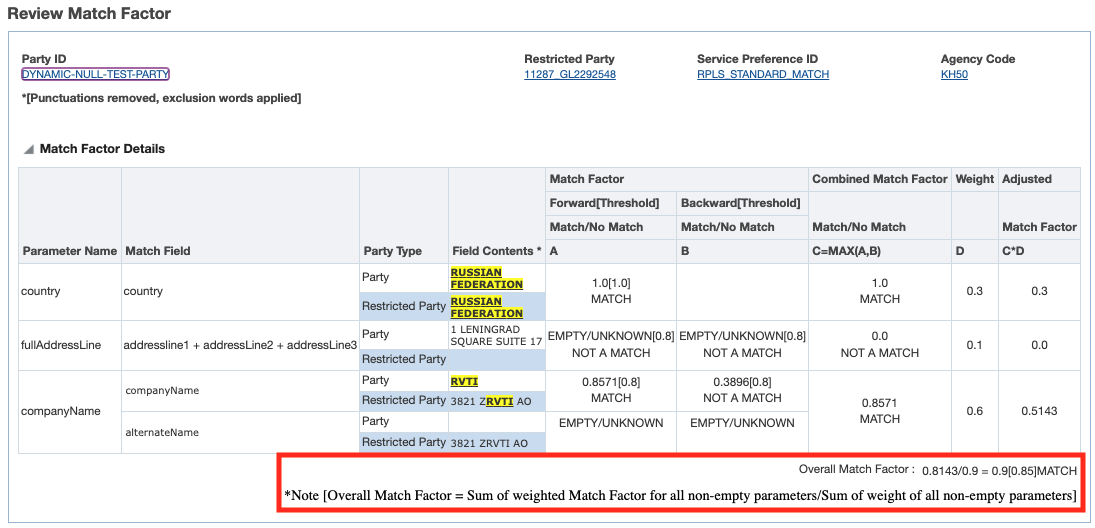
The calculations at the parameter level are the same as in previous releases:
- In the Match Factor column, GTM displays the details of the results of the engine. The engine calculates a Match Factor for each parameter and then determines if it is a match based on the threshold set at the parameter level (threshold is displayed in brackets). The results of the forward matching logic are in Column A while the results of the backward matching logic are in Column B.
- If you have both Forward Threshold and Backward Threshold configured in the service parameter, GTM uses the higher of the two values for the Combined Match Factor in Column C.
- The Adjusted Match Factor column displays the match factor at the parameter level. This is the Combined Match Factor (Column C) multiplied by the Weight from the service parameter (Column D).
The new feature takes place after the Adjusted Match Factors are calculated at the parameter level and are highlighted in red in the above screenshot. The summation of the adjusted match factors for all non-empty parameters is divided by the summation of the weight of all the non-empty parameters, ie. the parameters that show as a MATCH and are part of the calculation of the overall match factor. This, in essence, prorates the weight of the empty parameters across those parameters that are not empty.
When an empty parameter exists, either on the party or the restricted party, the restricted party screening DICE engine provides a higher quality result when using this enhancement. This better supports instances where a match exists between the party and restricted party even though some of the data is missing.
Steps to Enable
You don't need to do anything to enable this feature.
Tips And Considerations
- When the Opt In is set to TRUE, the existing gtm.rpls.match.setMatchFactorToZero property is ignored and GTM will prorate empty parameters across non-empty parameters.
- This enhancement is specific to the DICE engine only.
Key Resources
- For more information on configuring the restricted party screening process, please see the GTM How To/Configuration Topic called 'Restricted Party Screening' in help.
Enhancements have been made which enable you to purge and archive the Restricted Party Screening ad-hoc audit records. This enables you to purge ad-hoc audit records from the operational database but continue to store the audit records in the archive database. This feature is delivered with Opt In set to FALSE/not enabled.
By default, GTM will purge all records older than 30 days from the operational database and store them in the archive database. If you want to purge and archive more frequently, you can use the RPLS Ad Hoc Audit Purge process available within Configuration and Administration > Process Management.
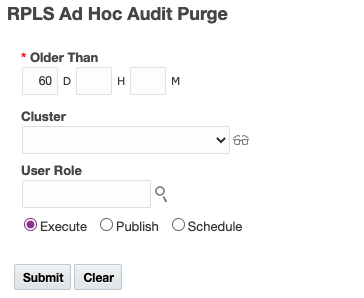
By enabling you to purge the operational database and archive ad-hoc RPLS audit records, you can view the audit records for an older Party/Restricted Party match.
Steps to Enable
You don't need to do anything to enable this feature.
Tips And Considerations
If you are currently using the existing Audit Cleanup process to purge your ad-hoc RPLS audit data, any data that has already been purged from the operational data will not be available to archive using the new RPLS Ad Hoc Audit Purge process.
New Fields Available on Item Classification
New fields have been added to item classification which provide additional details about the corresponding item including Item Type, Item Name, and Description. You can view these fields from within the Item Classification manager or when you access item classifications via the Item manager.
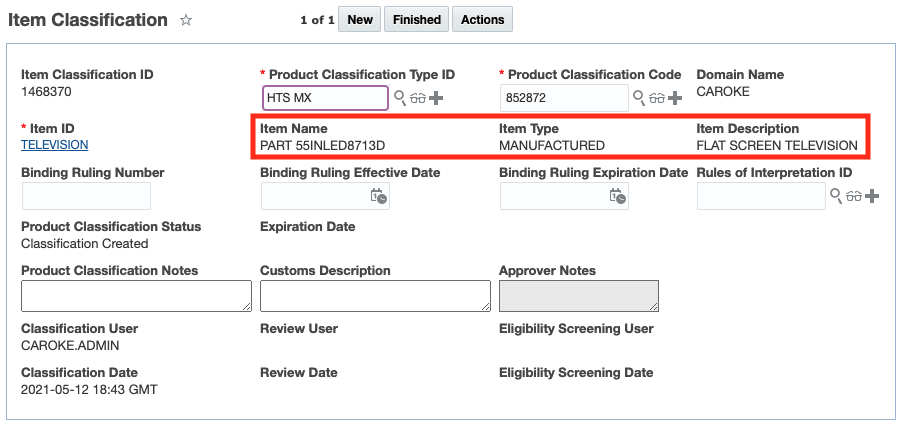
If you are classifying items, this information provides a visual confirmation of the item being classified.
Steps to Enable
You don't need to do anything to enable this feature.
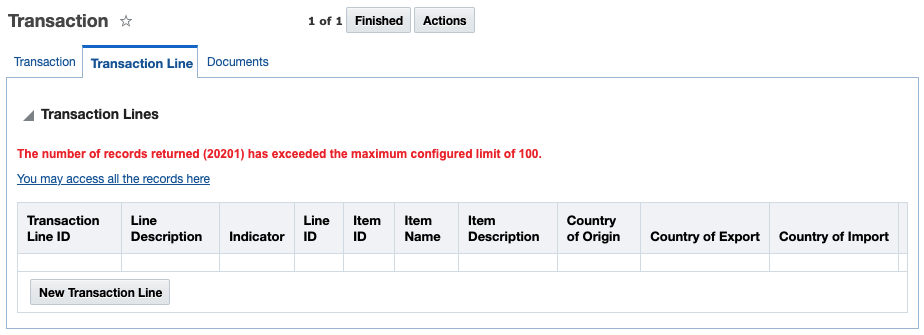
Configure the Number of Lines Displayed Across Objects
Some GTM objects could have a large number of lines depending on your business. You can now manage the number of lines displayed on the Trade Transaction and Declaration via a property. You can also manage the number of components displayed on the Trade Item Structure via a property. This enables you to configure the number of lines you want to see for these objects. If the number of lines exceeds the number you've configured, GTM displays a message and a hyperlink to access the appropriate finder results page.
The number of lines displayed is configured using the following properties:
- glog.query.limit.gtm.server.query.transaction.GtmTransactionLineQuery - This property works for both Trade Transactions and Declarations. The default value = 100.
- For Trade Transactions, this property determines the maximum number of Trade Transaction Lines displayed in the Trade Transaction Manager.
- For Declarations, this property determines the maximum number of Declaration Lines displayed in the Declaration Manager.
- glog.query.limit.gtm.server.query.structure.GtmStructureComponentQuery - Determines the maximum number of Trade Item Structure Components displayed in the Trade Item Structure Manager. The default value = 100
When objects have a large number of associated lines, they may be difficult to manage and slow to load. For Trade Transactions with a large number of lines, Declarations with a large number of lines, and Trade Item Structures with a large number of components, opening a finder result with the details is quicker and easier to manage the information. This feature is configurable so you can determine the number of lines that you want to see based on your business needs.
Steps to Enable
You don't need to do anything to enable this feature.
Key Resources
- For more information on setting properties in GTM, please see the "Property Files" topic and the "GTM Property Files" topic in Help.
Trade Item Structure Values Added to XML Integration and REST API
The Trade Item Structure XML integration and Trade Item Structure REST API resource have been updated to include values. On the Trade Item Structure and Trade Item Structure Components, you can specific a Value Qualifier and corresponding Value which can be sent or received with other systems.
You are able to easily integrate value data between GTM and other systems using the XML integration or REST API.
Steps to Enable
You don't need to do anything to enable this feature.
Key Resources
- For more information on integration, please see the 'Oracle Transportation and Global Trade Management Cloud Integration Guide'.
- For more information on the REST API for Transportation and Global Trade Management Cloud, please refer to docs.oracle.com.
Display Quantity for Component on Trade Item Structure
When you navigate to the Trade Item Structure manager, the Trade Item Structure Components grid now includes Quantity and Quantity UOM for each of the components listed.
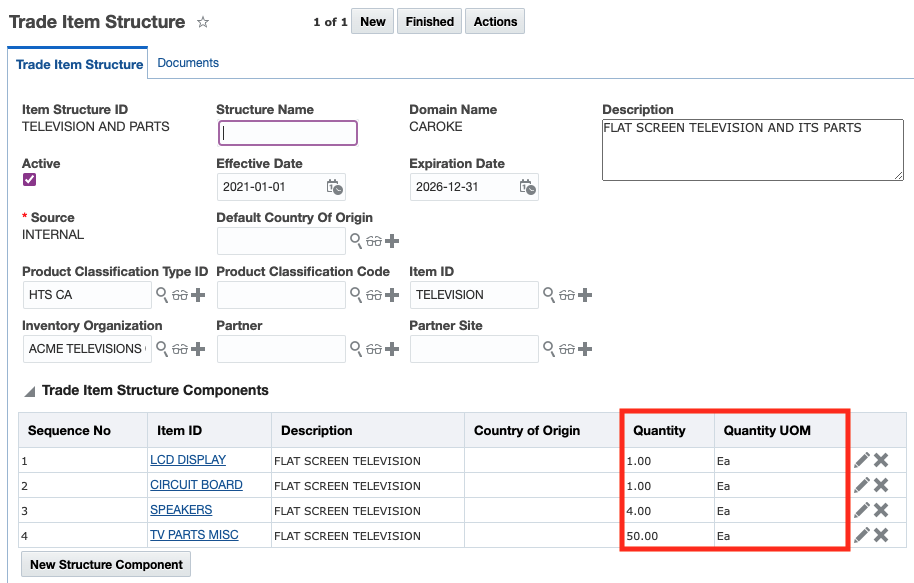
By displaying quantity information for each component directly on the trade item structure, you can clearly see the quantity and the unit of measure for each component that is part of the bill of material.
Steps to Enable
You don't need to do anything to enable this feature.
New Constraint Set Types Available
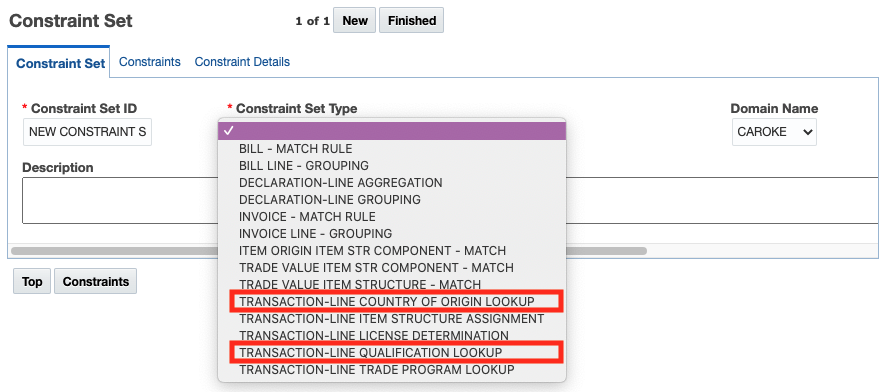
New Constraint Set Types are available to support your trade agreement scenarios. The new Constraint Set Types are:
- TRANSACTION-LINE COUNTRY OF ORIGIN LOOKUP - This constraint set is used to copy the country of origin plus supporting information from the item origin to the transaction line. It is used as part of the Look Up Country of Origin action on trade transaction line. You can select the constraint set at the time you run the action or specify it as a default in a logic configuration.
- TRANSACTION-LINE QUALIFICATION LOOKUP - This constraint set is used determine which item qualification record to copy from the item to the transaction line. It is used as part of the Qualify for Trade Agreement action on trade transaction line. You can select the constraint set at the time you run the action or specify it as a default in a logic configuration. GTM ships with an out of the box constraint set called TRANSACTION LINE QUALIFICATION LOOKUP.
Constraint sets are used to provide matching logic across GTM. By adding these new constraint sets, you are able copy static information on the item to a transaction line. For example, if you are shipping a manufactured good which has already been qualified for a trade agreement at the item level, you can copy the country of origin and qualification information from the item to the trade transaction line.
Steps to Enable
You don't need to do anything to enable this feature.
Tips And Considerations
If you do not want to give business users the ability to override the default constraint set when they run the action, use the property 'gtm.lookupcountryoforigin.constraintsetinput.ui'.
- When set to true, business users have the ability to override the default Constraint Set. (Default value = true)
- When set to false, business users will not see the input page with the GTM Constraint Set ID on the action and GTM will rely on the default constraint set.
If you want to set your constraint set as the default, you can:
- Add the constraint set to the generic logic configuration with a Logic Configuration Type = GTM LOGIC CONFIGURATION. GTM ships with a default logic configuration called GTM LOGIC CONFIGURATION DEFAULT.
- GTM ships with a default constraint set for trade agreement qualification which is already specified in the logic configuration that ships with GTM. You can override this constraint set with one you create.
- Add the logic configuration to a parameter set. Within the GTM GENERAL section, you can see a parameter = GTM LOGIC CONFIGURATION.
- Add the parameter set to your user preference. For the Preference = Parameter Set, enter your parameter set as the Value.
Key Resources
- For more information on how these constraint sets are used, refer to the following topics in this document:
- Improvements to Look Up Trade Program Action And Automation Agent Action On Trade Transaction Line
- Look Up Country Of Origin Action On Trade Transaction Line
- For more information on setting properties in GTM, please refer to the "User Preferences" topic in help.
Expand GTM Document Actions and Features to Additional Objects
This feature extends the document actions and features to include many objects that previously did not have document actions and capabilities enabled. Listed below - by action - are the new objects where this action has been added.
The Upload Document Action enables you to upload additional documents to business objects as well as supports uploading multiple documents in a single action. You have the option of selecting a document type for each document uploaded. This action has been added to the following GTM Business Objects:
- Campaign
- Campaign Lines
- Declaration Lines
- Item Qualification
- Item Classification
- Trade Transaction Lines
The Add Document Action enables you to perform many document functions including: (1) creating the document as a new document, linking to an existing document or copying an existing document, (2) triggering the action against one or many objects, (3) entering effective/expiration dates, and (4) versioning. This action has been added to the following GTM Business Objects:
- Declarations
- Trade Transaction
The Attach Document Action enables you to search and attach a document that was previously loaded to a business object. This action has been added to the following GTM Business Objects:
- GTM Shipment Line
- GTM Item Classification
This feature allows you to assign documents to objects where the uploading, adding or attaching of documents was not previously supported. Providing direct document Upload, Add or Attach capabilities simplifies the process of assigning documents to these objects.
Steps to Enable
You don't need to do anything to enable this feature.
Archive and Purge Documents Associated with Business Objects
Documents that are associated with certain GTM business objects are now archived and purged along with the object. When the following business objects are marked for purge, any associated documents are also marked for purge. When you trigger the purge process, the documents are added to the archive database and then purged.
- Item Origin
- Item Qualification
- GTM Campaign
- GTM Campaign Line
- GTM Transaction
- GTM Transaction Line
- GTM Shipment
- GTM Shipment Line
You can now archive and purge your documents along with the associated GTM business objects providing for a more consistent process for older data.
Steps to Enable
You don't need to do anything to enable this feature.
Tips And Considerations
First, you can select the objects using the Mark for Purge action. Once the objects have been marked, you as the DBA, can purge the record via the UI or though a scheduled purge process.
Key Resources
- For more information on the purge process, please refer to the "Data Purge" help topic.
A few enhancements have been made to GTM workbenches to better support your use cases including managing documents and creating workbenches for your bills of materials modeled as trade item structures. Support for the Documents table has been added to certain objects and saved searches have been added to help with the linkage between master and child objects.
Support for Documents Across Objects
Certain objects can now support a child table of Document enabling you to view and manage documents associated with a business object. When you create a workbench, you can select a GTM object as a master table and then add a child table of Documents. The following objects now support this capability:
- Item
- Trade Transaction
- Trade Transaction Line
- Declaration
- Declaration Line
- Campaign
Saved Search for Documents in Workbench
To better view documents related to GTM objects, out of the box saved searches have been added. When you create a workbench, you can select a GTM object as a master table. Then you can add a child table of Documents. The new saved searches make make the linkage between the GTM object and their associated documents. The following objects have had the corresponding saved searches added:
- Item with Saved Search = REQUIRED DOCUMENTS FOR ITEM
- Item Qualification with Saved Search = DOCUMENTS FOR ITEM TRADE PROGRAM
- Trade Transaction with Saved Search = REQUIRED DOCUMENTS FOR TRANSACTION
- Trade Transaction Line with Saved Search = DOCUMENTS FOR TRANSACTION LINE
- Declaration with Saved Search = REQUIRED DOCUMENTS FOR DECLARATION
- Declaration Line with Saved Search = DOCUMENTS FOR SHIPMENT LINE
- Campaign with Saved Search = REQUIRED DOCUMENTS FOR CAMPAIGN

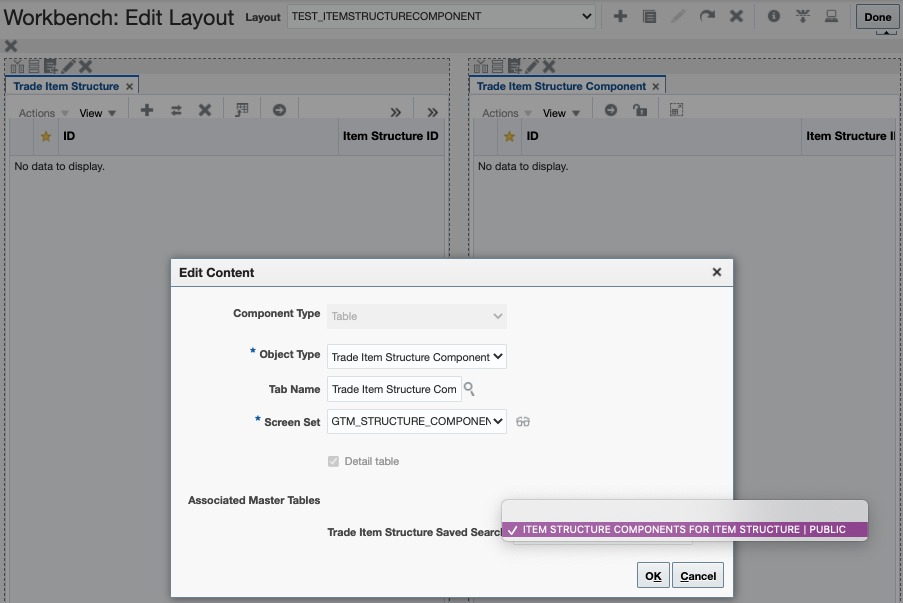
Saved Search for Trade Item Structure Components
To better view a bill of material and it's associated components, an out of the box saved search has been added. When you create a workbench with a master table of Trade Item Structure, you can add a child table of Trade Item Structure Component. To make the linkage between the master table and child table, a new saved search of ITEM STRUCTURE COMPONENTS FOR ITEM STRUCTURE is available.
These enhancements provide better support for managing documents from the workbench and to be able to easily create workbenches to manage your trade item structures and their components.
Steps to Enable
You don't need to do anything to enable this feature.
Key Resources
- For more information on configuring workbenches, please see the 'Configuring the User Interface' topic available in help under 'OTM How To/Configuration Topics'.
Item Origin Values Replaced by Item Trade Values
The Values grid on the Item Origin has been replaced by the Trade Values tab on the item and is no longer available. Using trade values on items provides more robust functionality for your cost/value data and can be used as part of the Trade Agreement Qualification process. Since an item can model both the buy side and the sell side, you can specify information for both your suppliers as well as your inventory organizations as trade values on the item. In addition, it is designed to work seamlessly with the data available from your costing system.
The Trade Values grid on the Item provides you more flexibility than the values on the Item Origin to manage your cost/value information.
Steps to Enable
You don't need to do anything to enable this feature.
Qualify for Trade Agreement Action on Trade Transaction Line
A new Qualify for Trade Agreement action has been added to enable you to qualify a trade transaction line for a trade agreement. When you qualify a transaction line for a trade agreement, GTM uses the finished good item on the transaction line and supporting data representing a bill of material. GTM will first determine if there is a matching qualification record that has a status of QUALIFIED on the item. If so, the qualification information is copied from the item qualification to the trade transaction line. If not, GTM will qualify the information on the trade transaction line. GTM uses a constraint set to identify the matching item qualification record for the item on the trade transaction line.
Currently, if GTM is looking up the qualification information from the item associated with the trade transaction line, the Trade Item Structure GID needs to be specified on the transaction line in a flex field attribute so that GTM can determine the item qualification record that applies. Using the property "gtm.transactionLine.flexFieldforItemStructure", you can defined which flex field you want to use. The default value is attribute1. In the manager layout you are using for trade transaction line, add this flex field attribute to the user interface.
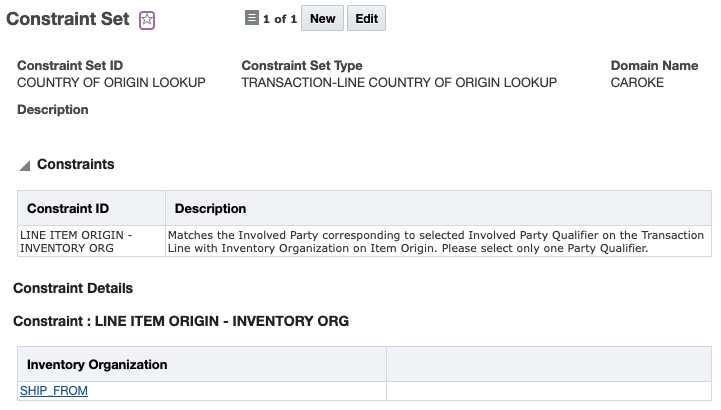
Define a Constraint Set
GTM uses a constraint set to determine which item qualification record matches a transaction line. GTM supports a default constraint set so that users can always use the same constraint set when they run the action. You can also override the default constraint set when you run the action.
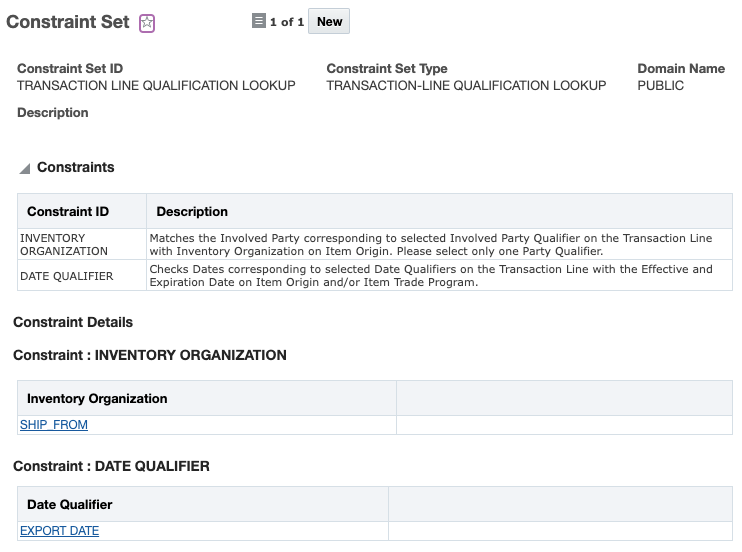
A new Constraint Set Type = TRANSACTION-LINE QUALIFICATION LOOKUP is introduced to support qualification on the trade transaction line. GTM ships with a default constraint set called TRANSACTION LINE QUALIFICATION LOOKUP which you can use.
If you want to set it as a default constraint set, you can:
- Add the constraint set to the generic logic configuration with a Logic Configuration Type = GTM LOGIC CONFIGURATION. GTM ships with a generic logic configuration called GTM LOGIC CONFIGURATION DEFAULT containing the default constraint set for qualification on the transaction line.
- Add the logic configuration to a parameter set. Within the GTM GENERAL section, you can see a parameter = GTM LOGIC CONFIGURATION.
- Add the parameter set to your user preference. For the Preference = Parameter Set, enter your parameter set as the value.
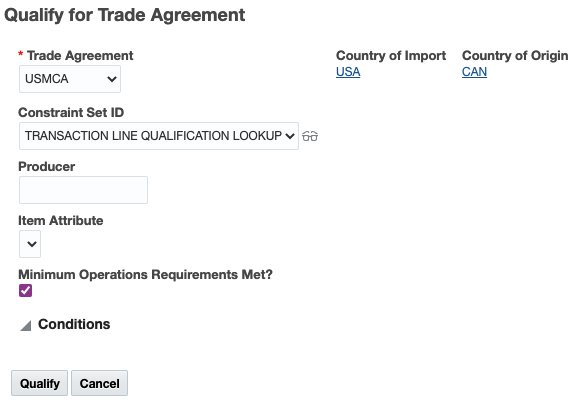
Qualify for Trade Agreement on Trade Transaction Line
When you run the Qualify for Trade Agreement action on a trade transaction line, the Country of Import and Country of Origin are populated based on information on the transaction or transaction line. You can specify:
- Trade Agreement - Enter the trade agreement for which you are qualifying a finished good. This is a required field.
- Constraint Set ID - Determines which item qualification record on the item should be used.
- Producer - If applicable, enter the producer of the goods.
- Item Attribute - If applicable, GTM displays the item attributes including Suffix. Select the one that applies based on your finished good.
- Minimum Operations Requirements Met - Mark the checkbox if the finished good meets the minimum operations requirements. If the minimum operations requirements are not met, GTM will display a message letting you know that the transaction line has not be qualified since minimum operations are not met.
- Conditions - If applicable, GTM will display any conditions that are available. Select Yes to indicate if the condition has been met.
NOTE: Before you qualify your transaction line for a trade agreement, a country of origin must be present on the trade transaction line. If you have item origins created for your items, you can use the Look Up Country of Origin action from the Trade Transaction or Trade Transaction Line.
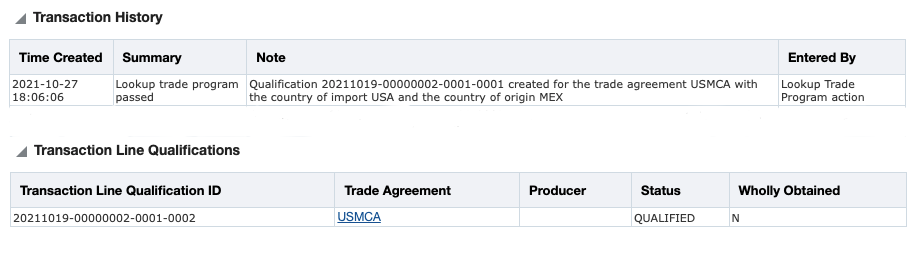
Once you click 'Qualify', GTM runs the qualification for the transaction line and:
- Populated the Reference Numbers with a Reference Number Qualifier ID = ITEM QUALIFICATION ID and the corresponding GID for the item qualification record
- Adds a row to the Transaction History with information about the qualification
- Adds Transaction Line Qualification details
A qualification record is created on the transaction line indicating if the item on the line qualifies for a trade agreement. In addition, information entered on the action is copied to the item qualification record. On the transaction line, you can see details about the qualification in the Transaction Lines Qualifications grid.
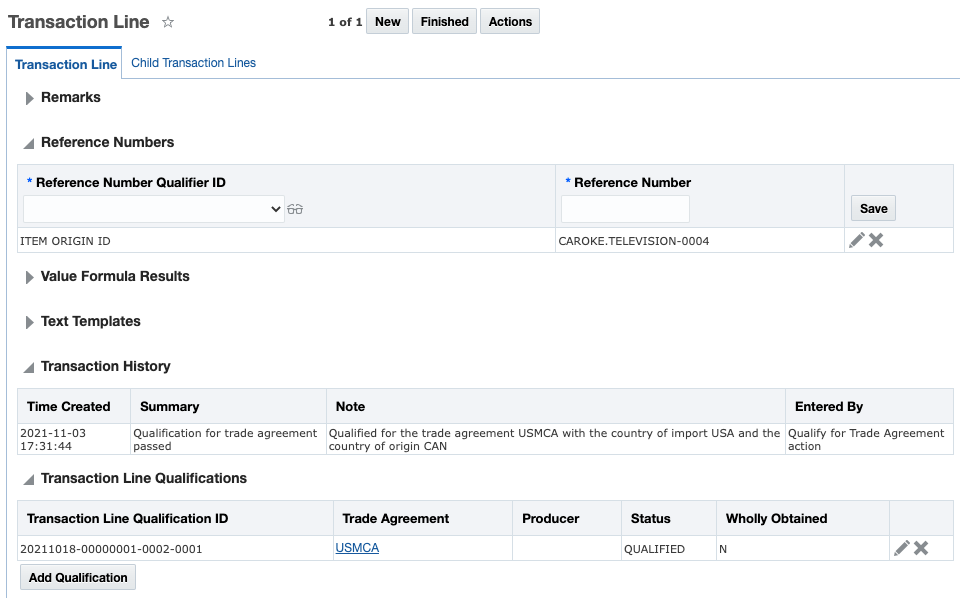
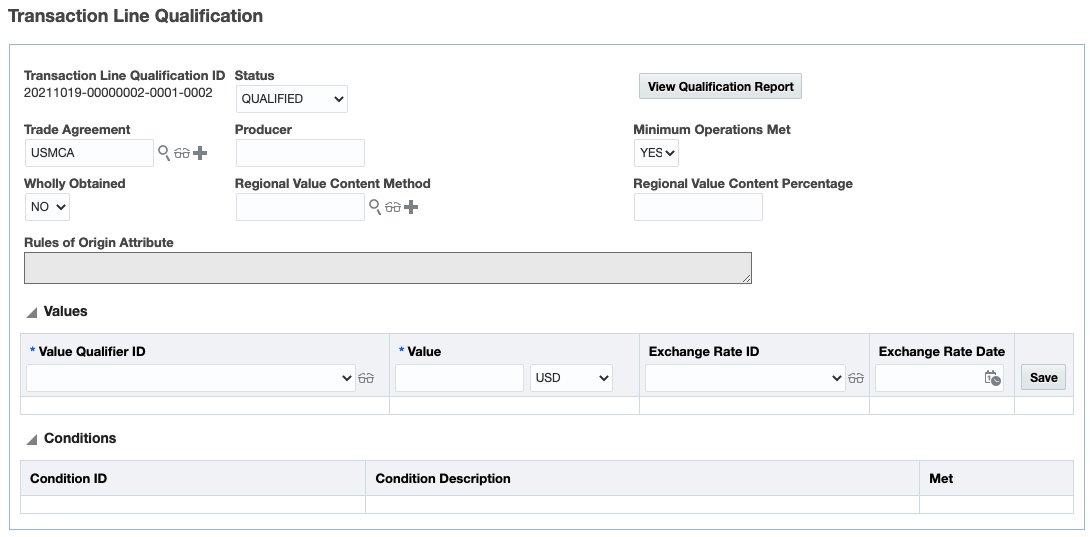
You can also edit the grid to see additional information.
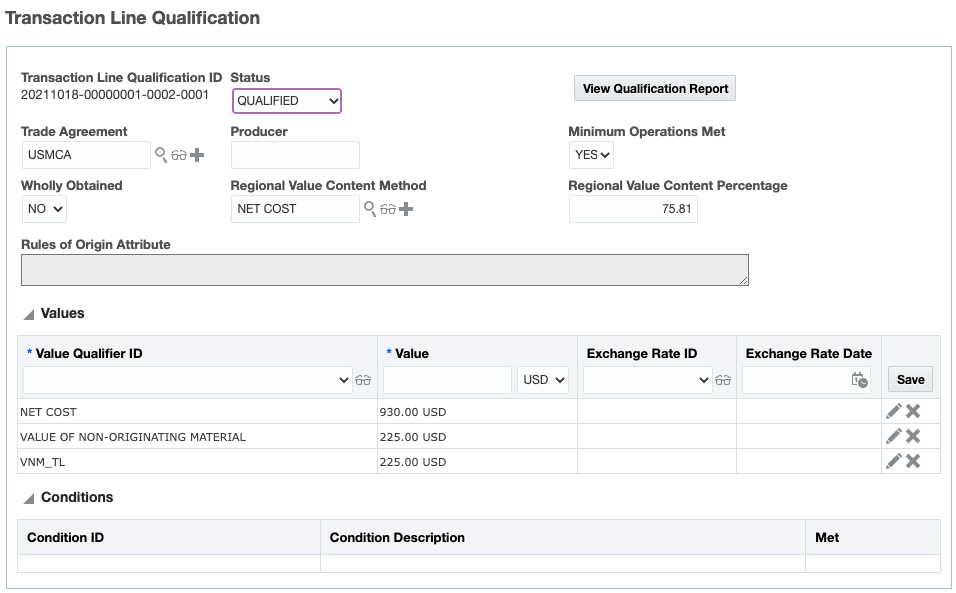
Click the View Qualification Report button to see details about the trade agreement qualification for the transaction line.
The qualify for trade agreement process on trade transaction line enables you to see if a finished good you are shipping qualifies for a trade agreement and can take advantage of a reduced duty rate.
Steps to Enable
You don't need to do anything to enable this feature.
Tips And Considerations
-
Make sure to specify the flex field attribute you want to use for your Trade Item Structure GID in the property "gtm.transactionLine.flexFieldforItemStructure". The default value is attribute1. This information is needed for GTM to determine which item qualification record to use when looking up the qualification data from the item on the transaction line.
- GTM can qualify your goods for hundreds of trade agreements available around the world. Please contact your third-party content provider if you want to add trade agreements and other data to your subscription.
- If the country of origin is not specified on the trade transaction line, you can run the Look Up Country of Origin action to look up the country of origin from the the associated item and copy it to the transaction line.
- You can use a Compliance Rule with a Category = ITEM STRUCTURE to assign an item structure to your trade transaction line.
Key Resources
- For more information on looking up the country of origin, please see the 'Look Up Country Of Origin Action On Trade Transaction Line' topic in this document.
- For more information on GTM properties, please see the 'GTM Property Files' topic in Help.
- For more information on configuring GTM including manager layouts, please see the 'Configuring the User Interface' topic in the OTM How To/Configuration Topics in help.
Qualify for Trade Agreement Automation Agent Action on Item
You can automatically qualify your items for trade agreements using automation agents. A new agent action called Qualify for Trade Agreement is available. For example, you can have an automation agent listening to agent events for when the item is created or modified. When this happens, GTM can automatically qualify your item for trade agreements. You can specify:
- Trade Agreement - Enter the trade agreement for which you are qualifying a finished good. This is a required field.
- Country of Import - Enter the country of import. This is a required field.
- Product Classification Type - If applicable, enter the product classification type.
- Producer - If applicable, enter the producer of the goods.
- Effective Date - If applicable, enter the effective date for the qualification. If you do not enter an effective date, GTM will use the current date.
- Expiration Date - If applicable, enter the expiration date for the qualification.
- Minimum Operations Requirements Met - Mark the checkbox to indicate the items have met the minimum operation requirements. If items have not met the minimum operation requirements, GTM will mark the items as not qualified.
Qualify for trade agreement enables you to see if a finished good qualifies for a trade agreement and can take advantage of a reduced duty rate. By automating this process, you can proactively determine if your items qualify for trade agreements.
Steps to Enable
You don't need to do anything to enable this feature.
Tips And Considerations
- If the item does not have the harmonized tariff product classification type and code specified for the country of import, GTM uses the first 6 digits of another harmonized tariff product classification code on the item to perform qualification.
- In some cases, GTM may not be able to determine if an item fully qualifies for a trade agreement. For example, there are instances where you need to select which Rules of Origin Attribute applies or a specific Condition that applies. In these cases, GTM will not create an item qualification record for the item. You can use the manual Qualify for Trade Agreement actions that are available on the Item, Item Origin, Item Qualification or Trade Item Structure for qualification.
Search for Items Based on Qualification Status
You can search for items based on their qualification status. For example, you can find all items that are eligible for a particular trade agreement so that you can create a campaign to solicit for certificates of origin and other information to support products you source from suppliers. Or, you can search for all finished goods that have been fully qualified for a trade agreement.
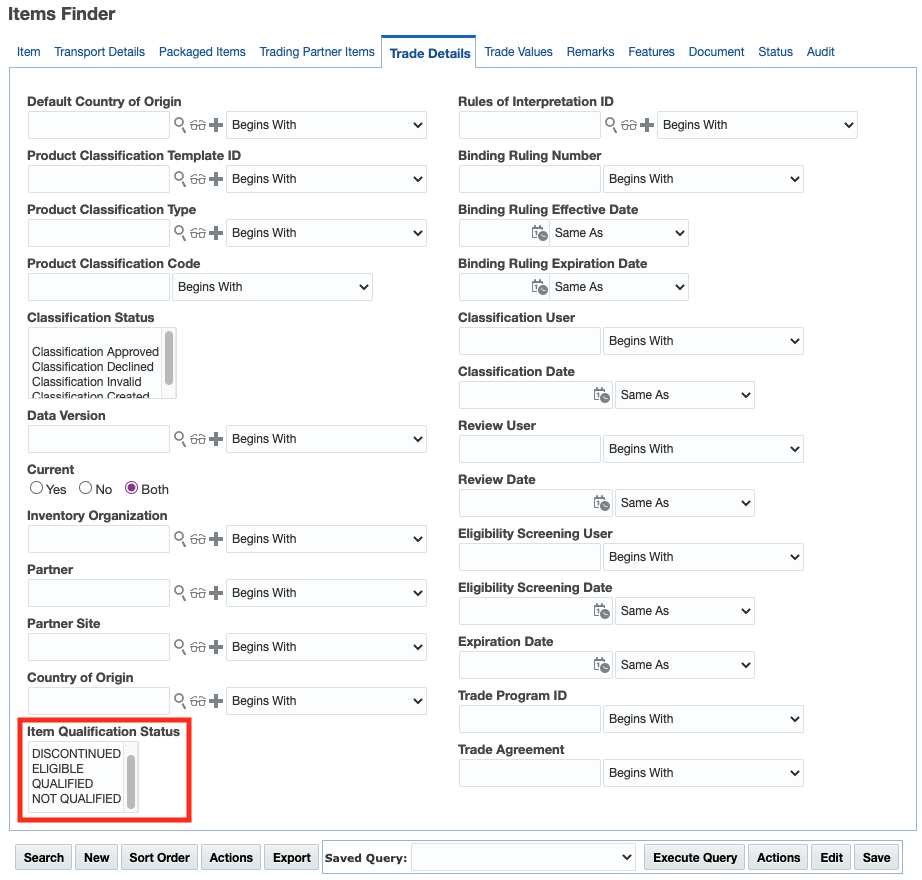
The addition of item qualification status to the Item finder enables you to narrow down the list of items you are viewing. This is particularly important as you run various trade agreement processes such as tariff eligibility or qualification.
Steps to Enable
You don't need to do anything to enable this feature.
Improvements to Look Up Trade Program Action and Automation Agent Action on Trade Transaction Line
The existing Look Up Trade Program action has been enhanced to (1) support a default constraint set as part of the action and (2) copy additional information to the trade transaction/declaration line. This action enables you to take advantage of the qualification information stored on the item qualification record associated with an item and copy it to lines. Once a purchased item has been fully qualified, you can look up the results and copy them to the corresponding line.
You can trigger the Look Up Trade Program action and agent action from:
- Trade Transaction
- Trade Transaction Line
- Declaration
- Declaration Line
Define A Constraint Set
To determine if an item matches a transaction/declartion line so that the trade program information can be copied, GTM uses a constraint set. GTM now supports a default constraint set so that users can always use the same constraint set when they run the action. In addition, you have the ability to:
- Override the default constraint set with a different one when you run the action
- Hide the Constraint Set ID on the action to ensure business users are always using the proper constraint set
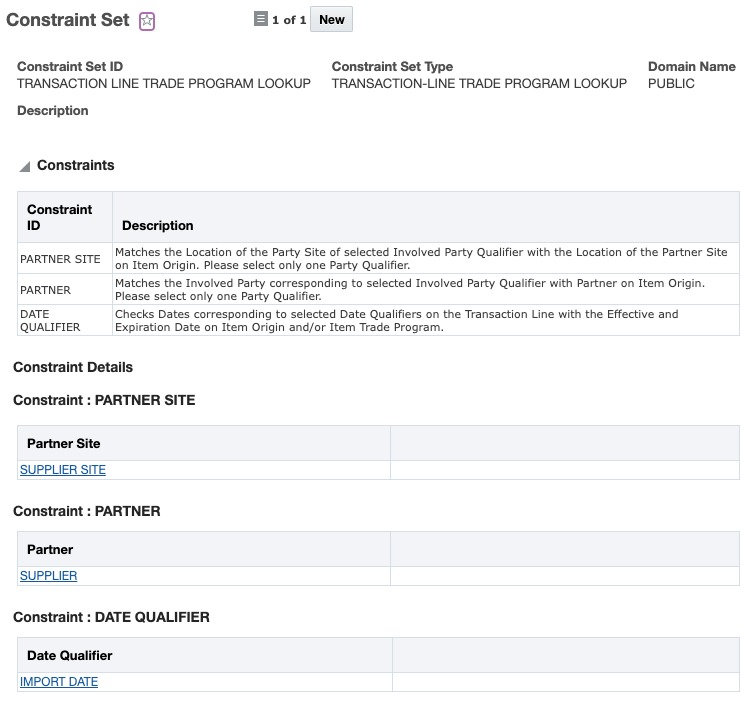
First you need to create a constraint set with a Constraint Set Type = TRANSACTION-LINE TRADE PROGRAM LOOKUP. This constraint set is used to determine which trade programs can be copied from the item to the transaction/declaration line. GTM ships with a default constraint set called TRANSACTION LINE TRADE PROGRAM LOOKUP which you can use.
If you want to set it as the default constraint set, you can:
- Add the constraint set to a generic logic configuration with a Logic Configuration Type = GTM LOGIC CONFIGURATION. GTM ships with generic logic configuration called GTM LOGIC CONFIGURATION DEFAULT containing the default constraint set for trade program lookup.
- Add the logic configuration to a parameter set. Within the GTM GENERAL section, you can see a parameter = GTM LOGIC CONFIGURATION.
- Add the parameter set to your user preference. For the Preference = Parameter Set, enter your parameter set as the value.
If you do not want to give business users the ability to override the default constraint set when they run the action, use the property 'gtm.lookuptradeprogram.constraintsetinput.ui'.
- When set to true, business users have the ability to override the default Constraint Set. (Default value = true)
- When set to false, business users will not see the input page with the GTM Constraint Set ID on the action and GTM will rely on the default constraint set.
Copy Additional Information to the Trade Transaction Line
When you trigger the Look Up Trade Program action, GTM uses the constraints in the constraint set to determine if the trade program and other supporting information in the item qualification on the item should be copied to the transaction line/declaration line. GTM displays a confirmation page containing details about the information copied from your items to your transaction lines/declaration lines. In previous versions, GTM populated the Trade Program and the Reference Numbers with a Reference Number Qualifier ID = ITEM QUALIFICATION ID and the corresponding GID for the item qualification record. GTM has enhanced this action to also populated:
- Transaction History - a row is added with information about the qualification
- Transaction Line Qualifications details
If you edit a transaction/declaration line qualification record, you can see even more information about why the line qualified for a trade agreement:
By enabling a default constraint set for the Look Up Trade Program action, you can ensure that your business users are using the proper matching logic in the action. Also, by copying and displaying more information about the qualification, you can see the details regarding why a particular item on a line qualified for a trade agreement.
Steps to Enable
You don't need to do anything to enable this feature.
Tips And Considerations
-
GTM ships with a constraint set called TRANSACTION LINE TRADE PROGRAM LOOKUP.
-
GTM ships with a logic configuration called GTM LOGIC CONFIGURATION DEFAULT which includes the out of the box constraint set TRANSACTION LINE TRADE PROGRAM LOOKUP. If you want to use this logic configuration, you can use the existing constraint set or create a new one to use for look up trade program. You can then add it as a parameter to the existing logic configuration.
- For the Look Up Trade Program action to perform, you must make sure that the item associated with the transaction line/declaration line is fully qualified for a trade agreement. You can confirm this by checking the item qualification record associated with the item and making sure the Status = QUALIFIED and Qualified = YES.
-
If you do not want to give business users the ability to override the default constraint set when they run the action, use the property 'gtm.lookuptradeprogram.constraintsetinput.ui'.
Key Resources
- For more information on setting properties in GTM, please refer to the "User Preferences" topic in help.
Look Up Country of Origin Action on Trade Transaction Line
The Look Up Country of Origin action enables you to look up the country of origin information for an item associated with a trade transaction line and copy it to the line. When you are qualifying trade transaction lines for trade agreements, the country of origin is key. If this information already exists on the item, you can copy the country of origin from the item to the transaction line so that it's available for trade agreement qualification and for documents.
You can trigger the Look Up Country Of Origin action from:
- Trade Transaction
- Trade Transaction Line
Define A Constraint Set
GTM uses a constraint set to match the transaction line to the item origins within the item to determine which country of origin should be copied. GTM supports a default constraint set so that business users use the same constraint set consistently when they run the action. You can also override the default constraint set when you run the action.
A new Constraint Set Type = TRANSACTION-LINE COUNTRY OF ORIGIN LOOKUP is introduced to determine which country of origin to copy from the item origins on an item to the transaction line.
If you want to set it as the default constraint set, you can:
- Add the constraint set to the generic logic configuration with a Logic Configuration Type = GTM LOGIC CONFIGURATION.
- Add the logic configuration to a parameter set. Within the GTM GENERAL section, you can see a parameter = GTM LOGIC CONFIGURATION.
- Add the parameter set to your user preference. For the Preference = Parameter Set, enter your parameter set as the Value.
If you do not want to give business users the ability to override the default constraint set when they run the action, use the property 'gtm.lookupcountryoforigin.constraintsetinput.ui'.
- When set to true, business users have the ability to override the default Constraint Set. (Default value = true)
- When set to false, business users will not see the input page with the GTM Constraint Set ID on the action and GTM will rely on the default constraint set.
Look Up Country of Origin from the Item
When you trigger the Look Up Country of Origin action, GTM uses the constraints defined in the constraint set to determine which item origin on the item to use for the transaction line and then updates the country of origin on the line. GTM displays a confirmation page listing the transaction lines that are updated. You can also see a reference number with a Reference Number Qualifier ID = ITEM ORIGIN ID and the corresponding GID for the item origin record.
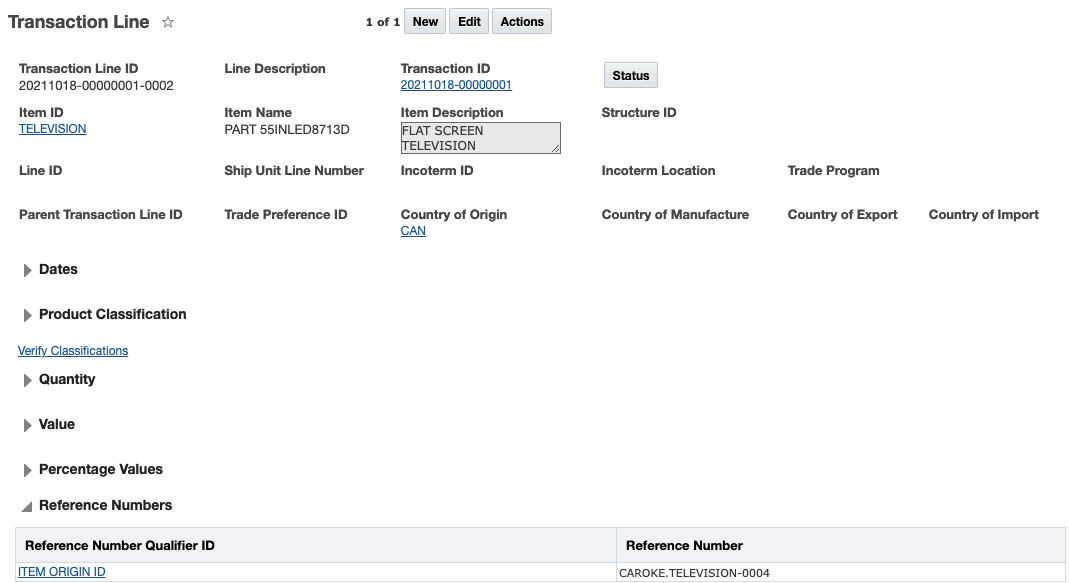
By looking up the country of origin information on the item and copying it to the transaction line, you can then determine if the item you are shipping qualifies for trade agreements. If so, you are able to save on duties related to the import of your finished goods.
Steps to Enable
You don't need to do anything to enable this feature.
Tips And Considerations
- GTM ships with a logic configuration called GTM LOGIC CONFIGURATION DEFAULT. If you want to use this logic configuration, create the constraint set you want to use as the default for look up country of origin and add it as a parameter to the existing logic configuration.
- If you do not want to give business users the ability to override the default constraint set when they run the action, use the property 'gtm.lookupcountryoforigin.constraintsetinput.ui'.
Key Resources
- For more information on setting properties in GTM, please see the "User Preferences" topic in help.
New Fields Available on Trade Transaction and Trade Transaction Line
New fields have been added to the trade transaction and trade transaction line which help you to view country of export, country of import and qualification information.
Trade Transaction
On the trade transaction, the following fields are now available:
- Country of Export - enables you to see the country of export for a trade transaction.
- Country of Import - enables you to see the country of import for a trade transaction.
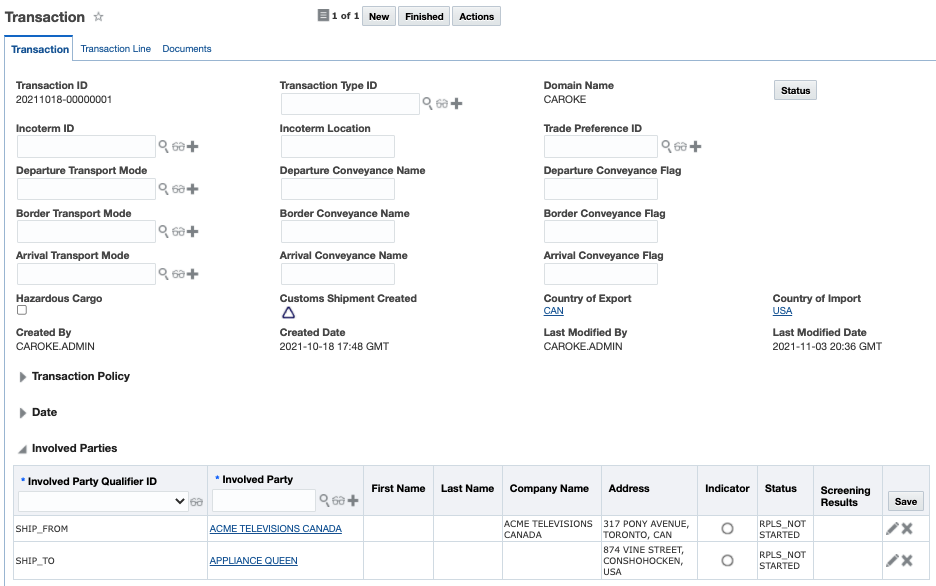
Trade Transaction Line
On the trade transaction line, the following fields are now available:
- Country of Export - enables you to see the country of export for a trade transaction line.
- Country of Import - enables you to see the country of import for a trade transaction line.
- Transaction Line Qualifications - if you run the Qualify for Trade Agreement action, you can see the results within this grid.

On the trade transaction line, if you want to see more details about the qualification, click the pencil icon to the right of the grid:
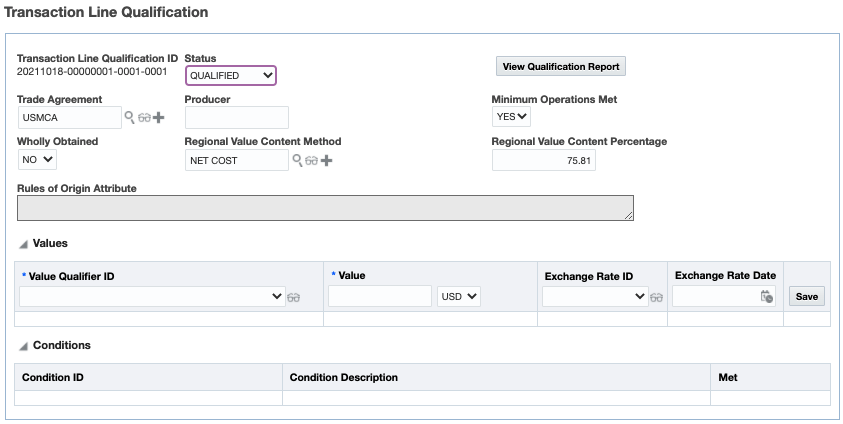
Adding these fields to the trade transaction and trade transaction line enables you to quickly see information that is important to you.
Steps to Enable
You don't need to do anything to enable this feature.
Tips And Considerations
The country of export and country of import fields can be populated in various ways and is dependent on the Optional Feature = USE COUNTRY OF IMPORT EXPORT DIRECT FIELD. You can populate these fields by:
- Deriving from a party/location on the transaction and/or transaction line based on qualifier
- Populating via integration
- Populating via the user interface
Key Resources
- For more information on the country of import and country of export fields, please refer to the 'Use Country of Import Export Direct Field' topic in this document.
- For more information on trade agreement qualification on the transaction line, please refer to the 'Qualify for Trade Agreement Action On Trade Transaction Line' topic in this document.
Use Country of Import Export Direct Field
Two new fields, the Country of Import and Country of Export, have been added to the Trade Transaction and the Trade Transaction Line. The fields are available on the finder, finder results, view and edit pages. This feature is delivered as follows:
- Existing Customers - Opt In set to FALSE/not enabled
- New Customers - Opt In set to TRUE/enabled
When the Opt In is set to FALSE, the country of import and country of export are derived from the involved party qualifiers on the trade transaction and trade transaction line respectively. Specifically, GTM looks up the party qualifier and then synchronizes the country with the Country of Import and Country of Export on the Transaction and Transaction Line. If it is not present, GTM then uses the location qualifier on the trade transaction. By default, GTM uses the involved party with a qualifier of SHIP_TO as the Country of Import and the involved party with a qualifier of SHIP_FROM as the Country of Export.
When the Opt In is set to TRUE, the Country of Import and Country of Export can be set via the user interface or via integration. If the fields are not set via the user interface or via integration, then GTM derives this information when you perform business actions such as Look Up Trade Program, Build Declaration or Qualify for Trade Agreement action.
Currently, the Country of Export is not used by any business logic. The Country of Import is being used in various actions. Regardless of the setting of the Optional Feature, certain actions are impacted by the introduction of these fields. GTM will first look to see if the fields are populated and use that information as part of these actions. If Country of Import and Country of Export are not populated, GTM will then default to the existing logic. The actions impacted are:
- Look Up Trade Program action
- Build Declaration action
- Compliance Rule - Only applies when you use a compliance rule to automatically assign a trade program to a transaction line
NOTE: If the optional feature is set to TRUE and the Country of Import and Country of Export fields are different than their corresponding involved parties, the explicit fields are used in logic.
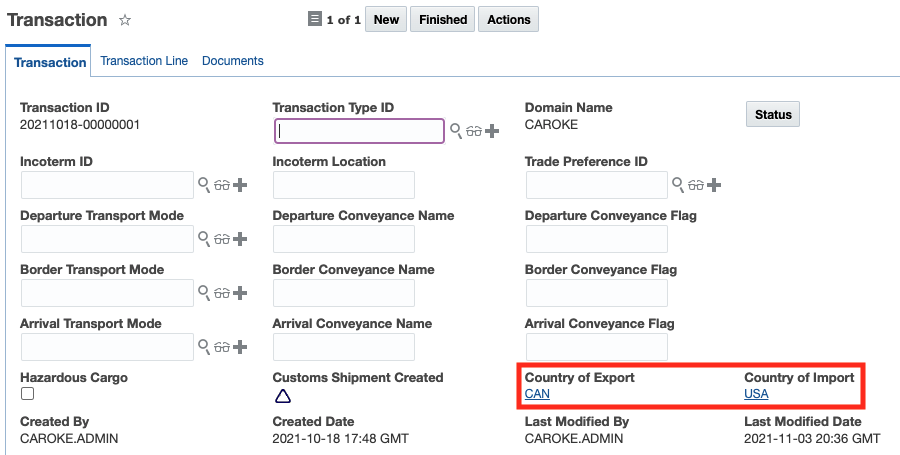
By adding the Country of Import and Country of Export as explicit fields, you can easily see this information from the trade transaction and trade transaction line.
Steps to Enable
You don't need to do anything to enable this feature.
Tips And Considerations
- When the Country of Import and/or Country of Export are derived from the involved party/location qualifier, a property is used to determine which involved party should be used:
- Country of Import - The gtm.dutyTax.dsg.ShipToLocation.locationQualifier tells GTM which involved party qualifier corresponds to the Country of Import. The default setting is SHIP_TO.
- Country of Export - The gtm.dutyTax.dsg.ShipFromLocation.locationQualifier tells GTM which involved party qualifier corresponds to the Country of Export. The default setting is SHIP_FROM.
Global Trade Intelligence (GTI)
This feature extends your analytics data analysis capabilities to include the Oracle Analytics Server (OAS) Data Visualization capabilities. Data Visualization provides you with the capabilities to generate configurable visual analytics - like maps, charts, graphs - for your existing BI subject areas - Transportation Intelligence, Global Trade Intelligence, Logistics Network Modeling and Logistics Machine Learning.
The Oracle Data Visualization capabilities are available to use directly through the Data Visualization link or the projects you create using Oracle Data Visualization can be deployed as panes within the Enhanced Workbench.
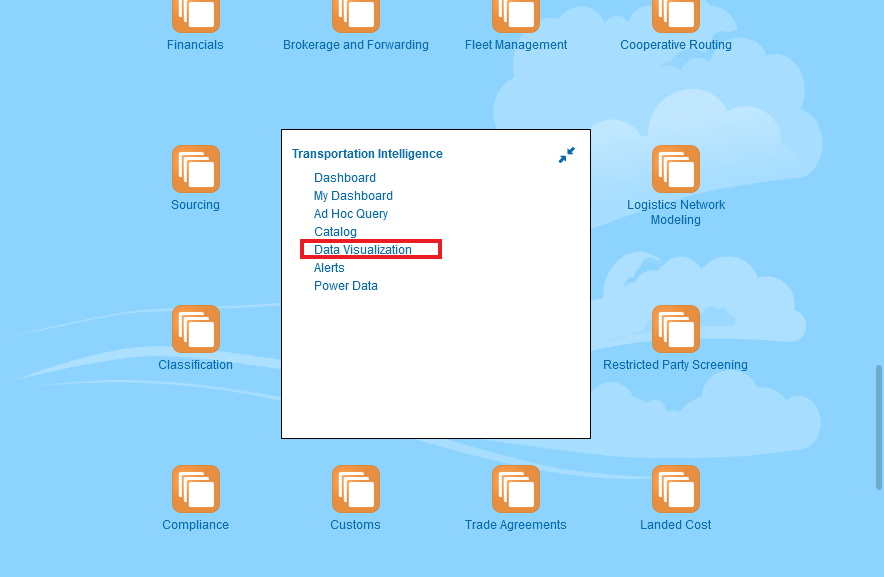
Data Visualization Transportation Intelligence Access
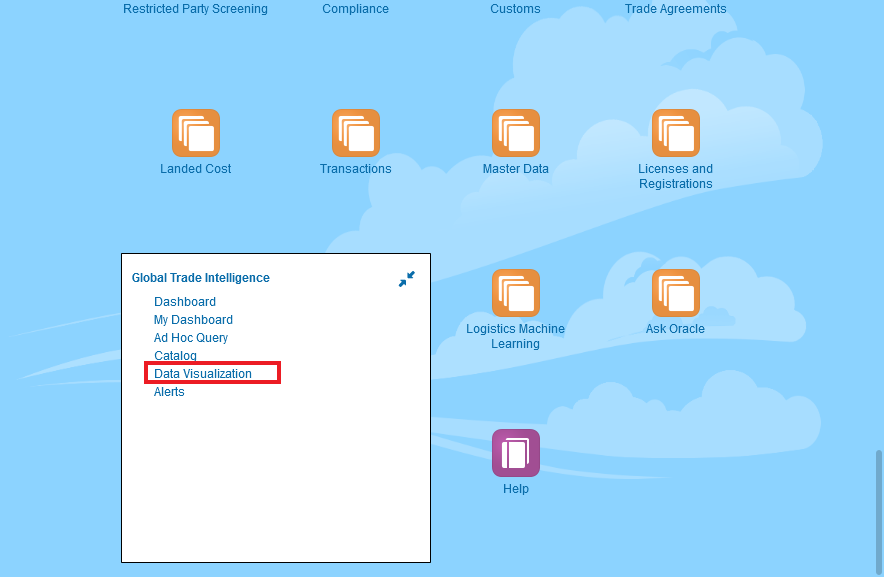
Data Visualization Global Trade Intelligence Access
There are seven pre-defined Data Visualization projects that have been provided to demonstrate the benefits of using Oracle Data Visualization to enhance your data analysis.
Pre-defined Projects include:
- Service Provider Metrics DV
- LML - Shipment Prediction Results
- LML - Shipment Training Results
- LML - Scenario Training Results
- LML - Input Data
- LNM - Scenario Summary
- LNM - Scenario Graphs
For Transportation Intelligence, the Service Provider Metrics DV pre-defined project has been provided. This project provides you with a visual look into your Service Providers performance.
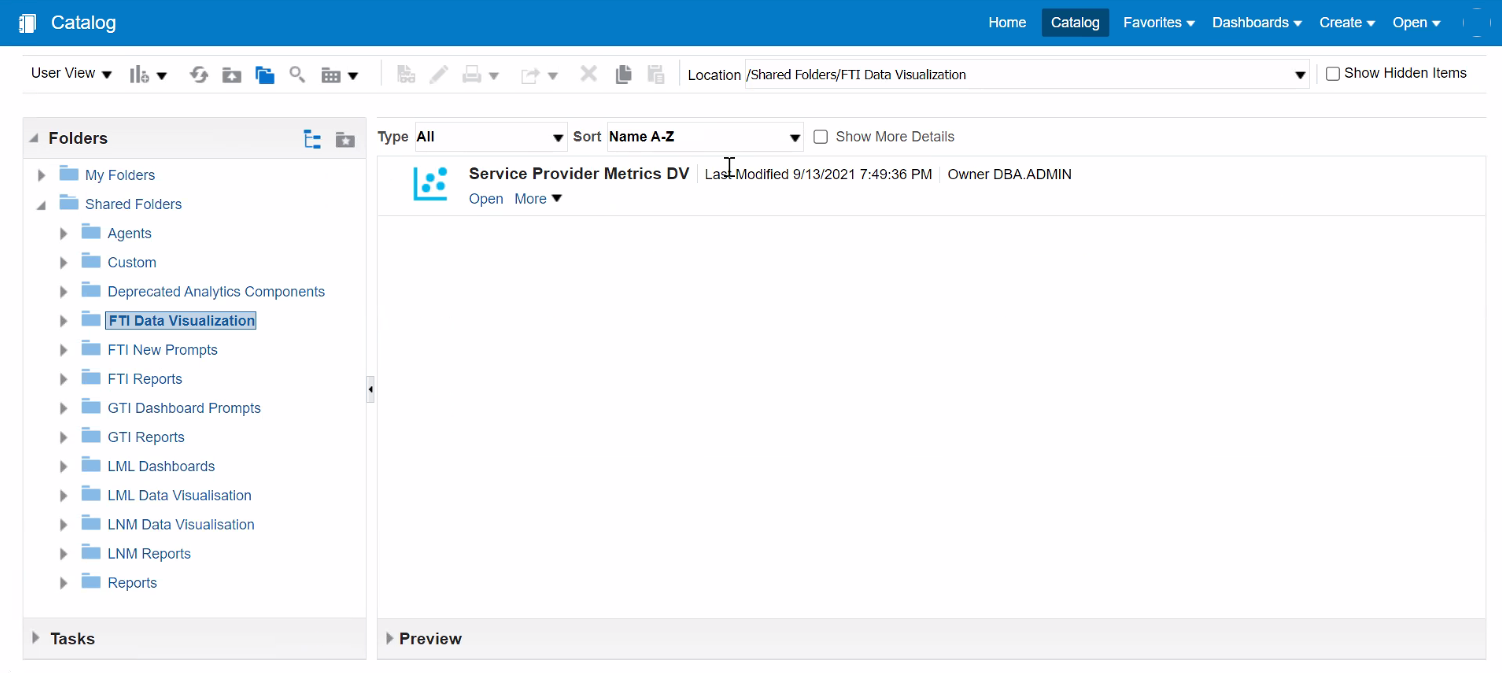
Service Provider Metric DV
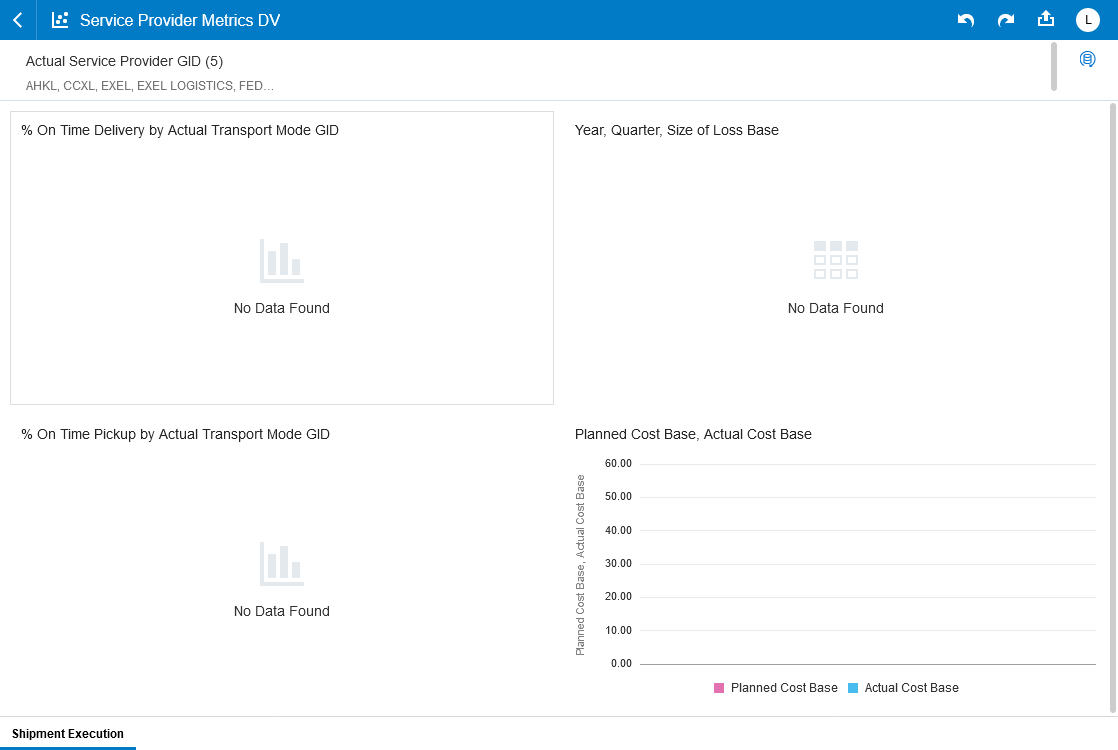
Carrier Metrics Pre-defined Project
For Logistics Machine Learning - several pre-defined data visualization projects have been provided. These pre-defined projects are available with the Data Visualization application directly, in addition, the pre-defined projects are also available for inclusion as panels in the Enhanced Workbench.
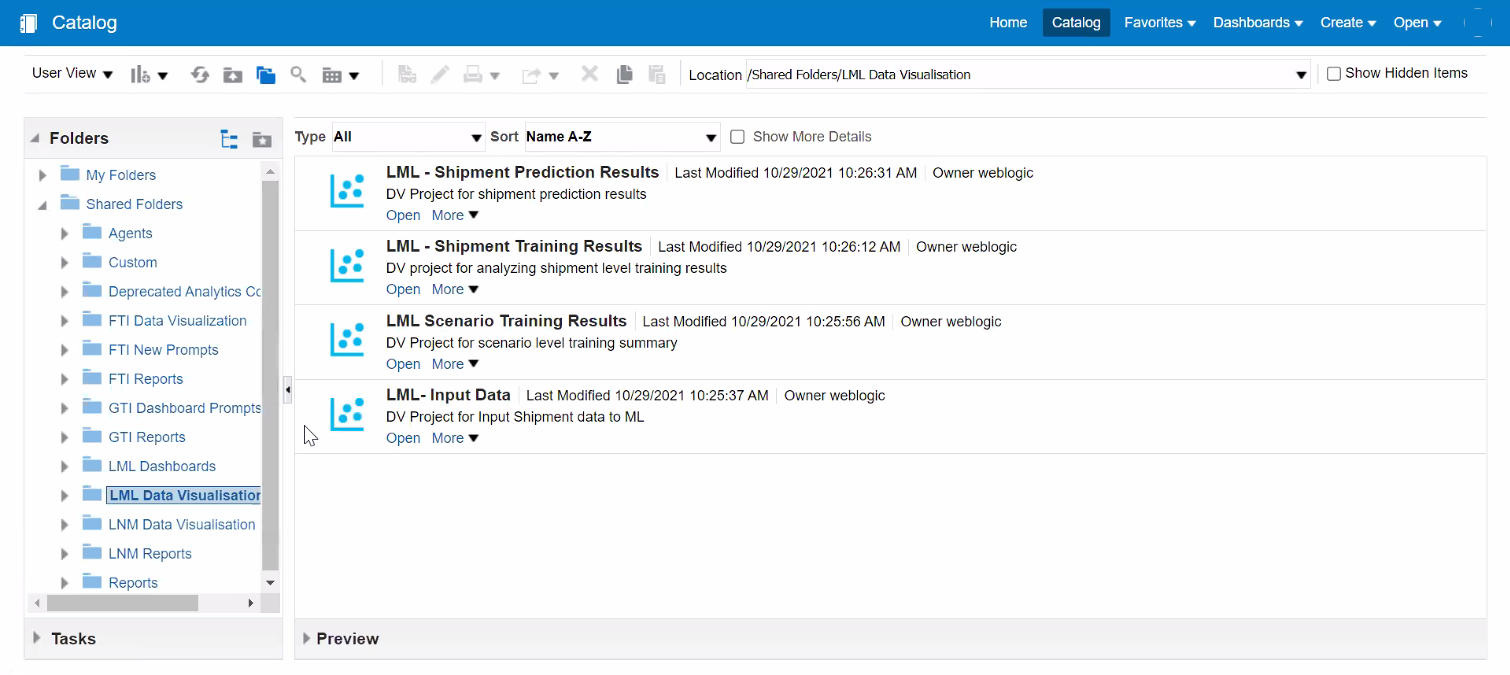
Logistics Machine Learning DV Folders
Below is an example of one of the pre-defined projects - LML-Input Data. This view is from within Data Visualization.
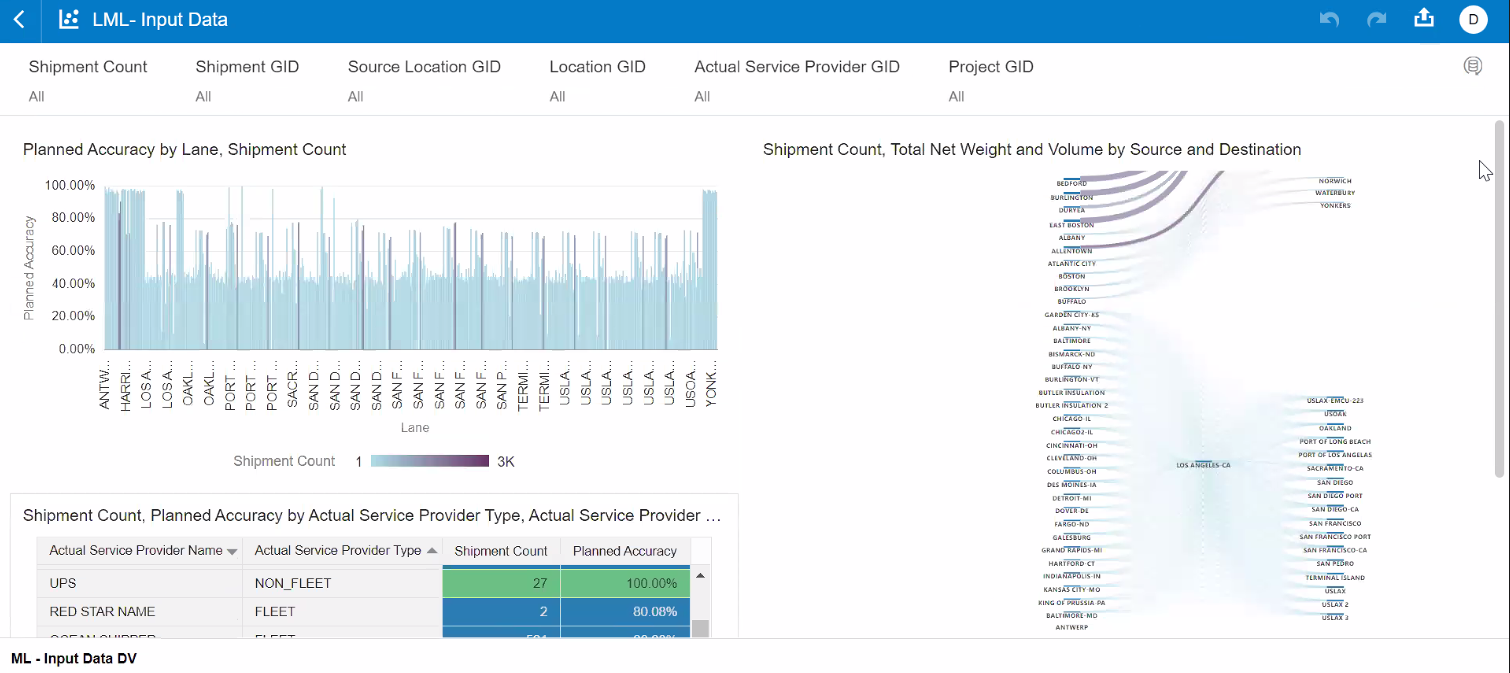
Pre-defined Project LML-Input Data
Here is the same project as above, but this time it has been embedded within the Logistics Machine Learning Enhanced Workbench.
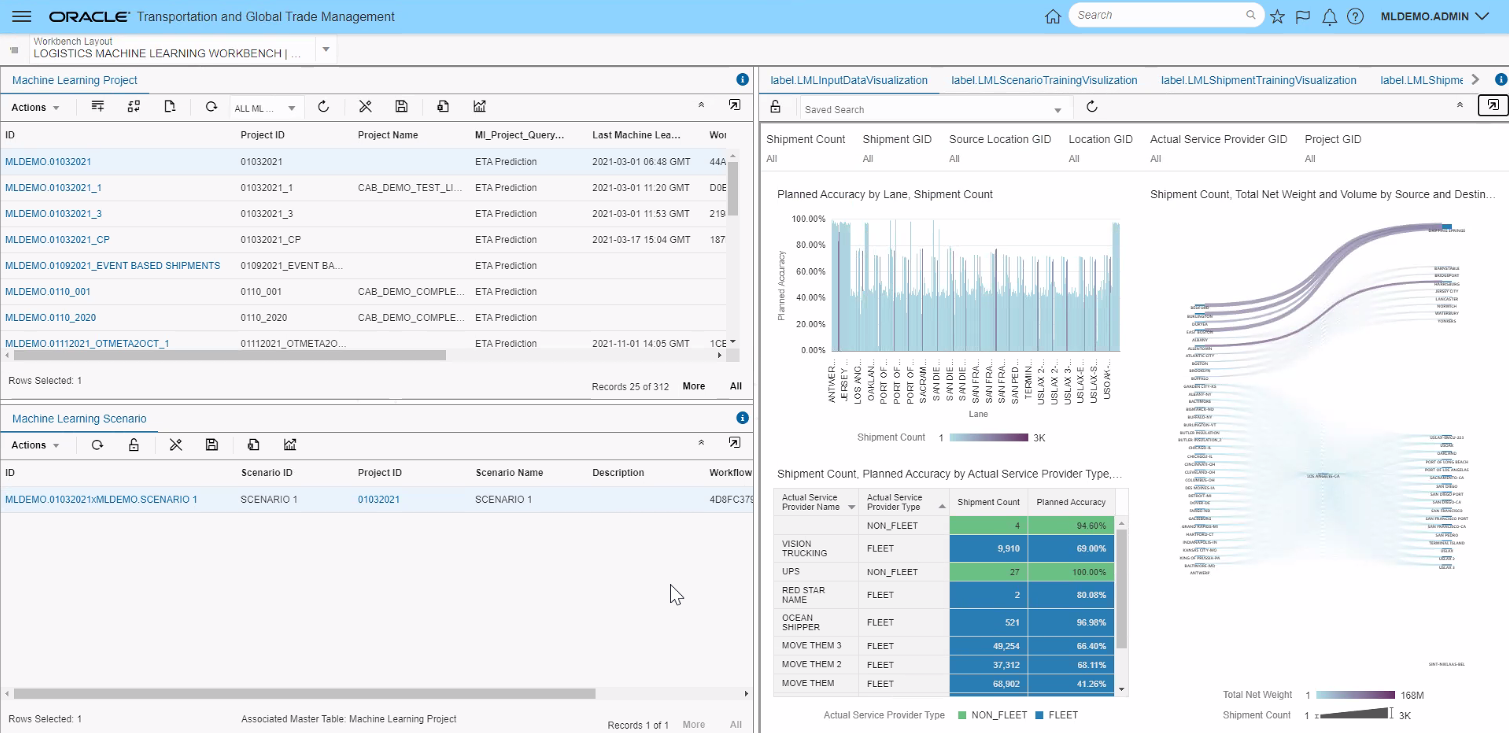
Pre-defined Project LML-Input Data in Enhanced Workbench
Below is the LML Scenario Training Results - pre-defined project, which demonstrates some of the additional graphical analysis options provided within a Data Visualization tool.
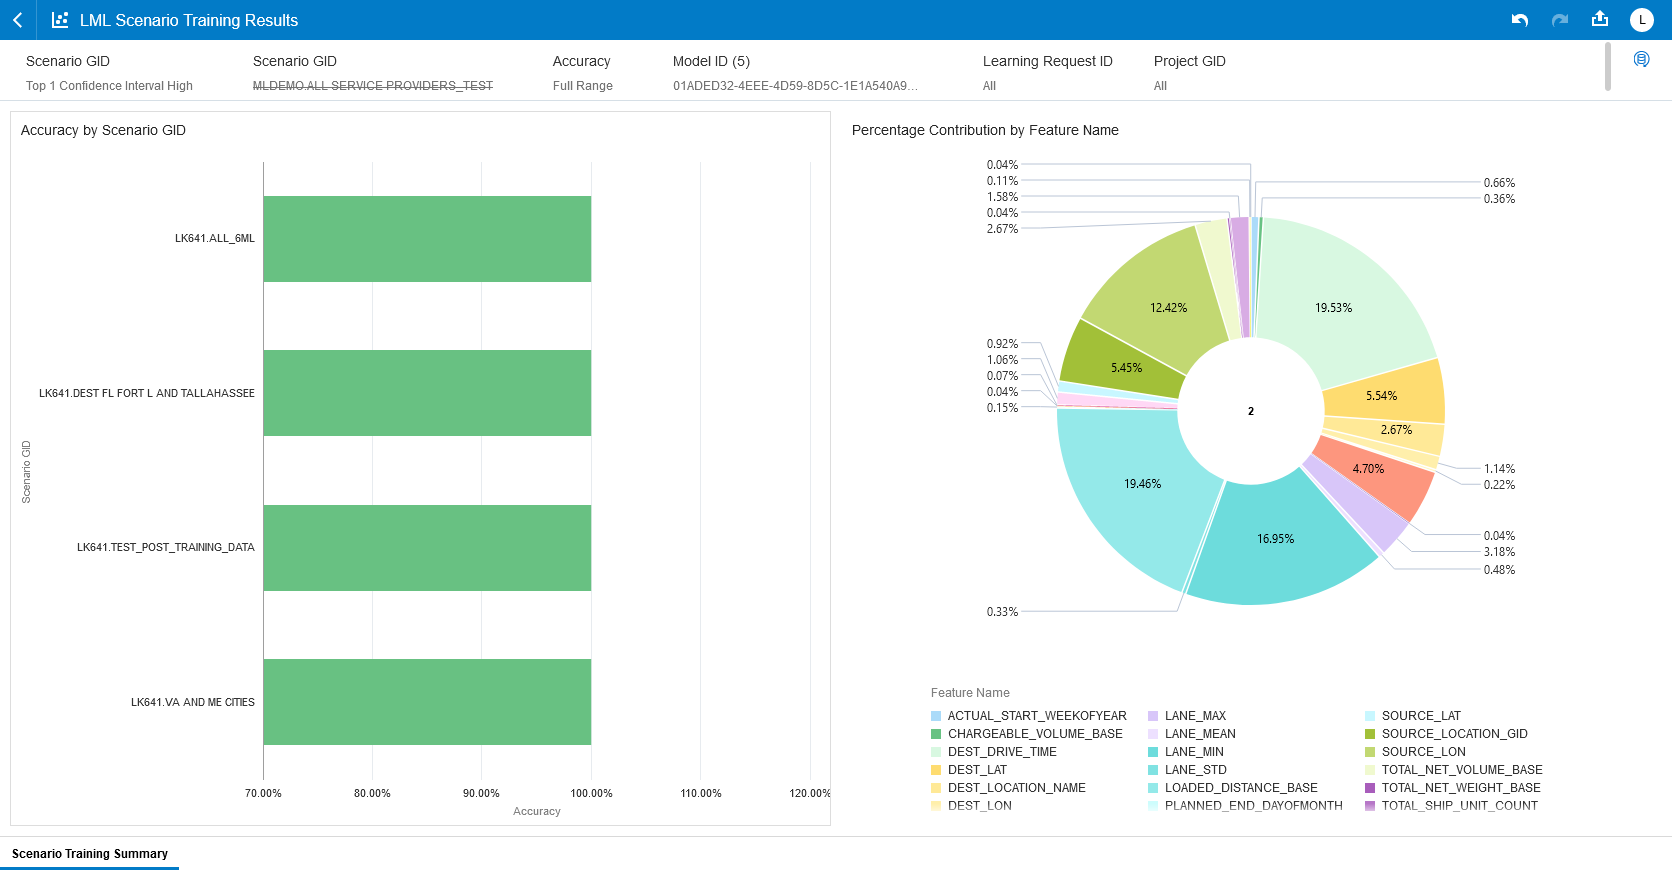
Pre-defined Project - LML Scenario Training Data
Other pre-defined projects provided for Machine Learning include LML - Shipment Prediction Results and LML - Shipment Training Results shown below.
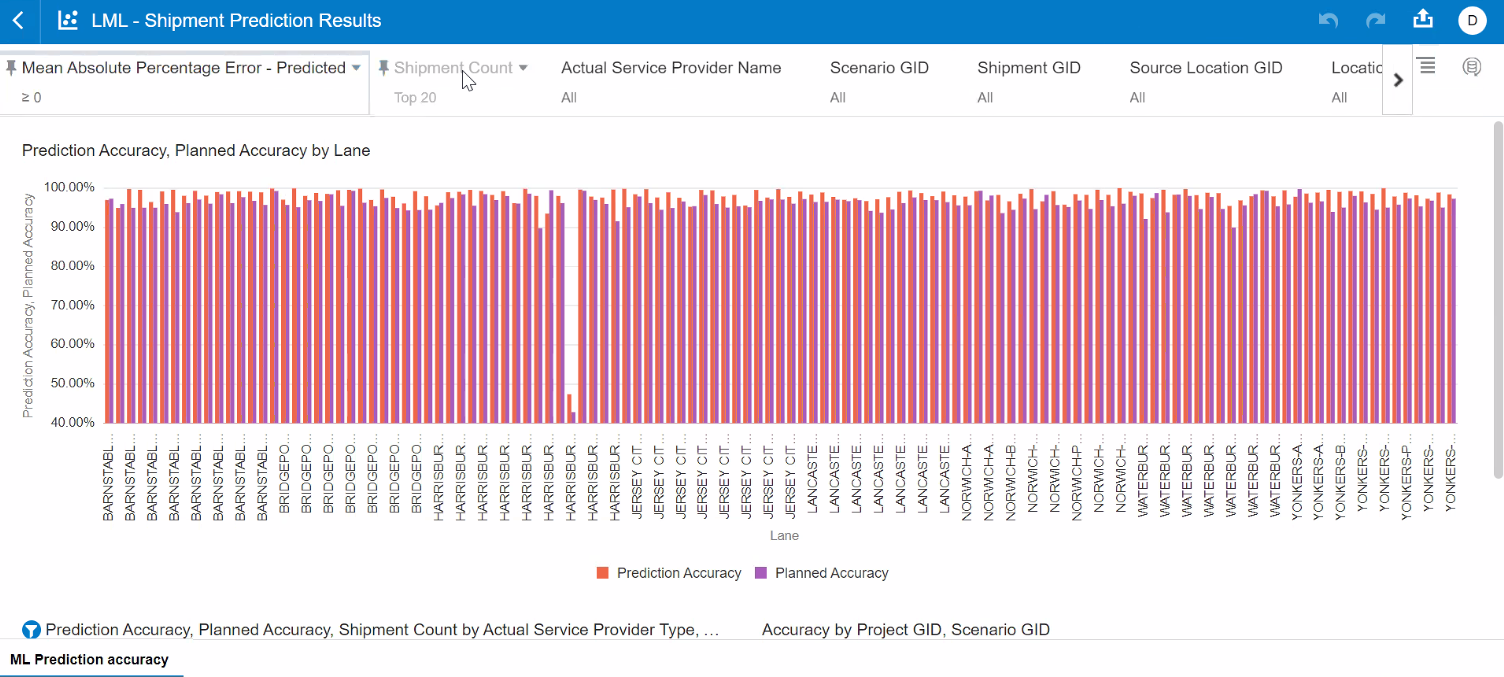
Pre-defined Project - LML - Shipment Prediction Results
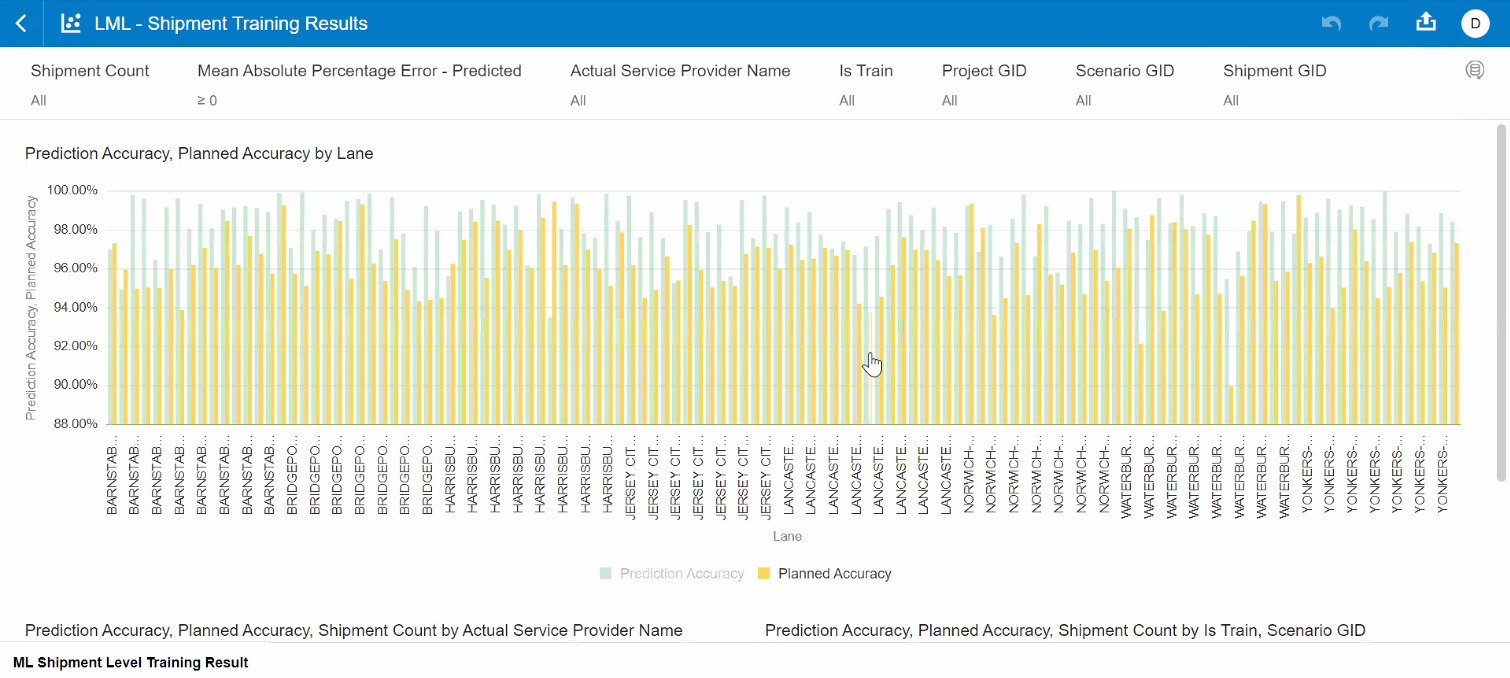
Pre-defined Project - LML - Shipment Training Results
For Logistics Network Modeling - several pre-defined data visualization projects have been provided. These pre-defined projects are available with the Data Visualization application directly as shown below, and these pre-defined projects are also available for inclusion as panels in the Enhanced Workbench.
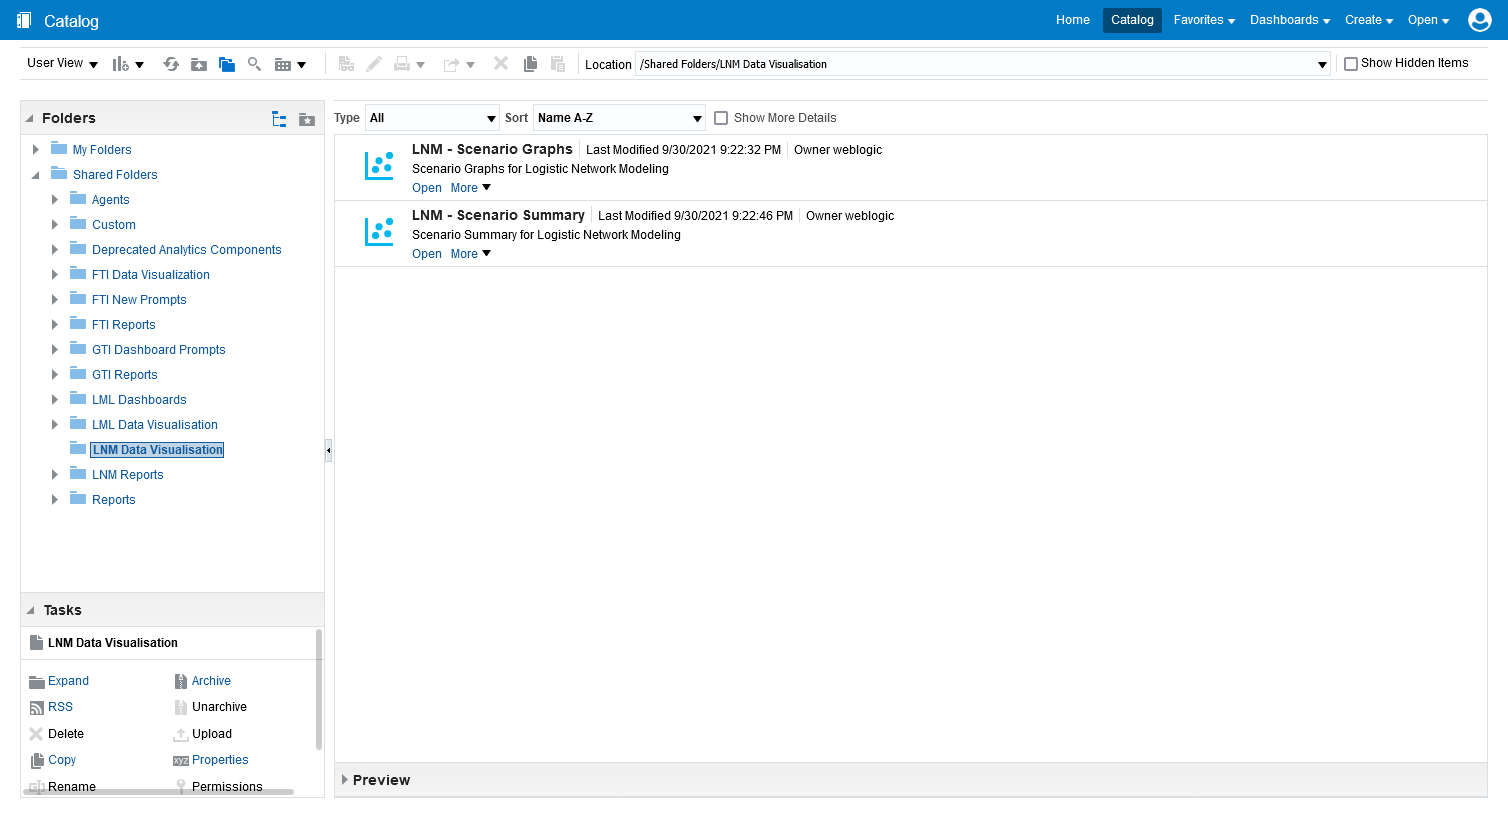
Pre-defined Projects for Logistics Network Modeling
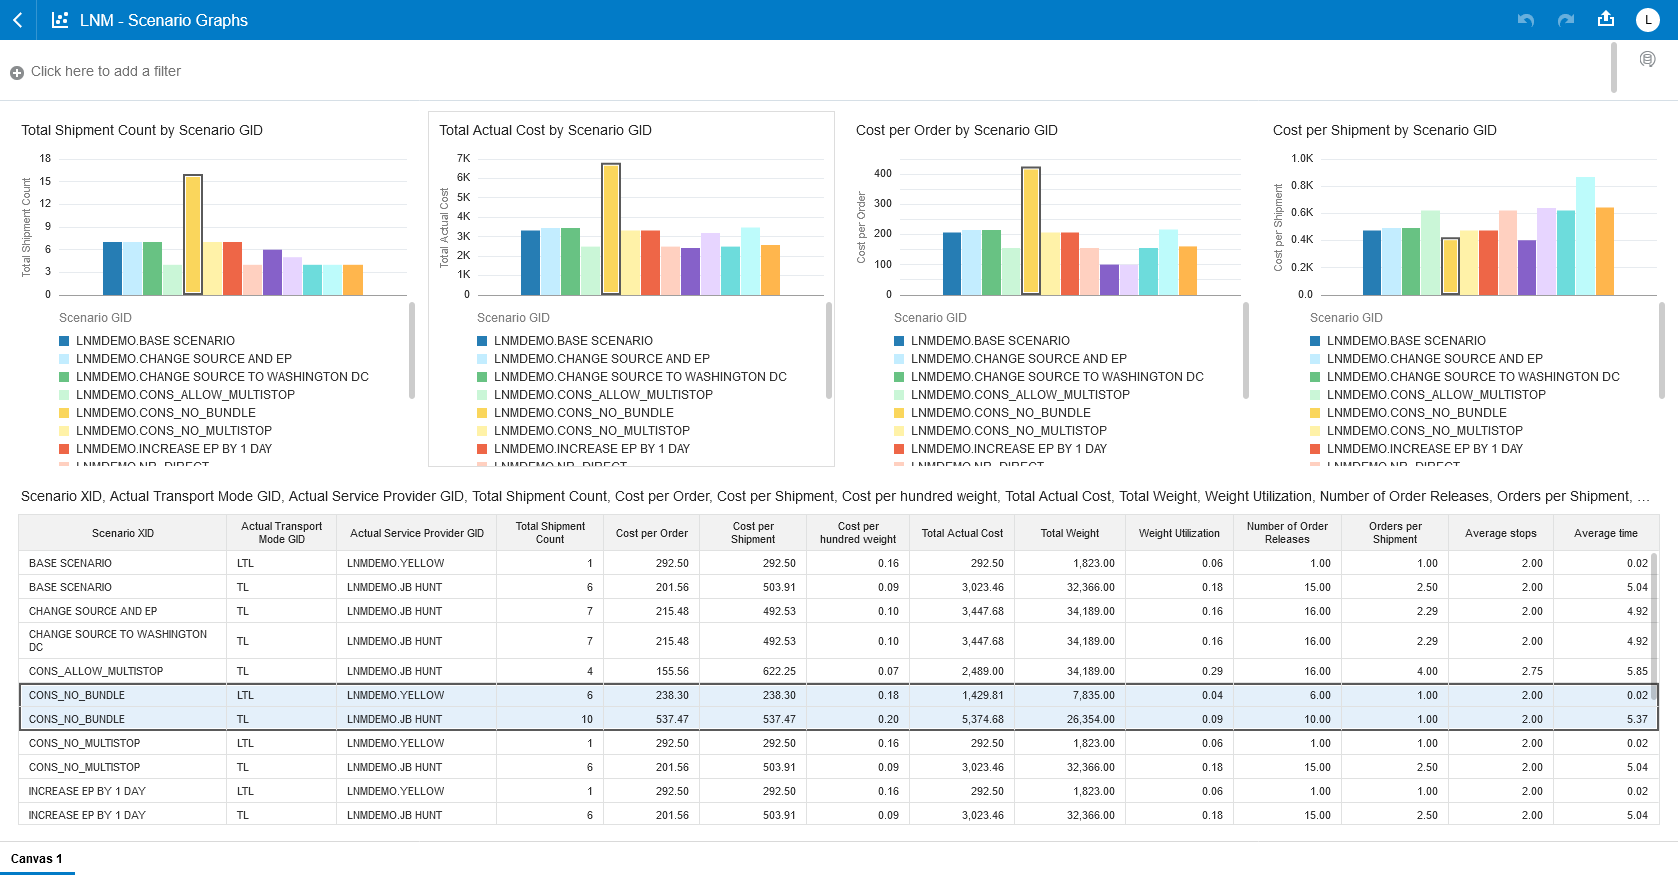
Pre-defined Project - LNM - Scenario Graphs
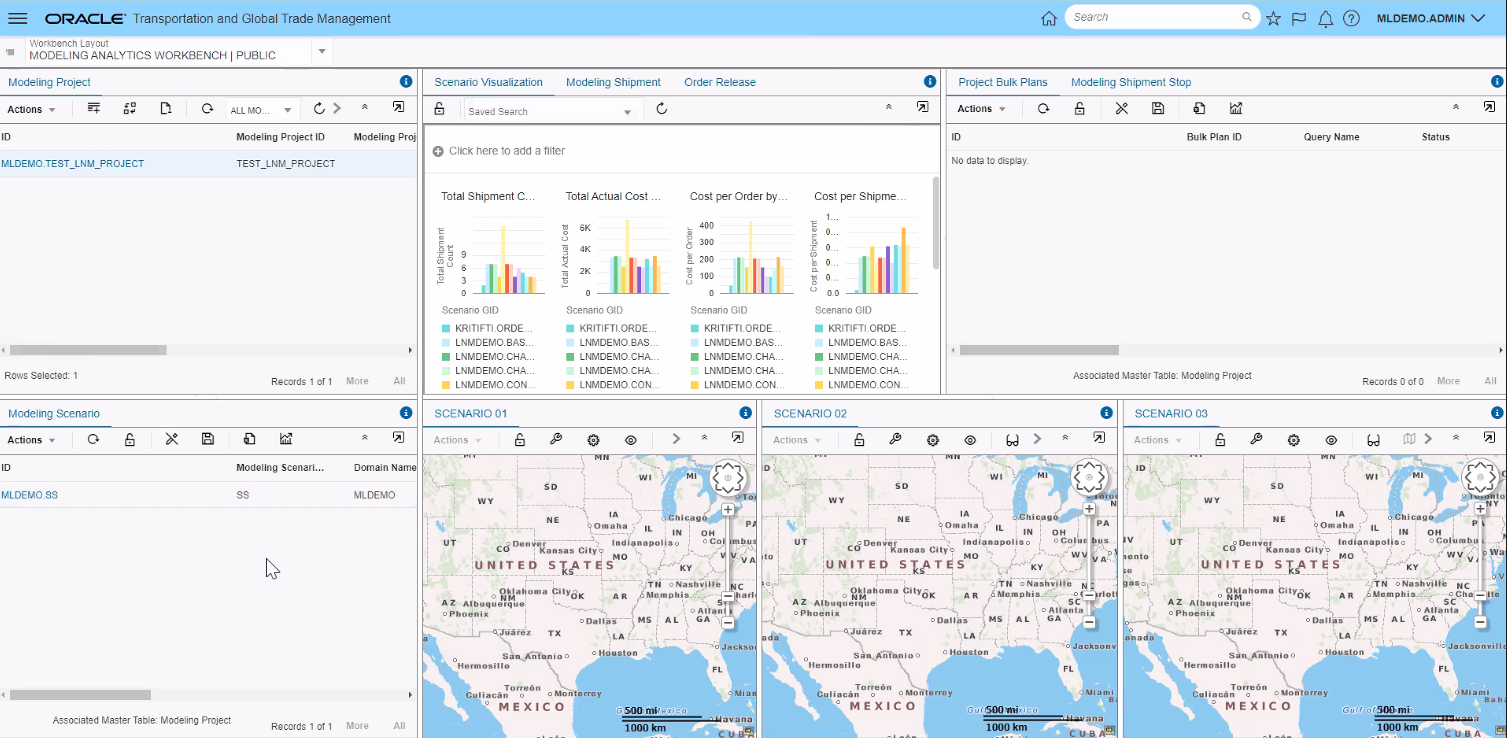
Pre-defined Project - LNM - Scenario Graphs In Enhanced Workbench
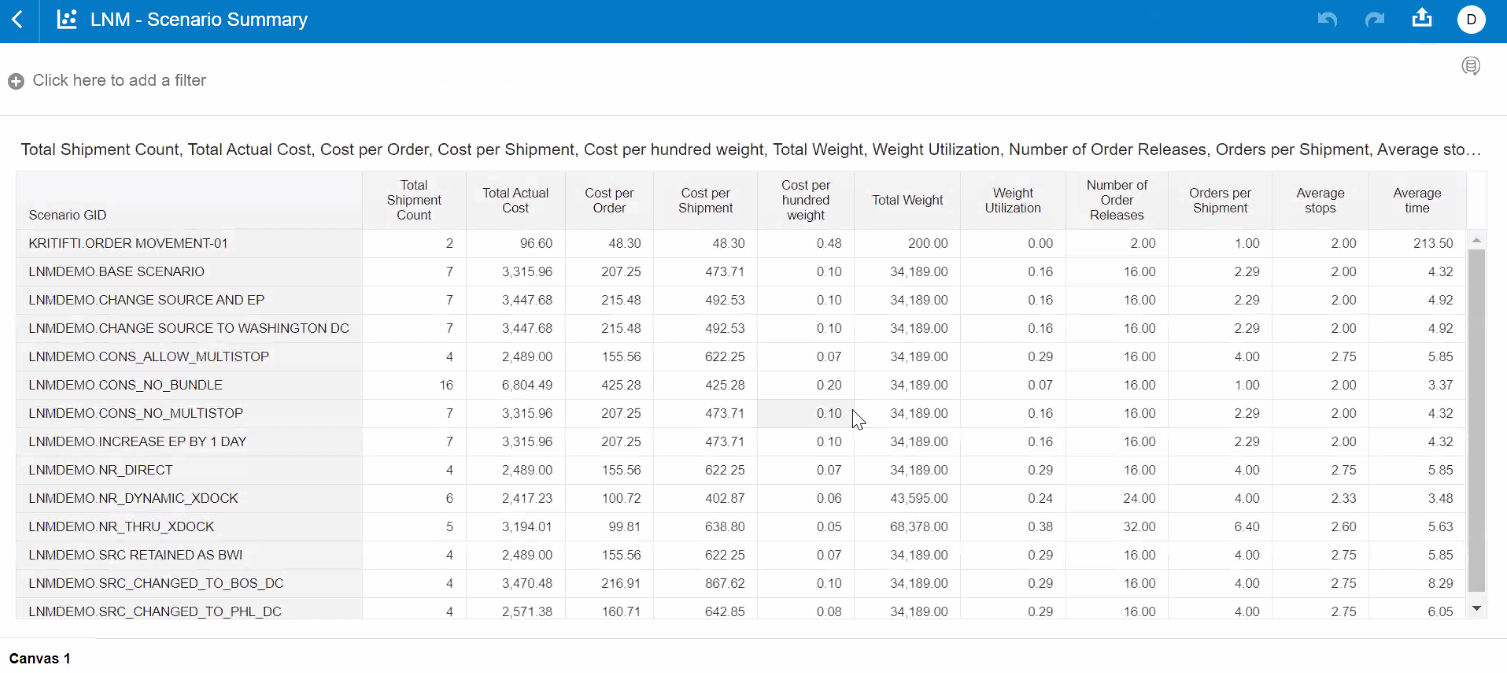
Pre-defined Project - LNM - Scenario Summary
Enhances the set of tools available to you for generating visual analytics reports for your BI data TI and GTI.
Steps to Enable
You don't need to do anything to enable this feature.