
- Revision History
- Overview
- Update Tasks
- Feature Summary
- Global Trade Management
-
- Transportation and Global Trade Platform
- Global Trade Management (Base)
- Trade Agreements
-
- Support for Qualification of Multi-level Bills of Material
- Support for Currency Conversion During Qualification
- Enhancements to Trade Agreement Qualification Logic
- Qualify for Trade Agreement Agent Actions for Item-Based Objects
- Enhancements to Qualify for Trade Agreement Action on Trade Transaction Line
-
- Customs Management
This document will continue to evolve as existing sections change and new information is added. All updates appear in the following table:
| Date | Product | Feature | Notes |
|---|---|---|---|
| 23 FEB 2023 | Transportation and Global Trade Platform | Limit Agent Loops | Updated document. Revised feature information. |
| 18 NOV 2022 | Transportation and Global Trade Platform | Use Domain Default From Address | Updated document. Delivered new feature in 22B. |
| 22 JUN 2022 | Transportation and Global Trade Platform |
Limit Agent Loops | Updated document. Revised feature information. |
| 19 APR 2022 | Transportation and Global Trade Platform | Next Generation Enhanced Workbench | Updated document. Revised feature information. |
| 25 MAR 2022 | Created initial document. |
 HAVE AN IDEA?
We’re here and we’re listening. If you have a suggestion on how to make our cloud services even better then go ahead and tell us. There are several ways to submit your ideas, for example, through the Ideas Lab on Oracle Customer Connect. Wherever you see this icon after the feature name it means we delivered one of your ideas.
GIVE US FEEDBACK
We welcome your comments and suggestions to improve the content. Please send us your feedback at otm-doc_us@oracle.com. Please indicate you are inquiring or providing feedback regarding the Oracle Fusion Cloud Global Trade Management What's New Feature in Update 22B.
DISCLAIMER
The information contained in this document may include statements about Oracle’s product development plans. Many factors can materially affect Oracle’s product development plans and the nature and timing of future product releases. Accordingly, this Information is provided to you solely for information only, is not a commitment to deliver any material, code, or functionality, and should not be relied upon in making purchasing decisions. The development, release, and timing of any features or functionality described remains at the sole discretion of Oracle.
This information may not be incorporated into any contractual agreement with Oracle or its subsidiaries or affiliates. Oracle specifically disclaims any liability with respect to this information. Refer to the Legal Notices and Terms of Use for further information.
This section gives you information to help you plan, deploy, and validate your update. We make frequent additions to this document, so don’t forget to check back and get the latest information before your update starts.
Review the Release Notes.
- The release notes include fixes, special instructions, and resolutions related to the Oracle Transportation and Global Trade Management Cloud.
- Release Notes can be found here:
- https://support.oracle.com/epmos/faces/DocumentDisplay?id=2827533.1
Use the following resources to prepare for and validate your Oracle Engagement Cloud update.
On My Oracle Support Read:
- Doc ID 2095509.1
- Oracle Cloud Applications - Transportation and Global Trade Management Cloud: Environment Refresh Policy
- Doc ID 2095528.1
- Oracle Cloud Applications - Transportation and Global Trade Management Cloud: Quarterly Update Planning
- Doc ID 2096782.1
- Oracle Cloud Applications - Transportation and Global Trade Management Cloud: Quarterly Update Planning FAQs
- Doc ID 2195580.1
- Oracle Cloud Applications - Transportation and Global Trade Management Cloud: Get Started with Your Implementation
- Doc ID 2508854.1
- Oracle Cloud Applications - Transportation and Global Trade Management Cloud: Quarterly Updates - Preparation and Testing Recommendations
Column Definitions:
Report = New or modified, Oracle-delivered, ready to run reports.
UI or Process-Based: Small Scale = These UI or process-based features are typically comprised of minor field, validation, or program changes. Therefore, the potential impact to users is minimal.
UI or Process-Based: Larger Scale* = These UI or process-based features have more complex designs. Therefore, the potential impact to users is higher.
Features Delivered Disabled = Action is needed BEFORE these features can be used by END USERS. These features are delivered disabled and you choose if and when to enable them. For example, a) new or expanded BI subject areas need to first be incorporated into reports, b) Integration is required to utilize new web services, or c) features must be assigned to user roles before they can be accessed.
| Ready for Use by End Users Reports plus Small Scale UI or Process-Based new features will have minimal user impact after an update. Therefore, customer acceptance testing should focus on the Larger Scale UI or Process-Based* new features. |
Customer Must Take Action before Use by End Users Not disruptive as action is required to make these features ready to use. As you selectively choose to leverage, you set your test and roll out timing. |
|||||
|---|---|---|---|---|---|---|
| Feature |
Report |
UI or |
UI or |
|
||
OAuth 2.0 and HTTP Header Profile Support for Addition Content Types |
||||||
Historical Metrics - Count Based Metric Types and Components Added for REST |
||||||
Next Generation Enhanced Restricted Party Screening Workbench |
||||||
Qualify for Trade Agreement Agent Actions for Item-Based Objects |
||||||
Enhancements to Qualify for Trade Agreement Action on Trade Transaction Line |
||||||
Transportation and Global Trade Platform
Next Generation Enhanced Workbench
This feature provides you with the first full release of the Oracle JET based Enhanced Workbench. This release of the Enhanced Workbench (Layouts and Designer) provides you with many of the same or equivalent features and functionality as the original Workbench (developed using ADF technology) while providing you with a long list of usability, functionality and performance improvements.
NOTE: The Enhanced Workbench and the original Workbench will continue to coexist for several update cycles to provide you with ample time to migrate from the older technology to the new Enhanced Workbench technology. Your migration to the Enhanced Workbench is supported by an easy to use migration tool (Workbench Manager) that allow you to easily move your existing Workbench Layouts into the new Enhanced Workbench infrastructure.
The Enhanced Workbench can be accessed via Configuration and Administration > User Configuration > Enhanced Workbench and is located below the original ADF based Workbench Designer and Workbench Manager.
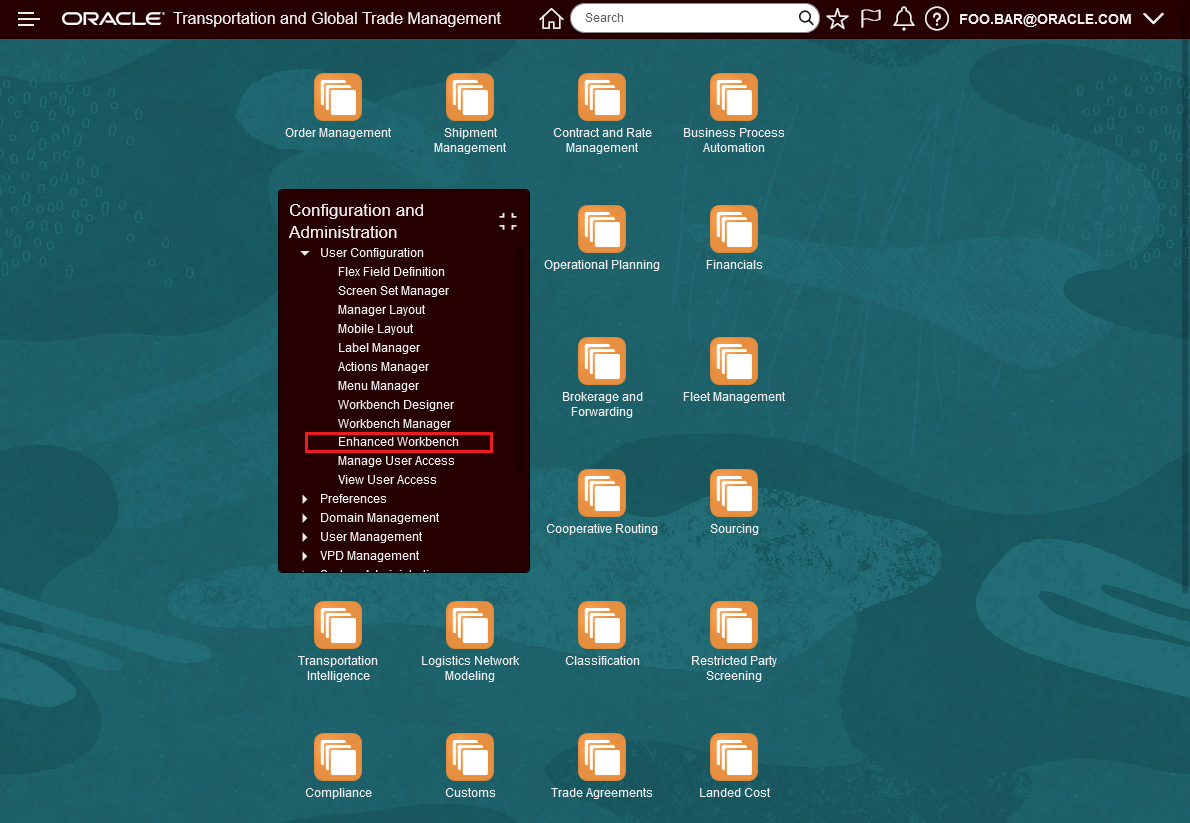
Enhanced Workbench Menu
Some of the highlights of the Enhanced Workbench include:
- The Workbench Manager which supports migrating your existing Workbench Layouts to the Enhanced Workbench Format
- A collapsible menu for navigation that you can easily toggle on and off
- An Analytics Dashboard Content Type which allows you to add BI content as a panel within the workbench
- A Data Visualization Content Type which allows you to incorporate data visualization project content within the workbench
- A Transactional Report Type which allows you to include an Oracle Analytics Publisher report within the workbench
- A new Shipment Gantt Content Type which provides you with a Gantt view of your shipments
- A new Overview Panel for all your Gantts that provides you with an improved navigation experience within the available Gantts
- Gantt Time Zone visibility and Time Zone selection hierarchy for all Gantts.
- The ability to do multiple splits per region
- An enhanced type ahead search in the Workbench Layout ID dropdown
- The ability to collapse tabs in a region to gain additional screen real estate
- Load Config Region now supports Edits within the Enhanced Workbench
- The ability to flip between the Region Content and the Region Details
- Improved Logging
- More Informative - Progress Bar – in-process Logging and error messages all improved
- Configurable “on the fly”
- Duration as a metric
Below you will find an example of just some of the changes and improvements provided by the new Enhanced Workbench.
The Workbench Manager allows you to easily find and select one or more of your Workbench layouts and convert the Workbenches between a Legacy or Enhanced Workbench view using the actions - Enhanced View Enabled - which moves the Legacy Workbench to an Enhanced Workbench - or Legacy View Enabled - which moves an Enhanced Workbench to a Legacy Workbench view.
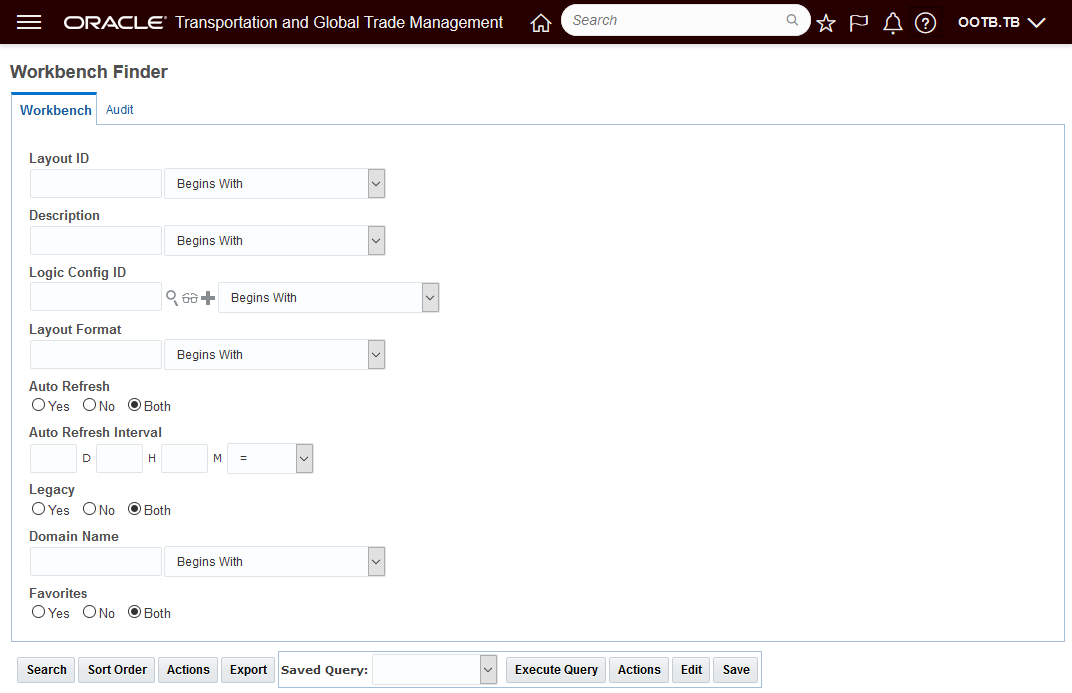
Workbench Manager Finder
Use the Workbench Manager to find all of your Legacy Workbenches.
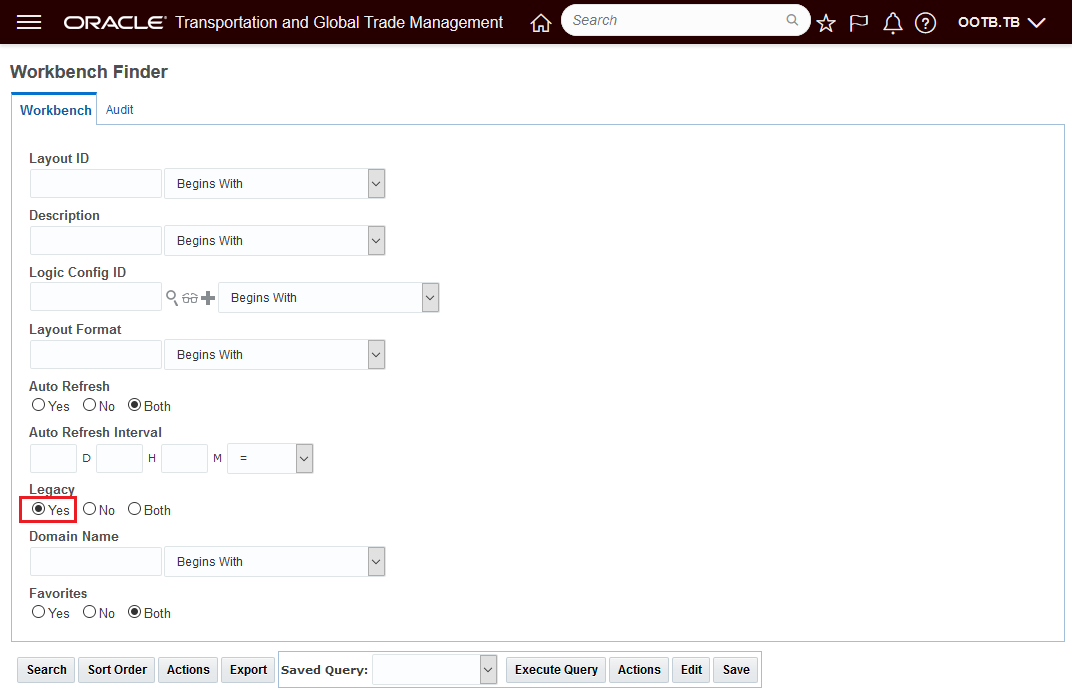
Workbench Manager Finder - Find Legacy Workbench Layouts
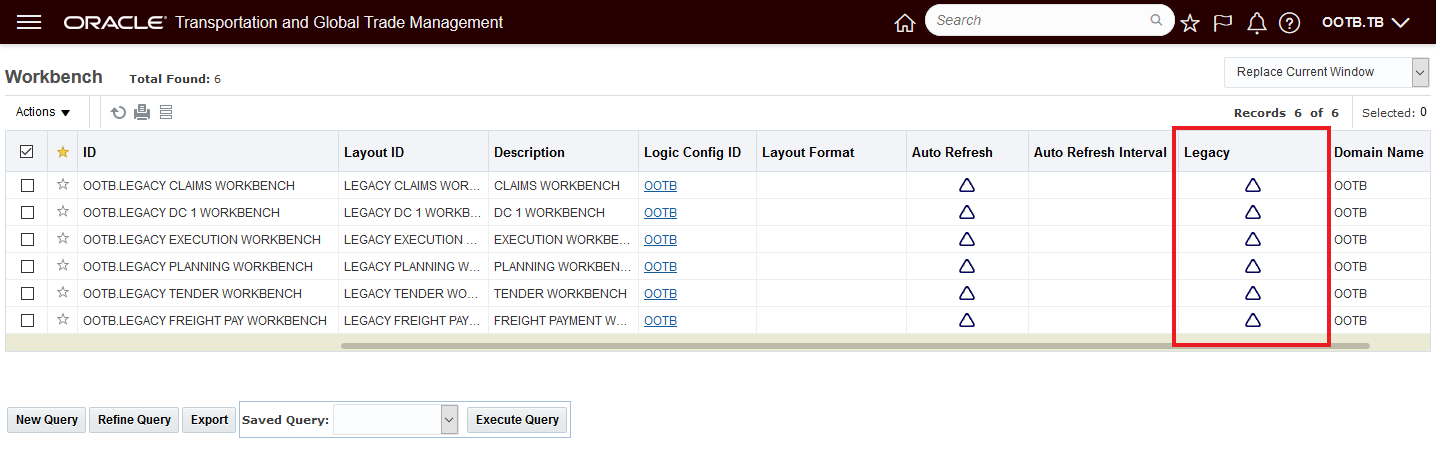
The results below show six Legacy Workbenches. Converting all six Workbenches from Legacy to Enhanced only requires you to select all six and run the action Enhanced View Enabled as shown below.
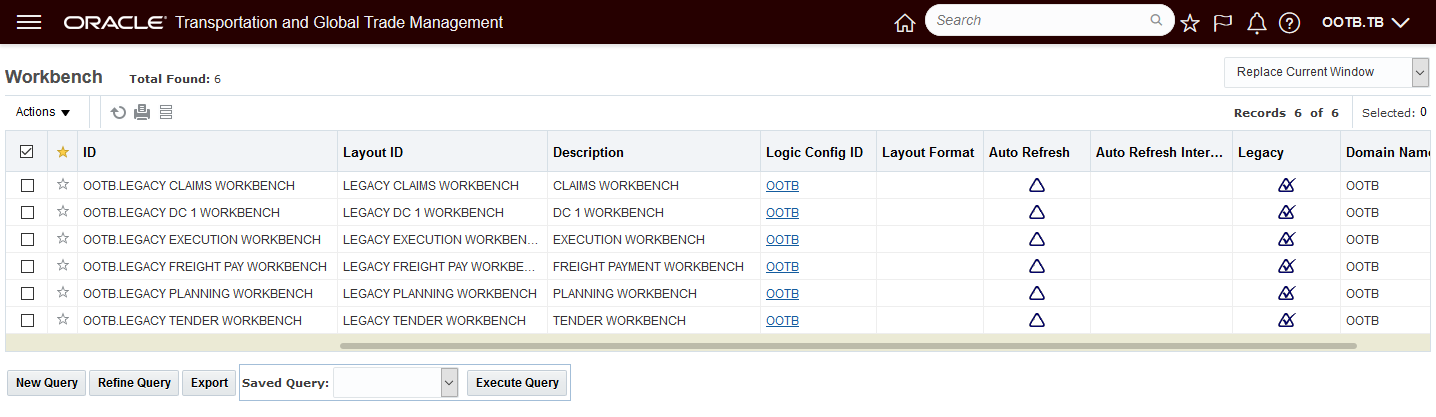
Legacy Workbench Finder Results
Select the set and convert them all to Enhanced using the action Enhanced View Enabled
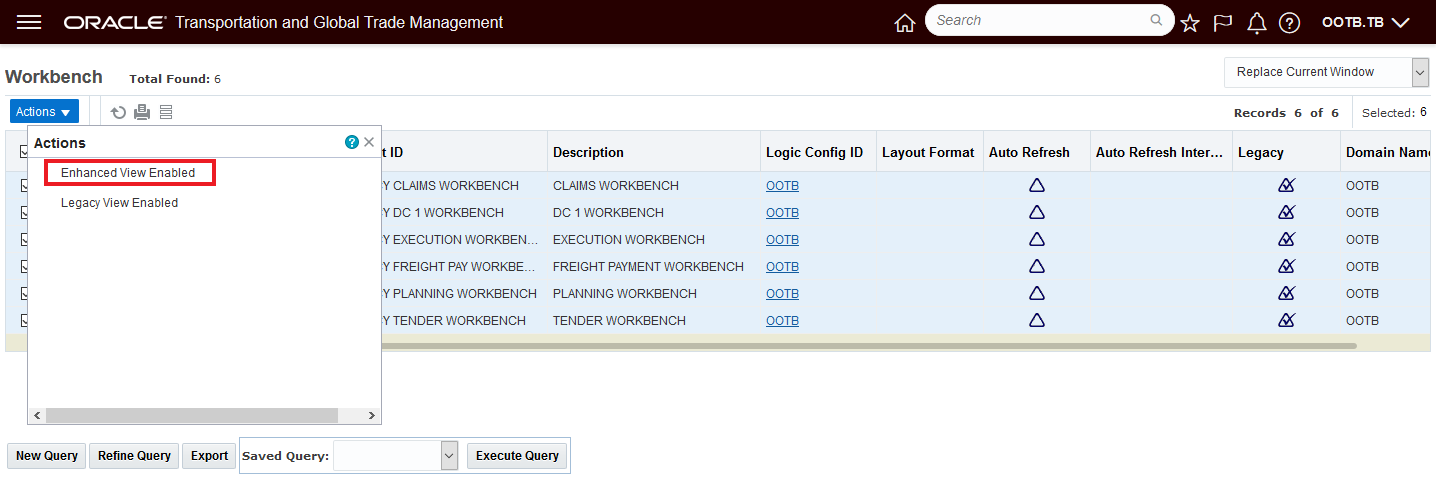
Enhanced View Enabled Action
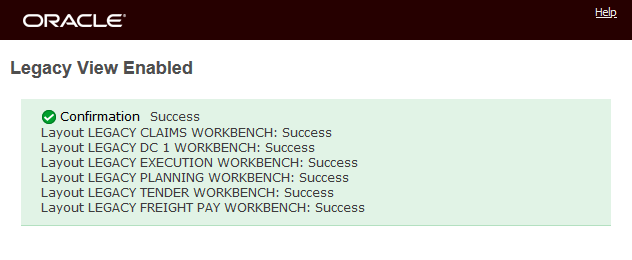
Results of running the action - each workbench is converted

Enhanced View Enabled - Workbench Conversion Message
The six selected Workbenches that were in the Legacy format are no longer legacy workbenches. The converted Workbenches will now show up in the Enhanced Workbench designer and not in the Legacy Workbench Designer.
Legacy to Enhanced View Converted
If, for some reason you need to convert the Workbenches back to the Legacy format - that can be done very easily by selecting the Workbenches and running the Legacy View Enabled action as shown below.
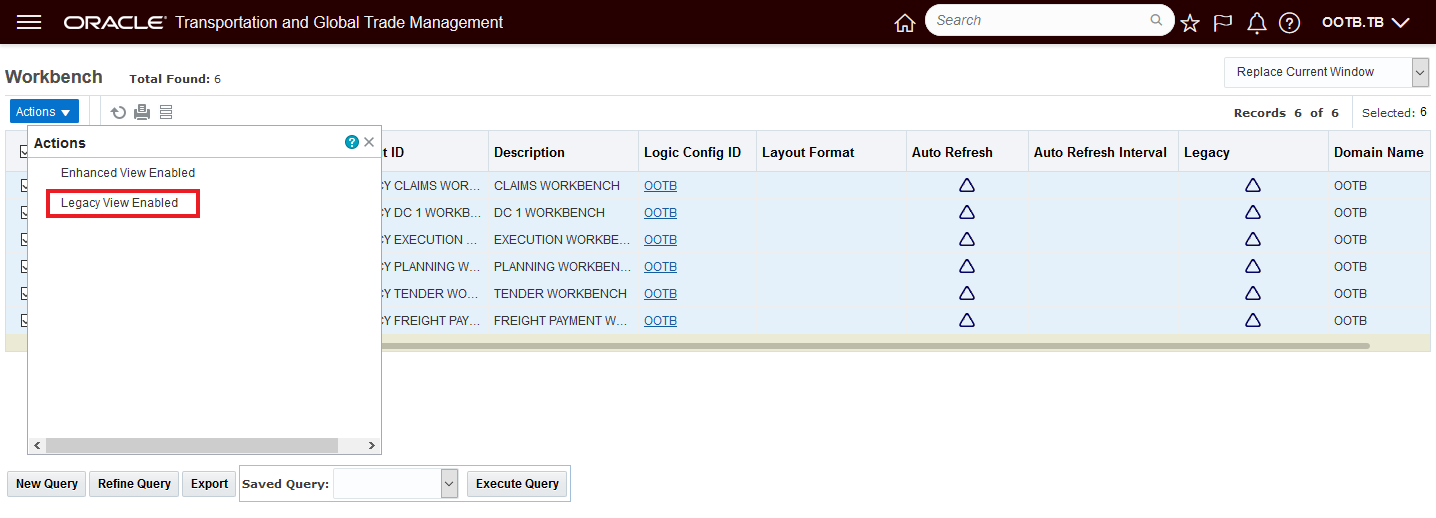
Enhanced Back to Legacy
Convert Back to Legacy
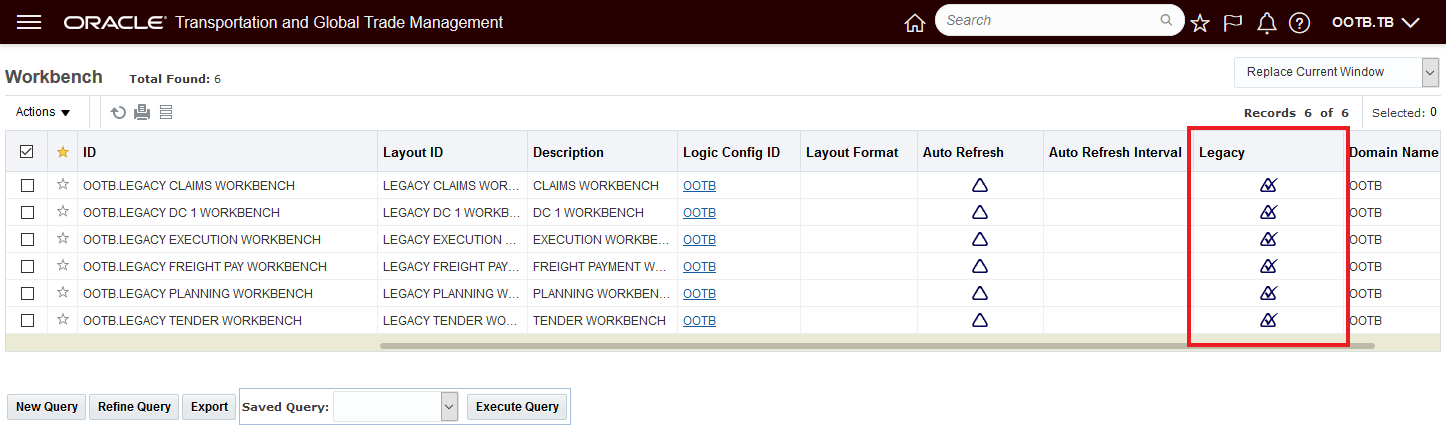
Legacy Flag Visible
The Enhanced Workbench Menu and Navigation options can be easily toggled on and Off.
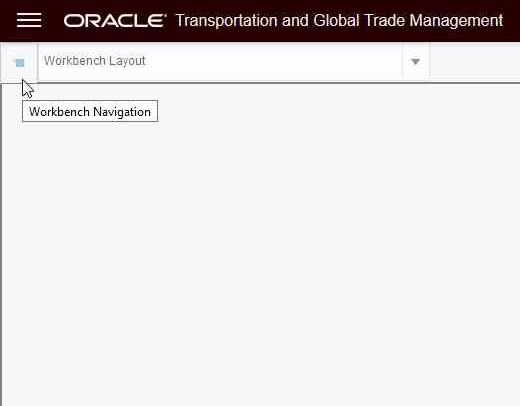
Enhanced Workbench Menu
Additional Content Types
- New Analytics Dashboard Content Type which allows you to add BI content as a panel within the workbench
- New Data Visualization Content Type
- New Shipment Gantt Content Type which provides you with a Gantt view of your shipments over time
- New Transactional Report Type which allows you to include an Oracle Analytics Publisher report within the workbench
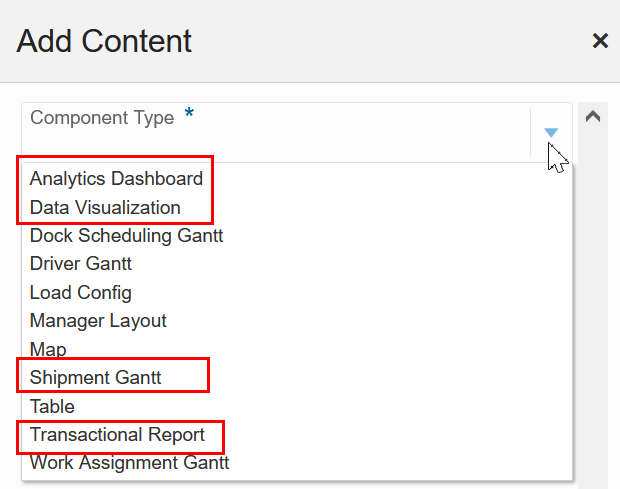
New Content Types Analytics and Shipment Gantt
Below is an example of the Analytics Dashboard Content Type incorporated into the Enhanced Workbench Layout. In this example, the Service Provider Metrics Dashboard is incorporated.
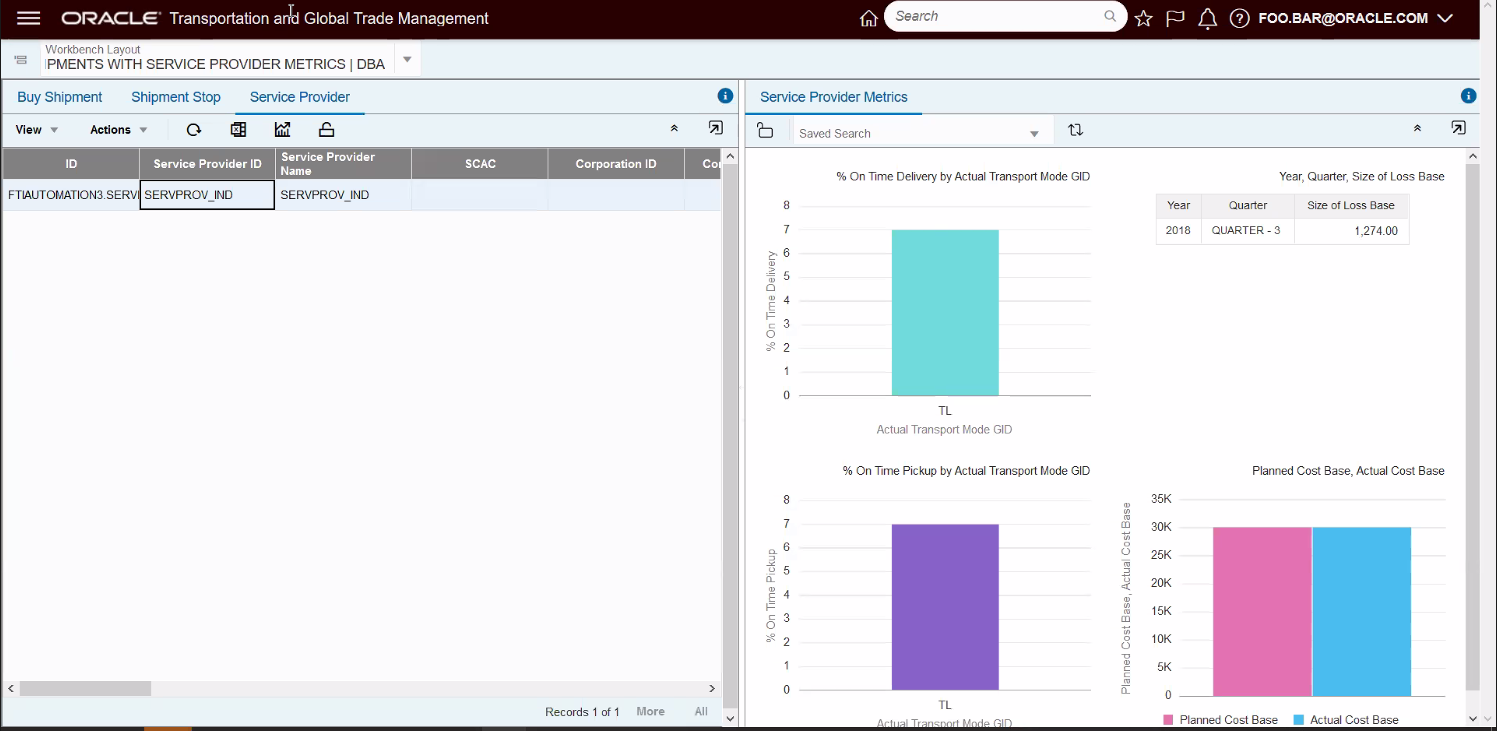
Analytics Dashboard Component - Service Provider Metrics
Below is an example of the new Data Visualization Content Type incorporated into the Enhanced Workbench Layout. In this example, the analysis is for Logistics Machine Learning accuracy.
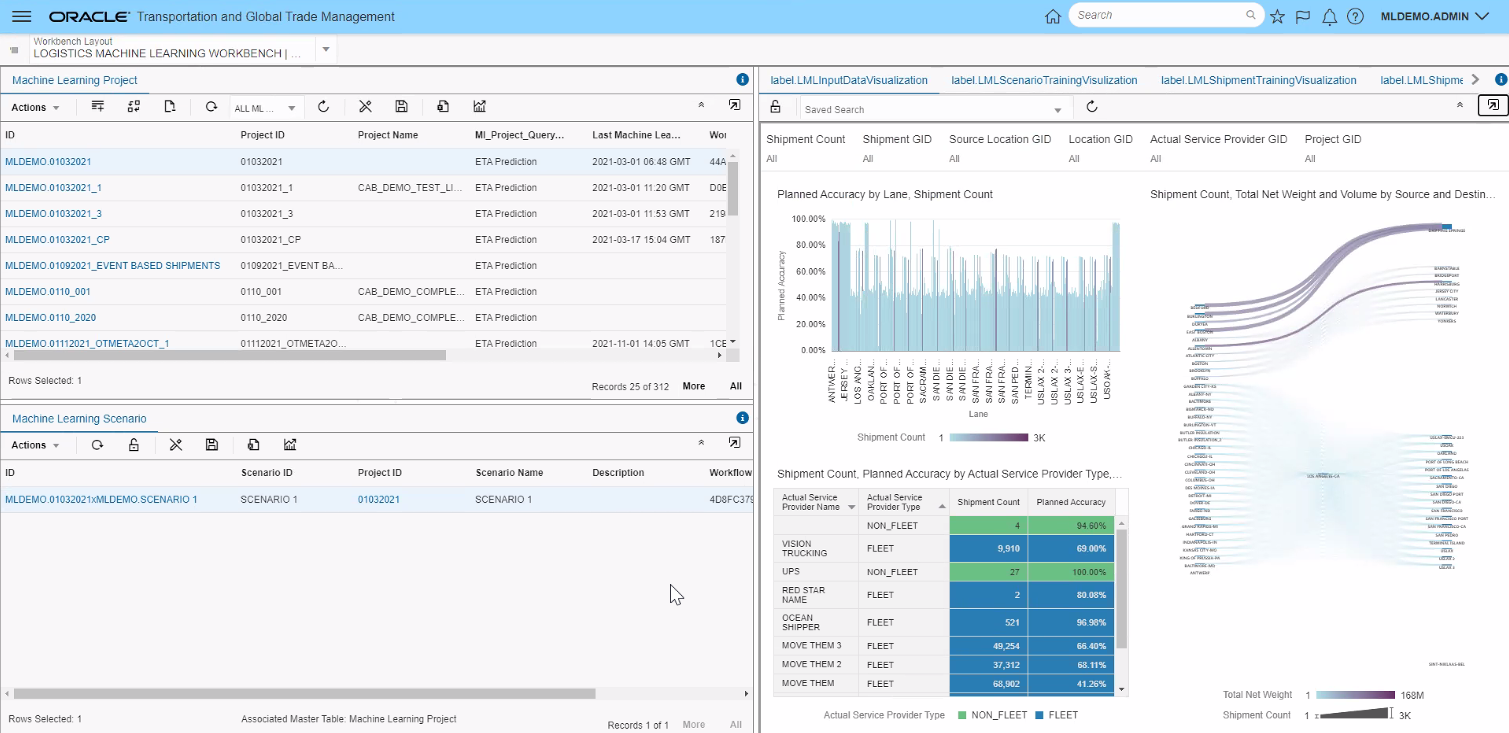
Data Visualization Content Type
The example below shows the new Shipment Gantt that provides you the opportunity to visualize your shipments and the stops in a Gantt format.

Shipment Gantt
The Shipment Gantt available hover info drills into both the shipment level and the stop level.
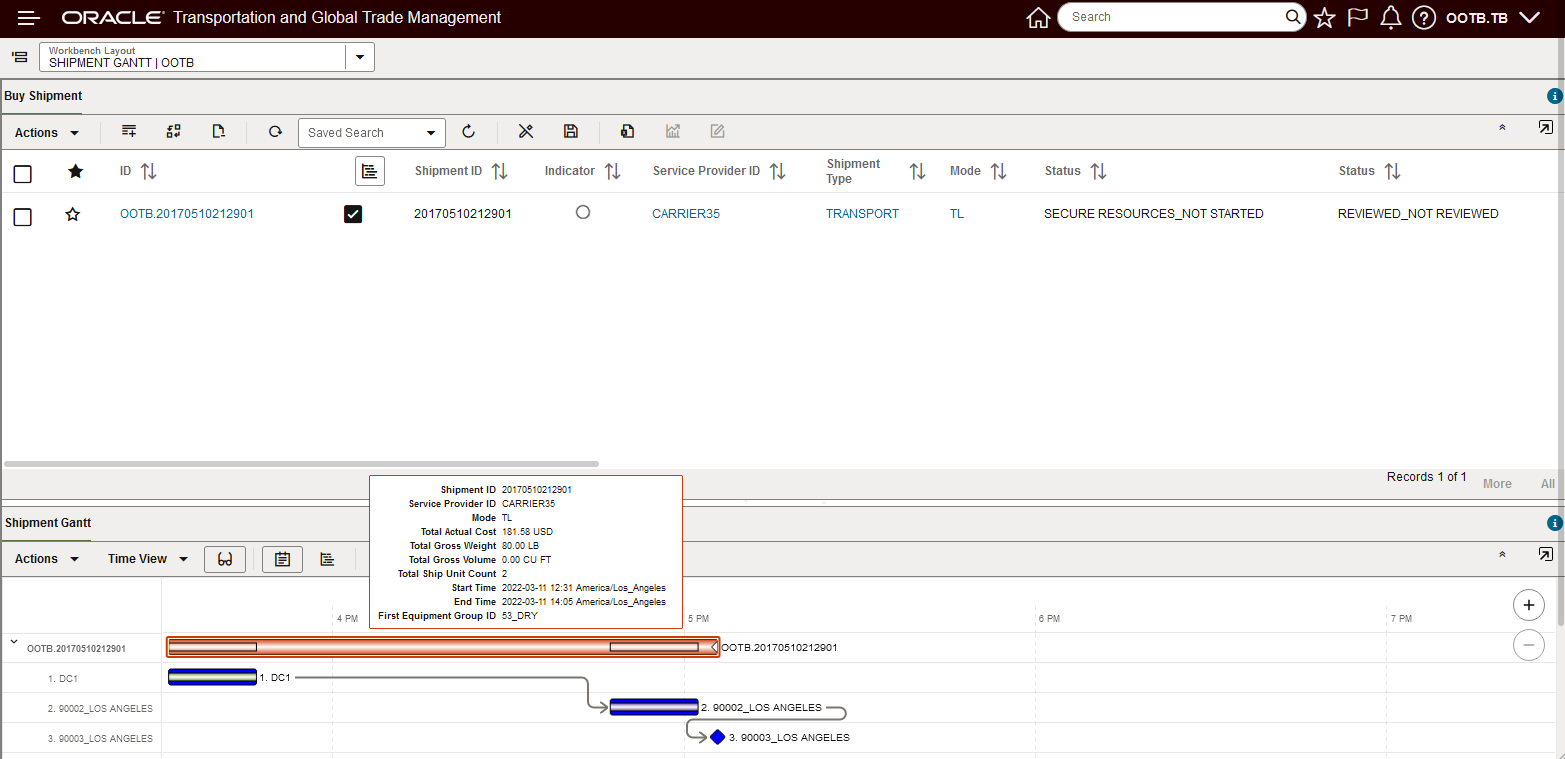
Shipment Gantt Shipment Hover

Shipment Gantt Stop Hover
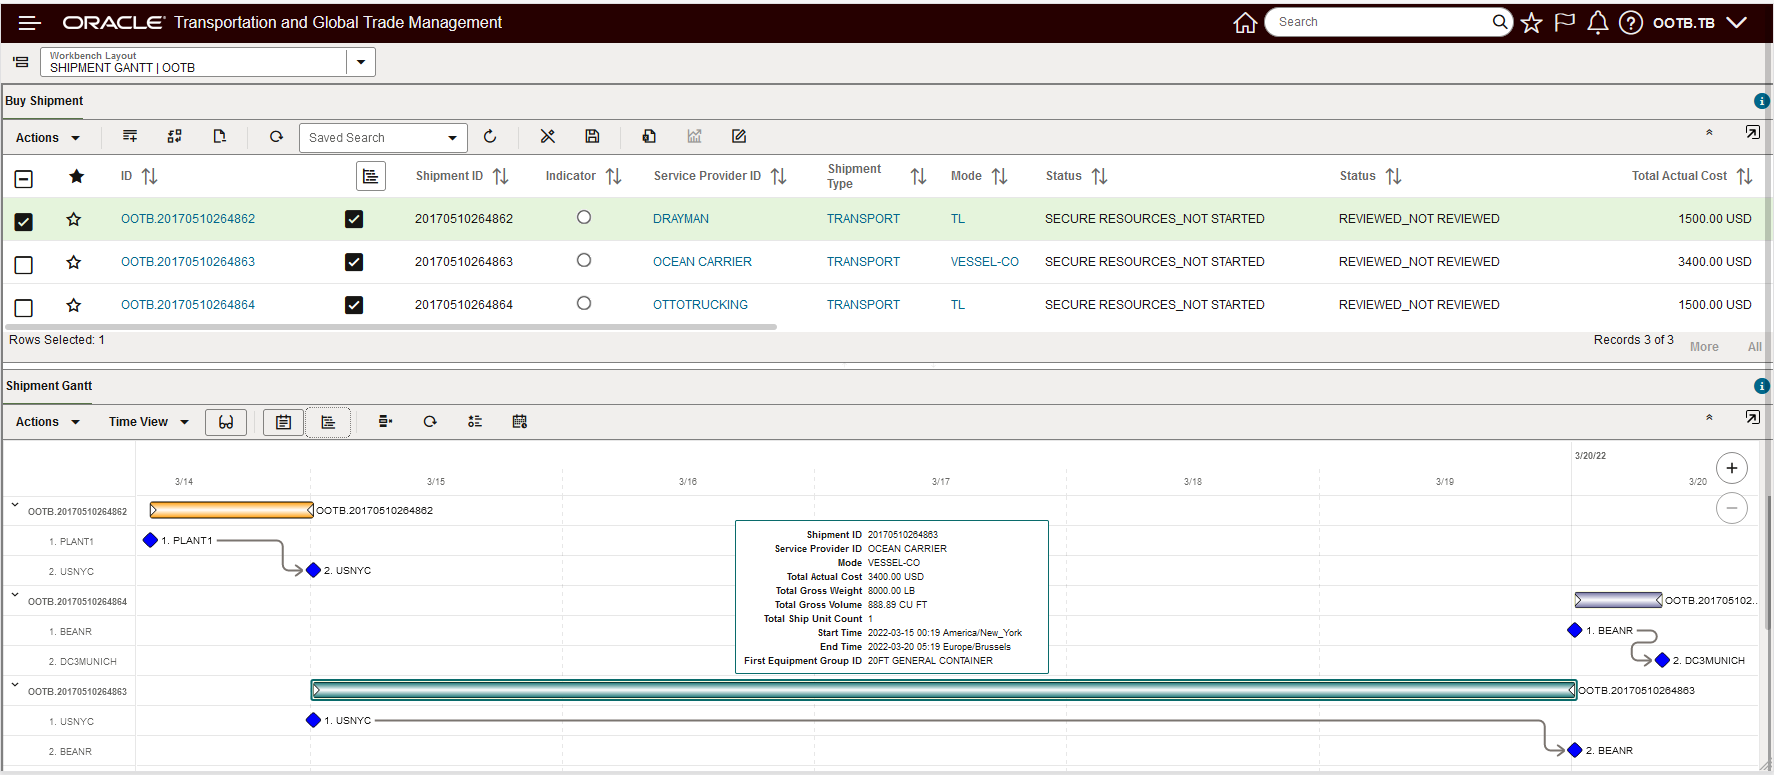
Shipment Gantt Ocean Shipment - Dray - Ocean - Dray
The Overview Panel has been added to all the Gantts (Dock Scheduling, Driver, Shipment, and Work Assignment) to allow for an improved Gantt navigation experience. The Overview allows you dynamically set the time window you wish to review the Gantt with, as well as allowing you to slide that window across time - either earlier or later.
In the example below, the Overview is used to focus on a set of shipments.
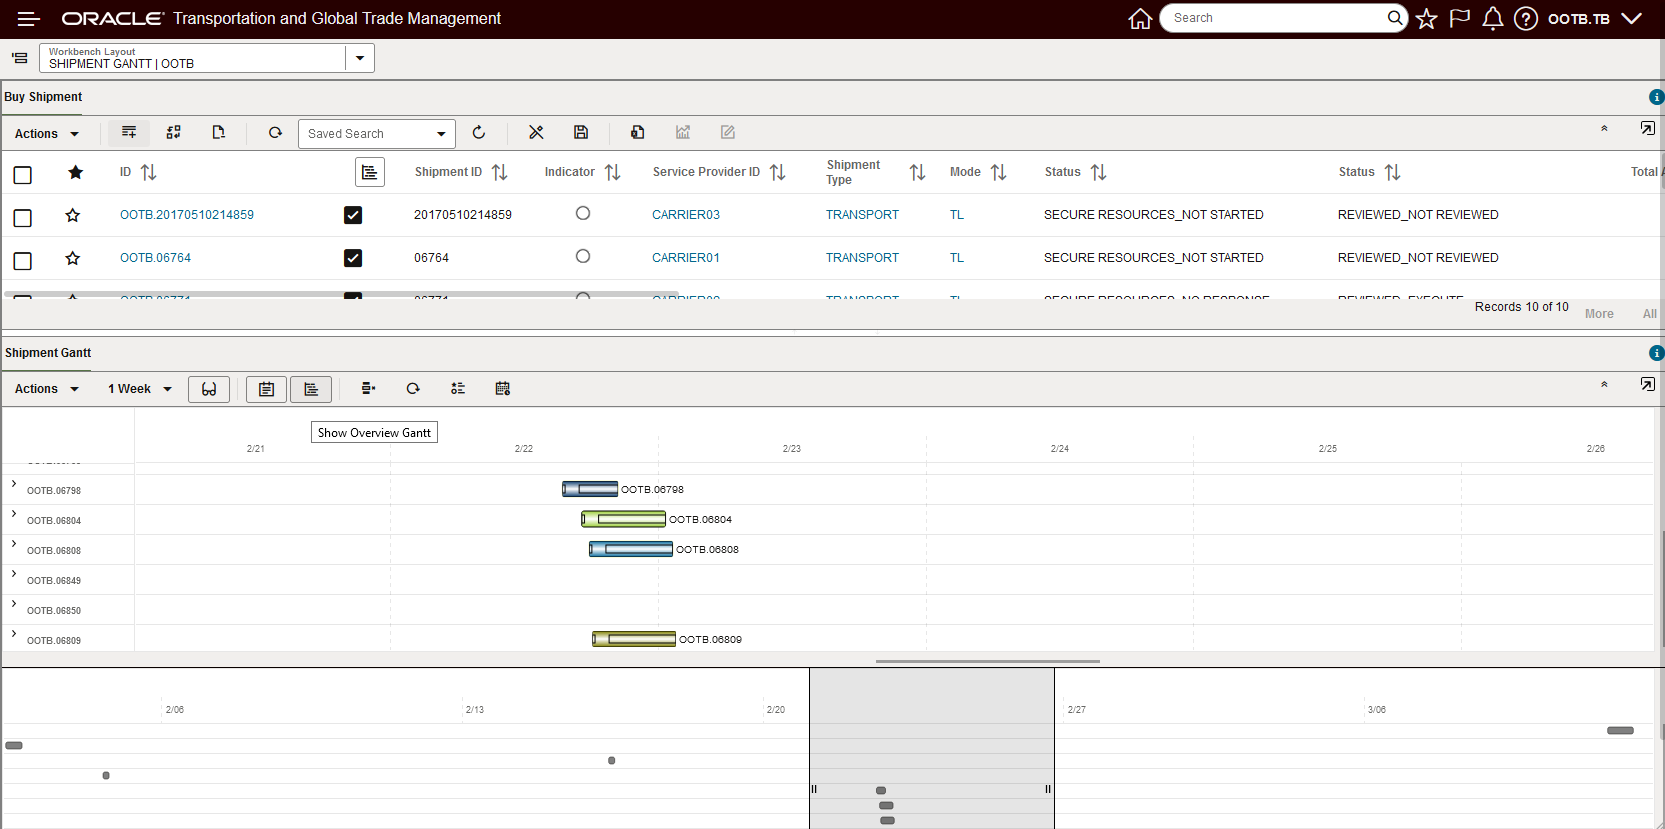
Gantt Overview
In the example below, the Overview is used to view all the shipments.
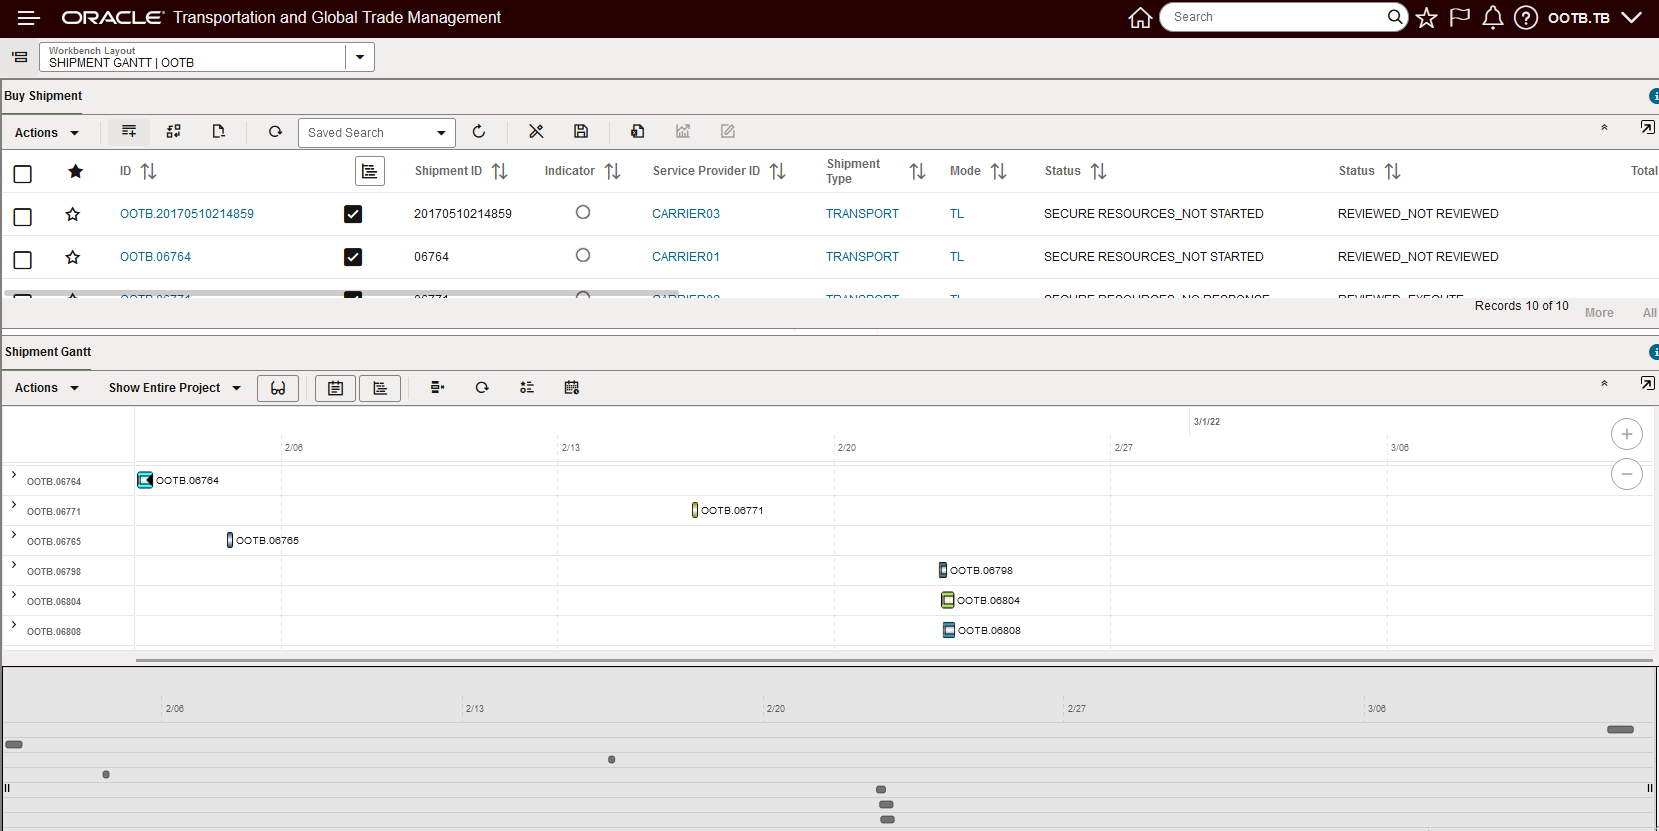
Project Level Overview Shipment Gantt
You can also use the Overview window to change your time frame - left (earlier), or right (later) and to narrow the time range to view.
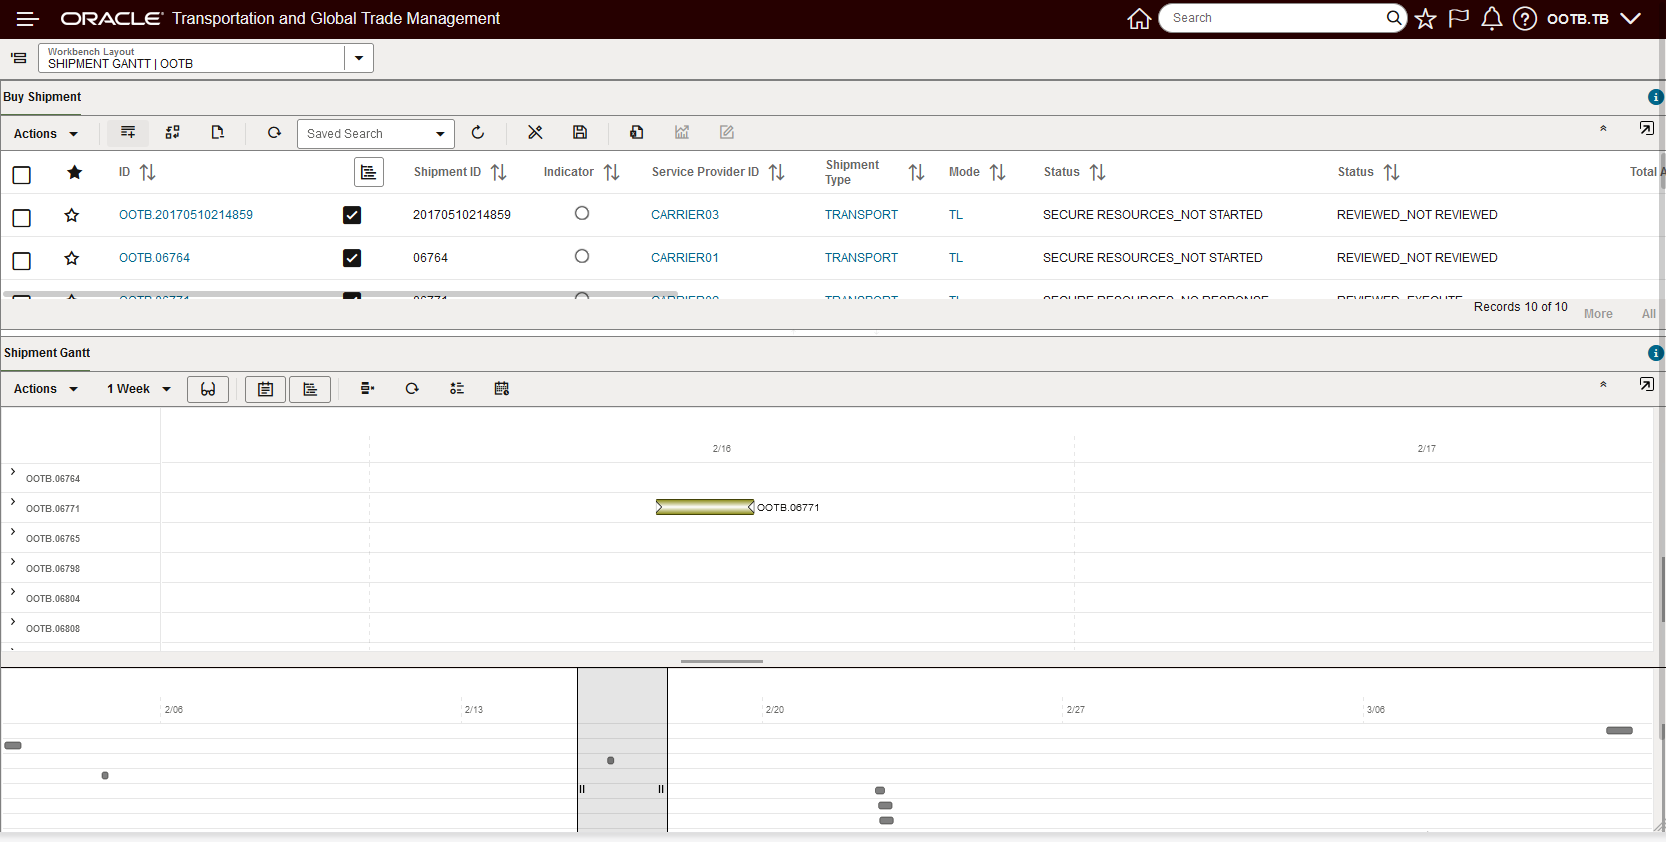
Overview Shifted to the Left with a Narrowed Time Window
The new Work Assignment Gantt, below, has also been enhanced to provide a clean, modern and more information rich view into your work assignments.
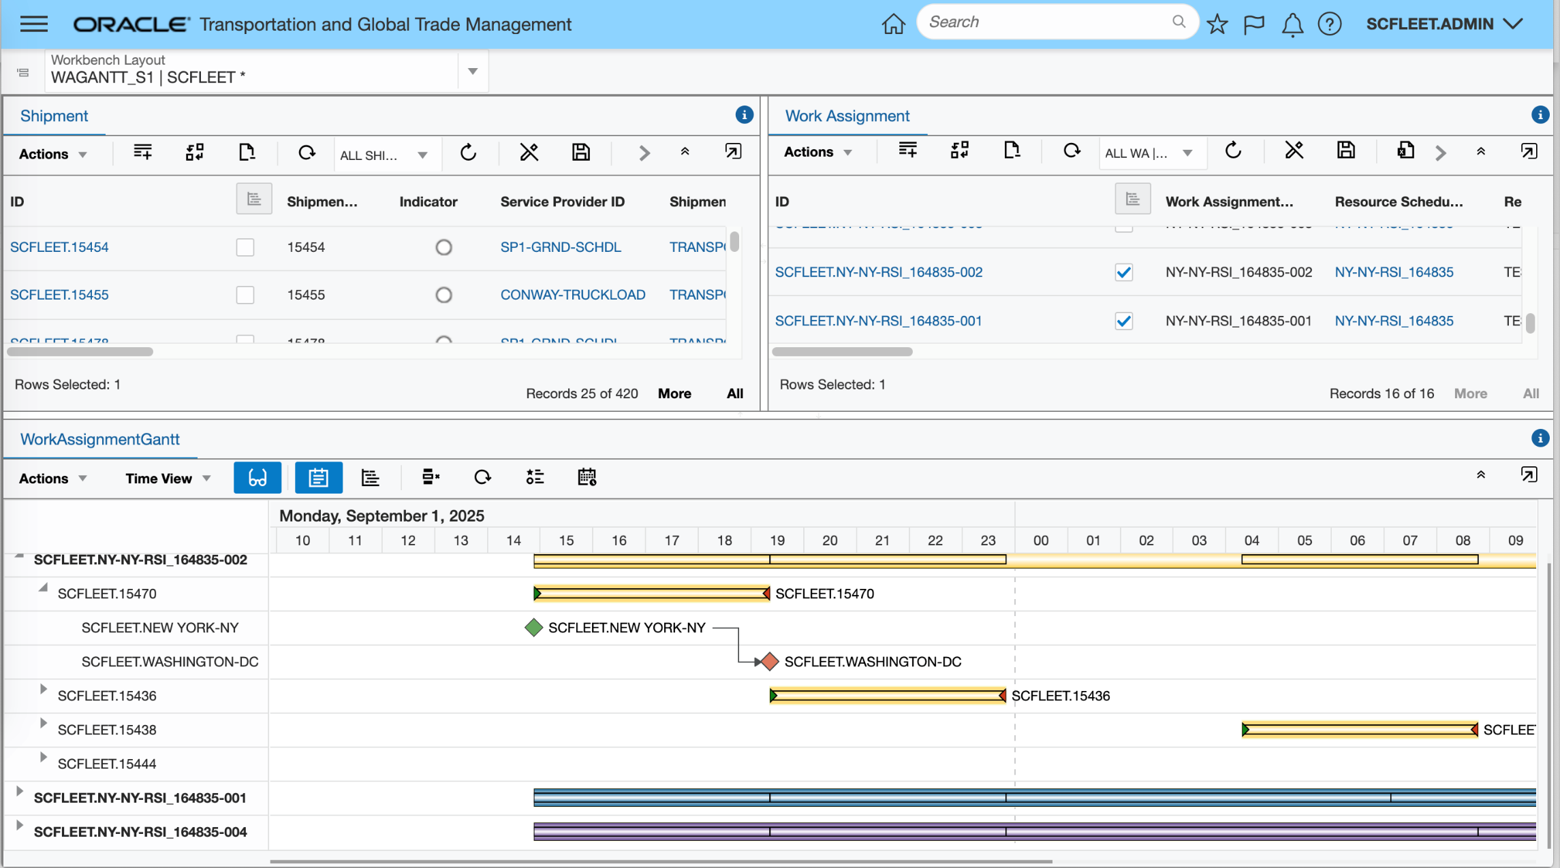
Work Assignment Gantt
Gantt Time Zone Improvements
The Enhanced Workbench Gantts now support a standard hierarchy for setting/determining the Time Zone used in the Gantt.
The Gantt time zone hierarchy logic is as follows:
- Use the time zone defined on the Workbench Gantt Logic Configuration.
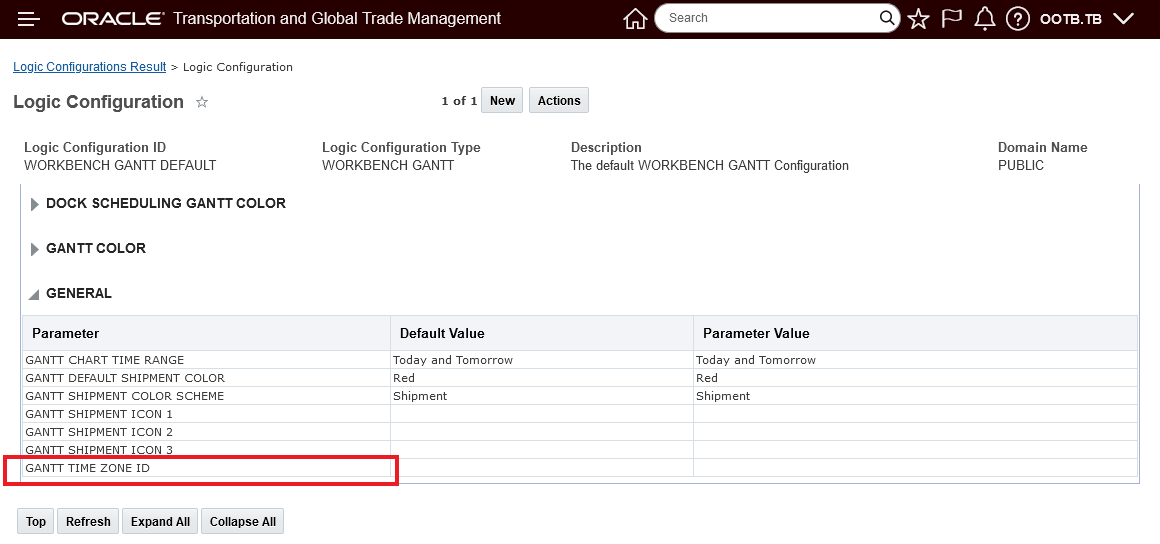
Workbench Gantt Time Zone Logic Configuration
- If no time zone is defined on the Workbench Gantt Logic Configuration - then use the time zone defined on the User Preference.
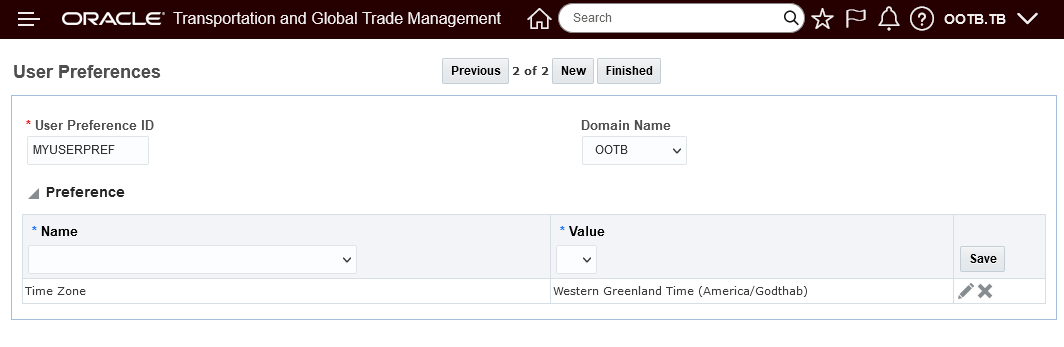
User Preference Time Zone
- If no time zone is defined on the User Preference then use the default time zone.
All of the Enhanced Workbench Gantts (Dock Scheduling, Driver, Shipment, and Work Assignment) now provide you with visibility to the time zone being used for the Gantt.
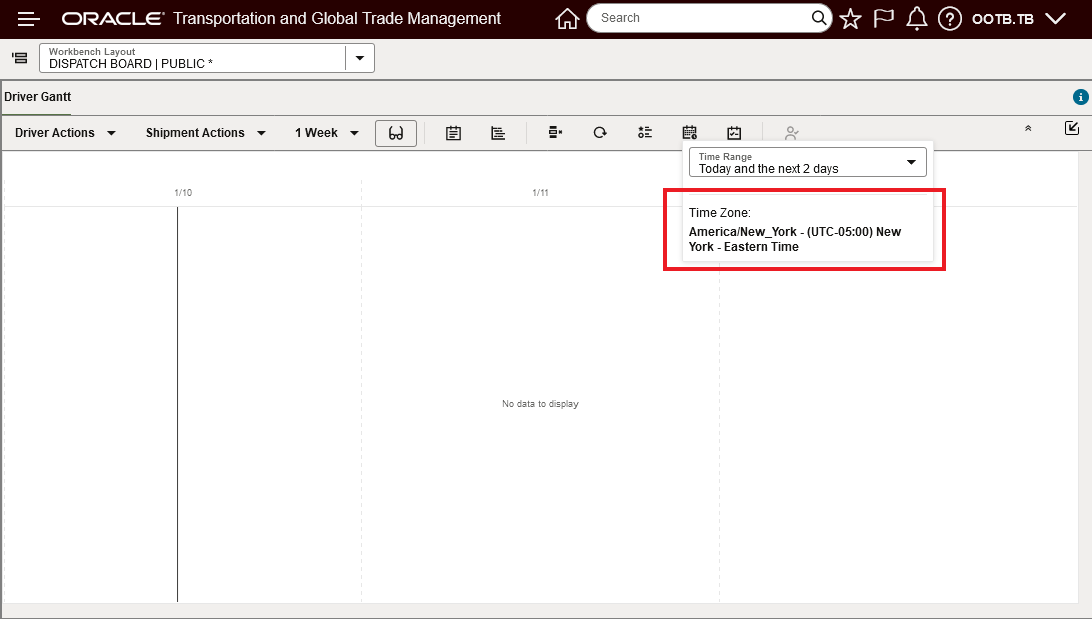
Time Range - Current Time Zone Visibility
The enhanced typeahead search in the Workbench Layout ID dropdown searches for your Workbench Layouts using a contains search for text entered.
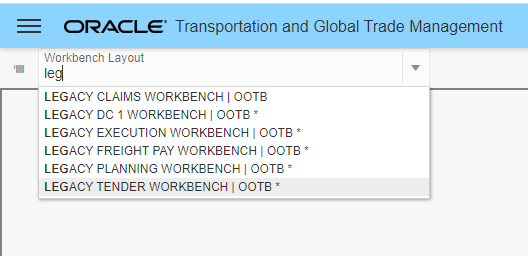
Improved Search - All Enhanced Workbenches with "leg" in the ID
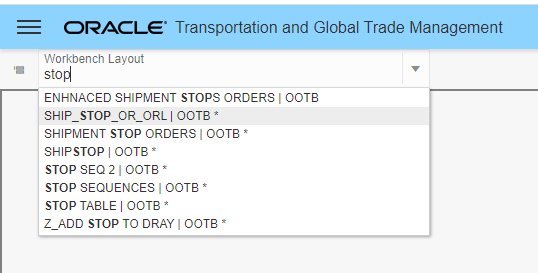
Improved Search - All Workbenches with "stop" in the ID
The example below shows the new capability available to you for collapsing your tabs.
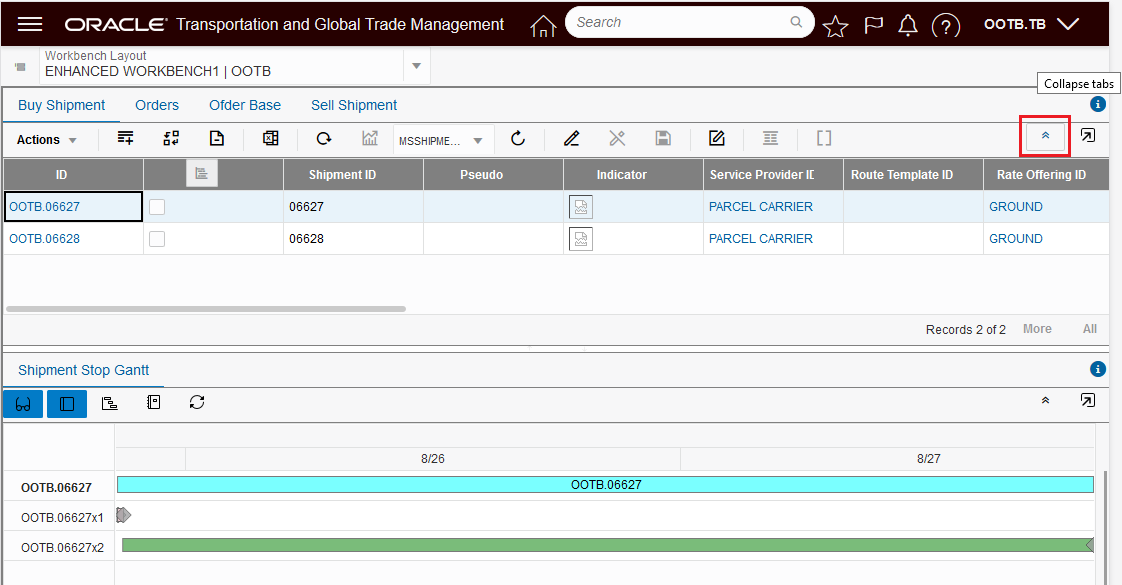
Expanded Tabs View

Collapsed Tabs View
The Load Config region now supports the Edit Load Config view and manipulations.
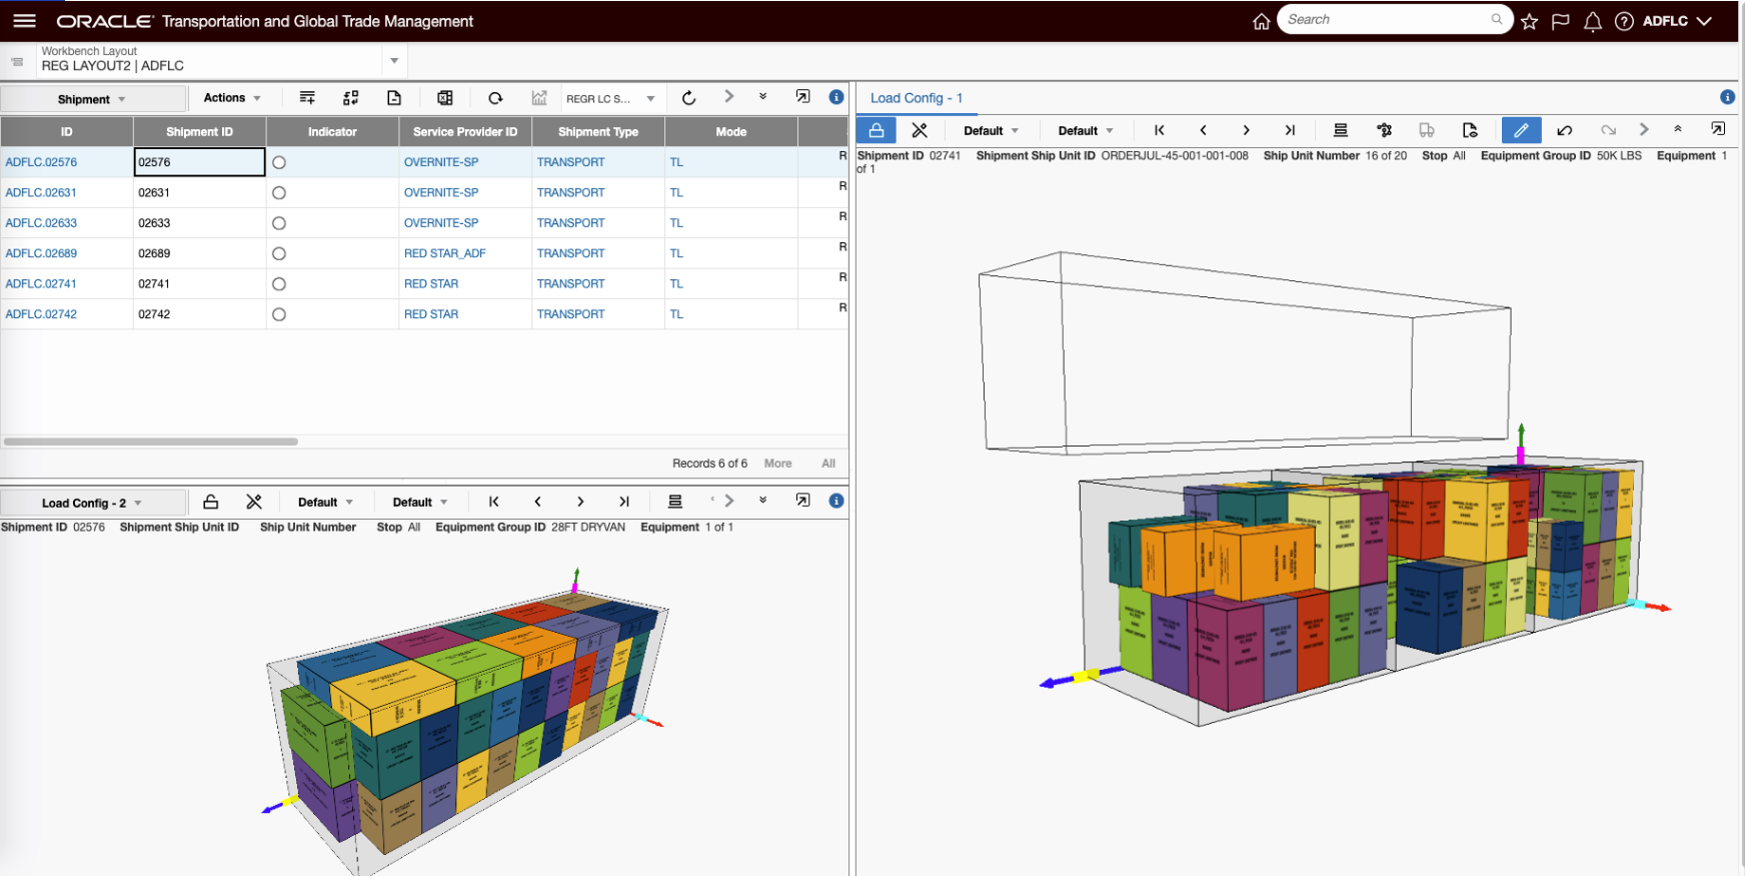
Edit Load Config Available in Enhanced Workbench
The Enhanced Workbench also provides you with greatly improved logging for trouble shooting workbench issues. In addition to improved and expanded Errors, Warnings and Info related messages, logging now uses colors to denote different levels of logging - Errors (red), Debug and Info messages (green).
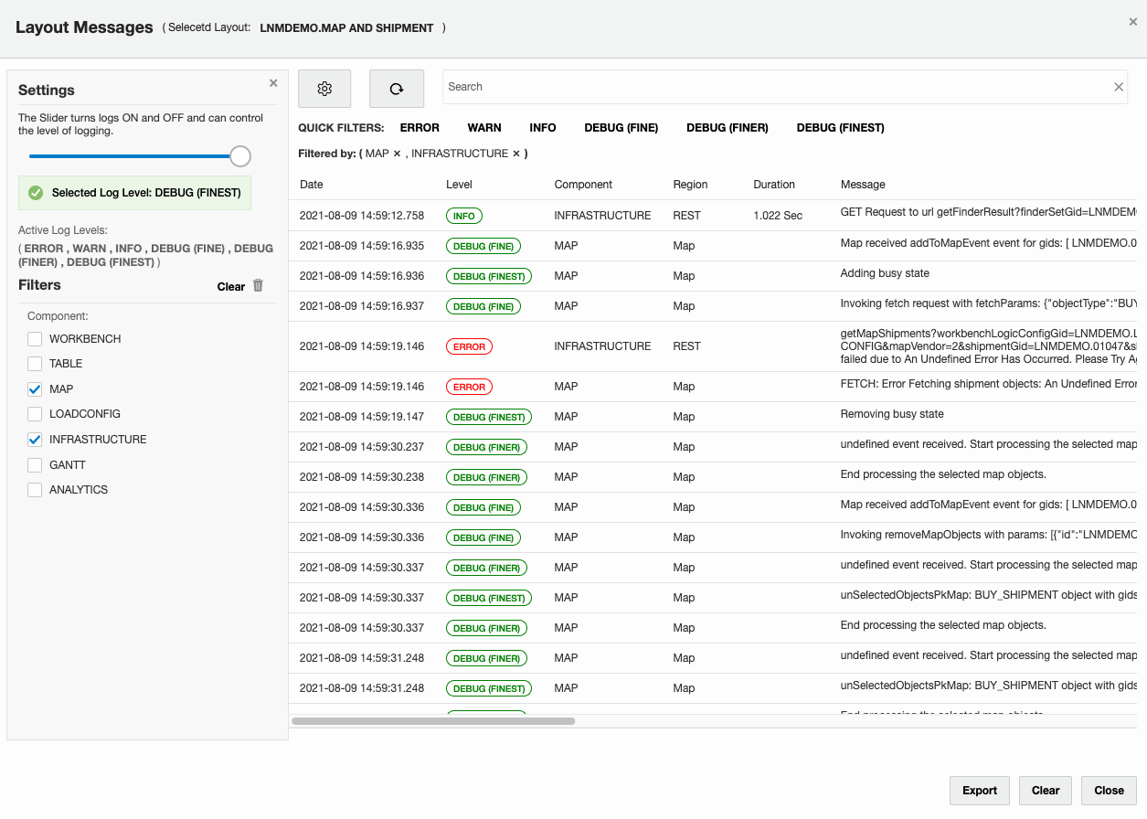
Improved Logging
Steps to Create a Basic Enhanced Workbench
The steps for creating a workbench using the new Enhanced Workbench Designer are equivalent to the steps you have used to create Workbenches previously. There are just a few differences in the navigation and icons displayed to access the functionality used to create and configure an Enhanced Workbench. The example below will be used to identify the steps required to create a simple Enhanced Workbench. The example will focus on the changes.
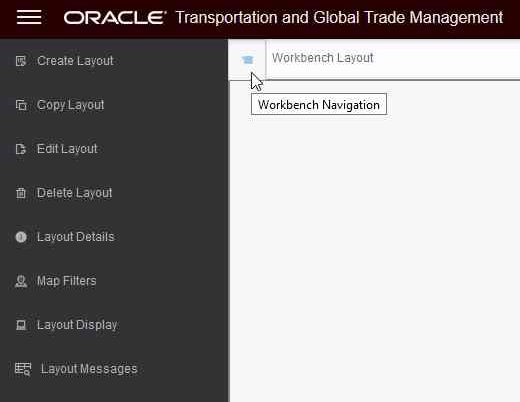
Step one is to navigate to the Enhanced Workbench Designer. Once there you will select the Create Layout option.
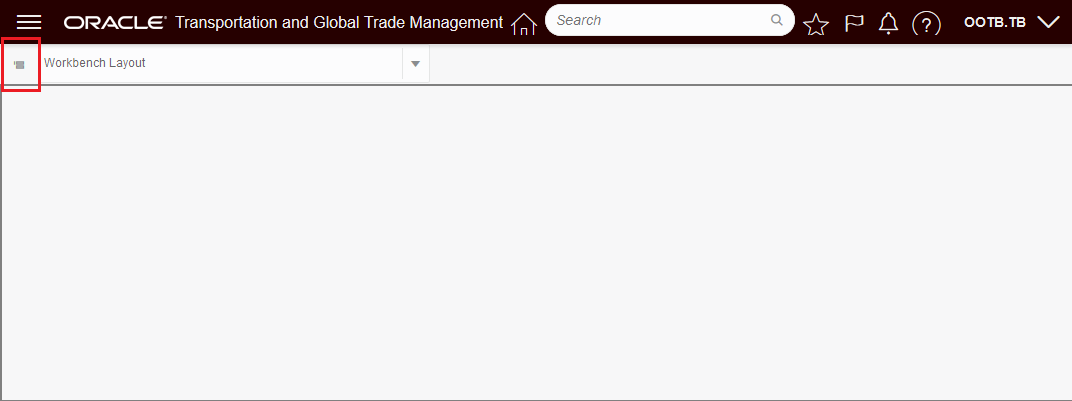
Bring up Enhanced Workbench Navigation menu.
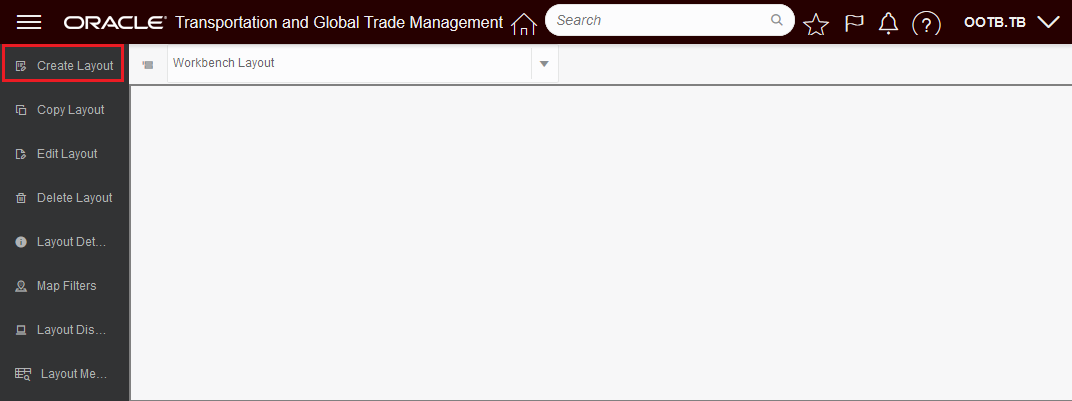
Select Create Layout.
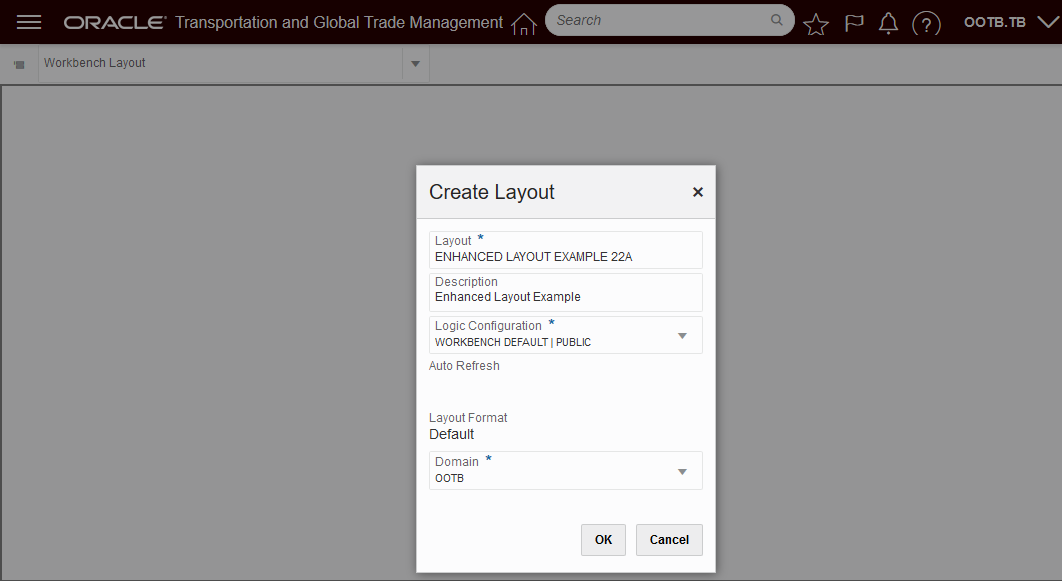
Enter info about your workbench.

Select the Tool Icon to add, delete, and edit content and split vertically or horizontally.
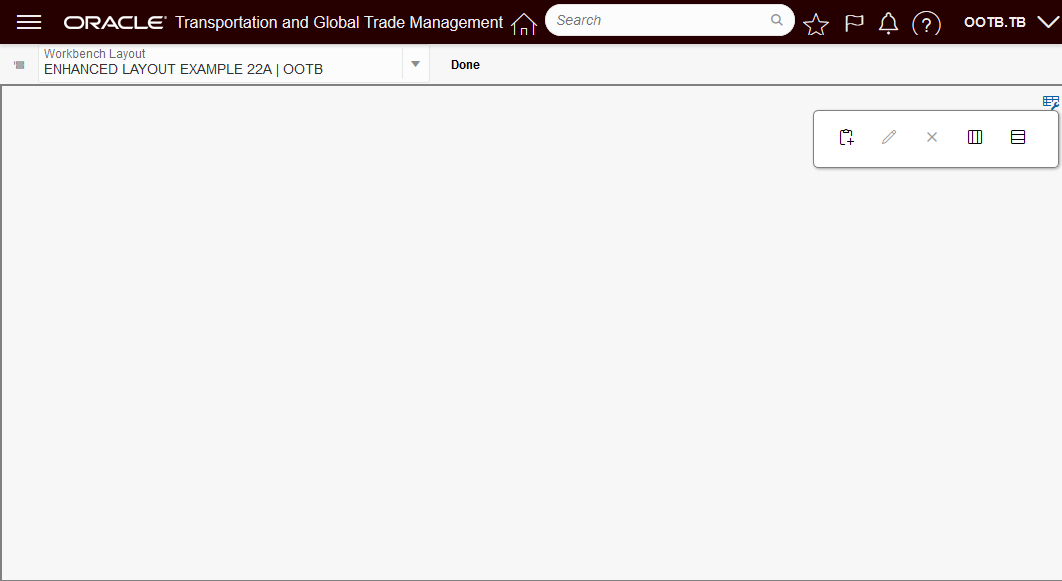
Tool Icon
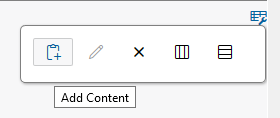
Add Content
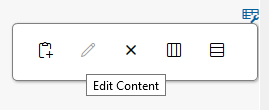
Edit Content
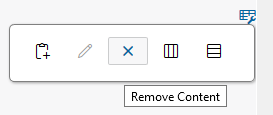
Remove Content
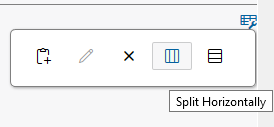
Split Horizontally
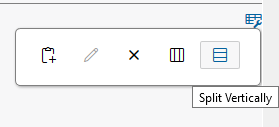
Split Vertically
This feature resets the development platform for the Workbench Designer and Workbench Layouts providing you with many usability, functionality and performance improvements.
Steps to Enable
You don't need to do anything to enable this feature.
Tips And Considerations
While the Enhanced Workbench is mostly equivalent to the original Workbench - there remains a short list of capabilities that are not yet available in the Enhanced Workbench. The list of items that remain on the product backlog for the Enhanced Workbench include:
- The “Layout Droplist”/upper band of the Enhanced Workbench screen is not collapsible.
- The Layout Display options are not available - i.e., the settings for Compact and Super Compact are not available.
- No Drag/Drop from Table to Gantt - this capability is used in appointment scheduling to drag stops into the Gantt for appointment schedule. For now schedule appointment actions will need to be used.
- No Right click on an Empty Slot in the Gantt to block/unblock a slot in the Appointment Gantt.
- No support for Work Queues in JET Workbench Tables.
- Map Filters are not available.
There are no steps required to enable the Enhanced Workbench feature and there are four Public Enhanced Workbenches available to use out-of-the-box (below).
Public Enhanced Workbenches:
- LOGISTICS MACHINE LEARNING WORKBENCH
- MODELING ANALYTICS WORKBENCH
- LOCATION BASED DOCK SCHEDULING WORKBENCH
- DIAGNOSTICS_LAYOUT
We would recommend either converting or re-creating one of your current ADF Workbenches using the Enhanced Workbench feature to become familiar with the new look and feel and the capabilities provided by the Enhanced Workbench.
NOTE: The Enhanced Workbench will ONLY work if the JET APPLICATION SHELL Optional Feature is Opted In.
Business Monitor – Alert Badge
This feature provides you with a visual Business Monitor Alert Badge that will be displayed, after a refresh, if any of the saved query counts in your Business Monitor are changed. The Business Monitor Alert Badge allows you keep your Business Monitor minimized and then use the Alert Badge as the trigger for you to open your Business Monitor to review the changes.
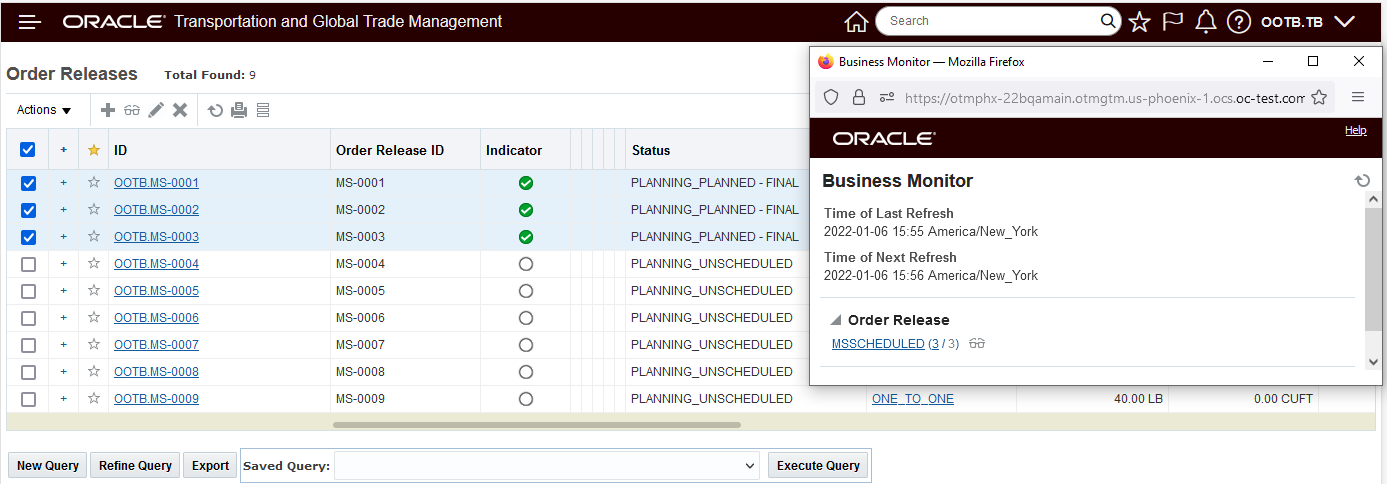
In the scenario below, the Business Monitor has one saved query for scheduled order releases, when three of the order releases are scheduled, the Alert Badge is displayed indicating that the count for the saved query has changed.
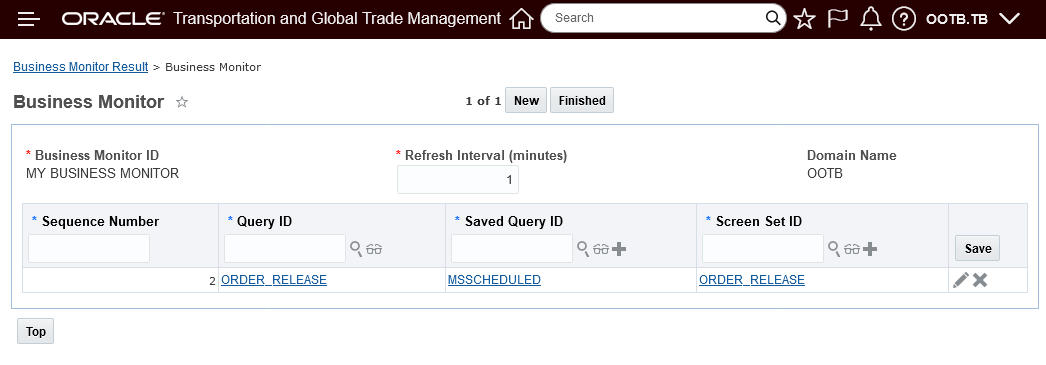
Example Business Monitor
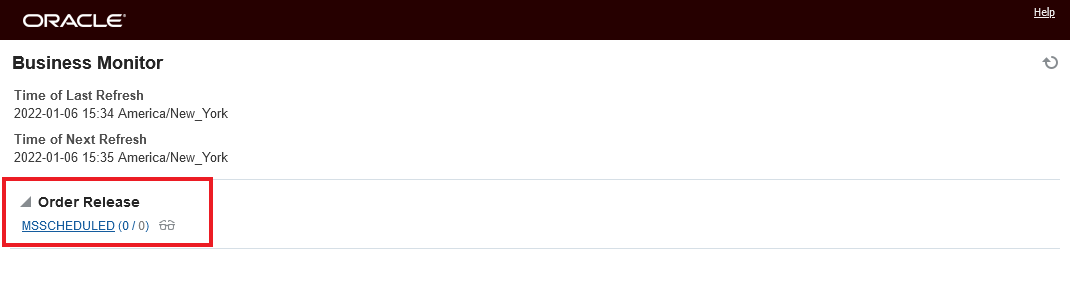
Starting Point No Scheduled Order Releases
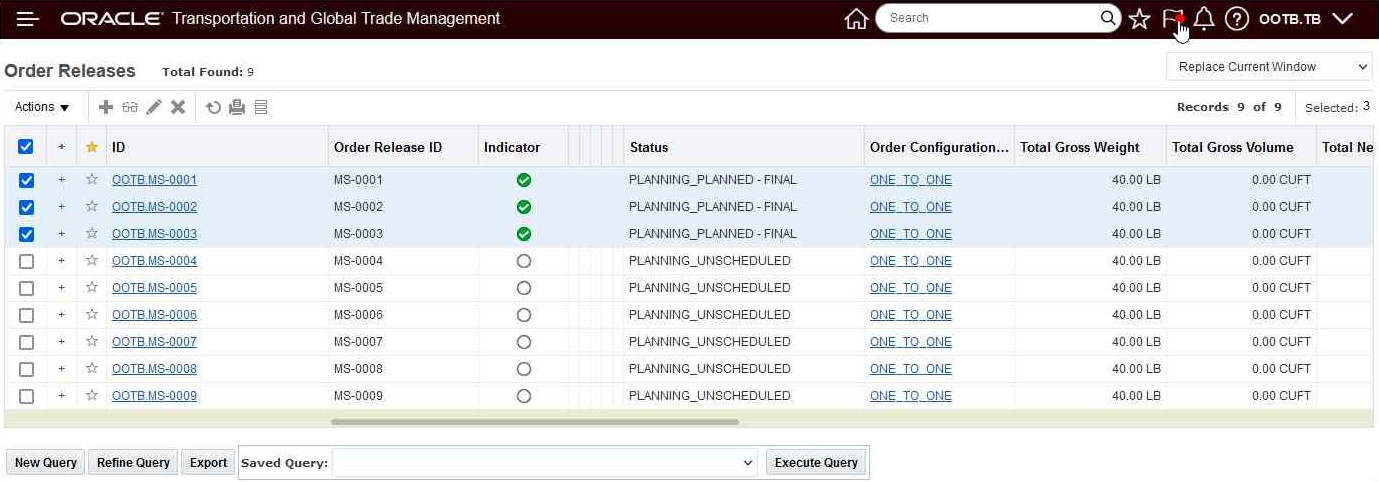
In the screen below, the order releases have been scheduled and as a result the Business Monitor Alert Badge in now on - indicating that the count in the business monitor saved query have changed.

Order Releases Scheduled - Alert Badge Visible
You can review the Business Monitor and clear the Alert Badge by clicking on the Business Monitor icon,
Review Business Monitor and Clear Alert Badge
Business Monitor Opened Alert Badge Cleared
The Business Monitor Alert Badge provides a proactive visual queue to help better monitor changes being traced by your configured Business Monitors.
Steps to Enable
You don't need to do anything to enable this feature.
Tips And Considerations
The Alert Badge is only available in the JET Home Page.
The Business Monitor must be open, but can be minimized, for the Alert Badge to be shown.
View Documents SmartLink Added
This feature adds the Documents SmartLink to an addition set of objects including:
- Demurrage Transaction
- Driver
- Equipment
- Power Unit
- Rate Record
- Rate Offering
- SKU
- Tracking Event
- Work Assignment
- Work Invoice
- Bond
- Campaign
- Campaign Line
- Declaration Line
- Item Classification
- Item Origin
- Item Qualification
- License Line
- Transaction Line
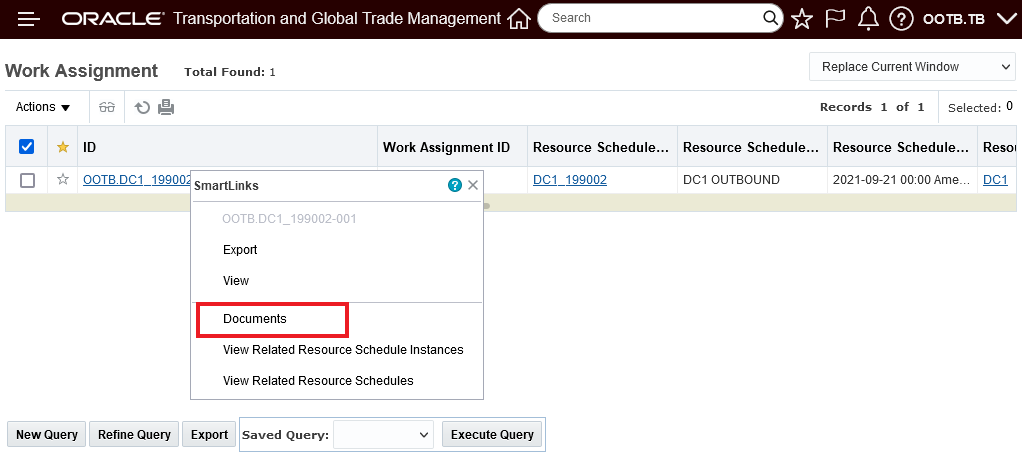
Document SmartLink
This feature improves access and visibility to the documents assigned to the objects where the Documents SmartLink has been added.
Steps to Enable
You don't need to do anything to enable this feature.
OAuth 2.0 and HTTP Header Profile Support for Addition Content Types
This feature extends the BuildNotifyMessageWorkflow, so that the workflow supports REST client capabilities for OAuth 2.0 and custom HTTP Header Profiles for the Content Types of application/xml, and text/xml. This change is in addition to the previously available capabilities provided for the Content Type of application/json.
Given the proper OAuth 2.0 configuration in the External System and the Content Type set to application/xml or text/xml - to take advantage of this new capability, all you will need to do is select REST as the method when sending your XML transmissions.
In the scenario below, the External system setup is created to support sending Content Type 'text/xml' outbound using OAuth 2.0.
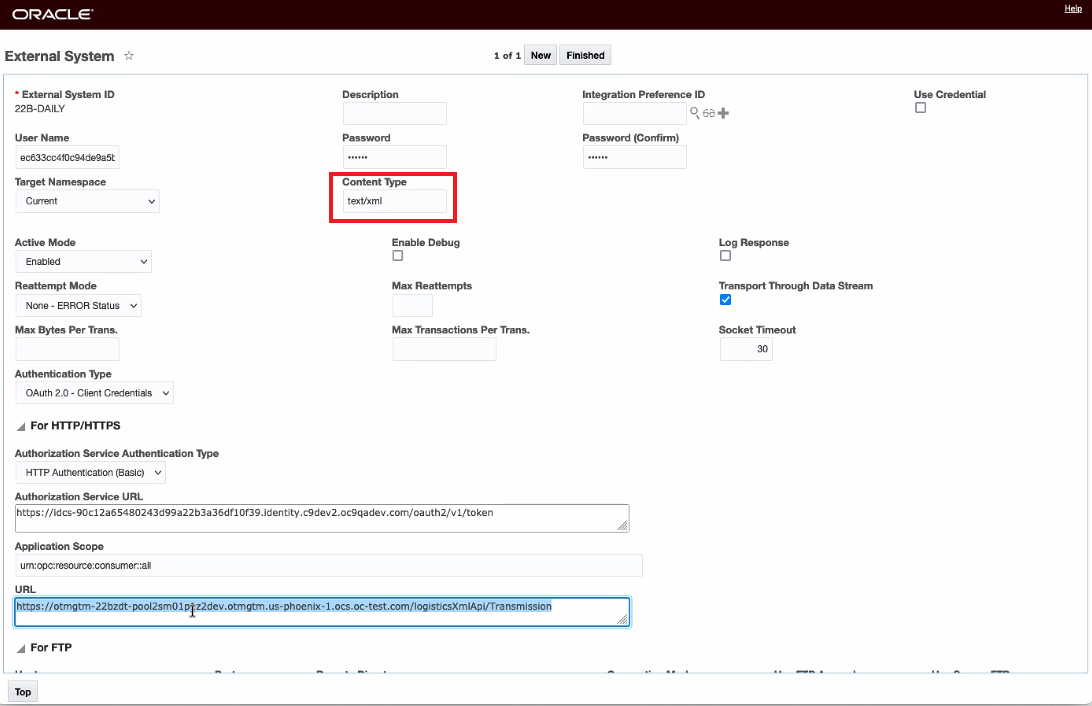
External System Setup
The external system defined above is selected and the run interface command is run against a location.
NOTE: The Notify Type selected is REST.
It is the combination of the REST comm method and the Content Type defined on the external system that determines how the new BuildNotifyMessageWorkflow workflow is used.
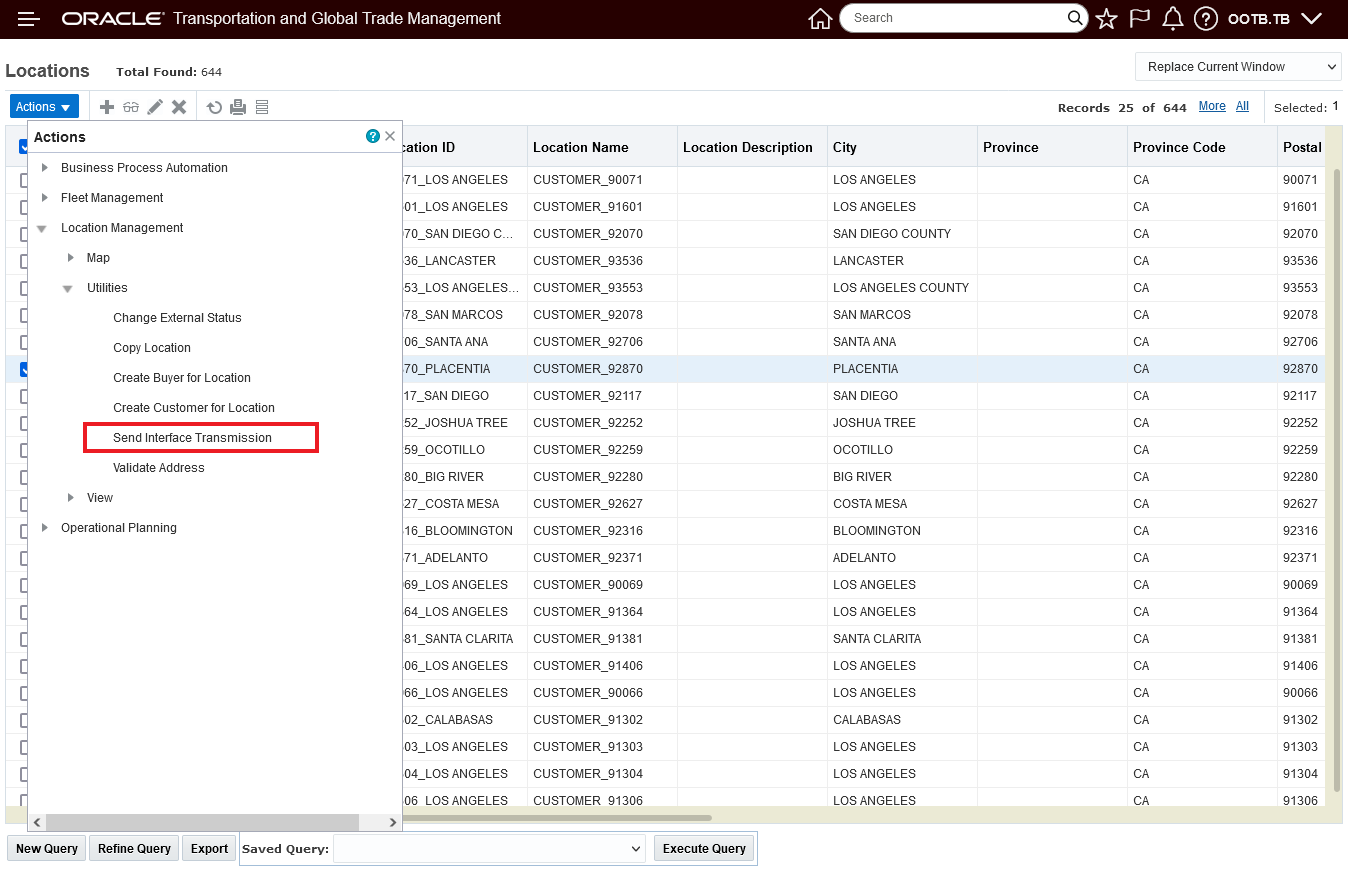
Send Interface Transaction
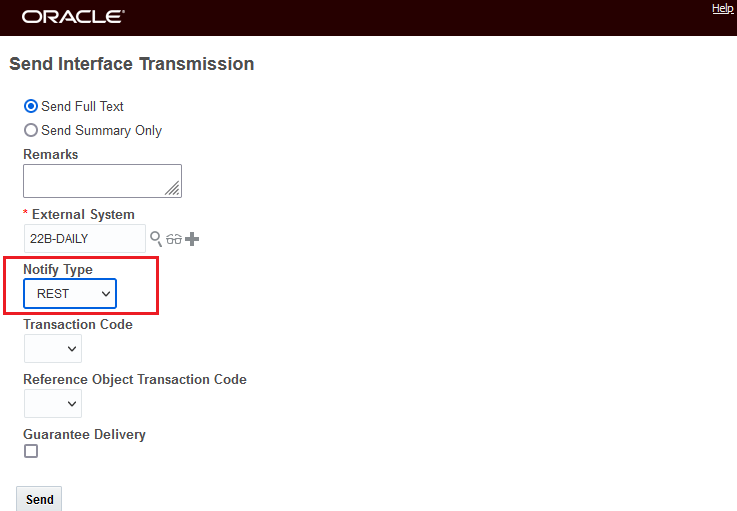
Select Notify Type of REST
If you opted to run Send Integration using the agent action - you would set the Notify Method in the agent action to REST - assuming the same External System setup.
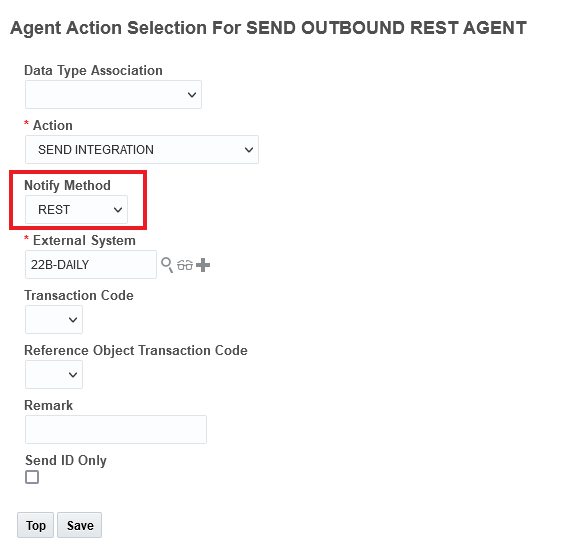
Agent
Provides you access to new integration capabilities (OAuth 2 and custom HTTP Header Profiles) when sending the Content Types of application/xml, and text/xml.
Steps to Enable
- Configure your External System to support OAuth 2.0 - set the Content Type to 'application/xml', or 'text/xml'.
- When using the configured External System for Send Integration/Send Interface Transmission - select 'REST' as the Notify Type/Notify Method.
Tips And Considerations
This feature supports the ability to send outbound Transmission XML with support for OAuth 2.0 and Header Profile. However, the new workflow does not support all the capabilities of Transmission XML integration, namely:
- Outbound Transmission Staging (e.g. issue allocation, send allocation etc)
- Tender Offer
This feature provides you with a new Log Type - Startup - which captures all the Log Ids related to system startup. Once system startup is complete, the Startup log is disabled. You will find the Startup Log Type beneficial in reviewing all the activities related to system startup.
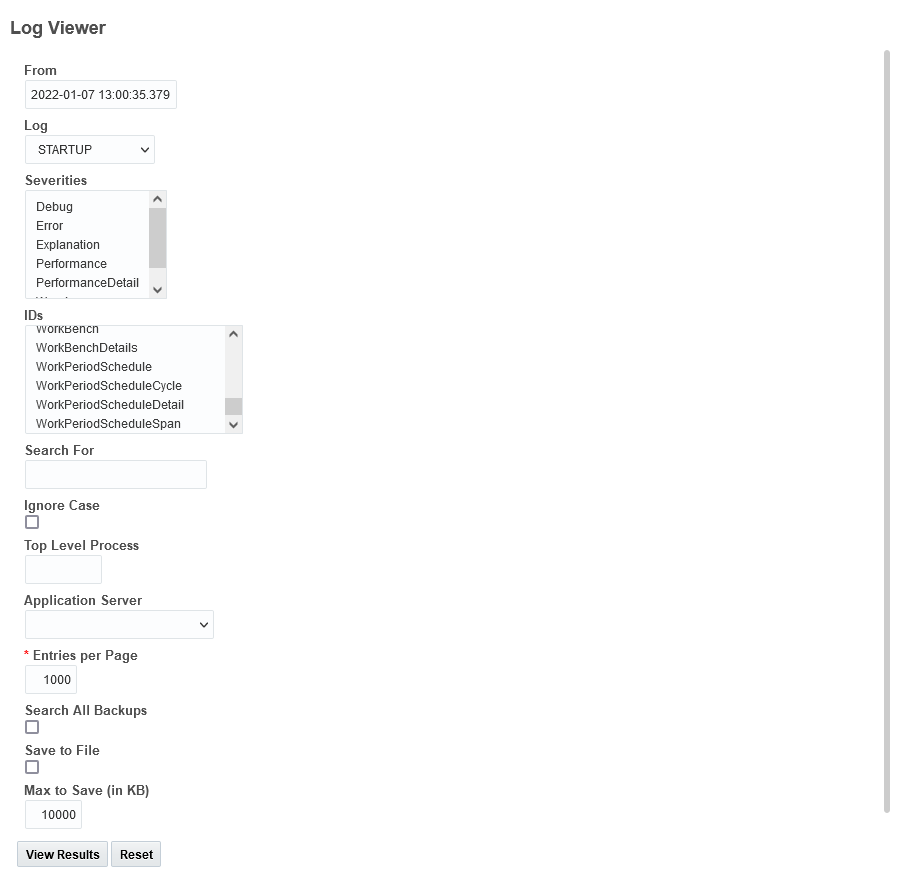
Log Viewer for Startup Log
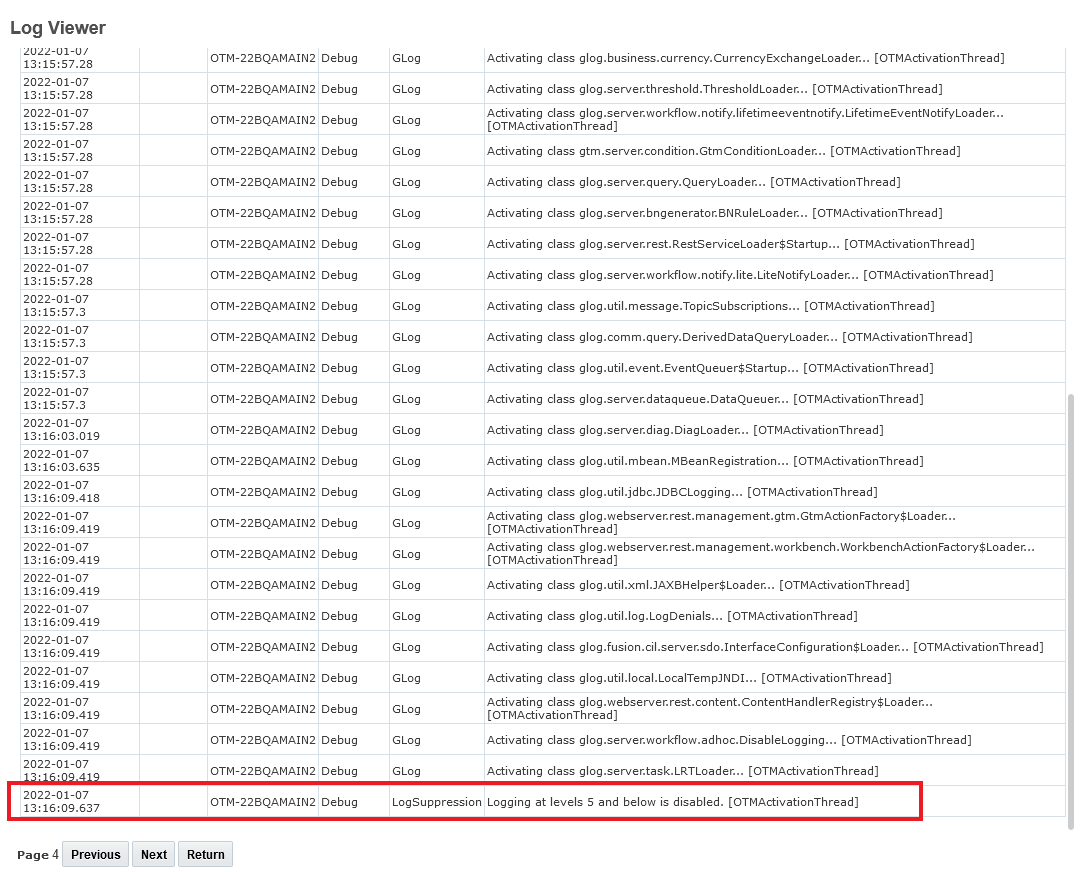
Startup Log Results and Disable Point
This feature provides you with a logging mechanism focused on capturing Startup related activities.
Steps to Enable
Like all logging in OTM, you will need to turn on the Startup logging and specify the details and file name to use for capturing the Startup log entries.
Configuration and Administration > Power Data > Diagnostics > Log Files.

Startup Log Setup
Suppress Currency Conversion Exceptions
The optional feature, SUPPRESS CURRENCY CONVERSION EXCEPTIONS - when enabled, will Log warnings rather than exceptions when currency conversion data are missing. The goal of the feature is to reduce unnecessary clutter in the exception log.
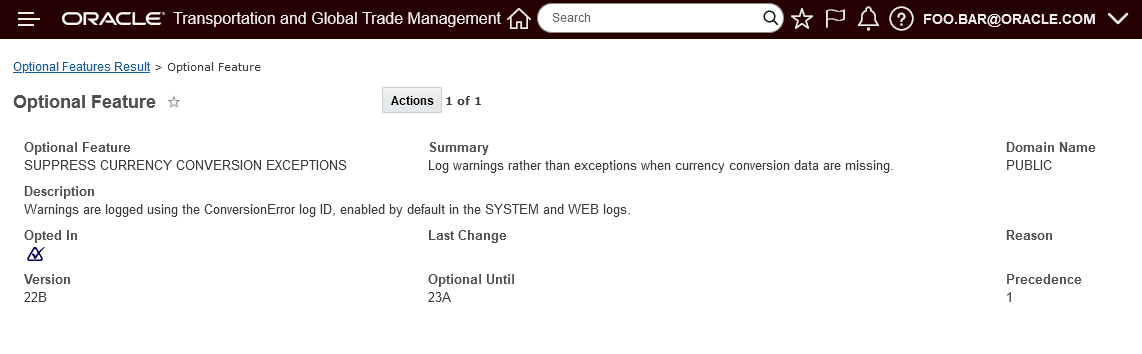
Optional Feature - Su
This feature will, when enabled, help reduce the unnecessary clutter in the exception logs.
Steps to Enable
You don't need to do anything to enable this feature.
Tips And Considerations
While the manager for these features refers to them as "optional" - each of these features will become mandatory when the Optional Until update is released. The optional aspect of these features refers to the period of time where there is an opportunity to Opt In/Opt Out of enabling the feature. During this "optional" period - the time between when the feature is released and the release prior to the Optional Until release - the request/desire/intention is for you to enable the feature(s) for testing purposes so that the transition to mandatory, as of the Optional Until release, is uneventful.
This page is accessed via Configuration and Administration > Property Management > Optional Features.
NOTE: Only the DBA.ADMIN user can access and use the Optional Features page.
This optional feature will provide you with improved stability by avoiding excessive memory usage related to unconstrained queries. When enabled, the Limit Agent Loops optional feature sets a limit for the FOR, FOR EACH and Data Type Association workflow agent loops to avoid excessive memory usage.
Limit Agent Loops - limits the number of items it will match to. Limit is 5000.
Improves the stability of your system by avoiding excessive memory usage related to agent loops.
Steps to Enable
You don't need to do anything to enable this feature.
Tips And Considerations
By default the same limit as been set for all Data Query Types - if necessary - the limit can be configured by Data Query Type in the situations where the default is too limiting.
While the manager for these features refers to them as "optional" - each of these features will become mandatory when the Optional Until update is released. The optional aspect of these features refers to the period of time where there is an opportunity to Opt In/Opt Out of enabling the feature. During this "optional" period - the time between when the feature is released and the release prior to the Optional Until release - the request/desire/intention is for you to enable the feature(s) for testing purposes so that the transition to mandatory, as of the Optional Until release, is uneventful.
This page is accessed via Configuration and Administration > Property Management > Optional Features.
NOTE: Only the DBA.ADMIN user can access and use the Optional Features page.
Metric Type - CPU Timer Ahead, CPU Timer Behind
This feature provides you with two new metric types for the CPU Component - CPU - TIMER AHEAD, and CPU - TIMER BEHIND, that will capture statistics related to these events. You will find this information beneficial when these metrics are correlated with other metrics where you note performance issues occurring at the same time as the CPU - TIMER BEHIND or AHEAD metrics are being reported.
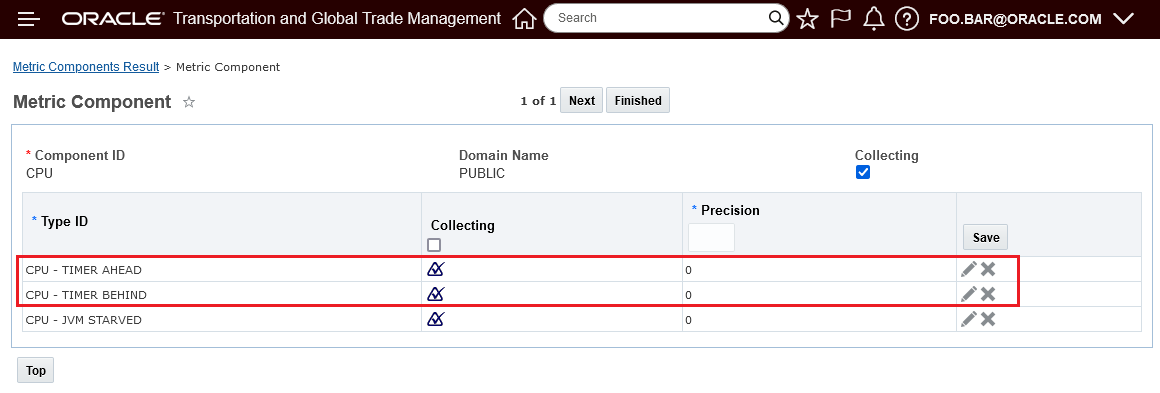
CPU Component ID Metric Types CPU - TIMER AHEAD and CPU - TIMER BEHIND
Allows you to gather CPU Component metrics for these additional Metric Types.
Steps to Enable
You don't need to do anything to enable this feature.
Finder for Metric Subcomponent
This feature provides you with a Finder to find and select the Metric Subcomponent for your Metric Type when defining a Metric Threshold. The ability to find or use autocomplete for the selection of the Metric Subcomponent will save you time and also reduce typos. In previous version the Metric Subcomponent was only a free form text field.
In the example below, note that the Metric Subcomponent Search allows you to limit the Subcomponent search by Metric Type ID - which will help you avoid setting up a miss-match between the Metric Type and the Metric Subcomponent.
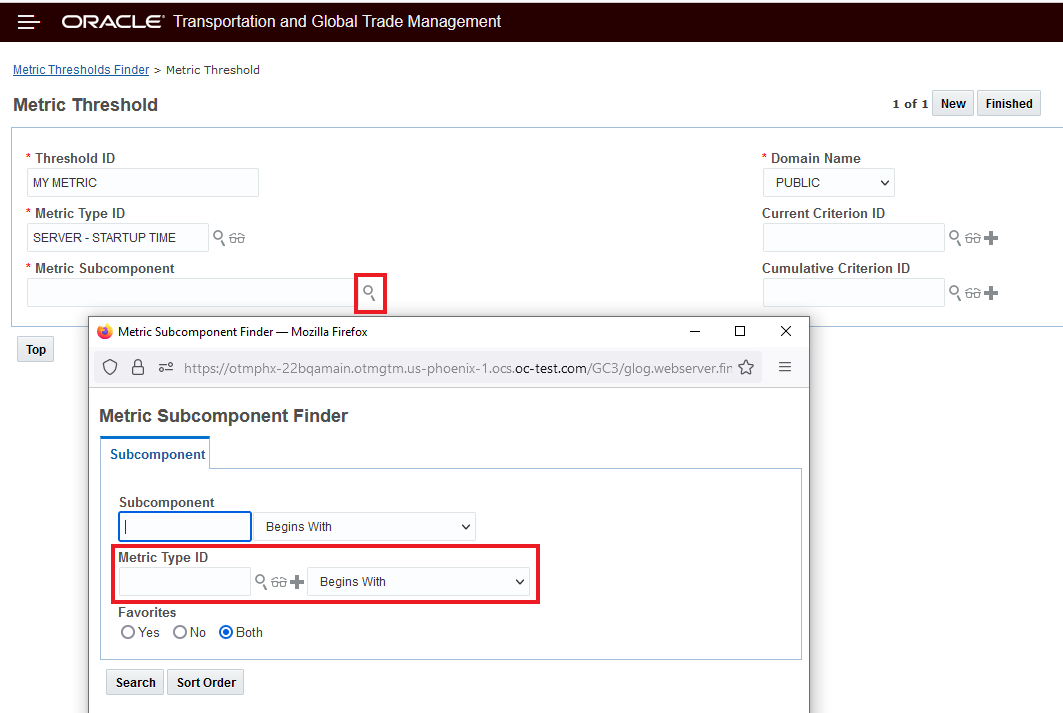
Threshold Metric Subcomponent Search - Option to Limit Search by Metric Type ID
The option to use autocomplete to select the Metric Subcomponent - while good from a time saving perspective - does not limit the autocomplete list by the selected Metric Type - so a miss-match between the selected Metric Type and the Metric Subcomponent is possible. In the example below, Restart is the correct selection.
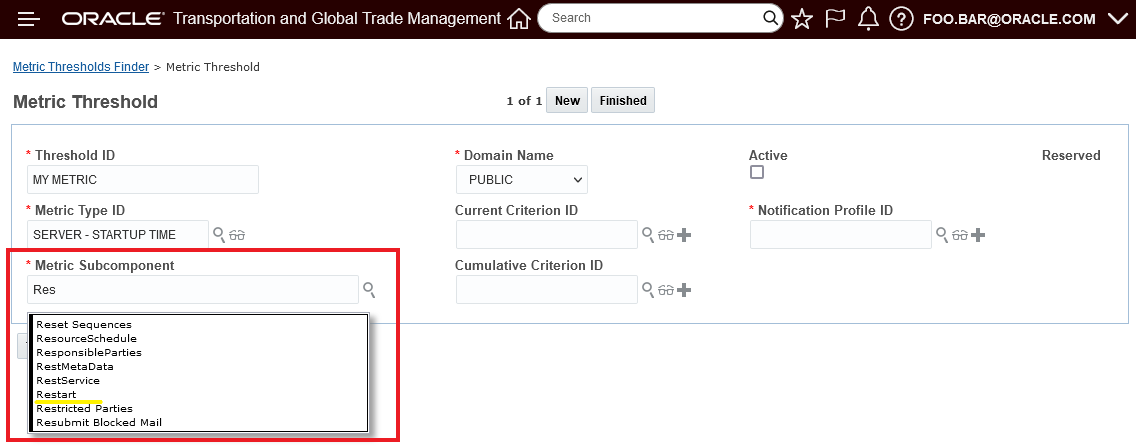
Threshold Metric Subcomponent Autocomplete
This feature will helps eliminate Metric Subcomponent typos by providing access to the list of available Metric Subcomponents using either a finder or auto-complete.
Steps to Enable
You don't need to do anything to enable this feature.
Limit the Collect Diagnostic Log Frequency
This optional feature sets a time limit for how frequently the Collect Diagnostic Logs can be run. The Collect Diagnostic Logs process can significantly impact performance when collecting heap dumps, JRA recordings or thread dumps. This feature sets the Collect Diagnostics Logs run frequency to five minutes.
In the example below - a threshold and notification have been setup, when the defined threshold is exceeded diagnostics logs are automatically collected and an email notification is sent. In the first email below, the threshold was exceeded and the diagnostics have been collected and are available in the archive specified.
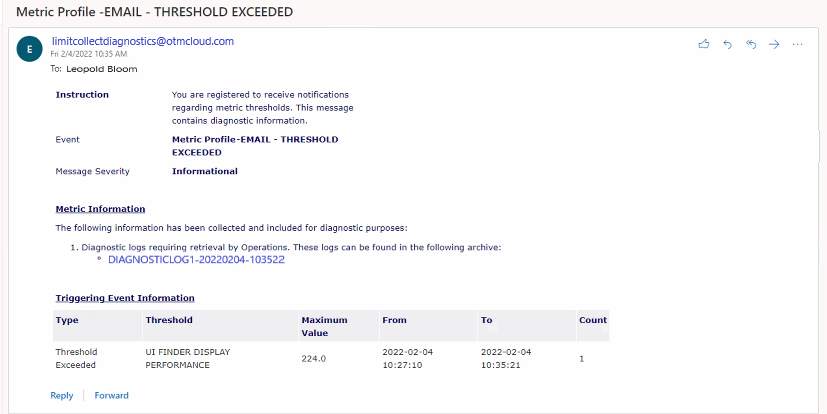
Threshold Exceeded - Collect Diagnostic Logs Run
The email below provides notification that the defined threshold was exceeded - but in this case diagnostic logs were not collected since the threshold was exceeded before the limit for the Collect Diagnostic Log was reached - in this case the next run of Collect Diagnostics cannot happen until 2022-02-04 10:40:22.
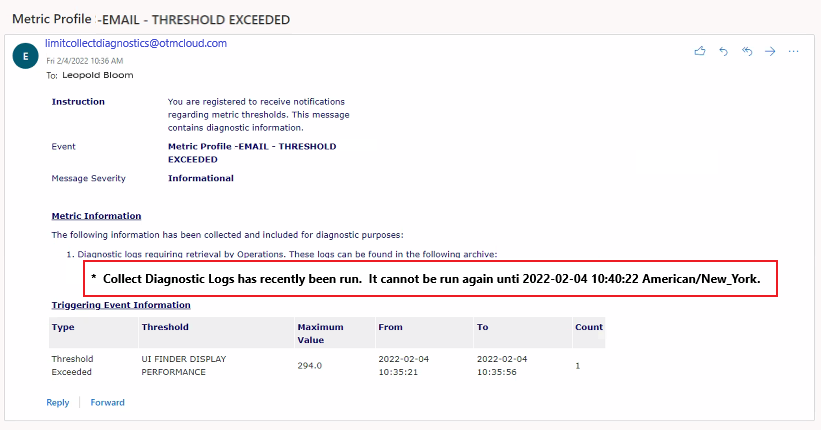
Collect Diagnostics Frequency Limit Example
In the example below, an attempt was made to run the Collect Diagnostic Log manually multiple times within the five-minute limit - the error indicates when the timer expirers and the Collect Diagnostic Log can be run again.
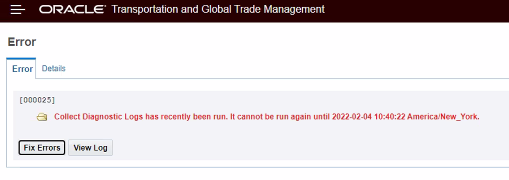
Limit Collect Diagnostic Log Frequency UI Error
Improves the stability of your system by limiting the frequency allowed for collecting diagnostics.
Steps to Enable
You don't need to do anything to enable this feature.
Tips And Considerations
While the manager for these features refers to them as "optional" - each of these features will become mandatory when the Optional Until update is released. The optional aspect of these features refers to the period of time where there is an opportunity to Opt In/Opt Out of enabling the feature. During this "optional" period - the time between when the feature is released and the release prior to the Optional Until release - the request/desire/intention is for you to enable the feature(s) for testing purposes so that the transition to mandatory, as of the Optional Until release, is uneventful.
This page is accessed via Configuration and Administration > Property Management > Optional Features.
NOTE: Only the DBA.ADMIN user can access and use the Optional Features page.
Use Domain Default from Address
This Optional Feature, when enabled will allow you to configure and use a domain level default From address for your outgoing emails.
Provides usability improvements for defining the default From email address used by the system.
Steps to Enable
You don't need to do anything to enable this feature.
With this Optional Feature, REST API DEFINITION CACHE, when enabled, an additional cache is maintained for a number of frequently used REST API resource definitions.
Improves the operation of the system by adding an additional cache for frequently used API resource definitions.
Steps to Enable
You don't need to do anything to enable this feature.
Tips And Considerations
While the manager for these features refers to them as "optional" - each of these features will become mandatory when the Optional Until update is released. The optional aspect of these features refers to the period of time where there is an opportunity to Opt In/Opt Out of enabling the feature. During this "optional" period - the time between when the feature is released and the release prior to the Optional Until release - the request/desire/intention is for you to enable the feature(s) for testing purposes so that the transition to mandatory, as of the Optional Until release, is uneventful.
This page is accessed via Configuration and Administration > Property Management > Optional Features.
NOTE: Only the DBA.ADMIN user can access and use the Optional Features page.
Open API Schema for REST API Resources
This feature provides you with external access to GET each resource specific schema description at runtime, where there is one metadata resource for each root resource.
The URL pattern to retrieve (GET only) a schema for example resource shipments, would be:
.../logisticsRestApi/resources/v2/metadata-catalog/shipments
The example response below (returned as "application/json" Content Type) will have the high level structure:
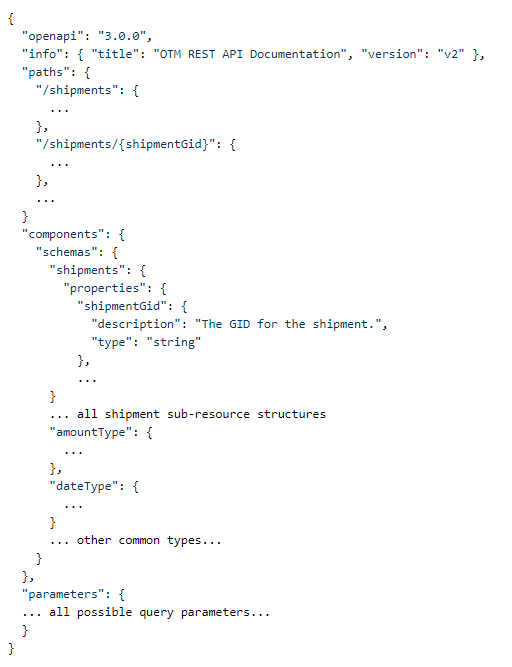
Example Response
NOTE: The common types - "amountType", "dateType" etc. - will appear in each schema.
The OpenAPI Schema provides you with run-time access to the resource schema - which provides you with more immediate access to the REST API schema information.
Steps to Enable
You don't need to do anything to enable this feature.
Key Resources
- Refer to the online documentation for how the runtime API can be used.
Historical Metrics - Count Based Metric Types and Components Added for REST
This feature extends the historical metric types and components available to provide you with count related metrics for REST services. Metric Types supported include SYNC REST and ASYNC REST for Read Counts, Create Counts and Delete Counts as well as ASYNC REST for Batch Counts and REST Custom Action Counts.
You can use these metrics and components to capture key REST count related statistics over time.
Newly Added Metric Component, Metric Type and Metric Subcomponents:
| Metric Component ID |
Metric Type ID |
Metric Subcomponent |
| REST CUSTOM ACTIONS |
REST CUSTOM - ACTIONS COUNT |
advancedQuery |
| SYNC REST RESOURCES |
SYNC REST - READ COUNT |
askOtmSavedQueries |
| REST CUSTOM ACTIONS |
REST CUSTOM - ACTIONS COUNT |
bulkQueries |
| SYNC REST RESOURCES |
SYNC REST - READ COUNT |
countryCodes |
| SYNC REST RESOURCES |
SYNC REST - READ COUNT |
currencies |
| SYNC REST RESOURCES |
SYNC REST - READ COUNT |
customsDeclarations |
| SYNC REST RESOURCES |
SYNC REST - CREATE COUNT |
documents |
| SYNC REST RESOURCES |
SYNC REST - READ COUNT |
documents |
| SYNC REST RESOURCES |
SYNC REST - READ COUNT |
incoterms |
| ASYNC REST RESOURCES |
ASYNC REST - CREATE COUNT |
items |
| ASYNC REST RESOURCES |
ASYNC REST - UPDATE COUNT |
items |
| SYNC REST RESOURCES |
SYNC REST - CREATE COUNT |
items |
| SYNC REST RESOURCES |
SYNC REST - READ COUNT |
items |
| SYNC REST RESOURCES |
SYNC REST - UPDATE COUNT |
items |
| REST CUSTOM ACTIONS |
REST CUSTOM - ACTIONS COUNT |
locations |
| SYNC REST RESOURCES |
SYNC REST - READ COUNT |
locations |
| REST CUSTOM ACTIONS |
REST CUSTOM - ACTIONS COUNT |
locations :: bulkQueries |
| SYNC REST RESOURCES |
SYNC REST - READ COUNT |
logicConfigurations |
| SYNC REST RESOURCES |
SYNC REST - READ COUNT |
orderBases |
| ASYNC REST RESOURCES |
ASYNC REST - CREATE COUNT |
orderReleases |
| SYNC REST RESOURCES |
SYNC REST - CREATE COUNT |
orderReleases |
| SYNC REST RESOURCES |
SYNC REST - READ COUNT |
orderReleases |
| SYNC REST RESOURCES |
SYNC REST - READ COUNT |
productClassificationCodes |
| SYNC REST RESOURCES |
SYNC REST - READ COUNT |
productClassificationTypes |
| SYNC REST RESOURCES |
SYNC REST - READ COUNT |
quickCodes |
| SYNC REST RESOURCES |
SYNC REST - READ COUNT |
quickEvents |
| REST CUSTOM ACTIONS |
REST CUSTOM - ACTIONS COUNT |
quotes |
| REST CUSTOM ACTIONS |
REST CUSTOM - ACTIONS COUNT |
quotes :: advancedQuery |
| REST CUSTOM ACTIONS |
REST CUSTOM - ACTIONS COUNT |
savedQueries |
| SYNC REST RESOURCES |
SYNC REST - READ COUNT |
savedQueries |
| SYNC REST RESOURCES |
SYNC REST - READ COUNT |
sellShipments |
| SYNC REST RESOURCES |
SYNC REST - READ COUNT |
sEquipments |
| ASYNC REST RESOURCES |
ASYNC REST - UPDATE COUNT |
serviceProviders |
| SYNC REST RESOURCES |
SYNC REST - READ COUNT |
serviceProviders |
| REST CUSTOM ACTIONS |
REST CUSTOM - ACTIONS COUNT |
shipments |
| SYNC REST RESOURCES |
SYNC REST - READ COUNT |
shipments |
| REST CUSTOM ACTIONS |
REST CUSTOM - ACTIONS COUNT |
shipments :: savedQueries |
| SYNC REST RESOURCES |
SYNC REST - READ COUNT |
timeZones |
| SYNC REST RESOURCES |
SYNC REST - CREATE COUNT |
trackingEvents |
| SYNC REST RESOURCES |
SYNC REST - READ COUNT |
transmissionReports |
| SYNC REST RESOURCES |
SYNC REST - READ COUNT |
transportModes |
Historical Metrics REST Count
Count Statistics below
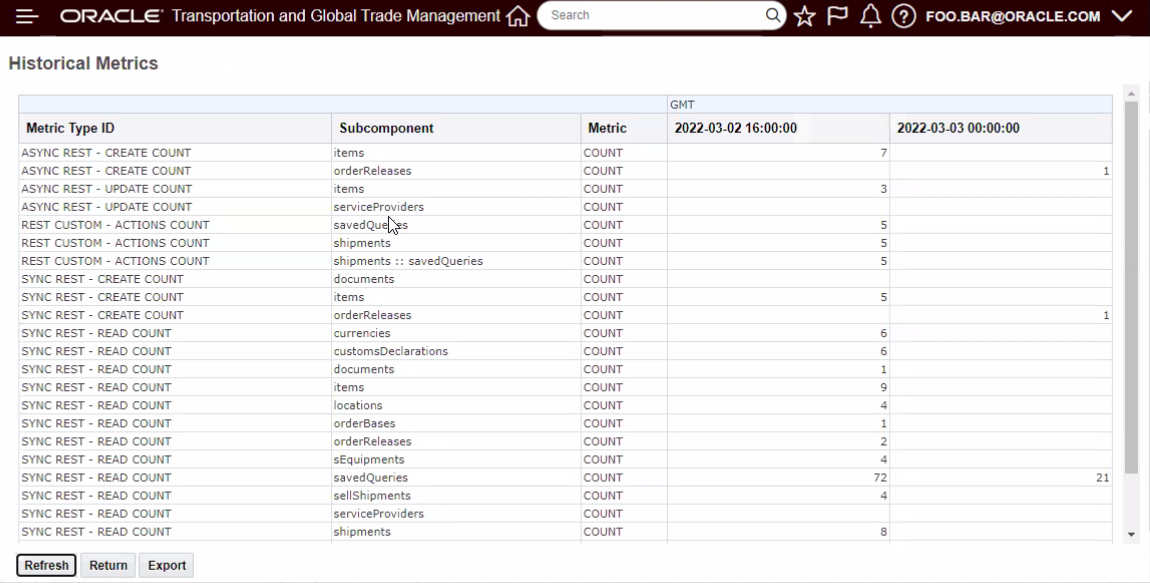
REST Count Statistics
This feature provides access to persisted metrics and statistics for your REST API activity.
Steps to Enable
You don't need to do anything to enable this feature.
Global Trade Management (Base)
Enhanced Restricted Party Screening Dice Engine
This feature provides you with improved performance when using the DICE engine for restricted party screening. This feature is delivered with Opt In set to FALSE/not enabled.
When enabled, the DICE engine will use the updated logic to improve the performance of the engine.
This feature provides performance improvements within the restricted party screening engine, which enables GTM to perform screening of your parties against denied party lists quicker.
Steps to Enable
You don't need to do anything to enable this feature.
Tips And Considerations
This enhancement is specific to the DICE engine only.
Key Resources
- For more information on configuring the restricted party screening process, please see the GTM How To/Configuration Topic called 'Restricted Party Screening' in help.
Next Generation Enhanced Landed Cost Simulator
This feature provides you with an enhanced Landed Cost Simulator using Oracle JET. The enhanced Landed Cost Simulator provides you with many of the same or equivalent features and functionality as the legacy Landed Cost Simulator (developed using ADF Technology).
Both the enhanced Landed Cost Simulator and the legacy Landed Cost Simulator will continue to coexist for a few update cycles in order to provide you with ample time to migrate from the older technology to the new enhanced technology. By default, the Landed Cost > Landed Cost Simulator menu link accesses the new enhanced JET technology.
You can select an existing Saved Simulation or enter the information to run a new simulation. Next, you can enter one to many Sourcing Options.
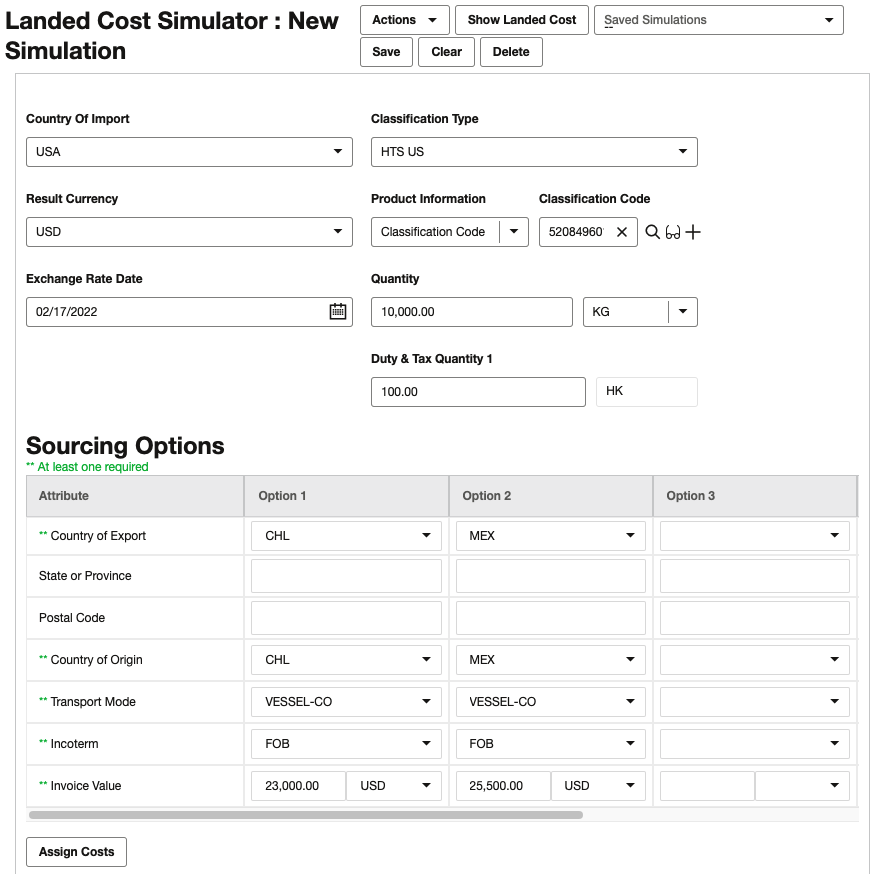
Once you enter all of the sourcing options, click Assign Costs to populate the Sourcing Details. Enter the Sourcing Details and click Show Landed Cost at the top of the page.
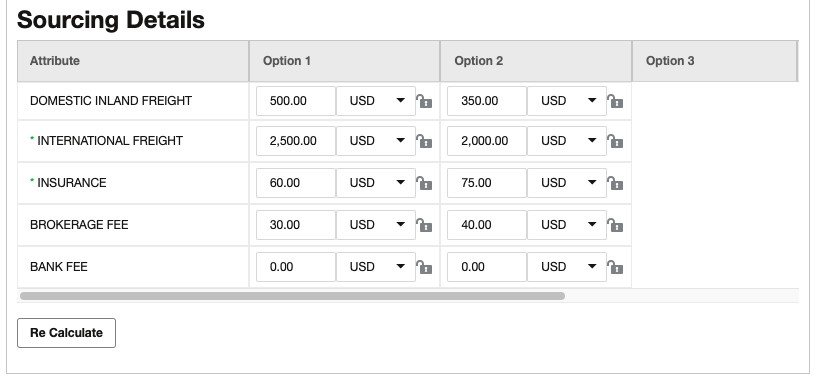
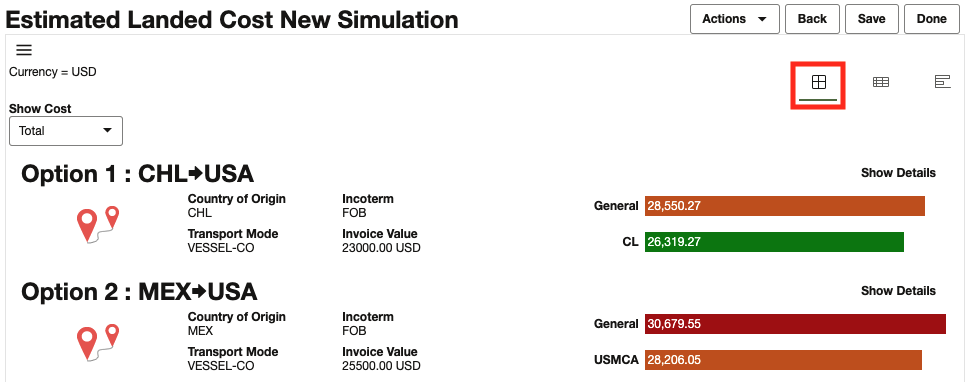
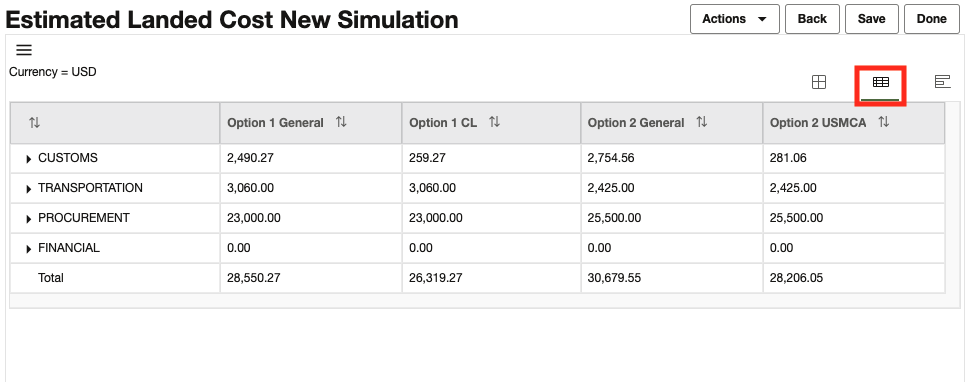
When you click Show Landed Cost, GTM displays the Summary View by default. To see other views, you can click the icons on the top right of the page below the Done button.
Summary View
The Summary view displays each of the sourcing options you entered including the Estimated Landed Cost for each of the options. You can click Show Details above each of the options to see more information in a table view.
Detail View
When you select the Detail view icon on the top right of the page below the Done button, GTM displays a table view for each of estimated landed cost results. Click the Arrow in each of the rows on the left to see a more detailed breakdown of the cost.
Graph View
When you select the Graph view icon on the top right of the page below the Done button, GTM displays a bar graph containing the estimated landed cost results.

The Enhanced Landed Cost Simulator estimates the landed cost for multiple scenarios in an ad-hoc fashion helping you to select the best sourcing option. The flow of the buttons and the overall navigation has been designed to provide you with a more natural and intuitive navigation path.
Steps to Enable
You don't need to do anything to enable this feature.
Key Resources
- For more information on the Landed Cost Simulator, please refer to the GTM How To/Configuration Topic in Help called Landed Cost Simulator.
Next Generation Enhanced Restricted Party Screening Workbench
This feature provides you with an enhanced Restricted Party Screening Workbench using Oracle JET. The enhanced Restricted Party Screening Workbench provides you with many of the same or equivalent features and functionality as the legacy Restricted Party Screening Workbench (developed using ADF Technology). Both the Enhanced Restricted Party Screening Workbench and the legacy Restricted Party Screening Workbench will continue to coexist for a few update cycles in order to provide you with ample time to migrate from the older technology to the new enhanced technology. By default, the Restricted Party Screening > Restricted Party Screening Workbench menu link accesses the legacy workbench.
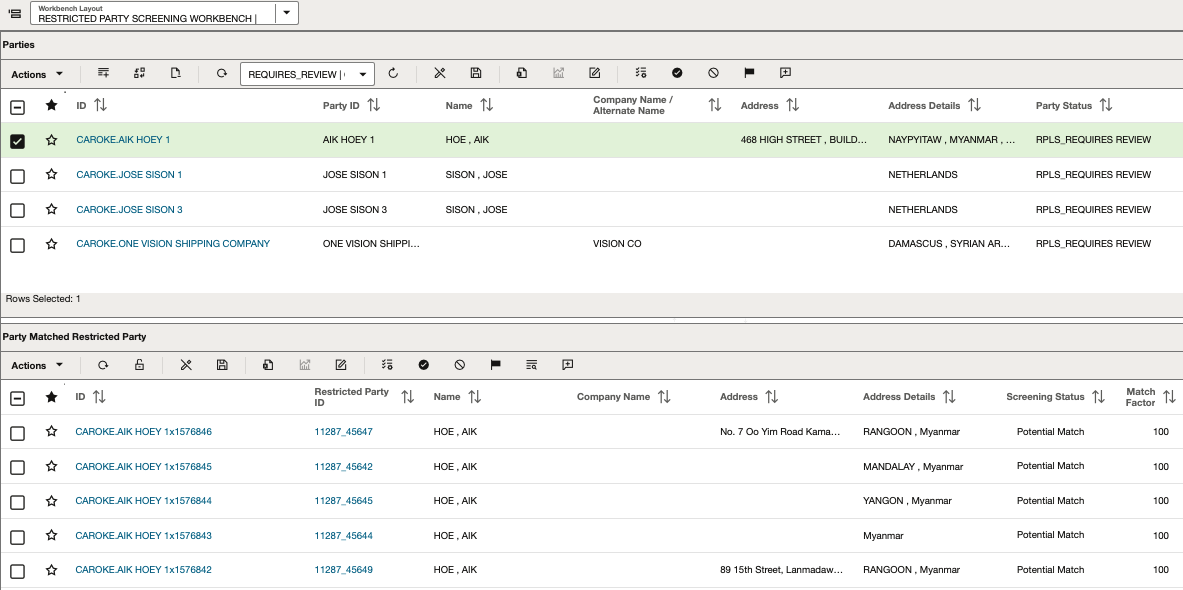
As in the legacy version of the Restricted Party Screening Workbench, you can define Saved Searches to filter the list of parties that are available in the table at the top of the page. When a party is selected in the top table, the bottom table updates with a list of restricted parties that are matched to the selected party.
In both tables, the standard workbench table icons and buttons are available. In addition, there are icons available that are specific to the Restricted Party Screening Workbench including:
- Party table (Contact object type)
- Requires Review
- Passed
- Failed
- Escalated
- Add Comment
- Matched Restricted Parties table
- Potential Match
- Not a Match
- Verified Match
- Escalated
- Review Match Factor
- Add Comment
This feature enables you to take advantage of the enhanced workbenches using Oracle JET which include many usability, functionality, and performance improvements.
Steps to Enable
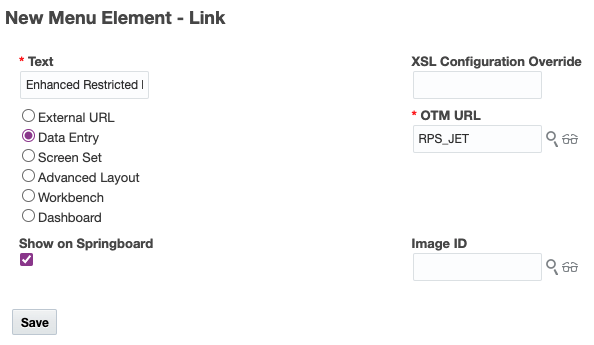
Before you can use the enhanced Restricted Party Screening Workbench, you need to add it to your menu. You can do this using the following steps:
- Navigate to Configuration and Administration > User Configuration > Menu Manager
- Select an existing menu or new menu to which you want to add the enhanced workbench
- Determine at which level you want to see the menu and click the folder
- Click the + sign to the right of the selected folder
- Select a Type of Link
- Enter the name of the menu in the Text field
- From the radio buttons, select Data Entry
- Within the OTM URL field, type ‘RPS’ and then select ‘RPS_JET’
- Click Save
If you added a new menu, you can make it visible on your menu by accessing Configuration and Administration > Manage User Access.
- Select User Access Type of User Menu
- Fill in your user information such as User ID, User Level, User Role, etc.
- Select Edit User Access and make the updates
Make sure to log out and log back in so your changes take effect.
Tips And Considerations
Work queues are not yet available using the Oracle JET technology. Support for work queues will be added in a future release.
Key Resources
- For more information, please see the OTM How To/Configuration topic called 'Configuring the User Interface' in help.
Document SmartLinks Available Across Objects
This feature provides you with a SmartLink that you can use to navigate to the Document Manager from various objects. The Documents SmartLink is now available from the following objects:
- Bond
- Campaign
- Campaign Line
- Declaration Line
- Item Classification
- Item Origin
- Item Qualification
- License Line
- Transaction Line
When you navigate to any of these objects, for example Campaign Line, you can then use the Documents SmartLink to quickly access the Documents Manager.
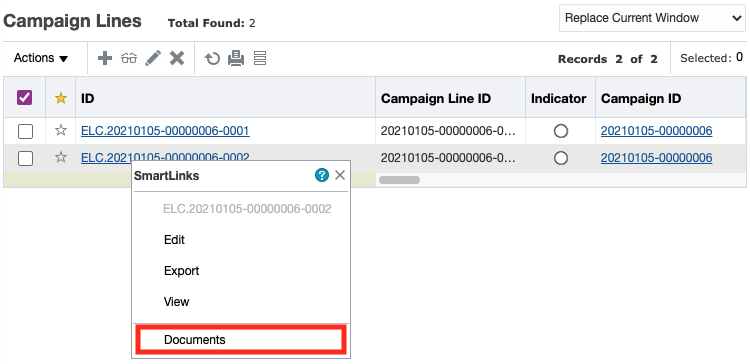
When selected, GTM displays the Document Manager finder results page listing all the documents associated with the object. You can then manage the document including viewing additional details about the document and deleting the document.

This feature improves access and visibility to the documents assigned to the objects where the Documents SmartLink has been added and helps users navigate the application in fewer clicks.
Steps to Enable
You don't need to do anything to enable this feature.
Manage Trade Incentive Programs
New objects have been added to GTM to manage your trade incentive programs including:
- Trade Incentive Programs
- Trade Incentive Program Types
- Trade Incentive Program Reference Numbers
In the future, these new objects will help to manage your special program information including details about the trade incentive programs.
Steps to Enable
You don't need to do anything to enable this feature.
Tips And Considerations
These objects are reserved for future use.
Support for Qualification of Multi-level Bills of Material
This feature provides you with support for qualifying multi-level bills of material in GTM. Bills of material (BOM), modeled as a trade item structure, can now be either a multi-level hierarchy or a flattened structure when you perform qualification. Additionally, support for alternate BOMs has been added to the data model and integration layer. These features allow for easier integration with your source system and a more flexible qualification process.
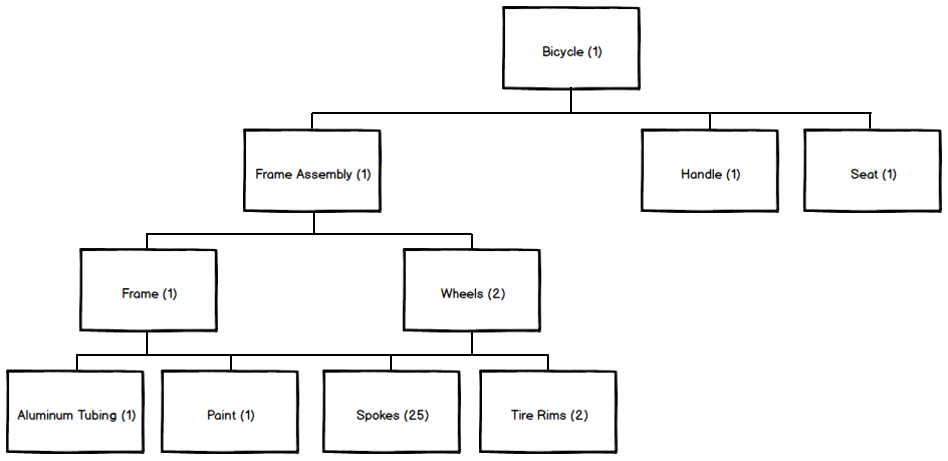
For example, you are shipping a finished good of a bicycle that is made up of various components. Some of the components, like the frame assembly, is also a bill of material containing components. GTM can screen the multi-level bill of material for the finished good based on the lowest level leaf nodes across the BOM. In this example, GTM uses the following components as part of the qualification analysis: Aluminum Tubing, Paint, Spokes, Tire Rims, Handle and Seat.
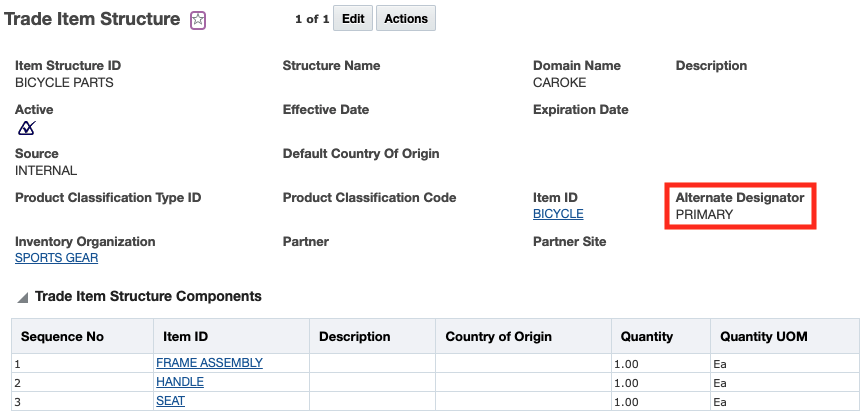
To support multi-level BOMs, a new field called Alternate Designator has been added to the Trade Item Structure. This field can be a unique name or ID given for each BOM hierarchy of an item in an inventory organization. This unique identification helps GTM to link the parent and child assemblies (BOMs). If the Alternate Designator field is populated, GTM looks across the finished good item structure and all the component item structures to verify that the value of this field is the same. A NULL value in this field indicates that this is the primary BOM or there is only one BOM for the parent and child items.
In addition, a new parameter called DEFAULT TRADE ITEM STRUCTURE QUANTITY QUALIFIER has been added to the Logic Configuration Type = GTM LOGIC CONFIGURATION. When qualifying a finished good item with a multi-level BOM, the item is qualified with respect to the leaf nodes of all the sub-assemblies or intermediate structures. The intermediate structures of each component is identified based on inventory organization, item, and alternate designator. This parameter is used to consider the quantity qualifier that will determine the quantity of each intermediate structure.
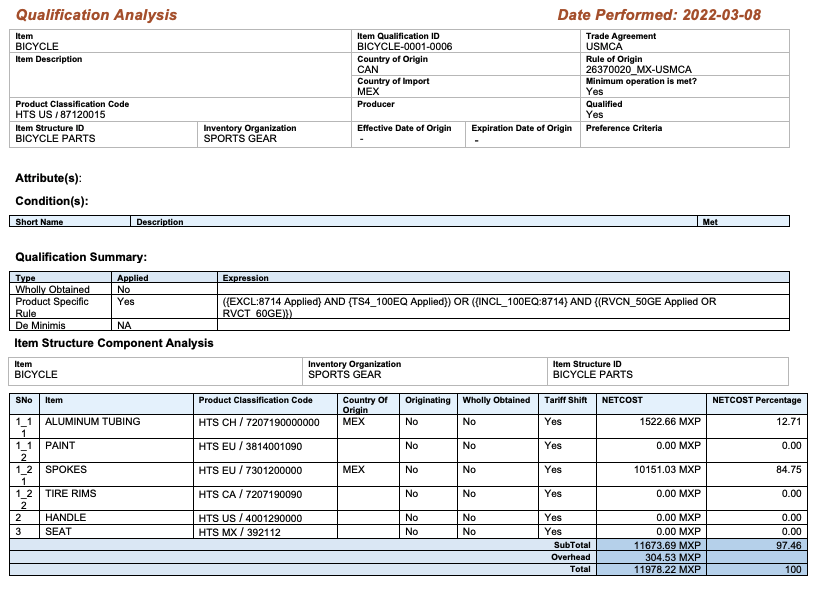
As in previous releases, the Qualify for Trade Agreement action is available from various item-based objects. This action now uses the Alternate Designator field in the qualification process. In the Qualification Report, you can see each of the lowest level components that were analyzed.
By supporting both flattened bills of material and multi-level bills of material, GTM provides for a more flexible qualification process. In addition, this feature allows for easier integration with your source system.
Steps to Enable
You don't need to do anything to enable this feature.
Tips And Considerations
GTM ships with a logic configuration called GTM LOGIC CONFIGURATION DEFAULT which set the default trade item structure quantity qualifier to QUANTITY.
Key Resources
- For more information about qualification, please refer to the 'Trade Agreement Qualification' topic in help.
Support for Currency Conversion During Qualification
GTM supports the ability to track item cost information in different currencies. This feature enables you to perform qualification using different currencies across the finished good and the components during the qualification process. GTM uses exchange rates to standardize on a single currency and provide you with the results of your trade agreement qualification analysis.
There are two ways you can specify exchange rate and currency information for the qualification process:
- Set up a default exchange rate for a regime
- Identify the exchange rate and/or currency to use when running the qualification action
Setting a Default Exchange Rate
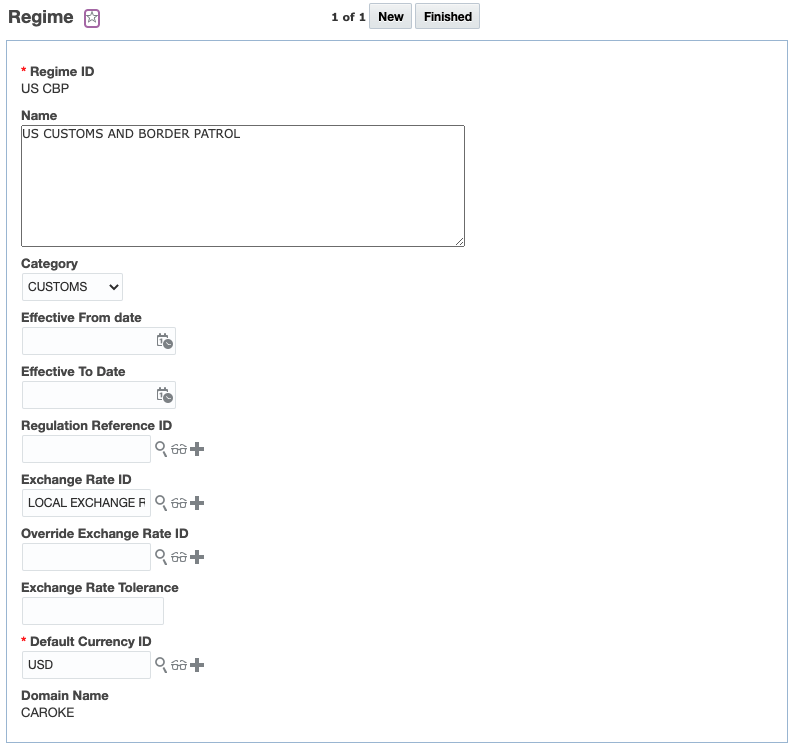
Since different regimes use different exchange rates, GTM enables you to set the exchange rate to use on the customs regime of a country or region. When you run the qualification actions, GTM can use the default rate on the customs regime to perform currency conversion and standardized on a single currency. To set up the default exchange rate, you can edit an existing customs regime or create a new one. You can specify:
- Category - must be set to CUSTOMS.
- Exchange Rate ID - specify the exchange rate ID.
- Override Exchange Rate ID - specify the override exchange rate ID. If both the exchange rate and override exchange rate are specify, GTM determines which exchange rate to use.
- Exchange Rate Tolerance - indicates the maximum amount of variation to be considered acceptable when comparing the primary exchange rate and override exchange rate.
- Default Currency ID - identify the default currency used by the regime. This is a required field.
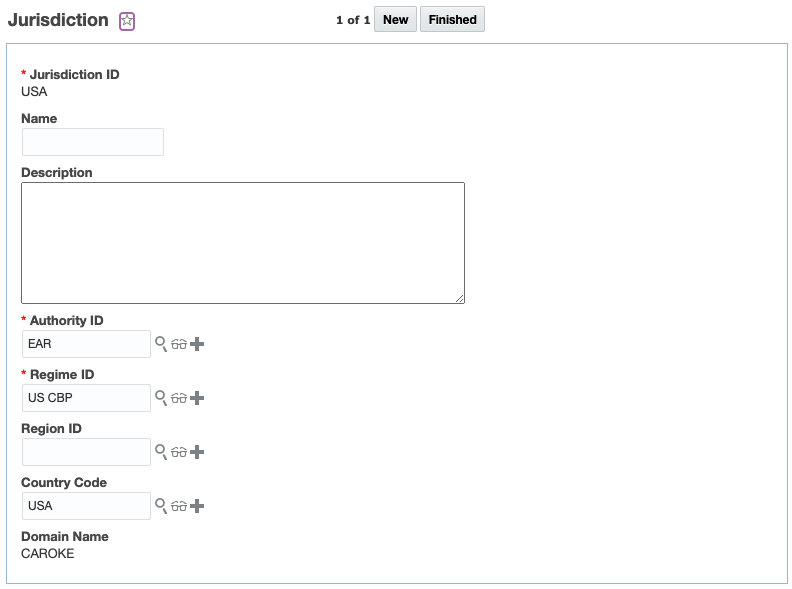
Once you add the exchange rate information to the regime, you need to create or modify a jurisdiction. On the Jurisdiction, you can specify:
- Authority ID - the authority associated with the jurisdiction. This is a required field.
- Regime ID - the regime for a particular jurisdiction related to the customs regime. This is a required field.
- Country Code - the country code for the jurisdiction. This is required to support the qualification process.
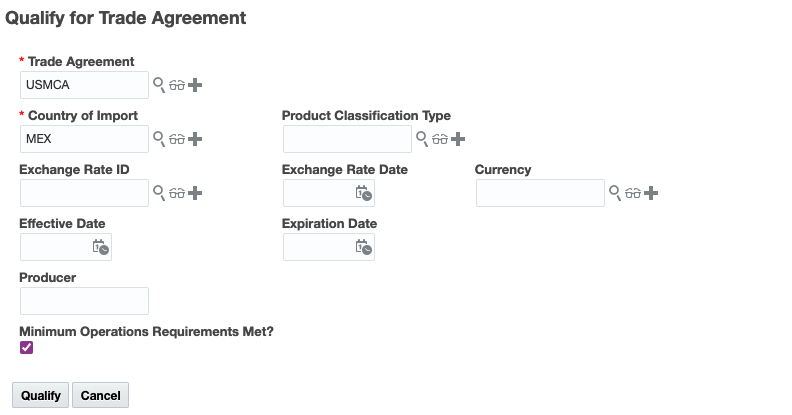
Specify Exchange Rate on the Qualification Actions
You can specify exchange rate information each time you trigger an action or agent action. If you have a default exchange rate configured, any exchange rate information specified on an action will override the default values set on the regime. This applies to the following business objects:
- Item (manual action, agent action and process management)
- Item Origin (manual action and agent action)
- Item Qualification (manual action and agent action)
- Trade Item Structure (manual action and agent action)
On each of the actions, you can specify Exchange Rate ID, Exchange Rate Date and/or Currency.
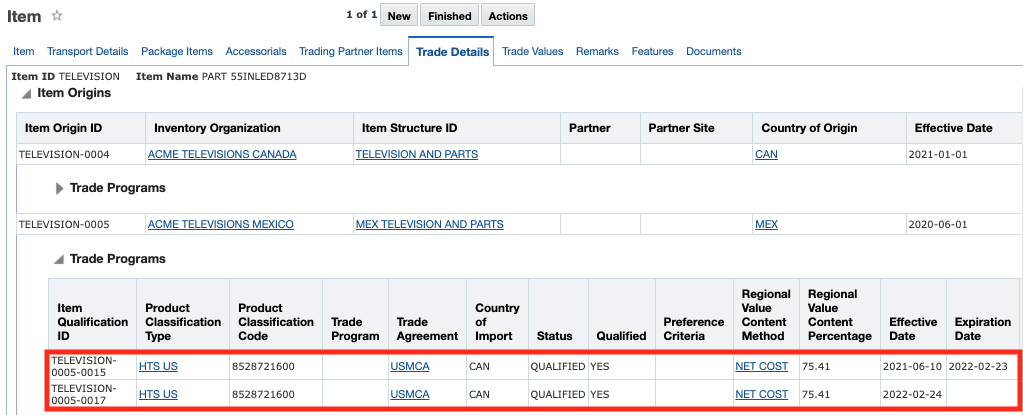
Once the action completes, you can see the results in the Item Qualification > Values grid and on the Qualification Report.
GTM enables you to track your item cost information in different currencies. This improves the flexibility of the application to support qualification across complex supply chains that may cross different currencies.
Steps to Enable
You don't need to do anything to enable this feature.
Tips And Considerations
You need to ensure that current exchange rates are stored in GTM.
Key Resources
- For more information about managing exchange rates, please refer to the 'Exchange Rates Management' topic in help.
- For more information about how primary and override exchange rates are used, please refer to the 'Regime' topic in help.
Enhancements to Trade Agreement Qualification Logic
This feature includes enhancements to the trade agreement logic. GTM now supports the following scenarios as part of the Qualify for Trade Agreement actions:
- Use of the Wholly Obtained flag on Item and Item Origin
- Consideration for the effective and expiration dates on Item Origin and Item Qualification including auto-expiration of prior qualification records
- Use of the Qualified status on Item Qualification in conjunction with the Country of Origin
- Component origin is considered as non-originating when there are multiple suppliers, and the correct supplier cannot be determined
Use Wholly Obtained Flag
This feature enables GTM to use the Wholly Obtained flag as part of the trade agreement qualification process. For example, you may have a finished good or component such as a plant harvested in one of the trade agreement countries. In this scenario, you can mark the Wholly Obtained flag and GTM will use that information as part of the qualification process. You do not need a supporting bill of material for finished goods that are wholly obtained.
The Wholly Obtained flag is available on the following objects:
- Item - the item is wholly obtained regardless of origin
- Item Origin - the item associated with certain origins is wholly obtained while others are not
GTM will first look to see if a trade item structure is available for the finished good and will perform qualification. If a trade item structure does not exist, GTM then looks to see if the Wholly Obtained flag is marked on the finished good.
Use Dates on Item Origin and Item Qualification Including Auto-Expiration of Prior Records
This feature enables GTM to use the dates specified on an item origin and item qualification record as part of the trade agreement qualification process. For an item, you may have an item origin that has an effective and expiration date associated with it. If that item origin has item qualification records associated with it, those qualification records also may have effective and expiration dates. When GTM is performing the Qualify for Trade Agreement action, these dates are honored within the logic so that an expired item origin and/or item qualification are not considered during future qualifications.
When you trigger the Qualify for Trade Agreement action, GTM will determine if there is an existing qualification record based on the Trade Agreement, Country of Origin, and Country of Import specified. If so, GTM will prompt you with a message confirming if you want to expire the existing record.

When you click Yes, GTM expires the existing item qualification and creates a new one. GTM will use the Effective Date and Expiration Date specified on the action. If neither are specified, GTM uses the current date as the Effective Date.
This enhancement applies to the Qualify for Trade Agreement actions on the following objects:
- Item (manual action and agent action)
- Item Origin (manual action and agent action)
- Item Qualification (manual action and agent action)
- Trade Item Structure (manual action and agent action)
- Qualify Items for Trade Agreement process in Process Manager
NOTE: If you enter dates on the action which exactly match the dates on the existing item qualification record, GTM will update the existing record. If you do not have an existing item qualification record, GTM will create a new record.
Use Qualified Status on Item Qualification
This feature enables GTM to use the Qualified status on the item qualification as part of the qualification logic. In addition to using the rules of origin and wholly obtained flag to determine qualification for a trade agreement, GTM verifies that the Qualified status of the components is set to 'Qualified'. This ensures that all the components from within the trade agreement countries/regions for a bill of material have the supporting certificates of origin and other data from suppliers and have been marked as 'Qualified'. Currently, this feature supports rules of origin rule types such of tariff shift, HS inclusion and HS exclusion.
NOTE: This feature does not support rules of origin rule types of regional value content method and de minimis. These rule types will be supported in a future release.
Component Origin is Considered as Non-originating
This feature enables GTM to consider a component origin as non-originating when the correct supplier cannot be determined. For example, you may have small parts such as bolts in your bill of material. You source the bolts from multiple suppliers, throw them into a large bin in the plant and are unable to track the country of origin on a bolt by bolt basis. Since GTM cannot determine the country of origin, GTM will consider the country of origin as non-originating for that item.
By continuing to enhance Trade Agreement Qualification, GTM is able to provide you with additional use cases to better support your business needs expanding qualification to a broader set of scenarios allowing more goods to qualify and less duty and tax to be paid by your customers.
Steps to Enable
You don't need to do anything to enable this feature.
Key Resources
- For more information on the qualification process, please refer to the GTM How To/Configuration Topic called Trade Agreement Qualification.
Qualify for Trade Agreement Agent Actions for Item-Based Objects
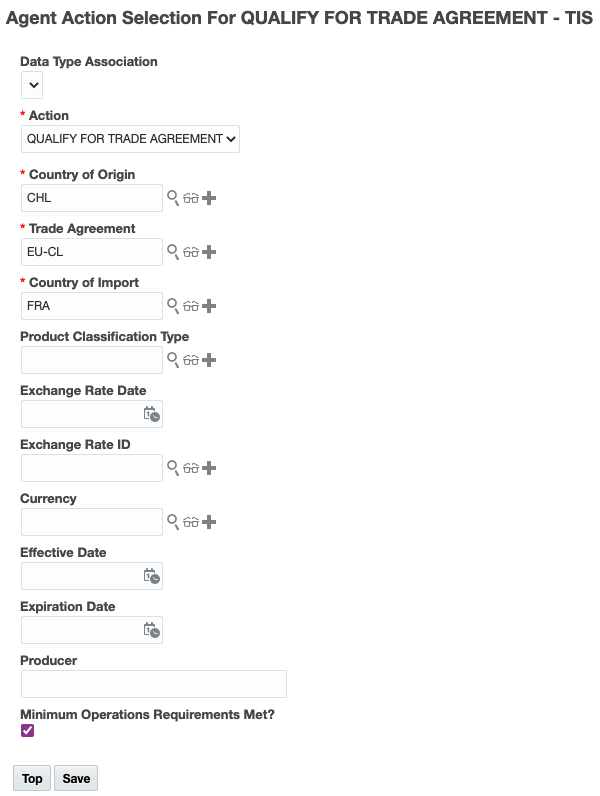
This feature provides you with the ability to automatically qualify certain item-based objects for trade agreements using automation agents. A new agent action called Qualify for Trade Agreement is available on the following Agent Types: Trade Item Structure, Item Origin and Item Qualification.
For example, you can have an automation agent listening to agent events for when a bill of material, modeled as a trade item structure, is created or modified. When this happens, GTM can automatically qualify your bill of material for trade agreements. You can specify:
- Country of Origin - Enter the country of origin. This is a required field.
- Trade Agreement - Enter the trade agreement for which you are qualifying a bill of material. This is a required field.
- Country of Import - Enter the country of import. This is a required field.
- Product Classification Type - If applicable, enter the product classification type.
- Exchange Rate Date - If applicable, enter the exchange rate date.
- Exchange Rate ID - If applicable, enter the exchange rate ID.
- Currency - If applicable, enter the currency.
- Effective Date - If applicable, enter the effective date for the qualification. If you do not enter an effective date, GTM will use the current date.
- Expiration Date - If applicable, enter the expiration date for the qualification.
- Producer - If applicable, enter the producer of the goods.
- Minimum Operations Requirements Met? - Mark the checkbox to indicate the minimum operations requirements have been met. If they have not been met, GTM marks the item associated with the trade item structure as not qualified.
Qualifying for trade agreements enables you to see if a finished good can take advantage of a reduced duty rate. By automating this process for various GTM objects, you can proactively determine if these objects, and the corresponding item, qualify for trade agreements and help your customers save money on duty and tax.
Steps to Enable
You don't need to do anything to enable this feature.
Tips And Considerations
-
If the item does not have the harmonized tariff product classification type and code specified for the country of import, GTM uses the first 6 digits of another harmonized tariff product classification code on the item to perform qualification.
-
In some cases, GTM may not be able to determine if an object, and it's corresponding item, fully qualifies for a trade agreement. For example, there are instances where you need to select which Rules of Origin Attribute applies or a specific Condition that applies. In these cases, GTM will not create an item qualification record for the item. You can use the manual Qualify for Trade Agreement actions that are available on the Item, Item Origin, Item Qualification or Trade Item Structure for qualification.
Key Resources
- For more information about the exchange rate and currency fields on the actions, please refer to the 'Support for Currency Conversion' topic in this document.
- For more information about qualification, please refer to the 'Trade Agreement Qualification' topic in help.
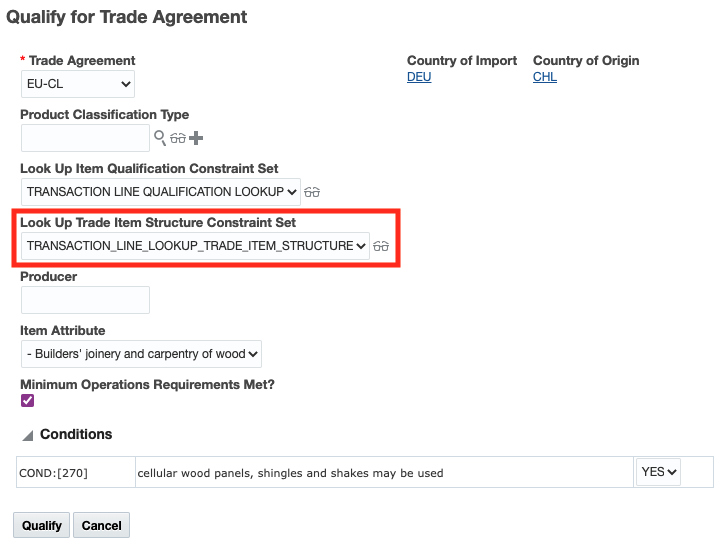
Enhancements to Qualify for Trade Agreement Action on Trade Transaction Line
This feature includes enhancements to the Qualify for Trade Agreement action on Trade Transaction Line. GTM now supports the following scenarios:
- Determining the proper trade item structure to use for qualification using constraint sets
- Use the first 6 digits of another harmonized tariff product classification code if the country of import classification code is not present
Determine Trade Item Structure
This feature enables GTM to determine the proper trade item structure to use for qualification. A new constraint set called TRANSACTION LINE - LOOKUP TRADE ITEM STRUCTURE is available. This constraint set matches data on the trade transaction line with data on the trade item structure associated with the transaction line item to determined which trade item structure to use. You can specify the data which you want to use for matching including inventory organization, supplier, supplier site, dates, reference numbers, remarks and flex field attributes. For example, you may want to match:
- Inventory organization on the trade item structure with the SHIP_FROM involved party on the transaction line
- Effective and expiration dates on the trade item structure with the EXPORT DATE on the transaction line

If you want to set the constraint set as the default, you can:
- Add the constraint set to a generic logic configuration with a Logic Configuration Type = GTM LOGIC CONFIGURATION. GTM ships with a generic logic configuration called GTM LOGIC CONFIGURATION DEFAULT containing the default constraint set for lookup item structure.
- Add the logic configuration to a parameter set. Within the GTM GENERAL section, you can see a parameter = GTM LOGIC CONFIGURATION.
- Add the parameter set to your user preference. For the Preference = Parameter Set, enter your parameter set as the value.
You can also specify the constraint set on the Qualify for Trade Agreement action on trade transaction line in the Look Up Trade Item Structure Constraint Set dropdown list.
Use First 6 Digits of any Harmonized Tariff Code
This feature enables GTM to determine trade agreement qualification even if the transaction line doesn't have the proper harmonized tariff product classification type and code. If the trade transaction line or the corresponding item does not have the product classification information related to the country of import, GTM uses the first 6 digits of another harmonized tariff product classification code on the item to perform qualification.
These enhancements make configuration of GTM more flexible and reduce the frequency with which users may need to enter data by automating identification of the appropriate item structure and leveraging the standardization of the harmonized tariff system to reduce user input requirements.
Steps to Enable
You don't need to do anything to enable this feature.
Tips And Considerations
- GTM ships with a constraint set called TRANSACTION_LINE_LOOKUP_TRADE_ITEM_STRUCTURE that you can use to determine the proper trade item structure.
- GTM ships with a logic configuration called GTM LOGIC CONFIGURATION DEFAULT, which includes the out of the box constraint set TRANSACTION_LINE_LOOKUP_TRADE_ITEM_STRUCTURE. If you want to use this logic configuration, you can use the existing constraint set or create a new one. You can then add it as a parameter to the existing logic configuration.
This feature provides enhancements to the AES Filing capability. Based on regulatory changes, the AES Template related to the X12.601 Customs & Border Protection (CBP) - Export Shipment Information specification has been updated as follows:
-
AES License Exception Code C64 (ACE) Authorized Cybersecurity Exports has been added. This license exception code is used for the following ECCNs: 4A005, 4D001, 4D004, 4E001, 5A001, 5B001, 5D001, and 5E001
As the regulations change for AES Filing, GTM is updated so that your export filing is in line with the current regulations.
Steps to Enable
You don't need to do anything to enable this feature.
Key Resources
- For more information about the AES filing regulations, please refer to the U.S. Customs and Border Protection website.