
- Revision History
- Overview
- Update Tasks
- Feature Summary
- Global Trade Management
-
- Transportation and Global Trade Platform
- Global Trade Management (Base)
- Trade Agreements
-
- Enhancements to Qualification of Multi-Level Bills of Material
- Enhancement to Currency Conversion During Qualification
- Enhancements to the Qualification Report
- Enhancements to Trade Agreement Formulas for Qualification Calculations
- New Qualified Status of Requires Review
- Approve Campaign Action Copies Data to Multiple Objects
- Use New Trade Agreement Qualification Parameters
-
- Trade Compliance
This document will continue to evolve as existing sections change and new information is added. All updates appear in the following table:
| Date | Module | Feature | Notes |
|---|---|---|---|
| 28 JUL 2023 | Transportation and Global Trade Platform | Force Use of Nickname | Updated document. Added additional steps required for Optional Feature. |
| 30 JUN 2023 | Transportation and Global Trade Platform |
Force Use of Nickname | Updated document. Added steps required for Optional Feature. |
| 20 SEP 2022 | Transportation and Global Trade Platform |
Limit Saved Query Results | Updated document. Revised feature information. |
| 08 SEP 2022 | Transportation and Global Trade Platform | Database Data Type Changes | Updated document. Delivered new feature in update 22C. |
| 24 JUN 2022 | Created initial document. |
 HAVE AN IDEA?
We’re here and we’re listening. If you have a suggestion on how to make our cloud services even better then go ahead and tell us. There are several ways to submit your ideas, for example, through the Ideas Lab on Oracle Customer Connect. Wherever you see this icon after the feature name it means we delivered one of your ideas.
GIVE US FEEDBACK
We welcome your comments and suggestions to improve the content. Please send us your feedback at otm-doc_us@oracle.com. Please indicate you are inquiring or providing feedback regarding the Oracle Fusion Cloud Transportation Management What's New Update 22C.
DISCLAIMER
The information contained in this document may include statements about Oracle’s product development plans. Many factors can materially affect Oracle’s product development plans and the nature and timing of future product releases. Accordingly, this Information is provided to you solely for information only, is not a commitment to deliver any material, code, or functionality, and should not be relied upon in making purchasing decisions. The development, release, and timing of any features or functionality described remains at the sole discretion of Oracle.
This information may not be incorporated into any contractual agreement with Oracle or its subsidiaries or affiliates. Oracle specifically disclaims any liability with respect to this information. Refer to the Legal Notices and Terms of Use for further information.
This section gives you information to help you plan, deploy, and validate your update. We make frequent additions to this document, so don’t forget to check back and get the latest information before your update starts.
Review the Release Notes.
- The release notes include fixes, special instructions, and resolutions related to the Oracle Transportation and Global Trade Management Cloud.
- Release Notes can be found here:
- https://support.oracle.com/epmos/faces/DocumentDisplay?id=2827533.1
Use the following resources to prepare for and validate your Oracle Engagement Cloud update.
On My Oracle Support Read:
- Doc ID 2095509.1
- Oracle Cloud Applications - Transportation and Global Trade Management Cloud: Environment Refresh Policy
- Doc ID 2095528.1
- Oracle Cloud Applications - Transportation and Global Trade Management Cloud: Quarterly Update Planning
- Doc ID 2096782.1
- Oracle Cloud Applications - Transportation and Global Trade Management Cloud: Quarterly Update Planning FAQs
- Doc ID 2195580.1
- Oracle Cloud Applications - Transportation and Global Trade Management Cloud: Get Started with Your Implementation
- Doc ID 2508854.1
- Oracle Cloud Applications - Transportation and Global Trade Management Cloud: Quarterly Updates - Preparation and Testing Recommendations
Column Definitions:
Report = New or modified, Oracle-delivered, ready to run reports.
UI or Process-Based: Small Scale = These UI or process-based features are typically comprised of minor field, validation, or program changes. Therefore, the potential impact to users is minimal.
UI or Process-Based: Larger Scale* = These UI or process-based features have more complex designs. Therefore, the potential impact to users is higher.
Features Delivered Disabled = Action is needed BEFORE these features can be used by END USERS. These features are delivered disabled and you choose if and when to enable them. For example, a) new or expanded BI subject areas need to first be incorporated into reports, b) Integration is required to utilize new web services, or c) features must be assigned to user roles before they can be accessed.
| Ready for Use by End Users Reports plus Small Scale UI or Process-Based new features will have minimal user impact after an update. Therefore, customer acceptance testing should focus on the Larger Scale UI or Process-Based* new features. |
Customer Must Take Action before Use by End Users Not disruptive as action is required to make these features ready to use. As you selectively choose to leverage, you set your test and roll out timing. |
|||||
|---|---|---|---|---|---|---|
| Feature |
Report |
UI or |
UI or |
|
||
User Preference Option to Set Home Page As Enhanced Workbench |
||||||
REST Content Type Support for Oracle Visual Builder Add-In for Excel |
||||||
Enhancements to Qualification of Multi-Level Bills of Material |
||||||
Enhancements to Trade Agreement Formulas for Qualification Calculations |
||||||
Enhanced View of Trade Item Structure on Transactions and Transaction Lines |
||||||
Look Up Country of Origin Agent Action Available on Transaction Line |
||||||
Transportation and Global Trade Platform
This feature provides a data type change, for the tables and columns listed below - increasing the length of the columns from NUMBER(10) to a full NUMBER(22) size so that the parent and child column lengths are consistent.
| Table | Column |
|---|---|
| OUT_XML_PROFILE_XPATH |
SEQUENCE_NO |
| GTM_CLASS_CODE_ATTRIBUTE |
SEQUENCE |
| GTM_CLASS_CODE_ATTRIBUTE |
ATTRIBUTE_SEQUENCE |
| GTM_DATA_LOAD_TYPE_FILE |
SEQUENCE_NO |
| IE_SHIPMENTSTATUS |
ORIG_TRANSACTION_NO |
| I_TRANSACTION_ACK |
REF_TRANSACTION_NO |
| I_TRANSACTION_DETAIL |
NEW_TRANSACTION_NO |
| I_TRANSMISSION |
SENDER_TRANSMISSION_NO |
| I_TRANSMISSION |
REFERENCE_TRANSMISSION_NO |
| I_TRANSMISSION_ACK |
REF_TRANSACTION_NO |
| I_TRANSMISSION_REPORT |
REF_TRANSACTION_NO |
| SERVPROV_TENDER_COMMENT |
RESPONSE_I_TRANSACTION_NO |
| SERVPROV_TENDER_EQUIPMENT |
RESPONSE_I_TRANSACTION_NO |
| SERVPROV_TENDER_REFNUM |
RESPONSE_I_TRANSACTION_NO |
| SHIP_GROUP |
PICKUP_TRANSACTION_NO |
| TENDER_COLLAB_SERVPROV |
RESPONSE_I_TRANSACTION_NO |
Provides you with consistency between the parent child column lengths for the tables and columns listed.
Steps to Enable
You don't need to do anything to enable this feature.
Tips And Considerations
Users of the Oracle GoldenGate service should take note of the DB changes and make those changes in their target DB.
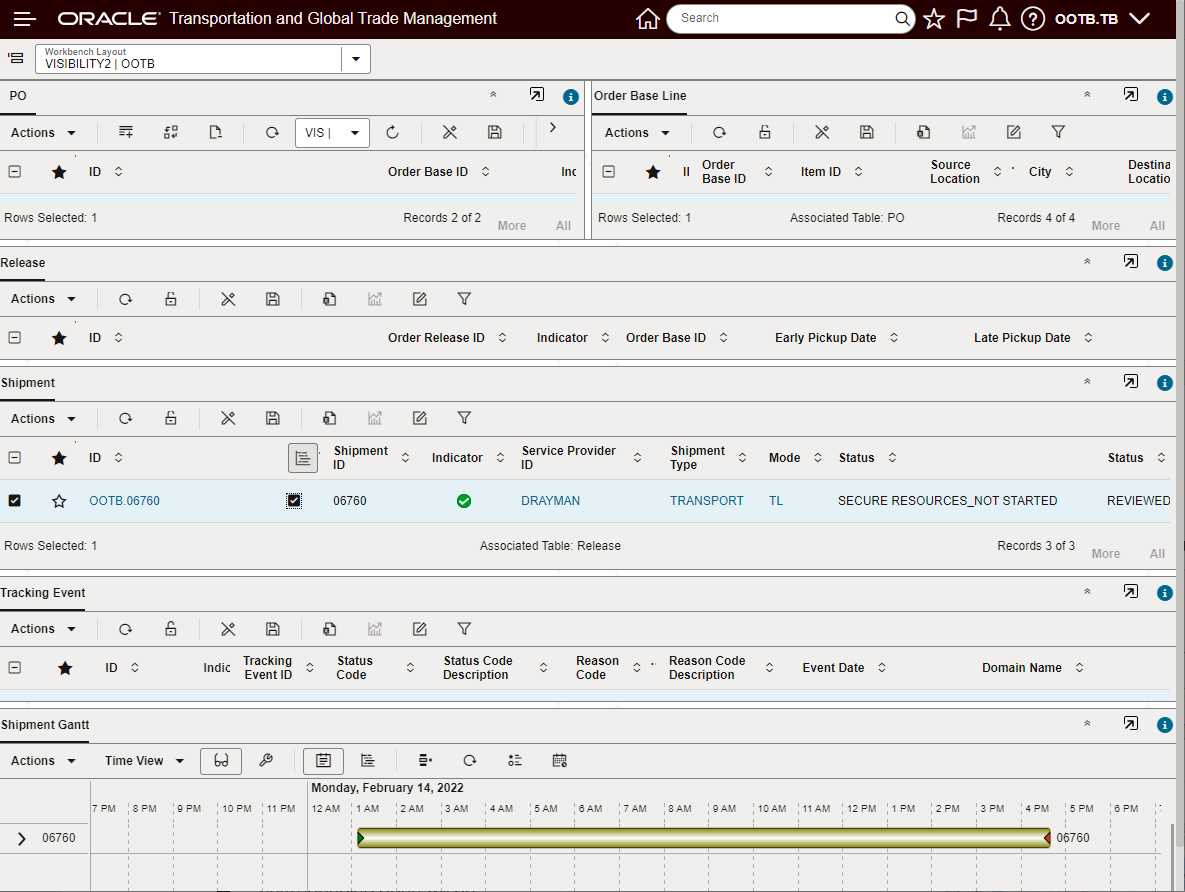
Enhanced Workbench Enhancements
This feature provides you with a set of new and improved capabilities and features for the Enhanced Workbench. Enhancements have been provided in a number of areas including:
- Action Checks for Table to Table Drag/Drop Actions
- Power Actions for Dock Scheduling Gantt
- Table Filters for Table objects
- New Gantt Parameters
- Additional Gantt Logic Configurations Parameters for UI Settings
- Enhanced Workbench Layout Option to Collapse All Tabs
- All Pre-existing PUBLIC Layouts moved to Enhanced Workbench Format including all Action related Workbenches and all Menu Workbenches.
Action Checks
New for the Enhanced Workbench is the ability to setup and use Action Checks for Table-to-Table Drag/Drop. When configured, as shown below, your action checked actions will provide you with an error message.
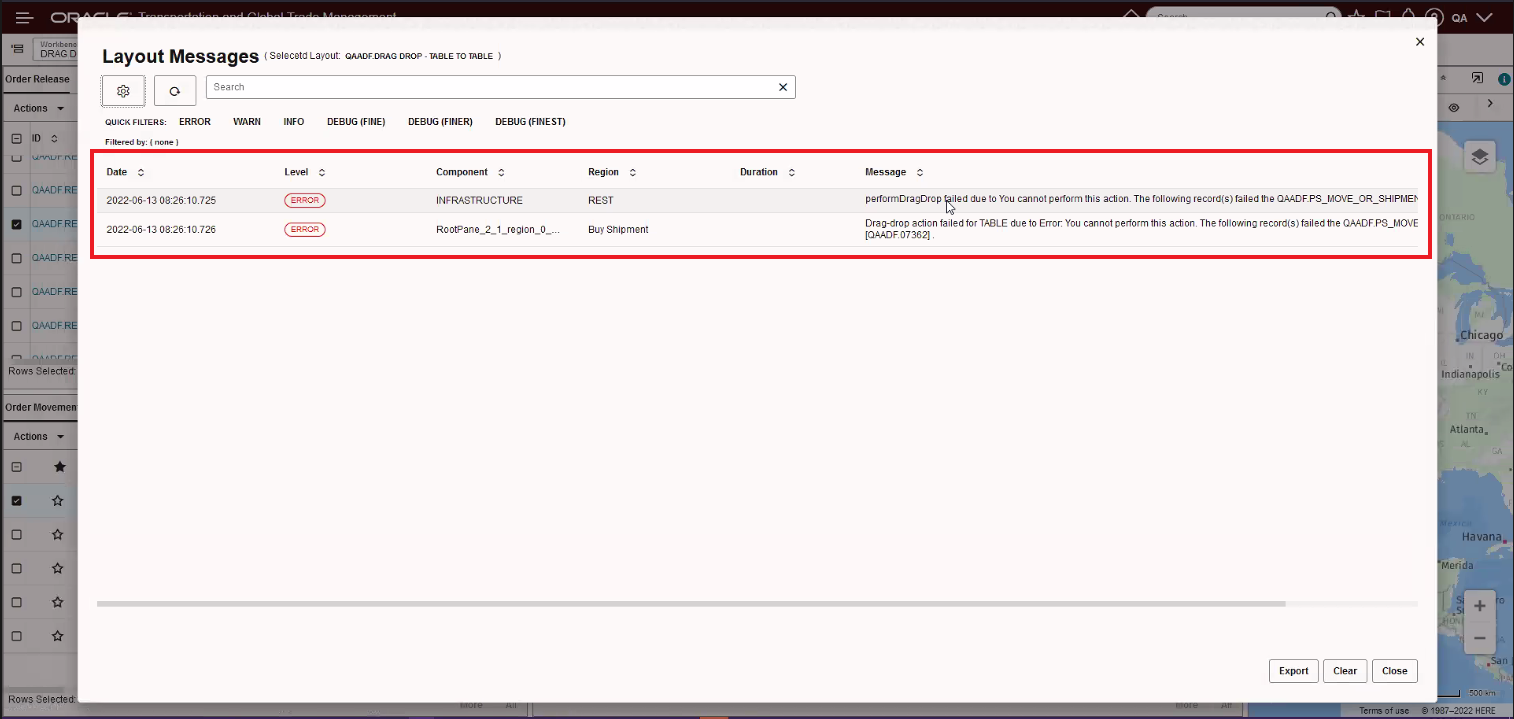
Action Check Error Message
Power Actions for Dock Scheduling Gantt
Below are the Power Actions supported in the Dock Scheduling Gantt. To configure Power Actions you navigate to Configuration and Administration > User Configuration > Manage User Access. In the User Access Type field select the option Power Action. You can configure Power Actions so that when a specific user works with dock scheduling, they are restricted in the actions that they can make to the appointments. If no power actions are defined for a user, then they have access to all actions. If some power actions are defined then that user has access to only those actions.
Power Actions:
- ADD REMARK
- ADJUST APPOINTMENT TIME
- BLOCK RESOURCE
- CHANGE APPOINTMENT ACTIVITY TYPE
- CREATE APPOINTMENT
- CUT APPOINTMENT
- DRAG AND DROP
- FIND NEXT AVAILABLE APPOINTMENT
- FIND PREVIOUS AVAILABLE APPOINTMENT
- MOVE TO YARD
- PASTE APPOINTMENT
- QUICK EVENT
- RE-COMPUTE APPOINTMENT
- RE-SCHEDULE APPOINTMENT
- RE-SCHEDULE APPOINTMENT - SHIPMENT GROUP
- REMOVE APPOINTMENT
- SCHEDULE APPOINTMENT
- SCHEDULE APPOINTMENT
- UNBLOCK RESOURCE
- VIEW APPOINTMENT
- VIEW RELATED SHIPMENTS
- VIEW SHIPMENT
Power Actions not available
NOTE: Currently OTM supports only right click actions of appointment on Enhanced Workbench Dock Scheduling Gantt and hence only corresponding power actions are available. All other actions listed below are currently unsupported in jet dock workbench and hence their corresponding power actions cannot be configured.
- BLOCK RESOURCE
- CREATE APPOINTMENT
- DOCK - UNBLOCK RESOURCE
- DOCK - CUT APPOINTMENT
- DOCK - PASTE APPOINTMENT
- DOCK - MOVE TO YARD
- DOCK - SCHEDULE APPOINTMENT
- DOCK - VIEW SHIPMENT
- DOCK - RESCHEDULE APPOINTMENT
- DOCK - RESCHEDULE APPOINTMENT - SHIPMENT GROUP
Table Filters
The Enhanced Workbench Table objects now support Filters. The filters provide you with a convenient way to quickly reduce the number of rows displayed for a table.
Table Toggle Filter On/Off
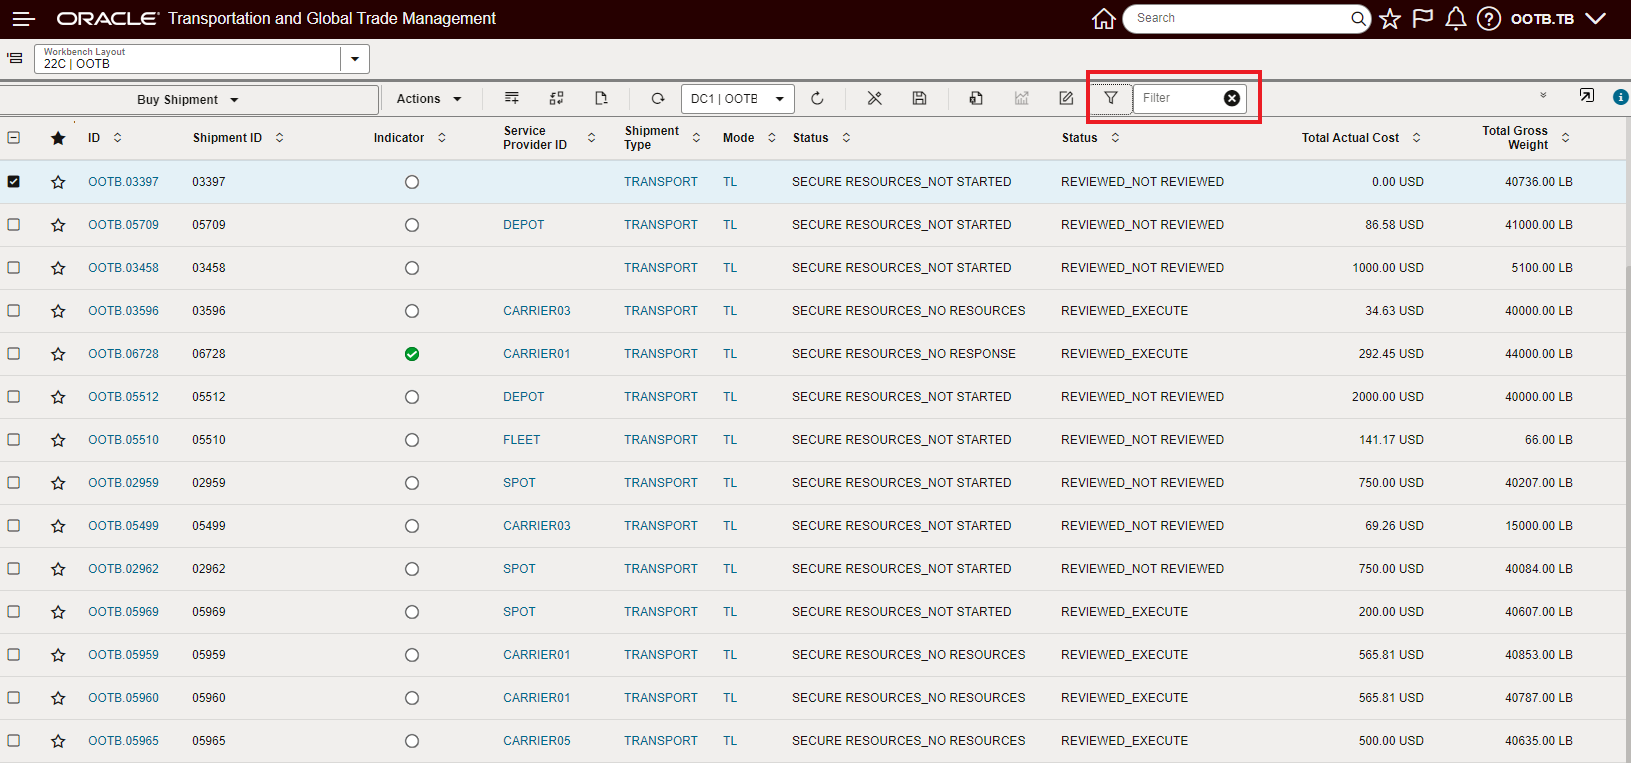
Table Filters - On/Off
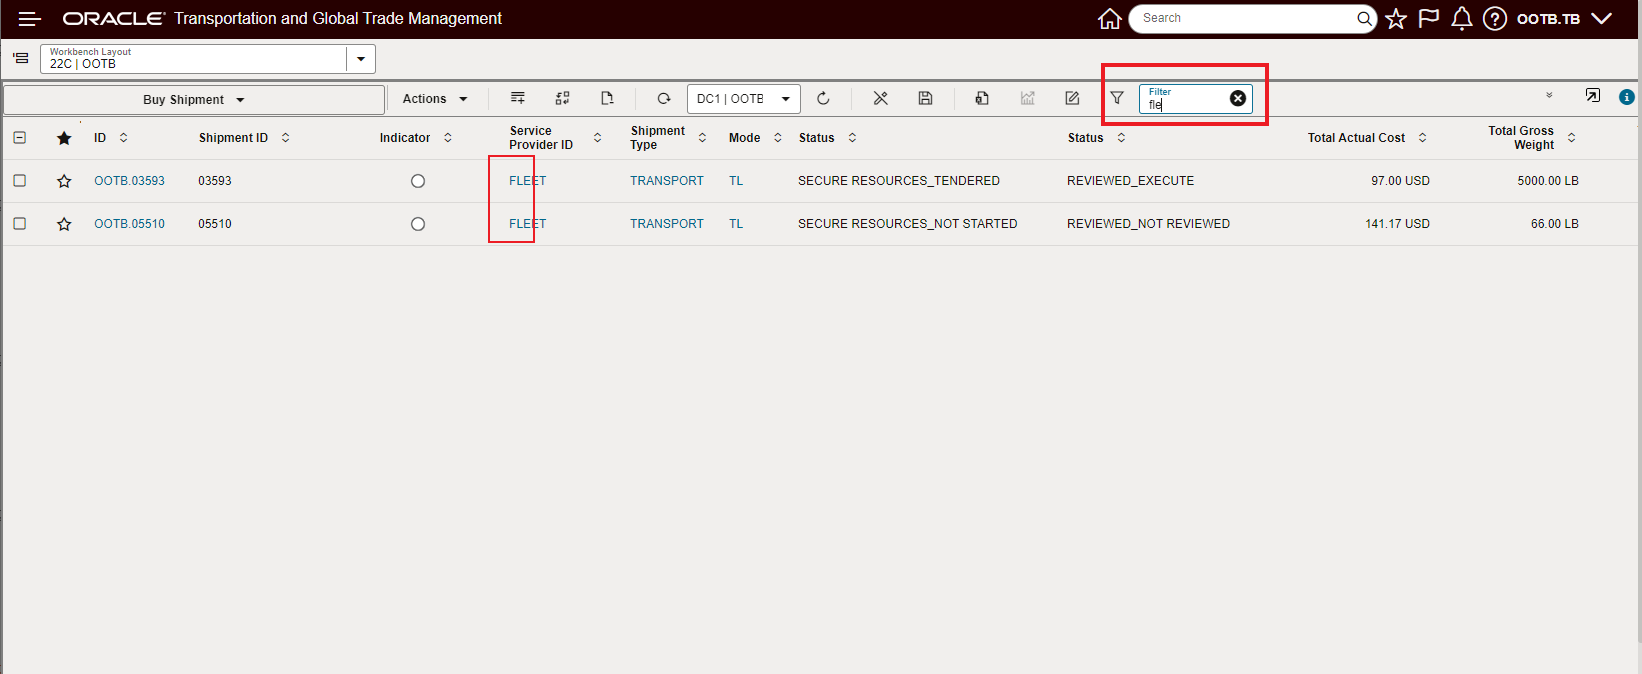
Table Filter Applied "fle"
Workbench Gantt Parameters
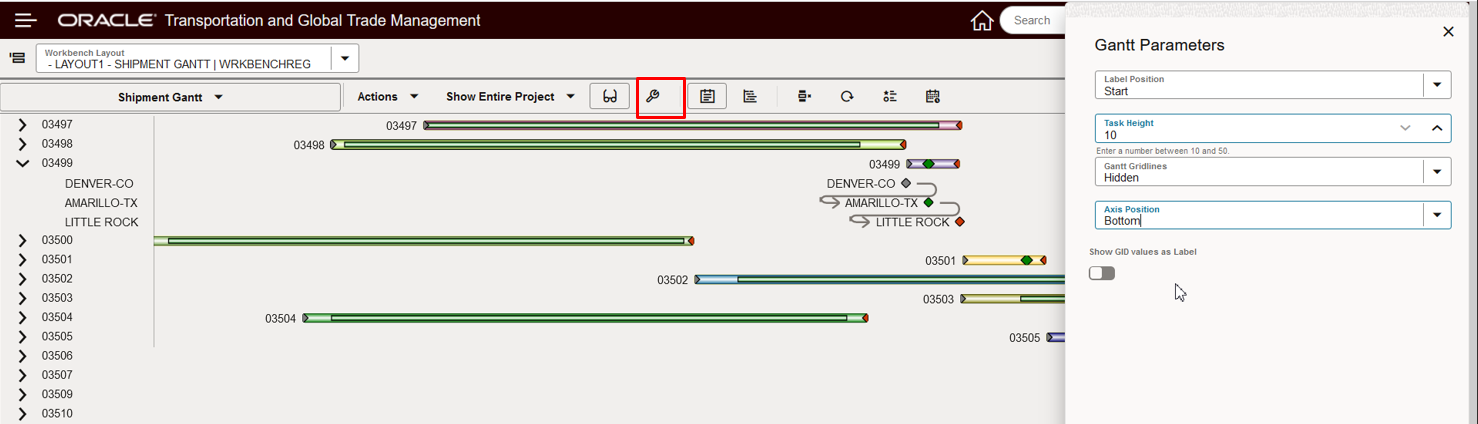
Gantt Parameters Example
In the example below, the Label Position and Gant Gridlines options have changed.
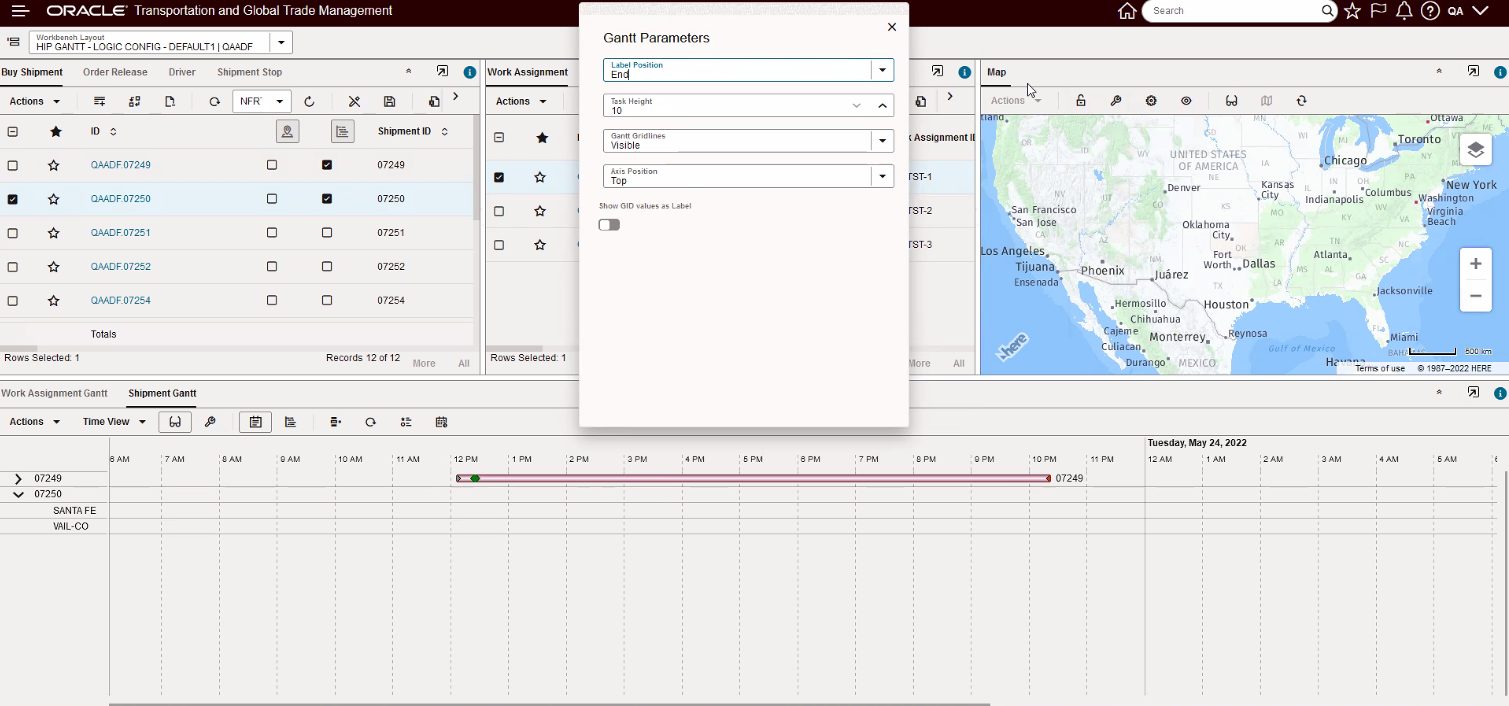
Gantt Parameter Example
Workbench Gantt Logic Configuration Changes
The highlighted Workbench Gantt Parameters have been added in 22C.
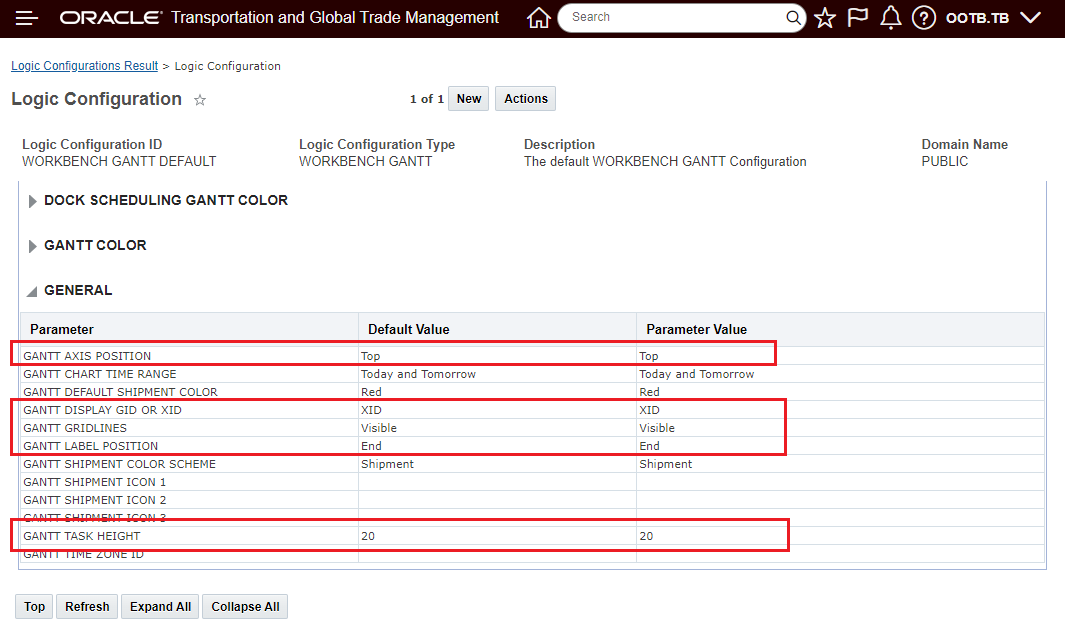
Workbench Gantt Logic Configuration Additions
Layout Details Option to Collapse All Tabs
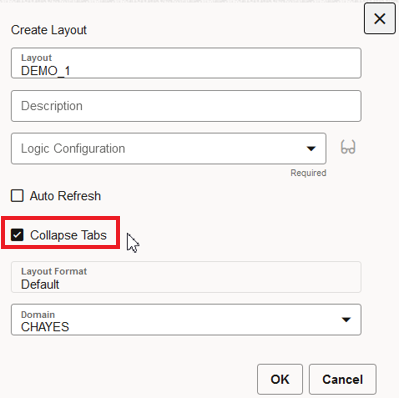
Collapse Tabs Option
In the example below, the Collapse Tabs options has been selected, with the tabs collapsed you gain additional working space.
Collapse Tabs Selected
In the example below, the Collapse Tabs option is not selected and available working space is now utilized for displaying the tab name.
Collapse Tabs Not Selected
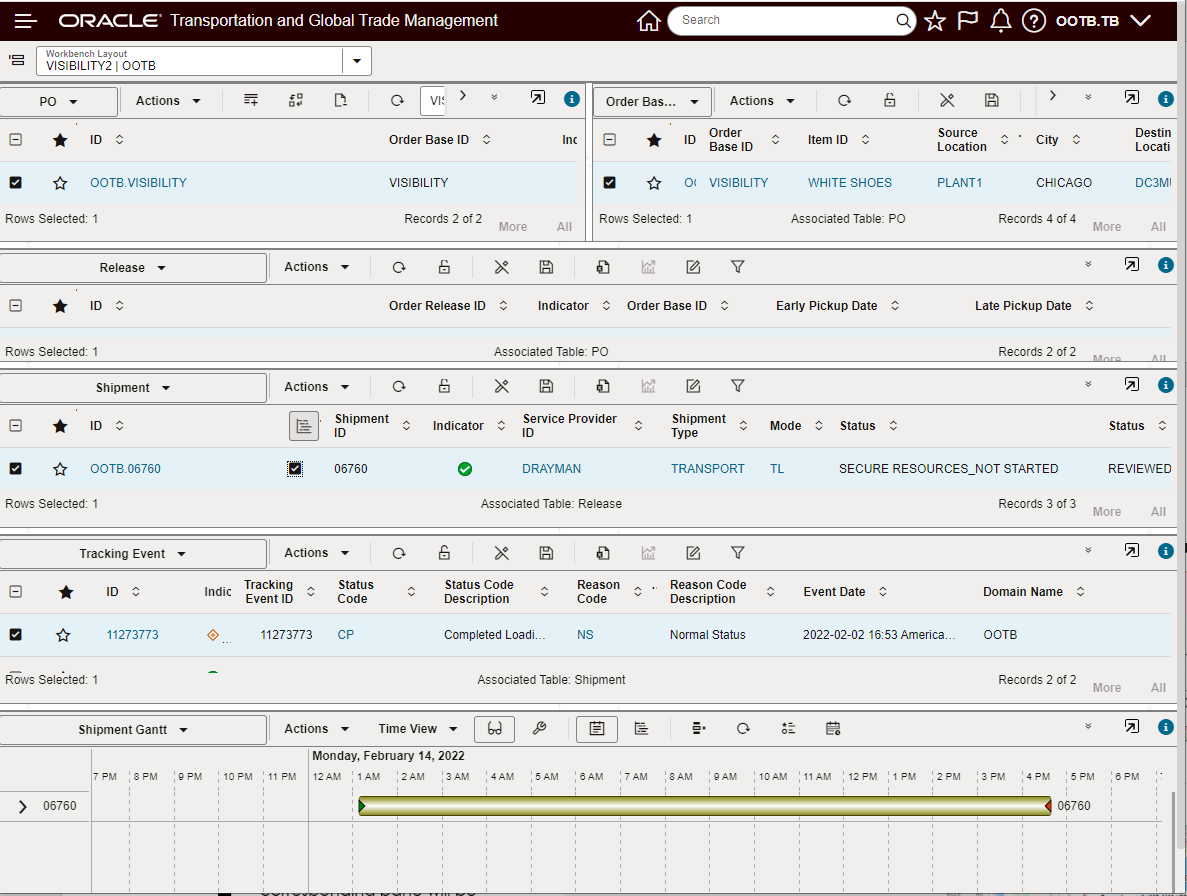
Pre-existing PUBLIC Layouts are Now in Enhanced Workbench Format:
- Actions including:
- Map Bulk Plan Results
- Map Shipment
- Map Order Release
- Graphical Diagnostics
- Etc.
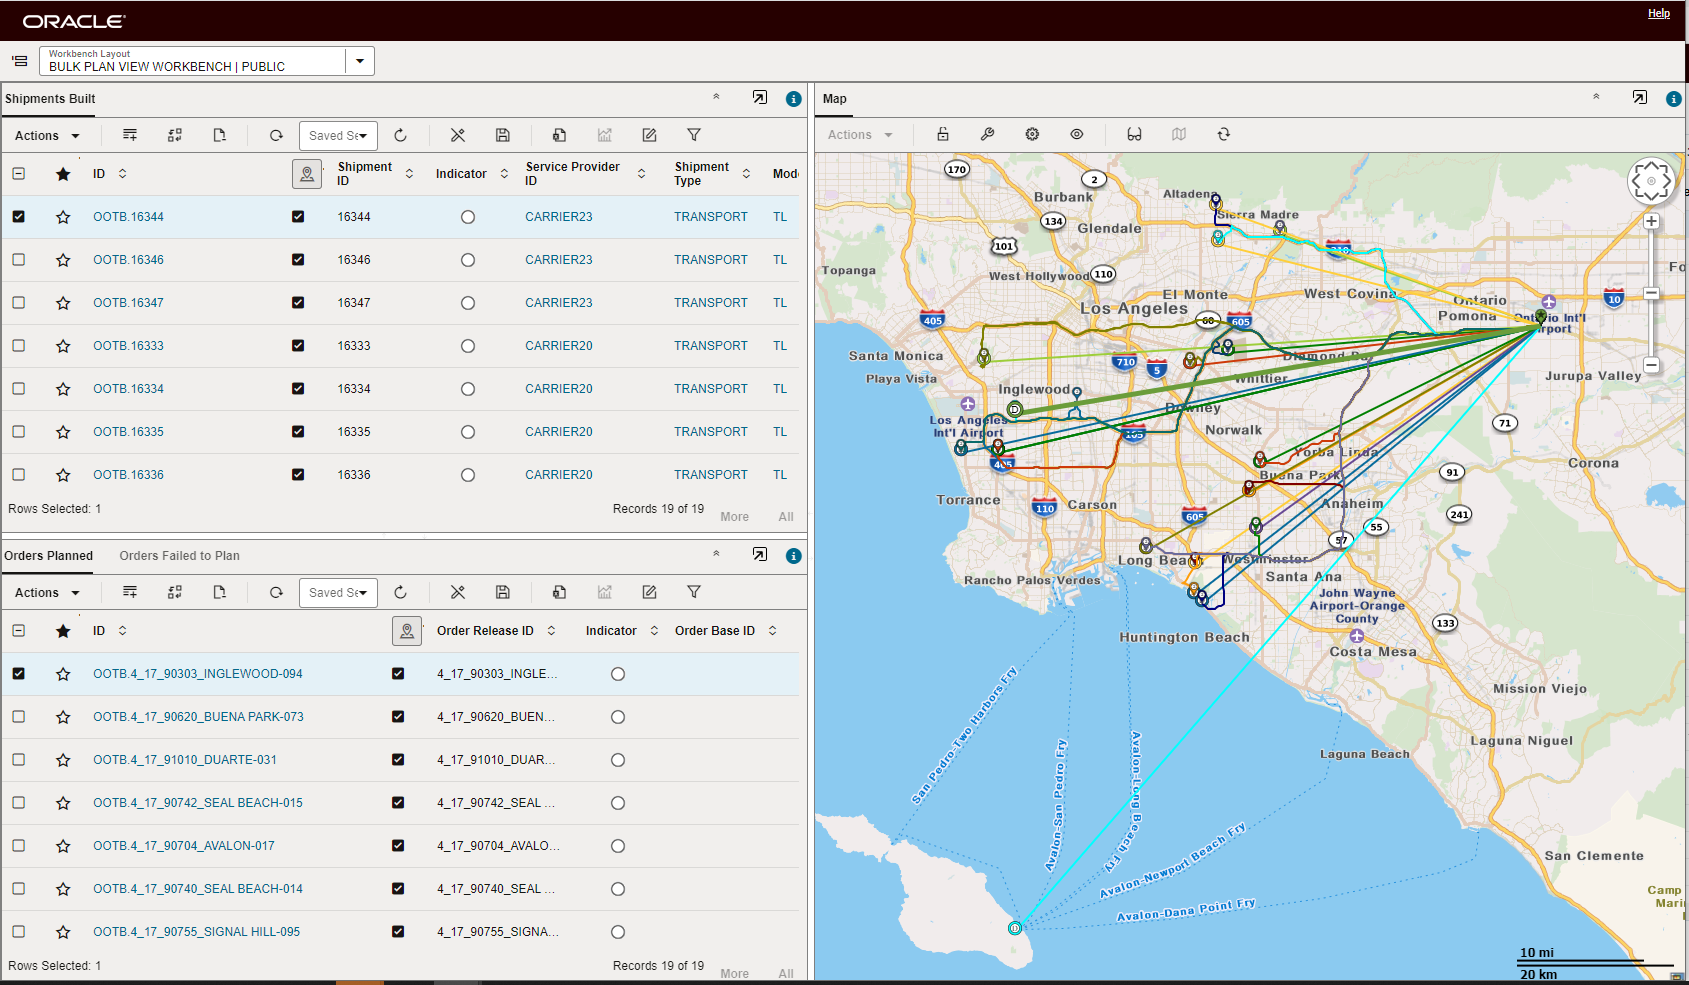
Workbench Actions - Map Bulk Plan Results
- Menu Links:
- Campaign Administrator Workbench
- Item Workbench
- Restricted Party Screening Enhanced Workbench
- Logistics Machine Learning Workbench
- Logistics Machine Learning Analytics Workbench
This feature provides a set of new capabilities and usability features for the new Enhanced Workbench functionality.
Steps to Enable
You don't need to do anything to enable this feature.
Tips And Considerations
NOTE: With the exception of the Restricted Party Screening Workbench (see below) all Menu and Action linked Workbenches - if necessary - can be reverted back to the legacy Workbench by setting the related Menu link or Action parameter back to the desired Workbench.
For the Restricted Party Screening Workbench, the process to to revert from the Enhanced Workbench to the legacy workbench is different.
If you are using an out of the box menu that ships with GTM:
- Navigate to Configuration and Administration > User Configuration > Menu Manager
- Select the out of the box menu where you want to enable the legacy workbench and click Copy User Menu
- Enter a User Menu ID
- Within the Restricted Party Screening section, you will see two folders, one for the enhanced version called ‘Restricted Party Screening Workbench’ and one for the legacy version called ‘Legacy Restricted Party Screening Workbench’.
- By default, the legacy workbench is hidden from the GTM menu. Right click on the folder for ‘Legacy Restricted Party Screening Workbench’ and select ‘Show’.
- If you want to hide the enhanced workbench from the GTM menu, Right click on the folder for ‘Restricted Party Screening Workbench’ and select ‘Hide’.
- Click Finished.
Next, you need to make the new menu visible in GTM.
- Navigate to Configuration and Administration > Manage User Access
- Fill in your user information such as User ID, User Level, User Role, etc.
- Select Edit User Access and make the updates
Make sure to log out and log back in so your changes take effect.
If you are using a menu that you created and customized:
- Navigate to Configuration and Administration > User Configuration > Menu Manager
- Edit the existing menu where you want to add the legacy workbench
- Determine at which level you want to see the menu and click the folder
- Click the + sign to the right of the selected folder
- Select a Type of Link and click Create
- Enter the name of the menu in the Text field
- From the radio buttons, select Workbench
- Within the Default Layout field, type ‘RESTRICTED PARTY SCREENING WORKBENCH’
- Click Save
- Click Finished
Table Filters
- The applied Filter will filter the view to data - it does not change the number of records of data active in the table. In the example below, 8 records are returned by the query, a Filter is applied so that only 3 rows of data are shown - when the Add All to Map is selected, the result is not just the mapping of the 3 rows filtered, but all 8 rows/shipments.
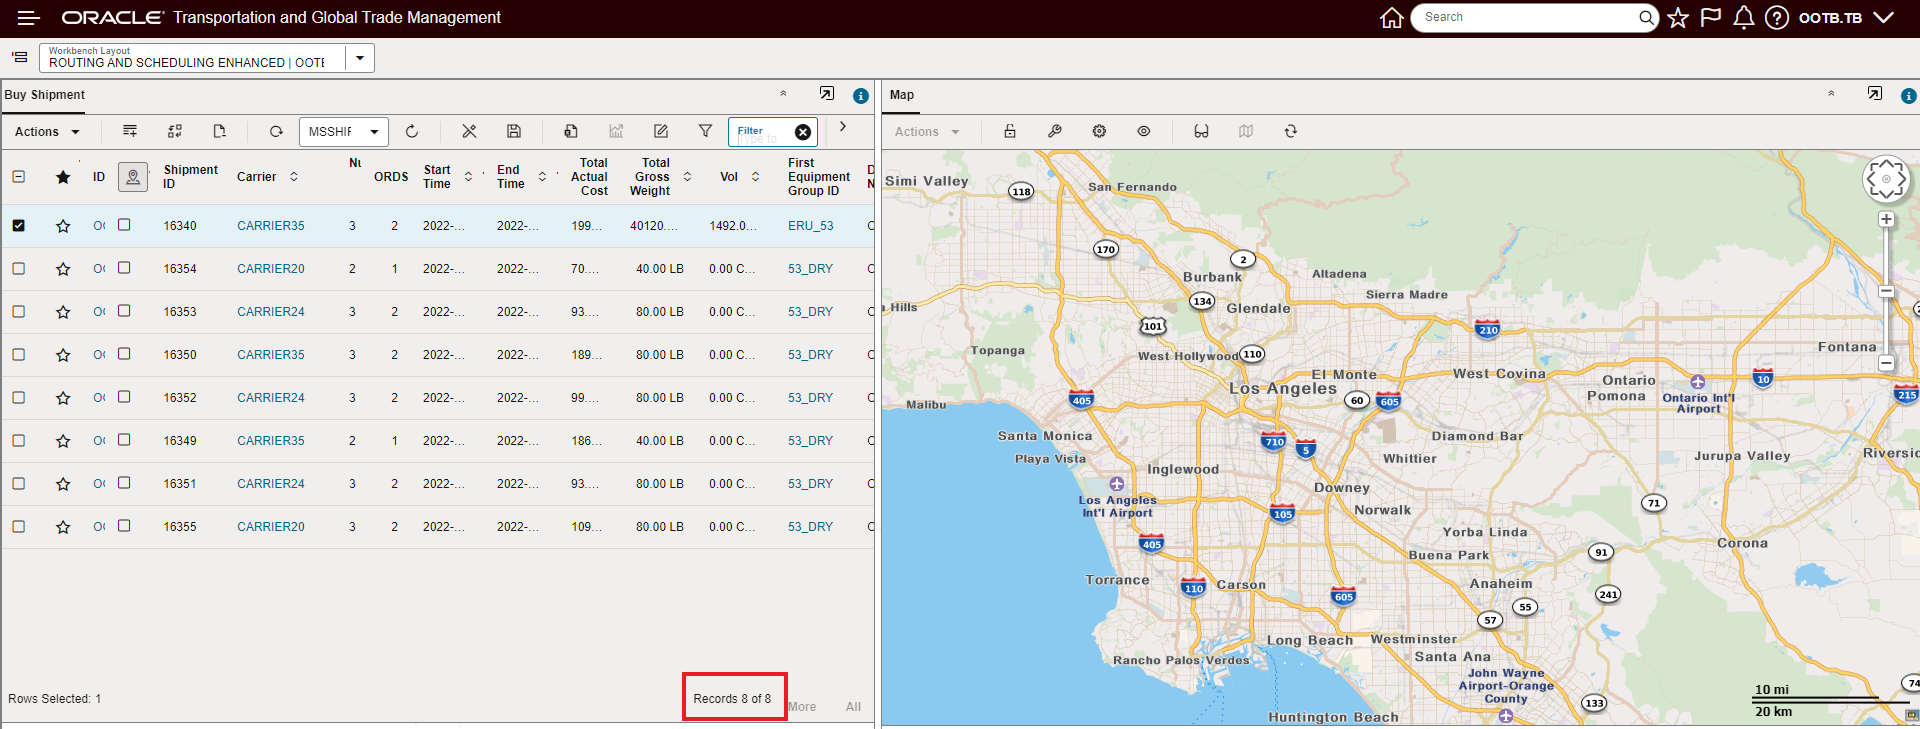
Unfiltered View - 8 Records
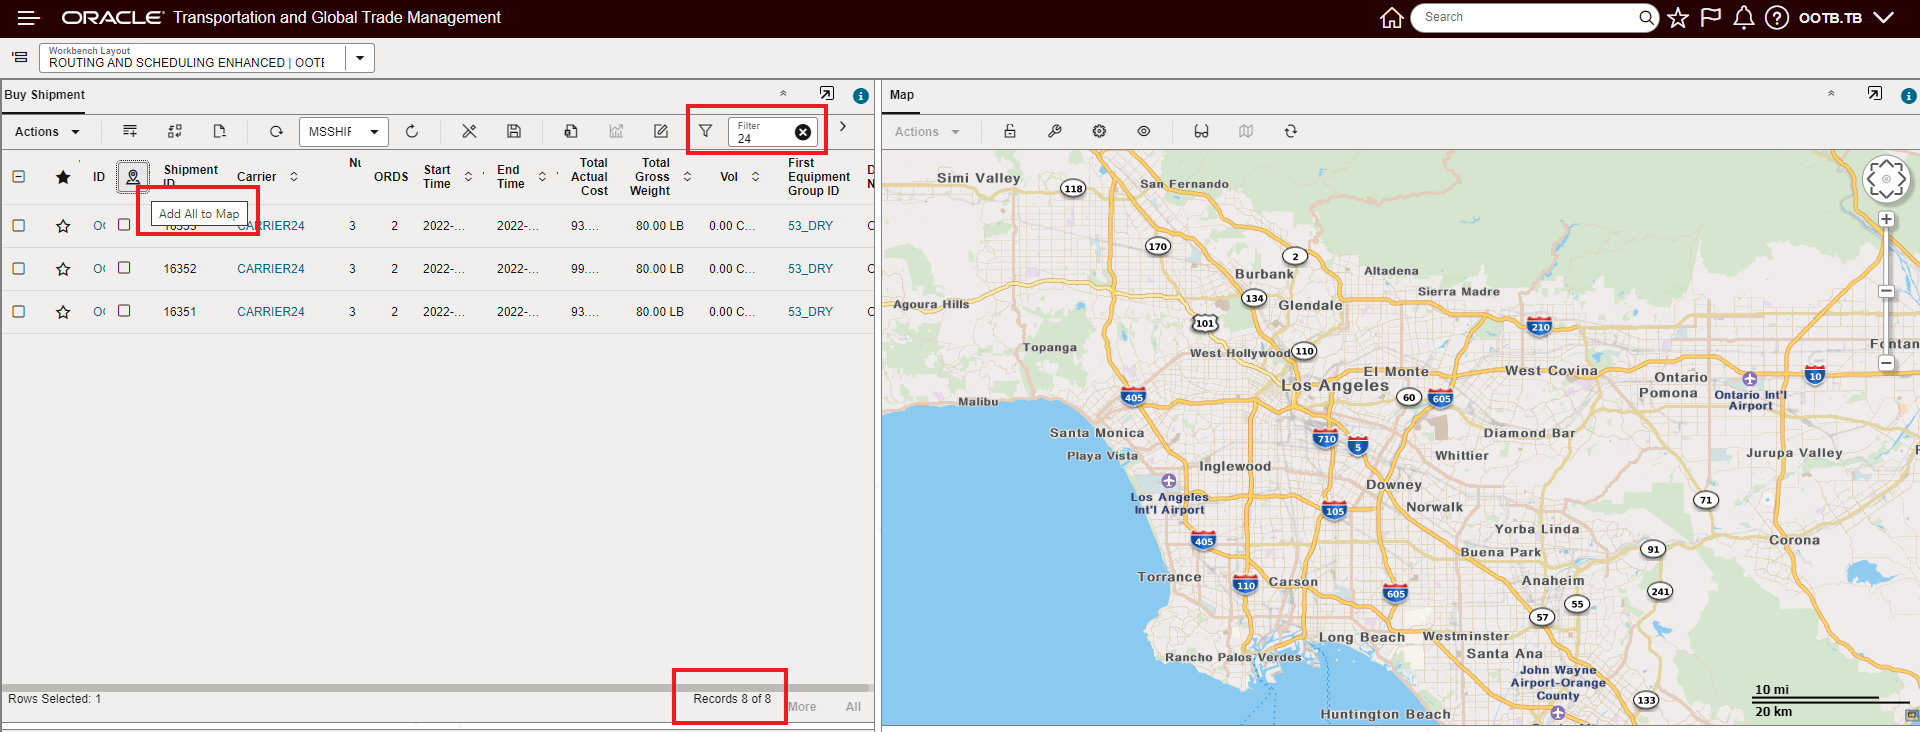
Filtered View - 3 Rows Shown Still 8 Records
Add All to Map - All 8 Records Added to Map not just the Filtered 3
- The Filter is not case sensitive,
User Preference Option to Set Home Page As Enhanced Workbench
This feature provides you with a new User Preference option - Home Workbench Layout ID - that you can use to specify the Enhanced Workbench you want to set as your Home Page. The specified Enhanced Workbench will be the UI that will be displayed once you log into the system and will be the UI displayed when you return to Home by selecting the Home icon.
The Home Workbench Layout ID User Preference option will replace the Springboard as the system Home UI.
In the example below, the user's preference is set so that the Enhanced Workbench they use every day is displayed as the Home page - so there is no need to start the day by navigating to the desired Enhanced Workbench.
Login
With the Home Workbench Layout ID set in the User Preference - the specified Enhanced Workbench is the UI that you see once you are logged into the system. There is no need to navigate to the Enhanced Workbench you use to complete your daily tasks.
My Workbench Shown
If you need to navigate to other managers, power data etc. you have access to both the Navigator and Search to navigate to different areas of the system.
The Navigator Is Still Available for Navigation
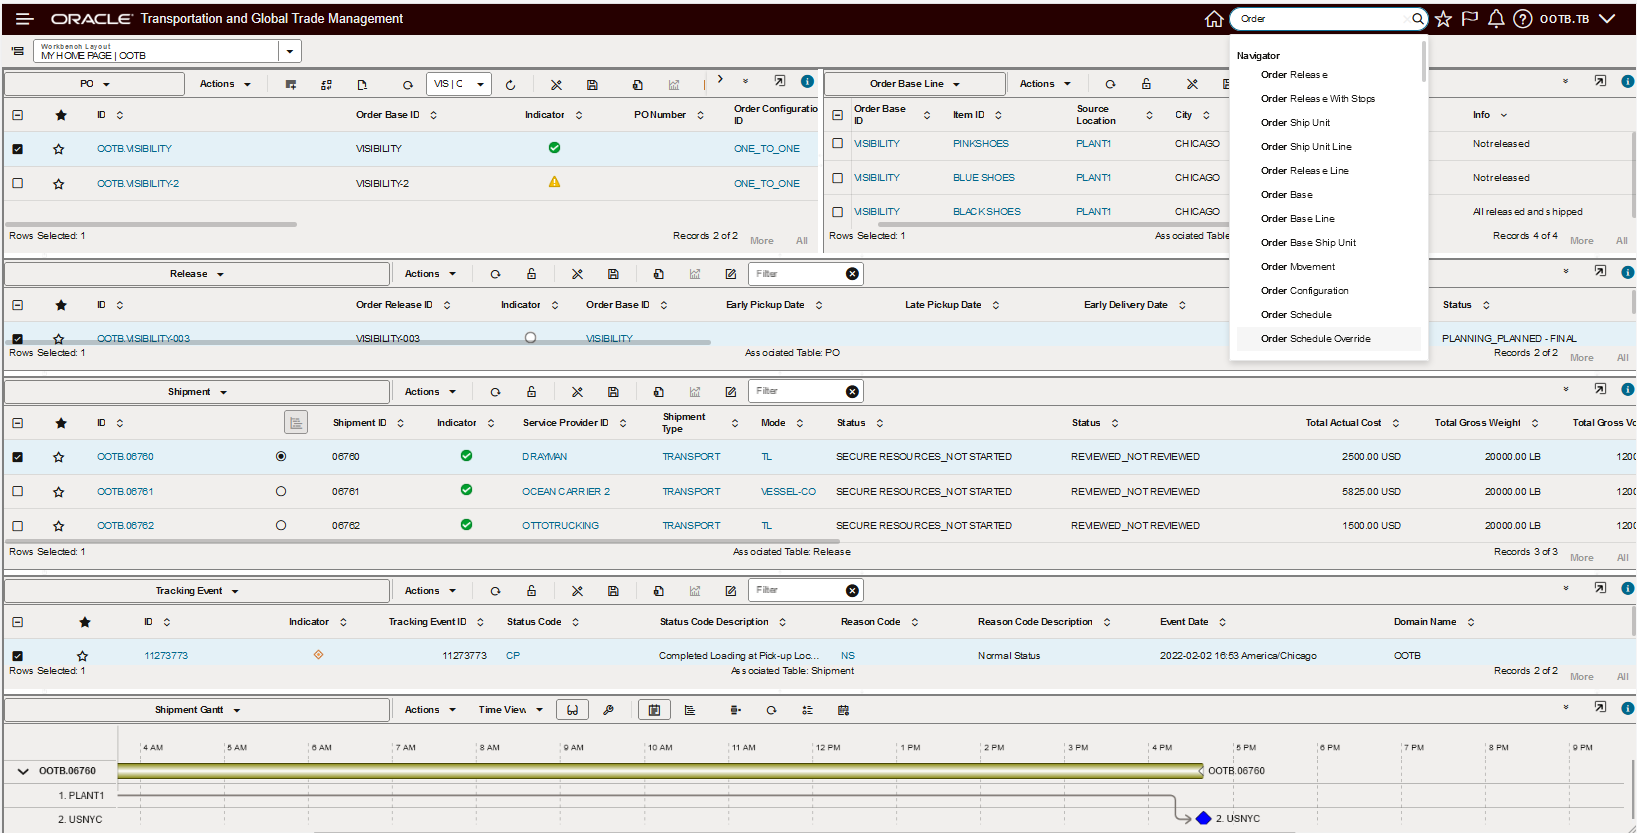
Search Is Still Available for Navigation
In the example below, the analyst responsible for Restricted Party Screening can now have their Restricted Party Screening Workbench be the initial screen presented to them after logging into the application - this puts them right where they need to be without having to navigate to their RPLS Workbench.
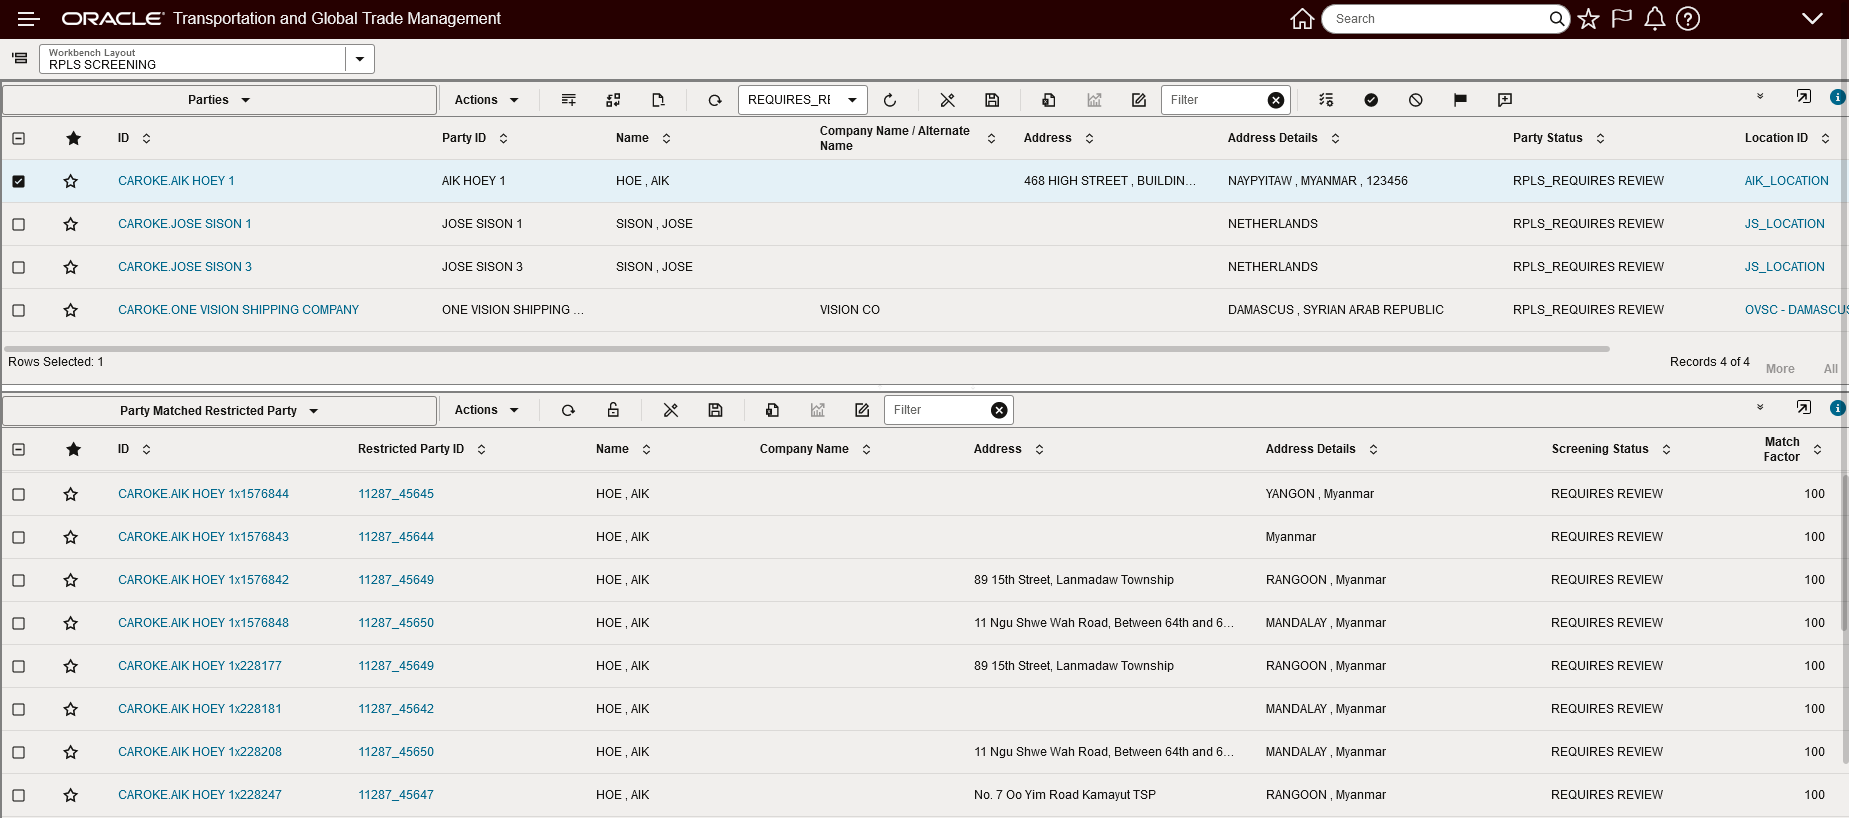
Home Page Workbench Restricted Party Screening
This feature eliminates unnecessary navigation for users who work exclusively within an Enhanced Workbench. For example - freight payment analyst, restricted party screeners.
Steps to Enable
To take advantage of this new User Preference option - Home Workbench Layout ID - you will need to configure the Home Workbench Layout ID option in an existing or new User Preference and then assign that configured User Preference to the desired usage level - either domain, user level or specific user.
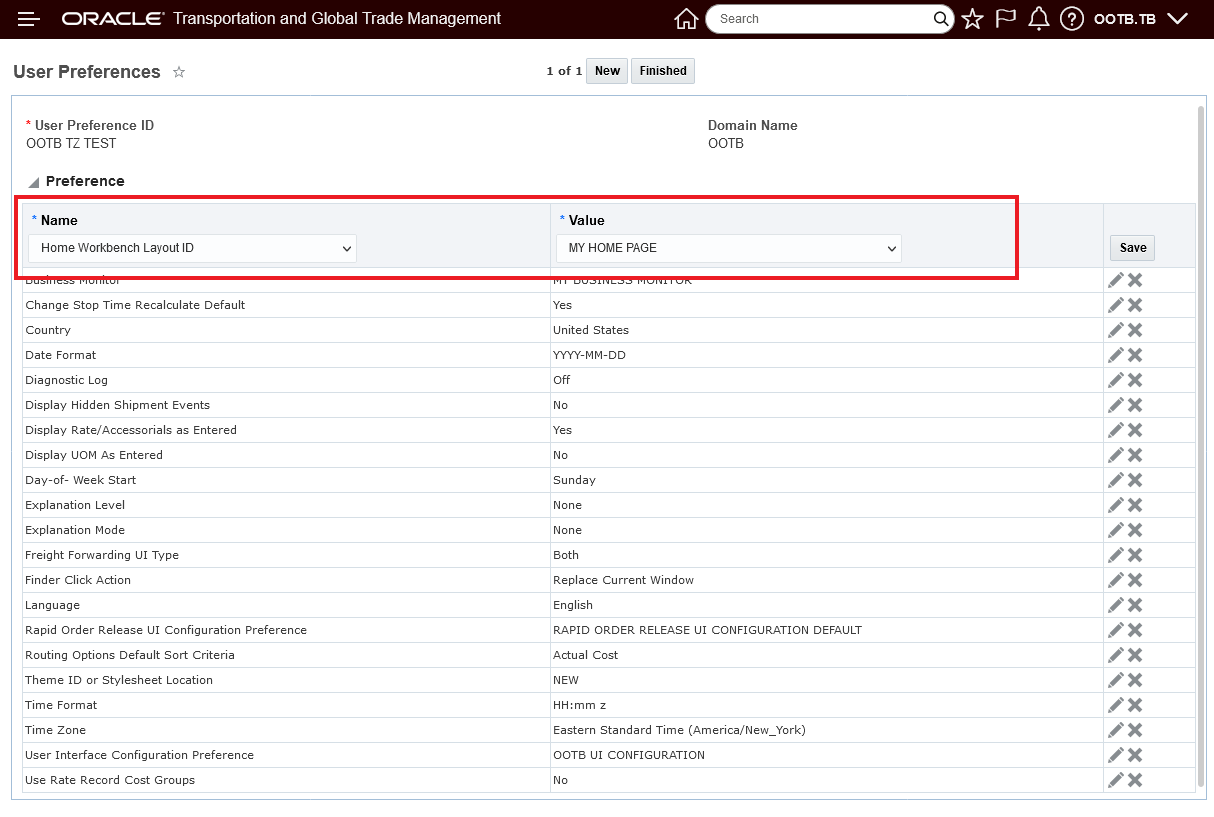
User Preference -
If the User Preference option - Home Workbench Layout ID - is not set, you will see the Springboard as your Home page - as shown below.
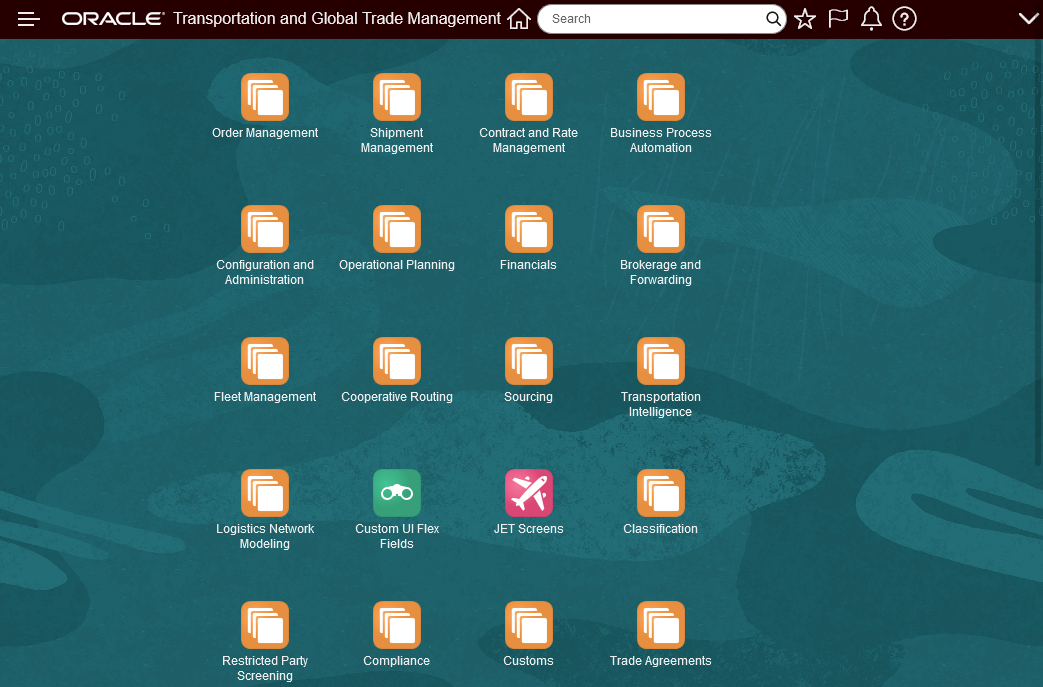
Springboard
REST Content Type Support for Oracle Visual Builder Add-In for Excel
This feature extends the flexibility of the REST services to support the Oracle Visual Builder Add-in for Excel content type requirements. With this feature, you can now develop Excel based solutions using Oracle Visual Builder Add-in for Excel and the system's standard REST capabilities.
Extends the options available for managing data to include using the Oracle Visual Builder Add-in for Excel.
Steps to Enable
You don't need to do anything to enable this feature.
Inbound Integration Status Alignment
This Optional Feature - Inbound Integration Status Alignment - when enabled, provides common processing of inbound XML integrations for the initial status value. Specifically, this feature will ignore - for II - insert ignore inbound XML transactions - an incorrectly provided initial status value provided for a new record/inserted record, and instead, will set the new records initial status value based on the initial value setup for the Status Type.
Provides consistent processing for status elements for all XML interfaces.
Steps to Enable
You don't need to do anything to enable this feature.
Key Resources
- A detailed description of this processing is available via the Cloud Integration Guide.
Oracle Analytics Server (OAS) Upgrade
This feature upgrades the Oracle Analytics Server (OAS) to the latest version 2022 v6.4. The latest version of OAS provides you with the latest set of correction and improvements in both performance and stability, as well as providing an updated UI look with a more pleasing color palette and improved icons.
OAS v6.4 UI Style Improvements
Provides access to the most recent Oracle Analytics Server (OAS) release - including bug fixes, performance improvements and a more modern UI style.
Steps to Enable
You don't need to do anything to enable this feature.
This feature provides a new diagnostics infrastructure that will monitor and manage the accumulation of files created by various processes in the system - with the goal of avoiding performance and system failures related to unavailable disk space issues caused by the (unnecessary) accumulation of files.
The File Management diagnostics will monitor all files created by various processes including:
- Data uploads
- Logging
- Temporary storage
File Metrics
To support notification, a new Metric Component, FILES, is available for file management. It includes the following metric types by use case:
- FILE COUNT – files added during the metric time period
- FILE CREATION FAILURE COUNT – new file failure due to resource maximums being reached
- FILE CREATION ALERT COUNT – new file alert due to resource alerts being reached
- FILE SIZE – since files may grow over time, this is a polled metric, checked every hour
- REMAINING DISK SPACE – a polled metric, checked every hour. On By use case, this reflects the remaining resources allocated to the use case. For Total, it reflect overall remaining disk space.
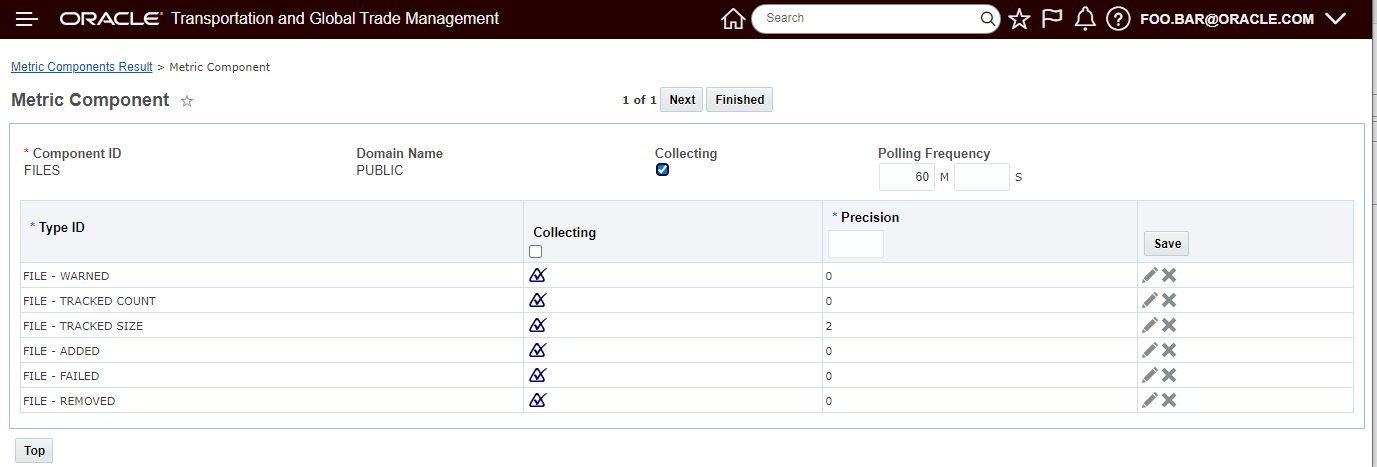
Metric Component
These can be used to set up various Metric Thresholds to warn users and Cloud Operations of critical loss of disk space. E.g., Cloud Operations can be notified when the REMAINING DISK SPACE goes below a fixed threshold, when the count of temporary files exceeds twice a daily average, or when a use case reaches 80% of its allocated limit.
File Deletion
A new staged, reserved recurring process periodically deletes managed files that:
- still exist and are closed (we cannot delete files with open file handles)
- are temporary and have exceeded their lifespan
- are alert-managed and are exceeding the resource usage allocated for their use case
Note that alert-managed files are deleted oldest to newest, until the maximums are no longer exceeded.
The option has also been provided for you to run the File Cleanup process to support file deletion for particular use case. For example, you may want to explicitly delete any temporary Mail files older than 10 minutes, regardless of the policy specified by the caller or properties.
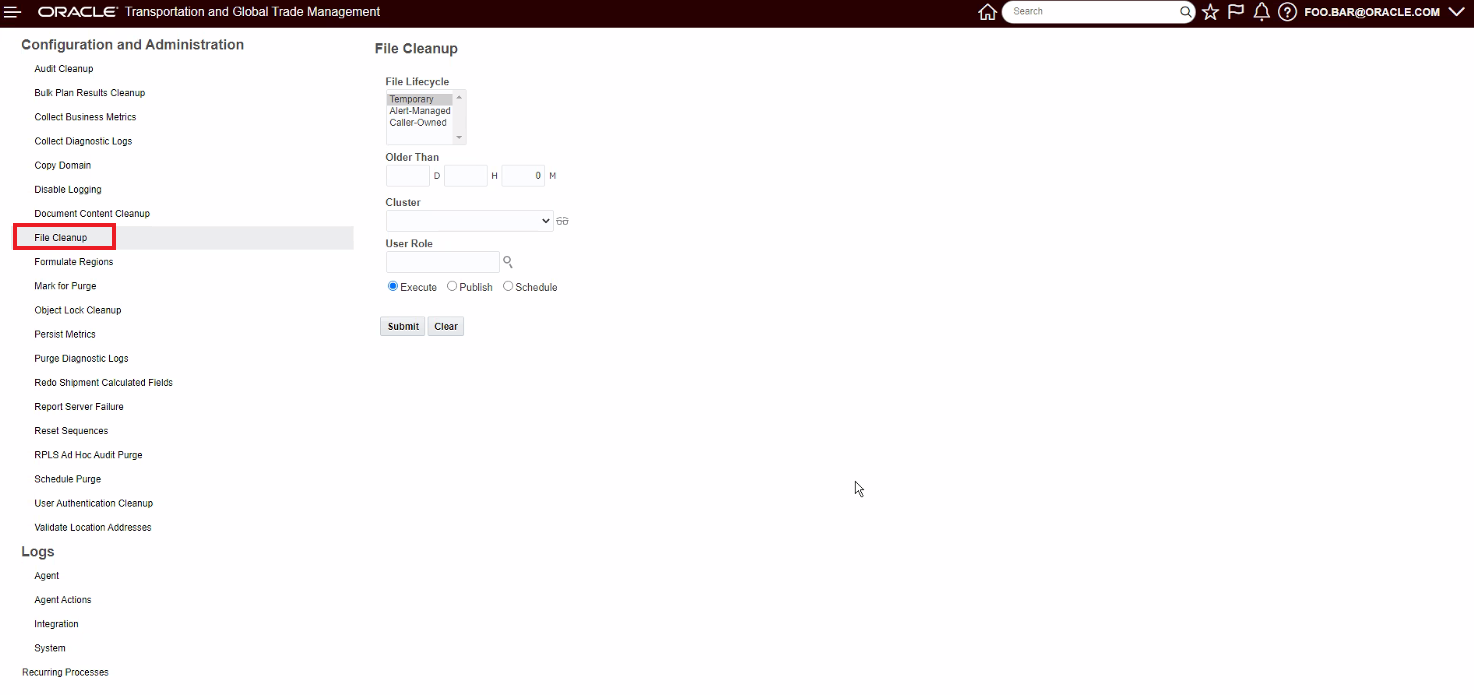
Every file created by the system is now associated with a Use Case. A use case consists of the following attributes, shared by all files of that use case:
- Ownership. Files may be temporary, alertManaged or callerOwned.
- Lifespan. Files have minimum and maximum lifespans.
- Resource Usage. A use case may have a maximum resource usage, specified in # of files and/or size of files. It may also have an alert usage (in # or size).
Logging
All additions and deletions of files to File Management are logged with a new FileManagement log ID. As the file deletion process runs, it may encounter files that have been deleted by the caller, these files will be logged specifically to distinguish between files that are explicitly deleted from files that are handled by File Management.
This feature improves system stability and performance by monitoring and managing the disk space used by files created by the system for various processes.
Steps to Enable
You don't need to do anything to enable this feature.
This Optional Feature - Limit Saved Query Results - when enabled - will limit the number of records that can be returned by your saved queries and saved conditions. For queries that return an excessive number of records, limiting the number of records returned will avoid undesirable impacts to system performance.
The default limit is set at 50k.
There are overrides defined for the following areas:
- Purge set to 1M
- Data Query set to 100M
- Update Classification set to 100k
This feature helps maintain system performance by avoiding system degradation caused by queries that return an excessive record count.
Steps to Enable
You don't need to do anything to enable this feature.
Tips And Considerations
Please contact Support to have limits raised for particular use cases or record types.
Optimize Transaction Synchronization
This Optional Feature - Optimize Transaction Synchronization - when enabled - allows transactional operations to no longer require thread coordination and synchronization.
This feature provides performance improvements for transactional operations by no longer requiring thread coordination and synchronization.
Steps to Enable
You don't need to do anything to enable this feature.
This Optional Feature - Optimize REST Finder - when enabled, will log the total number of columns retrieved for a REST API query. This information can then be used to set a limit on the size of any data returned to prevent excessive resource usage.
Provides insight into volumes and resource usage, the information gathered will provide insight and guidance for setting limits (if necessary/warranted) to avoid excessive resource usage and avoid performance issues.
Steps to Enable
You don't need to do anything to enable this feature.
Tips And Considerations
Do not disable unless advised by Support.
This Optional Feature - EMAIL COMPLIANT HTML - when enabled, will ensure Notification HTML is properly formed for Outlook and other email clients.
Changes include:
- Fixing up the table formatting for Data Changes
- Ensuring the logo image is inside the HTML body
This feature enforces HTML compliance on workflow notifications
Steps to Enable
You don't need to do anything to enable this feature.
Tips And Considerations
This feature may change existing notification formats slightly, but aids in email browser rendering.
Allow Restricted Password Characters
This Optional Feature - ALLOW RESTRICTED PASSWORD CHARACTERS - when enabled (enabled by default) - allows for the use of restricted characters '[', '#', and ']' when defining the password for a user in the system.
In previous version of the system, attempting to use any of the restricted charters '[', '#', and ']' in a user password - as shown below - would result in an error message.
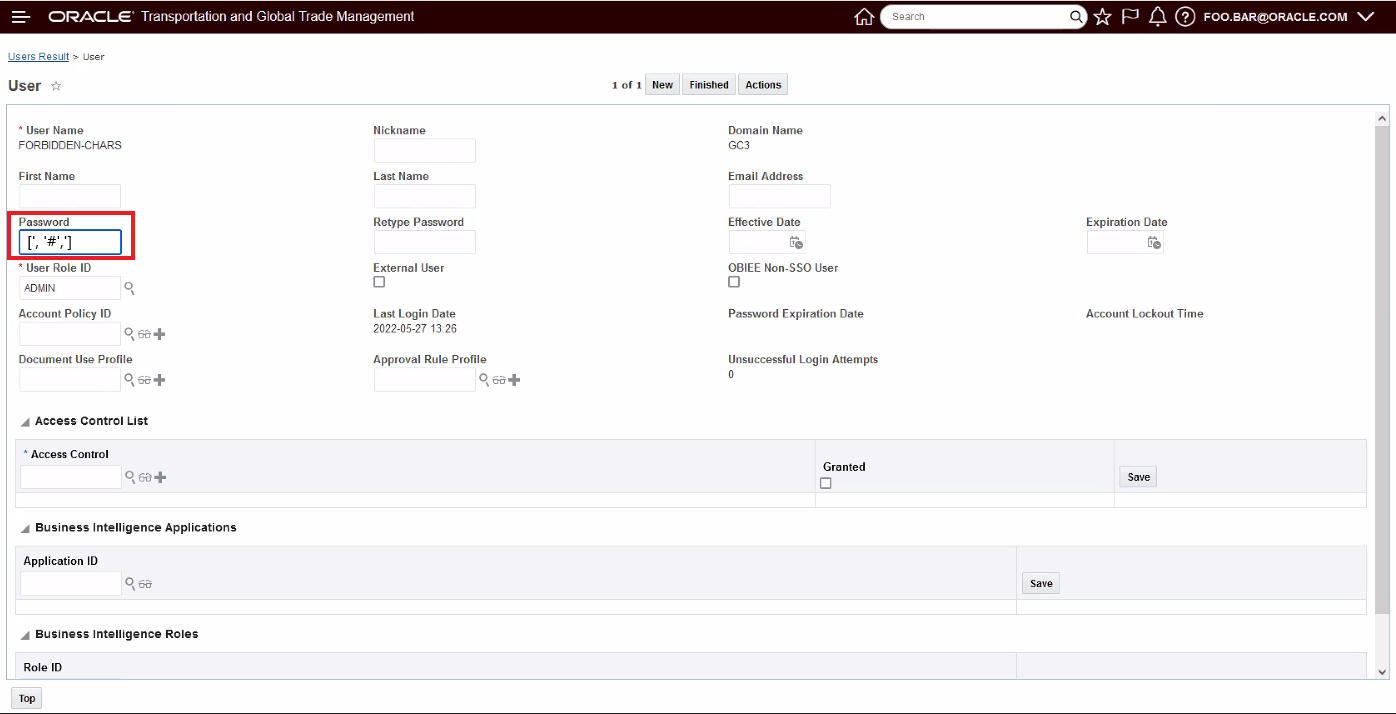
Restricted Characters Used In Password
Restricted Characters Used In Password Error
Expands the characters allowed when defining a user password in the system.
Steps to Enable
You don't need to do anything to enable this feature.
This Optional Feature - Force Use of Nickname - when enabled, will require Users in the system to have a Nickname configured.
The Nickname provided must be the same as the corresponding Oracle Identity Cloud Service User Name field.
Enforces a consistent setup and SSO mapping.
Steps to Enable
Suggested Steps
Identify the Users without Nicknames:
- Log in as DBA.ADMIN.
- Navigate to Configuration and Administration User Management User Manager.
- Use the User Finder screen, for the Nickname field select "Is Null" drop list option and for the Last Login Date select a date at least 3 or more months ago (depending on your user activity) and then select the "After" drop list option.
- Click Search.
- Every single one of the User records found requires a Nickname value that maps to the corresponding Oracle Identity Cloud Service User Name field.
Without the Nickname, the user will not be able to login to the application.
To find the Oracle Identity Cloud Service User Name to populate as the Nickname in OTM, you can Export All of the user records from Oracle Identity Cloud Service and then manually update the User Nickname value in OTM/GTM.
To get the list of Oracle Identity Cloud Service User Names:
- Log in to Oracle Identity Cloud Service .
- Navigate to Users.
- Click on the Export button to Export All. This will trigger a background job and then you will be able to download the csv file if you click the Job Link provided. You will receive emails from Oracle Identity Cloud Service that "Your User Export Job has been started" and "Your User Export Job is successful" that contain links for the Job Status Page.
Once you have the IDCS list, you will need to manually match up the OTM/GTM User record and IDCS record and then update the OTM/GTM user record with a Nickname value that corresponds to the Oracle Identity Cloud Service User Name field value.
Global Trade Management (Base)
Item Qualification - Deprecate Qualified Field
When this Optional Feature - ITEM QUALIFICATION - DEPRECATE QUALIFIED FIELD - is enabled, the QUALIFIED field from Item Qualification will be deprecated. The details are reflected in the STATUS field.
This feature reduces confusion and improves usability.
Steps to Enable
You don't need to do anything to enable this feature.
New Service Parameter for Restricted Party Screening
A new parameter has been added to the Restricted Party Screening Service Parameter to enable you to screen based on address data. Within the Master Data > Power Data > Configurations > Service Parameters menu option, there is a new parameter called 'addressCityProvincePostalCodeCountry' which allows you to screen parties based on full address, city, province, postal code, and country.

This enhancement allows for an alternative screening configuration that some customers may find useful or easier to tailor to their restricted party list screening needs.
Steps to Enable
You don't need to do anything to enable this feature.
Tips And Considerations
Once you create your service parameter, you need to assign it to a service preference to use it during restricted party screening.
Key Resources
- For more information on restricted party screening, please refer to the GTM How To/Configuration Topic called 'Restricted Party Screening'.
This feature provides a new Item Values manager. The Item Values manager gives you visibility into a specific set of trade item values. Since an item can model both the buy side and the sell side, you can specify information for either your suppliers or your inventory organizations. You can also model both the inventory organization and the supplier in one record indicating that the inventory organization purchased parts from a certain supplier. You can specify:
- Inventory Organization - specify where your company is manufacturing the finished good
- Partner - specify the party related to the trading partner or supplier who is providing the item
- Partner Site - specify the party site related to the trading partner or supplier who is providing the item
- Packaged Item - specify the packaged item that relates to the trade value
- Value details including:
- Value Qualifier ID
- Value
- Exchange Rate ID
- Exchange Rate Date
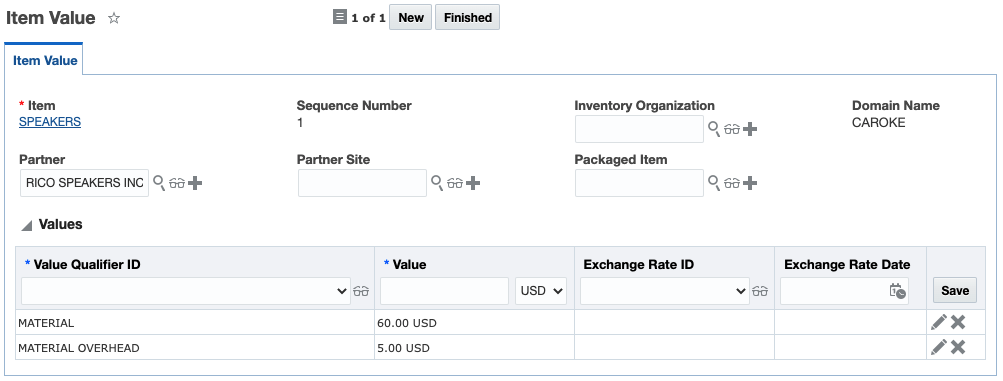
The addition of the new manager allows for direct access to this information without traversing via an Item screen.
Steps to Enable
You don't need to do anything to enable this feature.
Tips And Considerations
The expectation is that the item costing values would come into GTM from an ERP such as Oracle Fusion Cloud. The integration for item costing data to support trade item values will be added in a future release.
As in previous releases, the item values can also be viewed from the Item > Trade Values tab.
Key Resources
- For more information on the trade agreement qualification, please see the GTM How To/Configuration Topic called 'Trade Agreement Qualification'.
RPLS Supports AND Condition for Match Direction
This feature enables you to have additional flexibility in configuring the restricted party screening engine which helps to improve the match quality. This is an optional feature and is delivered with Opt In set to FALSE/not enabled.
When you opt in to this feature, you can set a new property called gtm.rpls.matchDirection.both.<service_preference_gid>. For example, if you are using a service preference called RESTRICTED_PARTY_SCREENING in the RPLS domain and you want to use the average match factor, the property would be set to 'gtm.rpls.matchDirection.both.RPLS.RESTRICTED_PARTY_SCREENING = forwardAndReverseWithAverageMatchFactor'.
This property is configured on a service preference by service preference basis. When the Match Direction on the Service Parameter is set to BOTH, this property tells GTM if it should use the Maximum Match Factor, the Minimum Match Factor or the Average Match Factor from the Forward Threshold and Reverse Threshold calculations. There are three available settings for this property:
- gtm.rpls.matchDirection.both.<domain.service_preference_gid> = forwardOrReverseWithMaxMatchFactor - This is the existing functionality and provides 'OR' capability when analyzing the forward threshold and the reverse threshold. When either the forward or the reverse threshold are met, the one that is met will be used as the match factor. If both the forward and the reverse threshold are met, then the maximum match factor is used.
- gtm.rpls.matchDirection.both.<domain.service_preference_gid> = forwardAndReverseWithMinMatchFactor - This provides 'AND' capability when analyzing the forward threshold and the reverse threshold. Both thresholds must be met and if they are, then the minimum of both thresholds is used as the match factor.
- gtm.rpls.matchDirection.both.<domain.service_preference_gid> = forwardAndReverseWithAverageMatchFactor - This provides 'AND' capability when analyzing the forward threshold and the reverse threshold. Both thresholds must be met and if they are, then the average of the two thresholds is used as the match factor.
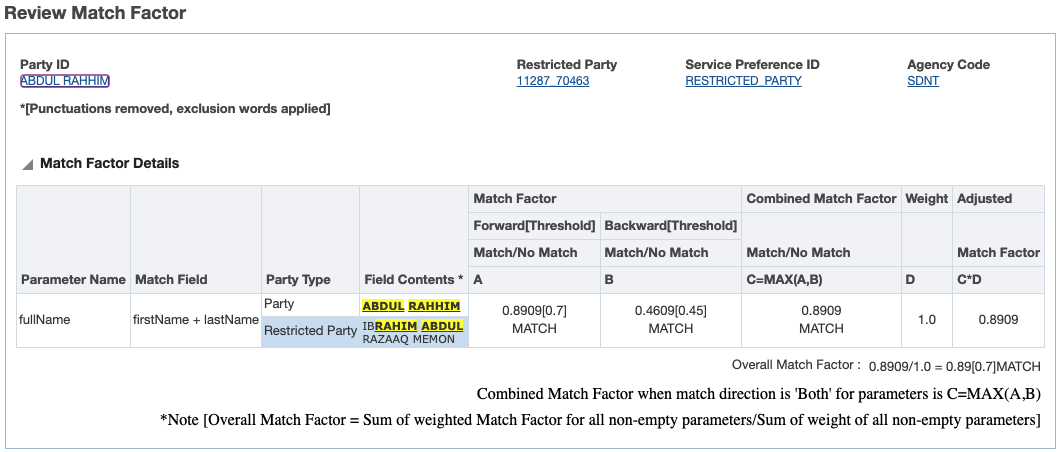
Maximum Match Factor
If you want to use the maximum of the forward and reverse match factors, you can set the property to gtm.rpls.matchDirection.both.<service_preference_gid> = forwardOrReverseWithMaxMatchFactor. When GTM runs restricted party screening, it calculates both the forward match factor and the reverse match factors. When either the forward or the reverse threshold are met, the one that is met will be used as the match factor. If both the forward and the reverse threshold are met, then the maximum match factor is used. In the below screenshot, note that Column C is using the maximum of Column A Forward[Threshold] and Column B Backward[Threshold].
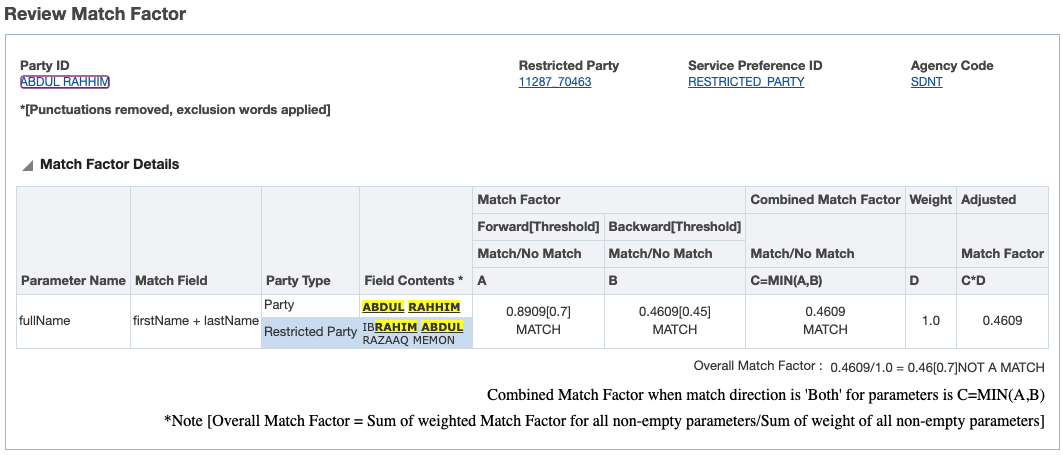
Minimum Match Factor
If you want to use the minimum of the forward and reverse match factors, you can set the property to gtm.rpls.matchDirection.both.<service_preference_gid> = forwardAndReverseWithMinMatchFactor. When GTM runs restricted party screening, it calculates both the forward match factor and the reverse match factor. Both thresholds must be met and if they are, then the minimum of both thresholds is used. In the below screenshot, note that Column C is using the minimum of Column A Forward[Threshold] and Column B Backward[Threshold].
Average Match Factor
If you want to use the average of the forward and reverse match factors, you can set the property to gtm.rpls.matchDirection.both.<service_preference_gid> = forwardOrReverseWithAverageMatchFactor. When GTM runs restricted party screening, it calculates both the forward match factor and the reverse match factor and uses the average of these two values in the calculations. Both thresholds must be met and if they are, then the average of both thresholds is used. In the below screenshot, note that Column C is using the average of Column A Forward[Threshold] and Column B Backward[Threshold].
This feature enables you to have additional flexibility in configuring the restricted party screening engine which helps to improve the match quality.
Steps to Enable
You don't need to do anything to enable this feature.
Tips And Considerations
If you set the Optional Feature to Opt In/Enabled but do not set the gtm.rpls.matchDirection.both.<domain.service_preference_gid> property, GTM will default to existing functionality where the maximum of the Forward and Backward Match Factors is used.
Key Resources
- For more information about restricted party screening, please see the GTM How To/Configuration topic called 'Restricted Party Screening'.
Generate Certificates of Origin from GTM Objects
You can generate a certificate of origin is available and can be generated from your campaign lines or transaction lines. You can use the out of the box document or use it as a template to create one specific to your business needs.
A new document type is available called PREFERENTIAL_COO. This document type specifies multiple Owned by objects including:
- GTM TRANSACTION LINE
- GTM CAMPAIGN LINE
- ITEM QUALIFICATION - This is not currently supported out of the box but can be added during implementation. Upload or copy of a certificate of the PREFERENTIAL_COO document type from campaign line to item qualification is supported.
The out of the box certificate of origin includes:
- Exporter, Importer and Producer
- Dates (Blanket Period)
- Details including:
- Description of Goods
- Classification Code
- Preference Criterion
- Producer
- Net Cost
- Country of Origin
This enhancement significantly reduces the setup required to generate certificates of origin for distribution to your customers or by your own vendors if they lack the appropriate tools themselves.
Steps to Enable
You don't need to do anything to enable this feature.
Enhancements to Qualification of Multi-Level Bills of Material
This enhancement improves the function of the trade agreement qualification process when analyzing multi-level bills of material. Prior versions performed an analysis conducted at only the leaf nodes of the structure. This enhancement enables the system to include values/costs captured at the sub-assembly level and include them in calculations if the sub-assembly is originating.
For example, if your frame consisting of a aluminum tubing and paint is originating, and value is added based on the frame being manufactured, that value add can be included when qualifying the intermediate component. This can help when qualifying the finished good.
By allowing the value added captured at an intermediate component level to be used, it allows allows for a more thorough qualification analysis process and may help some finished goods that were near the threshold for regional value content to now qualify.
Steps to Enable
You don't need to do anything to enable this feature.
Key Resources
- For more information on calculations in the qualification engine, please see the "Enhancements to Trade Agreement Formulas for Qualification Calculations" and "Enhancements to Qualification Report" topics in this document.
- For more information on trade agreement qualification, please see the GTM How To/Configuration Topic called Trade Agreement Qualification.
Enhancement to Currency Conversion During Qualification
An enhancement has been made to better support currency conversion during qualification. GTM can convert the currencies from the finished good and the components during the qualification process. This has been enhanced so that when currency conversion is performed, GTM converts the currency based on the country of origin of the finished good. For example, if your finished good is manufactured in Canada, when GTM performs the Qualify for Trade Agreement action, it will convert the component currencies to the Canadian Dollar.
This process improves the usefulness of the currency conversion process and aligns the resulting currency with the manufacturer's facility location.
Steps to Enable
You don't need to do anything to enable this feature.
Tips And Considerations
As in previous releases, there are two ways to specify the exchange rate and currency information for the qualification process:
- Set up a default exchange rate for a regime
- Identify the exchange rate and/or currency to use when running the qualification action
Key Resources
- For more information on configuring currency conversion during qualification, please see the What's New topic 'Support for Currency Conversion during Qualification' for Release 22B.
Enhancements to the Qualification Report
The Qualification Report has been enhanced to support multi-level bills of material and to provide you with more information about the qualification. The following improvements have been made:
- The header information has been updated to provide a better flow of the data. In addition, a new field reflecting the currency of the qualification report has been introduced. GTM can convert your currencies on the bill of material into the currency of the country of origin of the finished good.
- The Qualification Summary section tells you which rules of origin rule codes have been applied. When a regional value content method is used, GTM also displays the percentage met in the Product Specific Rule row. The percentage of each regional value content method is displayed in brackets.
- Item Structure Component Analysis has been updated to display details about the multi-level BOM.
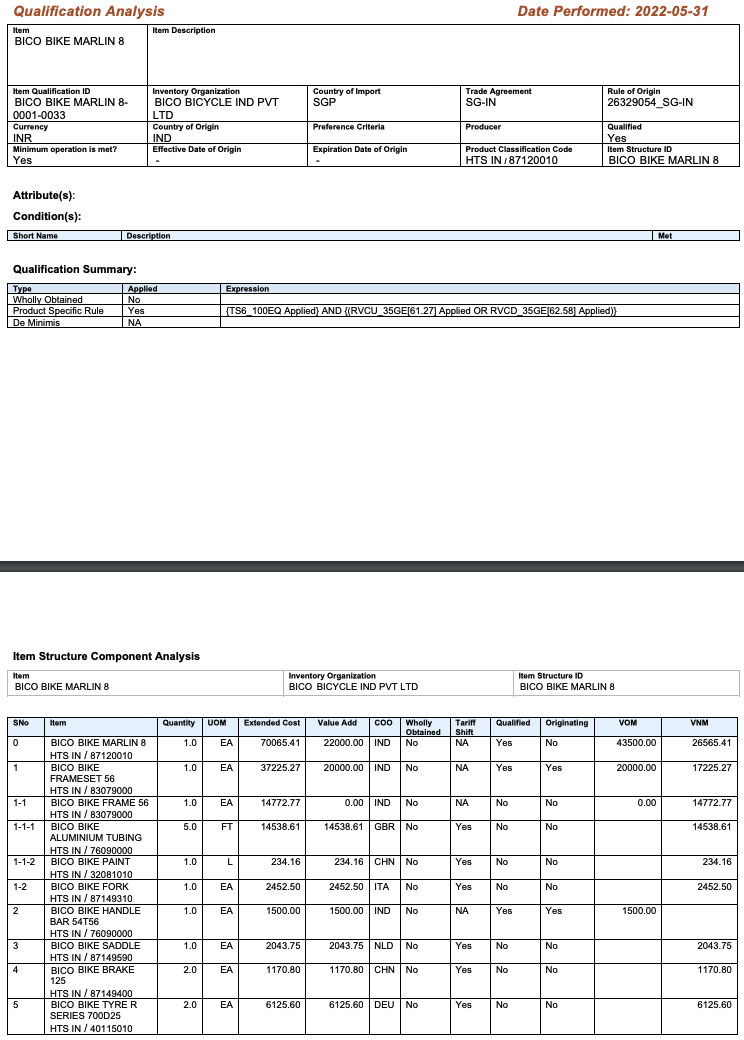
The Item Structure Component Analysis has been updated to provide you with more information:
- SNo - the sequence number indicates the level at which the item occurs in the bill of material. In the screenshot, Sequence Number 1-1-2 is the paint for the bicycle. It is a child component of the bicycle frame which is Sequence Number 1-1. The bicycle frame is a child component of the bicycle frame set which as a sequence number of 1.
- Item - displays the item associated with the trade item structure component and the product classification type/code.
- Quantity and UOM - displays the quantity and unit of measure for each component.
- Extended Cost - the calculated extended cost based on the formulae in the trade agreement.
- Value Add - any value add is calculated by the qualification engine and displayed.
- COO - indicates the country of origin.
- Wholly Obtained - indicates if the component is marked as wholly obtained.
- Tariff Shift - indicates if a tariff shift applies for the component.
- Qualified - indicates if the finished good and each of the components qualifies for the trade agreement.
- Originating - indicates if finished good and each of the components is considered originating in the country of origin.
- VOM - value of originating material calculated by the qualification engine.
- VNM - value of non-originating material calculated by the qualification engine.
Some of the values in the grid are entered as part of configuration and some are calculated by GTM. Specifically:
- Extended Cost - this is calculated by the formulae in the associated trade agreement. The trade agreement should have two dependent formulae, one for the extended value of the finished good bill of material and one for the extended value of the components.
- Value Add
- At the component level, the value add is the same as the extended cost.
- For the finished good or intermediate sub-assemblies, the value add equals the extended cost minus the value add of the immediate components that make up the sub-assembly. Specifically, VALUE ADD = EXTENDED COST - (SUM OF VALUE ADD ACROSS ALL COMPONENTS IN THE SUB-ASSEMBLY).
- VOM - Sum of all the Value Add of all the components including the intermediate sub-assemblies contained in the trade agreement regions/countries. This is saved on the item qualification record against the Value Qualifier = VALUE OF ORIGINATING MATERIAL.
- VNM - Sum of all the Value Add of only the leaf components in the bill of material excluding sub-assemblies that do not belong to the the trade agreement regions/countries. This is saved on the item qualification record against the Value Qualifier = VALUE OF NON-ORIGINATING MATERIAL.
- RVC Method - For rules of origin that contain a Regional Value Content Method, values that are required by the trade agreement should be entered into GTM on the item or transaction including Adjusted Value, Net Cost, Transactional Value, etc.
These improvements provide better visibility to the user of how the trade agreement qualification was performed and significant new information is provided to the user detailing each level of a multi-level BOM analysis.
Steps to Enable
You don't need to do anything to enable this feature.
Key Resources
- For more information about converting currencies during the qualification process, please see the "Enhancement to Currency Conversion" topic in this document.
- For more information about configuring formulas in a trade agreement, please see the "Enhancements to Trade Agreement Formulas for Qualification Calculations" topic in this document.
Enhancements to Trade Agreement Formulas for Qualification Calculations
Enhancements have been made to the required setup for trade agreement regional value content formulas to reduce the number of formulas that must be modeled and simplify their structure. Certain formulas no longer need to be configured in the Dependent Formulae grid because they have been moved into the logic of the qualification engine. Specifically, for the various regional value content methods, dependent formulae are no longer required. For other rule types like third country check and de minimis, dependent formulae will still need to be added to the trade agreement.
The Dependent Formulae model formulae which the logic relies upon to perform calculations. At a minimum, you need to model two formulae: one to calculate the extended cost of the finished good and a second to calculate the extended cost of the components. Once GTM calculates the extended cost of the finished good and all of the components, it uses the information to calculate other values such as value of originating material, value of non-originating material, and the value add for the finished good bill of material or intermediate bills of material.
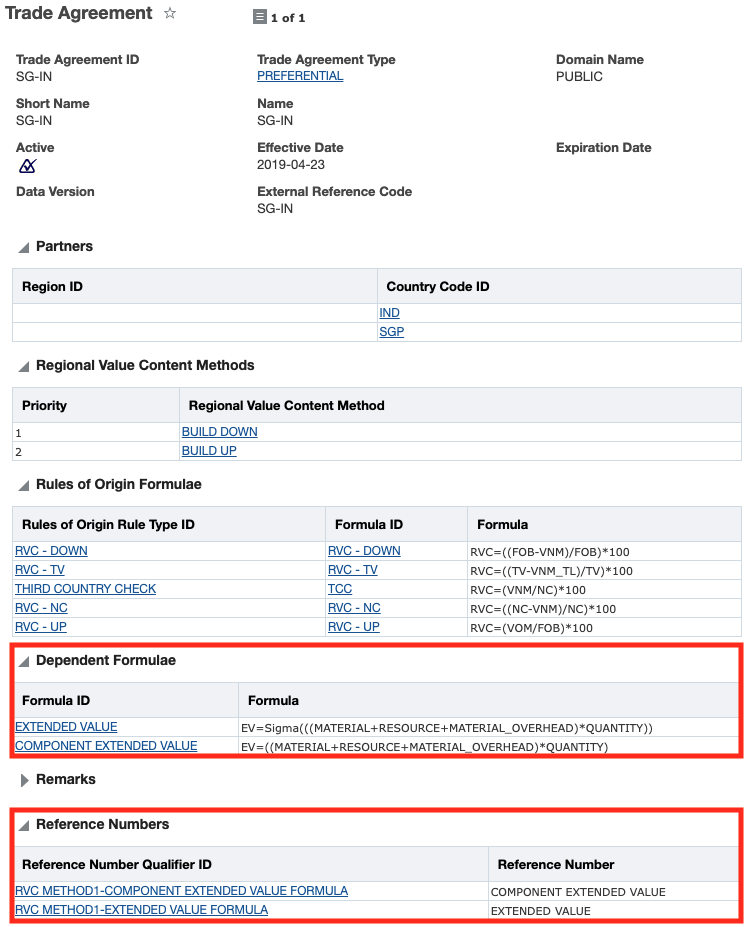
In the Dependent Formulae grid, you'll need to specify:
- A formula to calculate the value/cost of the finished good bill of material and intermediate bills of material. This is modeled using the EXTENDED VALUE formula in this example.
- A formula to calculate the value/cost of each of the components. This is modeled using the COMPONENT EXTENDED VALUE formula in this example.
- Formulas to calculate third country check and de minimis (if applicable to the trade agreement).
In the Reference Numbers grid, you'll need to specify:
- The qualifier = RVCMETHOD1_EXTENDED VALUE FORMULA specifies the formula used to calculate the extended cost of the finished good. For example, the Reference Number Qualifier ID = RVCMETHOD1_EXTENDED VALUE FORMULA has a value = EXTENDED VALUE.
-
The qualifier = RVCMETHOD1_COMPONENT EXTENDED VALUE FORMULA specifies the formula used to calculate the extended cost of each component. For example, the Reference Number Qualifier ID = RVCMETHOD1_COMPONENT VALUE FORMULA has a value = COMPONENT EXTENDED VALUE.
This enhancement will decrease the effort required to setup and configure the use of a new trade agreement in the system.
Steps to Enable
You don't need to do anything to enable this feature.
Tips And Considerations
In previous releases, the value of originating material and value of non-originating material needed to be included as dependent formulae. Now they are calculated as part of the logic using information from the formulae specified in the Dependent Formulae grid.
Key Resources
- For more information on the calculation of Value of Non-originating Material, Value of Originating Material, and value add, please see the 'Enhancements to the Qualification Report' topic in this document.
New Qualified Status of Requires Review
A new Status is available on the item qualification which enables you to see when a finished good cannot be fully qualified. When this occurs, GTM sets the item qualification status to REQUIRES REVIEW and adds a Reason Code and Reason Description to the item qualification. The Reason Code and Reason Description provides more information as to why a finished good cannot be fully qualified.
There are a number of reasons why a finished good cannot be fully qualified. A few examples are:
- Item Attribute and/or Condition are not selected. If an Item Attribute and/or Condition is specified in the rule of origin, you must select the appropriate data before a finished good can be fully qualified.
- The item structure is inactive or is missing from the item origin.
- The classification code is missing from the item.
The new REQUIRES REVIEW status enables you to manage this process by exception. You can create a business monitor which looks for items which have an item qualification status = REQUIRES REVIEW. You can then review any items that have this item qualification status and make changes so that the finished good can be fully qualified.
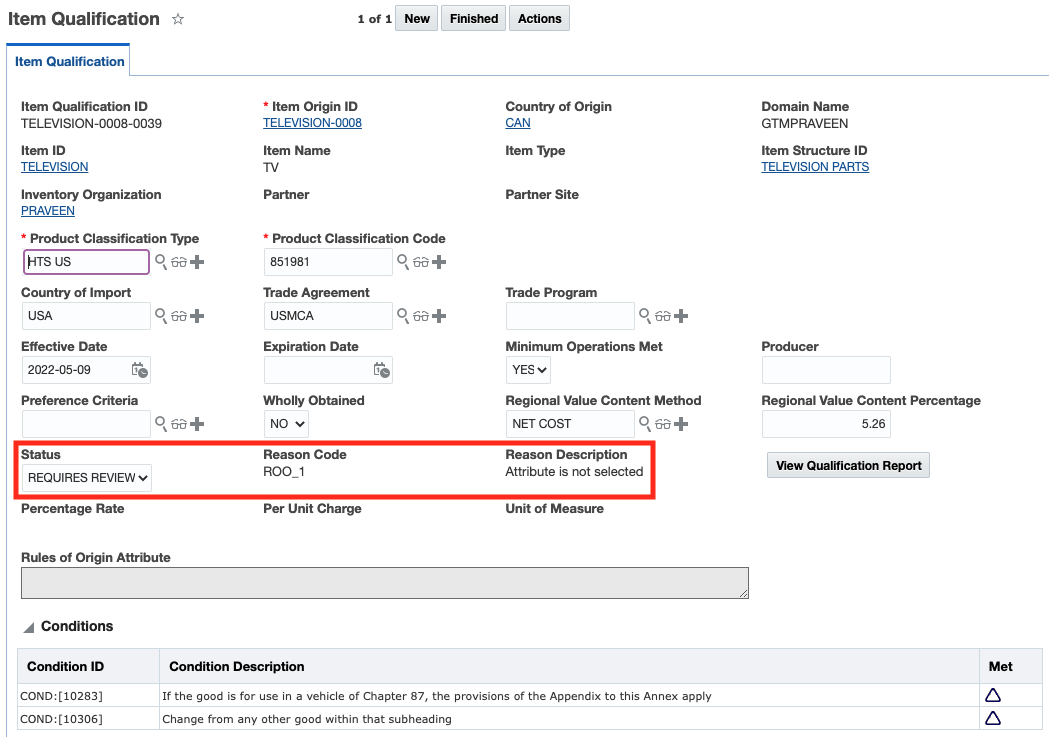
The new REQUIRES REVIEW status enables you to manage your qualification process by exception enabling tools and workflows to work with very high volumes of qualifications while still ensuring user are interacting with the process when needed.
Steps to Enable
You don't need to do anything to enable this feature.
Tips And Considerations
You are able to search on the Item Qualification Status from the Item Qualification, Item Origin and the Item managers.
Key Resources
- For more information on the qualification process, please refer to the GTM How To/Configuration Topic called Trade Agreement Qualification.
Approve Campaign Action Copies Data to Multiple Objects
Additional flexibility has been added enabling you to solicit your suppliers for data and copy it back to the appropriate business object when a campaign is approved. In previous releases, suppliers could enter classification data, origin data, and qualification data on a campaign line but the campaign administrator could only specify one object to be updated when a campaign line was approved. Now, all three sets of data can be solicited from suppliers in one campaign line. Once a supplier responds and a campaign administrator approves the campaign, the data is copied back to the appropriate item-based object.
To support this enhancement, changes have been made to data configuration and to logic configuration.
Data Configuration
The data configuration that you use to approve a campaign line has been enhanced, enabling you to copy data back to the appropriate item-based object. When you create a data configuration with an Association Type = Campaign Line to Item, the Attributes have been expanded to include all 3 Associations:
- Campaign Line - Item - copies the classification data from the campaign line to an item classification associated with the item
- Campaign Line - Item Origin - copies the origin data from the campaign line to an item origin associated with the item
- Campaign Line - Item Qualification - copies the qualification data from the campaign line to an item qualification associated with the item
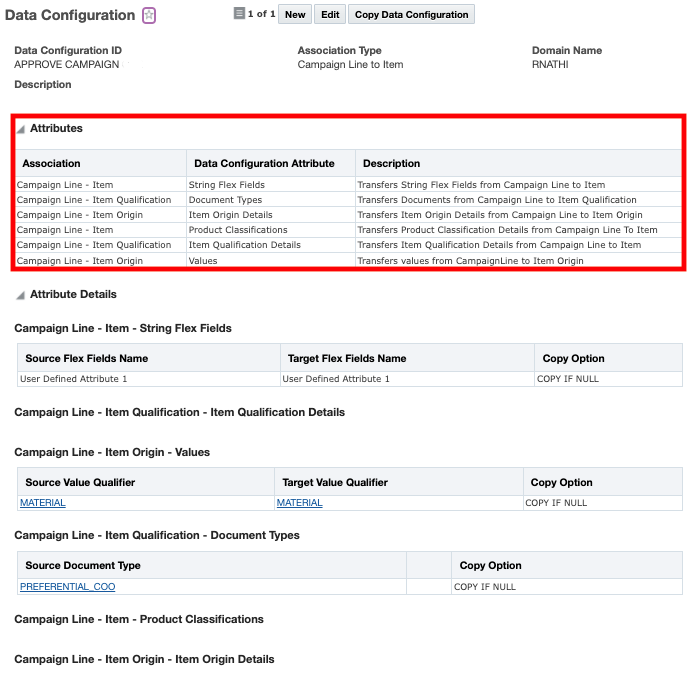
Logic Configuration
The logic configuration is also impacted by this feature.
- Approve Data Configuration - This is an existing parameter where you specify your updated data configuration which includes the 3 attributes for item, item origin, and item qualification.
- Purpose - To copy data upon approval to all 3 item-based objects, select a Purpose = Item.
This enhancement allows for soliciting multiple data sets, simultaneously from a supplier reducing both the number of campaigns that need to be executed as well as the amount of data entry required of your vendors.
Steps to Enable
You don't need to do anything to enable this feature.
Key Resources
- For more information about supplier solicitation, please to the GTM How To/Configuration Topic called Supplier Solicitation.
Use New Trade Agreement Qualification Parameters
A new logic configuration to support transactions has been added. This optional feature is delivered with Opt In set to FALSE/not enabled.
To simplify the setup of GTM, a new logic configuration with a type = GTM TRANSACTION LOGIC CONFIGURATION is available. You can assign this logic configuration to your trade transaction type. By adding a transaction-specific logic configuration and identifying it by transaction type, you can configure GTM to use different match criteria when running certain actions. When the trade transaction type is specified on the transaction and certain actions are trigger, the logic configuration drives the logic of these actions within GTM. For example:
- When looking up the country of origin information for purchased items, you may use criteria such as import date, supplier/supplier site and the ship to inventory organization to lookup the country of origin.
- When looking up the country of origin information for the manufactured items you are exporting, your criteria is different and may include export date and ship from inventory organization.
LOGIC CONFIGURATION
A new logic configuration with a type = GTM TRANSACTION LOGIC CONFIGURATION has been added. A default logic configuration called GTM TRANSACTION CONFIGURATION DEFAULT is available which you can copy and configure based on your business scenarios. For example, for manufactured items you may export, you can configure the logic configuration as follows:
When performing certain actions, you can configure the data that you want to use for matching directly on the logic configuration. This includes information such as:
- Country of Export Qualifier
- Country of Import Qualifier
- Date Qualifier
- Inventory Org Qualifier
- Partner Qualifier
- Partner Site Qualifier
- Quantity Qualifier
In addition, you can use the parameters in the Constraint Sets for Identifying Related Objects section for more detailed matching based on remarks, reference numbers, and flex field attributes.
TRADE TRANSACTION TYPE
Once you create your new logic configuration, you can assign it to a Trade Transaction Type. When certain actions are triggered, GTM will look to the logic configuration on the Trade Transaction Type and use it to match your item-based objects to transaction lines and update the transaction lines accordingly.
TRADE TRANSACTION ACTIONS
The new transaction-specific logic configuration is used by the following Trade Transaction Line actions:
- Look Up Country of Origin - For either purchased scenarios or manufactured scenarios, you can look up the country of origin information from the item origin on the item specified on the transaction line and copy it to the transaction line. GTM uses the matching criteria in the logic configuration to match the item origins on the item to the transaction line.
- Look Up Trade Program - For purchased scenarios, you can look up the trade program information from the item qualification associated with each of the item origins on the item specified on the transaction line and copy it to the transaction line. Prior to running this action, the trade program must be in the item qualification record. You can use the Tariff Eligibility Screening action on item or trading partner item to create the item qualification record and assign the trade program.
- Qualify for Trade Agreement - When qualifying your finished goods for trade agreements, GTM uses the matching criteria in the logic configuration to know which origin and item structure should be used.
This Optional Feature, when enabled, will allow GTM to use of the new logic configuration type = GTM TRANSACTION LOGIC CONFIGURATION. It helps you to transition from the default logic configuration type = GTM LOGIC CONFIGURATION previously used.
This enhancement greatly improves your ability to tailor how different processes respond to different transaction types improving the flexibility and configurability of the platform to match your business needs.
Steps to Enable
You don't need to do anything to enable this feature.
Tips And Considerations
If you do not Opt In to using the feature, GTM will continue to use the parameters defined in the logic configuration with a type = GTM LOGIC CONFIGURATION and/or the constraint sets defined on the actions. Once you Opt In to this feature and you trigger an action:
- The constraint sets will no longer appear on the actions
- GTM will look to the parameters defined in the new logic configuration with a type = GTM TRANSACTION CONFIGURATION
- If the parameters in the new logic configuration are not defined, GTM will then look to the generic logic configuration with a type = GTM LOGIC CONFIGURATION
While the manager for these features refers to them as "optional" - each of these features will become mandatory when the Optional Until update is released. The optional aspect of these features refers to the period of time where there is an opportunity to Opt In/Opt Out of enabling the feature. During this "optional" period - the time between when the feature is released and the release prior to the Optional Until release - the request/desire/intention is for you to enable the feature(s) for testing purposes so that the transition to mandatory, as of the Optional Until release, is uneventful.
This page is accessed via Configuration and Administration > Property Management > Optional Features.
NOTE: Only the DBA.ADMIN user can access and use the Optional Features page.
Enhanced View of Trade Item Structure on Transactions and Transaction Lines
To better view the trade item structure data on the trade transaction and the trade transaction line, a new field has been introduced and an existing field renamed. On the trade transaction line, the following enhancements are available:
- Item Structure ID - a new field called Item Structure ID is available which indicates the bill of material used for qualification or other business processes.
- Component of Trade Item Structure - an existing field that links to the Trade Transaction/Declaration Item Structure. This field was previously named 'Structure ID'.
These changes are available in the following screens:
Trade Transaction
- Finder - On the Transaction Line tab, you can query on Item Structure ID and Component of Transaction Item Structure.
- View - Within the Transaction Line section, the Item Structure ID and Component of Transaction Item Structure are displayed.
- Edit - On the Transaction Line tab, columns display the Item Structure ID and Component of Transaction Item Structure for each of the transaction lines or child lines displayed. Once you edit a specific line, these fields are also available.
Trade Transaction Line
- Finder - On the Transaction Line tab, you can query on Item Structure ID and Component of Transaction Item Structure.
- Finder Result - Item Structure ID and Component of Transaction Item Structure are displayed.
- View - Within the Transaction Line section, the Item Structure ID and Component of Transaction Item Structure are displayed.
- Edit - The Item Structure ID and Component of Transaction Item Structure are available.
This improvement provides clarity around which item structure is directly related to the item on a specific transaction line versus when that transaction line is a component of another item's structure.
Steps to Enable
You don't need to do anything to enable this feature.
Tips And Considerations
The Component of Trade Item Structure is available in previous releases. It was previously called 'Structure ID' throughout the Trade Transaction Manager and Trade Transaction Line Manager.
Look Up Country of Origin Agent Action Available on Transaction Line
A new agent action called Look Up Country of Origin is available which enables you to look up the country of origin information for an item associated with a trade transaction line and copy it to the line. This information can then be used when you are qualification a finished good item on a transaction line for trade agreements or on documentation.

When you set up your automation agent, select an Action = LOOK UP COUNTRY OF ORIGIN. You can also specify the Look Up Item Origin Constraint Set. This constraint set tells GTM which item origin on the item to use for the transaction line. When the automation agent is triggered, the country of origin from the item origin is assigned to the transaction line.
This enhancement helps reduce the amount of data entry required of the user in scenarios where the country of origin is not available on the transaction line and there are tasks requiring that data such as document generation, compliance screening or performing trade agreement qualification.
Steps to Enable
You don't need to do anything to enable this feature.
Key Resources
- For more information on configuring a default constraint set and logic configuration to use with the Look Up Country of Origin agent action, please see the 'Use New Trade Agreement Qualification Parameters' topic in this document.
Search for Transaction Lines by Transaction Involved Party
You can search for trade transaction lines based on the trade transaction involved party. On the Trade Transaction Line Manager, navigate to the Transaction tab. Multiple fields have been added including:
- Transaction Involved Party Qualifier ID - #1
- Transaction Involved Party ID - #1
- Transaction Involved Party Qualifier ID - #2
- Transaction Involved Party ID - #2
- Transaction Involved Party Qualifier ID - #3
- Transaction Involved Party ID - #3
This enhancement improves a user's ability to identify relevant transaction lines when working at that level in the application reducing clicks and saving time.
Steps to Enable
You don't need to do anything to enable this feature.
Add Objects to Campaign Available in Process Management
The Add Items to Campaign feature enables you to add items to a campaign as a bulk process. If you are soliciting many suppliers for data such as classification data, origin data or certificates of origin, you can now use this process to create campaign lines on a campaign. The campaign lines are created across all suppliers based on a saved query you define.
The Add Items to Campaign process can work with two different GTM objects:
- Item - select items to be added to the campaign
- Trade Item Structure - select trade item structures and GTM adds the component items for the selected trade item structures to the campaign
Prior to running the action, you need to create a campaign. Navigate to Trade Agreements > Campaigns. Click New. It can have 0 to many campaign lines. Some of the information you can enter includes:
- Campaign ID (if you don't enter one, GTM will generate one for you)
- Campaign Name
- Campaign Type ID (Required)
- Effective/Expiration Dates for the campaign
- Reminder Duration (for notifications sent to suppliers)
- Perspective (Required)
- Trade Agreement
- Purpose
- Involved Parties
- Remarks
- Reference Numbers
After the campaign is created, navigate to Master Data > Process Management > Add Items to Campaign. Select a Campaign Data Type indicating if you want to trigger the process for Items or Trade Item Structures. Depending on the Campaign Data Type selected, different fields are available.
Campaign Data Type = Item
When you select a Campaign Data Type = Item, you can indicate:
- Based on Item - Select the saved query that contains the items you want to include in the campaign.
- Campaign ID - Enter the ID of the campaign you previously created.
- User Role - Enter the user role that will be used to perform the process.
- Select Execute, Publish, or Schedule to determine when the process will be executed. By default, the process will be executed when you click Submit.
Campaign Data Type = Trade Item Structure
When you select a Campaign Data Type = Trade Item Structure, you can indicate:
- Based on Item - Select the saved query that contains the trade item structures you want to query. GTM will include the items on the trade item structure components of the trade item structures returned in the query.
- Origin Effective/Expiration Dates - if entered, origin dates will be copied to the corresponding fields on the campaign line.
- Qualification Effective/Expiration Dates - if entered, qualification dates will be copied to the corresponding fields on the campaign line.
- Campaign ID - Enter the ID of the campaign you previously created.
- User Role - Enter the user role that will be used to perform the process.
- Select Execute, Publish, or Schedule to determine when the process will be executed. By default, the process will be executed when you click Submit.

This process helps save users time by making it easier to load extremely large volumes of items to a supplier solicitation campaign.
Steps to Enable
You don't need to do anything to enable this feature.
Tips And Considerations
Prior to running the Add Items to Campaign in process management, you first need to create a campaign. You can then add the campaign lines using this process.
Key Resources
- For more information on campaigns, you can refer to the GTM How To Topic called 'Supplier Solicitation' in help.