
- Revision History
- Overview
- Update Tasks
- Feature Summary
- Global Trade Management
-
- Transportation and Global Trade Platform
- Global Trade Management (Base)
-
- Flex Field Attributes Added to Item Trade Value Integration
- Trade Values Added As a Table in Enhanced Workbench
- Support for Multiple Trade Item Structures Against an Item Origin
- Store 5 Years of Data in Operational Database
- Support for Document Sets Added to Additional Objects
- Send Child Transaction Lines Associated with Parent Transaction Lines Via Integration
-
- Trade Compliance
- Trade Agreements
-
- Overview of Enhancements to Trade Agreement Qualification
- Assign Preference Criteria During Trade Agreement Qualification
- Country of Import Optional When Qualifying Against Trade Agreements with Common Rules of Origin
- Define Formulas Based on Rules of Origin Rule Types
- Enhanced Support for Country of Origin During Qualification
- New Justification Types and Justification Codes Available
- Copy Additional Documents from Campaign Line to Item Qualification
- Inline Editing Available on the Campaign Administrator Workbench
- Support for Roll-up of Intermediate Components in Qualification Engine
- Enhancements to Qualification Report
- Enhancements to Add Item to Campaign Action
- Additional Fields Available on Item Qualification Finder Results
- Qualify for Trade Agreement Agent Action Available on Transaction Line
- Trigger Rules of Origin Download As Non-DBA User
-
- Customs Management
This document will continue to evolve as existing sections change and new information is added. All updates appear in the following table:
| Date | Module | Feature | Notes |
|---|---|---|---|
| 15 DEC 2023 | Transportation and Global Trade Platform |
Raise Status Change Events in New Process | Updated document. Revised feature information. |
| 05 APR 2023 | Trade Compliance | Enhancements to Review Match Factor Action | Updated document. Revised Tips and Considerations. |
| 17 FEB 2023 | Transportation and Global Trade Platform | Redwood UI Look and Feel Improvements | Updated document. Revised Tips and Considerations for Known Issue. |
| 21 DEC 2022 | Enhanced Workbench | Improvements to the Enhanced Workbench | Updated document. Revised feature information. |
| 16 DEC 2022 | Created initial document. |
 HAVE AN IDEA?
We’re here and we’re listening. If you have a suggestion on how to make our cloud services even better then go ahead and tell us. There are several ways to submit your ideas, for example, through the Ideas Lab on Oracle Customer Connect. Wherever you see this icon after the feature name it means we delivered one of your ideas.
GIVE US FEEDBACK
We welcome your comments and suggestions to improve the content. Please send us your feedback at oracle_fusion_applications_help_ww_grp@oracle.com.
DISCLAIMER
The information contained in this document may include statements about Oracle’s product development plans. Many factors can materially affect Oracle’s product development plans and the nature and timing of future product releases. Accordingly, this Information is provided to you solely for information only, is not a commitment to deliver any material, code, or functionality, and should not be relied upon in making purchasing decisions. The development, release, and timing of any features or functionality described remains at the sole discretion of Oracle.
This information may not be incorporated into any contractual agreement with Oracle or its subsidiaries or affiliates. Oracle specifically disclaims any liability with respect to this information. Refer to the Legal Notices and Terms of Use for further information.
This section gives you information to help you plan, deploy, and validate your update. We make frequent additions to this document, so don’t forget to check back and get the latest information before your update starts.
Review the Release Notes.
- The release notes include fixes, special instructions, and resolutions related to the Oracle Transportation and Global Trade Management Cloud.
- Release Notes can be found here:
- https://support.oracle.com/epmos/faces/DocumentDisplay?id=2898941.1
Use the following resources to prepare for and validate your Oracle Engagement Cloud update.
On My Oracle Support Read:
- Doc ID 2095509.1
- Oracle Cloud Applications - Transportation and Global Trade Management Cloud: Environment Refresh Policy
- Doc ID 2095528.1
- Oracle Cloud Applications - Transportation and Global Trade Management Cloud: Quarterly Update Planning
- Doc ID 2096782.1
- Oracle Cloud Applications - Transportation and Global Trade Management Cloud: Quarterly Update Planning FAQs
- Doc ID 2195580.1
- Oracle Cloud Applications - Transportation and Global Trade Management Cloud: Get Started with Your Implementation
- Doc ID 2508854.1
- Oracle Cloud Applications - Transportation and Global Trade Management Cloud: Quarterly Updates - Preparation and Testing Recommendations
Column Definitions:
Report = New or modified, Oracle-delivered, ready to run reports.
UI or Process-Based: Small Scale = These UI or process-based features are typically comprised of minor field, validation, or program changes. Therefore, the potential impact to users is minimal.
UI or Process-Based: Larger Scale* = These UI or process-based features have more complex designs. Therefore, the potential impact to users is higher.
Features Delivered Disabled = Action is needed BEFORE these features can be used by END USERS. These features are delivered disabled and you choose if and when to enable them. For example, a) new or expanded BI subject areas need to first be incorporated into reports, b) Integration is required to utilize new web services, or c) features must be assigned to user roles before they can be accessed.
Transportation and Global Trade Platform
Improvements to the Enhanced Workbench
This feature provides a set of new capabilities and features for the Enhanced Workbench. Enhancements have been provided in many areas, including:
- Layout Display - Compact, Super Compact
- Add New records
- Session based column rearrangement
- Session based column show/hide
- New Menu Location
- Map Filters
- Inline Edit for Flex Fields
- Action Checks for Inline Edit and Mass Update
- Bill Line Item Table Added
- Dock Scheduling Gantt Actions - Block Resource, Create Appointment
Layout Display - Compact, Super Compact
This enhancement reintroduces the Compact and Super Compact Layout Display options for your Enhanced Workbench. To change the Layout Display setting for your existing Enhanced Workbenches - you can edit the display and change the Layout Display to the desired setting - Compact or Super Compact. You also have the option of changing the display within a session - without saving the changes to your Enhanced Workbench.
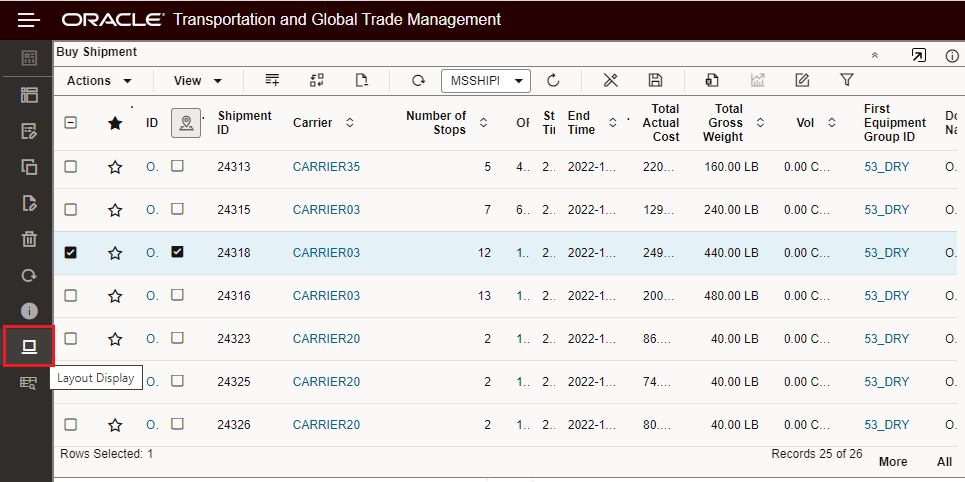
Layout Display
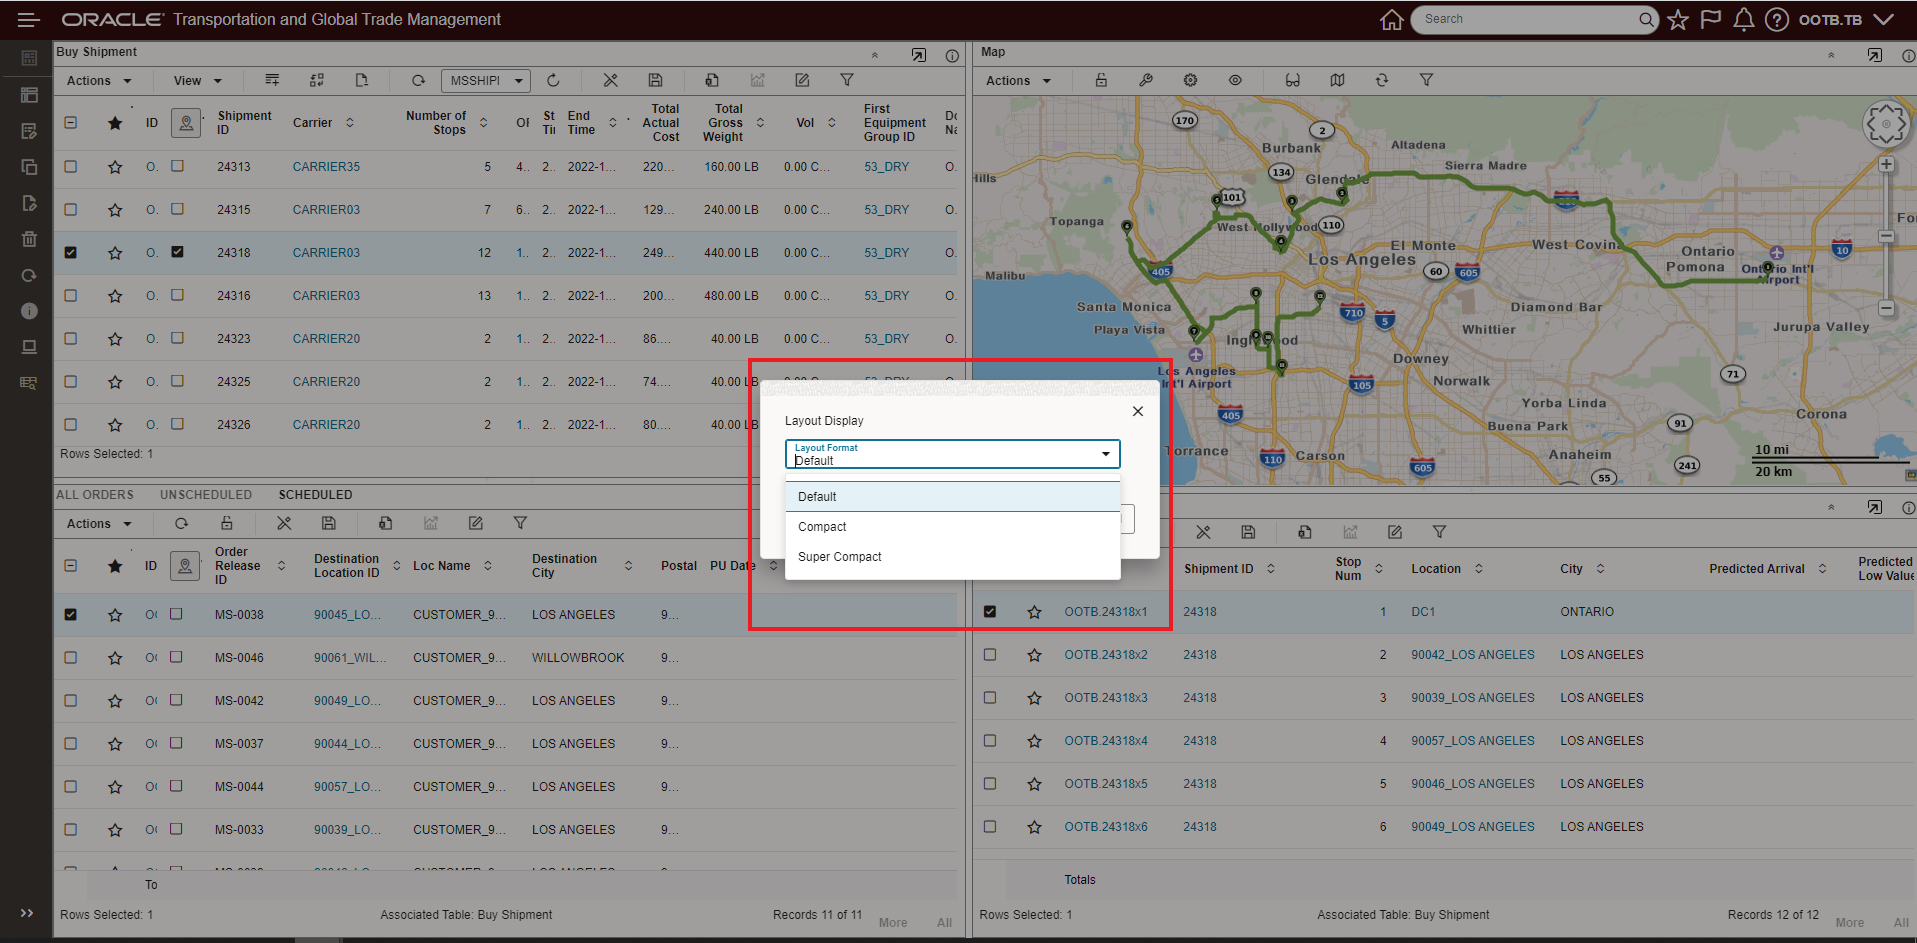
Layout Display Options - Default, Compact Super Compact
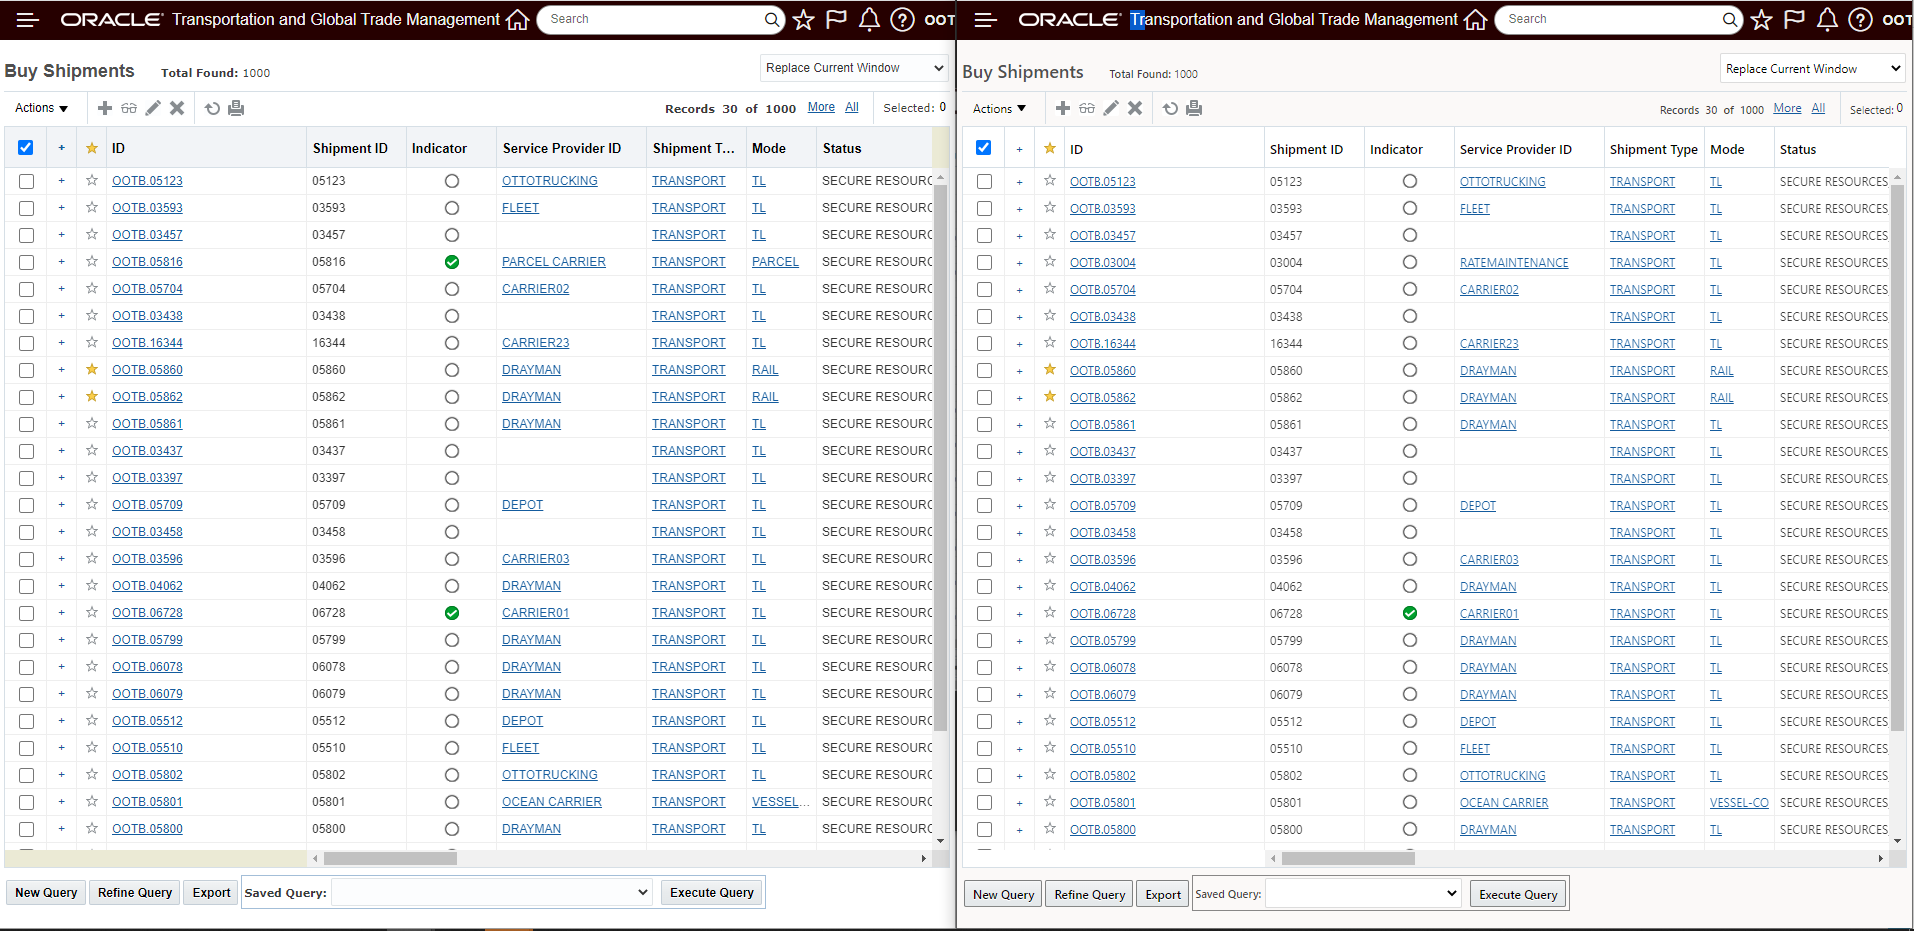
Side by side comparison of the different options. The Super Compact option provides visibility to about twice the number of rows of data when compared to the Default layout.
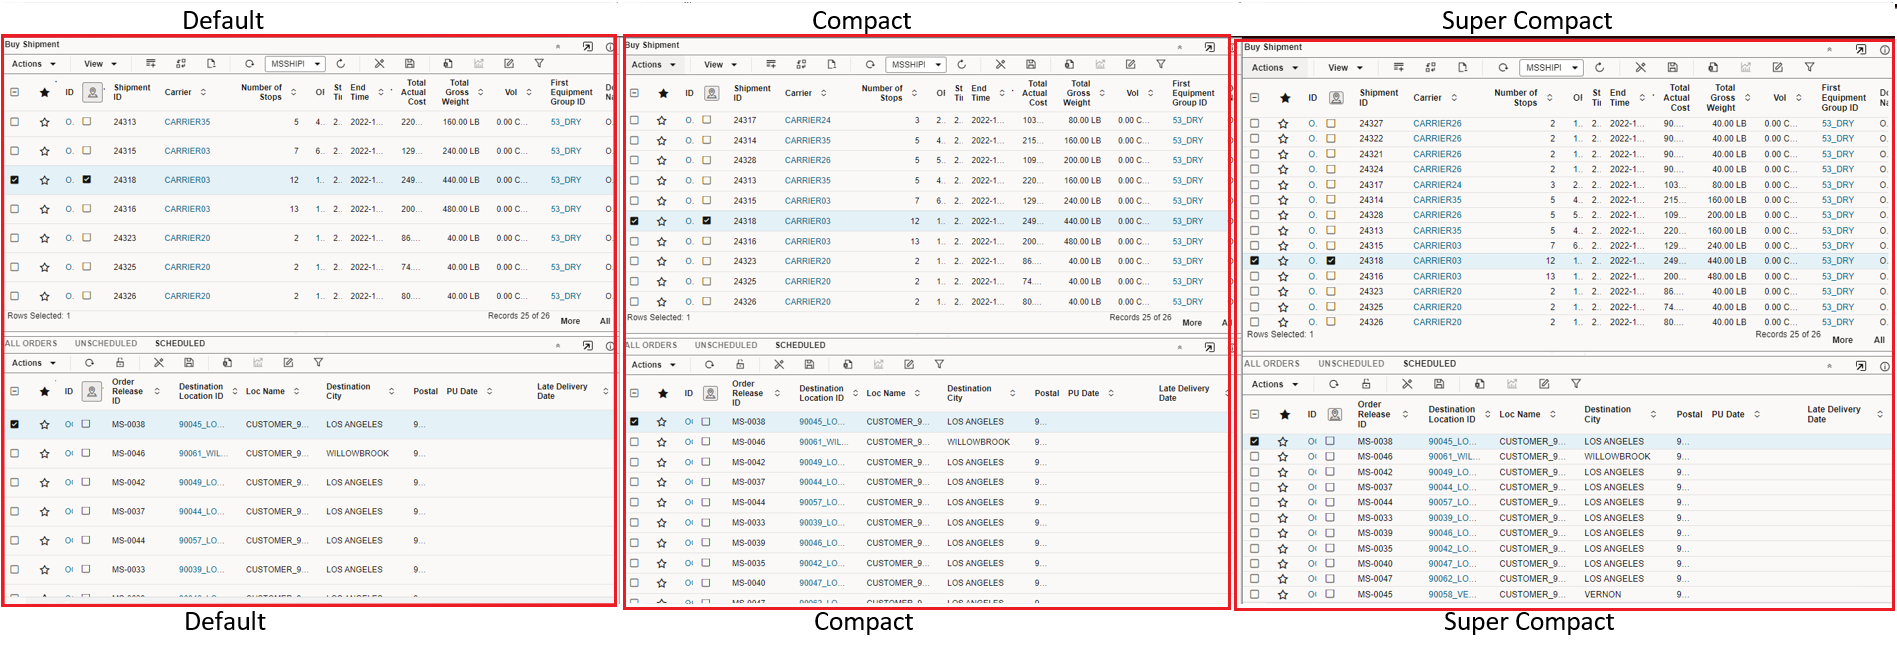
Side by Side Comparison - Default, Compact and Super Compact
NOTE: Images (all images - check boxes, favorites, indicators, etc.) that are included in your screen set will take up more space than text since the images include some "padding" - you can squeeze in more information by configuring your screen sets so they avoid including images.
Add New
The Enhanced Workbench now supports the ability for you to create New records within your Workbench tables. The create New option will be available for any screen set where the Show checkbox for the Control New option is selected. The ability to create new records directly from within the Enhanced Workbench expands your usage of the Enhanced Workbenches to support use cases that involve creating new records.
The create New option is initiated by selecting the plus  icon on the table menu.
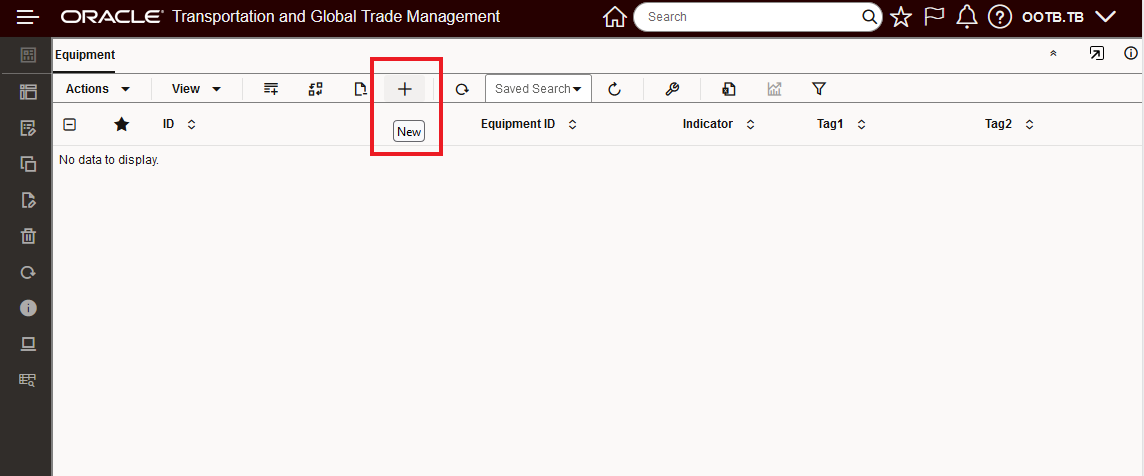
Create New Plus Sign Icon
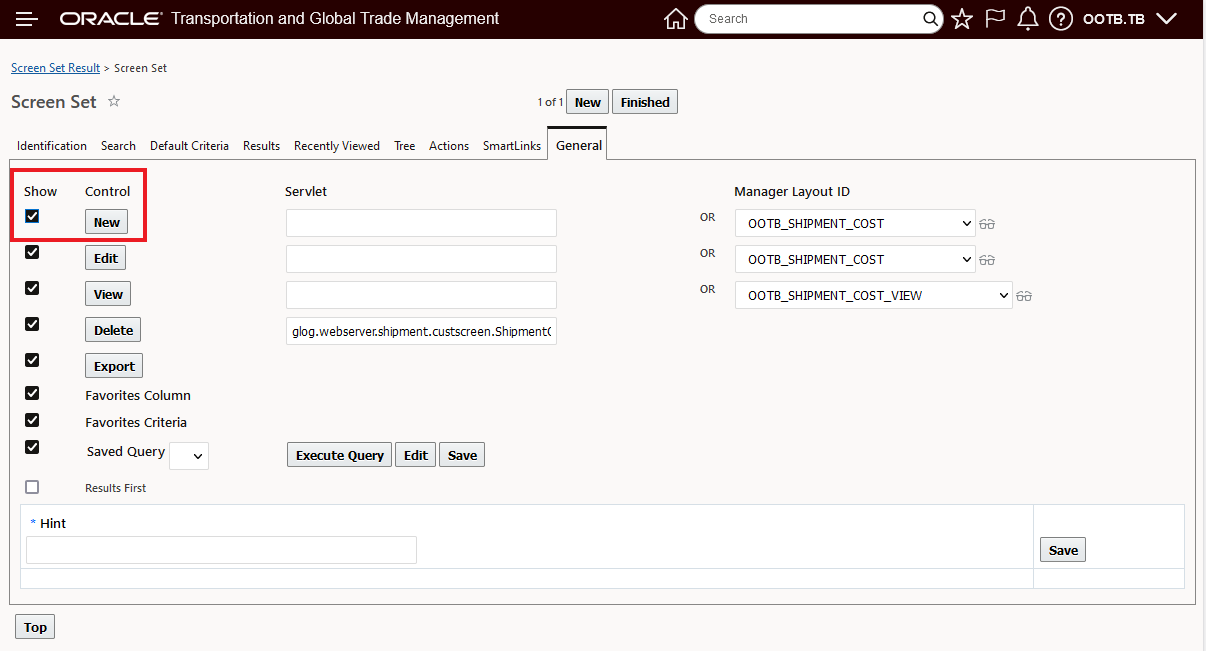
Screen Set for Create New - Show checkbox for the Control New option is selected
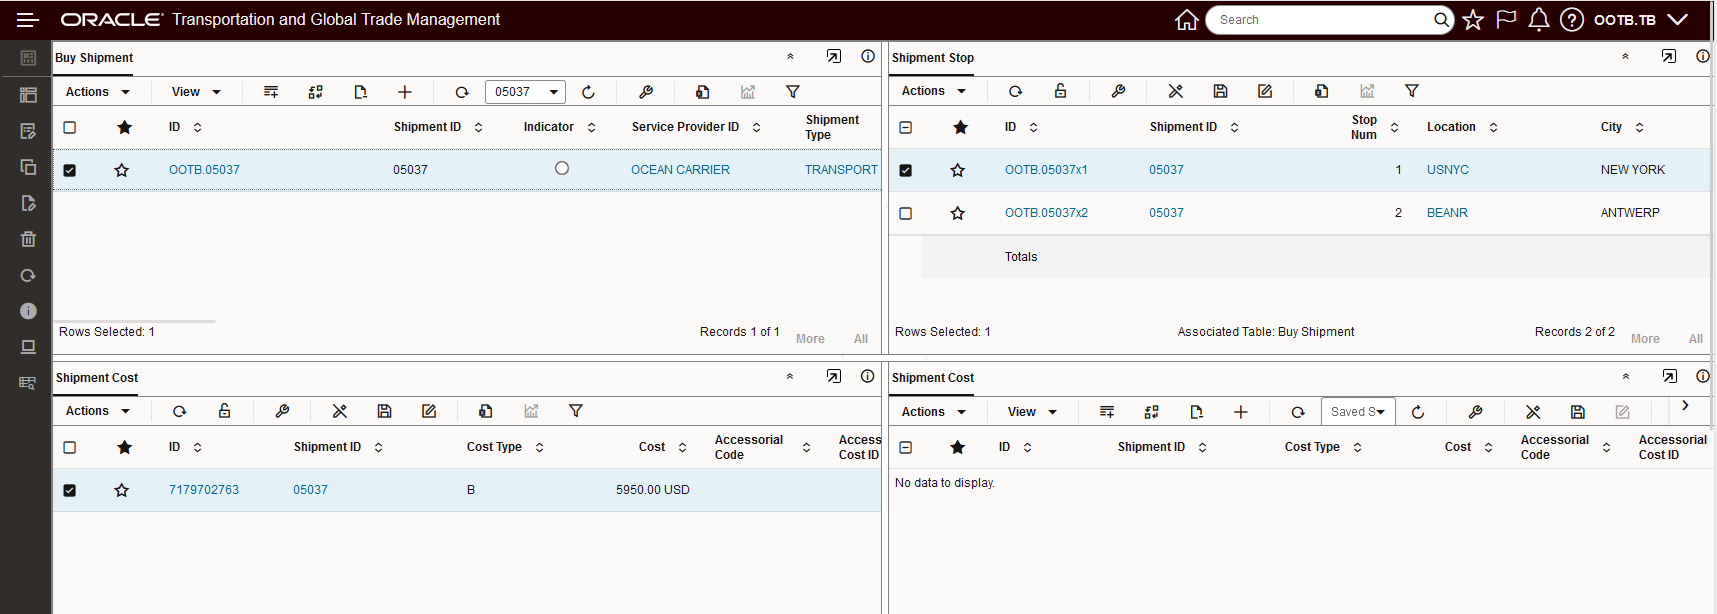
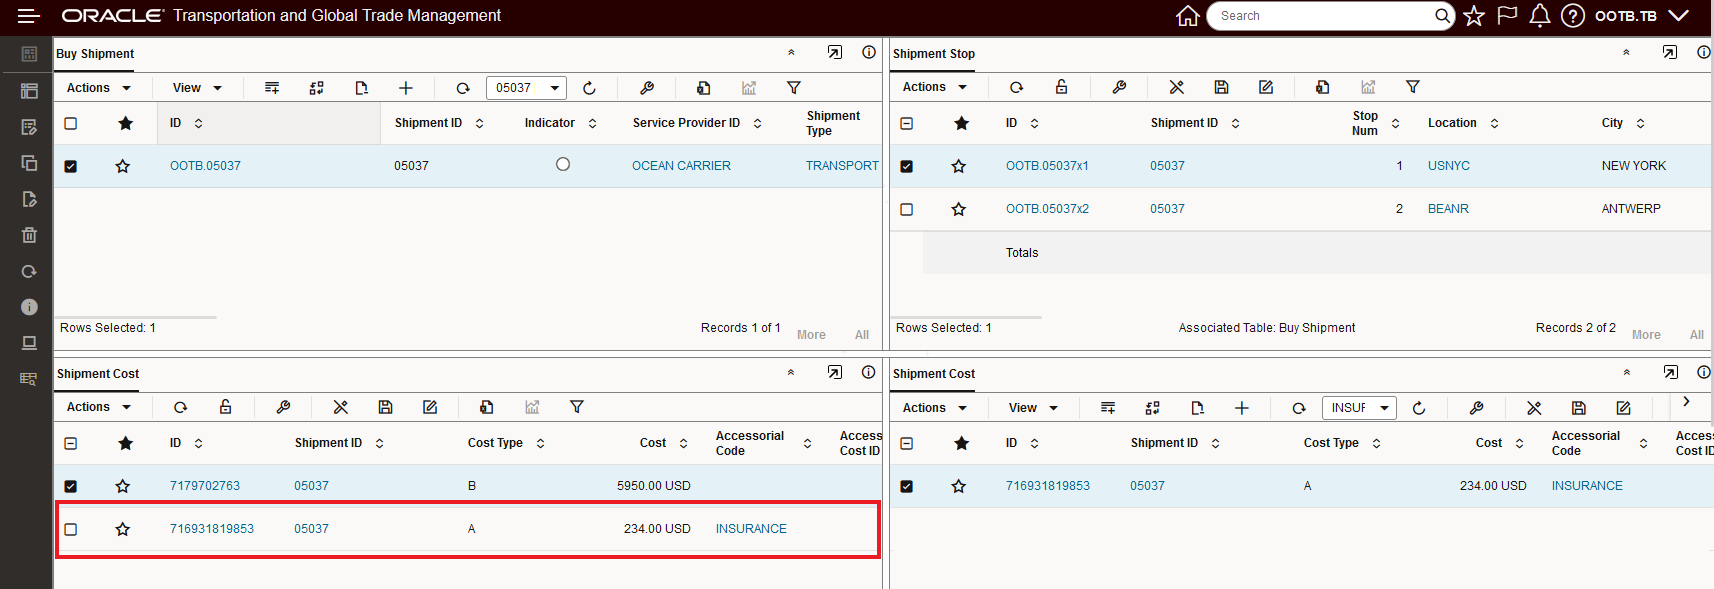
In the example below, the Enhanced Workbench has been created to review each Buy Shipment's Shipment Costs, and - when missing - allow the user to add a new Accessorial Shipment Cost for Insurance. To accomplish this, the Enhanced Workbench has been created with four panes.
- The upper left pane has the Buy Shipments
NOTE: The Buy Shipment screen set used does allows for create New.
- The lower left pane provides the Shipment Cost and is associated with the Buy Shipments.
NOTE: The associated Shipment Cost pane does not provide the option to create New.
- The upper right pane shows the Shipment Stops and is associated with the Buy Shipments - again, note that the associated Shipment Stop table does not provide the option to create New.
- The lower right pane, once again, is related to the Shipment Cost table - but in this pane the table is not associated with the Buy Shipment and the option to create New is available.

Create New Enhanced Workbench Example
To add a new shipment cost to a shipment - you would select the New  icon from the lower right Shipment Cost table view, this will - in this case - bring up a specifically configured Manager Layout for this task to enter the shipment Cost. The configure manager layout is configured specifically for the task to be accomplished - so any unnecessary fields have been removed (or defaulted) and only the minimum input required is shown.
For this use case - the purpose of the workbench is to review the shipment cost and - where necessary, add a Shipment Cost record for an INSURANCE accessorial.
Shipment 05037does not have the Insurance Accessorial as a current Shipment Cost.
Shipment Without Required Shipment Cost
To add the New shipment cost to this shipment - you would select the New option from the lower right Shipment Cost table. Selecting New, in this example, brings up the Shipment Cost manager layout which has been configured specifically for the task to be accomplished i.e., adding the Insurance Accessorial Cost.
NOTE: Unnecessary fields have been removed (or defaulted) and only the minimum input required is shown.
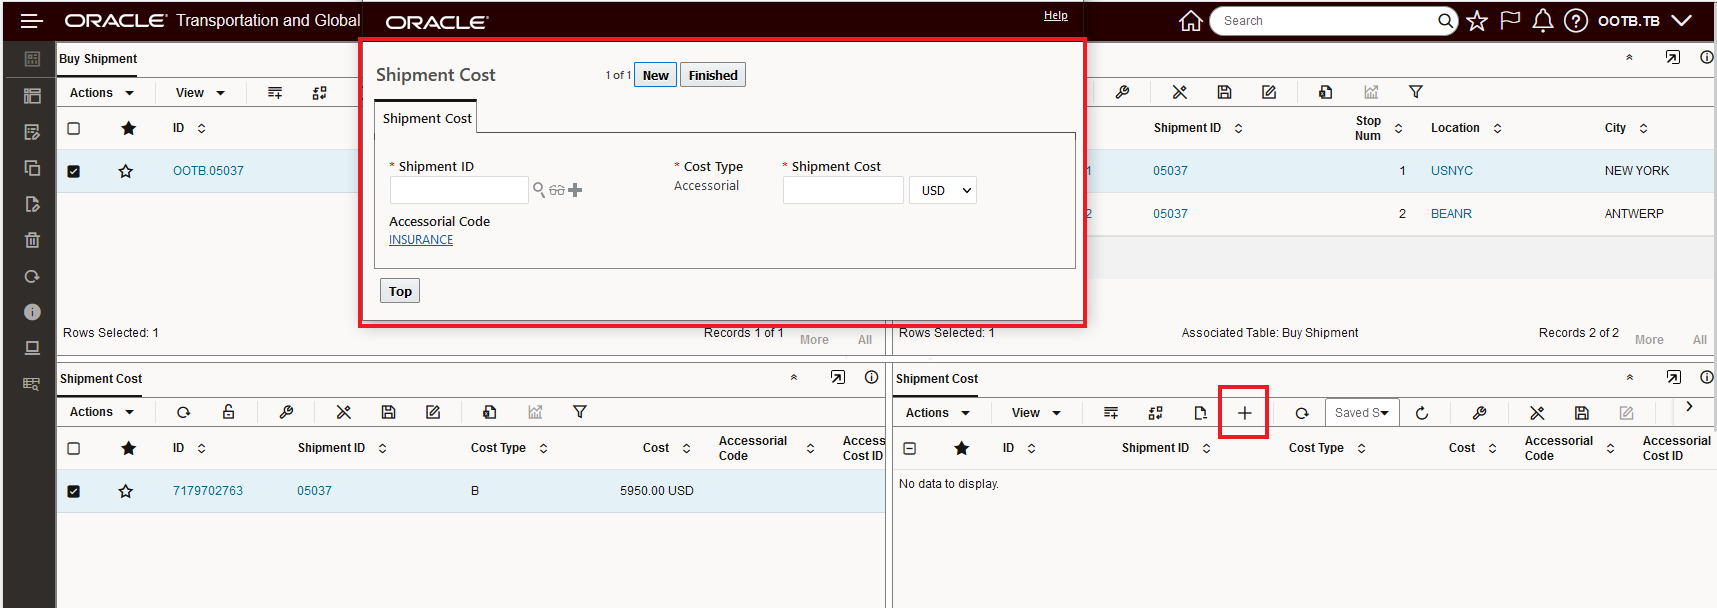
Create New Shipment Cost
To enter the Insurance Shipment Cost for the shipment 05037 - you would enter the shipment ID, Shipment Cost and hit Finished.
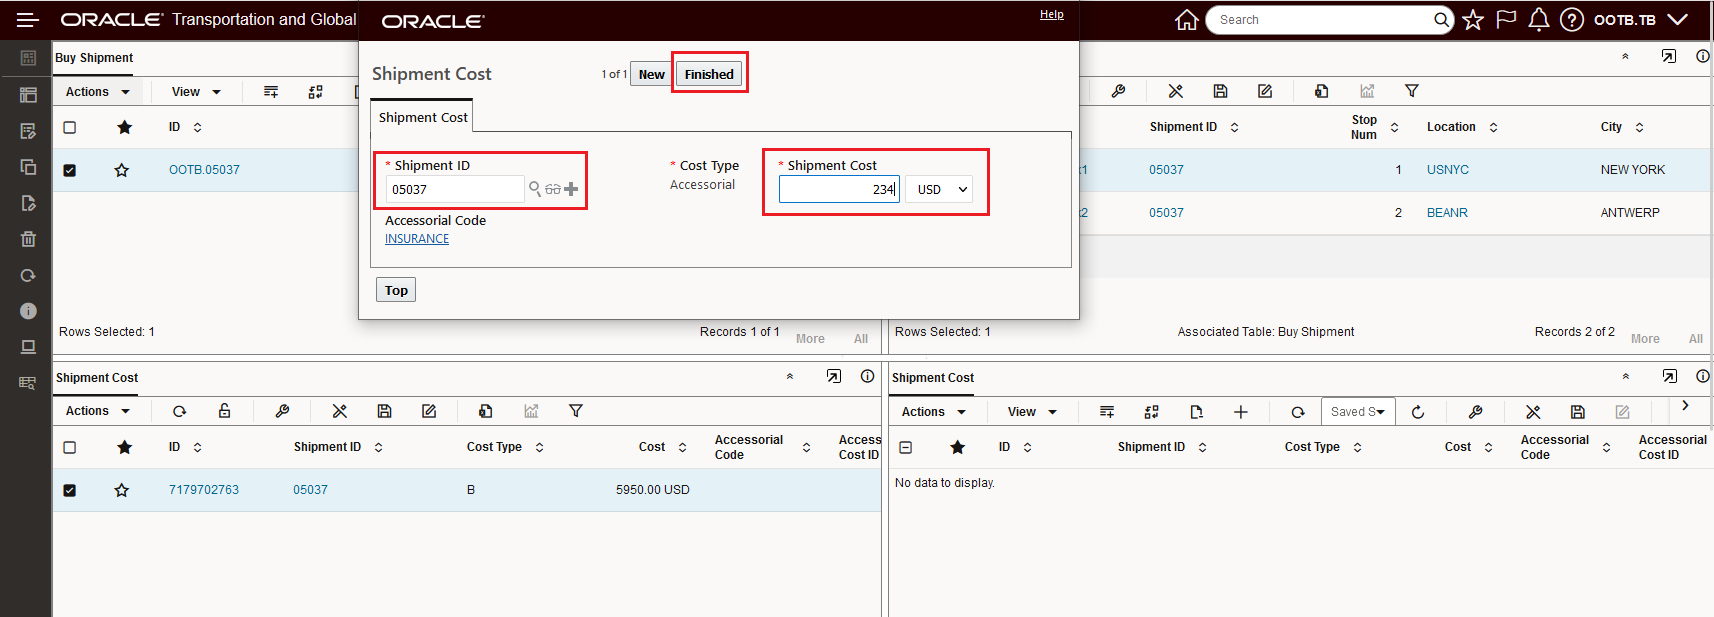
Enter Shipment Cost Info to Create New Shipment Cost Record
Once the Shipment Cost has been created, the Enhanced Workbench is refreshed, and the New Insurance Shipment Cost record is now shown.
Shipment Cost Create New
Column Rearrangement
The Enhanced Workbench now supports session based modifications to the columns displayed and the order in which the columns are displayed. In the example below, the Shipment ID column is moved from 2nd column to the 4th. You can perform the move column action by clicking the column header with the left mouse button - once the column is selected/highlighted - you can simply drag and drop the column to the desired position.
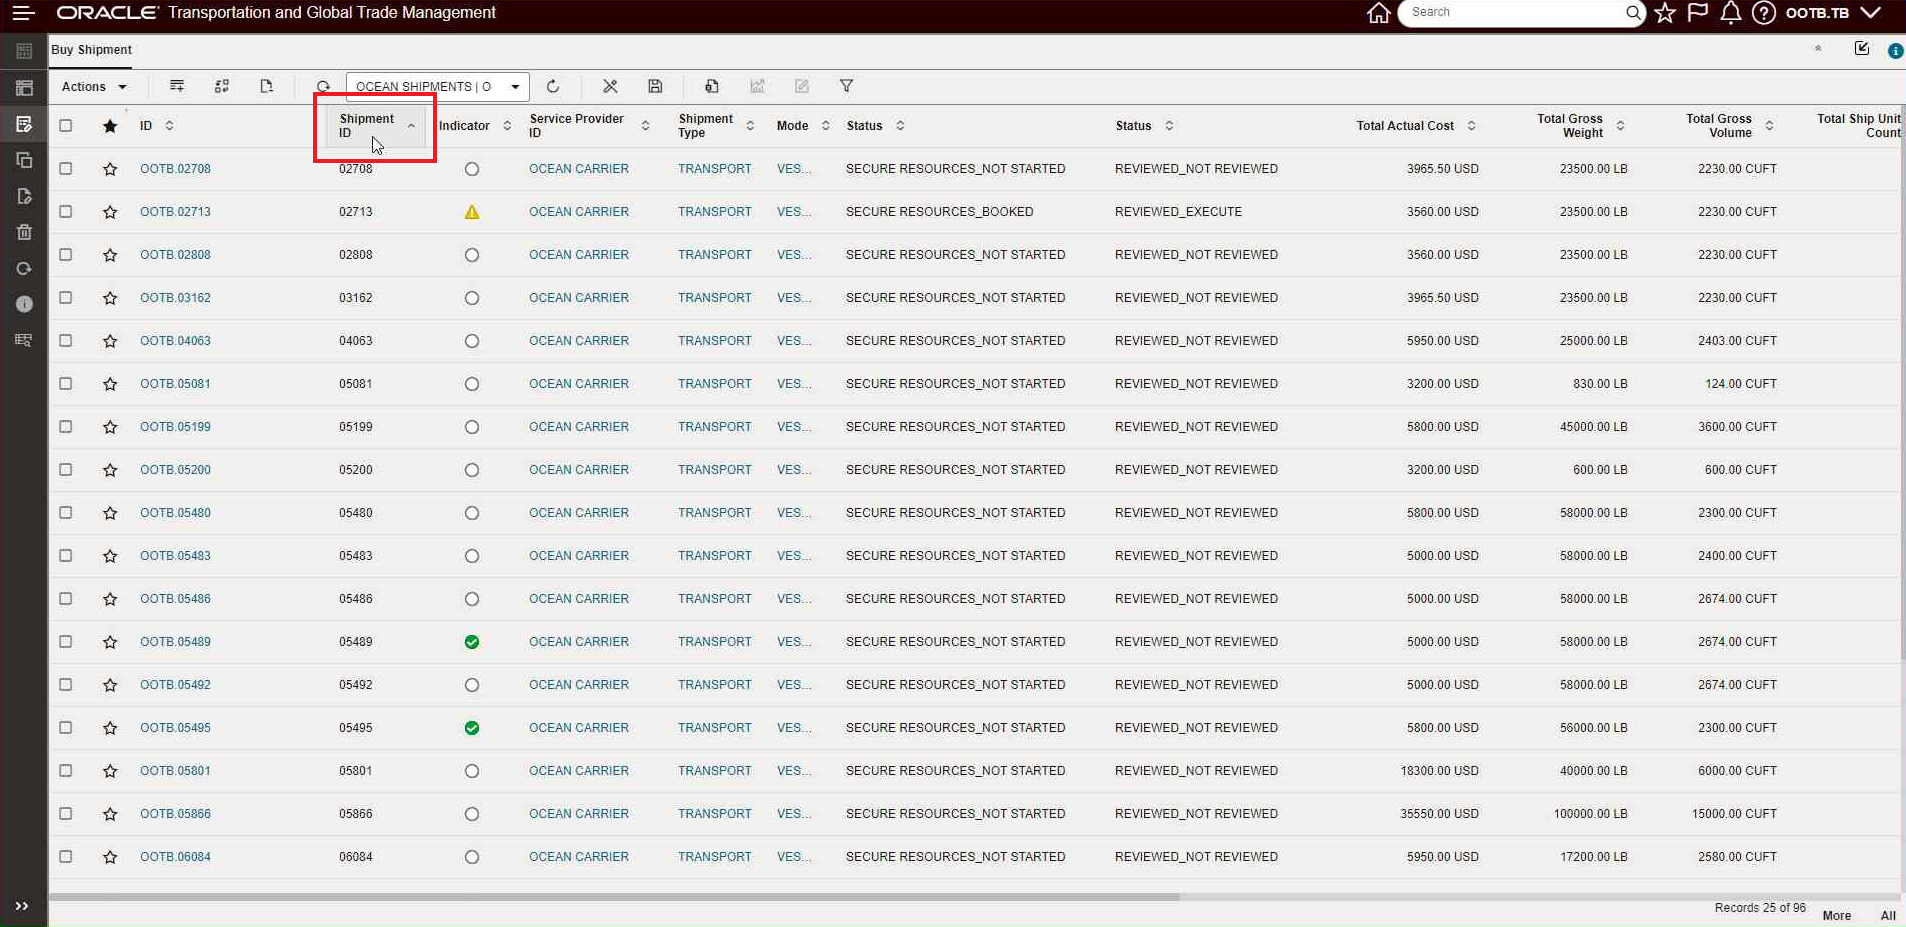
Select the Column to Move
Use the left mouse button to select the column to move - the column will be highlighted as shown below.

Select Column to Move
Drag the column the desired location. A blue line provides an indication where the column will be dropped.
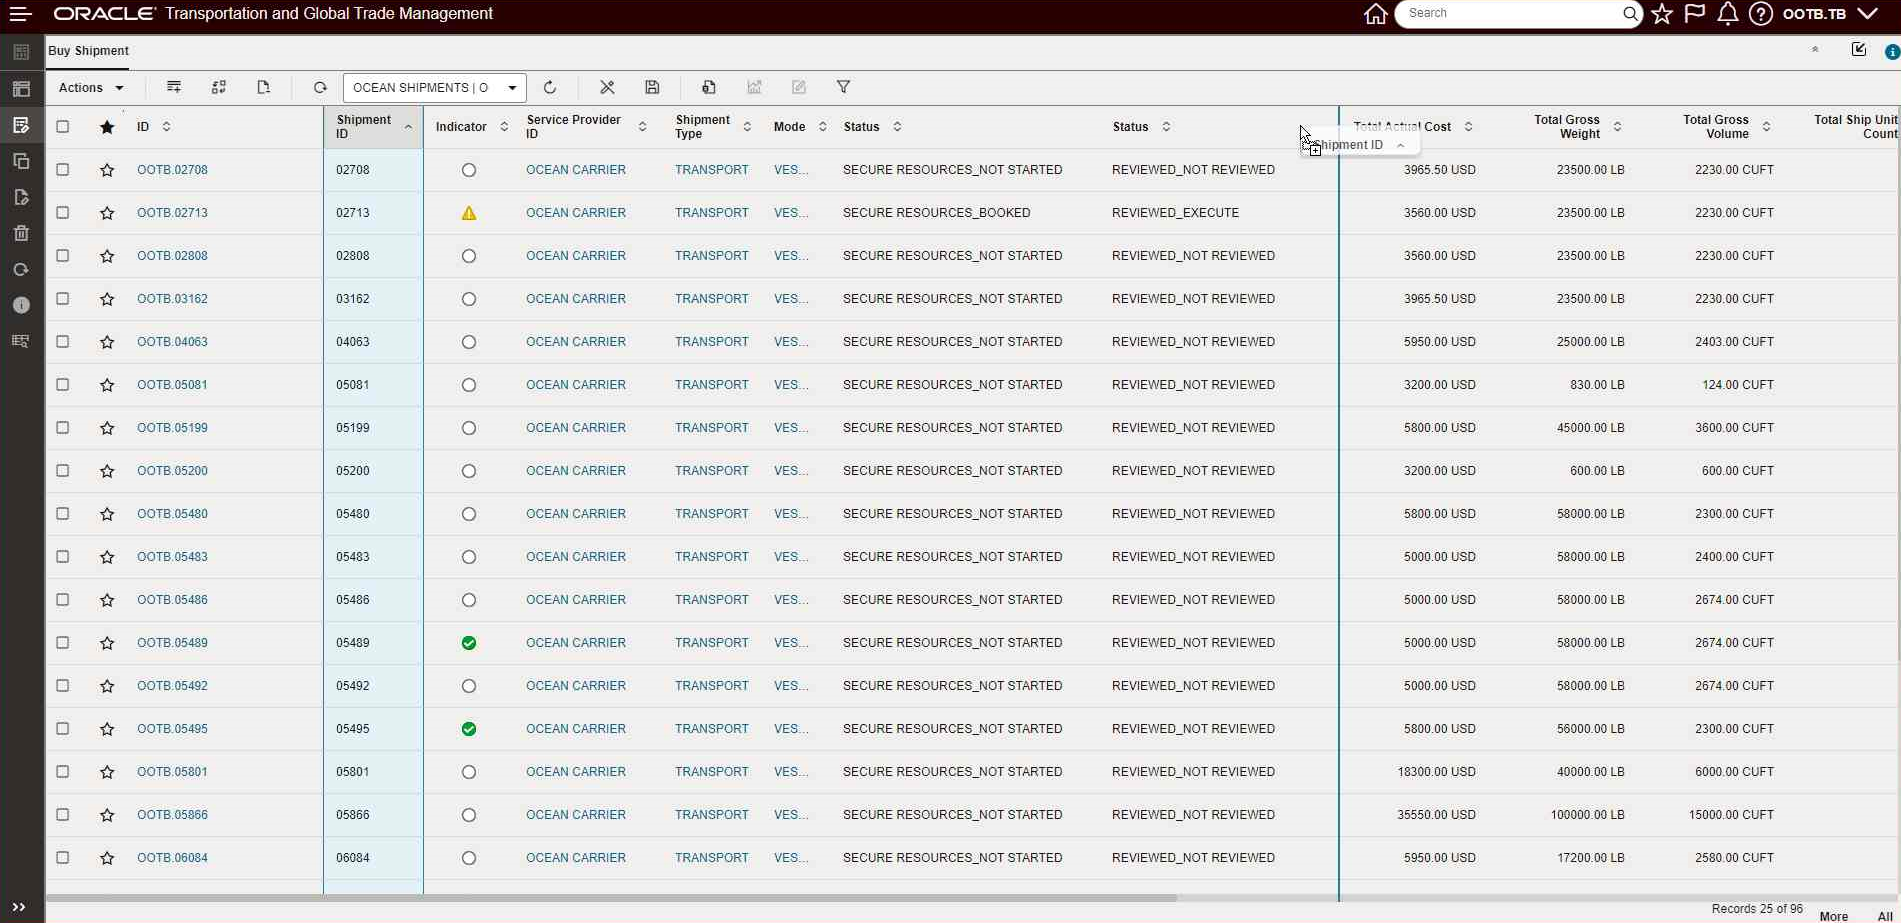
Drag the Column to Desired Location
Complete the drag and drop operation.
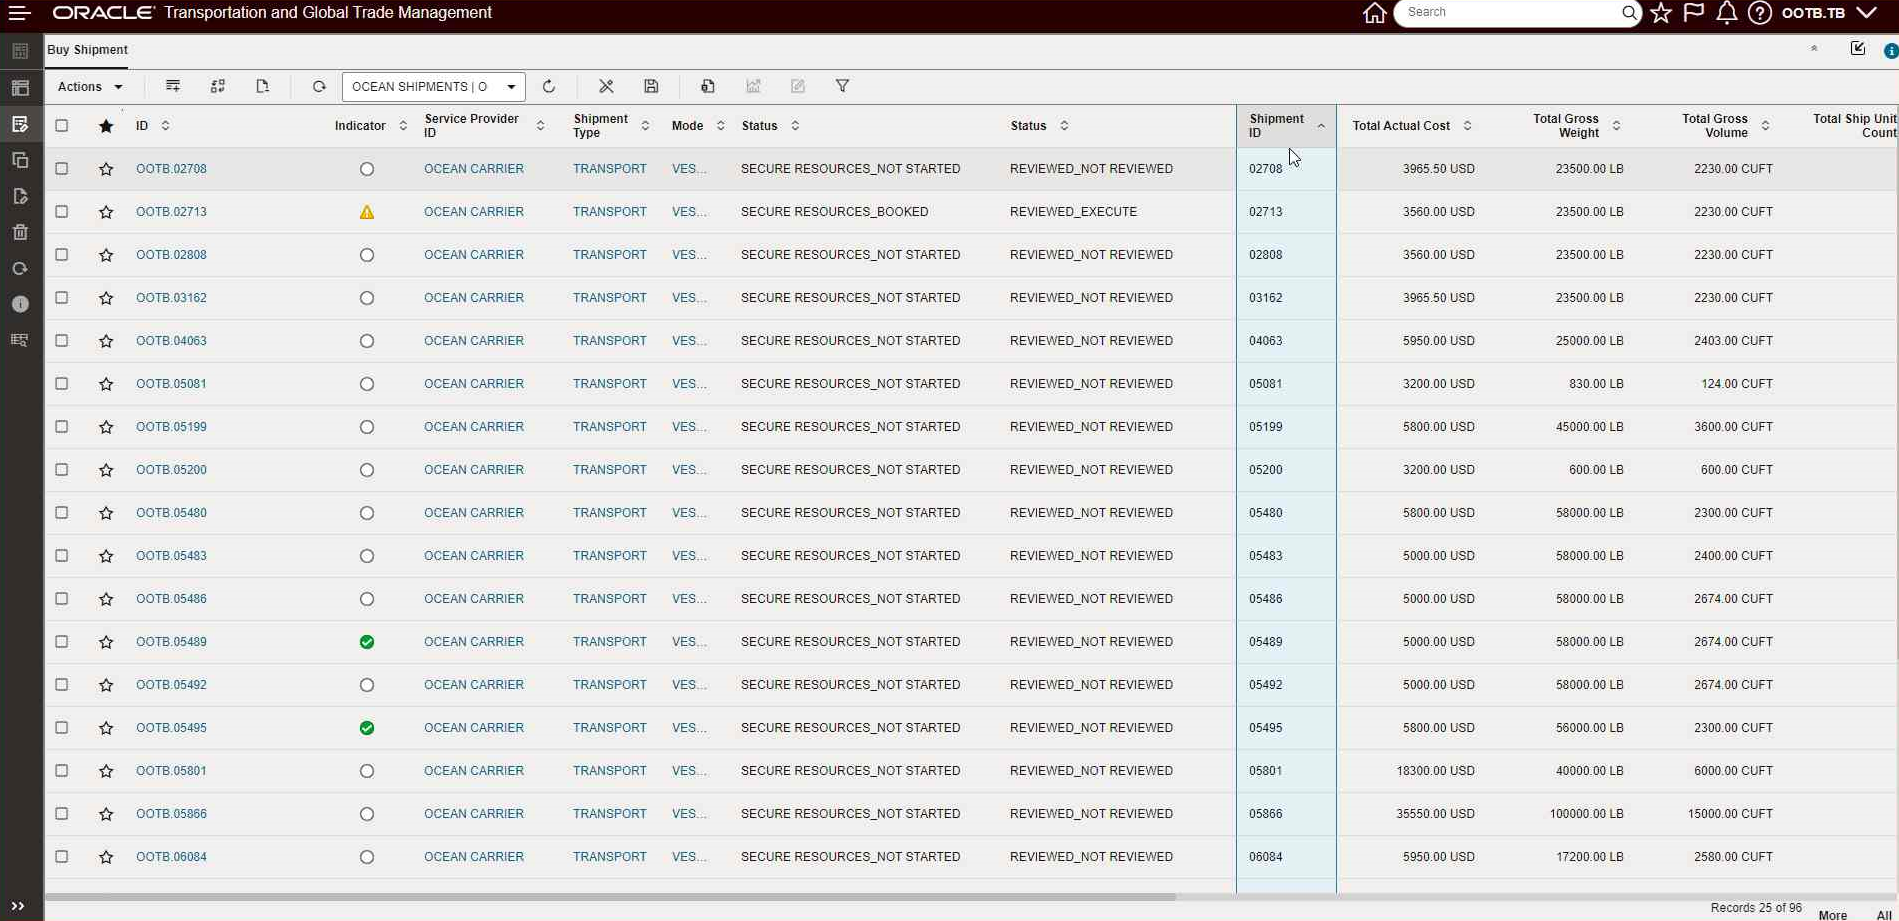
Column Moved to New Location
You can drag and drop multiple columns at once by doing a Ctrl_Click with the left mouse button to select more columns.
Multiple Columns Selected
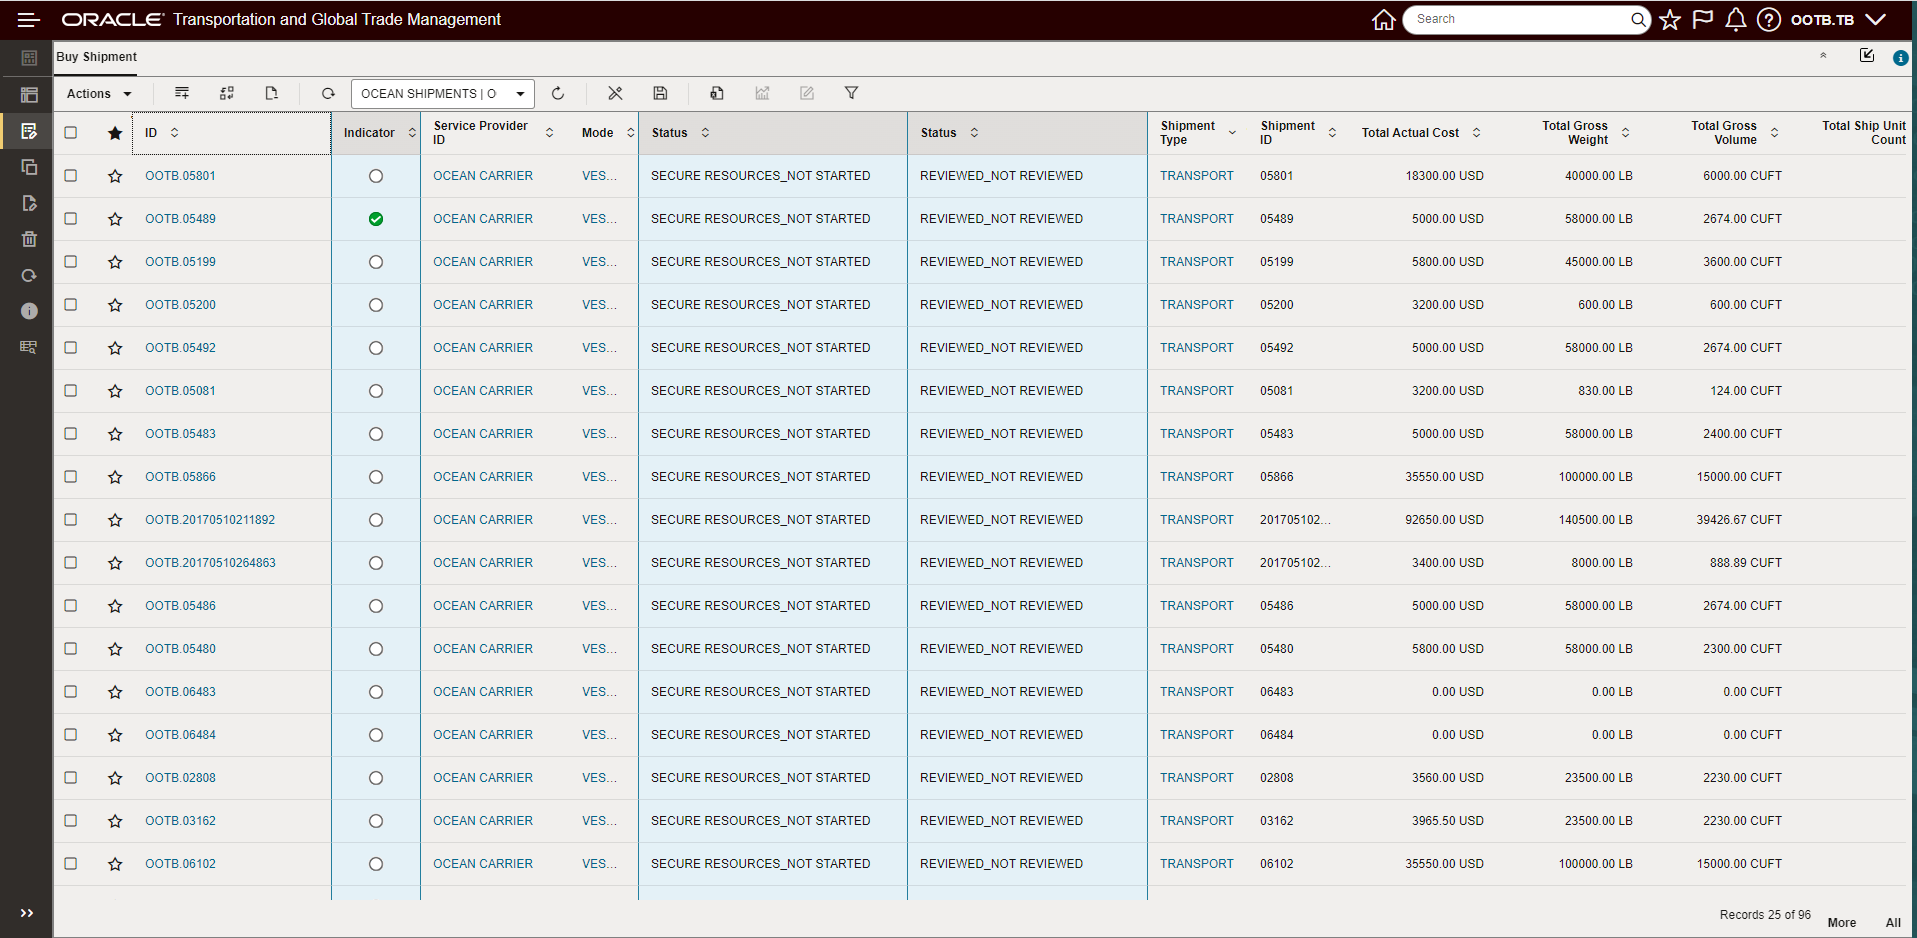
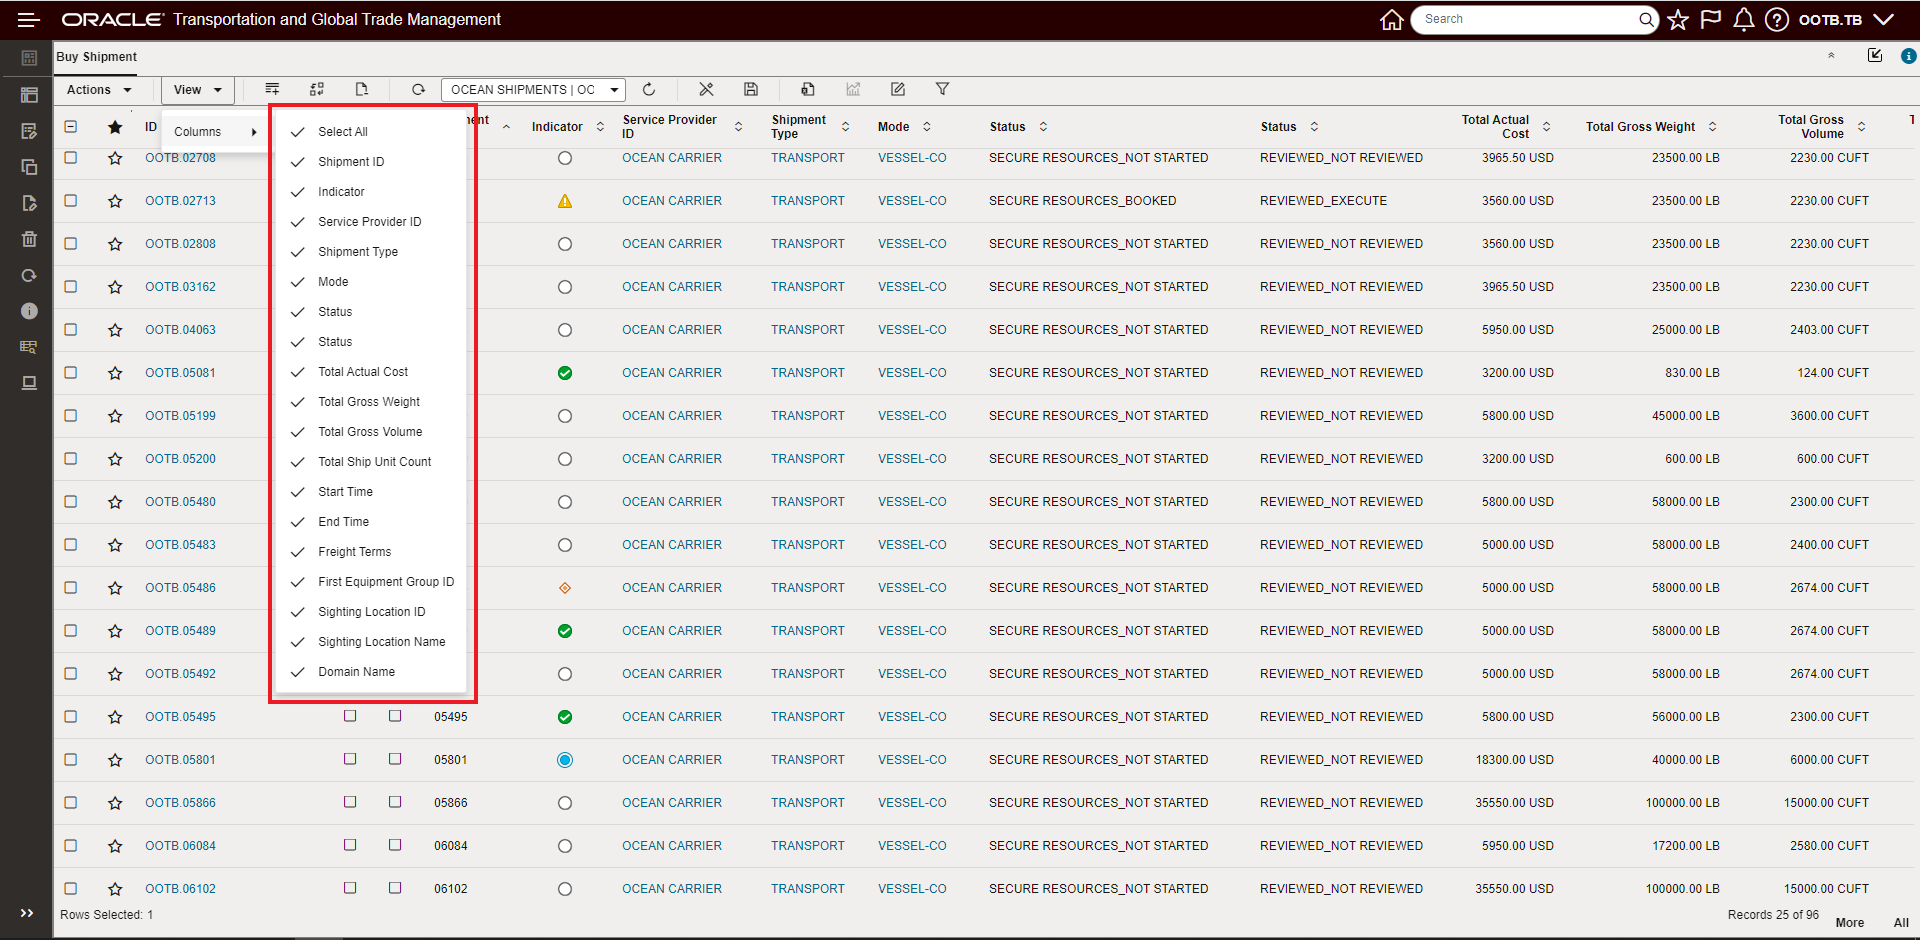
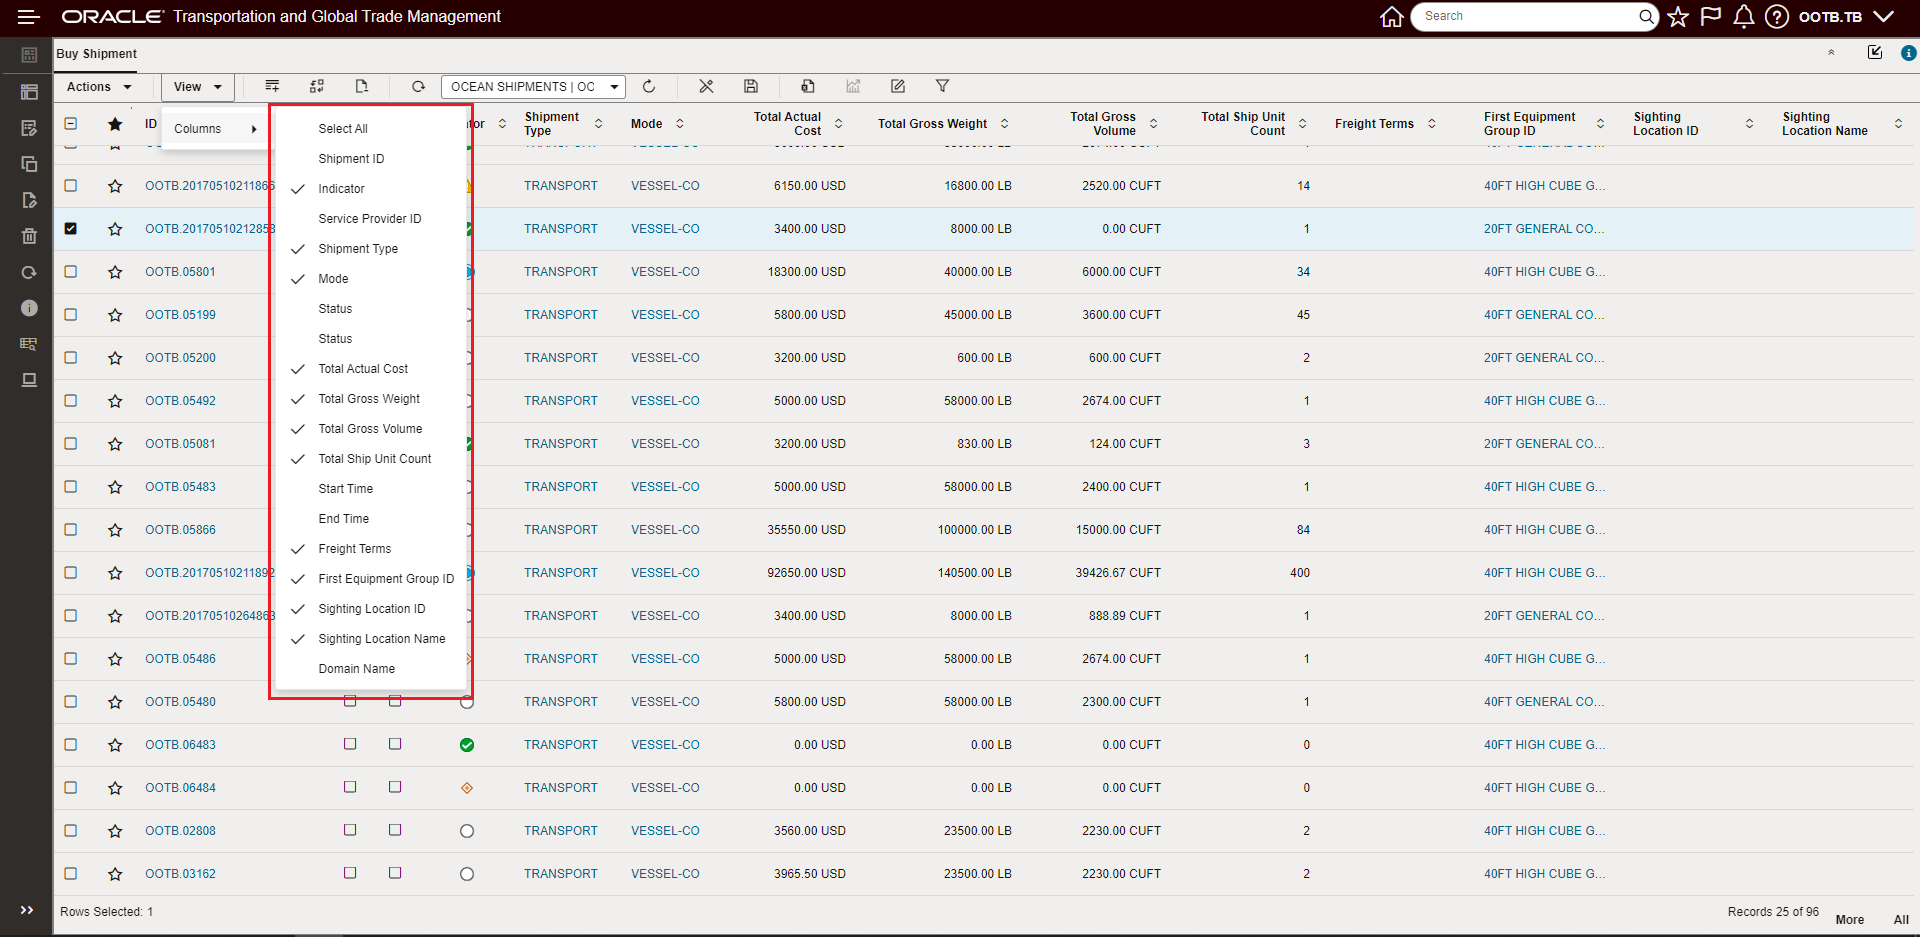
Session Based Column Show/Hide
The Enhanced Workbench allows you to change the View to show/hide a selected set of the available columns. Use the action View->Columns and then select or de-select the column to show/hide. You can reset the view to show all columns by selecting the Select All option.
View Column
In the example below, the unchecked columns (e.g., Shipment ID, Service Provider ID, Status, etc.) have been hidden
Columns Hidden
To reset the set of columns displayed, the Select All options is used.
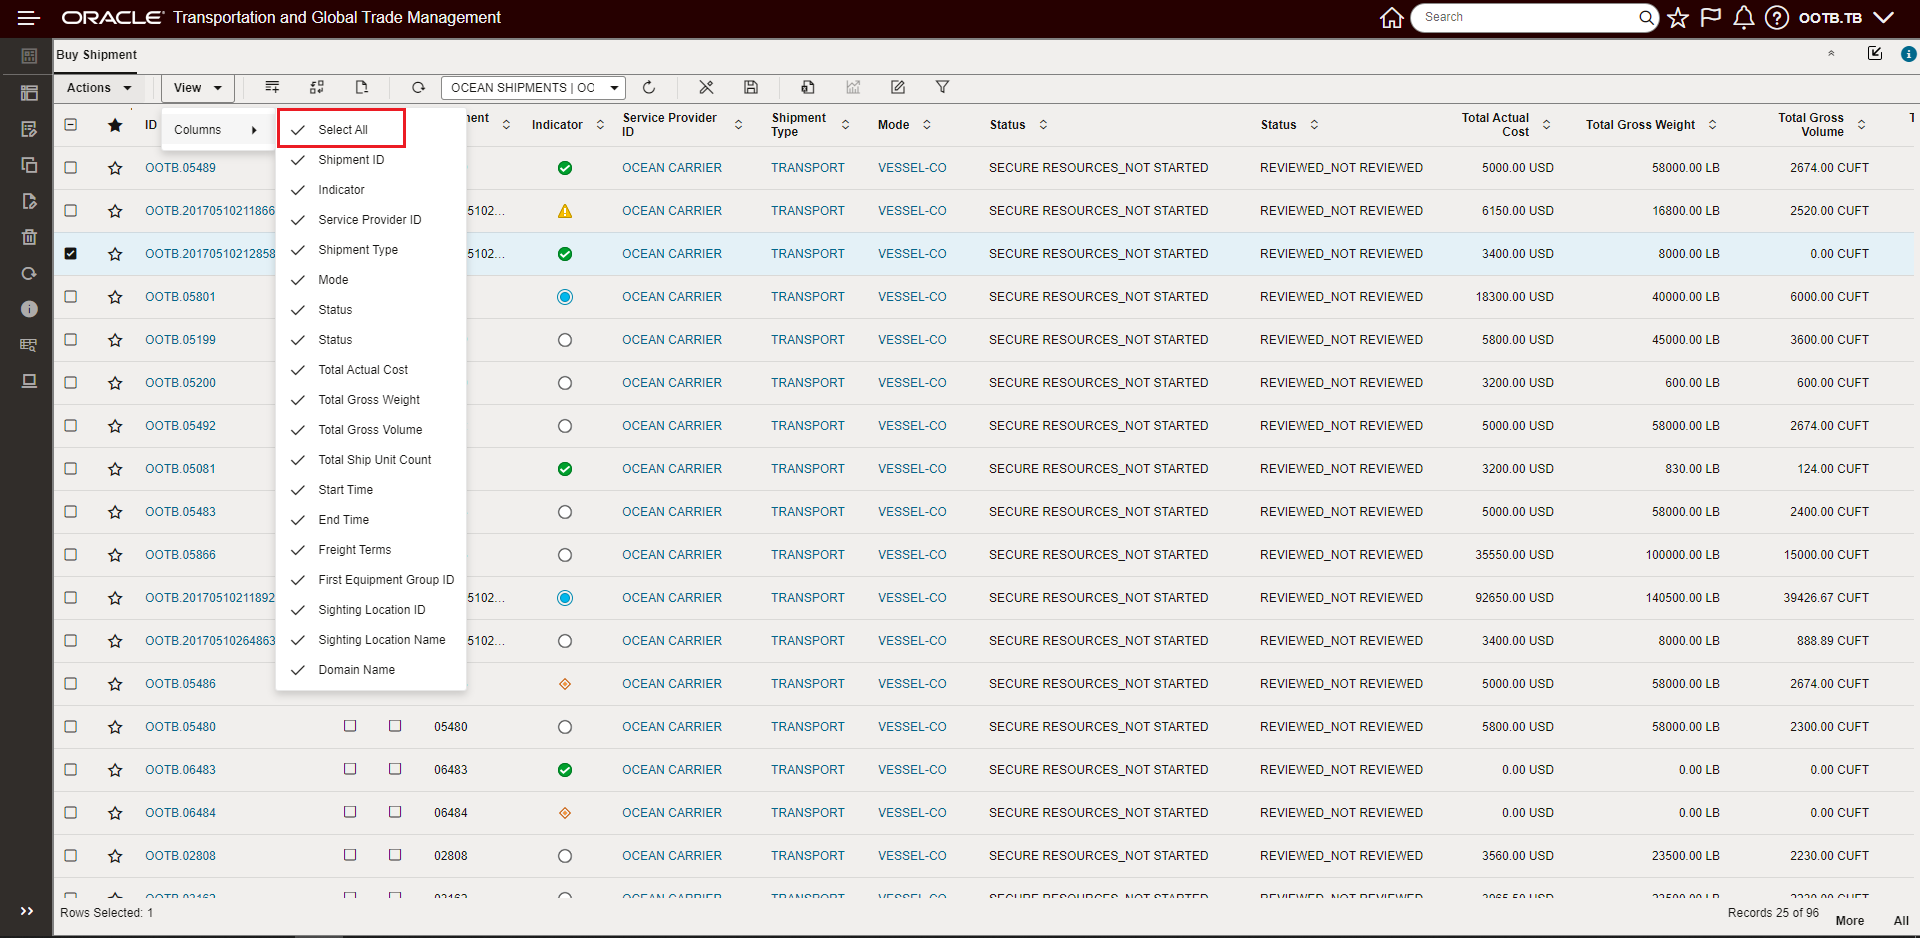
Select All
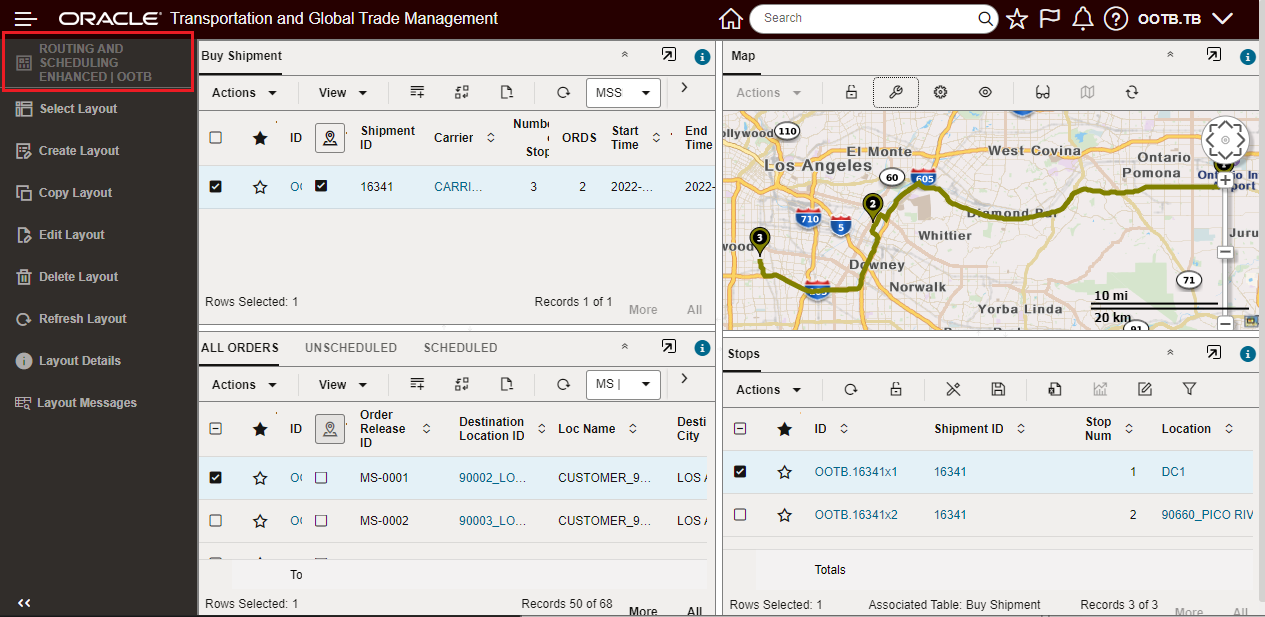
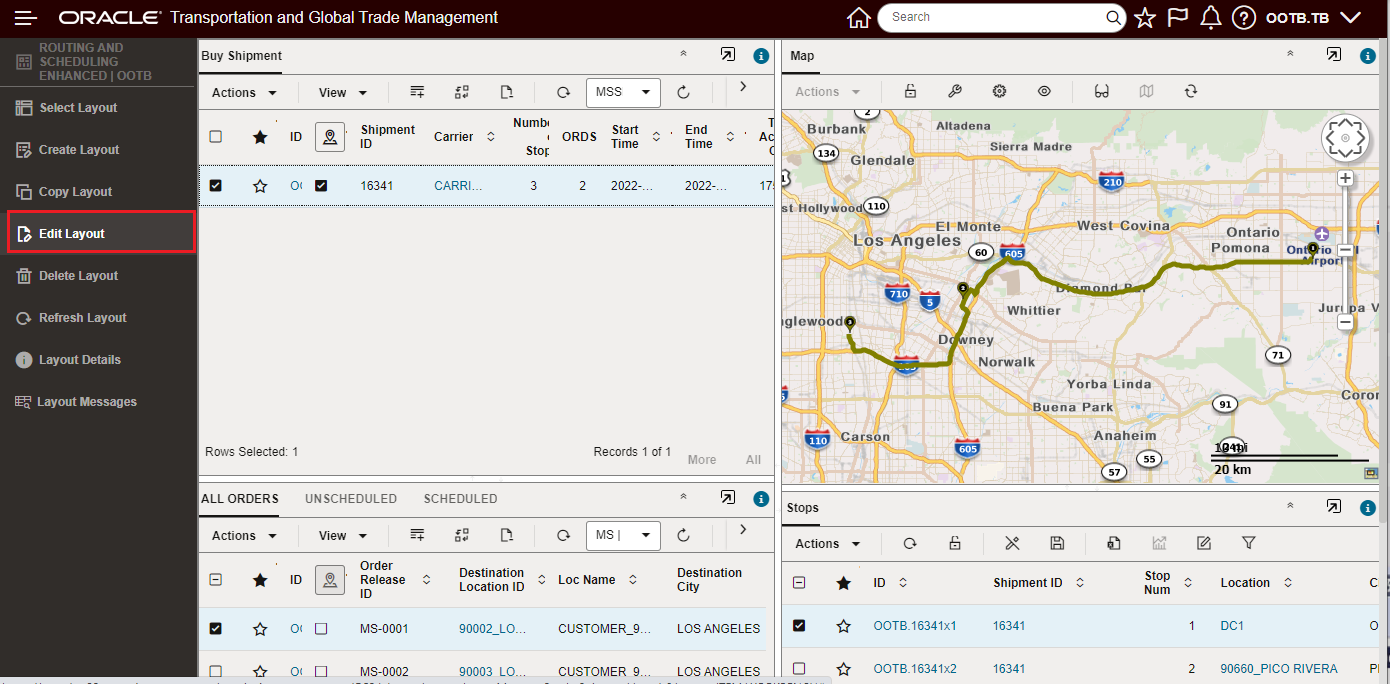
New Menu Location
To improve the amount of workable screen real estate available for you to use with the Enhanced Workbench, several improvements have been made to the Menu operation and the Select Layout drop down. The Select Layout drop down is now a Menu option - previously the Select Layout drop down consumed a dedicated row of screen real estate - that dedicated row is now available to display information in your Workbenches. The Menu previously was either fully visible or hidden - now the Menu can be expanded or collapsed - with each option providing Menu information and access - improving usability and screen management.
Below is the default starting setup for the Enhanced Workbench. Select Layout is now a Menu Option, Menu is expanded by default when opened in Workbench Designer mode, the Menu is collapsed when an Enhanced Workbench is opened from a Menu Link.
Enhanced Workbench New Menu Operation
Enhanced Workbench Open Via Menu Link Menu Collapsed
Select Layout is now one of the Menu options, when the Select Layout options is chosen the Drop Down for the available Workbenches is provided.

Select Layout
The selected layout is displayed at the top of the Menu above the Select Layout option.
Selected Layout
The Edit Layout option now toggles between initiating the edit and completing the edit of the layout - previously completed by selecting Done.
Edit Layout Select to Initiate Edit Layout - Done Editing to Complete
Once the edit is initiated, the Edit Layout toggles to Done Editing - which - when selected - will save the edits.
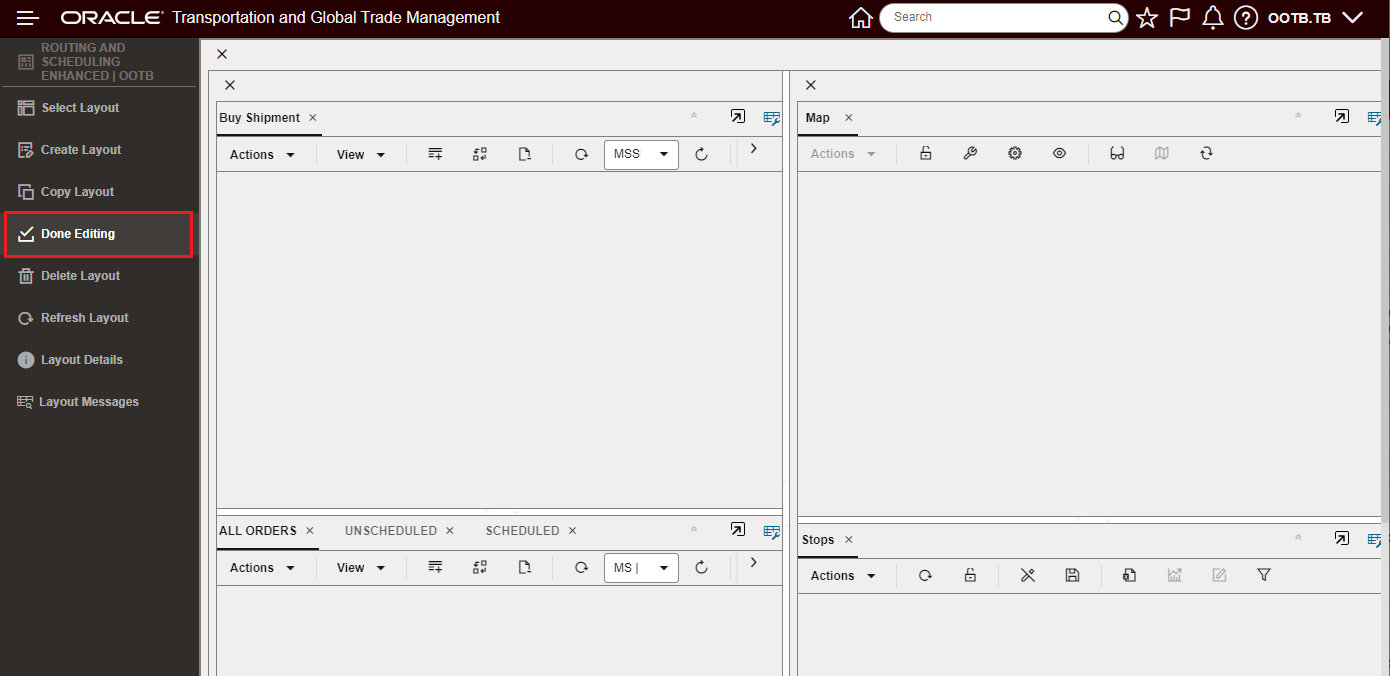
Edit Layout - Done Editing
Map Filters
You now have the option to apply filtering within the map view - across all the supported map vendor options - Oracle Map Cloud Services, HERE, and ALK. You will find this feature very useful in controlling the information displayed on the map.
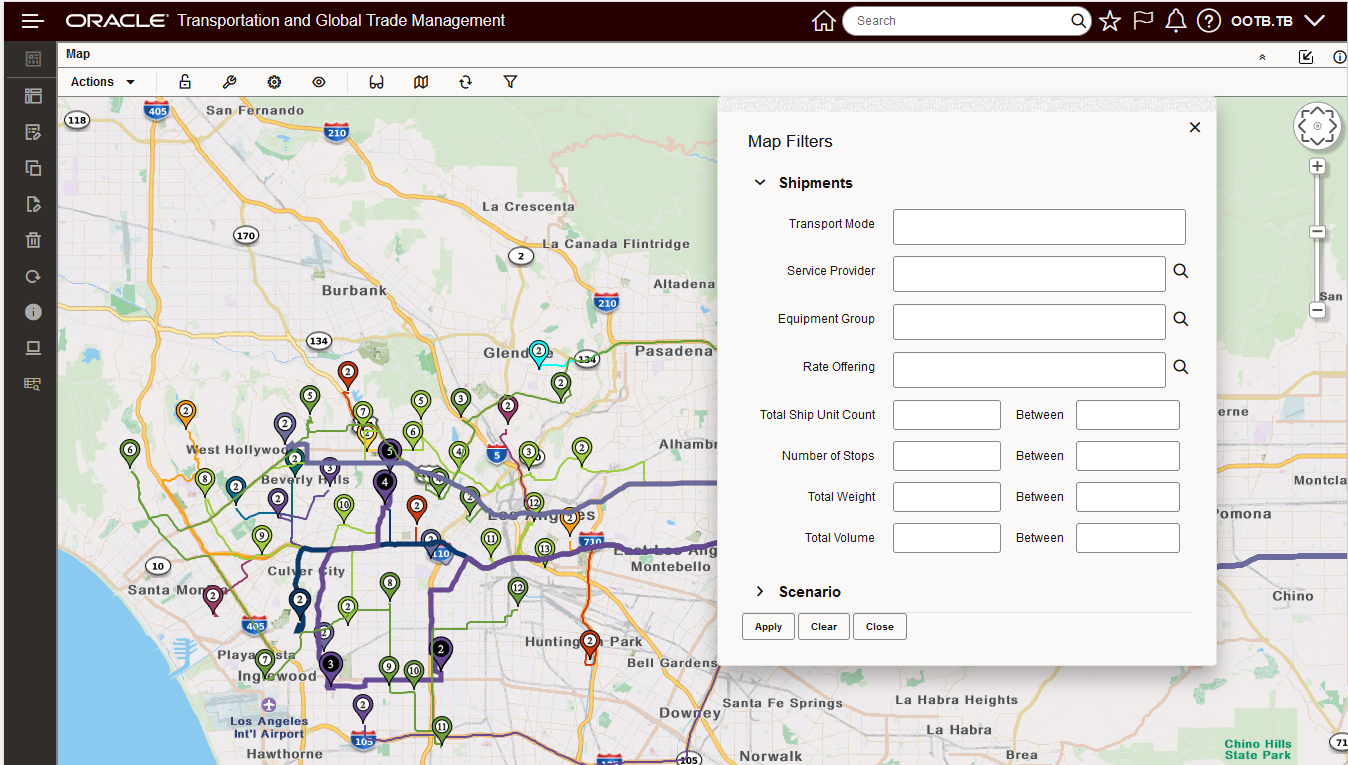
Map Filter
In the example below, the map view has been filtered to show TL Transport Mode for shipments with between 4 and 5 stops.
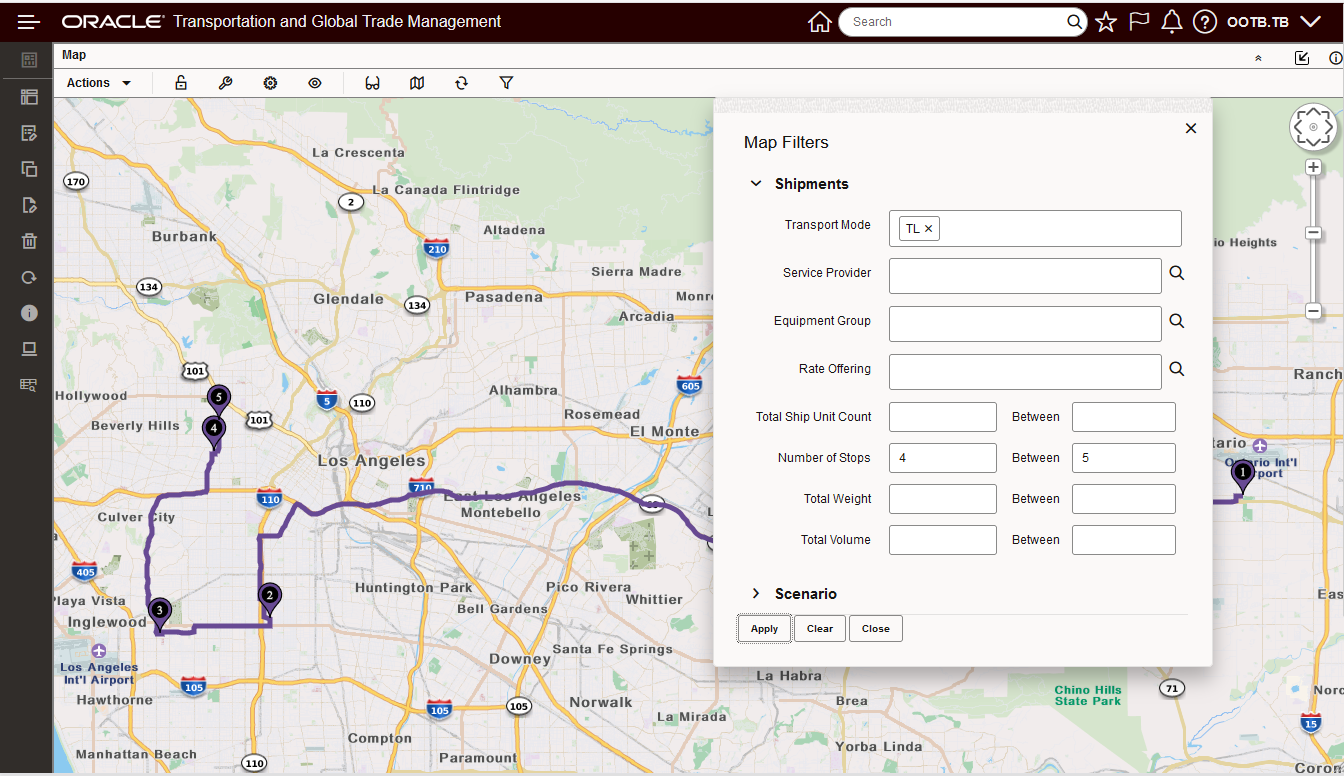
Applied Map Filter
Inline Edit for Flex Fields
Support for Inline Edit for Flex Fields (aka Attribute fields) has been added to the Enhanced Workbench. In the example below, the Power Unit Screen Set has been configured with three Flex Fields with edit enabled. Two of the fields are text fields and one is a calendar field. The configured screen set can be used for Inline Editing of the Flex Fields within the Enhanced Workbench.
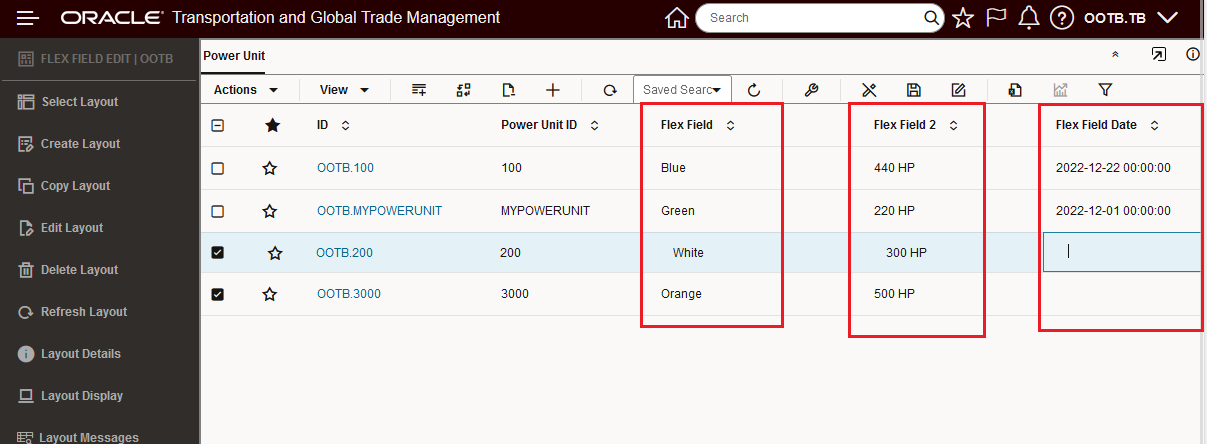
Inline Edit for Flex Fields
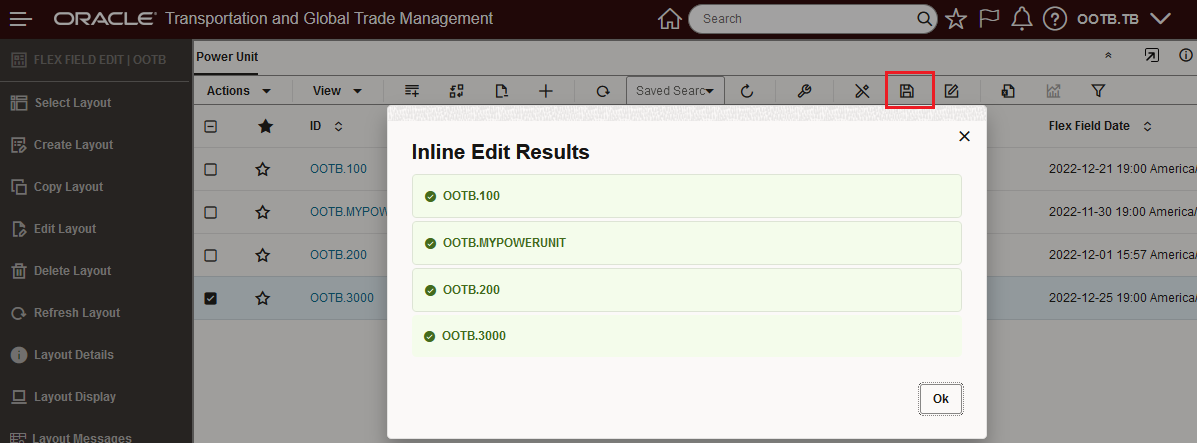
Select Save and the Flex Field Edits Are Saved
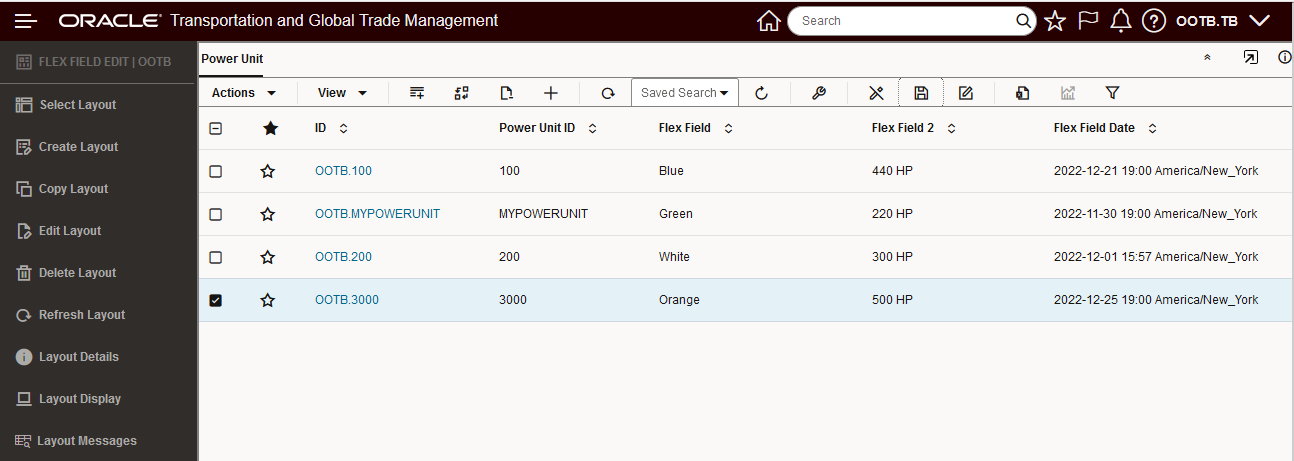
Result
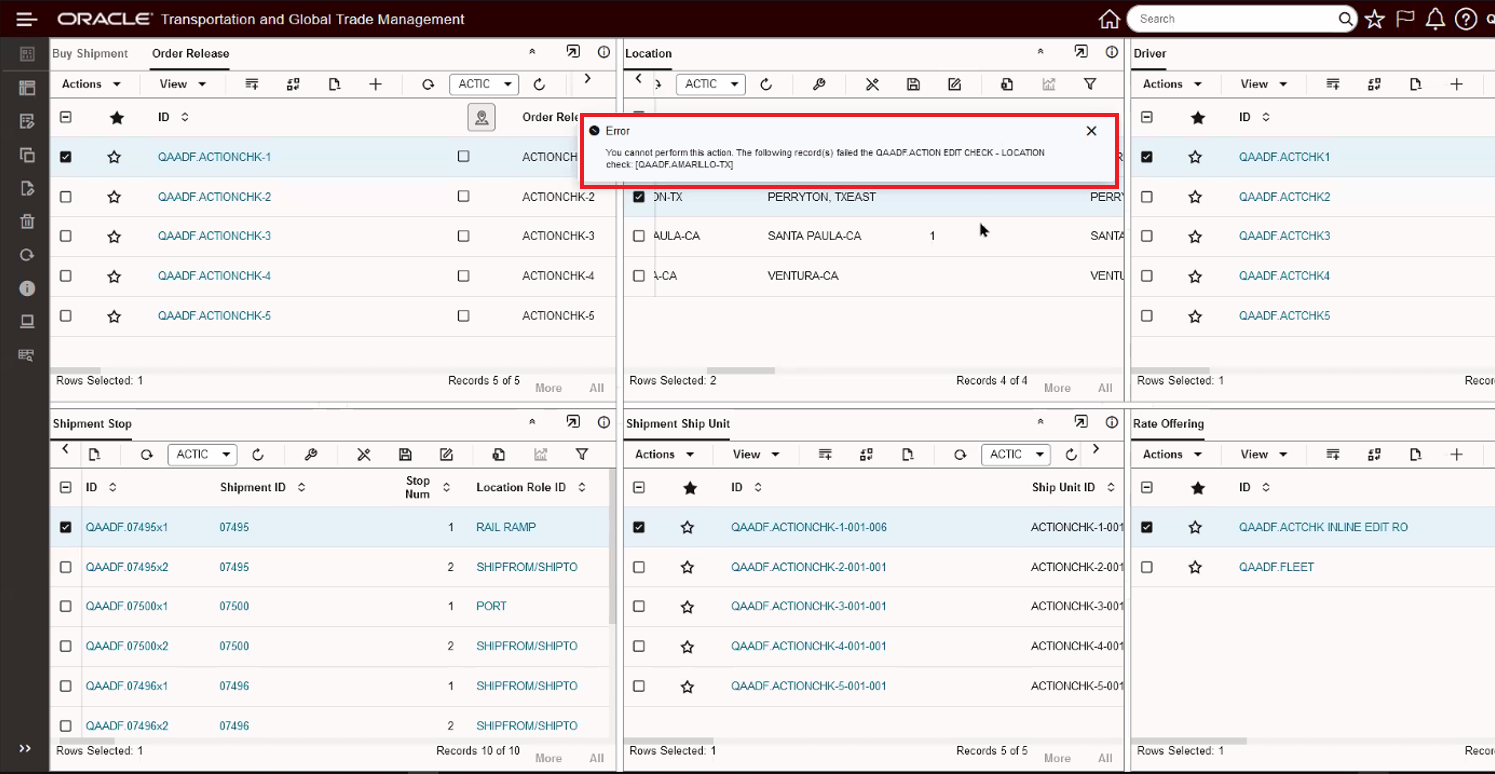
Action Checks for Inline Edit and Mass Update
This enhancement provides Action Checks on Inline editing and Mass update. The Inline editing and Mass update Action check capabilities are in addition to the already provided Enhanced Workbench Action Check capabilities provided for Drag and Drop. Actions Menu on the Table ,Gantt, Map and Manager Layouts.
In the example below- an Action Check has been configured and assigned for the Location. When the Action Check fails - as shown below, you will receive a message on the screen and the error will also be logged in the Layout Messages.

Inline Edit Action Check Error
Below is the Action Check Error message captured in the Layout Messages list.
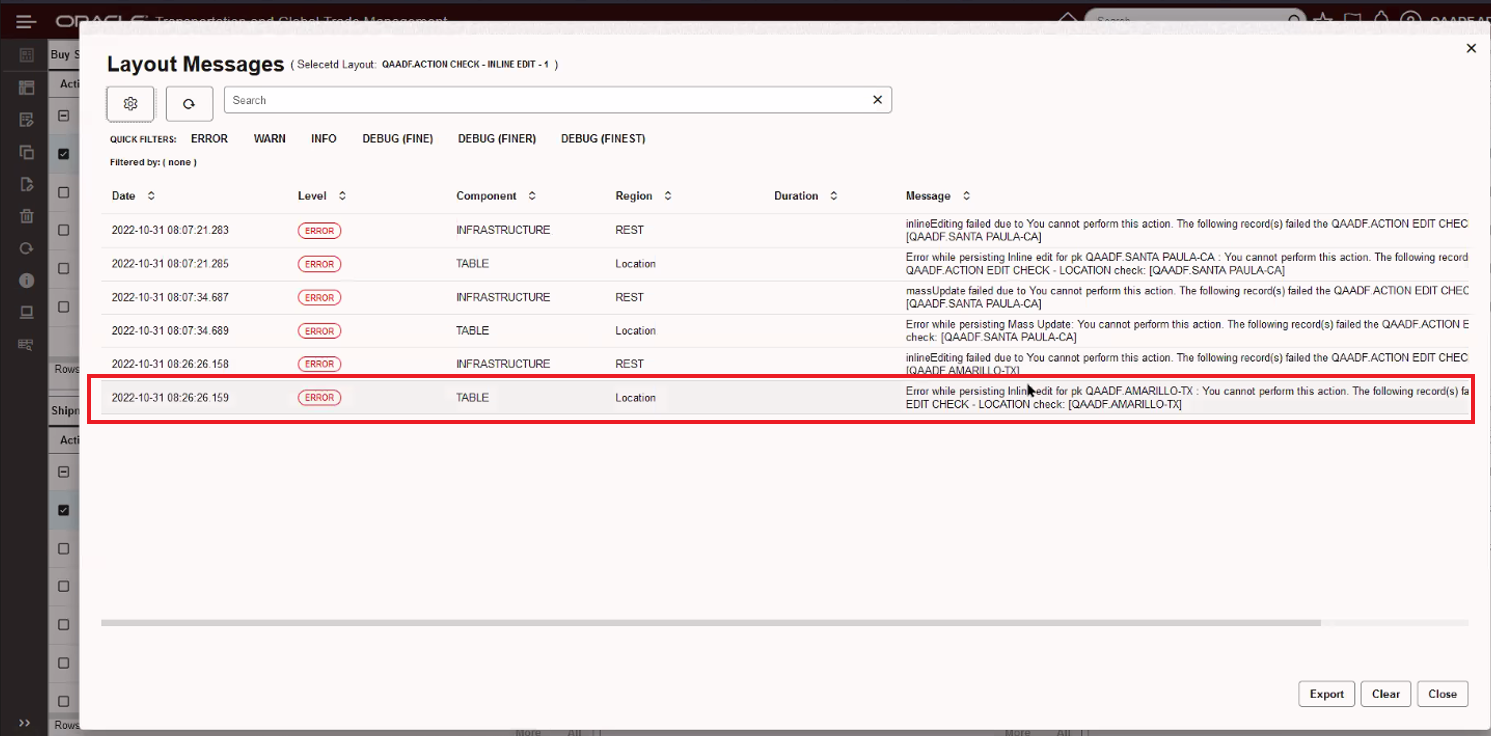
Inline Edit Action Check Error Message Layout Messages
Action Checks are also considered with Mass Updates. In the example below, the Action Check error has been trigged during a Mass Update. Like the Inline edit use case the error is provided on the screen and in the Layout Messages.
Mass Update Action Check Error Message
Bill Line Item Table Added
The Bill Line Item Table was added as an available table to include in your Enhanced Workbenches.
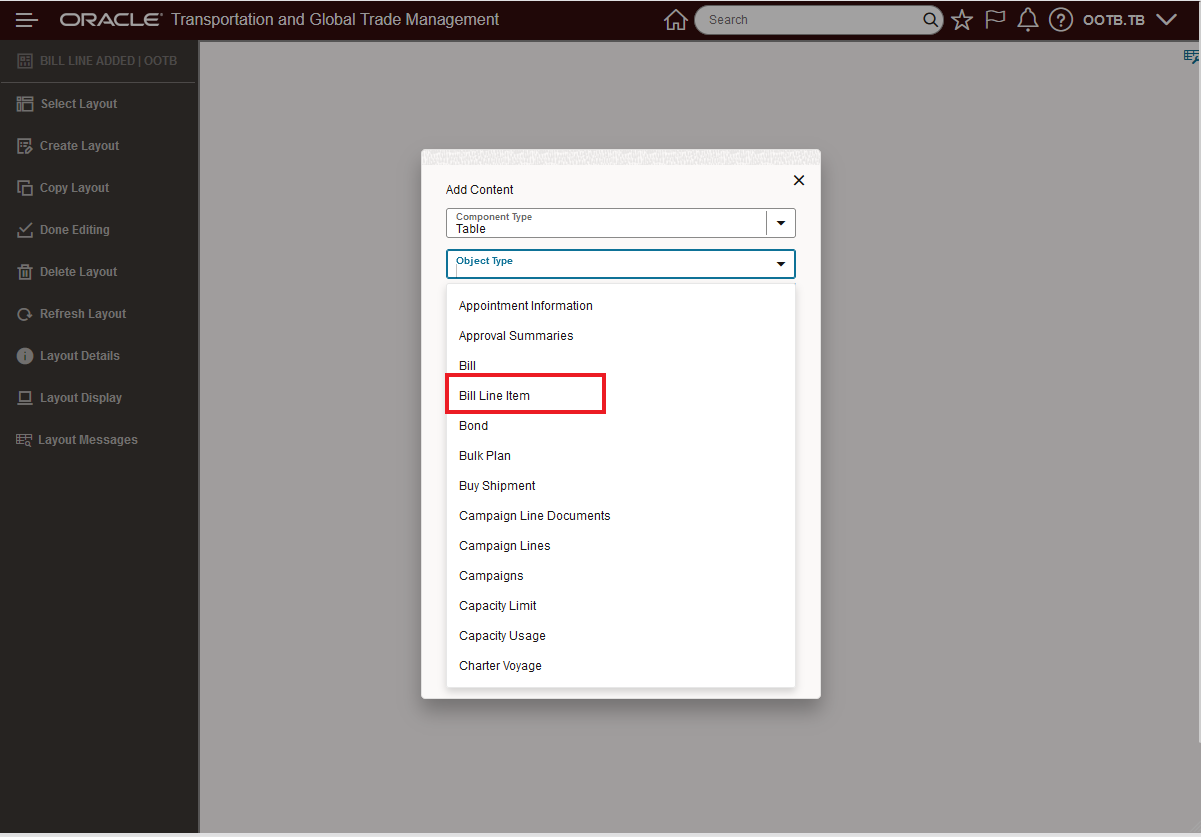
Bill Line Item Table Added
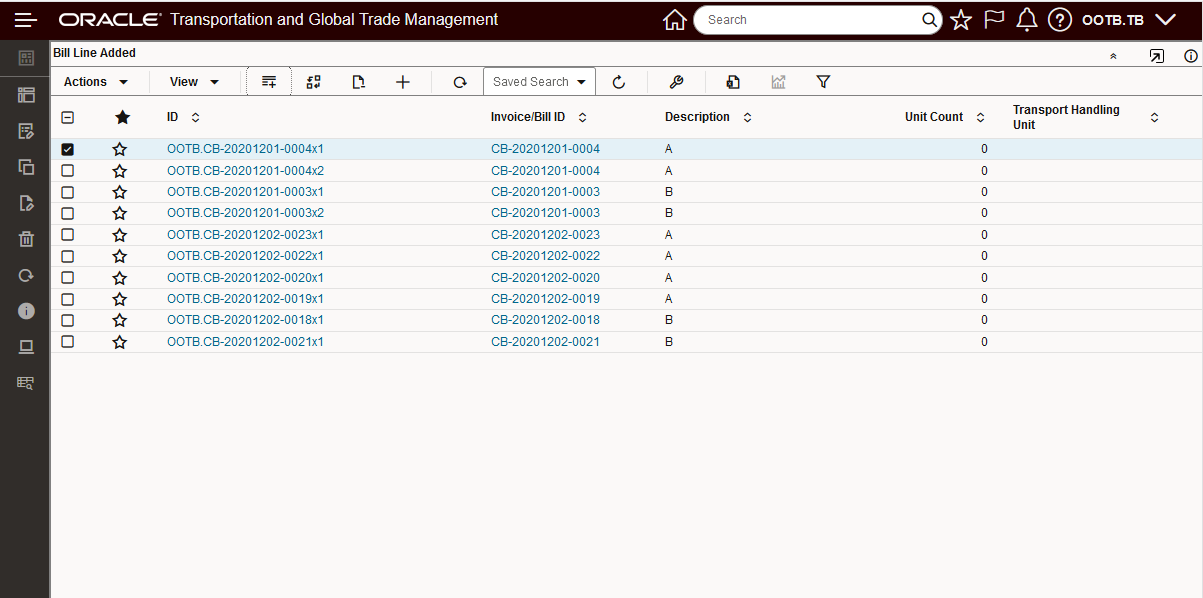
Bill Line Item Table
Dock Scheduling Gantt
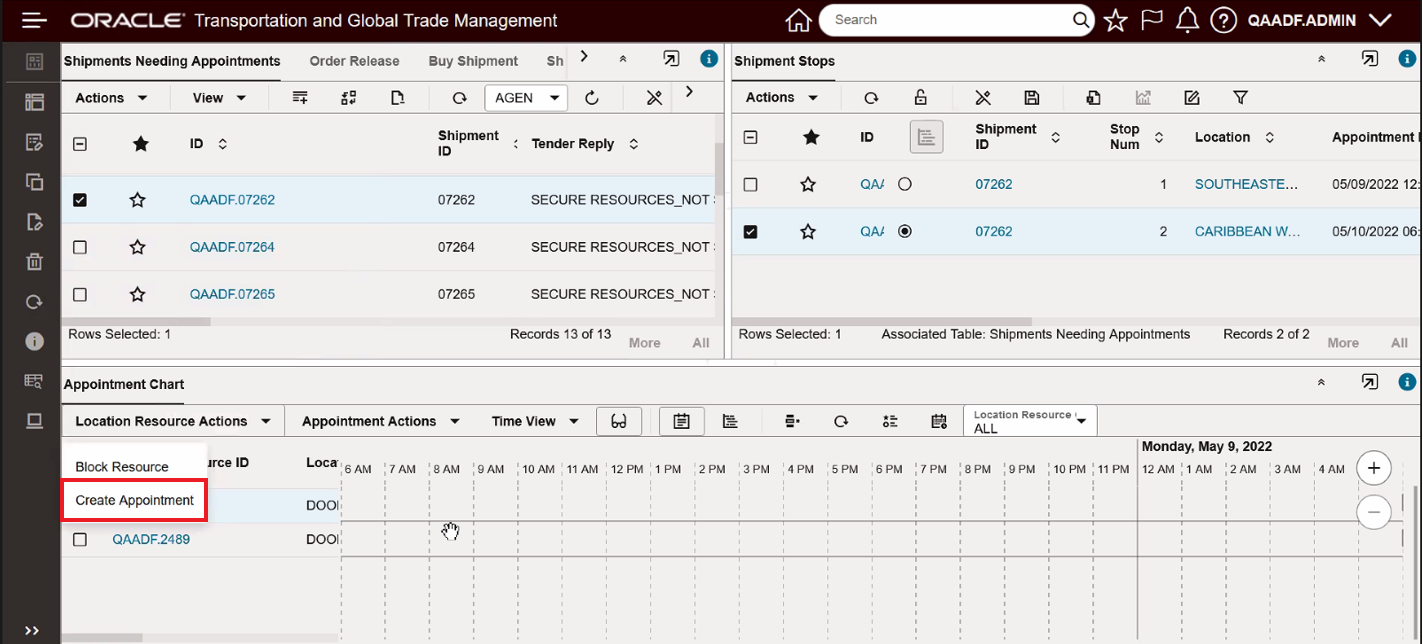
This feature provides two new Power Actions for the Enhanced Workbench Dock Scheduling Gantt - Block Slot and Create Appointment.
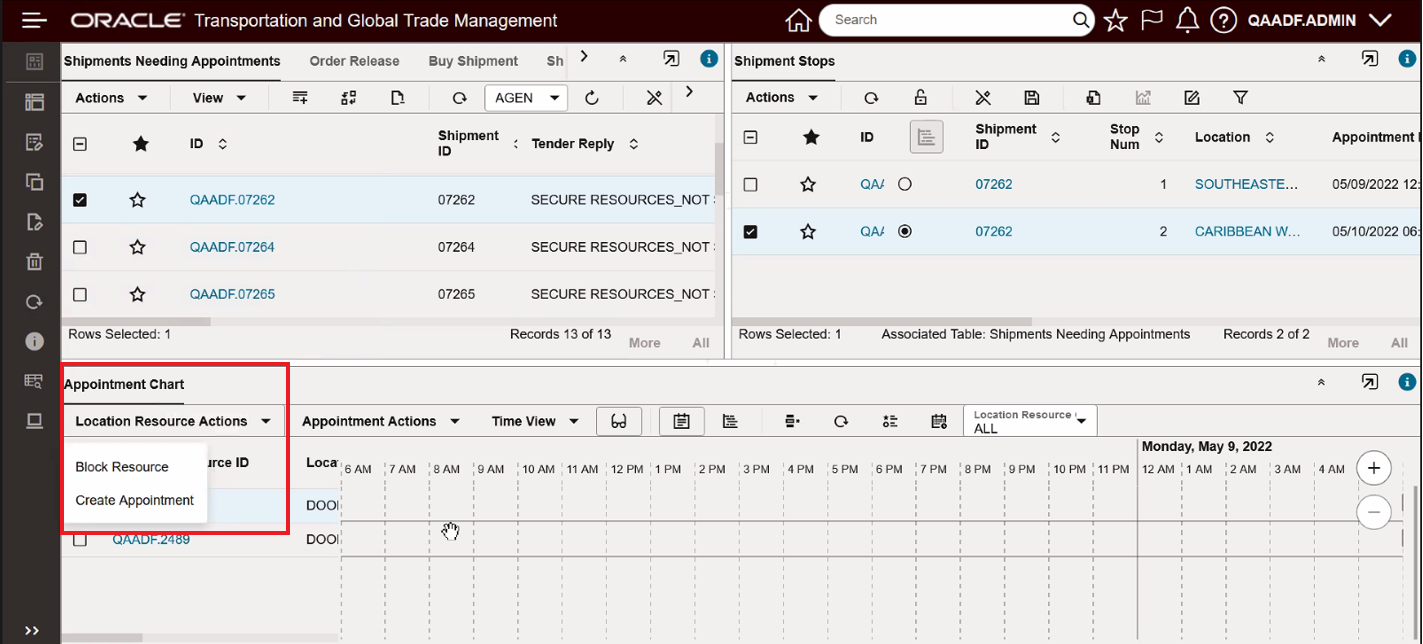
New Resource Actions
In the example below, the Block Resource Power Action will be used to block a time range of slots. Previously this action was invoked by clicking on the slot to block - one slot at a time - the new improved action supports blocking multiple slots with one run of the Block Resource action.
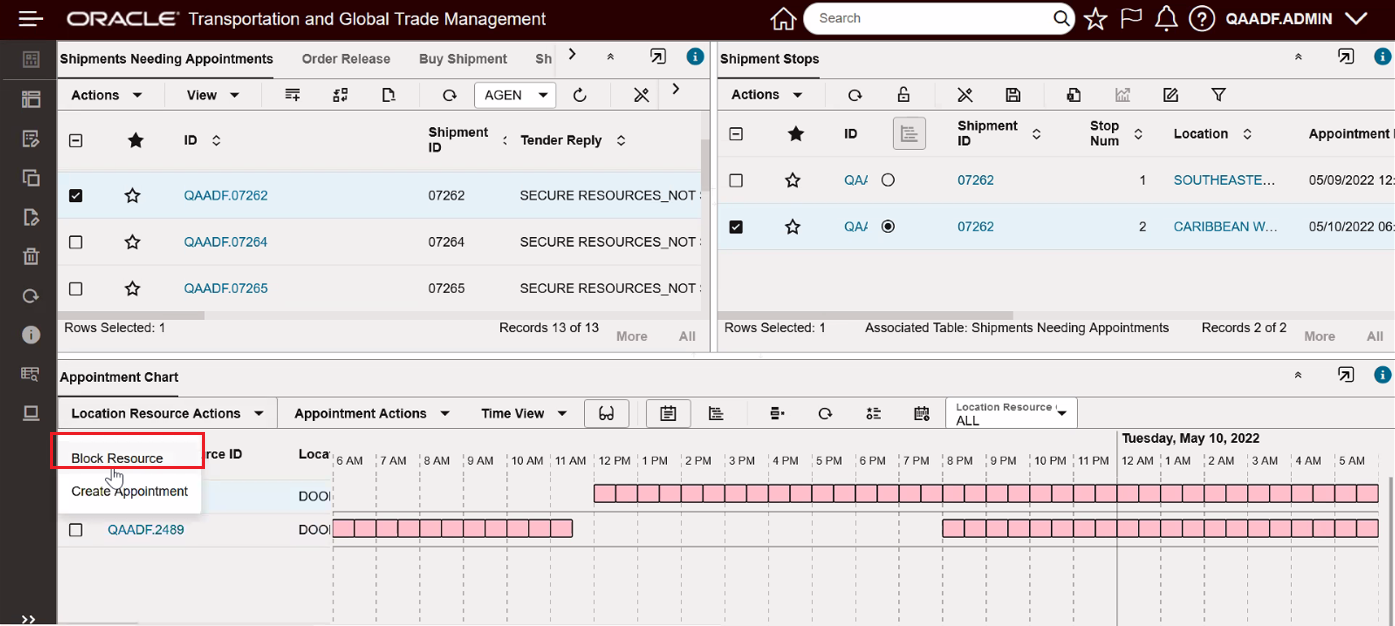
Select Block Resource Action
The Block Resource action takes - as input - a slot time range start and end - as shown below - the result of the block is shown in the Gantt when the action is run - in this case the slot from 6:00 AM to 7:30 AM are blocked..
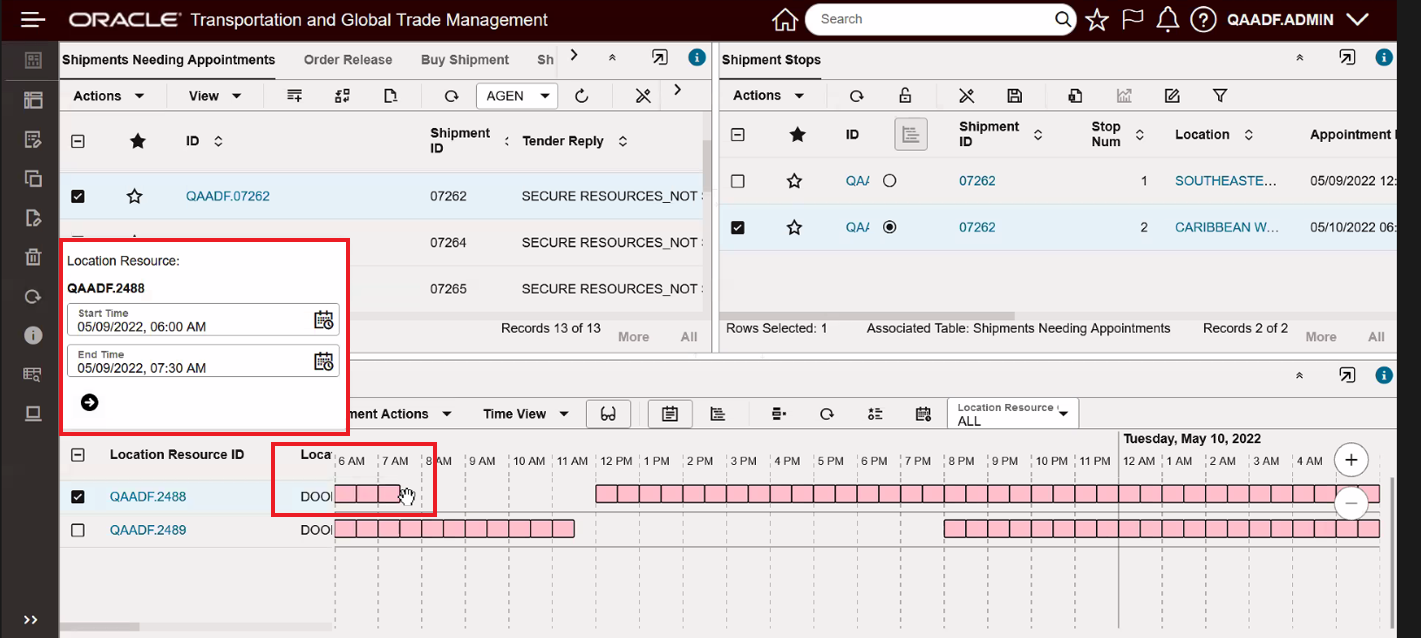
Block Resource Action Input
The Create Appointment action works as it has in previous versions with the legacy Manage Appointment UI and allows you to create an appointment for a shipment that was not planned/managed inside of OTM.
Create Appointment
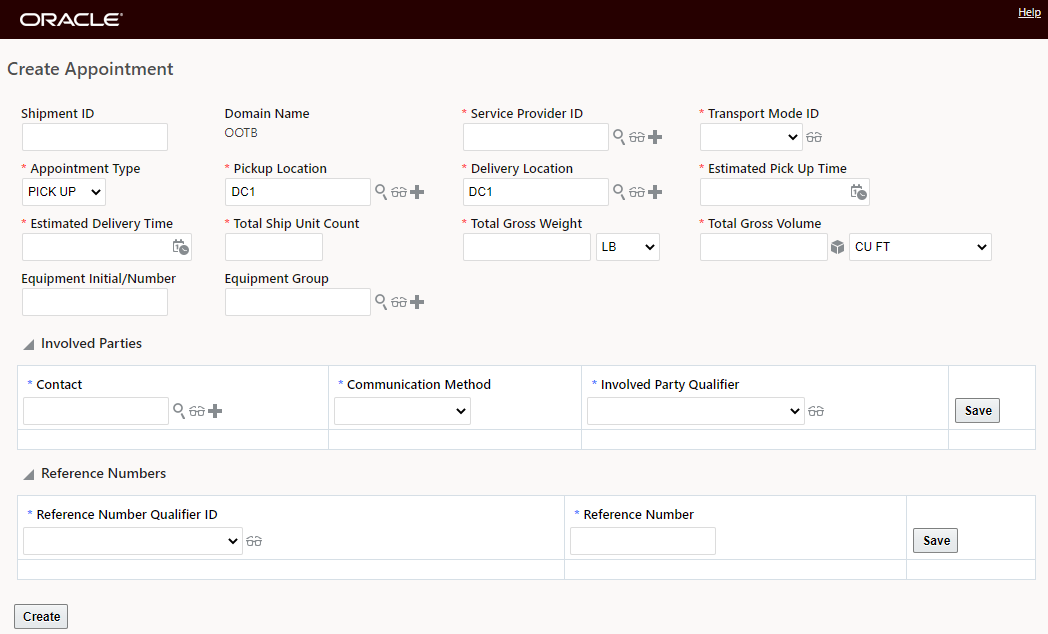
Create Appointment Manager
This feature provides additional features and usability improvements for the Enhanced Workbench - giving you more options for implementing Enhanced Workbenches to support more use cases and users.
Steps to Enable
You don't need to do anything to enable this feature.
Tips And Considerations
NOTE: The Enhanced Workbench relies on REST calls to access data, due to the current security infrastructure, the following additional setup is required.
- For users with any role other than ADMIN and DEFAULT the following Access Controls are necessary and can be added to the User Role or directly to the User:
- REST – Workbench
- Workbench – Create
- This is required only for Add/Delete
- Can also revoke the ability to Add/Delete

Enhanced Workbench - Access Control Setup = Provide Access - Revoke Add/Delete
- Additional Note: User Interface - View is needed
- This is included in COMMON
- By default, all user roles typically have this COMMON Access Control
The legacy Workbench Designer has been hidden from the PUBLIC menus. A first step toward the deprecation and removal of this older technology.
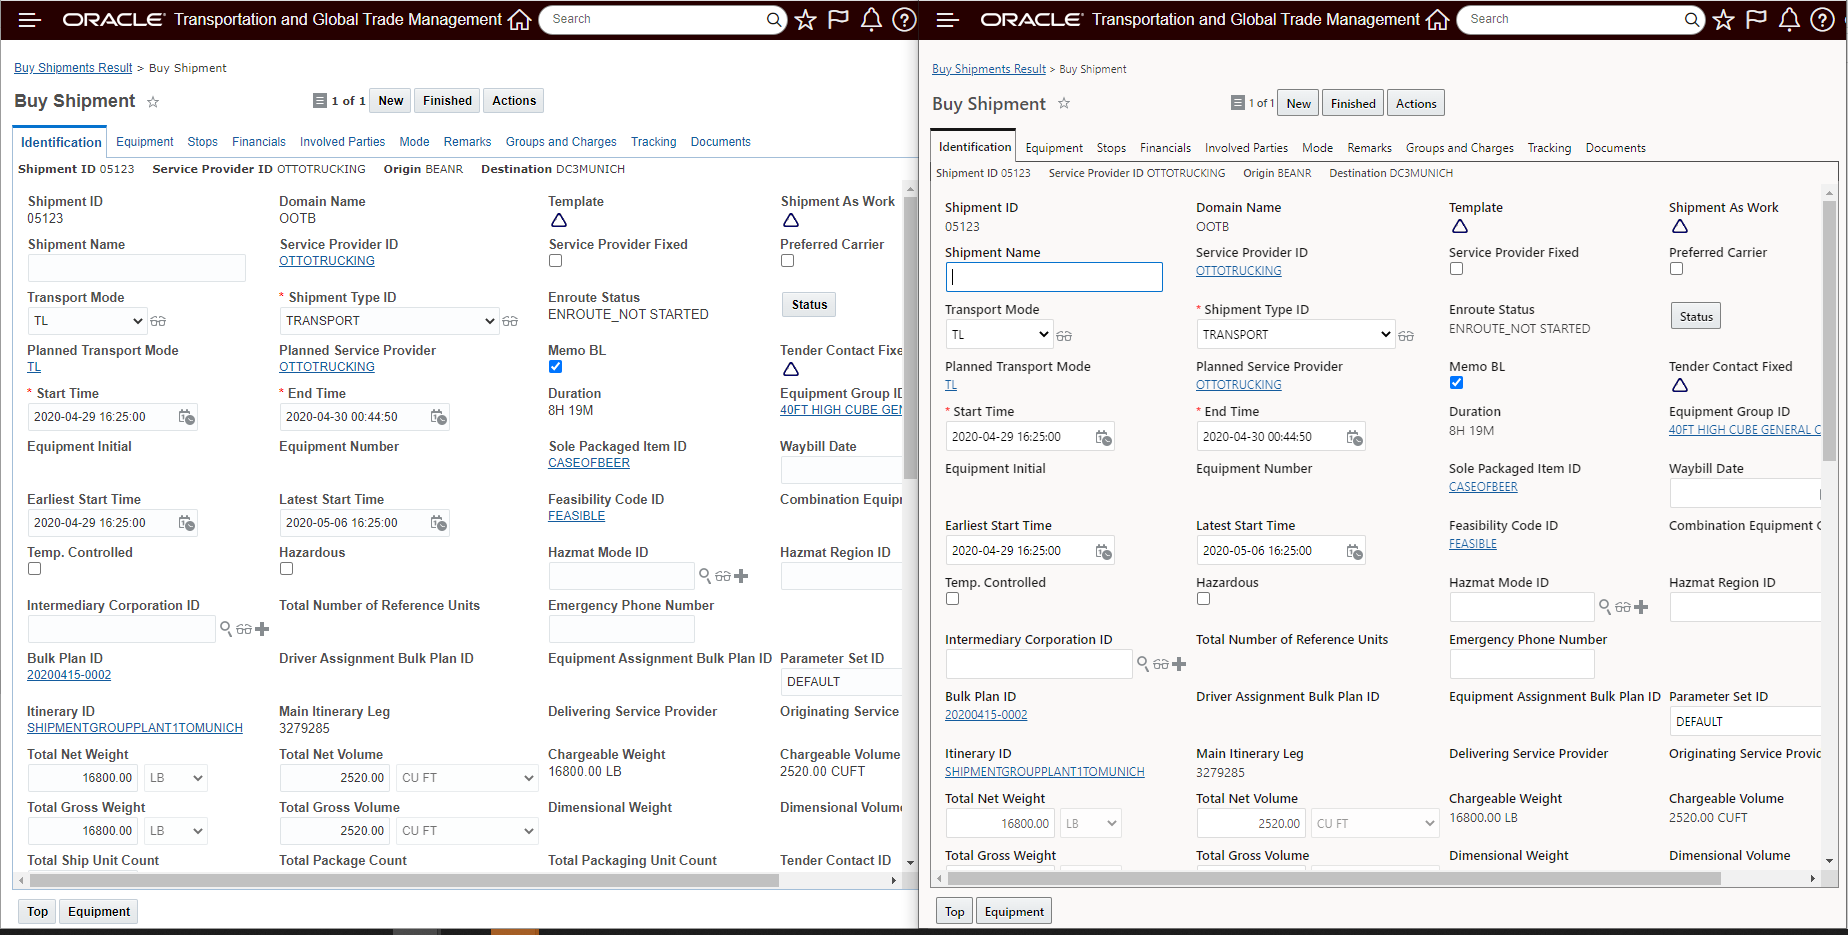
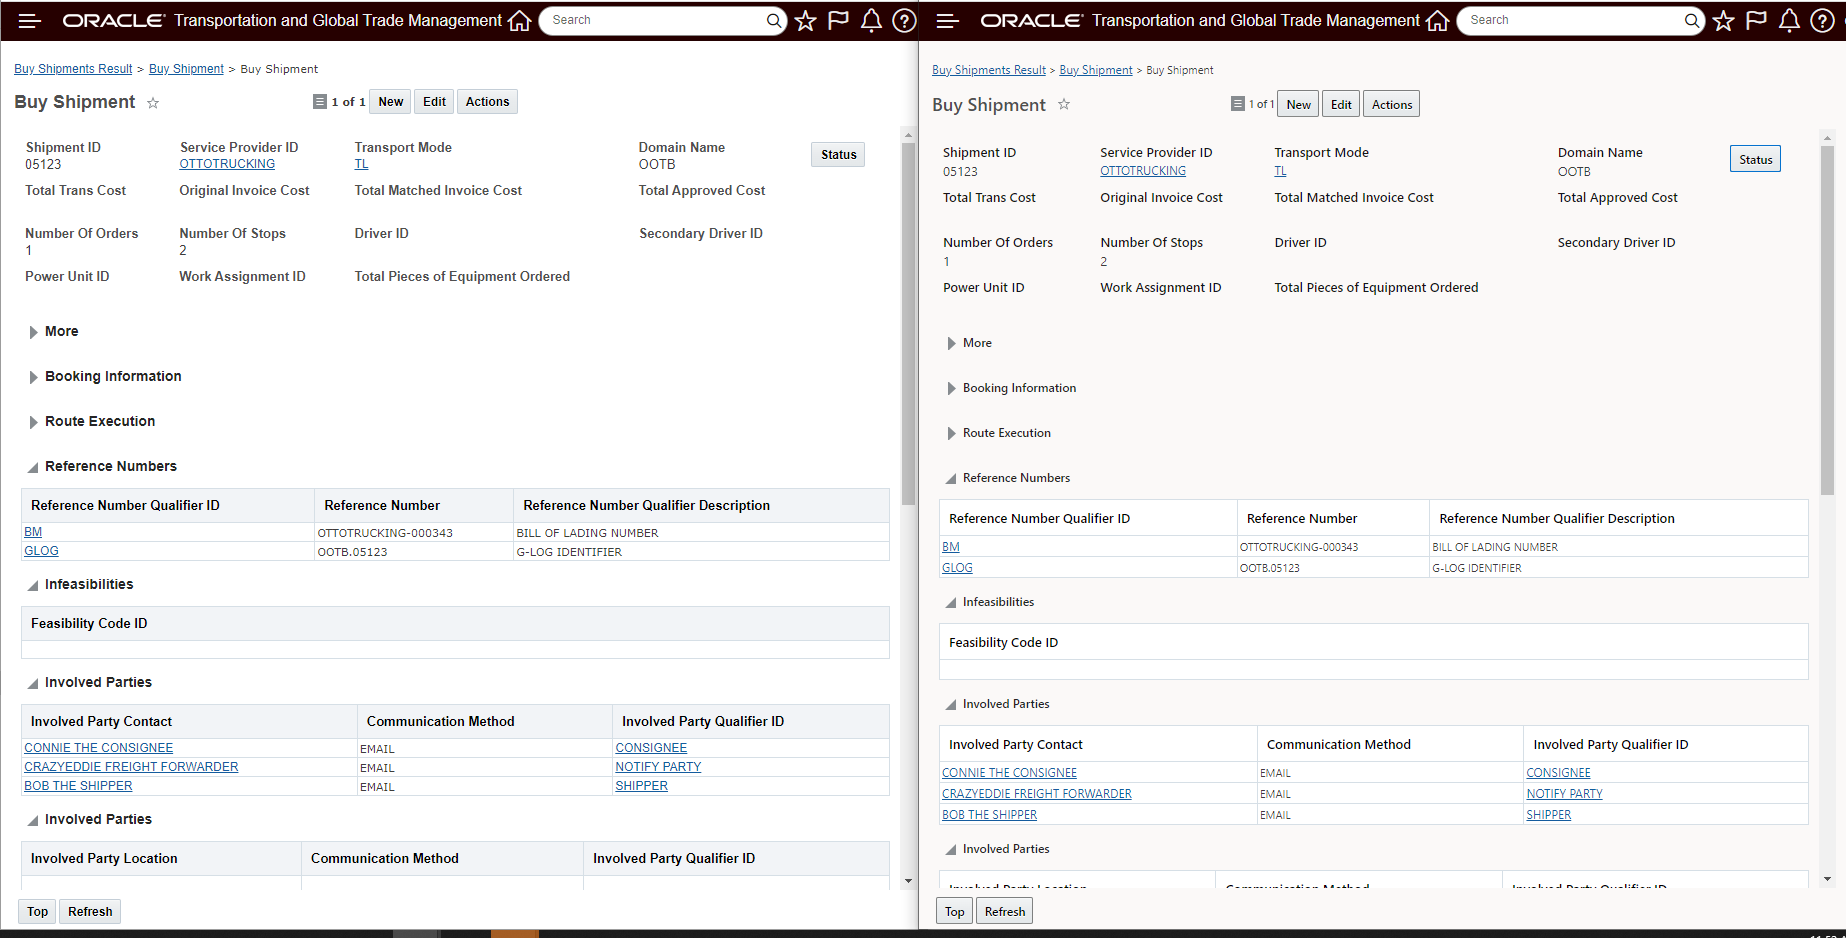
Redwood UI Look and Feel Improvements
This feature provides you with a set of UI style improvements designed to align the system's look and feel with Oracle's Redwood UI look and feel. You will find the consistent look and feel to be more comforting as you navigate between all of your Oracle Cloud applications.
To highlight the improvements, the images below provide a side by side comparison of the 22C UIs (on the left) and their improved Redwood altered versions provided in 23A (on the right). The differences are nuanced, but will be appreciated by all users who spend many hours of their day working across multiple Oracle Cloud applications.
The Shipment Finder image below captures many of the changes, which include:
- Shading of the "white space" on the UI, which allows the input fields on the UI to standout
- Changing the tab label colors from blue to black
- A more reserved use of bold fonts for heading, field labels etc.
- A slightly smaller more pleasing font size,
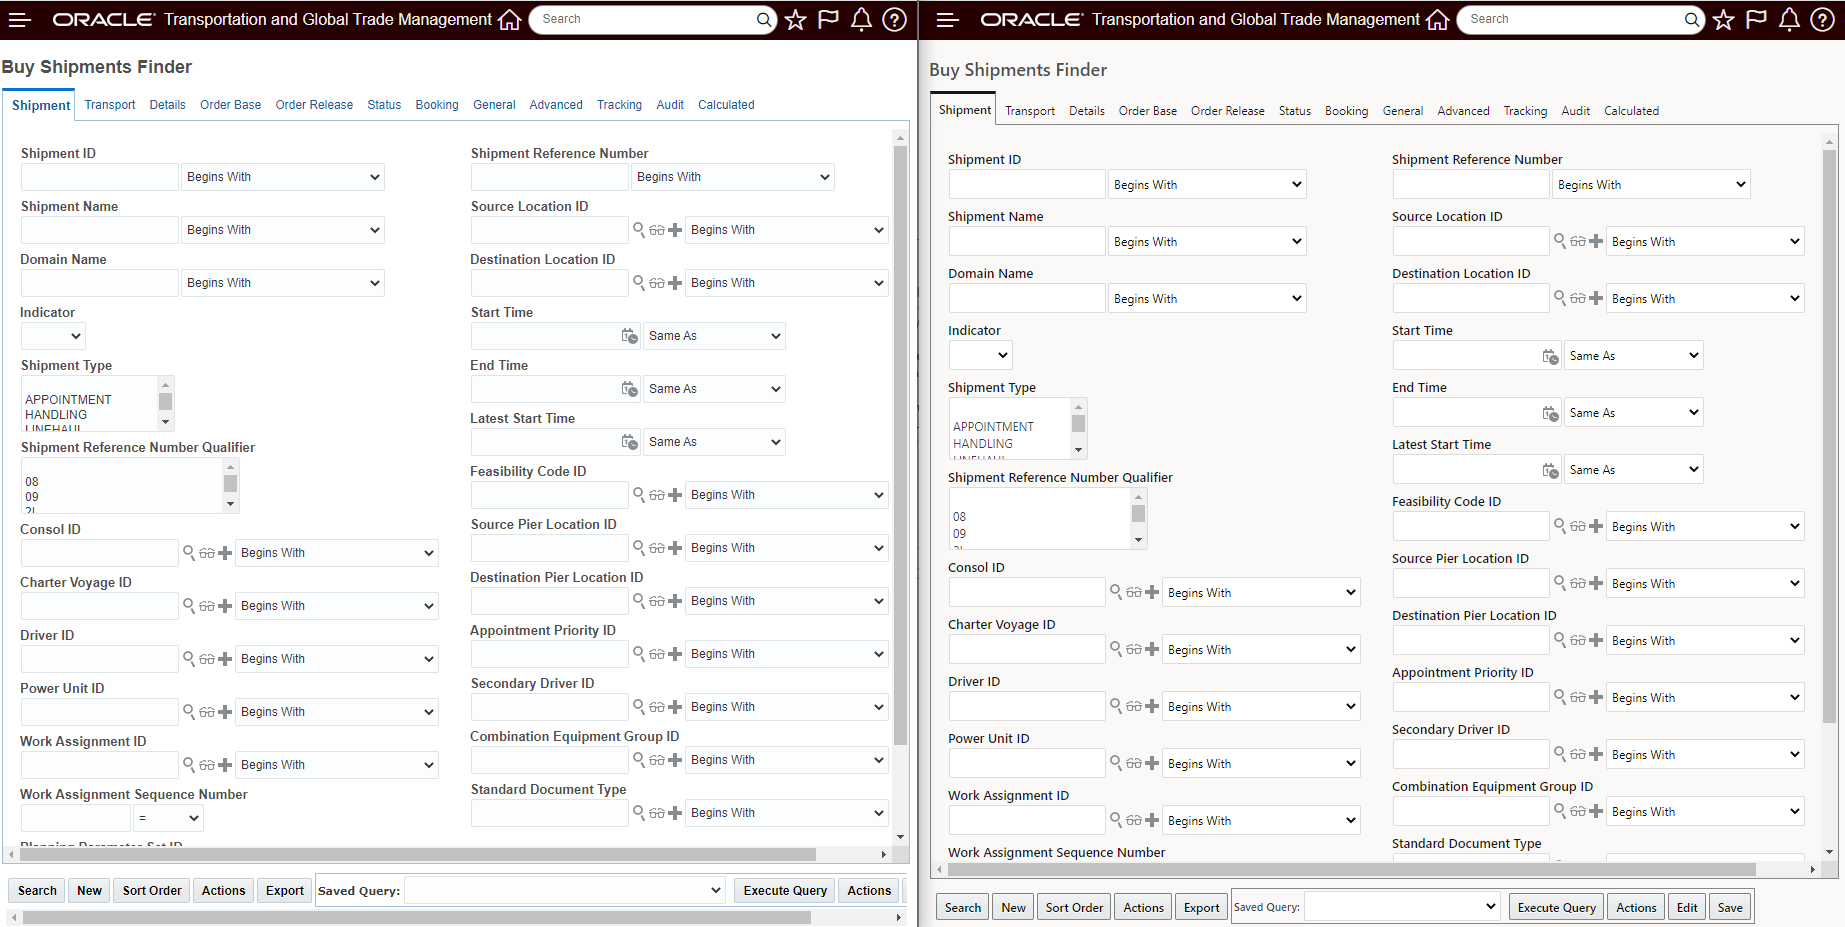
22C Shipment Finder Versus the 23A Redwood Shipment Finder
The 22C Shipment Finder Results versus the 23A Shipment Finder results, below, highlights the changes made around column shading. The Redwood UI (on the right), has removed the shading in the column headings, providing you with a cleaner more modern look.
22C Shipment Finder Result Versus 23A Redwood Shipment Finder Result
Similar to the Finder - the Manager in the Edit view below highlights many of the same improvements noted for the Finder.
- Shading of the "white space" on the UI, allows the input fields on the UI to standout
- Change in tabs label colors from blue to black
- A more reserved use of bold fonts for heading, field labels etc.
- A slightly smaller more pleasing font size,
22C Shipment Manager Edit v 23A Shipment Manager Edit
To complete the set - below is a comparison of the Shipment Manager View - 22C versus 23A.
Again - the View highlights the changes mentioned above.
- Shading on the column headings for the Grids is now white - which provides a cleaner look.
- A more reserved use of bold fonts for heading, field labels etc.
- A slightly smaller more pleasing font size,
22C Shipment Manager View Versus 23A Redwood Shipment Manager View
Finally - to complete the tour, below is an RIQ request with results.
22C RIQ Request Versus 23A RIQ Request
22C RIQ Results Versus 23A RIQ Results
Provides a consistent look and feel across Oracle Cloud applications.
Steps to Enable
You don't need to do anything to enable this feature.
Tips And Considerations
NOTE: There is a known issue where the Redwood Look and Feel does not get applied with custom themes. While we work to remedy this issue, follow the steps below to correct the issue:
-
Create a New Theme - DBA Access required - Configuration and Administration > Branding > Theme Management.
-
On the Select Theme UI, enter a name for the your new theme in the Create Theme field and then select OK.
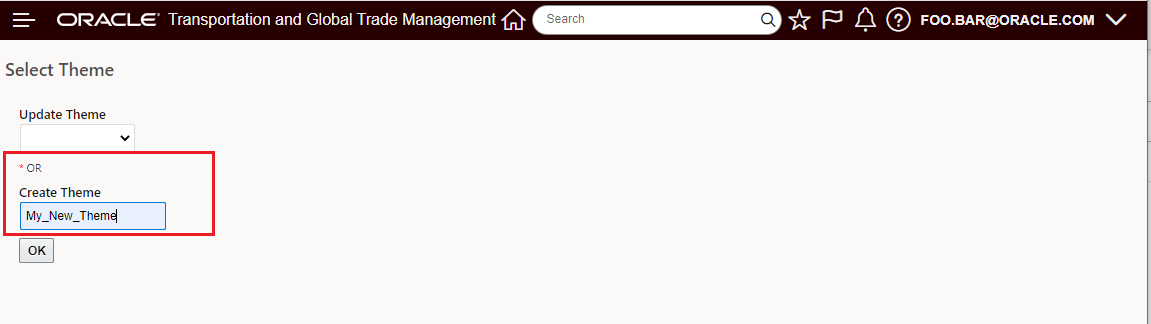
Create A New Theme
- In the Create Theme UI, select Save to save the new Theme, once you receive confirmation that the new theme has been created cancel out of the Create Theme UI.
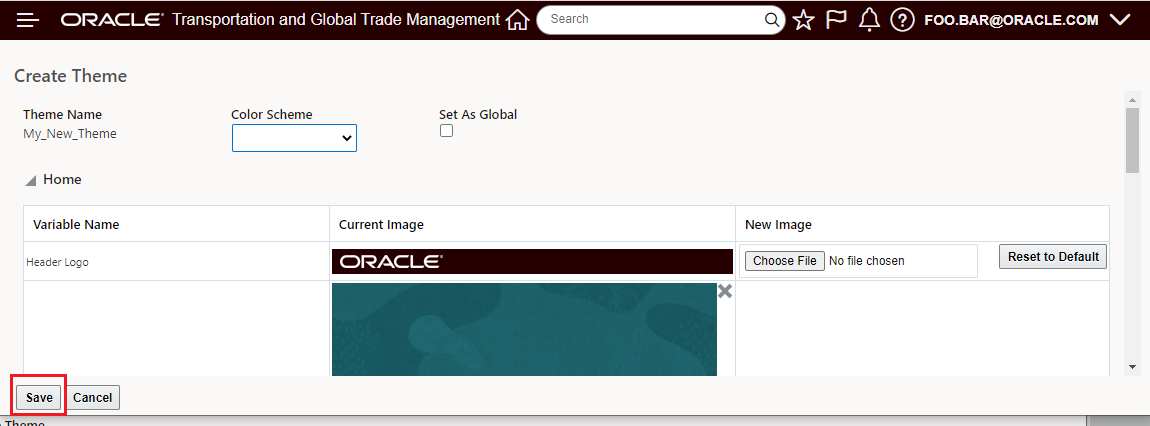
Save the New Theme
- On the Select Theme UI, under Update Theme - select the newly created theme from the drop down and then select OK.
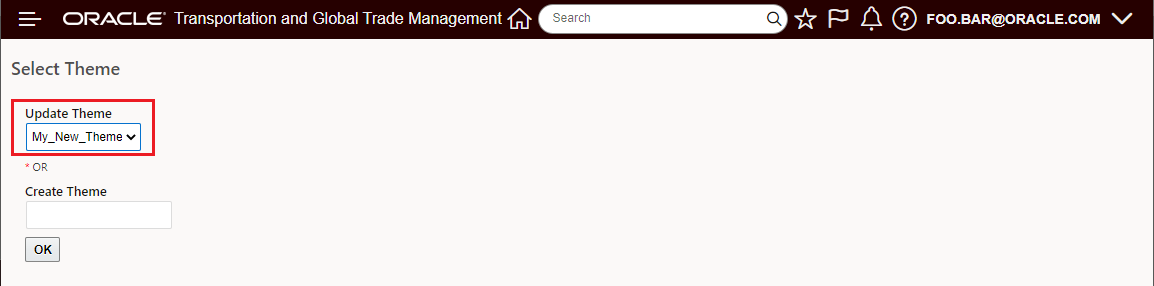
Update the New Theme
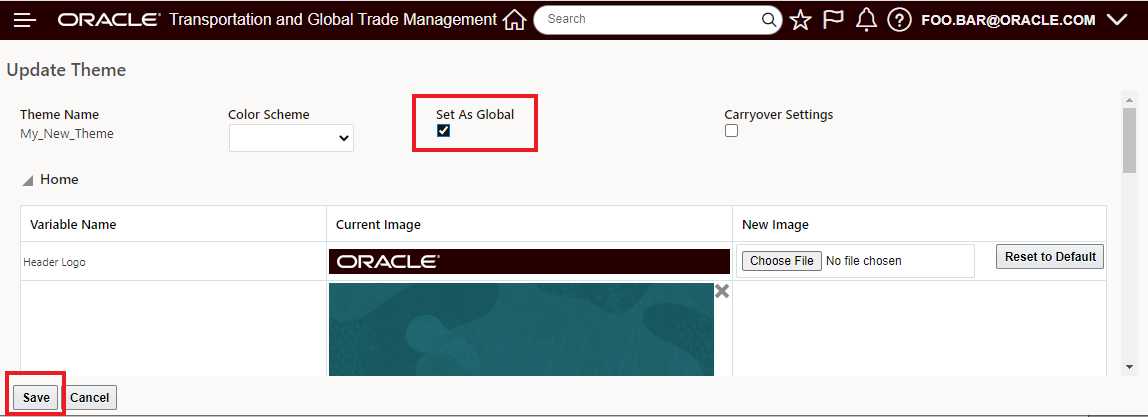
- Update/make changes to your newly created theme - you can change a setting and/or select Set as Global and then select Save.
- It’s the Save during the Update step that will bring in the Redwood Look and Feel changes into the new theme.
Update/Change Theme and Save
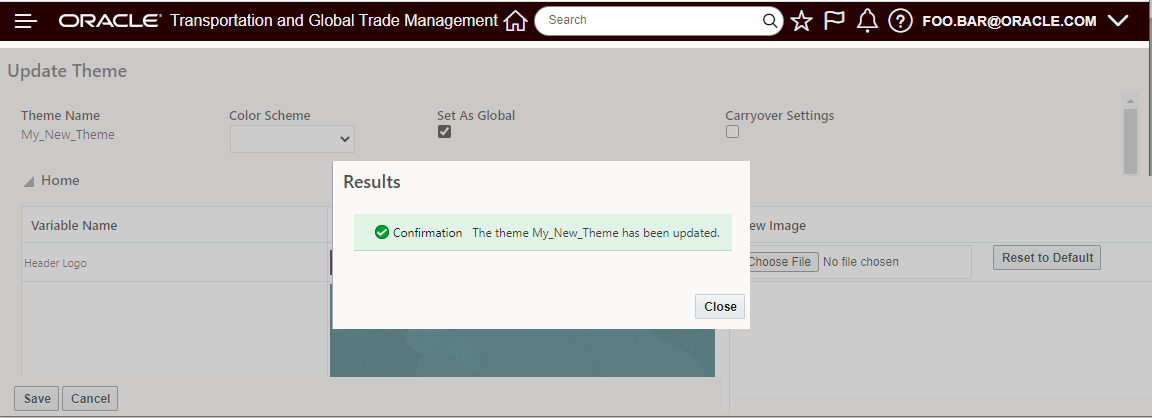
- Once the Update Is Confirmed the Redwood look and feel should be available/applied to the new theme.
Update Confirmed
This feature provides you with the second set of features for the evolving Data Export REST API. The Data Export REST API is designed to support the replication / export / extraction of table-oriented data from the system's database tables to external data repositories for the purposes of feeding analytical tools. This is a read-only service and all underlying tables will remain unchanged after the process. The export will happen in real time and the expectation is that the data to be exported should be reasonably static e.g., completed orders or shipments.
Provides another option for extracting data from the system to feed external data repositories.
Steps to Enable
You don't need to do anything to enable this feature.
Tips And Considerations
Note that this version of the Data Replication Service - REST Data API does not handle the processing of deletes or updates for replicated data.
Key Resources
For complete coverage of the available capabilities and recommended usage of the current version of the REST Data API the API documentation listed below, on docs.oracle.com, is the best source of information:
- Transportation and Global Trade Management Data Export Rest API Documentation
- Transportation and Global Trade Management Business Object Resource Rest API Documentation
Document Set Capabilities Added for Additional Objects
This feature extends the availability of the Document Sets functionality to the objects listed below. All objects listed have been extended to include the availability of the Assign and View Document Set web actions. The Send Document Sets agent actions has been added for the Order Releases, Shipment Stop, Shipment Groups, Invoices and Bills - as noted below.
- Order Releases
- Assign and View Document Set web actions added
- Send Document Sets agent action added
- Shipment Stop
- Assign and View Document Set web actions added
- Send Document Sets agent action added
- Shipment Groups
- Assign and View Document Set web actions added
- Send Document Sets agent action added
- Invoices
- Assign and View Document Set web actions added
- Send Document Sets agent action added
- Bills
- Assign and View Document Set web actions added
- Send Document Sets agent action added
- Items
- Assign and View Document Set web actions added
- Item Qualification
- Assign and View Document Set web actions added
- Campaigns
- Assign and View Document Set web actions added
- Campaign Lines
- Assign and View Document Set web actions added
Order Releases
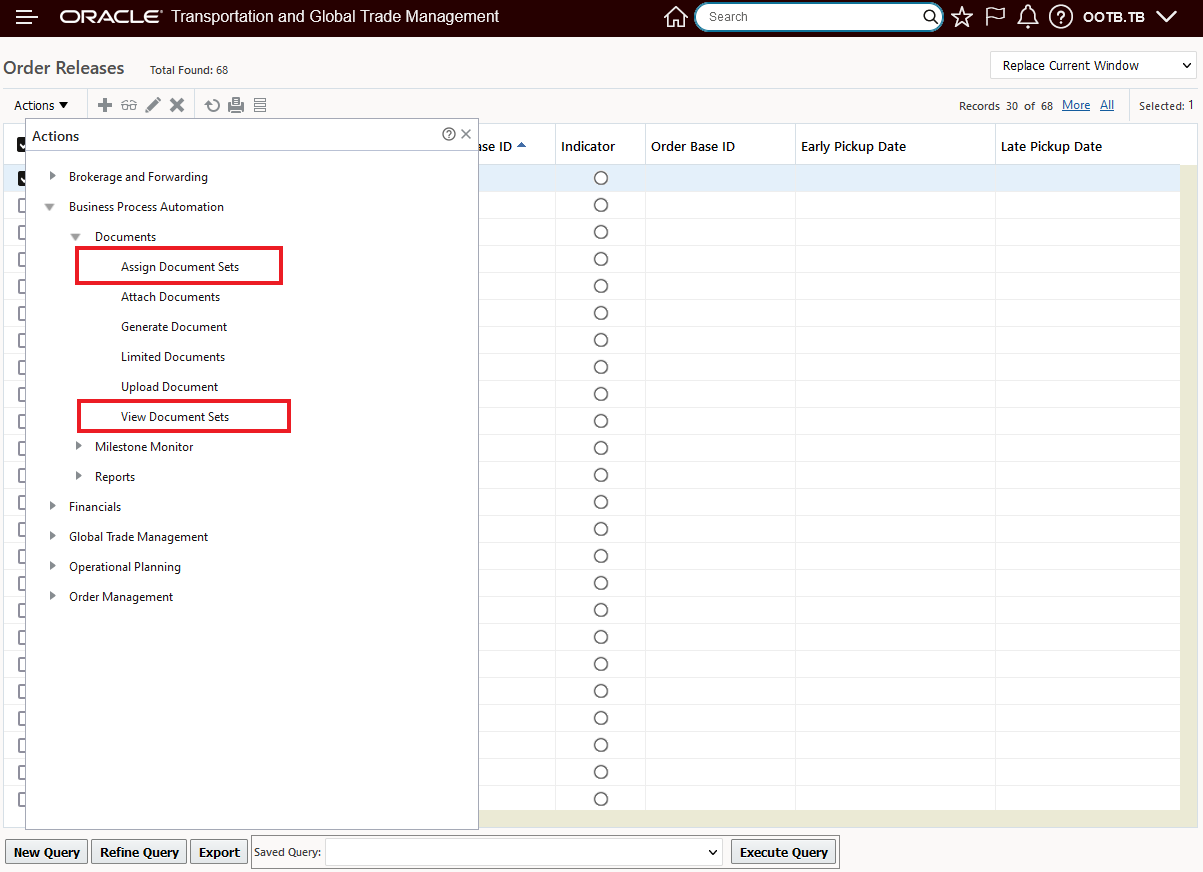
Order Release - Assign and View Document Sets Actions
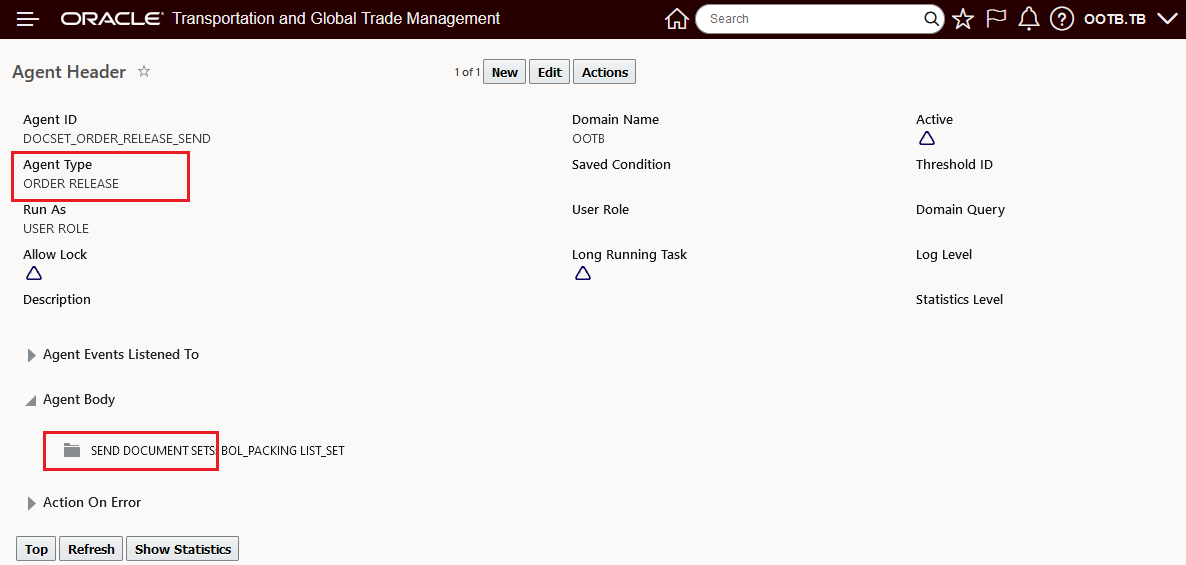
Order Release - Send Document Sets Agent Action
Shipment Stop
Assign Document Sets and View Document Sets was added to the Shipment Stop as part of the larger feature to add and manage documents at the Shipment Stop level.
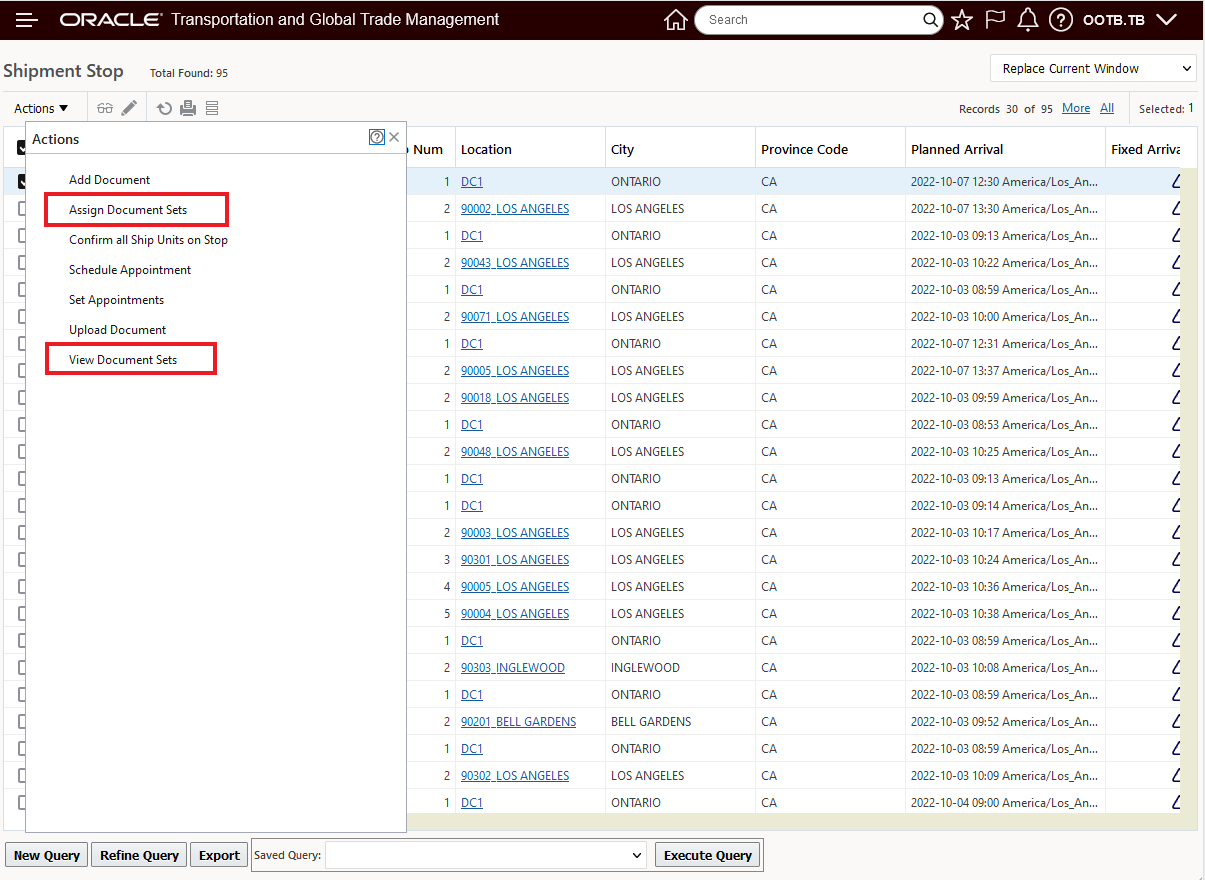
Shipment Stop - Assign and View Document Sets Actions

Shipment Stop - Send Document Sets Agent Actions
Shipment Groups
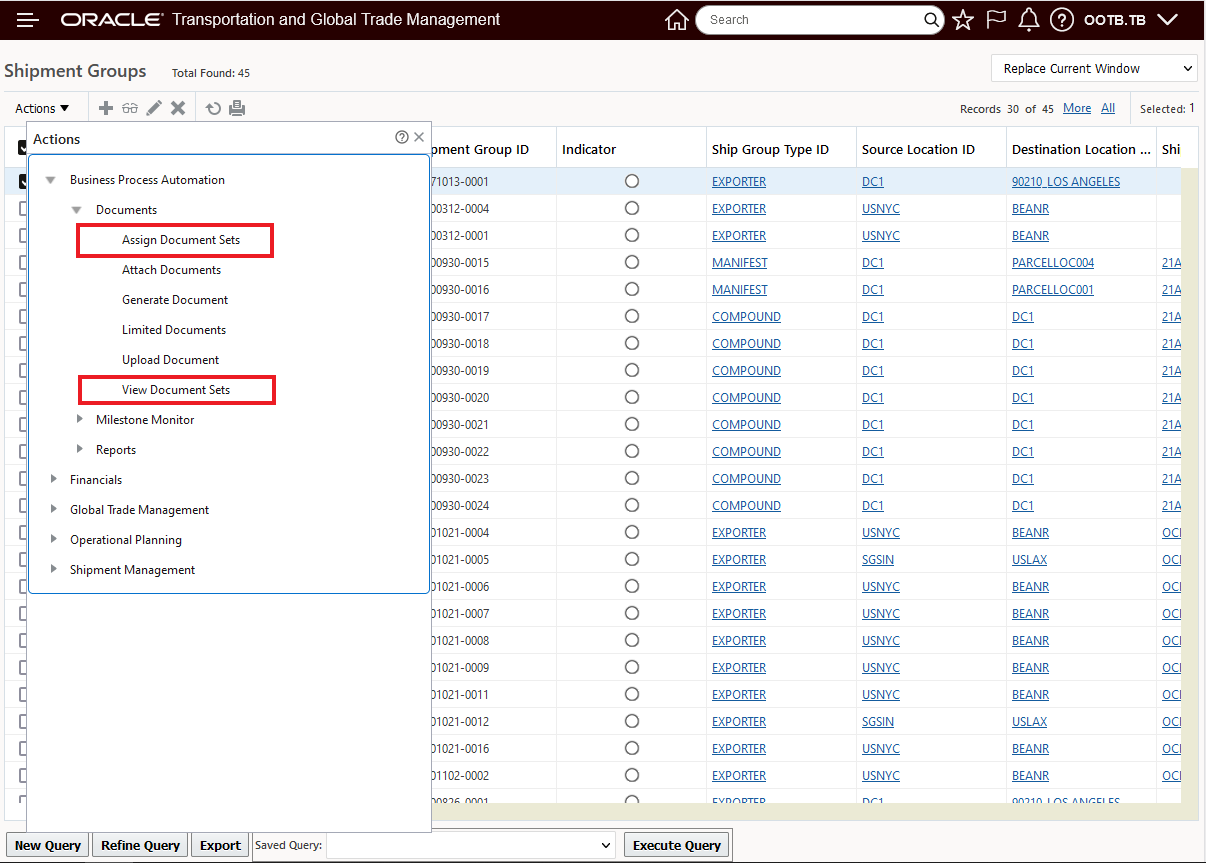
Shipment Group - Assign and View Document Sets Actions

Shipment Group- Send Document Sets Agent Actions
Invoices
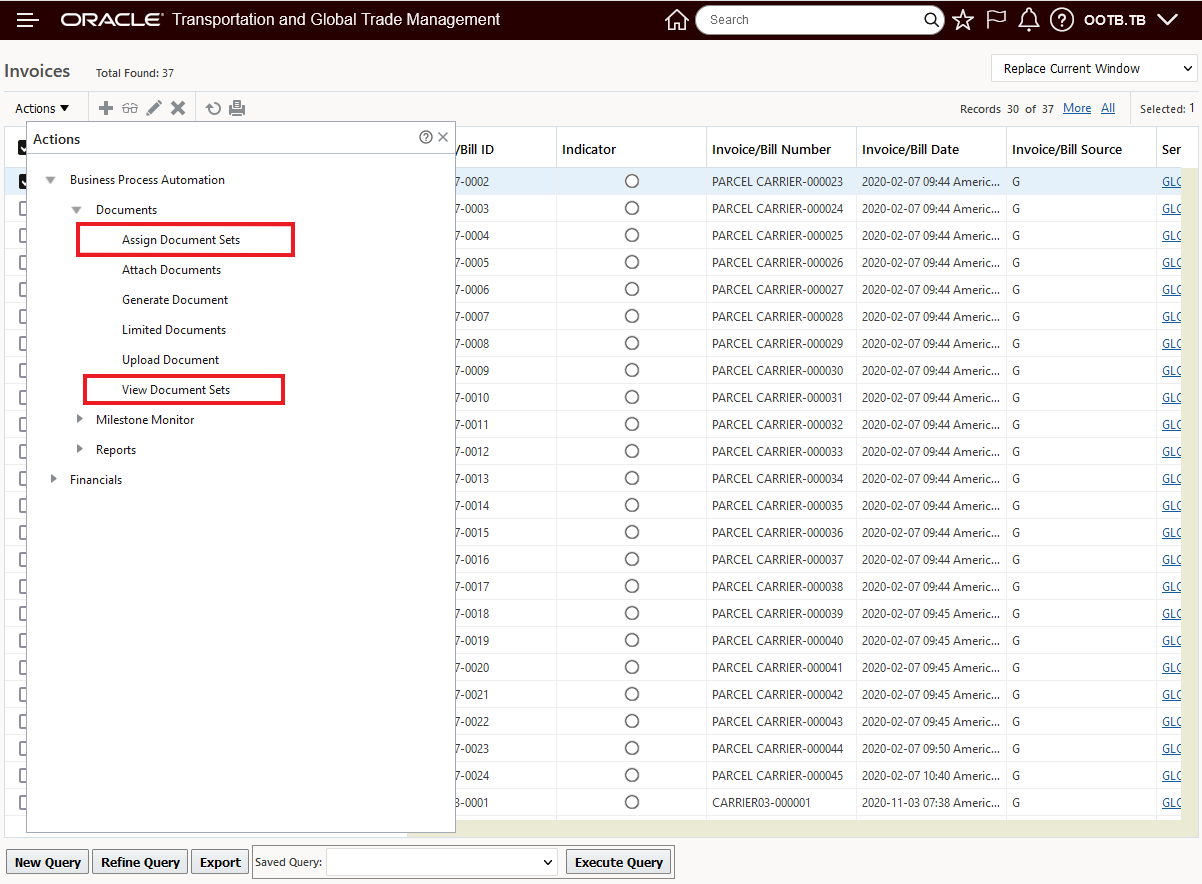
Invoices - Assign and View Document Sets Actions
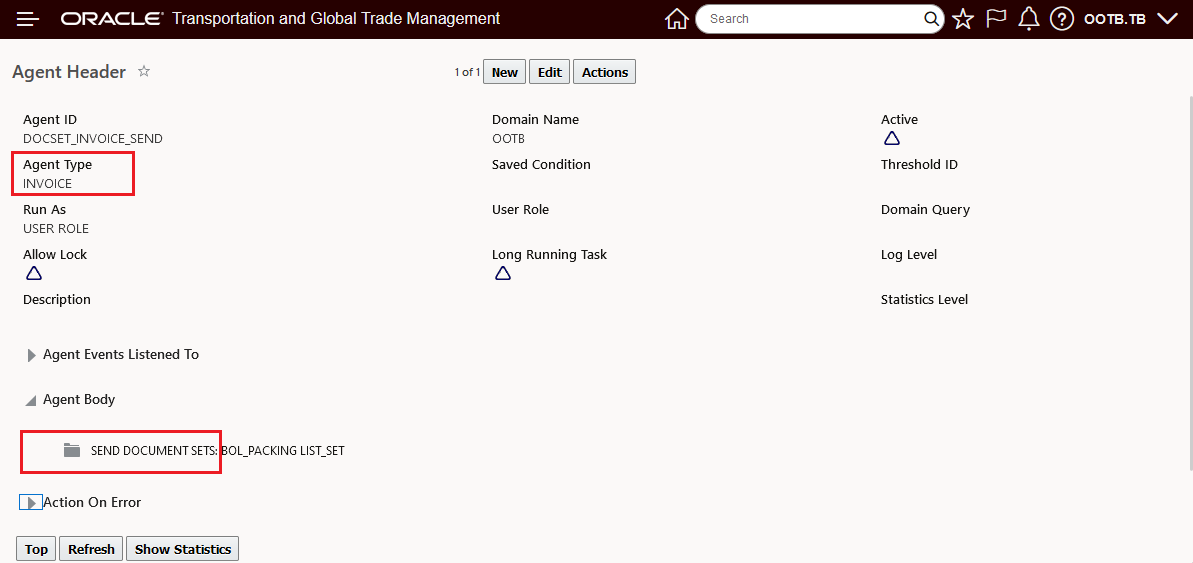
Invoice - Send Document Sets Agent Actions
Bills
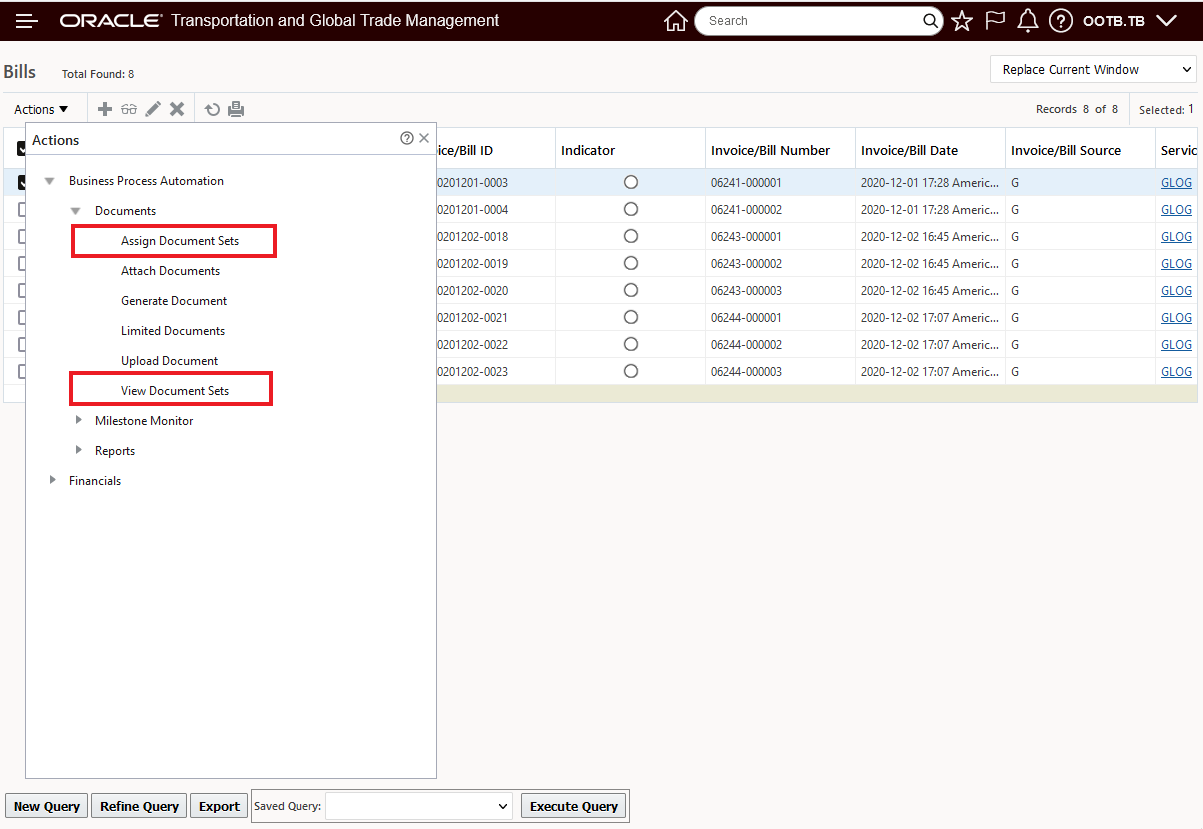
Bill- Assign and View Document Sets Actions
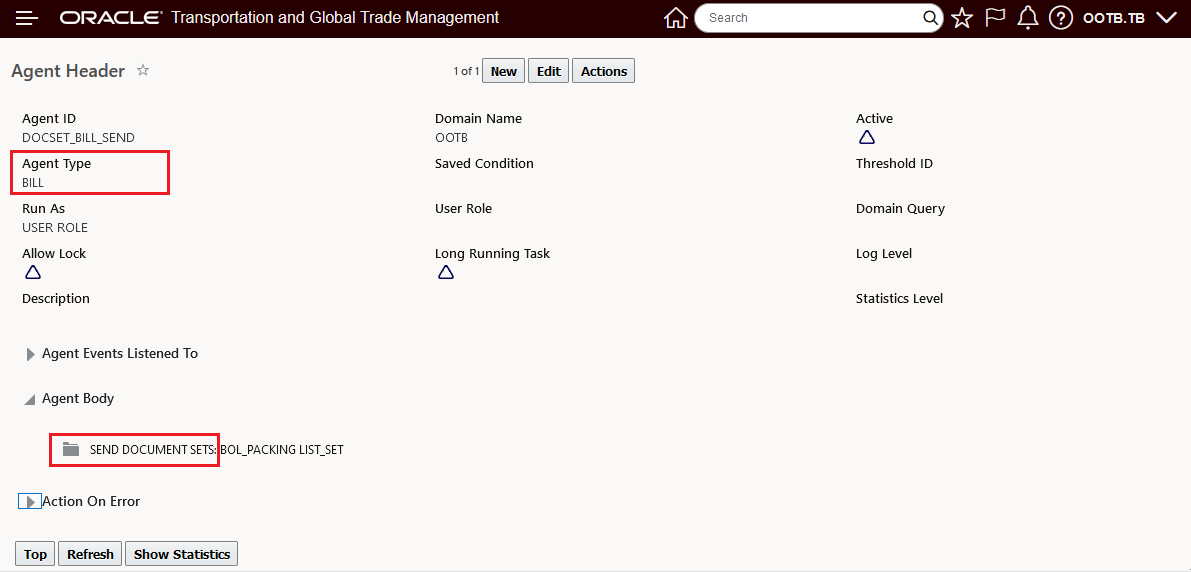
Bill - Send Document Sets Agent Actions
Items
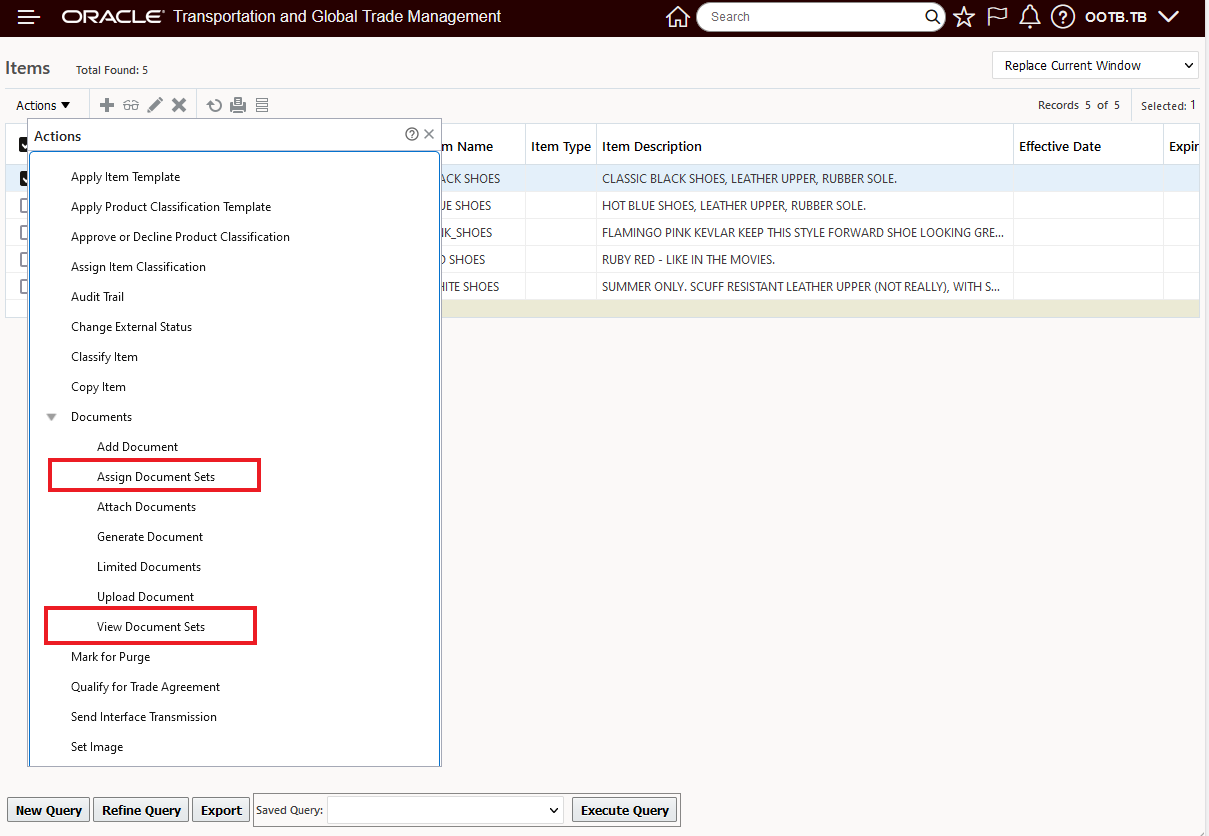
Item - Assign and View Document Sets Actions
Item Qualification
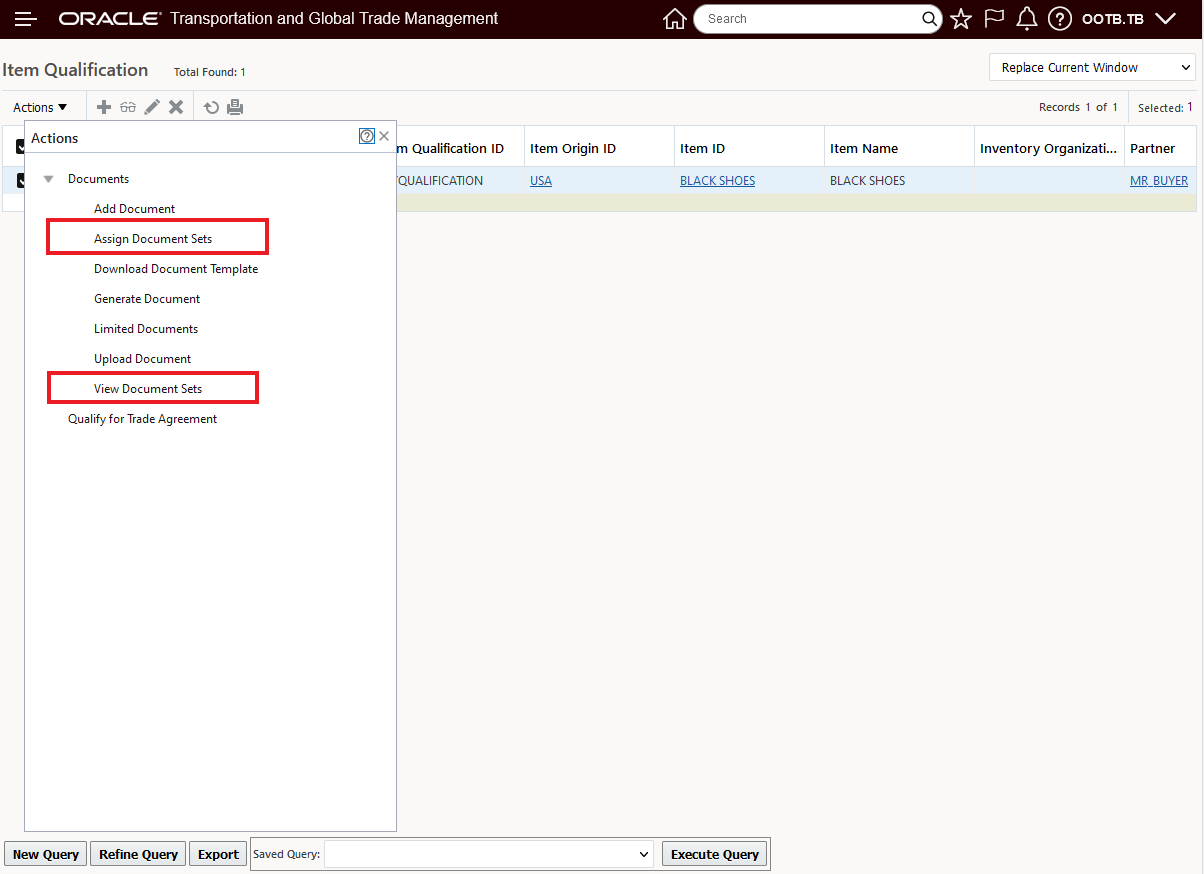
Item Qualification - Assign and View Document Sets Actions
Campaigns
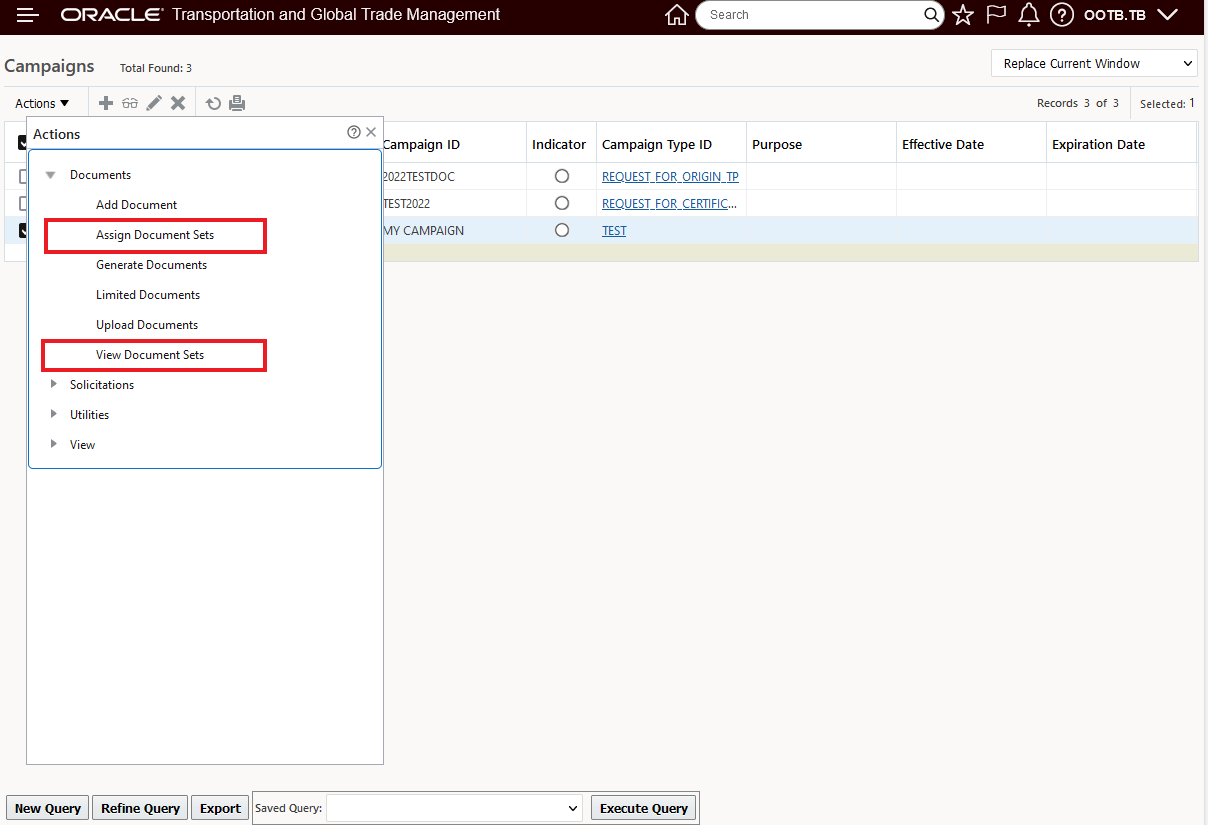
Campaigns - Assign and View Document Sets Actions
Campaign Lines
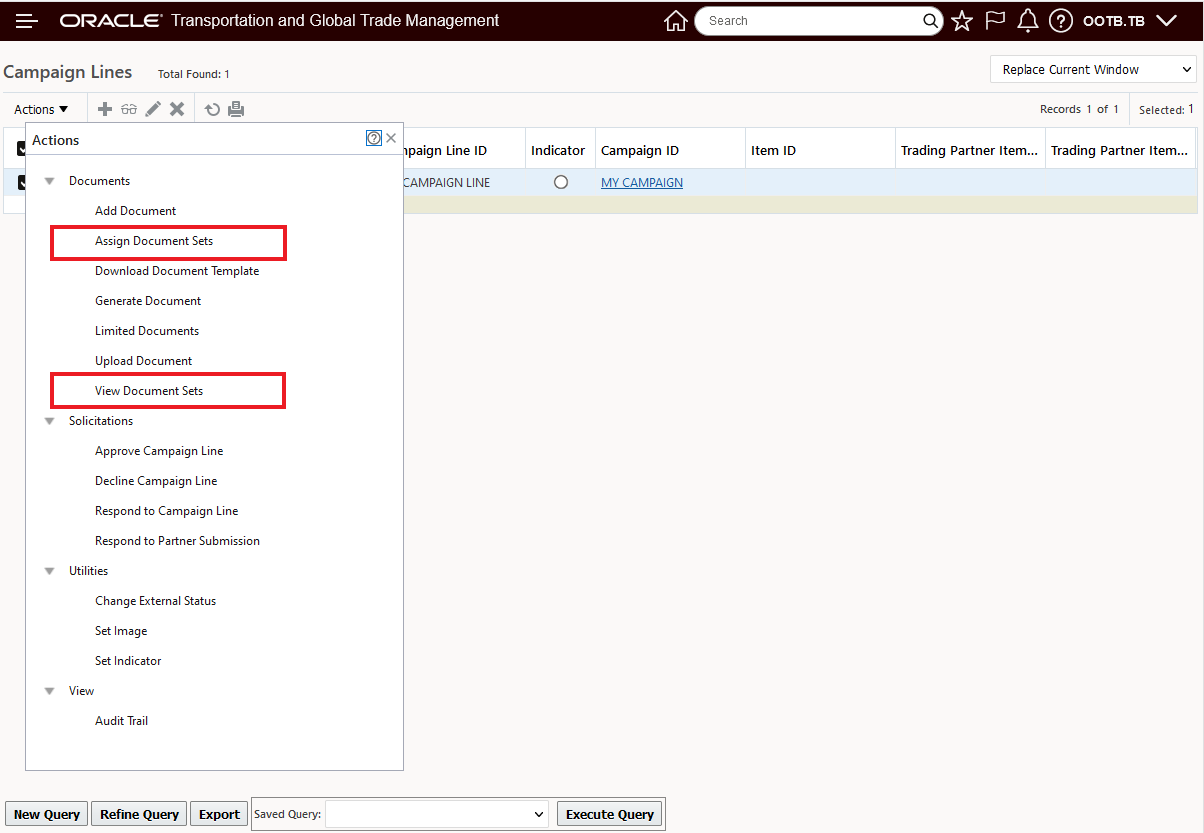
Campaign Lines - Assign and View Document Sets Actions
The addition of the Assign and View Document Set actions to additional objects simplifies the process of assigning and viewing sets of documents related to these objects.
Steps to Enable
You don't need to do anything to enable this feature.
Tips And Considerations
The Send Documents - Send Documents/Document Sets action/functionality was not included in the set of actions added for the six objects included in this feature.
Online Help Centralized on docs.oracle.com
This feature provides you with a new centralized location (docs.oracle.com) for the system's online Help. In previous versions, online Help was distributed with each installation - now, by default, all instances will access a single centralized online Help version. The switch to the new centralized online Help should be transparent to you and your users.
With this feature - Help can be updated universally for all clients on a given release, the Help is searchable on the Oracle Help Center, and Oracle can now collect metrics on what is read in online Help to identify and improve high traffic areas.
Steps to Enable
You don't need to do anything to enable this feature.
Tips And Considerations
If for some reason there is a need to revert back to the local vs centralized online Help, the property - glog.webserver.onlinehelp.enabled - can be set to false (the property by default is set to true) - when this property is set to false the help links will open using the local files that were installed along with the application.
This Optional Feature, when enabled, enforces a 512 MB CSV export file size limit. The 512 MB limit is being provided to avoid single file CSV file exports that could lead to a system failure by filling up available disk space. If you are running the export on the browser, and the file size exceeds the 512 MB limit, the error message will be raised on the screen, the export will complete with the amount of exported data being roughly equivalent to the export file size limit. If the export is not run in the browser, you will find limit error in the exception log.
This feature is designed to avoid system failures related to the filling of available disk space with an excessively large single CSV file export.
Steps to Enable
You don't need to do anything to enable this feature.
Tips And Considerations
NOTE: If you need to do a CSV file export larger than 512 MB:
- Until this Optional Feature is promoted - you can OPT Out of the feature and still export larger files than 512 MB.
- After this feature is promoted - you can raise a CR to request to increase the export limit.
Raise Status Change Events in New Process
This Optional Feature will raise status change events independently from the process triggering them, this change will help avoid contention issues with synchronous user actions and will improve performance.
NOTE: In 24A this Optional Feature was removed and replaced with the Optional Feature - PROPAGATE LOCKS TO TASK LISTS. Your OPT IN setting for the replaced Optional Feature RAISE STATUS CHANGE EVENTS IN NEW PROCESS were migrated to the new Optional Feature - PROPAGATE LOCKS TO TASK LISTS.
This feature provides the opportunity for improved performance by raising the status change event independently from the process triggering them.
Steps to Enable
You don't need to do anything to enable this feature.
Use Fallback Locale for Missing Translations
This Optional Feature, when enabled, uses a predefined fallback for translation bundles when a language is provided that has no default translations but requires a country specification, e.g., Portuguese.
This feature improves system resiliency.
Steps to Enable
You don't need to do anything to enable this feature.
Filter Agent Events Based on Data Query Type
This Optional Feature, when enabled, will filter agent events based on the data query type. When the Optional Feature is disabled, it will display agent events up to 1000 events.
Limits agents events based on the data query type - reducing the agents events listed.
Steps to Enable
You don't need to do anything to enable this feature.
This Optional Feature - when enabled - validates property entry. Based on strongly-typed property metadata, property values are checked for Boolean, numeric, list or other constraints.
This feature improves the usability and reliability of the system by validating property values.
Steps to Enable
You don't need to do anything to enable this feature.
Disable CSV Remote Host Support
This Optional Feature removes support for the import and export of CSV data to remote hosts. Support for the import and export of CSV data directly to remote host URLs is no longer available.
This feature simplifies the usage of the system by removing features that are no longer available.
Steps to Enable
You don't need to do anything to enable this feature.
Enforce Content Security Policy
This Optional Feature, when enabled, will stop a page from rendering whenever something in the page content violates a rule. When the feature is Opted Out, instead of the page not rendering, a message will be written to the browser’s console log.
This feature improves the security and resilience of the system.
Steps to Enable
You don't need to do anything to enable this feature.
Global Trade Management (Base)
Flex Field Attributes Added to Item Trade Value Integration
Flex field attributes for the Item Trade Values have been added to the Item XML schema and the Item REST API to better support sending and receiving this information with external applications. The following flex field attributes have been added:
- ATTRIBUTE1 TO ATTRIBUTE20
- ATTRIBUTE_DATE1 TO ATTRIBUTE_DATE20
- ATTRIBUTE_NUMBER1 TO ATTRIBUTE_NUMBER20
You are able to easily integrate trade value data including flex field attributes between GTM and external applications via integration.
Steps to Enable
You don't need to do anything to enable this feature.
Tips And Considerations
- For more information on integration, please see the 'Oracle Transportation and Global Trade Management Cloud Integration Guide'.
- For more information on the REST API for Transportation and Global Trade Management Cloud, please refer to docs.oracle.com.
Trade Values Added As a Table in Enhanced Workbench
The Trade Item Value details are supported within the Enhanced Workbench. This enables you to see the value information specified on the item as a table within the Enhanced Workbench. For example, you can copy the PUBLIC Item Workbench and add the Trade Item Value details as a tab. You can then add it to your menu.
When you add the trade item values to a workbench, you can specify details including Component Type, Object Type, Tab Name and Screen Set. Make sure to mark the Detail table checkbox and indicate the saved search under Associated Tables.
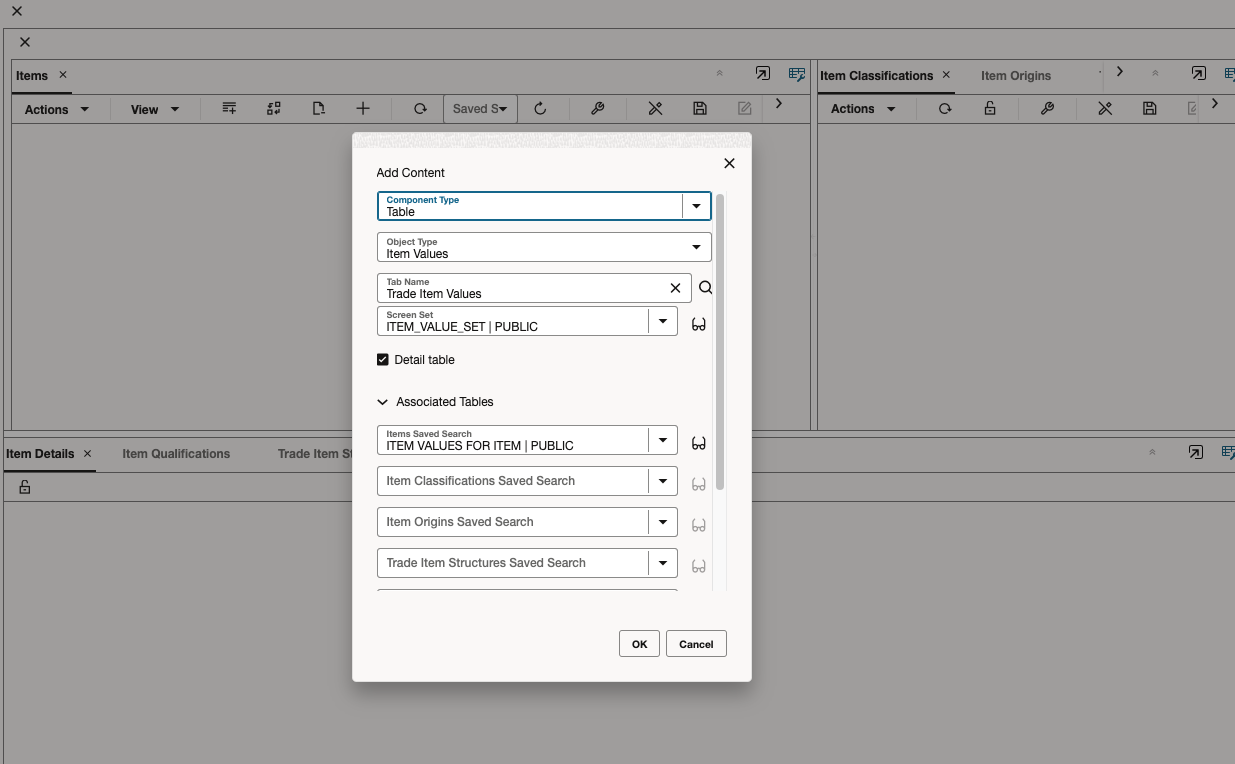
Once configured, when you select an item in the Enhanced Workbench, the trade values in the Trade Values tab on the Item are displayed.
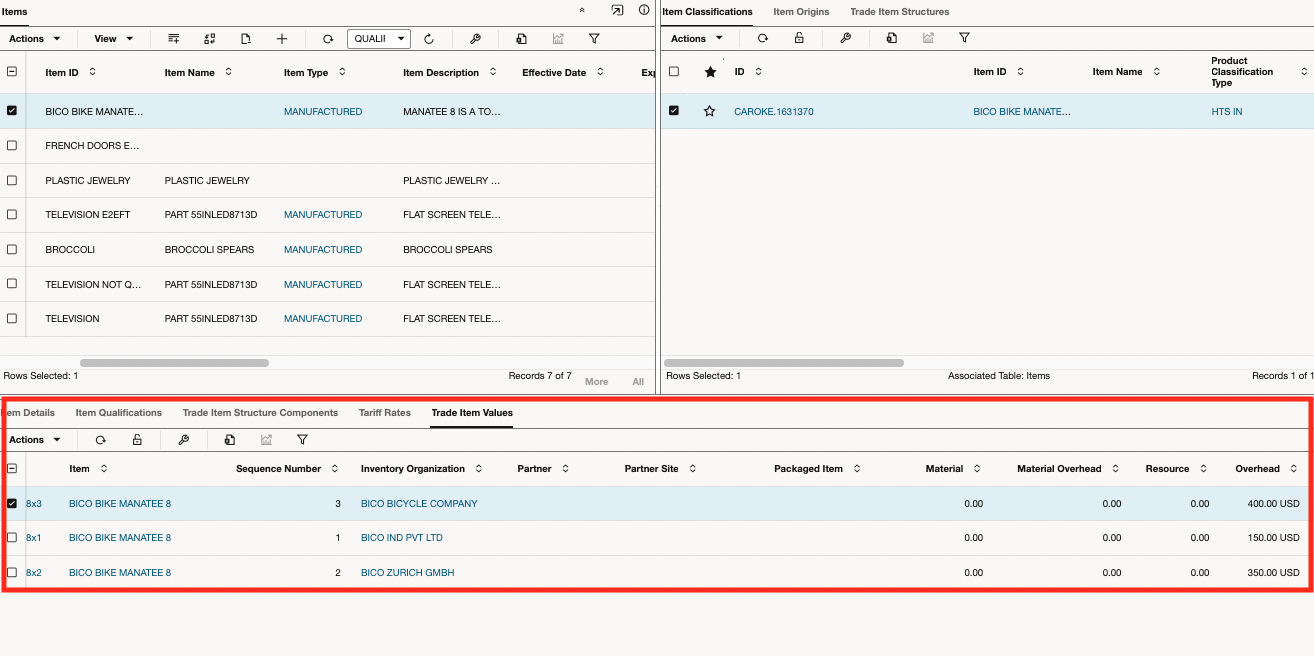
Useful for all users of GTM, the Trade Item Value details are supported within the Enhanced Workbench providing visibility into cost data. This enables you to see the value information specified on the item as a table within the Enhanced Workbench.
Steps to Enable
You don't need to do anything to enable this feature.
Key Resources
For more information on creating and configuring enhanced workbenches, please refer to the 'Enhanced Workbench' topic in help.
Support for Multiple Trade Item Structures Against an Item Origin
GTM now supports having multiple bills of material for a single item origin. In previous versions, the bill of material, modeled as a trade item structure, was specified on the item origin meaning that an item origin could only be associated with one trade item structure at a time. You no longer need to specify the trade item structure on the item origin.
When trade agreement qualification is triggered, if the trade item structure is specified on the item origin, it will be used to qualify the origin. If not, GTM then analyzes all the trade item structures associated with the item and matches the structure with the item origin based on inventory organization, partner, partner site and country of origin. The country of origin is determined based on the country of origin on the trade item structure or derived from the inventory organization on the trade item structure.
Once the trade item structure is determined for the item origin, the origin is then qualified. The item qualification record created includes the Item Structure ID that was qualified. Previously, the Item Structure ID field was a read-only field populated from the item origin. It is now a specific field on the Item Qualification record and indicates the trade item structure that was qualified for the item origin. This Item Structure ID is available from the view/edit screen and in the XML integration and REST API.

This enables easier management of data when bills of material version over time and you need to track them all under a single inventory org, or if there are multiple bills of material in-use at the same manufacturing location.
Steps to Enable
You don't need to do anything to enable this feature.
Key Resources
For more information on trade agreement qualification, please refer to the GTM How To/Configuration Topic called Trade Agreement Qualification.
Store 5 Years of Data in Operational Database
GTM can store 5 years of transactional data in the operational database. Previously, transactional data would be moved to the archive database after 2 years. By extending this timeframe, you are able to access data over a longer period of time in your operational database. This feature supports:
- Trade Transactions, Trade Transaction Lines and all supporting tables
- Declarations, Declaration Lines and all supporting tables
To better support compliance teams and their audit needs, GTM can store 5 years of transactional data in the operational database. Previously, transactional data would be moved to the archive database after 2 years. By extending this timeframe, you are able to access data over a longer period of time in your operational database for Trade Transactions and Declarations.
Steps to Enable
You don't need to do anything to enable this feature.
Tips And Considerations
This change only impacts the operational tables and does not impact the archive tables.
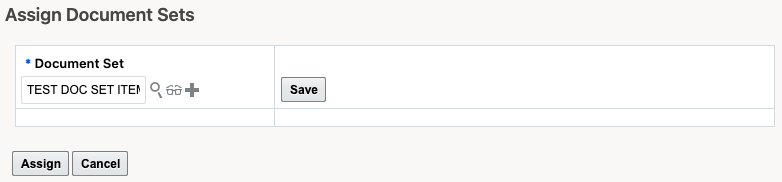
Support for Document Sets Added to Additional Objects
This feature enables you to use document sets with GTM objects. The Assign Document Set action and View Document Set action are supported on the following objects:
- Campaign
- Campaign Line
- Item
- Item Qualification
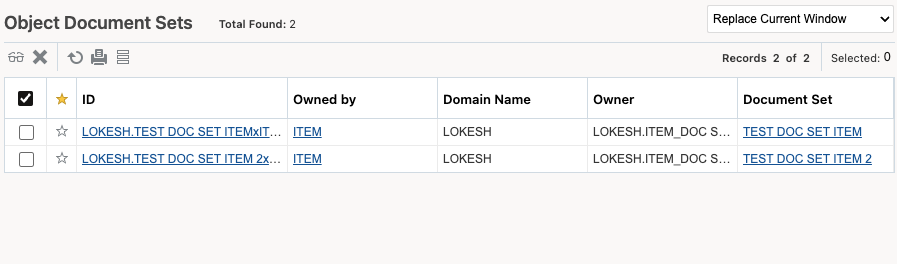
When you trigger the Assign Document Sets action, enter the Document Set you want to assign.
When you trigger the View Document Sets action, GTM displays a finder result with a list of the document sets assigned to the object.
This enhancement provides with more flexibility regarding document management configuration, and working with document sets can reduce user effort and save time compared to working with documents one at a time.
Steps to Enable
You don't need to do anything to enable this feature.
Tips And Considerations
Document Sets are also supported on Trade Transaction and Declaration.
Send Child Transaction Lines Associated with Parent Transaction Lines Via Integration
This feature enables you to send child transaction lines via integration when sending the parent transaction line out of GTM. Specifically when you send a parent line response outbound from GTM, the child line XMLs of the parent line are included in the outbound XML.
This enhancement allows for easier and more streamlined communication with external systems that need visibility into the results of GTM's compliance screening and other processes.
Steps to Enable
You don't need to do anything to enable this feature.
Key Resources
For more information on integration, please refer to the Integration Guide which is available on docs.oracle.com.
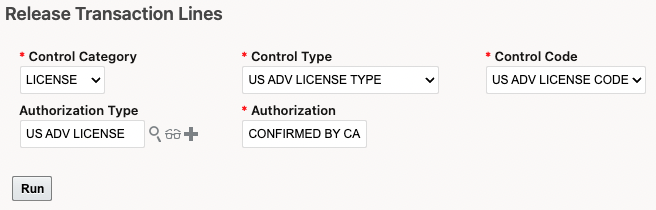
Release Multiple Transaction Lines in a Single Action
This feature enables you to select multiple transaction lines and release them using an authorization within a single action. You can query for a subset of transaction lines from the Trade Transaction Line manager. For example, you can search for all transaction lines with the same Control Type and Control Code. When you run the 'Release Transaction Lines' action, there are 3 control categories available:
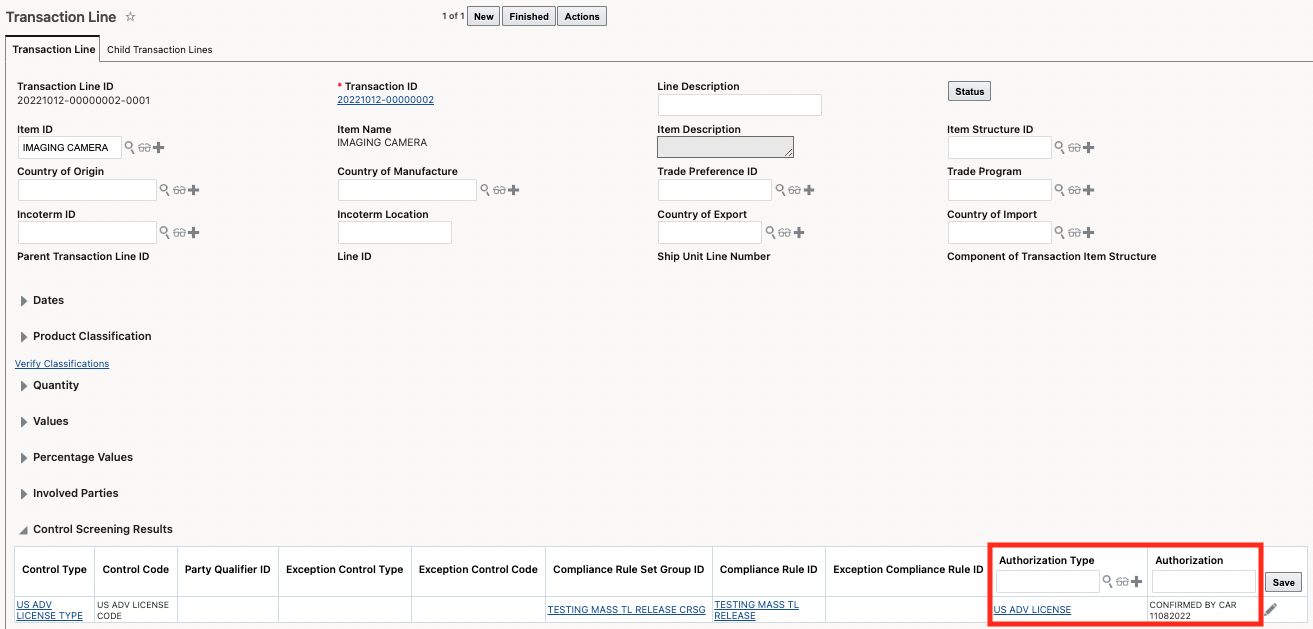
- LICENSE - On the action, enter the Control Type and Control Code you want to release on the line. Enter an Authorization Type and Authorization. The results display in the Control Screening Results grid on the transaction line. (This is the default value on the action).
- OTHER - On the action, enter the Control Type and Control Code you want to release on the line. Enter an Authorization. The results display in the Other Control Screening Results grid on the transaction line.
- SANCTION - On the action, enter the Control Type and Control Code you want to release on the line. Enter an Authorization. The results display in the Sanction Control Results grid on the transaction line.
For example, you want to release a Control Category = LICENSE on multiple transaction lines.
Once you run the action, the transaction line is updated with the authorization information.
This enhancement should significantly reduce the number of clicks a user has to take in the system to clear transactions saving significant amounts of the user's time.
Steps to Enable
You don't need to do anything to enable this feature.
Tips And Considerations
Before you can run this action, a Control Type and Control Code must be assigned to the transaction line in either the Control Screening Results grid, the Other Control Screening Results grid, or the Sanction Control Results grid.
When you run the 'Release Transaction Lines' action, the Control category is set by default to release a Control Category = LICENSE. You can change this to release the following Control Categories: OTHER and SANCTION.
Key Resources
For more information on control screening, please refer to the GTM How To/Configuration Topic called Trade Compliance Management.
Sorting on License Assignment Actions Is Configurable
When running certain license assignment actions, GTM can sort and display the licenses based on criteria you specify. Specifically, two new properties are introduced which work together and enable you to configure the sort order of the licenses in the actions. The properties are:
- gtm.licenseDetermination.sort.fields - Determines which fields are used to sort the licenses returned by the action. The gtm.licenseDetermination.sort.fields property can be configured to use any column names from the GTM_LICENSE or GTM_LICENSE_LINE tables. The format of the property should be GtmLicense:<column name without underscores> or GtmLicenseLine:<column name without underscores>. Sample configurations are:
- GtmLicense:expirationDate,GtmLicenseLine:licenseLineGid - Sorts by Expiration Date. If multiple licenses have the same expiration date, those licenses will be sorted by License Line ID. (This is the default value.)
- GtmLicenseLine:licenseLineGid,GtmLicense:expirationDate - Sorts by License Line ID. If the license line ID is listed multiple times, those licenses will be sorted by Expiration Date.
- GtmLicense:LicenseNumber - Sorts by License Number.
- gtm.licenseDetermination.sort.order - There are two possible values:
- asc - Displays the licenses in ascending order. (This is the default value.)
- desc - Displays the licenses in descending order.
The new properties are used by the following actions that are available on the Trade Transaction and Trade Transaction Line managers:
- Assign License
- Assign License - Show Options
- Reevaluate License

In the above screenshot, you can see that the license lines are sorted based on Expiration Date in ascending order. This is because the properties are set as follows:
- gtm.licenseDetermination.sort.fields = GtmLicense:expirationDate,GtmLicenseLine:licenseLineGid
- gtm.licenseDetermination.sort.order = asc
This helps users with having the information they most need quickly available for assigning a license.
Steps to Enable
You don't need to do anything to enable this feature.
Key Resources
For more information about license screening, please see the GTM How To/Configuration Topic called License Screening.
Improved Visibility of Dates During License Screening
When assigning a license to a trade transaction line, GTM uses the transaction date during assignment and adds it to a new Transaction Date field.
As in previous releases, GTM determines which date to use during license assignment based on the Date Qualifier defined on the License Code. For example, you may want to use the Date Qualifier = EXPORT DATE on the Trade Transaction for an export license. During license screening, GTM uses this Date Qualifier to identify the Transaction Date and compares it to the license effective/expiration dates to determine if the license line can be assigned.
When a license line is assigned to the transaction line, certain data is populated including the Transaction Date. In addition, the Assigned Date shows the date that the license was assigned to the transaction. The new Transaction Date field is available on the following objects:
- Trade Transaction Line in the Assigned Licenses grid
- License Line Usage History available from the Licenses and Registrations menu link or via a SmartLink from the License manager or License Line manager
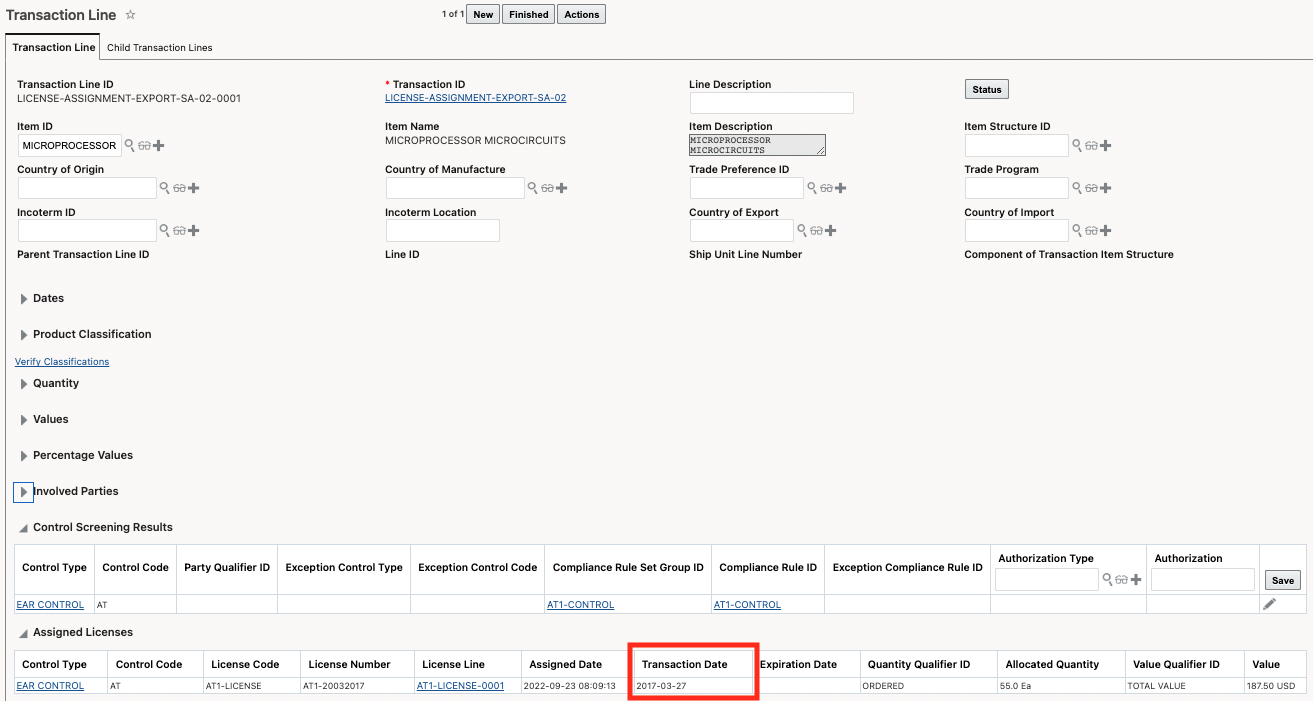
This enhancement provides users with a clear understanding both of when the process of license assignment was run by the system as well as what date the transaction using the license occurred.
Steps to Enable
You don't need to do anything to enable this feature.
Key Resources
For more information about license screening, please see the GTM How To/Configuration Topic called License Screening.
Manage Exclusion Words by Parameter for Restricted Party Screening
This feature enables you to create the exclusion words list used in restricted party screening by parameter. For example, when screening company name, you may want to exclude words such as 'Limited, Incorporated and Company'. When screening address lines, you may want to exclude words such as 'Road, Street, or Lane'. You can now configure GTM to have different words excluded from the screening engine by parameter which helps with your screening results and improves the performance of the restricted party screening engine.
The GTM property called 'gtm.rpls.useExclusionWords' tells GTM where you have your exclusion words list configured. When the property is set to 'gtm.rpls.useExclusionWords = GlobalExclusionServicePreference', you can configure your exclusion words list in the Master Data > Power Data > Configurations > Service Preference Parameters.
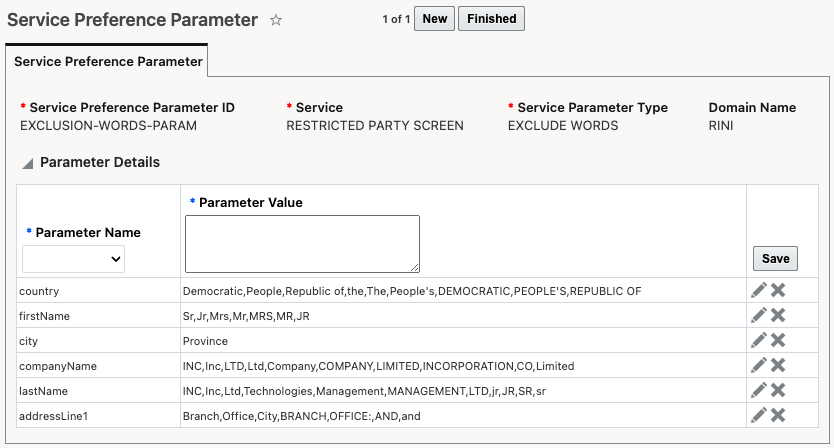
Once you define your exclusion words list, you can assign the Service Preference Parameter to the Service Preference you are using for restricted party screening.
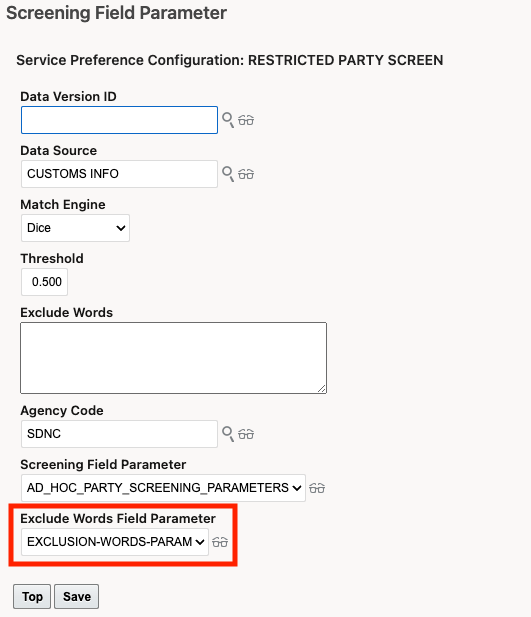
Once you've set the property accordingly and configured you service preference to include the Exclude Words Field Parameter, you can trigger restricted party screening with the service preference you defined to include the exclusion words list by parameter.
This enhancement will provide more precise and accurate matches from the restricted party screening engine reducing the number of records that need to be screened for false positives saving users time and effort.
Steps to Enable
You don't need to do anything to enable this feature.
Tips And Considerations
The GTM property called 'gtm.rpls.useExclusionWords' has existing values that you can also use. The supported values for this property are:
- Service Preference - GTM removes the exclusion words defined on the service preference for both the parties and denied parties.
- Global - GTM removes the global list of exclusion words (defined in the 'gtm.rpls.diceEngine.globalExclusionWords' property) from the parties and denied parties. This value is deprecated and it is recommended you use the new value 'GlobalExclusionServicePreference'.
- GlobalExclusionServicePreference - This new value enables you to configure your excluded words list in the Master Data > Power Data > Configurations > Service Preference Parameters.
- No - GTM will not remove exclusion words from the parties or denied parties.
- noExclusionFromDeniedParty - GTM will remove exclusion words from the parties but not from the denied parties.
Key Resources
For more information on restricted party screening, please refer to the GTM How To/Configuration Topic called 'Restricted Party Screening'.
Enhancements to Review Match Factor Action
In previous releases, the Review Match Factor action would stop running if it encountered a parameter that was not a match. A property has been added giving you the ability to configure how the Review Match Factor action works. Specifically, the 'gtm.rpls.reviewMatchFactor.runForAllParameters' property has been added. The values are:
- gtm.rpls.reviewMatchFactor.runForAllParameters = true - If this property is set to true, GTM will run the Review Match Factor action for all parameters in the service parameter and display the results. If a parameter is not a match GTM will consider it's Match Factor as 0 in the final Match Factor calculation. (This is the default value.)
- gtm.rpls.reviewMatchFactor.runForAllParameters = false - If this property is set to false, GTM will revert to the previous behavior and the action will stop running if a parameter is found to be not a match.
Enhancing the Review Match Factor action gives users increased flexibility in configuring the RPLS engine to their specific needs.
Steps to Enable
You don't need to do anything to enable this feature.
Tips And Considerations
Before this enhancement, the Review Match Factor action was tied to the Restricted Party Screening code which caused some limitations with the Review Match Factor action. For example - when trying to analyze a match, if the Review Match Factor action found a parameter that was not a match, the analysis would stop, by separating the code for the action, GTM is now able to set a parameter that is not a match to zero and continue to match the other parameters when the Review Match Factor action is run.
The provided property controls whether the analysis stops or continues when a parameter is not a match.
Since this action is used for analysis, it was decided to turn the new functionality on by default (versus keeping the original behavior) to provide you a clearer picture when analyzing your matches. The property does allow you to switch back to the previous behavior, if desired.
Overview of Enhancements to Trade Agreement Qualification
A number of enhancements have been made to the Trade Agreement Qualification functionality in GTM. These enhancements include:
- Assign preference criteria to item qualification record
- Country of import is optional for bi-directional trade agreements
- Out of the box formulas for certain rules of origin rule types such as net cost, transaction value, etc.
- Enhancements for determining country of origin
- Justification Types and Justification Codes giving you more detail about the qualification
- Support for the roll-up principle, also know as absorption
- Enhancements to the qualification report when the roll-up principle is used
In addition, the Trade Agreement How To topic in help has been updated to provide more information about qualification included configuration details, how the engine works, and details on the various formulas.
These enhancements provide a broad set of improvements to trade agreement qualification that improve the user experience, reduce data entry needs, and allow new calculation types under which more goods can potentially qualify for reduced or free duty rates.
Steps to Enable
You don't need to do anything to enable this feature.
Key Resources
For more information about each of these enhancements, please see the following topics in this document:
- Assign Preference Criteria During Trade Agreement Qualification
- Country of Import Optional for When Qualifying Against a Bi-directional Trade Agreement
- Define Formulas Based on Rules of Origin Rule Types
- Enhanced Support for Country of Origin During Qualification
- New Justification Types and Justification Codes Available
- Support for Roll-up of Intermediate Components in Qualification Engine
- Enhancements to Qualification Report
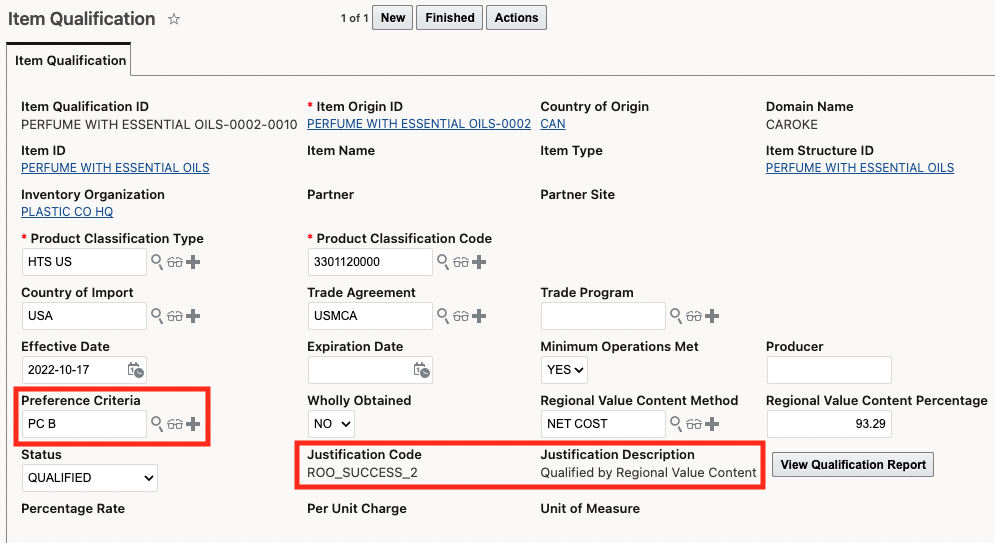
Assign Preference Criteria During Trade Agreement Qualification
You can now assign the preference criteria to the item qualification as part of the trade agreement qualification process. Preference criteria provides details about how your finished good qualifies for a trade agreement. For example, is it wholly obtained, does a product specific rule apply, is de minimis met and so on.
To configure GTM to automatically assign preference criteria, you need to create the preference criteria records as defined in the trade agreement. Preference Criteria is an existing object in GTM but new fields have been added to support assignment including:
- Priority - identifies order given in the trade agreement document for preference criteria. If more than one preference criteria applies, this defines the order in which they are assigned.
- Related Success Codes grid - identify the Justification Code(s) associated with the preference criteria. In this example, Preference Criteria of PC B is being modeled for USMCA. When qualification is successful, this justification code and the associated description are displayed on the item qualification.

When the Qualify for Trade Agreement action is triggered on your item-based objects, GTM qualifies your bills of material (modeled as trade item structures) for trade agreement qualification. If successful, GTM creates or updates the item qualification record. If the preference criteria can be determined, GTM assigns the Preference Criteria and displays the Justification Code and Justification Description with more details.
Users qualifying items for trade agreements can now automatically assign the preference criteria to the item qualification as part of the trade agreement qualification process.
Steps to Enable
You don't need to do anything to enable this feature.
Tips And Considerations
Depending on the bill of material being qualified and the preference criteria defined by government agencies, there may be times where GTM cannot automatically determine and assign the preference criteria as part of the qualification process. In this instance, you can manually assign the preference criteria on the item qualification record.
Key Resources
- For more information on Justification Codes, please see the 'New Justification Types and Justification Codes Available' topic in this document.
- For more information on trade agreement qualification, please refer to the GTM How To/Configuration topic called Trade Agreement Qualification.
Country of Import Optional When Qualifying Against Trade Agreements with Common Rules of Origin
When running the Qualify for Trade Agreement action, the Country of Import is now optional for trade agreements using a common set of rules of origin. For example, when a trade agreement has a single rule set that is applicable across all countries, the Country of Import is an optional field. This would include trade agreements such as the European Union-Singapore Trade Agreement or the South Korea-Canada Trade Agreement.
For trade agreements that have different rule sets per country, then Country of Import will still be required because it identifies which rule set should be used during qualification. For example, the USMCA trade agreement includes 3 member countries each with their own rule set: Canada, Mexico, and the United States. In this instance, GTM needs to know the Country of Import to use the proper rule set during the qualification process.
This provides users with both faster data input since less data is required, and the ability to streamline the number of records to be managed, saving significant user time and effort.
Steps to Enable
You don't need to do anything to enable this feature.
Key Resources
For more information on trade agreement qualification, please refer to the GTM How To/Configuration Topic called Trade Agreement Qualification.
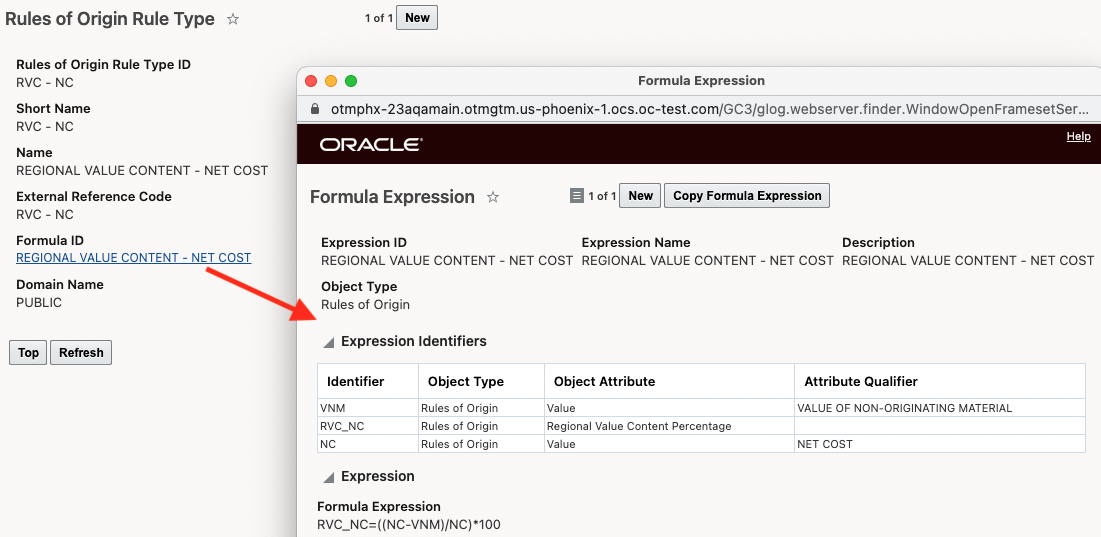
Define Formulas Based on Rules of Origin Rule Types
Formulas are now supported on the Rules of Origin Rule Type instead of configuring it on the trade agreement. GTM ships with formulas associated with certain Rules of Origin Rule Types to simplify the configuration for qualification. These out of the box formulas can be used as the default formulas. If you have a trade agreement where you want to use a different formula, you can create the new formula and add it in the Rules of Origin Formulae grid on the Trade Agreement. GTM will first look to see if there is a formula in the Trade Agreement and will use it. If not, it will then look to the Rules of Origin Rule Type and use the formula specified.
The following Rules of Origin Rule Types have a default formula associated with them:
- DEMIN
- FIFTY FIFTY
- HS INCLUSION
- THIRD COUNTRY CHECK
- Regional Value Content Method including:
- RVC-NC
- RVC-TV
- RVC-UP
- RVC-DOWN
- No tariff shift including:
- NTS-CHAPTER
- NTS-HEADING
- NTS-SUBHEADING
- NTS-ITEM
This enhancement will simplify the trade agreement configuration process and help expedite implementations.
Steps to Enable
You don't need to do anything to enable this feature.
Tips And Considerations
As part of this change, the Formula ID has been removed from the Regional Value Content Method.
Key Resources
For more information on trade agreement qualification, please see the GTM How To/Configuration topic called 'Trade Agreement Qualification' in help.
Enhanced Support for Country of Origin During Qualification
This feature enables GTM to create the item origin record of an intermediate item on a multi-level bill of material if the item origin has not be specified. In addition, the item origin for the intermediate item will also be qualified as part of the action.
When the Qualify for Trade Agreement action is triggered, GTM qualifies your finished good item for trade agreements. If a component item does not have an item origin record, GTM will determine the country of origin for the component in the following order and create the item origin:
- Country of Origin on the Trade Item Structure Component
- Default Country of Origin on the Item associated with the Trade Item Structure Component
- Country of Origin of the finished good
This saves users from having to perform data entry steps enabling them to be more productive in the system.
Steps to Enable
You don't need to do anything to enable this feature.
Key Resources
For more information on trade agreement qualification, please see the GTM How To/Configuration Topic called 'Trade Agreement Qualification' in help.
New Justification Types and Justification Codes Available
New Justification Types and Justification Codes have been added to GTM. These Justification Codes, previously called Reason Codes, are assigned to your item qualification when the Qualify for Trade Agreement action is triggered and provides more information about the qualification.
A new Justification Code power data page is available to create or manage your justification codes.
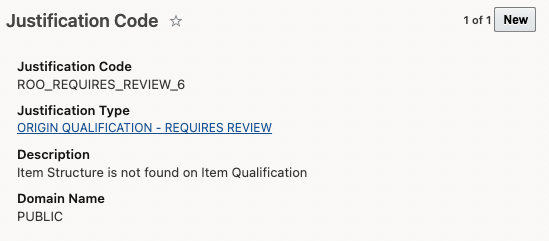
GTM ships with out of the box Justification Types and Justification Codes. The new available Justification Types are:
- ORIGIN QUALIFICATION - REQUIRES REVIEW - This is a new justification type with associated codes that tell you why an item qualification requires review.
- ORIGIN QUALIFICATION - SUCCESS - This is a new justification type with associated codes that tell you why an item qualification was successfully qualified.
The new Justification Types and Codes provide more information about the qualification process and end result making it easier to audit and review the qualification before signing a certificate.
Steps to Enable
You don't need to do anything to enable this feature.
Tips And Considerations
- GTM Reason Codes have been re-named to Justification Codes.
- GTM ships with pre-populated Justification Types and Justification Codes. You can create your own Justification Codes and associate them with one of the existing Justification Types.
- The new Justification Type = ORIGIN QUALIFICATION - REQUIRES REVIEW replaces the existing Justification Type = ROO ENGINE.
- To automatically assign the preference criteria during qualification, you can associate the appropriate Justification Code within the Preference Criteria power data.
Key Resources
- For more information on trade agreement qualification, please refer to the GTM How To/Configuration Topic called Trade Agreement Qualification.
- For more information on automatically assigning preference criteria during the qualification process, please see the 'Assign Preference Criteria During Trade Agreement Qualification Process' topic in this document.
Copy Additional Documents from Campaign Line to Item Qualification
This feature enables you to copy additional documents from a campaign line to an item qualification. If your supplier uploads additional documents to the campaign line that were not requested as part of the campaign, you can copy them over to the item qualification. This enables you to keep all documents uploaded to a campaign line on the item qualification.
Under the Association = Campaign Line - Item Qualification, a new Attribute called 'Additional Documents' is available. In addition, the Attribute called 'Document Types' has been renamed to 'Standard Documents'.
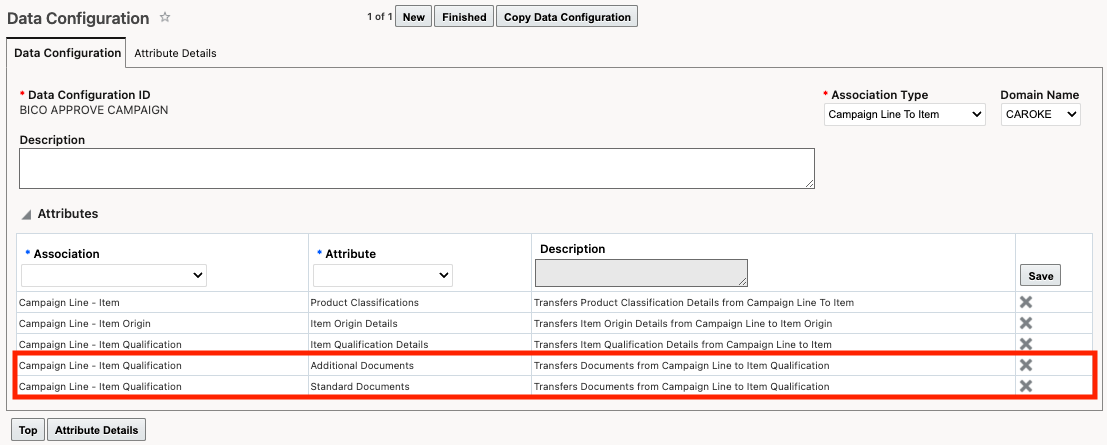
On the Attribute Details page, no additional information is required for the Additional Documents attribute. The input for Standard Documents remains unchanged.

This feature expands the amount of information and documentation that can be captured during the solicitation process.
Steps to Enable
You don't need to do anything to enable this feature.
Key Resources
For more information on managing your campaigns, please refer to the GTM How To/Configuration Topic called Supplier Solicitation.
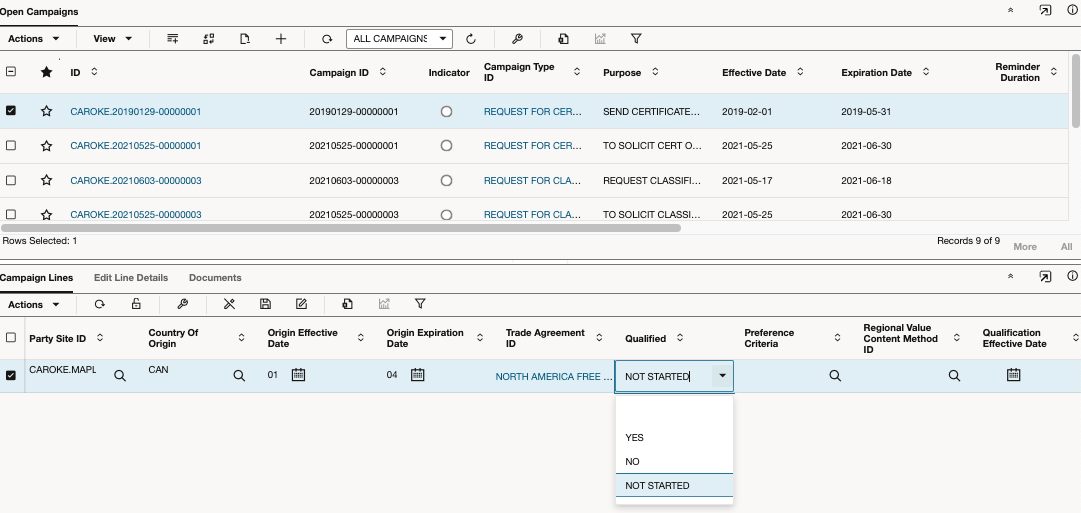
Inline Editing Available on the Campaign Administrator Workbench
Certain fields in the PUBLIC Campaign Administrator Workbench that ships with GTM are now editable fields using in-line editing. This enables you to quickly edit campaign line information without having to open the Campaign Line manager. To use in-line editing, double-click on the campaign line you want to modify. You can then make your edits. Depending on the type of field, you may be able to select the new value from a drop-down list, search for a new value, or select a date.
The fields that support in-line editing include:
- Trading Partner Item ID
- Product Classification Code
- Party Site ID
- Country of Origin
- Origin Effective and Expiration Dates
- Qualified
- Preference Criteria
- Regional Value Content Method ID
- Qualification Effective and Expiration Dates
This enhancement should improve the ease with which your vendors enter data in the campaign workbench and increase their compliance rate.
Steps to Enable
You don't need to do anything to enable this feature.
Key Resources
For more information on workbenches, please refer to the Configuration and Administration > Enhanced Workbench topic in help.
Support for Roll-up of Intermediate Components in Qualification Engine
GTM supports the roll-up principle which allows intermediate products to confer their originating status at 100% contribution rate when they are used in the production of a finished good. The roll-up principle, also known as absorption, enables the intermediate sub-assembly to be treated as originating if the applicable origin criteria has been met. The value of the non-originating components in the production of the sub-assembly are disregarded once the sub-assembly obtains originating status. The full value of the sub-assembly can then be used during qualification calculations.
Not all trade agreements support the roll-up principle. For those that do, you can flag the trade agreement using the Rollup Allowed checkbox to indicate that is it supported. Once you've flagged that a trade agreement supports the roll-up principle, the logic will treat the intermediate sub-assembly as 100% originating if the origin criteria in the rules of origin has been met.
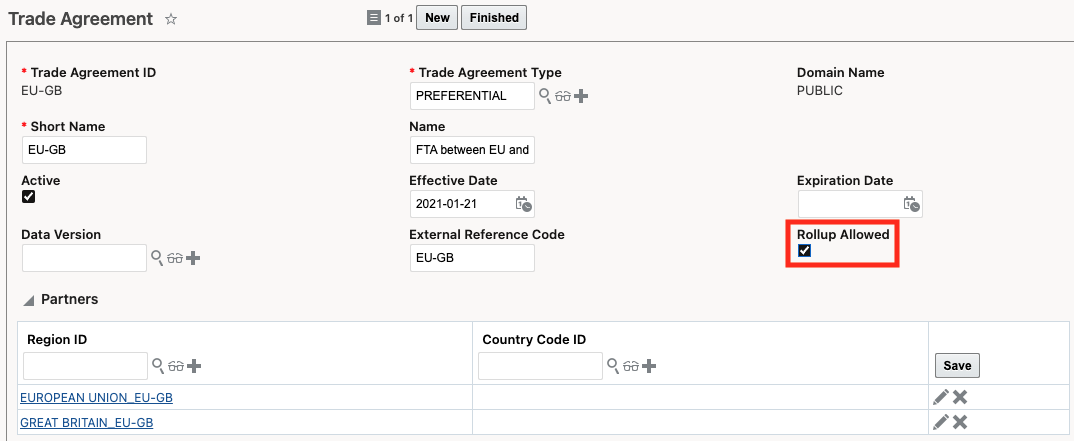
This process potentially allows a greater number of your finished goods to qualify for trade agreement benefits, providing duty and tax savings to your customers.
Steps to Enable
You don't need to do anything to enable this feature.
Key Resources
For more information on trade agreement qualification, please see the GTM How To/Configuration topic called Trade Agreement Qualification.
Enhancements to Qualification Report
The Qualification Report has been enhanced to support the roll-up principle. The roll-up principle, also know as absorption, enables the intermediate sub-assembly to be treated as originating if the applicable origin criteria has been met. When roll-up is applied in the qualification engine, the Qualification Report displays the results slightly differently than when roll-up is not applied. Specifically:
- Applied Provision - Indicates that ROLLUP has been applied.
- Item Structure Component Analysis - Displays the finished good and the first level components of the bill of material. It includes details such as Sequence Number, Item, Quantity, UOM, Extended Cost, Value Add, Country of Origin (COO), Wholly Obtained, Tariff Shift, Qualified, Originating, and Value of Originating Material (VOM).
- Qualified Intermediate Components - Displays the qualified intermediate sub-assembly and its components. It includes details such as Sequence Number, Item, Quantity, UOM, Extended Cost, Value Add, Country of Origin (COO), Wholly Obtained, Tariff Shift, Qualified, Originating, Value of Originating Material (VOM) and Value of Non-originating Material (VNM). This is a new section of the report.
The Qualification Report displays the results slightly differently when the roll-up principle is applied, helping users to understand the math that has occurred when auditing the process.
Steps to Enable
You don't need to do anything to enable this feature.
Tips And Considerations
The Applied Provision field also displays on the Qualification Report when roll-up is not used. In this scenario, it is currently not being populated.
Key Resources
- For more information on the roll-up principle enhancements, please see the What's New topic called 'Support for Roll-up of Intermediate Components in Qualification Engine' in this document.
- For more information on trade agreement qualification, please see the GTM How To/Configuration Topic called Trade Agreement Qualification.
Enhancements to Add Item to Campaign Action
Two enhancements have been made to the Add Item to Campaign action.
Standard Documents Supported
You can now add standard documents when running the Add Items to Campaign action. The Required Documents field has been added to the action when triggered from the following objects:
- Item
- Trading Partner Item
- Add Items to Campaign process in Process Management

Exclude Intermediate Items in Process Management
When running the Add Items to Campaign process within Process Management, you can exclude intermediate items so that they are not added to the campaign. This ensures you are creating campaigns with the correct set of items. The 'Exclude Intermediate Items' checkbox is available when the Campaign Data Type = Trade Item Structure.
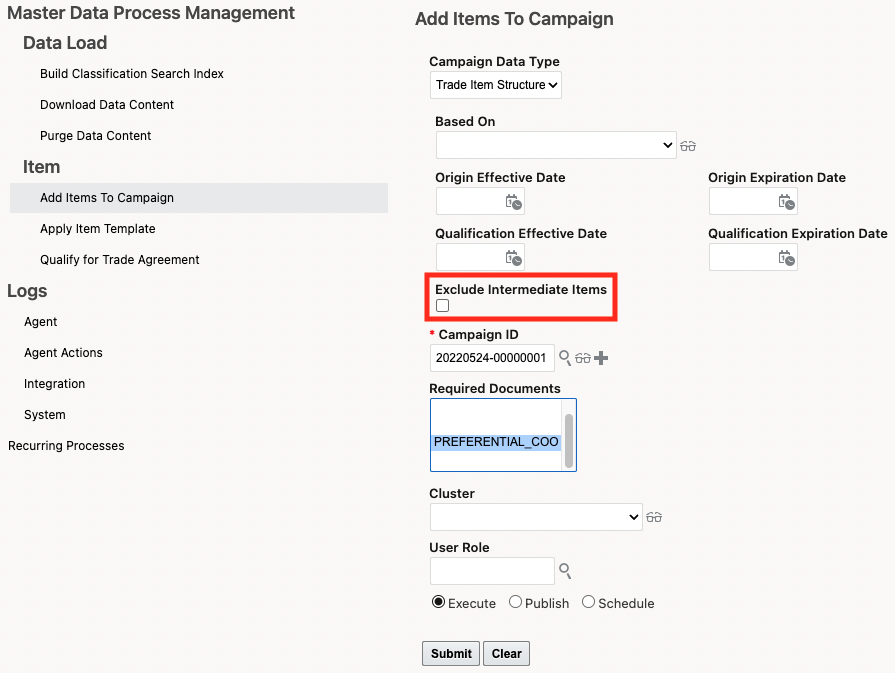
For users of supplier solicitation, two enhancements have been made to the Add Item to Campaign action which better help you to create and manage the items and supporting data added to campaigns.
Steps to Enable
You don't need to do anything to enable this feature.
Key Resources
For more information on campaign management, please refer to the GTM How To/Configuration Topic called Supplier Solicitation.
Additional Fields Available on Item Qualification Finder Results
Additional fields have been added to the Item Qualification finder results. The Percentage Rate and Per Unit Charge have been added so that you can easily see this information for an Item Qualification in the finder results and the Item Workbench.
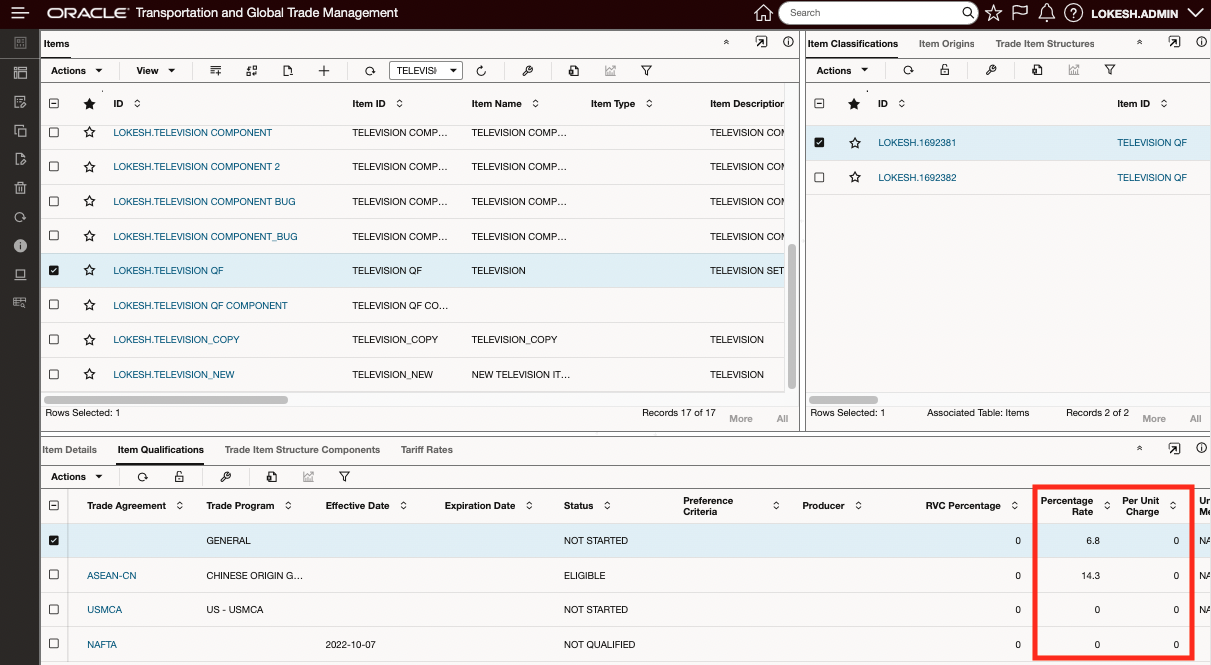
For users of trade agreement qualification, additional fields have been added to the Item Qualification finder results. The Percentage Rate and Per Unit Charge have been added so that you can easily see this information for an Item Qualification in the finder results and the Item Workbench.
Steps to Enable
You don't need to do anything to enable this feature.
Qualify for Trade Agreement Agent Action Available on Transaction Line
A new agent action called Qualify for Trade Agreement is available which enables you to qualify the item on the trade transaction line for a trade agreement. This enables you to automatically qualify a trade transaction line when it is created or modified.
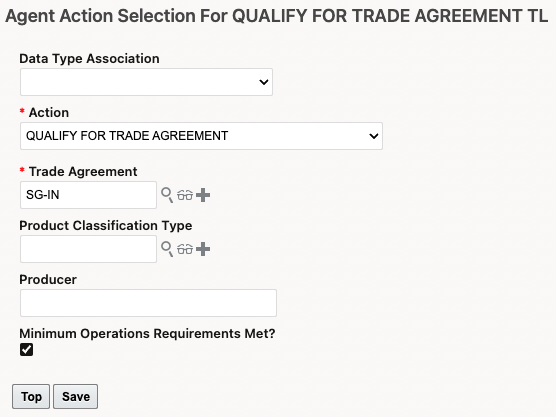
When you set up your automation agent, select an Action = QUALIFY FOR TRADE AGREEMENT. You can specify:
- Trade Agreement - specify the trade agreement you want to qualify against. This is a required field.
- Product Classification Type - If applicable, specify the Product Classification Type.
- Producer - If applicable, enter the Producer of the goods.
- Minimum Operations Requirements Met - Mark the checkbox if the finished good meets the minimum operations requirements. If the minimum operations requirements are not met, GTM is unable to qualify the transaction line.
Once triggered, GTM looks at the item on the transaction line to see if the item has been qualified. If so, the information is copied to the transaction line and the status is set to QUALIFIED. If the item has not been qualified, then qualification is run using the values on the transaction line and the associated trade item structure.
NOTE: Before you qualify your transaction line for a trade agreement, a country of origin must be present on the trade transaction line. If you have item origins created for your items, you can use the Look Up Country of Origin action from the Trade Transaction or Trade Transaction Line. If a country of origin is not present, GTM tries to identify the matching item origin based on the country of origin on the transaction line.
The qualify for trade agreement agent action enables you to automatically trigger qualification on a trade transaction line to see if a finished good you are shipping qualifies for a trade agreement allowing your customers to take advantage of reduced duty rates.
Steps to Enable
You don't need to do anything to enable this feature.
Tips And Considerations
- There may be instances where GTM is unable to fully qualify your transaction line. If this occurs, the status on the Transaction Line Qualification is set to NOT QUALIFIED.
- When qualifying the transaction line, the values of child transaction lines are not considered as components.
- Determining the country of origin on the transaction line depends on the 'Use New Trade Agreement Qualification Parameters' optional feature introduced in 22C. For more information about this optional feature, please refer to the 22C What's New topic of the same name.
Key Resources
For more information on trade agreement qualification, please see the GTM How To/Configuration Topic called Trade Agreement Qualification.
Trigger Rules of Origin Download As Non-DBA User
This feature enables you to download the Rules of Origin content data as a non-DBA user. As with other content downloaded from third party content providers such as restricted party or classification data, the rules of origin data download can be triggered by a business user and loaded into the PUBLIC domain.
The enhancement provides for simpler configuration and setup by systems integrators and GTM administrators.
Steps to Enable
You don't need to do anything to enable this feature.
Tips And Considerations
As with other content downloaded from third party content vendors such as restricted party or classification data, the rules of origin data download can be triggered by a business user and loaded into the PUBLIC domain.
This feature provides enhancements to the AES Filing capability. Based on regulatory changes, the AES Template related to the X12.601 Customs & Border Protection (CBP) - Export Shipment Information specification has been updated as follows:
-
The Foreign Trade Zone (FTZ) Identifier field has increased from 7 characters to 9 characters. The M1203 element in the AES template that ships with GTM has been updated to require 9 characters. Trailing zeros are added if your FTZ identifier is not 9 characters.
As the regulations change for AES Filing, GTM is updated so that your export filing is in line with the current regulations.
Steps to Enable
You don't need to do anything to enable this feature.
Key Resources
- For more information about the AES filing regulations, please refer to the U.S. Customs and Border Protection website.
Manage Authorization for Trade Incentive Programs
A new object called Trade Incentive Program Authorization has been added to GTM to manage authorizations related to your trade incentive programs.

In a future release, the authorization will help to manage your special program information including details about the trade incentive programs.
Steps to Enable
You don't need to do anything to enable this feature.
Tips And Considerations
These objects are reserved for future use.