
- Revision History
- Overview
- Update Tasks
- Feature Summary
- Transportation and Global Trade Management-Pre 21D
-
- Transportation and Global Trade Platform
- Workbench
- REST Services
-
- JSON Patch to Update Top-level Resource Attributes
- Add Update Support to Shipment Resource
- Bill/Invoice Additional Operations Supported
- Asynchronous Support for Tracking Event and Location Resources
- Add Tracking Event as Reference Resource for Power Unit, Order Base, Equipment and Shipment Ship Unit
- Basic Order Release Create and Update
- Add Support for Exchange Rate Resources
- Query Resources Using Attributes from Child Resources One Level Down
- Technical Features
-
- Optional Features - View and Actions
- Optional Feature - Agent Loop Lock Suppression
- Optional Feature - CSV Upload Refresh
- Optional Feature - Disable Message Credentials
- Optional Feature - XML Schema Validation
- Optional Feature - XSL Stylesheet Content Validation
- Optional Feature - Load Balance Topic Interface
- Optional Feature - Optimize Data Query Footprint
- Provide the Ability to Create Users for Calling OBIEE/BIPublisher APIs
- Other Enhancements
- Oracle Transportation Management (Base)
-
- Order Base Line Allocation
- Ahead/Late Visibility Enhancement
- Logistics Pipeline
- HERE Fleet Telematics API - Weekend Restrictions Considered for Direct Shipments
- PC*MILER Web - Favor and Avoid
- PC*MILER Web - Governor Road Speed
- Tender Type Element Added to PlannedShipment XML
- SMC³ CarrierConnect XL 3.0 - Ability to Discount by Movement Type
- Reference Number Qualifier Check on Tender Accept in Online Booking/Tendering UI
- Select All Added for Adding Line to Order Release Ship Unit
- Documentation Now Available In HTML and PDF Format
- Shipment Manager Enhancement
- Rapid Order Release - Get Rates Configuration Enhancement
-
- Transportation Operational Planning
-
- Load Configuration - Item Grouping Criteria
- Support Splitting by Shipment Ship Unit Count in Conopt Merge
- HERE and PC*MILER External Distance and Service Engine Bulk Plan Performance Statistics
- Refine Options Displays in Full Screen
- Capacity Considered in Network Routing Route Step
- Continuous Move Out and Back
- Dynamic Clustering to Consider Order Release Routing Constraints
- Planning Data - Export/Import
-
- Oracle Fleet Management
- Freight Payment, Billing, and Claims
- Logistics Network Modeling
- Global Trade Management (Base)
- Usability Improvements
-
- New Public External Systems for 3rd Party Content
- Remove Reference Numbers Via Manager Layout
- Additional GTM Objects Added to Workbench
- Additional Saved Queries to Support GTM Workbench
- Item Classification Manager and Workbench Support
- Item Origin Manager
- Copy or Link Documents to Trade Transaction and Declaration
- Reports Available Within GTM Menus
- Product Classification Enhancements
-
- Default Language for Classification Actions on Item
- Trigger Approve or Decline Product Classification Action on Item for a Product Classification Code
- View Product Classification Template with Invalid Codes
- View Item Template and Product Classification Template Used to Populate Item
- Binding Ruling Date and Number Support on Item, Trade Transaction and Declaration
- Tariff Rules of Interpretation Power Data
- Update Classification Includes Tariff Rules of Interpretation and Binding Ruling Data
- Classify Item Action Includes Tariff Rules of Interpretation and Binding Ruling Data
- Specify Tariff Rules of Interpretation and Binding Ruling Data on Product Classification Template
- Assign Item Classification Action on Item
- Support for Pseudo-Fields for Product Classification Codes
- Updates to Lookup Classification and Verify Classification Actions on the Line
- Improvements to Setting of Product Classification Status
- Required Classification Data Available in Product Classification Grid on Transaction Line
- Optional Feature - Manage Status by Verify Classification
- Trade Agreements
-
- Add to Campaign Action on Trading Partner Item
- Generate Sample US NAFTA Certificate of Origin from Campaign Lines
- Create Campaign Action on Trading Partner Item Filters on Trade Agreement
- Reminder Functionality for Supplier Solicitation
- Add to Campaign Action on Item
- Create Campaign Action on Item
- Run Tariff Eligibility Screening Action Against Multiple Objects
- Perform Eligibility Screening in Item Origin Manager
- Remove a Trading Partner Item from Campaign
- Remove an Item from Campaign
- Improved Support to Indicate If an Item is Fully Qualified for a Trade Program
- Campaign Workbench
- Support for Pseudo-Fields on Item Origin Manager
- Support for Pseudo-Fields on Campaign Line Grids
- Tariff Eligibility Screening Via Automation Agent
- Mark for Purge Available for Campaign Data
- Generate Consolidated NAFTA Document Across Campaign Lines
- Trade Program Profile Power Data
- Capture User and Date for Tariff Eligibility Screening
- Download Document Template Action on Campaign Line
-
- Customs Management
-
- AES Filer Validation Rule
- Specify Trade Program As Part of Declaration Aggregation Criteria
- Trade Program Field Added to Trade Transaction Line and Declaration Line
- Specify Trade Program As Part of Data Configuration for Declaration Line
- Automatically Assign Trade Program to Transaction Line and Declaration Line
- Look Up Trade Program Action on Trade Transaction and Declaration
- Specify Trade Program As Part of Declaration Grouping Criteria
-
- Global Trade Intelligence (GTI)
- Transportation and Global Trade Platform
This document will continue to evolve as existing sections change and new information is added. All updates appear in the following table:
| Date | Feature | Notes |
|---|---|---|
| 07 APR 2023 |
Optional Feature - XML Schema Validation | Updated document. Revised feature information. |
| 07 APR 2023 | Optional Feature - Disable Message Credentials | Updated document. Revised feature information. |
| 25 MAR 2022 | Optional Feature - Disable Message Credentials | Updated document. Revised feature and opt in information. |
| 17 DEC 2021 | Optional Feature - XML Schema Validation | Updated document. Revised feature and opt in information. |
| 17 DEC 2021 | Optional Feature - Disable Message Credentials | Updated document. Revised feature and opt in information. |
| 15 JUN 2021 | Optional Feature - Disable Message Credentials | Updated document. Revised feature and opt in information. |
| 15 JUN 2021 | Optional Feature - CSV Upload Refresh | Updated document. Revised feature and opt in information. |
| 15 JUN 2021 | Optional Feature - Load Balance Topic Interface | Updated document. Revised feature and opt in information. |
| 15 JUN 2021 | Optional Feature - XML Schema Validation | Updated document. Revised feature and opt in information. |
| 01 MAR 2021 | Optional Feature - Disable Message Credentials | Updated document. Revised feature information. |
| 17 FEB 2021 | Updated document. Revised feature information. |
|
| 12 AUG 2020 | Improvements to Escalating of a Party | Removed feature from update 20A. |
| 28 FEB 2020 | Rapid Order Release - Get Rates Configuration Enhancement | Updated document. Delivered feature in update 20A. |
| 24 FEB 2020 | Technical Features: Optional Feature - XML Schema Validation |
Updated document. Revised feature information. |
| 20 FEB 2020 | Product Classification Enhancements: Support for Pseudo-Fields for Product Classification Codes |
Updated document. Revised feature information. |
| 14 FEB 2020 | Technical Features: Optional Feature - XSL Stylesheet Content Validation |
Updated document. Revised feature information. |
| 05 FEB 2020 | Usability Improvements: New Public External Systems for 3rd Party Content |
Updated document. Revised feature information. |
| 10 DEC 2019 | Created initial document. |
This guide outlines the information you need to know about new or improved functionality in Oracle Transportation & Global Trade Management Cloud Update 20A. Each section includes a brief description of the feature, the steps you need to take to enable or begin using the feature, any tips or considerations that you should keep in mind, and the resources available to help you.
GIVE US FEEDBACK
We welcome your comments and suggestions to improve the content. Please send us your feedback at otm-doc_us@oracle.com. Please indicate you are inquiring or providing feedback regarding the Oracle Transportation & Global Trade Management What’s New in Update 20A.
This section gives you information to help you plan, deploy, and validate your update. We make frequent additions to this document, so don’t forget to check back and get the latest information before your update starts.
Use the following resources to prepare for and validate your Oracle Engagement Cloud update.
On My Oracle Support Read:
- Doc ID 2508854.1
- Oracle Cloud Applications - Transportation and Global Trade Management Cloud: Quarterly Updates - Preparation and Testing Recommendations
- Doc ID 2095528.1
- Oracle Cloud Applications - Transportation and Global Trade Management Cloud: Quarterly Update Planning
- Doc ID 2096782.1
- Oracle Cloud Applications - Transportation and Global Trade Management Cloud: Quarterly Update Planning FAQs
- Doc ID 2098110.1
- Oracle Cloud Applications - Transportation and Global Trade Management Cloud: Update Policy
Column Definitions:
Report = New or modified, Oracle-delivered, ready to run reports.
UI or Process-Based: Small Scale = These UI or process-based features are typically comprised of minor field, validation, or program changes. Therefore, the potential impact to users is minimal.
UI or Process-Based: Larger Scale* = These UI or process-based features have more complex designs. Therefore, the potential impact to users is higher.
Features Delivered Disabled = Action is needed BEFORE these features can be used by END USERS. These features are delivered disabled and you choose if and when to enable them. For example, a) new or expanded BI subject areas need to first be incorporated into reports, b) Integration is required to utilize new web services, or c) features must be assigned to user roles before they can be accessed.
Transportation and Global Trade Management-Pre 21D
Transportation and Global Trade Platform
This feature provides you with an improved user experience by opening Workbenches with the Workbench menu closed for those Workbenches that are created and added to either the Springboard or Navigator. Workbenches that you open within the Workbench Designer will open with the Workbench Menu expanded.
Opening the Workbenches with the Workbench Menu closed helps optimize the use of available space. If necessary, the user has the option to expand the Workbench Menu.

Workbench Opened Off of Springboard - Workbench Menu Collapsed

Workbench Opened From Workbench Designer
Steps to Enable
You don't need to do anything to enable this feature.
JSON Patch to Update Top-level Resource Attributes
This feature provides you with the ability to perform a JSON Patch update on a target resource to modify a property.
- Top level fields on resources can be updated using JSON Patch
- Child fields on resources can be updated using JSON Patch
Steps to Enable
Review the REST service definition in the REST API guides to leverage (available from the Oracle Help Center > your apps service area of interest > APIs & Schema). If you are new to Oracle's REST services you may want to begin with the Quick Start section.
Tips And Considerations
The feature is limited to the 'replace' operation of JSON Patch of top level and child fields.
Key Resources
The Help Center will provide you with complete information about the REST API for Transportation and Global Trade Management Cloud. Go to: https://docs.oracle.com/cloud/latest/otmcs_gs/OTMRA/index.html
Add Update Support to Shipment Resource
With this feature, you now have the basic capabilities required to update Shipments with the REST API. This includes being able to PATCH the top-level and child tables as well as POST to child tables.
The following capabilities have been provided:
- PATCH to shipment
- PATCH to shipment child tables
- POST to shipment child tables
- GET sShipUnits
- POST sShipUnits
- PATCH to sShipUnits
- PATCH to sShipUnits child tables
- POST to sShipUnits child tables
Steps to Enable
Review the REST service definition in the REST API guides to leverage (available from the Oracle Help Center > your apps service area of interest > APIs & Schema). If you are new to Oracle's REST services you may want to begin with the Quick Start section.
Key Resources
The Help Center will provide you with complete information about the REST API for Transportation and Global Trade Management Cloud. Go to: https://docs.oracle.com/cloud/latest/otmcs_gs/OTMRA/index.html
Bill/Invoice Additional Operations Supported
This feature extends the operations supported for the Bill/Invoice resources to include POST, PATCH and DELETE.
| Resources |
Operations Supported |
| Bill |
GET, POST, PATCH, DELETE |
| Invoice |
GET, POST, PATCH, DELETE |
Steps to Enable
Review the REST service definition in the REST API guides to leverage (available from the Oracle Help Center > your apps service area of interest > APIs & Schema). If you are new to Oracle's REST services you may want to begin with the Quick Start section.
Key Resources
The Help Center will provide you with complete information about the REST API for Transportation and Global Trade Management Cloud. Go to: https://docs.oracle.com/cloud/latest/otmcs_gs/OTMRA/index.html
Asynchronous Support for Tracking Event and Location Resources
With this feature, you now have asynchronous support for processing tracking event and location resources. This lets you stage requests and process from the queue asynchronously, allowing you to control the throughput for high volume transactions.
Steps to Enable
Review the REST service definition in the REST API guides to leverage (available from the Oracle Help Center > your apps service area of interest > APIs & Schema). If you are new to Oracle's REST services you may want to begin with the Quick Start section.
Key Resources
The Help Center will provide you with complete information about the REST API for Transportation and Global Trade Management Cloud. Go to: https://docs.oracle.com/cloud/latest/otmcs_gs/OTMRA/index.html
Add Tracking Event as Reference Resource for Power Unit, Order Base, Equipment and Shipment Ship Unit
This feature extends the Tracking Event as a reference resource for the Power Unit, Order Base, Equipment and Shipment Ship Unit. With these additions, you now have the ability to bring in tracking event information related to these additional objects.
Steps to Enable
Review the REST service definition in the REST API guides to leverage (available from the Oracle Help Center > your apps service area of interest > APIs & Schema). If you are new to Oracle's REST services you may want to begin with the Quick Start section.
Key Resources
The Help Center will provide you with complete information about the REST API for Transportation and Global Trade Management Cloud. Go to: https://docs.oracle.com/cloud/latest/otmcs_gs/OTMRA/index.html
Basic Order Release Create and Update
This feature provides you with the basic capability to create Order Releases synchronously in the REST API.
Steps to Enable
Review the REST service definition in the REST API guides to leverage (available from the Oracle Help Center > your apps service area of interest > APIs & Schema). If you are new to Oracle's REST services you may want to begin with the Quick Start section.
Tips And Considerations
This feature provides the ability to persist a new order release including the ability to generate a new ID. This is the first release of this functionality and provides very basic capabilities. The basic set of capabilities provided includes:
- The ability to create a structurally complete order releases.
- The ability to create order releases based on lines and have ship units packaging defined by OTM
- The ability to use the business number generator (BNG) to create the order release
This feature provides the ability to update an order release and provides the following capabilities:
- PATCH on orderReleases/<orderReleaseGid>
- PATCH on orderReleases/<orderReleaseGid>/shipUnits/<shipUnitGid>
- PATCH on orderReleases/<orderReleaseGid>/lines/<lineGid>
- POST on orderReleases/<orderReleaseGid>/shipUnits
- POST on orderReleases/<orderReleaseGid>/lines
Key Resources
The Help Center will provide you with complete information about the REST API for Transportation and Global Trade Management Cloud. Go to: https://docs.oracle.com/cloud/latest/otmcs_gs/OTMRA/index.html
Add Support for Exchange Rate Resources
This feature expands the verbs that can be used with the exchangeRates resource and the exchangeRates child resources. You can now use the 'GET' verb (singular and collection) on exchangeRates and its child resources.
Steps to Enable
Review the REST service definition in the REST API guides to leverage (available from the Oracle Help Center > your apps service area of interest > APIs & Schema). If you are new to Oracle's REST services you may want to begin with the Quick Start section.
Key Resources
The Help Center will provide you with complete information about the REST API for Transportation and Global Trade Management Cloud. Go to: https://docs.oracle.com/cloud/latest/otmcs_gs/OTMRA/index.html
Query Resources Using Attributes from Child Resources One Level Down
This feature provides you the ability to query on resources using attributes from child resources one level down.
For example:
- Search for a location resources where location reference number value ends with "TEST.
- /logisticsRestApi/resources/v2/locations?q=refnums.locationRefnumValue ew "TEST"
- Sear for location resources where location reference number value ends with "TEST" and remark text does not contain "TEST"
- /logisticsRestApi/resources/v2/locations?q=refnums.locationRefnumValue ew "TEST" and not remarks.remarkText co "TEST"
Support has been added to query on child attributes multiple levels deep.
For example:
- Search for order releases where the ship unit remark text equals "?SPIRIT"
- /logisticsRestApi/resources/v2/orderReleases?q=shipUnits.remarks.remarkText eq "SPIRIT"
- Search for shipments where the shipment ship unit order line release gid contains "ALH"
- /logisticsRestApi/resources/v2/shipments?q=stops.details.sShipUnits.lines.orderReleaseGid co "ALH"
Support has also been added for the child "bracket"construct. For example:
- Search for locations where reference numbers value ends with "TEST".
- /logisticsRestApi/resources/v2/locations?q=refnums[locationRefnumValue ew "TEST"]
- Search for locations where location reference number value ends with "TEST" and remark text does not contain "TEST"
- /logisticsRestApi/resources/v2/locations?q=refnums[locationRefnumValue ew "TEST"] and not remarks[remarkText co "TEST"]
Steps to Enable
Review the REST service definition in the REST API guides to leverage (available from the Oracle Help Center > your apps service area of interest > APIs & Schema). If you are new to Oracle's REST services you may want to begin with the Quick Start section.
Tips And Considerations
NOTE: Brackets are not currently working for grandchildren. e.g.:
- /logisticsRestApi/resources/v2/orderReleases?q=shipUnits.refnums[shipUnitRefnumValue eq "REFNUM"]
- /logisticsRestApi/resources/v2/orderReleases?q=shipUnits[shipUnitXid co "TEST"].refnums.shipUnitRefnumValue eq "REFNUM"
Key Resources
The Help Center will provide you with complete information about the REST API for Transportation and Global Trade Management Cloud. Go to: https://docs.oracle.com/cloud/latest/otmcs_gs/OTMRA/index.html
Optional Features - View and Actions
The Optional Features finder allows you, the DBA, to review and then determine your implementation decision (Opt In or Opt Out) for the Optional Features delivered in an update. For clients who are migrating to the new update version, you will find that most of the Optional Features included in the update are delivered with Opt In set to FALSE; these features require action on your part to enable them. You will also notice that many Optional Features come with a predefined Optional Until version specified. The Optional Until version is the update version where the optional nature of the feature expires and the Opted In selection is automatically selected and set to TRUE.
For clients who are being newly provisioned versus upgraded - most all of the Optional Features will be delivered with Opt In = TRUE.
Optional Features is accessed via Configuration and Administration > Property Management > Optional Features.
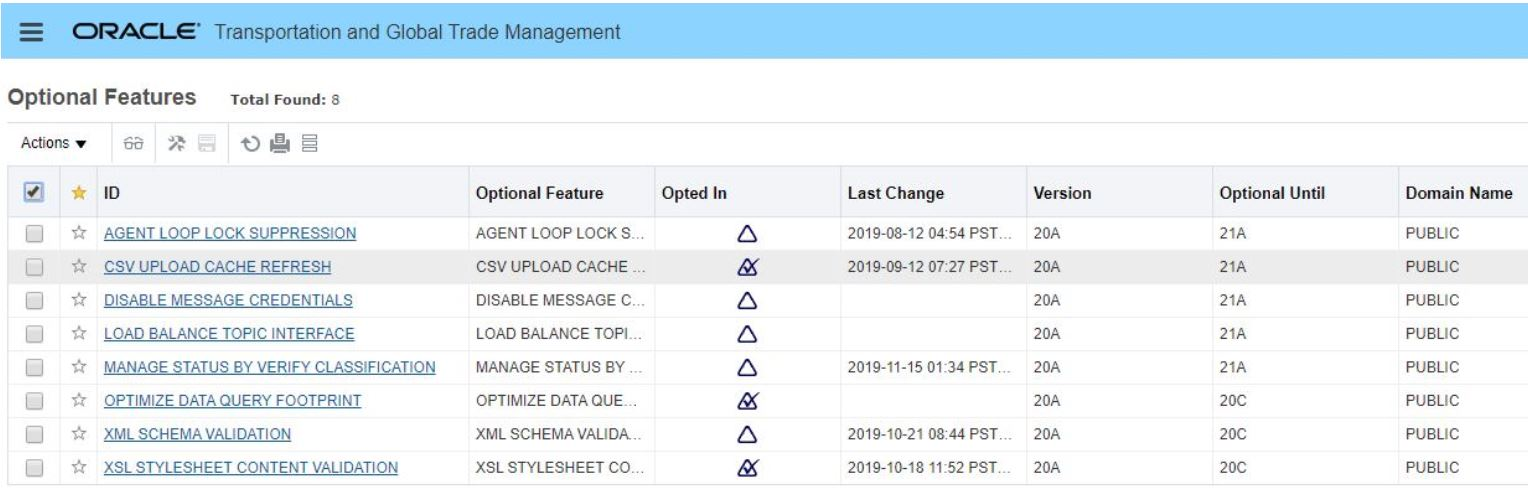
Optional Feature Finder Results for 20A
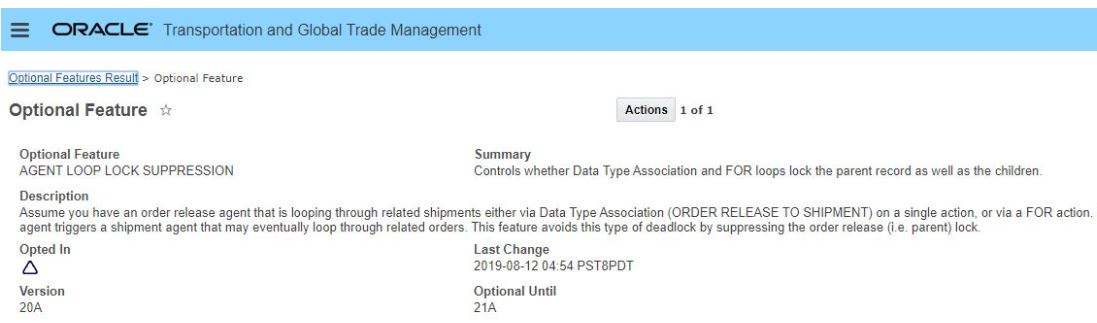
Optional Feature View
NOTE: Only the DBA.ADMIN user can access and use the Optional Features page.
You can search and view details for an optional feature using this page.
Information provided for the Optional Features includes:
- Optional Feature: Identifier/name of the feature.
- Summary: Brief explanation of the feature.
- Description: More complete explanation/overview of the feature.
- Opted In: Opt In status – Opt In = TRUE or FALSE
- Last Change: Last Opt In change date/time.
- Reason: Any time you enable or disable an Optional Feature, you will be prompted to provide a reason for the change.
- Version: Version the Opt In feature was released.
- Optional Until: Version Opt In feature is no longer Optional.
- Precedence: Optional features are often implemented with properties, and they could have overlapping properties – so one optional feature could override the property set by another optional feature. In this case, it is important to assign a precedence value to the features to keep track of which one takes precedent over the other. This should be a rare use case.
You have the ability to select an Optional Feature and run one of the two Actions available:
- Opt In - Opts into a feature and any feature that is dependent on this feature.
- Opt Out - Opts out of a feature and any feature that is dependent on this feature.
Steps to Enable
You don't need to do anything to enable this feature.
Tips And Considerations
It is recommended that all Optional Features be reviewed in the update they are delivered.
To review optional features go to the Optional Feature UI - Configuration and Administration > Property Management > Optional Features.
Access Requirements
- DBA Admin
Optional Feature - Agent Loop Lock Suppression
The Agent Loop Lock Suppression is an optional feature that lets you control whether or not the Data Type Association and FOR loops locks (or not) the parent record as well as the children records.
Given the scenario where an order release agent is looping through its related shipments either via Data Type Association (ORDER RELEASE TO SHIPMENT) on a single action, or via a FOR action; by default the action will first lock the order release and then, in turn, lock each related shipment. This setup can cause deadlocks in the situation where the agent triggers another shipment agent that may eventually loop through related orders. The agent lock suppression feature avoids this type of deadlock by suppressing the order release (i.e. parent) lock.
Steps to Enable
To Opt In to this feature:
- Go to the Optional Feature UI - Configuration and Administration > Property Management > Optional Features.
NOTE: Only the DBA.ADMIN user can access and use the Optional Features page.
- Select the Agent Lock Suppression feature
- Run the Action Opt In
Tips And Considerations
It is recommended that all Optional Features be reviewed in the release they are delivered.
To review optional features go to the Optional Feature UI - Configuration and Administration > Property Management > Optional Features.
Version Optional Feature Introduced 20A
Version where this optional feature is no longer Optional and becomes a mandatory opt in feature - 21A
Optional Feature - CSV Upload Refresh
This feature allows you, the DBA, to have OTM support immediate cache updates when CSV files are uploaded. This is an optional feature - the delivered default is for the feature to be on - Opted In = TRUE.
When uploading CSV files via integration, impacted database changes are now collected. These changes are used to properly update any web-tier or app-tier caches across all clustered servers. Note that this feature also applies to any update statements made via the DIRECT SQL UPDATE agent action when using DML Returning cache refresh.
Optional Until 22C
This feature provides the option for an immediate cache update when CSV files are uploaded.
Steps to Enable
You don't need to do anything to enable this feature.
Tips And Considerations
It is recommended that all Optional Features be reviewed in the release they are delivered.
To review optional features go to the Optional Feature UI - Configuration and Administration > Property Management > Optional Features.
Optional Feature - Disable Message Credentials
When enabled, this feature requires all inbound integration messages to use transport specific authentication, e.g. HTTPS Basic Authentication - the message content will no longer be scanned for user credentials.
This feature will improve performance, adds an extra layer of security and is aligned with industry standards.
Steps to Enable
This feature disables support for user credentials in the message for all inbound XML integration messages. All inbound integration messages must use transport-specific authentication, e.g. HTTPS Basic Authentication. When this optional feature is promoted to being on - the message content will no longer be scanned for user credentials.
- If credentials in the transmission header are being used, either inbound to OTM or outbound, those integrations need to be updated to not use them. You will have to use HTTPS Basic Authentication instead.
Tips And Considerations
It is recommended that all Optional Features be reviewed in the update they are delivered.
To review optional features go to the Optional Feature UI - Configuration and Administration > Property Management > Optional Features.
Optional Feature - XML Schema Validation
This feature, when enabled, will validate every inbound XML message against the set of XML Schema definitions. Strict validation will enforce rules like sequence of elements, invalid empty elements etc., all of which were allowed in the previous 'lax' validation logic. Any validation failure messages will be written to the application log and may require cross reference to the associated XML schema file to resolve the error.
This feature will validate every inbound XML message against the XML Schema definitions, ensuring strict schema compliance.
Steps to Enable
This feature, when enabled, will validate every inbound XML message against the set of XML Schema definitions. We recommend verifying your inbound XML before this feature's Opt In expiration.
To Opt In to this feature:
- Go to the Optional Feature UI - Configuration and Administration > Property Management > Optional Features.
NOTE: Only the DBA.ADMIN user can access and use the Optional Features page.
- Select the XML Schema Validation feature
- Run the Action Opt In
Tips And Considerations
By default this feature is disabled, but it is recommended that this feature be enable so that current messages can be tested for validity and corrected if needed.
To review optional features go to the Optional Feature UI - Configuration and Administration > Property Management > Optional Features.
Key Resources
- See Integration Guide for more details.
Optional Feature - XSL Stylesheet Content Validation
This feature performs a validation for all XLS stylesheet content. This feature is enabled by default. It is recommended that you run the Validate All Stylesheets action from the Stylesheet Content page to ensure that any custom stylesheets that you have uploaded to the system are proper XML and will be processed correctly by the system. If any of your custom stylesheets are not valid, you must re-load each of the non-valid stylesheets using the Stylesheet Content page.
The XSL Stylesheet Content Validation feature becomes a mandatory opt in feature with the 20C update.
Steps to Enable
-
Check your custom stylesheets.
-
Run the Validate All Stylesheets action from the Stylesheet Content page to ensure that any custom stylesheets that you have uploaded to the system are proper XML and will be processed correctly by the system. If one of your custom stylesheets is not valid, you must re-load it using the Stylesheet Content page.
-
-
Review all Optional Features.
-
To review optional features go to the Optional Feature UI - Configuration and Administration > Property Management > Optional Features.
-
Optional Feature - Load Balance Topic Interface
This feature, once enabled, allows you to setup OTM so that inbound Topic requests are published to Process Control and load balanced across multiple servers. When disabled, inbound Topic requests are executed immediately on the server that received the request.
Optional Until 22C
Allows you to setup OTM so that Inbound Topic requests are published to Process Control and then load balanced across multiple servers.
Steps to Enable
To Opt In to this feature:
- Go to the Optional Feature UI - Configuration and Administration > Property Management > Optional Features.
NOTE: Only the DBA.ADMIN user can access and use the Optional Features page.
- Select the Load Balance Topic Interface feature
- Run the Action Opt In
Tips And Considerations
Enabling this feature may delay the processing of the request for up to a minute as servers must poll for work.
It is recommended that all Optional Features be reviewed in the release they are delivered.
To review optional features go to the Optional Feature UI - Configuration and Administration > Property Management > Optional Features.
Optional Feature - Optimize Data Query Footprint
This feature provides you with a Restructured Data Query memory usage that allows the memory used by one custom event topic to be released when all work associated with that topic is completed. This memory optimization feature is applied to all Data Query topics by default, i.e., the feature set to Opt In = TRUE by default for both newly provisioned clients and existing customers who will be migrated to the 20A update. If for some reason there is a need to revert to the old memory usage, this can be accomplished by running the Opt Out Action.
This feature involved a number of lifetime and workflow changes focused on cleanup timing and event completion.
Steps to Enable
You don't need to do anything to enable this feature.
Tips And Considerations
Usage of this feature will suppress use of certain diagnostic features like Explanation that rely on full storage of workflow history.
It is recommended that all Optional Features be reviewed in the release they are delivered.
To review optional features go to the Optional Feature UI - Configuration and Administration > Property Management > Optional Features.
Version this Optional Feature was Introduced 20A.
The Optimize Data Query Footprint was delivered with Opted In = Yes.
Provide the Ability to Create Users for Calling OBIEE/BIPublisher APIs
This feature is for those clients who are currently using the OBIEE or BIPublisher APIs. Prior to the 20A update, all users were able to call the OBIEE/BIPublisher APIs. Starting with 20A, you must create a specific user for calling the OBIEE/BIPublisher APIs. This feature provides you with the user management configuration changes required to create a user to call the OBIEE/BIPublisher APIs.
Specifically, in the User Manager, you now have a OBIEE Non-SSO User check box that when checked will allow the user to directly access OBIEE via an non-SSO URL. This means that you can use the Oracle Business Intelligence Cloud Service (BICS) data synchronization tool to extract data from the cloud using the My Oracle Support (MOS) note 2386753.1.
Steps to Enable
This page is accessed via Configuration and Administration > User Management > User Manager. You must be logged in as Administrator.
- Select the OBIEE Non-SSO User check box to control whether the OTM user is added as a standalone (i.e. LDAP) user in OBIEE. This allows users to log in directly to OBIEE with their OTM User ID.
- The OBIEE Non-SSO check box allows you to directly access OBIEE via a non-SSO URL. T
- If you select this check box, you must also specify the BI role of BI Consumer or the connection between the OTM user and the WebLogic user will not be made.
- When entering a password, you must take into consideration the password restrictions of both WebLogic LDAP and OTM or you will see an error.
- It is recommended that you create a separate user with the OBIEE Non-SSO User check box selected since this user will not be able to access Analytics in the normal way.
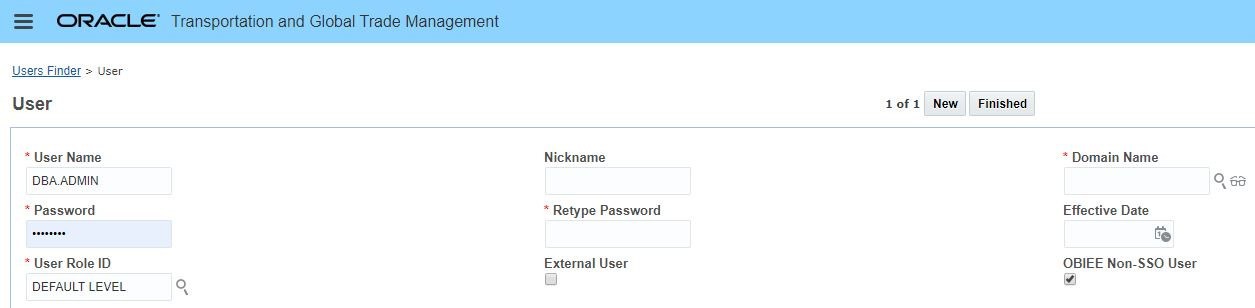
OBIEE Non-SSO User Check Box
This feature provides you, the DBA, with an Archived Documents finder and Finder Results along with a View action that will allow you to search for and view your archived documents.
You will find this page by navigating to Business Process Automation > Document Management > Archived Documents.
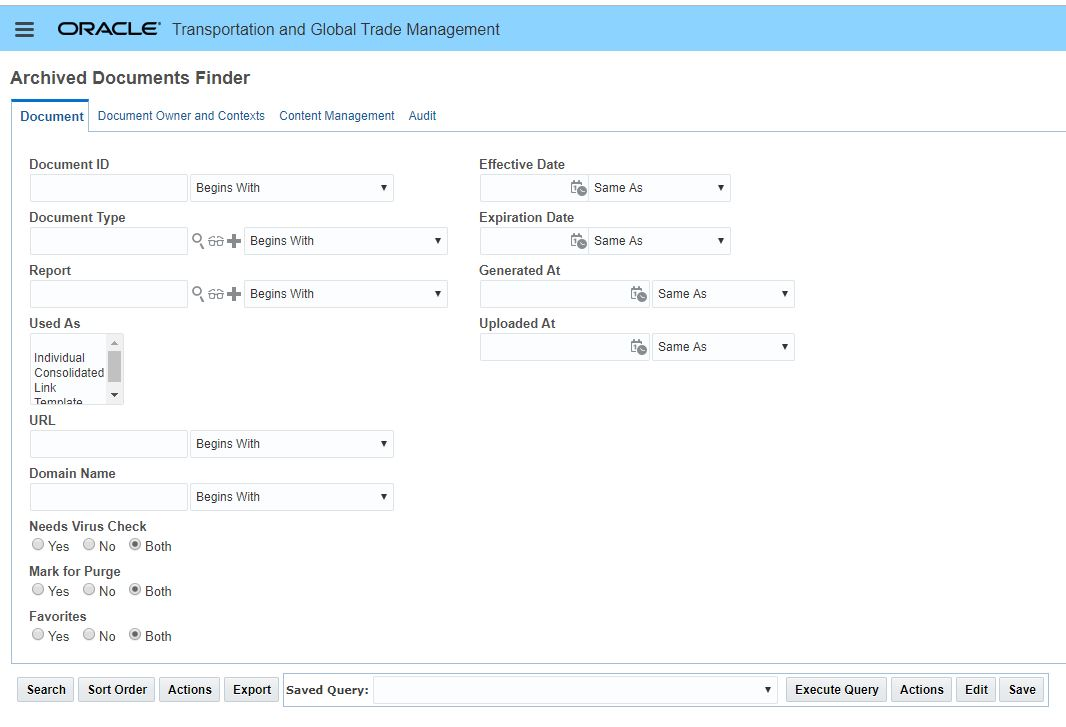
Archived Documents Finder
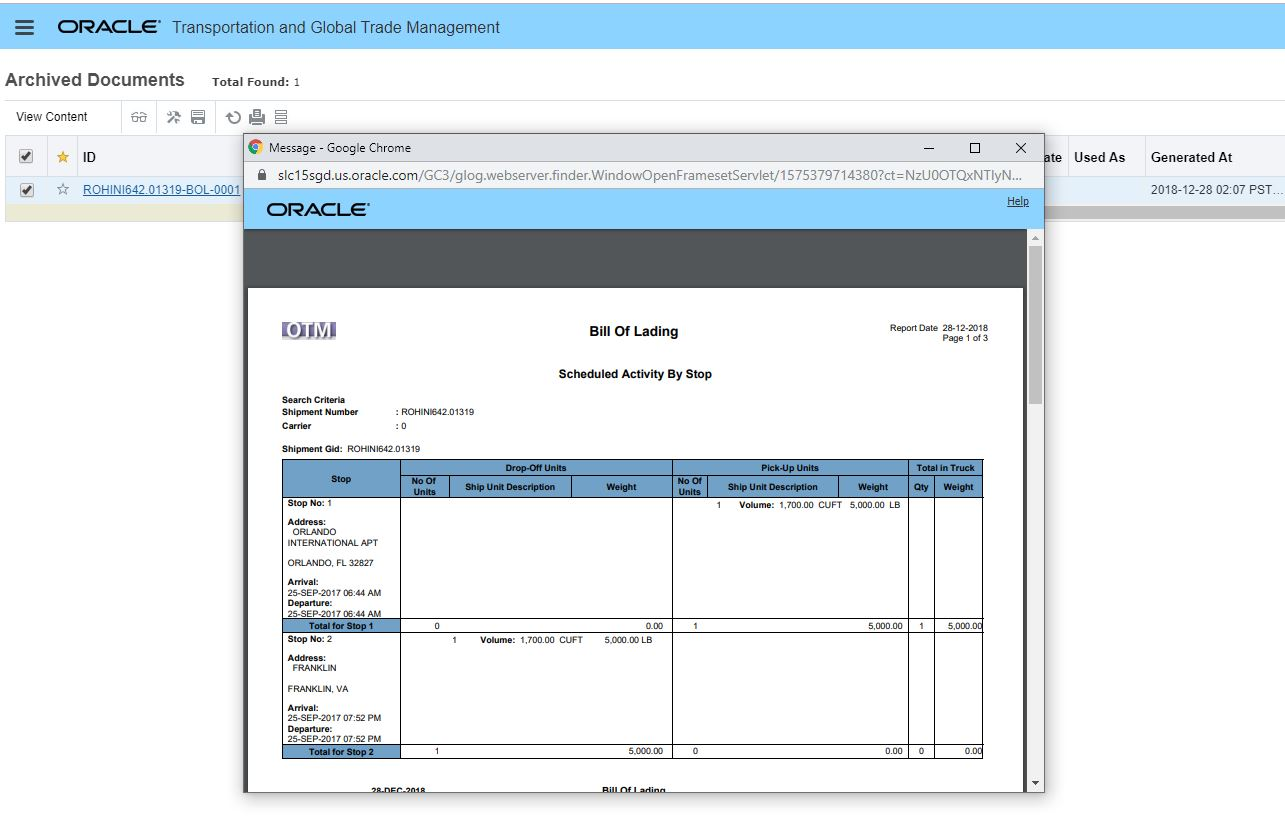
Archived Documents - View Content
Steps to Enable
You don't need to do anything to enable this feature.
Access Requirements
- Administrator
Generate Document Action Enhancement
The enhanced Generate Document action provides the below capabilities:
- Ability to generate a single document for multiple objects. For example, generate single 'Certificate Of Origin' for multiple Campaign Lines.
- Ability to update the content of the consolidated document, which in turn will reflect across the documents linked to it.
The Generate Document enhancement supports a variety of use cases based on the document type being considered and that document types attributes.
You can generate a single consolidated document for multiple objects using this action. For example, you can generate a single Certificate Of Origin for multiple campaign lines at the same time.
If you select multiple objects and a document type of 'consolidated', then a consolidated document and corresponding link documents are generated for the objects. Otherwise, only individual documents are generated for the objects selected.
If you select multiple objects and a document type of 'standard', then standard link documents are created. Else, if the document type is 'consolidated' then ad hoc link documents are created along with the consolidated document for the selected objects.
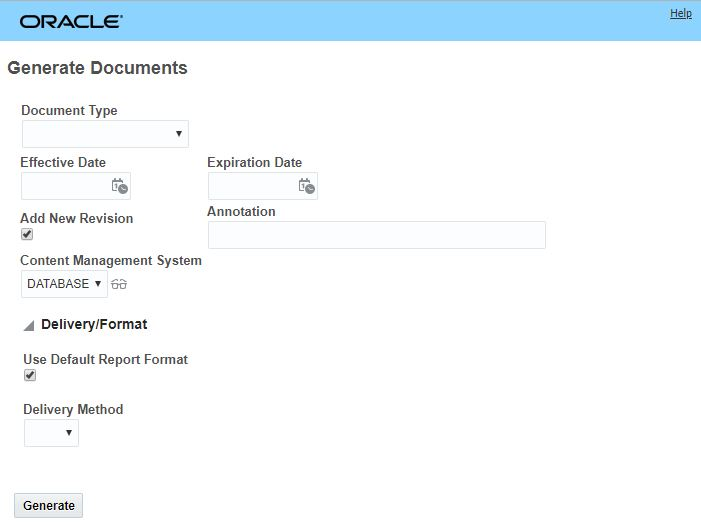
Generate Document Action
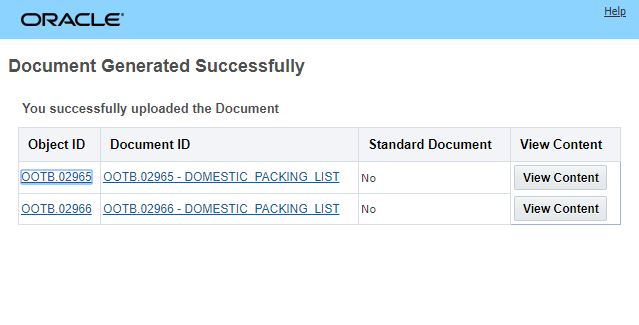
Generate Document Action Result
Steps to Enable
You don't need to do anything to enable this feature.
Tips And Considerations
The document must be based on a report for this action to function.
The Generate Document action is only available on the OTM Shipment, GTM Campaign, and GTM Campaign Line managers.
It is recommended that both the document type and the report should either be consolidated or neither should be consolidated for the report generation to work properly.
GTM and OTM Shared Saved Queries for Location, Contact and Item
This feature provides you with consistent access to your saved queries across OTM and GTM for Locations, Contact and Items. You can now define a saved query for your Locations, or Contacts or Items in either the GTM or OTM managers for these objects and the same saved query will be available for use in both the OTM and GTM managers for these objects.
Steps to Enable
You don't need to do anything to enable this feature.
View Item ID and Item Name Across Item Tabs
This feature provides you with visibility to an item's ID and Name as you move across the Item tabs. Having visibility to an Item's Item ID and Item Name while entering or viewing an Item will help insure that the proper item configuration has been provided.
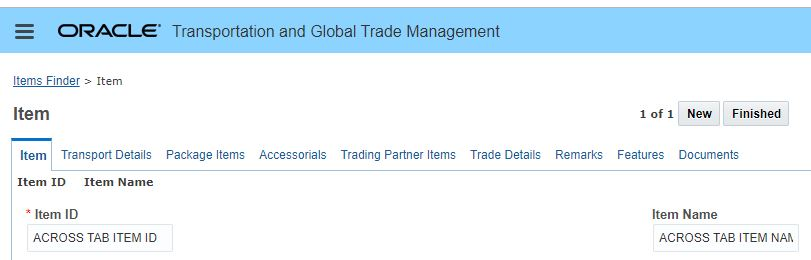
Item ID and Item Name Entry
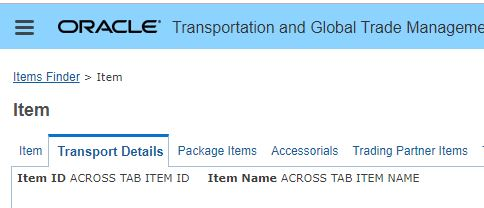
Transport Details Tab Item ID and Item Name Visibility Example
Steps to Enable
You don't need to do anything to enable this feature.
The PUBLIC data provided for Incoterms - Incoterm ID and Incoterm Description - has been updated to match the Incoterms 2020 rules released by the International Chamber of Commerce (ICC). The new Incoterm rules go into effect on January 1, 2020.
Steps to Enable
You don't need to do anything to enable this feature.
Key Resources
For more information about the Incoterms® 2020 rule changes, visit the International Chamber of Commerce (ICC) website at https://2go.iccwbo.org/
The existing country code file that ships with OTM and GTM has been updated to address changes to country names. The following has been updated:
- Swaziland has been renamed to Eswatini. On the country code record, the Country Name has been updated to ESWATINI. All other data remains the same.
- King Mswati III announced the name change as part of 50th birthday celebration of the country.
- Macedonia, the Former Yugoslav Republic has been renamed to North Macedonia. On the country code record, the Country Name has been updated to MACEDONIA, NORTH. All other data remains the same.
- Changed by referendum after a 27 year dispute.
Steps to Enable
As part of the install or update to this release, the country_code.csv file must be uploaded to update this information.
Oracle Transportation Management (Base)
The 18C High Volume Lines Feature allows you to load all of your detailed line level information - like different style, color or size information - into your Order Base Lines. The Order Configuration Aggregate Lines capability then provides you with the ability to aggregates the detailed lines (based on the configurable criteria) into aggregated lines on the Order Release - the aggregated Order Release Line data can then be used for planning purposes - with the benefit of reducing the number of lines considered in optimization..
The new Order Base Line Allocation feature provides you with the ability to perform cost allocation back to the detailed (non-aggregated) Order Base Line information providing you with the ability to allocate your transportation cost back to your detailed line level while still planning at an aggregated level.
Capabilities provided with this feature include:
- New Allocation Method and Allocation Rule for Order Base Line
- New metrics related to Order Base Line Allocation Method
- Ability to allocate the Shipment Cost/Voucher/Bill to the Order Base Line
- Include order base allocation details in Shipment, Voucher, Bill and Order Base outbound transmissions
Steps to Enable
To enable this feature you will need to create or modify an Allocation Rule and associated Allocation Rule Detail so that the new OB Line option is used as a Basis.
Ahead/Late Visibility Enhancement
The Ahead/Late Visibility feature provides you with the assorted tools you need (agent actions, new data base fields) to configure and set the Ahead/Late information on your shipments and tracking events.
With this feature, you can:
- Compare the planned delivery time on your shipment to the estimated time of arrival from the latest tracking
- Calculate the time differences between these times
- Determine the Ahead/Late value (Ahead, Late, On Time, etc.) that will be populated on the shipment and tracking event
- Set the threshold indicators (Green/Yellow/Red) on the shipment, tracking event and map view based on Ahead/Late calculation
- Populate the shipment and tracking event with the Ahead/Late Time
On the Shipment Manager Tracking Tab, you will now see the fields added to display the calculated Ahead/Late Time, Ahead/Late value and the current Estimate Time of Arrival.

Ahead/Late Added to Shipment Tracking Tab
The Tracking Event Finder has been enhanced to allow you to search for tracking events based on Ahead/Late Time, Ahead Late value.

Ahead/Late Added to Tracking Event Finder
In the Map View - your visibility to the current status regarding Ahead/Late is available on the Shipment pop-up as well as visually through the use of indicator color-coding.
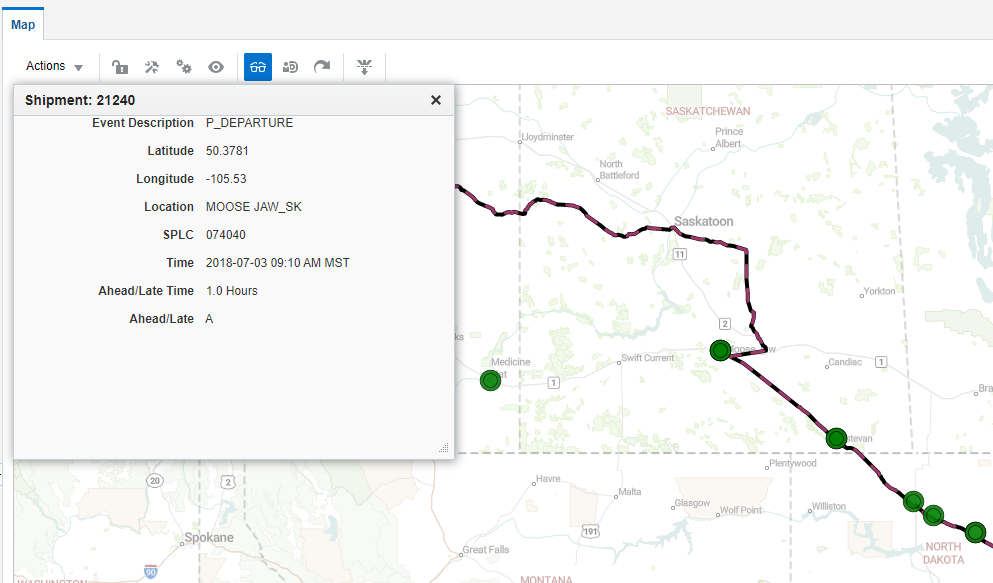
Ahead/Late Map Rendering
The Ahead/Late supports the following Ahead/Late values:
- A – Ahead of Schedule
- O – On Time
- L – Late
- T – Tardy (This can mean a degree of lateness depending on the user)
- B – Bad Order
- H – Held
- N – No Bill
- Y – Constructive Placed
- Z – Actual Placed
Steps to Enable
To benefit from this feature - you will want to configure an automation agent to:
- Match a tracking event to a shipment
- Assign the estimated time on the tracking event in a variable
- Assign the equivalent time from the shipment to a variable
- Compare the two variables and calculate the difference and store that value
- Then - based on value (late/early amount) setup thresholds for setting the following:
- Ahead/Late value - (A – Ahead of Schedule, O – On Time, L – Late, etc.)
- The indicator - (Green/Yellow/Red)
For example, the agent below provides some guidance on the possible setup and flow.
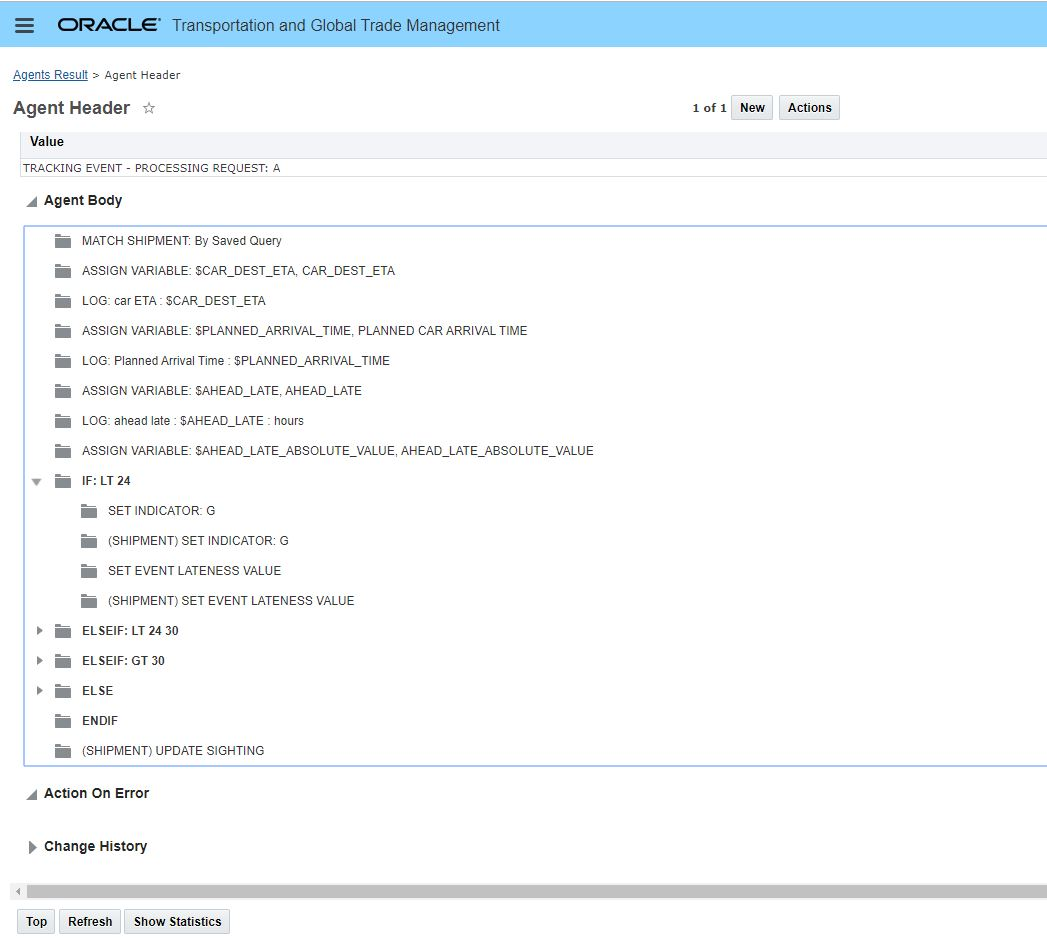
Ahead/Late Sample Agent
Tips And Considerations
Populating your tracking events and shipments with Ahead/Late information will increase the value of the Logistics Pipeline view.
A sample Automation Agent Agent ID = AHEAD_LATE SAMPLE - ARRIVAL EVENT has been provided to help guide you in the use and configuration of the new capabilities delivered with this feature.
This feature provides you with a summarized tracking event view into your shipments - including visibility into the current ETA (expected time of arrival) of the shipment and whether the current ETA is considered to be ahead of schedule, on-time or late. The Logistics Pipeline also provides access to two shipment related actions: Map Shipments and View Shipment Tracking Events.
This page is accessed via Shipment Management > Visibility > Logistics Pipeline.

Logistics Pipeline
The Logistics Pipeline finder results provides a consolidated view into the following types of information related to the last tracking/most recent tracking event received:
- First Equipment Initial and First Equipment Number
- Sighting Location ID
- Sighting Date
- Reported Event
- Reporting SCAC
- Equipment Destination
- Estimated Time of Arrival
- Ahead/Late Time - calculated amount of time the shipment is considered Ahead/Late
- Ahead/Late - Indicator for Ahead/Late Time - O - On Time, B - Bad Order, Y - Constructive Placed, L - Late, N - No Bill, T - Tardy
- Source Location ID
- Destination Location ID
- Sole Packaged Item
- Total Gross Weight
- Total Gross Volume
Steps to Enable
You don't need to do anything to enable this feature.
Tips And Considerations
The feature requires no setup - however to take full advantage of the view provided - it is recommended that the Ahead/Late feature be setup.
HERE Fleet Telematics API - Weekend Restrictions Considered for Direct Shipments
With this feature you now have the ability to use the HERE Fleet Telematics API to consider European legislated truck driving restrictions when planning direct (non-multi-stop) shipments in OTM. When enabled - the time and distance calculations for your direct shipments will consider any driving restrictions that apply considering weekend restrictions, public holiday restrictions or nighttime driving restrictions that apply. As part of the driving restriction evaluation, Here.com will optimize the driving route by either circumventing the restriction or waiting until the restriction ends.
Example of the Driving Bans supported by:
- Poland Driving Ban:
- Evening before Public holiday 18:00 to 22:00
- Public Holiday from 08:00 to 22:00
- Germany Driving Ban:
- Saturday 07:00 to 20:00
- Sunday & Public Holidays 00:00 and 22:00
- France Driving Ban:
- Friday 22:00 to 24:00
- Saturday 00:00 to 24:00
- Sunday & Public Holidays 00:00 and 22:00
- Day before Public Holiday 22:00 to 24:00
- Spain Driving Ban:
- No general ban on Sundays and public holidays. There are only regional driving bans and concerning the ADR goods.
When using this feature HERE does the following:
- Updates the shipment with information related to the transit time and distance,
- Will update the stop time at the destination stop with any wait time associated with any driving restrictions encountered in the route planned by HERE,
- Will include - in the destination stop time - any rest time related to hours of service rules HERE used in calculating the route - i.e., rest time calculated by HERE.
Steps to Enable
- You need to use the current host URL for HERE Fleet Telematics to make the desired request for rest times.
- The Here.Com External Distance Engine setup must include the Parameter Weekend Restrictions with the value Yes (Using Fleet Telematics) selected.
- The new custom route URL requires an additional mandatory field (driver_cost=30) for Weekend Restrictions as suggested by HERE.
Tips And Considerations
- The Weekend Restrictions feature only works with direct shipments - attempting to use the Weekend Restriction for a Multi stop shipment will result in an error message and the rate offering option will be skipped.

Multi-Stop Weekend Restrictions Error Message
- When the HERE weekend restrictions are enabled, OTM's hours of service (HOS) rules on the rate service (from either the shipment or the driver) are ignored.
PC*MILER Web - Favor and Avoid
This feature provides you with the ability to use a set of Route Modifiers or all of the PC*MILER Web Route Modifier Sets (with Favor and Avoid route modifiers) that you have configured and saved on the PC*MILER Web service using the PC*MILER Web Content Tools.
Inside of PC*MILER Web, the Favor and Avoid route modifiers allow to modify the routing in the following ways:
- Avoid: An avoided road segment is effectively treated as if it were closed unless no other road can be used for the route or if the total trip distance would be unacceptably inefficient.
- Favor: A favored road segment will be used in a route unless it is not practical to do so.
Steps to Enable
- Set up your Favor and Avoid Route Modifiers using the PC*MILER Web Content Tool.
- Go to the External Distance Engine page. This page is accessed via Shipment Management > Power Data > Geography > External Distance Engine.
- Select the External Engine Type = ALK
- Select the AVOIDS_AND_FAVORS_SETIDS parameter
- To use all the Route Modifier Set IDs setup for your API Key in PC*MILER Web set the Value to '-1'
- To apply specific SET IDs, add the set IDs as comma-separated values.
Key Resources
Information about using the PC*MILER Web Content Tool to create new Avoid or Favor route modifications can be found on the PC*MILER Web SUPPORT CENTER site . Go to: https://support.pcmiler.com/en/support/solutions
PC*MILER Web - Governor Road Speed
This feature provides you the ability to configure and use the Governor Road Speed feature provided by PC*MILER Web (ALK). When the Governor Road Speed parameter is configured, PC*MILER Web will use the Governor Road Speed as the maximum average road speed for doing route calculations. The Governor Road Speed will override all other road speeds that are greater than the Governor Road Speed value. The valid values for the Governor Road Speed parameter are between 1 and 100 mph, or 1 and 161 kph determined by DistanceUnits.
Steps to Enable
- Got to Shipment Management > Power Data > Geography > External Distance Engine.
- Select the External Engine Type = ALK
- Select the Parameter Governor Speed Limit
- Provide the desired/valid Governor Road Speed - a value between 1 and 100 mph, or 1 and 161 kph.
Tender Type Element Added to PlannedShipment XML
This feature adds the Tender Type element to the outbound PlannedShipment XML. The Tender Type element, with the associated values (Ordinary, Broadcast Tender, Spot Bid), will provide recipients with an indication of the response expected.
For example:
- For an Ordinary tender the expected response is Accept or Reject,
- For a Spot Bid the expected response is for the recipient to provide their charge for accepting the shipment.
Steps to Enable
You don't need to do anything to enable this feature.
SMC³ CarrierConnect XL 3.0 - Ability to Discount by Movement Type
This feature provides you with the ability to define discounts based on the Movement Type that is provided by the SMC³ CarrierConnect XL 3.0 version. You are able to define a different set of discounts for each of the Movement Types available/required.
With the upgrade to CarrierConnect XL 3.0 the interaction between OTM and SMC³ Rateware XL and CarrierConnect XL 3.0 is now handled using two independent calls. In the first call, OTM calls CarrierConnect 3.0 to get transit time information (and with this feature) the Movement Type information for the shipment lane to be rated. The information returned by CarrierConnect in the first call is then used by OTM to formulate the second call to Rateware XL - in this case - OTM will use the Movement Type to identify the discount values that should be provided to Rateware XL for rating..
Carrier Connect XL movement type designators are:
- DIRECT – originating carrier is in control of a shipment for the entire transit time
- INDIRECT – shipment is handed off to a different carrier in transit
- PARTNER – shipment is handed off to a partner carrier in transit
- CUSTOM – adds flexibility for a carrier to designate a special type of movement type that is different from DIRECT, INDIRECT, or PARTNER
Steps to Enable
- If you do not have different discounts by Movement Type then you do not need to make any changes to your Rate Offering or Rate Records - OTM will treat the discount entry that does not specify a Movement Type as the default discount that should be applied.
- If you want to create different discounts by Movement Type - Go to Contract and Rate Management > Contract Management > Rate Offering > Attributes tab and select the SMC Discount button.

SMC Discount
- Then enter the Movement Type (Direct, Indirect, Partner, Custom) and the Discounts that apply. Repeat for all the different Movement Type discounts required.
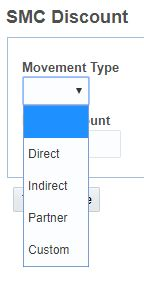
Movement Types
Tips And Considerations
The previous Rate Basis method for applying discounts for Direct and Indirect service points is no longer supported.

RBI Based Direct Indirect Point Discount Setup No Longer Supported
Reference Number Qualifier Check on Tender Accept in Online Booking/Tendering UI
This feature provides you with the ability to define a mandatory Shipment Reference Number Qualifier that must be provided by the Service Provider in the Online Booking/Tendering screen before a shipment can be accepted.
This capability is controlled with the property glog.tender.mandatoryShipmentRefNumberQual. When this property is set - the UI logic checks that the required Shipment Reference Number Qualifier has been provided and that the qualifier value entered is a number. If the Service Provider does not provide the necessary information they will receive a message.
For example, you can set the property to 'BOL'. Then for the Shipment Reference Qualifier, the service provider would need to enter 'BOL' and then enter a numeric value for the Shipment Reference Number as they accept the tender in the UI. This property does not affect accepting tenders via XML.
Steps to Enable
- Follow the instructions provided by the How to Set Properties from the OTM Application Instead of Manually Editing the glog.properties File (Doc ID 2177759.1)
- For the glog.tender.mandatoryShipmentRefNumberQual property specify the Shipment Reference Number Qualifier that should be required.
Tips And Considerations
This property requires that the Service Provider enter the specified Shipment Reference Number Qualifier on the Accept Tender UI. The logic does not check existing Shipment Reference Number Qualifiers that may already be on the shipment, the logic requires that the Shipment Reference Number Qualifier and Value (a number) must be provided on the Online Booking/Tendering Accept Tender UI.
Select All Added for Adding Line to Order Release Ship Unit
This feature provides you with the ability to select all of the lines for a new ship unit versus the previous option, which required you to add each line for a ship unit one at a time. The select all option is particularly helpful in situations where there are many lines on an order release, but only a few lines are not associated with the ship unit being built.
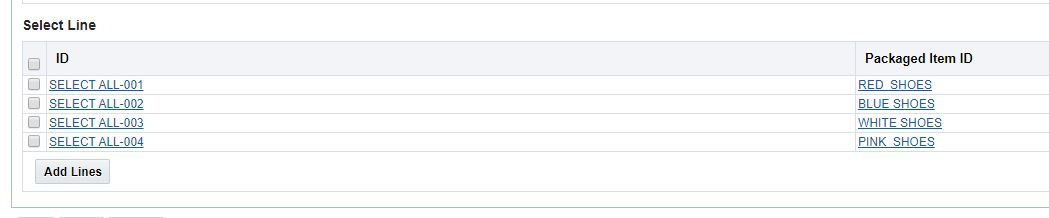
Select All Option for New Ship Unit Line Selection

Select All - All but One Line Selected to Create the Ship Unit
With the Select All option the user can easily create a Ship Unit that contains all the Lines, but one.
Steps to Enable
You don't need to do anything to enable this feature.
Documentation Now Available In HTML and PDF Format
With this feature you now have multiple options for working with the OTM/GTM documentation. The OTM/GTM documentation is now available in both an HTML as well as a PDF format.
For all of the documentation provided on docs.oracle.com you will now have the option to open the document either following the HTML link or the PDF link.
For example:
Getting Started with Oracle Cloud
HTML / PDF
The newly added HTML version of the documentation is indexed with the docs.oracle.com search tool, so the content is much easier to find. In addition, the HTML version of the documentation provides a more accessible view for the vision-impaired.
Steps to Enable
You don't need to do anything to enable this feature.
This feature provides you with visibility to the Equipment Initial and Equipment Number assigned to the first shipment equipment record assigned to a shipment. This feature also provides visibility to the Sole Packaged. Item. The Sole Packaged Item field will be populated when there is just one packaged item or commodity on the shipment otherwise it will be blank.
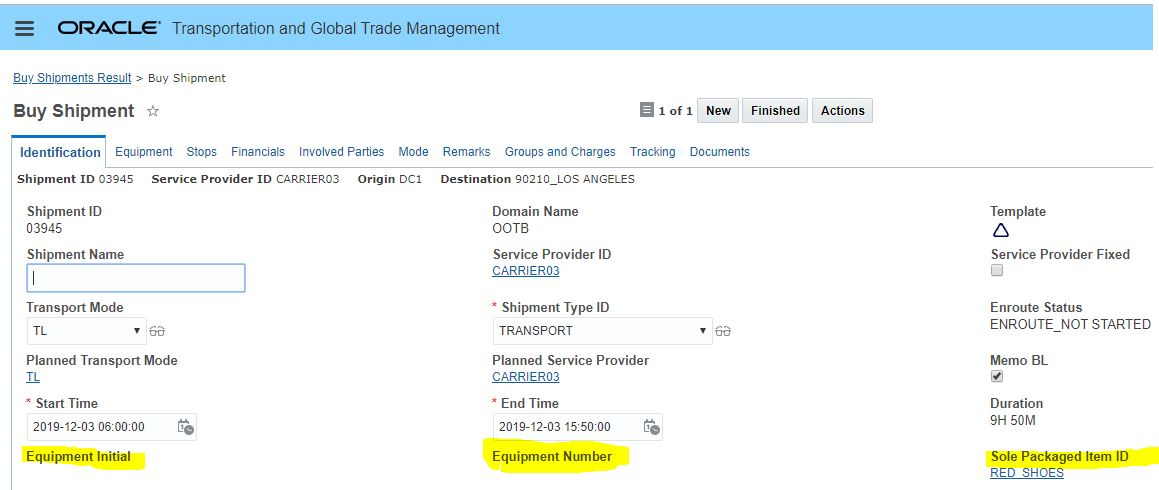
Shipment Edit with New Fields
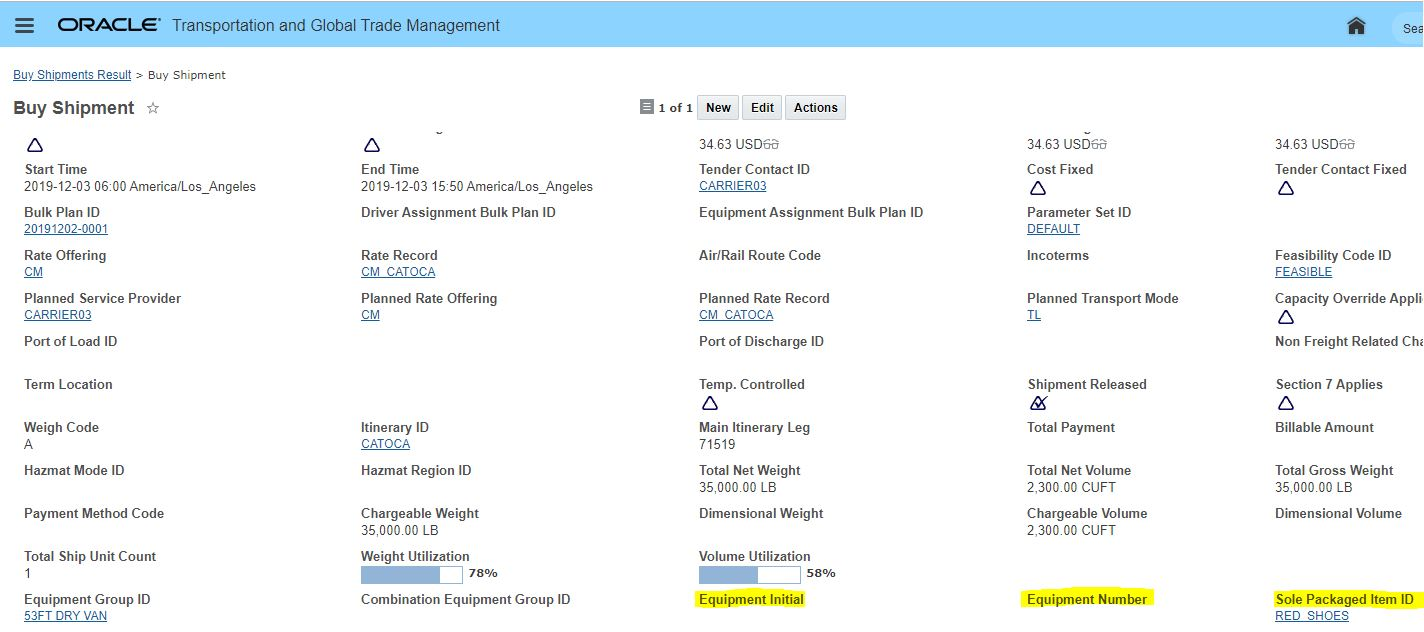
Shipment View with New Fields
Steps to Enable
You don't need to do anything to enable this feature.
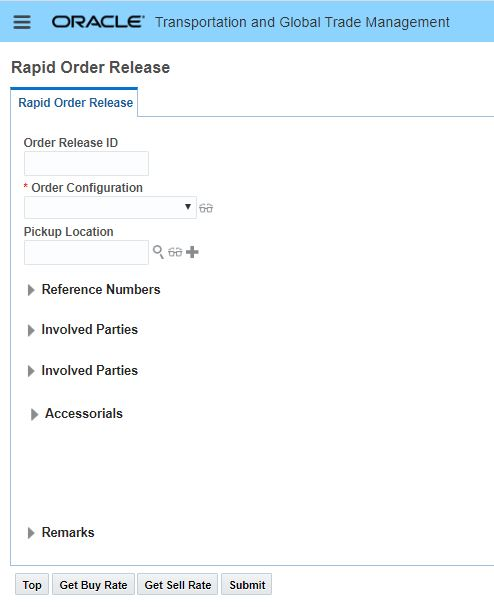
Rapid Order Release - Get Rates Configuration Enhancement
This feature provides users of the Rapid Order Entry screen with an improved configuration approach for selecting and displaying the Get Buy Rate and Get Sell Rate buttons options.
With this feature you now have the abiltity to easily configure the Rapid Order Entry screen to:
- Show both the Get Buy Rate and Get Sell Rate buttons (default setting),
Default - Show Get Buy and Get Sell
- Only show the Get Buy Rate or Get Sell Rate button,
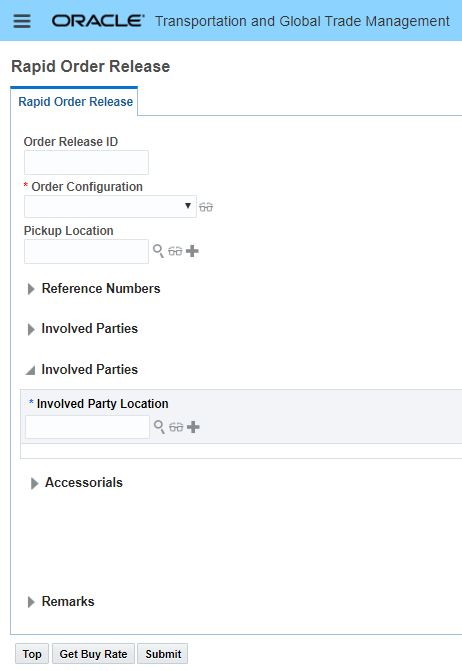
Get Buy
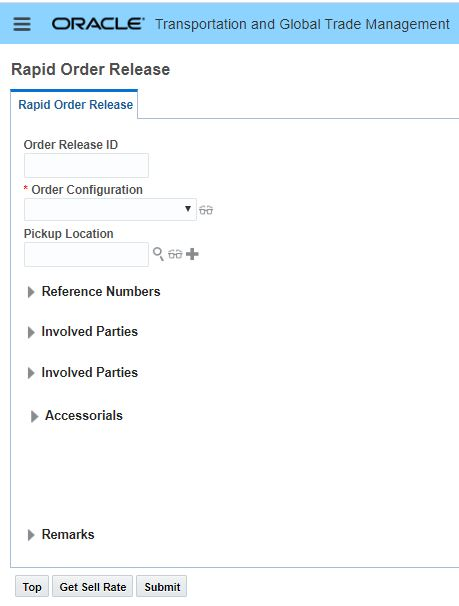
Get Sell
-
Hide the to Get Rates (Buy or Sell) buttons completely.
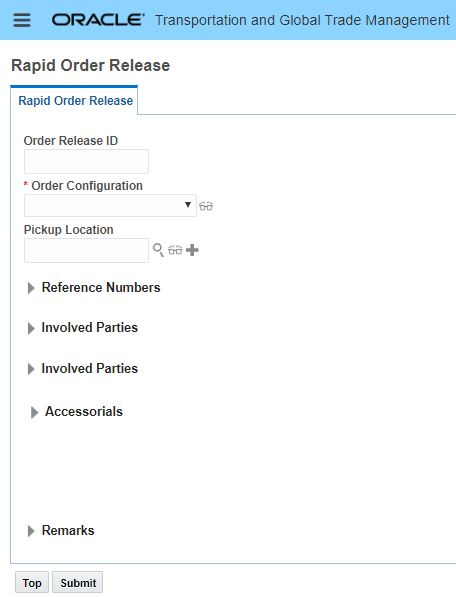
Hide Buy and Sell Get Rate Buttons
Steps to Enable
- Setup your Rapid Order Release Logic Configuration - select which option you want to have available for this Logic Configuration - Both or Buy or Sell or None.
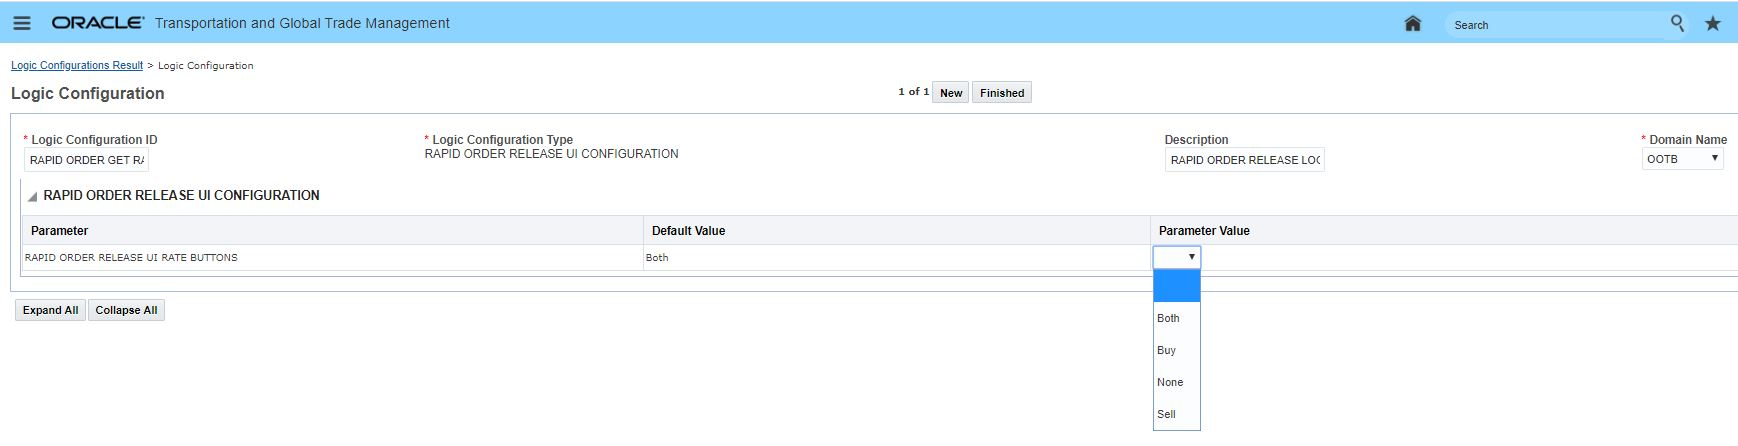 Rapid Order Release Logic Config
- In User Preferences - for the Rapid Order Release UI Configuration Preference select the value of the Logic Configuration you defined in step 1 that you want to use in the Rapid Order Release UI.
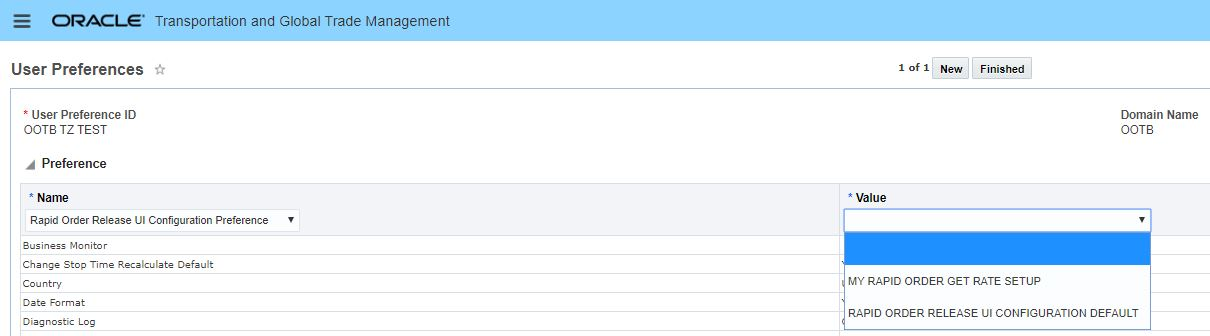
Rapid Order Release Get Rate User Preference
- Save the User Preference, Sign Out and then Log In to see the updated User Preference.
Tips And Considerations
NOTE: This feature replaces the property: glog.webserver.rapidorder.getrates which was used previously to support the Rapid Order Release UI Get Rates configuration. The new Logic Configuration and User Preference option provides you with more flexibility than was possible with the property driven approach, since property settings control the settings for the entire system and do not provide the option for more specific domain and/or user configuration.
Transportation Operational Planning
Load Configuration - Item Grouping Criteria
This feature provides you with the ability to select grouping criteria (by order, by ship unit or by order and ship unit) that will be used by the load configuration logic to keep the grouped items together in the equipment. This feature also seeks to reduce the splitting of the group that has been identified by the selected group criteria.
For example, when the ITEM GROUPING CRITERIA parameter is set to “1. Group by Order", all the items in each order are packed in continuum. In this case, while packing items of an order, if the equipment capacity is exhausted before an order is fully packed, the next equipment will be packed starting with the same order.
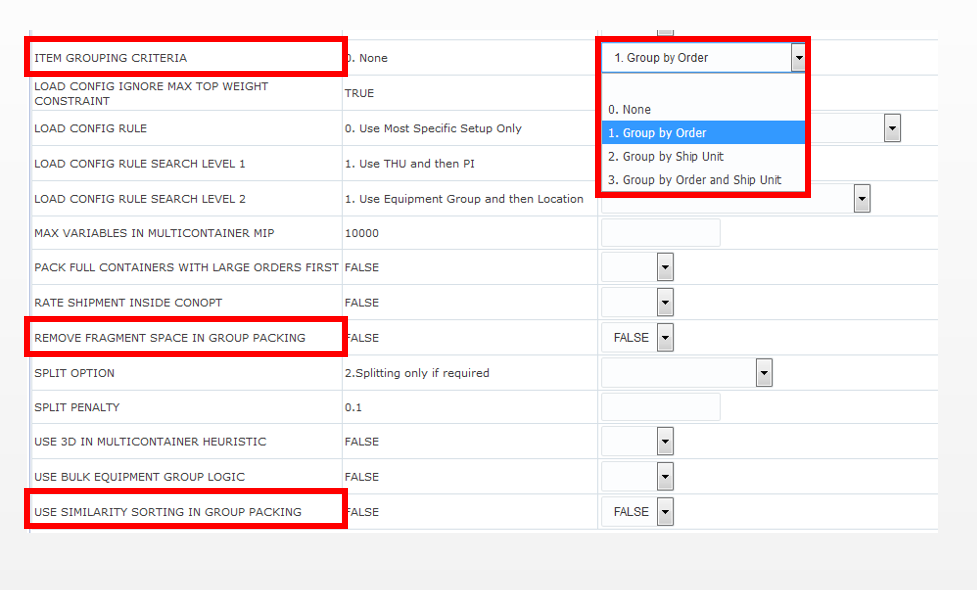
Group Packing Parameters
PARAMETER
In the container optimization tuning parameter section, the following parameters have been added:
- ITEM GROUPING CRITERIA: This provides an option for grouping items by a specified criteria and packs every group of items in continuum in the container.
- When the ITEM GROUPING CRITERIA parameter is set to 0. The group criteria is not considered.
- When the ITEM GROUPING CRITERIA parameter is set to 1. Group by Order, ship unit items in an order will be put in one group.
- When the ITEM GROUP CRITERIA is set to be 2. Group by Ship Unit, ship units with the same dimension across different order release will be put into one group.
- When the ITEM GROUP CRITERIA is set to be 3. Group by Order and Ship Unit, then ship units with the same dimension within the same order release will be put into one group.
- REMOVE FRAGMENT SPACE IN GROUP PACKING: {TRUE, FALSE(DEFAULT)}. This parameter controls the behavior for how fragmented space will be filled at the end of packing one group of items.
- When set to TRUE, OTM will not attempt to fill the fragmented space with items from a different group.
- When sent to FALSE, OTM will attempt to fill the fragmented space with items from a different group.
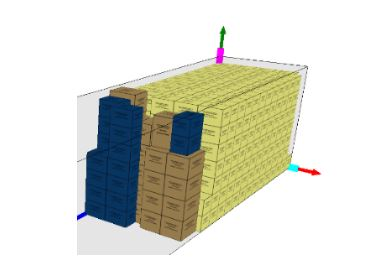
REMOVE FRAGMENT SPACE IN GROUP PACKING = TRUE
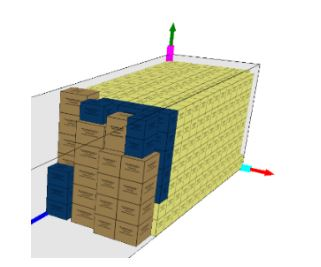
REMOVE FRAGMENT SPACE IN GROUP PACKING = FALSE
- USE SIMILARITY SORTING IN GROUP PACKING: {TRUE, FALSE(DEFAULT)}. This parameter controls how the packing item groups are sorted.
- When this parameter is off, the order is determined by the container optimization metric.
- When this parameter is on, the sorting behavior can be described as follows:
- The item group with largest dimension is the first group. When placing the i-th group, OTM selects the item group which has not appeared in the previous sequence and is most similar to the ( i - 1 )-th packing item group. By performing similarity sorting, OTM will produce a better placement for 3D loading.
Steps to Enable
The necessary container optimization tuning parameters must be set.
- ITEM GROUPING CRITERIA. This parameter controls the grouping
- REMOVE FRAGMENT SPACE IN GROUP PACKING: {TRUE, FALSE(DEFAULT)}. This parameter controls the behavior for how fragmented space will be filled at the end of packing one group of items.
- USE SIMILARITY SORTING IN GROUP PACKING: {TRUE, FALSE(DEFAULT)}. This parameter controls how the packing item groups are sorted
Tips And Considerations
The group packing approach can be used with all packing algorithms in OTM except Multicontainer MIP and Column Generation packing algorithms. In every algorithm, item groups are first sorted based on the container optimization metric and then packed one after the other starting with the largest group.
Support Splitting by Shipment Ship Unit Count in Conopt Merge
This feature provides you with an enhanced Conopt Merge algorithm splitting capability that will consider splitting shipment ship units that have been defined as a count when the split improves the solution quality by producing full-capacity shipments.
This new capability will be extremely useful for improving utilization in situations where orders are defined based on a ship unit count and the orders sizes fall into the less-than-truckload size range.
For example, given three orders releases all having the same source, but different destinations, and each order release defined based on a ship unit count, with each ship unit's gross weigh per ship unit entered as 5,000 pounds per ship unit - for a total of 30,000 pounds per order release. When these orders are planned using the new Conopt Merge functionality - OTM will generate 2 shipments that are utilized to 100% of the assigned equipment's capacity - (assuming 45,000 pounds as the capacity of the equipment group assigned) versus the previous non-spittable option which would have resulted in a solution requiring 3 shipments - 1 per order release.
Steps to Enable
- This new feature will be considered in situations where your orders have been defined based on a ship unit count and the order release is considered splittable, i.e., the Is Splittable flag has been checked.
- The Multistop Logic Configuration Multistop Consolidation Parameter = MULTISTOP CONSOLIDATION ALGORITHM TYPE must be set to 5.Conopt Merge
Tips And Considerations
Note that the other multistop algorithms (e.g., Savings algorithm) primarily try to minimize the total distance of the consolidated shipments, Conopt Merge's main objective is to maximize the capacity utilization of the consolidated shipments.
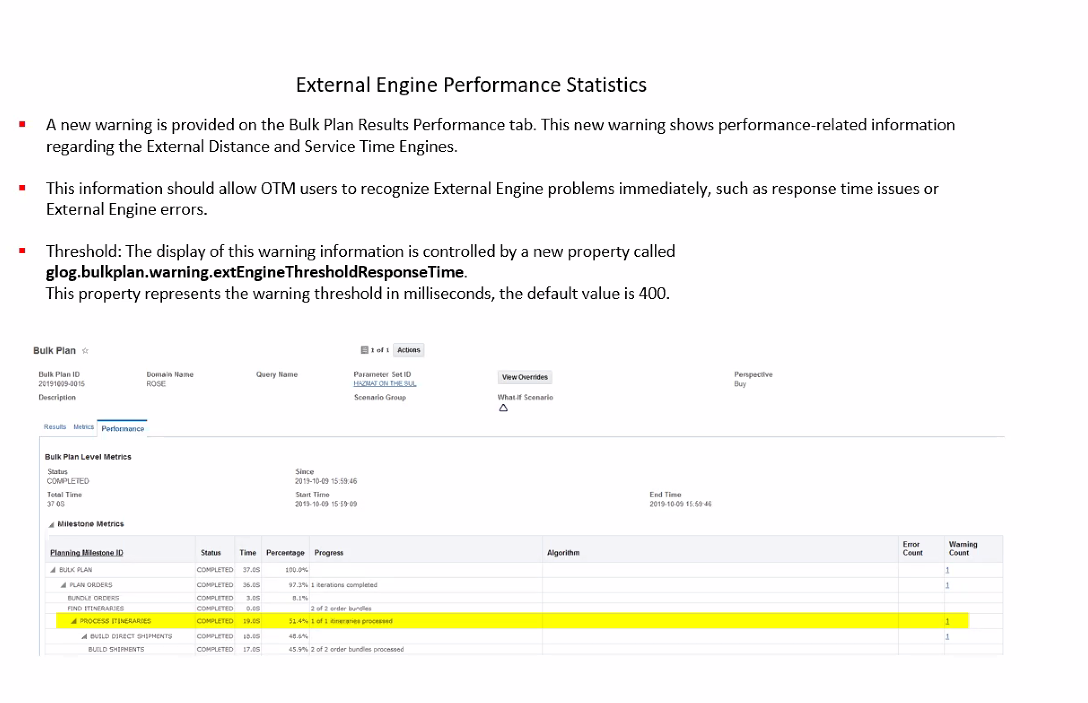
HERE and PC*MILER External Distance and Service Engine Bulk Plan Performance Statistics
This feature provides you with the ability to monitor the performance of your HERE or PC*MILER external distance and external service time engines so you can quickly identify potential performance issue in a bulk plan run that may be related to the calls made to these engines. In addition, this feature provides you with qualitative error messages that you will find beneficial when analyzing the results of a bulk plan.
The warning information provided by this feature can be found on the Bulk Plan Errors page, which is found on the Bulk Plan Results Performance tab.
For HERE and PC*MILER this feature will capture the following statistics:
- Number of Engine Hits - Number of the time that Distance/Service Engine is hit
- Number of Cache Hits - Number of times the caches are hit to fetch Distance/Service Time.
- Total Response Time - Sum of all the response times for all the hits to Distance/Service Engine in ms.
- Average Response Time - Average response time of hits to Distance/Service Engine in ms.
- Maximum Response Time - Highest response time of all hits to Distance/Service Engine in ms.
- Name of the Engines - The names of the Engines that are hit to bring distance or service
- URL - URL that is hit by the External Engine
- Error - In case of any error from the External Engine, only the first error is captured
Threshold: The display of this warning information is controlled by a new property called glog.bulkplan.warning.extEngineThresholdResponseTime.
- This property represents the warning threshold in milliseconds. The default is "400" (i.e., 400 milliseconds).
- This property can be changed by the user.
- The warning will be displayed when the average response time of either the External Distance Engine or External Service Engine exceeds this threshold value.
- The warning will also be displayed if the planning logic recognizes any External Engine error.
External Distance Service Engine issues
Steps to Enable
You don't need to do anything to enable this feature.
Tips And Considerations
This threshold warning property glog.bulkplan.warning.extEngineThresholdResponseTime default value is set to "400" (i.e., 400 milliseconds). You can adjust this time to increase or reduce the threshold used to generate a warning. Warnings will be displayed when the average response time of either the External Distance Engine or External Service Engine exceeds the threshold value
Refine Options Displays in Full Screen
This feature extends the viewable columns displayed when you select Refine Options as part of running the Show Routing Options action or the Show Network Routing Options action.

Previous Refine Options View
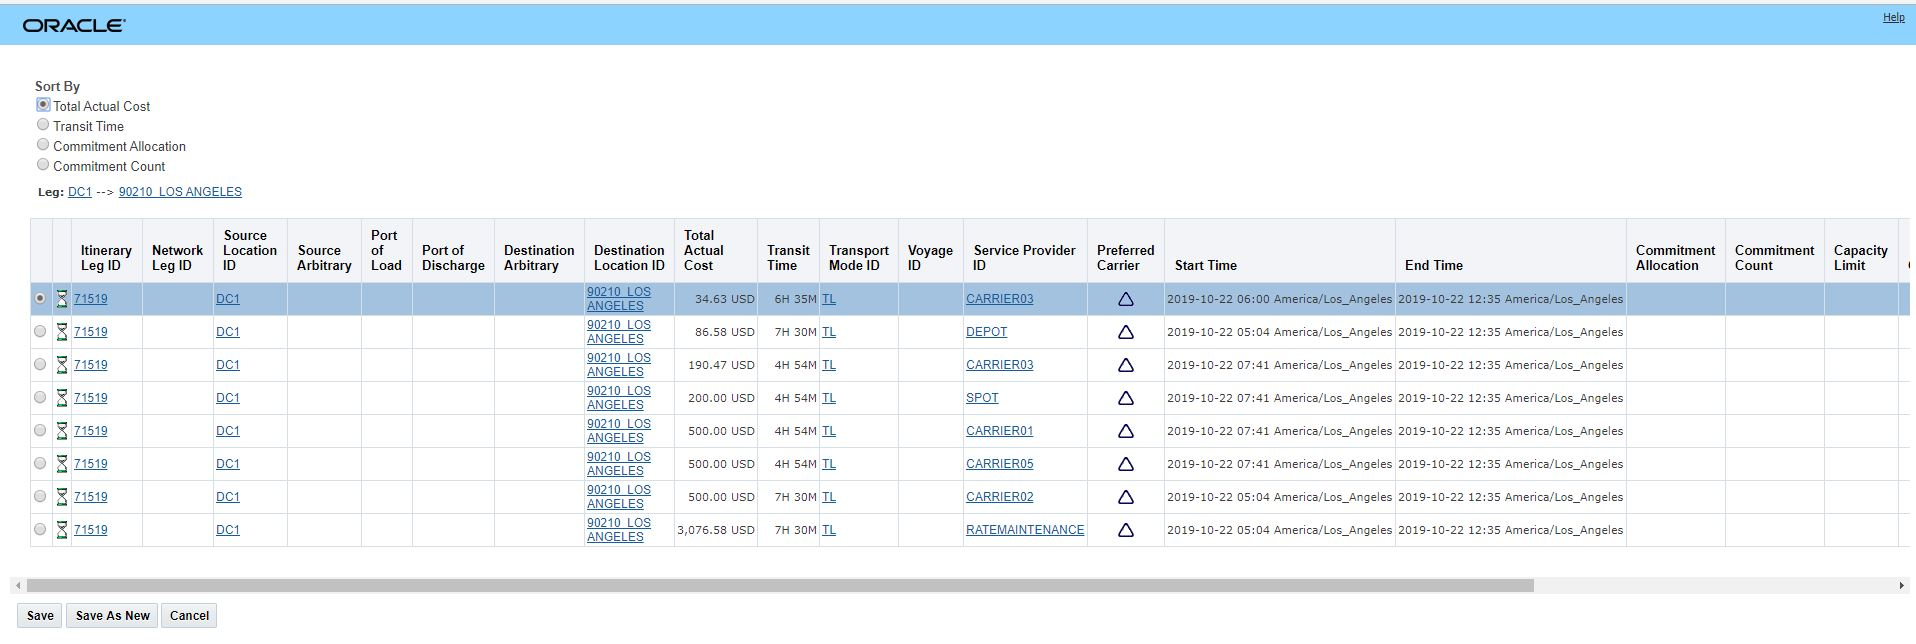
Full Screen Refine Options
Steps to Enable
You don't need to do anything to enable this feature.
Capacity Considered in Network Routing Route Step
The network routing planning step now considers the Service Provider Capacity in determining the best path through a defined network. This improvement in the network routing logic will avoid scenarios where the planning logic discovers the lack of capacity later in the planning process resulting in unscheduled orders or less than optional decisions regarding service provider assignment.
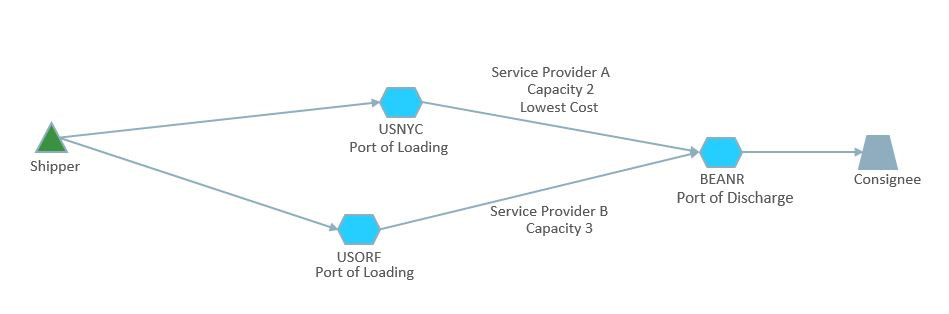
Capacity Considered in Network Routing
In the routing step inside of network routing, network routing will now consume the capacity on the USNYC to BEANR route first - using the lowest cost Service Provider A's capacity. Once that capacity is consumed, the remaining order movements will be routed using the unlimited (but more expensive) capacity on the USORF to BEANR route serviced by Service Provider B.
NR Route
Steps to Enable
You don't need to do anything to enable this feature.
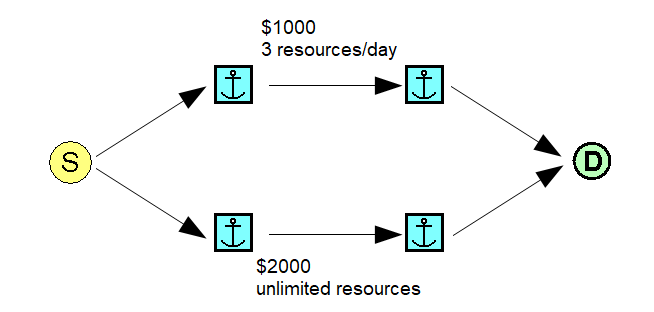
The Continuous Moves Out and Back feature provides you with the ability to create your continuous move tours so that the last shipment in the tour looks for opportunities to terminate the tour at a location that is near to the start of the first shipment in the continuous move tour.
The motivation for this feature is to better support scenarios where OTM's continuous planning logic is being used to plan fleet and/or dedicated fleet shipments where the desire is to have the last shipment in a tour return to the starting location/near the starting location of the tour.
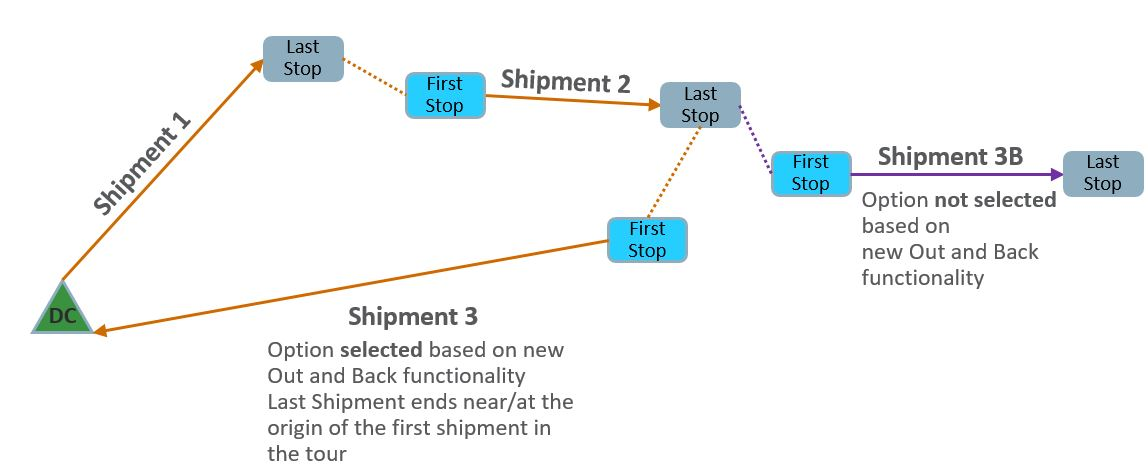
Continuous Move - Out and Back
Given the 4 shipments above to consider - where the last shipment to consider in the tour is Shipment 3 or Shipment 3B -- this feature provides you with the ability to favor assigning Shipment 3 to tour versus Shipment 3B.
Steps to Enable
To use this feature you will need to add a cost for returning from the end location of a continuous move to the start location of the continuous move tour using the CM RETURN DISTANCE COST FACTOR parameter, which is one of the parameters found in the Continuous Moves Logic Configuration.
In the CM Sequencing group of the Continuous Move Logic Configuration set a value for the CM RETURN DISTANCE FACTOR.
Note that as the setting is increased from zero (the default) the "cost" associated with returning from the end location of the continuous moves (CMs) last shipment back to the start location of the CM's first shipment is increased when considering the overall cost of the CM. The algorithm will - when considering shipments to add to a continuous move tour - look to minimize the cost of returning to the start location and will - all things being equal - attempt to select shipments that end closer to the start location.
This applies to both cost based and distance based CM algorithms. This extra cost only applies to CMs, not other shipment strings created with CM logic (e.g. work assignments, driver assignments). The extra cost is only used in determining CM formation. The cost is not persisted or added to any existing cost in any of the shipments associated with the CM.
Using this cost has the effect of creating CM shipment strings that form a "loop" such that the last shipment in the string ends closer to the start of the first shipment in the string.
The default of zero (0) has the same functionality as prior to addition of this parameter.
Dynamic Clustering to Consider Order Release Routing Constraints
This feature provides clients using the Dynamic Clustering algorithm with the ability to have the order release Routing Constraints constrain the routing options considered by the Dynamic Clustering algorithm. The order Routing Constrains will be considered when either or both of the Dynamic Clustering parameters are set to TRUE.
Steps to Enable
You don't need to do anything to enable this feature.
The Export Data to Zip File Input feature provides you with the ability to export the data required to run a bulk against for either a set of order releases (Bulk Plan Order Releases) or order movements (Bulk Plan Order Movements). The Import Planning Data feature then provides you with the ability to import the exported zip file into any server/domain that is running the same version of Oracle Transportation and Global Trade Management.
The Export Data to Zip File Input feature uses a sophisticated data crawler to identify and export all the related itineraries and rates required to bulk plan a set of order releases or order movements. The exported data are in .csv file format and are compressed into a .zip file. You can have the exported data sent to an email address as a .zop file if you provide a contact in the Contact ID field. A .zop file is sent since most email servers do not allow the sending of .zip files. If no contact is provided, you can download the file locally. The export option allows for a straight export as well as exporting with masking. Masking provides you with the ability to mask key/sensitive data - like names, IDs etc.
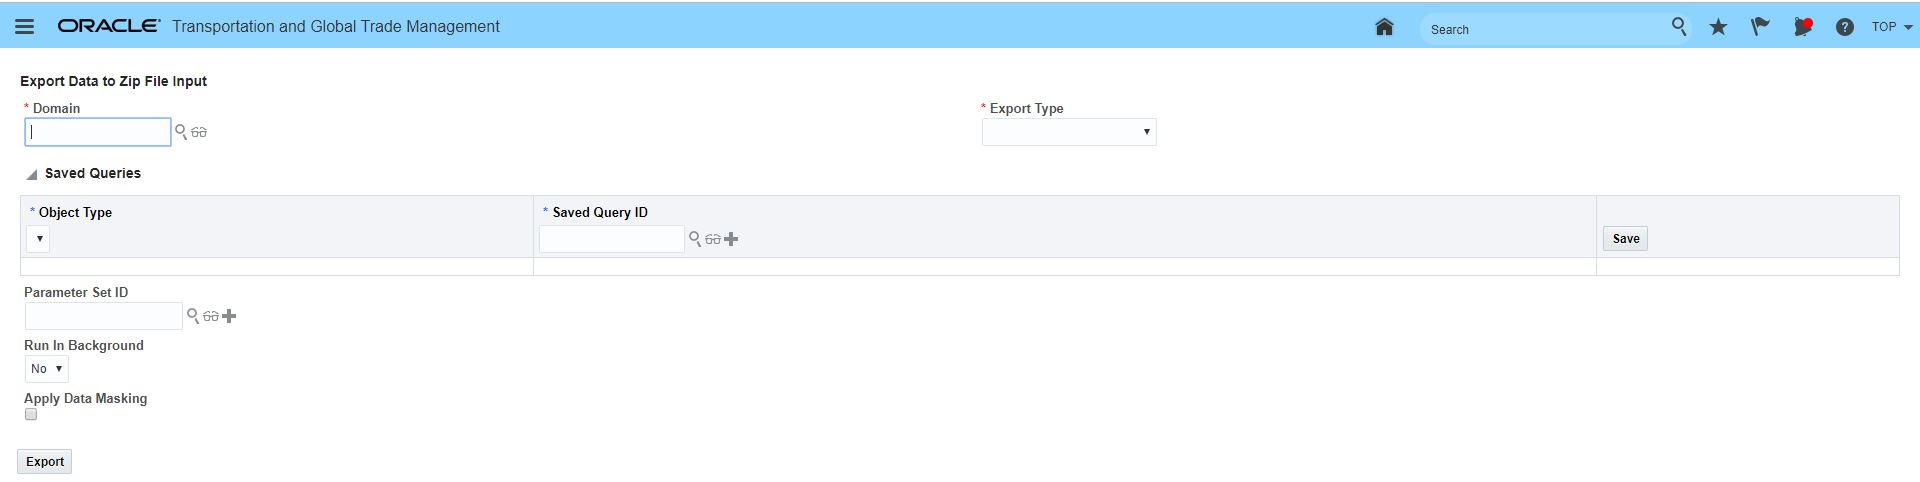
Export Data to Zip File Input
To export planning data to a zip file:
- Go to Operational Planning > Planning Data Import/Export > Export Planning Data.
- Select an export Domain. This is the domain from which the data will be exported. If the data includes reference data in other domains and the reference data is visible to the selected domain then the reference data is also exported.
- Select an Export Type of either Bulk Plan Order Releases or Bulk Plan Order Movements.
-
You can also add saved queries for the Object Types of Itinerary and Rate Geo. When your specify the saved queries for Itineraries and Rate Geos the export logic directly pulls the objects mentioned in the query and their related objects.
- Specify a Parameter Set ID. If you do not specify a parameter set ID, the default parameter set ID of the domain is exported. If the domain does not have a default parameter set defined, then no parameter set is exported.
- To run the action in the background, select Yes for Run in Background. If you selected Yes for Run in Background, select a contact in the Contact ID field.
- Optionally, select the Apply Data Masking check box to mask specific data in the exported .csv files.
- Click Export. If you selected Yes for Run in Background, you see the message stating that when the action finishes an e-mail will be sent to the contact. Click OK on the message and you return to the Export Data To Zip File Input page. If you selected No for Run Job in Background, you see Export Data to Zip File Result page.
EXPORT RESULTS SCREEN
This Export Data to Zip File Results page contains information about the export process status and objects exported. You can monitor the process and status to determine when the export is complete. The object grid allows you to see the count of the objects exported. The system validates the data for any missing primary keys, missing value for non-nullable columns, etc. The Message/Results field at the top of the page contains displays the current status in a message.
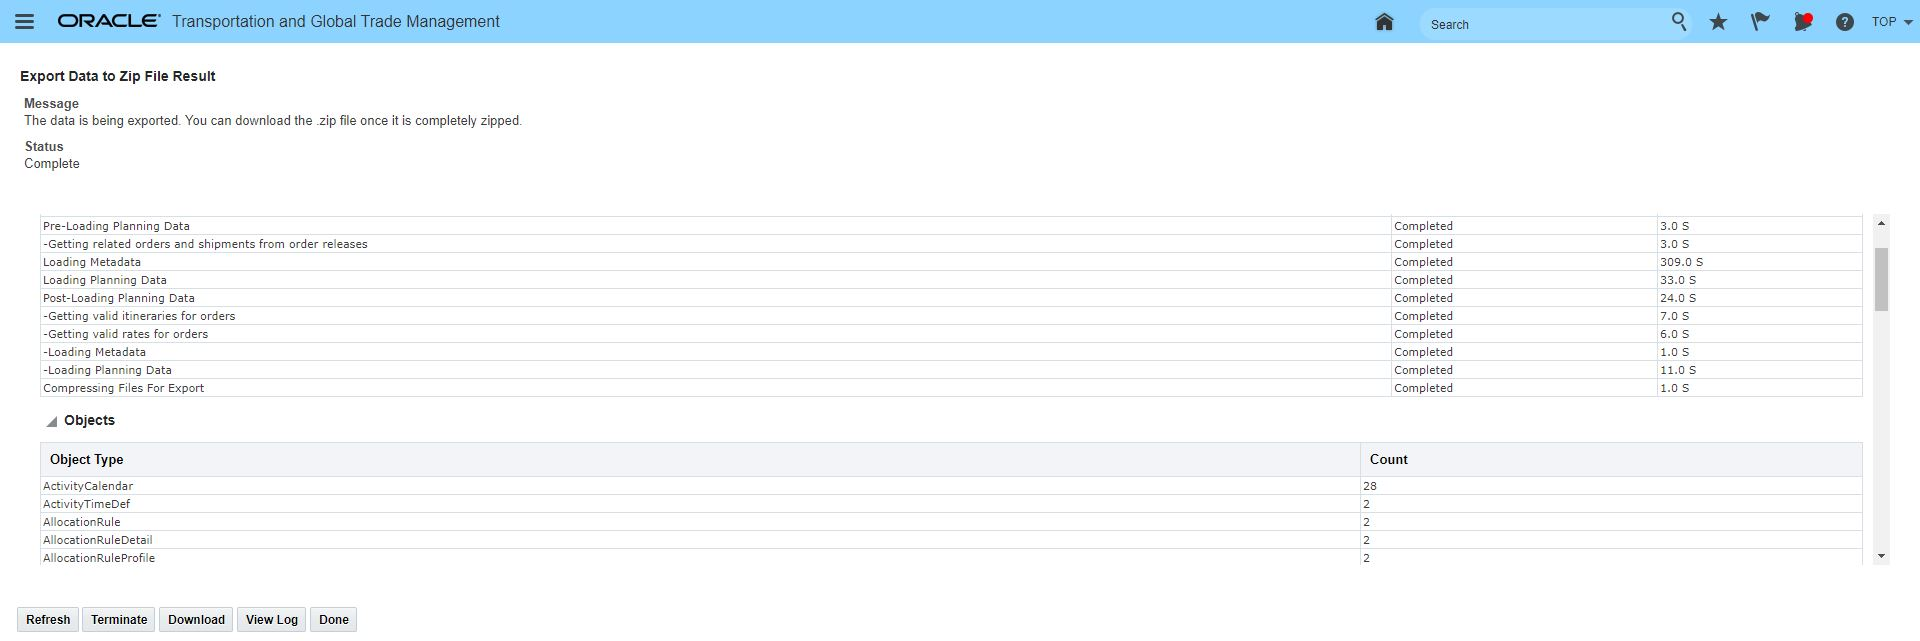
Export Data to Zip File Result
On the Results screen, you see the following buttons depending on the status of the export:
- Refresh: Click to update the page and monitor how the export is progressing. You can use a combination of the Status and Time to monitor a running process.
- Terminate: For some export scenarios, it may take a significant amount of time to gather and download data. Click Terminate to stop the export process if it is taking too long.
- Download: Click to download a .zip file. The .zip file contains many CSV files; one for each OTM object. The .zip file also contains a single XML file (manifest.xml) which includes domain names, names of all of the .csv files, OTM objects, and other metadata. You can edit the .csv files if necessary to update data or fix data to allow for the .zip file to be imported via the Import Planning Data page.
- View Log: Click to view the OTM log file. It is recommended that you turn on the Planning Data and Planning Data Log IDs so that your log file contains logging specific to export and import of planning data.
- Done: Click to return to the main export screen.
The Process States grid shows the following data:
- Process: Lists the main processes that are a part of exporting data, such as loading metadata, zipping files, etc.
- Status: Lists one of the possible statuses such as Running, Partially Completed, Completed, or Failed.
- Time: Time in seconds of the running or completed process.
The Objects grid shows the following data:
- Object Type
- Count
IMPORT PLANNING DATA
Use the Import Planning Data page to import the .zip file containing planning data that was exported using the Export Planning Data tool.

Import Planning Data
IMPORTING PLANNING DATA
- Go to Operational Planning > Planning Data Import/Export > Import Planning Data.
- Select a Transaction Type:
- II: Stands for Insert and Ignore. When used, if the record already exists, then it is not updated. If it does not exist, then it is inserted.
- IU: Stands for Insert and Update. Create a new record unless it already exists, in which case update the existing record with the new information. This is the default.
- Click Choose File to specify an Input Zip File. This must be a zip file created using Export Planning Data.
- Click Upload and the page updates to show new input fields.
- To run the action in the background, select Yes for the Run in Background. If you selected Yes for Run in Background, select a contact in the Contact ID field.
- Specify the From Domain and To Domain:
- On the Results screen, you see the following buttons depending on the status of the import::
- Refresh: Click to update the page and monitor how the import is progressing. You can use a combination of the Status and Time to monitor a running process.
- Done: Click to return to the main import screen.
- View Log: Click to view the OTM log file. It is recommended that you turn on the Planning Data and Planning Data Log IDs so that your log file contains logging specific to export and import of planning data.
- Download: Only available if there are validation errors during import.
Steps to Enable
You don't need to do anything to enable this feature.
Tips And Considerations
- The version of Oracle Transportation and Global Trade Management used for exporting the data must be the same version used to import the data.
- The Export Data to Zip File Input feature uses sophisticated database crawling logic to identify and gather all the object data required to recreate a bulk plan for a set of order releases or order movements. If the saved query for the order releases or order movements involves many records the time required to find all the related data (locations, itineraries, rates, etc.) can be considerable. If you are exporting a large number of orders (order releases or order movements) you should consider:
- Running the Export Data to Zip File Input feature using the Run In Background option
- Reducing the time required for generating the export data by limiting the itineraries and rates that need to be exported. This is accomplished by adding saved queries for the Object Types of Itineracy and Rate Geo. When your specify the saved queries for Itineraries and Rate Geos the export logic directly pulls the objects mentioned in the query and their related objects..
- The Export Data to Zip File Input feature does not export data like Ground schedules, Voyage schedules, or driver assignment data. This data often contains links to many unrelated shipments and therefore could bring in a lot of data that is unrelated to the order releases or order movements identified by the specified export query.
- Public data is not exported and imported - OTM assumes that the public data already exist in the server where the data is being imported.
- When importing data using the Import Planning Data feature and the Transaction Type = IU it's important to remember that the data will be updated (if it exists in the target domain) with the data being imported.
-
You can use the export types of Shipment Management and Order Management to export data for shipments, order releases, or order movements. If you provide a shipment/order release/order movement saved query, the system exports all objects related to those objects.
Driver Location Preference Extended to Include Lane and Region
The Driver Location Preference now supports Location Preference Type values (prefer or avoid) for Location, Region, and Lane. Previously you were only able to define a driver location preference at the location level.
The addition of Region and Lane will simplify the setup and maintenance associated with your Driver Location Preferences.
Steps to Enable
To take advantage of the new levels available for defining a driver's preference (prefers or avoid).
- Navigate to Fleet Management > Power Data > General > Driver Location Preference.
- Enter a unique Driver Location Preference ID for the driver preference being defined.
- Enter a Description of the driver preference - since many driver preferences are operationally driven it's recommended that the operational issue that initiated the creation of this Driver Preference Rule be included.
- In the Details table, select a Location Preference Type of either Prefer or Avoid. Prefer will incent the system via the weighted cost to assign shipments to the driver with the defined preference assigned, Avoid will incent the system via weight cost to avoid assignment shipments to the driver.
- Enter a Location Preference Value. This is the weighting of the preference which is considered in the weighted costing for assigning the driver.
- Enter a Location ID, a Region or a Lane ID. Region ID and Lane Id are now considered in the planning.
- Save the defined Driver Location Preferences
- Navigate to Shipment Management > Power Data > General > Logic Configuration
- Create or modify the Logic Configuration Type = Driver Configuration that will be assigned to the Driver(s) that will use the newly defined Driver Location Preferences.
-
Update the DRIVER PREFERENCES Parameter Value for LOCATIION PREFERENCE to the newly created Driver Location Preference.
-
Update any and all Drivers that require this change with the updated Driver Configuration ID.
Tips And Considerations
If you enter multiple level of preference (Location, Lane, Region) the following rules will apply for selecting the preference value that will apply.
- OTM will use the location if there is one. If not, OTM will check the lane and then finally the region.
- Ranking only works WITHIN lane and region, not across location, lane, and region. In other words, OTM will use the location if there is one. If not, OTM will use the highest-ranked lane and finally the highest-ranked region.
- Only one record will ever be returned because of the hierarchy described above. If there is more than one record matching the same location/lane/region, OTM will throw an error. So you cannot have prefer and avoid at the same time and there cannot be overlap.
Freight Payment, Billing, and Claims
Approve Invoice Action Enhanced to Approve Multiple Invoices
This feature provides you with the ability to approve multiple invoices using the Approve Invoice action. The change also provides you with an improved and more informed action UI that has been enhanced to support the process of reviewing and approving multiple invoices at once.

Approve Multiple Invoices
The Approve Invoice window displays the following fields:
- Invoice ID: Displays the ID of the selected invoice.
- Consolidated: Indicator to indicate if the selected invoice is a consolidated invoice.
- Invoice Amount: Displays the net amount due for the invoice.
- Previous Approved Invoice Amount: Displays the total amount that has been approved so far for a particular invoice. This is calculated by summing the amounts to be paid for all the vouchers that have been created previously for that invoice.
- Shipment ID: Displays the shipment ID of the matched shipment for an invoice. This field will be blank if no matched shipment is found or if the selected invoice is consolidated.
- Shipment Amount: Displays the total actual cost of the matched shipment. In case the selected invoice is consolidated, this value will be the sum of the actual costs of all the matched shipments.
- Previous Approved Shipment Amount: Displays the total amount that has been approved so far for a shipment. This is calculated by summing the amounts to be paid for all the vouchers for all the invoices present for that shipment.
- Amount to Pay: Displays the amount to be paid against an invoice which is being approved/adjusted. This is a mandatory input field.
- Adjustment Reason: This field will be populated on the voucher that is created.
NOTE: This field will specify any note when approving/adjusting an invoice.
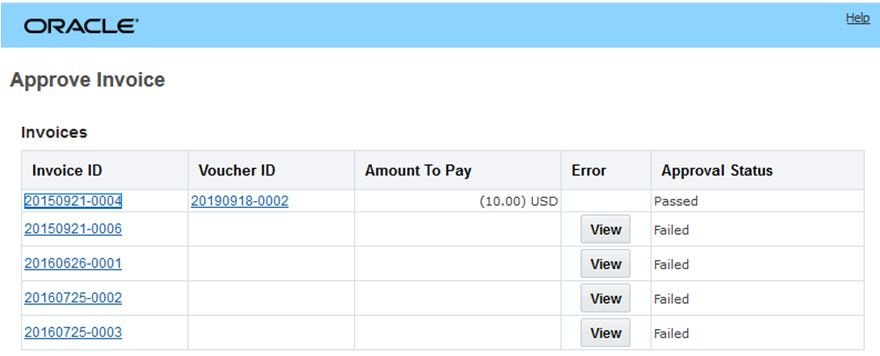
Approve Multiple Invoice Results
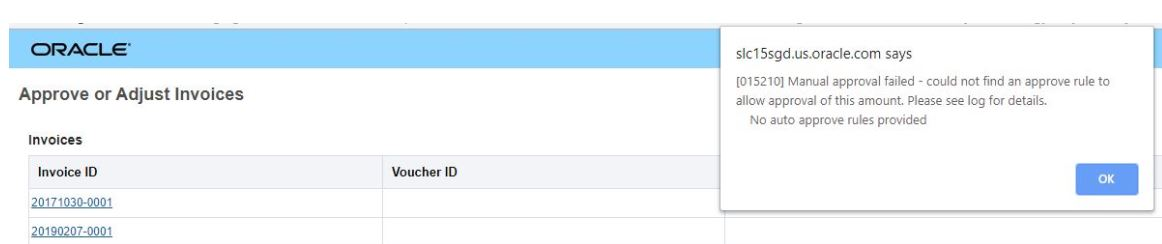
Approve Multiple Invoice Results - View Error
Steps to Enable
You don't need to do anything to enable this feature.
Tips And Considerations
This capability is not applicable in cases where the implementation involves approving invoices at the line level - in other words - in situations where the property glog.invoice.approveByLine is set to true. Attempting to approve multiple invoices in this case will result in an error message.
Insert, Update and Delete Order Release Using Scenario Data Change
This feature provides you with an enhanced Scenario Data Changes option for the Object Type = Order_Release. For the Order_Release Object Type you now have the option to specify a Change Type of either Update, Insert or Delete. While the Change Type of Update is functionally the same capability that is available to all the other Object types - the additions of Insert and Delete opens up some new and very powerful modeling options. For example, you are now able to easily duplicate an existing order by selecting the Change Type = Insert and then specifying the Number of New Objects (copies of the specified order release) you want to model.
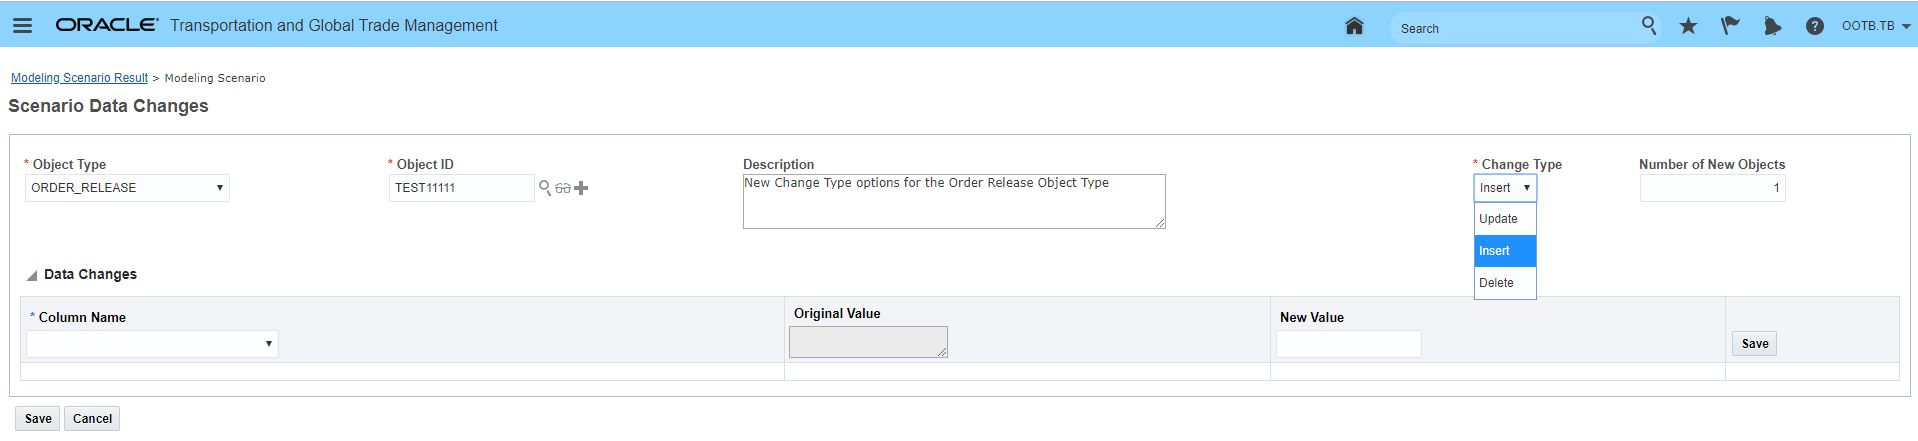
Scenario Data Changes - Order Release
This page is accessed via Logistics Network Modeling > Modeling Scenario.
For order release only insert or delete orders, as well as update data on existing orders. These changes override the changes made by data rules.
- Select the Object Type of ORDER_RELEASE, you will see the Change Type drop down with the options of:
- Update: Updates the specified order release with the data changes entered. Update is also used (behind the scenes) when changing data on other objects.
- Insert: Inserts the order release ID. You can also specify the Number of New Objects, which controls how many new order releases are inserted.
- Delete: Exclude the specified order release from the scenario planning.
- Select the Object ID to specify the object for which you would like to change some fields.
- Optionally, enter a Description.
- Enter any Data Changes:
- In the Column Name drop down, select an editable column for a given object type.
- View the Original Value of that field selected in the database. This is the original value of the field.
- Enter the New Value is a free-form text field which accepts input in accurate format. If the input is not provided in correct format, the changes may not be applied correctly.
Steps to Enable
You don't need to do anything to enable this feature.
Tips And Considerations
Changes that you make on this screen are only temporary and are not persisted to the actual objects in the database. This include new order releases and copied order releases.
Ability to Group Orders by Flex Fields in Scenario Bulk Plan
This feature provides you with additional Modeling Bulk Plan Specification Group By criteria - Flex Field Strings, Flex Field Numbers, Flex Field Dates, and Flex Field Currencies - the new criteria extends and simplifies the options you have available for defining your Bulk Plan Specifications within your modeling scenarios. While the previously available Group By criteria was tied to a limited set of data base fields (Bulk Plan ID, Source Location ID, Destination Location ID and Priority) the newly added Group By criteria provides you tremendous flexibility in defining how you want you Group Bys defined.

Bulk Plan Specification Group by Additions
Steps to Enable
- The Bulk Plan Specification and the new Group By criteria is accessed via Logistics Network Modeling > Power Data > Modeling Bulk Plan Specification.
- The bulk plan specification allows you to group the orders on a scenario and run bulk plans on each group.
- New for this update you now have the option of selecting a Group By of Flex Field String, Flex Field Number, Flex Field Date, or Flex Field Currency. When you select any of these new options you also need to specify the Flex Field Attribute to use.
The Export Data to Zip File Input feature provides you with the ability to export the data required to run a Logistics Network Modeling project or scenario in a different environment. The Import Planning Data feature provides you with the ability to import the exported zip file into any server/domain that is running the same version of Oracle Transportation and Global Trade Management.
The Export Data to Zip File Input feature uses a sophisticated data crawler to identify and export all the related itineraries and rates required run a Logistics Network Modeling project or scenario. The exported data are in .csv file format and are compressed into a .zip file. You can have the exported data sent to an email address as a .zop file if you provide a contact in the Contact ID field. A .zop file is sent since most email servers do not allow the sending of .zip files. If no contact is provided, you can download the file locally. The export option allows for a straight export as well as exporting with masking. Masking provides you with the ability to mask key/sensitive data - like names, IDs etc.

Export Date to Zip File Input Screen
EXPORT DATA TO ZIP FILE INPUT
To export planning data to a zip file:
- Go to Operational Planning > Planning Data Import/Export > Export Planning Data.
- Select an export Domain. This is the domain from which the data will be exported.
- Select an Export Type of Logistics Network Modeling.
- Specify an Object Type of either Modeling Project or Modeling Scenario and provide a saved query for the project or scenario you want to export.
- Optionally you can specify a Parameter Set ID to export. If you do not specify a parameter set ID, the default parameter set ID of the domain is exported.
- To run the action in the background, select Yes for Run in Background. If you selected Yes for Run in Background, select a contact in the Contact ID field.
- Select the Apply Data Masking check box to mask specific data in the exported .csv files.
- Click Export. If you selected Yes for Run in Background, you see the message stating that when the action finishes an e-mail will be sent to the contact. If you selected No for Run Job in Background, you see Export Data to Zip File Result page.
EXPORT DATA TO ZIP FILE RESULT SCREEN
This Export Data to Zip File Result page contains information about the export process status and objects exported. You can monitor the process and status to determine when the export is complete. The object grid allows you to see the count of the objects exported. The system validates the data for any missing primary keys, missing value for non-nullable columns, etc. The Message/Results field at the top of the page contains displays the current status in a message.

Export Data to Zip File Result Screen
On the Results screen, you see the following buttons depending on the status of the export:
- Refresh: Click to update the page and monitor how the export is progressing. You can use a combination of the Status and Time to monitor a running process.
- Terminate: For some export scenarios, it may take a significant amount of time to gather and download data. Click Terminate to stop the export process if it is taking too long.
- Download: Click to download a .zip file. The .zip file contains many CSV files; one for each OTM object. The .zip file also contains a single XML file (manifest.xml) which includes domain names, names of all of the .csv files, OTM objects, and other metadata. You can edit the .csv files if necessary to update data or fix data to allow for the .zip file to be imported via the Import Planning Data page.
- View Log: Click to view the OTM log file. It is recommended that you turn on the Planning Data and Planning Data Log IDs so that your log file contains logging specific to export and import of planning data.
The Process States grid shows the following data:
- Process: Lists the main processes that are a part of exporting data, such as loading metadata, zipping files, etc.
- Status: Lists one of the possible statuses such as Running, Partially Completed, Completed, or Failed.
- Time: Time in seconds of the running or completed process.
The Objects grid shows the following data:
- Object Type
- Count
IMPORT PLANNING DATA
Use the Import Planning Data page to import the .zip file containing planning data that was exported using the Export Planning Data tool.

Importing Planning Data Screen
IMPORTING PLANNING DATA
- Go to Operational Planning > Planning Data Import/Export > Import Planning Data.
- Select a Transaction Type:
- II: Stands for Insert and Ignore. When used, if the record already exists, then it is not updated. If it does not exist, then it is inserted.
- IU: Stands for Insert and Update. Create a new record unless it already exists, in which case update the existing record with the new information. This is the default.
- Click Choose File to specify an Input Zip File. This must be a zip file created using Export Planning Data.
- Click Upload and the page updates to show new input fields.
- To run the action in the background, select Yes for the Run in Background. If you selected Yes for Run in Background, select a contact in the Contact ID field.
- Specify the From Domain and To Domain:
- On the Results screen, you see the following buttons depending on the status of the import::
- Refresh: Click to update the page and monitor how the import is progressing. You can use a combination of the Status and Time to monitor a running process.
- Done: Click to return to the main import screen.
- View Log: Click to view the OTM log file. It is recommended that you turn on the Planning Data and Planning Data Log IDs so that your log file contains logging specific to export and import of planning data.
- Download: Only available if there are validation errors during import.
Steps to Enable
You don't need to do anything to enable this feature.
Tips And Considerations
- The version of Oracle Transportation and Global Trade Management used for exporting the data must be the same version used to import the data.
- The Export Data to Zip File Input feature uses sophisticated database crawling logic to identify and gather all the object data required to recreate a Logistics Network Modeling project or scenario. If the saved query for the project or scenario you are exporting involves many records the time required to find all the related data (locations, itineraries, rates, etc.) can be considerable. If your are exporting a large project or scenario you should consider:
- Running the Export Data to Zip File Input feature using the Run In Background option
- Reducing the time required for generating the export data by limiting the itineraries and rates that need to be exported. This is accomplished by adding saved queries for the Object Types of Itinerary and Rate Geo. When your specify the saved queries for Itineraries and Rate Geos the export logic directly pulls the objects mentioned in the query and their related objects.
- The Export Data to Zip File Input feature does not export data like Ground schedules, Voyage schedules, or driver assignment data.
- Public data is not exported and imported - OTM assumes that the public data already exist in the server where the data is being imported.
- When importing data using the Import Planning Data feature and the Transaction Type = IU it's important to remember that the data will be updated (if it exists in the target domain) with the data being imported.
This feature provides you with additional Table Name options when you define your Data Rules where the Rule Type of Column is selected. The Additional Data Rule Table Names available include:
- Ship_Unit
- Location_Profile
- Equipment_Group_Profile
- Equipment_Group
- Includes Column Name info for Compartment and ERUs
- Capacity_Usage
- Capacity_Limit
- Carrier_Commitment
With the addition of these new tables - you will now be able to simulate changes to your Equipment Group definitions - for example you can increase of decrease the effective capacity of various equipment groups. In addition, you will be able to modify capacity usage and capacity limits as well as modifying different carrier commitments.
Steps to Enable
You don't need to do anything to enable this feature.
This feature provides you with an additional view into your Logistics Network Modeling Modeling Shipments. The new Modeling Shipment View is available by following the Modeling Shipment ID link on the Modeling Shipment Finder Results to the Modeling Shipment View.
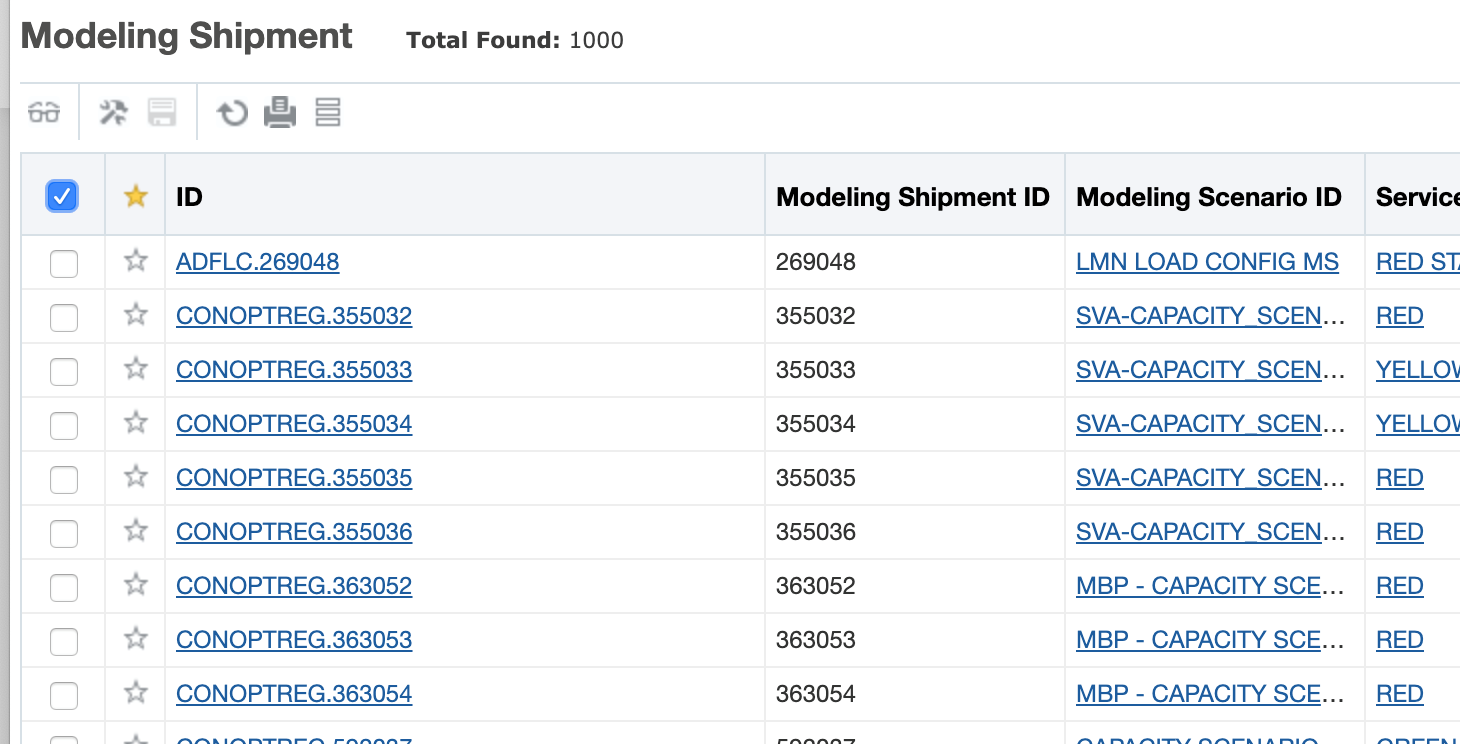
Modeling Shipment Finder Results
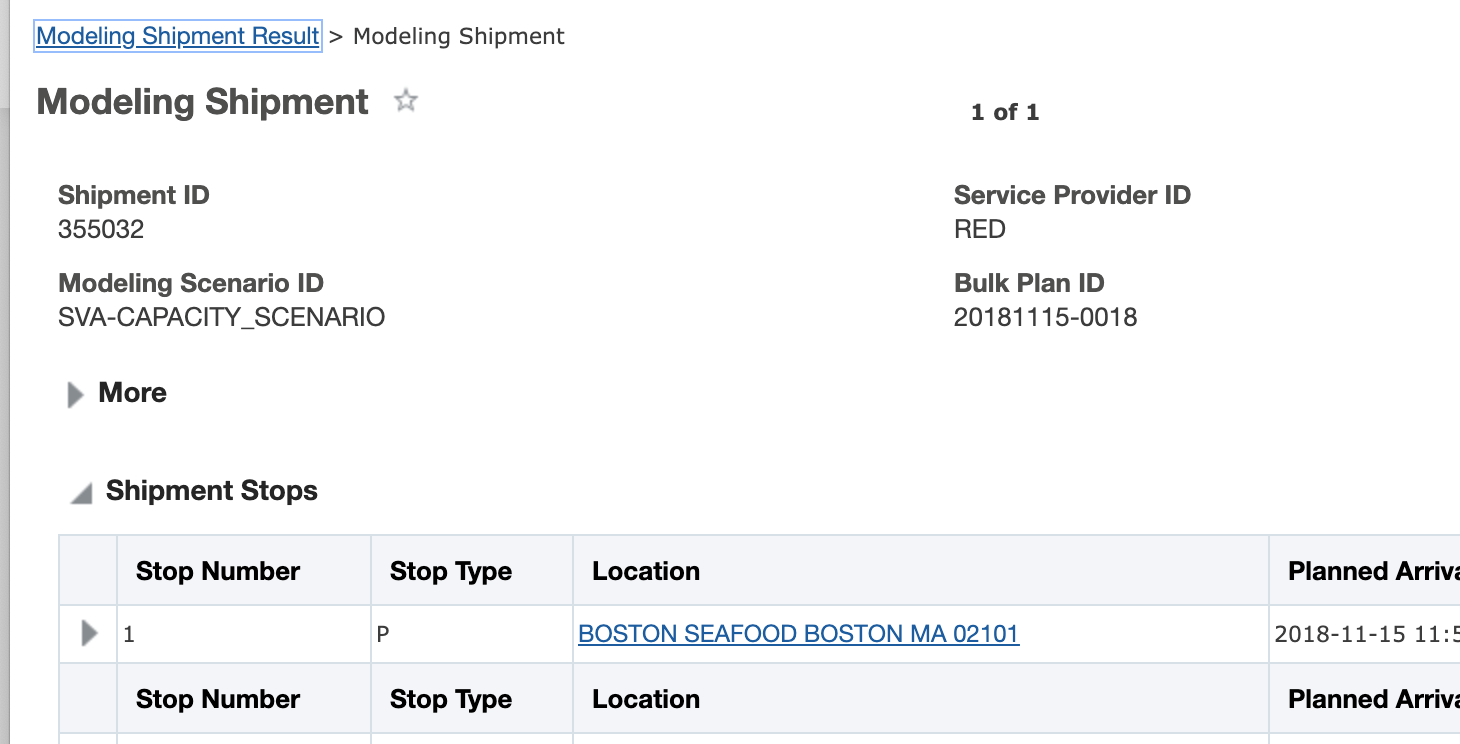
Modeling Shipment Manager View
Steps to Enable
You don't need to do anything to enable this feature.
Update Order Release Date Java Plugin
This feature provides you with the ability to define a data rule and data rule instance that will allow you to update your order release dates based on one of the dates on the order release. For example - this feature allows you to set the EARLY_DELIVERY_DATE, LATE_PICKUP_DATE, and LATE_DELIVERY_DATE based on the EARLY_PICKUP_DATE on an order. With this feature, you can easily setup projects and scenarios that allow you to compare different order date range options.
DATA RULE DEFINITION
In the example below the EARLY_DELIVERY_DATE, LATE_PICKUP_DATE, and LATE_DELIVERY_DATE are all being set based on the EARLY_PICKUP_DATE.
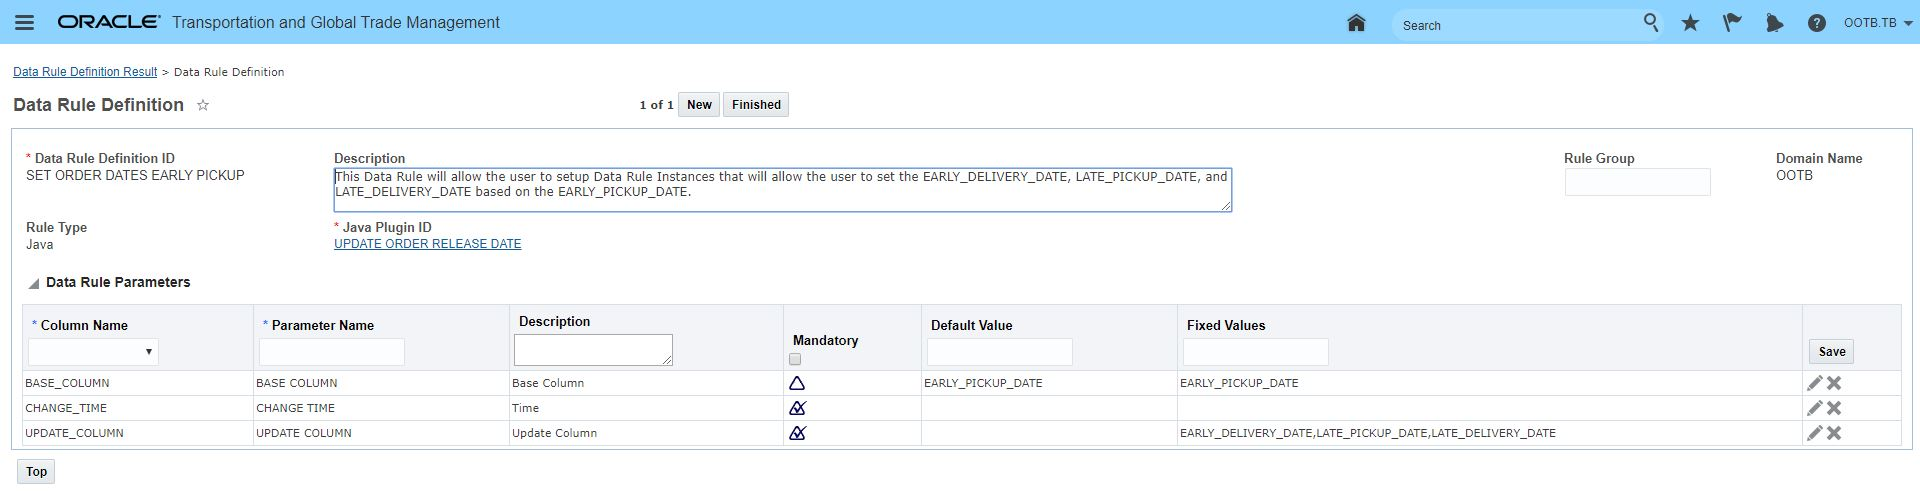
Data Rule Set Order Release Dates Based on Early Pickup Date
DATA RULE INSTANCES
In this example, three Data Rule Instances will be used to do the following:
- Set LATE_PICKUP_DATE = EARLY_PICKUP_DATE + 2 days
- Set EARLY_DELIVERY_DATE = EARLY_PICKUP_DATE + 1 day
- Set LATE_DELIVERY_DATA = EARLY_PICKUP_DATE + 4 days
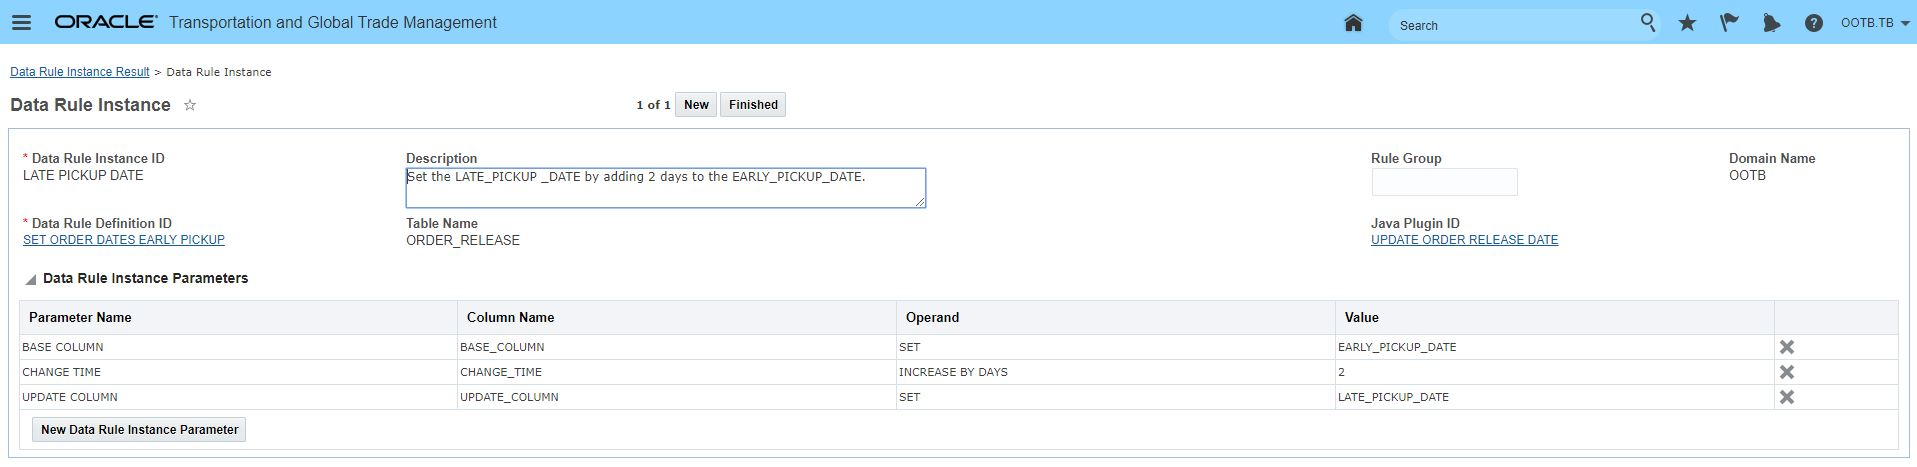
Data Rule Instance to Set Late Pickup Date
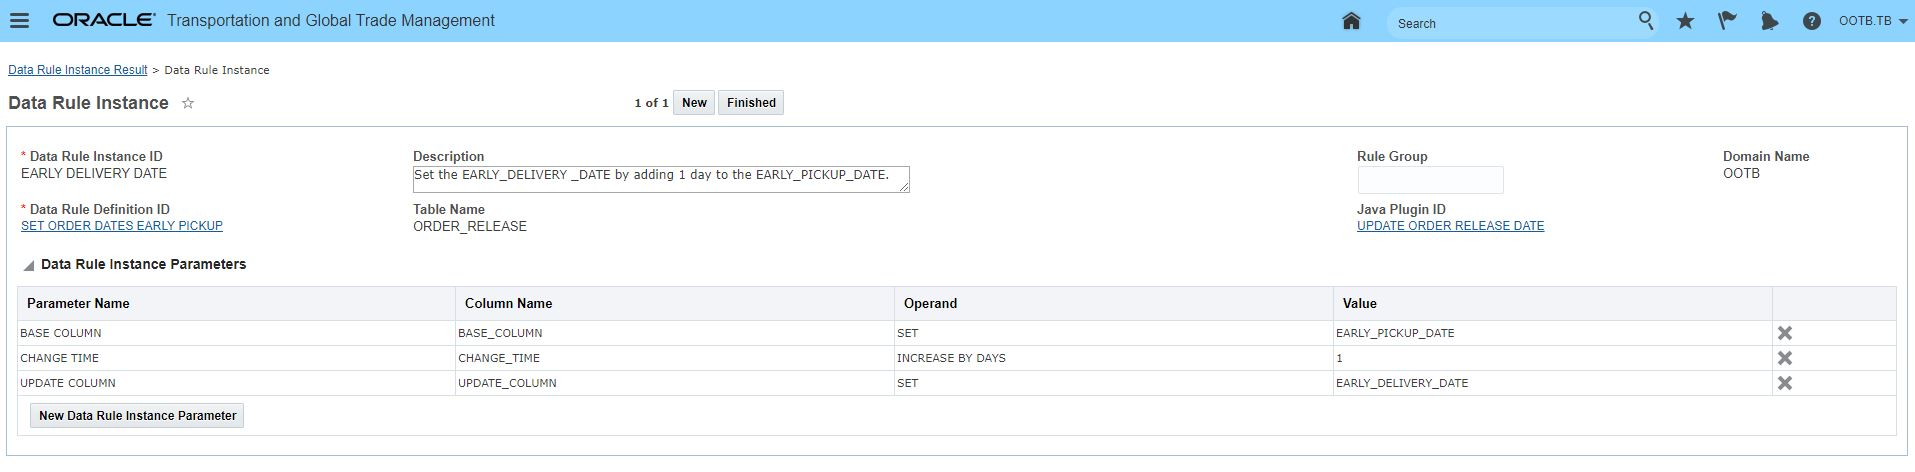
Data Rule Instance to Set Early Delivery Date
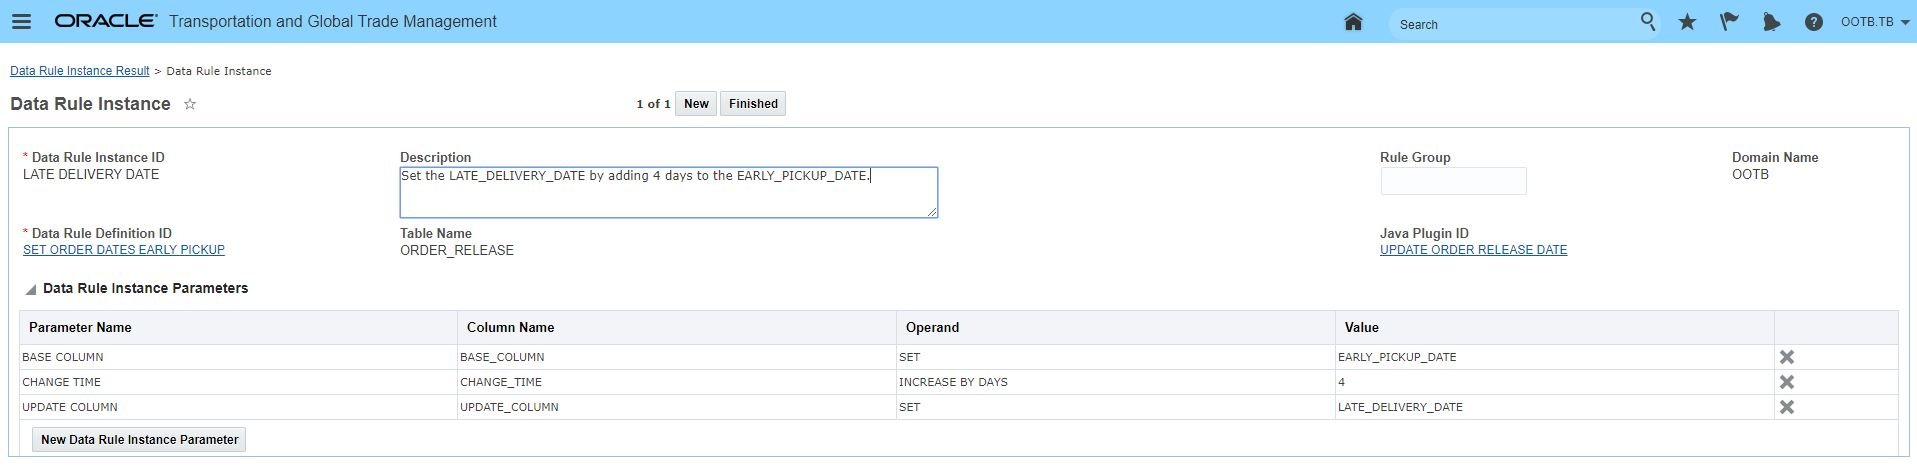
Data Rule Instance to Set Late Delivery Date
MODELING SCENARIO
The three Data Rule Instances are then used in the Modeling Scenario to set the order release dates.
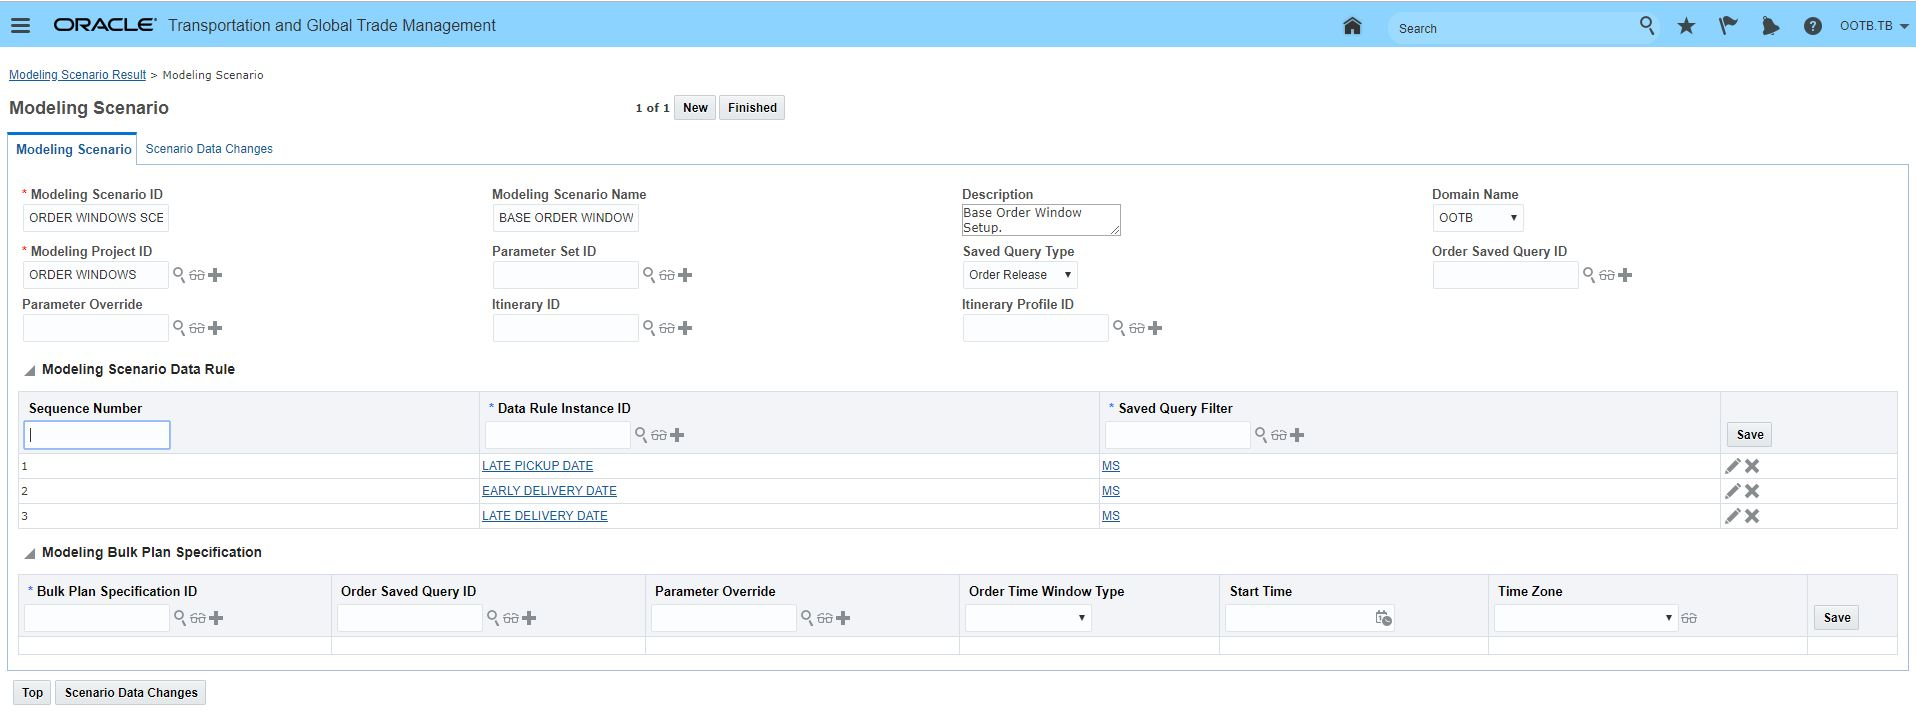
Modeling Scenario Usage or Update Order Release Date Data Rule Instances
Steps to Enable
- Setup the Data Rule for your UPDATE ORDER RELEASE DATE data rule. This page is accessed via Logistics Network Modeling > Power Data > Data Rule Definition.
- Select a Rule Type of Java.
- Enter the Java Plugin ID of UPDATE ORDER RELEASE DATE. The Data Rule Parameters grid populates with data based on the plugin.
- Define the columns to setup your rule:
- BASE_COLUMN: For the Data Rule Instance this sets the list of data field that will be used as the base column for setting the dates on the orders. The default value is LATE_DELIVERY_DATE and the fixed values are EARLY_PICKUP_DATE, EARLY_DELIVERY_DATE, LATE_PICKUP_DATE, LATE_DELIVERY_DATE.
- CHANGE_TIME: Number of days. Valid operands are "INCREASE BY DAYS" and "DECREASE BY DAYS". This is required.
- UPDATE_COLUMN: Valid values are EARLY_PICKUP_DATE, EARLY_DELIVERY_DATE, LATE_PICKUP_DATE, LATE_DELIVERY_DATE
-
Setup a Data Rule Instance based on the UPDATE ORDER RELEASE DATE data rule created above. This page is accessed via Logistics Network Modeling > Power Data > Data Rule Instance.
-
Select the Data Rule Definition for your UPDATE ORDER RELEASE DATE data rule.
- Then for the date that you wish to set - you will set provide the following
- BASE_COLUMN: the date on the order used to set the order date.
- CHANGE_TIME: the amount of days you wish to increase or decrease the order dates relative to the BASE_COLUMN. Valid operands are "INCREASE BY DAYS" and "DECREASE BY DAYS".
- UPDATE_COLUMN: Select the date you want to set.
- You will need to repeat steps 5 - 7 for each date you wish to set on your orders.
Tips And Considerations
UPDATE ORDER RELEASE DATE is the only java plugin available for Logistics Network Modeling.
Global Trade Management (Base)
New Public External Systems for 3rd Party Content
This feature provides you with two new public external system configurations that should be used to support external system interaction for Content Download and Duty & Tax Analysis.
New Public External System IDs:
- EXTERNAL_SYSTEM_TAX - to support Duty and Tax analysis. This external system must be specified in the GTM property: gtm.dutyTax.externalSystem.name.
- DESCARTES_CONTENT_DOWNLOAD_SERVICE - should be used for downloading the denied parties list and classification contents from Descartes. This External System ID must be specified in the Content Source(s) you are using to download data from Descartes. This external system includes the URL needed to download data from Descartes.
Users should use the Public External Systems to avoid versioning issues during data download into GTM from third-party content providers.
Complete set of Public External System IDs to use:
- DESCARTES_DUTY_TAX_SERVICE (existing) - provided previously to support using Descartes for the duty and tax action and landed cost simulator functionality.
- EXTERNAL_SYSTEM_TAX (new) - should be used for duty and tax analysis service.
- DESCARTES_CONTENT_DOWNLOAD_SERVICE (new) - should be used for downloading the denied parties list and classification contents from Descartes.
Steps to Enable
You don't need to do anything to enable this feature.
Tips And Considerations
To take advantage of the new DESCARTES_CONTENT_DOWNLOAD_SERVICE external system, you need to specify it in the Content Source you are using to download restricted party and product classification data from Descartes. In addition, you need to add the User Name and Password assigned to you by Descartes to the DESCARTES_CONTENT_DOWNLOAD_SERVICE external system.
Remove Reference Numbers Via Manager Layout
As you are customizing your GTM screens, you can remove the reference numbers grid from additional manager layouts. The enhancement is for the following manager layouts:
- Trade Transaction
- Trade Transaction Line
- Declaration (i.e. GTM Shipment)
- Declaration Line (i.e. GTM Shipment Line)
Steps to Enable
You don't need to do anything to enable this feature.
Tips And Considerations
If you are using the pseudo-field capability for your reference numbers, you can continue to do so and remove the reference numbers grid from the UI.
Additional GTM Objects Added to Workbench
This feature provides additional GTM objects that are now supported in the workbench. With these added objects, along with the long list of already supported objects, the Workbench should become the first place you go to configure any work environment that involves relating multiple objects and components together in one view.
Additional GTM objects available for adding as a table include:
- Party Site
- Trading Partner Item
- Item Origin
- Tariff Rate
- Item Trade Program
- Item Trade Program Required Document
Steps to Enable
You need to use the Workbench Designer to configure your workbenches.
Additional Saved Queries to Support GTM Workbench
Saved queries have been added to enable you to more easily configure Workbenches. The new saved queries that are available are:
- Party Sites for Party
- Trading Partner Items for Item
- Item Origins for Item
- Item Trade Programs for Item Origin
- Tariff Rates for Product Classification Code
- Tariff Rates for Item Classification Code
- Tariff Rates for Transaction Line Classification Code
- Tariff Rates for Declaration Line Classification Code
Steps to Enable
You don't need to do anything to enable this feature.
Item Classification Manager and Workbench Support
The Item Classification Manager enables you to manage your product classification data on an item. Previously, you could only see this information from within the item. The benefits of having a separate Item Classification Manager include:
- Direct access to product classification data without having to navigate to the item first
- Support for lifetime events, which enables you to set up automation agents. For example, you can create an automation agent to list to when the product classification data on an item is modified and notify a user.
- Ability to create an Item Workbench so that you can view and manage product classification data and other information for a particular item
- Trigger actions such as Approve Item Classifications and Decline Item Classifications for a specific product classification type/code combination on an item
The same data that is available on the product classification grid in the Item is also available in the Item Classification Manager. Moreover, new fields have been added including support for flex fields. The fields include:
- Item Classification ID
- Item ID
- Product Classification Type ID
- Product Classification Code
- Binding Ruling Number
- Binding Ruling Effective Date
- Tariff Rules of Interpretation ID
- Product Classification Status
- Expiration Date
- Product Classification Notes
- Customs Description
- Approver Notes
- Classification User
- Classification Date
- Review User
- Review Date
- Eligibility Screening User
- Eligibility Screening Date
- Flex fields
Steps to Enable
You don't need to do anything to enable this feature.
You can now create and manage item origins within the Item Origin Manager. This change enables you to directly access item origin data through the Master Data menu option. The same data is available when accessing item origin data directly or via the item.
With this enhancement, you can also:
- Trigger the Tariff Eligibility Screen action to determine if a particular item origin is eligible for a trade program
- Create workbenches that include item origin data
- Trigger workflow via automation agents with an Agent Type = ITEM ORIGIN
Steps to Enable
You don't need to do anything to enable this feature.
Tips And Considerations
Item Origin data can be accessed via the Item Origins manager or via the Item on the Trade Details tab.
Copy or Link Documents to Trade Transaction and Declaration
You can copy or link to documents in the Trade Transaction Line and Declaration Line managers using the Add Document action. When you trigger the Add Document action, you need to specify if the document is created as a new document, a link, or a copy.
- New Document - enables you to upload a document to the selected object. You need to choose the document file you want to upload.
- Link - enables you to link a document to the selected object from another object. You need to specify the document to which you want to link.
- Copy - enables you to copy a document to the selected object. You need to specify the document that you want to copy.
Steps to Enable
You don't need to do anything to enable this feature.
Reports Available Within GTM Menus
You can access reports directly from GTM menus instead of navigating to the Reports Manager within Business Process Management. You can quickly access reports from the following menus:
- Customs > Reports
- AES Filing
- Declaration Customs Commercial Invoice
- US NAFTA-Certificate of Origin on Campaign Line
- Trade Agreements > Reports
- US NAFTA-Certificate of Origin on Campaign Line
- Transactions
- Transaction Customs Commercial Invoice
- License and Registrations
- License Assignment Report
Steps to Enable
You don't need to do anything to enable this feature.
Tips And Considerations
Reports continue to be available from the Reports Manager as well as directly within GTM menus.
Product Classification Enhancements
Default Language for Classification Actions on Item
You can set a default language for various classification actions in GTM. In the Logic Configuration where the Logic Configuration Type = GTM PRODUCT CLASSIFICATION UI CONFIGURATION, you can set the parameter of LANGUAGE to your preferred language. Then, go into your User Preference and assign the Logic Configuration against the Preference = GTM Product Classification UI Configuration. When you access the following UIs, you will see that the language now defaults to the language you specified:
- Classify Item action on Item
- Classification Research
Steps to Enable
You don't need to do anything to enable this feature.
Tips And Considerations
Remember that when you make changes to your user preference, you need to log out of GTM and log back in for your changes to take effect.
Trigger Approve or Decline Product Classification Action on Item for a Product Classification Code
You can approve or decline a product classification code for an item one at a time. If your company has a person responsible for reviewing HS codes and another person responsible for reviewing ECCN codes, each person can approve or decline the codes for which they are responsible.
When you trigger the Approve or Decline Product Classification action on Item, you can specify a Product Classification Type ID. On the other hand, you can leave this field blank to see all Product Classification Type/Code combinations assigned to the Item. When you click OK, GTM displays the product classification information. Click the checkbox, select the Product Classification Status and enter Approver Notes for the product classification information you want to approve or decline. Then click OK.
Steps to Enable
You don't need to do anything to enable this feature.
View Product Classification Template with Invalid Codes
You can query your Product Classification Templates to see which ones have invalid product classification codes. As the tariff changes, you may have classification codes that are removed from the tariff and you can no longer use. GTM ships with PROD CLASS TEMPLATES WITH INVALID CODES saved query on the Product Classification Template so you can quick see which templates contain invalid codes. You can then update the templates with the new code.
You can also use this saved query in your business monitor so that you can monitor your product classification templates to ensure they are kept up to date.
Steps to Enable
You don't need to do anything to enable this feature.
View Item Template and Product Classification Template Used to Populate Item
You can now see the most recent template used to populate information on an item including the Item Template and the Product Classification Template. GTM saves the most recent item template and product classification template that was used. The Item Template ID is available as a read-only field on the Item tab and is populated by the Apply Item Template UI action and agent action. The Product Classification Template ID is available as a read-only field on the Trade Details tab of the Item and is populated by the Apply Product Classification Template UI action and agent action.
Steps to Enable
You don't need to do anything to enable this feature.
Binding Ruling Date and Number Support on Item, Trade Transaction and Declaration
You can now enter binding ruling date and binding ruling number on various GTM objects to justify the classification code you are using. You can enter this information on the following objects in GTM:
- Item Classification Manager
- Item Manager on the Trade Details tab
- Trade Transaction Line via the Trade Transaction Manager or Trade Transaction Line Manager
- Declaration Line via the Declaration Manager or Declaration Line Manager
Various actions can then take advantage of this information:
- Lookup Product Classification UI Action and Look Up Classification Agent Action - this existing action looks up the product classification data on the item and copies it over to the appropriate GTM transactional object. The action has been updated to also copy over the binding ruling date and binding ruling number. This action is available on the Trade Transaction, Trade Transaction Line, Declaration, and Declaration Line.
- Create/Add to Existing Declarations UI Action and Create Declarations Agent Action - this existing action is used to create a declaration or add to an existing declaration. The action has been updated to also copy over the binding ruling date and binding ruling number. This action is available on the Trade Transaction, Trade Transaction Line, Declaration, and Declaration Line.
- Propagate Changes to Declarations UI Action and Agent - this existing action is used to propagate changes to a declaration. The action has been updated to also copy over the binding ruling date and binding ruling number. This action is available on the Trade Transaction, Trade Transaction Line, Declaration, and Declaration Line.
In addition, the integration for Item, Trade Transaction, and Declaration have been updated to include Binding Ruling Date and Binding Ruling Number.
Steps to Enable
You don't need to do anything to enable this feature.
Tariff Rules of Interpretation Power Data
You can now create tariff rules of interpretation. These rules of interpretation can then be added to your item classifications so that you know which rule of interpretation was used to classify your item. In addition, various Item UI actions, automation agent actions, and process management items have been updated to enable you to specify a rule of interpretation including:
Item UI Actions
- Apply Item Template
- Apply Product Classification Template
- Assign Item Classification
- Classify Item
- Update Product Classification
Automation Agent Actions
- Apply Item Template
- Apply Product Classification Template
Process Management
- Apply Item Template
- Assign Item Classification
- Update Product Classification
You can see the Tariff Rules of Interpretation on the Item in the Trade Details tab. In addition, it has been added to the Item integration.
Steps to Enable
You don't need to do anything to enable this feature.
Tips And Considerations
GTM ships with the General Rules for the Interpretation of the Harmonized System published by the World Customs Organization. You can add country-specific rules of interpretation and use them as well. The csv file that ships with GTM must be loaded during installation.
Update Classification Includes Tariff Rules of Interpretation and Binding Ruling Data
The existing Update Classification enables you to change an existing product classification code on an item to a new product classification code. As part of this process, you can now specify the tariff rules of interpretation, binding ruling date, and binding ruling number that support the classification code assigned. This action can be triggered from:
- Item Actions > Update Product Classification
- Classification > Process Management > Update Classification Code
When you trigger this action, in addition to existing fields, you are now able to specify:
- Binding Ruling Number
- Binding Ruling Effective Date
- Tariff Rules of Interpretation ID
This information is then accessible from within the Item to which you assigned it or via the Item Classification manager.
Steps to Enable
You don't need to do anything to enable this feature.
Tips And Considerations
Since Tariff Rules of Interpretation are in power data, you will need to create these prior to assigning them to an item.
Classify Item Action Includes Tariff Rules of Interpretation and Binding Ruling Data
The existing Classify Item action on Item enables you to walk through research steps and classify your item. As part of this process, you can now specify the tariff rules of interpretation, binding ruling date, and binding ruling number that support the classification code being assigned.
When you trigger this action, in addition to classifying your item, you are now able to specify:
- Binding Ruling Number
- Binding Ruling Effective Date
- Tariff Rules of Interpretation ID
This information is then accessible from within the Item to which you assigned it or via the Item Classification manager.
Steps to Enable
You don't need to do anything to enable this feature.
Tips And Considerations
Since Tariff Rules of Interpretation are in power data, you will need to create these prior to assigning them to an item.
Specify Tariff Rules of Interpretation and Binding Ruling Data on Product Classification Template
You can enter the Tariff Rules of Interpretation ID, Binding Ruling Number, and Binding Ruling Date on your Product Classification Template. GTM enables you to enter this information against each Product Classification Type ID and Product Classification Code combination.
When you then trigger the Apply Product Classification Template action on your Item, GTM copies all of the product classification information into the Product Classifications grid on the Trade Details tab.
Steps to Enable
You don't need to do anything to enable this feature.
Assign Item Classification Action on Item
Assign Item Classification enables you to enter a specific product classification type and product classification code to classify your item. This action is for you if you have already performed your research and know the product classification code, plus other information, you want to assign to the item. This action can be triggered from:
- Item Actions > Assign Item Classification
- Classification > Process Management > Assign Item Classification
When you trigger this action, you are able to specify:
- Product Classification Type
- Product Classification Code
- Binding Ruling Number
- Binding Ruling Effective Date
- Tariff Rules of Interpretation ID
- Classification Notes
- Customs Description
This information is then accessible from within the Item to which you assigned it or via the Item Classification manager.
Steps to Enable
You don't need to do anything to enable this feature.
Tips And Considerations
Since Tariff Rules of Interpretation are in power data, you will need to create these prior to assigning them to an item.
Support for Pseudo-Fields for Product Classification Codes
You can use pseudo-fields for classification codes in various screens throughout GTM. This enables you to view a product classification code directly on the screen. Classification codes can now show as a specific field on the screen in the following objects:
- Item
- Product Classification Template
- Transaction Line
- Declaration Line
For example, if you want to see the HTS EU product classification code on the item finder results and the item view page, you can use manager layout to create a pseudo-field which will show a specific field on the screen. You can then link to this manager layout from your screensets.
When you configure GTM to display the Product Classification Code in a pseudo-field, the pseudo-field is read only. To update a product classification code, use the product classification grid available on the selected business object.
Steps to Enable
You can configure the user interface using manager layout and screensets to customize your fields to show as pseudo-fields. Please refer to the OTM How To/Configuration Topic called Configuring the User Interface for more information.
Updates to Lookup Classification and Verify Classification Actions on the Line
The functionality of the Lookup Classification action and Verify Classification action have been changed to better support updating of the classification status and required classification information. This change is available via Optional Features in GTM and affects both the trade transaction line and declaration line.
Starting in 20C, the Verify Classification action will set the TL_PRODUCT_CLASSIFICATION status on the transaction line and declaration line and update the Required Classification information. The Required Classification information, manually entering product classification data on the transaction line or declaration, and updating product classification data via integration will no longer set the TL_PRODUCT_CLASSIFICATION status or populate the Required Classification information.
Specifically:
- When you trigger the Lookup Classification action on the transaction line or declaration line, GTM copies the existing classification data on an item to the line.
- When you trigger the Verify Classification action, GTM clears any existing required classification data from the line and then looks at the service preference specified on the action to add the updated list of classification data to the Required Classification grid on the line. It will then set the TL_PRODUCT_CLASSIFICATION status on the transaction line.
- If product classification data is entered manually on the line or via integration, the TL_PRODUCT_CLASSIFICATION status is not set on the transaction line or declaration line.
To take advantage of this update, you need to log in as DBA and access Optional Features. Search for MANAGE STATUS BY VERIFY CLASSIFICATION and make sure to mark the 'Opted In' checkbox.
If you have not chosen to opt in, the previous functionality will continue to work by default. Specifically:
- When you trigger the Lookup Classification action on transaction line or declaration line, GTM copies the existing classification data on an item to the line and looks at the service preference specified on the action to add the updated list of classification data to the Required Classification grid. It will then set the TL_PRODUCT_CLASSIFICATION status on the line.
- When you trigger the Verify Classification action on transaction line or declaration line, GTM looks at the service preference specified on the action to add the updated list of classification data to the Required Classification grid. It will then set the TL_PRODUCT_CLASSIFICATION status on the line.
- If product classification data is entered manually on the line or via integration, the TL_PRODUCT_CLASSIFICATION status is set on the transaction line or declaration line.
Steps to Enable
You can opt in to the new logic by logging in as DBA and accessing Optional Features. By default, you are using the existing functional but you can use the new functionality by marking 'Opted In' on the MANAGE STATUS BY VERIFY CLASSIFICATION option.
Improvements to Setting of Product Classification Status
The functionality of the Lookup Classification action and the Verify Classification actions have been changed to better support updating of the classification status. This change is available via Optional Features in GTM and affects both the trade transaction line and declaration line.
Starting in 20C, the Verify Classification action will set the TL_PRODUCT_CLASSIFICATION status on the transaction line and declaration line. Manually entering product classification data on the transaction line or declaration, and updating product classification data via integration will no longer set the TL_PRODUCT_CLASSIFICATION status.
Specifically:
- When you trigger the Lookup Classification action on the transaction line or declaration line, GTM no longer updates the TL_PRODUCT_CLASSIFICATION status on the line.
- When you trigger the Verify Classification action, GTM sets the TL_PRODUCT_CLASSIFICATION status on the transaction line and declaration line.
- If product classification data is entered manually on the line or via integration, the TL_PRODUCT_CLASSIFICATION status is not set on the transaction line or declaration line.
To take advantage of this update, you need to log in as DBA and access Optional Features. Search for MANAGE STATUS BY VERIFY CLASSIFICATION and make sure to mark the 'Opted In' checkbox.
If you have not chosen to opt in, the previous functionality will continue to work by default. Specifically:
- When you trigger the Lookup Classification action on transaction line or declaration line, GTM will set the TL_PRODUCT_CLASSIFICATION status on the line.
- When you trigger the Verify Classification action on transaction line or declaration line, sets the TL_PRODUCT_CLASSIFICATION status on the line.
- If product classification data is entered manually on the line or via integration, the TL_PRODUCT_CLASSIFICATION status is set on the transaction line or declaration line.
Steps to Enable
You can opt in to the new logic by logging in as DBA and accessing Optional Features. By default, you are using the existing functional by can use the new functionality by marking 'Opted In' on the MANAGE STATUS BY VERIFY CLASSIFICATION option.
Tips And Considerations
For more information on the changes to the Lookup Classification action and the Verify Classification actions, please see the 'Updates to Lookup Classification and Verify Classification Actions on the Line' topic.
Required Classification Data Available in Product Classification Grid on Transaction Line
The functionality of the Lookup Classification action and Verify Classification action have been changed to better support updating of the classification status and required classification information. As part of this, the Required Classification has moved on the transaction line. The Required Classification information can be viewed by clicking the Verify Classification button under the Product Classification grid on the transaction line.
When you click the Verify Classification button, GTM displays the Transaction Line - Verify Classifications page. You can see the Transaction Line ID and Item ID. You can also get the list of required product classification types and the associated code. If a product classification code is missing, GTM tells you that a product classification code is missing for a specific type. An Information bar tells you if the Transaction Line status for classification is complete or incomplete. To get back to your transaction line, click the Back button.
Steps to Enable
You don't need to do anything to enable this feature.
Optional Feature - Manage Status by Verify Classification
When this optional feature is enabled, the TL_PRODUCT_CLASSIFICATION status on the transaction line will only be set by the Verify Classification action. Enabling this feature will disable the setting of the status by Lookup Product Classification action, UI and integration. This change is available via Optional Features in GTM and affects both the trade transaction line and declaration line.
The Verify Classification action will set the TL_PRODUCT_CLASSIFICATION status on the transaction line and declaration line and update the Required Classification information.
Verify Classification Action:
- When you trigger the Lookup Classification action on the transaction line or declaration line, GTM copies the existing classification data on an item to the line.
- When you trigger the Verify Classification action, GTM clears any existing required classification data from the line and then looks at the service preference specified on the action to add the updated list of classification data to the Required Classification grid on the line. It will then set the TL_PRODUCT_CLASSIFICATION status on the transaction line.
- If product classification data is entered manually on the line or via integration, the TL_PRODUCT_CLASSIFICATION status is not set on the transaction line or declaration line.
To take advantage of this update, you need to log in as DBA and access Optional Features. Search for MANAGE STATUS BY VERIFY CLASSIFICATION and make sure to mark the 'Opted In' checkbox.
If you have not chosen to opt in, the previous functionality will continue to work by default.
Specifically:
- When you trigger the Lookup Classification action on transaction line or declaration line, GTM copies the existing classification data on an item to the line and looks at the service preference specified on the action to add the updated list of classification data to the Required Classification grid. It will then set the TL_PRODUCT_CLASSIFICATION status on the line.
- When you trigger the Verify Classification action on transaction line or declaration line, GTM looks at the service preference specified on the action to add the updated list of classification data to the Required Classification grid. It will then set the TL_PRODUCT_CLASSIFICATION status on the line.
- If product classification data is entered manually on the line or via integration, the TL_PRODUCT_CLASSIFICATION status is set on the transaction line or declaration line.
Steps to Enable
If you are only using the Lookup Classification action and have not yet started to use the Verify Classification action, you'll need to take the following steps to enable:
- Create a Service Parameter with a Service = LOOK UP PRODUCT CLASSIFICATION. This tells GTM the list of product classification types you want to verify.
- Create a Service Preference with a Service = Classification Verification. Within the Service Preference Configuration, select the Service Parameter you previously created.
If you are already using both the Lookup Classification action and the Verify Classification action, additional setup is not required.
You can then run the actions manually from the Trade Transaction, Trade Transaction Line, Declaration or Declaration Line. If you are using automation agents to trigger the actions, make sure your agents are updated to including both of the following agent actions:
- LOOK UP CLASSIFICATION
- VERIFY CLASSIFICATION
Tips And Considerations
Regardless of whether you are running the actions manually or via an automation agent, you must run the lookup classification action first followed by verify classification action.
GTM is introducing Trade Agreements as a new area in the product. Trade Agreements and other supporting information enables you to proactively leverage the trade agreements your business can take advantage of to reduce duties and taxes. There are many Trade Agreements in effect globally, each with different parameters but all following a similar structure.
To be able to take advantage of the duties and taxes associated with a Trade Agreement, companies must:
- Follow Rules of Origin to qualify goods for participation in a specific program
- Produce Certificates of Origin and provide to them to your customers
- Collect Certificates of Origin from your suppliers and stored them for future use
- Declare the intent to use a trade agreement during the import entry process and send the appropriate certificates of origin to the local customs agency
In GTM, users can take advantage of the Trade Agreement capability including:
- Download and store duties, taxes, trade programs and other information from third party data content providers
- Manage trade agreement information
- Perform trade agreement eligibility screening and qualification on your items
- Create a campaign which enables you to solicit qualification data, documents and other information from suppliers to support the use of trade programs
- Suppliers and other users can respond to a campaign they have received
Add to Campaign Action on Trading Partner Item
You can add a trading partner item to an existing campaign by using the Add to Campaign action. This action enables you to select the trading partner item and then specify the Campaign ID of the campaign to which you want to add it. The Add to Campaign action is available as a manual action from the Trading Partner Item actions menu.
Steps to Enable
You don't need to do anything to enable this feature.
Generate Sample US NAFTA Certificate of Origin from Campaign Lines
A sample certificate of origin for the United States North American Free Trade Agreement (NAFTA) is available in GTM. You can generate the certificate of origin based on data on the campaign and campaign line. This enables suppliers to generate the certificate of origin out of GTM and then upload the document against one to many campaign lines.
The US NAFTA certificate of origin is available in the following menus:
- Business Process Automation > Reporting > Report Manager
- Trade Agreements > Reports
Steps to Enable
You don't need to do anything to enable this feature.
Tips And Considerations
Once a document is uploaded against a campaign line, a data configuration can be used to copy the documents to the item qualification record on an item at the time a campaign and/or campaign line is approved. This enables you to know that an item origin for a particular supplier has a certificate of origin in place to use a particular trade agreement.
Create Campaign Action on Trading Partner Item Filters on Trade Agreement
Additional filtering has been added when you trigger the Create Campaign action on Trading Partner Item. After you enter your criteria and click the Create Campaign button, GTM filters by the item origins based on the trading partner item and partner site combination. If you specify the trade agreement when you entered your criteria, GTM further filters the item origins based on the trade agreement being specified on the trade programs.
Steps to Enable
You don't need to do anything to enable this feature.
Reminder Functionality for Supplier Solicitation
Reminder duration enables you to specify how often a supplier or partner should be notified that they have campaign lines on a campaign to which they need to respond. When you create a campaign from your item or trading partner item, you can add a reminder duration in days. Once you create the campaign, a background process schedules reminders to be sent to partners on the campaign at the interval you specify. When you view an existing campaign, you can see the reminder duration that was set when the campaign was created.
For example, when you create a campaign, if you specify the Reminder Duration as 7 D (days), GTM will send a reminder to the partners on the campaign every seven days until the expiration date is reached.
Steps to Enable
You don't need to do anything to enable this feature.
Tips And Considerations
You can set the Reminder Duration during the Create Campaign action which is available as a manual action on the Item and Trading Partner Item.
Add to Campaign Action on Item
You can add an item to an existing campaign by using the Add to Campaign action. This action enables you to select the item and then specify the Campaign ID of the campaign to which you want to add it. The Add to Campaign action is available as a manual action from the Item actions menu.
Steps to Enable
You don't need to do anything to enable this feature.
Create Campaign Action on Item
You can create a campaign from an item using the ‘Create Campaign’ action. When you create a campaign, certain information must be specified and is then copied onto the Campaign including:
- Campaign Type – specify the type of campaign being created. Since logic configuration is identified in the campaign type, this required field helps to drive the workflow of the campaign.
- Product Classification Type – specify the product classification type for which you are creating a campaign.
- Campaign Owner Contact – identify the person who is managing the campaign.
- Effective and Expiration Date – enables you to specify the start and end dates of a campaign.
- Reminder Duration – specify how often the partners or suppliers on the campaign should be notified.
- Purpose – enter details regarding the purpose of the campaign.
- Trade Agreement – specify if the campaign is to solicit information related to a trade agreement.
- Required Documents – specify if the campaign is to solicit specific documents from trading partners.
After you enter your criteria and click the Create Campaign button, GTM filters by the item origins based on the trading partner item and partner site combination. If you specify the trade agreement when you entered your criteria, GTM further filters the item origins based on the trade agreement being specified on the trade programs.
Steps to Enable
You don't need to do anything to enable this feature.
Run Tariff Eligibility Screening Action Against Multiple Objects
You are able to select multiple objects on the finder results and then trigger the Tariff Eligibility Screening action against the list of objects.
For items, you can query and select all the items against which you want to run screening for a particular product classification code. GTM will determine the list of trade programs for each item and display the results across multiple pages, one page for each item. You can select the trade programs you want to assign and then move to the next page. Once you click Finish, all of the trade programs selected will be saved against the appropriate item.
For item origins where you can query and select all the item origins against which you want to run screening for a particular product classification code. GTM will determine the list of trade programs for each item origin and display the results across multiple pages, one page for each item origin. You can select the trade programs you want to assign and then move to the next page. Once you click Finish, all of the trade programs selected will be saved against the appropriate item origin.
Steps to Enable
You don't need to do anything to enable this feature.
Perform Eligibility Screening in Item Origin Manager
Since you can manage your item origin independently via the Item Origin Manager, you can now perform tariff eligibility screening on a particular item origin. When you trigger the Tariff Eligibility Screening action, you must enter a Product Classification Type. In addition, you can also add a savings threshold to indicate that you only want trade programs returned above a particular savings threshold.
When you click the Next button, GTM displays all the item origins that meet the criteria you entered. Select the trade programs you want to assign to your item origin and click Finish.
Steps to Enable
You don't need to do anything to enable this feature.
Remove a Trading Partner Item from Campaign
You can remove a trading partner item from a campaign by using the Remove from Campaign action. This action enables you to select the trading partner item and then specify the Campaign ID of the campaign from which you want to remove it. In addition, if the removal of the trading partner item from the campaign results in a campaign with zero campaign lines, you can choose to delete the empty campaign by checking the Remove Empty Campaign checkbox. The Remove from Campaign action is available as a manual action from the Trading Partner Item actions menu.
Steps to Enable
You don't need to do anything to enable this feature.
You can remove an item from a campaign by using the Remove from Campaign action. This action enables you to select the item and then specify the Campaign ID of the campaign from which you want to remove it. In addition, if the removal of the item from the campaign results in a campaign with zero campaign lines, you can choose to delete the empty campaign by checking the Remove Empty Campaign checkbox. The Remove from Campaign action is available as a manual action from the Item actions menu.
Steps to Enable
You don't need to do anything to enable this feature.
Improved Support to Indicate If an Item is Fully Qualified for a Trade Program
The Qualified field on the Trade Programs associated with an Item Origin has been updated to better reflect the qualified status. This dropdown list has 3 options:
- NOT STARTED - This is the initial status when you run Tariff Eligibility Screening and assign a trade program to an item origin.
- YES - You can select this option if you determine a trade program is fully qualified.
- NO - You can select this option if you determine a trade program is not fully qualified.
The Qualified dropdown list is available in the:
- Item Origins > Trade Programs on the Trade Details tab of the Item
- Trade Programs on the Item Origin
Steps to Enable
You don't need to do anything to enable this feature.
GTM ships with a PUBLIC Campaign Administrator Workbench which enables you to manage your campaigns from one place. The out-of-the-box workbench provides you with the ability to view Open Campaigns in the top of the workbench. You can run a saved search to view all the campaigns that meet the criteria you defined.
When you select a campaign in the Open Campaigns section, the bottom table is populated. There are three tabs available in the bottom pane of the workbench.
- Campaign Lines - This tab lists all the campaign lines associated with the selected campaign.
- Edit Line Details - For the line selected on the Campaign Lines tab, you can click this tab to edit that particular campaign line.
- Documents - For the line selected on the Campaign Lines tab, you can see all the documents including certificates associated with the Campaign Line.
Steps to Enable
You don't need to do anything to enable this feature.
Tips And Considerations
It is recommended that you copy the PUBLIC Campaign Administrator Workbench and modify the copied version to meet your requirements.
Support for Pseudo-Fields on Item Origin Manager
You can use pseudo-fields on certain grids on the Item Origin manager. This enables you to enter a value for a field directly on a screen and not have to manage it in a grid. The grids that now support pseudo-fields include:
- Item Origin - Values
- Item Origin - Item Qualification Reference Numbers
- Item Origin - Item Qualification Remarks
Steps to Enable
You can configure the user interface using manager layout and screensets to customize your fields to show as pseudo-fields. Please refer to the OTM How To/Configuration Topic called Configuring the User Interface for more information.
Support for Pseudo-Fields on Campaign Line Grids
You can use pseudo-fields on certain grids in the Campaign Line. This enables you to enter a value for a field directly on a screen and not have to manage it in a grid. The grids that now support pseudo-fields include:
- Campaign Line Remarks
- Campaign Line Reference Numbers
- Campaign Line Values
For example, if you have a reference number with a qualifier of SUPPLIER ITEM NUMBER on a campaign line, you can use manager layout to create a pseudo-field which will show a specific field on the screen for Supplier Item Number.
Steps to Enable
You can configure the user interface using manager layout and screensets to customize your fields to show as pseudo-fields. Please refer to the OTM How To/Configuration Topic called Configuring the User Interface for more information.
Tariff Eligibility Screening Via Automation Agent
You can trigger tariff eligibility screening via an automation agent. For the Agent Type = ITEM, there is a new agent action called CHECK TARIFF ELIGIBILITY. When you select this agent action, you can enter the following information:
- Product Classification Type (required)
- Trade Program Profile
- Savings Threshold
GTM uses the Trade Program Profile and Savings Threshold defined in the CHECK TARIFF ELIGIBILITY agent action to narrow down the trade programs that are automatically assigned to your item origin.
GTM determines the list of trade programs to analyze when you specify a trade program profile. Within the trade program profile, you can check the Compatible checkbox. If the Compatible checkbox is marked, GTM will analyze the list of trade programs included in the profile to see if any of the trade programs can be assigned to the item origin on the item. If the Compatible checkbox is not marked, GTM will analyze the list of trade programs not included in the profile, based on the product classification type defined, to see if any of the trade programs can be assigned to the item origin on the item.
When you specify a savings threshold, GTM will only consider trade programs where the savings threshold is exceeded. For example, if you enter a savings threshold of 3%, GTM will only consider trade programs where the percentage rate is less than the general rate by 3% or more. If the general rate for your product is 10% but there is a trade program rate of 5%, GTM would consider the trade program since the savings threshold is exceeded.
Steps to Enable
You don't need to do anything to enable this feature.
Tips And Considerations
Please see the Trade Program Profile topic for more information.
Mark for Purge Available for Campaign Data
This feature provides you, as the DBA, the ability to use mark for purge against Campaigns in GTM. Once a campaign has been marked for purge you, the DBA, can purge the record in the UI or through a scheduled purge process that you run against the object.
Steps to Enable
You don't need to do anything to enable this feature.
Generate Consolidated NAFTA Document Across Campaign Lines
As a supplier, if you need to produce one certificate of origin that applies to multiple campaign lines, you can do this by generating a consolidated NAFTA certificate of origin. You can select multiple campaign lines and trigger the Generate Document action. In the action, select a Document Type = US-NAFTA. Enter other information such as Document Number, Effective Date, Expiration Date and other details. Click Generate to produce the consolidated NAFTA certificate of origin.
Steps to Enable
You don't need to do anything to enable this feature.
Trade Program Profile Power Data
You can create a Trade Program Profile to group trade programs. The Trade Program Profile can then be specified when triggering tariff eligibility screening via an automation agent. By specifying a Trade Program Profile on the automation agent, you can narrow down the list of trade programs that can be considered during eligibility screening and assigned to the item origin.
In the Trade Program Profile, you can specify:
- Trade Program Profile ID
- Trade Program Profile Name
- Compatible - Indicates if the trade programs listed in the trade program profile are compatible with the eligible trade programs identified for an item origin at the time the automation agent runs.
- Product Classification Type ID - Enter a product classification type to filter the trade programs that are displayed below.
- Trade Program - The list of trade programs you want to include in the profile.
When you create an automation agent with an Agent Type = ITEM, you can then specify the Trade Program Profile on the CHECK TARIFF ELIGIBILITY agent action.
Steps to Enable
You don't need to do anything to enable this feature.
Tips And Considerations
Please see the Tariff Eligibility Screening via Automation Agent topic for more information.
Capture User and Date for Tariff Eligibility Screening
When you trigger Tariff Eligibility Screening on your Item via either the UI action or agent action, GTM captures the user who performed eligibility screening and the date on which the eligibility screening was performed. You can see this information on the Item Classification Manager or when you edit a row of the Product Classifications grid on the Item > Trade Details tab.
Steps to Enable
You don't need to do anything to enable this feature.
Download Document Template Action on Campaign Line
You can quickly download a document template that is associated with a campaign line via the Campaign Line actions. The Download Document Template action enables you to select a campaign line and download the template associated with the line. This enables you to quickly access the template that you are expected to use for your certificate of origin and other documents. You can then complete the template, upload it to the campaign line and include it in your submission back to your trading partner.
Steps to Enable
You don't need to do anything to enable this feature.
A Document Validation Rule has been added to confirm that the filer reported in the ISA04/ISA05 is the same as the USPPI reported in the N1 segment. If the filer and USPPI are not the same, then a forwarding agent is required to be reported in the N1 segment. In addition, the AES Filing Template has been updated to support this enhancement.
Steps to Enable
You don't need to do anything to enable this feature.
Specify Trade Program As Part of Declaration Aggregation Criteria
You can aggregate transaction lines into declaration lines based on trade program. In a Constraint Set with a Constraint Set Type = DECLARATION-LINE AGGREGATION, you can select a Constraint ID = LINE TRADE PROGRAM. Then, when you trigger the Create / Add to Existing Declarations action, GTM will use the AGGREGATION CONSTRAINT SET listed in the logic configuration on the declaration type to determine the criteria used to aggregate the transaction lines into declaration lines.
Steps to Enable
You don't need to do anything to enable this feature.
Trade Program Field Added to Trade Transaction Line and Declaration Line
There is a new Trade Program field available on the trade transaction line and declaration line. This field enables you to add the trade program in a specific field instead of remarks. You can populate the trade program on the line in a variety of ways:
- Use the Lookup Trade Program action
- Use a data assignment Compliance Rule to automatically assign the trade program
You can also use the trade program in constraint sets to
- Group trade transactions into declarations
- Aggregate trade transaction lines into declaration lines
Steps to Enable
You don't need to do anything to enable this feature.
Specify Trade Program As Part of Data Configuration for Declaration Line
You can copy trade program from a transaction line to a declaration line using data configuration. In a Data Configuration with an Association Type = Transaction to Declaration you can select an Association = Line-Line and an Attribute = Trade Program. Then, when you trigger the Create / Add to Existing Declarations action, GTM will use the DATA CONFIGURATION listed in the logic configuration on the declaration type to determine the data to copy from transaction/transaction line to declaration/declaration line.
Steps to Enable
You don't need to do anything to enable this feature.
Automatically Assign Trade Program to Transaction Line and Declaration Line
You can automatically assign the trade program to your transaction line or declaration line using a compliance rule. In a Compliance Rule with a Control Category = DATA ASSIGNMENT, you can specify the criteria that must be met for the rule to be assigned on the Compliance Rule tab. On the Controls Tab you provide the following information to assign the trade program:
- Sequence: identifies the sequence in which data is assigned to a business object.
- Action: identifies what data is assigned. In this case: Assign Trade Program.
- Action Details: Enter the particulars of the data to be assigned. In this case: Trade Program Name.
NOTE: You have to provide short name of the trade program on the compliance rule to assign it to a transaction line/declaration line.
When you trigger the Execute Compliance Rules action, if the criteria defined on the compliance rule is met, GTM will automatically assign the trade program to the line associated with the transaction or declaration.
You can trigger the Execute Compliance Rules action manually on the UI or via an agent action for the following business objects:
- Trade Transaction
- Trade Transaction Line
- Declaration
- Declaration Line
Steps to Enable
To implement this feature you will follow the standard steps for setting up a Compliance Rule where the Control Category = DATA ASSIGNMENT.
Look Up Trade Program Action on Trade Transaction and Declaration
You can look up the trade program on an item and copy that information to the trade transaction line or declaration line. When you trigger the action, GTM prompts you to enter a Constraint Set ID. The dropdown list displays constraint sets with a Constraint Set Type = TRANSACTION-LINE TRADE PROGRAM LOOKUP. When triggered, GTM looks to the item on the line and analyzes the item origin data on the item. If an item origin meets the constraints defined in the constraint set, the corresponding trade program is copied over to the line.
You can trigger the Look Up Trade Program action from:
- Trade Transaction
- Trade Transaction Line
- Declaration
- Declaration Line
Steps to Enable
You don't need to do anything to enable this feature.
Tips And Considerations
It is mandatory to configure the property gtm.dutyTax.dsg.shipToLocation.locationQualifier to be able to perform this action on a transaction/transaction line/declaration/declaration line. Else, an error will be displayed.
Specify Trade Program As Part of Declaration Grouping Criteria
You can group transactions into declarations based on trade program. In a Constraint Set with a Constraint Set Type = DECLARATION-LINE GROUPING, you can select a Constraint ID = LINE TRADE PROGRAM. Then, when you trigger the Create / Add to Existing Declarations action, GTM will use the GROUPING CONSTRAINT SET listed in the logic configuration on the declaration type to determine the criteria used to group transactions into declarations.
Steps to Enable
You don't need to do anything to enable this feature.
Global Trade Intelligence (GTI)
New Dashboards Available in Global Trade Intelligence
Four new dashboards are available for you in Global Trade Intelligence (GTI). These dashboards are collections of metrics related to common strategic goals. There are four tabs for the new dashboards:
- Purchase Orders - provides a view various data including:
- Purchase Orders by Month of Import, Importing Country, Transport Mode, on hold, and by control information
- Extended Amount by Month of Import, Importing Country, and Transport Mode
- Sales Orders - provides a view various data including:
- Sales Orders by Month of Import, Ship To Country, Transport Mode, on hold, and by control information
- Extended Amount by Month of Import, Importing Country, and Transport Mode
- Declarations - Exports - provides a view various data including:
- Export declarations by month of export and declaration type
- Export declaration lines by month of export and declaration type
- Extended Amount by month of export and declaration type
- Cost Breakdown by month of export and declaration type
- Declarations - Imports - provides a view various data including:
- Import declarations by month of import and declaration type
- Import declaration lines by month of import and declaration type
- Extended Amount by month of import and declaration type
- Cost Breakdown by month of import and declaration type
Steps to Enable
You don't need to do anything to enable this feature.
New Order Date Dimensions Available
Order Date Period and Fiscal - TT, TTLine, Dec, DecLine
There are additional columns available in the Global Trade Intelligence product which enables you to create ad-hoc reports based on Order Date. The new date-based dimensions are:
- Trade Transaction Analysis > Trade Transaction Order Date Period Dimensions: Order Date Period Dimensions enable you to create reports based on the ordered date on trade transactions.
- Trade Transaction Line Analysis > Trade Transaction Line Order Date Period Dimensions: Order Date Period Dimensions enable you to create reports based on the ordered date on trade transaction lines.
- Declaration Analysis > Declaration Order Date Period Dimensions: Order Date Period Dimensions enable you to create reports based on the ordered date on declarations.
- Declaration Line Analysis > Declaration Line Order Date Period Dimensions: Order Date Period Dimensions enable you to create reports based on the ordered date on declaration lines.
Steps to Enable
You don't need to do anything to enable this feature.