
- Revision History
- Overview
- Update Tasks
- Feature Summary
- Transportation and Global Trade Management
-
- Transportation and Global Trade Platform
- Oracle Transportation Management (Base)
- Execution Features
-
- New Public Shipment Group Workbench
- Workbench Drag and Drop Action - Shipment to Shipment Group
- Shipment Group Additional Header Level Fields
- Agent Action - Shipment - Add Shipment to Shipment Group with Rule Validation
- Apply Shipment Group Rule During Add Action
- Migrate Shipment Group Reference Number to New Shipment Group Reference Number Table
- Manual Repack Equipment Shipment Action
- Change Equipment Group Enhancement
- Send Documents Action - Send Multiple Documents to Recipients in One Email
- User Defined Attributes
- Rail Events and Re-planning
- OTM Base Workbench
- Transportation Operational Planning
- Freight Payment, Billing, and Claims
- Transportation Intelligence
- Logistics Network Modeling
- Global Trade Management (Base)
-
- Additional User Defined Attributes Added for GTM Objects
- Additional GTM Objects Supporting Work Queue in the Workbench
- Send Documents Action - Send Multiple Documents to Recipients in One Email
- Registrations - Add Attribute Fields and Support Pseudo-Fields
- New Content Set Detail Power Data
- SmartLink from Content Set to Content Set Detail
- Download Files from Data Load Process
- Trigger Notification Based on Data Load Success or Failure
- New Agent Type for Data Load Content Type
- CSV Upload Status Available on Data Load
- Trade Program and Tariff Rate Purge Processing Supported
-
- Trade Agreements
- Global Trade Intelligence (GTI)
This document will continue to evolve as existing sections change and new information is added. All updates appear in the following table:
| Date | Feature | Notes |
|---|---|---|
| 25 MAR 2022 | Optional Feature - Disable Custom HTTP Credentials | Updated document. Revised opt in information. |
| 17 DEC 2021 | Optional Feature - Disable Custom HTTP Credentials | Updated document. Revised feature and opt in information. |
| 15 JUN 2021 | Optional Feature - Load Stand Alone Invoices to TI | Updated document. Revised feature and opt in information. |
| 15 JUN 2021 | Optional Feature - Disable Custom HTTP Credentials | Updated document. Revised feature and opt in information. |
| 01 MAR 2021 | Optional Feature - Disable Custom HTTP Credentials | Updated document. Revised feature information. |
| 24 APR 2020 | Workbench - Enhanced Access Control for Creating New Workbenches |
Removed feature from update 20B. |
| 24 MAR 2020 | Created initial document. |
This guide outlines the information you need to know about new or improved functionality in Oracle Transportation & Global Trade Management Cloud Update 20B. Each section includes a brief description of the feature, the steps you need to take to enable or begin using the feature, any tips or considerations that you should keep in mind, and the resources available to help you.
GIVE US FEEDBACK
We welcome your comments and suggestions to improve the content. Please send us your feedback at otm-doc_us@oracle.com. Please indicate you are inquiring or providing feedback regarding the Oracle Transportation & Global Trade Management What’s New in Update 20B.
This section gives you information to help you plan, deploy, and validate your update. We make frequent additions to this document, so don’t forget to check back and get the latest information before your update starts.
Review the Release Notes.
- The release notes include fixes, special instructions, and resolutions related to the Oracle Transportation and Global Trade Management Cloud.
- Release Notes can be found here:
- https://support.oracle.com/epmos/faces/DocumentDisplay?id=2620583.1
Use the following resources to prepare for and validate your Oracle Engagement Cloud update.
On My Oracle Support Read:
- Doc ID 2508854.1
- Oracle Cloud Applications - Transportation and Global Trade Management Cloud: Quarterly Updates - Preparation and Testing Recommendations
- Doc ID 2095528.1
- Oracle Cloud Applications - Transportation and Global Trade Management Cloud: Quarterly Update Planning
- Doc ID 2096782.1
- Oracle Cloud Applications - Transportation and Global Trade Management Cloud: Quarterly Update Planning FAQs
- Doc ID 2098110.1
- Oracle Cloud Applications - Transportation and Global Trade Management Cloud: Update Policy
Column Definitions:
Features Delivered Enabled
Report = New or modified, Oracle-delivered, ready to run reports.
UI or Process-Based: Small Scale = These UI or process-based features are typically comprised of minor field, validation, or program changes. Therefore, the potential impact to users is minimal.
UI or Process-Based: Larger Scale* = These UI or process-based features have more complex designs. Therefore, the potential impact to users is higher.
Features Delivered Disabled = Action is needed BEFORE these features can be used by END USERS. These features are delivered disabled and you choose if and when to enable them. For example, a) new or expanded BI subject areas need to first be incorporated into reports, b) Integration is required to utilize new web services, or c) features must be assigned to user roles before they can be accessed.
Transportation and Global Trade Management
Transportation and Global Trade Platform
Optional Feature - Automatic Log Suppression
This optional feature provides you, the DBA with the ability to suppress logging for all Log IDs at or above a specified level of frequency - from Rare onward. The benefit of this feature is that excessive logging causes performance issues, so with AUTOMATIC LOG SUPPRESSION feature, you have the ability to suppress excessive logging and reduce the performance impact related to too much logging.
Steps to Enable
To Opt In to this feature:
- Go to the Optional Feature UI - Configuration and Administration > Property Management > Optional Features.
NOTE: Only the DBA.ADMIN user can access and use the Optional Features page.
- Select the AUTOMATIC LOG SUPPRESSION feature.
- Run the Action Opt In.
Tips And Considerations
It is recommended that all Optional Features be reviewed in the update they are delivered.
To review optional features go to the Optional Feature UI - Configuration and Administration > Property Management > Optional Features.
Version Optional Feature Introduced 20B
Version where this optional feature is no longer Optional and becomes a mandatory opt in feature - 22A
Optional Feature - Disable Custom HTTP Credentials
This feature will remove legacy HTTP credentials from HTTP header. HTTP user credentials must only be sent using HTTP Basic Authentication. This feature, when set to TRUE and/or when the opt in period expires and the feature is promoted will deprecate the use of legacy HTTP header parameters USERNAME and PASSWORD.
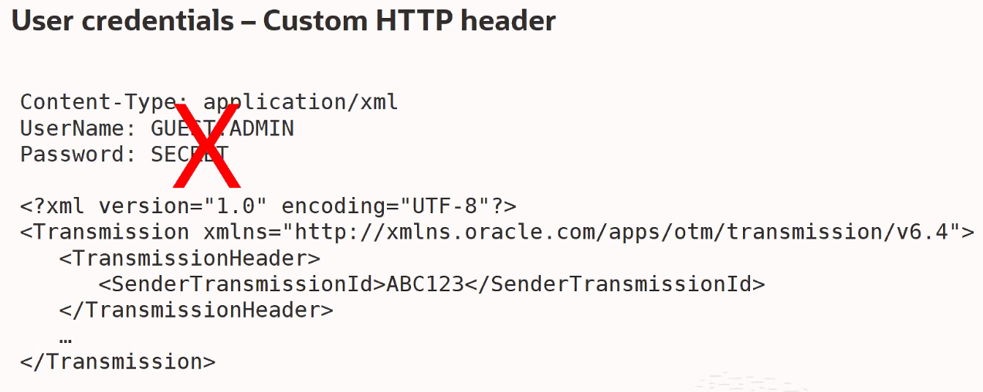
Disabled Custom HTTP Credentials
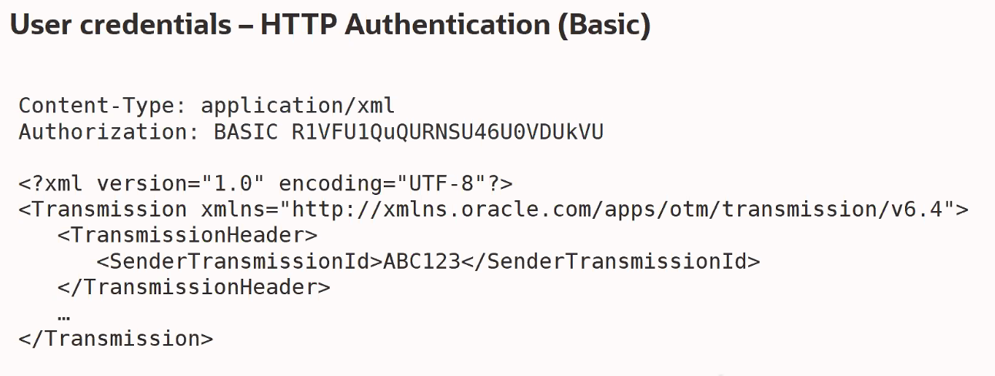
Required - HTTP Basic Authentication
This feature will improve performance, adds an extra layer of security and is aligned with industry standards.
Steps to Enable
HTTP user credentials must only be sent using HTTP Basic Authentication. This feature, when set to TRUE/once promoted will deprecate the use of legacy HTTP header parameters USERNAME and PASSWORD.
- If the OTM custom HTTP header parameters for USERNAME and PASSWORD are being used, then the corresponding integrations need to be updated to use HTTP Basic Authentication instead.
Tips And Considerations
It is recommended that all Optional Features be reviewed in the update they are delivered.
To review optional features go to the Optional Feature UI - Configuration and Administration > Property Management > Optional Features.
Optional Feature - Log Usage Statistics
When this optional feature is enabled, this feature will create rolling statistical time windows of log usage, by Log ID along with overall statistics. This information can be extremely useful in identifying excessive logging and/or in identifying newly enabled Log IDs that should be disabled.
Steps to Enable
To Opt In to this feature:
- Go to the Optional Feature UI - Configuration and Administration > Property Management > Optional Features.
NOTE: Only the DBA.ADMIN user can access and use the Optional Features page.
- Select the LOG USAGE STATISTICS feature.
- Run the Action Opt In.
Tips And Considerations
It is recommended that all Optional Features be reviewed in the update they are delivered.
To review optional features go to the Optional Feature UI - Configuration and Administration > Property Management > Optional Features.
This optional feature is no longer Optional and becomes a mandatory opt in feature in 22A.
Using this feature adds some contention to the logging infrastructure. It can be disabled to revert to optimal logging performance.
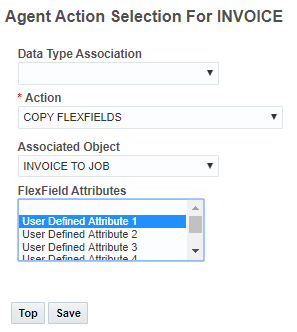
Agent Action - Copy Flexfields From/To Enhancement
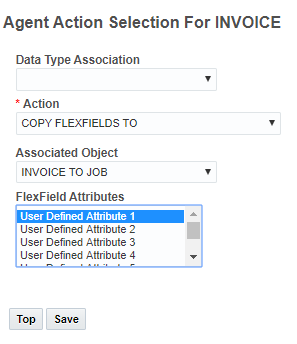
This feature provides you with direction specific (From or To) copy flexfields agent actions. With this feature - for any agent Type of X, the agent action COPY FLEXFIELDS will copy from X to its associated object/s. The new agent action COPY FLEXFIELDS TO will copy from the associated object/s to X. The To and From for the agent actions are with respect to the object on which agent is triggered. This feature will simplify your setup and minimize the possibilities for contention.
In the example below, with an agent type of invoice, the agent action COPY FLEXFIELDS will copy User Defined Attribute 1 FROM the Invoice to the associated object - in this case a Job.
Copy Flexfields
In the example below, with an agent type of INVOICE, the agent action COPY FLEXFIELDS TO will copy User Defined Attribute 1 from the associated object - the Job - TO the Invoice.
Copy Flexfields To
Steps to Enable
You don't need to do anything to enable this feature.
Workbench - Adding Content to the Workbench Supports Using Labels
The Search icon is now available to open the Label finder where you can search for and select a user-defined label to be used for the Tab Name.
Steps to Enable
You don't need to do anything to enable this feature.
Workbench - Mass Update Support for ID Fields
This feature provides you with the ability to perform mass updates to your ID related fields within your workbench tables. This enhancement extends the Mass Update capabilities already available by having the Search icon next to fields that require it. For example if Equipment Group ID is set as an editable field on the Order Release screen set, you can search for an Equipment ID to populate that field during Mass Update.
Steps to Enable
You don't need to do anything to enable this feature.
Tips And Considerations
Directly updating ID fields using mass update can have unintended consequences.
Key Resources
For setup information related to screen sets and mass update please review the Mass Update topic found in online Help.
Workbench Tables - Blank Date/Time Fields Follow User Preference for Local Time Zone When Inline Editing
This feature provides you with improved inline edit behavior for your blank date/time fields. When blank date/time fields are Inline edited on Workbench tables, they will display as per the user preference time zone and will only default to the UTC/system time zone if the user preference timezone is not configured.
Steps to Enable
You don't need to do anything to enable this feature.
Saved Query Flag Honored on the Screen Set When Working in a Workbench Table
When the Saved Query check box is deselected on a Screen Set (on the General tab), the Saved Search drop down in the associated Workbench Table is read only.
Steps to Enable
You don't need to do anything to enable this feature.
Tips And Considerations
Saved Search can be accessed by editing layouts. Users should make the layout read only to disable this access to Saved Search as well.
Oracle Transportation Management (Base)
New Order Release Method Option - Pack Each Item to Individual Ship Unit
This feature provides you with a new order release order configuration option that sets your Ship Unit Count so that it is equal to the Total Package Count on the order release line. To take advantage of this new order configuration option, you can use the Pubic Order Configuration of ONE_TO_ONE_PACK, or you can create your own Order Configuration and then for the Order Release Releasing Logic option One Ship Unit per Line select the Pack Each Item to Individual Ship Unit option.
While it was possible to configure orders in a similar fashion previously, the new Order Configuration setup option Pack Each Item to Individual Ship Unit option simplifies both the data setup and integration mapping requirements.
Example:
With the Order Configuration of ONE_TO_ONE_PACK and the input below:
- Packaged Item selected - MY_PACKAGED_ITEM
- Total Package Count set to 4
- Transport Handling Unit specified - in this example set to MY_ITEM_BOX.
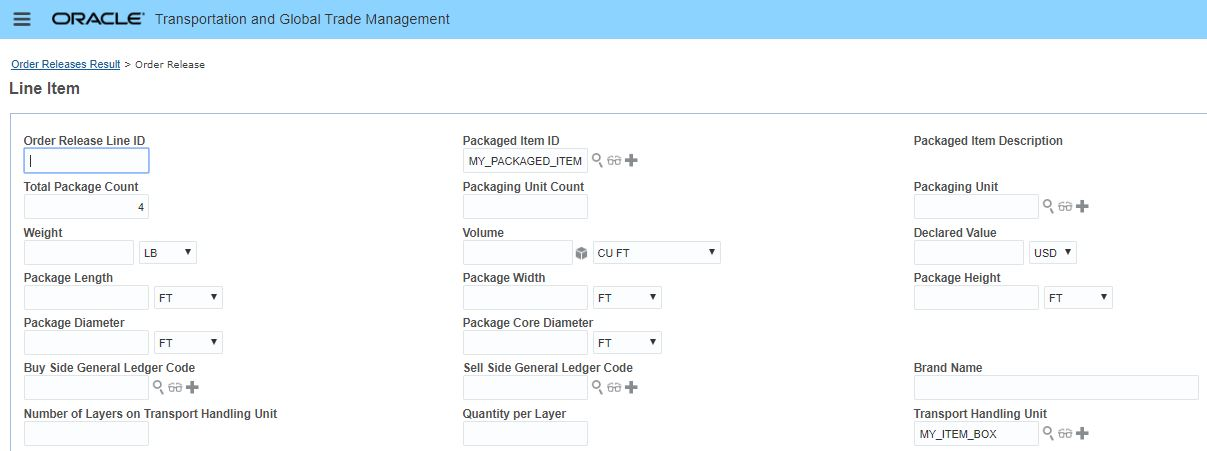
Order Release Line Input
Provides the Order Release Line below - with Ship Unit Count equal to the Total Package Count.

Order Configuration - ONE_TO_ONE_PACK - Order Release Line Example
Steps to Enable
You don't need to do anything to enable this feature.
Tips And Considerations
Note that you must provide a Transport Handling Unit when specifying your Line Item.
Order Modification with Packed Information from WMS/INV
This feature provides improved support for how OTM handles the update of packed information from Warehouse Management Systems and Inventory Management Systems. Once an order's SHIP UNIT ACTUAL status is enabled, OTM will apply the line modification and ship unit modification on an order independently - which means OTM will apply whatever the user specified changes are without any propagation within the order. Otherwise, OTM will apply order modification based on the order configuration.
Changes include:
- New Status Types and Values to understand when a shipment ship unit is in an actual state
- STATUS_TYPE_ENABLES_SHIP_UNIT_ACTUAL and STATUS_VALUE_ENABLES_SHIP_UNIT_ACTUALS
- Two planning parameters for ORDER MANAGEMENT
Steps to Enable
You don't need to do anything to enable this feature.
CarrierConnect XL 3.0 Support Service Type and Service Code
This feature provides you with the ability to configure the Service Type and Service Code values that will be transmitted to SMC³ CarrierConnect XL 3.0 so you can request service level information beyond the base/standard level of service offered by your Service Providers. By default the values transmitted to CarrierConnect XL 3.0 are Service Type = "STANDARD" and Service Code = "Standard-LTL". In previous versions of OTM there was no option for you to configure different values for the Service Type and Service Code.
With this feature, for Service Providers offering multiple levels of service, you can now setup a Rate Service (and related Rate Offering) and configure the Service Type and Service Code on the Rate Service so that the Service Type and Service Code mapped to a Service Provider's different level of service are transmitted to SMC³ CarrierConnect XL 3.0.
When configuring these values you should check with SMC³ to verify the expected values for the Service Types and Service Code.
Service Types (currently) map to the standard/harmonized list of service levels SMC³ CarrierConnect XL 3.0 supports:
- STANDARD,
- EXPEDITED,
- GUARANTEED.
Service Codes map to the Service Provider’s name for their service offering the current list includes the following:
- The Service Type = STANDARD maps to the Service Code = Standard-LTL
- The Service Type = EXPEDITED maps to the Service Code = Premium
- The Service Type = GUARANTEED maps to the Service Code = Guaranteed
If you do not have any Service Providers that offer additional level of service beyond Service Type = "STANDARD" and Service Code = "Standard-LTL" then NO ACTION is required.
Steps to Enable
If you do have Service Providers that do offer additional levels of service beyond Service Type = "STANDARD" and Service Code = "Standard-LTL" then here are the steps required for setting up and obtaining that Service Providers additional level of service from SMC³ CarrierConnect XL 3.0.
- Create a new Rate Service, Rate Service Type must be EXTERNALTRANSITDAYS.
- On the Rate Service Details tab put the correct/desired Service Type and Service Code.
- Configure a new Rate Offering Master with the discount from the Base that corresponds to the new Rate Service and Service Type and Service Code.
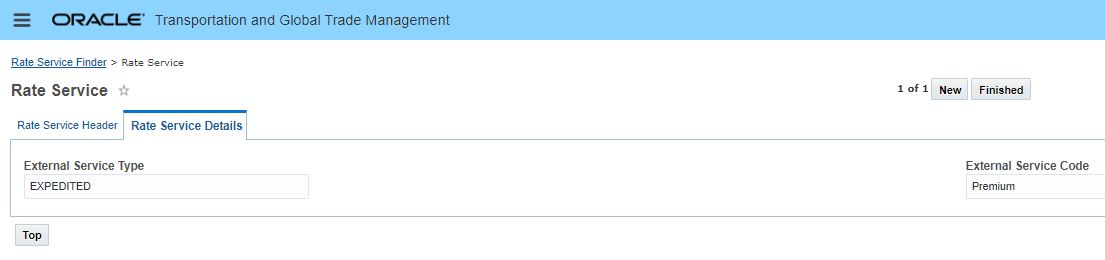
Rate Service Detail - Setup for the Service Type = "EXPEDITED" and Service Code = "Premium"
Tips And Considerations
You can only configure the Service Type and Service Code for the Rate Service Type of EXTERNALTRANSITDAYS.
You must provide values for both the Service Type and Service Code. If either value is blank, then OTM will revert to the default mapping where Service Type is set to "STANDARD" and Service Code is set to "Standard-LTL".
-
Check with your Service Provider and SMC³ for the proper values.
-
Note - the Service Type and Service Code fields on the Rate Service Detail tab are free form text fields (which allows for flexibility, but also introduces the risk of spelling mistakes) - and to complicate things further, the values are case sensitive.
Key Resources
SMC³ Support:
- Phone Number – 1-800-845-8090
- Email – CustomerSupport@smc3.com
REST - Add POST and PATCH Operations for Order Base Resource
This feature extends the operations available for the Order Base resource to include POST and PATCH. This is in addition to the GET operation that was available previously.
Steps to Enable
Review the REST service definition in the REST API guides, available from the Oracle Help Center > your apps service area of interest > REST API. If you're new to Oracle's REST services you may want to begin with the Quick Start section.
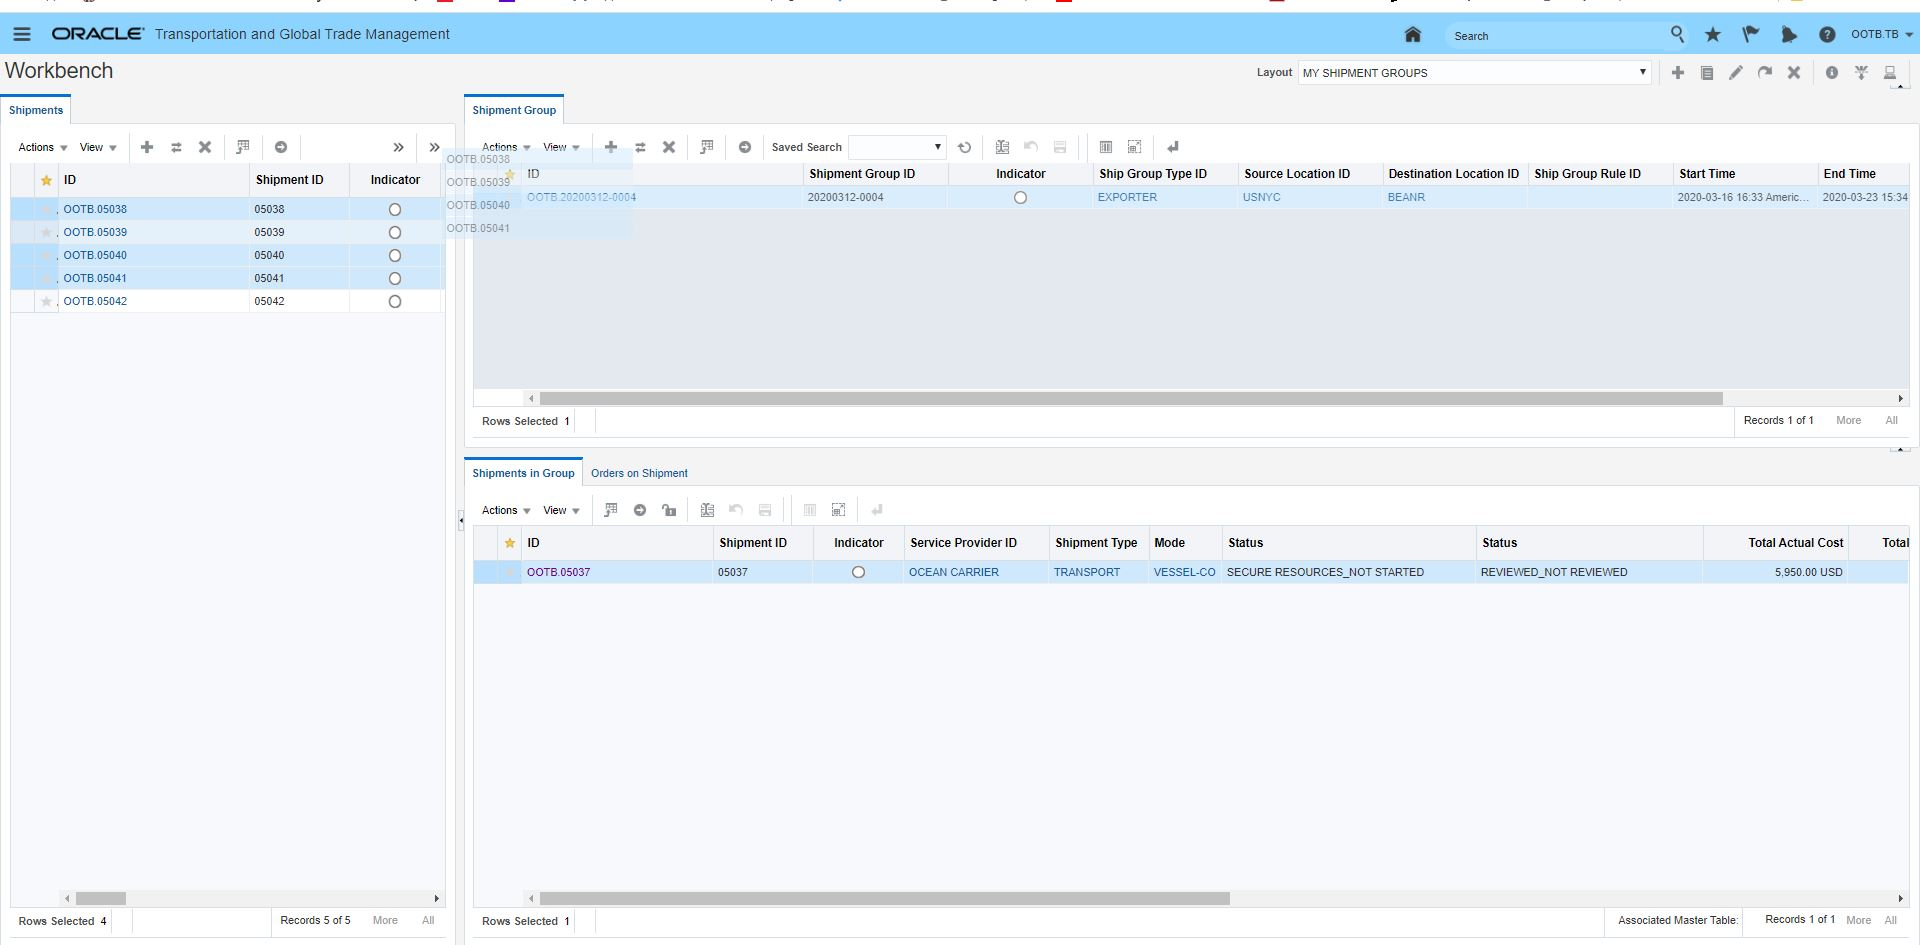
New Public Shipment Group Workbench
This feature provides you with a new sample Public Workbench (SHIPMENT GROUP WORKBENCH) that you can use as an example for developing your own shipment and shipment group focused Workbench. This Public Workbench was designed to support the activities related to creating and modifying shipment groups. The Public Shipment Group Workbench provides you with an out-of-the-box Workbench that provides a view into the shipments available to be added to shipment groups, your current shipment groups, the shipments already in the current shipment groups and the orders related to the shipments within the shipment group.
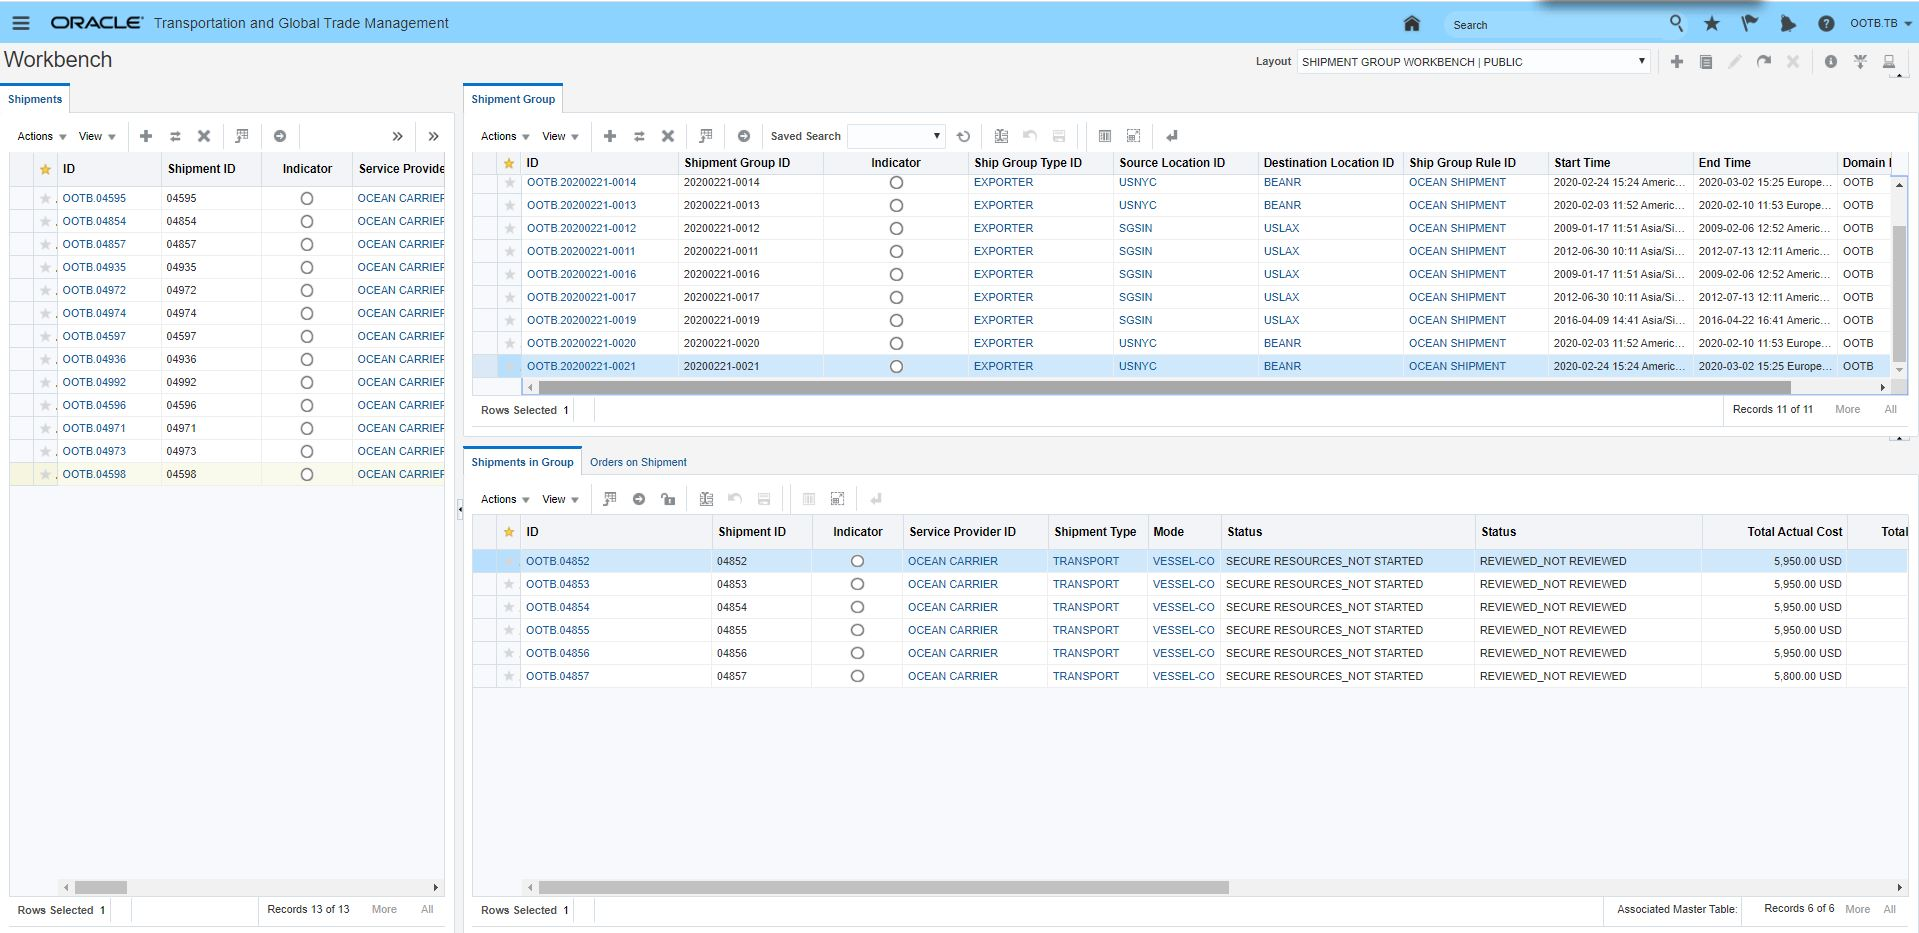
Shipment Group Workbench
Steps to Enable
You don't need to do anything to enable this feature.
Workbench Drag and Drop Action - Shipment to Shipment Group
This feature provides you with a new Drag and Drop action in the Workbench. You are now able to select and drag one to N shipments from your Workbench shipment table to a target Workbench shipment group table. The Drag and Drop activity triggers the action Add Shipments to Group to run in the background and will validate and perform the request.
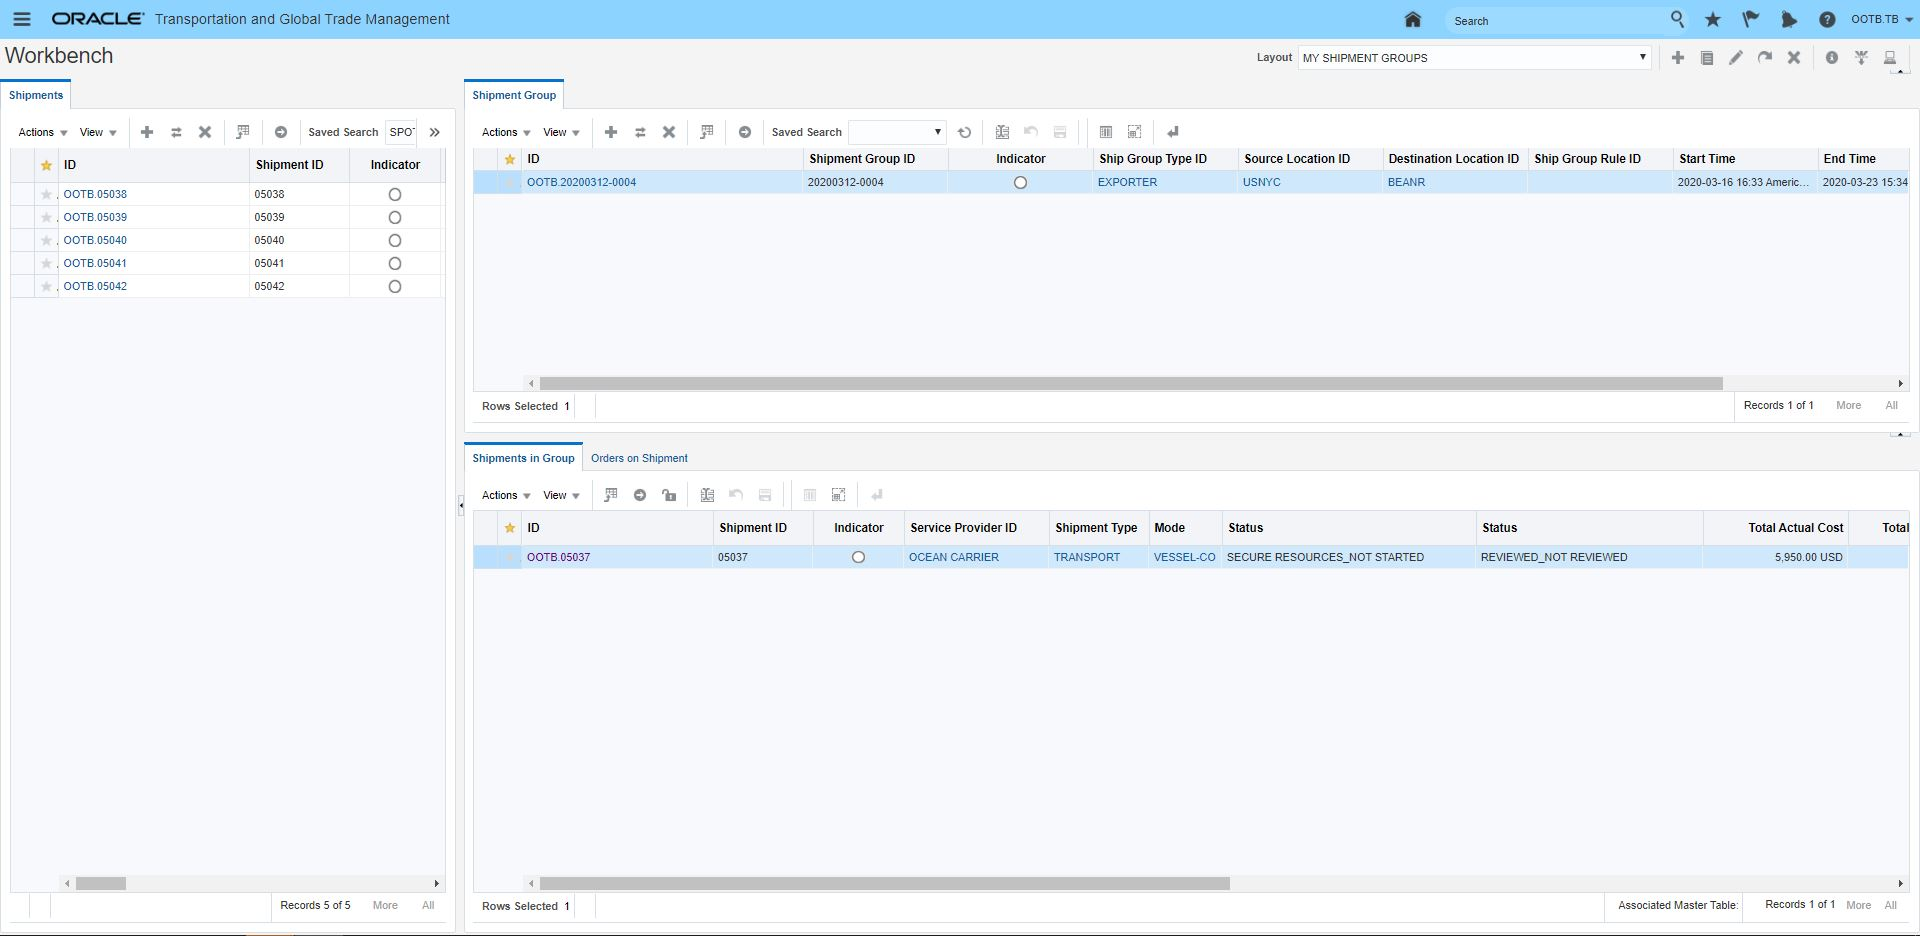
Drag and Drop
Drag Shipments to Shipment Group
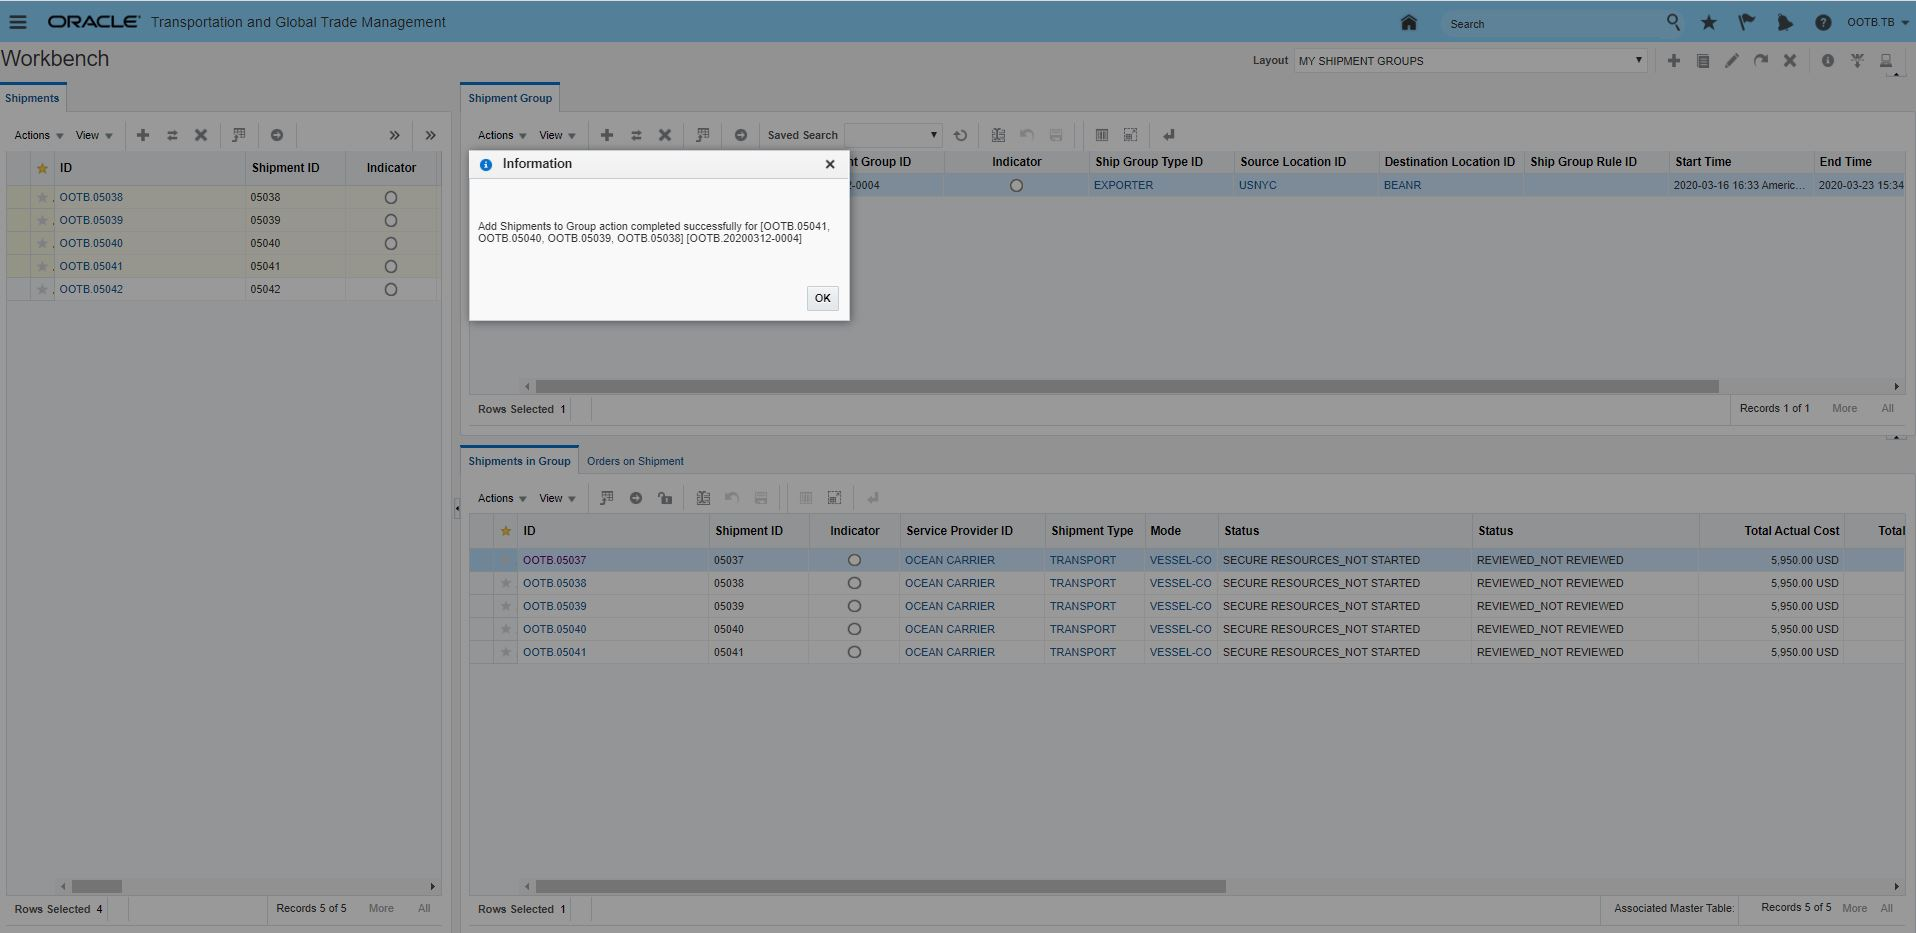
Drag and Drop Result
Steps to Enable
You don't need to do anything to enable this feature.
Shipment Group Additional Header Level Fields
This feature provides you with additional data fields that are now available on the the Shipment Group Header. Providing these fields on the Shipment Group header flattens out data access which improves usability and simplifies the generation of documents and reports for Shipment Groups.
The additional header fields include:
- Service Provider ID
- Voyage Number
- Shipment Equipment ID
- Port Of Load ID
- Port Of Discharge ID
Service Provider, Voyage Number (aka Service Schedule), Port Of Load and Port Of Discharge have been added to the Shipment Group Rule and will be populated with their matched values. Fields defined on a shipment group rule, such as service provider, master bill of lading reference number, or order sales order reference number will be populated onto the shipment group automatically during creation. It is also possible for the user to enter these directly and these fields have also been added to the Manager Layout and XML interfaces.
Steps to Enable
You don't need to do anything to enable this feature.
Agent Action - Shipment - Add Shipment to Shipment Group with Rule Validation
This feature provides you with the tools you need to automate the process of adding shipments to and/or creating new shipment groups considering the shipment group rules associated with your Shipment Group Types. One way this new capability can be used is with the agent action - ADD SHIPMENT TO SHIPMENT GROUP that - based on the Shipment Group Type specified - identifies the set of valid shipment group rules for the specified shipment group type and then either adds the shipment to all the existing groups where the shipment group rules are valid/pass or creates a new shipment group if no valid matching shipment groups exists.
Steps to Enable
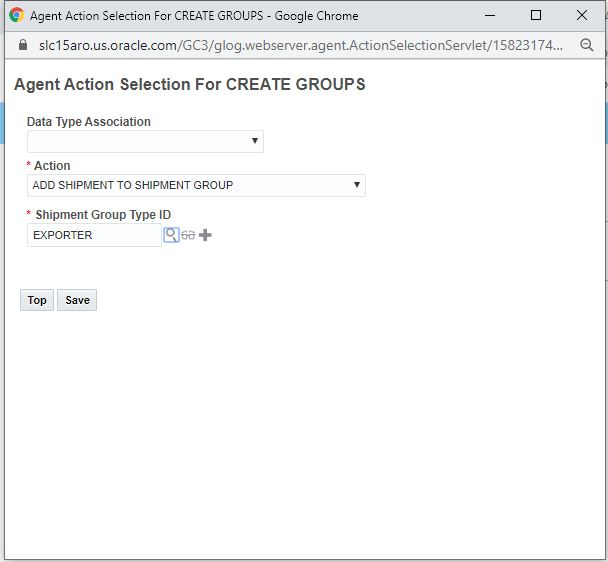
Agent Action
To use this feature you will need to:
- Configure a Shipment Automation Agent
- Select the ADD SHIPMENT TO SHIPMENT GROUP Action
- Specify the Ship Group Type ID to consider
Apply Shipment Group Rule During Add Action
This feature provides you with a way to insure that the shipments being added to a shipment group match the criteria defined on your Shipment Group Rules. To validate the matching criteria, you only need to define your matching criteria and then select the Validate Matching Criterial when defining your Shipment Group Rules. When the Validate Matching Criteria option is selected, the match criterial will be validated before any shipments can be added to the Shipment Group where the rule applies. If the matching criteria is not matched/the shipment is not valid based on the marching criteria defined, then an error will be raised.

Shipment Group Rule Matching on Service Schedule / Voyage
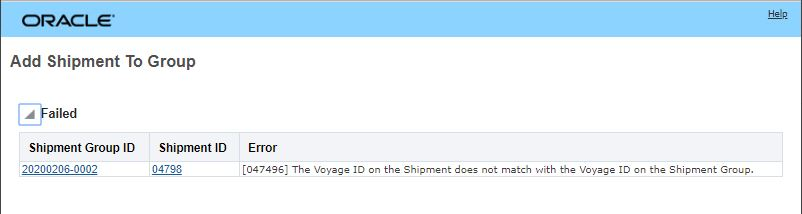
Shipment Group Rule Validation Failure
Steps to Enable
To use this feature you will need to:
- Define your Shipment Group Rule
- Select the option to Validate Matching Criteria
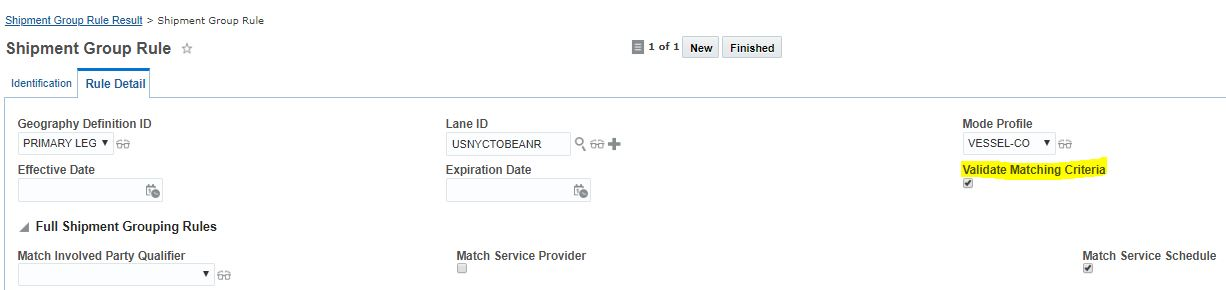
Validate Matching Criteria
In the example above, the Shipment Group Rule is validating the matching criteria for the same vessel/voyage.
Migrate Shipment Group Reference Number to New Shipment Group Reference Number Table
This feature provides the Shipment Group object with its own Reference Number Qualifier and Value tables. In prior updates, the Reference Number Qualifiers and Values provided on the Shipment Group where managed within the SHIPMENT_REFNUM_QUAL and SHIPMENT_REFNUM tables. With this feature - the Reference Number Qualifiers and Values related to Shipment Groups are now stored and managed in tables dedicated to managing the Reference Number Qualifiers and Values for Shipment Groups.
The Shipment Group Rule has also been modified to distinguish between the Shipment Reference Number Qualifier used by the rule to identify matching shipments and the Reference Number Qualifier that will be used on the shipment group to store the matched reference qualifier (and value) on the shipment group.
In the example below, this Shipment Group Rule will match and group shipments with same Shipment Reference Number Value where the Shipment Reference Number Qualifier is "MASTER" identified by the value entered in the Match Reference Qualifier field. The shipment group will store the values for the grouped shipments in the Shipment Group Reference Qualifier of "MAWB" - identified by the value entered in the Shipment Group Reference Number Qualifier (Shipment) field.

Shipment Match Qualifier to Shipment Group Reference Number Qualifier
This feature includes handling the proper migration of your existing Reference Number Qualifier and Values into the new Shipment Group Reference Qualifier and Value tables.
Steps to Enable
You don't need to do anything to enable this feature.
Tips And Considerations
If you have Shipment Group Saved Queries that are based on the Shipment Reference Number Qualifier, you will want to recreate those saved queries so they are based on the Shipment Group Reference Number Qualifier values instead. The Shipment Reference Number Qualifier in any manager layout will be migrated to the Shipment Group Reference Number Qualifier.
Manual Repack Equipment Shipment Action
The Manual Repack Equipment shipment action allows you to easily move a shipment ship unit (or part of a shipment ship unit) from one shipment equipment to another shipment equipment and/or add another shipment equipment to your shipment and then move shipment ship units to the newly added shipment equipment. You also have the opportunity to delete/remove ship units or move shipment ship units to an order movement(s) for planning on another shipment.
This action also enables the moving of ship units between compartments for a multi-compartment equipment as well as repacking the equipment for a ComboEquipment Fleet type of shipment.
This Manual Replace Equipment action is found here: Shipment Management > Shipment Management > Buy Shipments > Actions > Shipment Management > Change Shipment Details > Manual Repack Equipment.
MOVE SHIPMENT SHIP UNITS
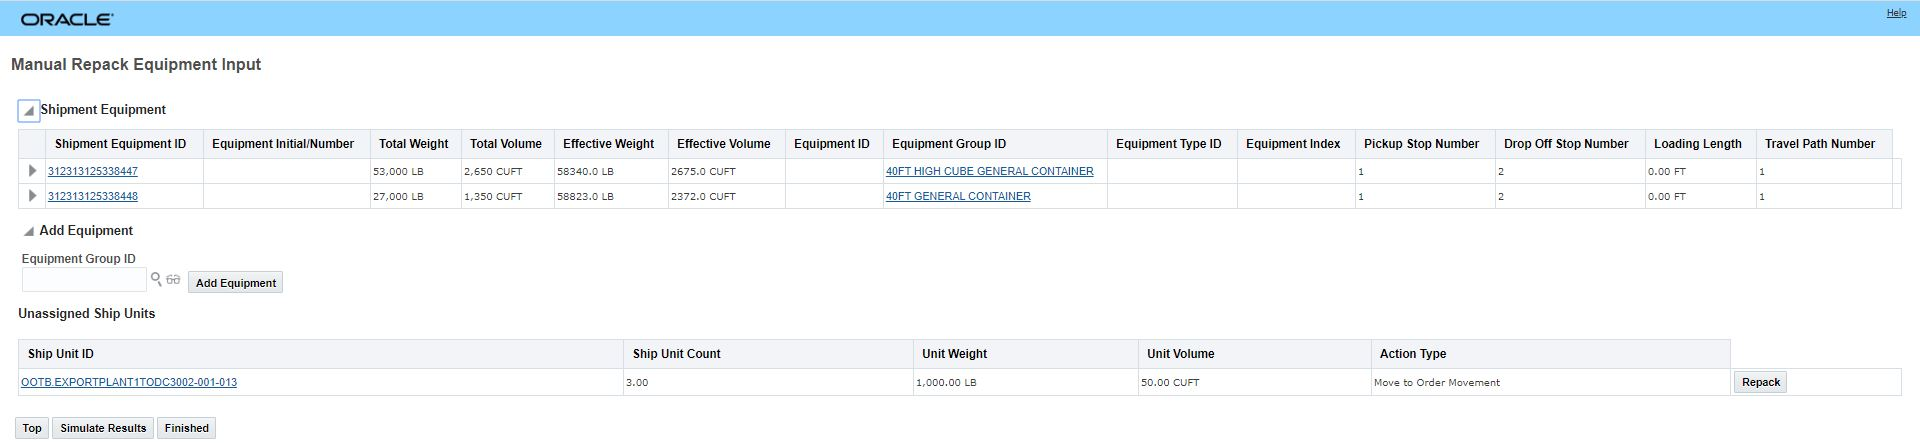
When you run the Manual Repack Equipment action, you will see the shipment equipment for the selected shipment and the associated ship units.
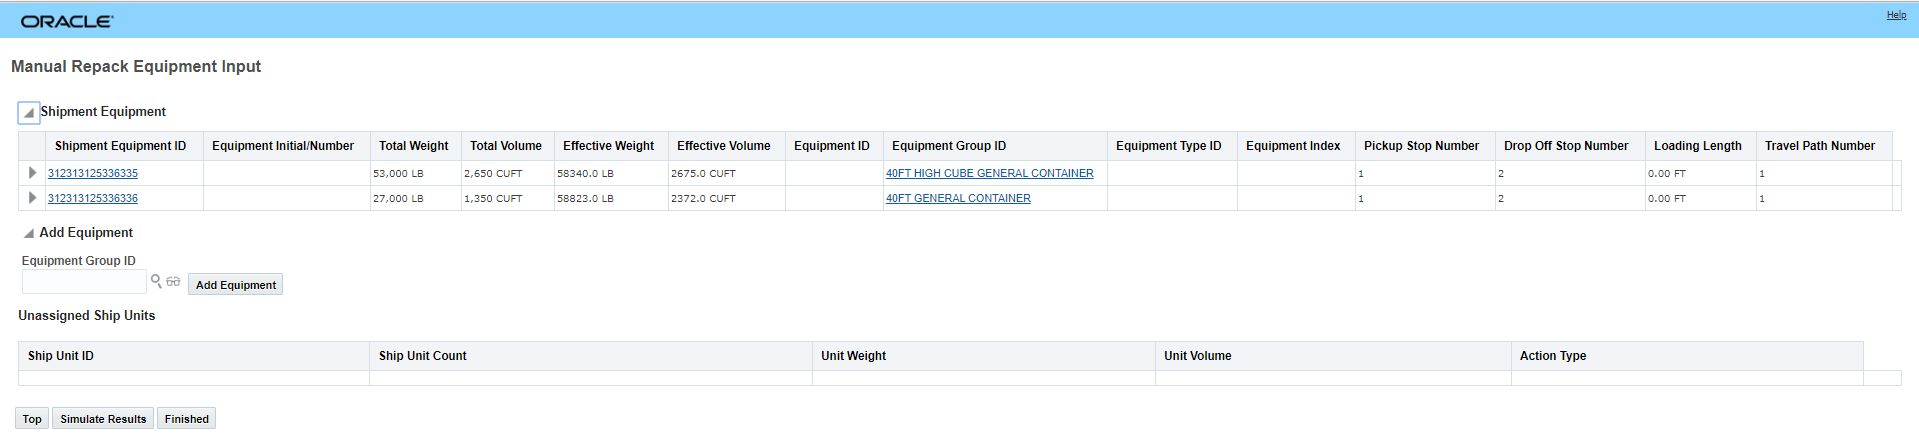
Manual Repack Equipment - Input Page
The Repack button allows you to repack shipment ship units into available shipment equipment or delete (all/some) of your ship units or move (all/some) of your ship units to order movements. In the example below, five ship units from shipment equipment 312313125336336 are being moved to shipment equipment 3123131253363355.

Manual Repack Equipment - Repack Button

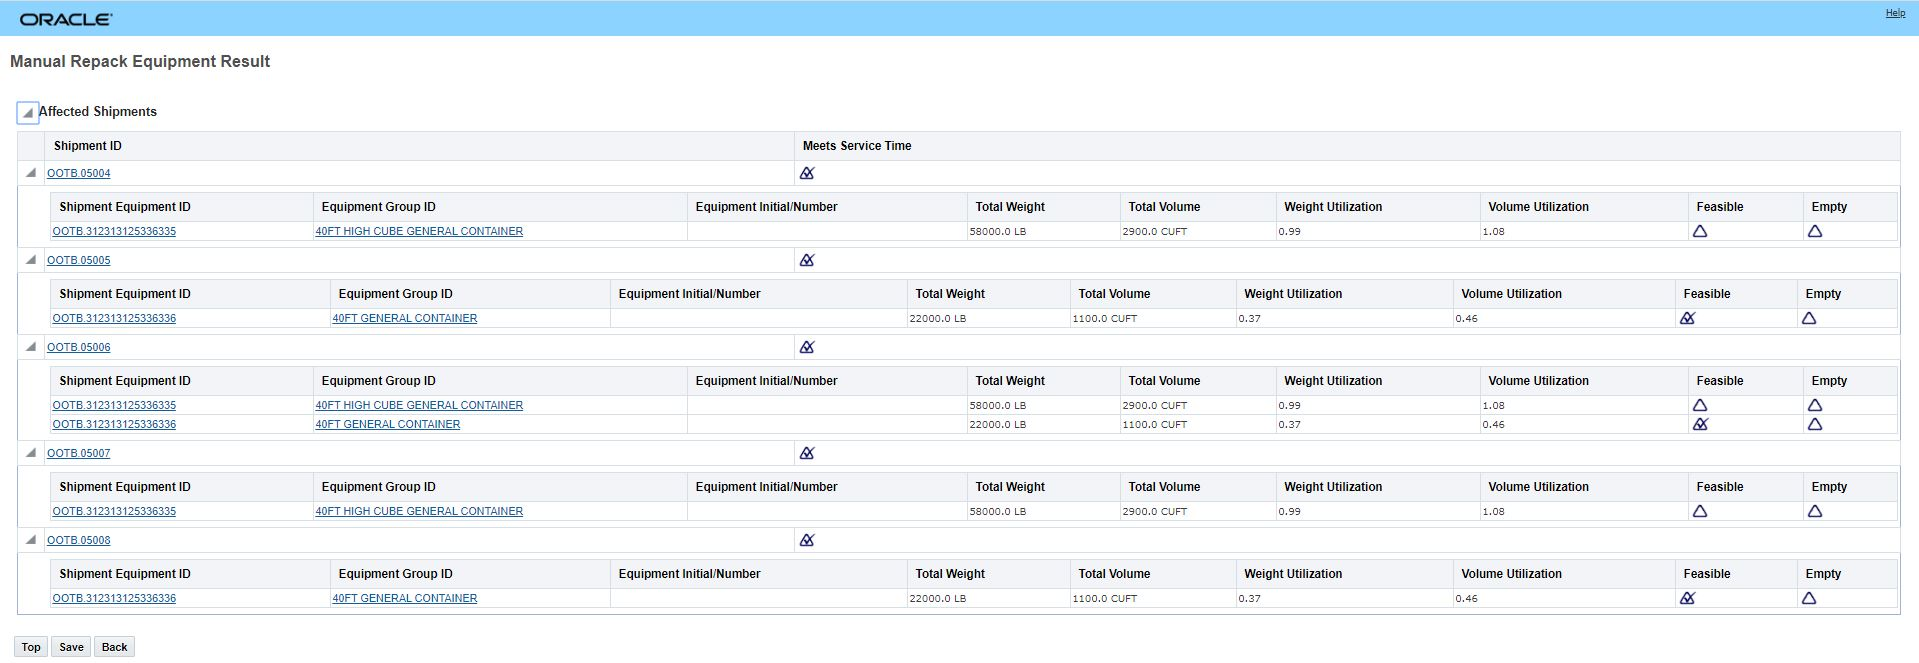
Manual Repack Detail Page - Repacking five Ship Units From Shipment Equipment 312313125336336 to 312313125336335

Manual Repack Equipment - Result
ADD EQUIPMENT
To Add an Equipment to your shipment just add an Equipment Group ID and select the Add Equipment option. The newly added equipment will be displayed in a new row under the Shipment Equipment section. Once added, you can move ship units into the newly added shipment equipment.
NOTE: Any empty equipment record on a shipment can be deleted - OTM will provide you with the option to delete empty equipment by enabling the Delete option on each row that contains an empty equipment record. Since your newly added equipment record will be empty to start, the Delete option will be available.
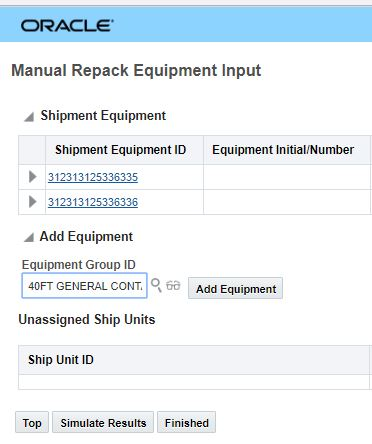
Manual Repack - Add Equipment
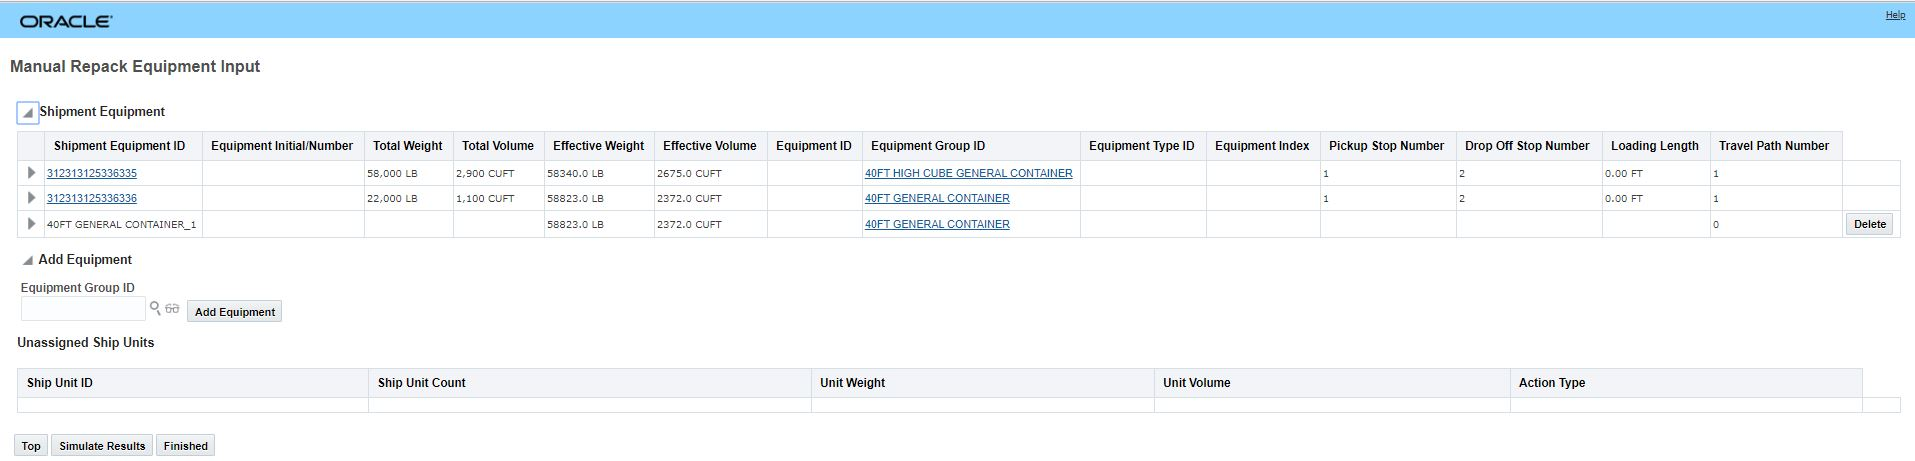
Manual Replace Equipment - Add Equipment
SIMULATE RESULTS
When you click the Simulate Results button, OTM provides an intermediate results page which shows you the impact of your changes - you can save the changes or go back.
Manual Repack - Simulate Results
MOVE TO ORDER MOVEMENT
The Manual Repack Equipment Move to Order Movement option allows you to move the identified number of ship units off of the current shipment equipment and onto unplanned order movements. These order movements can then be selected and planned separately.

Move to Order Movement
Move to Order Movement - Unassigned Ship Units
Moving the three shipment ship units using the move to order movement action - in this case - has created three order movements one order movement for each of the shipments in the travel path.
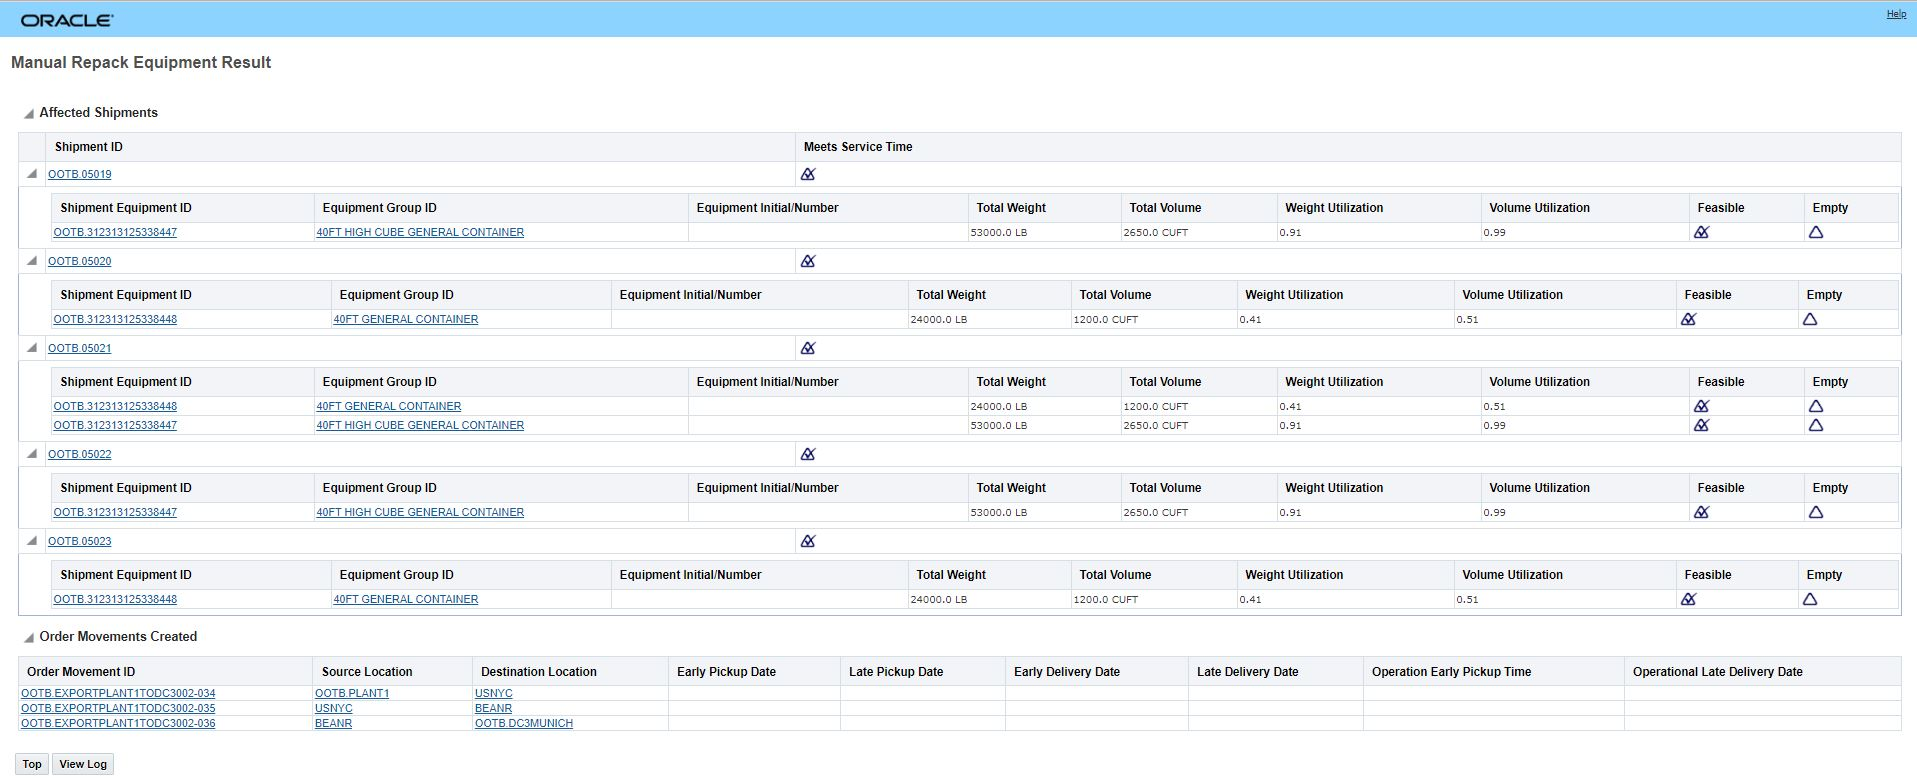
Move to Order Movement Result
Steps to Enable
You don't need to do anything to enable this feature.
Tips And Considerations
- You can configure the action layout using the MANUAL_REPACK_EQUIPMENT public manager layout. For example, you can rename and rearrange fields on this action to meet your business needs.
- The Travel Path Number is used to identify all the shipment equipments on a shipment that follow the same reuse equipment upstream or downstream shipment path. The shipment equipment with the same travel path will be assigned the same travel path number.
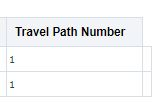
Travel Path Number
Change Equipment Group Enhancement
This feature provides you an enhanced Change Equipment Group action that provides two additional options:
- Change Select Equipment option
- The Change Select Equipment option allows you to select the shipment equipment record (or records) that you want to change the equipment group for.
- Recalculate without Service Provider Change option
- The Recalculate without Service Provider Change allows you to change the assigned equipment group and then recalculate the shipment cost using the assigned Service Provider. Previously, the recalculate cost option would recalculate the cost and evaluate the option of changing the assigned Service Provider to the lowest cost Service Provider.
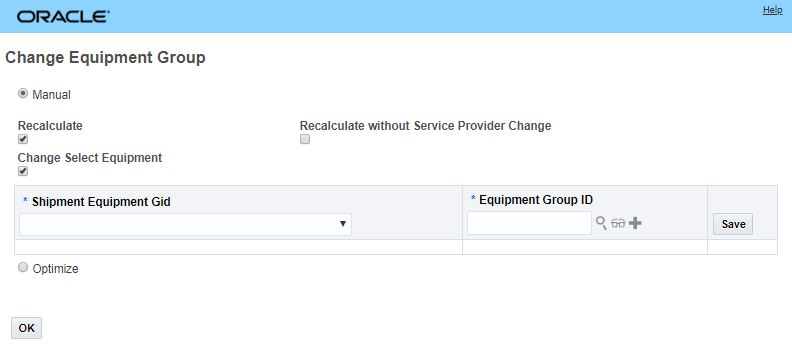
Change Equipment Group Action
Perform the steps below to change the equipment group:
- By default, the Manual check box is selected.
- Enter Equipment Group ID by performing a search or by entering the name of the equipment group you want.
- If the rate for the shipment includes the equipment group, select the Recalculate check box. Oracle Transportation Management recalculates the cost from the rate using the new equipment group. If the rate does not take the equipment group into consideration, then changing the equipment group does not change the cost for the shipment.
- When you select the Recalculate check box, the Recalculate without Service Provider Change check box appears. If you select this check box, OTM recalculates the cost and will not change the service provider even if a least cost service provider is available.
- Select the Change Select Equipment check box to select one or more equipment on the shipment to change the equipment group.
Steps to Enable
You don't need to do anything to enable this feature.
Tips And Considerations
When you run the Change Equipment Group action on a shipment which has multiple shipment equipments and you do not select the Change Select Equipment check box, OTM will change the equipment group of all the equipment on the shipment to the specified equipment group. Similarly, when you select the Change Select Equipment check box, OTM changes individual equipment to different equipment groups.
Send Documents Action - Send Multiple Documents to Recipients in One Email
The Send Shipment Documents action allows you to select and send multiple documents associated with a shipment (both Standard Documents and Additional Documents) in a single email to one or more contacts, one or more ad hoc email addresses, or one or more printers. This action also allows you to select a Reply To Contact. You can choose to send the documents as individual attachments or as a compressed file.
The Send Documents action is available for both the Buy and Sell Shipment Managers.
The Send Action is accessed via:
- Shipment Management > Shipment Management > Buy Shipments > Actions > Business Process Automation > Documents > Send Documents
- Shipment Management > Shipment Management > Sell Shipments > Actions > Business Process Automation > Documents > Send Documents
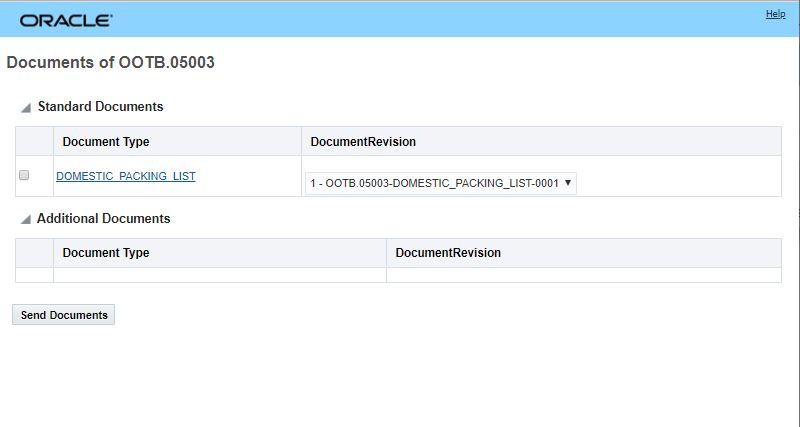
Send Documents - Select Documents and Document Revisions
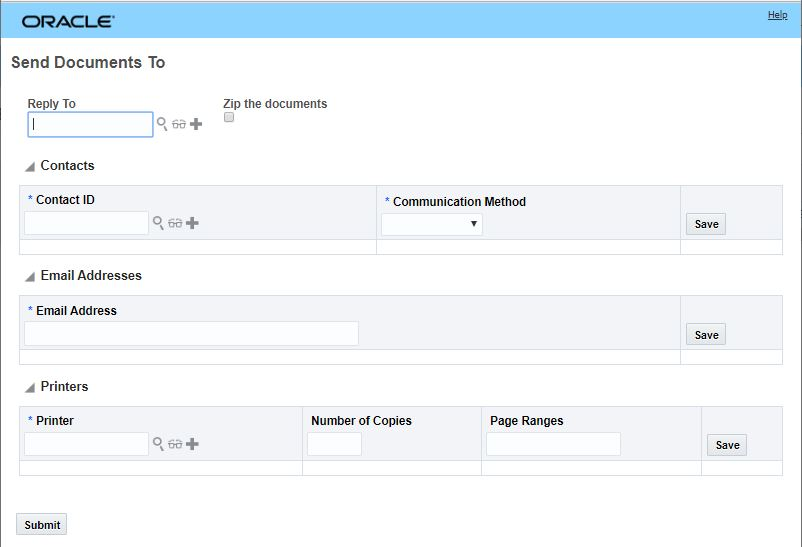
Send Documents - Select Recipients or Printers Input
Sending a Document
- Select the check boxes corresponding to the standard documents and the additional documents that you want to send in the mail.
- If there are multiple revisions for a standard document, select the required option from the Document Revision drop-down list.
- Click Send Documents.
- Select the contact for the Reply To field.
- Select the Zip the documents check box if you want to send the selected documents as a compressed file.
Contacts
- Enter the Contact ID to whom the mail is to be sent.
- Select an option from the Communication Method drop-down list to specify if the recipient has to be emailed, faxed, etc.
- Click Save.
Email Addresses
- Enter the email ID of the recipient in the Email Address field.
- Click Save.
Printers
- Enter an ID of the printer in the Printer field.
- Enter a number in the Number of Copies field.
- Enter the page numbers which have to be printed in the Page Ranges field.
- Click Save.
- Click Submit.
Steps to Enable
You don't need to do anything to enable this feature.
Tips And Considerations
NOTE: There are individual document attachment limits as well as limits for the set of documents being attached - when the allowable limits are exceeded, the document access in the email provided will be sent as a link vs an attachment.
- Individual document attachment limit. Documents that are greater than or equal to 1MB will be sent as a link vs an attachment.
- If you send five documents where four of the documents are 20KB and one of the documents is 1.1MB - the four documents at 20KB will be sent as attachments - the one 1.1MB document will be sent as a link.
- Total document attachment limit. If the set of attached documents is greater than or equal to 5MB, then the email will provide access to all the documents via links vs as attachments.
Additional User Defined Attribute Fields Added to Invoice
This enhancement provides you with 10 additional number user defined attribute fields and 10 additional date user defined fields. These additional user defined attribute fields have been added to both the invoice and invoice line tables. These additional attributes are available for you to use with your Invoice and Bill UI configurations, and are included in the XML APIs and the REST API related to the Invoice.
Changes:
- Attribute numbers 11 - 20
- Attribute date 11-20
Steps to Enable
You don't need to do anything to enable this feature, however, to take advantage of these additional user defined attribute fields you will need to add them to the appropriate screen sets and consider their mapping in your invoice related integrations.
Additional User Defined Attributes Added to Order Release
This enhancement provides you with 10 additional number user defined attribute fields and 10 additional date user defined fields. These additional user defined attribute fields have been added to the Order Release table. These additional attributes are available for you to use with your Order Release screen set and manager layout configurations, and are included in the XML and REST APIs related to the Order Release.
Changes:
- Attribute numbers 11 - 20
- Attribute date 11-20
Steps to Enable
You don't need to do anything to enable this feature.
Tips And Considerations
You do not need to do anything to enable this feature, however, to take advantage of these additional user defined attribute fields you will need to add them to the appropriate screen sets, managers and consider their mapping in your integrations.
Additional User Defined Attributes Added to Order Release Line
This enhancement provides you with 10 additional number user defined attribute fields and 10 additional date user defined fields. These additional user defined attribute fields have been added to the Order Release Line table. These additional attributes are available for you to use with your Order Release Line screen set and manager layout configurations, and are included in the XML and REST APIs related to the Order Release Line.
Changes:
- Attribute numbers 11 - 20
- Attribute date 11-20
Steps to Enable
You don't need to do anything to enable this feature.
Tips And Considerations
You do not need to do anything to enable this feature, however, to take advantage of these additional user defined attribute fields you will need to add them to the appropriate screen sets, managers and consider their mapping in your integrations.
Additional User Defined Attributes Added to Ship Unit
This enhancement provides you with 10 additional number user defined attribute fields and 10 additional date user defined fields. These additional user defined attribute fields have been added to the Ship Unit table. These additional attributes are available for you to use with your Ship Unit screen set and manager layout configurations, and are included in the XML and REST APIs related to the Ship Unit.
Changes:
- Attribute numbers 11 - 20
- Attribute date 11-20
Steps to Enable
You don't need to do anything to enable this feature.
Additional User Defined Attributes Added to Order Movement
This enhancement provides you with 10 additional number user defined attribute fields and 10 additional date user defined fields. These additional user defined attribute fields have been added to the Order Movement table. These additional attributes are available for you to use with your Order Movement screen set and manager layout configurations, and are included in the XML and REST APIs related to the Order Movement.
Changes:
- Attribute numbers 11 - 20
- Attribute date 11-20
Steps to Enable
You don't need to do anything to enable this feature.
Tips And Considerations
You do not need to do anything to enable this feature, however, to take advantage of these additional user defined attribute fields you will need to add them to the appropriate screen sets, managers and consider their mapping in your integrations.
How To - Rail Events and Re-Planning
This feature provides you with a new How To (Rail Events and Re-Planning) that provides you with the step by step instructions for executing three Intermodal rail scenarios.
The scenarios covered include the following:
- Local or Through
- One rail carrier bill. More than one rail carrier may transport.
- Rule 11
- More than one rail carrier bill. More than one rail carrier transports. More than one shipment and more than one ground service schedule.
- Crosstown
- More than one rail shipment with a truck movement in between. More than one shipment and more than one ground service schedule.
Steps to Enable
You don't need to do anything to enable this feature.
Tips And Considerations
This How To assumes that you have purchased various industry content from the providers of that content. Specially this How To assumes that you have purchased and loaded into OTM the following content:
-
The Standard Point Location Code® (SPLC™) - The SPLC is a 9 digit geographic code used by North American transportation industries, especially rail. The SPLC is owned and maintained by the National Motor Freight Traffic Association.
-
For more information go to: http://www.nmfta.org/Pages/SPLC
-
-
The Centralized Station Master (CSM) - The CSM is a geographic location file which contains data about rail and motor carrier points for North America and international areas.
-
For more information go to: https://public.railinc.com/
-
Agent Action - Shipment - Assign Next Repetition Schedule
The Assign Next Repetition Schedule agent action is simplifies the process of finding and assigning the next available schedule for a ground service shipment, adjusting the shipment times accordingly and then re-driving the impacted downstream shipments. This agent action is intended to be used for Ingate rail events.
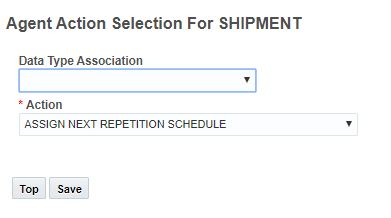
Assign Next Repetition Schedule
Steps to Enable
You don't need to do anything to enable this feature.
Key Resources
-
Review the OTM How To/Configuration Topic: Rail Events and Re-planning for more information about the intended use of this agent action.Review the OTM How To/Configuration Topic: Rail Events and Re-planning for more information about the intended use of this agent action.
Agent Action - Tracking Event - Calc Ahead/Late and Persist
This feature provides you with a new tracking event agent action Calc Ahead/Late and Persist that calculates the ahead (early) or late time and persists the actual or estimated arrival or departure time to the shipment stop. This new agent action use different event types (IN GATE, TRAIN ARRIVAL, IN TRANSIT, TRAIN DEPART, OUT GATE) to determine the calculations to perform.
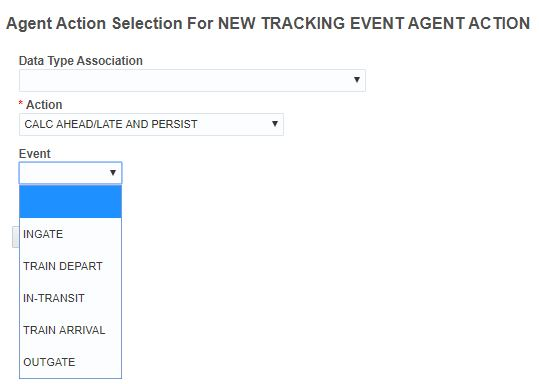
Calc Ahead/Late and Persist Agent Action
Below you will find an explanation of the events and the calculations performed.
Event Type: INGATE
- Takes the actual arrival from event.
- Takes the planned arrival, shipment and location based on the event Standard Point Location Code (SPLC).
- Calculates Ahead/Late time as Actual Arrival - Planned Arrival.
- Updates the actual arrival on the shipment stop based on the location obtained from the SPLC.
Event Type: TRAIN DEPART
- Takes the actual departure from the event.
- Takes the planned departure, shipment and location based on the event SPLC code.
- Calculates Ahead/Late time as Actual Departure - Planned Departure.
- Updates actual departure on the shipment stop based on the location obtained from the SPLC.
Event Type: IN-TRANSIT
- Takes the estimated arrival from the car destination ETA on event.
- Takes the planned arrival, shipment and location based on the car destination SPLC code.
- Calculates Ahead/Late time as Estimated Arrival - Planned Arrival.
- Updates estimated arrival on shipment stop based on the location obtained from the SPLC.
- This is the only action that updates the Estimated Time for events that happen between stops. It's worth noting that the stop is found based on the SPLC code - for Rule-11 rail shipments, this approach will find the last stop in the rail chain of shipments - the event may be associated with a prior shipment, but the ETA will update for the last shipment.
Event Type: TRAIN ARRIVAL
- Takes the actual arrival from the event.
- Takes the planned arrival, shipment and location based on the car destination SPLC code.
- Calculates the Ahead/Late time as Actual Arrival - Planned Arrival.
- Updates the actual arrival on shipment stop based on the location obtained from the SPLC.
Event Type: OUTGATE
- Takes the actual departure from the event.
- Takes the planned departure, shipment and location based on the car destination SPLC code.
- Calculates the Ahead/Late time as Actual Departure - Planned Departure.
- Updates the actual departure on shipment stop based on the location obtained from the SPLC.
Steps to Enable
You don't need to do anything to enable this feature.
Agent Action - Tracking Event - Estimate Recovery Time
The Estimate Recovery Time tracking event agent action updates the planned departure time and is used with In-transit, and Train Arrival rail events. This agent action is designed to improve recovery time estimates and improve the timing calculations for downstream shipments.
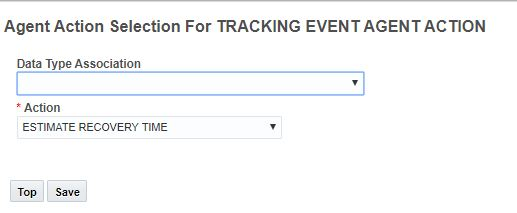
Estimate Recovery Time
Steps to Enable
You don't need to do anything to enable this feature.
Key Resources
-
Review the OTM How To/Configuration Topic: Rail Events and Re-planning for more information about the intended use of this agent action.Review the OTM How To/Configuration Topic: Rail Events and Re-planning for more information about the intended use of this agent action.
Agent Action - Tracking Event - Re-Drive Downstream Shipments
The tracking event Re-drive Downstream Shipments agent action can be used when the end time of a shipment has changed to re-drive impacted downstream shipments. The Re-drive Downstream Shipments agent action will find a shipment from the car destination Standard Point Location Code (SPLC) or the SPLC from the tracking event and will then use the end time of the shipment to re-drive shipments that are downstream from this shipment and update the times accordingly. When a shipment is ahead of schedule or on-time, there is no need to re-drive downstream shipments.
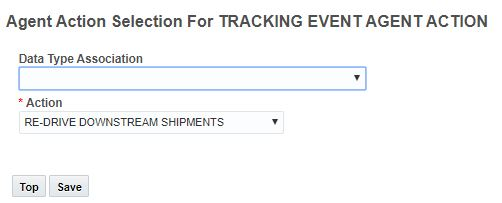
Re-drive Downstream Shipments
Steps to Enable
You don't need to do anything to enable this feature.
Key Resources
-
Review the OTM How To/Configuration Topic: Rail Events and Re-planning for more information about the intended use of this agent action.Review the OTM How To/Configuration Topic: Rail Events and Re-planning for more information about the intended use of this agent action.
Workbench Tables - Capacity Usage Added
When defining a Workbench Table, Capacity Usage is now an option in the Object Type drop down.
Steps to Enable
You don't need to do anything to enable this feature.
Workbench Maps - Color Orders on Map Based on Attributes
Additional options available in the Map Order Color Scheme Logic Configuration parameter allow you to color the lines on the map for Order Releases and Order Movements based on the following attributes:
- Source Location ID
- Destination Location ID
- Early Pickup Date
- Early Delivery Date
- Late Pickup Date
- Late Delivery Date
- Weight
- Volume
- Order Type
Steps to Enable
You don't need to do anything to enable this feature.
Tips And Considerations
The parameters would also be available at Map Parameters for each map. This could allow a different setting for each map on the layout.
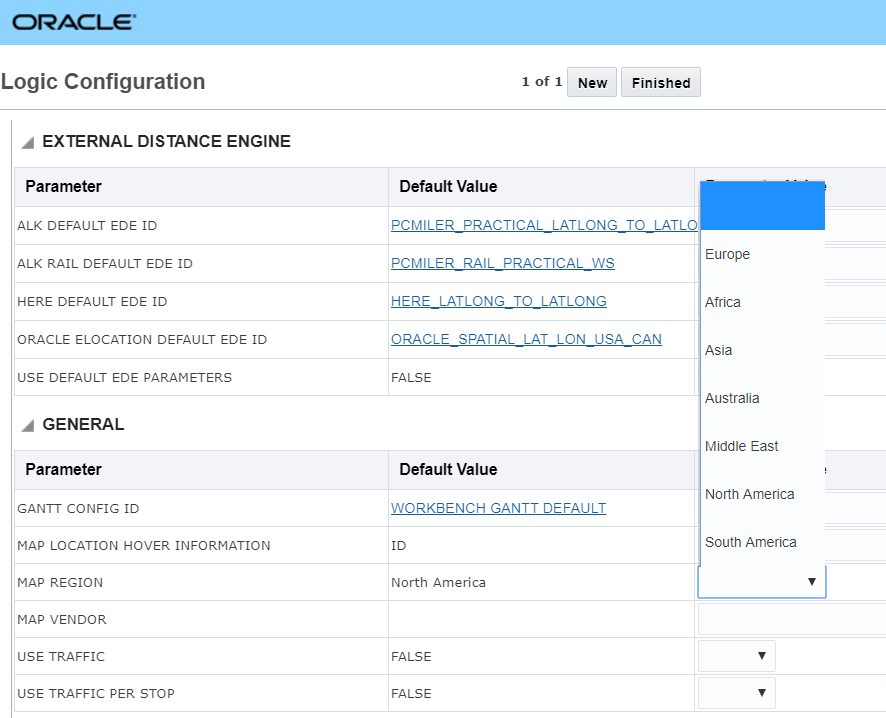
Workbench Maps - Set Default Map Region - ALK/Trimble MAPS
There is a new Logic Configuration for Workbench that allows you to set the Map Region for the Workbench Layouts. When using the Workbench Layout the map will default to the region specified, previously the map always defaulted to the United States.
The options are:
- Europe
- Africa
- Asia
- Australia
- Middle East
- North America
- South America

You can also set the Map Region when working in the map on the Workbench Layout. This setting is available in the Map Parameters. This setting is only used to specify the default region.

Steps to Enable
You don't need to do anything to enable this feature.
Workbench Maps - Set Default Map Region - HERE
There is a new Logic Configuration parameter for Workbench that allows you to set the Map Region for the Workbench Layouts. When using the Workbench Layout the map will default to the region specified, previously the map always defaulted to the United States. The options are:
- Europe
- Africa
- Asia
- Australia
- Middle East
- North America
- South America

You can also set the Map Region when working in the map on the Workbench Layout. This setting is available in the Map Parameters. This setting is only used to specify the default region.

Steps to Enable
You don't need to do anything to enable this feature.
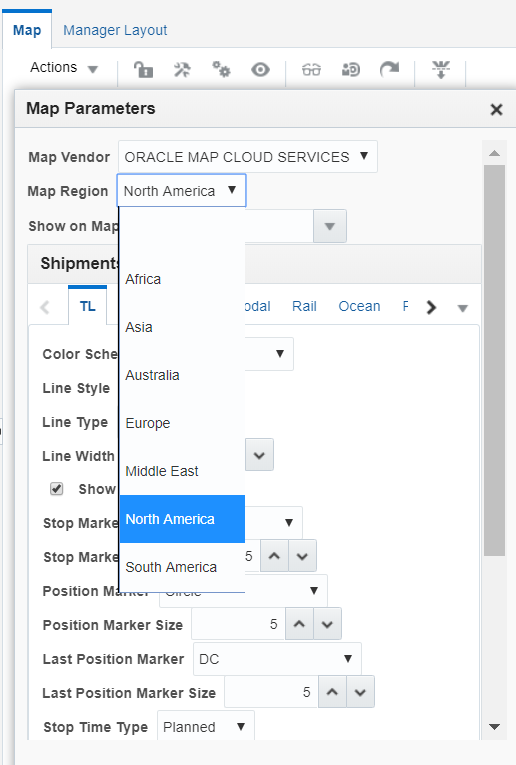
Workbench Maps - Set Default Map Region - Oracle Maps Cloud Service
There is a new Logic Configuration parameter for Workbench that allows you to set the Map Region for the Workbench Layouts. When using the Workbench Layout the map will default to the region specified, previously the map always defaulted to the United States. The options are:
- Europe
- Africa
- Asia
- Australia
- Middle East
- North America
- South America
You can also set the Map Region when working in the map on the Workbench Layout. This setting is available in the Map Parameters. This setting is only used to specify the default region.
Steps to Enable
You don't need to do anything to enable this feature.
Transportation Operational Planning
Edit Load Config - Load Configuration Decision Support Edit Tool
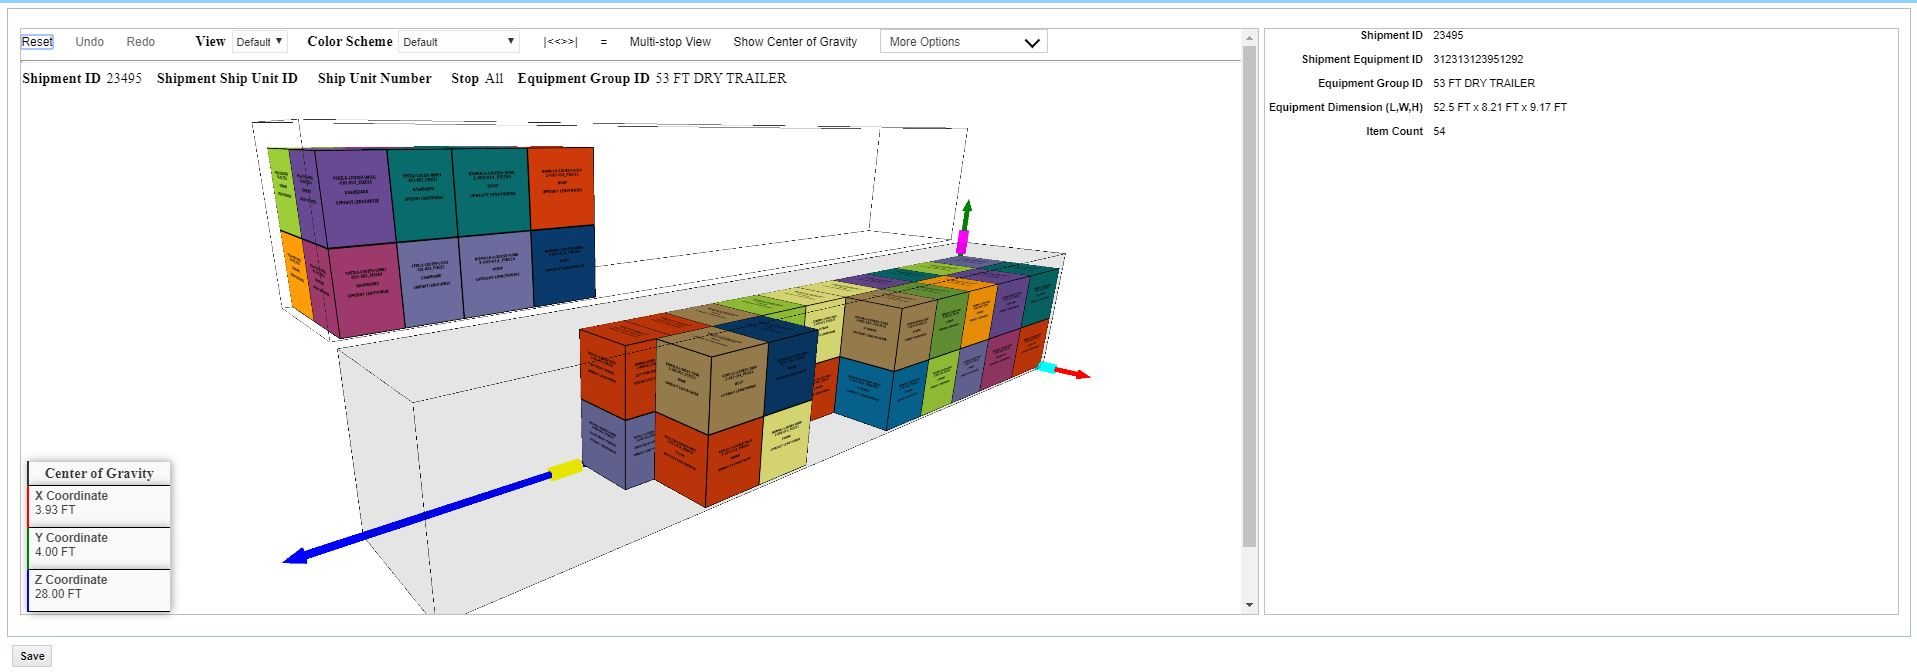
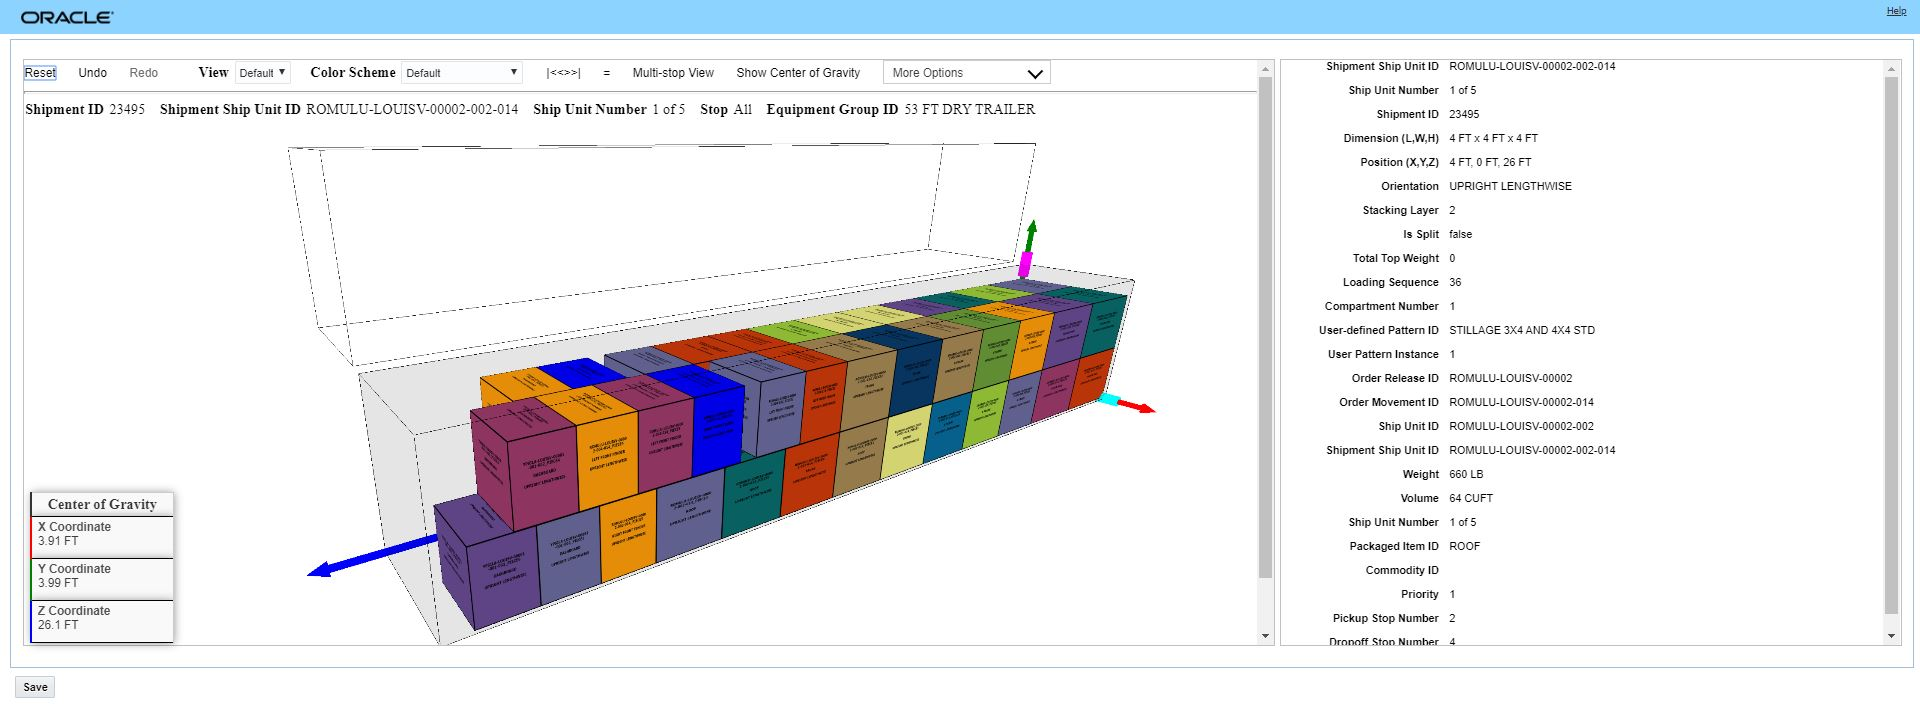
This feature provides users of OTM's 3D Load Configuration planning logic with a new action - Edit Load Config - and related decision support capabilities that allows you to fine-tune the 3D and/or User Defined Pattern load configuration solution generated by OTM's planning logic. With the Edit Load Config action, you can view and edit your load configuration planning results. The decision support edit capabilities allow you to move your shipment ship units within the equipment, or you can unpack all or some of the shipment ship units into the staging area and then repack the shipment ship units in your preferred position and orientation within the equipment.

3D Load Config Edit Tool
You can unpack part or all of the solution to the staging area using the sliders.
Unpack Ship Units to Staging Area
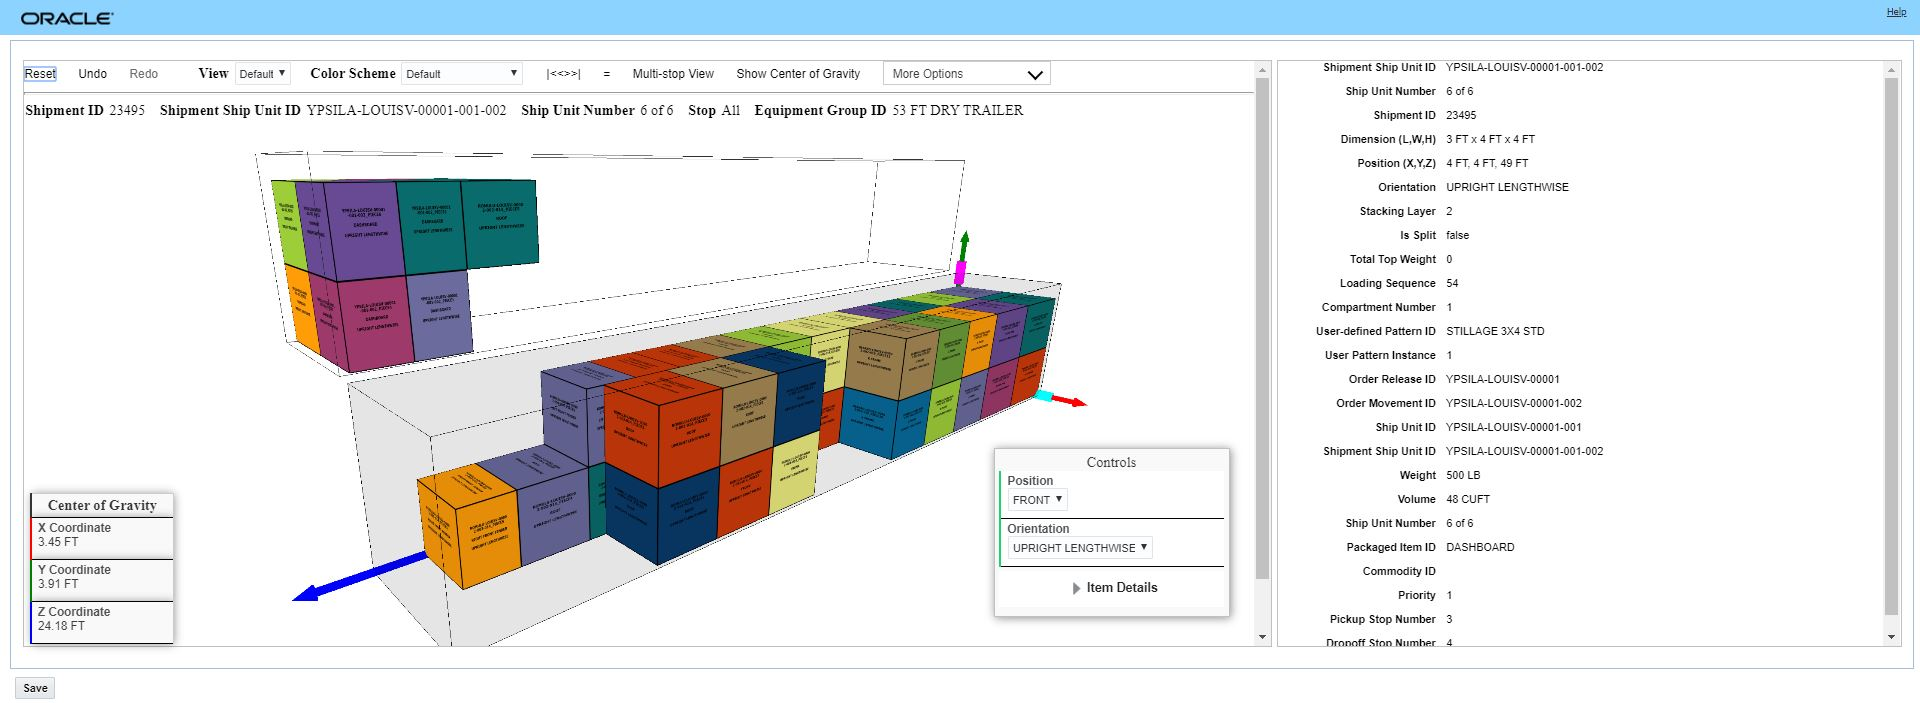
Manually Drag and Drop Ship Units Into Desired Position
For each ship unit you can try various positions and orientation as part of your solution tuning efforts.
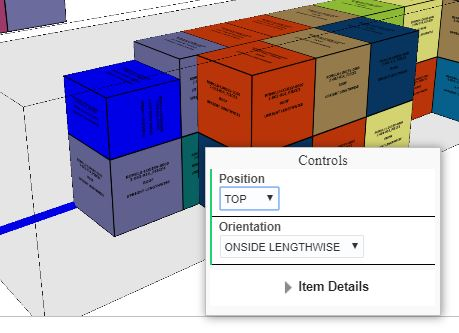
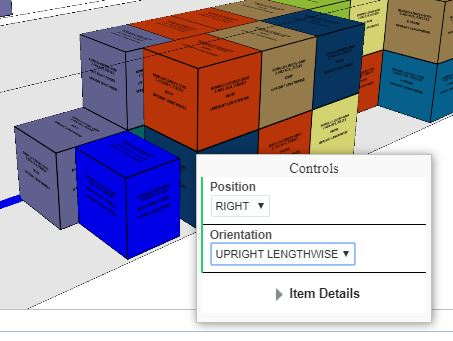
Adjust Position and Orientation As Desired
When you are done, you can save your edits or Reset and exit the tool
Save Edits
Steps to Enable
You don't need to do anything to enable this feature.
Tips And Considerations
You cannot leave any ship units in the staging area/parking lot - all ship units must be moved into the equipment before saving.
Multi-stop Sequencing Logic Considering Location Calendars
This feature provides you with an improved multi-stop sequencing logic that considers your location calendars during the step in the multi-stop planning process that generates the set of stop sequencing options that are evaluated within the multi-stop planning logic. The improved sequencing logic will now discard sequencing options that are infeasible due to your location calendars, by eliminating these location calendar infeasible sequence options, the set of sequences that are evaluated inside of the multi-stop planning logic are of a much higher quality (not infeasible for location calendar reasons), which translates into an overall improvement of the multi-stop planning solution quality.
Given the example below, where the location calendar effective time windows for Stop 1 and Stop 2 do not provide any over lapping time - the improved sequencing logic will discard any sequence option where Stop 2 (the later effective time window) is sequenced before Stop 1 ( the early effective time window).
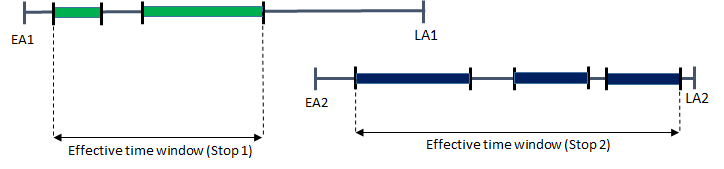
No Effective Overlap - Sequence Option Discarded
EXTRA TIME WINDOW OVERLAP BETWEEN STOPS - New tuning parameter
This feature also provides you with a new Logic Configuration - Multi-stop parameter: EXTRA TIME WINDOW OVERLAP BETWEEN STOPS - this optional parameter extends the overlap time window that is required to consider a sequencing option as desirable/feasible.
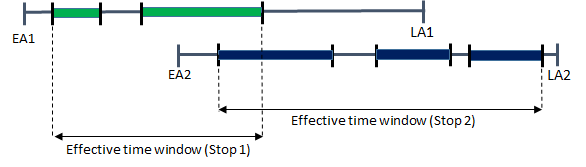
Minimum Overlap Effective Time Window
In the example above, assume the minimum overlap effective time is 15 minutes - meaning that there is a chance that the sequence option where Stop 2 is sequenced before Stop 1 is possible. However, you may want to eliminate this option from consideration because - while it is theoretically feasible - it is not operationally practical i.e., any sequence where Stop 2 ocurrs before Stop 1 greatly reduces (to an unacceptable level) the available time window (and the buffer time) available for delivering to Stop1.
The EXTRA TIME WINDOW OVERLAP BETWEEN STOPS parameter allows you to extend (increase) the minimum time window overlap required and is used in the sequencing logic to discard sequencing options that are not worth considering from a practical/operational perspective.
Continuing with the above example, if the EXTRA TIME WINDOW OVERLAP BETWEEN STOPS parameter is set to 20 minutes, then the minimum time overlap required will be evaluated in the sequencing algorithm as 15 minutes (calculated overlap) + 20 minutes = 35 minutes. The extra time window overlap value of 35 minutes will cause the sequence option with a minimum overlap effective time of just 15 minutes to be discarded.
Steps to Enable
You don't need to do anything to enable this feature.
Tips And Considerations
The sequencing logic is delivered as part of the core sequencing logic - there are no parameters required to turn on this new functionality.
NOTE: There is a chance that as part of this upgrade (and the introduction of this new multi-stop sequencing capability) that the solution quality of your multi-stop regression tests may change (be improved) as part of the update.
Use Location Level of Service to Determine Arbitrary Planning
This feature allows you to define a location's source arbitrary level of service and/or the location's destination arbitrary level of service. The specified level of service will be used in planning when selecting the arbitrary for servicing the location.
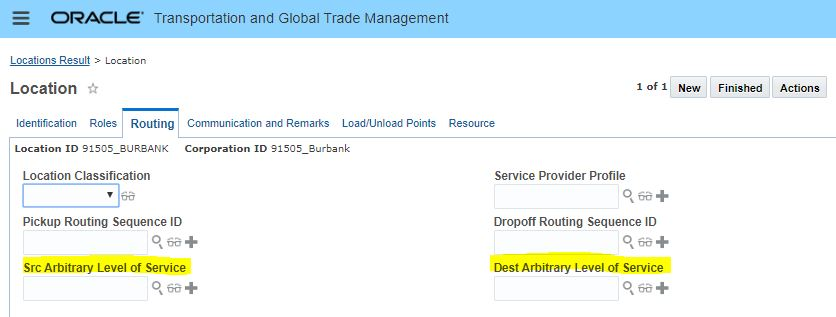
Location Arbitrary Level of Service
Steps to Enable
You don't need to do anything to enable this feature.
Tips And Considerations
Note that if you change the level of service to a faster/more expensive level of service and then run the Rerate Redrive action you will receive a validation error. To avoid this validation error set the Cost Fixed flag before running the Rerate Redrive action.
Commit Rush Hour Records in Batch
This feature provides you with a set of usability improvements for the process used to generate and save rush hour data.
Improvements include:
- Committing Rush Hour Records in batches versus waiting until the end of the process.
- Additional fields provided on the Generate Rush Hour Data process page:
- To Region Group ID
- To Location Profile ID
- Consider Reverse Direction
- Renaming of existing fields. Region Group ID to From Region Group ID and Location ProfileID to From Location Profile ID.
Steps to Enable
You don't need to do anything to enable this feature.
Network Routing Support for Auto Consolidate Multi-Equipment Single Shipment
This feature provides you with the option of using OTM's network routing planning logic to support your shipping scenarios (typically ocean shipping scenarios) where your desired solution is to have OTM merge shipments into a single consolidated multi-equipment shipment.
Previously, for itinerary legs configured with the Auto Consolidation Type of CONSOL INTO ONE SHIP MULTI EQUIP - only the Order Routing Method of Cost-Based Routing would support this option. With this feature you now have the opportunity to select either the Cost-Based Routing or the Network Routing as your Order Routing Method.
Steps to Enable
Assuming that you are currently using the Cost-Based Routing Order Routing Method to merge shipments into a single consolidated multi-equipment shipment - the changes required to switch your existing setup to use Network Routing as the Order Routing Method are:
- Set the Order Routing Method parameter to use Network Routing
-
Provide a Leg Consolidation Group ID on the itinerary leg where the multi-equipment to single shipment consolidation is required/desired i.e., itinerary leg where the Auto Consolidate Type is set to CONSOL INTO ONE SHIP MULTI EQUIP.
- Auto Consolidation Type defines the way shipments on this leg consolidation group gets consolidated. Choose one of the following options:
- Null indicates that there is no consolidation or multi-stop planning on this leg consolidation group.
- Multi-stop into One Equipment indicates that shipments built on this leg consolidation group are sent to multi-stop algorithm to consolidate into multi-stop shipments with one piece of equipment for each multi-stop shipment. Only the first leg and last leg of an itinerary can have this Auto Consolidation Type.
- Consolidate into One Shipment/Multiple Equipment indicates that all shipments built on this leg consolidation group will be consolidated into one shipment (if time window is feasible) with multiple equipment.
Freight Payment, Billing, and Claims
Optional Feature - Order Release-Allocate Secondary Charge Shipment
When this optional feature is enabled, the Allocate Cost Order Release action will support allocation of secondary charge shipments corresponding to related shipments and shipment groups the order is related to. This feature was added to provide consistency between how the allocation of order release cost are handled within OTM.
Previously, initiating the allocation of cost using the Order Release Allocate Cost action would allocate all cost related to the freighted shipments - but would not include the related secondary charge shipment cost, however, initiating the Allocate Cost action using the Shipment Allocate Cost action would allocate both the freighted shipment cost as well as all related secondary charge shipment cost. This feature, once enabled, provides consistency for the user when they run the Allocate Cost action from either the Order Release or Shipment.
Steps to Enable
To Opt In to this feature:
- Go to the Optional Feature UI - Configuration and Administration > Property Management > Optional Features.
NOTE: Only the DBA.ADMIN user can access and use the Optional Features page.
- Select the ORDER RELEASE-ALLOCATE SECONDARY CHARGE SHIPMENT feature.
- Run the Action Opt In.
Tips And Considerations
It is recommended that all Optional Features be reviewed in the update they are delivered.
To review optional features go to the Optional Feature UI - Configuration and Administration > Property Management > Optional Features.
This feature becomes a mandatory opt in feature with the 20C update.
Load User Information for Analytics
This feature provides you with a new process management action that allows you to load user related tables - VPD profiles, and domain grants - to HDOWNER. Previously, an entire ETL run was required to update the user configuration and VPD when the user's role was changed.
This page is accessed via:
- Transportation Intelligence > Process Management

Load User Information for Analytics
Steps to Enable
You don't need to do anything to enable this feature.
Tips And Considerations
You must be logged in as DBA.ADMIN to access this page and these processes.
Optional Feature - Load Stand Alone Invoices to TI
This feature provides you with the ability to load unmatched/stand-alone invoices into your historical database (HD) schema so that this information can be incorporated into reports and dashboards within Transportation Intelligence (TI). Currently, only invoices matched to a shipment in OTM are candidates for loading into the HD schema.
Since this change could (potentially) change the information you are loading into the HD Schema for invoices, this feature is being delivered as an optional feature.
Optional Until 22A
This feature provides you with the option to load both matched and unmatched invoices into the historical database schema allow you to report on invoices that have not yet been matched.
Steps to Enable
To Opt In to this feature:
- Go to the Optional Feature UI - Configuration and Administration > Property Management > Optional Features.
NOTE: Only the DBA.ADMIN user can access and use the Optional Features page.
- Select the LOAD STAND ALONE INVOICE TO TI feature.
- Run the Action Opt In.
Tips And Considerations
It is recommended that all Optional Features be reviewed in the update they are delivered.
To review optional features go to the Optional Feature UI - Configuration and Administration > Property Management > Optional Features.
Parent Invoice Loading and Consolidation Type
This feature extends the ETL (extract, transform, and load) and HD schema for the Transportation Intelligence solution so that the Parent Invoice is now its own loadable object. As part of this feature, the schema has also been extended to include the Invoice Consolidation Type column, which provides information related to the different types of invoices (and bills) process in OTM - Standard, Parent, and Child. With the addition of the Parent Invoice object and the Consolidation Type column, you can now easily develop reports for your Standard, Parent and Child Invoices.
Previously, your access to Parent Invoice information in Transportation Intelligence was limited to the Parent Invoice GID and was only provided from the Child Invoice perspective. This enhancement now provides you with a complete Parent Invoice to Child Invoice relationship.
Steps to Enable
You don't need to do anything to enable this feature.
Required Folder for All User-Defined Reports and Dashboards
All user-defined reports and dashboards must be created inside the /shared/Custom folder or a sub-folder. Defining reports and dashboards inside the shared/Custom folder will ensure your user-defined reports and dashboards are retained during upgrades. To help enforce this requirement, all out-of-the-box folders have been made read-only so you cannot save content in folders other than shared/Custom. If you try to save content outside of shared/Custom, you will see an error which may be one of the following: "Access denied for user to path..." or "Can't save in root folder."
Currently, as part of the upgrade process, Cloud Operations executes a pre-migration check to identify dashboards and reports that have been saved to locations other than shared/Customs. If you have reports or dashboards that have been saved in other locations, Cloud Operations will reach out to you and notify you that your reports need to be moved before the update is to avoid losing dashboards and reports. With this more proactive approach the goal is to eliminate the need for the premigration check going forward. For now, the premigration check will continue to be run.
Steps to Enable
You don't need to do anything to enable this feature.
Aggregate Scenario Results Action
The Aggregate Scenario Results action provides you with an easy to read aggregated tabular display of the modeling shipment metrics associated with the selected set of modeling scenarios or modling projects. You will find this action very useful for aggregating results for scenrios that take advantage of the multiple scenario bulk plan feature in logistics network modeling.
The Aggreate Scenaro Results action can be accessed via:
- Logistics Network Modeling > Modeling Project > Actions > Aggregate Scenario Results
- Logistics Network Modeling > Modeling Scenario > Actions > Aggregate Scenario Results
The Aggregate Scenario Results action provides the following information:
- Orders Planned: Sum of all order releases planned for all bulk plans in this scenario.
- Shipments Built: The sum of all modeling shipments built for all bulk plans in this scenario.
- Total Weighted Cost: Sum of the total weighted cost of all modeling shipments in the scenario.
- Total Weight: Sum of the total weight of all modeling shipments in the scenario.
- Total Net Weight: Sum of the total net weight of all modeling shipments in the scenario.
- Total Volume: Sum of the total volume of all modeling shipments in the scenario.
- Total Distance: Sum of loaded and unloaded distance of all modeling shipments in the scenario.
- % Weight Utilization:
- Get total weight capacity by summing up the effective weight of the first equipment group for all modeling shipments in the scenario.
- The % weight utilization is (total weight / total weight capacity)*100.
- % Volume Utilization: same as above but use volume fields instead.
- Get total volume capacity by summing up the effective volume of the first equipment group for all modeling shipments in the scenario.
- The % volume utilization is (total volume / total volume capacity)*100.
- Equipment Reference Unit Utilization: Sum of the equipment reference unit utilization of all modeling shipments in the scenario.
- Average Stops: Average of total number of stops / modeling shipments built
- Average Distance: Total distance / modeling shipments built
- Weighted Cost Per 100 <UOM>: Sum of (total actual cost /total weight).
- Cost Per <volume UOM>: Sum of total actual cost / total volume
- Cost Per < distance UOM>: Total actual cost / total distance
- Weighted Cost Per Order: Sum of total actual cost / (total weight / 100)
- Weighted Cost Per Shipment: Sum of total actual cost / modeling shipments built
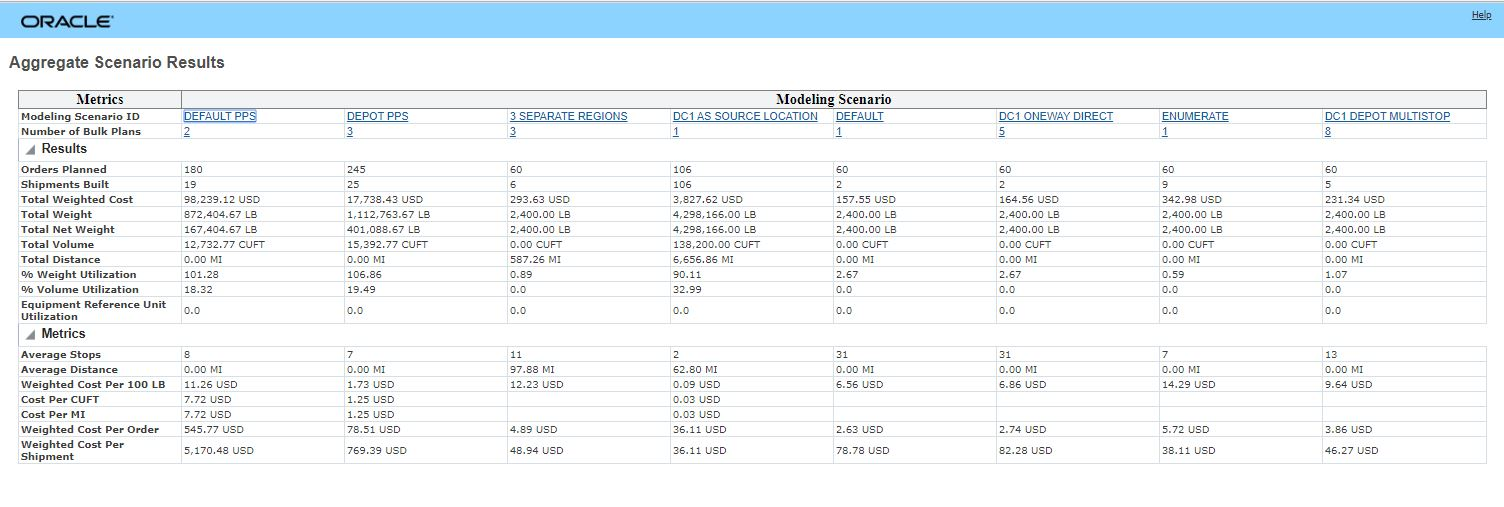
Aggregate Scenario Results
Steps to Enable
You don't need to do anything to enable this feature.
This feature provides you with a simple template based row/column .csv (comma-separated value) data loading option to help you load your Logistics Network Modeling data.
The Simple Template Import feature supports importing data for the following objects:
- Equipment groups,
- Order releases,
- Locations,
- Calendars,
EQUIPMENT GROUP TEMPLATE
- Equipment Group ID (mandatory)
- Equipment Group Name
- Effective Weight (mandatory)
- Effective Volume (mandatory)
- Height
- Width
- Length
CALENDAR TEMPLATE
Creating a simple calendar involves inserting data for both the calendar and the activities. The fields are:
- Calendar ID (mandatory)
- Activity ID (mandatory if specifying activities) used to specify Activity Type. This can be any PUBLIC record present in ACTIVITY table in OTM.
- Calendar Definition (mandatory if specifying Activity ID) used to define the times for a certain activity type on a calendar
CALENDAR DEFINITION DETAILS
The calendar definition requires a specific format of <Days>_<HH:MM-HH:MM>. Time must be in the format of: <HH:MM> where HH uses the 24 hour format. AM and PM are not recognized. The following characters must be used to represent days in <Days>:
- M for Monday
- T for Tuesday
- W for Wednesday
- R for Thursday
- F for Friday
- S for Saturday
- U for Sunday
LOCATION TEMPLATE
Location supported attributes are:
- Location ID (mandatory)
- Location Name
- City
- Province Code
- Postal Code (mandatory)
- Country Code
- Location Type
ORDER RELEASE TEMPLATE
Order release supported attributes are:
- Order Release ID (mandatory)
- Source Location ID (mandatory)
- Source City
- Source Province Code
- Source Postal Code
- Destination Location ID (mandatory)
- Destination City
- Destination Province Code
- Destination Postal Code
- Early Pickup Date, Early Delivery Date, Late Pickup Date, and Late Delivery Date
Ship unit supported attributes are:
- Ship Unit Weight (mandatory)
- Ship Unit Volume (mandatory)
- Ship Unit ID
- Ship Unit Count
- Ship Unit Length
- Ship Unit Width
- Ship Unit Height
Steps to Enable
You don't need to do anything to enable this feature.
Tips And Considerations
- For examples of the simple templates see the Knowledge Document 796594.1 on My Oracle Support.
- The Importing Data Help topics provides valuable information on UOMs, date formats and import load errors.
Smart Link View for Related Shipments for Scenarios
This feature provides users of the Logistics Network Modeling functionality with a new Smartlink which will allow you to view the Modeling Shipments related to your Modeling Scenarios.
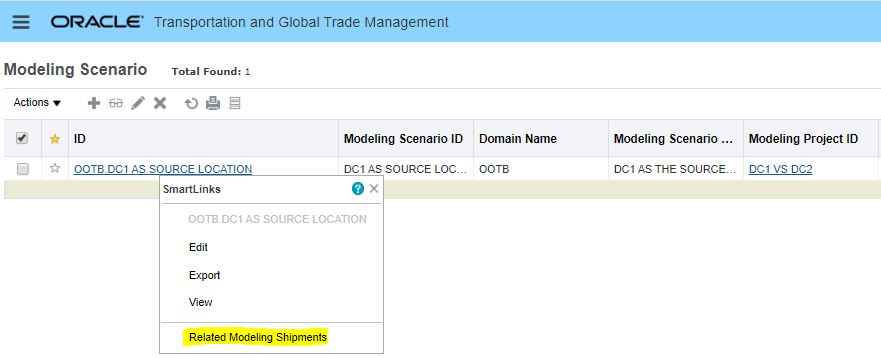
Modeling Scenario Smartlink to Modeling Shipments
Steps to Enable
You don't need to do anything to enable this feature.
Modeling Scenario Bulk Plans Support Cost-Based Routing Option
For users of the Logistics Network Modeling product, this feature provides you with the option of setting your ORDER ROUTING METHOD to either the Cost-based Routing option or the Network Routing option when running your Modeling Scenario bulk plans. Previously, the only option available for your Modeling Scenario bulk plans was the Network Routing option, now both ORDER ROUTING METHOD options - Cost-based Routing or the Network Routing - are available.
Steps to Enable
You don't need to do anything to enable this feature.
Tips And Considerations
Unless there is some specific reason to revert to the Cost-based Routing option - we recommend running your Modeling Scenario bulk plans with the ORDER ROUTING METHOD set to Network Routing.
Global Trade Management (Base)
Additional User Defined Attributes Added for GTM Objects
Additional Attribute fields have been added to GTM objects to enable you to add more dates or numbers specific to your business needs. You can now specify 10 additional date attributes and 10 additional number attributes.
The following fields have been added:
- ATTRIBUTE_DATE11 to ATTRIBUTE_DATE20
- ATTRIBUTE_NUMBER11 to ATTRIBUTE_NUMBER20
These attributes are available for the following business objects:
- Party (Contact)
- Item
- Trade Transaction
- Trade Transaction Line
- Declaration
- Declaration Line
Steps to Enable
You don't need to do anything to enable this feature.
Tips And Considerations
You can configure the user interface using manager layout and screensets to customize your user interface to show attribute fields and pseudo-fields.
Key Resources
-
Please refer to the OTM How To/Configuration Topic called Configuring the User Interface for more information.Please refer to the OTM How To/Configuration Topic called Configuring the User Interface for more information.
Additional GTM Objects Supporting Work Queue in the Workbench
Workbench Table supports being populated with Work Queues for the following objects:
- Item
- Trade Item Structure
- Trade Item Structure Component
- Trade Transaction
- Customs Shipment/Declaration
- Customs Shipment Line/Declaration Line
Steps to Enable
You don't need to do anything to enable this feature.
Send Documents Action - Send Multiple Documents to Recipients in One Email
You can send multiple documents in a single email from either the Trade Transaction or Declaration. This is helpful to users who want to send a packet of documents such as a broker packet.
From the manager, you can:
- Select standard documents and additional documents to include in one email
- Send the documents as multiple attachments or as a zip file containing the attachments
- Send one email to multiple contacts, email addresses, or IPP printers
A new action called 'Send Documents' is available on the Trade Transaction and Declaration that you can use to send multiple documents within a single email. When you trigger this action, you can select the Standard Documents and Additional Documents you want to include in the email. If it is a Standard Document which has multiple Document Revisions, you can select which document revision to send.
Once you select your documents and click Send Documents, you can:
- Specify a Reply To contact
- Indicate if you want to zip the documents into one compressed file or send the files as multiple attachments
- Enter the recipient of the files including:
- One to many Contacts
- One to many Email Addresses
- One to many Printers
Steps to Enable
You don't need to do anything to enable this feature.
Tips And Considerations
- If the size of the email including all the selected documents is greater than 5MB, the email will not include document attachments but will have links to the document content.
- If the size of an individual document in the email is greater than 1MB, the email will not include document attachments but will have links to the document content.
- This action also allows you to print the selected documents to a set of printers configured in BI Publisher.
Registrations - Add Attribute Fields and Support Pseudo-Fields
You can use attribute fields and take advantage of pseudo-field capabilities on Registrations. These enhancements enable you to:
- Add attribute fields to your Registrations. You can add the following fields:
- ATTRIBUTE1 to ATTRIBUTE20
- ATTRIBUTE_DATE1 to ATTRIBUTE_DATE10
- ATTRIBUTE_NUMBER1 to ATTRIBUTE_NUMBER10
- Enter a value for a field directly on the Registration Manager and not have to manage it in a grid. The following grids now support pseudo-fields:
- Dates
- Reference Numbers
- Remarks
Steps to Enable
You don't need to do anything to enable this feature.
Tips And Considerations
You can configure the user interface using manager layout and screensets to customize your user interface to show attribute fields and pseudo-fields.
Key Resources
-
Please refer to the OTM How To/Configuration Topic called Configuring the User Interface for more information.
New Content Set Detail Power Data
A new Content Set Detail power data page has been introduced. You are able to view the details of the documents downloaded as part of the data load process. GTM creates a new Content Set record automatically each time it downloads a status document at the beginning of the data load process. There are one to many Content Set Detail records in a Content Set, each one specific to a content type such as RESTRICTED PARTY, ECCN MX, HTS US, and so on. In the Content Set Detail, you can:
- View details about the downloaded data including the content set it's associated with, the content source used to download the data, the available date, the source data type, the source data country and the status of the download
- Download the files associated with the content set detail record
Steps to Enable
You don't need to do anything to enable this feature.
Tips And Considerations
To populate the Content Set Detail page, you need to have GTM configured to receive restricted party and product classification data from a 3rd party content provider such as Descartes.
Key Resources
-
Please refer to the GTM How To/Configuration Topic called Trade Content Download for more information.Please refer to the GTM How To/Configuration Topic called Trade Content Download for more information.
SmartLink from Content Set to Content Set Detail
You can now use a SmartLink to view all associated Content Set Detail records for a specific Content Set. When you access the SmartLinks from the Content Set power data page, you will see a new SmartLink called 'View Related Content Set Details'. When you trigger this SmartLink, GTM displays the Content Set Detail finder result page with all the associated Content Set Detail records.
Steps to Enable
You don't need to do anything to enable this feature.
Tips And Considerations
You can access the Content Set power data page from Master Data > Power Data > Data Loading > Content Set.
To populate the Content Set and Content Set Detail page, you need to have GTM configured to receive restricted party and product classification data from a 3rd party content provider such as Descartes.
Key Resources
-
Please refer to the GTM How To/Configuration Topic called Trade Content Download for more information.Please refer to the GTM How To/Configuration Topic called Trade Content Download for more information.
Download Files from Data Load Process
A Download option is available to enable you to retrieve all CSV files associated with a data load including those that loaded successfully and those that may have resulted in errors. In addition, all of the out.xml files, which are the results of the CSV load, are also included. If you have issues with a data load, this enables you to download the CSV files to determine if there was a problem with the file.
You can download the CSV files from the following pages:
- Master Data > Power Data > Data Loading > Data Loading
- Master Data > Power Data > Data Loading > Content Set (within the Content Set Detail grid)
- Master Data > Power Data > Data Loading > Content Set Detail
When you click the Download button, GTM provides all the CSV files and the out.xml files in the selected data load within a ZIP file. The Data Load ID is used as the name of the folder within the ZIP file.
Steps to Enable
You don't need to do anything to enable this feature.
Tips And Considerations
- A new reserved property called 'gtm.dataload.action.dataloadCsvZipFileDownloadLimitInMb' has been added to limit the size of the download (default value = 100). If the size of all the files together is greater than the value set in this property, the following error is displayed: 'Cannot download files since the total file size exceeds the {fileSize} MB download limit. Please increase the limit to download.' The files are available for download when the Data Load status is PROCESSED or POSTLOAD_ERROR.
- You can view the CSV Upload Status from the GTM Data Load Detail grid on the Data Load page. This will help you to determine if there is an issue with a particular file.
Key Resources
-
For more information on the CSV Upload Status, please see the What's New topic 'CSV Upload Status Available on Data Load'.For more information on the CSV Upload Status, please see the What's New topic 'CSV Upload Status Available on Data Load'.
Trigger Notification Based on Data Load Success or Failure
A new event type has been introduced to enable GTM to listen to a data load status change. This helps you to notify a user, using an automation agent, when a data load is successful, partially successful, or fails.
When you select an Agent Type = GTM DATA VERSION within an automation agent, a new Agent Event = GTM DATA VERSION - DATA LOAD STATUS CHANGED is available. When you select this agent event and click Restrictions, you can:
- Select a Data Load Content Type - the agent event will trigger for the data load content types you select. If you do not select a data load content type, the agent event will trigger for all data load content types within a data version.
- Select a Data Load Status - the agent event will trigger for the data load statuses you select. If you do not select a data load status, the agent event will trigger for all statuses within a data version. There are three different statuses that you can monitor:
- SUCCESS - this status is raised when the data load process completes without errors. This status is set when the corresponding Data Load Status is PROCESSED.
- PARTIAL SUCCESS - this status is raised when the data load process completes but there are errors in the processed records. This status is set when the corresponding Data Load Status is PROCESSED but there are errors in the CSV files.
- FAILURE - this status is raised when the data load process results in an error. This status is set when the corresponding Data Load Status is one of the ERROR statuses such as ERROR, PRELOAD_ERROR, POSTLOAD_ERROR, or LOADING_ERROR.
- If you select an Agent Action = NOTIFY CONTACT, you must specify the Contact to which the notification should be sent. When the email notification is sent, it contains the Data Load ID, Content Type, and Data Load Status. The Data Load ID can be a hyperlink which enables you to access the Data Load UI where you can download the CSV files in a zip file related to the data load.
Steps to Enable
You don't need to do anything to enable this feature.
Tips And Considerations
- To use this feature, you must set up an automation agent with events and actions defined. To access automation agents, click Business Process Automation > Agents and Milestones > Automation Agent.
- Notification is triggered for every zip file that is downloaded from the external system of the third party content provider.
Key Resources
-
For more information on automation agents, please see the Help topic 'OTM How To/Configuration Topics > Creating an Automation Agent'.For more information on automation agents, please see the Help topic 'OTM How To/Configuration Topics > Creating an Automation Agent'.
New Agent Type for Data Load Content Type
You can listen to content type events and take action via an automation agent. For example, if you want to notify someone that the HTS-US download failed, you can set up an automation agent with an Agent Type = GTM CONTENT TYPE. When you select this agent type, you can listen for a data load for a particular content type and notify someone when it completes successfully, fails or partially fails.
When you select an AGENT TYPE = GTM CONTENT TYPE, an Agent Event called GTM CONTENT TYPE - DATA LOADED is available. When you select Restrictions, you can:
- Listen for a specific Data Load Content Type such as HTS-US, ECCN-MX, RESTRICTED PARTY or TRADE AGREEMENT to name a few
- Select the Content Type Data Load Status you want to listen for including SUCCESS, PARTIAL SUCCESS, or FAILURE
To enable notification, select an Agent Action = NOTIFY CONTACT. You can then specify:
- Contact (Required)
- Communication Method
- Subject line
- Stylesheet Profile
Steps to Enable
You don't need to do anything to enable this feature.
Tips And Considerations
- If you do not select a Data Load Content Type within Restrictions, the automation agent will listen for all Data Load Content Types.
- GTM can download multiple zip files for one content type from the external system of the third party provider. However, only one event will be raised per content type downloaded.
- To troubleshoot a data load issue, please see the What's New topics: 'CSV Upload Status Available on Data Load' and 'Download Files from Data Load Process' topics.
CSV Upload Status Available on Data Load
A CSV Load Status has been added to the GTM Data Load Detail within the GTM Data Load page. In the GTM Data Load Detail grid, you can see each record that was loaded and the status of each record. Since the GTM Data Load is specific to a Data Load Type such as HTS-US or RESTRICTED PARTY, you will know which files loaded successfully and, if there is an issue, which file did not load properly. This will help you to troubleshoot issues during your data load.
The status values that have been added for a Data Load Detail record are:
- SUCCESS
- FAILURE
Steps to Enable
You don't need to do anything to enable this feature.
Tips And Considerations
If a Data Load Detail record has failed, you can use the Download feature to download the CSV file which failed.
Key Resources
-
For more information, please see the What's New topic 'Download Files from Data Load Process'.
Trade Program and Tariff Rate Purge Processing Supported
This feature provides you, as the DBA, the ability to purge trade program and tariff data associated with product classification data that you download from a third party content provider. In previous versions of GTM, you could select a data version associated with product classification data that you want to mark for purge and purge that data at a future point in time. This feature enables you to purge trade programs, tariff countries and tariff rates when you purge product classification data for a particular data version. When a data version related to product classification data is purged, the trade programs, tariff countries and tariff rates downloaded as part of the selected data version are also purged.
The tables that have been added to the existing purge capability for product classification data associated with a data version are:
- GTM_TARIFF_CODE
- GTM_TARIFF_COUNTRY
- GTM_TARIFF_RATE
Steps to Enable
You don't need to do anything to enable this feature.
Tips And Considerations
First, you can select the data version associated with the product classification data that you want to mark for purge. Once the data has been marked for purge you, the DBA, can purge the record in the UI or through a scheduled purge process that you run against the object.
Trade Agreements and other supporting information enables you to proactively leverage the trade agreements your business can take advantage of to reduce duties and taxes. There are many Trade Agreements in effect globally, each with different parameters but all following a similar structure.
To be able to take advantage of the duties and taxes associated with a Trade Agreement, companies must:
- Follow Rules of Origin to qualify goods for participation in a specific program
- Produce Certificates of Origin and provide them to your customers
- Collect Certificates of Origin from your suppliers and stored them for future use
- Declare the intent to use a trade agreement during the import entry process and send the appropriate certificates of origin to the local customs agency
In GTM, users can take advantage of the Trade Agreement capability including:
- Download and store duties, taxes, trade programs and other information from third party data content providers
- Manage trade agreement information
- Perform trade agreement eligibility screening and qualification on your items
- Create a campaign which enables you to solicit qualification data, documents and other information from suppliers to support the use of trade programs
- Suppliers and other users can respond to a campaign they have received
Item Qualification Manager and Lifetime Events
You can now create and manage item qualification data within the Item Qualification Manager. This change enables you to directly access item qualification data through the Master Data menu option. The same data is available when accessing item qualification data directly or via the item.
With this enhancement, you can also:
- Trigger actions and agent actions
- Create workbenches that include item qualification data
- Trigger workflow via automation agents with an Agent Type = ITEM QUALIFICATION
Steps to Enable
You don't need to do anything to enable this feature.
Tips And Considerations
Item Qualification data can be accessed via the Item Qualification manager or via the Item on the Trade Details tab.
Global Trade Intelligence (GTI)
Load User Information for Analytics
This feature provides you with a new process management action that allows you to load user related tables - VPD profiles, and domain grants - to HDOWNER. Previously, an entire ETL run was required to update the user configuration and VPD when the user's role was changed.
This page is accessed via:
- Global Trade Intelligence > Process Management
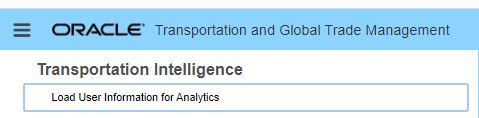
Load User Information for Analytics
Steps to Enable
You don't need to do anything to enable this feature.
Tips And Considerations
You must be logged in as DBA.ADMIN to access this page and these processes.
Required Folder for All User-Defined Reports and Dashboards
All user-defined reports and dashboards must be created inside the /shared/Custom folder or a sub-folder. Defining reports and dashboards inside the shared/Custom folder will ensure your user-defined reports and dashboards are retained during upgrades. To help enforce this requirement, all out-of-the-box folders have been made read-only so you cannot save content in folders other than shared/Custom. If you try to save content outside of shared/Custom, you will see an error which may be one of the following: "Access denied for user to path..." or "Can't save in root folder."
Currently, as part of the upgrade process, Cloud Operations executes a pre-migration check to identify dashboards and reports that have been saved to locations other than shared/Customs. If you have reports or dashboards that have been saved in other locations, Cloud Operations will reach out to you and notify you that your reports need to be moved before the update is to avoid losing dashboards and reports. With this more proactive approach the goal is to eliminate the need for the premigration check going forward. For now, the premigration check will continue to be run.
Steps to Enable
You don't need to do anything to enable this feature.