
- Revision History
- Overview
- Update Tasks
- Feature Summary
-
- Transportation and Global Trade Platform
- Oracle Transportation Management (Base)
-
- Ocean FCL Consol Enhancement
- Shipment Group - Split Shipment Group Action
- Shipment Group - Open for Add/Remove and Close for Add/Remove Actions
- Shipment Group - Change Equipment Group Action
- Run Change Equipment Group Action for Multiple Shipments
- Run Edit Service Provider and Cost Action for Multiple Shipments
- Merge Shipment Ship Unit Action
- Rail Intermodal Enhancements
- Rate Geo Rail Beyond Rate Rule
- Change Level of Service Shipment Action and Agent Action
- Ask Oracle Container Optimization Enhancement
- Set Dimensions on Ship Unit Considering Packaged Item or Packing Unit
- Workbench - Additional Location Details in Map Drag/Drop Dialog
- Optional Feature - Disable Null Criteria Shipment Grouping
- Optional Feature - Order Base XID Adheres to Child Domain BN Rule
- Improve Business Data Purge Process
- ZIP Entry Size Validation
-
- Transportation Operational Planning
- Transportation Intelligence
- Logistics Network Modeling
- Logistics Digital Assistant
- Global Trade Management (Base)
-
- Additional Fields Available on Item Origin
- Public Item Workbench
- Manager Layout for Product Classification Code
- Support for Binding Ruling Expiration Date
- Support for Additional Date and Number Flex Fields During Configuration
- Agency Code Added to Party Actions and Screens
- Improvements to Assign Item Classification Action
- Capturing Value on Item Structure and Item Structure Component
- Enhancements to Excluded Words Setup for Restricted Party Screening
- Limit the Maximum Number of Denied Parties During Screening
-
- Trade Agreements
- Supplier Solicitation
-
- Hide Product Classification Data on the Campaign
- Product Classification Type Not Required on Campaign Creation
- Set Certain Campaign Statuses Via Actions
- Documentation Updates Regarding Creating a Supplier Domain
- Improvements to Approve Campaign Action on Campaign
- Status Changed Agent Event Added for Campaign and Campaign Line
-
- Upcoming Changes
This document will continue to evolve as existing sections change and new information is added. All updates appear in the following table:
| Date | Product | Feature | Notes |
|---|---|---|---|
| 15 JUN 2021 | Transportation and Global Trade Platform | Optional Feature - Force HTML Document Download | Updated document. Revised feature information and opt in date. |
| 10 DEC 2020 | Oracle Transportation Management (Base) |
Improve Business Data Purge Process | Updated document. Delivered feature in 20C. |
| 10 DEC 2020 | Oracle Transportation Management (Base) |
ZIP Entry Size Validation | Updated document. Delivered feature in 20C. |
| 12 AUG 2020 | Transportation and Global Trade Platform |
Mail Management | Updated document. Revised feature information. |
| 29 JUN 2020 | Created initial document. |
This guide outlines the information you need to know about new or improved functionality in Oracle Transportation & Global Trade Management Cloud Update 20C. Each section includes a brief description of the feature, the steps you need to take to enable or begin using the feature, any tips or considerations that you should keep in mind, and the resources available to help you.
GIVE US FEEDBACK
We welcome your comments and suggestions to improve the content. Please send us your feedback at otm-doc_us@oracle.com. Please indicate you are inquiring or providing feedback regarding the Oracle Transportation & Global Trade Management What’s New in Update 20C.
This section gives you information to help you plan, deploy, and validate your update. We make frequent additions to this document, so don’t forget to check back and get the latest information before your update starts.
Review the Release Notes.
- The release notes include fixes, special instructions, and resolutions related to the Oracle Transportation and Global Trade Management Cloud.
- Release Notes can be found here:
- https://support.oracle.com/epmos/faces/DocumentDisplay?id=2620583.1
Use the following resources to prepare for and validate your Oracle Engagement Cloud update.
On My Oracle Support Read:
- Doc ID 2095509.1
- Oracle Cloud Applications - Transportation and Global Trade Management Cloud: Environment Refresh Policy
- Doc ID 2095528.1
- Oracle Cloud Applications - Transportation and Global Trade Management Cloud: Quarterly Update Planning
- Doc ID 2096782.1
- Oracle Cloud Applications - Transportation and Global Trade Management Cloud: Quarterly Update Planning FAQs
- Doc ID 2195580.1
- Oracle Cloud Applications - Transportation and Global Trade Management Cloud: Get Started with Your Implementation
- Doc ID 2508854.1
- Oracle Cloud Applications - Transportation and Global Trade Management Cloud: Quarterly Updates - Preparation and Testing Recommendations
Column Definitions:
Features Delivered Enabled
Report = New or modified, Oracle-delivered, ready to run reports.
UI or Process-Based: Small Scale = These UI or process-based features are typically comprised of minor field, validation, or program changes. Therefore, the potential impact to users is minimal.
UI or Process-Based: Larger Scale* = These UI or process-based features have more complex designs. Therefore, the potential impact to users is higher.
Features Delivered Disabled = Action is needed BEFORE these features can be used by END USERS. These features are delivered disabled and you choose if and when to enable them. For example, a) new or expanded BI subject areas need to first be incorporated into reports, b) Integration is required to utilize new web services, or c) features must be assigned to user roles before they can be accessed.
Transportation and Global Trade Platform
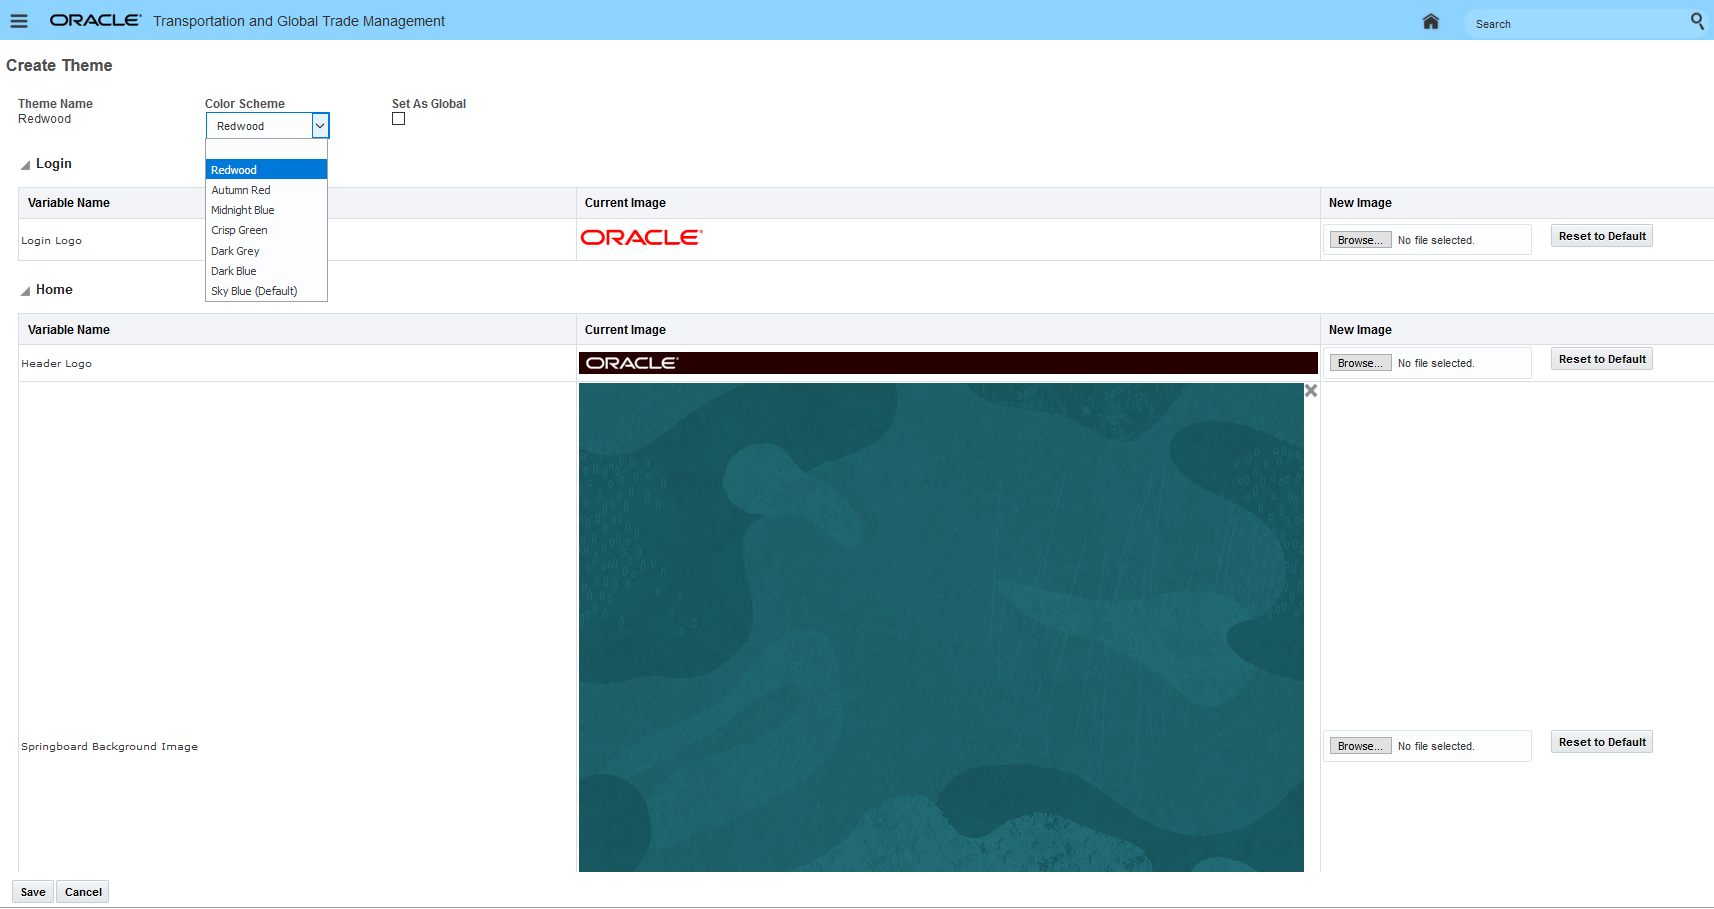
User Interface - Redwood Theme Available
This feature provides you with a new Redwood Color Scheme option that you can use to create a new theme to apply to your OTM/GTM instance. The Redwood Color Scheme is designed to be a warmer, more organic and human color palette.
Redwood Theme
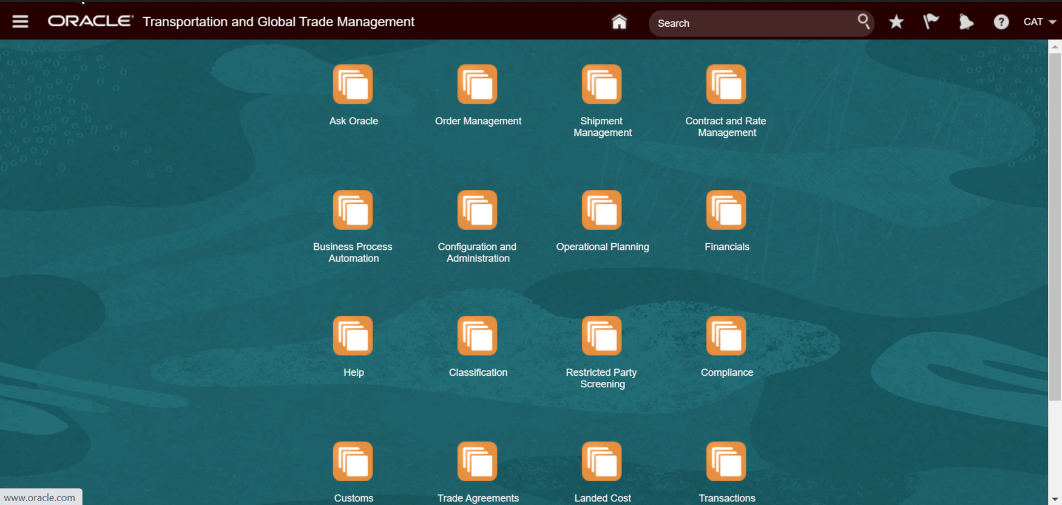
Spring Board Redwood Theme
Steps to Enable
To set your OTM/GTM theme to the new Redwood option:
- Navigate to Configuration and Administration > Branding > Theme Management. This page can only be accessed by someone with DBA access.
- Give your new Theme a name.
- Select Redwood as the Color Scheme from the Color Scheme dropdown.
- Save your changes
Optional Feature - Force HTML Document Download
This feature requires that any existing or newly uploaded HTML document in the Document Manager be downloaded locally for viewing purposes versus allowing the HTML to be rendered within the OTM/GTM browser window. By requiring you to download all your HTML documents for viewing, the potential for malicious HTML impacting other OTM/GTM user sessions and OTM/GTM application data is minimized. This feature is delivered as an enabled optional feature.
Optional Until 22A
This feature helps minimize the the potential for malicious HTML impacting other OTM/GTM user sessions and OTM/GTM application data.
Steps to Enable
If you need to change the Opt In state for this feature:
- Go to the Optional Feature UI - Configuration and Administration > Property Management > Optional Features.
NOTE: Only the DBA.ADMIN user can access and use the Optional Features page.
- Select the Force HTML Document Download feature.
- Run the Action Opt Out.
Tips And Considerations
NOTE: This is a change in behavior - previously your HTML documents could have been rendered in the OTM browser window. This change was made and enabled to improve the security of your OTM/GTM environment.
Optional Feature - User Interface Performance Metrics
This feature provides you with a rolling statistical snap shot into the performance of your interface components including: Finder Servlets, Finder Result Servlets, Manager Servlets, User Actions, Application Utilities and Servlets, and Diagnostic Servlets. You will find the performance metrics extremely useful in analyzing the usage and performance of the OTM/GTM user interface components.
This screen can be accessed when logged in as DBA.ADMIN. You then navigate to Configuration and Administration / Technical Support / Diagnostics and Tools / Web Tier / UI Performance Metrics.
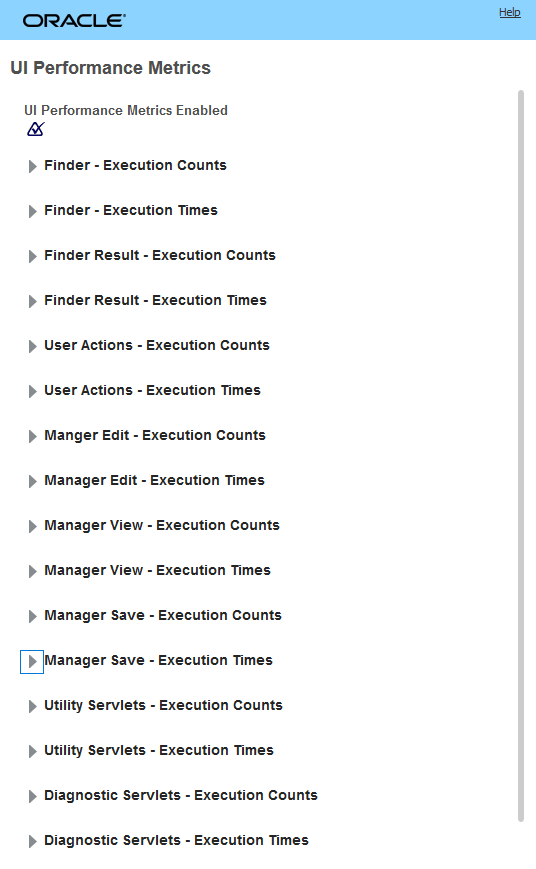
UI Performance Metrics - Components
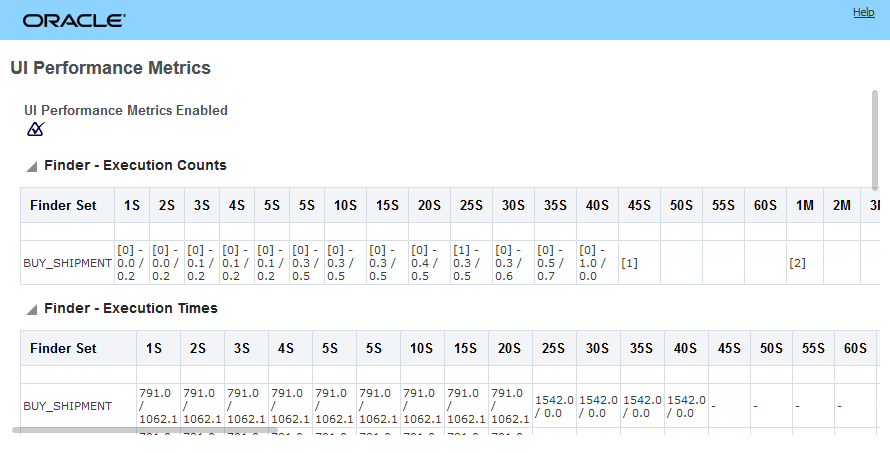
The UI Performance Metrics feature measures the execution counts and execution times across a set of pre-defined time windows. The number of time windows (or time blocks) used to gather performance statistics are arranged into four sets of buckets:
- Five 1-second time windows [1S, 2S, 3S, 4S, 5S] capturing counts and time snap shots for 1 second ago, then 2 seconds ago, up to 5 seconds ago.
- Twelve 5-second time windows [5S, 10S, 15S, 20S, 25S ...... 60S] capturing counts and time snap shots for 5 seconds ago, then 10 seconds ago, up to 60 seconds ago.
- Fifteen 1-minute windows[1M, 2M .. 15M] capturing counts and time snap shots for 1 minute ago, then 2 minutes ago, up to 15 minutes ago..
- Twenty four 1-hour windows[1H, 2H ... 24H] capturing counts and time snap shots for 1 hour ago, 2 hours ago, up to 24 hours ago.
The data captured in each cell for count related performance statistics follows the format { [count] average / standard deviation} and should be interpreted as what were the counts 1 second ago, 2 seconds ago... 24 hours ago.
The data captured in each cell for time related performance statistics follows the format {average / standard deviation} the unit of measure is milliseconds. Again, the information should interpreted as what were the average times 1 second ago, 2 seconds ago,... 24 hours ago.
UI Performance Metrics
In the Finder - Execution Counts for the BUY_SHIPMENT. For this row:
- 5S to 60S Time Window Section
- The information here indicates that activity has been captured for up to the 45 seconds ago time window, all time windows from 50S (50 seconds ago) through 60S (60 seconds ago) are blank - no data
- 40 seconds ago, the average so far is 1, the count in this time window is 0
- 1M to 60M Time Window Section
- The information indicates that for the 1 minute ago time window so far the count is [2] - but no averages have been calculated since the activity has not been captured for a minute yet - the minute time window is still in process
- 1H to 24H (not shown)
- If visible - the 2M to 60M values would be blank (no date) and the hour ago time windows for 1H would have the value of [2] - with no average or standard deviation calculated since activity for an hour has not been captured yet.
- 1S to 5S Time Window Section
- There has been no count activity for these time windows when the screen shot was taken - but the average and standard deviations have been captured from activity that occurred previously.
In the Finder - Execution Times for the BUY_SHIPMENT row - for each time window the average time and standard deviation are provided.
Cells that are blank represent no data cells/no data gathered yet.
Cells with "-" represent cells where the data is statistically 0 : count is 0, avg is 0, stdev is 0. This happens when there was activity some time ago, but very little in the recent past; the avg and stdevs would slowly tend to 0.
Steps to Enable
To Opt In to this feature:
- Go to the Optional Feature UI - Configuration and Administration > Property Management > Optional Features.
NOTE: Only the DBA.ADMIN user can access and use the Optional Features page.
- Select the UI PERFORMANCE METRICS feature.
- Run the Action Opt In.
Tips And Considerations
It is recommended that all Optional Features be reviewed in the update they are delivered.
To review optional features go to the Optional Feature UI - Configuration and Administration > Property Management > Optional Features.
Version Optional Feature Introduced 20C
Version where this optional feature is no longer Optional and becomes a mandatory opt in feature - 22A
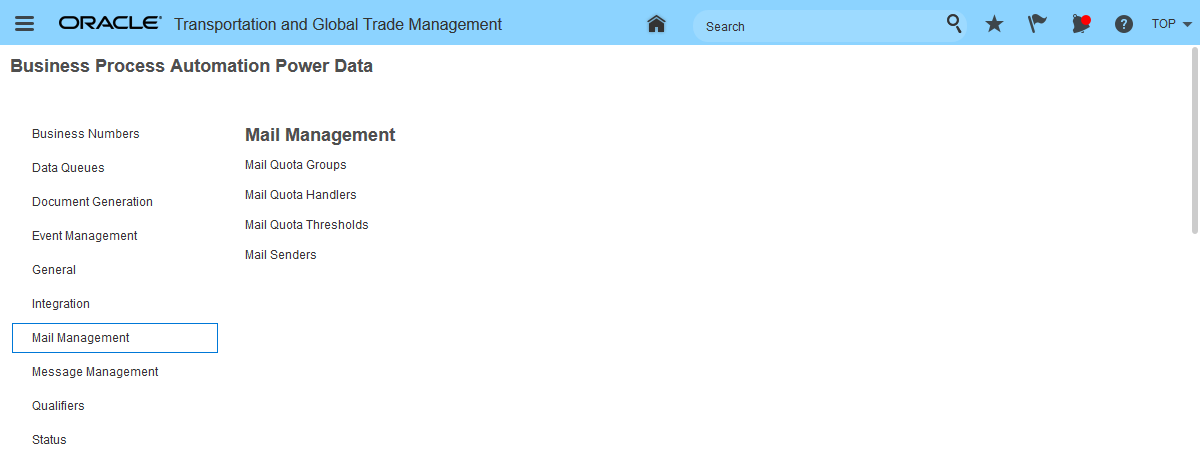
This feature provides you with the capabilities you need to gain better visibility and management of your Email Notifications. You (the DBA) should use Mail Management tools to understand the types and volumes of notifications being generated by your instance. Email notifications are a critical business function, most email recipients employ tools to block unwanted email, aka spam. Ensuring the prompt delivery of email from your OTM/GTM instance, requires that Oracle maintain a good reputation with these anti-spam vendors/tools. A key indicator of potential spam is excessive email volume.
The Mail Management involves the following components:
BLOCK MAIL FINDER
When fully deployed - email traffic that falls out of acceptable threshold limits may be blocked - the Blocked Mail Finder is where those Blocked emails will be identified.

Blocked Mail Finder
THE MAIL QUOTA GROUPS
Mail Management Power Data
For 20C, the default property values for this feature have been set to always enable mail quota tracking , the OPS quota has been set to a an arbitrarily large value.
Glog.mail properties added for this feature include the following:
| glog.mail.diagnoseQuota.group.<display interval name>.count= <display interval count> |
For the MAIL QUOTA performance collector. The number of display intervals for this group. Note that in-memory counts will only display intervals for which they have data. Defaults vary by display interval name. |
| glog.mail.diagnoseQuota.group.<display interval name>.interval= <display interval length> |
For the MAIL QUOTA performance collector. The duration of the display interval in this group. This should be a multiple of the track quota interval. |
| glog.mail.quota.email |
A comma delimited list of email addresses. When the overall email quota is exceeded, these emails will be notified. If no emails are defined using this property, then no notifications are sent. |
| glog.mail.quota.notificationFrequency |
Controls frequency of block email notifications. The notification frequency represents how often the quota blockage email resent. E.g., a frequency of 10 would send out an email on the first quota blockage and every ten blocked emails after that. |
This feature provides Mail Management controls that will allow your instance of OTM/GTM to remain in good standing with other sites you communicate with by monitoring the type and volume of emails being transmitted.
Steps to Enable
You don't need to do anything to enable this feature.
Tips And Considerations
For the first release of this feature (20C), the Mail Management feature will be used to monitor volumes and gather statistics. In a future release, the email volume information gathered (starting in 20C) will be used to set an overall quotas that will be enforced for each instance.
To help insure that your XML is valid based on OTM's schema, this feature provides you with an easy to use XML validation tool that you can use to insure that your XML is valid. You can use this tool by simply pasting your proposed XML into the XML to Be Validated window and then selecting the Validate button. The tool will run a validation against the provided XML and will either return an "OK" to indicate has passed the XML validation, or the tool will return with information regarding invalid content.
The XML Schema Validation tool is accessed via Business Process Automation > Integration > Integration Manager > XML Schema Validation
XML Schema Validation
Place the XML to be validated in the XML to Be Validated text box.
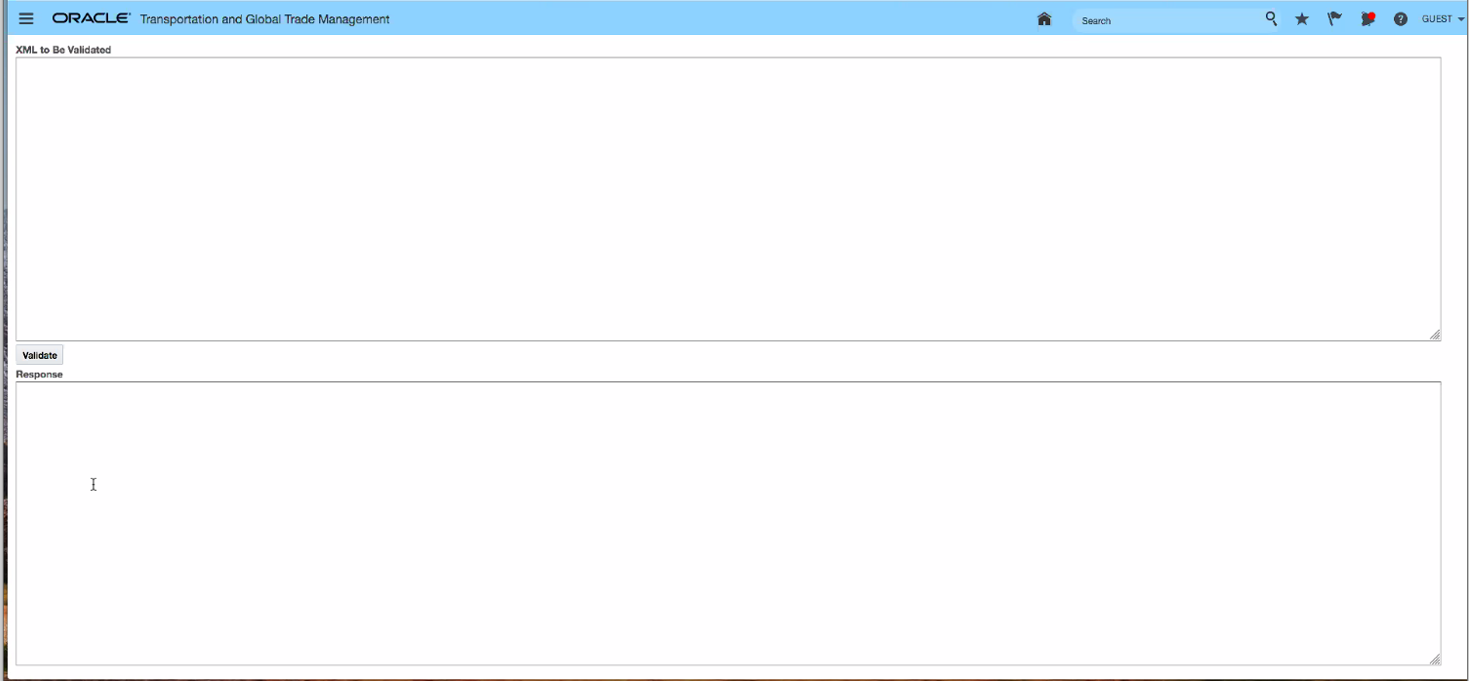
Input Screen
In the example below, the XML Schema Validation tool is used to validate the sample related to the location element. In this case the tool verifies that the XML is valid by providing an "OK" response.
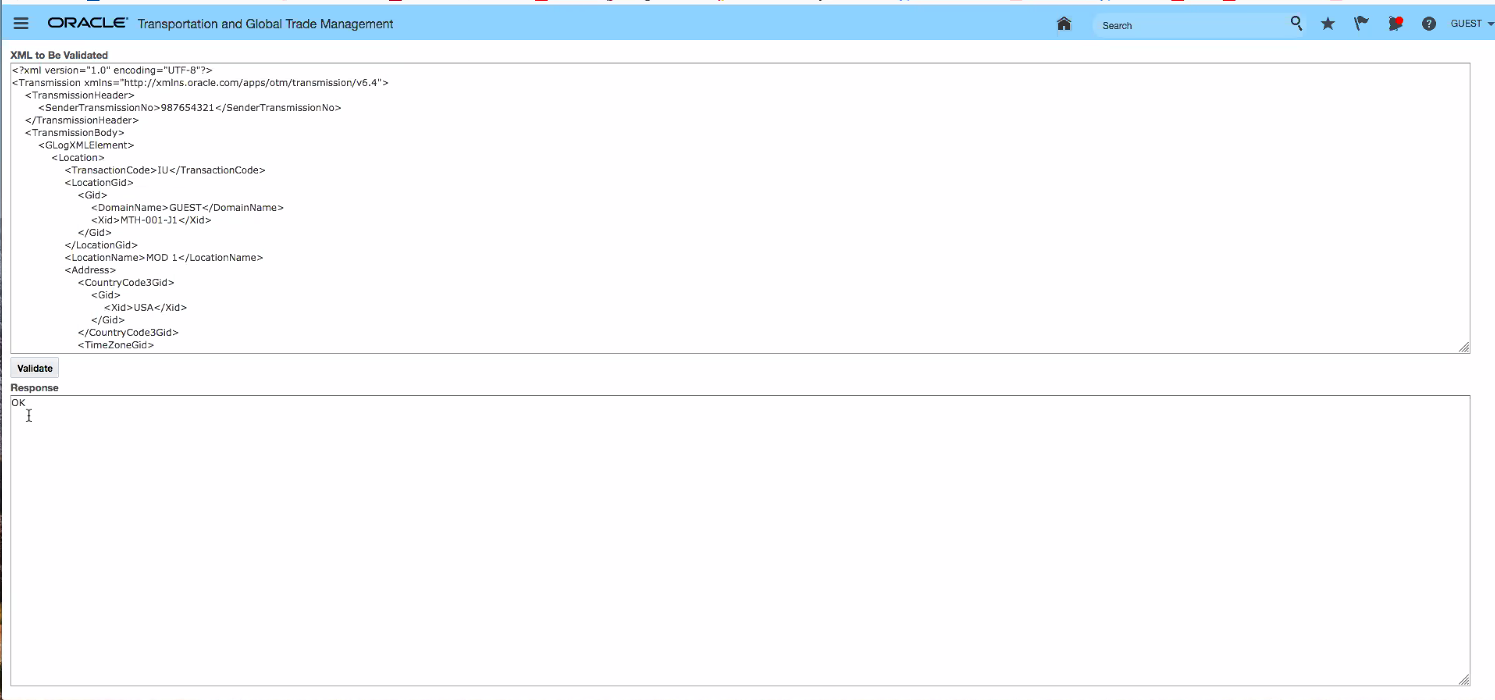
Validated Input
In the example below, the XMLSchema Validation tool identifies an issue with the content provided. Note that the Response provides some indication of the problem encountered.
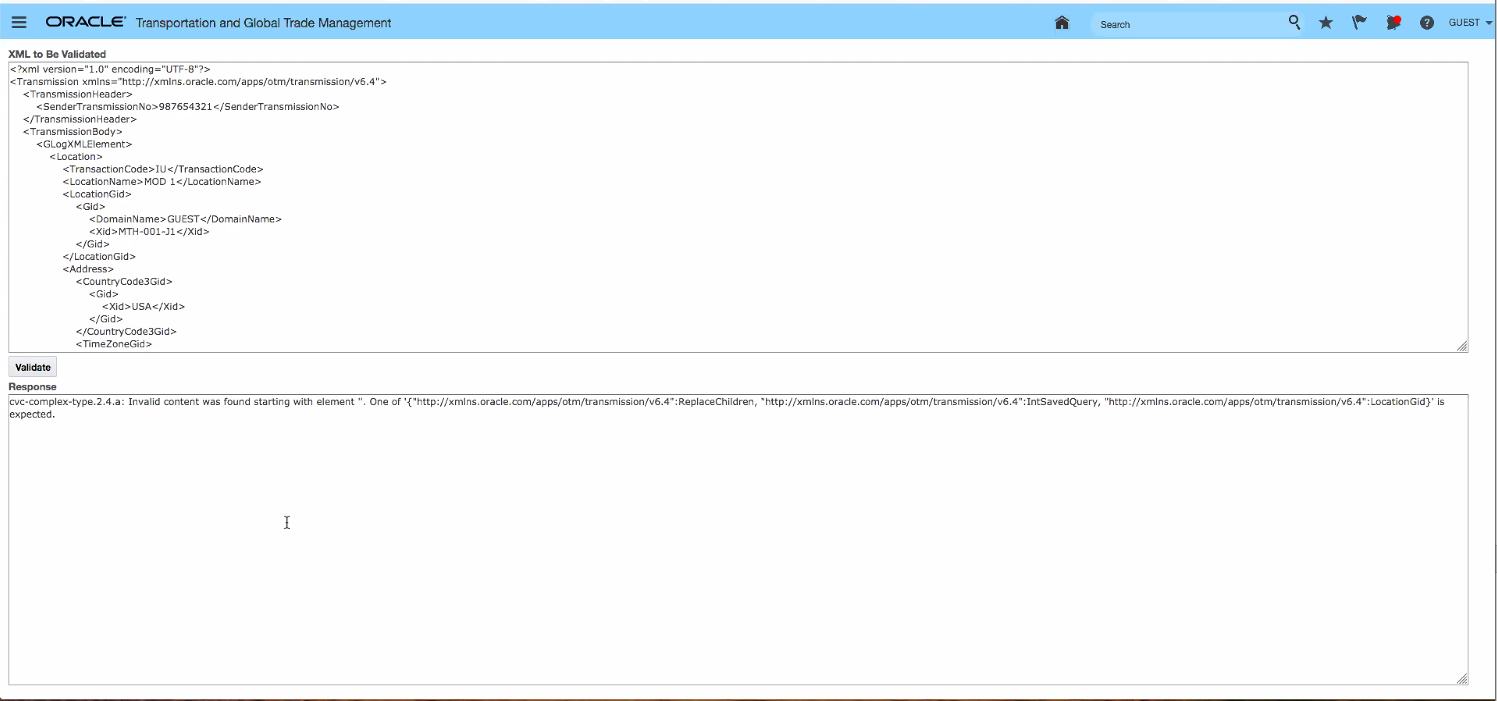
Validation - Issue Found
Steps to Enable
You don't need to do anything to enable this feature.
REST - Power Data Phase 1 - for Major Objects
This feature represents the first release of REST Service enabled power data resources. This first phase deliverable is focused on single table power data elements related to OTM/GTM major objects - like order base, order release, item, location, shipment, trade transaction etc. The list of supported power data resources (over 100) is provided below, more complete information regarding these resources can be found in the REST services documentation.
The addition of power data resources, enhances your ability to create your own UIs and mobile applications based on OTM and GTM's major objects.
| r Data Resources |
| accessorialCodes |
| activities |
| activityTypes |
| adjustmentReasons |
| allocationGroups |
| appointmentPriorities |
| billableIndicators |
| bulkMixingFamilies |
| calendarEventTypes |
| capacityLimitGroups |
| claimCostTypes |
| claimLineItemPackageStatuses |
| claimLineItemReferenceNumberQualifiers |
| claimReferenceNumberQualifiers |
| communicationMethods |
| compartmentTypes |
| consolidationProfiles |
| consolidationTypes |
| consolReferenceNumberQualifiers |
| costCategories |
| countryCodes |
| currencies |
| damageCauses |
| damageNatures |
| damageNotifyPoints |
| damageTypes |
| dataQueryTypes |
| declaredValueQualifiers |
| deviceReferenceNumberQualifiers |
| driverReferenceNumberQualifiers |
| driverTypeWorkProfiles |
| driverWorkProfiles |
| equipmentAttributeQualifiers |
| equipmentGroupCompartments |
| equipmentMarks |
| equipmentReferenceNumberQualifiers |
| equipmentTypeJoins |
| erpcs |
| feasibilityCodes |
| flexibleCommodityQualifiers |
| hazardousClassifications |
| hazmatApprovalExemptions |
| hazmatExternalDistanceEngineMappings |
| hazmatPackageTypes |
| hazmatTechnicalNames |
| hazmatTransportMessages |
| iataSCRCodes |
| incoterms |
| invoiceLineItemReferenceNumberQualifiers |
| invoiceReferenceNumberQualifiers |
| invoiceServiceCodes |
| invoiceStopReasons |
| invoiceStopReferenceNumberQualifiers |
| involvedPartyQualifiers |
| itemFeatureQualifiers |
| itemQualificationReferenceNumberQualifiers |
| itemReferenceNumberQualifiers |
| itemTypes |
| junctionCodes |
| legConsolidationGroups |
| levelOfServices |
| locationCompatibilities |
| locationGroupCompatibilities |
| locationGroups |
| locationQualifiers |
| locationReferenceNumberQualifiers |
| locationRoles |
| movePerspectives |
| nmfcClasses |
| nonconformanceReasonCodes |
| orderBaseLineReferenceNumberQualifiers |
| orderBaseReferenceNumberQualifiers |
| orderBaseShipUnitContentReferenceNumberQualifiers |
| orderBaseShipUnitReferenceNumberQualifiers |
| orderMovementReferenceNumberQualifiers |
| orderReleaseLineReferenceNumberQualifiers |
| orderReleaseReferenceNumberQualifiers |
| orderReleaseTypes |
| orderTypes |
| orientations |
| packagedItemReferenceNumberQualifiers |
| packagedItemTypes |
| packagingFormCodeReferenceNumberQualifiers |
| partnerItemReferenceNumberQualifiers |
| payableIndicators |
| paymentMethodCodes |
| planningGroups |
| planPartitions |
| powerUnitReferenceNumberQualifiers |
| processingCodes |
| qualityFactorProfiles |
| quoteReferenceNumberQualifiers |
| railIntermodalPlans |
| rateAttributes |
| rateClassifications |
| rateGroups |
| rateQualities |
| rateRecordReferenceNumberQualifiers |
| reasonCodes |
| remarkQualifiers |
| resourceTypes |
| routingNetworks |
| routingRuleReferenceNumberQualifiers |
| routingSequences |
| scacs |
| serviceProviderAliasQualifiers |
| shipmentInformationalCostQualifiers |
| shipmentReferenceNumberQualifiers |
| shipmentShipUnitLineReferenceNumberQualifiers |
| shipmentShipUnitReferenceNumberQualifiers |
| shipmentStopReferenceNumberQualifiers |
| shipmentTypes |
| shippingAgentRules |
| shipUnitLineReferenceNumberQualifiers |
| shipUnitReferenceNumberQualifiers |
| shipUnitSpecReferenceNumberQualifiers |
| sitcs |
| stationCodes |
| statusCodes |
| stccs |
| stowageModes |
| timeWindowEmphasises |
| timeZones |
| userDefinedCommodities |
| vatOutcomes |
| vatProvincialRegistrations |
| vatRegistrations |
| vesselReferenceNumberQualifiers |
| voyageServiceTypes |
| weightBreaks |
Steps to Enable
Review the REST service definition in the REST API guides, available from the Oracle Help Center > your apps service area of interest > REST API. If you're new to Oracle's REST services you may want to begin with the Quick Start section.
REST - Get Method For Documents and Images
This feature provides you with the ability to use the GET method for Documents and Images. The GET method capability is available for root Business Resources that supports documents.
GET method for documents supported root resources:
- bills
- campaigns
- customDeclarations
- damageClaims
- drivers
- equipment
- invoices
- items
- locations
- orderBases
- orderMovements
- orderReleases
- powerUnits
- quotes
- sellShipments
- serviceProviders
- shipments
- trackingEvents
- tradeParties
- tradeTransactions
- vouchers
Steps to Enable
Review the REST service definition in the REST API guides, available from the Oracle Help Center > your apps service area of interest > REST API. If you're new to Oracle's REST services you may want to begin with the Quick Start section.
Oracle Transportation Management (Base)
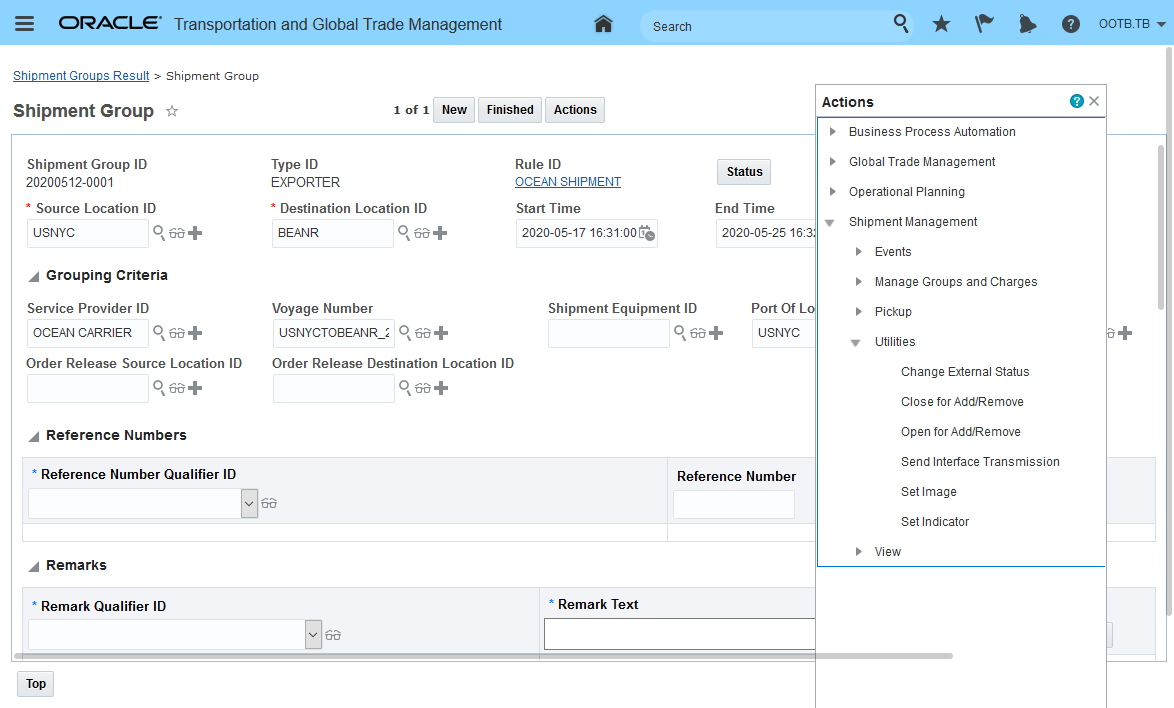
This feature extends OTM's Consol capabilities to fully support the process of booking/reserving full container load (FCL) slots on a vessel/voyages before your order releases are available for planning. When your order release(s) become available for planning, you can now plan those order releases into your reserved capacity.
This feature involves a number of improvements across the ocean pre-booking/reservation use case. The changes provide are highlighted below.
You now have the ability to define an Ocean FCL Consol Type. The Ocean FCL Consol Type - like the other Consol Types - Flight, Chartered Voyage Stowage - determines the information provided on the Consol screen.
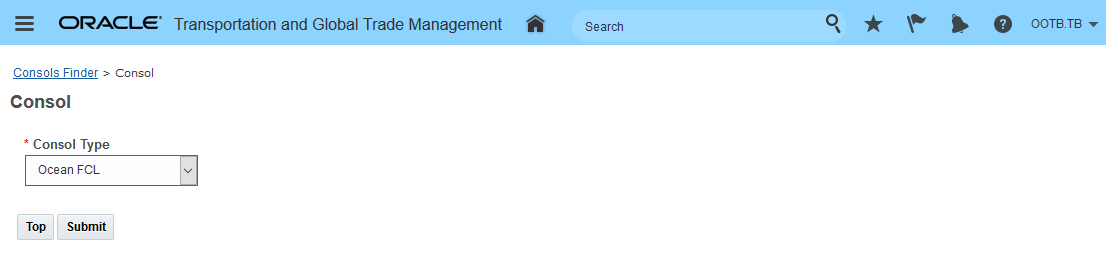
Select the Ocean FCL Consol Type
Ocean FCL Consol Type Manager
The Ocean FCL Consol Type Fields provided include:
- Service Provider - Service Provider. If not specified directly OTM will look to the voyage table for the related Service Provider.
- One Shipment per Container - If this flag is checked then a separate shipment will be created for each of the containers specified for the consol. If unchecked then one shipment (with multiple shipment equipments) will be created for all the containers specified on the consol. The default value is unchecked i.e., one shipment with one or more shipment equipment.
- Transport Mode - For information. For example, VESSEL-CO.
- Consolidation Type - Used for informational purposes or for automatic assignment of non-freight related charges to a Job.
- Hazmat Type - Used to classify the Consol for Hazmat compatibility - Hazmat Only, No Hazmat, Hazmat Allowed.
- Incoterms - Used for information purposes.
- Flexible Commodity Qualifier and Commodity Code - Defines the Flexible Commodify Qualifier and Commodify Code associated with this Consol.
- Expected Fields - Expected Vessel ID, Expected Voyage ID, Expected Departure Time, Expected Arrival Time - When defining the Ocean FCL Consol you must provide at least one of the expected fields.
- Receipt Location ID - Optional - Used to capture inland location where freight could be received. Note - if a Receipt Location ID is provided then this will be the first stop of the shipment created for the consol.
- Port of Load - Starting point for the voyage - required. If the optional Receipt Location ID is not specified than the Port of Load will be the first stop on the shipment(s) generated for the consol.
- Port of Discharge - Ending point for the voyage - required. If the optional Delivery Location ID is not specified then the Port of Discharge will be the last stop on the shipment(s) created for the consol.
- Delivery Location ID - Optional - Used to identify the inland point where the freight will be delivered. Note - if a Delivery Location ID is provide it will be the last stop on the shipment(s) created for the consol.
- Itinerary Profile - The itinerary profile defines the consol's applicability to network legs.
- Involved Parties - Used to capture the involved parties related to the consol - these will be copied to the shipment(s) created for the consol.
- Reference Numbers - Used to capture the reference numbers (like Booking Number) related to the consol - these will be copied to the shipment(s) created for he consol.
- Remarks - Used to capture any remarks related to the consol - entered remarks will be copied to the shipment(s) created for the consol.
- Equipment Groups - Required. The Equipment Group grid is where you specify the size of container and number of containers you want to create for the consol Again, the One Shipment per Container flag controls how the shipments and the related shipment equipment (containers) are generated. By default, one shipment will be created with as many shipment equipment records you specify in the grid. If the One Shipment Per Container flag is checked - then the consol will create one shipment for each equipment group (container specified in the grid.
To demonstrate the changes provided with this enhancement, the example below steps you through the basic use case and highlights the many enhancements.
In the example below, two Ocean FCL Consols have been created to reserve capacity for three 40FT High Cube General Containers. For this example the equipment groups reserved are the same, but you can add rows to the Equipment Group grid and request a mix of equipment groups - they do not need to be the same equipment group.
The multiple Ocean FCL Consols represent the different sailings that you want to book into. For this example, the consols are created to represent a sailing on week 24 and a second sailing on week 27.
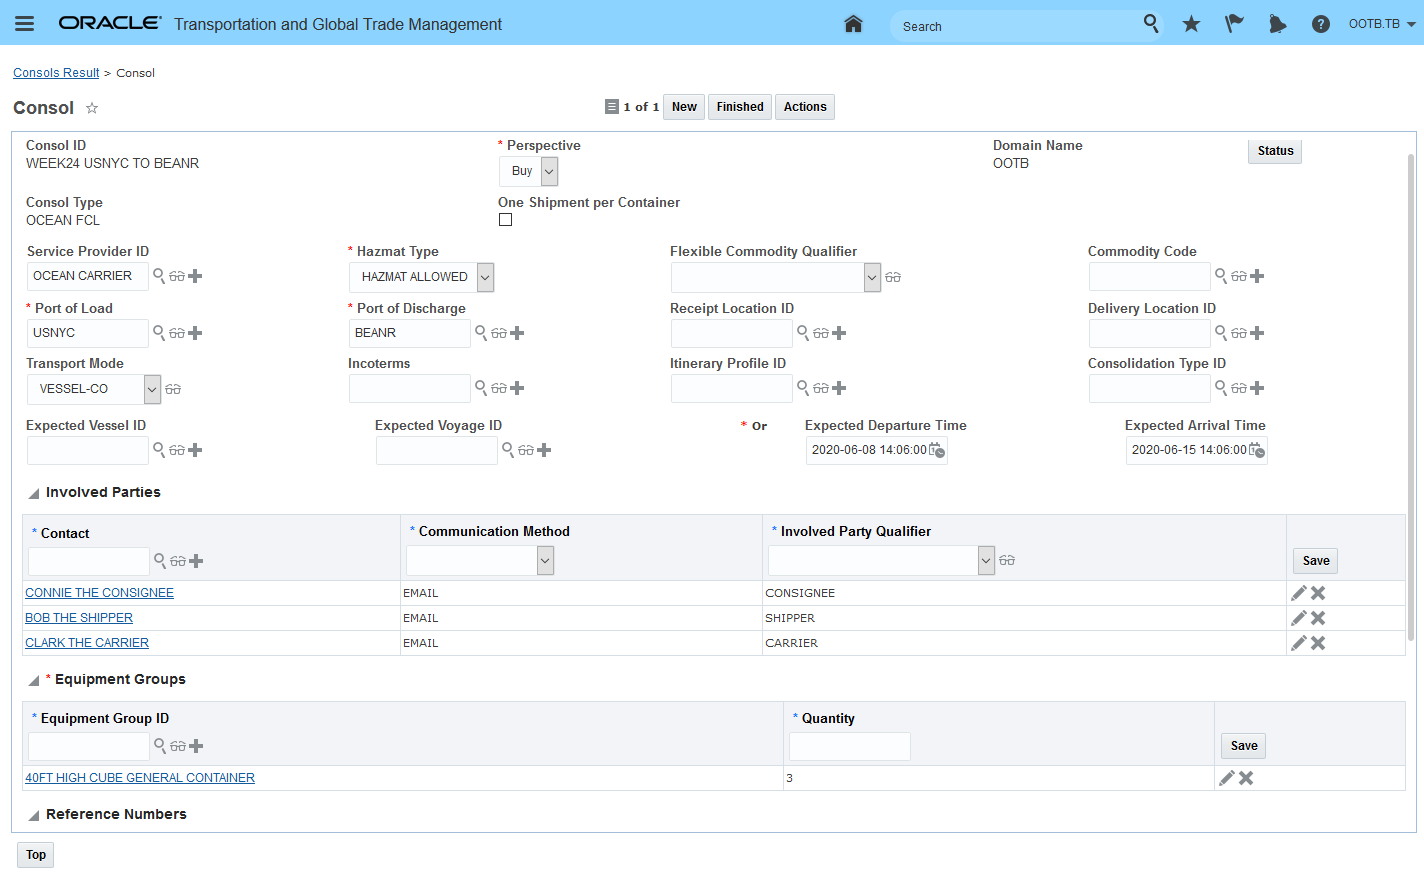
Example Ocean FCL Consol Week 24
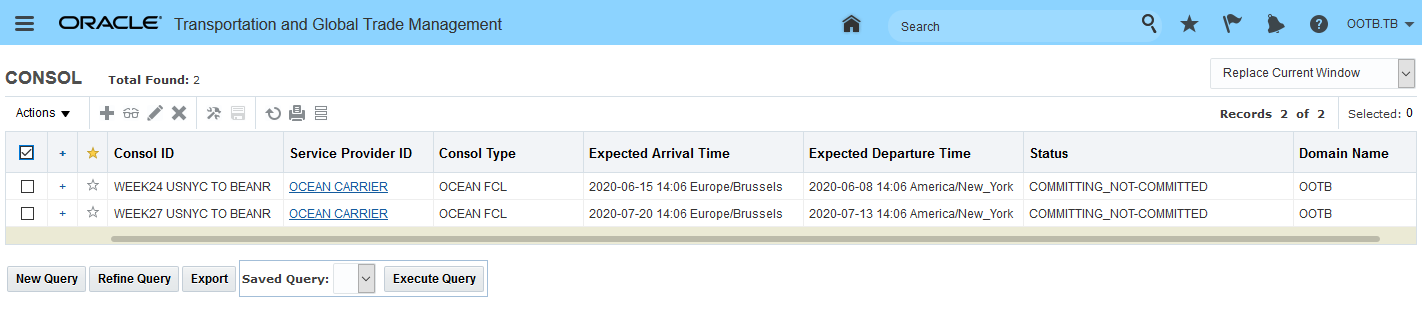
Ocean FCL Consols Week 24 and Week 27
To book orders into the reservations you need to create a consol shipment. The Consol Action - Create Shipment is used to generate consol shipments for the two Ocean FCL Consols defined above.
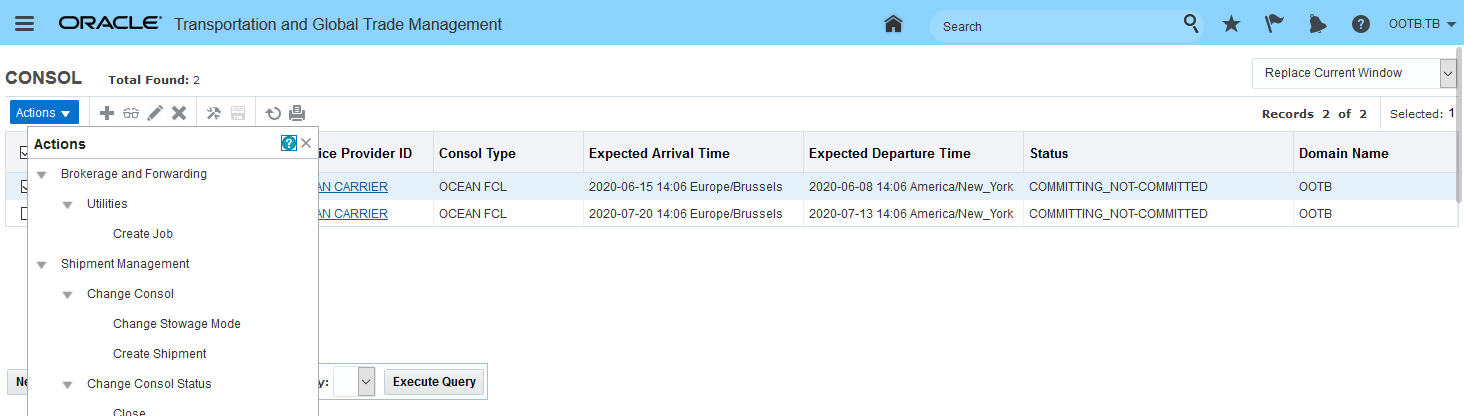
Consol Action - Create Shipment - Single Select Action
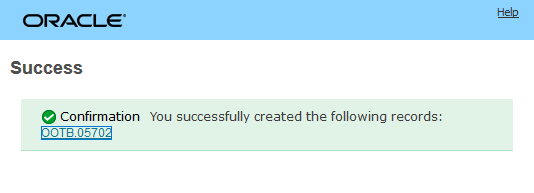
Create Shipment Action Result
Below is the shipment created for the Week24 Consol defined above. Note that the generated shipment has the Reference Numbers, Involved Parties, requested equipment groups and the specified Port of Load - USNYC and Port of Discharge - BEANR defined on the consol.
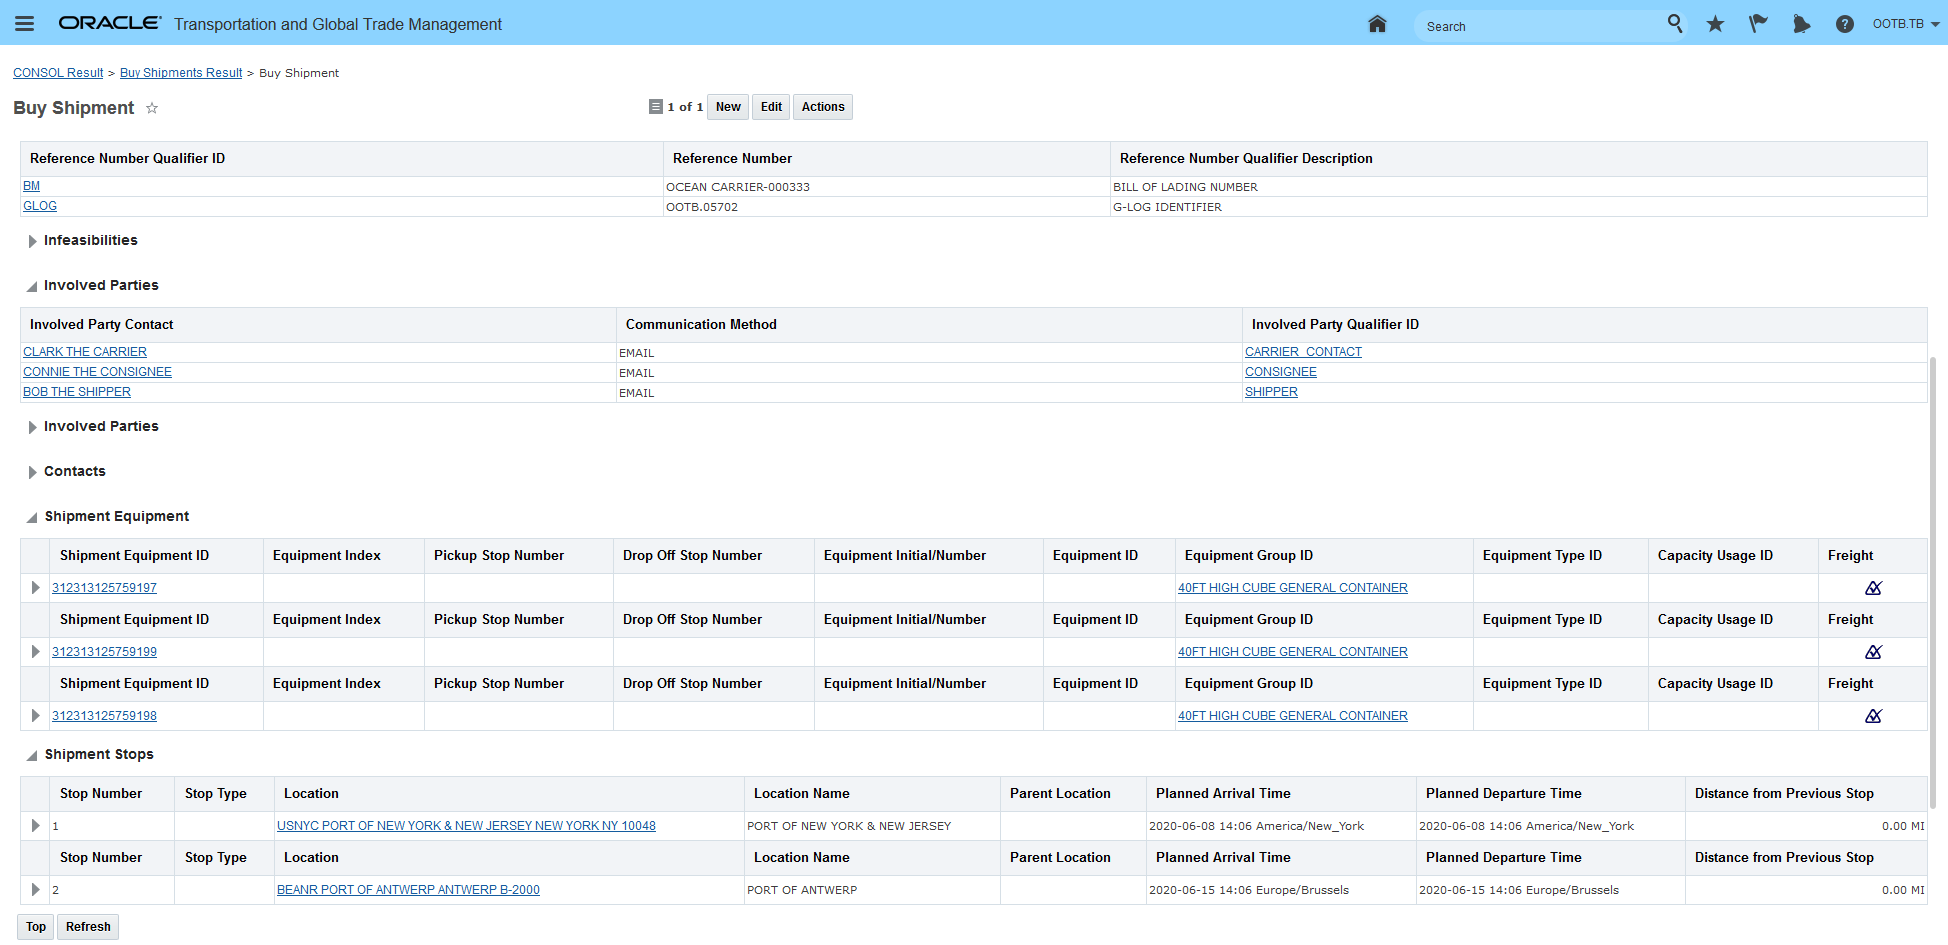
Created Shipment - Specific From Consol Provided
With the Ocean FCL Consols created and the Consol Shipments created for those Ocean FCL Consols, the next step in the process is to plan order releases into the reserved capacity.
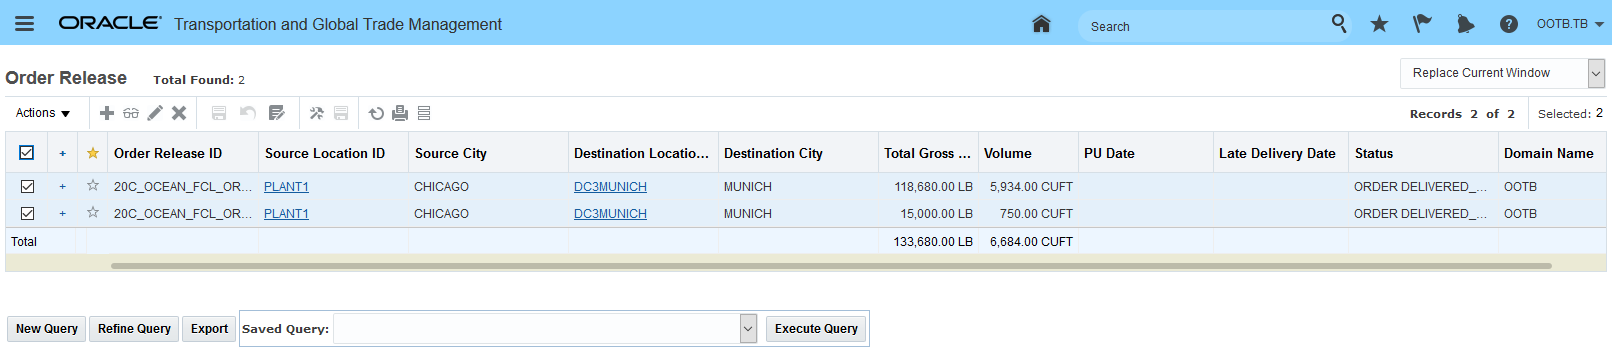
Orders Releases to Plan Into Available Consol Shipment
The action Build Buy Shipment On Primary Leg Show Consol Options will be used to plan order releases into the Week 24 consol shipment. This action, in addition to assigning the order to the consol shipment, will also create the necessary order movements for other legs involved in the end-to-end move.
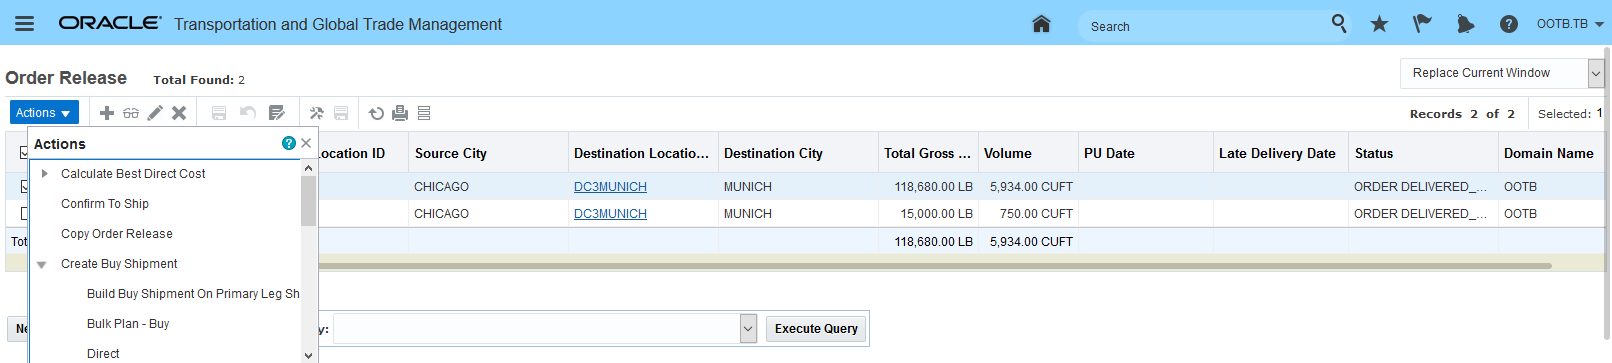
Build Buy Shipment On Primary Leg Show Consol Options
When the Build Buy Shipment On Primary Leg Show Consol Options action is run only the earliest option is shown - the Week24 option - the Service Time Parameter BOOK ORDER USING EARLIEST CONSOL (the default is true) - allows you to limit or expand the options shown. In this example, the default value is set, so only the earliest option is shown.
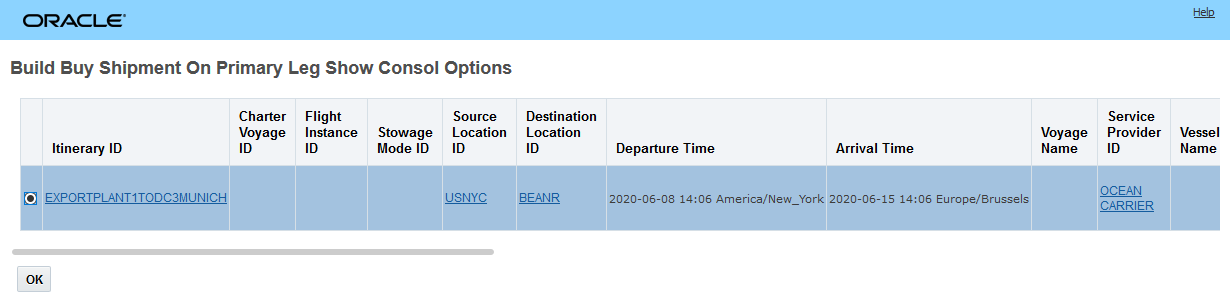
Build Buy Shipment On Primary Leg Show Consol Options
The action's result is shown below.
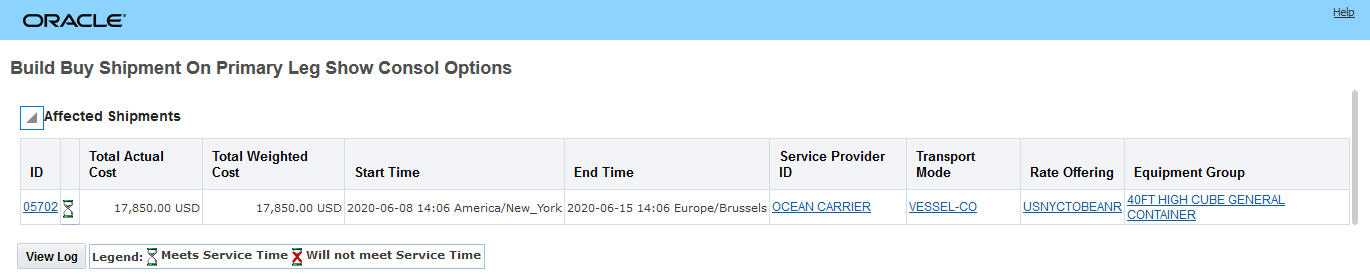
Build Buy Shipment On Primary Leg Show Consol Options - Result
After the first order has been planned onto the shipment two of the 40FT HIGH CUBE GENERAL CONTAINERS are essentially full (see below). The third container (first in the list 312313125759197) has remaining capacity. One of the enhancements related to this feature is a change to the logic associated with both the Build Buy Shipment On Primary Leg Show Consol Options action and the Build Buy Shipment On Primary Leg - these actions have been enhanced so that when you are adding orders to your OCEAN FCL Consol Type, any previously loaded shipment ship units will retain their assigned equipment group/equipment group compartment when evaluating additional orders.
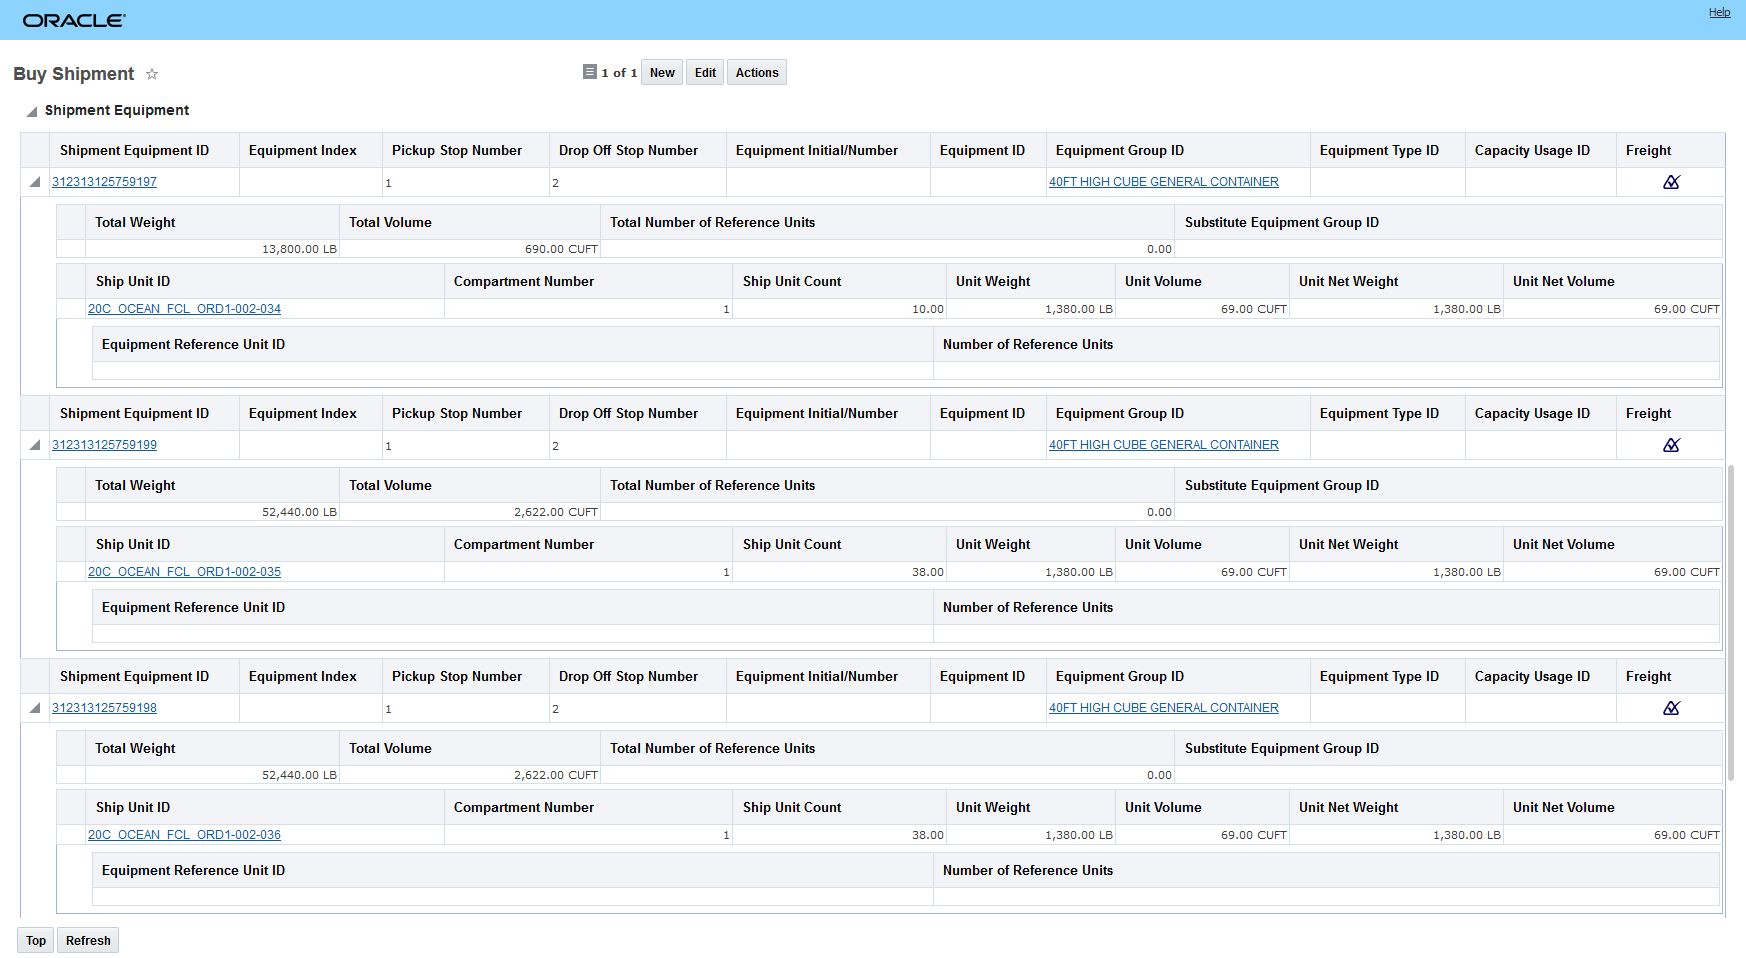
Build Buy Shipment On Primary Leg Show Consol Options - Result
In the Shipment Equipment image below, the second order has been planned into the consol. Note that the action Build Buy Shipment on Primary Leg Show Consol Options has kept all the shipment ship units planned for the first order in their originally assigned shipment equipment and the second order was added to the shipment equipment with capacity.
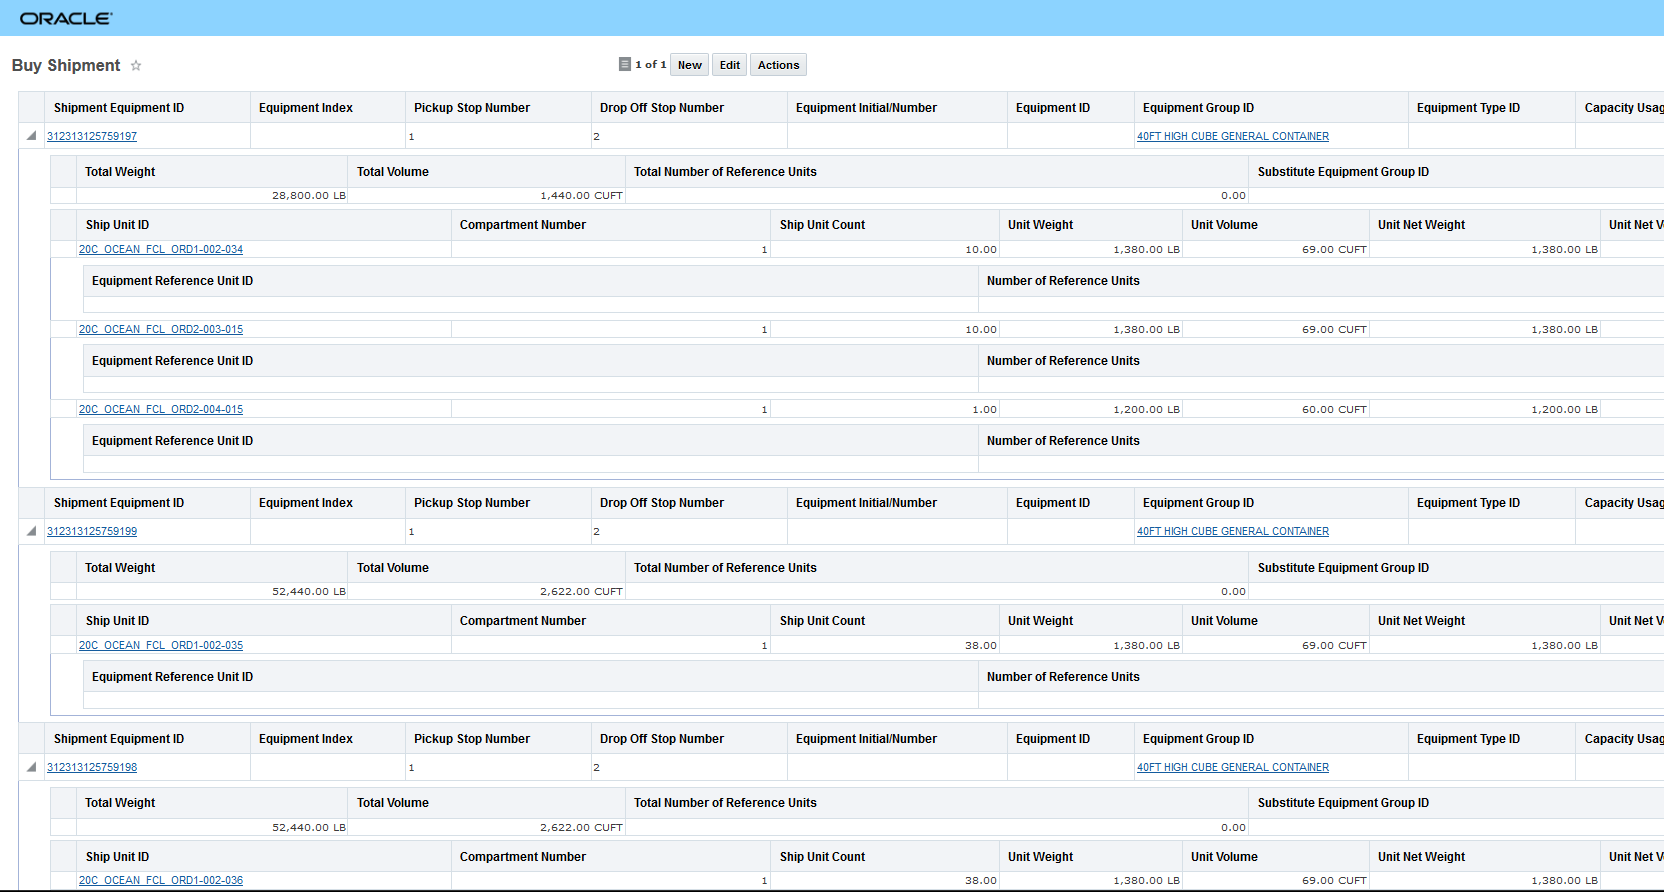
Build Buy Shipment On Primary Leg Show Consol Options - Result - Both Orders
Again - this feature will be extremely beneficial if you are looking to reserve capacity with an ocean carrier before your orders are available - and then - when your orders are available - consume the reserved capacity.
Steps to Enable
You don't need to do anything to enable this feature.
Tips And Considerations
Below are some of the conditional rules associated with how OTM determines the stops and the stop times on the shipment(s) created for the Ocean FCL consol.
- Stops for the created shipment(s):
- Port of Load and Port of Discharge – Will be the pickup and delivery stops on the shipment if Receipt Location ID or Delivery Location ID are not provided.
- If Receipt Location ID and/or Delivery Location ID are set - these locations will become additional stops (pickup and delivery) on the created shipment.
- Arrival Time and Departure Time on the shipment stops:
- If Receipt Location ID is specified, this will be the first stop of the shipment. The Expected Departure Time on the consol is required and is copied to the Planned Arrival Time and Planned Departure Time on this shipment stop.
- Port of Load:
- If Receipt Location ID is specified, Port of Load will be the second stop of the shipment. On this stop, all the Planned/Estimated/Actual Arrival/Departure Times will be null.
- If Receipt Location ID is not specified, Port of Load will be the first stop of the shipment.
- If Expected Departure Time on the consol is specified, it is copied to the Planned Arrival Time and Planned Departure Time on this shipment stop.
- If Expected Departure Time on the consol is not specified, find the stop on the voyage that matches the Port of Load. Copy its Planned/Estimated/Actual Arrival/Departure Times to the corresponding fields on the shipment stop.
- If all 3 (Planned/Estimated/Actual) Arrival values on the stop are null, go through the Departure Times on this stop in this sequence (Actual, Estimated, Planned) and copy the first not-null value to the Estimated Arrival Time.
- If all 3 (Planned/Estimated/Actual) Departure values on the stop are null, go through the Arrival Times on this stop in this sequence (Actual, Estimated, Planned) and copy the first not-null value to the Estimated Departure Time.
- Port of Discharge:
- If Delivery Location ID is specified, Port of Discharge will not be the last stop of the shipment. On this stop, all the Planned/Estimated/Actual Arrival/Departure Times will be null.
- If Delivery Location ID is not specified, Port of Discharge will be the last stop of the shipment.
- If Expected Arrival Time on the consol is specified, it is copied to the Planned Arrival Time and Planned Departure Time on this shipment stop.
- If Expected Arrival Time on the consol is not specified, find the stop on the voyage that matches the Port of Discharge. Copy its Planned/Estimated/Actual Arrival/Departure Times to the corresponding fields on the shipment stop.
- If all 3 (Planned/Estimated/Actual) Arrival values on the stop are null, go through the Departure Times on this stop in this sequence (Actual, Estimated, Planned) and copy the first not-null value to the Estimated Arrival Time.
- If all 3 (Planned/Estimated/Actual) Departure values on the stop are null, go through the Arrival Times on this stop in this sequence (Actual, Estimated, Planned) and copy the first not-null value to the Estimated Departure Time.
- If Delivery Location ID is specified, this will be the last stop of the shipment. The Expected Arrival Time on the consol is required and is copied to the Planned Arrival Time and Planned Departure Time on this shipment stop.
- The evaluation of the order/order movement is done considering weight, volume and equipment reference units (ERUs), the evaluation does not consider 3D or user defined patterns.
- The build shipment on primary leg actions Build Buy Shipment On Primary Leg Show Consol Options action and the Build Buy Shipment On Primary Leg action ignore the Equipment Assignment Type of Re-use Equipment that is found on the itinerary legs. Order movements sharing the same s ship units can only be created based on stuffing and de-stuffing locations in the UNITIZED mode.
To support backward compatibility, the BUILD SHIP ON PRIMARY LEG OBEY REUSE EQUIP ON LEG parameter has been added.
- When this parameter is set to false (default), the current behavior is retained.
- When this parameter is set to true, and the consol shipment is not UNITIZED (typical case), OTM will look at the leg reuse equipment setting, and create order movements that share the same s ship unit. We recommend changing the parameter to true.
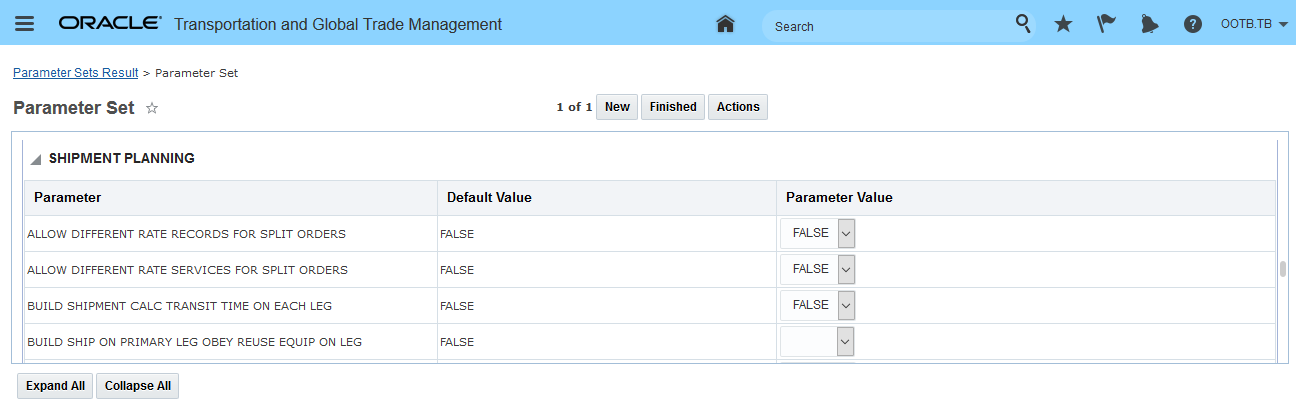
Build Ship On Primary Leg Obey Reuse Equip On Leg Parameter
Shipment Group - Split Shipment Group Action
This new Split Shipment Group action allows you to split your full or partial shipment groups into new/additional shipment groups. The portion of the shipment group that is split off from the parent will retain all of the header level information from the original shipment group. You will find this feature particularly useful when shipment groups are used to model ocean shipping scenarios and your ocean booking must be split into two or more separate bookings.
FULL SHIPMENT GROUP - SPLIT SHIPMENT GROUP EXAMPLE
In the example below - there are 3 shipments (05486, 05489, 05495) in the shipment group for the ocean booking going from USNYC to BEANR. The Split Shipment Group will be used to split off one of the shipments/containers (05486) from this shipment group and have it create another shipment group.

Split Shipment Group
From within the Shipment Group Workbench - you can initiate the Split Shipment Group action as shown below.
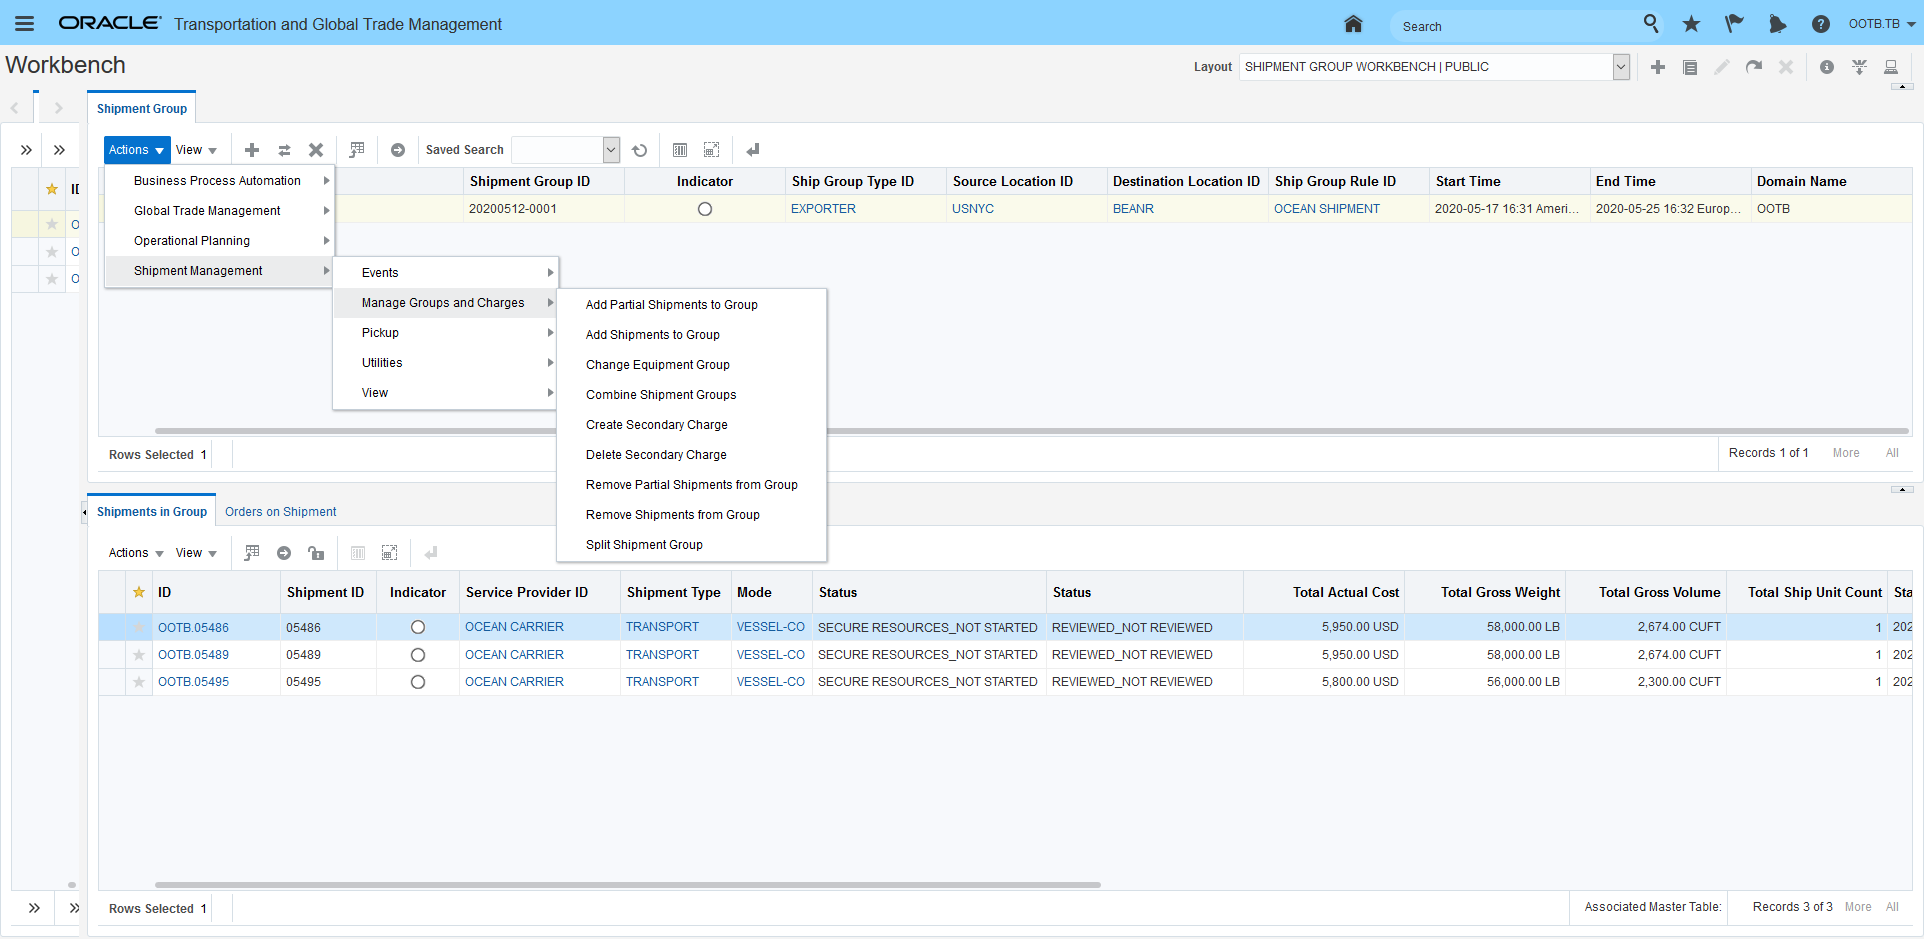
Run Action Split shipment Group
When the Split Shipment Group action is run - the action provides you with the option to select the shipment or shipments you want to split off from the shipment group. In this case the shipment 05486 will be selected and split off.
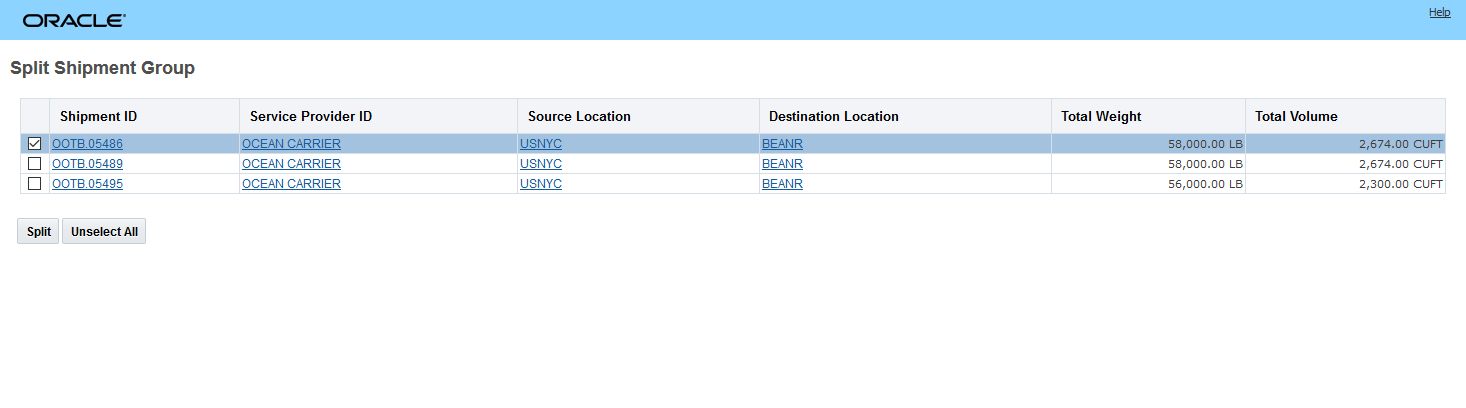
Select and Split Off Shipment 05486
The result of the action is the generation of a "New Shipment Group (Split Shipment Group) and the retention of the original "Parent Shipment Group".
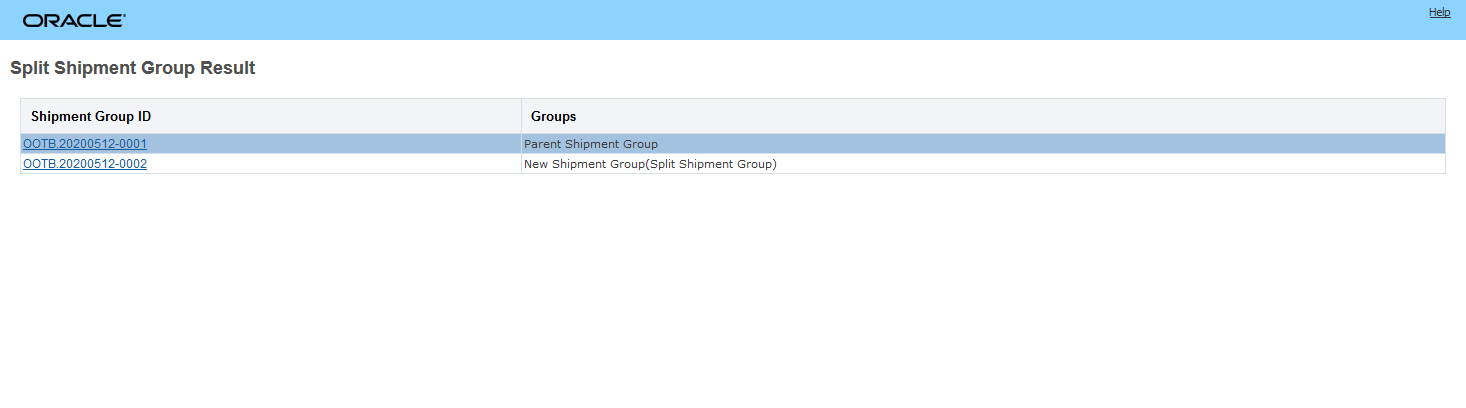
Split Shipment Group Result
In the workbench the result of the Split Shipment Group action are below. The New Shipment Group - 20200512-002- contains the one shipment 05486, the original Parent Shipment Group - 20200512-001 - contains the original/remaining shipments 05489 and 05495.
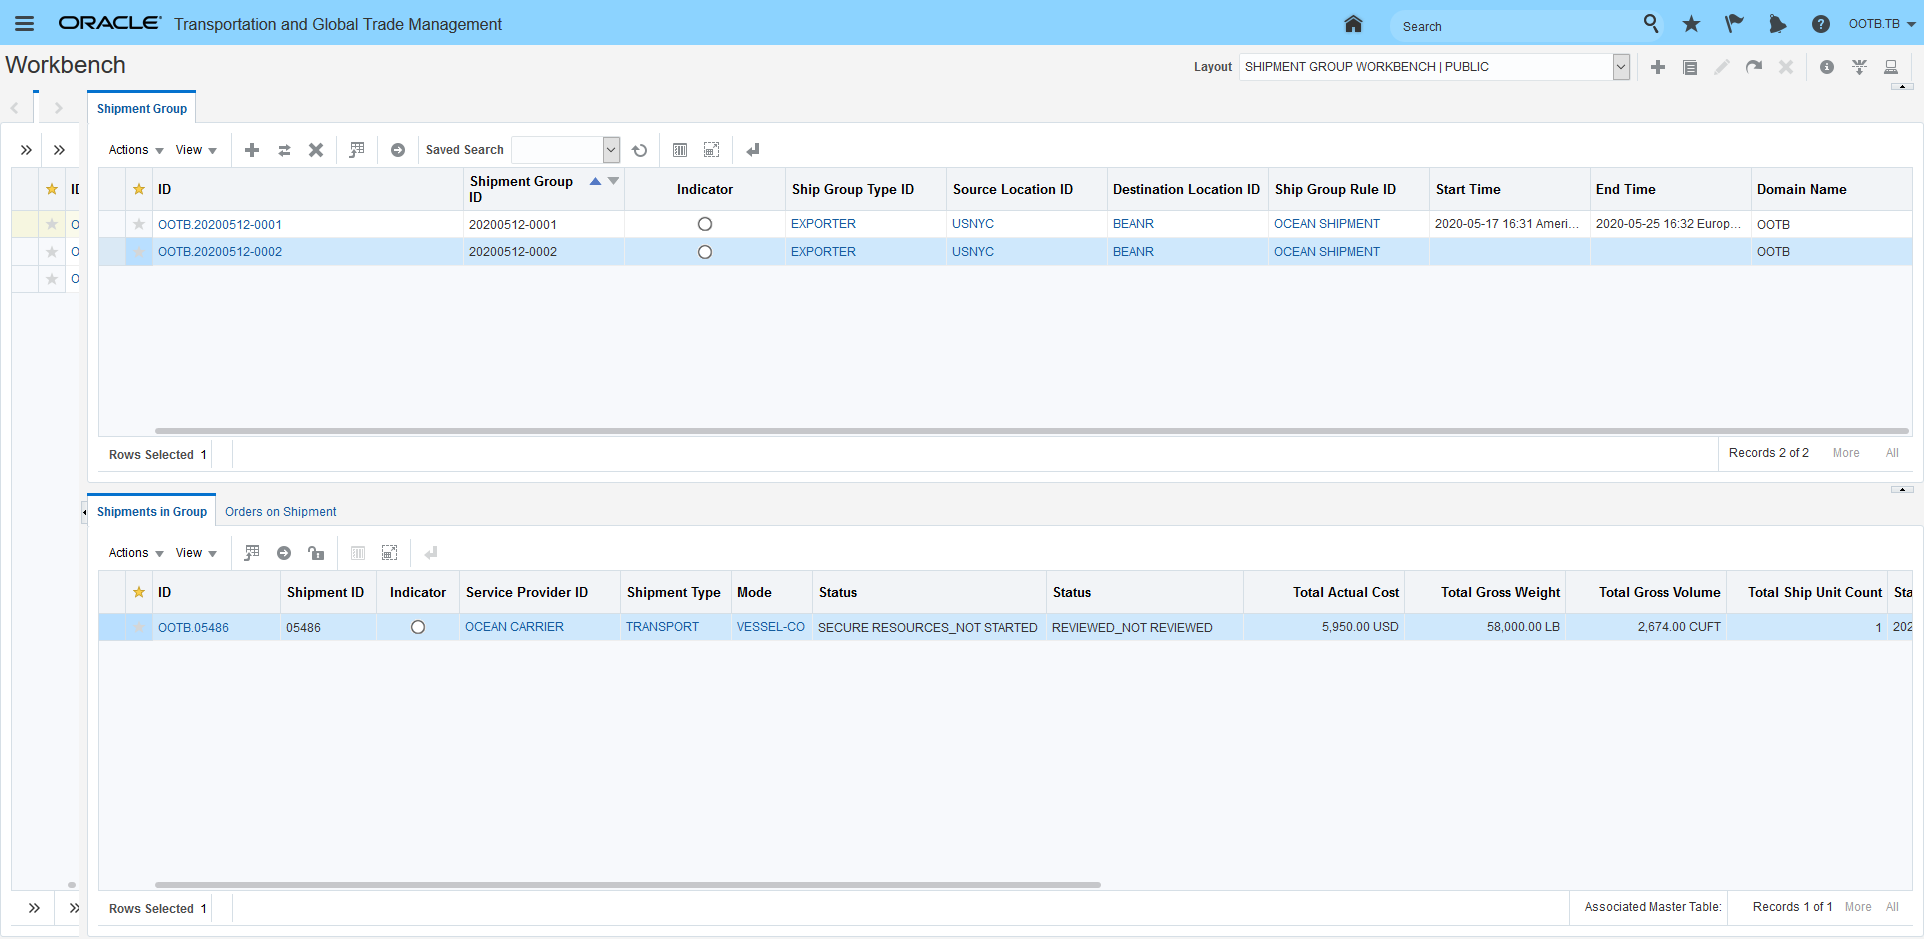
Workbench View - New Shipment Group
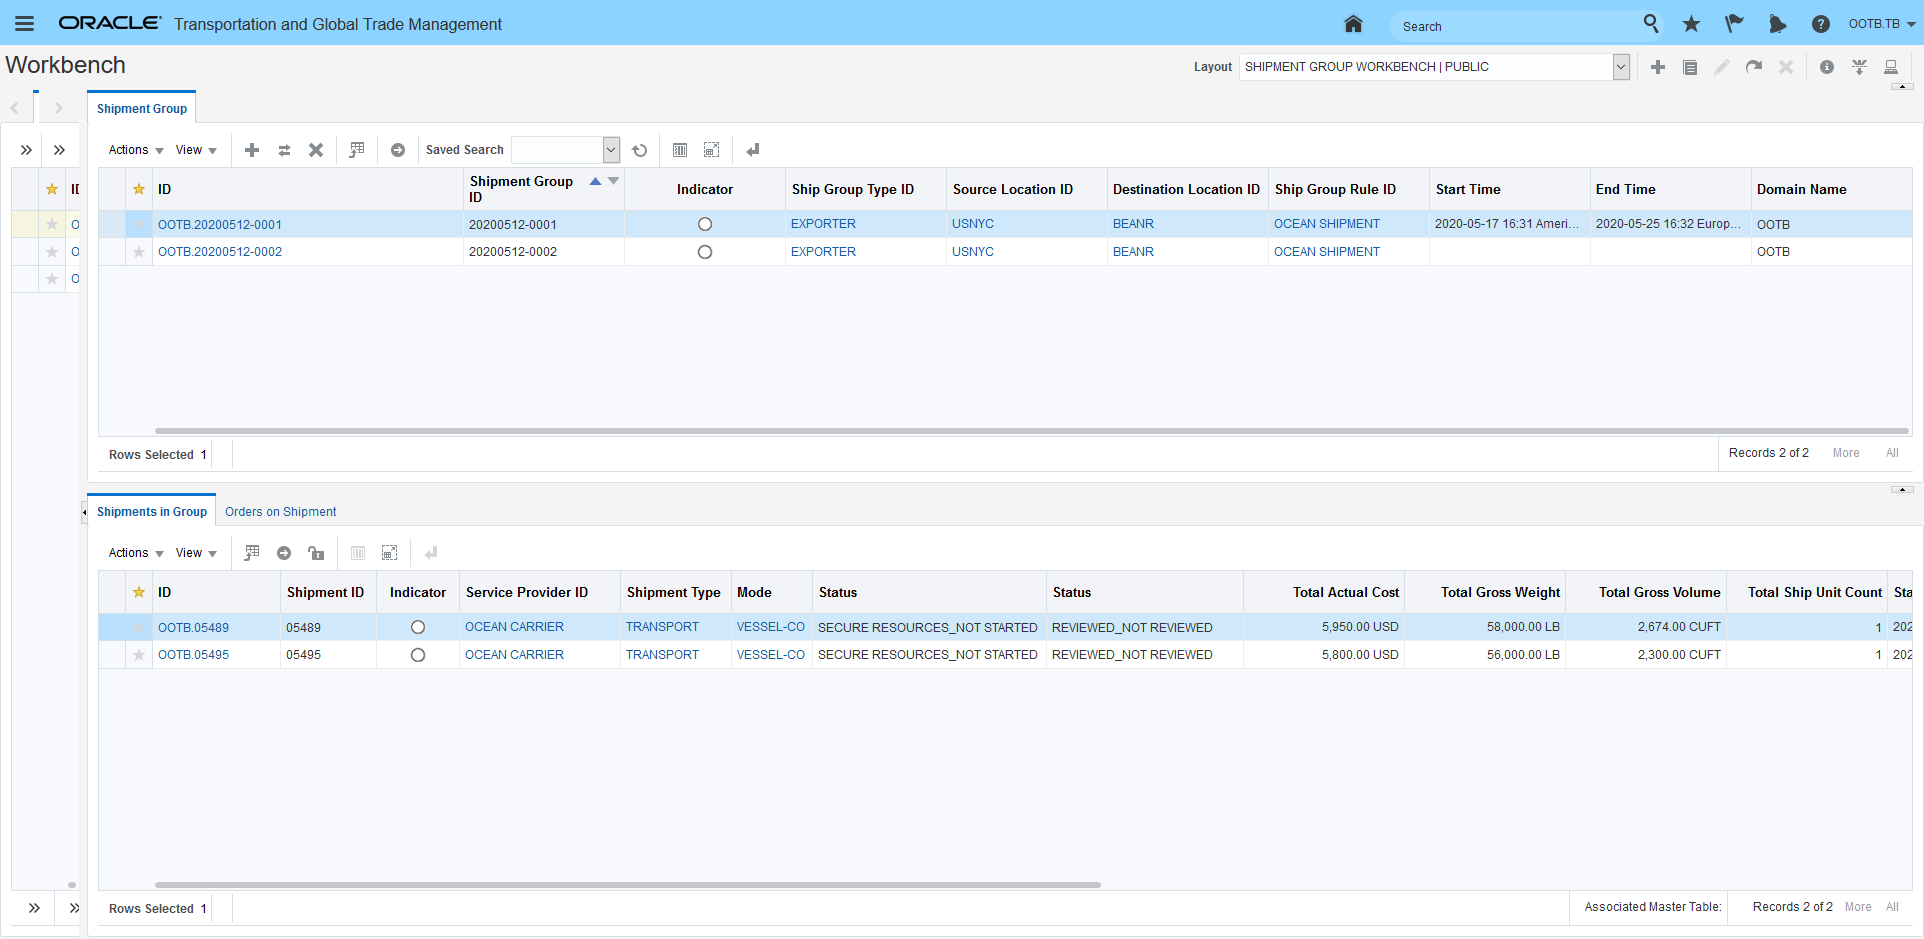
Workbench View Parent Shipment Group
PARTIAL SHIPMENT GROUP - SPLIT SHIPMENT GROUP EXAMPLE
In the example below - the Split Shipment Group action will be used to split a partial shipment group (20200513-004) into two shipment groups. In this example, the partial shipment group has been created using a shipment group rule where the partial shipment groups are generated based on the order release Involved Party Qualifier of BILL TO. In the example below - there are two order releases (PARTIALSG01 and PARTIALSG01_B) with the same BILL TO involved party (KARL) that are on two shipments (05498 and 05499). Note that the original shipment group has two Remarks associated with the shipment group - the Remarks will be copied to the New Shipment Group as part of the Split Shipment Group action.
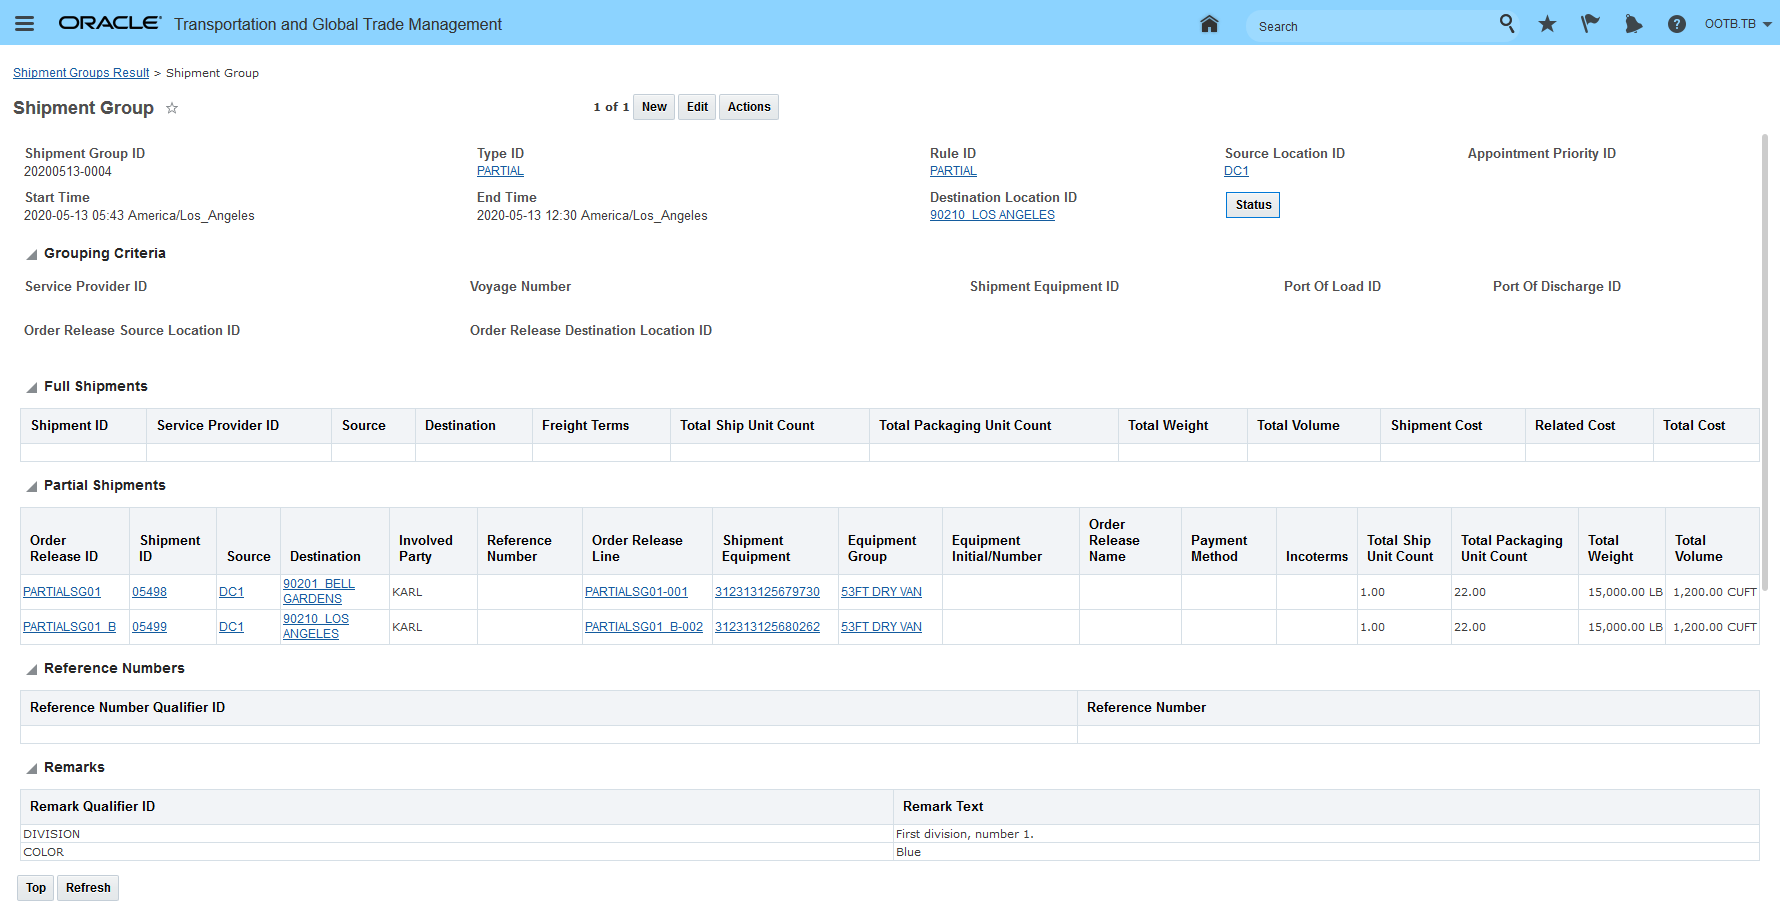
Partial Shipment Group Split
In this example, the action is being run from the Shipment Group Manager.
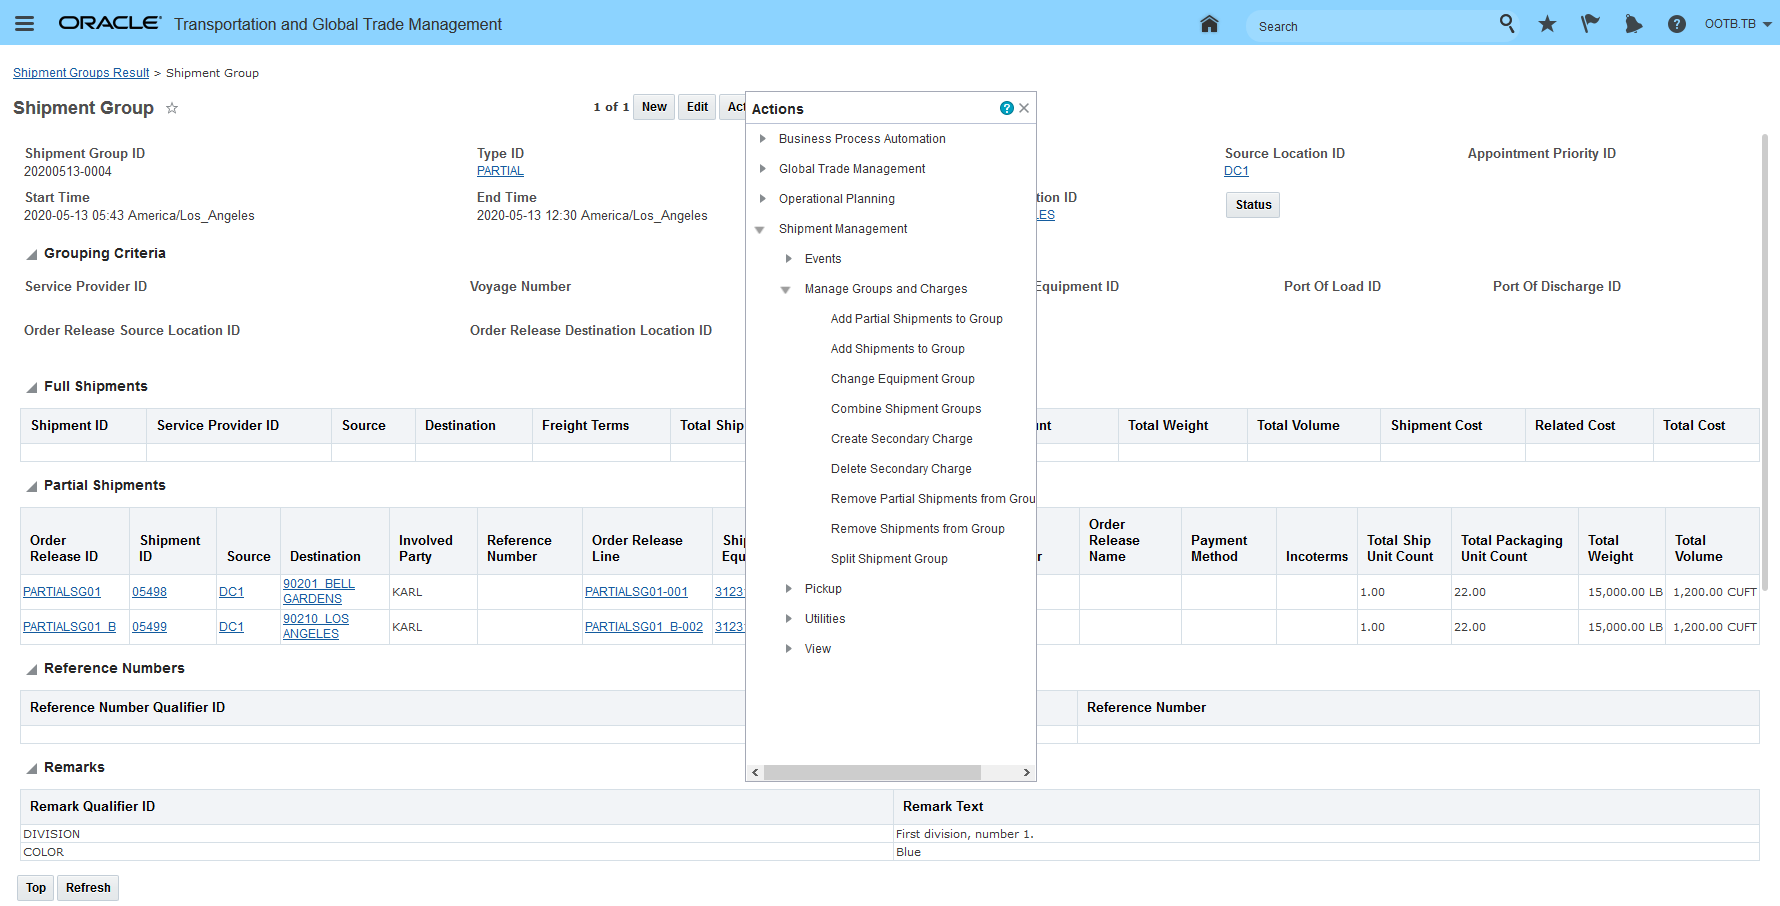
Run Split Shipment Group Action - Partial Shipment Group Split Example
As before, the Split Shipment Group Action provides the options available for splitting. In this case the partial shipment group on 05498 will be selected and split off into a new shipment group.

Split Shipment Group Action - Select
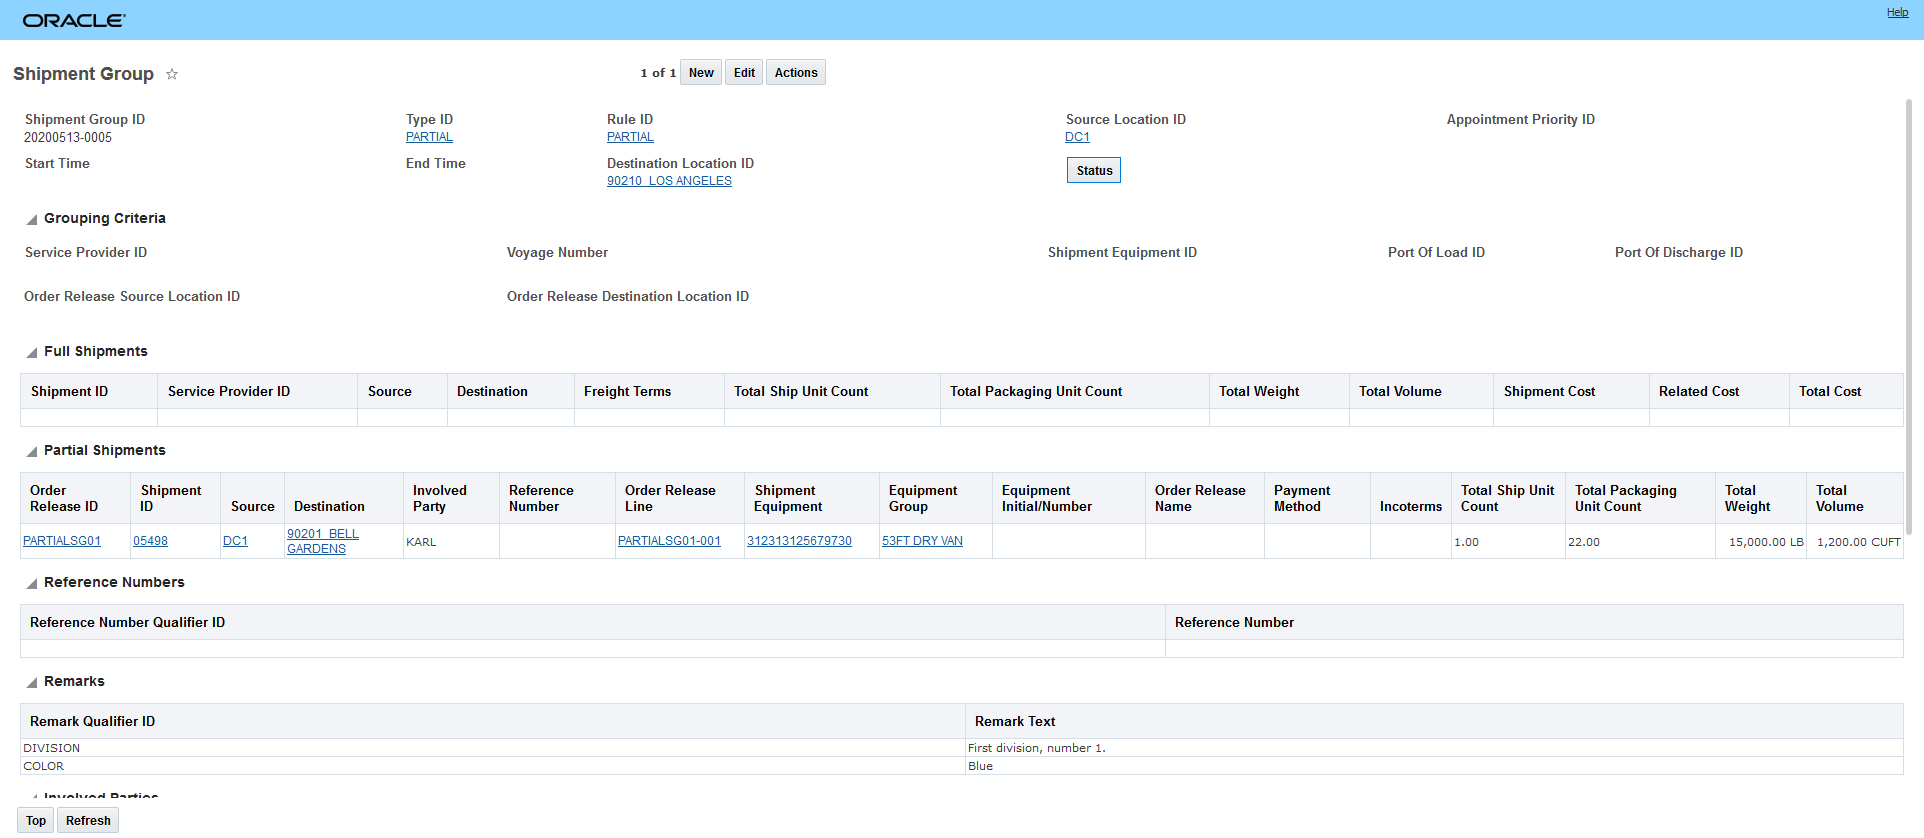
Below are the results from the action. There are now two partial shipment groups - the original/parent shipment group 20200513-004 with the partial shipment group information related to shipment 05499 and the new shipment group 20200513-005 related to shipment 05498. Note that the Remarks have been copied from the parent shipment group to the new shipment group.

Parent Shipment Group
New Shipment Group
Steps to Enable
You don't need to do anything to enable this feature.
Shipment Group - Open for Add/Remove and Close for Add/Remove Actions
This feature provides you with a new internal status type actions and logic, that will allow you to control when your shipment group is either open and available for having additional shipments added to or removed from your shipment group or closed, when you no longer want to allow for any additional shipments to be added to or removed from the group. You will find this feature particularly useful for ocean scenarios, where you want to allow shipments and containers to be added to a shipment group up to a cut-off point, then from that point on any additional shipments that would have previously have been added to the existing group will either form another/new shipment group or will be added to an open shipment group.
With this feature you now have a new Status Type SHIP_GROUP OPEN FOR ADDITION - this Status Type has two possible status values - SHIP_GROUP OPEN FOR ADDITION_OPEN - the shipment group is open for additions and removals and SHIP_GROUP OPEN FOR ADDITION_CLOSED - the shipment group is no longer open for additions or removals.
When a shipment group is set to SHIP_GROUP OPEN FOR ADDITION_OPEN - shipments that meet the criteria for being added to the shipment group will be added - either manually, or through process management or via an agent. When the Status Type SHIP_GROUP OPEN FOR ADDITION is set to the value SHIP_GROUP OPEN FOR ADDITION_CLOSED new candidate shipments will no longer be added to the shipment group and removing shipments from the group will also result in an error message.
Setting/changing the Status Type Value for the SHIP_GROUP OPEN FOR ADDITION Status Type is handled using the Shipment Group Actions Open for Add/Remove and Close for Add/Remove.
Shipment Group Open for Add/Remove and Closed for Add/Remove Actions
When the shipment group Status Type of SHIP_GROUP OPEN FOR ADDITION is set to SHIP_GROUP OPEN FOR ADDITION_CLOSED and you attempt to add or remove a shipment from the group you will see the following error message.
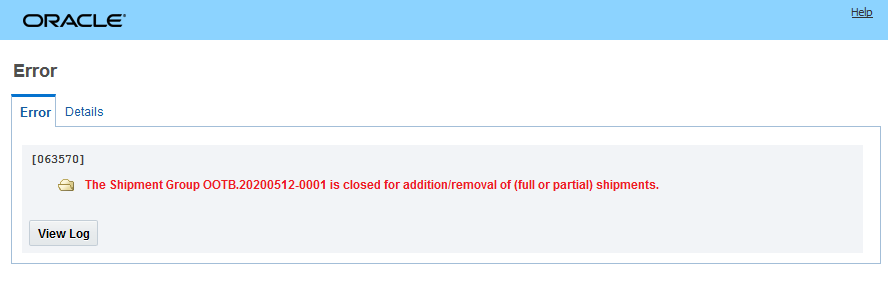
Closed Shipment Group Error Message
If you wish to add or remove a shipment from a shipment group once it has been closed - all you need to do is run the action Open for Add/Remove and you will be able to continue to add or remove shipments from the group.
The new functionality applies to both Full and Partial Shipment Groups.
Steps to Enable
You don't need to do anything to enable this feature.
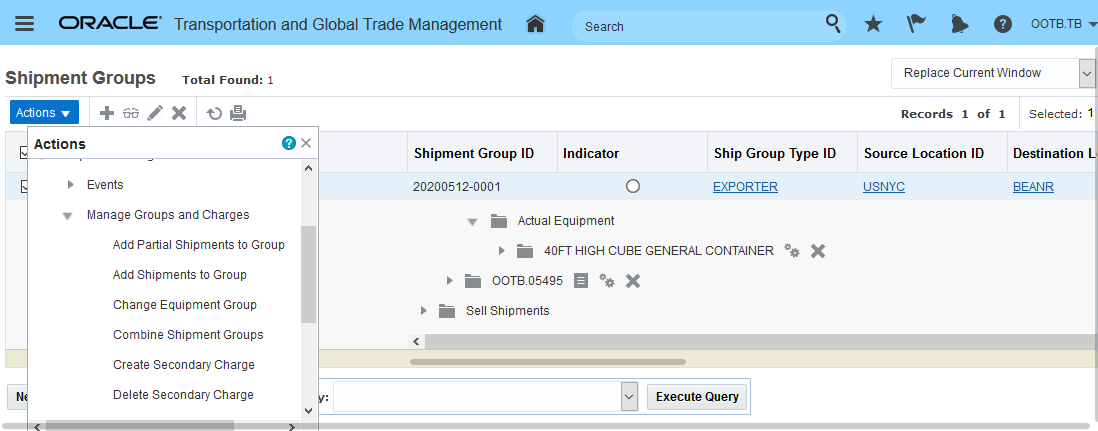
Shipment Group - Change Equipment Group Action
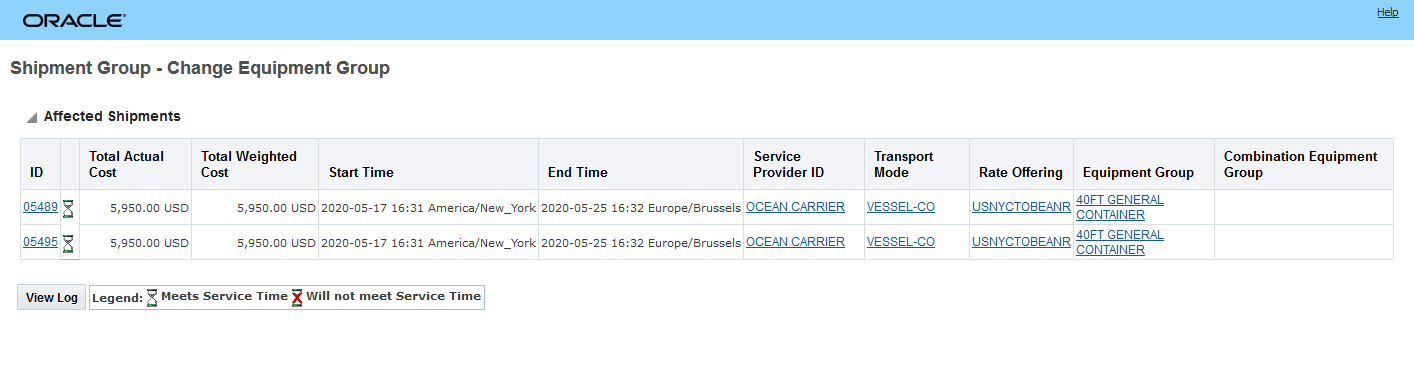
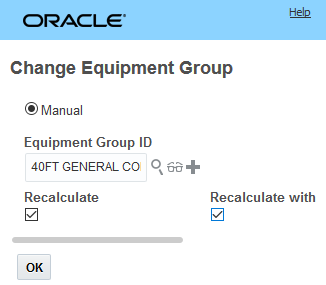
This feature provides you with a Change Equipment Group action on the shipment group level which will allow you to change the equipment group assigned to the shipments in the shipment group.
In the example below, the shipment group 20200512-0001 has two shipments both assigned to a 40FT HIGH CUBE GENERAL CONTAINER - the Change Equipment Group action on the Shipment Group will be used to manually change the assigned equipment group for all the shipments in the shipment group to a 40FT GENERAL CONTAINER.
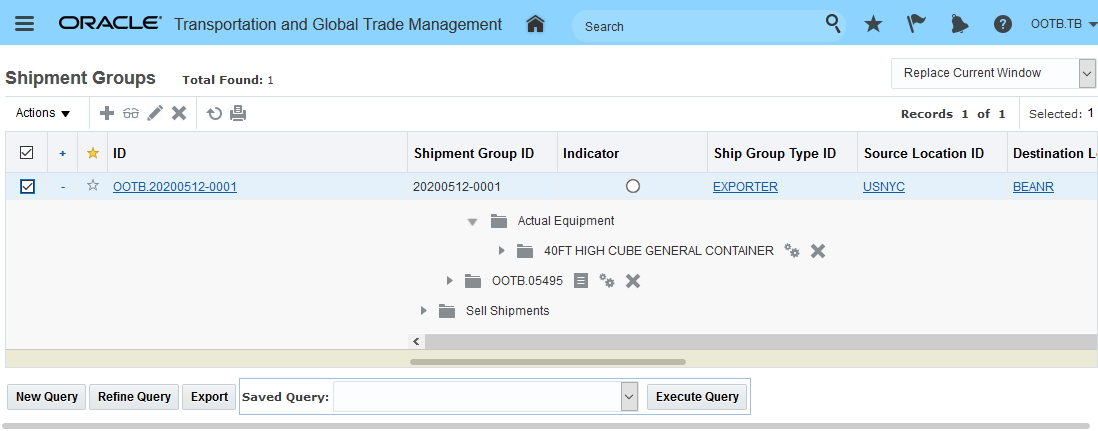
Shipment Group Change Equipment Group Action
Change Equipment Group Action
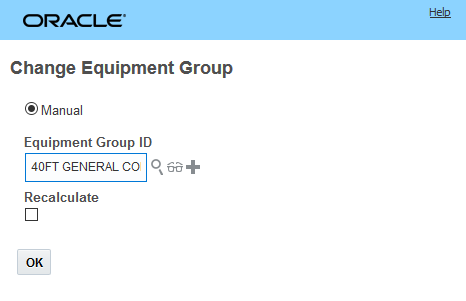
Change Equipment Group Input
Change Equipment Group Result
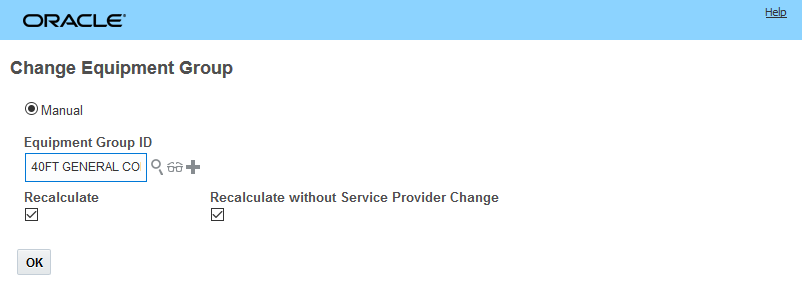
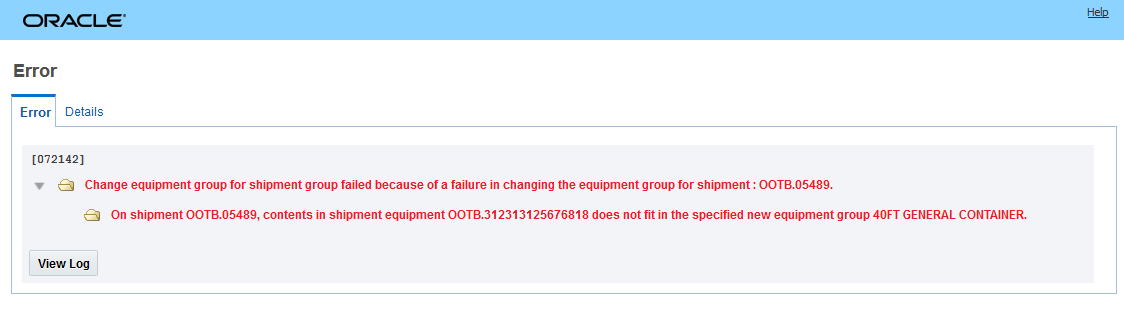
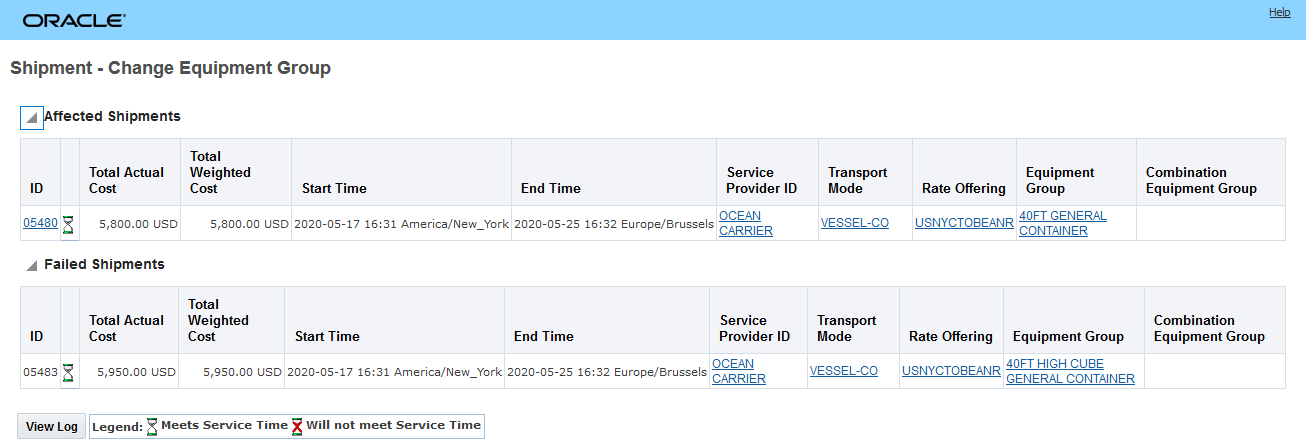
In the example below, the Change Equipment Group action will be used to change the equipment group from the 40FT HIGH CUBE GENERAL CONTAINER equipment group to the smaller 40FT GENERAL CONTAINER. This time around - the action will be run with the Recalculate options selected. In this example the Change Equipment Group action will not be successful because one of the shipments in the group is too large to fit in a 40FT GENERAL CONTAINER. When the Change Equipment Group action is run against the Shipment Group, the action operates in an all or nothing fashion - if any of the shipments in the group fails to change, then none of the equipment groups will change.
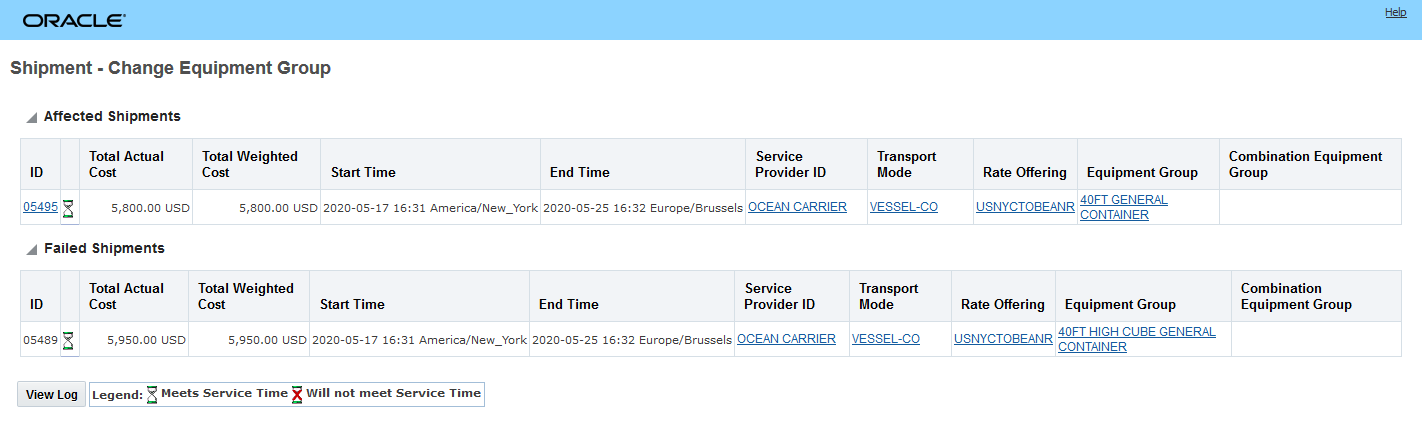
Note - this behavior is different from how the Change Equipment Group action would operate if it were run from the Shipment Manager against the set of shipments included in the Shipment Group. For the same set of shipments, running the action from the Shipment Manager would result in one shipment successfully being changed to the 40FT GENERAL CONTAINER and one shipment noted as Failing. Within the context of a Shipment Group, however, the Change Equipment Group action operates in an all or nothing fashion.
Change Equipment Recalculate
Change Equipment Error- Equipment Too Small
Result - Change Equipment Group Run From Shipment Manager
Steps to Enable
You don't need to do anything to enable this feature.
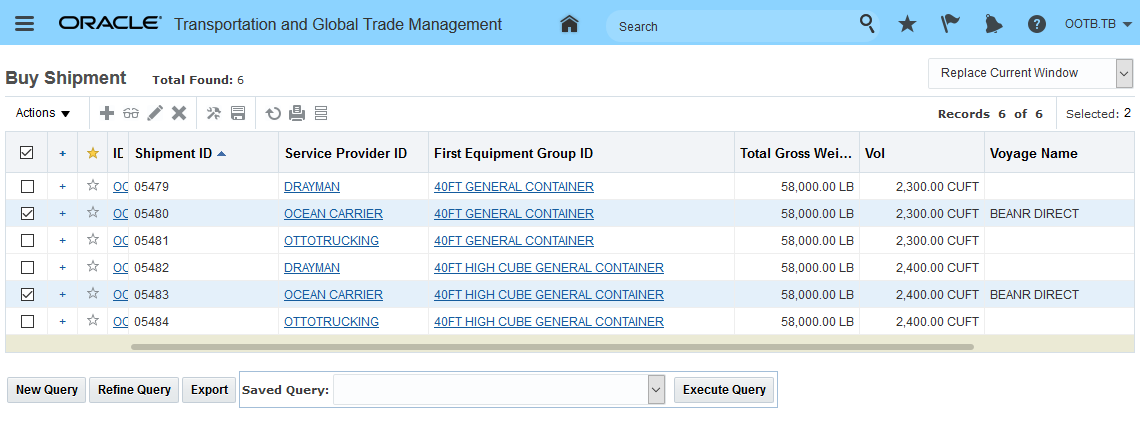
Run Change Equipment Group Action for Multiple Shipments
This feature extends the Change Equipment Group shipment action so that the action can support a multiple shipment select option as an input. You will find this change particularly helpful in scenarios where more than one shipment's equipment group needs to be changed to a different equipment group. For example, in the situation where an ocean booking modeled in OTM as multiple planned shipments must have all the equipment groups assigned changed from a 40 Foot General Container equipment group to a 40 Foot High Cube Container equipment group.
In the example below, there are two orders moving door-to-door from Plant1 to DC3MUNICH.
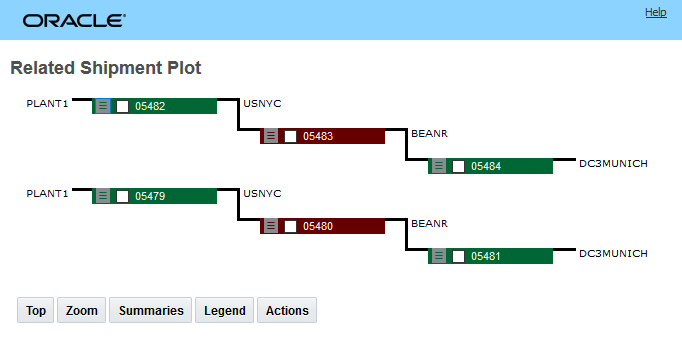
Example - Door - To - Door Six Shipments for Two Orders
The original solution has all six shipments assigned to a 40FT GENERAL CONTAINER - as seen below. With this feature you can now select both of the ocean shipments (05477 and 05480) and change the assigned equipment group from the currently assigned 40FT GENERAL CONTAINER to a 40FT HIGH CUBE GENERAL CONTAINER.
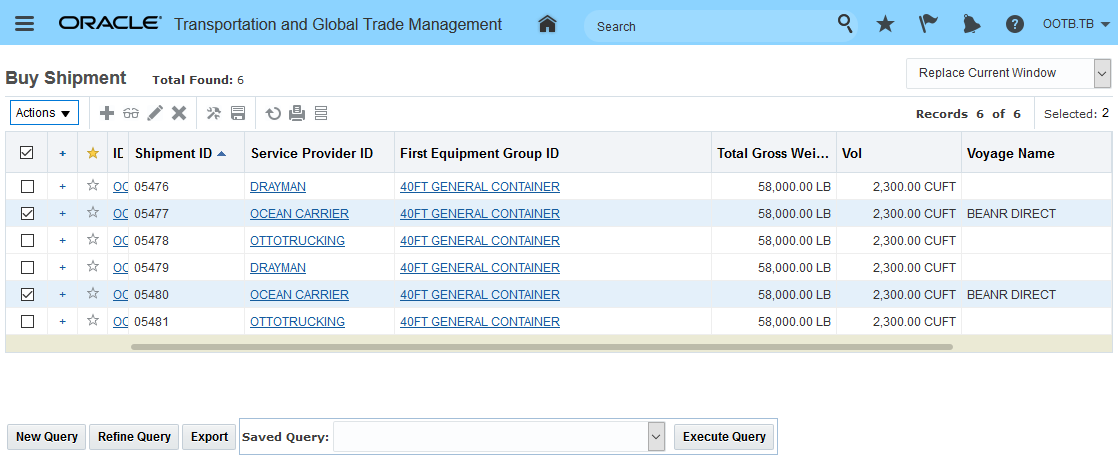
Six Shipments Assigned to a 40FT GENERAL CONTAINER Equipment Group
After selecting the two ocean shipments the action input screen appears as shown below. In this example, the equipment group is going to be changed - manually - from the assigned 40FT GENERAL CONTAINER to a 40FT HIGH CUBE GENERAL CONTAINER.
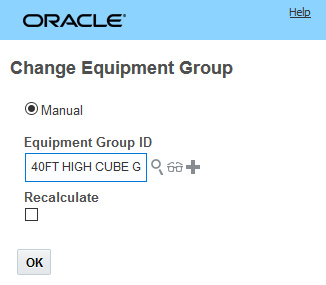
Change Equipment Group Action - Manual Change to 40FT High Cube
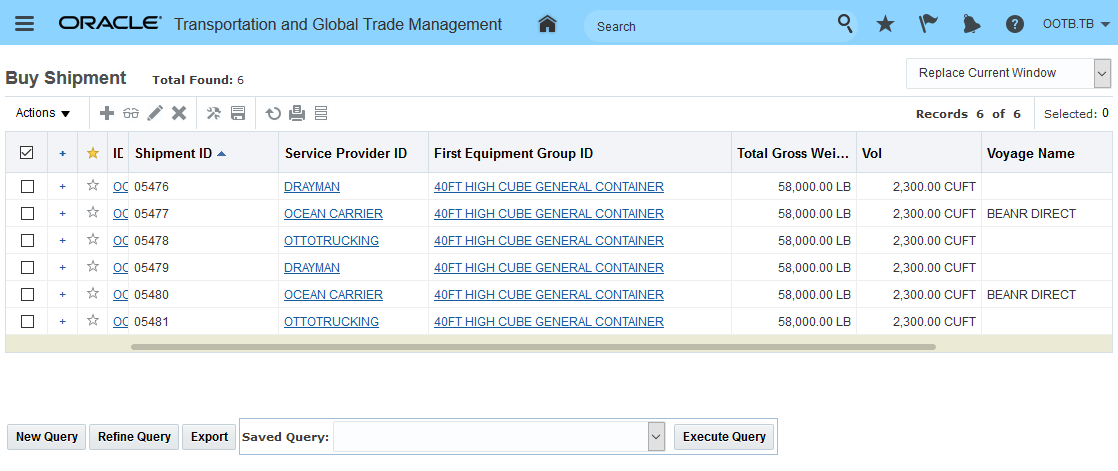
The result is below. You will notice that in addition to changing the equipment group for the two ocean shipments (05477 and 05480) all of the related shipments have had their equipment groups changed to the 40FT HIGH CUBE GENERAL CONTAINER as well - this is because this is a re-use equipment scenario - so changing the equipment group on the downstream ocean shipment automatically changed the equipment groups on the upstream and downstream shipments.
Change Equipment Group - All Shipments Changed
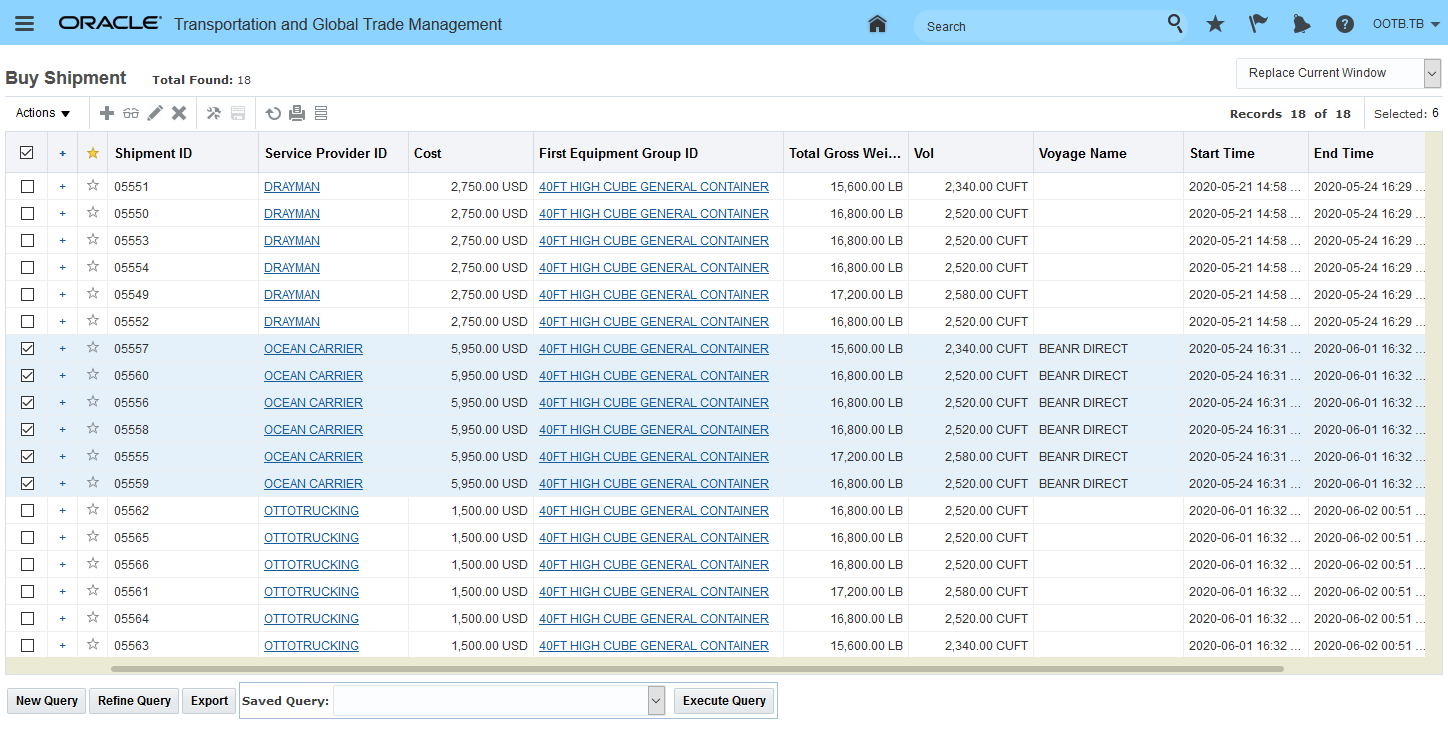
In the next example - the Recalculate option will be used - in this case the shipments will be evaluated for feasibility and only one set of shipments -in this example - can be feasibly changed.
In the action result screen below you will note that in this case the successful shipment (05480) and the Failed shipment (05483) are identified.
Success and Failed Shipment
In the finder result below, after the action is complete - the shipment 05480 and the related shipments (05479 and 05481) that could be feasibly be changed to the 40FT GENERAL CONTAINER are changed, the other Failed shipment 05483 and the related shipments (05482 and 05484) are not changed.
Finder Result - Successful Shipment Changed - Failed Shipment Remain Unchanged
Steps to Enable
You don't need to do anything to enable this feature.
Run Edit Service Provider and Cost Action for Multiple Shipments
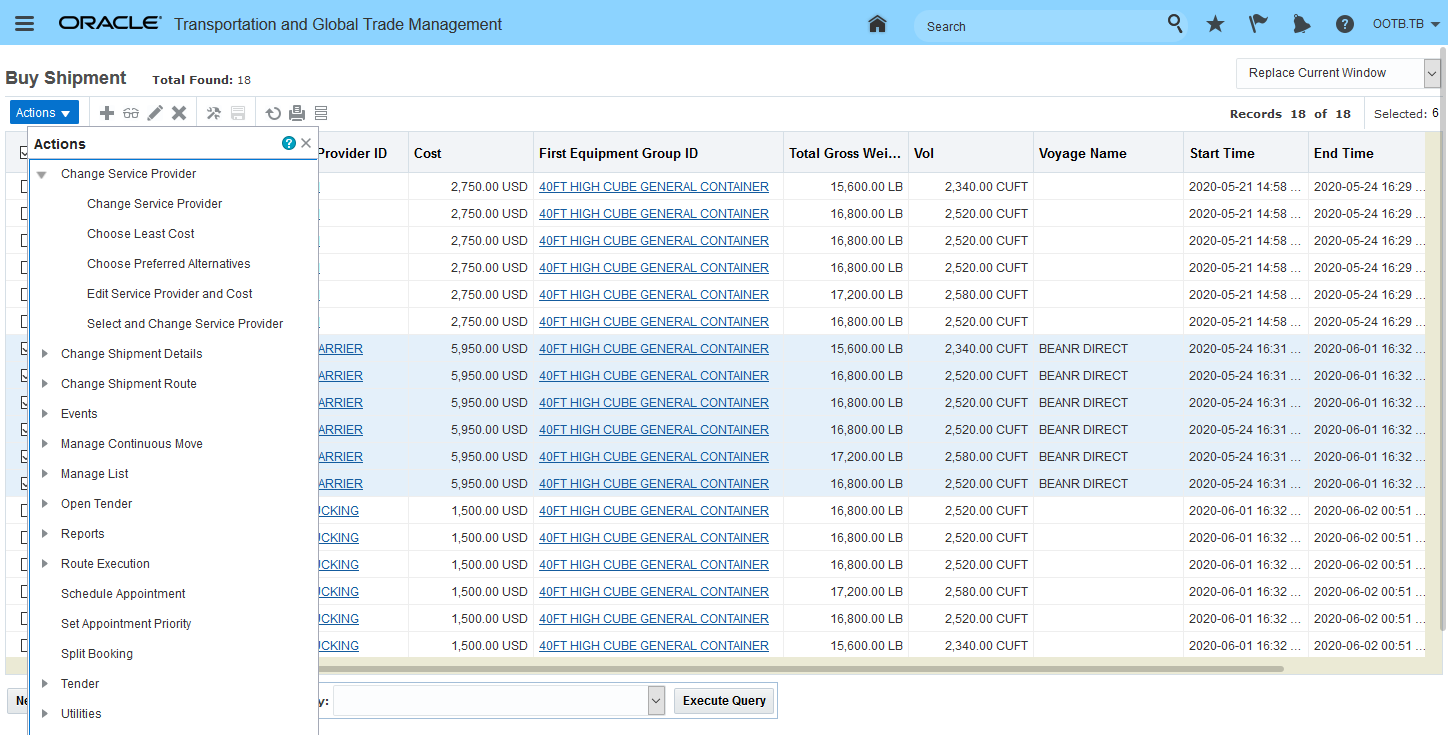
This feature extends the capabilities of the Edit Service Provider and Cost action so that the action can be run against multiple shipments. You will find this enhancement to be very useful in any scenario where you need to change/update a set of shipments to a different cost or update the set of shipments so they all have the same service provider and cost.
For example, given the shipments below, there are six ocean shipments (selected) that are assigned to Ocean Carrier with a per shipment/container cost of 5,959 USD. Using the Edit Service Provider and Cost action - you can now update all six of the ocean shipments to reflect a new 5,750 USD per shipment/container cost provided by Ocean Carrier 2.
Edit Service Provider and Cost Action - Multiple Ocean Shipments Selected
The action is found under Shipment Management > Change Service Provider > Edit Service Provider and Cost.
Edit Service Provider and Cost - Action
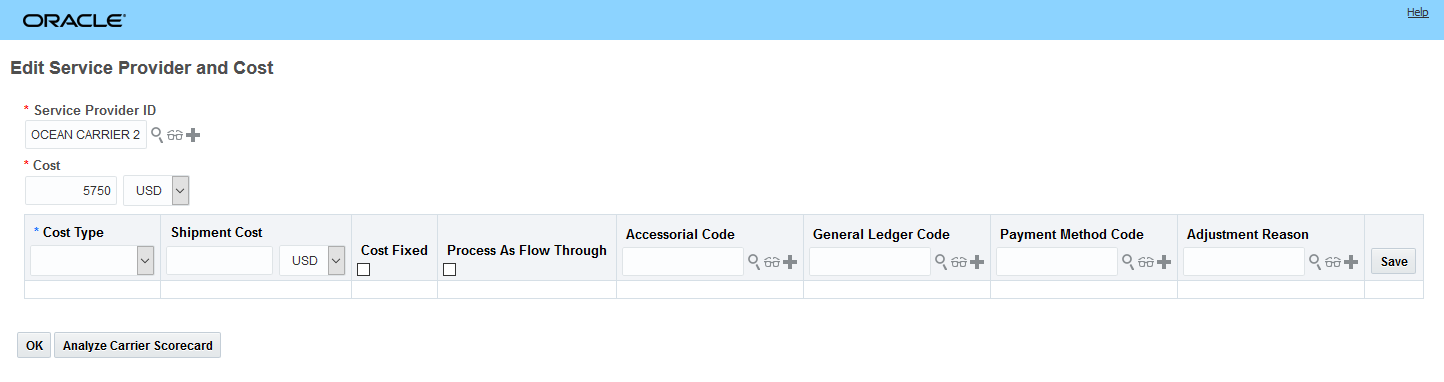
In this example, the action is being run to change all six of the ocean shipment from Ocean Carrier with a per shipment/container cost of 5,950 USD to Ocean Carrier 2 with a per shipment/container cost of 5,750 USD. Note - the action supports specifying cost at a lower level of detail if that is required.
Edit Service Provider and Cost - Action Input
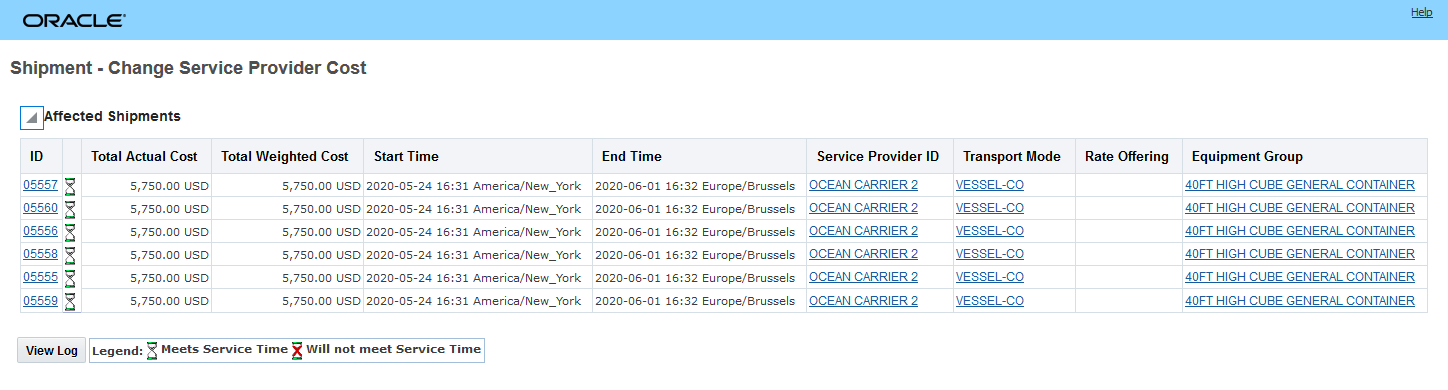
Below is the result of the action, the six selected shipments have been updated so that the service provider is now Ocean Carrier 2 and the per shipment/container cost is now 5,750 USD.
Edit Service Provide and Cost Action Screen Result
Here's the result again, but in the original Shipment finder results view.
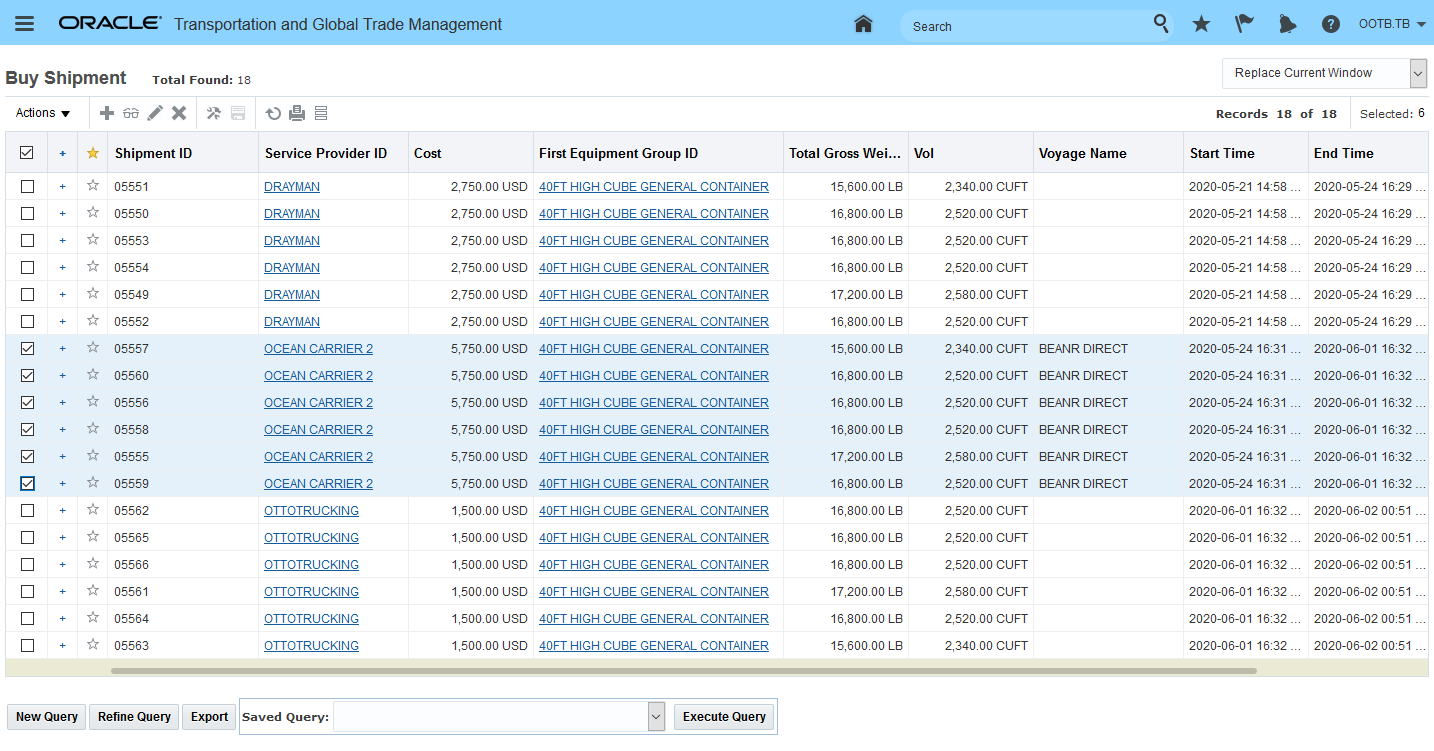 Edit Service Provider and Cost Action Result
Steps to Enable
You don't need to do anything to enable this feature.
Tips And Considerations
The Service Provider that you are changing to must have the following two items setup:
- The Allows Spot Rating - must be checked on the Service Provider. If this is not checked you will see this error message:
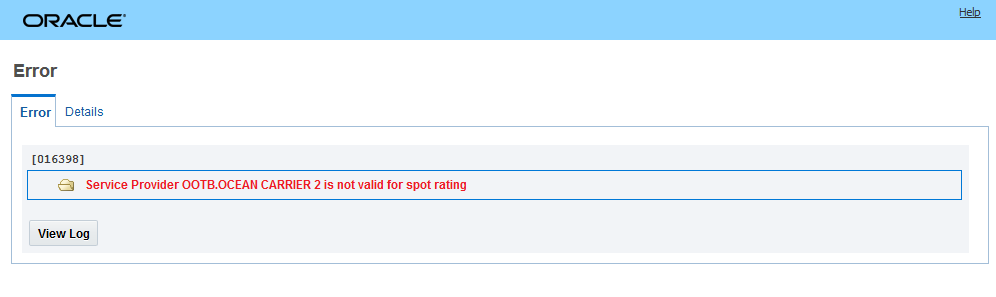
Allows Spot Rating Flag Not Checked Error Message
-
You must provide a Rate Service on the Service Provider. If a Rate Service has not been assigned to the Service Provider you will see this error message:

No Rate Service on Service Provider Error Message
Setup for Ocean Carrier 2 - a Rate Service has been assigned and the Allows Spot Rating is checked.
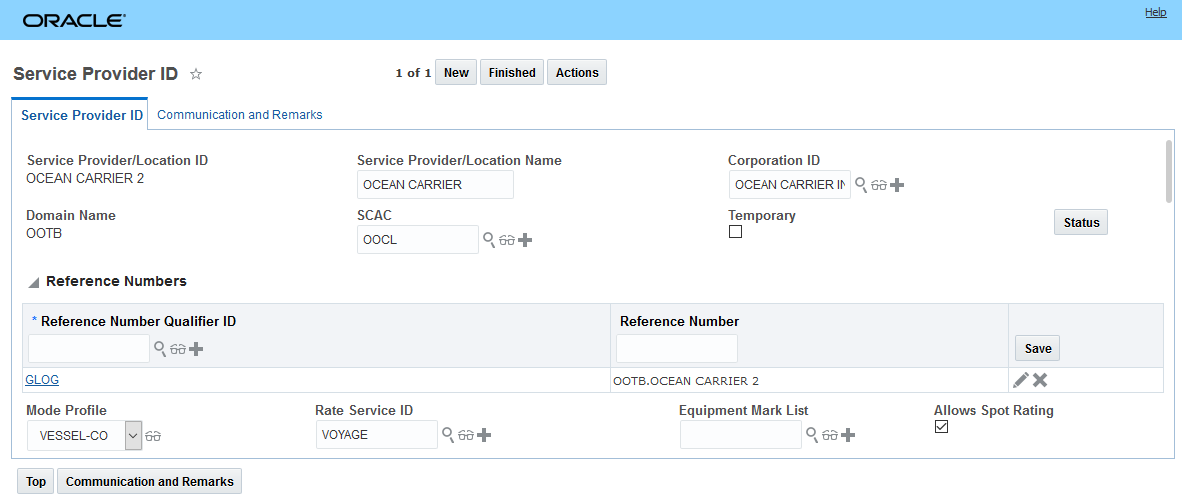
Ocean Carrier 2 Service Provider Setup
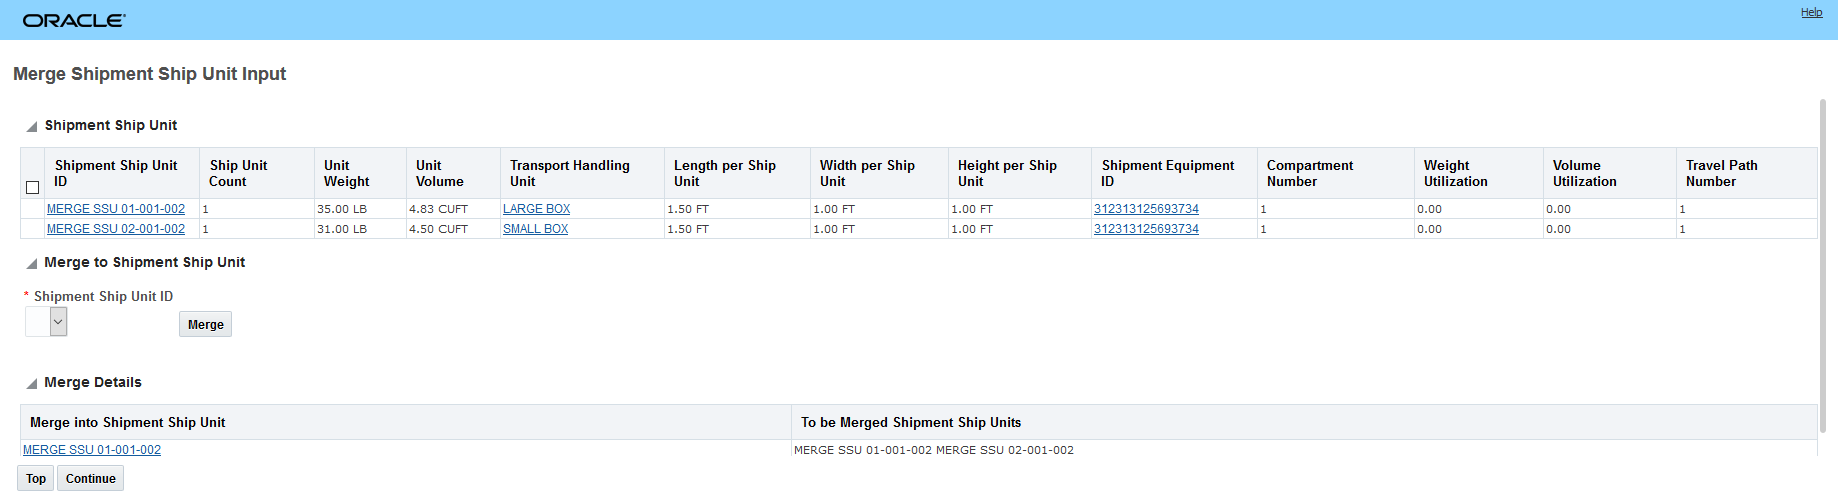
Merge Shipment Ship Unit Action
This feature provides you with the ability to easily merge two shipment ship units together. You will find this particularly useful in situations where you have multiple orders and ship units going to the same customer -and you want to manually merge the shipment ship units together.
The new Merge Shipment Ship Unit action is accessed via Shipment Management > Shipment Management > Buy Shipments > Actions > Shipment Management > Change Shipment Details > Merge Shipment Ship Unit.
The steps involved in merging shipment ship units:
- Select the shipment you want to run the Merge Shipment Ship Unit action against.
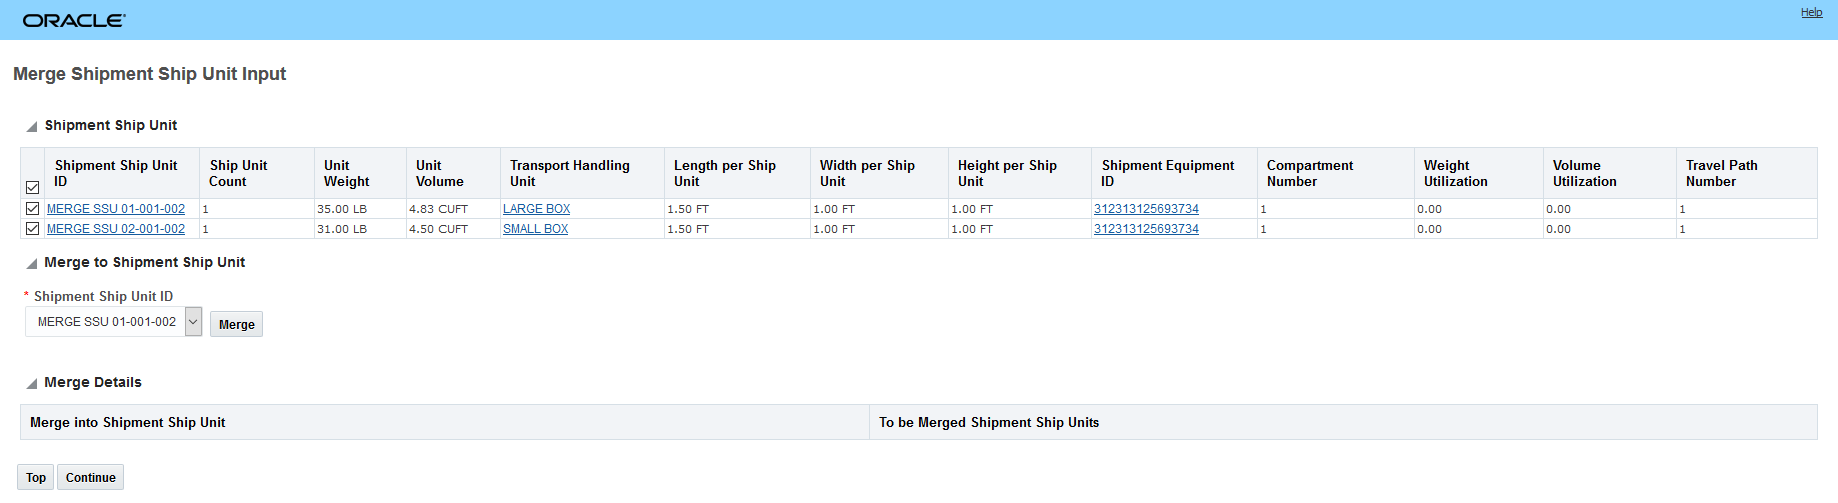
- On the Merge Shipment Ship Unit Input page, under the Shipment Ship Unit section, select the ship units you want to merge. This section contains shipment ship unit details such as SSU ID, ship unit count, unit weight and volume, shipment equipment ID, equipment utilization, travel path number, and so on. For example, a shipment has four SSUs (S1, S2, S3, and S4) and you selected S1, S2, and S3 to merge shipment ship units.
- Next, you must merge the selected SSUs to one specific SSU. Under the Merge to Shipment Ship Unit section, select the ship unit ID from the Shipment Ship Unit ID drop-down list. For example, you want to merge S1, S2, and S3 to the S1 ship unit. In this case, you will select S1 from the Shipment Ship Unit ID drop-down list.
- Click Merge. The selected ship units will be merged to one specific SSU. For example, S1, S2, and S3 will be merged to the S1 ship unit.
In the example below, there are two orders going from the same source and destination - the orders are shipping in a large box and a small box - the planner wants to merge the two shipment ship units together so that both items are shipping together in the large box.

Two Shipment Ship Units to Merge
Merge Shipment Ship Unit Action
In this example, the shipment ship unit in the SMALL BOX - MERGE SSU 02-0001-002 will be merged into the shipment ship unit MERGE SSU 01-0001-002 which is using a LARGE BOX.
NOTE:
- You must select at least two SSUs to merge.
- All the selected SSUs must have the same Travel Path Number.
- The Merge to Shipment Ship Unit section is mandatory.
- You will not be able to select SSUs with ship unit count more than 1.
- You must specify at least one merge to continue with this action.
Merge Shipment Ship Unit Action - Input
Below - after you click Merge - OTM provides a view into the action to be taken.
Merge Shipment Ship Unit - Execution Details
After selecting Continue, OTM displays the Affected Shipments section that contains list of shipments and SSUs that are merged. Selecting Save will save the changes. Note that the resulting total weight has been adjusted to eliminate the weight for the removed small box transportation handling unit.
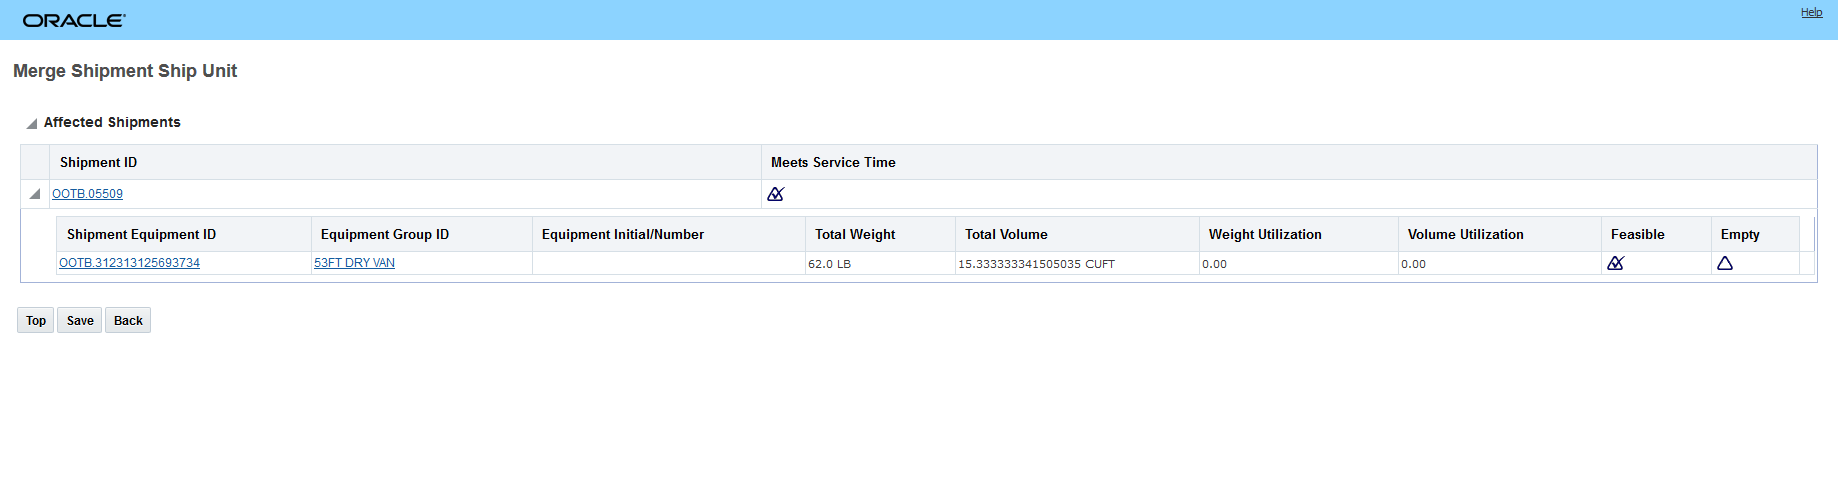
Merge Shipment Ship Unit - Result
Steps to Enable
You don't need to do anything to enable this feature.
Tips And Considerations
VALIDATIONS
You cannot perform this action on the following shipments:
- A shipment created from a schedule with a type of Dynamic trip or Static trip.
- A multi-stop shipment which reuses an equipment of this shipment.
- If order movements with reuse leg for a shipment equipment has multiple source or destination locations i.e., if a shipment equipment is planned for reuse leg then shipment will be a multi-stop shipment.
- Shipment with load configuration placement.
- If shipment equipment has reuse legs with corrupted data.
This feature provides you with a set of new features and capabilities focused on improving the operational usage of OTM for intermodal shipment planning and execution. Specifically, this enhancement involves changes in the following areas:
- CALC AHEAD/LATE AND PERSIST agent action. Three new agent event types have been added to the CALC AHEAD/LATE AND PERSIST agent action:
- ARRIVAL AT PICK UP LOCATION:Takes the actual arrival from event-Takes Planned arrival based on shipment gid and location obtained.
- Calculate Ahead Late time as Actual Arrival - Planned arrival-Update actual arrival on shipment stop
-
DEPART PICKUP LOCATION:Takes actual departure from event -Takes Planned departure based on shipment gid and location obtained
-
Calculate Ahead Late time as Actual Departure - Planned Departure-Update actual departure on shipment stop
-
-
ARRIVAL AT TERMINAL(DELIVERY): Takes actual arrival from event-Takes Planned arrival based on shipment gid and location obtained.
-
Calculate Ahead Late time as Actual Arrival - Planned arrival-Update actual arrival on shipment stopNew Agent Actions have been provided to calculate and persist Drayage Events to stops
-
- ARRIVAL AT PICK UP LOCATION:Takes the actual arrival from event-Takes Planned arrival based on shipment gid and location obtained.
-
ASSIGN NEXT REPETITION SCHEDULE and RE-DRIVE DOWN STREAM SHIPMENTS agent actions. The ASSIGN NEXT REPETITION SCHEDULE and RE-DRIVE DOWN STREAM SHIPMENTS agent actions have been enhanced to re-drive all downstream shipments - including rail shipments using a ground service rate service - so that the agent actions will update the estimated times associated with each stop of the shipments - including having the ability to find a later feasible schedule when required.
-
ESTIMATE RECOVERY TIME agent action. The ESTIMATE RECOVERY TIME agent action has been enhanced to include options for determining the method of calculation for recovery time. The options available are USE RUSH HOUR FOR INGATE, USE RUSH HOUR FOR RECOVERY, USE DELTA. The addition of the Rush Hour option is to provide a way to accommodate the estimate of the dwell or recovery time that is dependent on the time of day.
- USE RUSH HOUR FOR INGATE - The “Use Rush Hour for Ingate” calculation method will look for rush hour entries that have a lane of location to location where both locations are the stop location of the in-gate event. Only rush hour entries that have Apply To Source selected will be considered. Any entry that has a calendar which covers the arrival time at the location will be considered. Of these, the entry with the largest rush hour delay will be used. The rush hour delay will represent the entire activity time at the location. This activity time will be added to the stop arrival time to determine the new stop departure time.
- USE RUSH HOUR FOR RECOVERY - The “Use Rush Hour for Recovery” calculation method will be the same as the ingate method except it will use the location of the train arrival and will only look for rush hour entries with Apply To Source unselected.
- USE DELTA - the Delta Method is only applicable in cases where the arrival and departure were previously set by planning. This is likely where the Ground Service was used to plan the Train Arrival time (ARR) and Available time (DPT).
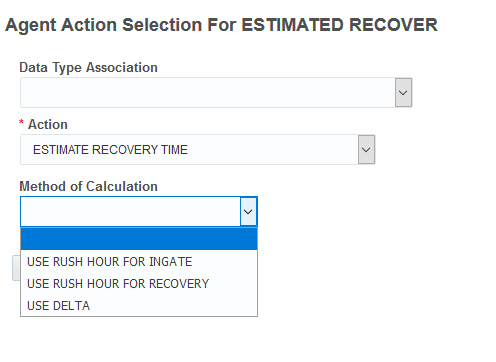
Estimate Recovery Time - Method of Calculation
Steps to Enable
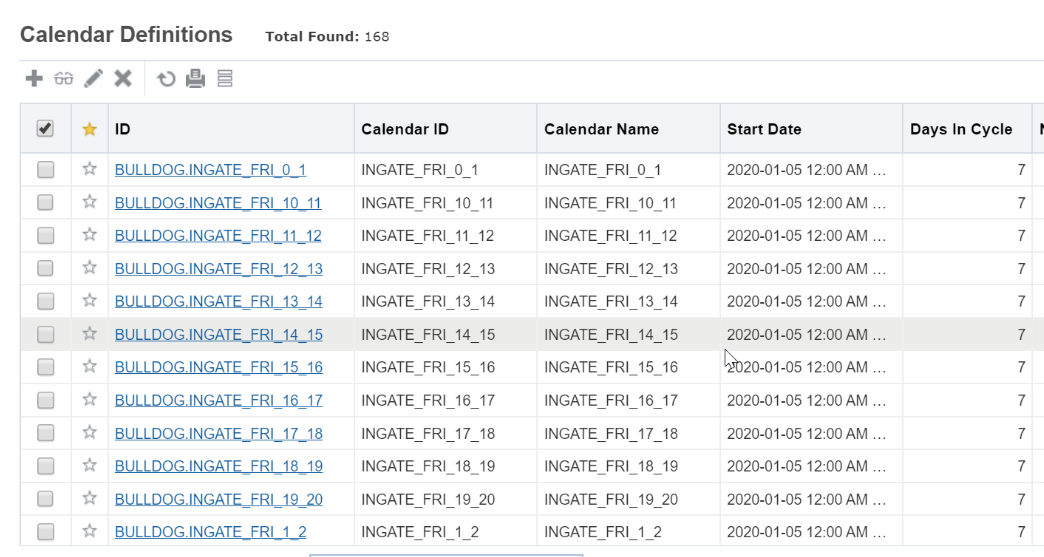
For the method of calculation for recovery time that are Rush Hour based- the information below will be helpful in configuring this setup.
- This Rush Hour setup is Agent Driven only and is not part of the initial planning.
- Rush Hour estimation is only available for the event update.
- Initial plan uses the Ground Service to plan ARR and DPT from the stop.
- The Lane for the Rush Hour setup is defined as same location to same location.the SAME LOCATION PAIR.
- Code would look for these unique records. Ex CIO to CIO.
- Each ramp location is unique - Not intended to make the lane for multiple ramps in the same configuration.
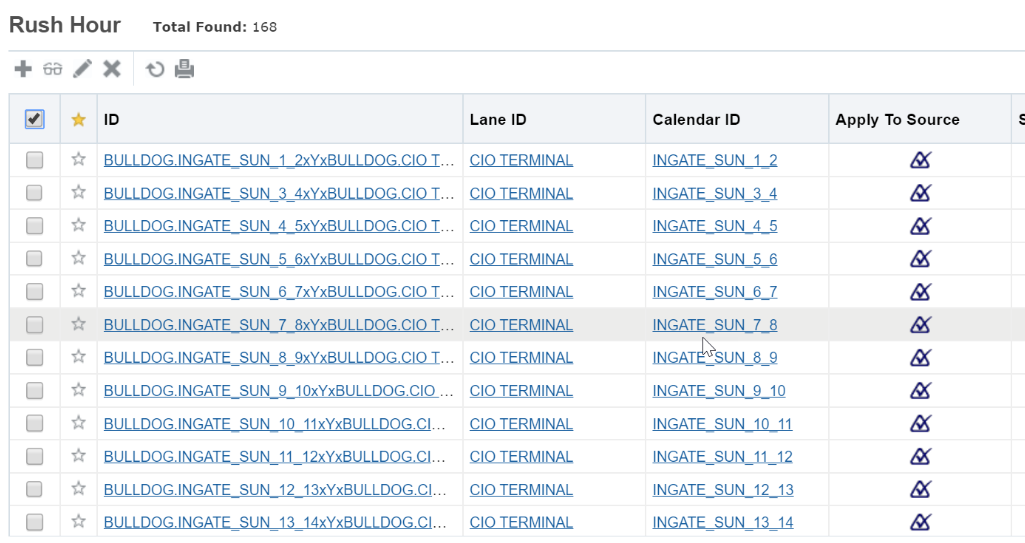
Rush Hour Table Setup
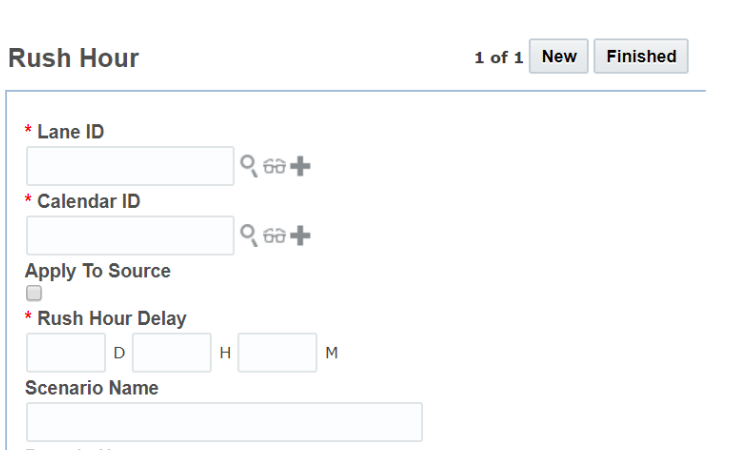
Rush Hour
Suggested setup for lane:
- Lane for IN-GATE is from service region to the specific Intermodal ramp
- Buckets should be defined by Day of week and Hour of Day
- APPLY TO SOURCE = Y Applies to INGATE – beginning of trip
- APPLY TO SOURCE = N Applies to Recovery Time – end of trip
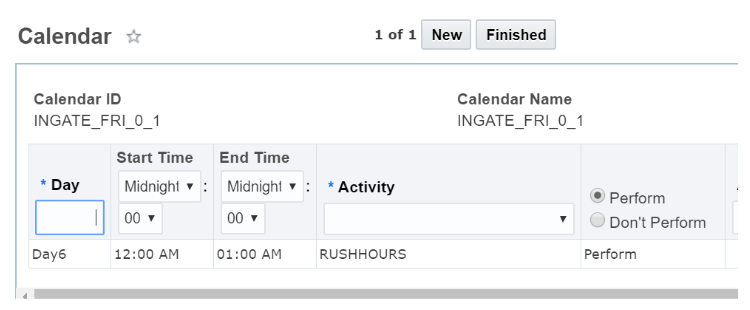
Rush Hour Calendar Activity Setup
Only 1 Activity Per Calendar - you will need to generate many calendars to provide an accurate time of day dependent coverage representing the recovery times.
Example of Calendar Setup
Example of Rush Hour Setup
Rate Geo Rail Beyond Rate Rule
This feature provides you with a new rule - Rate Geo Rail Beyond Rate Rule - which will allow you to control whether a FOR/FROM BEYOND RAIL rate record can be used on a non-Rule 11 leg.
When this new rule is included in the rate geo rule set, the following rule is enforced in the rate record validation logic: A rate record with the rate offering mode of RAIL, and with either the FOR BEYOND or FROM BEYOND flag checked, will be invalid to use for a leg whose rule 11 instruction is "Not Rule 11".
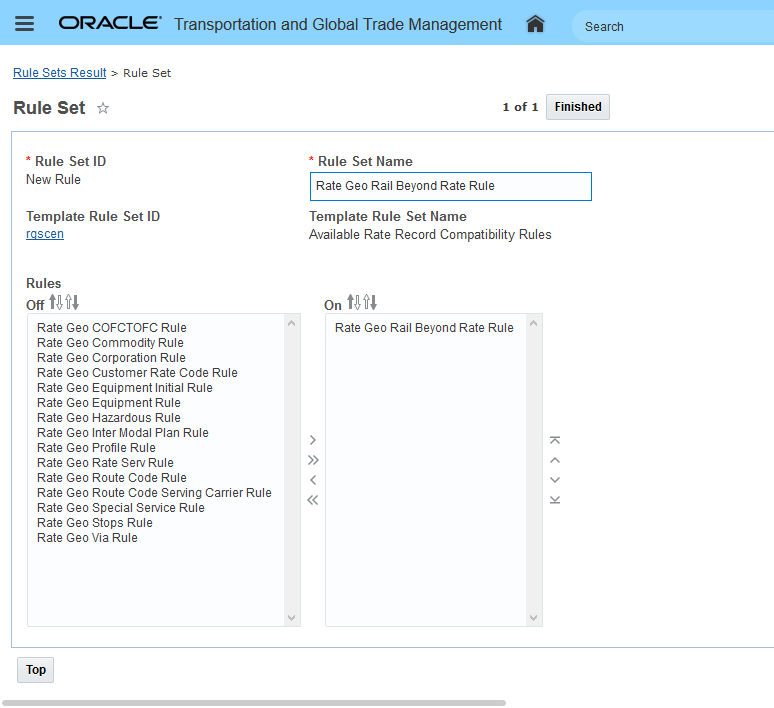
Rate Geo Rail Beyond Rate Rule
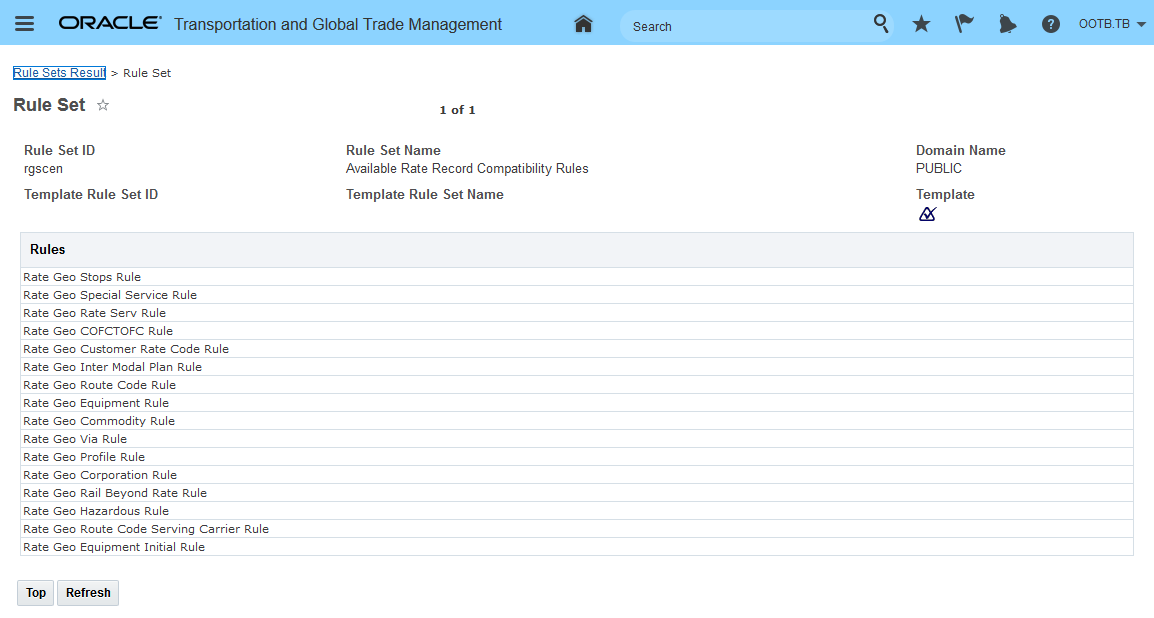
Rate Geo Rail Beyond Rate Rule Public Rule Set - rgscen
Steps to Enable
You don't need to do anything to enable this feature.
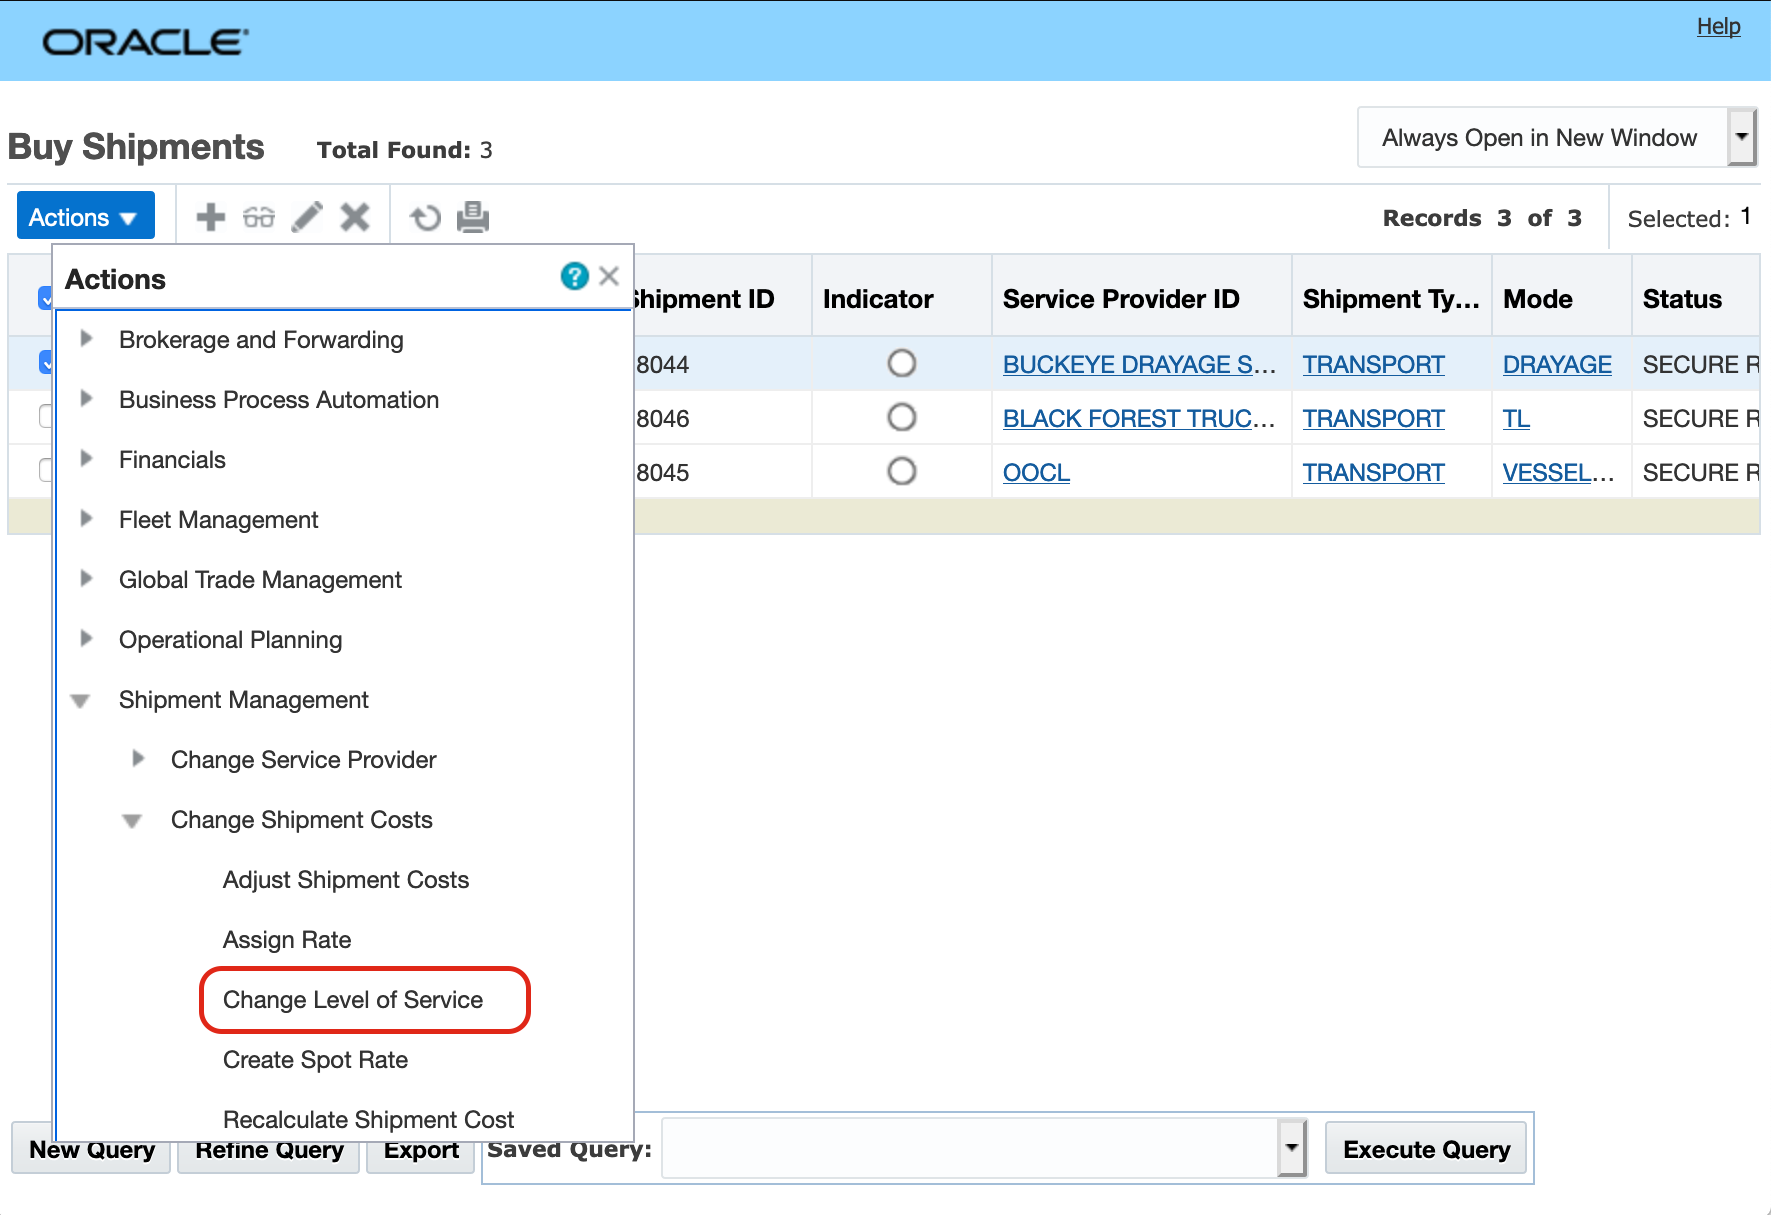
Change Level of Service Shipment Action and Agent Action
This feature provides you with a new shipment action and agent action that allows you to change the destination level of service of the shipment to a different level of service.
The action does the following: For the destination level of service, when the shipment is modified, OTM looks at the VIA DEST STOP on the shipment. OTM determines the best (latest) time PLANNED, ESTIMATE, ACTUAL on the stop as the stop time. Then OTM uses the rate service from the new level of service and re-estimates the remaining times on the shipment. If there is a downstream shipment, and the redrive check box is selected, OTM will redrive it.
This action has the following options:
- Destination Arbitrary Level of Service: This is validated the same as the shipment so you can only select appropriate values.
- Redrive Downstream Shipments: This option redrives the downstream shipments.
- Downstream Location Profile ID: This field will appear if you click the Redrive Downstream Shipments check box.
This action is accessed via Shipment Management > Shipment Management > Buy Shipments or Sell Shipments > Actions > Shipment Management > Change Shipment Costs > Change Level of Service.
Change Level of Service Action
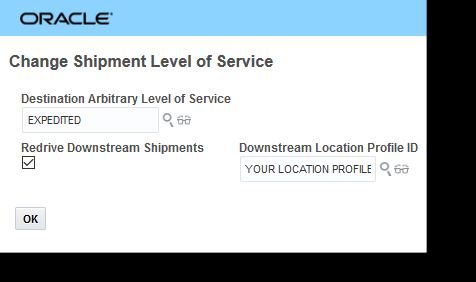
Change Level of Service Action Input
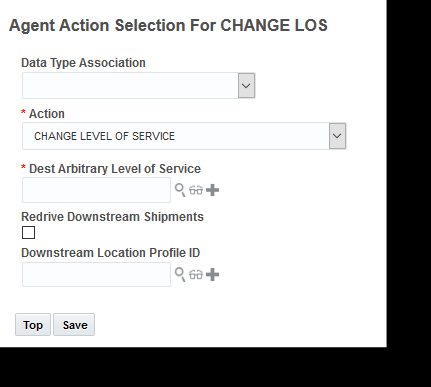
Change Level of Service Agent Action
Steps to Enable
You don't need to do anything to enable this feature.
Ask Oracle Container Optimization Enhancement
This feature provides you with information about the number of Units (transport handling units) loaded into to each equipment group when you are doing what-if container loading analysis using the Ask Oracle Container Optimization tool. The Units information is provided when you drill into any of the solutions displayed on the Solution Comparisons page.
The additional Units information is particularly useful in situations where your transport handling unit information maps back directly to that products being shipped. For example - in the simplest case - where your transport handling units relate directly to a specific product on a 1:1 basis the Units column information will allows you to quickly determine the optimal number of units (number of products) that fit into a specific equipment group (40 Foot High Cube Standard Ocean Container) and/or a variety of equipment groups (All Ocean Containers). This information can be very useful in guiding order quantities/break points for order quantities. In the example below 59 units fits nicely (with high utilization) into one 20 foot container and one 40 foot high cube container - while 60 units of the same transport handling unit yields a significantly less desirable solution.
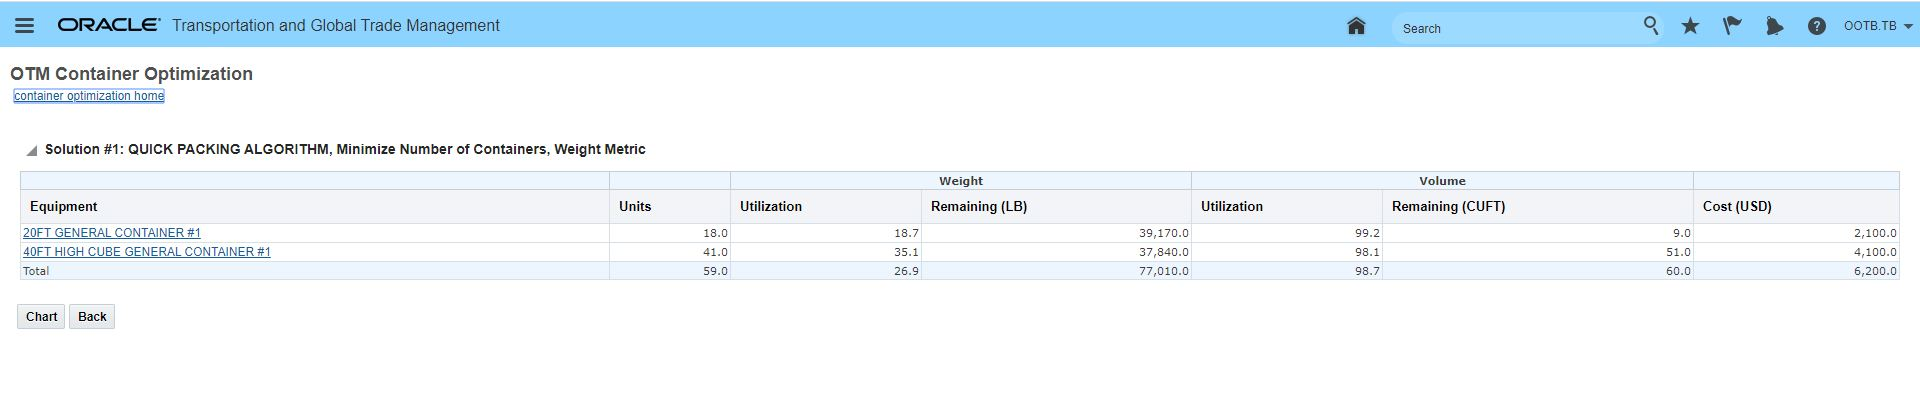
Ask Oracle - OTM Container Optimization - Units Column
Steps to Enable
You don't need to do anything to enable this feature.
Set Dimensions on Ship Unit Considering Packaged Item or Packing Unit
This feature supports the case where you have defined your configuration such that your ship unit has no transport handling unit specified and there is only one order release line to build the ship unit from. In this case, the one Packaging Unit specified on the line will be used to set the dimensions for the ship unit. If no Packaging Unit is specified, then the specified Packaged Item on the order line will be considered for setting the dimension for the ship unit.
For example - given an Order Config where Gross Volume=Always/Calculate Using Ship Unit Dimensions. An order having one line with a Package Item having the dimensions LxWxH of 2x3x4 will provide a resulting order ship unit with the dimensions of LxWxH of 2x3x4 and a Total Gross, Gross, and Net Volumes=24 (as per the order config formulas)
Steps to Enable
To use this feature you must have a properly configured Order Configuration, for example where Gross Volume=Always/Calculate Using Ship Unit Dimensions, and that order configuration must be assigned to the order releases.
Workbench - Additional Location Details in Map Drag/Drop Dialog
The Workbench Logic Config parameter MAP LOCATION HOVER INFORMATION now controls the location information provided to you when you perform Workbench Drag/Drop actions that involve locations. With this new feature - in addition to the information provided previously - like Stop #, you have the option to set the MAP LOCATION HOVER INFORMATION parameter to see the Id, Location Id, Location Name, or Location City State Country in the drag/drop action.

Map Location Hover Information Parameter
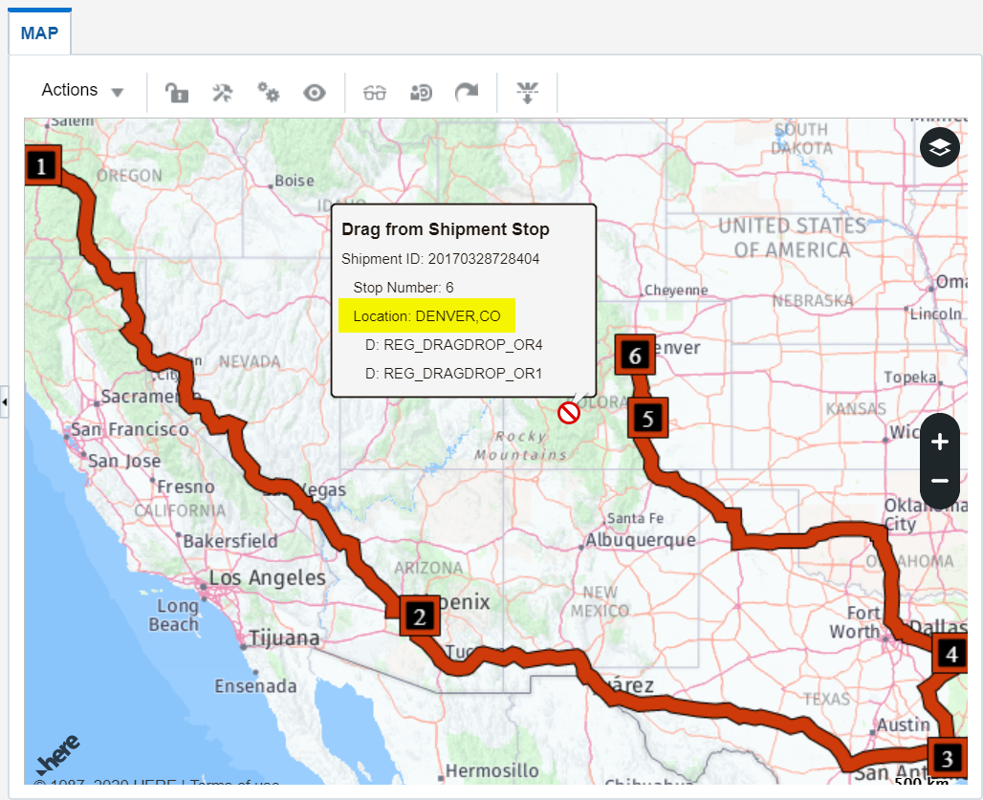
Location Hover Parameter Providing More Info
Steps to Enable
You don't need to do anything to enable this feature.
Optional Feature - Disable Null Criteria Shipment Grouping
This optional feature, when enabled, will stop the creation of shipment groups for partial shipments where the partial shipments do not have any values that match the matching criteria defined on the shipment group rule.
Steps to Enable
To Opt In to this feature:
- Go to the Optional Feature UI - Configuration and Administration > Property Management > Optional Features.
NOTE: Only the DBA.ADMIN user can access and use the Optional Features page.
- Select the Disable Null Criteria Shipment Grouping feature.
- Run the Action Opt In.
Tips And Considerations
It is recommended that all Optional Features be reviewed in the update they are delivered.
To review optional features go to the Optional Feature UI - Configuration and Administration > Property Management > Optional Features.
This optional feature is no longer Optional and becomes a mandatory opt in feature in 21B.
Optional Feature - Order Base XID Adheres to Child Domain BN Rule
When this feature is enabled, a business number rule in the child domain will be used to generate an order base XID when an order base is created in that child domain.
Steps to Enable
To Opt In to this feature:
- Go to the Optional Feature UI - Configuration and Administration > Property Management > Optional Features.
NOTE: Only the DBA.ADMIN user can access and use the Optional Features page.
- Select the Order Base XID Adheres To Child Domain BN Rule feature.
- Run the Action Opt In.
Tips And Considerations
It is recommended that all Optional Features be reviewed in the update they are delivered.
To review optional features go to the Optional Feature UI - Configuration and Administration > Property Management > Optional Features.
This optional feature is no longer Optional and becomes a mandatory opt in feature in 21B.
Improve Business Data Purge Process
This optional feature fixes a potential data loss problem by excluding data created after your purge process has started. With this feature, the potential for data loss caused when both the purge process and inbound integrations run simultaneously has been corrected.
Avoids the potential loss of data.
Steps to Enable
You don't need to do anything to enable this feature.
This feature restricts the maximum size of the uncompressed content of an uploaded ZIP archive file.
Avoids the potential for excessively large uncompressed content from ZIP archive files to be loaded.
Steps to Enable
You don't need to do anything to enable this feature.
Transportation Operational Planning
Use Single Service Provider Rule
This enhancement provides you with the functionality you need to support the business scenario where your location - for operational efficiency reasons - only allows one service provider to visit the location on a given day. In this scenario - there are multiple service providers that could service that location, and those service providers all have both capacity limits and commitment allocations and the location has multiple shipments that require servicing on a given day.
Previously - OTM could have been configured to honor both the availability and commitment requirements at a location - however - OTM would have - within a single day (or single bulk plan run) selected and assigned the service providers to the shipments in a way that would have minimized cost while honoring the service provider capacity and commitment requirements - i.e., different service providers could have been assigned to shipments in a single day (or bulk plan).
Given the requirements above, the new Use Single Service Provider Rule feature provides the ability to have OTM assign a single service provider to ALL of the shipments for given day (or per bulk plan run). With the new Use Single Service Provider Rule - all things being equal - the additional constraint of assigning the same service provider to all the shipments for a day will - in many cases - produce a high cost solution - but will satisfy the location's requirement/need to only coordinate and communicate with a single service provider on any given day.
CONSIDER THE FOLLOWING BUSINESS CASE:
Goods are being shipped direct from multiple sources to one destination on a one-leg itinerary.
- 5 shipments from Antlers OK to Tulsa OK (153.5 miles)
- 7 shipments from Tonkawa OK to Tulsa OK (112.5 miles)
- 3 shipments from Delaware OK to Tulsa OK (76.1 miles)
- 3 shipments from Inola OK to Tulsa OK (32.5 miles)
Several service providers are available on all of the lanes, with different costs and capacity
- Proudie: $1 per mile, 6 trucks per day
- Stanhope: $2 per mile, 7 trucks per day
- Slope: $3 per mile, 7 trucks per day
- Neroni: $4 per mile, unlimited capacity
DIFFERENT SOLUTION SCENARIOS
No Capacity Constraints
If there were no capacity limits, then OTM would plan all of the shipments on the cheapest carrier: Proudie (total cost = $1880). SPA logic would not be needed.
Capacity Constraints
With the capacity constraints above, SPA logic would be encouraged to give the longest shipments to the cheapest carrier until it ran out of trucks, then the next cheapest, etc.
So the solution would be as follows (total cost = $3131):
- 5 shipments from Antlers OK to Tulsa OK: 5 shipments for Proudie
- 7 shipments from Tonkawa OK to Tulsa OK: 1 shipments for Proudie, 6 shipments for Stanhope
- 3 shipments from Delaware OK to Tulsa OK: 1 shipments for Stanhope, 2 shipment for Slope
- 3 shipments from Inola OK to Tulsa OK: 3 shipments for Slope
Use Single Service Provider Rule (All-or-Nothing Scenario)
The above solution is the cheapest, but it has two different service providers visiting both the Tonkawa and Delaware locations. Under the Use Single Service Provider Rule, only one service provider can visit each pickup location.
The solution that satisfies the Use Single Service Provider Rule rules would be as follows (total cost = $3320):
- 5 shipments from Antlers OK to Tulsa OK: 5 shipments for Proudie
- 7 shipments from Tonkawa OK to Tulsa OK: 7 shipments for Stanhope
- 3 shipments from Delaware OK to Tulsa OK: 3 shipment for Slope
- 3 shipments from Inola OK to Tulsa OK: 3 shipments for Slope
The solution is somewhat more expensive, and one cheap Proudie truck is left unused even though more expensive Slope trucks are being used.
Use Single Service Provider Rule (All-or-Nothing Scenario) with Commitment Count
In this scenario, each service provider also has a commitment count of one shipment per day, on the lane that includes all of these shipments. (This constraint means that each service provider must get at least one shipment per day, if there are enough shipments to allocate.)
The solution that satisfies the Use Single Service Provider Rule and the commitment count constraint would be as follows (total cost = $3417):
- 5 shipments from Antlers OK to Tulsa OK: 5 shipments for Proudie
- 7 shipments from Tonkawa OK to Tulsa OK: 7 shipments for Stanhope
- 3 shipments from Delaware OK to Tulsa OK: 3 shipment for Slope
- 3 shipments from Inola OK to Tulsa OK: 3 shipments for Neroni
In this case, the most expensive service provider Neroni gets three shipments even though only one shipment would satisfy the commitment count constraint. All three Inola shipments must go to only one service provider.
Steps to Enable
The setup for this feature requires two configuration steps:
- On the location you will need to configure the Use Single Service Provider Rule field. Selecting "For Pickups and Deliveries" option will make the location use the single service provider rule for either pickups or deliveries.
Location Setup - Use Single Service Provider Rule
- Enable the parameter "USE SINGLE SERVICE PROVIDER RULE" This specifies if and how the single service provider rule will be used during service provider assignment.
- 0. Do not use: In this case, single service provider rule will not be used. This is the default.
- 1. By day: In this case, a single service provider will be assigned on a per day basis.
- 2. By bulk plan: In this case, a single service provider will be assigned to all the shipments visiting a single-service-provider location under one bulk plan, regardless of what service providers are previously assigned going into that location.
Parameter Setup - Use Single Service Provider Rule
Tips And Considerations
- Change Service Provider: the user will be allowed to change the service provider on a shipment, even if this results in more than one service provider going into that location on that day.
- OTM may leave some orders unplanned even though there are available resources.
- For example:
- Two service providers, each with 3 resources per day.
- Two locations:
- Location A with 2 shipments
- Location B with 4 shipments
- In this scenario, OTM can plan only 3 shipments for location B.
- For example:
-
Multistop shipment scenario considerations.
-
The Use Single Service Provider Rule logic will work in a multistop scenario where you want the pickup at your distribution center to use a single service provider - but the delivery locations on the shipment do not have a use single service provider constraint.
-
The Use Single Service Provider Rule logic will not work for a multistop scenario where multiple distribution center locations are shipping to the same set of delivery locations and the delivery locations are configured with Use Single Service Provider Rules. In this case there is a chance that the same delivery location - being sourced from different distribution center locations - could be serviced by multiple service providers.
-
Edit Load Config - Considers Compartments
This feature enhances the Edit Load Config action to include consideration for equipment group compartments. With the enhanced Edit Load Config action, you can now view and edit your load configuration planning results and edit the solution moving your shipment ship units within the your equipment/equipment compartments. The Edit Load Config action allows you to easily unpack all or some of the shipment ship units into the staging area and then repack the shipment ship units in your preferred position and orientation within the equipment/equipment compartment.
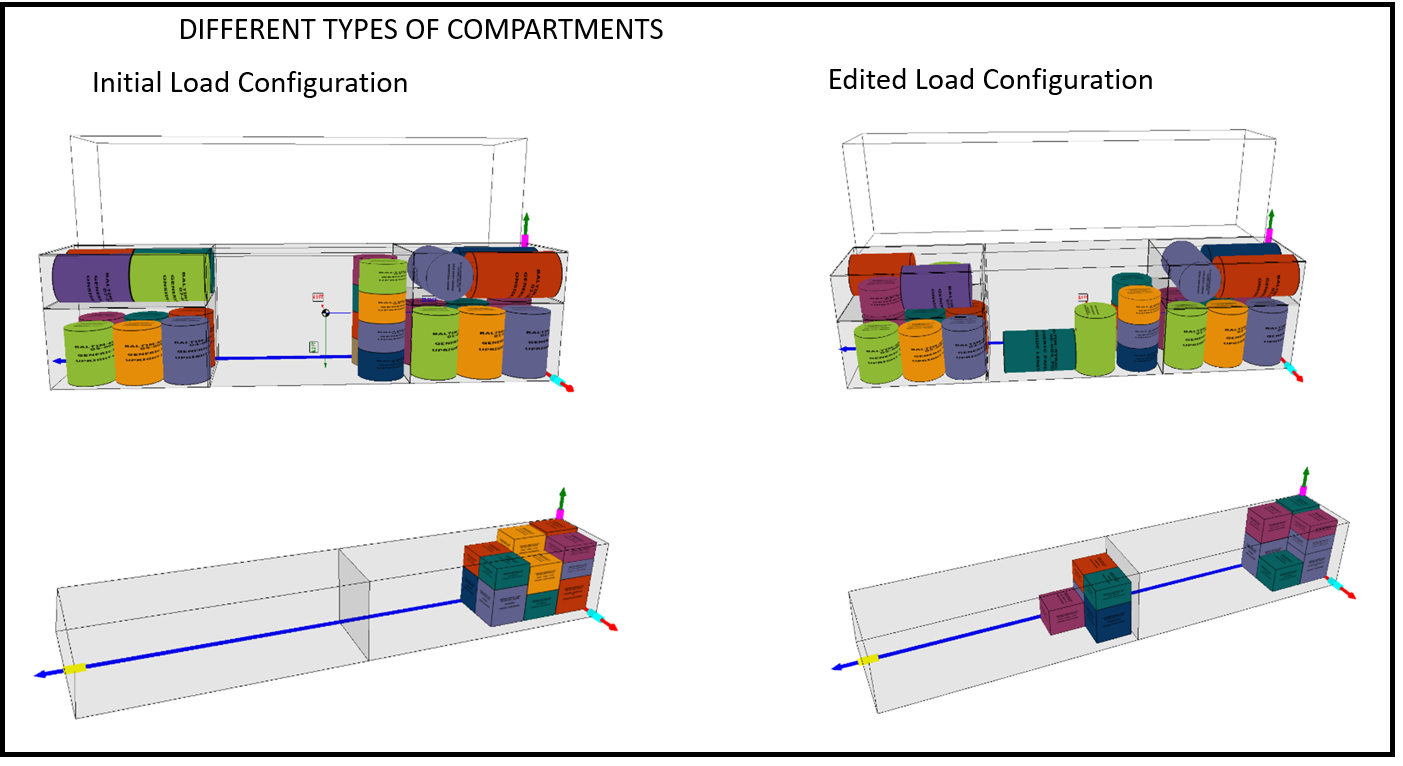
Edit Load Config with Compartments
Steps to Enable
You don't need to do anything to enable this feature.
Order Base Added to Transportation Analysis Subject Areas
This feature extends the Transportation Analysis Subject areas supported by Transportation Intelligence to include a new analysis folders for the Order Base, Order Base Line and Order Base Ship Unit. You, as a Transportation Intelligence user, can now perform comprehensive analysis (ad-hoc query) or build custom reports around OTM's Order Base.
New analysis folders include:
- Order Base Analysis
- Order Base Ship Unit Analysis
- Order Base Line Analysis
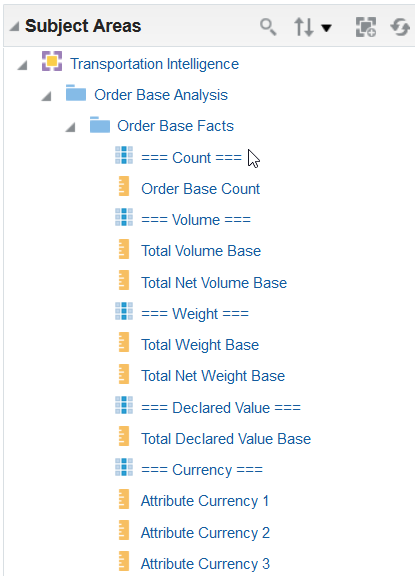
Order Base Facts
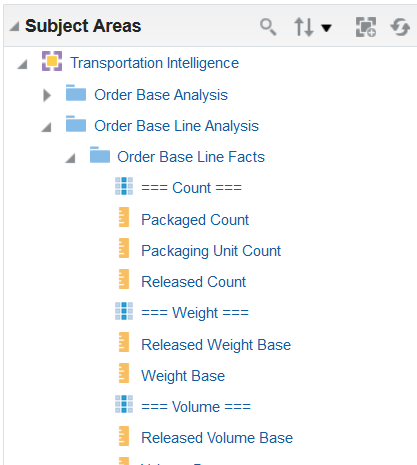
Order Base Line Facts
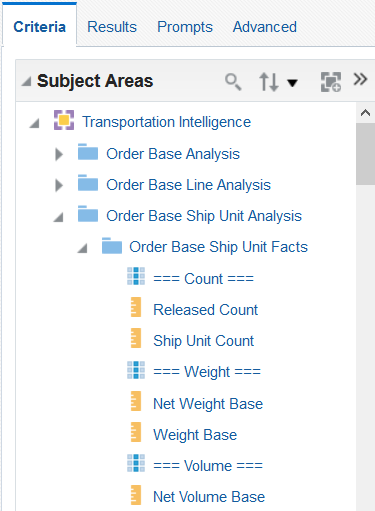
Order Base Ship Unit Facts
Steps to Enable
Leverage new subject area(s) by adding to existing reports or using in new reports. For details about creating and editing reports, see the Creating and Administering Analytics and Reports book (available from the Oracle Help Center > your apps service area of interest > Books > Administration).
Simple Template Import for Lane, Rate Offering and Rate Record
This feature provides you with a simple template based row/column .csv (comma-separated value) data loading option to help you load your Logistics Network Modeling data. This feature extends the Simple Template Import feature to include importing data for the following objects:
- Lane
- Rate Offering
- Rate Record
LANE TEMPLATE
Lane definition (x_lane) supported attributes are:
- Lane ID
- Source Geo Hierarchy is taken from the following. One of the following must be specified.
- Source Location ID
- From City
- From State/Province
- From Zip3
- From Zip5
- From Country
- Destination Geo Hierarchy is taken from the following. One of the following must be specified.
- Destination Location ID
- To City
- To State/Province
- To Zip3 - if specified Country defaults to USA
- To Zip5
- To Country
RATE OFFERING TEMPLATE
Rate offering supported attributes are:
- Rate Offering ID
- Carrier Location ID - Carrier Location ID specifies the name of the SERVPROV for this rate offering.
- Rate Distance ID - must be a PUBLIC record. Rate Distance ID = LOOKUP ELSE ESTIMATE
- Rate Service ID
- Transport Mode ID - must be a PUBLIC record. Transport Mode ID = TL
- Rate Offering Type ID - must be a PUBLIC record. Rate Offering Type ID = TL
- Stops Included In Rate
- Minimum Cost - Currency = USD
Rate offering stops supported attributes are:
- Rate Offering ID
- Low Stop
- High Stop
- Per Stop Cost - Currency = USD
RATE RECORD TEMPLATE
Below is the list of supported rate basis items:
- Shipment
- Shipment Total Distance Traveled
- Shipment Total Empty Distance Traveled
- Shipment Total Loaded Distance Traveled
- Shipment Total Transit Time
- Shipment Total Weight
- Shipment Total Volume
Steps to Enable
You don't need to do anything to enable this feature.
Tips And Considerations
The simple templates, as the name implies - are designed to support simpler data loading requirements - the simple Rate Offering, Rate Record templates do not support the many complex rate basis items and configurations that are supported by OTM's rating engine. If you need to load more complex rate records the Rate Maintenance tool is recommended for supporting those requirements.
Key Resources
- For examples of the available simple templates see the Knowledge Document 796594.1 on My Oracle Support.
- The Importing Data Help topic provides valuable information on the simple templates including: information about default values, UOMs, date formats, loading errors etc. the UOMs, date formats and import load errors.
Use Sourcing/Proposed Rates In Modeling Scenarios
This feature allows you to create modeling scenarios with your proposed rates (IS_SOURCING_RATE set to "true") which will allow you to validate the rates before making them active in OTM as well as allowing you to compare these rates to your currently active rates.
In the example below - a Modeling Project (ACTIVE_RATES_V_PROPOSED_RATES) has been defined with two Modeling Scenarios. One Modeling Scenario (ACTIVE_RATES) has been created to run a simulation based on the active rates in OTM. A second Modeling Scenario (PROPOSED RATES) has been created to generate the same as above, but using proposed rates i.e., rates where the IS_SOURCING_RATE flag is set to "true" which must be set to "false" for the rates to be used in planning.
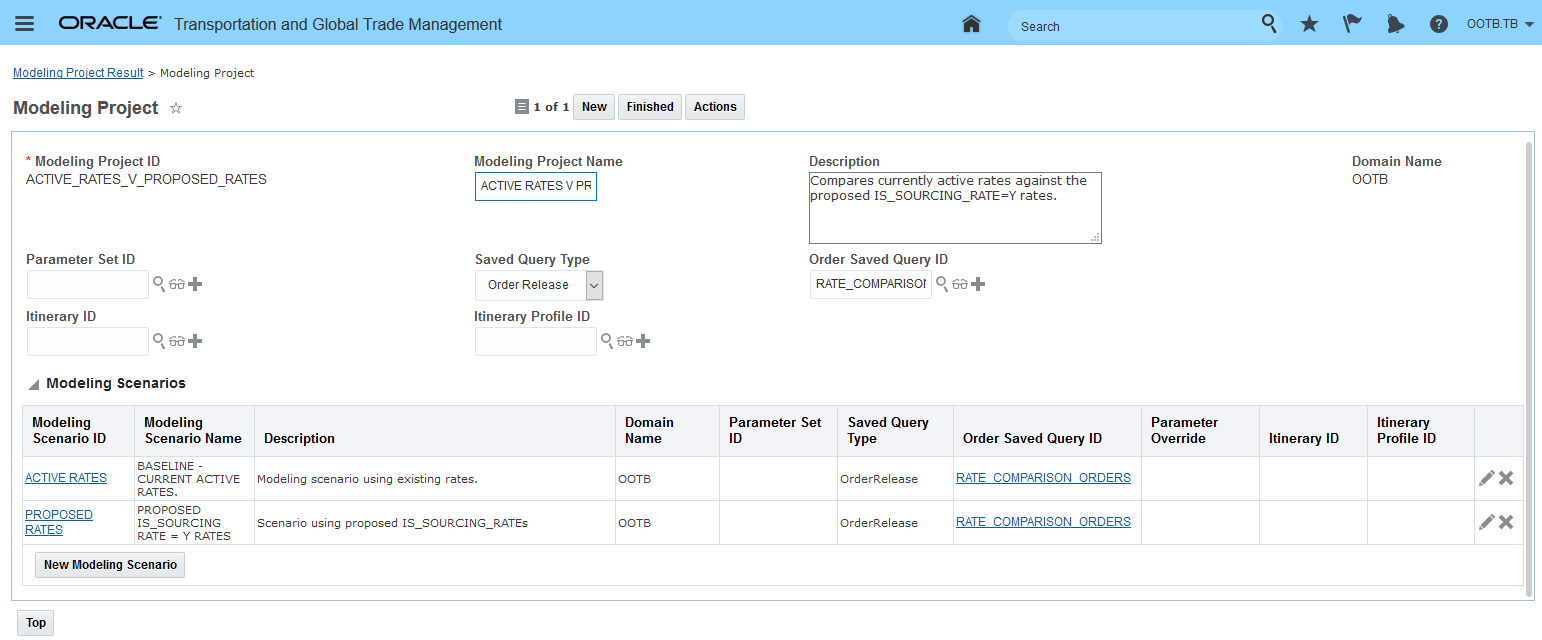
Modeling Project Comparing Active Rates to Sourcing Rates
For the PROPOSED RATES modeling scenario the there are two Modeling Scenario Data Rules defined:
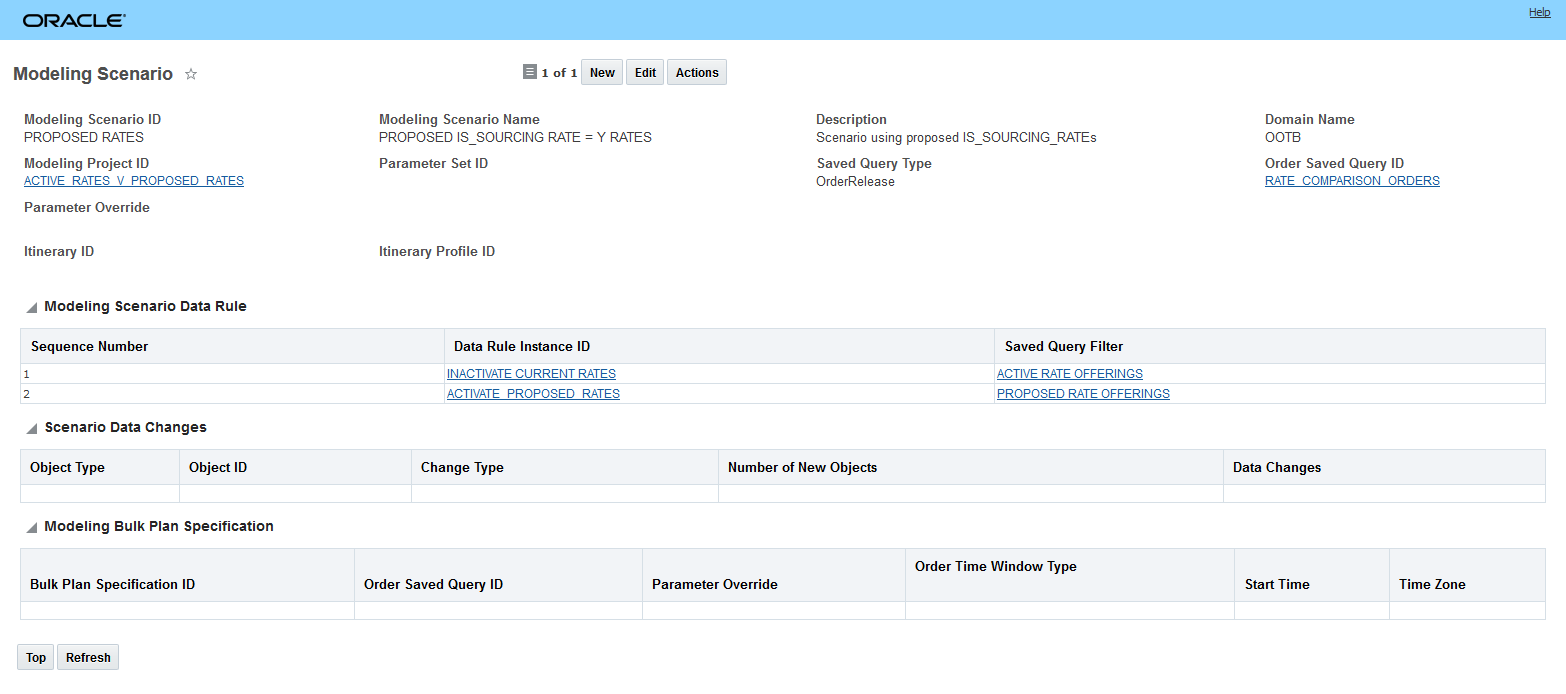
Proposed Rates Modeling Scenario
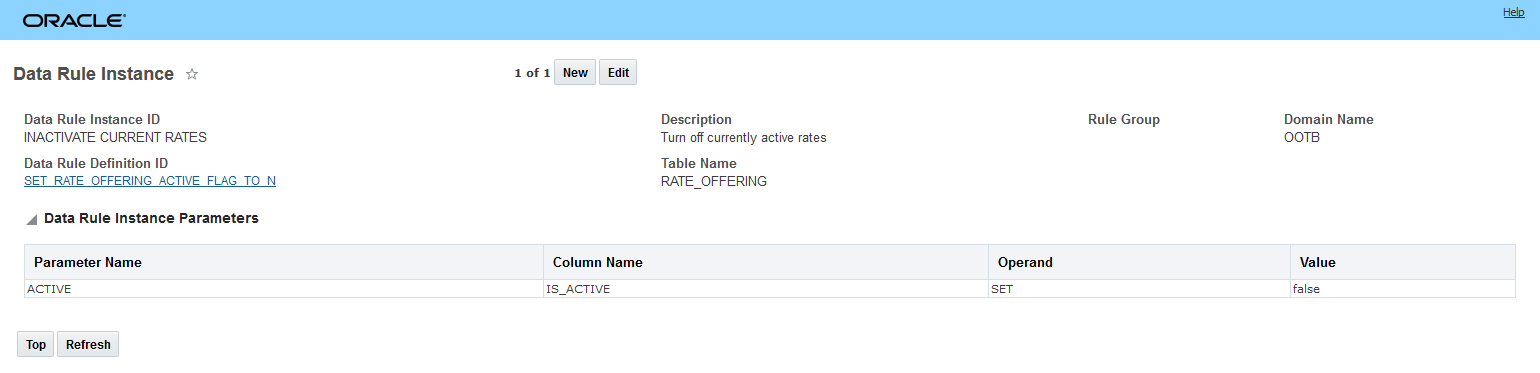
- The first Modeling Scenario Data Rule defined for this Modeling Scenario is used to turn off the current/active rate offerings so that they are not considered in the PROPOSED RATES scenario. To do this, the Rate Offering IS_ACTIVE column is SET to "false" - this change will make your active rates inactive for this Modeling Scenario.
Data Rule Instance to Inactivate Active Rates
- A second Modeling Scenario Data Rule is used to turn on your proposed rates. To do this Rate Offering column IS_SOURCING_RATES is SET to "false" - by setting the IS_SOURCING_RATE column to "false" the rates will be used by bulk planning in the PROPOSED RATES Modeling Scenario.
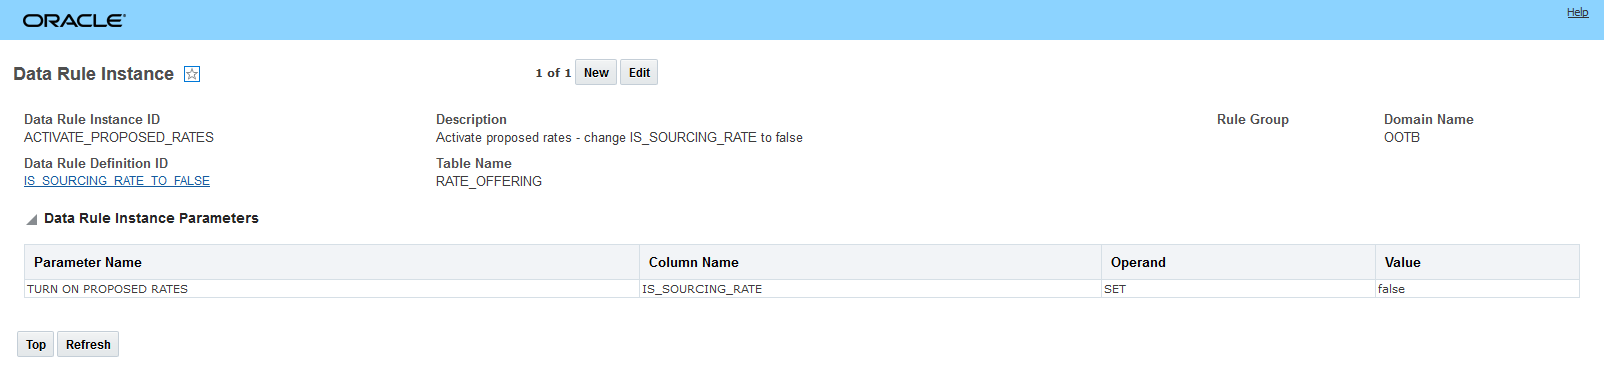
Set IS_SOURCING _RATE Flag to False
Steps to Enable
As noted - to generate a Modeling Scenario that takes advantage of the newly enabled IS_SOURCING_RATE attribute, you will need to create Modeling Data Rule and Modeling Data Rule Instance that allows the IS_SOURCING_RATE to be used in your Logistics Network Modeling simulations. The Modeling Data Rule needs to change SET the IS_SOURCING_RATE to "false" for your IS_SOURCING_RATE rates to be used in planning.
Rail Mode Modeling Shipments Mappable with ALK Maps Rail Layer
This feature provides you with the ability to map your Logistics Network Modeling modeling shipments that are assigned to the rail mode of transport using the ALK Maps Rail Layer. The ALK Maps Rail Layer will display your rail shipment's travel path according to the rail route versus mapping the shipment following a road network. The benefit of this feature is an accurate representation of the rail route your rail modeling shipments will follow.
Steps to Enable
This features requires the necessary ALK Maps products be licensed. Once licensed the necessary setup steps can be found in Help.
Logistics Digital Assistant - OTM Order/Shipment Status Skill
This feature serves as your introduction to the Logistics Digital Assistant and its OTM Order/Shipment Status skill. Digital assistants use artificial intelligence for natural language processing to create more conversational and human interactions between the user and the related application(s). The Logistics Digital Assistant (LDA) is enabled through the use of Oracle's digital assistant platform, Oracle Digital Assistant (ODA), which provides the tools and capabilities you need to build AI-powered assistants with task-specific skills, like the OTM Order/Shipment Status skill.
The Logistics Digital assistant is a set of Logistics-related conversational skills for ODA (initially, only the OTM Order/Shipment Status skill). The Logistic Digital Assistant simplifies the interaction between non-core users (customers, suppliers, partners, etc.) and the OTM/GTM application, providing access to the application's data without the barriers of specific terminology, training and mastery of new UI navigation skills.
Below is an example that illustrates the Logistics Digital Assistant and the OTM Order/Shipment Status skill in action.
The LDA screen below appears after the user has logged in. It's important to note that at this point the Logistic Digital Assistant knows who the user is and all interactions are dependent on the data access that user is entitled to. With additional skills, the answer to the simple question "What can you do?" would include additional capabilities. Initially, the Logistics Digital Assistant can "can help you track an order".
NOTE: The Getting Starting Guide for LDA covers - in great detail - all of the required enabling steps including: ODA setup/configuration and licensing, identity management setup, user setup, and OTM setup.

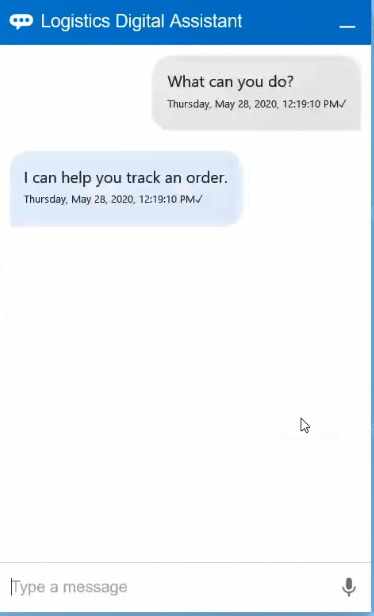
Logistics Digital Assistant Greeting
Once the Logistic Digital Assistant is clear on what the users wants to accomplish - in this case help the users with their "Where are my orders?" query - the Logistics Digital Assistant routes the user to the appropriate skill - in this case the OTM Order/Shipment Status skill.
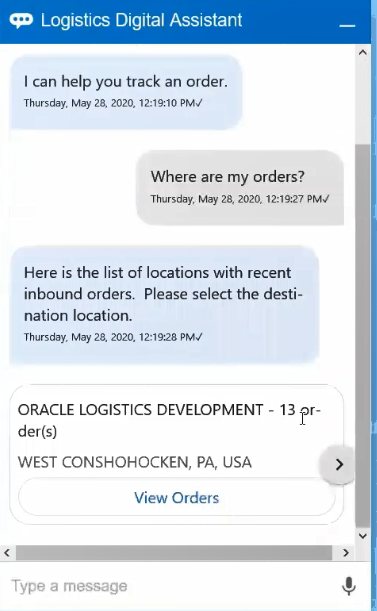
User Is Known And The Skill Returns Orders For The User's Locations
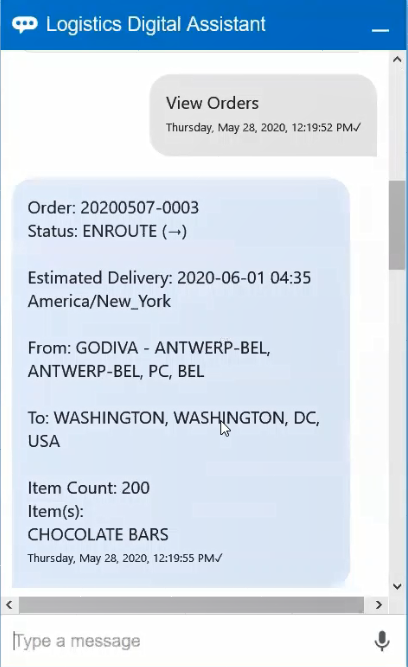
Information About the Order Is Provided - Status And Content Of The Order
The OTM Order/Shipment Status skill guides the user through the process of finding the information that was requested, the flow here is provided as an example/packaged flow - you have the option to use the flow as is or you have the ability via ODA to extend the dialog and the information provided in this flow.

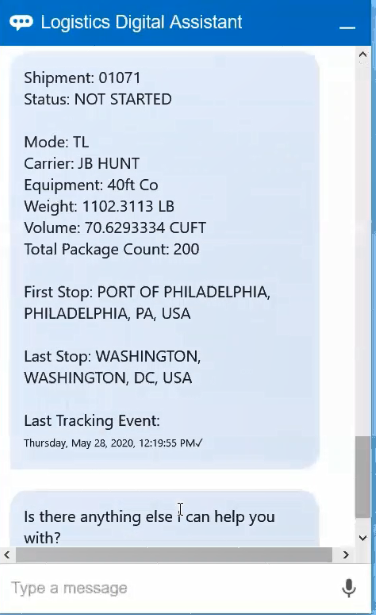
OTM Order/Shipment Status Information and Flow
Steps to Enable
Enablement of the LDA involves deployment of an ODA instance, pulling the OTM Order/Shipment Status Skill from the skill store, configuring authentication service using Oracle Identity Cloud Service (IDCS) and completing the necessary setup in OTM. Please refer to the Getting Starting Guide for LDA for all required enabling steps.
USER CONFIGURATION
- Once your Logistics Digital Assistant is fully configured, deployment requires the setup of users in Identity Cloud Service (IDCS) and Oracle Transportation Management Cloud Service.
- The OTM users require access to the new 'Digital Assistant' Access Control List and as a best practice should have an efficient VPD Profile associated to the User Role(s) to maximize the user experience.
- After the user credentials and the Assistant's URL have been communicated to your customers, accessing the Assistant simply requires navigating to the URL and authenticating in a mobile or desktop browser.
EXTENSIBILITY AND ADAPTABILITY
- The Logistics Digital Assistant can be extended and modified to meet your customers' expectations.
- You can leverage any other REST-enabled objects in OTM-GTM by connecting their Rest endpoints to the Digital Assistant.
- Changes to the Assistant's Utterances will allow you to interpret new user input. The extraction of keywords from a user input can be modified through the Assistant's Entities. Adding additional intents, entities, and user utterances will allow the AI-powered natural language processing engine to interpret new user input.
- Even the dialog flow itself can be tailored to your audience. Changes to the dialog flow require knowledge of YAML and JavaScript.
Tips And Considerations
The Oracle Cloud Infrastructure (Gen 2) architecture is a prerequisite for deploying ODA, LDA and the related skill(s) with OTM.
Oracle Digital Assistant uses Oracle Cloud Infrastructure Identity and Access Management (IAM) as its base service for authentication and authorization. Through IAM, you can also set up federation to other identity providers, such as Oracle Identity Cloud Service (IDCS).
IAM is a policy-based identity service. The tenancy administrator for your organization needs to set up compartments, groups, and policies that control which users can access which resources and how. For an overview of this process, see Setting Up Your Tenancy.
Global Trade Management (Base)
Additional Fields Available on Item Origin
This feature provides you with the ability to specify the Item Structure ID and Description at the item origin level. On an Item Origin, you can add the:
- Item Structure ID which enables you to capture the item structure origin. An item structure may have multiple origins that could vary by inventory organization, partner and partner site.
- Description which enables you to specify a description such as a general description or manufacturing description associated with a particular item origin. You can use this field to enter a description that is specific to an inventory organization, partner or partner site.
The new fields are available on the Item Origin manager as well as in the Item Origins in the Item > Trade Details tab.
Steps to Enable
You don't need to do anything to enable this feature.
The Item Workbench that ships with GTM enables you to see data related to an item in one place including classifications, origins, item structures and associated tariff rates. With this workbench, you can manage many aspects of an item from one screen. The Item Workbench includes multiple panes and tabs which you can navigate through. You can also trigger actions from each of the various panes.
On the top left, you'll see the Items tab. You can use a Saved Search to populate this tab. Once this tab is populated, the other panes and tabs will be populated as well.
On the top right, there are two tabs available:
- Item Classifications - Displays all the classification data associated with the selected item.
- Item Origins - Displays all the item origin records associated with the selected item.
Across the bottom there are four tabs available:
- Item Details - Displays the edit page of the selected item.
- Item Qualifications - Displays all the item qualification records associated with the selected item.
- Item Structures - Displays the item structures associated with the selected item.
- Tariff Rates - Displays the tariff rates associated with the selected item classification.
Steps to Enable
You don't need to do anything to enable this feature.
Tips And Considerations
- If you want to make changes to the Item Workbench, it is recommended that you copy the public Item Workbench that ships with GTM and make changes to the copy.
- For more information about workbenches, please see the OTM How To/Configuration Topic called 'Configuring the User Interface' and select 'Configuring a Workbench Layout'.
Manager Layout for Product Classification Code
New manager layouts have been added for Product Classification Code. The manager layouts enable you to:
- Display Product Classification Code data in the Workbench
- Configure the Product Classification Code view and edit screens
The manager layouts that have been added are:
- GTM_PROD_CLASS_CODE_VIEW - this relates to the Product Classification Code view page
- GTM_PROD_CLASS_CODE - This relates to the Product Classification Code edit page

Steps to Enable
You don't need to do anything to enable this feature.
Tips And Considerations
For more information on configuring the Product Classification Code page or adding it to a workbench, please see the 'Configuring the User Interface' topic available in help under 'OTM How To/Configuration Topics'.
Support for Binding Ruling Expiration Date
Binding Ruling Expiration Date has been added to Product Classification data and is available across many GTM objects where Product Classification data appears. You’re now able to see this information which will help you understand when a Binding Ruling Number being used to justify a classification code on an Item, will expire.
Binding Ruling expiration date has been added to the Product Classification data available in the following objects:
- Item (including actions such as Apply Product Classification Template, Update Product Classification Code & Assign Item Classification)
- Item Classification
- Product Classification Templates
- Trade Transaction
- Trade Transaction Lines
- Declaration
- Declaration Lines
Steps to Enable
You don't need to do anything to enable this feature.
Tips And Considerations
Biding Ruling Effective Date and Binding Ruling Number are already available in the program now and can be used as needed.
It is recommended that you populate your Binding Ruling information on the Item so that, as you perform actions such as ‘Look Up Product Classification’, this information is copied to your Transactions and Declarations.
Support for Additional Date and Number Flex Fields During Configuration
You are now able to use Date Flex Field and Number Flex Field qualifiers when creating Data Configuration and Constraint Sets. Using Date Flex Fields and Number Flex Fields when setting up your Constraint Set, will allow matching Transaction Lines with Trade Programs based on these same values when running the “Trade Lookup” action on Transactions.
Steps to Enable
You don't need to do anything to enable this feature.
Agency Code Added to Party Actions and Screens
The Agency Code has been added to a few additional screens. The Agency Code helps you to understand the government agency that has added a restricted party to a list.
To better help you to make a decision when performing your restricted party screening and resolution, the agency code has been added to the Party Manager > Party Screening Matches tab on both the view and edit pages. Navigate to Parties which is available from either the Restricted Party Screening menu option or the Master Data menu option. Enter your search criteria for a party and click Search. On the view page for a particular party, you can see the Agency Code within the Restricted Party Screening section. On the edit page for a particular party, you can see the Agency Code on the Party Screening Results tab.
The Agency Code is has also been added to the "Review Match Factor" action. Navigate to Parties which is available from either the Restricted Party Screening menu option or the Master Data menu option. Enter your search criteria for a party and click Search. Select a party and click Actions > Review Match Factor. In the results, you can see the Agency Code at the top of the page.
Steps to Enable
You don't need to do anything to enable this feature.
Tips And Considerations
In many other screens, you can already view the agency code including:
- Party Manager > Actions > Screening Services >
- Perform Full Restricted Party Screening
- Restricted Party Screening
- Party Manager > Actions > View > Review Screening Results
- Trade Transaction > Actions > Compliance >
- Screen Restricted Parties
- View Party Screening Results
- Trade Transaction Line > Actions > Compliance >
- Screen Restricted Parties
- View Party Screening Results
- Declaration > Actions > Compliance >
- Screen Restricted Parties
- View Party Screening Results
- Declaration Line > Actions > Compliance >
- Screen Restricted Parties
- View Party Screening Results
- Restricted Party Screening Workbench in the Matched Restricted Parties tab
Improvements to Assign Item Classification Action
The "Assign Item Classification" Action has been improved to assist you in assigning a classification code to an existing item.
When you trigger the "Assign Item Classification" Action, you can enter information such as the Product Classification Type, Product Classification Code, and other data to support your item classification such as Binding Ruling and Tariff Rules of Interpretation information. For the Product Classification Code, you can now click the 'i' button next to the field to confirm the code you have entered is a valid code. GTM displays the corresponding description of the Product Classification Code. If the code entered is not a valid code, GTM displays an error message telling you that no description was found.
Steps to Enable
You don't need to do anything to enable this feature.
Capturing Value on Item Structure and Item Structure Component
In order to help users with capturing cost data for an Item Structure, enhancements have been made to the Trade Item Structure and Trade Item Structure Component to better support value information. This will enable you to manage different types of costs related to your bills of material.
On the Trade Item Structure, a new Values grid has been added. This grid includes:
- Value Qualifier ID
- Value
- Exchange Rate ID
- Exchange Rate Date
On the Trade Item Structure Component, a Values grid is already available. You can now enter exchange rate information for the values contained in the grid. The new fields are:
- Exchange Rate ID
- Exchange Rate Date
Steps to Enable
You don't need to do anything to enable this feature.
Enhancements to Excluded Words Setup for Restricted Party Screening
In a recent release, GTM introduced the concept of a global exclusion words list which is set via the existing 'gtm.rpls.globalExclusionWords' property. Prior to this, you would need to set up the exclusion list at the engine level within a specific service preference. Many customers have one exclusion words list that they would need to set up in each individual restricted party engine service preference. To make this setup easier, a global exclusion words list to be used during restricted party screening was introduced and configured via a property.
In the current release, improvements have been made to move the global list from the property and into a global service preference. Specifically, if you have been using a global exclusion words list that you set up in the 'gtm.rpls.globalExclusionWords' property, you can now use a public Service Preference called 'GLOBAL_EXCLUSION_WORD_SERV_PREF' for the same capability. In addition, if you have a global exclusion word list set up in this property, the list is copied into the new global service preference as part of the installation of GTM 20C.
You will continue to use the 'gtm.rpls.useExclusionWords' property to tell GTM where to look for your exclusion words list. However, a new value has been added for this property and can be configured within a property set:
- GlobalExclusionServicePreference - this new value tells GTM to use the exclusion words list in the new Service Preference 'GLOBAL_EXCLUSION_WORD_SERV_PREF'.
The existing values for the 'gtm.rpls.useExclusionWords' property continue to be supported:
- Global - this value tells GTM to use the exclusion words list defined in the 'gtm.rpls.globalExclusionWords' property. This value will be deprecated and it is strongly recommended that you start to use the same list as defined in the public Service Preference called 'GLOBAL_EXCLUSION_WORD_SERV_PREF'.
- Service Preference - this value tells GTM to use the exclusion words list defined for each individual engine you've set up via service preference. For example, you may have a service preference set up for the 'Dice' engine and a second service preference set up for the 'Exact Match' engine. When you configured the Service Preference Details for each of these engines, you specified an Exclude Words list to be used when the property is set to this value.
- noExclusionFromDeniedParty - this value tells GTM to exclude the words from the party but not from the restricted parties.
- No - the system will not remove exclusion words from either the party or the restricted parties.
If you are using the global exclusion words list today and have the properties configured as follows in your property set, a migration has happened as part of the installation of GTM 20C. However, you need to tell GTM that you want to start to use the new global service preference. The details are:
- Check to see if you are using the global exclusion words list. Do you have the following properties listed in your property sets?
- gtm.rpls.useExclusionWords = Global
- gtm.rpls.globalExclusionWords = is populated with your exclusion words list
- If so, the list has been migrated to the public Service Preference called 'GLOBAL_EXCLUSION_WORD_SERV_PREF'. You need to configure GTM to use the list in the service preference by setting the following property:
- gtm.rpls.useExclusionWords = GlobalExclusionServicePreference
NOTE: GTM will still support 'gtm.rpls.useExclusionWords = Global' property for backward compatibility. Once your company has started to use the exclusion words on the 'GLOBAL_EXCLUSION_WORD_SERV_PREF' service preference, it is recommended that the property 'gtm.rpls.globalExclusionWords' containing the list is deleted. The global exclusion list via the property will be deprecated and removed in a future release.
Steps to Enable
To use the new global exclusion list configured via a service preference, you need to:
- New customers:
- Navigate to Master Data > Power Data > Configurations > Service Preference and edit the existing 'GLOBAL_EXCLUSION_WORD_SERV_PREF' service preference. Within the service preference, click the pencil to edit the existing 'Service = Restricted Party Screening' and click 'i' next to Service Preference Configuration. Add your list to the Exclude Words text field. (This service preference can only be edited as DBA.)
- Set the property gtm.rpls.useExclusionWords = GlobalExclusionServicePreference
- Existing Customers:
- Set the property gtm.rpls.useExclusionWords = GlobalExclusionServicePreference
- If you previously had this property set to gtm.rpls.useExclusionWords = Global, the exclusion words list in the property gtm.rpls.globalExclusionWords was copied to the Service Preference called 'GLOBAL_EXCLUSION_WORD_SERV_PREF' as part of the installation of 20C.
- Based on the migration of the exclusion words list, a full screening of your party master will not occur provided that you do not make changes to the exclusion words list after migration.
Tips And Considerations
For existing customers, based on the migration of the exclusion words list, a full screening of your party master will not occur. However, a full screening of your party master will occur if you:
- Make any further modifications to the exclusion words in the new global service preference after you have set the property 'gtm.rpls.useExclusionWords = GlobalExclusionServicePreference'
- Make changes to a party, data version, or engine level screening preference
It is highly recommended that customers use the global exclusion words list defined in the public Service Preference called 'GLOBAL_EXCLUSION_WORD_SERV_PREF' since the 'gtm.rpls.useExclusionWords = Global' will be deprecated and removed in a future release.
For more information about these properties, please see the 'gtm.rpls Properties' topic in help.
Limit the Maximum Number of Denied Parties During Screening
In order to improve the performance of the system, a new property has been introduced to help limit the maximum number of restricted parties that are stored in the cache at any given time to prevent potential out-of-memory issues.
The new property is called 'gtm.rpls.maxDeniedPartiesInCache'. Default value = 500000.
If the number of restricted parties exceeds the number set in the property, an error will display in the logs "The number of active denied parties exceeds {limit}. Please reduce the number of active denied parties or increase the limit."
This property applies to all restricted party screening actions across GTM including actions on Parties, Trade Transactions, Trade Transaction Lines, Declarations, and Declaration Lines. The property also applies to the ad hoc Restricted Party Screening page.
Steps to Enable
You don't need to do anything to enable this feature.
Tips And Considerations
For more information on setting properties in GTM, you can refer to the 'Property Sets' topic in Help.
Trade Agreements and other supporting information enables you to proactively leverage the trade agreements your business can take advantage of to reduce duties and taxes. There are many Trade Agreements in effect globally, each with different parameters but all following a similar structure.
To be able to take advantage of the duties and taxes associated with a Trade Agreement, companies must:
- Follow Rules of Origin to qualify goods for participation in a specific program
- Produce Certificates of Origin and provide them to your customers
- Collect Certificates of Origin from your suppliers and stored them for future use
- Declare the intent to use a trade agreement during the import entry process and send the appropriate certificates of origin to the local customs agency
In GTM, users can take advantage of the Trade Agreement capability including:
- Download and store duties, taxes, trade programs and other information from third party data content providers
- Manage trade agreement information
- Perform trade agreement eligibility screening and qualification on your items
- Create a campaign which enables you to solicit qualification data, documents and other information from suppliers to support the use of trade programs
- Suppliers and other users can respond to a campaign they have received
New Partners Grid on Trade Agreement
A new Partners grid has been introduced on Trade Agreements to replace the existing Member Nations grid. The Partners grid specifies the countries or regions that are partners in the trade agreement. By default, the Member Nations grid will no longer be displayed since it is replaced by the Partners grid. If you want to continue to see the Member Nations grid, you can set the property 'gtm.tradeAgreement.memberNationGrid.display' = true. (Default value = false.)
Steps to Enable
You don't need to do anything to enable this feature.
Tips And Considerations
If you have existing Trade Agreements that include information in the Member Nations grid, the existing data will be copied into the Partners grid as part of the migration from 20B to 20C.
New Fields Available on Item Qualification Finder and Finder Results
The Item Qualification Finder and Finder Results have been updated to include more fields. With these additional fields, you are able to find item qualification records based on item or party information and to see this additional information in your finder results.
Specifically, you can now search on the following fields and see them in the finder results:
- Item ID
- Item Name
- Inventory Organization
- Partner
- Partner Site
- Country of Origin
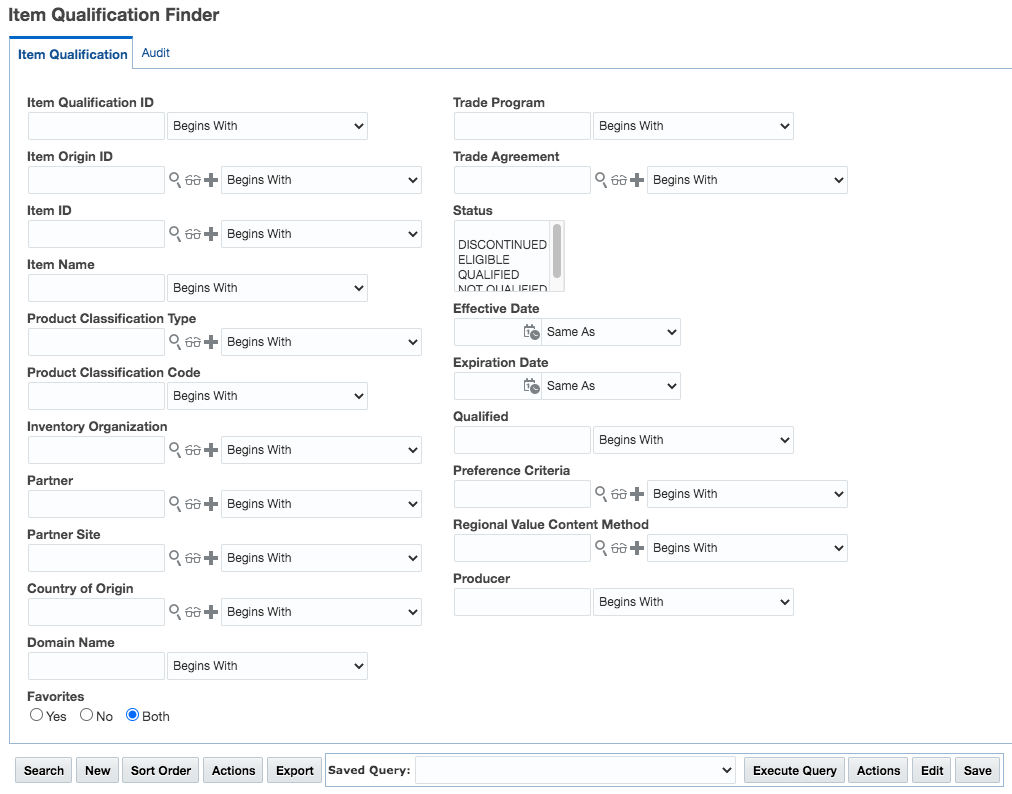
Steps to Enable
You don't need to do anything to enable this feature.
Partner Site No Longer Required on Item Origin
When entering a partner on the item origin, you no longer need to specify a partner site. The functionality is as follows:
- A Partner can be entered without a corresponding Partner Site
- A Partner Site can be entered but a corresponding Partner must be specified
These changes are available on:
- Item in the Trade Details tab within the Trade Programs grid
- Item Origin Manager
Steps to Enable
You don't need to do anything to enable this feature.
Hide Product Classification Data on the Campaign
You can now choose whether you want to hide or show the product classification data on the campaign. This enhancement enables you to solicit your suppliers for documents and information that are not specific to a product classification code. To avoid confusion, you can now hide the product classification data on your campaign entirely. When you configure GTM to hide the product classification details, the following fields are hidden:
- Product Classification Type on the Campaign
- Product Classification Type and Product Classification Code on the Campaign Line
To use this enhancement, go to Master Data > Power Data > Configurations > Logic Configurations. In the Logic Configuration Type = GTM CAMPAIGN CONFIGURATION, there is a new parameter called 'DISPLAY PRODUCT CLASSIFICATION DETAILS'. The Default Value = Yes. If you do not want to see the product classification details, set the Parameter Value = No.
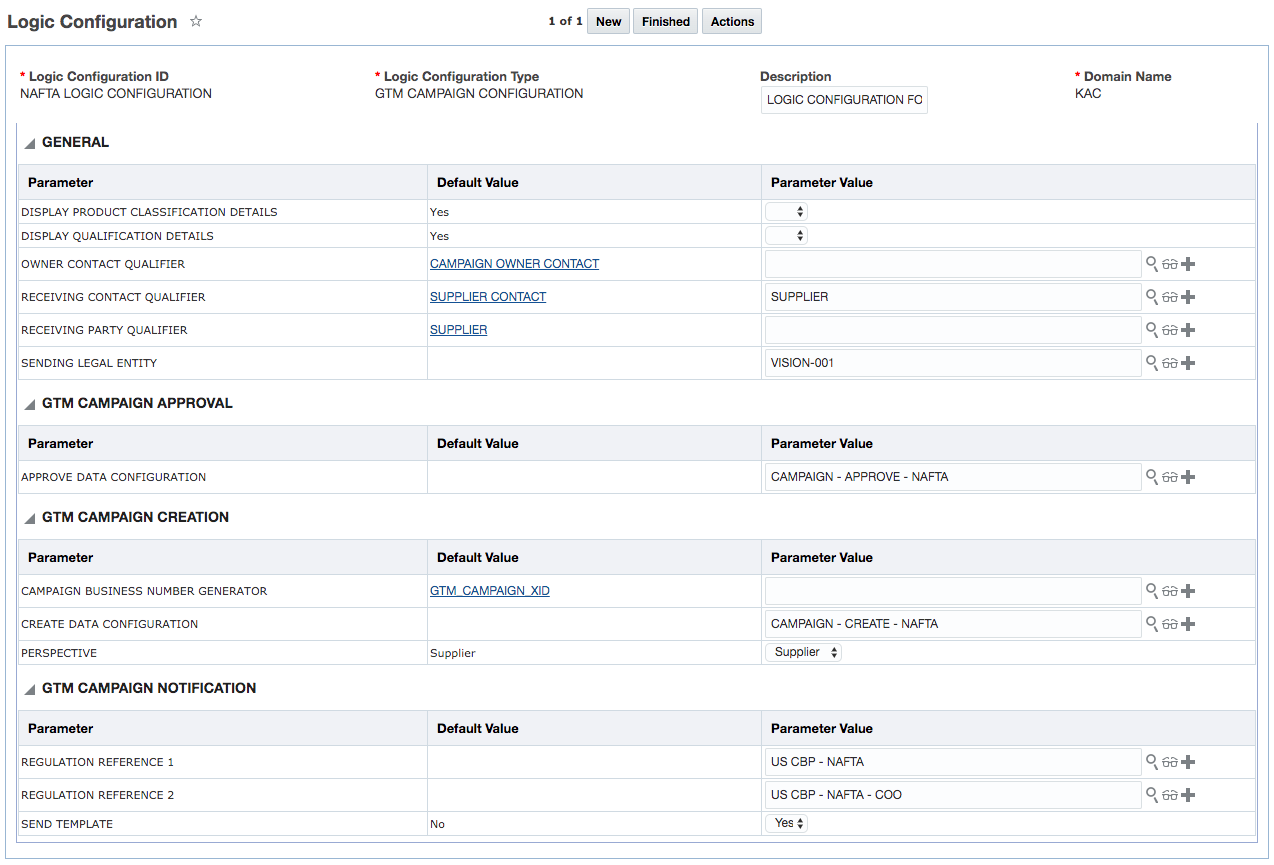
You can then assign the logic configuration to a Campaign Type. When you specify a campaign type during campaign creation, the logic configuration is used to drive the workflow of the campaign. This includes whether the product classification details should be shown or hidden on the campaign and campaign line.
NOTE: If you set the new 'DISPLAY PRODUCT CLASSIFICATION DETAILS' parameter in an existing logic configuration to a different value, then it will be honored across all campaigns. For example, if you have campaigns that you created in 20B using a logic configuration for CEFTA, any changes of the parameter will be honored in all campaigns that the logic configuration is associated with. If you do not want to impact existing campaigns, it is recommended that you create a new logic configuration to hide your product classification details. Remember, you can check the setting for the logic configuration through the campaign type on the campaign.
Steps to Enable
You don't need to do anything to enable this feature.
Tips And Considerations
- In the Logic Configuration with a type = GTM CAMPAIGN CONFIGURATION, the new parameter is called 'DISPLAY PRODUCT CLASSIFICATION DETAILS'. The default value is Yes meaning the product classification data will be displayed on the campaign and campaign line.
- If you change an existing logic configuration to hide the product classification details and it has already been used to create a campaign, then the existing campaigns will no longer display the product classification details. If you do not want to impact existing campaigns, it is recommended that you create a new logic configuration to hide your product classification details.
Product Classification Type Not Required on Campaign Creation
You no longer need to enter a product classification type when creating a campaign. This enables you to create a campaign to solicit documents and data that are not related to a particular product classification code.
You can trigger the "Create Campaign action" from:
- Item
- Trading Partner Item
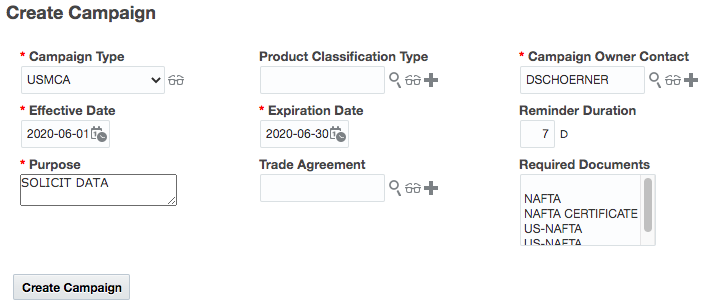
Steps to Enable
You don't need to do anything to enable this feature.
Set Certain Campaign Statuses Via Actions
You can set certain statuses on the Campaign using specific actions.
As a campaign administrator, you can trigger the Close Campaign action when you are finished working on a campaign. This action changes the status on the campaign to a status type of CAMPAIGN_STATUS with a corresponding value of CAMPAIGN_CLOSED.
If you close a campaign by accident, you can trigger the Reopen Campaign action. This action changes the status on the campaign to a status type of CAMPAIGN_STATUS with a corresponding value of CAMPAIGN_IN_PROGRESS.
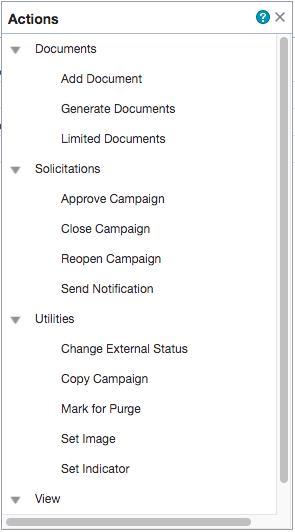
Steps to Enable
You don't need to do anything to enable this feature.
Documentation Updates Regarding Creating a Supplier Domain
The documentation in 'Help' telling you how to create a supplier domain to be used for campaign management has been updated. Configuring GTM to support a supplier domain allows a supplier to have proper access to the campaign, campaign line, document templates and other information. Small changes have been made to existing external predicates. Also, new external predicates have been added related to trade agreements, qualification details, documents and parties.
You can view this documentation by accessing help and navigating to 'GTM How To/Configuration Topics > Supplier Solicitation > Supplier Solicitation: Configuration Steps'. In this page, click on "Supplier Access Configuration" for more details.
Steps to Enable
You don't need to do anything to enable this feature.
Improvements to Approve Campaign Action on Campaign
The "Approve Campaign Action" on the Campaign has been improved to better support your approval process. When you run the "Approve Campaign" Action, from the Campaign, all Campaigns Lines in a status CAMPAIGN_LINE_RESPONDED will be updated to status CAMPAIGN_LINE_APPROVED while all other Campaign Lines in other statuses are left unchanged. This enhancement optimizes the Campaign Line approval process allowing you to approve multiple Campaign Lines in CAMPAIGN_LINE_RESPONDED status at the same time without affecting the other Campaign Lines in other statuses.
If no Campaign Lines are in status CAMPAIGN_LINE_RESPONDED, the action is not performed on any line and a message is shown "No Campaign Lines found in RESPONDED status" is displayed. If Campaign is in status CAMPAIGN_CLOSED, the action is not performed on any Campaign and a message is shown, "The campaign is CLOSED and status will not change".
In addition, once you trigger the action, GTM will display a clear message for each line on the campaign so that you know which lines had their status changed.
Steps to Enable
You don't need to do anything to enable this feature.
Tips And Considerations
If you want to set the status on individual lines, you should do it through the Campaign Line manager.
Status Changed Agent Event Added for Campaign and Campaign Line
This enhancement comes from the improvements made to Campaign and Campaign Line actions. Two new agent events have been added that listen to status changes on the Campaign and Campaign Line. The new agent events are:
- GTM CAMPAIGN - STATUS CHANGED
- GTM CAMPAIGN LINE – STATUS CHANGED.
These agent events enables you to create automation agents to listen to a status change on a campaign or campaign line and take action. A few of the available agent actions are set an indicator, send a campaign notification and notify a contact or involved party.
Steps to Enable
You don't need to do anything to enable this feature.
Tips And Considerations
An automation agent can be set up so that it listens to status changes and notifies user or sets an indicator so a campaign administrator can review and take action.
'If you want more information about campaigns, please see the GTM How To/Configuration Topic called 'Supplier Solicitation'.
This section includes details about additional changes in this update that might change the way your products work.
REPLACED OR REMOVED FEATURES
From time to time Oracle replaces existing Cloud service features with new features, or removes existing features. Replaced features may be put on a path to removal. As a best practice, you should use the newer version of a replaced feature as soon as the newer version is available.
This section identifies the features in this Cloud service that have been replaced or will be removed.
| Change Name | Target Removal | Description | Replaced In | Comment |
|---|---|---|---|---|
| IntXmlService and IntGtmXmlService To Be Removed |
21A | The IntXmlService and IntGtmXmlService from the application in the 21A release. |
N/A | These services have been in a deprecated state for several years now, if you are still utilizing these services you should transition to the TransmissionService prior to 21A. |
| Next Generation Mobile Application |
N/A | The next generation of the Mobile Application is being developed using a new development platform. The expectation is that the next generation Mobile Application, when available, will involve usability improvements and changes in the following areas:
|
2021 | The specific release timing for the next generation of the Mobile Application has not yet been finalized, this entry is intended to provide you with some early notification that changes are anticipated. As we get closer to releasing the next generation Mobile Application more details about the benefits and changes will be provided. |
| Here.com New Authentication Approach |
N/A | The new OAuth 2.0 Token credentials approach supported by HERE will be implemented in the upcoming 21A release. Until the new authentication approach is supported by OTM (for both the Workbench Map and for External Distance Engine usage) the App ID and App Code approach will continue to be supported by HERE for OTM implementations. |
21A | By default, new subscriptions to HERE are being provisioned with the new authentication approach - access to the App ID and App Code, for OTM, is being provided as an exception - if you need help with obtaining access to HERE with the App ID and App Code approach you can contact Sarath Menon at HERE (sarath.menon@here.com) or by informing your HERE Account Representative that HERE is being implemented with OTM. When provided - you will want to upgrade to the new OAuth 2.0 Token credentials approach as soon as possible. |