
- Revision History
- Overview
- Update Tasks
- Feature Summary
- Transportation and Global Trade Management
-
- Transportation and Global Trade Platform
- UI And Workbench
- Documents
- REST Services
- Analytics
- Technical Features
-
- XML Schema Validation - Update
- Restrict External ID (XID) Creation to Valid Characters
- Disable IntXmlService and IntGtmXmlService
- DBXML Maximum Export Size Restricted
- Use Nested GID in Agent DTA
- CSV Upload Refresh - Update
- Load Balance Topic Interface - Update
- Optimize Data Query Footprint - Update
- Process Manager - Run As User Role
- Performance Metric Collection
- OTM User to Oracle Identity Cloud Service Auto Creation
- External System Support for OAuth2.0
- Oracle Transportation Management (Base)
- Shipment Group
- Shipment
-
- Shipment Equipment Manager
- Manager Layout Enabled Action - Change Service Provider
- Multi-Select for Change Schedule Action
- Additional User Defined Attribute Fields Added to Shipment and Shipment Stop
- Manager Layout - Remove Booking Information Section from Shipment
- Manager Layout Enabled Action - Merge Shipments
- Shipment Manager - License Plate Field Added to Screen Set
- Booking And Tendering
- Usability Improvements
- External Distance Engine and Map Enhancements
- Staged Integrations
- Logistics Machine Learning
- Transportation Operational Planning
-
- Consol Shipments - Build Shipment Actions Bulk Planning for Order Movement
- Parameter to Control Retain or Delete for Empty Shipment Equipment
- Run Insert Non Freight Related Stop for Non-Fleet Service Providers - Add Container Yard Stop
- Merge Shipment Action - Enhanced
- Support Split by Equipment for Reuse Equipment Shipment Legs
- Multi-Stop - Shuttle Lot Activity Time Enhancement
- Multi-Stop - Cluster Merge Enhancements
- Load Configuration 3D Pattern/User Defined Pattern Enhancement
- Edit Load Config Additional Packing Constraints
- Save As User-Defined Pattern
-
- Freight Payment, Billing, and Claims
- Oracle Fleet Management
- Logistics Digital Assistant
- Global Trade Management (Base)
-
- Improvements to Propagating Information from OTM Objects to GTM Objects
- Order Release to Transaction Data Configuration Using New Date and Number Attributes
- Display All Address Lines on Party
- Support for Trade Values on Item
- View Additional Details About Trading Partner on Item
- Additional SmartLinks on Item-Related Objects
- Visibility To Item Information On Item Origin
- Identify the Campaign Purpose in Logic Configuration
- Solicit Information for an Item Using Campaign Management
- Solicit Information for an Item Origin Using Campaign Management
- Partner Item to Campaign Data Configuration Using New Date and Number Attributes
- Campaign Line to Item Data Configuration Using New Date and Number Attributes
- New Attribute Fields Added to Various Objects
- Additional Pseudo-Fields Available Across Various Objects
- Transaction Line Attribute Flex Fields Sent in Outbound XML
- Update Various GTM Integration Elements to Be Optional
- New Resources Added to REST APIs
- Use GTM General Parameter Set
- Allow Declaration Grouping Criteria Changes
-
- Trade Agreements
- Trade Compliance
- Customs Management
- Global Trade Intelligence (GTI)
- Transportation and Global Trade Platform
- Upcoming Changes
This document will continue to evolve as existing sections change and new information is added. All updates appear in the following table:
| Date | Product | Feature | Notes |
|---|---|---|---|
| 25 MAR 2022 | Transportation and Global Trade Platform |
Updated document. Revised opt in information. | |
| 17 DEC 2021 | Transportation and Global Trade Platform |
Updated document. Revised opt in information. | |
| 25 JUN 2021 | Transportation Operational Planning | Merge Shipment Action - Enhanced | Updated document. Revised feature information. |
| 15 JUN 2021 | Technical Features | Use Nested GID in Agent DTA | Updated document. Revised feature and opt in information. |
| 12 MAR 2021 | Trade Agreements | Rules of Origin - Data Download and Objects | Updated document. Revised feature information. |
| 24 FEB 2021 | Transportation and Global Trade Platform |
Manager Layout Enabled - Contact Manager |
Removed feature from update 21A. |
| 19 FEB 2021 | Transportation and Global Trade Platform |
Disable IntXmlService and IntGtmXmlService | Updated Document. Revised feature information. |
| 17 FEB 2021 | Transportation and Global Trade Platform | REST - New Query String Parameters to Hide/Show Primary Key Fields in REST Payload | Updated document. Delivered feature in update 21A. |
| 05 FEB 2021 | Oracle Transportation Management (Base) | Updated document. Delivered feature in update 21A. |
|
| 05 FEB 2021 |
Oracle Fleet Management | Work Assignment - First Shipment Selected Planning Parameter |
Updated document. Delivered feature in update 21A. |
| 18 DEC 2020 | Created initial document. |
This guide outlines the information you need to know about new or improved functionality in Oracle Transportation & Global Trade Management Cloud Update 21A. Each section includes a brief description of the feature, the steps you need to take to enable or begin using the feature, any tips or considerations that you should keep in mind, and the resources available to help you.
GIVE US FEEDBACK
We welcome your comments and suggestions to improve the content. Please send us your feedback to otm-doc_us@oracle.com. Please indicate you are inquiring or providing feedback regarding the Oracle Transportation & Global Trade Management What’s New in Update 21A.
This section gives you information to help you plan, deploy, and validate your update. We make frequent additions to this document, so don’t forget to check back and get the latest information before your update starts.
Review the Release Notes.
- The release notes include fixes, special instructions, and resolutions related to the Oracle Transportation and Global Trade Management Cloud.
- Release Notes can be found here:
- https://support.oracle.com/epmos/faces/DocumentDisplay?id=2620583.1
Use the following resources to prepare for and validate your Oracle Engagement Cloud update.
On My Oracle Support Read:
- Doc ID 2095509.1
- Oracle Cloud Applications - Transportation and Global Trade Management Cloud: Environment Refresh Policy
- Doc ID 2095528.1
- Oracle Cloud Applications - Transportation and Global Trade Management Cloud: Quarterly Update Planning
- Doc ID 2096782.1
- Oracle Cloud Applications - Transportation and Global Trade Management Cloud: Quarterly Update Planning FAQs
- Doc ID 2195580.1
- Oracle Cloud Applications - Transportation and Global Trade Management Cloud: Get Started with Your Implementation
- Doc ID 2508854.1
- Oracle Cloud Applications - Transportation and Global Trade Management Cloud: Quarterly Updates - Preparation and Testing Recommendations
Column Definitions:
Features Delivered Enabled
Report = New or modified, Oracle-delivered, ready to run reports.
UI or Process-Based: Small Scale = These UI or process-based features are typically comprised of minor field, validation, or program changes. Therefore, the potential impact to users is minimal.
UI or Process-Based: Larger Scale* = These UI or process-based features have more complex designs. Therefore, the potential impact to users is higher.
Features Delivered Disabled = Action is needed BEFORE these features can be used by END USERS. These features are delivered disabled and you choose if and when to enable them. For example, a) new or expanded BI subject areas need to first be incorporated into reports, b) Integration is required to utilize new web services, or c) features must be assigned to user roles before they can be accessed.
Transportation and Global Trade Management
Transportation and Global Trade Platform
UI Configuration Logic Configuration
This feature provides you with a UI Configuration Logic Configuration Type that you can use to configure some UI behaviors.
The parameters available with the UI Configuration Logic Configuration include:
HOME PAGE PARAMETER
- OPERATORS FOR NAVIGATION LINK SEARCH - allows you to set the search criteria to Begins With or Contains for the Navigator Links.
NOTE: Does not apply to Saved Searches.
- Default Value=Begins With
- New Option=Contains
Below is an example of the default/current behavior. All navigation links that begin with "SHIPM" are returned.
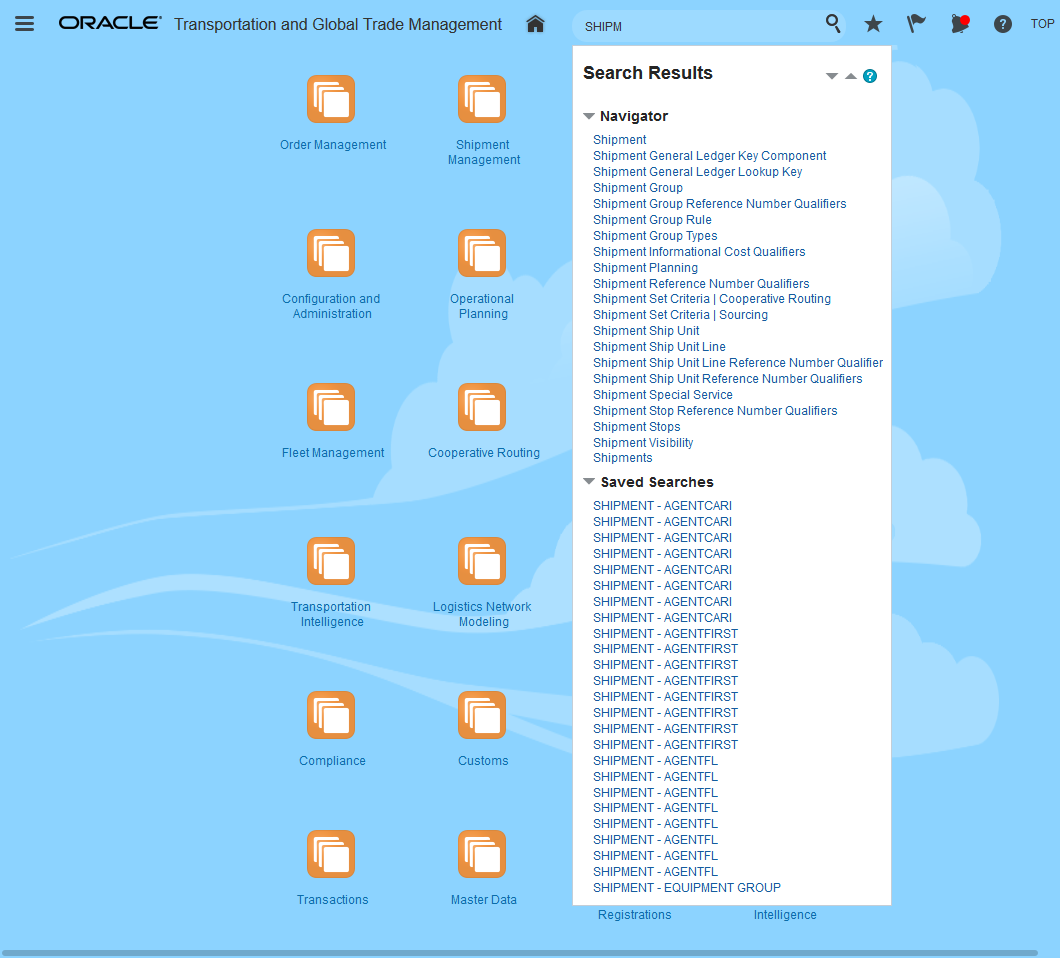
Operators for Navigation Link Search - Default Begins With
Below is an example using the parameter OPERATORS FOR NAVIGATION LINK SEARCH set to the Contains. The search here is for Navigator links that contain "HIP". Note that many more options are returned using the Contains option.
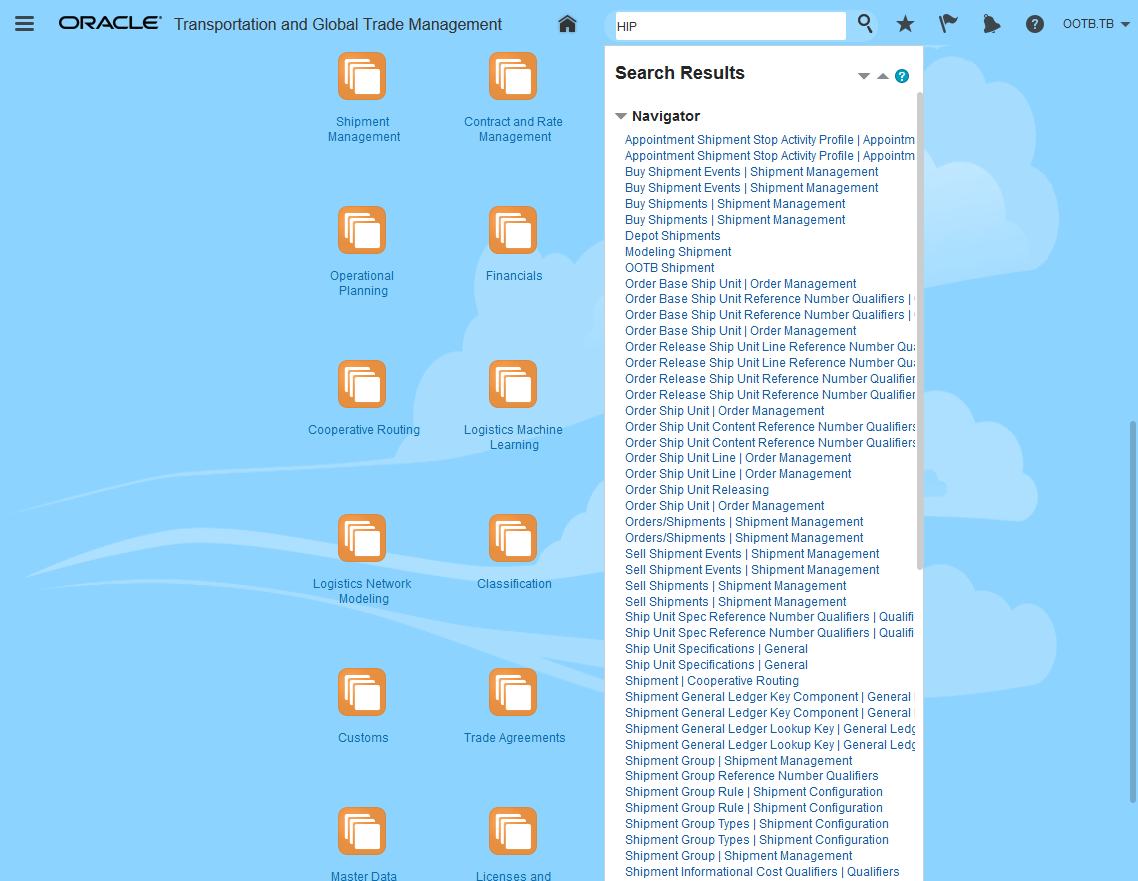
Operators for Navigation Link Search - Contains
RESULT SELECTIONS PARAMETERS
- AUTO SELECT WHEN ONE RECORD - in the situation where one record is returned/available to perform an operation/action - this feature allows you to proceed without forcing you to select the one/only record available.
- Default Value=FALSE - not selected - current behavior.
- New option=TRUE - single record is selected - new behavior. This will apply to finder, edit, and action results screen.
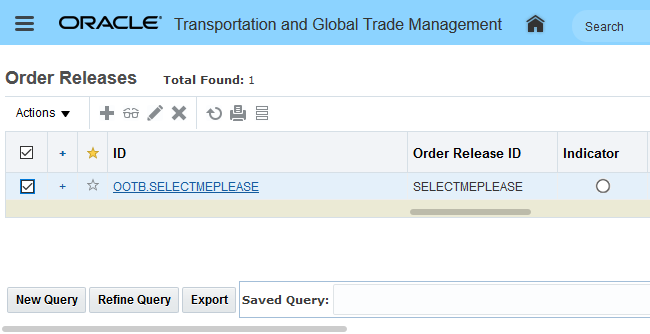
Below is an example of the default/current behavior. When a finder result returns one record the returned result is not selected automatically and if you attempt to proceed with running an action the popup message appears..
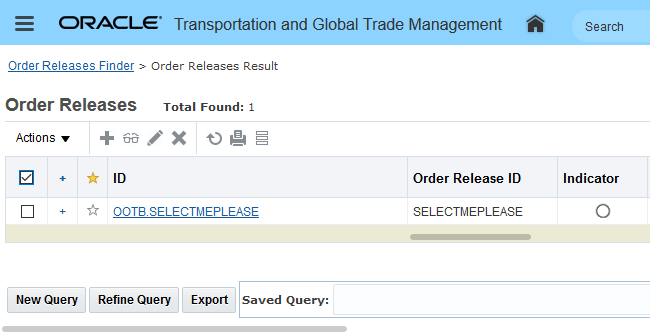
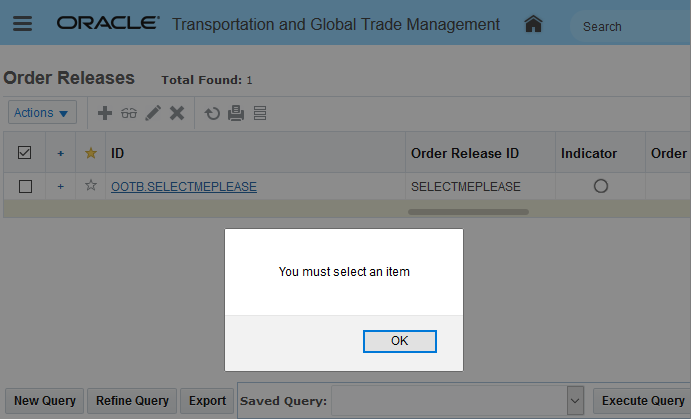
Auto Select When One Record Default/Current Behavior
Below is an example of the new behavior. With the parameter for AUTO SELECT WHEN ONE RECORD set to TRUE, the finder result with one record result automatically selects the single record.
Result Selection - Auto Select When One Record - True
- MAINTAIN SELECTIONS WHEN RERUN QUERY - provides you with the option to retain your selected records (new behavior) or not retain your selected records and receive a warning that the selection will be lost when you re-run the query - current behavior.
- Default Value=FALSE
Below is an example of the default/current behavior. When MAINTAIN SELECTIONS WHEN RERUN QUERY is set to the default value of FALSE a warning message is displayed informing you that the selected records will be lost if you proceed with running the query.
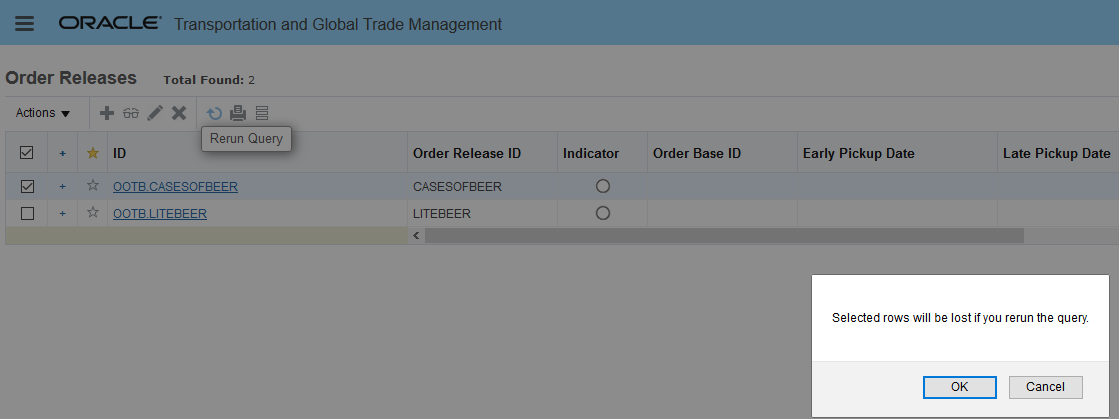
Maintain Selections When Rerun Query - Default Value - FALSE
When MAINTAIN SELECTIONS WHEN RERUN QUERY is set to TRUE the selection is maintained and the message "Selected rows will be lost if you rerun the query" is no longer shown.
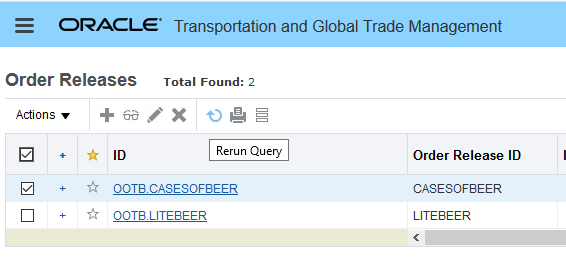
Maintain Selections When Rerun Query - Set to TRUE - New Option
The new UI Configuration Logic Configuration Type is below.
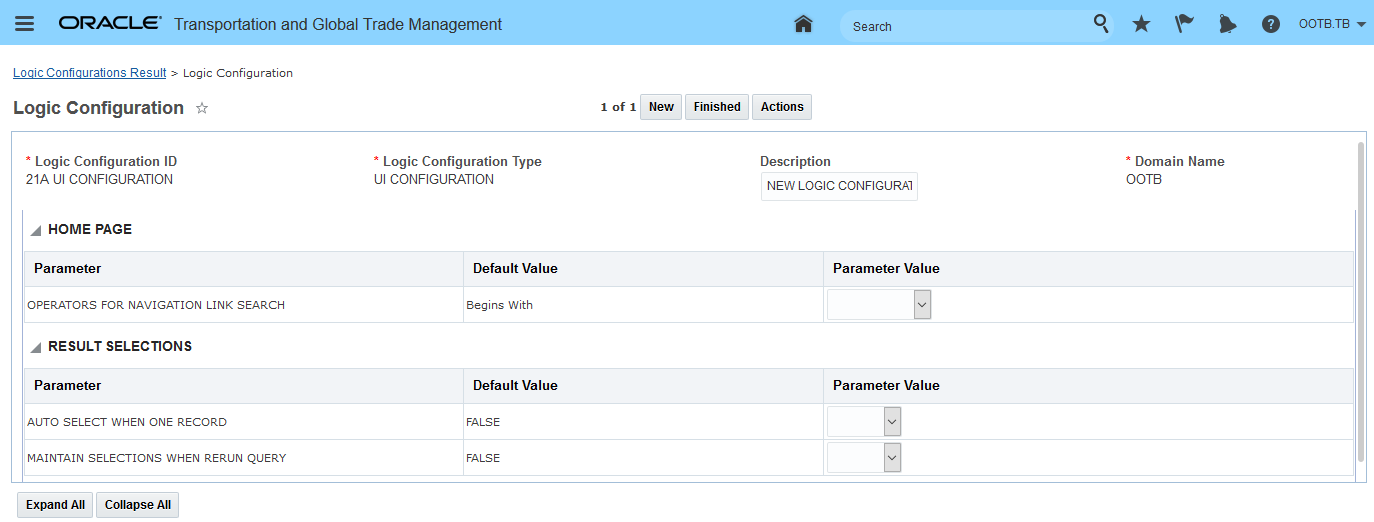
UI Configuration Logic Configuration Type
You have the following options for setting the UI Configuration Logic configuration:
- You can use the seeded public Logic Configuration which is provided with the parameters set to the default settings, ID = UI CONFIGURATION DEFAULT
- You can create your own UI Configuration Logic Configuration and use that in your assorted domains.
- You can create your own UI Configuration Logic Configuration and assign the desired UI Configuration for your users using the User Preference UI Configuration Preference option.
- You can set the glog property glog.webserver.ui_configuration_default_logic_config to select the Logic Configuration to use at the instance wide level.
Below is an example of a setup at the User Preference level.
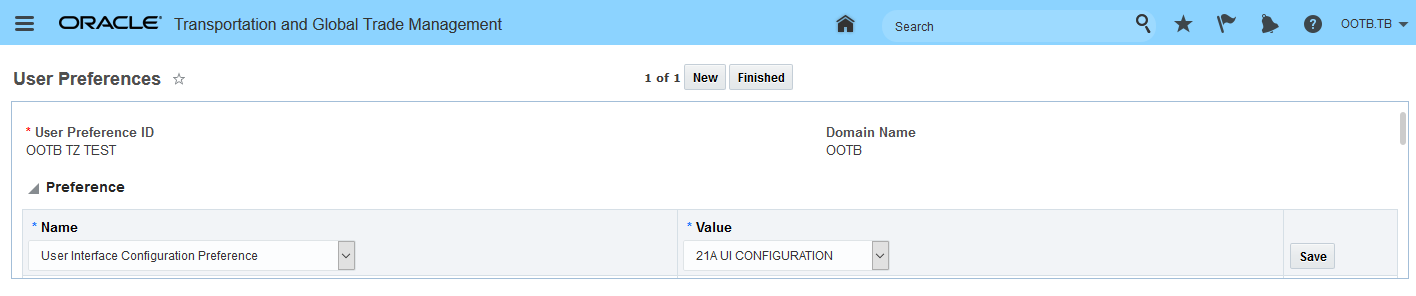
UI Configuration Set on User Preference
This feature improves the user's access to navigator links and improves the user's efficiency by eliminating unnecessary mouse clicks.
Steps to Enable
You don't need to do anything to enable this feature.
Manager Layout - UOM and Currency Field Size Setting
This feature provides you with the option of modifying the field size of your UOM and Currency fields. You can change the field size of your UOM and Currency fields by editing the field in the Manager Layout and then setting the Field Size attribute to the desired size.
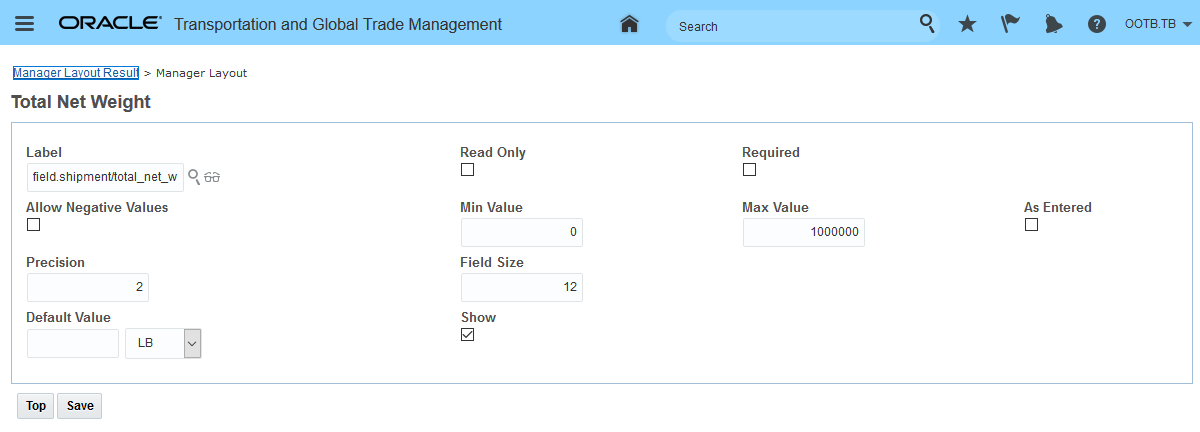
Field Size Attribute
This feature will allow you to increase or decrease the field size of your UOM and Currency fields, which will provide you with less wasted space on your UIs.
Steps to Enable
You don't need to do anything to enable this feature.
Manager Layout Grid Configuration - Separate Disable Options for Creation and Deletion
This feature provides you with two additional options for configuring your manager layout grids. Specifically, this feature allows you to configure your grids with creation disabled while deletion is allowed or with deletion disabled while creation is allowed. Previously, the options related to creation and deletion were combined into one Disable Creation and Deletion option - so you either enabled or disabled both creation and deletion options together.
.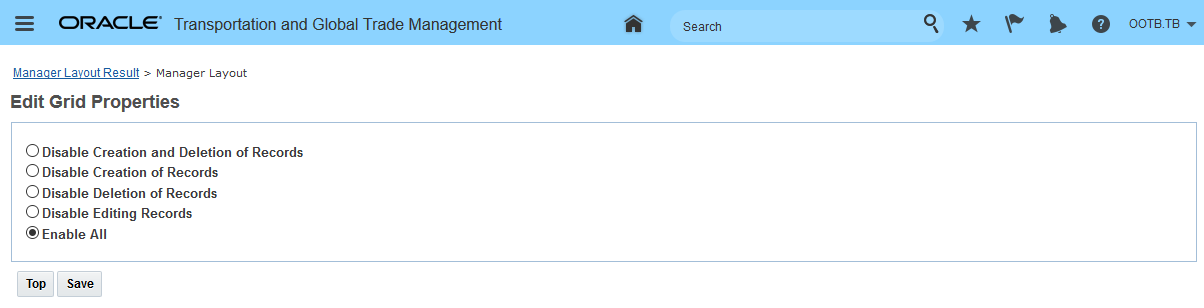
Manager Layout Grid Configuration
The additional manager layout grid configuration will be extremely beneficial for all clients who have business scenarios that required the configuration of grids that required separate configuration control for the creation or deletion of grid entries.
Steps to Enable
You don't need to do anything to enable this feature.
Workbench - Create/Copy Access Control Enhancement
This feature provides you with a new Access Control List value "Workbench - Create" that you can configure to control access to the Workbench Create/Copy options at the User or User Role level.
By default, most users will have access to the Create/Copy buttons as highlighted below.

Create/Copy Available in Workbench
This feature provides you with the option - at the user and user role levels - to disable the Create/Copy buttons on the Workbench - as highlighted below.

Create/Copy Buttons Disabled (grayed out)
This feature is controlled by a new Access Control List value "Workbench - Create". This new Access Control has been provided as a child of the "DEFAULT" and "ADMIN" Access Control Lists so that all users with the "DEFAULT" and "ADMIN" roles will have access to the create and copy buttons by default. You - as ADMIN - have the option to grant/not grant access for your users at the User or User role level.
Provides you with additional controls for the access your users will have to create/copy the Workbenches the user(s) have access to in your implementation.
Steps to Enable
- To prevent a user from Create and Copy buttons, you can revoke the "Workbench - Create" ACL from the User
.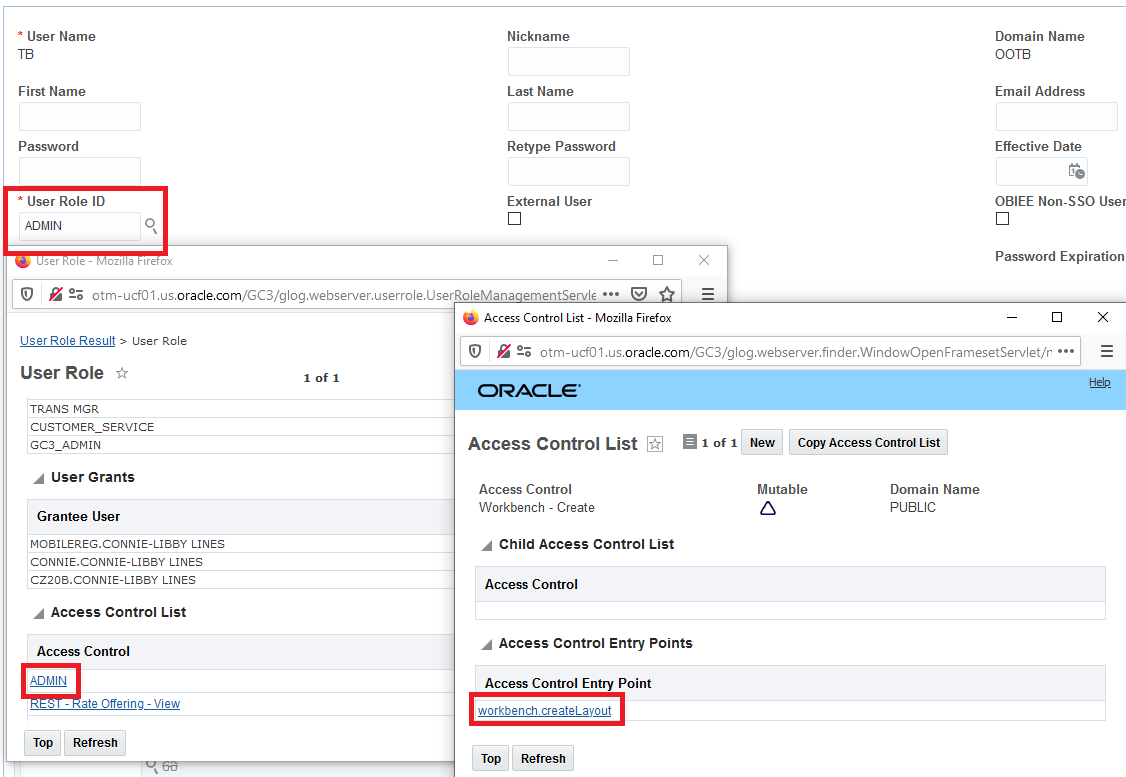
Starting Setup ADMIN User Role with Workbench Create Layout Access
To remove workbench create and copy access for a user - add the 'Workbench - Create' entry below (with the Granted option unchecked) to the user's Access Control List.
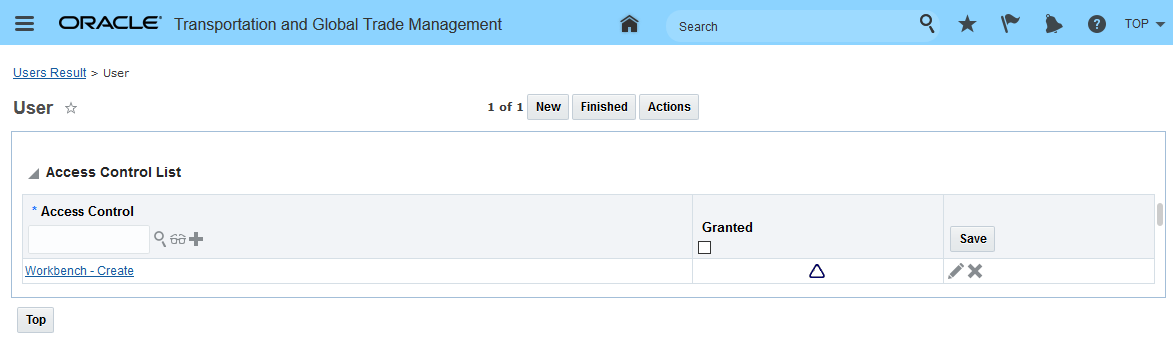
Access Control Entry to Remove Create/Copy Access for a User
To remove workbench create and copy access for a User Role - add the 'Workbench - Create' entry, as shown above (with the Granted option unchecked), to the User Role Access Control List.
The Document Sets feature allows you to predefine a set of document types that you want to send as a set to one or more involved parties based on the party's involved party qualifier. You'll find this feature extremely useful in any situation where the set of document types sent to your involved parties is repetitive.
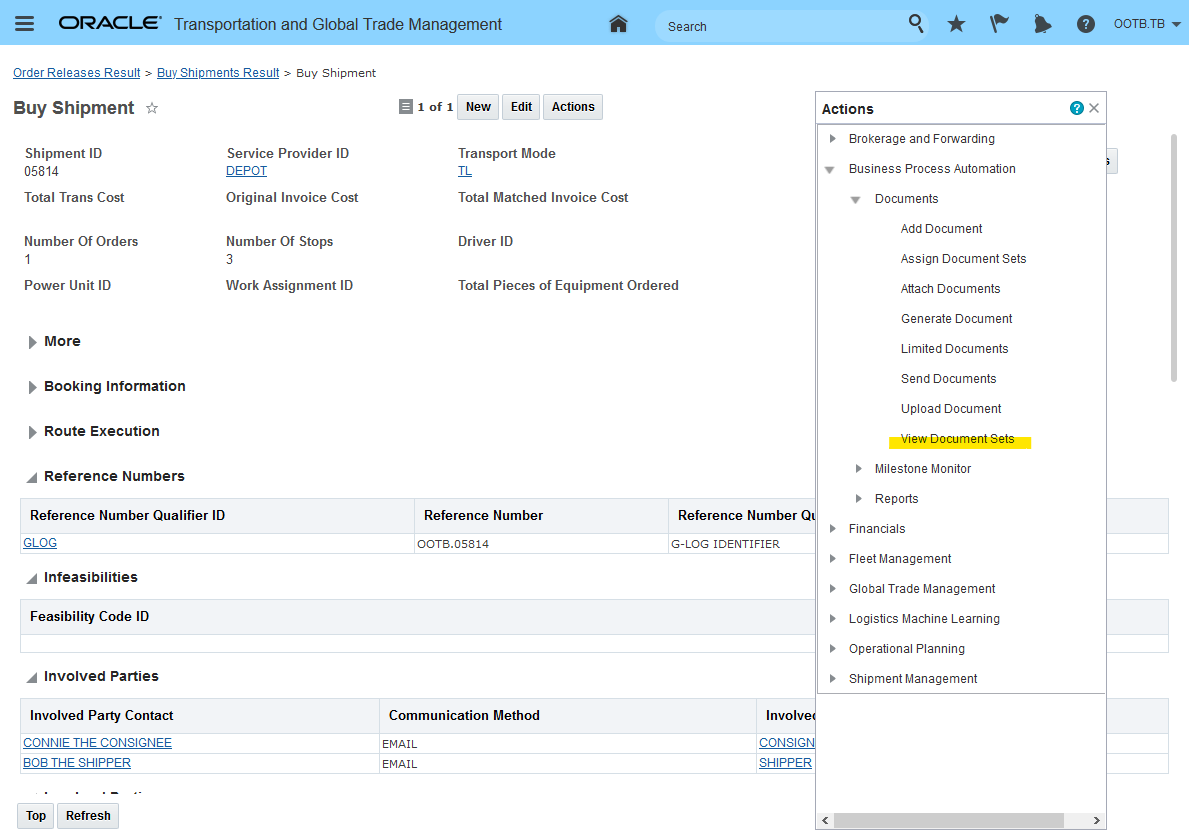
For the supported objects - Shipment (both Buy and Sell), Trade Transaction and Declaration - this feature provides you with the ability to:
- Use the UI Action - Assign Document Sets - to assign document sets to the supported objects
- Use the UI Action - View Document Sets - to view or remove assigned document Sets
- Use the enhanced UI Action - Send Documents - to send document sets or documents
- Use the Agent Action - Send Document Sets - to send the assigned document sets from the supported objects
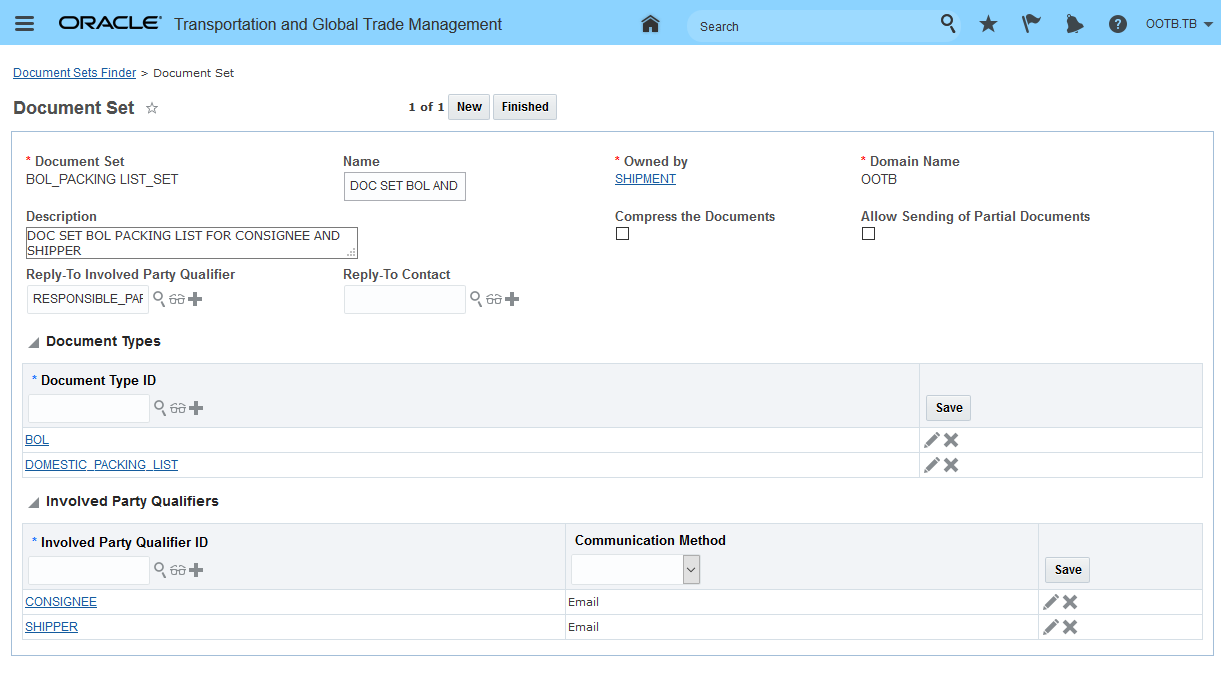
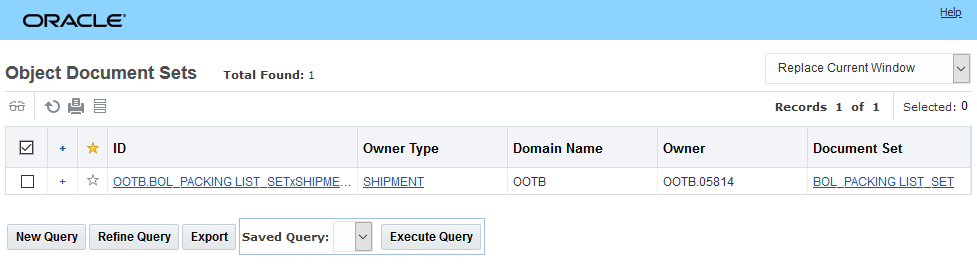
In the example below - a document set (BOL_PACKING LIST_SET) owned by the shipment has been created. This Document Set will - when assigned to an object (in this case a Shipment), allow you to send the assigned document types of BOL and Domestic Packing List to the Consignee and Shipper Involved Parties via email using the Send Document Action..
Document Set Example Setup
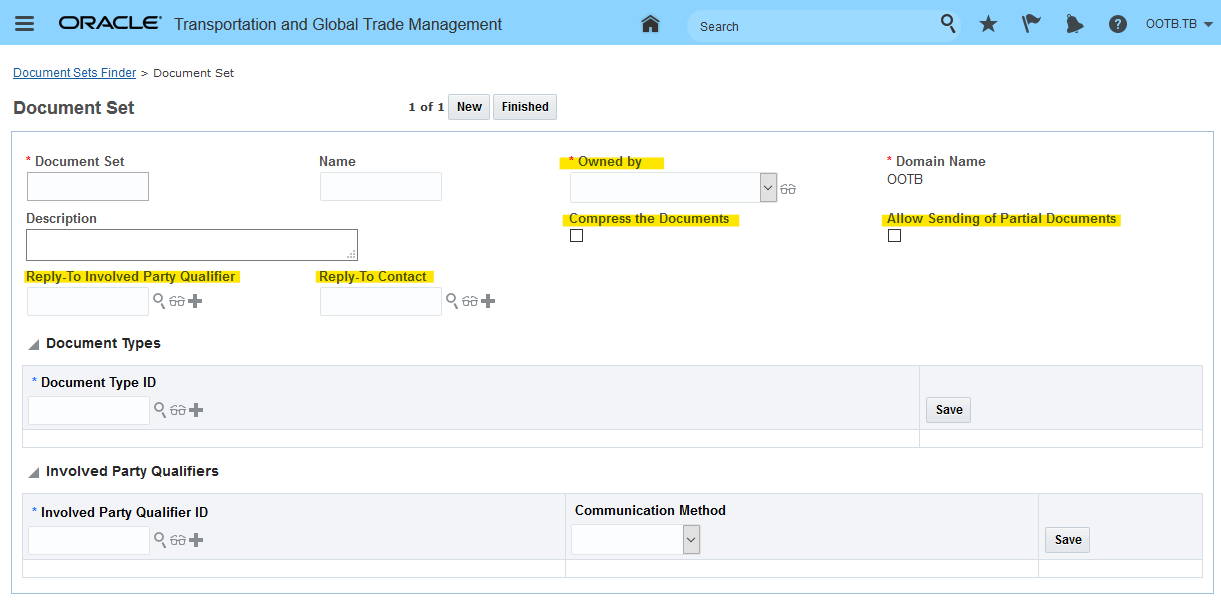
The setup is straightforward - a few items to note on the Document Set manager:
- The Owned By drop down allows you to select the objects in OTM and GTM that you want to assign a Document Set to - the currently supported objects are Shipment (Buy/Sell), Trade Transaction and Declaration.
- Selecting the Compress the Documents check box will compress the documents in the set and sends them via email as an attached .zip file. If you do not select this check box, documents will be sent as individual attachments.
- The Allow Sending of Partial Documents check box will allow you to send the document set if only some of the document types in the document set are on the business object. If you do not select this check box, an email will be sent only if all the document types defined for the Document Set are on the business object.
- Reply-To - you have the option of entering the Reply-To for the Document Set by either specifying a Reply-To involved party using the Reply-To Involved Party Qualifier field or you can enter a Reply-To contact ID directly in the Reply-To Contact field. The value entered in Reply-To Contact field will take precedence over the value mentioned in the Reply-To Involved Party Qualifier field.
.
Document Set Features
Once defined - the Document Set can be assigned to an object and then sent. In the example below - the Document Set created above is manually assigned.
NOTE: You can assign more than one Document Set to an object.
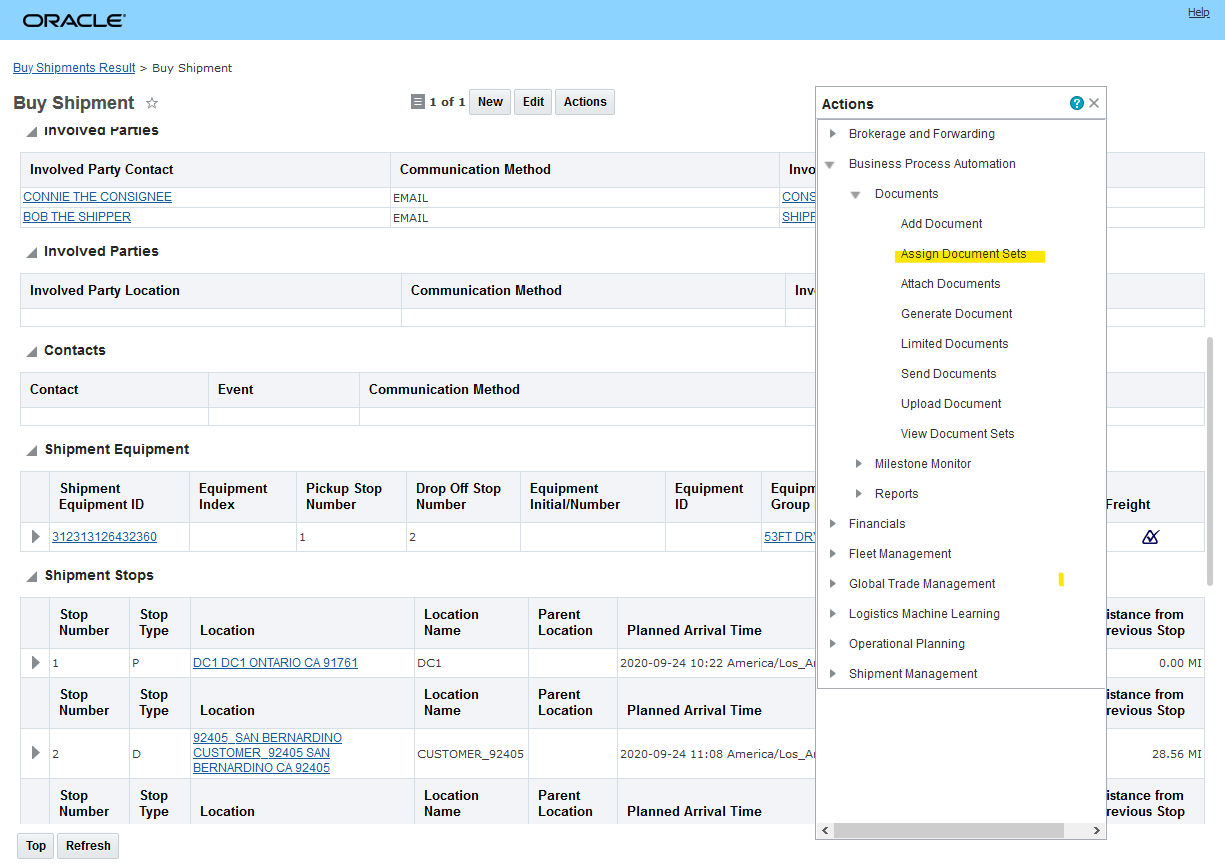
Manually Assign Document Set to Shipment
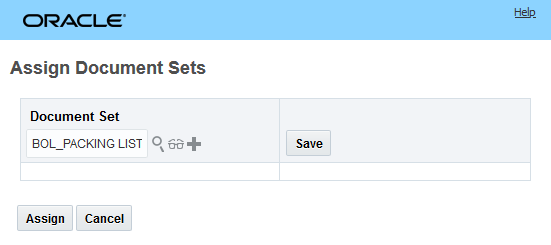
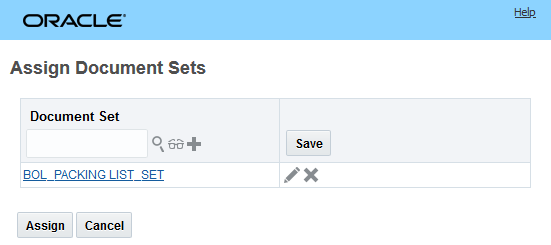
Assign Document Set Input
Assign Document Set Result
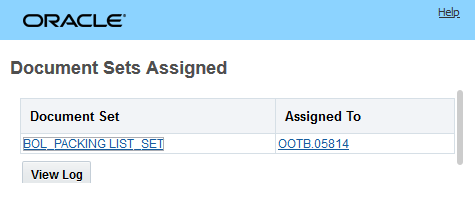
To see the Document Sets assigned to an object you can use the View Document Sets Action.
View Assigned Document Sets
View Document Sets Results
To send document sets - you will use the Send Documents Action - this action has been enhanced to support sending individual documents or document sets.
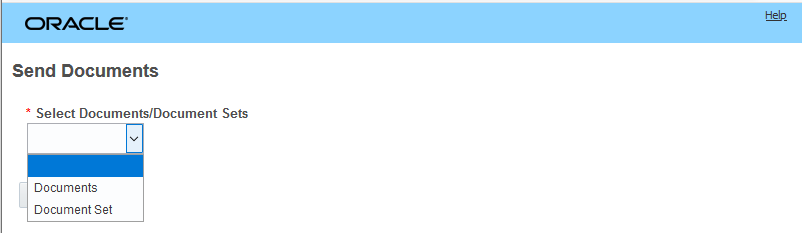
Send Documents Action - Documents and Document Sets Supported
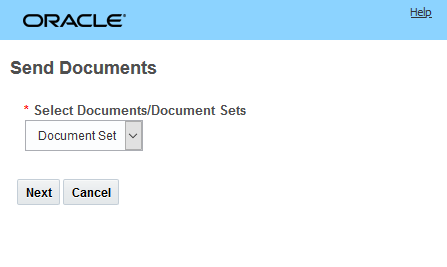
Send Document Sets
Select the document set or sets to send.

Send Document Sets - Select Document Set to Send Action Input
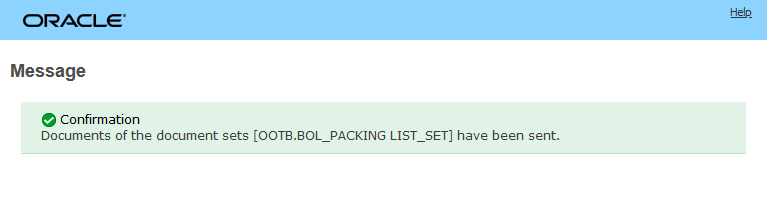
Send Document Success
Both of the involved parties Bob Shipper (Involved Party Shipper) and Connie Consignee (Involved Party Consignee) receive the two documents in the defined Document Set via email. Email received below.
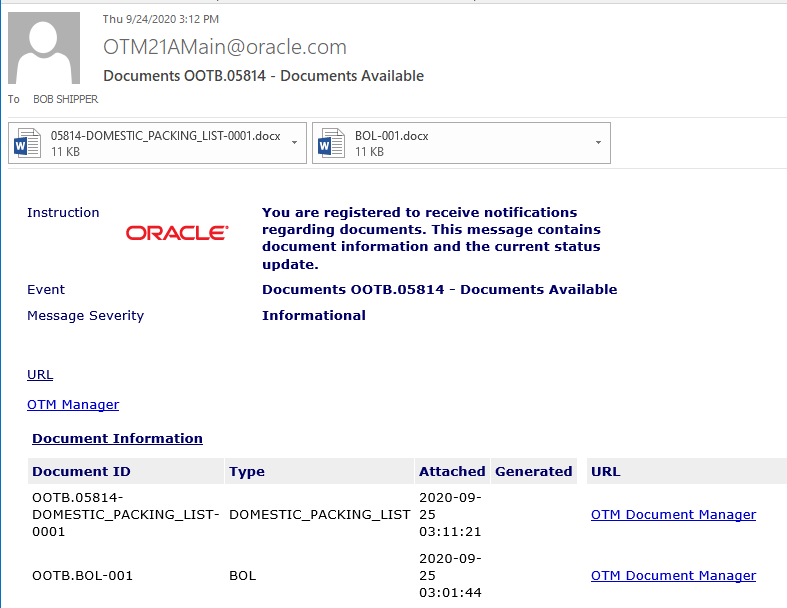
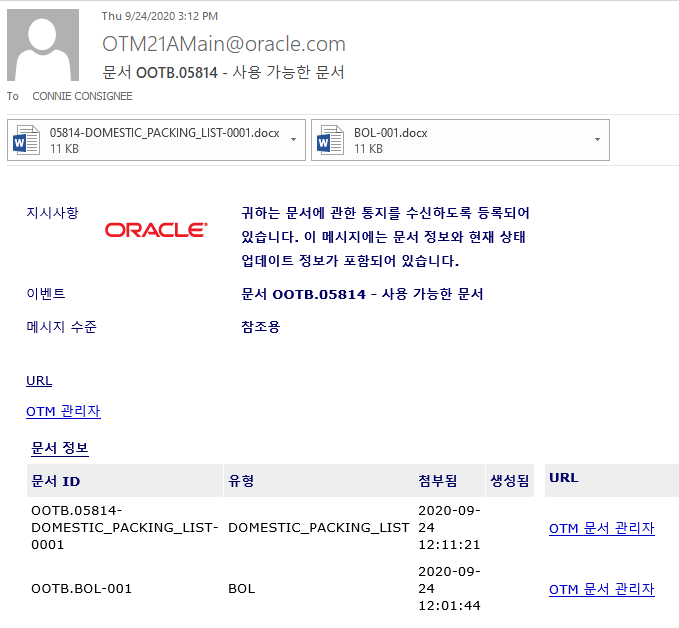
Emails Received by Bob Shipper and Consignee
If the selected Document Set assigned to the shipment required that all document types be present on the object and if this requirement was not satisfied, then in this case the Send Documents action will fail and the message below will be provided..
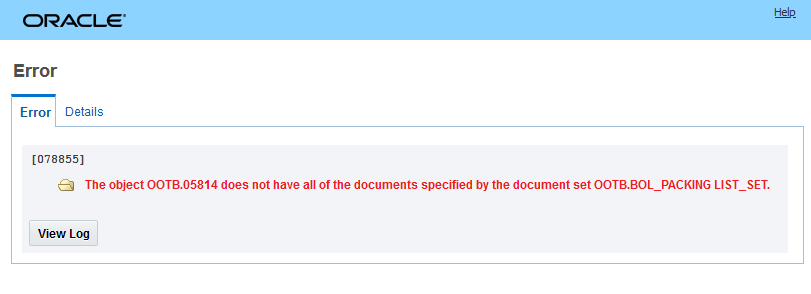
Not All Documents Assigned to Object Error
In the simple example below, when the agent action is triggered - assuming the Involved Parties and Document Types have been assigned to the shipment - then the documents will be transmitted to the defined involved parties in the Document Set.
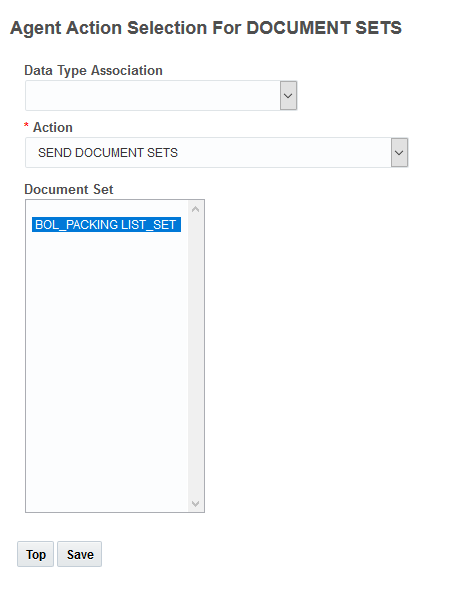
Send Document Agent Action Setup
For the Shipment (both Buy and Sell), Trade Transaction and Declaration, this feature simplifies the steps required for selecting the set of document types that should be sent and the involved parties who should be receiving those various document types.
Steps to Enable
To use/send a Document Set you will need to create a document set first. The steps for adding a Document Set are provided below.
Navigate to Business Process Automation > Power Data > Document Generation > Document Types to create a Document Set.
- Enter a unique identifier in the Document Set field.
- Enter the name of the document set in the Name field.
- In the Owned By drop down field select the business object for which the document set will be applicable.
- Enter a description of the document set in the Description field.
- Select the Compress the Documents check box to compress the documents and send them via email as an attached .zip file. If you do not select this check box, documents will be sent as individual attachments.
- Select the Allow Sending of Partial Documents check box to send email even if documents of only some of the document types on the business object are present. If you do not select this check box, an email will be sent only if documents of all the document types mentioned on the business object are present.
- Enter the involved party qualifier on the object that would be used to specify a contact to send reply emails in the Reply-To Involved Party Qualifier field.
- Enter a contact ID directly in the Reply-To Contact field. This contact will receive the reply emails. The value entered in this field will take precedence over the value mentioned in the Reply-To Involved Party Qualifier field.
Tips And Considerations
The Send Document Set Action - in addition to checking if the object does or does not have all the required documents (based on the configuration) will also check if the object has all of the Involved Party Qualifiers defined in the Document Set.
For example, if the Document Set has a Shipper and Consignee Involved Party Qualifier defined and the object you wish to send the Document Set from only has one of the required Involved Parties defined, the error message below will be provided when sending the document set using the web action. An equivalent error message will be provided in the Logs if you trigger the Send Document Set via an agent action.
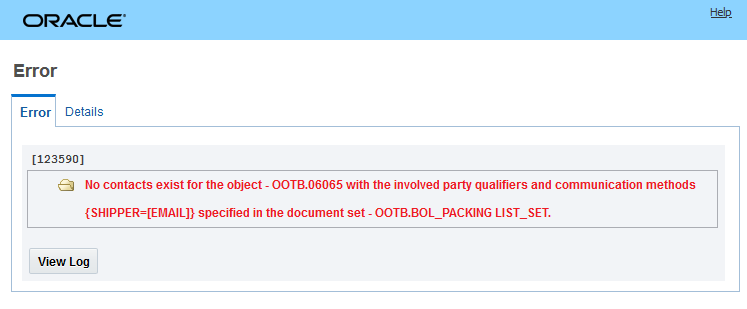
Object Missing Document Set Involved Party Qualifier
REST - New Query String Parameters to Hide/Show Primary Key Fields in REST Payload
Almost all resources in OTM/GTM use a Unique Global Identifier, or 'GID', as the primary key for records in the database. The GID value is a concatenation of an External Identifier, or XID, and a Domain Name. Sub-resources can also have their own GID field as well as their parent GID field. In an earlier release of the REST API, the data returned for a specific resource request contained all GID, XID and Domain Name attributes which meant that there was a level of redundancy between those values, and most of the sub-resources returned since the parent GID was repeated in each sub-resource even though the parent GID is implicit within the enclosing context.
In Release 19B, two properties were introduced to control whether or not the primary and parent GIDs were returned by default:
- glog.fusion.cil.restapi.config.hideParentPks
- glog.fusion.cil.restapi.config.hidePks
To support backward compatibility, the property settings were set so that the GIDs were returned and the recommendation at that time was to change the properties to not return the GIDs as it was intended to be the default logic in a future version. In Release 20C, the default property values were updated so that these GIDs were not returned.
In Release 21A, two new URL query parameters have been added to replace these properties and therefore allow the GIDs to be returned on a request by request basis. REST client applications should therefore be modified to use the new query parameters instead of the system properties.
The new parameters allow the GIDs to be returned on a request by request basis.
Steps to Enable
Review the REST service definition in the REST API guides, available from the Oracle Help Center > your apps service area of interest > REST API. If you're new to Oracle's REST services you may want to begin with the Quick Start section.
Tips And Considerations
The properties provided previously are no longer considered - your REST client applications should therefore be modified to use the new query parameters instead of the system properties.
REST - Batch Processing/Asynchronous REST API
This feature provides you with the option of using the REST APIs to perform batch loading of OTM objects. Previously, the OTM/GTM Rest Services only supported a synchronous one record at a time operation versus the asynchronous processing available using the XML-based SOAP APIs.
New Capabilities added as part of this feature:
- Transmissions resource - capability to POST the Transmission resource
- Transmission supports mixed resource types with (potentially) mixed operation types e.g. POST & JSON PATCH
- Support for Transmissions with refnums
- Support Transmissions with sender reference
- Support for Transmission and Transactions with Process Groups and sequencing
This feature introduces the option of using the REST API in JSON format to load batches of data into OTM/GTM.
Steps to Enable
You don't need to do anything to enable this feature.
Tips And Considerations
The intention of this feature is to cover all batch scenarios using REST, however, there is the possibility (this being the first release of this new functionality) that some scenarios may not work in an optimal fashion and/or some of your desired scenarios are not yet fully supported.
The REST Asynchronous/Batch Processing capabilities provided by this feature should be considered as an additional integration option available for you to use depending on your integration requirements and the scenarios that need to be supported. This feature is not intended to replicate or serve as a replacement for the XML Soap Based APIs that have been in the application for 20 plus years. We suggest starting with a mixed/hybrid integration approach where the heavy lifting/high volume interfaces remain (for now) on the XML based APIs - while the available REST capabilities are used to support scenarios where the REST architectural style, protocol and message format provide a better fit.
Key Resources
- See the REST API online documentation for a complete description of the new capability.
REST - Power Data Phase 2 - for Major Objects
This feature represents the second release of REST Service enabled power data resources. This second phase deliverable is focused on more complex multi-table power data elements related to OTM/GTM major objects - like order base, order release, item, location, shipment, tracking event, trade transaction etc. The supported power data resources along with information regarding these resources can be found in the REST services documentation.
In addition to the newly added power data resources, User Access Control List entries have been added so you can control which users are and are not allowed to have access to the REST APIs for View and Update.
User Access Control List Additions:
- REST - Exchange Rate Configuration - Update
- REST - Exchange Rate Configuration - View
- REST - Transmission Configuration - Update
- REST - Transmission Configuration - View
- REST - Voucher Configuration - Update
- REST - Voucher Configuration - View
The additional power data REST resources allows you to extend the application for reporting purposes, UI development or mobile application development.
Steps to Enable
Review the REST service definition in the REST API guides, available from the Oracle Help Center > your apps service area of interest > REST API. If you're new to Oracle's REST services you may want to begin with the Quick Start section.
Key Resources
- REST API for Transportation and Global Trade Management Cloud document available here
REST - POST, PATCH, DELETE Methods Supported for Document Resources
This feature provides you with the ability to POST, PATCH, and DELETE your document resources. With these additions - you now have the GET (provided in an earlier update), POST, PATCH, and DELETE methods available to use with your document resources.
Similar to uploading a document in the Document manager the code will attempt to ascertain the Type (BLOB or CLOB) and Mime Type (text/plain, image/jpeg, etc.).
- The clobContent attribute should be used when uploading text documents (text/plain, text/xml, text/html, etc.). It should be a BASE64 encoded version of the string, which is to be saved.
- The blobContent attribute should be used when uploading binary documents (image/jpeg, image/pdf, etc.). It should be a BASE64 encoded version of the file, which is to be saved.
This feature allows you to upload/create documents using REST services.
Steps to Enable
You don't need to do anything to enable this feature.
REST - Add JSON Patch Test Operation
This feature expands the available JSON PATCH operations to include "test" capability to make the JSON PATCH operations conditional based on the object data content. For OTM/GTM, this means accepting a JSON PATCH compliant message to apply a number of modifications to a REST API resource.
Provides you with the option of applying a number of modifications to a REST API resource.
Steps to Enable
Review the REST service definition in the REST API guides, available from the Oracle Help Center > your apps service area of interest > REST API. If you're new to Oracle's REST services you may want to begin with the Quick Start section.
This feature will allow you (the DBA.ADMIN) to - when necessary - run an incremental ETL data load from a date (in the past) that you specify (the Lookback Date) which will allow you to load data that may have been skipped as part of your daily/standard ETL load process.
In the example below, the Last Refresh was on 2020-11-23 06:49:40, and by default the next daily ETL run would load data from this date/time forward, however, the Lookback setup below (Lookback ETL checked and Lookback Date specified) will run an incremental ETL starting on the specified Lookback Date of 2020-11-02 and will load data looking forward 14 days i.e., to 2020-11-16. Any data in this range that failed to load previously will be loaded as part of this incremental run.
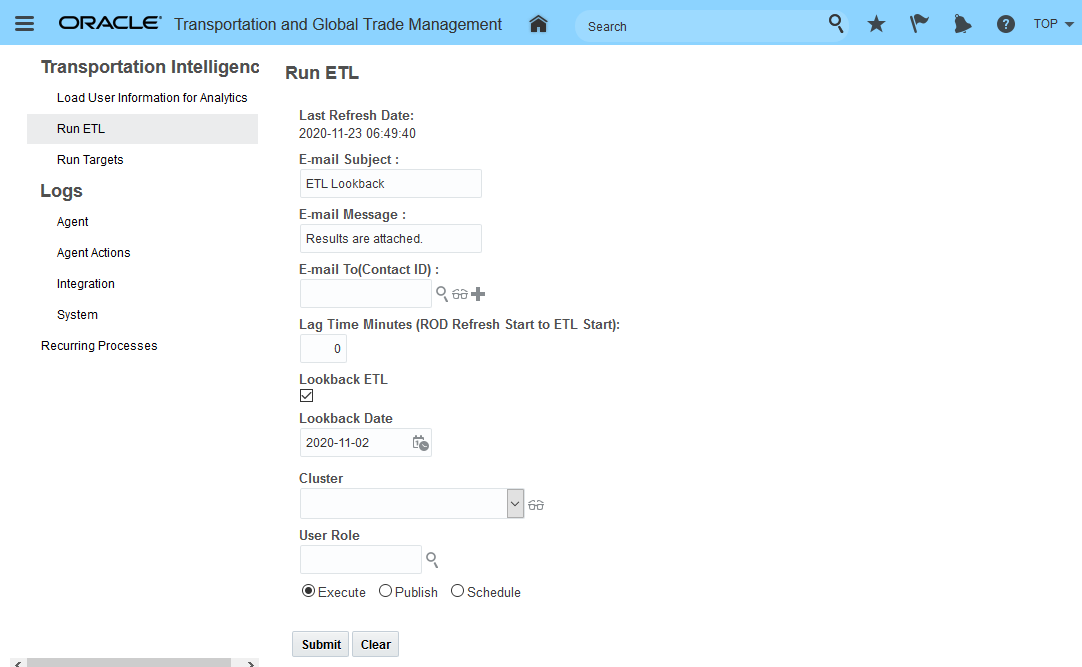
Process manager ETL Lookback Example
This feature provides you with the ability to load data that, for whatever reason, failed to load/was skipped in prior ETL runs.
Steps to Enable
You don't need to do anything to enable this feature.
XML Schema Validation - Update
The XML Schema Validation feature was originally released with the 20A update with the Opt In set to FALSE/not enabled. For 21A, the Opt In is now TRUE/enabled by default. In addition, the Optional Until upgrade has been moved to the 21C update.
This feature, when enabled, will validate every inbound XML message against the set of XML Schema definitions. Strict validation will enforce rules like sequence of elements, invalid empty elements etc., all of which were allowed in the previous 'lax' validation logic. Any validation failure messages will be written to the application log and may require cross reference to the associated XML schema file to resolve the error.
Enforcing valid XML messaging improves instance security.
Steps to Enable
You don't need to do anything to enable this feature.
Tips And Considerations
While the manager for these features refers to them as "optional" - each of these features will become mandatory when the Optional Until update is released. The optional aspect of these features refers to the period of time where there is an opportunity to Opt In/Opt Out of enabling the feature. During this "optional" period - the time between when the feature is released and the release prior to the Optional Until release - the request/desire/intention is for you to enable the feature(s) for testing purposes so that the transition to mandatory, as of the Optional Until release, is uneventful.
This page is accessed via Configuration and Administration > Property Management > Optional Features.
NOTE: Only the DBA.ADMIN user can access and use the Optional Features page.
Key Resources
- See Integration Guide for more details.
Restrict External ID (XID) Creation to Valid Characters
The Validate ID feature, when enabled, will validate newly created records in OTM to insure that the external IDs (XIDs) entered do not contain restricted characters. The goal is to restrict the creation of XIDs to containing only numbers, upper-case letters, spaces, underscores and dashes.
The set of restricted characters is: , x > < = / & ? ; # $ ' " \r \n ( )
If a potential XID for a new record contains a restricted character, the transaction will fail. The validation for the XID will be handled for records entered via the XML and/or REST based APIs as well as records entered using the managers.
When the feature is enabled, you will receive a warning message in the managers listed below, if your proposed XID contains a restricted character.
- Buy Shipments
- Sell Shipments
- Location Manager
- Order Release
- Order Base
- Order Movement
- Item
- Packaged Item
- Driver Manager
- Itinerary Manager
- Rate Offering
- Rate Record
This feature will eliminate problems caused when invalid characters are used to generate object XIDs.
Steps to Enable
You don't need to do anything to enable this feature.
Tips And Considerations
Create all your XIDs so they contain only numbers, upper-case letters, spaces, underscores and dashes.
While the manager for these features refers to them as "optional" - each of these features will become mandatory when the Optional Until update is released. The optional aspect of these features refers to the period of time where there is an opportunity to Opt In/Opt Out of enabling the feature. During this "optional" period - the time between when the feature is released and the release prior to the Optional Until release - the request/desire/intention is for you to enable the feature(s) for testing purposes so that the transition to mandatory, as of the Optional Until release, is uneventful.
This page is accessed via Configuration and Administration > Property Management > Optional Features.
NOTE: Only the DBA.ADMIN user can access and use the Optional Features page.
Disable IntXmlService and IntGtmXmlService
The Disable IntXmlService and IntGtmXmlService feature disables the IntXmlService and IntGtmXmlService. This feature is set to TRUE/enabled by default.
While these services have been deprecated for several update cycles, this optional feature has been provided as a final notice that these services are beyond end-of-life and should no longer be used.
As background, these two services were replaced by a redesigned schema that was delivered in the v6.4.2 release (Q1 2017). The original GLogXML and GLogXML-GTM schema files had become cumbersome and problematic for modern SOA integration tools and needed to be updated. Changing the schema definitions also meant we had to produce a new SOAP service – TransmissionService – which supported the new schema messages.
The Integration Guide, starting with the 6.4.2 release, has explained that the IntXmlService and IntGtmXmlService were deprecated.
The benefits for moving to the the new schema are many and include:
- Access to features involving schema enhancements provided since v6.4.2.
- Improved performance. Pre-6.4.2 message formats are passed through an XSLT transformation to internally convert to the newer syntax and so avoiding this will improve performance.
- Required to support the Strict Schema Validation feature which is also enabled in 21A.
Disabling features that are no longer supported and should no longer be used.
Steps to Enable
You don't need to do anything to enable this feature.
Tips And Considerations
While the manager for these features refers to them as "optional" - each of these features will become mandatory when the Optional Until update is released. The optional aspect of these features refers to the period of time where there is an opportunity to Opt In/Opt Out of enabling the feature. During this "optional" period - the time between when the feature is released and the release prior to the Optional Until release - the request/desire/intention is for you to enable the feature(s) for testing purposes so that the transition to mandatory, as of the Optional Until release, is uneventful.
This page is accessed via Configuration and Administration > Property Management > Optional Features.
NOTE: Only the DBA.ADMIN user can access and use the Optional Features page.
DBXML Maximum Export Size Restricted
The DBXML Export Limit feature restricts the DBXML maximum export size, when the size limit is hit you will receive a 'DBXMLExport exceeded maximum export size.' message. This feature is set to TRUE/enabled by default.
The Opt In/Opt Out for this mandatory feature expires with the 22A update.
The business benefit of this feature is that excessively large DBXML exports will be aborted rather than overloading the server.
Steps to Enable
You don't need to do anything to enable this feature.
Tips And Considerations
While the manager for these features refers to them as "optional" - each of these features will become mandatory when the Optional Until update is released. The optional aspect of these features refers to the period of time where there is an opportunity to Opt In/Opt Out of enabling the feature. During this "optional" period - the time between when the feature is released and the release prior to the Optional Until release - the request/desire/intention is for you to enable the feature(s) for testing purposes so that the transition to mandatory, as of the Optional Until release, is uneventful.
This page is accessed via Configuration and Administration > Property Management > Optional Features.
NOTE: Only the DBA.ADMIN user can access and use the Optional Features page.
The Use Nested GID in Agent DTA feature when enabled, will remap the $GID inside a Data Type Association loop to be the child object of the association and the $PARENT will be assigned to the agent's business object.
This feature is set to True/enabled by default.
Optional Until 22C
This feature remaps $GID and $PARENT variables within agent Data Type Association loops.
Steps to Enable
You don't need to do anything to enable this feature.
Tips And Considerations
While the manager for these features refers to them as "optional" - each of these features will become mandatory when the Optional Until update is released. The optional aspect of these features refers to the period of time where there is an opportunity to Opt In/Opt Out of enabling the feature. During this "optional" period - the time between when the feature is released and the release prior to the Optional Until release - the request/desire/intention is for you to enable the feature(s) for testing purposes so that the transition to mandatory, as of the Optional Until release, is uneventful.
This page is accessed via Configuration and Administration > Property Management > Optional Features.
NOTE: Only the DBA.ADMIN user can access and use the Optional Features page.
The CSV Upload Cache Refresh feature was originally released in the 20A update, in the 21A update the Optional Until version has been moved to the 21C update.
This feature allows you, the DBA, to have OTM support immediate cache updates when CSV files are uploaded. By default the Opted In is set to TRUE/enabled.
When uploading CSV files via integration, impacted database changes are now collected. These changes are used to properly update any web-tier or app-tier caches across all clustered servers. Note that this feature also applies to any update statements made via the DIRECT SQL UPDATE agent action when using DML Returning cache refresh.
Improves CSV file integration processing.
Steps to Enable
You don't need to do anything to enable this feature.
Tips And Considerations
While the manager for these features refers to them as "optional" - each of these features will become mandatory when the Optional Until update is released. The optional aspect of these features refers to the period of time where there is an opportunity to Opt In/Opt Out of enabling the feature. During this "optional" period - the time between when the feature is released and the release prior to the Optional Until release - the request/desire/intention is for you to enable the feature(s) for testing purposes so that the transition to mandatory, as of the Optional Until release, is uneventful.
This page is accessed via Configuration and Administration > Property Management > Optional Features.
NOTE: Only the DBA.ADMIN user can access and use the Optional Features page.
Load Balance Topic Interface - Update
The Load Balance Topic Interface feature was originally released with the 20A update. In 21A, the Load Balance Topic Interface feature's Opt In has been set to TRUE/enabled by default and the Optional Until update version has been changed to 21C.
This feature, once enabled, allows you to setup OTM so that inbound Topic requests are published to Process Control and load balanced across multiple servers. When disabled, the inbound Topic requests are executed immediately on the server that received the request.
Provides you with the ability to so that inbound topic requests are published to the process control and load balanced across multiple servers.
Steps to Enable
You don't need to do anything to enable this feature.
Tips And Considerations
While the manager for these features refers to them as "optional" - each of these features will become mandatory when the Optional Until update is released. The optional aspect of these features refers to the period of time where there is an opportunity to Opt In/Opt Out of enabling the feature. During this "optional" period - the time between when the feature is released and the release prior to the Optional Until release - the request/desire/intention is for you to enable the feature(s) for testing purposes so that the transition to mandatory, as of the Optional Until release, is uneventful.
This page is accessed via Configuration and Administration > Property Management > Optional Features.
NOTE: Only the DBA.ADMIN user can access and use the Optional Features page.
Optimize Data Query Footprint - Update
The Optimize Data Query Footprint feature was originally delivered with the 20A update. For 21A, the Optimize Data Query Footprint Optional Until update has been moved to 21C.
This feature provides you with a Restructured Data Query memory usage that allows the memory used by one custom event topic to be released when all work associated with that topic is completed. This memory optimization feature is applied to all Data Query topics by default, i.e., the feature set to Opt In = TRUE/enabled by default.
This feature involved a number of lifetime and workflow changes focused on cleanup timing and event completion.
Improves performance.
Steps to Enable
You don't need to do anything to enable this feature.
Tips And Considerations
While the manager for these features refers to them as "optional" - each of these features will become mandatory when the Optional Until update is released. The optional aspect of these features refers to the period of time where there is an opportunity to Opt In/Opt Out of enabling the feature. During this "optional" period - the time between when the feature is released and the release prior to the Optional Until release - the request/desire/intention is for you to enable the feature(s) for testing purposes so that the transition to mandatory, as of the Optional Until release, is uneventful.
This page is accessed via Configuration and Administration > Property Management > Optional Features.
NOTE: Only the DBA.ADMIN user can access and use the Optional Features page.
Process Manager - Run As User Role
This feature allows you to setup your Recurring Processes so that they run using a specified User Role. The functionality provided for Process Manager is meant to be equivalent to the Run As functionality provided with automation agents.
On the Process Manager, you now have the option to enter a User Role. When you execute, publish, or schedule the recurring process, the specified user role will be used to perform the process, just like when you execute automation agents. The specified User Role can be used to specify a separate VPD role or another domain to run with.
In the Process Manager example below for the Release Orders - you now have the option to specify the User Role to run the process as.

Process Manager - User Role
Adding the Run As User Role option to the Process Manager allows the process to be run based on the User Role specified.
Steps to Enable
You don't need to do anything to enable this feature.
This feature provides you with the ability to collect various performance metrics over time, and persist the performance metrics to the database in hourly, daily and weekly rollups. Once persisted, you can retrieve the historical metric data for a given time period and review the raw data, and/or export the data for additional analysis.
The recurring process, Persist Metrics, accessed via Configuration and Administration > Process Management > Persist Metrics is used to persists diagnostic metrics into tables that are aggregated by hour/day/week. A reserved recurring process runs this process hourly, so you should not need to run this process yourself.

Reserved Recurring Persist Metrics Process
This Persist Metrics process:
- retrieves all completed hourly data from the metric registry
- bulk inserts the data into the PERF_METRIC_DATA_HOUR table
- inserts data into the PERFM_COLLECT_HISTORY table to reflect completed hours, pending days and pending weeks
- queries the PERFM_COLLECT_HISTORY table to determine if any daily or weekly data is ready for rollup
- bulk inserts rollups into the PERF_METRIC_DATA_DAY and PERF_METRIC_DATA_WEEK table
- updates the PERFM_COLLECT_HISTORY table to reflect completed daily and weekly rollups
- inserts placeholders into the PERF_METRIC_DATA_INDEX table to support metric queries with missing data
This process was designed to minimize contention points, optimize database performance and support metric persistence in a SCA environment.
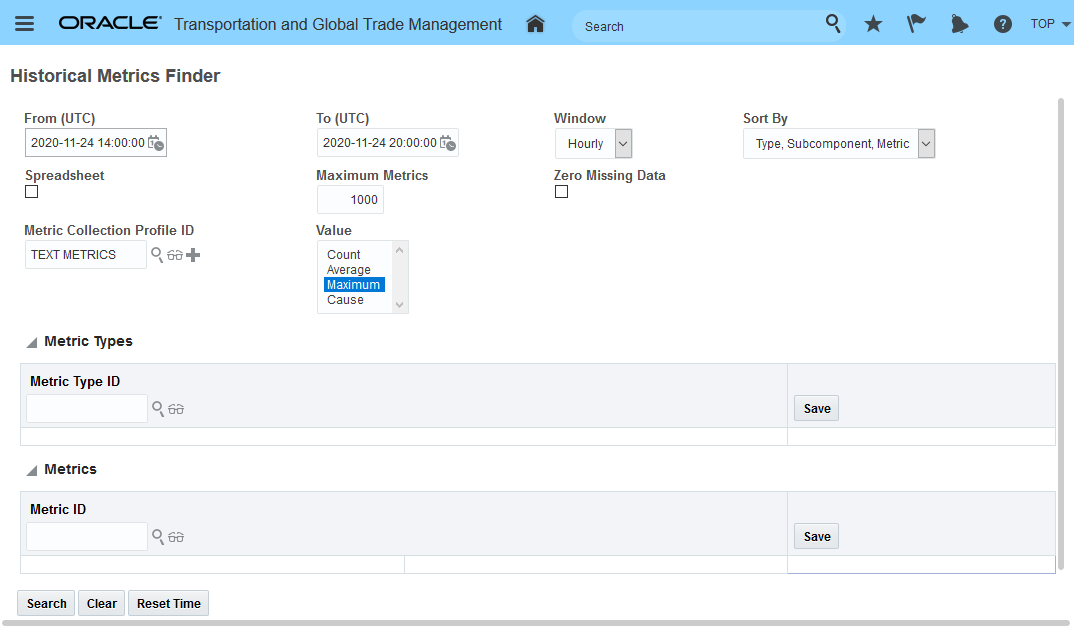
HISTORICAL METRICS UI
The Historical Metrics UI is used to review gathered metrics, this page is accessed via Configuration and Administration > Technical Support > Historical Metrics.
NOTE: You must be a DBA to access this page.
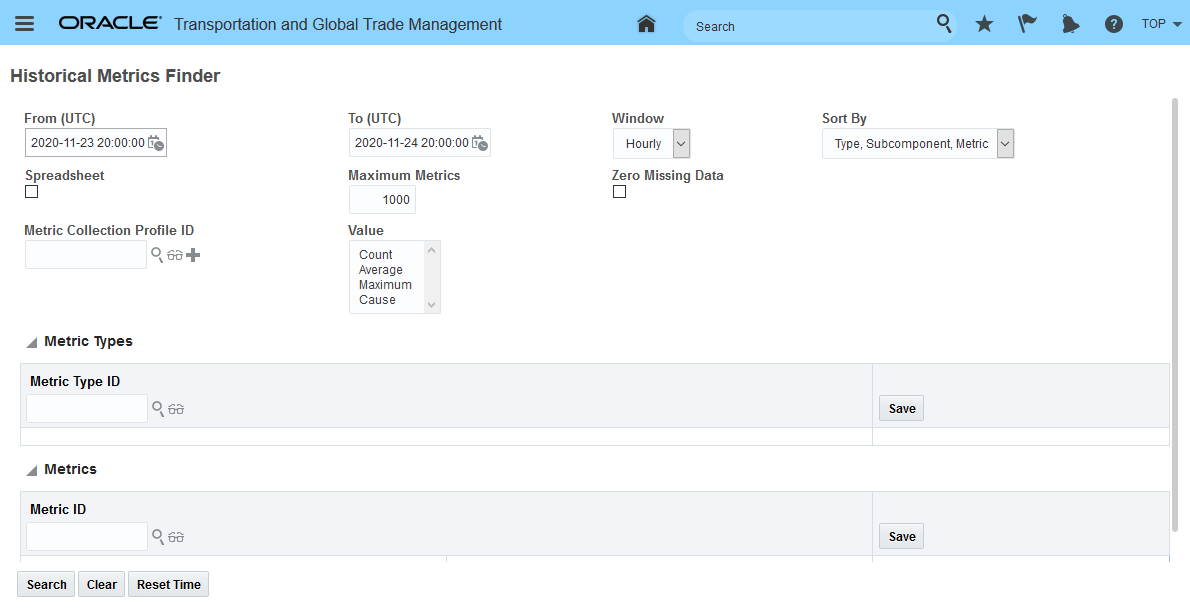
Historical Metrics UI
This page is used to gather metrics on your system.
- Count: A count metric measures a number of times some event occurs over an hour. E.g., for a given log ID, the number of log lines logged for that ID in an hour.
- Performance: A performance metric measures the time for some process to complete. E.g., the process time for a workflow topic in the batch Event Queue. Note that performance metrics maintain the total count, total time and maximum time for the metric. Thus, they implicitly hold a count metric for the number of times the process was executed.
- Enter a From and To range for your query.
- Select the Window. This controls whether hourly, daily, or weekly data is used. Each window type has a default time range. For example, Hourly defaults to the previous day, while Daily defaults to the previous month.
- Select a Sort By to control the display of the output.
- If you want the output to be saved as a tab-delimited spreadsheet file, select the Spreadsheet check box.
- Set the maximum number of results returned in the Maximum Metrics field.
- Select the Zero Missing Data check box to fill in empty data columns with zeros. If this is not selected, then any columns which have no data are excluded from the results of your query. While excluding empty data is useful in some cases, if you are generating a chart or graph from the returned data, then including zero value results will give you a more accurate graph.
- If you have a set of metrics that you frequently query and have saved that set in a metric collection profile, enter it in the Metric Collection Profile field.
- Select one or more Values that you want to display.
- Count: The total number of metrics submitted in the hour.
- Average: The average metric.
- Maximum: The maximum metric.
- Cause: Displays which topic caused the maximum metric value.
HISTORICAL METRICS UI RESULTS
After you click the Search button, the results of your query are displayed, sorted according to the Sort By field. If you included both metric types and metrics, the metrics are listed after the metric types. The results can be displayed on the screen or exported as a tab-delimited file.
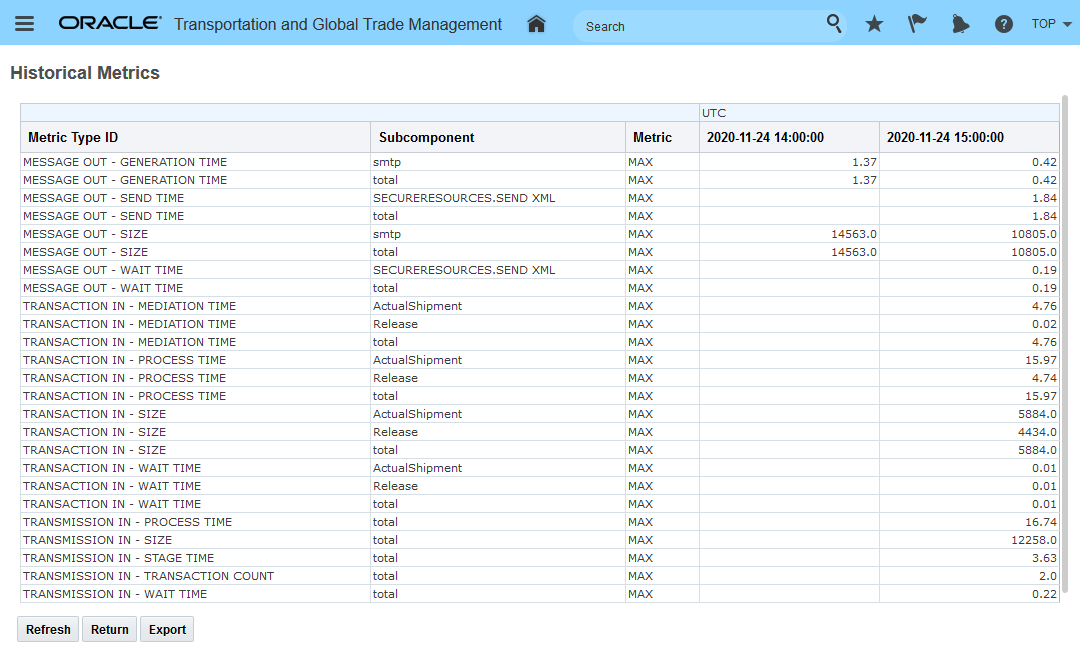
Historical Metrics UI Results
The result above was generated by this Historical Search UI input.
Historical Metrics UI Search
Provides you - the DBA - with the tools required to monitor the overall performance of your OTM/GTM instance.
Steps to Enable
You don't need to do anything to enable this feature.
Tips And Considerations
This feature replaces the Optional Feature - User Interface Performance Metric - that was delivered in 20C.
OTM User to Oracle Identity Cloud Service Auto Creation
This feature supports the creation of Oracle Identity Cloud Service (IDCS) users from OTM eliminating the previous requirement of having to create the OTM/GTM users in both OTM/GTM and IDCS. With this feature, the user(s) that you create in OTM/GTM will automatically be created in IDCS.
As part of this feature, the information captured for OTM/GTM users has been expanded to capture the IDCS required fields - First name, Last Name and Email Address.
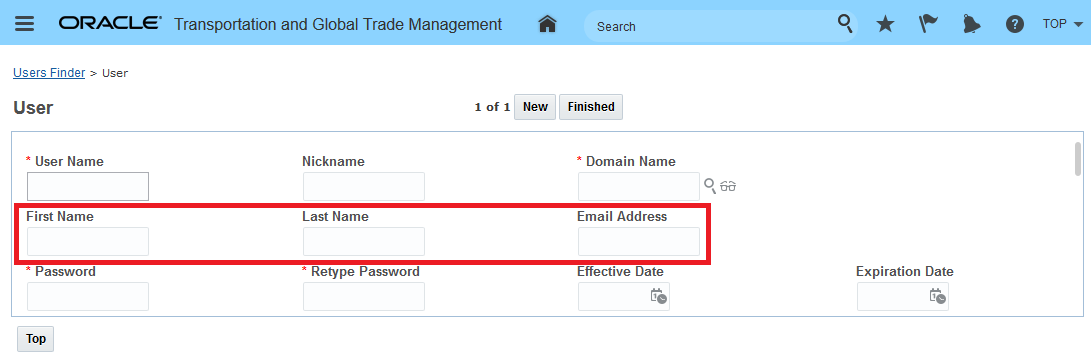
New User Fields Added For IDCS
The IDCS user record will be created based on the information provided in the follow 4 OTM/GTM fields:
- Nickname - required for IDCS and is mapped to the User Name in IDCS
- First Name - required for IDCS, maps to First Name
- Last Name - required for IDCS, maps to Last Name
- Email Address - a valid email address is required for IDCS, maps to Email address and may be mixed case
For example, the user below will be created in IDCS automatically.
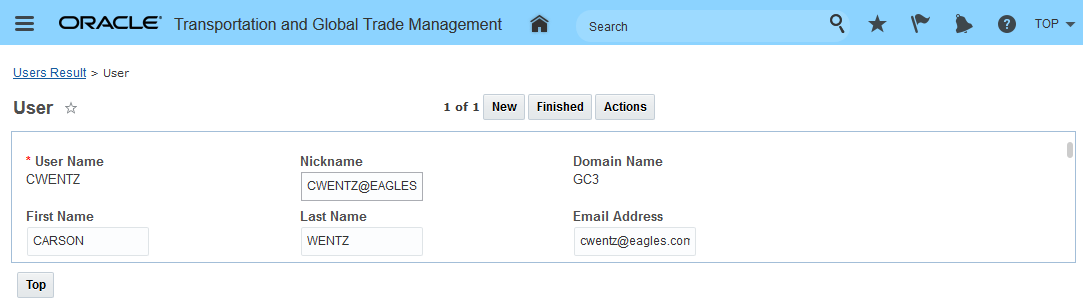
OTM/GTM User
The automatically created IDCS user record for the user above in OTM/GTM is below. Note the fields automatically mapped into the created IDCS user - User Name (mapped from Nickname in OTM/GTM), First Name, Last Name and Email Address.
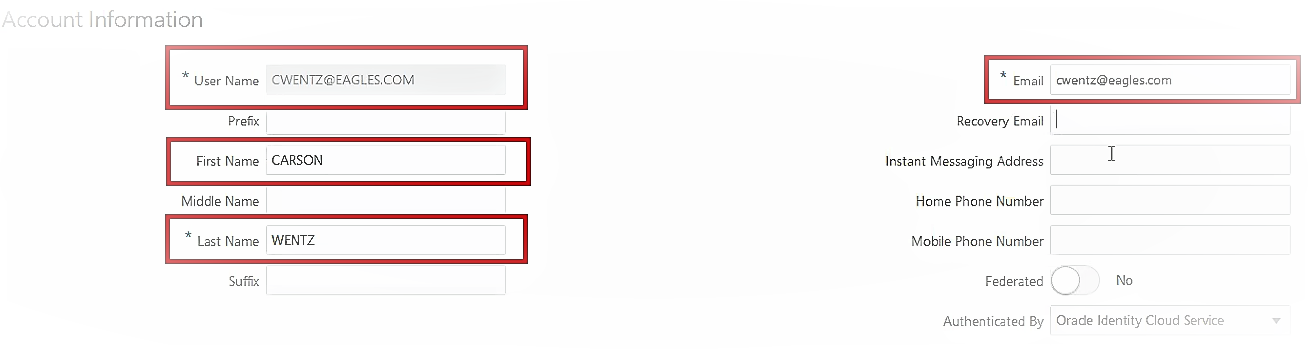
Automatically Created IDCS User
This feature simplifies the creation of users in IDCS by providing you with the option to automatically create your IDCS user entries directly from your OTM/GTM user entry.
Steps to Enable
- In IDCS create a Confidential Application (trusted Application)
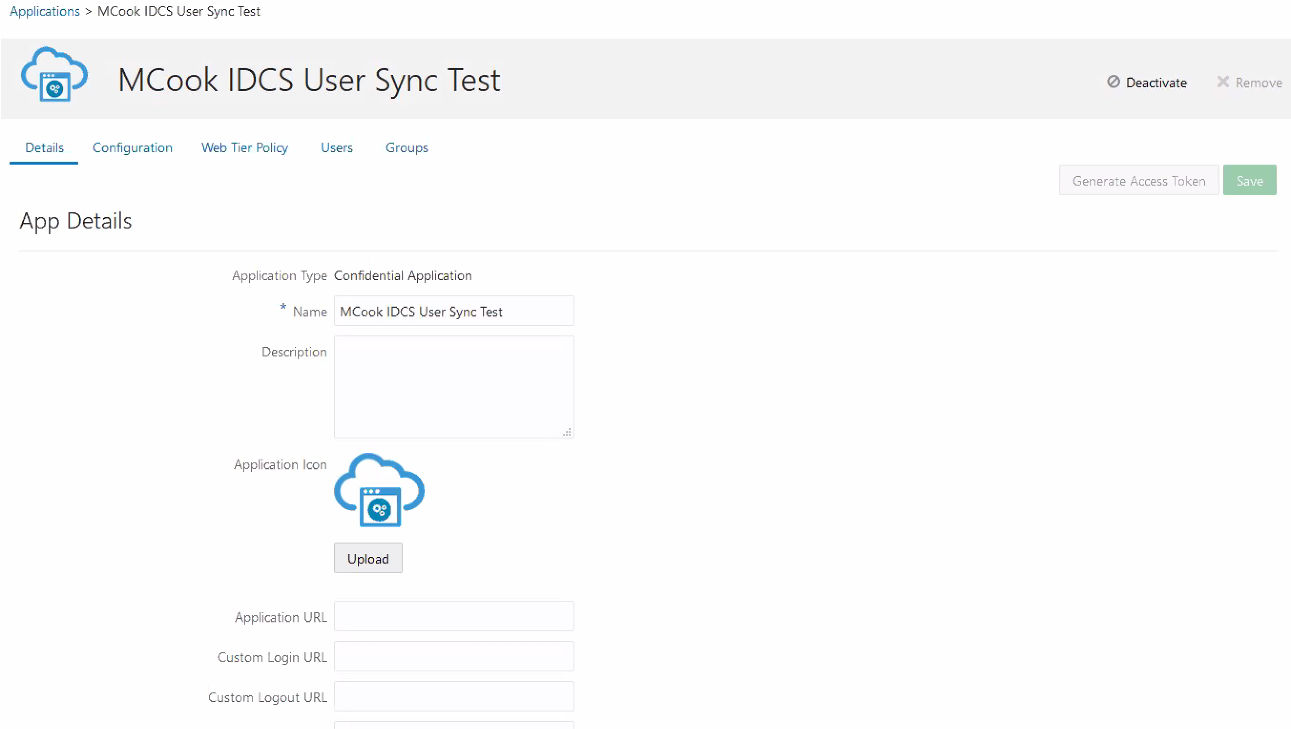
IDCS Create Confidential Application
- In IDCS Capture Client ID and Secret
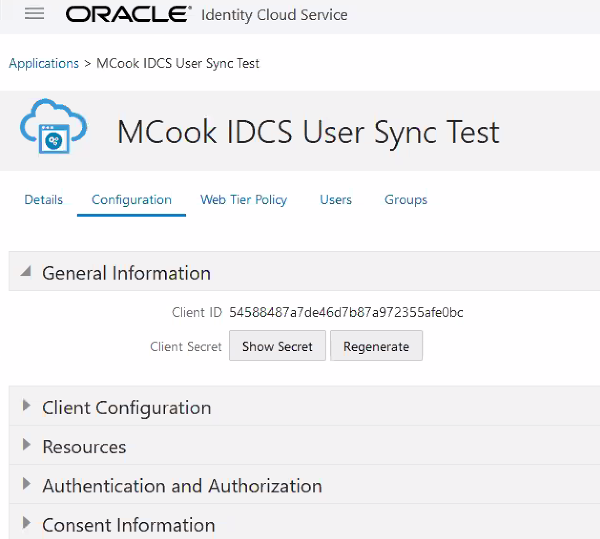
IDCS Generate Secret Code
- In OTM/GTM create an external system with the:
- IDCS-Service-Instance URL
- Authorization Service URL
- Application Scope
- Client ID and Secret
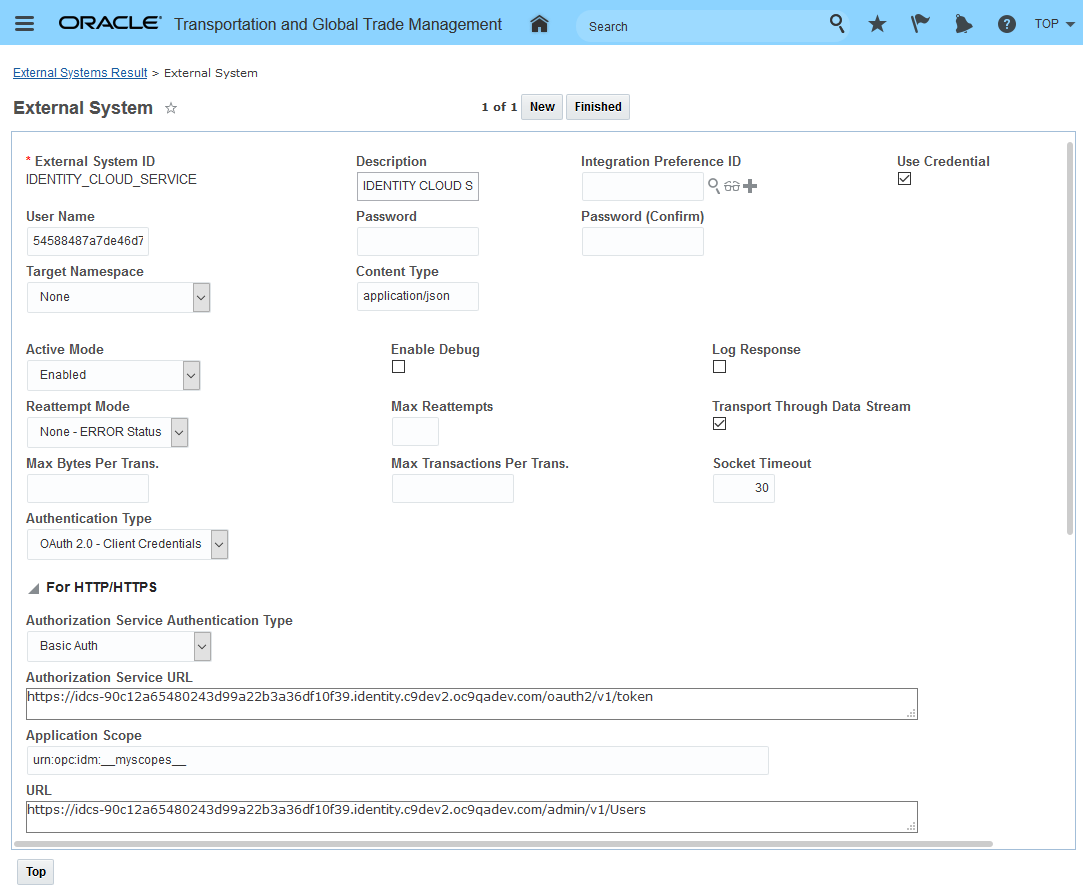
External System Example
- In OTM/GTM set the following properties to enable auto synchronization with IDCS.
Instruction Key Value Description Set glog.security.user.idcs.autosynchronization
true Set glog.security.user.idcs.externalSystem
IDENTITY_CLOUD_SERVICE
IDENTITY CLOUD SERVICE External System
Tips And Considerations
NOTE: This setup/option is available to Gen2 cloud infrastructure clients using IDCS.
The user synchronization is managed using the properties below. Create is enabled by default, Delete is disabled by default.
- Create is controlled by this property - glog.security.user.idcs.allowCreate=true
- Delete is controlled by this property - glog.security.user.idcs.allowDelete=false
External System Support for OAuth2.0
This feature extends the options available to you for defining your external system Authorization Type to include HTTP Authentication (Basic), Pre-authenticated URL and OAuth 2.0 - Client Credentials. Additional configuration options have been provided within the OAuth 2.0 - Client Credentials Authorization Type to support the HERE Technologies OAuth 1.0 Signature authorization implementation.
On the External System UI, the fields displayed in the For HTTP/HTTPS section of the UI are now tied to the Authentication Type selected.
HTTP AUTHENTICATION (BASIC)
HTTP Basic authentication is the simplest technique for enforcing access controls to web resources.
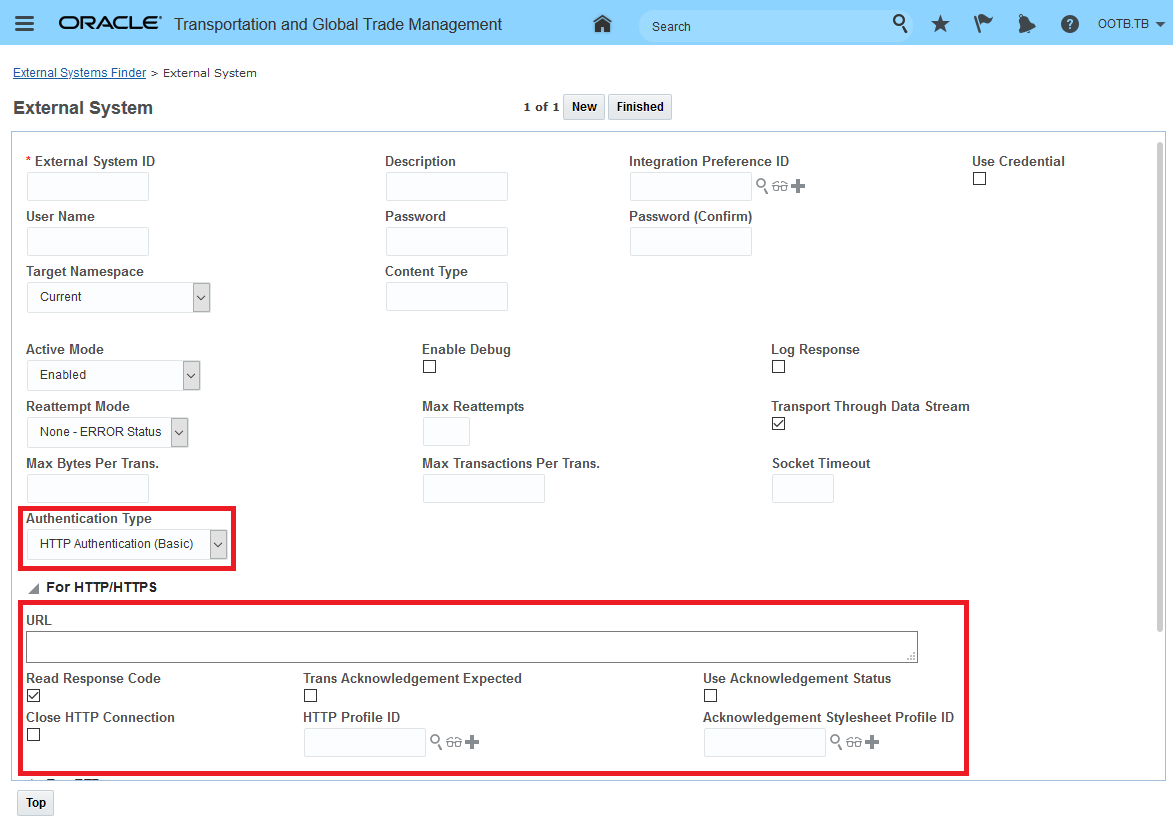
HTTP Authentication (Basic)
When you select HTTP Authentication (Basic) as the authentication type, the following fields are available.
- URL: Specify URLs with both HTTP or HTTPS in this field.
- The Read Response Code should be selected if you want the HTTP response code to be validated.
- The Trans Acknowledgement Expected should be selected if you expect the transaction acknowledgement to be received when sending via synchronous protocol.
- The Use Acknowledgement Status check box specifies if the transmission acknowledgement status should be used as the status of the transmission.
- The Close HTTP Connection check box should be selected to close the HTTP connection after interacting with the external system.
- Use the HTTP Profile ID to define a connection to an EBS instance.
- Enter an Acknowledgement Stylesheet Profile ID if you are using Stylesheet Profiles to format your OTM messages.
PRE-AUTHENTICATED REQUEST
Pre-authenticated URL provides a way to let users access an object without having their own credentials, as long as the request creator has permissions to access those objects. Only use this option if you receive the pre authenticated URL from the source whose data you need to access. For example, Logistics Machine Learning uses a pre authenticated URL to allow customers to save objects to an Oracle Cloud Infrastructure or OCI data store.
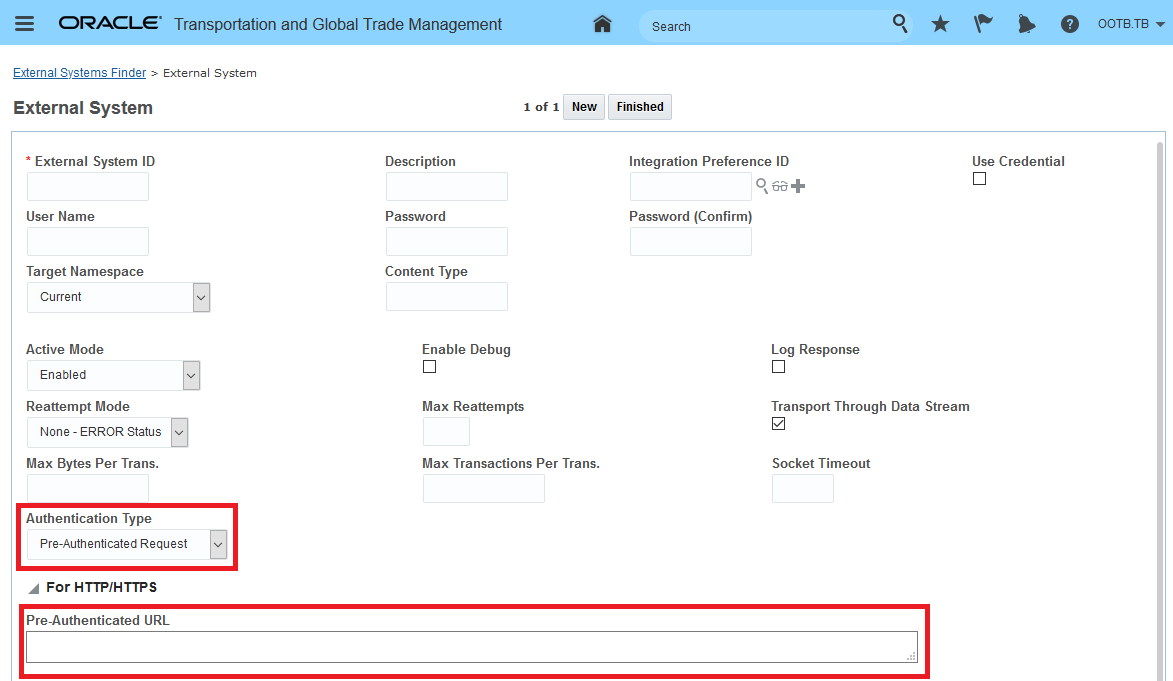
Pre-Authenticated URL
When you select the Pre-Authenticated Request authentication type, the Pre-Authenticated URL is visible.
- Enter the Pre-Authenticated URL. This URL is only visible when you initially create the external system. If you edit the external system, you only see asterisks and cannot change the URL.
OAUTH 2.0 - CLIENT CREDENTIALS
This option allows you to configure your external system following the OAuth 2.0 specification.
OAuth 2.0 - Client Credentials With Authorization Service Authentication Type = HTTP Authentication (Basic)
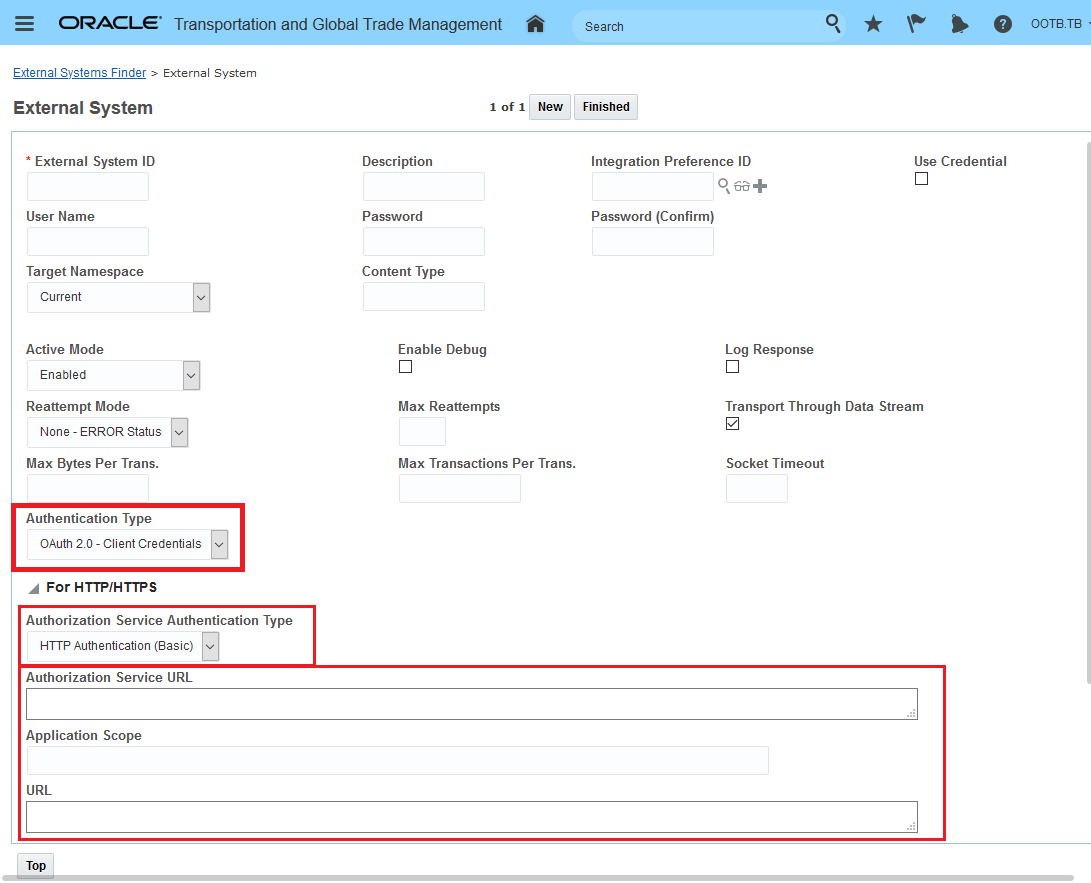
OAuth 2.0 - Client Credentials with Authorization Service Authentication Type = HTTP Authentication (Basic)
- Select an Authorization Service Authentication Type in this case HTTP Authentication (Basic). The option you choose determines what fields are available in this section. This is the method used to request authorization from authorization service on behalf of the client.
- Enter the Authorization Service URL to call the authorization service.
- Enter the Application Scope. This is a blank delimited set of strings defined by the authorization service that limit the access scope for this client.
- Enter the URL.
OAuth 2.0 - Client Credentials With Authorization Service Authentication Type = HERE OAuth 1.0 Signature
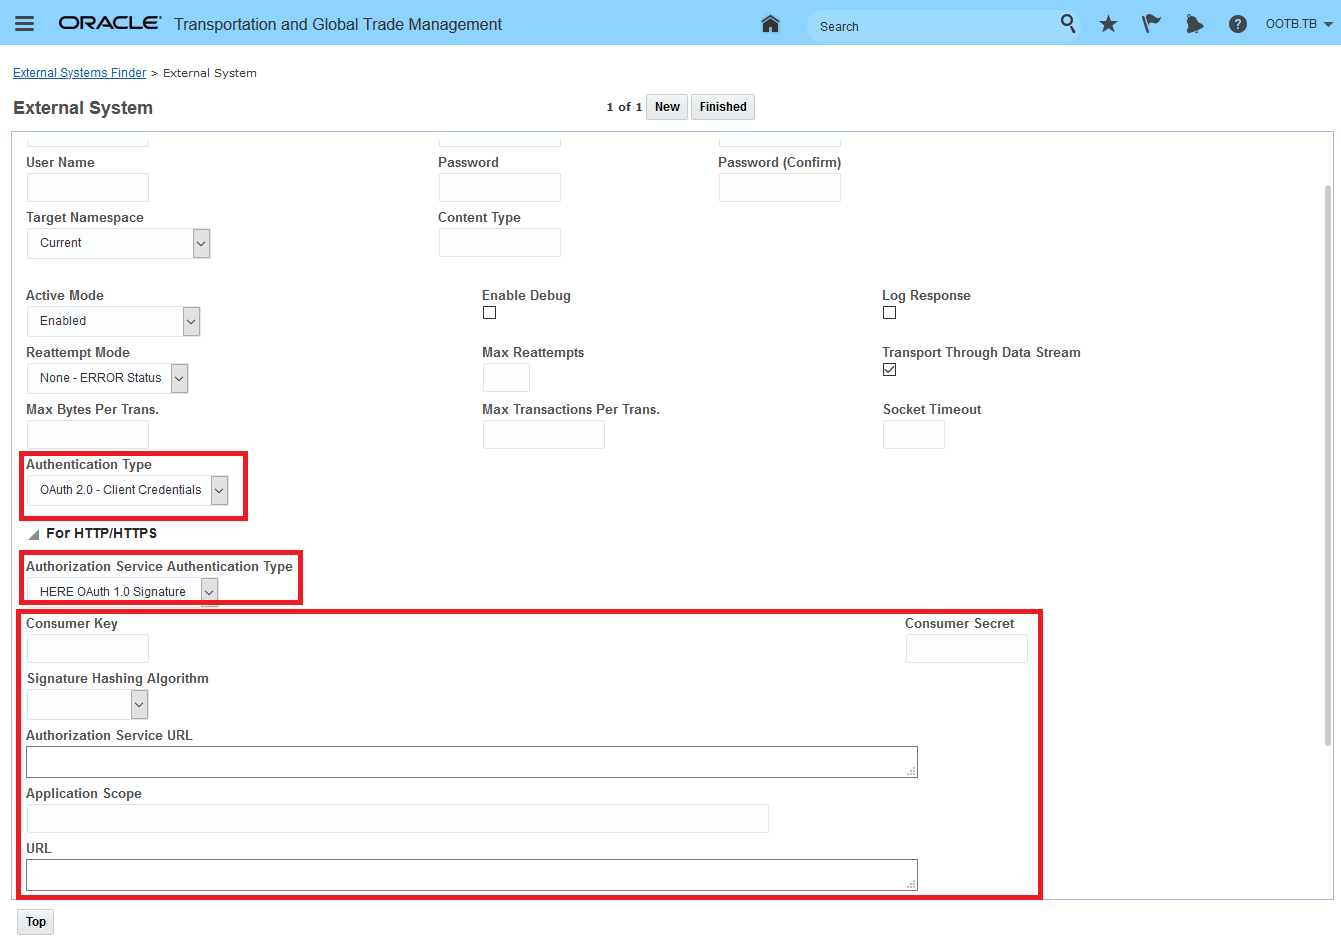
OAuth 2.0 - Client Credentials with Authorization Service Authentication Type = HERE OAuth 1.0 Signature
- Select an Authorization Service Authentication Type in this case HERE OAuth 1.0 Signature. The option you choose determines what fields are available in this section. This is the method used to request authorization from authorization service on behalf of the client.
- The Consumer Key field - This is the key required by authentication service which is provided by HERE Technologies.
- The Consumer Secret field - Password related to the consumer key - again this is provided by HERE Technologies.
- The Signature Hashing Algorithm field - This is the algorithm used to sign the message if required by the authentication type. Option HMAC-SHA256.
- Enter the Authorization Service URL to call the authorization service. Value provided by HERE Technologies.
- Enter the Application Scope. This is a blank delimited set of strings defined by the authorization service that limit the access scope for this client.
- Enter the URL. Review HERE configuration to determine appropriate value.
OAuth 2.0 has become the defacto standard for REST API security adding this option supports the larger industry trend towards this approach to authentication.
Steps to Enable
You don't need to do anything to enable this feature.
Oracle Transportation Management (Base)
Shipment Group - Stop Level Tracking Event Enhancement
This feature provides you with the ability to enter stop based events against your shipment groups and then have the stop based events propagated to all the shipments (with that stop) so that additional actions can be triggered. You will find this feature extremely beneficial for any scenario where the set of shipments in your shipment group share the same source and destination stops. For example, if you use shipment groups to model an ocean leg - where all the shipments in your shipment groups are on the same vessel/voyage and share the same source stop (POL) and destination stop (POD) - this feature will allow you to enter one stop based tracking event at the shipment group level and have that single tracking event raise the stop event for all the shipments in the group that share the related stop.
Previously - OTM did have a way to validate and process stop based tracking events at a shipment group level - all of your stop level tracking events had to be entered on a per shipment basis for each shipment in the group.
In the example below, all six shipments in the shipment group are booked onto the same vessel/voyage going from source location (POL) of USNYC to the destination location (POD) of BEANR. A set of stop based tracking events will be entered at the shipment group level to highlight the enhancements made to the Tracking Event UI and to show the propagation to the related shipments once the shipment group stop event(s) are added.
Shipment Group Example
To enter an event against the shipment group run the Add Tracking Event Action as shown below.
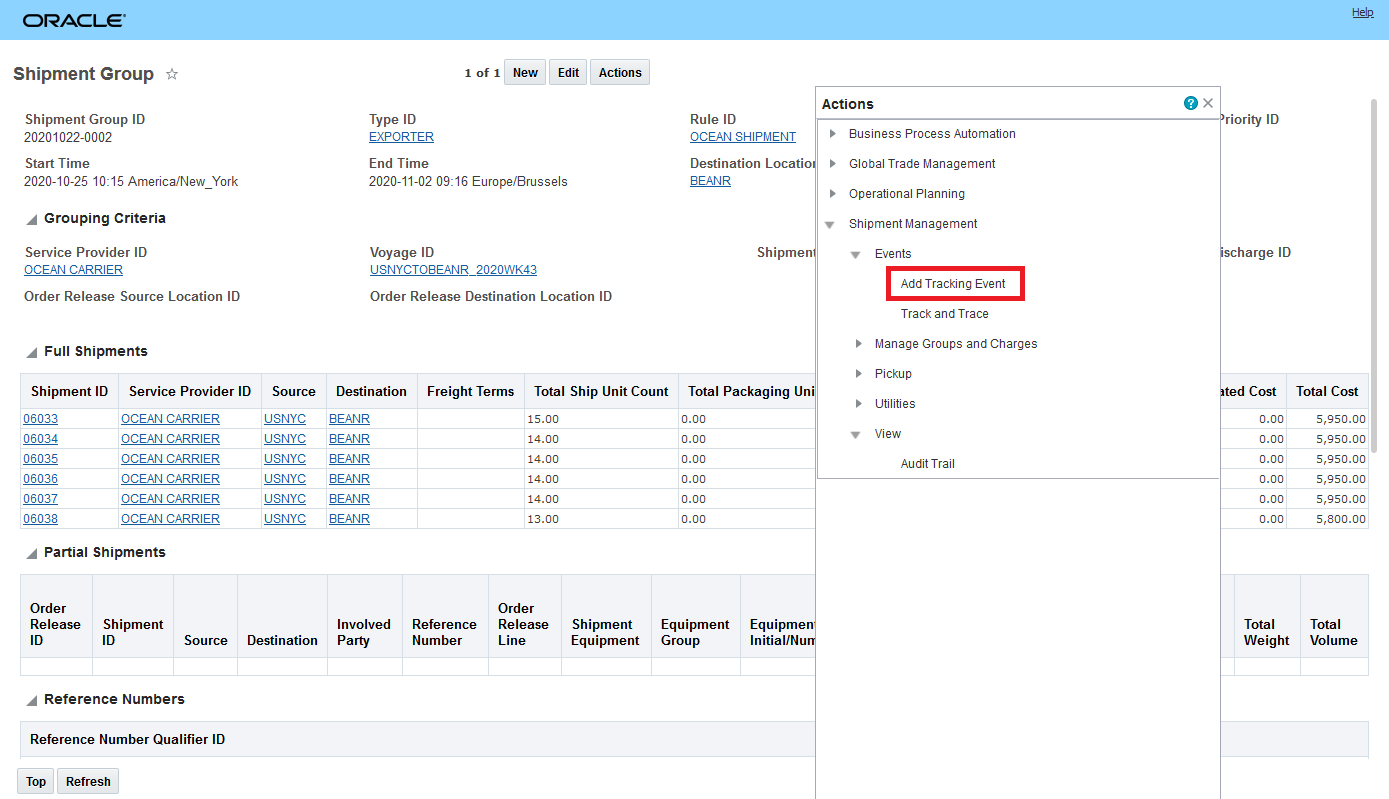
Add Tracking Event Action
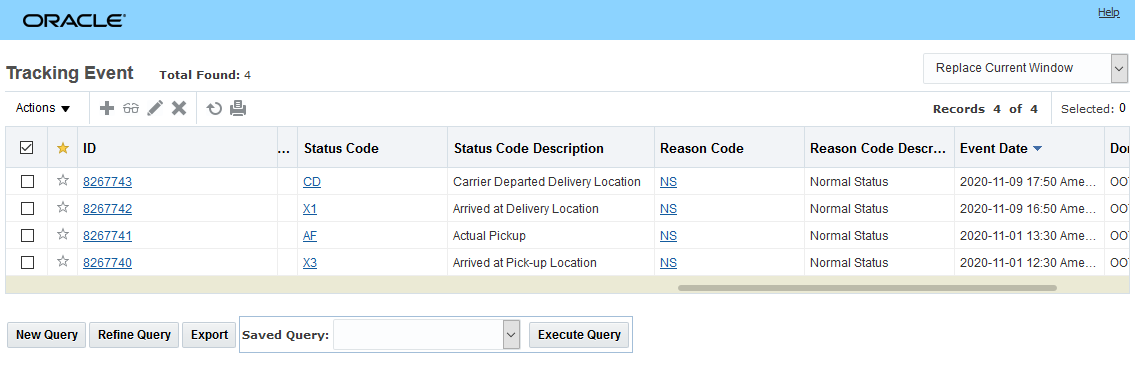
The Tracking Event UI has been enhanced with the highlighted changes below. The Shipment Group ID and Shipment Group Type ID are now provided/visible when entering Shipment Group Related Events. The new Tracking Event Type field allows you to tag your tracking events by a type classification for query purposes. The stops related to the Shipment Group are now validated and are available for selection when creating a shipment group stop based event.
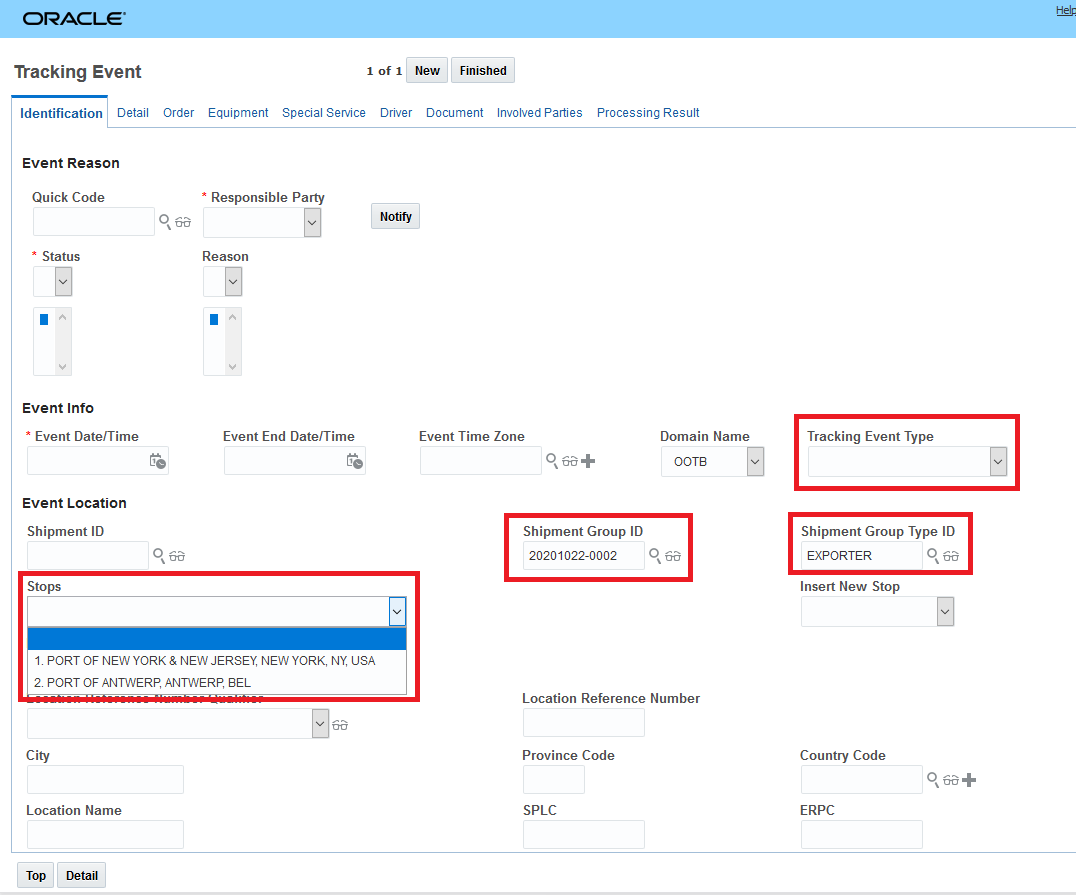
Shipment Group Stop Based Tracking UI Enhancements
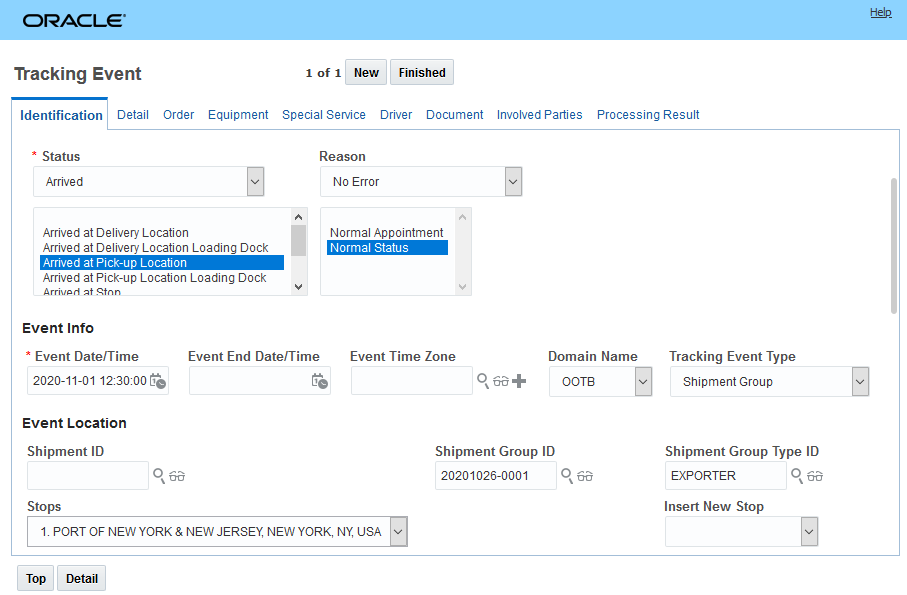
Shipment Group Stop Based Tracking Entry - Tracking Event 1 - Arrived at Pickup Location
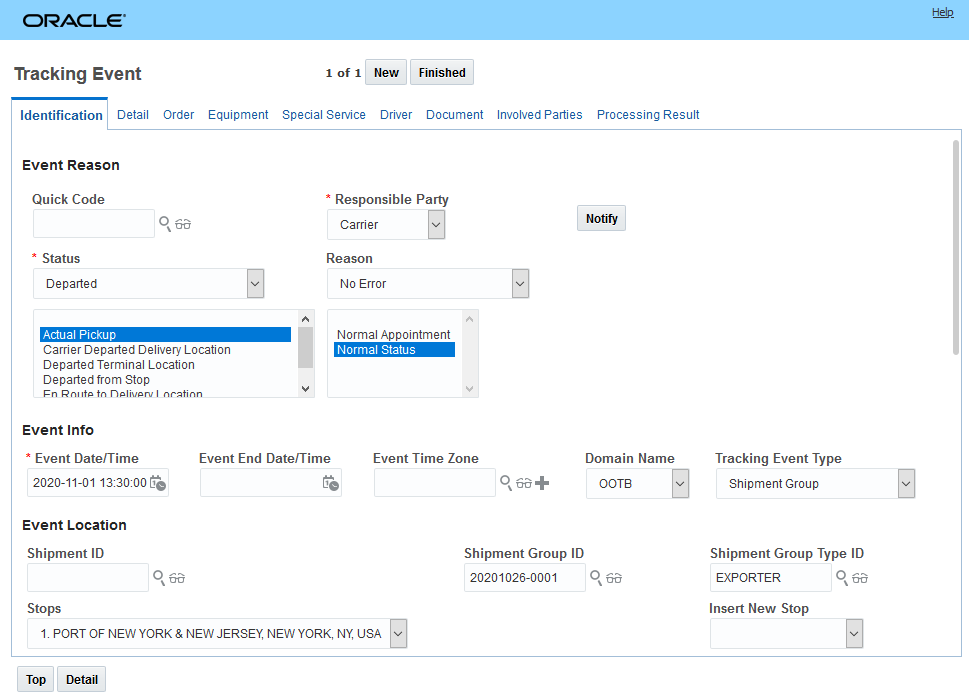
Shipment Group Stop Based Tracking Entry - Tracking Event 2 - Departed from Pickup Location
The complete set of Shipment Group Stop Events is provided below - tracking events added for arrival and departure from USNYC and tracking events added for the arrival and departure from BEANR.
Shipment Group Stop Based Tracking Entry Events View
Using a simple agent - the shipment stop tracking events entered at the shipment group level are also available on the shipments in the group that share the shipment group stop(s). The relationship between the shipment group stop and the shipments that share those stops allows you to do additional processing for the shipments - like redrive the shipments, set images etc.
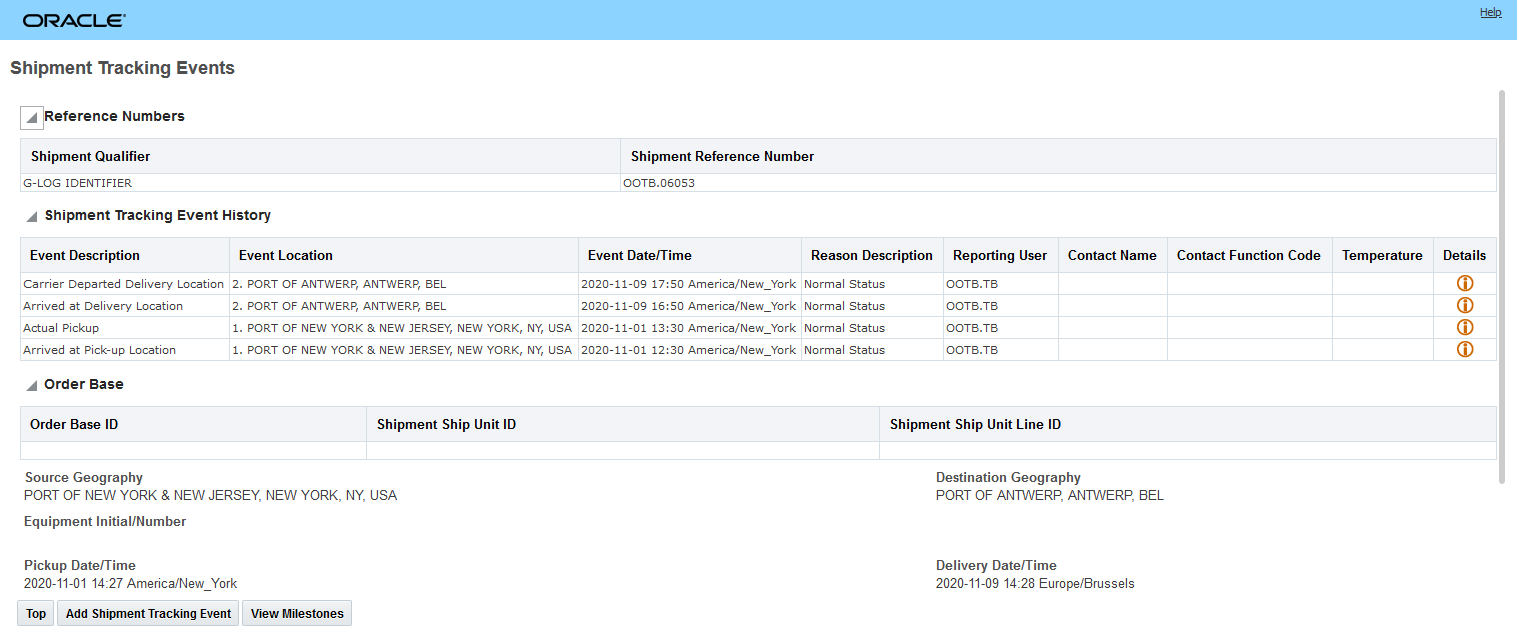
Shipment Tracking Event View of the Stop Based Tracking Events Added for the Shipment Group
The stops considered for shipment group stop entry are the Port of Load and Port of Discharge - if available, if those stops are not available on the shipment group, then the Source Location and Destination Location of the shipment group are used. The following convention is followed for assigning stop numbers to the stop locations for a Shipment Group.
If Port of Load and Port of Discharge are populated on shipment group:
- Port of Load
- Post of Discharge
If Port of Load and Port of Discharge are not populated on Shipment Group
- Source Location of Shipment Group
- Destination location of Shipment Group
If a shipment group stop tracking event is entered against the shipment group and none of the shipments in the shipment group share that stop location you will see the error message below.

Invalid Stop Event
AUTO MATCH TO OBJECT IDS IMPROVEMENT
The planning parameter AUTO MATCH TO OBJECT ID(S) will now - when set to TRUE - perform an auto-match for tracking events entered against an object in the UI as well as for tracking events entered via integration - which was the previous behavior.
The AUTO MATCH TO OBJECT ID(S) parameter supports auto-match by ID for the following objects:
- Shipment
- Order Base
- Order Release
- Driver
- Power Unit
- Equipment and
- Shipment Group
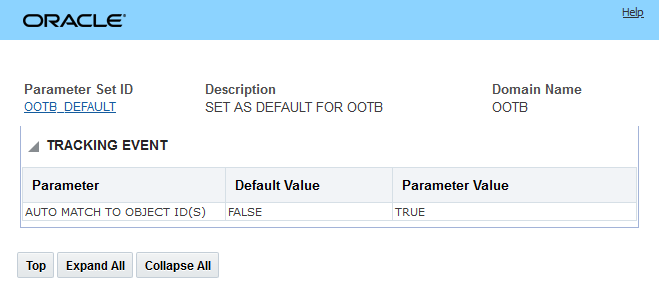
Planning Parameter Auto Match to Object ID(S)
This enhancement simplifies the entry of stop based tracking events that are related to the shipments in a shipment group. Previously - for stop related events for shipments in a shipment group - you were required to enter the stop related tracking events for each of the shipments in the shipment group. This was true even in the situation where all the shipments in the group shared the same stop location(s) - for example - an ocean shipment group where all the shipments in the group share the same source and destination location. With this feature, you can now enter your stop related tracking events at the shipment group level and the lifetime events and tracking events can propagate down to the shipments in the shipment group allowing you to trigger agent actions against the shipments that share the same stop location.
Steps to Enable
You do not need to enable this feature, however, to take full advantage of the feature you will need to alter your process for entering tracking events - either via the UI or via integration. Specifically you will need to alter your processes to provide the required and optional information related to this enhancement - e.g., Tracking Event Type, Shipment Group ID, Shipment Group Type ID, Stop(s).
Tips And Considerations
We recommend using the AUTO MATCH TO OBJECT ID(S) parameter to match your tracking events to your shipment, shipment group, order release, order base, equipment, driver, or power unit. If you currently have an agent performing this match - we recommend that you migrate to the AUTO MATCH TO OBJECT ID(S) parameter to support the matching of your tracking events to the related object when the ID is provided of the object is provided.
Shipment Group - Additional SmartLinks
This feature provides you with an expanded set of SmartLinks that you can use to navigate to and from your shipment groups and their related objects.
From the Shipment Group you now have the additional SmartLinks:
- View Related Buy Shipments
- View Related Sell Shipments
- View Related Order Movements
- View Related Order Releases
- View Related Reference Numbers
- View Related Remarks
From the Order Release, Order Movement, Buy Shipments and Sell Shipments Screens you now have the additional SmartLink:
- View Related Shipment Groups
The expanded shipment group SmartLinks menu is below.
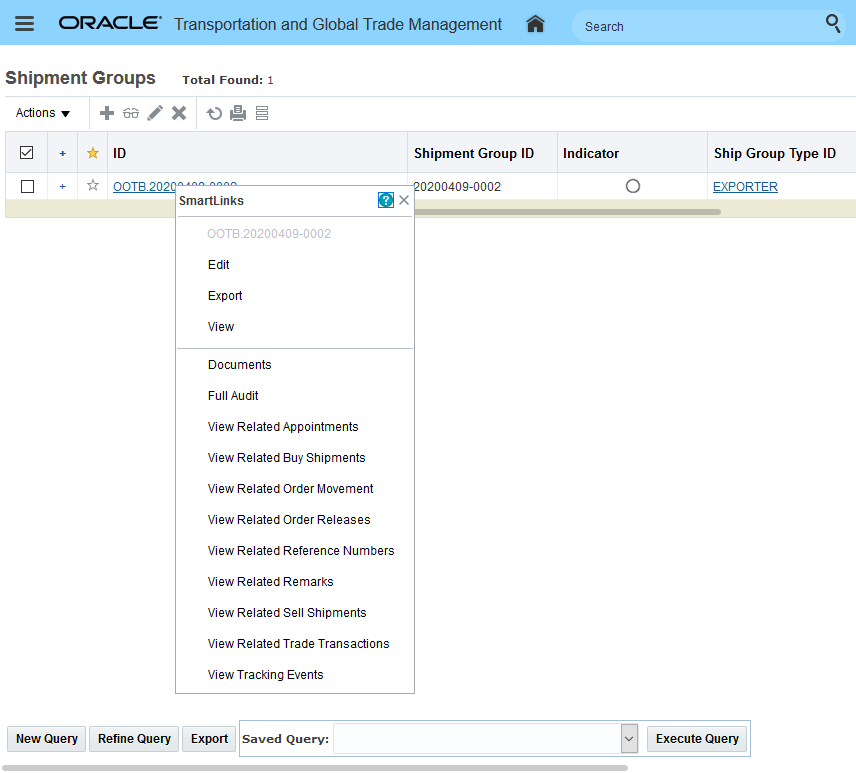
Shipment Group Additional SmartLinks
The View Related Buy Shipments, View Related Sell Shipments, View Related Order Movements, View Related Order Releases and View Related Shipment Groups all return a finder result.
For example View Related Buy Shipments

View Related Buy Shipments
The SmartLinks for View Related Reference Numbers and View Related Remarks provide a summarized multi-object view of the objects related to the shipment group.
View Related Reference Numbers SmartLink will display a hierarchy of reference number records for the shipment group. This hierarchical view of the reference numbers at different levels is extremely beneficial for verifying that your required reference number information has been provided at all levels.
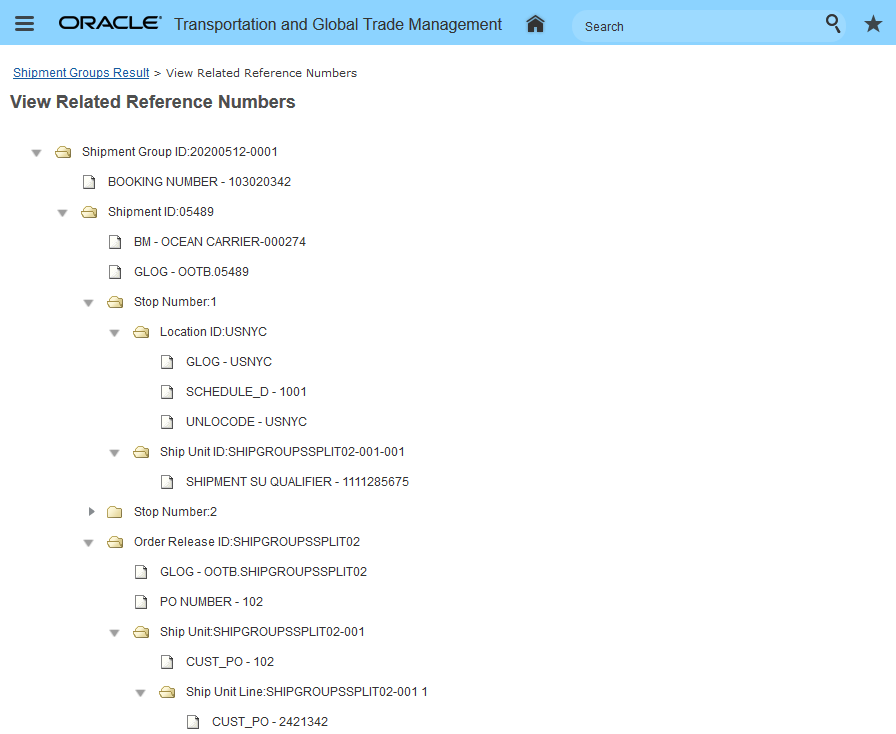
View Related Reference Numbers
The View Related Remarks SmartLink like the View Related Reference Numbers SmarkLink displays a hierarchy of remark records for the shipment group. This view is extremely helpful in reviewing the remarks across the objects related to the shipment group. You must select the Remark Level that you wish to see - in the example below, the Remark Qualifiers are all level 2.
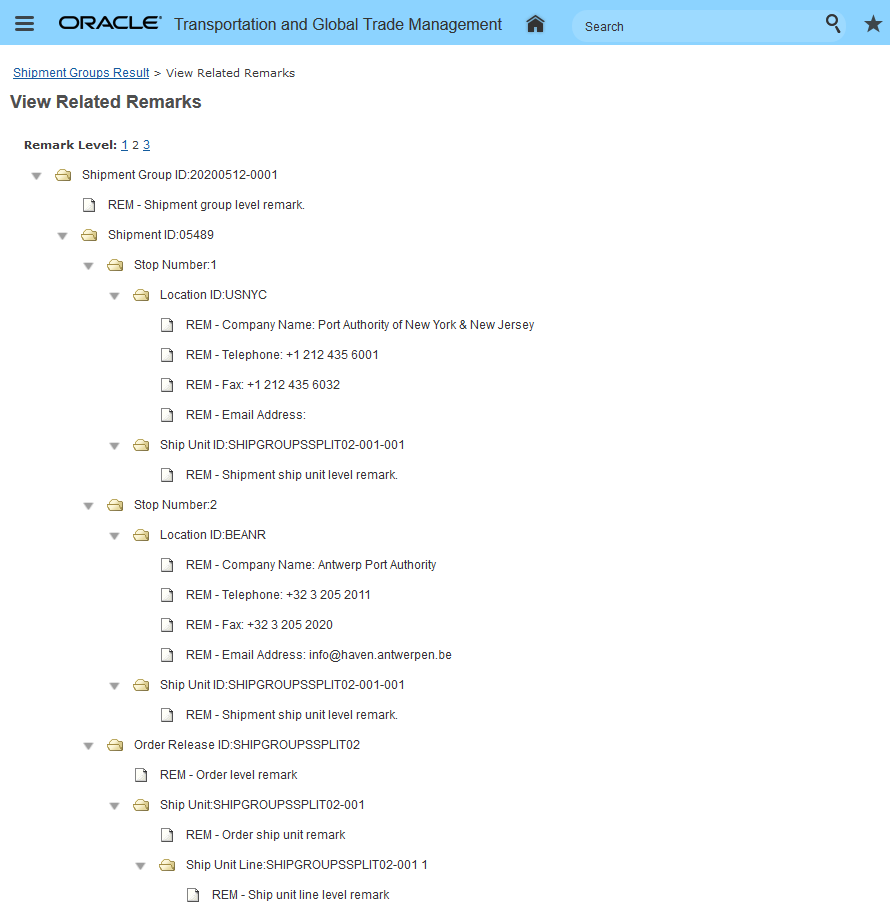
View Related Remarks
This feature simplifies your navigation as you move from a shipment group to the shipment group's related objects (e.g., shipments, order releases) or navigate from a shipment group's related objects to the related shipment group(s).
Steps to Enable
You don't need to do anything to enable this feature.
Tips And Considerations
You (DBA.ADMIN) can select the screen set used for a user's SmartLink query results via Configuration and Administration > User Configuration > Manage User Access > Access Type = Field Screen Set. For example, in the setup below the SmartLinks for View Order Release (Query ID ORDER_RELEASE) will use the ORDER_RELEAE_OOTB screen set.
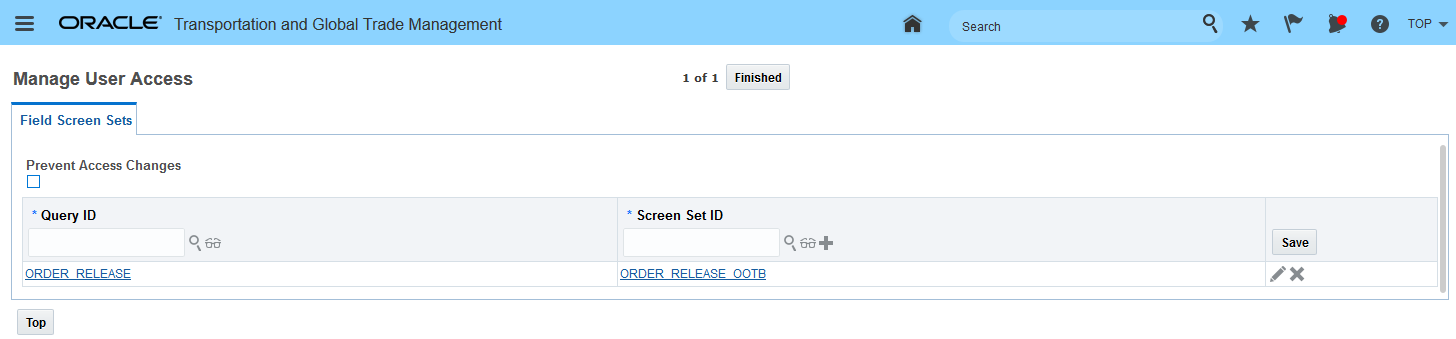
Finder Screen Set Example: Order Release Query
Shipment Group - Change Start Time Action
This feature provides you with a Change Start Time action on the shipment group level, which will allow you to change the start time assigned to the shipments in the shipment group as well as changing the start time and end time of the shipment group itself.
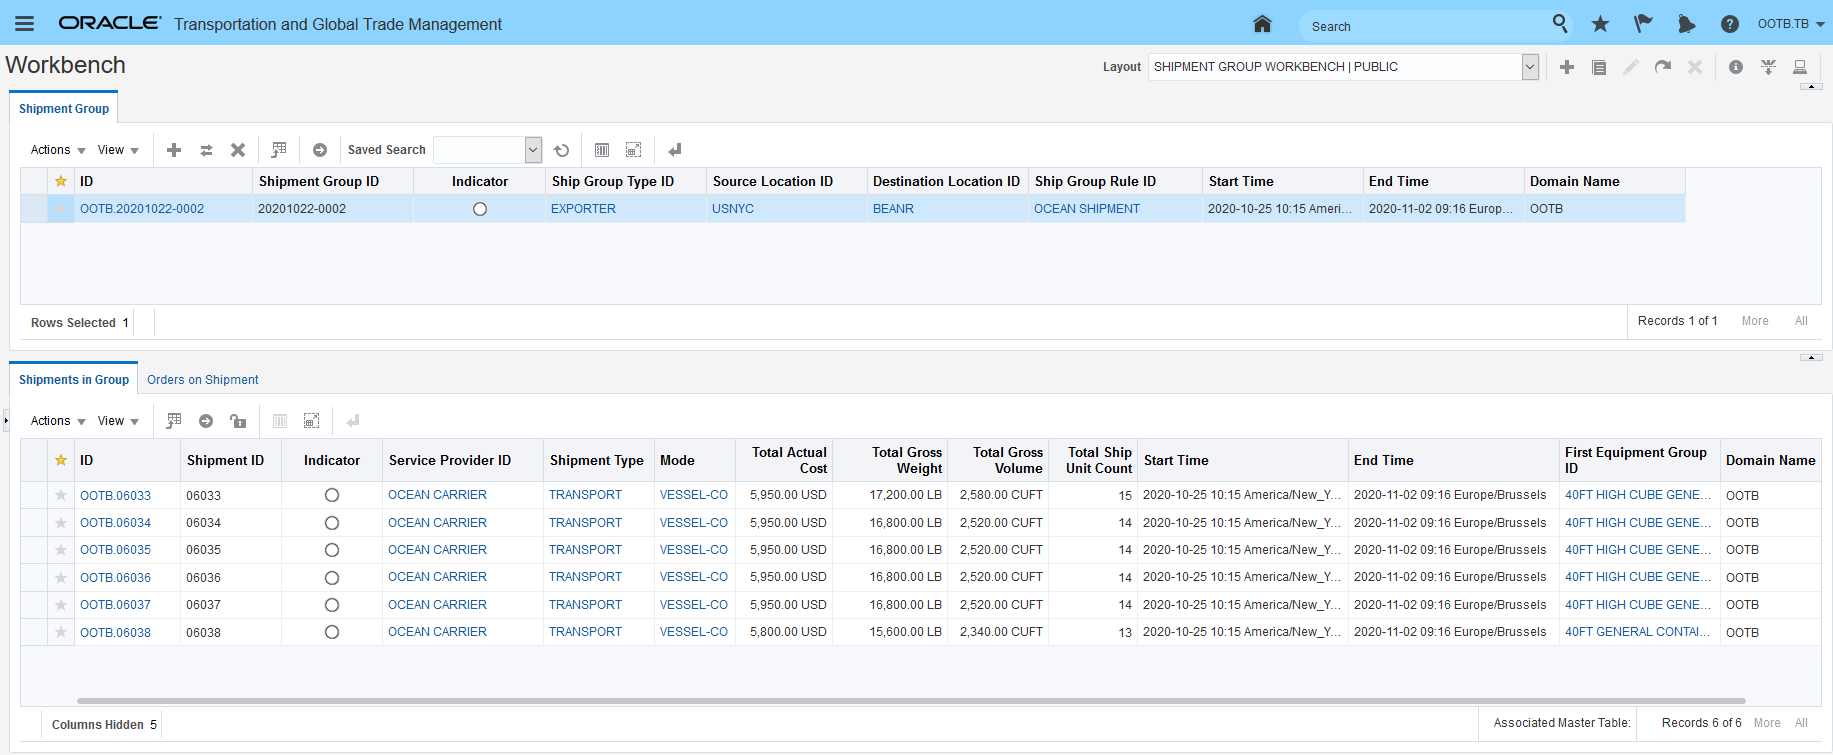
In the example below (using the Public Shipment Group Workbench) - a shipment group with four shipments all starting on 2020-08-31 15:38 will be changed to a new start time of 2020-09-07 16:21:00 using the shipment group Change Start Time action.
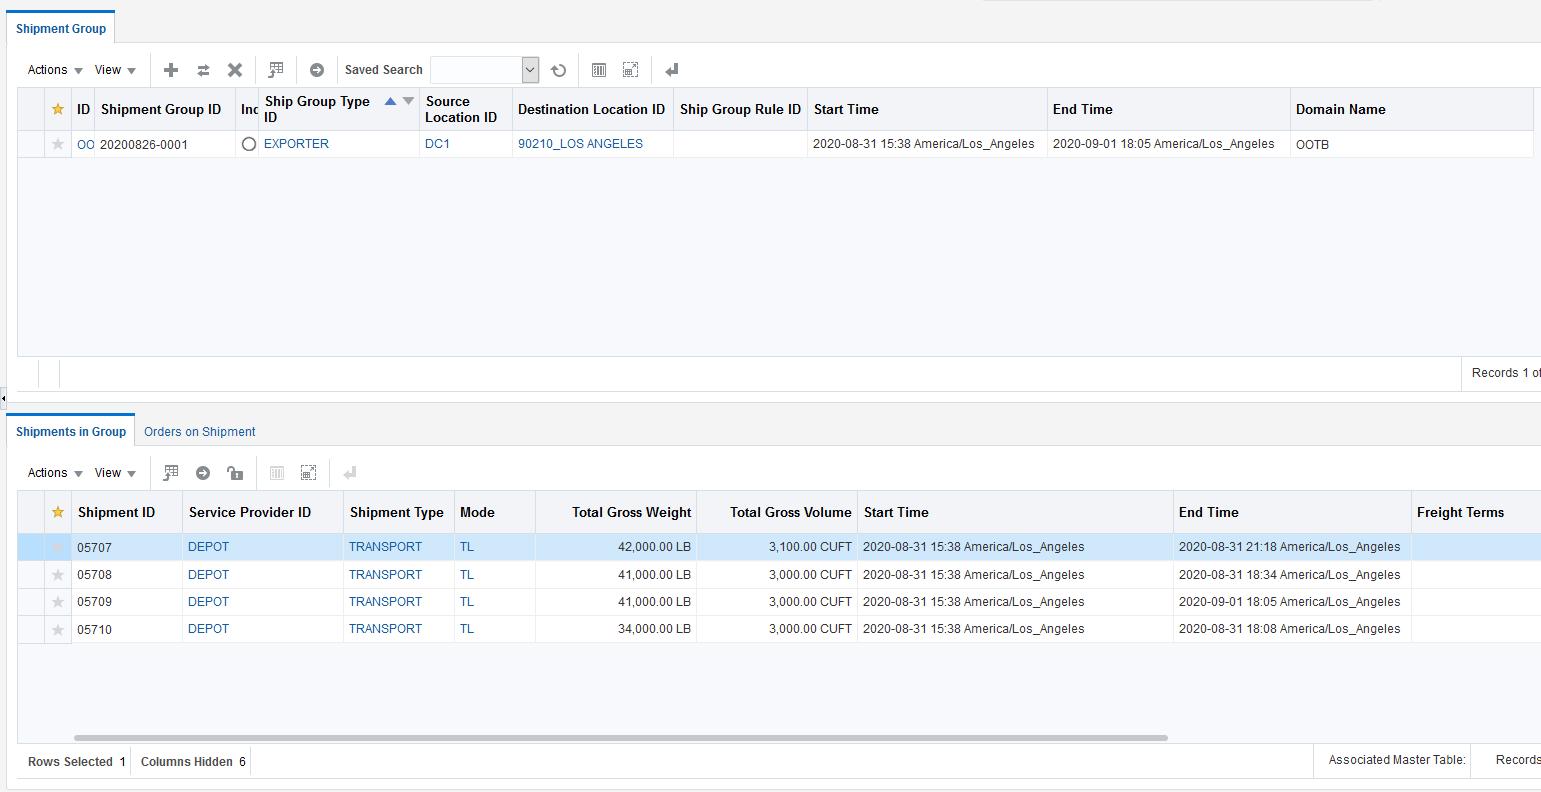
Shipment Group With Four Shipments Starting On August 31st
At the shipment group level the Change Start Time action is selected.
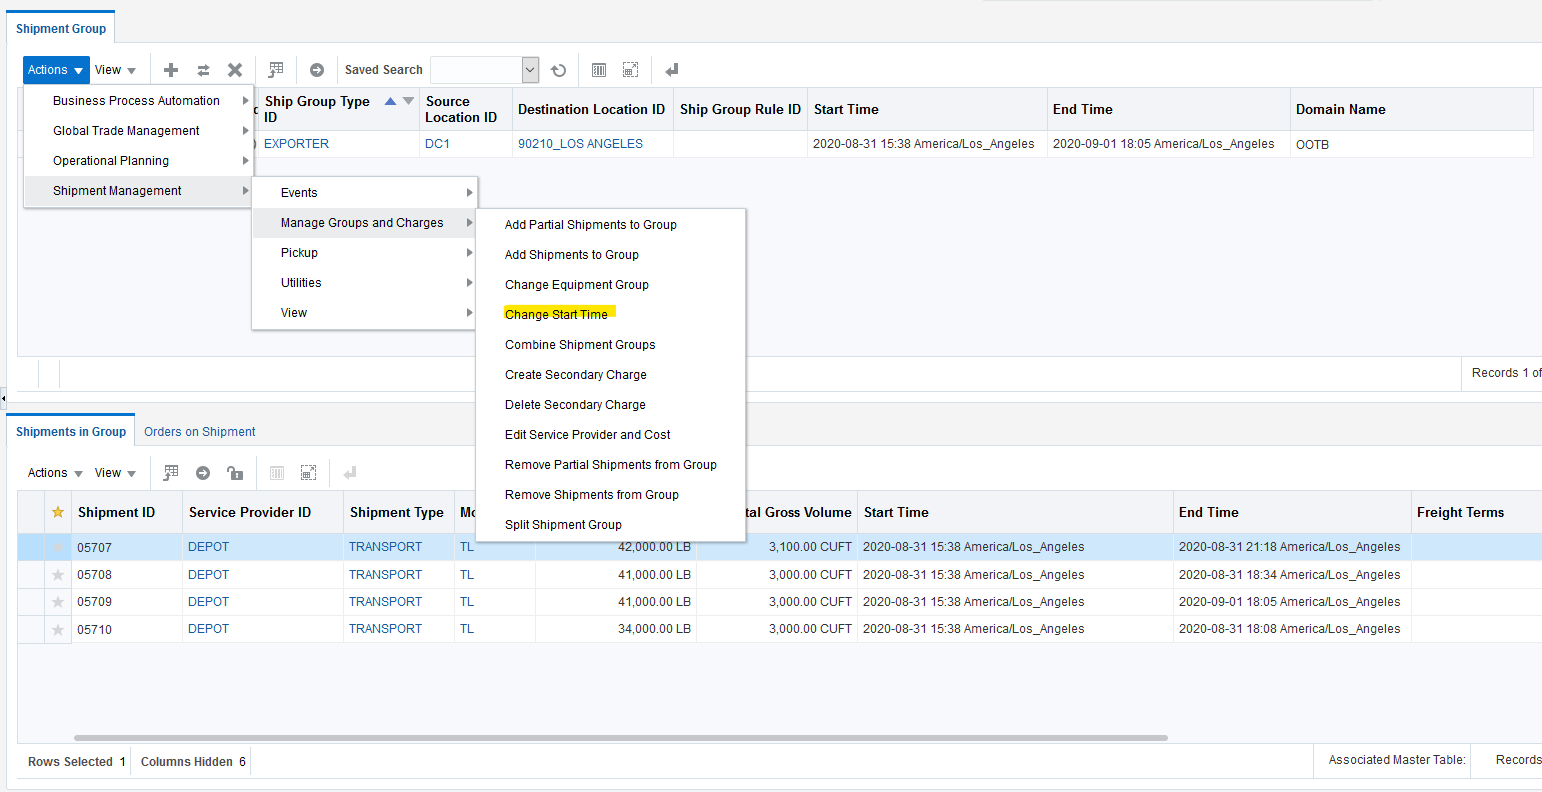
Change Start Time Action Initiation
In the action input screen - the Change Start Time action will change all the shipments and the shipment group times to 2020-09-07 16:21:00 the start times on the shipments will be set to Fixed.
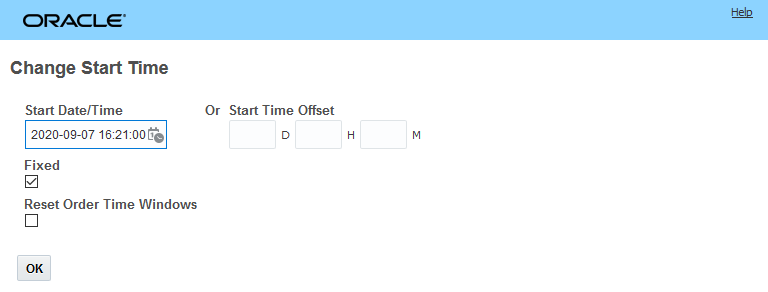
Change Start Time Action Input
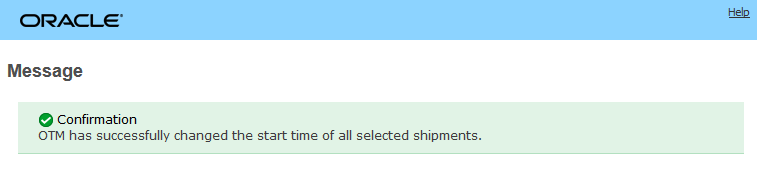
The result screen after the action is executed provides information related to the success or failure of the action. The Change Start Time action at the shipment group level operates on an all or nothing basis - all the shipments in the group must be successfully changed - or none of the shipments will be changed. In this example, all of the shipments were successfully changed.
In the workbench view below the results of Change Start Time action are clear. The shipment group Start Time is 2020-09-07 16:21:00 (as specified in the action) and the End Time has also been updated to reflect the latest End Time for the shipments in the group. All of the shipments in the group have also been successfully updated with their new Start and End Times.
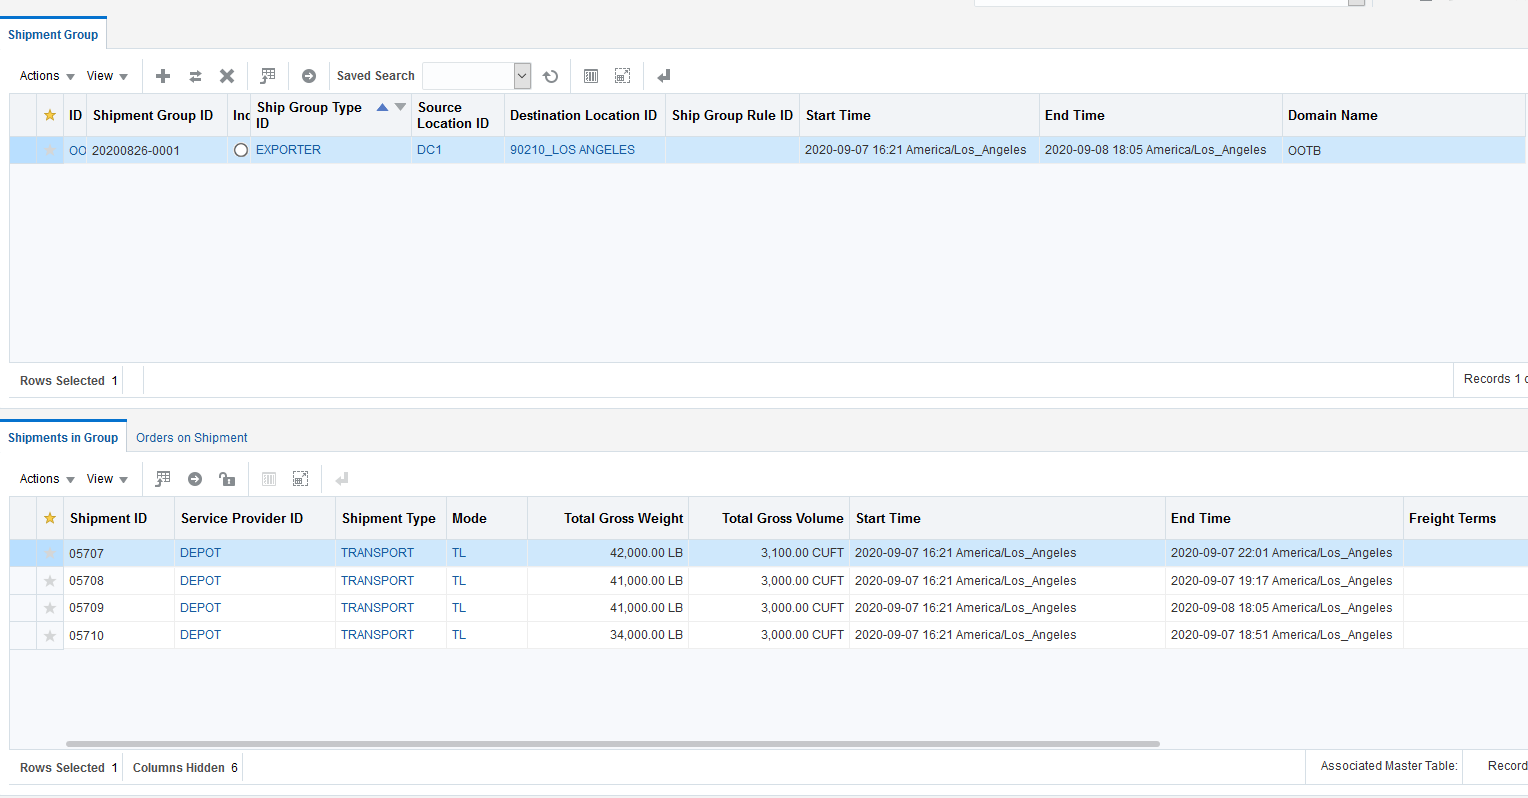
Change Start Time Action Workbench Result View
The Change Start Time action on the shipment group will provide productivity improvements when all of the shipments in your shipment group require a start time change.
Steps to Enable
You don't need to do anything to enable this feature.
Tips And Considerations
The behavior of the Change Start Time action run against a shipment group operates in an all or nothing fashion - meaning that all the shipments in the group must be successfully updated or none of the shipments will be updated. The behavior of the Change Start Time action run against a set of shipments in shipment manager is slightly different - in this case the action will note any shipments that fail to process, but will process the shipments that can be processed - so the shipments that can be changed will be changed, and those shipments that fail will be noted.
Shipment Group Rule - Match Date Enhancement
This feature provides you with an additional time based Shipment Group Rule criteria - Match Date - that you can use to generate your shipment groups based on time related attributes - either Start Date or Daily. The Start Date option will create shipment groups based on your shipment start dates - a different shipment group will be created for each of the start dates in the group of shipments being considered. You can use the Start Date option to easily create a shipment group that contains all the shipments shipped from your DC each day. For example, you can use this capability to create a parcel manifest to group all your parcel shipments shipped from your DC each day.
The Daily option creates daily shipment groups that include all the shipments where the shipment start and end dates cover the shipment group daily criteria. For example, given two shipments where one starts on the 1st of September and ends on the 5th and another shipment that starts on the 3rd and ends on the 6th. The Match Date Daily option will create 6 daily shipment groups where the first shipment will be included in the first five daily shipment groups and the second shipment will be included in 3 of the daily shipment groups starting on the 3rd and going to the 6th. - both shipments will appear in the daily shipment groups for the 3rd, 4th and 5th while only shipment 1 will appear in the daily shipment group on the 1st and only shipment 2 will show up in the shipment group on the 6th. The Daily option will allow you to calculate and assign secondary charge shipments to the shipment group to capture daily charges related to the shipments included in each of the daily groups. The charges calculated for the shipment group can then be allocate to all shipments and orders contained in the various daily shipment groups.

Daily Option
MATCH DATE - START DATE OPTION
In example below, the new Match Date option will be used to generate a daily manifest of parcel shipments shipping out of a specified DC.
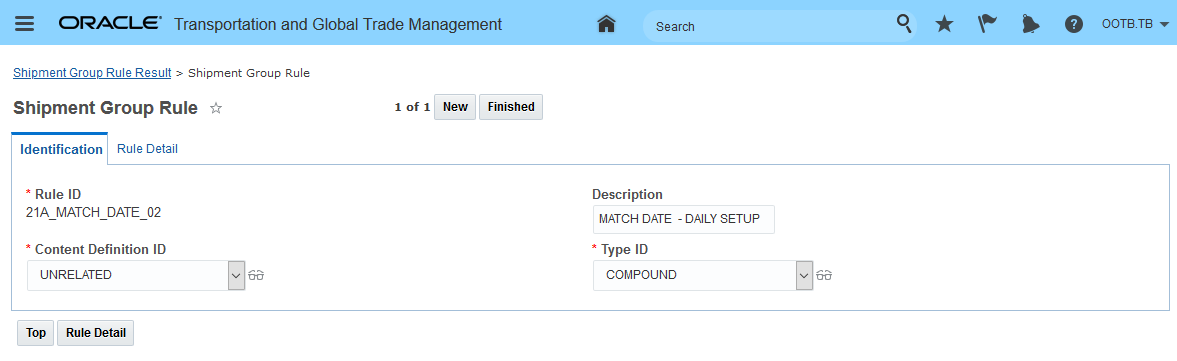
The match rule that will be used for this scenario is below. For the manifest scenario, the Content Definition should be set to Unrelated and the Type ID should be set to Manifest.
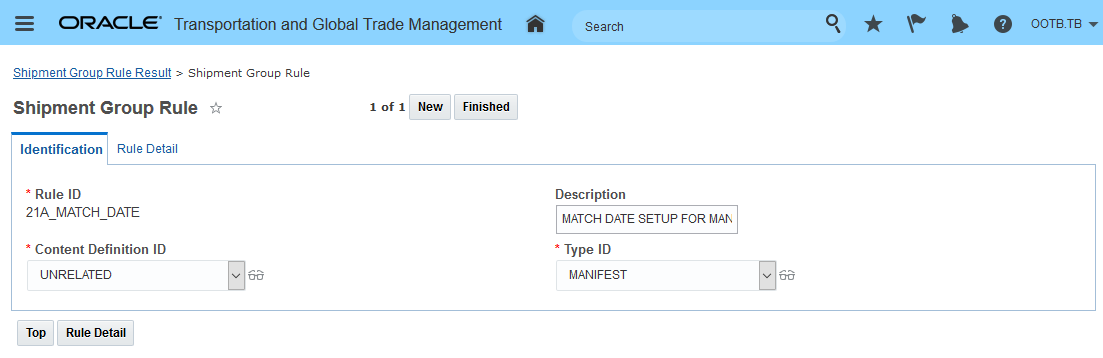
Shipment Group Rule Manifest Scenario Rule Identification
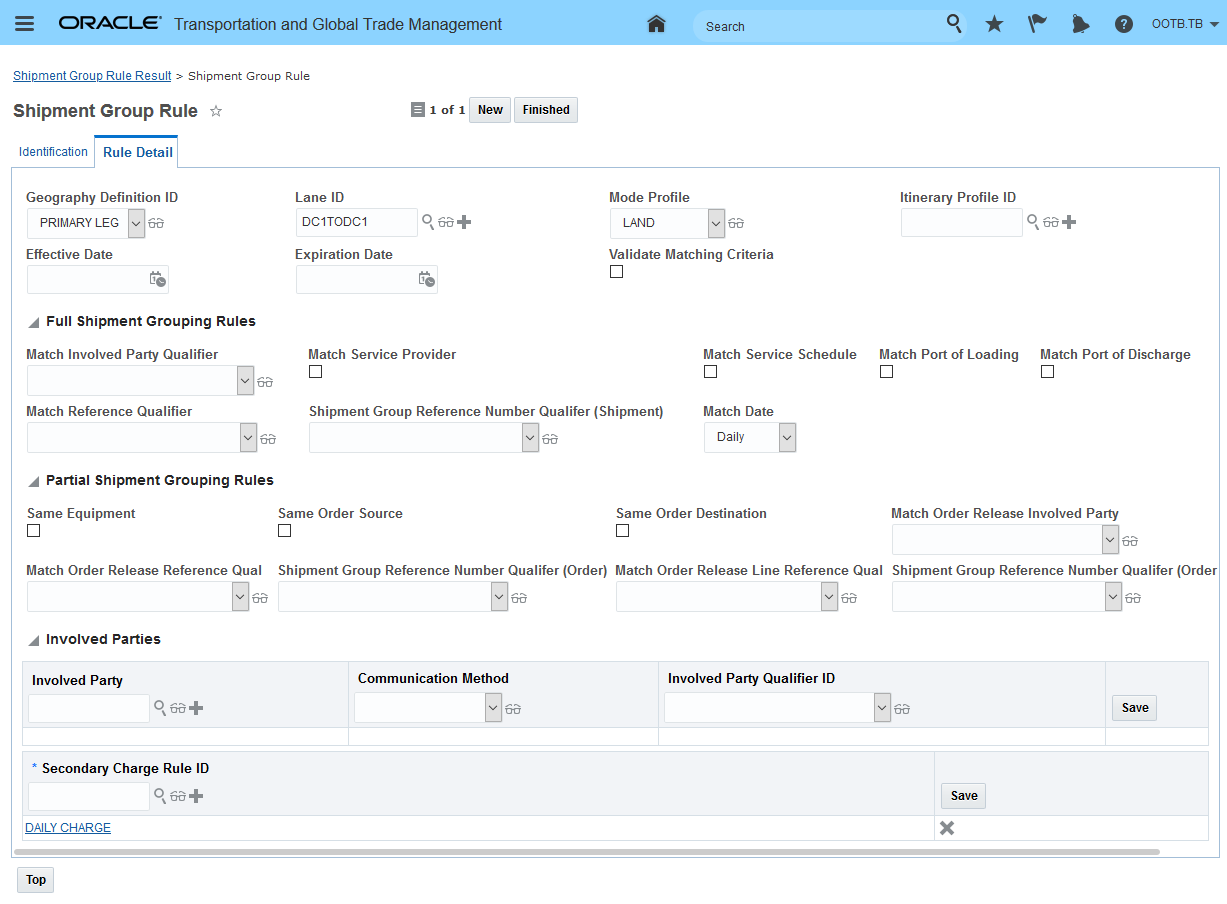
On the Shipment Group Rule Rule Detail tab, the Match Date option is set to the Start Date option. Since this is a manifest/shipment group rule to group the parcel shipments by carrier and date - the Mode Profile is set to Parcel, the Full Shipment Grouping Rules are set to Match By Service Provider and the Match Date option is set to Start Date.
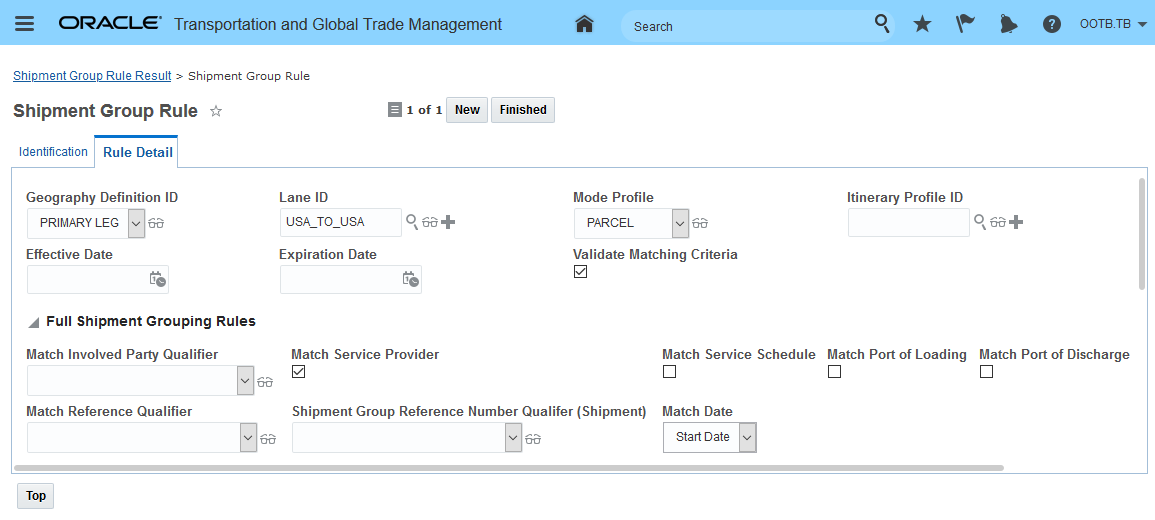
Shipment Group Rule Manifest Scenario - Rule Detail
The shipments that will be evaluated and grouped are below they cover two days of shipping - September 1st 2021 and September 2nd 2021 - all of the shipments in this example are for the same carrier so the result will be two shipment groups for the two days involved.
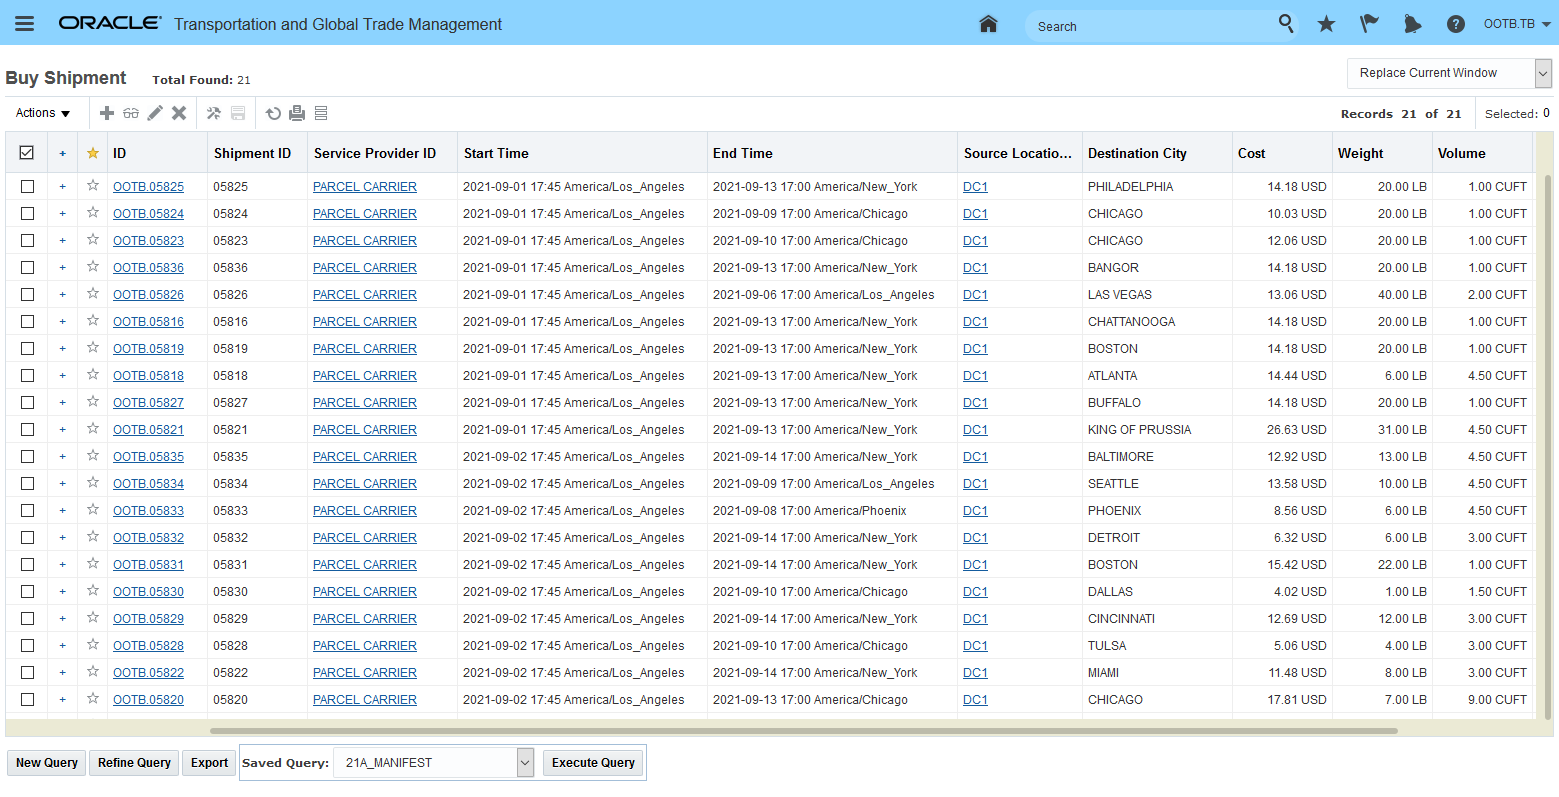
Manifest Scenario Shipments
Business Process automation is used to run the rule against the set of shipments to be considered.

Create Shipment Group Process Management
Result of Create Shipment Group Process Management.
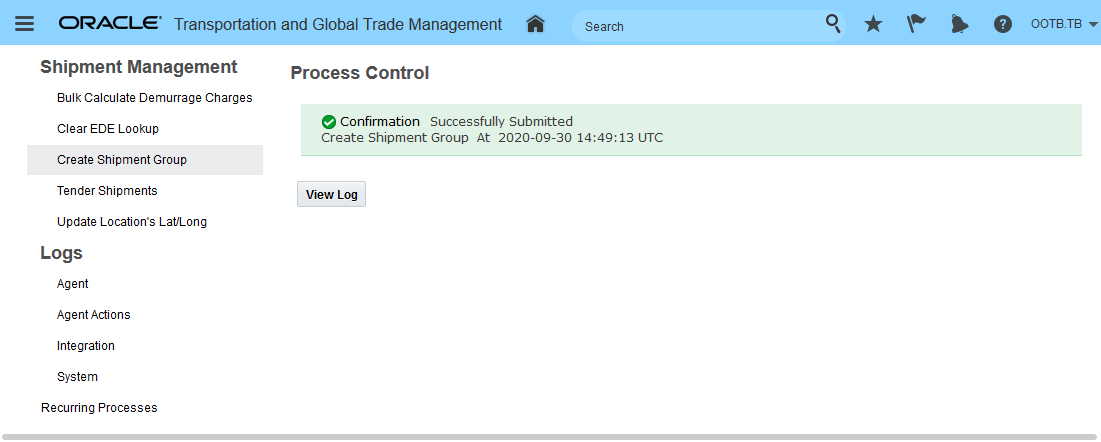
Process Management Result Screen
Below - are the two shipment groups created - one for the parcel shipments shipping on September 1st and a second for the shipment leaving on the 2nd.

Two Shipment Groups Created September 1st and 2nd
Below is a workbench view of the shipment groups and their grouped shipments by date.
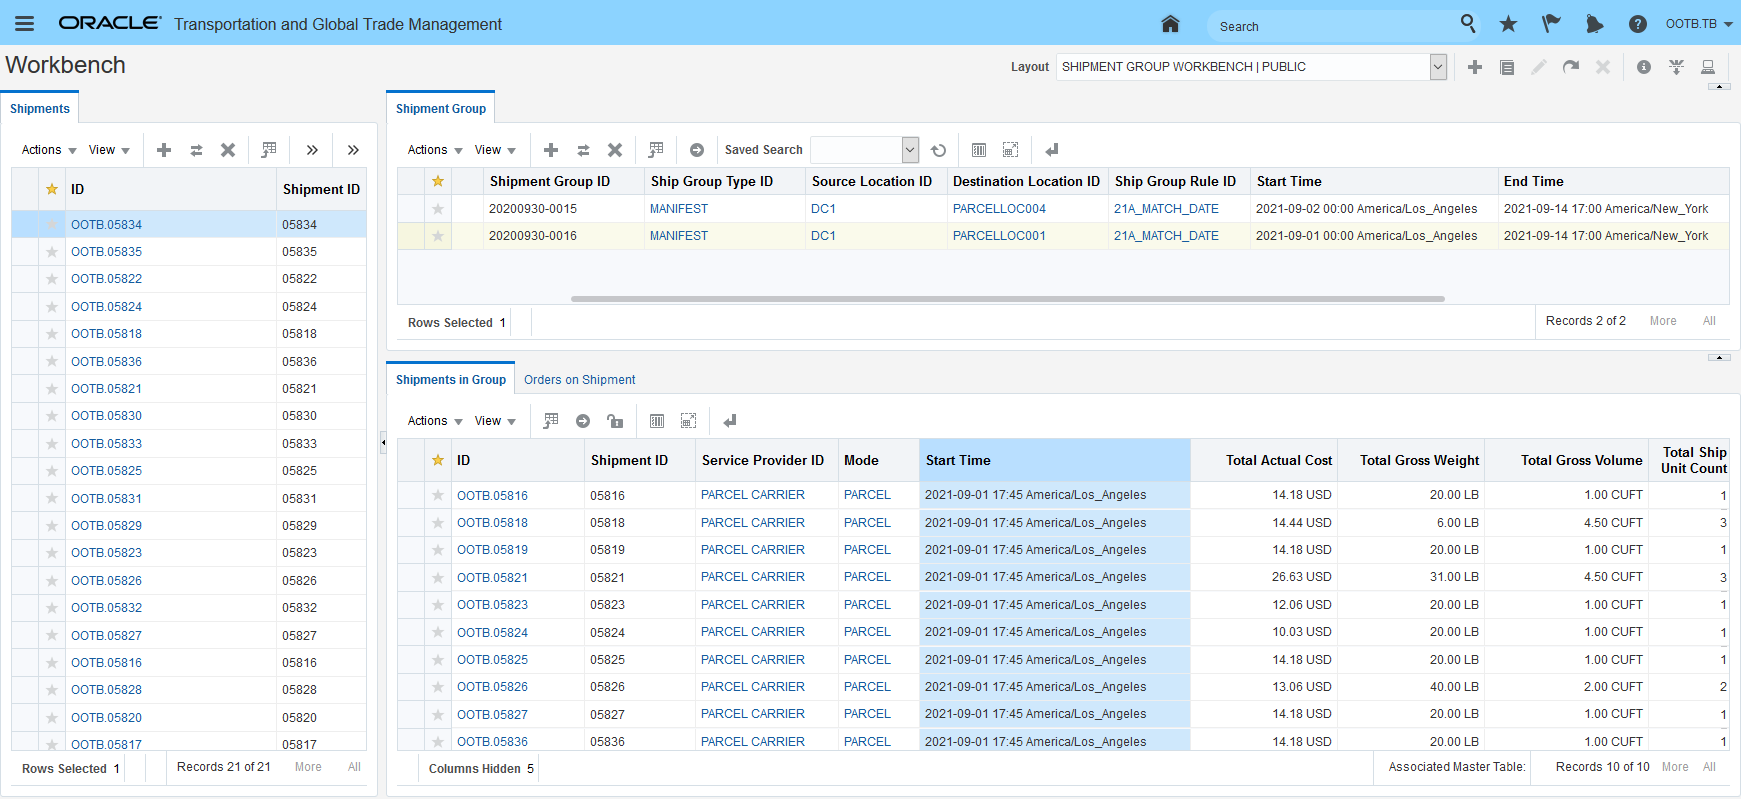
Workbench View - Groups and Shipments September 1st
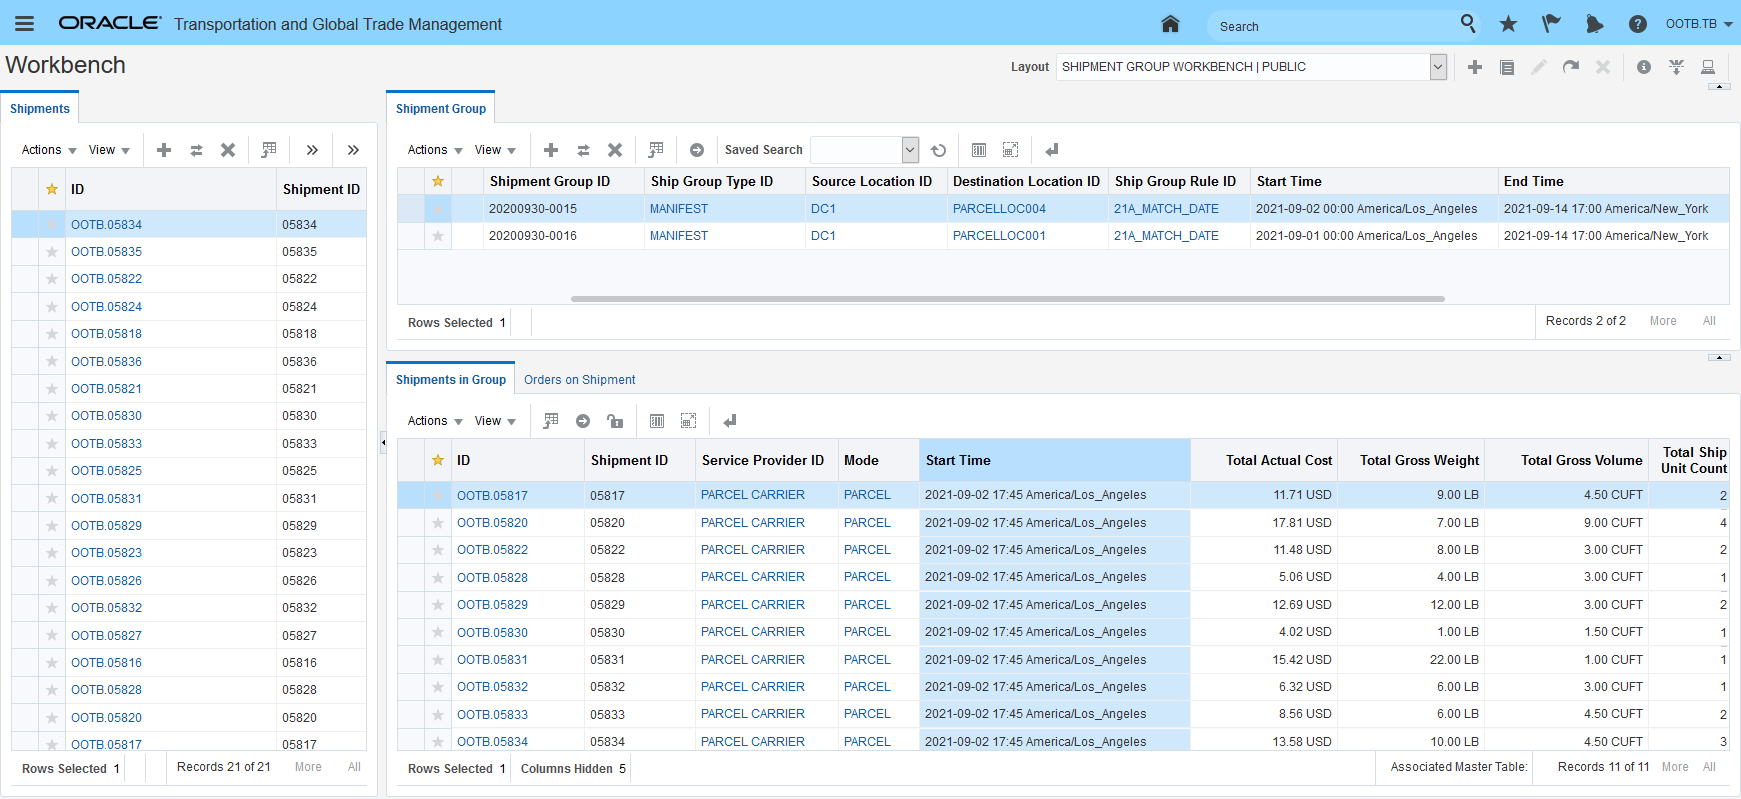
Workbench View - Groups and Shipments September 2nd
MATCH DATE - DAILY OPTION
In the scenario below, the Daily option on the shipment group rule is being used to generate daily shipment groups that include - for a Compound location - all of the shipments being held at the compound. In this scenario, there is a one time fixed charge per shipment on the compound and then a fixed cost per day that should be allocated to all the shipments in the compound. In this example - the per shipment cost is $100 per shipment - the daily charge of $200 is modeled using a secondary charge shipment assigned/generated with the shipment group using the Daily option. In this example, there are 7 shipments. On the first day, all 7 shipments are in the compound - so the generated shipment group contains all 7 shipments and all 7 shipments share in the $200 cost. On the second day - only 6 of the shipments remain - so the 2nd shipment group only has 6 shipments in the group - the pattern continues until the 7th day when only 1 shipment is on the lot.
The rule setup for this scenario is below. Note that the Content definition is set to UNRELATED. The Type ID of COMPOUND was created for this example and is not PUBLIC data.
Shipment Group Rule Compound Scenario Rule Identification
Since this scenario is modeling a holding location, the lane is from and to the same location - in this case DC1. The Mode Profile is LAND and includes Handling as a mode. The only Full shipment Group rule configuration is for the Match Date - which is set to Daily. The Shipment Group Rule also include the setup to create the per day secondary charge shipment when the group(s) are created.
Shipment Group Rule Compound Scenario Rule Detail
The 7 shipments that will be evaluated and grouped are below, they cover 8 days of handling activity at DC1 - from September 30th 2020 to October 7th 2020.
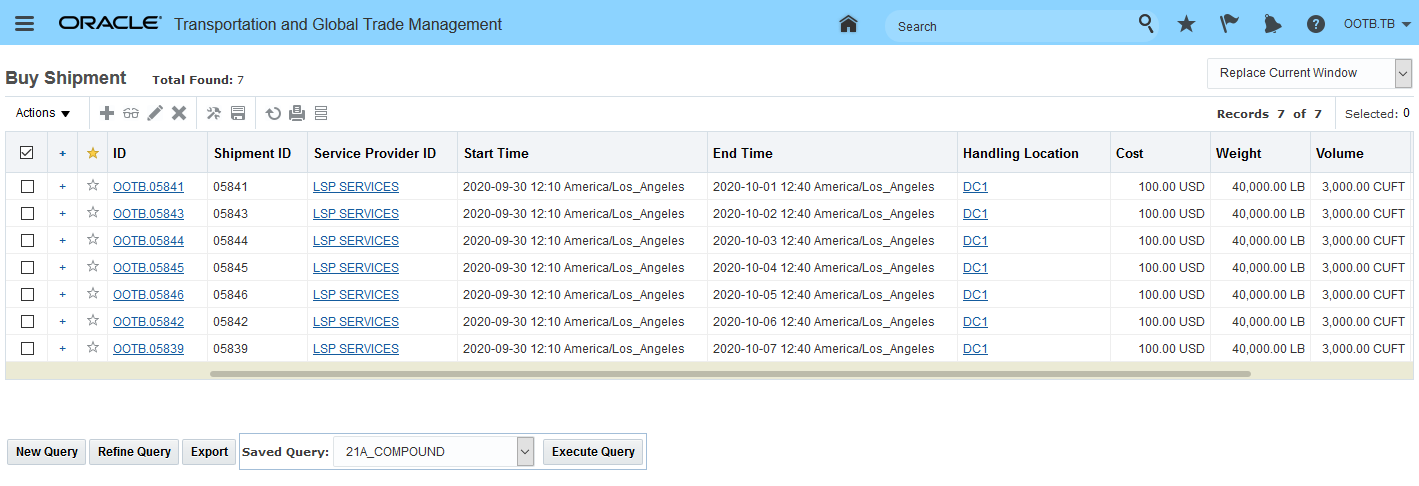
Shipments Considered for Grouping
Business Process automation is used to run the rule against the set of shipments to be considered.
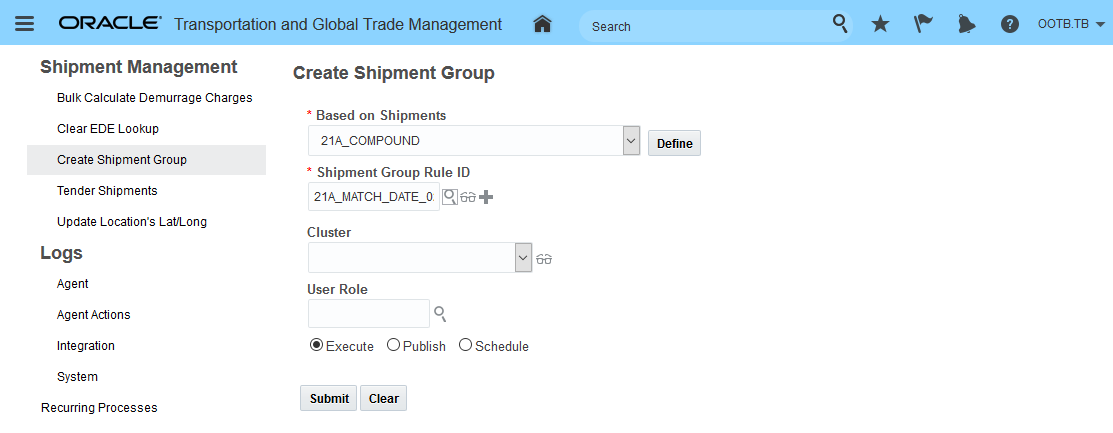
Process Automation
Results - eight daily shipment groups generated starting with September 30th and going to October 7th.
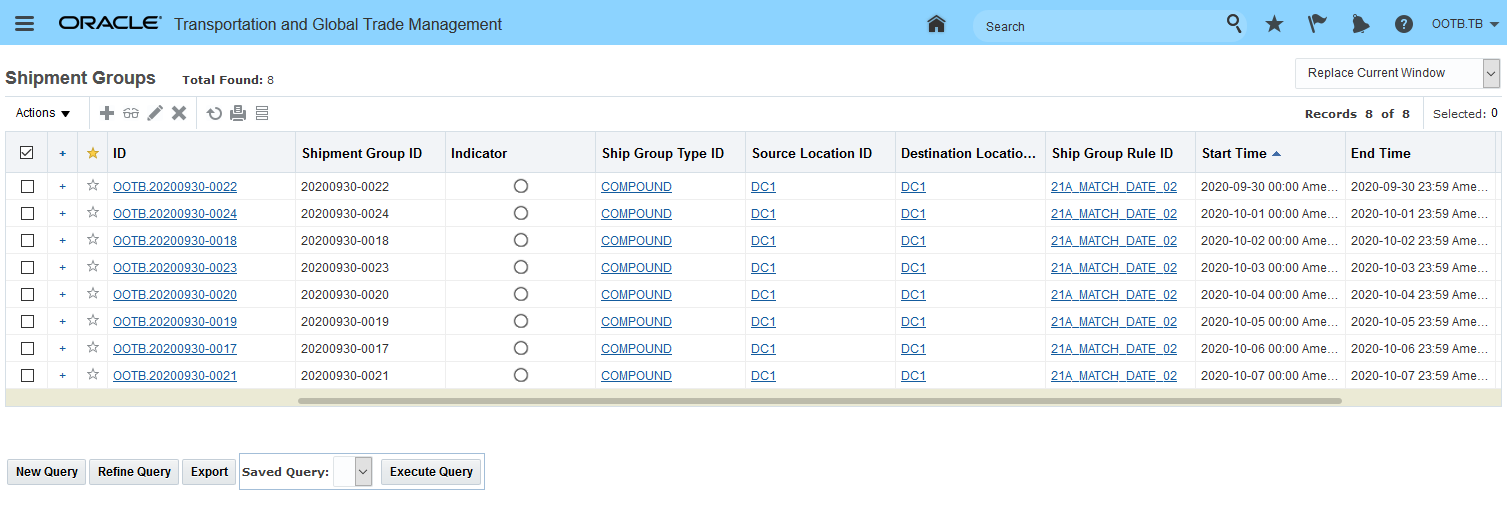
Daily Shipment Groups Generate
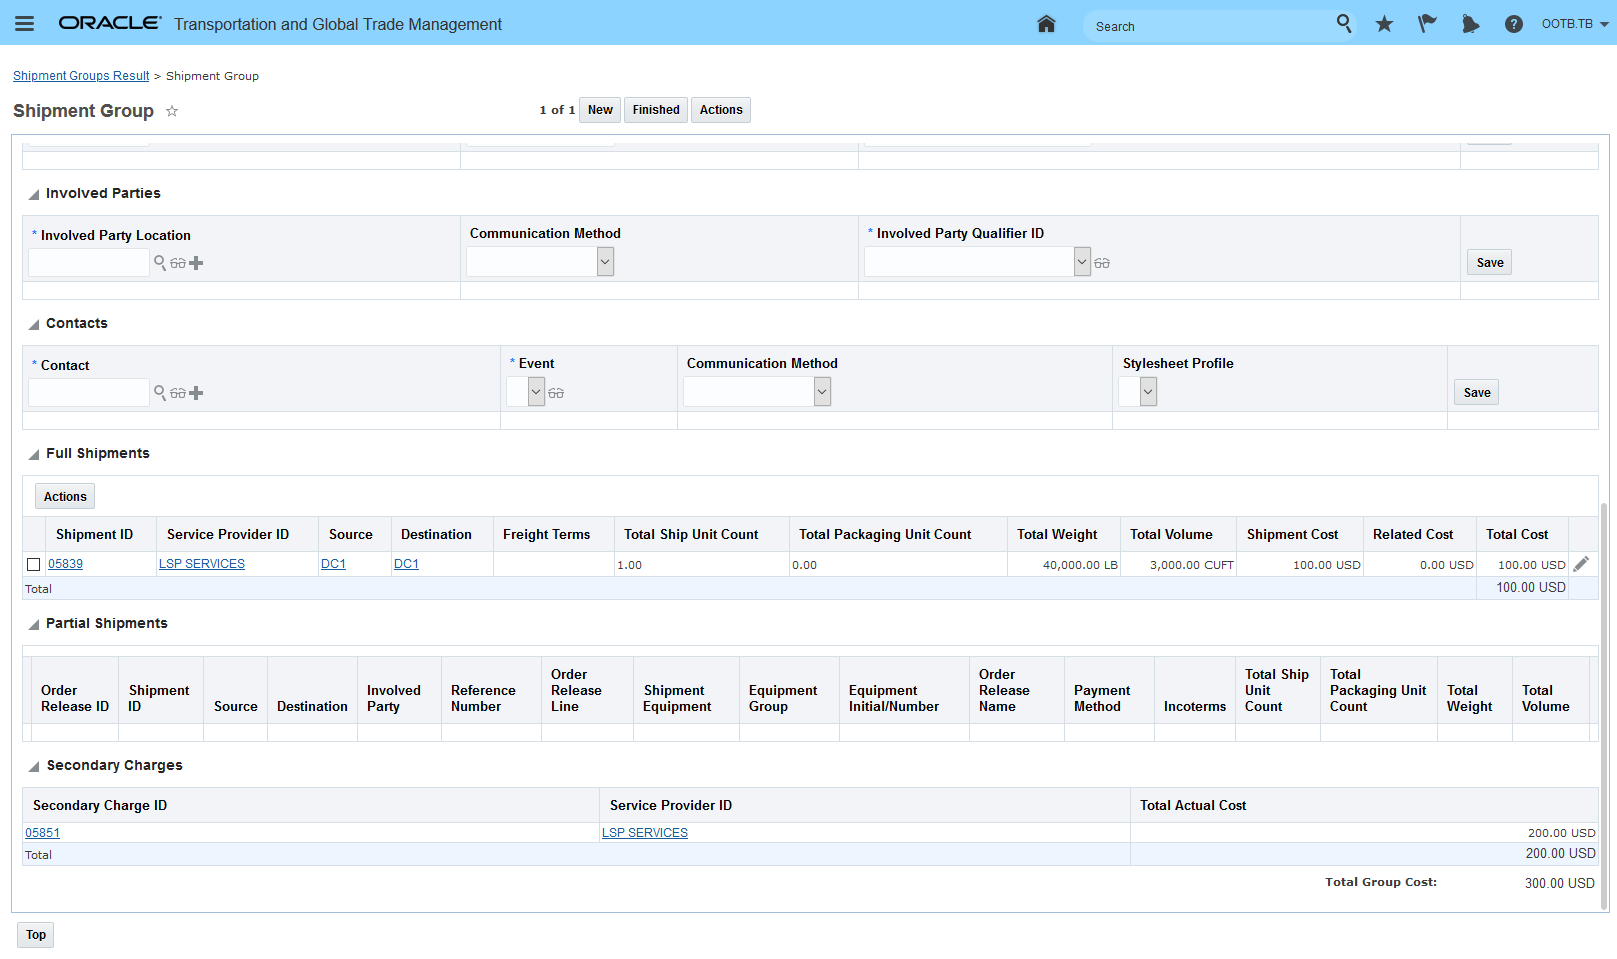
The daily shipment groups on the 30th (and the 1st of October) contain all 7 shipments. Note the calculation and inclusion of the secondary charge shipment.
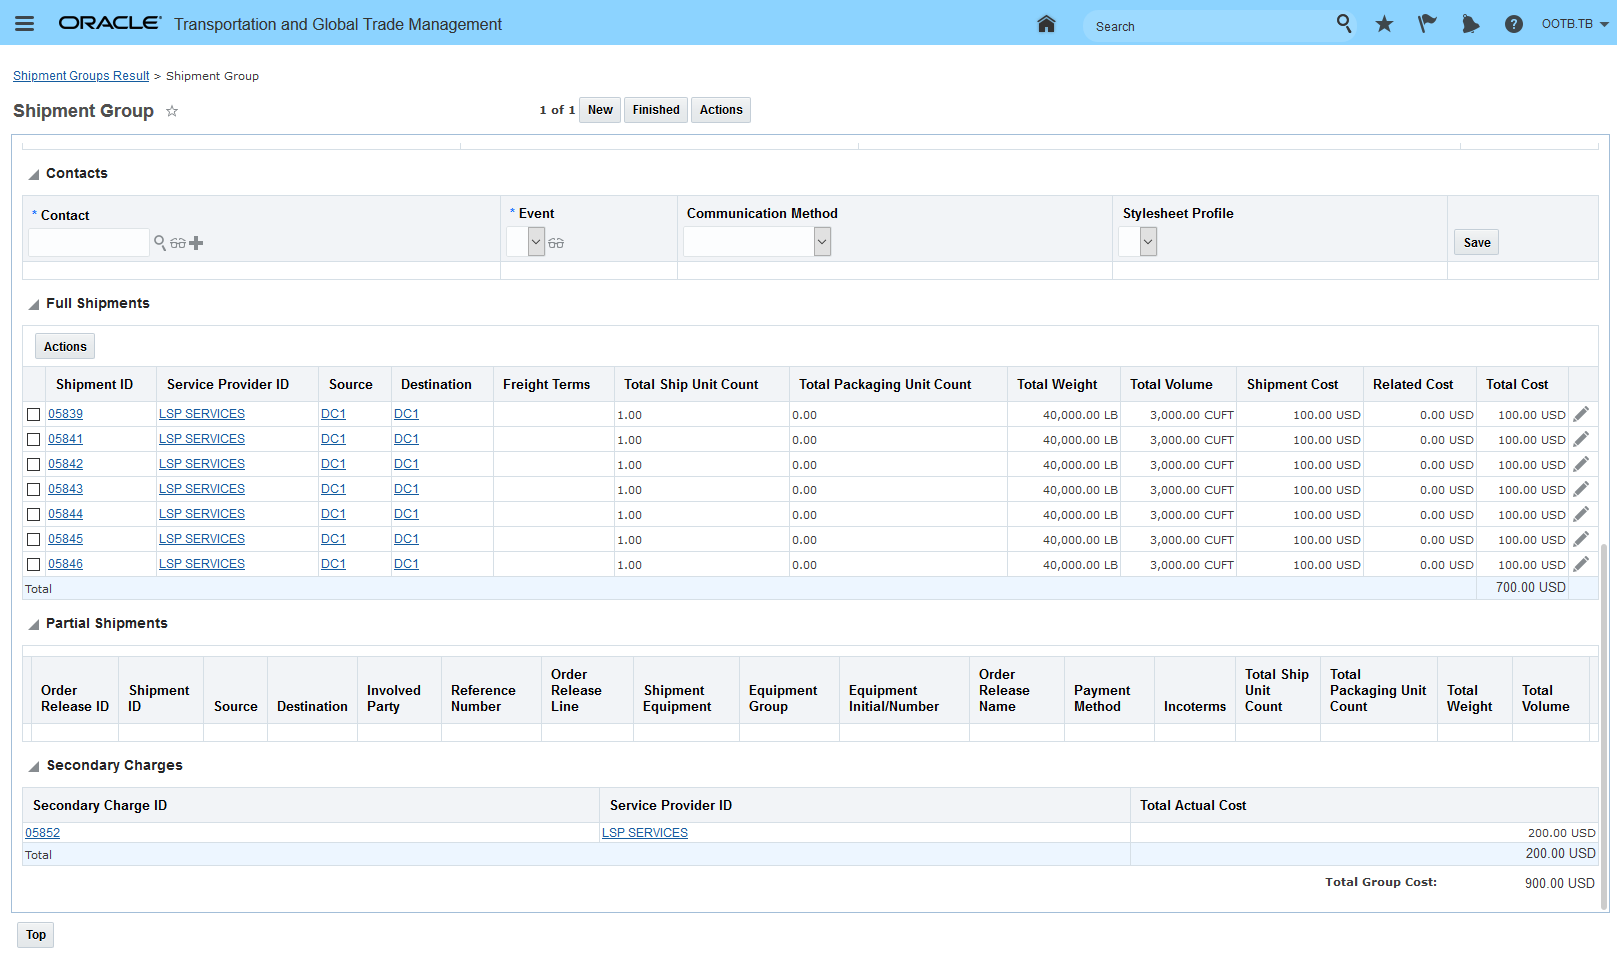
Daily Shipment Group September 30th
The last group in the daily series only contains 1 shipment - the last shipment that was on the DC1 compound on October 7th.
Daily Shipment Group October 7th
ALLOCATION
Below is an example of the order allocation that is available for the orders related to the shipments in the compound handling scenario. In the first example, the order (and shipment) were on the compound for the 30th of September and the 1st of October. In this case, the order has been allocated the $100 charge for entering the compound and then has been allocated the order's portion of the daily fixed charge of $200 that is shared across the orders/shipments on the compound each day. For this order - which was on the compound with 6 other orders/shipments - the order is allocated 1/7th of the $200 daily fixed charge ($28.58) for each of the two days the shipment was on the compound.
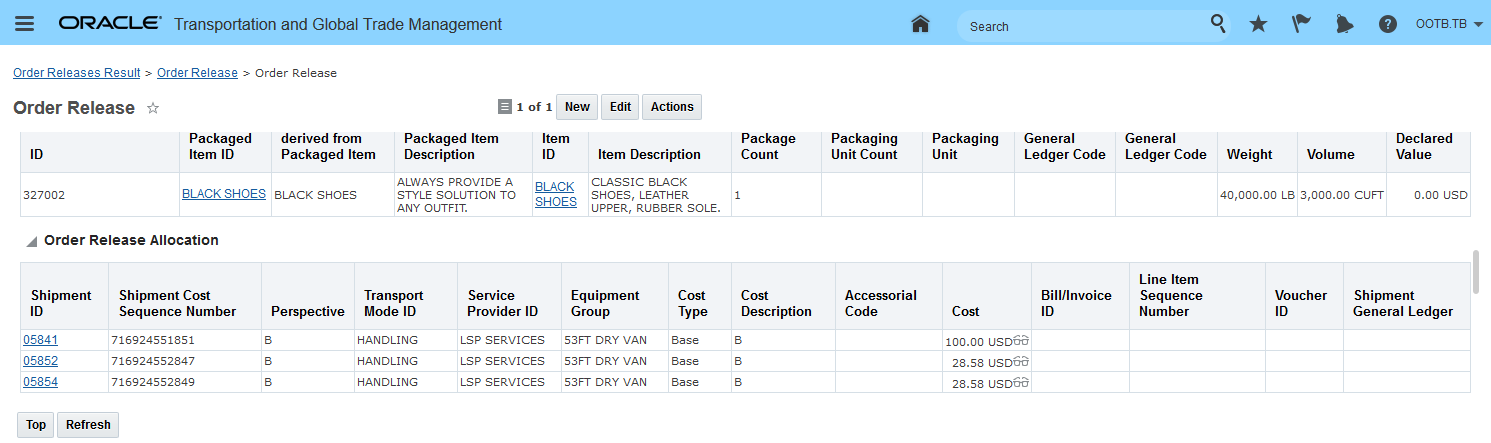
Order Allocation For 2 Days in the Compound - With 6 Other Shipments
In the example below - the allocation has been run for the order that arrived on the 30th and departed on the 7th of October. In this case, the order has the allocated $100 cost for entering the compound and then the order receives it share of the proportioned $200 daily charge for each of the 8 days the order/shipment was on the compound. Allocation details and explanation below.
| Cost | Allocated Cost For | Number of orders/shipments In compound daily | Date |
|---|---|---|---|
| $100 | 1x entrance to compound charge | September 30th | |
| $28.57 | Portion of $200 daily fixed cost | 7 | September 30th |
| $28.57 | Portion of $200 daily fixed cost |
7 | October 1st |
| $33.33 | Portion of $200 daily fixed cost |
6 | October 2nd |
| $40.00 | Portion of $200 daily fixed cost |
5 | October 3rd |
| $50.00 | Portion of $200 daily fixed cost |
4 | October 4th |
| $67.67 | Portion of $200 daily fixed cost |
3 | October 5th |
| $100.00 | Portion of $200 daily fixed cost |
2 | October 6th |
| $200.00 | Portion of $200 daily fixed cost |
1 | October 7th |
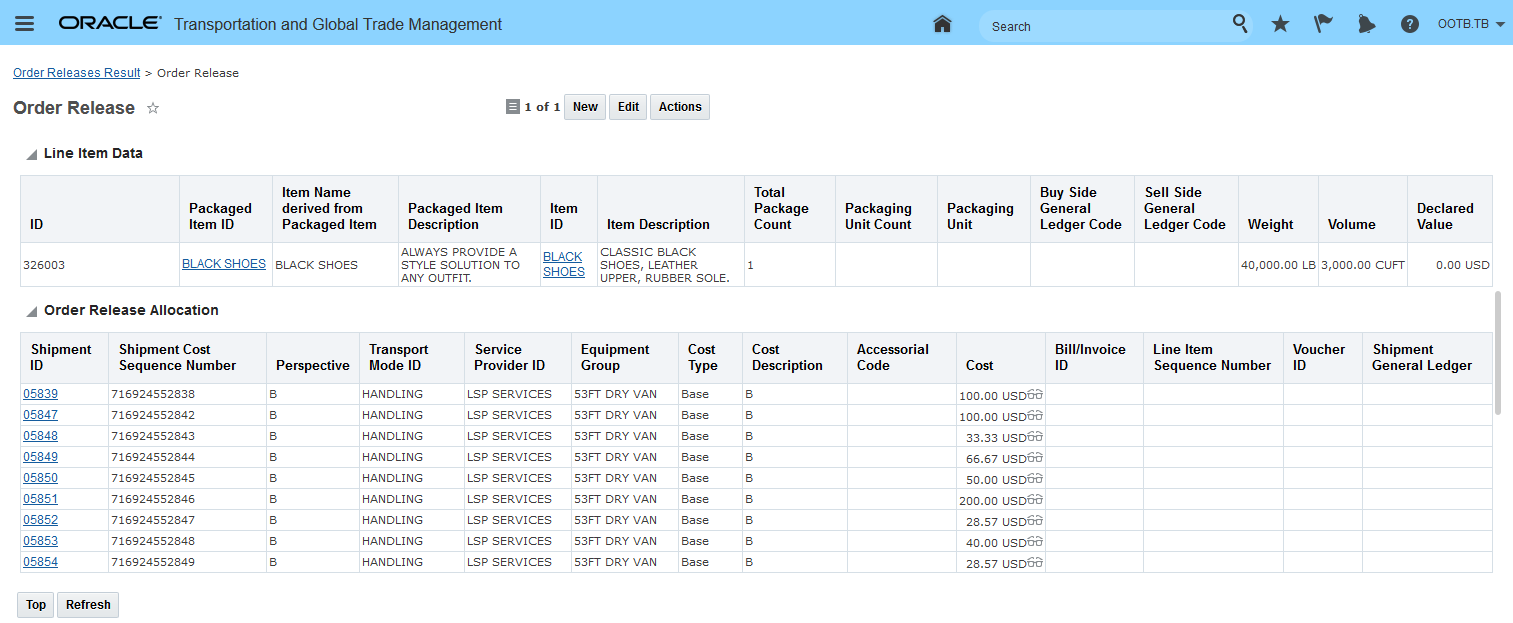
Allocation of 8 Day Compound Order
Provides you with the ability to model common time based shipment grouping scenarios - like dwell time at a compound or a daily carrier manifest.
Steps to Enable
To use the Match Date option you will need to select this option when defining your Shipment Group Rules.
Navigate to Shipment Management > Power Data > Shipment Configuration > Shipment Group Rule.
On the Shipment Group Rule Identification Tab:
- Enter a Rule ID and Description for the rule you want to define
- Set the Content Definition ID to Unrelated
- Use the Type ID to select the shipment group type that you want to build using this rule. I would recommend creating meaningful Type IDs so you can categorize your Shipment Group Rule
On the Shipment Group Rule Rule Detail Tab enter the standard details for your rule:
- Geography
- Mode
- Etc
Full Shipment Grouping Rules:
-
Enter the option you wish to use for your Match Date (Start Date or Daily) - all shipments in the group must have the same time as defined for the group. Shipments will be grouped either based on the same start time or on a daily basis.
Manager Layout Enabled Action - Split Shipment Group
This feature provides you with the ability to use Manager Layout configuration capabilities to configure the Split Shipment Group action so that the options provided when running the action are aligned to the requirements of your Implementation.
Using the Manager Layout capabilities you can configure the default Split Shipment Group action - shown below - to completely remove input values or provide a limited set of options for the user.
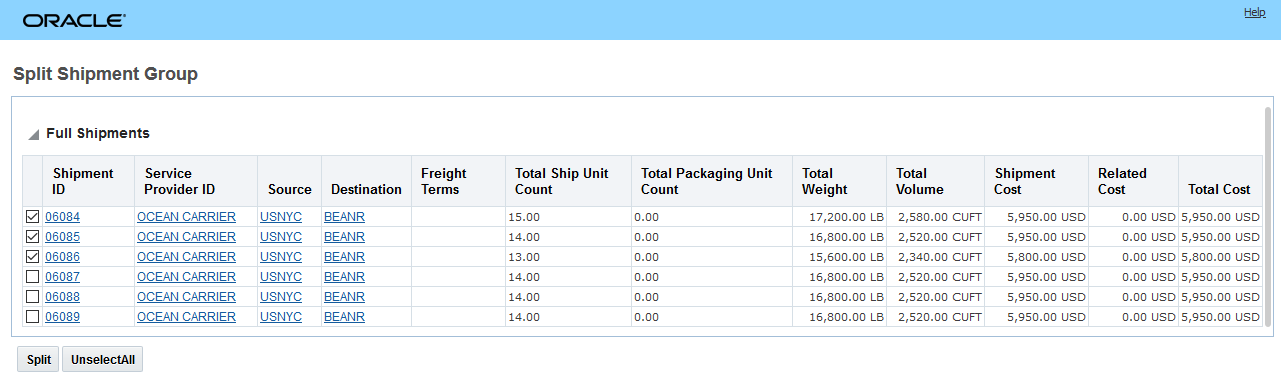
Out-of-the-Box Split Shipment Group Action
Within the Manager Layout you have the option to configure how the action looks. You can remove or reorder the columns shown on the input screen.

Manager Layout Configuration Options for Split Shipment Group Action
The ability configure the Split Shipment Group action using the Manager Layout functionality will allow you to trim down and simplify the data shown. For example - you can remove unused columns from the grid as well as reorder the columns so the most important columns show up first.
Steps to Enable
There are no steps require to enable this feature - however - to take advantage of manager layout configuration capabilities provided for the Split Shipment Group action - you will need to use the Manager Layout Action configuration capabilities to configure the action. Then you will need to assign the configured action to the desired manager layout.
At a high level the steps involved are:
- Copy the public layout for the action.
- Configure the action - remove sections, set defaults, remove or reorder fields and columns etc.
- Assign the configured action to the desired manager and screen set.
Create Shipment Group Action Enhancements
This feature provides you with a set of enhancements to the Create Shipment Group action. The Create Shipment Group action UI and logic have been enhanced to provide the option of specifying the Shipment Group Type, Shipment Group Rule and whether or not the shipment being evaluated should be added to an existing shipment group that meets the specified Shipment Group Rule ID criteria or if the shipment should create a new shipment group.
One of the benefits of this new logic, is the ability to have OTM add your shipment to an existing shipment group based on the specified Shipment Group Rule ID without you having to find the matching shipment group and then moving your shipment into that existing group. You now have the option to have OTM automatically add the shipment to an existing shipment group or create a new shipment group.
In addition to the UI and business logic improvements, the Create Shipment Group Action can now be configured using Manager Layout configuration capabilities.
In the example below, the Create Shipment Group action will be used to create a shipment group for a shipment evaluating the entered Shipment Group Rule ID.
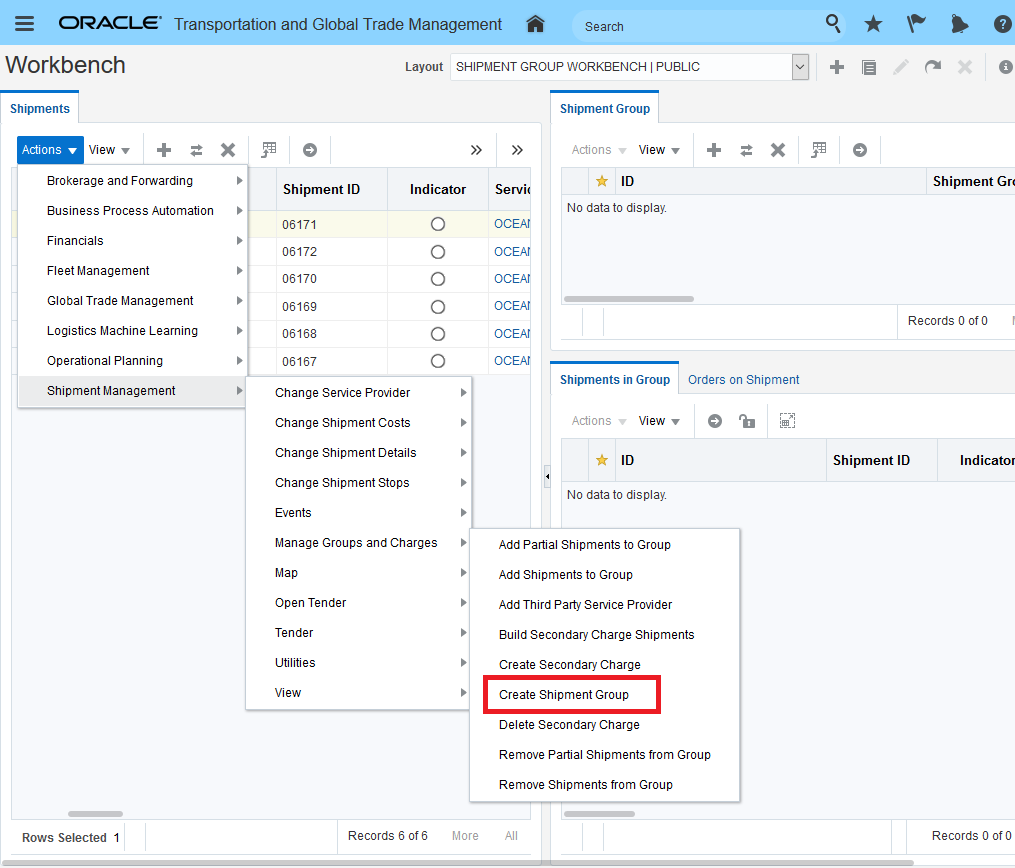
Create Shipment Group Action
Below is the new action input dialog box that is shown when you run the Create Shipment Group action. This action input screen allows you to input the dialog Shipment Group Type ID, Shipment Group Rule ID and your Add to existing group (if found) selection of Yes/No. The ability to find an existing shipment group or not is driven by the Shipment Group Rule ID and the matching criteria specified on the rule.
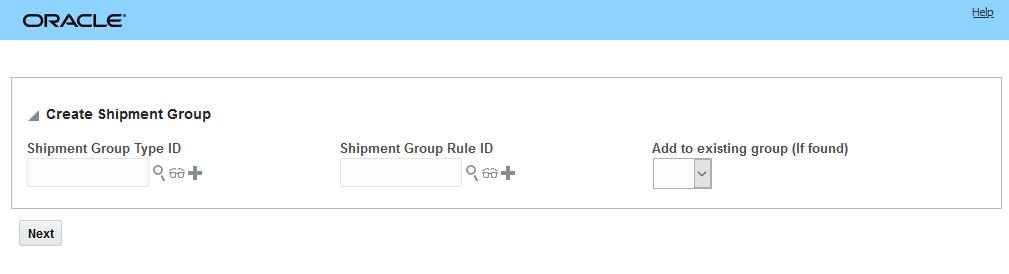
New Create Shipment Group Action Input
In the example below, the action input will allow the shipment to be added to an existing shipment group - if a match is found. If no match is found, then a new shipment group will be created. In this case, no match was found and a new shipment group was created.
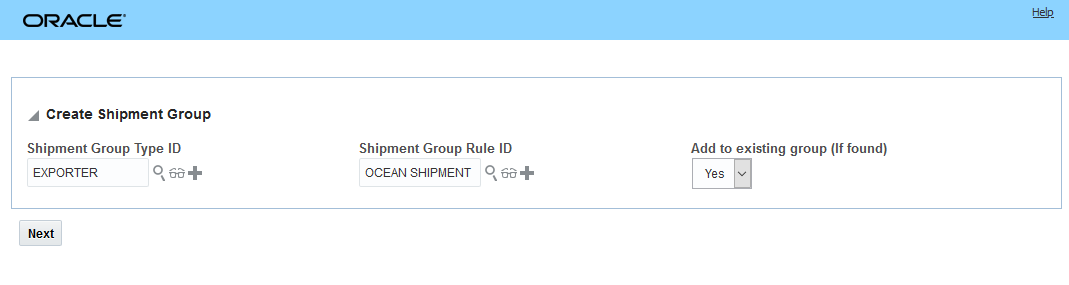
Sample Create Shipment Group Input
Given the shipment, the Shipment Group Rule and the action input, in this case no matching shipment group was found so a new shipment group was created as indicated by the Created Shipment Groups information shown.
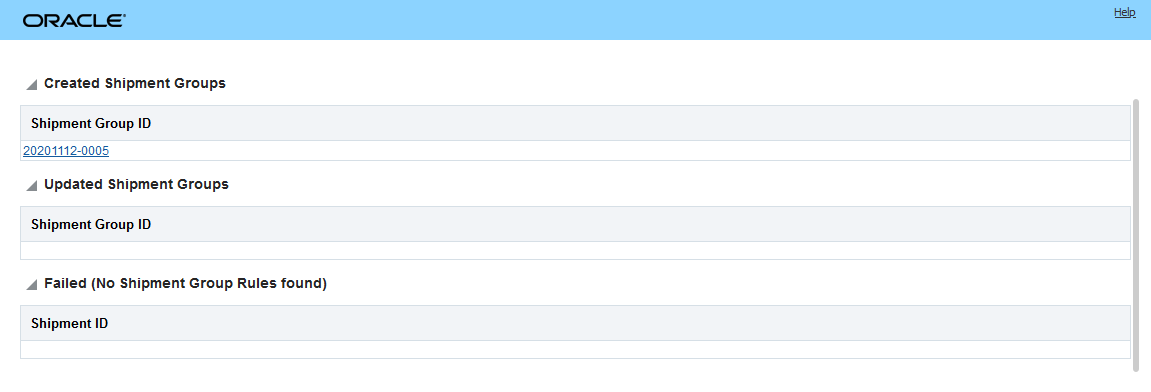
Create Shipment Group Action Result
Below is the result of the action above - there is one shipment group created using the Ocean Shipment Shipment Group Rule that contains one shipment.
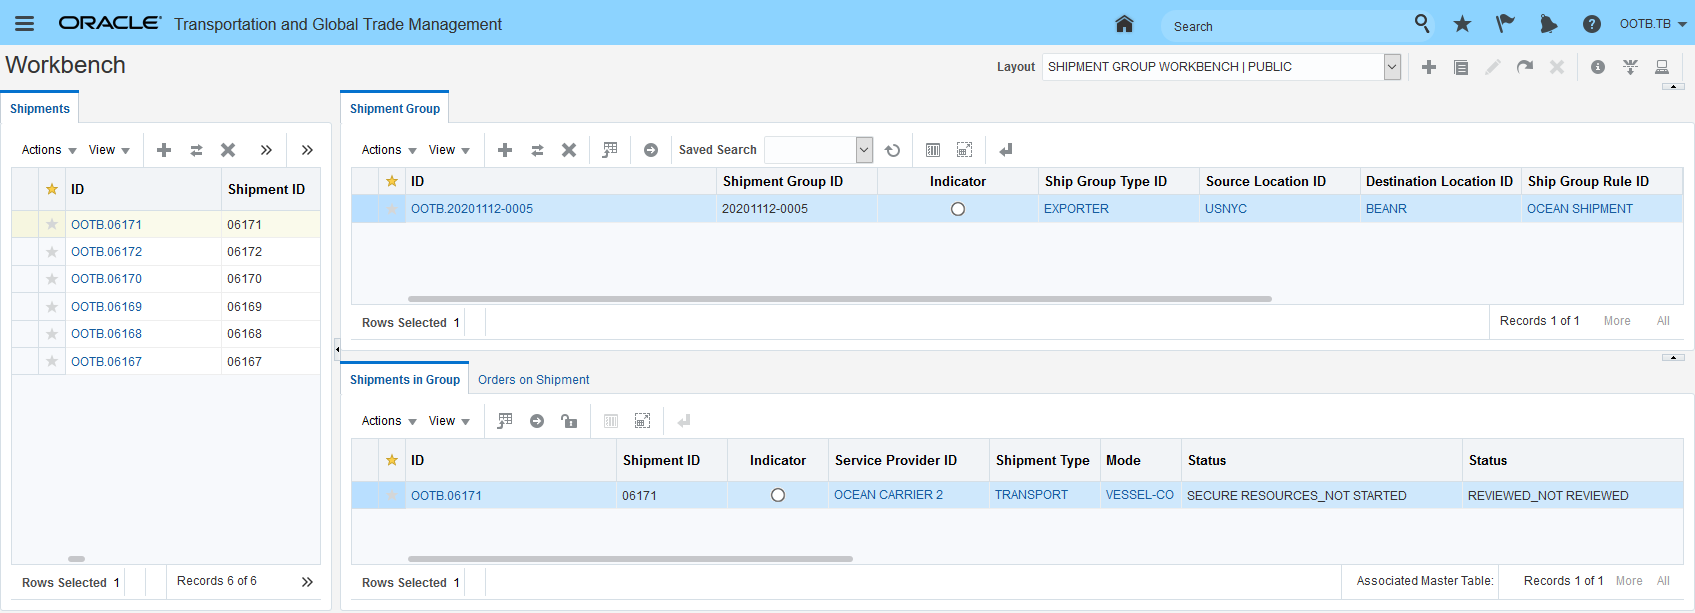
Workbench View
In example below, the same action will be run - but this time a shipment group already exists - so the shipment (06172) will be added to the existing group versus creating an entirely new shipment group.
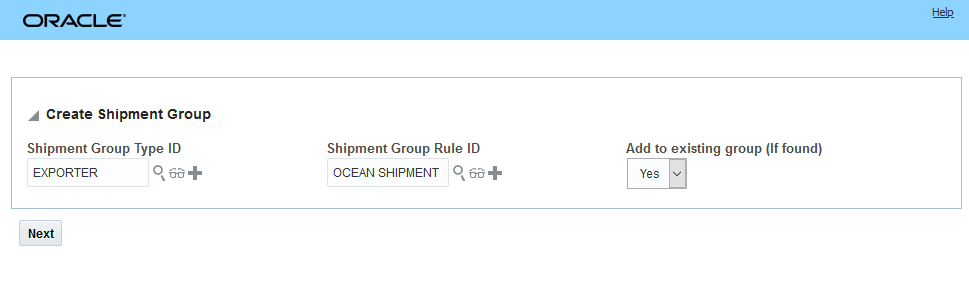
Create Shipment Group Action Input
Note that in this case the result of the action is that the shipment group has been updated versus being created.
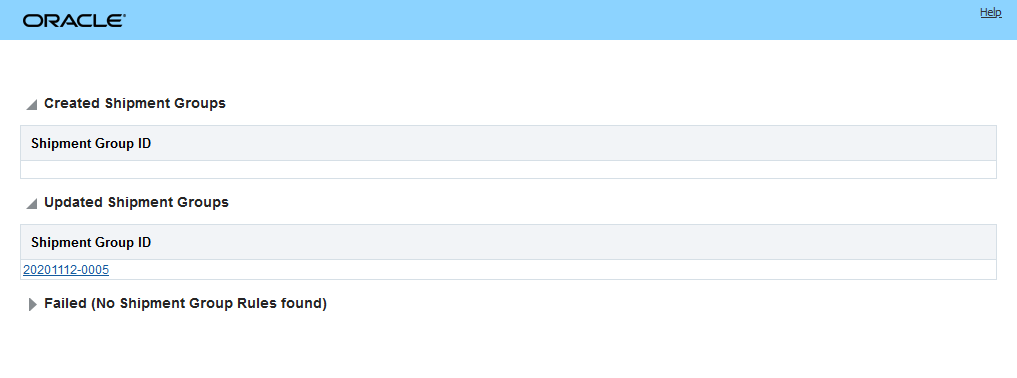
Create Shipment Group Action Result - Updated Shipment Groups
In the workbench view below, you can see that the additional shipment was added to the existing shipment group.
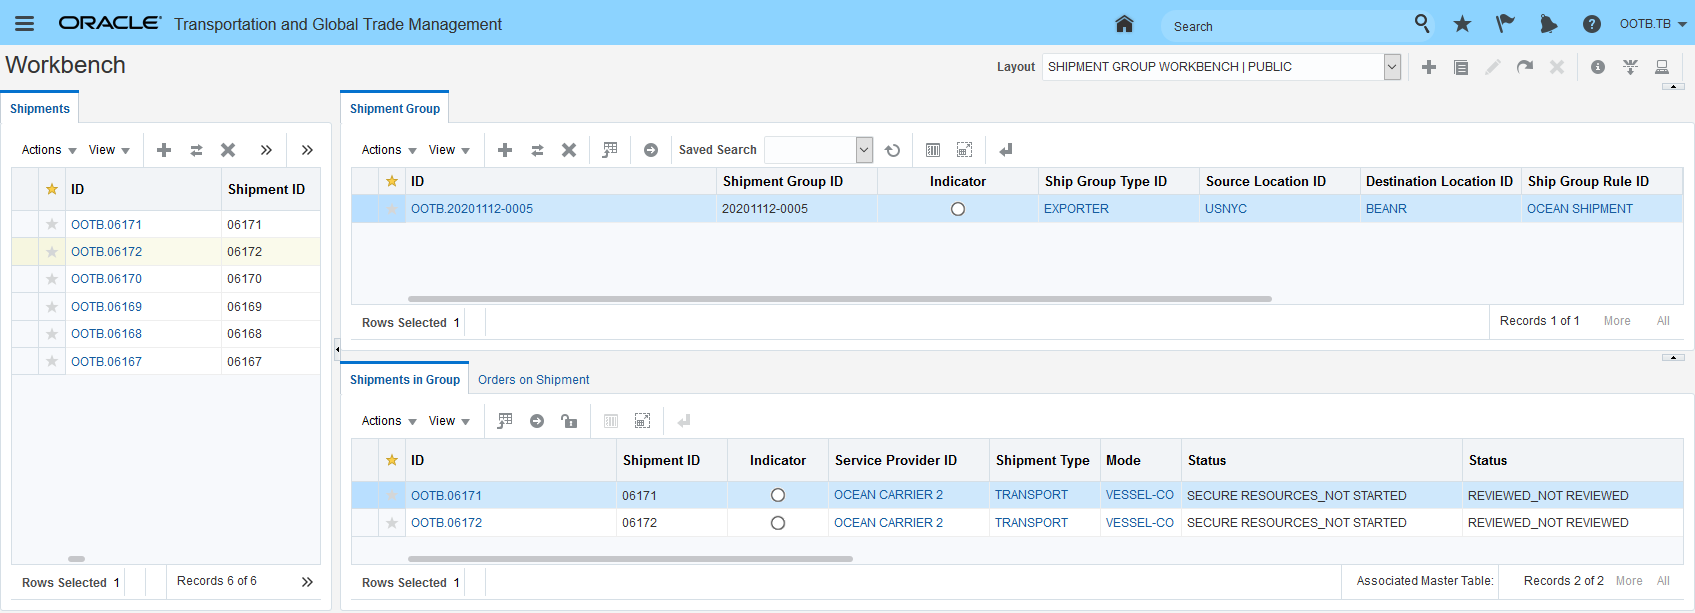
Workbench View Shipment Added to Existing Shipment Group
In the example below, the option to not add to the existing shipment group is selected. In this case, a new shipment group will be created for the shipment even if there exists a matching shipment group.

Create Shipment Group Add to Existing Group Set to No
The action result shows that a new shipment group has been created for the shipment.
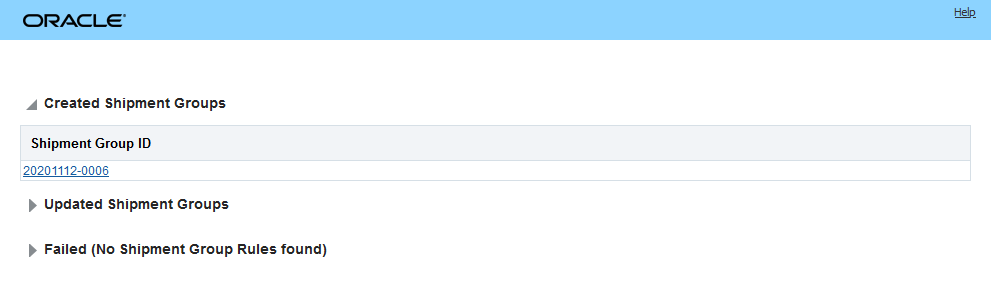
Create Shipment Group Result
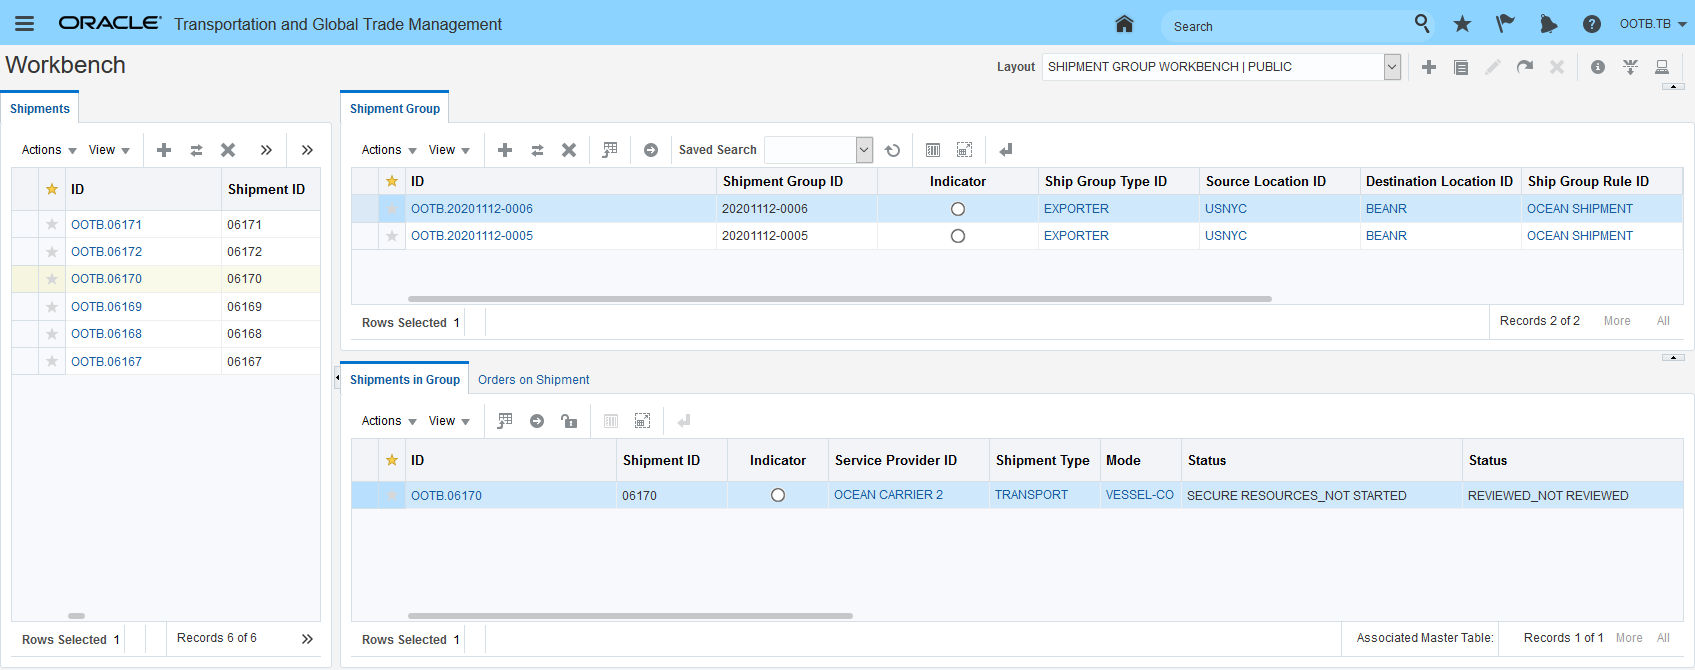
Result Workbench View
Note that none of the fields in the new action input screen are required. In this example, the new input for the action will not be used/no input provided.
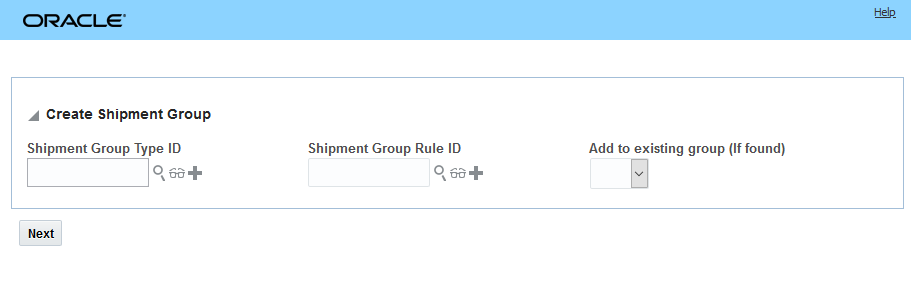
Create Shipment Group Action - No Input
Skipping the first Create Shipment Group input screens brings you to the original Create Shipment Group input screen shown below where you are required to enter the Shipment Group Type ID, Source Location ID and Destination Location ID for the shipment group being created.
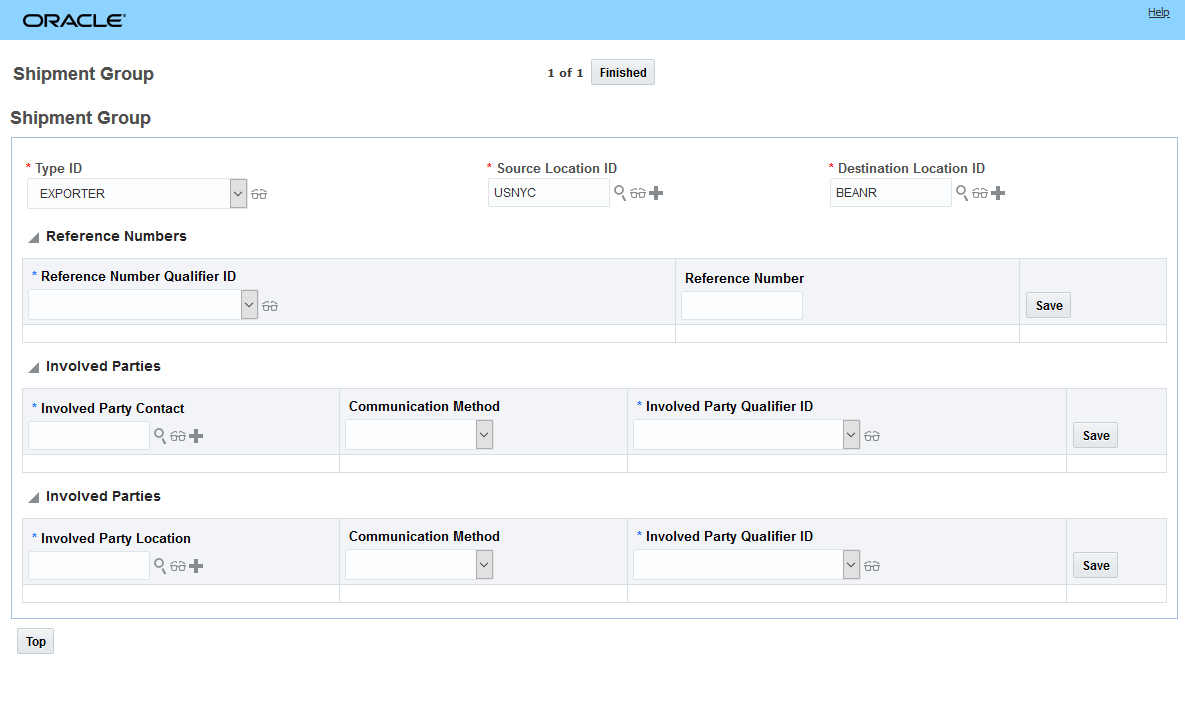
Create Shipment Group Action Original Action Input Screen
In the Workbench view below, note that the last shipment group created does not have a Shipment Group Rule ID associated with it. With no Shipment Group Rule assigned, there is no way to automatically add shipments to the group. Adding shipments to this shipment group must be done manually.
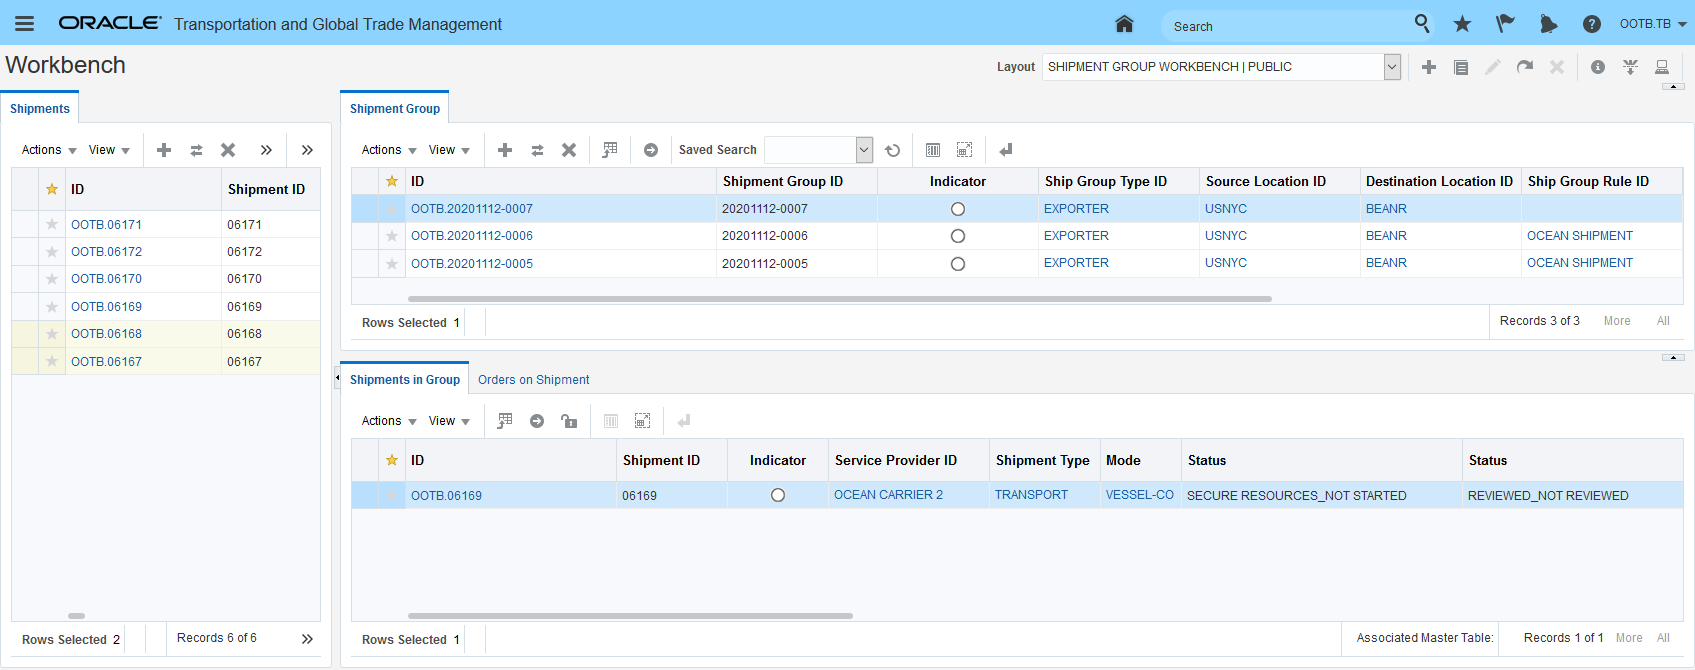
Workbench View Three Shipment Groups Created
In addition to the UI input and logic changes described above, you can use Manager Layout capabilities to configure the default Create Shipment Group action - shown below - to completely remove input values or provide a limited set of options for the user.

Out-of-the-Box Create Shipment Group Action
Within the Manager Layout, you have the option to configure how the action looks - as shown below. You can remove or reorder options/fields shown.

Manager Layout Configuration Options for Create Shipment Group Action
Additional configuration available includes options to hide search/view/new, set a fixed list for selection or select a default.
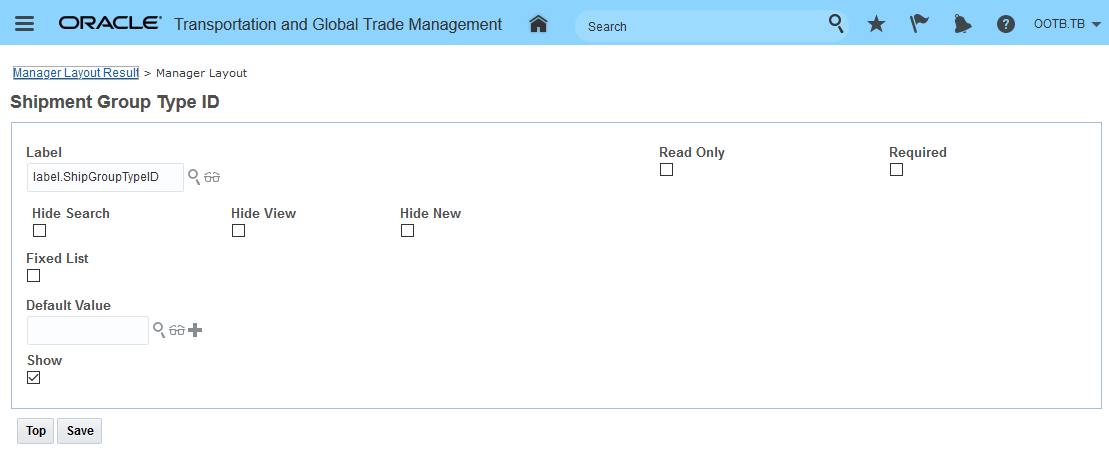
Addition Field Level Configuration Available
The ability configure the Create Shipment Group action using the Manager Layout functionality will allow you to trim down and simplify the data shown and the action experience so that it matches your specific implementation requirements. For example - if your users should only use a specific set of Shipment Group Types you can limit their selection to just the allowed list of types.
Steps to Enable
There are no steps require to enable this feature - however - to take advantage of manager layout configuration capabilities provided for the Create Shipment Group action - you will need to use the Manager Layout Action configuration capabilities to configure the action. Once configured, you will then need to assign the configured action to the desired manager layout.
At a high level the steps involved are:
- Copy the public layout for the action.
- Configure the action - remove sections, set defaults, remove or reorder fields and columns etc.
- Assign the configured action to the desired manager and screen set.
This feature provides you with a new Shipment Equipment Manager that you can configure and use as standalone manager, and/or configure and use with your Workbenches, and/or configure for viewing the shipment equipment information from within your shipment manager.
The Shipment Equipment Manager is accessed via Shipment Management > Shipment Management > Shipment Equipment
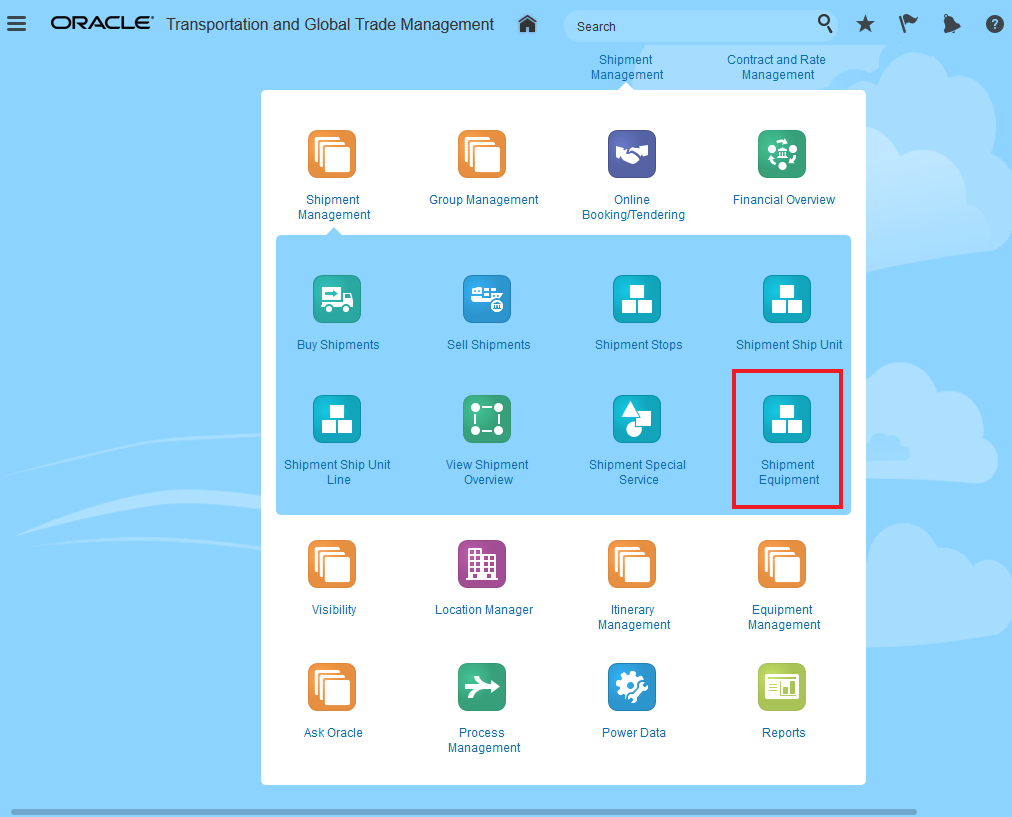
Springboard Shipment Equipment Manager
The Shipment Equipment Finder allows you to search for your Shipment Equipment records by a number key attributes like Equipment ID, Equipment Number, Seal Numbers, Attributes, Shipment ID and Audit details,
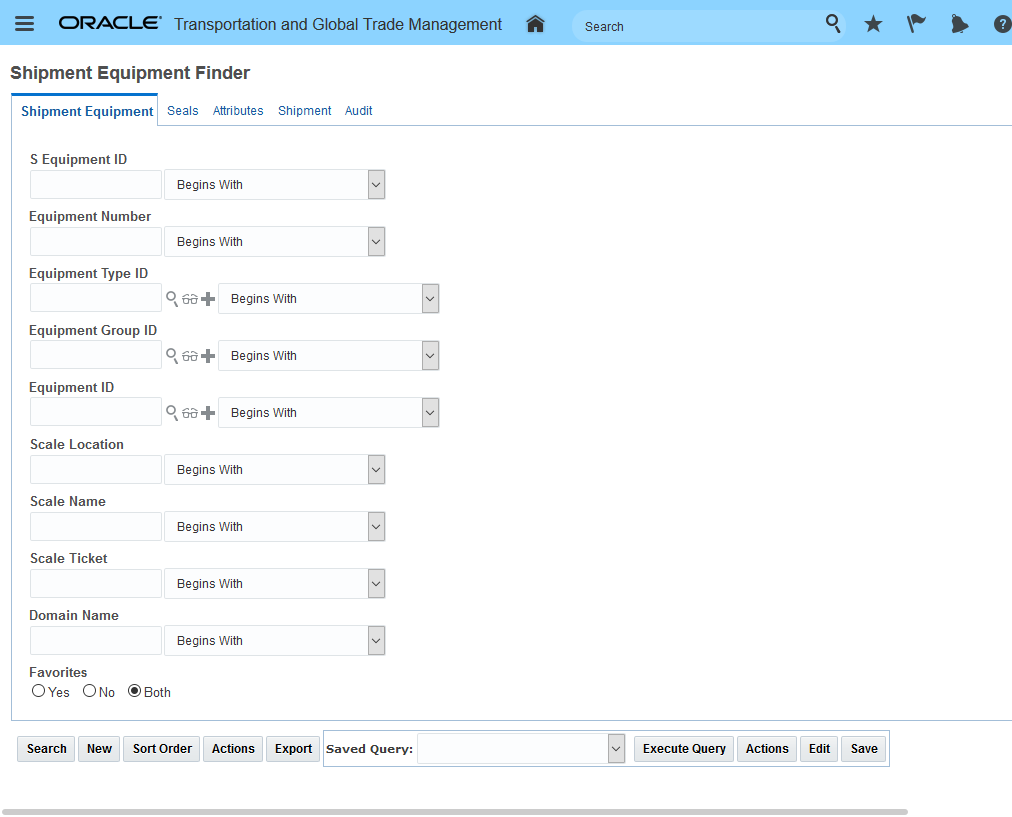
Shipment Equipment Finder
You have the option to add, edit and view your Shipment Equipment records. To support the Add option a Business Number Generator (BNG) has been added to automatically generate the Shipment Equipment ID if you do not provide one.
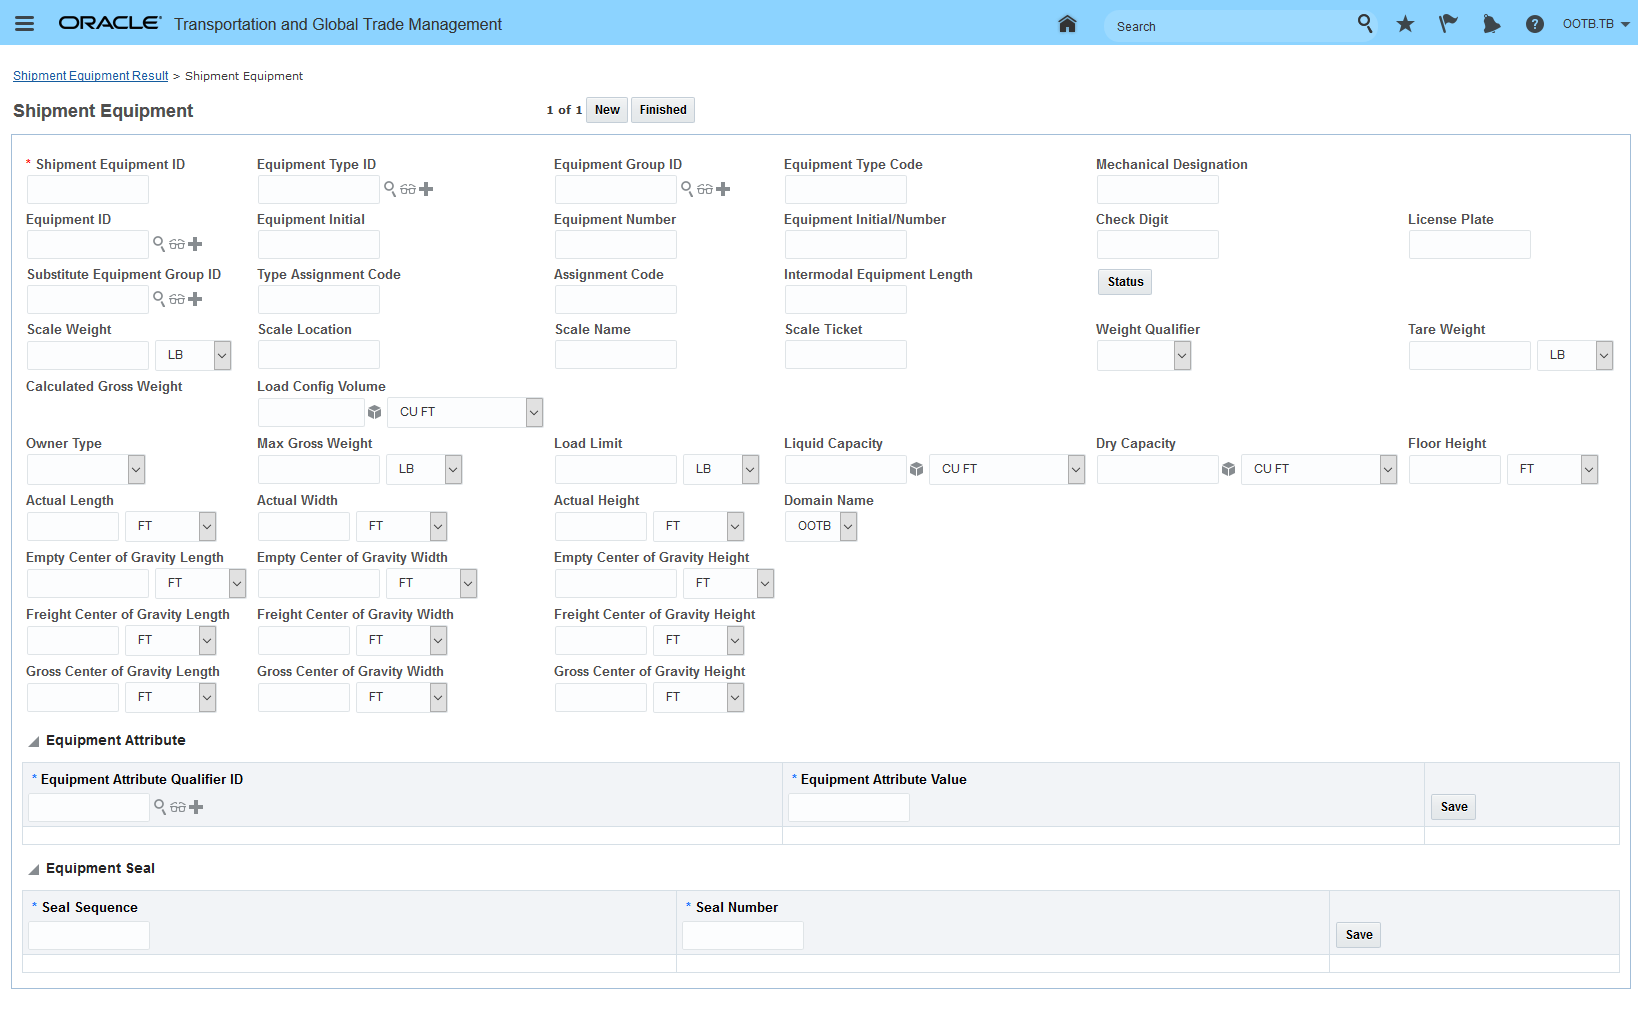
Shipment Equipment Manager - Add New Shipment Equipment
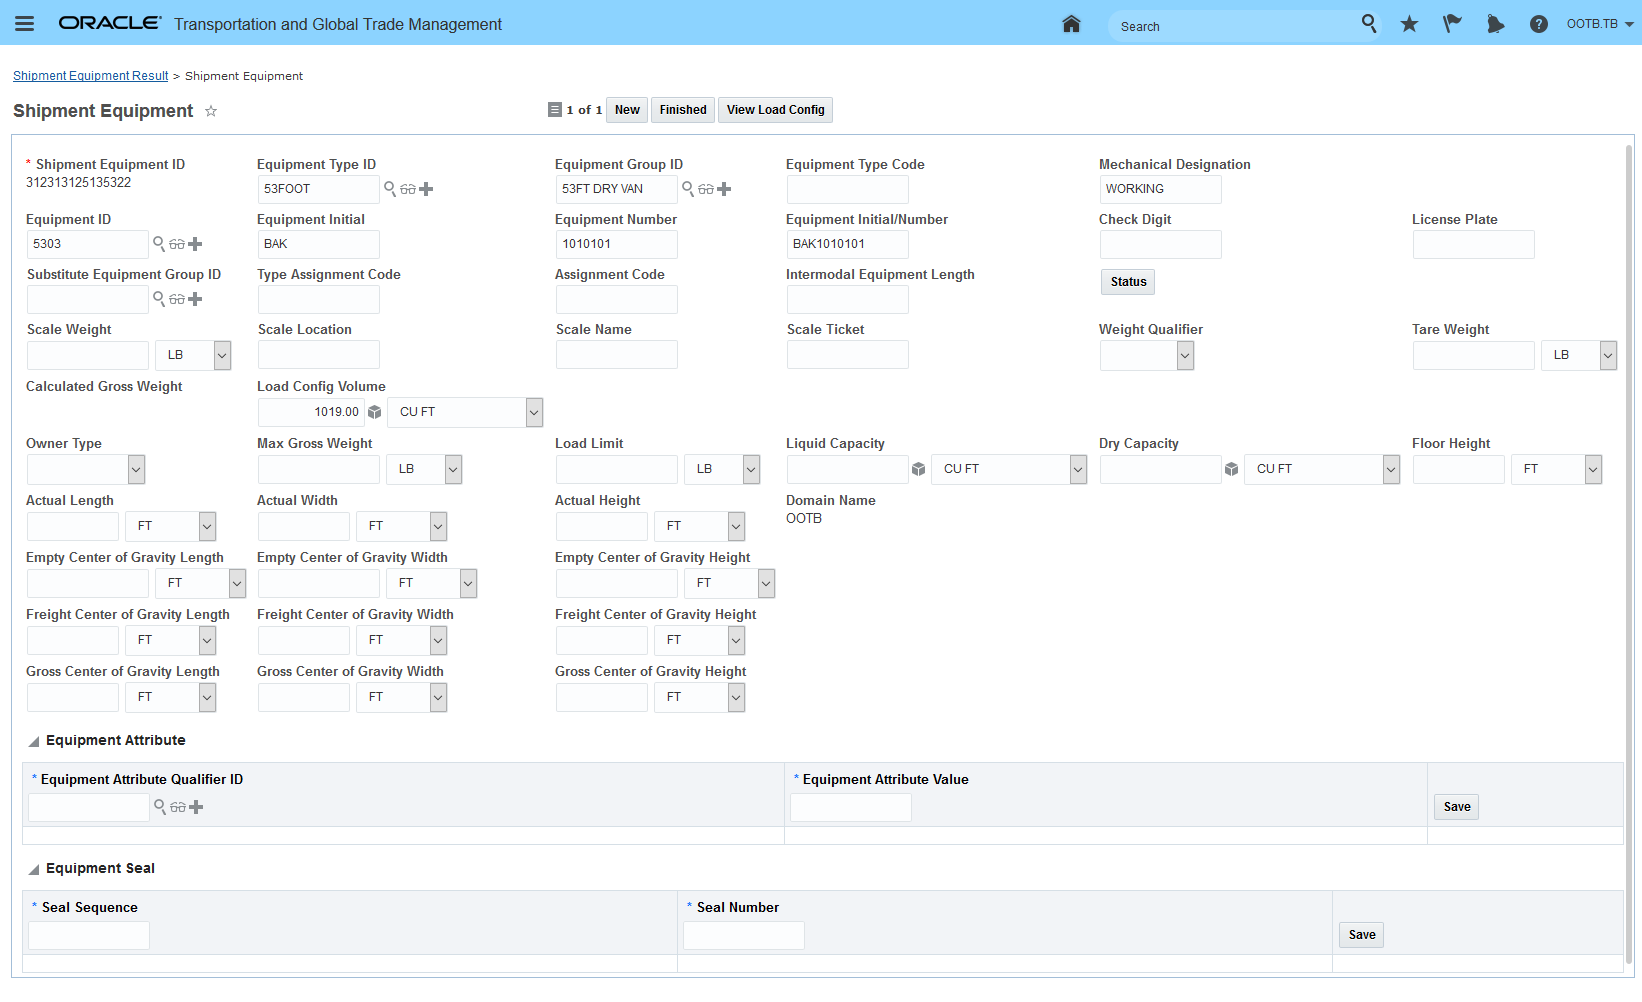
Shipment Equipment Manager - Edit Shipment Equipment
The Shipment Equipment View provides visibility related to the shipment equipment as well as providing Shipment Ship Unit level information.
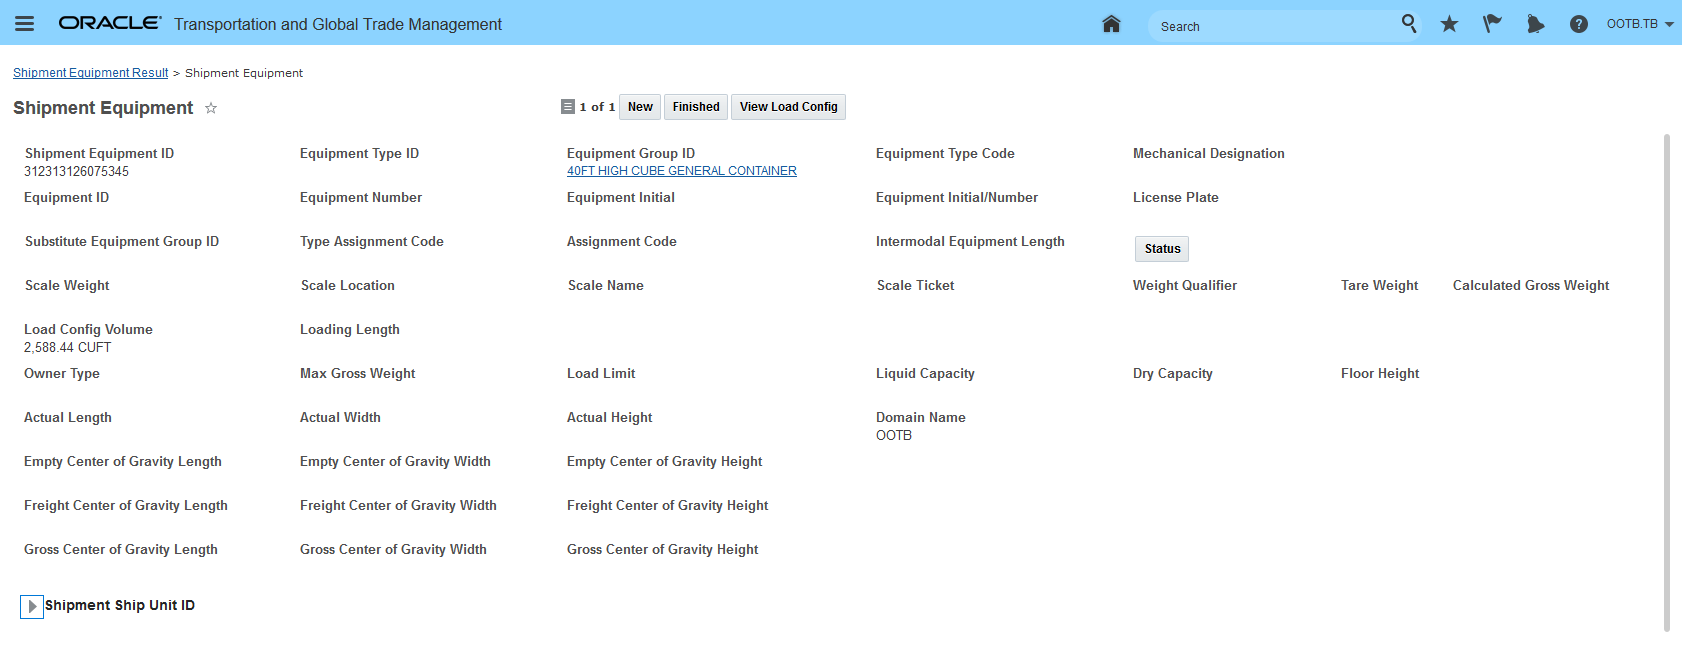
Shipment Equipment Manager - View Shipment Equipment
The Shipment Equipment Shipment Ship Unit section of the Shipment Equipment view screen provides you with immediate access to details related to the ship units and the packaged items associated with the ship units.
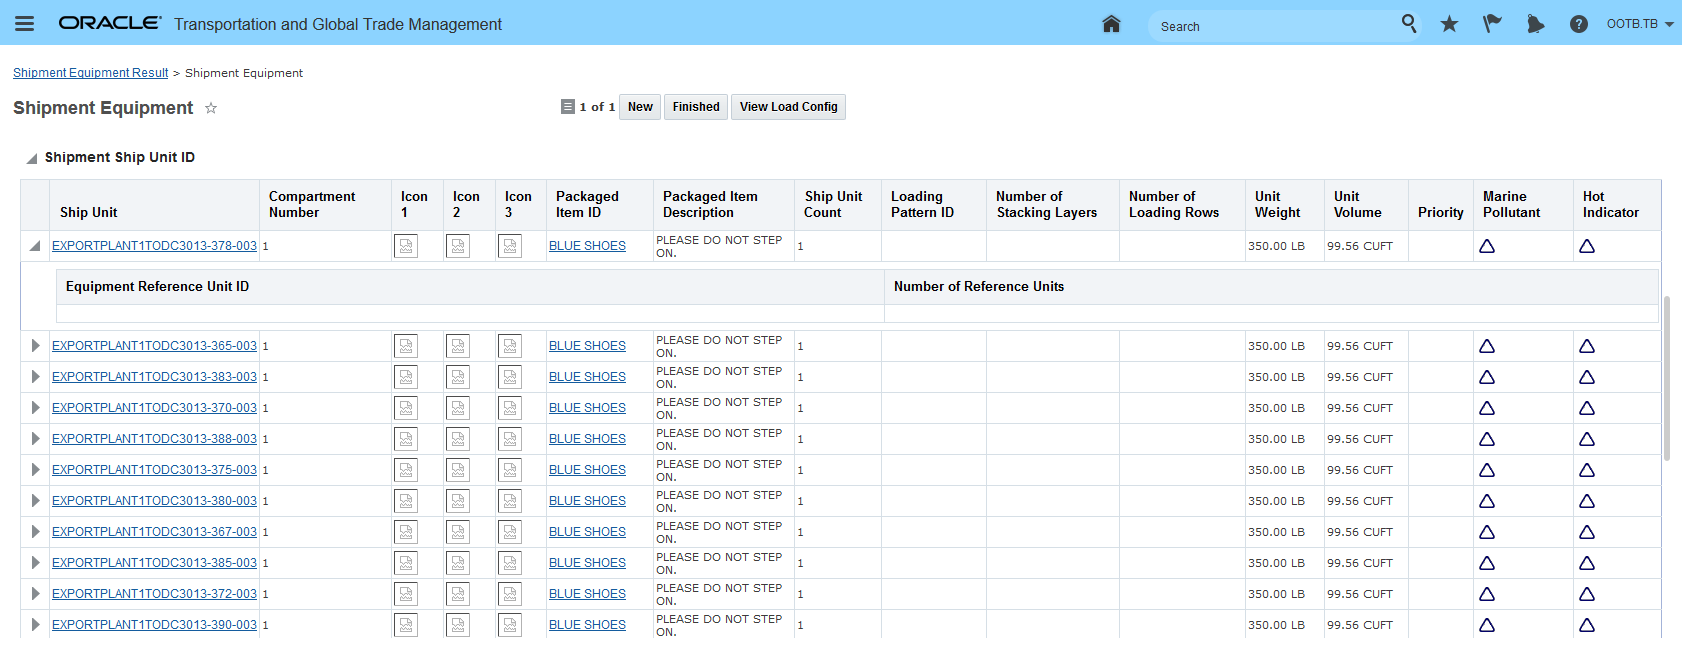
Shipment Equipment Manager - View Shipment Ship Units
In addition to being a stand-alone manager - the Shipment Equipment object has also been added to the Workbench as an available table option. Public saved queries have been provided so you can easily link your shipments to their related shipment equipment(s).
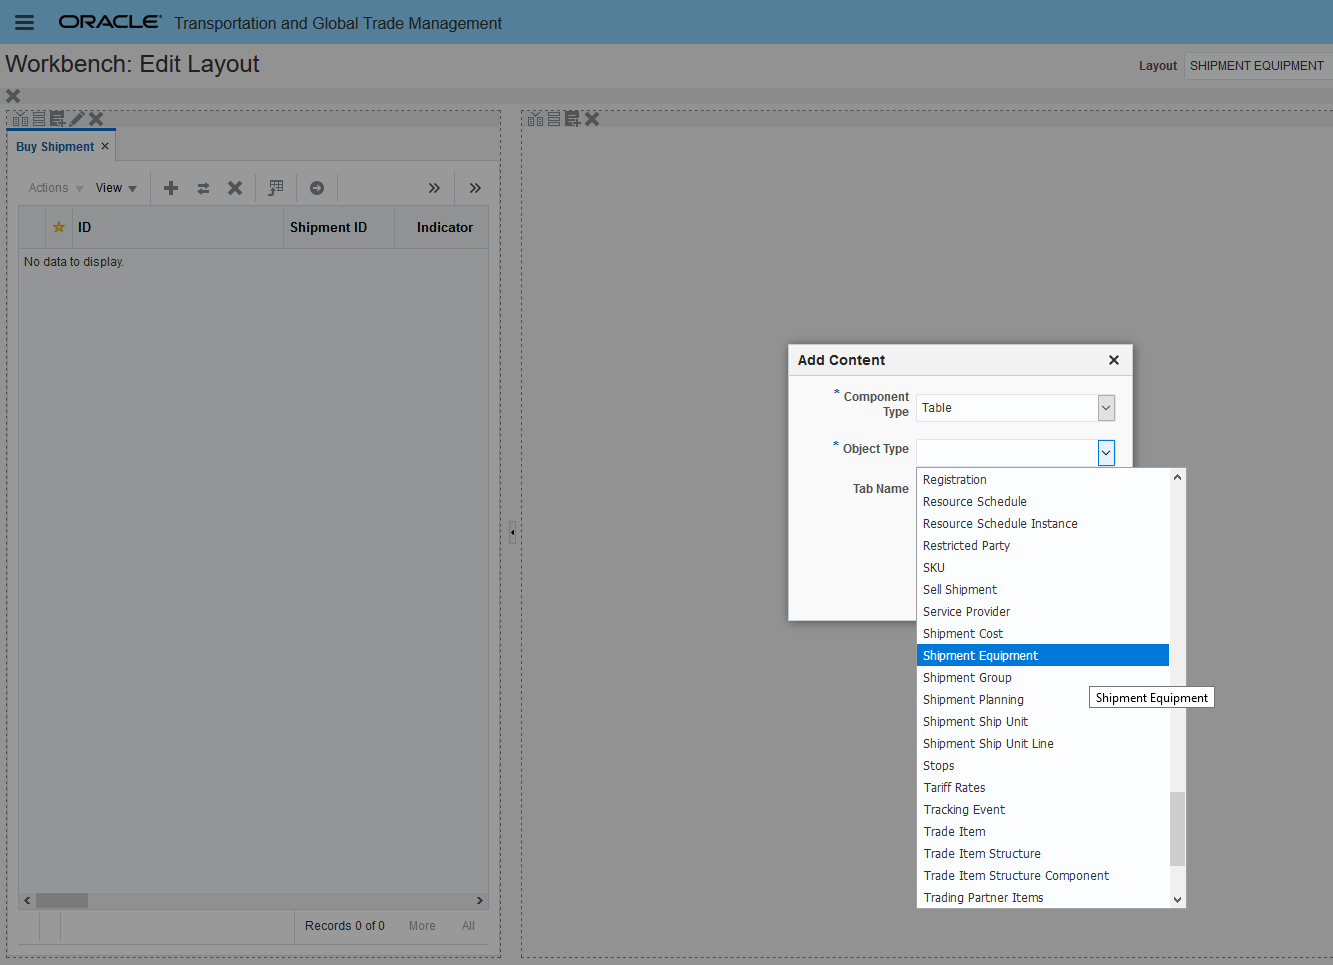
Shipment Equipment Manager - Workbench Setup Shipment Equipment Table Object
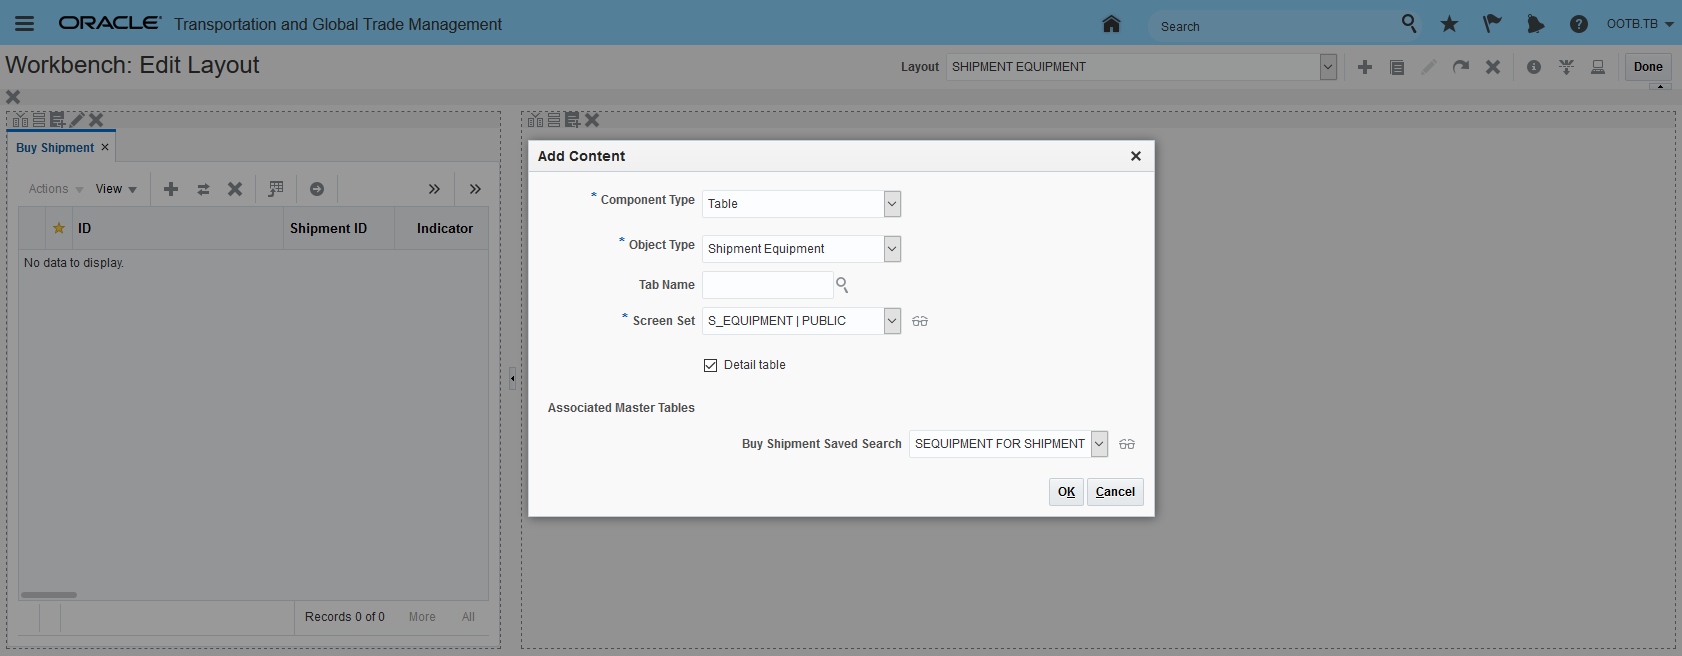
Shipment Equipment - Workbench Setup Detail Table Buy Shipment Saved Search
In the dray-ocean-dray Workbench example below, including the new Shipment Equipment table allows you to easily see the drayage shipments and their individual shipment equipment records as well as providing visibility to the set of shipment equipment records consolidated onto the ocean shipment.
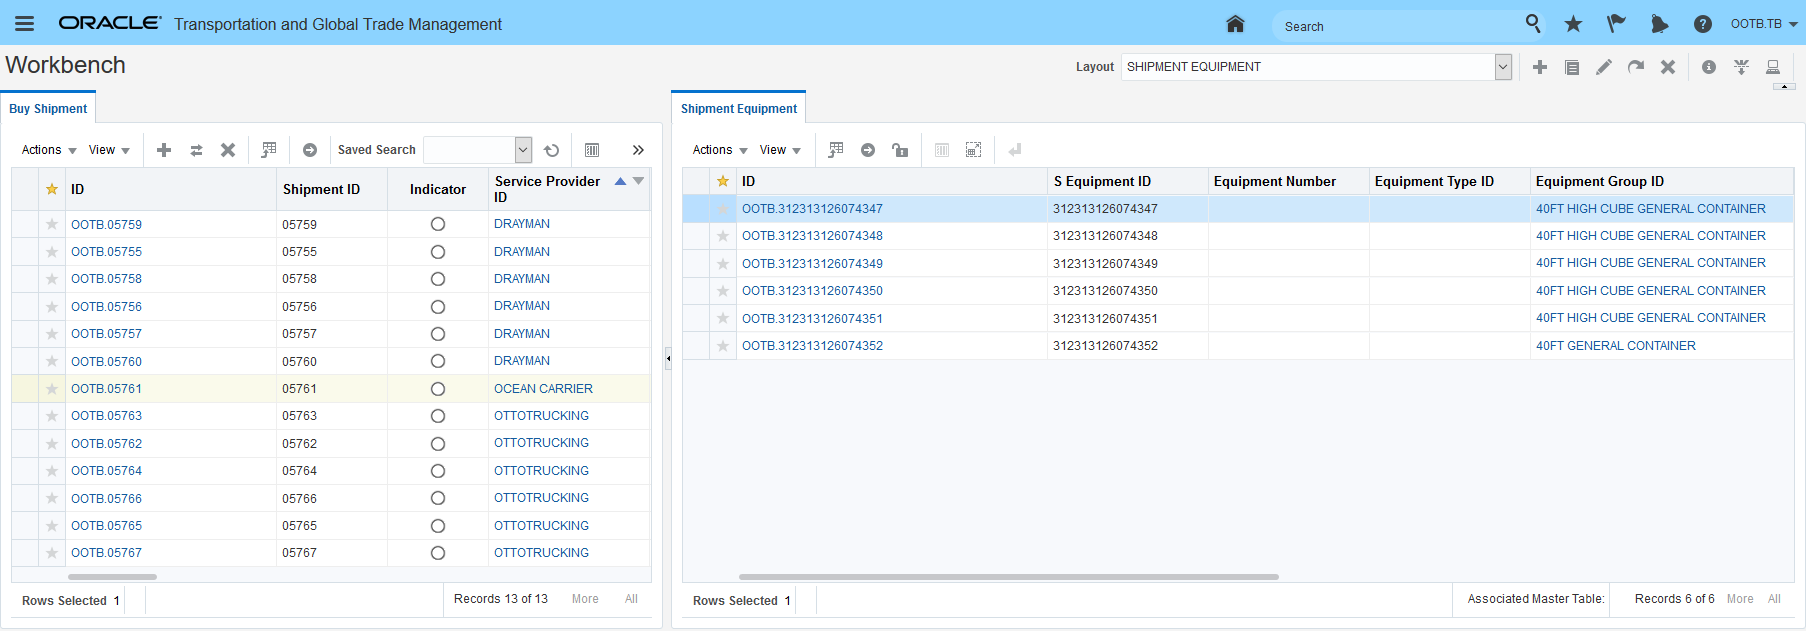
Shipment Equipment Manager - Workbench Example
Like most managers - you can configure the Shipment Equipment Manager in the following ways.
You can configure your finders to display only those fields that are relevant to your implementation.
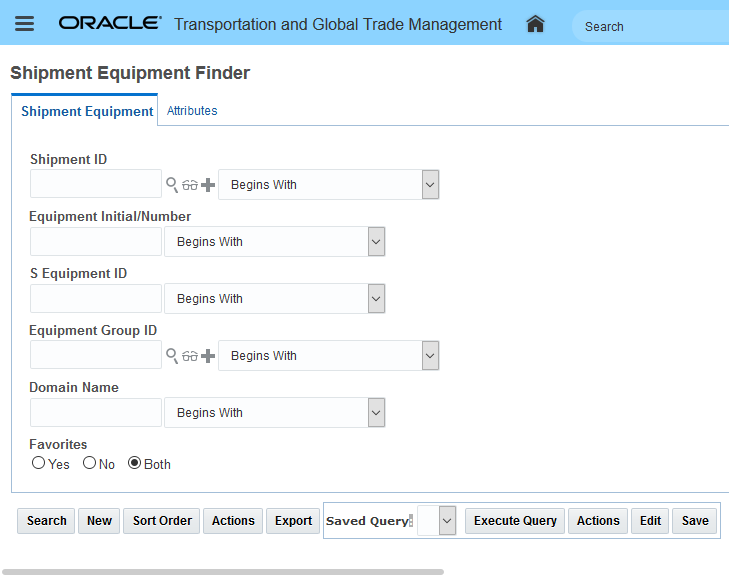
Simplified Shipment Equipment Manager Finder
You can configure your finder results to only those fields required. You can - of course - also configure those fields you may wise to update in the finder results - in the example below, the Equipment Initial/Number is editable.
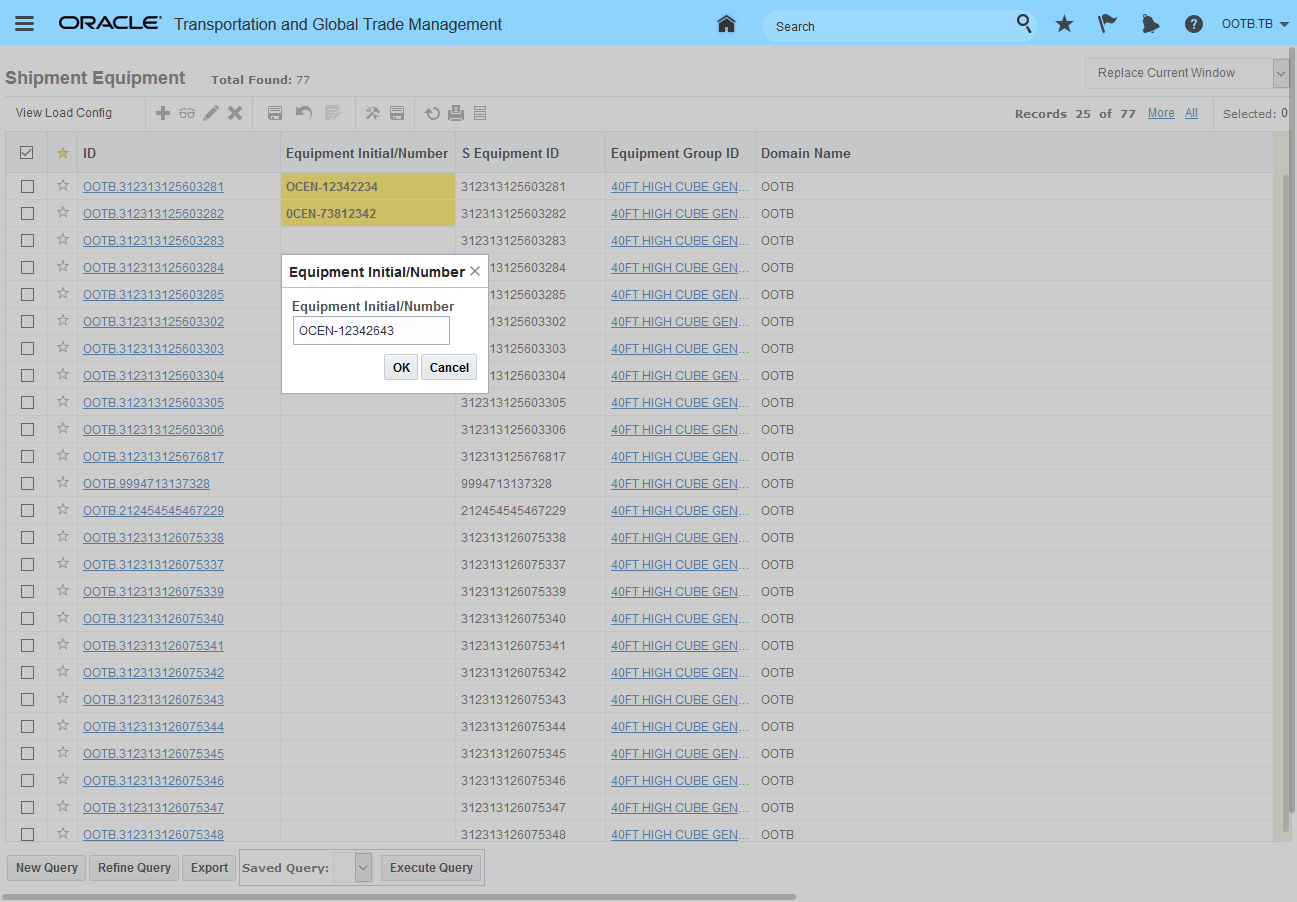
Finder Results Configuration Example
You can also configure via Manage User Access and Field Screen Sets the Equipment Manager view to be shown to the user when they find the Shipment Equipment from within the Shipment manager. In the example below, the view from within the shipment manager for the shipment equipment, has been configured to display only a very limited set of fields.
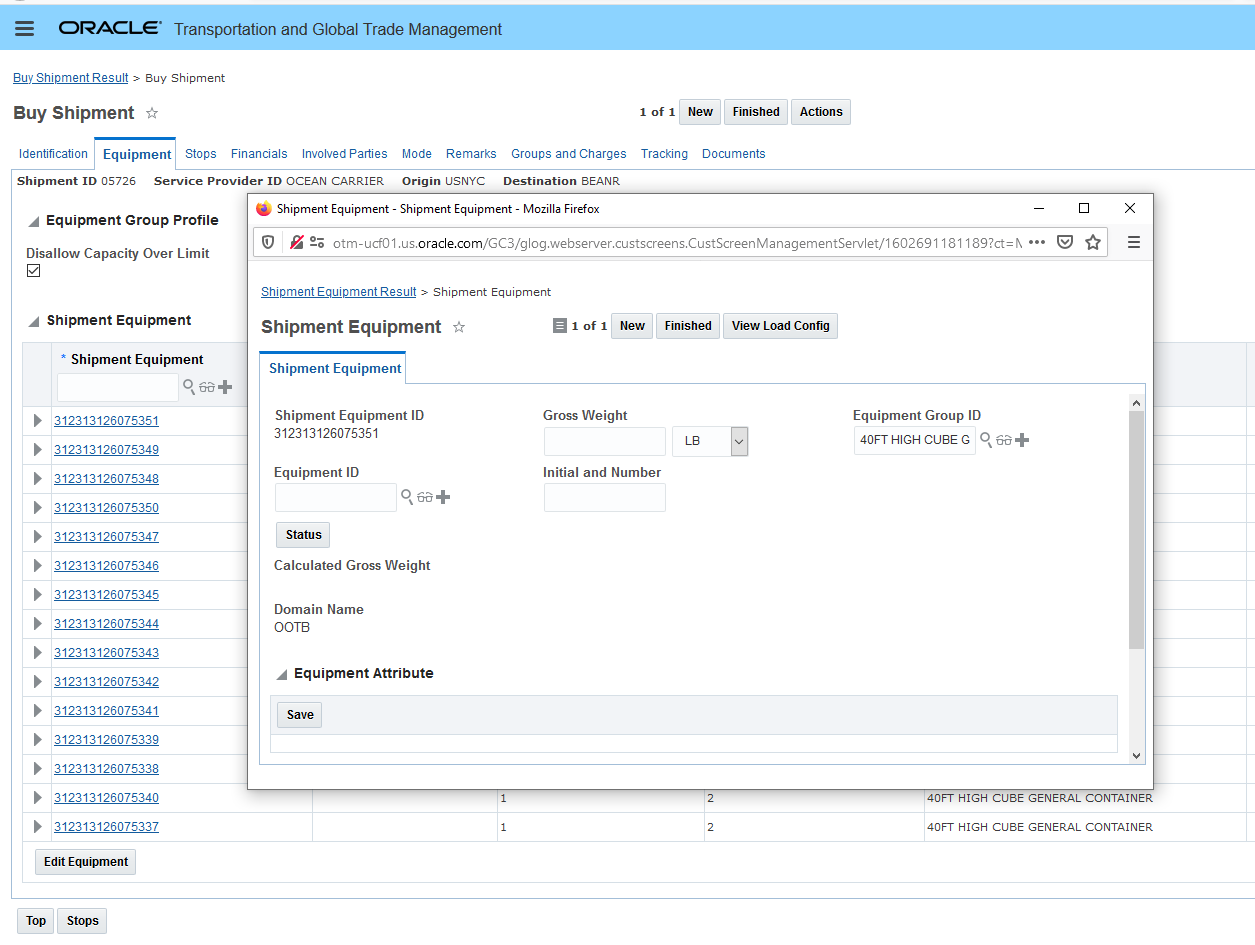
Shipment Manager Customized Shipment Equipment Find View
As is the case with all managers, the Shipment Equipment manager provides you with the option to configure the finder, finder results, and manager layout to provide your users with information that is more relevant to your implementation. The Shipment Equipment manager also provides you with the option to simplify the navigation steps required to view your shipment equipment information.
Steps to Enable
You don't need to do anything to enable this feature.
Tips And Considerations
You do not need to do anything to enable this feature - but we recommend configuring the view to the Shipment Equipment so the information provided is tailored to your implementation.
Manager Layout Enabled Action - Change Service Provider
This feature provides you with the ability to use Manager Layout configuration capabilities to configure the Change Service Provider action so that the Change Service Provider action is aligned to the requirements of your Implementation.
In the examples below, the differences between the PUBLIC/default Change Service Provider action - the first screenshot - and the opportunities available using this feature to configure the action are shown.
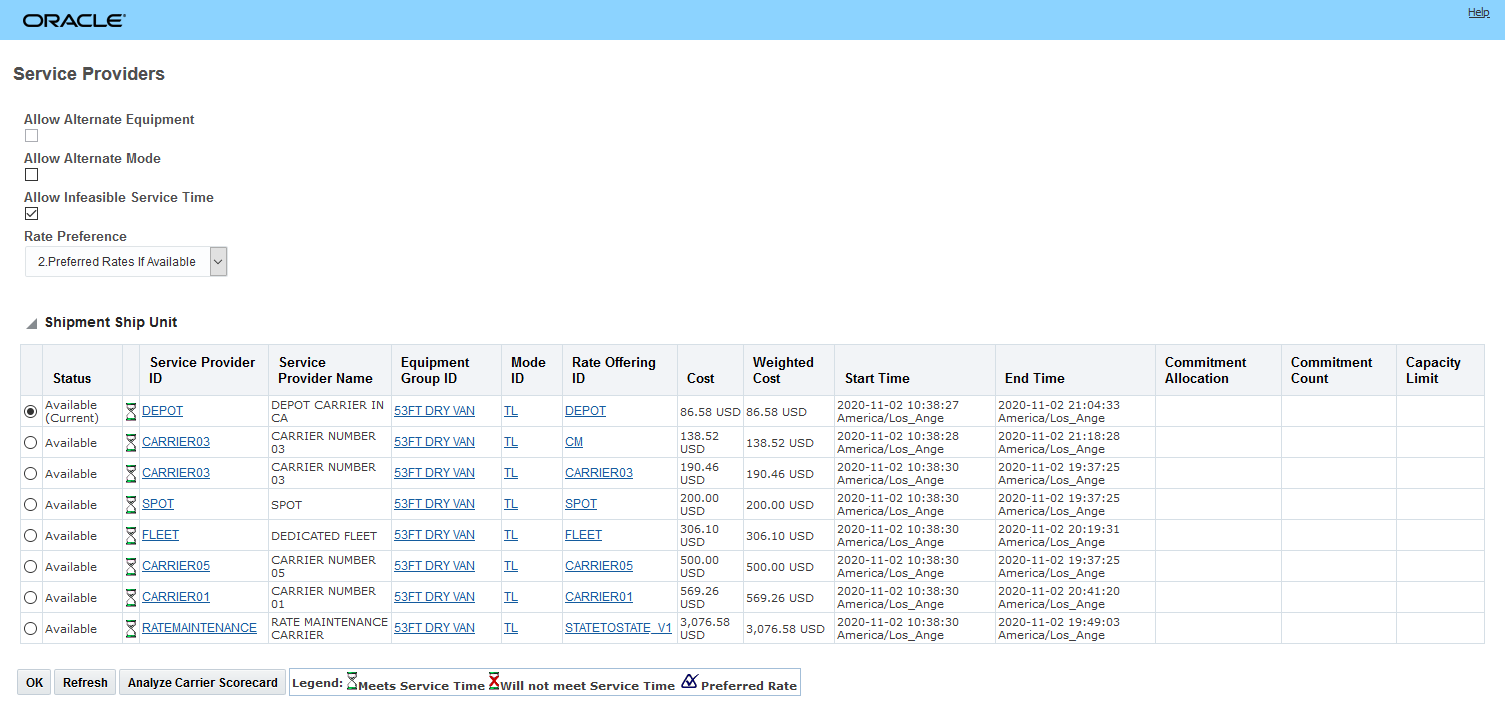
Out-of-the-Box Change Service Provider Action
In the example below - the Allow Alternate options have been trimmed down to only allowing service time infeasible service provider options and the shipment ship unit grid has been configured to remove unnecessary columns.
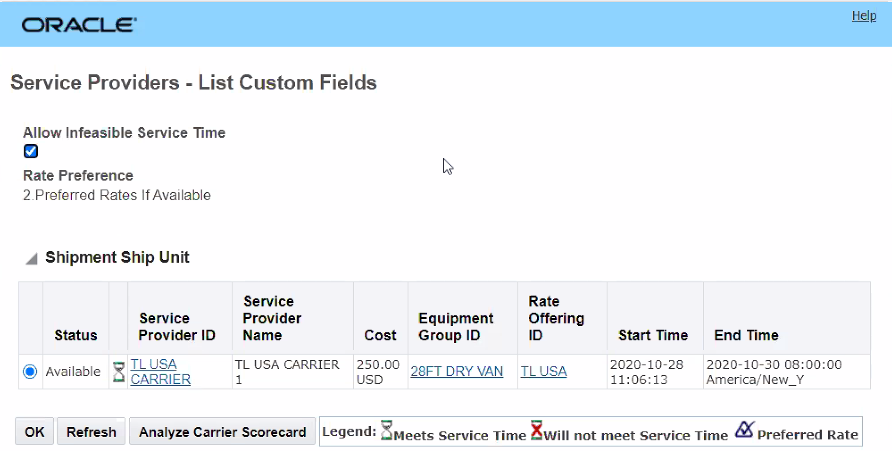
Configured Change Service Provider Action Example 1
In the example below, the Change Service Provider action has been configured as an additional action - Choose Least Cost - which has been configured to allow the user to just pick the service provider to change to from a list. With this configuration, the action provides a very clear and concise process for changing the service provider.
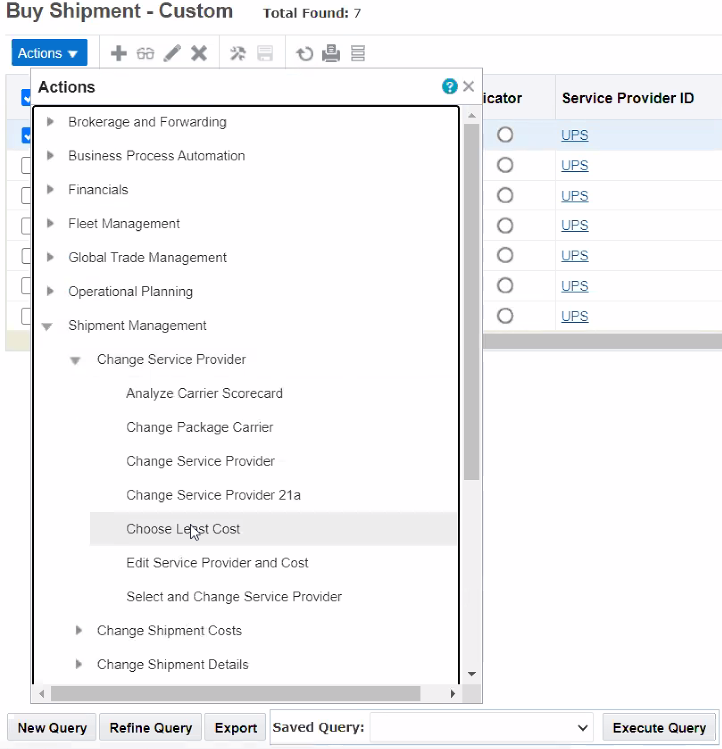
Configured Change Service Provider Action Example 2 - Action Naming
Running the configured action Choose Least Cost brings of the simplified screen below - that allows the user to easily identify and select the least cost service provider from the list.
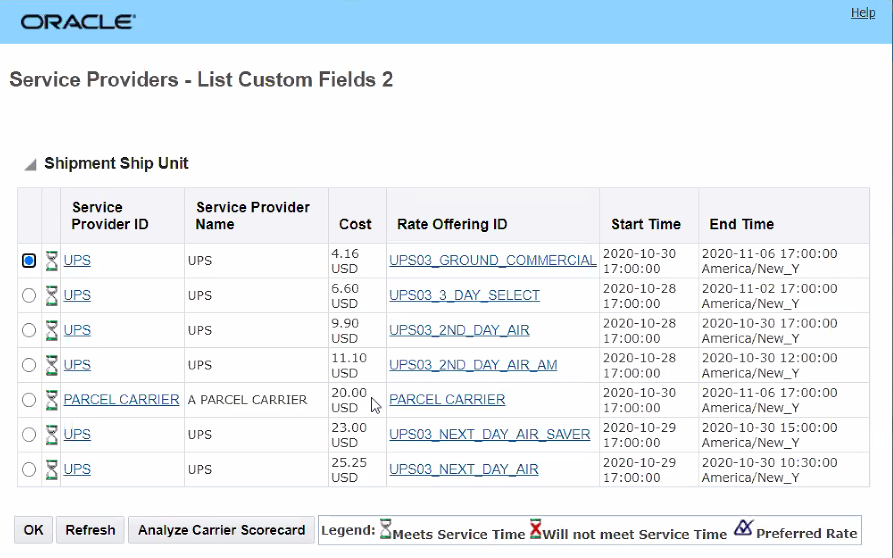
Configured Change Service Provider Action Example 2
The ability configure the Change Service Provider action using the Manager Layout functionality will allow you to trim down and simplify the data shown and the action experience so that it matches your specific implementation requirements. For example - if your users only change carrier for specific modes of transport this feature will allow you to eliminate fields that are not relevant for the mode being considered.
Steps to Enable
There are no steps require to enable this feature - however - to take advantage of manager layout configuration capabilities provided for the Change Service Provider action - you will need to use the Manager Layout Action configuration capabilities to configure the Change Service Provider action to the experience you desire and then assign the configure action to the desired manager layout.
At a high level the steps involve
- Copy the public layout
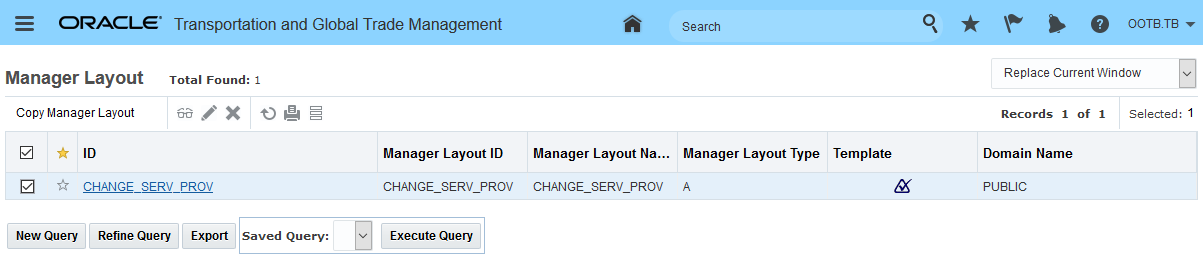
Configuration - Copy Public Manager
- Configure the Action Manager as desired.
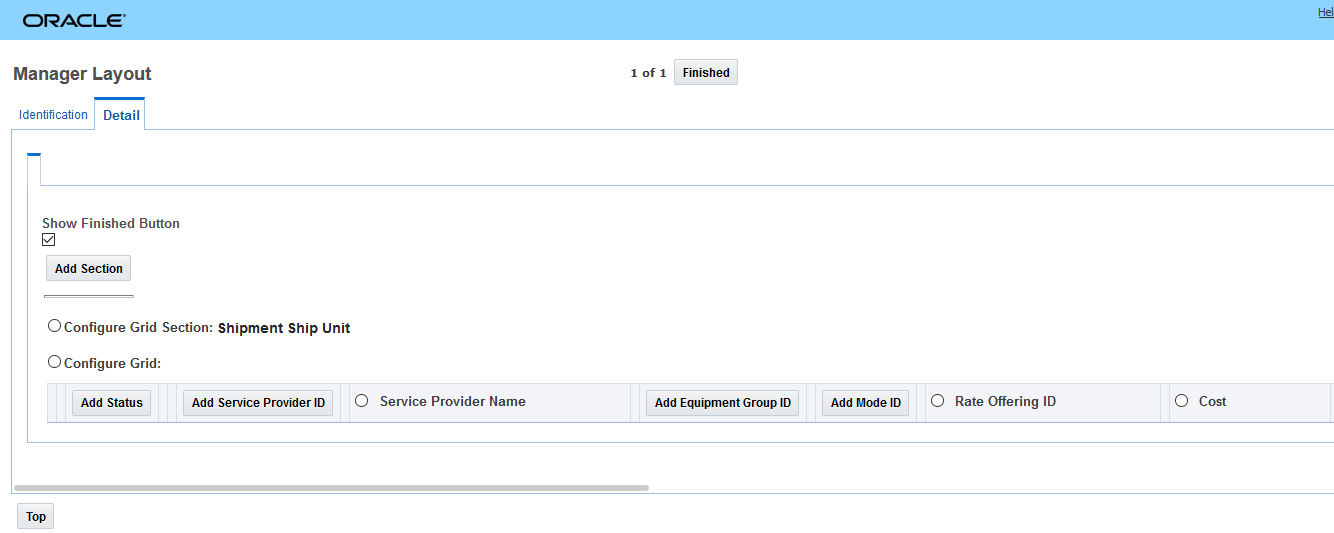
Configured Change Service Provider Action
-
Create a New Action for your configured action.
- Assign your configured action to the desired manager/screen set.
Key Resources
- See the Creating New Actions topic in Online Help for more information.
Multi-Select for Change Schedule Action
This feature extends the Change Schedule shipment action so that the action can support a multiple shipment select option as an input. You will find this change particularly helpful in scenarios where you need to change a set of shipments currently using the same voyage or flight to a different voyage or flight.
In the example below - there are two orders that have been planned separately using a multi-leg itinerary. The two shipments going from PHL to LAX (shipment 20170510124893 and shipment 20170510124896) are assigned to the same flight - DIRECTPHLLAX departing on August 2nd at 6:00 AM.
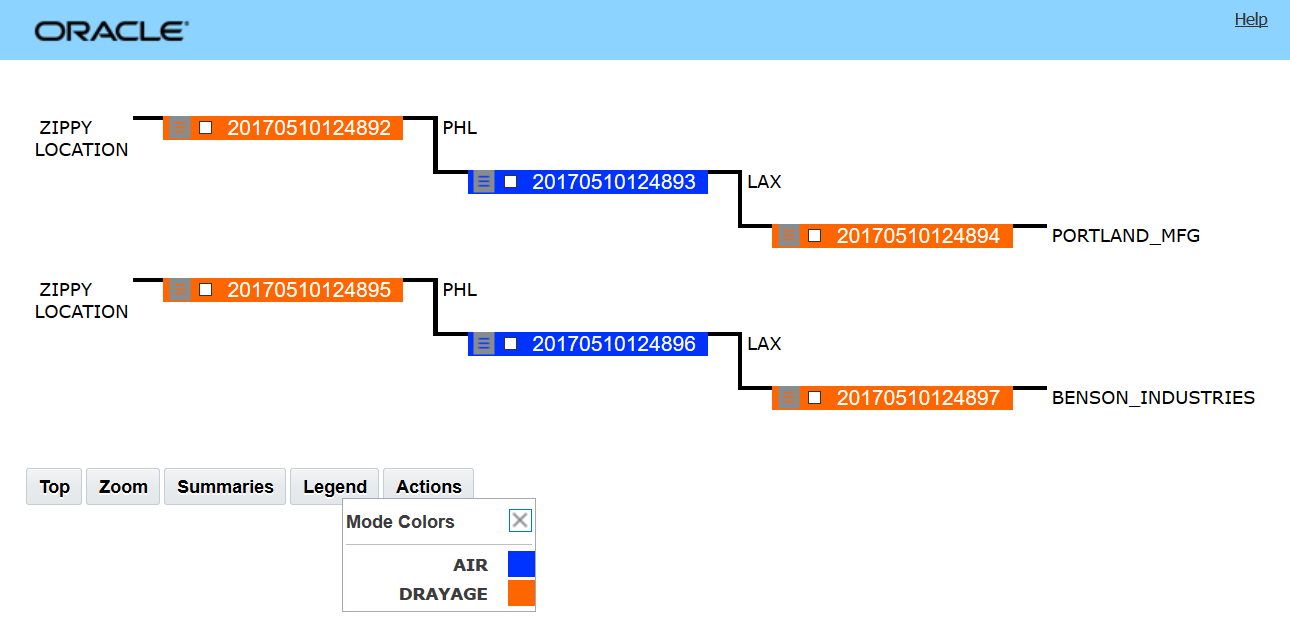
Change Flight Example
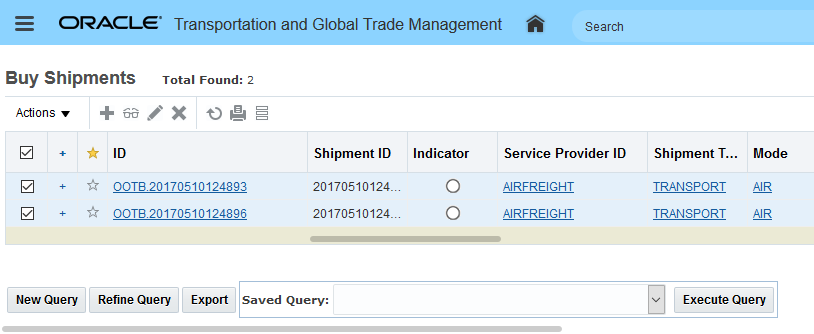
Select the Multiple Air Shipments
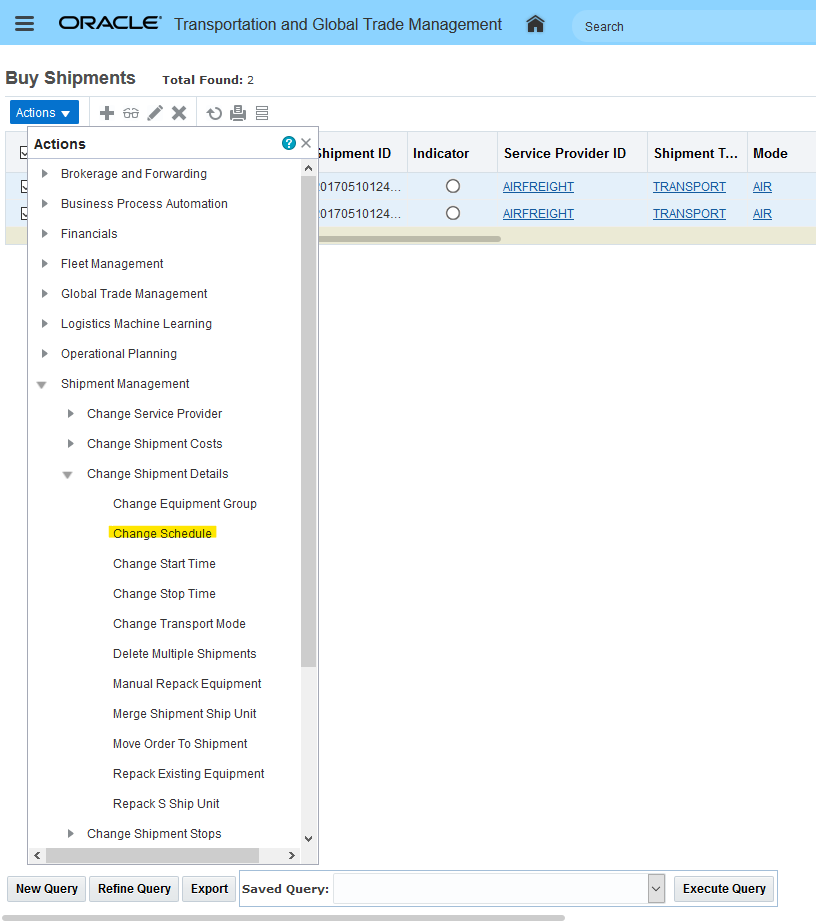
Change Schedule Action with Multiple Shipments Selected
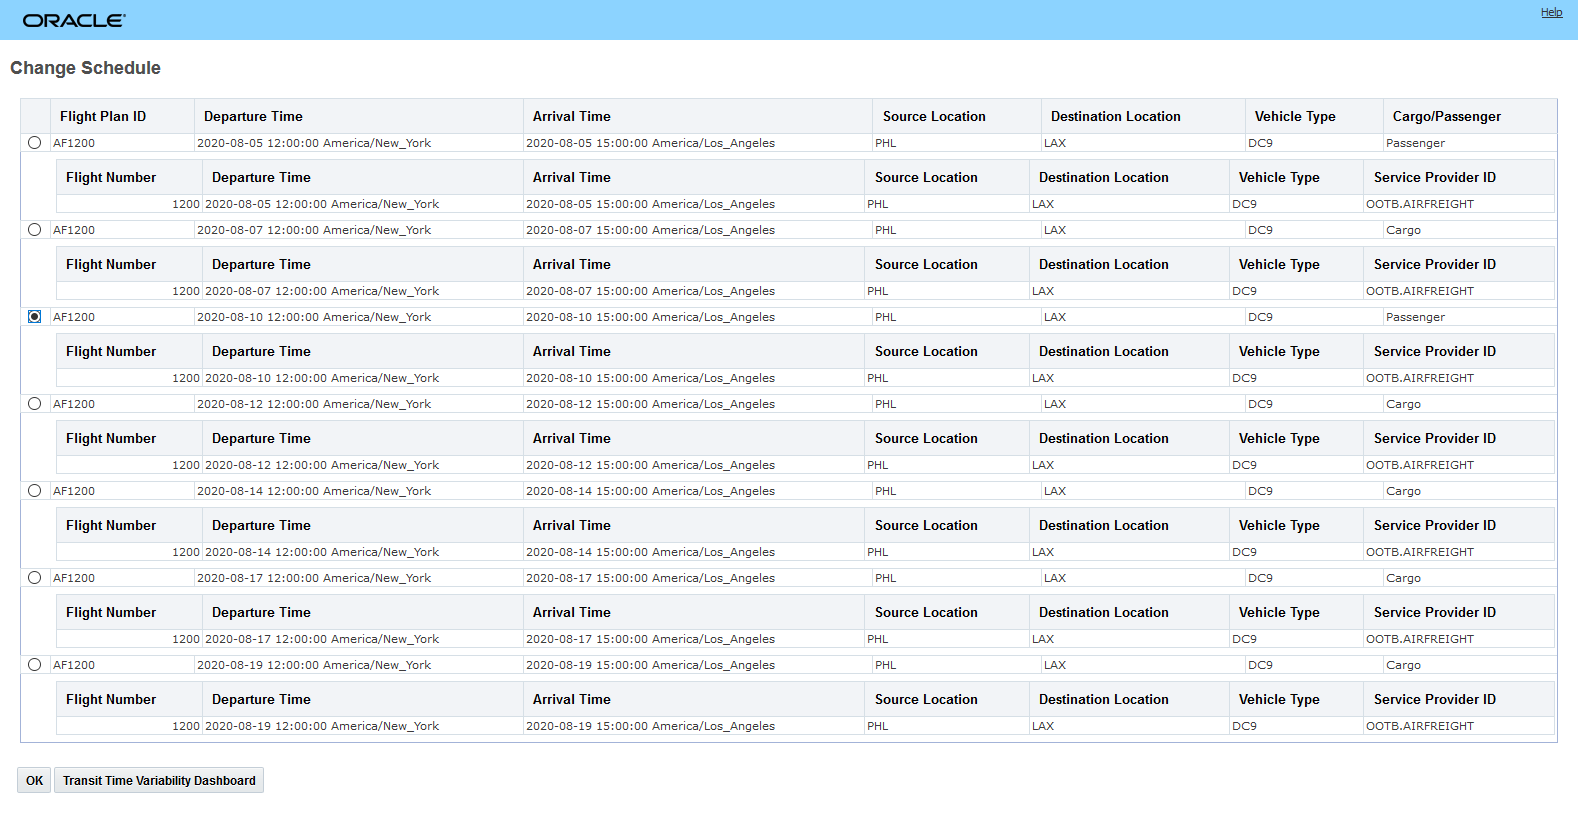
Change Flight Options Returned - Select Flight Leaving on August 10th at 12:00:00
Both of the selected shipments are now updated to the selected flight - Flight Number AF1200 departing on 2020-08-10 12:00:00 America/New_York.

Result
The same functionality, multi-shipment select - is available for ocean shipments using vessel schedules.
In the ocean scenario below - the two shipments are assigned to a voyage USNYCTOBEANR_2020WK41 going from USNYC to BEANR departing on the 11th of October.
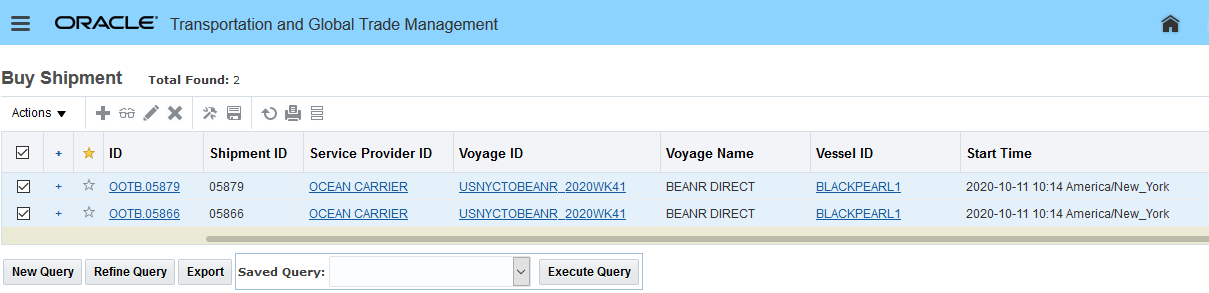
Ocean Shipments for Change Schedule Scenario
When the Change Schedule action is run against the two shipments, the following action input screen comes up. You have the option to run the Find Schedules option or you can run the finder to find the New Voyage ID for your shipments.
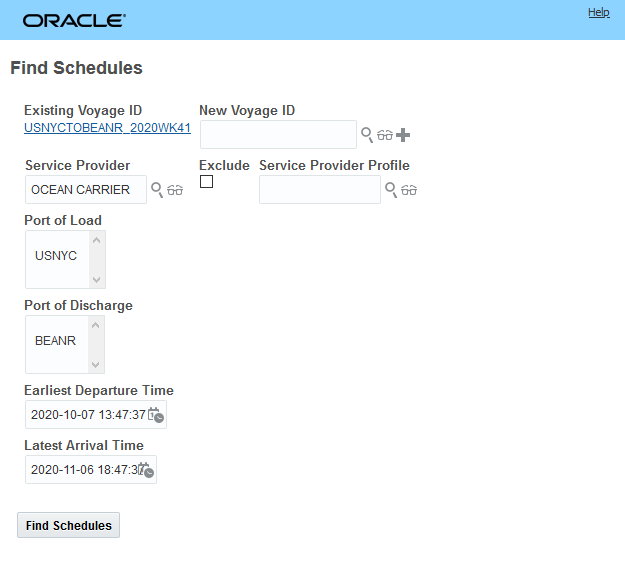
Change Schedule Action Input - Voyage Scenario
Find Schedules provides the following options - you can select the desired option and select OK.
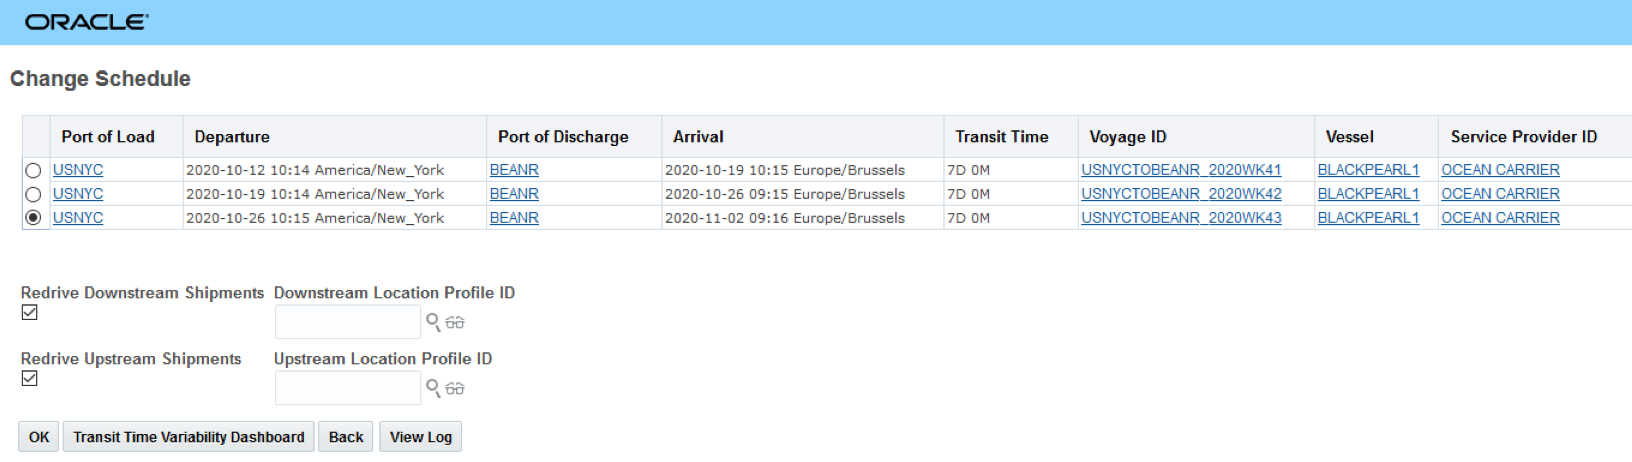
Find Schedules Options
Below is the result screen for the Find Schedules option with Redrive for Downstream and Upstream Shipments selected - note that all impacted shipments for the two oceans shipments are provided - in this case all 26 shipments.
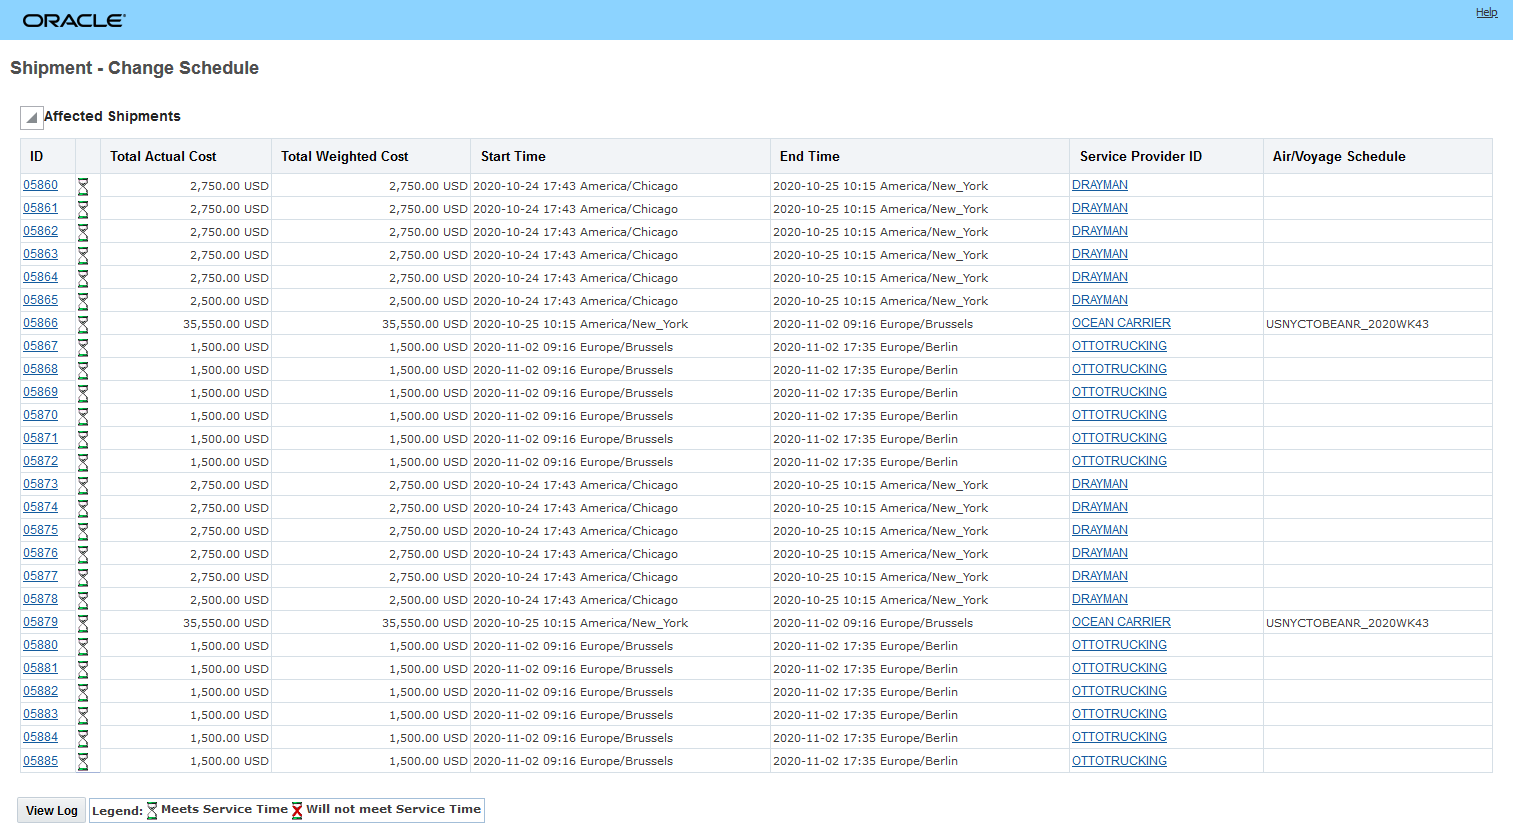
Find Schedules Result
You can also select your new schedule by running a finder to find the New Voyage ID to assign. In this case you find and select the voyage you want to assign, select Finish and then run the Find Schedules option (limited to the voyage you selected) to complete the assignment.
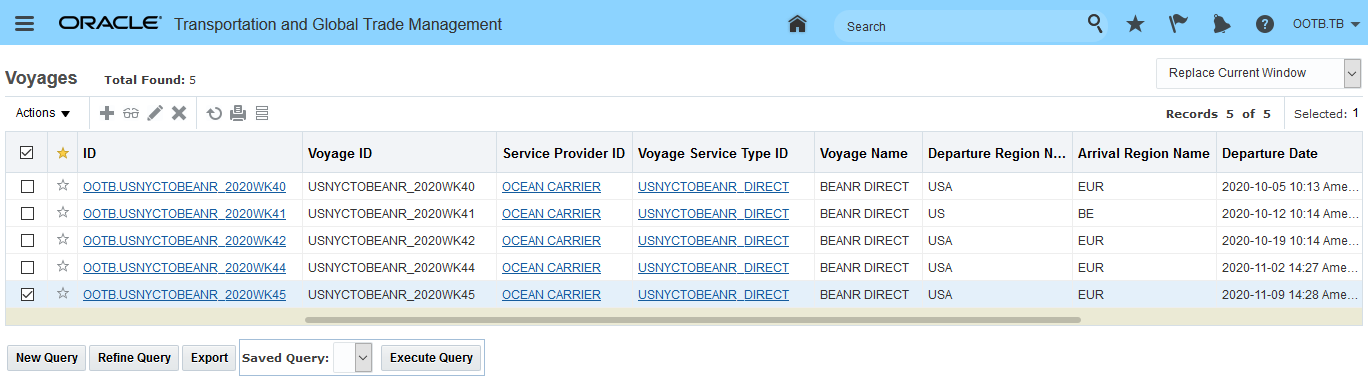
Find New Voyage ID
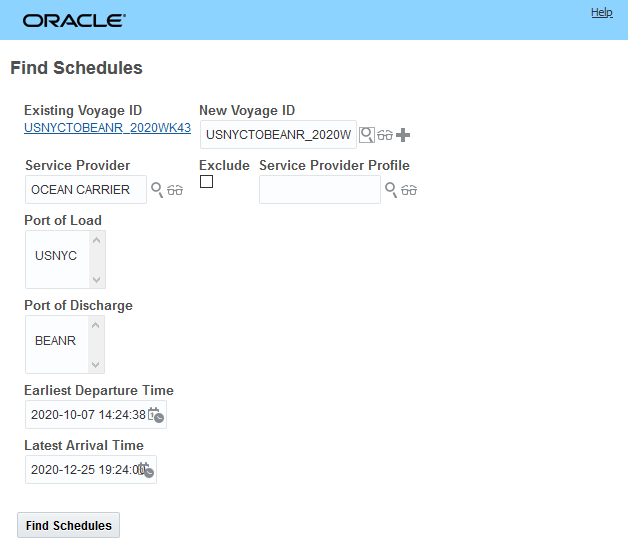
Selected Voyage then Run Find Schedules
The Find Schedules is now limited to the voyage selected using the finder. In this case, the voyage departing in Week45. Select the voyage and hit OK.
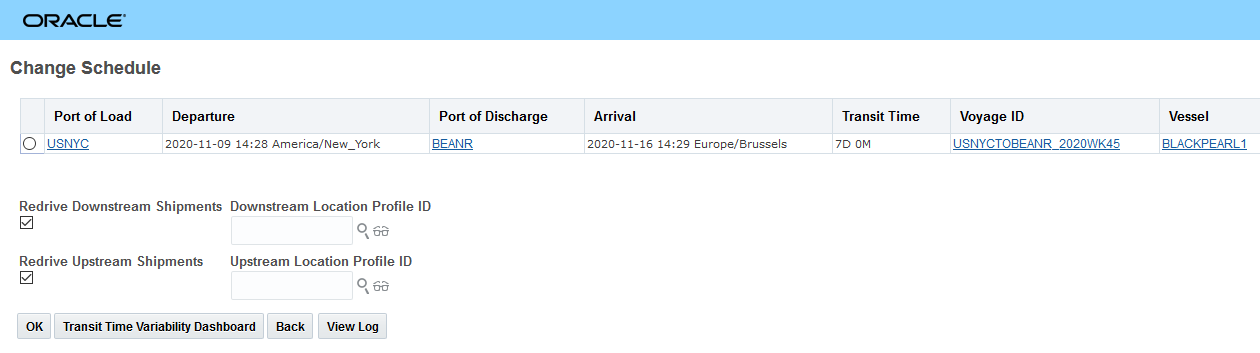
Find Schedules Input Limited by Find New Voyage ID
This feature will save you a considerable amount of time in any situation where you have multiple shipments that need to be changed from one schedule to another. For example, in any situation where you have multiple shipments booked on the same flight or voyage and the flight or voyage is cancelled/or delayed and you must change all the impacted shipments to a later/different scheduled flight or voyage.
Steps to Enable
You don't need to do anything to enable this feature.
Additional User Defined Attribute Fields Added to Shipment and Shipment Stop
This enhancement provides you with 10 additional number user defined attribute fields and 10 additional date user defined fields. These additional user defined attribute fields have been added to the shipment and shipment stop tables. These additional attributes are available for you to use with your Shipment and Shipment Stop UI configurations, and are included in the related XML and REST APIs.
Changes:
- Attribute numbers 11 - 20
- Attribute date 11-20
The additional user defined attribute fields will simplify the time and effort required to map your informational data fields related to the shipment and/or shipment stop.
Steps to Enable
You don't need to do anything to enable this feature, however, to take advantage of these additional user defined attribute fields you will need to add them to the appropriate screen sets and consider their mapping in your Shipment related integrations.
Manager Layout - Remove Booking Information Section from Shipment
This feature provides you with the option of removing the Booking Information section from your Shipment Manager layouts - New, Edit and View.
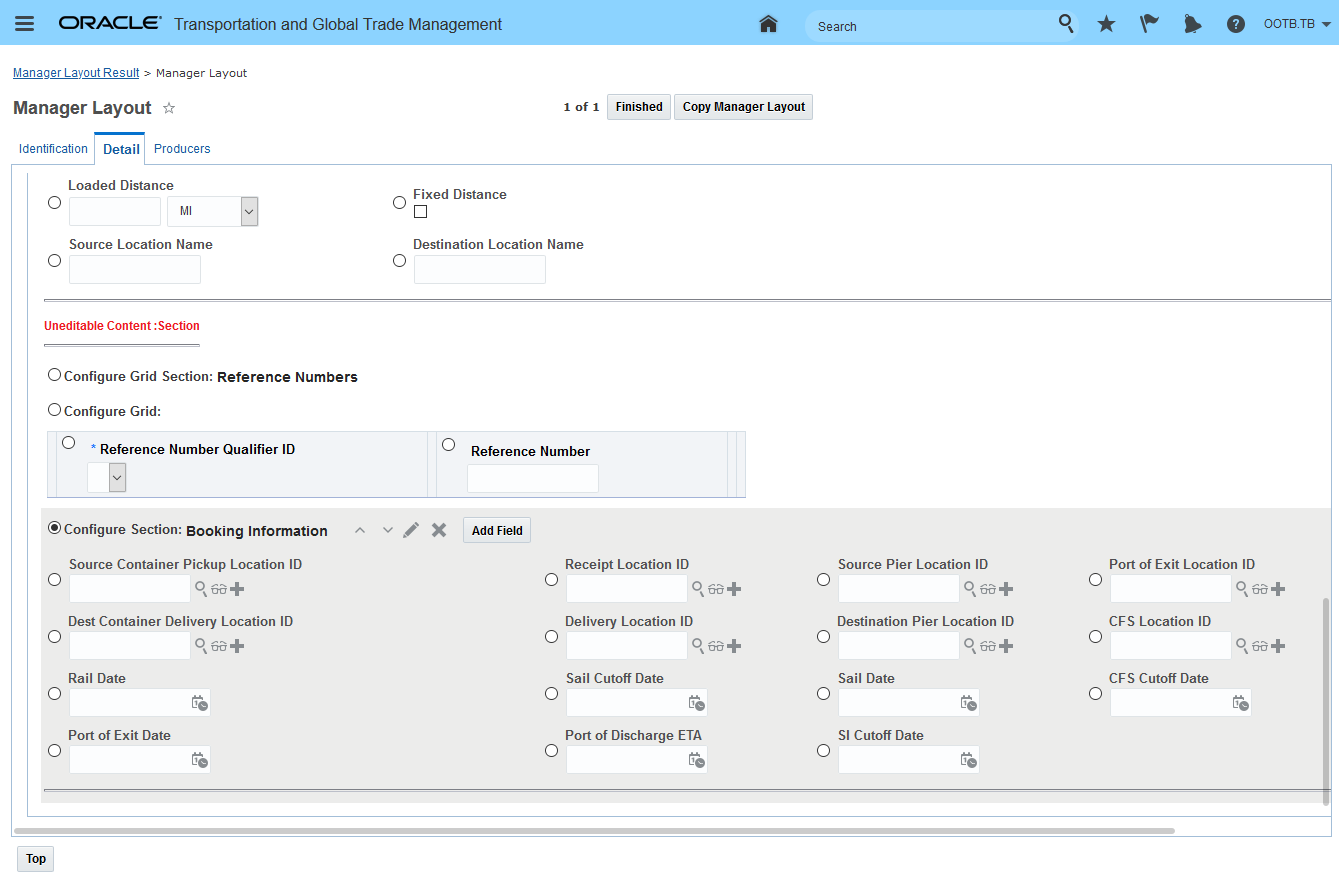
Option to Remove Booking Information Section
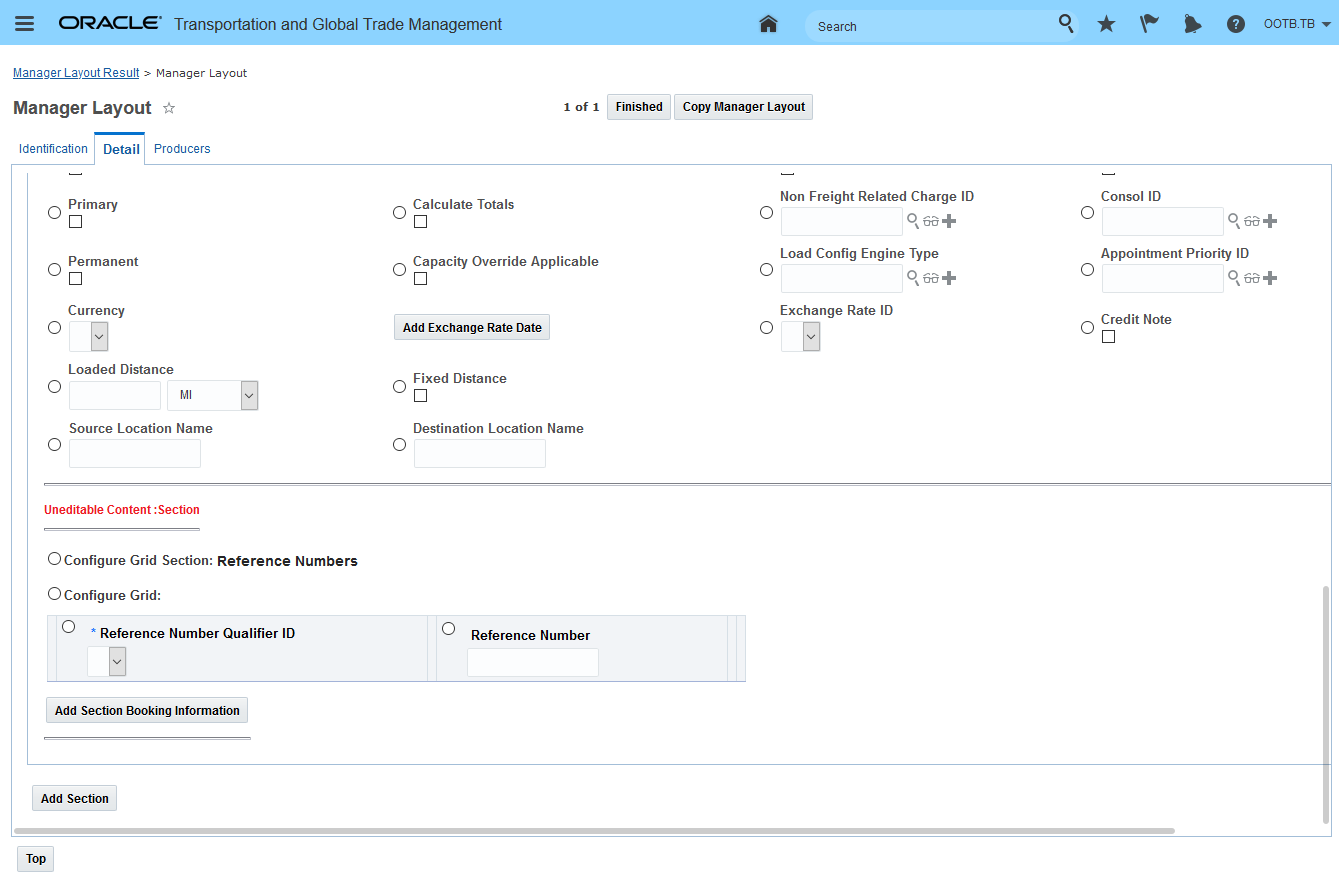
Removed Booking Information Section - Option to Add
Below is an example of shipment manager edit screen with Booking Information section removed.
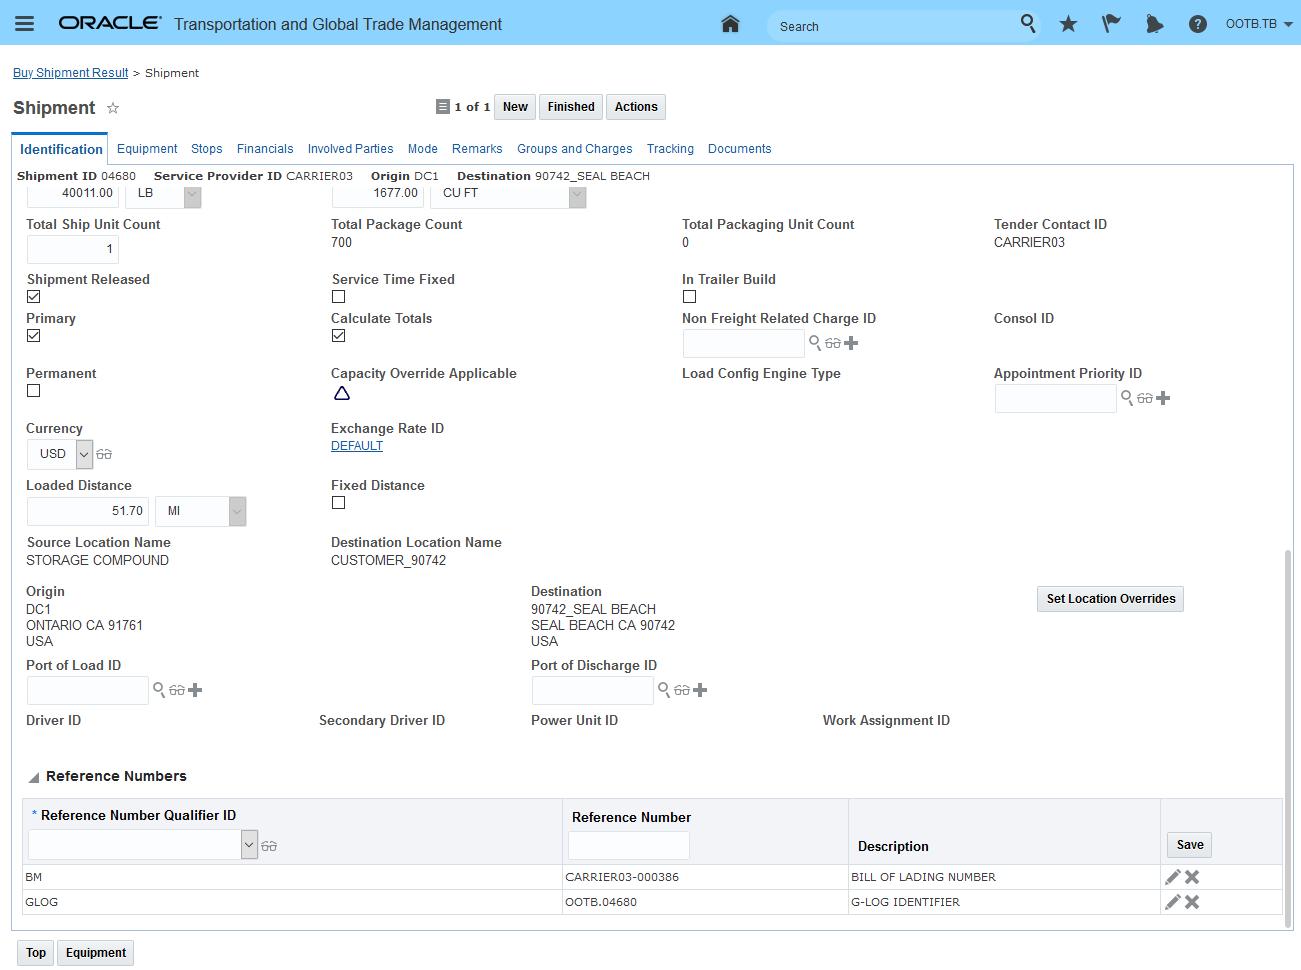
Shipment Manager Edit - Booking Information Section Removed
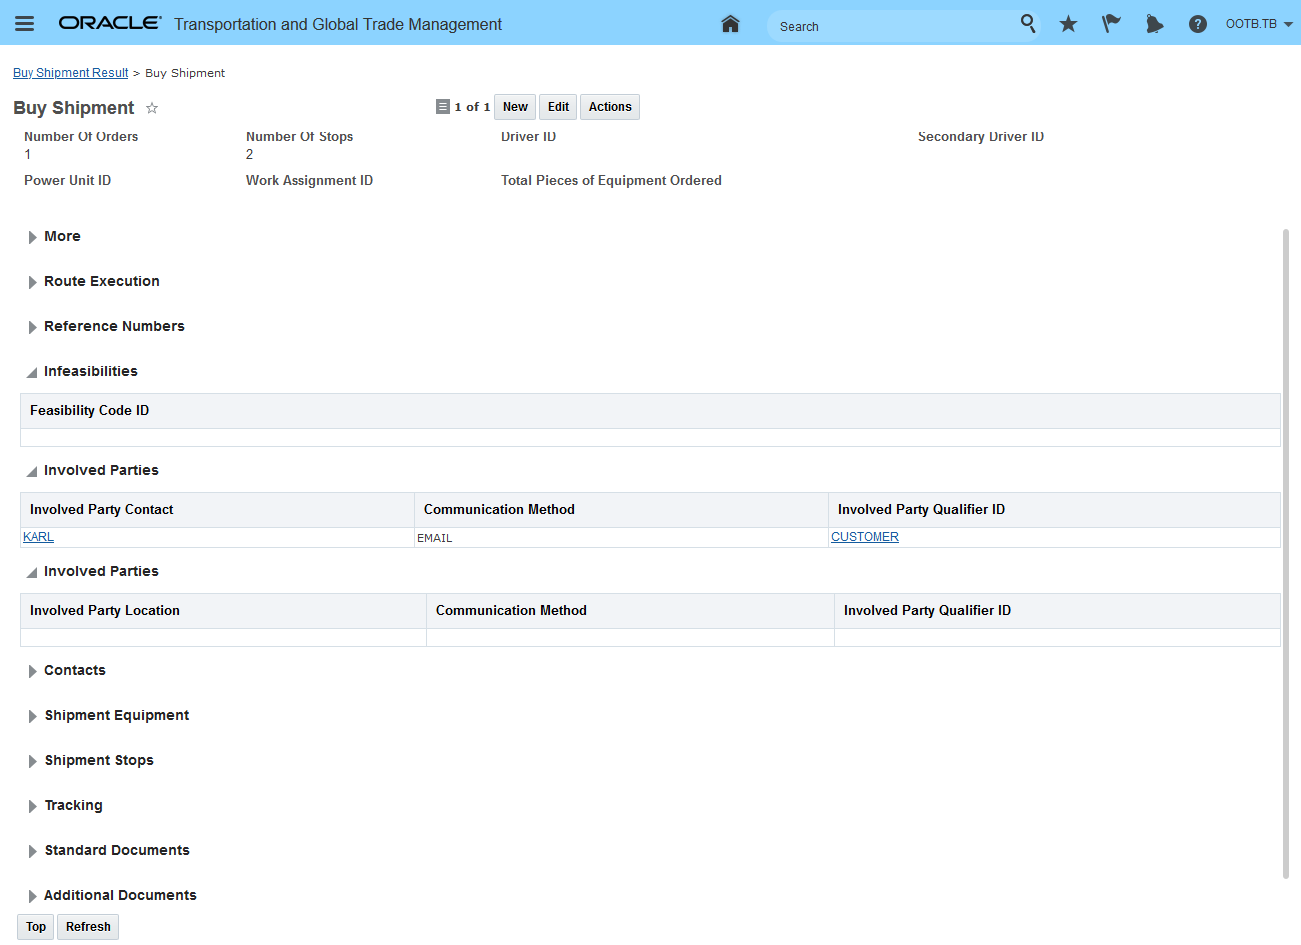
Shipment Manager View - Booking Information Section Removed
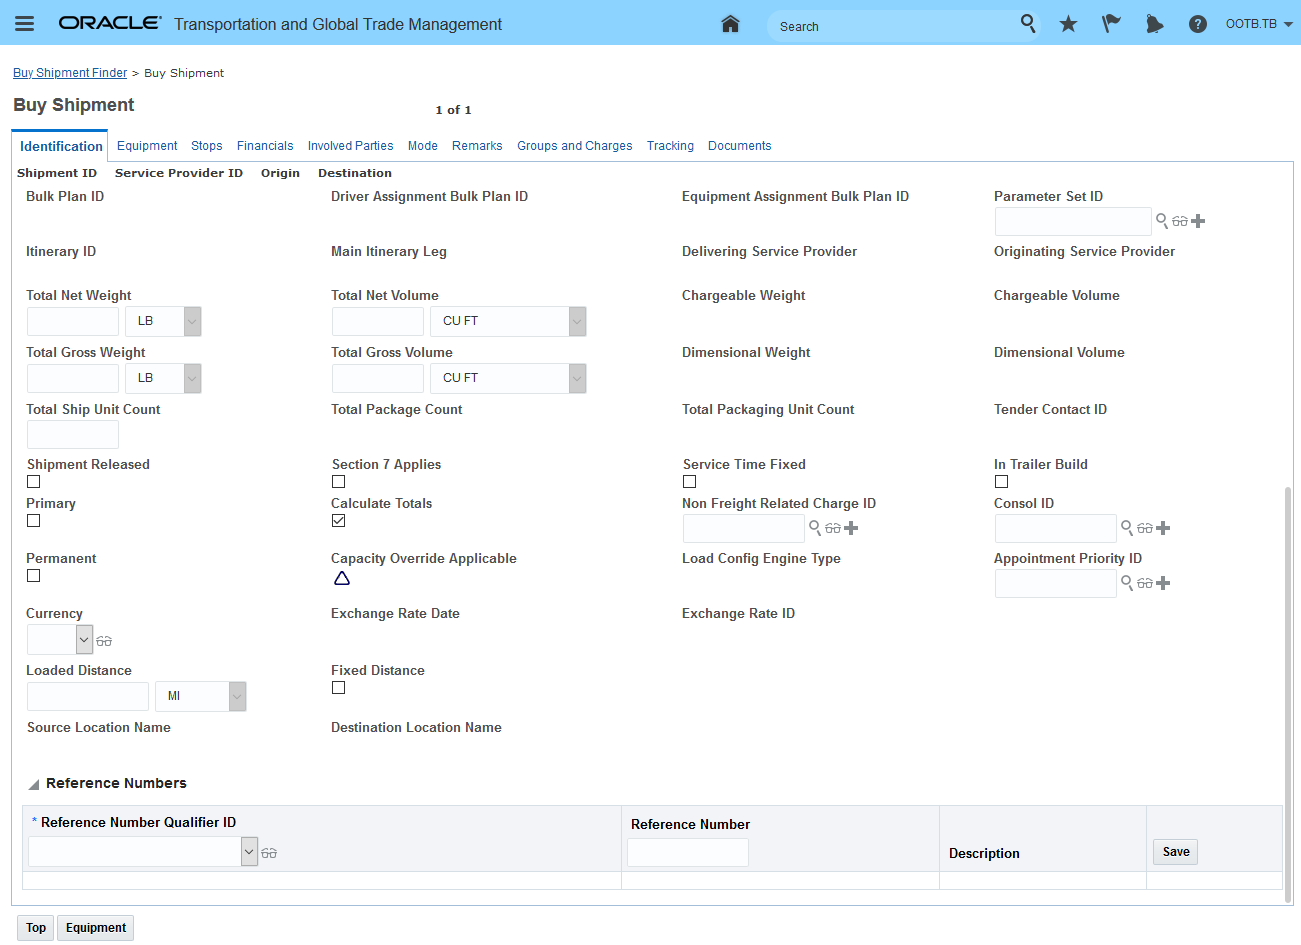
Shipment Manager New - Booking Information Section Removed
The ability to remove the Booking Information section from your shipment manager (New, View and Edit) will reduce confusion for users who focus on modes of transportation that do not require a booking process - modes like less-than-truckload, truckload and parcel.
Steps to Enable
To take advantage of this feature you will need to:
- Remove the Booking Information section from your shipment manager layouts - New, View and Edit.
- Configure your screen sets to use the newly modified shipment manager layouts.
Manager Layout Enabled Action - Merge Shipments
This feature provides you with the ability to use Manager Layout configuration capabilities to configure the Merge Shipment action so that the options provided when running the action are aligned to the requirements of your Implementation.
Using the Manager Layout capabilities you can configure the default Merge Shipment action - shown below - to completely remove the Optimize or Manual options and/or tailor the options/inputs within the options.
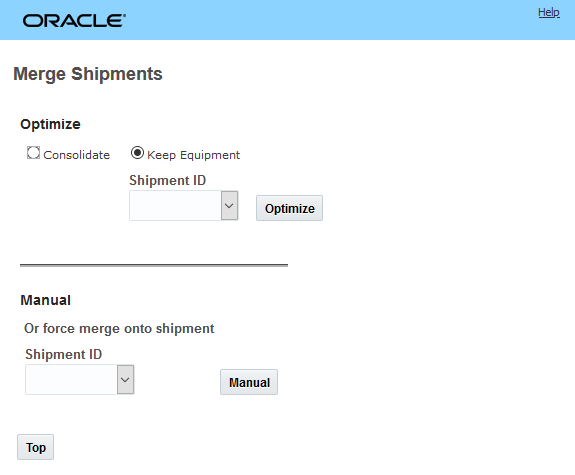
Out-of-the-Box Merge Shipments Action
Within the Manager Layout you have the options to configure how the action looks - as shown below.
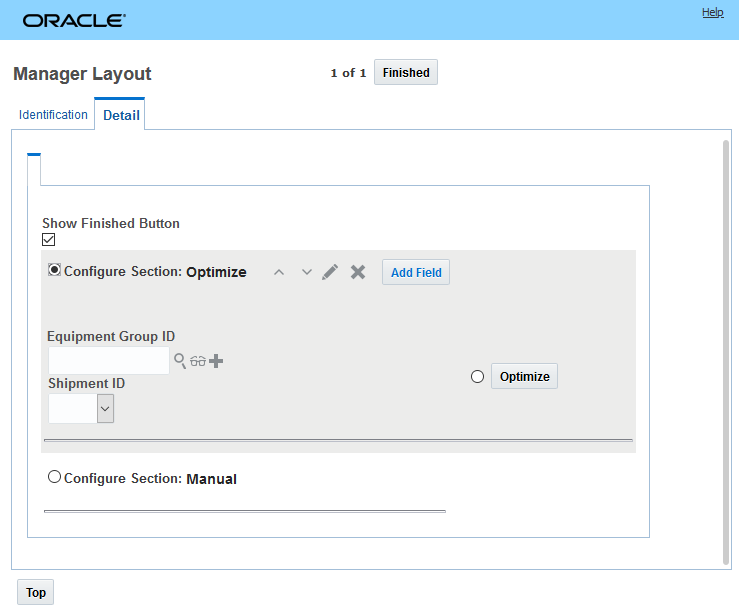
Manager Layout Configuration Options for Merge Shipment Action
The ability configure the Merge Shipment action using the Manager Layout functionality will allow you to trim down and simplify the data shown and the action experience so that it matches your specific implementation requirements. For example - if your users should only use Optimize when running the Merge Shipments action you can remove the option for them to manually perform the merge.
Steps to Enable
There are no steps require to enable this feature - however - to take advantage of manager layout configuration capabilities provided for the Merge Shipments action - you will need to use the Manager Layout Action configuration capabilities to configure the action. Then you will need to assign the configured action to the desired manager layout.
At a high level the steps involved are:
- Copy the public layout for the action.
- Configure the action - remove sections, remove or reorder fields and columns etc.
- Assign the configured action to the desired manager and screen set.
Shipment Manager - License Plate Field Added to Screen Set
This feature extends your ability to search for your shipments by allowing you to add the License Plate field from the shipment equipment object to your shipment screen set.
In the example below, the Shipment Equipment has the License Plate field populated with the value "ABC-123"
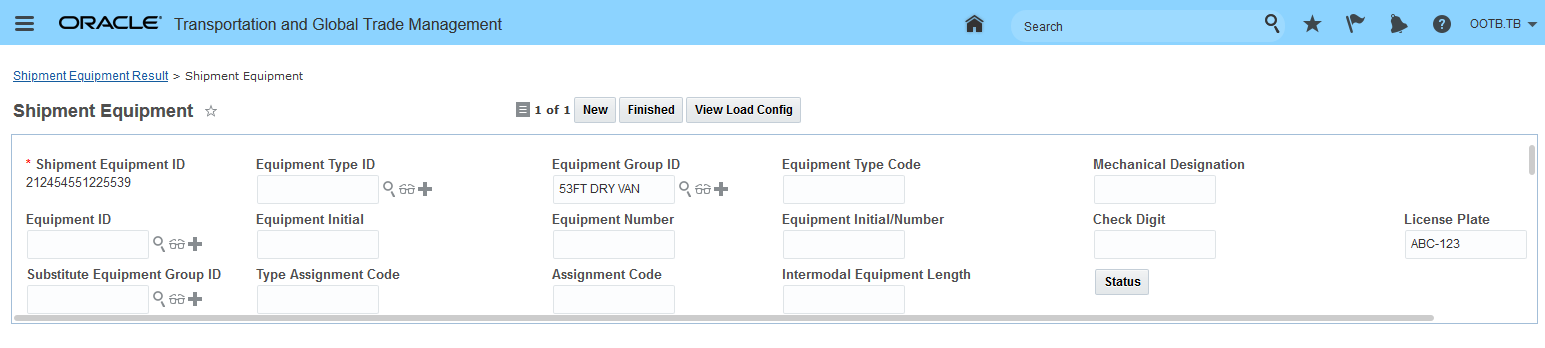
Shipment Equipment License Plate Field
To perform a shipment search using the License Plate field the License Plate field must be added as a search field option on the shipment finder.
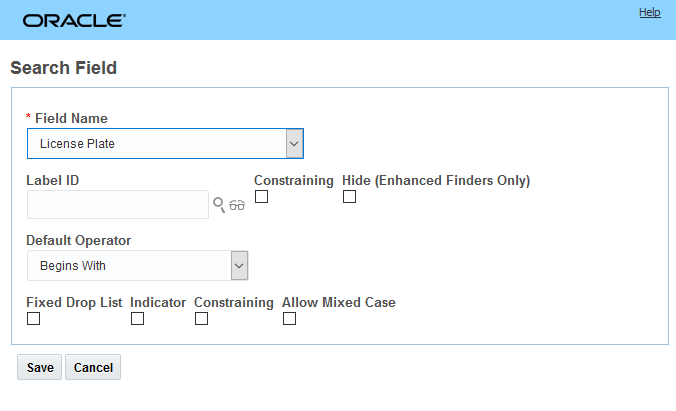
Add License Plate Field to Shipment Finder
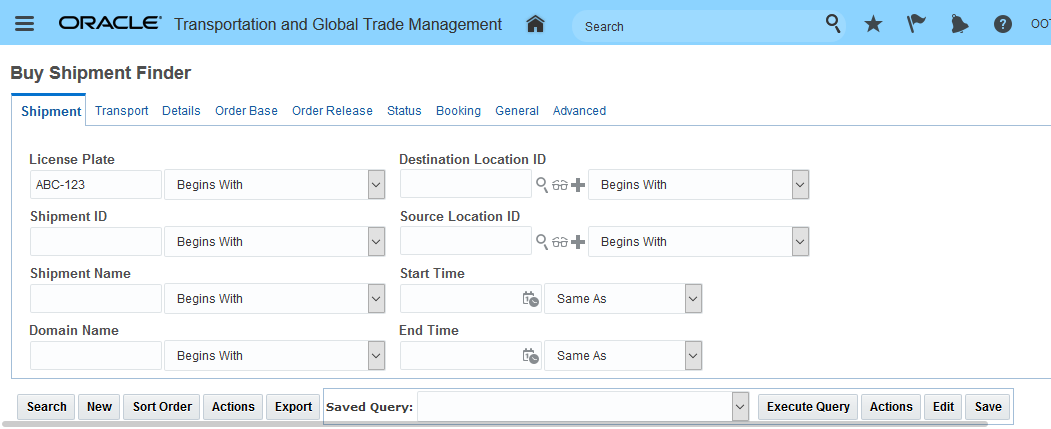
Shipment Search Using License Plate
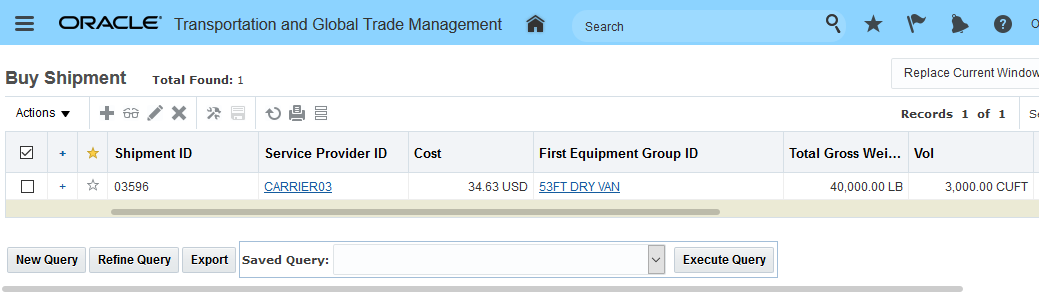
Shipment Finder Result for License Plate Search
Extends the shipment search capabilities to include the shipment equipment license plate number.
Steps to Enable
The License Plate field is not - by default - included in the Public shipment manager screenset - you will need to add the License Plate field to your shipment screen set if you wish to search using this field.
Multi-Select for Step Tender Action
This feature allows you to select and initiate a Step Tender process on more than one shipment. When you run the action with multiple shipments selected the values entered for Expected Response Time and Step Tender Time will apply for the set of shipments selected. You will find this change extremely beneficial if your OTM implementation requires you to manually select and kick-off your Step Tendering process for multiple shipments.
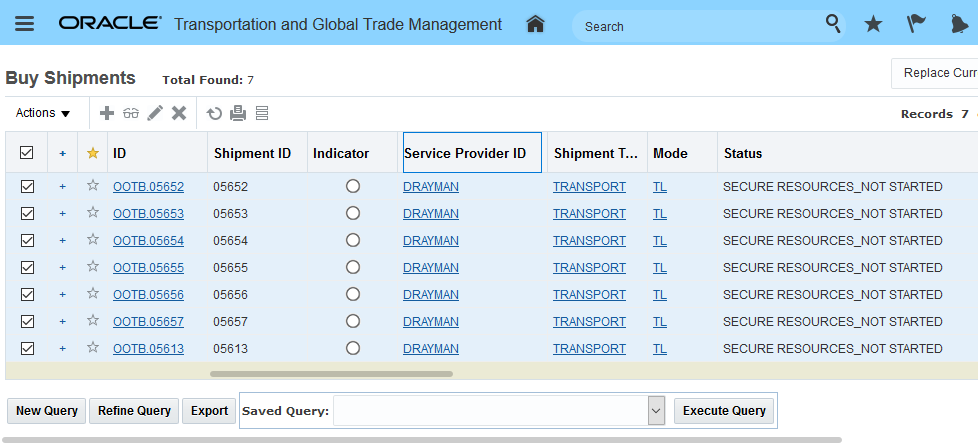
Step Tender Multi-Select Option
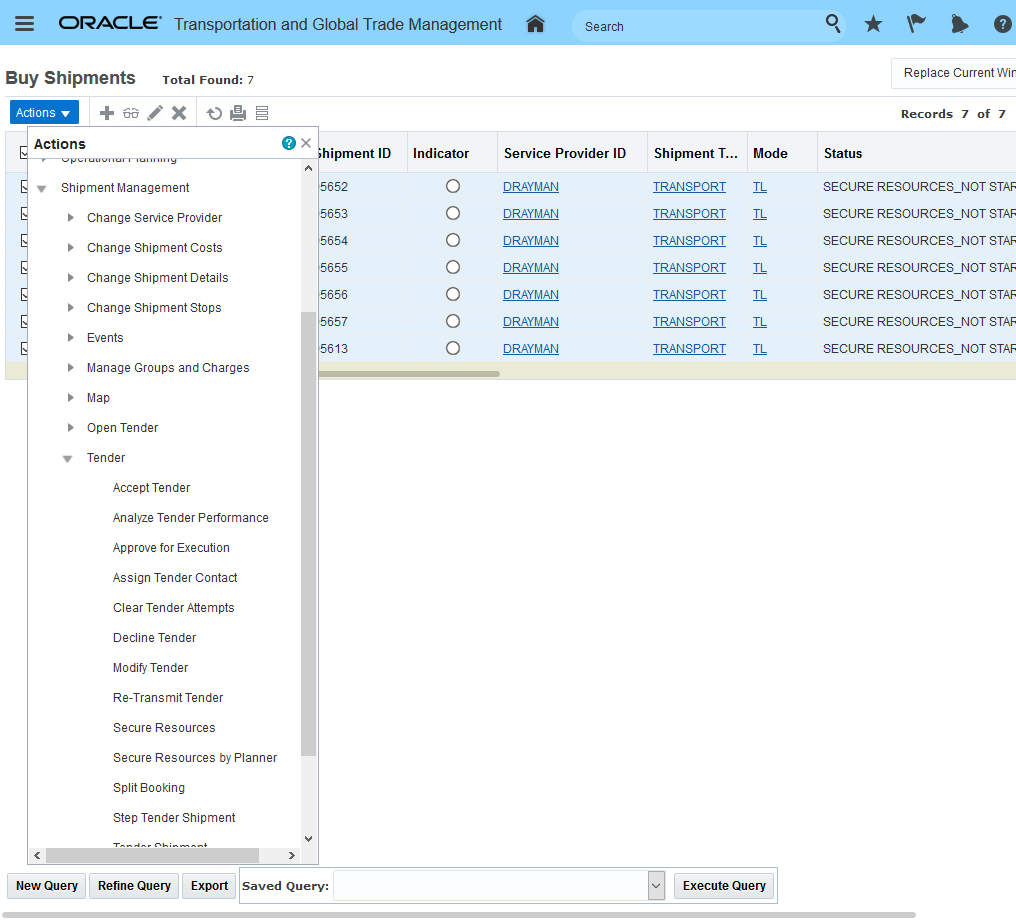
Step Tender Action
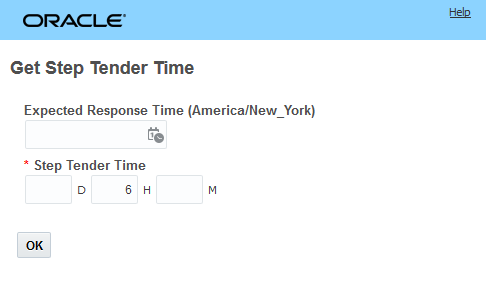
Timing for Step Tenders
Below you will notice that the Step Tender Results now provides information related to the Processing Status and the Time for the step tender(s).
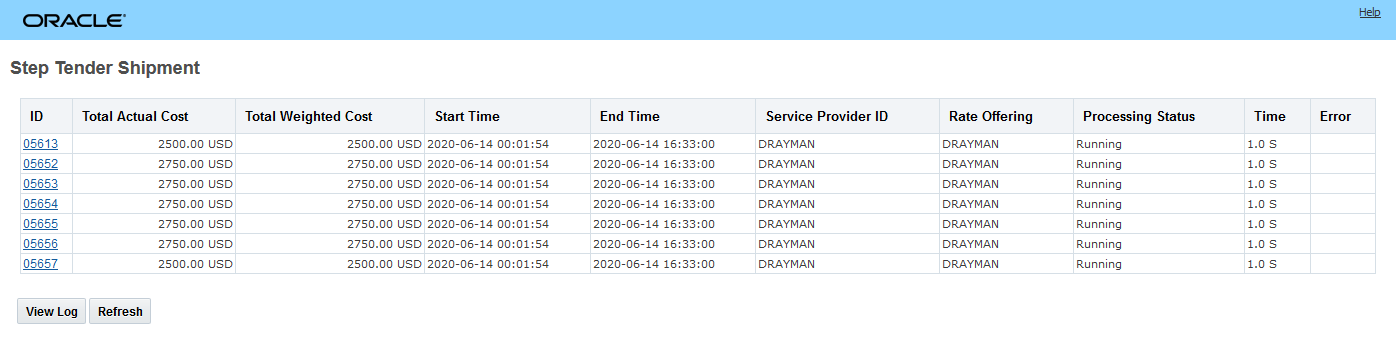
Multi-Select All Selected Shipments Step Tendered
The seven shipments selected for Step Tendering will each follow the process outlined below assuming a step timer of 1 hour.
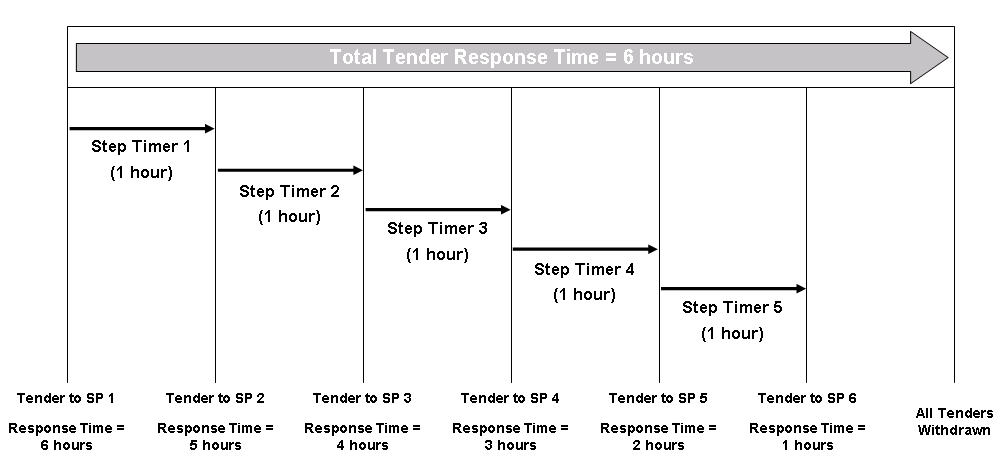
Process for Each Shipment
This feature will reduce the time required to manually select and tender multiple shipments that share the same step tender timing.
Steps to Enable
You don't need to do anything to enable this feature.
Spot Bid Auto-Award Additional Percent Value Enhancement
This feature provides you with the ability to - in the scenario where your spot bid timer expires, to set the additional cost percent to a value that is greater than 100%. In previous versions, 100% was the maximum value allowed.
The Collaboration parameter BROADCAST TENDER MAX COST ADDITION PERCENT is used to set the percent value used to determine how high the lowest bid can be when the system evaluates the lowest bid provided when the spot bid timer expires. If the lowest bid is greater than the calculated value, then all of the bids will be ignored and the tender offer status of the shipment will be set to NO RESPONSE. If the lowest bid is below calculated maximum cost, then it will be selected and the bid process will continue as normal.
In the example below, a Spot Bid Tender is being sent out for a shipment with a shipment cost of 200.00 USD. The BROADCAST TENDER MAX COST ADDITION PERCENT parameter is set to 250.00 - which equates to a 250% additional cost amount threshold. All of the submitted bids are too high - so when the spot bid timer expires the tender offer status will be set to NO RESPONSE and the spot bid process will end with no service provider awarded.
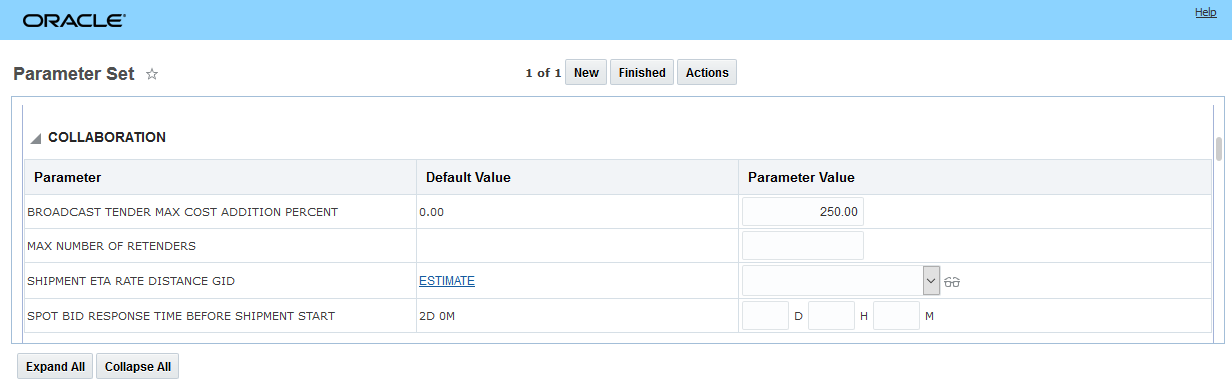
BROADCAST TENDER MAX COST ADDITIONAL PERCENT SET = 250.00
Given the bids below (all above the calculated maximum) - when the timer expires the shipment will be set to No Response since none of the bids provided are below the calculated maximum cost.
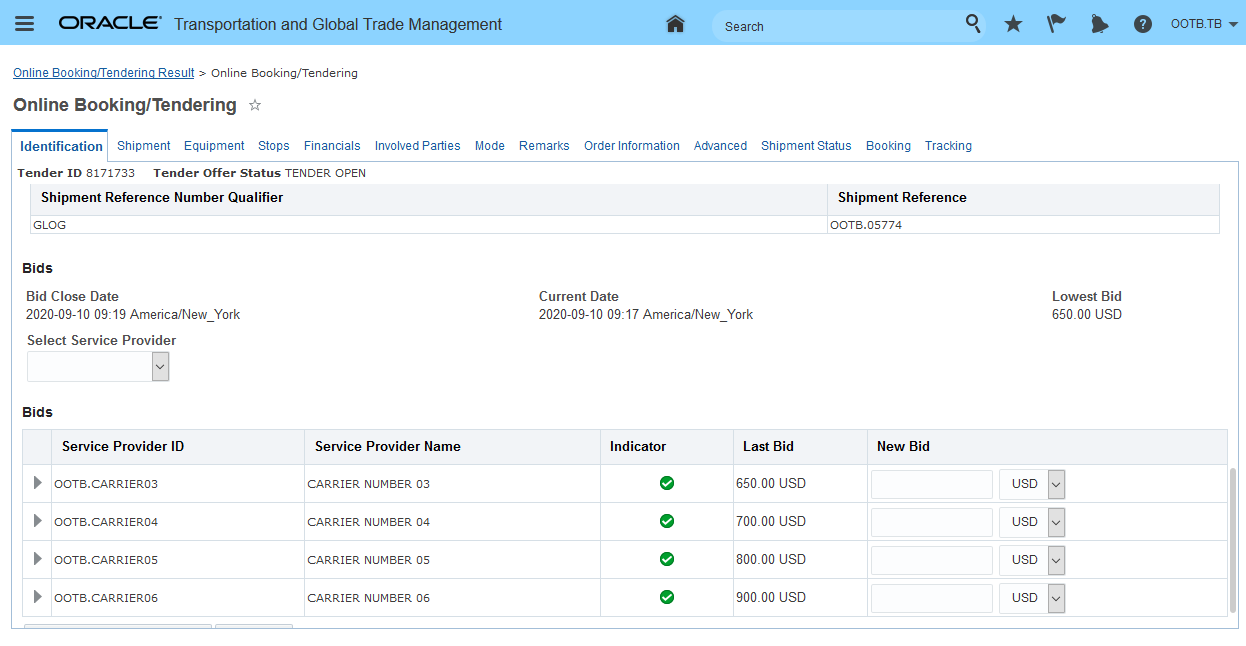
Submitted Bids All Too High
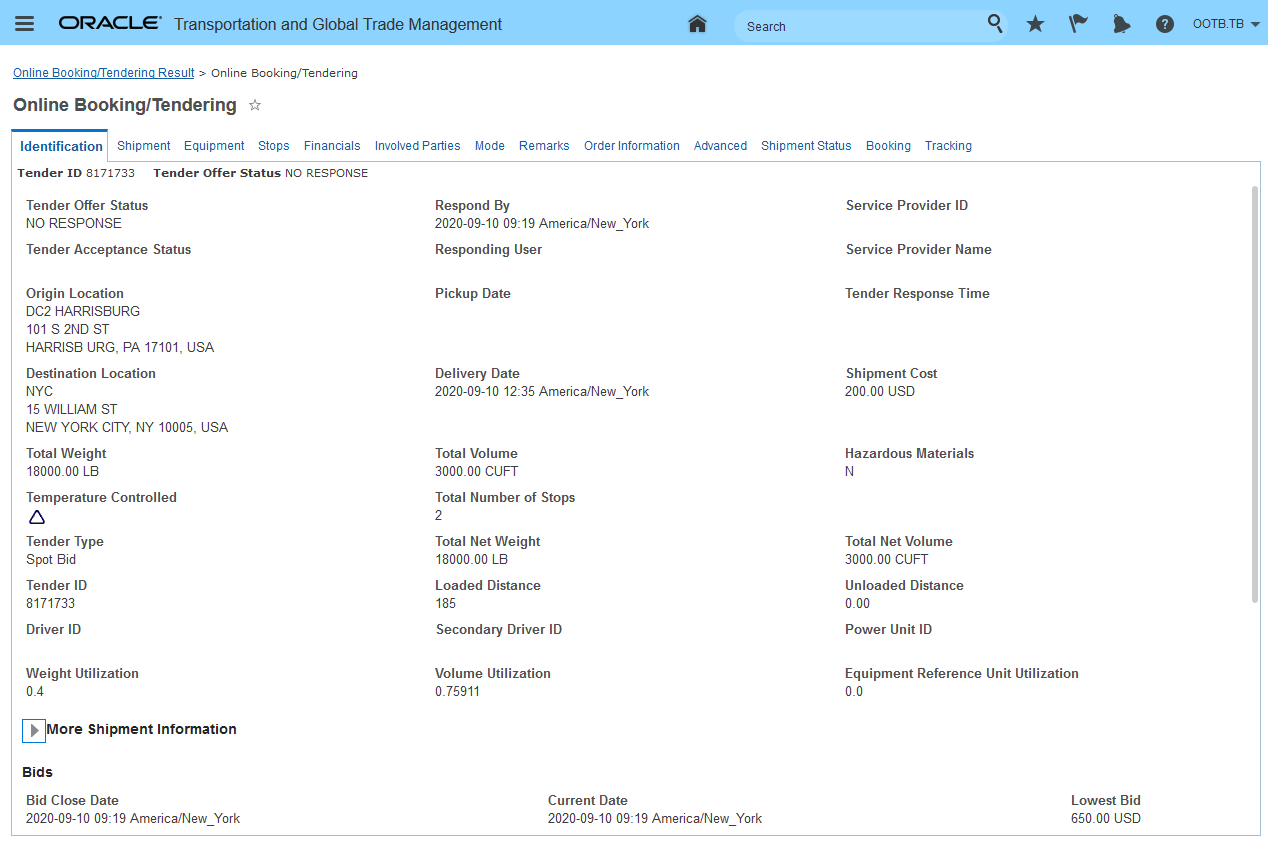
When Timer Expires Tender Status Is No Response
In the example below - with the same setup - BROADCAST TENDER MAX COST ADDITIONAL PERCENT SET = 250.00 - the bid for 500.00 USD will be accepted and the spot tender process continues as per normal.
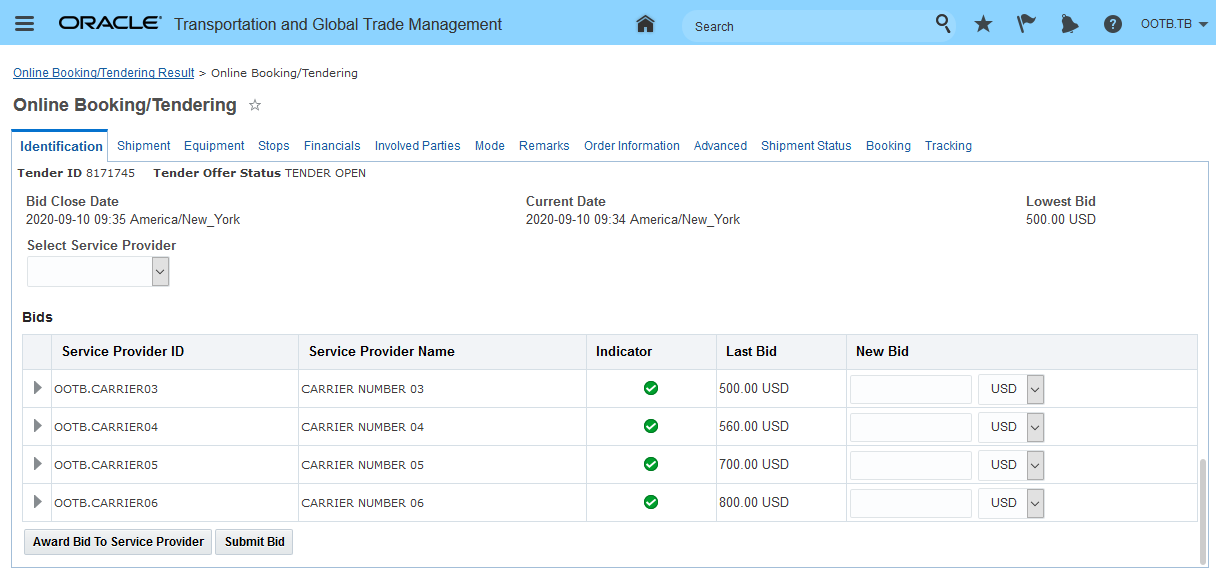
Acceptable Bids Greater than 100%
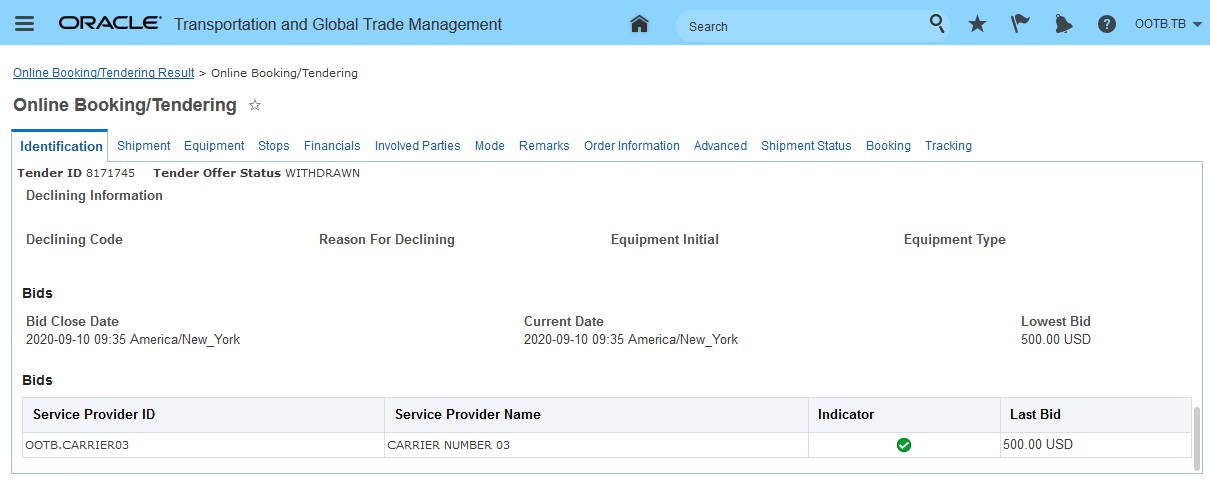
Previously, you were limited to constraining the timer expiration auto-award process to bids that were less than or equal to 100% above the shipments cost. The 100% limitation was considered a limitation in implementations where a wide variation in the cost calculated for the service providers involved was possible - typically in a Fleet v Common Carrier setup. This feature eliminates this limitation.
Steps to Enable
Controlling the additional percentage allowed for a Spot Bid Tender is managed using the Collaboration parameter BROADCAST TENDER MAX COST ADDITIONAL PERCENT. To use this feature you must set the BROADCAST TENDER MAX COST ADDITIONAL PERCENT to your desired value.
Secure Resources Maximum Number of Retenders Enhancement
This feature extends the options you have for defining the maximum number of retenders attempted for your shipments when securing resources. The Secure Resources Agent Action now includes the options to specify the maximum number of retenders using the Maximum Number of Retenders field or you can specify a saved query in the Select Maximum Number of Retenders field that sets the number of retenders based on the results (number) returned from the saved query. There is also a new Planning Parameter - Max Number of Retenders - that can be defined to set the maximum number of retenders allowed for your shipments.
NOTE: Previously the MAX_NUM_RETENDERS workflow parameter was used to set the maximum number retenders for a shipment.
The order of application for the new options - for the Secure Resources Agent Action use case - is as follows:
- The Secure Resources Agent Action value Maximum Number of Retenders - if provided - will be used if entered - the Select Maximum Number of Retenders option will be ignored in this setup.
- The Secure Resources Agent Action value Select Maximum Number or Retenders will be used if the Maximum Number of Retenders value is Null.
- If the Secure Resources Agent Action is not configured then the new Planning Parameter MAX NUMBER OF RETENDERS will be used - if populated.
- If no new configurations are provided then the MAX_NUM_RETENDERS workflow parameter is used.
For the UI Actions Tender, Secure Resources the order for defining the Max Number of Retenders is as follows:
- The new Planning Parameter MAX NUMBER OF RETENDERS will be used - if populated - for your shipments that are using the configured planning parameter set.
- If the Planning Parameter MAX NUMBER OF RETENDERS is Null, then the MAX_NUM_RETENDERS workflow parameter will be used.

Secure Resources Agent Action - New Maximum Retenders Options
A new parameter has been added to the COLLABORATION Section of the Parameter Set screen.
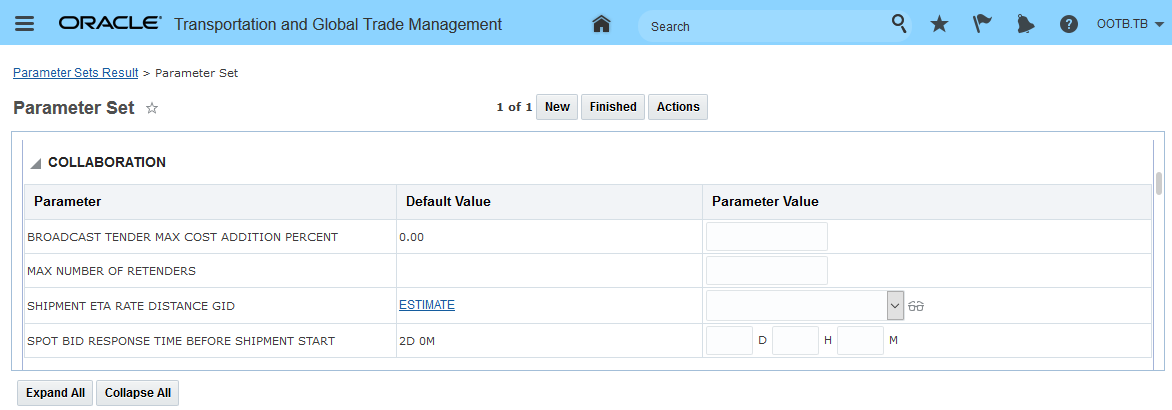
New MAX NUMBER of RETENDER Parameter
A new Maximum Number of Re-tenders field is available for you to add to your Shipment Manager, Finder and Finder results. The Maximum Number of Re-tenders field stores the current maximum number of re-tender value for the shipment.
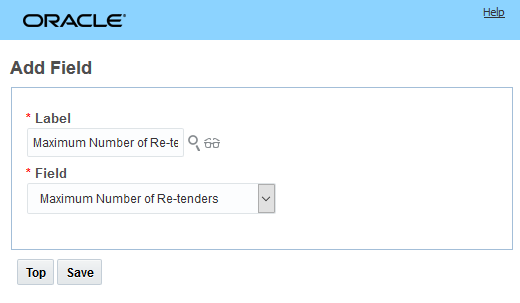
Add Maximum Number Re-tenders to Your Manager

Add Maximum Number of Re-tenders to Your Finder
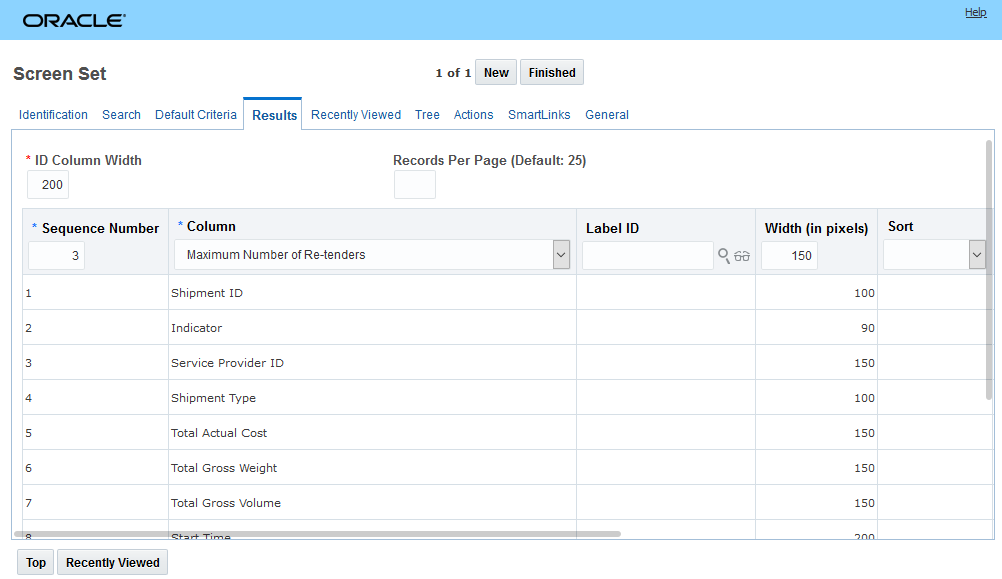
Add Maximum Number of Re-tenders to Your Finder Results
In the example below, the shipment has been planned using a Planning Parameter Set where the MAX NUMBER OF RETENDERS parameter has been set to 3.
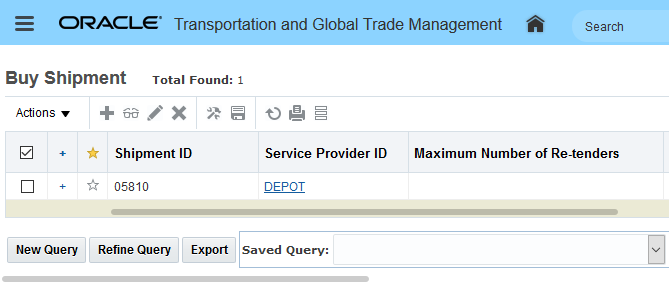
Maximum Number or Re-tenders in Null After Planning
When the UI Action Tender or Secure Resources is run against the shipment the value for the Maximum Number or Re-tenders is set - in this case, it is set to 3.
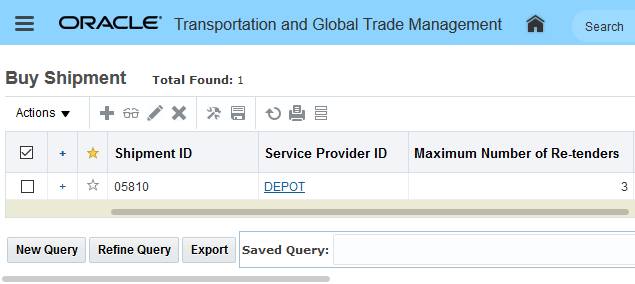
Maximum Number or Retenders in Set
Provides you with a more dynamic/configurable method for setting the maximum number of tenders for a shipment.
Steps to Enable
This new option is available in the Secure Resources Agent Action - you will need to set the value in the Secure Resources agent action to take advantage of this feature.
Tips And Considerations
The MAX_NUM_RETENDERS workflow parameter does not populate the value shown on the shipment for Maximum Number of Retenders - this value is only populated via the Secure Resources Agent Action or the Planning Parameter MAX NUMBER OF RETENDERS.
Secure Resources Action - Additional Processing Information Added
This feature provides you with additional information and awareness regarding the current status of your Secure Resources transactions. Specifically, this feature provides you with Secure Resources processing information regarding the Process Status, Time, and any Error messages/info related to the processes.
The additional columns and information provided are highlighted below. The additional columns provided are Processing Status, Time (processing time) and Error. You also have the option to Refresh the screen while to see the current status.
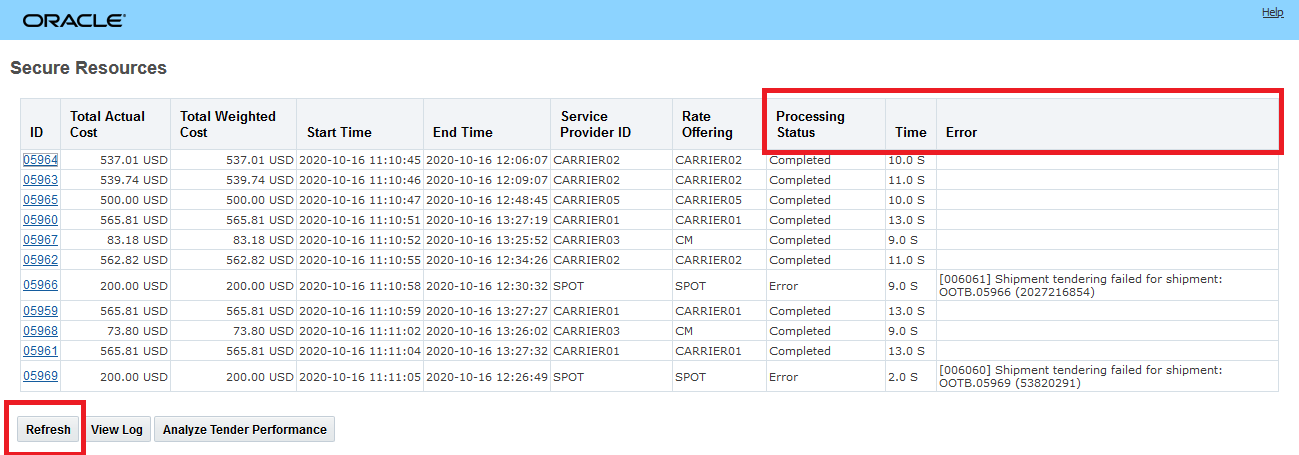
Secure Resources Processing Screen
This feature provides you with more insight into the current status of your in-process Secure Resource transactions. The additional status insight will allow you to be more proactive when errors arise.
Steps to Enable
You don't need to do anything to enable this feature.
Order Release Search - Source and Destination Location Zone 4 Fields Added
This feature extends the order release finder options available on the location tab to include the Source and Destination Location Zone 4 Fields.
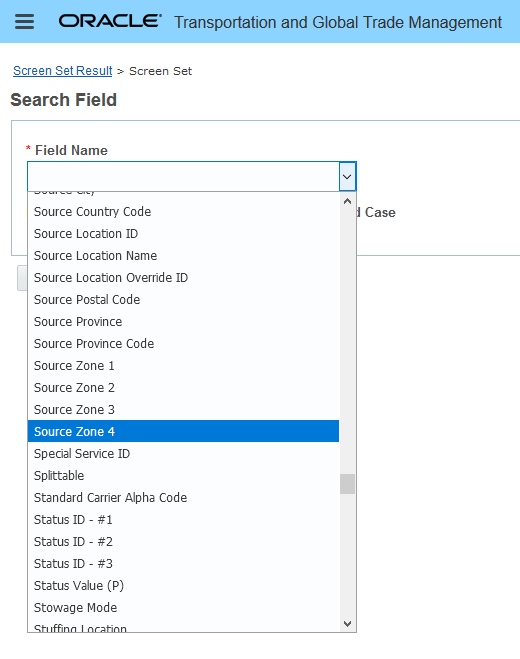
Source Location Zone 4 Field
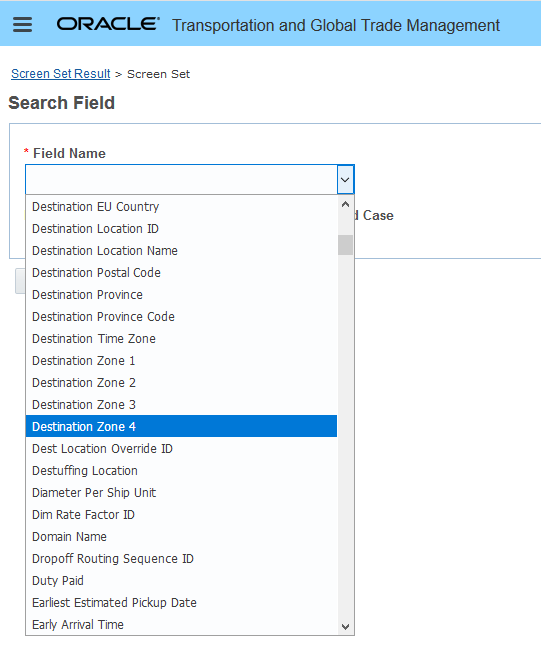
Destination Zone 4 Field
This feature provides you with a complete set of source/destination location zone fields 1-4, that you can use for your location based order release searches.
Steps to Enable
You will need to add the fields to your order release finder screen set. Follow the standard steps provided in help to extend your order release finder to add one or both of these fields to your order release finder.
Order Release - Packaged Item Description Added to Select Line Section
This feature adds the Packaged Item Description field to the Select Line grid of the Add Ship Unit section of the order release UI.
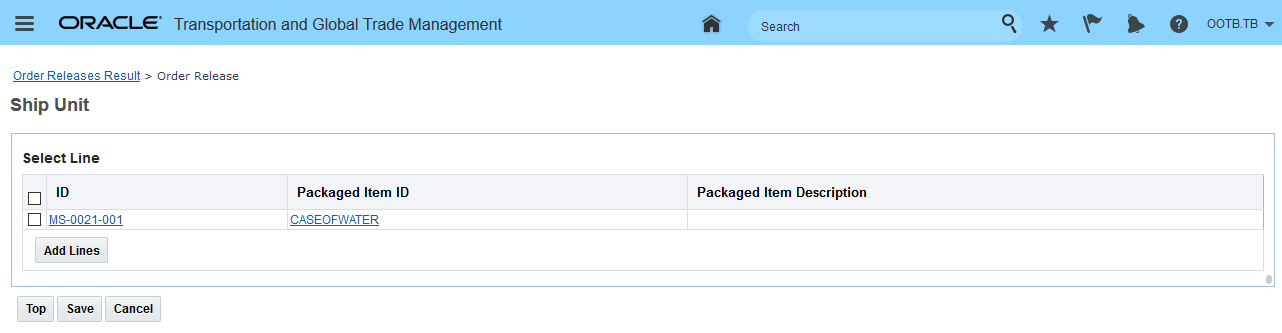
Package Item Description Added to Select Line Grid
This feature provides you with additional reference information regarding the available lines that can be added to the new ship unit.
Steps to Enable
You don't need to do anything to enable this feature.
Vessel Name Added to Ask Oracle About Vessel Schedules
This feature extends the information provided by the Ask Oracle About Vessel Schedules to include the Vessel Name in the results.
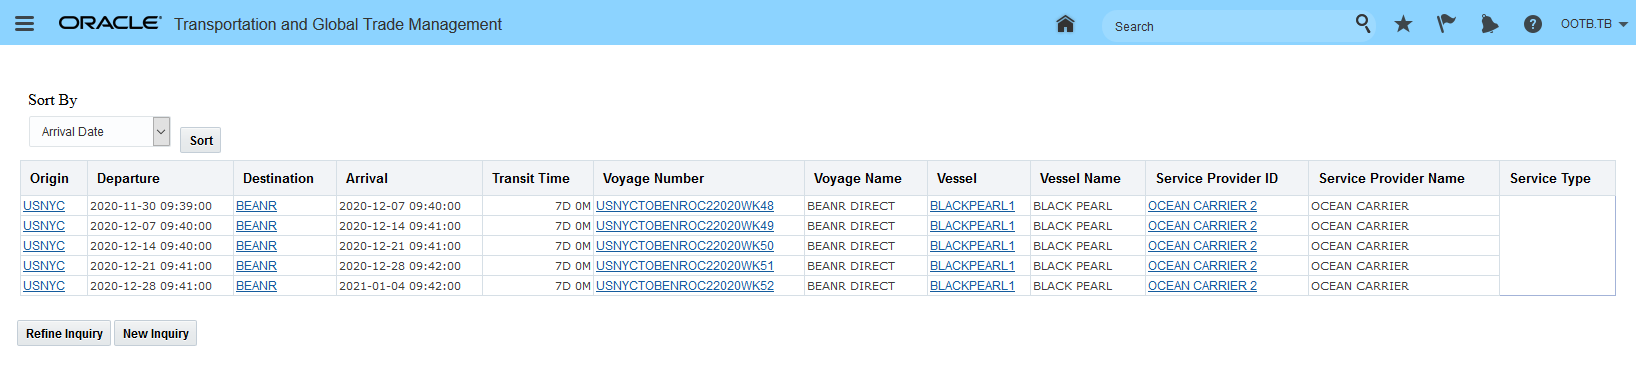
Ask Oracle About Vessel Schedules Results - Vessel Name Added
The Vessel Name in the Ask Oracle Vessel Schedule results provides an identifier that is easier to remember than the Vessel ID - which is often mapped to the IMO number or call sign for the vessel assigned to the voyage.
Steps to Enable
You don't need to do anything to enable this feature.
Location Manager Layout - Country Code Replace GID Option
This feature allows you to change your location manager layout so that you are able to display the country name versus the country code. You will find this particularly helpful if you are not familiar with the country codes used, by default, to identify the country related to a location.
By default, OTM will display the selected version of the country code (ISO 2 or 3). This feature provides you with the configuration option to change this to Country Name instead.
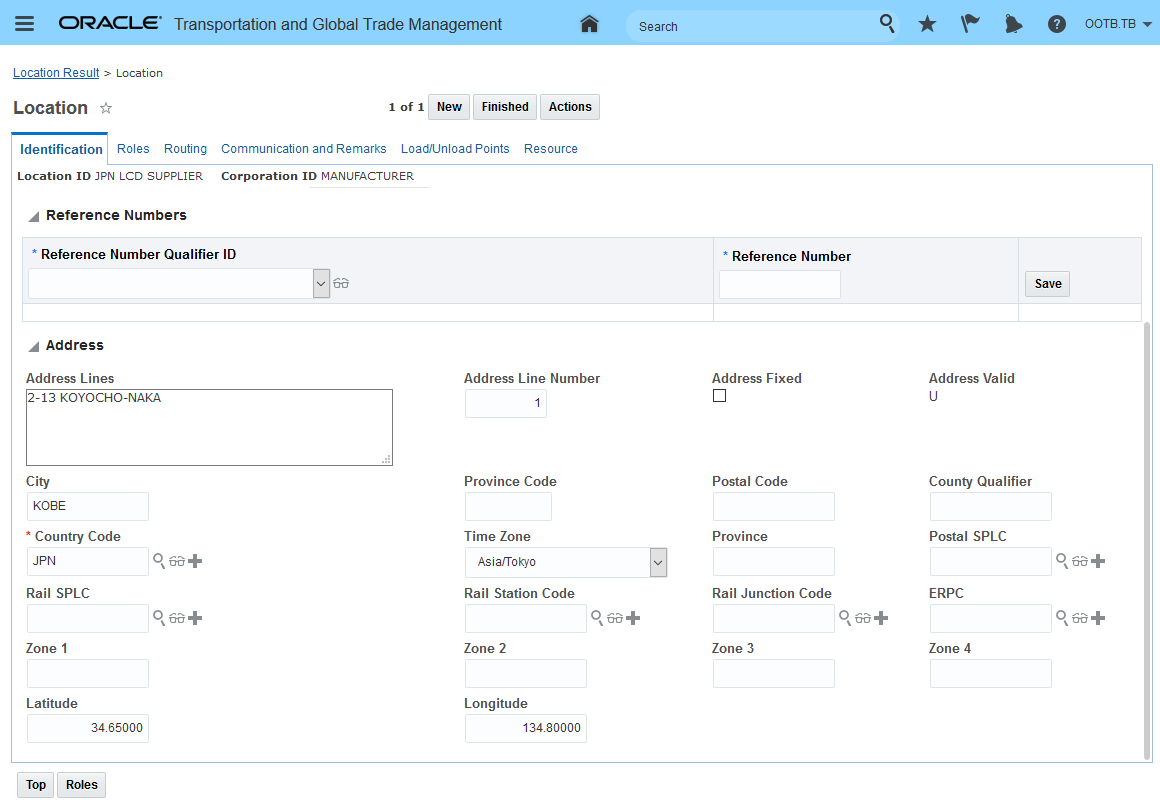
Country Code
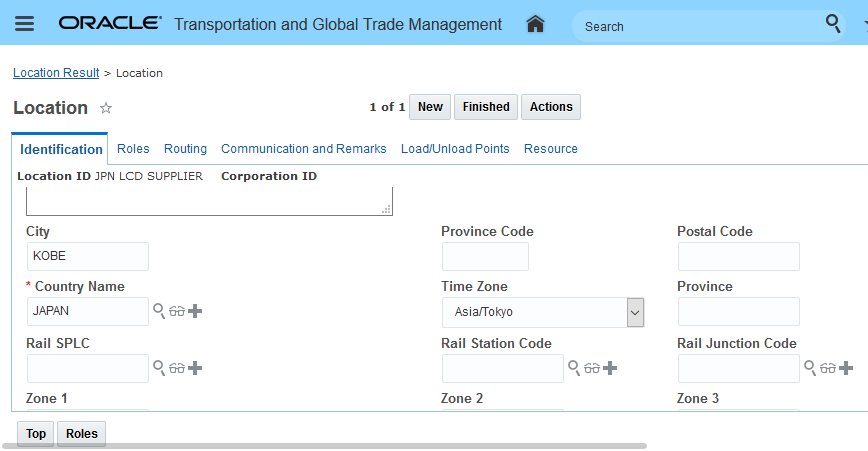
Country Code to Country Name Change
By providing the option to see the country name versus the country code, confusion regarding the country assigned to a location's address is eliminated.
Steps to Enable
In the manager layout, the new option Replace GID has been added to allow you to substitute the Country Name field for the Code/GID. This Replace GID option is available for both Edit and View. Note that the label was also changed in the example below.
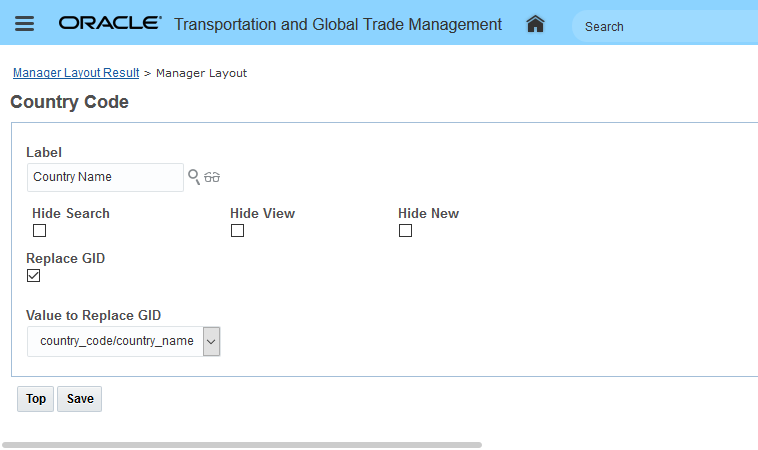
Location Manager Layout Replace GID Option
External Distance Engine and Map Enhancements
HERE Technologies Mandatory Authentication Method Upgrade
This feature provides you - the user of HERE Technologies services - with the enhancements required to switch the current authentication approach used to call HERE Technologies (app_id and app_code) to the new authentication approach supported by HERE Technologies - API Keys, and optionally, for EDE/ESE usage - OAuth 2.0 Token Credentials.
NOTE: The current authentication approach being used today for HERE Technologies authentication - app_id and app_code - will no longer be supported by HERE Technologies after December 31st 2021. If you are currently using HERE Technologies for any of these services - Address Validation/Geocoding, Distance and Service Time, Generate Rush Hour, Custom Routes, Custom Locations, Weekend Restrictions (Using Fleet Telematics) and/or Mapping - you will need to make plans to transition to HERE's new authentication approach before the end of 2021.
This feature provides you with the ability to upgrade to the latest version of the HERE Technologies supported authentication approach.
Steps to Enable
The steps - at a high level - for moving to the new authentication approach involve the following:
- Be on the 21A or later update level of OTM.
-
Generate your API Key on HERE Technologies site. Information regarding the steps required can be found here: https://developer.here.com/documentation/authentication/dev_guide/topics/api-key-credentials.html.
NOTE: You have the option to use a different authentication approach - OAuth 2.0 Token Credentials for your EDE/ESE calls to HERE Technologies. Our assumption is that for simplicity sake, you will opt to move to the API Key approach for both HERE Maps and EDE/ESE services versus using a different authentication approach for the two different services.
- Set the property glog.ExternalDistanceEngine.HERE.authenticationType to ApiKey.
NOTE: The values are case sensitive:
- By default, this property is set to the currently supported approach AppIdAppCode.
- This property can have one of the values below:
- AppIdAppCode (default)
- ApiKey
- OAuth
- Enter the API Key value received from HERE Technologies in this property:
Set here.api_key
********
- For HERE Maps the following properties need to be set:
here.useLatestApi
true here.core_url
here.service_url
here.ui_url
here.event_url
here.css_url
here.core_legacy_url
here.service_legacy_url
You also have the option of configuring the application to use OAuth 2.0 Token Credentials for your EDE/ESE calls to HERE Technologies. You will need to perform all the steps above to support the API Key authentication approach for your HERE Map usage. The steps required for setting up the OAuth 2.0 Token Credentials authentication approach can be found in Online Help under the How To Set Up the HERE Engine to Use the REST Service and OAUth Authentication.
Key Resources
You should review the Oracle Transportation and Global Trade Management Cloud Getting Started Guide and the OTM's Online Help for the most complete accurate up-to-date information on the setup.
The following link explains the process for obtaining the new API keys or OAuth Tokens from HERE Technologies:
To verify that your HERE Maps license has successfully migrated to the new HERE license key; you can email Sarath.menon@here.com to receive validation that the license migration has been successful.
Trimble MAPS - Drag and Drop Enhancement
This feature provides you - the user of the Trimble/ALK map component - with the option to initiate actions within the map using an intuitive drag and drop navigation. With this feature, you will be able to initiate the following actions via a drag and drop interaction:
- Move order to/from a shipment
- Unassign an order from a shipment
In the example below, the unassigned order MS-0005 (with Line Style = Destination) will be moved to the shipment 05859 using the drag and drop path to initiate and complete the move action.
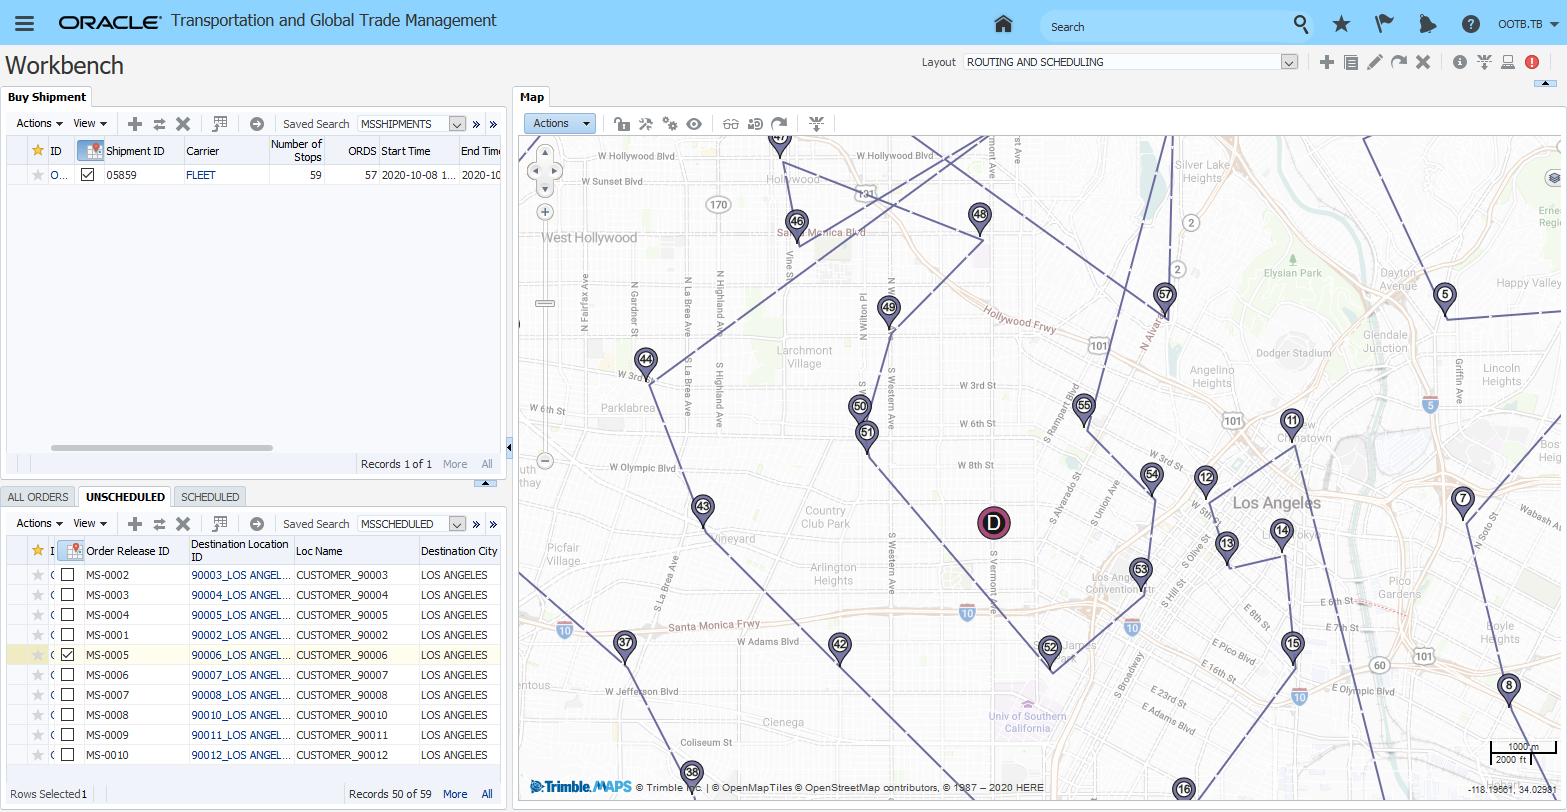
Step 1 - Select the Order
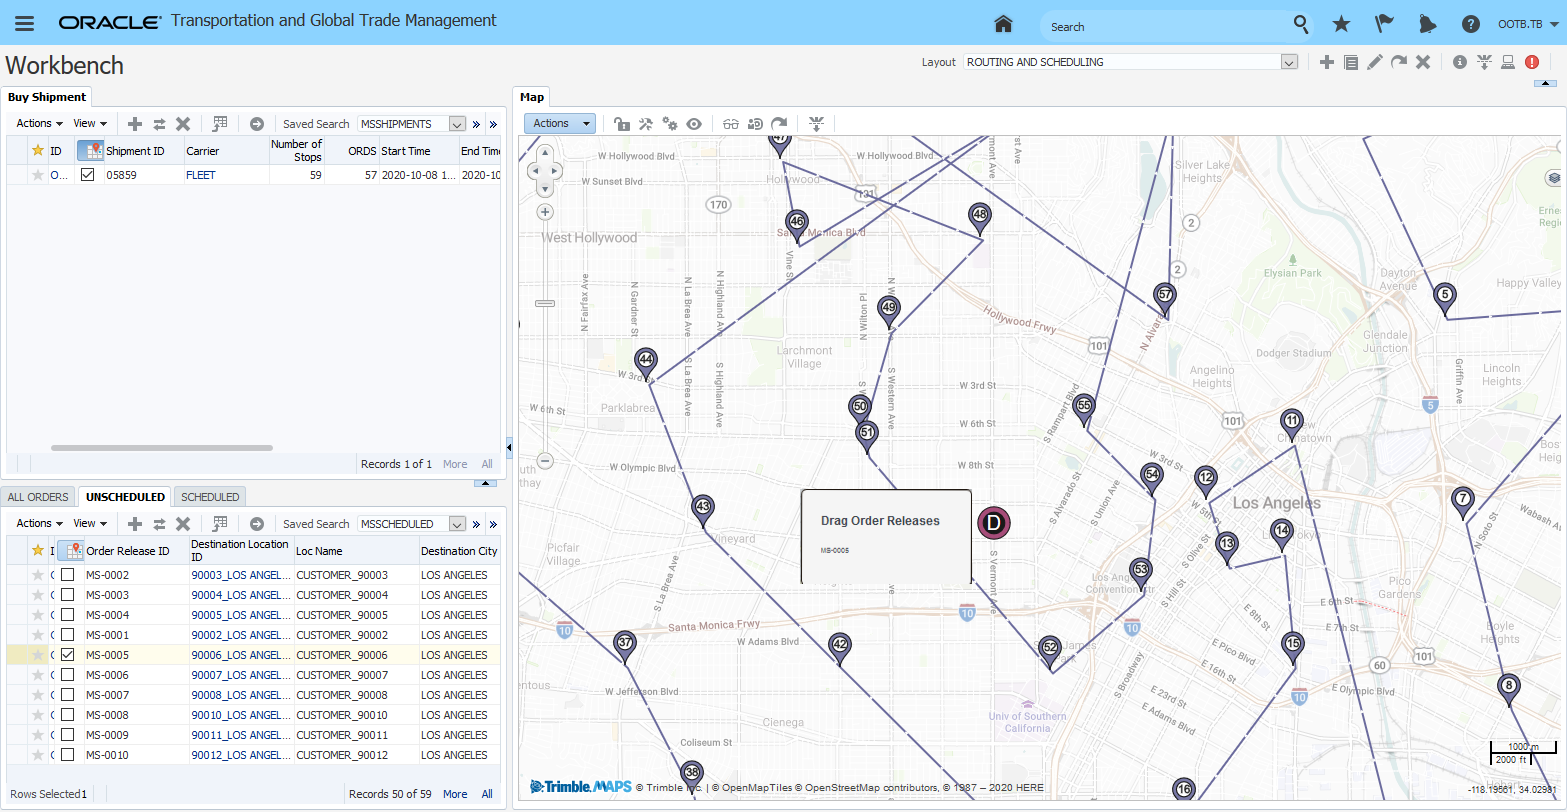
Step 2 - Initiate Drag Drop to Target Shipment (Right Mouse Button and Drag to Target)
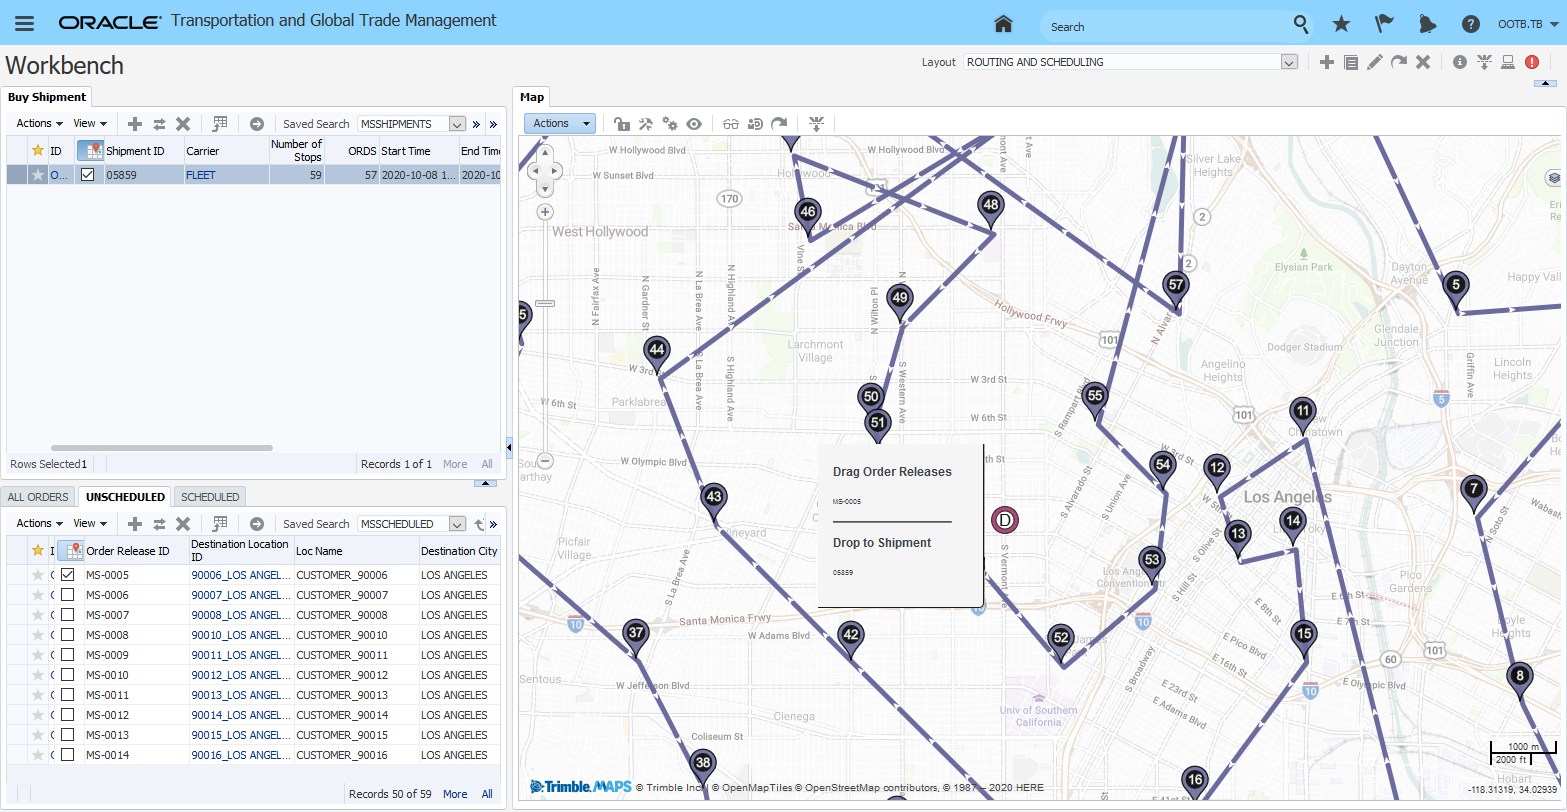
Step 3 - Drop to Target Shipment
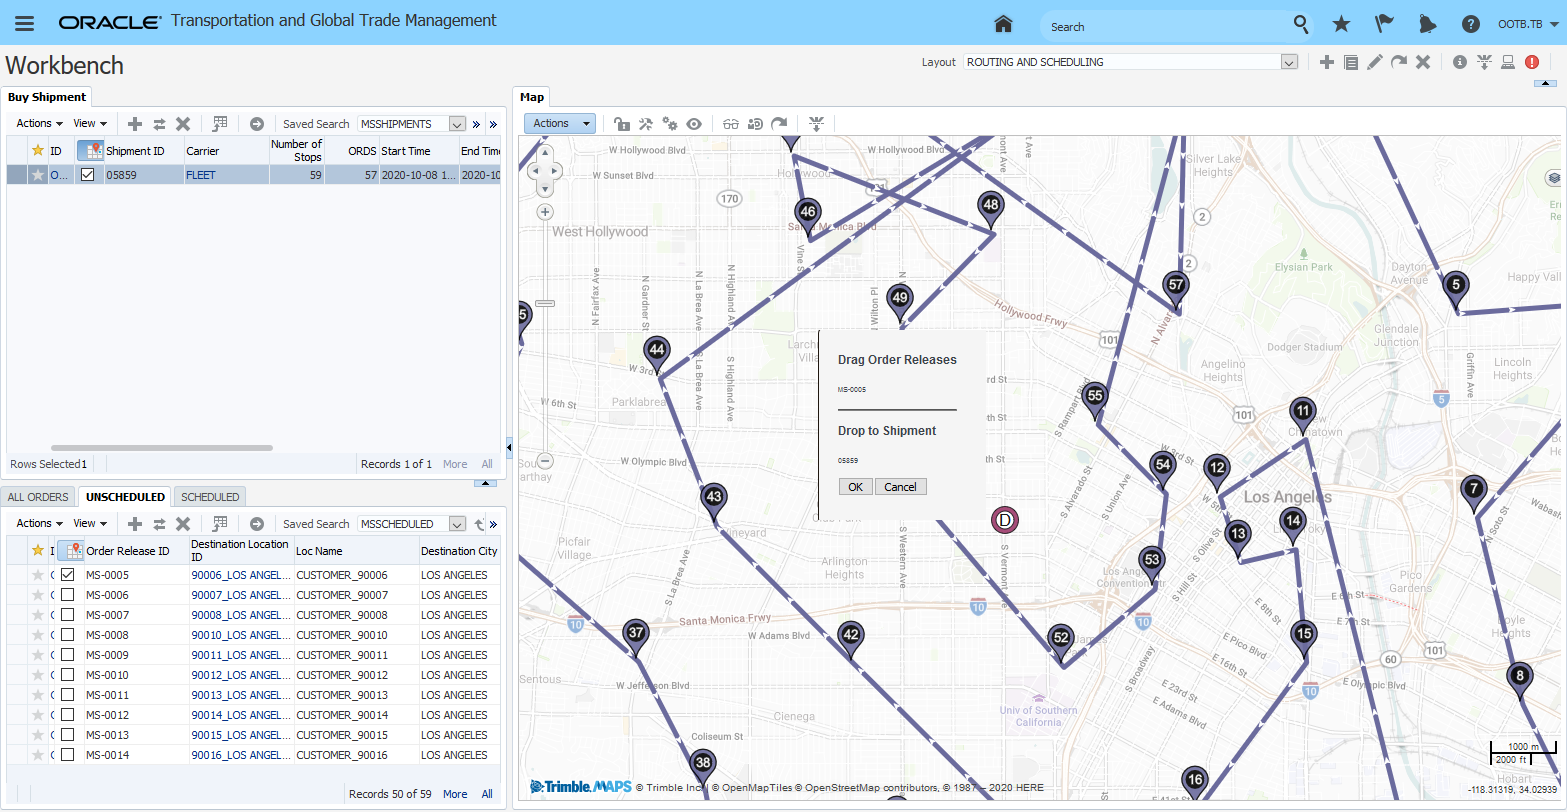
Step 4 - OK to Initiate Action
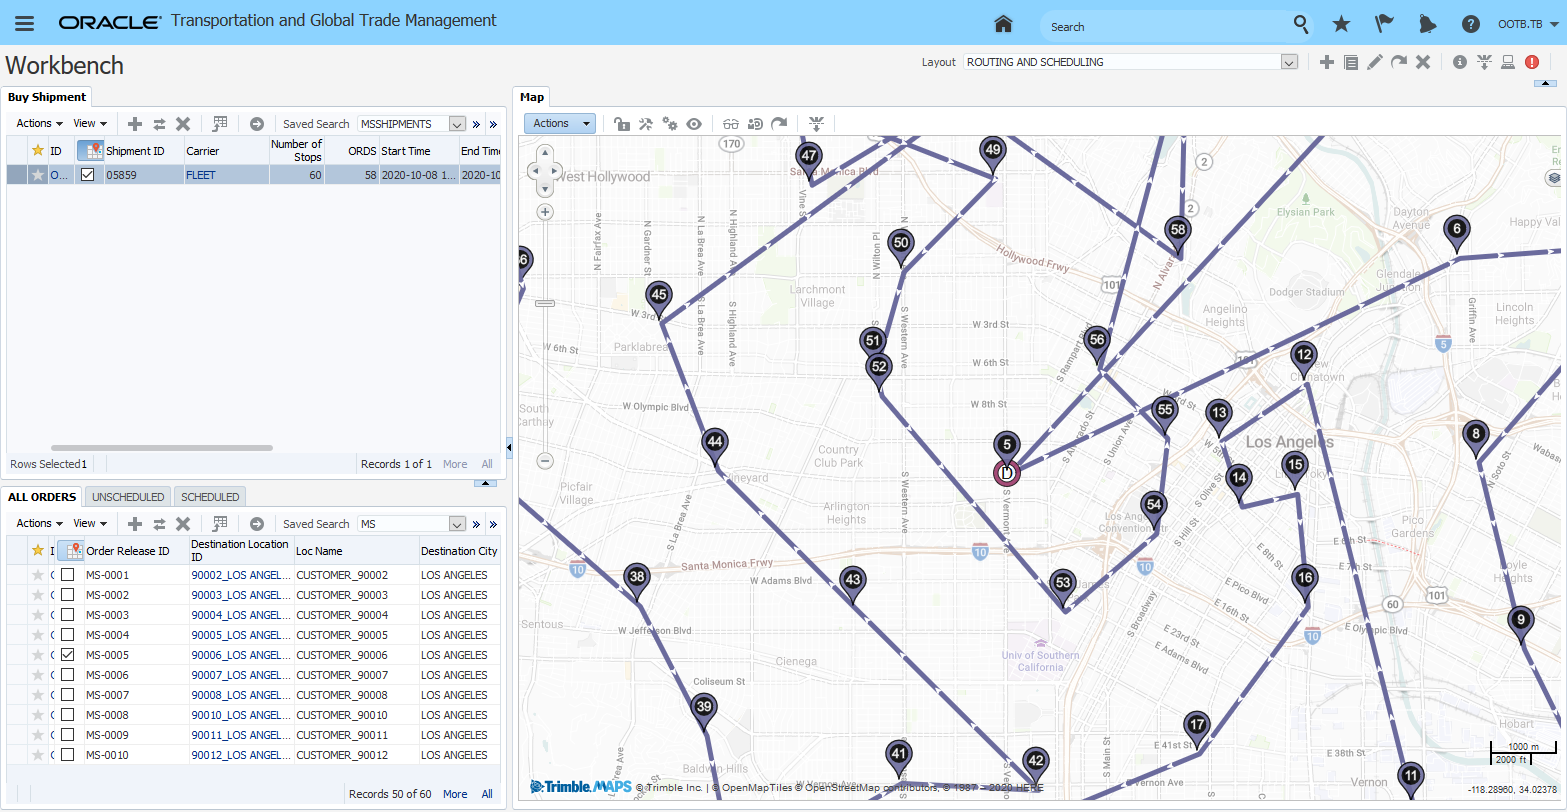
Step 5 - Move Action Complete
You also have the option of dragging the order(s) off of the shipment.
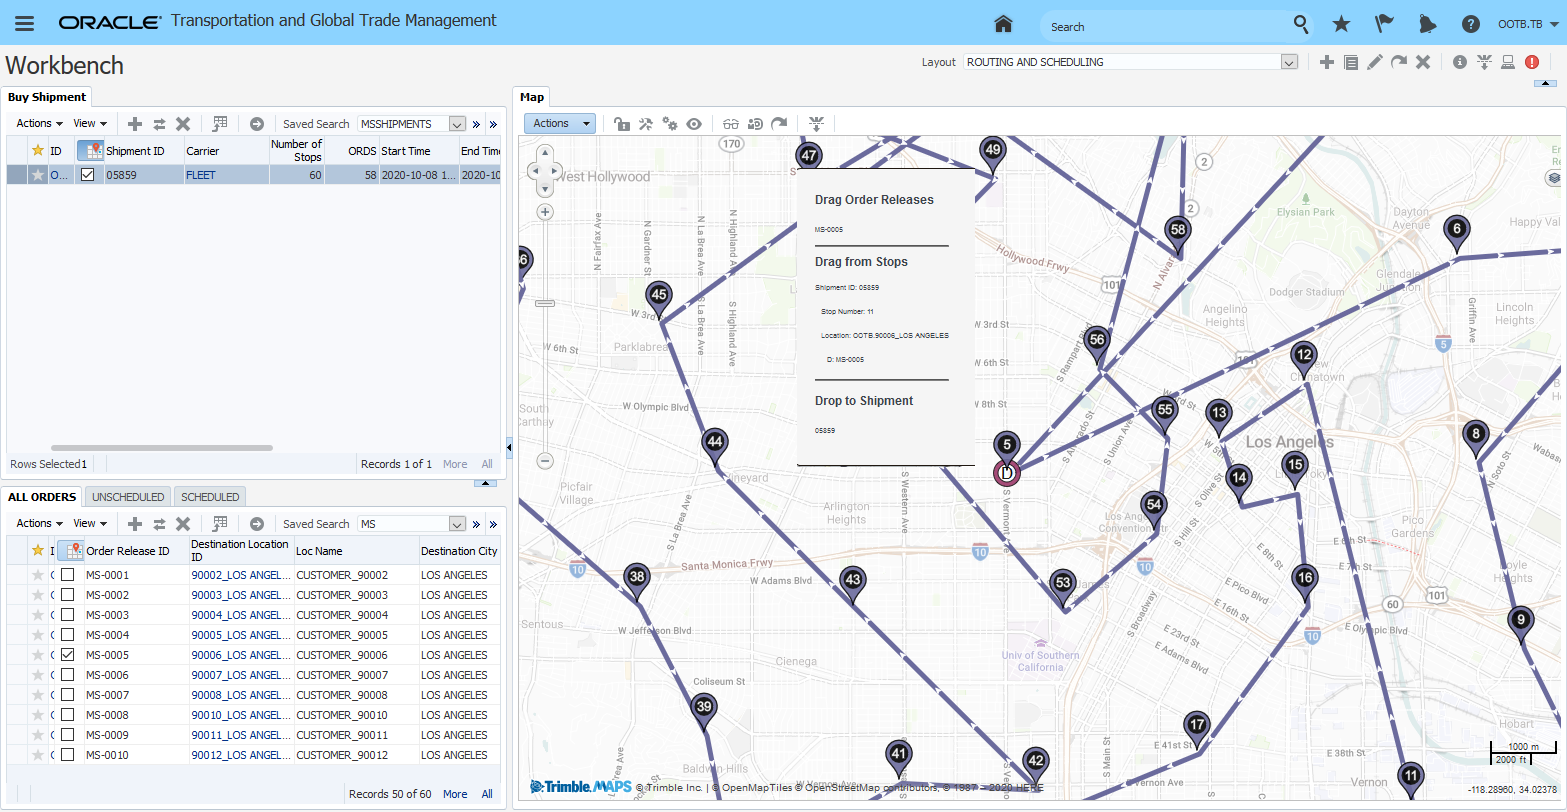
Drag from Drop to
This feature provides you with a more intuitive and human method for invoking actions from within the Trimble MAP view of your orders and shipments.
Steps to Enable
You don't need to do anything to enable this feature.
Tips And Considerations
The first release of this functionality does not support these variations:
- Drag and Drop between Multi Layer to Single layer and vice versa.
- Drag and Drop between Multi Layer to Multi layer.
Staged Buy Shipment View for WMS Cloud
This feature provides you with a public/staged shipment manager view (Manager Layout ID - SHIP_BUY_WMS_VIEW) that has been configured to provide a clean, single tab view to the OTM shipment that can be viewed from within the WMS Cloud after the proper configuration has been completed. The view has been designed to provide OTM shipment information that is relevant to the WMS Cloud user.
The SHIP_BUY_WMS_VIEW has been simplified to
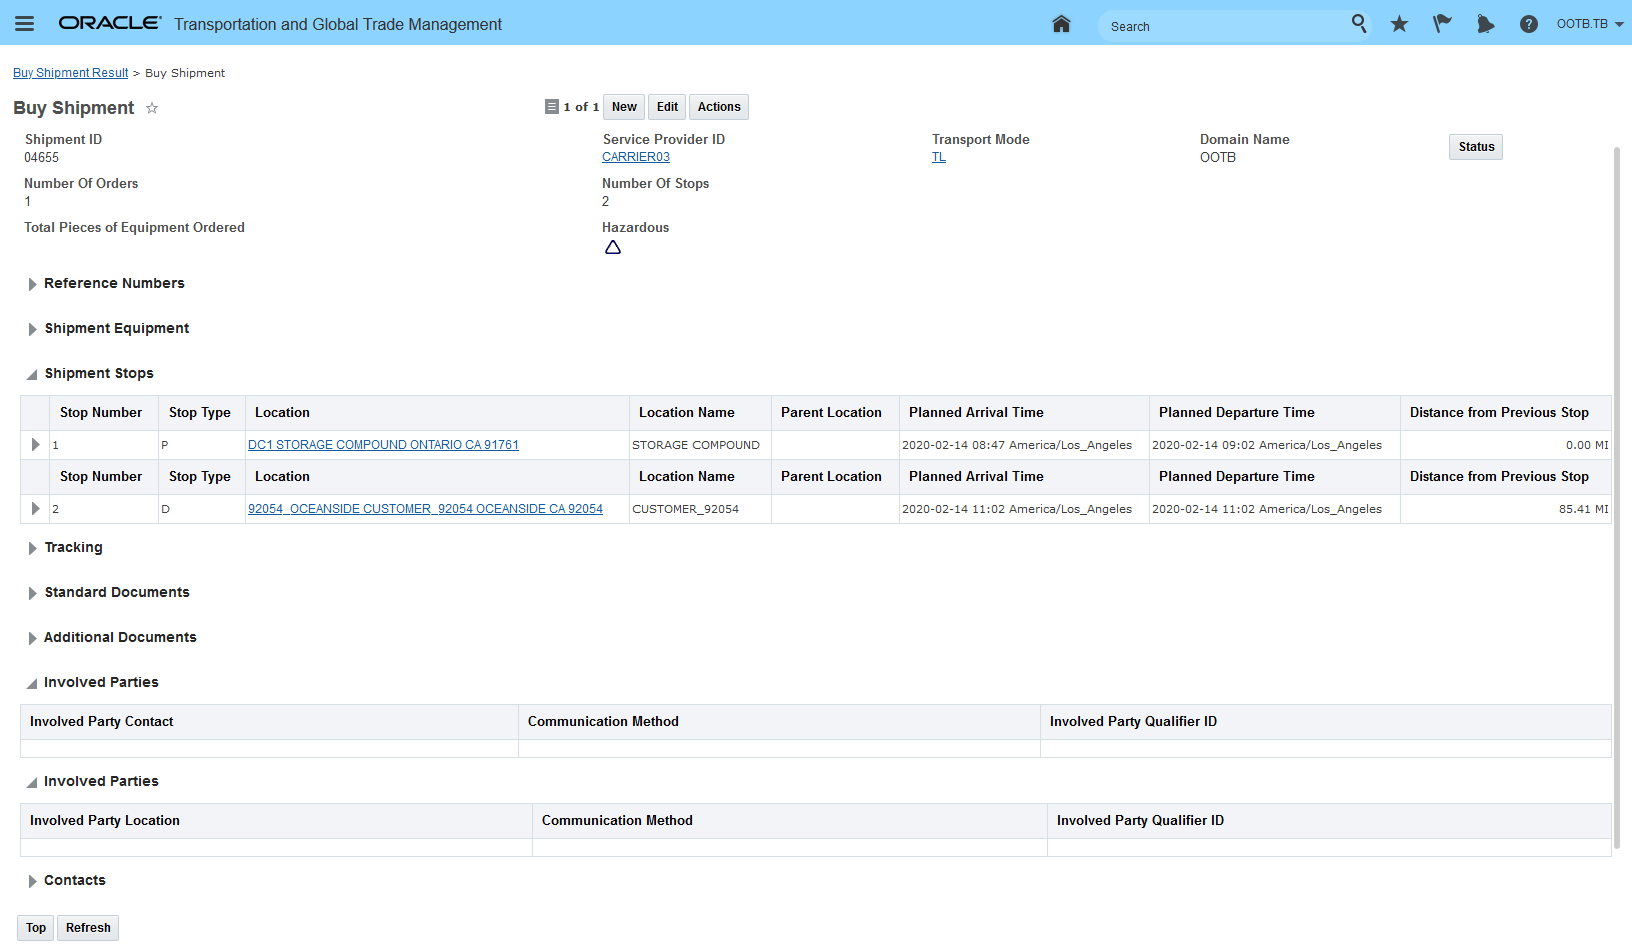
Staged Buy Shipment View Manager for WMS Cloud
The staged OTM shipment manager has been configured to provide a clean/more tailored view to the OTM shipment screen so that when viewed from within the WMS Cloud the information provided is relevant to the WMS user accessing the information.
Steps to Enable
You don't need to do anything to enable this feature.
Staged Data for IoT Fleet Monitoring and Cargo Monitoring Solutions
This feature provides you with the staged data required to support the standard IOT Fleet Monitoring and Cargo Monitoring flows. The stage data includes reference numbers, agents and external status types and values.
High Level Flows Supported:
- Order level tracking data into OTM from an OM (or any Order Management System) and need to pass to Shipment to IoT.
- OTM sends planned shipment to WMS. WMS sends tracking id attached to the shipment, equipment, ship unit, ship unit line and sent back into OTM – passed out to IoT in the planned shipment on shipment confirmation.
- Tracker ID is ‘entered’ in OTM and passed out on the planned shipment
- Tracker ID is stored in IoT and only the resulting tracking events against the shipment is sent back into OTM.
- IoT sends in the ID for the tracker reference number into OTM – not going to do this flow at this time.
- In all of these paths the related tracking data will be sent back into OTM via the tracking event
The data is staged in the FA (Fusion Applications) domain in OTM. The FA domain contains the sample data and agents that are used by the integration flows with the Fusion Applications. This sample data is provided so you can copy the provided data content into your domain(s) and extend as required for your implementation needs.
STAGED DATA
Shipment External Status:
- IOT_FM_SENT
- IOT_FM_NOT_SENT
- IOT_FM_SENT
Remark Qualifier:
- IOT_Special_Instruction
- IOT_FM_LINK
- IOT_DELIVERY_NOTE
- IOT_DRIVER_EVENT
Reference numbers to support the Fleet Monitoring flows:
Shipment Reference Numbers:
- IOT_FM_ID
- VEHICLELICENSEPLATE
- INVOICE
- CAPACITYPROVIDERACCOUNTCODE
- PORTABLETRACKERID
- VEHICLEELDID
- DOT_NUMBER
- SYSTEM
- MC_NUMBER
- PRIMARYDRIVERMOBILENUMBER
- PRIMARYDRIVERALTERNATEMOBILENUMBER
- SECONDARYDRIVERMOBILENUMBER
- SECONDARYDRIVERALTERNATEMOBILENUMBER
- IOT_BILL_OF_LADING
- BM – already included in Public domain
The following reference numbers support the Cargo Monitoring flow:
Shipment Reference Numbers:
- IoT_Carrier_TrackingNum
- IoT_Device_Hardware_ID_1
- IoT_Device_Hardware_ID_2
- IoT_Device_Name_1
- IoT_Device_Name_2
Order ShipUnit Reference Number:
- IoT_Asset_Name
- IoT_Device_Hardware_ID_1
- IoT_Device_Hardware_ID_2
- IoT_Device_Name_1
- IoT_Device_Name_2
Order Release Line Item Reference Number:
- IoT_Asset_Name
- IoT_Device_Hardware_ID_1
- IoT_Device_Hardware_ID_2
- IoT_Device_Name_1
- IoT_Device_Name_2
Shipment ShipUnit Reference Number:
- IoT_Asset_Name
- IoT_Device_Hardware_ID_1
- IoT_Device_Hardware_ID_2
- IoT_Device_Name_1
- IoT_Device_Name_2
Shipment Ship Unit Line Item Reference Number:
- IoT_Asset_Name
- IoT_Device_Hardware_ID_1
- IoT_Device_Hardware_ID_2
- IoT_Device_Name_1
- IoT_Device_Name_2
Equipment Attribute:
- IoT_Asset_Name
- IoT_Device_Hardware_ID_1
- IoT_Device_Hardware_ID_2
- IoT_Device_Name_1
- IoT_Device_Name_2
- IOT_EQUIPMENT_TYPE
- IOT_EQUIPMENT_LENGTH_VALUE
- IOT_EQUIPMENT_LENGTH_UOM
- IOT_EQUIPMENT_MAX_WEIGHT_VALUE
- IOT_EQUIPMENT_MAX_WEIGHT_UOM
- IOT_EQUIPMENT_MAX_VOLUME_VALUE
- IOT_EQUIPMENT_MAX_VOLUME_UOM
Agents:
- IOT SEND SHIPMENT
- IOT SEND SHIPMENT UPDATE
- IOT DELETE SHIPMENT
The staged data for the IoT Fleet Monitoring and IoT Cargo Monitoring flows is provided to simplify and accelerate your configuration of the implementation of the IoT solution offerings.
Steps to Enable
You don't need to do anything to enable this feature.
Key Resources
- Review the available documentation for the IoT Fleet Monitoring and Cargo Monitoring solutions.
This feature provides you with the introductory release of OTM’s Logistics Machine Learning capabilities. This new feature provides you with the ability to use advanced Machine Learning capabilities to predict the transit time of your OTM shipments. You will find the Logistics Machine Learning capabilities to be extremely beneficial for predicting the transit time for all modes of transportation where the transit time calculation is based on a schedule or a static zone-to-zone or postal code to postal code lookup.
Specifically, you will find the introductory Logistics Machine Learning prediction capabilities will be most beneficial for the following modes of transport:
- Air - where the ETA is based on published flight schedules,
- Ocean - where the transit time and ETA are based on published voyage schedules,
- Rail – where the transit time and ETA are based on published rail schedules,
- Intermodal - where, from a shipper’s perspective, the ETA is often based on a “slow truck” simulation guesstimate,
- Barge – where the transit time maybe based on a published schedule, but is typically modeled as a simple lookup guesstimate,
- Less-Than-Truckload – where the transit time is based on a published postal code to postal code lookup table,
- Parcel – where the transit time and ETA are based on either a “guaranteed” level of service - for example, Overnight AM, Next Day etc or the service is based on a static zone to zone lookup table to determine the transit time/transit days between two zones.
In the example below, the setup prerequisites are assumed. This use case covers the ten steps required to obtain a Machine Learning Transit Time prediction for your shipments. Steps that will be covered include:
- Creating a Machine Learning Project
- Loading the Machine Learning Project Data into Analytics (OTM to Analytics)
- Performing Pre-training Analytics and analysis with the Logistics Machine Learning Subject Area
- Exporting the Machine Learning Project to the Machine Learning Service (Analytics to Object Store then IoT IA ingests from Object Store)
- Defining data to train - setup Machine Learning Scenario(s)
- Loading Shipment Data into Analytics - provides visibility by project by scenario to the number of records selected and loaded
- Performing Training on the selected Machine Learning Scenarios
- View Training Results - Review Feature Importance Summary from training
- Running Perform Prediction on an OTM operational shipment
- Reviewing Prediction Results
Logistics Machine Learning Folder
Step 1 - Create a Machine Learning Project - the machine learning project is used to identify the set of data to be used for training - the Machine Learning Scenarios segment the data in to the actual sets of data that will be used for training and the development of models. For example - at the project level, you could select all your shipments in the USA, and then at the scenario level you could run the training by mode. For the Machine Learning Project you need a Project ID - the ID should be meaningful from the perspective of using the project (and scenarios) for predictions once your models have been developed. You also need to specify an Objective - your options are limited to Planned ETA Prediction.
- Go to Logistics Machine Learning > Machine Learning Project.
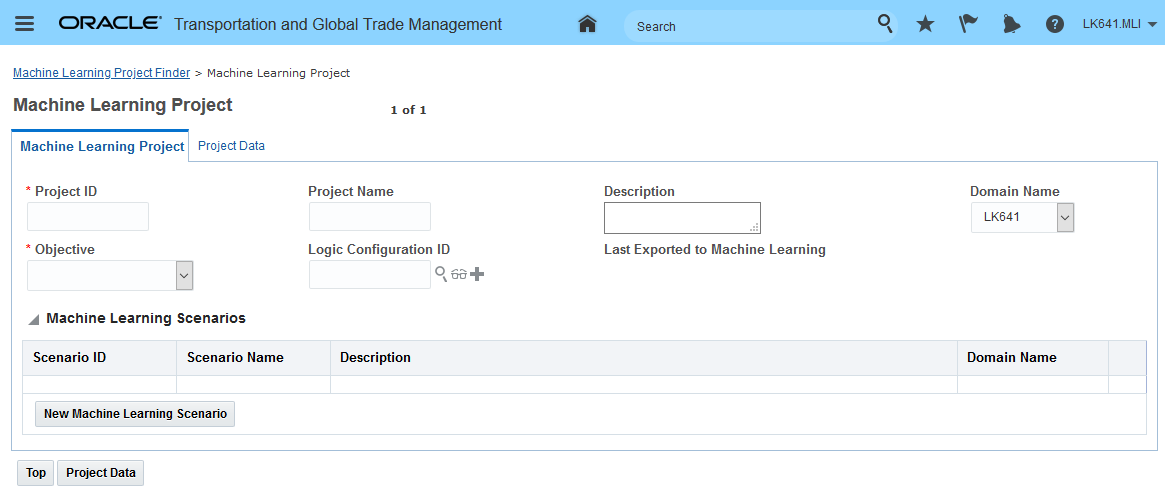
Machine Learning Project
On the Machine Learning Details tab, you will enter the saved queries for your shipment data to identify the shipments to include in your Machine Learning Project.
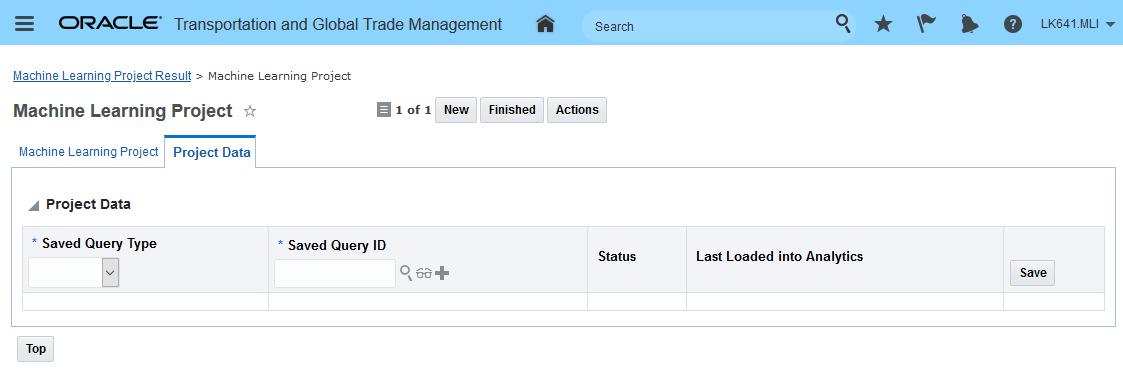
Machine Learning Project Details
In this example - the Machine Learning Project has been defined with a saved query that includes all the shipments in the US that are parcel and truckload direct. The Logic Configuration was not specified so the default logic configuration values will be used for this Machine Learning Project.
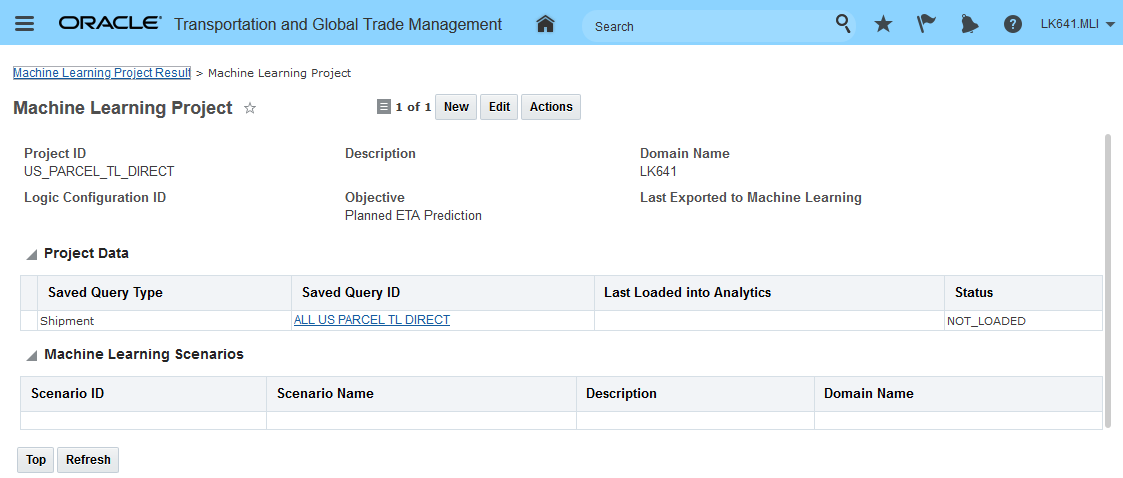
Machine Learning Project Example All US Parcel and Truckload Shipments
The default Machine Learning Logic Configuration is shown below. See On-line help for more information.

Machine Learning Logic Configuration
Step 2 - Load the Machine Learning Project Data into Analytics (OTM to Analytics). In this step, the data defined in my Machine Learning Project will be loaded into Oracle Transportation Intelligence. This step provides you with the option of performing some Pre-Training Analytics against your data.
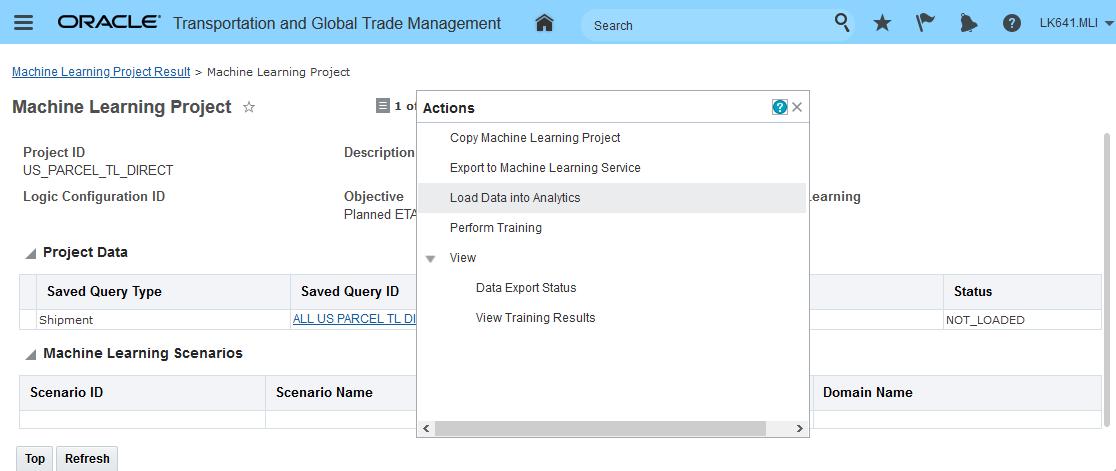
Machine Learning Project Load to Analytics
The process may take a few minutes.
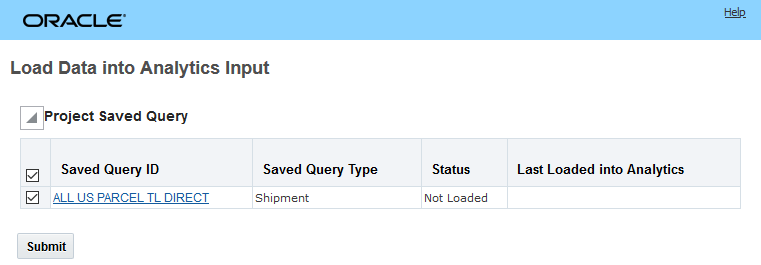
Machine Learning Project Load to Analytics
When you run this action via the UI, you can monitor the load process status by hitting the Refresh button.
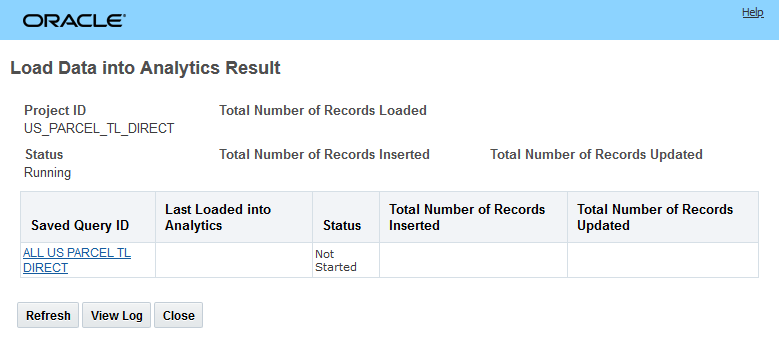
Machine Learning Project Load to Analytics Initial Status
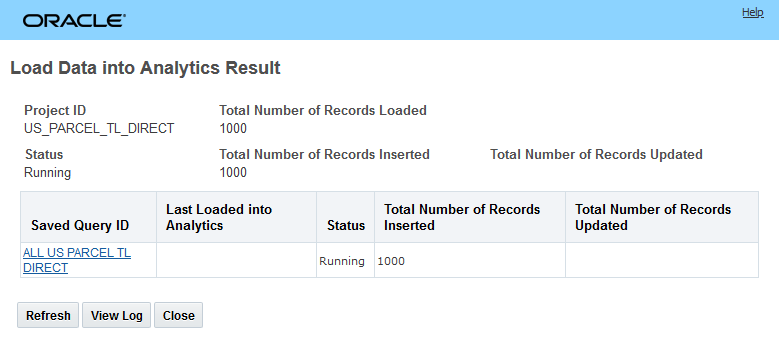
Machine Learning Project Load to Analytics Status - In process/Running
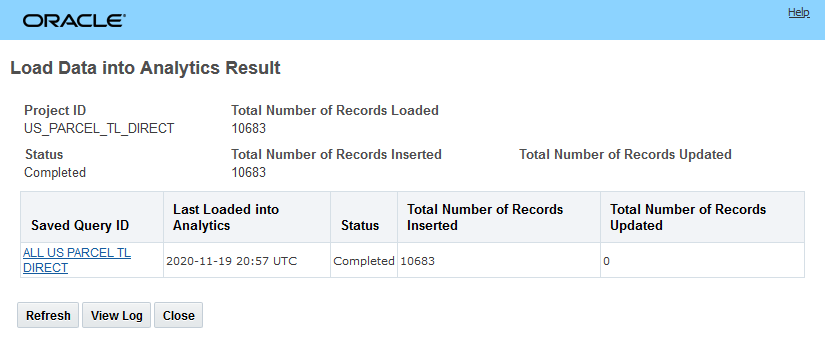
Machine Learning Project Load to Analytics Status Completed
You can also see the Last Load to Analytics Date/time and Status on the Machine Learning Project.
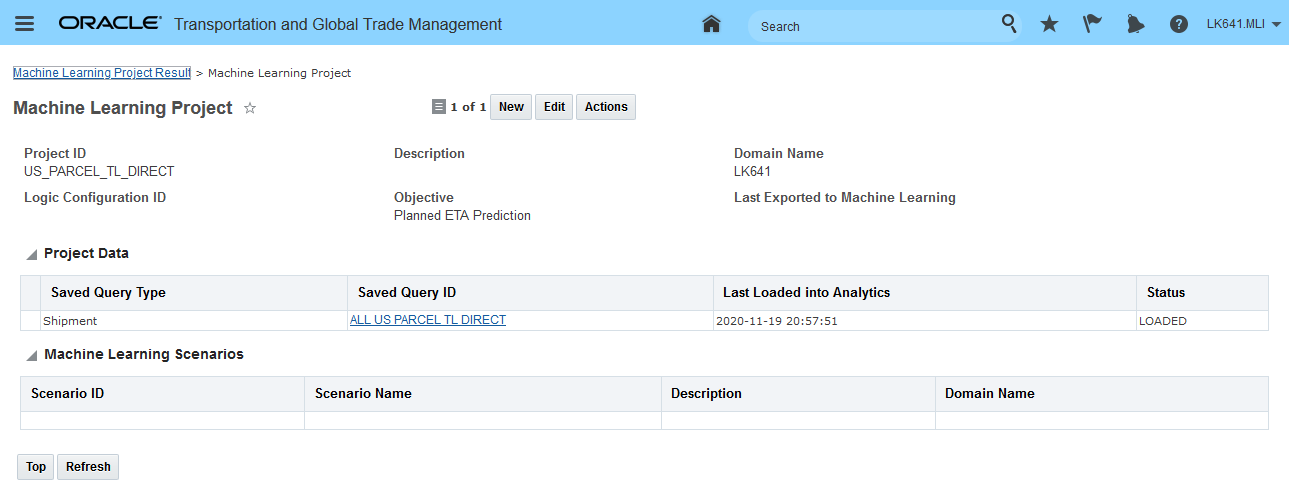
Machine Learning Project Load to Analytics Status on Machine Learning Project
Step 3 - Perform Pre-training Analytics and analysis with Logistics Machine Learning Subject Area
Go to Transportation Intelligence and search for the Logistics Machine Learning subject area. Pre-training analytics and reporting is not a required step - but this step/option is provided so that you can gather more insight into the data that will be used in training the model/models.
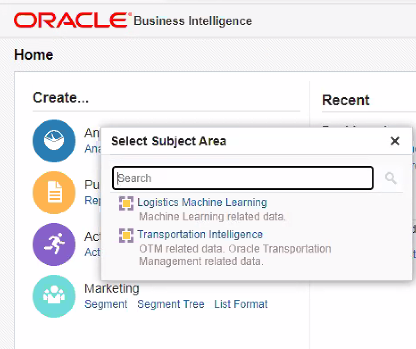
Logistics Machine Learning Subject Area
In addition to the four Machine Learning specific folders - there are cross subject area folders provided from Transportation Intelligence that will allow you to do broader reporting and analysis for the Logistics Management Shipments.
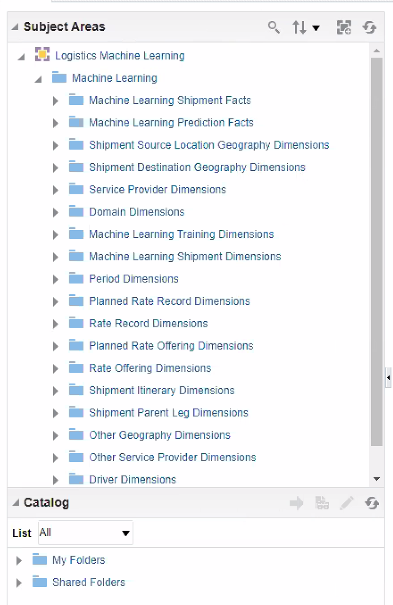
Logistics Management Subject Area Folders
Step 4 - Export the Machine Learning Project to the Machine Learning Service (Analytics to Object Store to IoT IA)
In this step, you run the Export to Machine Learning Service against your Machine Learning Project to move your Machine Learning Project data from Analytics to Object Store. Once the data is moved to Object Store then IoT IA will perform data ingestion where the data is moved from Object Store and formulated for machine learning purposes.

Action Export to Machine Learning Service
This action is a two-step process. In the first step, the Machine Learning Project data is unloaded from Analytics into a CSV file. In the second step, you specify the Object Store external system setup (the one with the pre-authorized URL) and then submit the Exported CSV file for loading into Object Store. These steps all complete quickly.
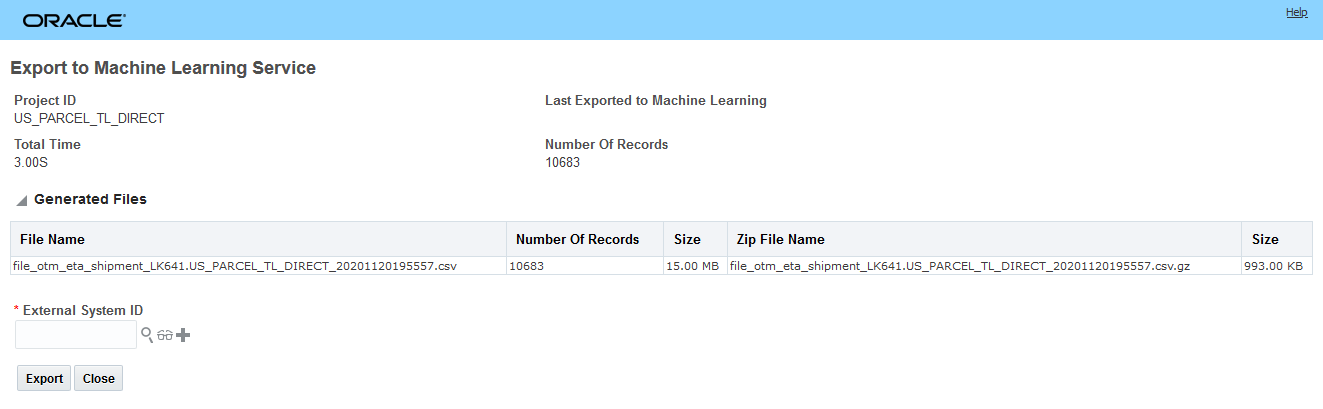
Action Export to Machine Learning Service - CSV Creation
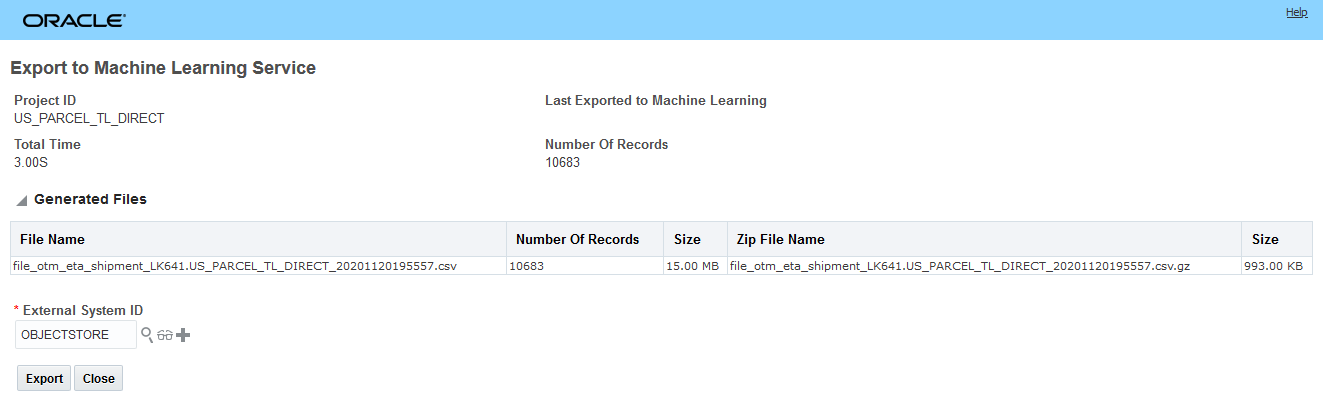
Action Export to Machine Learning Service - Export
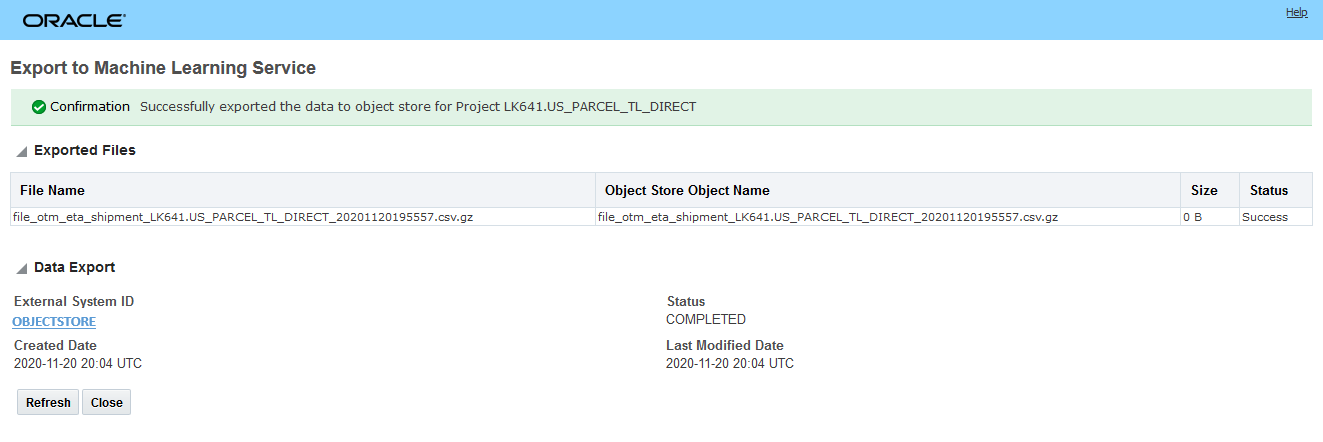
Action Export to Machine Learning Service - Export Complete
At this point, the Machine Learning Project data has been successfully loaded form OTM to Analytics to Object Store and then the data was ingested by IoT IA from Object Store.
Step 5 - Define data to train - setup Machine Learning Scenario(s)
In this step, the actual data to be submitted for training will be defined. In this example, the Machine Learning Project contains all the data for the US for both the Parcel Mode and the Truckload Direct Mode. In this step two Machine Learning Scenarios will be created - one for Parcel and one for Truckload Direct since the goal is to have two different models developed for these two different modes of transportation.
Navigate to Logistics Machine Learning > Machine Learning Scenario and create a new scenario. In this example, a scenario is defined against the machine learning project for the parcel shipments. The key pieces of information in the Machine Learning Scenario are the Machine Learning Project and the filter(s) used to identify the subset of data in the Machine Learning Project that will be used to train the model.
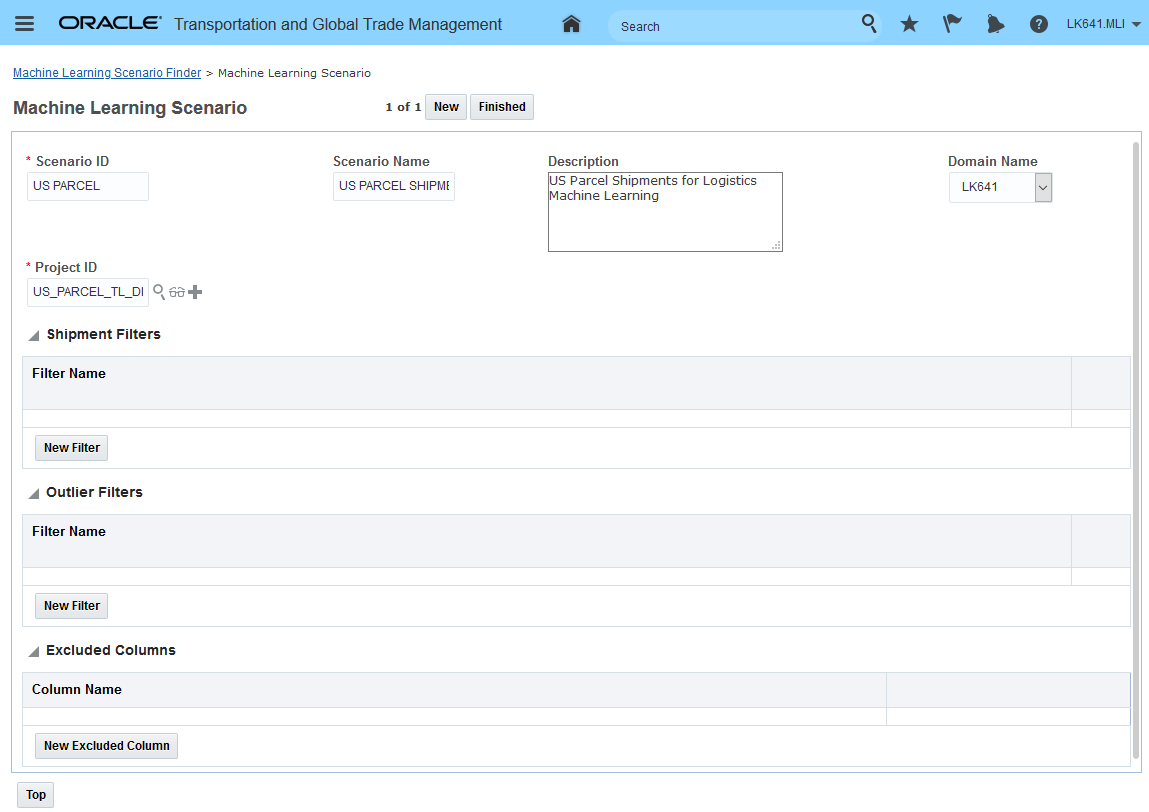
Machine Learning Scenarios - Parcel
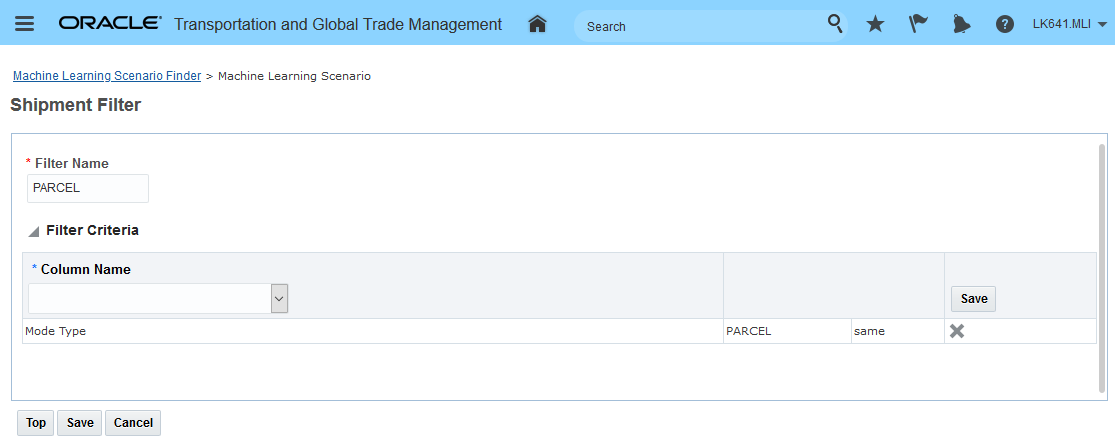
Machine Learning Scenarios - Parcel Filter
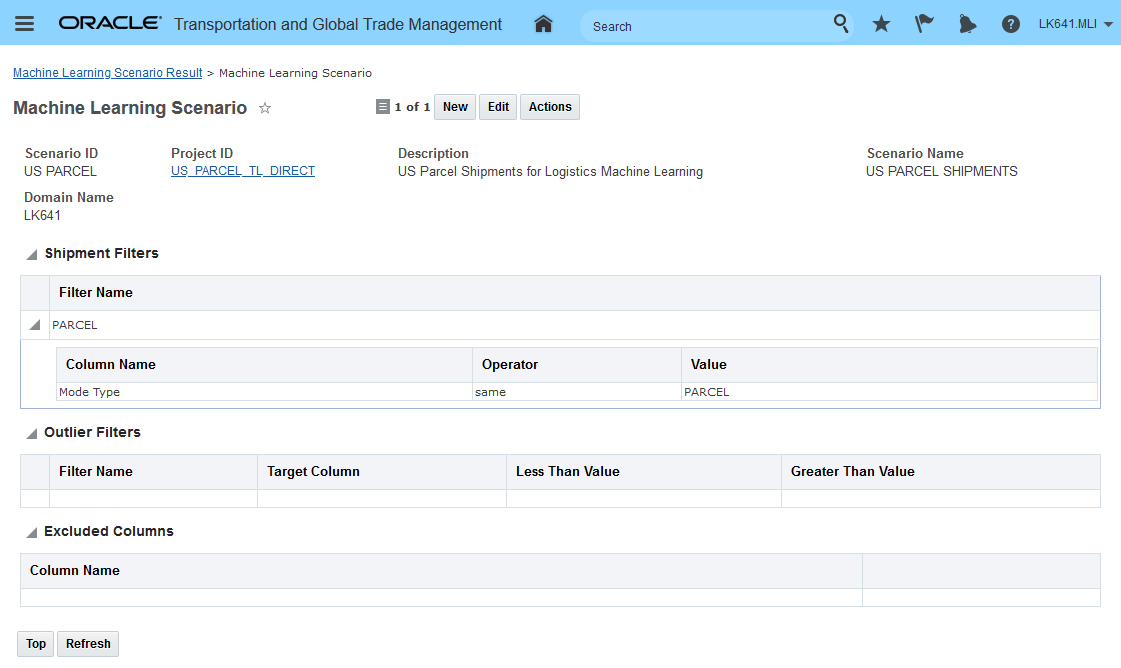
Machine Learning Scenarios - Parcel Complete
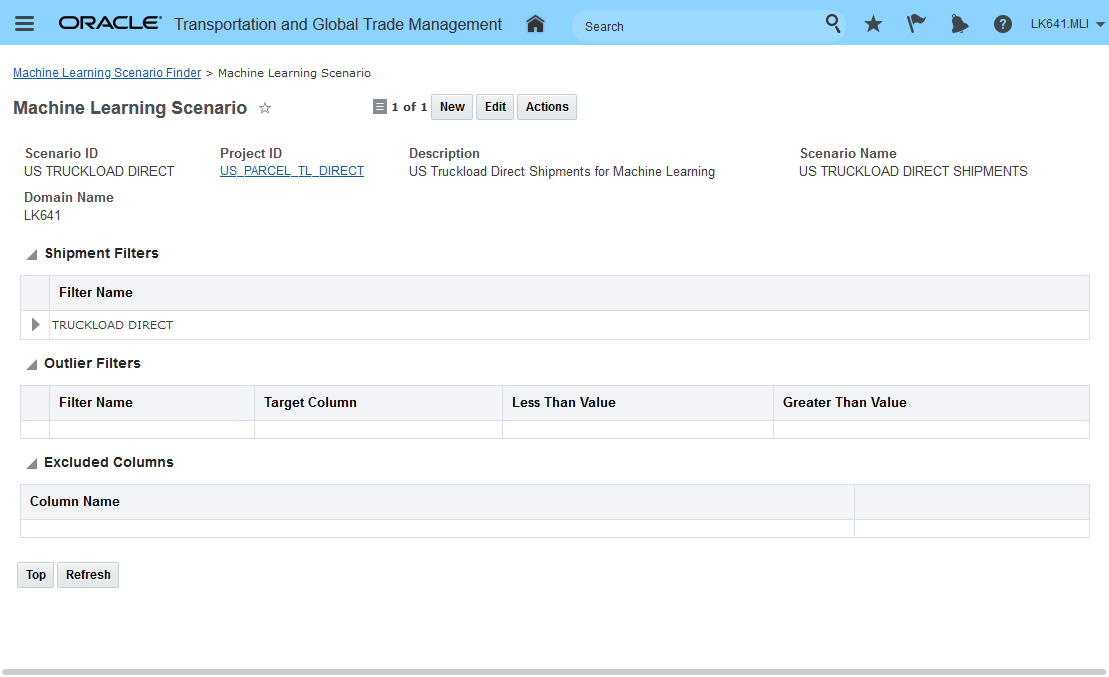
Machine Learning Scenarios - Truckload Complete
While not used in this scenario - the Outlier Filter allows you to specify actual transit time constraints to limit shipments included in the scenario data and the Excluded Columns lets you select certain columns and have them excluded from the scenario data.
Step 6 - Load Shipment Data into Analytics - provides visibility by project by scenario the number of records selected and loaded
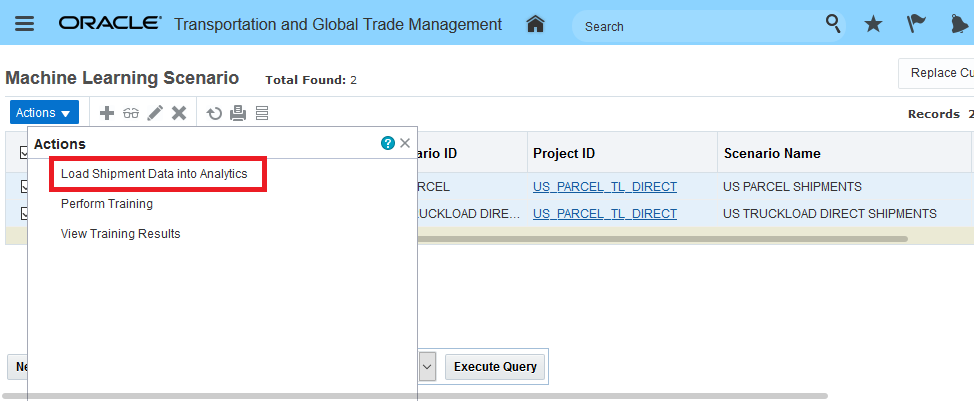
Load Shipment Data Into Analytics
When the Load Shipment Data into Analytics is run against your scenario(s) information about the number of records Selected, number of records Loaded and a count of Outliers is provided. In the example below, the scenarios were loaded previously - which is why the count for Loaded and Outlier are zero.
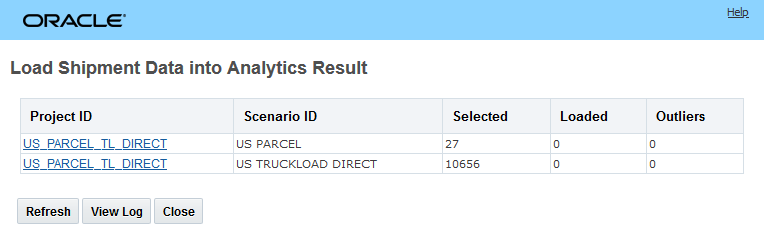
Load Shipment Data Into Analytics Results
Step 7 - Perform Training on the selected Machine Learning Scenarios. In this step, you will initiate the training for your Machine Learning Scenarios. You can initiate the training on a scenario by scenario basis or you can run the action to initiate the training at the Machine Learning Project level. In this example, the training will be initiated at the project level.
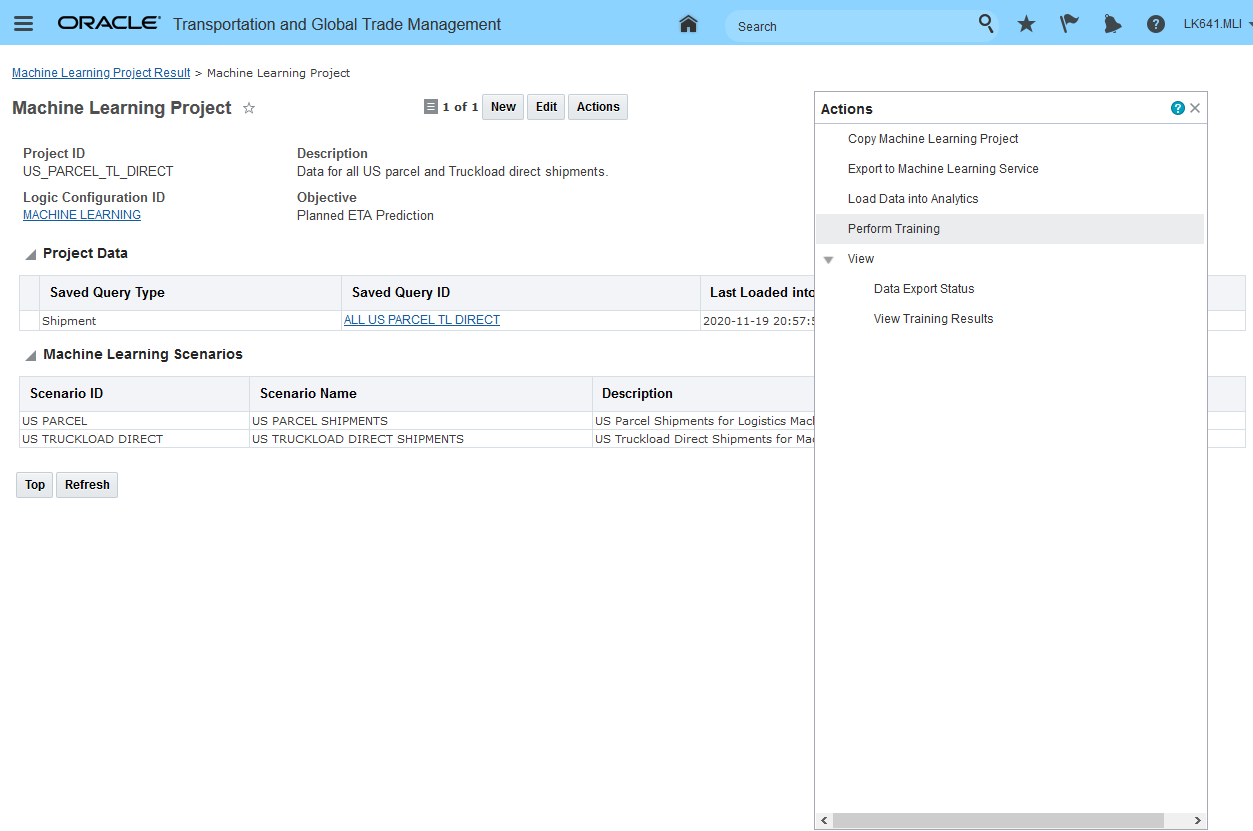
Logistics Machine Learning Perform Training
When the action is run the Machine Learning Scenarios to be trained for the project are presented and then you select submit.
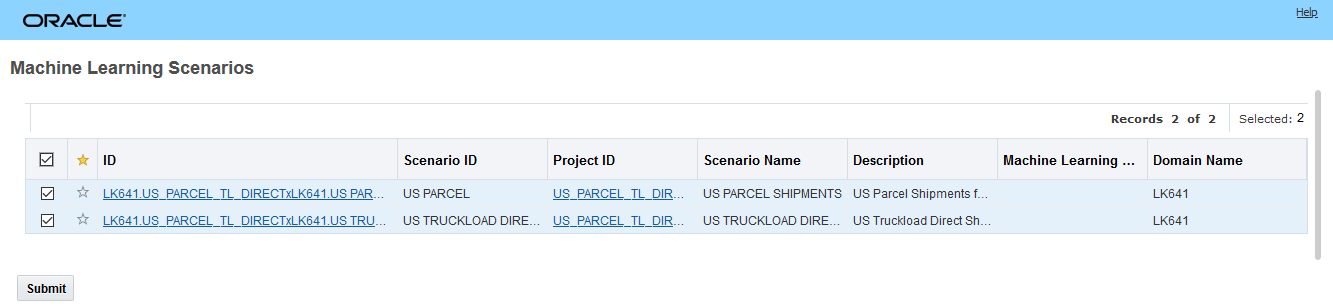
Logistics Machine Learning Perform Training
As the models are trained, you can check on the status by hitting refresh. The possible status values are:
- ACCEPTED: IOT Service has accepted the request to train model for scenario, but the training has not yet began.
- PROCESSING: IOT Service is currently training a model for scenario.
- COMPLETED: The training is successfully completed.
- FAILED: The training Failed.
Notice that in the example below the US PARCEL scenario has failed. The reason provided is that the data provided does not provide enough information to develop a model. In this case, the problem is related to the source of the data i.e., testing data that was simply copied multiple times. A common failure in running the models is related to not having enough data points to develop a model from - there needs to be enough data at the lane level (city to city or location ID to location ID) for machine learning to development a model.
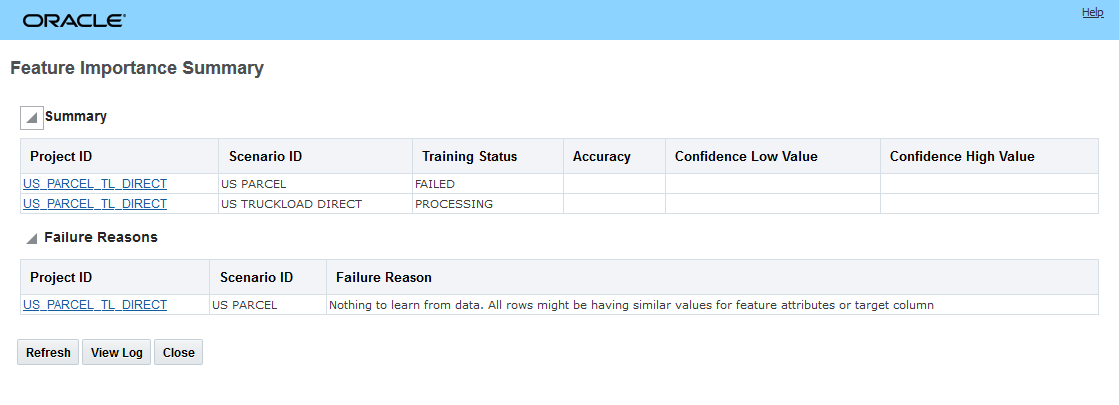
Logistics Machine Learning Training Status
Step 8 - View Training Results - Review Feature Importance Summary from training
When the training is complete - in this case when the training competed for the US TRUCKLOAD DIRECT scenario, the following information about the developed model is provided. The Summary provides information related to the overall model fit - Accuracy, and then a confidence range low and high. The Feature Importance Summary identifies the features in the model and their contribution to the accuracy of the model.
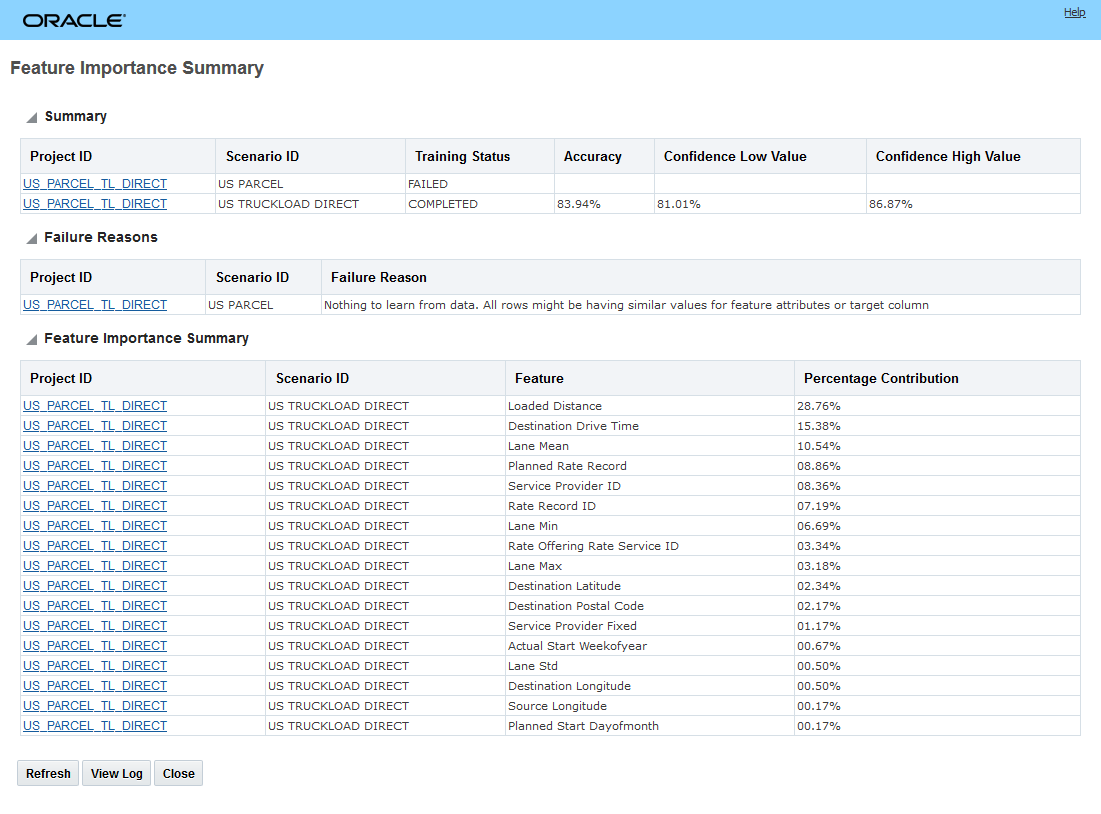
Logistics Machine Learning Training Complete
Step 9 - Run Perform Prediction on OTM operational shipments
In this step, the model(s) developed above will be used to perform predictions on operational shipments in OTM. The Perform Prediction action is a multi-select action so it can be run on a set of shipments. In the example below, the action will be run on a shipment with a planned duration of 1D 15H 58M.
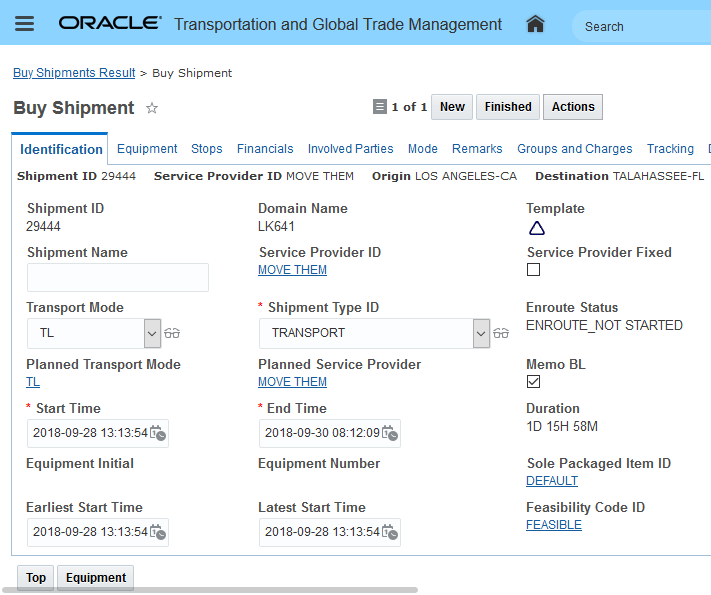
Perform Prediction
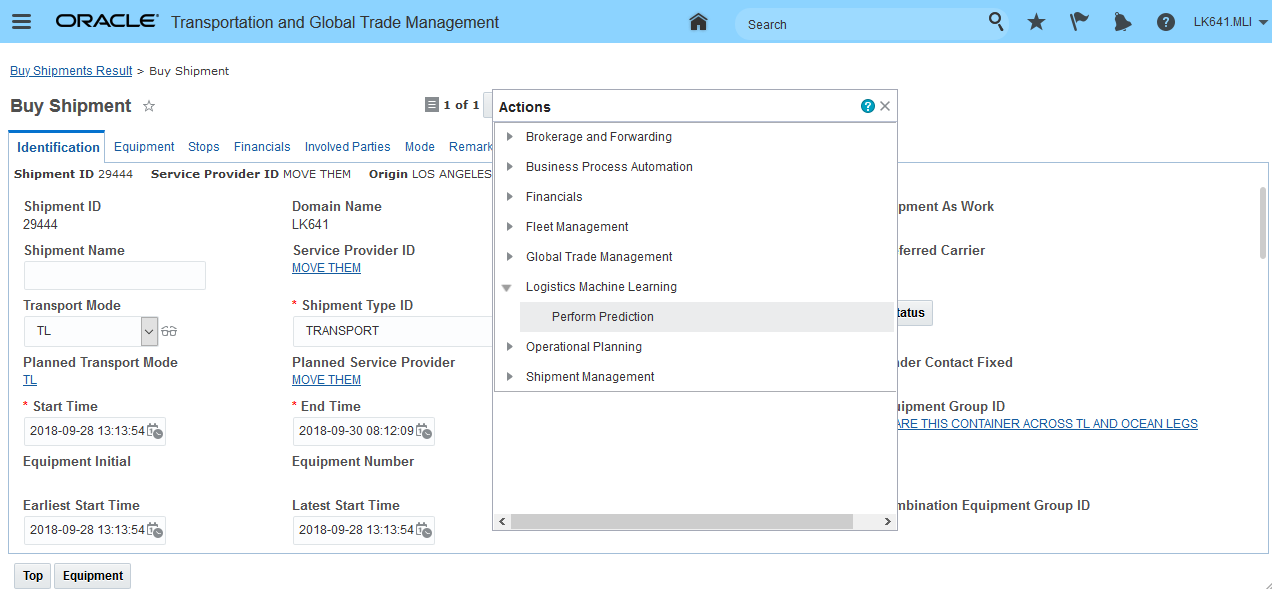
Perform Prediction Action
When you run the action, you will be required to pick the Machine Learning Project and the Machine Learning Scenario that maps to the Machine Learning Model you want to use for this prediction. Once you specify the input, you can then run the prediction by selecting the Perform Prediction button.
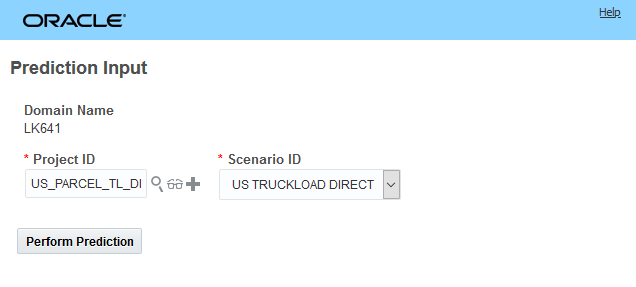
Perform Prediction Action Input
The Perform Prediction process runs through a few steps before the prediction is provided. In the first step, the shipment is accepted for the model.
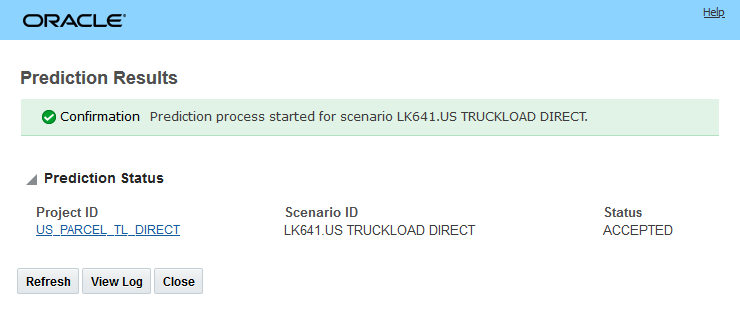
Perform Prediction Processing Accepted
There are situations where the shipment selected to run a prediction on cannot be predicted and the request fails. A common reason for this is that the model being used was developed with data that did not include the lane for the shipment. When this occurs, you will see a message like the one below.
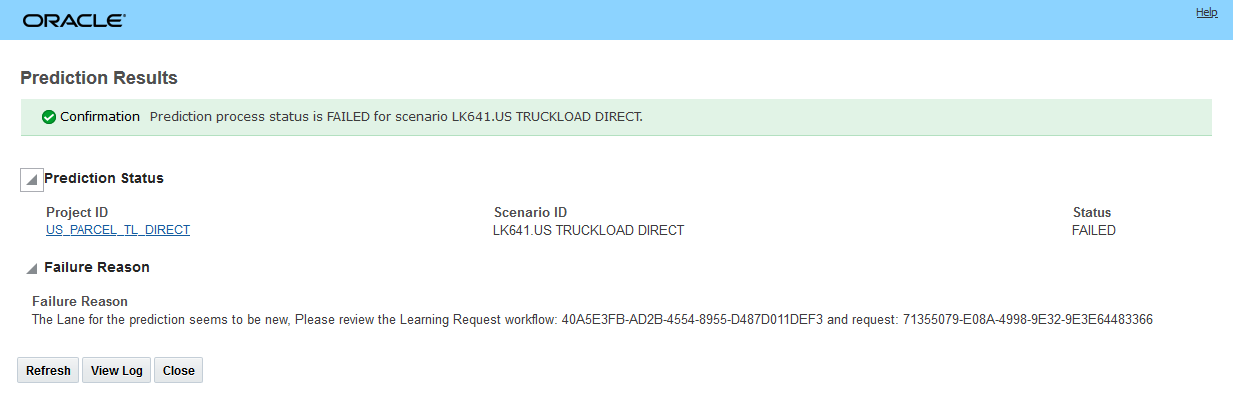
Perform Prediction Processing Failed
When the Perform Prediction is complete, the results of the prediction are provided.
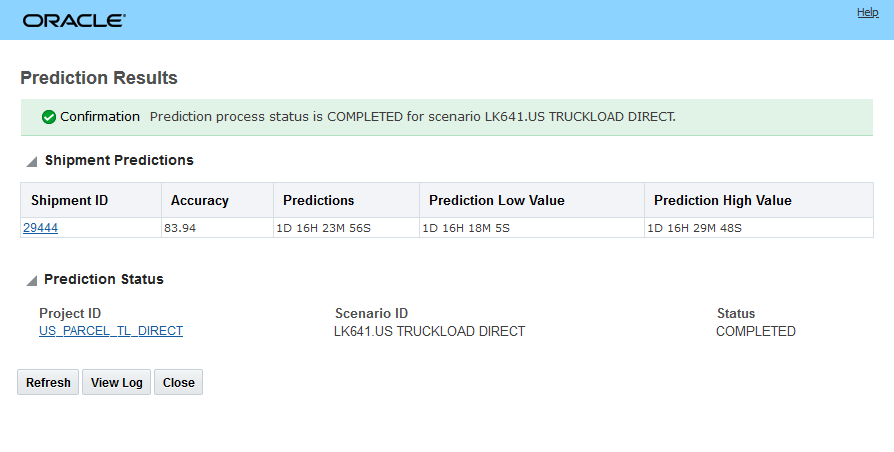
Perform Prediction Processing Results
Step 10 - Review Prediction Results
The planned duration for the shipment that the prediction was run against is 1 D 15H 58M the prediction provided by the model is 1D 16H 23M 56S. The information provided by the prediction may or may not cause you to take action.
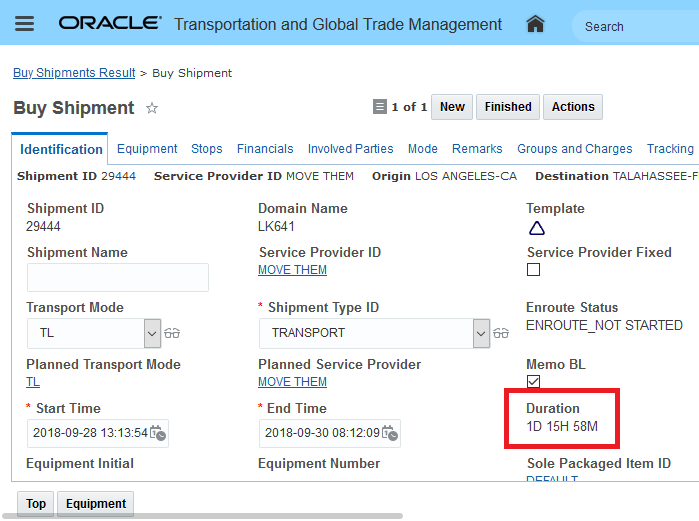
Review Shipment Duration
The Prediction Results for the shipment above (29444) is provided below. The Prediction interval (Low Value/High Value) provides a range of values that predicts the value of a new observation, based on the model. The prediction interval of 1D 16H 18M and 1D 16H 29M tells you that future transit time for shipments with similar attributes will fall into that range 95% of the time. There is a 5% chance that a transit time will not fall into this interval. Prediction Value Low indicates the lower end of the interval and Prediction High Value indicates the higher end. Accuracy provides an overall model accuracy percent. Based on the model the 1D 15H 18M planned duration may be a bit low.

Compare to Prediction
AUTOMATION
The ten steps defined above would not - typically - be how you would configure and run Logistics Machine Learning. Once you become comfortable with the process, you can configure the Machine Learning Process Management options (Logistics Machine Learning > Process Management) so that many of the steps are managed as reoccurring processes. This means that on an on-going basis, the criteria defined in your Machine Learning Projects and Scenarios can be used to continue to supply new training data to IoT IA so that the models can improve over time.
The available Machine Learning Process Management options include Extract Data, Perform Training and Perform Prediction.

Extract Data
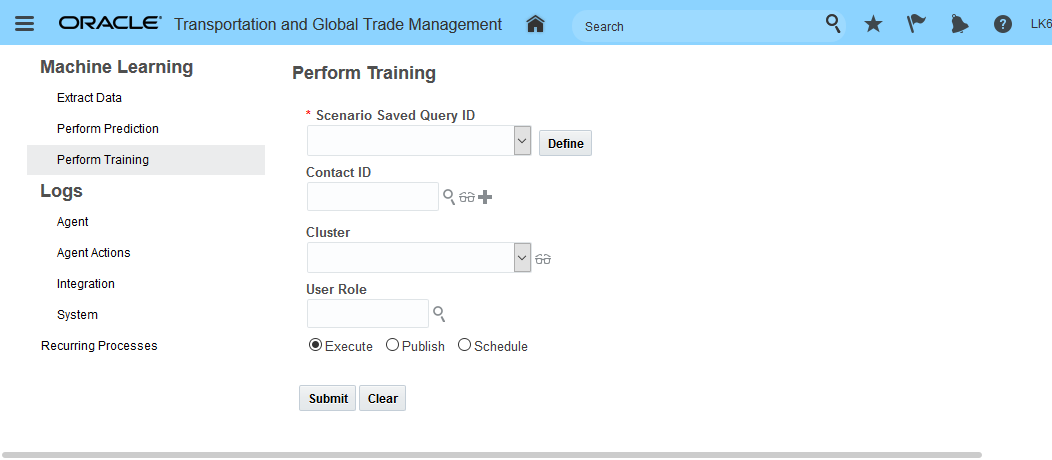
Perform Training
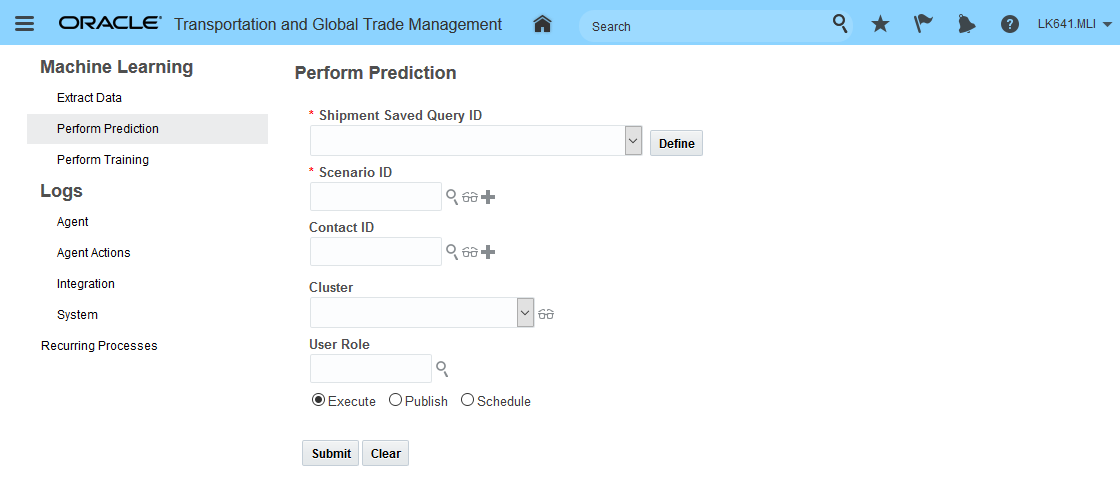
Perform Prediction
The Logistic Machine Learning feature provides you with additional information and insight into the expected/predicted transit time you can expect for your shipments. This additional perspective into the predicted transit time for your shipments can be used to adjust deliver expectations and improve customer satisfaction.
Steps to Enable
Logistics Machine Learning involves several different Oracle solutions, which need to communicate with each other. The required services include Oracle Cloud Infrastructure Object Storage (OCI Object Store), Oracle IoT Intelligent Applications Cloud (IoT IA), Oracle Transportation Intelligence (OTI), and Oracle Transportation Management Cloud (Base).
Setup steps for using Logistics Machine Learning include the following:
Subscriptions to the supporting technologies used to provide the solution: Oracle Cloud Infrastructure Object Storage (OCI Object Store) and Oracle IoT Intelligent Applications Cloud (IoT IA).
For Oracle Transportation Intelligence (OTI)
- Ensure that OTI is installed and running.
- Provide access to the Logistics Machine Learning Intelligence subject area and dashboard.
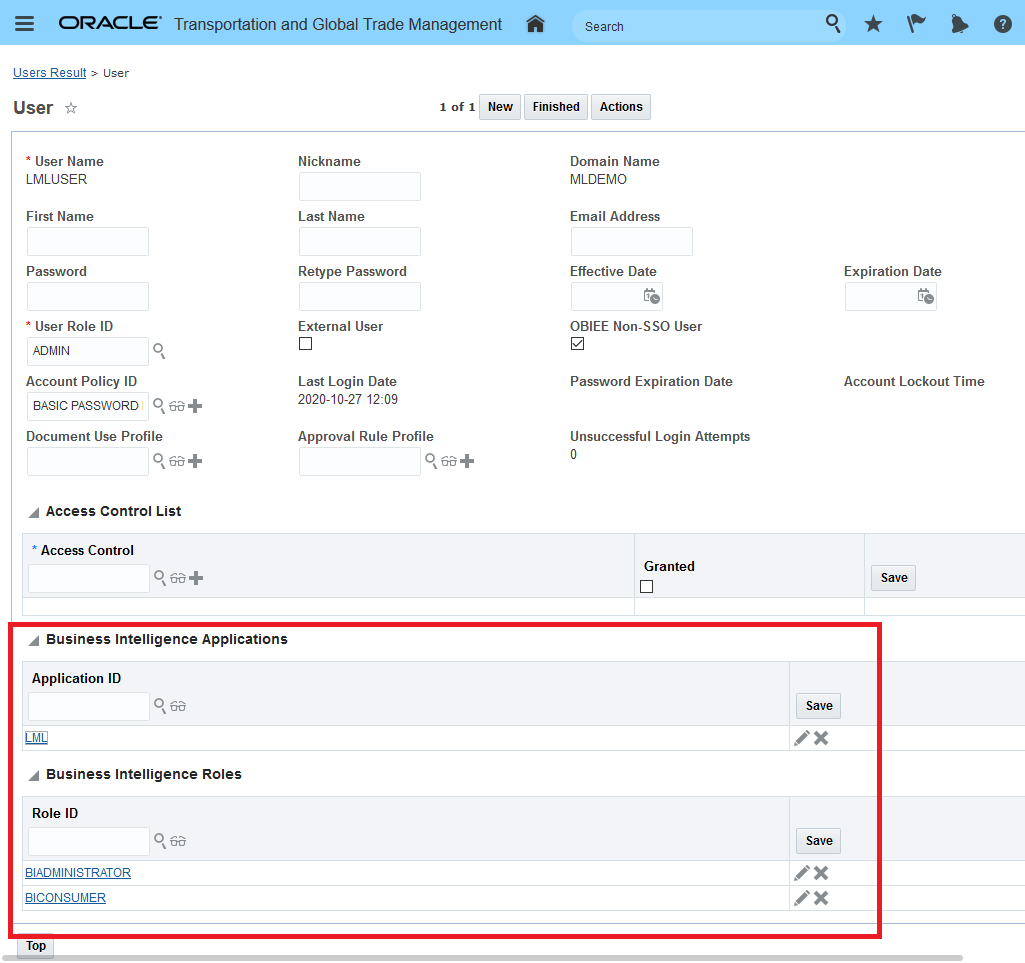
Logistics Machine Learning OTI Access
OCI Object Store
- Obtain a pre-authenticated URL and then in OTM establish an External System that uses this pre-authenticated URL
For IoT IA
- Obtain and setup information required to connect to the IoT IA server, information for training moves from OTM to OTI to Object Store - IoT IA ingests the information for training directly from Object Store and therefore requires access to Object Store.
- Set the following OTM properties:
- glog.business.machinelearning.rest.requestBaseUrl: Contains the URL to the machine learning service for all Logistics Machine Learning actions.
- glog.business.machinelearning.rest.mlRestUserName: Contains the User name for the connection to the machine learning service for all Logistics Machine Learning actions.
- glog.business.machinelearning.rest.mlRestPassword: Contains the Password for the connection to the Oracle Machine Learning Cloud Service for all Logistics Machine Learning actions.
Transportation Operational Planning
Consol Shipments - Build Shipment Actions Bulk Planning for Order Movement
This feature extends the planning options for consol shipments (Ocean FCL) to include the planning of order movements into consols using the planning actions Build Shipment on Leg, Build Shipment Show Options and Move to Consol Shipment. In addition, you now have the option to Bulk Plan your order movements into consol shipments - which provides you with the option of automating the process of consuming your pre-booked Ocean FCL consol capacity over a series of independent Order Movement Bulk Plan runs.
In the examples below, the Ocean FCL Consol shipment 05931 will be used to demonstrate the new capabilities. As a quick reminder - the Ocean FCL consol was introduced in the 20C upgrade. To generate the Ocean FCL shipment you need to do the following.
- Got to Shipment Management > Group Management > Consols.
- Create a Consol Type of Ocean FCL
- Enter in the specifics for your consol - in particular the carrier, timing, equipment groups etc.
- Run the action Create Shipment
Select Consol Type of Ocean FCL
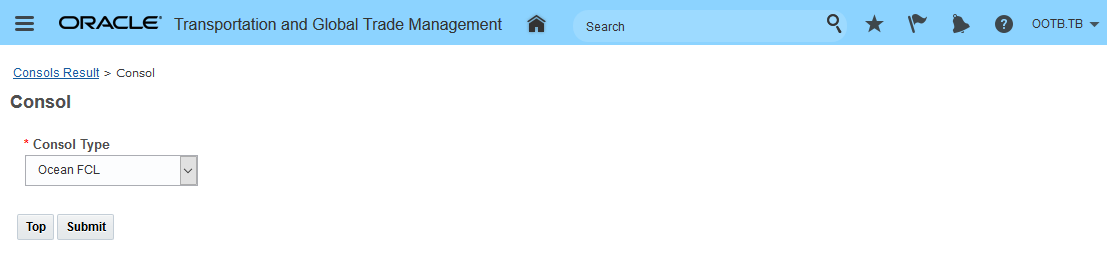
Select Consol Type Ocean FCL
Enter the details for the Ocean FCL Consol.
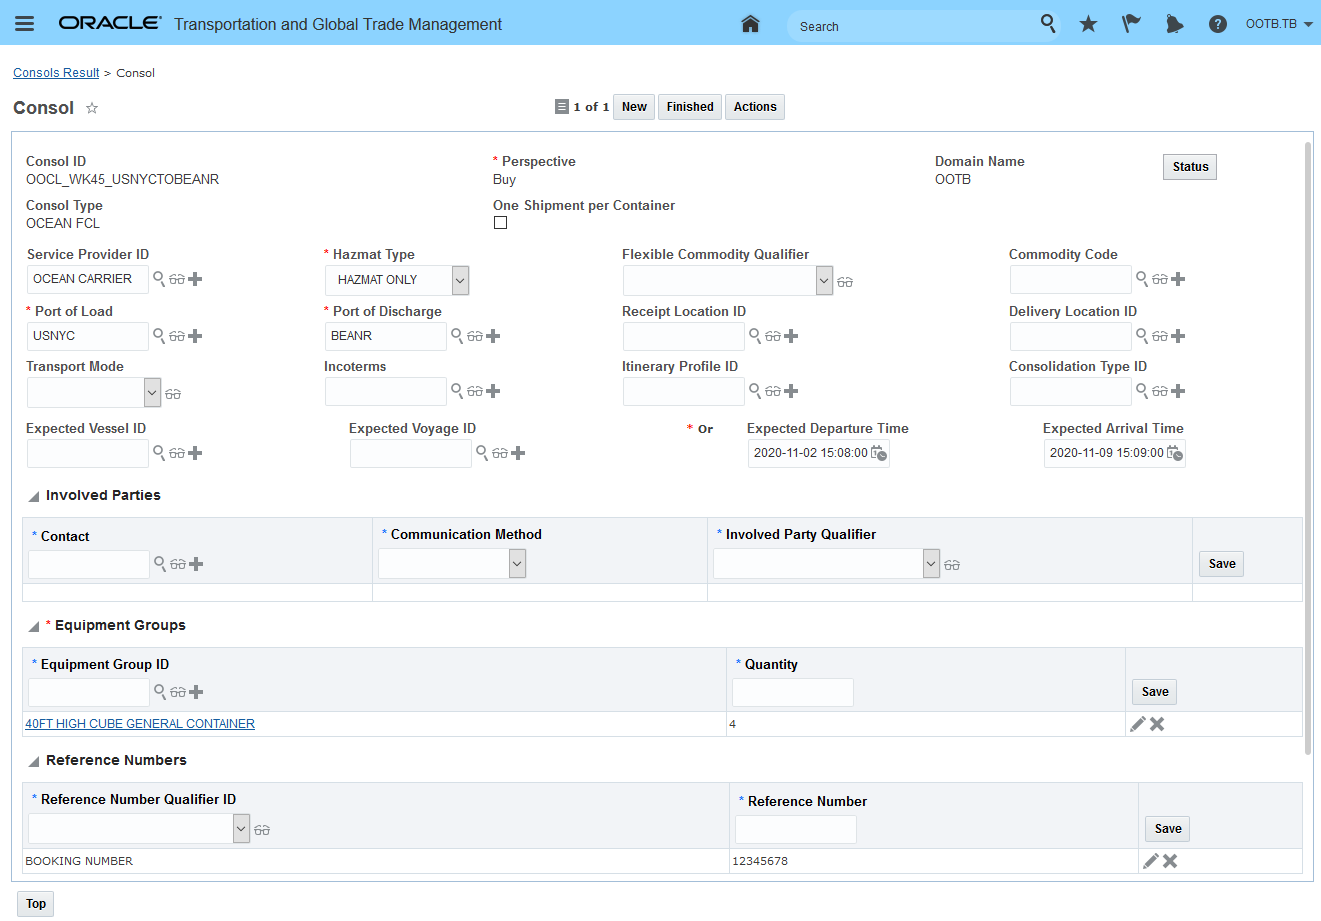
Enter Ocean FCL Details - Ports, Timing, Equipment Groups and Counts
Create your consol shipment.
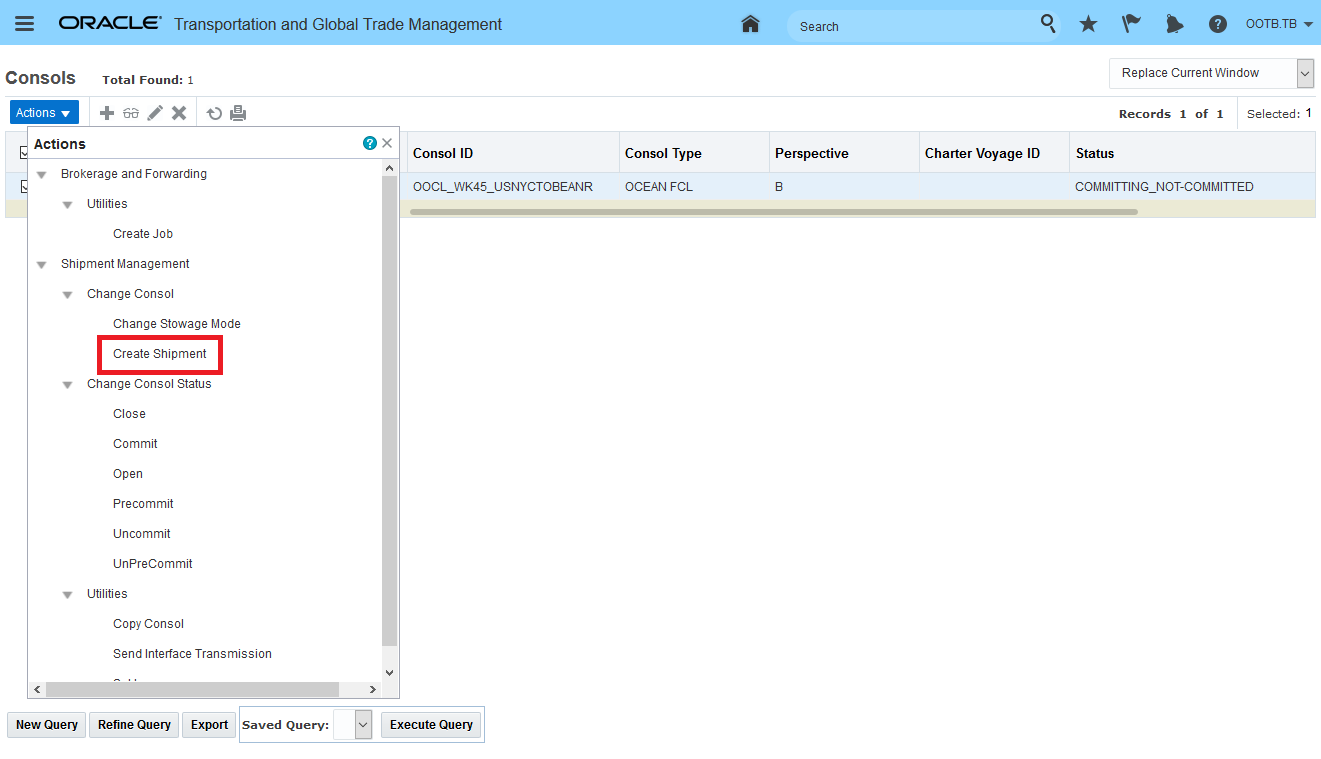
Run Create Shipment Action to Create Consol Shipment
The created consol shipment 05931 - available for planning going from USNYC to BEANR with reserved capacity of four 40FT HIGH CUBE GENERAL CONTAINERS.
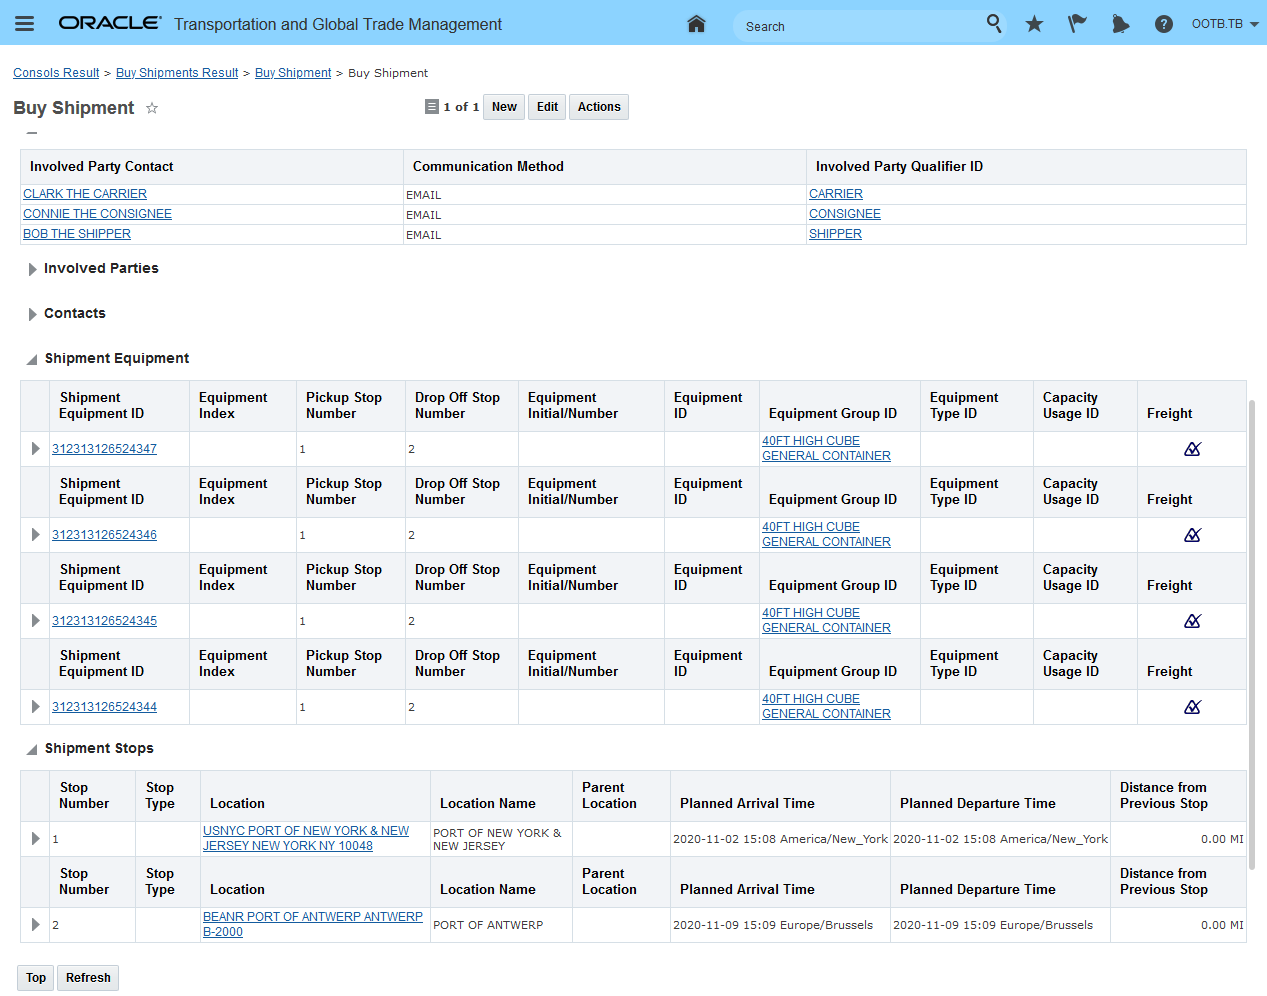
Created Consol Shipment 05931
Now - With 21A, you have the ability to plan your order movements onto the available Ocean FCL consols. In the examples below the order movement 21A_OCEAN_FCL_ORD1-012 will be planned onto the consol shipment 05931 using the actions Build Shipment on Leg, Build Shipment Show Options and Move to Consol Shipment.
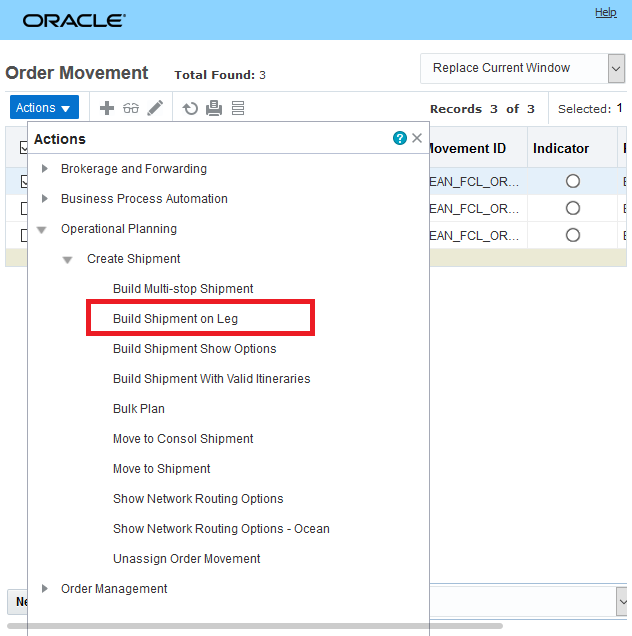
Build Shipment on Leg

Build Shipment on Leg Action - Result
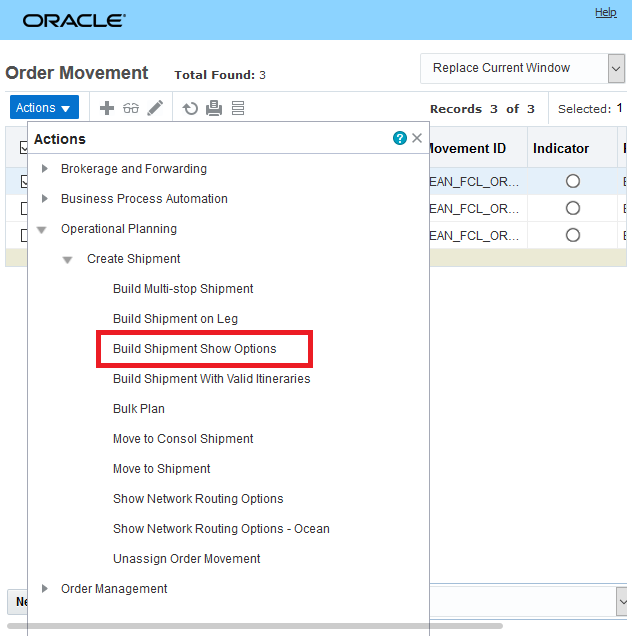
Build Shipment Show Options

Build Shipment Show Options Action - Input/Options

Build Shipment Show Options Action - Result
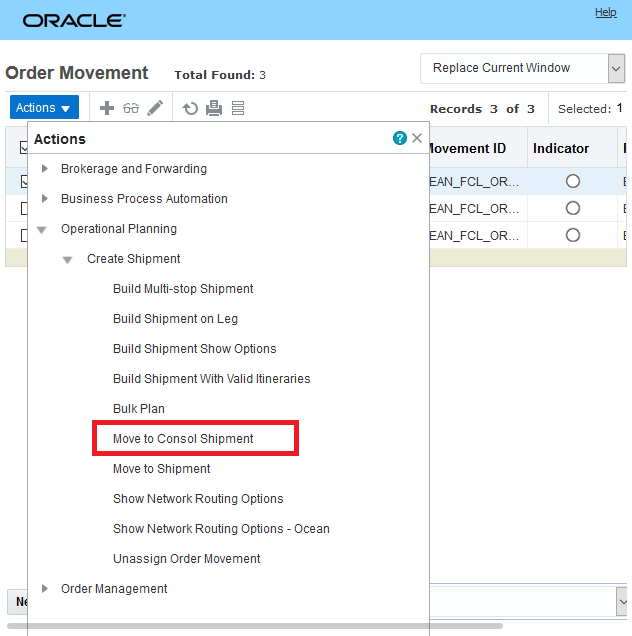
Move to Consol Shipment

Move to Consol Shipment Action - Input/Options

Move to Consol Shipment Action - Result
For all of the actions, the results for the consol shipment 05931 are below - the freight is moved into one of the available equipment - the other 3 equipment remain empty.
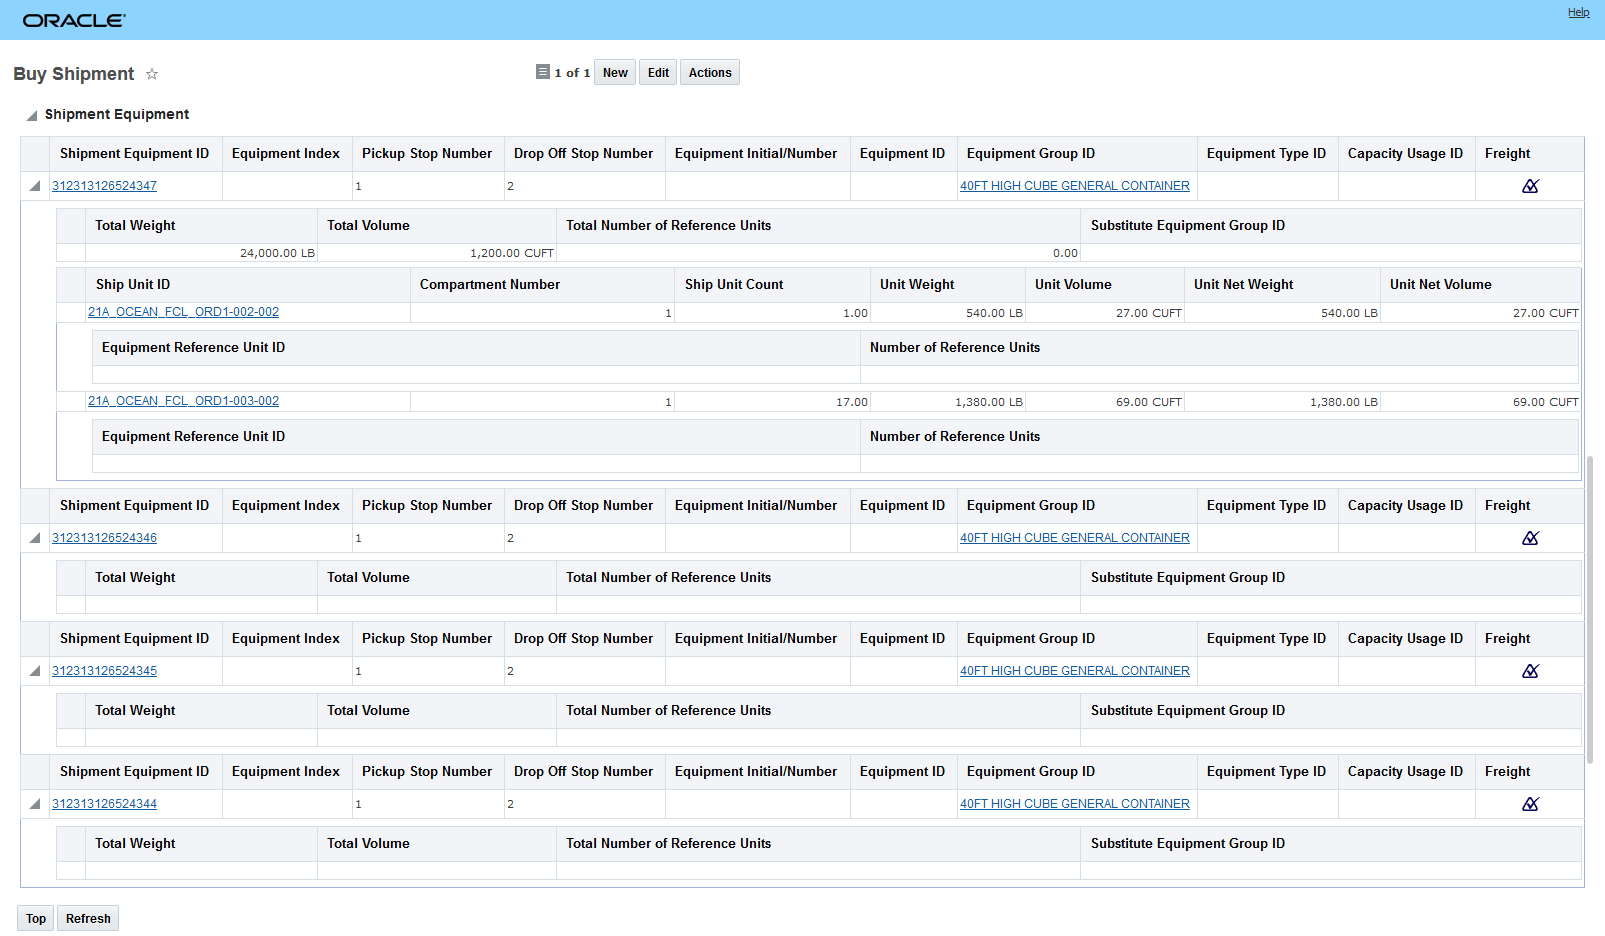
Consol Shipment View from Actions
In the example below - multiple independent Bulk Plan runs will be run against two sets of Order Movements to demonstrate the opportunity you now have to plan order movements into consol shipments over a series of bulk planning runs. This is an extremely beneficial feature since it supports the consumption of the available consol capacity over multiple independent bulk plan runs in a way that mirrors how the order demand/order movements actually become available in an operational setting - i.e., over time. In this example, one set of order movements will be planned in one Bulk Plan run - those order movements will result in a pre-carriage dray shipment feeding into the available consol shipment and then a subsequent dray shipment after the consol shipment. In the 2nd bulk plan run - the freight from second set of order movements will be added to the partially full consol shipment used in the first bulk plan.
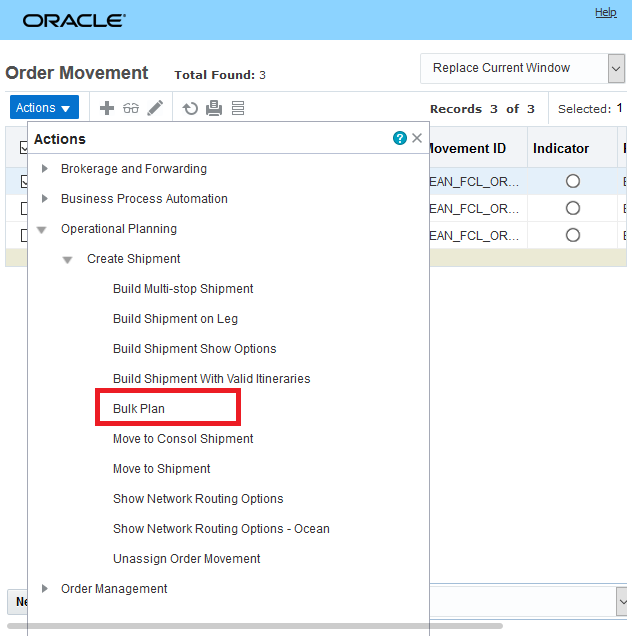
Bulk Plan Set of Order Managements
The result from the first bulk plan is a pre-carriage shipment feeding into the consol shipment 05931 and then an on-carriage shipment taking the freight from POD to the destination.

Bulk Plan Set Order 1 Order Movements Results
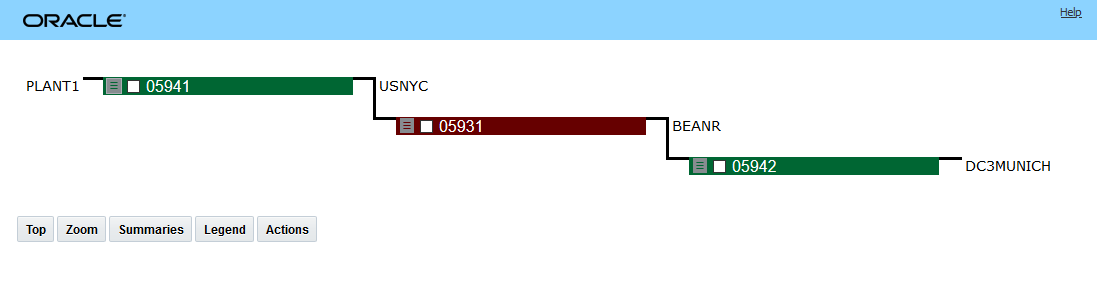
Bulk Plan Set Order 1 Order Movements Results Plot
Below is the drill down into the consol shipment after the first bulk plan run. Only one of the available shipment equipments is used.
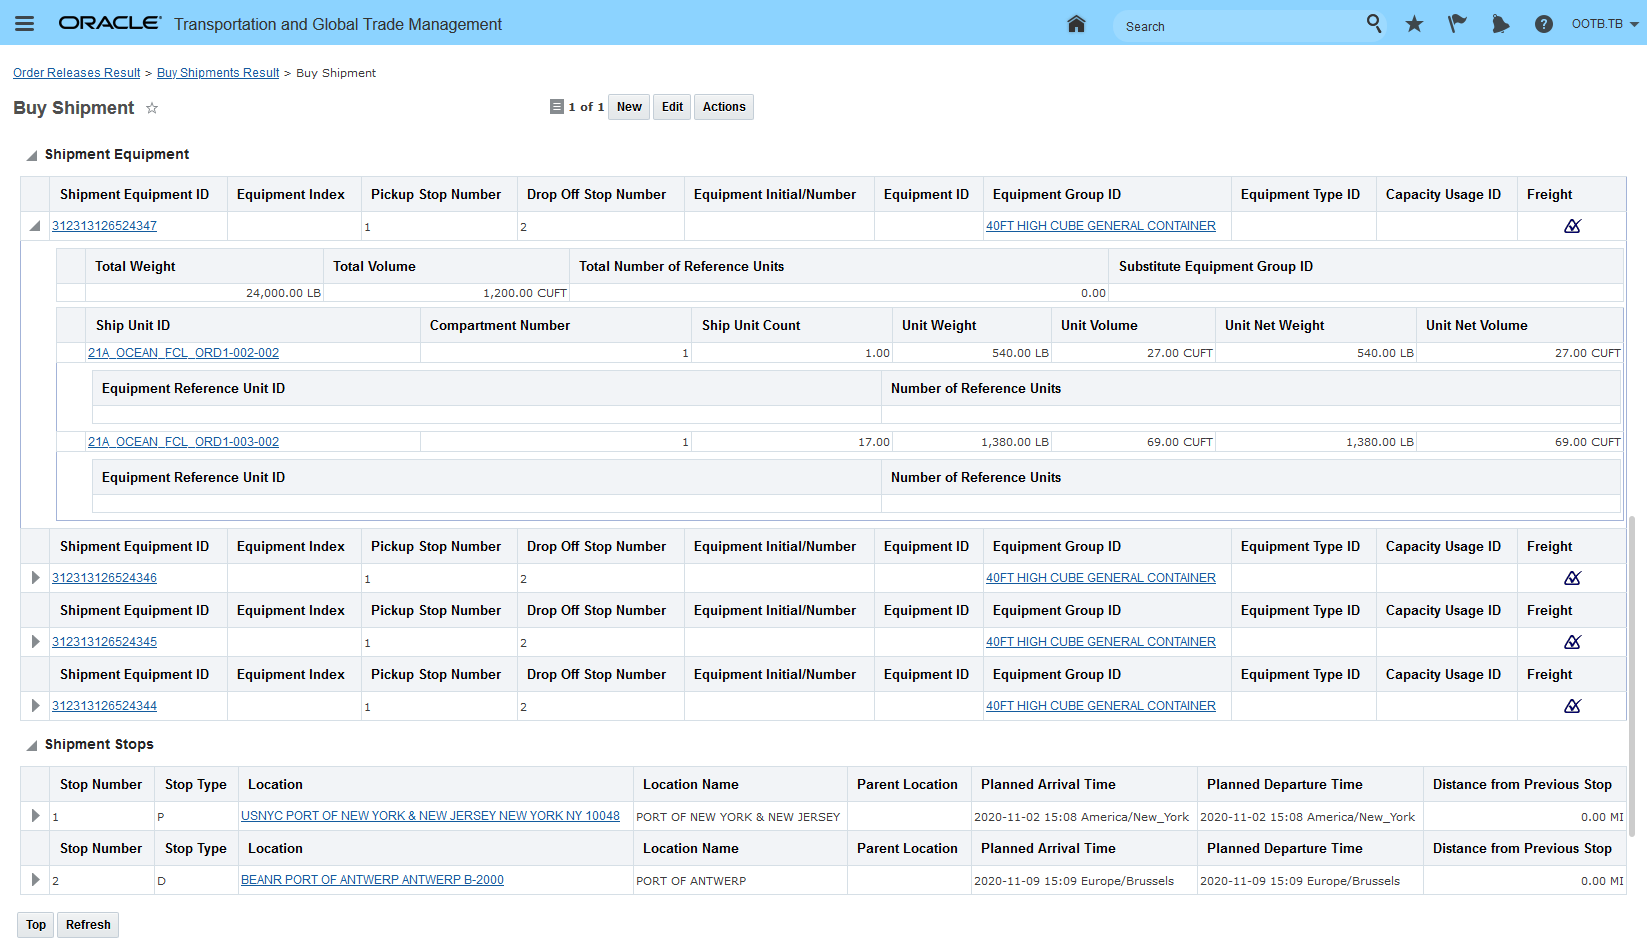
Consol Shipment 05931 After Bulk Plan 1
Now the second bulk plan will be run against the 2nd set of Order Movements.
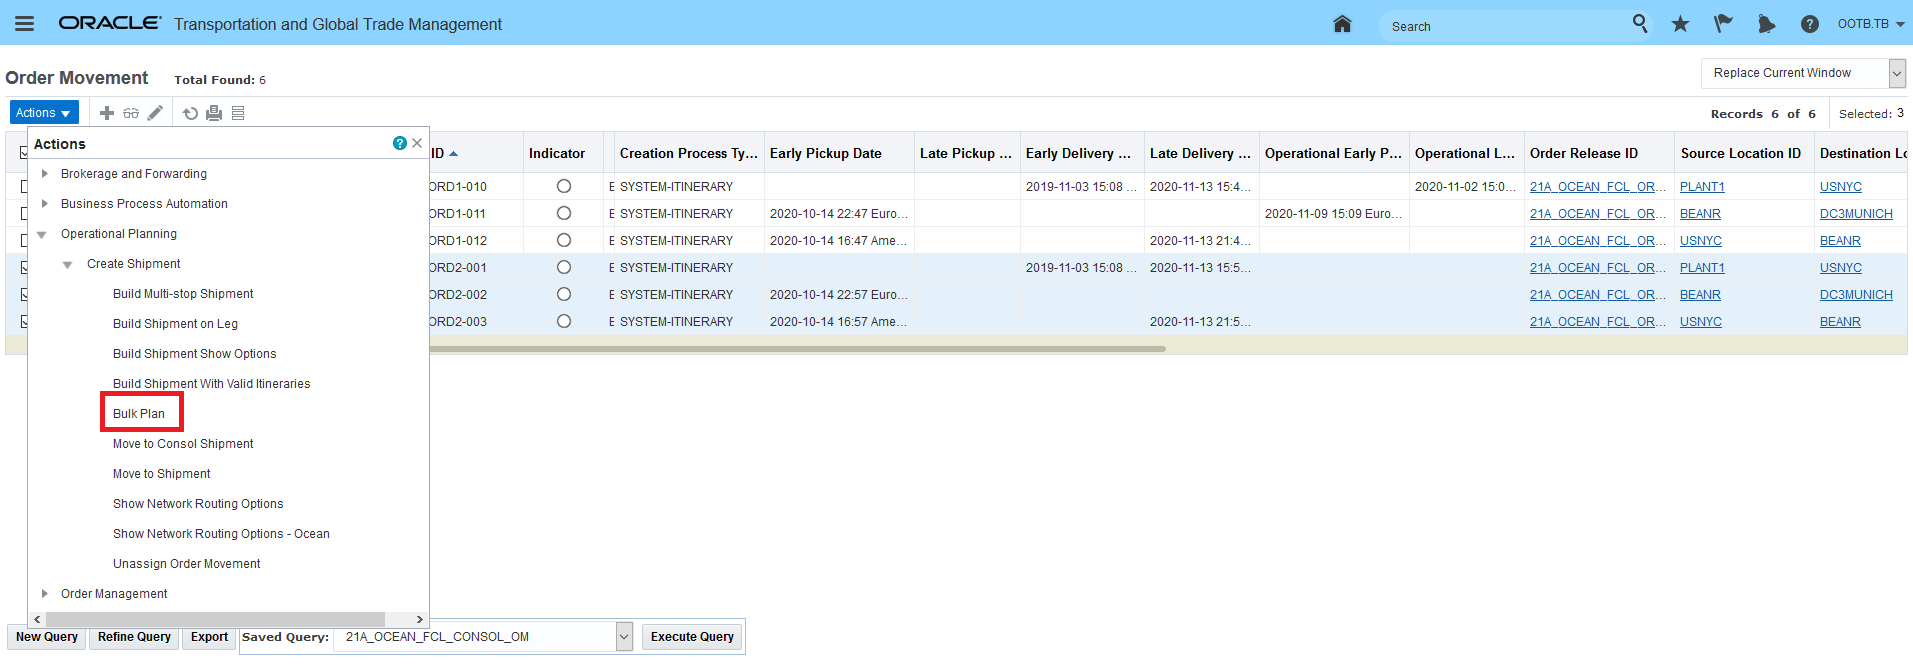
Bulk Plan Set Order2 Order Movements
The solution in the second bulk plan run is very similar to the first bulk plan run - but you will note that in the second bulk plan run the consol shipment 05931 is now handling the freight from both runs/both order movements i.e., the freight was added to the existing consol shipment in the second bulk plan run.
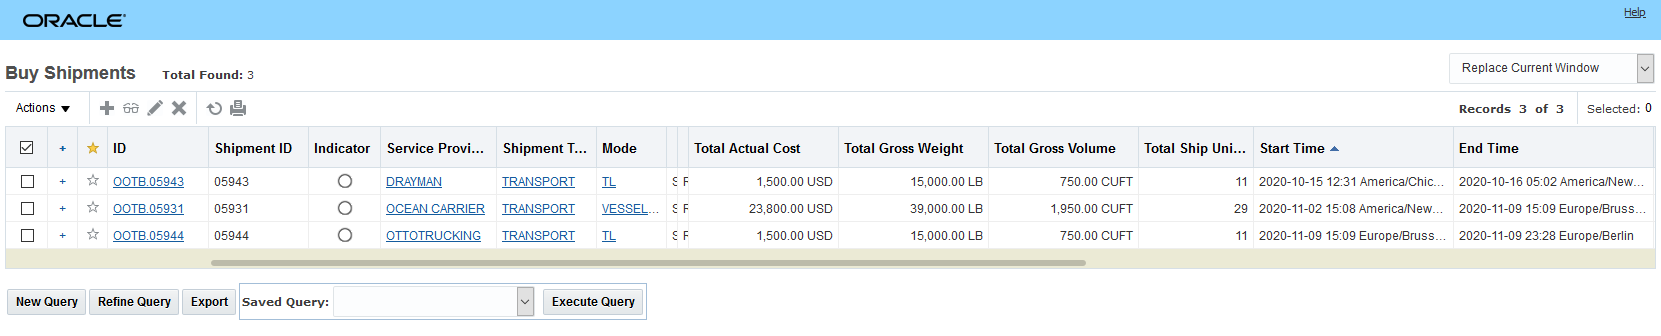
Bulk Plan Set Order 2 Order Movements Results
In the plot below you see the 4 dray shipments and the 1 consol shipment used in the solution across the two bulk plan runs.
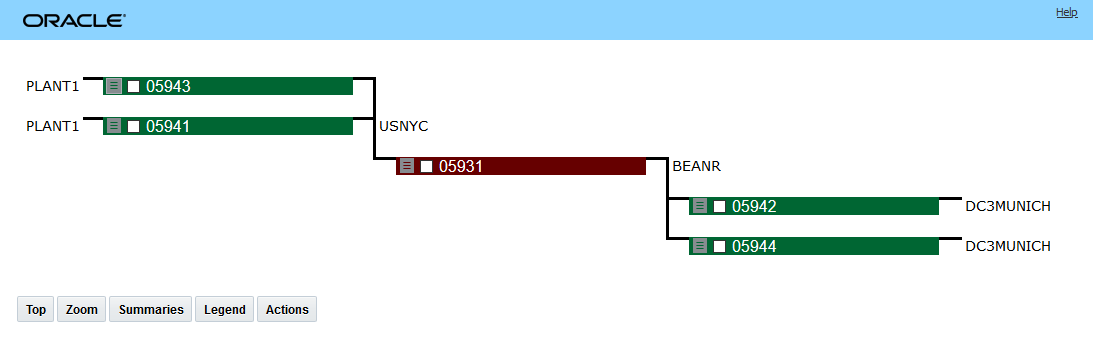
Bulk Plan Result Plot After 2nd Bulk Plan
Drilling into the consol shipment - again you see that freight added from the first order movement bulk plan and the additional freight added in the second order movement bulk plan run.
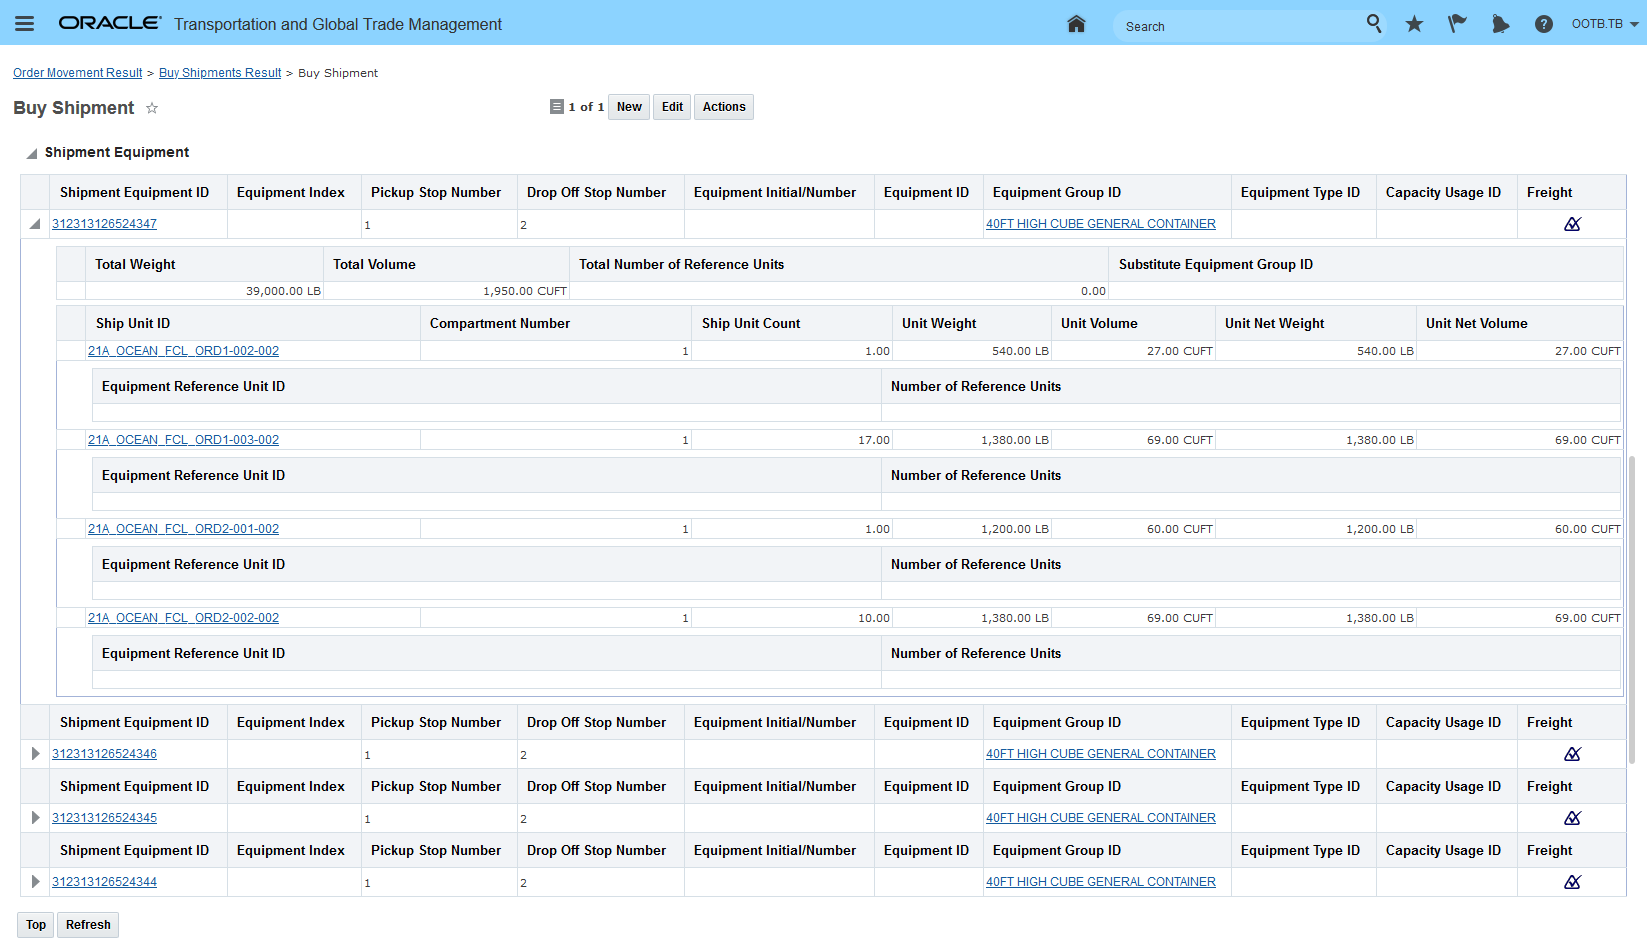
Consol Shipment 05931 After BP 2
This feature provides you with additional flexibility in the usage of your consol shipments. You now have the option to plan the usage of your pre-booked consol capacity by selecting and planning your order movements directly or by having the evaluation and planning handled by bulk planning - either in one bulk plan or over a series of bulk plan runs.
Steps to Enable
To use this feature you do need to:
- Setup a consol type of Ocean FCL.
- Run the Create Shipment action against your Ocean FCL.
- Set your planning parameter ORDER ROUTING METHOD to use Network Routing.
Tips And Considerations
There are various scenarios where your selected order movements will cannot be planned into a consol. The more common scenarios and resulting errors are provided below.
If you select two order movements that do not have the same travel path and then run either the Build Shipment on Leg or Build Shipment Show Options actions you will receive the error message below. This can occur if the order movements are on different itinerary legs or if the order movements use the same itinerary leg but are from order releases that are have different source and destination locations and therefore cannot travel together.
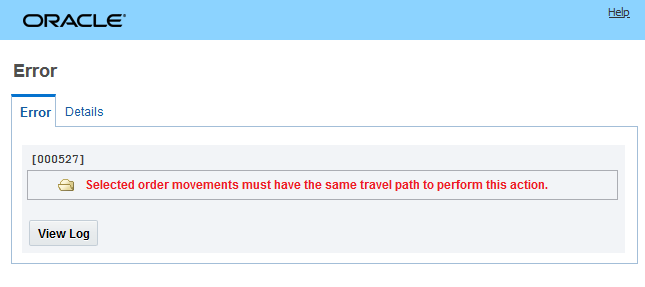
Travel Path Incompatible Message
If your selected order movements are a mix of both consol leg and non-consol leg order movements then you will receive the error message below when you run either the Build Shipment on Leg or Build Shipment Show Options actions.
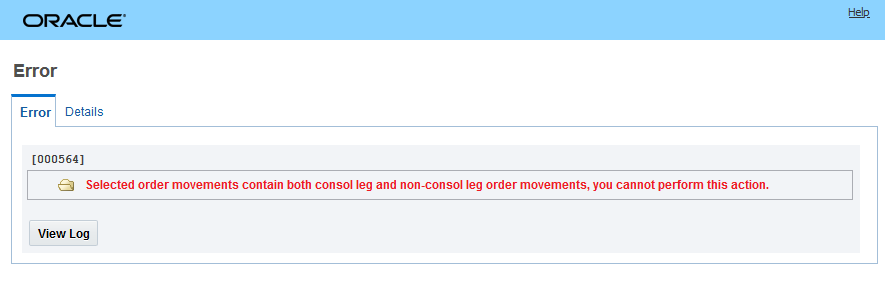
Consol and Non-Consol Leg Order Movements
The option for Bulk Planning does not include Order Releases - for now, the option to perform Bulk Planning into the Consol Shipment is limited to Order Movements.
Parameter to Control Retain or Delete for Empty Shipment Equipment
This feature provides you with the ability to control whether or not an empty shipment equipment that's on a multi-equipment shipment is deleted when the last shipment ship unit in that shipment equipment is removed. This feature controls the empty shipment equipment processing for order modifications and/or shipment actuals updates.
This new capability is controlled using the parameter RETAIN EMPTY SEQUIPMENTS ON SHIPMENT - the default is FALSE- which will cause the empty shipment equipment to be deleted - setting the value to TRUE will retain the empty shipment equipment.
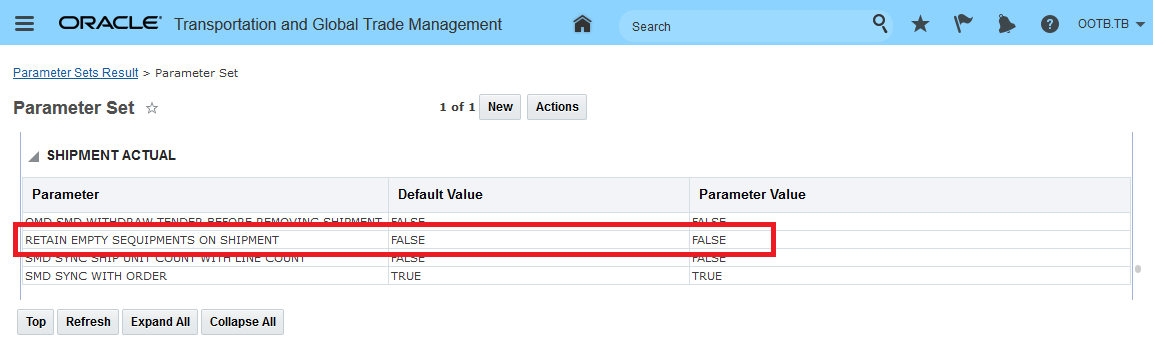
Retain Empty Shipment Equipment on Shipment Parameter
This feature provides you with additional configuration options regarding the processing of your multi-equipment shipments and how empty shipment equipments are handled.
Steps to Enable
To enable the new behavior, you will need to set the Shipment Actual planning parameter RETAIN EMPTY SEQUIPMENTS ON SHIPMENT to TRUE.
Run Insert Non Freight Related Stop for Non-Fleet Service Providers - Add Container Yard Stop
This feature allows you to configure OTM so that shipments assigned to non-fleet service providers can have non-freight related stops added to non-fleet service provider shipments. This feature is designed to support the use case where - for your ocean shipment scenarios, you want to model the empty pickup location instructions to your drayage carrier as an actual stop on the drayage shipment as opposed to just providing that information on the shipment header.
For example, in the scenario below the dray shipment assigned to the Service Provider DRAYMAN goes directly from the plant in Chicago to the port - the goal of this feature is to allow you to easily add information about the stop before the pickup stop at the plant that would model the stop involved in picking up the empty container before going to the plant and then heading to the port.
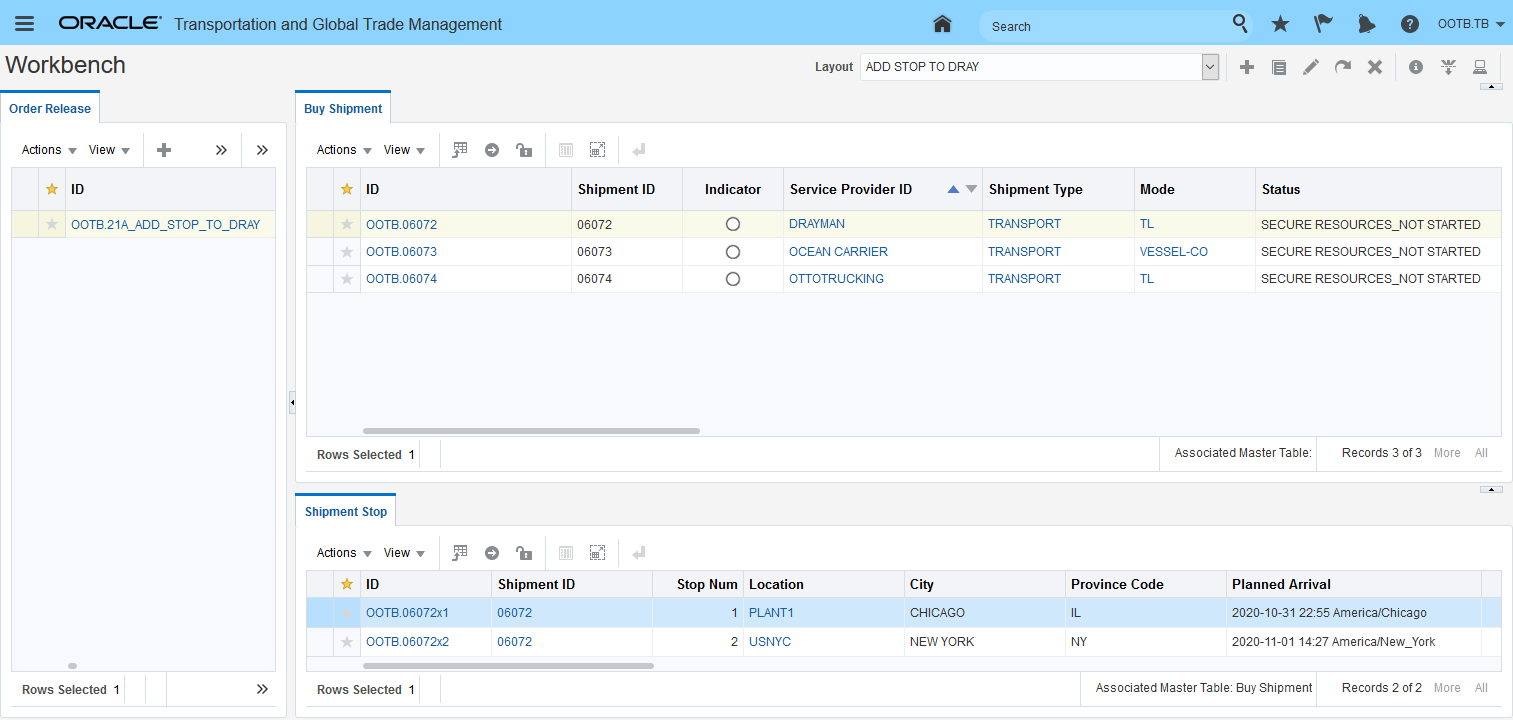
Dray-Ocean-Dray Scenario
To add the additional stop at the container yard (once the ocean carrier or forwarder provides the information) you simple run the action Insert Non Freight Related Stop as shown below against the dray shipment.
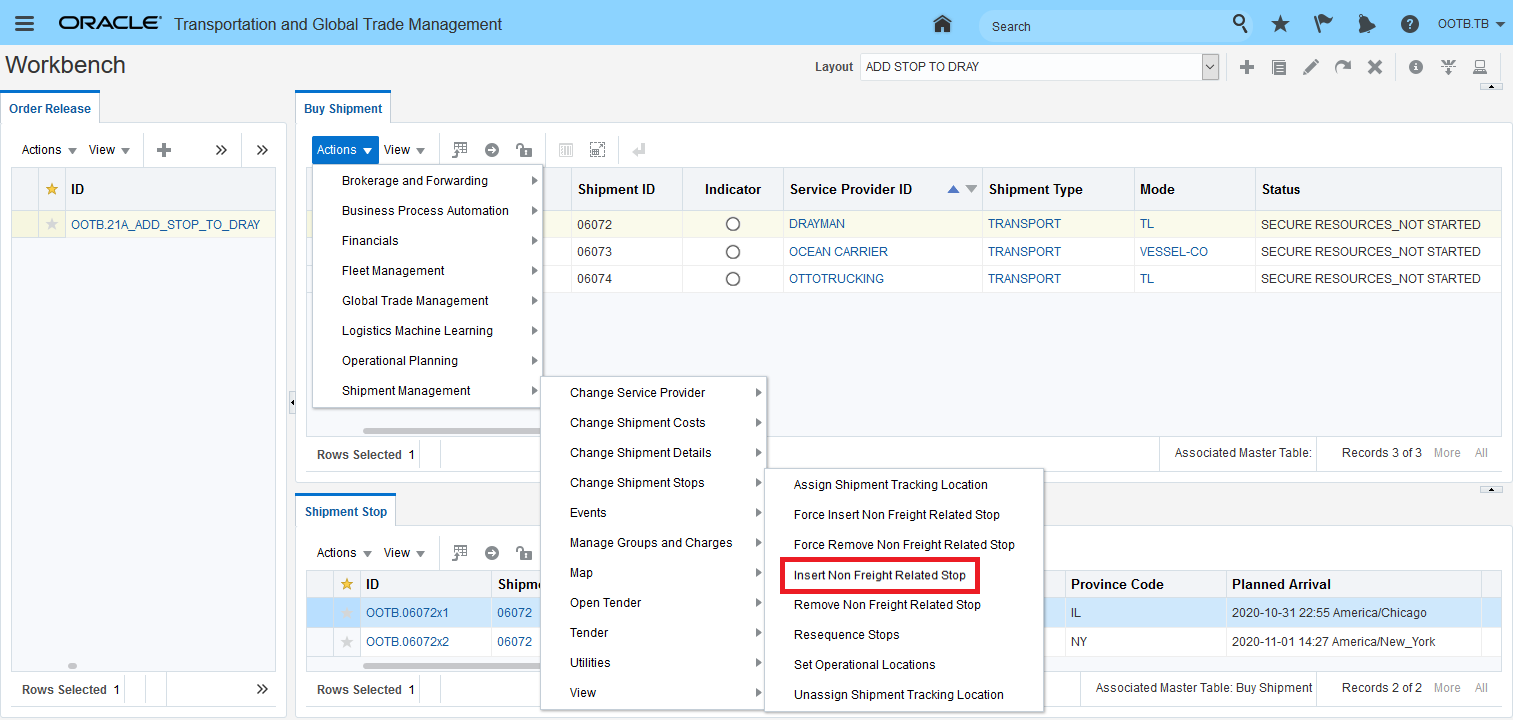
Run Action - Insert Non Freight Related Stop
In the input dialog box, enter in the non freight related stop where the dray carrier should collect the empty container. In this case, the NFR Location ID (the stop to be added) is the CHI_CONTAINER_YARD.
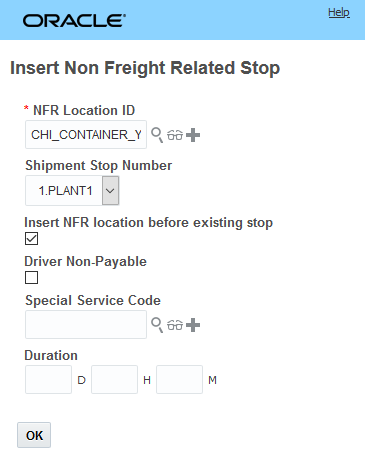
Insert Non Freight Related Stop Action Input Screen
The action result screen shows the impact of adding the non freight related stop for the set of shipments involved.
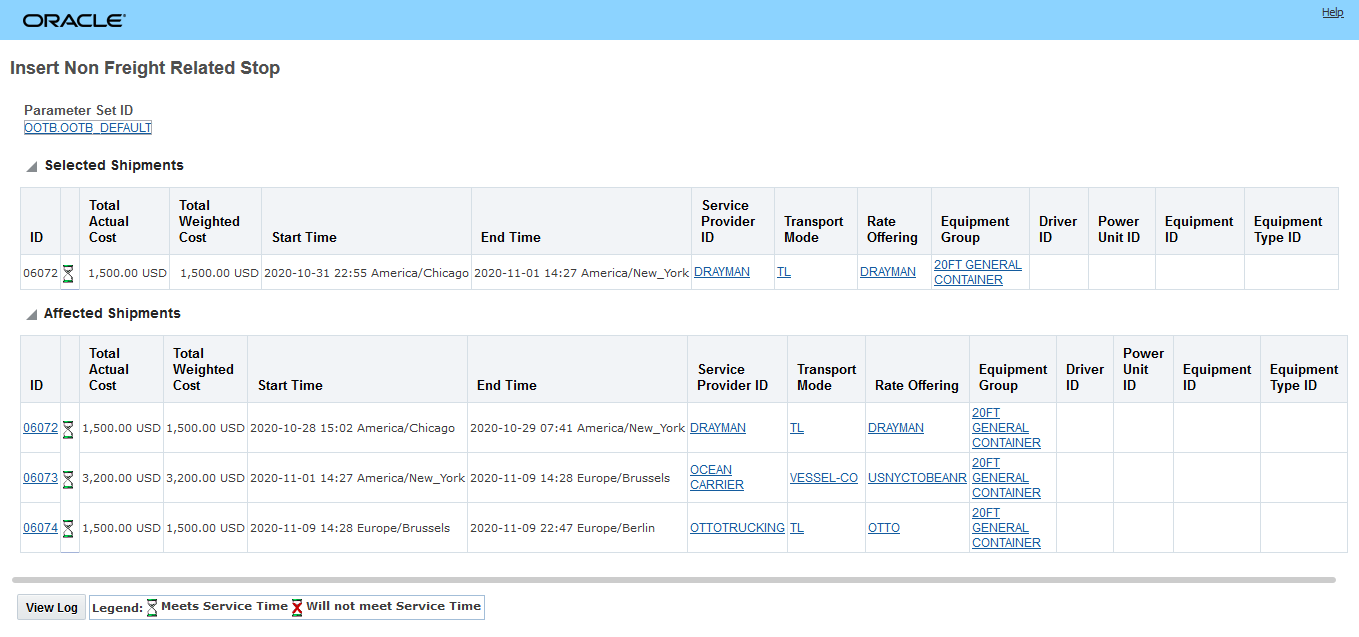
Insert Non Freight Related Stop Action Result Screen
Below is the solution as seen in the Workbench once the Insert Non Freight Related Stop Action is complete. With the additional stop at the CHI_CONTAINER_YARD added to the shipment the additional stop information can be provided to the service provider in the same way the other freight related stops on the shipment are provided - the service provider is no longer required to look in different areas of the message to find stop related information.
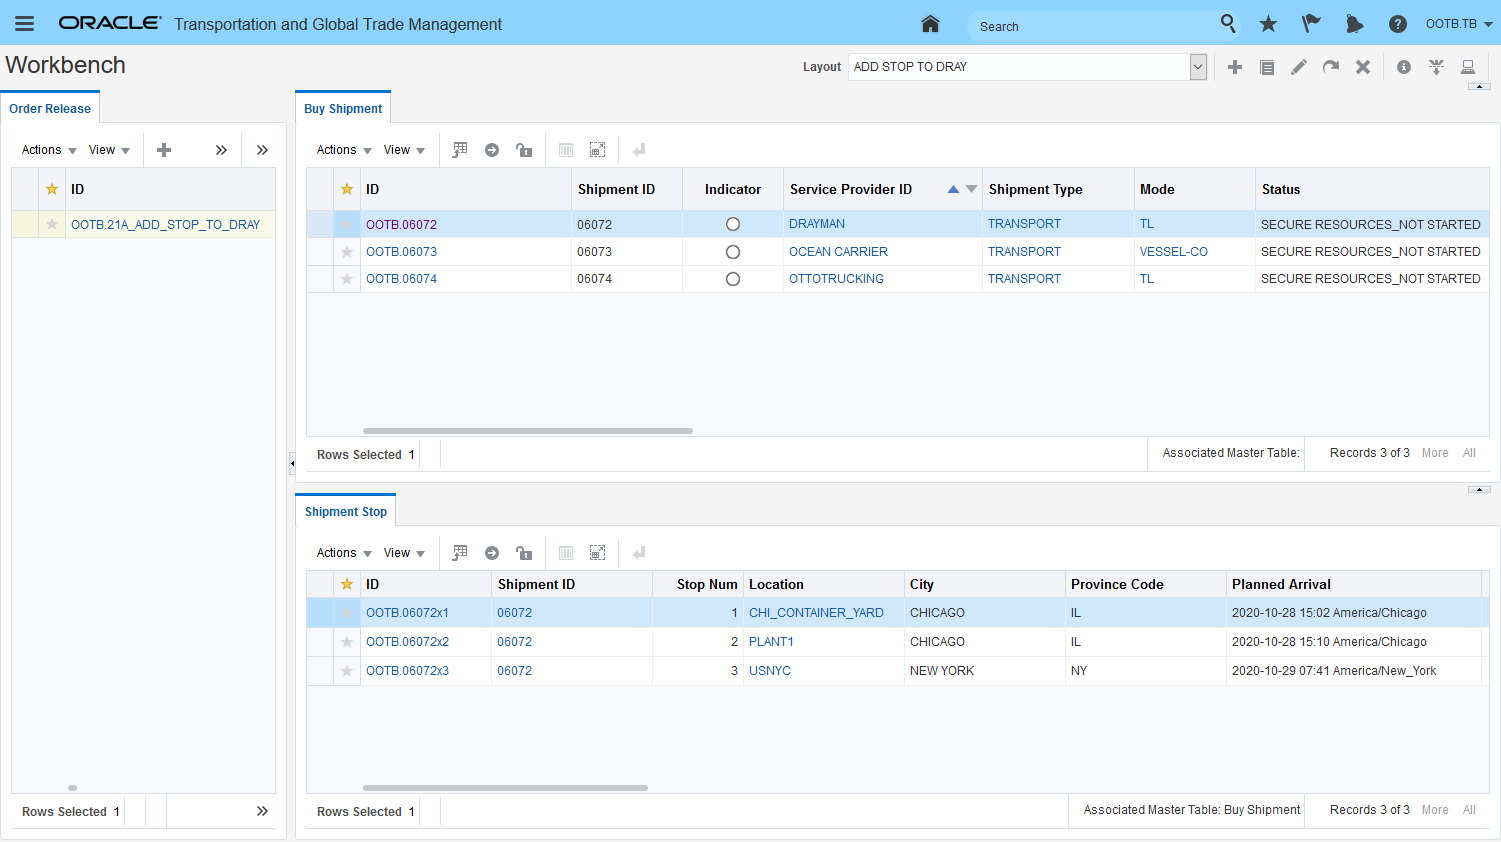
Workbench View with Stop Added
This feature provides you with a more direct approach for communicating to your pre-carriage dray carriers the additional non freight related stops required to pickup the empty container required for your ocean shipments.
Steps to Enable
To run the action Insert Non Freight Related Stop for a shipment assigned against a non-fleet service provider shipment you need to set the two parameters below to TRUE.
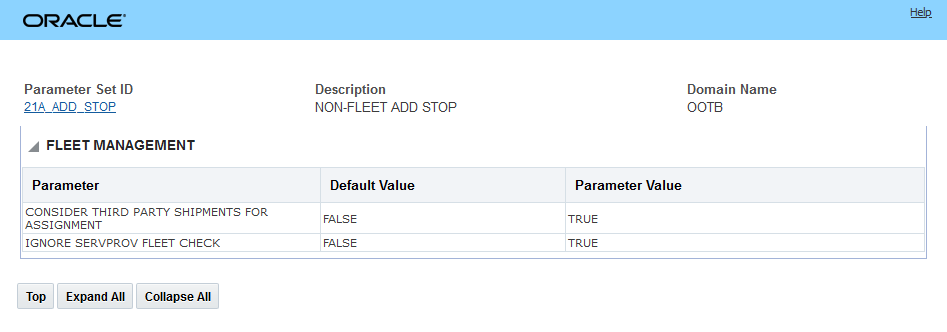
Parameter Setup
Without the parameter setup above, you will see the message below if you attempt to run the Insert Non Freight Related Stop action against a non-fleet service provider shipment.
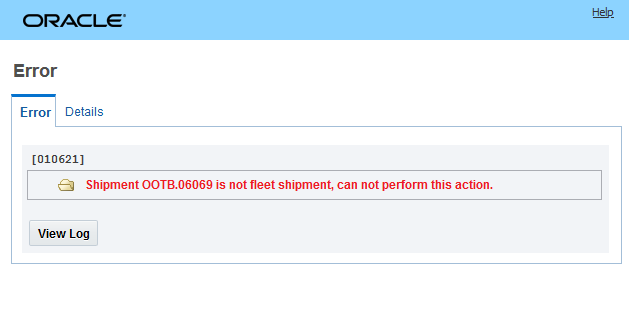
Error Message Non-Fleet Service Provider Attempting to Run Insert Non Freight
Merge Shipment Action - Enhanced
This feature enhances the options for handling the shipment equipment assigned to your shipments when you run the Merge Shipment action.
Now - when you select Optimize as the option to run you can either:
- Select Consolidate and enter an equipment in the Equipment Group ID.
Or
- Select Keep Equipment and select the target shipment from the Shipment ID drop-down list.
NOTE: You must select either 'Consolidate' or 'Keep Equipment' to continue with optimize merge of shipments.
KEEP EQUIPMENT
If you click Keep Equipment, you get the option to choose a target shipment. If you do not select any target shipment, the first shipment will be chosen as the target shipment. All the equipment from the selected shipments will be merged into the target shipment, and the downstream shipments will be re-driven.
This feature extends the decision support capabilities provided to you for manual/just do it type solution manipulations.
Steps to Enable
You don't need to do anything to enable this feature.
Support Split by Equipment for Reuse Equipment Shipment Legs
This enhancement allows you use the Split Shipment action to split your shipments by equipment for shipments generated from itinerary legs configured with Equipment Assignment Type set to Re-use Equipment. The need to split shipments by equipment for ocean scenarios where the solution is generated from an itinerary where the first leg is configured with the Equipment Assignment Type set to Optimize Equipment and the subsequent itinerary legs, for the ocean and on-carriage legs, are configured with the Equipment Assignment Type set to Re-use Equipment is a common scenario.
Previously - with itinerary legs where the Equipment Assignment Type was set to Re-use Equipment (ocean) and Re-use Equipment (on-carriage) - you were not able to split off a shipment equipment from your multi-equipment ocean shipment - either as a new set of parallel shipments or to an existing parallel shipment - this limitation has been removed with this enhancement.
In the example below, the itinerary is configured with 3 legs with the Equipment Assignment Type set as Optimize Equipment for the first leg, and then Re-use Equipment for the second and third leg. In the example, 2 dray shipments deliver two containers on two shipments (06213 and 06214) for the ocean shipment (06215) moving from USNYC to BEANR the ocean leg is then split out into two shipments (06216 and 06217) on the third leg for final delivery. To demonstrate the feature one of the shipment equipments on the ocean shipment will be split off to its own parallel set of shipments.
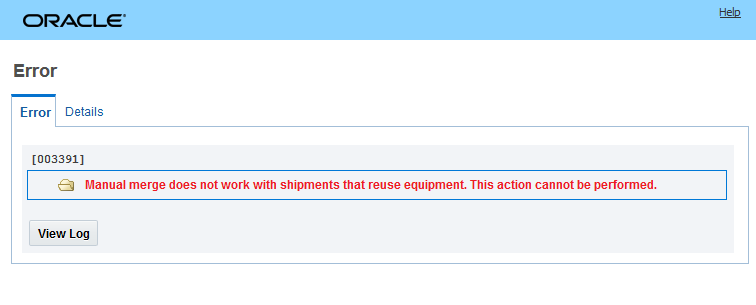
Split by Equipment Example
For the ocean shipment 06215 the action Split Shipment is run. Note the two shipment equipments on the shipment before the action is run.
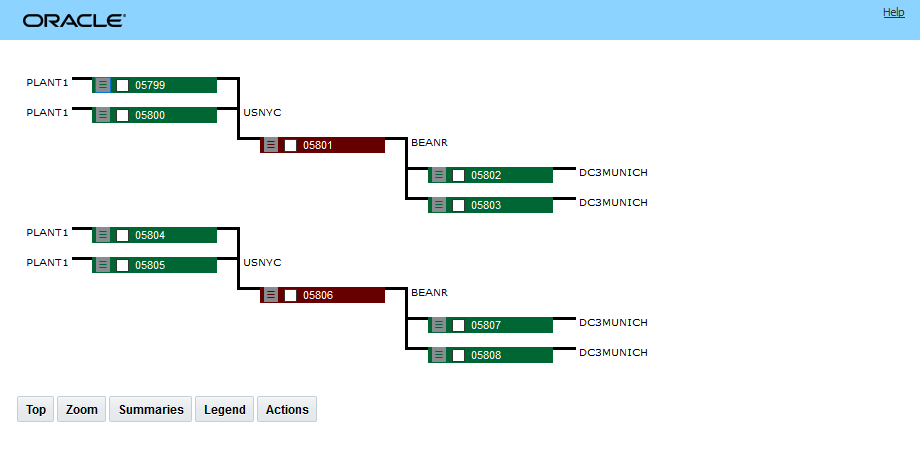
Run Split Action
Select the option to split the shipment by Equipment - as shown below.
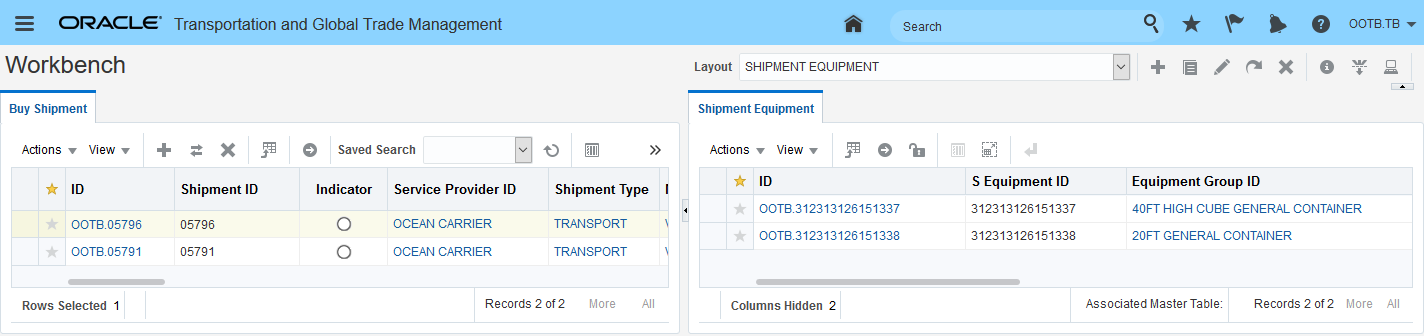
Split by Equipment
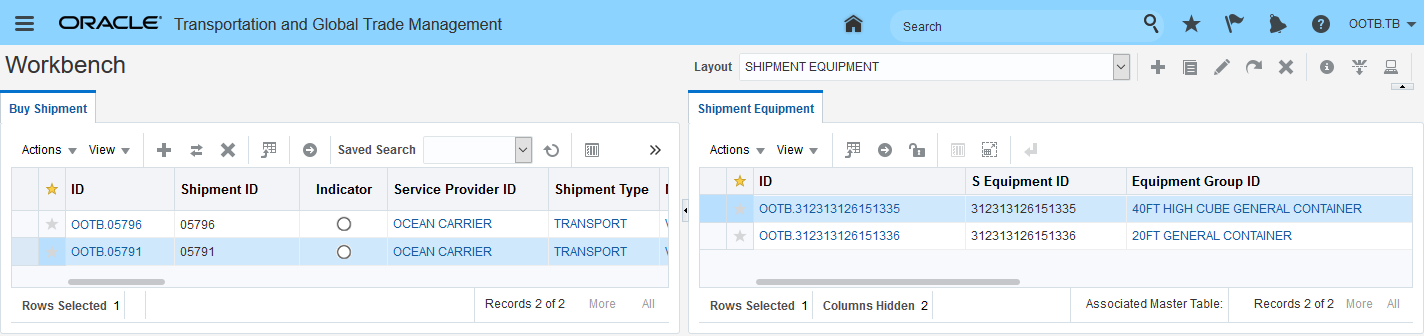
Input
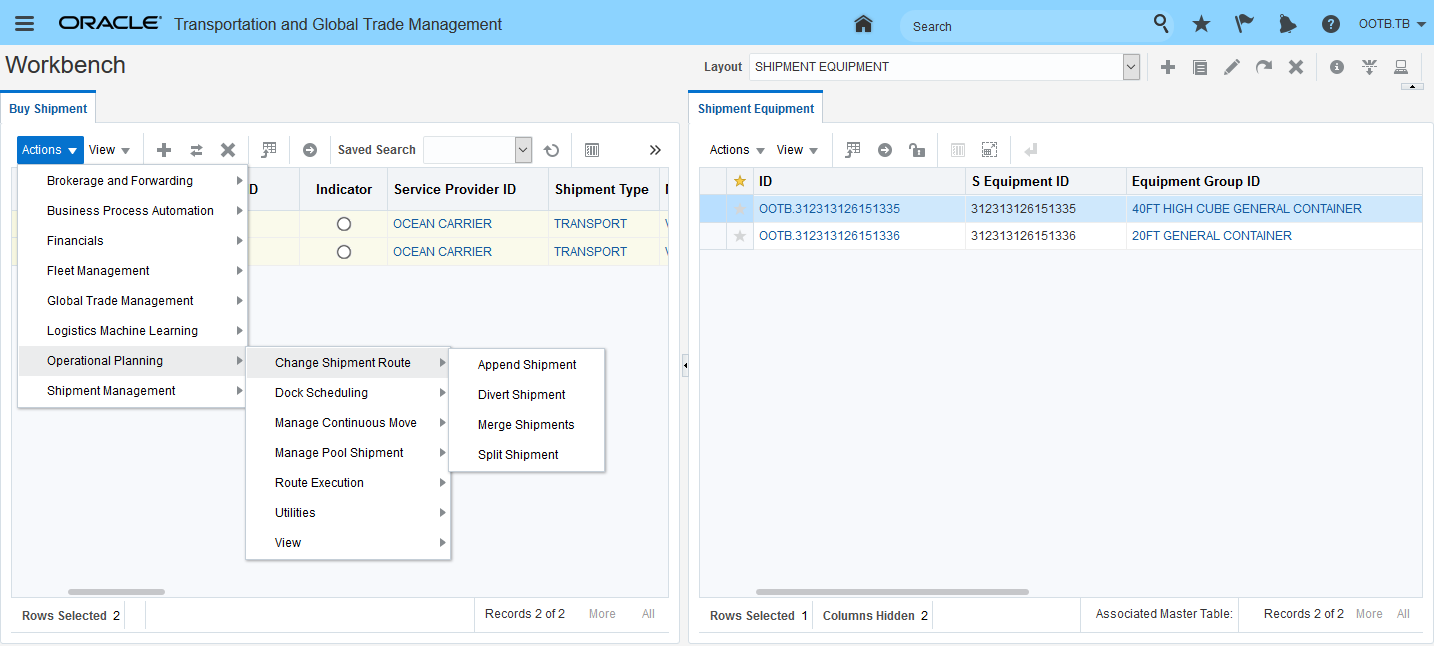
Result
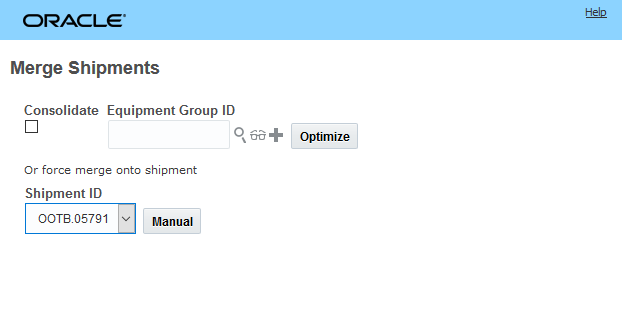
New Parallel Solution and Original Solution Plot
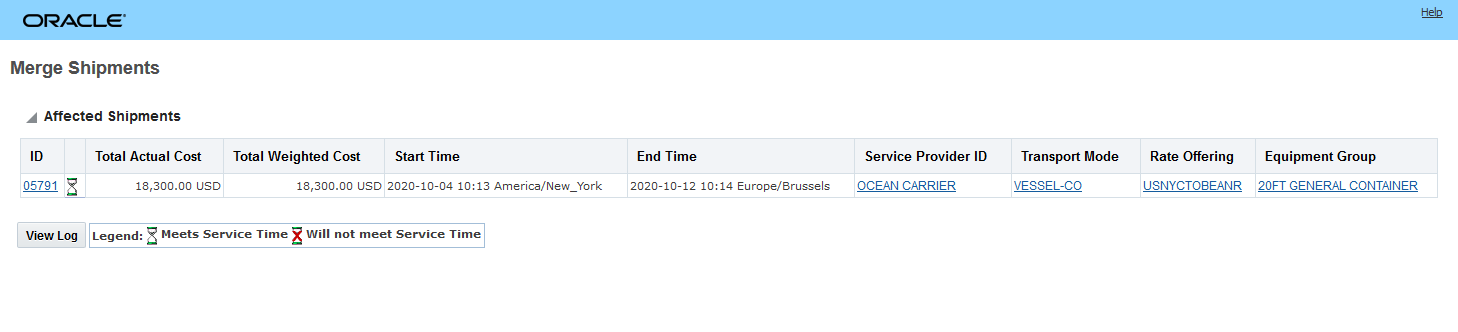
Shipment 06215 and Shipment Equipment Ending in 8478 Retained
As desired, the shipment equipment ending in 8477 was split off to the parallel shipment solution
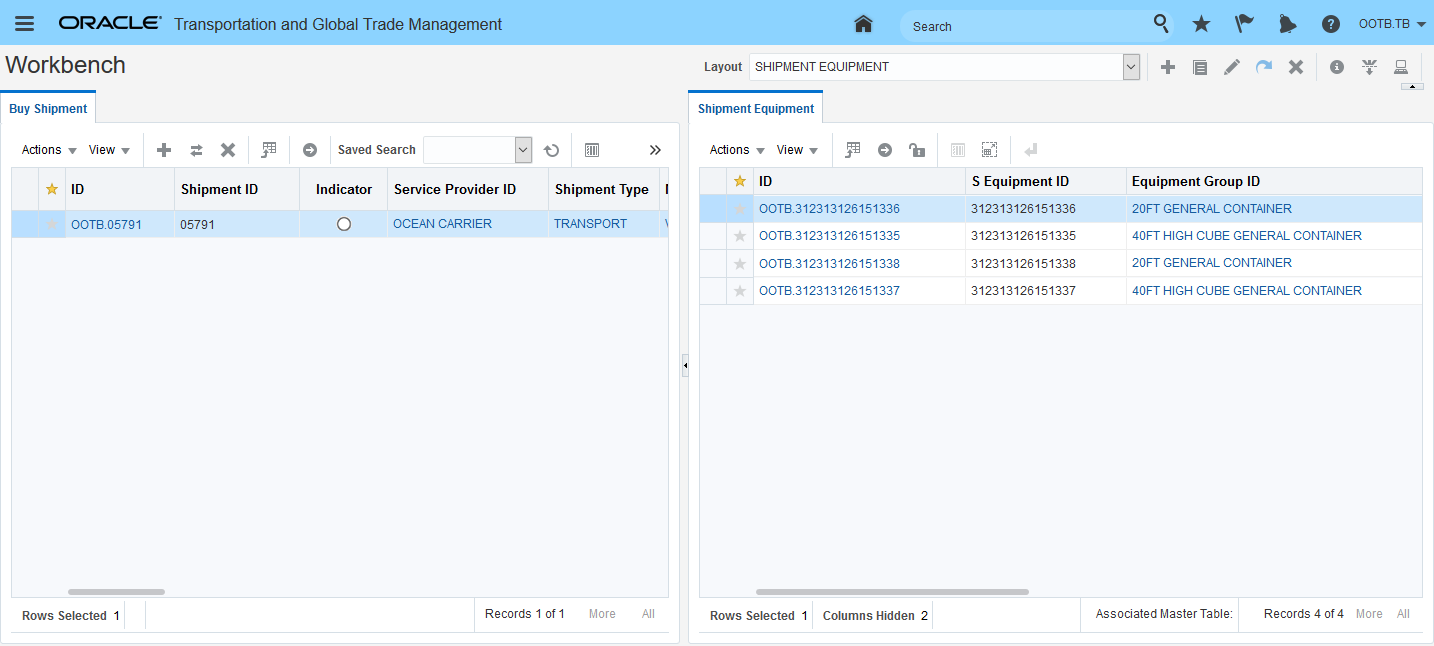
Shipment 06218 and Shipment Equipment Ending in 8477 Moved
In the second example below - the shipment equipment will be split off to an existing parallel set of shipments.

Shipment Starting Point
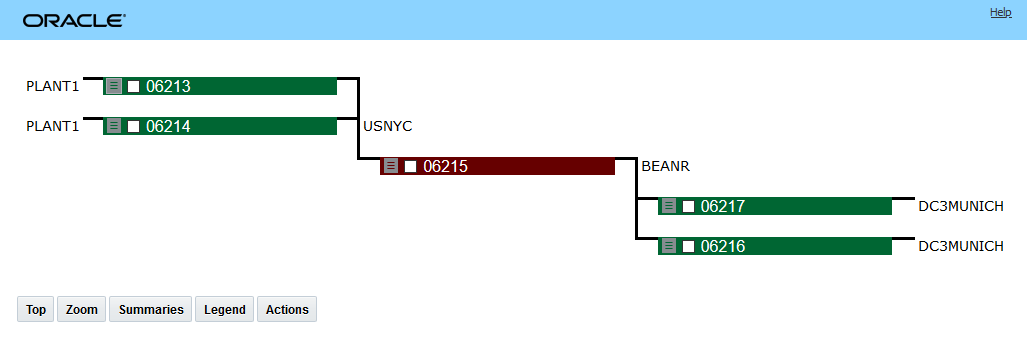
Action Input - Move Shipment Equipment 8492 from Shipment 04029 to Shipment O4025
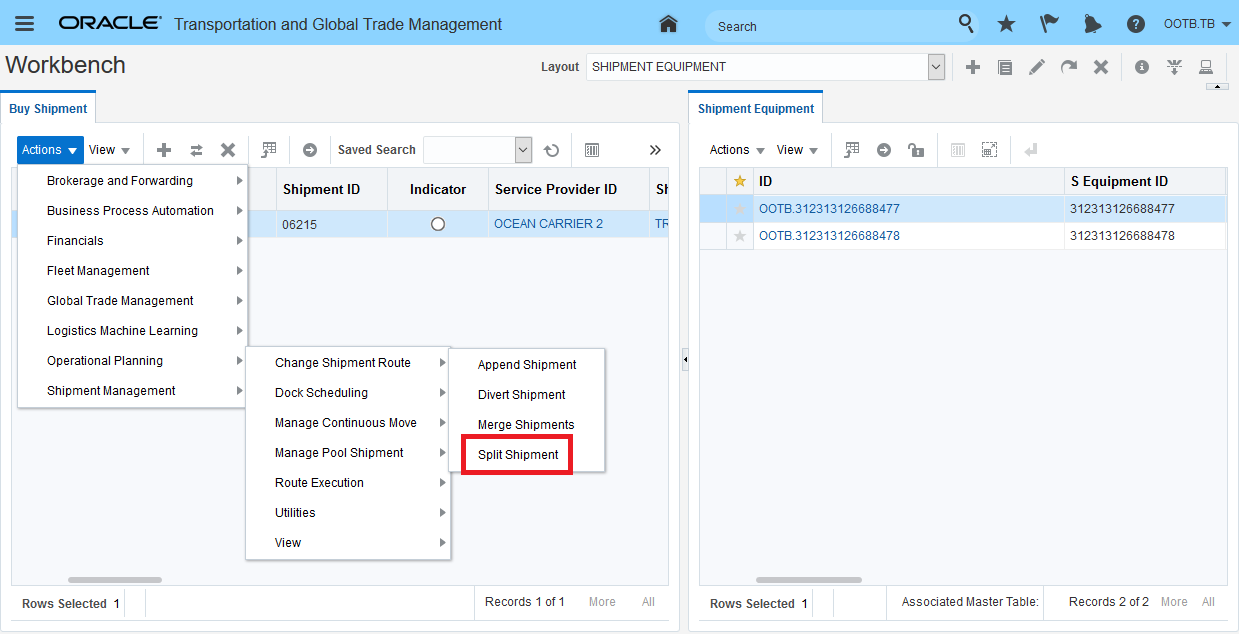
Split Shipment Action Result
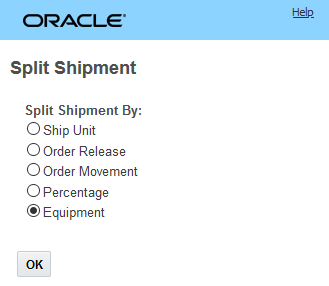
Split Shipment Equipment Result
Provides support for common ocean scenarios where the shipment equipment on the ocean shipment is split off onto parallel solution.
Steps to Enable
You don't need to do anything to enable this feature.
Multi-Stop - Shuttle Lot Activity Time Enhancement
This feature allows you to model the activity time associated with using a shuttle lot to support delivering to locations where a combination equipment group (e.g., box truck and trailer) is too big to service the location directly, but the location can be serviced by the combination equipment group if the trailer is dropped at a shuttle lot and then one or more trips are made back-and-forth from the shuttle lot to the delivery location using just the box truck portion of the combination equipment.
Operationally this setup is used in situations where the distribution center is located far from the area where the deliveries are to be made - and it makes economic sense to have the driver line haul to the area using a combination equipment group and then incur the additional handling time required for shuttle lot activities versus servicing these locations directly from the DC with a smaller truck.
In the examples, below the Shuttle Lot Required Location 01 can only be serviced using the Box Truck equipment group. Economically, it does not make sense to just send a Box Truck from the DC to this location since there are other locations in the area that can be serviced directly by the Combination Equipment Group (Box Truck and Trailer). The Shuttle Lot enhancement allows OTM to model the trade off between the additional activity time and cost required to deliver to the constrained Shuttle Lot Required Location 01 using just the Box Truck versus other solution opportunities.
In the shipment stop example below - stop number 4 requires the additional shuttle activity time of 1 hour and 45 minutes. The other locations in the shipment only require a fixed activity time of 15 minutes.
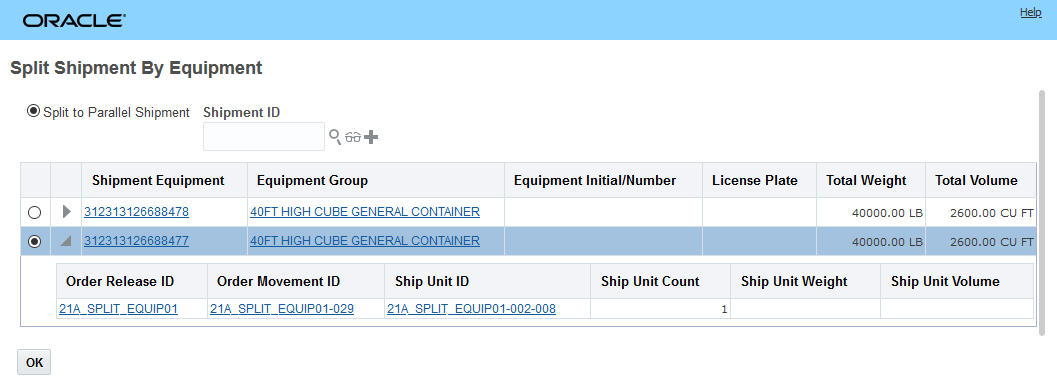
Additional Stop Activity Time to Model Shuttle Lot Activities
The 1 hour 45 minute activity time models the time required to perform the shuttle activities illustrated below. Specifically, the additional activity time represents the additional activity time required to go to/from the shuttle lot location, the time required to drop the trailer at the shuttle location and the time required to reconnect the trailer at the shuttle lot and continue with the shipment.
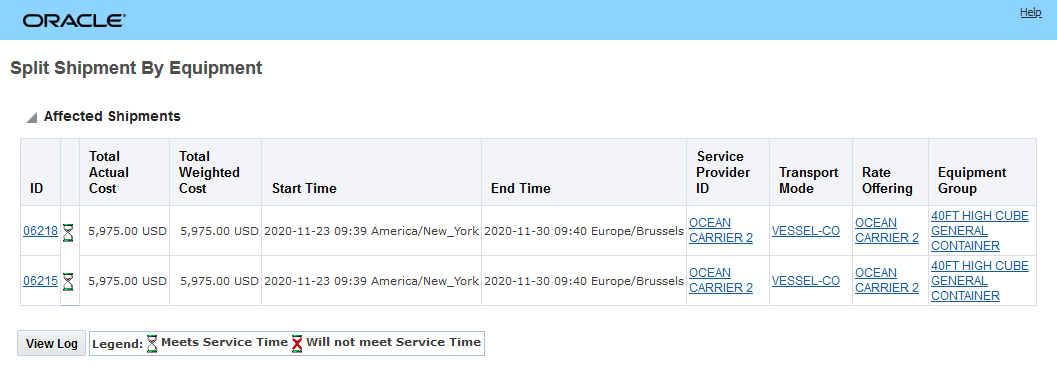
Operational Shuttle Activities Covered by Shuttle Activity Time
In the example below, the modeling needs to estimate the time required to perform all the Shuttle Lot activities mentioned above, plus the additional time required to reload the Box Truck from the Trailer at the Shuttle Lot.
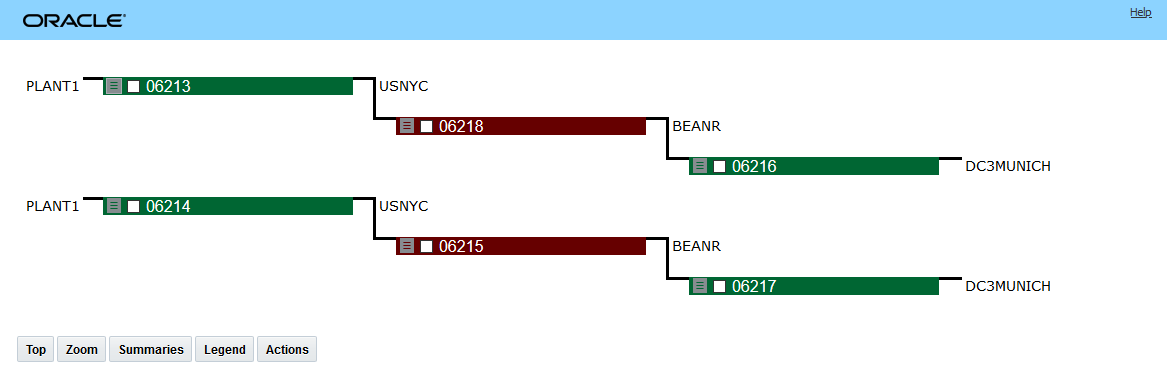
Shuttle Lot Reload Scenario
In the shipment stop view below - stop number 4 - the Shuttle Lot Required Location 01 location - is receiving an order that weighs a little more than the capacity of the Box Truck. In this case - the Shuttle Lot logic and configuration provides you with a way to add a per reload variable time amount to the activity time calculated for this stop to accommodate for the additional reload activities occurring at the shuttle lot to support this scenario. You will notice that stop number 4 now requires 3 hours and 45 minutes of activity time. The 3 hours and 45 minutes includes the 1 hour and 45 minutes of fixed activity time calculated in the first example plus an addition per reload variable time of 2 hours to handle the reloading activities and re-delivery time at this location. While there is quite a lot of physical activity involved in this scenario.
NOTE: OTM only models all this activity in one lump activity time amount on the stop.
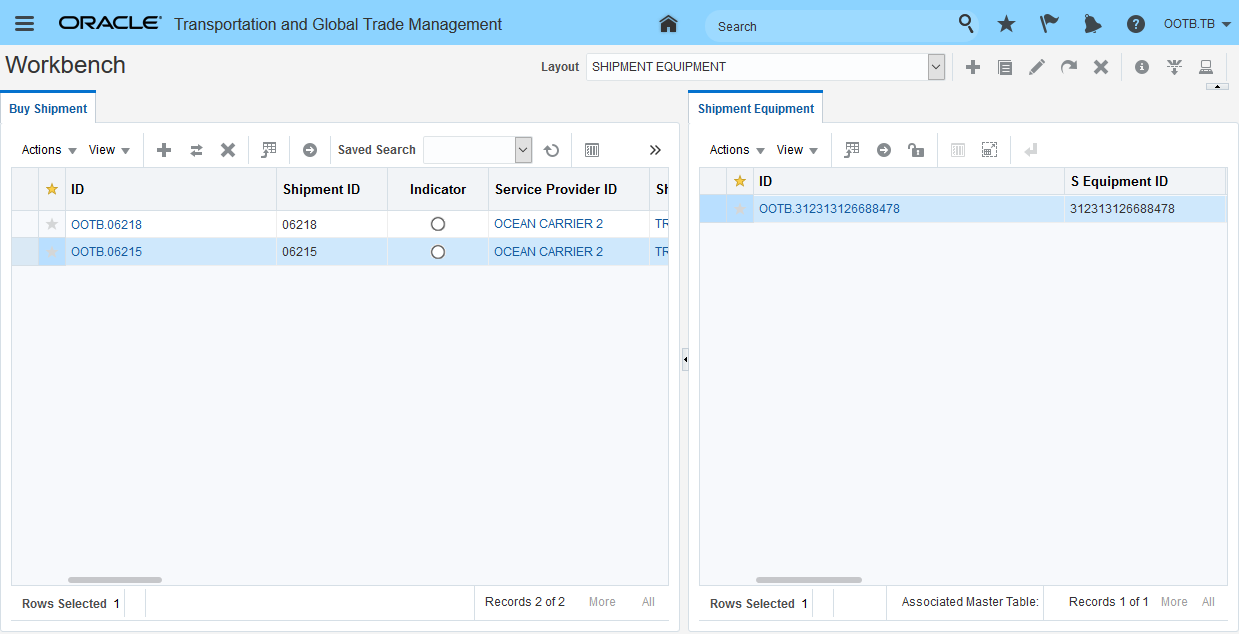
Shuttle Lot Reload Scenario Shipment Stops View
This feature allows you to more accurately model the activity time associated with delivering to constrained locations in your network that can only be serviced by the first child equipment group defined in your combo equipment groups. The ability to configure and account for the equipment compatibility and the activity time requirements for these scenarios allow you to create multi-stop stop solutions that both cost effective and feasible.
Steps to Enable
- Set the parameter CHECK STOP SPECIAL SERVICE IN EQUIPMENT PACKING to True.
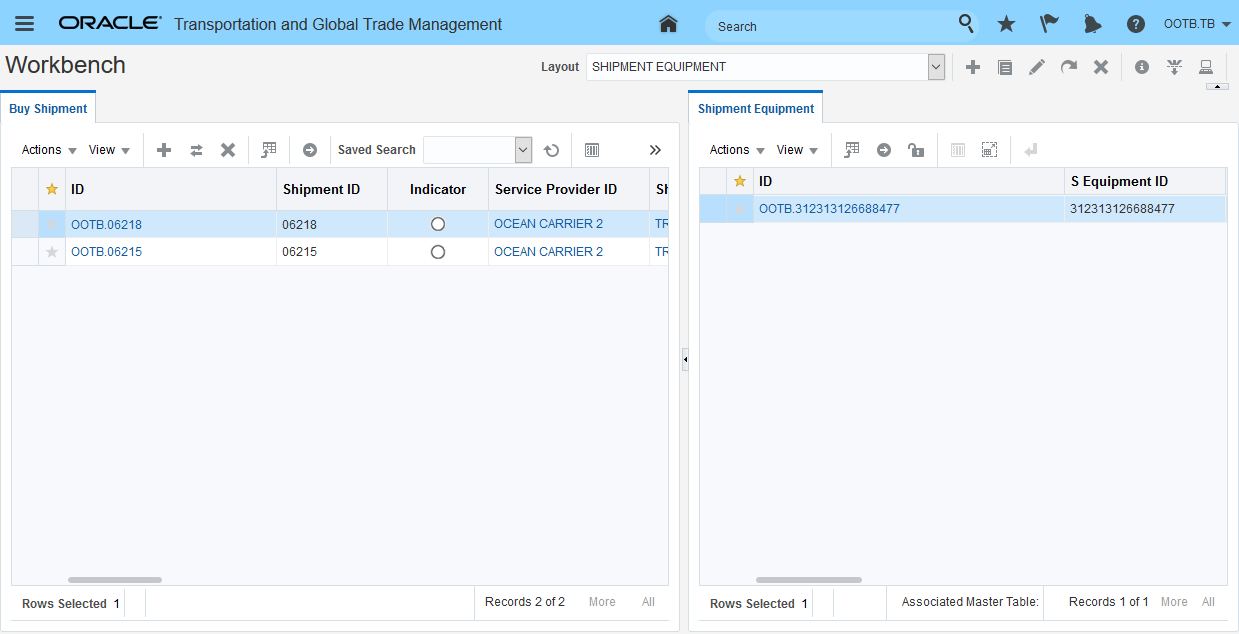
Container Optimization Parameter - Check Stop Special Service in Equipment Packing Set to TRUE
- Define your combination equipment group, Note that Child Equipment Group Sequence number 1 equipment group is expected to be the shuttle delivery truck/box truck which is making the delivery. The capacity of the Child Equipment Group Sequence number 1 equipment group is used to determine the number or reloads (if any) required to service the location.
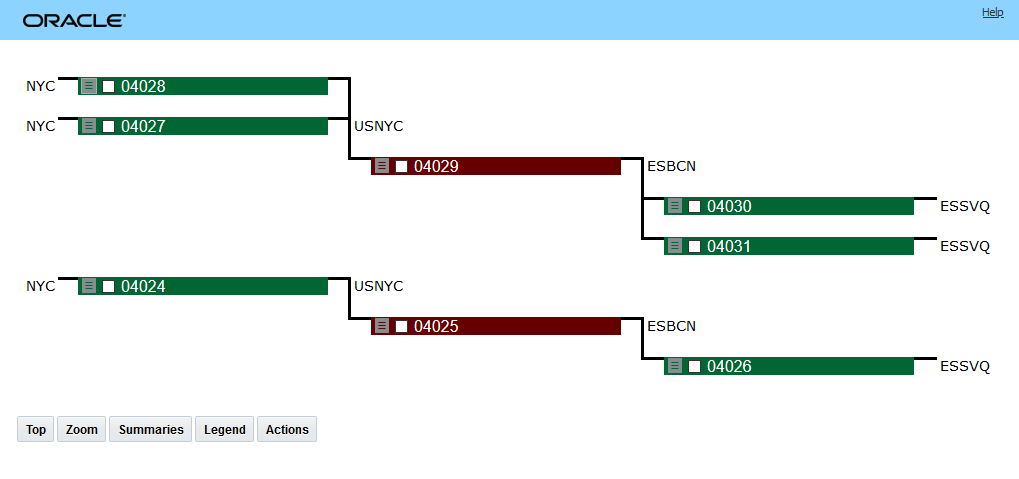
Combination Equipment Group
- Define a shuttle lot equipment group profile.
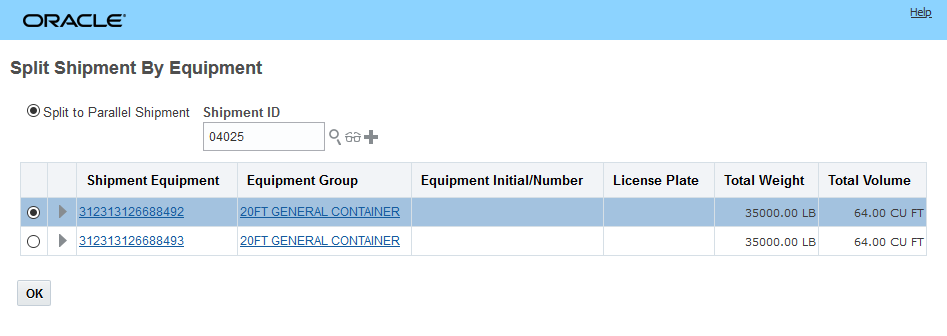
Define Equipment Group Profile
- Assign the Equipment Group Profile and Shuttle Lot Equipment Group Profile to the necessary location(s). The logic looks for the overlapping Equipment Group(s) between the Equipment Group Profile and Shuttle Lot Equipment Group Profile when identifying the Equipment Group(s) to consider. While not restricted on the UI the equipment groups defined in the Shuttle Lot Equipment Group Profile are assumed to be Combination Equipment Groups.
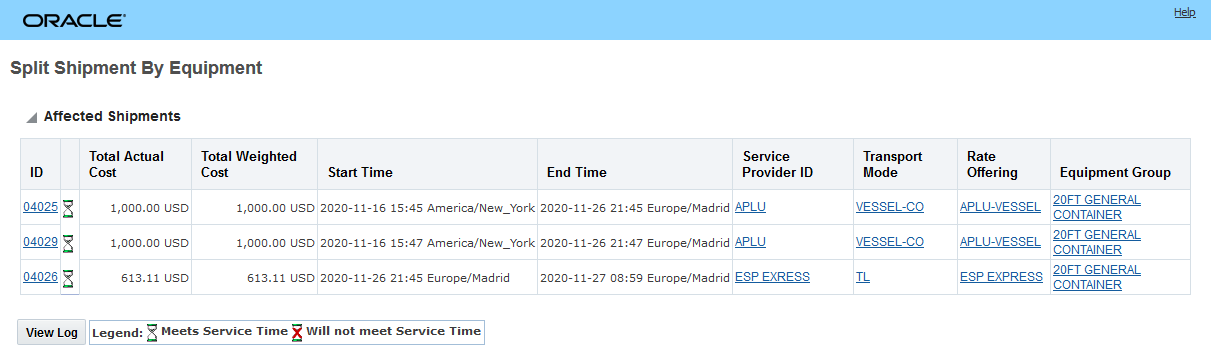
Equipment Group Profile Location Setup
- Define a special service with activity type of "SHUTTLE_LOT".
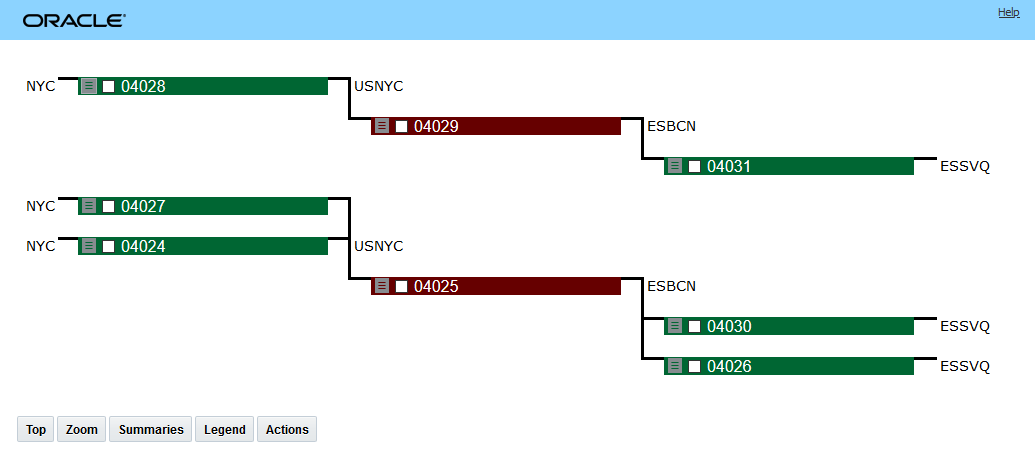
Special Service Configured for Activity Type SHUTTLE_LOT
- On the Location Roles tab, enter your special service.
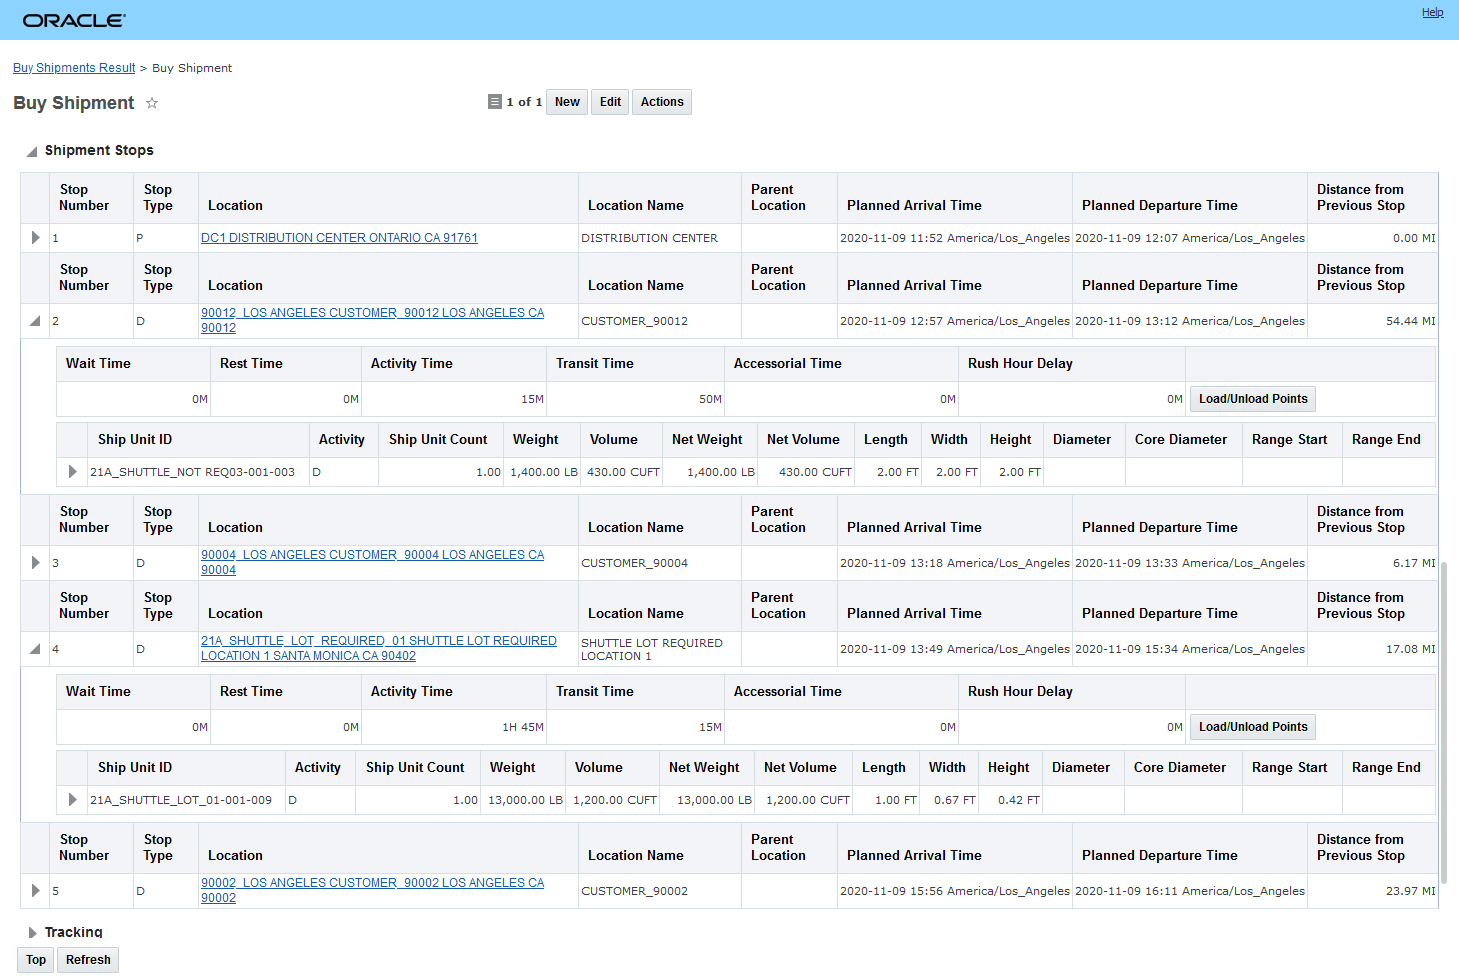
Assign Shuttle Lot Special Service to Location
- On the Location Role Profile, define the fixed and variable activity time for your shuttle lot special service. The fixed duration (not a per-ship-unit duration) specified on the activity time definition is the Shuttle Lot Fixed Time. The variable duration specified on the activity time definition is Shuttle Lot Reload Time. The total reload time is computed by multiplying this reload time with the estimated number of reloads.
NOTE: All other fields on the activity time definition are ignored during shuttle lot activity time computation, i.e. when the activity type of the special service used on the activity time definition is SHUTTLE_LOT.

Activity Time Setup - Location Activity Time Definitions
In the setup below, the highlighted elements are key. The Special Service ID is required to link the service time definition to the Special Service being used with the Shuttle Lot setup and the Fixed Stop Time and Variable Stop Time define the activity time for the shuttling activities.
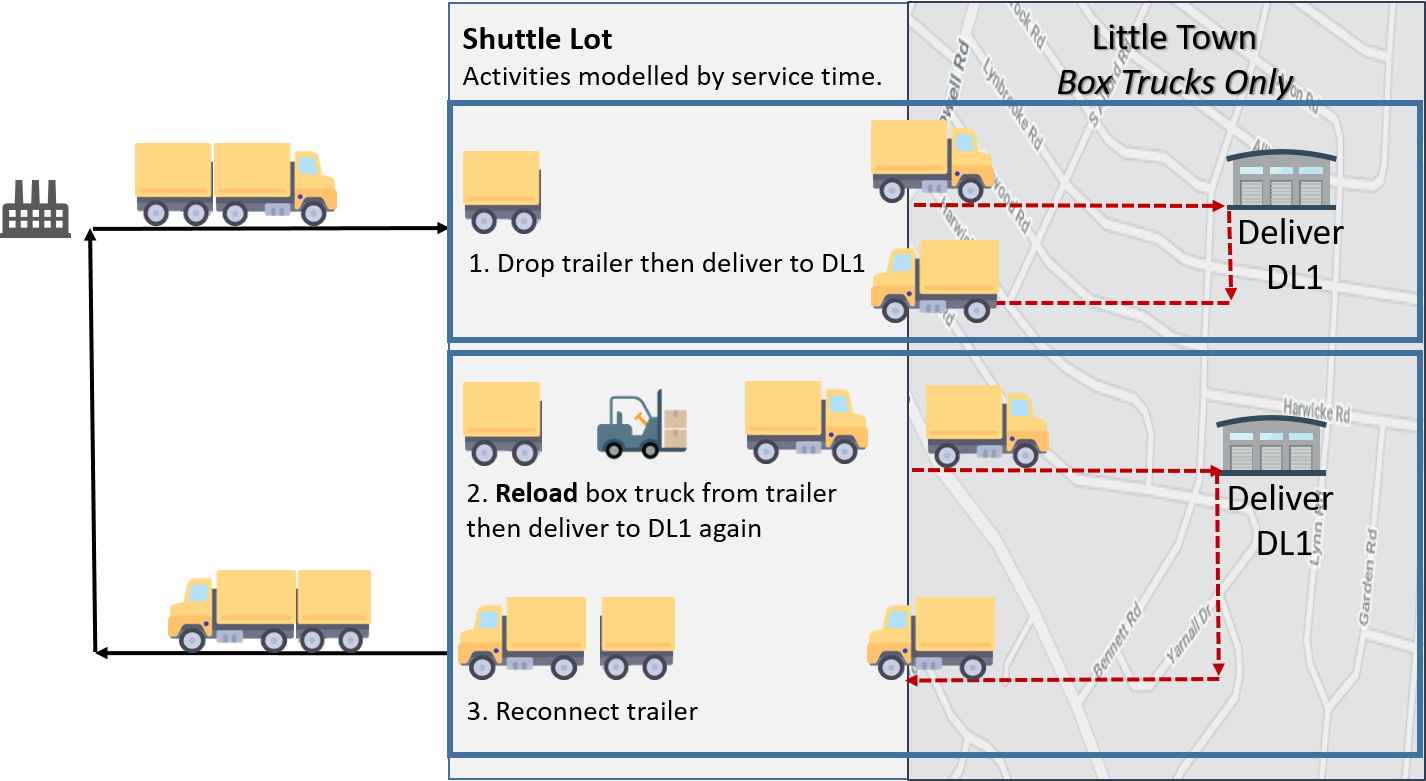
Activity Time Definition
Tips And Considerations
In practice, it may be possible to perform multiple deliveries to multiple locations with the box truck after dropping the trailer at the shuttle lot. While this scenario may be possible in practice, OTM will treat each of these stops as shuttle lot stops and will calculate and add the shuttle activity time to both stops. Assuming a shuttle lot fixed activity time of 1 hour and 45 minutes - both of the deliver stops identified below will have the 1 hour and 45 minute activity time calculated and added to each stop.
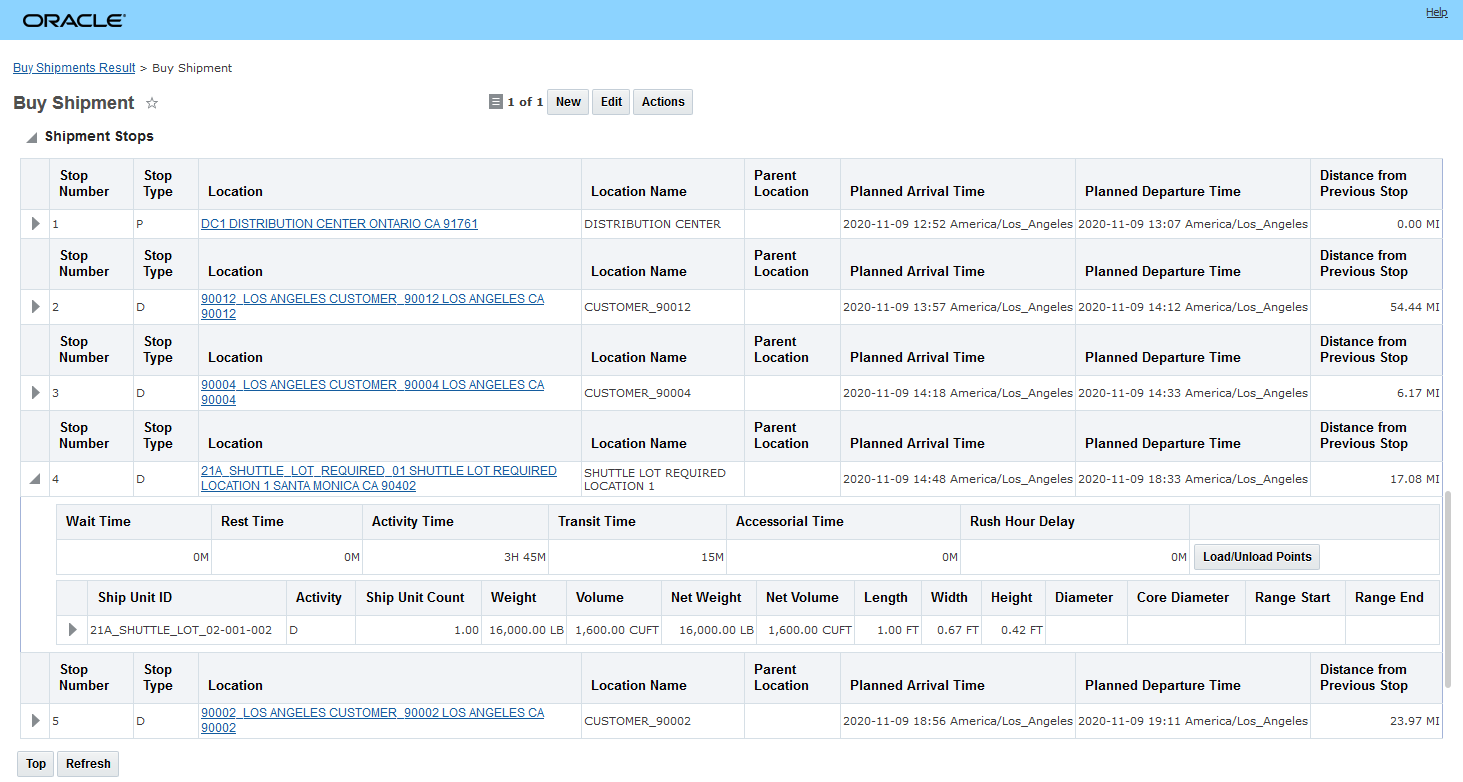
Multi-Stop - Cluster Merge Enhancements
With this feature, the Clustering Merge Multistop Consolidation Algorithm Type option has been improved and now provides you with two options to consider when tuning the algorithm for your multistop problems that involve a high number of stops.
The previously available approach, the Legacy Cluster Building Algorithm (aka Sweep) has been enhanced to include more approaches for resolving shipments that fail to merge using this approach. In addition, this feature also provides you with a new Clustering Merge Multistop Consolidation Algorithm Type option, the MIP Cluster Building Algorithm, that provides a set of tuning options that allow you to adjust the consolidation approach based on a set of common problem attributes e.g., tight time windows, varied equipment group constraints etc.
Specific changes related to this feature include the following.
There is a new Multistop Cluster Merge Group in the Multistop Logic Configuration dedicated to the Cluster Merge Algorithm setup.

Cluster Merge Parameter Group Multistop Logic Config
You can choose to use either the Legacy Cluster Building Algorithm or the new MIP Cluster Building Algorithm.
LEGACY CLUSTER BUILDING ALGORITHM
For this update, the Legacy Cluster Building Algorithm has been enhanced to include strategies for dealing with shipments that fail to merge - previously any failed to merge shipment would be planned using the fallback solution approach.
MIP CLUSTER BUILDING ALGORITHM
The MIP Cluster Building Algorithm is a sophisticated cluster-forming algorithm that considers all the compatibilities among direct shipments and provides more flexibility regarding how the cluster is formed by using the concept of similarity. The similarity concept is controlled using the parameters below. The use of one parameter over another is based on the nature of the problem you are attempting to solve and the unique requirements/similarities presented in the data. The similarity concepts include distance saving, equipment compatibility, priority, rate and time window. These parameters are defined in the Multistop Cluster Merge Group and only apply to the MIP Cluster Building Algorithm.
- MULTISTOP DISTANCE METRIC WEIGHT - This parameter provides a weighting for the distance metric in determining similarity between two direct shipments.
- MULTISTOP EQUIPMENT METRIC WEIGHT - This parameter provides a weighting for the compatible equipment metric for determining similarity between two direct shipments.
- MULTISTOP PRIORITY METRIC WEIGHT - This parameter provides a weighting for the order priority metric for determining similarity between two direct shipments.
- MULTISTOP RATE METRIC WEIGHT - This parameter provides a weighting for the compatible rate metric for determining similarity between two direct shipments.
- MULTISTOP TIME WINDOW METRIC WEIGHT - This parameter provides a weighting for the time window metric for determining similarity between two direct shipments.
The following examples provide some insight into the use of these criteria.
Scenario 1: Cluster based on Time
You have three types of orders: must-go (late delivery date is the same as the early pick-up date), should-go (late delivery date is one or two days after early pick-up date) and can-go (late delivery date is four or five days after early pick-up date). Your business requirement is to put must-go orders into one shipment, and, if there is equipment capacity remaining, put some should-go or can-go orders into the shipment as well. In this case, providing a weighting for MULTISTOP TIME WINDOW METRIC WEIGHT makes sense.
Scenario 2: Cluster based on Compatible Equipment
You need to send goods from one distribution center to multiple destinations in one region, and the destination locations mostly are compatible with both large and small capacity equipment groups. The challenge is that some locations can only handle the smaller equipment groups. The business requirement is to build multi-stop shipments based on the destination location's equipment constraint. In this case, providing a weighting for the MULTISTOP EQUIPMENT METRIC WEIGHT makes sense.
MULTISTOP CLUSTER MERGE STRATEGY
The cluster merge algorithm can be divided into two major steps: forming clusters and building multi-stop shipments for those clusters. In the multi-stop shipment building process for a cluster, there could be cases where direct shipments fail to merge into the multi-stop shipment for that cluster. The parameter MULTISTOP CLUSTER MERGE STRATEGY is used to configure how OTM handles those failed-to-merge direct shipments.
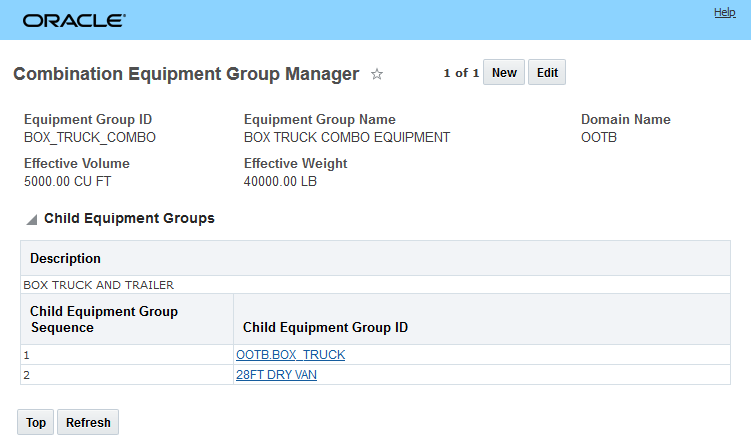
Multi-Stop Cluster Merge Strategy
This parameter determines how OTM handles those failed to merge direct shipments. The options are:
- Value set to 0. Use cleanup cluster: OTM collects all the failed-to-merge direct shipments, and runs another iteration of forming clusters & building multi-stop shipments from clusters.
- Value set to 1. Push to next cluster: OTM re-assigns the failed-to-merge shipment to the unplanned cluster that is the most similar to the shipment.
- Value set to 2. Iterate cluster generation: OTM collected the failed-to-merge shipment together with all the not-yet-consolidated direct shipments and runs another iteration of forming clusters and building multi-stop shipments from clusters iteration.
This feature provides you with an additional set of multistop algorithms designed to support problems that involve a high number of stops.
Steps to Enable
You don't need to do anything to enable this feature.
Tips And Considerations
The additional Multistop Cluster Merge algorithms are intended for problems that involve shipments with a higher number of stops. If you have multistop problems where the existing algorithm options - Concurrent Savings, Sequential Savings etc. are not producing either satisfactory solutions and/or providing satisfactory run-time results, then you should consider investigating the Cluster Merge options.
Key Resources
- For more information see the Help topic "Bulk Plan Multi-stop Shipment Clustering Merge Algorithm" for more information and guidance related to using these algorithms.
Load Configuration 3D Pattern/User Defined Pattern Enhancement
This feature provides you with a set of improvements related to defining your Load Configuration 3D Patterns (User Defined Patterns). All User Defined Patterns will now have a Pattern Type (Row, Stack, Full) assigned to them. Your current User Defined Patterns will be migrated to the default value of Row. The persistence of the Equipment Group associated with your User Defined Pattern has also been enhanced to support the various options available for defining and saving your User Defined Patterns.
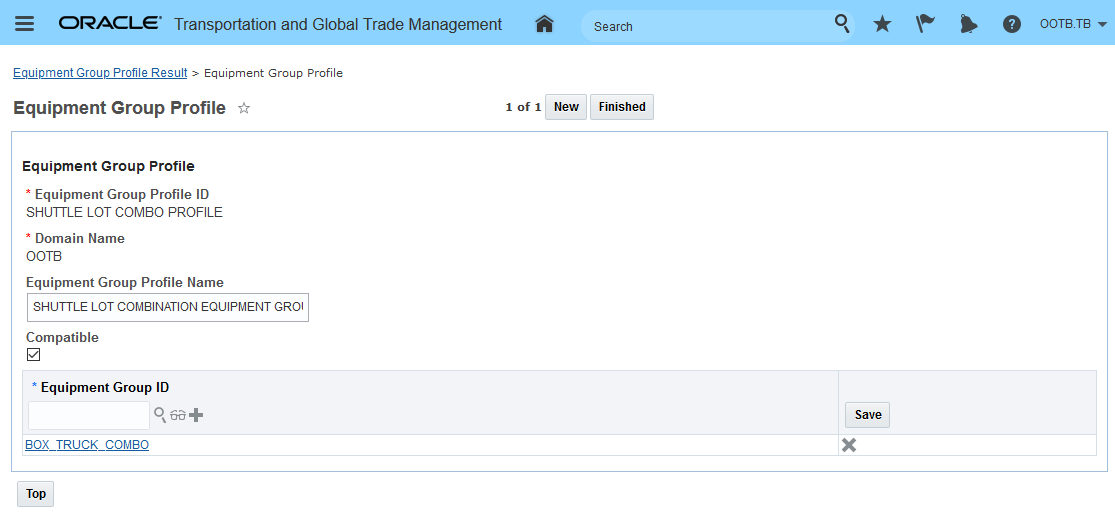
Load Configuration 3D Pattern UI
The Pattern Type can be one of the following:
- Row - Should be assigned to user defined patterns used to fill a row (or "wall") in the container, which will then be filled out by other rows or individual items (default)
- Stack - Future pattern type/not yet supported. This Pattern Type will be related to patterns where an individual stack can be used to fill out a row along with other stacks
- Full - Should be assigned to user defined patterns used to fill the entire container, so only one pattern is used for a container
NOTE: Pattern Type is not related to any Load Configuration logic - Pattern Type (for now) is only used to classify your patterns. The Pattern Type field cannot be NULL, the default value in the UI is Row. All existing patterns will be have their Pattern Type set to Row as part of the upgrade.
The enhancements related to Equipment Group involve changes to how this optional field is set and persisted. The Equipment Group assigned to your User Defined Pattern should represent the equipment group that the pattern has been built for, as such it makes the most sense for Full pattern types, but could also be used for Rows and Stacks.
Depending on the approach used for defining your User Defined Pattern the Pattern Type and Equipment Group fields will be set as follows:
- When creating a User Defined Pattern from scratch the values will be set as follows:
- the Pattern Type field will be automatically set to Row
- the Equipment Group field will be set from the Equipment Group on that UI
- When creating a User Defined Pattern from Ask Conopt the values will be set as follows:
- the Pattern Type field will be automatically set to Full
- the Equipment Group field will be set to the selected Equipment Group
- When creating a User Defined Pattern from a shipment the values will be set as follows:
- the Pattern Type field will be automatically set to Full
- the Equipment Group field will be set to the Equipment Group from the shipment.
This enhancement provides you with an easy way to classify the intended usage of your User Defined Patterns that will simplify the selection and usage of the available patterns.
Steps to Enable
You don't need to do anything to enable this feature.
Edit Load Config Additional Packing Constraints
This feature expands the packing constraints considered with the Edit Load Config tool to include - in addition to the checks provided previously for Space check and Placement check - the six additional packing constraint checks listed below.
Additional checks added:
- Curvature check (equipment with curved roofs)
- Orientation check (Orientation on LC setup)
- Floor Compatibility check (maximum stacking height permitted)
- Stacking Constraint check (stacking above, stacking below)
- Stacking Height check (max stacking height defined on LC setup)
- Stacking Layer check (number of layers that can be stacked)
The available constraints are checked when an item orientation or placement are modified. In the example below, the Curvature check fails (along with a few other checks) when an attempt is made to move an item to the outer edges of the container - where the roof curves down.
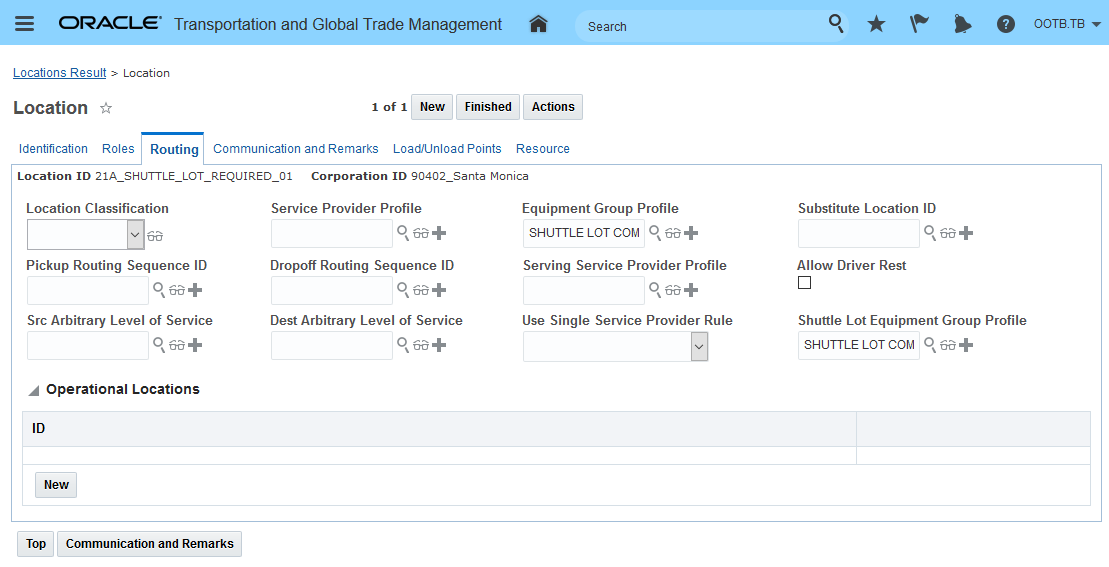
Curvature Check Failed
In the example below, the Orientation check fails.

Orientation Check Failure
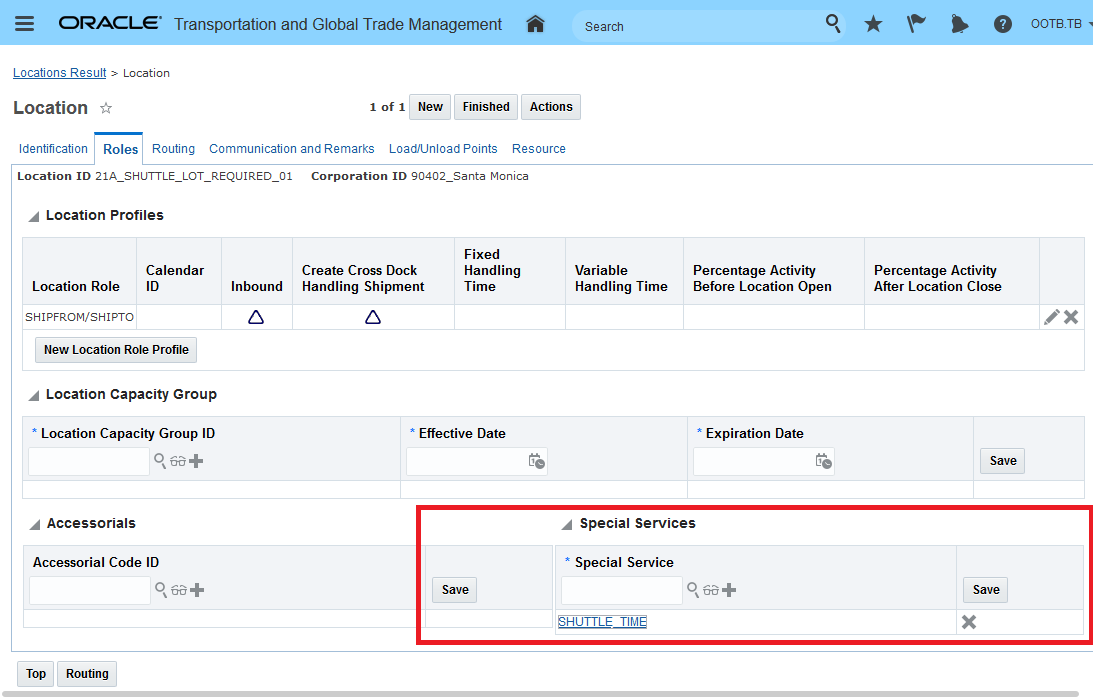
Orientation Check Failure Message
All of the additional checks operate in a similar fashion. You have the option to not check the constraints if you desire. This can be done by unchecking the Check Constraints option.
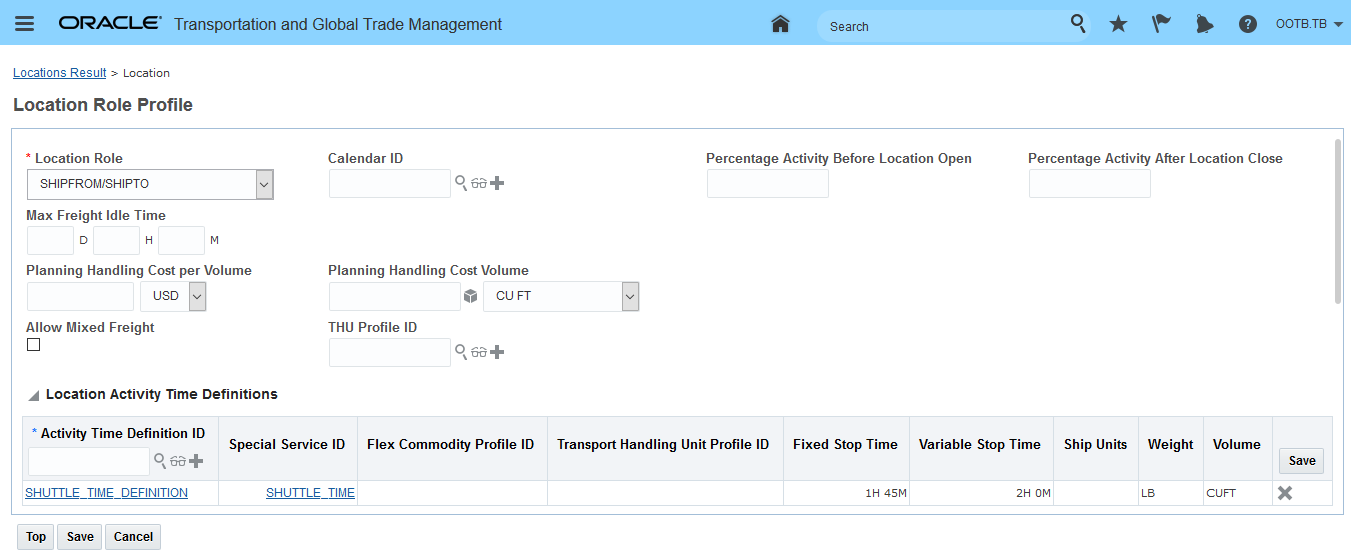
Uncheck Check Constraints Option
This feature helps insure that your edited load configurations are feasible based on a set of packing constraints.
Steps to Enable
You don't need to do anything to enable this feature.
Tips And Considerations
Note that the following constraints are not considered:
- Load Bearing Weight check
- Max Side Weight check
- Number of Items Directly Below check
- No Loading Split Items Below check
The Save As User-defined Pattern feature provides you with the option of saving your shipment's 3D loading configuration as a User-defined Pattern. Once saved as a User-defined Pattern, the pattern can be considered in future planning runs. The Save as User-defined Pattern option is available when you select the (View) Load Config action for your shipments.
To save a user defined pattern you will need to use the View Load Config option.
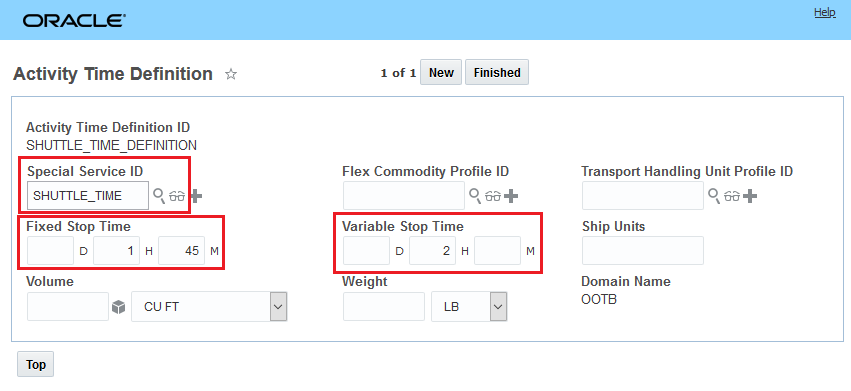
Load Config Action
After the action is run - the option for saving the load config solution as user-defined pattern is provided as one of the actions.
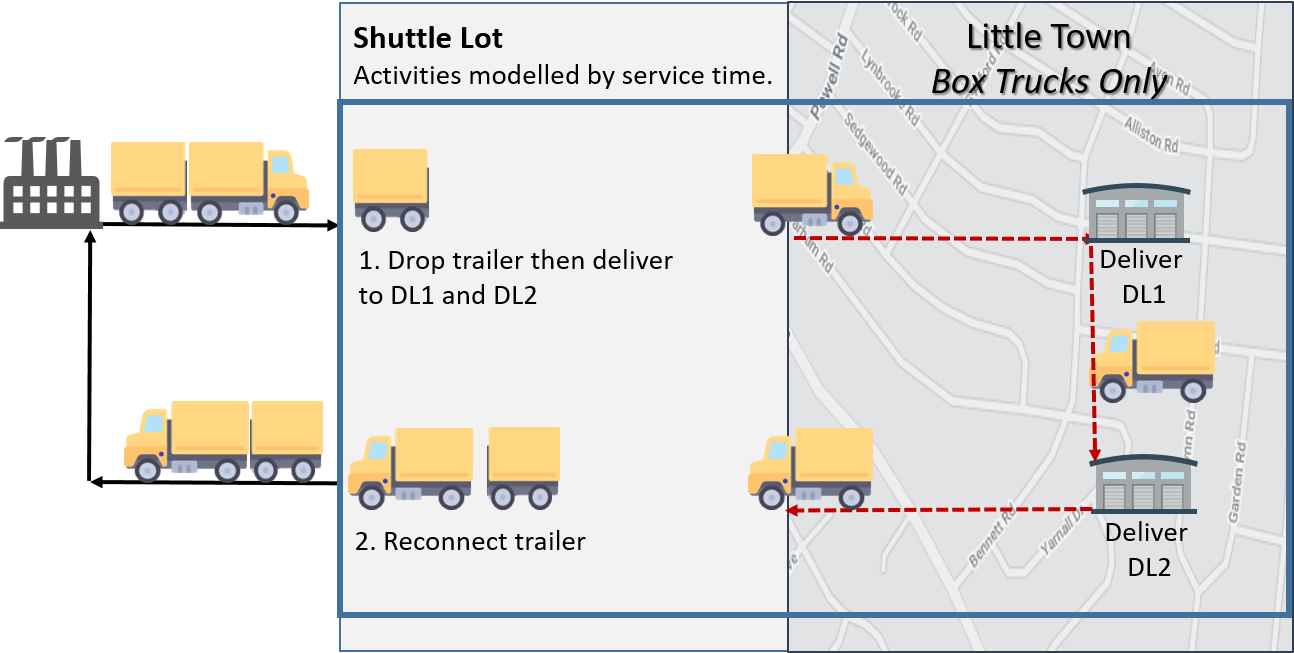
Save As User-Defined Pattern
Depending on your use case, you can save the pattern either as a User-defined Pattern using either Packaged Items or Transport Handling Units.
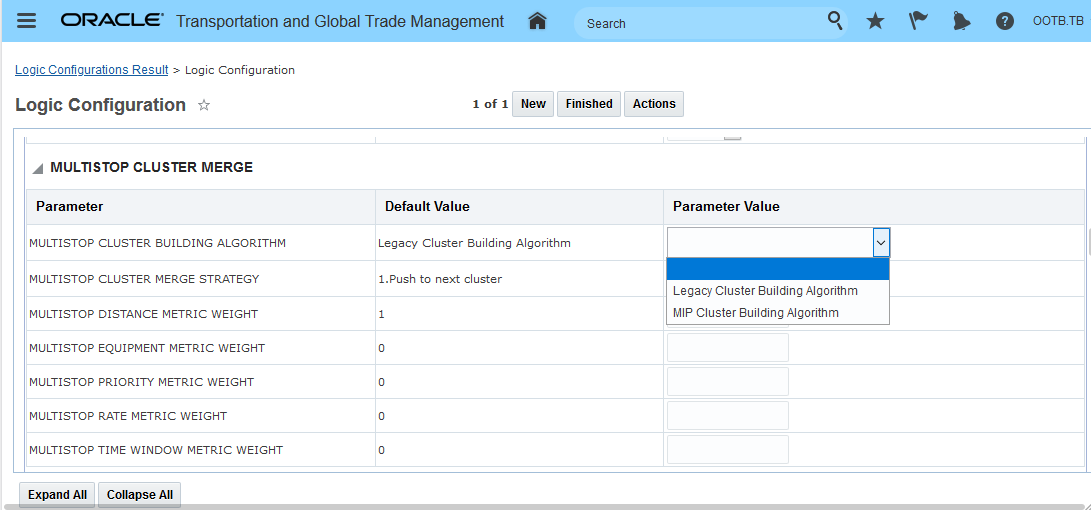
Save As User-Defined Pattern - Save Dialog Box
Below is the confirmation of the saved result. The Confirmation - when successful - will provide you with a link to the saved User-defined Pattern.
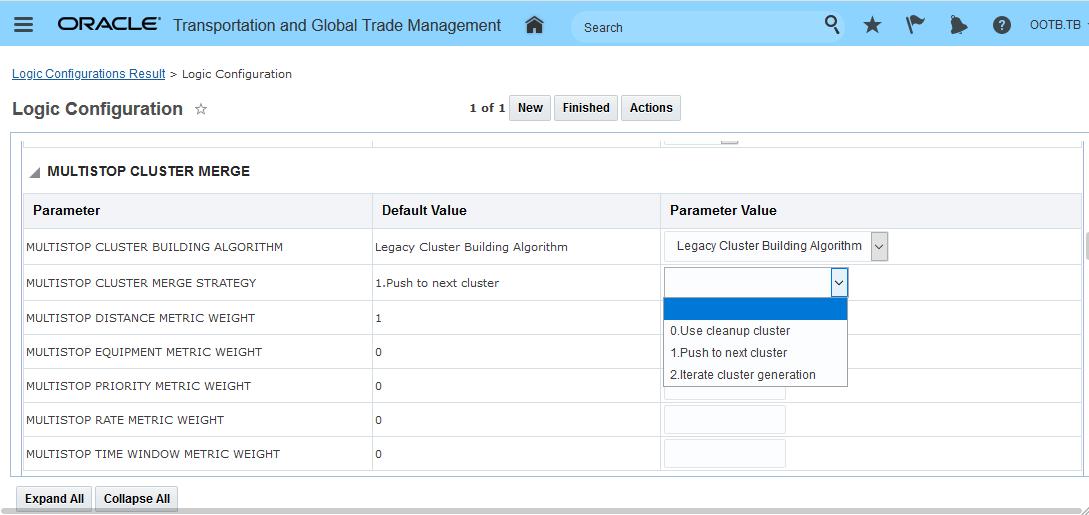
There are various situations where an error may occur during the saving on the User-defined Pattern. Errors include the following:
-
Load Config 3D ID already exists: If the user tries to save the pattern using an existing Load Config 3D Pattern ID.
-
Packaged Items not defined: If any of the PIs is null while saving using Packaged Items.
- Packaged Items do not match the SU dimensions: If any of the PIs and its ship unit dimensions do not match.
- For example: a ship unit with TiHi or with multiple PIs, when PI dimensions are manually overridden by SU dimensions.
-
Transport handling Units not defined: If any of the THUs is null while saving using Transport Handling Units.
- Transport handling Units do not match the SU Dimensions: If any of the THUs dimensions and its ship unit dimensions do not match.
- For example, when THU dimensions are manually overridden by SU dimensions.
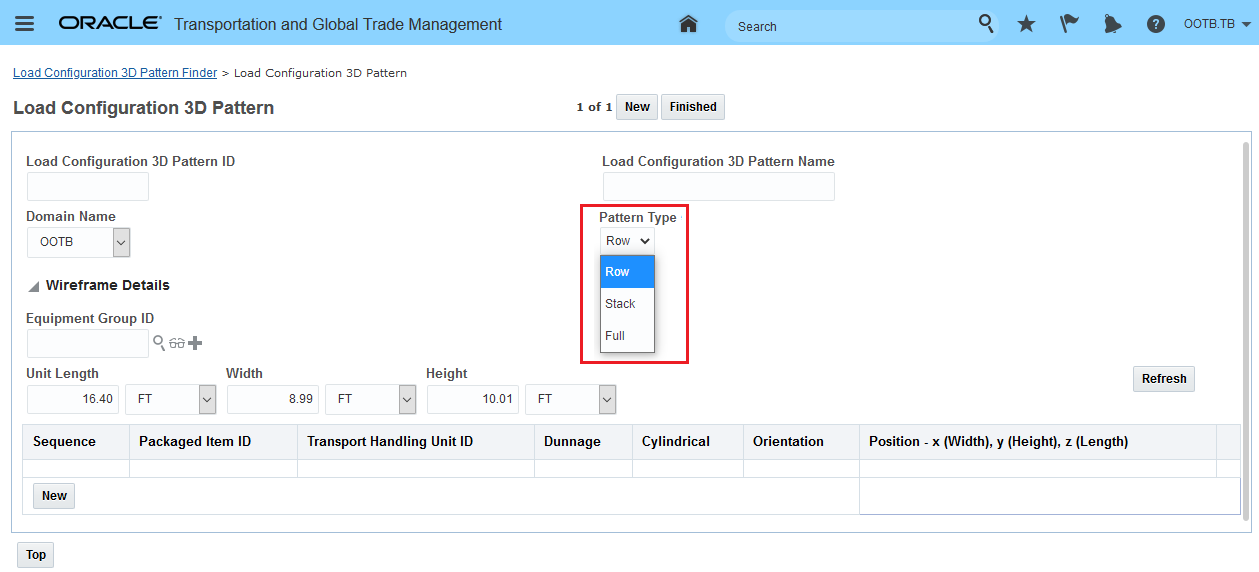
Save As User-Defined Pattern - Save Result
This feature provides you with a direct method for saving OTM generated load configuration solutions as user defined patterns. The ability to easily review and save desirable user defined patterns will save time in the generation of desirable patterns and the use of User-Defined Patterns in planning will help reduce run-time and improve solution quality.
Steps to Enable
You don't need to do anything to enable this feature.
Tips And Considerations
Note the following limitations and requirements for using this feature:
- This feature does not support multi-compartment saving.
- Obstructions and Dunnages are not saved.
- In order to use the saved User-defined Patterns, your Container Optimization logic configuration should not have the parameter 'CONSIDER SCORING LOGIC IN 3D PLACEMENT' set to 'true'.
Freight Payment, Billing, and Claims
Split Financials - Invoice and Bill
This feature provides you with the ability to support settlement scenarios where the requirements call for the generation and settlement of multiple invoices against a single buy side shipment and/or on the sell side - the splitting/generating of multiple bills against a single sell side shipment.
-
On the buy side, this feature provides the ability to split invoices based on currency, involved party, order owner, order refnum, order remark, payment method, and Incoterm.
- On the sell side, this feature provides the ability to generate split bills based on currency, bill to party, involved party, cost identifier, reference number, remarks, and Incoterm.
Multiple Invoices Involved Party Split
The auto-generation and settlement of multiple Invoices for a single buy-side shipment is a common practice in Europe. In the example below, two different business units (identified as Involved Parties on the orders) are consolidated into one buy side shipment. The settlement process for this single buy side shipment requires that two separate invoices be generated and settled (approved and vouchered) based on the allocated cost calculated for the two orders from the two business units (Involved Parties) participating in this shipment.
In the example below, the Split Financial functionality will be used to split the three costs below for shipment 06221 into two invoices split by the involved parties on the order and proportioned based on an order release level ship unit count allocation.
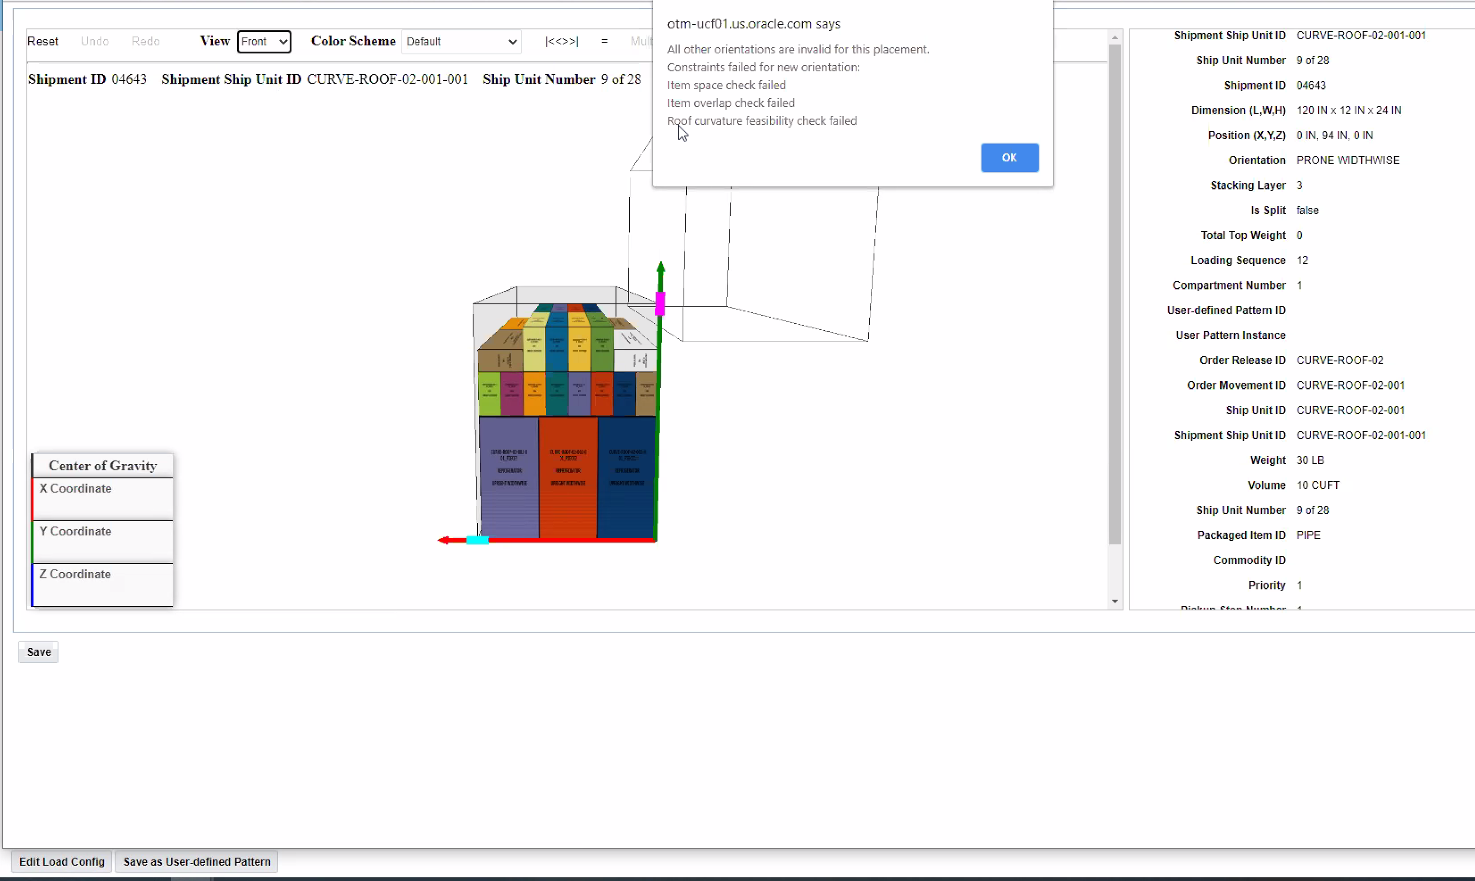
Shipment
Below are the resulting Invoices for the two involved parties with the charges split based on ship unit count allocation with one involved party having 20 shipment units and the other involved party having 40 ship units. In this example, the source for the cost information is from the order allocation of the shipment cost that is then grouped into the two invoices by involved party.
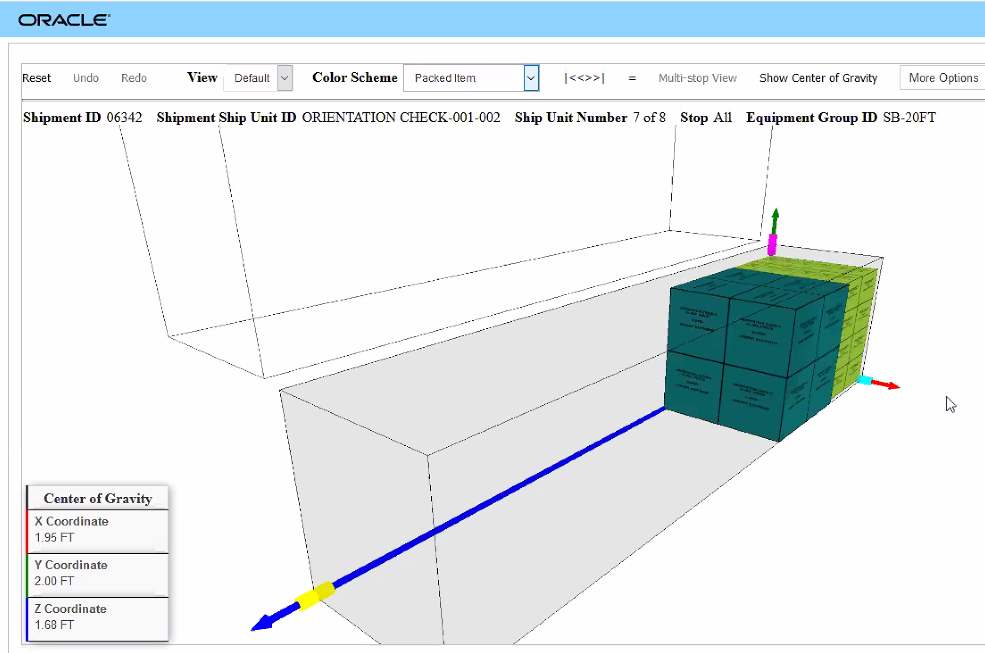
Split Financial Generated Invoices
The key for generating the split invoice and bill is the configuration of the Invoice/Bill Rule. The Invoice/Bill Rule (previously called Split Rule) is used to configure how to match an Invoice/Bill Rule to a shipment, determine the source for the cost/charges to include in the invoice/bill, the involved parties to assign and the grouping logic to use for generating the split bills and invoices.
The Invoice/Bill Rule is accessed via Financials > Power Data > General > Invoice/Bill Rule.
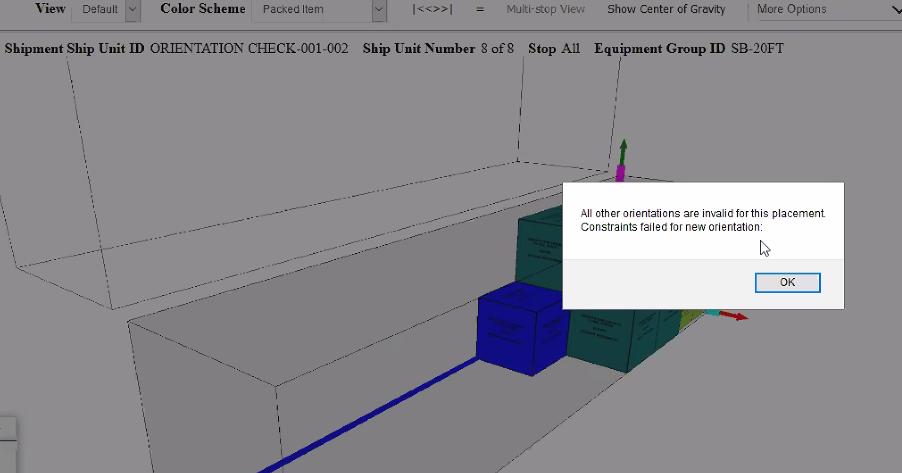
Invoice/Split Rule
The key information configured in the Invoice/Split Rule includes:
- The rule type - invoice or bill.
- The Invoice Line Origin - where is cost/charge source for the invoice/bill. Options available:
- Shipment Cost. OTM generates one invoice for each cost line.
- Order Release Allocation: OTM uses the order allocation records to generate an invoice or a bill. A separate invoice or bill is created for each allocation record of the order release.
- Order Release Line Allocation: OTM uses the order release line allocation records to generate an invoice or a bill.
- Order Base Line Allocation: OTM uses the order base line allocation records to generate an invoice or a bill.
- Bill To Party Assignment - used to assign the bill to party/Involved Party Qualifier to each cost. This is key for logistics service provider scenarios where specific charges are billed to specific parties to a shipment based - often - on Incoterms.
- Line Grouping Constraint Set - used to define the logic used for grouping lines (charges/cost).
Below is the Invoice/Split Rule used for the split invoice example. The invoice Line Origin is based on Order Release Allocation, in this case, there is no need to assign Involved Parties to specific Cost Types and no Bill To Party Assignment is provided/needed. The Line Grouping Constraint Set is used to group the order release allocated cost into the invoices that are generated.
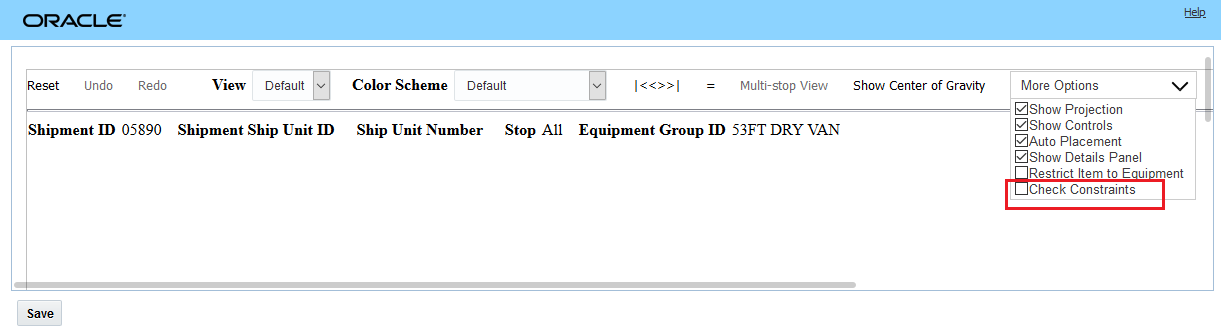
Invoice/Split Rule - Split Invoice
The Line Grouping Constraint Set used with the split invoice Invoice/Bill Rule. In this example, the grouping of the order release allocation is being done based on the Involved Party Qualifier of Bill-To. Each of the orders in this scenario has a Bill-To assigned.
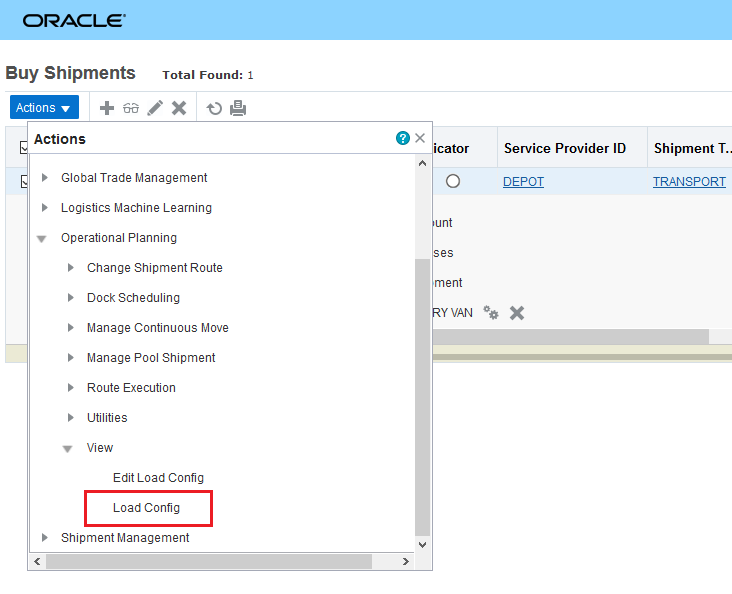
Line Grouping Constraint Set
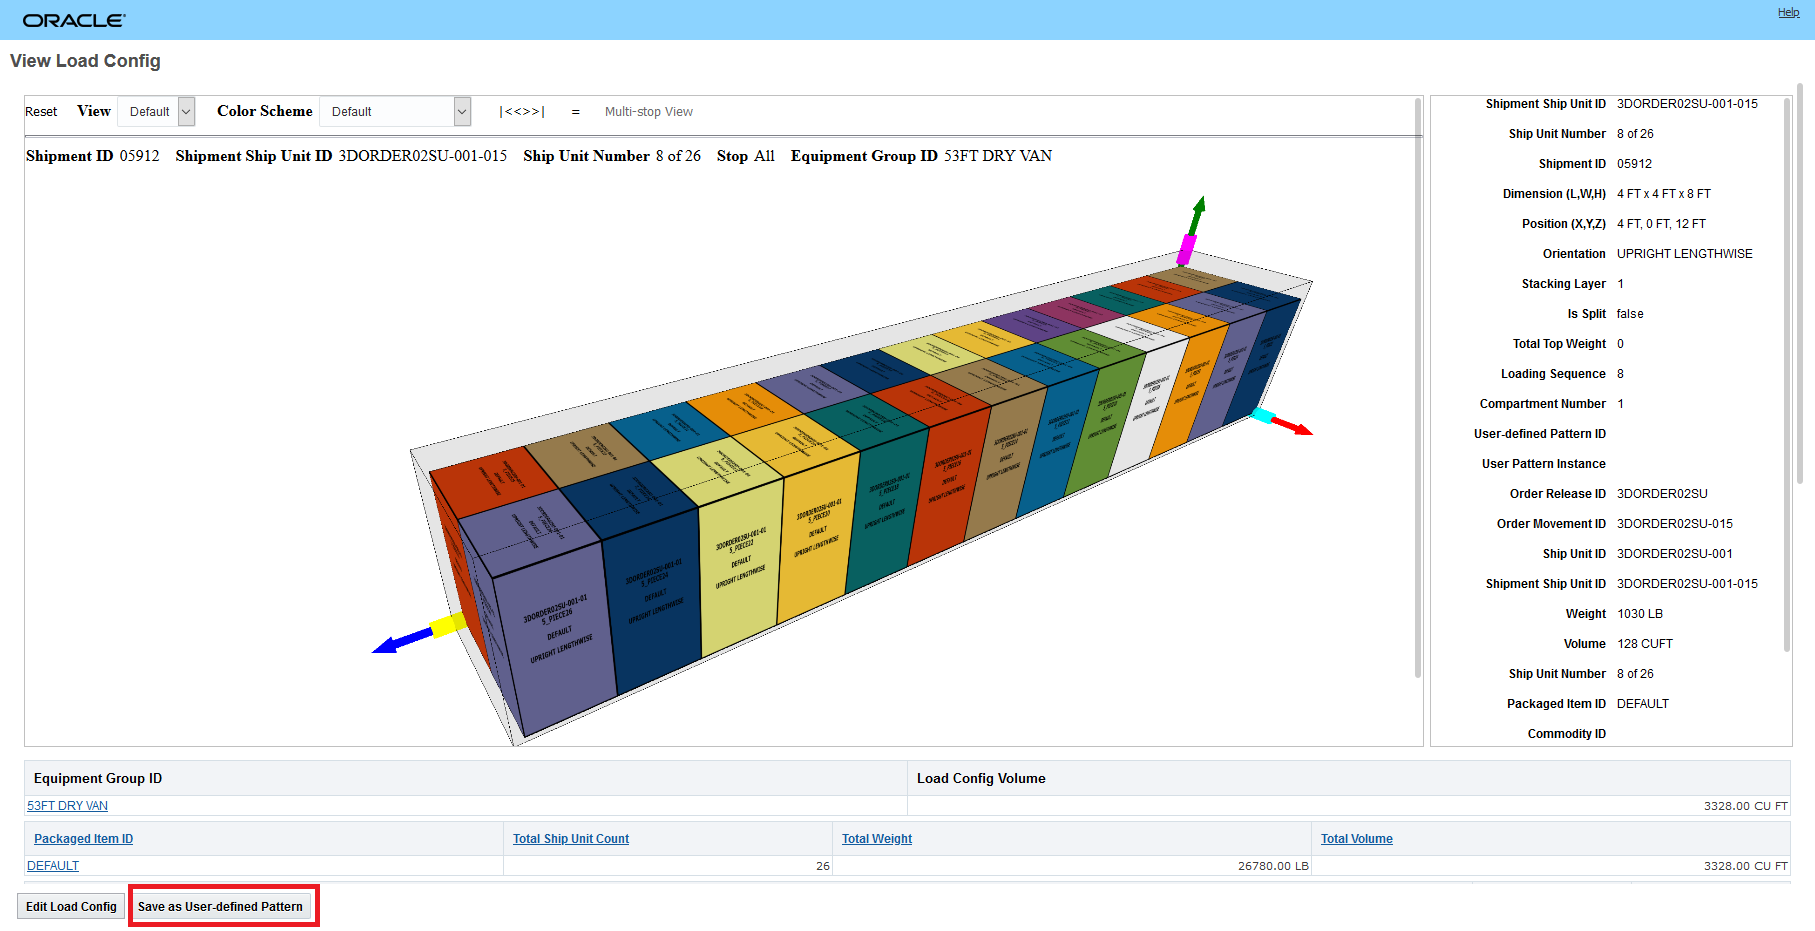
Bill-To Involved Party Order 1
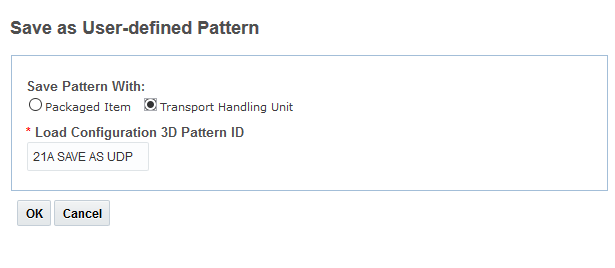
Bill-To Involved Party Order 2
The generation of the invoices using the Invoice/Bill Rule follows the same process as before, but in this case a Workbench is used to demonstrate. The two order releases for the two business units are on shipment 06221, the cost have been allocated to the order release. Run the action Create Invoice.
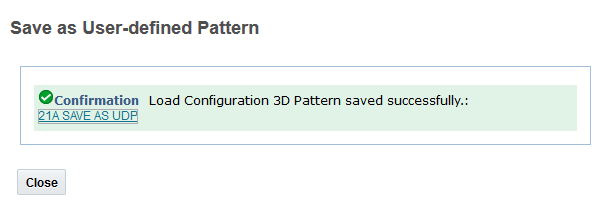
Create Invoice Action
Action input - either allow the system to find a matching Invoice/Bill Rule or input the rule to use. In this case the rule to use was entered.
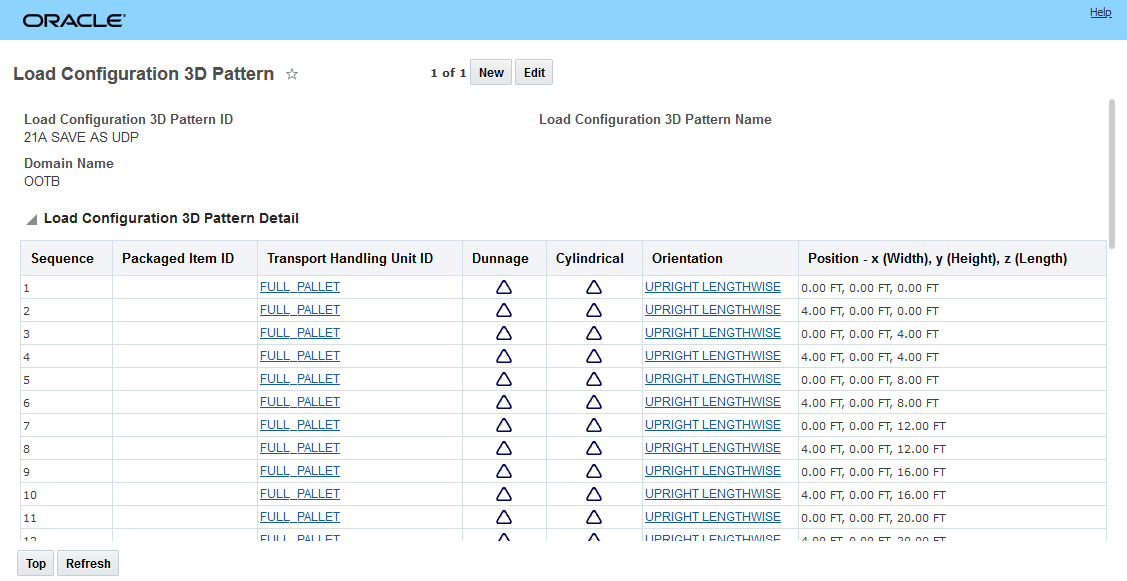
Create Invoice Action Input
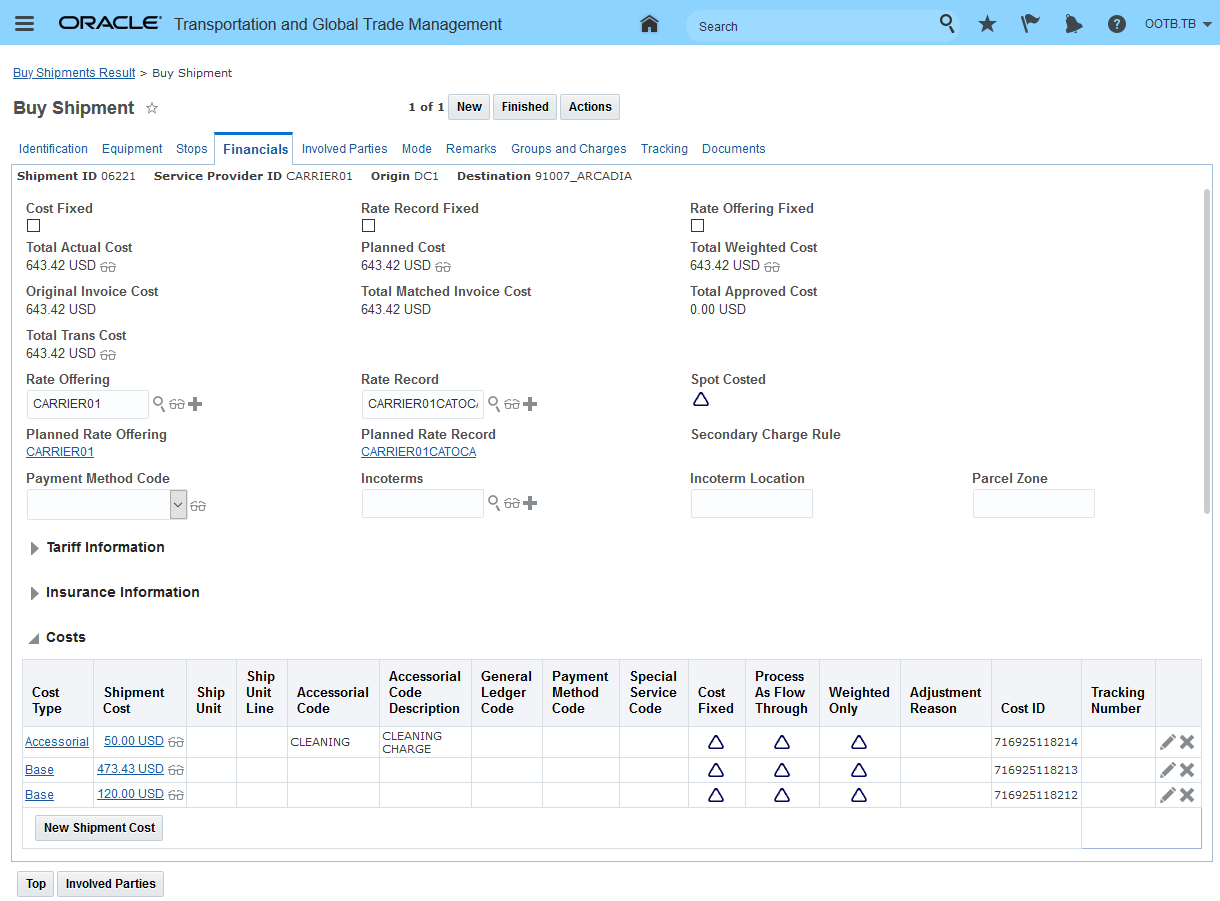
Create Invoice Action Result
In the Workbench view, the result is the two order releases on the one shipment generating two invoices.

Create Invoice Action Result Workbench
The invoices contain the allocated costs for each of the two Bill-To Involved parties.
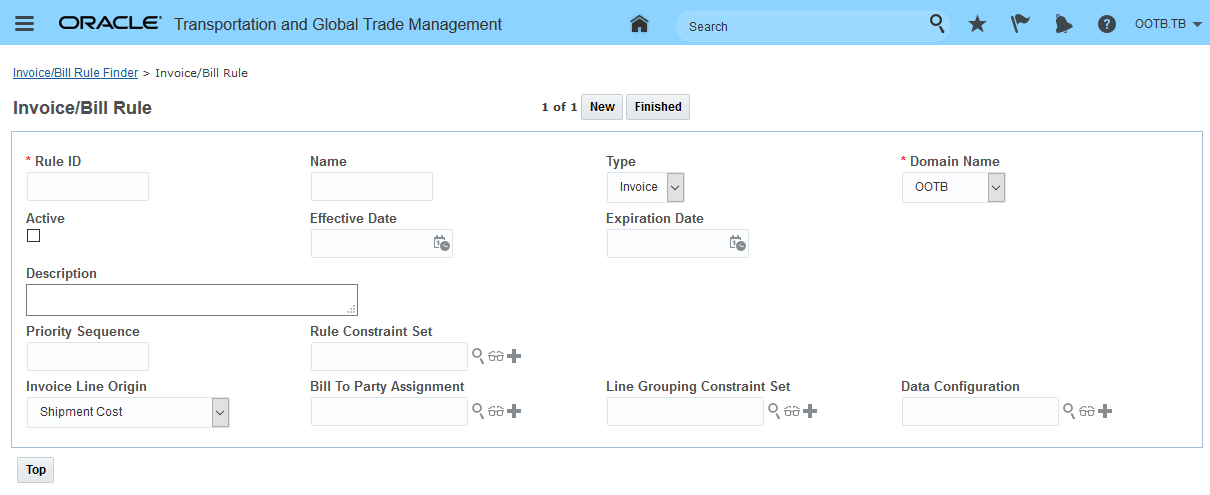
Invoice for Bill-To Involved Party Business Unit 01

Invoice for Bill-To Involved Party Business Unit 02
SELL SIDE SPLIT BILL
The single sell side shipment multiple bill capability supports the case where you, the Logistics Service Provider - are required by your customer to split and bill for charges based on agreed to attributes related to the work being done. In the example below, the customer requires accessorial charges to be billed separately from the related base freight charges. For this example, the sell side shipment has the charges below - two accessorials, one related to documentation and a second for security and then a fixed and variable base freight charge. In this case, the desire is to split out the charges by cost type (Base and Accessorial).
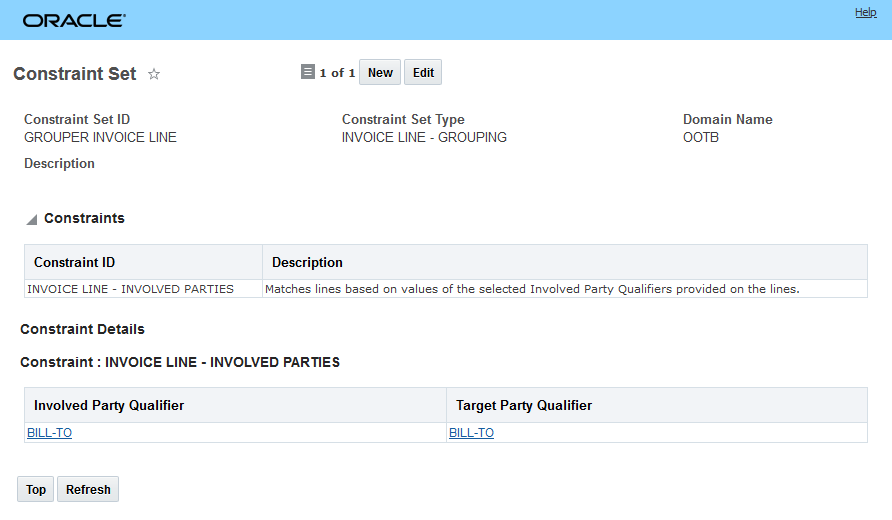
Sell Side Shipment
The required bills for this shipment are below.
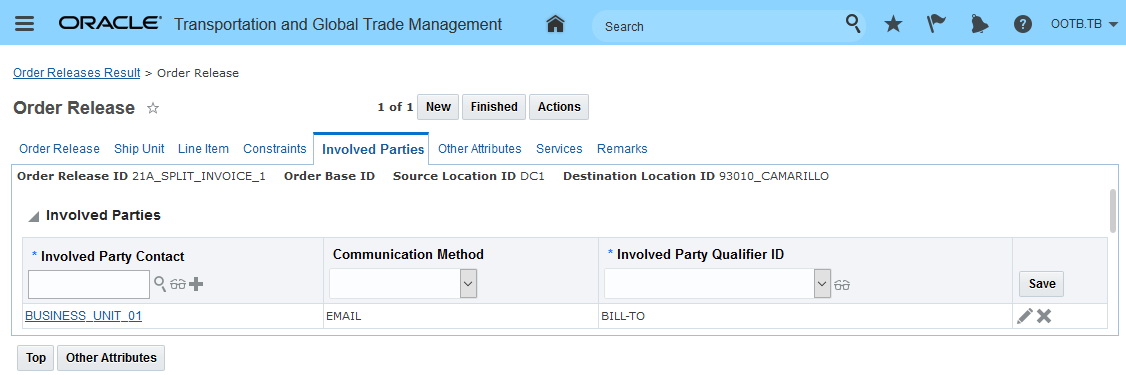
Bills Generated
The bills for the sell side shipment were generated using the Invoice/Bill Rule below.

The Line Grouping Constraint Set is below.
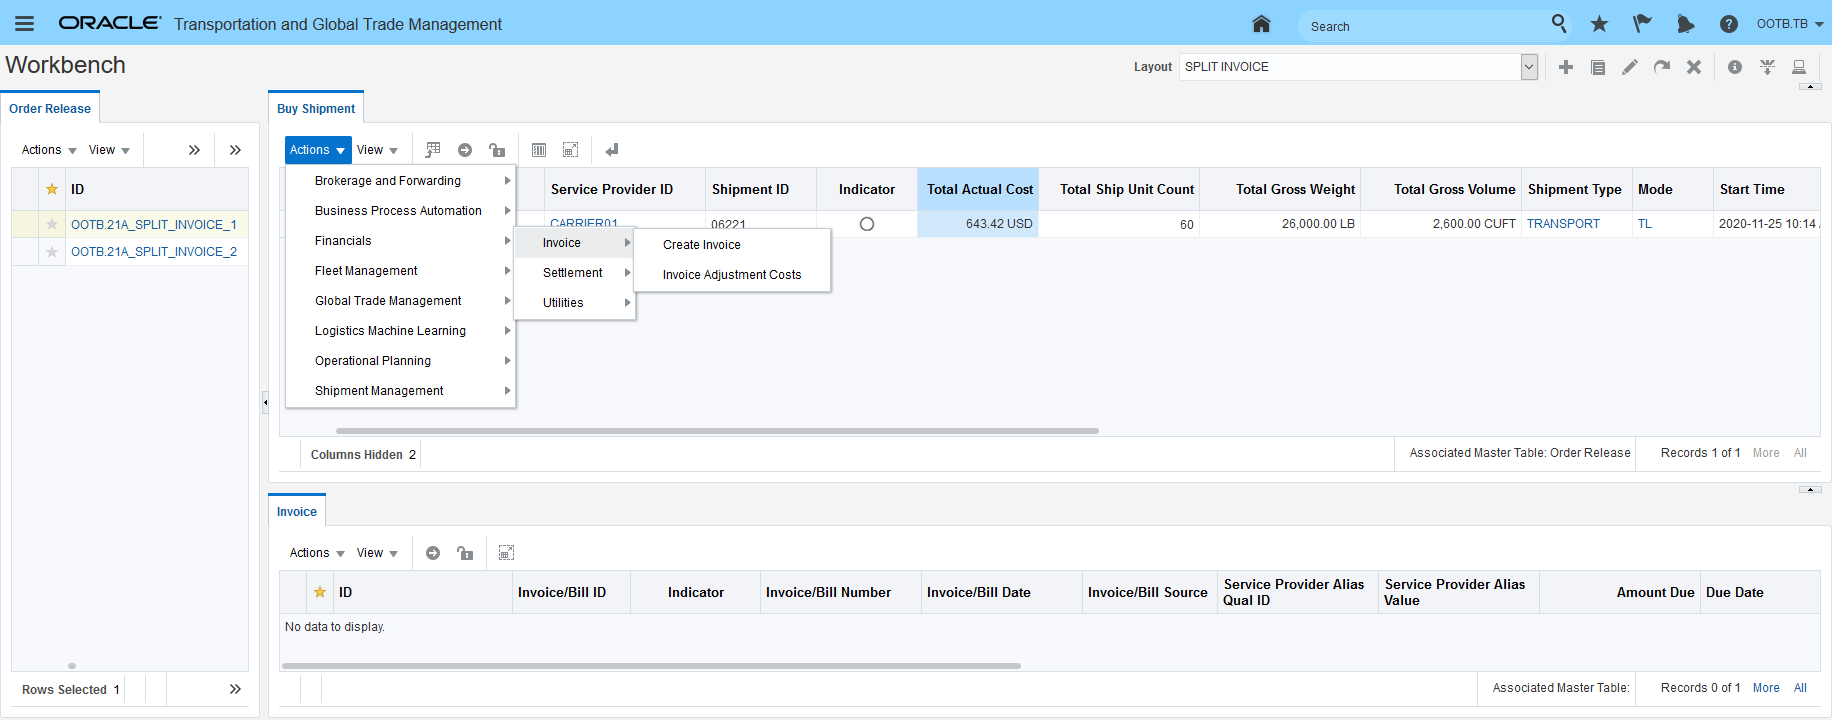
Line Grouping Constraint Set
In the example below, the requirement is to generate three different bills for the charges on the shipment for the three different involved parties to the shipment - Shipper, Consignee and Customer. In this case, the Shipper will receive the bill for the Document Fee, the Consignee will receive the charge for the Security Fee and the Customer will receive the charges for the freight charges/Base Cost Type.
The sell side shipment cost information is provided below.
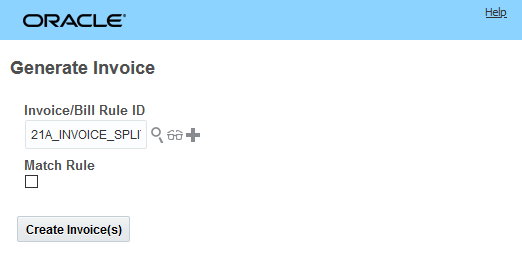
Sell Side Shipment Cost Info
The three invoices generated for the shipment are below.
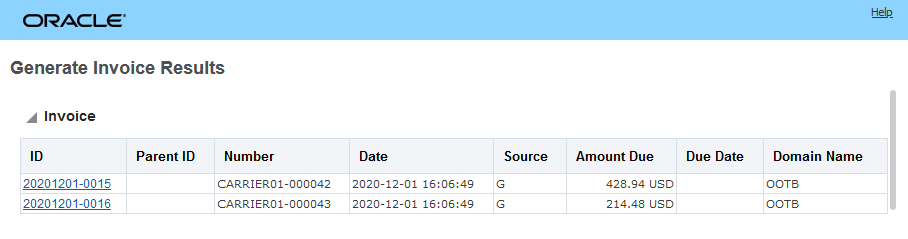
Split Bills Generated by Involved Party
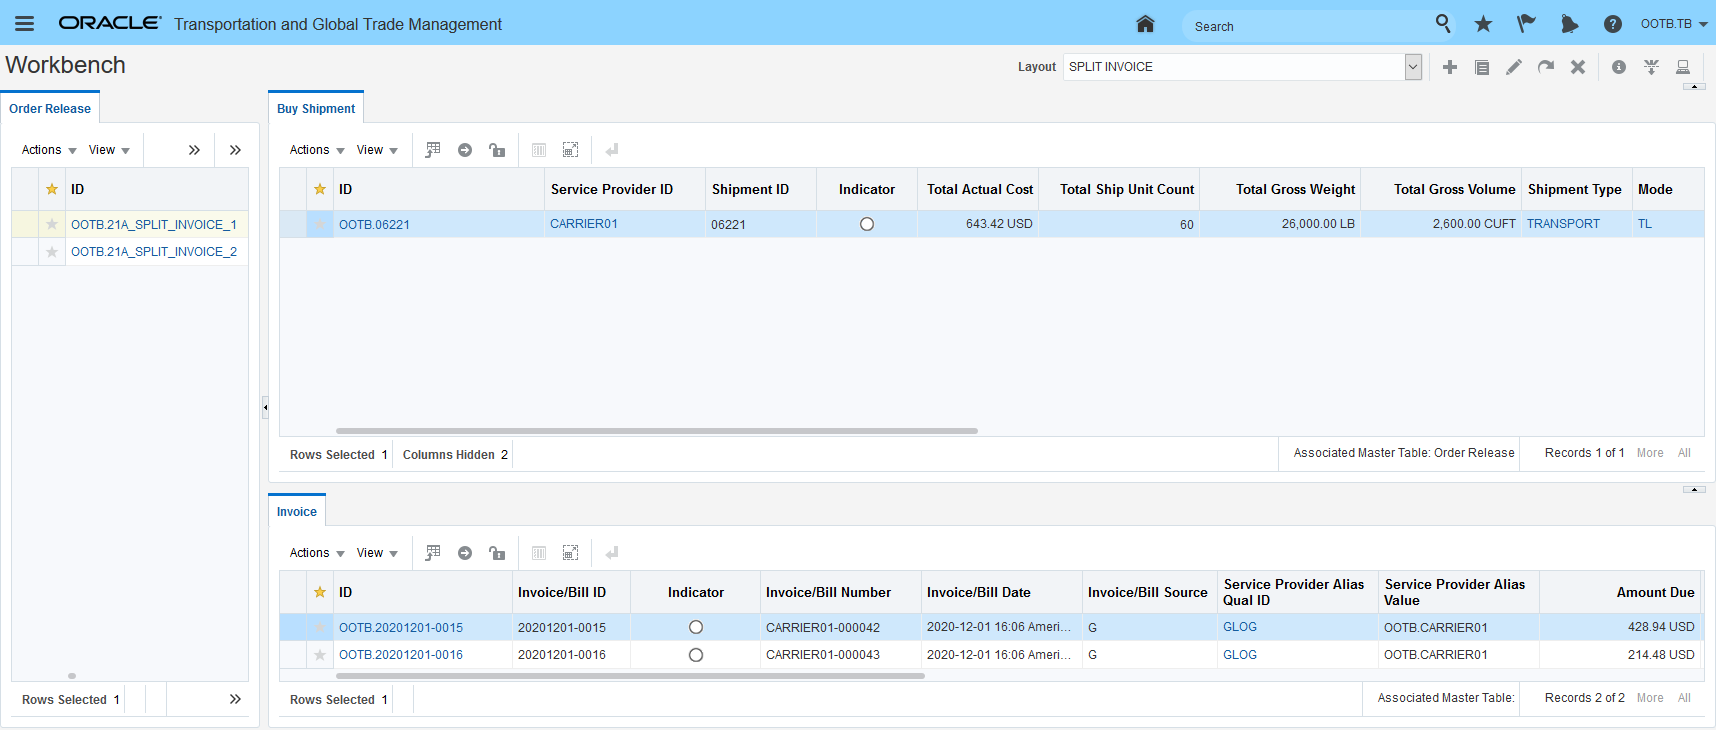
Customer Bill
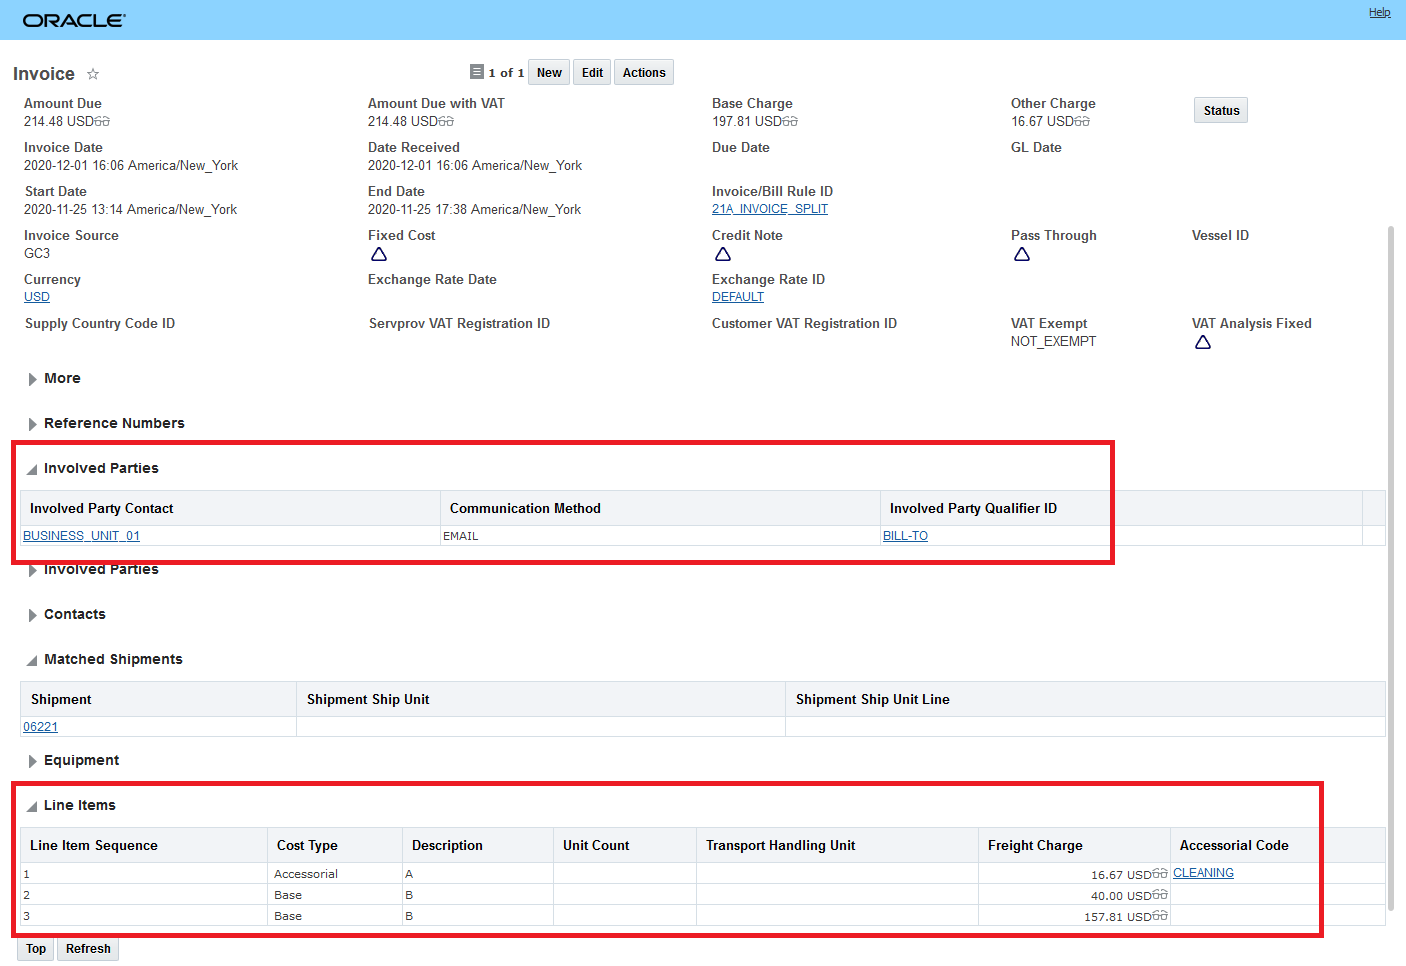
Shipper Bill

Consignee Bill
This feature provides you with the ability to handle the common European freight payment scenario where a single buy side shipment requires the generation and settlement of multi-invoices against the single buy side shipment. This feature, on the sell side, allows you to split your sell side charges into multiple bills based on your customer's requirements.
Steps to Enable
You don't need to do anything to enable this feature.
Allocation Enhancement for Count Based Allocation Metrics
This feature extends the allocation metrics available related to counts for the Order, Order Line and OB Line. In addition, with the inclusion of Equipment Reference Units (ERU) as an allocation metric, you now have greater flexibility to define and allocate to your own specific metrics.
For the Allocation Method Order Basis the additional allocation metrics include:
- SU Count
- SU Count Carried Distance
- SU Count Direct Distance
- ERU Count
- ERU Count Carried Distance
- ERU Count Direct Distance
- Piece Count Carried Distance
- Piece Count Direct Distance
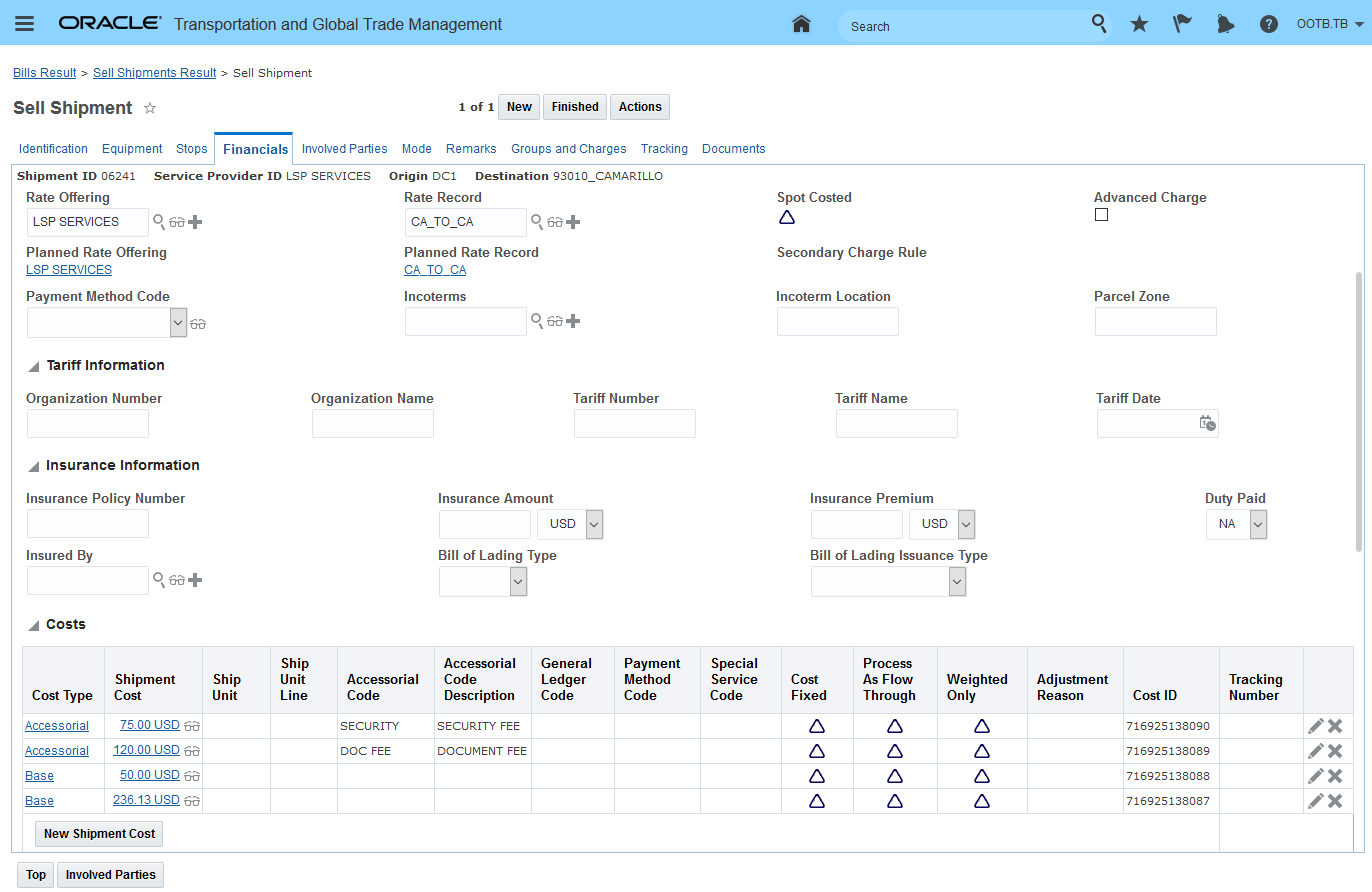
Order Basis Allocation Metrics Added
For the Order Line and OB Line Allocation Method Basis the allocation metrics available have been expanded to include:
- Piece Count Carried Distance
- Piece Count Direct Distance
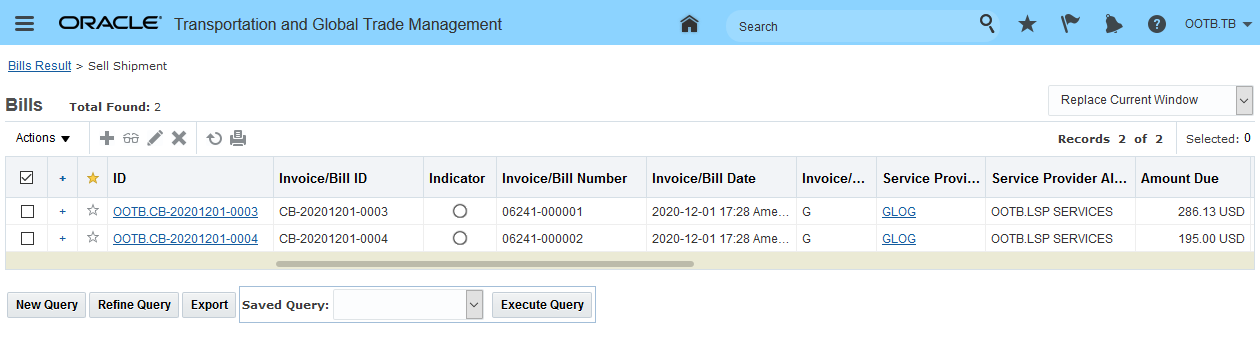
Line and OB Line Allocation Metrics Added
SHIP UNIT COUNT
In the example below, the Ship Unit Count metric will be demonstrated. In this example, the shipment is a multi-stop shipment with two orders - one order with 10 Ship Units (Standard Pallets) and a second order with 30 Ship Units (Large Box). The total cost to be allocated for this shipment is a Base cost of $105.40.
In this example, the allocation setup is based just on Ship Unit Count.
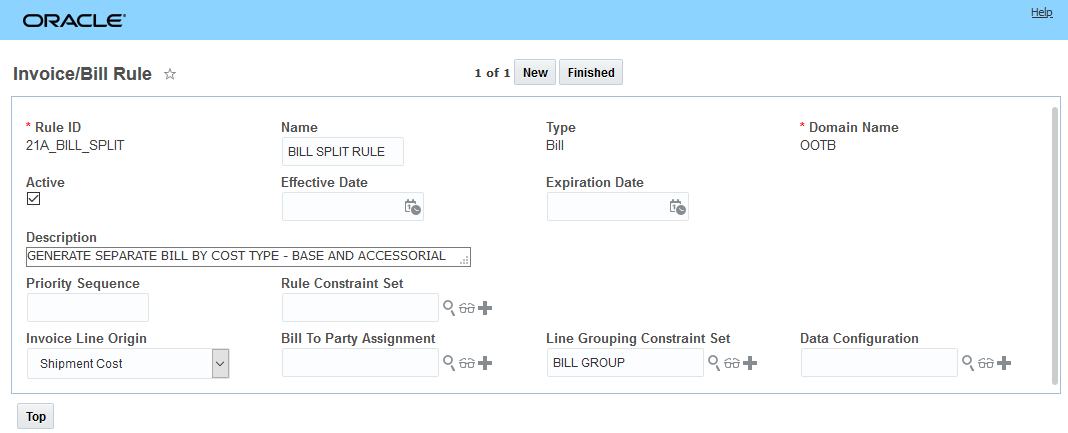
Ship Unit Count Metric Setup
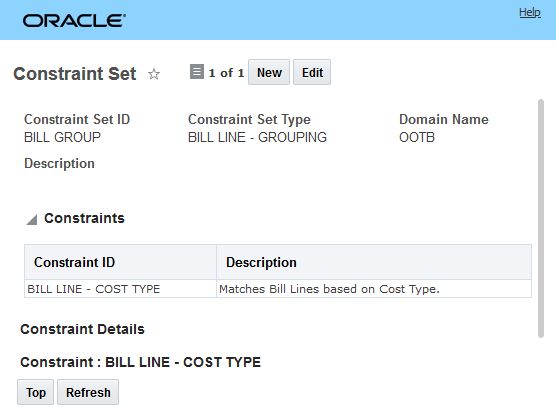
Sample Order 1 - 10 Ship Units - Standard Pallet
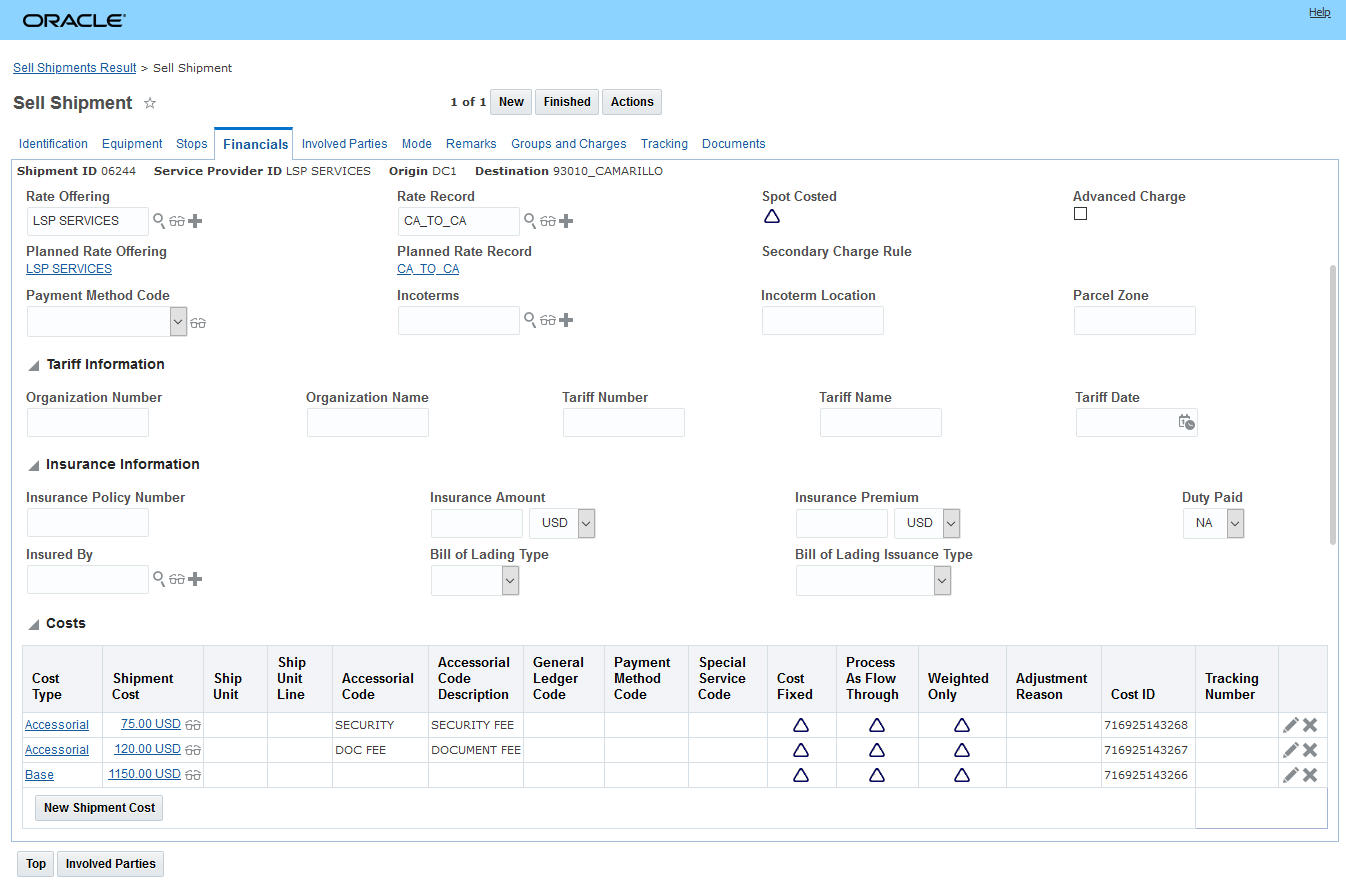
Sample Order 2 - 30 Ship Units - Large Box
After running the Allocate Cost action on the shipment the allocation of the 105.40 USD cost for the two orders based on Ship Unit Count is as follows:
- For the first order with 10 Ship Units - the orders allocated cost is 26.35 USD = (105.40 USD / 40 Total Number of Ship Units) * 10 Ship Units on this Order = 23.35 USD
- For the second order with 30 Ship Units - the orders allocated cost is 79.05 USD = (105.40 USD / 40 Total Number of Ship Units) * 30 Ship Units on this Order = 79.05.USD
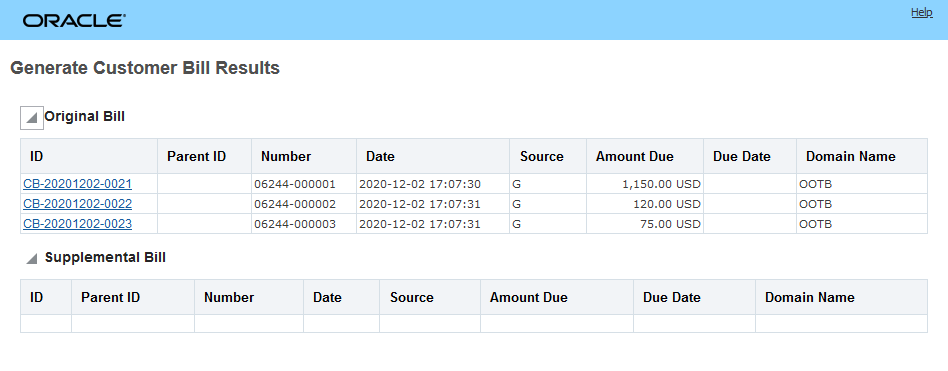
Sample Order 1 - 10 Ship Units Allocated Cost
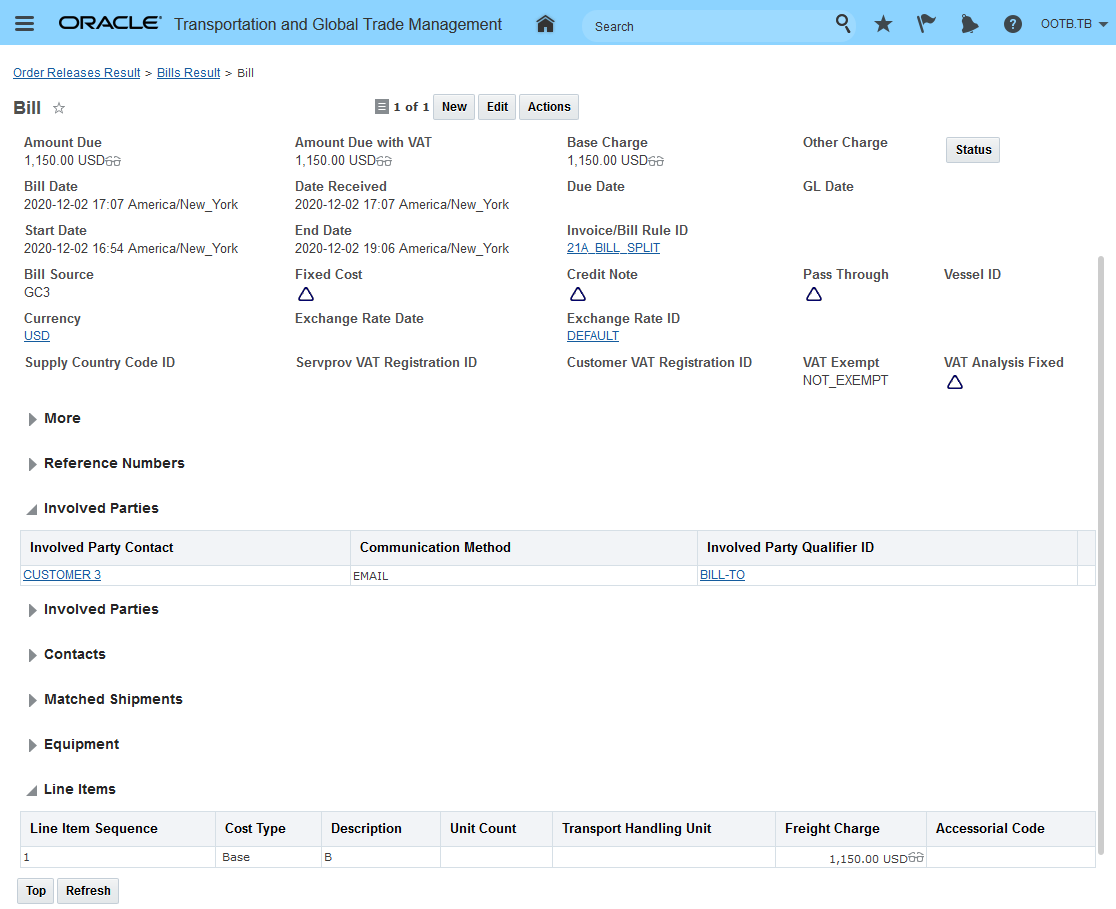
Sample Order 2 - 30 Ship Units Allocated Cost
SHIP UNIT COUNT DIRECT DISTANCE
In this example, the same orders and shipment will be used - but for this example, the metric Ship Unit Count Direct Distance will be used for the allocation.

Ship Unit Count Direct Distance Metric Setup
After running the Allocate Cost action on the shipment the allocation of the 105.40 USD cost for the two orders based on Ship Unit Count Direct Distance is as follows:
- For the first order with 10 Ship Units and a direct distance of 70.2 miles - the order's allocated cost is 24.86 USD = (105.40 USD / ((70.2 order 1's direct distance * 10 Ship Units) + (75.81 order 2's direct distance * 30 Ship Units)) * (70.2 order 1 direct distance * 10 Ship Units) = 24.86 USD
- For the second order with 30 Ship Units and a direct distance of 75.81 miles - the order's allocated cost is 80.54 USD = (105.40 USD / ((70.2 order 1's direct distance * 10 Ship Units) + (75.81 order 2's direct distance * 30 Ship Units)) * (75.81 order 2's direct distance * 30 Ship Units) = 80.54 USD.
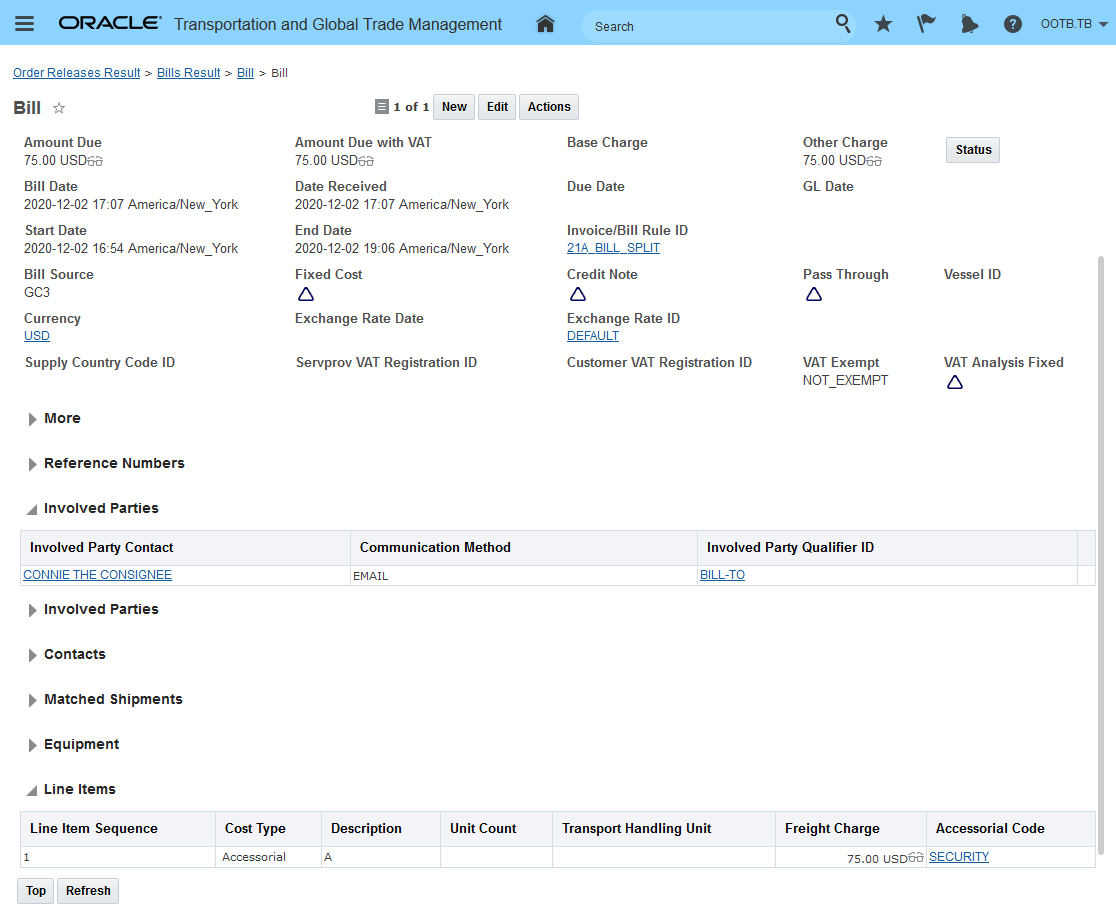
Ship Unit Count Direct Distance Metric - Order 1
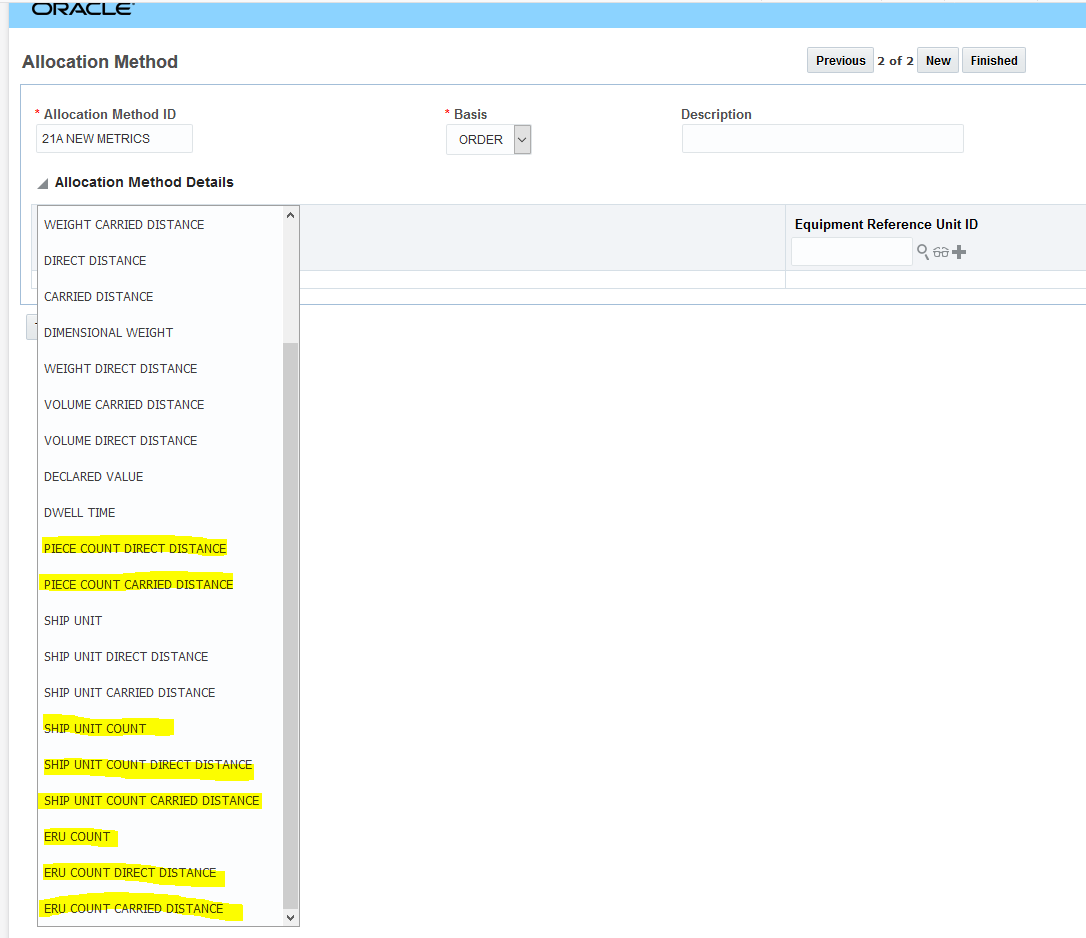
Ship Unit Count Direct Distance Metric - Order 2
SHIP UNIT COUNT CARRIED DISTANCE
In this example, the same orders and shipment will be used - but for this example, the metric Ship Unit Count Direct Distance will be used for the allocation.

Ship Unit Count Carried Distance Metric Setup
After running the Allocate Cost action on the shipment the allocation of the 105.40 USD cost for the two orders based on Ship Unit Count Direct Distance is as follows:
- For the first order with 10 Ship Units and a carried distance of 48.70 miles - the order's allocated cost is now 23.59 USD = (105.40 USD / ((48.70 order 1's carried distance * 10 Ship Units) + (56.30 order 2's carried distance * 30 Ship Units)) * (48.70 order 1 carried distance * 10 Ship Units) = 23.59 USD
- For the second order with 30 Ship Units and a carried distance of 56.30 miles (48.70 + 7.60) - the order's allocated cost is 81.81 USD = (105.40 USD / ((48.70 order 1's carried distance * 10 Ship Units) + (56.30 order 2's carried distance * 30 Ship Units)) * (56.30 order 2's carried distance * 30 Ship Units) = 81.81 USD.
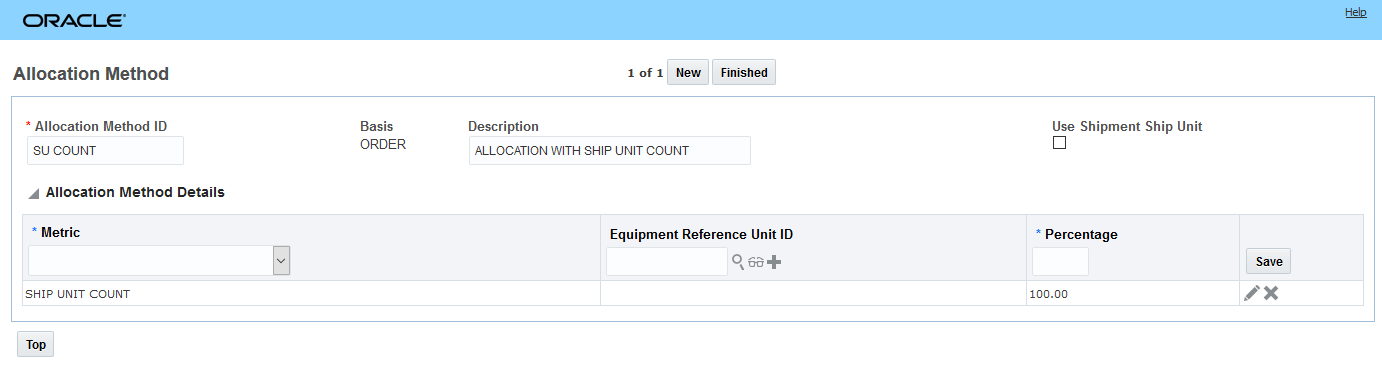
Shipment Carried Distance
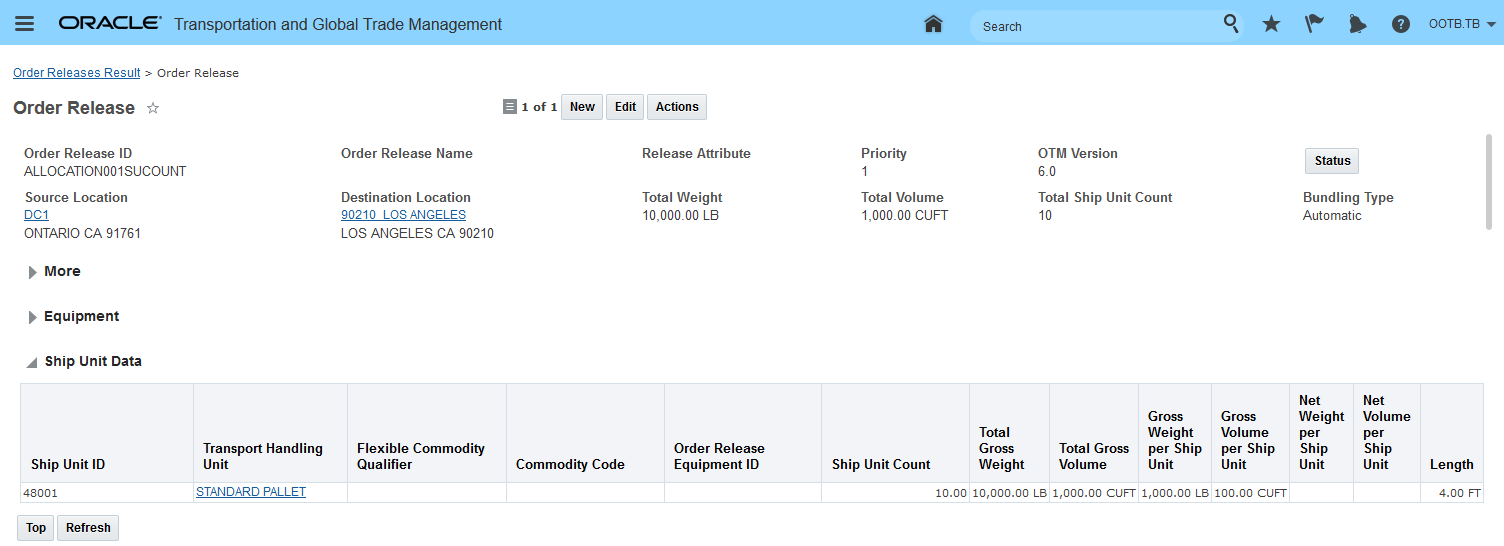
Ship Unit Count Carried Distance Metric - Order 1

Ship Unit Count Carried Distance Metric - Order 2
These additional allocation metrics will be particularly beneficial if you have been looking for an allocation method based on a count of ship units (e.g., number of pallets) or if you were looking for an allocation metric based on the space consumed (e.g., pallet spaces) by a ship unit in an equipment group using Equipment Reference Units (ERUs).
Steps to Enable
To setup the new allocation method metrics the following steps are required:
- Define your Allocation Rule Profile and assign it to the appropriate Service Provider
- Define the Allocation Rule for the Allocation Rule Profile
- Define the Allocation Rule Detail
- Define the Allocation Method for the Allocation Rule Detail
- For the Allocation Method select a Basis of Order, Line or OB Line
- For the Allocation Method Details Metric from the drop down
- if you are selecting an ERU related metric - you will need to specify Equipment Reference Unit ID to use
Tips And Considerations
Equipment Reference Unit allocation - the assumption when using this metric is that all you orders will have the same ERU defined.
The Equipment Reference Unit ID on the Allocations Methods Details grid will only be used and is required when you select any of the ERU based metrics:
- ERU Count
- ERU Count Carried Distance
- ERU Count Direct Distance
This feature continues the on-going extension of the available REST resources to include the allocation resource as a child resource under the Shipment, Sell Shipment, Bill, Voucher, Order Release, Order Release Line and Order Base Line.
Provides you with access to the allocation information for all of the parent resources that support allocation Shipment, Sell Shipment, Bill, Voucher, Order Release, Order Release Line and Order Base Line.
Steps to Enable
You don't need to do anything to enable this feature.
Status Value Added to Voucher Finder Result Screen
This feature extends the Voucher Finder Result screen so that it can be configured to show selected Voucher Status values for selected Voucher Status Types.
In the example below, the Status Type of ISSUED was added. You can add all four Status Types (ALLOCATION_VOUCHER, ISSUED, RECHARGE, VOUCHER GUARANTEED DELIVERY) to the Voucher Finder Results if necessary.
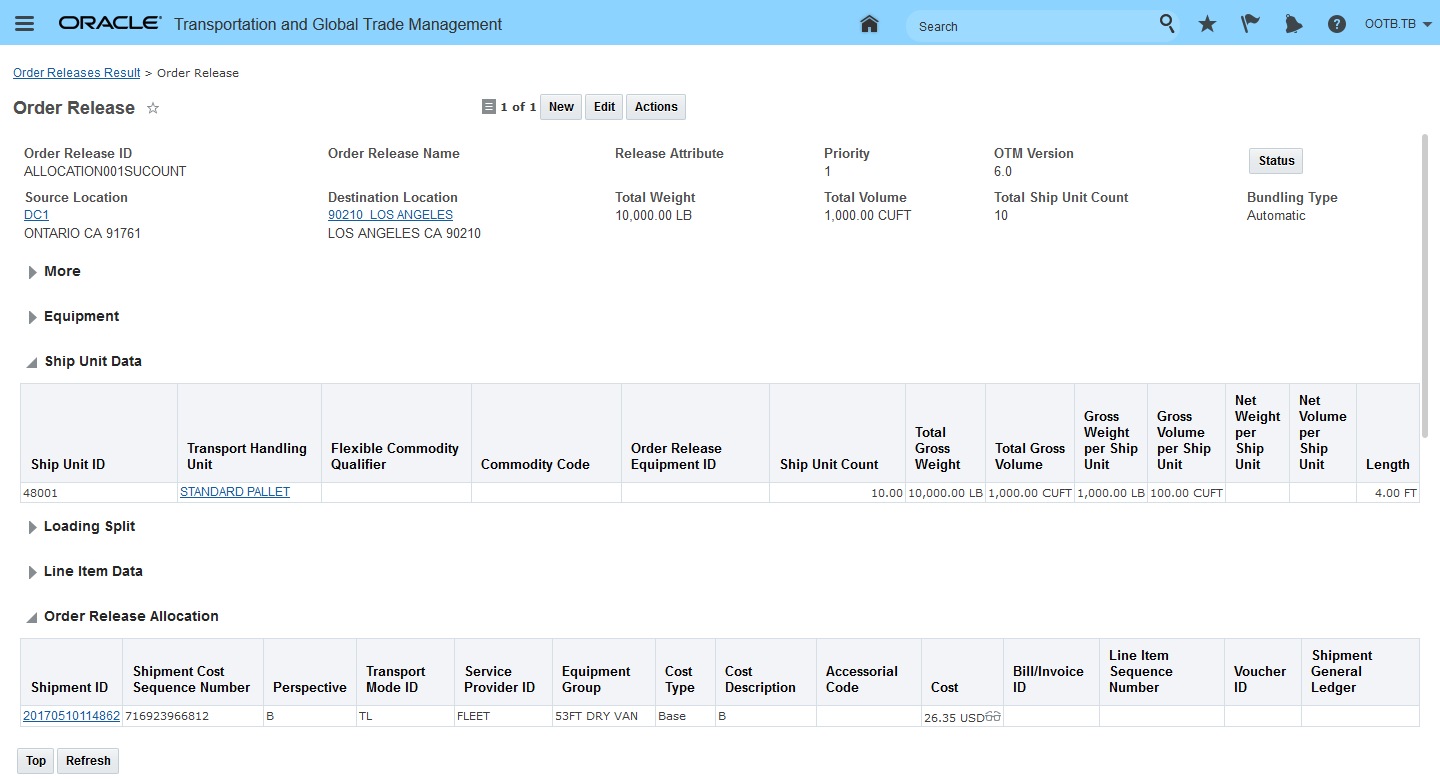
Configured Voucher Finder Result - Status Type ISSUED Added
This feature eliminates the need to drill into the Voucher record to view the Status Type and Value of each Voucher record.
Steps to Enable
- Go to Configuration and Administration > User Configuration > Screen Set Manager and copy the PUBLIC Voucher Screen set.
- On the Results Tab select the Status (P) column.
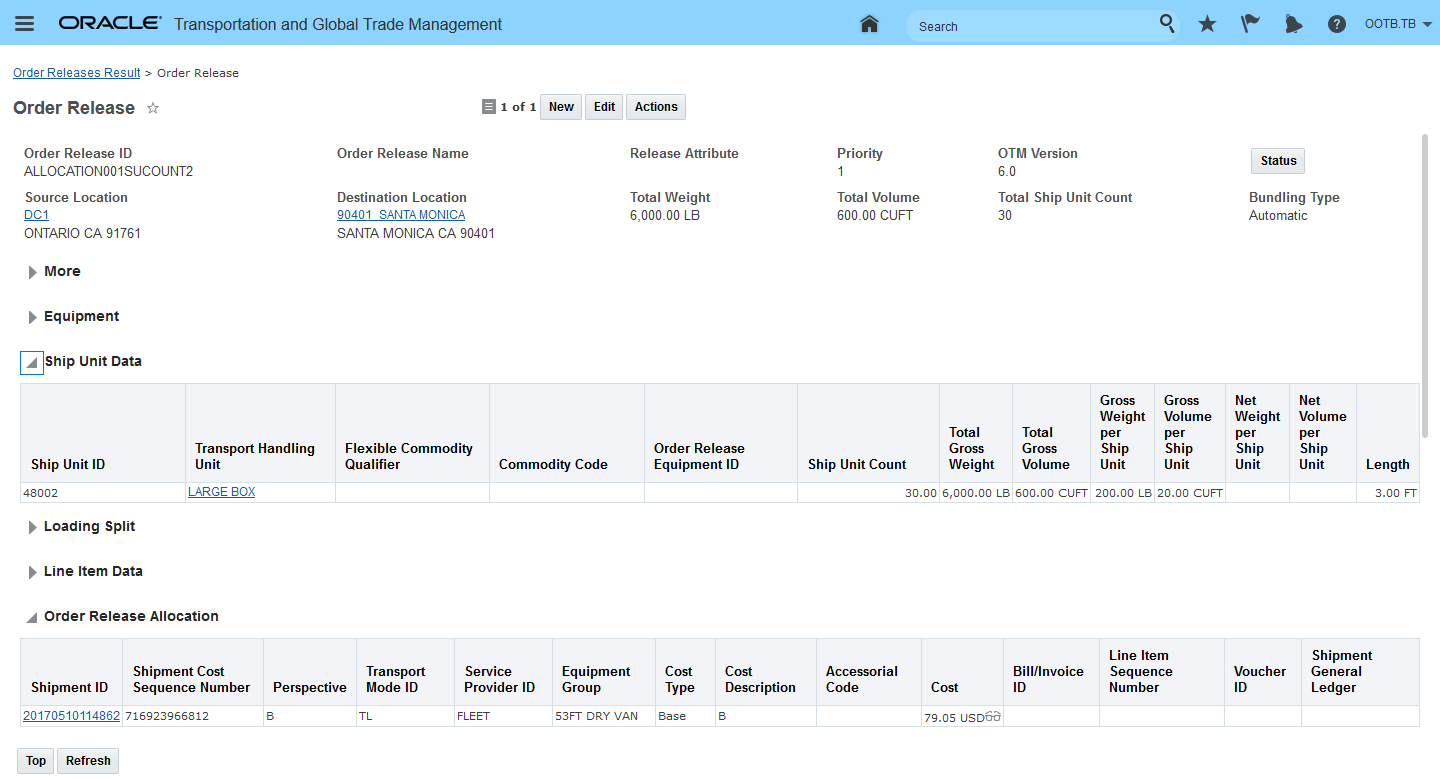
Select Column Status (P)
- Select the Status Type you want to add to the Finder Results screen.
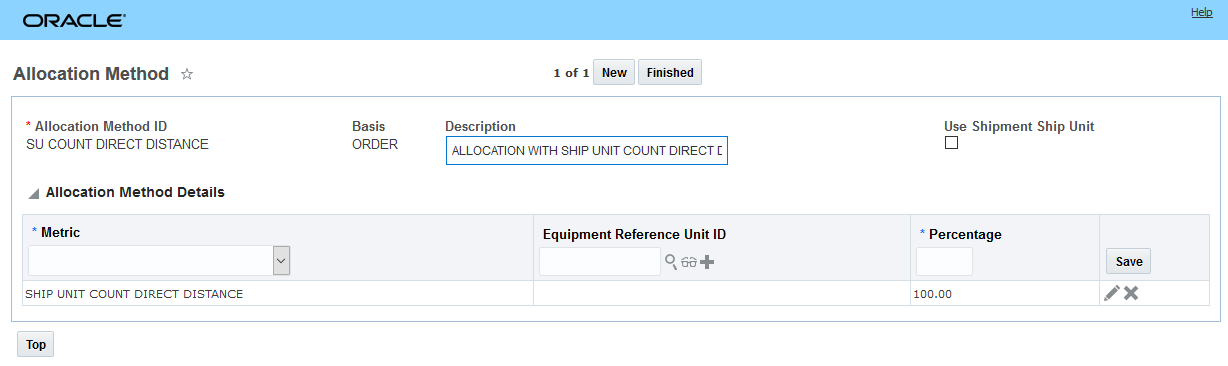
Select Status Type for Finder Result Column
- Once all columns are configured save the new screen set.
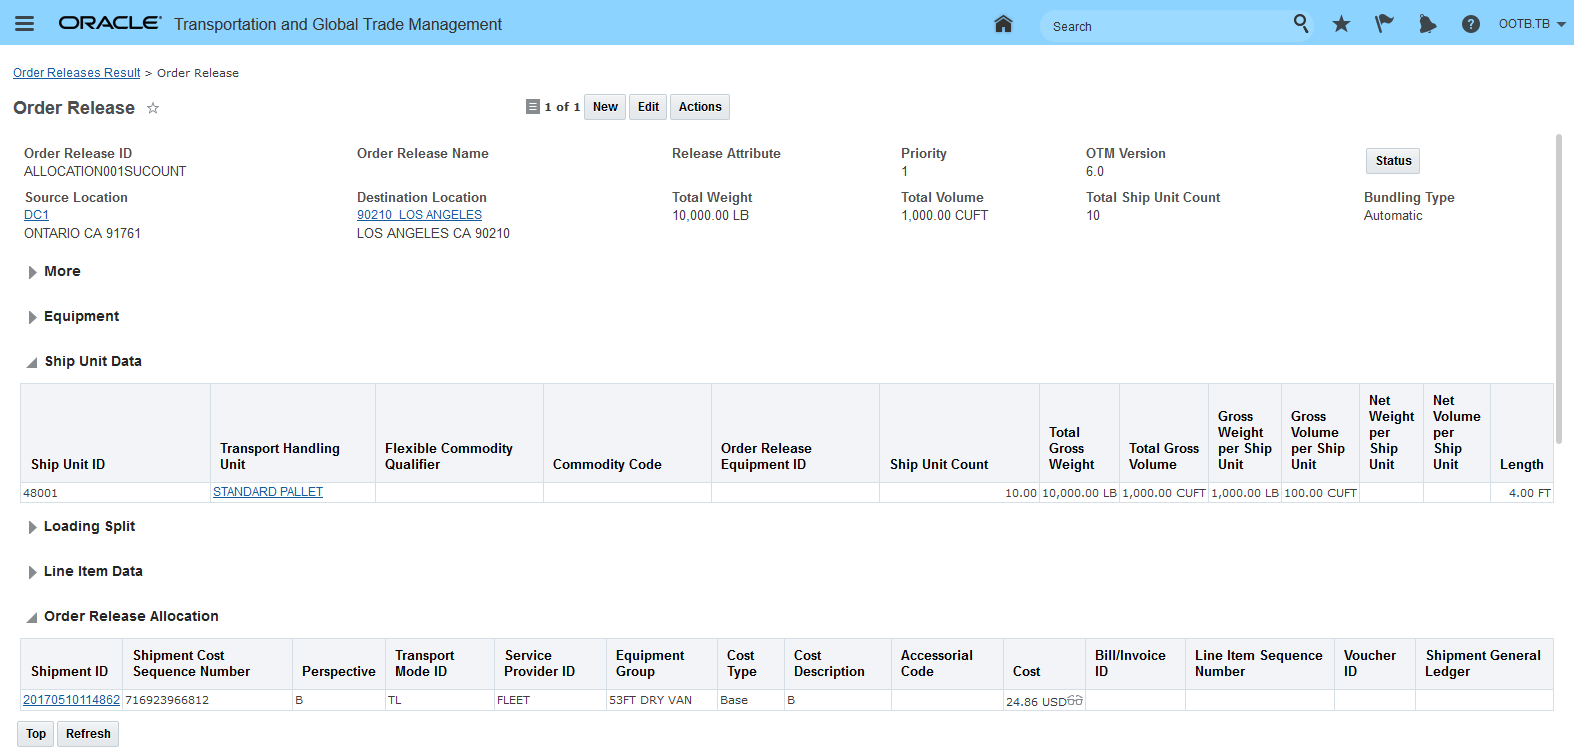
Columns Configured
- Add the new screen set to the appropriate Menu(s) - Configuration and Administration > User Configuration > Menu Manager.
Work Assignment - First Shipment Selected Planning Parameter
This feature provides you with a new planning parameter that allows you to select the method used when determining the first shipment from which to build a work assignment. You will find the new parameter RS SEQUENTIAL SAVINGS SORT METHOD in the Resource Scheduler Consolidation group within the Fleet Management Parameters.
The RS SEQUENTIAL SAVINGS SORT METHOD parameter supports the following values:
- "0. None" the default. With this option, the first shipment to merge is selected based on an internally generated ID.
- "1. Start time ascending" will choose the shipment with the earliest start time as the shipment around which to build a work assignment.
- "2. Weight descending" will choose the shipment with the heaviest weight as the shipment around which to build a work assignment.
- "3. Duration descending" will choose the shipment with the longest duration as the shipment around which to build a work assignment.
- "4. Cost descending" will choose the shipment with the highest cost as the shipment around which to build a work assignment.
- "5. Savings descending" will choose the shipment pair, which offers the most savings as the shipments around which to build a work assignment.
This feature provides you with the ability to guide the algorithm into build into work assignments that are more likely to contain the types of shipments desired by the resources associated with the work assignments.
Steps to Enable
You don't need to do anything to enable this feature.
Tips And Considerations
Previously, the parameter RS SEQUENTIAL SAVINGS SORT METHOD was implemented as a set of properties. The values set for those properties will still be used if the RS SEQUENTIAL SAVINGS SORT METHOD is set to the default value.
Specifically - the following glog.business properties will be in considered when the RS SEQUENTIAL SAVINGS SORT METHOD parameter is set to the default of "0. None.":
- glog.business.workAssignment.sortBasedOnShipmentCost
- glog.business.workAssignment.sortBasedOnShipmentStartTime,
- glog.business.workAssignment.sortBasedOnShipmentWeight.
Logistics Digital Assistant Usability Enhancements
This feature provides you with several Logistics Digital Assistant (LDA) usability enhancements.
With this update, your LDA log-in experience has been streamlined to provide you with direct access to the bot. Now, with 21A, you will no longer be prompted with the "please sign in” button as part of the bot dialog flow. Once you enter your credentials on the OTM IDCS sign-in screen, you will be able to use the bot directly.
There have also been some improvements in the dialog flow and some updates to the chat UI so that it has the latest look-and-feel.
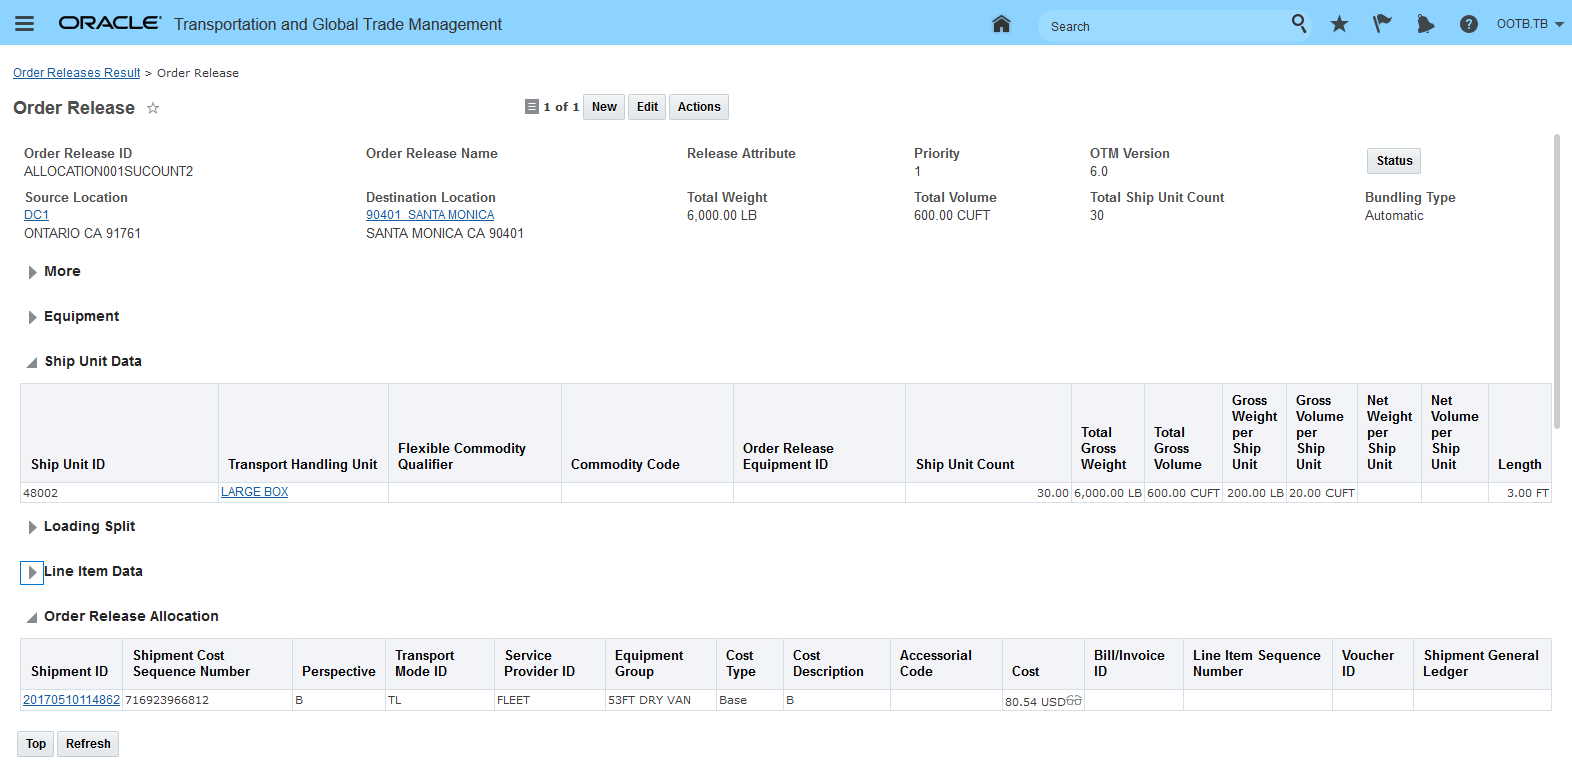
New Log-In Experience - Direct Access to the Bot
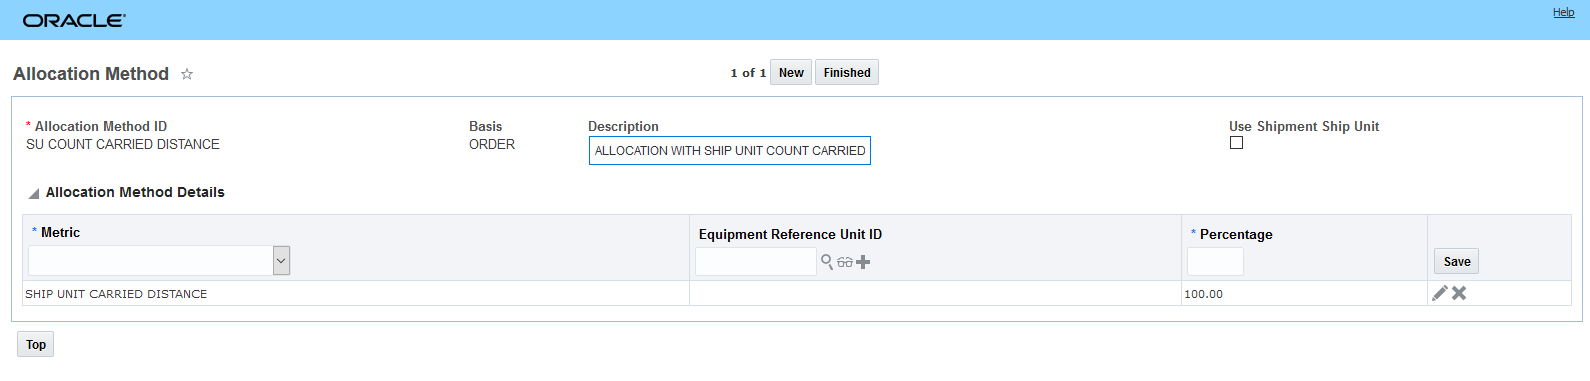
Improved Dialog Flow
This LDA release provides you with an improved log-in navigation path, and an improved dialog flow.
Steps to Enable
You don't need to do anything to enable this feature.
Global Trade Management (Base)
Improvements to Propagating Information from OTM Objects to GTM Objects
Propagating changes has been improved so that:
- Changes and deletions to OTM Order Releases and OTM Shipments properly flow to GTM Trade Transactions
- Changes and deletions to Trade Transactions properly flow to Declarations
For example, you can create a trade transaction from an OTM order release or OTM shipment. At a future point in time, you can use the transaction to create a declaration in GTM. The declaration can then be used for customs filing. When changes or deletions are made to the order release or shipment, GTM needs to ensure that these changes are updating the trade transaction and then the declaration accordingly. For example, the state of the declaration needs to be considered so that GTM knows whether to update the declaration or not. If a declaration has already been filed with customs, you may not want to update the declaration. Improvements have been made across the flow to ensure changes and deletions are being propagated to downstream objects properly. Changes have been made to the existing actions across OTM and GTM.
Specifically, the following improvements have been made:
- If an OTM Shipment Ship Unit or Ship Unit Line is deleted, the changes should flow to the GTM Trade Transaction Line. If you have a trade transaction that was created before the shipment was executed and for some reason, a shipment ship unit or ship unit line does not ship, you need to honor that change in GTM. Enhancements have been made to ensure that changes and deletions to the upstream OTM objects flow into GTM and update the trade transactions and trade transaction lines.
- GTM can propagate changes to declarations while honoring a status. Declarations are filed with different customs regimes. Each customs regime has different rules and statuses for when a declaration is filed and when it is accepted. You can create statuses for declarations based on the customs regime statuses. Then, you can ensure GTM only updates the declarations that are in a certain status. In the Logic Configuration with a Logic Configuration Type = GTM DECLARATION CONFIGURATION, a new Parameter = ALLOWED DECLARATION - DECLARATION SAVED QUERY has been added to enable you to check whether the declarations can be modified. You can define a saved query and assign it to the parameter. The saved query uses the Declaration GID as input and checks for statuses. The declaration can be modified if the saved query returns results. For example, you may want to modify declarations that have not yet been filed with customs. You can identify the statuses in the saved query assigned to the logic configuration parameter so that only declarations in the appropriate statuses are updated. If this parameter is not defined, all declarations are available for modification.
- If you are grouping trade transaction lines into declaration lines and changes are made to one of the transaction lines, GTM needs to handle this properly. Previously, if the transaction line data used earlier as grouping criteria changes, it was difficult for GTM to transfer those changes to the declaration. Enhancements have been made so that, if you change a trade transaction line such that it does not match with the earlier declaration anymore, GTM re-groups the transaction lines based on the changes. GTM will create new declarations or adds the transaction lines to existing declarations. Deletions of a transaction line are also handled appropriately. For example, say you group all transactions with an export date of November 30, 2020 into a declaration. If the export date of one of those trade transactions changes, GTM re-groups the transaction into a different declaration based on the date change.
There is one additional change you will see on the Declaration Line. In the Reference Lines grid, a Reference ID field has been added. Depending on the scenario, this Reference ID will be the Transaction ID or Declaration ID from which the Declaration Line was created.
By being able to better handle changes and deletions from upstream OTM objects, GTM can ensure that updates to the trade transaction and declaration are properly handled. In addition, by understanding the status of the declarations, GTM can ensure that only certain declarations are being updated and the impact to filings sent to customs agencies is minimal. This gives you more control over which declarations are updated and when they are updated.
Steps to Enable
You don't need to do anything to enable this feature.
Order Release to Transaction Data Configuration Using New Date and Number Attributes
On the Data Configuration, new flex fields have been added so that you have a total of 20 date flex field attributes and 20 number flex field attributes in addition to the existing 20 string flex fields. For a Data Configuration with an Association Type of 'Order Release to Transaction', the User Defined Attribute Date 11-20 and User Defined Attribute Number 11-20 flex fields have been added to the Associations 'Header-Header' and 'Line-Line'. You can continue to use the existing Attributes.
The Source Flex Fields Name and Target Flex Fields Name have been updated to support:
- User Defined Attribute Date 11-20
- User Defined Attribute Number 11-20
When you create or propagate changes from an OTM Order Release, GTM uses the data configuration to copy data from the order release to the trade transaction.
By adding the additional 10 user defined attribute date flex fields and 10 user defined attribute number flex fields to the data configuration, you have more flexibility in defining the data to be copied from your order release to your trade transaction.
Steps to Enable
You don't need to do anything to enable this feature.
Display All Address Lines on Party
On the Party, you can see all four address lines specified in the associated location. This enables you to see all the address lines from within a party and helps you when you are processing parties that are in a required review status. Depending on the configuration of your service parameter, you may already be screening all four address lines.
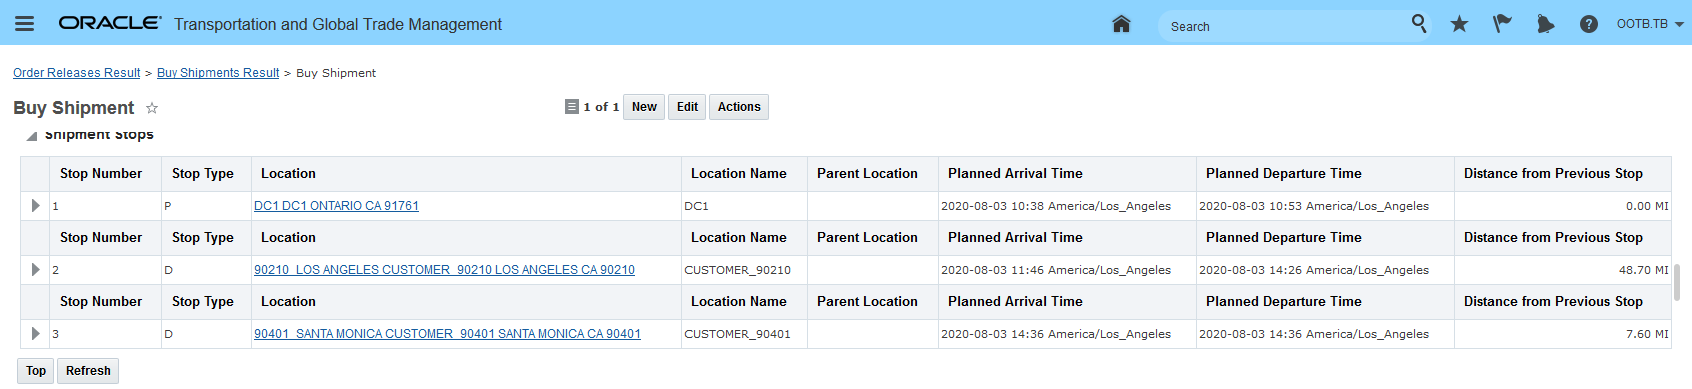
Since you can see all the address lines for the location associated with the party, you are able to make better decisions when you are processing parties that are in a required review status.
Steps to Enable
You don't need to do anything to enable this feature.
Tips And Considerations
GTM already supports the ability to screen all four address lines by selecting the Parameter Name of 'fullAddressLine' in your Service Parameter. For more information on configuring the Restricted Party Screening process, please see the GTM How To/Configuration Topic called 'Restricted Party Screening'.
Support for Trade Values on Item
There is a new tab called Trade Values available on the Item. On this tab, you can specify trade item value information that is then used during trade agreement qualification. Since an item can model both the buy side and the sell side, you can specify information for both your suppliers as well as your inventory organizations. You can specify multiple Trade Values against an item and can include details such as:
- Inventory Organization – specify where your company is manufacturing the finished good
- Partner – specify the party related to the trading partner or supplier who is providing the item
- Partner Site – specify the party site related to the trading partner or supplier who is providing the item
- Packaged Item – specify the packaged item that relates to the trade value
- Value details including:
- Value Qualifier ID
- Value
- Exchange Rate ID
- Exchange Rate Date
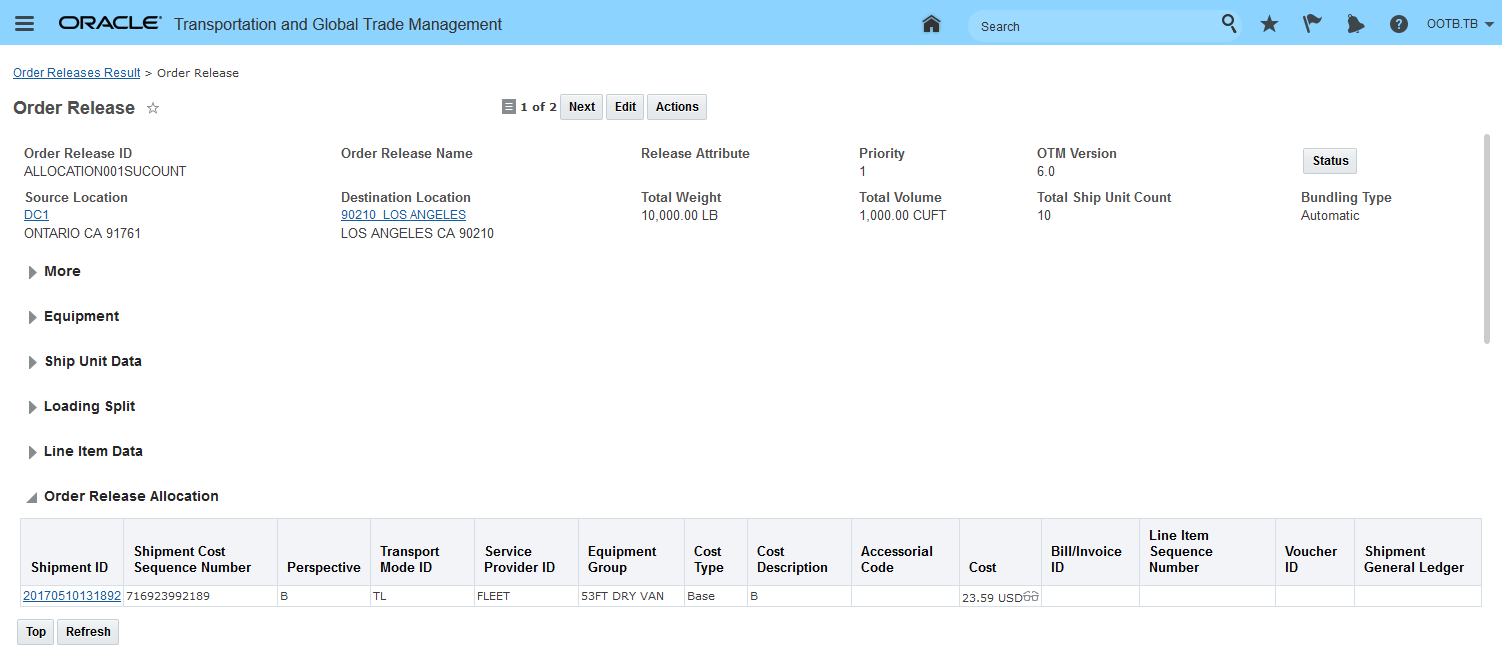
When you view this information on the Trade Values tab, GTM displays certain key information by default including:
- Sequence Number
- Inventory Organization
- Partner
- Partner Site
- Packaged Item
- Material
- Material Overhead
- Resource
- Outside Processing
- Overhead
- Unit Cost
- Last PO Price
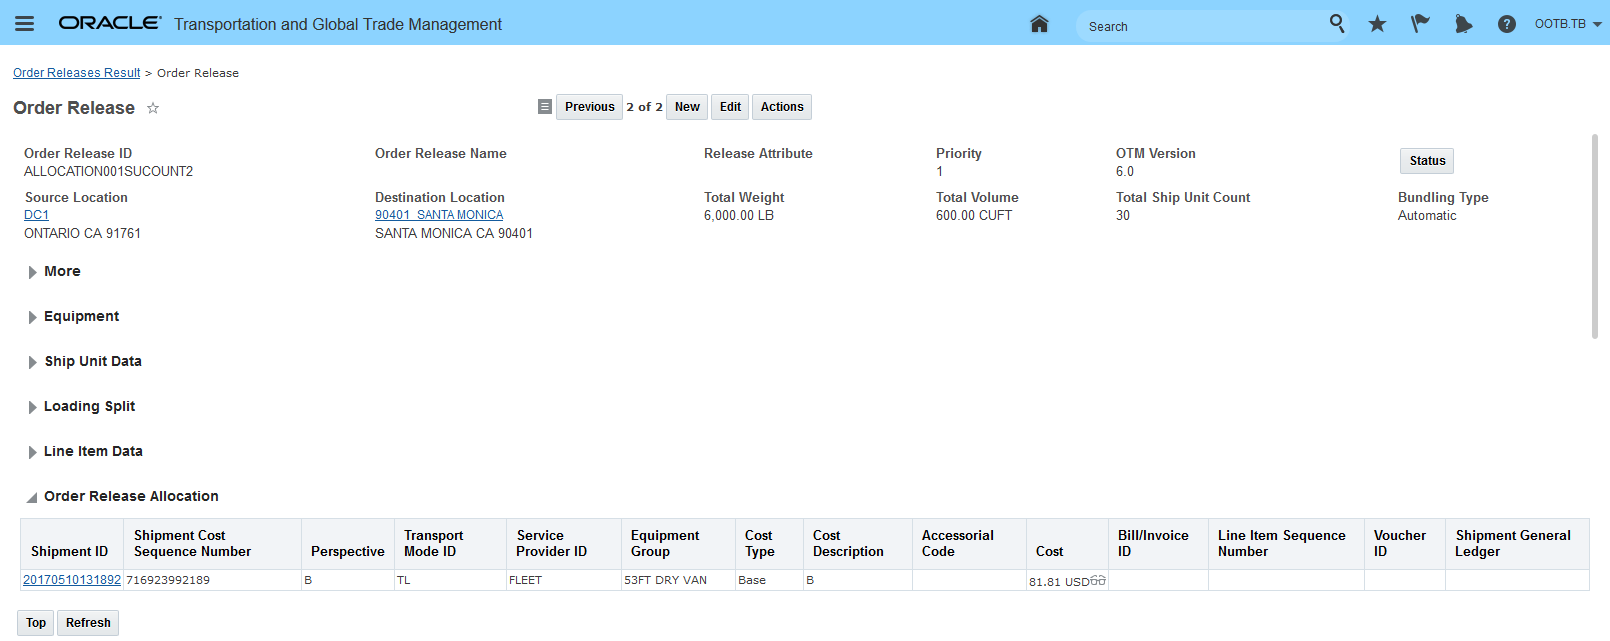
The trade value data enables you to understand the values such as material costs and overhead associated with an inventory organization or partner/partner site.
Steps to Enable
You don't need to do anything to enable this feature.
Tips And Considerations
- The expectation is that the item costing values would come into GTM from an ERP such as Fusion. The integration for the item costing data to support trade values will be added in a future release.
- GTM supports the item costing values across various objects to assist in the trade agreement qualification process. The Values grid was available in previous versions of GTM in the following objects:
- Item Structure
- Item Structure Component
- Item Qualification
- For more information on trade agreement qualification, please see the ‘Trade Agreement Qualification’ topic in this document.
View Additional Details About Trading Partner on Item
The Trading Partner Items tab on the Item has been enhanced to display additional information about the Trading Partner Items and Item Partner Site Associations listed.
In the Trading Partner Items grid, you can see:
- Trading Partner Item
- Trading Partner
- Trading Partner Item Identifier
- Trading Partner Item Name
- Trading Partner Item Description
- Effective Date
In the Item Partner Site Associations grid, you can see:
- Party Site
- Party
- Party Status
- Party Contact Name
- Party Contact Phone
- Party Contact Email
- Location
- Location Country

You are able to see details about all the Trading Partner Items and Item Partner Site Associations directly on the Item. This enables you to easily know which trading partner item and party sites are associated with the item in one place.
Steps to Enable
You don't need to do anything to enable this feature.
Additional SmartLinks on Item-Related Objects
New SmartLinks have been added to the Item and to the Item Origin.
On the Item, you can link to other objects using the following SmartLinks:
- View Related Campaign Lines
- View Related Declaration Lines
- View Related Item Origins
- View Related Item Qualifications
- View Related License Lines
- View Related Registrations
- View Related Trade Item Structures
- View Related Transaction Lines
In addition, the 'View Item Related Rules' on SmartLink has been renamed to 'View Related Compliance Rules'.
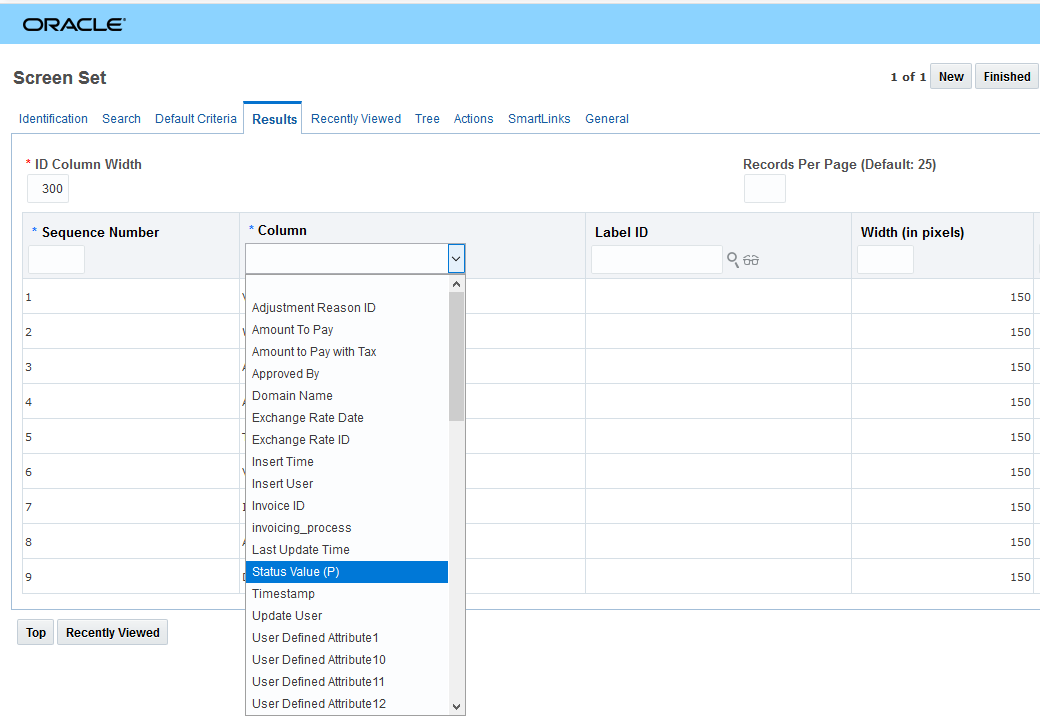
On the Item Origin, you can link to related Item Qualifications using the 'View Related Item Qualifications' SmartLink.

SmartLinks enable you to navigate more quickly to information that you need. They enable you to see objects related to the object you are currently viewing.
Steps to Enable
You don't need to do anything to enable this feature.
Visibility To Item Information On Item Origin
The item origin displays information about the associated item. This information is available within the Item Origin. In addition to the Item ID, you can see:
- Item Name
- Item Type
- Item Description
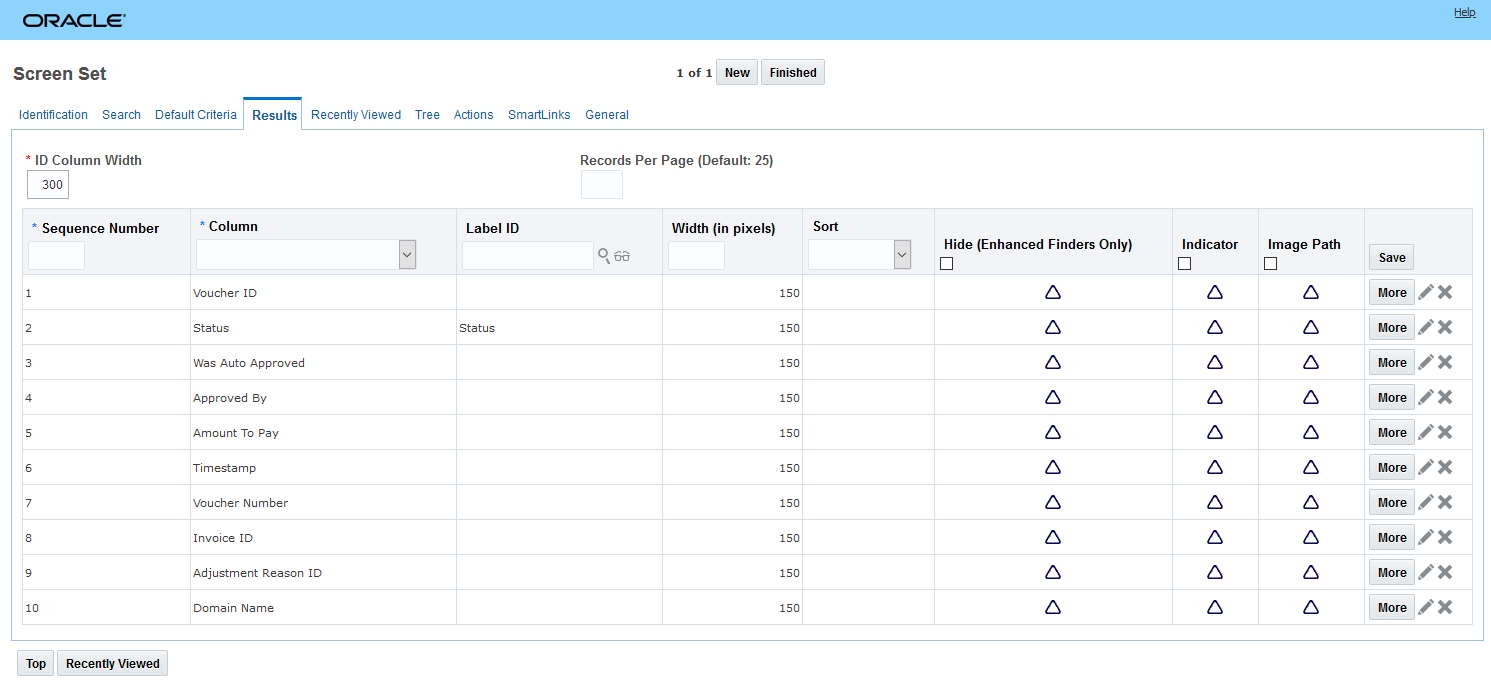
The item information on the item origin enables you to quickly see which item to which the item origin is related.
Steps to Enable
You don't need to do anything to enable this feature.
Identify the Campaign Purpose in Logic Configuration
When configuration a logic configuration with a Logic Configuration Type = GTM CAMPAIGN CONFIGURATION, you can specify the purpose of the campaign. When a campaign is created, the purpose is used to identify the type of data being requested and determines the content of the notification being sent. The options available for Purpose in the logic configuration are:
- Item - used when you are soliciting your trading partners for item data such as product classification codes and supporting documents.
- Origin - used when you are soliciting your trading partners for item origin data such as country of origin and supporting documents.
- Qualification - used when you are soliciting your trading partners to qualify items for trade programs.
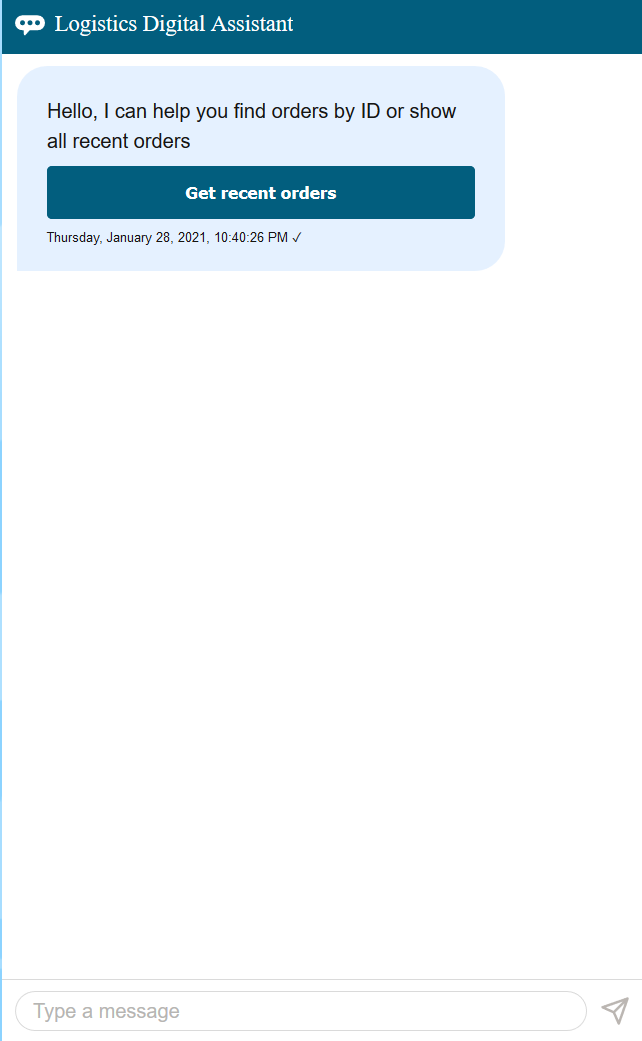
In addition to soliciting your trading partners to qualify items for trade programs, you can now solicit your trading partners for item-related data or item origin-related data. By identifying the purpose, GTM knows they type of data you are soliciting and can tailor the notification that is sent to trading partners.
Steps to Enable
You don't need to do anything to enable this feature.
Tips And Considerations
- For more information on soliciting trading partners for item-related data, please see the topic 'Solicit Information for an Item using Campaign Management' in this document.
-
For more information on soliciting trading partners for item origin-related data, please see the topic 'Solicit Information for an Item Origin using Campaign Management' in this document.
-
For more information on Campaign Management and Supplier Solicitation, please refer to the GTM How To/Configuration Topic called 'Supplier Solicitation' in help.
Solicit Information for an Item Using Campaign Management
You can now solicit item-specific information from your trading partners using Campaign Management. This enhancement enables your suppliers to provide information not related to the qualification of a trade program. Once solicited, you can copy the item information from the campaign line to the item. Specifically, you can solicit information such as product classification data, documents, reference numbers, remarks and flex field attributes. Item information can be solicited for either a partner or a partner site.
As a campaign administrator, you can configure the following data:
- Data Configurations are used to determine which data is copied among GTM objects.
- When creating a campaign, you can use the Association Type = Partner Item to Campaign to copy information from your item to the campaign line. You can copy reference numbers, remarks, and flex field attributes to your campaign line.
- When approving a campaign, you can use the Association Type = Campaign Line to Item to copy information from your campaign line to your item. You can copy product classification data, documents, reference numbers, remarks, and flex field attributes to your item.
- Logic Configurations are used to drive the workflow for the campaign process. For the campaign process, you use a logic configuration with a Logic Configuration Type = GTM CAMPAIGN CONFIGURATION.
- You can specify the data to copy from your item to the campaign line using the Parameter = CREATE DATA CONFIGURATION. This parameter is used when the campaign is created.
- You can specify the data to copy from your campaign line to the item using the Parameter = APPROVE DATA CONFIGURATION. This parameter is used when the campaign is approved.
- You can specify the purpose of the campaign using the Parameter = PURPOSE. This parameter tells GTM the type of campaign you are creating and is used to drive the notification sent to your trading partners. To solicit information related to item origin, select the Purpose = Item.
- Campaign Type is where you specify the Logic Configuration to use. You must specify a campaign type when you create a campaign.
You may want to solicit your trading partners for classification codes and supporting documentation. By enhancing the campaign, the campaign administrator can create a campaign to solicit this information from multiple trading partners at one time. You can then send the campaign lines that are specific to your trading partners so that they can provide this information. Once they respond to their campaign lines, you can confirm you have the information you need. When you approve a campaign line, this information is copied back to the item and can then be used for trade transactions, declarations for customs filings, and other documentation.
Steps to Enable
You don't need to do anything to enable this feature.
Tips And Considerations
For more information on Campaign Management and Supplier Solicitation, please refer to the GTM How To/Configuration Topic called 'Supplier Solicitation' in help.
Solicit Information for an Item Origin Using Campaign Management
You can now solicit your trading partners such as suppliers for country of origin and other information related to an item origin. This enhancement enables your suppliers to provide information not related to the qualification of a trade program. Once the campaign line is approved, GTM copies the information provided by suppliers from the campaign line to the item origin. Specifically, you can solicit information including item origin details, values, documents, and flex field attributes.
As a campaign administrator, you can configure the following data:
- Data Configurations are used to determine which data is copied among GTM objects.
- When creating a campaign, you can use the Association Type = Partner Item to Campaign to copy information from your item origin to the campaign line. You can copy item origin details, reference numbers, remarks, and flex field attributes to your campaign line.
- When approving a campaign, you can use the Association Type = Campaign Line to Item to copy information from your campaign line to your item origin. You can copy item origin details, values, documents, and flex field attributes.
- Logic Configurations are used to drive the workflow for the campaign process. You can use a logic configuration with a Logic Configuration Type = GTM CAMPAIGN CONFIGURATION.
- You can specify the data to copy from your item origin to the campaign line using the Parameter = CREATE DATA CONFIGURATION. This parameter is used when the campaign is created.
- You can specify the data to copy from your campaign line to the item origin using the Parameter = APPROVE DATA CONFIGURATION. This parameter is used when the campaign is approved.
- You can specify the purpose of the campaign using the Parameter = PURPOSE. This parameter tells GTM the type of campaign you are creating and is used to drive the notification sent to your trading partners. To solicit information related to item origin, select the Purpose = Origin.
- Campaign Type is where you specify the Logic Configuration to use. You must specify a campaign type when you create a campaign.
You may want to solicit your trading partners for country of origin and supporting documentation. By enhancing the campaign, the campaign administrator can create a campaign to solicit this information from multiple trading partners at one time. You can then send the campaign lines that are specific to your trading partners so that they can provide this information. Once they respond to their campaign lines, you can confirm you have the information you need. When you approve a campaign line, this information is copied back to the item origin and can then be used for trade transactions, declarations for customs filings, and other documentation.
Steps to Enable
You don't need to do anything to enable this feature.
Tips And Considerations
For more information on Campaign Management and Supplier Solicitation, please refer to the GTM How To/Configuration Topic called 'Supplier Solicitation' in help.
Partner Item to Campaign Data Configuration Using New Date and Number Attributes
On the Data Configuration, new flex fields have been added so that you have a total of 20 date flex field attributes and 20 number flex field attributes. For a Data Configuration with an Association Type of 'Partner Item to Campaign', the following Associations have been enhanced to include the User Defined Attribute Date 11-20 and User Defined Attribute Number 11-20 flex fields:
- Trade Agreement-Campaign
- Partner Item-Campaign Line
- Item-Campaign Line
The data configuration that defines the data to be copied when a campaign is created is specified in the 'CREATE DATA CONFIGURATION' parameter on the logic configuration. Once the Logic Configuration is created, it can be assigned to a Campaign Type. When a campaign is created with that campaign type, the logic configuration assigned to the campaign type is used to drive the workflow of the campaign including the data that is copied to the campaign/campaign line from the trade agreement, partner item and item.
By adding the additional 10 user defined attribute date flex fields and 10 user defined attribute number flex fields to data configuration, you have more flexibility in defining and copying data that is specific to your business.
Steps to Enable
You don't need to do anything to enable this feature.
Campaign Line to Item Data Configuration Using New Date and Number Attributes
On the Data Configuration, new flex fields have been added so that you have a total of 20 date flex field attributes and 20 number flex field attributes. For a Data Configuration with an Association Type of 'Campaign Line To Item', the following Associations have been enhanced to include the User Defined Attribute Date 11-20 and User Defined Attribute Number 11-20 flex fields:
- Campaign Line - Item
- Campaign Line - Item Origin
- Campaign Line - Item Qualification
The data configuration that defines the data to be copied when a campaign is approved is specified in the 'APPROVE DATA CONFIGURATION' parameter on the logic configuration. Once the Logic Configuration is created, it can be assigned to a Campaign Type. When a campaign is created with that campaign type, the logic configuration assigned to the campaign type is used to drive the workflow of the campaign including the data that is copied to the item, item origin and item qualification from the campaign line.
By adding the additional 10 user defined attribute date flex fields and 10 user defined attribute number flex fields to data configuration, you have more flexibility in defining and copying data that is specific to your business.
Steps to Enable
You don't need to do anything to enable this feature.
New Attribute Fields Added to Various Objects
New attribute fields have been added to support date fields 11-20 and number fields 11-20. You can use attribute fields and take advantage of pseudo-field capabilities across GTM objects. These fields have been added to:
- Trading Partner Item
- Item Origin
- Item Qualification
- Trade Agreement
- Campaign
- Campaign Line
These enhancements enable you to use attribute fields in addition to the existing attribute fields and include:
- ATTRIBUTE_DATE11 to ATTRIBUTE_DATE20
- ATTRIBUTE_NUMBER11 to ATTRIBUTE_NUMBER20
These new fields give you the flexibility to add an additional 10 date attributes and 10 number attributes bringing the total of attribute fields on these objects to 20 text attributes, 20 date attributes and 20 number attributes.
Steps to Enable
You don't need to do anything to enable this feature.
Tips And Considerations
You can configure the user interface using manager layout and screensets to customize your user interface to show attribute fields.
Key Resources
- Please refer to the OTM How To/Configuration Topic called Configuring the User Interface for more information.
Additional Pseudo-Fields Available Across Various Objects
A number of objects have been updated to better support pseudo-fields in manager layout and grid-flattening in screensets. This enables you to view and edit data that is in a grid directly on the screen as a specific field. The following objects support this capability:
The Date grid on:
- License
- Declaration
- Declaration Line
- Trade Transaction
- Trade Transaction Line
The Reference Number grid on:
- Bond
- Campaign
- License
- License Line
- Item
- Location
- Party
The Remark grid on:
- Bond
- Campaign
- License
- License Line
- Location
- Party
The Product Classification Description on:
- Product Classification Code
The Percentage Value grid on:
- Declaration Line
- Trade Transaction Line
The Quantity grid on:
- Registration
The Status on:
- Campaign
- Campaign Line
- Item
- License
- License Line
- Trade Item Structure
The Value grid on:
- Item
- Trade Item Structure
- Registration
By enabling GTM to support pseudo-fields and grid-flattening across various objects, you are able to identify and show the data that is important to your business in a specific field.
Steps to Enable
You don't need to do anything to enable this feature.
Tips And Considerations
You can configure the user interface using manager layout and screensets to customize your fields to show as pseudo-fields. Please refer to the OTM How To/Configuration Topic called 'Configuring the User Interface' for more information.
Transaction Line Attribute Flex Fields Sent in Outbound XML
The GtmTransaction XML Element has been updated so that the corresponding Trade Transaction Lines include the attribute flex fields. You can send all the available attributes including ATTRIBUTE 1-20, ATTRIBUTE_NUMBER 1-20, and ATTRIBUTE_DATE 1-20 outbound to an external system.
Being able to define data in the attribute flex fields and send this data to other systems is important to support your business processes.
Steps to Enable
You don't need to do anything to enable this feature.
Update Various GTM Integration Elements to Be Optional
Certain XSDs have been modified to mark the non-mandatory XML elements as optional.
| Element/ComplexType |
Element |
|---|---|
| UserDefinedTypeType | TypeGid |
| UserDefinedTypeType | Code |
| UserDefinedCodeType | GtmCode |
| UserDefinedCodeType | Code |
| GtmRegistrationDateType | GtmRegistrationGid |
| GtmRegRelatedItemType | GtmRegisrationGid |
| GtmRegRelatedCommodityType | GtmRegistrationGid |
| GtmRegRelatedUDCommodityType | GtmRegistrationGid |
| GtmRegRelatedLicenseType | GtmRegistrationGid |
| GtmRegRelatedRegistrationType | GtmRegistrationGid |
| GtmValueType (Item.xsd) | ExchangeRateInfo |
By making these elements optional, your schema will properly pass the optional feature "XML Schema Validation".
Steps to Enable
You don't need to do anything to enable this feature.
Tips And Considerations
For more information on integration, please see the 'Oracle Transportation and Global Trade Management Cloud Integration Guide'.
New Resources Added to REST APIs
New and enhanced REST resources have been added for you to support your business needs. They are:
- Item - the root resource has been expanded to include Item Classification, Item, Item Origin and Item Qualification
- Item Structure
- Trading Partner Item
The public REST APIs can be used to access data stored in GTM. They also enable you to construct integrations to other systems.
Steps to Enable
You don't need to do anything to enable this feature.
Tips And Considerations
- You can find more information about REST API for Transportation and Global Trade Management Cloud on docs.oracle.com.
- The new Item Trade Value data will be REST enabled in a future release.
When enabled, Product Classification Type and Language user preferences are set based on the parameter GTM LOGIC CONFIGURATION of the Parameter Set page. This disables setting the preference from GTM Product Classification UI Configuration user preference. This feature is delivered with Opt In set to FALSE/not enabled. The Opt In/Opt Out option will expire with the 21C upgrade.
Provides standardization for managing Product Classification Type and Language user preferences.
Steps to Enable
You don't need to do anything to enable this feature.
Tips And Considerations
While the manager for these features refers to them as "optional" - each of these features will become mandatory when the Optional Until update is released. The optional aspect of these features refers to the period of time where there is an opportunity to Opt In/Opt Out of enabling the feature. During this "optional" period - the time between when the feature is released and the release prior to the Optional Until release - the request/desire/intention is for you to enable the feature(s) for testing purposes so that the transition to mandatory as of the Optional Until release is uneventful.
This page is accessed via Configuration and Administration > Property Management > Optional Features.
NOTE: Only the DBA.ADMIN user can access and use the Optional Features page.
Allow Declaration Grouping Criteria Changes
The Allow Declaration Grouping Criteria Changes feature when enabled, allows for grouping criteria changes to be considered during propagation of changes from transaction to declaration. When disabled, the propagation of changes fails and an error message is displayed indicating the failure. This feature is set to TRUE/enabled by default.
This feature is optional until 22A update.
Provided as a way to elegantly introduce the grouping criteria consideration as part of managing propagation changes from transaction to declaration.
Steps to Enable
You don't need to do anything to enable this feature.
Tips And Considerations
While the manager for these features refers to them as "optional" - each of these features will become mandatory when the Optional Until update is released. The optional aspect of these features refers to the period of time where there is an opportunity to Opt In/Opt Out of enabling the feature. During this "optional" period - the time between when the feature is released and the release prior to the Optional Until release - the request/desire/intention is for you to enable the feature(s) for testing purposes so that the transition to mandatory as of the Optional Until release is uneventful.
This page is accessed via Configuration and Administration > Property Management > Optional Features.
NOTE: Only the DBA.ADMIN user can access and use the Optional Features page.
Trade Agreements and other supporting information enables you to proactively leverage the trade agreements your business can take advantage of to reduce duties and taxes. There are many Trade Agreements in effect globally, each with different parameters but all following a similar structure.
To be able to take advantage of the duties and taxes associated with a Trade Agreement, companies must:
- Follow Rules of Origin to qualify goods for participation in a specific program
- Produce Certificates of Origin and provide them to your customers
- Collect Certificates of Origin from your suppliers and stored them for future use
- Declare the intent to use a trade agreement during the import entry process and send the appropriate certificates of origin to the local customs agency
In GTM, users can take advantage of the Trade Agreement capability including:
- Download and store duties, taxes, trade programs and other information from third party data content providers
- Manage trade agreement information
- Perform trade agreement eligibility screening and qualification on your items
- Create a campaign which enables you to solicit qualification data, documents and other information from suppliers to support the use of trade programs
- Suppliers and other users can respond to a campaign they have received
This feature enables you to determine if goods you manufacture qualify for trade agreements based on the associated rules of origin. If your finished goods qualify for a trade agreement, you can produce the appropriate certificates of origin and provide them to your customers.
This feature continues to expand on foundational building blocks introduced previously in the Campaign Management and Supplier Solicitation area of Trade Agreements that supports the importing of goods from suppliers under a trade agreement. Objects such as Item Origin, Item Qualification, Trade Agreement and so on are reused. In some instances, these objects are expanded to support Trade Agreement Qualification and the exporting of goods you produce under a trade agreement.
In previous releases, you could track the item origins associated with an item. You may source a particular good from various suppliers. Alternatively, you may produce that good. Or you may even do both. Regardless of whether you are buying or selling goods, you can model an item with multiple item origins. Each item origin should include the country of origin and other information such as country of manufacture and effective/expiration dates.
In addition:
- For a good you purchase from suppliers, you can have multiple partners and/or partner sites to model all the suppliers for a particular item.
- For a finished good, you may have multiple inventory organizations to model all the facilities where a good is manufactured. You could use the same item structure across all inventory organizations, or each inventory organization may have a different item structure.
Other key data that is needed for the trade agreement qualification process includes:
- Rules of origin including product-specific rules and base rules
- Item Structure and Item Structure Components and underlying Items (a single level bill of material is currently supported)
- Cost data for the manufactured good and it’s components
You can:
- Download trade agreements and rules of origin data from third party content providers.
- Define the formula expressions that are needed for the calculations that determine the qualification for a trade item structure.
- Configure GTM including your trade item structures and associated trade item structure components which include key data from the underlying items. These objects are used to model your bill of material (BOM). The BOM can be brought in from upstream ERP systems and stored in GTM for use during the trade agreement qualification process.
- Run the existing Tariff Eligibility Screening action to determine if your manufactured goods are eligible to take advantage of a trade agreement. This is an optional step.
- Analyze the BOM for a finished good to determine if it qualifies for a trade agreement based on the rules of origin.
- Generate a report containing the details of trade agreement qualification.
DOWNLOAD RULES OF ORIGIN CONTENT
To support trade agreement qualification, you can download the rules of origin content from third party content providers. Each trade agreement has its own set of rules. Within the rules of origin are product-specific rules and base rules. You can download the following data that will then be available in power data:
- Trade Agreements – models trade agreements available around the world. Trade agreement data can be downloaded as part of the tariff data or the rules of origin data. Once downloaded, you can supplement this data by adding the formula expressions specific to a trade agreement to determine the value of originating material, value of non-originating material, net cost, regional value content methods, and de minimis.
- Rules of Origins – criteria used to determine the qualification of the product and supports preferential rules and non-preferential rules.
- Rules of Origin Product Specific Rules – defines rules that are applied at the classification code level or across a range of classification codes. Product-specific rules include tariff shift, regional value content, HS inclusion, HS exclusion, substantial transformation or some combination of these rules.
- Rules of Origin Rule Types – groups the rules of origin within a specific type. Examples are Regional Value Content, Tariff Shift, HS Exclusion, HS Inclusion or Third Country Check (De Minimis).
- Rules of Origin Rule Codes – captures the details for the various rules of origin rule types and is used to determine if a product meets the qualification for origin.
DEFINE THE FORMULA EXPRESSIONS
Formula expressions are used to perform the calculations necessary to determine if a finished good meet the criteria for trade agreement qualification. Each trade agreement provides details regarding how to calculate the net cost, value of originating material, value of non-originating material, regional value content, de minimis, etc. These rules vary by trade agreement. The various formulas are set up using formula expressions and then assigned on the trade agreement so GTM knows which calculations to perform for a particular trade agreement. GTM ships with sample formula expressions that can be used or can be the basis for a similar formula expression.
CONFIGURE TRADE ITEM STRUCTURE AND ASSOCIATED OBJECTS
There are certain objects that must exist in GTM to perform trade agreement qualification. This data can be entered directly into GTM or can be brought in via integration from an ERP.
A trade item structure as well as all of its components have an underlying item where certain details are modeled. GTM uses data from the trade item structure, trade item structure components and their underlying items to determine whether the BOM for a finished good qualifies for a trade agreement. For example, if you have a trade item structure with three components, you would have a total of four items: one associated with the trade item structure and one for each component.
On the item associated with the trade item structure, you can model data for your finished good including the product classification type, product classification code and item origin information. In the item origin, you can model the inventory organization manufacturing the finished good as well as country of origin data.
On the item associated with each of the trade item structure components, you can model data such as the product classification type, product classification code and item origin data. The item origin should include information regarding the partner /partner site who supplied the component or the inventory organization who manufactured the component.
In addition, cost data is necessary to support the trade agreement qualification process. This cost data, called trade values, is used in the calculations that determine if a finished good can take advantage of a trade agreement. Through the item, you can capture trade value information based on origin, inventory organization, partner, partner site, and so on. Trade value information can be captured at the following levels:
- Trade Item Structure – a Values grid is available
- Trade Item Structure Component – a Values grid is available
- Item – a new Trade Values tab has been added
- Item Qualification – a Values grid is available
RUN TARIFF ELIGIBILITY SCREENING (OPTIONAL)
You can trigger the Tariff Eligibility Screening action to determine if the item underlying the trade item structure can take advantage of a trade agreement. Even though this is an optional step, it will help you to understand for which trade agreements your manufactured goods are eligible. This action can be triggered from the Item or the Item Origin.
ANALYZE THE BILL OF MATERIAL FOR TRADE AGREEMENT QUALIFICATION
You can analyze the BOM, modeled as a trade item structure, to determine if it fully qualifies for a trade agreement based on the rules of origin. Each component with the trade item structure is analyzed to determine if the finished good qualifies for a trade agreement. There are two ways to do this:
- Trigger the Qualification Analysis ad-hoc screening within the Trade Agreements menu. This screen enables you to specify certain criteria to determine trade agreement qualification. Since this is an ad-hoc screening, the data is not stored in GTM. You can specify:
- Item Structure (required) – enter the bill of material you want to analyze for trade agreement qualification.
- Product Classification Type (required) – enter the product classification type for your importing country.
- Country of Origin – you can specify the country of origin. If it is not specified, GTM uses the other criteria specified plus the item origin or default country of origin on the item to determine the country of origin.
- Trade Agreement (required) – enter the trade agreement for which you want to determine qualification.
- Effective/Expiration Dates – enter the effective/expiration dates for the qualification.
- Trigger the Qualify for Trade Agreement action on Item Qualification. This action enables you to qualify a specific item qualification for a trade agreement. You can specify:
- Item Attributes – if applicable, select the appropriate Suffix or Ex (i.e. Exception) in the corresponding rules of origin.
- Producer – if applicable, identify the producer.
- Effective/Expiration Dates – enter the effective/expiration dates for the qualification.
- Minimal Operations Requirements Met – select Yes or No. For trade agreement qualification to be performed, Yes must be selected.
Regardless of where this action is triggered, GTM uses the input parameters and determines the rules of origin that apply. If a product-specific rule can be applied, \GTM looks at applicable Suffix or Ex (i.e. Exception) Rules and applies the product-specific rule.
If a product-specific rule cannot be applied, GTM looks to see if a base rule like a de minimis rule can be applied. Once the analysis is complete, the results page displays:
- Item
- Trade Item Structure
- Product Classification Type
- Product Classification Code
- Trade Agreement Short Name
- Country of Origin
- Qualified flag
- Link to Rules of Origin Qualification Report
If you trigger Qualify for Trade Agreement action on the Item Qualification, the results are stored on the item qualification including:
- Updating the Qualified flag
- Adding Regional Value Content Percentage
In addition, you can view the following data on the Item Qualification based on the qualification:
- Percentage Rate
- Per Unit Charge
- Unit of Measure
Once qualified, you can generate the certificates of origin and provide them to your customers.
GENERATE THE QUALIFICATION REPORT
Whether you analyze the bill of material via the ad-hoc Qualification Analysis screen or using the Qualify Trade Agreement action on the Item Qualification, you can view the results in a report. Click the View Qualification Report to see the details of the analysis that GTM performed.
There are many trade agreements in effect globally. Depending on the goods you are manufacturing and where the components are sourced, there may be opportunities for your organization to save money when exporting finished goods. GTM enables you to you to determine if goods you manufacture qualify for trade agreements based on the associated rules of origin.
Steps to Enable
You don't need to do anything to enable this feature.
Tips And Considerations
In the current release, GTM can calculate trade agreement qualification based on the following rules of origin types:
- HS Exclusion or HS Inclusion
- Regional Value Content based on Net Cost
- Tariff Shift
- De Minimis (Third Country Check)
The following areas will be enhanced in a future release:
- Support for marking rules of origin
- Support for additional rules of origin including wholly owned or produced goods, 50/50, base rules for sets, etc.
- Trade Agreement Qualification based on multi-level BOMs including enhanced origin lookup and value lookup
- Triggering the Qualify for Trade Agreement action from other objects including Item, Trade Item Structure, Trade Transaction and Trade Transaction Line
- Calculations based on Transaction Value and storing the results on a Transaction Line
- Enhanced Qualification Report
For more detailed information about functionality discussed here, please see the following topics in this document:
- Enhancements to Trade Agreements
- New Action on Item Qualification
- Qualification Analysis for Trade Agreements
- Rules of Origin – Data Download and Objects
- Rules of Origin Data Purge
- Support for Trade Values on Item
Rules of Origin - Data Download and Objects
To support the Trade Agreement Qualification of your finished goods, new objects have been added for the rules of origin data. This data can be provided as content from a third-party content provider.
A new Content Category called GTM_RULES_OF_ORIGIN and a new Content Type called RULES OF ORIGIN are added to GTM. When you download your rules of origin data, a new data version is created. It is recommended you create a new content source for your rules of origin data.
When you trigger the Master Data > Process Management > Data Load > Download Data Content process, GTM downloads the rules of origin content and populates the rules of origin tables. The rules of origin content includes the following objects:
- Rules of Origins – defines the criteria needed to determine or qualify the origin of a product. There is one Rules of Origin for each trade agreement and importing region/country combination. The different types of Rules of Origin include Preferential Rules, Non-preferential Rules and Marking Rules. Rules of Origin include:
- Effective/Expiration Date
- Region/Country Code
- Applicable Base Rules
- Action to View Product Specific Rules
- Rules of Origin Product Specific Rules – models rules that apply to a product classification code or range of product classification codes. This is where ‘Ex’ (i.e. exception) is defined where items under a product classification code that are an exception may be able to roll up to the next level. ‘Suffix’ is also defined here where your items may fall into one suffix or another but not both.
- Rules of Origin Rule Types – models different kinds of rules such as Regional Value Content, Tariff Shift, HS Inclusion, HS Exclusion, Third Country Check (De Minimis) and so on. Regional Value Content can be calculated based on Net Cost, Transaction Value, Build Up and Build Down.
- Rules of Origin Rule Codes – captures more details for the Rules of Origin Rule Types and is used to determine if an item meets the qualification for origin. Rule Codes apply to both base rules and product specific rules. Rules of Origin Rule Code include:
- Rules of Origin Rule Type ID
- Rules of Origin ID
- Start and End Classification Code
- Percentage Operator and Value
Having access to the rules of origin data in GTM enables you to determine if your finished goods can take advantage of trade agreements thereby saving on the duties you need to pay.
Steps to Enable
Prior to download, please contact your third-party content provider to add the rules of origin data to your subscription.
Tips And Considerations
The following areas will be enhanced in a future release:
- Support for marking rules of origin
- Support for additional rules of origin including wholly owned or produced goods, 50/50, base rules for sets, etc.
- Calculations based on Transaction Value and storing the results on a Transaction Line
Additional things to consider:
- Trade Agreement data is also downloaded as part of the rules of origin data. For more information, please see the ‘Enhancements to Trade Agreements’ topic in this document.
- It is recommended you create a new content source when you first download the rules of origin data.
- If you are planning to download rules of origin data, it is recommended that you create a new content source for the new content type = RULES OF ORIGIN.
- If you want to receive rules of origin data including trade agreements, check with your content provider about adding this data to your subscription.
This feature provides you, as the DBA, the ability to purge rules of origin data that you download from a third-party content provider. You can select a data version associated with rules of origin data that you want to mark for purge and purge that data at a future point in time.
When a data version for rules of origin data is purged, the following tables are impacted:
- GTM_RULES_OF_ORIGIN
- GTM_ROO_BASE_RULE
- GTM_ROO_PSR
- GTM_ROO_PSR_DESCRIPTION
- GTM_ROO_RULE_CODE
- GTM_ROO_RULE_CODE_DESC
- GTM_DATA_LOAD
- GTM_CONTENT_SET_D
- GTM_CONTENT_SET_D_ATTR
- GTM_DATA_LOAD_ATTRIBUTE
- GTM_DATA_LOAD_DETAIL
- GTM_DATA_VERSION
Providing a purge process for your rules of origin content enables you to keep the volume of data in these tables at a reasonable level.
Steps to Enable
You don't need to do anything to enable this feature.
Tips And Considerations
First, you can select the data version associated with the rules of origin data that you want to mark for purge. Once the data has been marked for purge you, the DBA, can purge the record in the UI or through a scheduled purge process that you run against the object.
Enhancements to Trade Agreement Object
Enhancements have been made to the Trade Agreement object to support trade agreement qualification. Specifically, you can:
- Configure GTM to receive trade agreement data from third-party content providers. You can download this information as part of the tariff data used to support tariff eligibility screening or as part of the rules of origin data used to support trade agreement qualification.
- Specify additional information to support trade agreement qualification calculations including regional value content methods and dependent formulas.
To configure GTM to receive trade agreement data from a third-party content provider, you can either:
- Receive it as part of the tariff data that is downloaded along with your product classification data. This is recommended if you do not plan to take advantage of the trade agreement qualification capability.
- Receive it as part of the rules of origin data. A new Content Type = RULES OF ORIGIN has been added to GTM. When you create a Content Source for the rules of origin data and assign the new content type, rules of origin and trade agreements are downloaded when you trigger the Download Data Content process for the content source.
New fields have been added to the trade agreements including:
- Partners – If you are receiving trade agreement data from a third-party content provider, the Partners grid is populated with the region/country information for the partnering nations. If you previously used the Member Nations grid, it has been replaced by the Partners grid.
- To support trade agreement qualification, the following information can be specified:
- De Minimis Formula – identifies the formula expression for the De Minimis calculation for the trade agreement. For example, to take advantage of this trade agreement, the value of the manufactured goods must have non-originating content that is less than 7% of the value of the good.
- Regional Value Content Methods – identifies the formula expressions used to calculate the percentage of originating and/or non-originating material for the Regional Value Content calculations. For example, a trade agreement will have various regional value content methods that are supported based on net cost and transaction value. All of the calculations related to regional value content methods for a trade agreement can be specified.
- Dependent Formulae – model the formula expressions for any other necessary calculations. For example, you can specific the formula related to the calculation of the value of originating materials, net cost or transaction value. This provides visibility into the details of the formulas for a trade agreement.
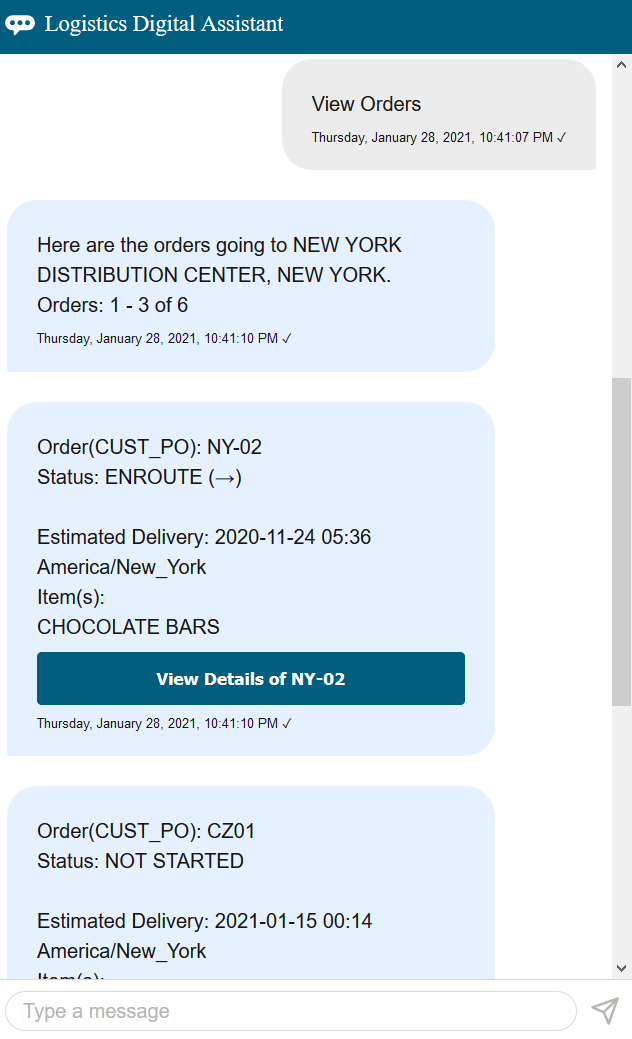
Trade Agreements are used in two different processes in GTM:
- When you perform Tariff Eligibility Screening for your items, you need this information to understand if your items are eligible to take advantage of a trade agreement.
- When you perform Trade Agreement Qualification, you need this information to understand if your manufactured goods qualify for a trade agreement.
Steps to Enable
You don't need to do anything to enable this feature.
Tips And Considerations
- Calculations based on transaction value are not currently supported in GTM.
- The Member Nations grid is hidden by default since it is replaced by the Partners grid. This is controlled by the property ‘gtm.tradeAgreement.memberNationGrid.display’ which has a default value of ‘false’. If you want to display the Member Nations grid, set the property value to ‘true’.
- If you are planning to download rules of origin data, it is recommended that you create a new content source for the new content type = RULES OF ORIGIN.
- If you are already receiving product classification data, check with your content provider about adding the tariff data including trade agreements to your subscription.
- If you want to receive rules of origin data including trade agreements, check with your content provider about adding this data to your subscription.
-
For more information, please see the ‘Rules of Origin - Data Download and Objects’ topic in this document.
Qualification Analysis for Trade Agreements
A new ad-hoc screening is available to perform Qualification Analysis for trade agreements. For a finished good, you can see if the bill of material, modeled as a trade item structure, qualifies to take advantage of a trade agreement. The Qualification Analysis screen enables you to perform ad-hoc screenings on your trade item structures but does not save the data to GTM. To perform an ad-hoc qualification analysis, navigate to Trade Agreements > Qualification Analysis.
On the Qualification Analysis, you can specify:
- Item Structure (required) - enter the bill of material you want to analyze.
- Country of Origin - you can specify the country of origin. If it is not specified, GTM uses the other criteria specified plus the item origin or default country of origin on the item to determine the country of origin.
- Trade Agreement (required) - enter the trade agreement for which you want to determine qualification.
- Effective/Expiration Date
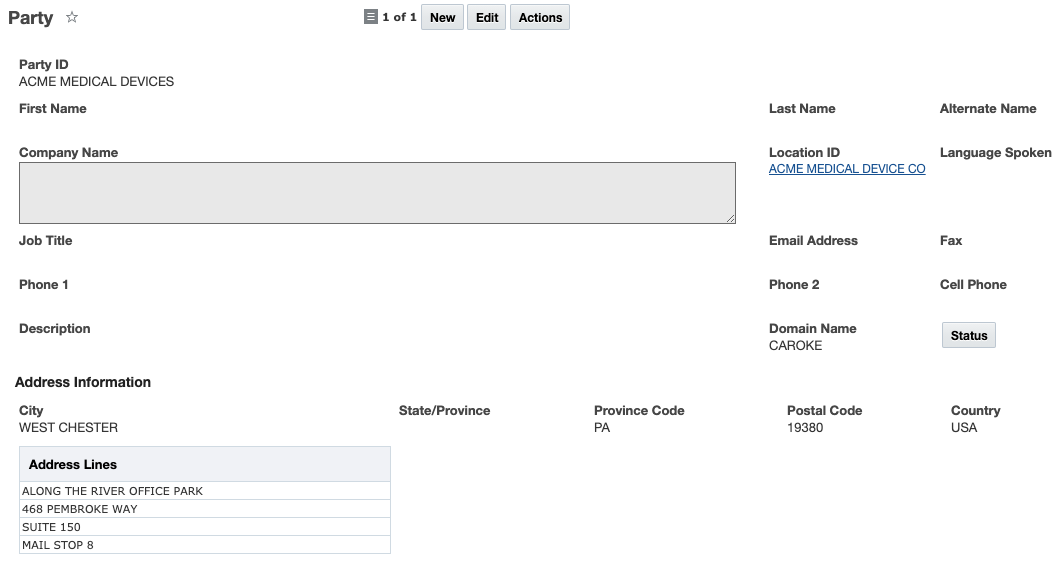
Once you click Match, GTM displays the Qualification Analysis results including:
- Item - the item associated with the trade item structure
- Trade Item Structure - the bill of material you specified for analysis
- Product Classification Type - the product classification type for the importing country
- Product Classification Code - the code that corresponds to the product classification type you specified
- Trade Agreement Short Name - the trade agreement for which you want to run the qualification analysis
- Country of Origin - the country of origin that is being qualified
- Qualified flag - a check mark indicates if the trade item structure qualifies for the trade agreement
- Rules of Origin Qualification Report - click the link to see more details regarding the qualification
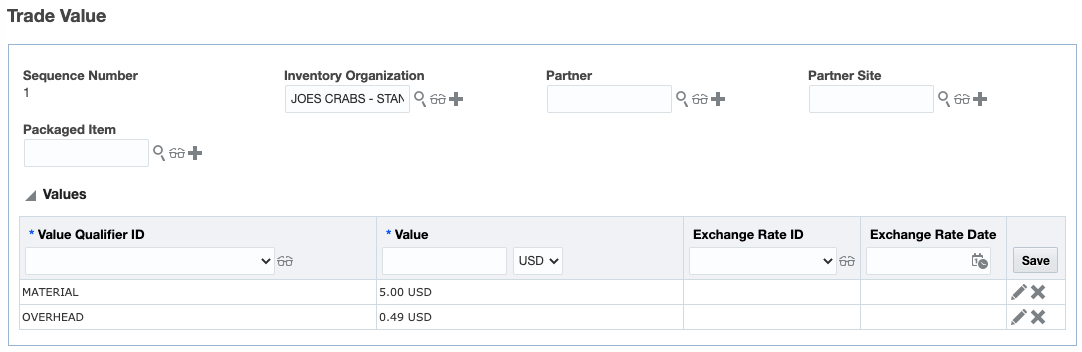
The Qualification Analysis ad-hoc screening enables you to quickly see if a trade item structure qualifies for a particular trade agreement.
Steps to Enable
You don't need to do anything to enable this feature.
Tips And Considerations
For more information on trade agreement qualification, please see the 'Trade Agreement Qualification' topic in this document.
New Action on Item Qualification
A new action has been added to enable you to qualify the item qualification for a trade agreement. When you run the action for an Item Qualification, you can specify:
- Item Attribute - if applicable, select the appropriate Suffix or Ex (i.e. exception) that are in the corresponding rules of origin
- Producer - if applicable, identify the producer
- Effective/Expiration Date - enter the effective/expiration date for the qualification.
- Minimum Operations Requirements Met - you must select Yes to qualify the record.
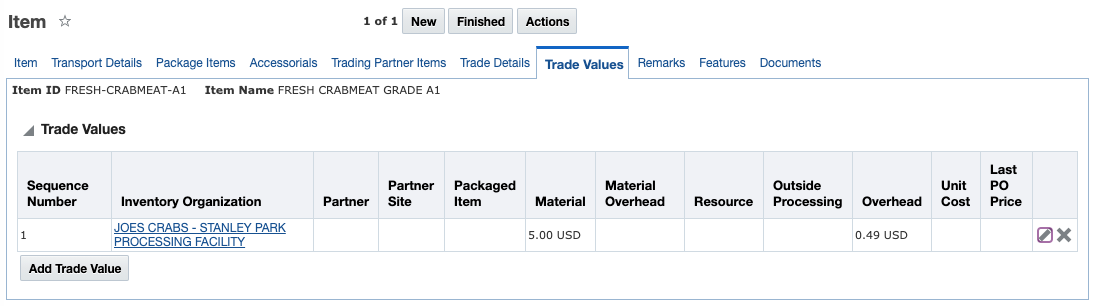
By triggering the Qualify for Trade Agreement action, you can see if your finished good qualifies for a trade agreement and can take advantage of a reduced duty.
Steps to Enable
You don't need to do anything to enable this feature.
Tips And Considerations
For more information on trade agreement qualification, please see the 'Trade Agreement Qualification' topic in this document.
Additional Information Available on Item Qualification
Additional fields including tariff rate information are available on the Item Qualification. Some of the new fields give you visibility to item data associated with the item qualification including:
- Item Type
- Item Structure ID
In addition, when you qualify an item origin, the associated tariff rates for a product classification type/code combination and trade program are displayed including:
- Percentage Rate
- Per Unit Charge
- Unit of Measure
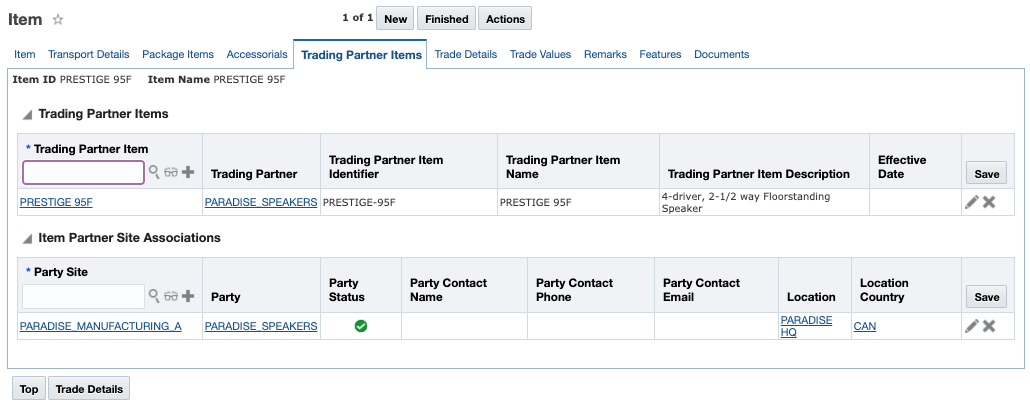
You can see this information from within:
- Item Qualification
- Item Origin within the Trade Programs grid
- Item on the Trade Details tab within the Trade Programs grid
The tariff rate information enables you to quickly understand the duty that is associated with a particular item qualification. Once an item origin is qualified for a product classification type/code combination and trade program, the associated tariff rates are displayed enabling you to make better sourcing or supplier decisions.
Steps to Enable
You don't need to do anything to enable this feature.
Tips And Considerations
In the Trade Programs grid, the Producer field has been hidden from the out of the box manager layout since it is only relevant to certain trade programs. This applies to the manager layouts for Item and Item Origin. To add this field back in the manager layout, please see the OTM How To/Configuration topic called 'Configuring the User Interface'.
GTM Logic Configuration for Default Settings
A new logic configuration has been introduced which enables you to set default settings in GTM. The logic configuration with a Logic Configuration Type = GTM LOGIC CONFIGURATION enables you to specify default settings for both restrict party screening and product classification. This logic configuration includes the following parameters:
- DEFAULT PRODUCT CLASSIFICATION LANGUAGE - specify the product classification language you want to use as the default in the Product Classification Lookup, Classify Item action, and Duty & Tax Lookup. This is an existing capability that was moved from a different logic configuration type.
- DEFAULT PRODUCT CLASSIFICATION TYPE - specify the product classification type you want to use as the default in the Product Classification Lookup, Classify Item action, and Duty & Tax Lookup. This is an existing capability that was moved from a different logic configuration type.
- DEFAULT RPS SERVICE PREFERENCE - specify the service preference you want to use as a default in the ad-hoc Restricted Party Screening. This is a new capability.
The ability to default the Product Classification Language and Product Classification is existing capability available within a Logic Configuration with a Logic Configuration Type = GTM PRODUCT CLASSIFICATION UI CONFIGURATION. For consistency purposes, a new Logic Configuration Type = GTM LOGIC CONFIGURATION is introduced to contain all the default values. If you are using the product classification defaults already, it is recommended that you move this information into the new logic configuration.
NOTE: Once you move the product classification defaults into the new Logic Configuration Type = GTM LOGIC CONFIGURATION, you need to tell GTM to use the new logic configuration. Log in as DBA and navigate to the Optional Feature = USE GTM GENERAL PARAMETER SET and mark the Opted field to use the new Logic Configuration Type. The Logic Configuration Type = GTM PRODUCT CLASSIFICATION UI CONFIGURATION will be deprecated and removed in a future release.
By enabling you to set defaults for your restricted party ad-hoc screening and various product classification process, you can ensure your users are seeing the information that is important to them.
Steps to Enable
You don't need to do anything to enable this feature.
Tips And Considerations
The ability to default the service preference for restricted party screening is a new capability. For more information, please see the 'Default Service Preference for Restricted Party Screening' topic in this document.
Default Service Preference for Ad-Hoc Restricted Party Screening
You can configure a default service preference that is used in the ad-hoc Restricted Party Screening. If you are unsure which service preference to use, a default one can be configured and assigned to the user to ensure you are using the correct one. If you want to select a service preference different from the default configured, you can do so using the Service Preference dropdown list on the ad-hoc Restricted Party Screening page.
To configure this, you need to set up:
- Service Preference
- Logic Configuration
- Parameter Set
- User Preference
Here are the details:
- Service Preference - create the service preference you want to assign as your default.
- Logic Configuration - in a logic configuration with a Logic Configuration Type = GTM LOGIC CONFIGURATION, you can specify the service preference. In the Parameter = DEFAULT RPS SERVICE PREFERENCE, specify the service preference you want to use as the default on the ad-hoc Restricted Party Screening page.
- Parameter Set - in the parameter set, identify the logic configuration that contains the default parameters. In the GENERAL section of the Parameter Set in the GTM LOGIC CONFIGURATION parameter, add the logic configuration you want to use for your default preferences.
- User Preference - add the parameter set containing your default parameters to your user preference. Within the Preference section, select a Name = PARAMETER SET and add a Value of the parameter set you want to use.
- If you do not configure a default service preference, the ad-hoc Restricted Party Screening will use the service preference = AD_HOC_PARTY_SCREENING_SERV_PREF that ships with GTM.
Once you have configured GTM, when you navigate to the ad-hoc Restricted Party Screening page, you will see the default Service Preference you've defined is selected on the dropdown list. You can override the default by clicking the Service Preference dropdown and selecting another Service Preference.
While using the ad hoc Restricted Party Screening, you may not know which service preference to use. You can configure a default service preference to ensure the correct one is being used.
Steps to Enable
You don't need to do anything to enable this feature.
Tips And Considerations
Once a user preference is created, you need to assign it to an entire domain, a specific user, or a specific user level. For more information on configuring a user in GTM, please refer to the 'User Preferences' topic and the 'User Preference Access' topic in help.
For more information on the Logic Configuration Type = GTM LOGIC CONFIGURATION, please see the 'GTM Logic Configuration for Default Settings' topic in this document.
Remove Party/Restricted Party Matches That No Longer Meet the Threshold
Restricted party screening has been enhanced so that a restricted party that is no longer a match to a party is not displayed as a match. When restricted party screening is performed, GTM re-screens existing matches and updates their match factors. If you have an existing party/restricted party match that falls below the overall threshold defined on the service preference, you can decide if you want to see this party/restricted party match based on status. For example, if you have a party/restricted party match in a REQUIRES_REVIEW status and once it’s re-screened it does not meet the threshold, you may want to remove it from the list because it no longer needs to be reviewed.
A new property is available called ‘gtm.rpls.deleteRestrictedPartyScreeningForValues’. If you list multiple statuses in this property, you should separate them by a comma. The following values can be entered:
- APPROVED - indicates the match is verified.
- ESCALATED - indicates the match is escalated.
- REJECTED - indicates the match is not a match.
- REQUIRES_REVIEW - indicates the match is a potential match. (This is the default value.)
You can update the property with the status values that should be considered for removal. By default, party/restricted party matches in a REQUIRES_REVIEW status will be deleted if a match does not meet the overall threshold upon re-screening.
If a party/restricted party match is no longer valid, you can remove it from the list thereby ensuring you do not spend time reviewing the match.
Steps to Enable
You don't need to do anything to enable this feature.
Highlight Alternate Name in Party Match Actions
If an alternate name is a potential match against a restricted party, highlighting of the match across the alternate name and restricted party is available. This enables you to see which data on the party is being matched to the data on the restricted party. This is available in the following Party actions:
- Restricted Party Screening
- Review Screening Results
- Perform Full Restricted Party Screening
- Review Match Factor
By adding highlighting to the alternate name, you are able to see if a match is based on the company name or the alternate name of the party.
Steps to Enable
You don't need to do anything to enable this feature.
Add Authorization Type to Manually Release a Control
In addition to the existing Authorization text field, you can add an Authorization Type to manually add license information to release a control. In the Control Screening Results grid on the Trade Transaction Line and Declaration Line, you can use a combination of the Authorization Type and Authorization to release a hold.
If you have licenses but have not configured the full License Management capability, you can model your licenses using the Authorization Type and Authorization. The Authorization Type is linked to power data so that you can model this similar to your licenses. This information can be copied from the transaction line to the declaration line and can then be used on your AES Filing or other customs declarations to indicate the license used. For AES purposes, the Authorization Type is sent at the License Code and the Authorization Code is sent at the License Number.
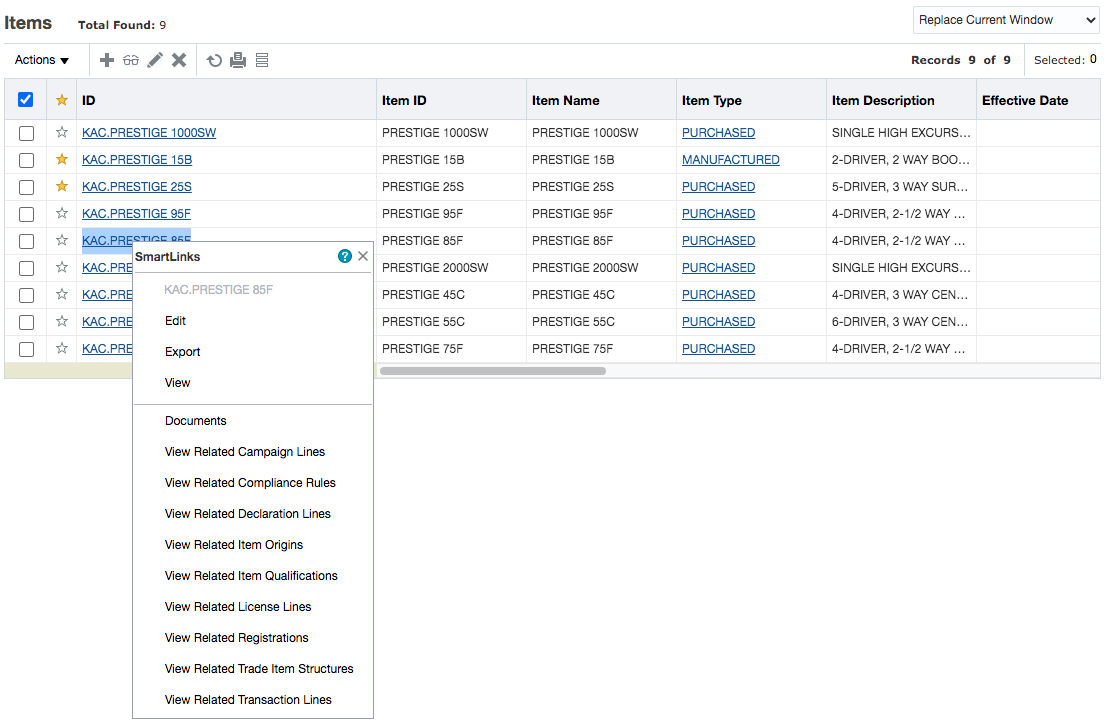
If you only have a few licenses and choose to not use the full License Management capability, you can configure the Authorization Type and use it with the Authorization to indicate the license you are using and release a control.
Steps to Enable
You don't need to do anything to enable this feature.
This feature provides enhancements to the AES Filing capability. Based on regulatory changes, the AES Template related to the X12.601 Customs & Border Protection (CBP) - Export Shipment Information specification has been updated as follows:
- AES License Code C37, Civil End Users (CIV) is no longer supported. As such, the mapping has been removed. Based on the regulatory changes, if you specify CIV as the license code or license exception code, then "S00" will be reported.
- AES License Code C63 (YFA) for ECCN 0A501.y Firearms Related Commodities has been added. This license code is used for .y components under 0A501.y and former USML items containing .y subparts.
As the regulations change for AES filing, the GTM product is updated so that your filing is in line with the current regulations.
Steps to Enable
You don't need to do anything to enable this feature.
Tips And Considerations
For more information about the AES filing regulations, please refer to the U.S. Customs and Border Protection website.
Delete Saved Simulation from Landed Cost Simulator
You can remove a Saved Simulation on the Landed Cost Simulator page using the Delete button. You can do this by:
- Selecting the Saved Simulation you want to remove from the dropdown list.
- Clicking the Delete button to the right of the dropdown list to remove the Saved Simulation.
- Clicking OK to confirm you want to remove the Saved Simulation. Once confirmed, the Saved Simulation no longer appears in the dropdown list.
If you have Saved Simulations that you no longer use or you may have created by accident, you can remove them from the list so that they no longer appear.
Steps to Enable
You don't need to do anything to enable this feature.
Select Multiple Objects When Triggering Estimate Duty and Taxes Action
You can trigger the Estimate Duty and Taxes action on multiple objects. When you trigger this action, details are sent to a third party content provider. The third party content provider processes the request and returns the duty and tax details. The confirmation page displays all transactions that were selected and a status as to whether the data returned successfully. You can trigger this action from:
- Transactions > Trade Transactions > Actions > Calculations > Estimate Duty and Taxes
- Customs > Declarations > Actions > Calculations > Estimate Duty and Taxes
The information that is returned is stored in the Values grid on either the Trade Transaction, Trade Transaction Line, Declaration or Declaration Line depending on the data returned. For example, Merchandise Processing Fee (MPF) will be stored in the Values grid on the header while the duty will be stored in the Values grid on the line.
By enabling the Estimate Duty and Taxes action to support multiple objects, you will be able to save time when processing your transactions and declarations for duty and tax information.
Steps to Enable
You don't need to do anything to enable this feature.
Tips And Considerations
You can select up to 10 trade transactions or declarations when you trigger the Estimate Duty and Taxes action from the user interface.
Lookup Trade Program Using New Date and Number Attributes in Constraint Set
On the Constraint Set, new flex field attributes have been added so that you have a total of 20 date flex field attributes and 20 number flex field attributes. For a Constraint Set with a Constraint Set Type of 'TRANSACTION-LINE TRADE PROGRAM LOOKUP', the User Defined Attribute Date 11-20 and User Defined Attribute Number 11-20 flex fields have been added to the following Constraint IDs:
- ORIGIN DATE FLEX FIELD
- ORIGIN NUMBER FLEX FIELD
- QUALIFICATION DATE FLEX FIELD
- QUALIFICATION NUMBER FLEX FIELD
When you trigger the Look Up Trade Program action, you must enter a Constraint Set ID containing the constraints that are used to look up the qualified trade program on the item associated with the trade transaction/declaration for the same country of origin as that on the transaction line. GTM then copies that information to the trade transaction line/declaration line.
By adding the additional 10 user defined attribute date flex fields and 10 user defined attribute number flex fields to the constraint set, you have more flexibility in defining the constraints to be used when looking up the trade program.
Steps to Enable
You don't need to do anything to enable this feature.
Global Trade Intelligence (GTI)
New Dimensions Available on Trade Transaction and Trade Transaction Line
Additional columns have been added the Global Trade Intelligence schema for the Trade Transaction and Trade Transaction Line that will allow you to create ad-hoc reports based on transport mode, conveyance name and conveyance flag. In addition, updates have been made to existing columns as well.
The Trade Transaction Analysis > Trade Transaction Transport Mode Dimensions has been expanded as follows:
- Transport Mode - New arrival and departure columns have been added enabling you to model the transport mode used for arrival, border crossing and departure.
- Arrival Transport Mode GID
- Arrival Transport Mode XID
- Border Transport Mode GID (previously called Transport Mode GID)
- Border Transport Mode XID (previously called Transport Mode XID)
- Departure Transport Mode GID
- Departure Transport Mode XID
- Conveyance - New arrival and departure columns have been added enabling you to model the conveyance details for the arrival, border crossing and departure.
- Arrival Conveyance Name
- Arrival Conveyance Flag
- Border Conveyance Name (previously called Conveyance Name)
- Border Conveyance Flag (previously called Conveyance Flag)
- Departure Conveyance Name
- Departure Conveyance Flag
The Trade Transaction Line Analysis > Trade Transaction Line Transport Mode Dimensions has been expanded as follows:
- Transport Mode - New arrival and departure columns are available so you can model the transport mode used for arrival, border crossing and departure.
- Arrival Transport Mode GID
- Arrival Transport Mode XID
- Border Transport Mode GID (previously called Transport Mode GID)
- Border Transport Mode XID (previously called Transport Mode XID)
- Departure Transport Mode GID
- Departure Transport Mode XID
- Conveyance - New arrival and departure columns are available so you can model the conveyance details for the arrival, border crossing and departure.
- Arrival Conveyance Name
- Arrival Conveyance Flag
- Border Conveyance Name (previously called Conveyance Name)
- Border Conveyance Flag (previously called Conveyance Flag)
- Departure Conveyance Name
- Departure Conveyance Flag
These new fields enable you to model various transport mode and conveyance details for reporting purposes. In regions such as Europe, you many need to specify the transport modes and conveyance details across the supply chain.
Steps to Enable
You don't need to do anything to enable this feature.
Tips And Considerations
In previous versions of GTI, the Conveyance Name and Conveyance Flag were modeled in the Trade Transaction Analysis > Trade Transaction Dimensions folder. If you have existing reports using the old folder, it is recommended that you start to use the new fields within the Trade Transaction Analysis > Trade Transaction Transport Mode Dimensions folder. The Conveyance Name and Conveyance Flag in the Trade Transaction Analysis > Trade Transaction Dimensions folder will be deprecated in a future release.
New Dimensions Available on Declaration and Declaration Line
Additional columns have been added to the Global Trade Intelligence schema for the Declaration and Declaration Line that will allow you to create ad-hoc reports based on transport mode, conveyance name and conveyance flag. In addition, updates have been made to existing columns as well.
The Declaration Analysis > Declaration Transport Mode Dimensions has been expanded as follows:
- Transport Mode - New arrival and departure columns have been added enabling you to model the transport mode used for arrival, border crossing and departure.
- Arrival Transport Mode GID
- Arrival Transport Mode XID
- Border Transport Mode GID (previously called Transport Mode GID)
- Border Transport Mode XID (previously called Transport Mode XID)
- Departure Transport Mode GID
- Departure Transport Mode XID
- Conveyance - New arrival and departure columns have been added enabling you to model the conveyance details for the arrival, border crossing and departure.
- Arrival Conveyance Name
- Arrival Conveyance Flag
- Border Conveyance Name (previously called Conveyance Name)
- Border Conveyance Flag (previously called Conveyance Flag)
- Departure Conveyance Name
- Departure Conveyance Flag
The Declaration Analysis > Declaration Dimensions has been expanded as follows:
- Customs - New columns have been added enabling you to model customs-related information.
- Declaration Type GID
- Declaration Type XID
- Declaration Type Code
- Declaration Sub Type GID
- Declaration Sub Type XID
- Declaration Sub Type Code
- Procedure GID
- Procedure XID
- Procedure Code
- Procedure Detail GID
- Procedure Detail XID
- Procedure Detail Code
- Prior Procedure GID
- Prior Procedure XID
- Prior Procedure Code
- Trade Preference GID
- Trade Preference XID
- Trade Preference Code
- Bond GID
- Bond XID
- Bond Number
- Valuation Method GID
- Valuation Method XID
- Valuation Method Code
The Declaration Line Analysis > Declaration Line Transport Mode Dimensions has been expanded as follows:
- Transport Mode - New arrival and departure columns have been added enabling you to model the transport mode used for arrival, border crossing and departure.
- Arrival Transport Mode GID
- Arrival Transport Mode XID
- Border Transport Mode GID (previously called Transport Mode GID)
- Border Transport Mode XID (previously called Transport Mode XID)
- Departure Transport Mode GID
- Departure Transport Mode XID
- Conveyance - New arrival and departure columns have been added enabling you to model the conveyance details for the arrival, border crossing and departure.
- Arrival Conveyance Name
- Arrival Conveyance Flag
- Border Conveyance Name (previously called Conveyance Name)
- Border Conveyance Flag (previously called Conveyance Flag)
- Departure Conveyance Name
- Departure Conveyance Flag
The Declaration Line Analysis > Declaration Line Dimensions has been expanded as follows:
- Customs - New columns have been added enabling you to model customs-related information.
- Declaration Type GID
- Declaration Type XID
- Declaration Type Code
- Declaration Sub Type GID
- Declaration Sub Type XID
- Declaration Sub Type Code
- Procedure GID
- Procedure XID
- Procedure Code
- Procedure Detail GID
- Procedure Detail XID
- Procedure Detail Code
- Prior Procedure GID
- Prior Procedure XID
- Prior Procedure Code
- Trade Preference GID
- Trade Preference XID
- Trade Preference Code
- Bond GID
- Bond XID
- Bond Number
- Valuation Method GID
- Valuation Method XID
- Valuation Method Code
- Trade Program Short Name
These new fields enable you to model various transport mode, conveyance details, and customs-related information for reporting purposes. In areas such as Europe, you many need to specify the transport modes and conveyance details across the supply chain.
Steps to Enable
You don't need to do anything to enable this feature.
Tips And Considerations
In previous versions of GTI, the Conveyance Name and Conveyance Flag are modeled in the Declaration Analysis > Declaration Dimensions folder. If you have existing reports using this folder, it is recommended that you start to use the new fields within the Declaration Analysis > Declaration Transport Mode Dimensions folder.
This section includes details about additional changes in this update that might change the way your products work.
MISCELLANEOUS CHANGES
| Change | Description | Comment |
|---|---|---|
| Removed UI Performance As Optional Feature | The UI Performance Metrics feature has been removed from the Optional Features list and has been implemented as a user controlled feature - Performance Metrics Collection. |