
- Revision History
- Overview
- Update Tasks
- Feature Summary
- Transportation Management
-
- Transportation and Global Trade Platform
- Transportation Management (Base)
- UI Configuration
-
- Contact Manager Moved to Manager Layout
- Power Unit - Grid Fatten Remark Field
- Packaged Item Description Visible After Running Add New Line Item Added
- Manager Layout Direct URL Link In Stylesheet to User's Configured Manager Layout
- Create Secondary Charge Action Moved to Manager Layout
- Work Assignment Screen Set - Results Add User Defined Images and Indicator
- Planning Actions
-
- Create Multi-Block Shipment - Shipment Action
- Create Work Assignment Shipment Sort Display Property
- Enhanced Split Shipment Action - Split by Delivery Stop
- Add Repack Ship Unit and Repack Equipment Action Menu Options to Sell Shipment
- Move Order to Shipment Action Supports Multi Order Select
- Change Equipment Action Recalculate Input Options
- Booking and Tendering
- Financials
- Shipment Group
- Dock Scheduling
- Performance and Metrics
- Rates and Rating
- Ocean Enhancements
- Usability Enhancements
-
- Add Business Number Generator to Ground Schedules
- Decline Reason Code Mandatory for Service Provider Decline and Planner Withdraw/Declines
- Special Service Activity Time at Source Considering Shipment Destination
- Property to Ignore Shipment Tender Status for Service Provider Set Appointments
- Perform Recharge Action Order Release Sell Shipment Status to Allow Sell Shipment Delete
- Equipment Reference Units
- External Distance Engines
- Logistics Machine Learning
- Transportation Intelligence
This document will continue to evolve as existing sections change and new information is added. All updates appear in the following table:
| Date | Product | Feature | Notes |
|---|---|---|---|
| 11 FEB 2022 | Transportation and Global Trade Platform | Outbound REST | Updated document. Revised feature information. |
| 04 FEB 2022 | Transportation Management (Base) | HERE Technologies V8 for Distance and Service Time | Updated document. Revised feature information. |
| 17 DEC 2021 | Created initial document. |
This guide outlines the information you need to know about new or improved functionality in Oracle Transportation Management Cloud Update 22A. Each section includes a brief description of the feature, the steps you need to take to enable or begin using the feature, any tips or considerations that you should keep in mind, and the resources available to help you.
 HAVE AN IDEA?
We’re here and we’re listening. If you have a suggestion on how to make our cloud services even better then go ahead and tell us. There are several ways to submit your ideas, for example, through the Ideas Lab on Oracle Customer Connect. Wherever you see this icon after the feature name it means we delivered one of your ideas.
GIVE US FEEDBACK
We welcome your comments and suggestions to improve the content. Please send us your feedback at otm-doc_us@oracle.com. Please indicate you are inquiring or providing feedback regarding the Oracle Transportation Management What’s New in Update 22A.
DISCLAIMER
The information contained in this document may include statements about Oracle’s product development plans. Many factors can materially affect Oracle’s product development plans and the nature and timing of future product releases. Accordingly, this Information is provided to you solely for information only, is not a commitment to deliver any material, code, or functionality, and should not be relied upon in making purchasing decisions. The development, release, and timing of any features or functionality described remains at the sole discretion of Oracle.
This information may not be incorporated into any contractual agreement with Oracle or its subsidiaries or affiliates. Oracle specifically disclaims any liability with respect to this information. Refer to the Legal Notices and Terms of Use for further information.
This section gives you information to help you plan, deploy, and validate your update. We make frequent additions to this document, so don’t forget to check back and get the latest information before your update starts.
Review the Release Notes.
- The release notes include fixes, special instructions, and resolutions related to the Oracle Transportation and Global Trade Management Cloud.
- Release Notes can be found here:
- https://support.oracle.com/epmos/faces/DocumentDisplay?id=2620583.1
Use the following resources to prepare for and validate your Oracle Engagement Cloud update.
On My Oracle Support Read:
- Doc ID 2095509.1
- Oracle Cloud Applications - Transportation and Global Trade Management Cloud: Environment Refresh Policy
- Doc ID 2095528.1
- Oracle Cloud Applications - Transportation and Global Trade Management Cloud: Quarterly Update Planning
- Doc ID 2096782.1
- Oracle Cloud Applications - Transportation and Global Trade Management Cloud: Quarterly Update Planning FAQs
- Doc ID 2195580.1
- Oracle Cloud Applications - Transportation and Global Trade Management Cloud: Get Started with Your Implementation
- Doc ID 2508854.1
- Oracle Cloud Applications - Transportation and Global Trade Management Cloud: Quarterly Updates - Preparation and Testing Recommendations
Column Definitions:
Report = New or modified, Oracle-delivered, ready to run reports.
UI or Process-Based: Small Scale = These UI or process-based features are typically comprised of minor field, validation, or program changes. Therefore, the potential impact to users is minimal.
UI or Process-Based: Larger Scale* = These UI or process-based features have more complex designs. Therefore, the potential impact to users is higher.
Features Delivered Disabled = Action is needed BEFORE these features can be used by END USERS. These features are delivered disabled and you choose if and when to enable them. For example, a) new or expanded BI subject areas need to first be incorporated into reports, b) Integration is required to utilize new web services, or c) features must be assigned to user roles before they can be accessed.
Transportation and Global Trade Platform
Next Generation Enhanced Workbench
This feature provides you with the first release of the Oracle JET based Enhanced Workbench. This first release of the Enhanced Workbench (Layouts and Designer) provides you with many of the same or equivalent features and functionality as the original Workbench (developed using ADF technology) while providing you with a long list of usability, functionality and performance improvements.
NOTE: While the first release of the Enhanced Workbench has many of the features and functions of the current Workbench, it is not yet fully functionally equivalent and should only be used for review, testing and evaluation purposes. The Enhanced Workbench should not be rolled out into production.
Both the Enhanced Workbench and the original Workbench will continue to coexist for several update cycles in order to provide you with ample time to migrate from the older technology to the new Enhanced Workbench technology. Your migration to the Enhanced Workbench will be supported by migration tools that will allow you to easily move your existing Workbench Layouts into the new Enhanced Workbench infrastructure.
Some of the highlights of the Enhanced Workbench include:
- The Workbench Manager which supports migrating your existing Workbench Layouts to the Enhanced Workbench Format - and vice versa
- A collapsible menu for navigation that you can easily toggle on and off
- A new Analytics Dashboard Content Type which allows you to add BI content as a panel within the workbench
- A new Data Visualization Content Type which allows you to incorporate data visualization project content within the workbench
- A new Transactional Report Type which allows you to include an Oracle Analytics Publisher report within the workbench
- A new Shipment Gantt Content Type which provides you with a Gantt view of your shipments
- A new Overview Panel for your all your Gantts that provides you with an improved navigation experience within the available Gantts
- The ability to do multiple splits per region
- An enhanced type ahead with contains Workbench Layout ID dropdown search
- The ability to collapse tabs in a region to gain additional screen real estate
- Load Config Region now supports Edits within the Enhanced Workbench
- The ability to flip between the Region Content and the Region Details
- Improved Logging
- More Informative - Progress Bar – in-process Logging and error messages all improved
- Configurable “on the fly”
- Duration as a metric
Below you will find an example of just some of the changes provided by the new Enhanced Workbench.
The Workbench Manager allows you to easily find and select one or more of your Workbench layouts and convert the Workbenches between a Legacy or Enhanced Workbench view using the actions - Enhanced View Enabled - which moves the Legacy Workbench to an Enhanced Workbench - or Legacy View Enabled - which moves an Enhanced Workbench to a Legacy Workbench view.
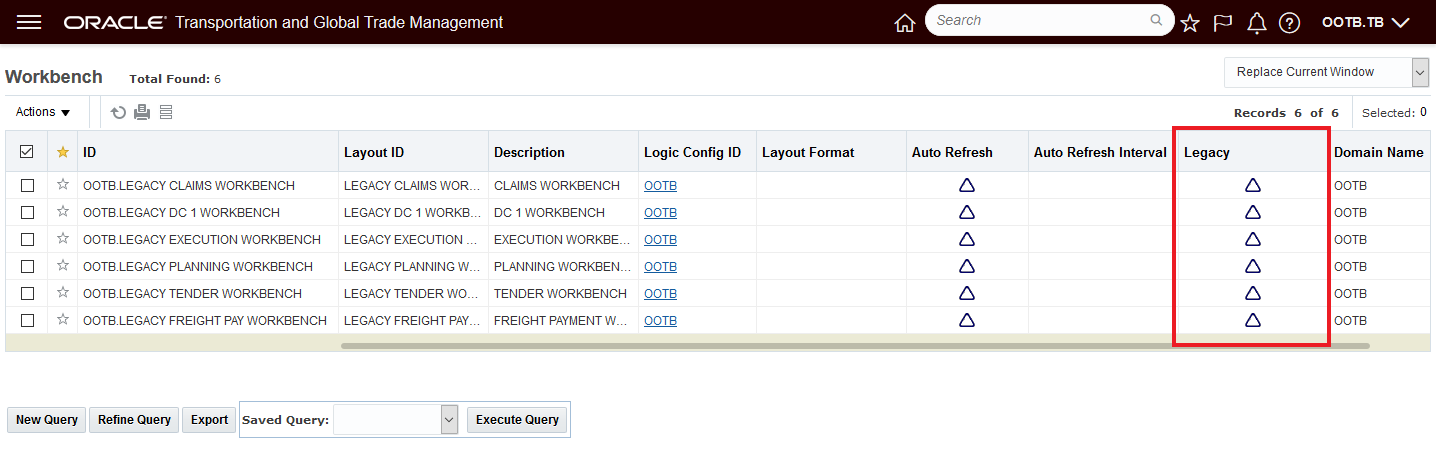
Workbench Manager Finder
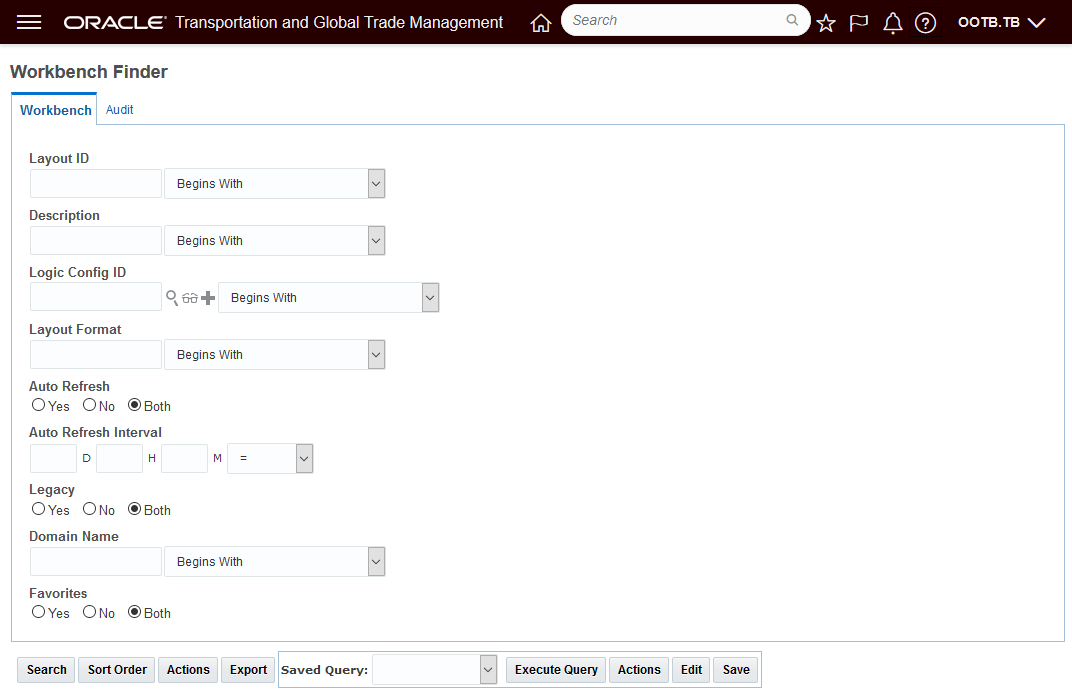
Use the Workbench Manager to find all of your Legacy Workbenches.
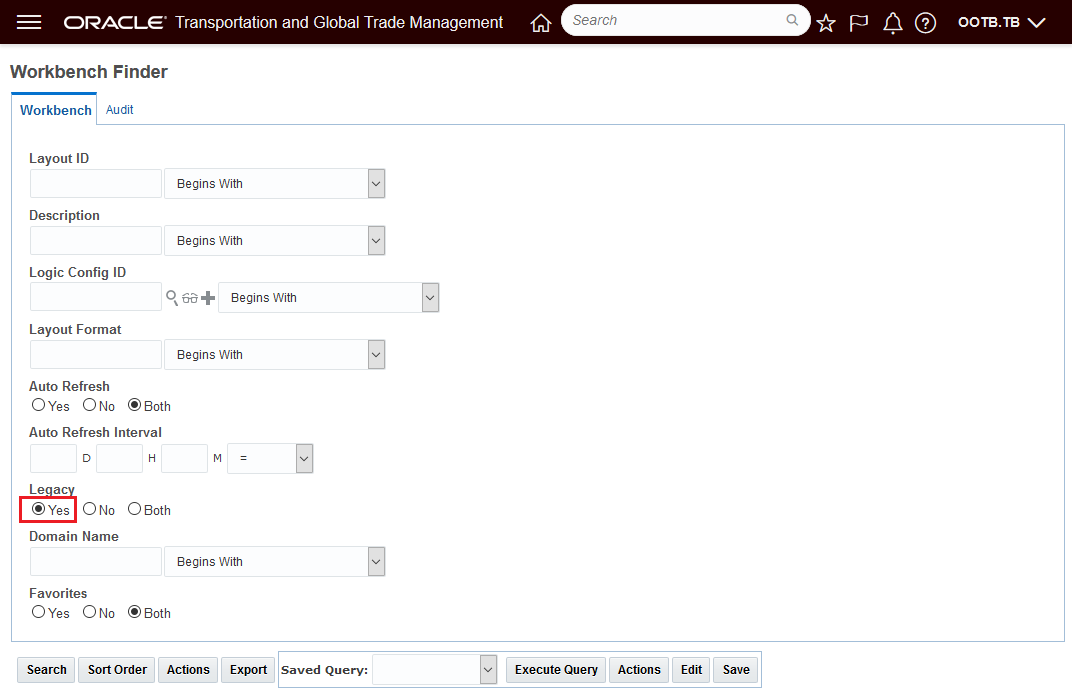
Workbench Manager Finder - Find Legacy Workbench Layouts
The results below show six Legacy Workbenches. Converting all six Workbenches from Legacy to Enhanced only requires you to select all six and run the action Enhanced View Enabled as shown below.
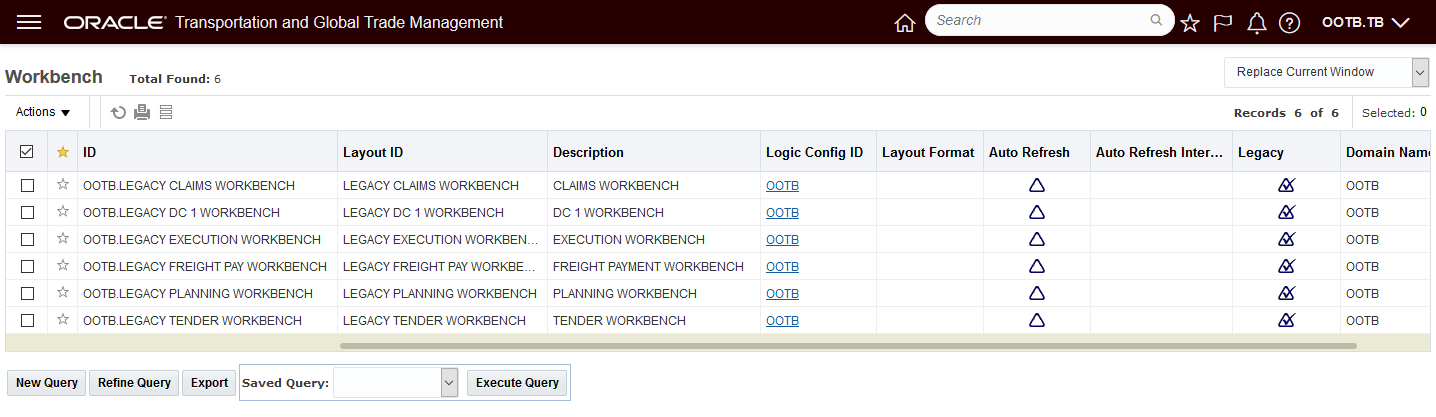
Legacy Workbench Finder Results
Select the set and convert them all to Enhanced using the action Enhanced View Enabled
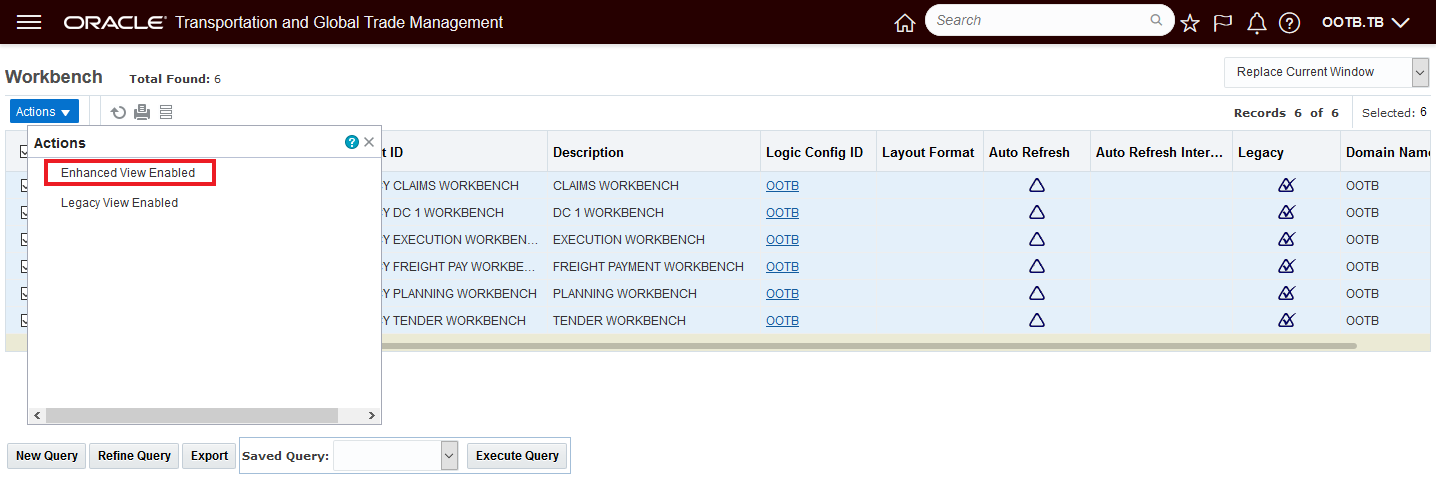
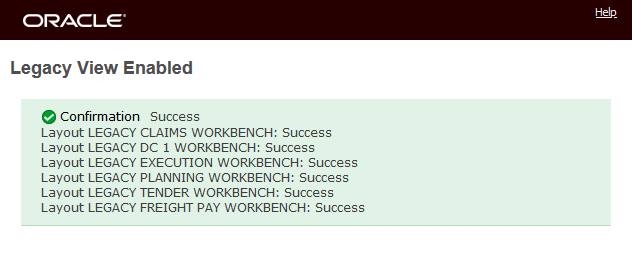
Enhanced View Enabled Action
Results of running the action - each workbench is converted

Enhanced View Enabled - Workbench Conversion Message
The six selected Workbenches that were in the Legacy format are no longer legacy workbenches. The converted Workbenches will now show up in the Enhanced Workbench designer and not in the Legacy Workbench Designer.
Legacy to Enhanced View Converted
If, for some reason you need to convert the Workbenches back to the Legacy format - that can be done very easily by selecting the Workbenches and running the Legacy View Enabled action as shown below.

Enhanced back to Legacy
Convert Back to Legacy
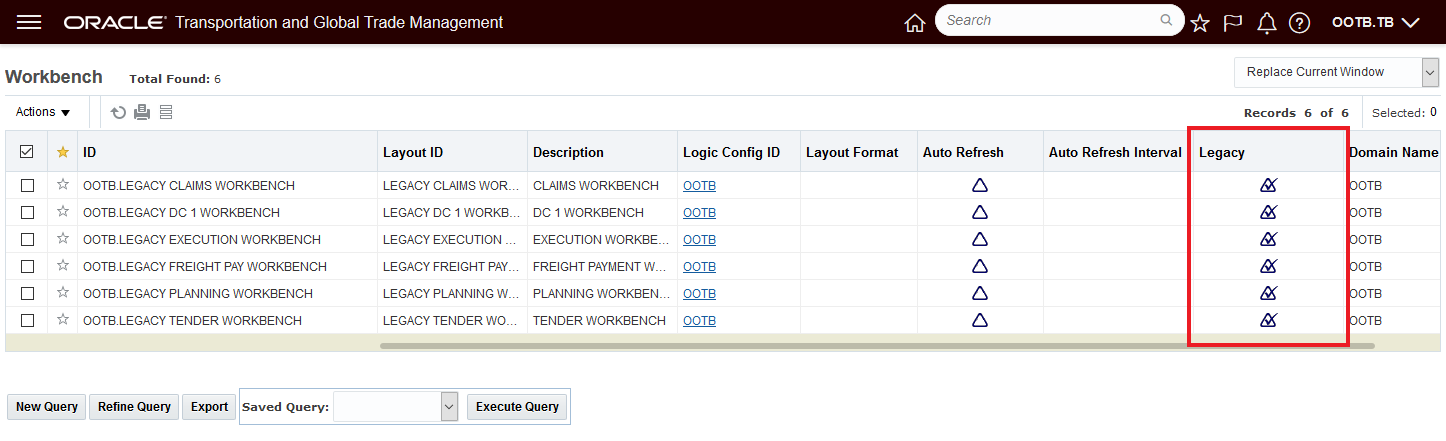
Legacy Flag Visible
The Enhanced Workbench Menu and Navigation options can be easily toggled on and Off.
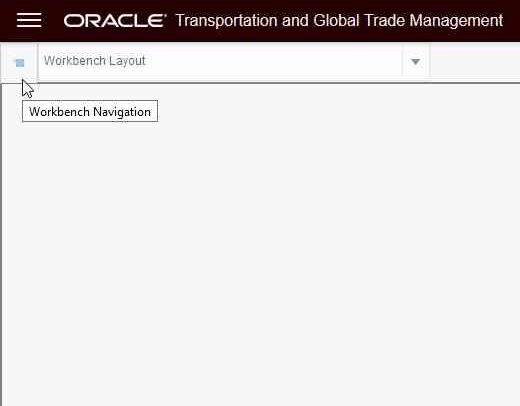
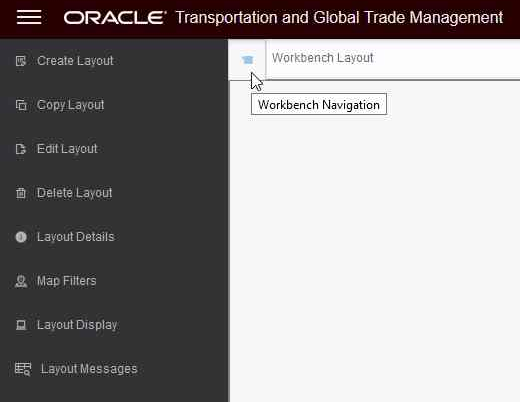
Enhanced Workbench Menu
Additional Content Types
- New Analytics Dashboard Content Type which allows you to add BI content as a panel within the workbench
- New Data Visualization Content Type
- New Shipment Gantt Content Type which provides you with a Gantt view of your shipments over time
- New Transactional Report Type which allows you to include an Oracle Analytics Publisher report within the workbench
New Content Types Analytics and Shipment Gantt
Below is an example of the Analytics Dashboard Content Type incorporated into the Enhanced Workbench Layout. In this example, the Service Provider Metrics Dashboard is incorporated.
Analytics Dashboard Component - Service Provider Metrics
Below is an example of the new Data Visualization Content Type incorporated into the Enhanced Workbench Layout. In this example the analysis is for Logistics Machine Learning accuracy.
Data Visualization Content Type
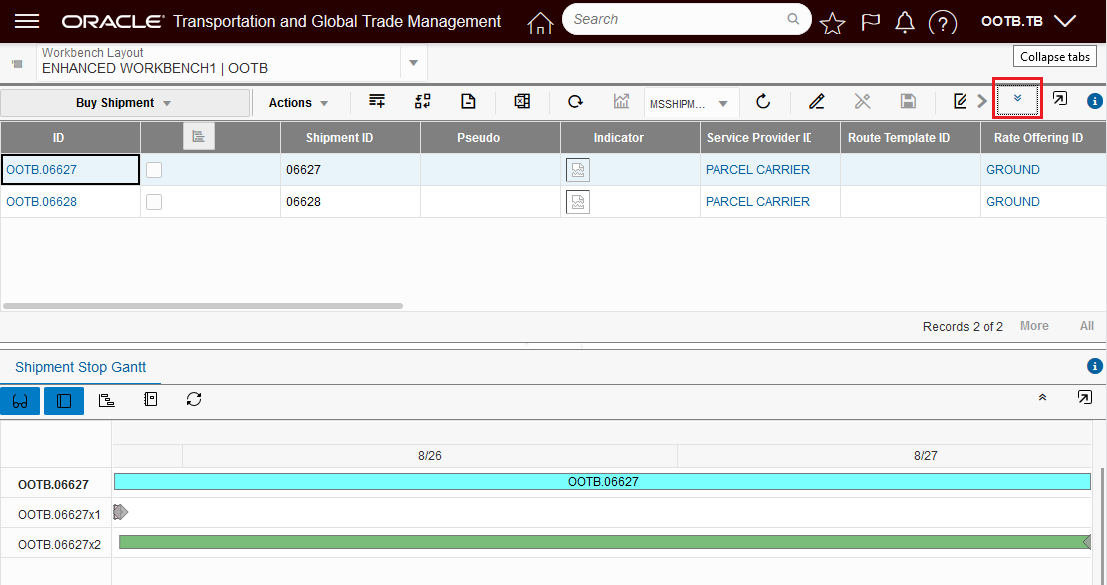
The example below shows the new Shipment Gantt which provides you with the opportunity to visualize your shipments in a Gantt format.
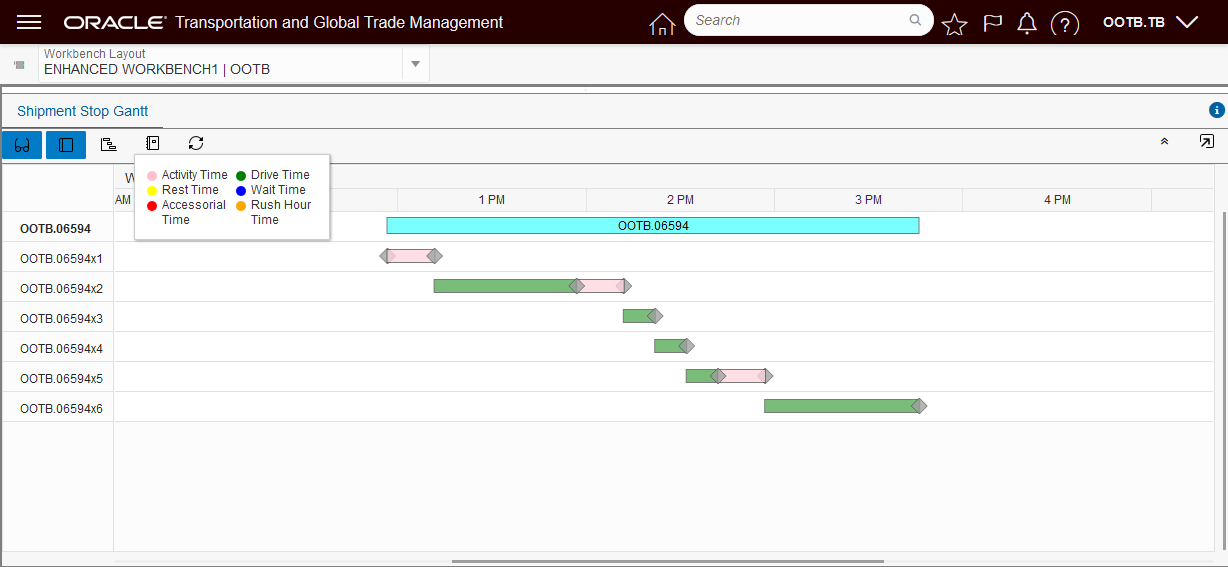
Shipment Stop Gantt
The Overview Panel has been added to all the Gantts (Dock Scheduling, Driver, Shipment, and Work Assignment) to allow for an improved Gantt navigation experience. The Overview allows you dynamically set the time window you wish to review the Gantt with, as well as allowing you to slide that window across time - either earlier or later.
In the example below, the Overview - by default - sets an overview window that covers the entire shipment timeline.
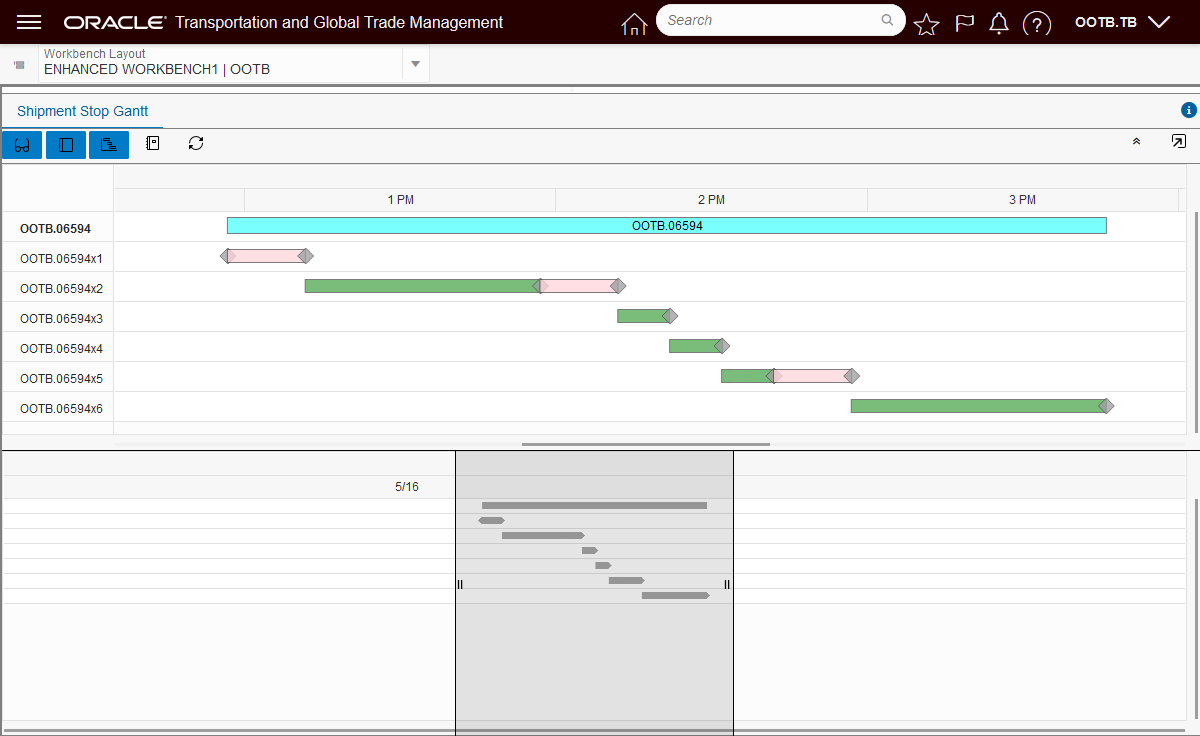
Gantt Overview
You can "zoom in" to a more specific time by simply reducing the size of the Overview window.
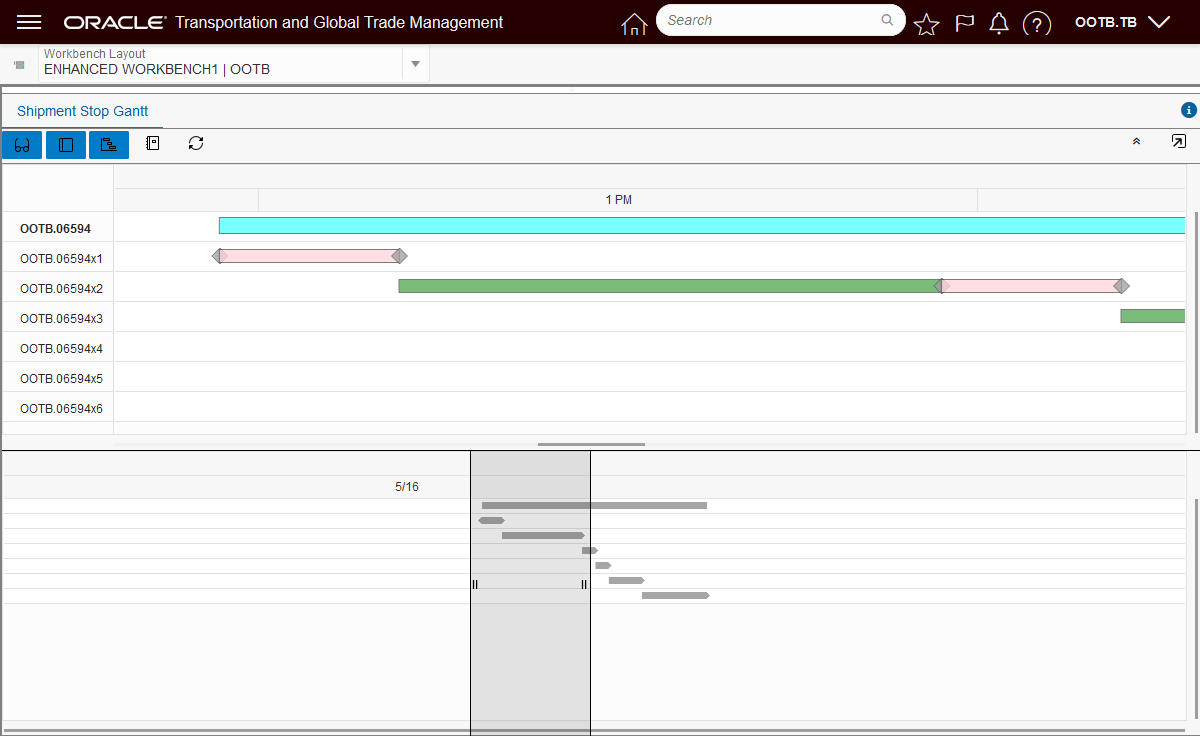
Narrow Overview Gantt Window
You can also use the Overview window to change your time frame - left (earlier), or right (later).
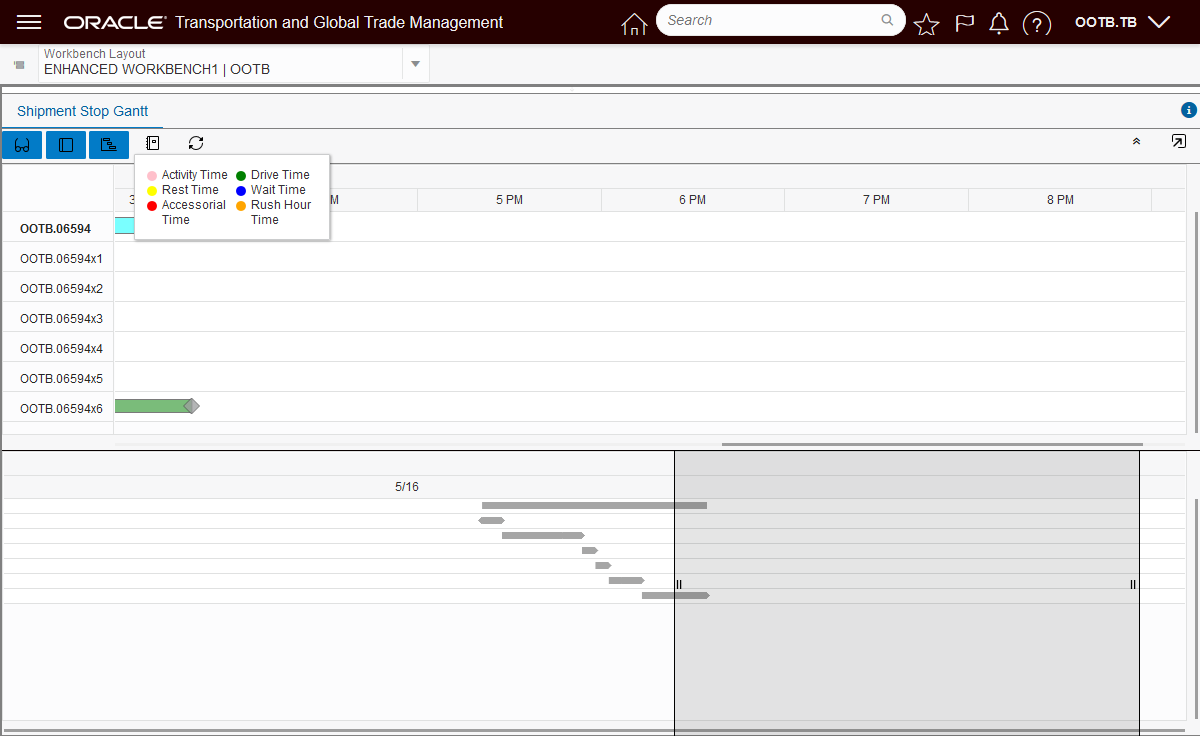
Overview Shifted to the Right
The new Work Assignment Gantt, below, has also been enhanced to provide a clean, modern and more information rich view into your work assignments..
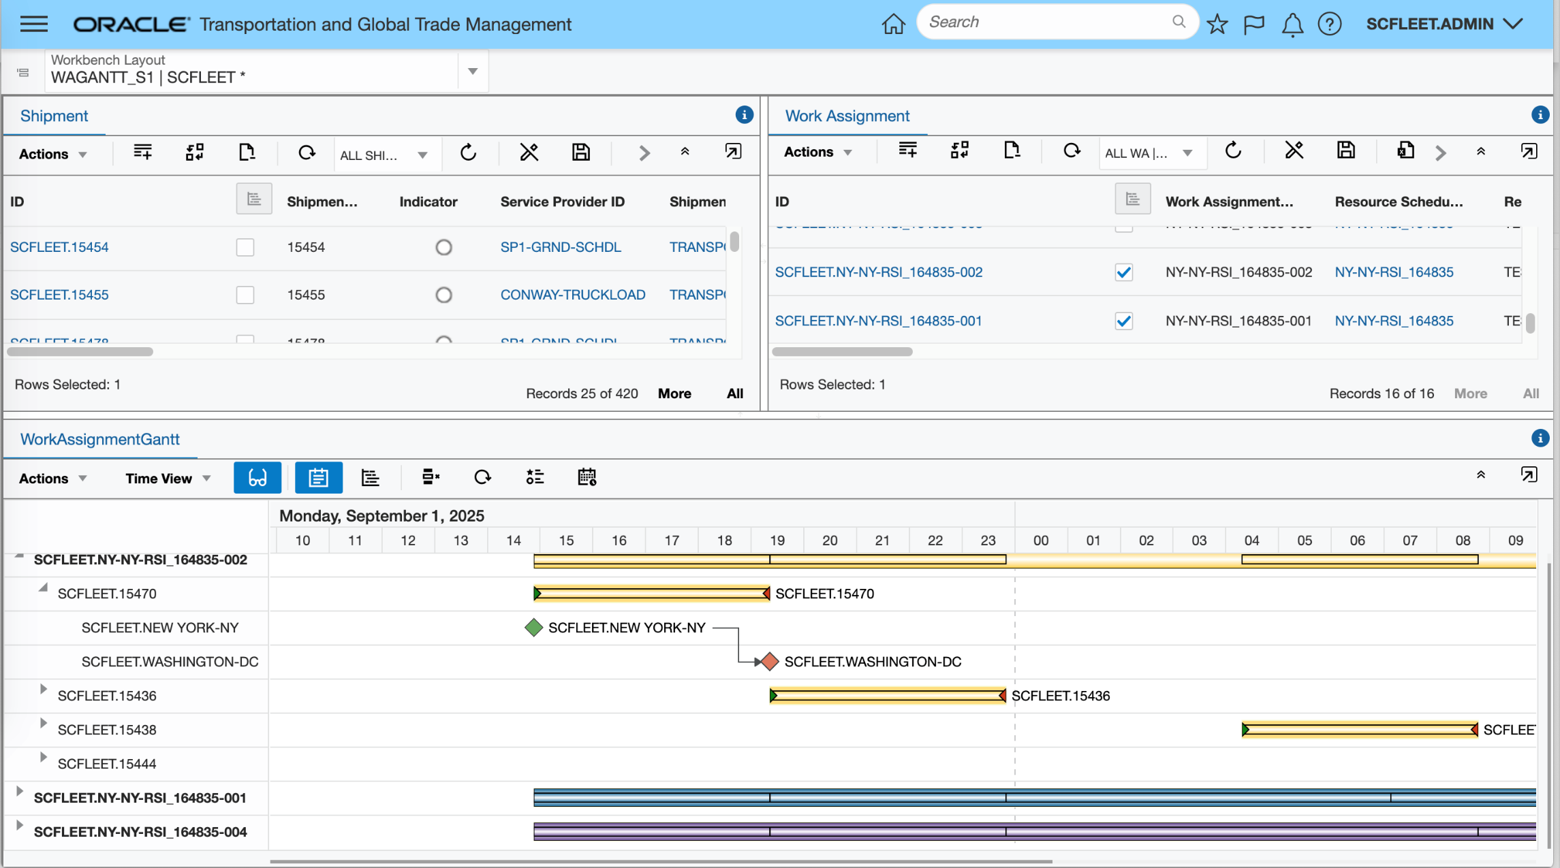
Work Assignment Gantt
The Enhanced Workbench Drop Down provides you with an improved typeahead Search capability looking for Workbench Layouts in the dropdowns using a contains search for text entered.
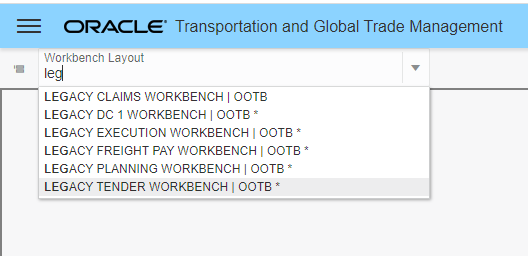
Improved Search - All Enhanced Workbenches with "leg" in the ID
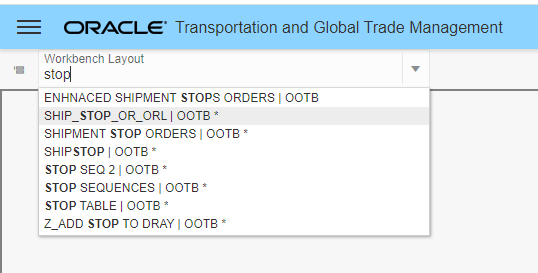
Improved Search - All Workbenches with "stop" in the ID
The example below shows the new capability available to you for collapsing your tabs.
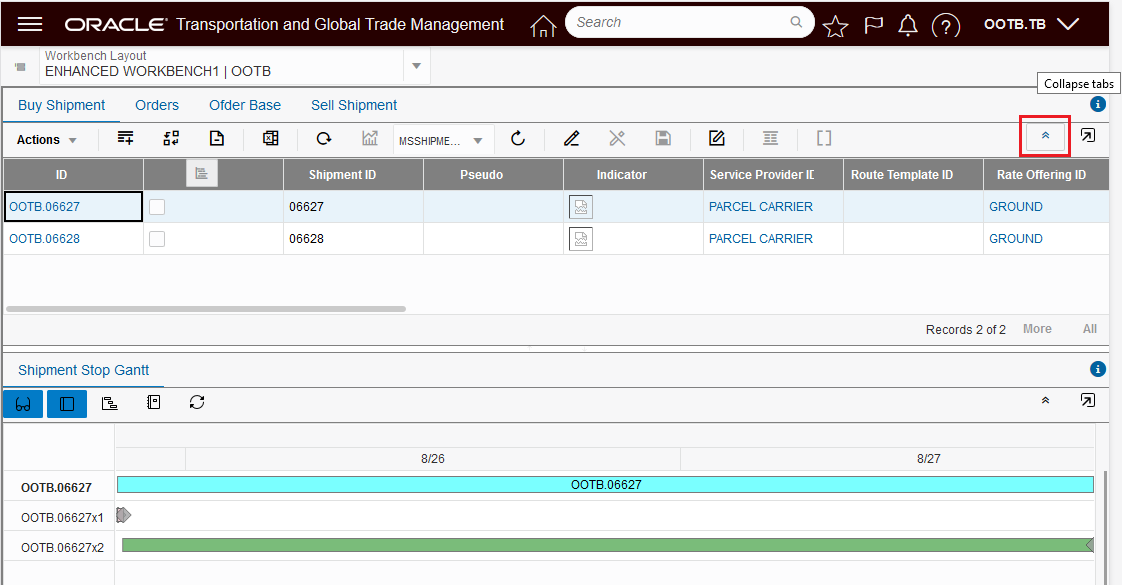
Expanded Tabs View
Collapsed Tabs View
The Load Config region now supports the Edit Load Config view and manipulations.
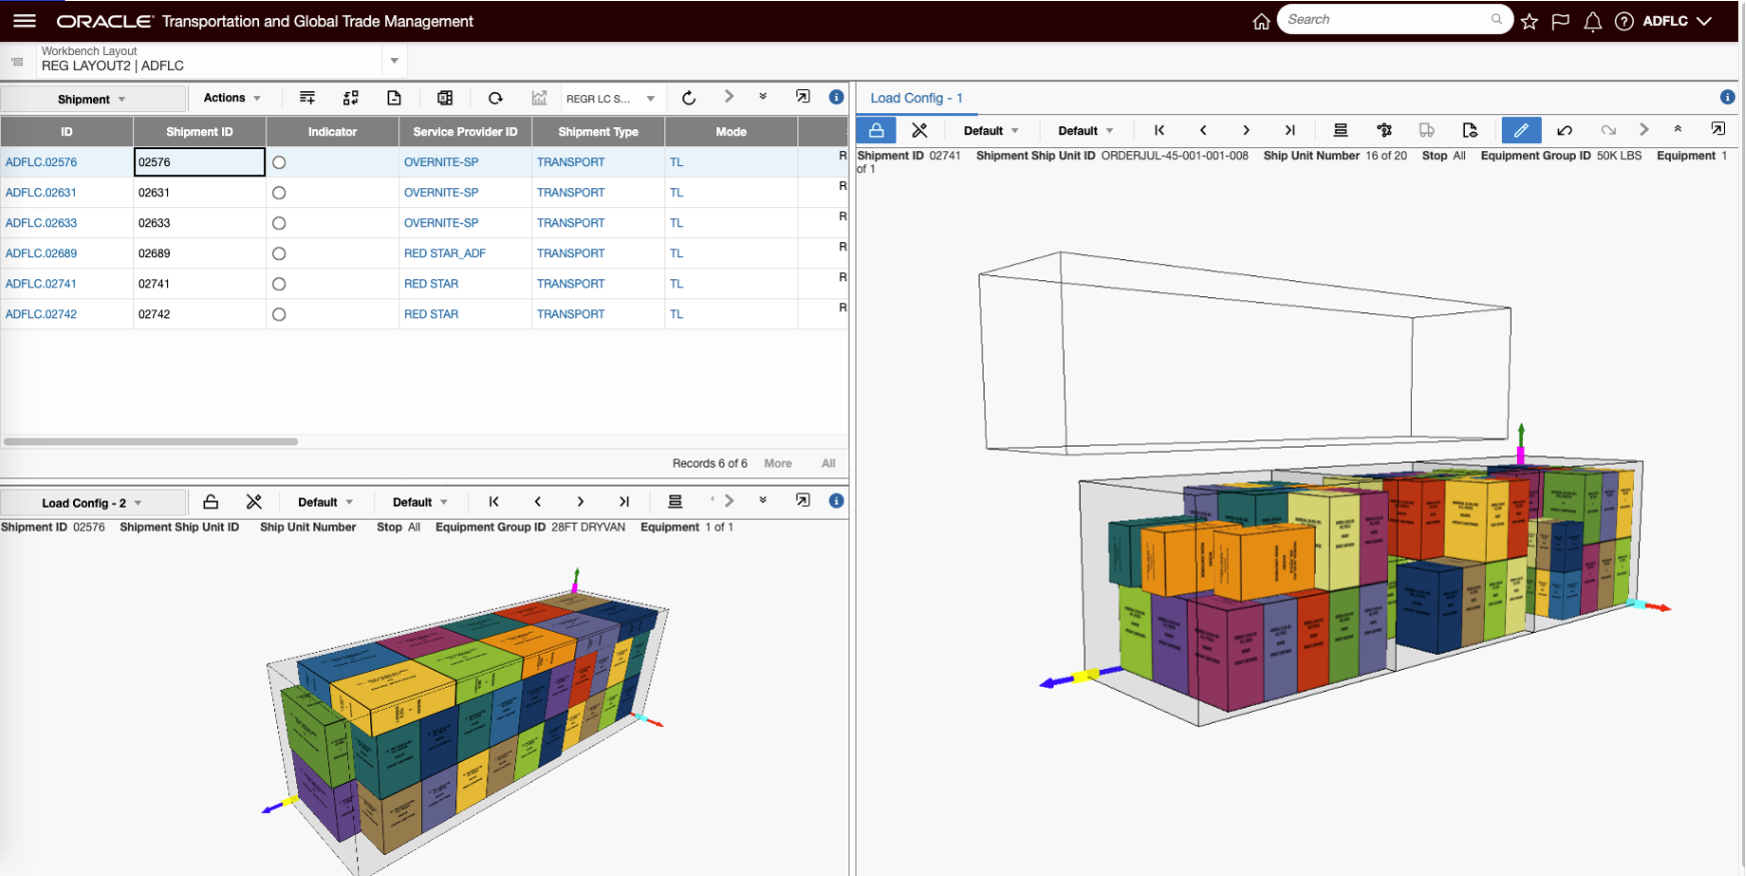
Edit Load Config Available in Enhanced Workbench
The Enhanced Workbench also provides you with greatly improved logging for trouble shooting workbench issues. In addition to improved and expanded Errors, Warnings and Info related messages, logging now uses colors to denote different levels of logging - Errors (red), Debug and Info messages (green).
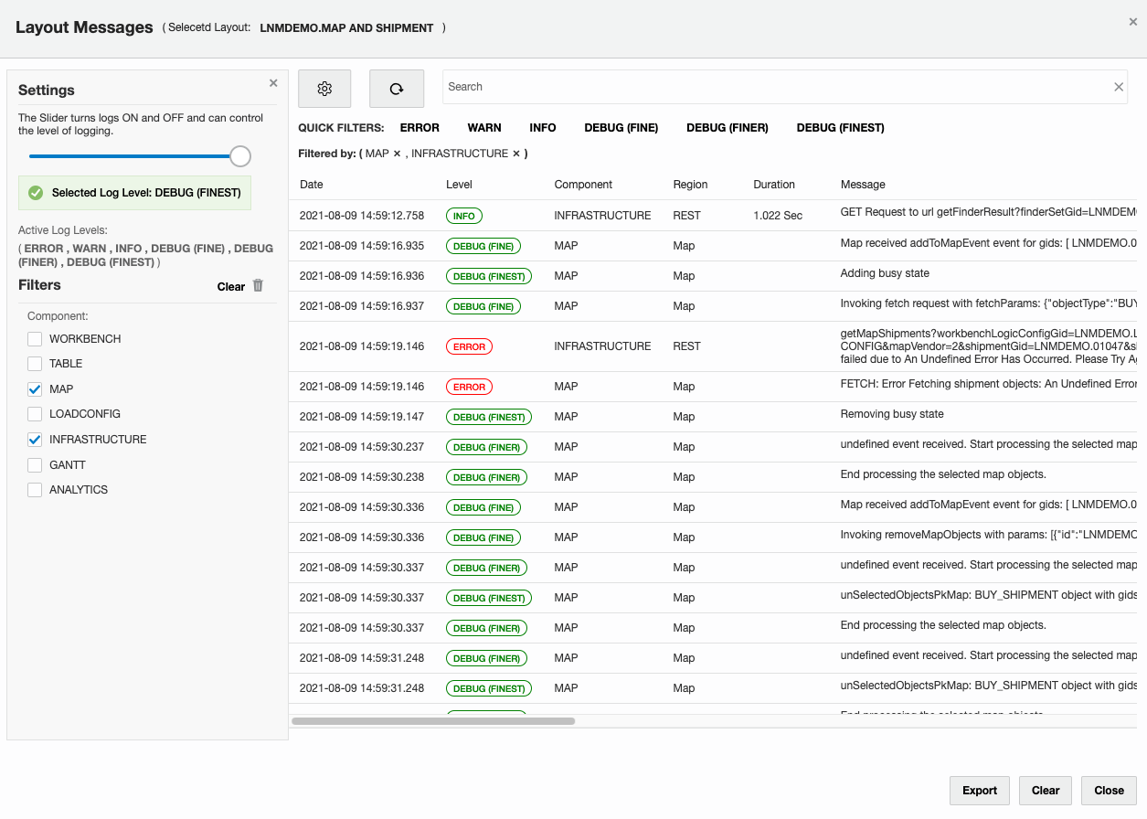
Improved Logging
Steps to Create a Basic Enhanced Workbench
The steps for creating a workbench using the new Enhanced Workbench Designer are equivalent to the steps you have used to create Workbenches previously. There are just a few differences in the navigation and icons displayed to access the functionality used to create and configure an Enhanced Workbench. The example below will be used to identify the steps required to create a simple Enhanced Workbench. The example will focus on the changes.
Step one is to navigate to the Enhanced Workbench Designer. Once there you will select the Create Layout option.

Bring up Enhanced Workbench Navigation menu.
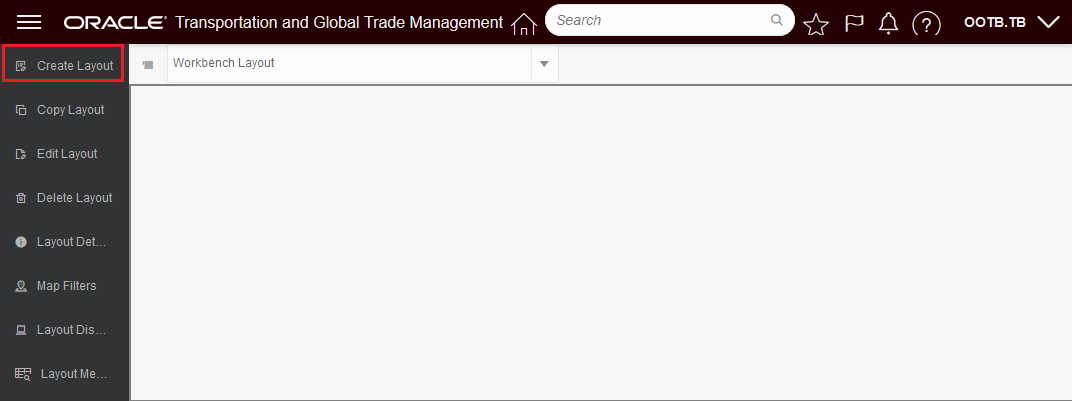
Select Create Layout.
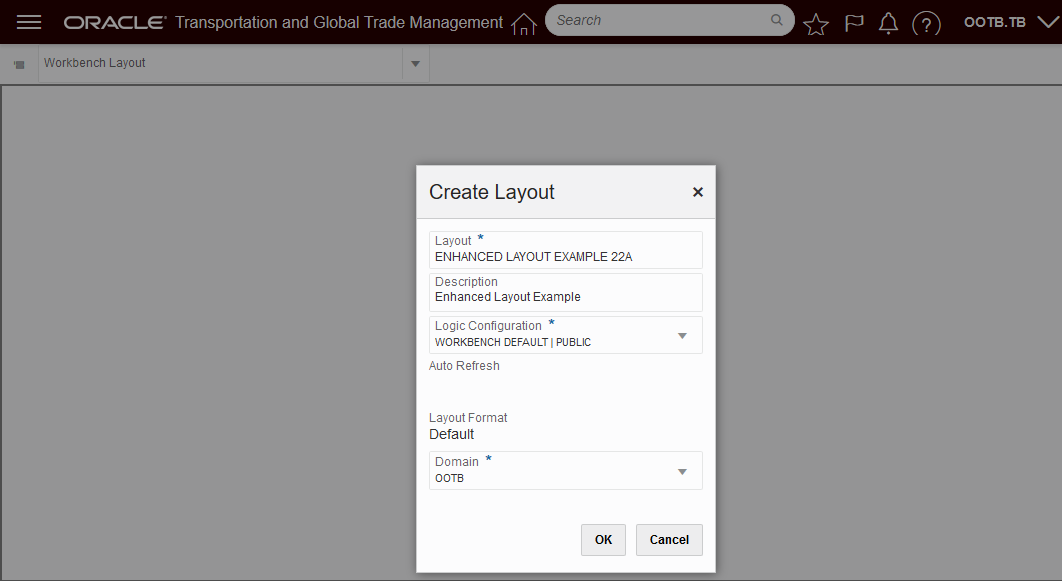
Enter info about your workbench.

Select the Tool Icon to add, delete, and edit content and split vertically or horizontally.
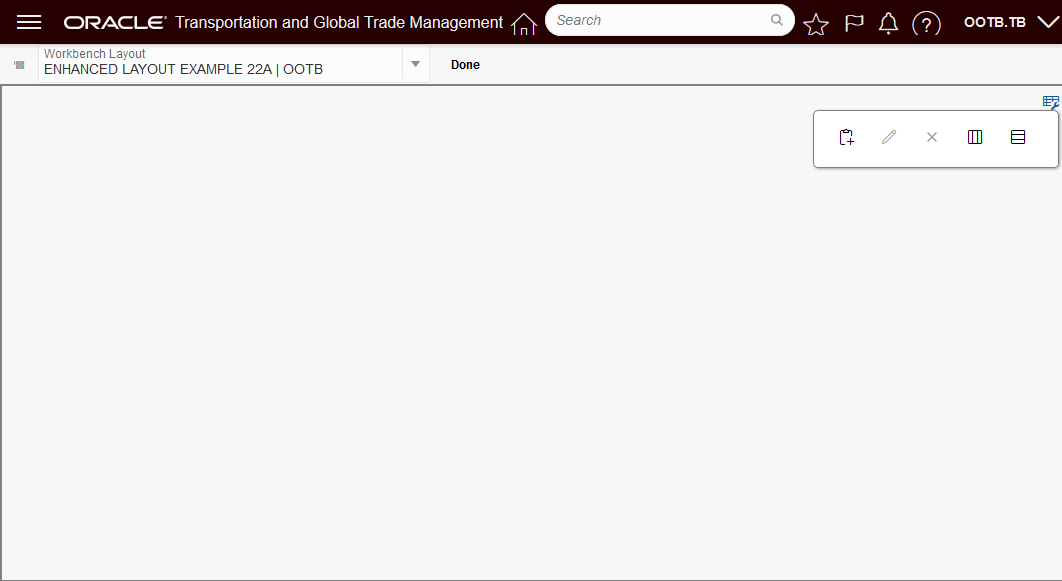
Tool Icon
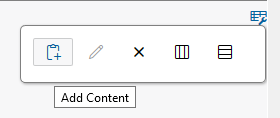
Add Content

Edit Content

Remove Content
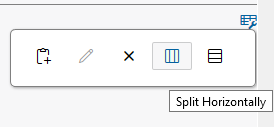
Split Horizontally
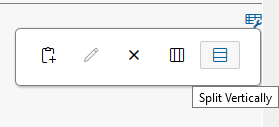
Split Vertically
This feature resets the development platform for the Workbench Designer and Workbench Layouts providing you with many usability, functionality and performance improvements.
Steps to Enable
The Enhanced Workbench Designer can be made visible on your menu by doing the following:
- Configuration and Administration > User Configuration > Manage User Access
- Select User Access Type of User Menu
- Fill in your user info - User ID, User Level, User Role etc.
- Select Edit User Access
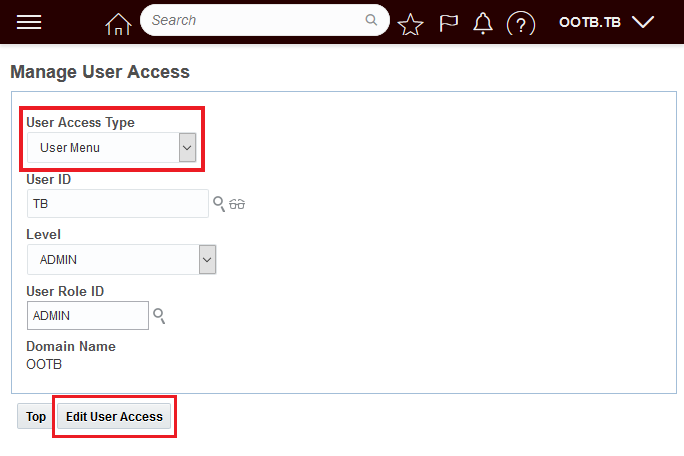
Manage User Access
- Add the ENHANCEDWORKBENCH_MENU to the User Menus you have access to

Add Enhanced Workbench Menu
- When completed the Icon for the Enhanced Workbench Prototype should be visible.
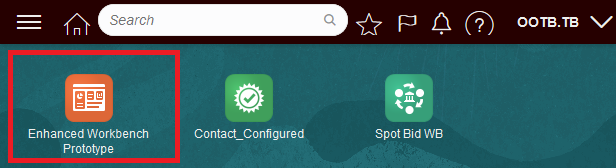
Enhanced Workbench Access Provided
Tips And Considerations
NOTE: Important! The 22A Enhanced Workbench Prototype is provided for testing and evaluation purposes ONLY. The Enhanced Workbench Prototype is NOT intended to be used in your production environment. The Enhanced Workbench Prototype provides significant improvements and additional features - but does not yet have full functional equivalence with the legacy Workbench.
The Enhanced Workbench will ONLY work if the JET APPLICATION SHELL Optional Feature is Opted In.
Display User Defined Image Description When Hovering
This feature uses the User Defined Image's Description field, when included in the screenset, as the hover text provided when you hover over your User Defined Image(s).
Previously - when you hovered over a User Defined Image in your finder results, the hover text provided was limited to the generic text "User Defined Image"..
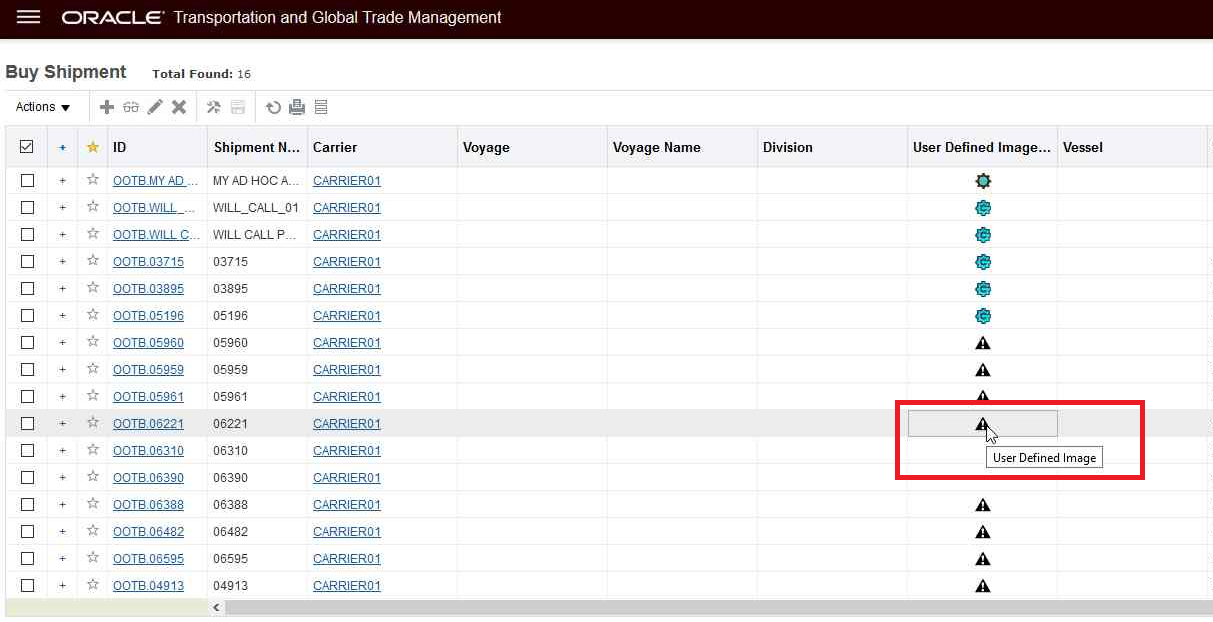
Original User Defined Image Hover Text
With this enhancement, you can configure your screen sets to include the User Defined Image Description fields and when this field is included the hover text provided for the related User Defined Image image will be the User Defined Image Description field.
. 
New Hover Text Behavior - User Defined Image Description Field Displayed
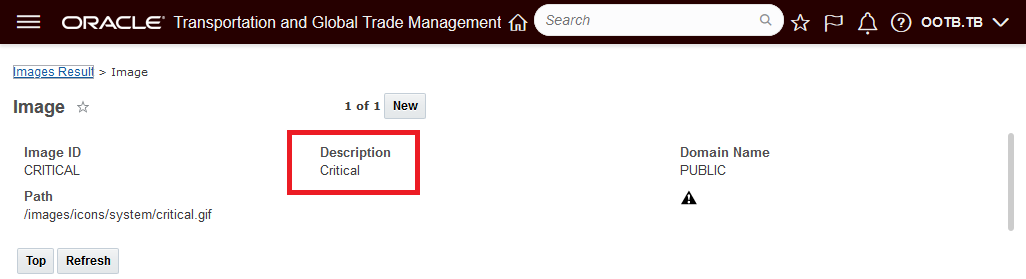
User Defined Image
This feature provides you with a quick way to confirm, via hover, what the various User Defined Image(s) represent on your finder results.
Steps to Enable
To enable this feature you will need to include the User Defined Image Description field in your finder results for all the User Defined Images included in your finder results. You can include the User Defined Description fields as a normal addition to the screen set - with a normal width so that the User Defined Description is fully displayed and visible - or - you have the option of adding the User Defined Description field with the width set to "0" which will enable the hover for the image, but will not add the description field to your finder results.
In the setup below - the User Defined Description field for the User Defined Image 1 was added to the screen set with the width set to "0". This enables the hover, without adding the Description field as a column in the finder results.
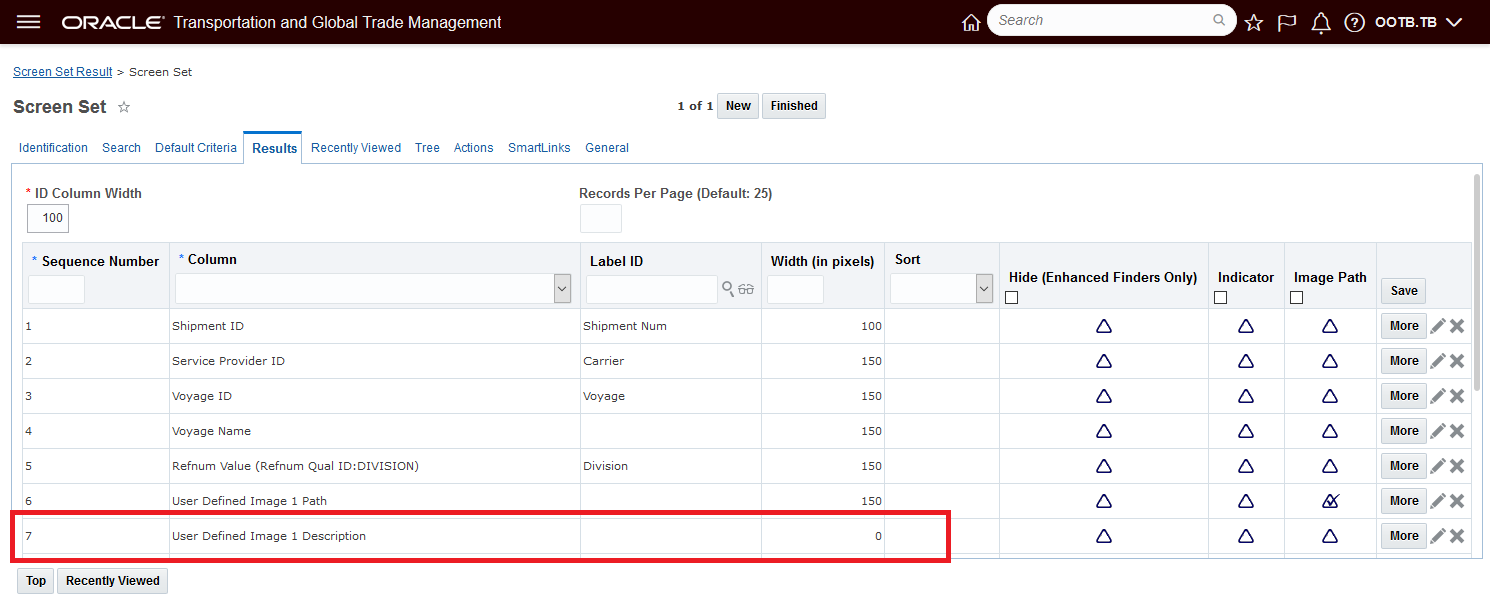
Setup - User Defined Image Description Field Added - Width = "0"
Screen Set Inline Edit and Mass Update Supports Flex Field Types
This feature provides Screen Set Inline Edit and Mass Update support for editing Flex Fields that have field types of:
- FlexPickList
- FlexDropList
- FixedDropList
Define a Flex Field with a field type of one of the above, add it as a column in the screen set results and set it as editable. When a user edits the field in the results they will be presented with the appropriate options.
This feature adds more editing capabilities in the screen set results.
Steps to Enable
You don't need to do anything to enable this feature.
New Property to Configure the Tables to Not Validate XID Characters
This feature provides you with a new property - glog.ui.validateXid.suppress.<table>=true - that you can use to select the table or tables you do not wish to have your XIDs validated for restricted characters: , x > < = / & ? ; # $ ' " \r \n ( ) when the Optional Feature Validate ID (released in 21A) is enabled.
The Validate ID feature, when enabled, will validate newly created records in OTM to insure that the external IDs (XIDs) entered do not contain restricted characters. The goal is to restrict the creation of XIDs to containing only numbers, upper-case letters, spaces, underscores and dashes. This feature allows you to select the tables you would like to have this logic suppressed.
If a potential XID for a new record contains a restricted character, and the Validate ID logic is enabled, the transaction will fail.
In the example below, the Validate ID logic is enabled and the attempt to enter the location with a location id that contains restricted characters fails.
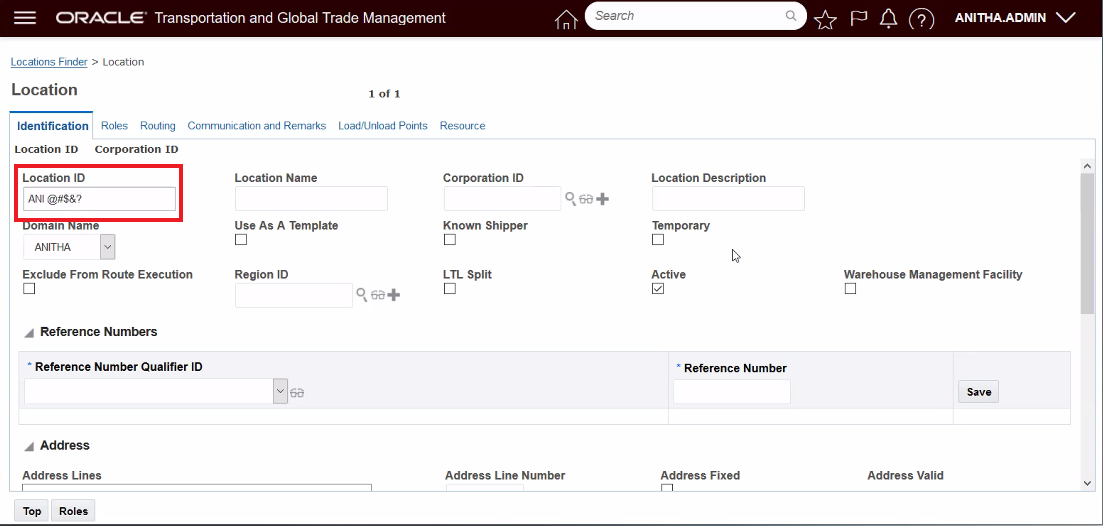
Location with Restricted Characters in the XID
When you attempt to save this location record with an ID that contains restricted characters you receive the following message.
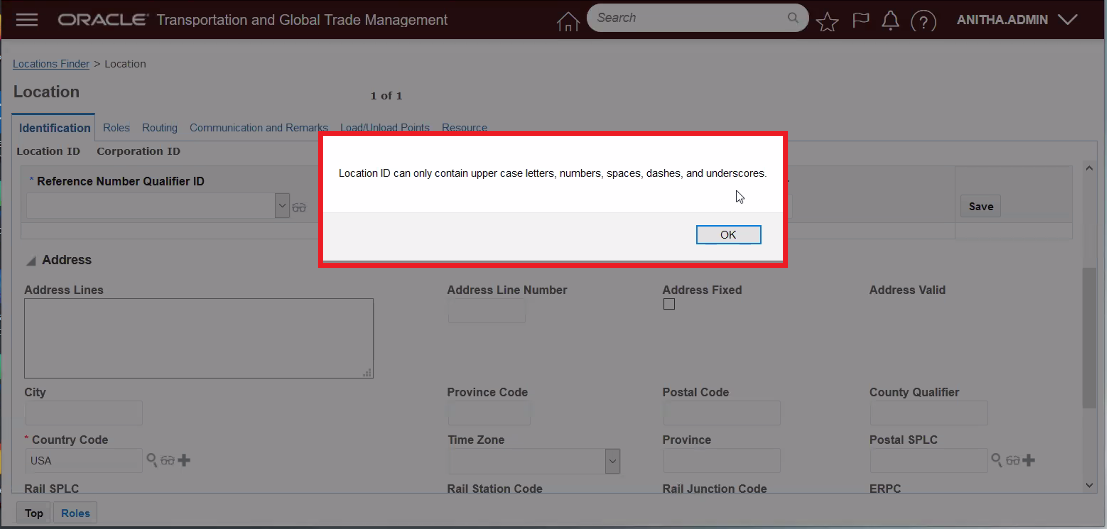
Error Message Received for Restricted Characters in an ID
Setting the property glog.ui.validateXid.suppress.location = true will suppress the Validate ID logic and will allow the location to be saved even with restricted characters in the ID.
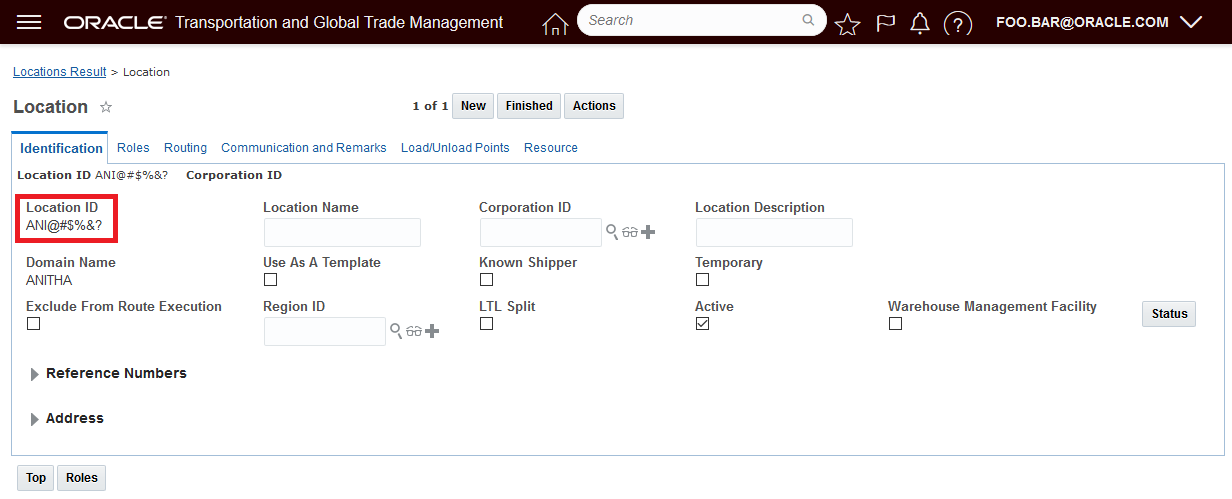
With Property Set to Allow Special Characters for the Location Table
The set of restricted characters is: , x > < = / & ? ; # $ ' " \r \n ( )
The Validate ID logic validates the XID if they are sent in via XML, REST or via the UI - the new property - glog.ui.validateXid.suppress - will suppress the XID validation logic for the same set of entry points i.e., XML, REST and UI.
Provides you with the option - if necessary - on a table by table basis to override the Validate ID features logic to disallow the entry of XIDs with restricted characters.
Steps to Enable
To use this feature, you will need to set the property for all the table(s) you wish to have the Validate ID restricted character logic ignored.
Either create or select the Property Set to configure. Configuration and Administration > Property Management > Property Sets.
NOTE: Only the DBA.ADMIN user can access and use the Property Sets page.
Set the property glog.ui.validateXid.suppress for the desired table or tables. The format is glog.ui.validateXid.suppress.<table name>= true
In the example below the Location table and Item table have been configured so that the Validate ID logic regarding restricted characters is suppressed.

Property Set Example for Location and Item
UI Logic Configuration Parameter - Show Domain Name for Duplicate Values
This feature provides you with a new UI Logic Configuration parameter SHOW DOMAIN NAME FOR DUPLICATE VALUES that will, when configured, in situations where duplicate drop down values are found, display the domain name next to the drop down list value so you can select the right value based on the domain.
In the example below, the parameter Show Domain Name For Duplicates Values is set to True and drop downs, with duplicate values, show the domain names next to the duplicate values. In this case, the Reference Number Qualifiers ANI and AO are duplicates and the related domain names OOTB and PUBLIC are shown next to the duplicate values. For the Payment Method Codes dropdown the values of PP and PPD are also duplicates and are found in the OOTB and PUBLIC domains. Note that only the duplicate values have the | Domain Name addition provided - this makes it easy for you to identify the duplicate values.
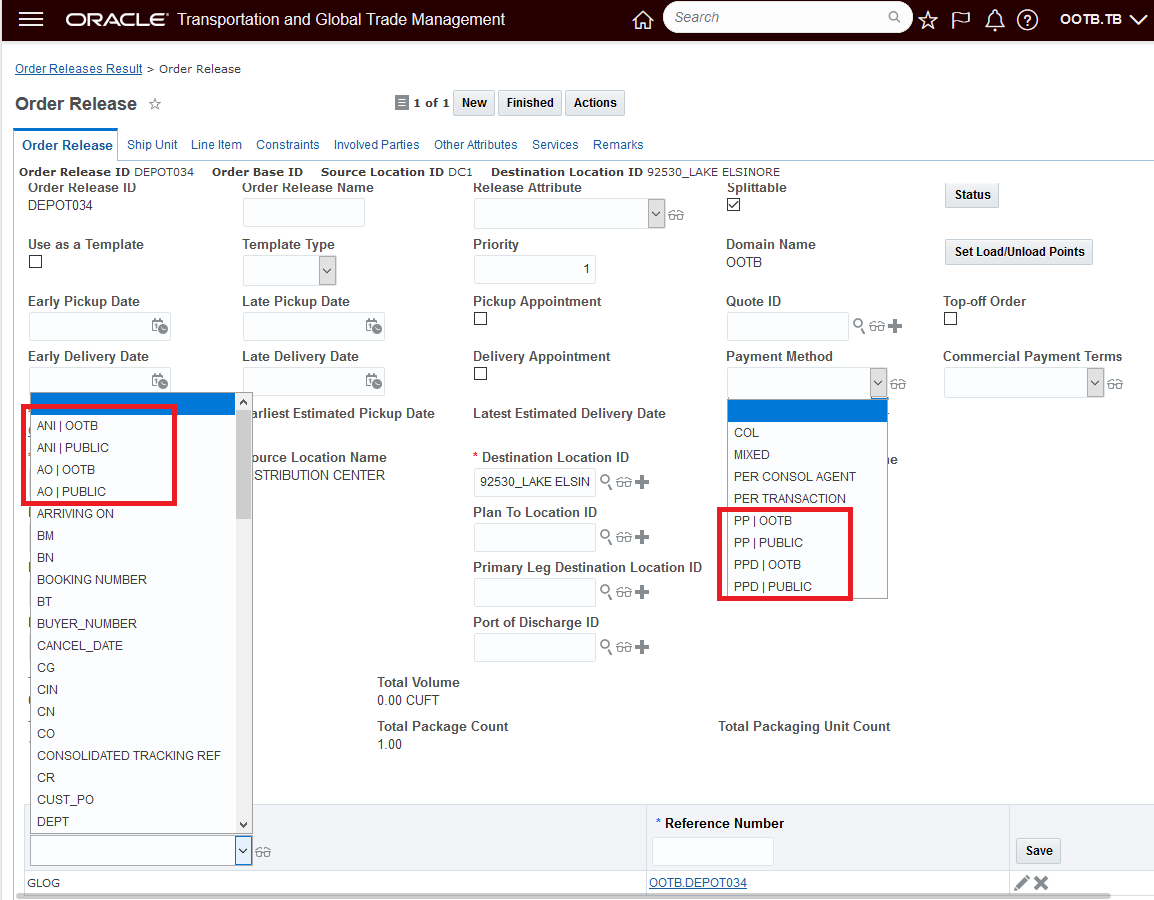
Example Drop Down with Duplicate Name with Domain Names Provided
Allows you in situations where duplicate values for a drop down reside in multiple domains, to easily pick the correct value from the correct domain.
Steps to Enable
To enable the new Display Domain Name when Duplicates are found functionality, your UI Logic Configuration must be configured so that the Show Domain Name For Duplicate Values parameter is TRUE. Then the related logic config must be assigned so that it used in your User Preference.
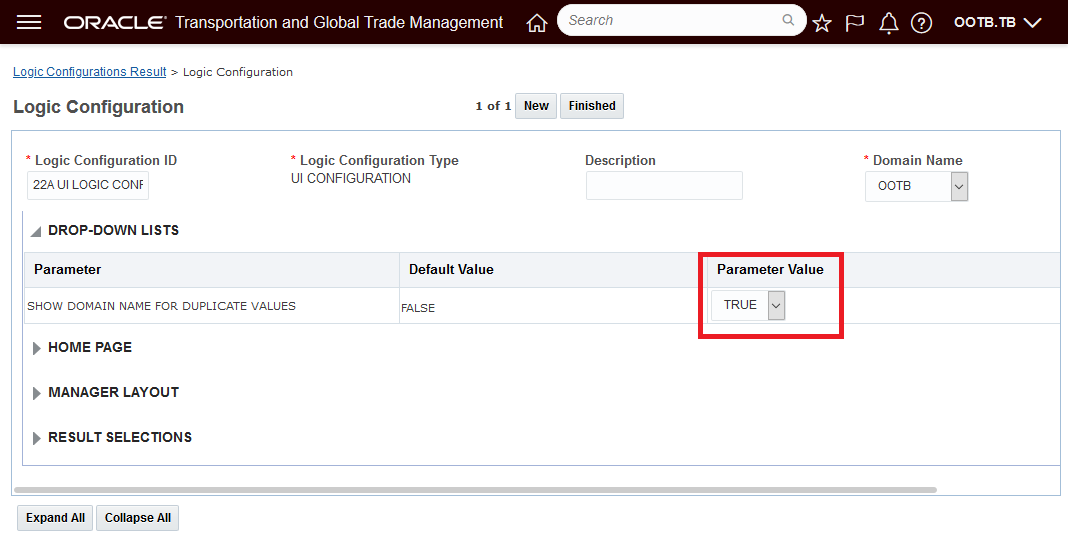
Display Domain Name When Duplicates Found Setup
Tips And Considerations
This doesn't include the finder Saved Query Droplist, Flex Field Droplists, Droplists on ADF screens, or Droplists on JET screens.
SharePoint Online Content Management System Integration Using MS Graph API
This feature extends the content management system options available for managing documents inside of OTM/GTM to include integration to SharePoint Online using the Microsoft Graph (MS Graph) API. Once configured, the integration provides the ability to add, view, modify and delete documents stored in the SharePoint Online content management system from within OTM/GTM.
In the example below - the document 20210818-0002 is saved to SharePoint online as OTM-ROHINI642.20210818-0002.
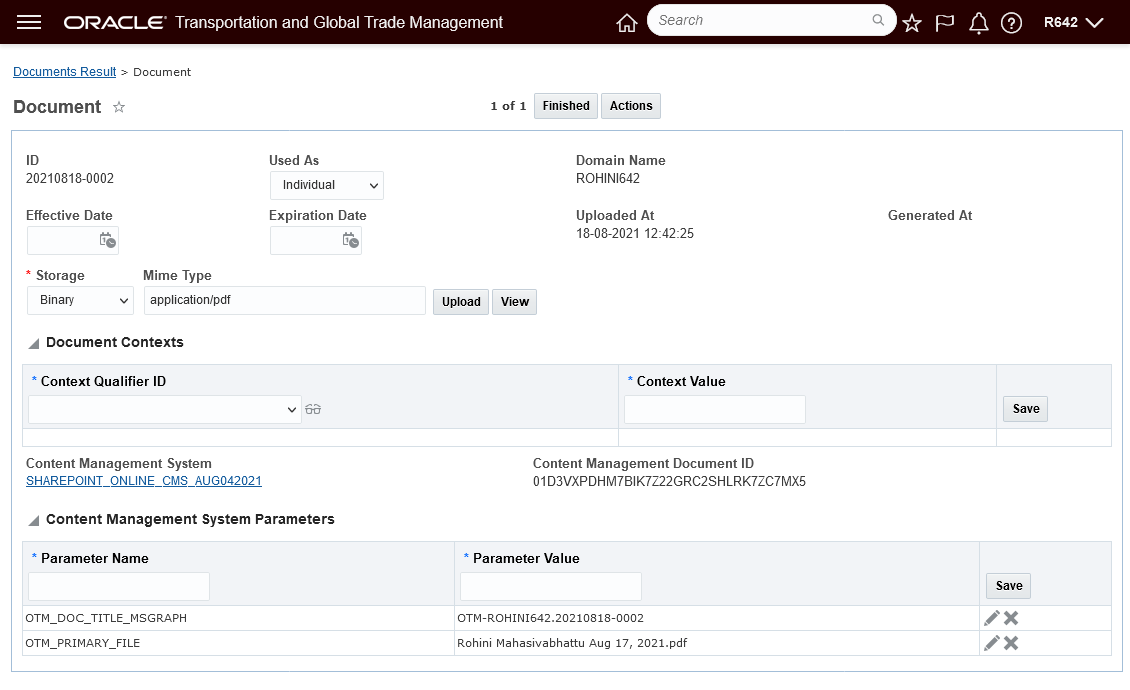
OTM Document Created - Storage In SharePoint Online
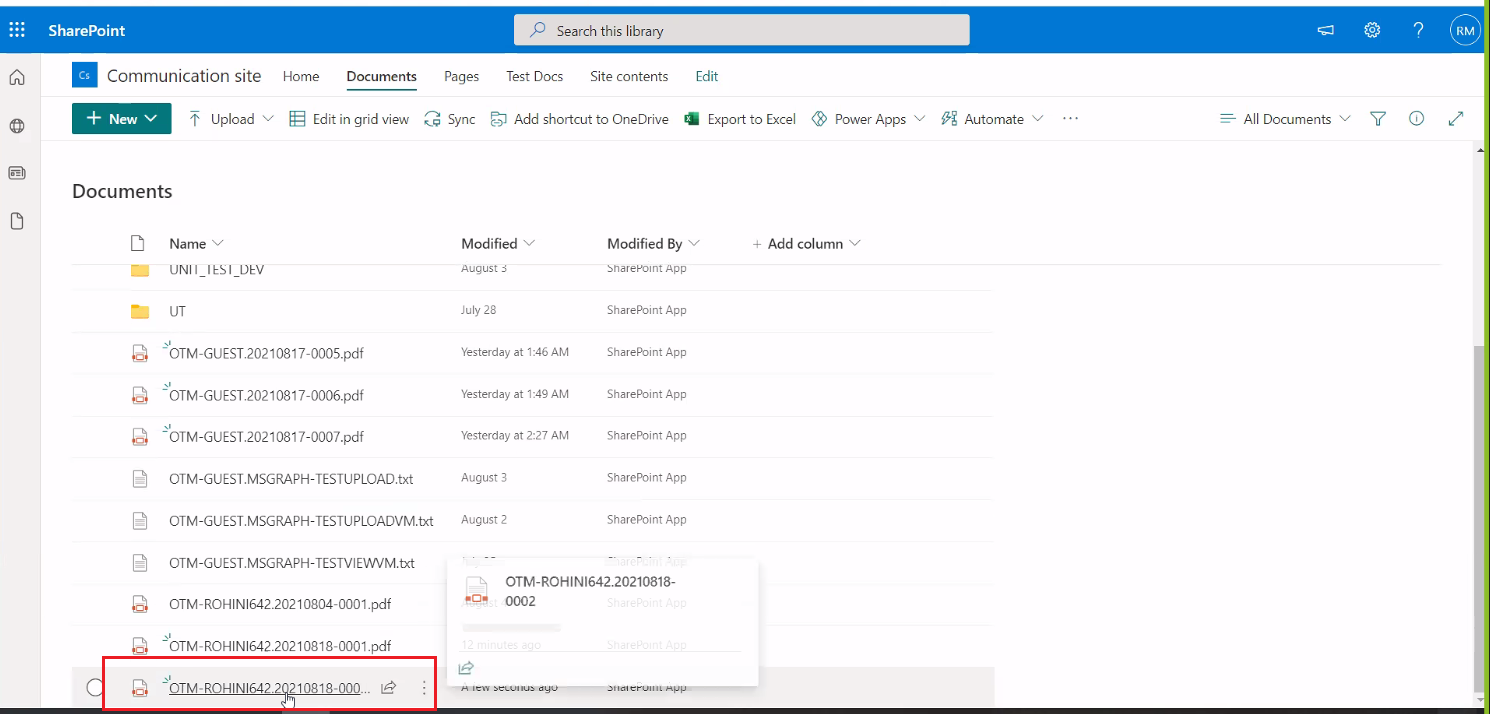
Document Stored in SharePoint Online
Extends the available CMS options in OTM/GTM to include the popular SharePoint Online content management system.
Steps to Enable
Setup for Using SharePoint with OTM/GTM
SharePoint Online Setup
SharePoint Online Setup
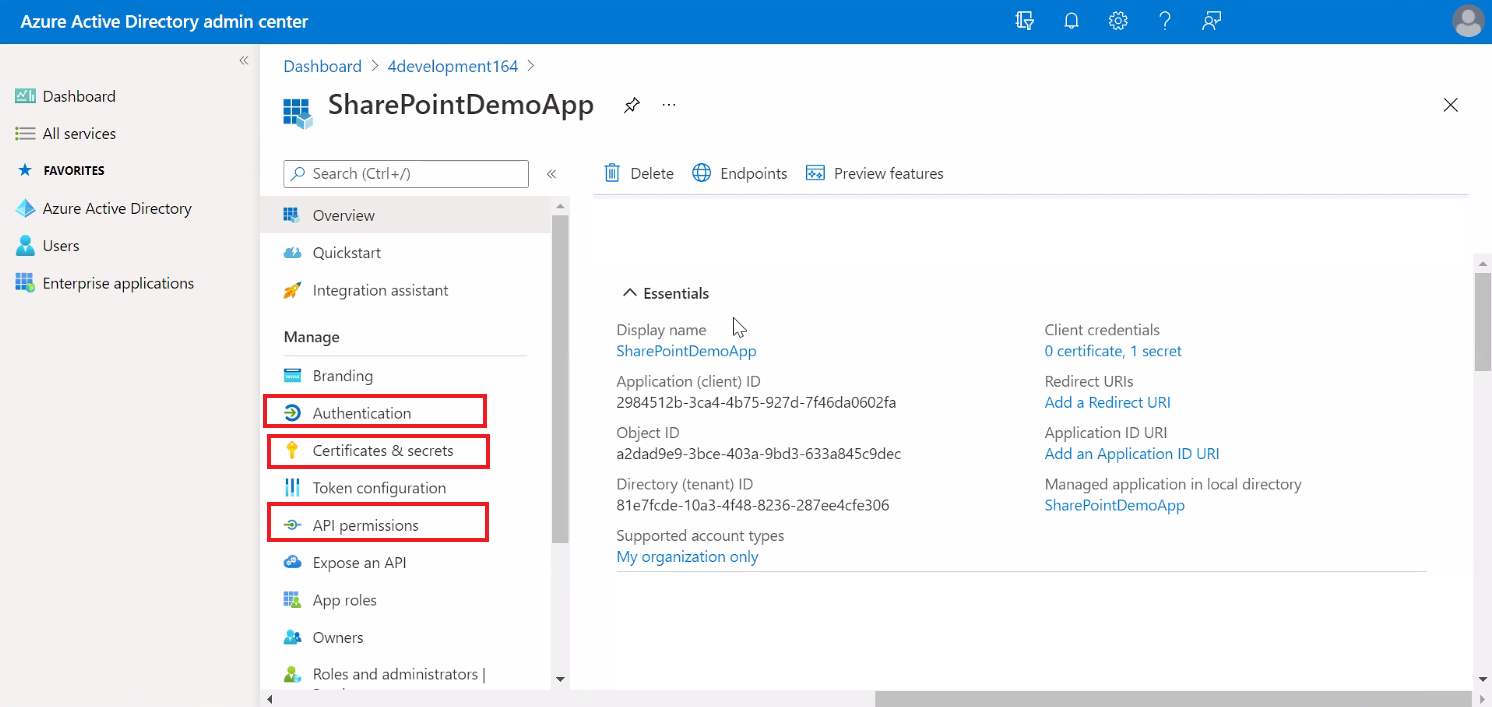
- Register the OTM/GTM application in the Azure Active Directory (AAD) portal. OTM will communicate with SharePoint by means of this application.
- Configure a Client Secret for the application which will be used for authentication purposes. This can be achieved by creating a new Client Secret under "Certificates and Secrets".
- Provide adequate permissions to the newly registered application so that the Microsoft Graph API calls work. This can be achieved by via API Permissions > Add a Permission > Microsoft Graph, and then selecting the required permissions from "Delegated Permissions" and "Application Permissions".
Once the permissions are granted, the application is ready for use. You will have the following details generated once the application is registered:
- Application (client) ID
- Directory (tenant) ID
- Secret Value (obtained while creating the Client Secret)
These will be required for the next steps where you will configure OTM to work with SharePoint.
Setting Up an External System In OTM
You will be required to configure an external system in OTM that will enable you to authenticate/interact with SharePoint.
The input fields should be set as follows:
- Authentication Type: OAuth 2.0 - Client Credentials
- Authorization Service Authentication Type: Microsoft Graph API
- Client ID: Provide the Application (client) ID value generated after registering the application
- Client Secret: Provide the Secret Value generated after registering the application
- Authorization Service URL: https://login.microsoftonline.com/{Directory (tenant) ID}/oauth2/v2.0/token (replace {Directory (tenant) ID} with the actual value)
- Application Scope: https://graph.microsoft.com/.default
- URL: https://graph.microsoft.com/v1.0/drives (acts as a base URL for all API requests)
Setting Up Content Management System In OTM
You have to configure a Content Management System (CMS) in OTM for SharePoint.
The input fields should be set as follows:
- System Type: SharePoint Online
- External System: Select the External System created in the above section
- Drive ID: This represents the location where the documents will be stored . The drive ID to be used can be obtained by means of an API call. Microsoft Graph provides certain ways to obtain the drive ID. You can refer to Microsoft documentation for Microsoft Graph APIs (Microsoft Graph > v1.0 reference > Files > Drives > Get drive) to check for the various ways to obtain the drive ID.
See On-Line Help Topic - Setup for Using SharePoint with OTM OTM/GTM - for more information.
Tips And Considerations
The integration to SharePoint requires that your SharePoint service must support the Microsoft Graph API.
Key Resources
- The Overview of Microsoft Graph API can be found here-> https://docs.microsoft.com/en-us/graph/overview?view=graph-rest-1.0
Expand Document Actions and Features to Additional Objects
This feature extends the document actions and features to include many objects that previously did not have document actions and capabilities enabled. Listed below - by action - are the new objects where this action has been added.
Upload Document Action added to the following Business Objects:
OTM
- Demurrage Transaction
- Rate Record
- Rate Offering
- Work Assignment
- Driver Work Invoice
GTM
- Campaign
- Campaign Lines
- Declaration Lines
- Item Qualification
- Item Classification
- Trade Transaction Lines
Add Document Action has been added to the following Business Objects:
OTM
- Item
- Sell Shipment
GTM
- Declarations
- Trade Transaction
Attach Document Action has been added to the following Business Objects:
OTM
- Demurrage
- Rate Record
- Rate Offering
- Work Assignment
- Driver Work Invoice
GTM
- GTM Shipment Line
- GTM Item Classification
This feature allows you to assign documents to objects where the uploading or adding of documents was not previously supported. Providing direct document Add or Upload capabilities simplifies the process of assigning documents to these objects.
Steps to Enable
You don't need to do anything to enable this feature.
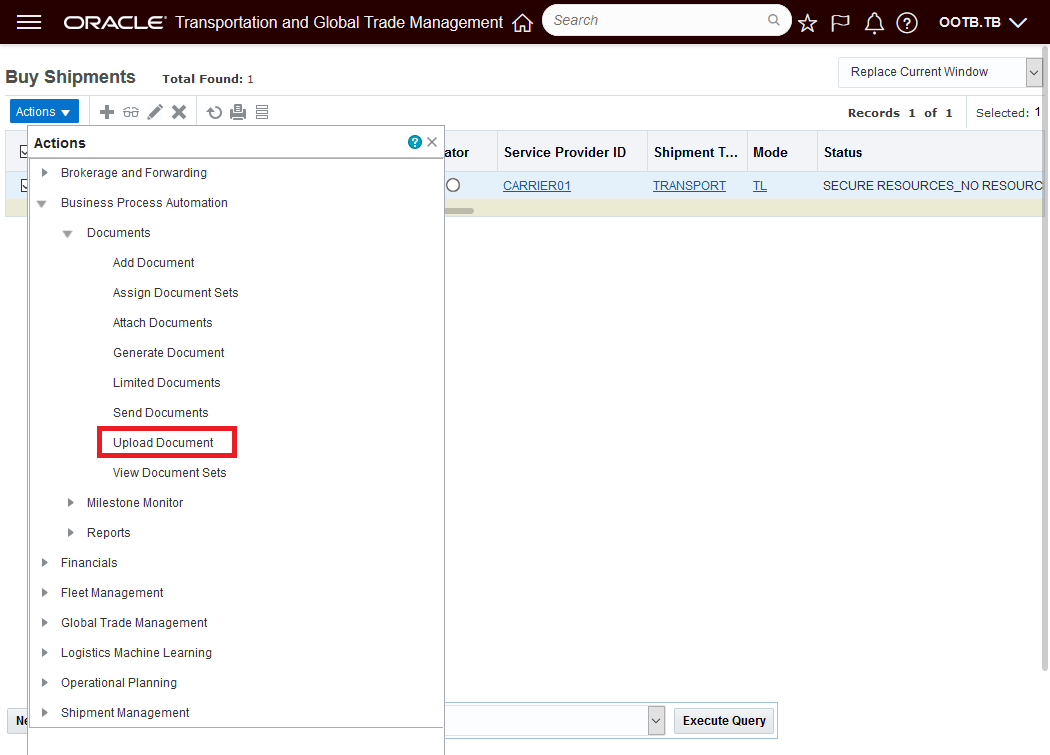
Upload Document Action with Document Type Assignment
This feature provides you with an easy way to specify your Document Types when you use the Upload Document Action. You can specify the Document Type in situations where you are uploading one or many documents.
In the example below - two document types (BOL and Packing List) are being uploaded in one multi-select run of the Upload Document Action and will be assigned to the desired Document Type.
In this case the Upload Document action is being run against a Buy Shipment.
Run Upload Document Action
Browse and select the documents you wish to upload. In this case two documents are selected to be uploaded.
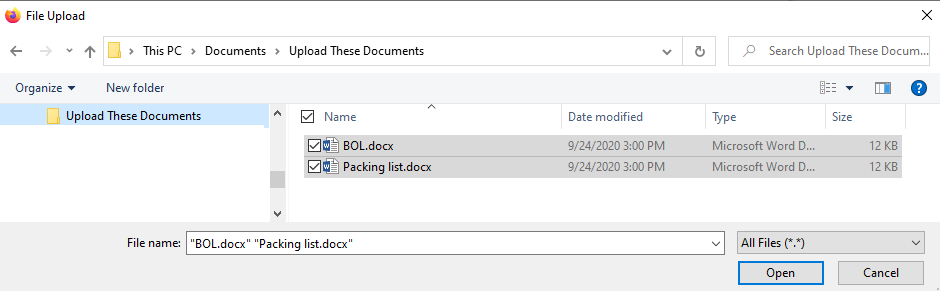
Browse and Select the Documents to Upload
Once the documents have been selected then select Upload.
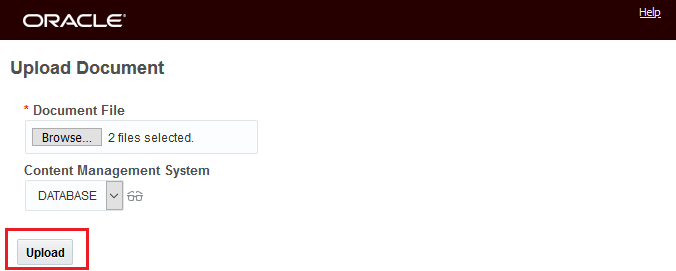
Select Upload
In the dialog box below - after the Upload has been initiated - you are given the opportunity to specify the Document Type using the Document Type Dropdown next to each of the documents being uploaded.
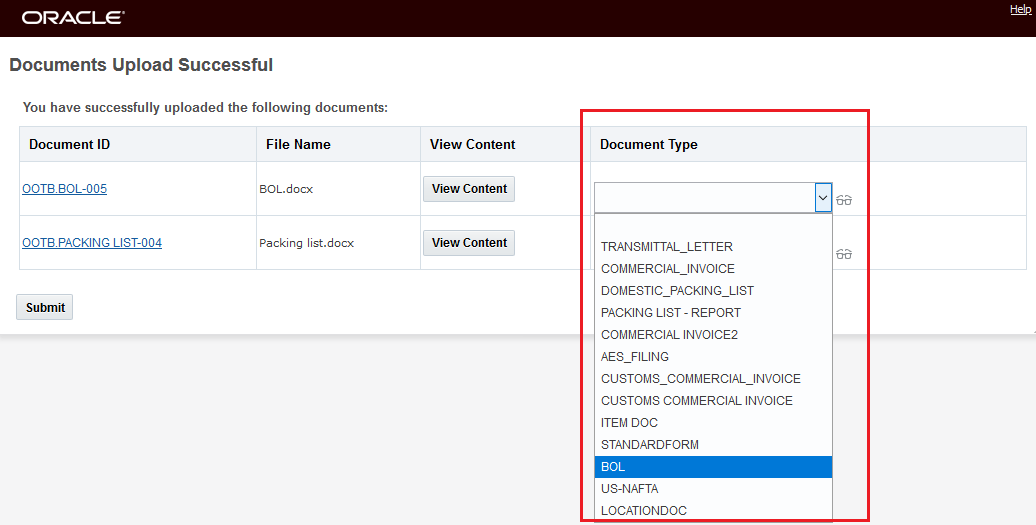
Select Document Type
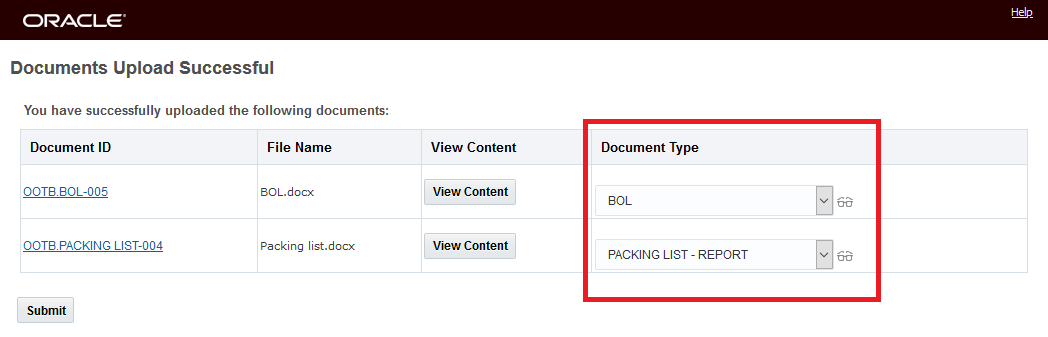
Selected Document Types
When you run Submit - after selecting your Document Types a verification is provided for the selections made.
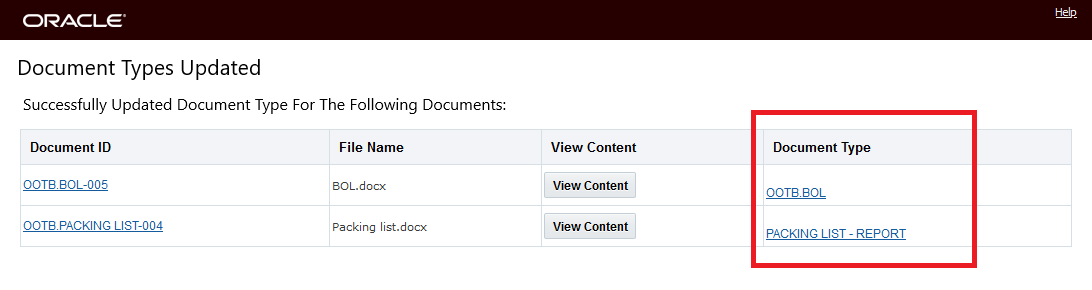
Document Type Update Verification
You will find this feature beneficial in any scenario where you wise to upload ad hoc documents - and as part of that upload - you wise to specify the uploaded documents Document Types.
Steps to Enable
You don't need to do anything to enable this feature.
Tips And Considerations
NOTE: These Upload is used to Upload Ad Hoc documents.
This feature provides you with a consolidated XML Schema definition - OTMGTM.xsd - that consolidates all of the separate XML schema files into a single schema.
The OTMGTM.xsd file can be downloaded from Business Process Automation > Integration > Integration Manager > Retrieve Schemas.
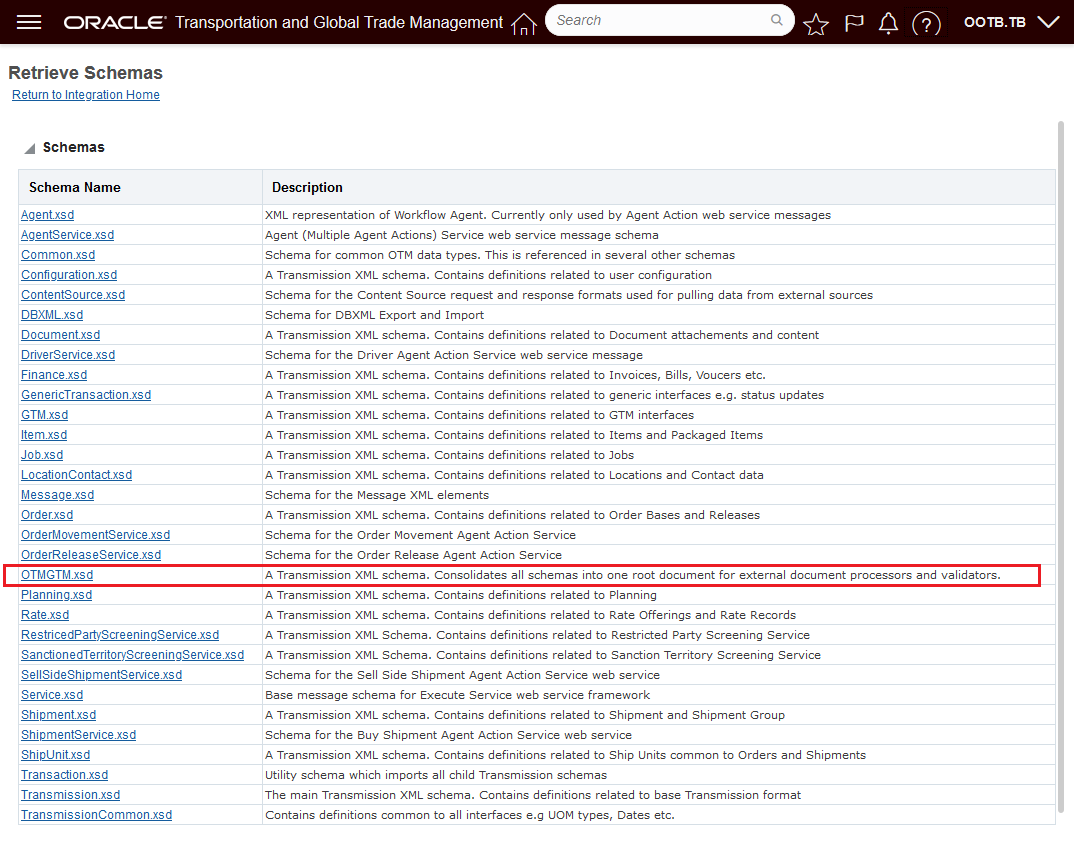
OTMGTM.xsd File
The OTMGTM.xsd consolidated schema provides you with more flexibility when using third party tools to do schema validation or the processing of messages.
Steps to Enable
You don't need to do anything to enable this feature.
DBXML Maximum Message Size Increased to 10MB
This feature increases the default DBXML export and import maximum message size from 5MB to 10 MB (mega bytes). The maximum message size was introduced in the 21A DBXML MAXIMUM EXPORT SIZE RESTRICTED optional feature. The maximum message size was originally set to 5MB, this feature doubles the maximum allowed.
Provides you with the option to import/export DBXML messages up to 10MB.
Steps to Enable
You don't need to do anything to enable this feature.
Tips And Considerations
Increase default DBXML export and import maximum message size to 10 MB (mega bytes).
Inbound Integration Acknowledgement Pre-Staging
This feature provides improvements in the processing of transmissions that contain a large number of transactions. This feature breaks the processing of these transmissions into two steps:
- Step 1 - Saves the transmission setting the status to New and then sends back the acknowledgment (ACK).
- Step 2 - Stages/parses the transactions in the transmission.
The default/current behavior is for all the transactions in an inbound transmissions to be staged/parsed first before sending back the transmission ACK - which, in some cases, can be longer than the time allowed by the sending system for receiving the transmission ACK. With this feature enabled, the ACK will be transmitted back before (pre) the staging/parsing of the transactions in the transmission.
This feature will reduce the time required to return an acknowledgement (ACK) to the sending system when the transmission being processed contains a large number of transactions.
Steps to Enable
To take advantage of the new processing behavior you will need to set the property- glog.integration.transmission.enableInboundPreStaging - to true.
To change the property:
- Navigate to Configuration and Administration > Property Management > Property Sets
- Select the Property set to modify.
- Set set the property glog.integration.transmission.enableInboundPreStaging to true.
NOTE: Only the DBA.ADMIN user can access and use the Property Sets page.
The optional feature, OVERRIDE DATAQUEUE PARAMETER - when enabled, overrides any parameter settings so that inbound transmissions always use integration data queues.
Extends you analysis and reporting abilities to include analysis of your Invoice Facts by Involved Party.
Steps to Enable
You don't need to do anything to enable this feature.
Add Event Date to Order Release XML
This feature adds the Event Date to the Tracking Event data provided within the Order Release XML.
Extends information provided about the order release.
Steps to Enable
You don't need to do anything to enable this feature.
This feature provides you with the next set of enhancements to the Historical Metrics capabilities. The Historical Metrics platform allows you to proactively monitor the health and performance of your OTM/GTM instances. In this latest enhancement iteration, you will find enhancements across the Historical Metric platform, including improvements in your ability to define and automate the collection of metrics and the ability to automatically send notifications when your performance metrics exceed defined thresholds.
Areas enhanced or added in this update include:
- How to Configure Metric Collection
- The new How To provides directions on metric collection, threshold definition, metric notification and viewing metrics
- Metric Cumulative Criterion
-
A cumulative criterion allows you to compare one or two historical bases to trigger a cumulative threshold. For example, you want to see if your bulk plans are taking longer to run now than they have historically, you can compare a recent value basis against an historical one. Cumulative criteria only trigger hourly, when they are recalculated based on the invocation of Persist Metrics, and they are used to trigger performance trends as opposed to critical events.
-
- Metric Current Criterion
-
A Metric Current Criterion provides a way to watch performance in real time and can generate notifications in real time. You would use a current criterion to capture diagnostic information as it happens.
-
- Metric Historical Basis
-
Metric Historical Basis is a definition of a historical value and is used by both the cumulate and current thresholds. You could use an historical basis to define the average value over the last 5 days, the maximum value over the last 3 weeks, the total count over the last two hours, or the average over the last four days of the week. The Metric Historical Bases used by cumulative and current thresholds are updated hourly when Persist Metrics is automatically run.
-
- Metric Threshold
-
You use a Metric Thresholds to establish when a metric notification will be triggered. You can create thresholds based on Metric Cumulative Criterion and Metric Current Criterion.
-
In a Cumulative threshold, you compare one historical value to another (or to a fixed value). Historical values are updated hourly by the Persist Metrics recurring process and all cumulative thresholds are checked.
-
In a Current threshold, you compare current values to a historical or fixed value. They hold the current hour's average, maximum, and count along with any new value to accumulate into statistics. When a current threshold compares to a historical value, it uses the historical calculations last calculated by Persist Metrics.
-
-
Provides improved monitoring and proactive notification regarding the performance of your OTM/GTM instances.
Steps to Enable
Depending on the area you wish to monitor, there are a number of setup steps required. See the Help Topic - How to Configure Metric Collection - for guidance.
Tips And Considerations
NOTE: You must be a DBA to access this page.
The optional feature, PROTECT SECURITY CACHE - when enabled, disallows any cache clears from impacting security caches. Clearing security caches via a Clear or Clear All can impact system performance and lead to race conditions and outages.
This feature improves up time and system performance by guarding against the clearing of security caches via a Clear or Clear All which can impact system performance and lead to outages.
Steps to Enable
You don't need to do anything to enable this feature.
The optional feature, TIMEOUT PROPERTY ACCESS - timeouts on property retrieval allow properties to be retrieved, even though the data may be out-of-date. Timeouts on property updates will force an error.
This feature provides a more graceful approach for managing timeouts on property retrieval.
Steps to Enable
You don't need to do anything to enable this feature.
DBXML Security Updates with Auto Cache Handling
The DBXML SECURITY UPDATES WITH AUTO CACHE HANDLING optional feature allows for the DBXML import of various security records without the need for any manual cache refresh. Specifically, this feature provides special handling for the following records to properly synchronize caches:
- GL_USER, USER_ROLE, USER_ROLE_ACR_ROLE,
- GL_USER_ACR_ROLE, ACR_ROLE,
- ACR_ROLE_ROLE, ACR_ENTRY_POINT,
- ACR_ROLE_ENTRY_POINT.
When this feature is enabled, data inserts, updates and deletes will be sent through custom security code, automatically updating security caches. No additional cache clears are necessary.
For the selected set of records, this feature eliminates the need to manually perform a cache refresh when these records are imported via DBXML.
Steps to Enable
You don't need to do anything to enable this feature.
Tips And Considerations
While the manager for these features refers to them as "optional" - each of these features will become mandatory when the Optional Until update is released. The optional aspect of these features refers to the period of time where there is an opportunity to Opt In/Opt Out of enabling the feature. During this "optional" period - the time between when the feature is released and the release prior to the Optional Until release - the request/desire/intention is for you to enable the feature(s) for testing purposes so that the transition to mandatory, as of the Optional Until release, is uneventful.
This page is accessed via Configuration and Administration > Property Management > Optional Features.
NOTE: Only the DBA.ADMIN user can access and use the Optional Features page.
Transportation and Global Trade Management UI Automation Sample Selenium Scripts
A set of sample Selenium scripts with documentation is now available for you to review and consider using as a basis for creating your own Selenium scripts to help with your OTM/GTM UI testing efforts. The scripts and documentation are found under MOS Note 2822896.1.
This feature provides you with sample Selenium scripts that you can consider reviewing and using as a basis for creating your own Selenium scripts to test your Transportation and Global Trade Management UIs. The objective of the samples is to facilitate your use of Selenium (Selenium web driver and Oracle JET web driver) for UI test automation.
Steps to Enable
You don't need to do anything to enable this feature.
Tips And Considerations
The scripts are provided "as-is" and will require configuration/customization to work in your instance of OTM/GTM.
Automatic Indexing Enabled for Archive Schema
This feature enables Automatic Indexing on the archive schema to facilitate queries on archived data to support your audit reporting requirements. Before this enhancement, attempts to run reports against the Archive Schema for specific date ranges could result in unacceptable amount of run-time. The enabled automatic indexing provided in this enhancement improves query retrieval run-time to support your archive reporting requirements.
Provides improved run-time for reports run against the Archive Schema.
Steps to Enable
You don't need to do anything to enable this feature.
This feature extends the REST API capabilities to include sending outbound business objects following the same REST resource formats available for processing your inbound messages.
This feature provides you with the option to select the REST notify communication method in the following actions:
Send Interface Transmission
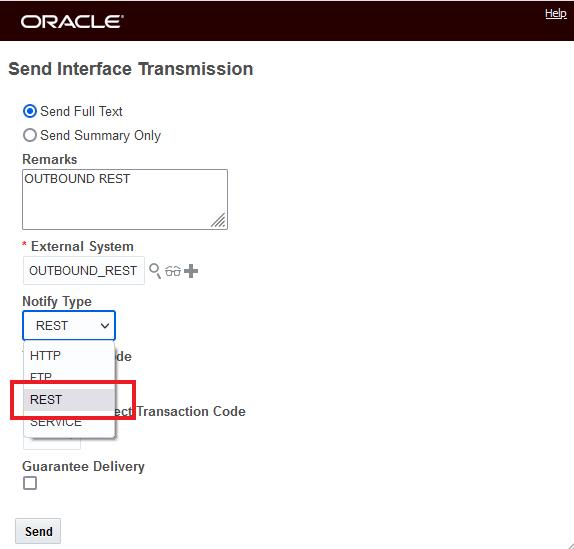
Send Interface Transmission
Send Integration Agent Action

Send Integration Agent Action
Send Integration process
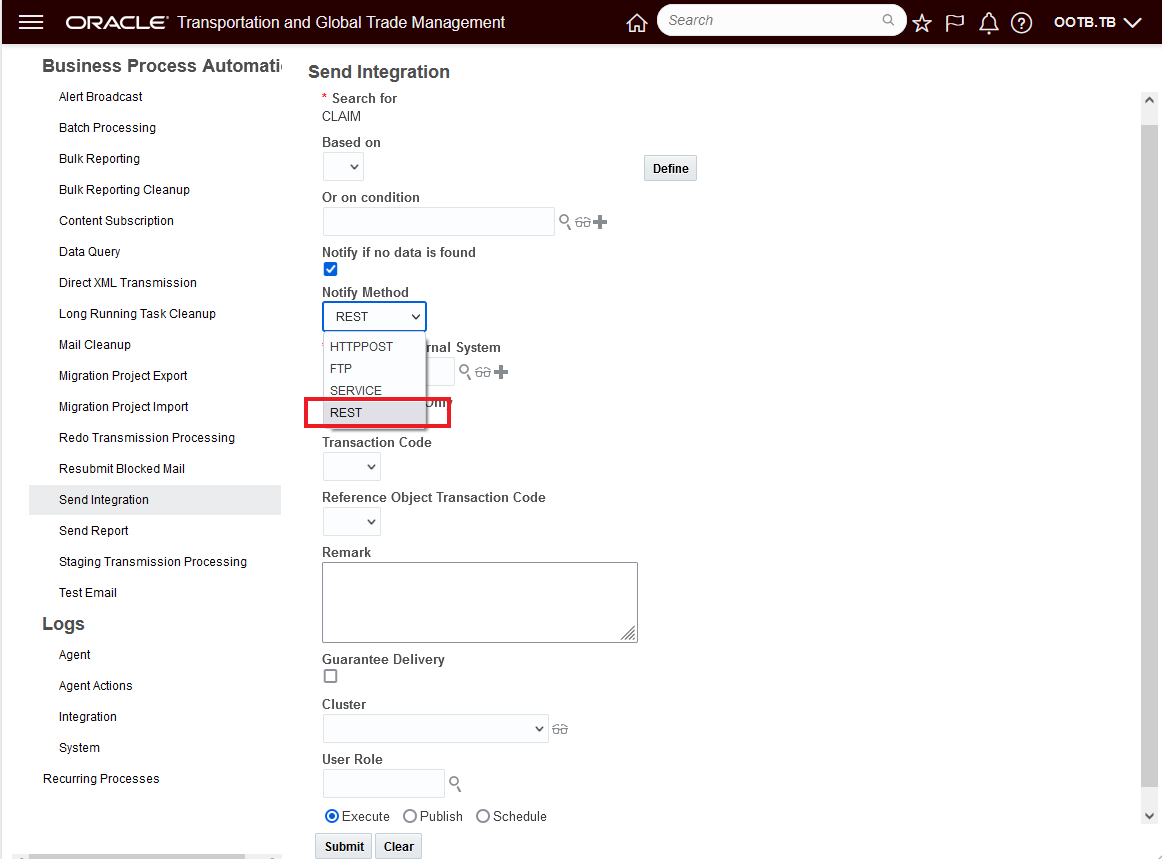
Send Integration
In the example below, the Send Interface Transmission action for an order release is demonstrated.
The Notify Type of REST needs to be selected and the External System Content Type must be 'application/json'.
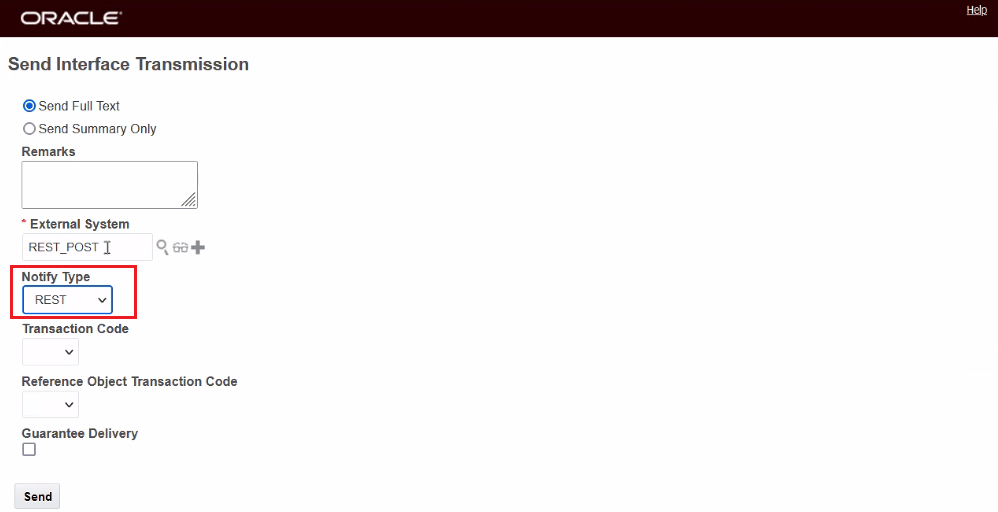
Send Interface Transmission - Order Release
The transmission Result for this Transmission is below. One Transmission with one Transaction.
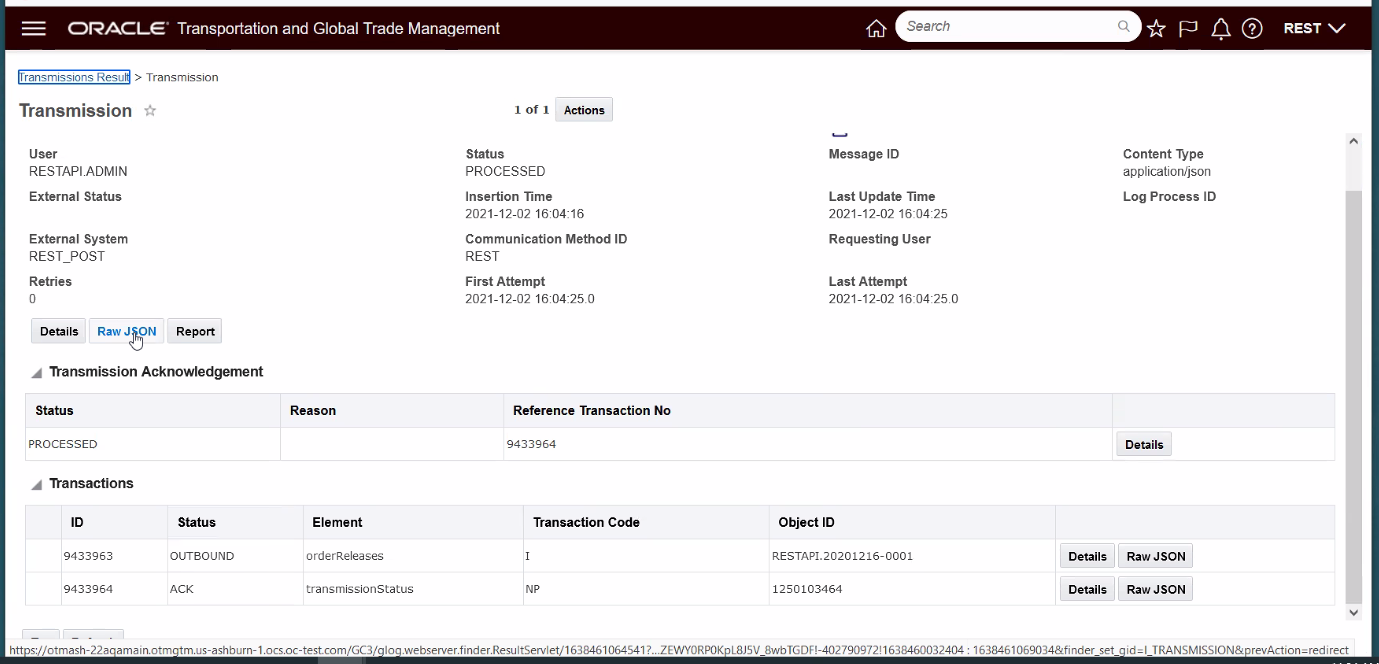
Transmission Result
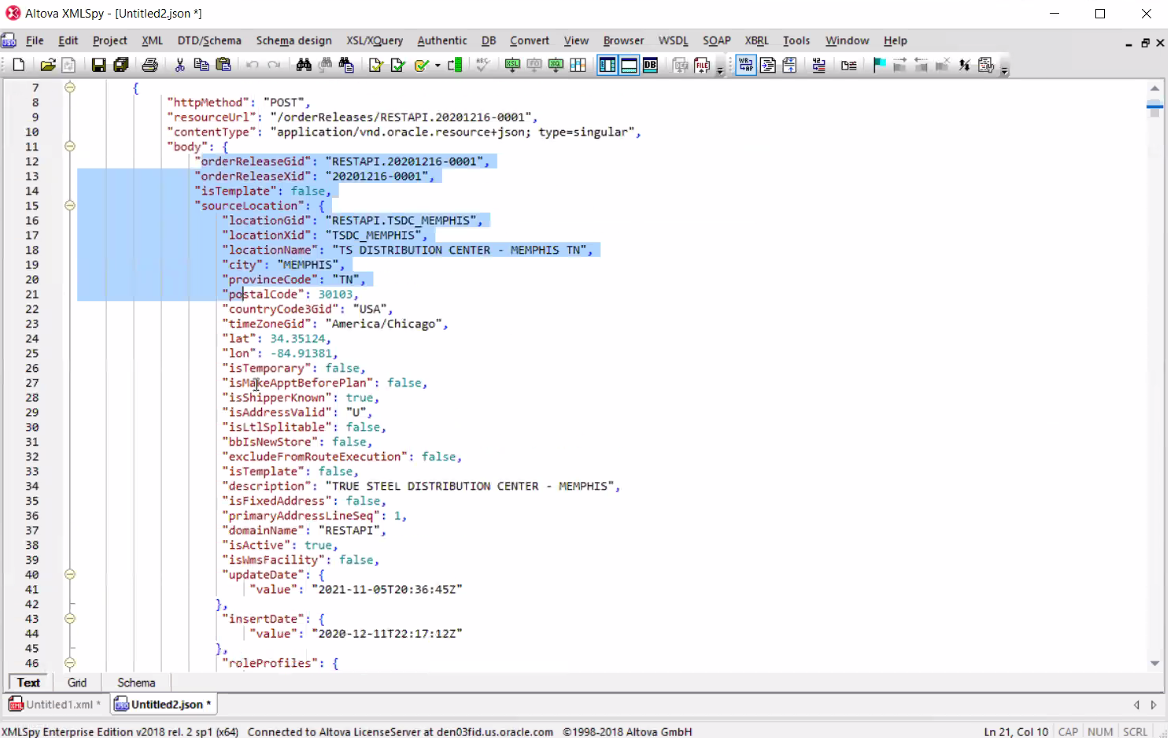
And the outbound POST transmission for the Order Release is below.
Outbound POST
You can send multiple outbound transactions in a transmission using REST by using Send Integration and specifying a saved query. In the example below, the specified saved query will create a transaction for six order releases.
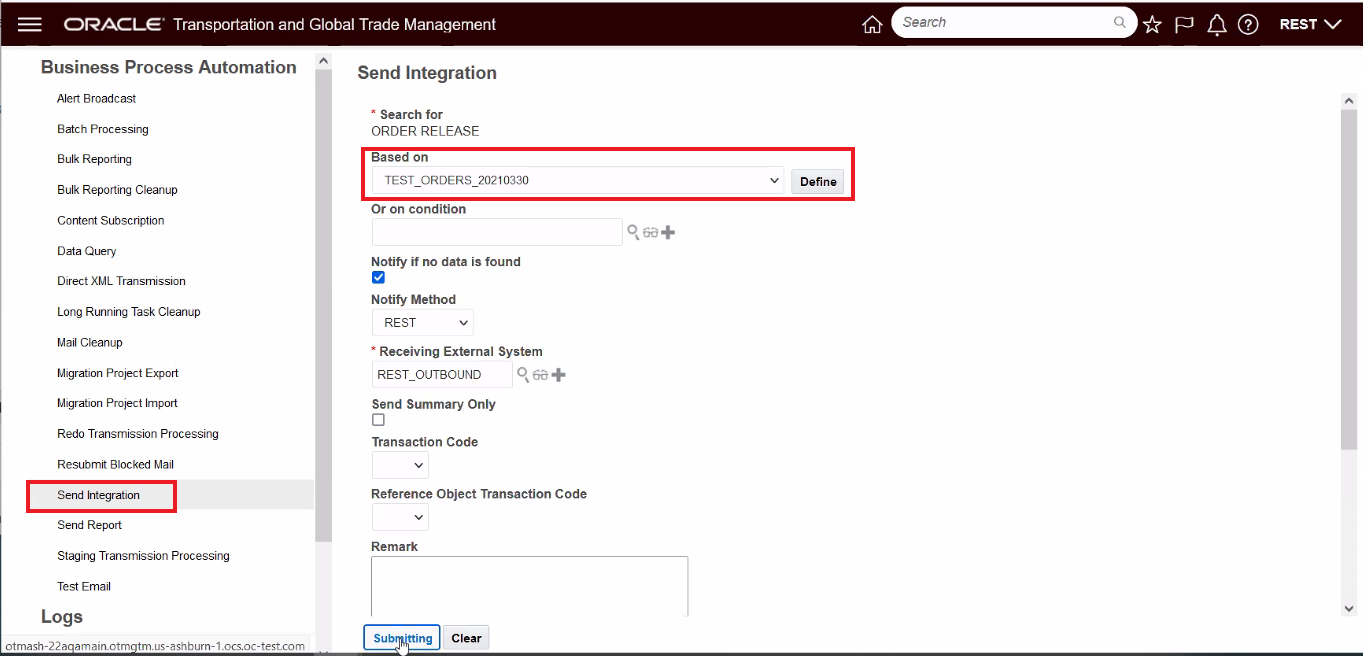
Send Integration with Saved Query
The Send Integration above results in the following Transmission Result - one Transmission with six Transactions - one for each of the order releases returned by the specified saved query.
Transmission Result - Multiple Transactions
This feature provides you with the opportunity to take advantage of the lightweight, easier to work with REST JSON format to support your outbound integration requirements.
Steps to Enable
You don't need to do anything to enable this feature.
Tips And Considerations
The target External System must have the Content Type specified as "application/json".
External System Content Type - is "application/json"
This is the same Content Type and format used by the inbound BATCH API "transmissions" resource.
Both messages will adhere to the Open API schema described by the OTM/GTM online REST API documentation on docs.oracle.com.
Outbound REST is limited to sending the full resource content which is equivalent to the response for a 'GET' on the same resource with 'expand=all' query parameter.
STAGING capability is not yet supported.
Send REST Event Notification Agent Action
This feature provides you with the ability to configure an agent using the new agent action - SEND REST EVENT, that, when configured, will send a small message notification to the specified external system that a lifetime event has occurred against the object. The event information received can then be used to initiate a GET for the related object. With the send event notify and GET approach, you have the option to either GET the complete object or you can parse down your GET request to just the elements of interests.
The SEND REST EVENT action will accepts the following parameters:
- External System - required
- Reference Value
- Should be the choice between a static value entered as an input field or as the result of a single valued Saved Query.
- Override Resource Name
- Send Reason
Sent REST Event
The outbound message will contain the following information:
- External Reference (from reference value above)
- Send Reason (from above)
- Triggering event (i.e. lifetime event)
- Root resource URL
The SEND REST EVENT agent action is available for these Agent Types:
| BILL |
| CONSOL |
| CONTACT |
| CLAIM |
| DOCUMENT |
| DRIVER |
| EQUIPMENT |
| INVOICE |
| ITEM |
| LOCATION |
| ORDER BASE |
| ORDER MOVEMENT |
| ORDER RELEASE LINE |
| ORDER RELEASE |
| PARTNER ITEM |
| POWER UNIT |
| QUOTE |
| RATE OFFERING |
| SELL SIDE SHIPMENT |
| SERVICE PROVIDER |
| SHIPMENT SHIP UNIT |
| SHIPMENT |
| TRACKING EVENT |
| VOUCHER |
| VOYAGE |
| WORK INVOICE |
| GTM CAMPAIGN |
Simplifies the setup required for notifying external systems that a lifetime event has occurred against an object and supports an integration pattern where the external system is notified of an event and then the GET for the object can be tailored to retuning just the elements of interest.
Steps to Enable
You will need to either create a new Automation Agent or modify an existing agent to use this feature.
Go to Business Process Automation > Agents and Milestones > Automation Agent.
The Agent Manager allows you to construct agents that are key components of configurable Oracle Transportation Management processing. An agent listens for an Oracle Transportation Management event, verifies a user-defined condition, and executes one or more actions that you choose from an action library.
Create an agent using the following tabs that you must follow sequentially:
- Agent Header defines basic information such as ID, agent type, and whether the agent is active as well as the events and event conditions that trigger the agent to process actions.
- Actions defines the actions that are executed when specific events are met - in this case you will want to select the SEND REST EVENT agent action for the selected object.
- Error Handling defines the actions to take when errors occur during the processing of an agent.
Read Only Shipment Group Resource Added to REST API
The feature extends the available REST Resources to include the Shipment Group along with the Shipment Group's Secondary Charge details. The Shipment Group REST Resource supports a GET (read only) request.
Provides you with read access to your shipment group(s) using the REST API.
Steps to Enable
Review the REST service definition in the REST API guides, available from the Oracle Help Center > your apps service area of interest > REST API. If you're new to Oracle's REST services you may want to begin with the Quick Start section.
Batch Asynchronous Support for Power Data Resources
This feature enables the Power Data REST resources to use the batch framework for loading.
Provides you with the option to load Power Data in batch using REST Services.
Steps to Enable
Review the REST service definition in the REST API guides, available from the Oracle Help Center > your apps service area of interest > REST API. If you're new to Oracle's REST services you may want to begin with the Quick Start section.
Transportation Management (Base)
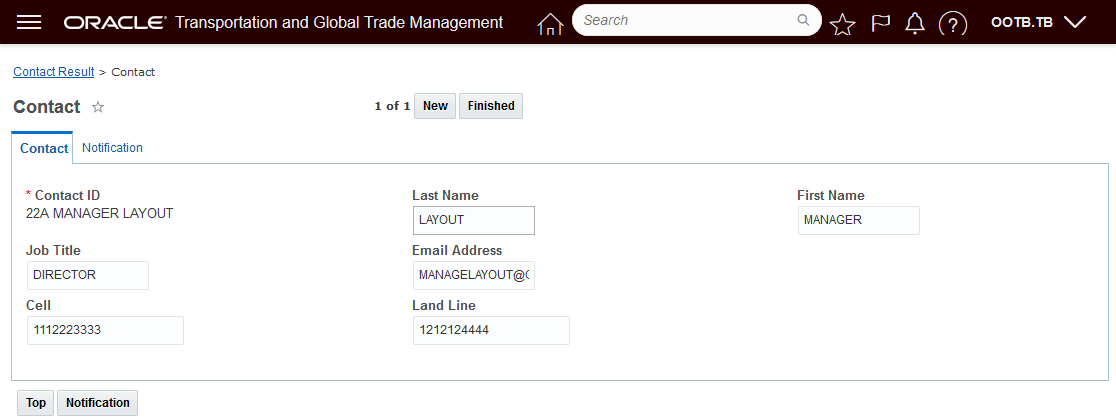
Contact Manager Moved to Manager Layout
This feature provides with the ability to configure your contact manager for both view and edit using manager layout functionality.
Below is an example of the Public Contact Manager Layout for Edit (and New), and an example of the Contact Manager configured using the Manager Layout capabilities - where fields have been removed, moved and re-labeled.
Public Contact Manager Layout - Edit
Below is the Contact Manager configured using the Manager Layout capabilities. Fields have been removed and relabeled.
Contact Manager Configured - Edit
Below is an example of the Public Contact Manager layout for View and a configured version of the Contact Manager View.

Public Contact Manager Layout - View
Below is the configured Contact Manager view with fields removed, rearranged and relabeled.
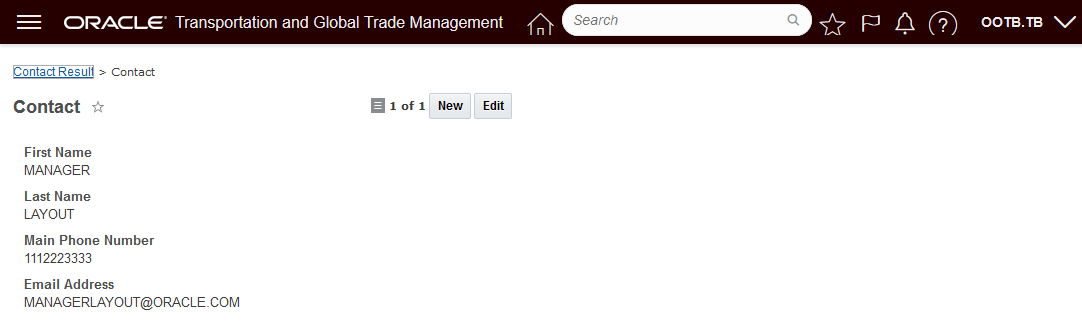
Manager Layout Configured Contact Manager Layout - Edit
Allows you to configure your Contact Manager - for both view and edit - so that the layout is simplified (unused features and fields removed) and labeled and organized to improve both navigation and general usability.
Steps to Enable
To take advantage of this feature you will need to:
- Copy the public Contact Manager Layouts to create new Contact Manager Layouts for view and edit.
- Copy and configure a new Contact Manager Screen Set (or modify an existing one) and point to the newly configured Contact Manager layouts for edit and view.
- Add the new Contact Manager Screen Set to your Menu using the Menu Manager.
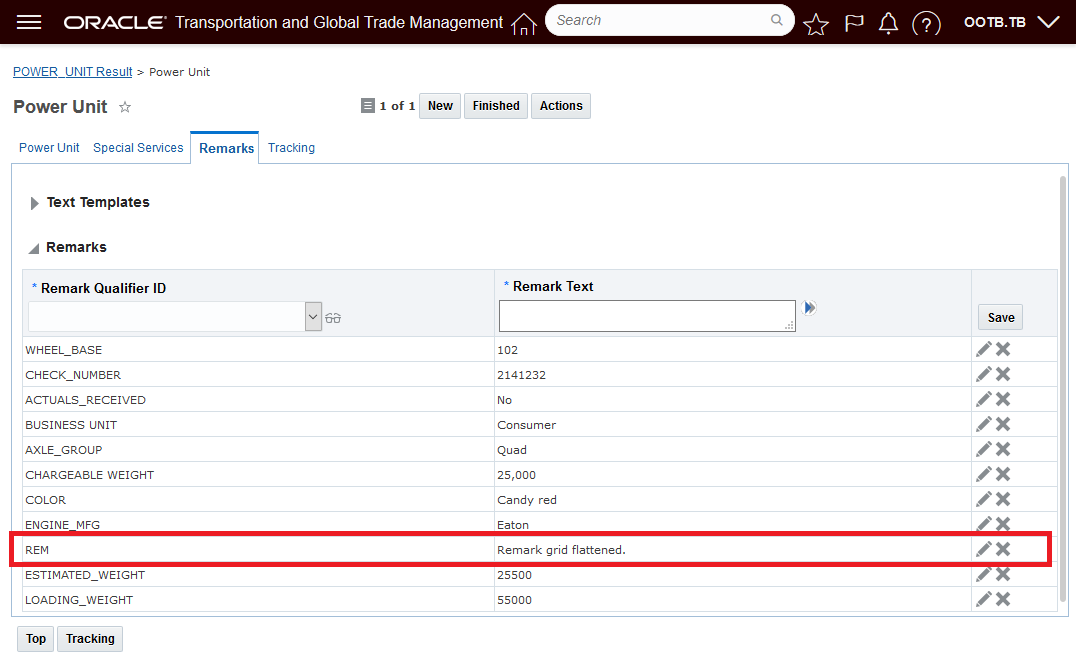
Power Unit - Grid Fatten Remark Field
This feature provides you with the ability to grid flatten the Remark field on the Power Unit screen set.
In the example below the Remark field has been grid flattened for the Remark Qualifier Value "REM".

Grid Flattened Remark Field Example
In the example below - without Grid Flattening - the REM qualifier and value do not stand out.
Without Grid Flattening
Allows you to promote selected Remark Qualifiers so they appear as "real" fields simplifying the management and improving the visibility of the configured Remark Qualifier and the values entered.
Steps to Enable
To enable this feature you will need to do the steps required to configure a pseudo or grid flattened field.
- Create a new screen sent for you Power Unit object or modify your existing screen set.
- Add the Remark(P) field to the finder results for your Power Unit screen set.
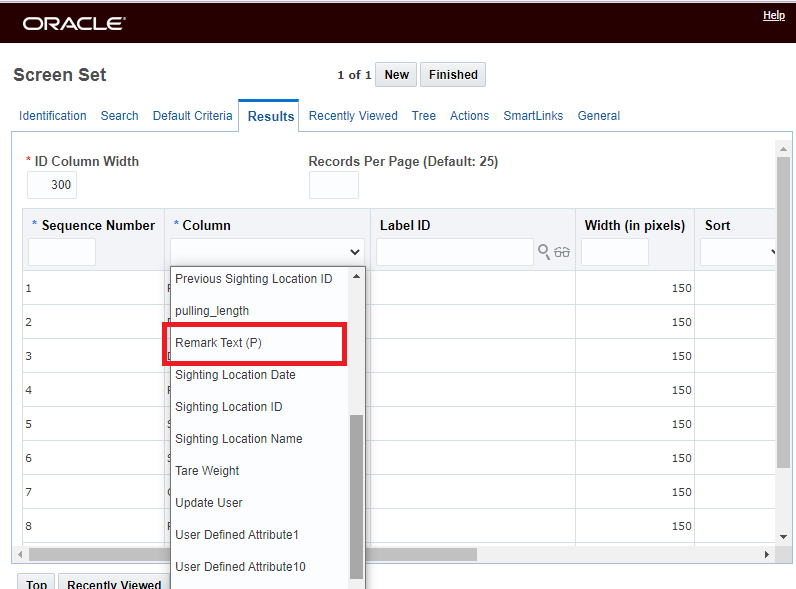
Add Remark Text (P) Pseudo Field to Finder Results
- Select the qualifier you want to grid flatten.

Select the Remark Qualifier - REM in this case

Screen Set Setup
Packaged Item Description Visible After Running Add New Line Item Added
This feature provides visibility to the Packaged Item Description on the Ship Unit Form immediately after you run add a New Line Item and Save. Previously, you would have had to save the order release and then edit the order release to see the Packaged Item Description.
The set of screen shots below illustrate the benefits of this feature.
In the first step, you select the New Line Item button on the Ship Unit.
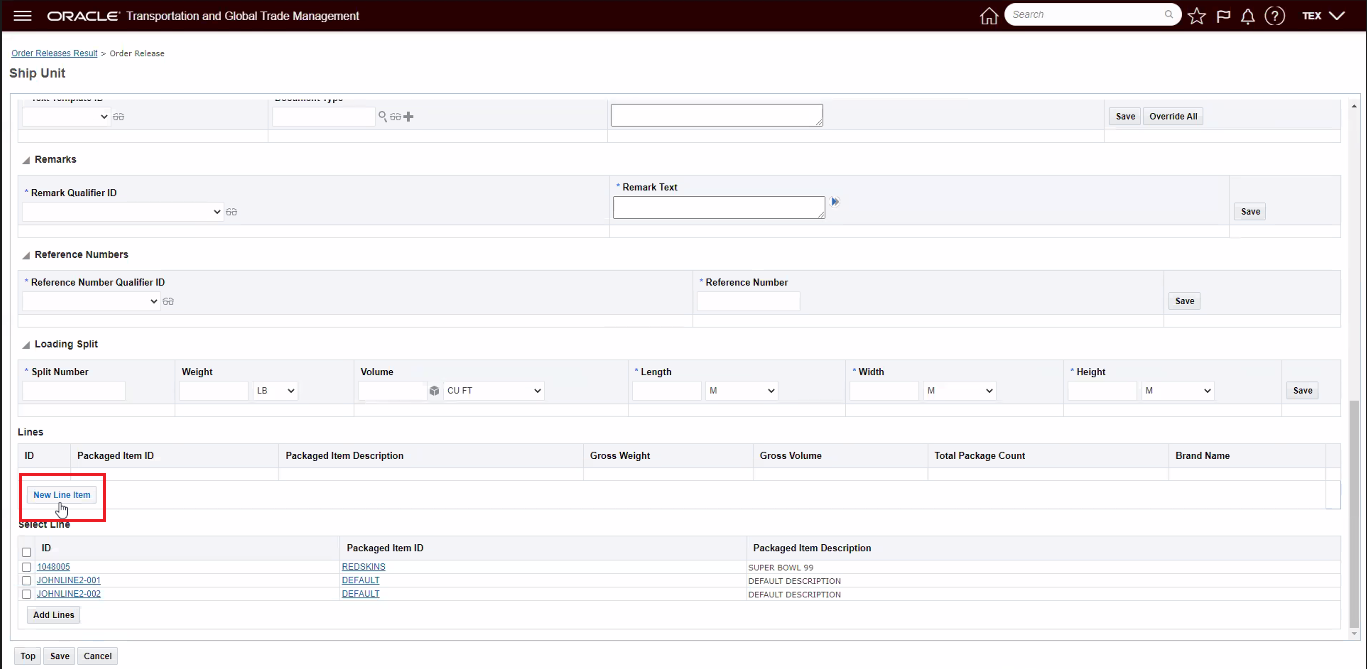
On Order Release Ship Unit - New Line Item
In the second step - you add the new line item and Save.
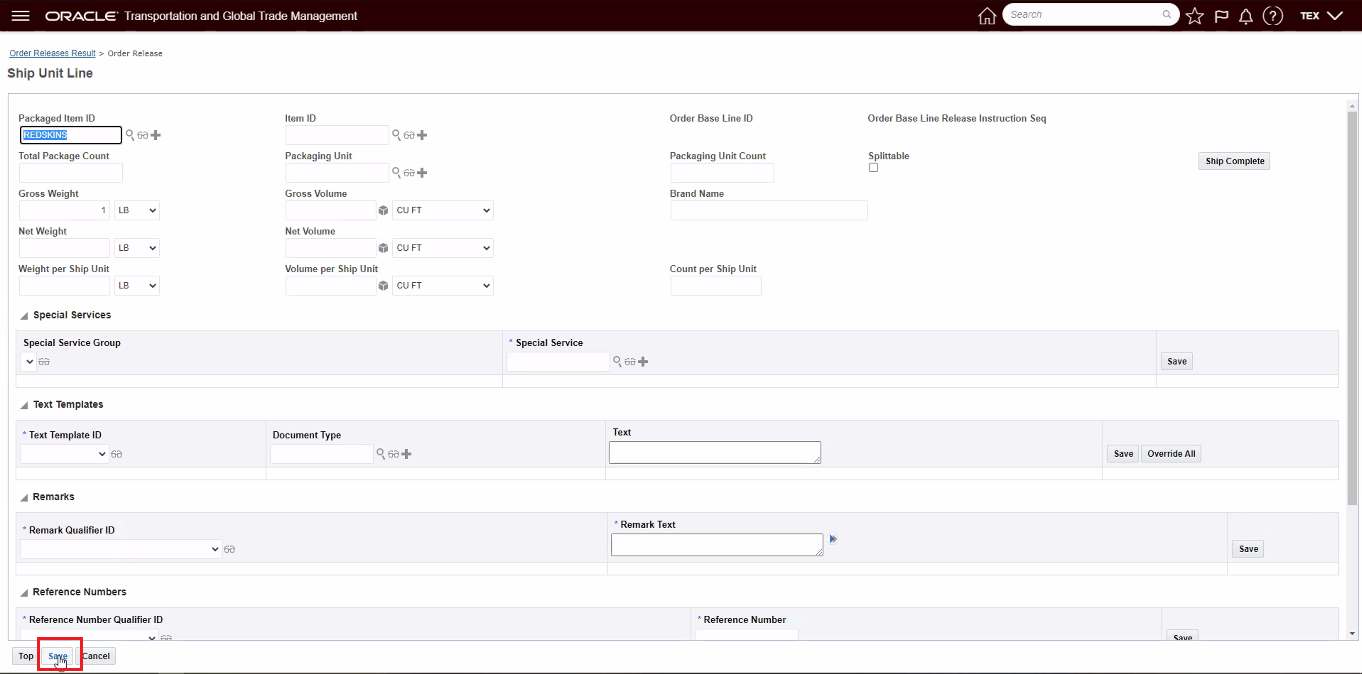
Add New Line Item
In the screen below, you will not see the Packaged Item Description populated for the newly added line item.
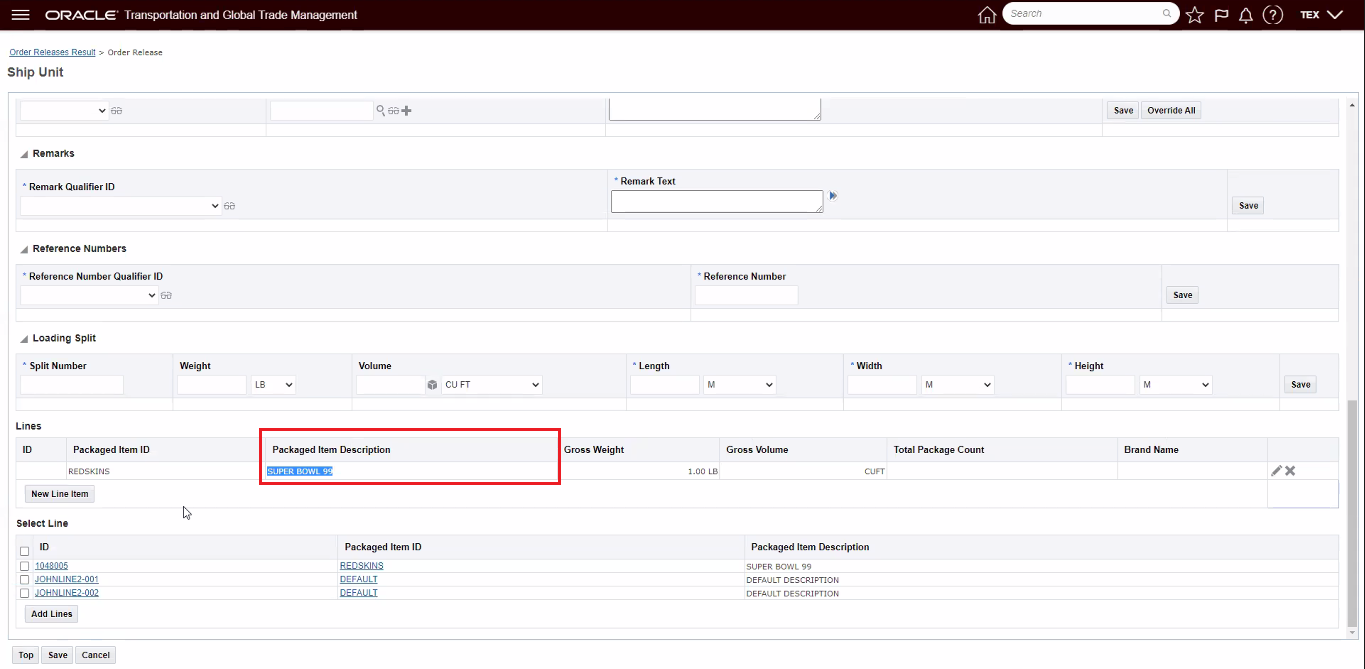
Package Item Description Populated
Provides you with more information about the packaged items beyond just the Packaged Item Id.
Steps to Enable
You don't need to do anything to enable this feature.
Manager Layout Direct URL Link In Stylesheet to User's Configured Manager Layout
This feature supports, for the Buy Shipment Manager Layout, Order Release Manager Layout and Invoice Manager Layout, the ability to have your direct OTM URL link link into the user’s configured Manager Layout instead of the PUBLIC Manager Layout.
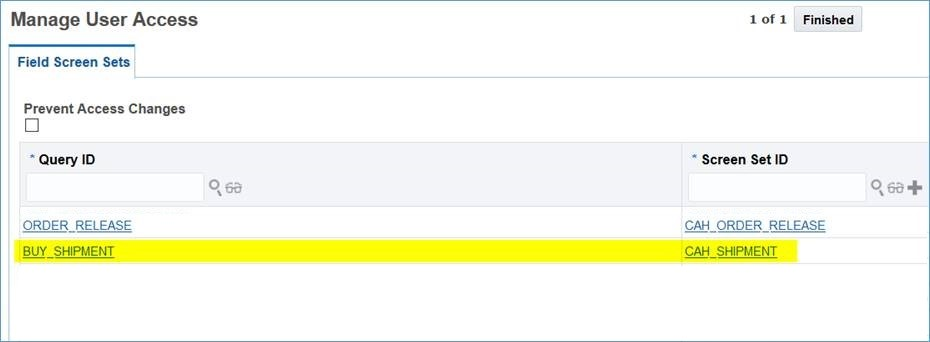
Finder Screen Set Setup for CAH Shipment - Configured Buy_Shipment Manager Layout
With the Finder Screen Sets setup above for , following the direct URL link https://otmash-22aqamain.otmgtm.us-system-1.ocs.oc-test.com//GC3/ShipmentEditRouter?pk=CHAYES.50423 links to the specified shipment using the the Screen Set CAH_SHIPMENT and related manager Layout - as shown below.
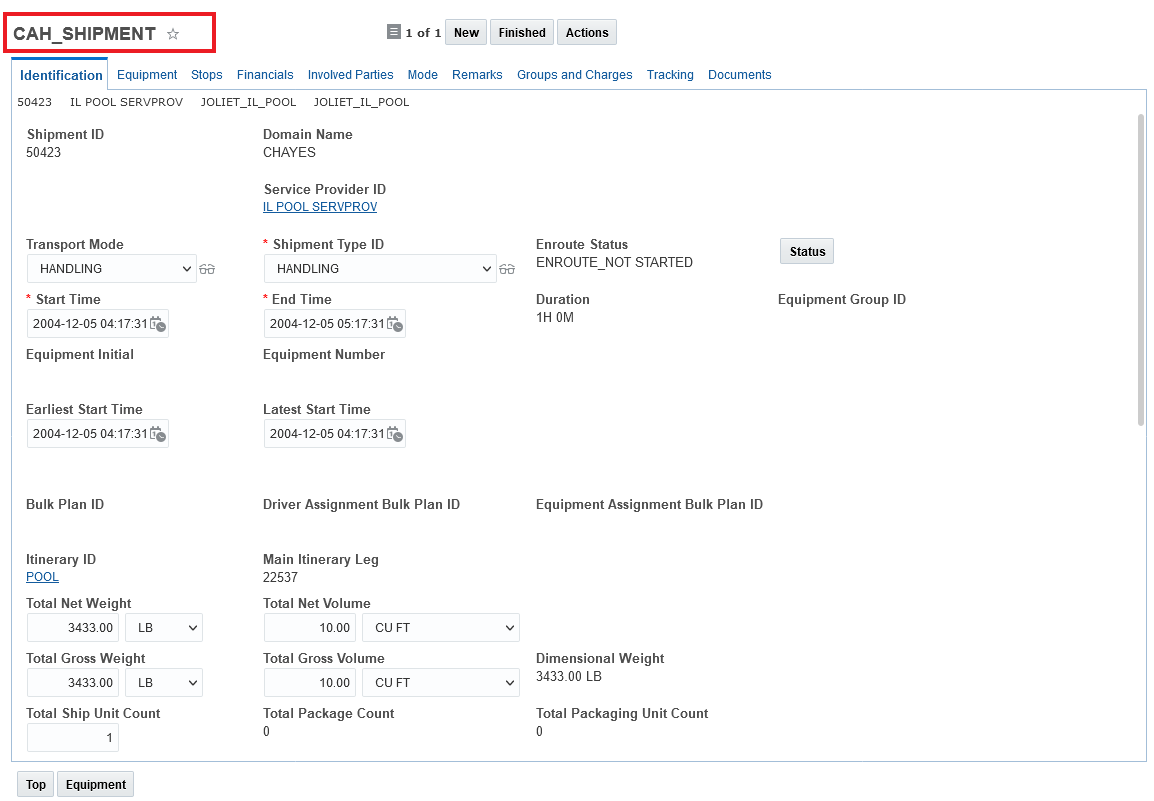
Direct Link Links to User Access Specified Screen Set and Manager Layout
Provides you with improved control over the information users see for the Buy Shipment, Order Release and Invoice, as well as providing a more consistent manager layout experience for the user.
Steps to Enable
The Manage User Access Type of Field Screen Sets is used to set the layout used for the user for the Buy Shipment Layout, Order Release Layout and Invoice Layout.
Access this page via Configuration and Administration > User Configuration > Manage User Access.
NOTE: You must have DBA.ADMIN access to Manage User Access.
In the User Access Type field, select the option Field Screen Sets. Click Edit User Access. The Field Screen Sets page opens.
Use this page to configure the default screen set that is used for the Buy Shipment, Order Release or Invoice.
:
Configuration Example - Buy_Shipment and Order Release
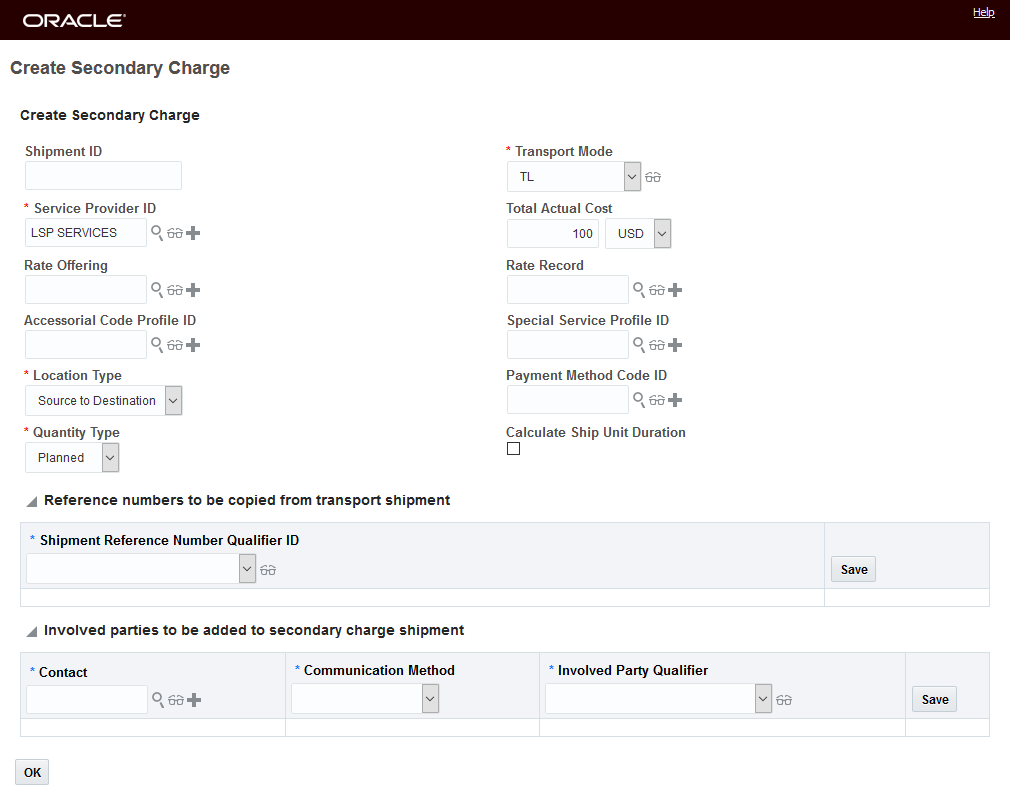
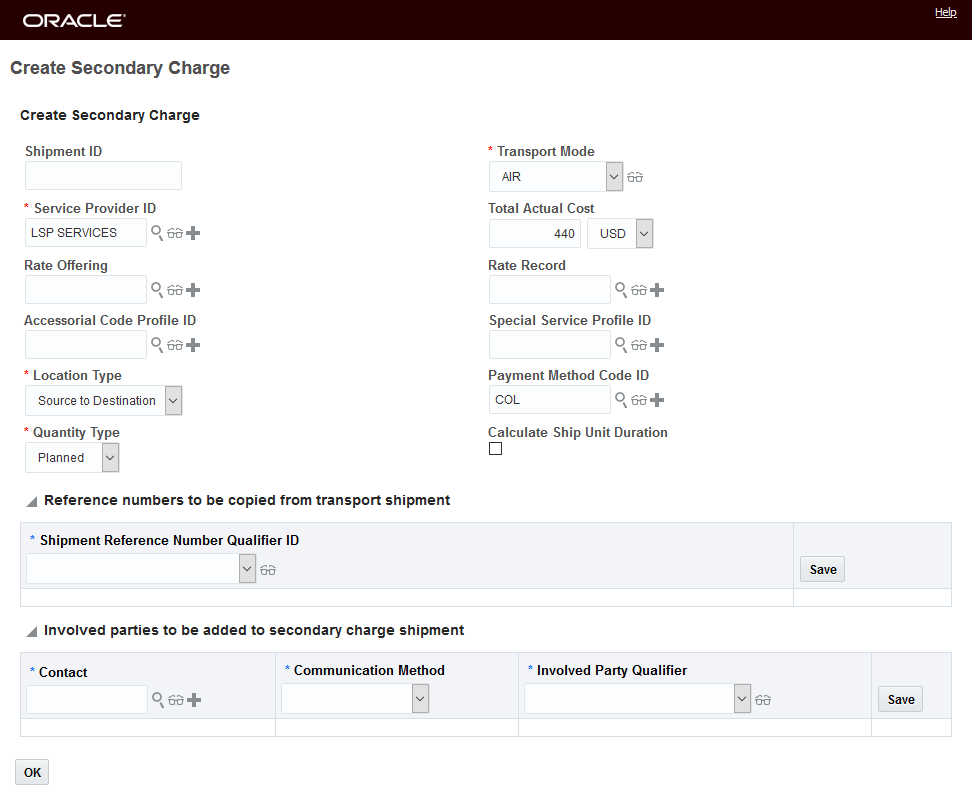
Create Secondary Charge Action Moved to Manager Layout
This feature adds manager layout capabilities to the Create Secondary Charge action which allows you to configure the action input. With this enhancement, you can hide unnecessary fields or as necessary, make other fields mandatory.
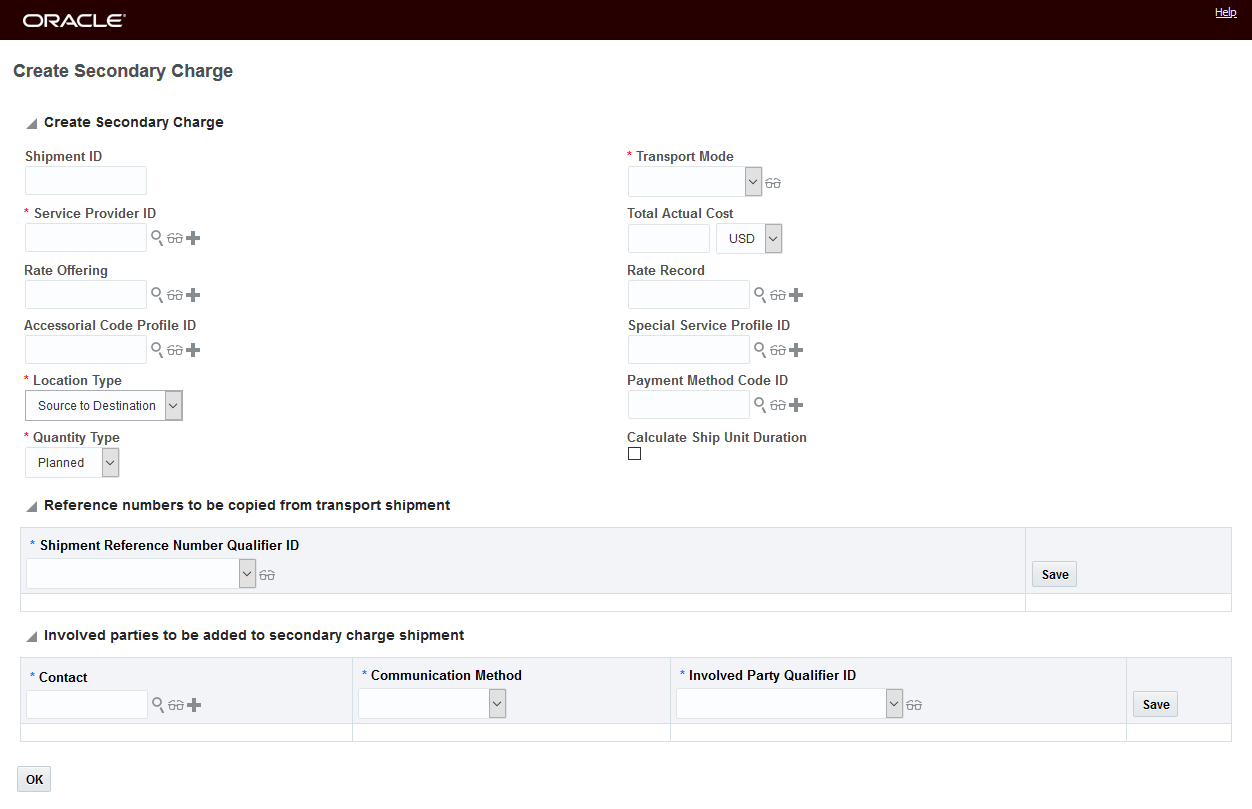
Create Secondary Charge - Standard Action Input
In the example below, Transport Mode defaults to TL, both the Rate Offering ID and Rate Record have been made Mandatory, and the Involved Party grid and the Calculate Ship Unit Duration Check Box have been removed.
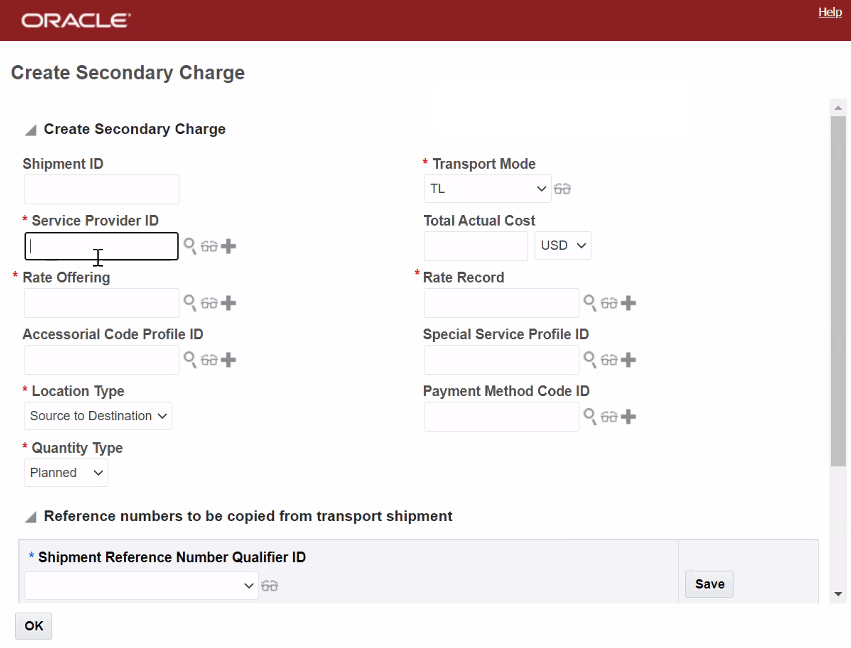
Create Secondary Charge - Configured Action Input
Allows you to configure the Create Secondary Charge action to meet the needs of your implementation, improving usability and adoption of the application.
Steps to Enable
You don't need to do anything to enable this feature.
Tips And Considerations
Note, the previous Shipment Create Secondary Charge action supported a multi-select action input. When the action was run against multiple shipments, the Create Secondary Charge input page would be displayed for each selected shipment, one at a time, and a secondary charge shipment would be created for each of the shipments after each input step. Unfortunately, the old Create Secondary Charge action did not provide any information about which of the selected shipments the secondary charge was being created for as it stepped through the selected set of shipments and created secondary charge shipments. See example below. The inability to understand which shipment was being processed in the multi-select shipment running of the Create Secondary Charge action was considered confusing by most users.
For example, using the previous Create Secondary Charge, you are able to select multiple shipments and run the action.
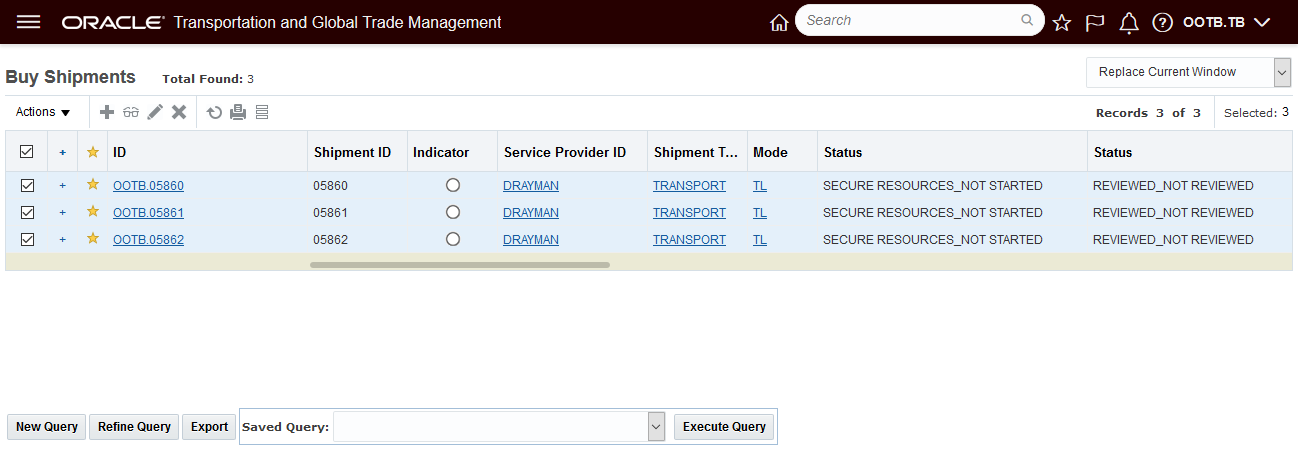
Old Multi-Select Create Secondary Charge Action Behavior
For each of the shipments selected you are given an action input screen and then shown the resulting secondary charge shipment - but you have no way of knowing which shipment you are creating the secondary charge shipment for.
Input Screen 1

Secondary Charge Shipment 1

Input Screen 2
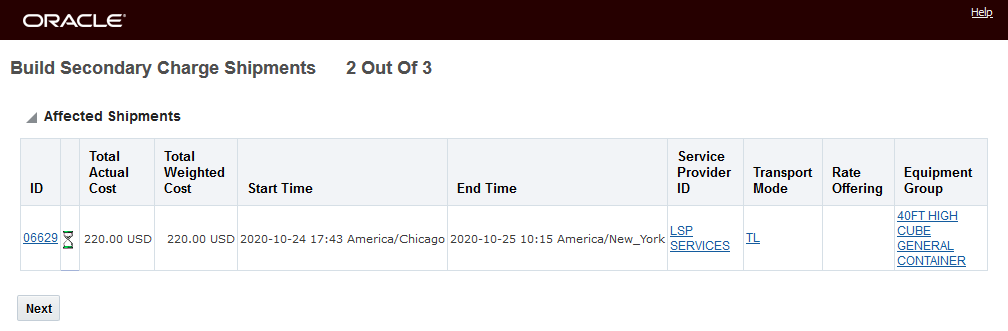
Secondary Charge Shipment 2
Input Screen 3
Secondary Charge Shipment 3
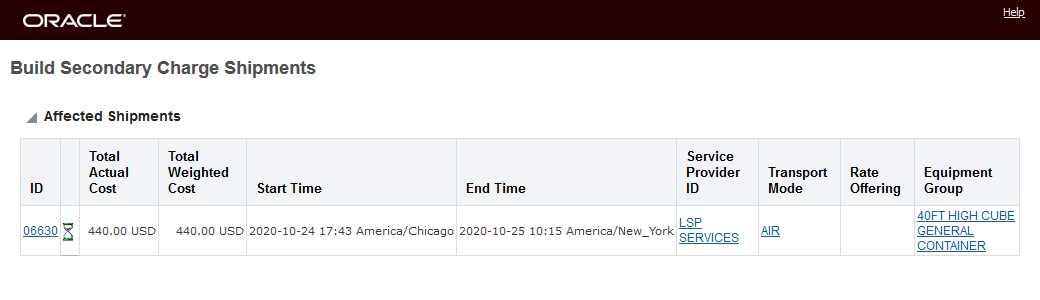
The new manager layout enabled Create Secondary Charge action avoids the multi-select issue by dis-allowing a multi-select shipment input. With the new Create Secondary Charge action, if you select multiple shipments and run the action you will receive this message.
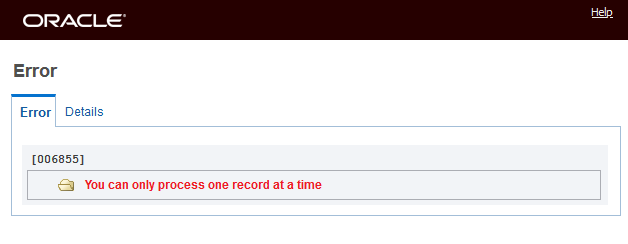
Create Secondary Charge - Multi-Shipment Select Error Message
NOTE: The new Create Secondary Charge action and behavior (multi-select not supported) are now the default for this action, however, if for some reason the previous Create Secondary Charge action's behavior is required, you have the ability to revert to the previous version of the action by replacing the new Create Secondary Charge action with the previous action - now called Create Secondary Charge (Deprecated) in your Buy Shipment and Shipment Group screen sets.
Configuration and Administration > User Configuration > Screen Set Manager. Actions tab.

Revert to Old Behavior - Replace Create Secondary Charge action with Create Secondary Charge (Deprecated)
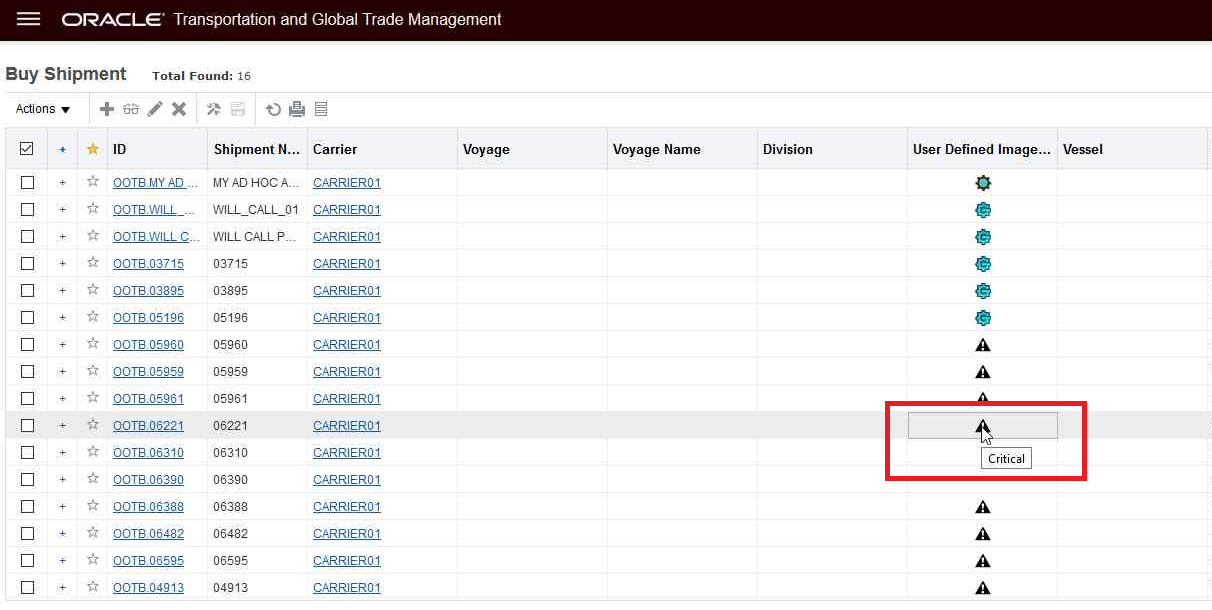
Work Assignment Screen Set - Results Add User Defined Images and Indicator
This feature enhances the Work Assignment Screen Set to include User Defined Images (1-5) and an Indicator. You can set the Image(s) and Indicator using the actions Set Image and Set Indicator on the Work Assignment or via an agent action.
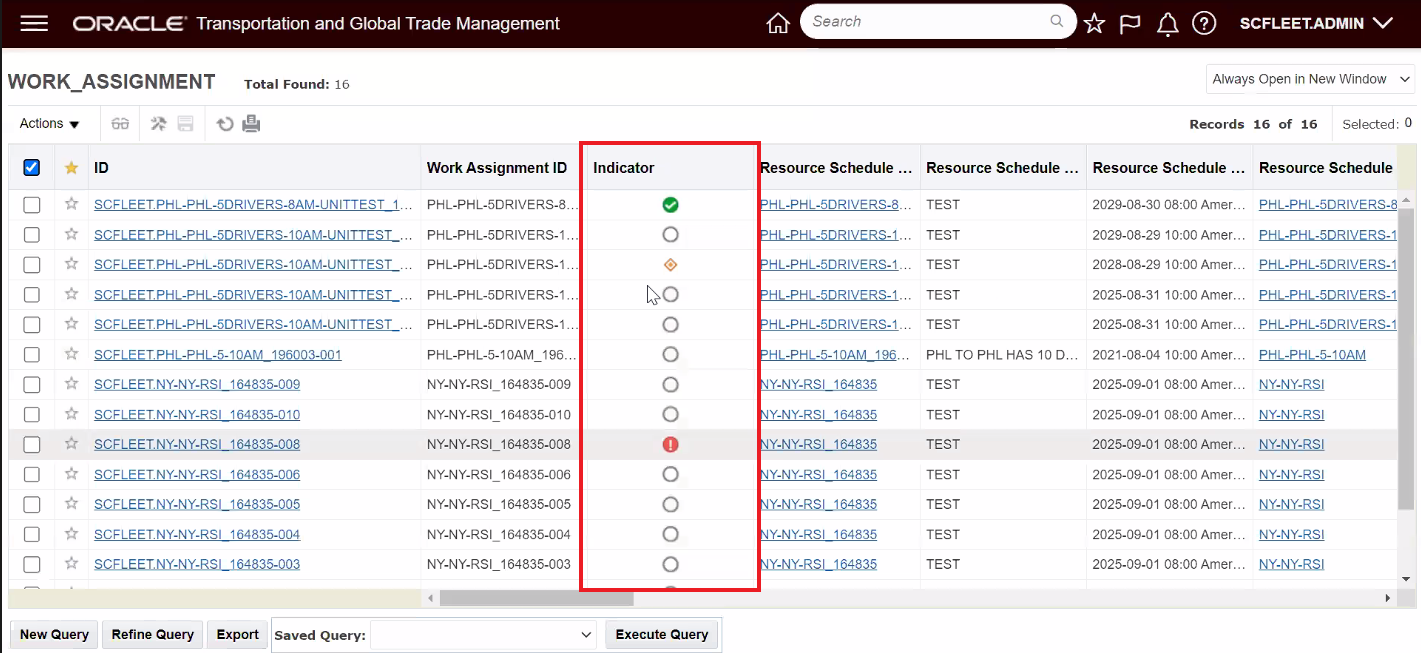
Work Assignment Screen Set Results - Indicator Added
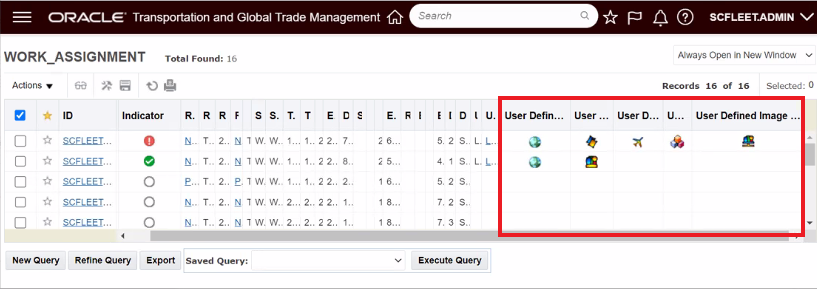
Work Assignment Screen Set Result - User Defined Images Added
Provides you with the option of setting User Defined Images (1-5) and/or an Indicator on your Work Assignments to provide visual queues to the current condition and status of your Work Assignments.
Steps to Enable
To take advantage of this feature you will need to add the User Defined Image(s) and Indicator to an existing or new Work Assignment Screen Set.

Screen Set Setup - Indicator and User Defined Images 1-5
Once configured - you can use the Set Image and/or Set Indicator to set the image(s) and indicator to your Work Assignments.
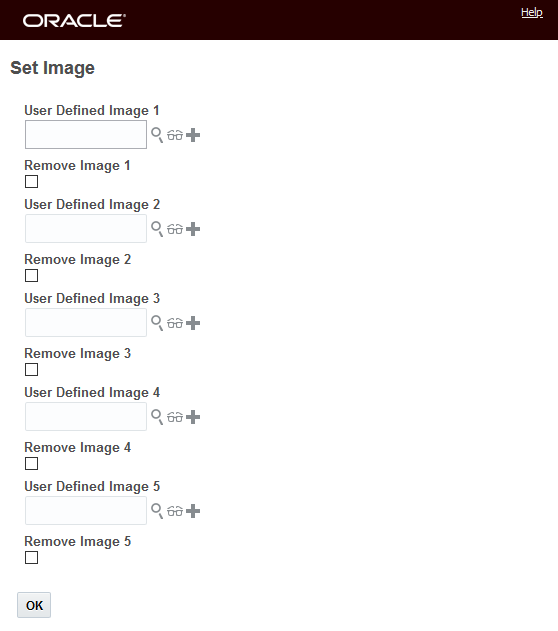
Set Image Action - Set or Remove Image(s)
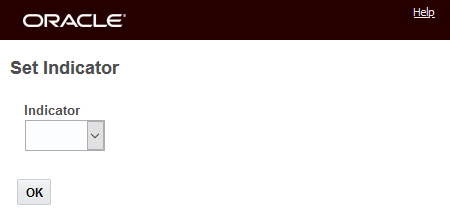
Set Indicator Action Selection
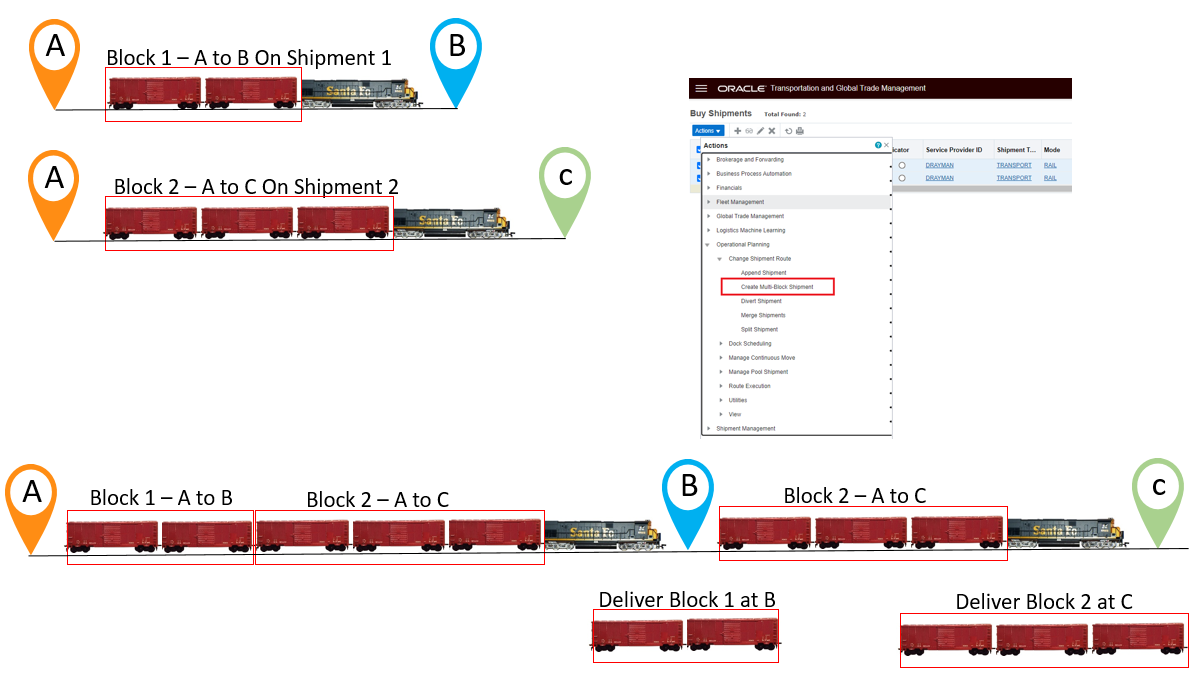
Create Multi-Block Shipment - Shipment Action
This feature provides you with a new Create Multi-Block Shipment action, that will create a multi-stop shipment from a selected set of direct shipments where the stops in this scenario assume a "delivery" of shipment equipment at the stops. You will find this feature useful in all your European Unit Train rail scenarios where the unit train involves delivering one or more rail cars at different junctions on the route. The usage assumption for this feature is that the creation of the Multi-Block Shipment will occur after the details related to the individual Block Shipments have been finalized - i.e., Equipment Initial and Number are added, shipment actuals have been processed etc.
In the example below, there are two individual block shipments - Shipment 1 going from A to B with two rail cars and Shipment 2 going from A to C with three rail cars. The Create Multi-Block Shipment action allows you to select your single block shipments (which share the same Reservation Number) and then create one Multi-Block shipment with - in this case, five rail cars with two delivery stops - one stop at location B delivery two rail cars and a second stop at location C delivering three rail cars..
The process for building the desired Multi-Block shipment - once the prerequisite have been completed - involves first building the individual Block Shipments (in this case Shipment 1 going from A to B and Shipment 2 going from A to C) which can be accomplished by selecting all the orders for the desired blocks and running a Bulk Plan where the Planning Parameters have been configured so that each rail car in the individual Block Shipments are loaded as desired. Once the individual Block Shipments are created, then you create the Multi-Block Shipment by selecting the two individual Block Shipments and running the action Create Multi-Block Shipment. The Create Multi-Block Shipment action will take the two individual Block Shipments and create one Multi-Block Shipment by consolidating the individual Block Shipments into one of the selected Individual Block Shipments.
Block to Multi-Block Example
Create Multi-Block Shipment
In the example below, there are two individual Block Shipments - 03599 and 03606, each of these shipments contains five shipment equipments as shown in the Workbench below. Block Shipment 03599 goes from Burns Harbor IN to Flint MI, Block Shipment 03606 goes from Burns Harbor IN to Pontic MI.
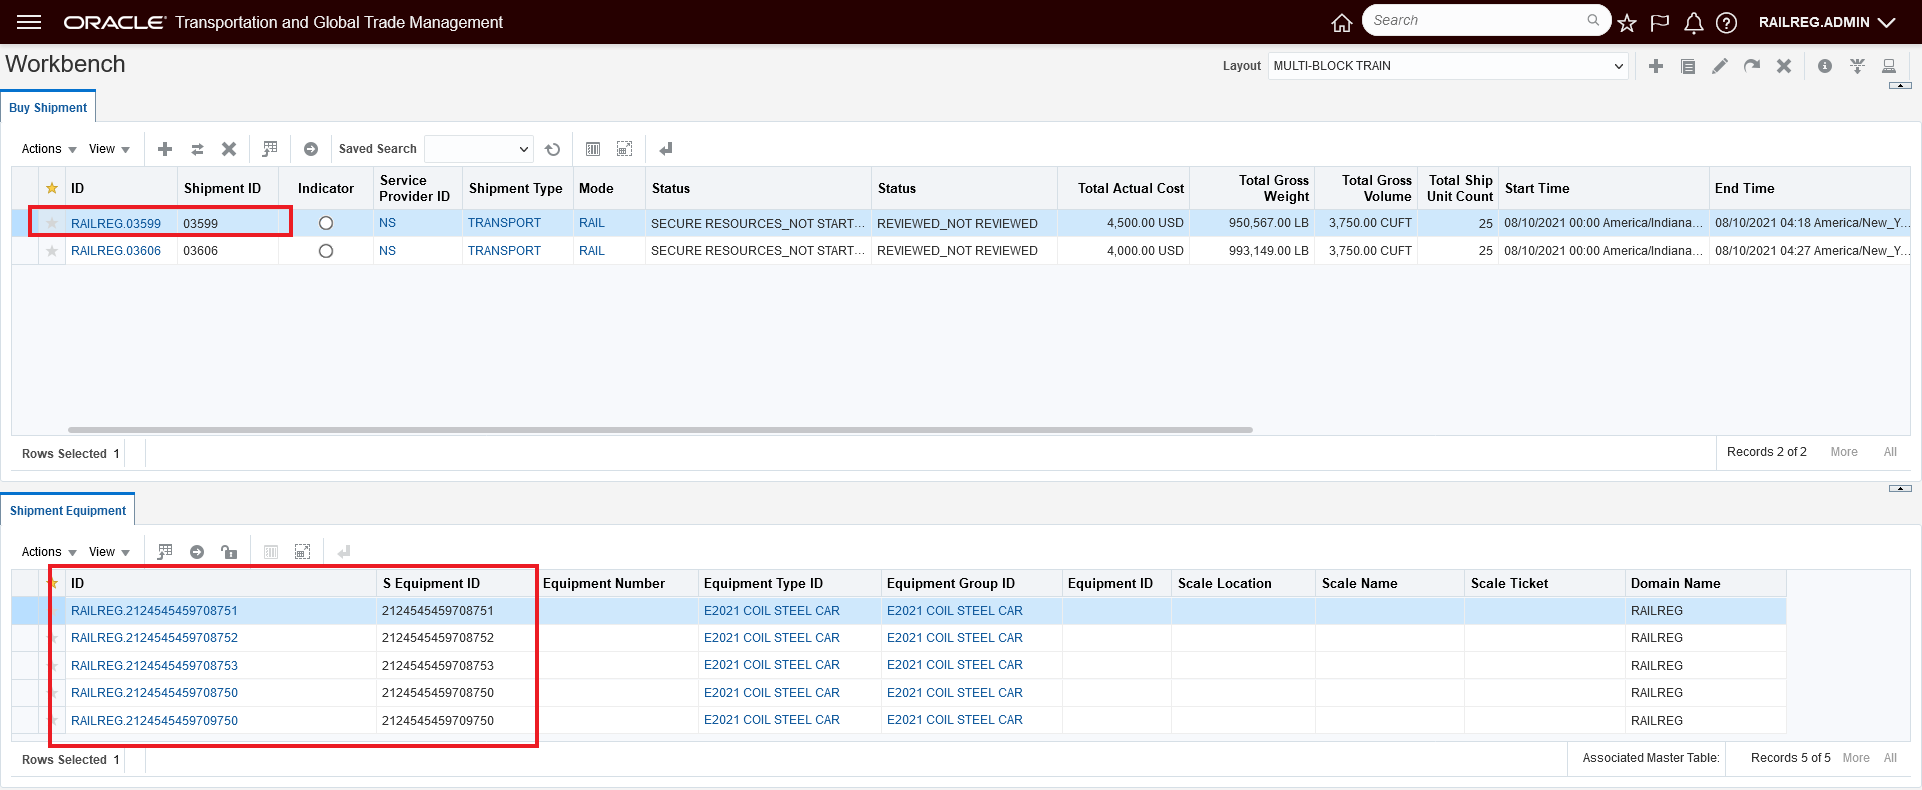
Block Shipment 03599

Block Shipment 03606
Assuming - as noted above - all the actuals have been reported against the two independent Block Shipments- - then you can run the action - Create Multi-Block Shipment - as shown below to create a single Multi-Block Shipment from the two Block Shipments.
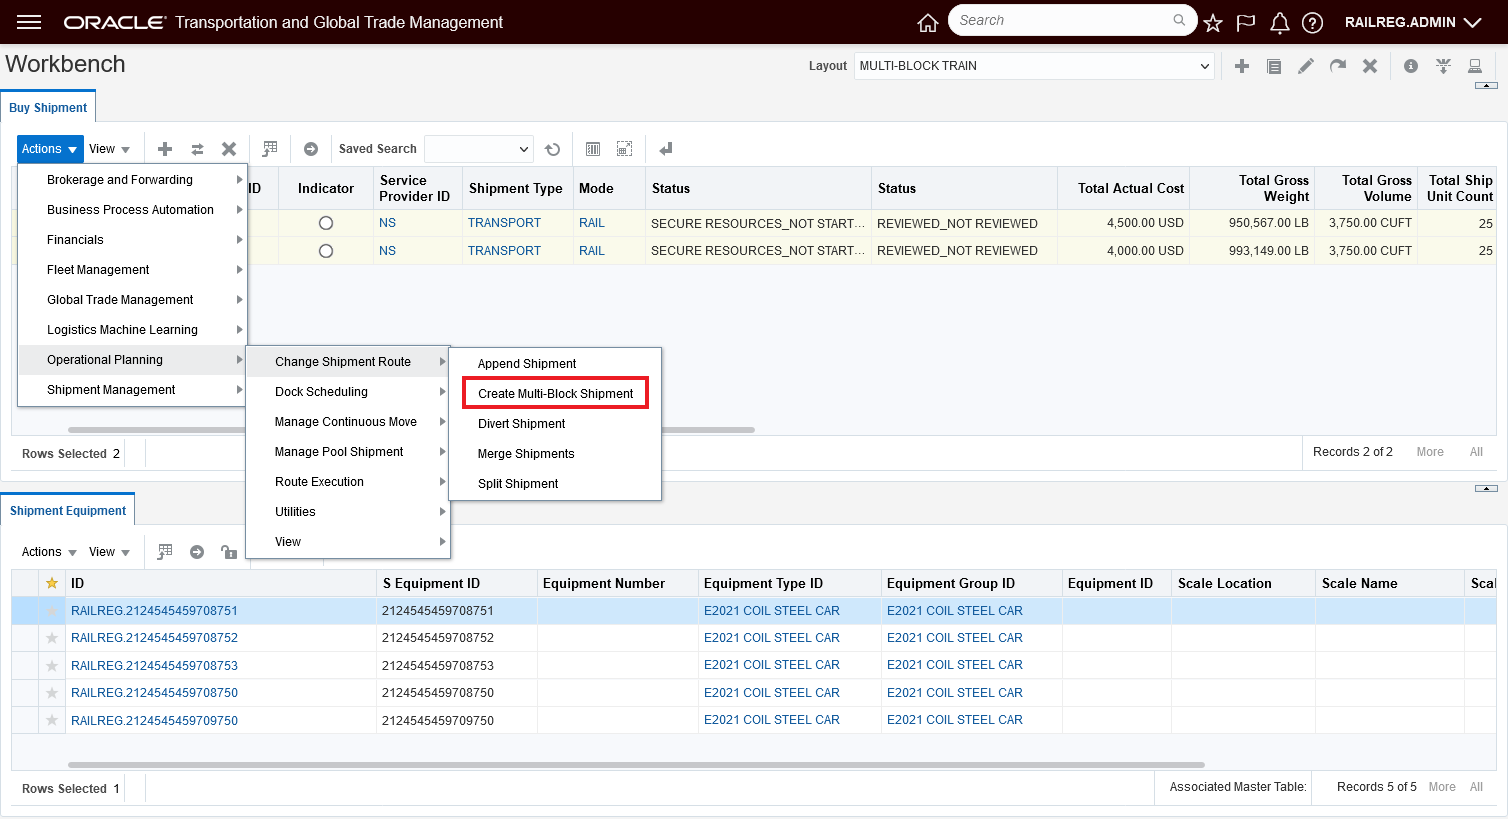
Create Multi-Block Shipment Action
The action input for the Create Multi-Block Shipment action highlights some of the setup required to properly generate the Multi-Block Shipment. Specifically, the Reservation Number and Air/Rail Route Code are key to the successful setup for this action to run. The individual two-stop Block Shipments selected for this action must all have the same Reservation Number. You can enter the appropriate Air/Rail Route Code or - as shown below - the Air/Rail Route Code will be displayed if it is already assigned to all the shipments selected. The Air/Rail Route Code is used to determine the appropriate rate record to use for the combined shipment, and to determine the stop sequence for the combined shipment.
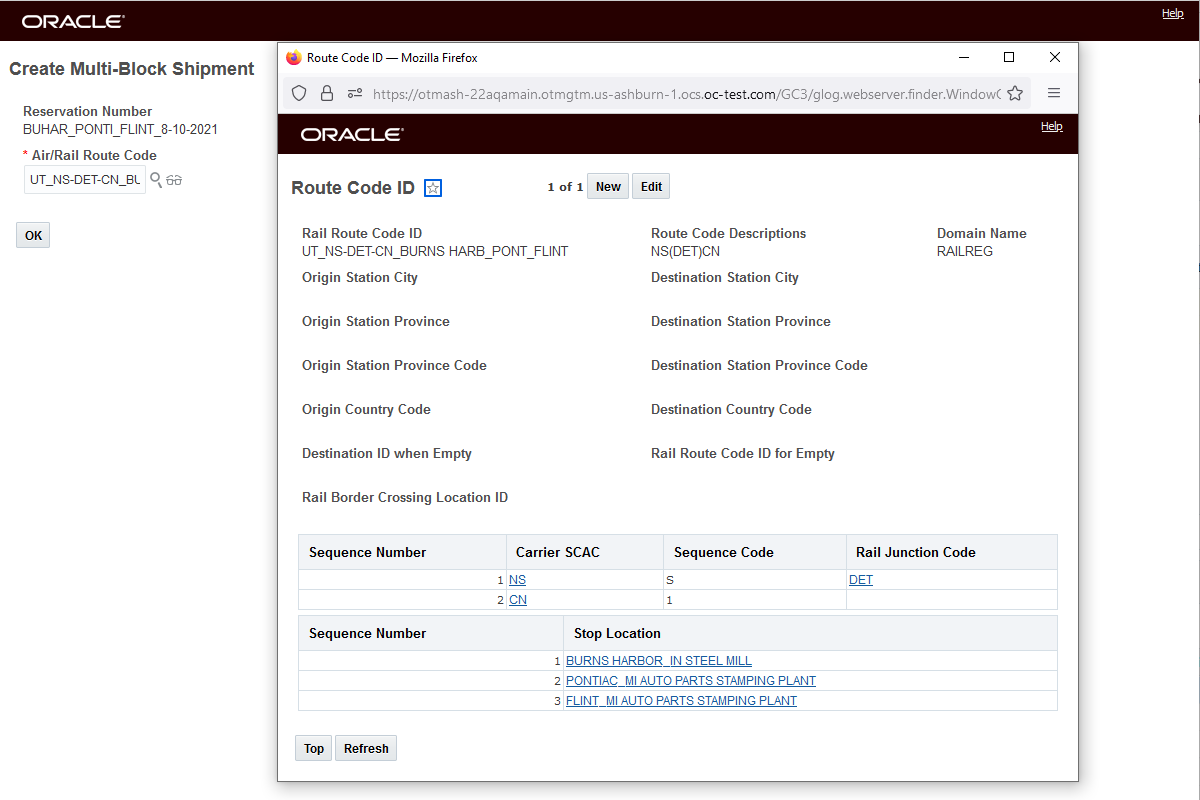
Action Input
View into Route Code Details
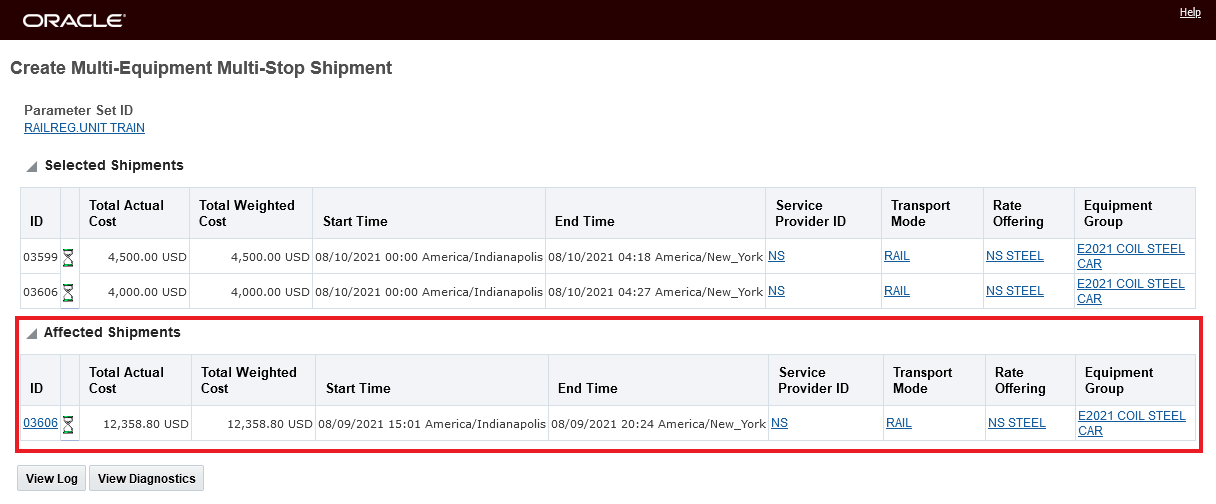
Result - Block Shipment 03599 Merged into Shipment 03606 to Create the Multi-Block Shipment
As you can see in the workbench below the Create Multi-Block Shipment has created one Multi-Block shipment 03606 with ten shipment equipments - from the two Block Shipments selected.
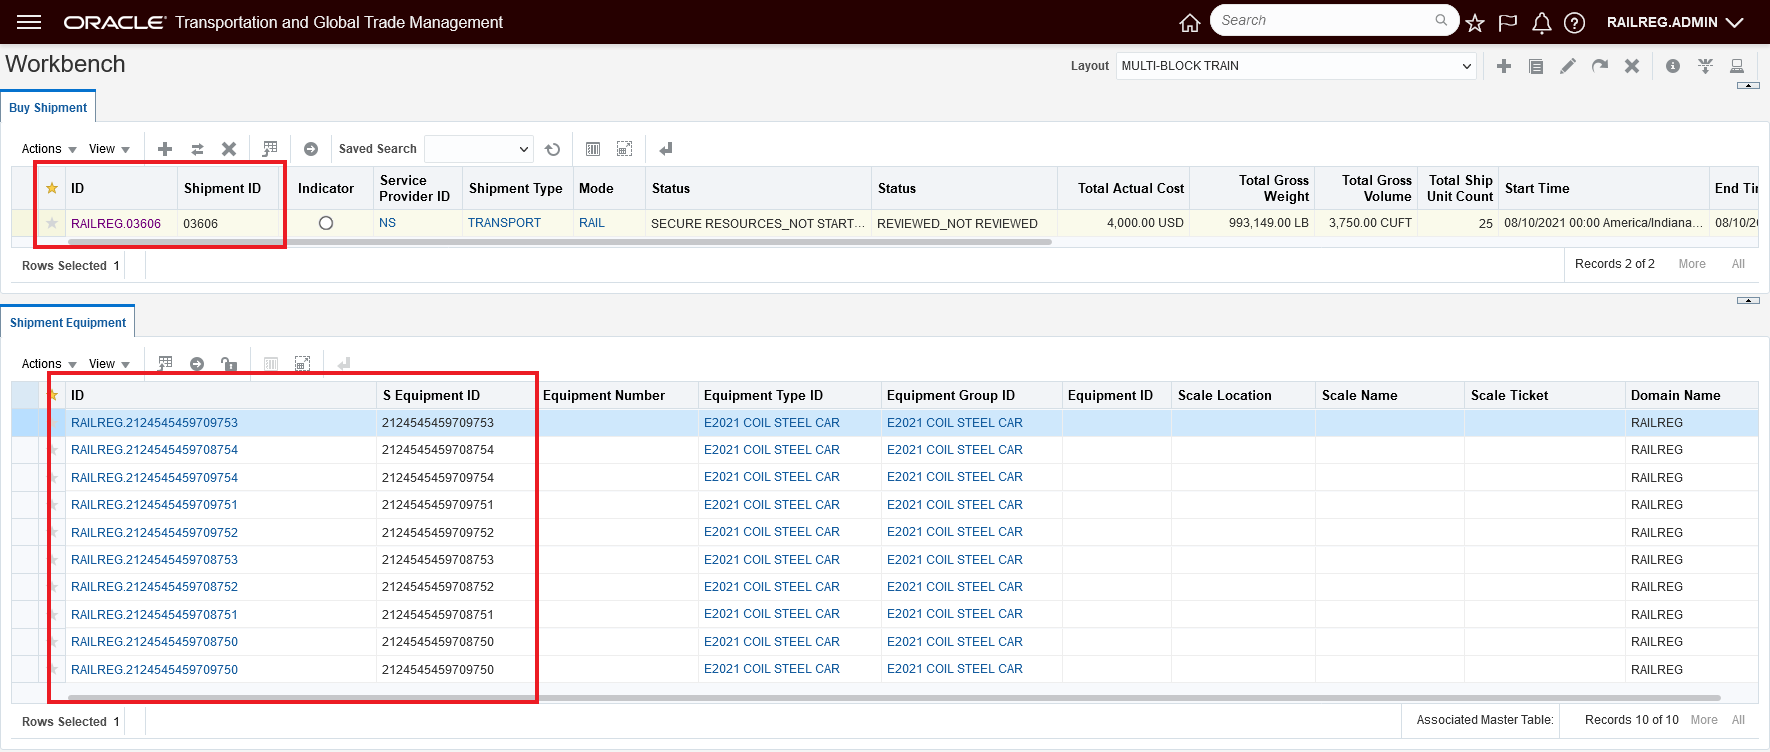
Resulting Multi-Block Shipment 03606
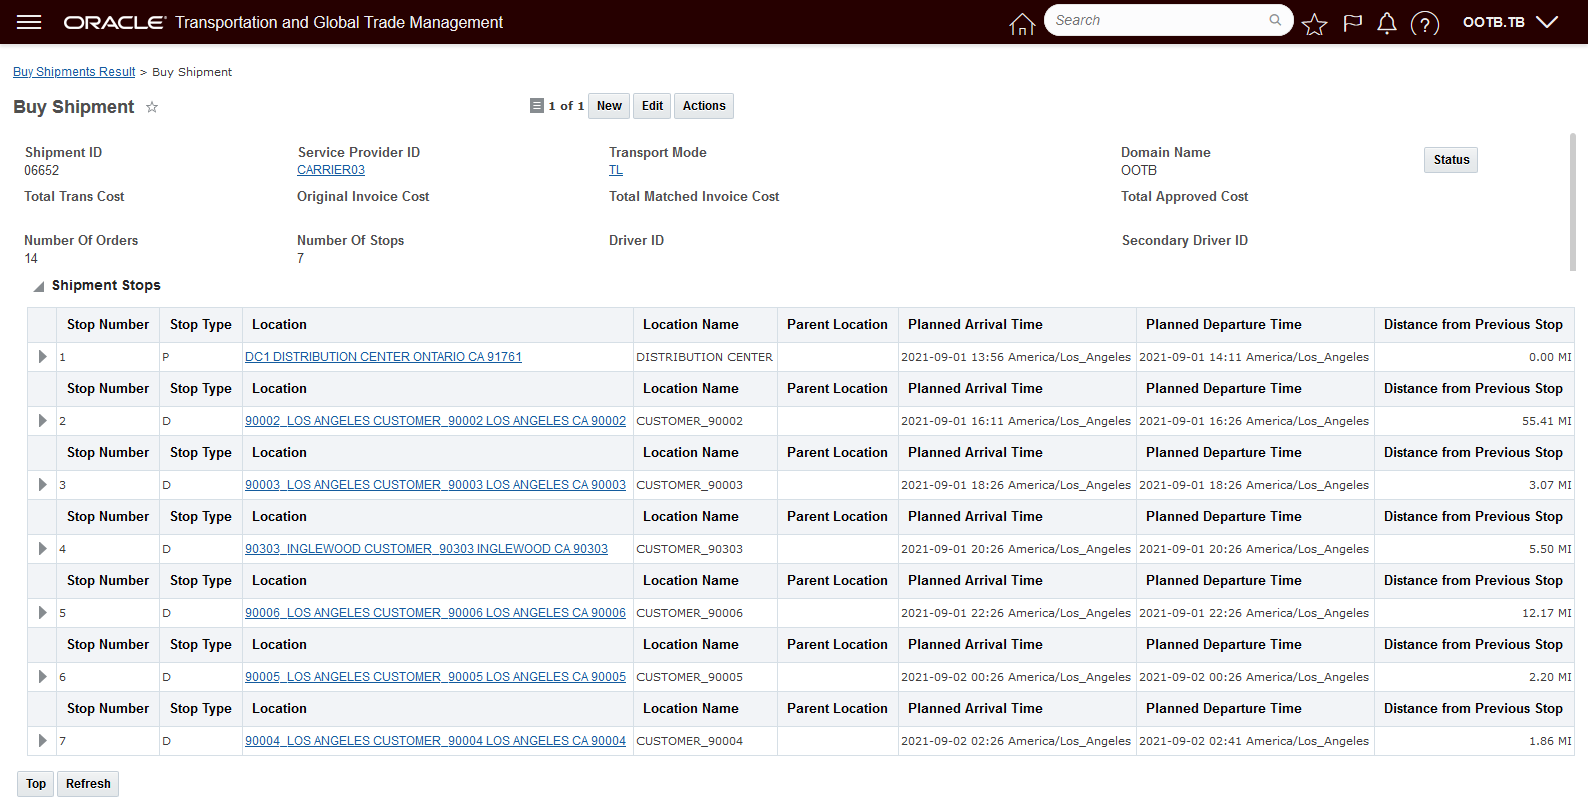
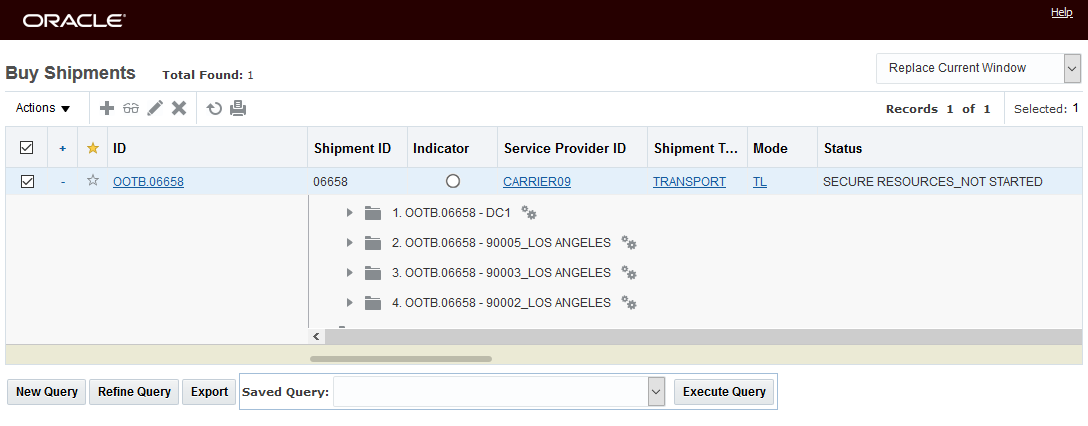
While the Shipment to Shipment Equipment provided above is an excellent way to visualize the shipment equipment on the Multi-Block Shipment, you will find the Running Manifest to be very helpful in determining the equipment being delivered at the stops on the Multi-Block Shipment. The Manifest report provides you a clear view into the activity occurring between stops. The Running Manifest is available here-> Shipment Management > Shipment Management > Buy Shipments > Actions > Shipment Management > View > Running Manifest.
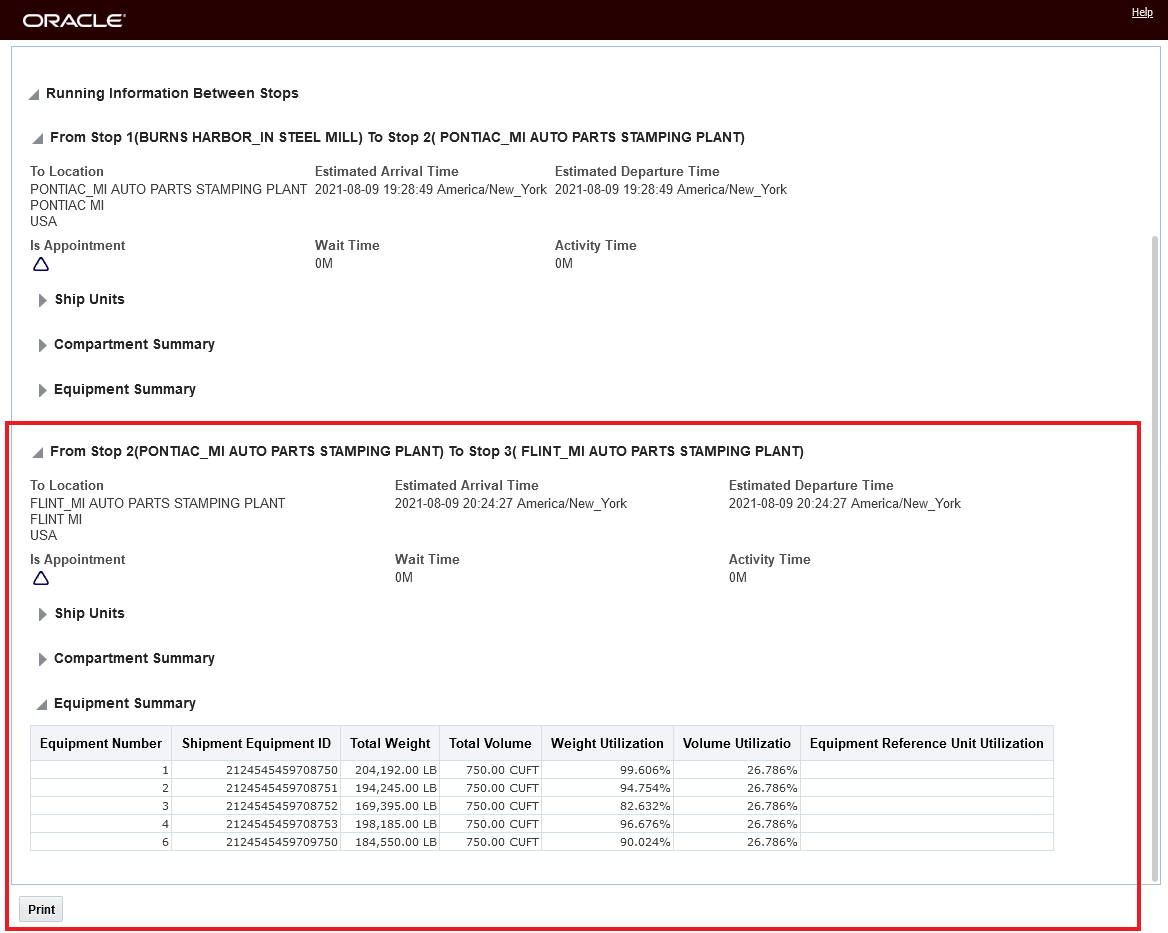
Shipment Manifest View Equipment Summary from Stop 2 Pontiac to Stop 3 Flint
This new action is accessed via Shipment Management > Shipment Management > Buy Shipments > Actions > Operational Planning > Change Shipment Route > Create Multi-Block Shipment.
You will find this feature useful in solving all your European Unit Train rail scenarios where the unit train involves delivering sets rail cars at different junction points along the route.
Steps to Enable
A Multi-Block Shipment is created for a particular Rail Route Code and Reservation Number. The successful creation of a Multi-Block Shipment depends upon the correct set-up of Capacity Limits, Rail Route Codes and Reservation data.
As shown below, the relevant Capacity Limit records used to create the Block Shipments should specify the Route Code ID and Reservation Number. A Capacity Limit is required for each of the individual Block Shipments - but Capacity Limits are not part of the Multi-Block Shipment process - in this business scenario your capacity limit management is handled by lane for each of the individual Block Shipments not for the final Multi-Block Shipment..
In the example above - where there are two Block Shipments - one from Burns Harbor to Flint and one from Burns Harbor to Pontiac - there are two Capacity Limit records defined as shown below.
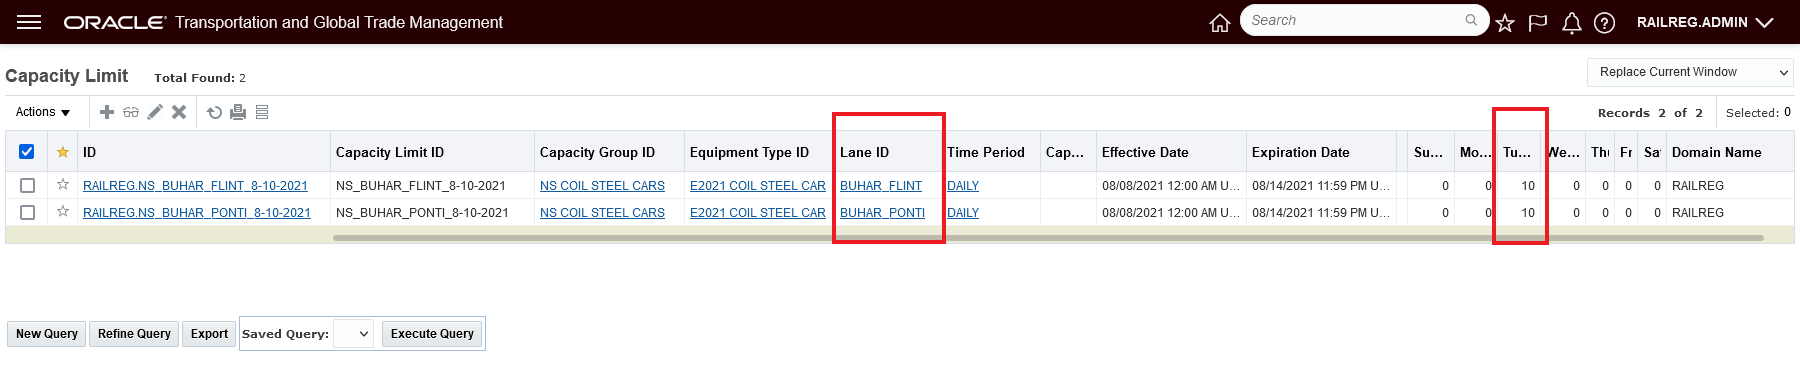
Capacity Limits
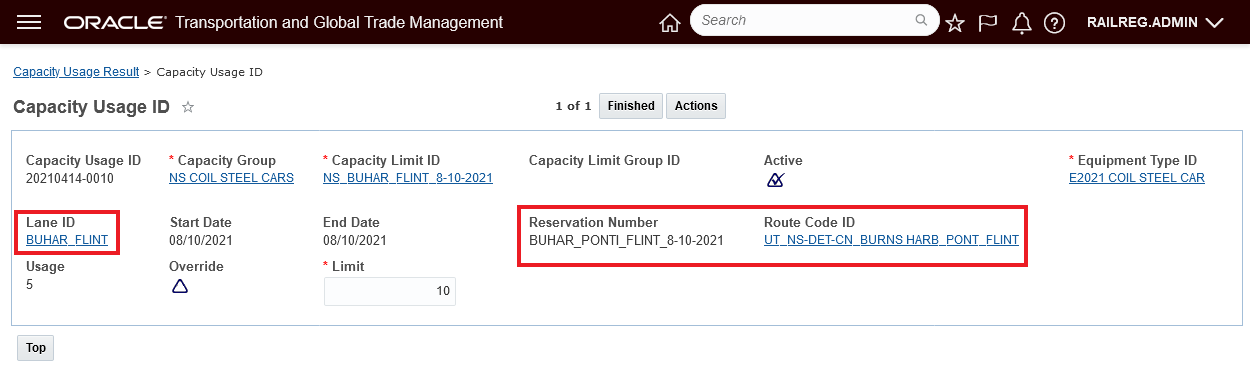
Notice that both of the Capacity Limit Records, for both of the lanes involved have the same Reservation Number and Route Code assigned. Route Code: UT_NS-DET-CN_BURNS HARB_PONT_FLINT and Reservation Number: BUHAR_PONTI_FLINT_8-10-2021
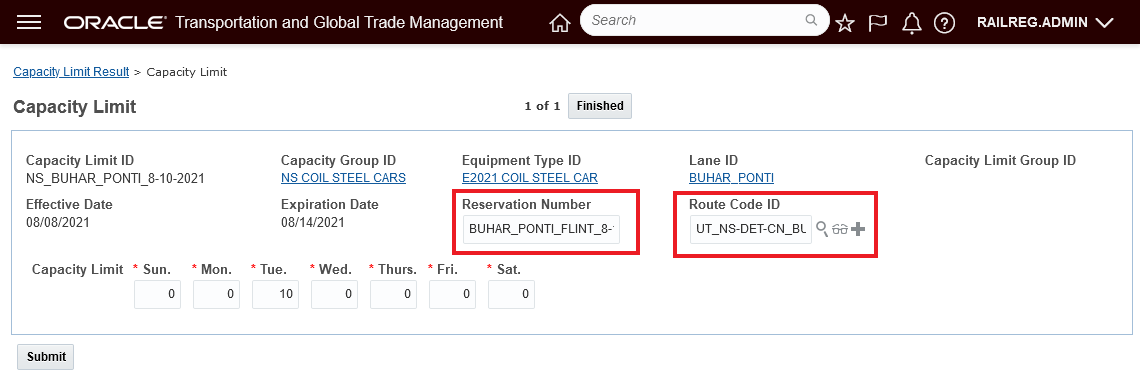
Capacity Limit Burns Harbor to Pontiac
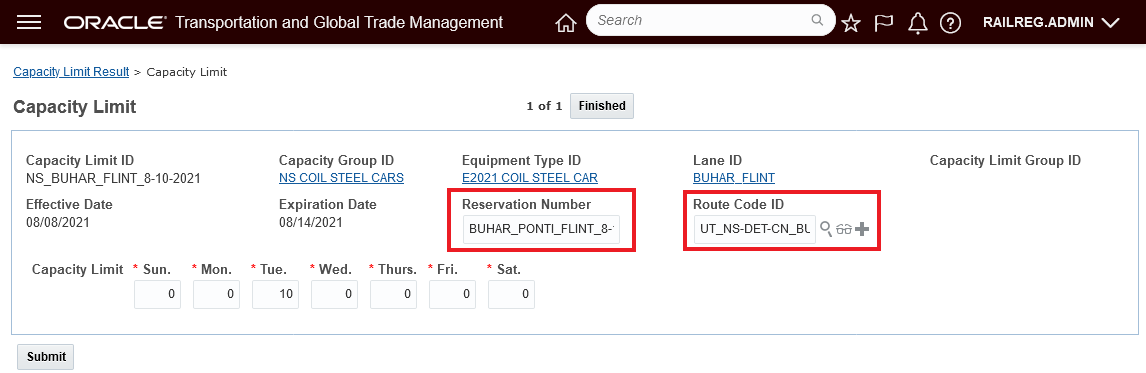
Capacity Limit Burns Harbor to Flint
The Route Code Configuration is below.
The Multi-Block check box indicates that this route code will be used for creating a Multi-Block train. Selecting this check box will enable you to specify the sequence and the stop locations of the Multi-Block train. When the Multi-Block check box is selected, you will need to enter a Sequence Number to order the stop locations of the Multi-Block train as well as entering the Location IDs for the Multi-Block stops in the Stop Location field.
There are some regional variations on what is required - in the United States, where many customers use PC*MILER RAIL, additional details are required in the top grid - Carrier SCAC, Sequence Code and possibly Rail Junction Code, while in Europe, only the lower Sequence table is needed
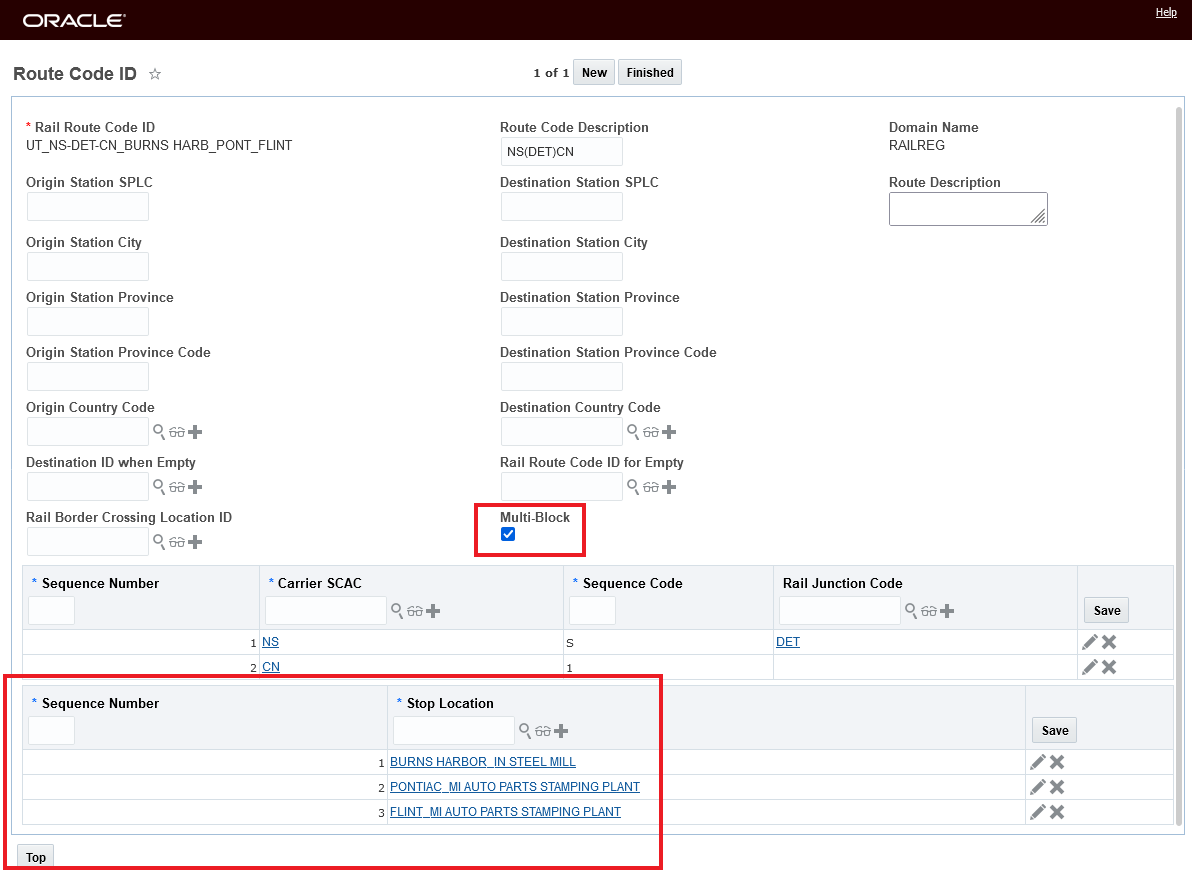
Route Code Detail
Below are the two Capacity Usage records used in planning the two Block Shipments - note the Capacity Usage records contain the required Reservation Number and Route Code information - this information is populated on each of the Bulk Shipments when they are planned. 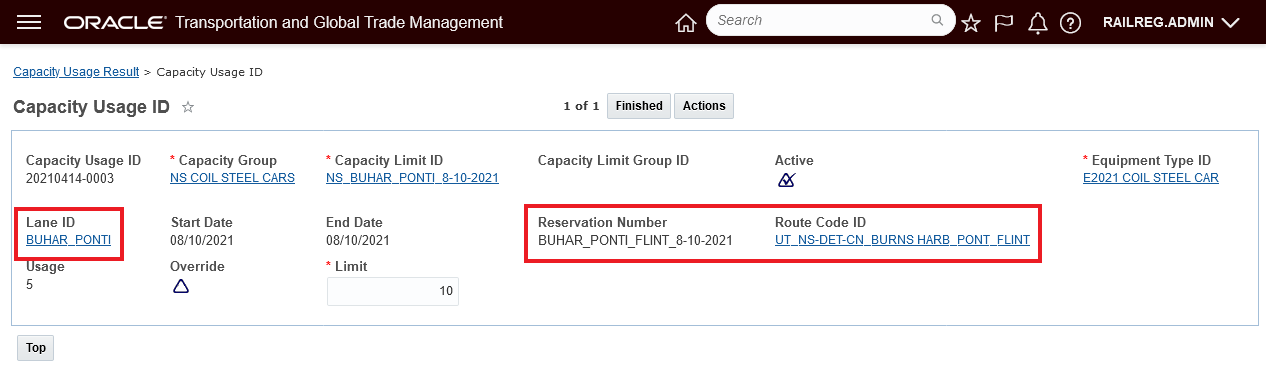
Capacity Usage Burns Harbor to Pontiac
Capacity Usage Burns Harbor to Flint
This feature provides support for unit train rail activities that involve splitting off rail cars at different junctions along the route.
- Different Capacity Limit records with the same Reservation Number can be used for block shipments that will ultimately be combined into a multi-block shipment.
The relevant Rail Route Code records will have the "Multi-Block" flag checked.
- Each of the Rail Route Code records should specify the complete stop sequence for multiple stops for the multi-block shipment.
- Rail Route Code
NOTE: In ordinary truckload scenarios, a Capacity Limit record represents recurring capacity, that is, capacity that is available each day or each week, etc. However, in the multi-block scenario, a Capacity Limit record represents capacity available for a particular day and reservation, not recurring capacity that will also be available in future days.
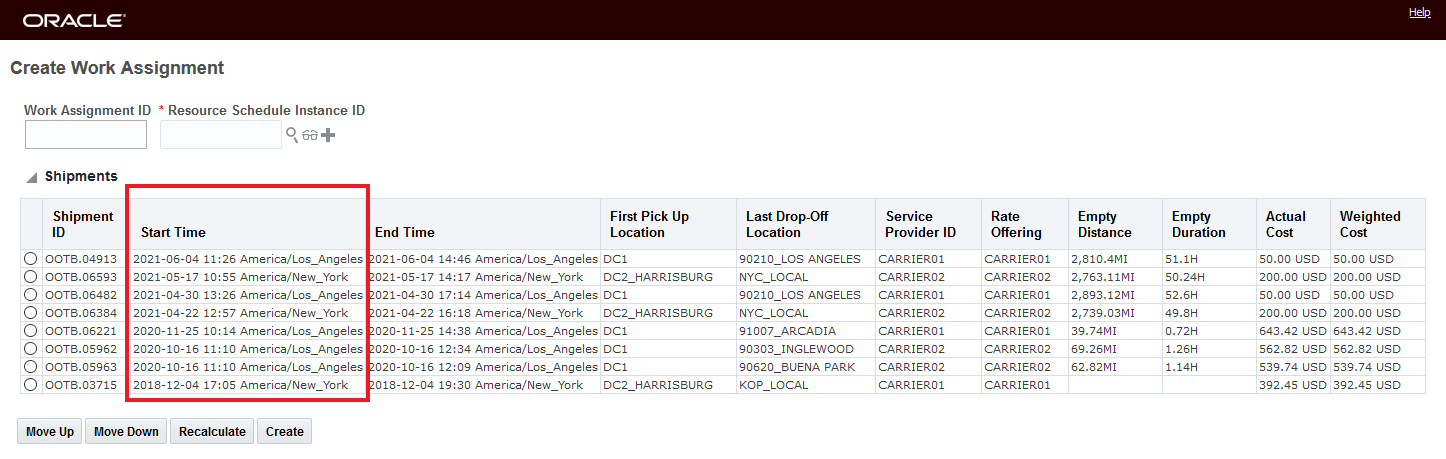
Create Work Assignment Shipment Sort Display Property
This feature provides you with a new property - glog.business.shipment.action.createWAInput.sortByStartTime - that allows you to set the sort order of the shipments selected when running the Create Work Assignment action. You can set the property to sort the selected shipments by the shipment Start Time either in Ascending (A) or Descending (D) order.
Below is an example of the default sort order for a set of eight shipments provided as input to the Create Work Assignment action. Note that the sort order is hard to determine and if your desired work assignment was to be created in an ascending order starting with the earliest shipment - you would need to manually re-sequence the shipments to accomplish this desired outcome.
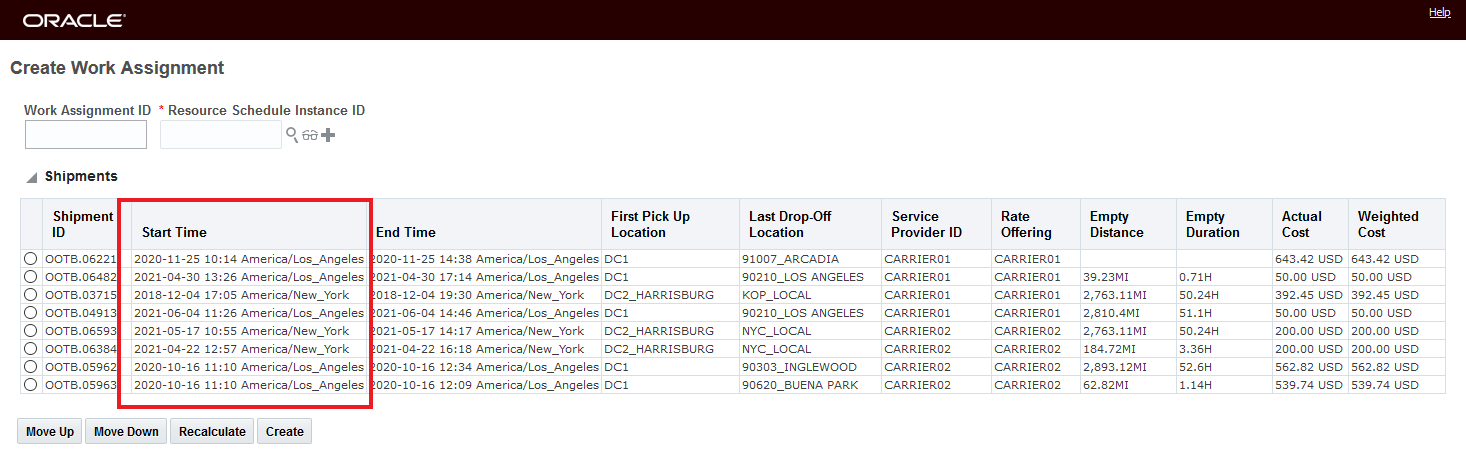
Create Work Assignment Action Default Shipment Sort
Below is the same set of shipments, but in this case the property glog.business.shipment.action.createWAInput.sortByStartTime has been set to "A" so that the shipments are now sorted by Start Time in ascending order. In this case - if your goal was to create a work assignment with the shipments in ascending start time order - with the new property set to "A", there's no longer a need to manually move the shipments up/or down in the list - it's done automatically.
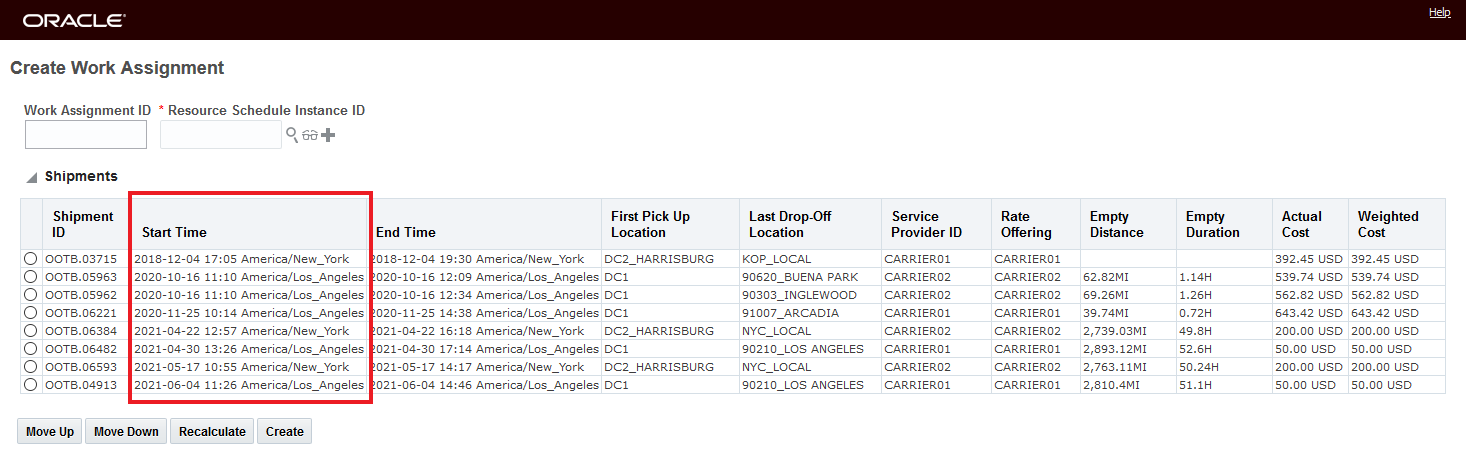
Create Work Assignment Action with Property Set to Sort Shipments in an Ascending Start Time Order
Create Work Assignment Action Property Set to Sort Shipments in a Descending Start Time Order
This feature improves the usability of the Create Work Assignment action by providing a consistent and intuitive ordering of the set of shipments selected to create the work assignment.
Steps to Enable
The property glog.business.shipment.action.createWAInput.sortByStartTime needs to be set to use this feature.
To set the sort order to ascending the property value should be set to "A" as shown below.

Ascending Option
To set the sort order to descending the property value should be set to "D" as shown below.

Descending Option
Enhanced Split Shipment Action - Split by Delivery Stop
This feature provides you with an additional Split Shipment action option - Stop - Delivered Order Releases that allows you to easily split your shipment by delivery stop (for all order releases delivered at the stop) or by a selected set of order release(s) delivered at the selected stop.
In the example below - the shipment contains six delivery stops (seven stops in total) and 14 orders. Several of the delivery stops contain multiple orders. The new Split Shipment By action option Stop - Delivered Order Releases when selected will display all the delivery stops on the shipment and then allows you to expand the view by delivery stop to review and select the order(s) to split by.
Example Shipment - Many Delivery Stops with Multiple Order Releases Per Delivery Stop
Two split the shipment using the new option, you fist need to select the shipment and run the Split Shipment action.

Split Shipment Action
After running the action, the next screen that is shown is the Ignore the Following Constraints screen.
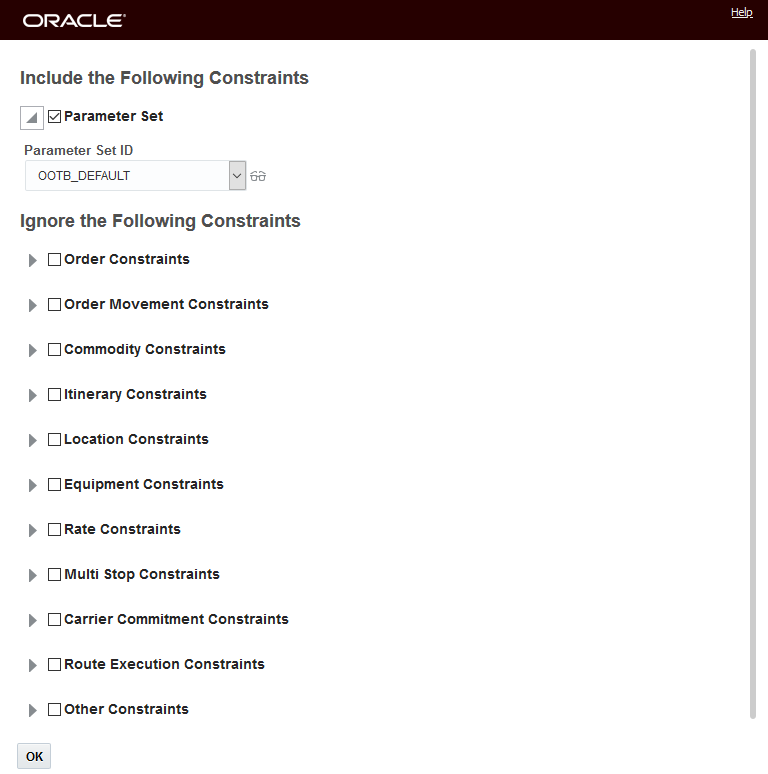
Ignore the Following Constraints
The new Split Shipment option Split Shipment By: Stop-Delivered Order Releases has been added to the list of Split Shipment action options available previously.
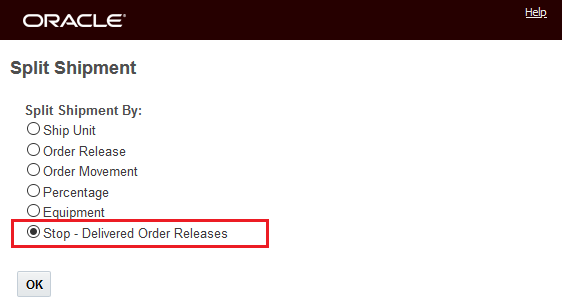
Split Shipment Action Split Shipment By Stop - Delivered Order Releases
The Stop - Delivered Order Releases Split Shipment By selection presents you with the Split Shipment opportunities for the selected shipment by deliver stop and then by order within each delivery stop. Like all the other Split Shipment By options, you have the standard options to Leave Unplanned, Split to Direct Shipment, Split to Parallel Shipment etc.
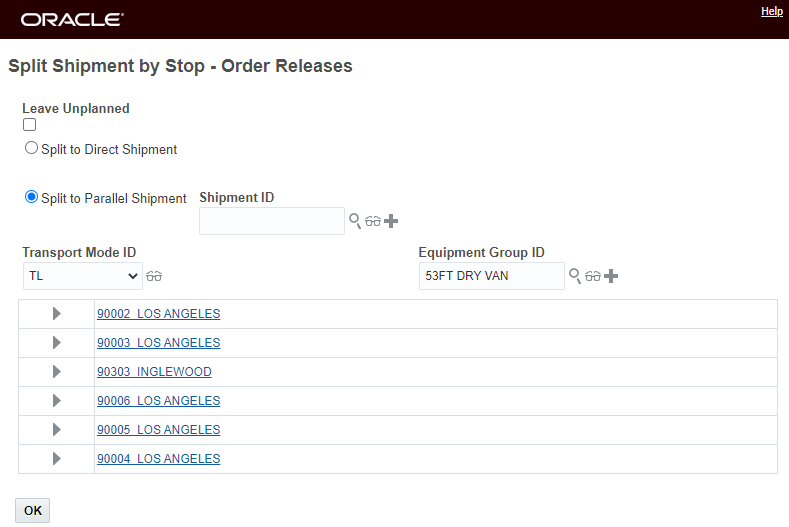
Deliver Stops Collapsed
In this example - one order (MS-0005) from the 4th delivery stop will be spit to a parallel shipment.
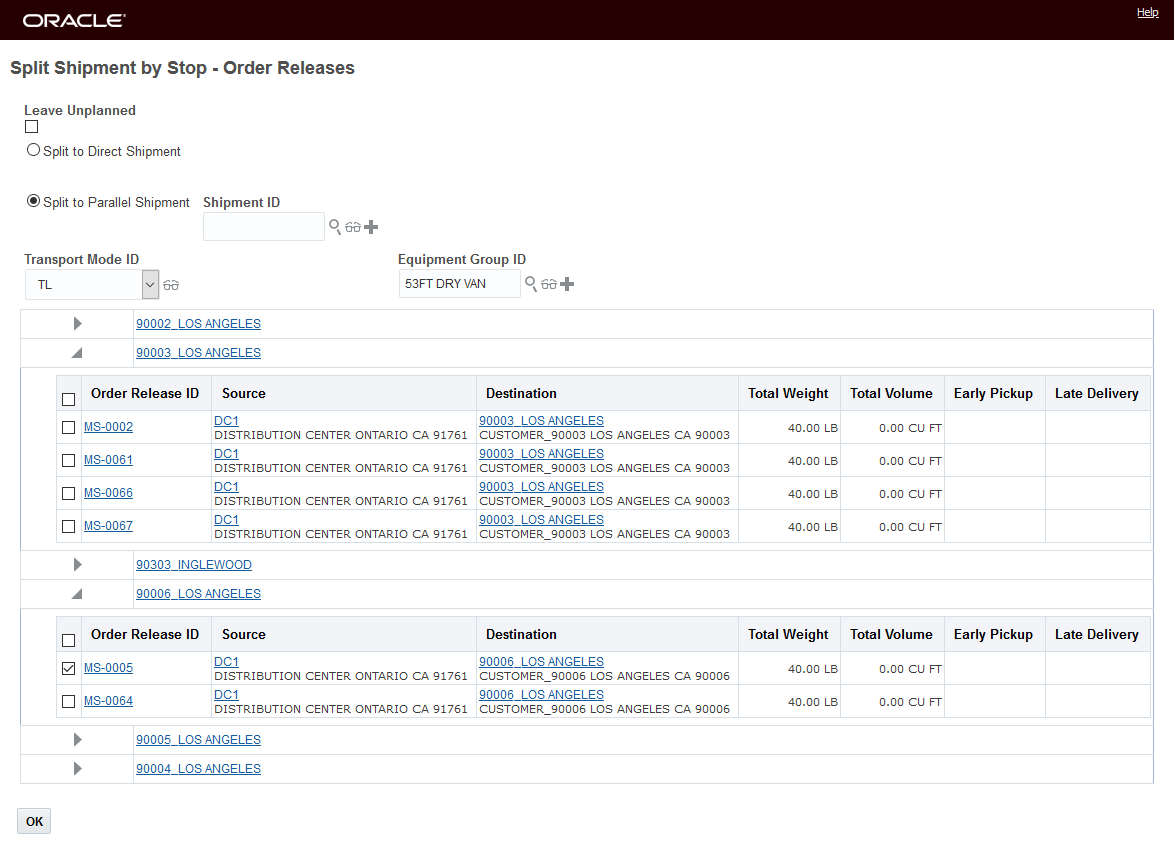
Split Shipment By action option Stop - Delivered Order Releases display
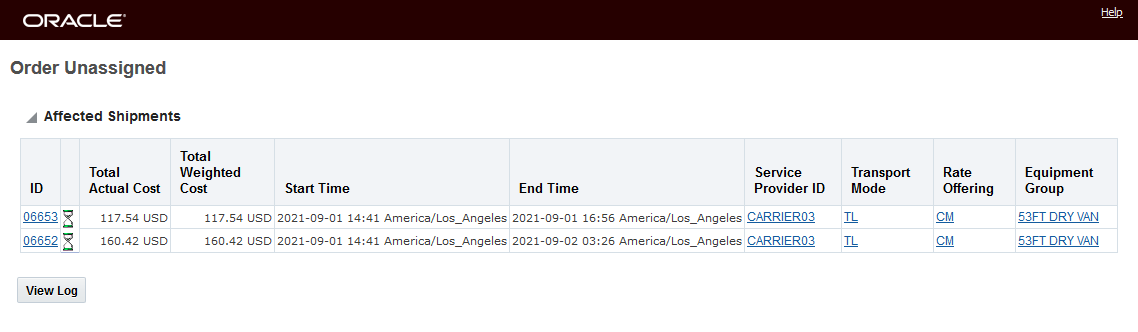
Given the input provided above, the result (below) is to create a new parallel shipment 06653, with the one selected order MS-0005 that was on delivery stop 4 at the 90006 LOS ANGELES location.
Result
In the example below - all of the order releases for the first delivery stop (location 90004 Los Angeles) on the shipment 06658 will be split off to a new parallel shipment..

Split Delivery Stop Action Delivery Stop Order Release Selection
The first stop on the shipment is expanded and all the order releases are selected - then OK is selected.
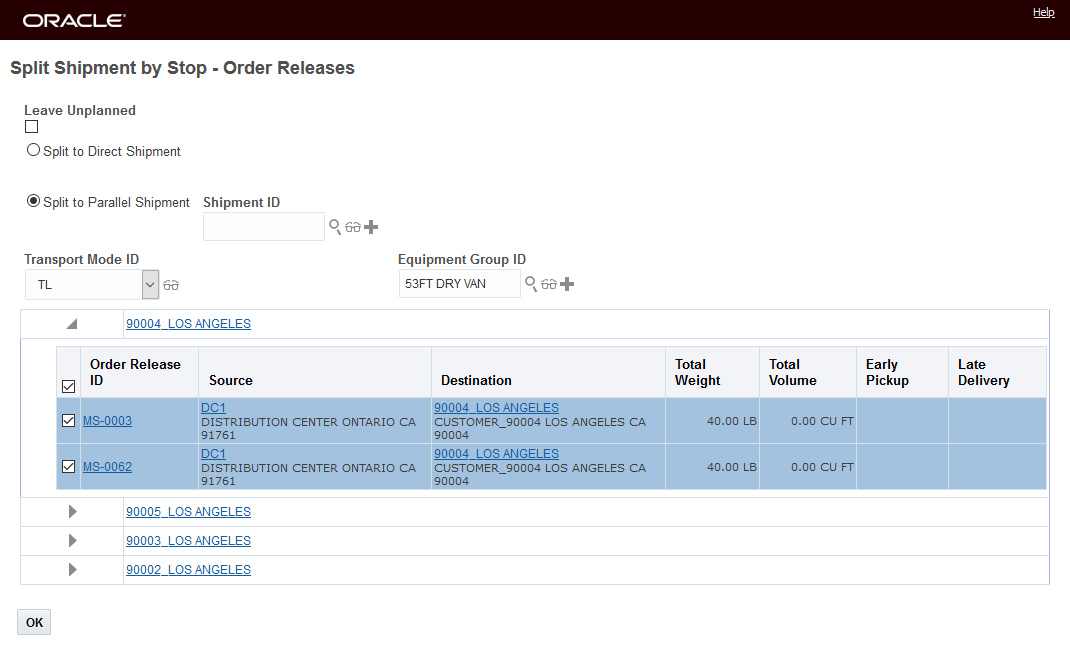
All Order Releases for Stop Selected
The result is two shipments - the original shipment 06658 - with the delivery stop and order releases split off and the new shipment 06659- created for the split off order releases from the first delivery stop.
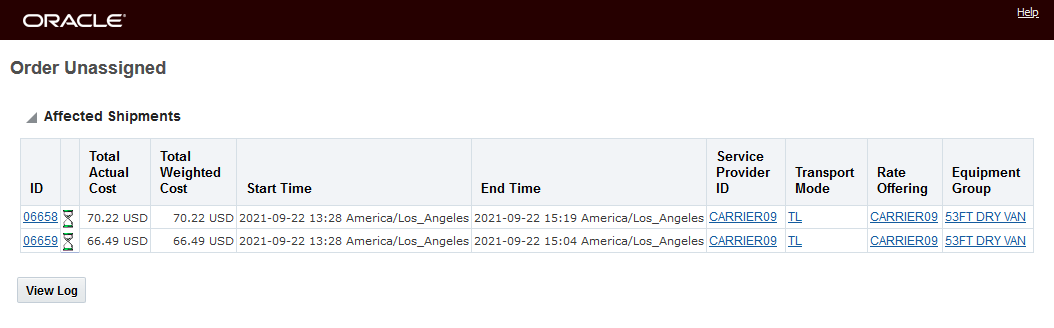
Result
Below is the stop level view of the shipments.
Split From Shipment With Four Delivery Stops

New Shipment Created From the Split Off Order Releases from the First Delivery Stop
You will find the shipment split option beneficial in any outbound shipping situation that involves many delivery stops with each stop, potentially, containing many order releases.
Steps to Enable
You don't need to do anything to enable this feature.
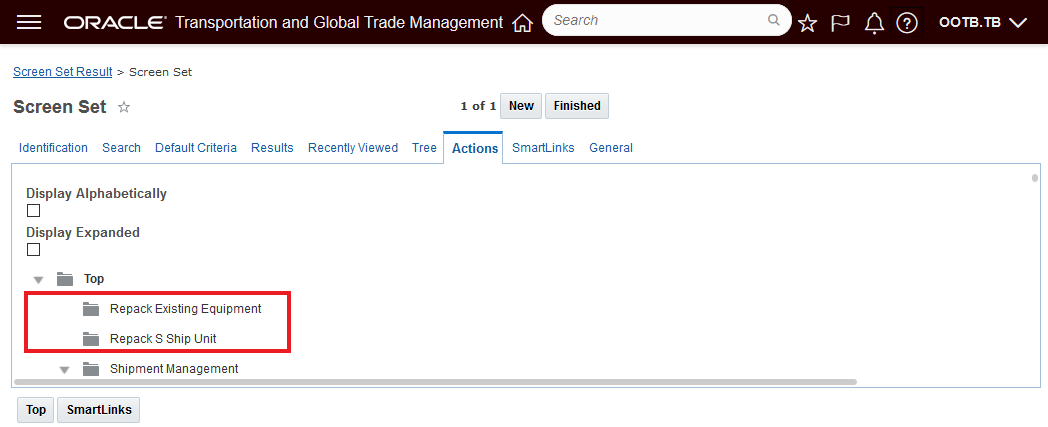
Add Repack Ship Unit and Repack Equipment Action Menu Options to Sell Shipment
This feature provides you with the ability to add the action menu options, Repack Existing Equipment, Repack S Ship Unit to your Sell Side Shipment Screen Set.
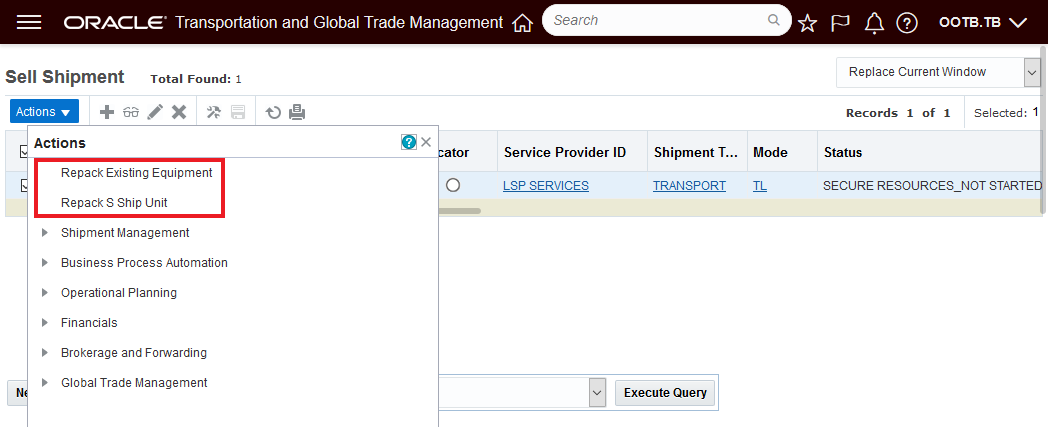
Repack Existing Equipment and Repack S Ship Unit Actions Added
This feature provides additional equivalence capabilities between the Buy and Sell side shipments allowing you to perform more operational changes to your Sell Side shipments.
Steps to Enable
The additional actions are not provided as default actions for the Sell Side Shipment Screen Set - you will need to add the additional actions to a new and/or existing Sell Side Shipment screen set.
To add the new action menu options to your Sell Side Shipment Screen Set go to Configuration and Administration > User Configuration > Screen Set Manager. Then go to the Actions tab.
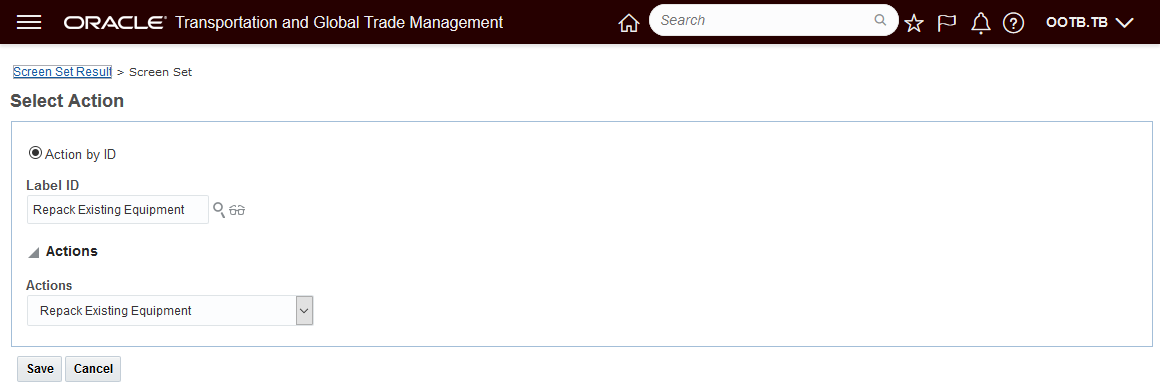
Add Repack Exiting Equipment Action

Add Repack S Ship Unit
Position the newly add actions on the Sell Side Shipment Actions Menu.
Action Menu Location
Move Order to Shipment Action Supports Multi Order Select
This feature enhances the Move Order To Shipment action to allow you to select and move multiple orders to the shipment in a single run of the action. You will find this feature useful in any situation where you have the need to quickly select and move multiple orders to a shipment.
In the example below, the shipment 6717 has just 1 order on it. With this feature - adding 3 more orders to this shipment can be accomplished by running the Move Order To Shipment action once.
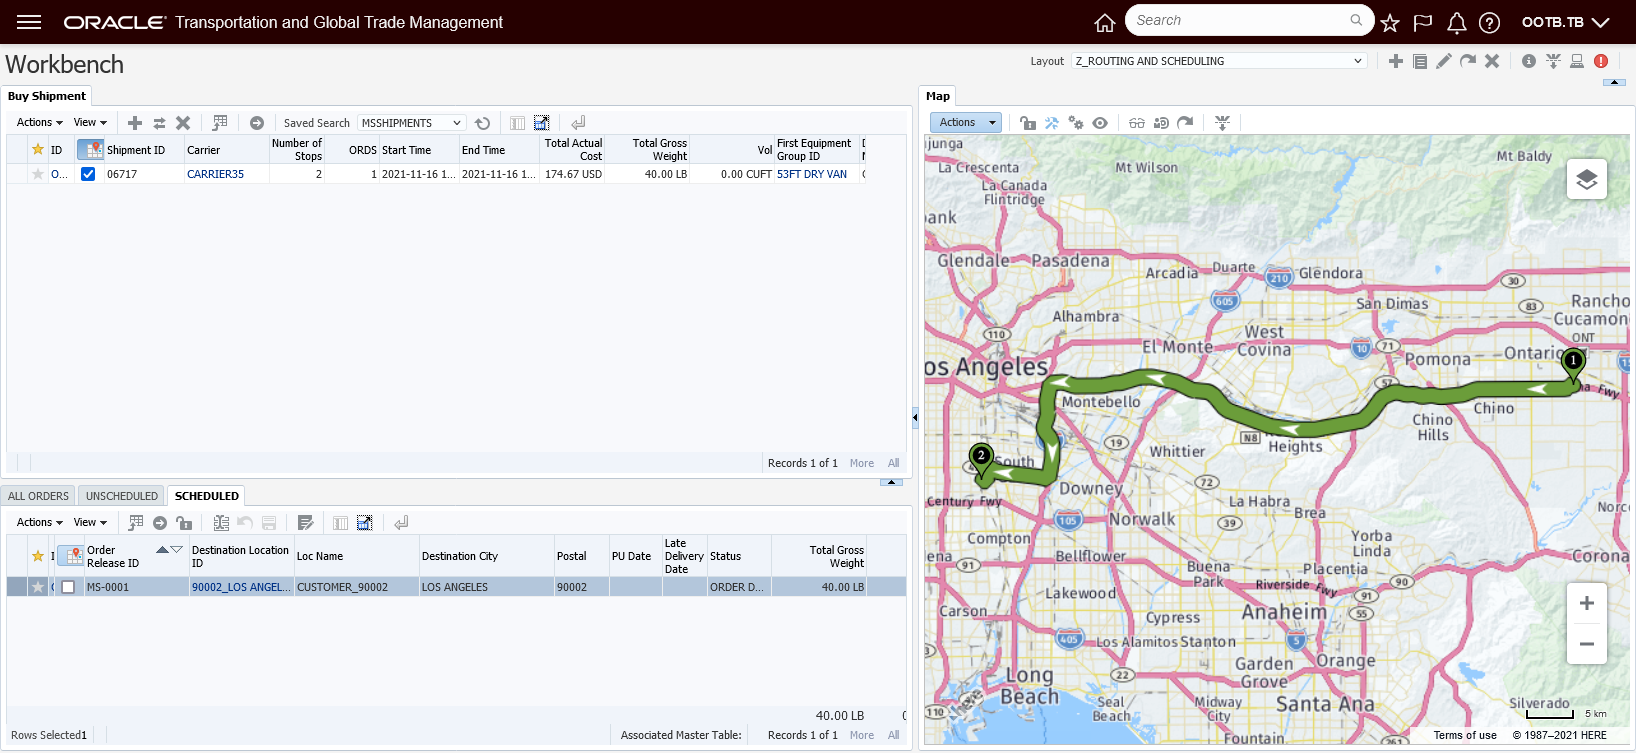
Original Shipment
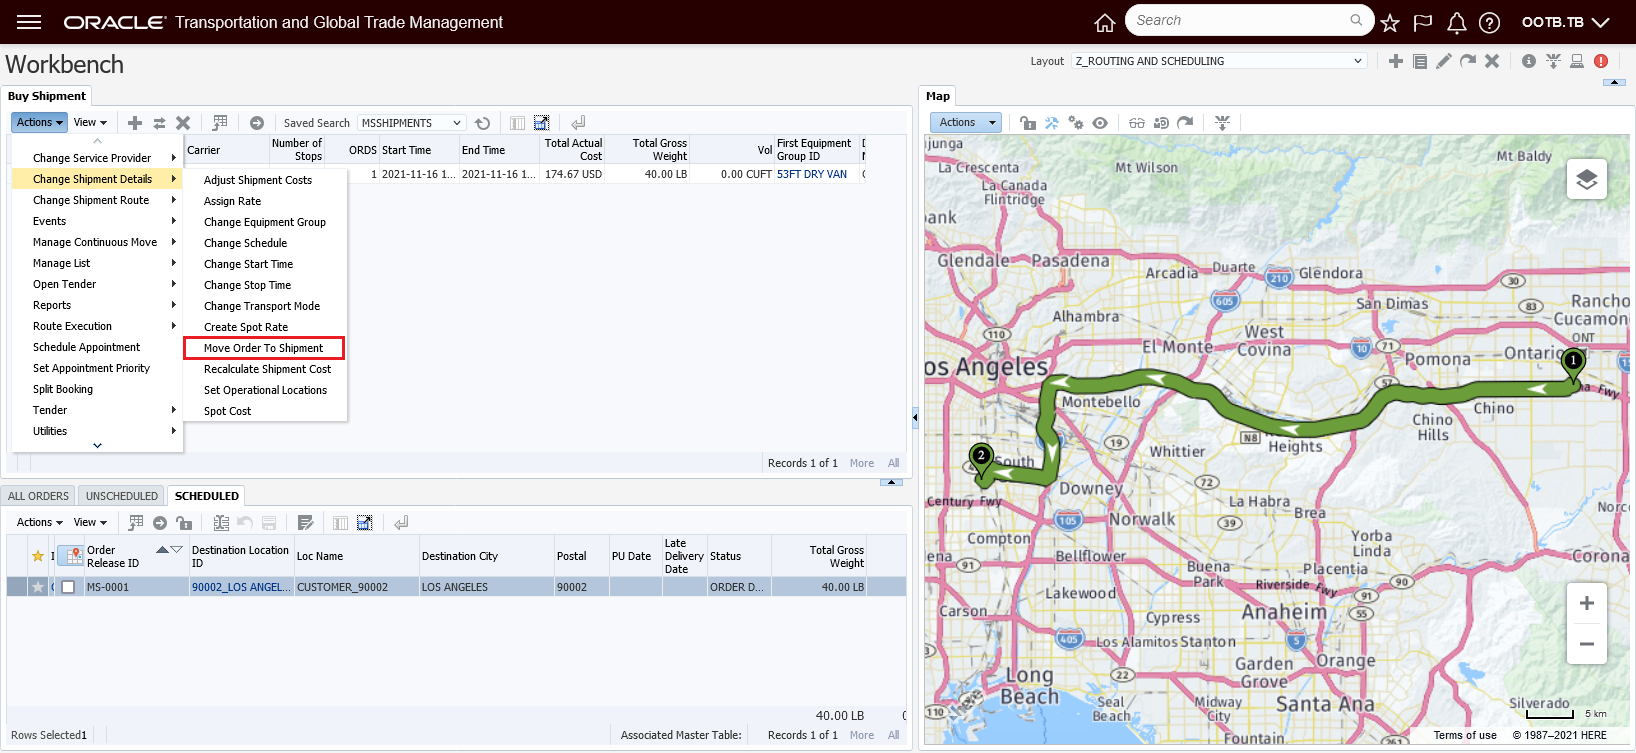
Move Order to Shipment Action
Input screen = select 3 orders to add to shipment.

Move Order to Shipment Input Screen
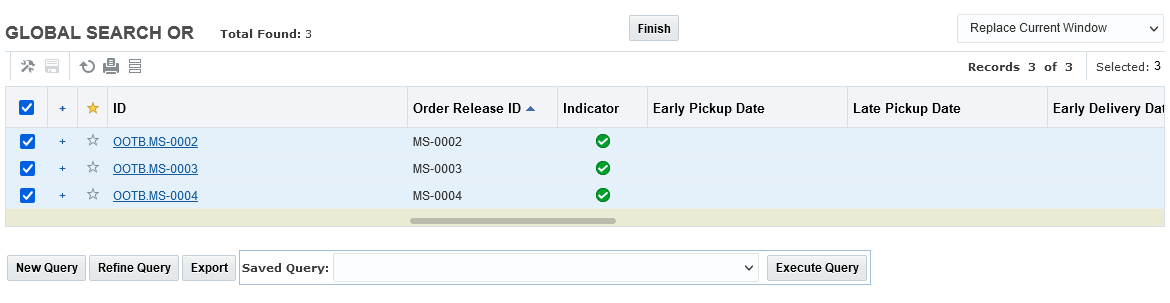
Move Order to Shipment Multi-Select Supported
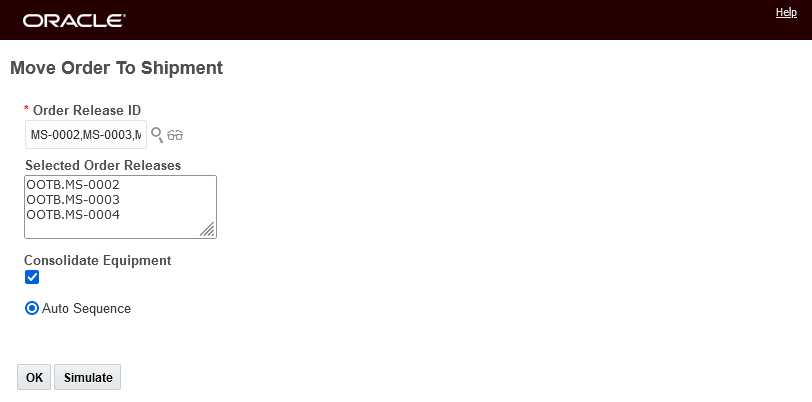
Selected Orders
Hit Okay and refresh and the result is the three additional orders moved to the shipment.
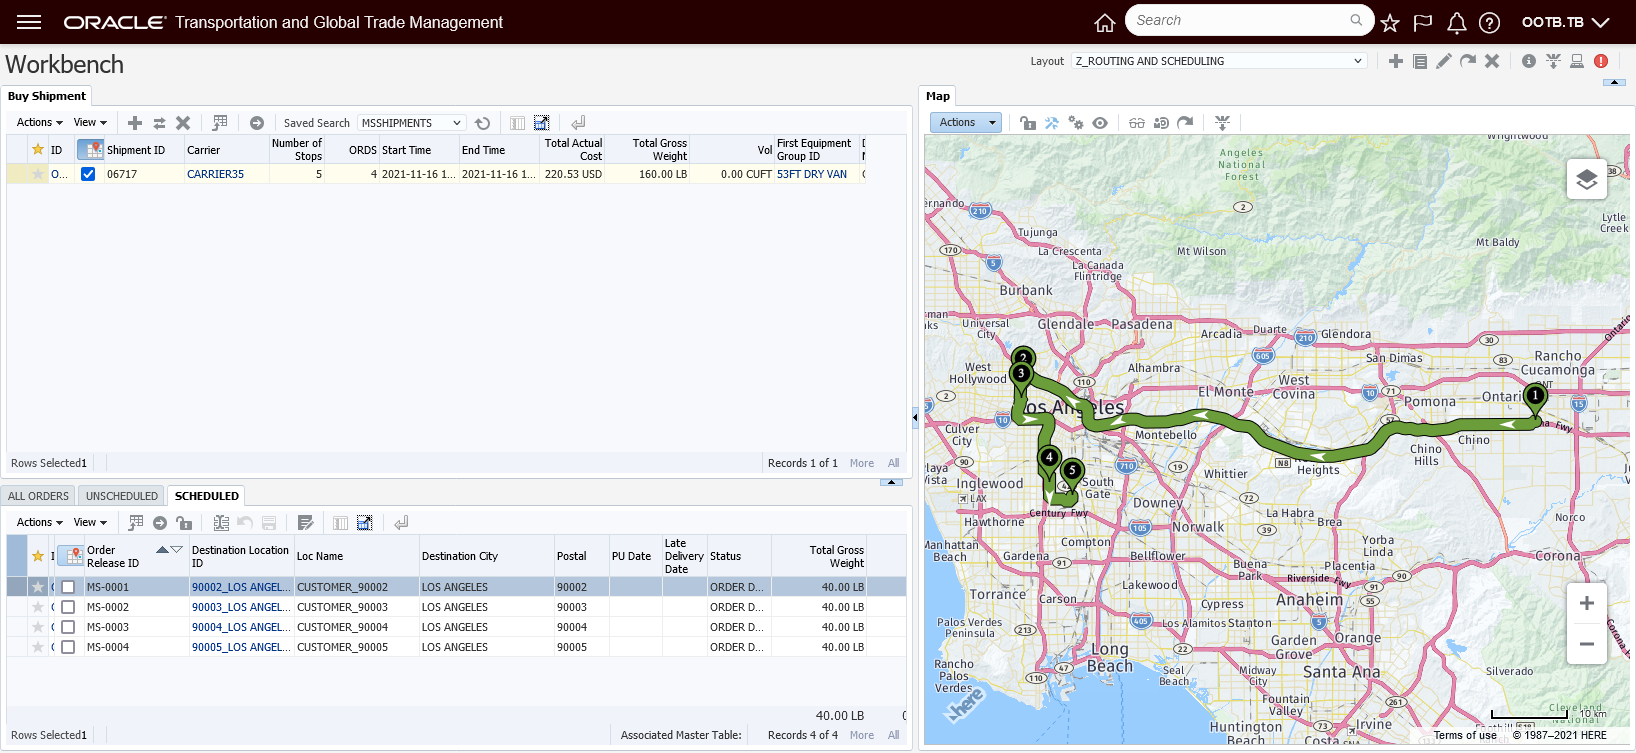
Result of Action
Simplifies the time required to move orders to an existing shipment by allowing for multiple orders to be moved in one run of the action.
Steps to Enable
You don't need to do anything to enable this feature.
Change Equipment Action Recalculate Input Options
This feature provides you with a new property - glog.webserver.changeEG.ChangeEquipmentGroupRecalcFlag - that allows you to configure the Recalculate and Recalculate without Service Provider Change check boxes on the Change Equipment Group action input screen. The new property supports the default option, where the Recalculate and Recalculate without Service Provider Change are not selected - you also have the option to select just the Recalculate option or you can have both the Recalculate and Recalculate without Service Provider Change selected.
Below is the default Change Equipment Group action input screen. The Recalculate option is, by default, not selected.
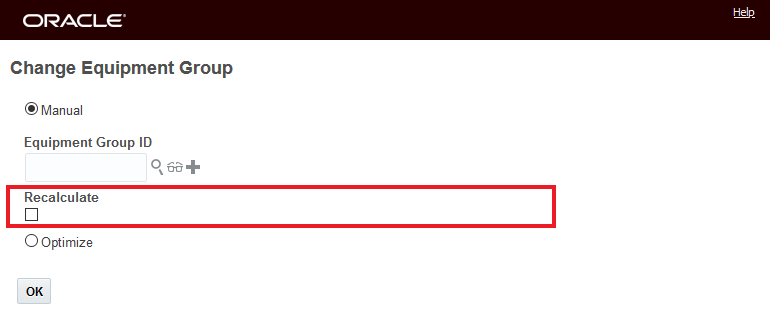
Default - Recalculate Check Box Not Selected
Below is the Change Equipment Group action input screen with the property glog.webserver.changeEG.ChangeEquipmentGroupRecalcFlag set to On. With this setting, only the Recalculate option is selected.

Property Set to On
Below is the Change Equipment Group action input screen with the property glog.webserver.changeEG.ChangeEquipmentGroupRecalcFlag set to OnWithoutSPChange. With this value set, both the Recalculate and Recalculate without Service Provider Change are selected.
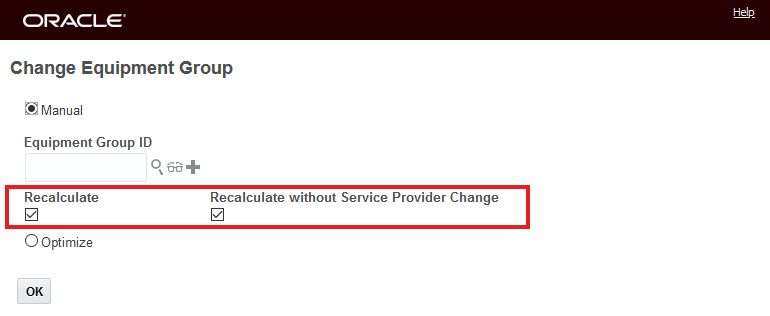
Property Set to OnWithoutSPChange
In situations where the usage of the Change Equipment Group action should, by default, involve a recalculation, this feature helps enforce that requirement by selecting the desired recalculation option by default.
Steps to Enable
To take advantage of the new behavior, you will need to set the property glog.webserver.changeEG.ChangeEquipmentGroupRecalcFlag to the desired value.
- Navigate to Configuration and Administration > Property Management > Property Sets
- Select the Property set to modify.
- Setting the property glog.webserver.changeEG.ChangeEquipmentGroupRecalcFlag to On will select the Recalculate option.
or
- Setting the property glog.webserver.changeEG.ChangeEquipmentGroupRecalcFlag set to OnWithoutSPChange which will select both the Recalculate and Recalculate without Service Provider Change options
NOTE: Only the DBA.ADMIN user can access and use the Property Sets page.
Spot Bid Tender - Optional Bids
This feature allows you to extend your spot bid process to include receiving optional bids from your Service Providers. Optional bid conditions supported include supporting bids for different Pickup Date(s), Source Location(s), Destination Location(s), Mode(s), and Transit Time(s). In addition, for air freight related spot bids, this feature provides the ability to for the Service Provider to specify the proposed Flight Instance ID and indicate if the flight is a Direct flight. All of the proposed optional bids, with their condition(s), are available for you to review and compare within the Spot Bid Tender screen.
The Optional Spot Bid Tender includes the following additions:
For the planner, the Spot Bid Tender UI now includes a new Has Bid Options column to indicate the Spot Bids that contain one or more Bid Option(s).

Spot Bid Tender - Has Bid Options Indicator Column
For your Service Providers, a new Spot Bid Tender manager has been provided to allow the Service Providers to manage all of their Spot Bid Tender responses. The new Spot Bid Tender manager provides the Service Provider with the ability to include both bids for the base shipment (Service Provider bids without any optional conditions) and optional bids as part of their spot bid tender response.
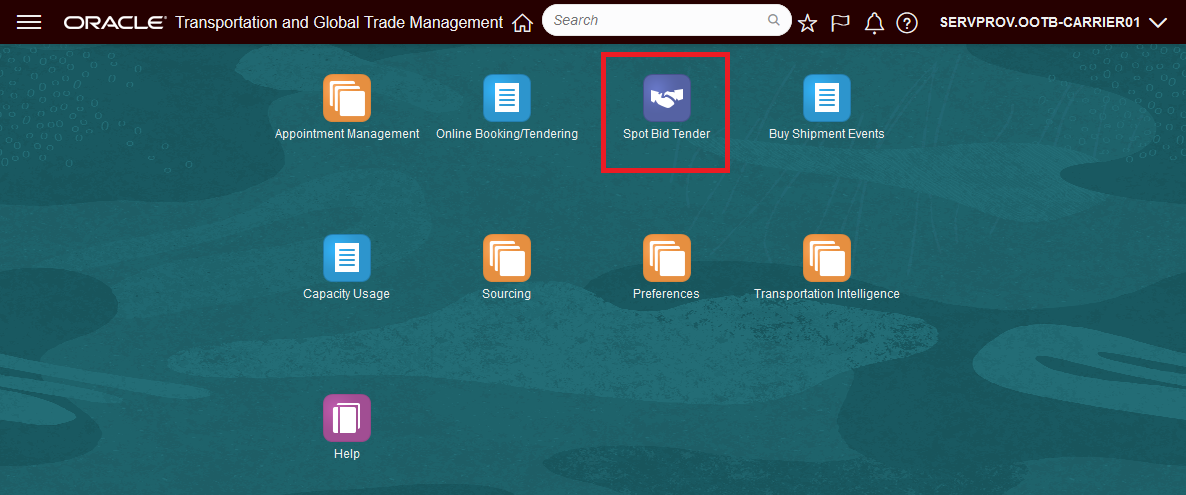
Service Provider Spring Board - New Manager Spot Bid Tender
To simplify the UI and the workflow for responding to Spot Bids, the new Spot Bid Tender manager has been designed specifically for the Service Provider to manage all of their Spot Bid Tender responses.
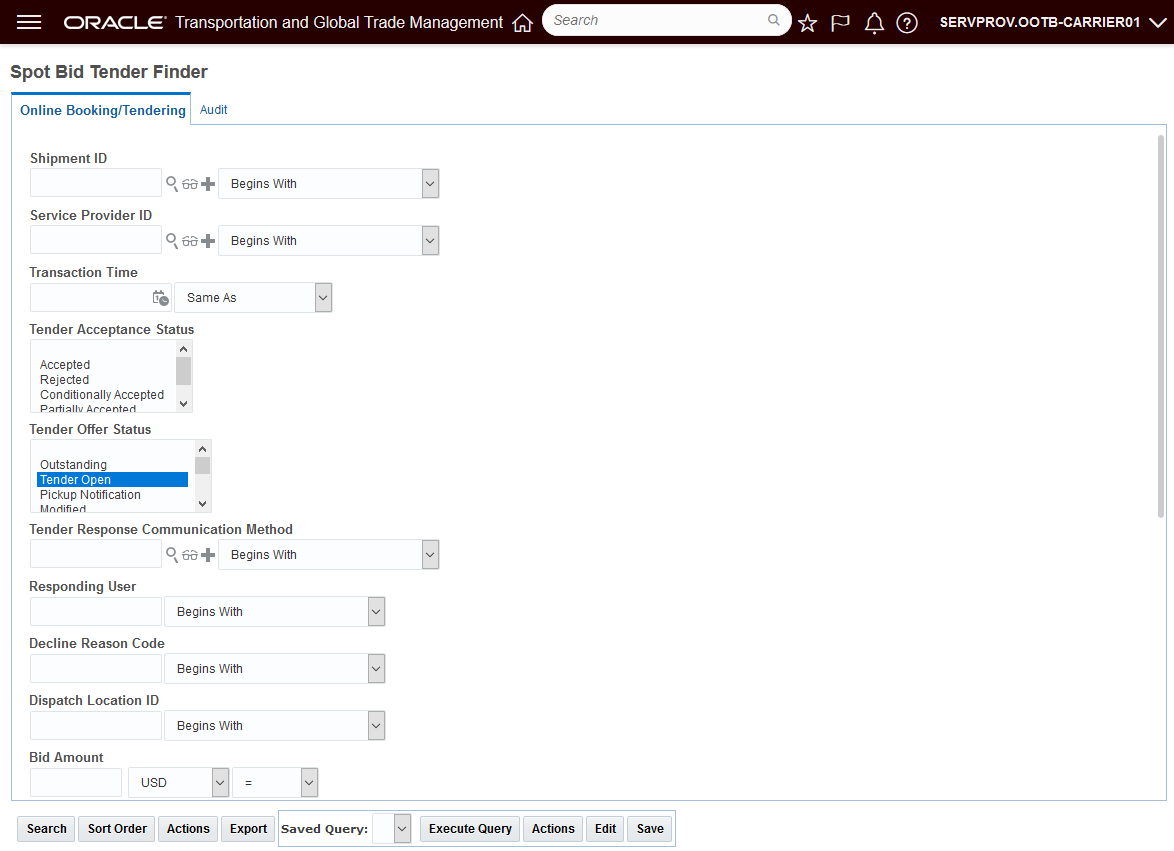
Spot Bid Tender - Finder
The finder result for the Spot Bid Tender is below.

Spot Bid Tender - Finder Result
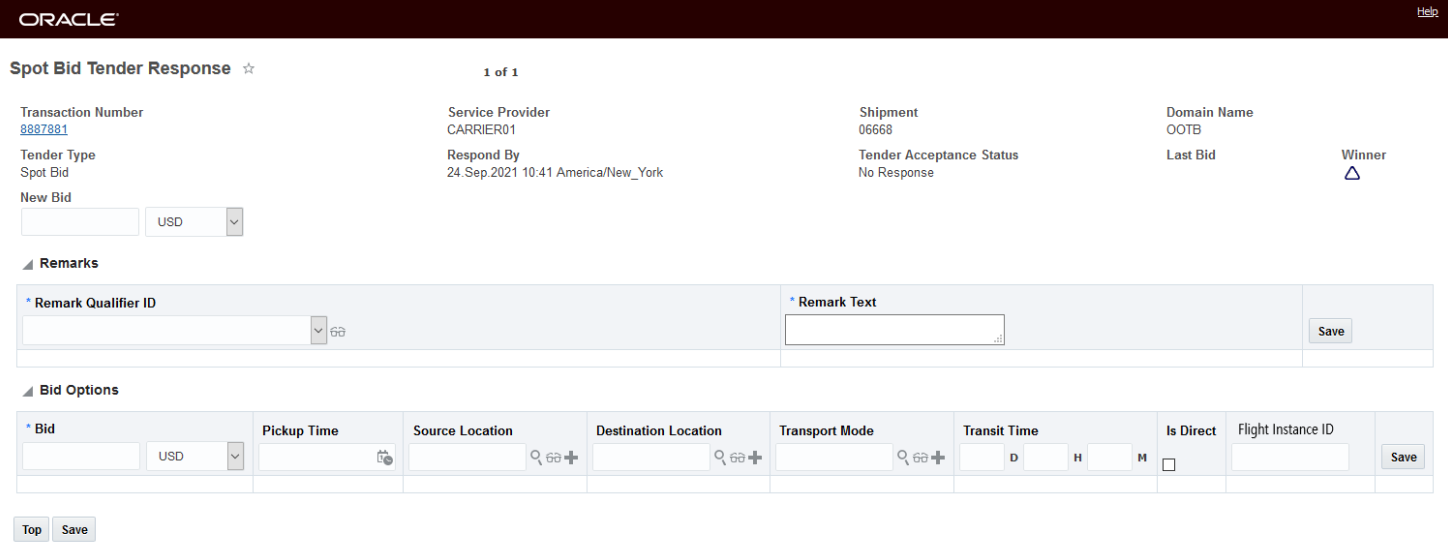
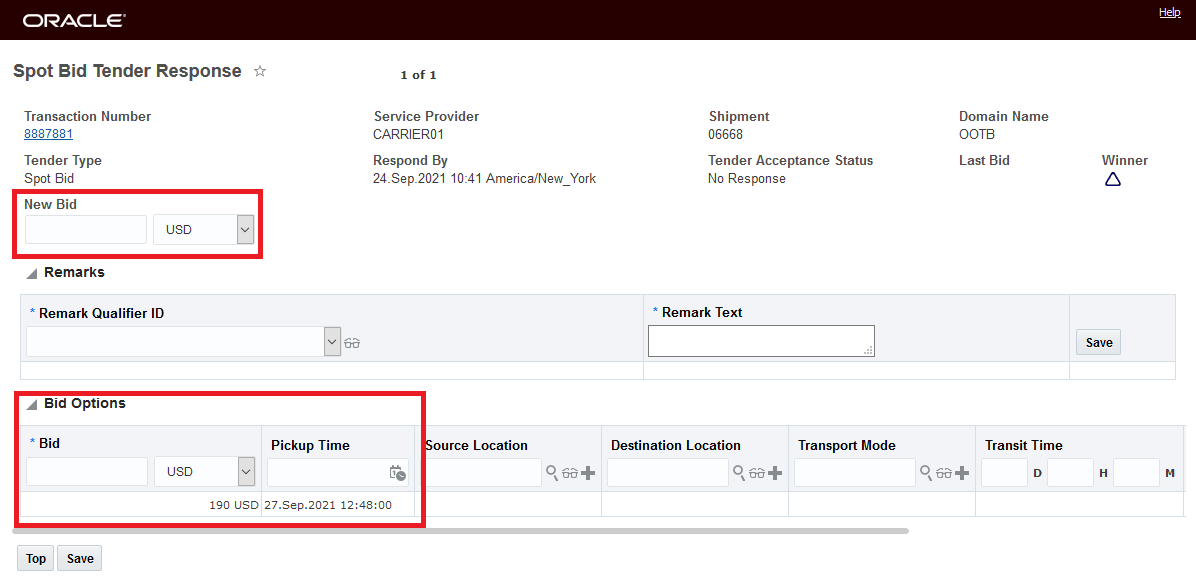
The new Spot Bid Tender Response UI (below), provides a Bids Options grid where your Service Providers can enter their Optional Bids. Note the grid supports the option for entering multiple optional bids - so the optional bids may involve one or more conditions. For example, a service provider could have one Bid Option for a different pickup date and another Bid Option for the same pickup date and a longer transit time.
Spot Bid Tender Response Screen
In the scenario below, the shipment 06668 will be sent out for spot bids to five service providers. Three of the Service Providers will provide Bid Options - some with and some without a bid for the base shipment, one service provider will provide just a bid for the base shipment (with no Optional Bids) and one Service provider will provide no bids at all.
In the Spot Bid Tender Response below, Carrier01 does not provide a bid for the base shipment, but does enter one Optional Bid of 190.00 USD that is dependent on accepting the proposed pickup date on the 27th of September at 12:48.
Carrier01 Optional Bid Only - Different Pickup Date
In the Spot Bid Tender Response below, Carrier03 offers both a bid for the base shipment (195.00 USD) as well as an Optional Bid of 180.00 USD that is dependent on accepting the proposed 2 day transit time.
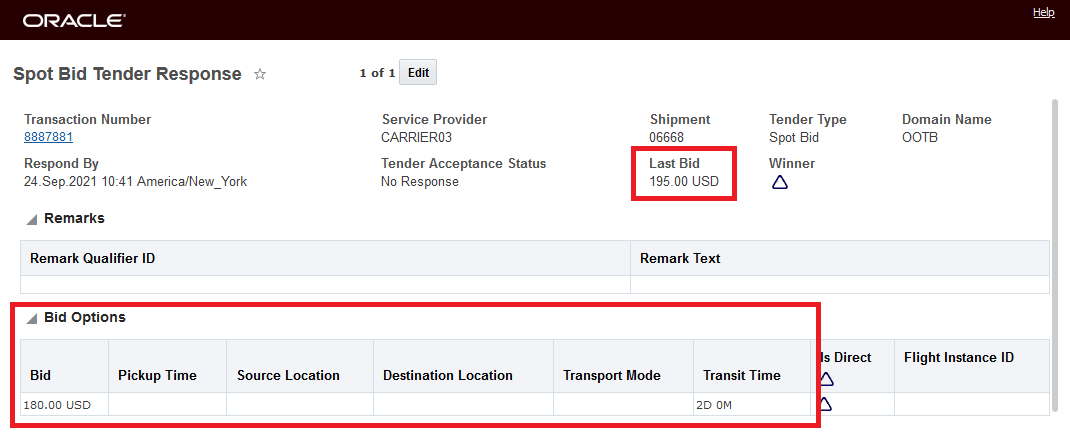
Carrier03 Base Bid and Optional Bid for 2 Day Transit
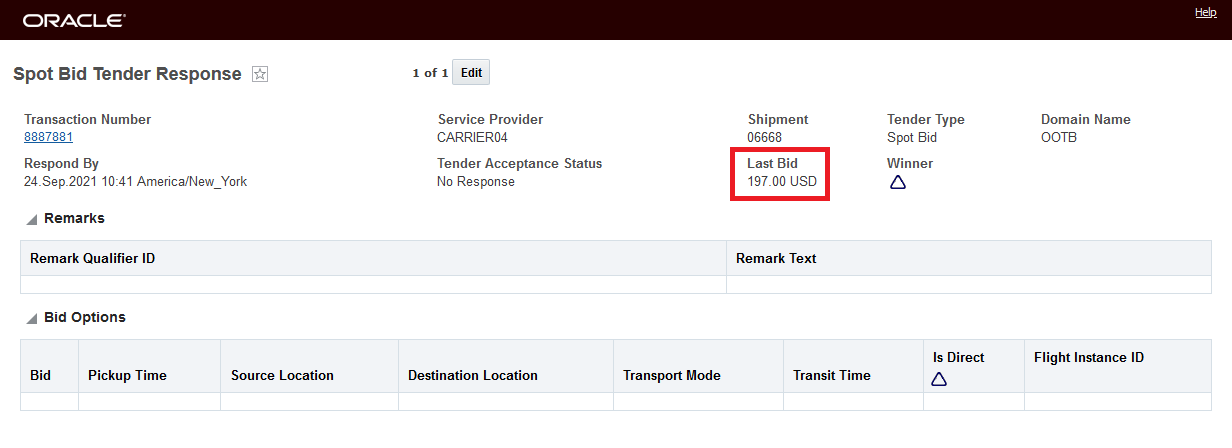
In the Spot Bid Tender Response below, Carrier04 only offers a bid for the base shipment (197.00 USD) and does not offer any Optional Bids.
Carrier04 Base Shipment Bid Only
Carrier05 does not provide a bid.
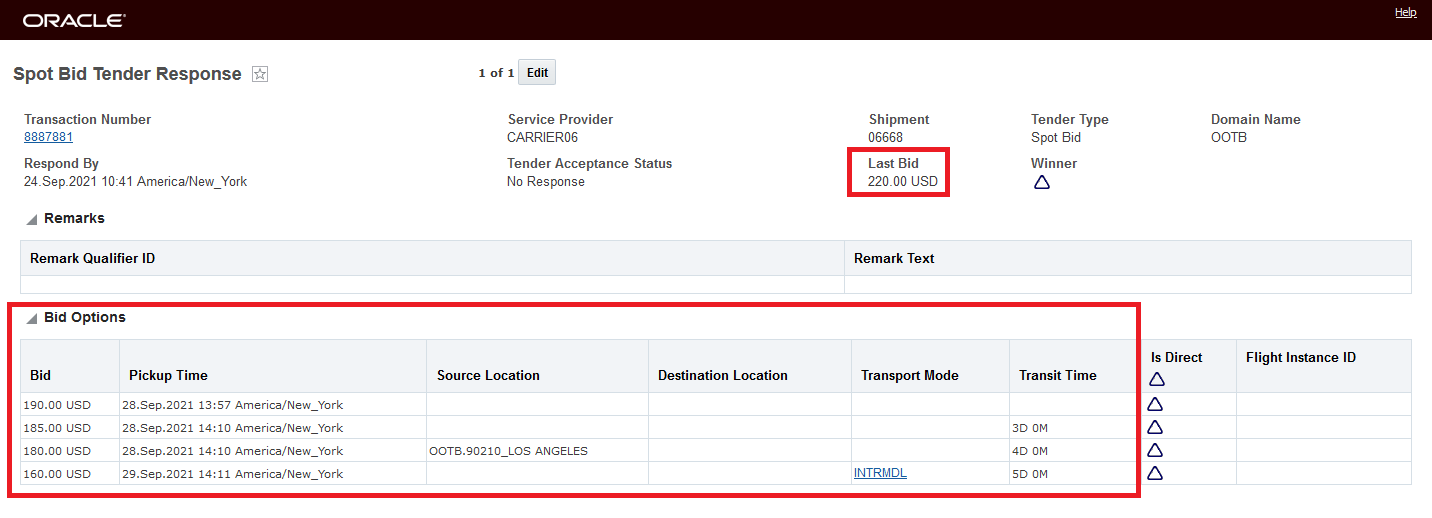
In the Spot Bid Tender Response below, Carrier06 provides a bid for the base shipment and then provides four different Optional Bids, all dependent on different conditions.
The Planner View to the variety of Spot Bid Responses entered above provides a quick summary into the responses received. The Bid Amount column shows you the service providers who have offered bids for the base shipment, and the Has Bid Options identifies the Service Providers (Carrier01, Carrier03, and Carrier06) who have provided Optional Bids.

Spot Bid Tender View
For a more complete review of the Bid Options - you can use the new action View All Bid Options - this action provides an overview of the Service Providers and their bid responses - both for the base shipment bids as well as the Optional Bids. You run this action by selecting one (single select action) of the Spot Bid Tender responses for the shipment of interest.

View All Bid Options
The initial unexpanded View All Bid Options screen shows all the Service Providers that have participated in the Spot Bid. The Last Bid column shows the latest bid for the base shipment - in this example Carrier03, Carrier06 and Carrier04 have all provided a base shipment bid - Carrier 4 only has a bid for the base shipment (so there is no option to expand Carrier 4's response) and Carrier05 has no bids. The arrow to expand the Bid Options only appears for Service Providers who have provided a Bid Option - Carrier03, Carrier01, and Carrier06.

View All Bid Options Detail Screen
The expanded view provides you with the details you need to fully evaluate all the options available. From within this screen, you can award the shipment to any of the Service Providers that have provide a Bid Option by selecting one of their Optional Bids and then selecting the Award Bid To Service Provider Action.

View All Bid Options - Expanded View
To select between the Service Provider bid for the base shipment or to select one of the optional bids, you can do this by selecting the Service Provider Spot Tender Response from the Spot Bid Tender screen and then running the action Award Bid.
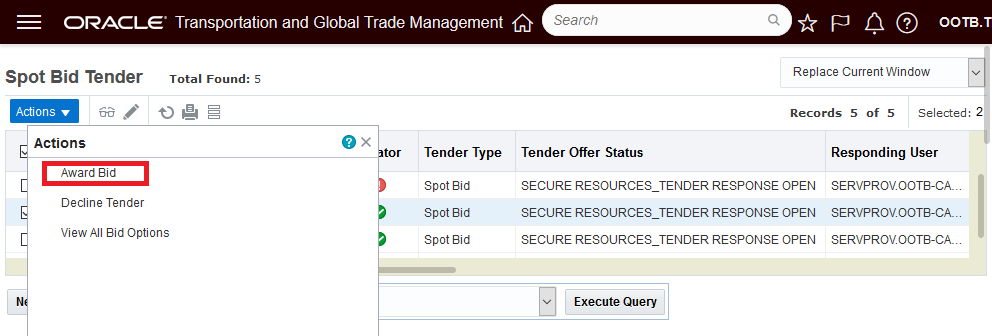
Award Bid Action Provide the Option to Select the Base Bid or an Optional Bid
In the example below, for Carrier03, you can choose between Awarding the Bid for the Base Shipment Bid, the Last Bid amount of 195.00 USD, or you can select the Optional Bid in the grid for180.00 USD with a 2-day transit time.
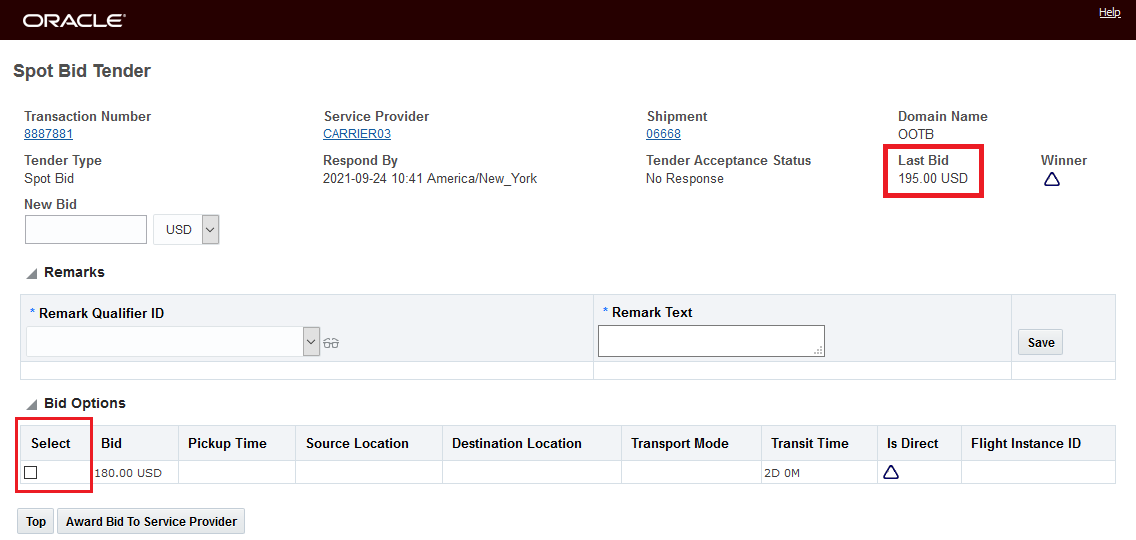
Carrier03 Base Bid Plus Bid Options
For this example, the Bid Option for Carrier03 is selected the Award Bid To Service Provider is selected.

Select Carrier03 Optional Bid and Award Shipment
Once the Award Bid To Service Provider is complete, the shipment 06668 has Carrier03 as the assigned service provider and the transit time has been updated to reflect the 2-Day transit time associated with the selected Optional Bid.

Carrier03 Optional Bid Shipment Update - 2-Day Transit Time
The cost has been updated to match the award Optional Bid cost of 180.00 USD.

Below is an explanation of how the optional bid conditions specified are processed against the shipment when the Optional Bid is awarded.
If the Optional Bid is for a new Pickup Date, the Pickup Date will update the shipment start time. The shipment stop's estimated arrival and departure times will also be updated. This logic is controlled by the property glog.server.workflow.tender.redriveOnPickupChange when set to true.
NOTE: The 22A Optional Bid functionality fully replaces the functionality delivered in the 21C Update, which only supported Optional Bids for Pickup Dates.
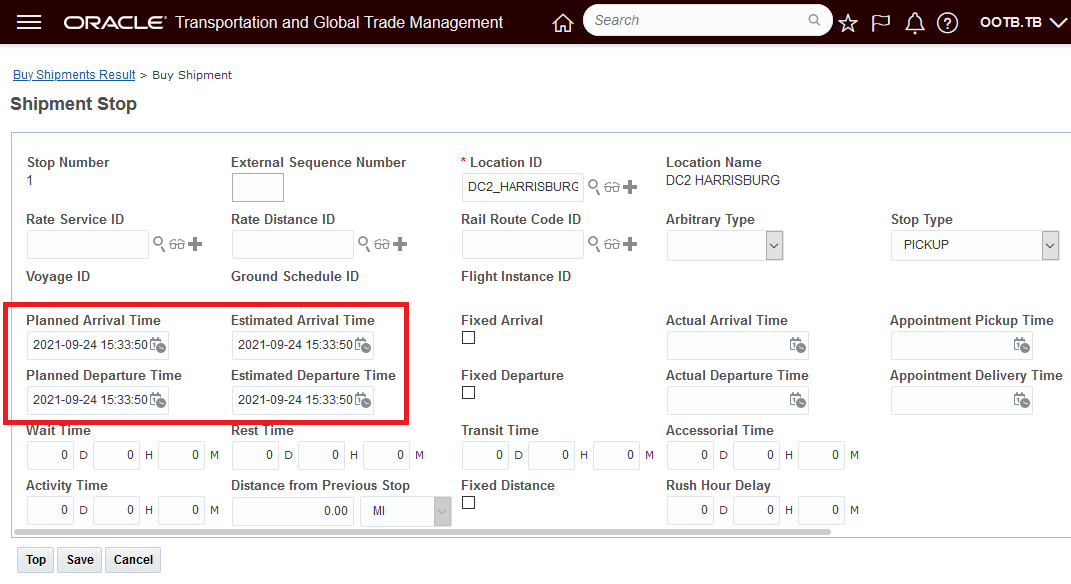
Original Shipment Pickup Date
Pickup Time Bid Option submitted and Awarded.
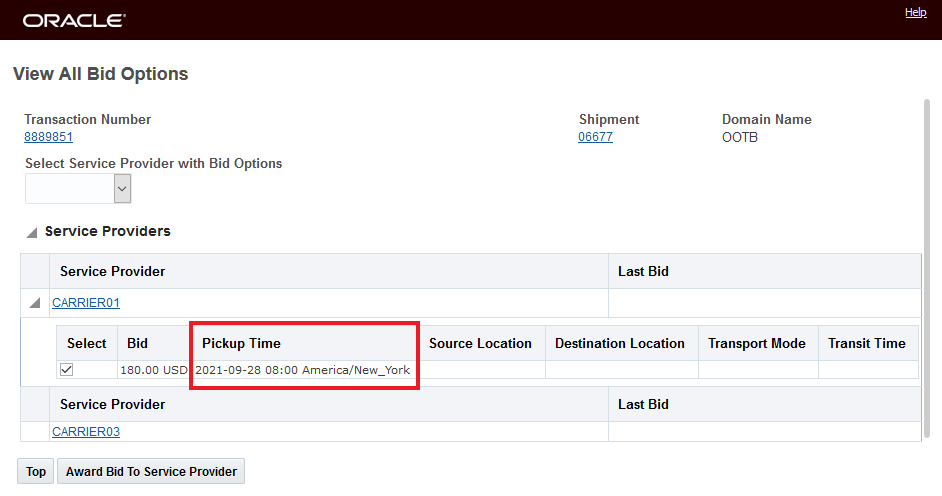
Bid Option Different Pickup Date Bid Selected
Updated shipment stop times reflecting the Awarded Bid Option.
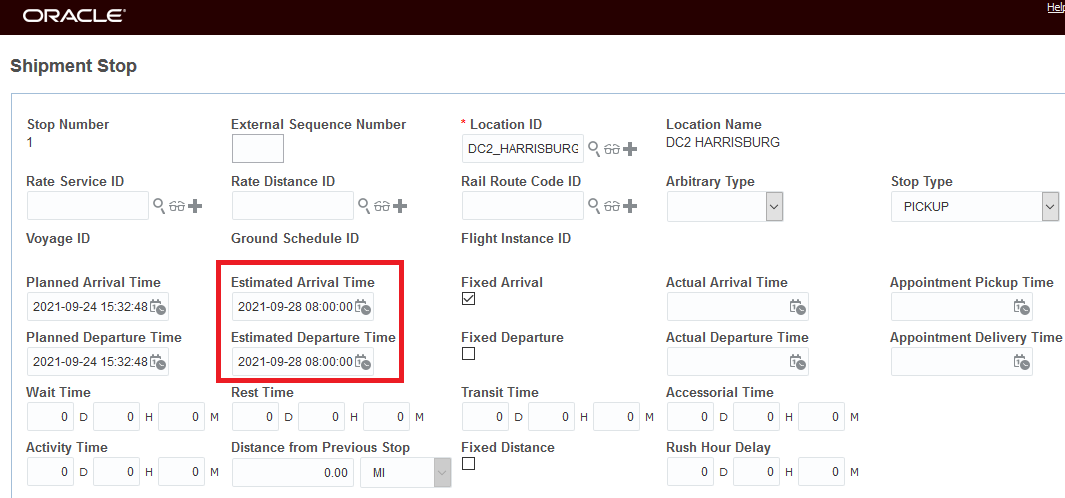
Shipment After Optional Bid Accepted
For Bid Options that involve a new shipment source location, the Source Location will be updated based on the first pickup stop of the shipment. The system updates the source location of the selected shipment and related order movements. If the upstream leg is unplanned, the system updates the destination location of the order movement. The use case here assumes that the spot bid shipment is related to the Service Provider's operation - an Air Shipment going from one airport to another airport and the Optional Bid is proposing a different departing airport (and flight) or an Ocean Shipment where the optional bid is proposing a different POL.
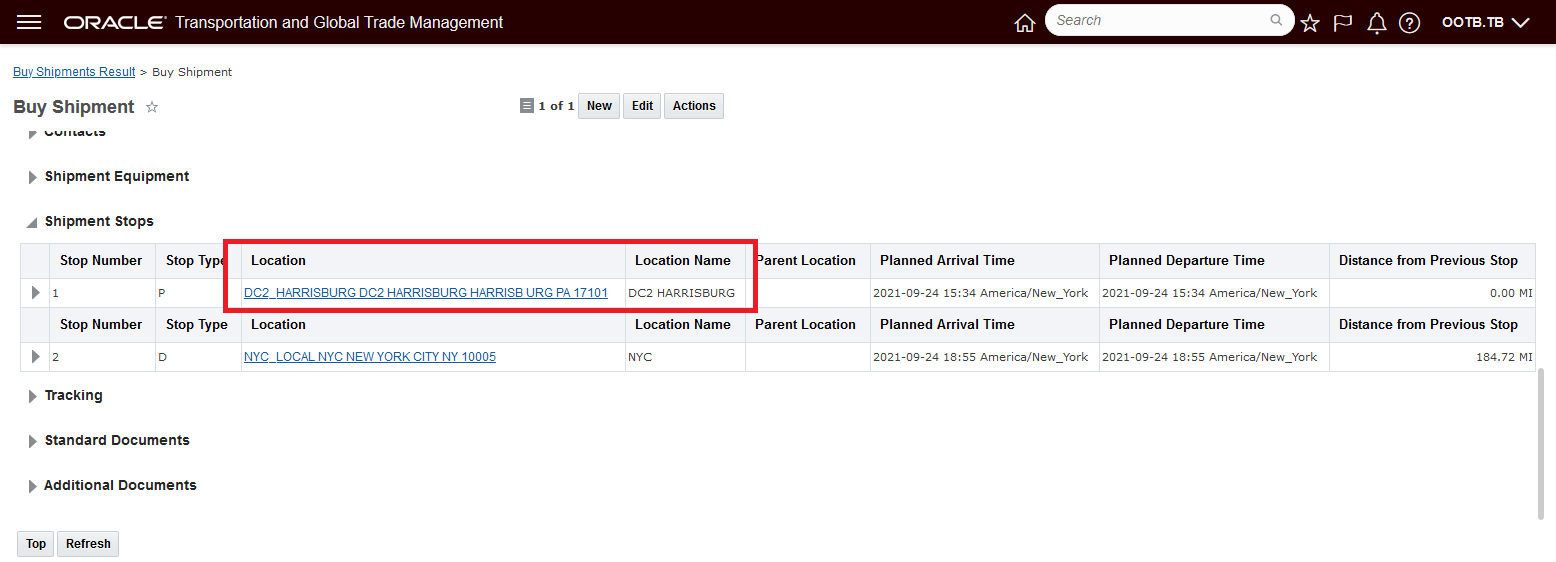
Original Shipment Source Location - DC2
The Bid Option selected is to change the Source Location to LSP SERVICES.
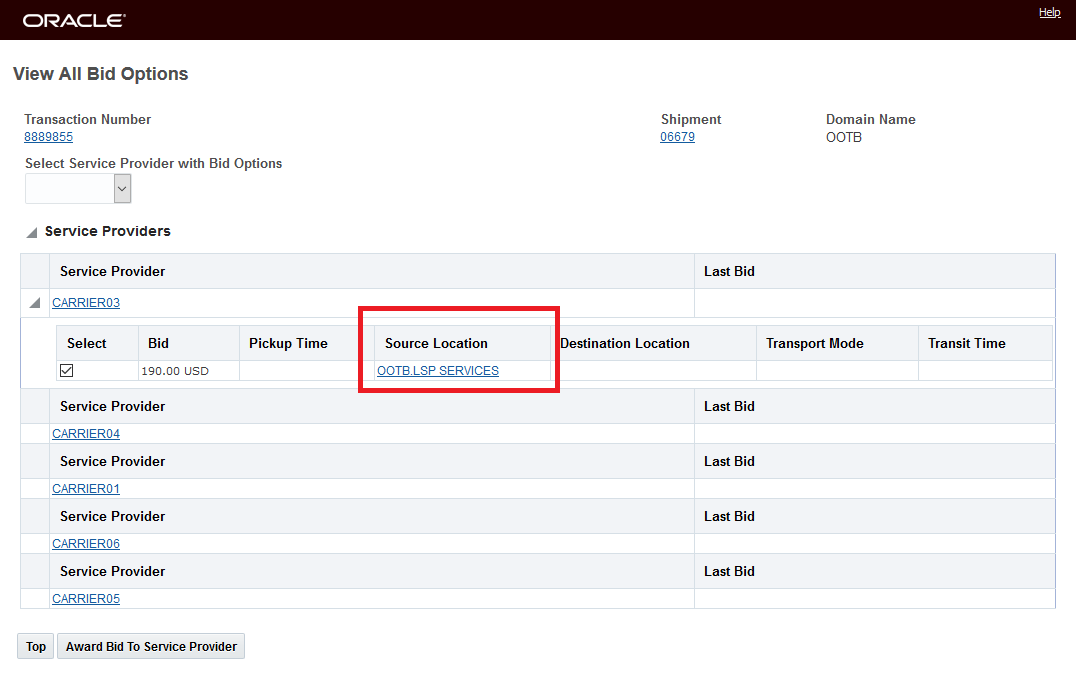
Bid Option Different Source Location Bid Selected
Once the Award Bid To Service Provider is complete, the shipment has been updated to reflect the new Source Location related to the Optional Bid selected.
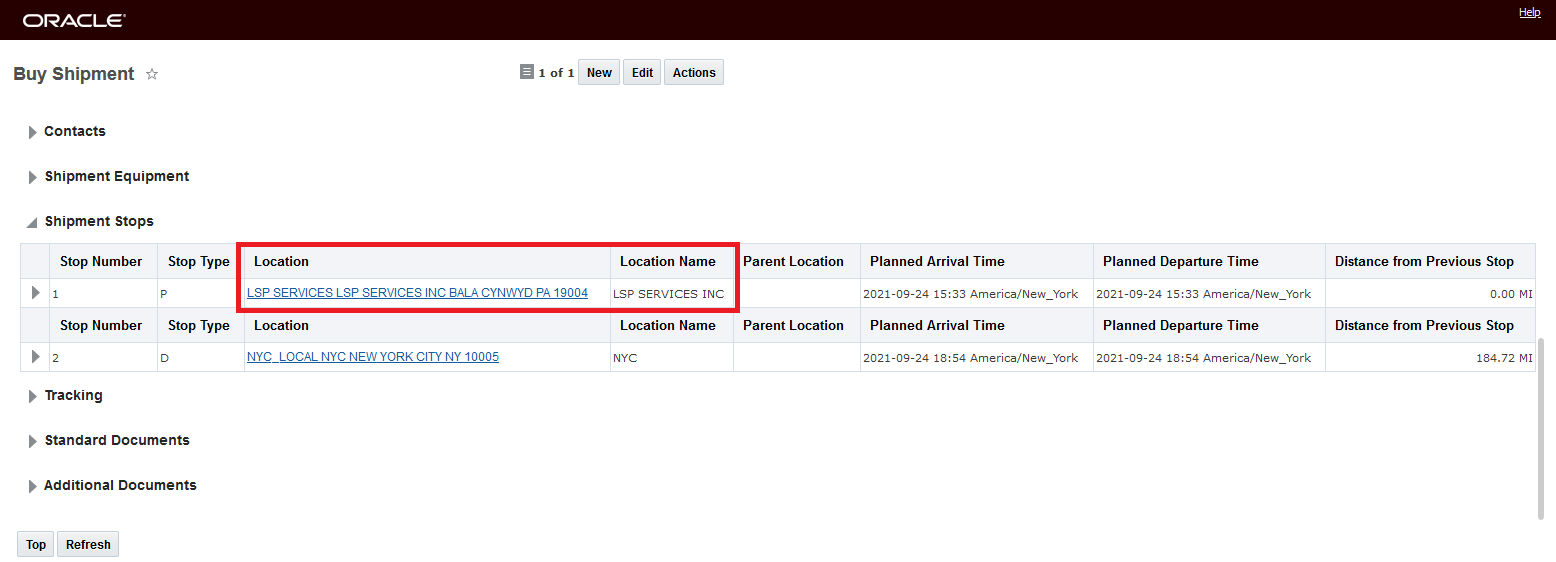
Shipment After Optional Bid Accepted
For Bid Options that involve a new shipment Destination Location, the Destination Location will be updated based on the last drop-off stop of the shipment. The system updates the destination location of the selected shipment and related order movements. If the downstream leg is unplanned, the system updates the source location of the order movement. Again, like the Source Location scenario, the intended use case is that the shipment being spot bid tendered is related to the Service Provider's operation - so an Air Shipment going from one airport to another airport where the Optional Bid is proposing a different arriving airport (and flight) or an Ocean Shipment where the optional bid is proposing a different POD.

Original Shipment Destination
The Bid Option selected is to change the Destination Location to KOP LOCAL.
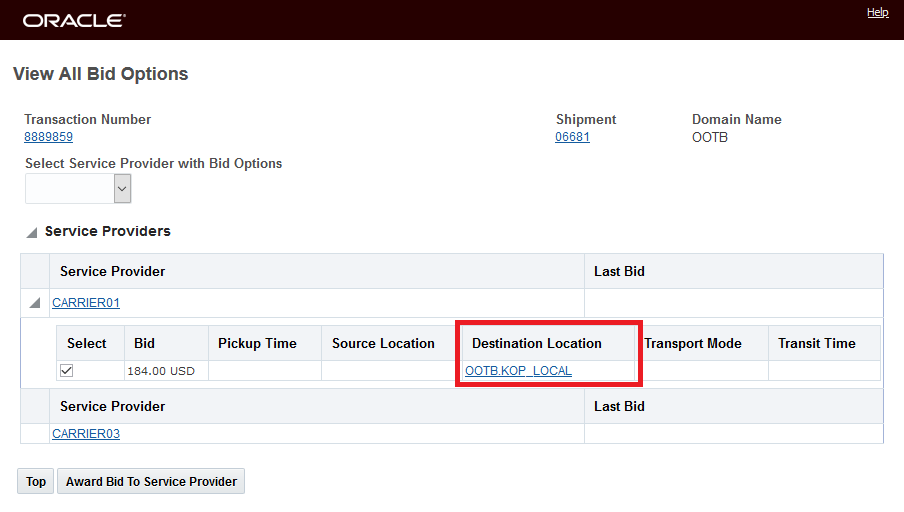
Bid Option Different Destination Bid Selected
Once the Award Bid To Service Provider is complete, the shipment has been updated to reflect the new Destination Location related to the Optional Bid selected.
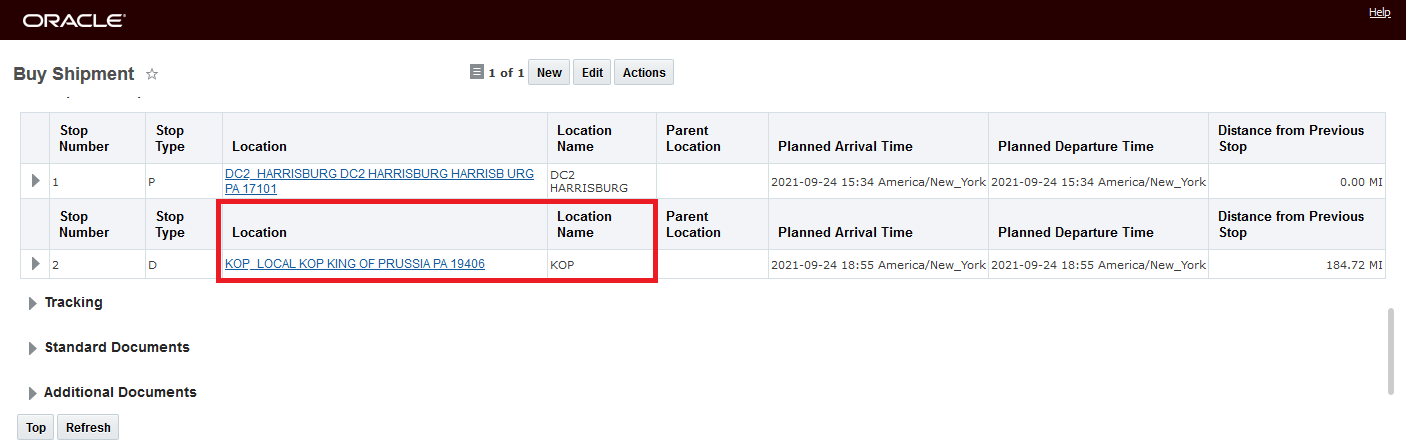
Shipment After Optional Bid Accepted
For Bid Options that involve a new shipment Mode, the Transport Mode will be updated on the shipment directly. If the transport mode is not part of the TENDER_MODES workflow parameter, the shipment will not be tendered.
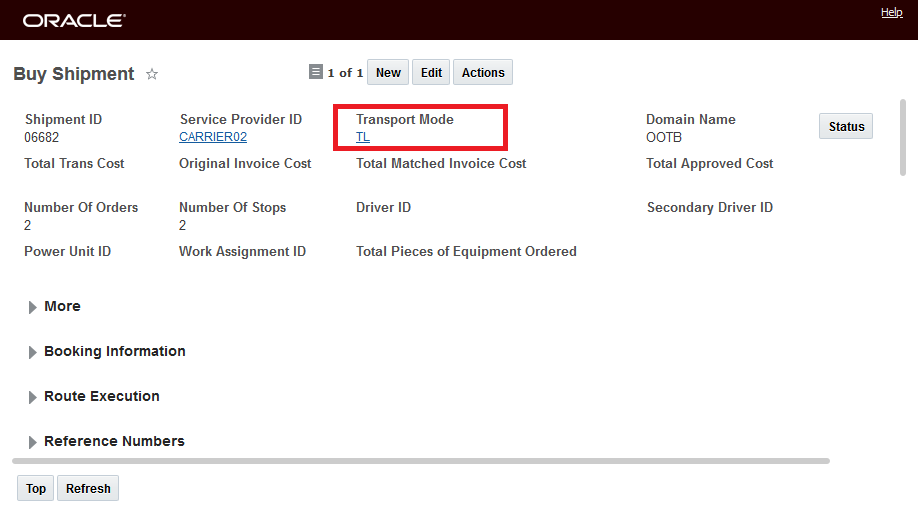
Original Shipment Mode
The Bid Option selected is to change the Destination Transport Mode from TL to INTRMDL.

Bid Option Different Mode Optional Bid Selected
Once the Award Bid To Service Provider is complete, the shipment has been updated to reflect the new Transport Mode related to the Optional Bid selected.
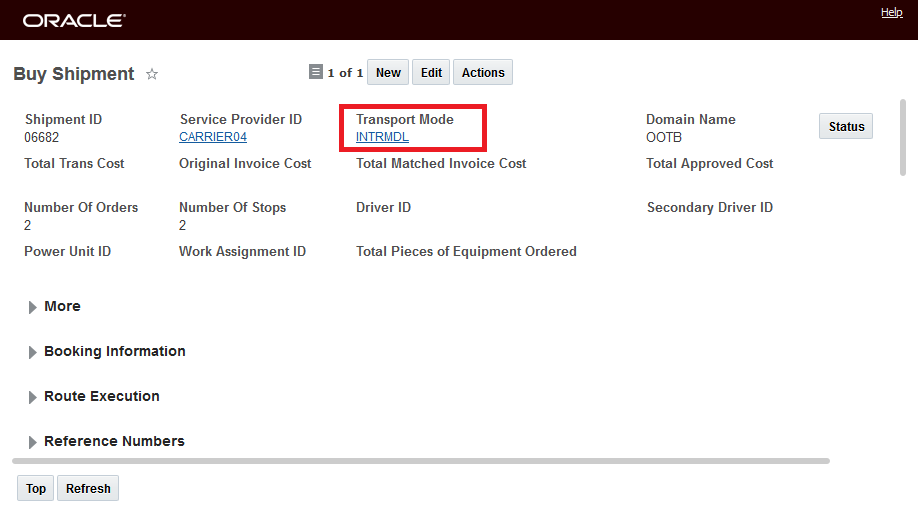
Shipment After Optional Bid Accepted
For Bid Options that involve a new Transit Time, the Transit Time will be displayed only on shipments with two stops: one pickup and one drop off stop. The Transit Time value will be updated to the drop off stop. The shipment stop times will be marked as fixed.

Shipment Before Change Transit Time Bid Selected
The Bid Option selected is to change the Transit Time to 4 Days.
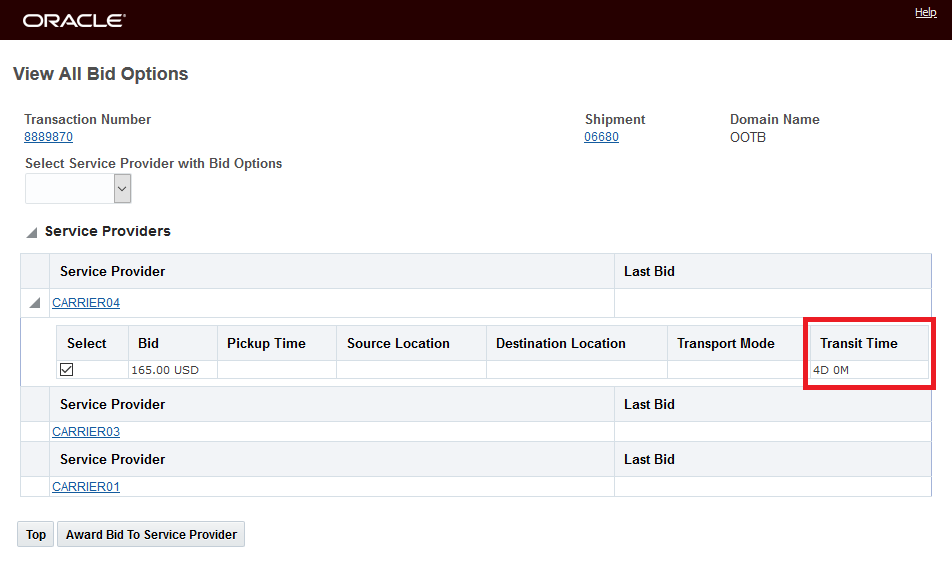
Bid Option Award Selected Change Transit time
Once the Award Bid To Service Provider is complete, the shipment will be updated to reflect the new Transit Time, and the shipment stop times will be marked as fixed.
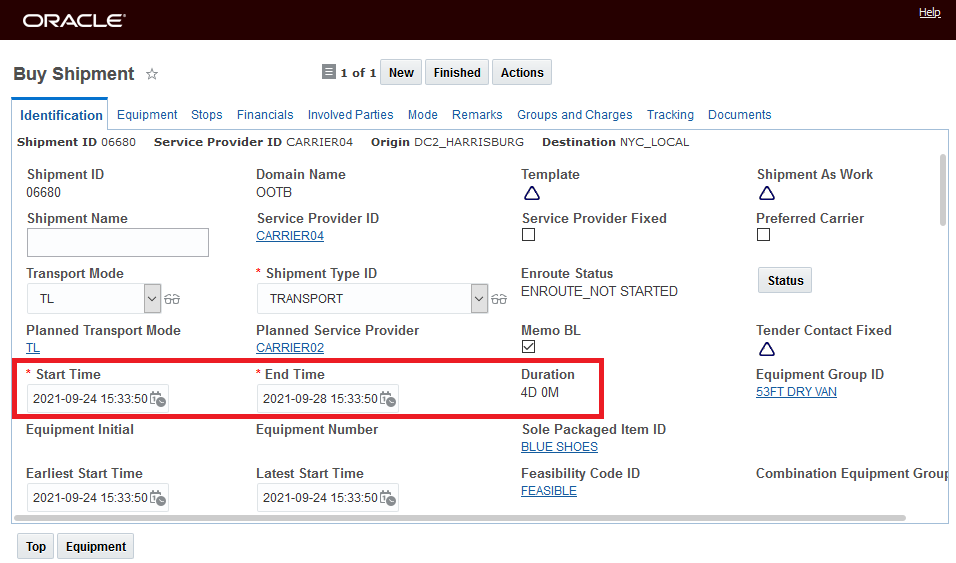
Shipment After Bid Option Awarded

Transit Time Stop View Stop Time Fixed
The additional Bid Options of Flight Instance ID and Direct allow you to expand your Spot Bid Tender scenarios to include receiving spot bids for your air shipments.
In the example below - the Service Provider is entering a bid for Flight Instance ID 14445 and the Service Provider has indicated that this is a Direct flight by selecting the Direct check box.
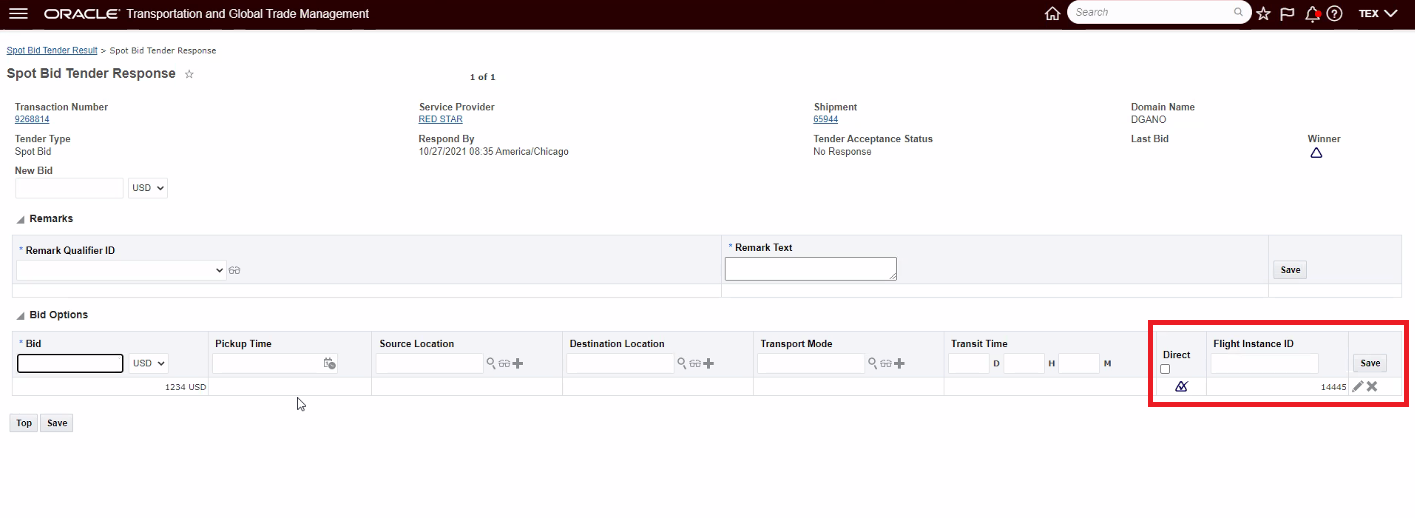 Flight Bid Option
When you select the Bid Option, the shipment will be updated with the Flight Instance and the related information.
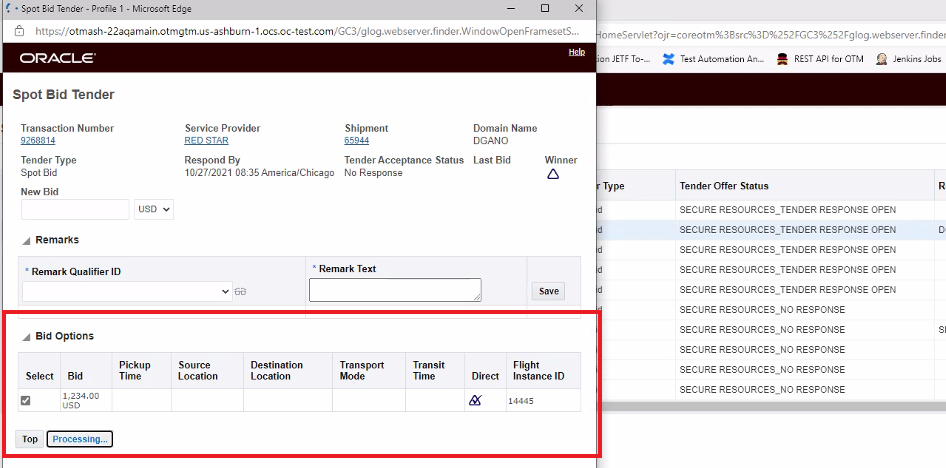
Flight Instance ID Bid Option Selected
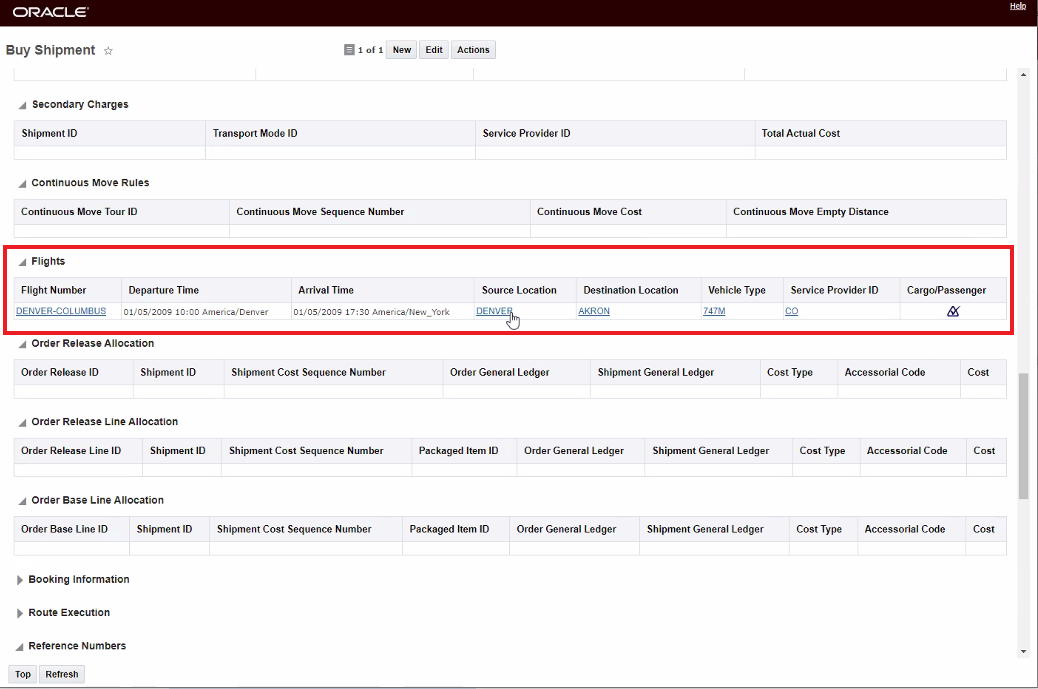
Updated Shipment with Flight Instance Information
Extending the spot bid tendering process to allow the service provider to propose options expands the opportunity for you to receive a lower cost bid in exchange for accepting the proposed condition. For example - a service provider may propose a considerably reduced cost for pickup up the shipment tomorrow - when they have too much equipment in the area, versus today when equipment and driver availability is tight.
Steps to Enable
You don't need to do anything to enable this feature.
Tips And Considerations
- The Online Booking/Tendering Screen remains the same - and continues to support spot bid responses against the base shipment. The Online Booking/Tender manager does not support any Optional Bids.
NOTE: The 21C Update Feature - SPOT TENDER BID RESPONSE PROPOSED PICKUP TIME - has been replaced by this 22A feature.
- You have the option to use Automation Agents to automate what you choose to do when a spot bid tender is selected with bid options. To provide guidance - a sample Automation Agent has been staged in the Public Domain. You can use this sample Agent as a guide for configuring an Agent that fits your specific needs.
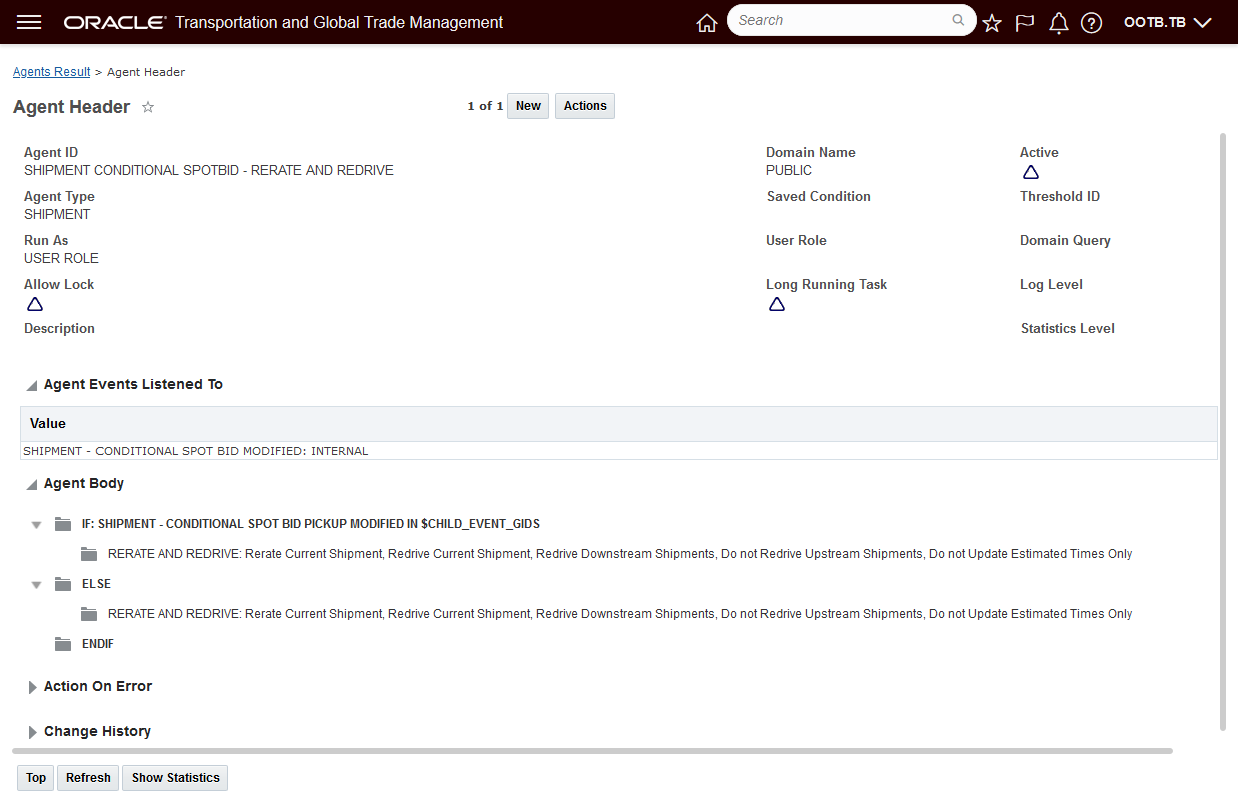
PUBLIC SHIPMENT CONDITIONAL SPOTBID - RERATE AND REDRIVE Automation Agent
Spot Bid Action - Generate Lists of Service Providers
This feature provides you with the ability to control how the Spot Bid Action Service Provider screen generates and selects the Service Providers to include in a spot bid tender. You will find this feature extremely useful in any scenario where the number of Service Providers that could be considered for a Spot Tender is large.
The new capabilities are enabled by a set of three properties which are all false by default:
- glog.webserver.opentender.servProvLoadOnDemand
- glog.webserver.opentender.servProvDefaultUnSelected
- glog.webserver.opentender.displayPopupOnSave
. 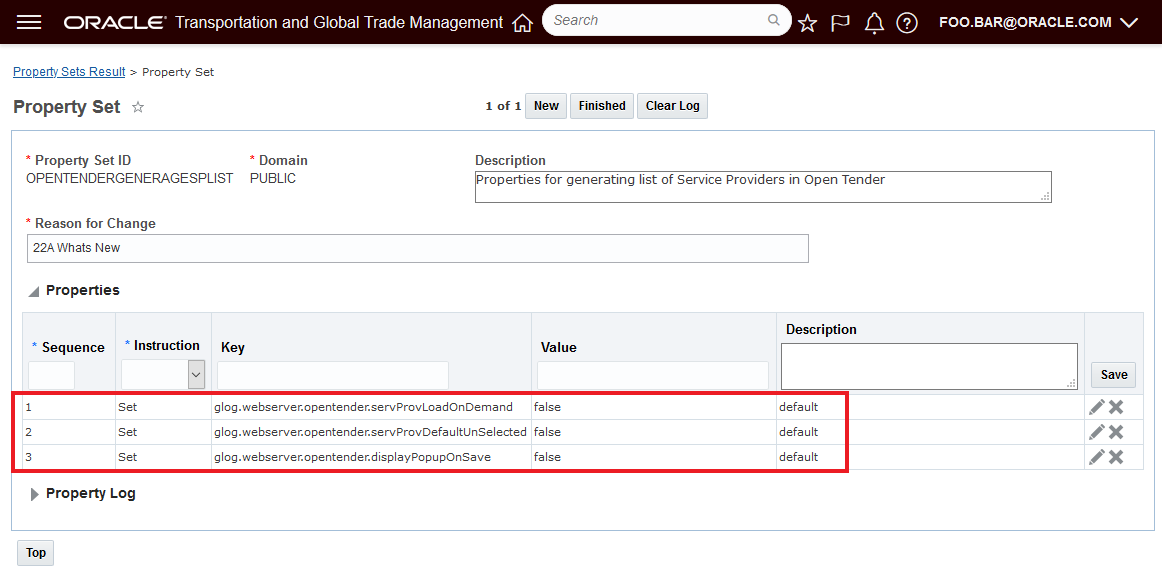
New Properties All False By Default
When the action Spot Bid Tender is run - the default behavior for the Service Provider list screen is to display and select all of the Lane Service Providers as shown below.
Default Behavior
Setting the property glog.webserver.opentender.servProvLoadOnDemand to true, as shown below - allows you to generate the Lane Service Providers on demand..
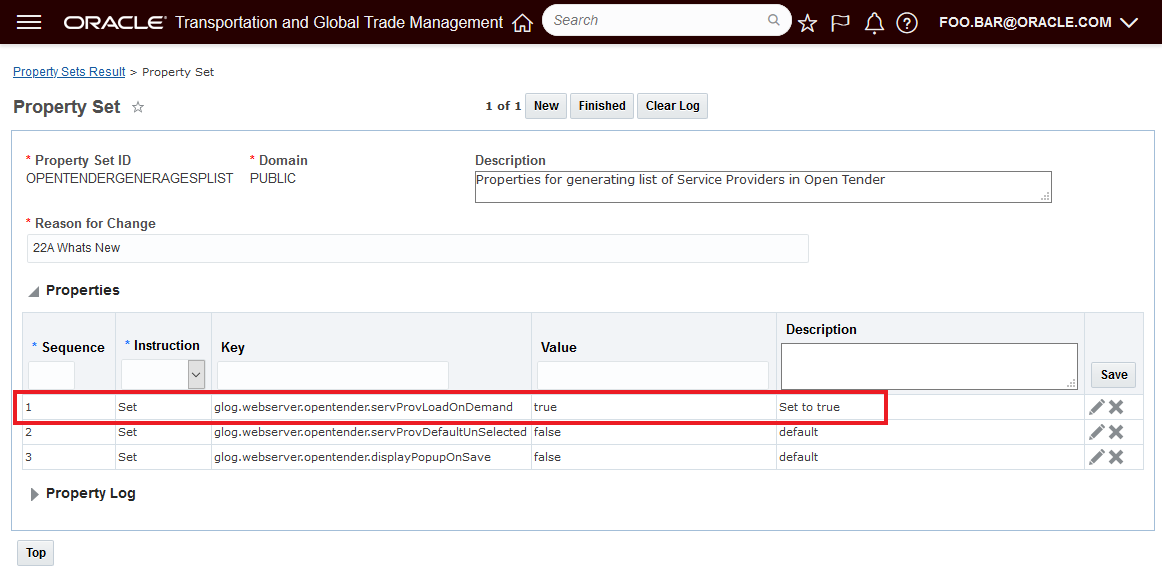
Set Property glog.webserver.opentender.servProvLoadOnDemand to True
With the glog.webserver.opentender.servProvLoadOnDemand property set to true - running the Spot Bid Tender actions results in the Service Provider list screen shown below. The list of service providers is not automatically generated, and a new option Add Lane Service Providers is now visible.
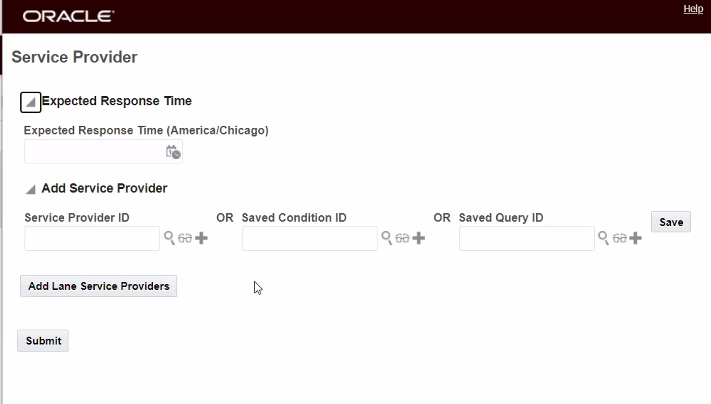
Service Prover List Screen with Property glog.webserver.opentender.servProvLoadOnDemand Set to True
Selecting the Add Lane Service Providers button, as shown below, will generate the list of Lane Service Providers.
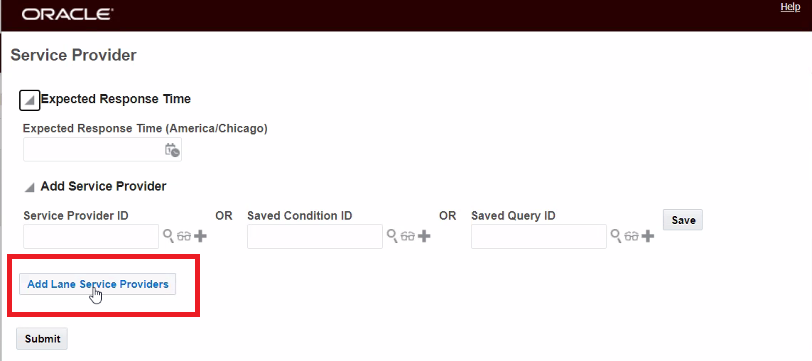
Run Add Lane Service Providers to Generate List of Service Providers
The result of the Add Lane Service Providers selection is shown below, the list of Lane Service Providers is generated and selected.
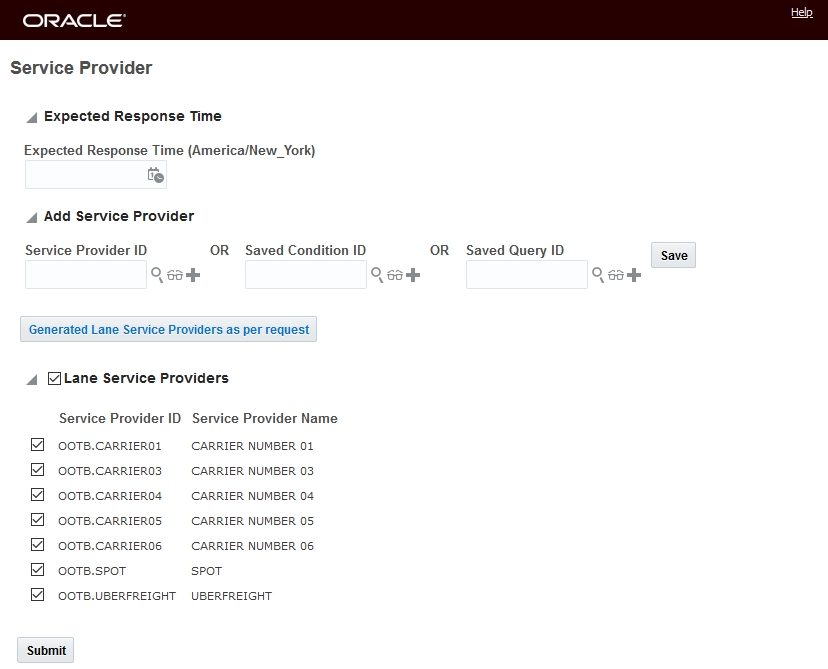
Add Lane Service Providers Result
The property glog.webserver.opentender.servProvDefaultUnSelected allows you to control whether the lists of Lane Service Providers is selected (default behavior = false) or unselected (new behavior = true). This property handles the selection choice whether the list of Lane Service Providers is generated using Add Lane Service Providers or when the screen is originally generated and the property glog.webserver.opentender.servProvLoadOnDemand = false.
In the example below, both glog.webserver.opentender.servProvLoadOnDemand and glog.webserver.opentender.servProvDefaultUnSelected are set to true. When the Spot Bid Tender action is run, and the list of Service Providers is generated using the Add Lane Service Providers button, the list of Service Providers will be unselected. If the property glog.webserver.opentender.servProvLoadOnDemand were sent to false, then the Service Provider list generated when you run the Spot Bid Tender action would have been generated with all the Service Providers unselected.

Property glog.webserver.opentender.servProvDefaultUnSelected Set to true
With the property glog.webserver.opentender.displayPopupOnSave set to true - if you enter a value in the Service Provider ID, Saved Condition ID, or Saved Query ID field and then press the Save Button a pop up will displayed, assuming some Lane Service Providers have been selected - asking if you want to keep the selected Lane Service Providers or not. If you select ‘Ok’ then the selected Lane Service Providers will stay selected, if you select 'Cancel' then the selected Lane Service Providers will unselected.

Saving Service Provider ID - Popup Select OK
Result of hitting 'OK', the Lane Service Providers are selected..
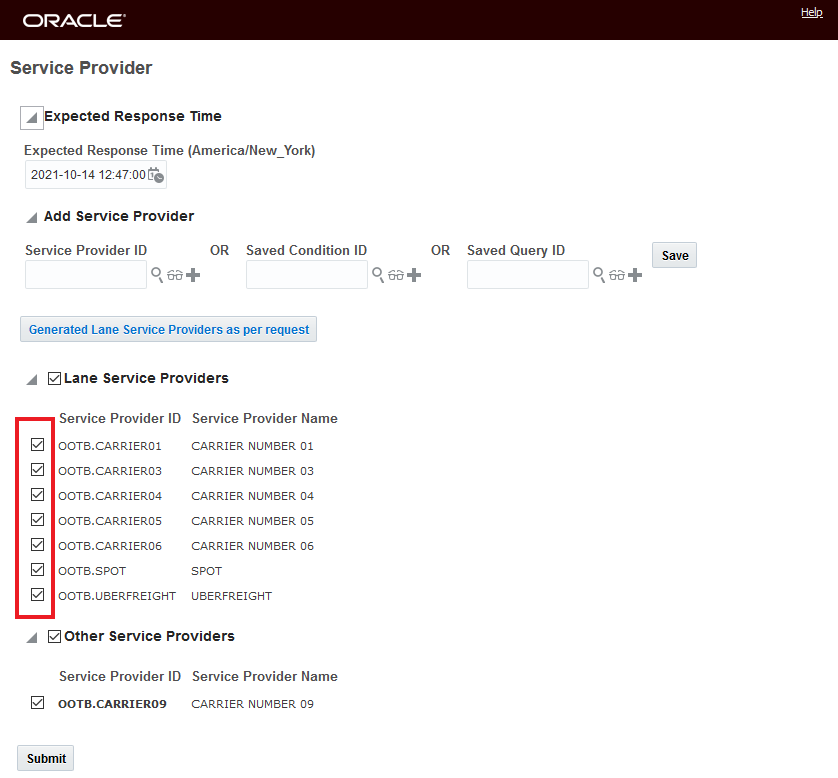
Result of OK - Lane Service Providers Selected
If - on the other hand, you select 'Cancel' at the prompt, then the list of Lane Services Providers is unselected.

Select Cancel at the Prompt
Result of selecting 'Cancel', the list of Lane Service Providers is unselected.

Lane Service Providers Unselected On Cancel
This feature simplifies the process of generating and selecting the list of Service Providers to include in a Spot Bid Tender. This feature will be very beneficial if you have a large number of potential Service Providers that could be considered in your Spot Bid Tenders.
Steps to Enable
The new capabilities are enabled by the properties below, all are false by default, enabling the new behavior requires setting the property or properties to true depending on your desired behavior:
- glog.webserver.opentender.servProvLoadOnDemand
- glog.webserver.opentender.servProvDefaultUnSelected
- glog.webserver.opentender.displayPopupOnSave
NOTE: You must have DBA.ADMIN access to configure the properties.
Limit Remark Qualifiers for Online Booking/Tendering
This feature provides you with two new properties you can configure to control the set of Remark Qualifiers that will be displayed in the Online Booking/Tendering UI and whether the Remarks section of the Online Booking/Tender UI is expanded or collapsed by default.
By default the Online Booking/Tending UI will display all the Remark Qualifiers the Service Provider has rights to see. In the example below - the default behavior provide a confusing list of Remark Qualifiers.
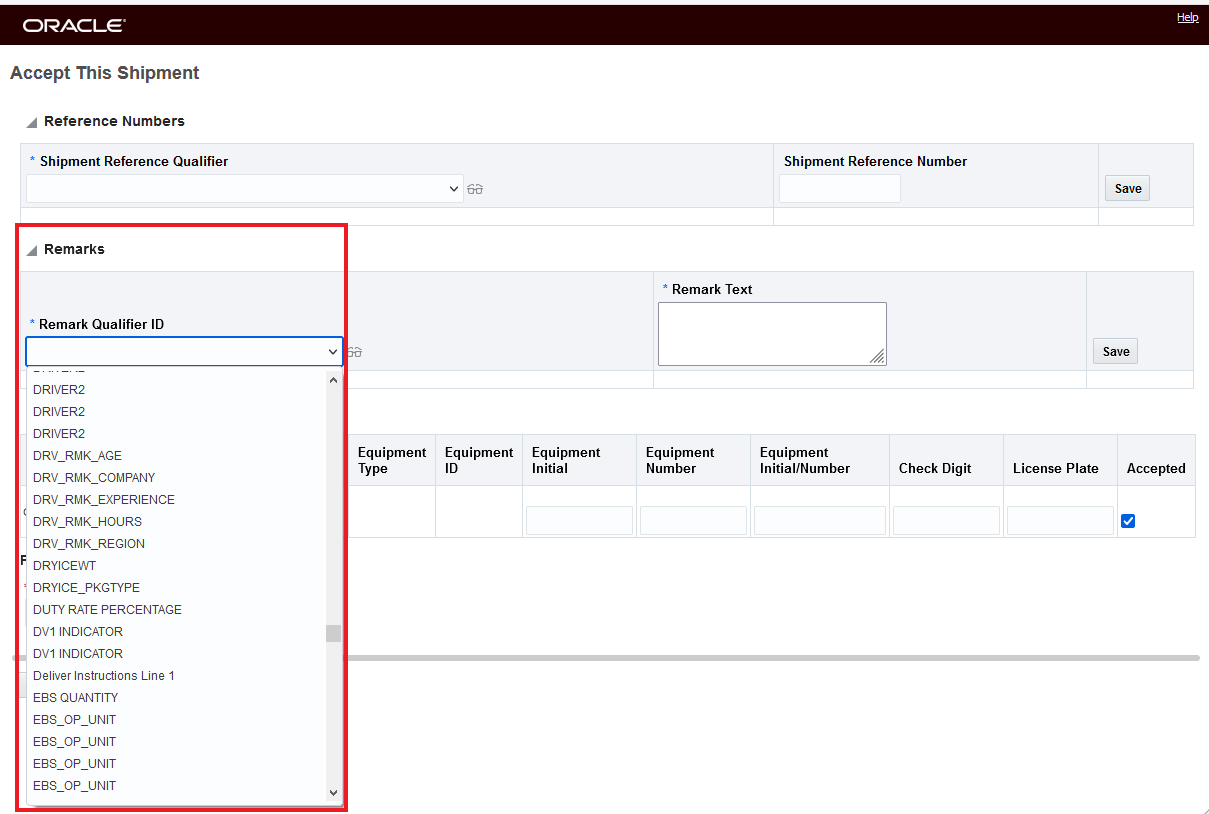
Default Behavior
By setting the property glog.webserver.tender.servprovRemarksQualifiers - you can select the Qualifiers to display in the drop down for the Service Providers. In this case only the Remark Qualifier IMPORTANT_REMARK is provided.
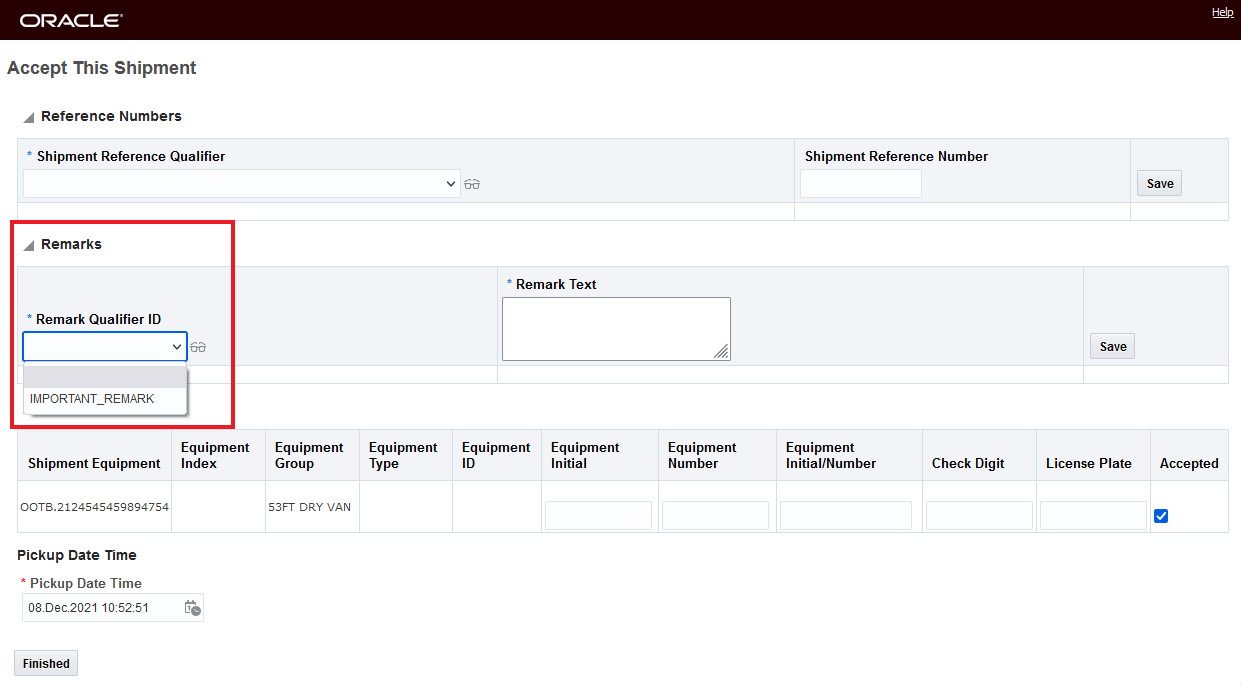
Remark Qualifier Set
To have the Service Provider details expanded or collapsed by default you can use the new property glog.webserver.opender.expandServProvDetails. The default is true - expanded - setting the property to false will collapse the details when the screen is opened.
This feature improves the usability of the Online Booking and Tendering screen by allowing you to eliminate unused or unnecessary Remark Qualifiers and simplifying access to the Remarks grid.
Steps to Enable
To take advantage of these two new configuration options there are two new properties that you have the option to set.
By setting the property glog.webserver.tender.servprovRemarksQualifiers - you can select the Qualifiers to display in the drop down for the Service Providers.
To Control if the Remark section is expanded by default when the Online Booking/Tendering screen launches you can set the glog.webserver.opender.expandServProvDetails property. The default value is true/expanded setting the value to false will collapse the details.
NOTE: Only the DBA.ADMIN user can access and use the Property Sets page.
Invoices - Find Valid Matches Action Includes Shipment Group Matches
This feature expands the capabilities of the Invoice action Find Valid Matches to include matching to/finding valid matches that include Shipment Groups.
This action is accessed via Financials > Payment Invoice Management > Payment Invoice > Actions > Financials > Matching > Find Valid Matches. The matching process is governed by the match rule profile assigned to the service provider.
Find Valid Matches Includes Valid Shipment Groups
In previous versions of OTM, the Find Valid Matches action was limited to finding buy shipment matches vs the expanded capability that now finds all buy shipments or shipment groups that fit the match rule profile for the selected invoice.
This feature expands the capabilities available to you for supporting invoice match scenarios that involve matching invoices to a a shipment group or buy shipment.
Steps to Enable
You don't need to do anything to enable this feature.
Tips And Considerations
- This is a single select action - you can only find valid matches for one invoice at a time.
- The Find Valid Matches action cannot be used on parent consolidated invoices, but can be used on child invoices.
Invoice - View Related Shipment Group SmartLink
This feature extends the available Invoice SmartLinks to include a View Related Shipment Group SmartLink that will link you to the Shipment Group related to the Invoice.
View Related Shipment Group SmartLink

Related Shipment Group
This usability enhancement simplifies the UI navigation related to processing Invoices related to a Shipment Group.
Steps to Enable
You don't need to do anything to enable this feature.
Allocation XML - Sequence Number Added
This enhancement adds the AllocSeqNo and AllocCostSeqno to the AllocationBase outbound xml. The AllocSeqNo and AllocCostSeqno have been added to the allocation details info for Shipment, Order Release, Order Base and Voucher outbound XMLs.
Provides sequencing details in the allocation XML.
Steps to Enable
You don't need to do anything to enable this feature.
Shipment Group Rule Match Date Options Extended to Include Weekly and Monthly Options
This feature extends the Match Date options available to you when defining your Shipment Group Rule to include a Monthly or Weekly grouping option. These additional options - along with the original options of Daily and Per Day - provide a nice automation option for your shipment grouping requirements that require either a weekly or monthly grouping.
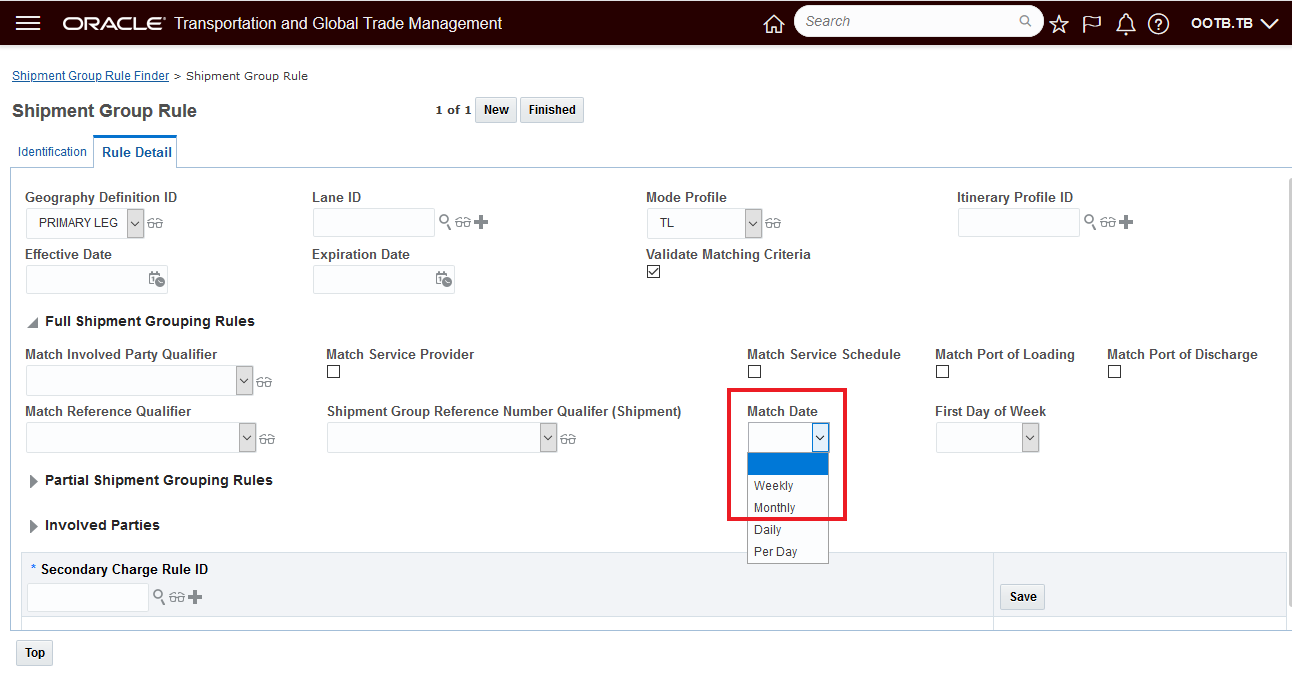
New Weekly Monthly Options for Shipment Group Rule Match Date
When you select the option of MONTHLY, then the shipments belonging to the same month will be grouped together to form one shipment group. The shipment group start date and end date will be the 1st of the month (based on early start date of the shipments) and the last day of that month, respectively.
When you select the option of WEEKLY, then shipments belonging to the same week will be grouped together to form one shipment group. You can select a particular day as the start of a week from the First Day of Week drop-down list. The shipment group start date will be based on the early start date of the shipments and the 'first day of the week' configuration.
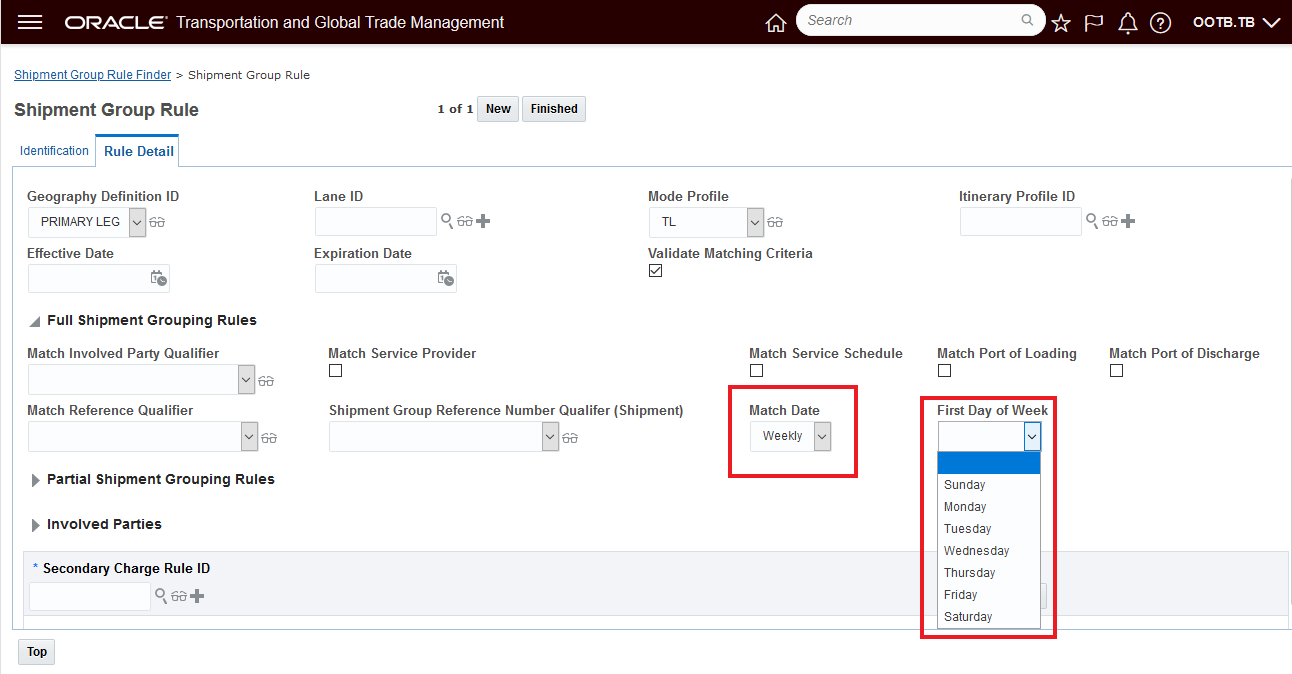
Weekly and First Day of Week Options
This feature helps automate the generation of your shipment groups when the grouping requirement are either monthly or by week.
Steps to Enable
You will need to configure a Shipment Group Rule to take advantage of the new Match Date Options. To create a new Shipment Group Rule navigate to Shipment Management > Power Data > Shipment Configuration > Shipment Group Rule and follow the directions provide in On-Line Help.
Dock Scheduling Maximum Ship Units Allowed Added to Rule Set
This feature provides you with a Maximum Ship Units Allowed constraint value that you can add to your Appointment Rule Sets so that you can setup doors that are dedicated to handling pickup/deliver stops with a limited number of ship units.
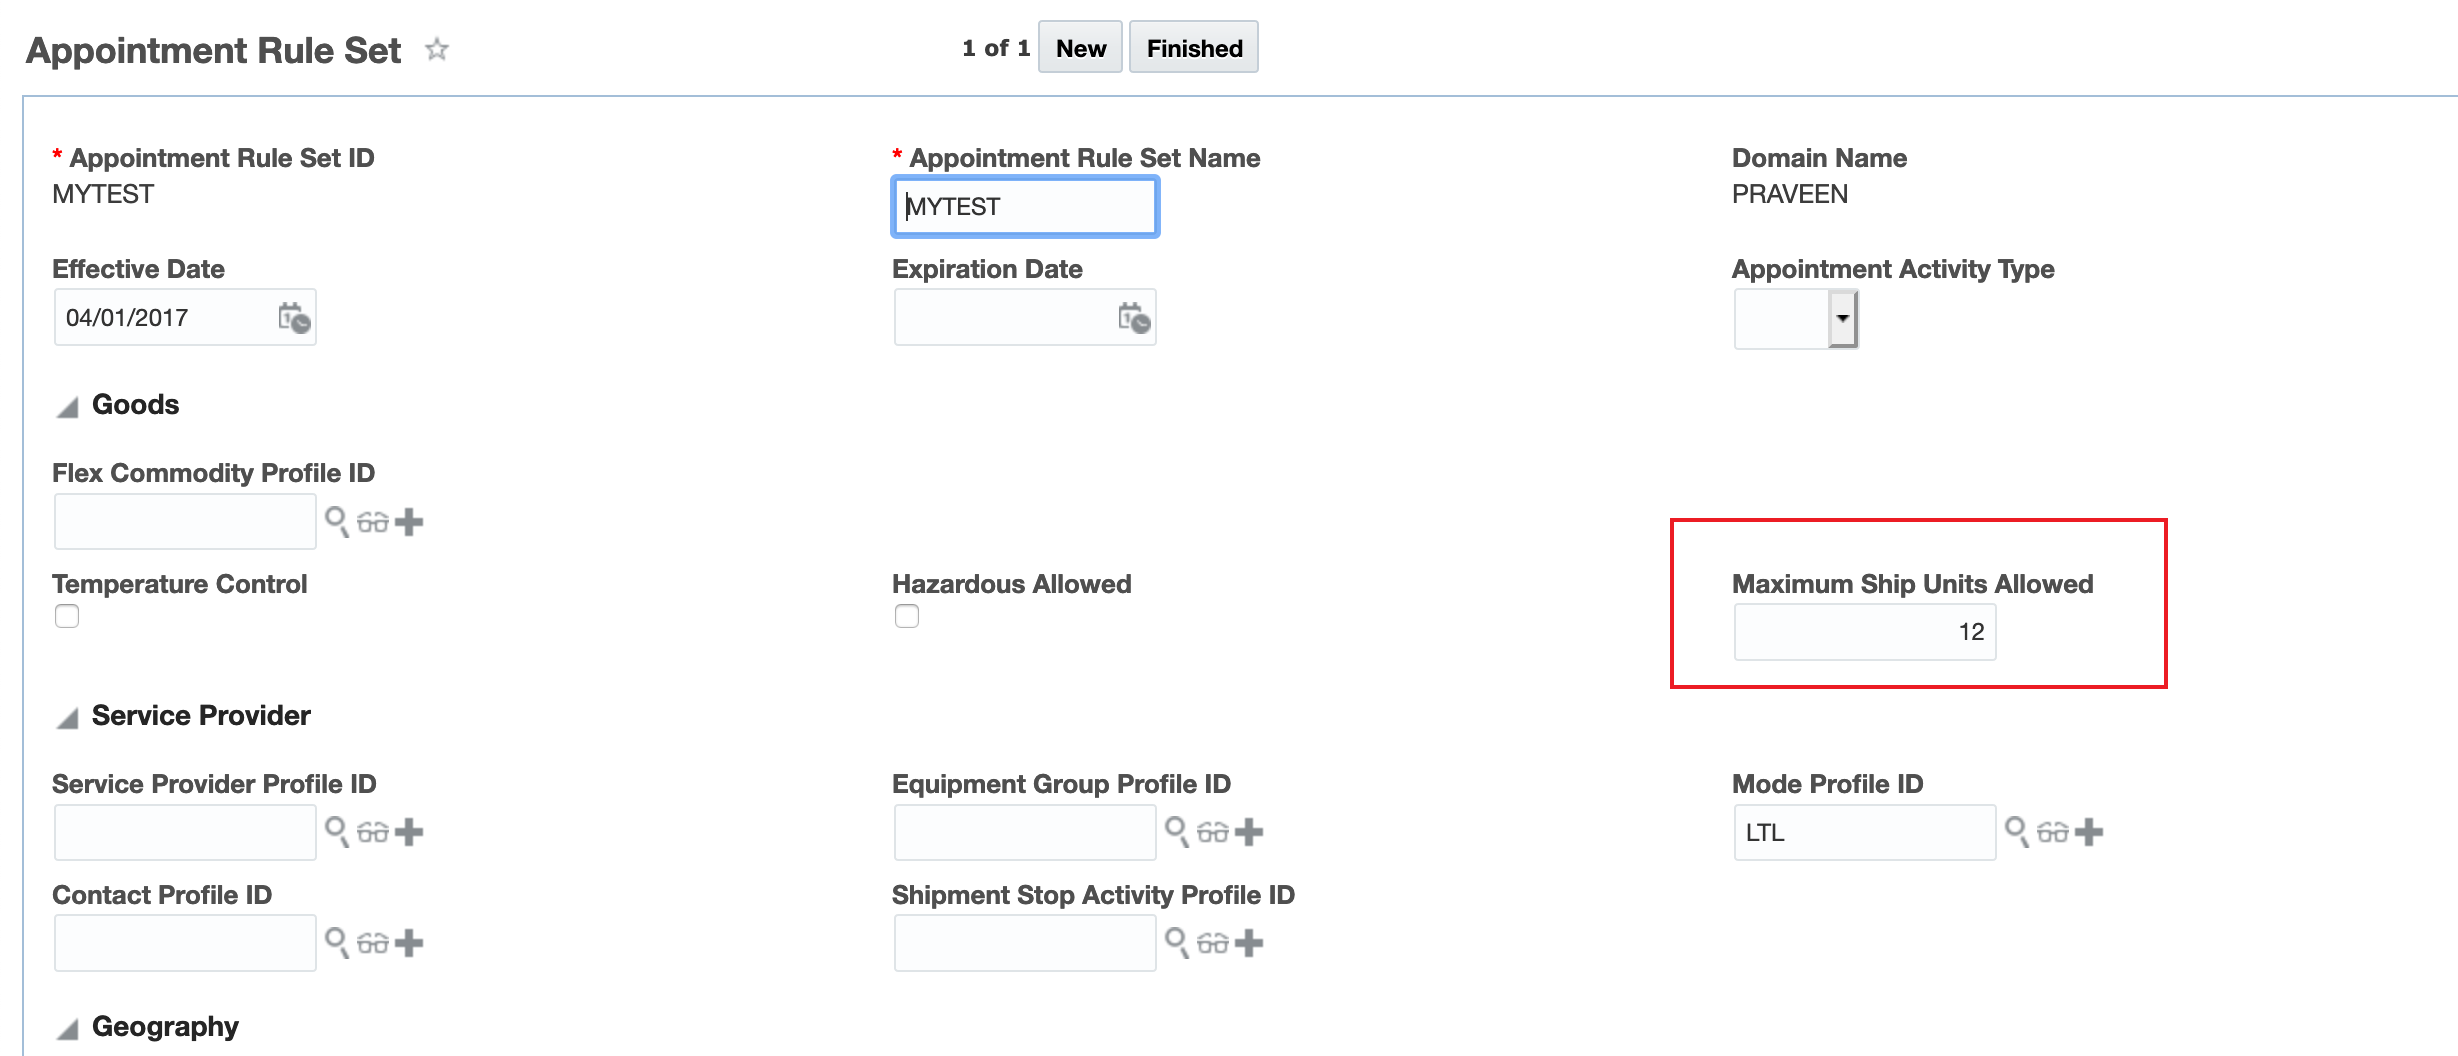
Appointment Rule Set Maximum Number of Ship Units
Allows you to set some of your doors for appointment scheduling for those stops containing with a smaller/maximum number of ship units allowing them to be used as fast turnover/express dock doors.
Steps to Enable
If you wish to use this feature your current Appointment Rule Set(s) will need to be modified or new Appointment Rule Sets will need to be configured and assigned the appropriate location resource or location resource group for a location.
Planning Robustness Enhancements
This feature provides a set of planning robustness features which are focused on avoiding out-of-memory situations caused by the evaluation of a an excessively large number of options Specific areas now being checked and/or limited include:
- The overall number of leg options considered,
- The number of via point combinations,
- The number of possible shipment start times that are evaluated when Location Capacity Optimization is run
- The presence of "bad data" in Equipment Packing.
Planning Robustness - Large Number of Leg Options
In previous versions of OTM, the evaluation of a large number of leg options could result in an out-of-memory error message during the shipment building process. As part of the planning process, OTM creates a separate set of shipments corresponding to every leg option before evaluating all the possible leg options with the drive routine. In most scenarios, the number of options is not excessively large, however, in some setups where there are a large number of rate options, equipment groups and/or arbitraries involved, the possibility for an extremely large number of leg options can increase dramatically.
The following factors contribute to the number of options considered, with the number of rates and equipment groups and arbitraries being the most significant factor in the generation of a large numbers of leg options.
- Large number of orders in a bundle
- Multi-leg itinerary
- Large number of via-point combinations (arbitraries)
- Large number of level-of-service definitions
- Large number of equipment groups and rates
- Multi-modal equipment group sets
During shipment building, leg options for an order bundle are created and processed in five steps:
- Create equipment options
- Create base leg options from equipment options
- Expand leg options based on arbitraries
- Expand leg options based on cost
- Leg option optimization
Previously available parameters and properties provided the ability to limit the number of leg options considered in the case of a large number of rates, however, these controls did not provide a top-level control to limit the overall number of leg options to consider for an order bundle, or the number of via point combinations allowed. This feature addresses those limitations.
Control to limit the total number of leg options for an order bundle:
You can now limit the total number of leg options for an order bundle using the property "glog.business.itinerary.maxLegOptions" (default value = 50000). This property specifies the maximum total number of leg options allowed for an order bundle on a leg. When the number of leg options is more than the specified limit, only the first N number of leg options (by default = 50,000) will be considered for shipment planning.
In the example below, the property glog.business.itinerary.maxLegOptions = 1400. When the bulk plan is run, and the leg options exceeds the 1,400 value, the warning messages below are displayed.


Warning Max Leg Options
Planning Robustness - Number of Via Point Combinations
Previously, the property glog.business.shipment.maxNumViaPointCombinations = N, which sets the limit on the number of via point combinations allowed for an order bundle, was only considered when VALIDATE EQUIPMENTS BY RATES was true. Now the property glog.business.shipment.maxNumViaPointCombinations = N is checked regardless of VALIDATE EQUIPMENTS BY RATES setting, either true or false.
In the case below, the property glog.business.shipment.maxNumViaPointCombinations= 100. When the number of via point combinations exceeds 100, the message below is provided.
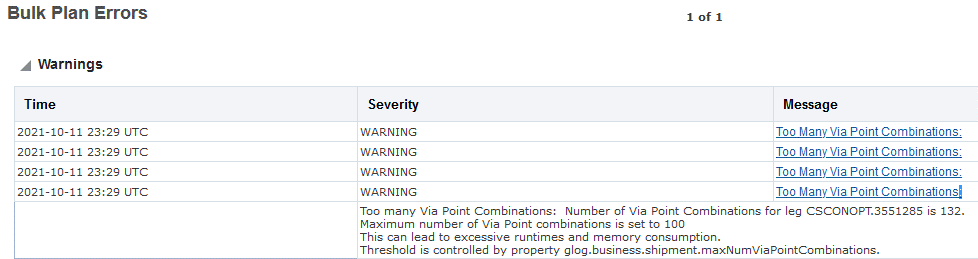
New Warning Message for Property glog.business.shipment.maxNumViaPointCombinations
glog.bus iness.itinerary.maxLegOptions= 1400
Planning Robustness -Location Capacity Optimization - Limit Start Time Options
This robustness feature provides you with a new property glog.business.location.locationCapacityOptimizer.maxNumShipmentStartTimes with a Default value = 5,000 that sets a limit for the number of start time options that will be evaluated for each shipment in the Location Capacity Optimizer. .
This property has been added to avoid out-of-memory errors in Location Capacity Optimizer setups where the configuration of the values for the combination of the following parameters generated too many start time options:
- LOCATION CAPACITY OPTIMIZER TIME SPAN - This is the time span or horizon for which different shipment start times are tried. It is only used if the Check Location Capacity parameter is set to TRUE and the Use Greedy Capacity Assignment Algorithm is set to false. Concern is too large of a value for this parameter i.e., many days.
- LOCATION CAPACITY OPTIMIZER TIME STEP - This is the time step durations between each shipment start time trials. It is only used if the Check Location Capacity parameter is set to TRUE and the Use Greedy Capacity Assignment Algorithm is set to false. Concern is having this parameter set to too small of a value - i.e., minute(s).
At the beginning of Location Capacity Optimization, the number of start times for a shipment can be estimated by dividing time span with the time step. If this estimated number of start times exceeds the specified limit, Location Capacity Optimization logic will be skipped entirely.
If the number of start time options is greater than the value specified in the glog.business.location.locationCapacityOptimizer.maxNumShipmentStartTimes property, the warning message below will be provided in the Bulk Plan Milestone Metrics.
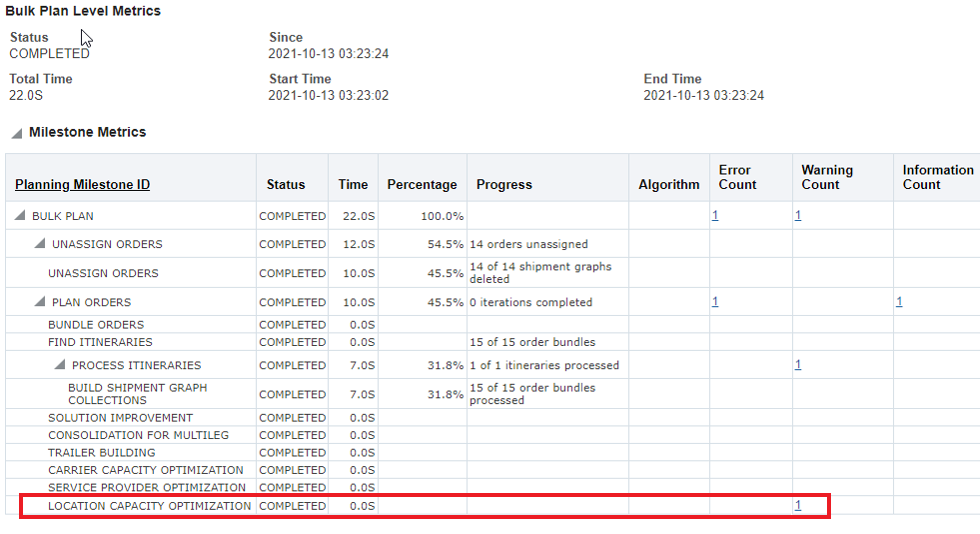

Warning Message Too Many Shipment Start Time Options
Planning Robustness - Bad Data Causing Out Of Memory Errors in Equipment Packing
This robustness feature focuses on avoiding OTM application crashes caused by "bad data" that leads to excessive packing inside of the Conopt Logic which eventually exhausts the available memory causing an out-of-memory error. The "bad data" leading to the out-of-memory situation is typically one of the following:
- Unusually large orders (high gross weight/volume, high ship unit count)
- Unusually large ship unit (high gross weight/volume, high count, 0/unspecified count)
- Unusually small equipment group effective weight/volume
- Certain packing logic (e.g., Order Bundle Splitting, Large Order Splitting) running into issues with unusual ship unit counts
- A divide by zero error while determining item count
Solution
To address these issues, checks have been added at various entry points in the planning logic to stop erroneous data from being used in planning. The additions to the planning logic include:
- Identifying and failing early in the planning state when an unusually large order condition is found
- Fail the Conopt packing solution if the number of equipments packed exceeds a set threshold. This check will be performed as a quick check before packing as well as a checking during actual packing.
The above steps will avoid out-of-memory errors in the cases where erroneous order data/"bad data" are provided as input to planning. In all cases where a preemptive failures is triggered by these "bad data" situations - you will find the failures reported in the Exception logs as well as Diagnostics.
The following new properties have been added to support these newly added preemptive checks:
- glog.business.consolidation.bulkplan.orderMaxTotalWeight: This property specifies the maximum allowable total weight of an order.
- The default UOM (Unit of Measure) for weight in the planning domain will be used as the UOM for this weight. An order will fail to plan if its total weight is more than this value. The default value of this property is 10,000,000.
- glog.business.consolidation.bulkplan.orderMaxTotalVolume: This property specifies the maximum allowable total volume of an order.
- The default UOM (Unit of Measure) for volume in the planning domain will be used as the UOM for this volume. An order will fail to plan if its total volume is more than this value. The default value of this property is 1,000,000.
- glog.optimization.packingsolver.maxTotalPackedResources: This property specifies the maximum number of equipments that can be used in the packing solution.
- The default value of this property is 100,000.
This feature improves the resiliency of bulk planning by avoiding situations that have, in the past., lead to out-of-memory errors and system crashes.
Steps to Enable
You don't need to do anything to enable this feature.
Tips And Considerations
- Note on the default values provided for these robustness features. It is difficult to know where the memory threshold would be for any given customer, the default robustness values have all been set to values that will handle most all reasonably configured instances, but low enough to avoid out-of-memory errors.
- There remains a small possibility that your current configuration is successfully generating a number of options that is beyond the number set for the default values, but below the point where you would experience an out-of-memory error. In the unlikely case that you find yourself in that situation, you have the option to increase the values so they are above the shipped default values. We would - of course - suggest restraining yourselves from increasing the values to the point where you run the risk of hitting an out-of-memory error.
Use Improved Delete Shipments Action
This feature provides you with the option of using the improved/new delete shipment API when deleting shipments. The new API has been provided as an Optional Feature - to take advantage of the new faster Delete Shipment API, you will need to enable this optional feature.
When enabled your delete shipment requests will use the new Delete Shipment API. This includes delete shipment actions initiated via the Shipment Action Delete Multiple Shipments, the Delete Shipment Agent action and selecting and deleting multiple shipments via the shipment finder results UI.
The Shipment Action Delete Multiple Shipments action navigation path is - Shipment Management > Shipment Management > Buy Shipments or Sell Shipments > Actions > Shipment Management > Change Shipment Details > Delete Multiple Shipments.
In the example below, all three of the shipments related to shipment 06721 have been selected and the action Delete Multiple Shipments will be used to delete all of the selected shipments. When the optional feature is enabled this action will run using the new improved API.

Delete Multiple Shipments Shipment Action
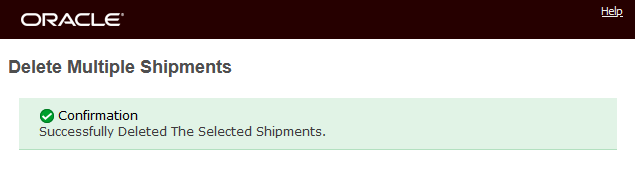
Result
As a reminder, the Delete Multiple Shipments checks to insure that all related shipments are selected, so shipment integrity is checked. In the example below one of the three related shipment is not selected, when the action runs an error message is displayed.

Not All Related Shipments Selected
When the optional feature USE IMPROVED DELETE SHIPMENTS ACTION is enabled, the Delete Shipment agent action will also use the new improved delete shipment API. Note the addition of Check Shipment Integrity option (explained below) for the Delete Shipment agent action.
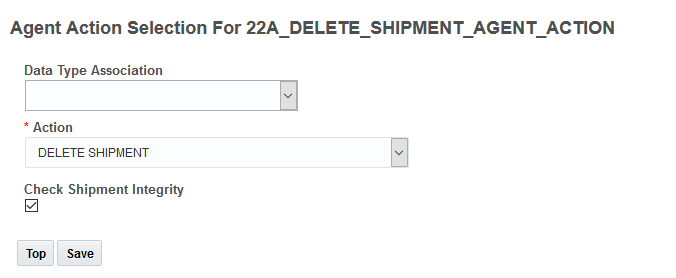
Delete Shipment Agent Action
Check Shipment Integrity
To handle the situation where not all of the related shipments are selected for deleting, the new API takes an additional parameter called Check Shipment Integrity with the default value of checked/true. When Check Shipment Integrity is true, the API will not delete shipments if there are still related shipments in database that are not going to be deleted. As the name implies, the intention here is to preserve the integrity of the data. In situations where data integrity does not need to be maintained after the delete, you can set the Check Shipment Integrity flag to false. When set to false, shipments with related shipments can be deleted (along with the related order movements) and the related order release(s) PLANNING status type will be updated to the status value of PLANNED - PARTIAL.
When enabled, the delete multiple shipments via the Shipment Finder Results will also use the new improved Delete Shipment API.

Finder Result Delete Shipment
For scenarios where many shipments are deleted at once, the new API provides significant performance improvements.
Steps to Enable
You don't need to do anything to enable this feature.
Historical Metrics - Components Added for Rate Distance, Rate Service and Rating
This feature extends the historical metric components available to you to include components for Rate Distance, Rate Service and Rating. You can use these new components to capture performance statics, monitor and compare the statistics over time, set different thresholds and have the system provide notification when performance falls outside of your defined thresholds.
Newly added components include:
- RATE DISTANCE
- External Distance Engine statistics. Tracks the performance of external distance engine.
- RATE SERVICE
- External Service Time statistics. Tracks the performance of external service engine.
- RATING
- Rate Costing - Base: Base cost rating statistics. Tracks the performance of base cost rating.
- RATING - INTERNAL: Rating within OTM.
- Rate Costing - Accessorial: Accessorial cost rating statistics. Tracks the performance of accessorial cost rating.
- RATING - INTERNAL: Rating within OTM.
- Rate Costing - Min: Minimum cost rating statistics. Tracks the performance of getting the absolute minimum charge that applies to the shipment.
- RATING - INTERNAL: Rating within OTM.
- Rate Costing - Max: Maximum cost rating statistics. Time to calculate the absolute maximum charge that applies to the shipment.
- RATING - INTERNAL: Rating within OTM.
- Rate Costing - StopOff: Stop off charges rating statistics. Tracks the performance of stop off charges rating.
- RATING - INTERNAL: Rating within OTM.
- Rate Costing - Quality: Quality Rating statistics. Tracks the performance of qualifying the shipment using Rate Quality ID.
- RATING - INTERNAL: Rating within OTM.
- Rate Costing - External: RatewareXL: RatewareXL rating engine statistics. Tracks the performance of external rating engine RatewareXL.
- RATING - EXTERNAL: Rating using external rating engine.
- Rate Costing - External: RatewareXL CC - Total: Total Carrier Connect XL rating engine statistics. Tracks the performance of external rating engine Carrier connect XL.
- RATING - EXTERNAL: Rating using external rating engine.
- Rate Costing - External: RatewareXL CC - Transit Time: Carrier Connect XL transit time statistics. Tracks the performance of Carrier Connect XL in getting the transit time.
- RATING - EXTERNAL: Rating using external rating engine.
- Rate Costing - External: RatewareXL CC - Rating: Carrier Connect XL rating statistics. Tracks the performance of RatewareXL for rating when Carrier connect XL rating engine is used for rating.
- RATING - EXTERNAL: Rating using external rating engine.
- Rate Costing - External: Generic<External System Gid>: Generic external rating engine statistics. Tracks the performance of Generic external rating engine.
- RATING - EXTERNAL: Rating using external rating engine.
- Rate Costing - Base: Base cost rating statistics. Tracks the performance of base cost rating.
NOTE: Metric type RATING - EXTERNAL is enabled by default, and RATING - INTERNAL is disabled by default.
This feature provides access to persisted metrics and statistics for Rate Distance, Rate Service and Rating that will help you identify and avoid performance issues.
Steps to Enable
You don't need to do anything to enable this feature.
Waybill Date - Rating Date for Shipment
This feature provides you with the option of specifying a Waybill Date on your shipment that will be used instead of the shipment start data in determining the rates that will be considered for rating the shipment. This new capability is available for both buy and sell side shipments and the Waybill Date field has been added to both the Shipment XML and the REST APIs. The Waybill Date is intended to be used to represent the date for contractual agreement of carriage i.e. the date the waybill was prepared.
You will find the Waybill Date to be useful in many scenarios, in particular for rail rule-11 shipments - where consecutive shipments are tendered under one waybill, but invoiced by multiple carriers, the Waybill Date field will allow you to set the billing date for the shipments in the rule-11 solution to the one waybill date under which all the carriers agreed to perform the service.
In the scenario below - Carrier35 has two rate records with different effective dates. The shipment in the first example is being planned with a shipment start time on the 15th of November, but the Waybill in this scenario is being finalized on the 8th of November - a week before the shipment is operationally starting. To support this scenario, the Waybill Date will be set to November 8th - which will impact the rates considered/used - but will not impact the timing of the shipment from an operational perspective.
In this setup Carrier35 has two rate records, one rate is effective until the 12th of November and a second rate is effective starting on the 14th of November.
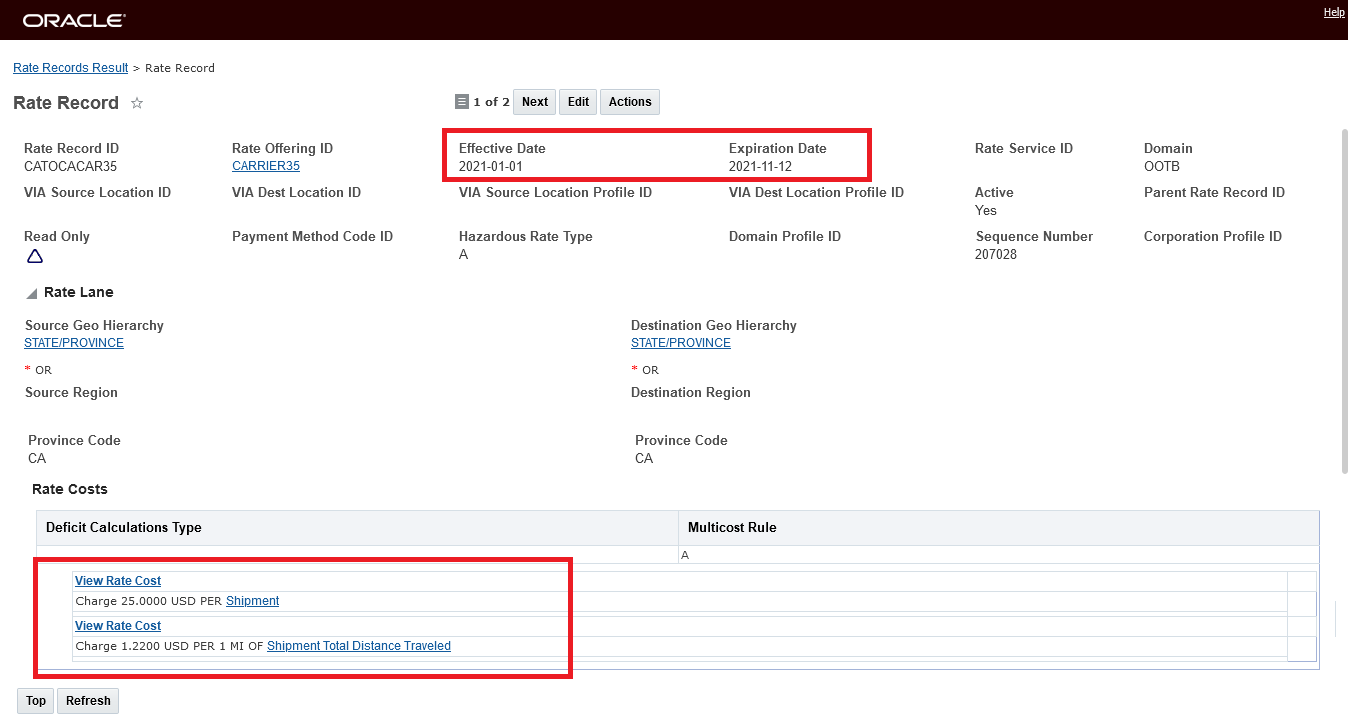
Rate Record - Expires on November 12th
The new rate record is effective on 11 14

Rate Record - Effective November 14th
The shipment below has as Start Time of November 15th, but the Waybill Date for the shipment needs to be November 8th. Without the Waybill Date entered, OTM plans and rates the shipment using the Start Time of the shipment - since the Start Time is November 15th - the rate that was effective on the rate that was effective on the 14th, NEWRATE_11_12_21 is used.
Shipment Planned on November 10th
Adding the required Waybill Date of November 8th on the shipment will allow the shipment to find the rate for the shipment considering the entered Waybill Date versus the default/standard behavior of using the Shipment Start Date.
Shipment Waybill Date Added November 8th
To recalculate the shipment considering the Waybill Date you can run either the Assign Rate action or the Rerate Redrive action - in this case the Rerate Redrive action is selected.

Rerate redrive action run
The result of the Rerate Redrive is below - note that the rate changes as desired, but the Shipment Start and End dates remain the same as before.
Rerate Redrive Action Run Result
The view of the shipment after the Waybill Date has been entered and the action Rerate Redrive was run is below. Note that the cost is now based on the rate that was effective on the date of the specified Waybill Date - Rate Record CATOCACAR35.

Shipment After Waybill date and Rerate Redrive
In the scenario below - using the same service provider (Carrier35) and rate records, The Waybill Date will be set to November 16th, a date/time that is later than the Shipment Start Time of November 10th. In this scenario the shipment will be rated with a higher rate than the rate that was selected based on the Shipment Start Date.
The shipment, as planned, is below, the Shipment Start Time is on November 10th and the selected rate is the rate that was effective on the 10th of November - CATOCACAR35 - no Waybill Date is provided.
Shipment As Planned
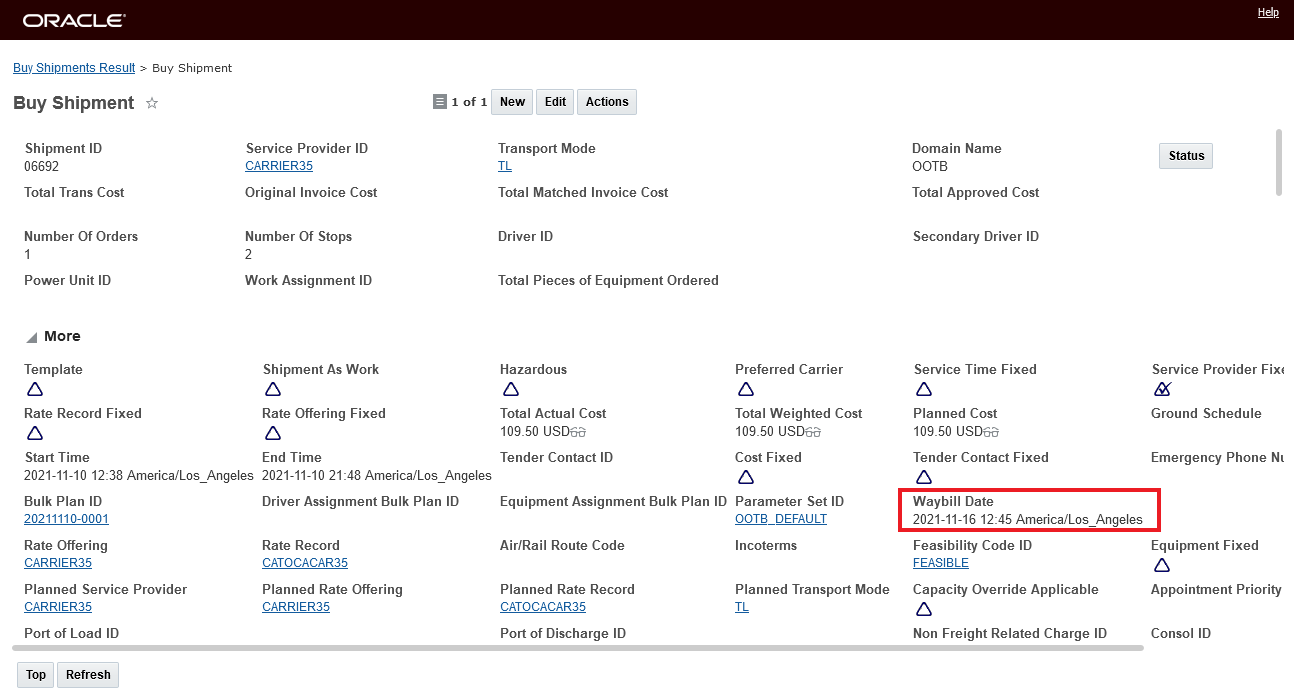
Waybill Date November 16th Added
When the action Rerate and Redrive is run, the shipment is re-rated using the rate that was effective on November 16th (NEWRATE_11_12_21) - but the Start Time of the shipment does not change.
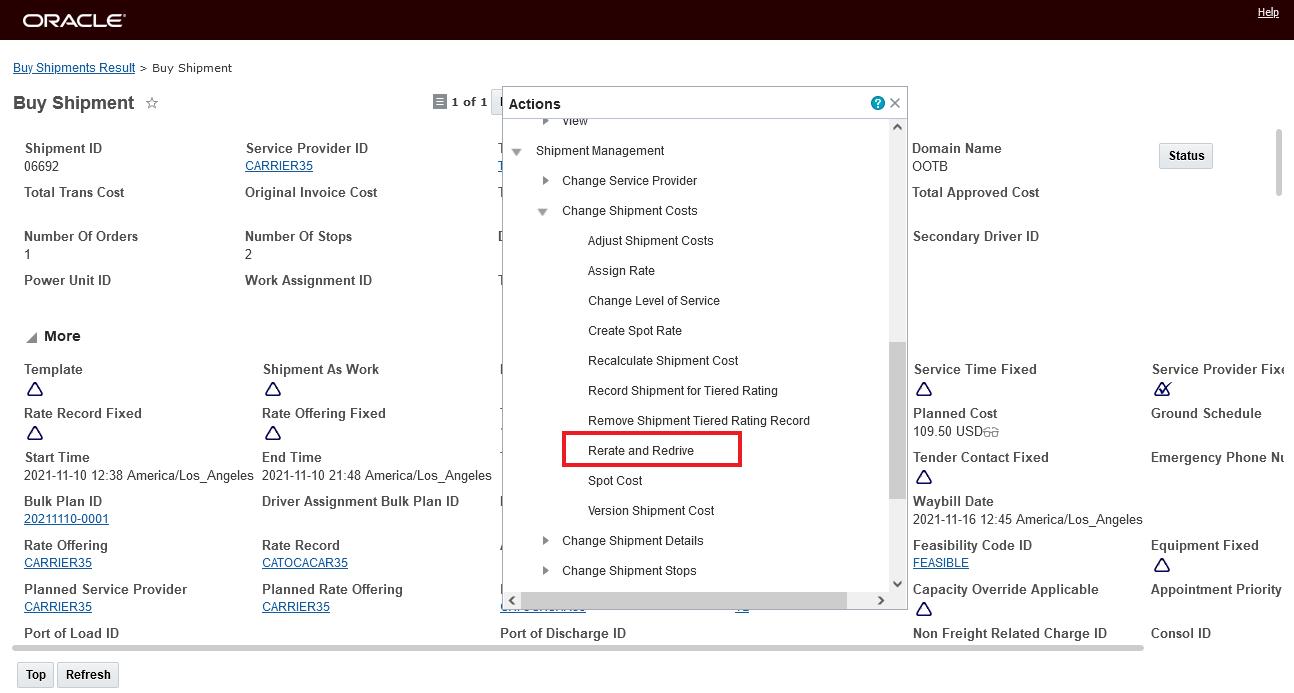
Run Rerate Redrive Action
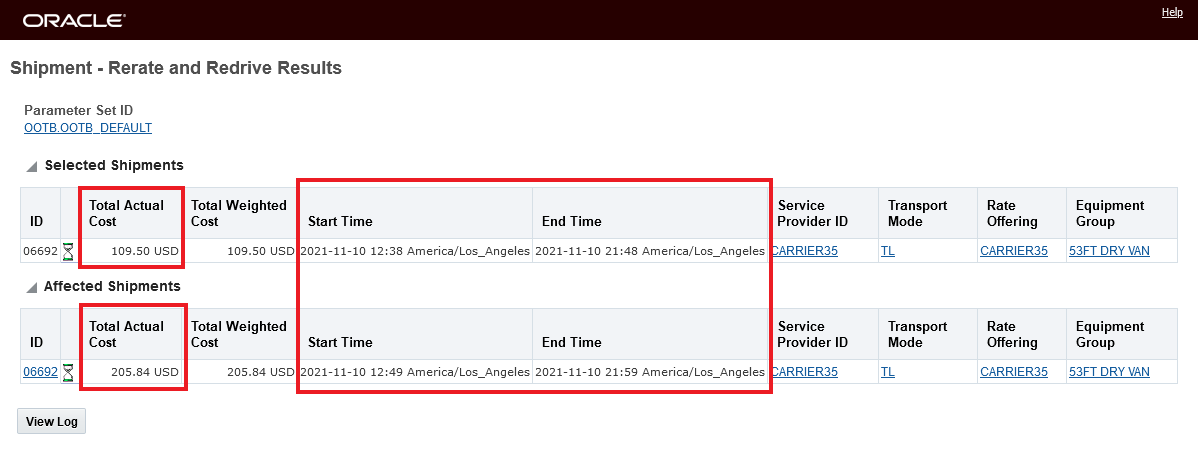
Rerate and Redrive Action Results

Shipment After Rerate and Redrive with Waybill Date of November 16th
Provides the ability for you to set the date used for rating of the shipment - a common requirement for Rail and other modes of transportation.
Steps to Enable
You don't need to do anything to enable this feature.
Rate Basis Item - Shipment Total Distance (Including Depot Stops)
This feature provides you with a single Rate Basis Item (RBI) - Shipment Total Distance (Including Depot Stops), that will calculate a shipment's total distance including the distance from the the Source Depot to the First Stop and the distance from the Last Stop to the Destination Depot stop. With the new Shipment Total Distance (Including Depot Stops) RBI, you can setup up a rate with a single RBI that will calculate the total distance and cost for your shipments for shipments with and without depot stops.
In previous versions of OTM, configuring a rate that would calculate the correct total distance and cost for shipments that involved depot stops required configuring three separate rate costs with three different RBIs.
- Shipment Total Distance Traveled
- Provides the sum of the distance between stops for all stops on a shipment, regardless of whether the equipment is loaded or empty, calculated using the rate distance assigned to a rate offering.
NOTE: The total distance for this rate basis does not include distances to and from a depot.
- Shipment Distance from the Source Depot to the First Stop
- Provides the distance from the source depot location to the first pickup stop location. It is calculated using the rate distance assigned to the rate offering.
- Shipment Distance from the Last Stop to the Destination Depot
- The distance from the last pickup/delivery stop to the destination depot calculated using the rate distance assigned to the rate offering.
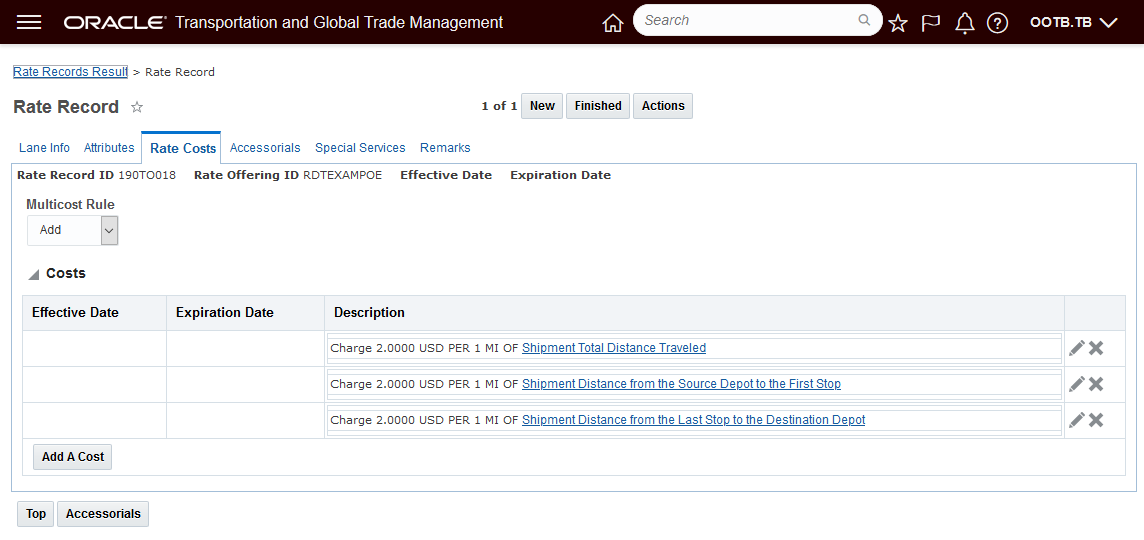
Previous Depot Shipment Total Distance Rating Setup
Now, you can simplify this setup and obtain the same results using the Shipment Total Distance (Including Depot Stops) RBI. The Rate Record Rate Cost setup below is equivalent to the setup above.
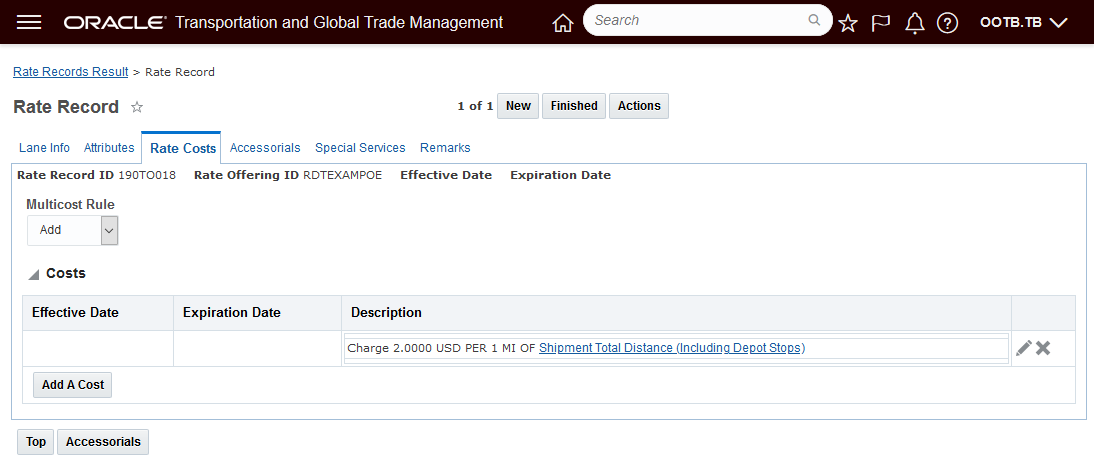
New Shipment Total Distance (Including Depot Stops) RBI
This feature simplifies the setup and rate maintenance required for the rates used to calculate the distance and cost for shipments that (may) include depot stops.
Steps to Enable
To take advantage of this feature you will need to either create new rate records that define their Rate Cost using the new Shipment Total Distance (Including Depot Stops) RBI or update your rate records that were using the three RBI Rate Cost setup and convert them to the new single Shipment Total Distance (Including Depot Stops) RBI setup.
Tips And Considerations
Note, the Shipment Total Distance (Including Depot Stops) RBI does not support a calculating different costs for the different distance segments involved in a depot stop shipment i.e., the distance from the the Source Depot to the First Stop, the distance from the Last Stop to the Destination Depot stop and the distance from the Pickup Stop to the Final Delivery Stop. The Shipment Total Distance (Including Depot Stops) RBI assume a single rate per distance for the entire shipment. If you have different rates for the different segments of the shipment, than the three RBIs is the correct setup.
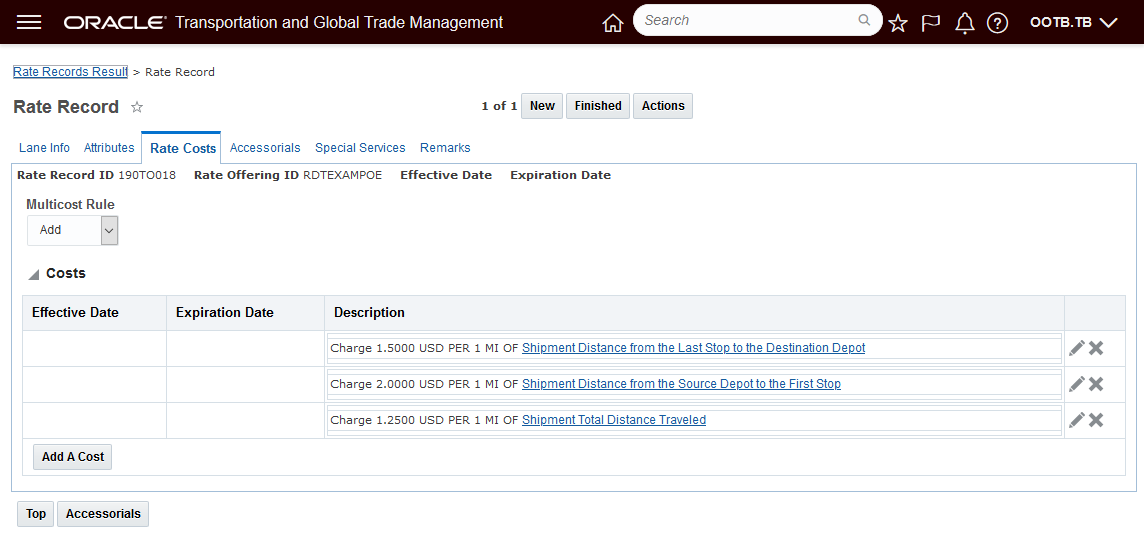
Three RBIs for Different Per Mile Rates
Finder Result with Voyage Arrival/Departure Times At Port Locations
This feature allows you to configure your Buy Side Shipment finder results to include additional columns to display the Depart and Arrive Voyage Locations and the Depart and Arrive Activity Date/Time information for your Ocean Shipments that are planned using Vessel schedules.
In the example below, the finder results have been configured to include the Arrive and Depart columns. This configuration provides you with information about both the Ocean Shipment Start and End times - which includes - in this example - both cutoff time and recovery time as well as information about the voyage departure time from USNYC and arrival time at BEANR.

Configured Finder Results with Depart/Arrive Activity Times
This feature enhances the information readily available to you for planning and tracking your ocean shipments.
Steps to Enable
To benefit from this feature you will need to modify and/or create a screen set that is configured to display the new columns.
To setup the new columns do the following.
- On your Buy Shipment Finder Results tab. Select the Voyage Port Dates (P) field and provide your desired label and width as shown below for creating the Depart column..
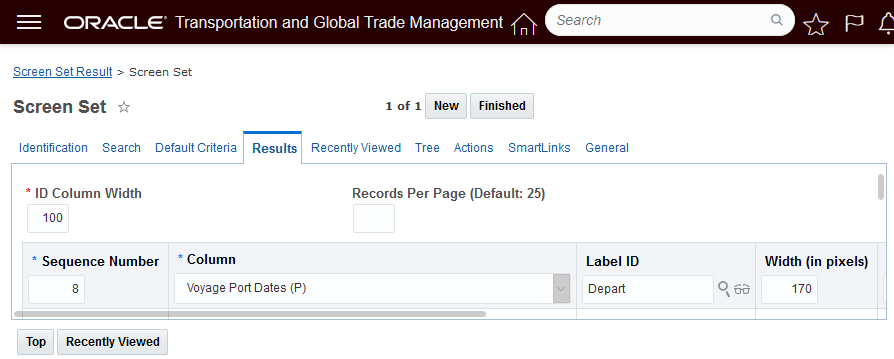
Setup - Departure Column
- When you save the above entry you will need to define the activity type to display "D" for Depart or "A" for Arrive. The selection for Depart "D" is below.
Specify Activity D - Depart, A - Arrive
- Select the Voyage Port Dates (P) field again - but this time enter the desired label and width as shown below for creating the Arrive column.
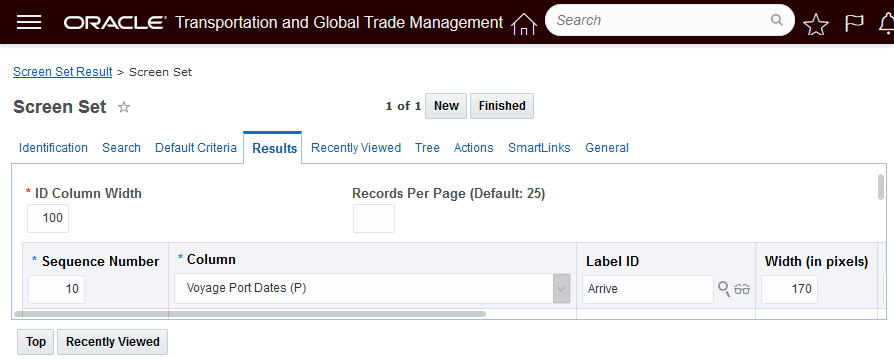
Setup - Arrive Column
- When you save the above entry you will need to define the activity type to display "D" for Depart or "A" for Arrive. The selection for Arrive "A" is below.
Specify Activity D - Depart, A - Arrive
The screen set below is what was used for the example shown.
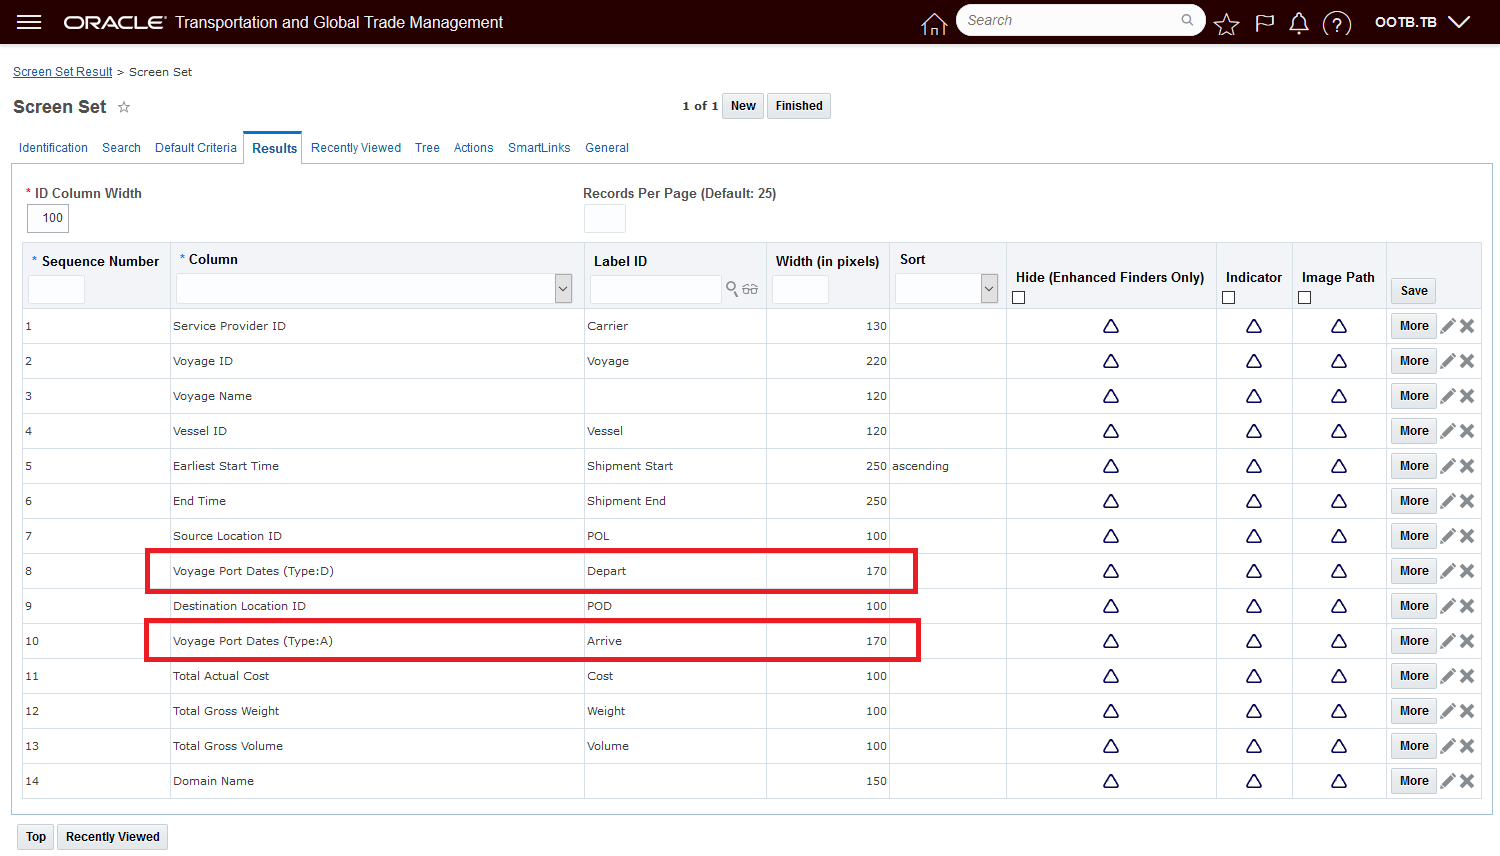
Example Screen Set
Tips And Considerations
Note that the time provided for the Depart and Arrive activities are provided using the Coordinated Universal Time (UTC) time standard.
Vessel and Vessel Manager Enhancements
This feature upgrades the Vessel Manager to a true Manager Layout, which provides you with the option of configuring the Vessel Manager Edit and/or View manager layouts. This feature also extends the Vessel object to include the standard set of User Defined Fields that you can add to your configured Edit and View Manager Layouts and your Finder and Finder Results Screen Sets.
Vessel Manager - Configured Manager Layout Example
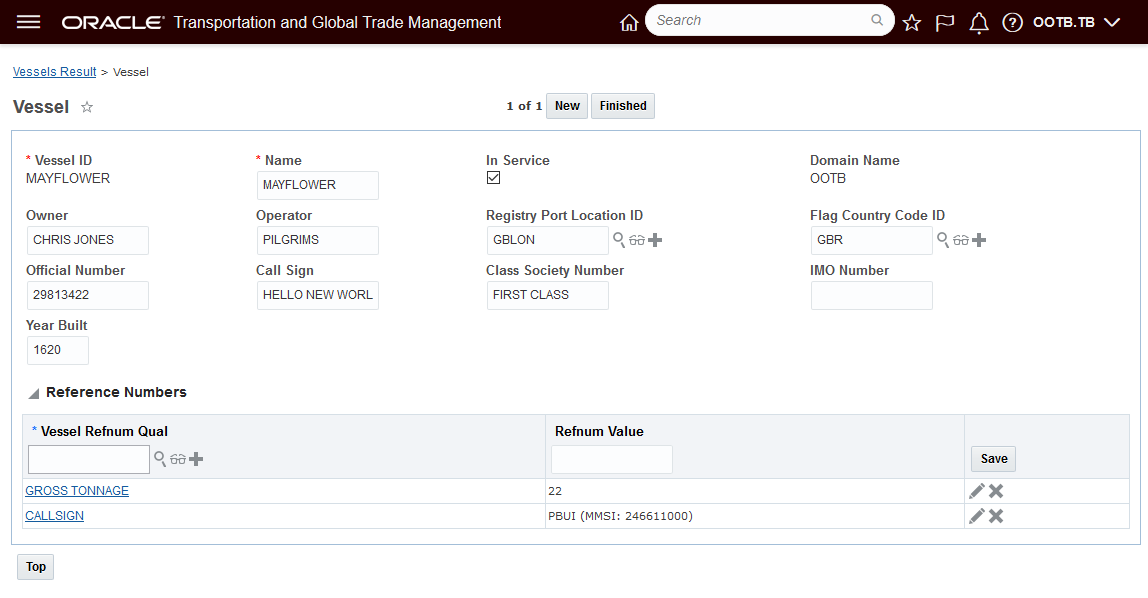
Vessel Manager - Public Manager Layout
User Defined Fields added to the Vessel object include the following fields:
- 20 - VARCHAR(150) ATTRIBUTE Fields
- 10 - NUMBER Fields
- 10- DATE Fields
Allows you to configure and simplify the Vessel Edit and View managers so they are tailored to your implementation requirements.
Steps to Enable
The ability to configure your Vessel Edit and View screens is enabled by default, to take advantage of this feature you would need to do the following:
- Copy the Public Vessel Manager Layout Edit or View.
- Modify the Edit or View managers as desired
- Save the changes and modify your Vessel Screen Set to use your newly configured Vessel Managers.
Add Business Number Generator to Ground Schedules
With this feature, you now have the ability to use a business number generator (BNG) to generate the ID for your Ground Schedules. Using BNG simplifies the ground schedule creation process by automating the generation of the Ground Schedule ID while also providing structure around the naming convention used in generating your Ground Schedule IDs.
This feature provides you with a new BN Rule BN Type of GROUND_SCHEDULE_GEN_XID that allows you to specify the Rule Definition and BN Generator for generating your Ground Schedule IDs. The BN Type of GROUND_SCHEDULE_GEN_XID supports a Date and Sequence option like {dddddddd:id=1}-{nnnn:contexts=1:start=1} or just a Sequence option like {nnnnn:start=1} for generating your Ground Schedule IDs.
In the example below - the first Ground Schedule for the 20th of September 2021 has been created - 20210920-0001.

BNG Ground Schedule ID
This feature simplifies the ground schedule creation process and provides you with some structure around the naming convention (date and sequence, sequence etc.) used for the Ground Schedule ID. In addition, with a more structured/standard Ground Schedule ID, searching for ground schedules becomes easier and duplicate foreign key errors can be avoided when users accidently attempt to create new Ground Schedule Ids that already exists.
Steps to Enable
To enable this feature you will need to setup a Business Number Generator Rule for your Ground Schedules. Business Process Automation > Power Data > Business Numbers > Business Number Rule.
Below are two examples of the rules you might consider setting up.
The first example below shows the BN Rule setup to generate Ground Schedules with a date and sequence number. The example shows the setup and the BN Test Results for this configuration.
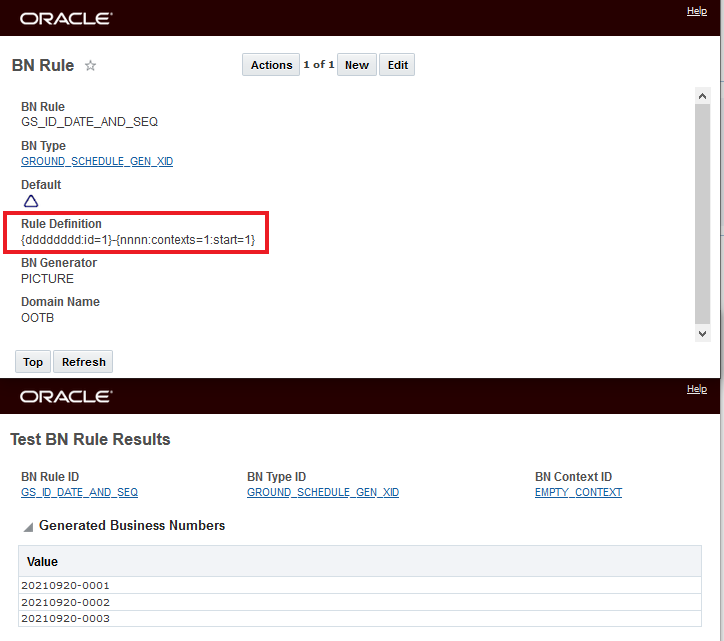
Date and Sequence Number BNG Setup
The second example, below, shows the BN Rule setup to generate Ground Schedules with just a sequence number. The example shows the setup and the BN Test Results for this configuration.

Sequence Number BNG Setup
Decline Reason Code Mandatory for Service Provider Decline and Planner Withdraw/Declines
This feature provides you with two new properties that you can configure to require that your Service Provider and/or the Planner provide a Decline Reason Code when your Service Provider user Declines a tender or your Planning user Withdraws or Declines a tender.
The two properties that you will use to control this behavior are:
The property glog.webserver.tender.ui.planner.declineReasonRequired supports the Planner Withdraw & Decline tender scenario - the default value is false i.e., the Decline Reason Code is not mandatory - setting the property to true will make the Decline Reason Code mandatory.
The property glog.webserver.tender.ui.servprov.declineReasonRequired supports the Service Provider Decline tender scenario. the default value is false i.e., the Decline Reason Code is not mandatory - setting the property to true will make the Decline Reason Code mandatory.
In the examples below - both the properties are false, the default behavior - the Decline Reason Code is not required.

Planner Select the Action to Decline or Withdraw the Tender

Action Input Screen - Decline Reason Code Not Mandatory

Withdraw or Decline Completed Without Decline Reason Code

Service Provider Decline Decline Reason Code Not Mandatory
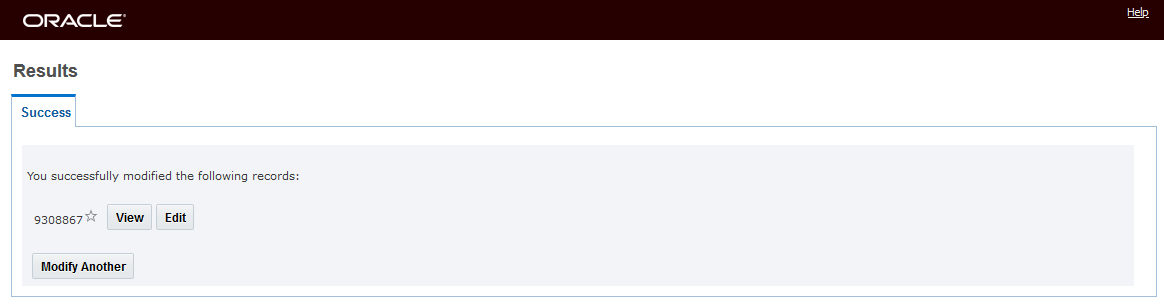
Decline Processed with No Warnings
In the examples below - both the properties are set to true, the Decline Reason Code is now required.
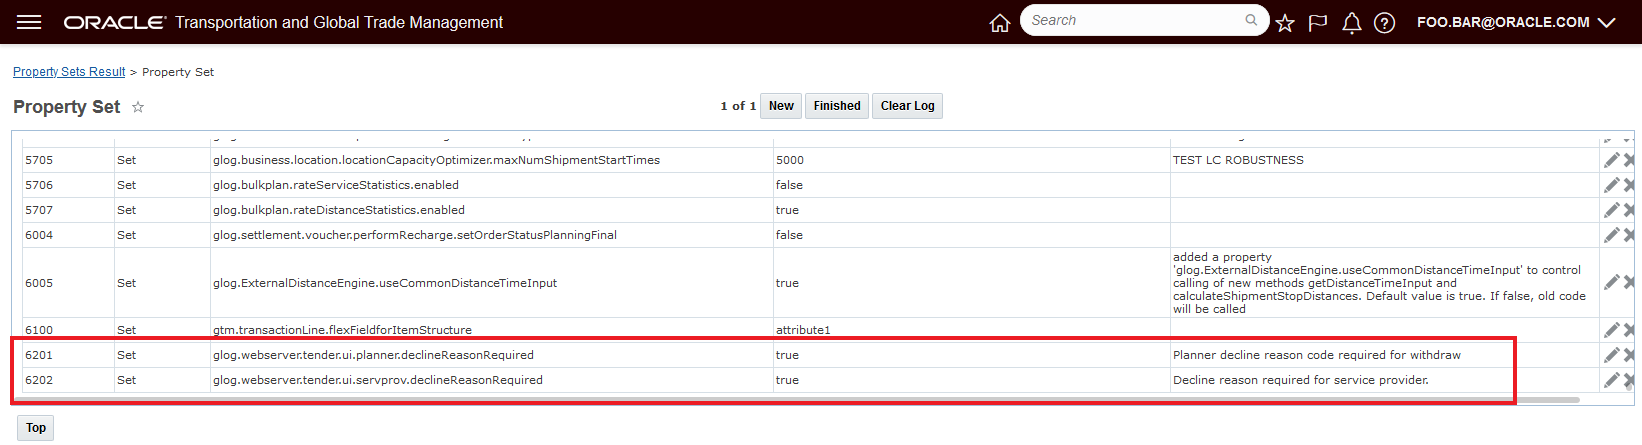
Properties Set to True
For the Planner use case with the property glog.webserver.tender.ui.planner.declineReasonRequired set to true - the Planner's Withdraw or Decline action now requires a Decline Reason Code be provided.

Planner Select the Action to Decline or Withdraw the Tender
With the property glog.webserver.tender.ui.planner.declineReasonRequired set to true the Planner's Withdraw or Decline action now requires a Decline Reason Code be provided.
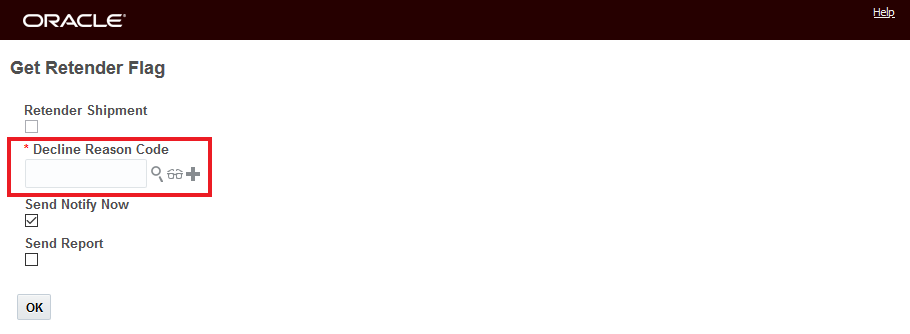
Planner Decline or Withdraw Action Now Requires a Decline Reason Code
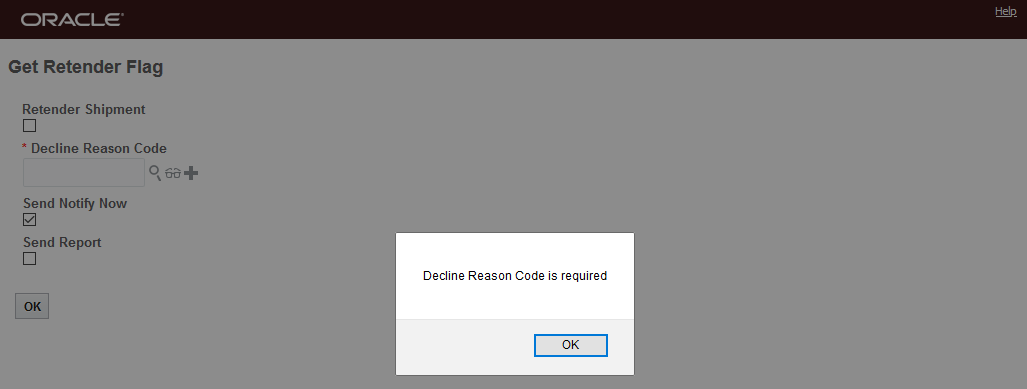
Hitting OK Without a Reason Code Provides an Error
Below is the Service Provider use case with the property glog.webserver.tender.ui.servprov.declineReasonRequired set to true. The Service Provider Decline tender scenario now requires a Decline Reason Code.
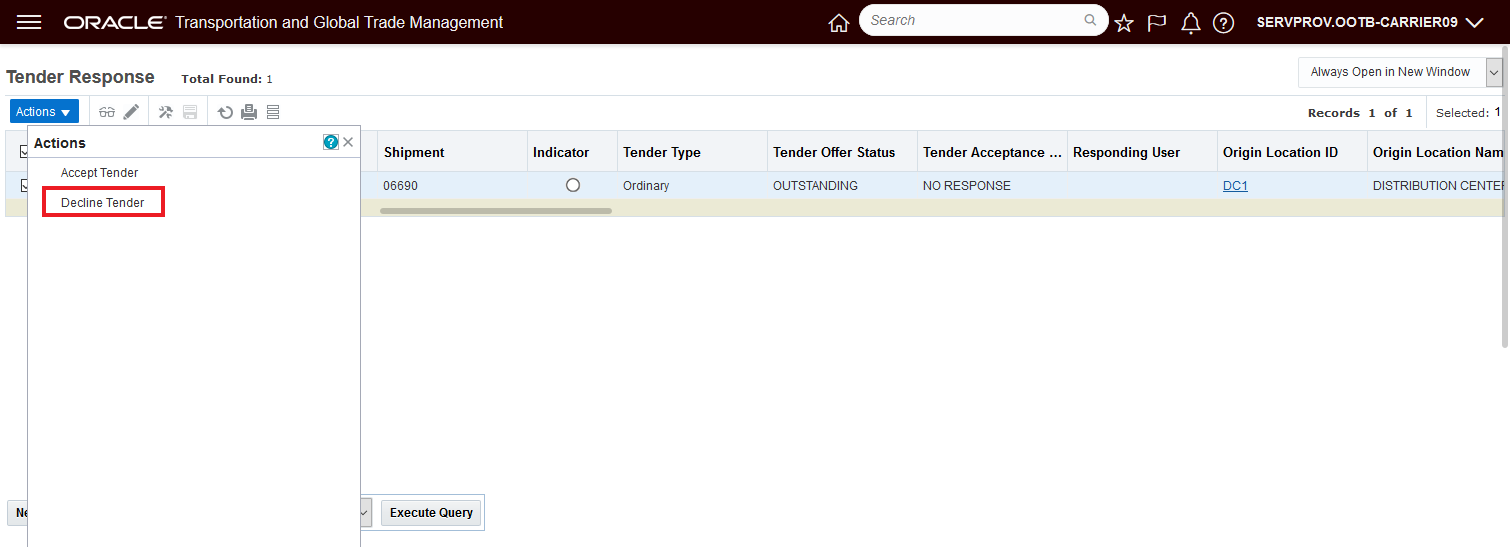
Service Provider Selects Decline
With the property glog.webserver.tender.ui.servprov.declineReasonRequired set to true the Service Provider Decline tender scenario now requires a Decline Reason Code.

Service Provider Decline Action Requires a Decline Reason Code

Attempt to Finish Without Decline Reason Code Error Message
Provides insight into the reason for Service Provider tender Declines as well as Planner initiated Withdraws and Declines - important information to gather in an extremely resource constrained market.
Steps to Enable
To take advantage of the new behavior - mandatory Decline Reason Code entry for either the Planner or Service Provider scenarios you will - depending on your requirements - need to set one or both of the provided properties to true.
To change the properties:
- Navigate to Configuration and Administration > Property Management > Property Sets
- Select the Property set to modify.
- Set one or both of the properties as for your desired usage
- The property glog.webserver.tender.ui.planner.declineReasonRequired supports the Planner Withdraw & Decline tender scenario - the default value is false i.e., the Decline Reason Code is not mandatory - setting the property to true will make the Decline Reason Code mandatory.
- The property glog.webserver.tender.ui.servprov.declineReasonRequired supports the Service Provider Decline tender scenario. the default value is false i.e., the Decline Reason Code is not mandatory - setting the property to true will make the Decline Reason Code mandatory.
NOTE: Only the DBA.ADMIN user can access and use the Property Sets page.
Special Service Activity Time at Source Considering Shipment Destination
This feature extends the Special Services definition to support adding fixed stop time to the source location based on the shipments final destination location. You will find this feature useful in situations where the time required for preparing a shipment at the source is different based on your shipment's final destination.
Along with new business logic to properly identify and apply the additional activity time, this feature provides a new Select a Default for Source/Dest option L - Lane on the Special Service manager. This new L- Lane option is in addition to the already available Select a Default for Source/Dest options of S - source, D - destination, or B - both stops. For the special L - Lane based use case option, when the special service is entered on the destination location (last drop-off location) the special service will be applied to the source location (first pick-up location) of the shipment using the Location Activity Time Definition for the special service defined on the source location.

New L Lane Based Option for Default Source/Dest configuration
In the example below - the default load time at the source location is - MATERIAL SOURCE - is 1 day fixed, however, in the case where the shipment's final destination is ATLANTA RAIL RAMP, the total activity time at the source location will be doubled to 2 days - as shown below.
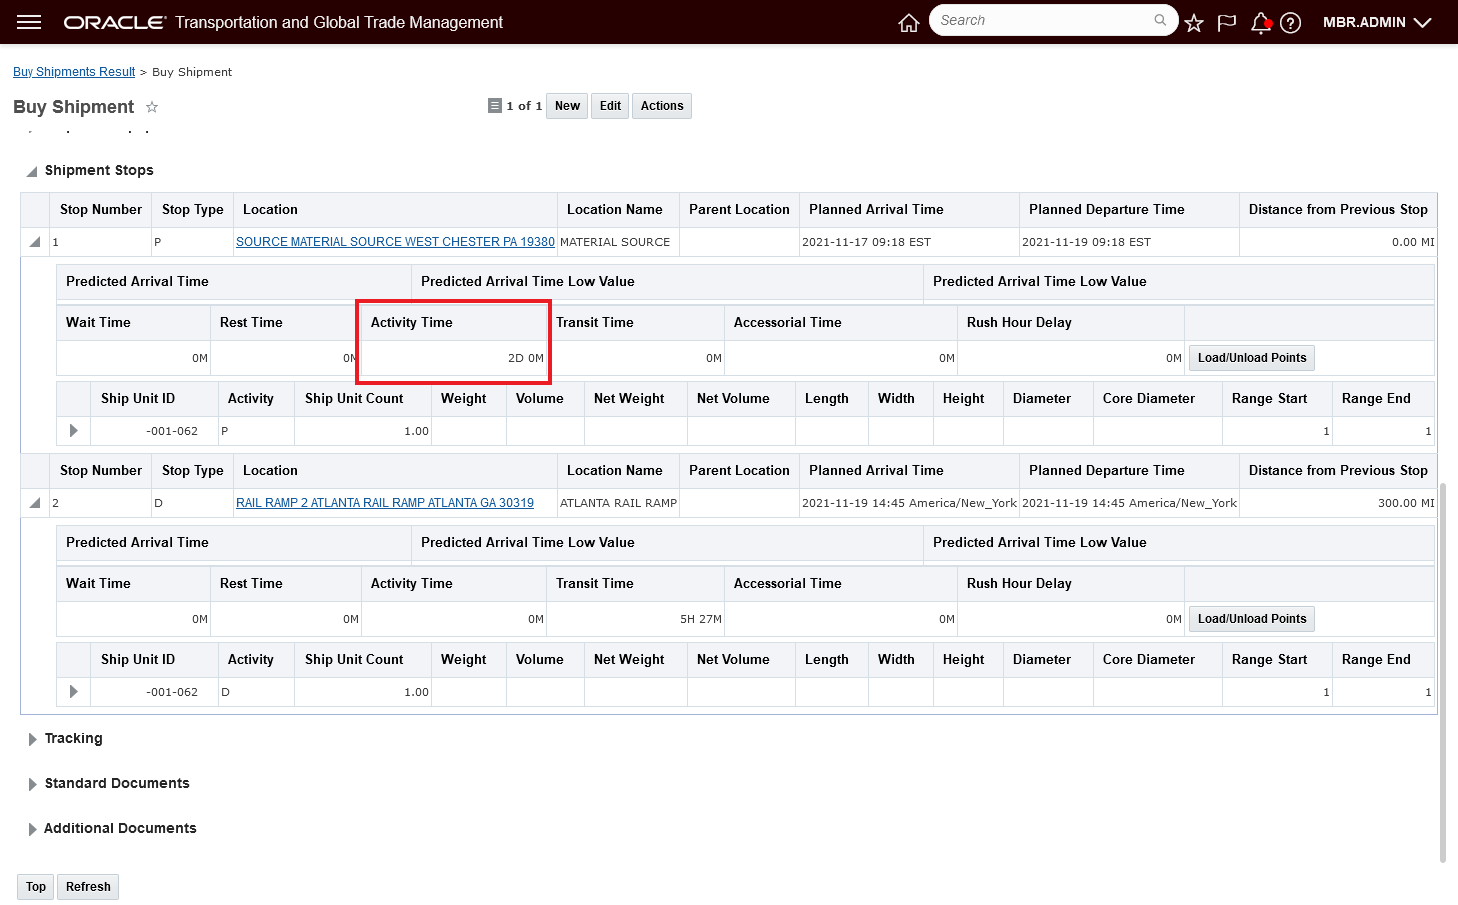
Desired Activity Time Calculated - 2 Days
To support this scenario, a Special Service must be defined as shown below with the Select a Default for Source/Dest option set to L - and with the Activity Type set to LOAD.

DWELL - 2 Days Special Service
On the source location, the Location Activity Time Definitions must be configured for the defined special service. In this case, the RAMP - 2 DAYS Activity Time Definition is used to configure the activity time added for the Special Service DWELL - 2 DAYS. In addition, a default load time at the source location of 1 day fixed has also defined. The Location Activity Time Definition - DEFAULT LOAD TIME will add a 1 day fixed load time activity by default. The additional default activity time has been added to highlight the fact that the activity times are cumulative - so in this case 1 day default fixed plus the additional 1 day fixed when the Lane based special service applies.
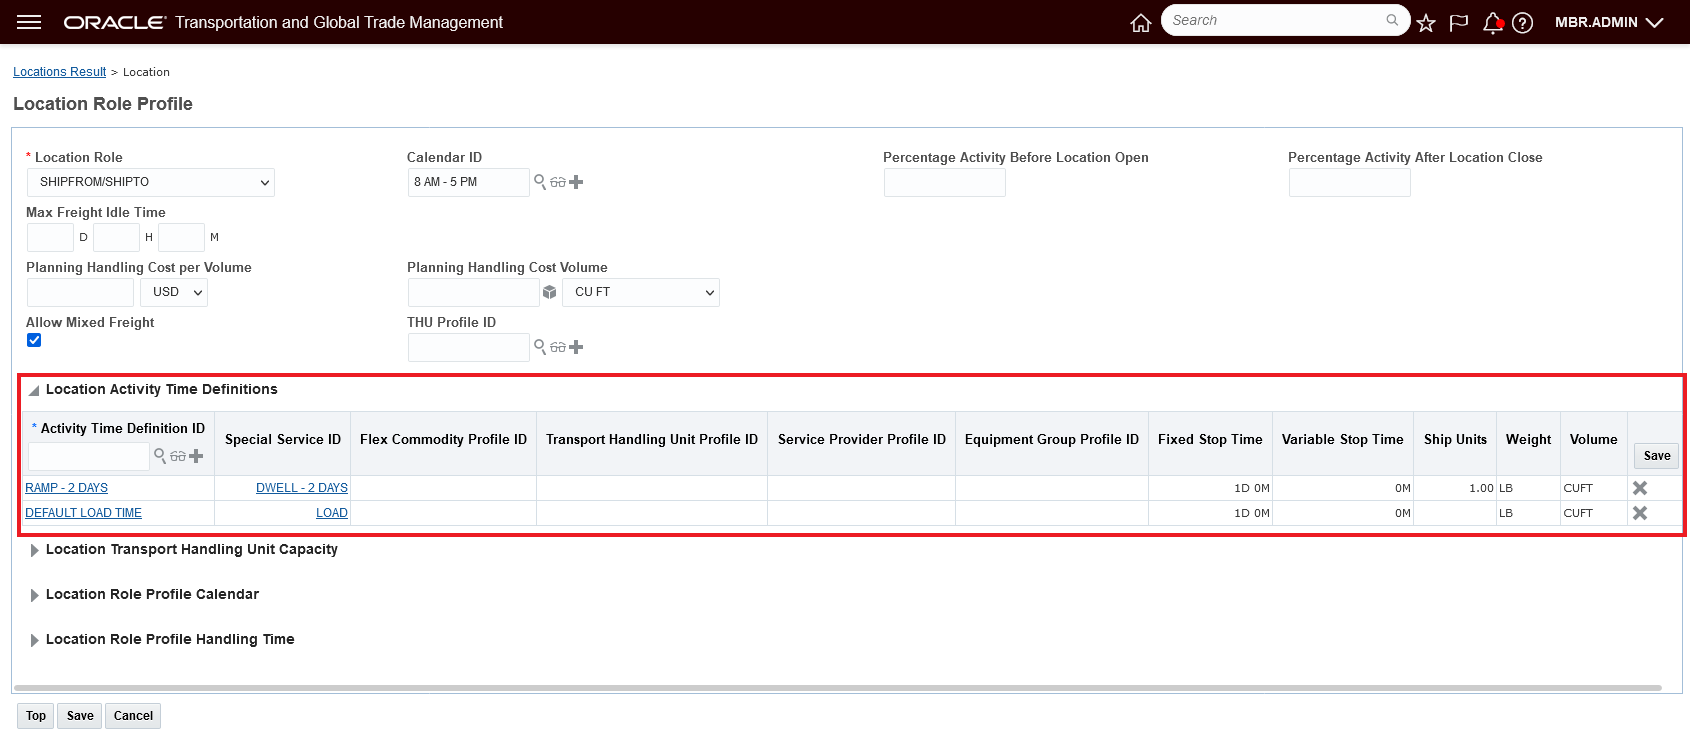
Source Location Activity Time Setup

RAMP - 2 DAYS Activity Time Definition
For the destination where the additional activity time should be added to the source location, the Special Service DWELL - 2 DAYS must be assigned. In this example, the DWELL - 2 DAYS special service is added to the ATLANTA RAIL RAMP location.
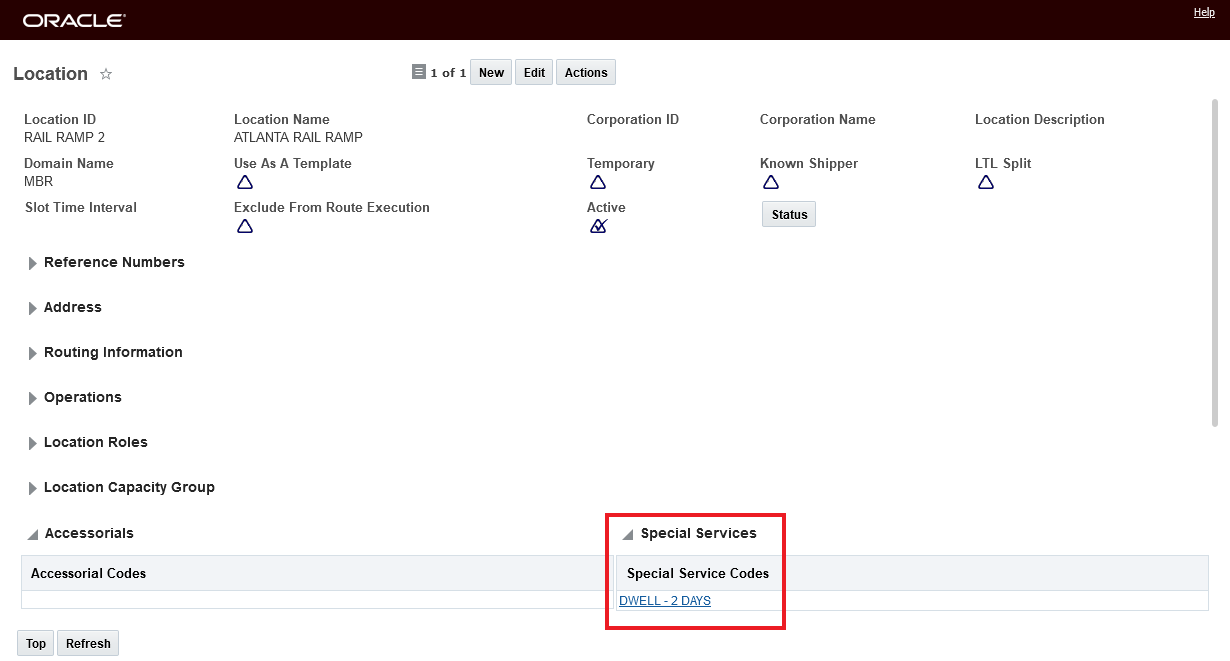
Destination Location Setup
Provides you with the option of having loading times at the source location influenced by the shipments final destination location. This feature will be extremely useful in situations where additional loading time is required based on the transportation hub involved in your shipping scenario - for a specific rail ramp, port location, or airport.
Steps to Enable
- Create a special service - and set the Default for Source/Dest option to L.
- Configure the Location Activity Time Definition for the specific service on the source location
- Add the newly created special service to the destination locations where the additional activity time for the source location is required.
Tips And Considerations
For the Lane (L) based special service, only the Fixed Stop Time in the activity time definition will be considered, variable stop time will not be considered even if you have it specified on the Special Service.
Property to Ignore Shipment Tender Status for Service Provider Set Appointments
This feature provides you with a new property - glog.appointment.servprov.ignoreShipmentTenderStatus - that allows your Service Providers to set appointments for shipment stops ignoring the current constraint related to the shipment tender status. Previously - for a Service Provider setting appointments - the shipment tender status was required to be either Accepted, Booked or Pickup Notification. Now, with the glog.appointment.servprov.ignoreShipmentTenderStatus property set to true - your Service Providers can set appointments regardless of the shipment's tender status.
Today - when a Service Provider uses the Appointment Management feature to set an appointment for a shipment - the shipment must be in one of the accepted tender status values - Accepted, Booked or Pickup Notification. If the shipment is not in one of the accepted status values (in this case Secure Resources Not Started) then an error is raised.

Service Provider Spring Board Navigate to Appointment Management
Within the Appointment management Workbench, if your Service Provider runs the Set Appointment actions against a shipment not in one of the accepted tender status values an error is raised.
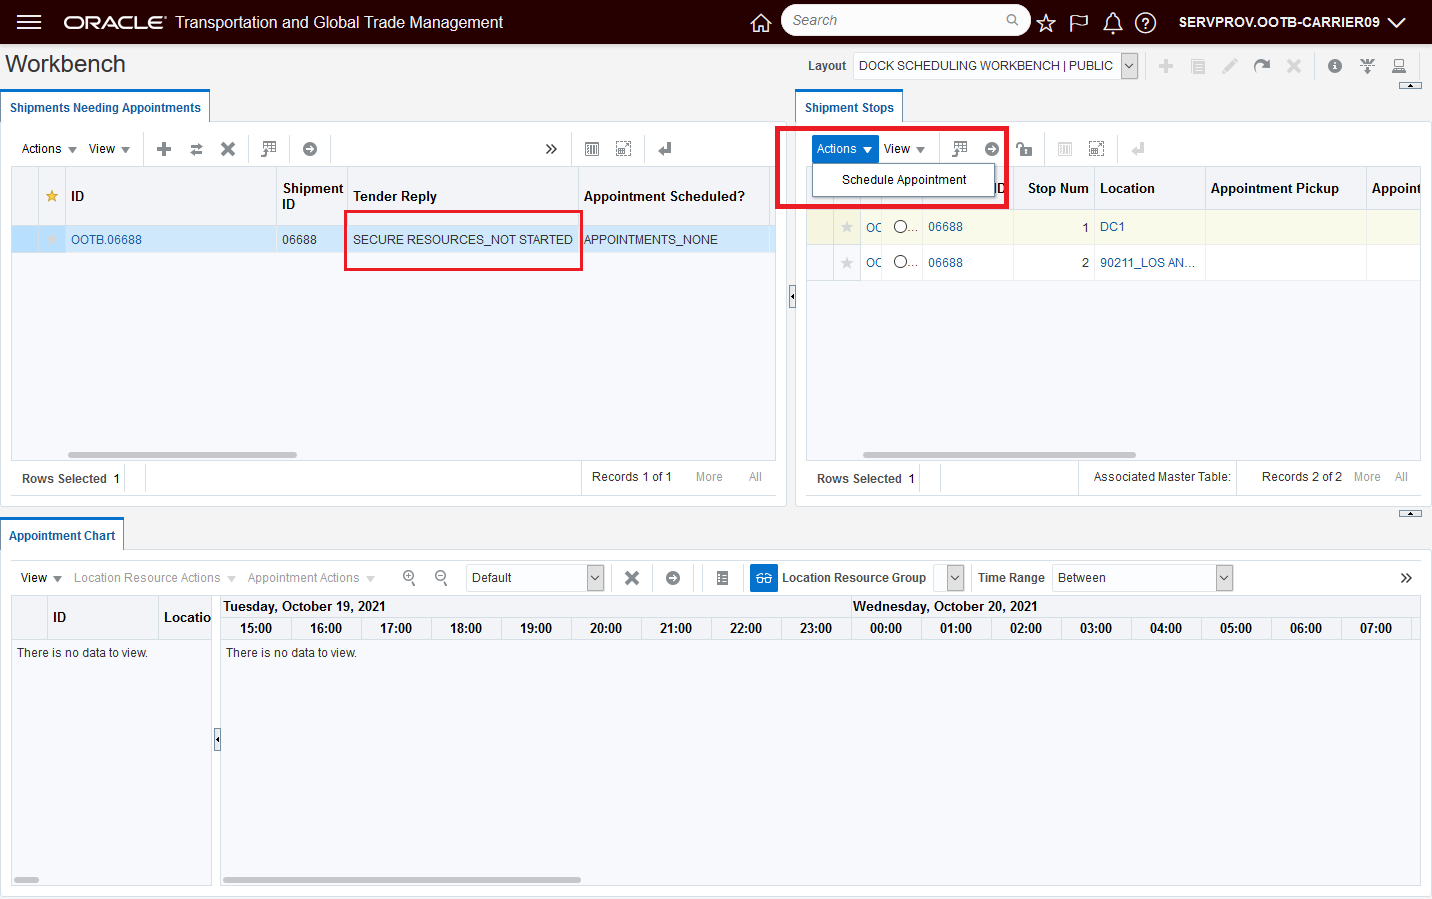
Run Schedule Appointment Action
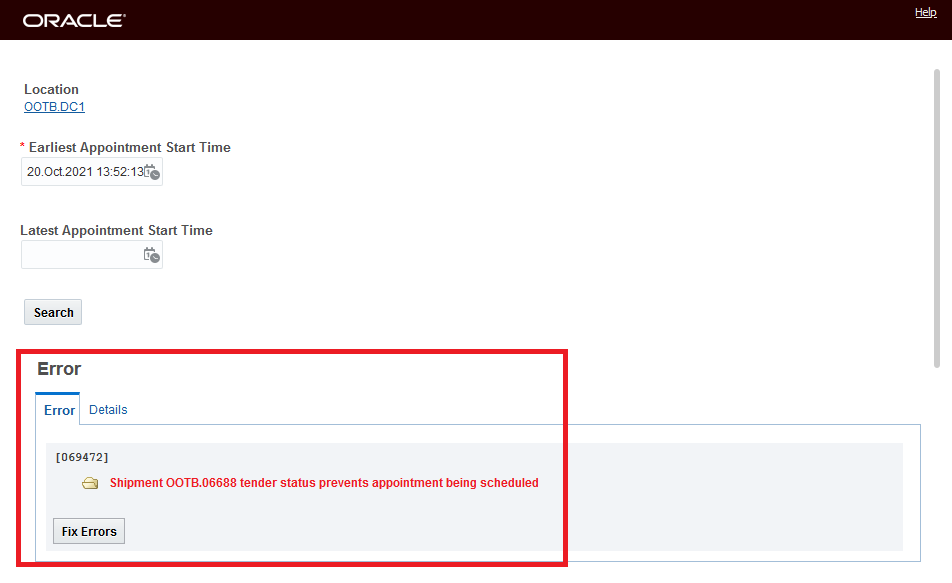
Tender Status Error Message
Setting the property glog.appointment.servprov.ignoreShipmentTenderStatus property to true, as shown below - will allow the same shipment in the same status to have the appointment scheduled.
Set Property
Now when the Set Appointment action is run against the same shipment logged in as the Service Provider - no error is displayed and appointment options are provided.
No Error Related to Tender Status
This feature allows you, for your service providers who are responsible for setting appointments, but are not involved in a booking/tendering process (like a fleet or dedicated fleet) - to set appointments without worrying about the shipments tender status.
Steps to Enable
To take advantage of the new behavior - ignoring the tender status, you will need to set the property glog.appointment.servprov.ignoreShipmentTenderStatus to true.
- Navigate to Configuration and Administration > Property Management > Property Sets
- Select the Property set to modify.
- Set the property glog.appointment.servprov.ignoreShipmentTenderStatus to true.
NOTE: Only the DBA.ADMIN user can access and use the Property Sets page.

Set Property to True
Tips And Considerations
NOTE: This feature applies to User Role Id = ServProv User Roles - other User Roles do not have this constraint and have the ability to set appointments without being constrained by the tender status.
Perform Recharge Action Order Release Sell Shipment Status to Allow Sell Shipment Delete
This feature provides you with the option to configure OTM so that when the Perform Recharge action is run, the related order release(s) have their status type value for the status type PLANNING_SELL set to a value of PLANNING_PLANNIED - FINAL - a status value that will allow the Sell Shipment created as part of running the Perform Recharge action to be deleted.
In previous versions, the order release status type of PLANNING_SELL would be not be changed, and would remain as PLANNING_SELL_NEW, this status value does not allow the related Sell Side Shipment to be deleted.
This new behavior is controlled with the property glog.settlement.voucher.performRecharge.setOrderStatusPlanningFinal.
The default value is true - when set to true when you execute the Perform Recharge action, the order release status value will be set as 'PLANNING_SELL_PLANNED - FINAL' for the 'PLANNING_SELL' status type, this status value will allow the created sell side shipment to be deleted.
When the property is set to false, the order release status type of PLANNING_SELL will remain unchanged, with a value of PLANNING_SELL_NEW, this status value will not allow the related Sell Side Shipment to be deleted and the error message (below) will be displayed.
Status Related Error Message on Sell Side Shipment Delete
This feature provides you added flexibility for deleting sell side shipments that you have generated for Recharge purposes.
Steps to Enable
The new behavior is on by default, i.e., the property glog.settlement.voucher.performRecharge.setOrderStatusPlanningFinal default value is true, meaning the status value on the order release will be changed to PLANNING_PLANNIED - FINAL when the Perform Recharge action is run. If you would prefer the previous behavior - where the status value was not changed, then the property glog.settlement.voucher.performRecharge.setOrderStatusPlanningFinal should be set to false.
To change the property glog.settlement.voucher.performRecharge.setOrderStatusPlanningFinal
- Navigate to Configuration and Administration > Property Management > Property Sets
- Select the Property set to modify.
- Set the property glog.settlement.voucher.performRecharge.setOrderStatusPlanningFinal to false - to revert to the original behavior or true to support the new behavior.
NOTE: Only the DBA.ADMIN user can access and use the Property Sets page.
Equipment Reference Unit Management
This feature provides you with a number of enhancements related to the visibility and usage of Equipment Reference Units (ERU).
Shipment Ship Unit screen:
- New Equipment Reference Units grid added to Shipment Ship Unit Manager.
- New 'Fixed ERU Count' check box indicates whether the system uses Equipment Reference Units (ERU) defined on the shipment ship unit or the ERU is derived from orders. The Fixed ERU Count check box allows you to preserve the ERUs that you edited on shipment ship unit.

Shipment Ship Unit UI Changes
Shipment View Screen:
Add an Equipment Reference Units grid with totals calculated for each Equipment Reference Unit ID.

View Shipment Shipment Ship Unit Equipment Reference Unit
This feature improves the visibility and management of Equipment References Units throughout the entire transportation life cycle - providing more visibility and control for how ERUs are used and managed.
Steps to Enable
You don't need to do anything to enable this feature.
The optional feature, USE S SHIP UNIT EQUIP REF UNIT - when Opted In (set to true) enables the following Equipment Reference Unit Management functionality:
- Persist the s_ship_unit_equip_ref_unit records
- Loading the s_ship_unit_equip_ref_unit records
- Allows the user to add/edit s_ship_unit_equip_ref_unit records in the s_ship_unit manager
- Provides access to the is fixed ERU count field on s ship unit editor
- Displays the new Shipment Ship Unit Equipment Reference Units in More for shipment viewer
- Allows the s equipment equipment reference unit section to query the s_ship_unit_equip_ref_unit record
- Recalc of ERU utilization looks at the s_ship_unit_equip_ref_unit record
- Does not ignore the s_ship_unit_equip_ref_unit records thru integration, i.e. support persist, and export
This optional feature provides you with a way to easily turn on and off access to the enhanced and improved Equipment Reference Unit Management capabilities.
Steps to Enable
You don't need to do anything to enable this feature.
Tips And Considerations
Setting the Use S Ship Unit Equip Unit to false/off turns off the newly added Equipment Reference Unit Management features.
Trimble PC*MILER Class Overrides for National Network
This feature extends the ALK parameters you can use to configure PC*MILER (ALK) to include the Class Overrides for the National Network feature. The available options for the ALK Class Overrides parameter include NONE, Fifty-Three Foot, National Network, and Fifty-Three Foot and National Network. You should review the PC*MILER documentation to determine which of these options, if any, are right for your implementation.

PC*MILER (ALK) Class Overrides
Expands the parameters available to you for configuring your usage of PC*MILER.
Steps to Enable
To take advantage of the new Class Overrides parameter for PC*MILER (ALK), you will need to either create a new External Distance Engine and configure the new setup to include the desired value for the Class Overrides parameter, or, you can modify your existing ALK External Distance Engine setup and include the Class Override parameter as an additional parameter in your current ALK setup.
- Navigate to Shipment Management > Power Data > Geography > External Distance Engine
- Create a new and/or select you current ALK External Distance Engine configuration - External Engine Type = ALK.
- In the Parameter drop down, for External Engine Type = ALK, select the Class Overrides parameter and then select the desired value. Value options:
- 0 - NONE,
- 1- Fifty Three Foot,
- 2 - National Network,
- 3 - Fifty Three Foot and National Network.
You should review the PC*MILER documentation to determine which of these options, if any, are right for your implementation.
ALK Configured to Use 1 - Fifty Three Foot
HERE Technologies V8 for Distance and Service Time
This feature provides you with the option of configuring your connection to Here Technologies for your Distance and Service Time requirements using HERE Technologies Version 8.
HERE v8 provides a number of new features, expanded content, plus performance and quality improvements.
HERE v8 usage/use cases supported - Distance and Service Time.
This feature provides you with access to the latest enhancements, content and fixes available from HERE Technologies..
Steps to Enable
To use v8, you will need to update the External System tied to your HERE External Distance Engine to use the proper end point. https://router.hereapi.com/v8/
Tips And Considerations
HERE V8 OTM use cases supported:
- Distance
- Service Time
HERE V8 OTM use cases NOT YET supported:
- Geo coding
- Rush Hour
- Custom Routes
- Custom Locations
- Weekend Restrictions (Using Fleet Telematics)
Shipment Flex Fields Available in Machine Learning Scenario
This feature expands the Shipment columns available for consideration in your machine learning model to include the standard set of User Defined Attribute fields. The inclusion of the standard set of Shipment User Defined Attribute fields allows you to enhance your machine learning model to include external features when developing the model.
The set of User Defined Attribute available on the Shipment include flex columns, on some of the main business objects. There are:
- 20 varchar2 flex columns with 150 length
- 20 date columns
- 20 number columns
- 3 currency columns
The Shipment User Defined Attribute fields can be used to define your Machine Learning Scenario Shipment Filters, your Outlier Filters as well as being available for exclusion/inclusion in the Shipment Included and Excluded Columns functionality.
Machine Learning Scenario Shipment Filters - User Defined Attributes added as Shipment Filter Criteria. You can use your Shipment User Defined Attributes to narrow down the list of shipments based on the selected User Defined Attribute.
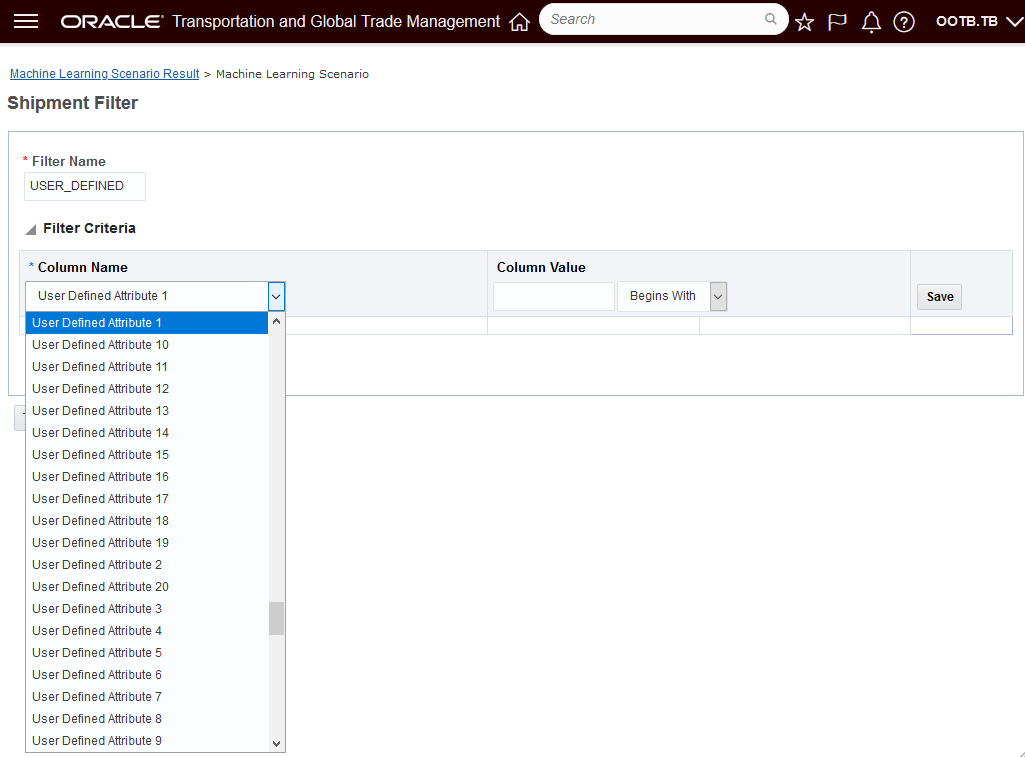
Shipment Filters - User Defined Fields
Machine Learning Scenario Outlier Filters - User Defined Attributes added as Outlier Filter Criteria you can enter the desired User Defined Attribute and value and Actual Transit Time value (less than/greater than) to filter.
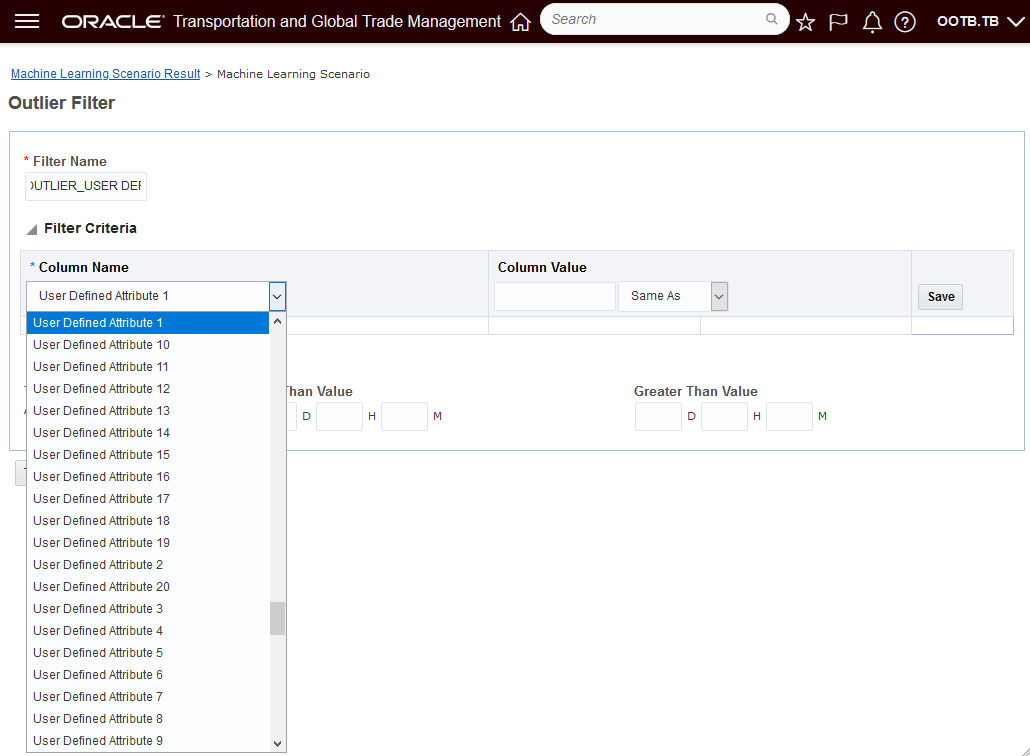
Outlier Filters - User Defined Fields
By default, the User Defined Attributes are included in the machine learning model, you have the option to selectively exclude (or include) these columns using the Shipment Included and Excluded Columns functionality when defining your Machine Learning Scenario.
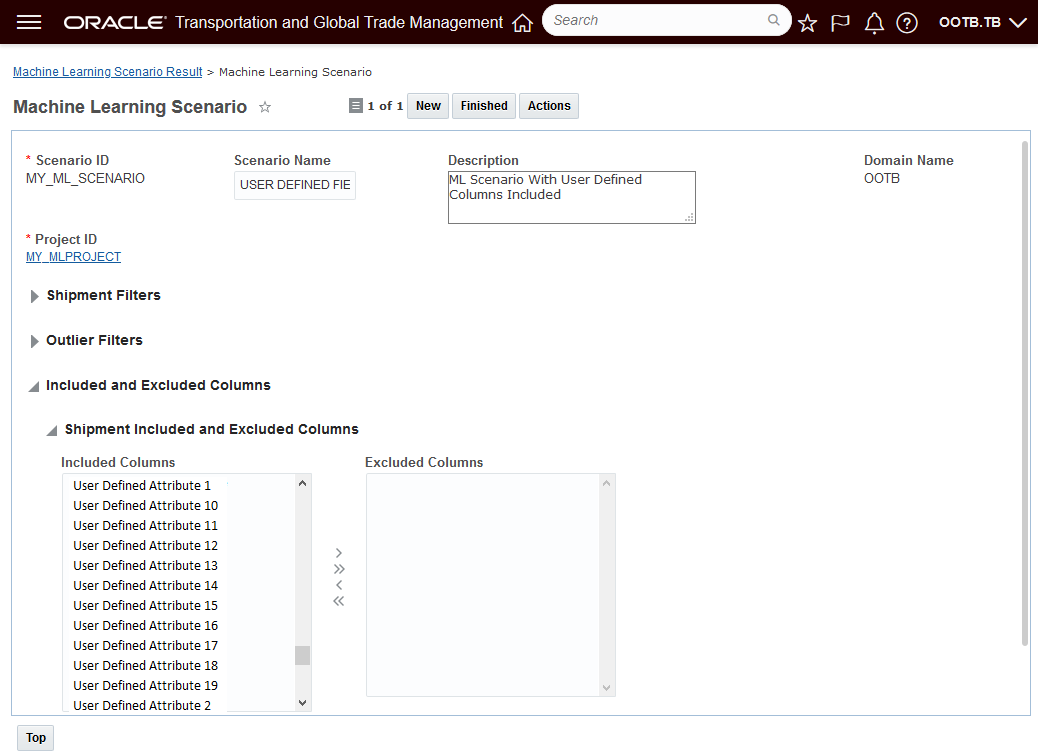
Machine Learning Scenario Shipment Included and Excluded Columns - User Defined Attributes
This feature provides you with the ability to easily filter your Machine Learning Scenarios based on your shipment Flex Fields as well as extending the modeling process to include the Shipment Flex Field in model development..
Steps to Enable
You don't need to do anything to enable this feature.
This feature extends your analytics data analysis capabilities to include the Oracle Analytics Server (OAS) Data Visualization capabilities. Data Visualization provides you with the capabilities to generate configurable visual analytics - like maps, charts, graphs - for your existing BI subject areas - Transportation Intelligence, Global Trade Intelligence, Logistics Network Modeling and Logistics Machine Learning.
The Oracle Data Visualization capabilities are available to use directly through the Data Visualization link or the projects you create using Oracle Data Visualization can be deployed as panes within the Enhanced Workbench.
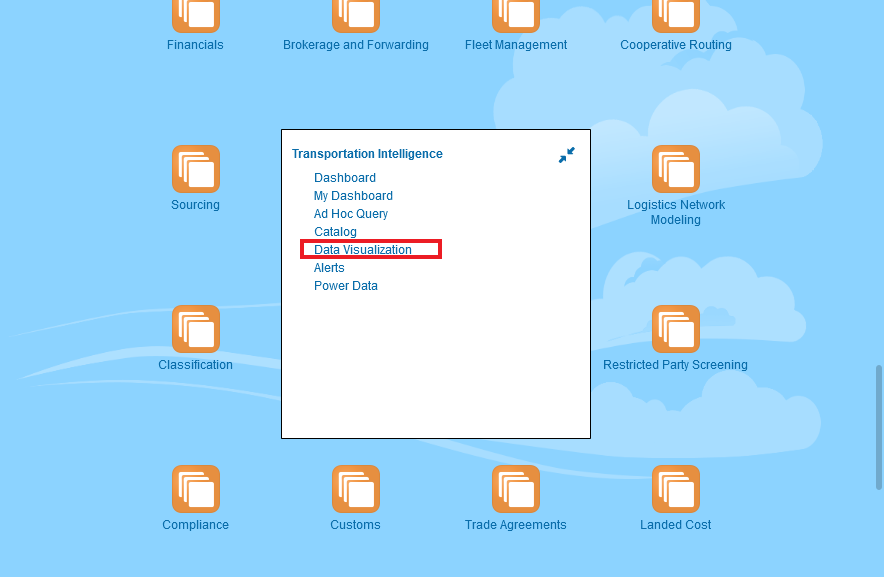
Data Visualization Transportation Intelligence Access
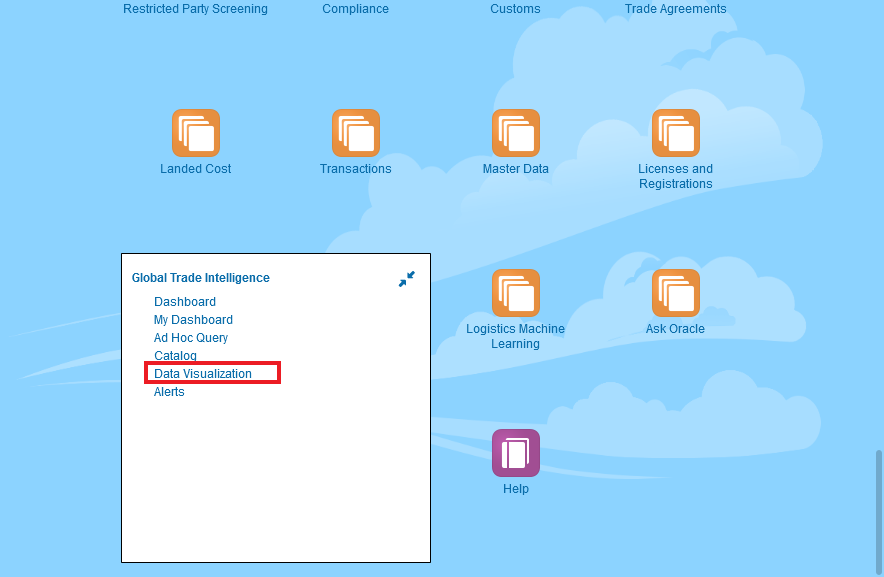
Data Visualization Global Trade Intelligence Access
There are seven pre-defined Data Visualization projects that have been provided to demonstrate the benefits of using Oracle Data Visualization to enhance your data analysis.
Pre-defined Projects include:
- Service Provider Metrics DV
- LML - Shipment Prediction Results
- LML - Shipment Training Results
- LML - Scenario Training Results
- LML - Input Data
- LNM - Scenario Summary
- LNM - Scenario Graphs
For Transportation Intelligence, the Service Provider Metrics DV pre-defined project has been provided. This project provides you with a visual look into your Service Providers performance.
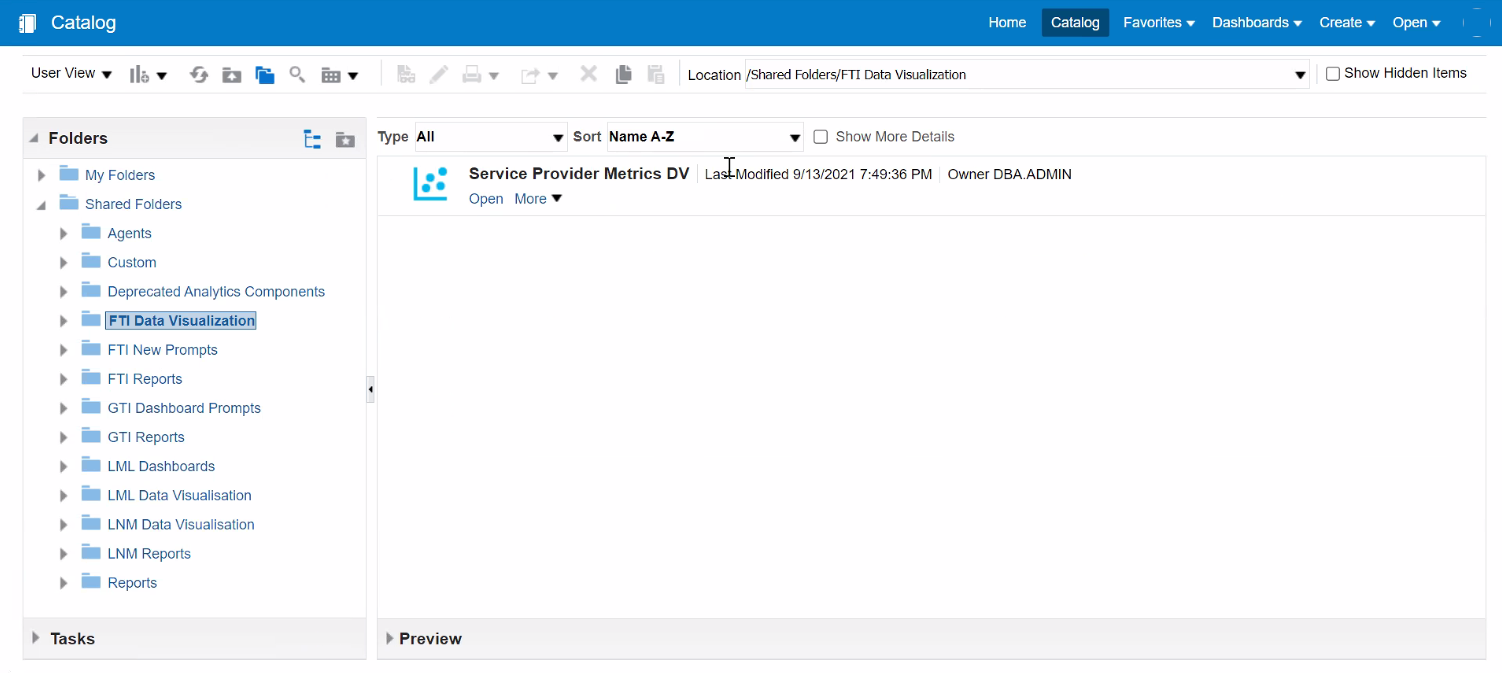
Service Provider Metric DV

Carrier Metrics Pre-defined Project
For Logistics Machine Learning - several pre-defined data visualization projects have been provided. These pre-defined projects are available with the Data Visualization application directly, in addition, the pre-defined projects are also available for inclusion as panels in the Enhanced Workbench.

Logistics Machine Learning DV Folders
Below is an example of one of the pre-defined projects - LML-Input Data. This view is from within Data Visualization.

Pre-defined Project LML-Input Data
Here is the same project as above, but this time it has been embedded within the Logistics Machine Learning Enhanced Workbench.

Pre-defined Project LML-Input Data in Enhanced Workbench
Below is the LML Scenario Training Results - pre-defined project, which demonstrates some of the additional graphical analysis options provided within a Data Visualization tool.

Pre-defined Project - LML Scenario Training Data
Other pre-defined projects provided for Machine Learning include LML - Shipment Prediction Results and LML - Shipment Training Results shown below.
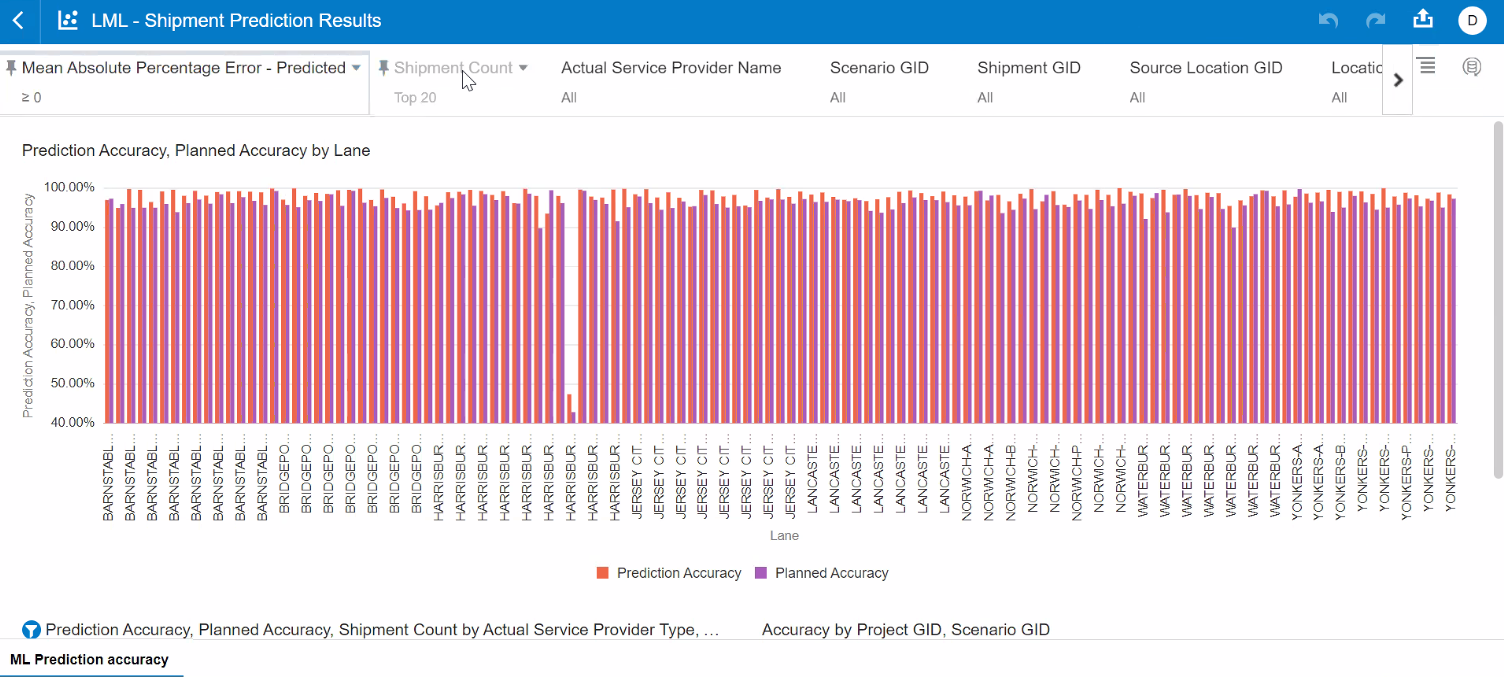
Pre-defined Project - LML - Shipment Prediction Results
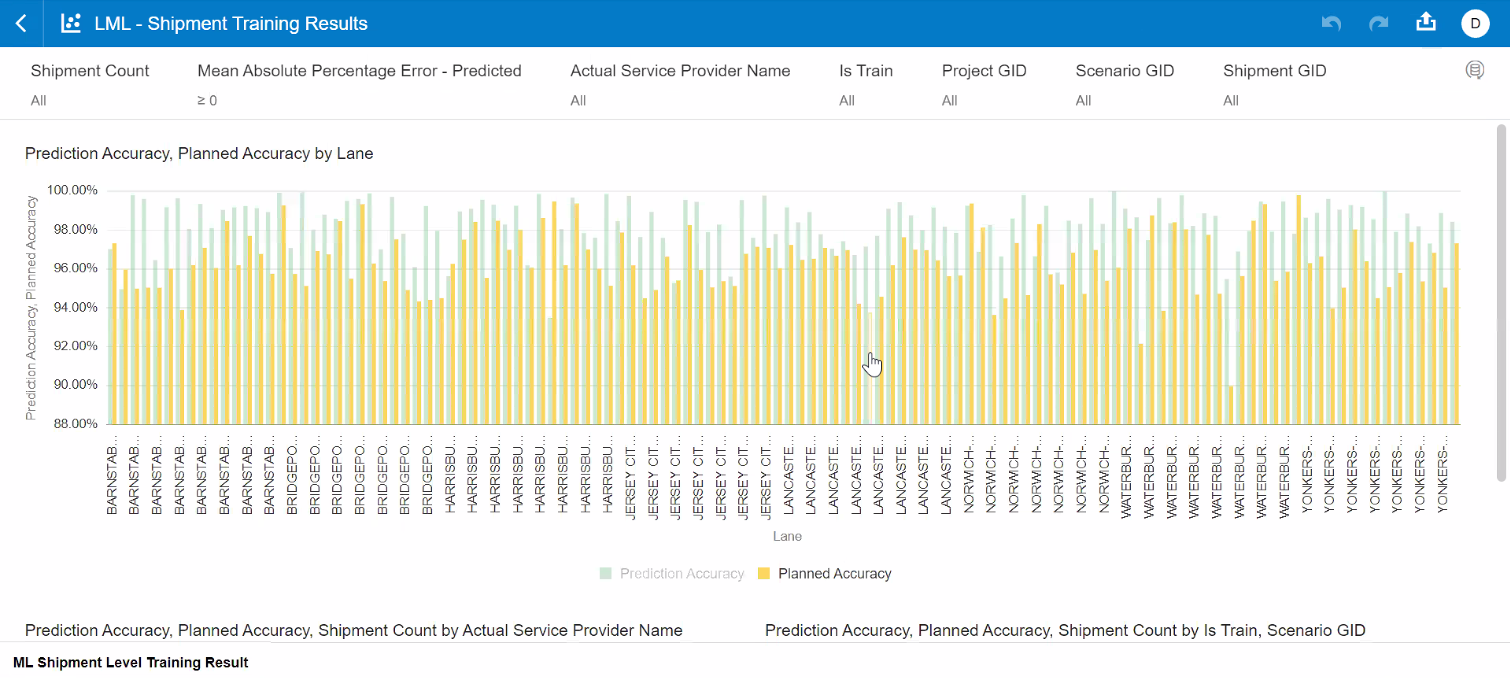
Pre-defined Project - LML - Shipment Training Results
For Logistics Network Modeling - several pre-defined data visualization projects have been provided. These pre-defined projects are available with the Data Visualization application directly as shown below, and these pre-defined projects are also available for inclusion as panels in the Enhanced Workbench.

Pre-defined Projects for Logistics Network Modeling
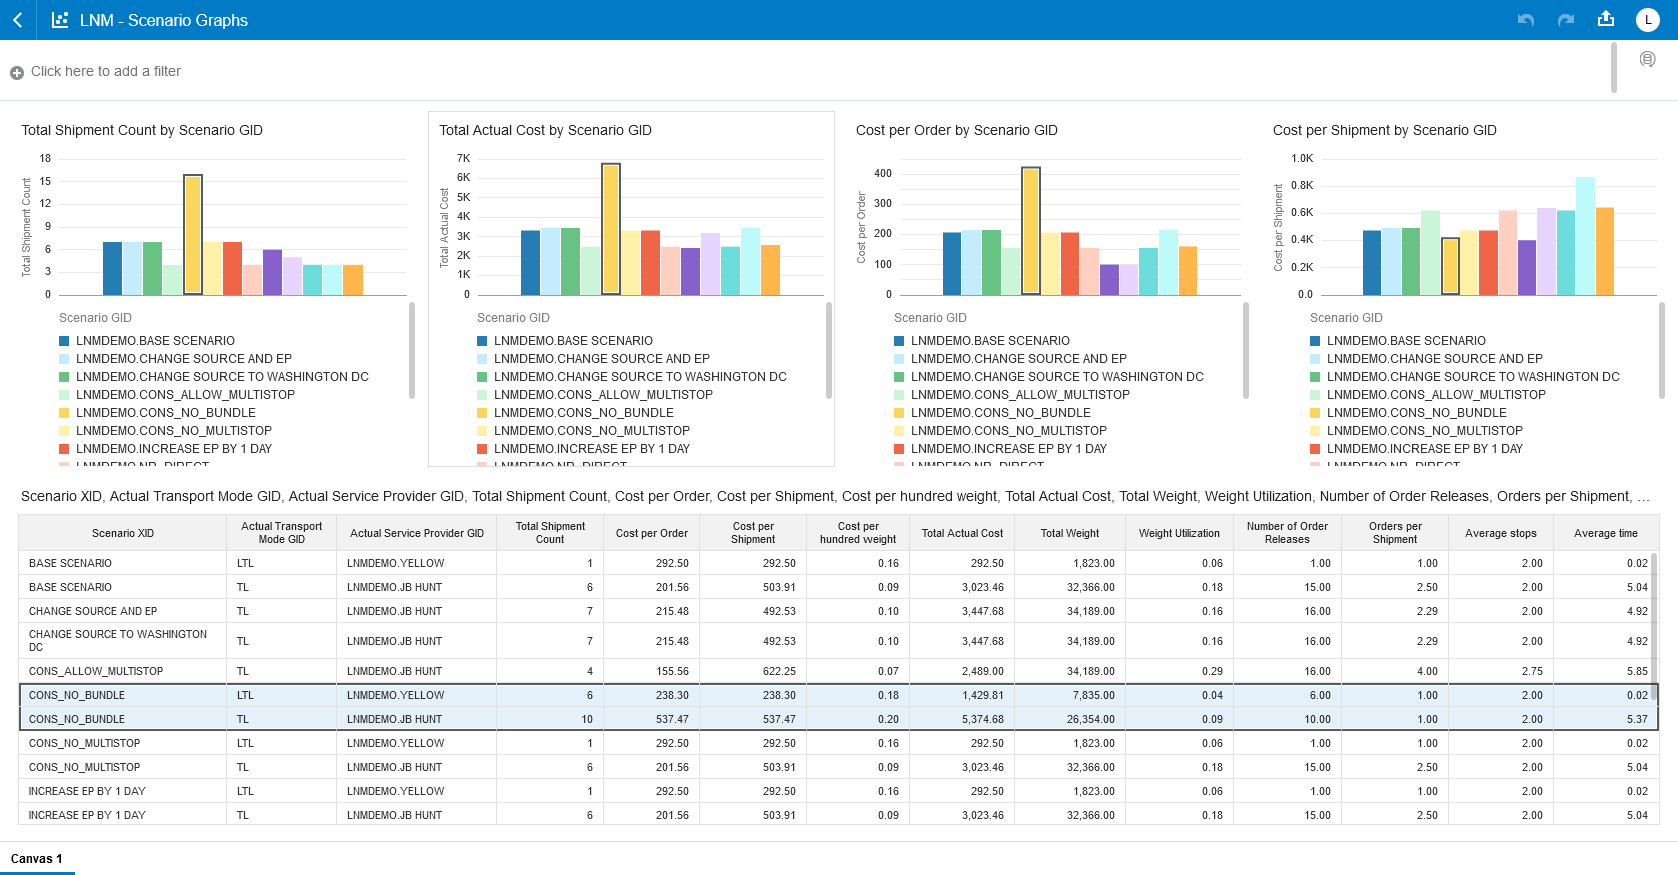
Pre-defined Project - LNM - Scenario Graphs
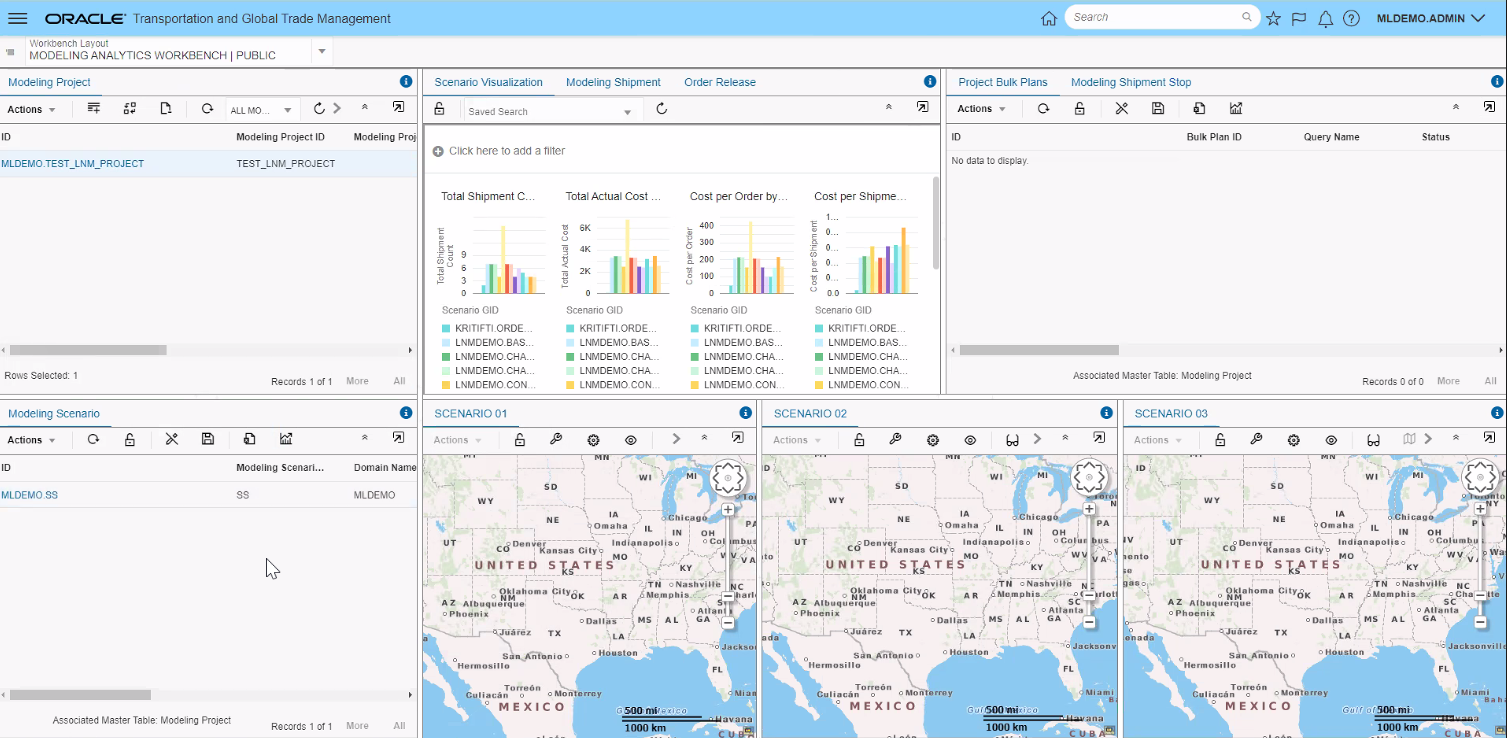
Pre-defined Project - LNM - Scenario Graphs In Enhanced Workbench

Pre-defined Project - LNM - Scenario Summary
Enhances the set of tools available to you for generating visual analytics reports for your BI data TI and GTI.
Steps to Enable
You don't need to do anything to enable this feature.
User Defined Attribute Fields Added to Subject Areas
This feature adds or extends the available User Defined Attribute fields to variety of Transportation Subject Areas. The added User Defined Attributes have been added from various OTM objects including Shipment, Shipment Stop, Order Release, Order Movement, Invoice and Invoice line.
The OTM object to Transportation Intelligence mapping for the User Defined Fields added is below.
| OTM | Transportation Intelligence |
|---|---|
| SHIPMENT | F_SHIPMENT_DETAIL |
| SHIPMENT_STOP | F_SHIPMENT_STOP_D |
| ORDER_RELEASE | F_ORDER_RELEASE_DETAIL |
| INVOICE | F_SHIPMENT_INVOICE_BILL_DETAIL |
| ORDER_MOVEMENT | W_ORDER_MOVEMENT_F |
| OR_ATTRIBUTE% are from ORDER_RELEASE |
F_SHIPMENT_ORDER_RELEASE_COST |
| INVOICE_LINE | F_SHIPMENT_INVOICE_BILL_LINE_D |
Ten Additional User Defined Attribute Number and Date fields have been added to the following Transportation Intelligence Tables:
- F_SHIPMENT_DETAIL
- F_SHIPMENT_STOP_D
- F_ORDER_RELEASE_DETAIL
- F_SHIPMENT_INVOICE_BILL_DETAIL
- W_ORDER_MOVEMENT_F
Ten Additional User Defined Attribute Number and Date fields have been added from both the Shipment and Order Release OTM objects to the Shipment Order Release fact table. The Transportation Intelligence Table modified is:
- F_SHIPMENT_ORDER_RELEASE_COST
The standard set of User Defined Attribute fields from the Invoice line - twenty User Defined Attribute Text fields, twenty User Defined Number fields, twenty User Defined Data fields and three Currency fields - have been added to the following Transportation Intelligence table:
-
F_SHIPMENT_INVOICE_BILL_LINE_D
All the newly added User Defied Attribute Number fields have also been added to the appropriate aggregate tables.

User Defined Attribute Fields Available In Transportation Intelligence
This feature extends the facts and dimensions available to you for reporting to include all the User Defined Attribute fields from the main OTM objects.
Steps to Enable
You don't need to do anything to enable this feature.
Invoice Involved Party Dimension Enhancement
This feature extends the Transportation Intelligence solution to support the ability to slice your Invoice facts by Involved Party. The solution supports all Involved Party qualifiers - whether Public or qualifiers that you have created for your implementation.
Invoice Involved Party
Extends you analysis and reporting abilities to include analysis of your Invoice Facts by Involved Party.
Steps to Enable
You don't need to do anything to enable this feature.
Invoice Approval Status Dimension Added for Invoice
This feature extends the dimensions provided on for the Invoice to include a new column for the Invoice Approval Status. The possible status values provided for the Invoice Status Type of Approval are:
- Approval_Not_Approved,
- Approval_Approved_Auto
- Approval_Approved_Manual
- Approval_Approved_Addendum
- Approval_Approved_Rejected
- Approval_Failed
This feature extends the dimensions available for analysis to include insight into your Invoice Approval Status.
Steps to Enable
You don't need to do anything to enable this feature.