
- Revision History
- Overview
- Update Tasks
- Feature Summary
- Transportation Management
-
- Transportation and Global Trade Platform
- Transportation Management (Base)
- Transportation Operational Planning
-
- Move Order to Existing Shipment Action - More Options - Enhanced
- Ask Oracle Container Optimization - Weight and Volume Decimal Precision
- Convert Multi-Segment Shipments to Multiple Shipments
- Multi-Container MIP - ERU Limit Number of Reference Units Honored
- Enhanced Graphical Diagnostics - Export Logs
-
- Freight Payment, Billing, and Claims
- Transportation Intelligence
This document will continue to evolve as existing sections change and new information is added. All updates appear in the following table:
| Date | Module | Feature | Notes |
|---|---|---|---|
| 28 JUL 2023 | Transportation and Global Trade Platform | Force Use of Nickname | Updated document. Added additional information regarding steps required for this Optional Feature. |
| 30 JUN 2023 | Transportation and Global Trade Platform |
Force Use of Nickname | Updated document. Added steps required for Optional Feature. |
| 28 Oct 2022 | Freight Payment, Billing and Claims | Enable Allocation Parallel Processing | Updated document. Delivered new Optional Feature in update 22C. |
| 20 SEP 2022 | Transportation and Global Trade Platform |
Limit Saved Query Results | Updated document. Revised feature information. |
| 08 SEP 2022 | Transportation and Global Trade Platform | Database Data Type Changes | Updated document. Delivered new feature in update 22C. |
| 24 JUN 2022 | Created initial document. |
 HAVE AN IDEA?
We’re here and we’re listening. If you have a suggestion on how to make our cloud services even better then go ahead and tell us. There are several ways to submit your ideas, for example, through the Ideas Lab on Oracle Customer Connect. Wherever you see this icon after the feature name it means we delivered one of your ideas.
GIVE US FEEDBACK
We welcome your comments and suggestions to improve the content. Please send us your feedback at otm-doc_us@oracle.com. Please indicate you are inquiring or providing feedback regarding the Oracle Fusion Cloud Transportation Management What's New Update 22C.
DISCLAIMER
The information contained in this document may include statements about Oracle’s product development plans. Many factors can materially affect Oracle’s product development plans and the nature and timing of future product releases. Accordingly, this Information is provided to you solely for information only, is not a commitment to deliver any material, code, or functionality, and should not be relied upon in making purchasing decisions. The development, release, and timing of any features or functionality described remains at the sole discretion of Oracle.
This information may not be incorporated into any contractual agreement with Oracle or its subsidiaries or affiliates. Oracle specifically disclaims any liability with respect to this information. Refer to the Legal Notices and Terms of Use for further information.
This section gives you information to help you plan, deploy, and validate your update. We make frequent additions to this document, so don’t forget to check back and get the latest information before your update starts.
Review the Release Notes.
- The release notes include fixes, special instructions, and resolutions related to the Oracle Transportation and Global Trade Management Cloud.
- Release Notes can be found here:
- https://support.oracle.com/epmos/faces/DocumentDisplay?id=2827533.1
Use the following resources to prepare for and validate your Oracle Engagement Cloud update.
On My Oracle Support Read:
- Doc ID 2095509.1
- Oracle Cloud Applications - Transportation and Global Trade Management Cloud: Environment Refresh Policy
- Doc ID 2095528.1
- Oracle Cloud Applications - Transportation and Global Trade Management Cloud: Quarterly Update Planning
- Doc ID 2096782.1
- Oracle Cloud Applications - Transportation and Global Trade Management Cloud: Quarterly Update Planning FAQs
- Doc ID 2195580.1
- Oracle Cloud Applications - Transportation and Global Trade Management Cloud: Get Started with Your Implementation
- Doc ID 2508854.1
- Oracle Cloud Applications - Transportation and Global Trade Management Cloud: Quarterly Updates - Preparation and Testing Recommendations
Column Definitions:
Report = New or modified, Oracle-delivered, ready to run reports.
UI or Process-Based: Small Scale = These UI or process-based features are typically comprised of minor field, validation, or program changes. Therefore, the potential impact to users is minimal.
UI or Process-Based: Larger Scale* = These UI or process-based features have more complex designs. Therefore, the potential impact to users is higher.
Features Delivered Disabled = Action is needed BEFORE these features can be used by END USERS. These features are delivered disabled and you choose if and when to enable them. For example, a) new or expanded BI subject areas need to first be incorporated into reports, b) Integration is required to utilize new web services, or c) features must be assigned to user roles before they can be accessed.
Transportation and Global Trade Platform
This feature provides a data type change, for the tables and columns listed below - increasing the length of the columns from NUMBER(10) to a full NUMBER(22) size so that the parent and child column lengths are consistent.
| Table | Column |
|---|---|
| OUT_XML_PROFILE_XPATH |
SEQUENCE_NO |
| GTM_CLASS_CODE_ATTRIBUTE |
SEQUENCE |
| GTM_CLASS_CODE_ATTRIBUTE |
ATTRIBUTE_SEQUENCE |
| GTM_DATA_LOAD_TYPE_FILE |
SEQUENCE_NO |
| IE_SHIPMENTSTATUS |
ORIG_TRANSACTION_NO |
| I_TRANSACTION_ACK |
REF_TRANSACTION_NO |
| I_TRANSACTION_DETAIL |
NEW_TRANSACTION_NO |
| I_TRANSMISSION |
SENDER_TRANSMISSION_NO |
| I_TRANSMISSION |
REFERENCE_TRANSMISSION_NO |
| I_TRANSMISSION_ACK |
REF_TRANSACTION_NO |
| I_TRANSMISSION_REPORT |
REF_TRANSACTION_NO |
| SERVPROV_TENDER_COMMENT |
RESPONSE_I_TRANSACTION_NO |
| SERVPROV_TENDER_EQUIPMENT |
RESPONSE_I_TRANSACTION_NO |
| SERVPROV_TENDER_REFNUM |
RESPONSE_I_TRANSACTION_NO |
| SHIP_GROUP |
PICKUP_TRANSACTION_NO |
| TENDER_COLLAB_SERVPROV |
RESPONSE_I_TRANSACTION_NO |
Provides you with consistency between the parent child column lengths for the tables and columns listed.
Steps to Enable
You don't need to do anything to enable this feature.
Tips And Considerations
Users of the Oracle GoldenGate service should take note of the DB changes and make those changes in their target DB.
Enhanced Workbench Enhancements
This feature provides you with a set of new and improved capabilities and features for the Enhanced Workbench. Enhancements have been provided in a number of areas including:
- Action Checks for Table to Table Drag/Drop Actions
- Power Actions for Dock Scheduling Gantt
- Table Filters for Table objects
- New Gantt Parameters
- Additional Gantt Logic Configurations Parameters for UI Settings
- Enhanced Workbench Layout Option to Collapse All Tabs
- All Pre-existing PUBLIC Layouts moved to Enhanced Workbench Format including all Action related Workbenches and all Menu Workbenches.
Action Checks
New for the Enhanced Workbench is the ability to setup and use Action Checks for Table-to-Table Drag/Drop. When configured, as shown below, your action checked actions will provide you with an error message.
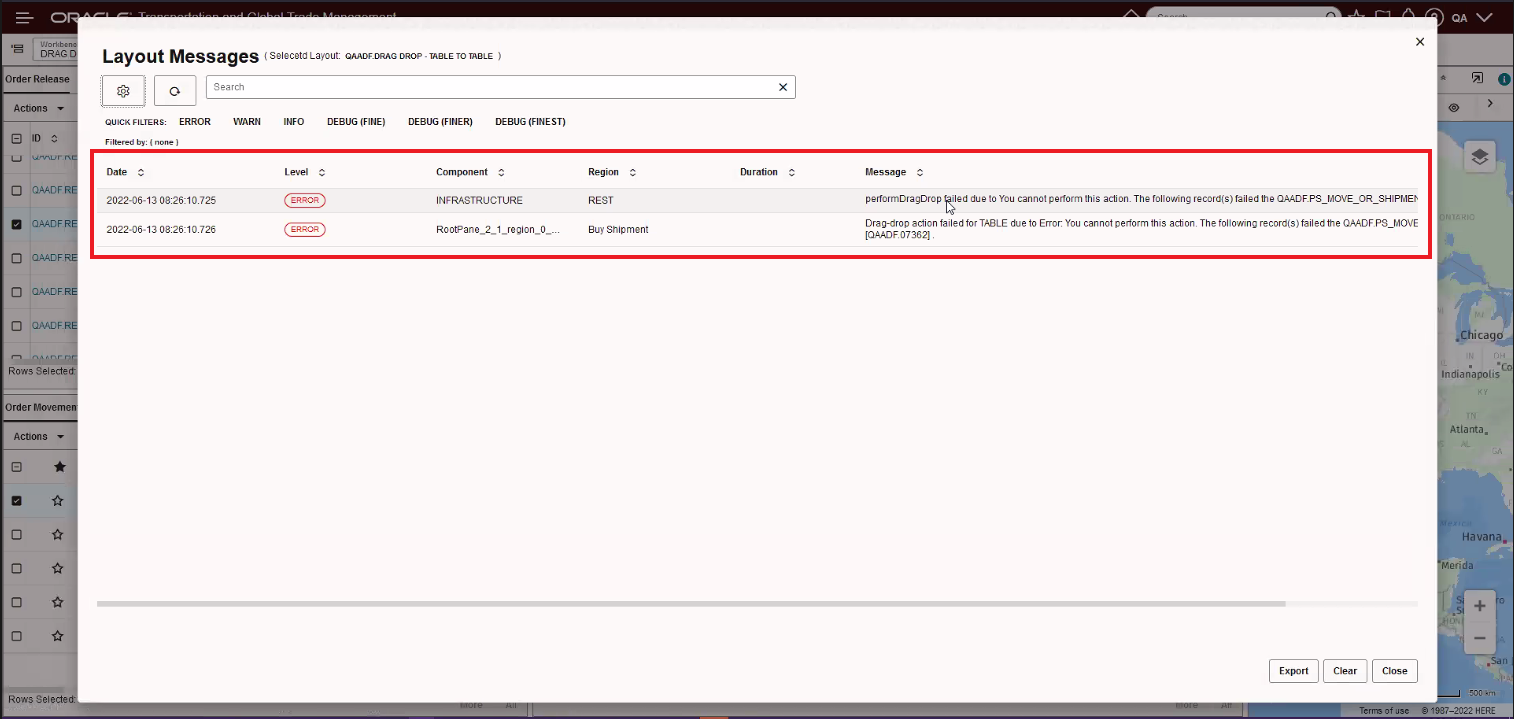
Action Check Error Message
Power Actions for Dock Scheduling Gantt
Below are the Power Actions supported in the Dock Scheduling Gantt. To configure Power Actions you navigate to Configuration and Administration > User Configuration > Manage User Access. In the User Access Type field select the option Power Action. You can configure Power Actions so that when a specific user works with dock scheduling, they are restricted in the actions that they can make to the appointments. If no power actions are defined for a user, then they have access to all actions. If some power actions are defined then that user has access to only those actions.
Power Actions:
- ADD REMARK
- ADJUST APPOINTMENT TIME
- BLOCK RESOURCE
- CHANGE APPOINTMENT ACTIVITY TYPE
- CREATE APPOINTMENT
- CUT APPOINTMENT
- DRAG AND DROP
- FIND NEXT AVAILABLE APPOINTMENT
- FIND PREVIOUS AVAILABLE APPOINTMENT
- MOVE TO YARD
- PASTE APPOINTMENT
- QUICK EVENT
- RE-COMPUTE APPOINTMENT
- RE-SCHEDULE APPOINTMENT
- RE-SCHEDULE APPOINTMENT - SHIPMENT GROUP
- REMOVE APPOINTMENT
- SCHEDULE APPOINTMENT
- SCHEDULE APPOINTMENT
- UNBLOCK RESOURCE
- VIEW APPOINTMENT
- VIEW RELATED SHIPMENTS
- VIEW SHIPMENT
Power Actions not available
NOTE: Currently OTM supports only right click actions of appointment on Enhanced Workbench Dock Scheduling Gantt and hence only corresponding power actions are available. All other actions listed below are currently unsupported in jet dock workbench and hence their corresponding power actions cannot be configured.
- BLOCK RESOURCE
- CREATE APPOINTMENT
- DOCK - UNBLOCK RESOURCE
- DOCK - CUT APPOINTMENT
- DOCK - PASTE APPOINTMENT
- DOCK - MOVE TO YARD
- DOCK - SCHEDULE APPOINTMENT
- DOCK - VIEW SHIPMENT
- DOCK - RESCHEDULE APPOINTMENT
- DOCK - RESCHEDULE APPOINTMENT - SHIPMENT GROUP
Table Filters
The Enhanced Workbench Table objects now support Filters. The filters provide you with a convenient way to quickly reduce the number of rows displayed for a table.
Table Toggle Filter On/Off
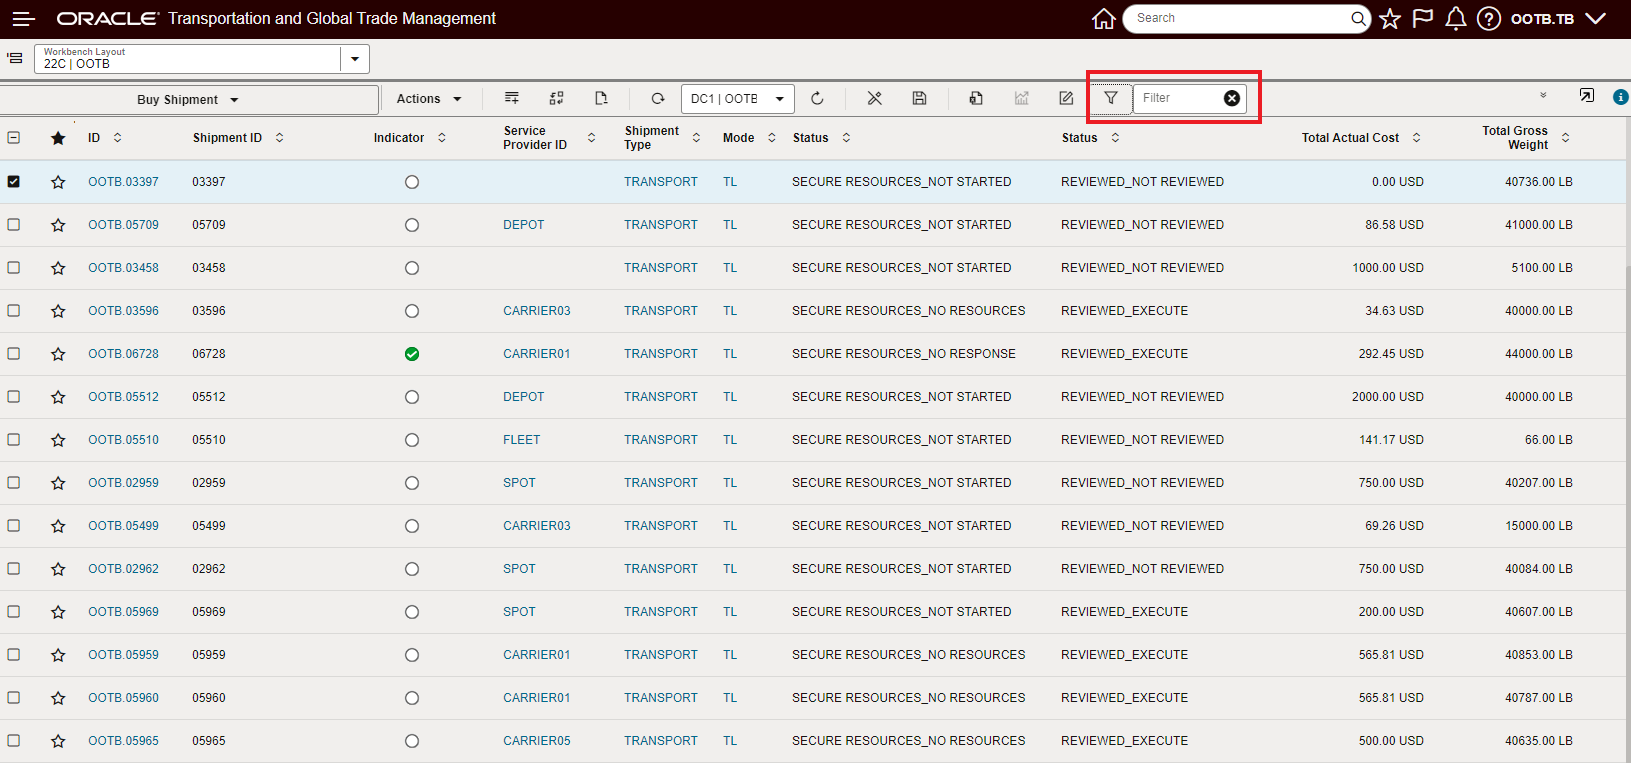
Table Filters - On/Off
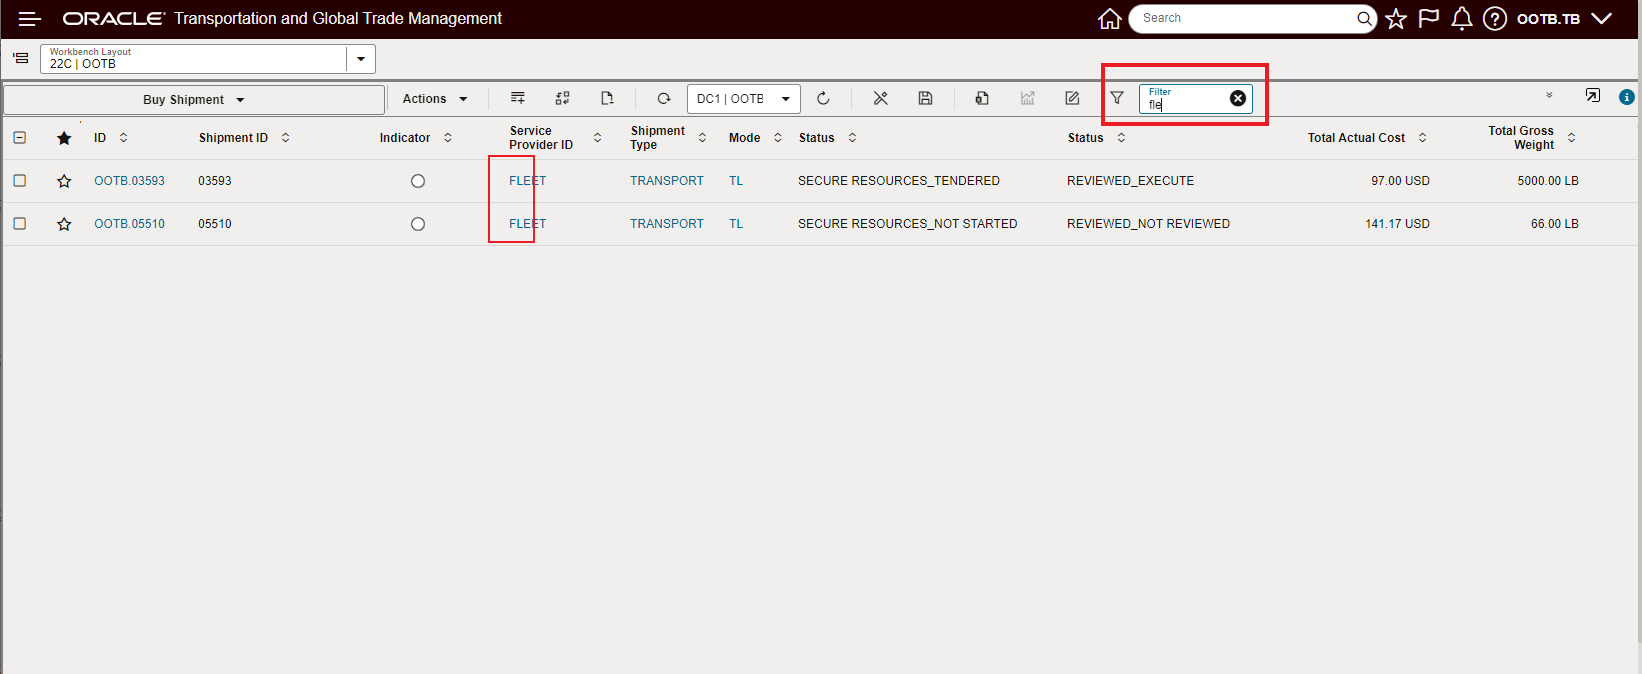
Table Filter Applied "fle"
Workbench Gantt Parameters
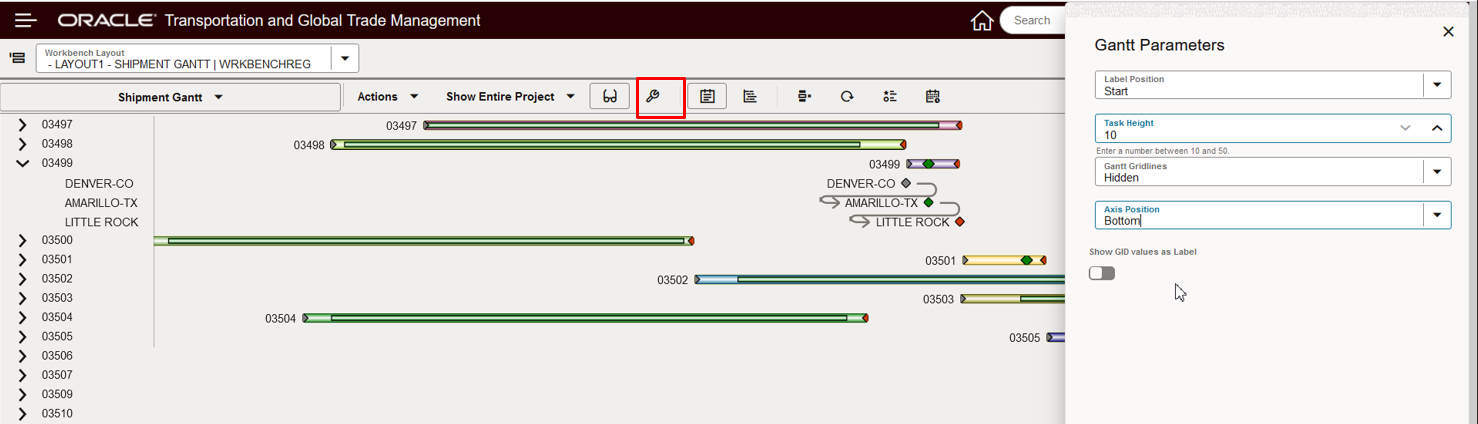
Gantt Parameters Example
In the example below, the Label Position and Gant Gridlines options have changed.
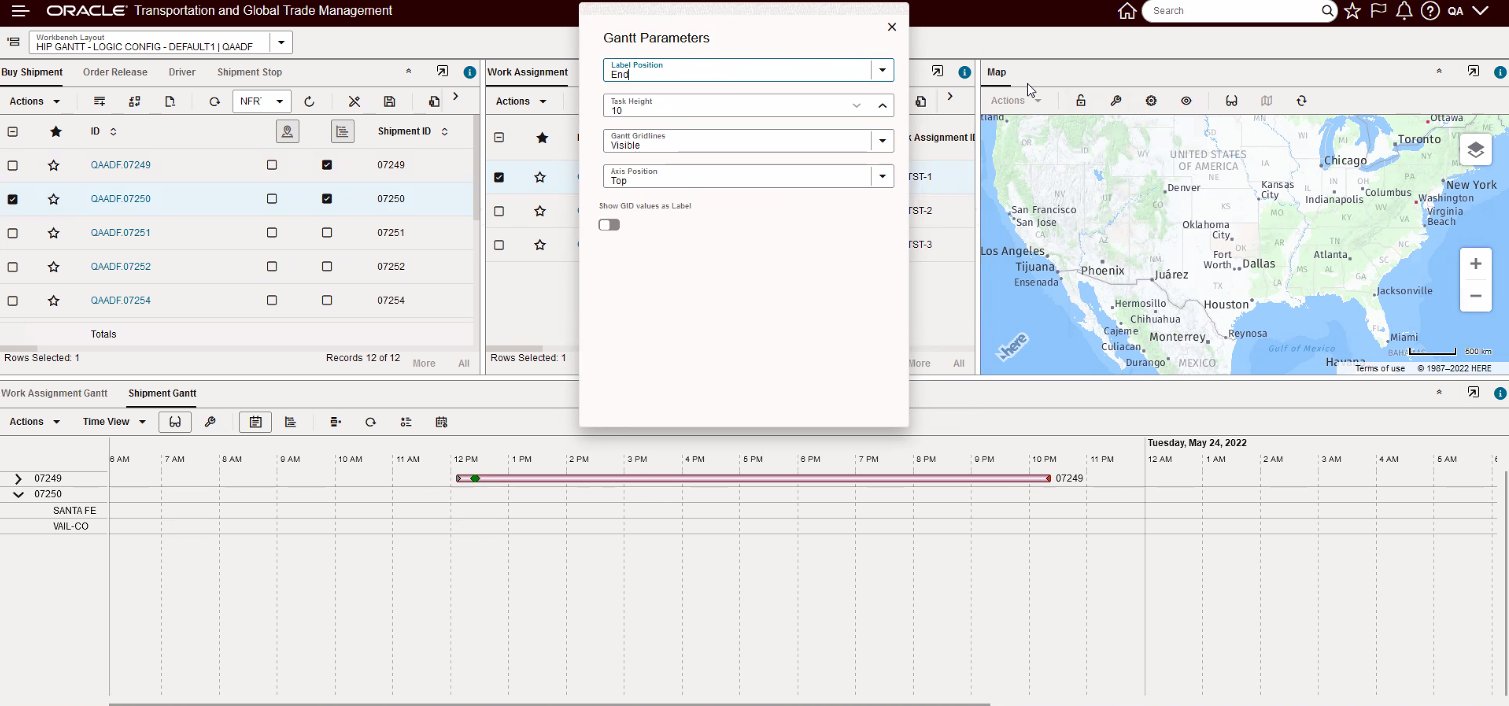
Gantt Parameter Example
Workbench Gantt Logic Configuration Changes
The highlighted Workbench Gantt Parameters have been added in 22C.
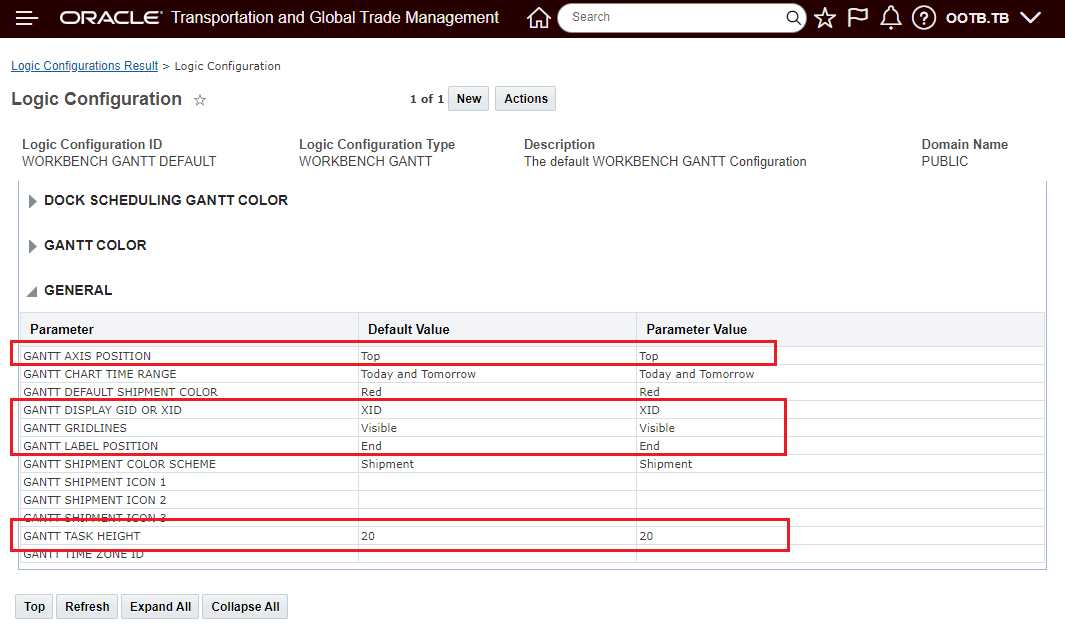
Workbench Gantt Logic Configuration Additions
Layout Details Option to Collapse All Tabs
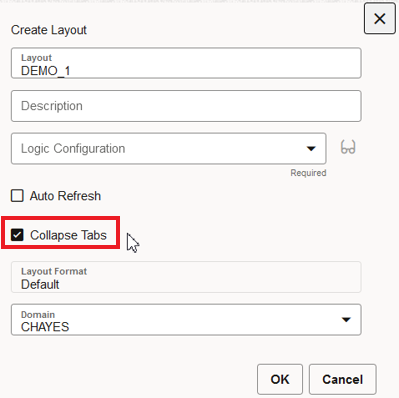
Collapse Tabs Option
In the example below, the Collapse Tabs options has been selected, with the tabs collapsed you gain additional working space.
Collapse Tabs Selected
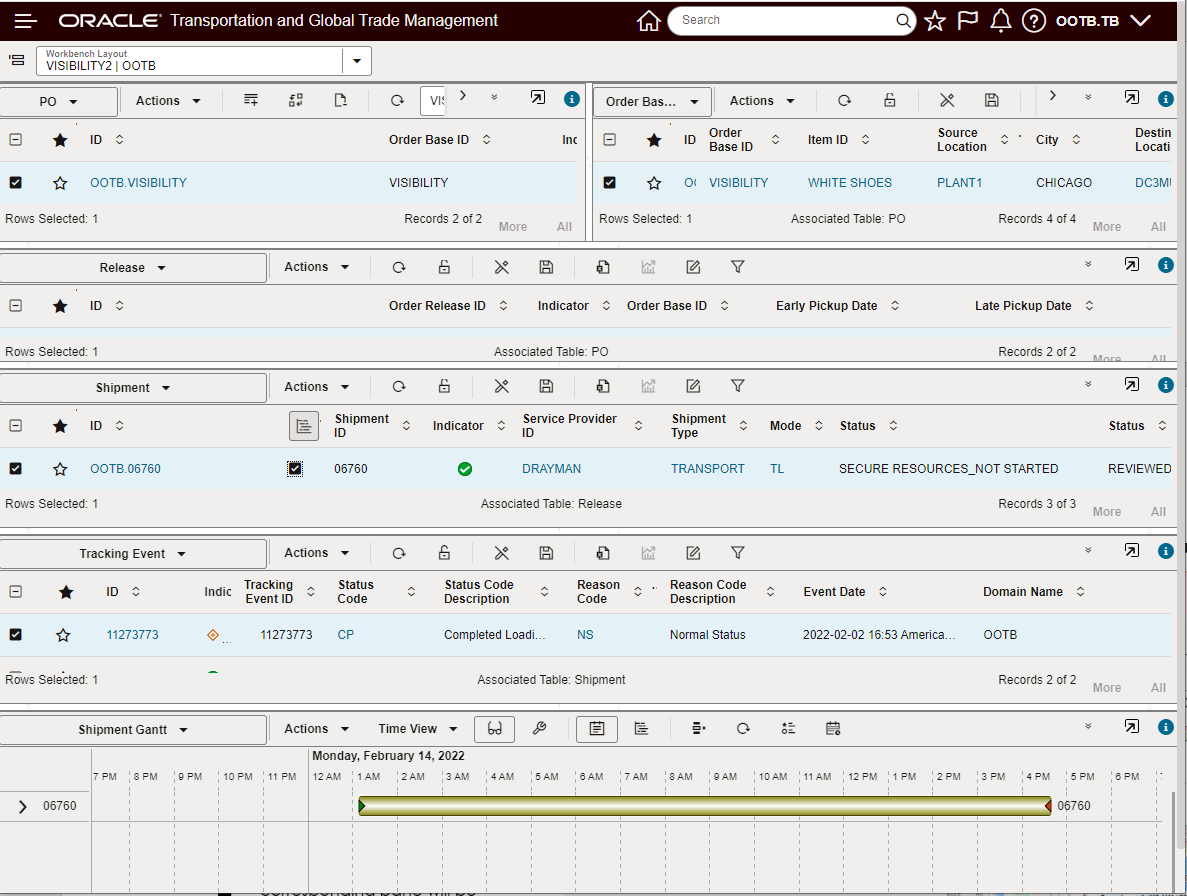
In the example below, the Collapse Tabs option is not selected and available working space is now utilized for displaying the tab name.
Collapse Tabs Not Selected
Pre-existing PUBLIC Layouts are Now in Enhanced Workbench Format:
- Actions including:
- Map Bulk Plan Results
- Map Shipment
- Map Order Release
- Graphical Diagnostics
- Etc.
Workbench Actions - Map Bulk Plan Results
- Menu Links:
- Campaign Administrator Workbench
- Item Workbench
- Restricted Party Screening Enhanced Workbench
- Logistics Machine Learning Workbench
- Logistics Machine Learning Analytics Workbench
This feature provides a set of new capabilities and usability features for the new Enhanced Workbench functionality.
Steps to Enable
You don't need to do anything to enable this feature.
Tips And Considerations
NOTE: With the exception of the Restricted Party Screening Workbench (see below) all Menu and Action linked Workbenches - if necessary - can be reverted back to the legacy Workbench by setting the related Menu link or Action parameter back to the desired Workbench.
For the Restricted Party Screening Workbench, the process to to revert from the Enhanced Workbench to the legacy workbench is different.
If you are using an out of the box menu that ships with GTM:
- Navigate to Configuration and Administration > User Configuration > Menu Manager
- Select the out of the box menu where you want to enable the legacy workbench and click Copy User Menu
- Enter a User Menu ID
- Within the Restricted Party Screening section, you will see two folders, one for the enhanced version called ‘Restricted Party Screening Workbench’ and one for the legacy version called ‘Legacy Restricted Party Screening Workbench’.
- By default, the legacy workbench is hidden from the GTM menu. Right click on the folder for ‘Legacy Restricted Party Screening Workbench’ and select ‘Show’.
- If you want to hide the enhanced workbench from the GTM menu, Right click on the folder for ‘Restricted Party Screening Workbench’ and select ‘Hide’.
- Click Finished.
Next, you need to make the new menu visible in GTM.
- Navigate to Configuration and Administration > Manage User Access
- Fill in your user information such as User ID, User Level, User Role, etc.
- Select Edit User Access and make the updates
Make sure to log out and log back in so your changes take effect.
If you are using a menu that you created and customized:
- Navigate to Configuration and Administration > User Configuration > Menu Manager
- Edit the existing menu where you want to add the legacy workbench
- Determine at which level you want to see the menu and click the folder
- Click the + sign to the right of the selected folder
- Select a Type of Link and click Create
- Enter the name of the menu in the Text field
- From the radio buttons, select Workbench
- Within the Default Layout field, type ‘RESTRICTED PARTY SCREENING WORKBENCH’
- Click Save
- Click Finished
Table Filters
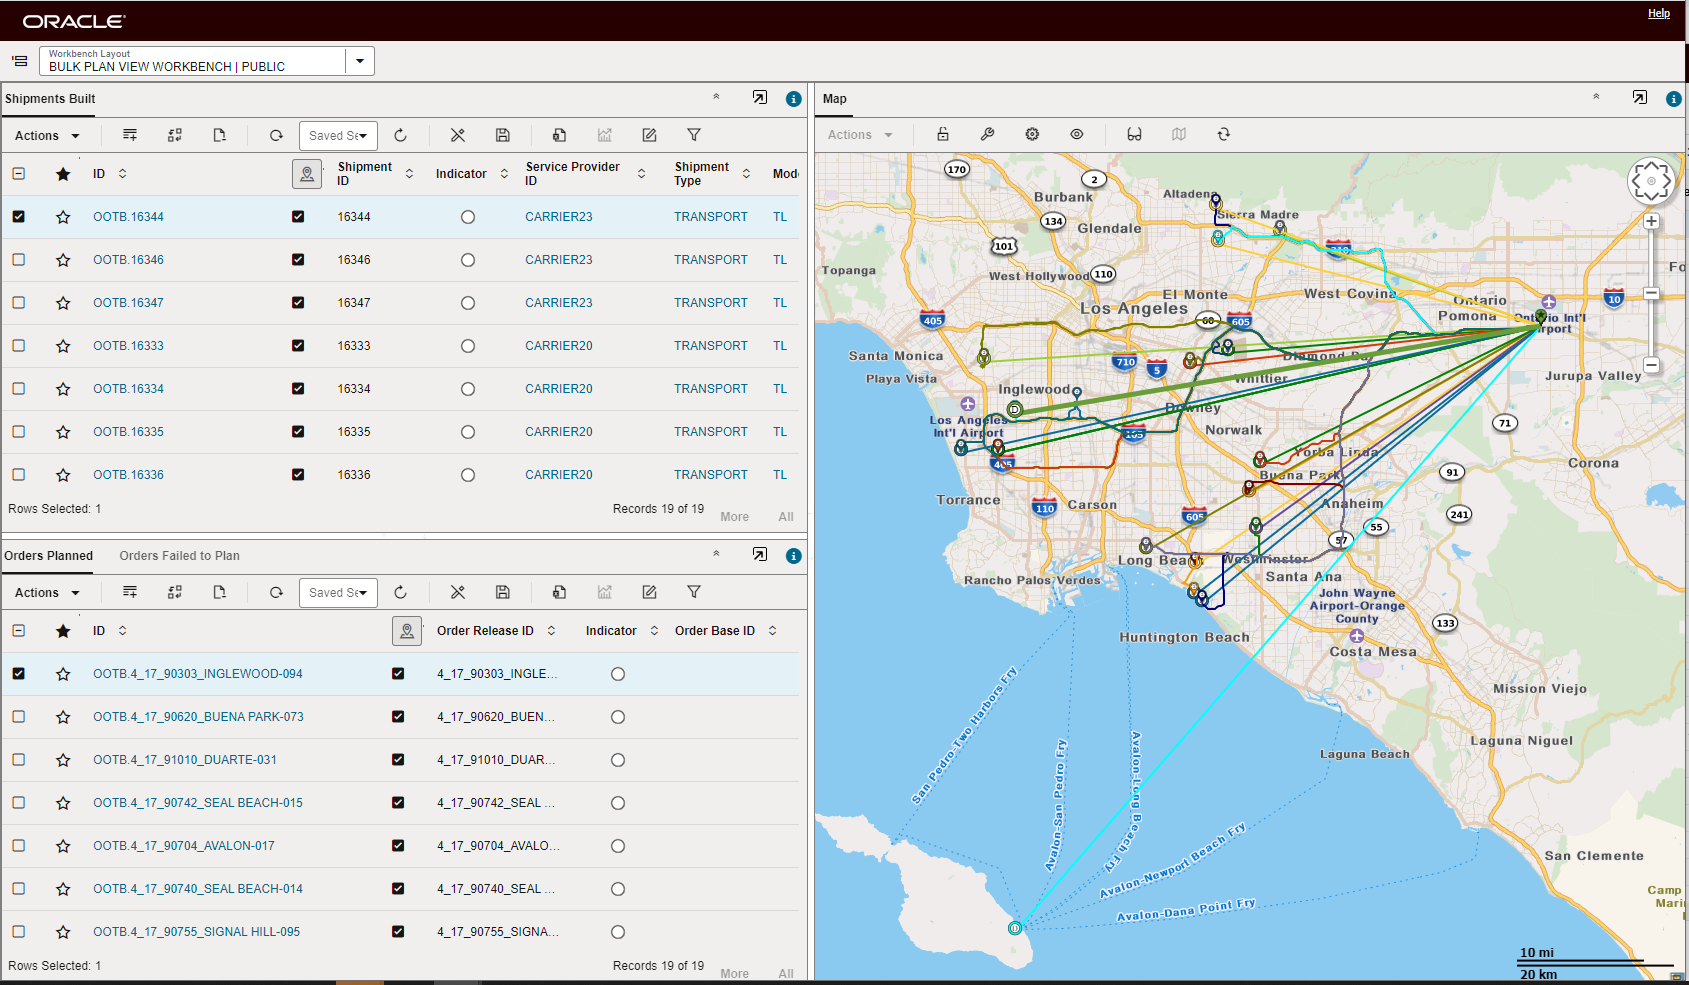
- The applied Filter will filter the view to data - it does not change the number of records of data active in the table. In the example below, 8 records are returned by the query, a Filter is applied so that only 3 rows of data are shown - when the Add All to Map is selected, the result is not just the mapping of the 3 rows filtered, but all 8 rows/shipments.
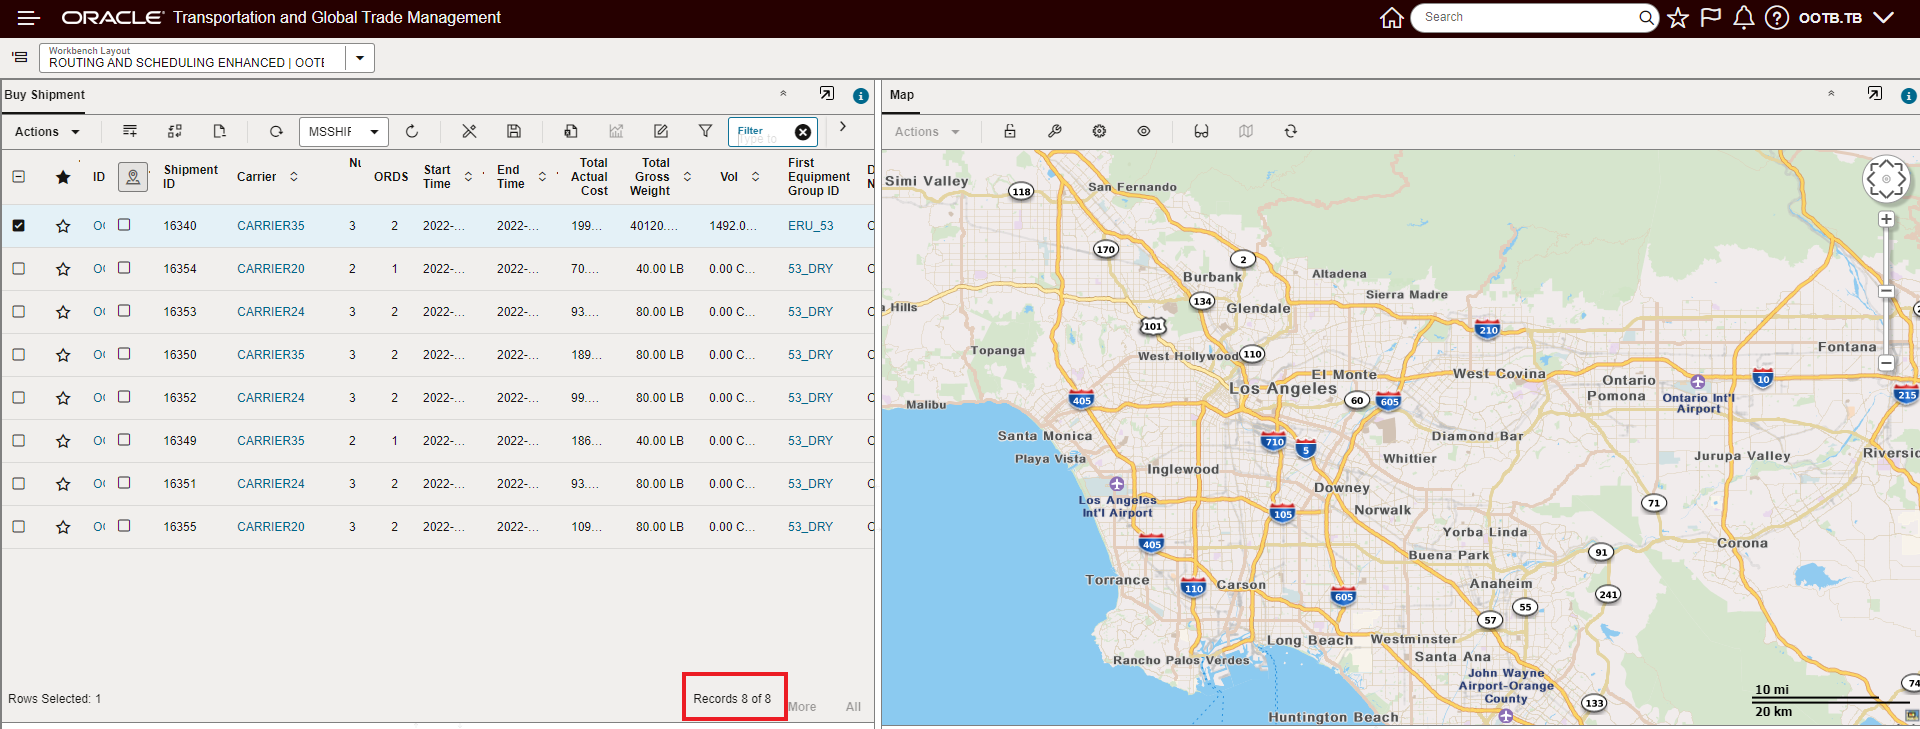
Unfiltered View - 8 Records
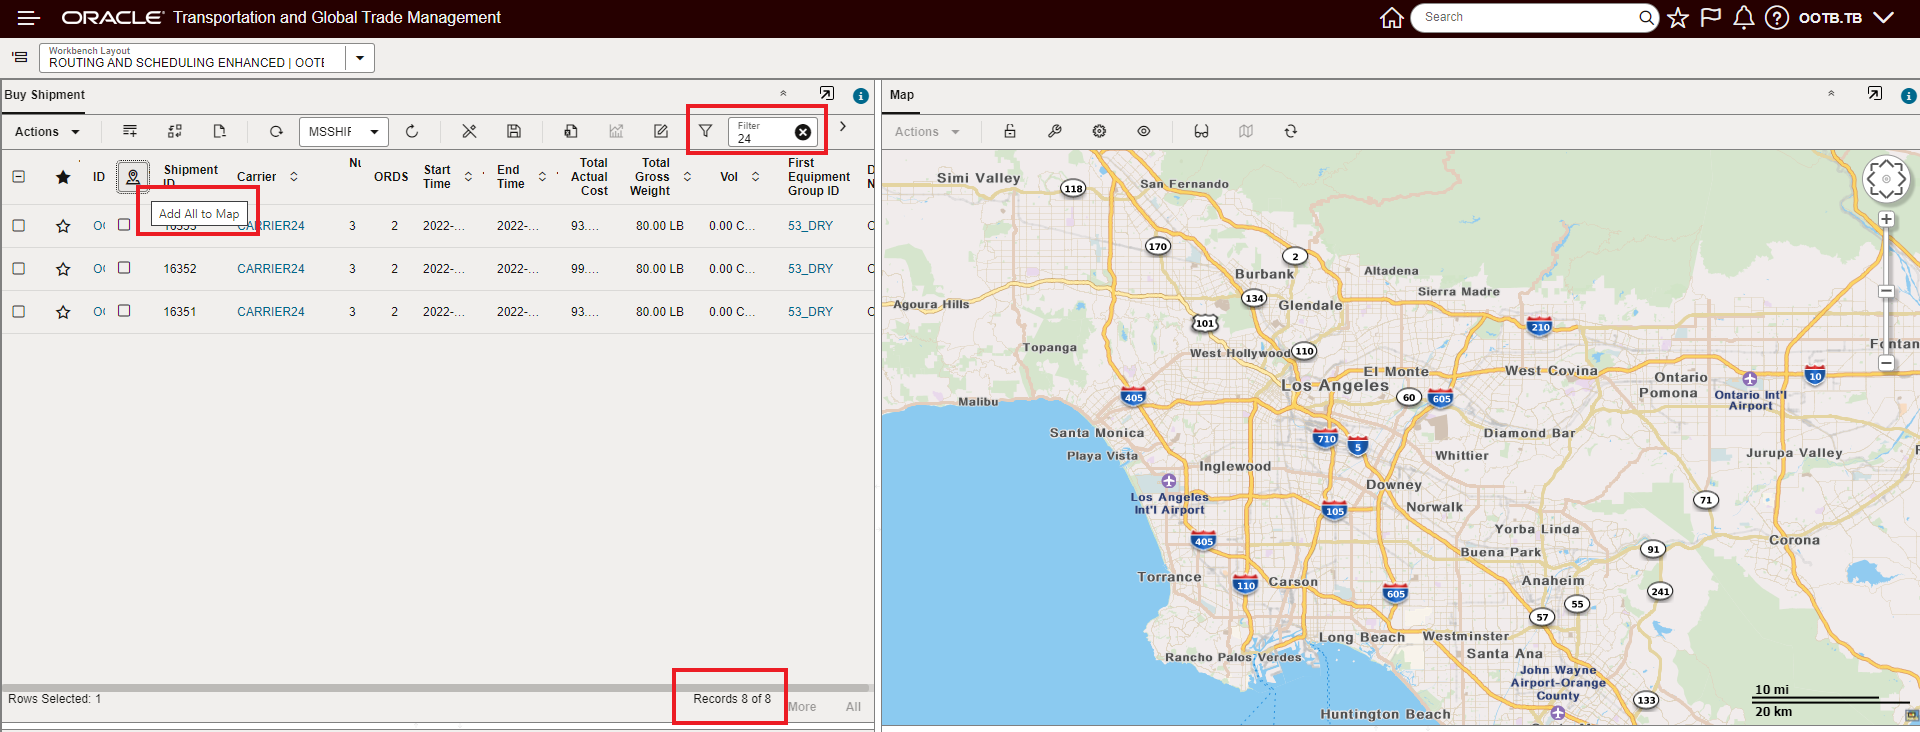
Filtered View - 3 Rows Shown Still 8 Records

Add All to Map - All 8 Records Added to Map not just the Filtered 3
- The Filter is not case sensitive,
User Preference Option to Set Home Page As Enhanced Workbench
This feature provides you with a new User Preference option - Home Workbench Layout ID - that you can use to specify the Enhanced Workbench you want to set as your Home Page. The specified Enhanced Workbench will be the UI that will be displayed once you log into the system and will be the UI displayed when you return to Home by selecting the Home icon.
The Home Workbench Layout ID User Preference option will replace the Springboard as the system Home UI.
In the example below, the user's preference is set so that the Enhanced Workbench they use every day is displayed as the Home page - so there is no need to start the day by navigating to the desired Enhanced Workbench.
Login
With the Home Workbench Layout ID set in the User Preference - the specified Enhanced Workbench is the UI that you see once you are logged into the system. There is no need to navigate to the Enhanced Workbench you use to complete your daily tasks.
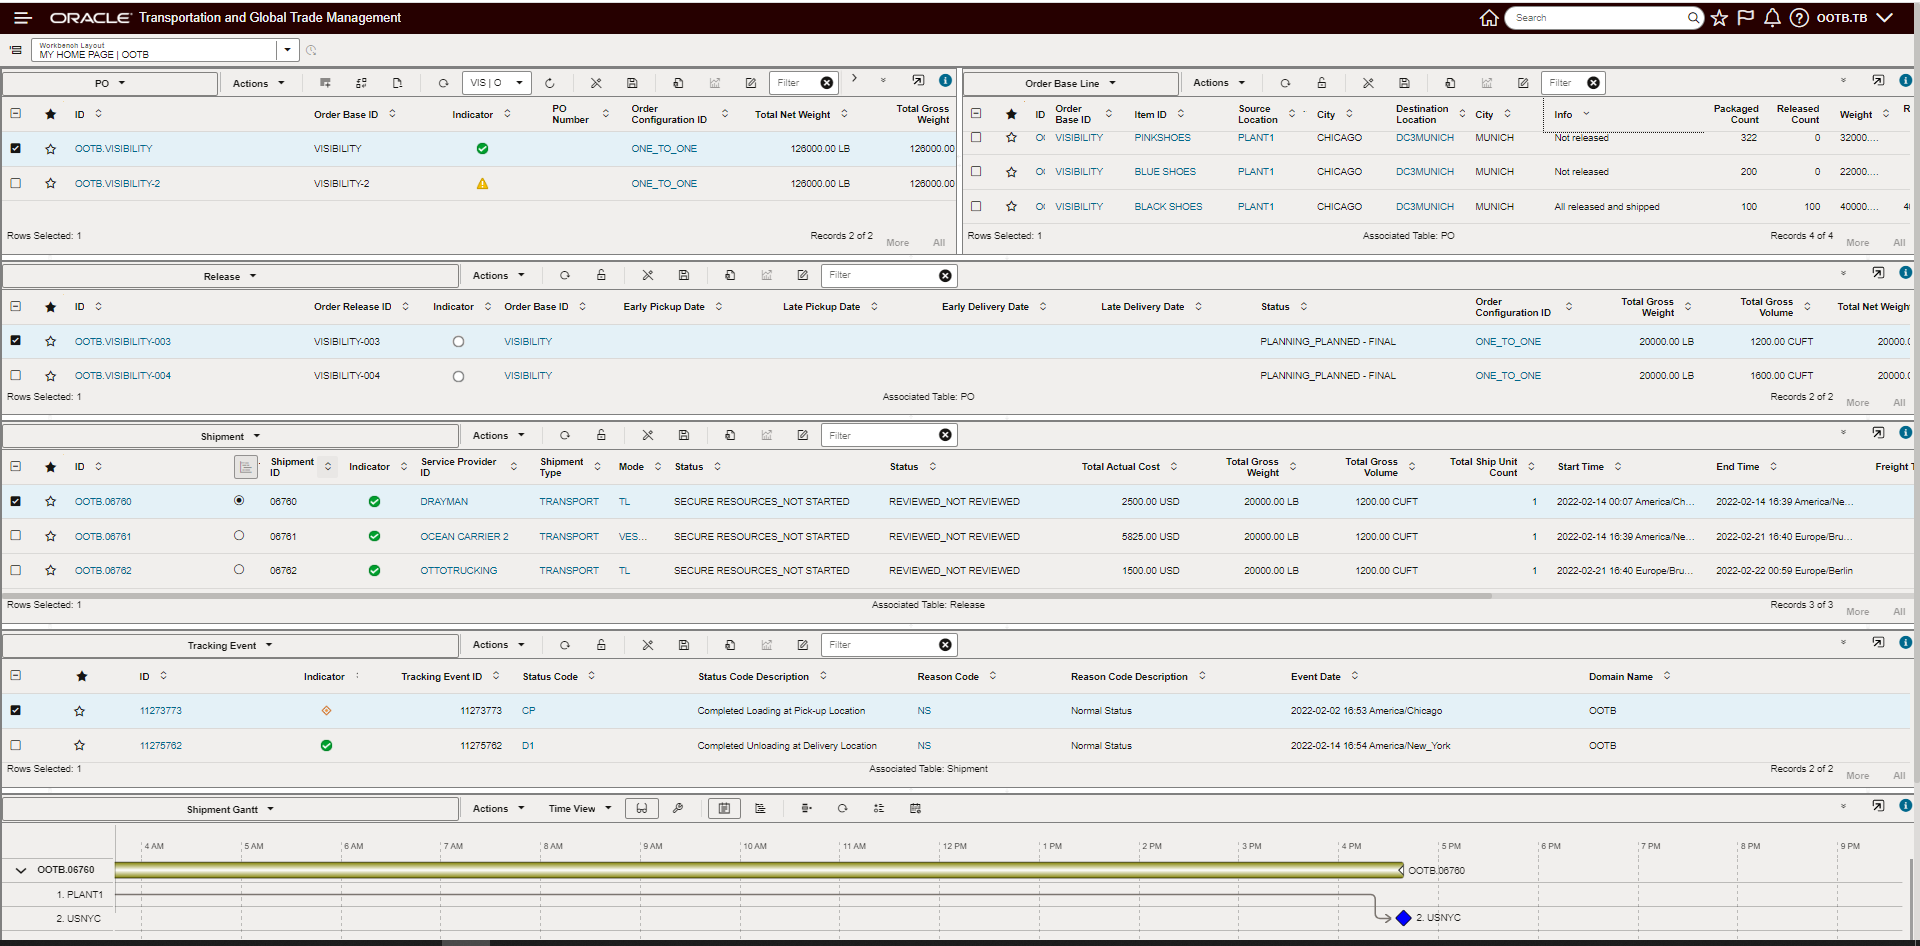
My Workbench Shown
If you need to navigate to other managers, power data etc. you have access to both the Navigator and Search to navigate to different areas of the system.
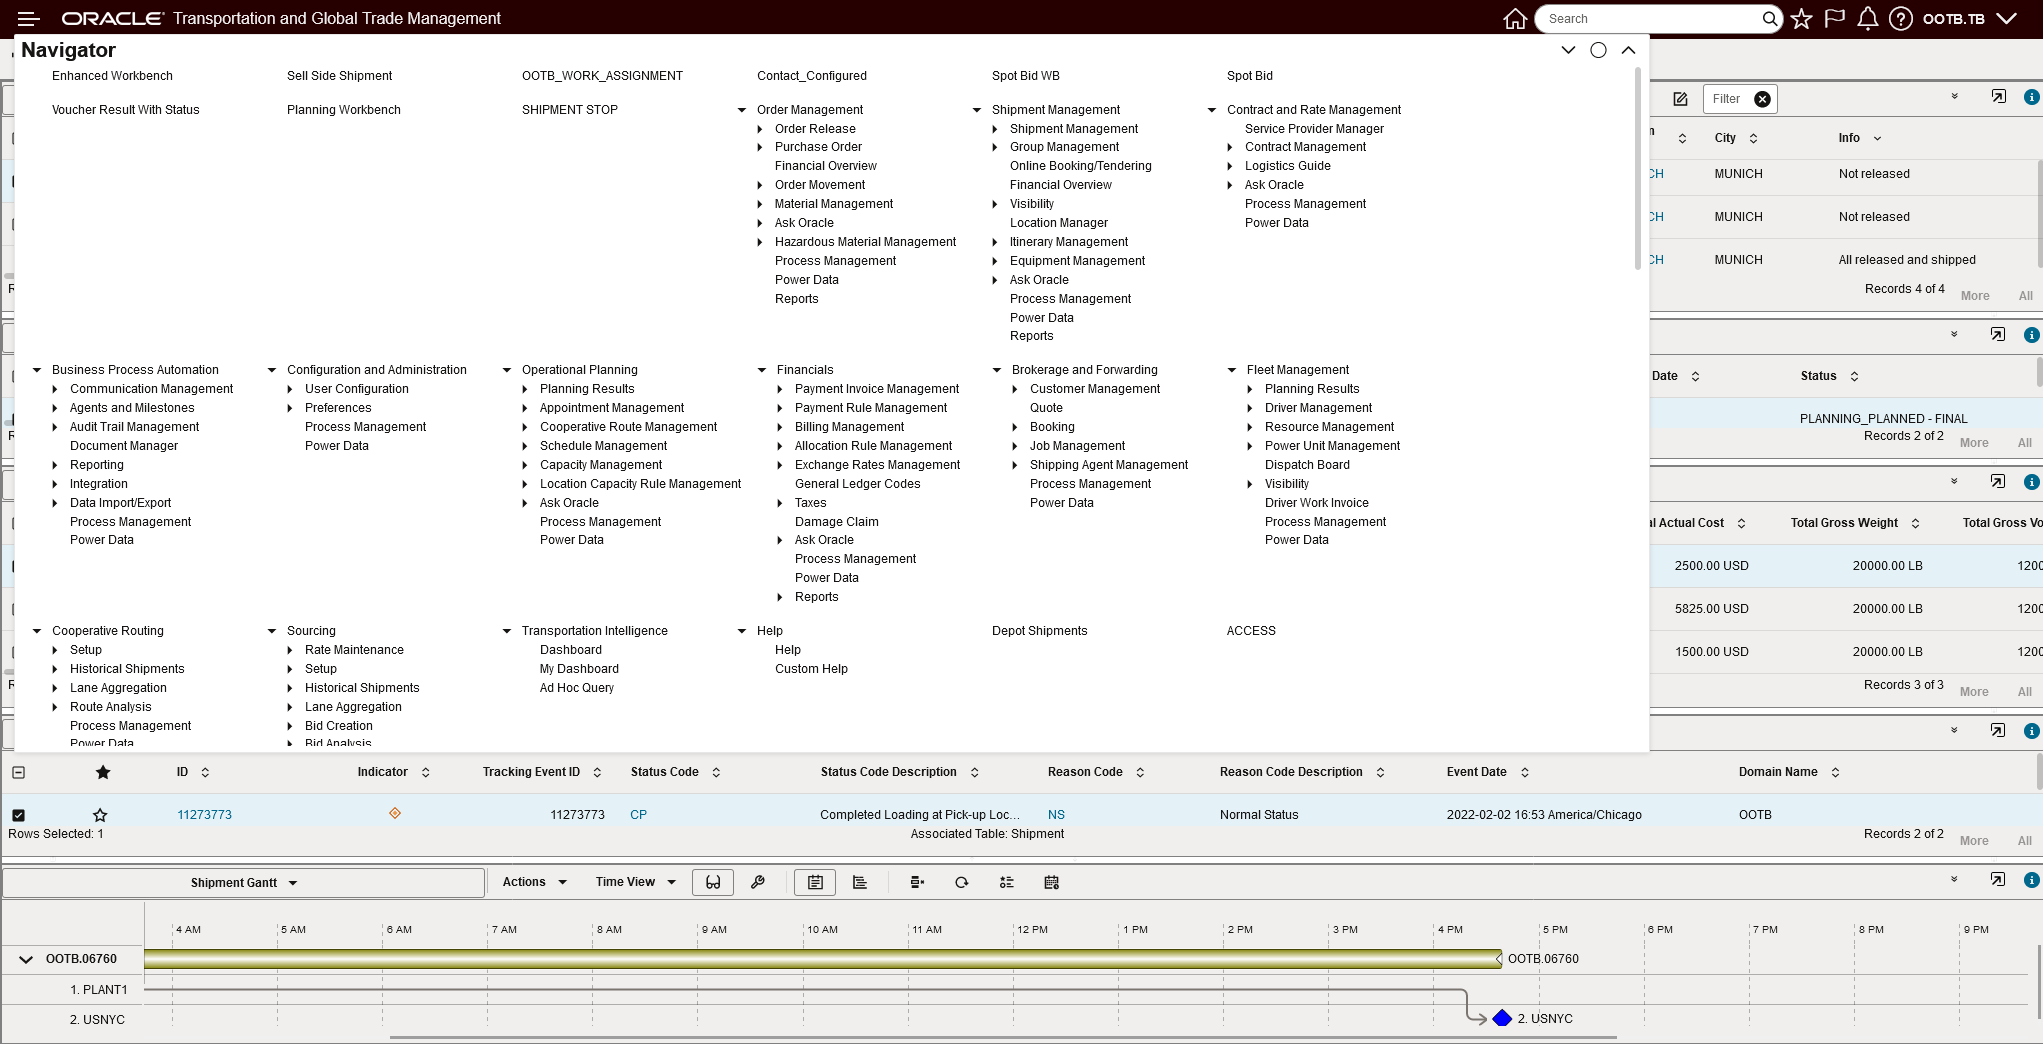
The Navigator Is Still Available for Navigation
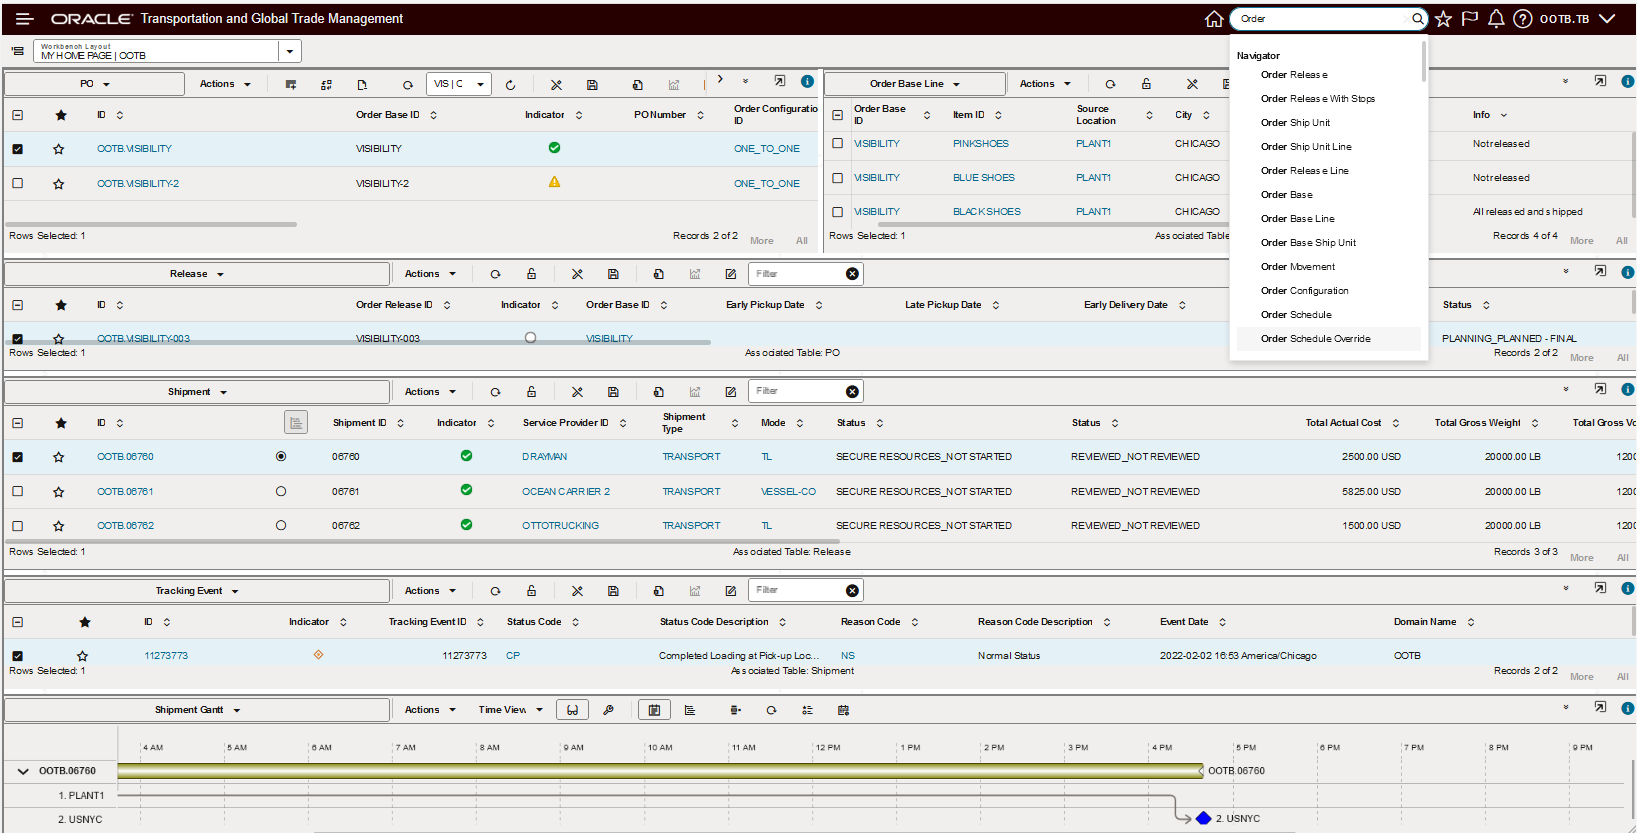
Search Is Still Available for Navigation
In the example below, the analyst responsible for Restricted Party Screening can now have their Restricted Party Screening Workbench be the initial screen presented to them after logging into the application - this puts them right where they need to be without having to navigate to their RPLS Workbench.
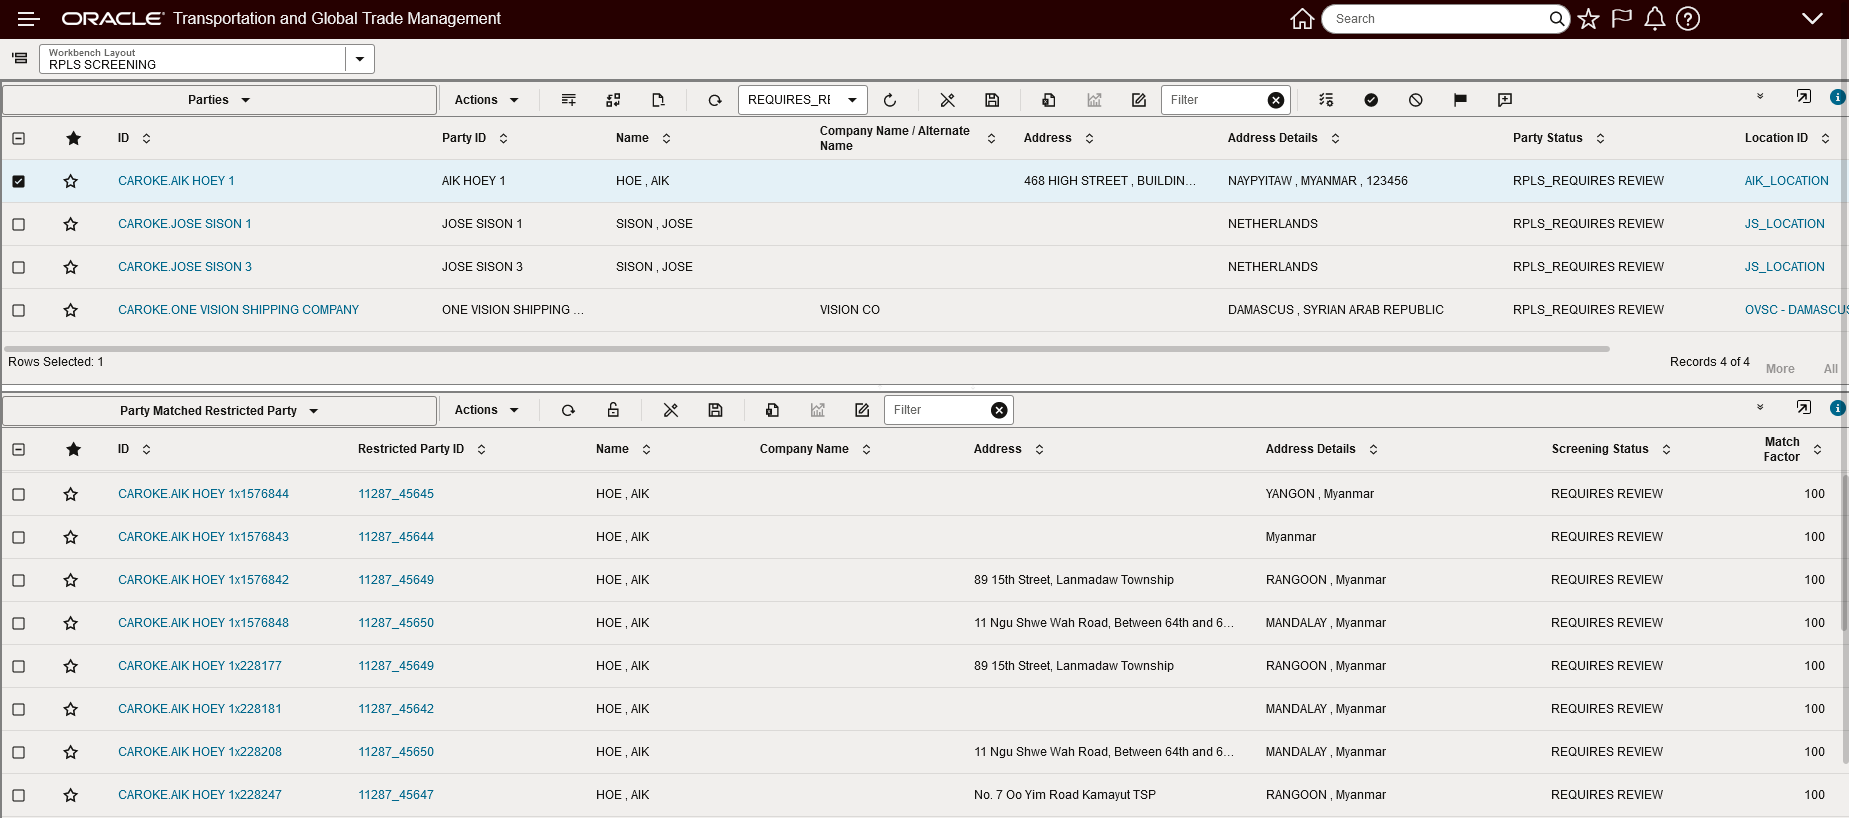
Home Page Workbench Restricted Party Screening
This feature eliminates unnecessary navigation for users who work exclusively within an Enhanced Workbench. For example - freight payment analyst, restricted party screeners.
Steps to Enable
To take advantage of this new User Preference option - Home Workbench Layout ID - you will need to configure the Home Workbench Layout ID option in an existing or new User Preference and then assign that configured User Preference to the desired usage level - either domain, user level or specific user.
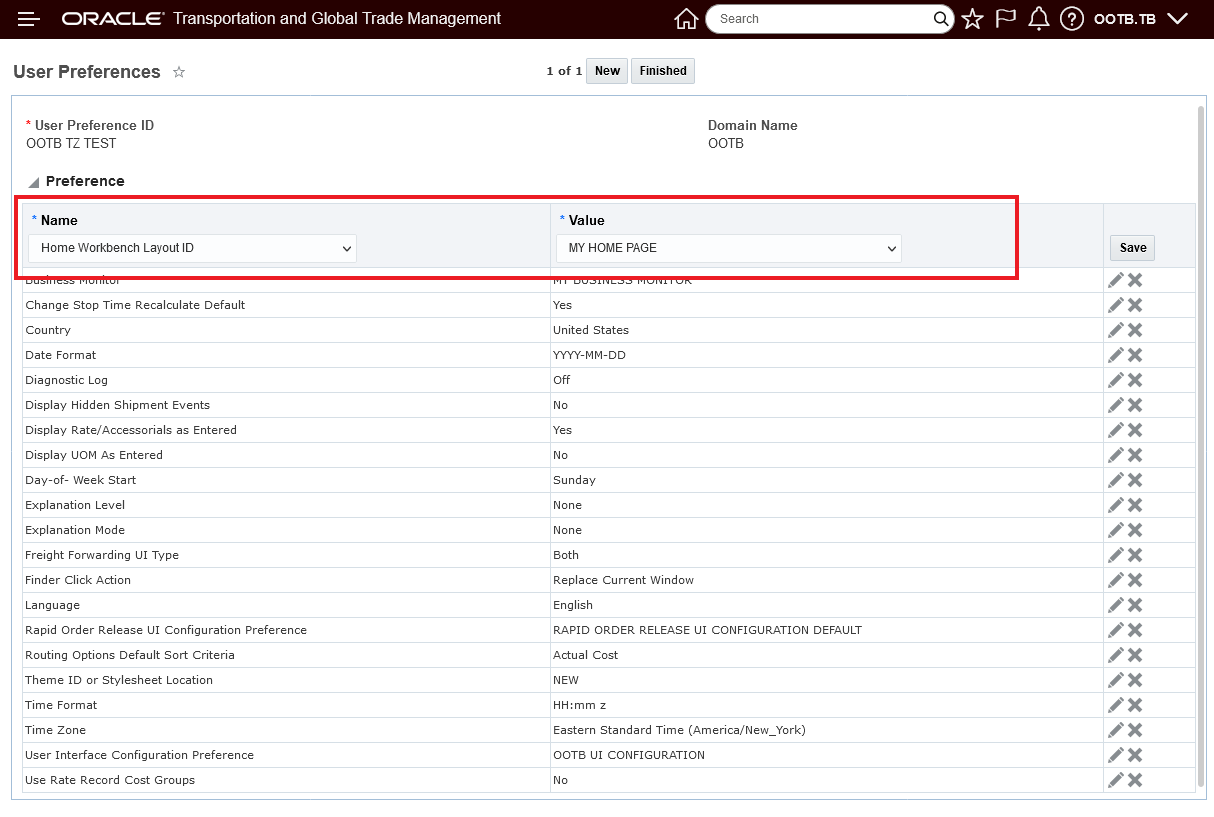
User Preference -
If the User Preference option - Home Workbench Layout ID - is not set, you will see the Springboard as your Home page - as shown below.
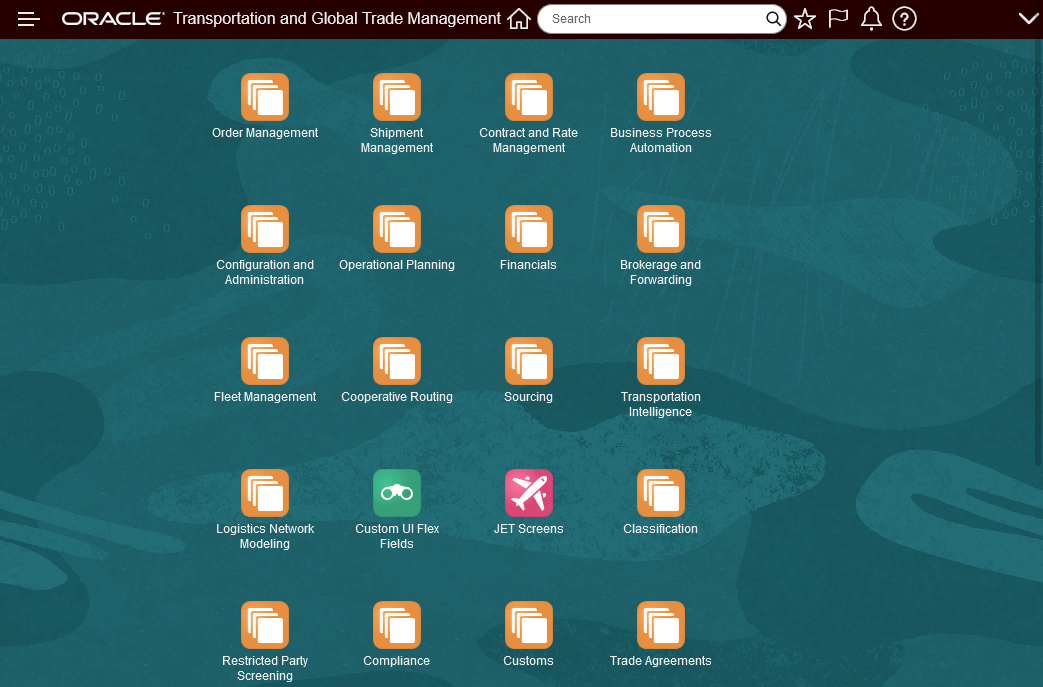
Springboard
REST Content Type Support for Oracle Visual Builder Add-In for Excel
This feature extends the flexibility of the REST services to support the Oracle Visual Builder Add-in for Excel content type requirements. With this feature, you can now develop Excel based solutions using Oracle Visual Builder Add-in for Excel and the system's standard REST capabilities.
Extends the options available for managing data to include using the Oracle Visual Builder Add-in for Excel.
Steps to Enable
You don't need to do anything to enable this feature.
Inbound Integration Status Alignment
This Optional Feature - Inbound Integration Status Alignment - when enabled, provides common processing of inbound XML integrations for the initial status value. Specifically, this feature will ignore - for II - insert ignore inbound XML transactions - an incorrectly provided initial status value provided for a new record/inserted record, and instead, will set the new records initial status value based on the initial value setup for the Status Type.
Provides consistent processing for status elements for all XML interfaces.
Steps to Enable
You don't need to do anything to enable this feature.
Key Resources
- A detailed description of this processing is available via the Cloud Integration Guide.
Oracle Analytics Server (OAS) Upgrade
This feature upgrades the Oracle Analytics Server (OAS) to the latest version 2022 v6.4. The latest version of OAS provides you with the latest set of correction and improvements in both performance and stability, as well as providing an updated UI look with a more pleasing color palette and improved icons.
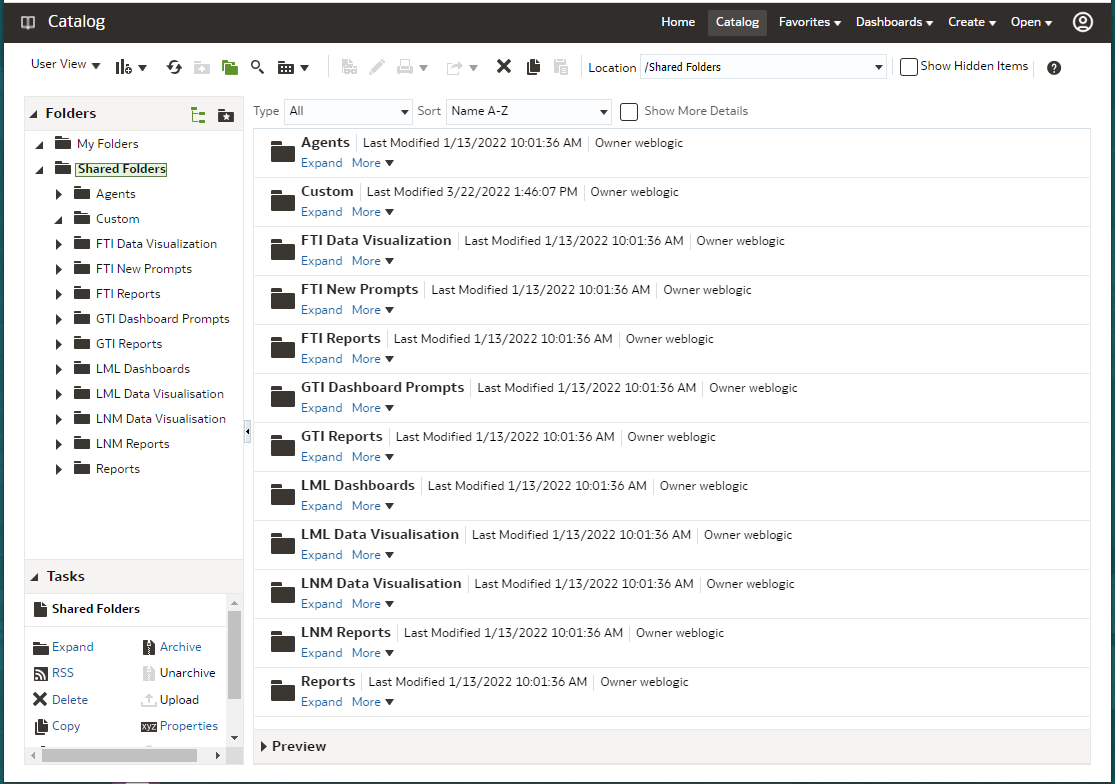
OAS v6.4 UI Style Improvements
Provides access to the most recent Oracle Analytics Server (OAS) release - including bug fixes, performance improvements and a more modern UI style.
Steps to Enable
You don't need to do anything to enable this feature.
This feature provides a new diagnostics infrastructure that will monitor and manage the accumulation of files created by various processes in the system - with the goal of avoiding performance and system failures related to unavailable disk space issues caused by the (unnecessary) accumulation of files.
The File Management diagnostics will monitor all files created by various processes including:
- Data uploads
- Logging
- Temporary storage
File Metrics
To support notification, a new Metric Component, FILES, is available for file management. It includes the following metric types by use case:
- FILE COUNT – files added during the metric time period
- FILE CREATION FAILURE COUNT – new file failure due to resource maximums being reached
- FILE CREATION ALERT COUNT – new file alert due to resource alerts being reached
- FILE SIZE – since files may grow over time, this is a polled metric, checked every hour
- REMAINING DISK SPACE – a polled metric, checked every hour. On By use case, this reflects the remaining resources allocated to the use case. For Total, it reflect overall remaining disk space.
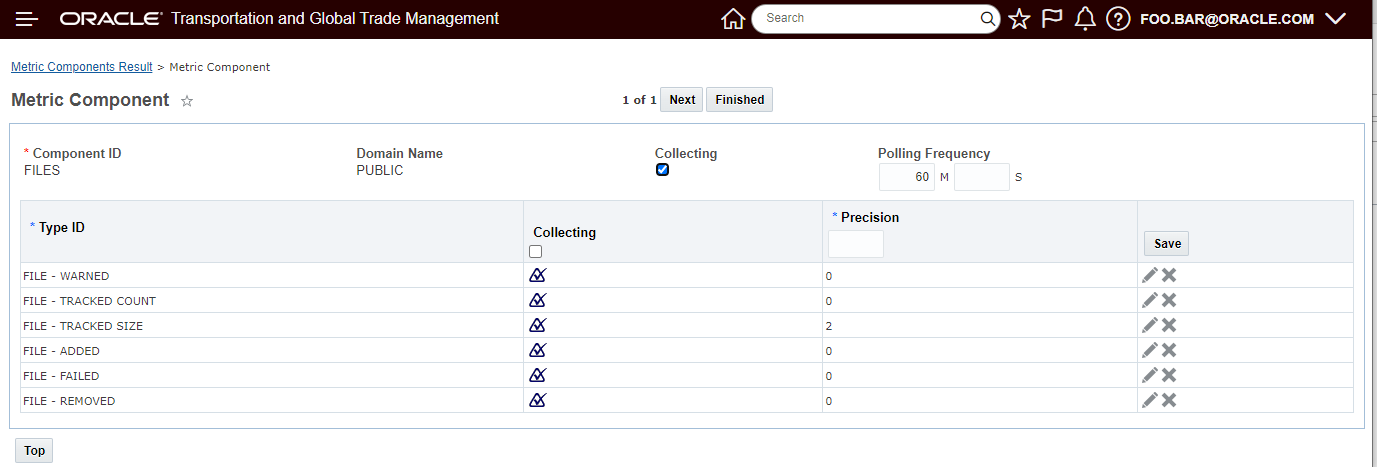
Metric Component
These can be used to set up various Metric Thresholds to warn users and Cloud Operations of critical loss of disk space. E.g., Cloud Operations can be notified when the REMAINING DISK SPACE goes below a fixed threshold, when the count of temporary files exceeds twice a daily average, or when a use case reaches 80% of its allocated limit.
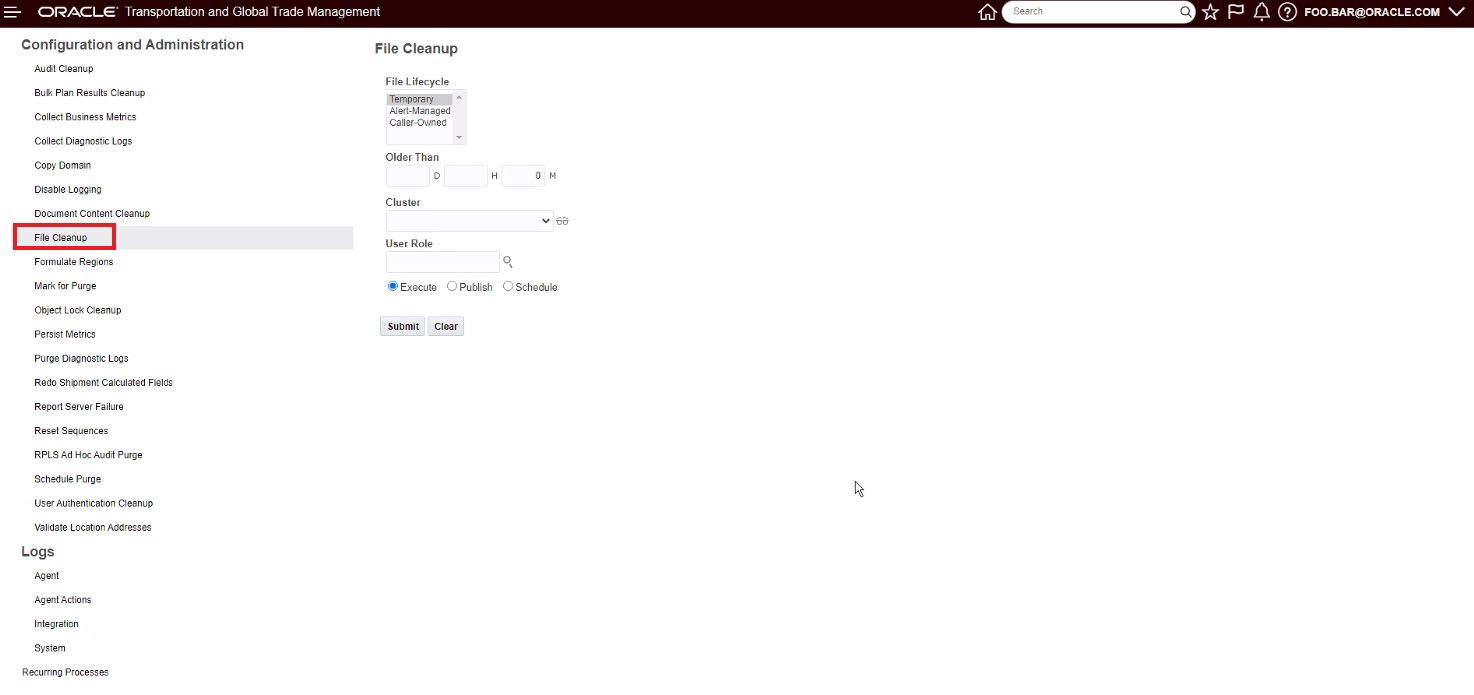
File Deletion
A new staged, reserved recurring process periodically deletes managed files that:
- still exist and are closed (we cannot delete files with open file handles)
- are temporary and have exceeded their lifespan
- are alert-managed and are exceeding the resource usage allocated for their use case
Note that alert-managed files are deleted oldest to newest, until the maximums are no longer exceeded.
The option has also been provided for you to run the File Cleanup process to support file deletion for particular use case. For example, you may want to explicitly delete any temporary Mail files older than 10 minutes, regardless of the policy specified by the caller or properties.
Every file created by the system is now associated with a Use Case. A use case consists of the following attributes, shared by all files of that use case:
- Ownership. Files may be temporary, alertManaged or callerOwned.
- Lifespan. Files have minimum and maximum lifespans.
- Resource Usage. A use case may have a maximum resource usage, specified in # of files and/or size of files. It may also have an alert usage (in # or size).
Logging
All additions and deletions of files to File Management are logged with a new FileManagement log ID. As the file deletion process runs, it may encounter files that have been deleted by the caller, these files will be logged specifically to distinguish between files that are explicitly deleted from files that are handled by File Management.
This feature improves system stability and performance by monitoring and managing the disk space used by files created by the system for various processes.
Steps to Enable
You don't need to do anything to enable this feature.
This Optional Feature - Limit Saved Query Results - when enabled - will limit the number of records that can be returned by your saved queries and saved conditions. For queries that return an excessive number of records, limiting the number of records returned will avoid undesirable impacts to system performance.
The default limit is set at 50k.
There are overrides defined for the following areas:
- Purge set to 1M
- Data Query set to 100M
- Update Classification set to 100k
This feature helps maintain system performance by avoiding system degradation caused by queries that return an excessive record count.
Steps to Enable
You don't need to do anything to enable this feature.
Tips And Considerations
Please contact Support to have limits raised for particular use cases or record types.
Optimize Transaction Synchronization
This Optional Feature - Optimize Transaction Synchronization - when enabled - allows transactional operations to no longer require thread coordination and synchronization.
This feature provides performance improvements for transactional operations by no longer requiring thread coordination and synchronization.
Steps to Enable
You don't need to do anything to enable this feature.
This Optional Feature - Optimize REST Finder - when enabled, will log the total number of columns retrieved for a REST API query. This information can then be used to set a limit on the size of any data returned to prevent excessive resource usage.
Provides insight into volumes and resource usage, the information gathered will provide insight and guidance for setting limits (if necessary/warranted) to avoid excessive resource usage and avoid performance issues.
Steps to Enable
You don't need to do anything to enable this feature.
Tips And Considerations
Do not disable unless advised by Support.
This Optional Feature - EMAIL COMPLIANT HTML - when enabled, will ensure Notification HTML is properly formed for Outlook and other email clients.
Changes include:
- Fixing up the table formatting for Data Changes
- Ensuring the logo image is inside the HTML body
This feature enforces HTML compliance on workflow notifications
Steps to Enable
You don't need to do anything to enable this feature.
Tips And Considerations
This feature may change existing notification formats slightly, but aids in email browser rendering.
Allow Restricted Password Characters
This Optional Feature - ALLOW RESTRICTED PASSWORD CHARACTERS - when enabled (enabled by default) - allows for the use of restricted characters '[', '#', and ']' when defining the password for a user in the system.
In previous version of the system, attempting to use any of the restricted charters '[', '#', and ']' in a user password - as shown below - would result in an error message.
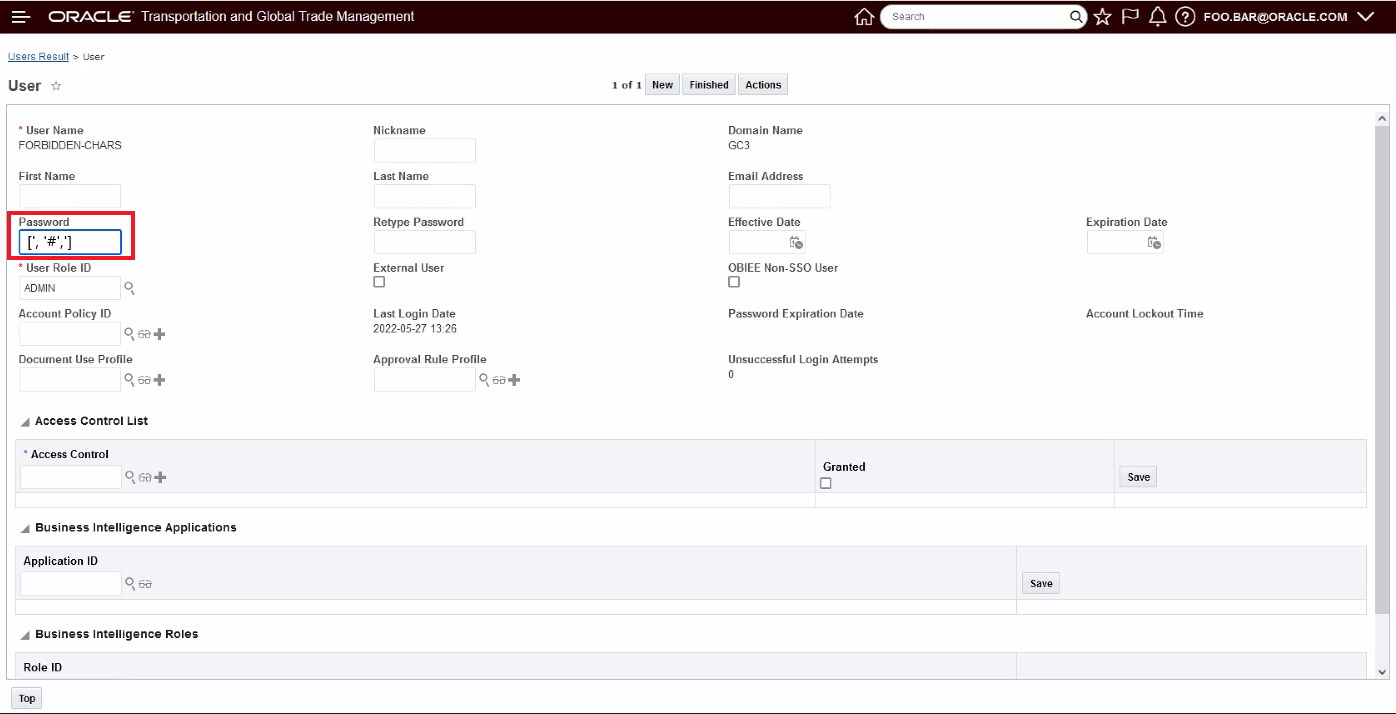
Restricted Characters Used In Password
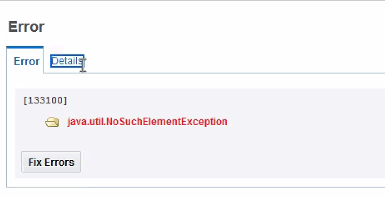
Restricted Characters Used In Password Error
Expands the characters allowed when defining a user password in the system.
Steps to Enable
You don't need to do anything to enable this feature.
This Optional Feature - Force Use of Nickname - when enabled, will require Users in the system to have a Nickname configured.
The Nickname provided must be the same as the corresponding Oracle Identity Cloud Service User Name field.
Enforces a consistent setup and SSO mapping.
Steps to Enable
Suggested Steps
Identify the Users without Nicknames:
- Log in as DBA.ADMIN.
- Navigate to Configuration and Administration User Management User Manager.
- Use the User Finder screen, for the Nickname field select "Is Null" drop list option and for the Last Login Date select a date at least 3 or more months ago (depending on your user activity) and then select the "After" drop list option.
- Click Search.
- Every single one of the User records found requires a Nickname value that maps to the corresponding Oracle Identity Cloud Service User Name field.
Without the Nickname, the user will not be able to login to the application.
To find the Oracle Identity Cloud Service User Name to populate as the Nickname in OTM, you can Export All of the user records from Oracle Identity Cloud Service and then manually update the User Nickname value in OTM/GTM.
To get the list of Oracle Identity Cloud Service User Names:
- Log in to Oracle Identity Cloud Service .
- Navigate to Users.
- Click on the Export button to Export All. This will trigger a background job and then you will be able to download the csv file if you click the Job Link provided. You will receive emails from Oracle Identity Cloud Service that "Your User Export Job has been started" and "Your User Export Job is successful" that contain links for the Job Status Page.
Once you have the IDCS list, you will need to manually match up the OTM/GTM User record and IDCS record and then update the OTM/GTM user record with a Nickname value that corresponds to the Oracle Identity Cloud Service User Name field value.
Transportation Management (Base)
Mobile App - Next Generation Progressive Web App
This feature provides you with the first full release of the all-new Mobile App. The new Mobile App is a completely new Mobile App developed from the ground up as a Progressive Web Application (PWA) versus being developed and deployed as native IOS or Android apps.
This first full release of the all-new Mobile App supports the standard dispatch to driver use case - providing end-to-end visibility and execution capabilities to handle your driver's Active shipment, Confirmed shipments, Assigned shipments, Future shipments and Completed shipments activities. The new Mobile App provides all the capabilities required to allow your driver(s) to perform shipment confirmation, enter tracking events, upload documents and photos, and sign-on-glass. In areas where your driver has lost cell coverage and is off-line, the application supports uninterrupted processing of driver activities and will queue up required events for synching once cell coverage is back.
In addition - the new Mobile App provides you with the opportunity to easily configure, from within OTM, the look and feel of the deployed Mobile app, as well as providing you with options to brand the Mobile App, limit access to various data and tailor/limit access to available features - for example remove the option for the driver to upload photos or sign on glass.
If you are a current user of the legacy native IOS or Android apps - developed using the MAF (Oracle Mobile Application Framework) tool, we strongly encourage you to review the capabilities of the new Mobile App and, certainly for the driver use case, consider moving to the new Mobile App as soon as possible to begin taking advantages of the many usability, performance and configurability options provided by this feature.
Driver Flow Use Case
The use case supported by the new Mobile application is demonstrated below. In this example, the driver has been assigned five shipments. The driver will review their Assigned shipments and Confirm one or more of their assigned shipments. From the list of Confirmed shipments, the driver will be prompted to Start the shipment with the earliest start date. Once started, the selected shipment will be the driver's one Active shipment. The application will prompt the driver to provide Arrived and Departed event information for every stop on the shipment - in stop order. The driver has the option to enter additional tracking events, upload documents or photos and sign on glass. Once the last stop Departed event has been entered, the Active shipment will move from the Active status to the Completed Shipments list, at this point the Driver will review and Confirm more Assigned shipments or select the next shipment in the list of Confirmed shipments to Start.
Once the OTM Mobile app has been setup on the driver's homepage - all they will need to do is open the app and log in - as shown below.
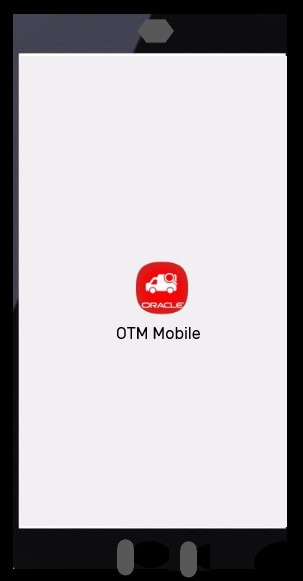
Mobile App on the Home screen - Select the OTM Mobile Icon to get started
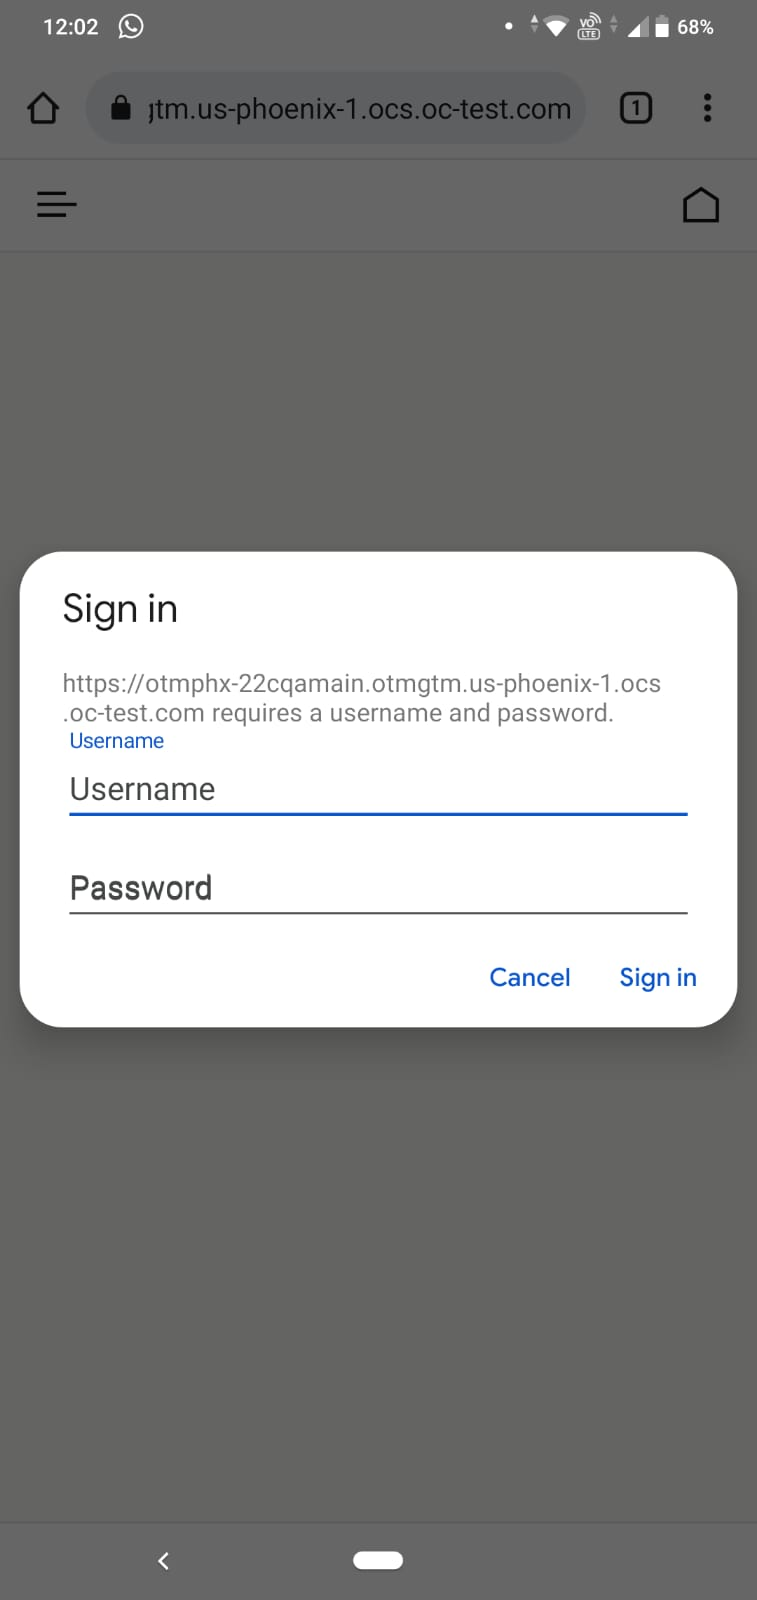
Login Greeting
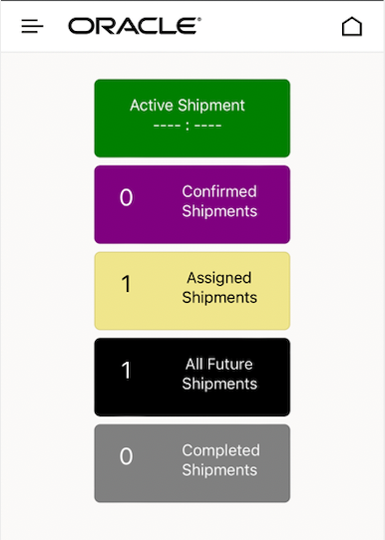
The Dashboard view below provides the driver immediate information regarding the driver's shipments - Active Shipment, Assigned Shipments, Confirmed Shipments, and Completed Shipments. The progression is as follows:
- Assigned Shipments – These represent the shipments that have been assigned to this driver by the dispatcher.
- Confirmed Shipments - These are the set of shipments that the driver has reviewed and Confirmed. The driver selects the shipment(s) to Confirm from the list of Assigned Shipments.
- Active – Only one shipment can be active at a time. The selection of the Active Shipment (the shipment to Start) is done from within the Confirmed Shipment list. Only one shipment in the Confirmed Shipments list will be available for the driver to Start (make Active) and that shipment will be the shipment with the earliest start date in the Confirmed Shipments list.
- Active Shipment - The Active Shipment, as the name implies, is the current shipment the driver is working on. The Active Shipment is active until the last stop’s departed event is entered.
- All Future Shipments – This list provides a view into the Assigned Shipments and Confirmed Shipments. This view provides the same set of actions as that of individual menu of Assigned and Confirmed Shipments.
- Completed Shipments – This list provides a view into the shipments completed by the driver.
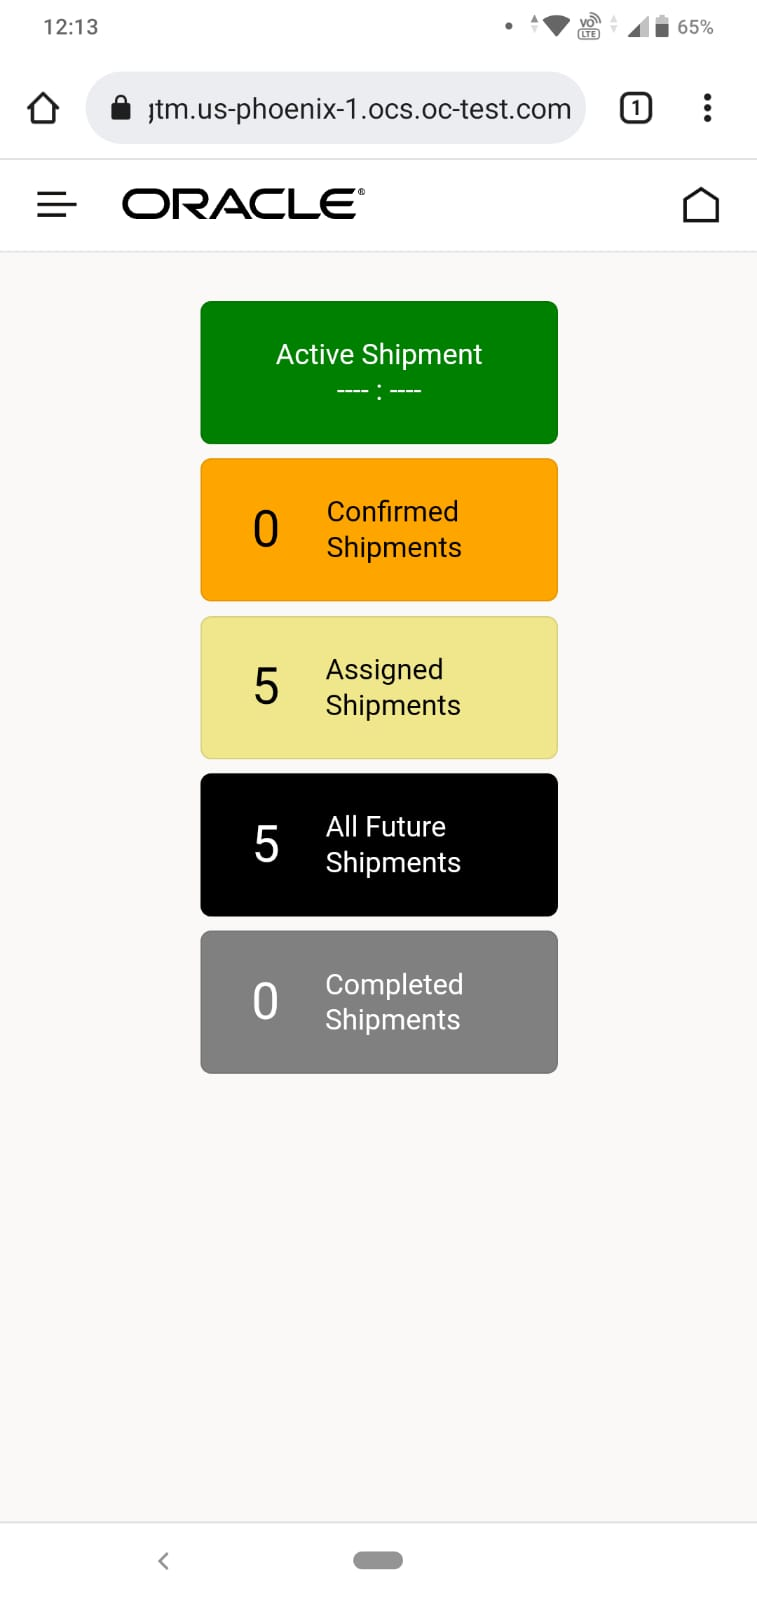
Mobile Dashboard
Drill down to review the five shipments currently assigned.
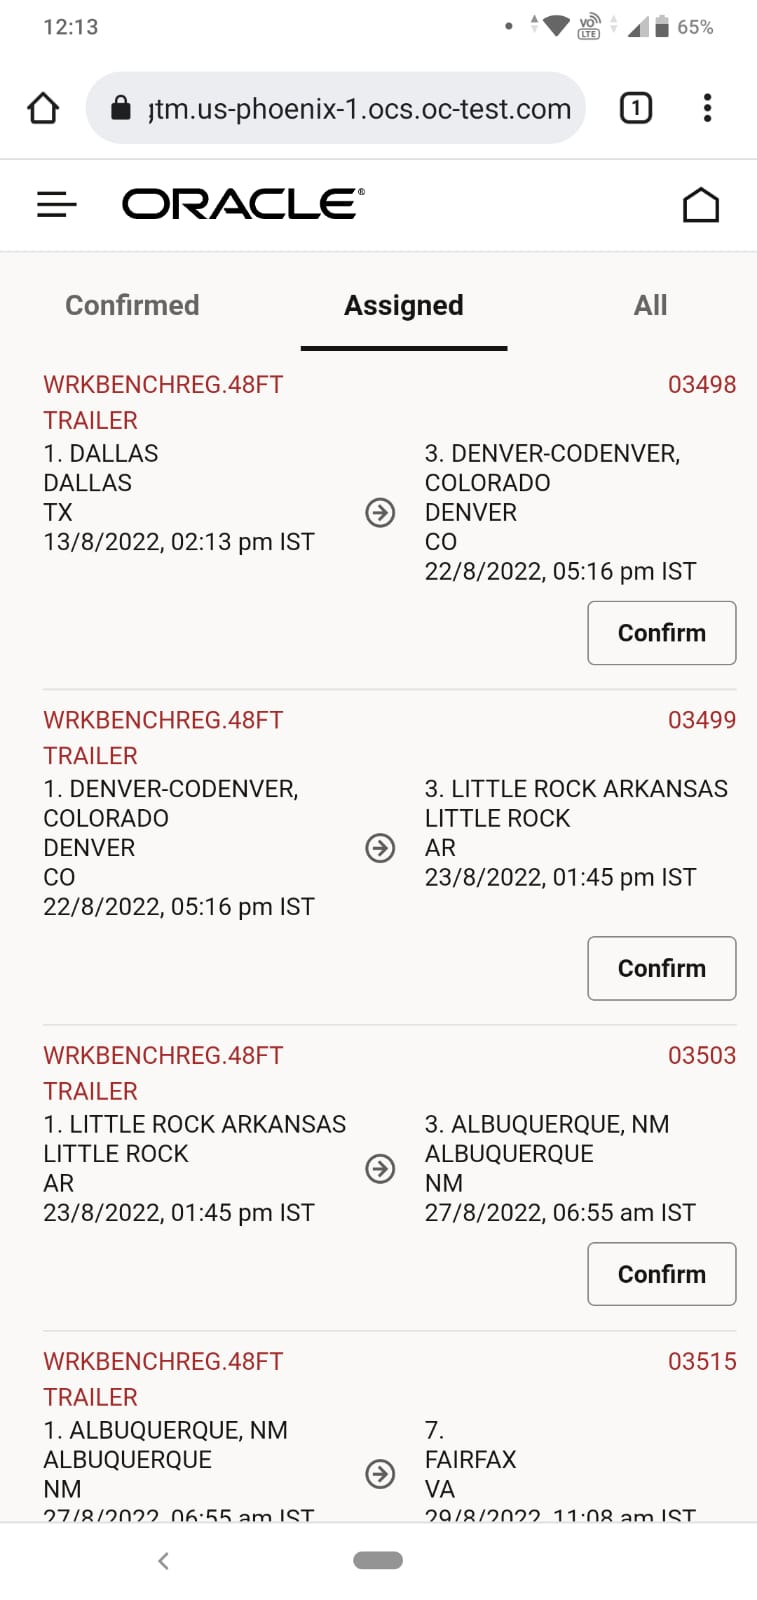
Drill Down to Shipment Header Info
Confirm the first shipment in the Assigned list - 03498.
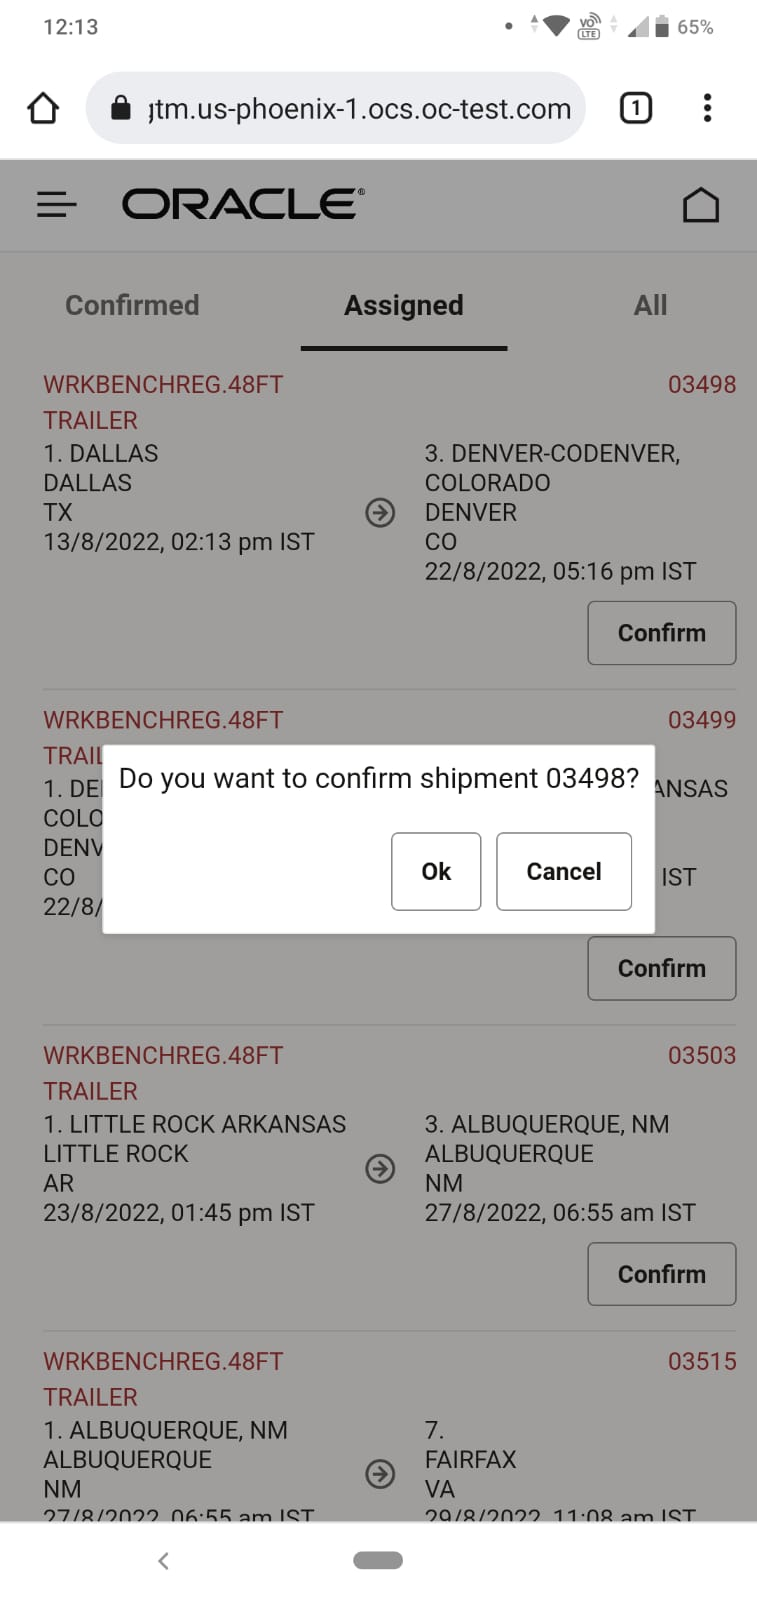
Confirm Shipment 03498 From Assigned List
After being Confirmed - shipment 03498 is added to the list of Confirmed shipments.
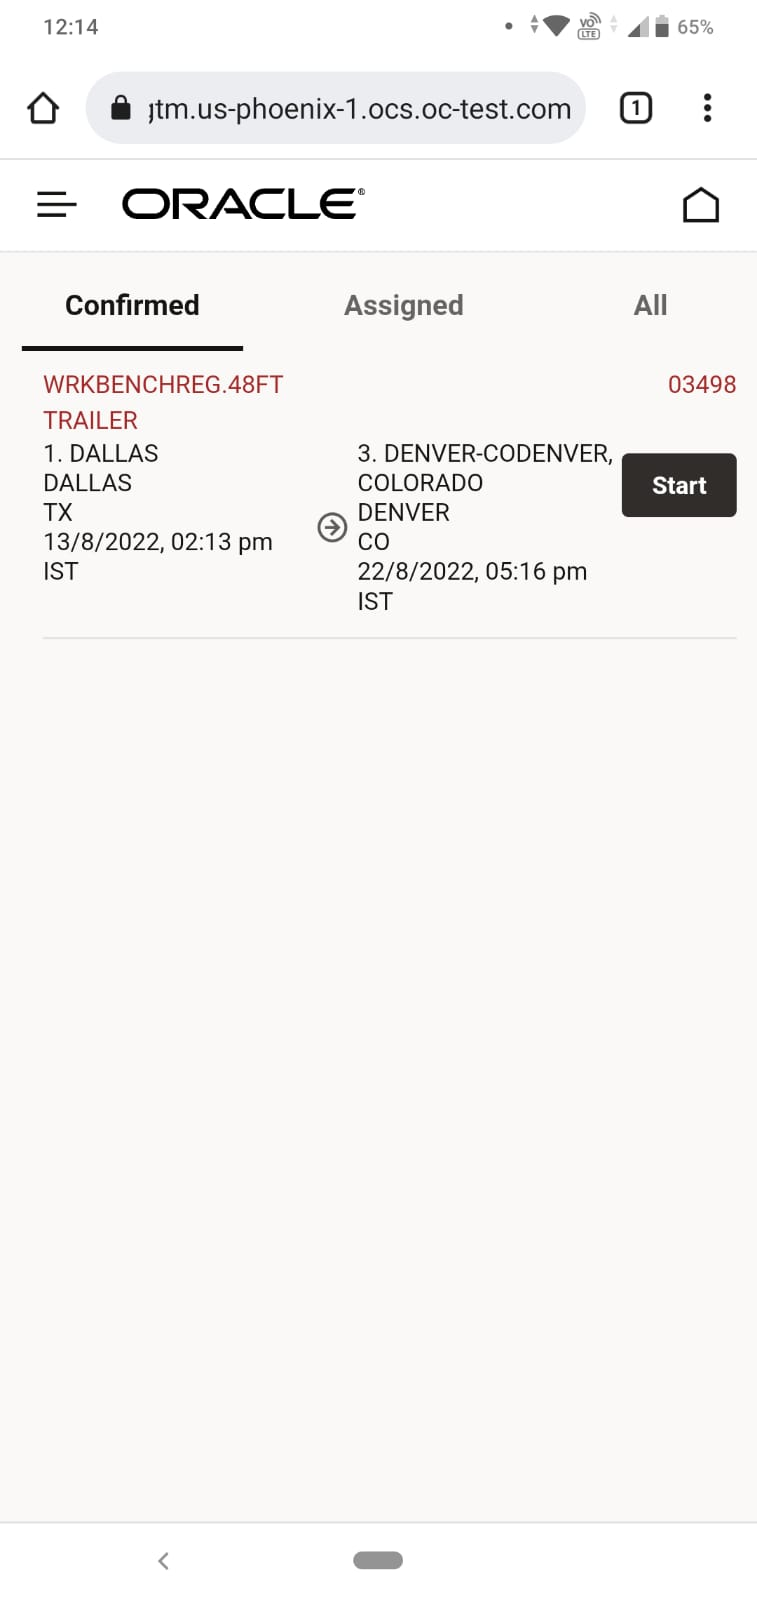
Confirm Shipment 03498 In Confirmed List
Next the driver adds shipment 03499 and 03503 to the list of confirmed shipments. Note that 03498 is tagged with the Start button - this is because there are no active shipments currently, and 03498 has the earliest start date/time of all the shipments in the Confirmed list - and therefore is the shipment that will be made Active and completed first.
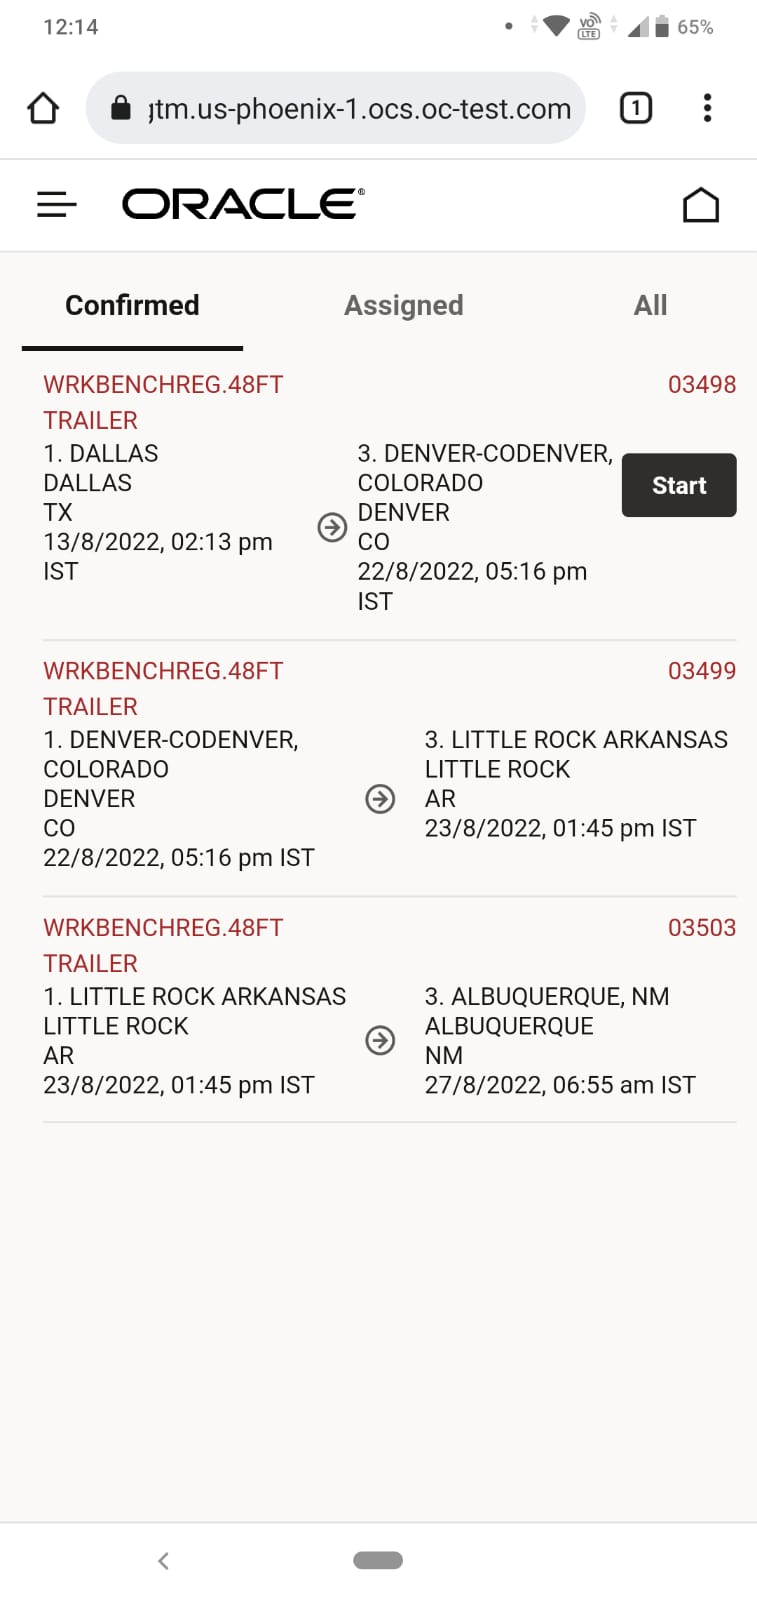
Confirm Shipments List
To make shipment 03498 the Active shipment - the driver just selects the Start button, and then shipment 03498 will move from the Confirmed Shipments list to the Active Shipment list.
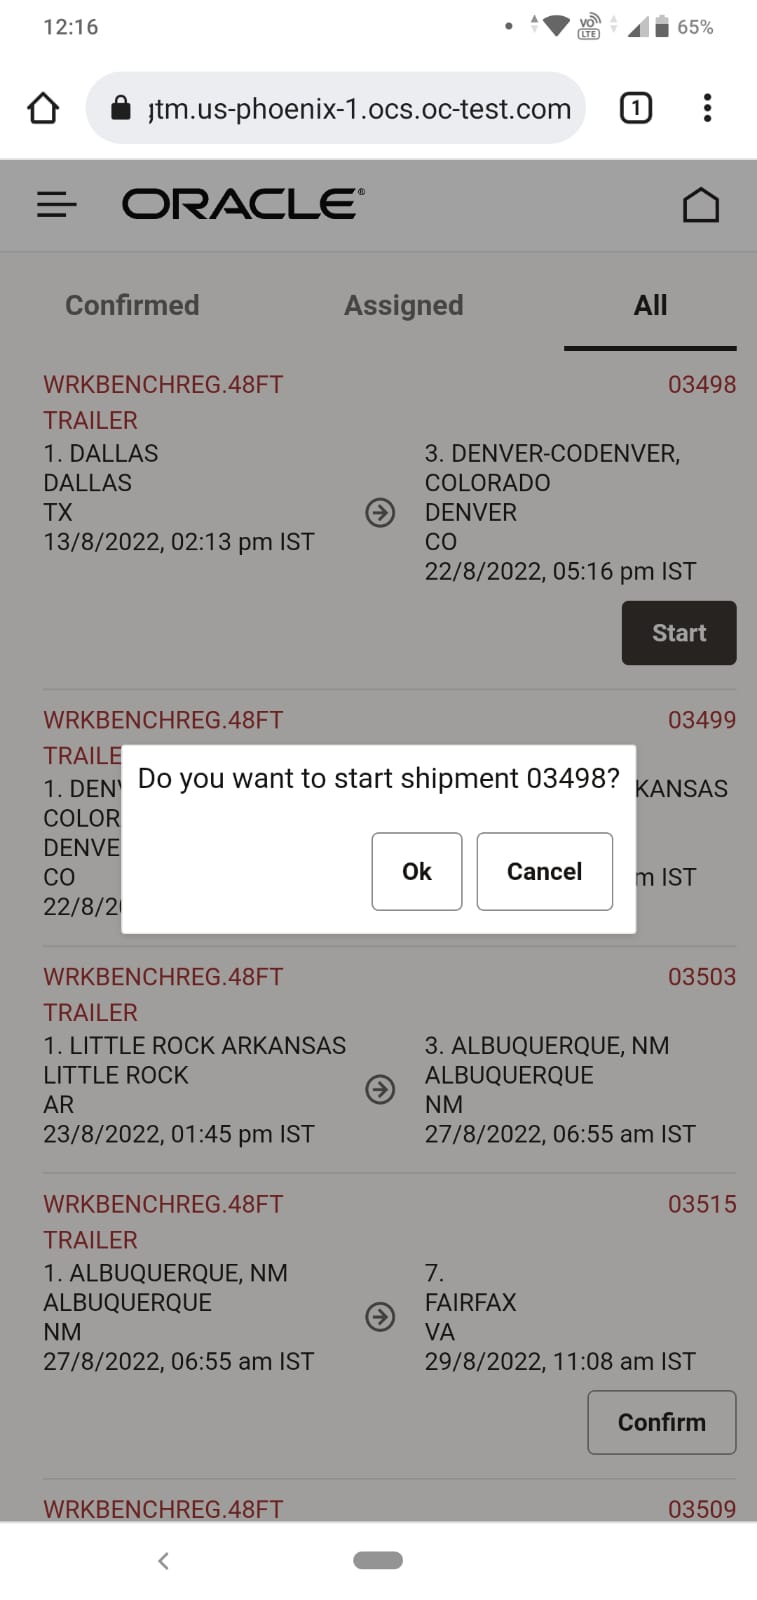
Start 03498
Once shipment 03498 is made Active - the Dashboard is updated to reflect the current counts. There are two Confirmed shipments in the list, two Assigned but not confirmed shipments, four Future Shipments (Confirmed and Assigned) and one Active Shipment
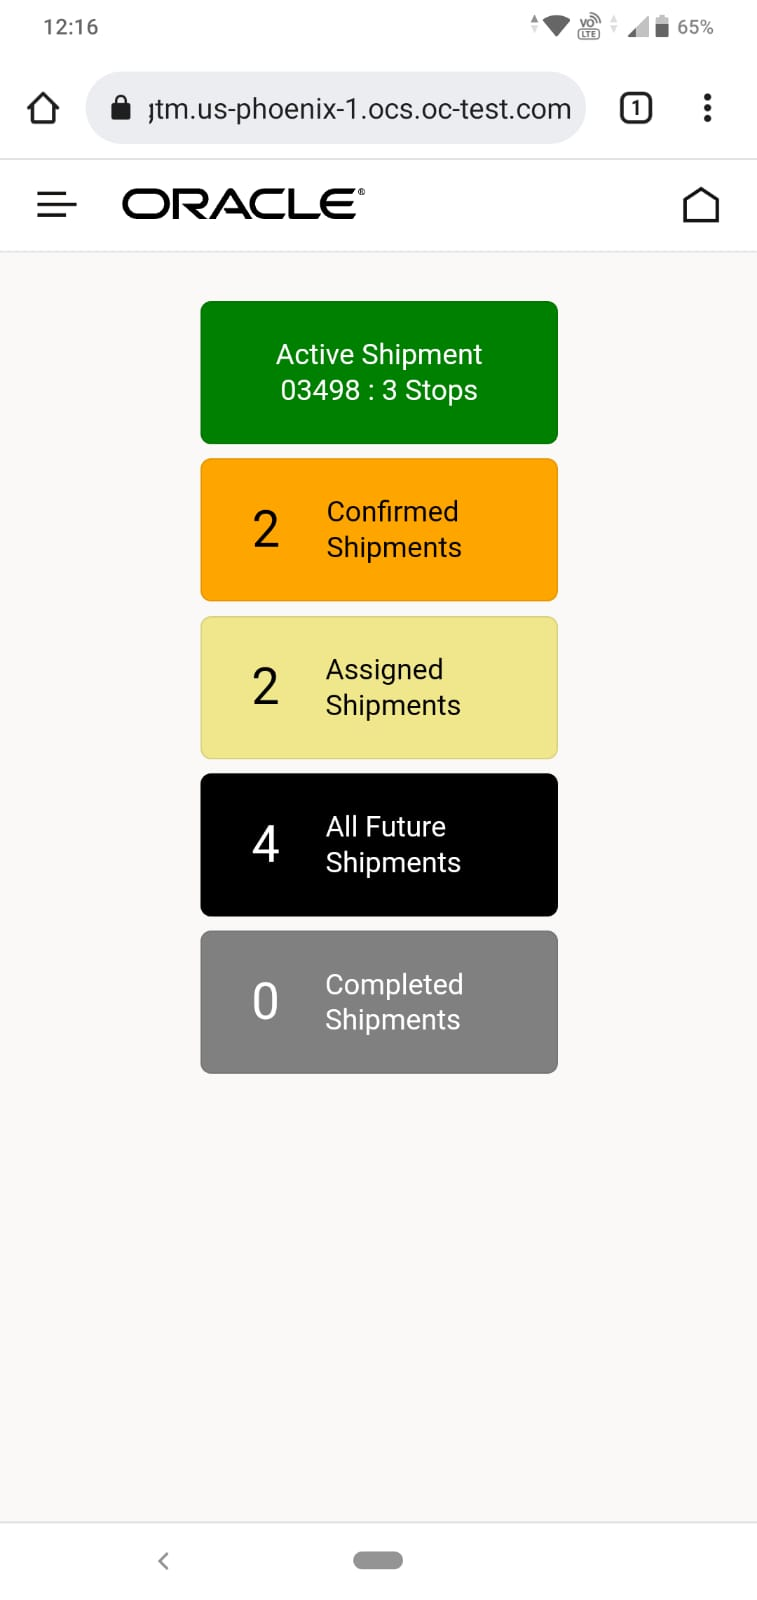
Shipment 03498 Dashboard Update
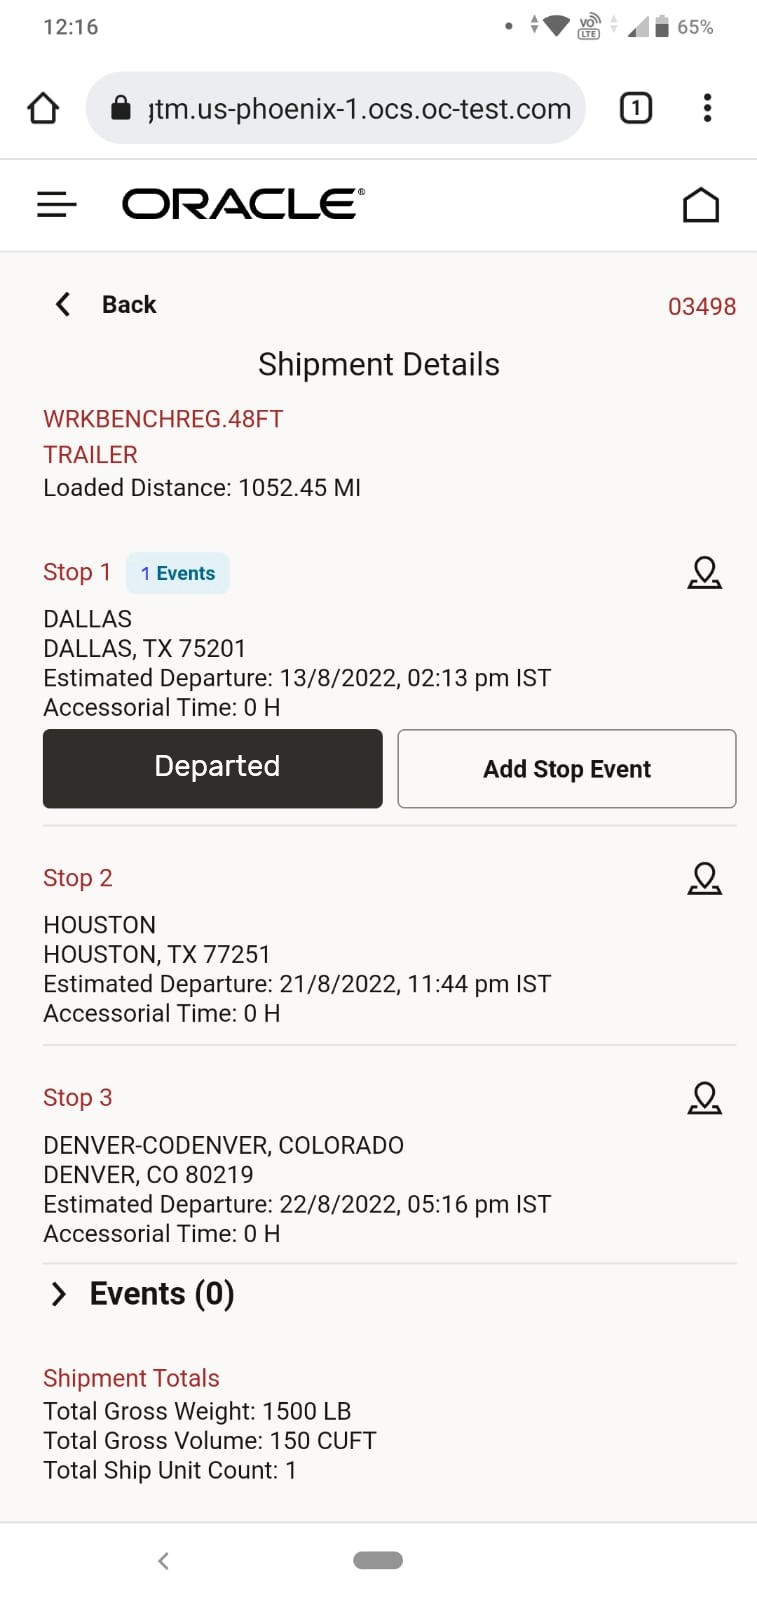
As the driver begins executing the Active shipment 03498, the Mobile app will provide a series of call to action prompts that will help guide the driver in providing both Arrived and Departed Tracking Events for each stop on the shipment.
In the example below - on the Shipment Details view, the driver is prompted to enter the Arrived event at the first stop - Dallas, TX - they also have the option of entering additional stop events, as necessary, using the Add Stop Event button.
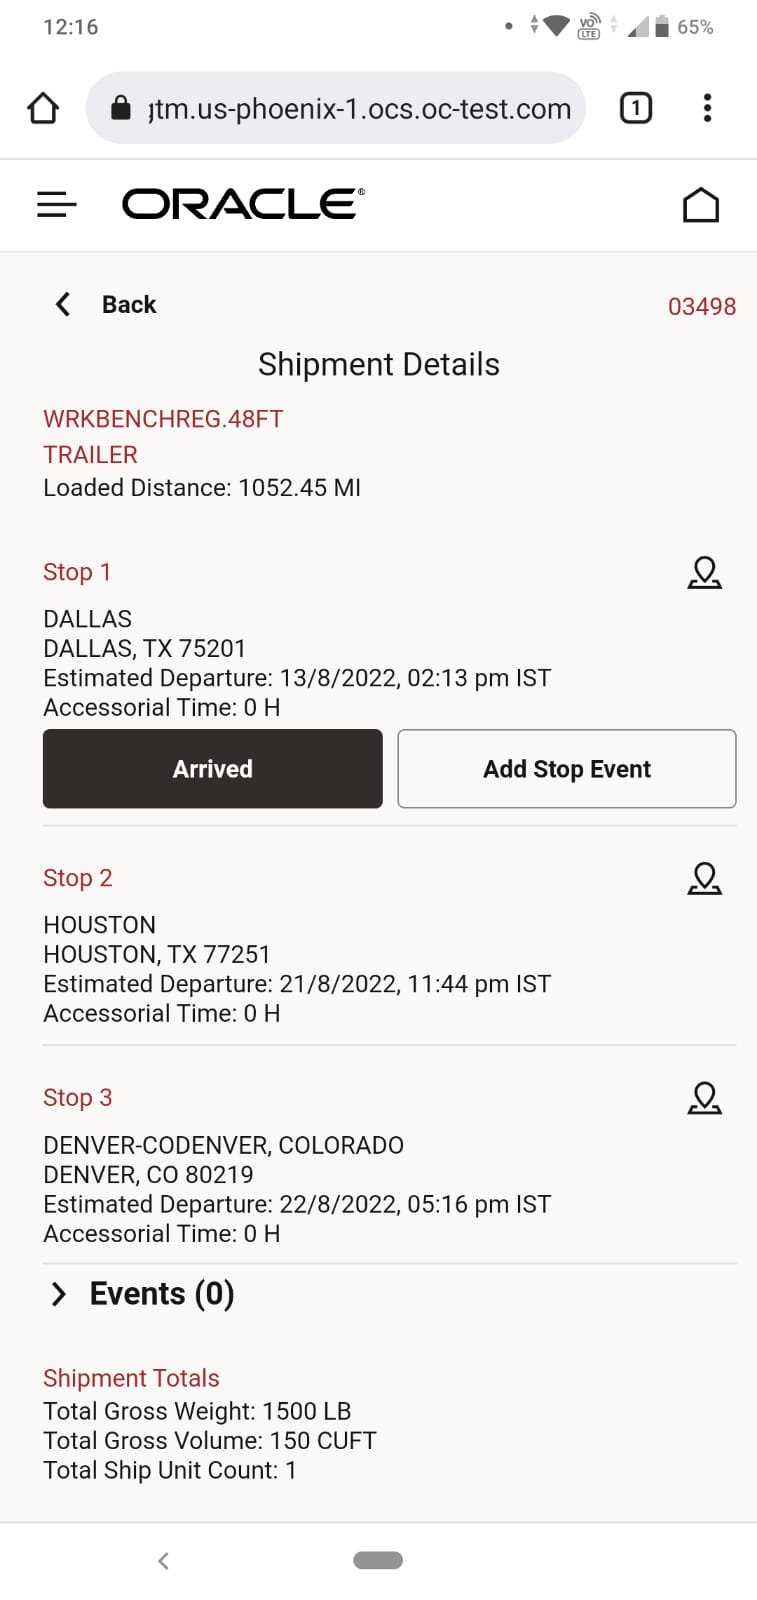
Call to Action - Arrived
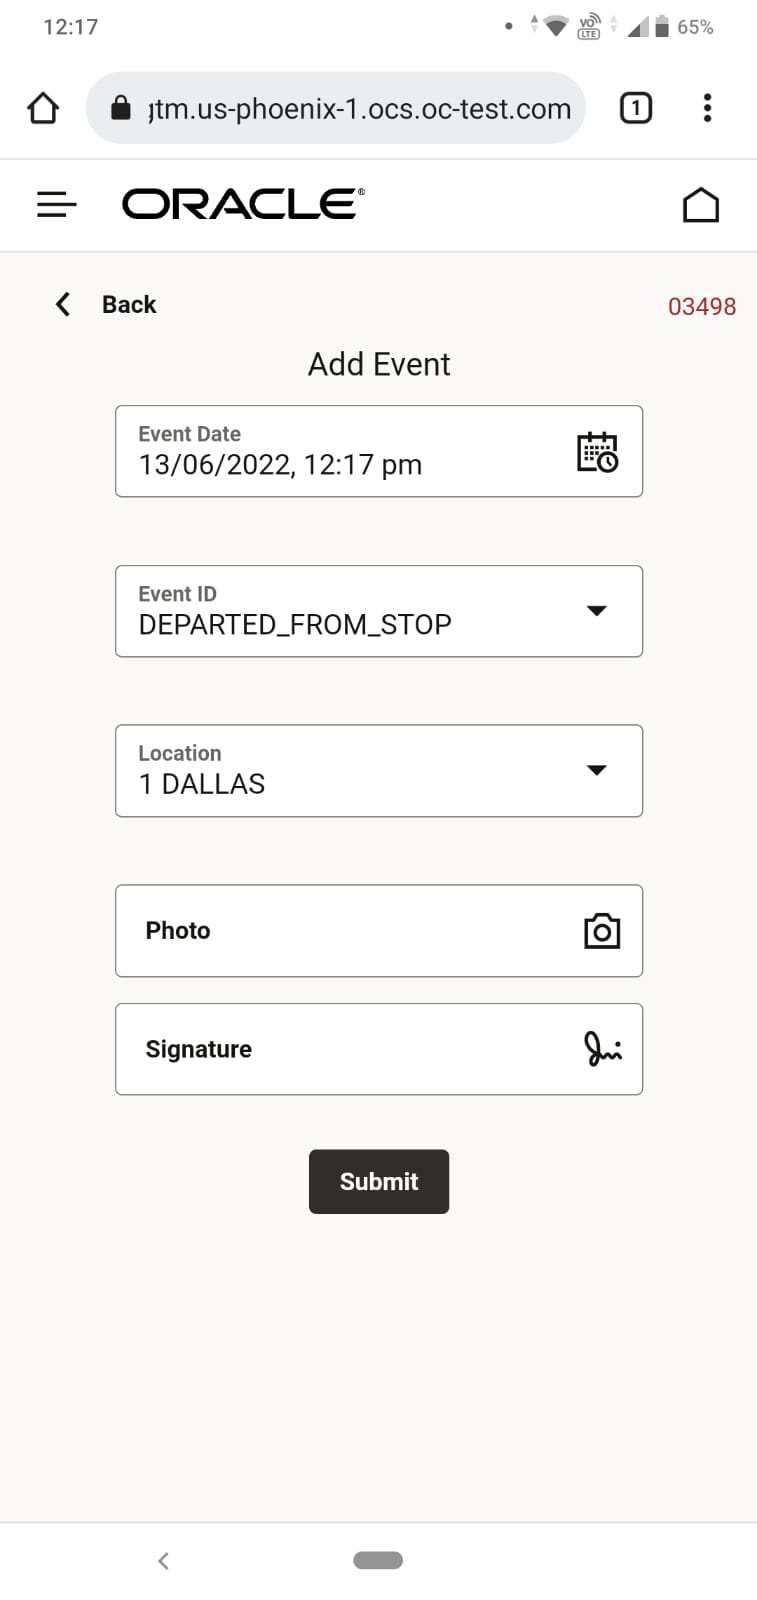
The process - which is repeated for each stop on the shipment, follows the steps below. The call to action - Arrived or Departed - appears on the driver's screen as the shipment is executed. When the driver arrives, they will select the Arrived option - when Arrived is selected, the Tracking event entry screen will automatically be populated with the current date/time and the appropriate event code - the driver has the options to add additional information - or they can simply select Submit. After selecting Submit, the Mobile App verifies that the event was entered.

Arrived Call to Action
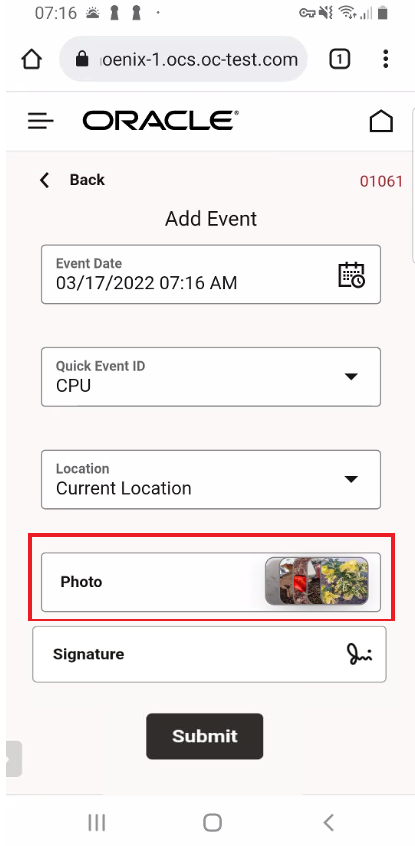
After initiating the entry of the Arrived event - the Tracking Event information below - Date/Time, Event ID, Location - are automatically added to the Tracking Event that will be submitted - note that the driver has the option of Signature/Sign On Glass or uploading photos as part of the Tracking Event entry process.
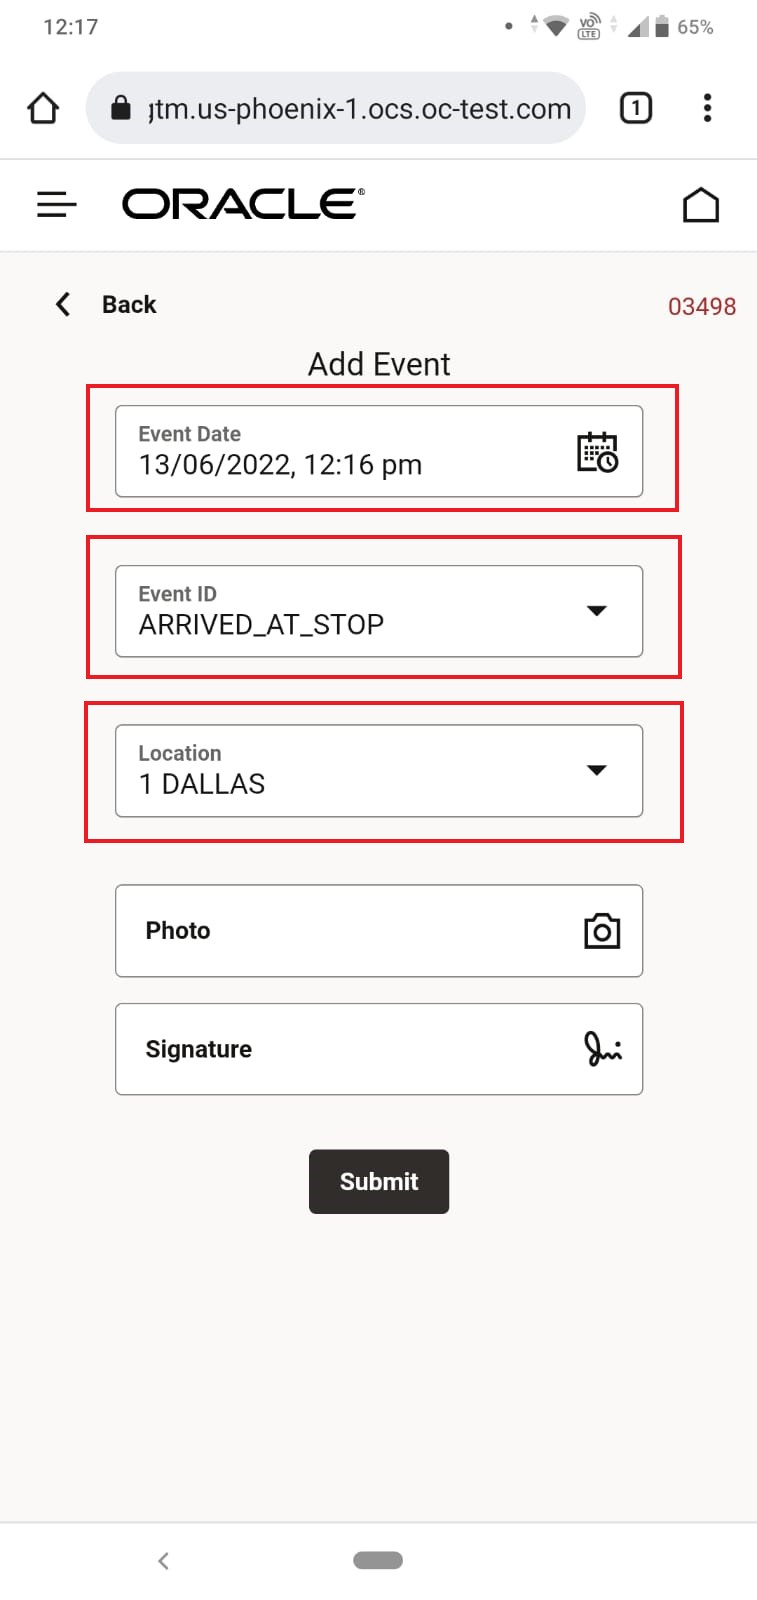
Tracking Event Info Automatically Populated
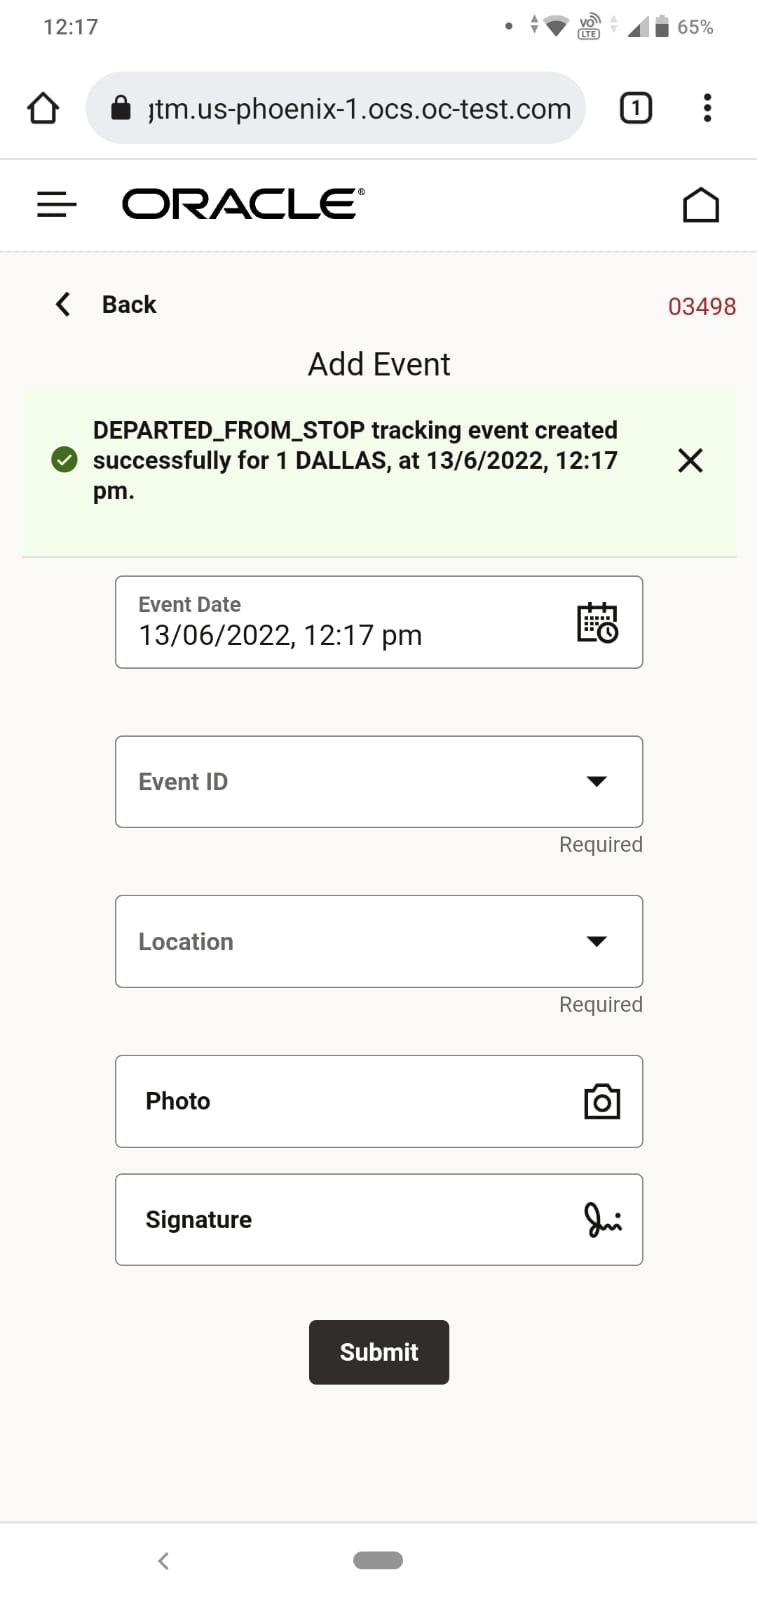
If the information provided is correct, the driver only needs to hit the Submit button, the Mobile App will confirm the adding of the Tracking event - as shown below. The driver can add additional Tracking Events or hit < Back and continue.
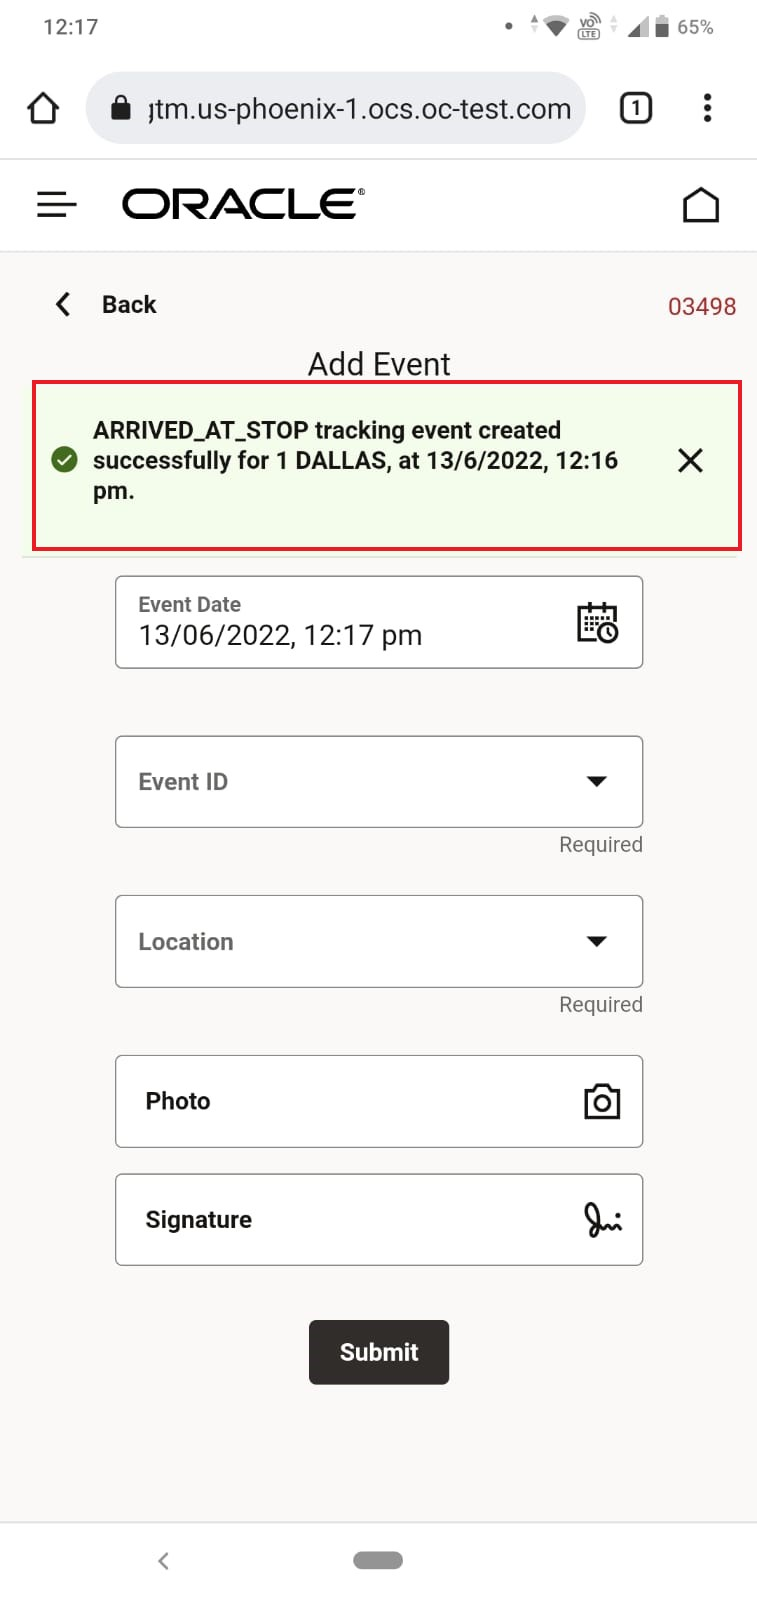
Tracking Event Added
As noted, the Mobile Application provides call to action prompts for both Arrived and Departed Tracking Event entry - below - for completeness - is the Departed Event entry for stop 1, note that for Stop 1 Dallas, the Mobile App is already indicating that one event has been entered - this would be the Arrived Tracking Event entered above.
Stop 1 Departed Event Prompt
Departed Event Entry and Submit
Confirmation that the Departed Event was added successfully.
Departed Event Successfully Entered
The process continues until the final stop's Departed Tracking Event is entered; at that point, the shipment is complete. In the screen below, you will notice that the Mobile App provides you with a count of the Tracking Events added by stop - in this case Arrived and Departed Tracking Events for each stop - and a complete list of all the events entered for the shipment - in this case six events - Arrived and Departed for each of the three stops..
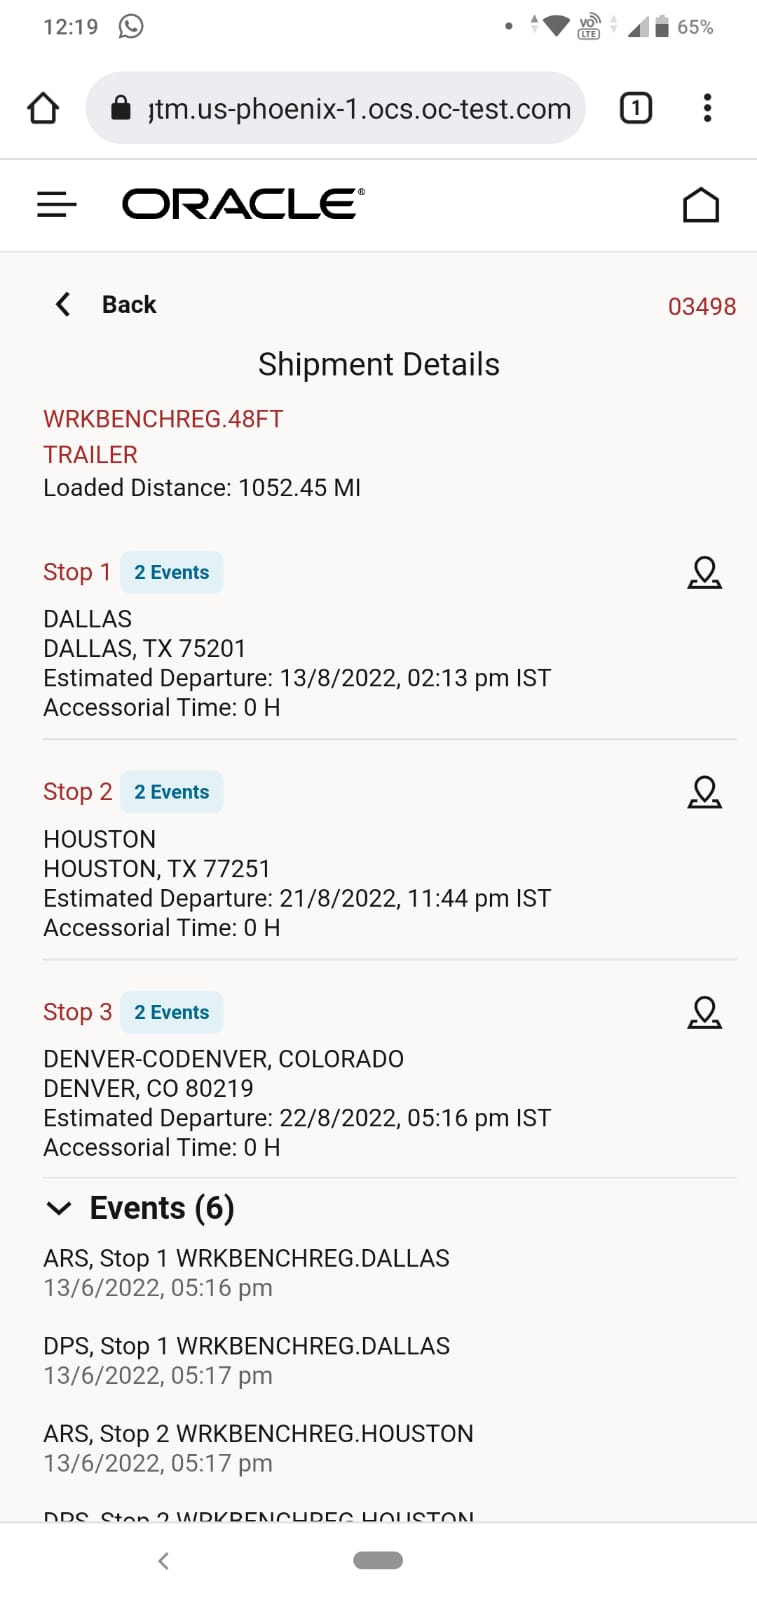
Completed Shipment All Arrived/Departed Tracking Events Entered
Offline Processing.
In the example below - an Arrived Tracking Event has been entered for a stop - but the driver is currently out of range/off-line. When this happens, the Mobile App will queue up the entered Tracking Event(s) and process them - automatically - once the Mobile App is back on-line.
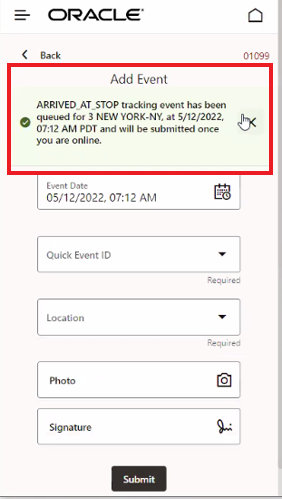
Tracking Event Entered and Queued Mobile App Off-line
The success and/or errors messages related to the processing of queued events can be reviewed in the Mobile Apps Main Menu. You navigate to the Mobile Apps Main Menu via the Hamburger Icon. The Offline Messages option provides you with Error Messages and Success Messages for the queued event processing.
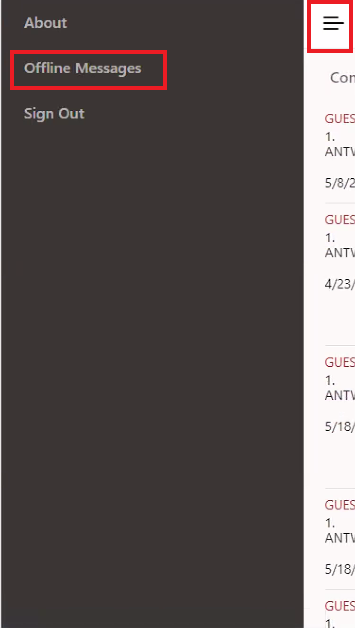
Main Menu - View
You have the option to delete no longer need offline messages.
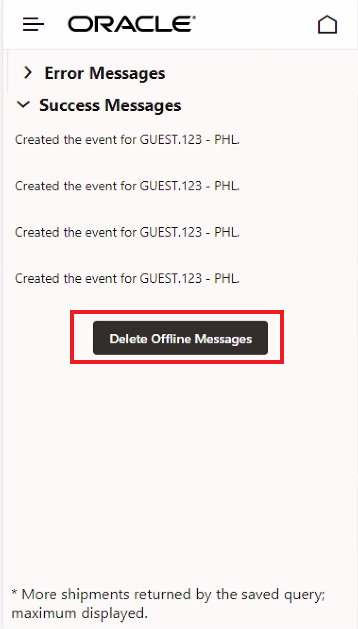
Offline Messages Errors Success
Upload Photos and Signature
When you enter an event with the Mobile App - you have the opportunity to add photos and a Signature (sign on glass) to the Tracking Event being created. In the example below, the Mobile App will be used to add both photos and a Signature. In both cases - for photos and Signatures - the entered information will be attached to the shipment as documents,
To sign on glass/provide a signature select the Signature option on the Event entry screen, as shown below.
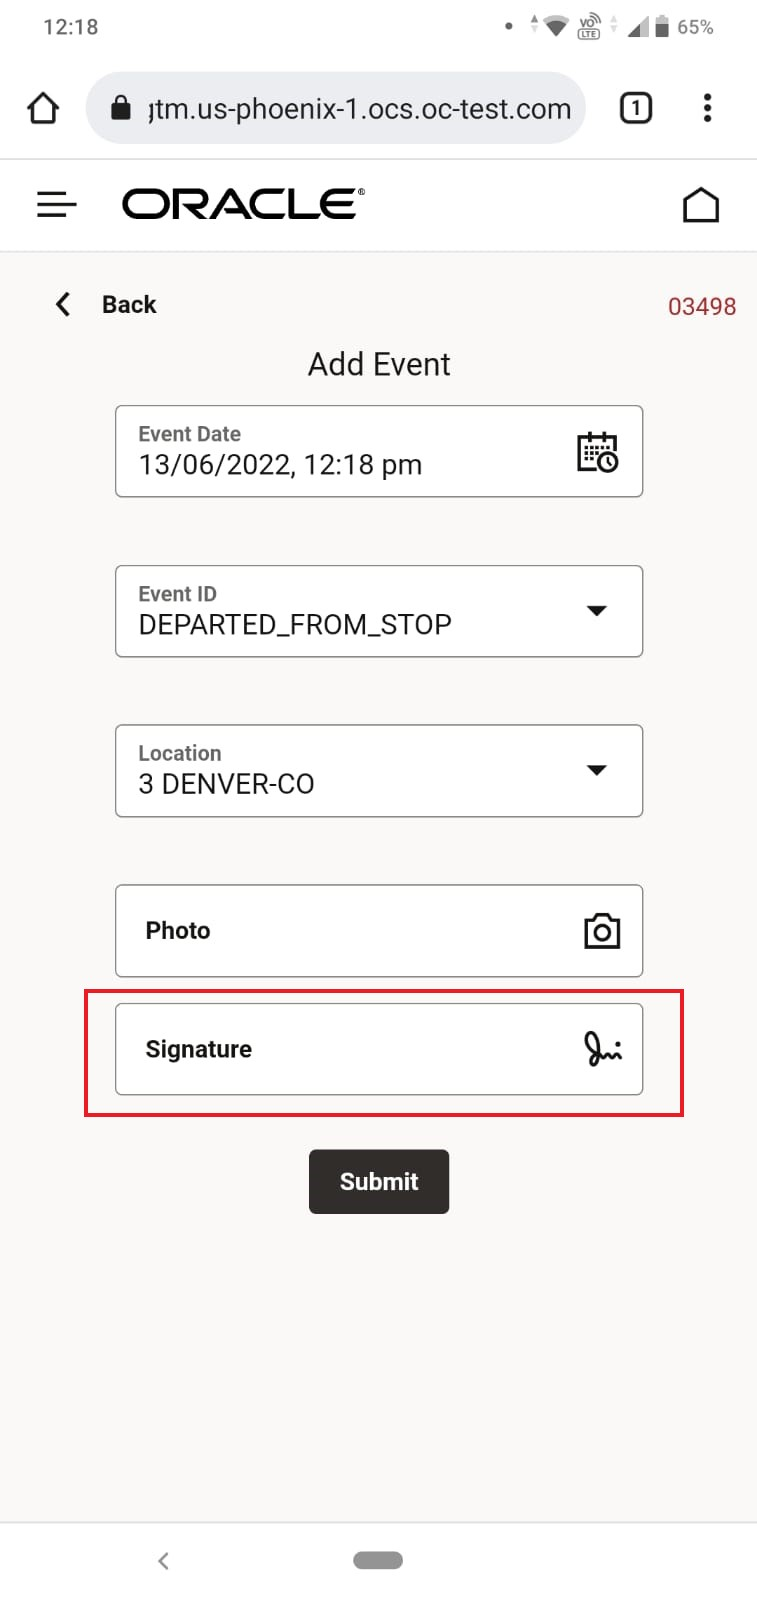
When the dialog box appears - Add Signature and then select Save Signature when satisfied/done.

Signature Entry
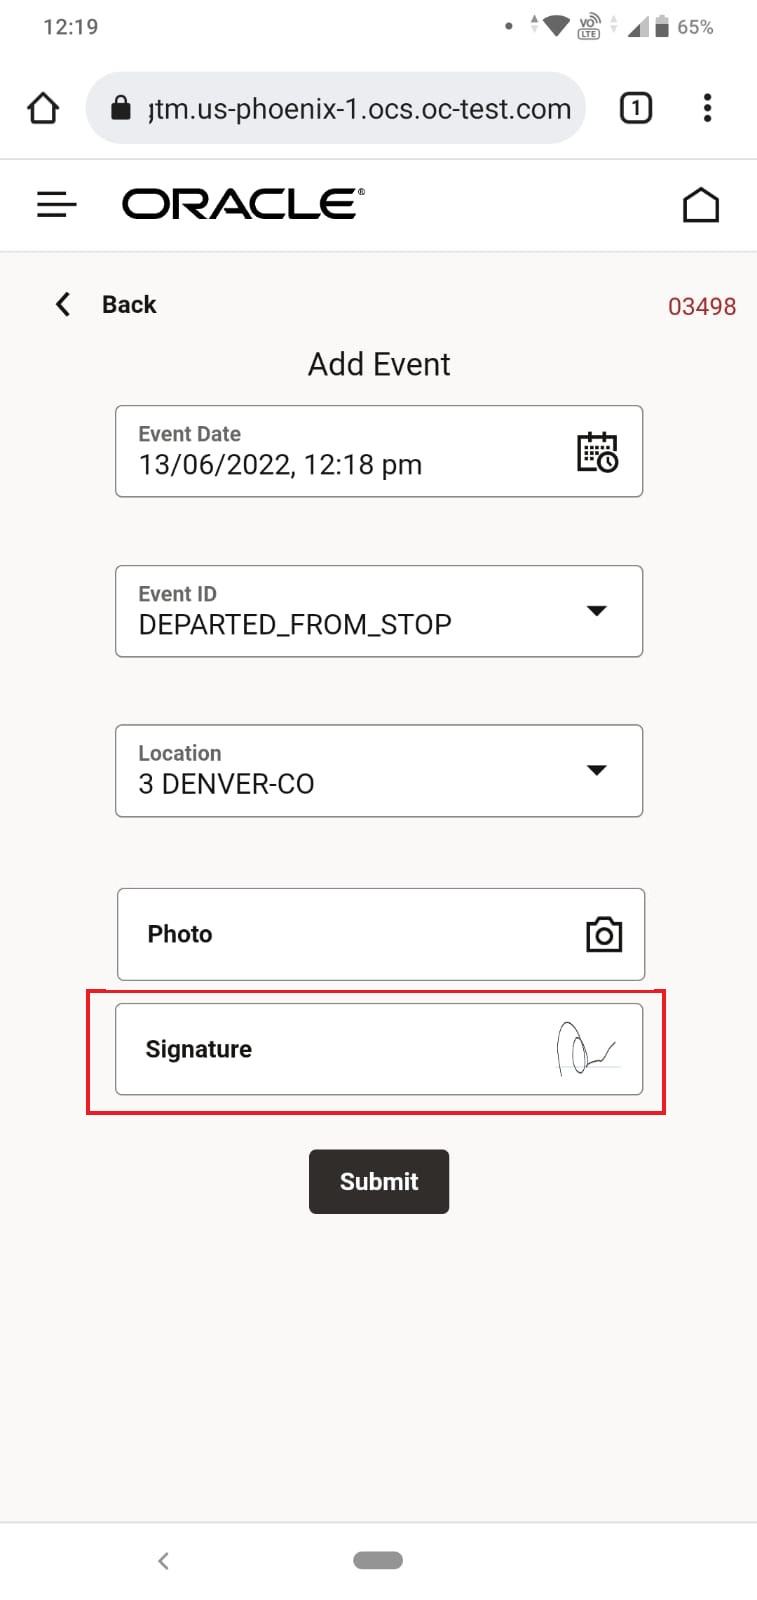
Signature Entered
For photos - you have the option to take a photo and add it or use the photos on your phone. To initiate adding a photo - you select the Photo option on the Event entry screen as shown below,
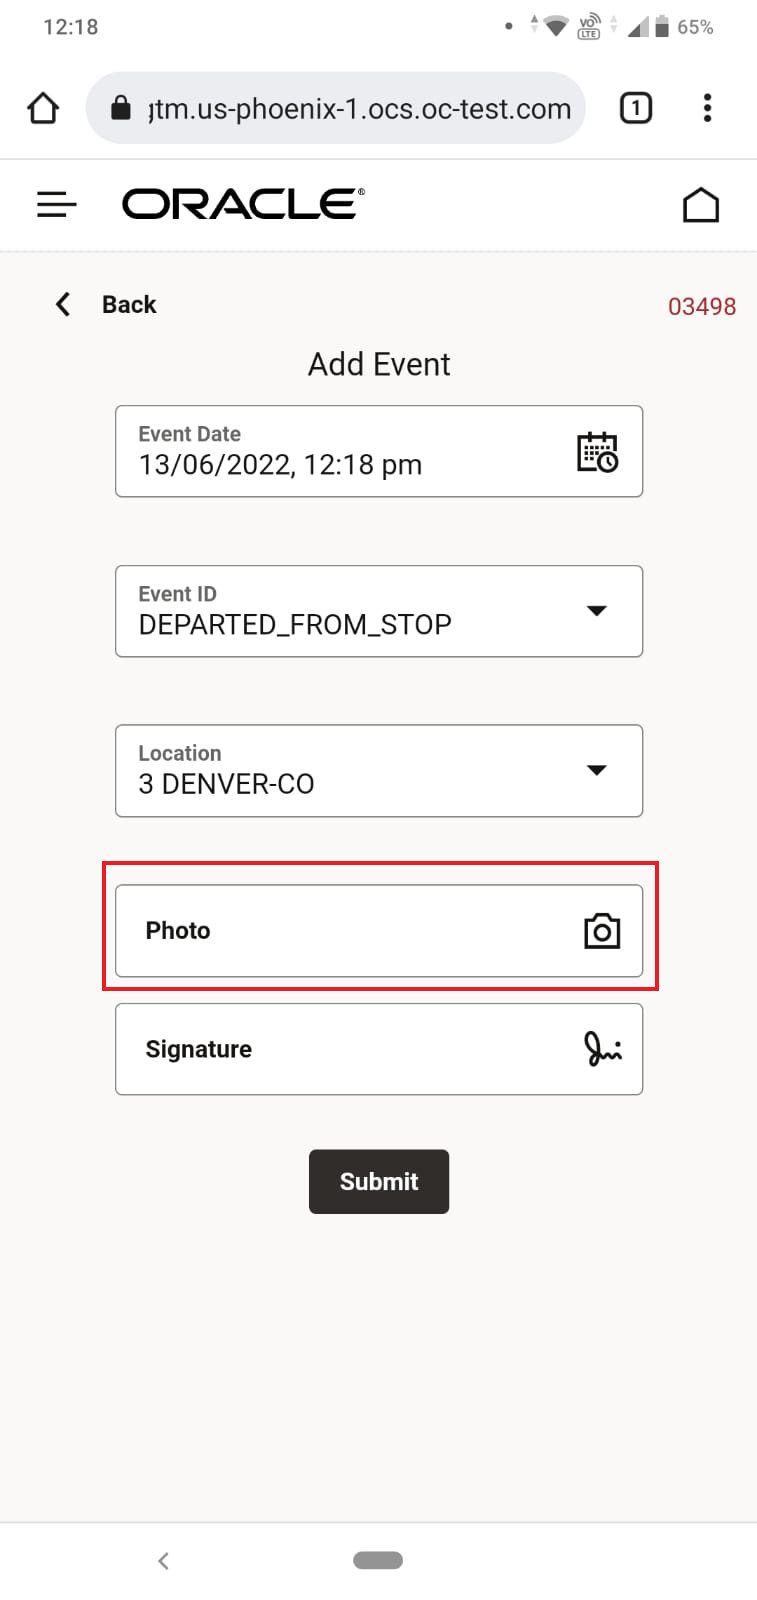
Add Photo
Selecting the Photo option provides the dialog box below.
Add Picture Dialog Box
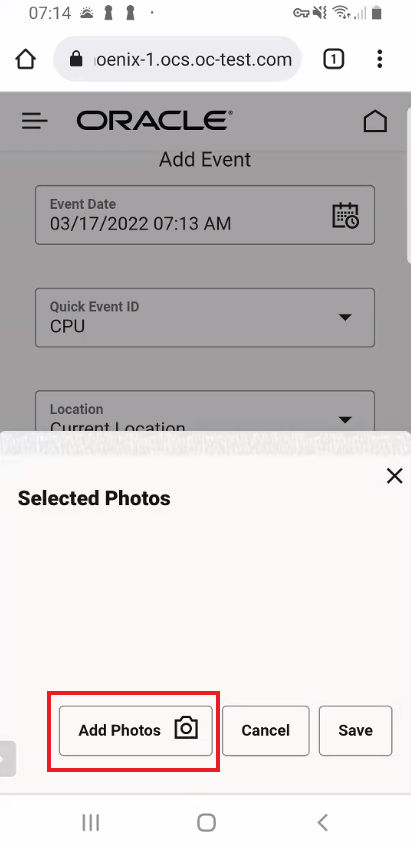
When you select the add photos option - you have the opportunity to add photos from your phone or take a new photo.

Take Picture or Browse and Select
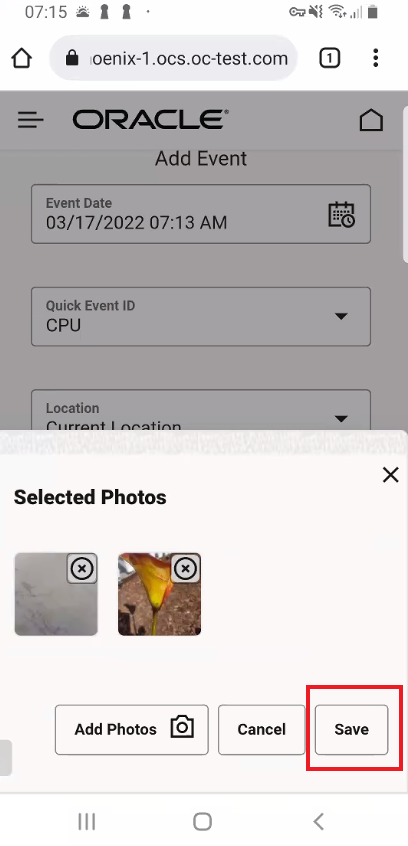
Selected for Upload Save
Result for the save Selected Photo below. You would then select Submit to Add the Event. Photos and Signatures are attached to the shipment as documents
Selected Images Loading
The Photos and Signatures are uploaded to the shipment as Ad Hoc documents as shown below.
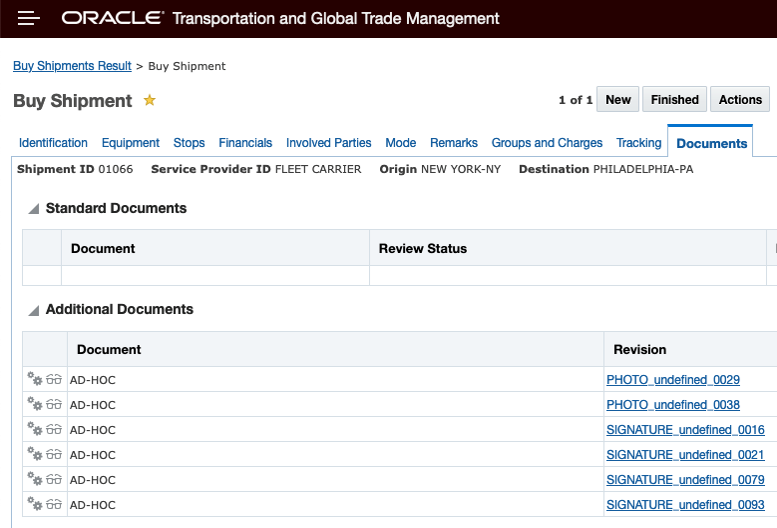
Uploaded Photos and Signatures
Plot Stop Location
The Mobile App also provides you with the option of plotting your stop locations on a map. For the first release of the Mobile App the only mapping option supported is Oracle Map Cloud Service. The Mobile App will use the location's latitude and longitude - if provided - to plot the stop location - if there is no latitude and longitude value provided for the location - then the plot will be determined by geocoding the location using the location's address. In the two screen shots below you will notice that the icon displayed on the map for the stop location changes based on how the coordinate was determined.
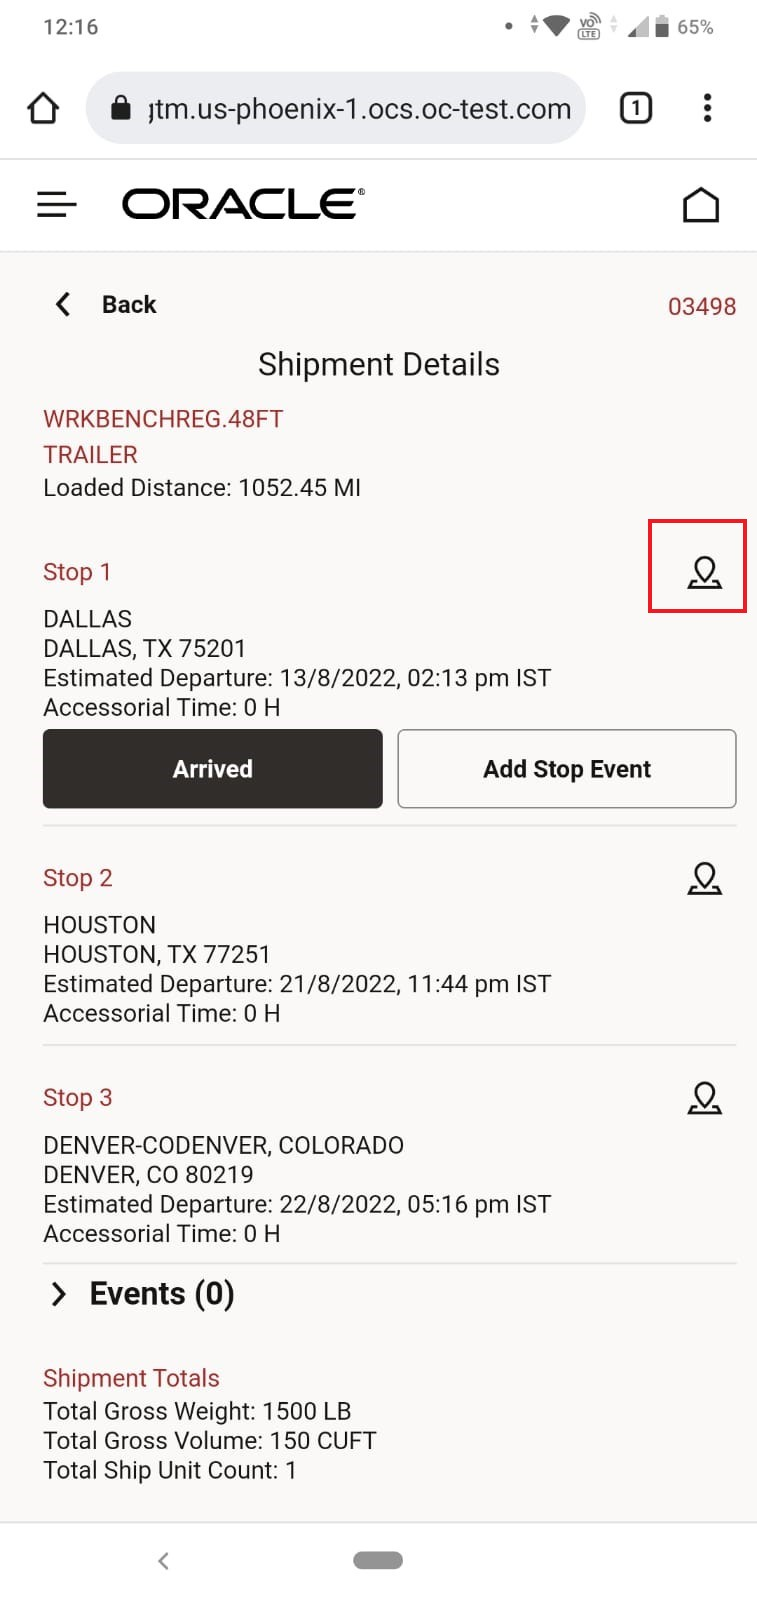
Select the Plot Icon to plot stop location
Below is an example of the plot icon provided when the plot is completed using the location's latitude and longitude.
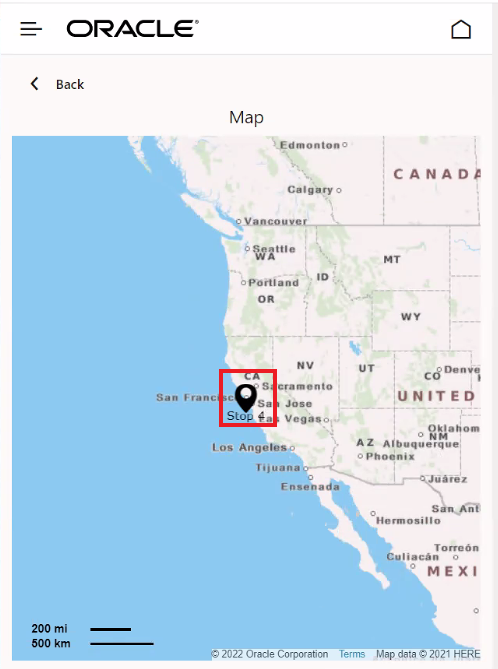
Stop Location Plotted Using Location's Latitude and Longitude
In the screen shot below, the stop location was plotted using the stop location's address.
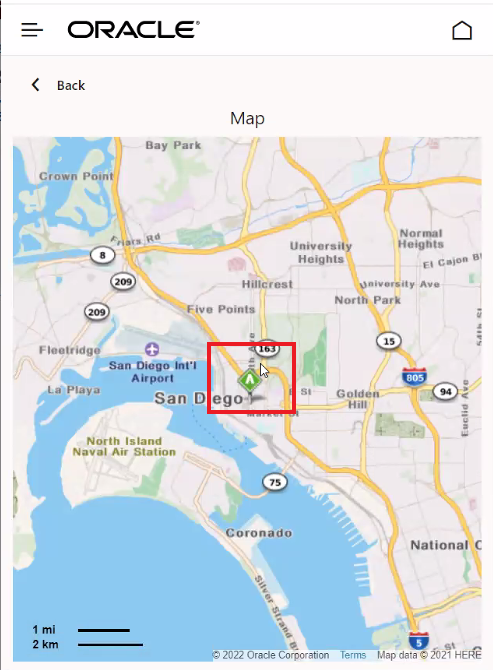
Stop Location Plotted Using Location's Address
Mobile Layout Configuration
The new Mobile App provides you with the ability to easily configure the look and feel of the mobile application home page as well as changing the saved queries used to populate the information displayed in the application. This new capability is enabled through Mobile Layout, which provides access to the Meta data layer used to define the look and feel of the Mobile Application. As noted in the setup steps below - the Mobile App user's look and feel is dependent on the Mobile Layout that has been assigned to their User Preference. You can configure a new Mobile Layout for your users, by copying and editing a Mobile Layout. With the Mobile Layout you can change the number of boxes shown on the home page, change the font, color and labels of the boxes shown, change the saved query used to populate the boxes, change data elements shown in the Shipment and Shipment Details list views - and more.
Note that the Mobile Layout is configured using JSON and the REST API, so some technical skills are required. The Mobile Layout access is limited to DBAs and can be found by navigating to Configuration and Administration > User Configuration > Mobile Layout.
Below is a section of the Default Mobile Layout - the section covering the five boxes on the Home page.
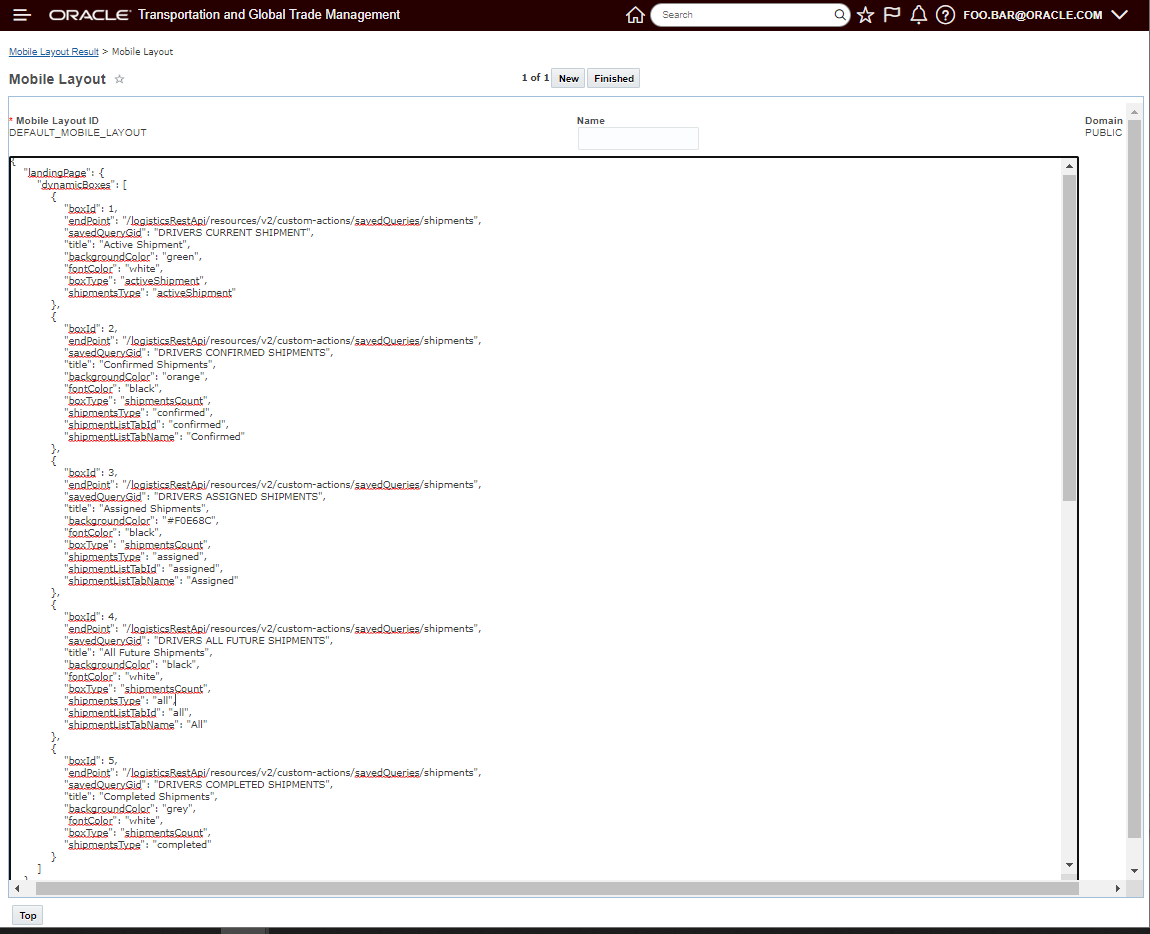
Default Mobile Layout
The instructions for the layout and the results are provided in relatively clear language. Below is a drill down into the instructions for boxid 1 (Active Shipment) of the Home Page.
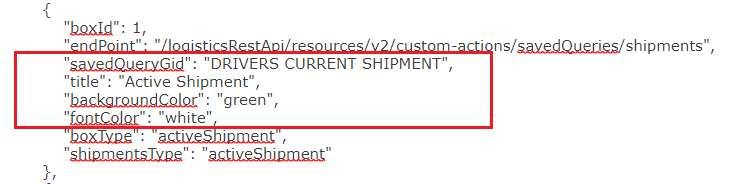

Box 1 Mobile Layout Configuration
The four elements, below, provide the key elements for the information provided and the color scheme used for this box. The ability to remove boxes, add boxes and change the values entered for these four elements provides you with a lot of configuration opportunities.
- savedQueryGid - "DRIVERS CURRENT SHIPMENT" - a Public Saved Query,
- title - "Active Shipment",
- backgroundColor "green",
- fontColor "white".
As a simple example, the Mobile Layout below has been modified for the boxid 2 (Confirmed Shipments), in this simple example, the box color and text color are modified.
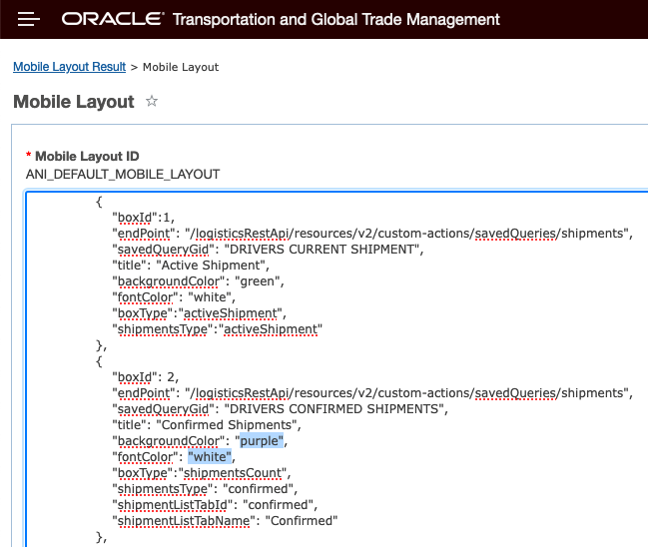
Mobile Layout Modified - Box ID 2
The result of this configuration change is below- the Confirmed Shipments box is now purple with white font.
 from the default
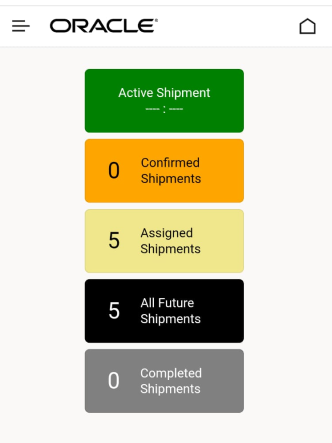
Mobile Layout Modified - Result
This feature provides you access to the completely redeveloped/all-new OTM Mobile App - which provides improvements across the board for performance, usability as well as providing you with options for more configurability.
Specific benefits:
- Platform agnostic: one app works across all devices and browsers
- Mobile configuration from within OTM including options for branding
- Pages can be rendered on any browser (phone, tablet, desktop)
- Configuration changes can be deployed immediately
- Changes are simple and can be done at your discretion
- Native app look and feel
- Better performance
Steps to Enable
You will need to do the following steps to deploy the Mobile App. For all the Drivers who will be using the Mobile App their related Users in OTM will need the following:
The Driver's User in OTM will need the following items added to their User's Access Control List:
- Mobile Web Application REST - View: If you want the user to have read-only access to the mobile app. All mobile web app users should have this setting.
- Mobile Web Application REST - Update: If you want the user to Start/Confirm Shipments or Add Event, you will need to provide them with this access.
The Driver's User will need to have the desired Mobile Layout ID added to their User Preference. We recommend that you copy the Default Mobile Layout and use a copied version (so it can be modified if desired) vs just using the Public Default Mobile Layout ID.
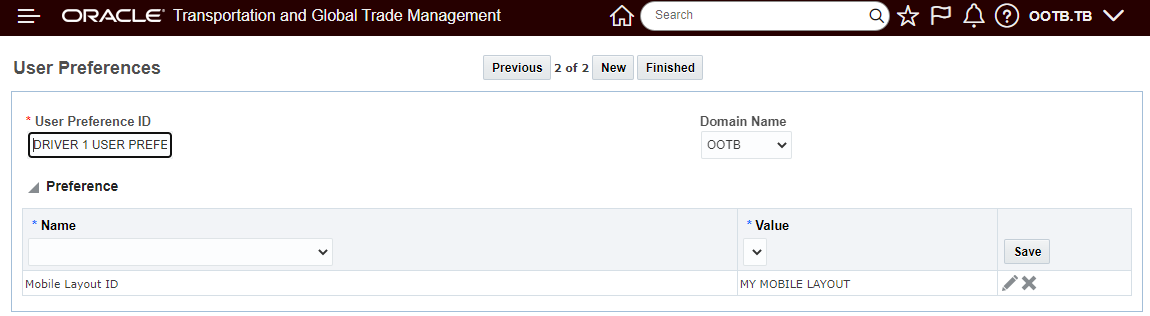
Mobile Layout ID Set on User Preference
Once the User setup is complete - the last step involves providing the URL to the Mobile Application for your Users. The Mobile App URL will be your cloud URL appended with "/logisticsmobile". For example: https://otm-engmpod.otm.us26.oraclecloud.com/logisticsmobile.
When the User clicks on the provided link for the Mobile App, they will have the option to add the Mobile App to their Home screen for future use.
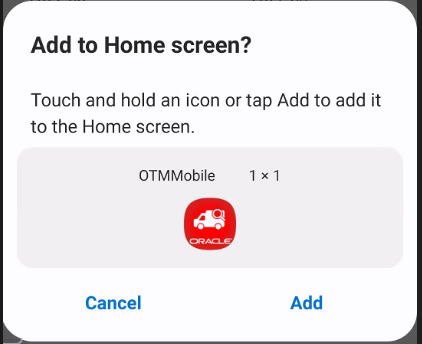
Add to Home Page
.
Tips And Considerations
For the first release of the Next Generation Mobile App the Third Party Carrier Use Case is not supported. The Third Party Carrier Use Case provides a mobile solution for small Mom&Pop carriers to review Tenders (accept/decline) enter tracking events, capture signatures and upload photos.
There is no compression option for the uploads - documents and pictures and uploads are IMG files only.
Spot Bid Tender and Online Booking/Tendering
Rate Based Per Unit Spot Bid Tender Response Option
This feature provides you with the ability to allow your Service Providers to respond to Spot Bid Tenders with a bid that is provided on a per unit rate basis (e.g., per Total Weight, per Total Volume, per Total Distance Traveled etc.) in addition to the previously available all-in total shipment cost bid response options.
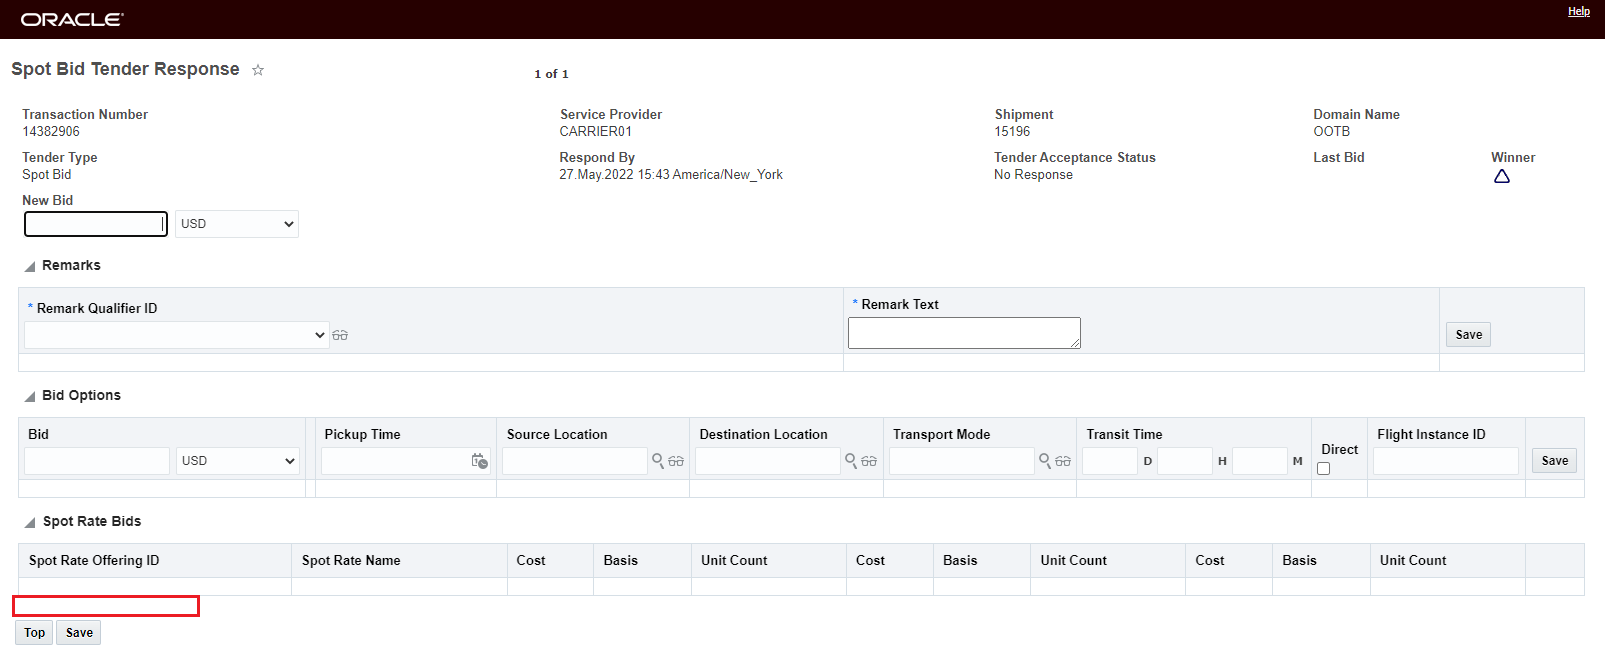
The Spot Bid Tender Response now includes a Spot Rate Bid section that will allow the Service provider to respond to the bid with a rate based response.
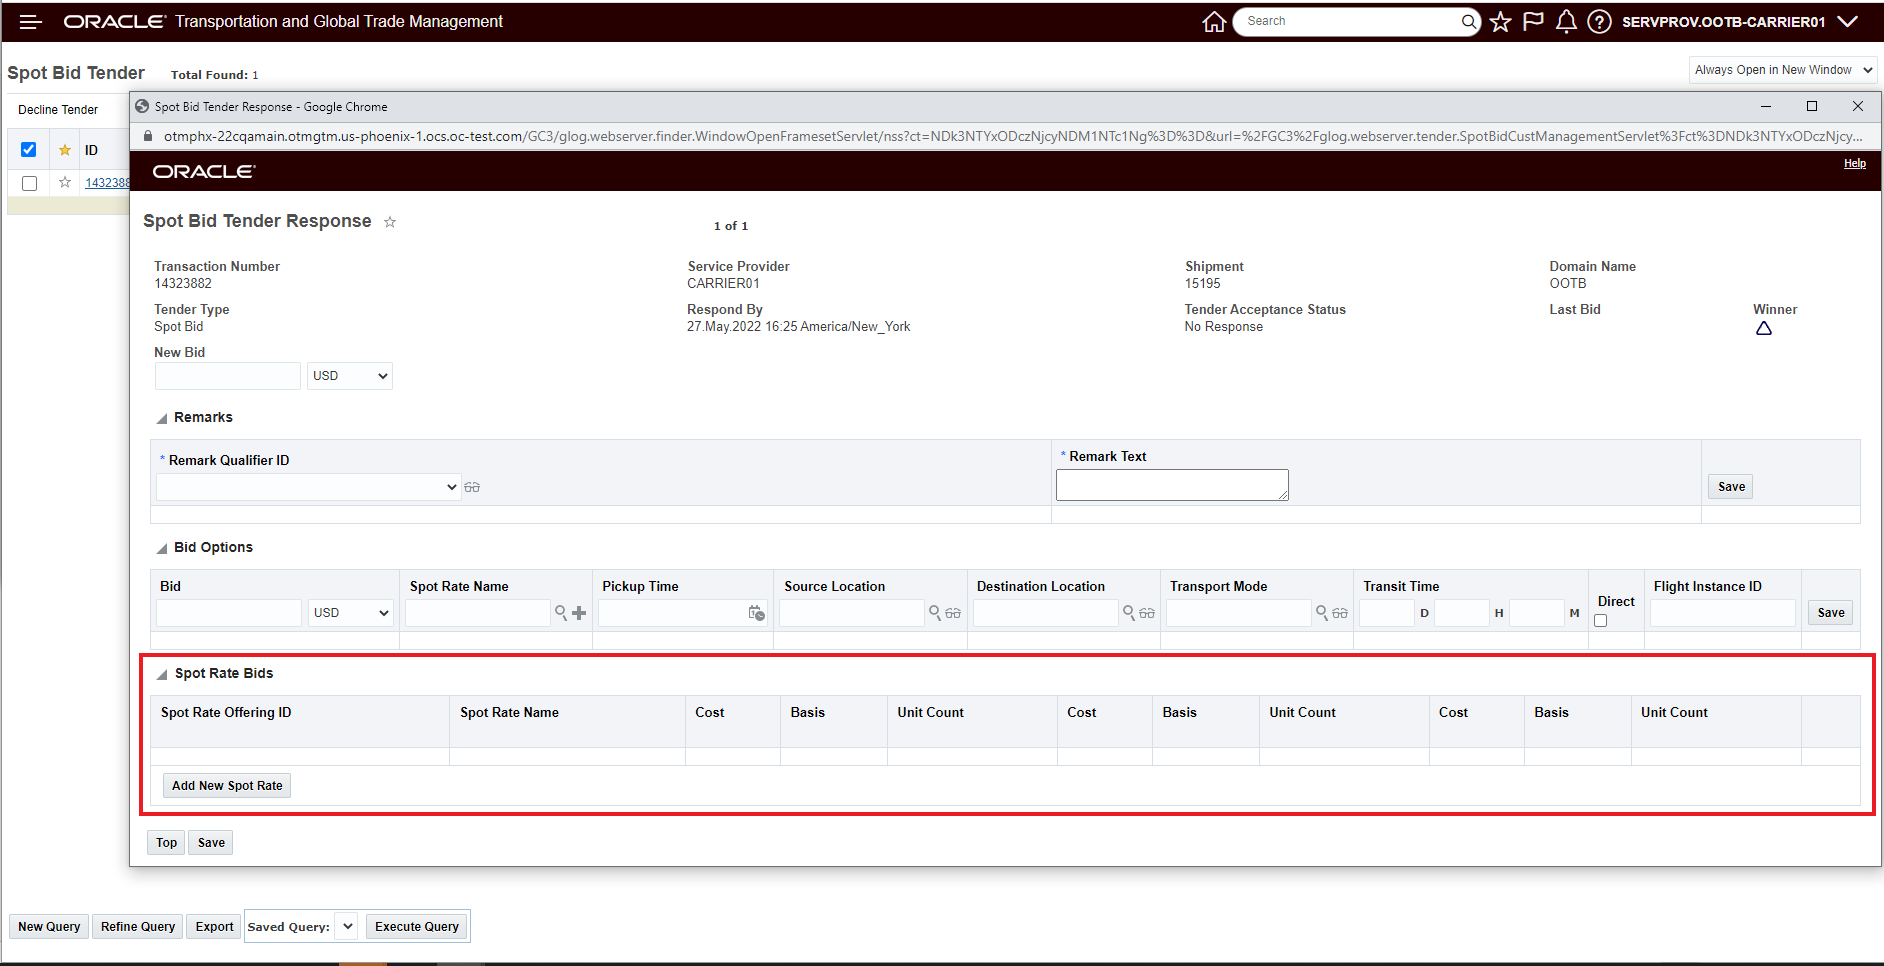
New Spot Bid Tender Response Screen
By selecting the Add New Spot Rate button, the Spot Rate Bid entry screen will open, as shown below. The Spot Rate Bid screen, allows you to enter a rate based bid response. The Spot Rate Bid requires:
- Spot Rate Offering ID - select the Spot Rate Offering for the Service Provider - to use this feature, Service Providers must have a Spot Rate Rate Offering defined,
- Spot Rate Name - an identifier for the specific rate record being entered,
- Cost - a cost per,
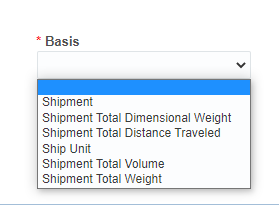
- Basis - a Rate Basis for the cost per - to not overwhelm the users of this functionality - a selected/limited set of RBIs are provided in the dropdown,
- Unit Count and Unit Count Type - the per unit count and UOM for the rate entered depends on Basis selected.
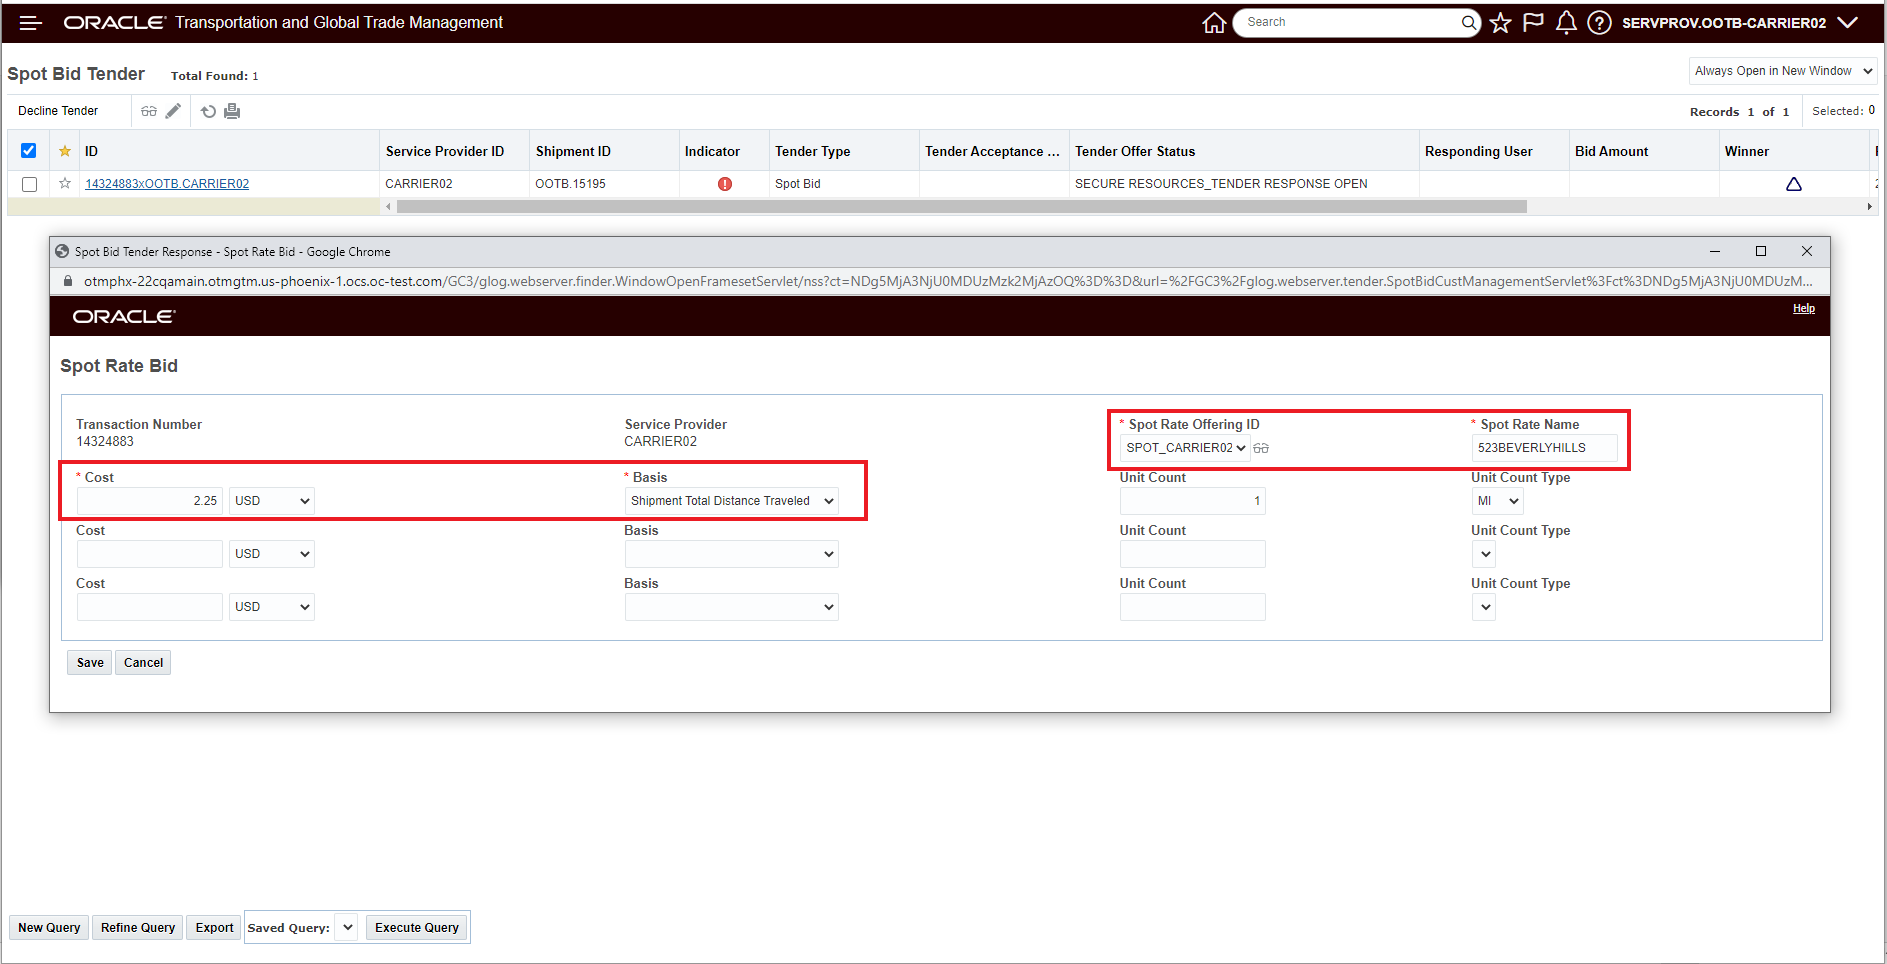
Spot Rate Entry
When entering a Spot Bid Rate - you are required to enter at least one rate, you have the option of adding two additional rates when creating the rate for the bid. The rating is additive.
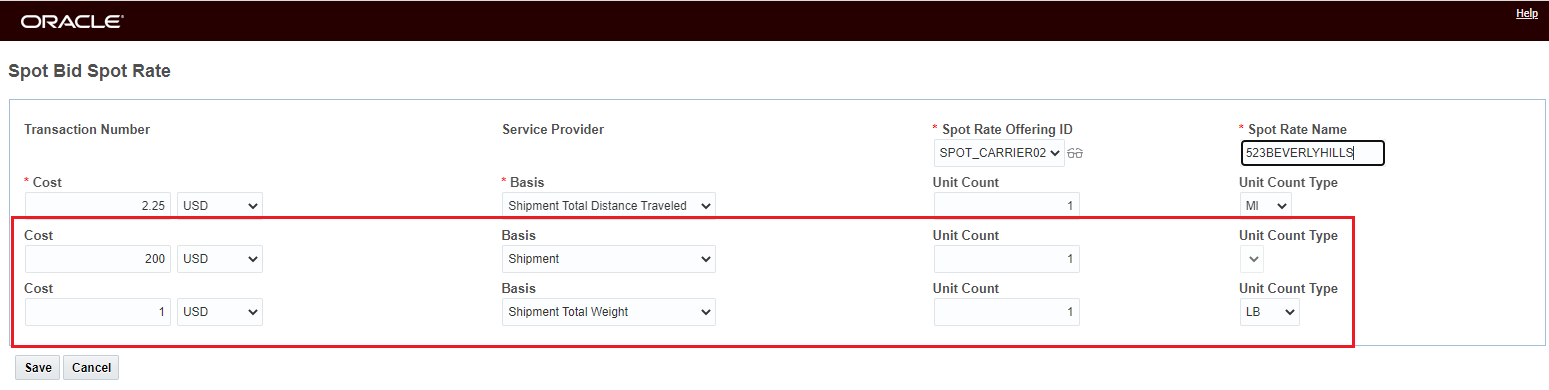
Multiple Rate Entry
After hitting Save for the Spot Bid Spot Rate entry - above, the screen below appears - in this screen the Service Provider can add a Remark.
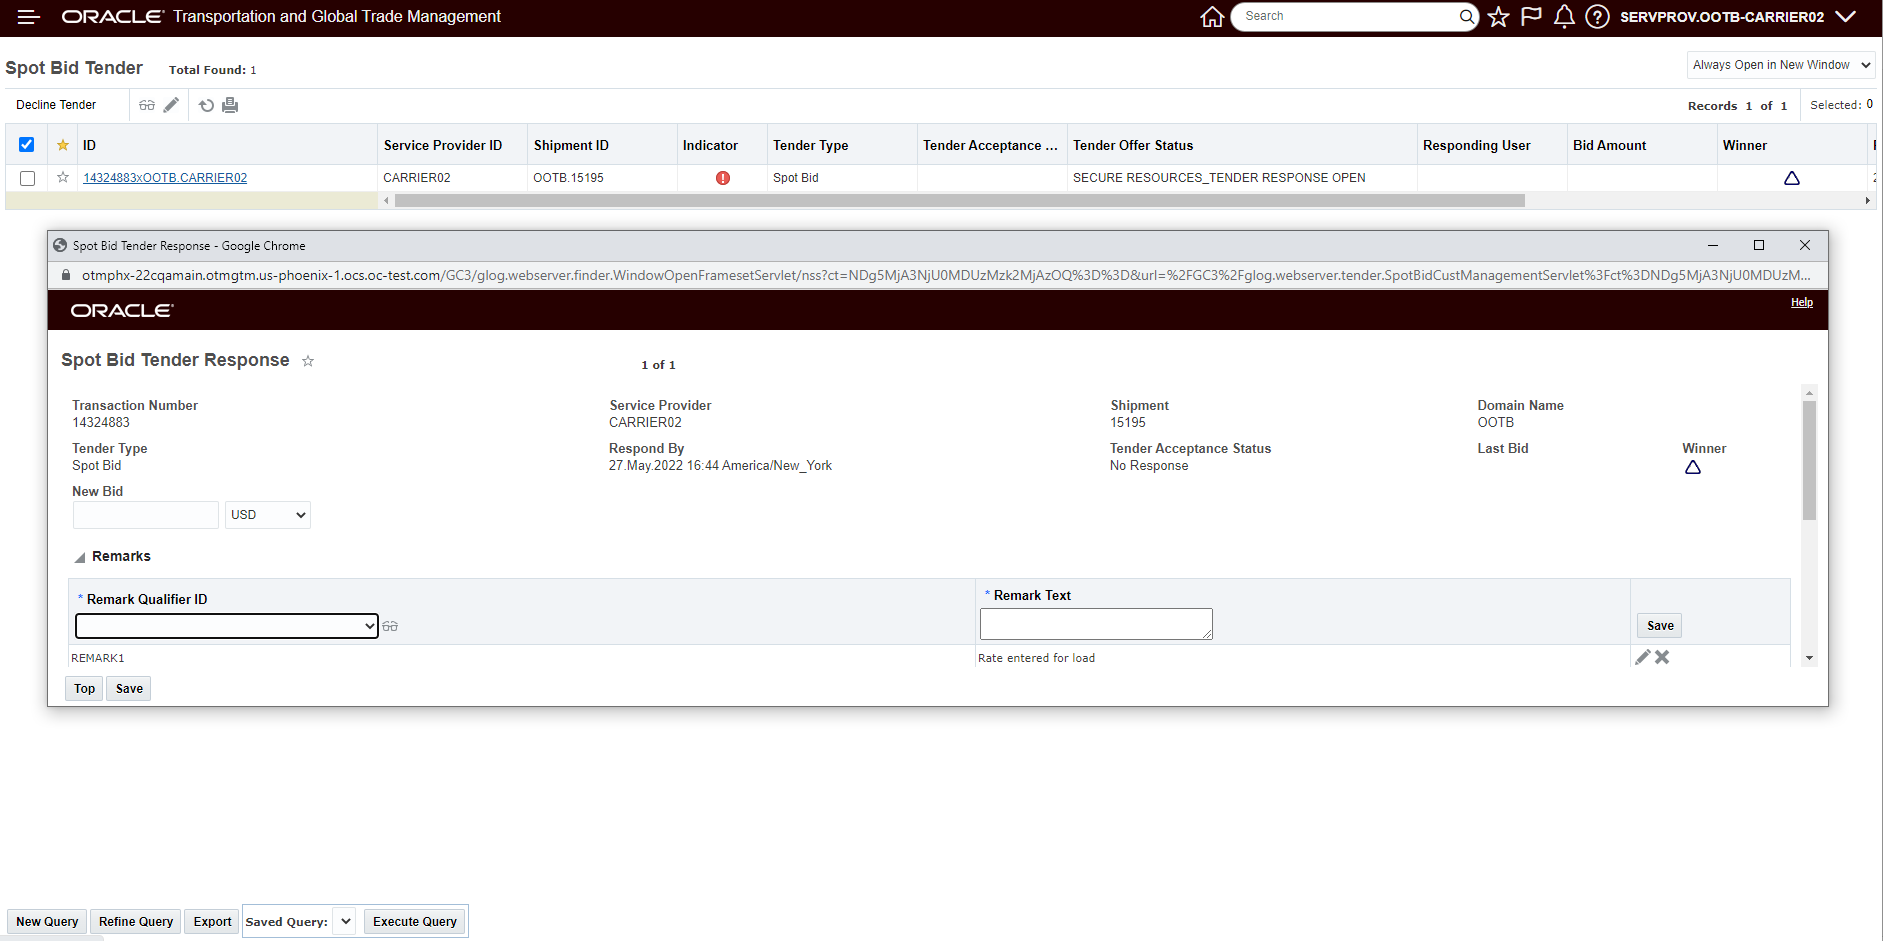
Spot Rate Entry Step 2 After Spot Bid Spot Rate Entry
Below is the completed Spot Bid Spot Rate Entry for the Service Provider.

Spot Rate Entered
In the example below, the Spot Rate Bid is Awarded to the service provider - and the total shipment cost is calculated.
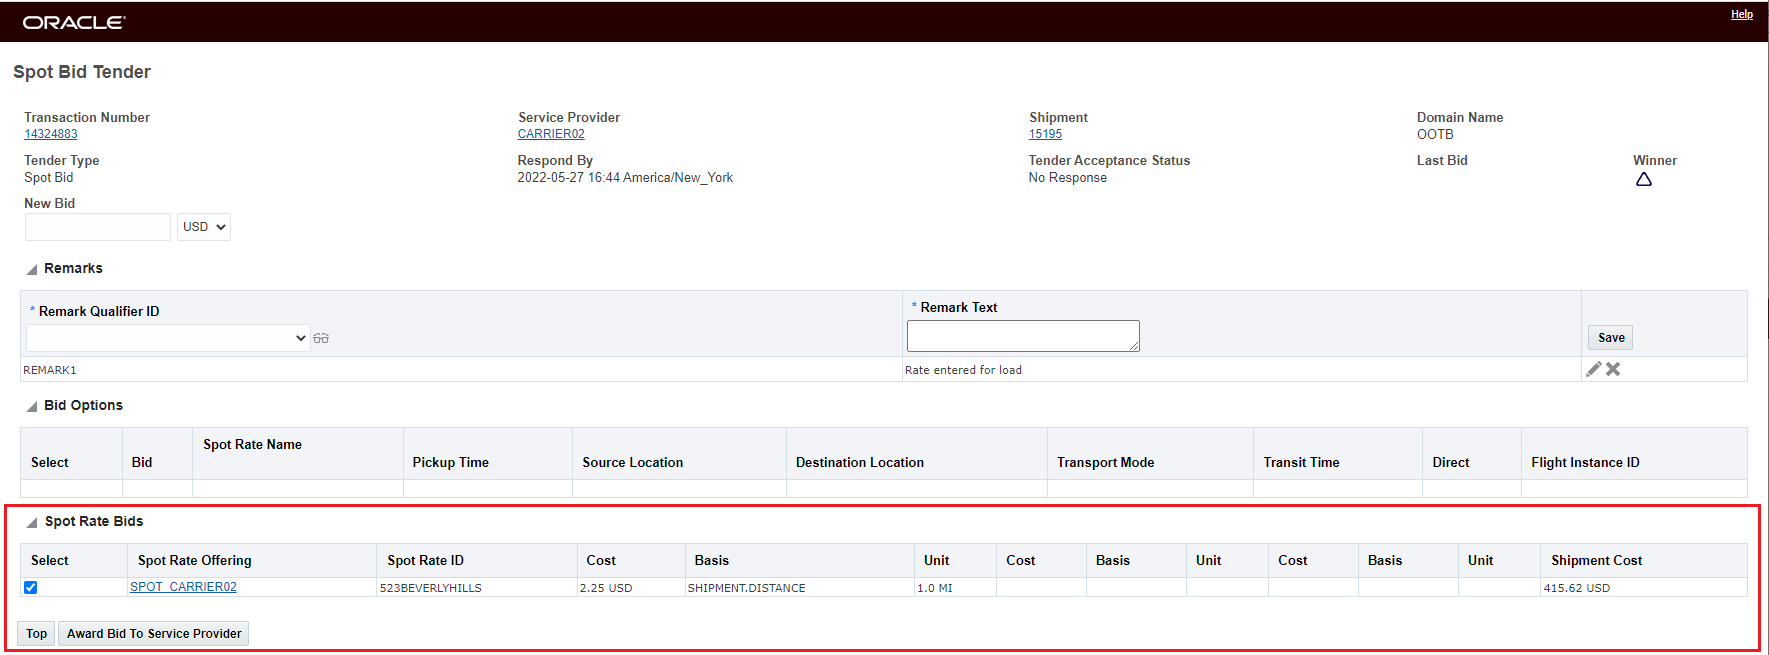
Award the Spot Rate Based Offer
Once the shipment is awarded to the Service Provider, the related shipment is updated with the Awarded Service Provider's Spot Rate Offering along with the created Rate Record generated from the Spot Rate Bid entry.
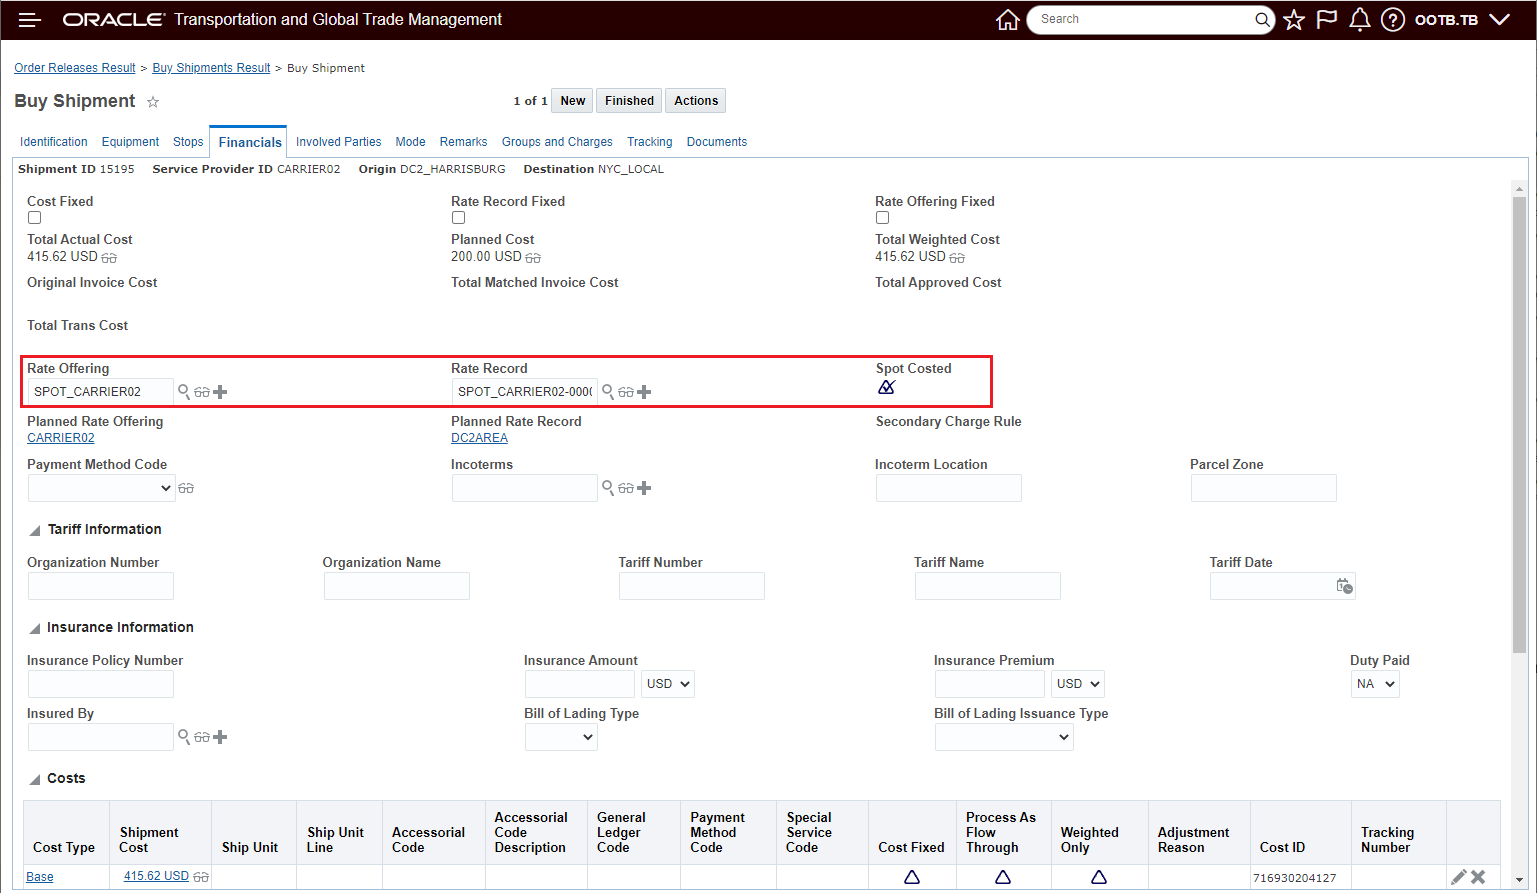
Spot Rate Result After Award to Carrier
Below is the Rate Record created for the Service Providers Spot Rate Offering

Rate Record Created
In the example below - the Service Provider, Carrier03, is responding using all three rate option inputs provided. In this case Carrier03 is entering a rate per Shipment Total Distance, a cost per Shipment and a rate per 100 pounds.

All Three Rate Entry Options Used
After entering the rate, the Service Provider hits Save and the UI shows the three entered basis items, cost/rate and related unit count for the rates are shown.

Entered Spot Rate
When the planner chooses to award the Spot Bid tender to Carrier03 - the total cost based on the cost, rate basis and unit count is provided. In this case, the Shipment Cost is 890.34 USD.
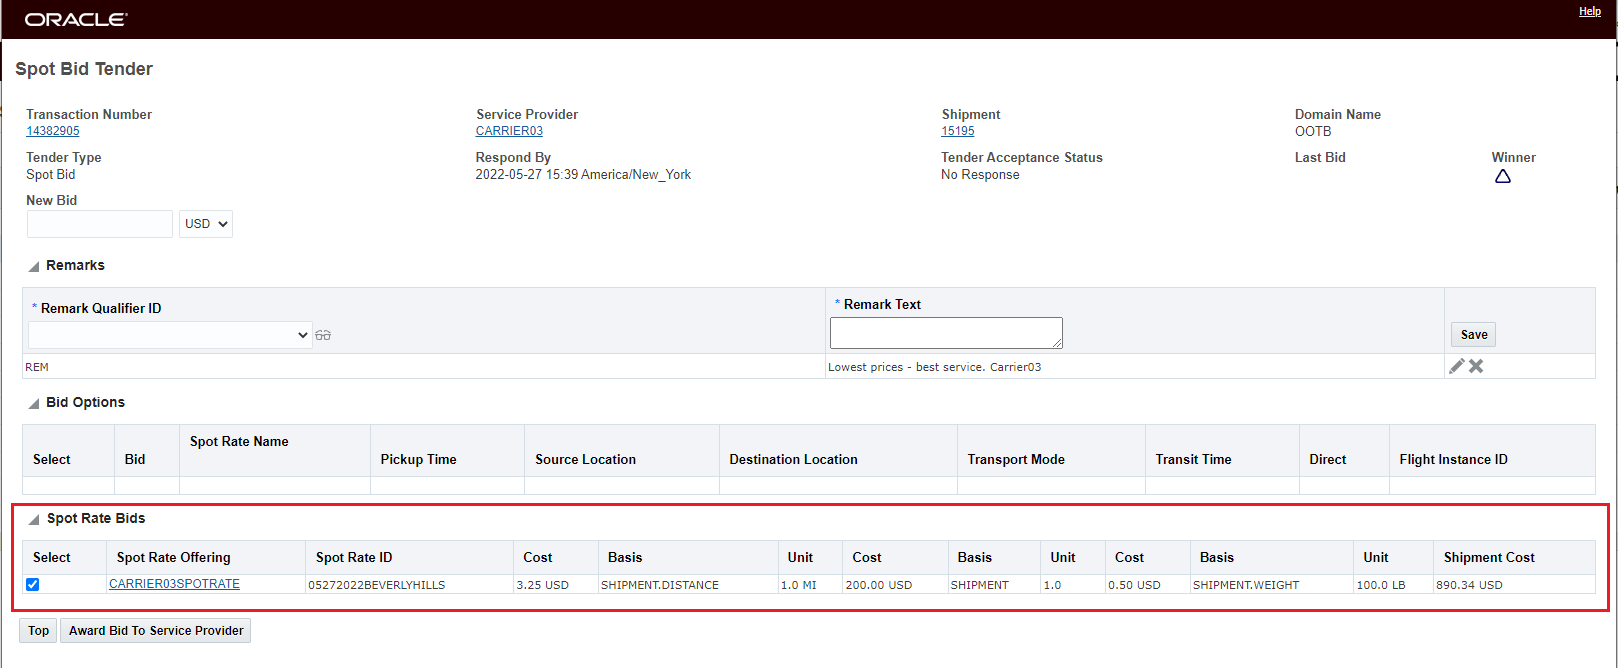
Award Bid to Carrier03
As above - awarding the bid to the Service Provider generates the related rate record for the Service Providers Spot rate offering.
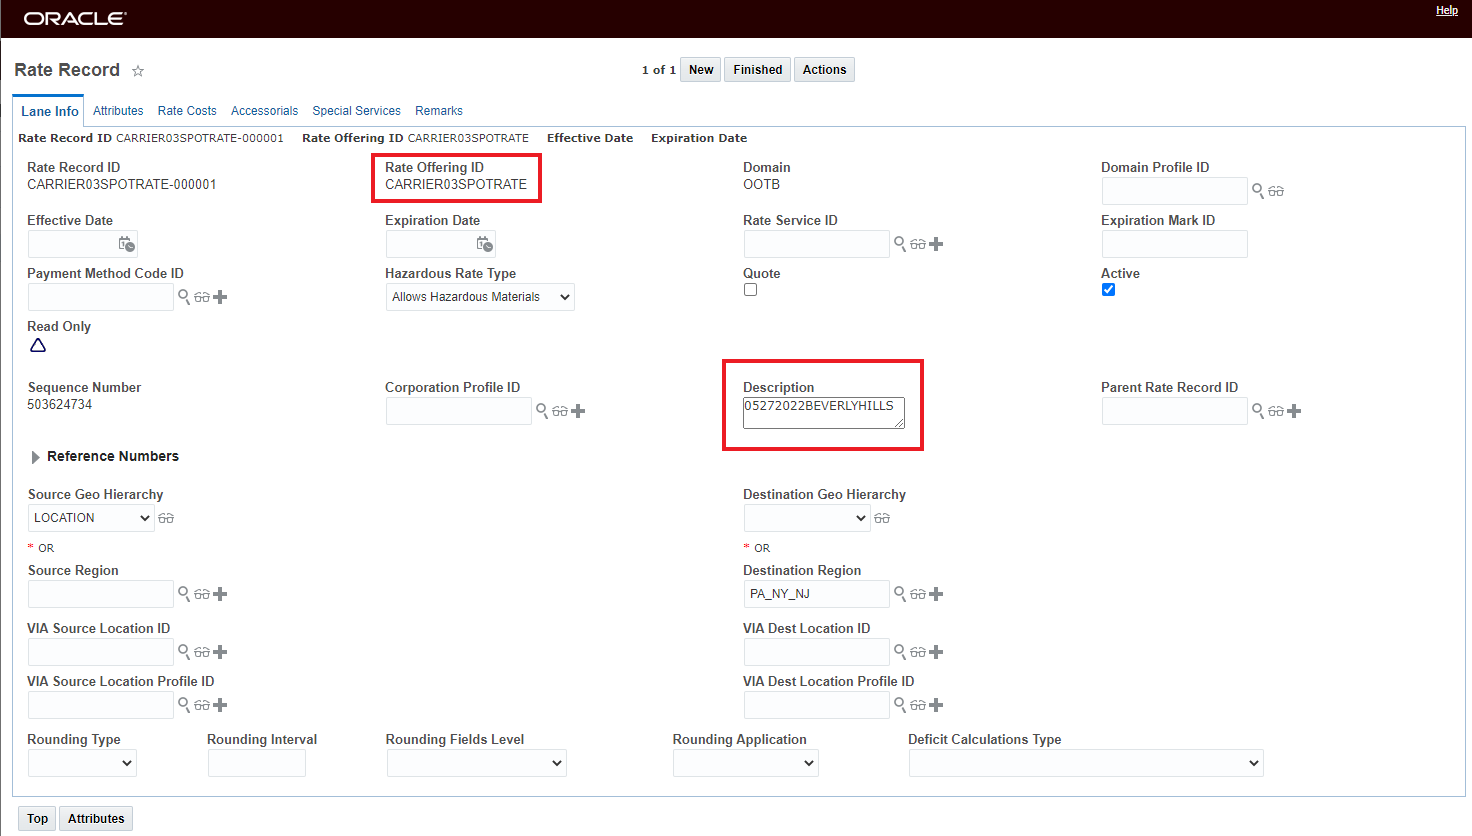
Rate Record Lane Info
Below is the Rate Record Rate Cost created based on the Spot Rate Bid entered. The three entered rates are additive - the calculated cost is the Shipment Total Weight cost, plus the per Shipment, plus the Per Shipment Total Distance Traveled cost.
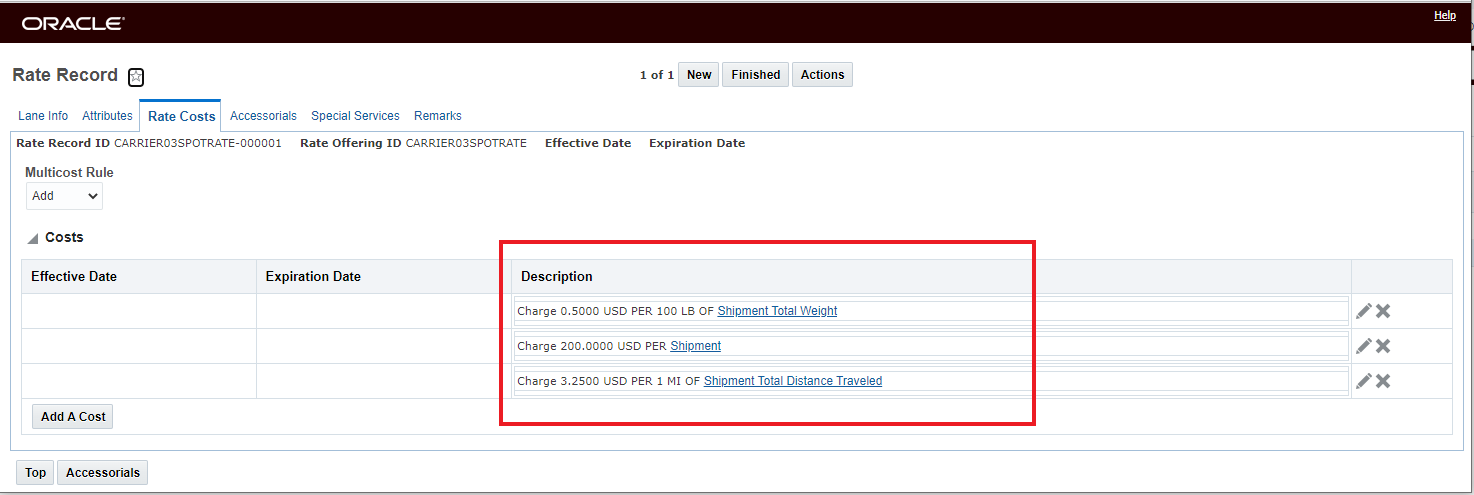
Rate Cost
In the example below - Carrier02 is providing two different Spot Rate Bid responses. One rate is offered as a Bid Option - in this case - the rate is applicable if the shipment can be picked up on Tuesday June 14th ( v Friday June 10th) the other Spot Rate Bid is for the shipment as it was tendered - so for the current pickup date of June 10th.
The link between the Bid Option and the Spot Rate Bid is handled using the Spot Rate Name. As shown below, when you enter your Bid Option (and the option is to be calculated as rate v a cost) you will enter a Spot Rate Name for the Bid Option's Spot Rate.
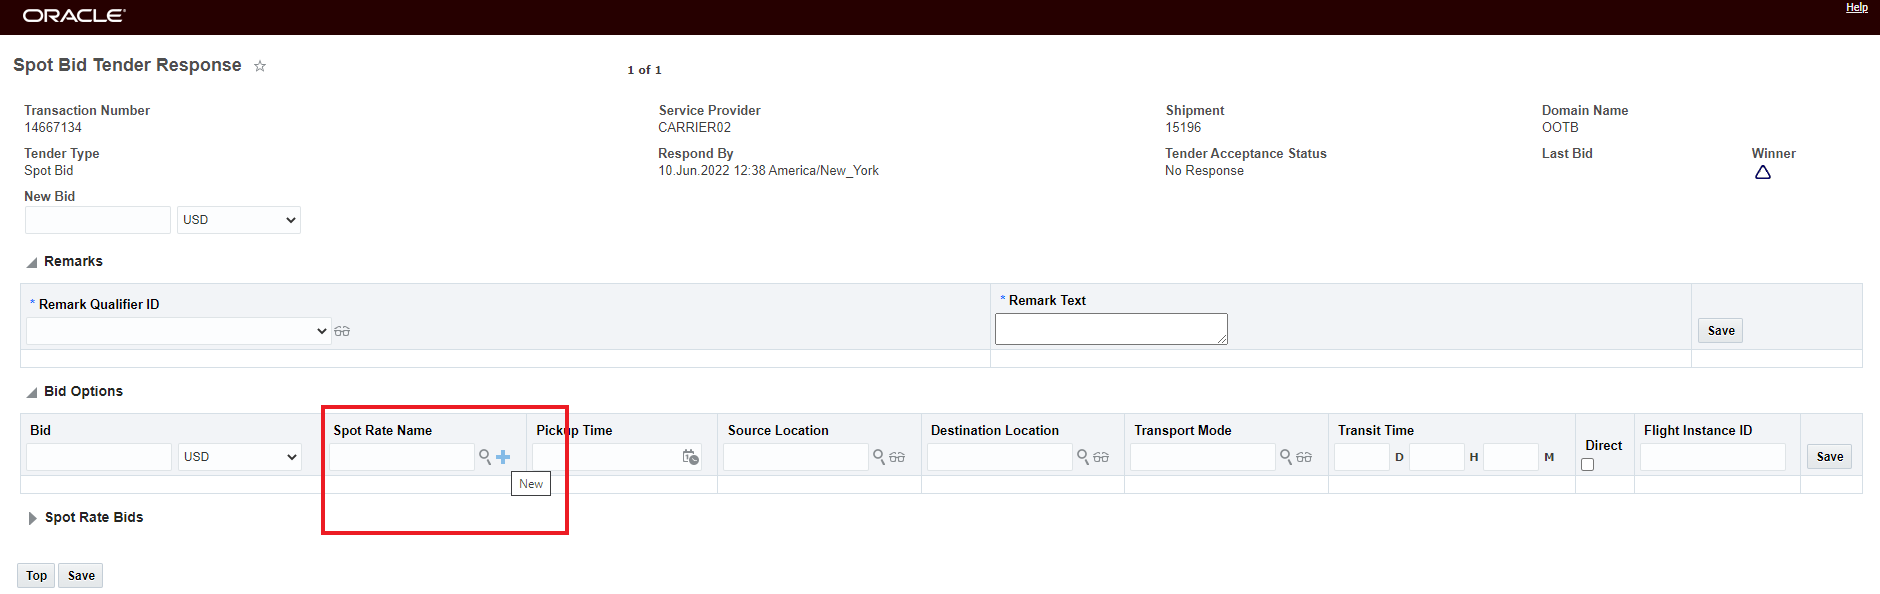
Add Spot Rate Name
The new Spot Rate Name field - shown below - allows you to enter all the Spot Rate Details for the Bid Option - including the Spot Rate Name - in this case OPTIONAL - PICKUP TIME.
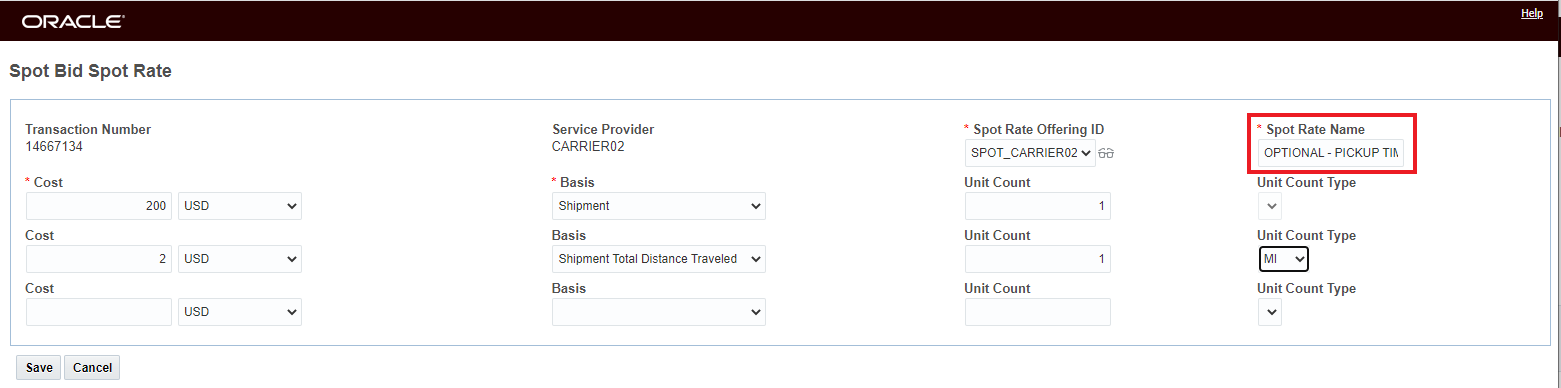
Spot Rate Entry for Bid Options
When you select save for your Spot Rate Bid Option, both the Bid Options grid and the Spot Rate Bid grid will be populated. The Bid Options grid captures the conditional option (different Pickup Time in this case), and the Spot Bid Rate grid captures the details of the rate. The Bid Option and the Spot Bid Rate are linked together by the Spot Rate Name In the example below - the Spot Bid Tender Response provides two options - a Spot Rate Bid Option for a different Pickup date and a Spot Rate Bid of 250.00 USD Per Shipment plus 2.75 USD Per Mile for Shipment Total Distance Traveled for the shipment as tendered.
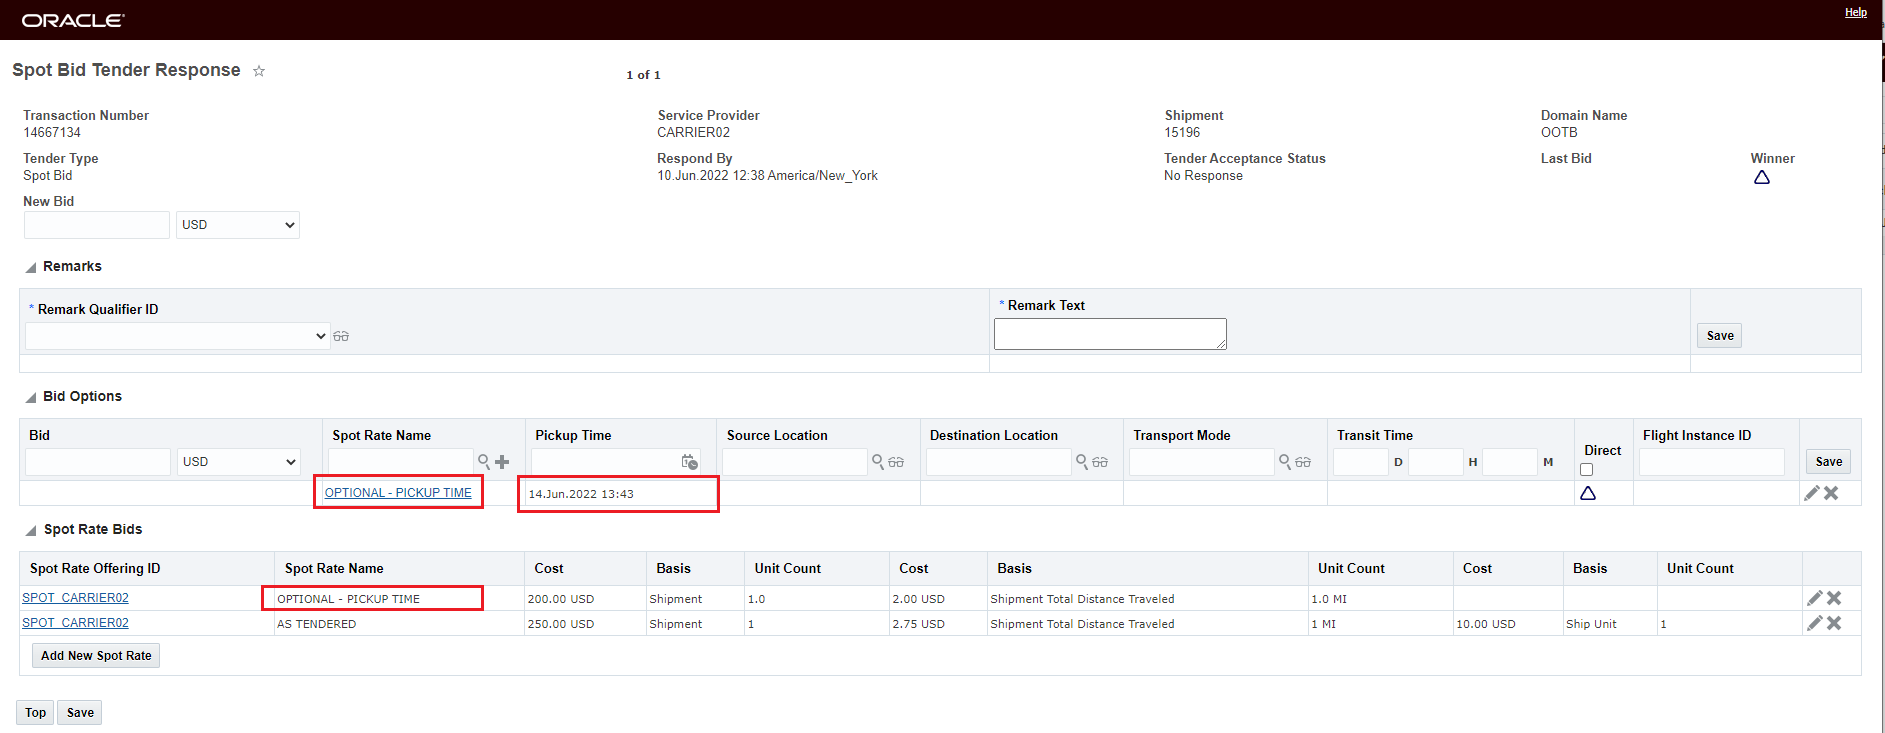
Spot Bid Response - Spot Rate Based Bid Option and a Spot Rate Bid
Expands the options for entering rates to include per rate in addition to the shipment cost based options.
Steps to Enable
To extend the option for your Service Providers to respond to a Spot Tender with a rate versus just a cost, the following setup is required for the Service Provider.
The Service Provider must have the Allows Spot Rating option selected.
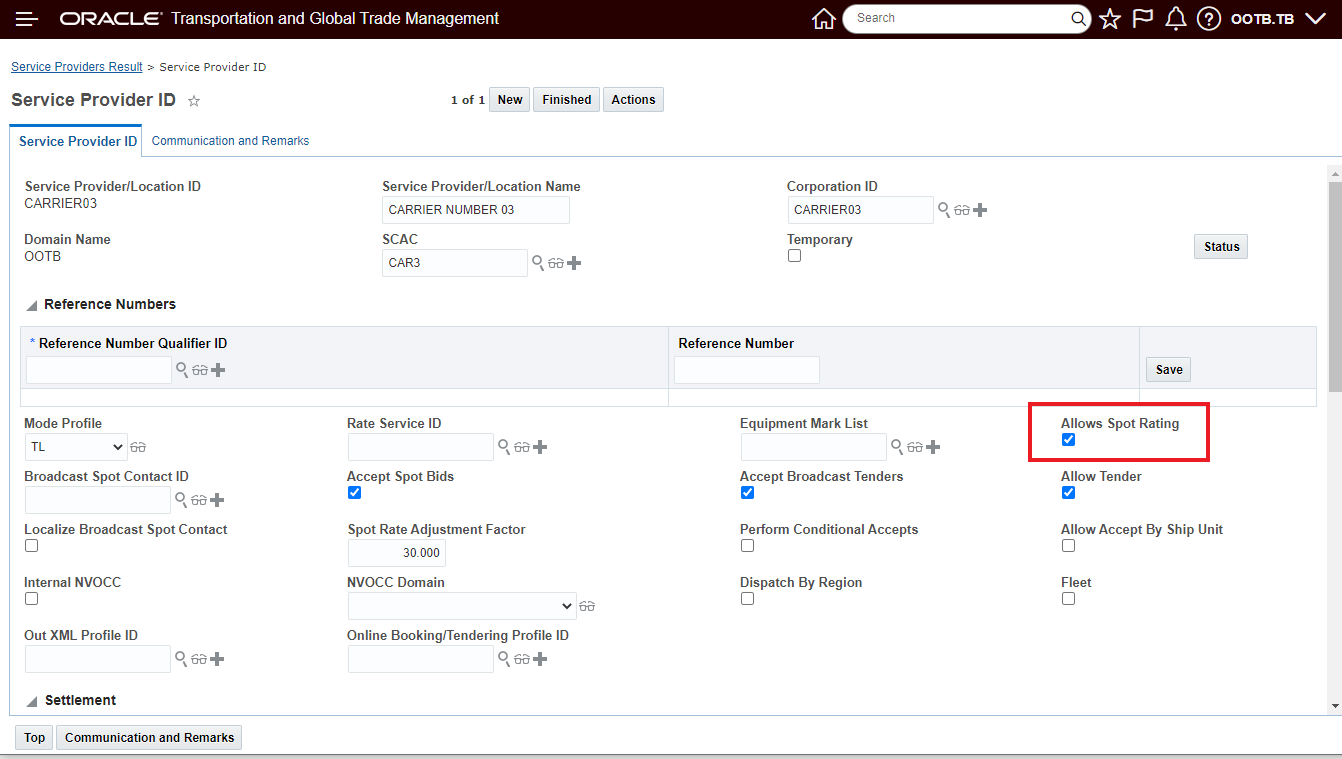
Allow Spot Rating on Service Provider
If you do not have the Allows Spot Rating option selected for the service provider the Spot Bid Tender screen will look like the screen below and the UI button Add New Spot Rate will not be available.
Service Provider Spot Bid Tender Screen without Allows Spot Rating selected
The Service provider must have a Spot Rate Offering configured.
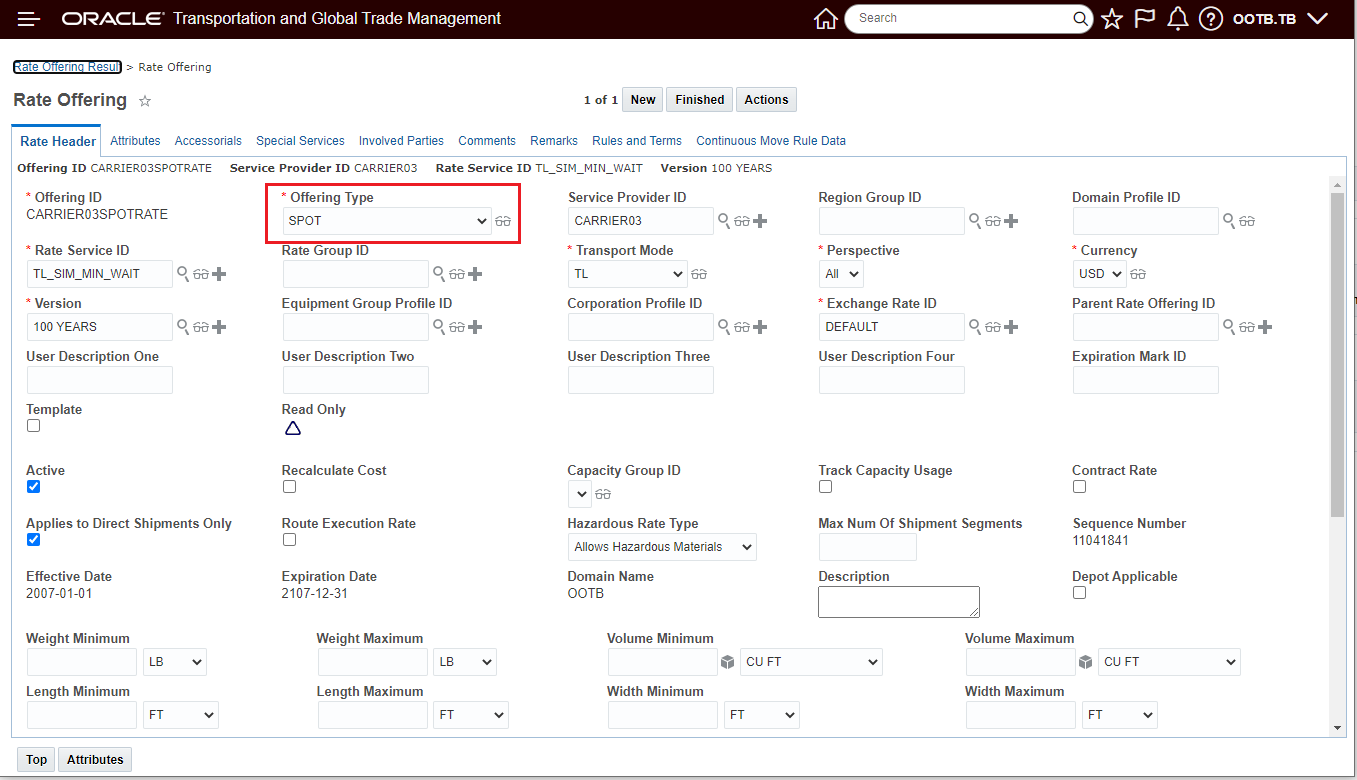
Spot Tender Rate Offering
If the setup is not configured - when the Service Provider goes to respond to a Spot Tender with a Rate Bid they will not be able to successfully add a rate - since the required Rate Offering is not available as shown below.
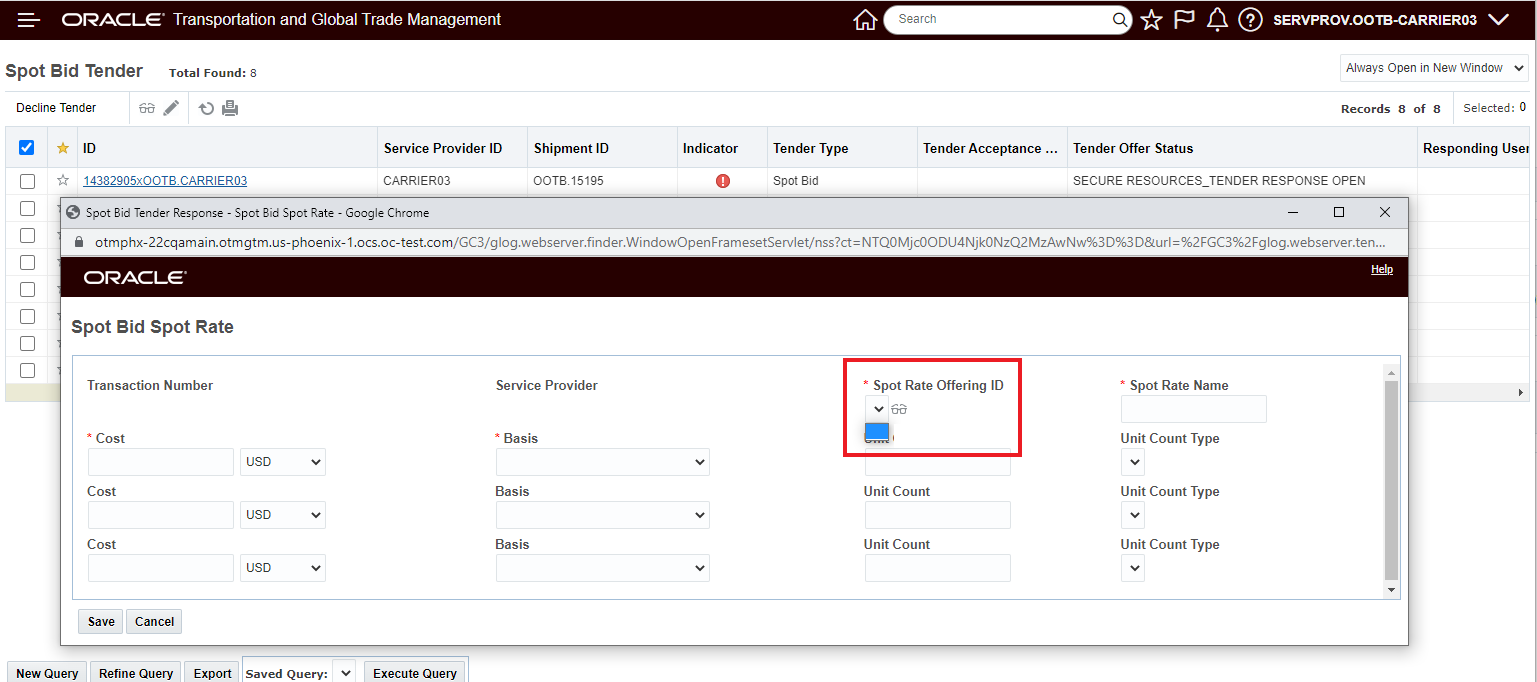
Service Provider Not Configured for Spot Rate Bids
Tips And Considerations
Depending on your implementation - you may not be offering all the bid response options supported by Spot Bid Tendering functionality. To configure/minimize the options and simplify the screen for your Service Providers, you should consider configuring the manager layout(s) for the Spot Tender UI. Go to Configuration and Administration > User Configuration > Manager Layout to change the layout..
- Edit - TENDER_SERVPROV_SPOT_RATE
- Edit - SPOT_BID
- View - SPOT_BID_VIEW
- View - TENDER_SERVPROV_SPOT_RATE_VIEW
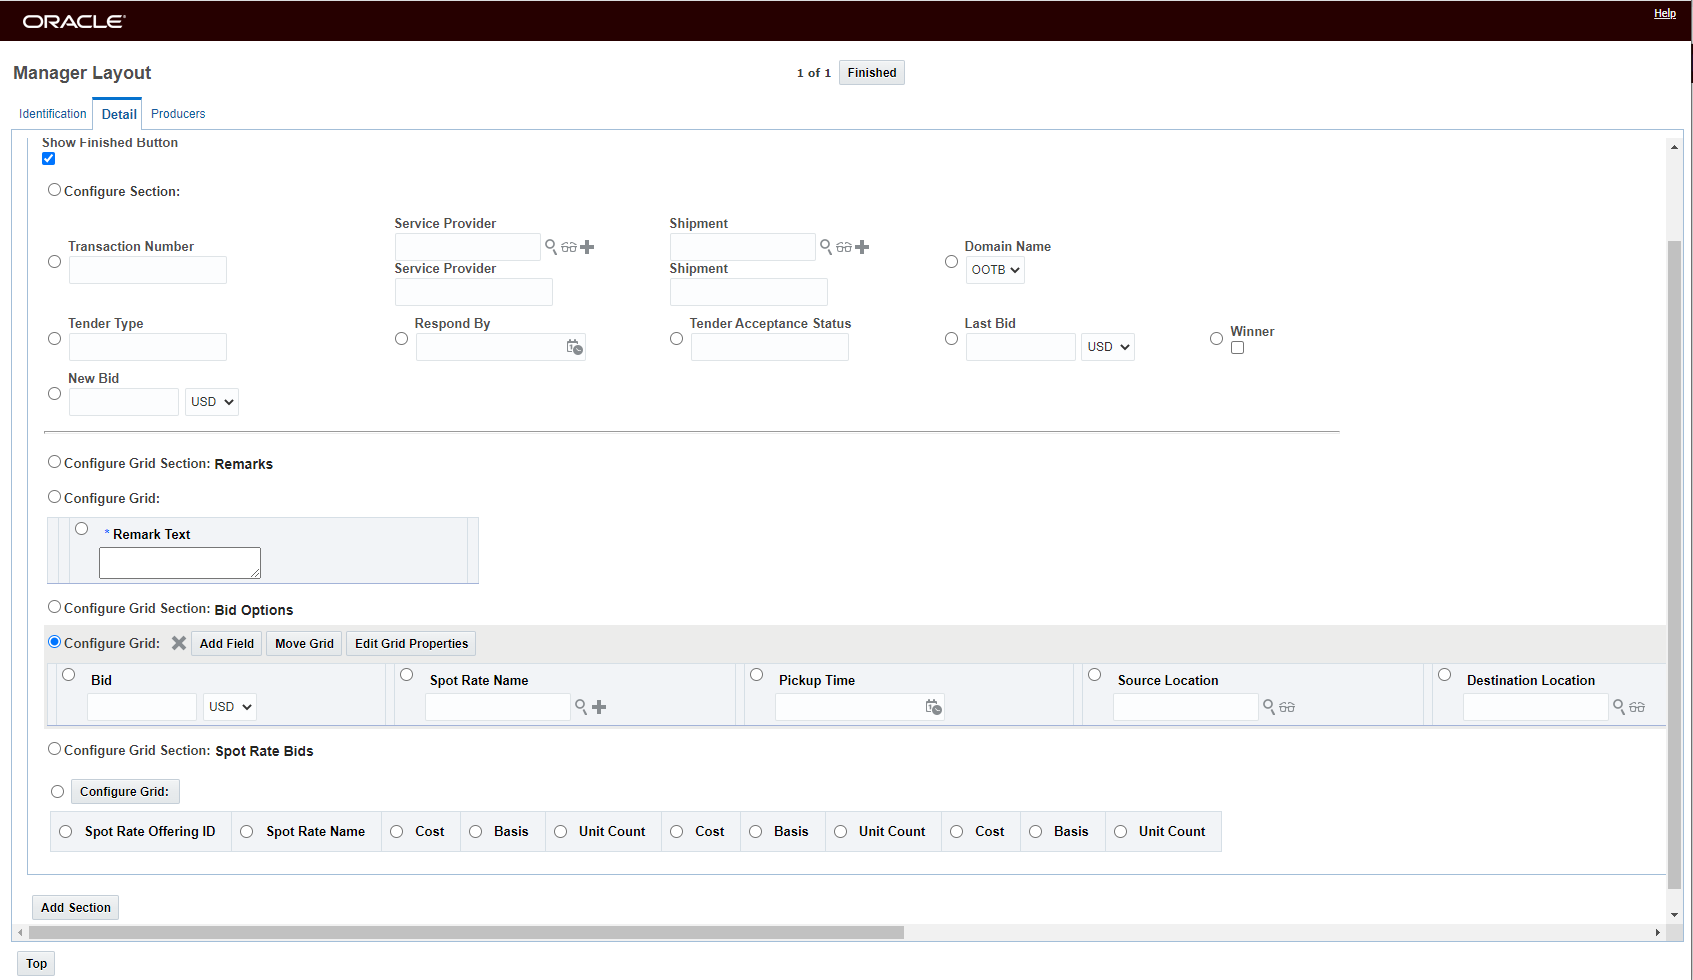
Spot_Tender - Manager Layout Edit
NOTE: Only the Rate Basis Items below are available for Spot Rate Bids.
..
The ability to review and analyze all of the different bids entered across all your service providers considering all the options available for both cost based bids with and without Bid Options and Spot Rate Based Bids - again, with and without Bid Options - is limited at this point.
Public Enhanced Workbench - Spot Bid Workbench
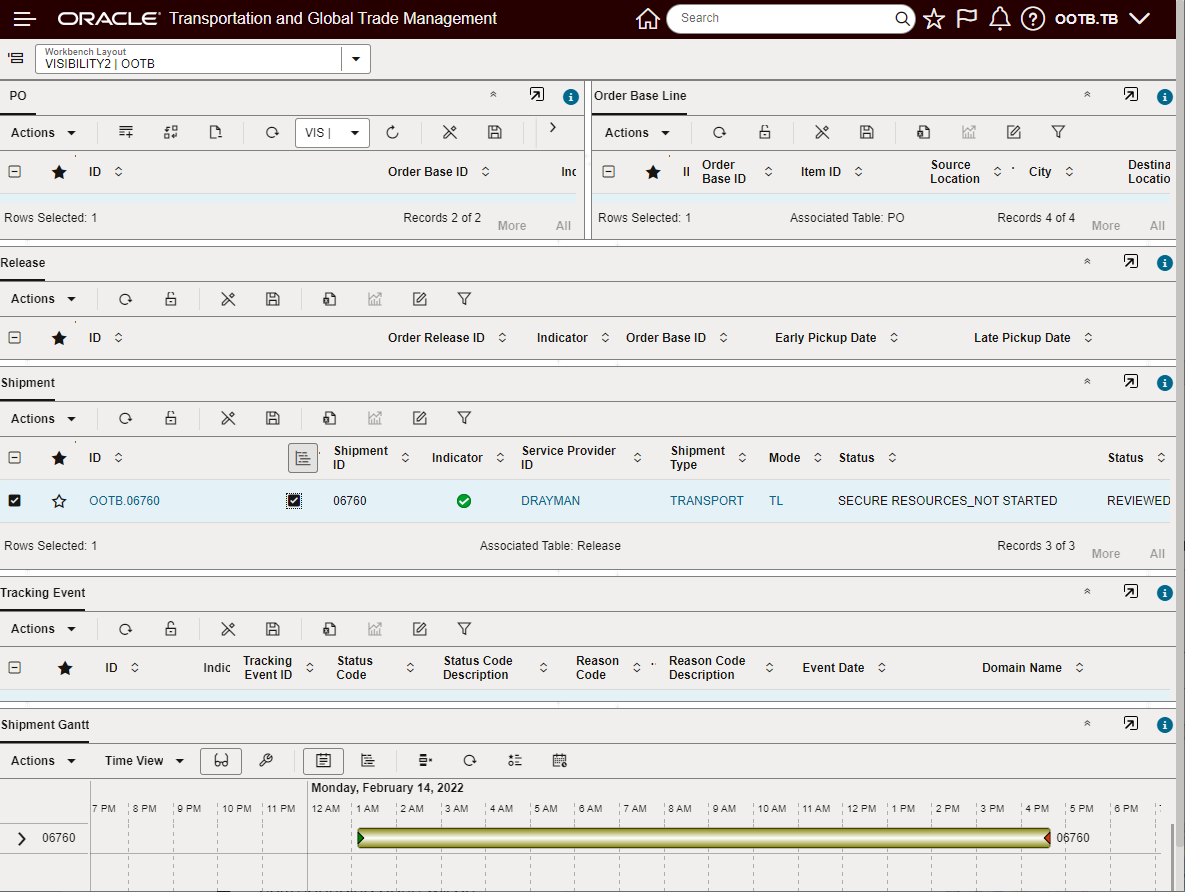
This feature provides you with a new Public Enhanced Workbench - Spot Bid Workbench - that provides you with insight into all of your Spot Bid Tender activity. The Spot Bid Workbench takes advantage of the newly added Open Tender facts and dimension and highlights the benefits of the Data Visualization capabilities provided with Oracle Analytics Server.
The Spot Bid Workbench provides the following elements:
- The top left panel provides you with all your Open Tendered Shipments (Spot Tenders and Broadcast Tenders) using a provided Public Saved Query - Open Tendered Shipments.
- The lower left panel, for your selected Spot Bid Tenders - provides you visibility to your outstanding Spot Bid Tenders and Responses.
- Note that Broadcast Tenders do not have Spot Bid Tender info so this panel will be blank if the highlighted shipment is for a Broadcast Tender.
- In the right panel, you have access to various Data Visualization graphs and charts providing insight and analysis including - Historical Shipments By Lane, Service Provider Scorecard and Historical Open Tender Performance.
Public - Spot Bid Tender Workbench
As noted - in the right panel, you have access to various Data Visualization graphs and charts providing insight and analysis. The Historical Shipments By Lane tab is driven by the Shipment's panel - to populate the analysis you select a shipment and then select the Run Analytics icon. Information provides insight into Historical Cost versus Transit Time for the Service Providers on the lane.
Historical Shipments by Lane
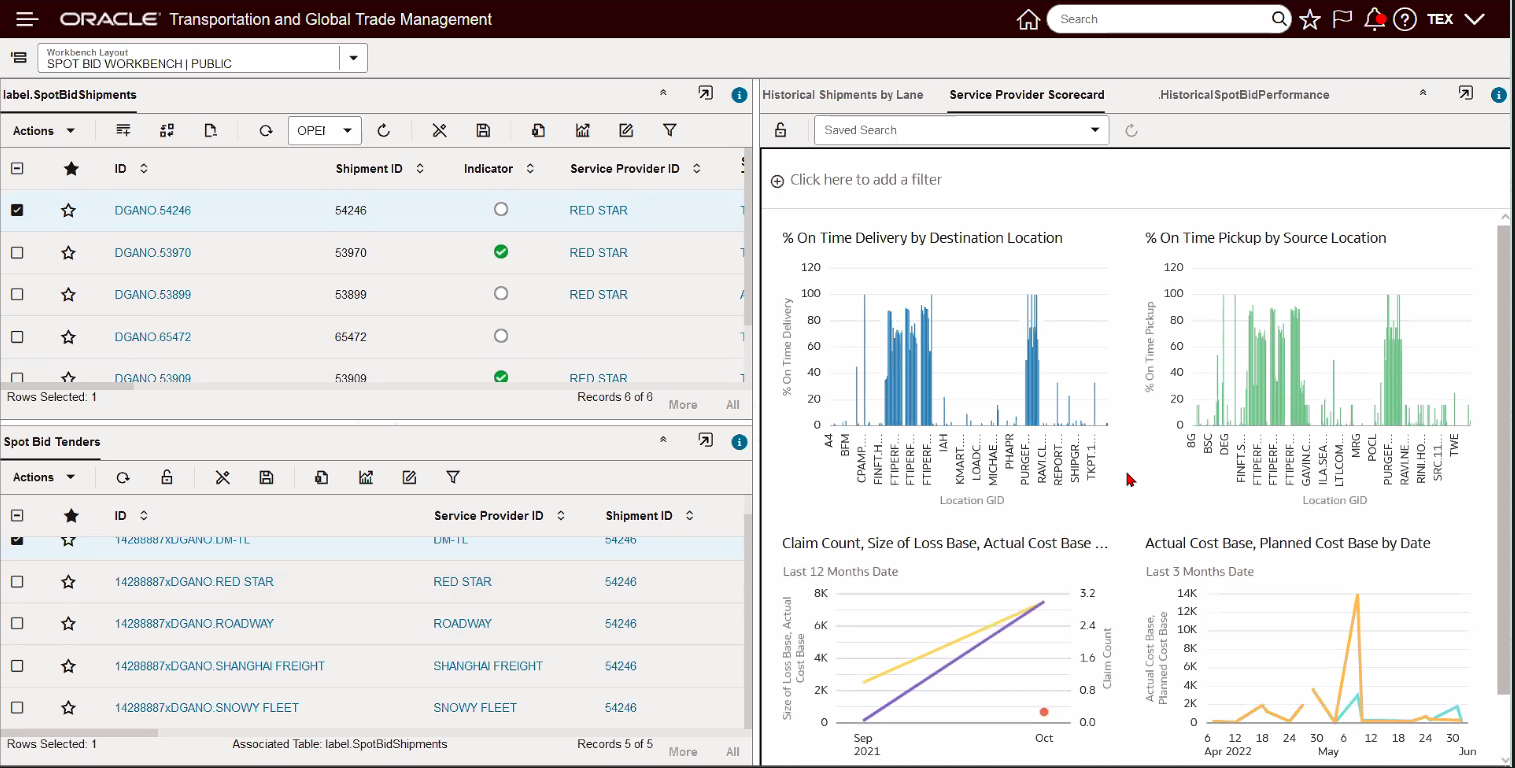
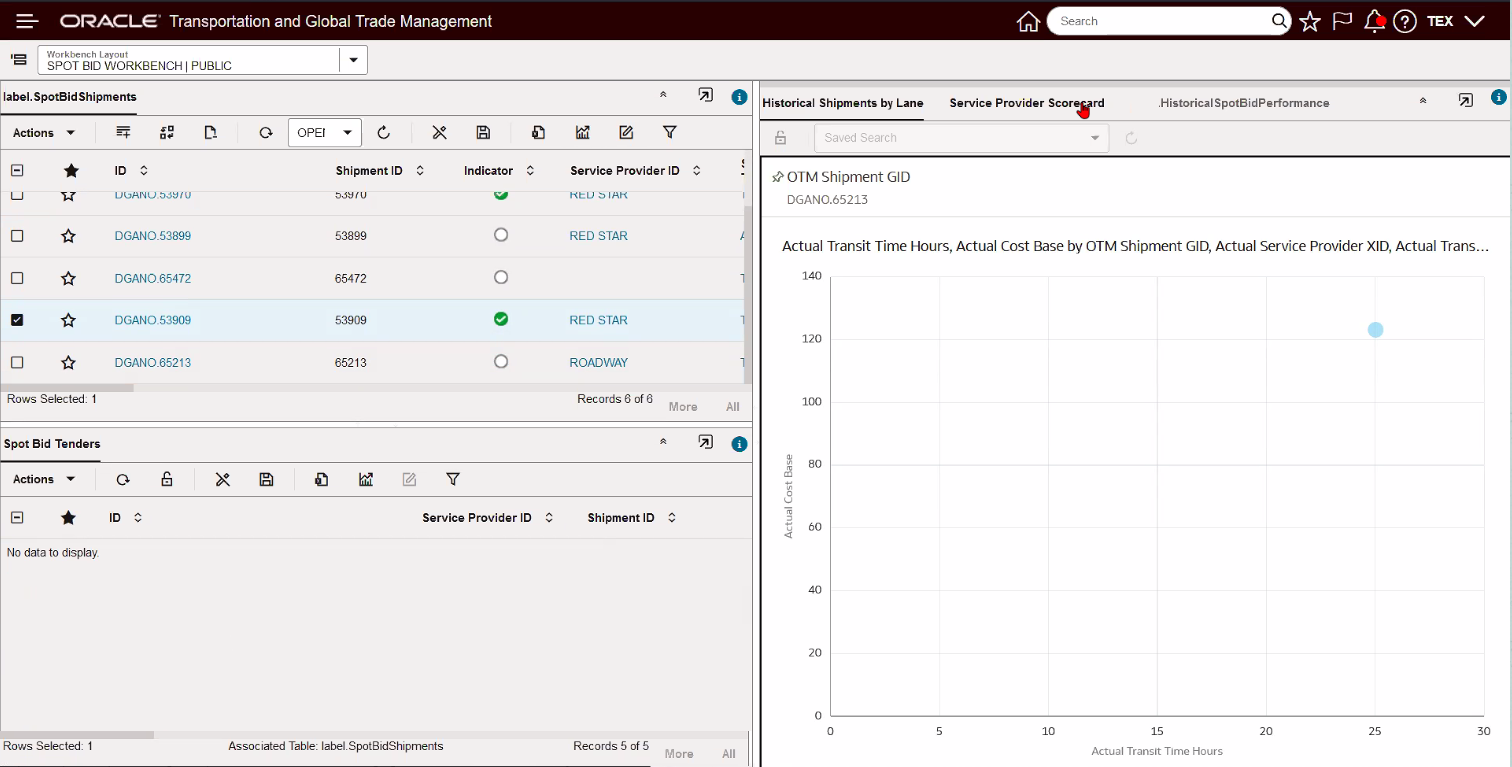
The Service Provider Scorecard is driven by the Spot Tenders panel - to populate the Service Provider Scorecard, select a spot tender and then select the Run Analysis icon. The Service Provider Scorecard provides insight into the Service Providers On-time Performance, their Claims activity, and their Planned Cost vs Actual Cost differences.
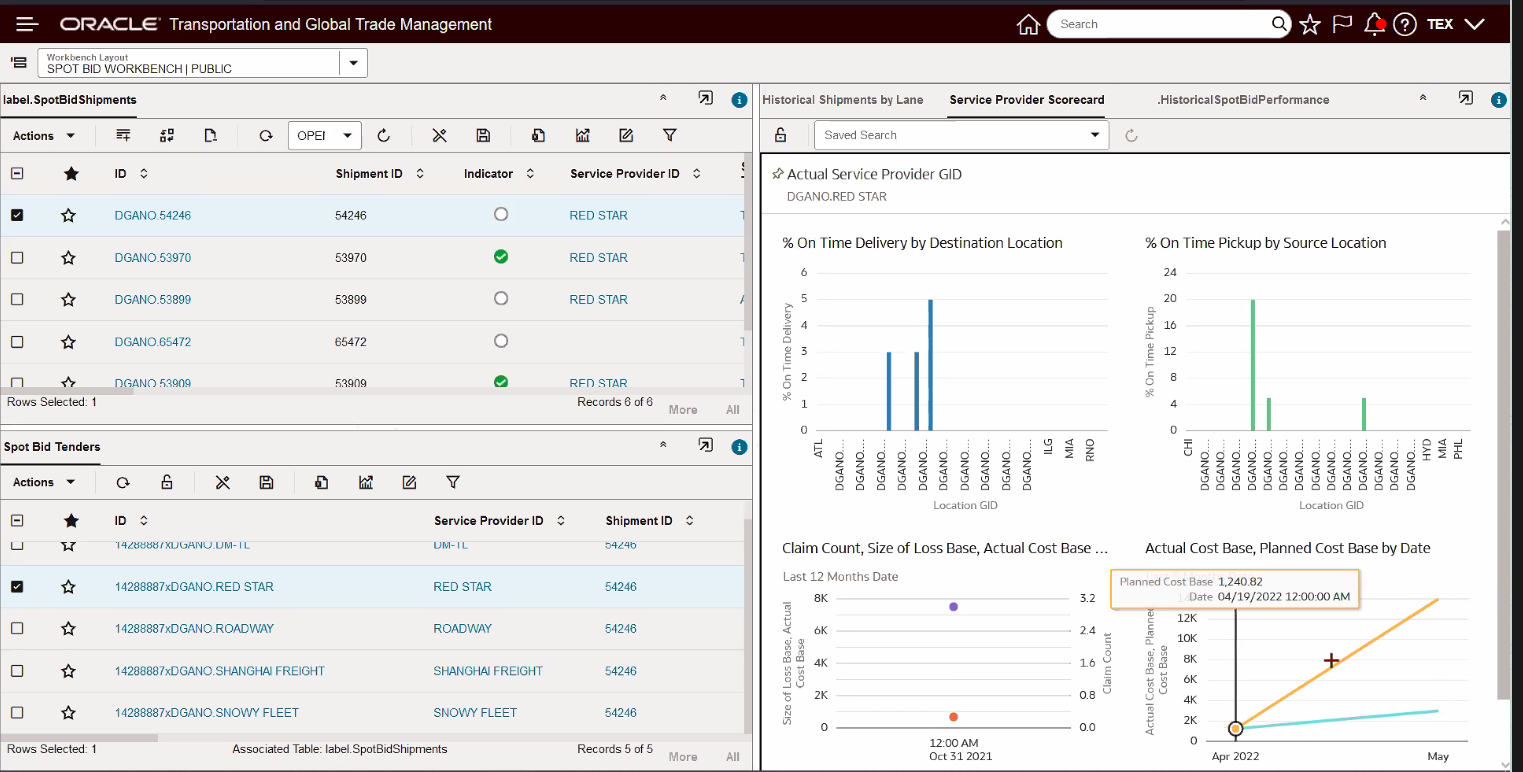
Service Provider Score Card
The Historical Open Tender Performance tab provides insight into the overall open tender performance, helping you to identify Service Providers who respond to Spot Bids, respond quickly, provide good performance and are competitive from a spot cost/bid perspective.
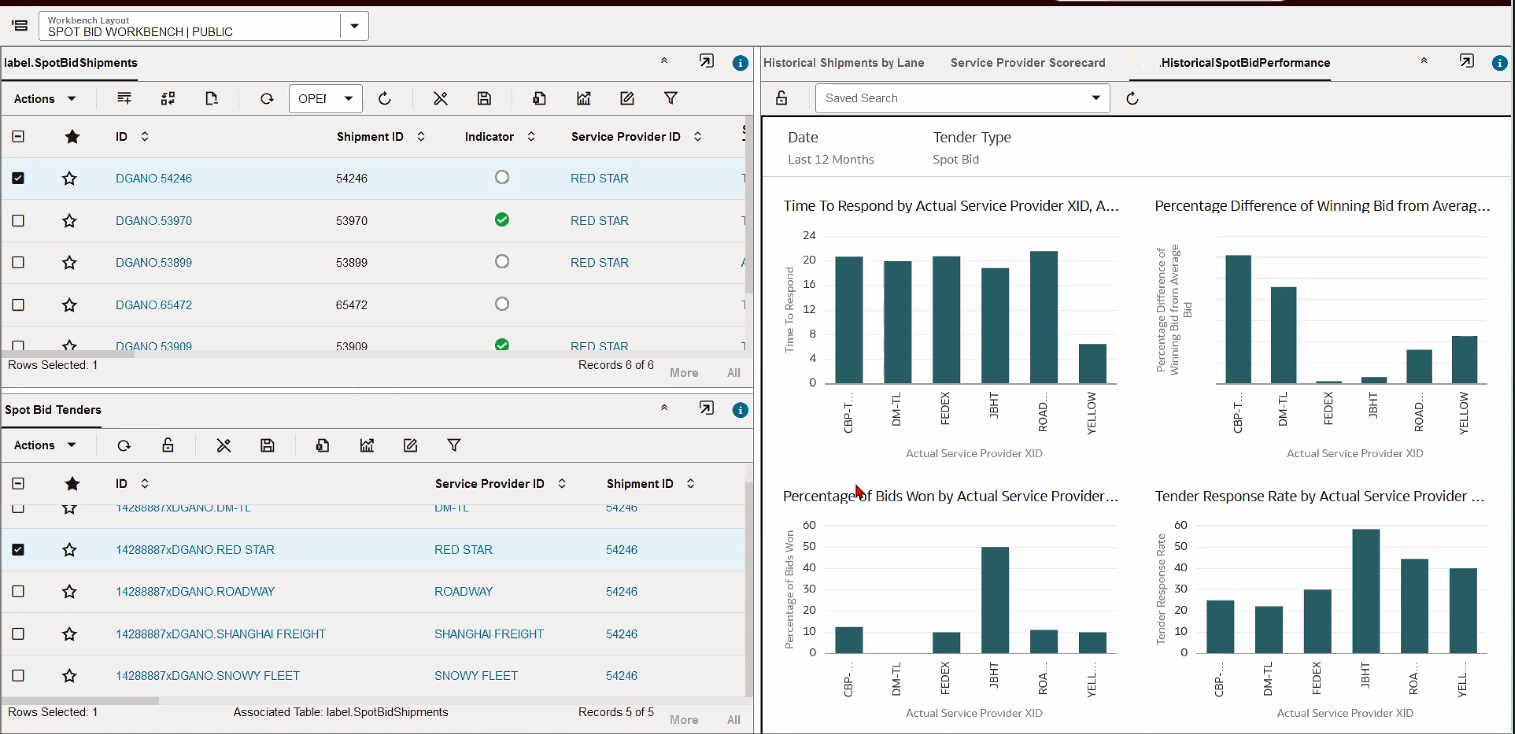
Historical Spot Bid Performance
Provides you with out-of-the-box insight into your Open Tenders allowing for more informed decision-making.
Steps to Enable
You don't need to do anything to enable this feature.
Tips And Considerations
NOTE: The provided Public Saved Query - Open Tendered Shipments - is returning both Spot Bid Tendered shipments and Broadcast Tendered Shipments. Broadcast Tendered shipments do not have Spot Bid Tender info - so if you are highlighting a shipment that has been Broadcast Tendered no info will be displayed in the Spot Bid Tenders panel.
Property to Configure Pickup Time Options
This feature provides you with an option to set the initial value of the pickup time as part of the tendering process. When the service provider does the tender accept, you have the option to allow the service provider to enter a different pickup time. This feature provides you with options for determining how the initial value for the pickup time is set - options provided are:
- shipment early start time,
- late start time
- blank requiring the service provider to enter a value.
This feature provides both configurability and usability improvements.
Steps to Enable
This new feature is controlled with the property: glog.tender.pickUpTimeOption
Default: No value - current behavior
New Property values:
- B - Blank will show the Pickup Date Time field as blank - the service provider will need to enter a value.
- E - The Early Pickup/Start Time will be the value shown in the Pickup Date Time field. If the shipment has no value set for Earliest Start Time, then the Start Time of the shipment will be used.
- L- Latest Pickup Time will be the value shown in the Pickup Date Time field.
Tips And Considerations
The table below defines all the options for the possible settings for the two properties related to the Pickup Date Time field.
Hide Pickup Date - property: glog.webserver.tender.ui.hidePickupDate
Pickup Time Options - property: glog.tender.pickUpTimeOption
| Hide Pickup Date | Pickup Time Options | User Role | Result |
|---|---|---|---|
| FALSE | NOT SET | Servprov | Early Start - default |
| FALSE | NOT SET | Planner | Early Start - default |
| FALSE | B | Servprov | Blank |
| FALSE | B | Planner | Blank |
| FALSE | E | Servprov | Early Start |
| FALSE | E | Planner | Early Start |
| FALSE | L | Servprov | Late Start |
| FALSE | L | Planner | Late Start |
| TRUE | NOT SET | Servprov | Hidden |
| TRUE | NOT SET | Planner | Early Start |
| TRUE | B | Servprov | Hidden |
| TRUE | B | Planner | Blank |
| TRUE | E | Servprov | Hidden |
| TRUE | E | Planner | Early Start |
| TRUE | L | Servprov | Hidden |
| TRUE | L | Planner | Late Start |
NOTE: When configuring these properties - changes to the property values will not be reflected in outstanding tenders i.e., tenders with records in the tender collaboration table. To see the impact of the property changes you will need to re-tender the shipment.
Dock Scheduling - Use Activity Time for Shipment Group Appointments
This feature provides you with the option to configure the Location Resources for Appointment Scheduling so that the cumulative activity time of the shipments in the Shipment Group are used to determine the number of slots required for scheduling an appointment.
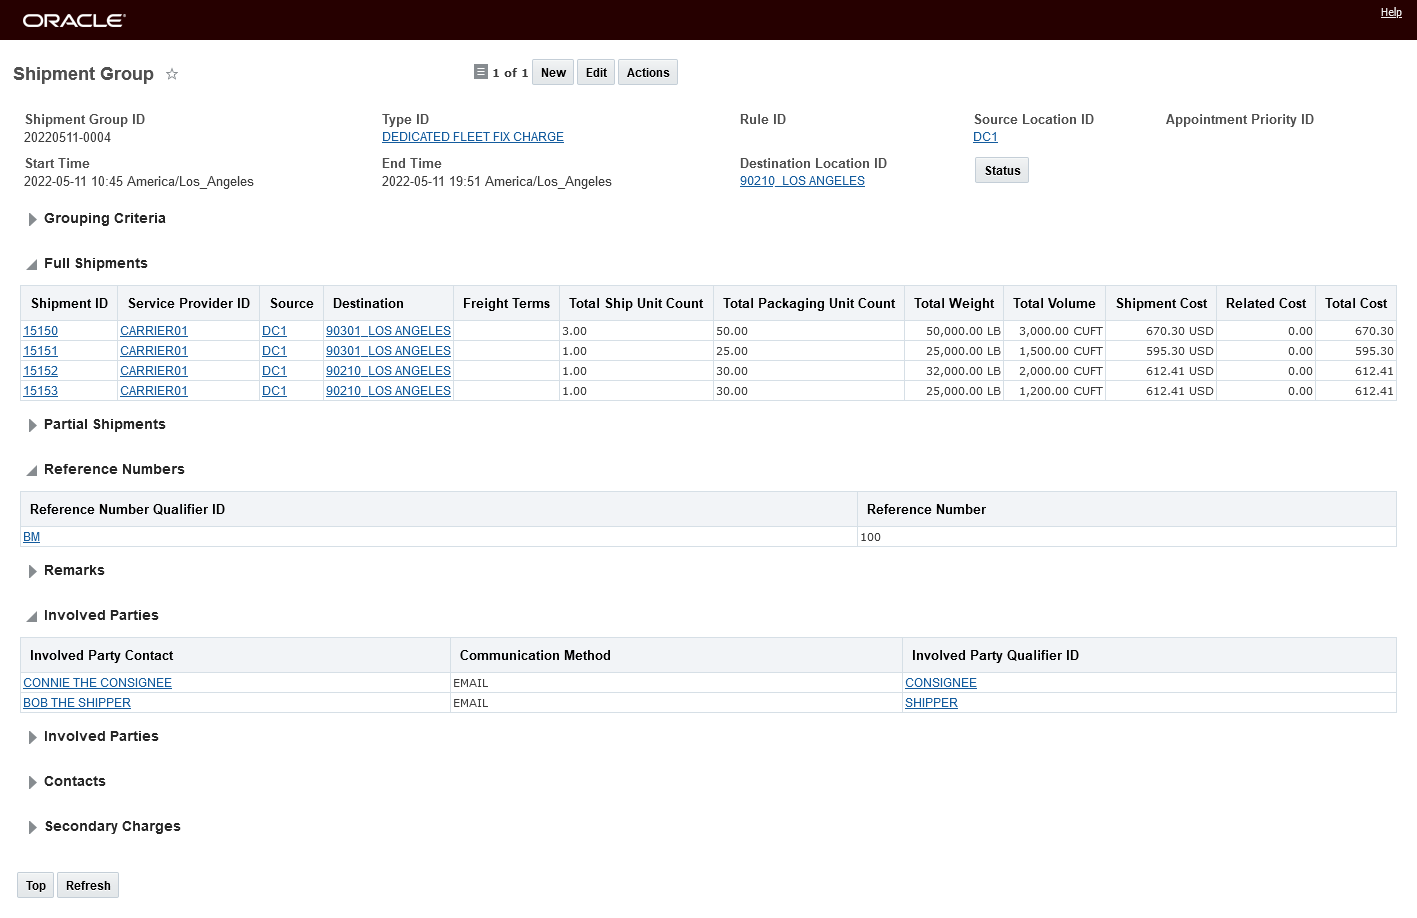
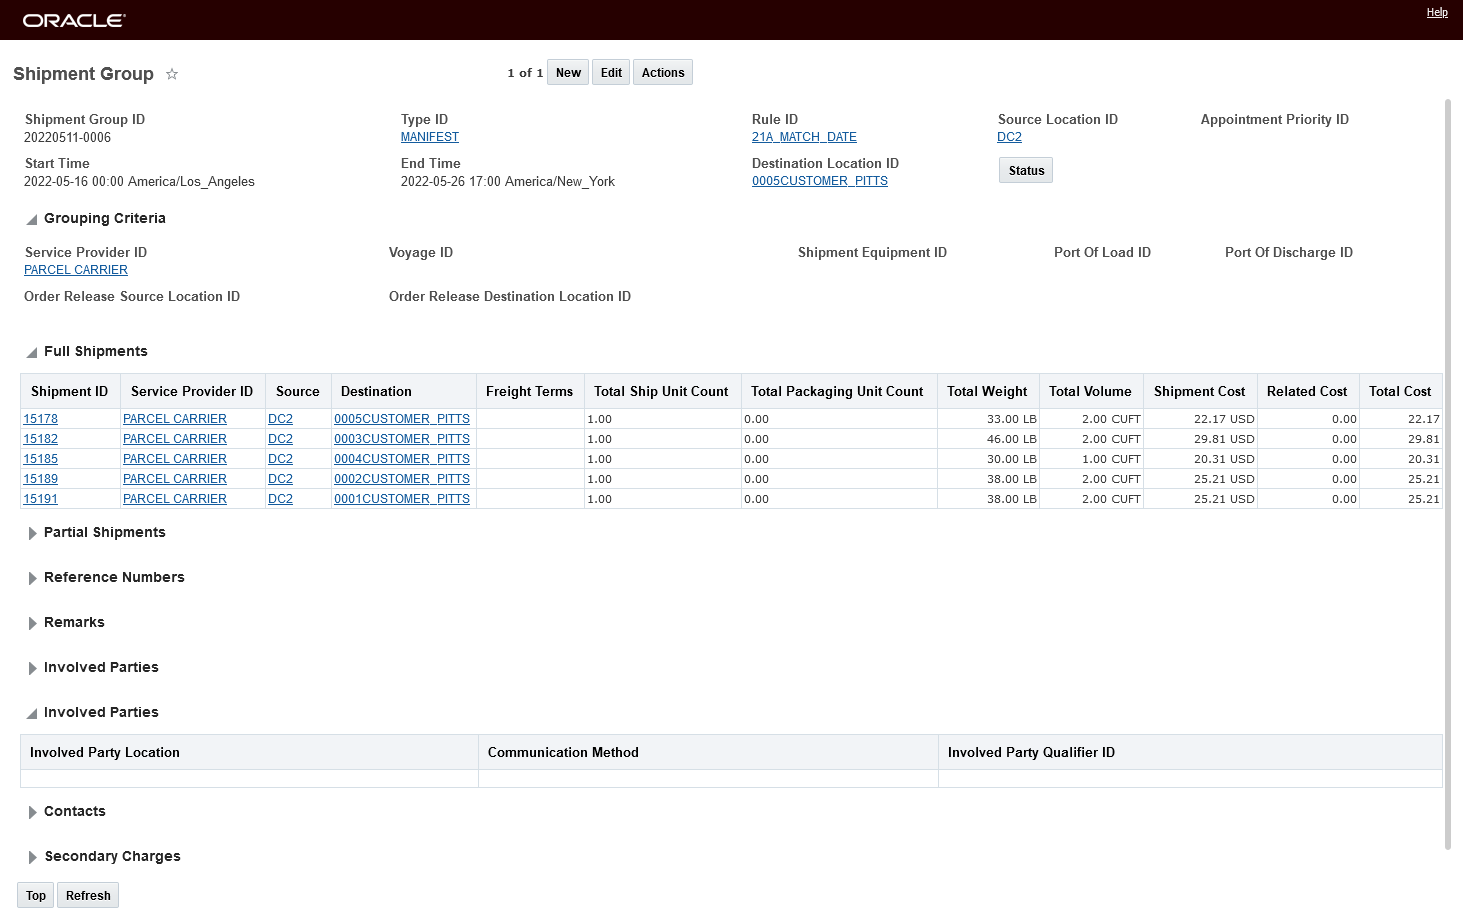
In the example below, a Shipment Group with five LTL Shipments is being picked up at the Des Moines-IA location. The pickup stop at the source location (Des Moines-IA) requires a pickup appointment.
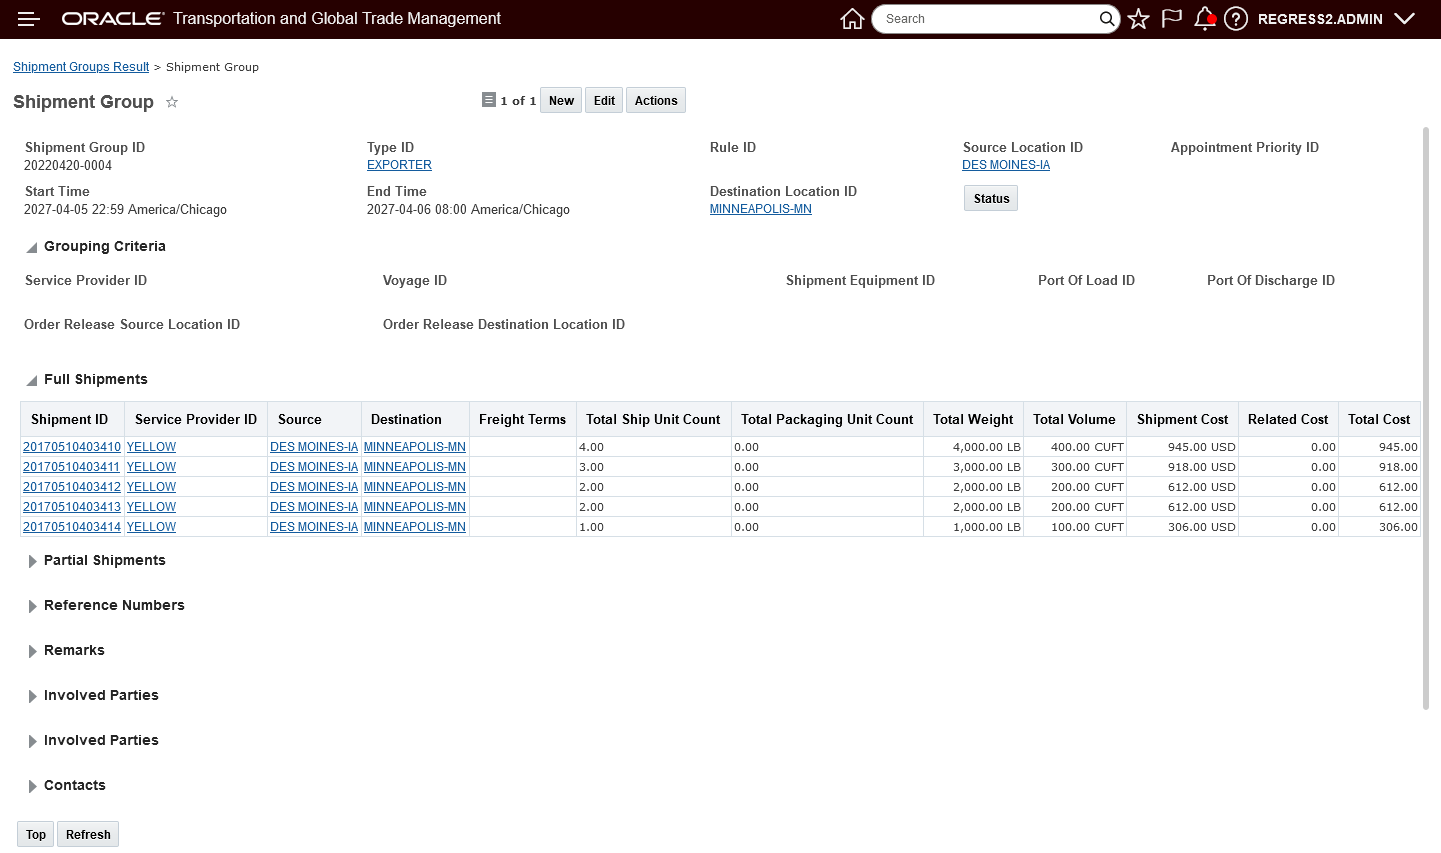
Shipment Group
The Slot Time Interval for the pickup location is set to 30 Minutes.
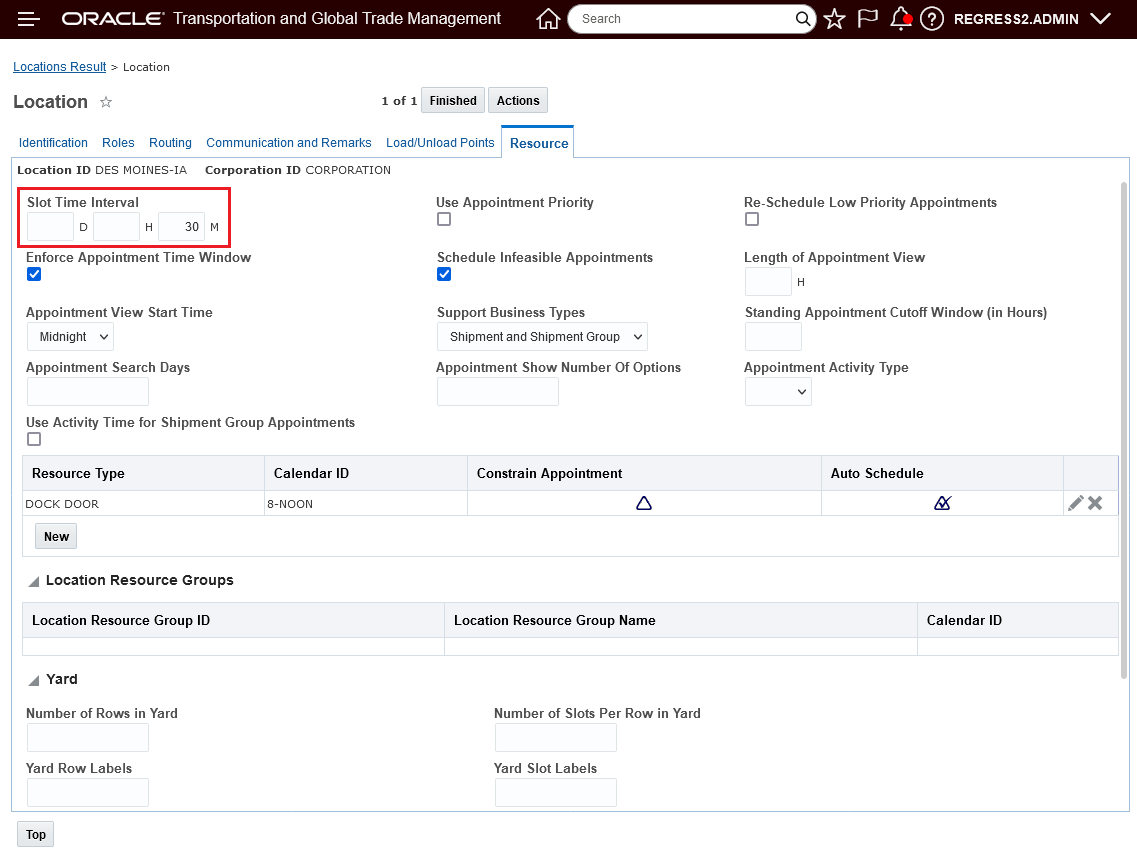
Location Slot Time Interval Setup
The activity time for this location is set to 15 minutes per ship unit.
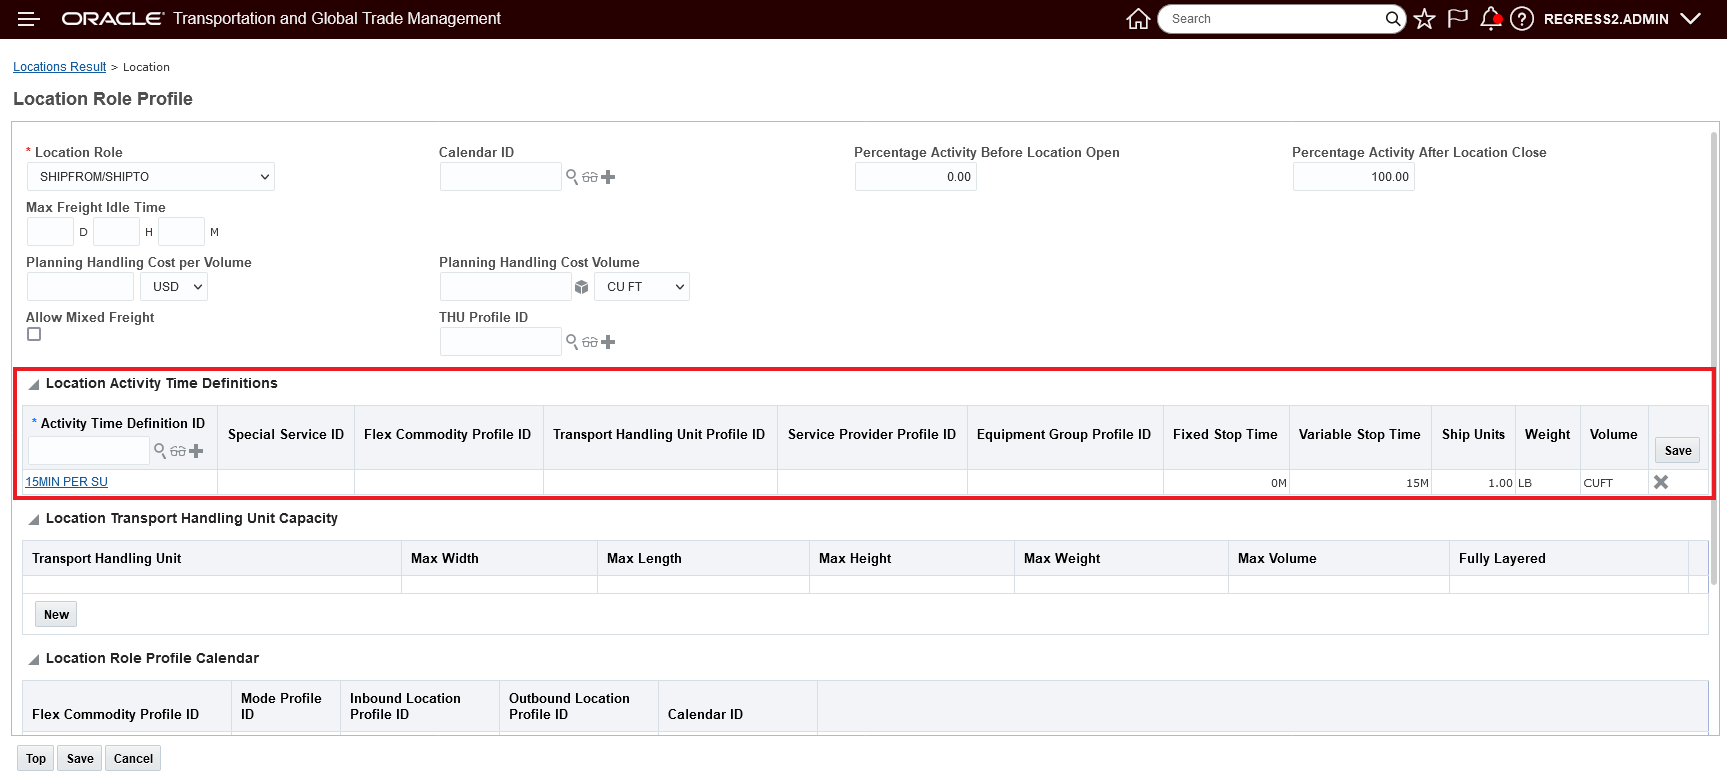
Location Activity Time 15 Minutes Per Ship Unit
In this first example, the new configuration option - Use Activity Time for Shipment Group Appointments - is unchecked (the default value/previous behavior setting). In this case - the previous behavior will be used to scheduling the appointment for the Des Moines Stop in the Shipment Group - specifically only one appointment slot - for 30 Minutes - will be used to schedule the appointment - the activity time for shipments in the group for the Des Moines location will not be considered.

Use Activity Time for Shipment Group Appointments not selected
When the Schedule Appointment - Show Options is run for this Shipment Group - the options provided are for single 30 minute slots - the activity time at the stop is not considered.
Schedule Appointment - Show Options
When the new option - Use Activity Time for Shipment Group Appointments is selected - as shown below - the activity time at the stop for the shipment group appointments will be considered.
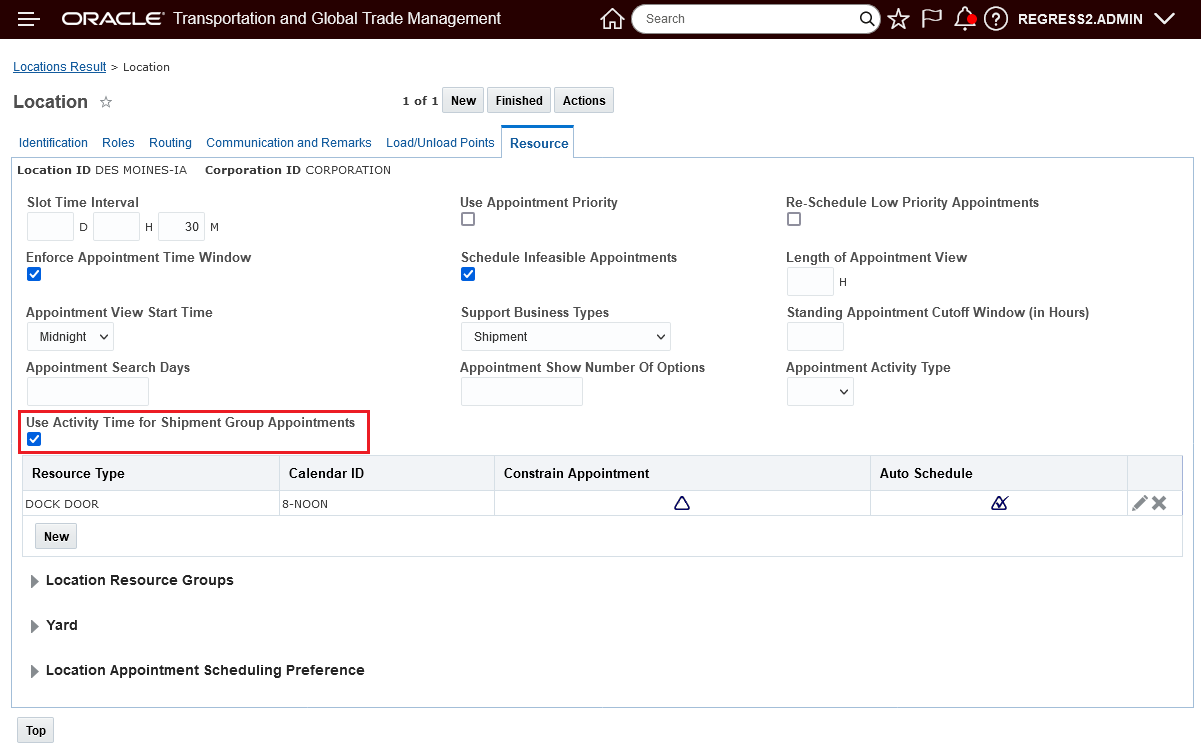
Use Activity Time for Shipment Group Appointments - Selected
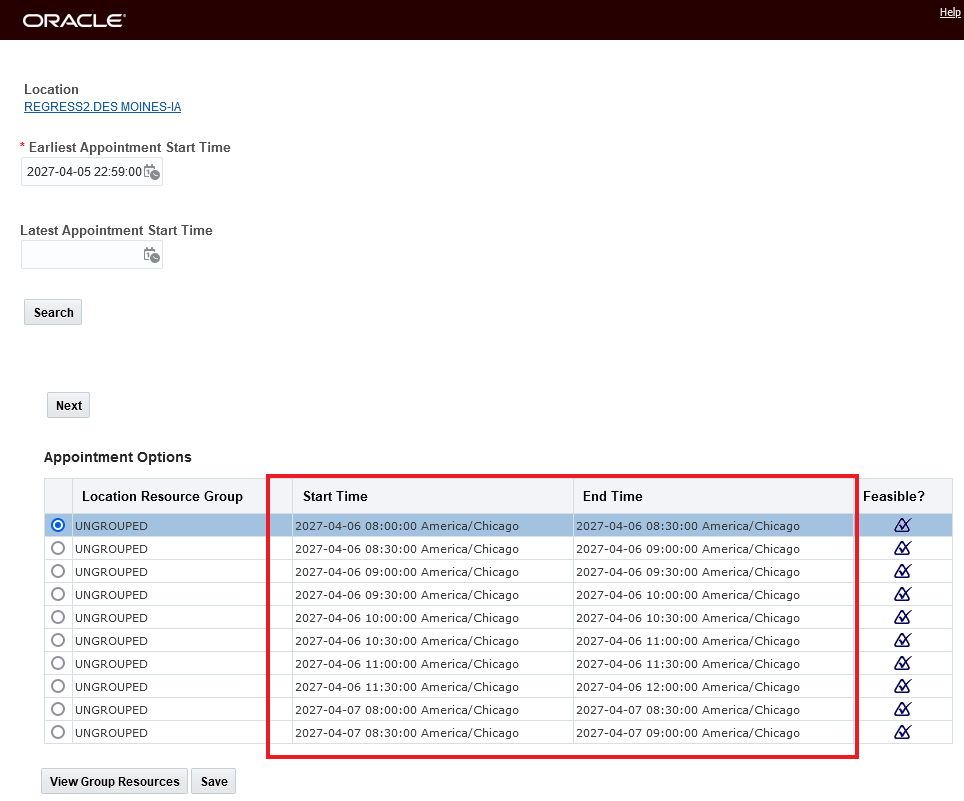
As shown below - with the Use Activity Time for Shipment Group Appointments selected - when you schedule an appointment for the stop in the Shipment Group - demonstrated here using the - Schedule Appointment - Show Options - action - the activity time is now considered. In this case, the five LTL shipments have a total of twelve (12) Ship Units - and the activity time is set at 15 minutes per Ship Unit so the total activity time required for the pickup appointment is three (3) hours - all of the options shown require 3 hours of time.

Schedule Appointment - Show Options - Use Activity Time Shipment Group Appointments Selected
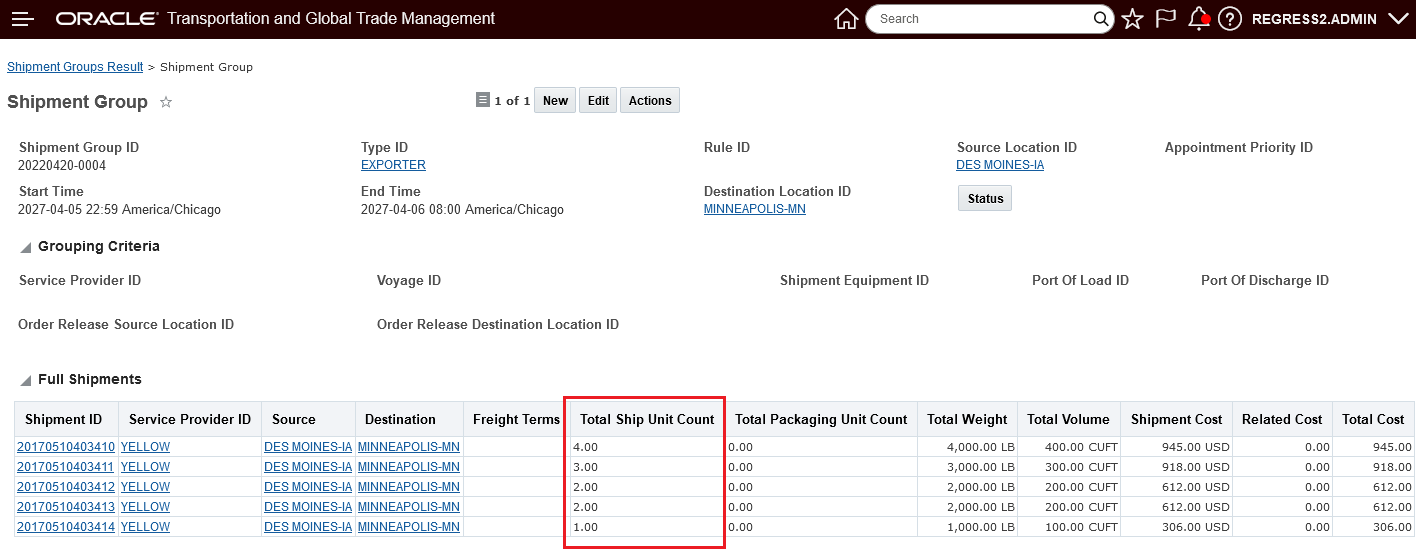
Shipment Group Ship Units for Activity Time
You will find this feature beneficial if your shipment group stop appointment scheduling requirements require considering the activity time at the stop - for loading or unloading activities - when determine the time and number of slots required to schedule your shipment group appointments.
Steps to Enable
You don't need to do anything to enable this feature.
Create Shipment Group (Auto/Manual)
This feature provides you with two new Shipment Group creation actions - Create Shipment Group Auto and Create Shipment Group Manual - that will (eventually) replace the legacy Create Shipment Group action. The two new actions provide a more direct approach for either manually creating Shipment Groups (Create Shipment Group Manual) or automatically creating Shipment Groups (Create Shipment Group Auto) using Shipment Group Rules. The legacy action mixed both options into a single action, making the input requirements unclear to the user.
In addition to providing a more intuitive path for creating your Shipments Groups, the new Create Shipment Group (Auto/Manual) actions provide you with additional controls/options for determining the domain to be used when the Shipment Group is created - either the Shipment Object domain or the domain of the User running the actions.
This feature was inspired by the use cases where your users - with limited access to the application (e.g., Service Providers) - are tasks with generating Shipment Groups and the requirement is to save the created Shipment Group in the domain of the Shipments that are being grouped versus being created in the domain of the User running the action.
In the examples below, the two actions - Create Shipment Group Manual and Create Shipment Group Auto will be demonstrated.
In the first example - Create Shipment Group Manual - will be used to manually create a shipment group with a set of dedicated fleet shipments.
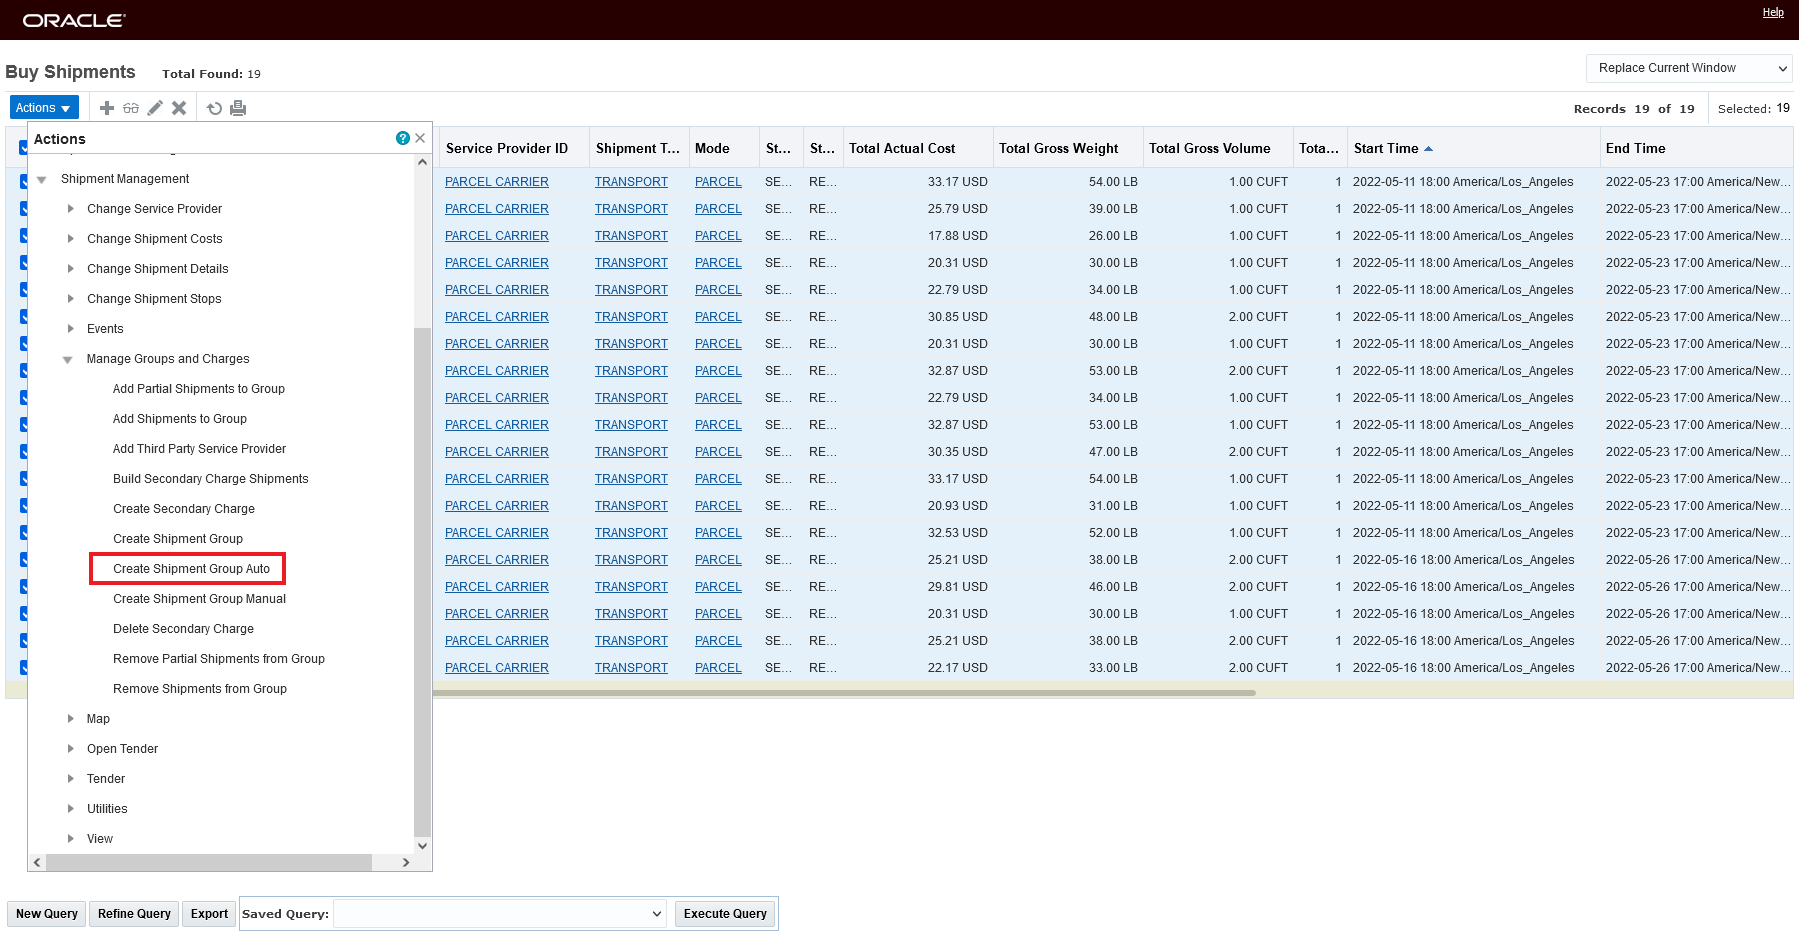
This action is found via the path Shipment Management > Shipment Management > Buy Shipments > Actions > Shipment Management > Manage Shipment Groups and Charges > Create Shipment Group Manual.

Create Shipment Group Manual
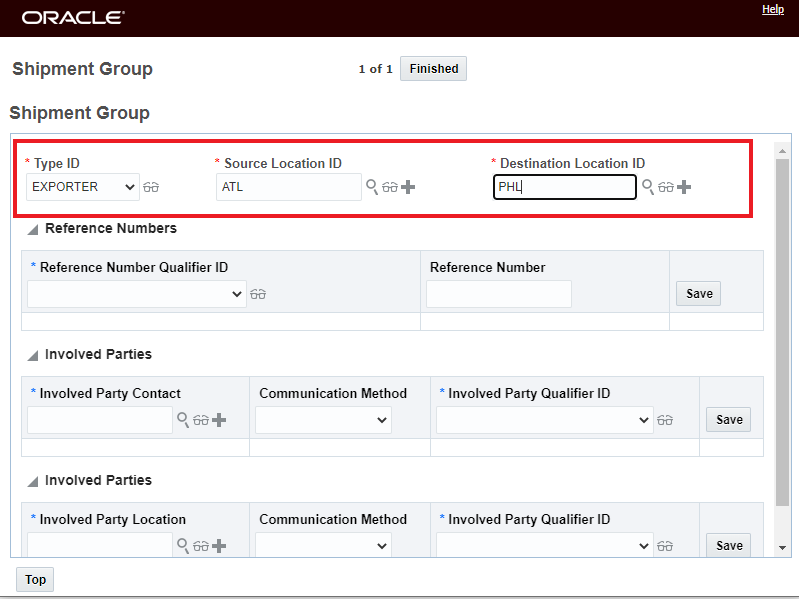
When the Create Shipment Group Manual action is run, the action input step takes you directly into the screen below, where you enter the required Type ID, Source Location ID and Destination Location ID for the Shipment Group being created. You also have the opportunity to add additional optional information related to Reference Numbers and Involved Parties.

Create Shipment Group Manual Shipment Group Input
Below is the created Shipment Group after running the action.
Create Shipment Group Manual Result
The Create Shipment Group Auto option takes advantage of Shipment Group Rules to generate the shipment groups for the selected set of shipments.
In the example below, two shipment groups will be created based on the Shipment Group Rule Selected.
Create Shipment Group Auto
When you run the Action Create Shipment Group Auto - the input page below is provided.
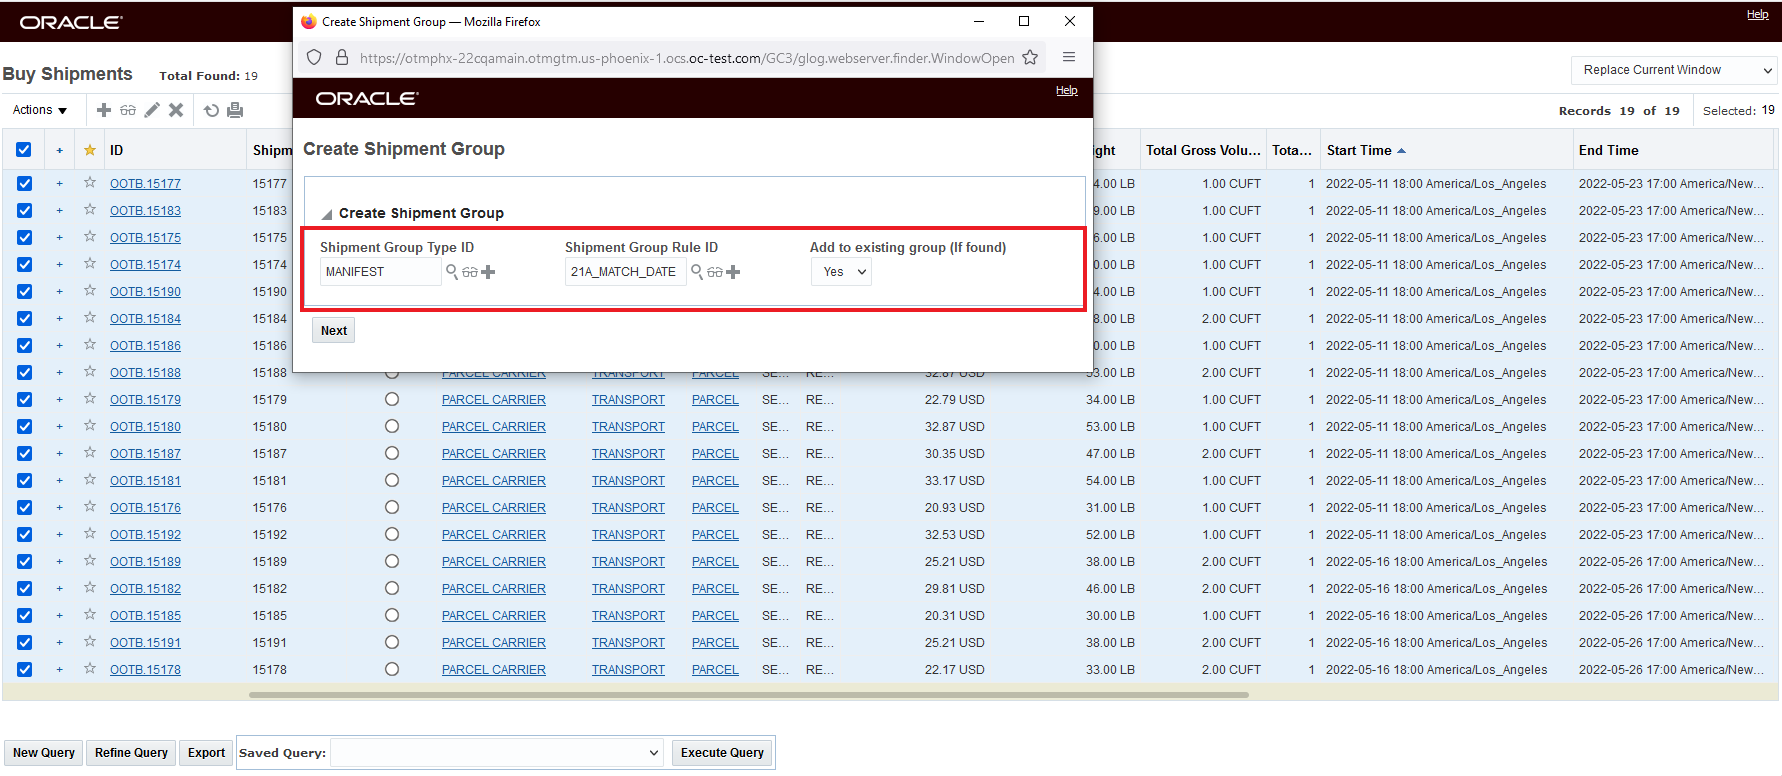
Create Shipment Group Auto Action Input
In this case, where the Shipment Group Rule selected has the Group Rules as Daily and the set of shipments selected depart on two different days - two different Shipment Groups are automatically created.

Create Shipment Group Auto Result
The Shipment Groups created - based on the rule - have the shipments grouped by ship date. One group is for the set of shipments starting on the 11th of May, the second group is for the shipments starting on the 16th of May.
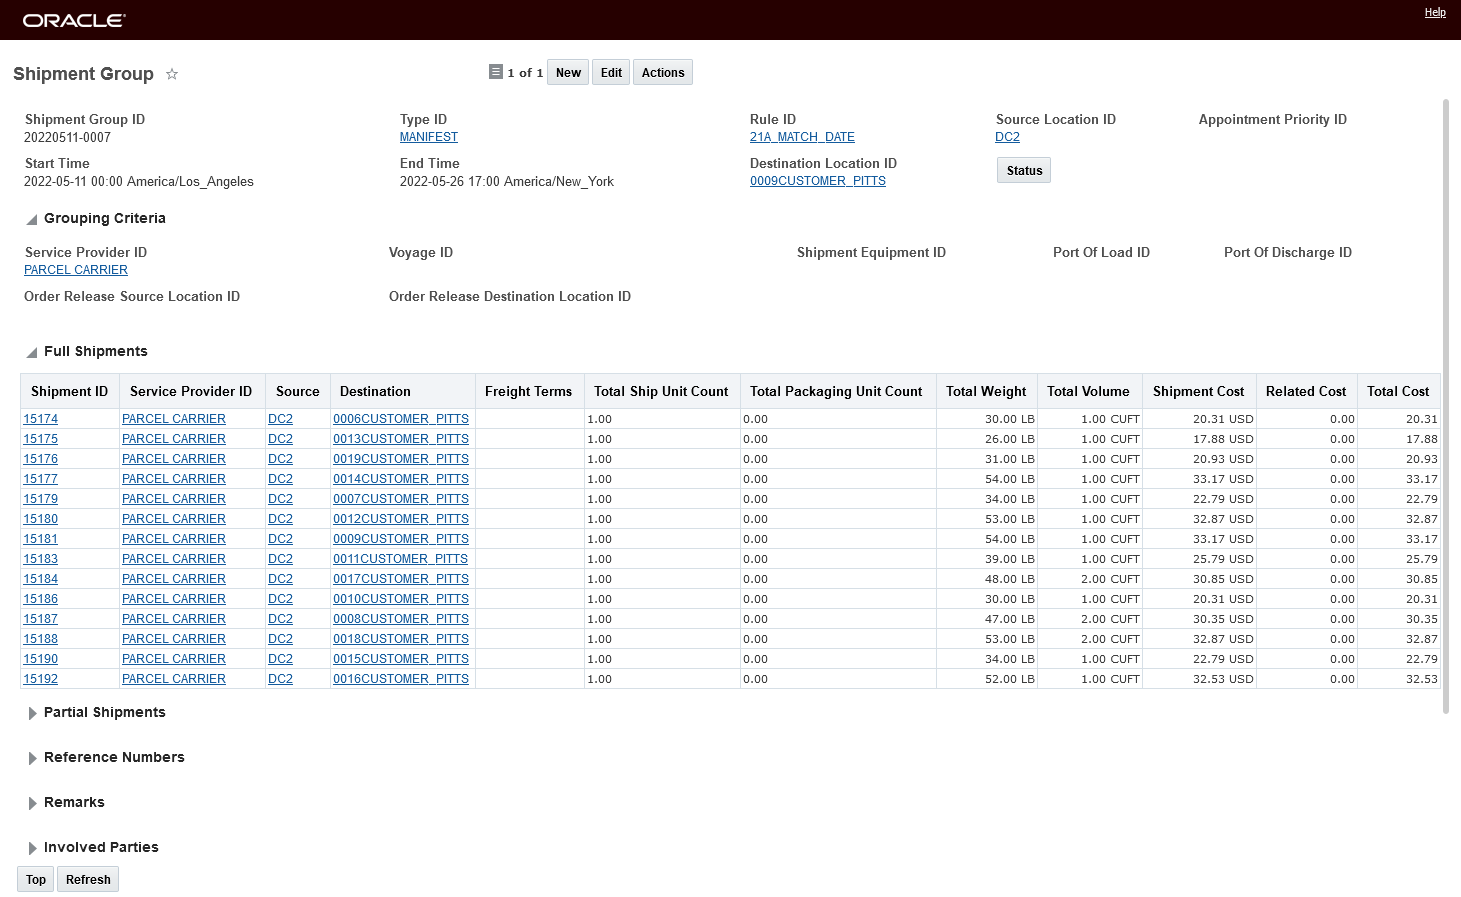
Results
Shipment Group Auto Result
Domain Creation Options - Object v User
Before this enhancement, running the legacy Create Shipment Group action would save the created Shipment Groups in the domain of the user running the action. For implementations where the task of Shipment Group creation was being managed by Service Providers - the desire was to have the generated Shipment Groups created in the domain of the shipments being grouped, versus the domain (Service Provider's domain) of the user running the action. Now - by default - the new actions - Create Shipment Group Auto and Create Shipment Group Manual - will create the Shipment Groups in the domain of the selected shipments. This new behavior is controlled by the new property - glog.shipgroup.createShipmentGroup.useShipmentDomain - that is set to true by default. You can revert to the previous/legacy behavior by setting the property to false.
Note - the assumption is that all of the selected shipments are in same domain - if not - then one of the shipment domains will be used.
You have the option to control this behavior at the Manage User Access level. To manage this at the Manage User Access level, you must set the property glog.shipgroup.createShipmentGroup.useShipmentDomain to false - the property is set to true by default, and when set to true the property will override settings made at the Manage User Access Level i.e., when set to true - values set at the Manage User Access level for these actions will be ignored.
User Access setup. In the example below - the Manage User Access has been configured so that when the User Creates a Shipment Group the Shipment Group will be create in the User's Domain.
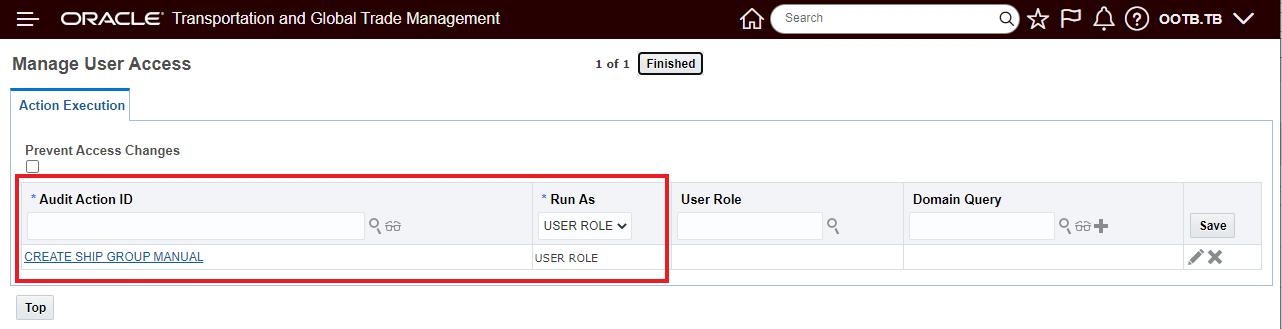
Setup for Create Shipment Group In Users Domains
Assuming the property - glog.shipgroup.createShipmentGroup.useShipmentDomain is set to false - so by default the Create Shipment Group Auto and Create Shipment Group Manual will create the Shipment Group in the User's domain - the setup below - using Manage User Access, for, in this example, just the Create Shipment Group Manual action, will create the Shipment Group in the domain of the Shipments. Note that you can set this up differently for the two actions.
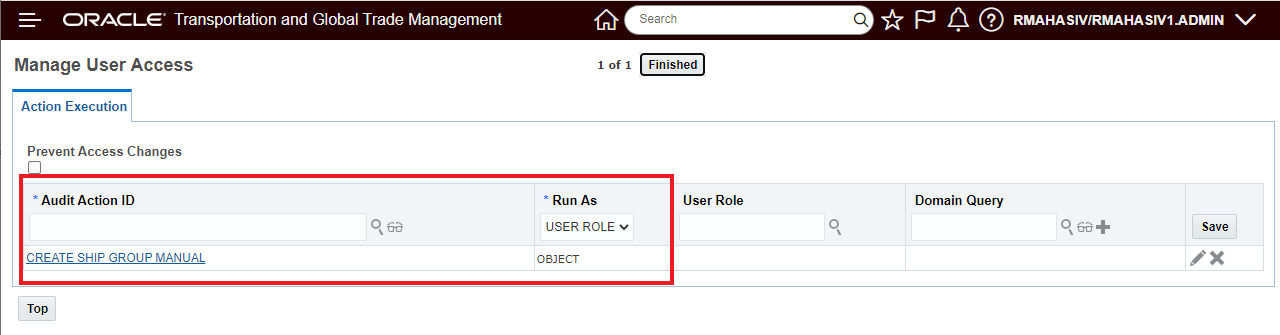
Setup for Create Shipment Group Manual use Shipment Domain
To demonstrate the new behavior - the shipment below - in its parent domain (RMAHASIV) - will be put into a shipment group using the Create Shipment Group Manual action run by the user who is logged into a subdomain (RMAHASIV/RMAHASIV1).

User in Subdomain - Shipment in Parent Domain
Create Shipment Group Manual input
The result of running the action is that the newly created Shipment Group is in the parent domain versus the subdomain of the User where the action was run.
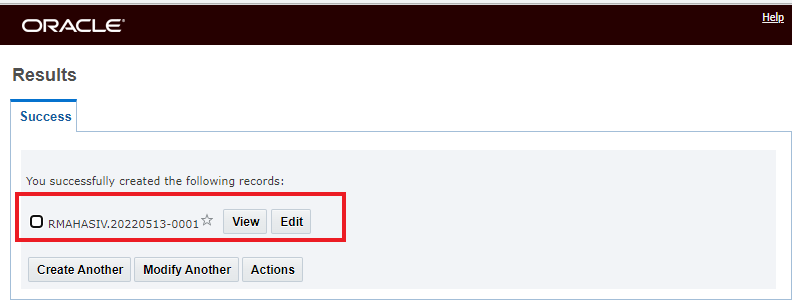
Create Shipment Group Manual Result

Create Shipment Group Manual Result Finder Result
This feature provides improved usability with two Create Shipment Group actions tailored to specific use case, as well as providing you with improved control for determining the domain used (User v Object) when creating a Shipment Group.
Steps to Enable
You don't need to do anything to enable this feature.
Tips And Considerations
Note the new property - glog.shipgroup.createShipmentGroup.useShipmentDomain - is set to true by default - so by default the new actions - Create Shipment Group Auto and Create Shipment Group Manual will create the Shipment Groups in the domain of the selected shipments. You can revert to the previous/legacy behavior by setting the property to false.
NOTE: The assumption is that the shipments being grouped are all in the same domain. If this is not the case - a domain from the set of shipments selected will be the domain used.
The legacy action Create Shipment Group will be deprecated in a future update.
Action Split by Ship Unit Includes Equipment Reference Unit Details
This feature enhances the Split Shipment Split by Ship Unit action to include Equipment Reference Unit (ERU) details.
The Split Shipment Split By Ship Unit is available under Actions > Operational Planning > Change Shipment Route > Split Shipment. Then choose Split Shipment By: Ship Unit.
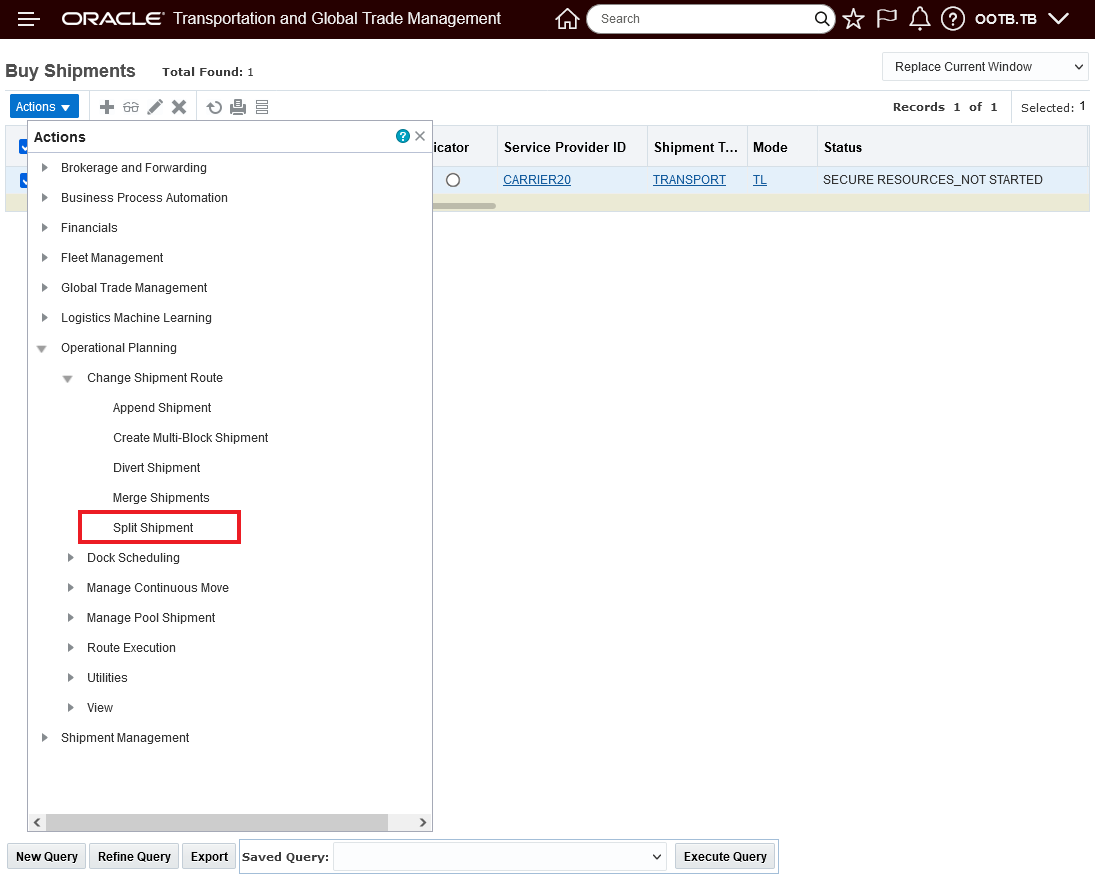
Split Shipment Action
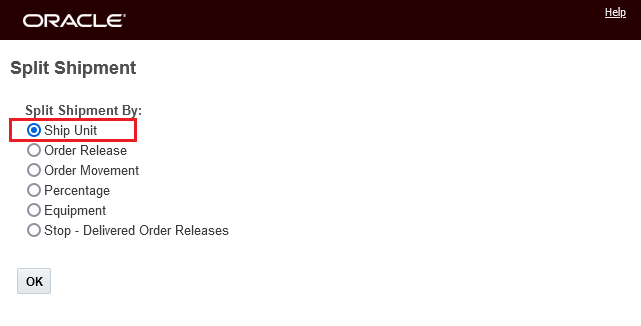
Split Shipment By Ship Unit Option
In the example below - all of the Ship Units are ERU related - so ERU details are provided for both Ship Units on the shipment.

Split By Ship Unit Ship Unit Selection with ERU Details
In the example below, some of the Ship Units do and some Ship Units do not have ERU details to show. Ship Unit MYU-20090731-2-002-006 and Ship Unit MYU-20090731-2-006-001 both have ERU details to show - while all the other Ship Units do not.

Equipment Reference Details Provided
This feature provides you valuable information and insight into your Ship Unit Equipment Reference Units when running the action Split Shipment by Ship Unit.
Steps to Enable
You don't need to do anything to enable this feature.
Ship Unit Building Logic - Set THU Weight When Null
This feature will set a default value (a high value) for your Ship Unit Spec Max Weight field in cases where this field is Null. The default value will avoid packing solution quality issues (where packaged items are packed into their own ship unit) when performing ship unit building using the Generate Ship Units action.
The example below demonstrates the benefits of this new feature.
The setup here is that the Ship Unit Spec has no Max Weight defined - the Max Weight field is Null.
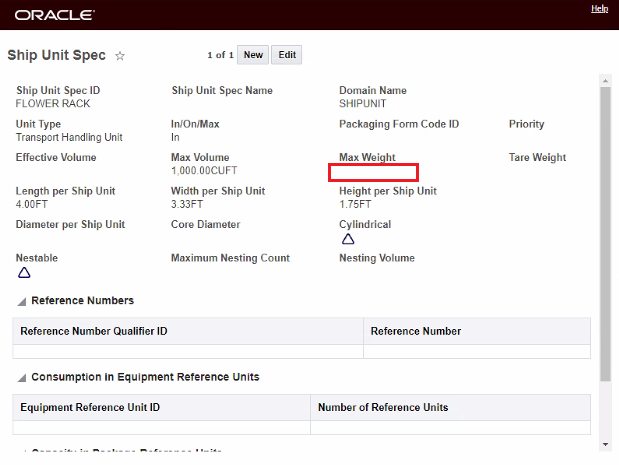
Ship Unit Spec - Max Weight Null
Previously - with this setup - properly configured packaged items that should support mixed packing were not packing as desired. In the example below, each of the packaged items - ends up in its own THU - no mixed packing is provided.

Previous Packing Solution
With this enhancement, given the same ship unit spec configuration and packaged items, the desired mixed packing solution is provided. Two THUs - one with three packaged items and a second THU with two packaged items are generated.
New Packing Solution
This usability feature provides the desired packing without requiring addition configuration steps.
Steps to Enable
You don't need to do anything to enable this feature.
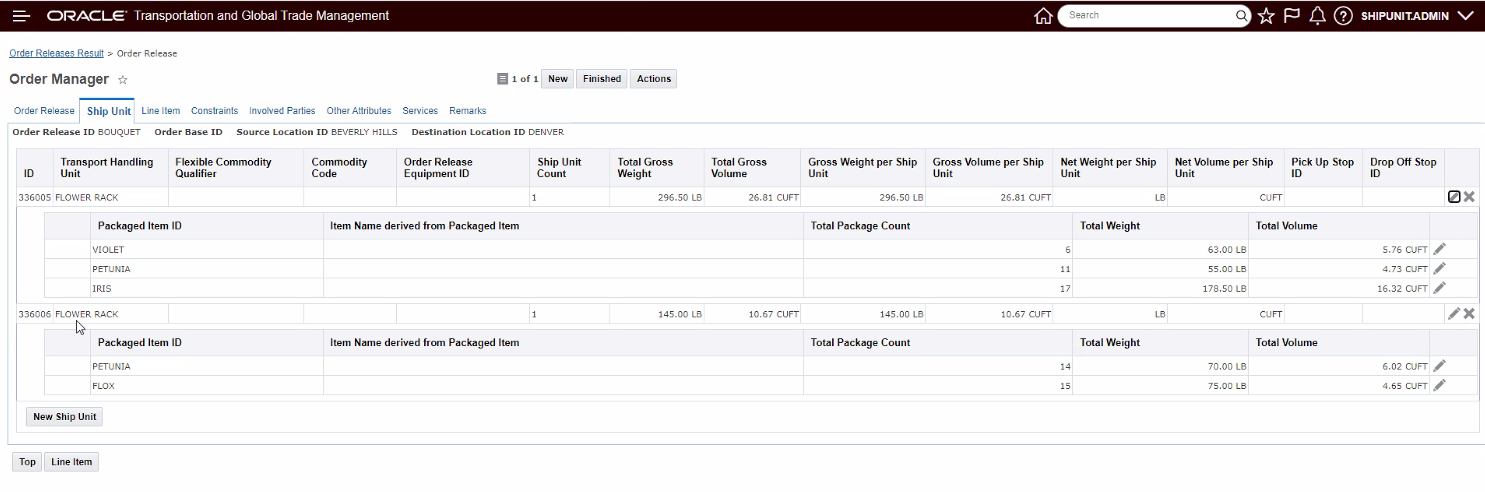
Order Base SmartLink - View Order Base Remarks
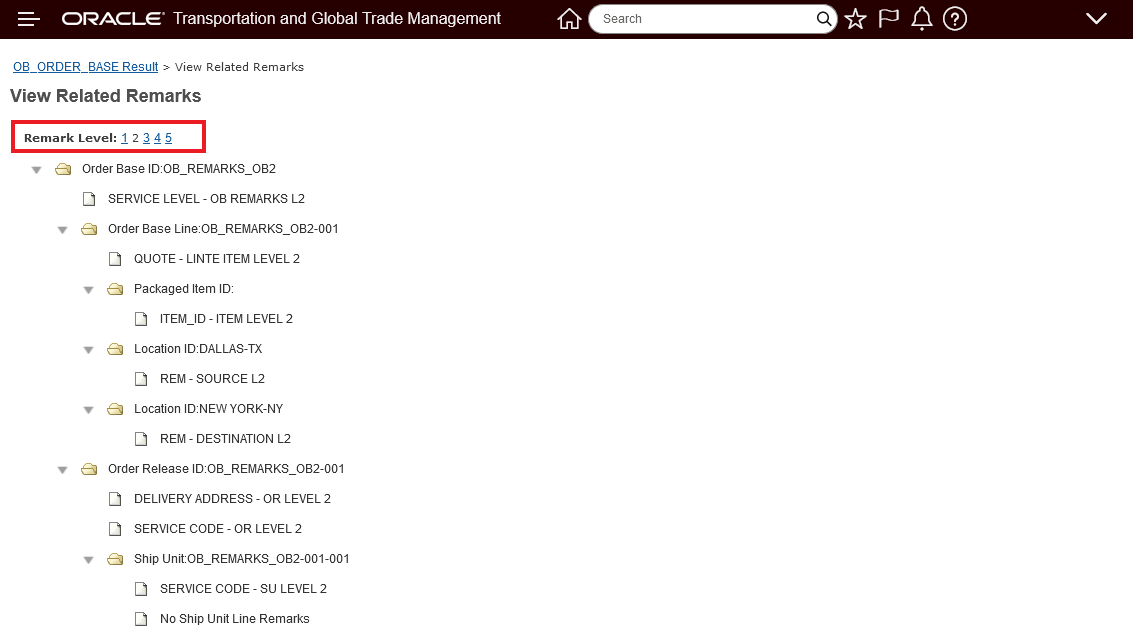
This feature adds the View Related Remarks SmartLink functionality to the Order Base. The View Order Base Remarks SmartLink pulls all of the remarks from the business objects related to the Order Base and shows them in tree view grouped into separate tabs by Remark Qualifier Level.
For Order Base, the sequence that the Remarks are provided is Order Base followed by related Order Release(s):
- Order Base
- Order Base Line
- Packaged Item
- Source Location
- Destination Location
- Order Base Ship Unit
- Source Location
- Destination Location
- Ship Unit Line
- Packaged Item
- Order Release
- Ship Unit
- Ship Unit Line
- Order Base Line
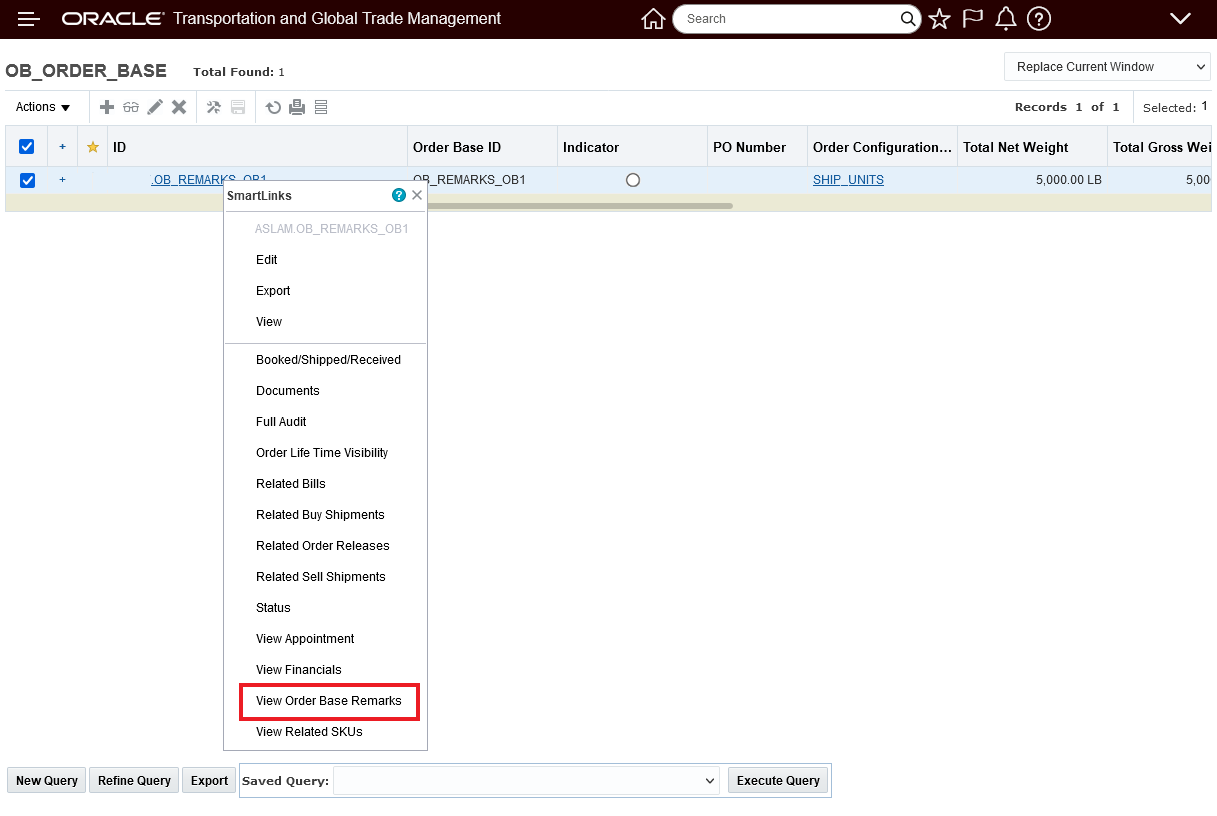
Order Base View Related Smart Links
In the example below, the Level 1 and 2 Remarks for the Order Base are shown for an Order Base defined with Ship Units.

View Order Base Remarks - Level 1 Ship Unit View
In the example below - the Level 2 remarks are shown.
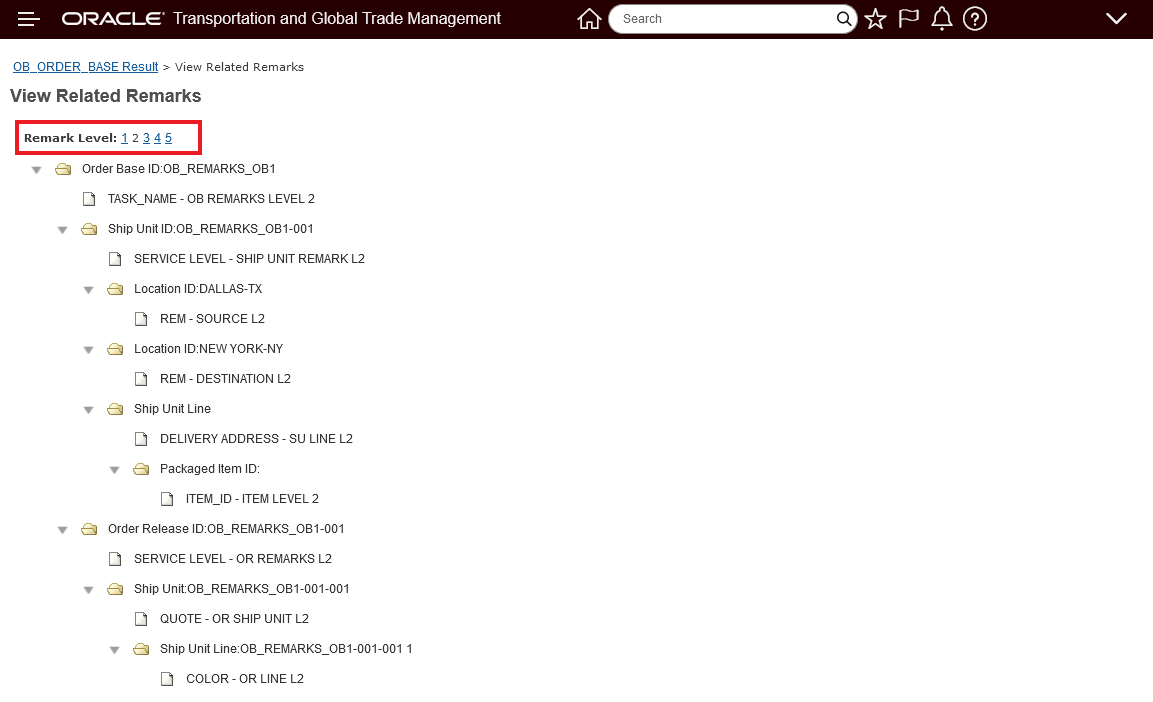
View Order Base Remarks - Level 2 Ship Unit View
In the example below, the Level 1 and 2 Remarks for the Order Base are shown for an Order Base defined with Lines.
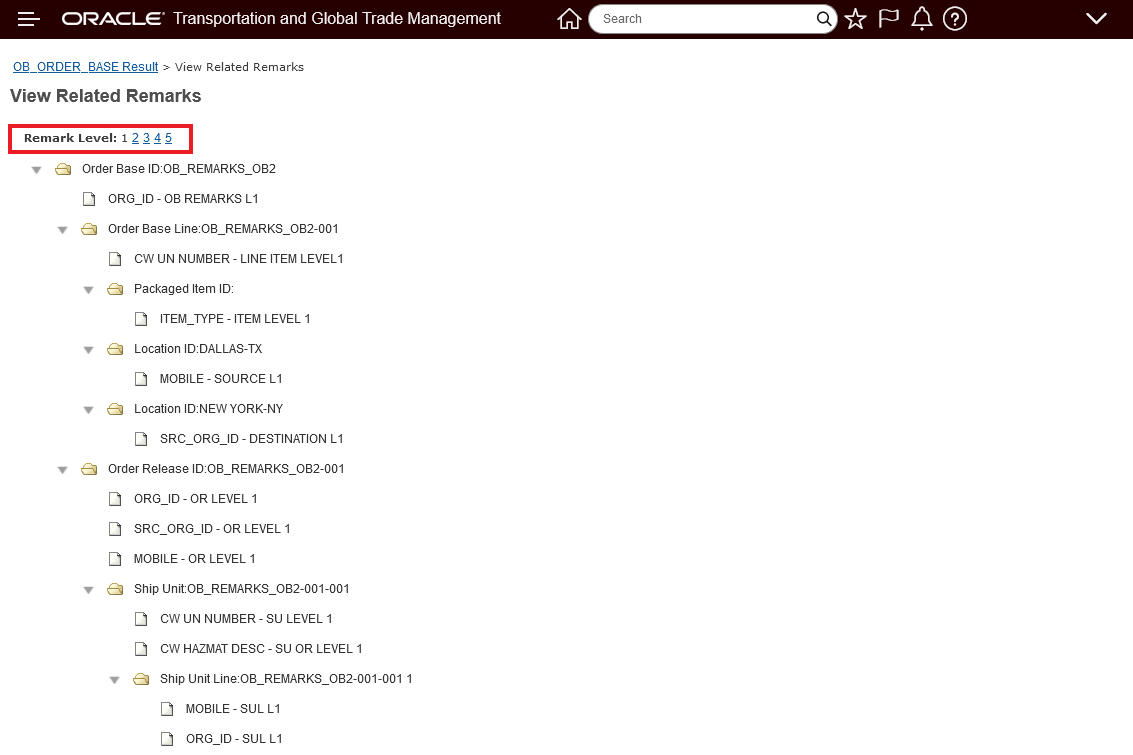
View Order Base Remarks - Level 1 Lines View
In the example below - the Level 2 remarks are shown.
View Order Base Remarks Level 2 Line View
You will find this feature useful in any situation where you would like to review all of the related remarks for your Order Base - stored at different levels - in a single view - eliminating the need to drill into the related objects to review the entered remarks.
Steps to Enable
You don't need to do anything to enable this feature.
Ship Unit Lifetime Events Added
This feature enhances the lifetime events being raised by OTM at the Ship Unit level for both Order Release Ship Unit and Shipment Ship Unit. The addition of lifetime events at the Ship Unit level allows you to configure Automation Agents to perform actions when these events are raised.
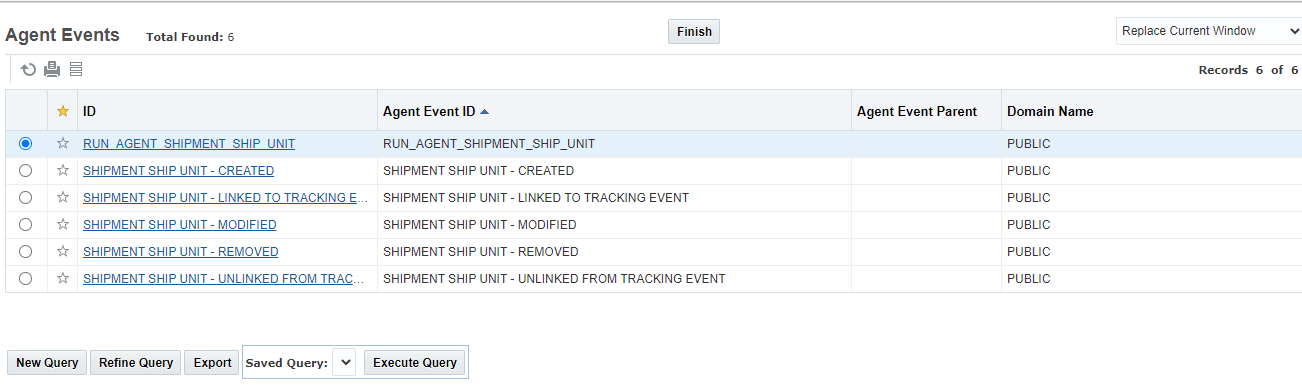
Shipment Ship Unit Lifetime Agent Events Added
For the Order Release Ship Unit the following events have been added.
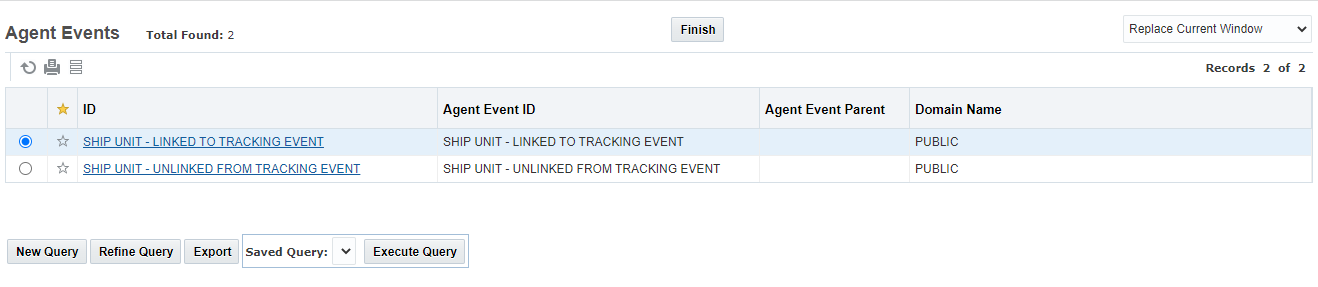
Order Release Ship Unit Lifetime Events Added
This feature also provides custom event support for Ship Unit
- RUN_AGENT_ORDER_RELEASE_SHIP_UNIT
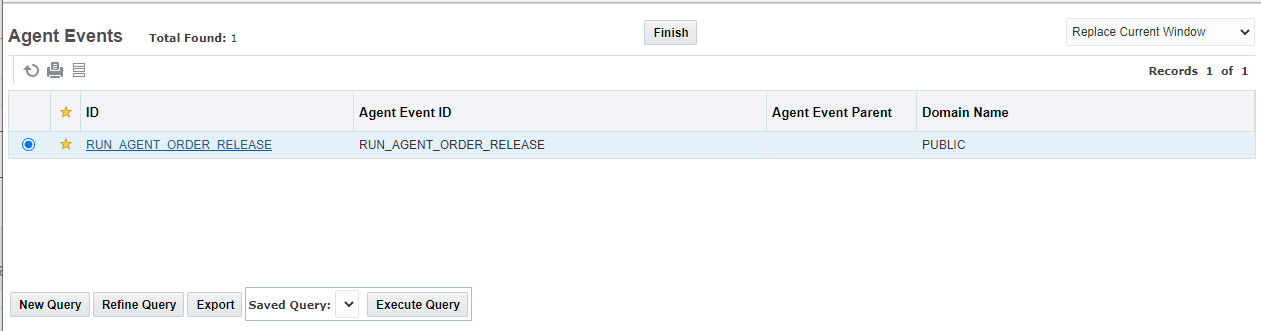
Custom Event Support - Run Agent Order Release Ship Unit
In the example below, an Automation Agent has been configure to send a notification and set the image to G (Green) whenever a Ship Unit is Modified - either via an API or through the UI.
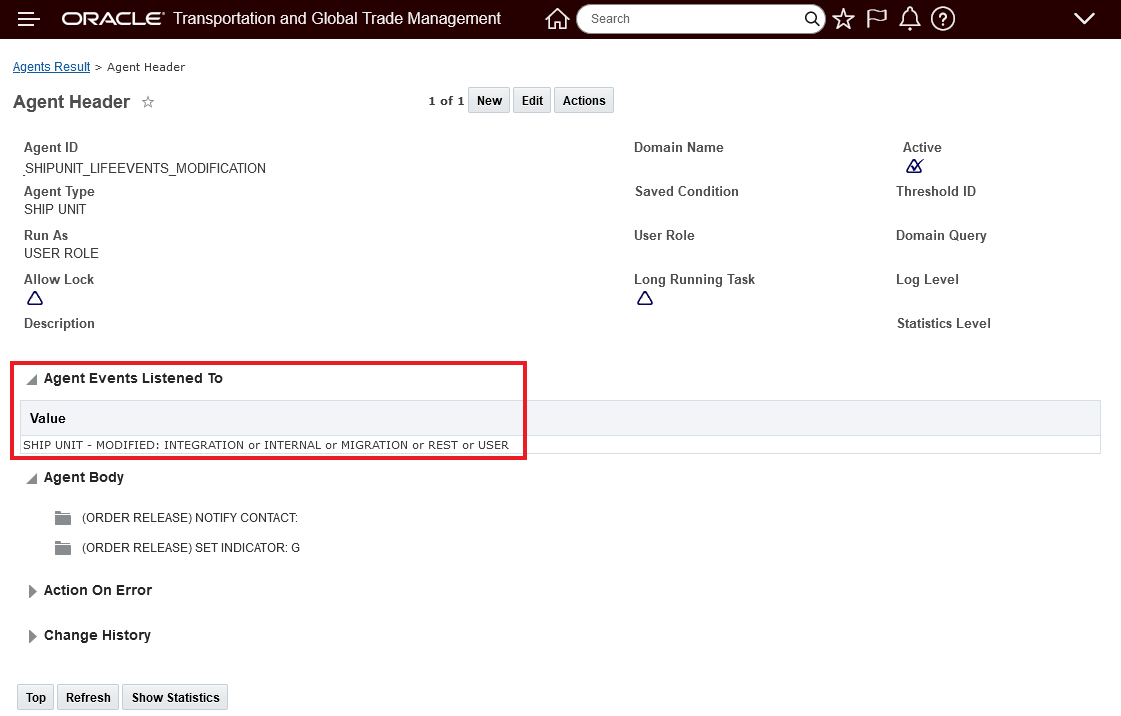
Agent Example - Ship Unit Modified Lifetime Event
When the agent above runs - the Modified Ship Unit will have its indicator set to Green and an email notification will be sent.
This feature provides you with the ability to implement Automation Agents that can be triggered by Ship Unit lifetime events Created, Modified or Deleted.
Steps to Enable
To take advantage of the feature you will need to either modify and/or create Automation Agents that listen for the newly provided Ship Unit lifetime events.
Equipment Based Sighting Event Status
This feature provides you with additional fields on the equipment object to capture and provide equipment level tracking information related to equipment in-transit, equipment spotted at destination and dwell time.
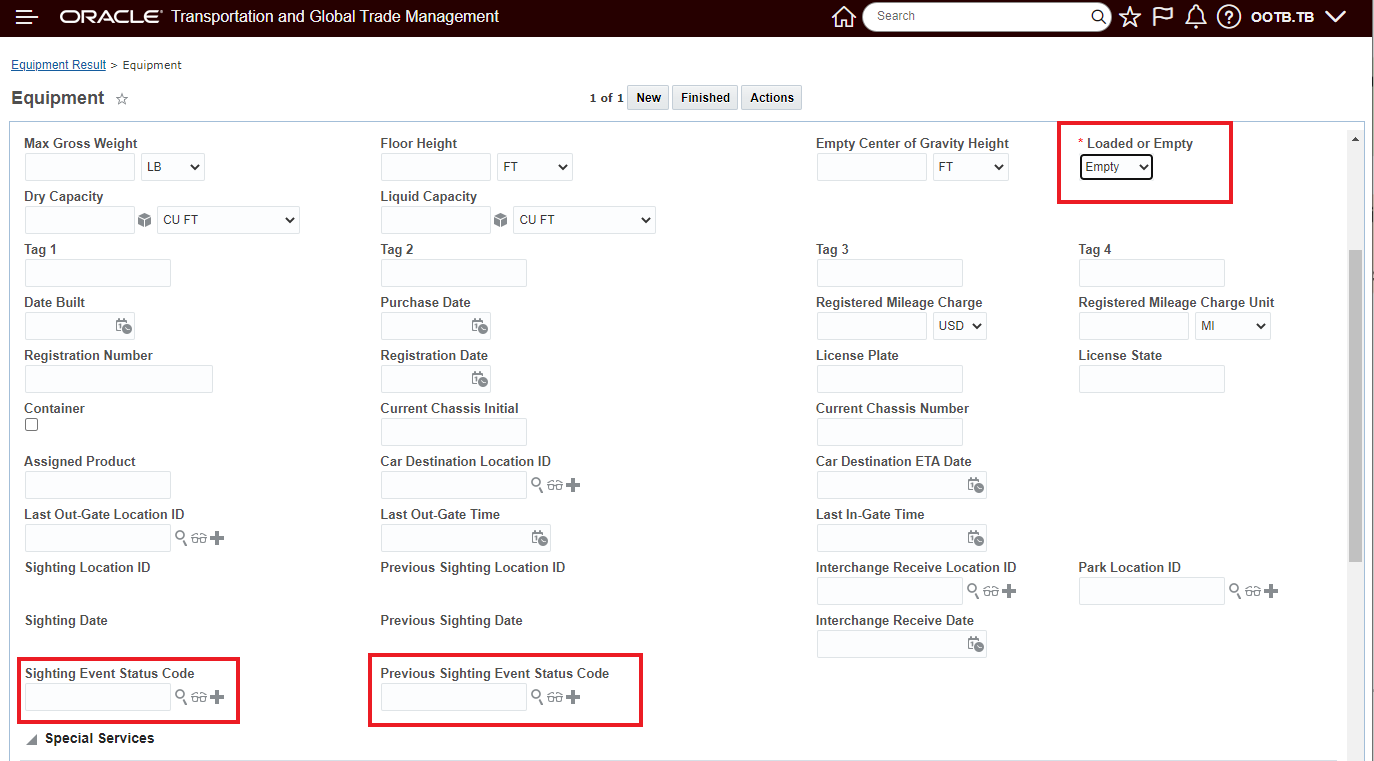
Equipment New Fields
The Public UPDATE SIGHTING agent action has been enhanced to support the new fields.
The fields are available in the Finder and Finder Results for Equipment.

Equipment Finder
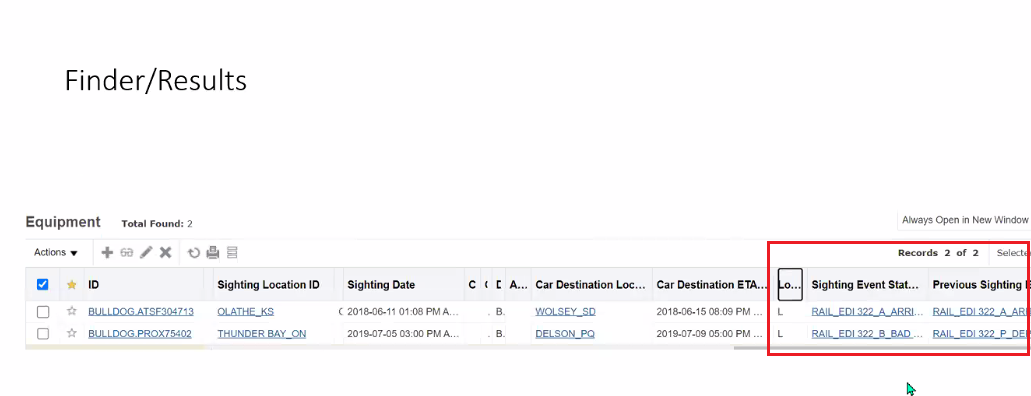
Finder Results
This feature provides you with new information that is beneficial for tracking the location of your equipment and avoiding demurrage charges.
Steps to Enable
You don't need to do anything to enable this feature.
Ground Schedule/Ground Service
Business Number Generator Ground Schedule and Ground Service
This feature extends BN Rule BN Type of GROUND_SCHEDULE_GEN_XID to allow you to specify the Rule Definition and BN Generator for generating your Ground Schedule and Ground Service IDs. The BN Type of GROUND_SERVICE_GEN_XID supports a Date and Sequence option like {dddddddd:id=1}-{nnnn:contexts=1:start=1} or just a Sequence option like {nnnnn:start=1}. The BN Type also supports Service Provider like {rrrr:id2:xml=SERVPROV}, and for the Ground Service related ID generations - the BN Type supports Repetition Schedule Service - like {r*:id3:xml=REPETIONSCHEDULESERVICE}.
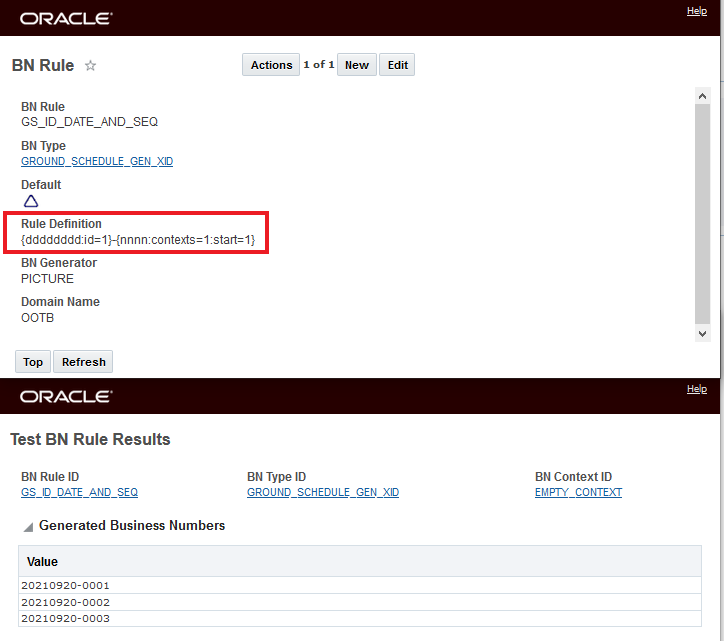
To demonstrate the new capabilities the Business Number Rule, below, will be used.
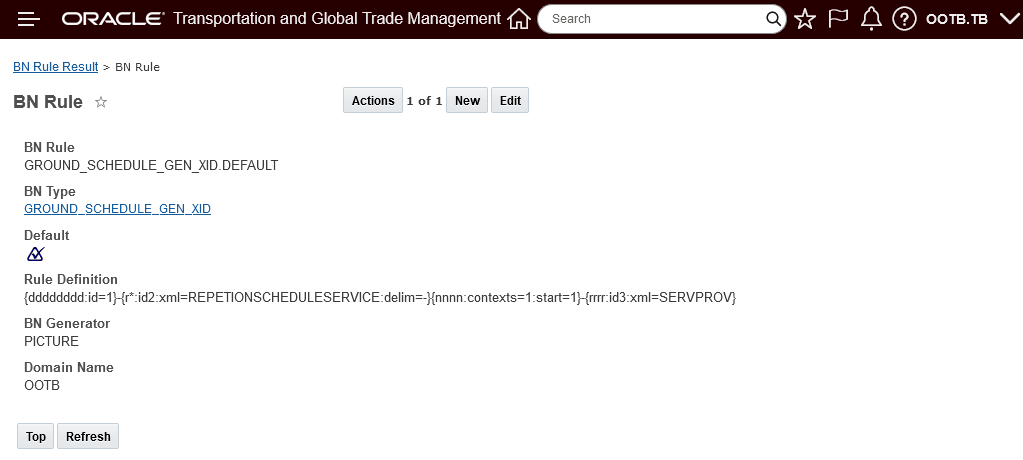
Business Number Rule Definition
The Rule Definition for this Business Number Rule contains four elements
- {dddddddd:id=1} - which provides the date
- {r*:id2:xml=REPETIONSCHEDULESERVICE:delim=-} - provides the Repetition Schedule Service Id for Ground Service IDs - note the addition of :delim=- will - if there is no Repetition Schedule Service Id specified - which will be the case when this Business Number Rule is used to generate IDs for Ground Schedules - will suppress the "-" that would appear in the business number between different segments.
- {nnnn:contexts=1:start=1} - provides a sequence number
- {rrrr:id3:xml=SERVPROV} - provides the first four characters of the Service Provider ID.
Below is an example of the IDs generated for a Ground Service entry using the Business Number Rule above

Ground Service Ids
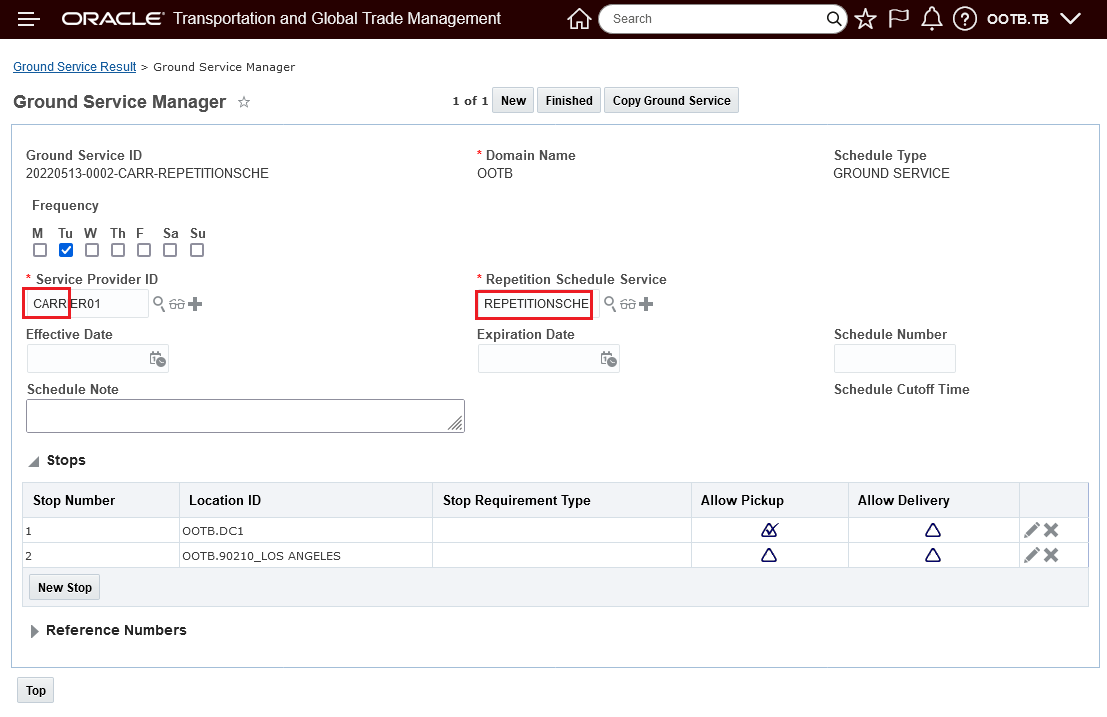
Ground Service Used for BN Test Above
In the example below, the Business Number Rule was used to generate the ID for the Ground Schedule. Note that Ground Schedule ID 20220513-0004-CARR - skips the Repetition Schedule Service Id when generating the Ground Schedule ID.
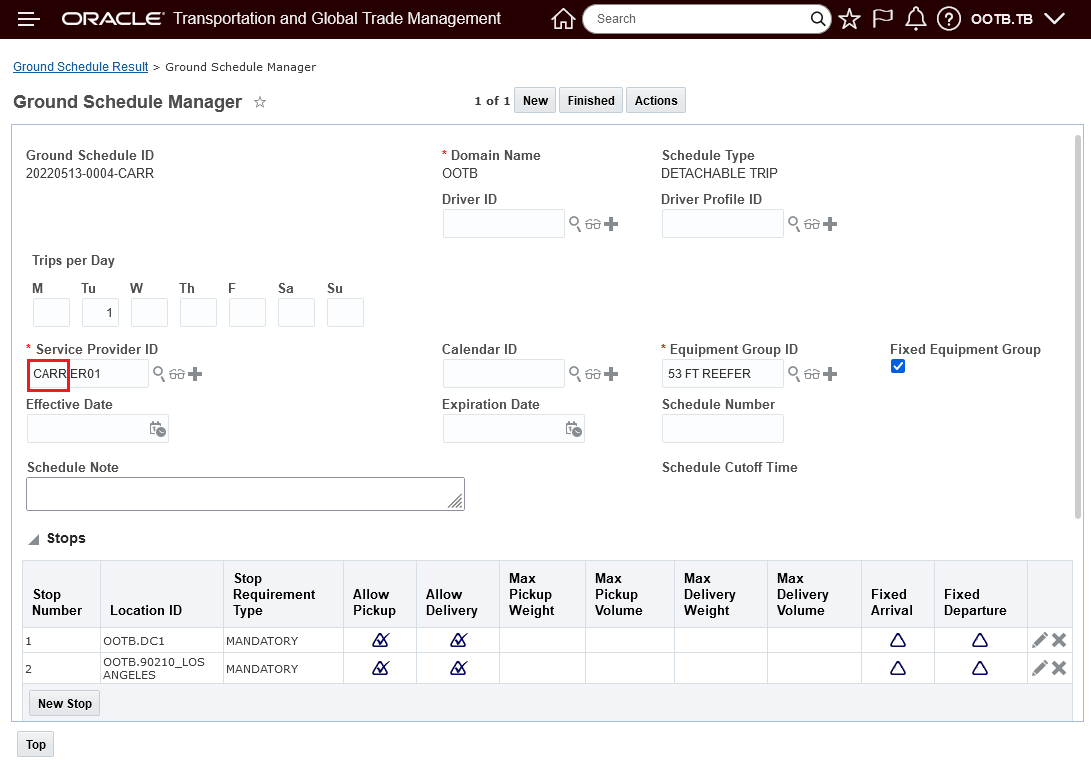
Ground Schedule
This feature simplifies both the Ground Schedule and Ground Service creation process and provides you with some structure around the naming convention used for the Ground Schedule and Ground Service IDs. In addition, with more structured/standard IDs, searching for Ground Schedule and Ground Service records becomes easier.
Steps to Enable
To enable this feature you will need to setup a Business Number Generator Rule.
Business Process Automation > Power Data > Business Numbers > Business Number Rule.
Below is an example of a rule you might consider setting up.
The example below shows the BN Rule setup to generate the ID with a date and sequence number. The example shows the setup and the BN Test Results for this configuration.
Date and Sequence Number BNG Setup
Tips And Considerations
Below are a few examples for setting up your Business Number Rule for Ground Service and Ground Schedule IDs.
RULE DEFINITION: {dddddddd:id=1}-{nnnn:contexts=1:start=1}
- GROUND_SERVICE = 20220427-0002
- New data in GROUND_SCHEDULE = 20220427-0003
RULE DEFINITION: {r*:id=1:xml=SERVPROV}-{nnnn:contexts=1:start=1}
- GROUND_SERVICE (Service Provider ID: SNOWY FLEET and Repetition Schedule Service = DENVER) = SNOWY FLEET-0001
- GROUND_SCHEDULE (Service Provider: SNOWY FLEET and Repetition Schedule Service is not available) = SNOWY FLEET-0002
RULE DEFINITION: {rrrr:id=1:xml=SERVPROV}-{r*:id=2:xml=REPETIONSCHEDULESERVICE}-{nnnn:contexts=1:start=1}
- GROUND_SERVICE (Service Provider: ROADWAY and Repetition Schedule Service = DENVER) = ROAD-DENVER-0001
- GROUND_SCHEDULE (Service Provicer: ROADWAY and Repetition Schedule Service is not available) = ROAD--0002 - note the double hyphen "--" This can be solved by using "delim=- " with the replacement fields, when delim is add the extra ‘-‘ is removed when the value is null.
RULE DEFINITION: {rrrr:id=1:xml=SERVPROV}-{r*:id=2:xml=REPETIONSCHEDULESERVICE:delim=-}{nnnn:contexts=1:start=1}
Ground Schedule Results Reference Number and Remarks Added
This feature enhances the Ground Schedule screenset Finder Results to include the ability to add grid flattened results for both Reference Numbers and Remarks. In the example below, both the Reference Number field (My GS Ref Num) and Remark field (My GS Remark) have been configured for this Finder Results screenset.
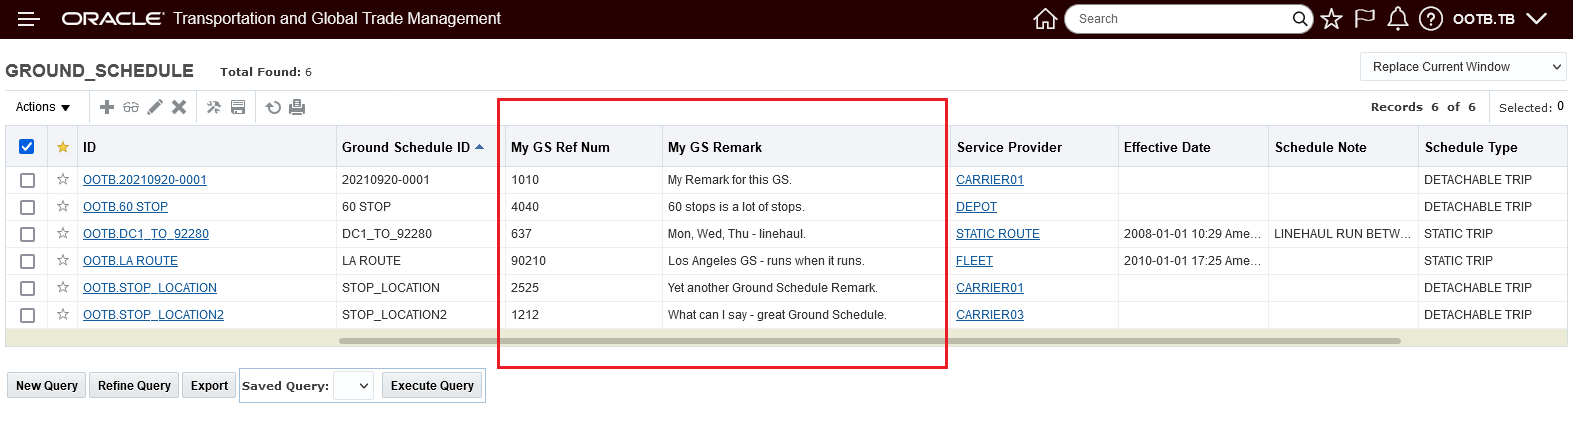
Configured Remarks and Reference Number on Grounds Schedule Finder Results
You will find this feature useful if you use Remarks and Reference Numbers to classify and/or identify your Ground Schedules.
Steps to Enable
To take advantage of this feature you will need to either modify your current Grounds Schedule screenset to include the grid flattened Remarks and/or Reference Numbers you wish to add or create a new Screenset configured to take advantage of the new capabilities.
In the example below - the Reference Number Qualifier MY GROUND SCHED REF NUM has been selected for the values to show in the Finder Results and the Remark Qualifier REM has been selected to show the Remark values.
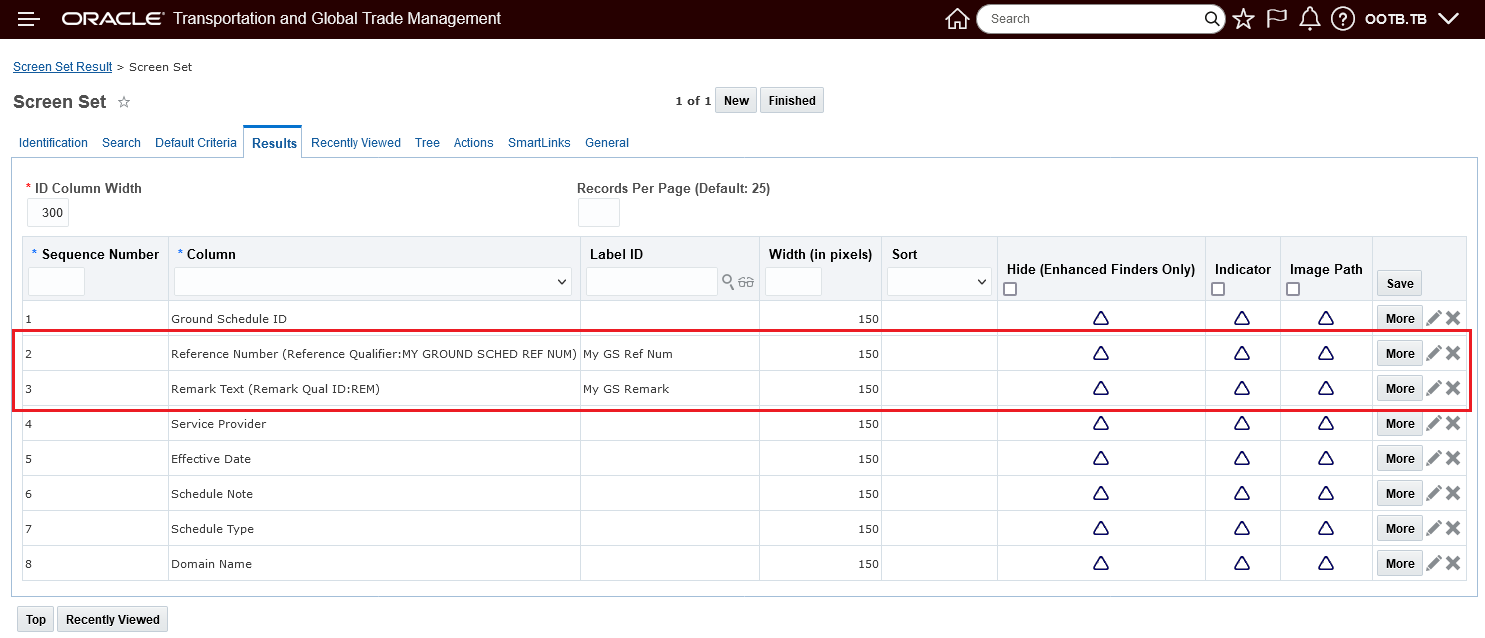
Screen Set Configuration- Ground Schedule Finder Result - Reference Number and Remark
Rate Basis Items - Shipment Source and Shipment Destination Depot Stop
This feature provides two new RBIs (Rate Basis Items) Shipment Source Depot Stop and Shipment Destination Depot Stop - the new RBIs allow EDEs (External Distance Engines) to get all stops including Shipment Source and Shipment Destination Depot Stops for external rating purposes.
Provides additional detail to external distance engines for more accurate rating.
Steps to Enable
You don't need to do anything to enable this feature.
HERE Technologies - Geocoding and Search API v7
This feature provides you with the option to upgrade from the HERE Technologies Geocoder API v6 (which is in maintenance mode), to the new Geocoding and Search API v7. The new HERE Technologies Geocoding and Search v7 service provides the following enhancements:
- Improved address parsing logic,
- Enhanced Points Of Interest (POI) coverage,
- Higher frequency of content updates,
- Fits into HERE Technologies unified API framework,
- Improved geocoding accuracy,
- Improved geocoding match rates.
The new HERE Technologies Geocoding and Search v7 service provides improvements in address parsing logic, enhanced Points Of Interest (POI) coverage, improvements in geocoding accuracy and geocoding match rates. In addition, v7 is the currently supported version of HERE Technologies Geocoding and Search service.
Steps to Enable
To move to the new HERE Technologies Geocoding and Search v7 service, you will need to define a new External System for your External Distance Engine that you have configured to support geocoding/address validation in OTM.
You will have to provide the Consumer Key and Consumer Secret obtained from HERE.
For the setup details required, please refer to On-line Help.
- OTM HOW TO/CONFIGURATION TOPICS INTEGRATING WITH HERE ENGINE
- HERE Geocoding
- External System
- Authentication
Tips And Considerations
NOTE: HERE Technologies have indicated that the HERE Geocoder API v6 (which they have listed as currently being in maintenance mode) will be moving to end-of-life status soon. We recommend moving to the new and improved Geocoding and Search API v7 as soon as possible to avoid any surprises or disruptions. If you have questions or concerns about the end-of-life timing for this service, please contact your existing HERE Technologies account team.
HERE Technologies current request is that all customers, using older versions of their Location Services, move to the newer versions that are supported by their new API framework and their supported authentication methods (in this case OAuth 2.0) by September 30, 2022. Again, any questions or concerns regarding this timing should be directed to your HERE Technologies account team.
Key Resources
For the setup details required, please refer to On-line Help.
- OTM HOW TO/CONFIGURATION TOPICS INTEGRATING WITH HERE ENGINE
- HERE Geocoding
HERE Technologies - v8 API Available for Generate Rush Hour Data
This feature upgrades the Here Technologies API used in the Generate Rush Hour Data process to Here Technologies v8 API. The v8 API takes advantage of Here Technologies new unified API framework and provides you access to new features, expanded content, more secure authentication and authorization, plus performance and quality improvements.
The feature provides the following improvements:
- The Generate Rush Hour Data process (point to point) can now be run with the HERE Routing API v8.
- New for this update, the Generate Rush Hour Data process can now take advantage of the HERE Large Scale Matrix Routing API which allows for a single request to support a matrixed set of from to values vs point to point.
- As required by Here Technologies, the authentication and authorization approach used has been upgraded. For all the Generate Rush Hour Data process integrations to Here Technologies v8 API the authentication and authorization approach supported is OAuth 2.0 - for all connections.
Here Technologies v8 API, provides a number of new features, expanded content, plus performance and quality improvements.
Steps to Enable
You will need to reconfigure your Generate Rush Hour Data process to use the new v8 API and the new required OAuth 2.0 authentication and authorization approach. This change will involve setting up a new External System for your HERE External Distance Engine to use the proper end point and to setup the OAuth 2.0 authorization.
You will need to contact your existing HERE Technologies account team for your required OAuth 2.0 credentials.
Tips And Considerations
HERE Technologies requests that all customers using older versions of their Location Services move to the newer versions that are supported by their new API framework and their supported authentication methods (in this case OAuth 2.0) by September 30, 2022. If you have any questions or concerns - please contact your existing HERE Technologies account team.
Key Resources
Please refer to On-line Help "Integrating with HERE Engine" for information on
- Setting up your External System
- Setting up your External Engine(s)
- Authentication
- Obtaining API Key or OAuth 2.0 Credentials
Contact your existing HERE account team for information regarding your required credentials.
Email Logo Positioning Options
This feature provides you with a new property - glog.mail.logo.placement - that provides you with a variety of logo placement options. Logo position options include various above, below and embedded options.
The property glog.mail.logo.placement supports the following placement options/values:
- outside - this is for backward-compatible - with this option the <img> is placed outside of the HTML<body>
- aboveLeft - the <img> is placed above the message contents, horizontally aligned left
- aboveCenter - the <img> is placed above the message contents, horizontally aligned center
- aboveRight - the <img> is placed above the message contents, horizontally aligned right
- belowLeft - the <img> is placed below the message contents, horizontally aligned left
- belowCenter - the <img> is placed below the message contents, horizontally aligned center
- belowRight - the <img> is placed below the message contents, horizontally aligned right.
- embedLeftTop - the <img> is placed to the left of the message contents, vertically aligned top
- embedLeftCenter - the <img> is placed to the left of the message contents, vertically aligned center
- embedLeftBottom - the <img> is placed to the left of the message contents, vertically aligned bottom
- embedRightTop - the <img> is placed to the right of the message contents, vertically aligned top
- embedRightCenter - the <img> is placed to the right of the message contents, vertically aligned center
- embedRightBottom - the <img> is placed to the right of the message contents, vertically aligned bottom
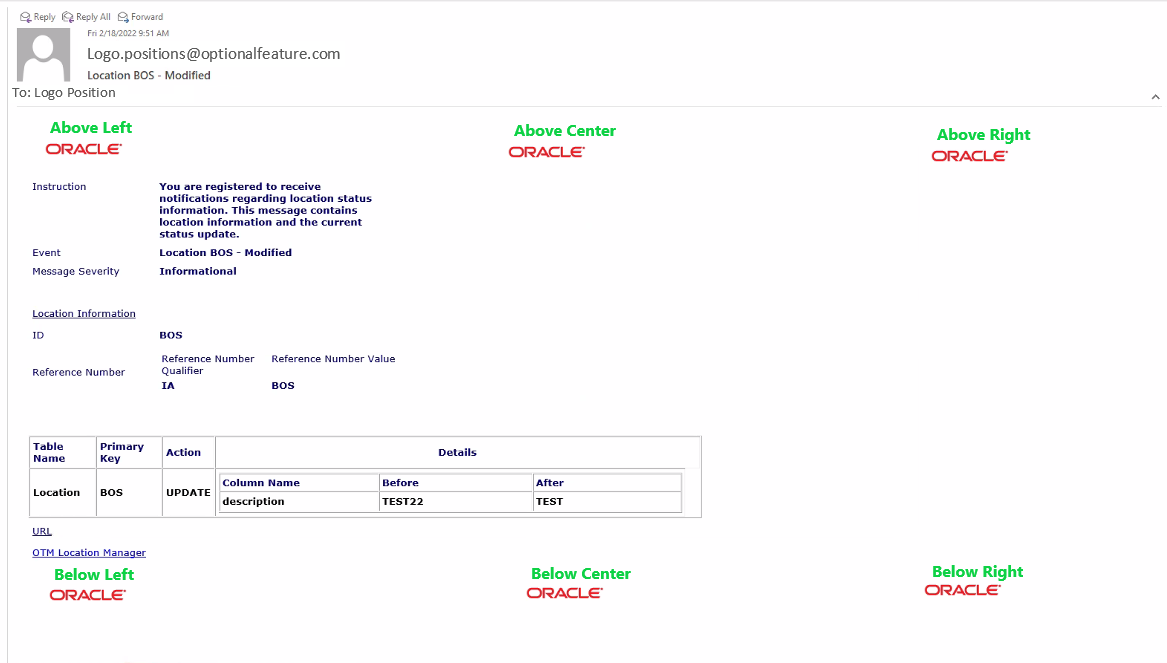
Above and Below Example
Provides control for the positioning of your logo in your OTM generated emails.
Steps to Enable
You don't need to do anything to enable this feature.
Property to Set Shipment As Work (SAW) Inserts to Persist Only
This feature provides you with a new property - glog.integration.shipmentactual.saw.persistonly - that, by default, will load your Shipment As Work (SAW) integrations as persist only. The persist only option will take the SAW data as provided and will avoid executing business logic unnecessarily. The benefit provided, for SAW integrations will be an improvement in performance.
When enabled, business logic will not be performed and the shipment XML will be persisted as is. Default = true.
For SAW integrations, this feature will provide performance improvements.
Steps to Enable
You don't need to do anything to enable this feature.
Tips And Considerations
The property glog.integration.shipmentactual.saw.persistonly is set to true by default. This means, for your SAW (Shipment As Work) integrations, unless you have already set your SAW integrations to persist only with an integration command or via an agent action - the default value of true for this property will change the current processing done when loading your SAWs.
Shipment Group Element Added to Voucher Outbound XML
This feature adds the ShipmentGroup element to the Voucher outbound XML. Now, if a Voucher is related to a Shipment Group Invoice the ShipmentGroup element is provided in the outbound Voucher XML. You will find the additional Shipment Group details - like Shipment Group Type, Reference Numbers, Status etc., beneficial when sending Voucher information to other systems.
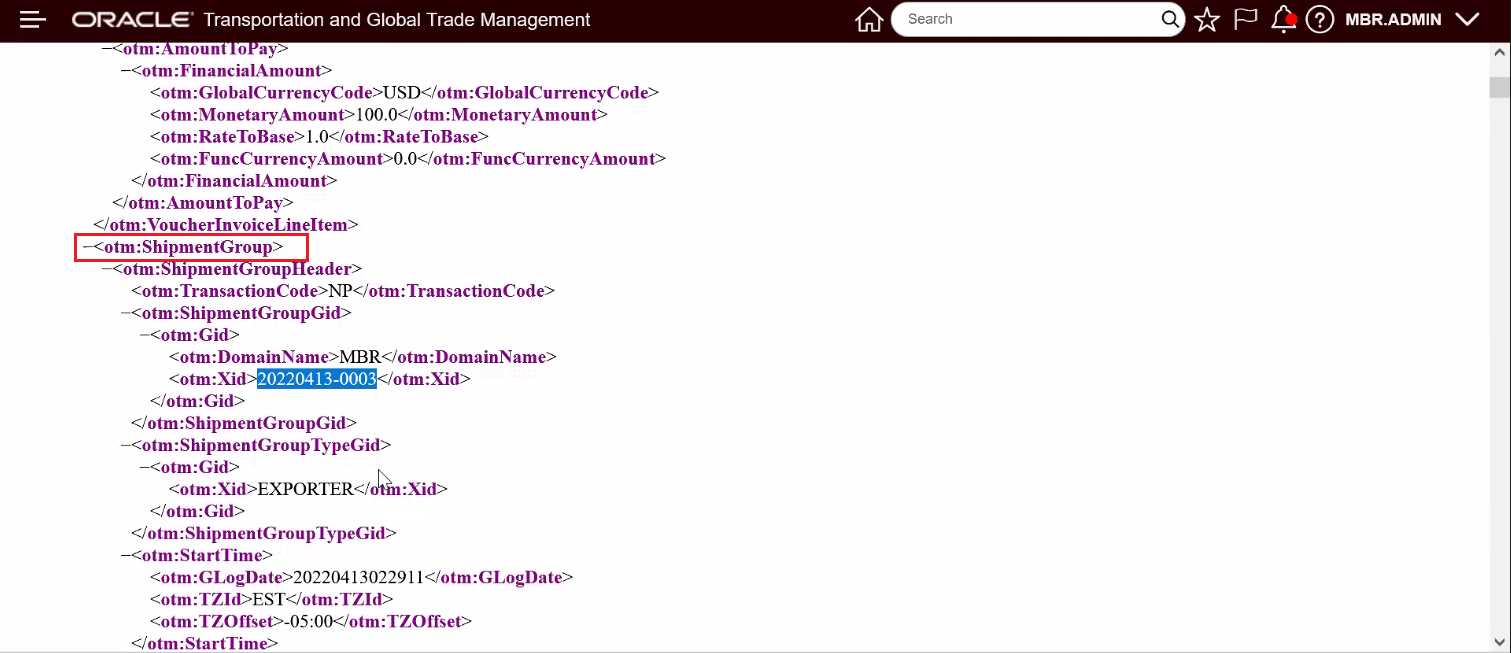
Voucher XML - Shipment Group Element
This feature, for Vouchers related to Shipment Group Invoices - provides you with additional Shipment Group information in the outbound Voucher XML that can be used for downstream financial processing.
Steps to Enable
You don't need to do anything to enable this feature.
Tips And Considerations
If the Voucher is related to an invoice for a Shipment, then OTM will send the Shipment element in the outbound Voucher XML, if the Voucher is related to an invoice for a Shipment Group, OTM will send the ShipmentGroup element in the outbound Voucher XML.
Service Provider Flex Fields Added to XML Schema
This features adds the available Flex Fields to the Service Provider XML schema.
This feature provides you with the option of integrating in your Service Provider Flex Fields via the XML API.
Steps to Enable
You don't need to do anything to enable this feature.
XML - Approval Rule Profile Element Added to User Interface
This enhancement expands the Configuration.xsd to include the Auto Approve Rule Profile ID for the user.
<xsd:element name="AutoApproveRuleProfileGid" type="GLogXMLGidType" minOccurs="0">
The addition of the Auto Approve Rule Profile ID for the user in the XML allows this element to be loaded along with the other user attributes simplifying the user setup process.
Steps to Enable
You don't need to do anything to enable this feature.
Transportation Operational Planning
Move Order to Existing Shipment Action - More Options - Enhanced
This feature enhances the Move Order to Existing Shipment action's - More Options path so that the More Options path now provides you with the ability to Simulate the impact of moving your selected order to a set of shipments (based on a saved query) before you commit to making the change. Previously, the More Options path provided you with the ability to Show Options for your order and then, from the options provided, you selected the shipment to move the order to. The enhanced More Options path, provides you with the ability to Show Options, then from that list of options provided - you now have the opportunity to select one or all of the options provided and run a Simulation on the selected set of shipments to see the impact (cost delta etc.) of moving the target order to a set of possible shipments. Then, from the Simulated results view - you can select - with more information and insight, the best shipment to move the order to.
The example below will demonstrate the power of the new More Options path.
In this example, the MS-0001 order is a late order - there are nineteen shipments planned for the day - the Move Order to Existing Shipment More Options selection will be used to evaluate the impact of moving the order to the existing shipments.
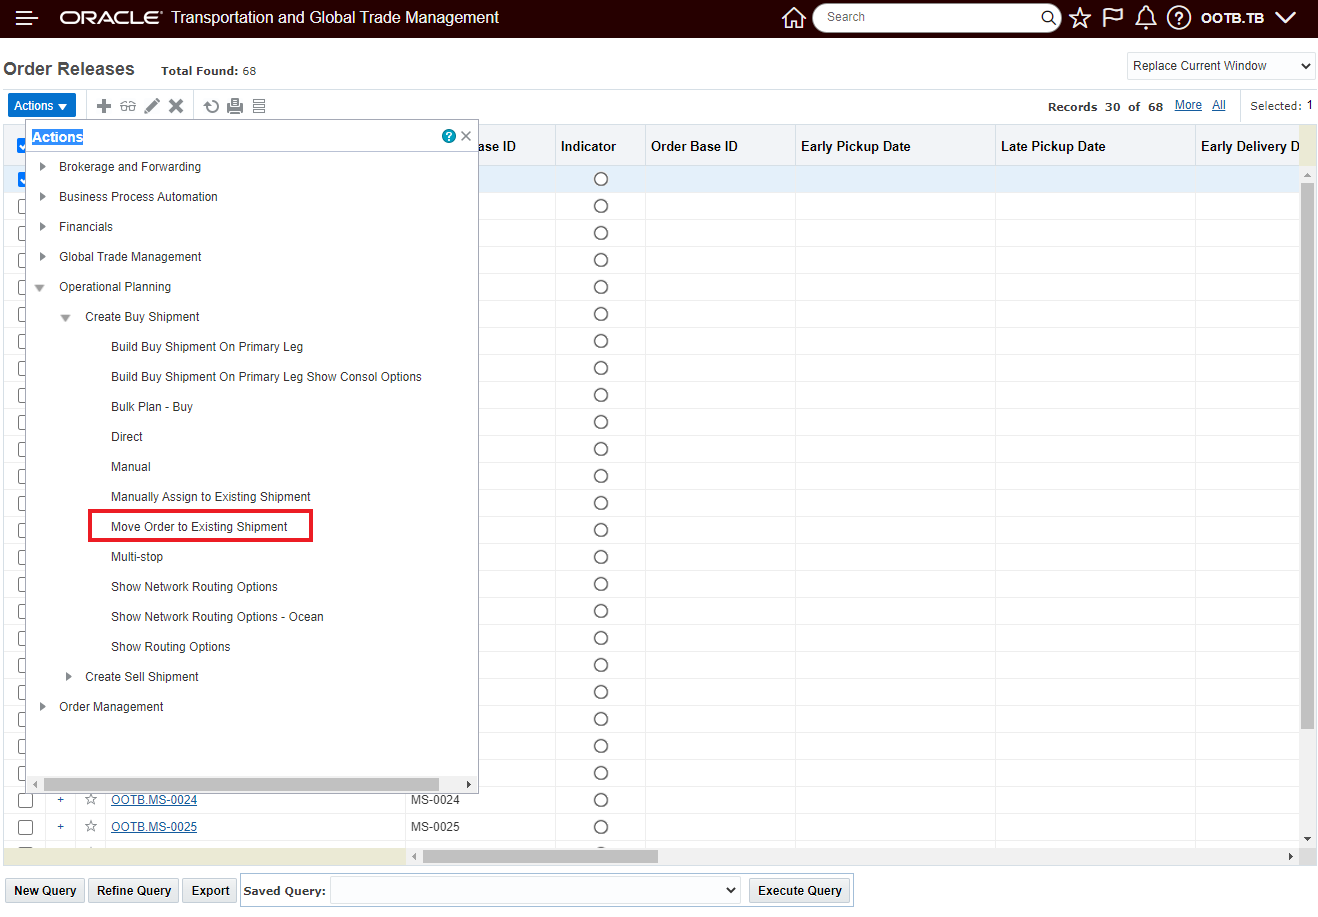
Run action Move Order to Existing Shipment
The action input options for a single order release selection scenario remain the same as before.
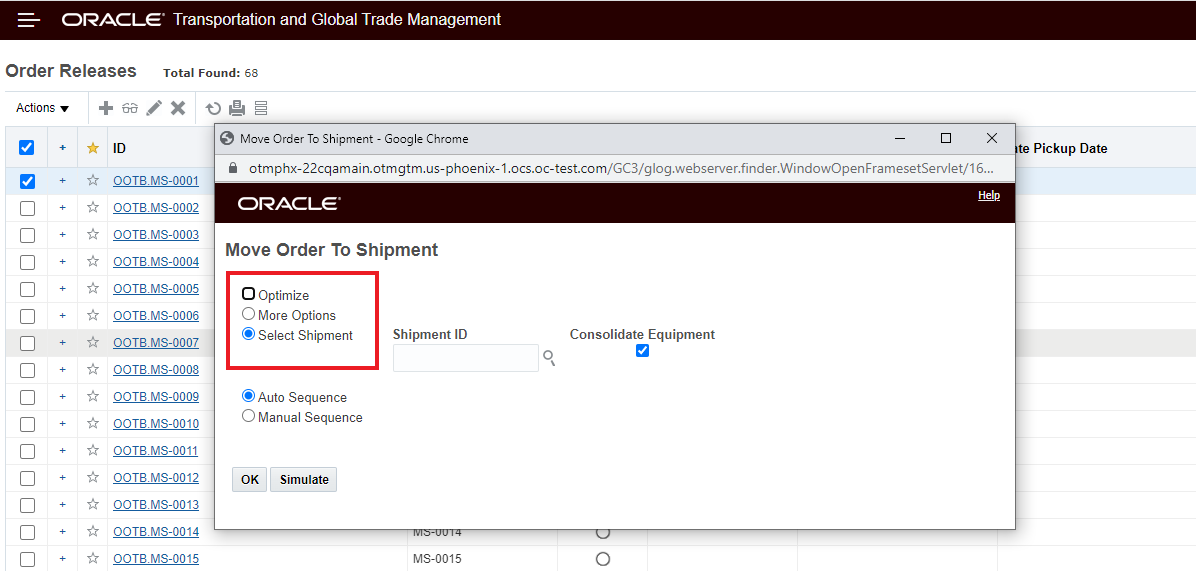
Move Order to Exiting Shipment Action Options
For the selected MS-0001 order release - the goal is to find the best shipment in today's plan that the order can be added to. In this example, the shipments for today can be found using the TODAYS SHIPMENTS saved query.
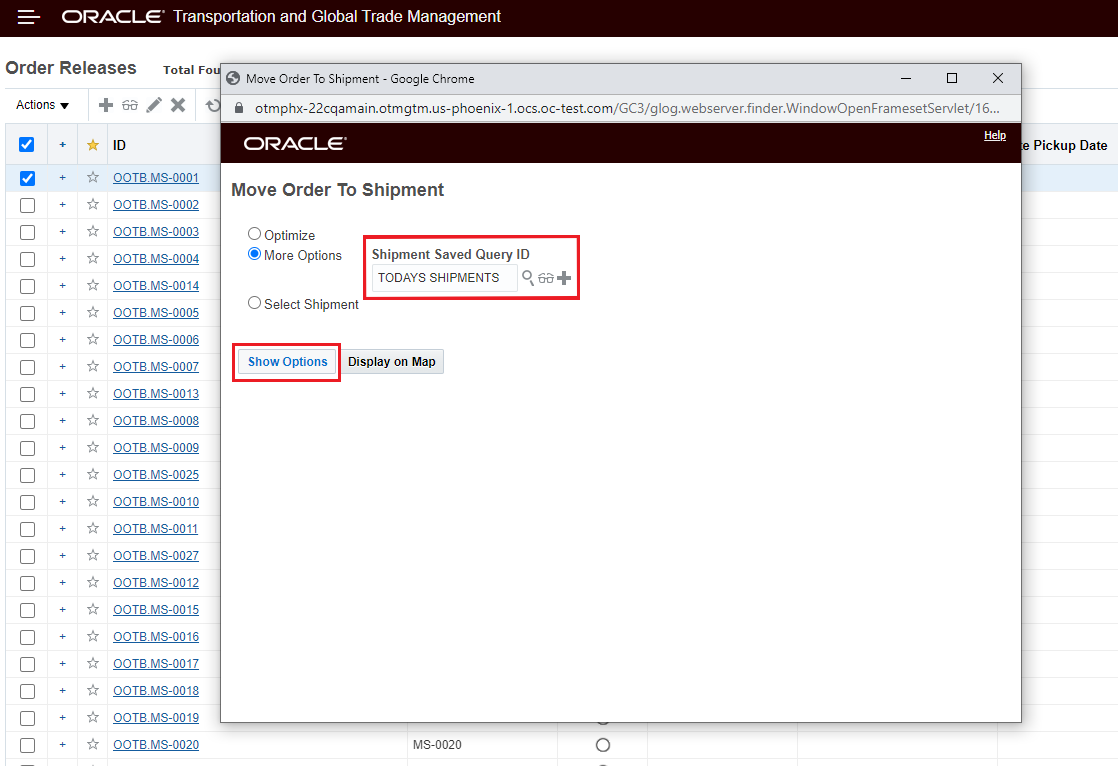
More Options - Saved Query Input
After selecting More Options, entering the saved query for today's shipments and then selecting the Show Options button, the list of candidate shipments is provided as shown below. In this step, you have the option of selecting some or all the shipments provided in the saved query to run a Simulation against to see the impact of moving the order to the shipments. You also have the option to select a specific shipment and just move the order to the shipment directly - this is done by selecting the shipment you want and hitting OK. In this example, the Simulate option will be run for all of the selected/available shipments.
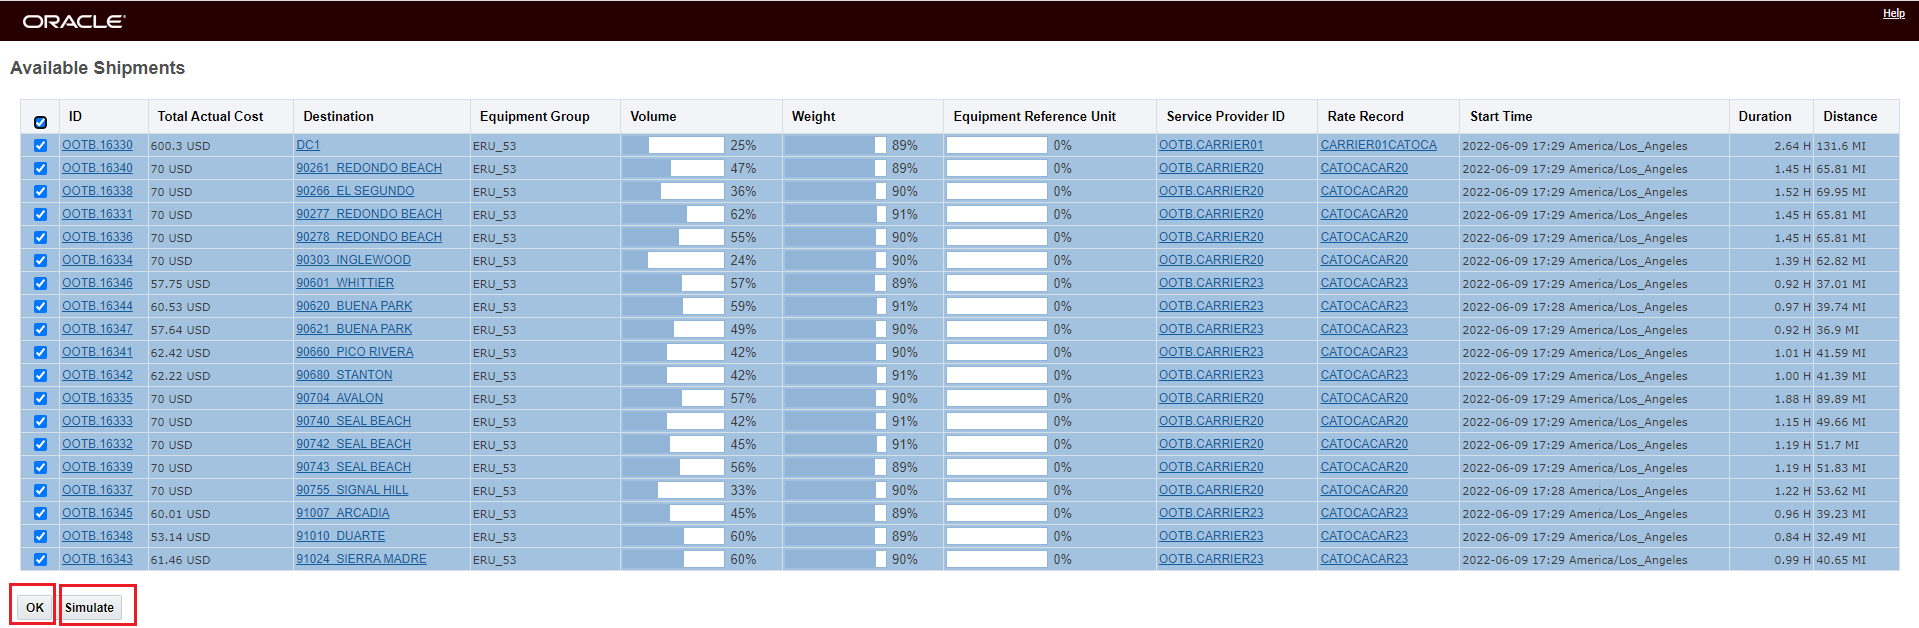
Select to Move or Select to Simulate
The result of running the Simulate is below. With this insight - selecting the best shipment to move the order release to is easy since you have the right information to make an informed decision.
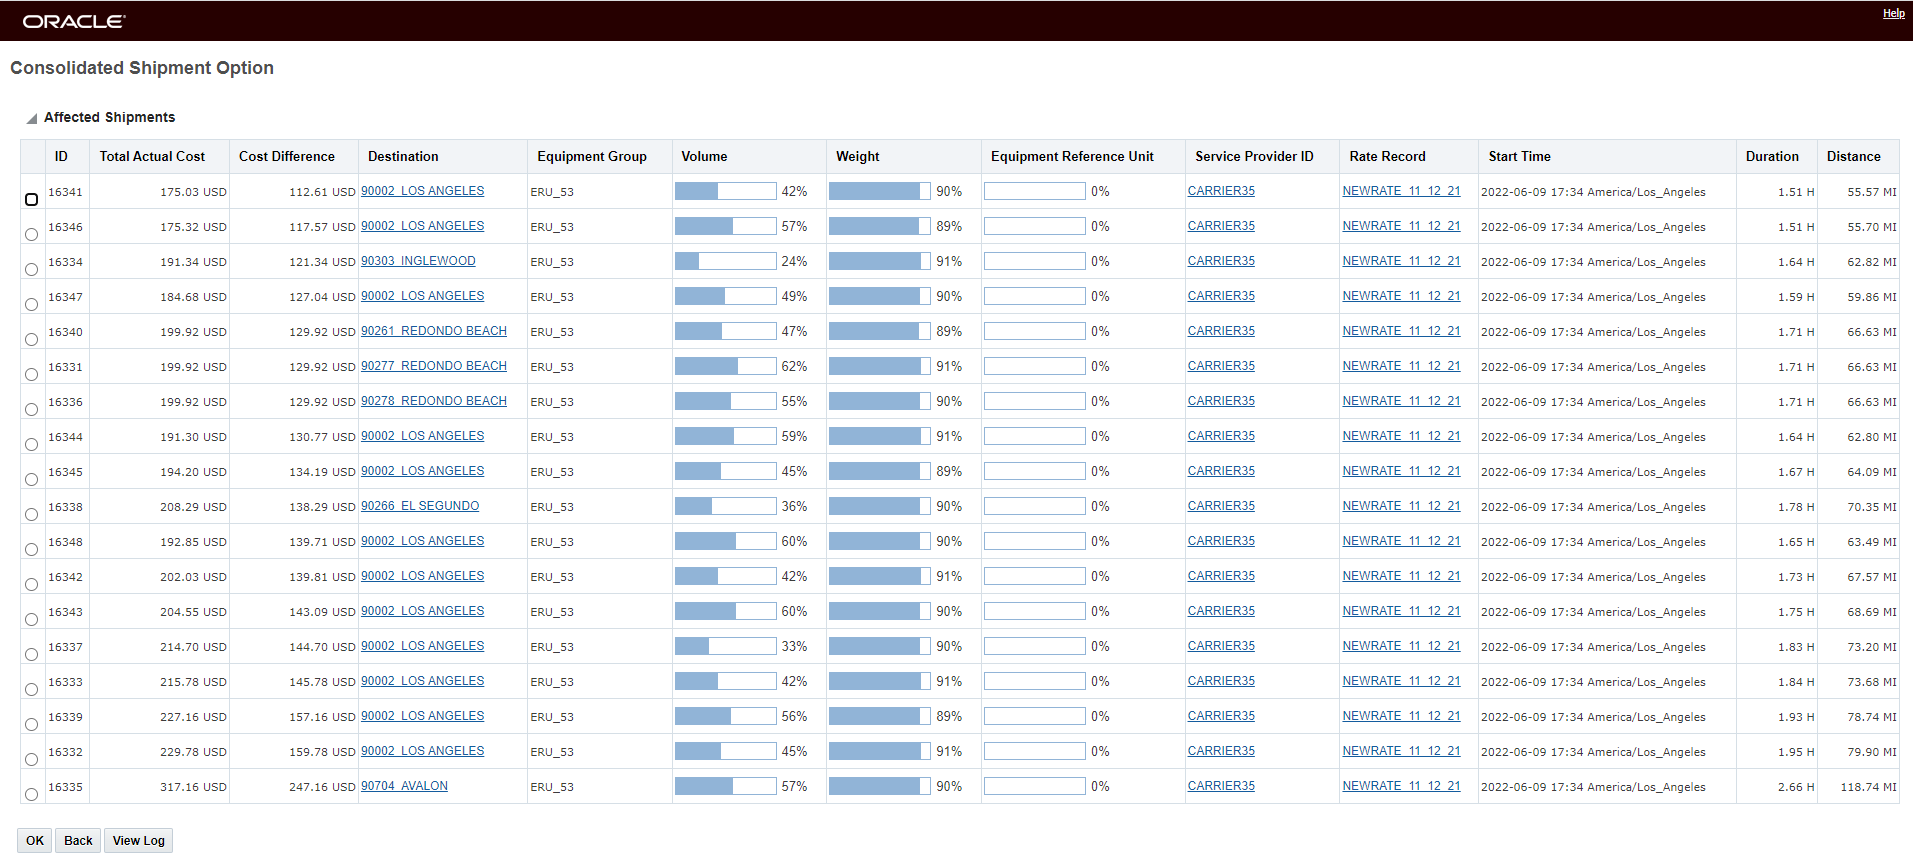
Simulate Result
From the simulation results you can select the best shipment to move the order to, in this case - since the simulation results are sorted based on Cost Difference, the first shipment in the list represents the shipment with the lowest cost difference when moving the order to the shipment.

Select Shipment 16341 to Move Order Release MS-0001 To
The end result of running the action.

Move Order to Exiting Shipment More Options Result
This feature provides you with a more complete view into the impact of moving an order release to a set of possible shipments - providing you with the information you need to make a more informed decision from both a cost and service perspective.
Steps to Enable
You don't need to do anything to enable this feature.
Tips And Considerations
Note, the Simulation has the option to change several attributes of the candidate shipments - including: the stop sequence, equipment group, rate offering, rate record and service provider - when evaluating the option of adding the selected order release to the candidate shipment(s).
Ask Oracle Container Optimization - Weight and Volume Decimal Precision
This feature extends the Ask Oracle Container Optimization decimal precision input allowed for your Transport Handling Unit (THU) weight and volume fields from 2 to 4 digits. This extra precision allows for a more precise measure for the number of THUs a piece of Equipment can hold.
In the example below - the benefit of this feature is clearly demonstrated. In the first example, the definition of the number of digits is limited to 2 - and the values are rounded up. In the second example, the 4 digits are used to define the THU - and this additional precision allows for a larger number of THUs to fit into the equipment.
In the example below, the user defines the THU using just 2 digits of precision for Weight and Volume - 1.22 Weight (LB) per and .12 Volume (CUFT) per.

THU Defined with 2 Digits for Weight and Volume
The maximum number of units that the equipment will hold - based on Volume (utilization 100%) - is 31250 - the number entered above.
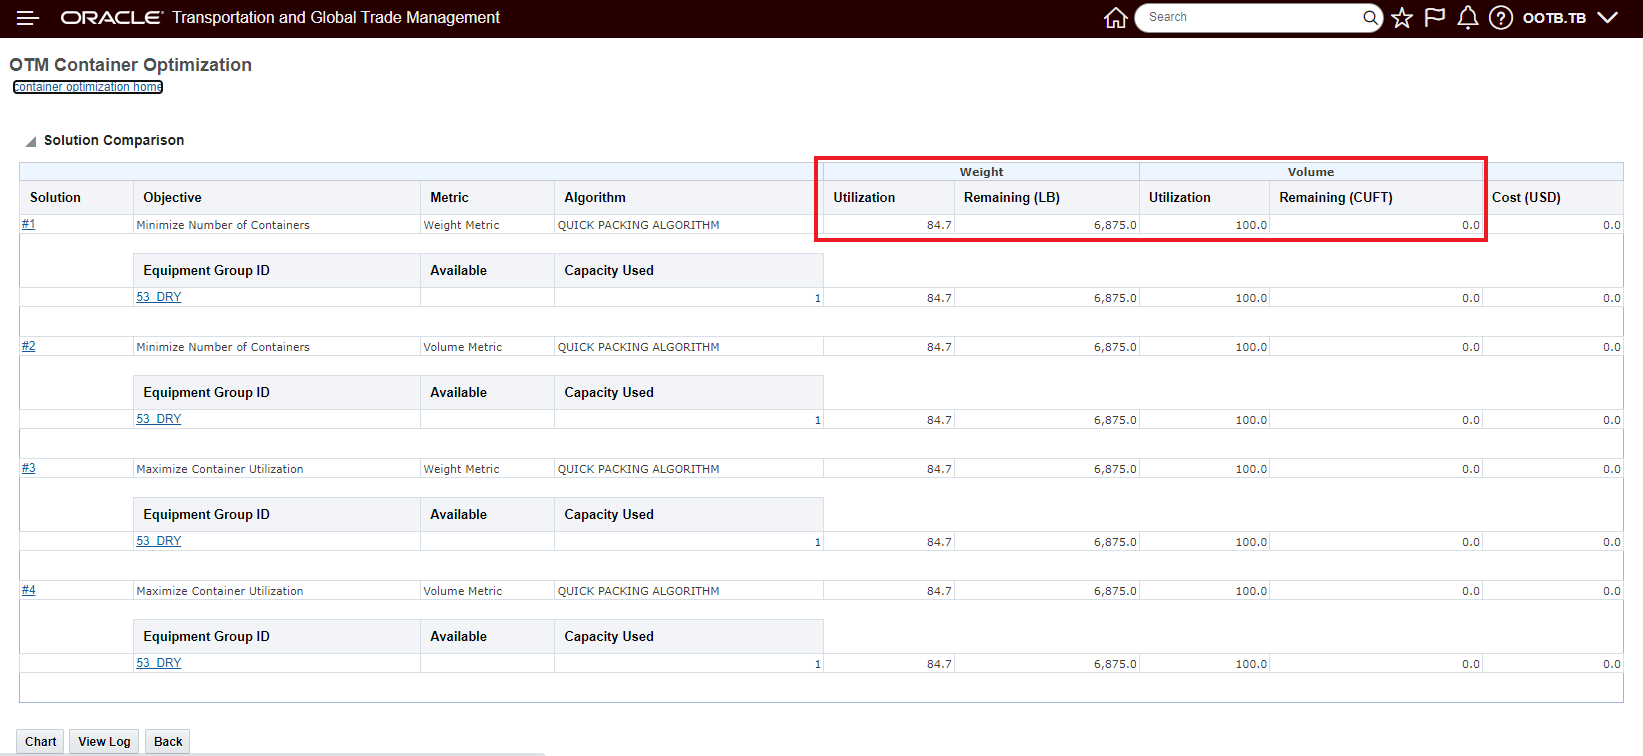
Results with 2 digits for Weight and Volume
With the same number of units - but using the extended decimals to more accurately input the per THU Weight and Volume, a lower utilization solution is the result - as shown below.

More Precise Input Using 4 Digits for Weight and Volume
The result - for the same 31250 units is below - note that there is now additional capacity - Volume capacity (utilization 96.8% v 100%) - to add more units.

Result Same Number of Units but 4 Digits Decimal Precision
The additional capacity - in this example - allows for an additional 1040 units.
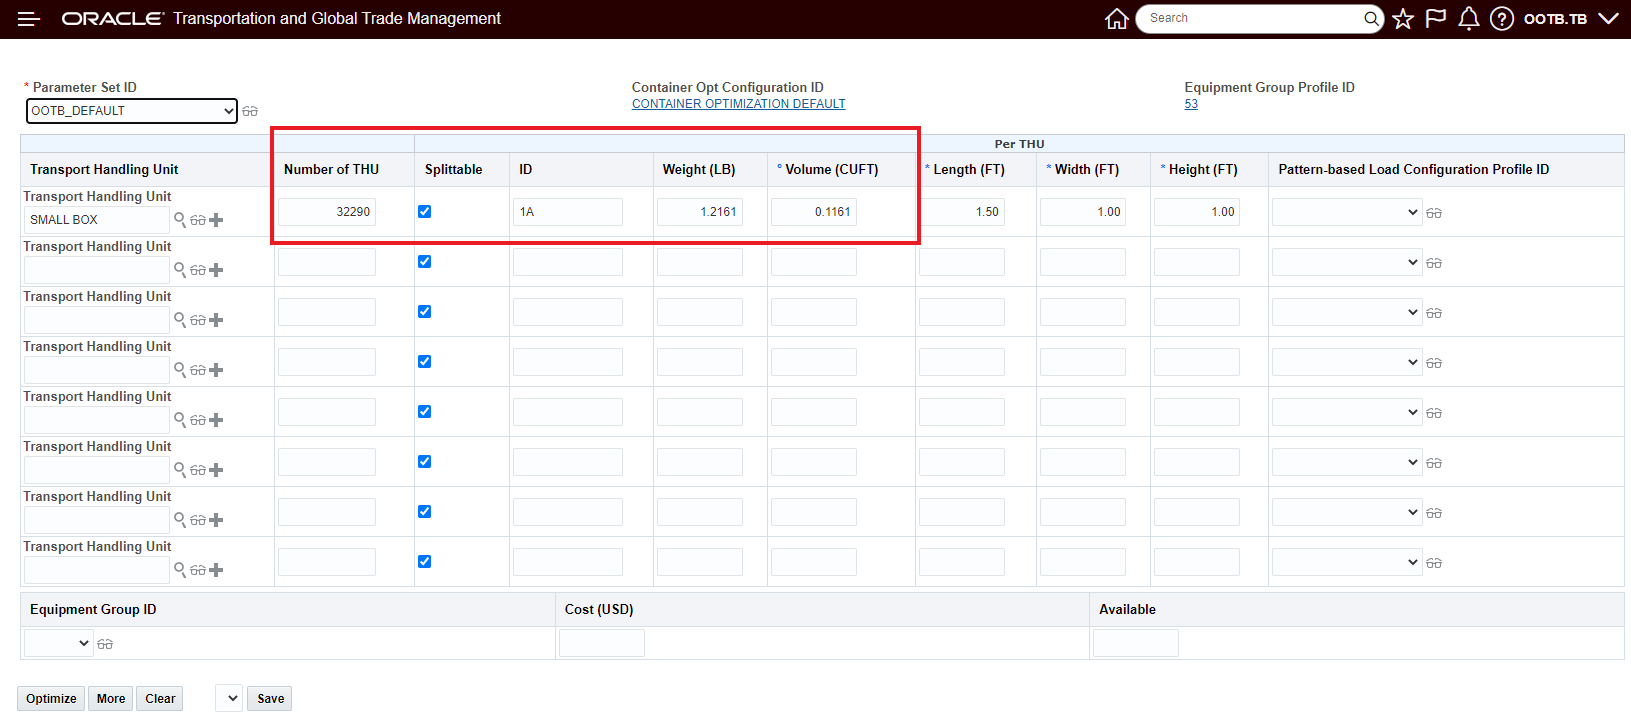
Additional Units Added

Result with Additional 1040 Units
Allows for more precise definition of the weight and volume consumed by each Transport Handling Unit - allowing for - potentially - a higher number of units to be considered for each piece of equipment - resulting in higher utilization and reduced transportation cost.
Steps to Enable
You don't need to do anything to enable this feature.
Tips And Considerations
Note that the change from 2 to 4 digits for the decimal precision is for Weight and Volume only.
Convert Multi-Segment Shipments to Multiple Shipments
This feature provides you with the option of converting your multi-stop multi-segment shipments into single shipments by segment so that these single shipments can then be planned using Work Assignment logic. This approach combines the robust multi-stop planning capabilities with the resource scheduling capabilities provided with the Work Assignment planning logic.
As illustrated below, this new capability allows you to take advantage of the multi-stop/multi-segment planning capabilities provided by bulk planning to develop good single candidate shipments for Work Assignment planning to string.
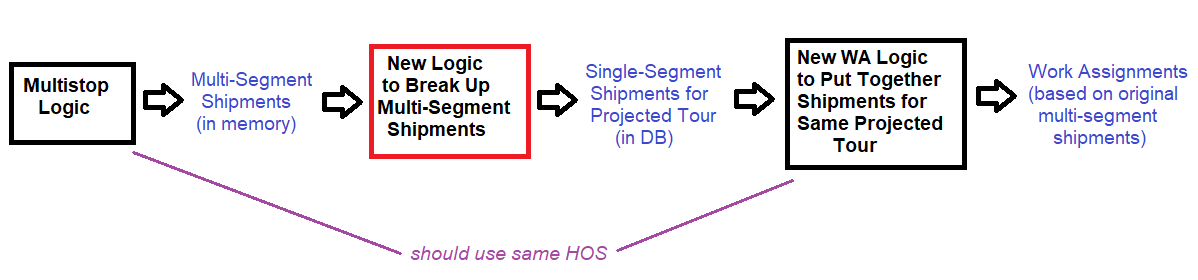
Multi-Stop Multi-Segment and Work Assignment Flow
To use this new functionality, you will need to set the MULTISTOP Logic Configuration parameter CONVERT MULTI SEGMENT TO MULTI SHIPMENT to Convert to Single Segment Shipments. The default is Do not convert. You will also need to set the MULTISTOP SEQUENCING parameter MULTISTOP MAXIMUM SEGMENTS PER SHIPMENT to a value greater than 1 to generate multi-segment shipments.
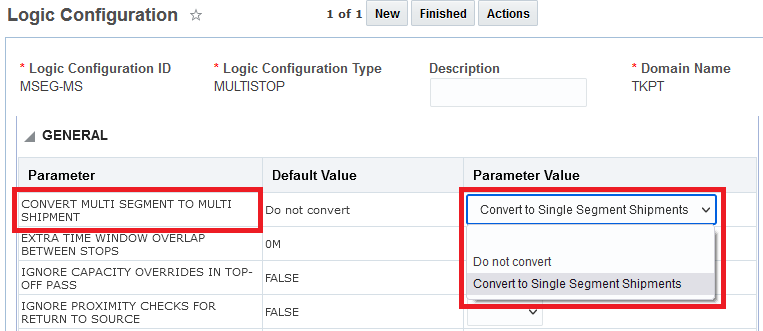
New Multistop Logic Configuration Parameter - Convert Multi Segment To Multi Shipments
With this new parameter set to Convert to Single Segment Shipments - for your multi-segment shipments this new logic will convert your multi-segment shipments into single shipments. The examples below illustrate the new functionality. In this example, OTM has generated a thirteen stop multi-segment shipment - consisting of three segments.
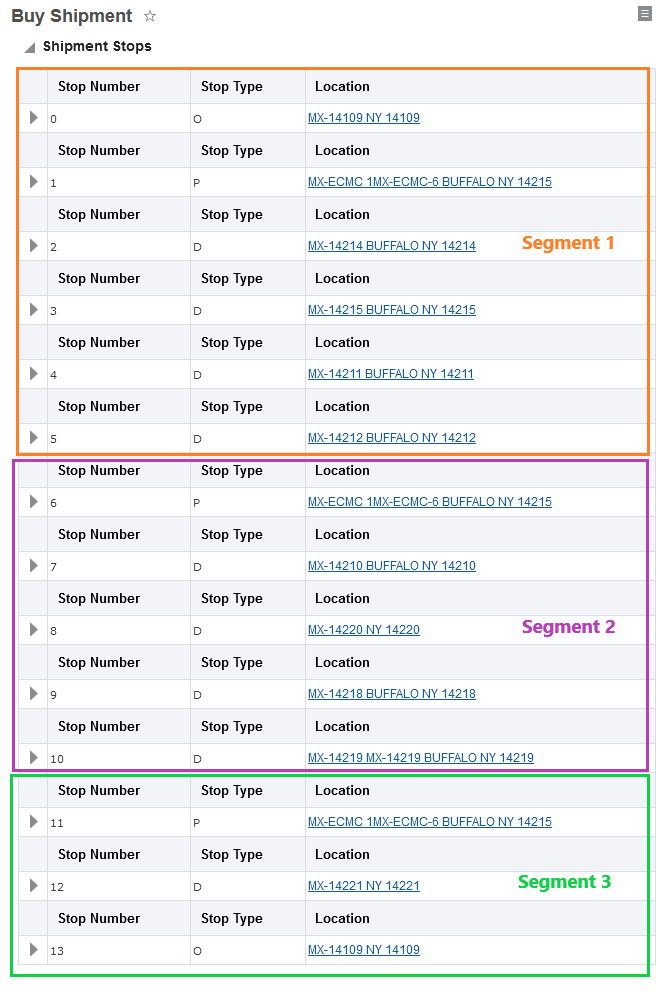
Multi-Stop Multi-Segment Shipment - Three Segments
With the new Convert to Single Segment Shipments planning parameter on - the multi-segment shipment above will be split into 3 candidate shipments as illustrated below.
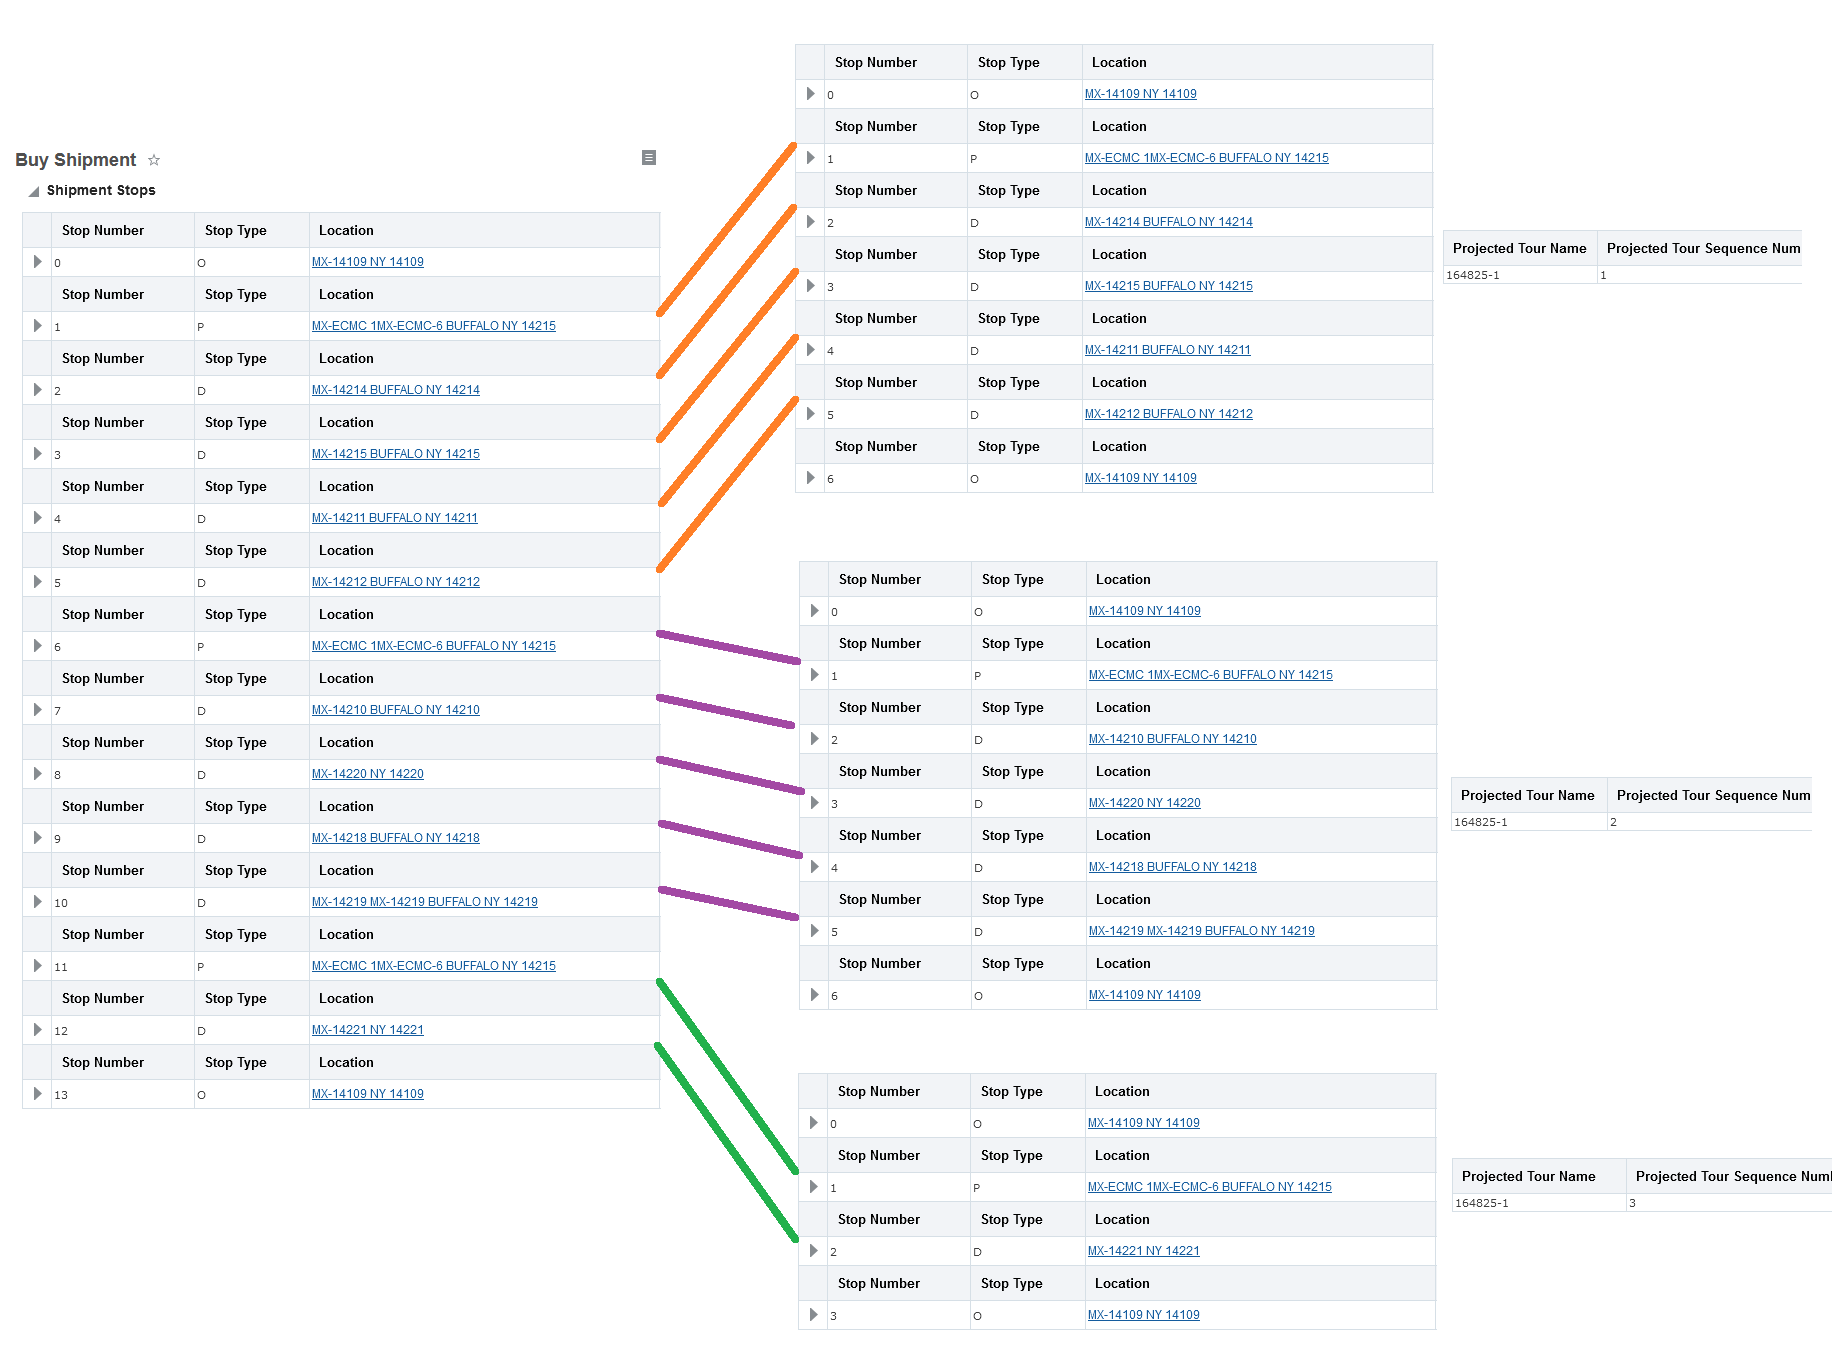
Converted Multi-segment Shipment
The split is - as expected by segment, the individual shipments have all been updated with a new Projected Tour Name and Projected Tour Sequence Num - this information will be used by the Work Assignment Logic to keep this set of shipments together (if possible) within a single Resource Schedule Instance. The Projected Tour Sequence Num will be used to guide the sequencing of the shipment within the Work Assignment.
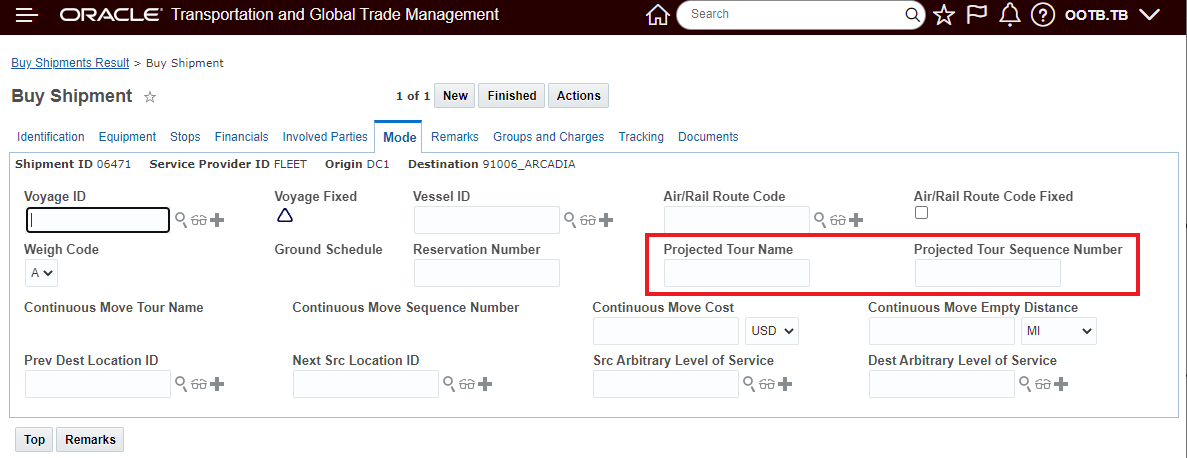
Projected Tour Name and Sequence
Note that for the single-segment shipments created with the new logic:
- each corresponds to a segment from what was originally a multi-segment shipment
- each has a corresponding Projected Tour ID and Projected Tour Sequence Number
- each has its own depot stops (if applicable)
- each is driven without regard to the others (they are not driven as they would have been as part of multi-segment shipment)
- might each have different sequencing than it would have had in the multi-segment shipment
The Projected Tour Name and Projected Tour Sequence Number is an editable field on the Shipment. You can enter a Projected Tour Name and a Projected Tour Sequence Number to a set of shipments, manually, if you already know the set of shipments you would like to see in a Work Assignment and the sequence of those shipments. Again - the set of shipments and the sequence specified must not overload the Resource Schedule Instance.
Shipments that would have been single-segment shipments to begin with are not affected.
This feature extends OTM's available multi-stop and tour building planning capabilities, when applied to the right use case and scenario, the new capabilities will provide you with improved solution quality and additional cost savings.
Steps to Enable
To take advantage of this feature you must be planning with multi-segments, the Convert to Single Segment Shipments parameter must be on/converting and you should be using Resource Schedules and Work Assignment planning logic.
Tips And Considerations
Note that for a specified Projected Tour Name - the Work Assignment logic requires an all or nothing solution i.e., either all the shipments for the same Projected Tour Name are assigned or none will be assigned.
Each of the individual segment shipments will be re-driven after they are split - start times, rates, equipment etc. could change as part of this process.
If you are using Capacity Limits - each of the individual segments shipments may require capacity - so the single multi-stop multi-segment shipment could have only consumed one available resource - if the multi-segment shipment is split into three shipments - each of those shipments could now require capacity.
Multi-Container MIP - ERU Limit Number of Reference Units Honored
This feature enhances the Multi-container MIP (USE MULTICONTAINER MIP = TRUE) so that values entered for the Limit Number of Reference Units are honored. Previously, only the Maximum Number of References Units value was honored using this option.
In the example below - the Limit Number of Reference Units is set to 3000.0 and the Maximum Number of References Units is set to 3600.0.

Setup with Limit Number and Maximum Number
Based on the setup above and a one for one with packaged items - the shipment below honors the Limit Number of Reference Units - 3000.0 and the Equipment Reference Unit Utilization is 83% - 3000.0 (Limit)/3600.0 (Max)

Limit Honored and ERU Utilization
Provides consistent processing across the various container planning options for the ERU Limit Number of Reference Units value entered on ERUs.
Steps to Enable
You don't need to do anything to enable this feature.
Enhanced Graphical Diagnostics - Export Logs
This feature adds the Export log capabilities to the Enhanced Graphical Diagnostics UI. To switch to the Enhanced Graphical Diagnostics - you will need to Opt In to the USE ENHANCED GRAPHICAL DIAGNOSTICS optional feature. Once opted in, the Graphical Diagnostic Views provided for Sunburst, Tree and Block will be the Enhanced Graphical Diagnostics Views.
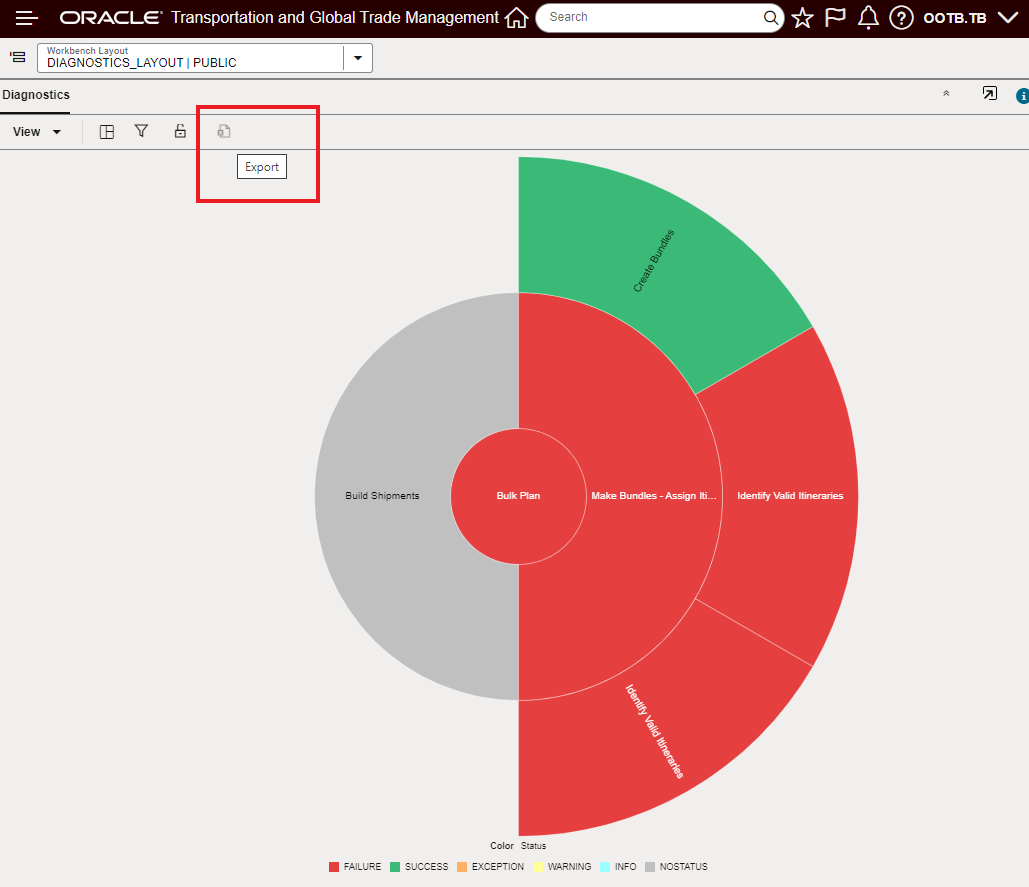
Enhanced Graphical Diagnostics - Export
The Export button initiates the download of the zip file.
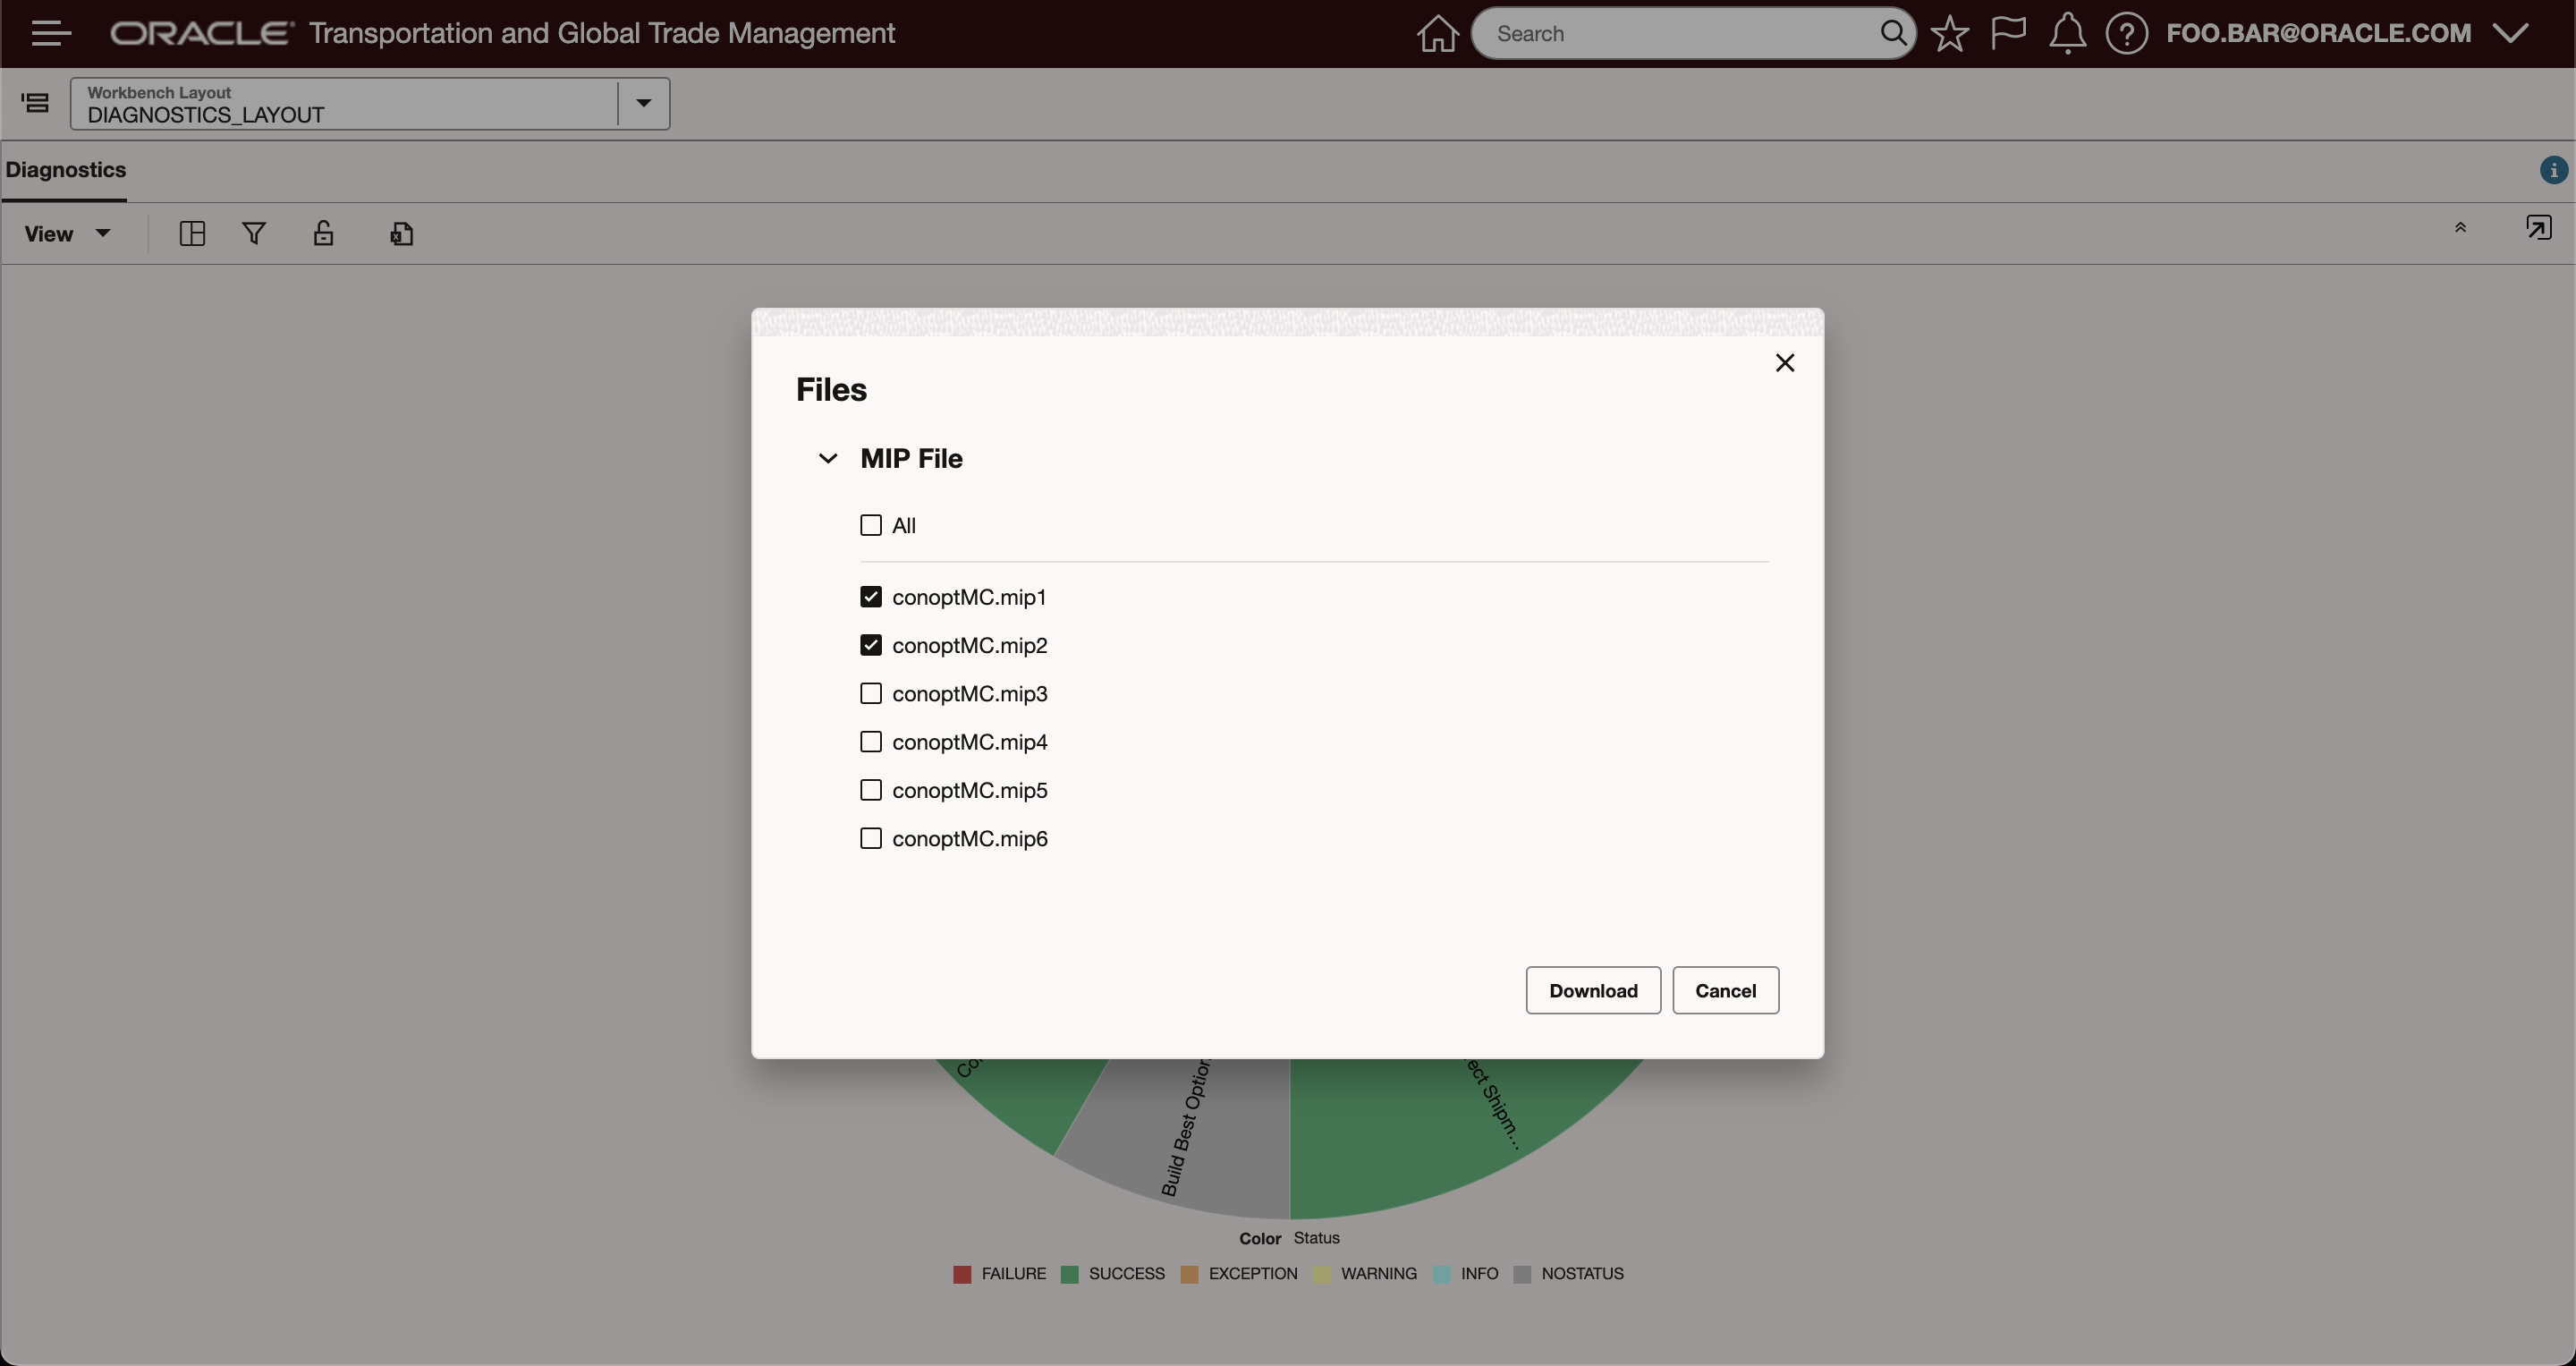
Export Dialog
This feature provides the last piece of functional equivalence between the legacy Graphical Diagnostics and the new and improved Enhanced Graphical Diagnostics.
Steps to Enable
You don't need to do anything to enable this feature.
Freight Payment, Billing, and Claims
Allocate VAT from Invoice Line
This feature enhances the Allocation Rule to provide you with the option of allocating the voucher VAT amount to the order release, order release line or order base line.
Changes provided to support this new capability include the following:
A new Voucher VAT checkbox has been added to the Allocation Rule definition. The new Voucher VAT checkbox is only visible when you select the Voucher checkbox when defining your Allocation Rule. Selecting the Voucher VAT checkbox indicates that you want the VAT (value added tax) of the voucher to be allocated when this Allocation Rule is applied. The VAT allocated will be displayed as a VAT code on the order release/order release line/order base line page. The related order releases, order release lines, or order base lines are fetched based on the cost reference records saved against the cost lines. The cost references for voucher lines are fetched based on the invoice line item cost references.
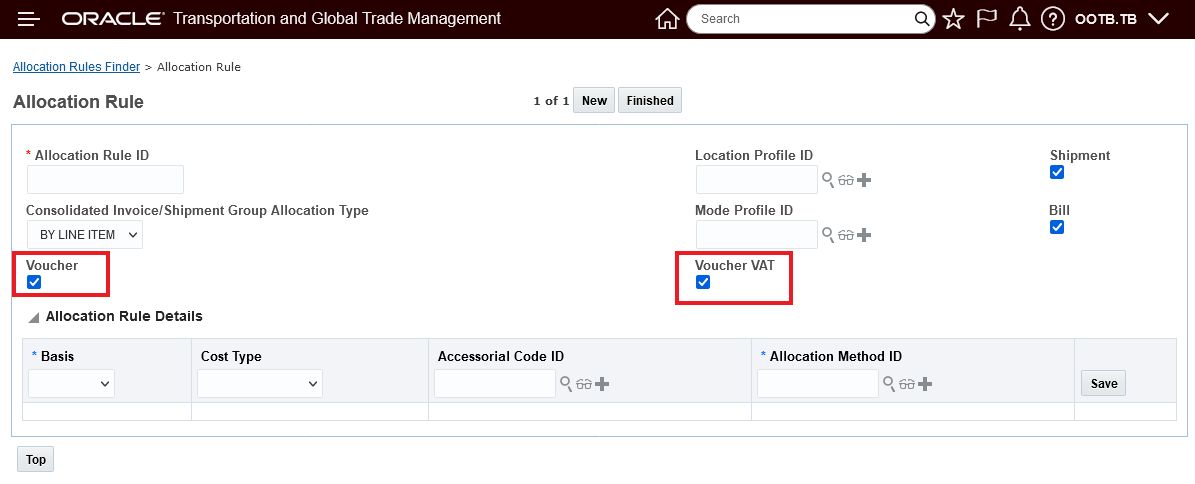
Allocation Rule Voucher VAT Option Checked - Default
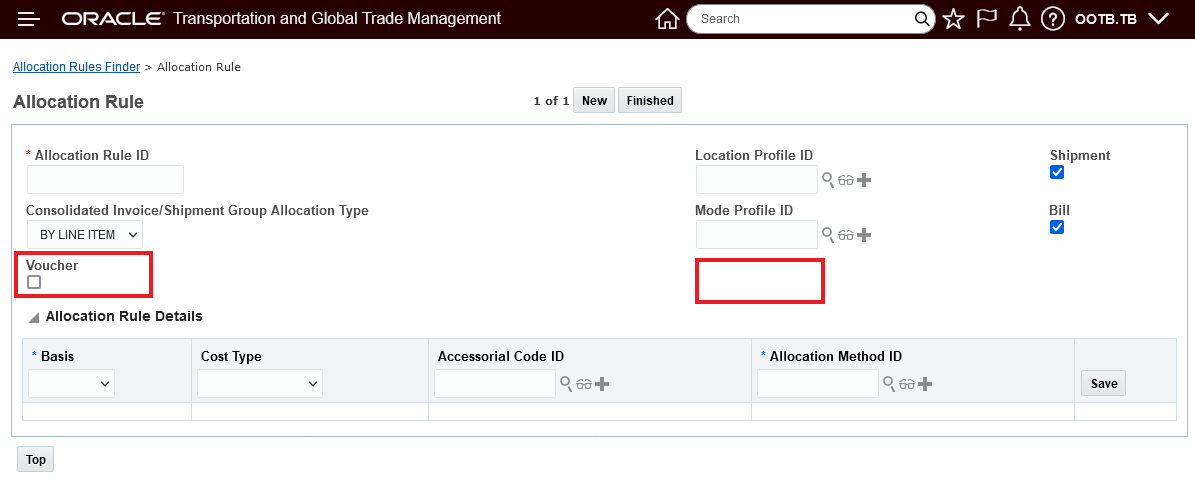
Allocation Rule Voucher Option Unchecked - No Voucher VAT Allocation
In the example below - the Voucher has a Base Cost of 3000 USD - the VAT is 15% or 450 USD. The VAT will be allocated to the Order Release by weight and then to the Order Release Line.
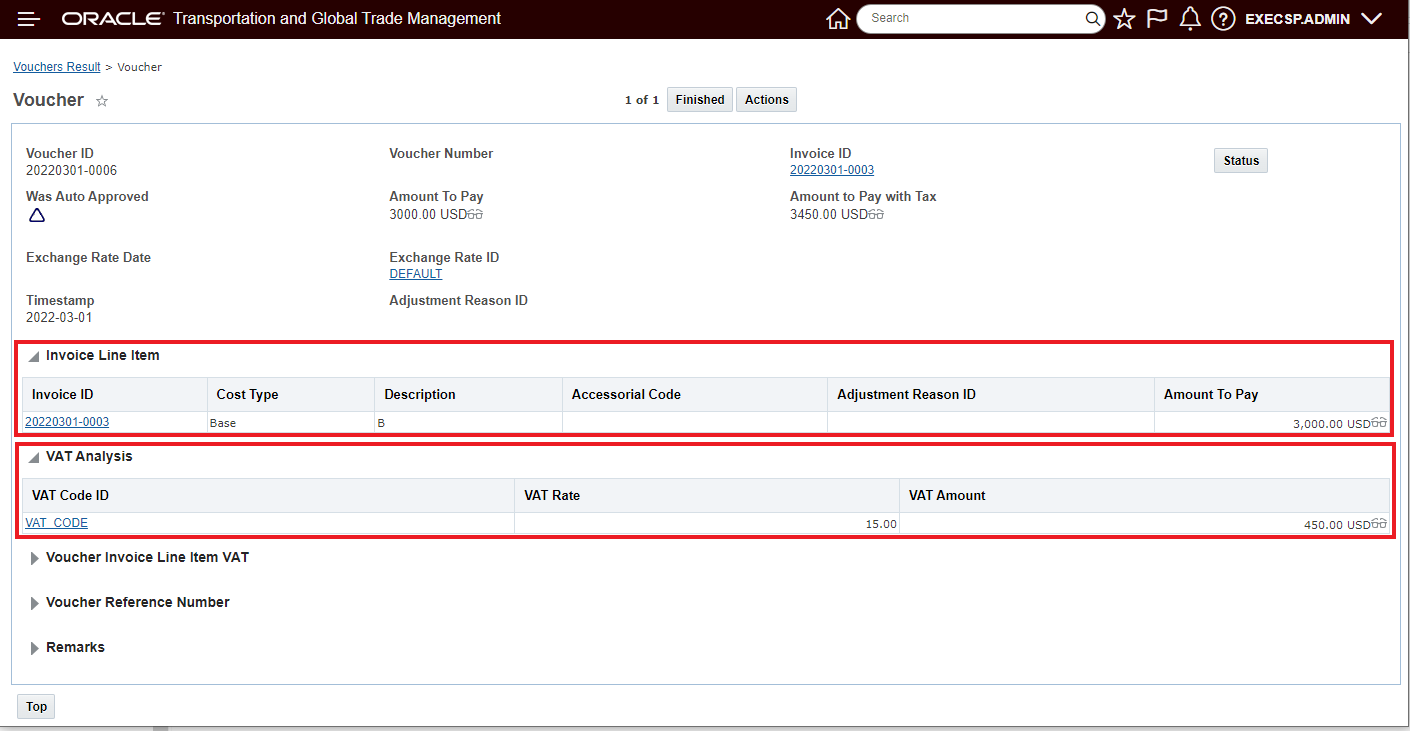
Voucher Example
Below is the Allocation Rule used to do the Order Release Allocation. In this example, there is only one Order Release so all 450 USD VAT will be allocated to the single Order Release.
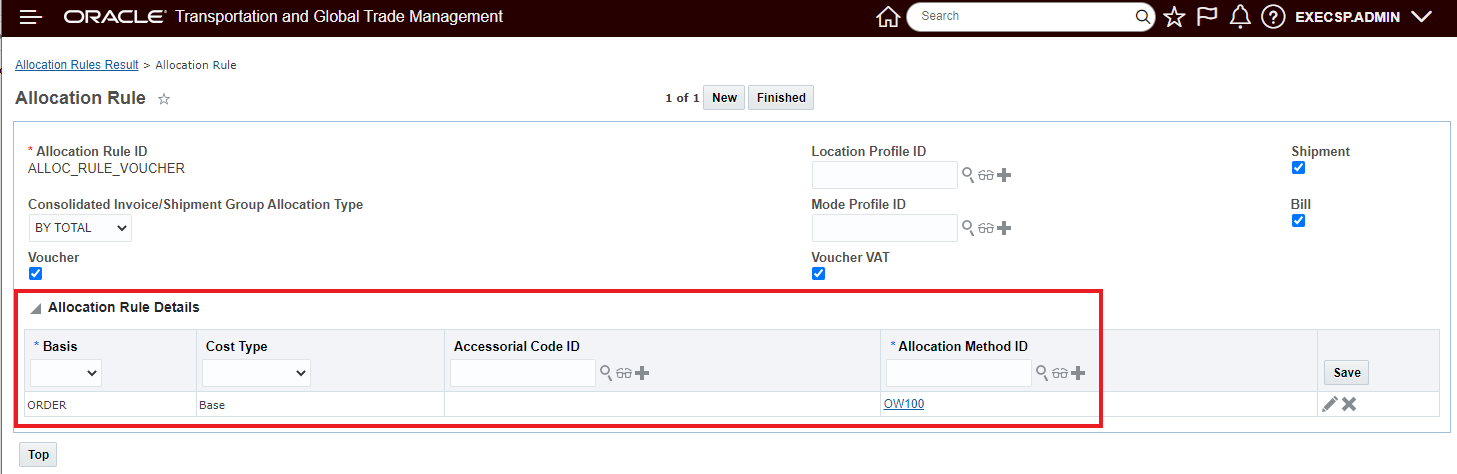
Allocation Rule for Order Release Allocation
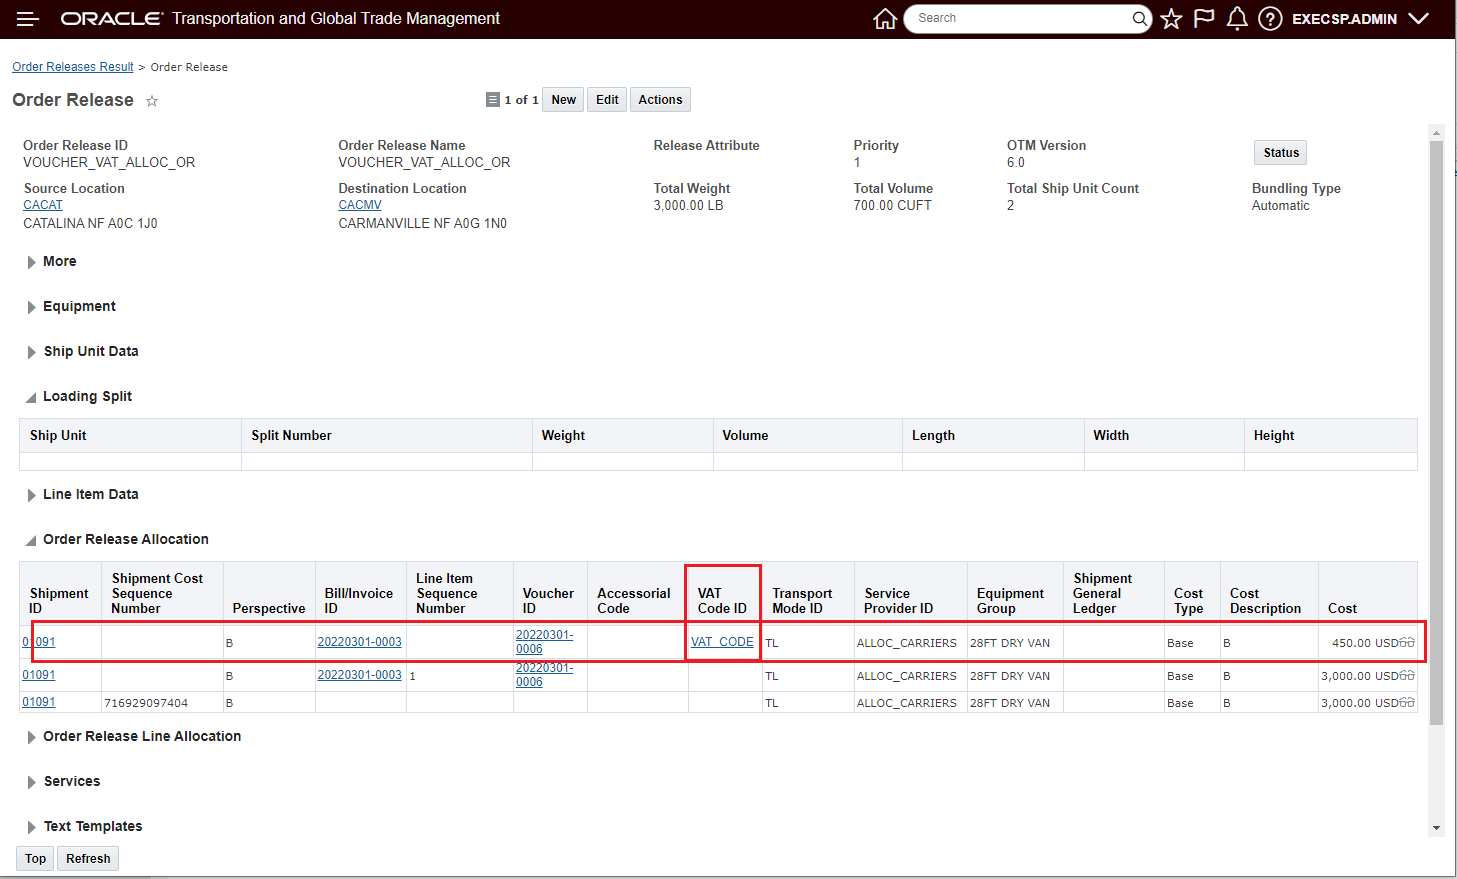
Order Release Level VAT Voucher Allocation
Below is the Allocation Rule used to do the Order Release Line Allocation. In this example there is are two Order Release Lines so the 450 USD VAT will be allocated to each of the Order Release Lines by weight - based on the Allocation Rule used.
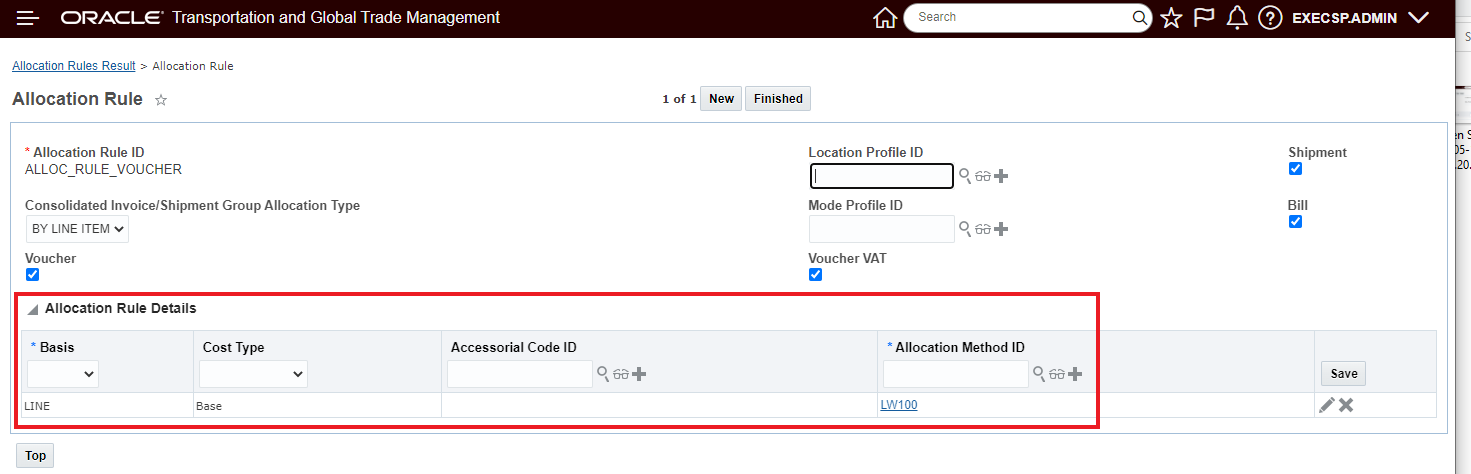
Allocation Rule for Order Release Line Allocation
Below is the Order Line Allocation, allocated by weight, including the Voucher VAT amount or 450 USD. For the two Order Release Lines, the Voucher VAT is allocated 150 USD for one line and 300 USD for the other line.
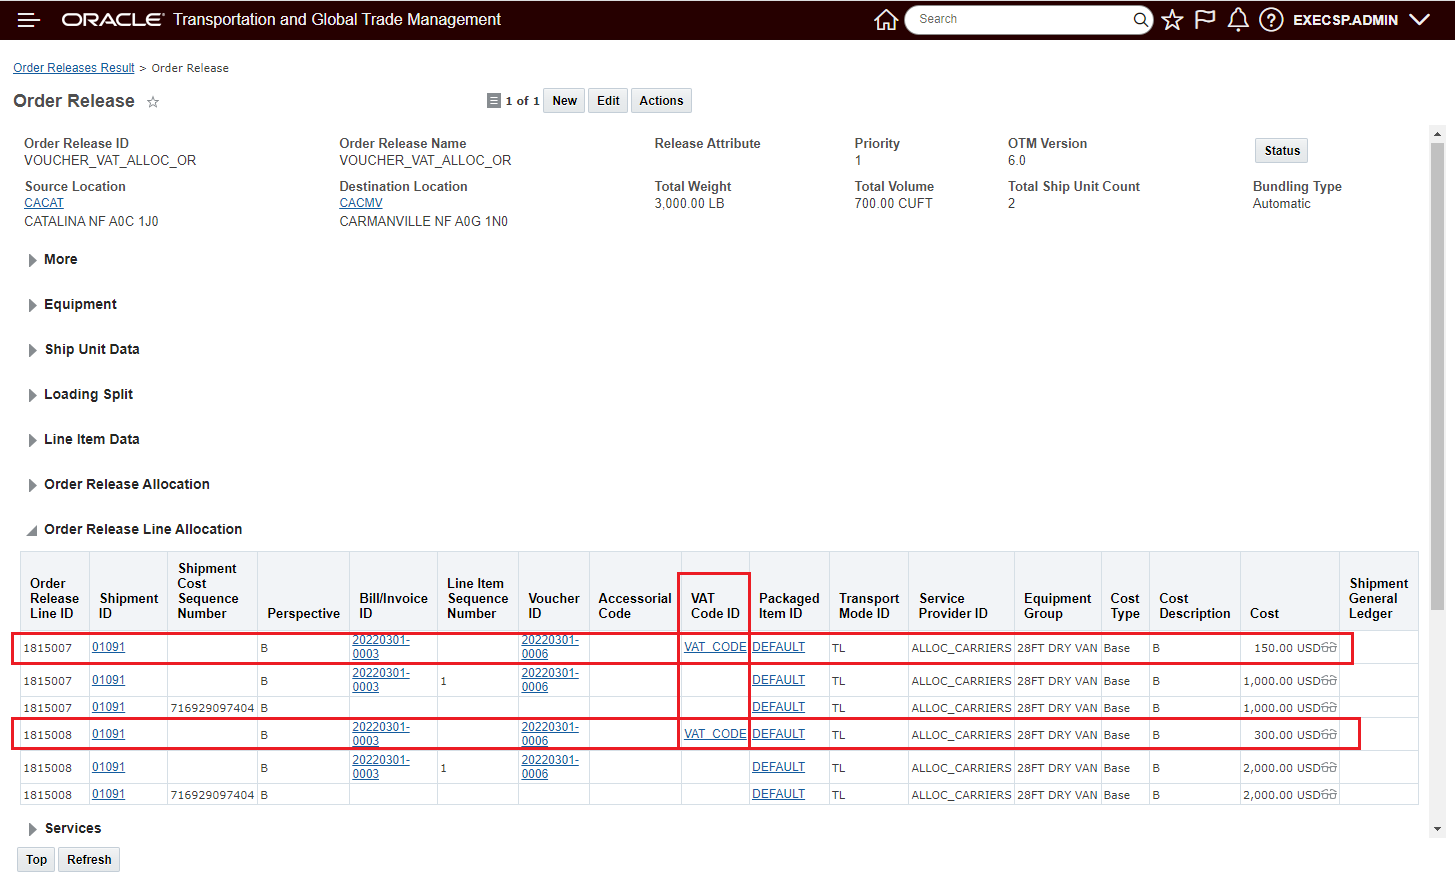
Order Release Line Level Voucher VAT Allocation
This feature extends the financial information provided by OTM to include the allocation of the VAT amount.
Steps to Enable
If you wish to allocate your Voucher VAT amounts, you will need to either create a new Allocation Rule and select both the Voucher and Voucher VAT options or modify your Allocation Rules to select the option to include allocation of the Voucher and the Voucher VAT.

Allocation Rule Setup
Key Resources
- The On-line Help provides excellent information regarding how the allocation Logic for Voucher VAT works with and without cost references and the process based on Invoice approval status and Voucher issue status.
Allocate Shipments of Shipment Group UI Action and Agent Action
This feature provides you with a new Shipment Group UI Action - Allocate Shipments of Shipment Group - and a new Agent Action - Allocate Ship Group Shipments - that will allocate all the shipments in a shipment group.
The new UI action is available under Shipment Management > Group Management > Shipment Group > Actions> Financials > Allocate Shipments of Shipment Group.
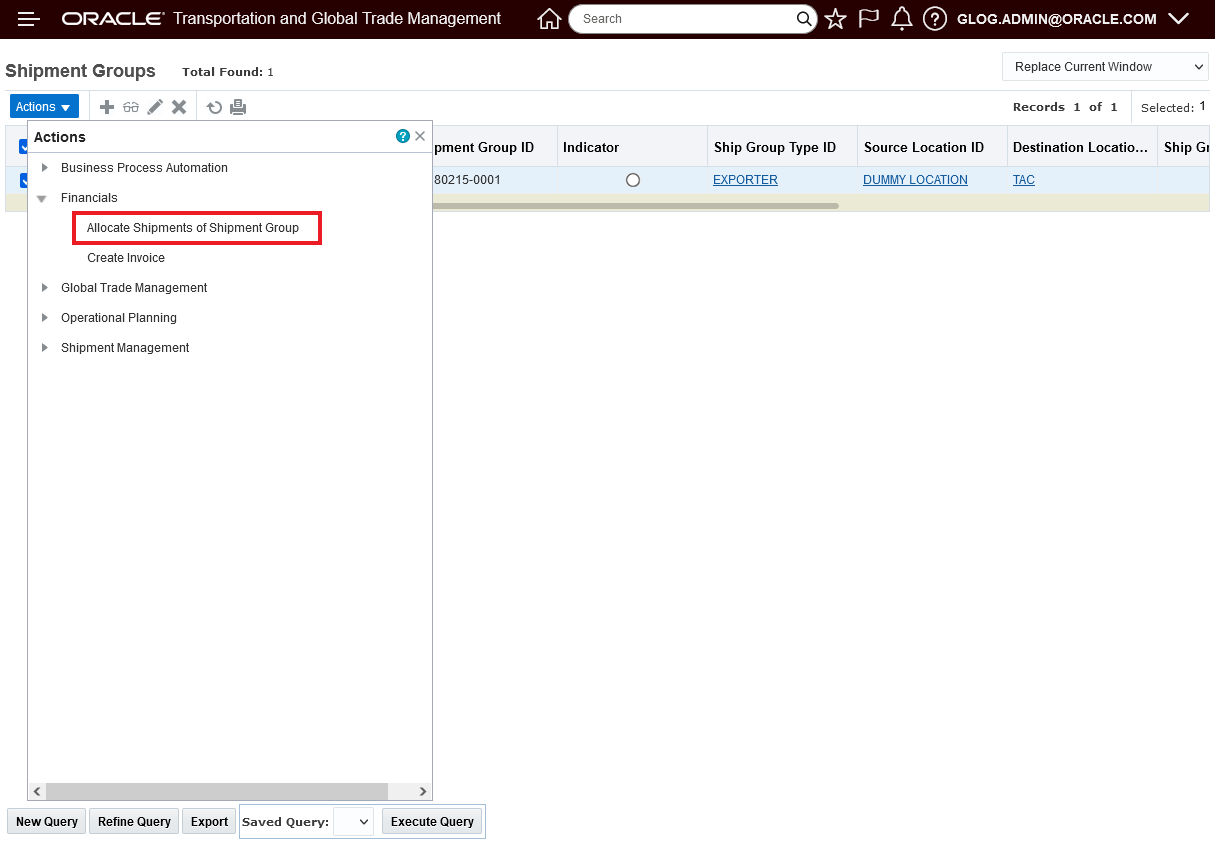
Allocate Shipments of Shipment Group Action
Below is an example of the results provided by the Allocate Shipments of Shipment Group action.
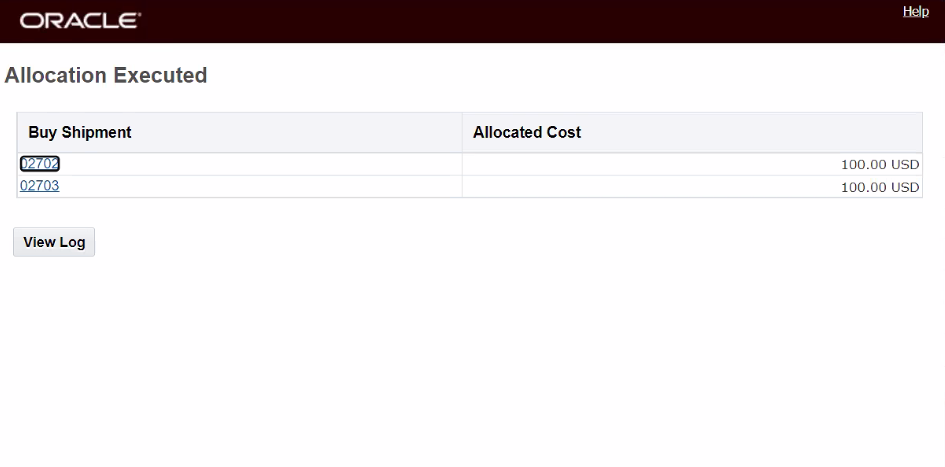
Allocate Shipments of Shipment Group Action Results
The Allocate Shipments of Shipment Group UI Action is a multi-select action. In the example below, four shipment groups containing eleven shipments are allocated in one run of the Allocate Shipments of Shipment Group UI action.
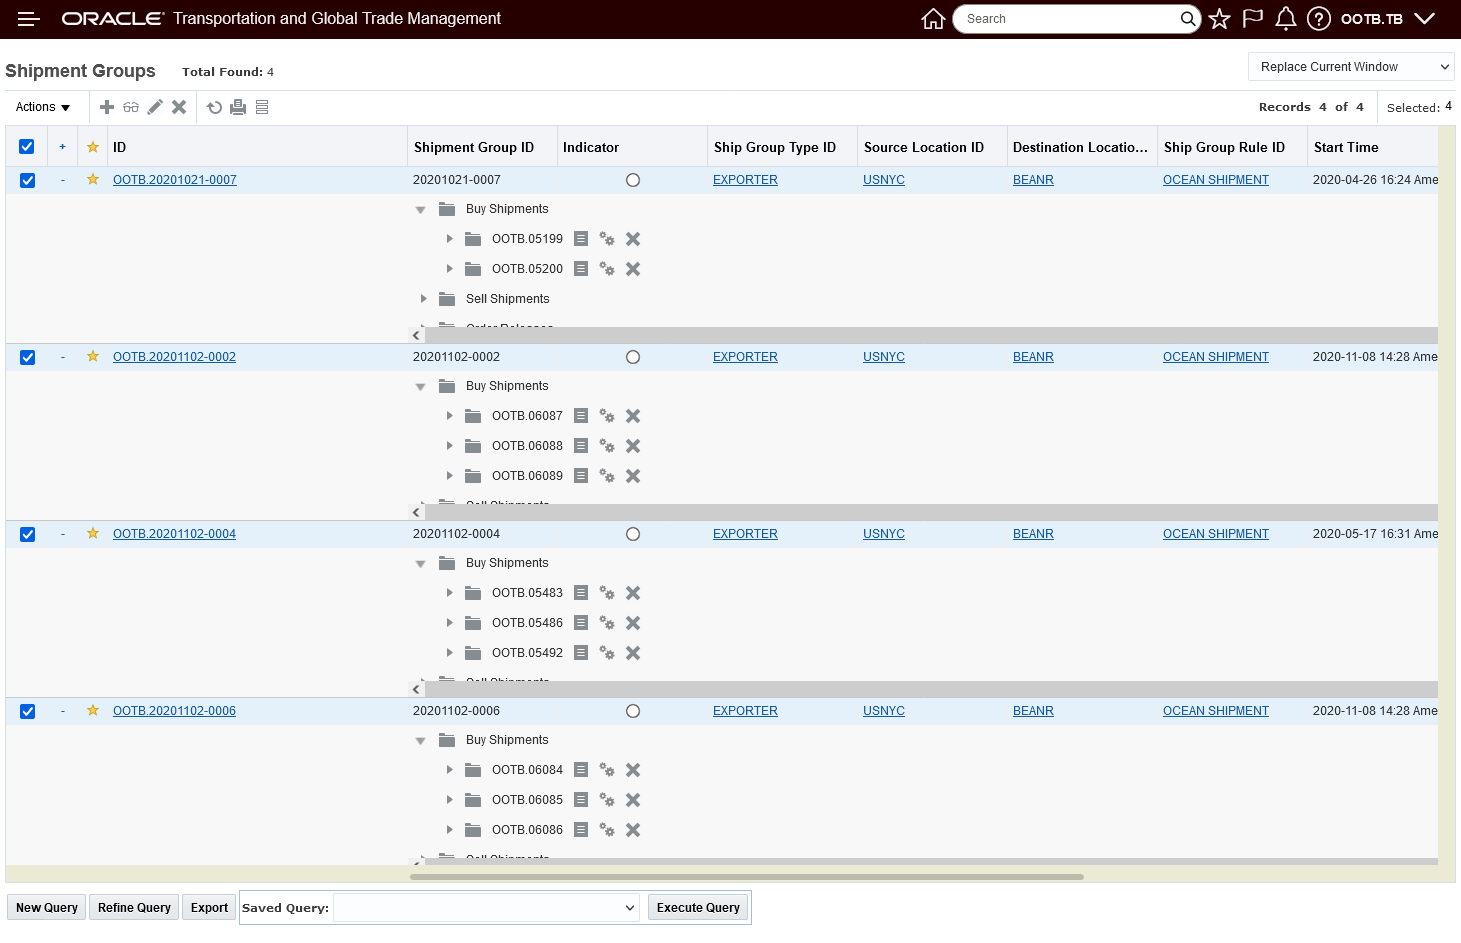
Multi-Select Four Shipment Groups
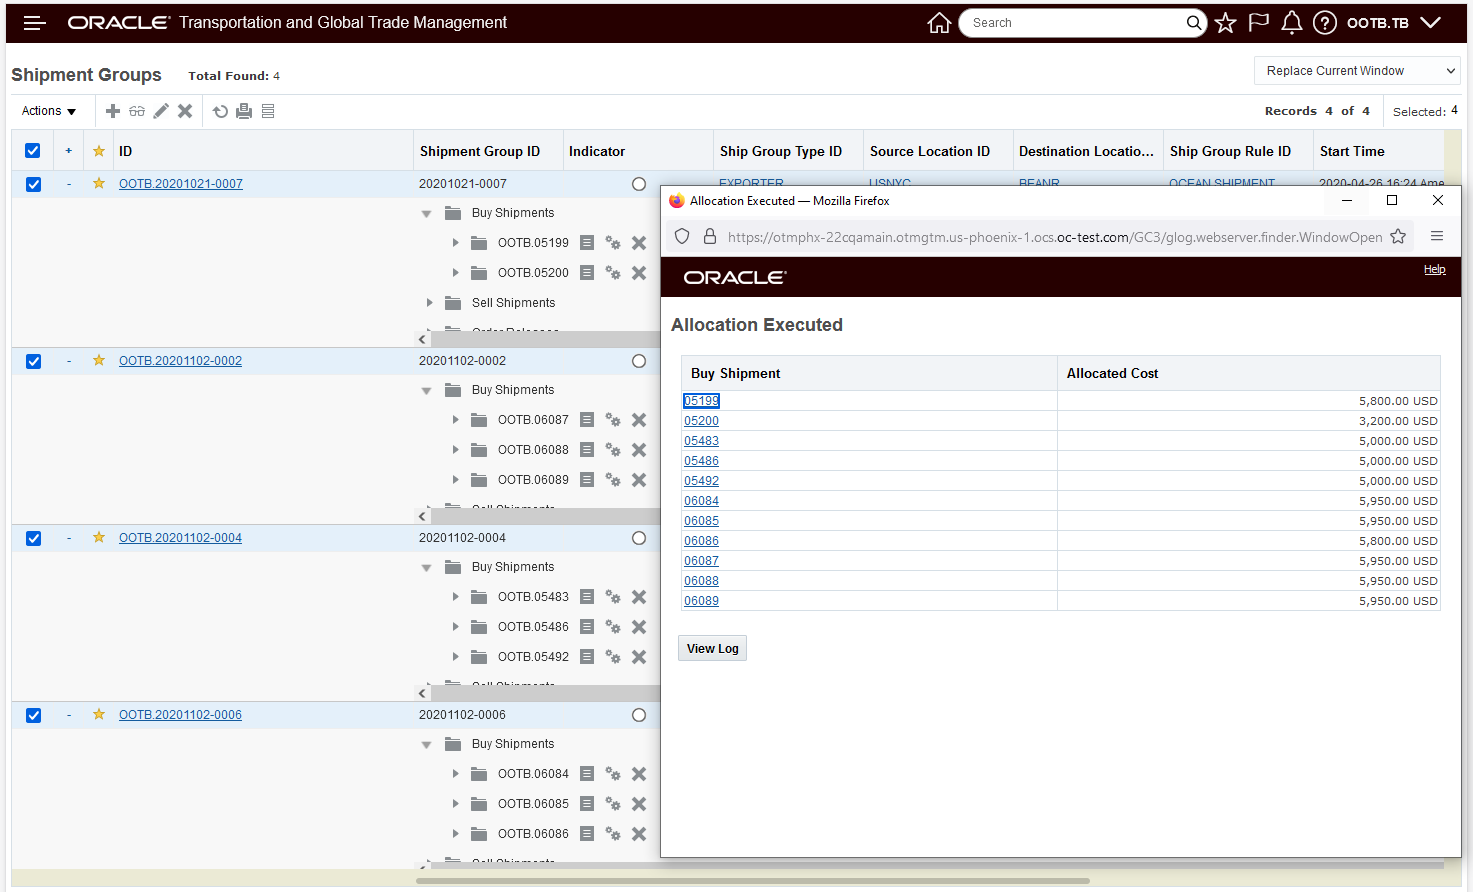
Results for the Four Shipment Groups Selected
The new Shipment Group Agent Action - Allocate Ship Group Shipments - provides you with the option of automating the allocation of the shipments in a shipment group.
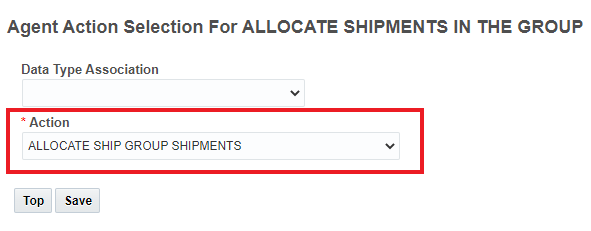
Agent Action
This usability feature simplifies the process of allocating shipments in a shipment group.
Steps to Enable
You don't need to do anything to enable this feature.
Tips And Considerations
Note the action does not support the Allocation of Shipment Groups with Partial Shipment. An error will be provided if the Allocate Shipments of Shipment Group action is run against Shipment Groups with Partial Shipments.

Error Allocate Shipments of Shipment Group Action Run Against Partial Shipment Groups
This action is not Manager Layout enabled.
Approve Invoice - Option to Hide/Show New Invoice Line Button
This feature provides you with a property - glog.invoice.manualApprove.disableAddNewInvoiceLineButton - which allows you to control whether to display or hide the New Invoice Line button when you run the Approve Invoice action. The default value for the the property is 'false' the New Invoice Line button is shown. To hide the New Line Item button the property should be set to 'true'.
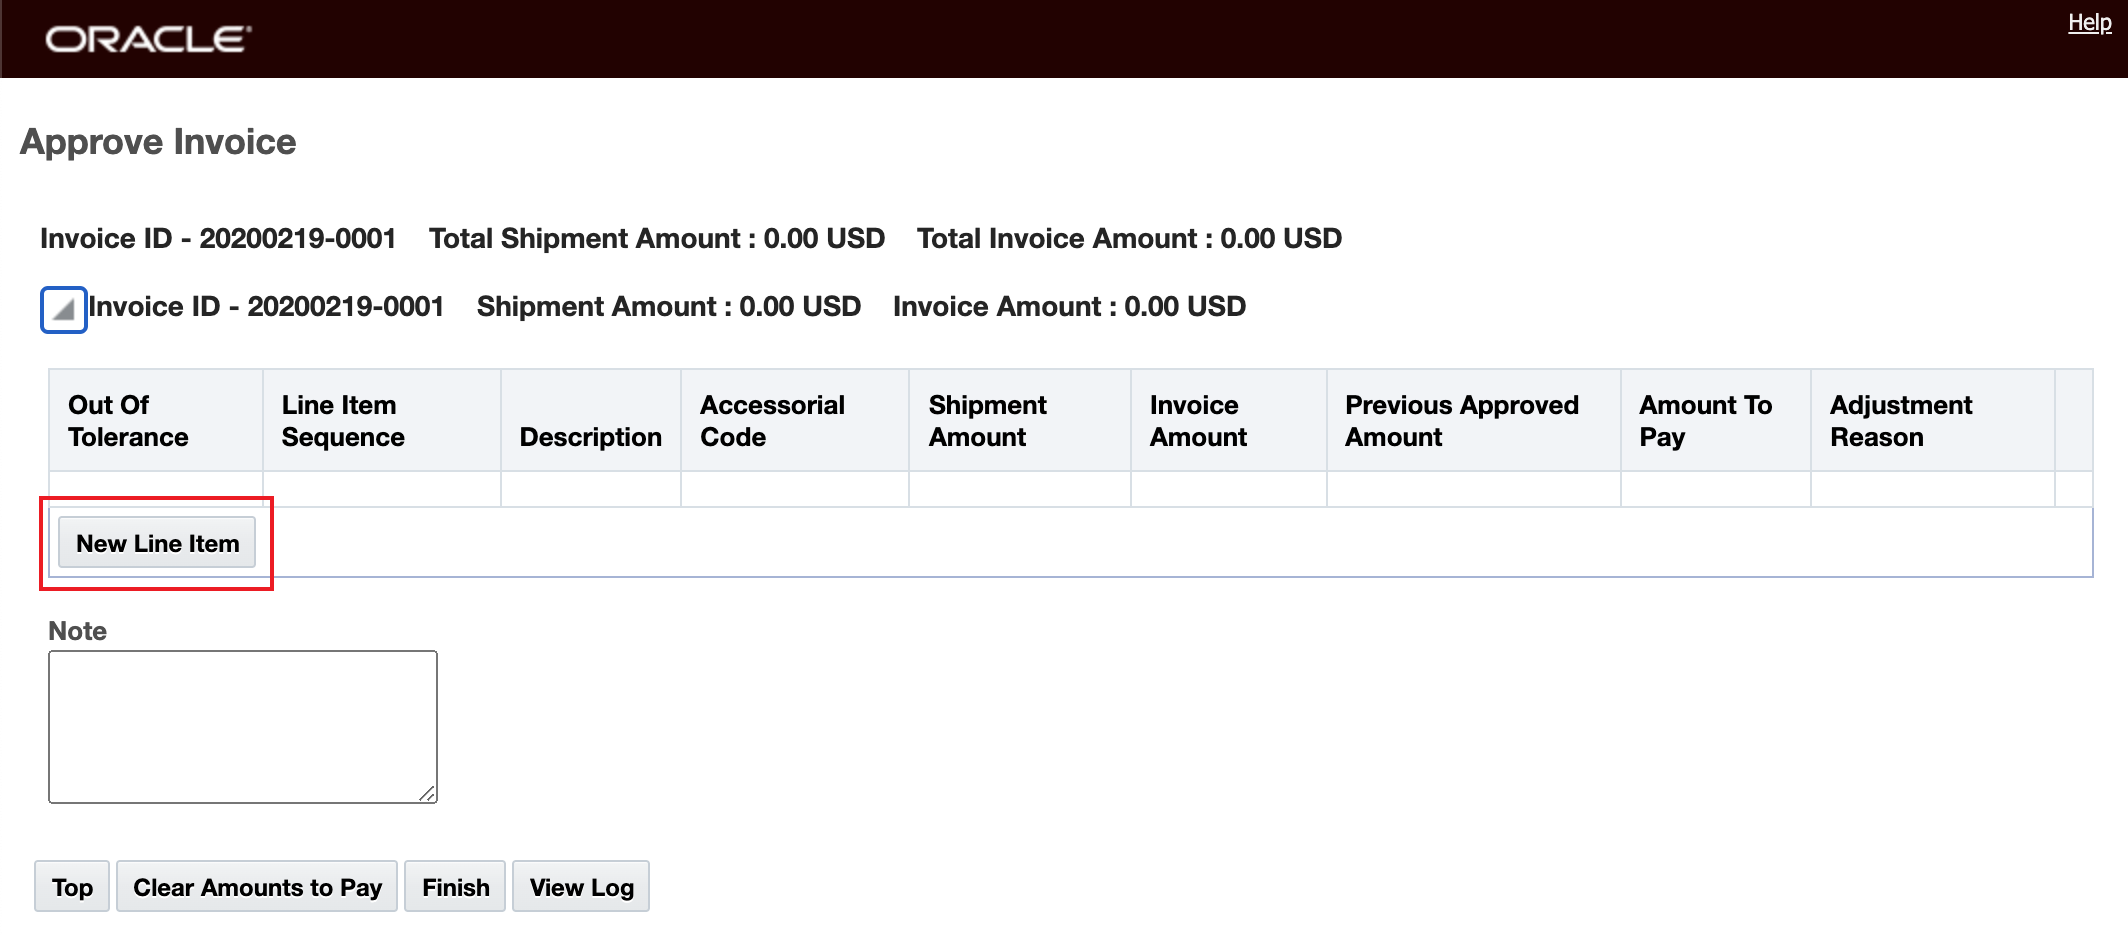
New Line Item Button is Shown - Default
In the example below, the property - glog.invoice.manualApprove.disableAddNewInvoiceLineButton has been set to "true", and the New Invoice Line button is hidden.
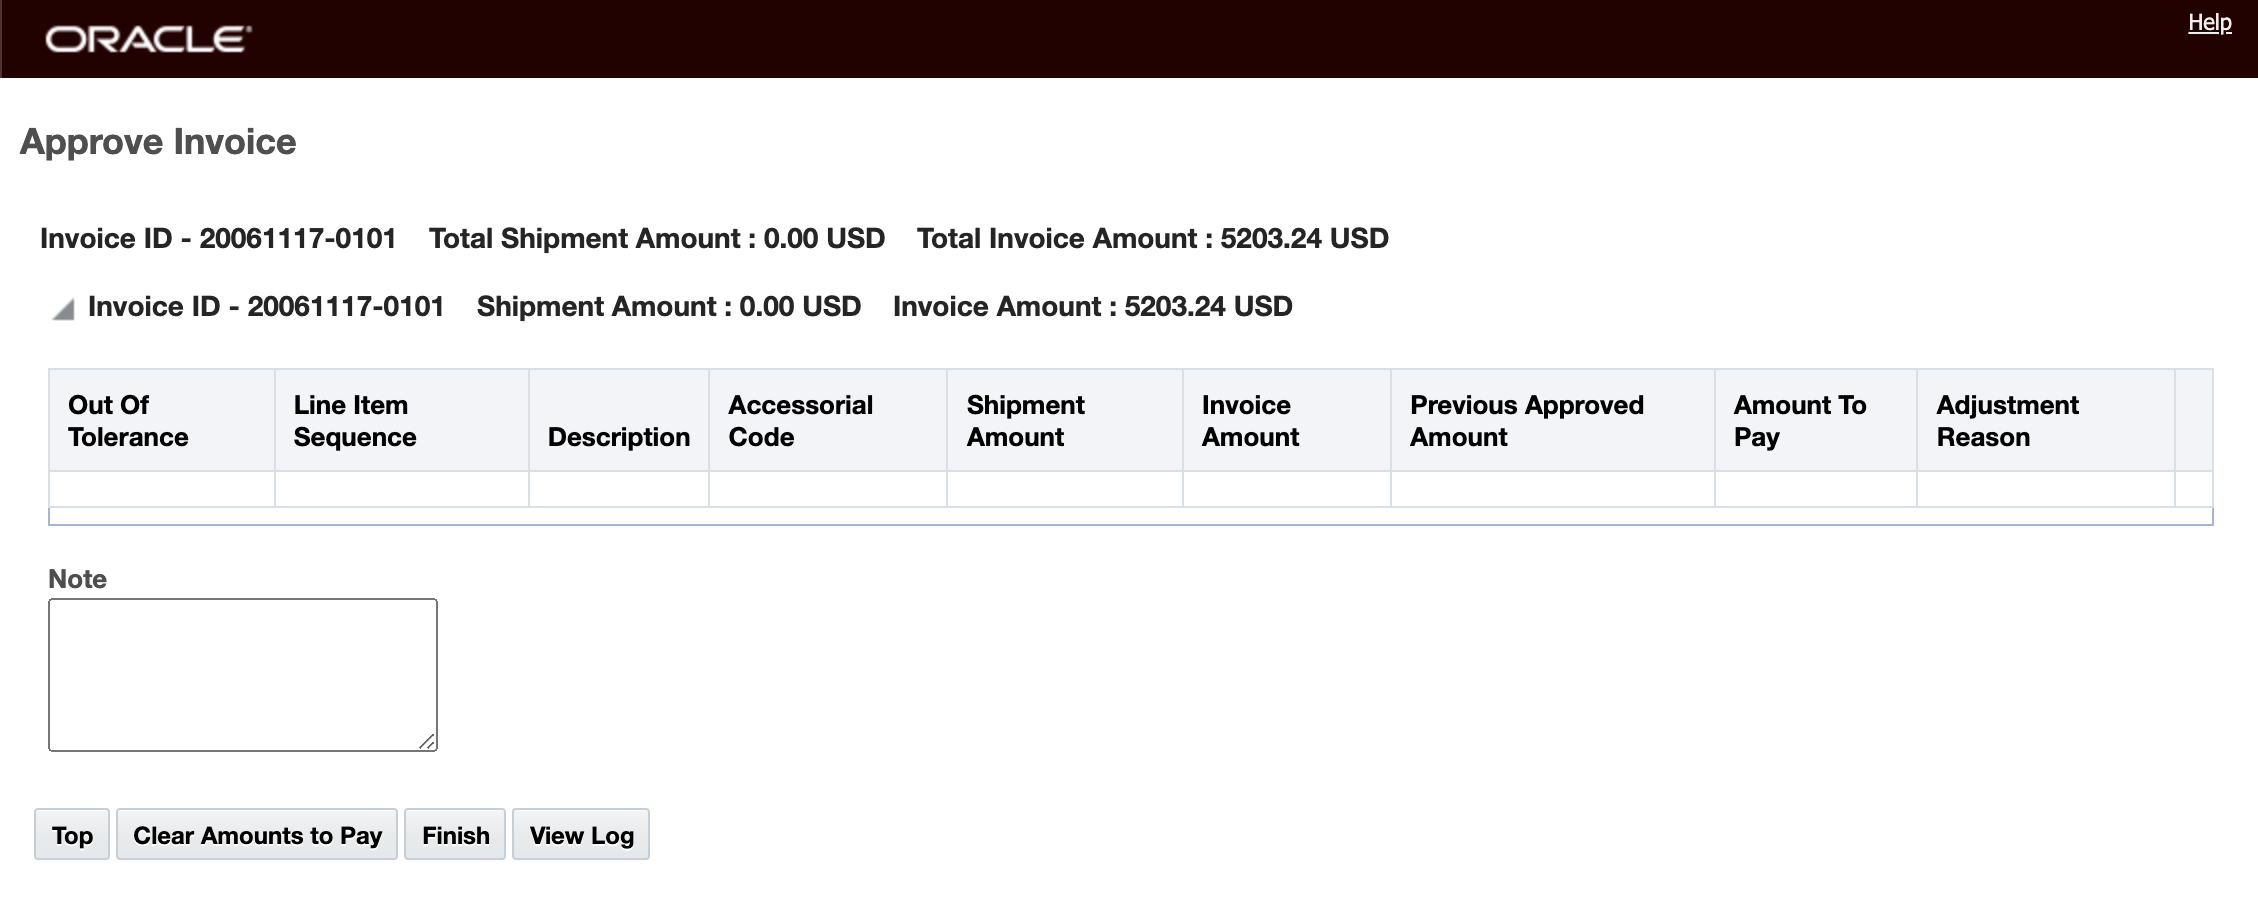
New Line Item Button is Hidden
This feature provides you with additional controls as part of your Invoice Approval process - limiting the users ability to add additional line item charges.
Steps to Enable
You don't need to do anything to enable this feature.
Shipment Cost User Defined Attribute Fields Added
This feature extends the Shipment Cost object to include the standard set of User Defined Attribute fields - 20 Text fields, 20 Date fields, 20 Number fields, and 3 Currency fields. The additional fields are available for you to configure your screensets and manager layouts and are included in the related XML and REST APIs.
Shipment Cost User Defined Attributes add:
| User Defined Attribute Field |
|
|---|---|
| ATTRIBUTE1 to ATTRIBUTE20 |
VARCHAR2(150) |
| ATTRIBUTE_CURRENCY1 to ATTRIBUTE_CURRENCY3 |
|
| ATTRIBUTE_DATE1 to ATTRIBUTE_DATE20 |
DATE |
| ATTRIBUTE_NUMBER1 to ATTRIBUTE_NUMBER20 |
NUMBER() |
In the example below, the Shipment Cost Screenset used in the Enhanced Workbench has been configured to include an example set of the added User Defined Fields.
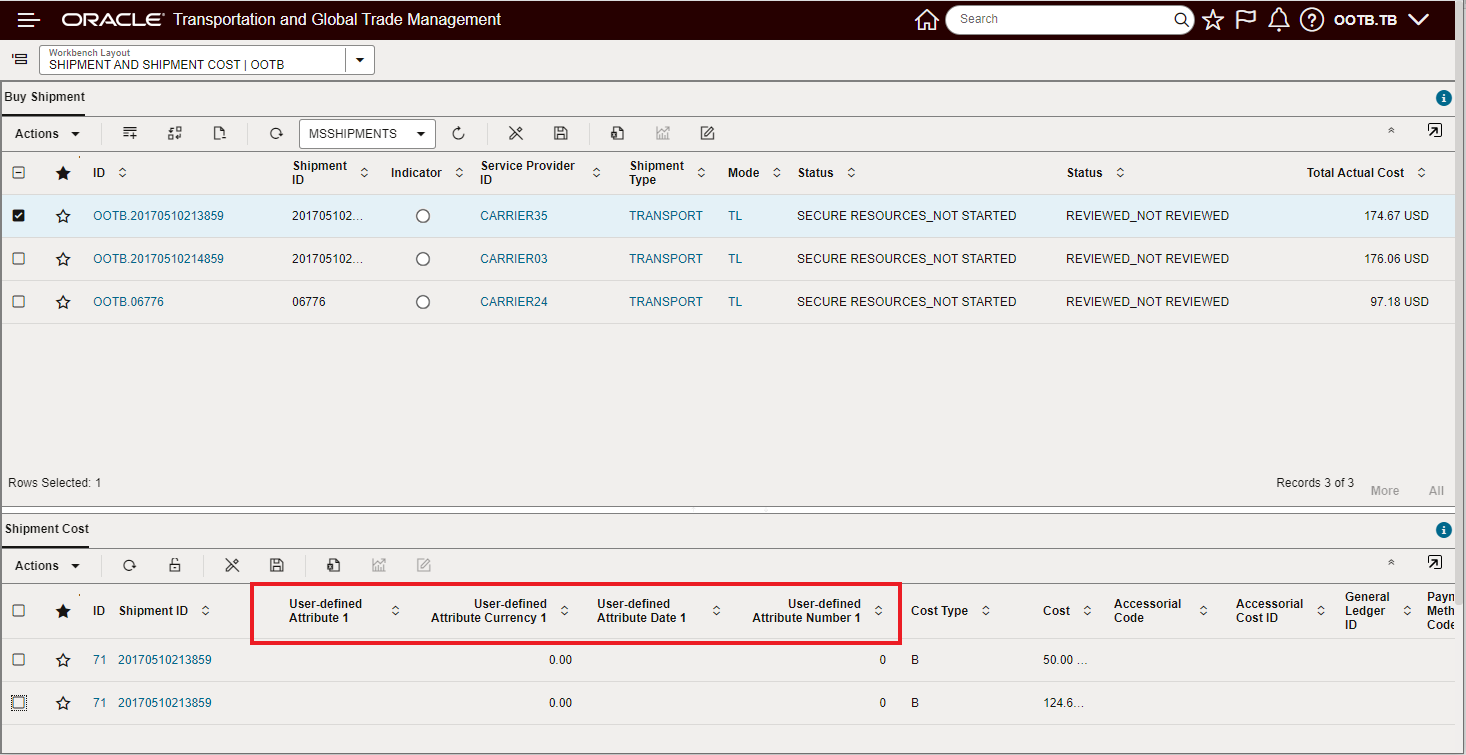
Shipment Cost With Attribute Fields - Workbench Example
You can also add the User Defined fields to your Shipment Manager (both Buy and Sell) Financials tabs. In the example below, the Sell Side Shipment Manager Layout has been configured to include a set of User Defined fields.
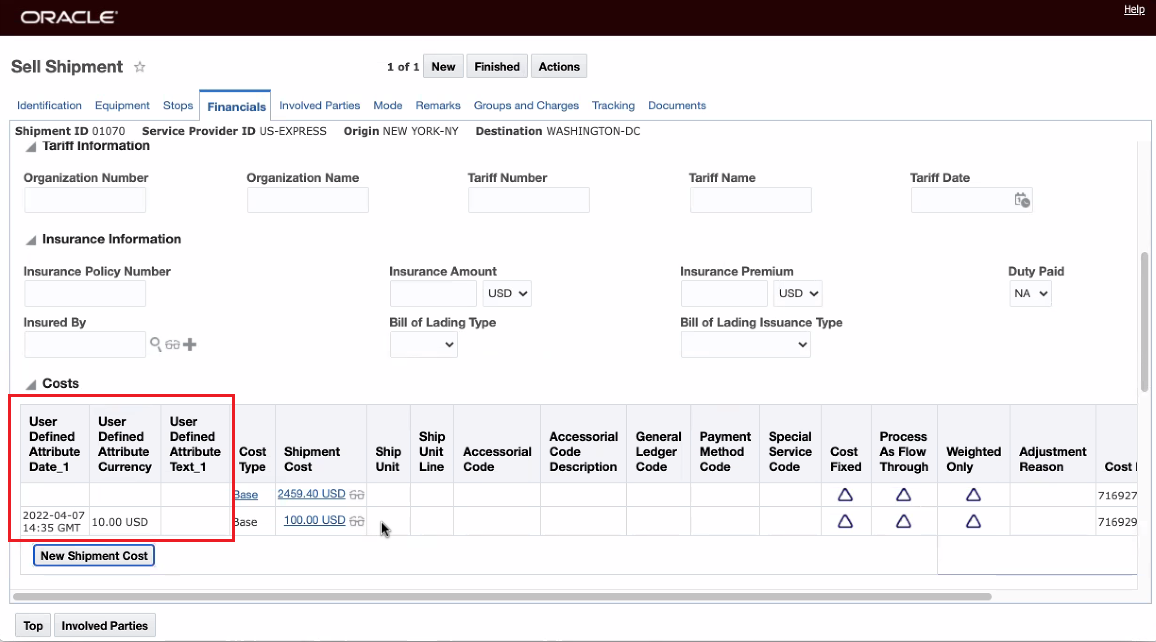
Shipment Cost User Defined Attributes Added to Shipment Manager Financials Tab
For Shipment Cost - the user defined fields can be added to the Manager Layout and Screenset for both Finder and Finder Results.
In the example below, the Shipment Cost Manager Layout (Edit) has been configured to include a set of User Defined fields in their own section of the screen.
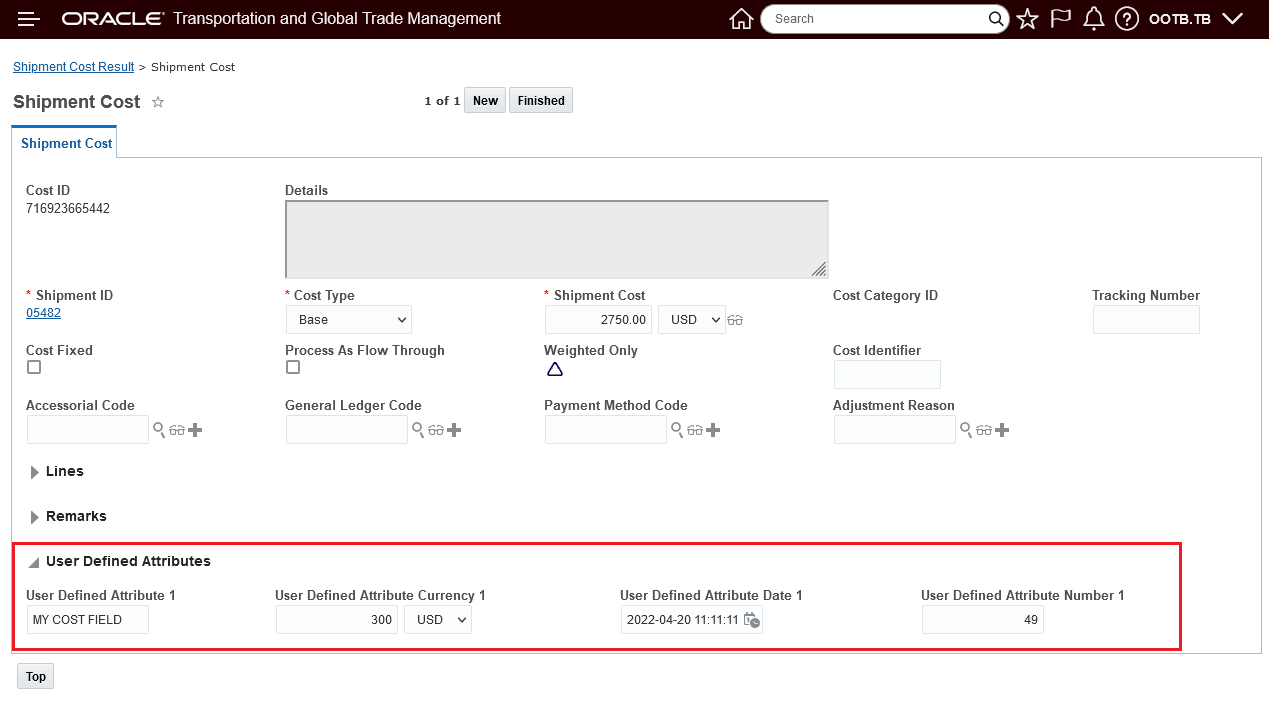
Shipment Cost Manager Layout Edit with User Defined Attribute Fields
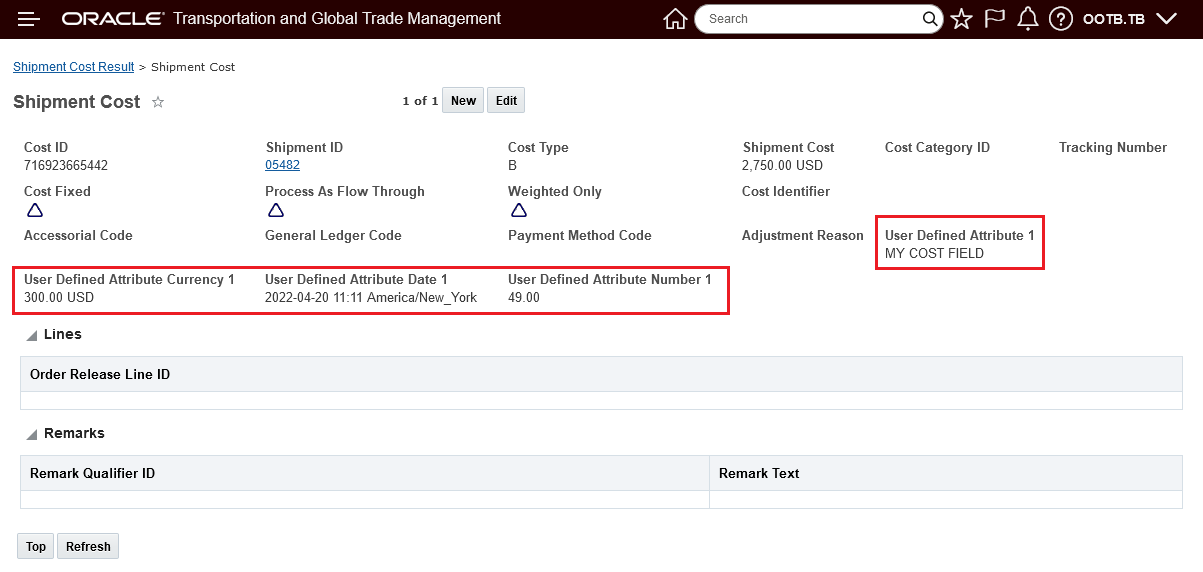
Shipment Cost Manager Layout View with User Defined Attribute Fields
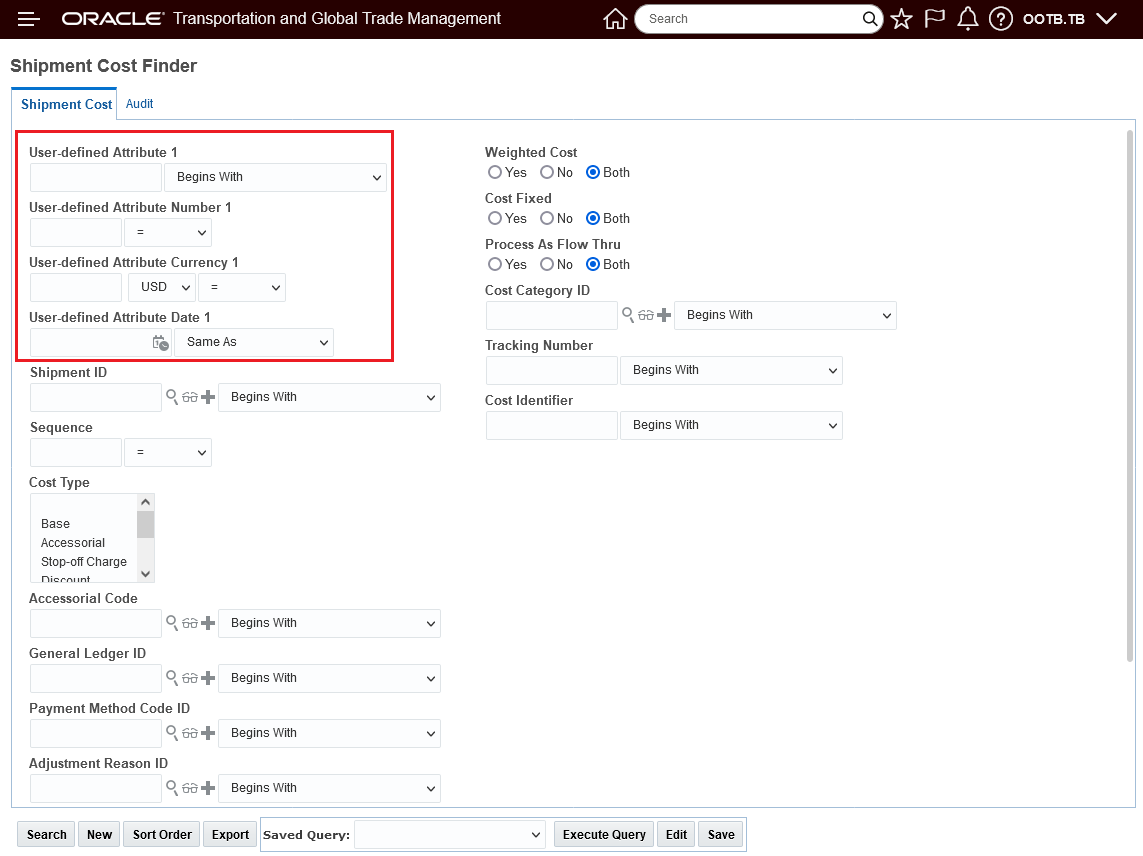
Shipment Cost Finder
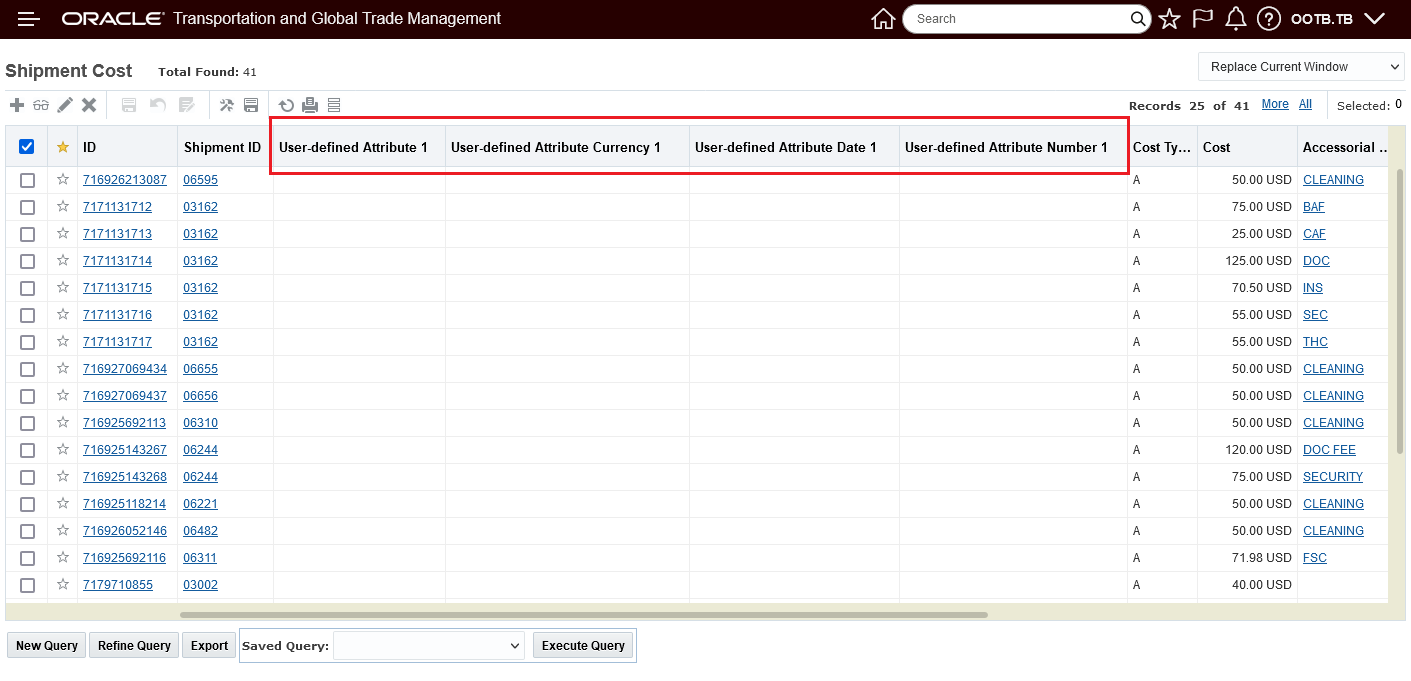
Shipment Cost Finder Results
Provides you with additional configuration options for capturing your own Shipment Cost attributes. The attributes captured can then be provided to other systems using XML or REST APIs.
Steps to Enable
You don't need to do anything to enable this feature.
Tips And Considerations
While the feature is provided ready to use - you will need to add the fields to your manager layout and screensets to take full advantage of the new capabilities provided by this enhancement.
Enable Allocation Parallel Processing
The Optional Feature Enable Allocation Parallel Processing, when enabled, will run the allocation process in parallel, when disabled, the allocations will be processed sequentially.
Provides improved performance for allocation processing.
Steps to Enable
You don't need to do anything to enable this feature.
Tips And Considerations
The optional feature "ENABLE ALLOCATION PARALLEL PROCESSING" is dependent on the optional feature "RAISE STATUS CHANGE EVENTS IN NEW PROCESS". When "ENABLE ALLOCATION PARALLEL PROCESSING" is enabled, "RAISE STATUS CHANGE EVENTS IN NEW PROCESS" is enabled automatically. If "RAISE STATUS CHANGE EVENTS IN NEW PROCESS" is disabled, "ENABLE ALLOCATION PARALLEL PROCESSING" is also disabled.
Subject Area - Open Tender Performance
This feature provides you with a new Subject Area - Open Tender Performance - that provides you with all the facts and dimensions required to develop Reports and Dashboards to analyze your Open Tenders (Broadcast and Spot Bid Tender) Performance.
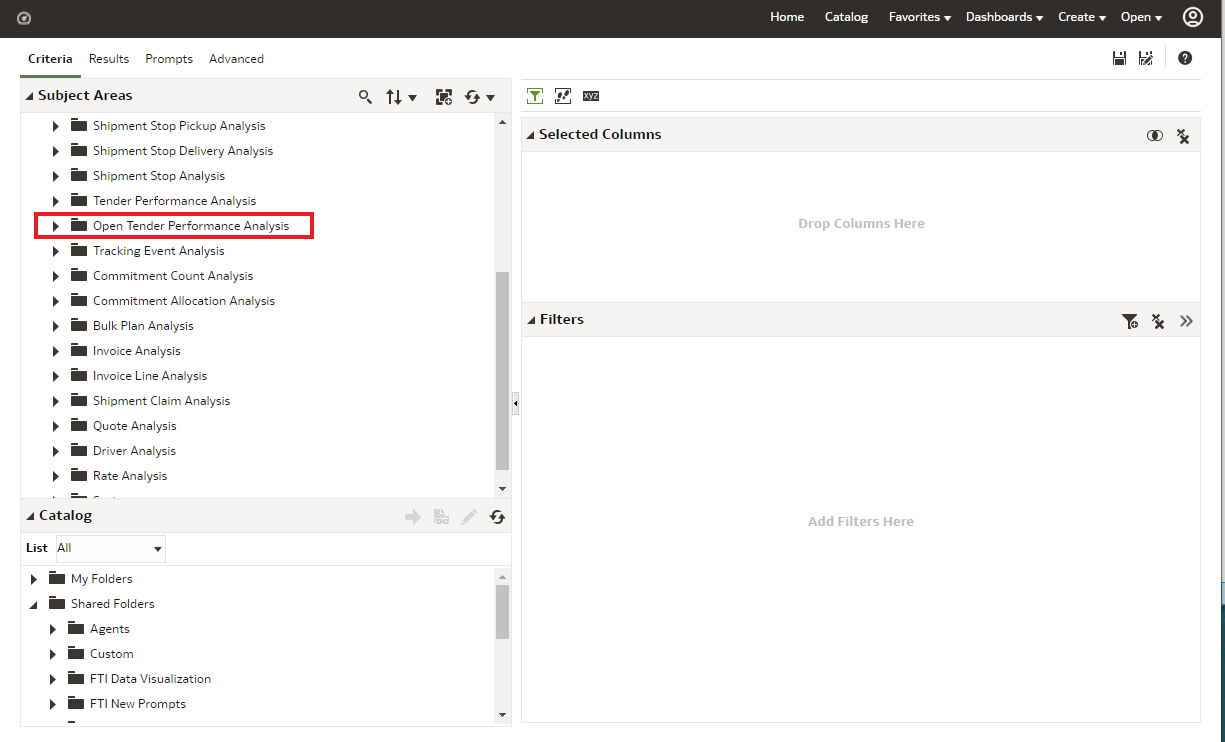
Open Tender Performance Subject Area
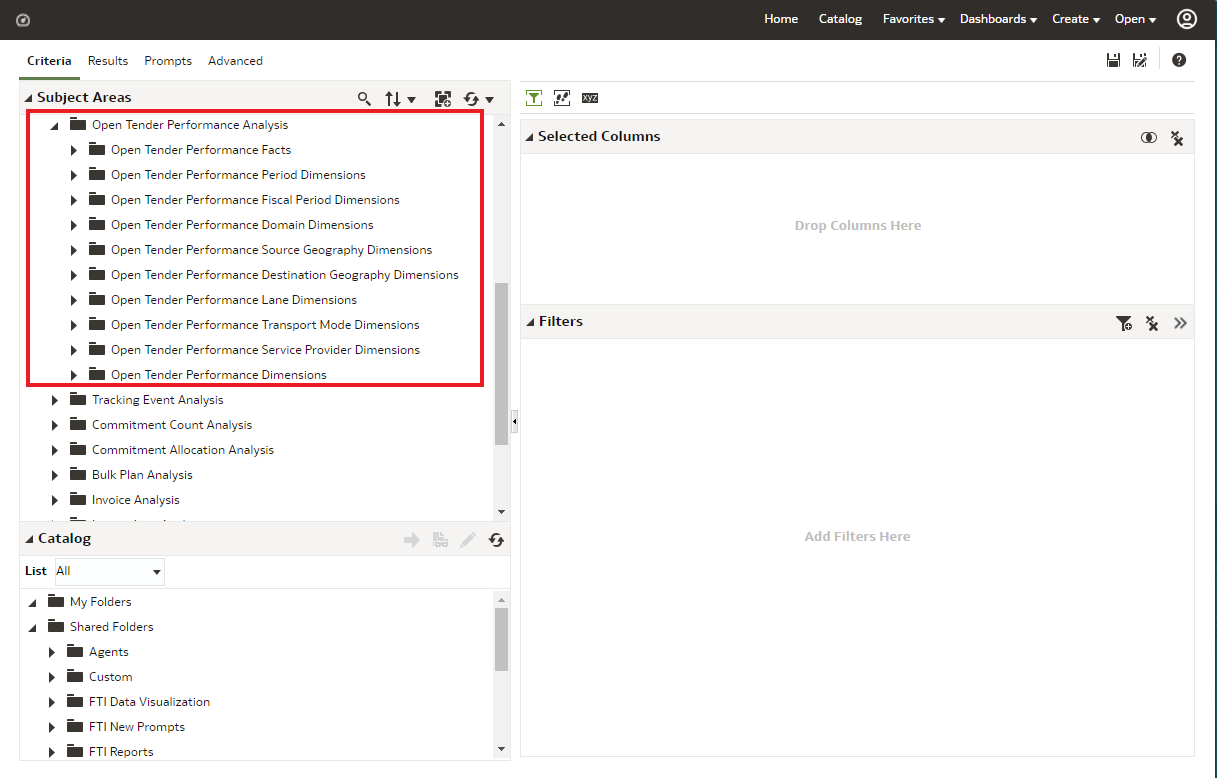
Open Tender Performance Subject Area
This feature improves the insights and analysis available to you for your Spot and Broadcast tendering activities by providing the unique set of facts and dimensions related to the Spot and Broadcast process.
Steps to Enable
You don't need to do anything to enable this feature.
Key Resources
- The facts and dimensions provide by the Open Tender Performance Subject Area have been used to develop the Public Spot Bid Workbench.