
- Revision History
- Overview
- Update Tasks
- Feature Summary
- Transportation Management
-
- Transportation and Global Trade Platform
- Transportation Management (Base)
- Transportation Operational Planning
- Freight Payment, Billing, and Claims
- Fleet Management
This document will continue to evolve as existing sections change and new information is added. All updates appear in the following table:
| Date | Module | Feature | Notes |
|---|---|---|---|
| 17 MAR 2023 | Created initial document. |
 HAVE AN IDEA?
We’re here and we’re listening. If you have a suggestion on how to make our cloud services even better then go ahead and tell us. There are several ways to submit your ideas, for example, through the Ideas Lab on Oracle Customer Connect. Wherever you see this icon after the feature name it means we delivered one of your ideas.
GIVE US FEEDBACK
We welcome your comments and suggestions to improve the content. Please send us your feedback at oracle_fusion_applications_help_ww_grp@oracle.com.
DISCLAIMER
The information contained in this document may include statements about Oracle’s product development plans. Many factors can materially affect Oracle’s product development plans and the nature and timing of future product releases. Accordingly, this Information is provided to you solely for information only, is not a commitment to deliver any material, code, or functionality, and should not be relied upon in making purchasing decisions. The development, release, and timing of any features or functionality described remains at the sole discretion of Oracle.
This information may not be incorporated into any contractual agreement with Oracle or its subsidiaries or affiliates. Oracle specifically disclaims any liability with respect to this information. Refer to the Legal Notices and Terms of Use for further information.
This section gives you information to help you plan, deploy, and validate your update. We make frequent additions to this document, so don’t forget to check back and get the latest information before your update starts.
Review the Release Notes
The release notes include fixes, special instructions, and resolutions related to the Oracle Fusion Cloud Transportation and Global Trade Management.
Read the Documentation
The documentation library contains the release notes, the online help, the implementation guides, the API guides, preparation and testing recommendations, and links to other resources.
Read On My Oracle Support
Use the following resources to prepare for and validate your Oracle Engagement Cloud update.
- Doc ID 2174060.2: Information Center: Oracle Transportation Management. This document aggregates publications as well as describing documentation, support, and integration options.
- Doc ID 796594.1: Oracle Transportation and Global Trade Management Documentation and Training Resources. Describes the published documentation available. Use this document to ensure that you leverage all existing resources to learn about, install, implement, and use this product.
- Doc ID 2195580.1: Oracle Cloud Applications - Transportation and Global Trade Management Cloud: Get Started with Your Implementation. Begin with this document to start your implementation.
- Doc ID 2095528.1: Oracle Cloud Applications - Transportation and Global Trade Management Cloud: Quarterly Update Planning. Describes standard quarterly update policies and practices.
- Doc ID 2096782.1: Oracle Cloud Applications - Transportation and Global Trade Management Cloud: Quarterly Update Planning FAQs. Helps with the understanding of the upgrade process.
- Doc ID 2095509.1: Oracle Cloud Applications - Transportation and Global Trade Management Cloud: Environment Refresh Policy. Describes how to prepare for and request an environment refresh.
Column Definitions:
Report = New or modified, Oracle-delivered, ready to run reports.
UI or Process-Based: Small Scale = These UI or process-based features are typically comprised of minor field, validation, or program changes. Therefore, the potential impact to users is minimal.
UI or Process-Based: Larger Scale* = These UI or process-based features have more complex designs. Therefore, the potential impact to users is higher.
Features Delivered Disabled = Action is needed BEFORE these features can be used by END USERS. These features are delivered disabled and you choose if and when to enable them. For example, a) new or expanded BI subject areas need to first be incorporated into reports, b) Integration is required to utilize new web services, or c) features must be assigned to user roles before they can be accessed.
Transportation and Global Trade Platform
Improvements to Enhanced Workbench
This feature provides a set of new capabilities and features for the Enhanced Workbench. Improvements have been provided in several areas, including:
- Table - Content Details - Default First Row Selected/Not Selected Option
- Table - Filter on Table and Action Selection Enhancement
- Dock Scheduling Gantt Usability - Refocus Gantt after running actions
- Dock Scheduling Gantt Usability - Unblock Slot UI Action
- Gantt Usability - Hover Text Configuration
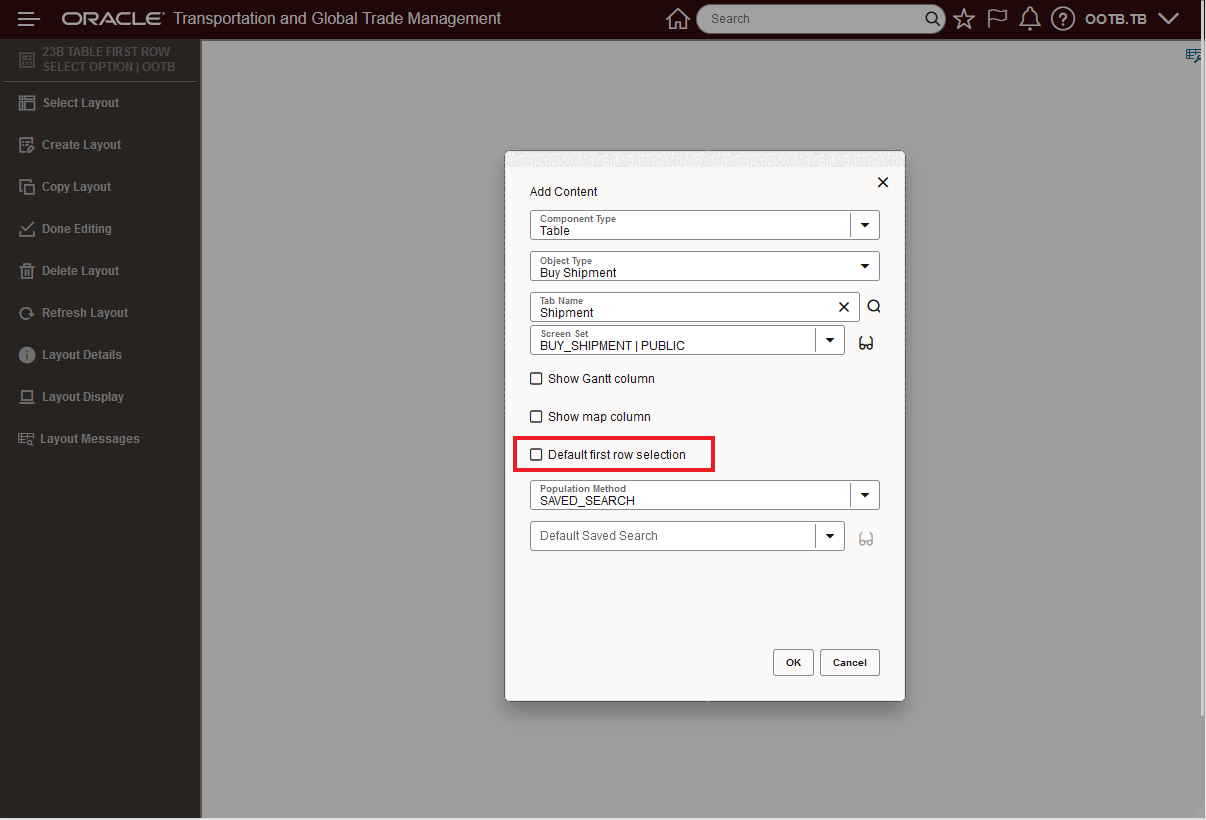
Table - Content Details - Default First Row Selected/Not Selected Option
This feature provides you with the option of having the first row of data in an Enhanced Workbench table default to being selected or not selected. In previous versions of the Enhanced Workbench, by default, the first row of data in a table was always selected, this feature allows for the default behavior to be that the first row of data in the table is not selected by default. Removing the first record default selection should help eliminate the accidental inclusion of the first row of data when running actions. Your existing/previously created Enhanced Workbenches will have the Default first row selection on by default (previous behavior), for newly added Table Content the Default first row selection will be deselected by default (new behavior).
In the example below, the Enhanced Workbench is setup with a parent child relationship to demonstrate the new behavior. In the first example, the setup supports the new default behavior - Default first row selection - not checked.
Parent Table Setup - Default First Row Selection - Not Checked
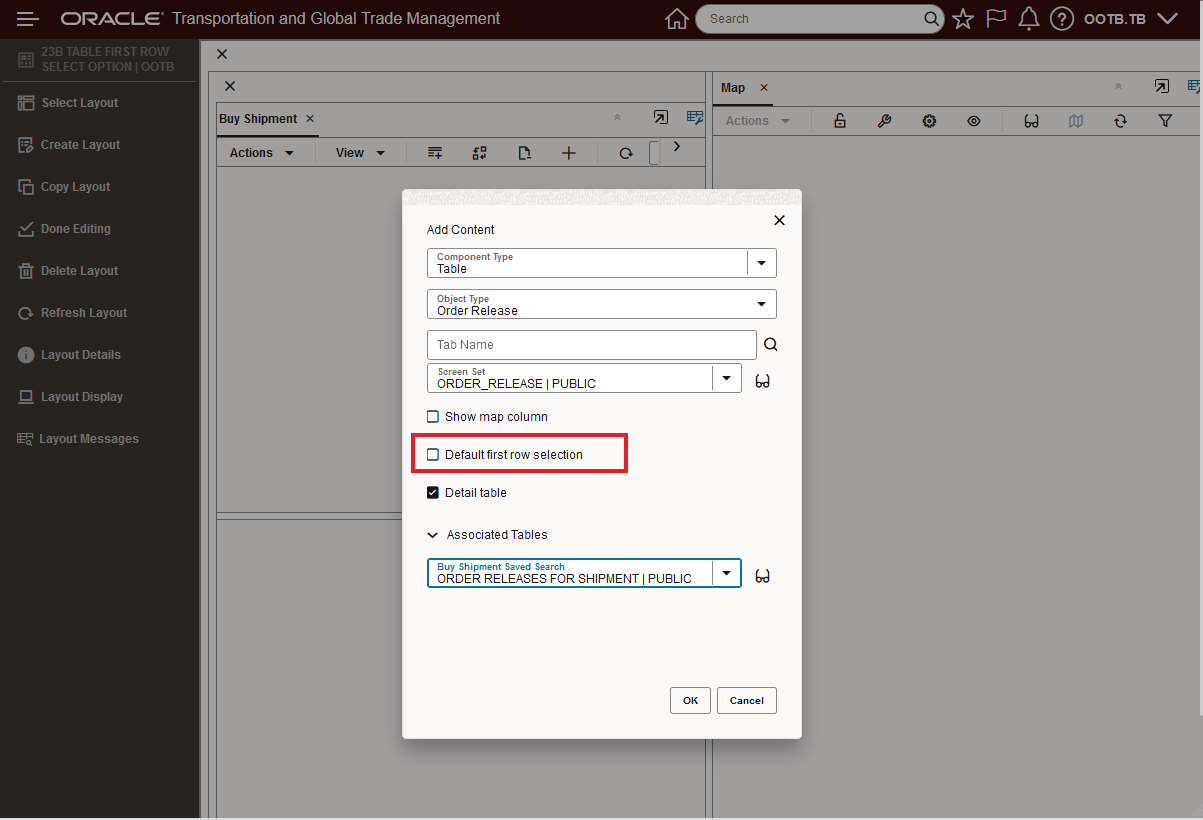
Child Table Setup - Default First Row Selection - Not Checked
When the Enhanced Workbench with the Table Details configured above is opened, note that the first record in the Parent Table is not selected. Also note that since the first record is not selected no records are displayed in the related Order Release child table.
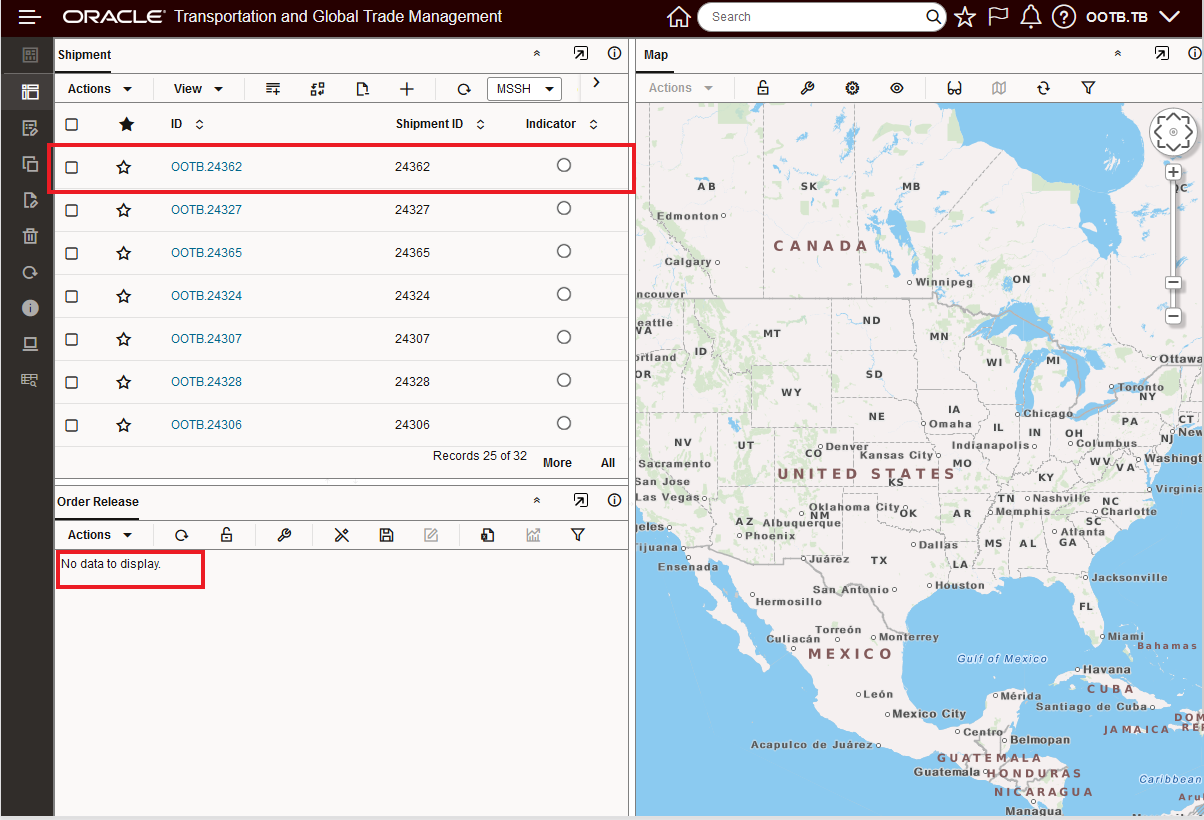
Enhanced Workbench Behavior with Default First Row Selection Not Selected
Below, for comparison, is the previous default behavior with the first row automatically selected.
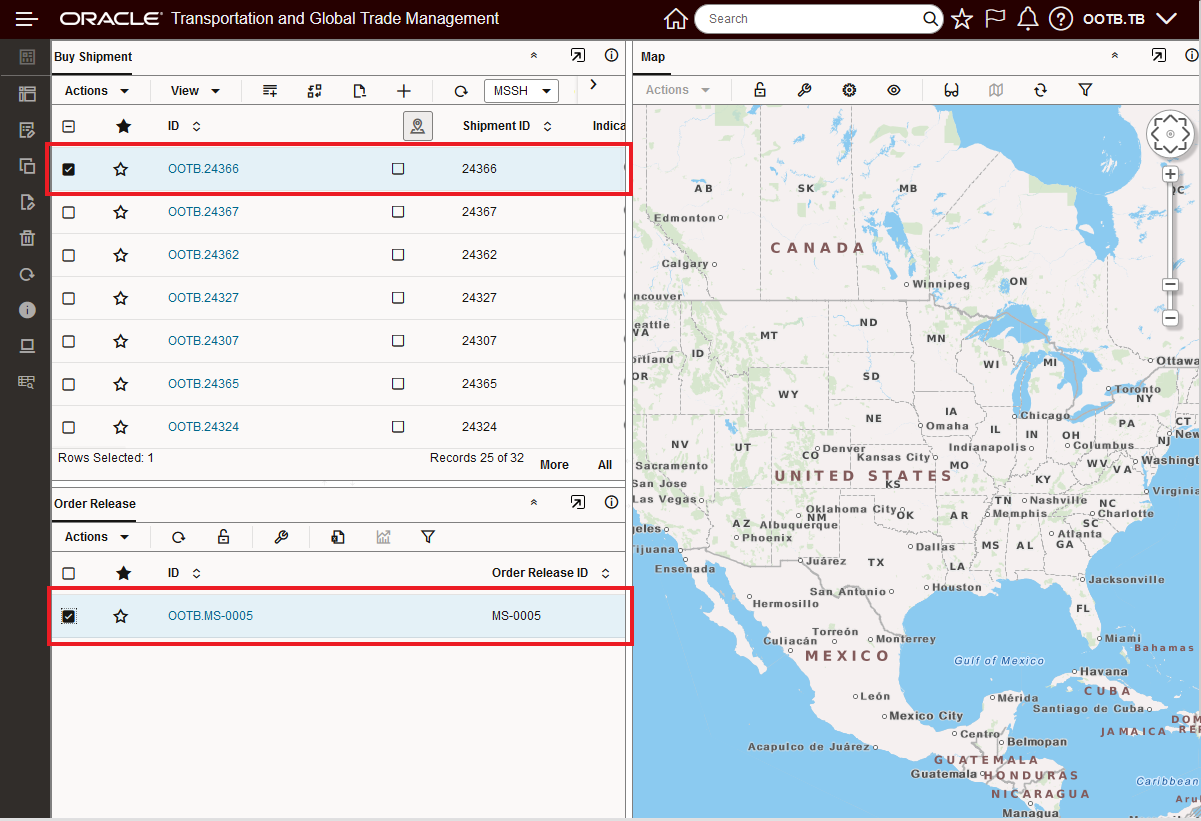
Enhanced Workbench with Default First Row Selection Selected
Table - Filter on Table and Action Selection Enhancement
The interaction between your Filtered Set and the selection of rows for running an Action has been improved. Now, the selected records for running actions will be based on the unfiltered and filtered set of rows provided. In addition, as you switch between an unfiltered to filtered view or filtered to unfiltered view, any selections you have made when you switch between unfiltered to filtered or filtered to unfiltered will be cleared.
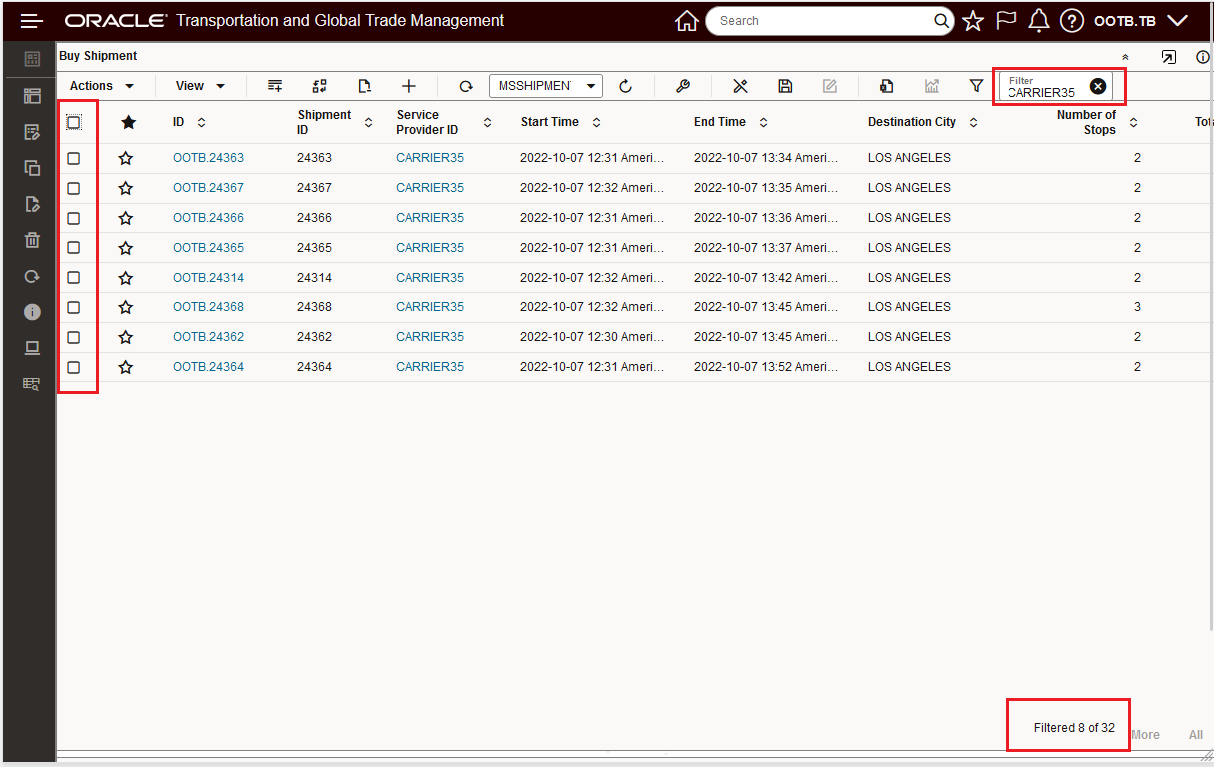
In the example below, the total shipments returned by the saved query (MSSHIPMENT) is 32, when the table is filtered to the text string CARRIER35 there are only 8 rows that meet that filtered criteria. When you now Select All in the filtered view - only the 8 filtered records are selected and will be acted on. To demonstrate the change, the Export action is used in the example below.
Previously, the filtered view only changed the view to the rows displayed, but filtering did not change the set of rows considered available for selection - so a Select All on an filtered view or an unfiltered view would result in the same set of records being selected. In the example below, previously - filtering the set of records down to the 8 record view and then doing a Select All would have resulted in selecting all 32 records, not just the 8 filtered records, with this change - the Select All considers the filtered view as the set to select from.

Shipment Table 32 Rows Returned and Selected
In the example above, all 32 records are selected, when you filter for CARRIER35 - the filtered view of 8 records is shown.
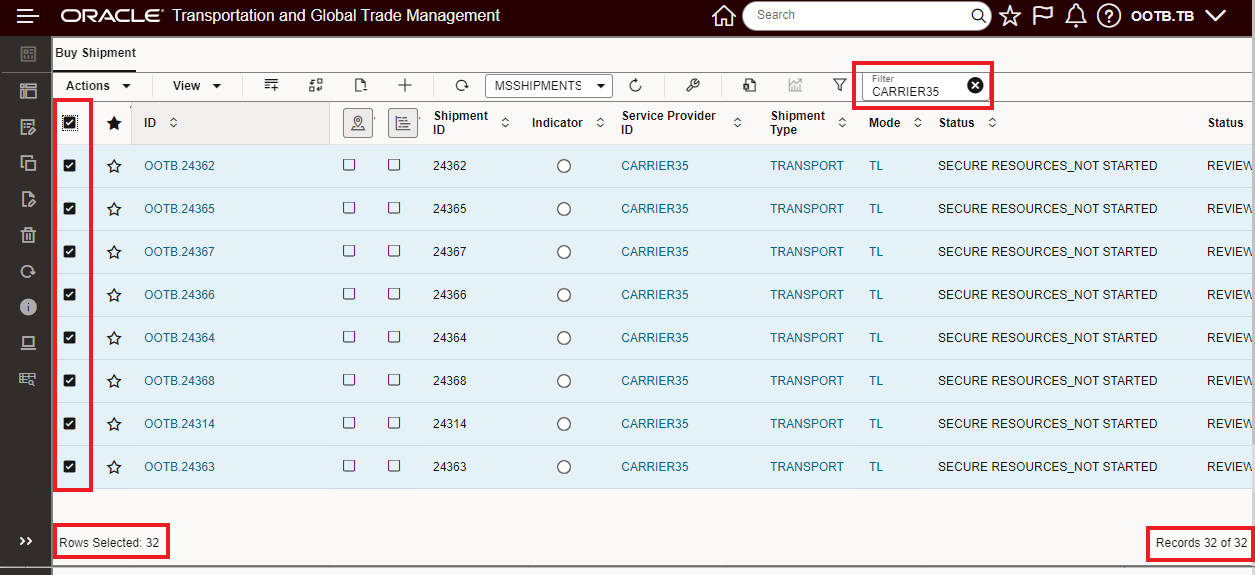
NOTE: Switching between the unfiltered view - above, to the filtered view below, deselects any records selected.
Select All Cleared Filtered Set Shown
When you Select All with the filtered set, only the records in the filter set - in this case the 8 records - will have the action run against them. In this example the Export was used to demonstrate how this works.

Select All for Filtered Set Runs on Filtered Set
NOTE: In previous versions of the software, the same set of actions above would have resulted in the unfiltered set (all 32 records) being acted rather than just the filtered set.
Previous Behavior - Select All Selects All Returned vs Filtered Selection
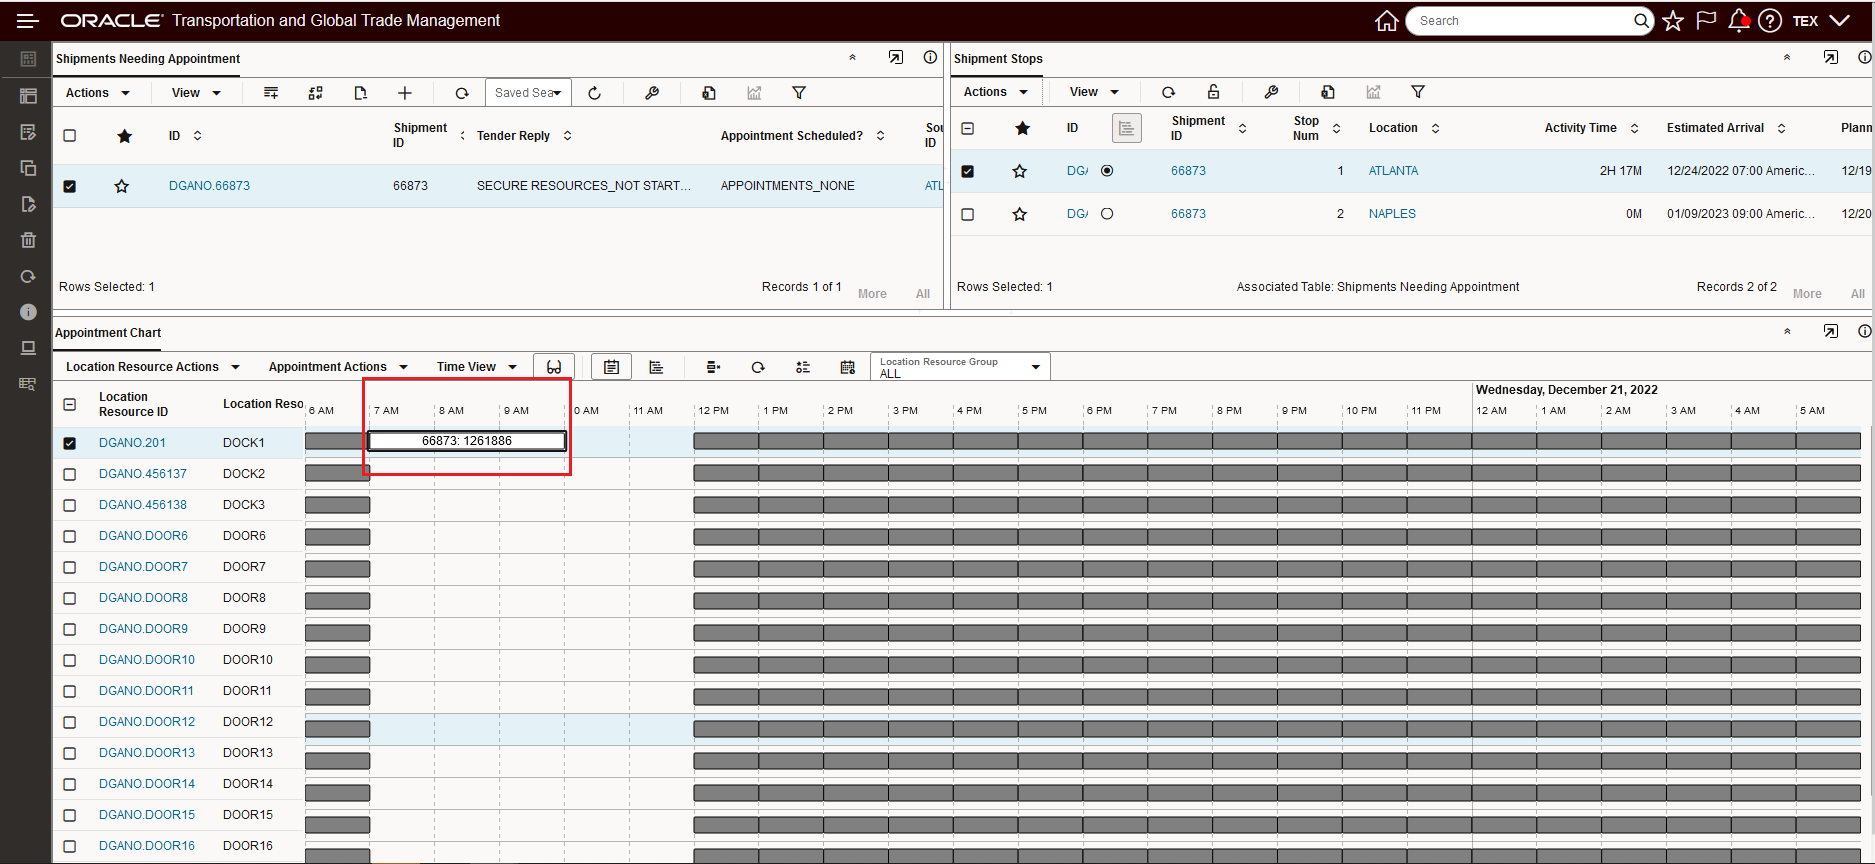
Dock Scheduling Gantt Usability - Refocus Gantt After Running Actions
This feature will refocus the Gantt to show the time range related to the result of action being run. In the example below, the initial focus is on Wednesday December 21st and Thursday December 22. In this example, an appointment will be scheduled for the 20th and the Gantt will automatically refocus to the slot where the appointment has been scheduled.
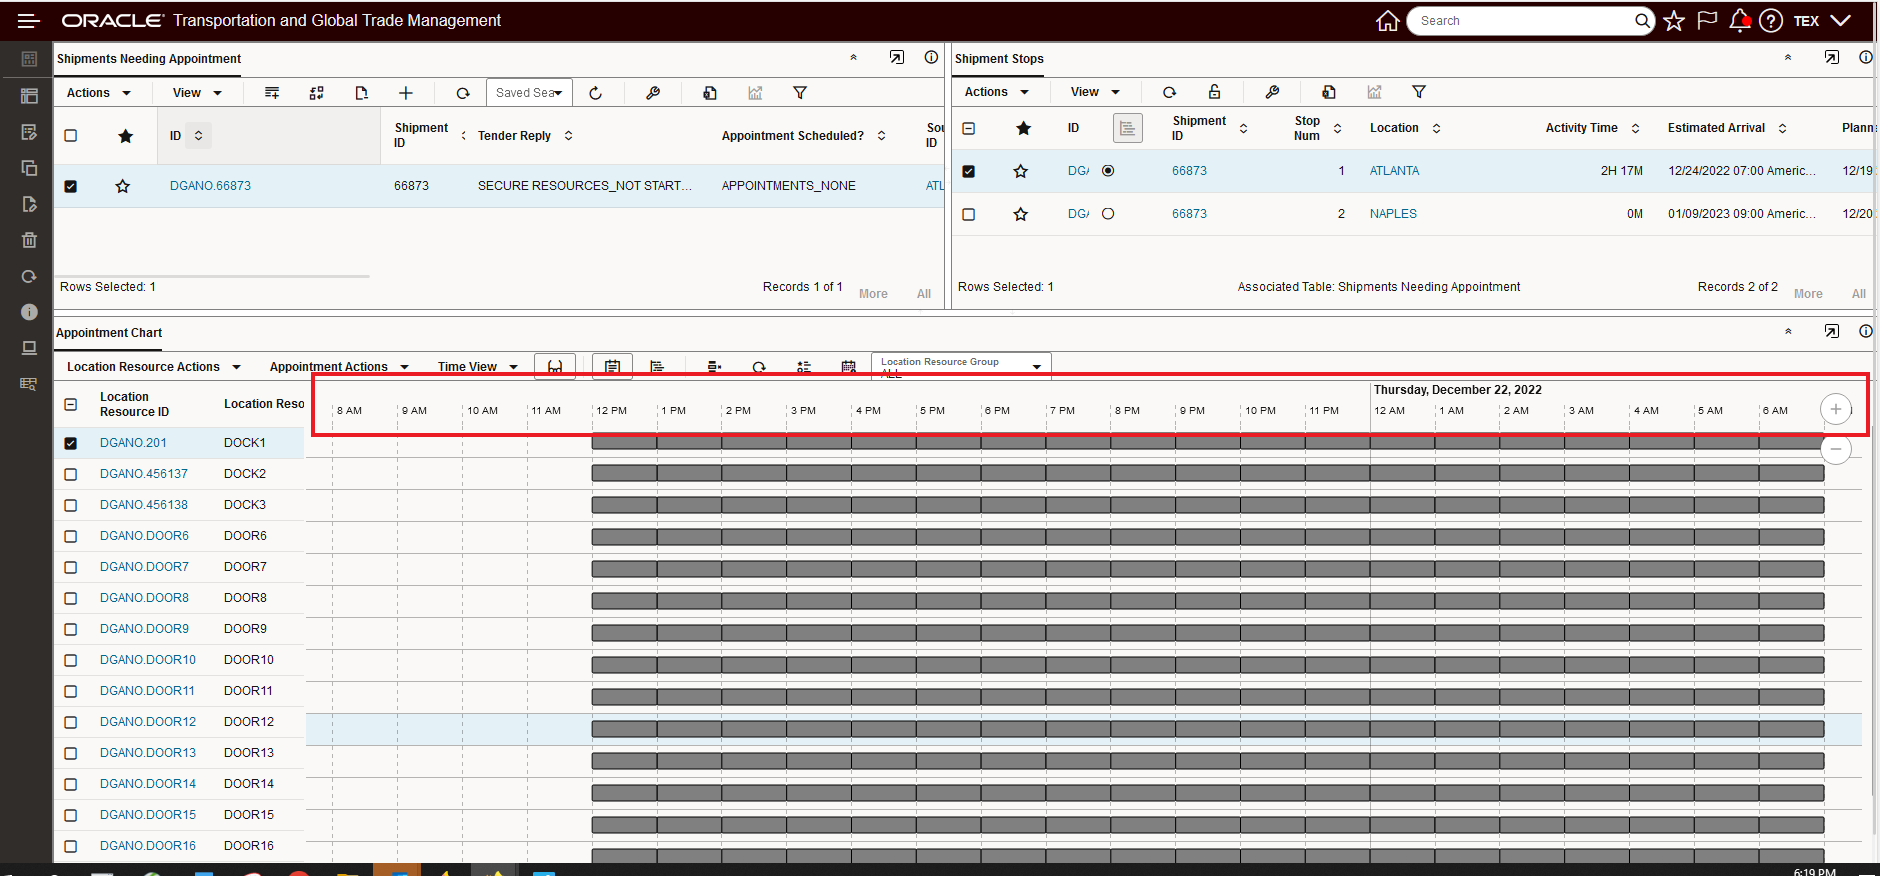
Initial Focus
The shipment stop's appointment is being scheduled for 7:00 AM on the 20th.
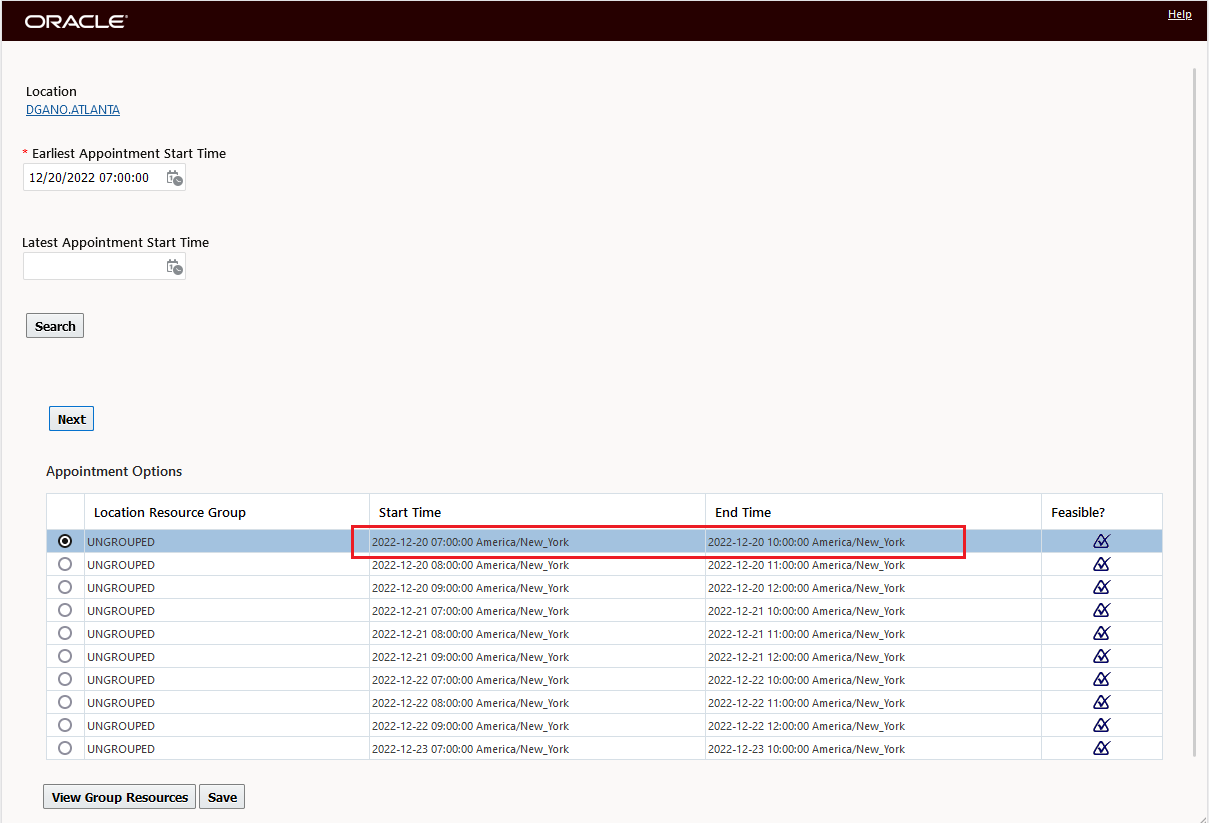
Schedule Appointment
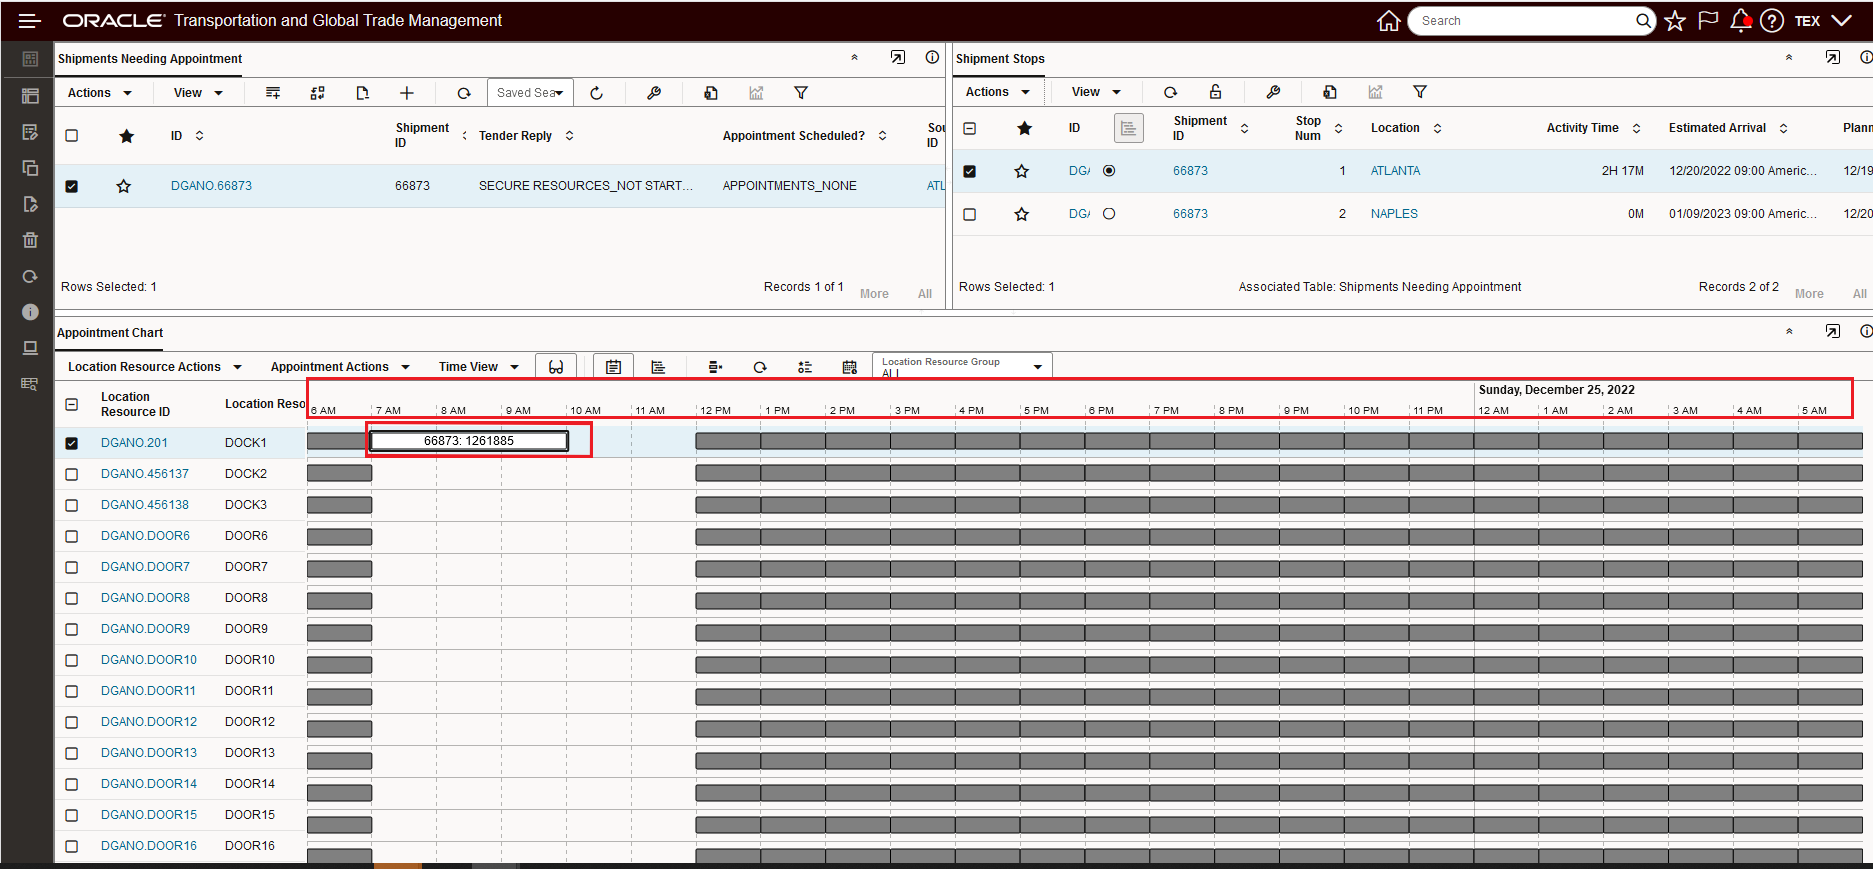
The resulting refocused Gantt is below.
NOTE: The Gantt has shifted to the left to the 20th to show the schedule appointment.
Refocused Gantt
In the example below, the action will result in shifting the focus beyond what was visible on the Gantt before running the action - in this scenario - before refocusing - there is a check to make sure you want to change the focus and the visible time range.
Start Time for Appointment Adjusted Outside of Current Range
Before adjusting the focus to a new Time Range/outside of the current Time Range Monday/Tuesday 19th/20th, the system checks to make sure the re-focus is okay.

Refocus Outside of Range Warning
Refocused Time Range below, 24th/25th.
Refocused Time Range
Dock Scheduling Gantt - Unblock Slot UI Action
This enhancements provides an Unblock Slot UI Action which is a complementary UI action to the recently added Block Action. In the example below, the new Unblock UI Action will be used to Unblock Dock2 for the 7:00 AM to 9:00 AM slots.
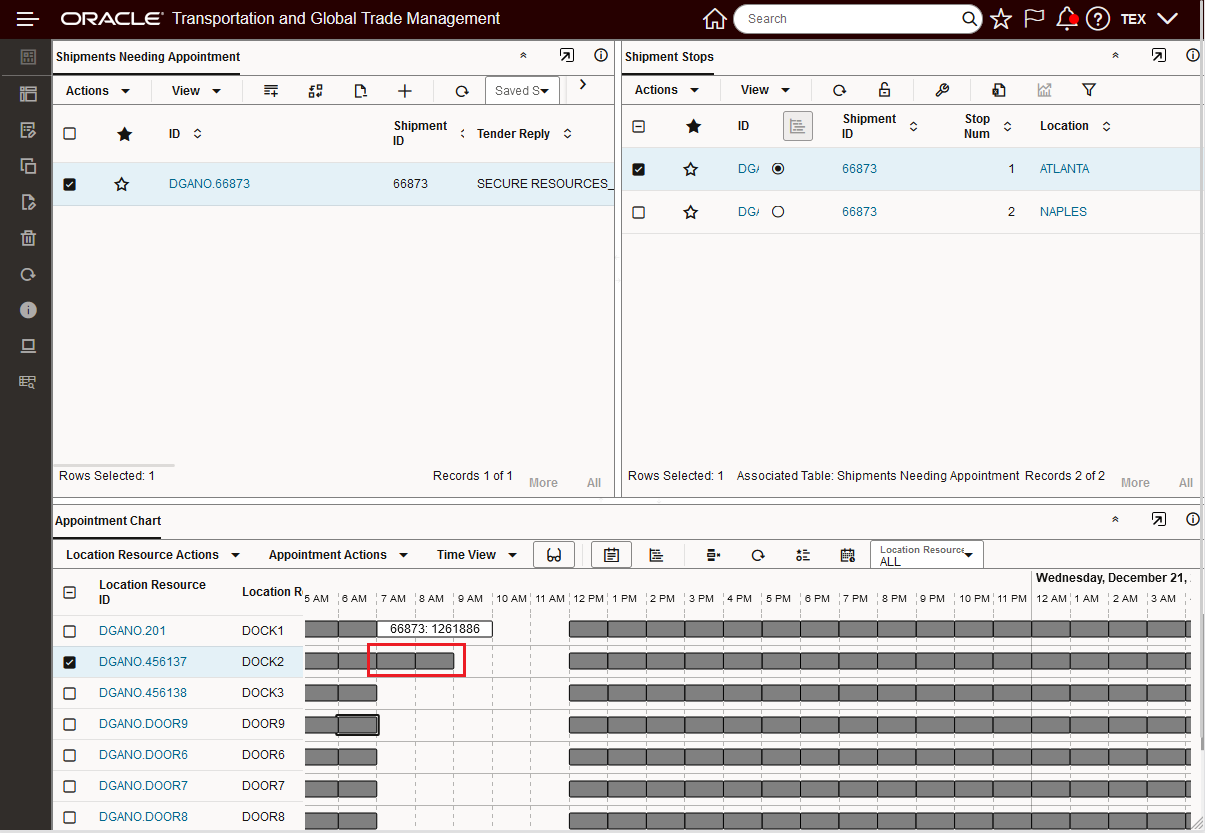
Block Dock2 From 7:00 AM to 9:00 AM
To initiate the Unblock Action, select it from the Location Resource Actions menu, as shown below.
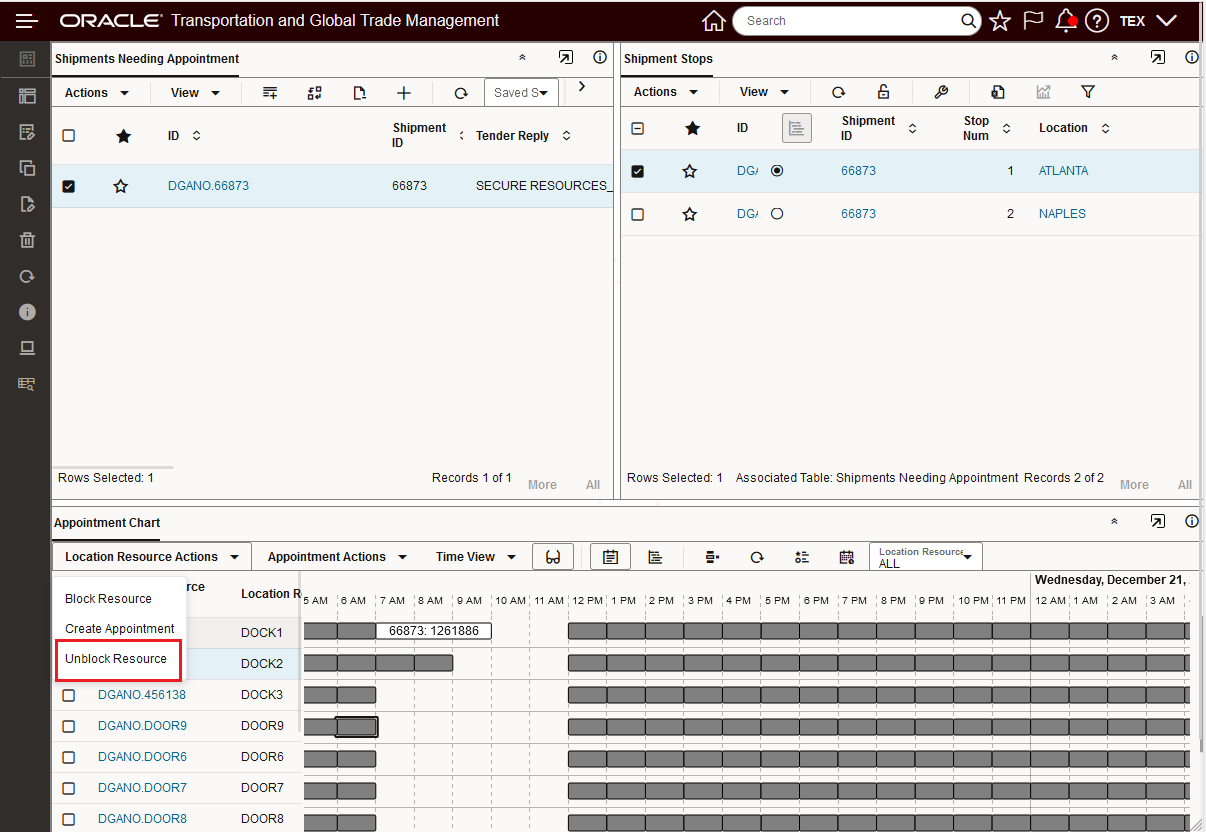
Location Resource Actions Unblock Resource
Enter in the Start and End Time for the range to be Unblocked and then select the arrow to initiate the action.
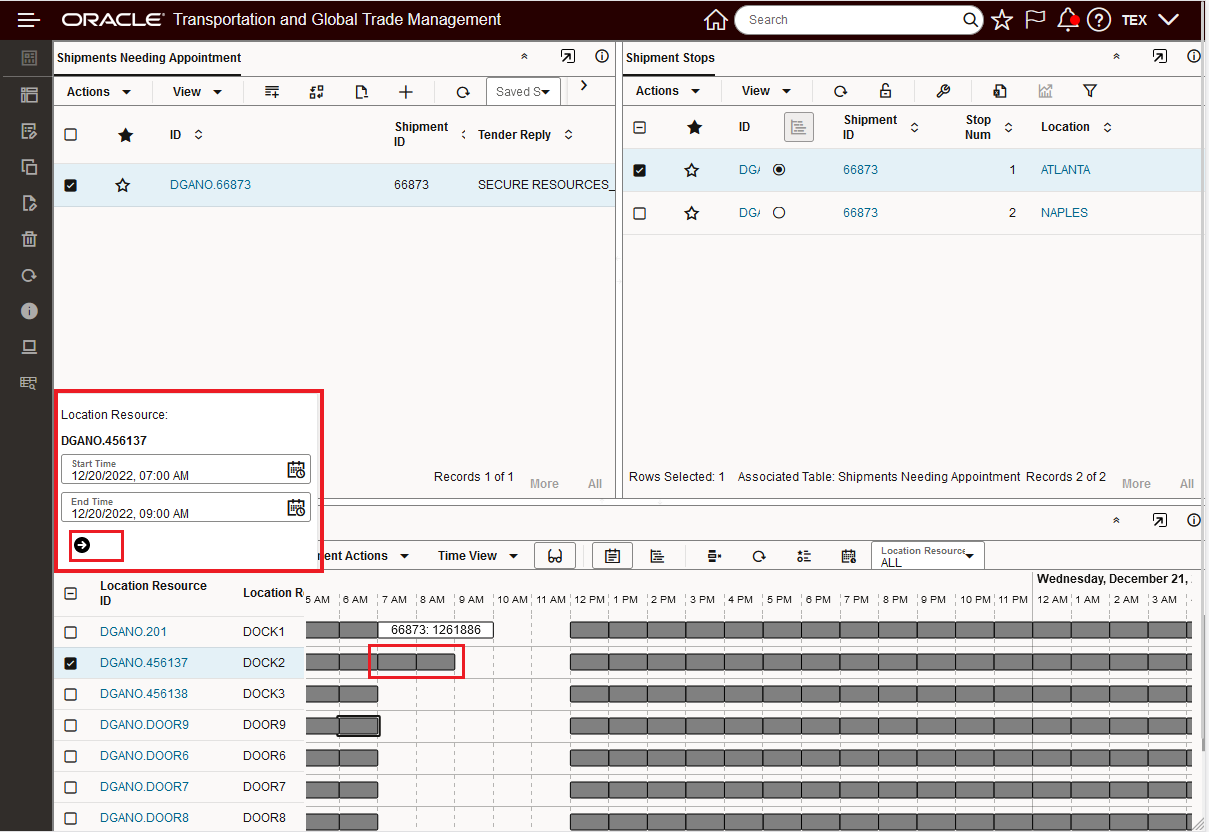
Unblock Resource Action Input
The result is below, Dock2 is now Unblocked between 7:00 AM and 9:00 AM as shown below
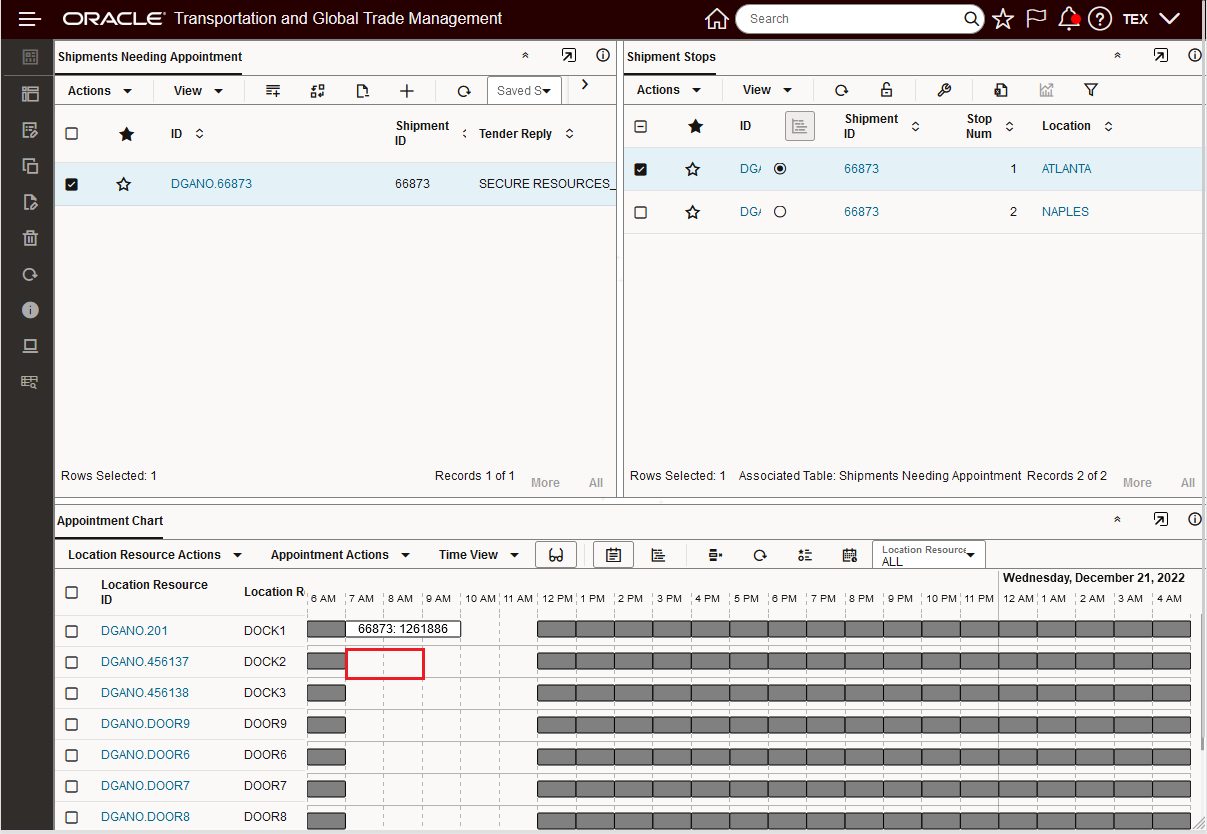
Unblock Action Complete
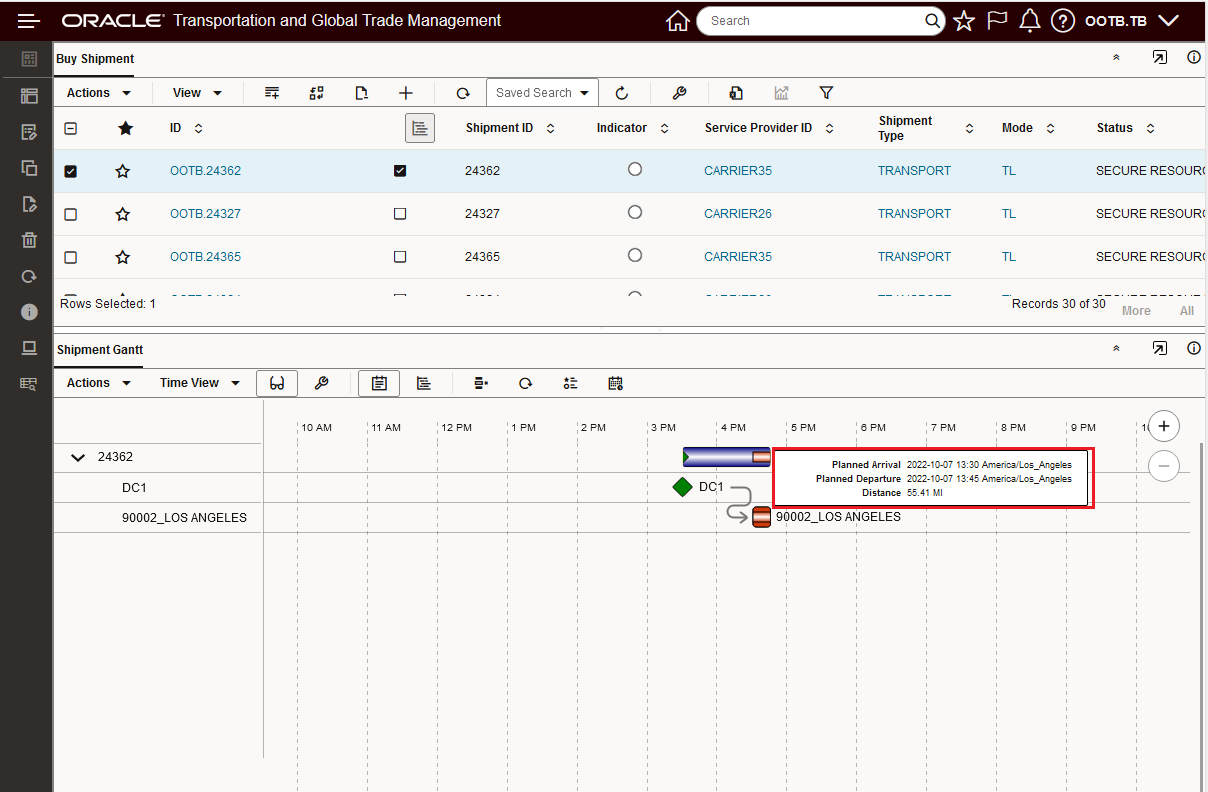
Gantt Hover Text
This feature provides you with several options for configuring the Hover Text displayed in your Gantts - Shipment, Work Assignment or Driver. You have the option of configuring the Hover Text based on the Public Screen Set (the default behavior), or you can configure and select your own Screen Set to use for the Hover Text or you can use both the Public Screen Set and your configured Screen Set to identify the fields to display in the Hover Text.
Hover Text Configuration Options:
- Public Screen Set
- Configured Screen Set
- Public Screen Set and Configured Screen Set
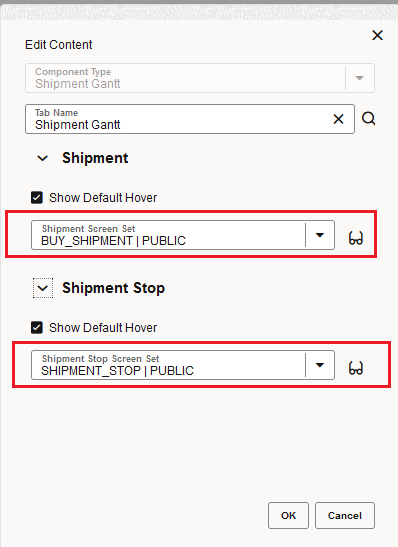
In the example below, the Shipment Gantt will be used to demonstrate the capabilities, the same pattern is provided for all of the Gantts and their related Hover Text enabled objects.
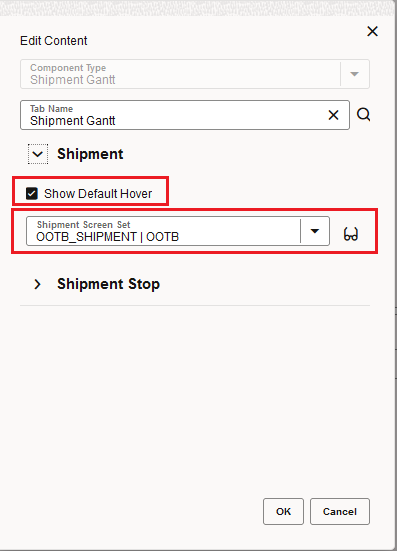
The Shipment Gantt default configuration is shown below. In this setup, the default Public Screen Sets for both the Shipment and Shipment Stop are used to configure the Hover Text. In this specific setup, the setup is redundant since the option to Show Default Hover and the selected Screen Set to use will use the same Public Screen Set - BUY_SHIPMENT. The option to Show Default Hover comes into play when you want the Hover Text to include both the fields configured for Hover Text in the Public Screen Set plus the fields configure in your configured Screen Set.
NOTE: The Edit Content UI requires that a Screen Set be selected, so there is not an option to Show Default Hover, but not select a Screen Set.
Configuring the Hover Text
Below is the Hover Text shown for the Public Buy_Shipment Screen Set.

Hover Text Shipment - Default Public Screen Set
Below is the default Hover Text displayed for the Shipment Stop.
Hover Text Shipment Stop - Default Public Screen Set
In the example below - both the Default Public Screen Set and the Configured Screen Set have been selected to provide the Hover Text displayed for the shipment. The top set of fields are coming from the Public Screen Set via the Show Default Hover option and the bottom set of fields are provided by the configured Screen Set selected in the Content Details setup screen.
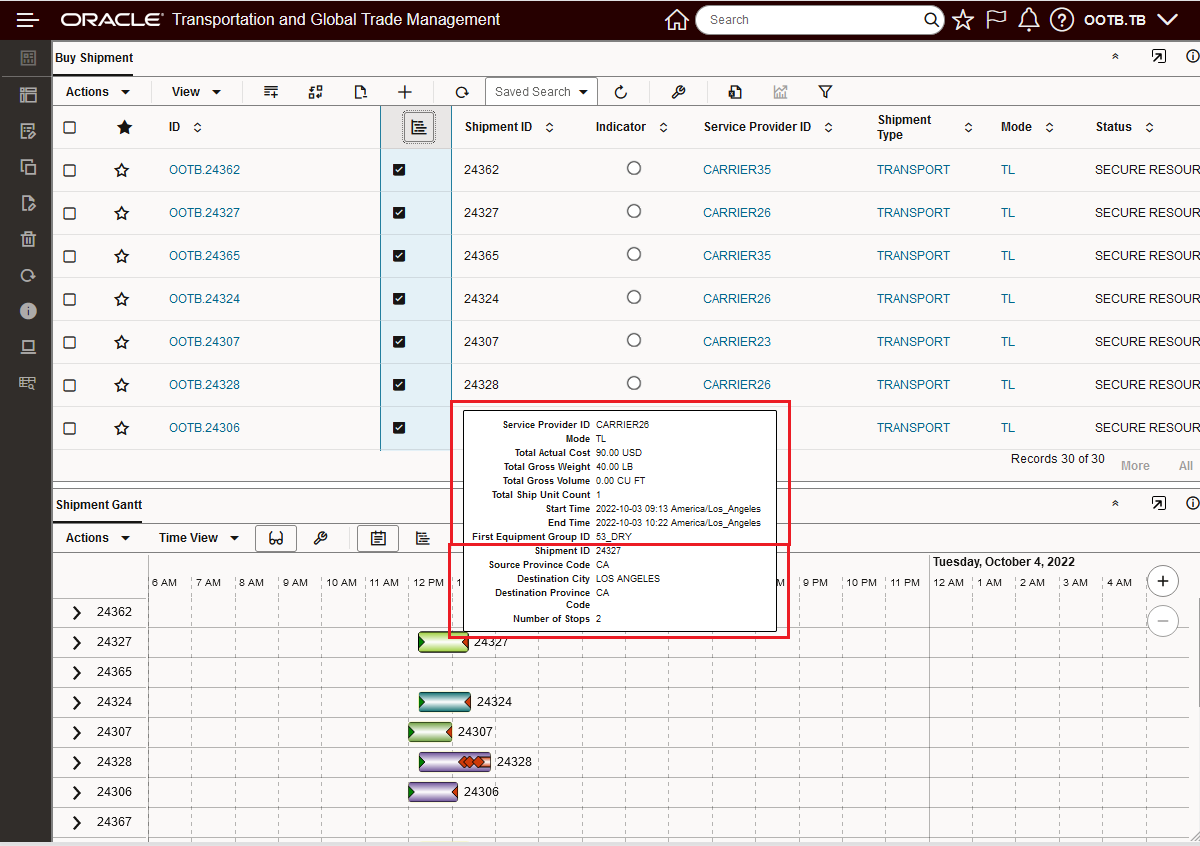
Show Default Hover Plus Configured Screen Set Hover Text
The configuration for the above Hover Text setup is below. The Show Default Hover option includes the fields configured with the Include In Hover Text checked in the Public BUY_SHIPMENTS Screen Set. The additional fields Included In Hover Text fields come from the configured OOTB_SHIPMENT Screen Set fields that have been configured with the Include in Hover Text checked.
Show Default Hover Plus Configured Screen Set Hover Text
Below is the OOTB_SHIPMENT Screen Set used in the Shipment Hover configuration above. All of the highlighted fields (red and blue) for this Screen Set have the Include in Hover Text option selected, but only the fields highlighted in red will extend the fields included in the Hover Text since the fields in blue are already included in the Public Screen Set and as such are covered by that Screen Set.

Screen Set OOTB_SHIPMENT
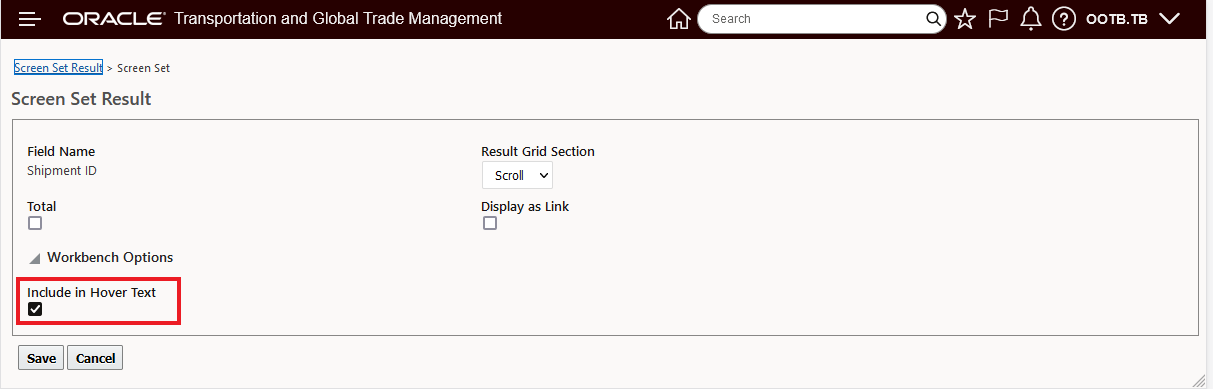
To configure a Field to include as Hover Text - select More for the field, and then check the Include in Hover Text, as shown below for the Shipment ID.
Include in Hover Text
In the example below, the option to Show Default Hover is unchecked, in this setup only the Screen Set selected in the drop down - the OOTB_SHIPMENT Screen Set - will be used to configure the Hover Text shown.
Show Default Hover Unchecked
With the configuration above - only the Include in Hover Text fields configured for the OOTB_SHIPMENT Screen Set are shown.
Hover Text Defined in Configured Screen Set
This feature provides additional features and usability improvements for the Enhanced Workbench - giving you more options for implementing Enhanced Workbenches to support more use cases and users.
Steps to Enable
You don't need to do anything to enable this feature.
Tips And Considerations
NOTE: The Enhanced Workbench relies on REST calls to access data, due to the current security infrastructure, the following additional setup is required.
- For users with any role other than ADMIN and DEFAULT the following Access Controls are necessary and can be added to the User Role or directly to the User:
- REST – Workbench
- Workbench – Create
- This is required only for Add/Delete
- Can also revoke the ability to Add/Delete
Document Set - Send Multiple Documents for Same Document Type
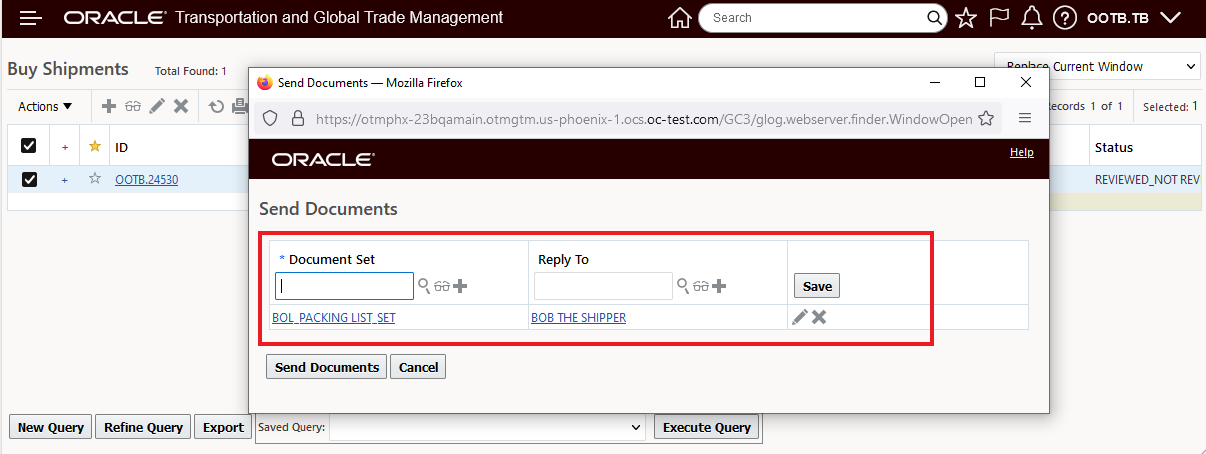
This feature enhances the Document Set capabilities to include the option of sending multiple documents (Ad Hoc documents) of the same Document Type when you run the Send Documents action or agent action for your Document Set.
In the example below, the BOL_PACKING LIST_SET Document Set has been created with two Document types. The Packing List - Report Document Type has the option to Allow Multiple Documents selected and the second Document Type BOL does not. When this Document Set is assigned to a shipment and if there are multiple documents assigned to the shipment for the Packing List - Report Document Type then the multiple documents assigned for that Document Type will be sent when the action Send Documents is run for the BOL_PACKING LIST_SET Document Set.
Document Sets Allow Multiple Documents Option
In the shipment below - with the Document Set BOL_PACKING LIST_SET assigned, all three of the Packing List - Report Document Types assigned to the shipment will be sent, along with the assigned BOL Document Type.

Shipment Documents - Multiple of the Same Document Type - Packing List - Report
Running the Send Documents action. First you select the Document Sets option - as shown below.
Send Document Action- Select Document Set Option
Next, select the Document Set to use - in this case BOL PACKING LIST SET.
Select Document Set
Then select Send Documents.
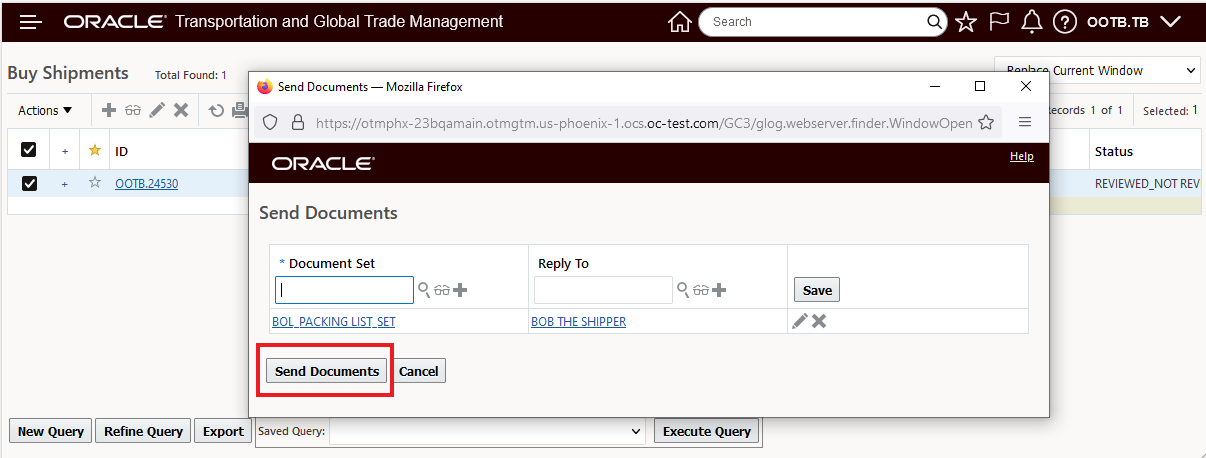
Send Documents
The result is below - an email with all four documents, BOL and the three Packing Lists.
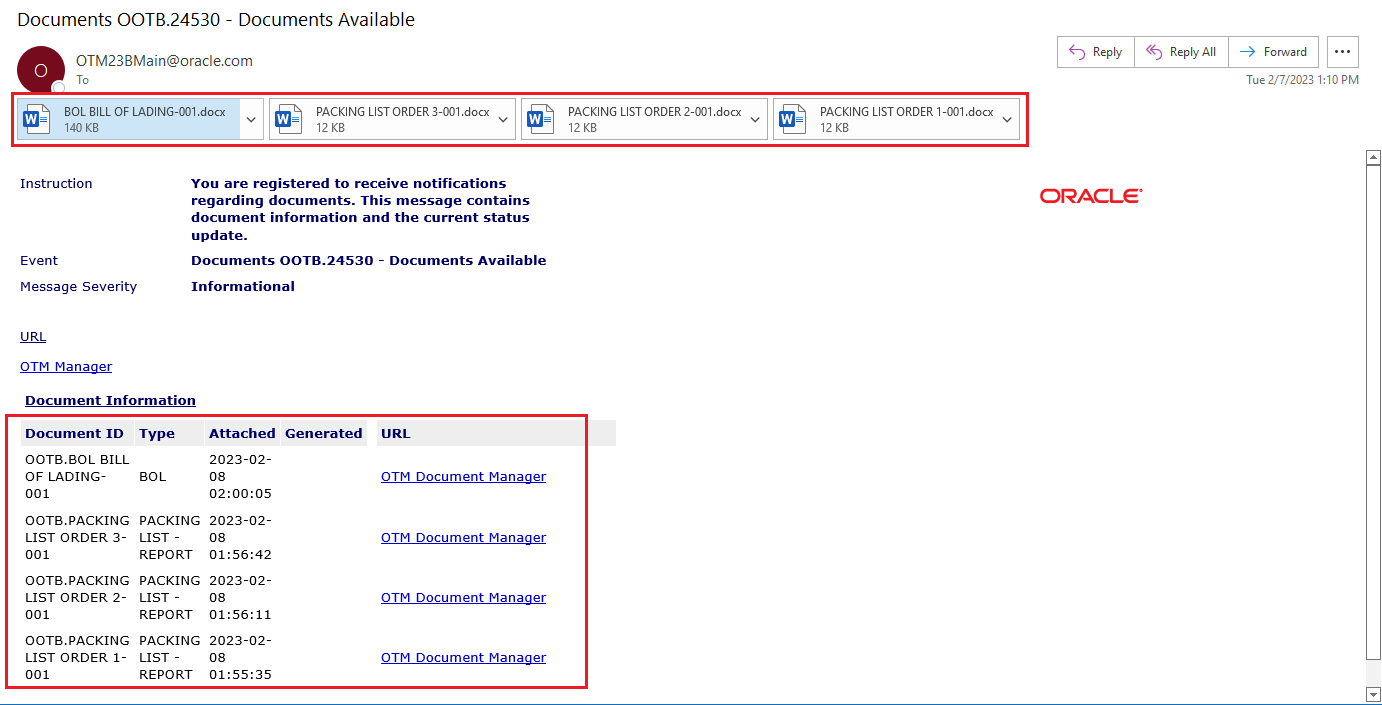
Document Set Sent - Multiple Same Document Type
This feature improves the usability of the Send Documents action for Document Sets by supporting scenarios where you have a Document Set assigned with multiple documents of the same Document Type - and the requirement is to send all/multiple documents in the Document Set of the same Document Type.
Steps to Enable
To take advantage of this new Multiple Document capability, you will need to either modify and/or create a new Document Set with the Allow Multiple Documents option selected for the Document Types that you wish to send multiple documents for.
Tips And Considerations
The Allow Multiple Documents option only applies to Ad Hoc documents.
Usability, Performance and Stability
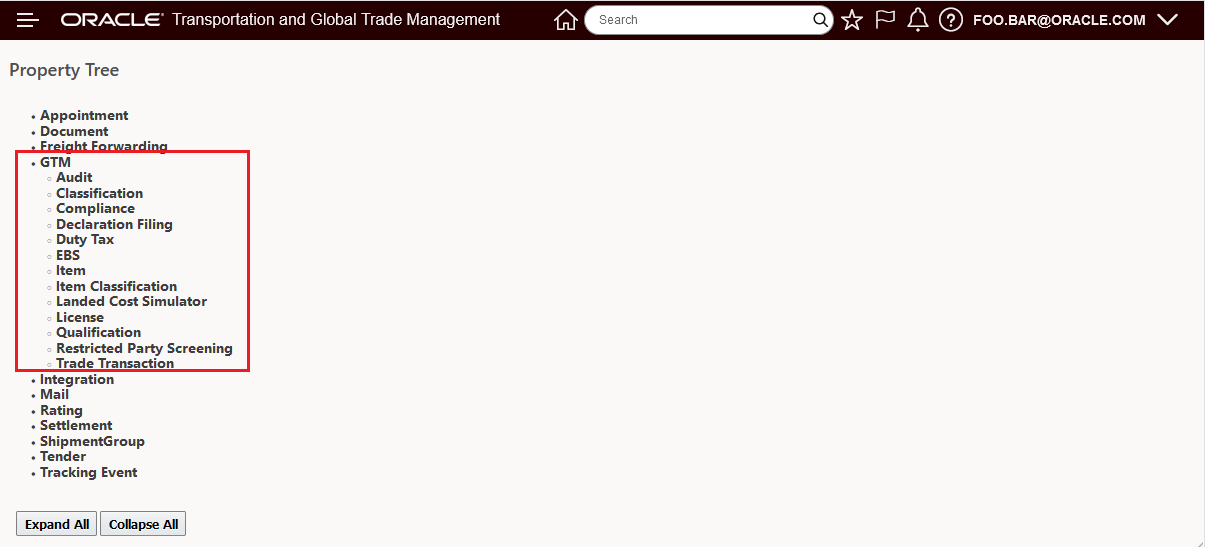
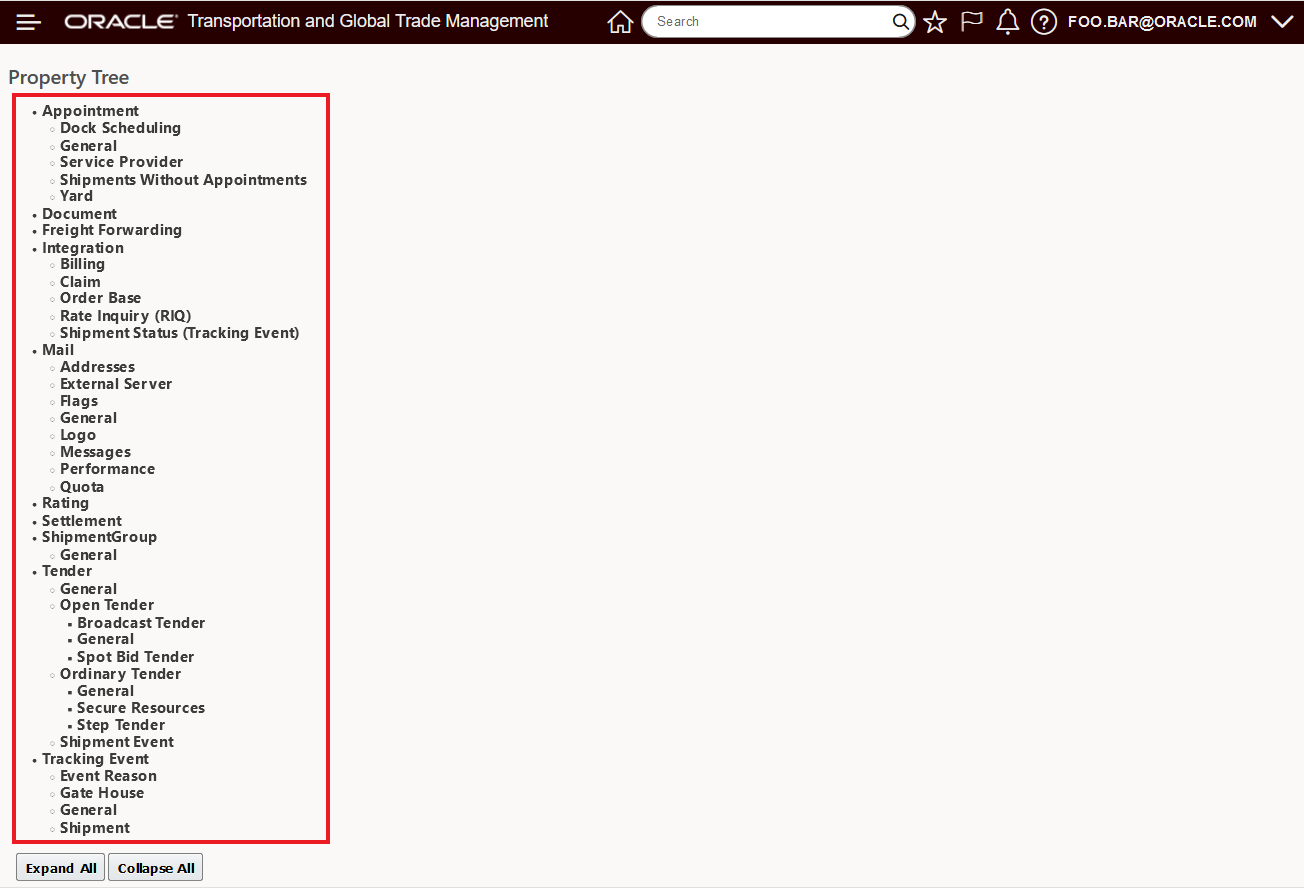
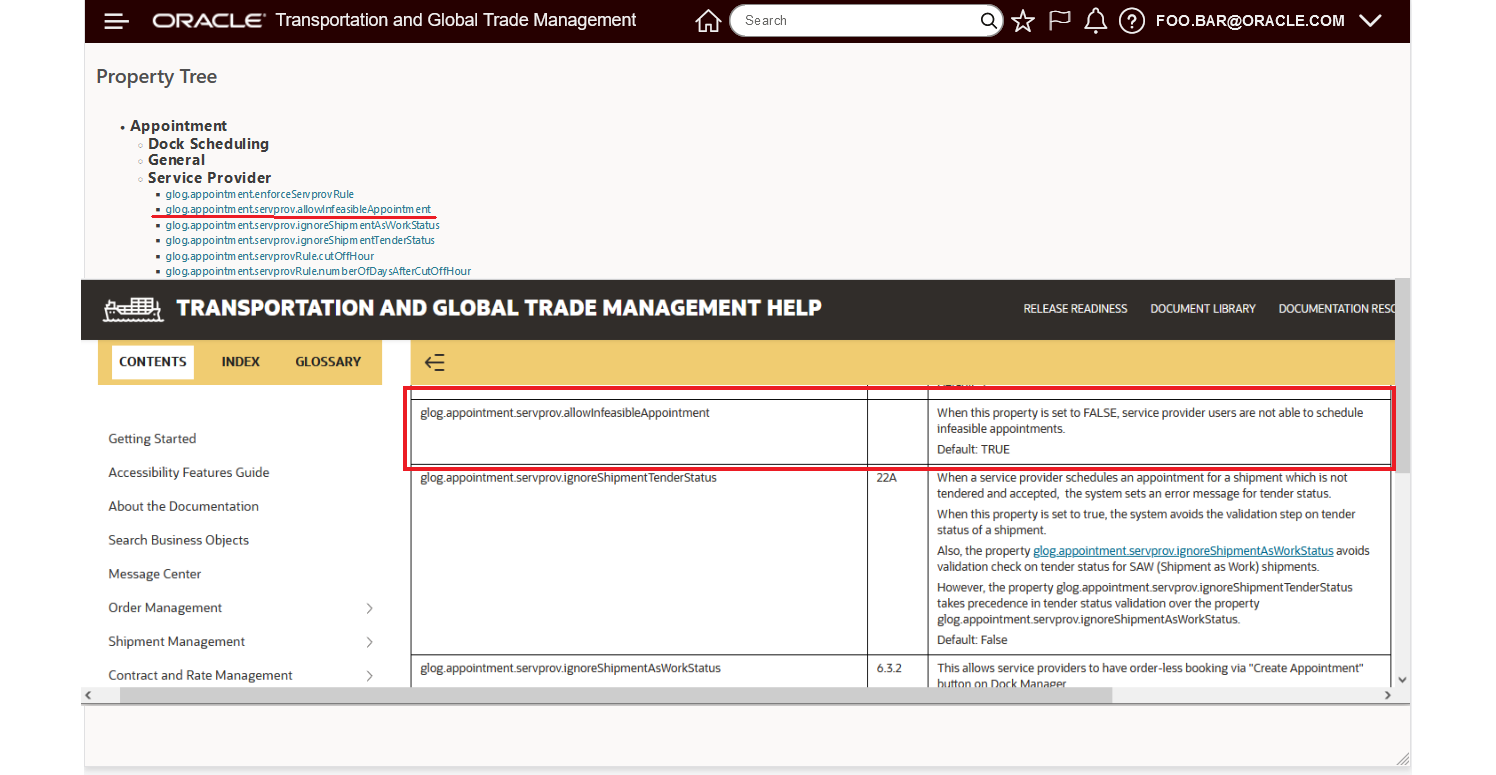
The Property Tree provides you (the DBA.ADMIN user) with a logically grouped view into the many properties available within the system. The Property Tree provides you with a vastly improved approach for identifying and understanding the configuration options available using the properties available in the system.
The Property Tree view is available via Configuration and Administration > Property Management > Property Tree.

Property Tree Collapsed View
Below is the GTM Group expanded out to the Subgroup level.
GTM Expanded to Group and Subgroup Levels
Below is the Property Tree more fully expanded to the Group and Subgroup level.
NOTE: Not all Groups have Subgroups - for example Document and Freight Forwarding.
Property Tree Expanded to Group and Subgroup Level
In the example below, the Appointment Group and the Service Provider Subgroup are fully expanded to provide visibility to the properties assigned to the Appointment/Service Provider Subgroup. The Document Group has also been expanded - the Document Group has no Subgroups - so the expanded Group shows all of the Document properties.
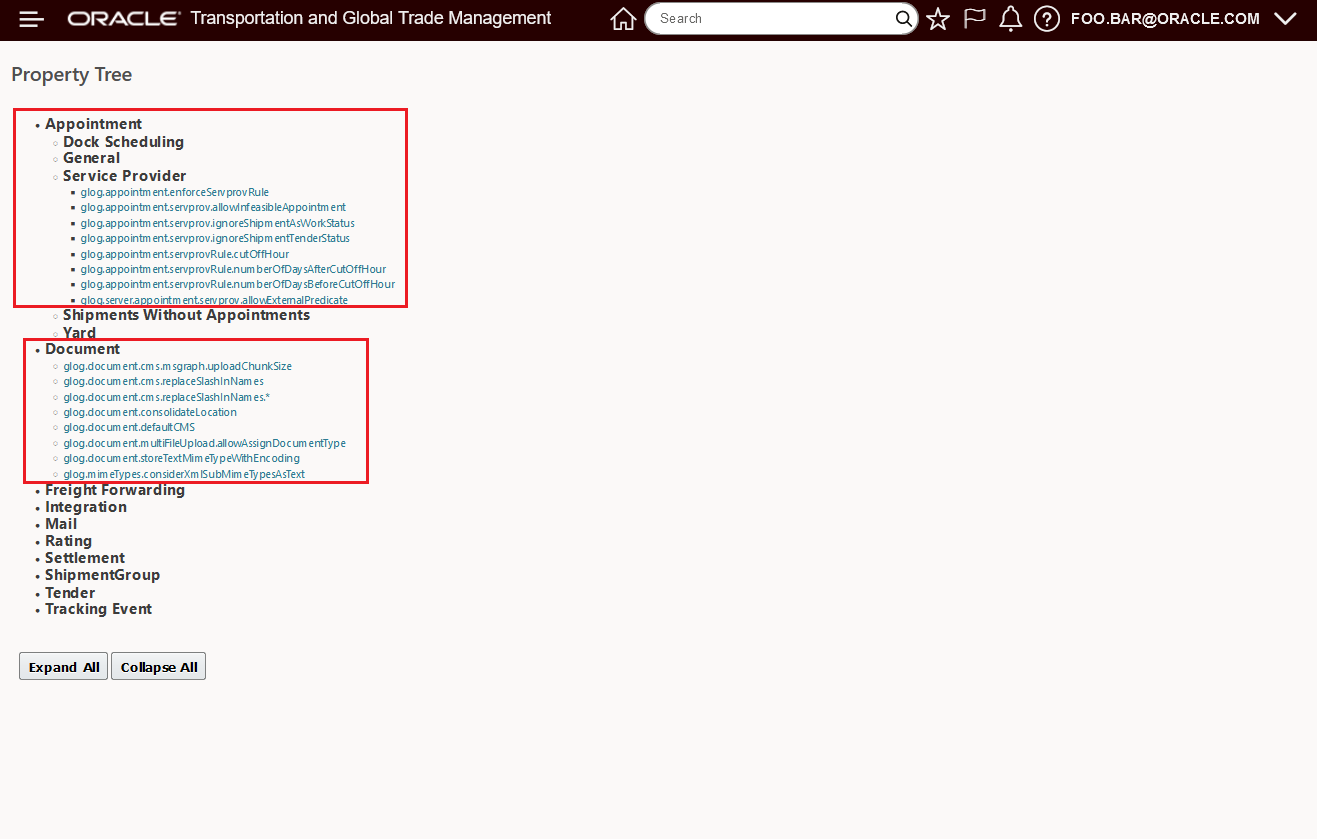
Property Tree Fully Expanded For Group and Subgroup Level
The example below highlights the Tooltips (hover over the property link) that are available in the Property Tree, for many properties the Tooltip alone can provide you with enough information to understand the options and usage for the highlighted property. In this case, the highlighted property will allow the Service provider to schedule infeasible appointments.
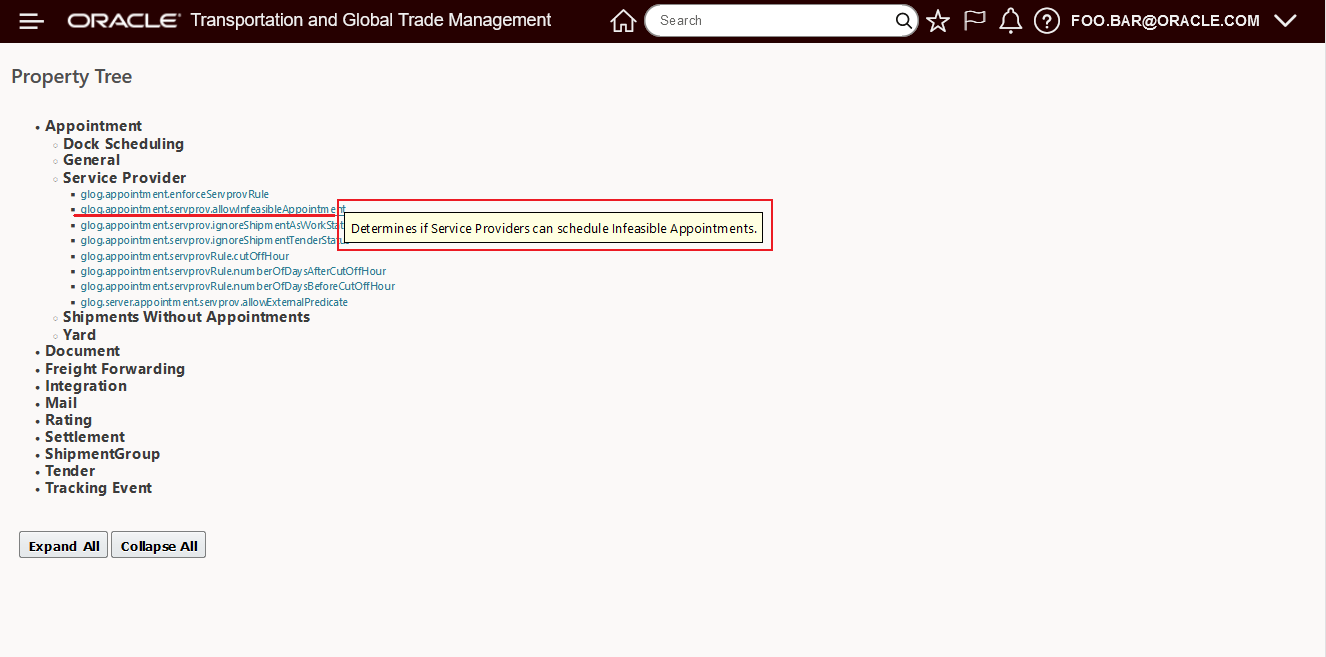
Property Tree Tooltip
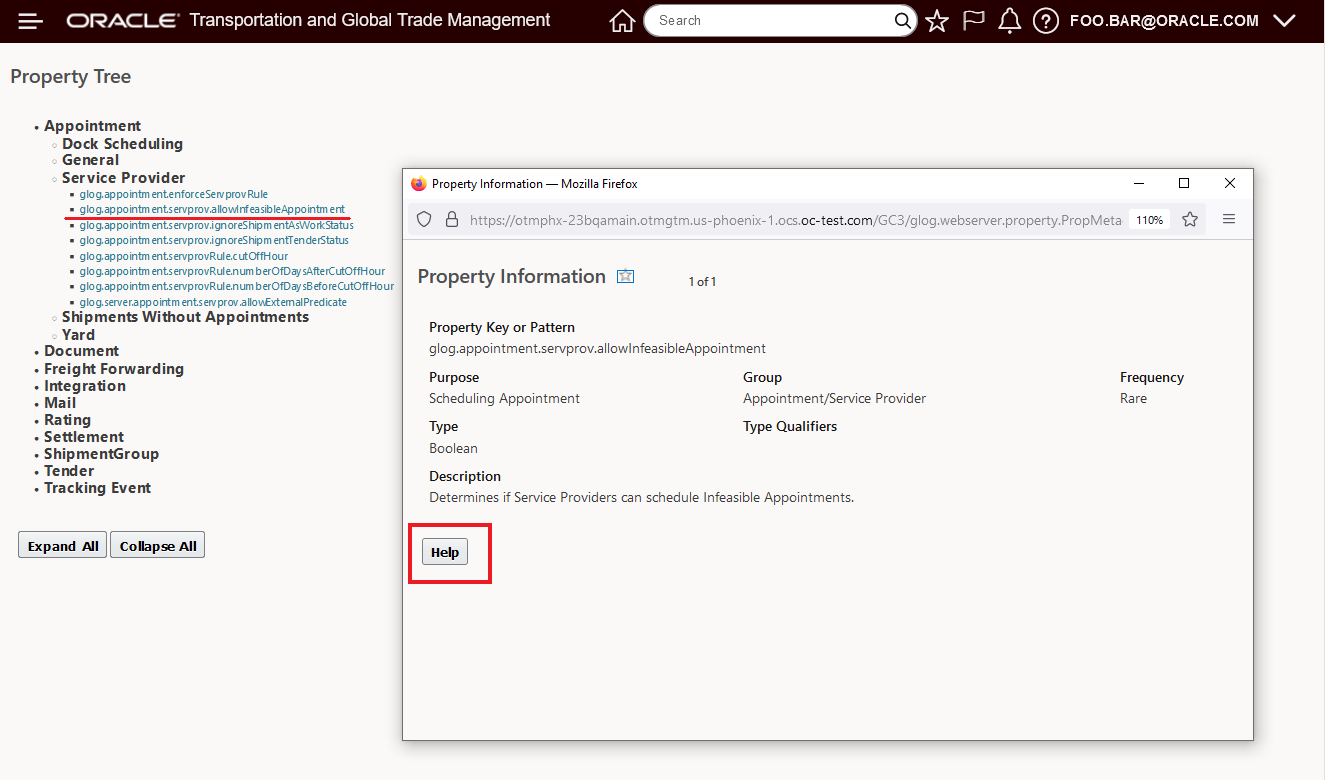
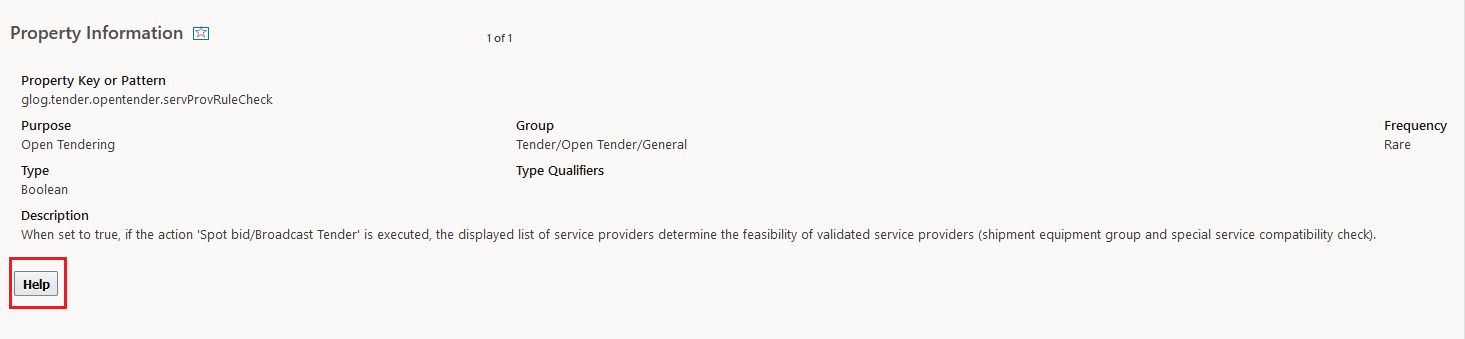
Continuing with the example above, you can bring up a property's Property Information panel by clicking on the property link. The Property Information provides additional information about the property and also provides a direct link to the property's related Help.
Property Tree - Property Information
Following the Help link from the Property Information will bring you to the Help for the Property - either directly - as shown in the example below - or to the section where that property is documented - in situations where the number of properties is limited.
Property Tree - Property Information - Property Help
This feature improves visibility to and the understanding of the many available properties in the system.
Steps to Enable
You don't need to do anything to enable this feature.
Tips And Considerations
Only the DBA.ADMIN user can access and use the Property Tree page.
This is the first release of the Property Tree - not all of the many properties in the system have been Grouped and included in this first release. The intention is that all existing and newly added properties will be included in the Property Tree in future releases.
This feature provides you with the tools you need to validate the from/to email addresses used in the system, as well as providing you with diagnostic and troubleshooting tools that provide a better understanding of the email activity on your cloud system and help you resolve issues with your e-mails not being received.
The Mail Validation capabilities can be found navigating to Business Process Automation > Power Data > Mail Management > Mail Validation.
NOTE: You must have DBA.ADMIN access to navigate to this page.
The Mail Validation feature allows you validate that an email can be sent from the system. If you enter only a From and To email address, the system will validate up to the point of sending an email without sending an email. To actually send an email, you only need to include a Subject.
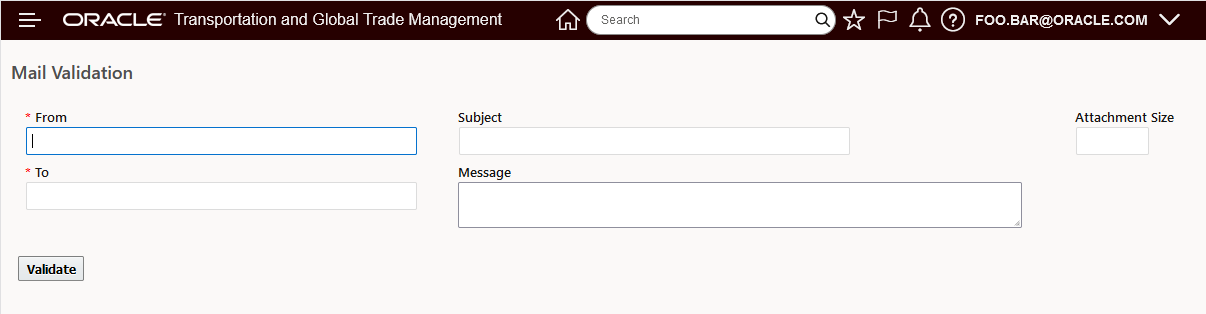
Mail Validation
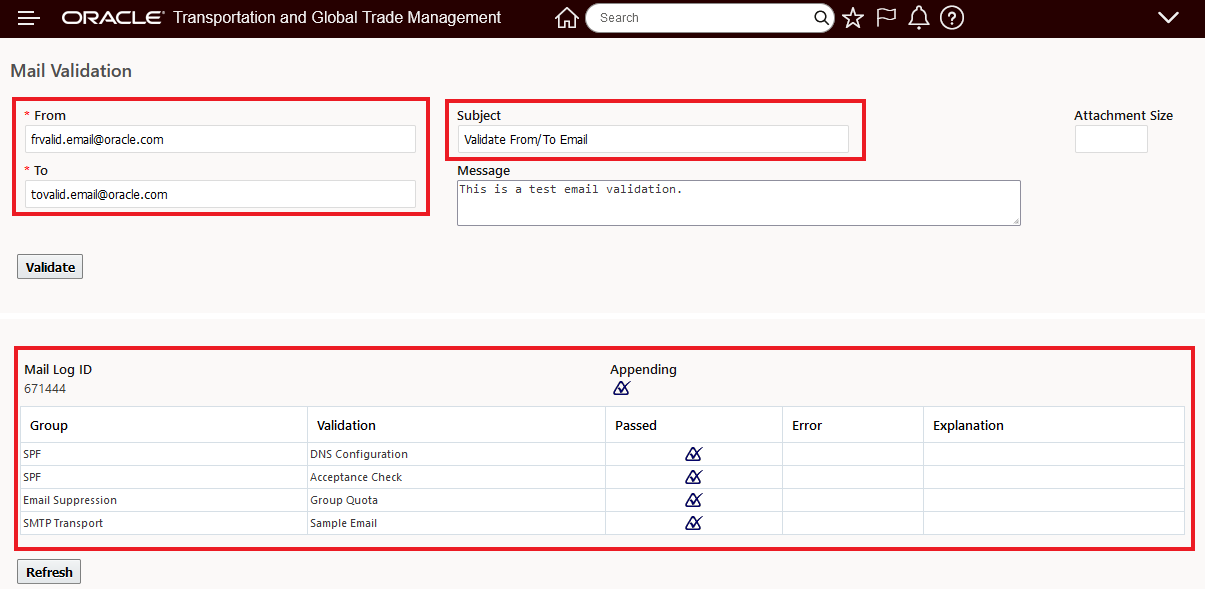
In the example below, the email addresses entered will be validated, and since the Subject is provided - this validation will include sending an email as part of the validation.
Mail Validation - Example
The Mail Log provides information about the Validations run and whether the validation passed or failed. On-line Help (Mail Validation Troubleshooting) provides you with complete information about each validation - Checks, Explanations and Restrictions.
Below is the email transmitted as part of the validation run above.

Email Sent with Mail Validation
This page allows you validate that an email can be sent from the system.
NOTE: If you enter only a From and To email address, the system will validate up to the point of sending an email without sending an email. To actually send an email, just include a Subject.
This feature provides the tools to proactively validate the email addresses used in the system, as well as providing troubleshooting insights to identify why emails were not received.
Steps to Enable
You don't need to do anything to enable this feature.
Tips And Considerations
The Mail Validation feature was delivered in the 23A update after 23A was initially shipped.
For Gen 1/Oracle Public Cloud (OPC) instances, the Mail Validation feature validates:
- the SPF DNS record
- the overall SPF check
- OTM mail quota
- SMTP without exceptions
For Gen2/Oracle Cloud Infrastructure (OCI), the Mail Validation provides a more complete set of validations. For example,
| DKIM.Active |
Checks if an active DKIM record is available in the mail sender’s Oracle Mail Email Domain. |
| DKIM.Configured |
Checks the DNS in the mail sender DKIM subdomain. |
Key Resources
- For more information, the following Help Topics provide excellent coverage of the Mail Validation feature:
- Mail Validation
- Mail Validation Troubleshooting
- Mail Senders
This feature provides a set of improvements to the File Management/File Cleanup feature. Specifically, the File Cleanup algorithms have been refined and expanded to improve the monitoring of resource usage and the related file cleanup actions initiated when the monitored resource usage types are exceeded.
File Cleanup is accessed via Configuration and Administration > Process Management > Configuration and Administration > File Cleanup.
NOTE: You must be logged in as a DBA.ADMIN to access this page.
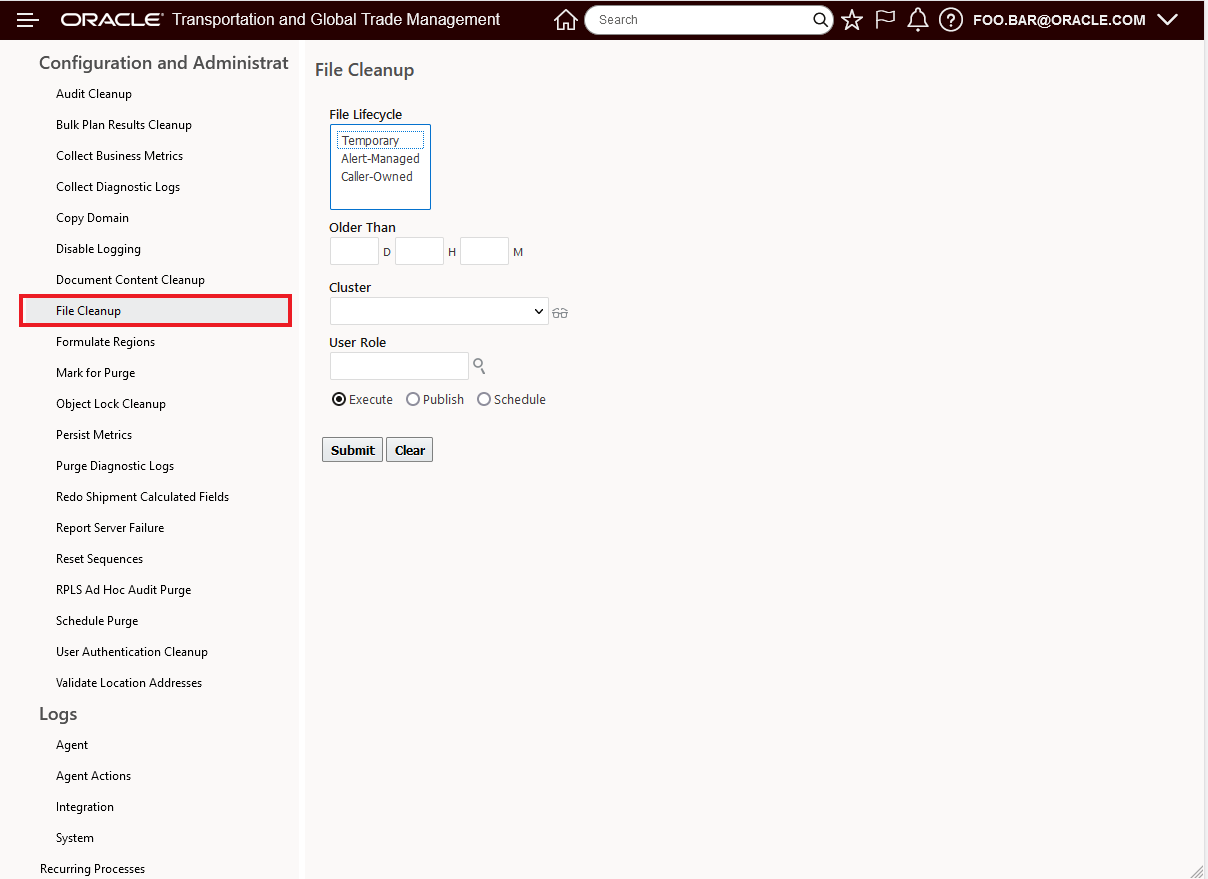
File Cleanup
This feature monitors the system to avoid excessive disk space usage and is provided to improve system resiliency.
Steps to Enable
You don't need to do anything to enable this feature.
Key Resources
- See the File Cleanup topic in Help for a complete explanation of the File Cleanup feature's setup and usage.
This Optional Feature, when enabled, will Use file-based content for REST API metadata. The use of file-based content makes it easier to manage and maintain the REST API metadata.
The use of file-based content (vs DB) makes it easier to manage and maintain the REST API metadata, providing a much more extensible metadata repository for future features.
Steps to Enable
You don't need to do anything to enable this feature.
Tips And Considerations
This feature is dependent on the Optional Feature: SUPPORT REST SEQUIPMENT REFERENCE both Optional Features should be Opt In.
Transportation Management (Base)
Service Provider Tender Constraints - Spot Bid Tender and Broadcast Tender
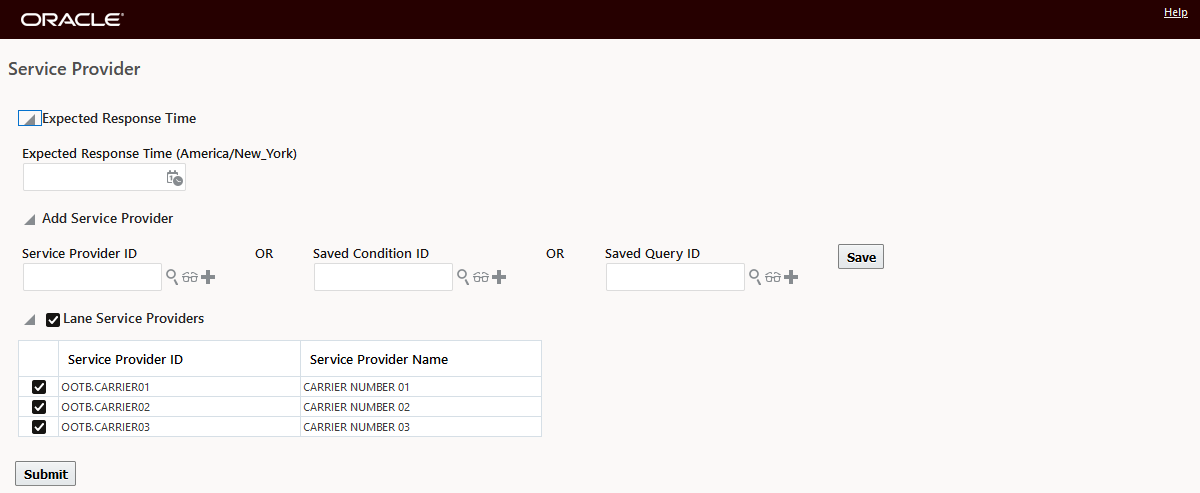
This feature provides you with the option to configure, for your Service Providers, the compatible/supported Equipment Groups and Special Services that the Service Provider supports along with the option to check that the Service Provider(s) being considered for your Broadcast and Spot Bid Tenders are feasible/support the shipment's required Equipment Group(s) and Special Services.
Service Provider Tender Constraints Tab
In the example below three Service Providers are configured to accept Spot Bid Tenders. Two of the Service Providers (Carrier01, Carrier02) have Tender Constraints defined - one Service Provider (Carrier03) has no Tender Constraints.
For Service Provider Carrier01, both the Equipment Group Profile and Special Services Tender Constraints are configured. For Carrier01, they will only be marked as feasible if the Equipment Group on the shipment is included in the specified Equipment Group Profile and the set of Special Services required on the shipment is covered by the Special Services identified for the Service Provider in the Tender Constraint Special Services grid.
NOTE: An unspecified Special Service does not imply that the Service Provider supports that Special Service i.e., if you specify any Special Service in the Special Services grid for the Tender Constraints, you will need to list all of the Special Services supported by the Service Provider.
Service Provider Carrier01 Tender Constraints
For Service Provider Carrier02, the Tender Constraints are limited to the Special Services listed below.
Service Provider Carrier02 Tender Constraints
For Service Provider Carrier03, there are no Tender Constraints defined, so Equipment and Special Services are not considered when determining the Service Provider Feasibility.
Service Provider Carrier03 Tender Constraints
Given the Tender Constraints setup above, and with the property glog.tender.opentender.servProvRuleCheck to true, when the Shipment 2433 below is tendered, the requirements for both Equipment Group and Special Services will be evaluated to determine the Service Providers Spot Bid Tender/Broadcast Tender feasibility.
For Shipment 2433 - the Equipment Group 53_DRY is specified/required.
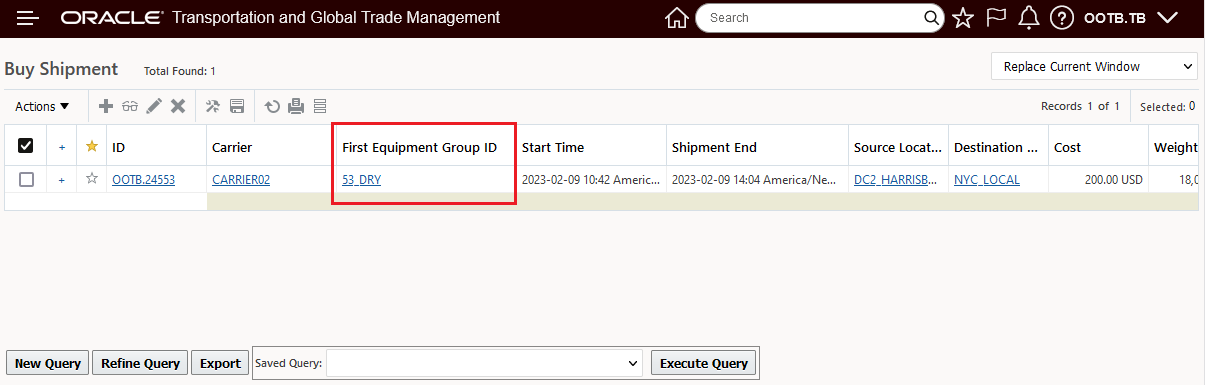
Shipment Equipment Group
In addition, the Shipment 24553 also requires the three Special Services below - Unload, Load and Hazardous.
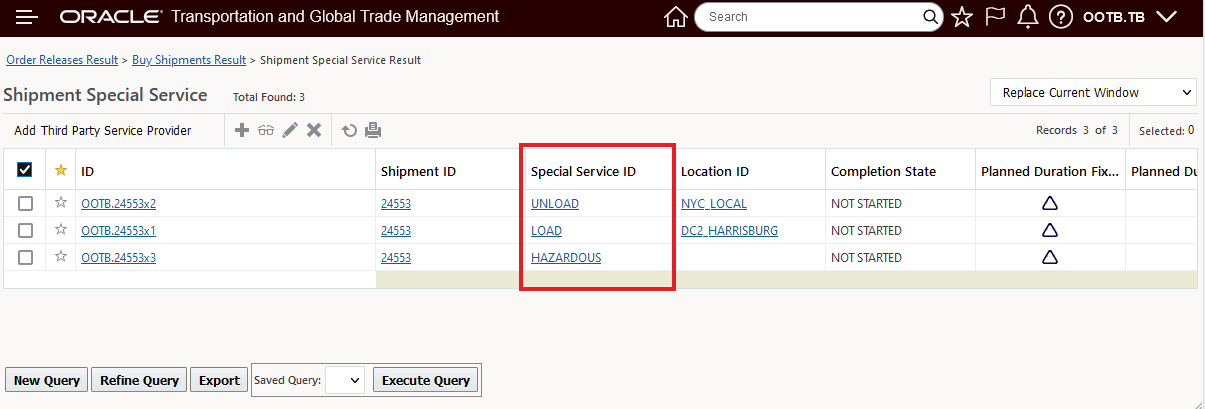
Shipment Special Services
When the Shipment 24553 is Spot Bid Tendered - the following Feasibility results are provided based on the Shipment's requirements (Equipment Group and Special Services) and the Service Provider Tender Constraints configured.
In this case both Service Providers Carrier01 and Carrier03 are Feasible, Service Provider Carrier02 is marked as not being feasible.
The Feasibility issue for Service Provider Carrier02 is a mismatch between the Special Services they support - Load and Unload - and the Shipment's 24553 Special Service requirements - Load, Unload and Hazardous.
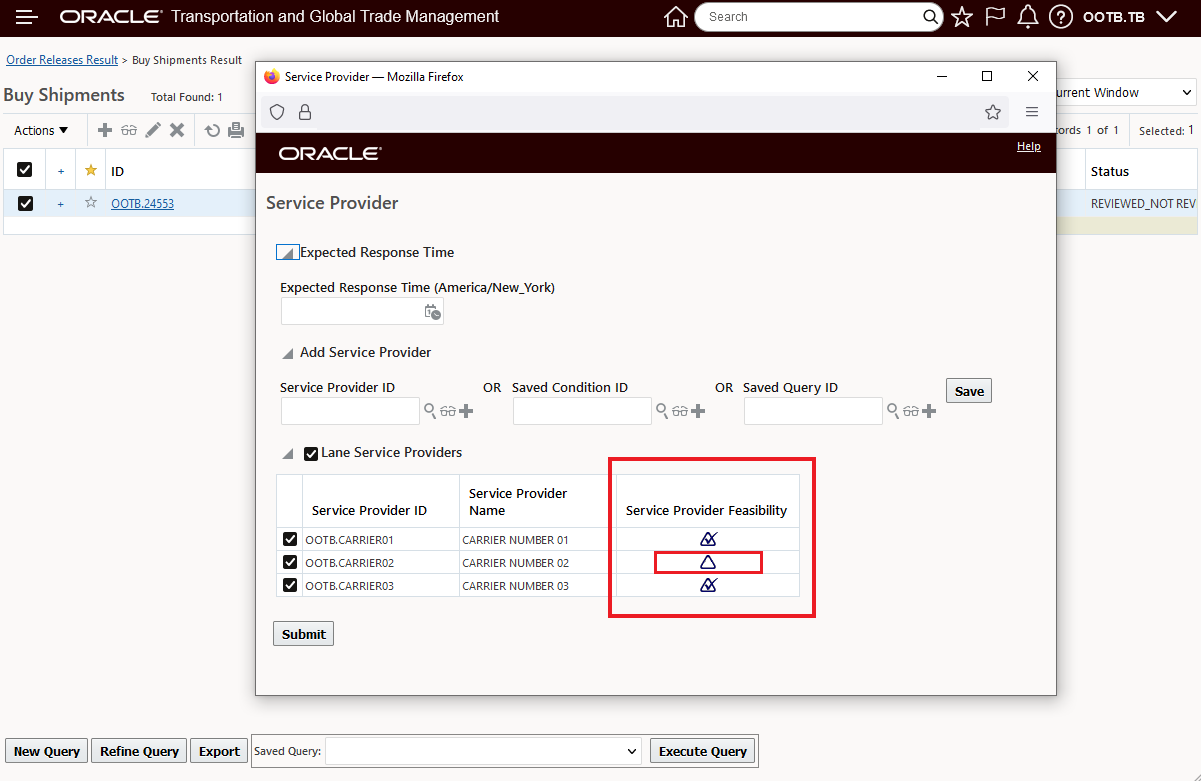
Spot Bid Tender - With Tender Constraints
The Service Provider Feasibility indicator identifies Service Providers with feasibility issues identified.
NOTE: All of the Service Providers are still selected for tendering - you have the option to deselect any Service Provider based on their Feasibiity, so they are not included in the Tender.
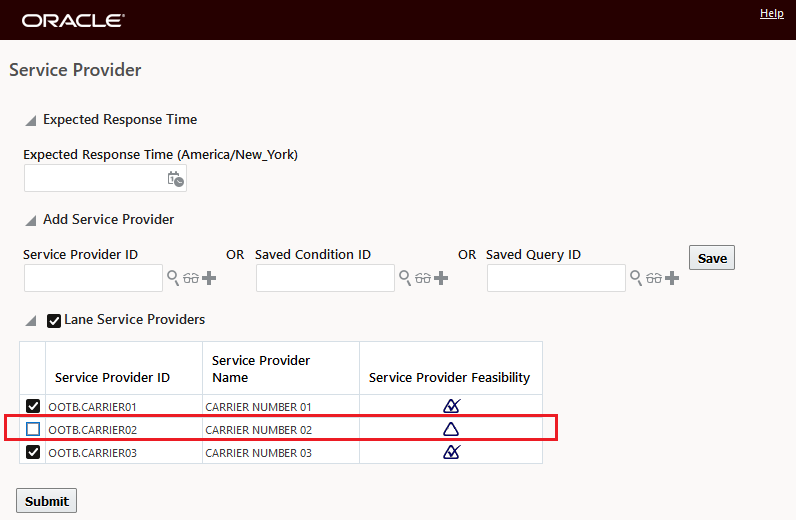
Deselect the Infeasible Service Provider Carrier02
With the property glog.tender.opentender.servProvRuleCheck to false (Default), the same Spot Bid Tender submission operates as it has in previous releases.
Default glog.tender.opentender.servProvRuleCheck to False
This usability feature provides you with the ability to configure your Service Provider's Broadcast Tender and Spot Tender supported capabilities and then have those capabilities checked against your shipments that you are Broadcast or Spot Tendering to easily identify the Service Provider(s) that can feasibly support the request.
Steps to Enable
To enable this feature you will need to configure the Tender Constraints for your Service Providers. If you do not specify any Tender Constraints for your Service Provider(s) the interpretation is that there is no constraint.
In addition to defining your Service Provider Tender Constraints, you will need to set the property glog.tender.opentender.servProvRuleCheck to true, the default - for backward compatibility - is false.
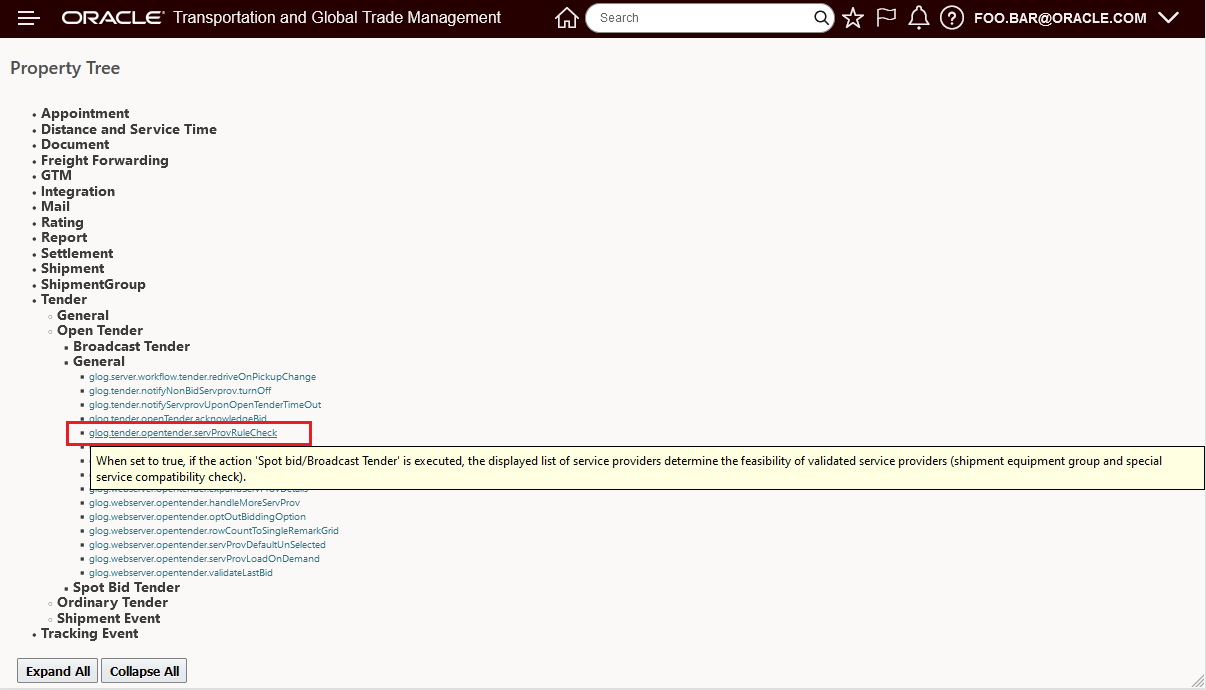
Property Tree - ServProvRule Check - Tender Constraints
Property Information

Property Help
Tips And Considerations
The Equipment Group Tender Constraint is checked against all the Equipment Groups on the Shipment - so for multi-equipment Shipments - all of the Equipment Groups on the Shipment need to be included in the Service Provider's Tender Constraint Equipment Group Profile.
The Tender Constraints, at the Service Provider level, has been implemented at the Service Provider level to support the tender use cases (Spot Tender and Broadcast) for the Service Providers who do not/will not have a Rate Offering setup in the system - where these constraints would typically be configured. Configuring Tender Constraints at the Service Provider level greatly simplifies the setup and management of these constraints in support of the transactionally based Spot and Broadcast tender scenarios.
Dock Scheduling - Multiple Appointments Rule Check
This feature provides you with additional rule checks that will avoid scheduling parallel/overlapping appointments in situations where you have multiple commodities - each requiring an appointment - loaded into the same equipment. The new logic will ensure that the multiple appointments scheduled for the commodities in the same equipment are not scheduled simultaneously or overlap.
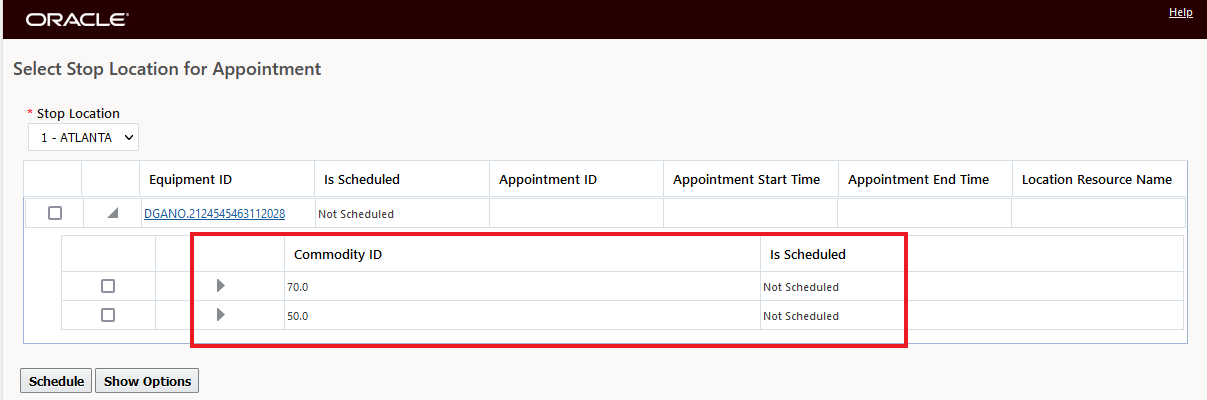
Two Commodities One Shipment Equipment
Scheduled appointment for the first commodity 70.0 at 9:00 AM for Dock1.

One Appointment Scheduled
When the second commodity is scheduled, as shown below, the second appointment is scheduled for a time slot (in this case 10:00 AM Dock1) that does not overlap with the first commodity's appointment time.
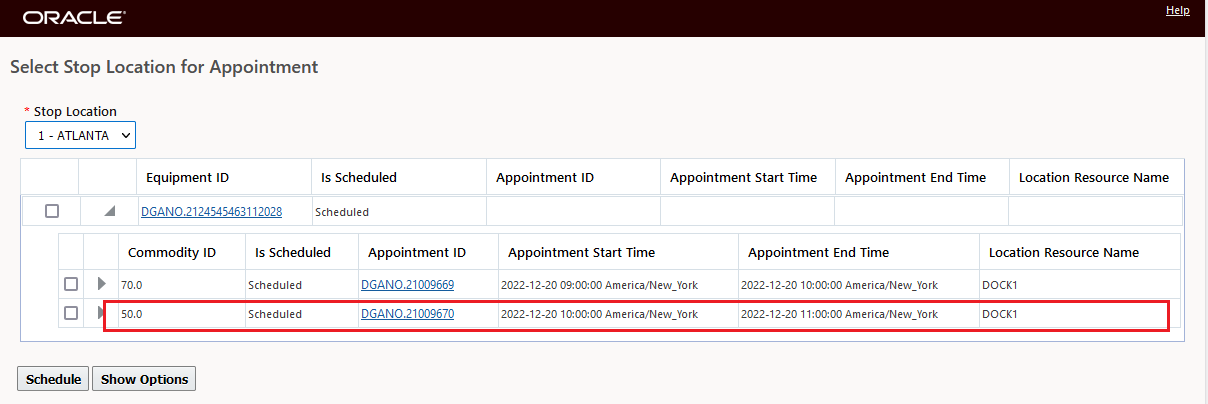
Second Appointment Scheduled
In the Schedule Gantts, an attempt to move the appointments so they overlap will result in an error message.
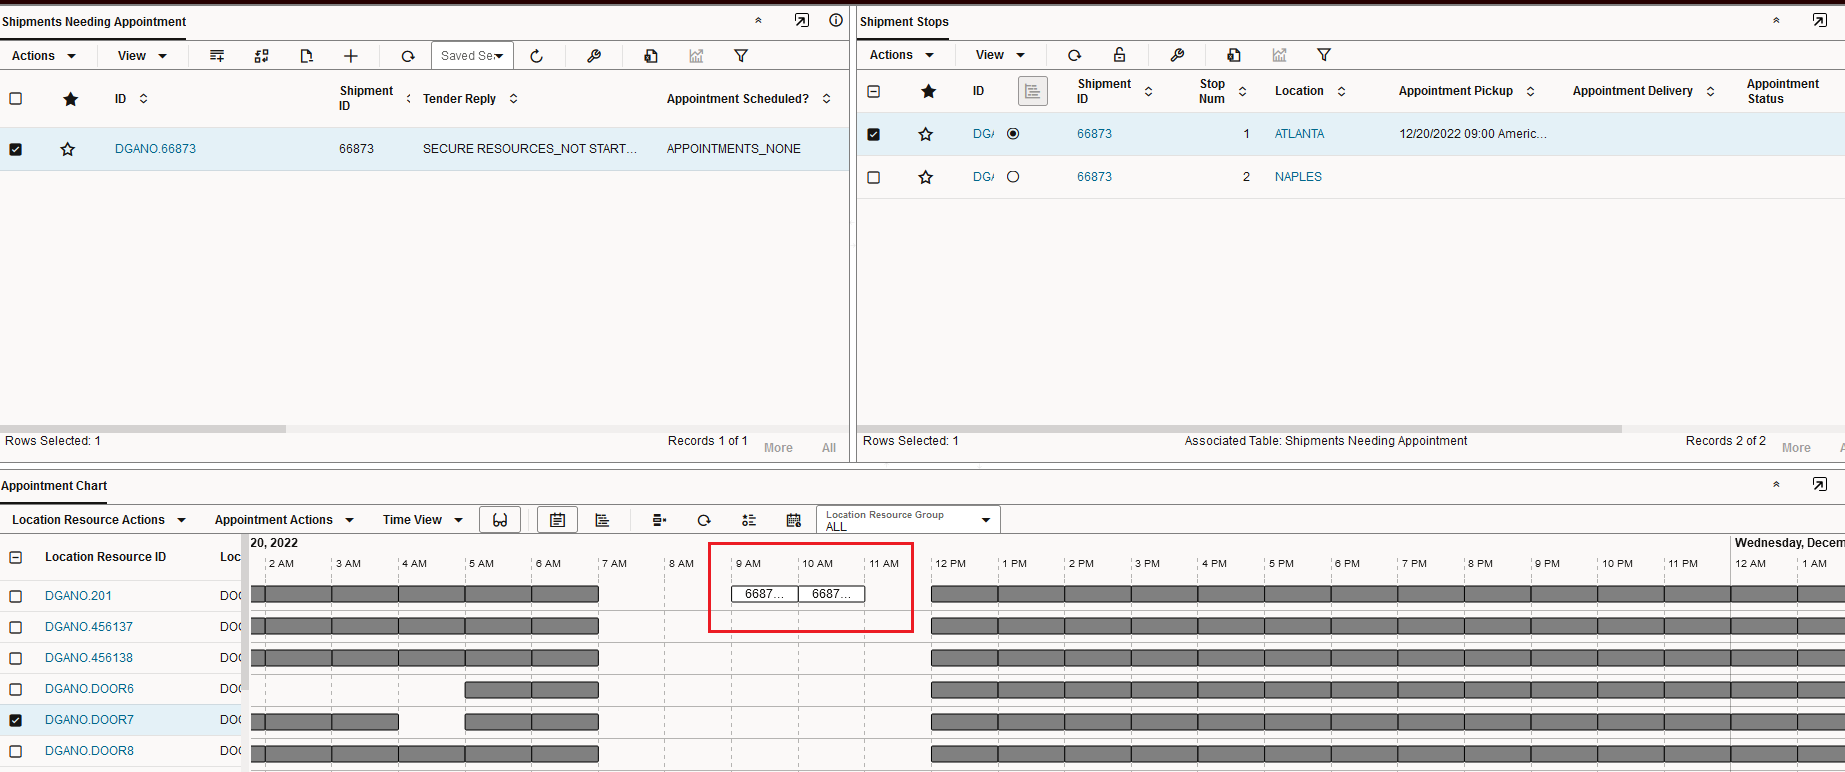
Appointments As Scheduled
An attempt to move the appointments so that they happen in parallel or overlap leads to an error message, as shown below.
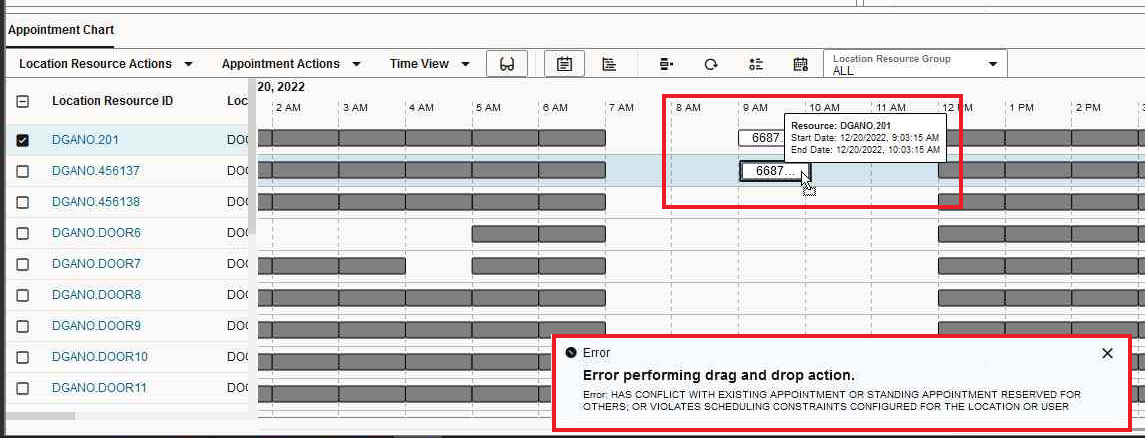
Disallowed Appointment Overlap
The same is true in the legacy Dock Scheduling Gantt, as shown below. When you drag and drop the appoint in a slot that overlaps with the other commodity appointment in the same shipment equipment an error is raised, and the change is reverted when you attempt to Save the change.
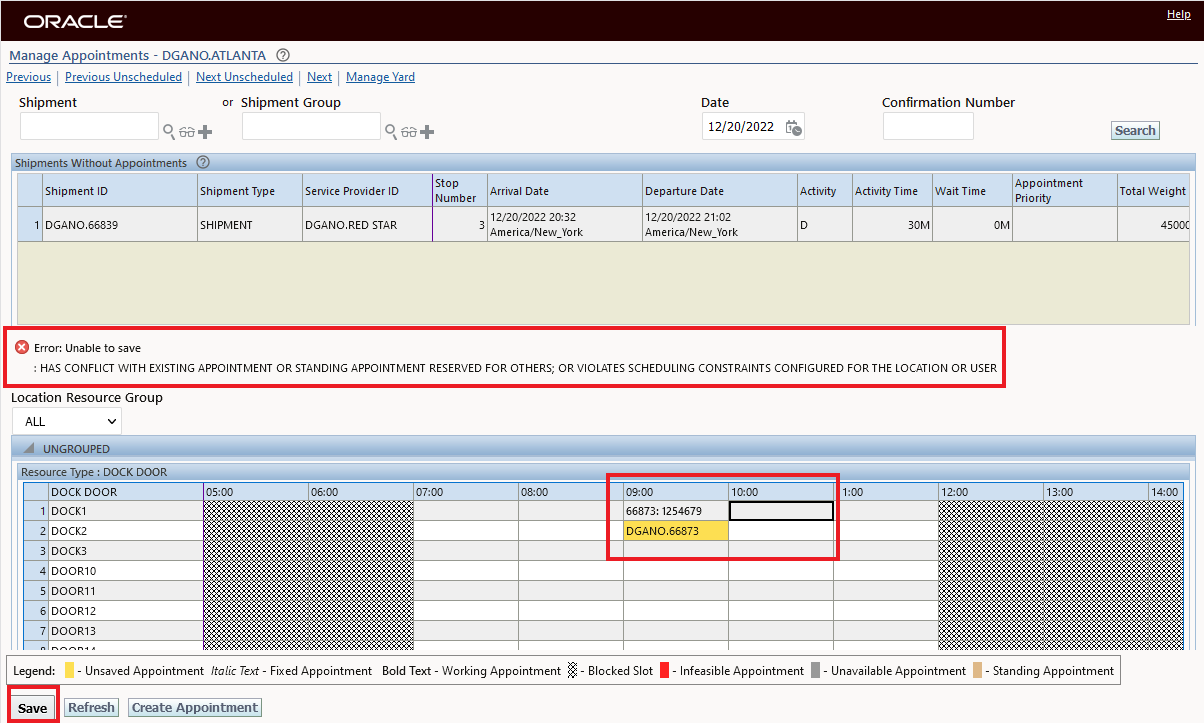
Legacy Schedule Gantt Error Message for Disallowed Move
This feature improves the usability of the Dock Scheduling feature by ensuring that infeasible simultaineous appointments are not scheduled by the system.
Steps to Enable
You don't need to do anything to enable this feature.
Shipment XML - Appointment Info - Flex Commodity and Equipment Added
This feature extends the Shipment.xsd to include two new fields in the AppointmentInfo element:
- FlexCommodityCode - User defined commodity code for shipment ship unit.
- EquipmentGid - The GID for equipment associated with the shipment.
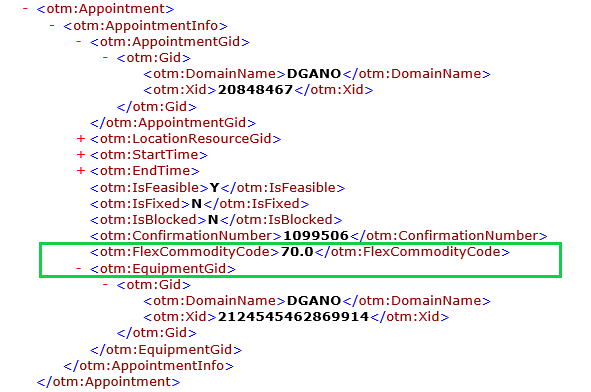
Appointment XML
Extends the information provided in the AppointmentInfo to support scenarios where multiple appointments are being scheduled - either by commodity and/or by shipment equipment.
Steps to Enable
You don't need to do anything to enable this feature.
Mobile Application Enhancements
This feature provides a list of new features and improvements to the new Mobile Application.
The highlights include the following enhancements:
- Improved Button Spacing (OK, Cancel)
- Visibility to Ship Unit Planned Quantities
- Hide Box Option
- Expand Accordion Option
- Refresh On Home - Refresh Reload Improvements
- Refresh All
- Exception Event
- Display User Id, Nickname and Role
- Properties for Document Type Enabled
- Decline Reason Code - Service Provider Flow
Improved Button Spacing
To help reduce the accidental selection of an action i.e., Ok versus Cancel - the spacing between the options has been increased.
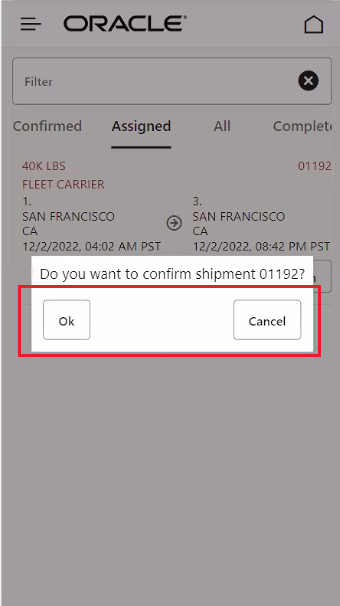
Ok Cancel Button Spacing Increased
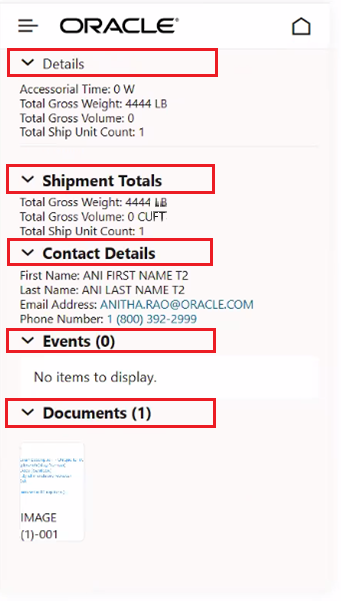
Visibility to Ship Unit Planned Quantities
The Ship Unit Received Quantity flow has been enhanced to show the Planned Quantities on the Ship Unit - the Planned Quantities are now displayed in the Ship Unit Received Quantities section and in the Received Quantity entry view - as shown below.
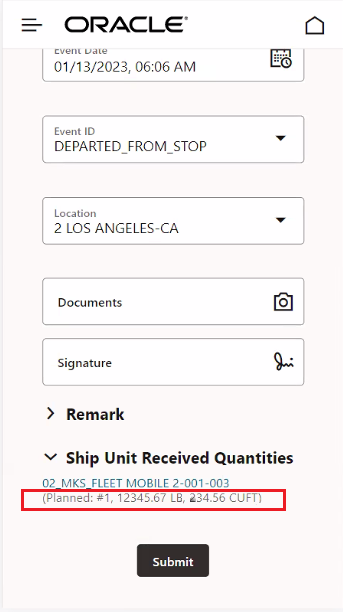
Visibility to Planned Quantities in the Ship Unit Received Quantity Section
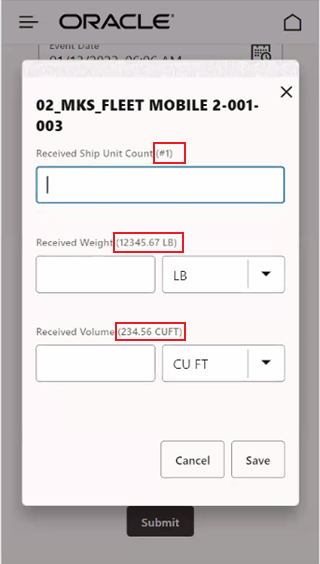
Visibility to Planned Quantities in the Received Quantity Entry View
Hide Box Option
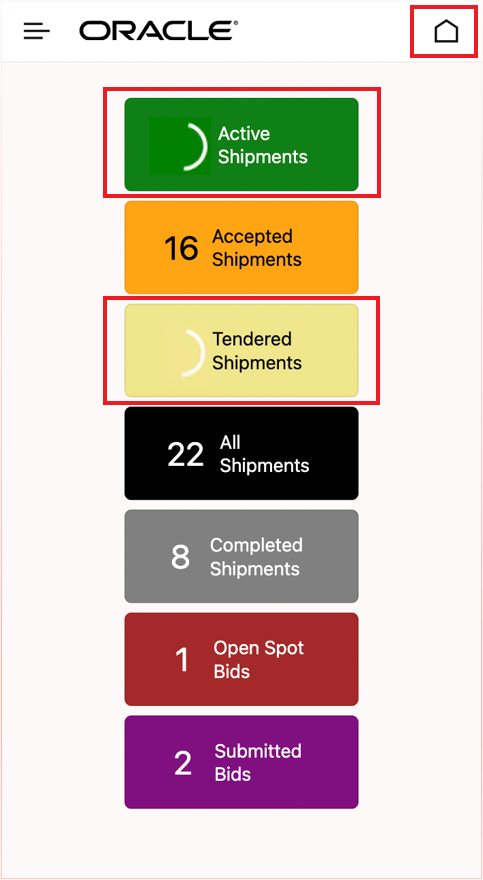
Previously, you had the option of removing Boxes from your Mobile Layout Dashboard, this option allows you to Hide vs Removing the Boxes from your Mobile Layout Dashboard. The Hide option provides all the benefits of the Remove option - e.g., avoids running the query to populate the count, as well simplifying the display for the user. In the example below - the Service Provider Dashboard by default shows all seven Boxes on the Mobile Dashboard. To demonstrate the Hide option, the Mobile Layout will be configured to Hide the Spot Tender related boxes - Open Spot Bids and Submitted Bids.
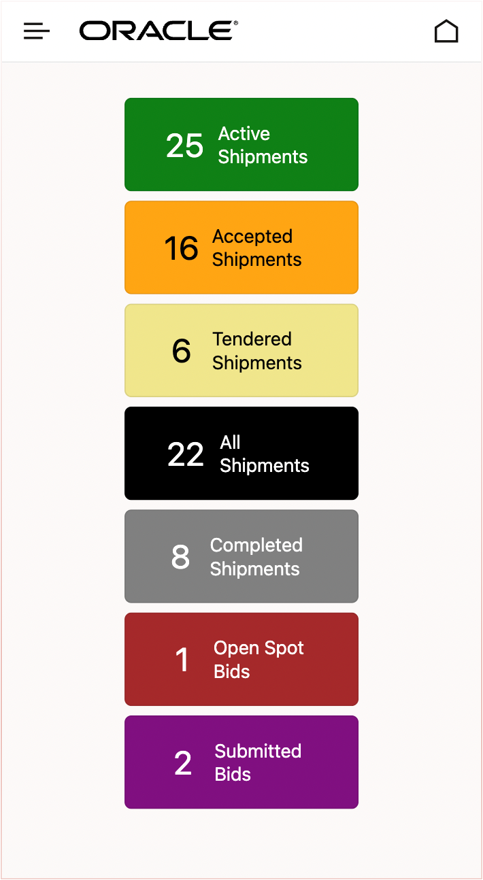
Default Service Provider Dashboard
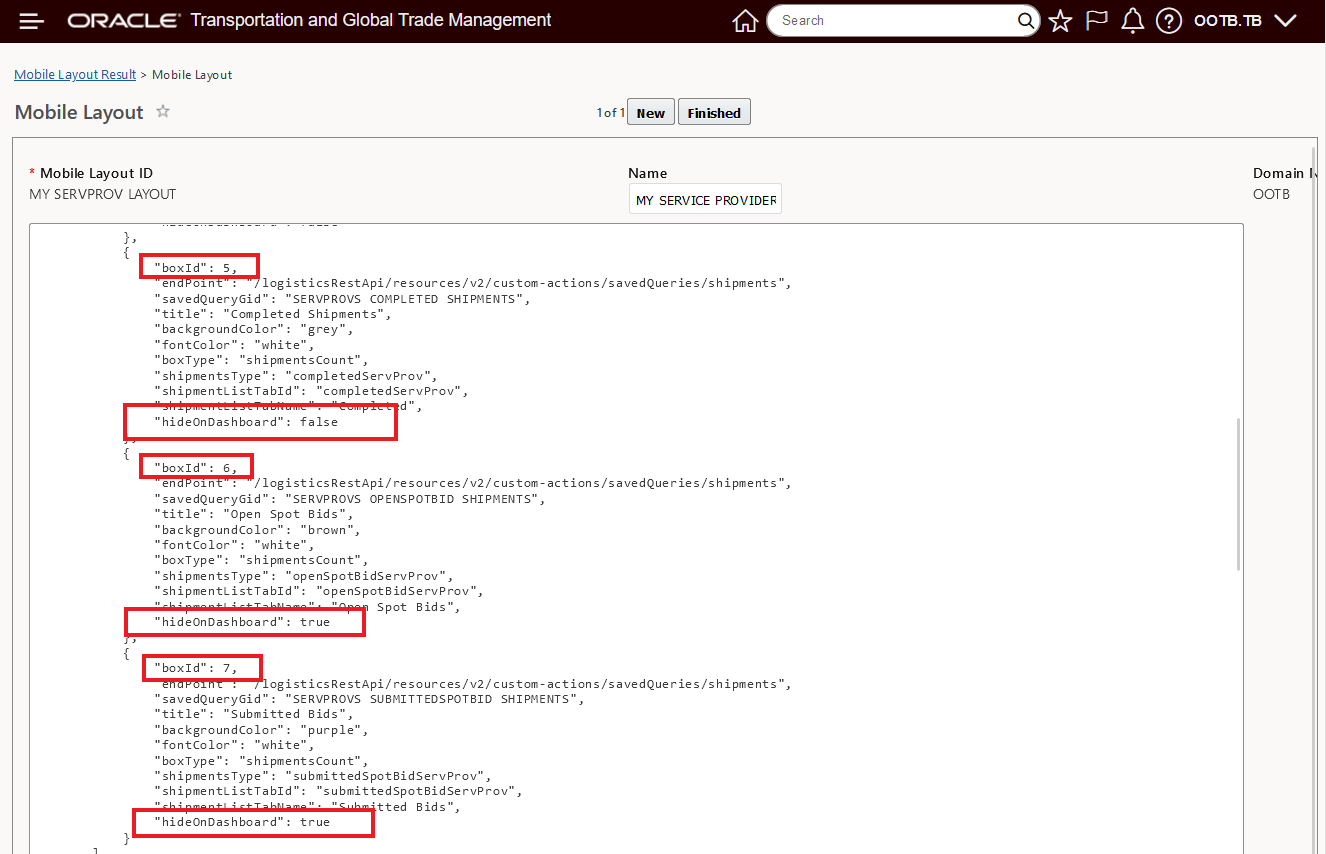
In the Mobile Layout below, boxId 6 - Box 6 Open Spot Bids and Boxid 7 Box 7 Submitted Bids have been changed so that the hideOnDashboard parameter is now set to true - which will hide the related boxIds. The boxIds 1-5 will retain their default values for the hideOnDashboard parameter i.e., false as shown by boxId 5 below, and will not be hidden.
Mobile Layout Configured to Hide BoxId 6 and 7
Selecting the Mobile Layout above as Mobile Layout to use, the Mobile Dashboard will be rendered as shown below - both Box 6, Open Spot Bids and Boxid 7, Submitted Bids are now hidden.
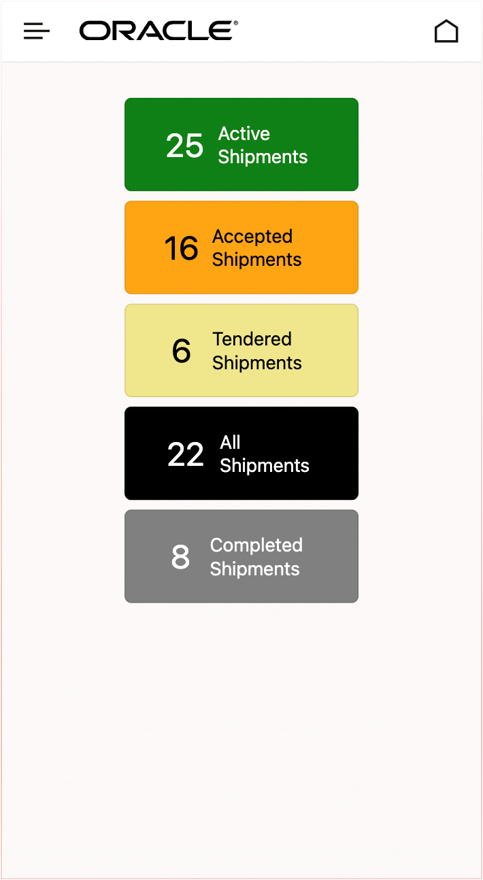
Configured Mobile Dashboard Box 6, Open Spot Bids and Boxid 7, Submitted Bids are hidden
Expand Accordion Option
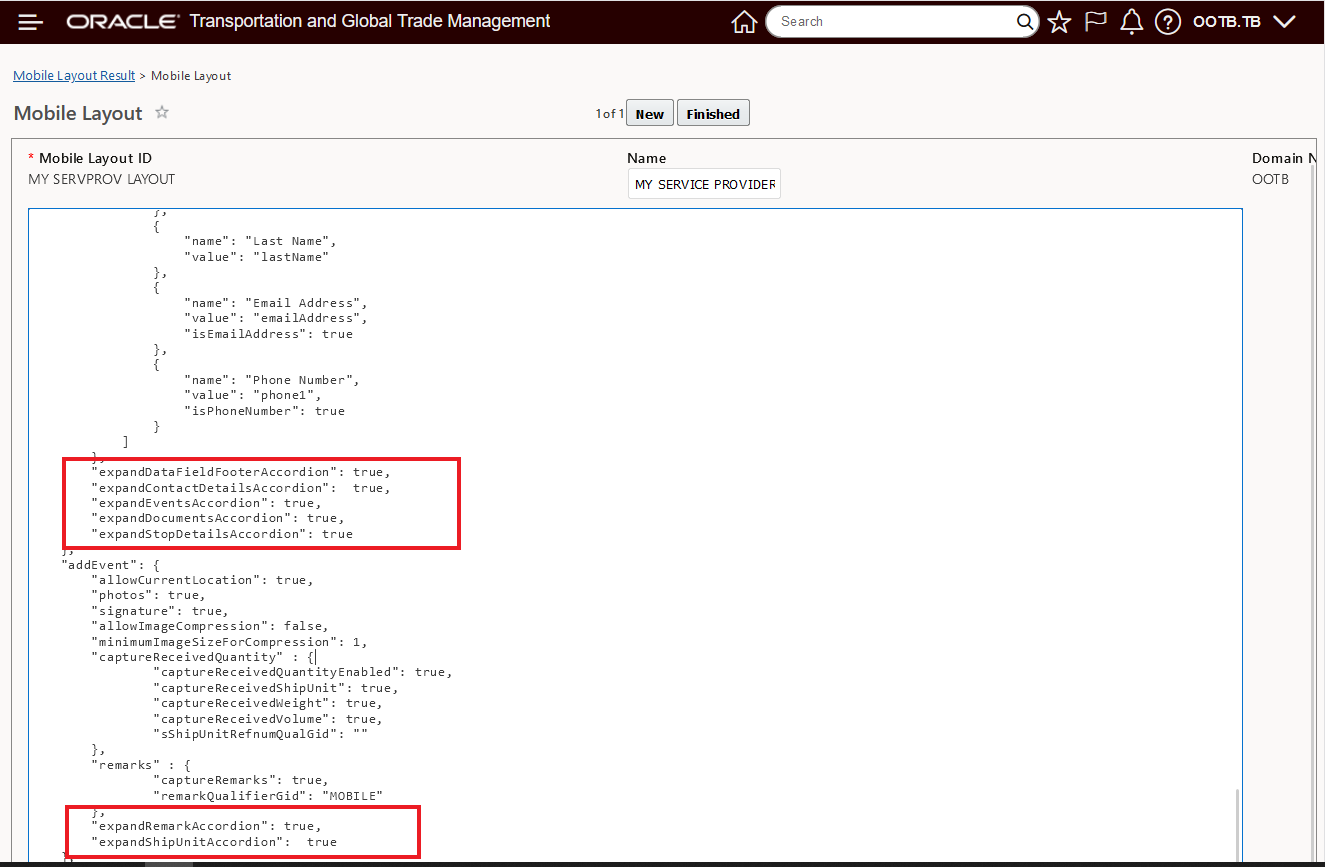
This enhancement provides you with a new parameter option to configure your Accordian UI settings within your Mobile Layout. You now have the option of setting the Accordian controls within the Mobile Layout to be displayed in an expanded fashion or, by default, to be displayed in a collapsed fashion.
In the Mobile Layout below, the Accordian parameters for both the Shipment Details and the Event Entry have been configured to display the Accordians in these sections in an expanded fashion.
Mobile Layout - Expand Accordion Parameter Expand Set to True
Using the Mobile Layout configured above, when you open the Shipment Details and the Event Entry screens, the Accordions are expanded as shown below.
Shipment Details Expand Accordian Set to True
Add Event Expand Accordian Set to True
For comparison, the default display, with the expandRemarkAccordian and expandShipUnitAccordian set to the default of false provides the collapsed Accordian display below.
Add Event Expand Accordian Set to False the Default
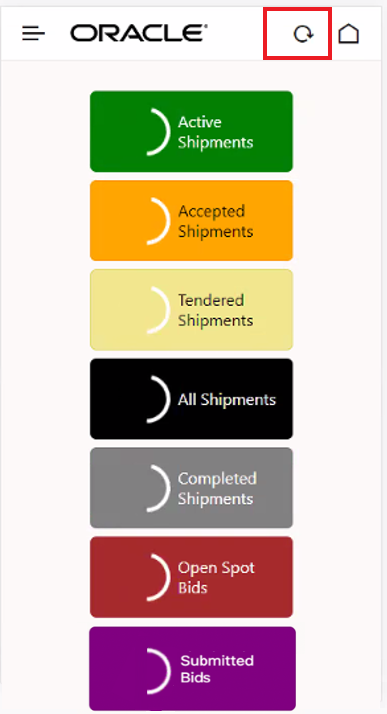
Refresh On Home - Refresh Reload Improvements
This feature allows you to configure which Boxes are refreshed (query is re-run) when the Home icon is selected. The goal of this feature is to improve the performance of the Mobile app by reducing unnecessary refreshes.
NOTE: If you do not find a Box and its related information of value - you might consider Hiding that Box on your Dashboard.
To configure the Boxes that are not going to be refreshed when Home icon is selected, you will set the parameter “refreshOnHome”:=false in the Mobile Layout. By default the Mobile Layout has “refreshOnHome”:=true - all Boxes will be refreshed when the Home icon is selected.
In the example below, the Active Shipments and Tendered Shipments Boxes will be refreshed “refreshOnHome”:=true all of the other Boxes will be set to not refresh,“refreshOnHome”:=false.
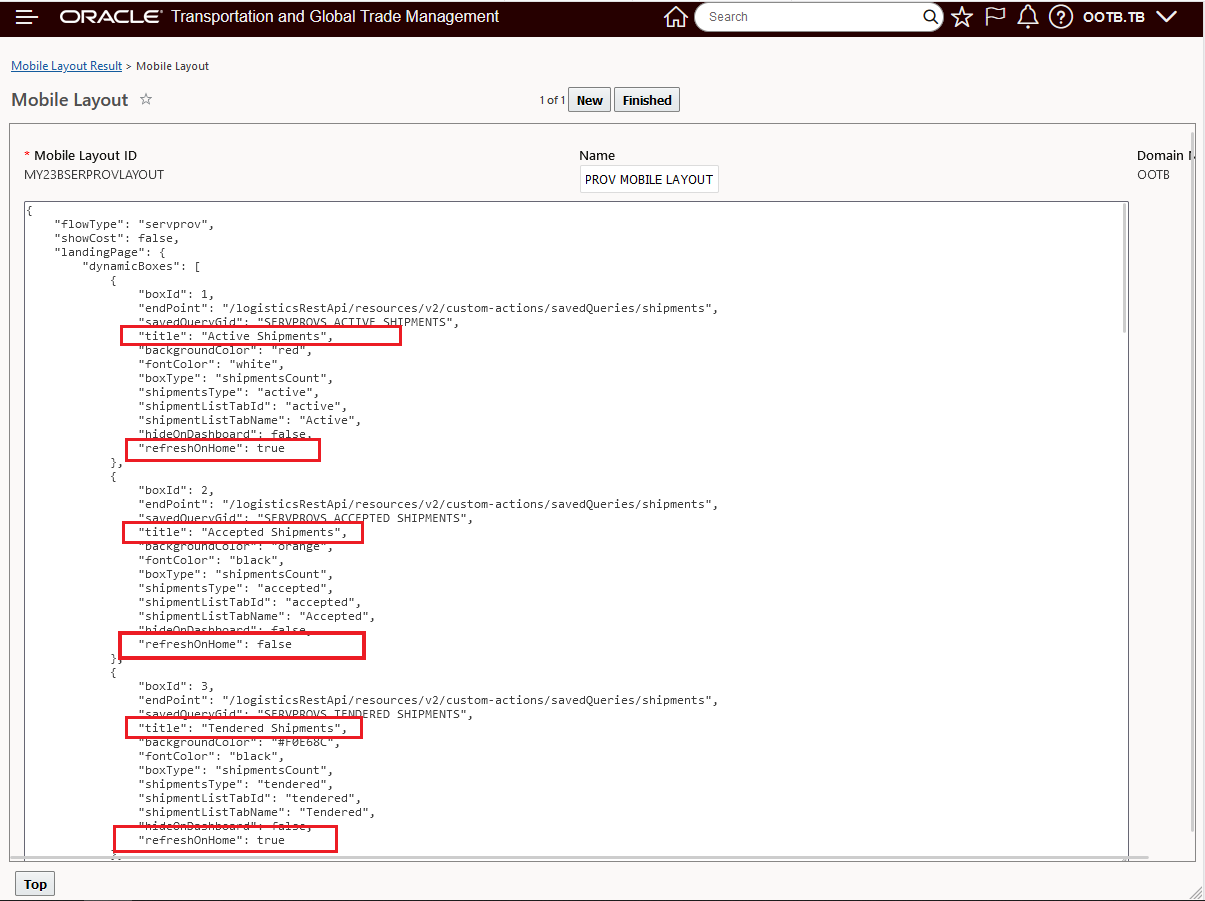
Mobile Layout Refresh Only Active Shipments and Tendered Shipments
With the Mobile Layout above in user, when the Home icon is selected - only the two Boxes configured with “refreshOnHome”:=true will be refreshed - as shown below.
Refresh On Home Active Shipments and Tendered Shipments
Refresh All
The Refresh On Home option above allows for configurability and selection of which Boxes are refreshed, the Refresh All option below, will refresh the data for all Boxes configured on the Mobile Dashboard..
Refresh All Option
Exception Event
The Exception Event enhancement allows you to configure and display, for usage within the Mobile App, a standard Exception Event. The Exception Event parameters available allow you to Show (or not) the option for Exception Events (true/false) - "showExceptionEvent", select an Exception Event quick code to use when entering an Exception Event "exceptionEventQuickCode", select the default entry for the location to use (current, first, last) - "exceptionEventLocation", and create your own Exception Event label to show on the Mobile App - "exceptionEventLabel".
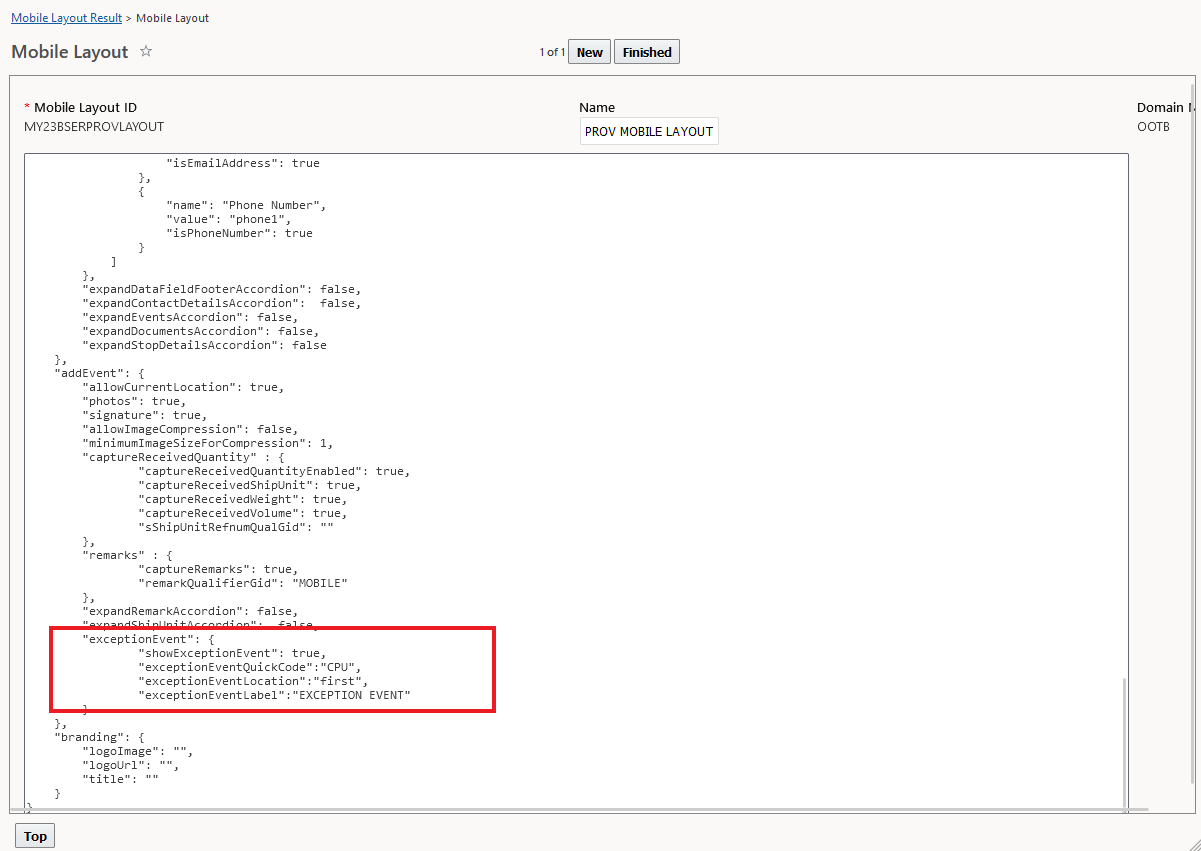
Mobile Layout - Exception Event Parameters
In the example below, the Exception Event Parameters have been configured as shown.
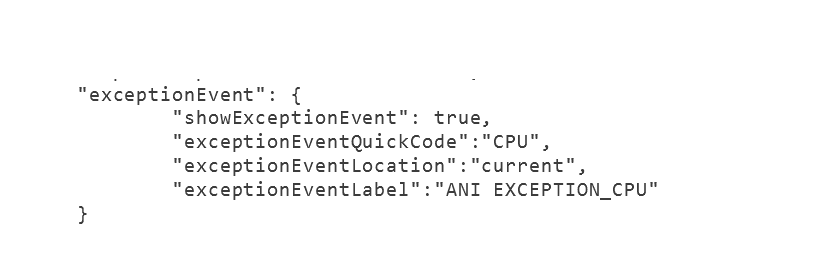
Mobile Layout Exception Event Mobile Layout Parameters
When the Mobile Layout with the Exception Event parameters above is used, the Mobile Application will be displayed as shown below.
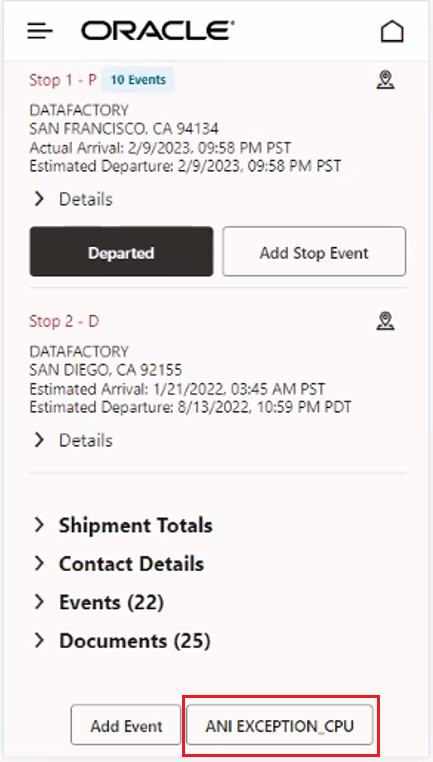
Exception Event - Show Exception Event with Configured Label
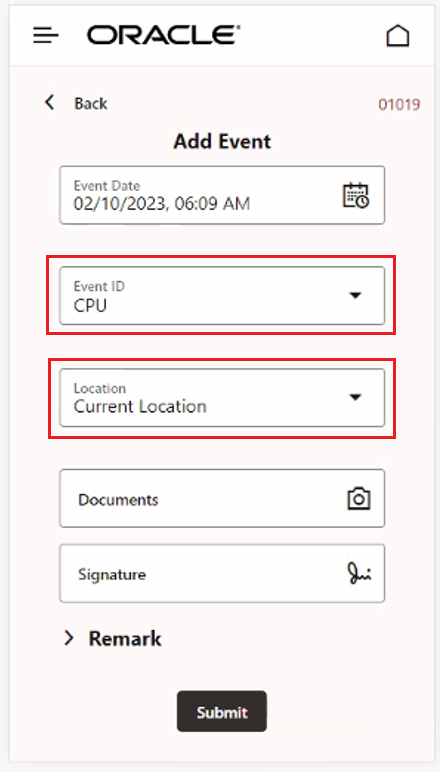
Exception Event - Quick Code and Location Configured
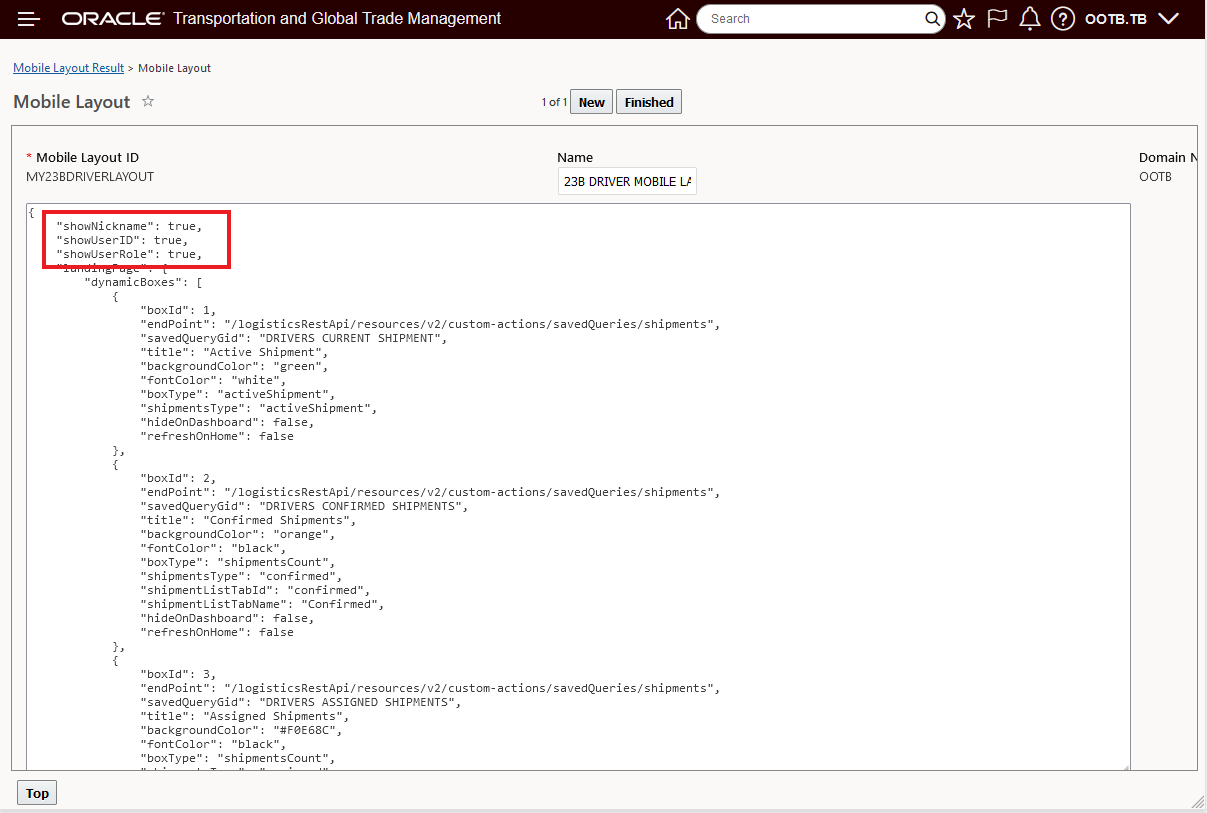
Display User Id, Nickname and Role
This feature provides with the option to show (or not) the user's Nickname, User ID and User Role within the Mobile App. Once again, the parameters to configure this capability are provided in the Mobile Layout. Setting the parameter to false will not show the selected parameter.
Mobile Layout User Display Parameters
In the example below, all three parameters are set to true, so all three values are shown.
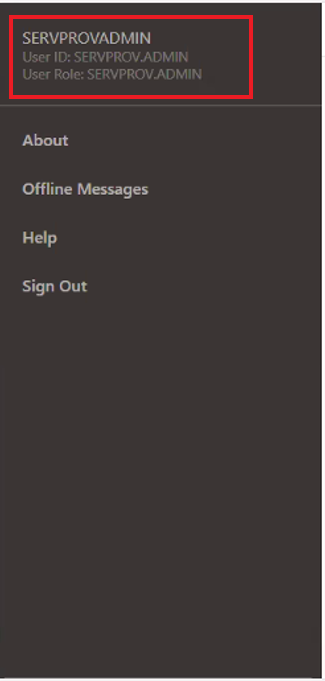
User Nickname, User ID and User Role Shown
Properties for Document Type Enabled
The following properties have been enabled for the PWA Mobile Application. These properties define the Document Type associated with images, signatures, or PDFs collected on the Mobile Application and entered as part of an event.
- glog.mobile_image.quick_code_gid.QUICK_CODE_GID.document_def_gid =DOCUMENT_DEF_GID
- glog.mobile_signature.quick_code_gid.QUICK_CODE_GID.document_def_gid =DOCUMENT_DEF_GID
- glog.mobile_pdf.quick_code_gid.QUICK_CODE_GID.document_def_gid =DOCUMENT_DEF_GID
For example, If you create an event using a Quick Code of GUEST.ARRIVED and you want the associated document to have a document type of GUEST.MOBILE_IMAGE, the property will look like this:
- glog.mobile_image.quick_code_gid.GUEST.ARRIVED.document_def_gid=GUEST.MOBILE_IMAGE
For a signature it would look like this:
- glog.mobile_signature.quick_code_gid.GUEST.ARRIVED.document_def_gid=GUEST.MOBILE_SIGNATURE
For a PDF it would look like this:
- glog.mobile_pdf.quick_code_gid.GUEST.ARRIVED.document_def_gid=GUEST.MOBILE_PDF
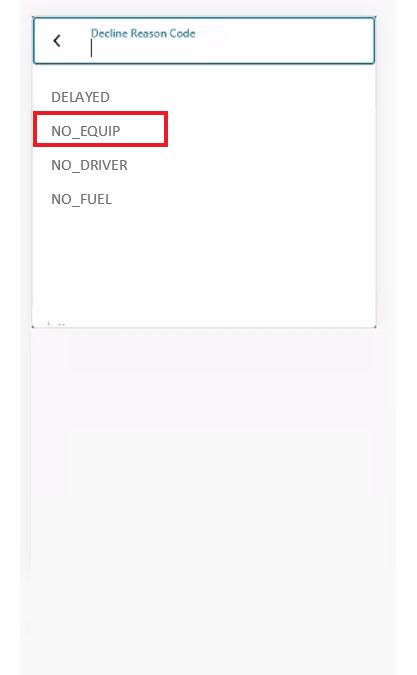
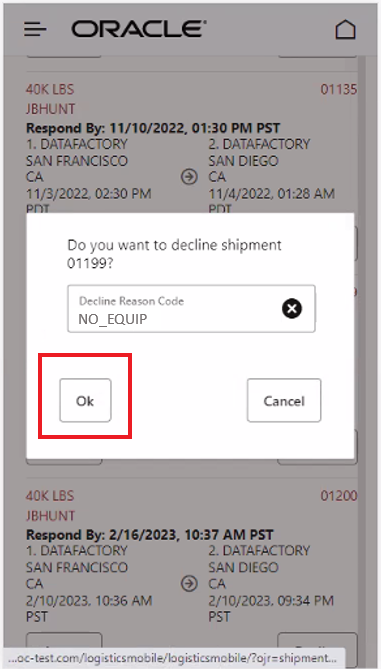
Decline Reason Code - Service Provider Flow
This feature provides you with the ability to enter and save the Service Provider's Decline Reason Code.
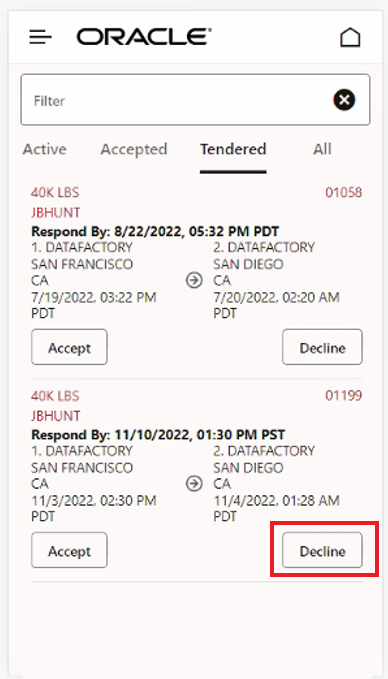
Select Decline for a Tendered Shipment
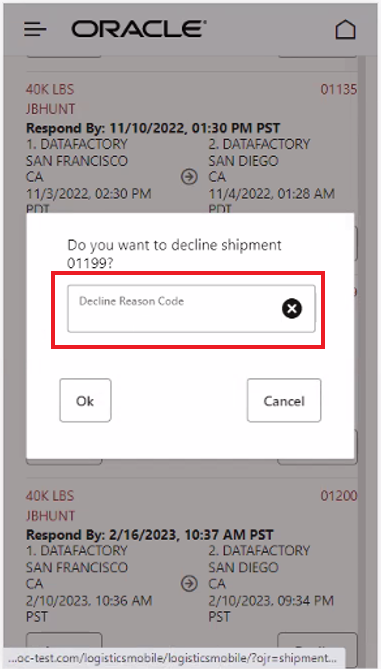
Decline Reason Code Entry
Lookup and select the desired Decline Reason Code from the list of available codes.
Decline Reason Code Lookup
In the final step select OK to Decline the Tender and save the selected Declined Reason Code.
Finalize Decline With Reason Code
These features represent the next phase of innovation , usability upgrades, and general improvements for the Mobile Application, all focused on improving your productivity and user experience when using the Mobile Application.
Steps to Enable
You don't need to do anything to enable this feature.
Tips And Considerations
NOTE: All the features listed above are supported by both the Service Provider Mobile Layout and the Driver Mobile Layout unless otherwise indicated.
Order Management/Fusion Application Integration
Order Release - Mod - Future Processing Agent Action - Option to Always Generate Ship Units
This feature adds the option for the Order Release - Mod - Future Processing Agent Action to Always Generate Ship Units for Line Based Order. This feature is intended to improve the handling of integration scenarios where upstream and downstream systems cannot provide the necessary backpointers and references to OTM to coordinate downstream system updates for shipment actuals and upstream order modifications.
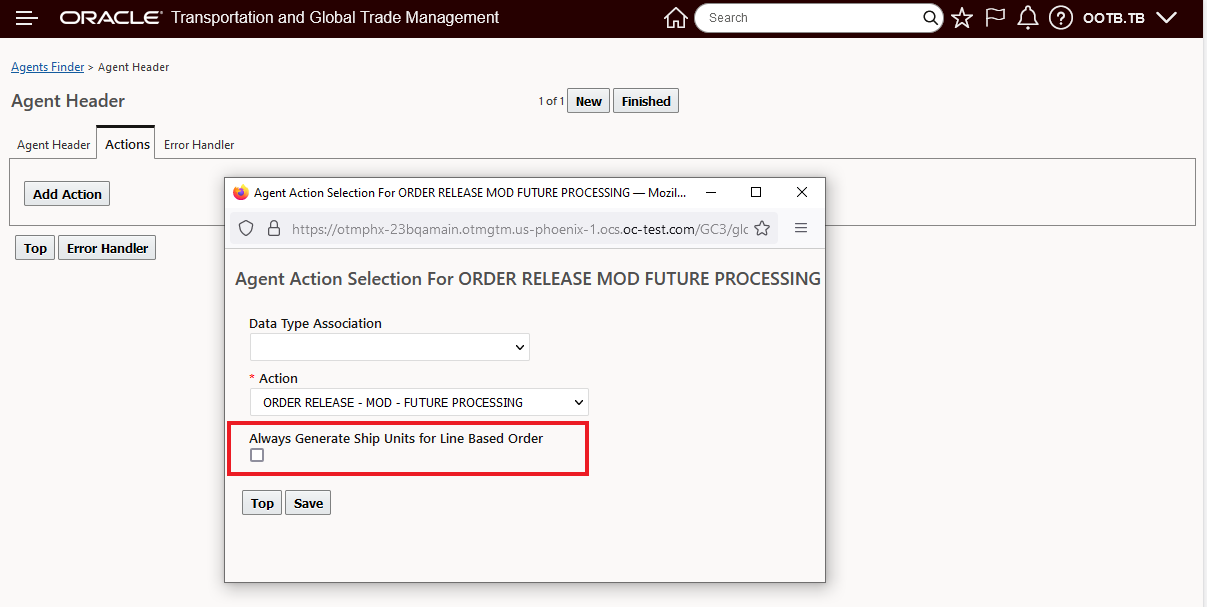
Always Generate Ship Units Option
The use case for this option involves scenarios where the actuals provided for a shipment remove the backpointers reference to the original order release ship unit, in this case, when an order modification is processed with the Always Generate Ship Units for Line Based Order option selected, the ship units on the order release will be deleted and regenerated, if the order is planned on a shipment, and the shipment ship unit to ship unit backpointer exists, the ship units will not be regenerated.
This feature is intended to better handle integration scenarios where upstream and downstream systems cannot provide the necessary backpointers and references to OTM to coordinate downstream system updates for shipment actuals and upstream order modifications. This feature, along with the Order Release Action - Sync Shipped Quantity with Order and Shipment Action - Removed Planned Shipment Ship Units, will provide practical tools for improving your Fusion Application integration.
Steps to Enable
You don't need to do anything to enable this feature.
Order Release Action - Sync Shipped Quantity with Order
The Order Release Action - Sync Shipped Quantity with Order is intended to be used to support the orchestration between upstream and downstream systems where a temporary delta occurs between the upstream system's ordered quantity and how the downstream system handles the fulfillment of the order. Specifically, this action is intended to help support the scenario where the upstream system sends an order into OTM for 100 units, OTM builds a shipment for the 100 units and sends that shipment to the downstream system for fulfillment. The downstream processes the shipment, but the actualized count provided for the originally planned shipment is only for 90 units, leaving a balance of 10 that needs to be planned onto a separate shipment. This feature supports the generation of a balancing transaction in OTM for the unactualized portion of the order so that the balance can be planned onto a follow-on shipment.
Specifically, the action Sync Shipped Quantity with Order will create, for the unshipped balance, a new order movement and shipment ship unit with the shipment ship unit line with an item total package count equal to the unshipped balance. This newly created order movement can then be used by OTM to ship the remaining balance.

Order Release Action
In the example below, the original Order Release is 1 Ship Unit with a Total Package Count for 100 units.
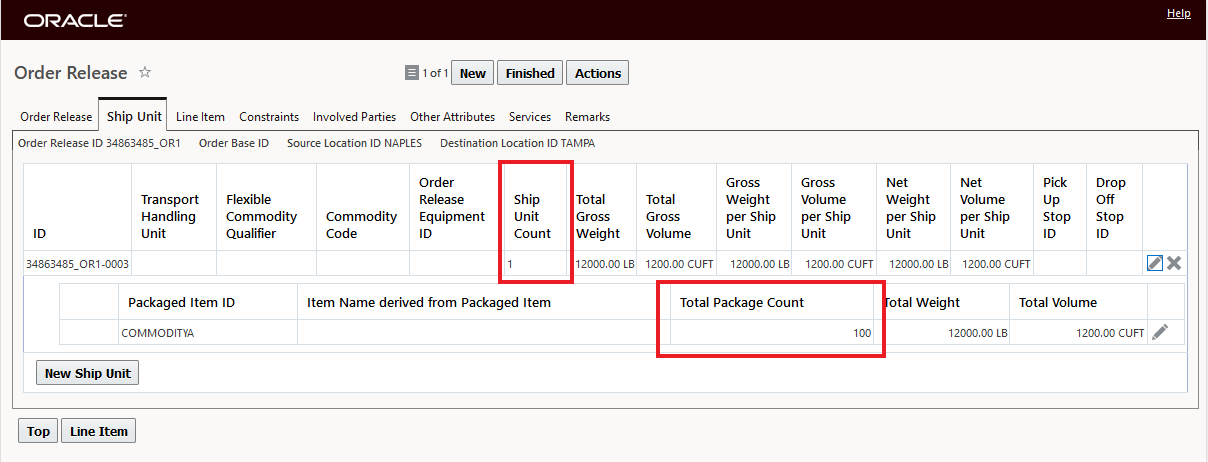
Order Release
The original shipment is planned and sent downstream for processing. The downstream system then actualizes the shipment with a count of only 90 units.
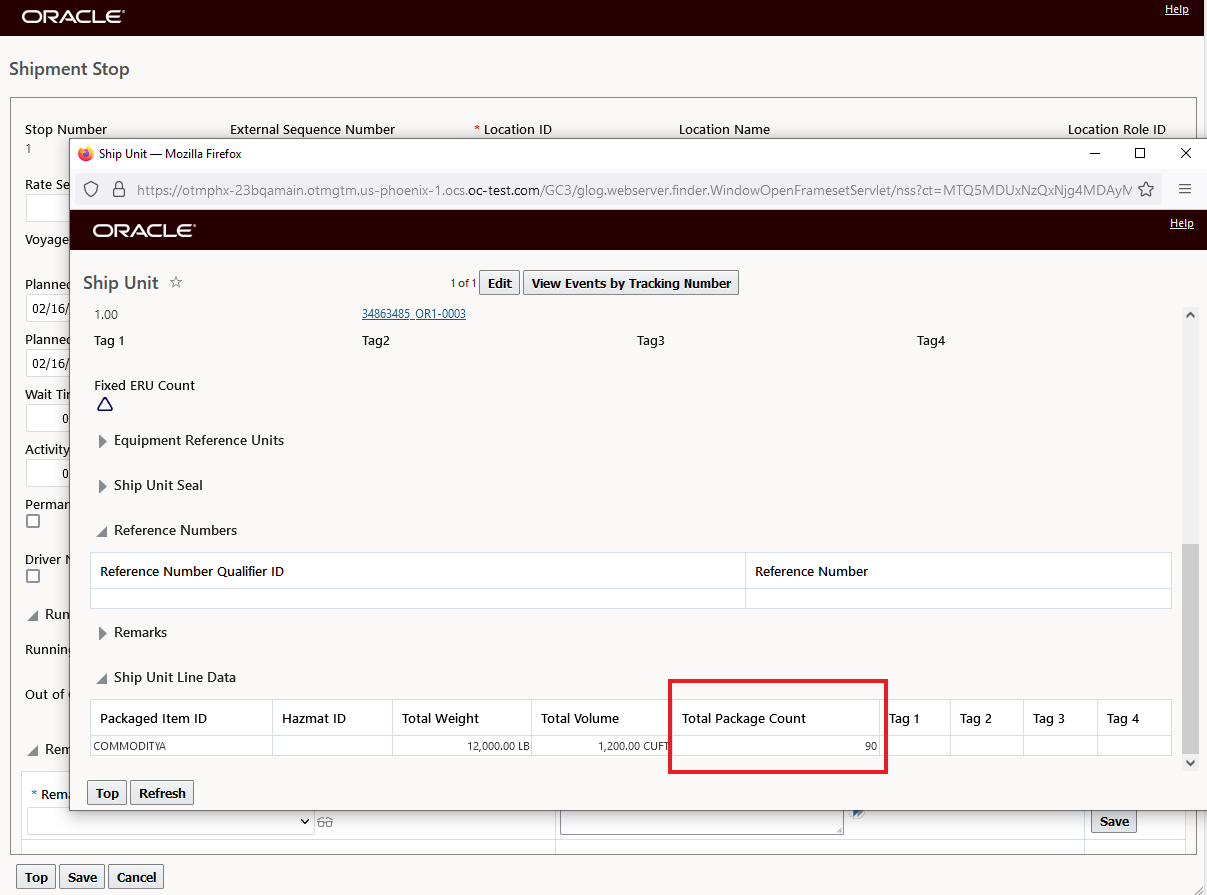
Actualized Shipment - Total Package Count of 90
When the action Sync Shipped Quantity with Order is run against the Order Release - the Order Release now has two Order Movements. The original actualized Order Movement with a Ship Unit with a Total Package Count of 90 and a new Order Movement with a Ship Unit with a Total Package Count of 10 - the unactualized balance.
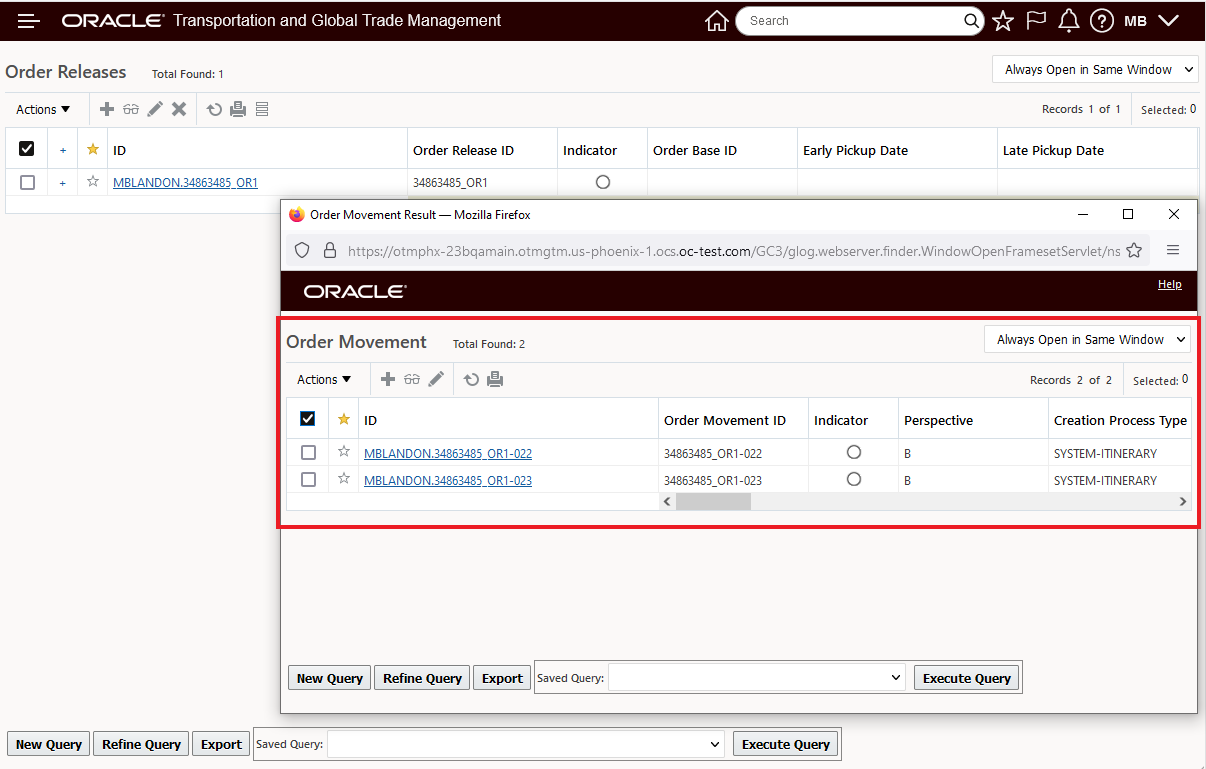
Order Release - Two Related Order Movements
The original actualized Order Movement with a Ship Unit (count of 1) with a Total Package Count of 90 is below.
Actualized Shipment Order Movement - Total Package Count of 90
Then the additional Order Movement with the balance, that has a single Ship Unit (count of 1) with a Total Package Count of 10 - the unactualized balance. This Order Movement will be used to plan a shipment for the balance, which is then sent to the downstream system for shipping.
Order Movement with Total Package Count Balance of 10
This feature provides a processing option for situations where your upstream Order Management and system and downstream Inventory solution require the transportation solution to manage certain partial ship scenarios. This feature, along with the Order Release - Mod - Future Processing Agent Action - Option to Always Generate Ship Units and Shipment Action - Removed Planned Shipment Ship Units, will provide practical tools for improving your Fusion Application integration.
Steps to Enable
You don't need to do anything to enable this feature.
Tips And Considerations
The Sync Shipped Quantity with Order action is only applicable:
- For Order Releases with an order configuration of ONE TO ONE and when the Order Release is planned on single leg shipment
When the Sync Shipped Quantity with Order action is run, the system will display an exception under the following scenarios:
- Order is not planned on any shipments.
- If an actual is not received for any related shipment ship units.
- If the planning parameters FIELD NAME FOR SSU ACTUAL RECEIVED and FIELD VALUE FOR SSU ACTUAL RECEIVED are not defined.
- If order is planned on multi-leg shipments.
- If the order configuration is not ONE TO ONE.
Key Resources
- The Sync Shipped Quantity with Order action Help provides excellent coverage for usage of the action.
- To provide more context for the usage of this action, you should review the Integrating with Oracle Integration Cloud Guide. In particular, the Sample Integrations for Fusion Applications Integrations.
Shipment Action - Remove Planned Shipment Ship Units
This feature provides you with a new Shipment Web Action - Remove Planned Shipment Ship Units - which provides you the option to manually remove the planned ship units on a shipment in situations where the planned shipment ship units have not/will not receive any actual values. The Remove Planned Shipment Ship Units web action is intended to be used in situations where the standard setup - where the Remove Planned Shipment Ship Units is handled using the existing Agent Action - Remove Planned S Ship Units - requires a retry/manual intervention.
The action can be found by navigating to Shipment Management > Shipment Management > Buy Shipments > Actions > Shipment Management > Utilities > Remove Planned Shipment Ship Units.
Shipment Web Action Remove Planned Shipment Ship Units
When the action is run (single select action), the result plays back information on the affected shipment, as shown below.
Action Result
This feature improves the usability of the system by providing you with an optional/as needed manual clean-up option to address operational integration issues that can occur from time to time. This feature, along with the Order Release - Mod - Future Processing Agent Action - Option to Always Generate Ship Units and Order Release Action - Sync Shipped Quantity with Order, will provide practical tools for improving your Fusion Application integration.
Steps to Enable
You don't need to do anything to enable this feature.
Key Resources
- To provide more context for the usage of this action, you should review the Integrating with Oracle Integration Cloud Guide. In particular, the Sample Integrations for Fusion Applications Integrations.
Flight Consol with Flight Info Not Required
This feature allows you to create your Flight Consol without requiring you to provide a Flight ID (and all the related Flight Schedule data), or the Departure Date.
Now, when you create your Flight Consol, the Flight ID and Departure Date are no longer required fields, as shown below.
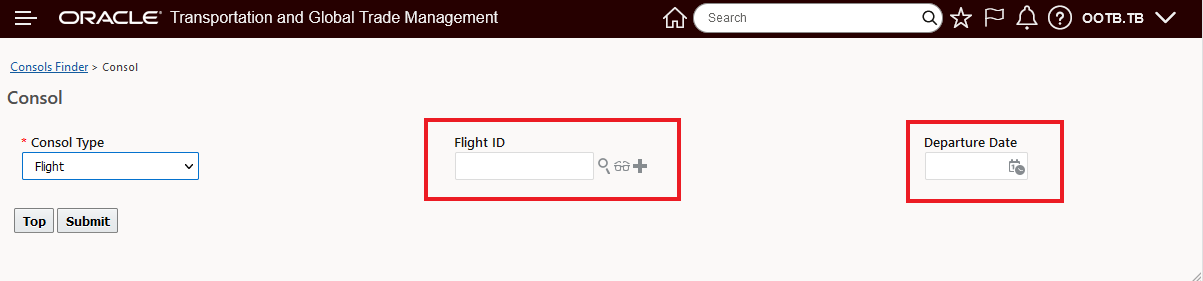
Flight ID No Longer a Require Field
When you create a Flight Consol Type without specifying a Flight ID (and Departure Date), you are required to specify some key information that previously would have been provided from the Flight information - like Expected Departure/Arrival Time, Source Location, Destination Location and Service Provider. The required information is highlighted below.
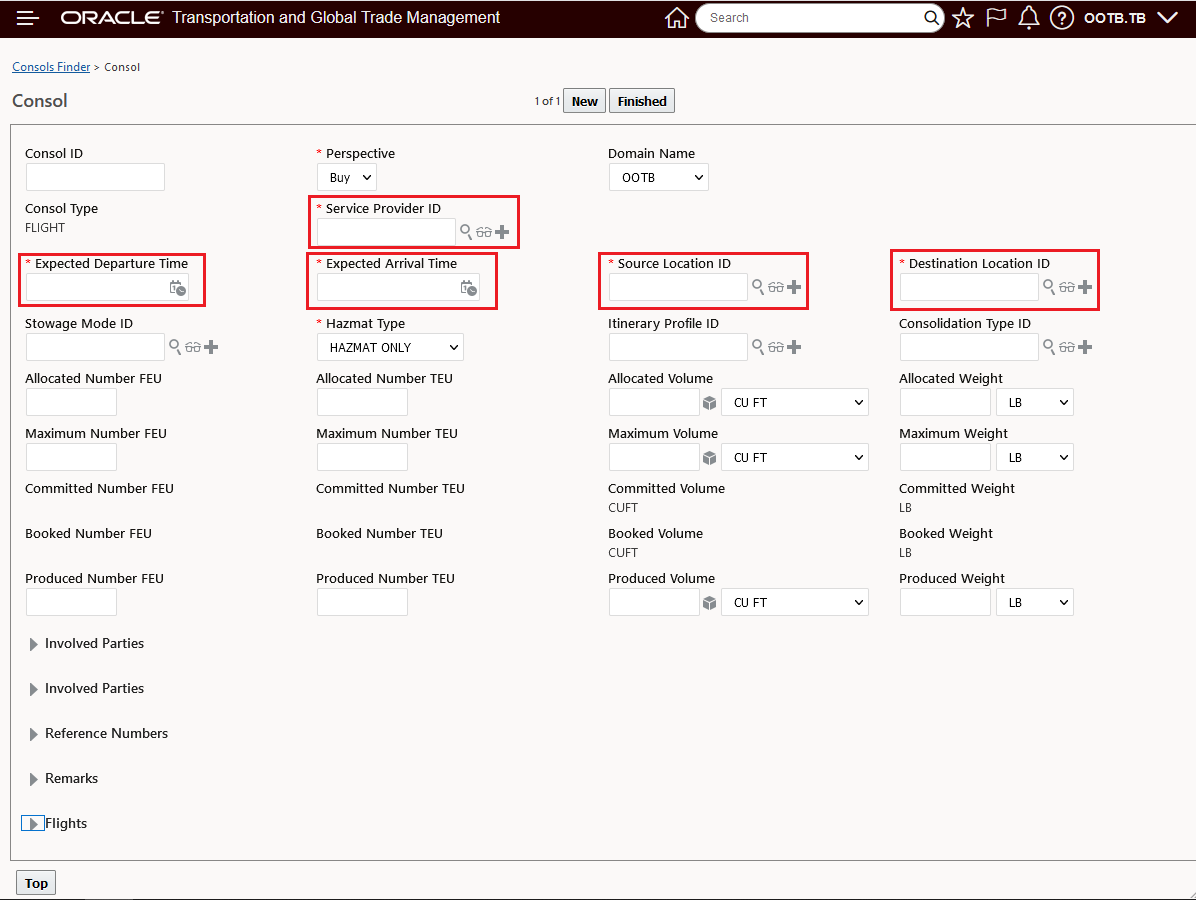
Flight Consol - No Flight ID - Required Field
In the example below, a Flight Consol has been created for February 13th going between PHL and LAX. Expected Departure and Arrival Times are also specified/required.
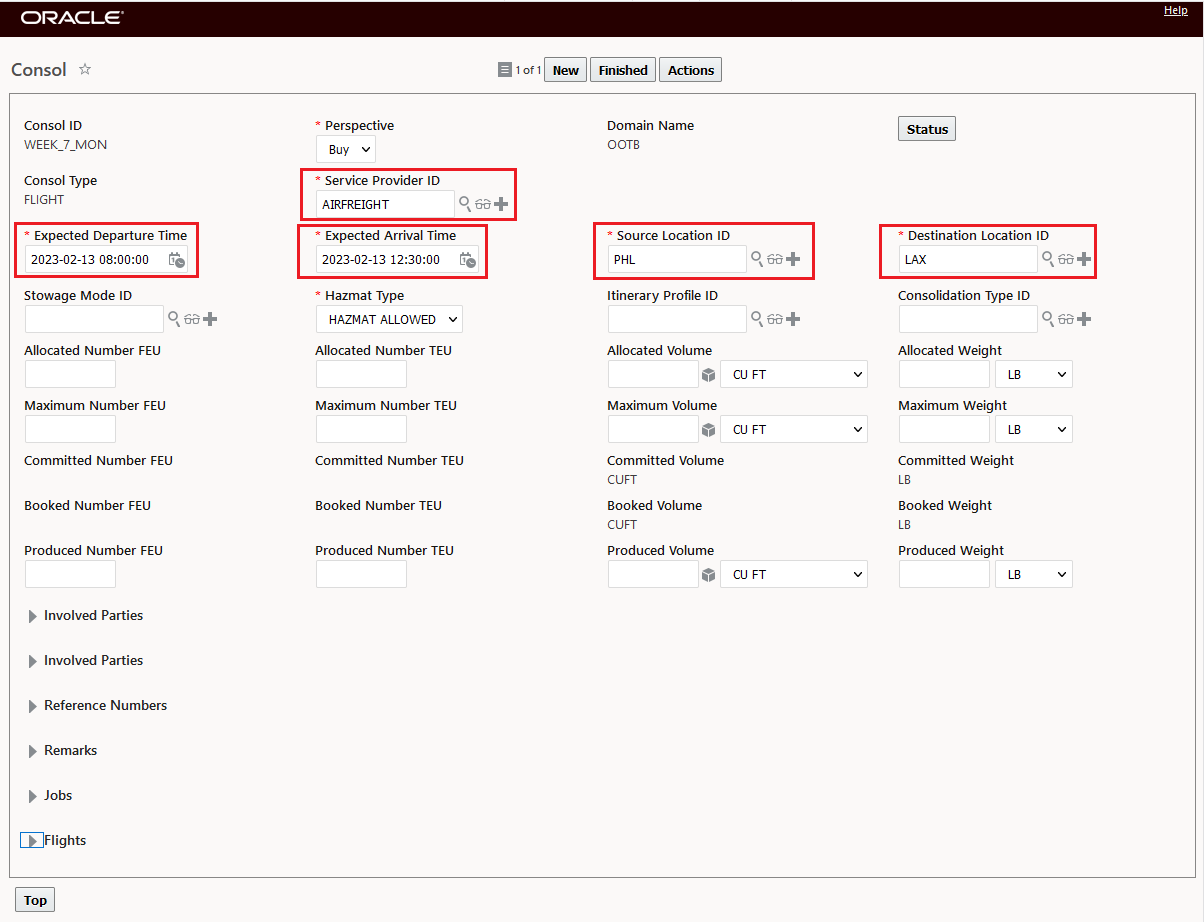
Flight Consol PHL to LAX on February 13th
The Flight Consol without the Flight ID and related flight information operates as it did previously.
Once you create the Flight Consol with the required input, you run the Create Shipment Action - as shown below.
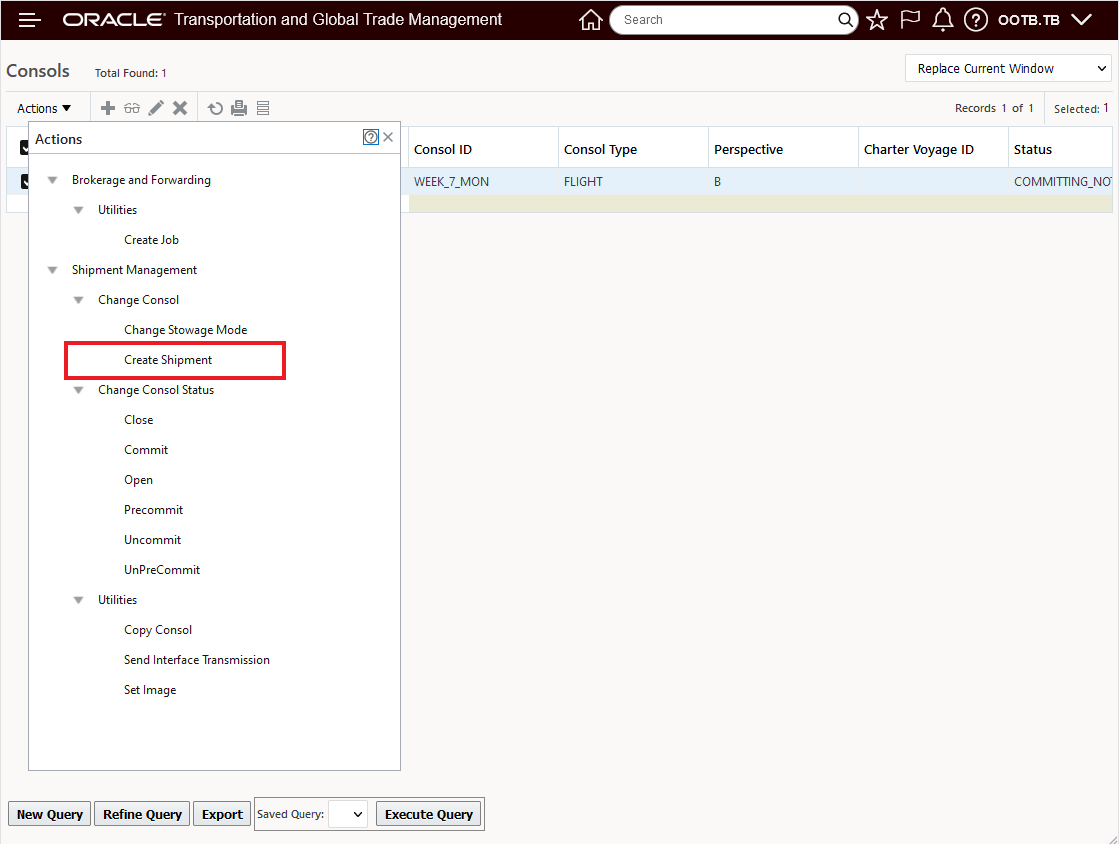
Flight Consol - Create Shipment

Flight Consol Shipment Created
With the Flight Consol Shipment created, you're ready to book your air freight into the available Flight Consol Shipment.
In this example, the orders are being booked into the Flight Consol by running the action Build Buy Shipment On Primary Leg Show Consol Opitons.
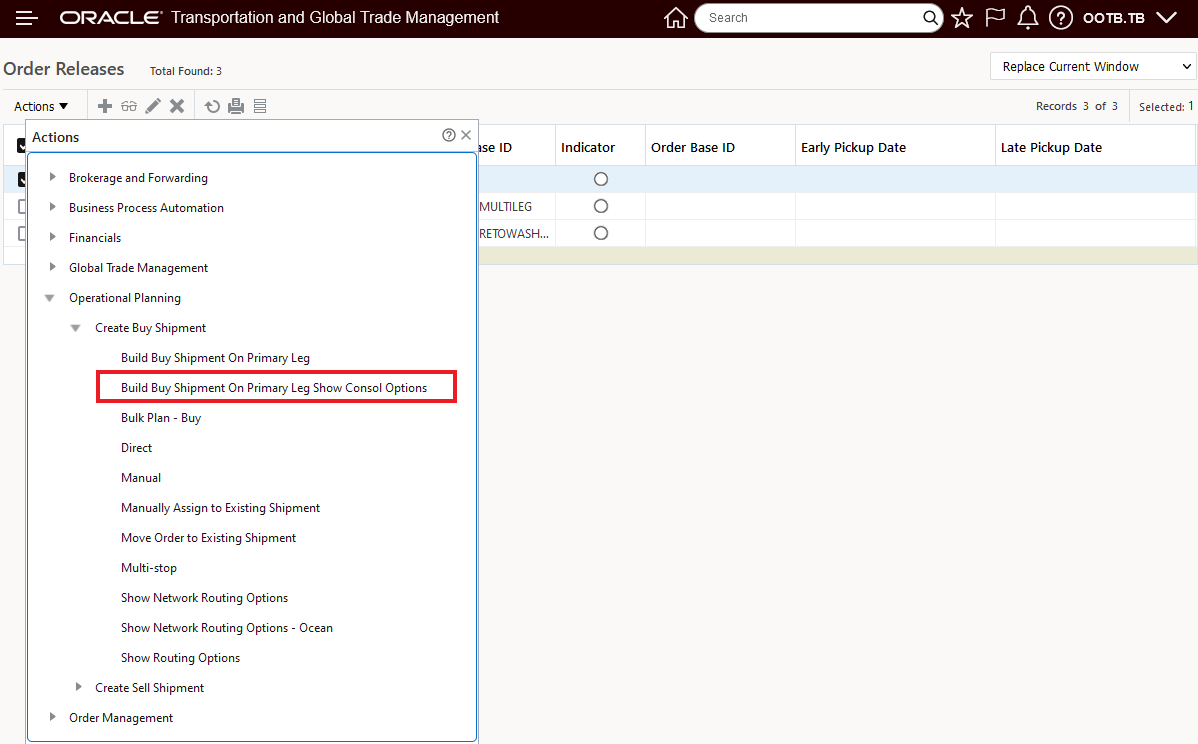
Run Build Buy Shipment On Primary Leg Show Consol Options
Running the action brings up the available Flight Consol going between PHL to LAX on February 13th, as shown below.
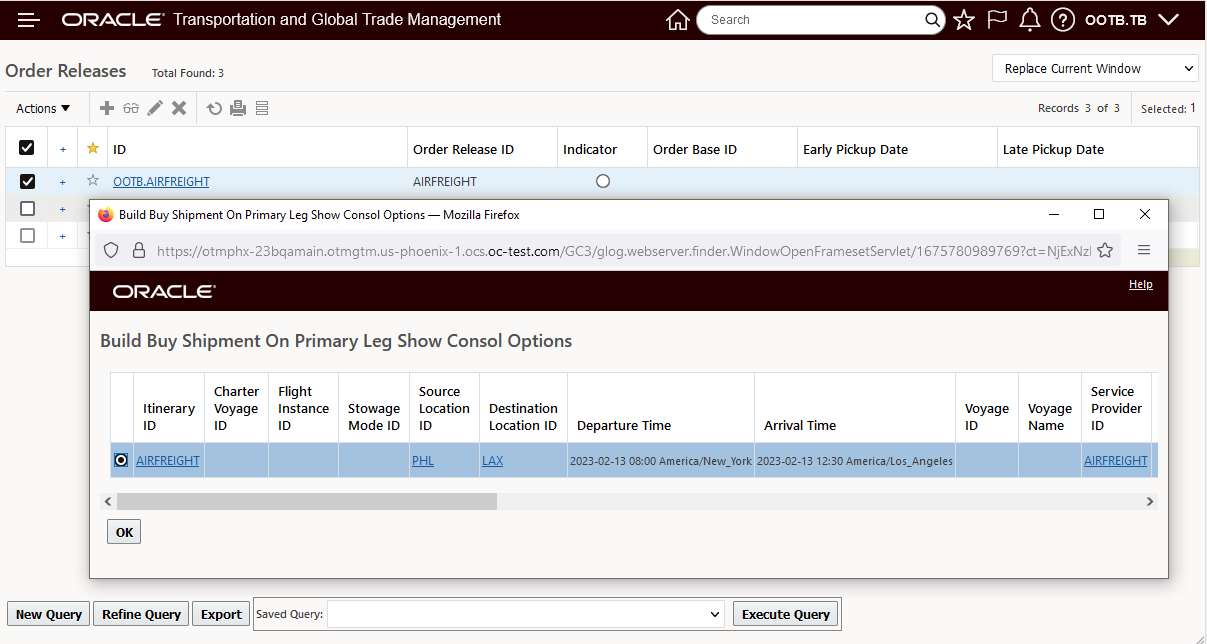
Selecting OK, above assigns the order to the Flight Consol Shipment 24528.
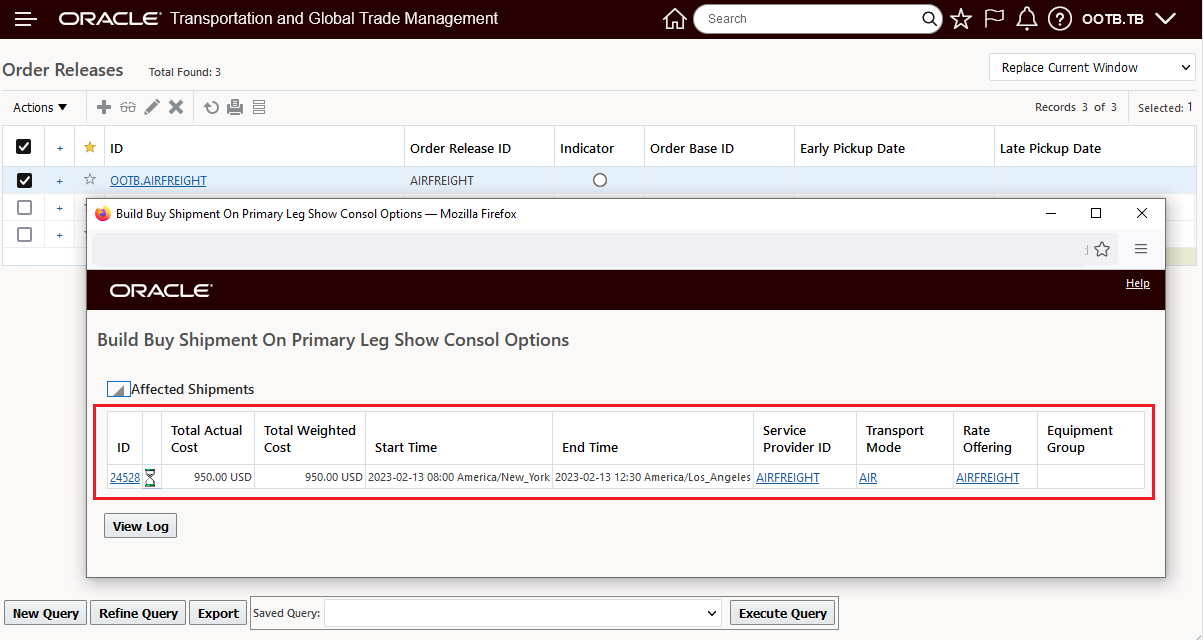
Order Assigned to Flight Consol
The Flight Consol Shipment, after assigning the order, is below. Using this new feature, you are now able to create the Flight Consol, create the Flight Consol Shipment then add freight to the Flight Consol Shipment all without the need to create an Air Schedule with Flight Data.
NOTE: The Flight Consol Shipment uses the Expected Departure and Arrival Times from the Consol as the Planned Departure/Arrival times on the stops.
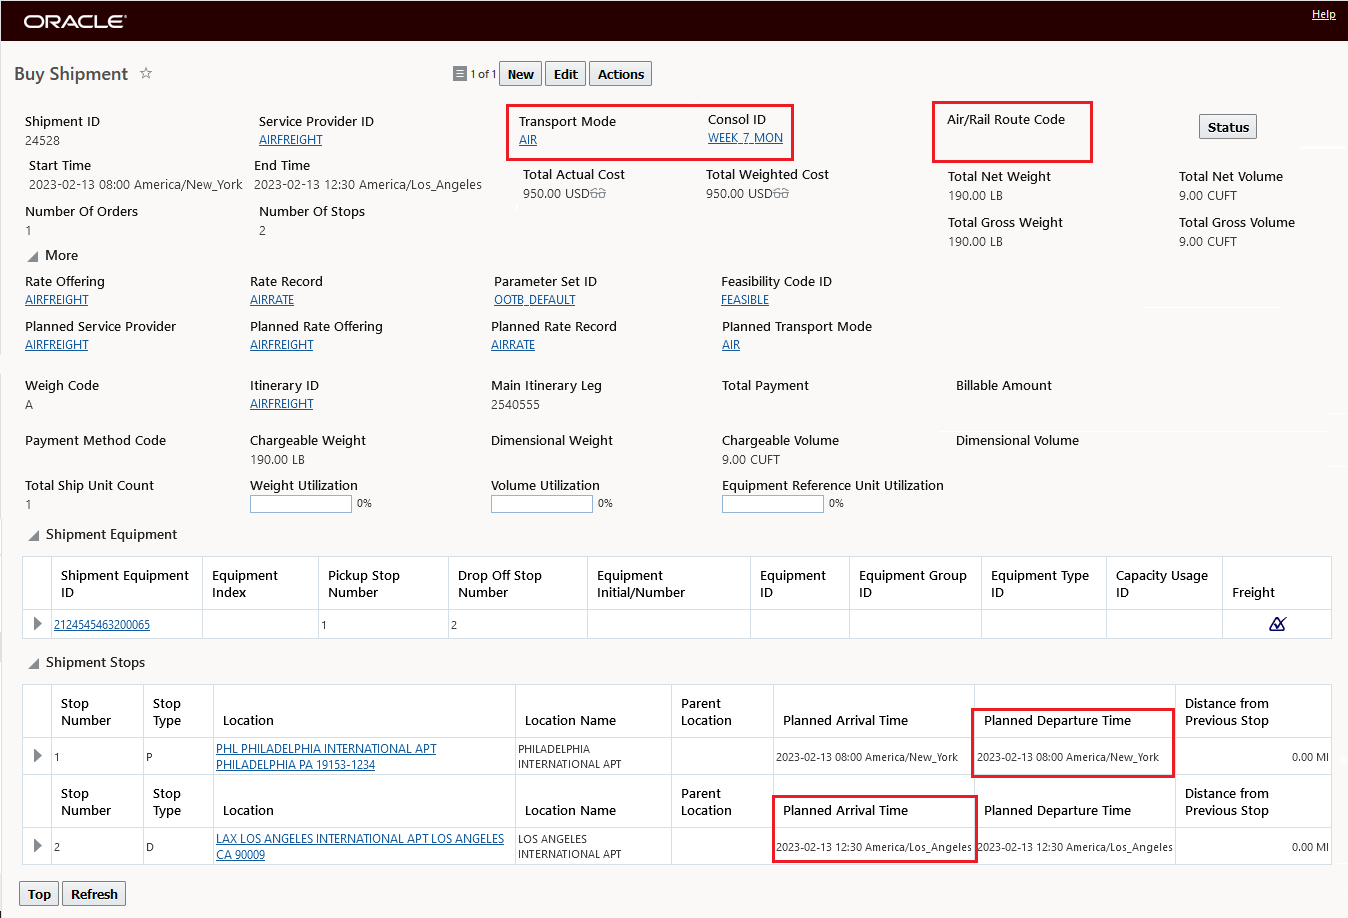
Flight Consol Shipment
This feature allows for the definition and usage of Flight Consols without requiring the setup of Air Schedules with Flight Schedule data. You will find this feature useful in scenarios where you need to book freight into a flight consol before you receive the specific flight details from your freight forwarder.
Steps to Enable
You don't need to do anything to enable this feature.
Ground Schedule - Force Generate Additional Ground Schedule Shipments
This feature provides you with a new Ground Schedule action, Force Generate Shipments, that allows you to add additional Grounds Schedule Shipments on an ad hoc/as needed basis . You will find this feature particularly useful in situations where you rely on Ground Schedules Shipments to support your operation and you find that from time-to-time you need to supplement your regularly generated Ground Schedule Shipments with additional ad hoc Ground Schedule shipment(s).
In the example below, the Ground Schedule is configured to generate ten Ground Schedule Shipments when it runs. To demonstrate the features capabilities, the ten Ground Schedule Shipments will be generated using the Generate Shipments action, and then the Force Generate Shipments action will be used to generate two additional Ground Schedule Shipments for Tuesday February 14th..
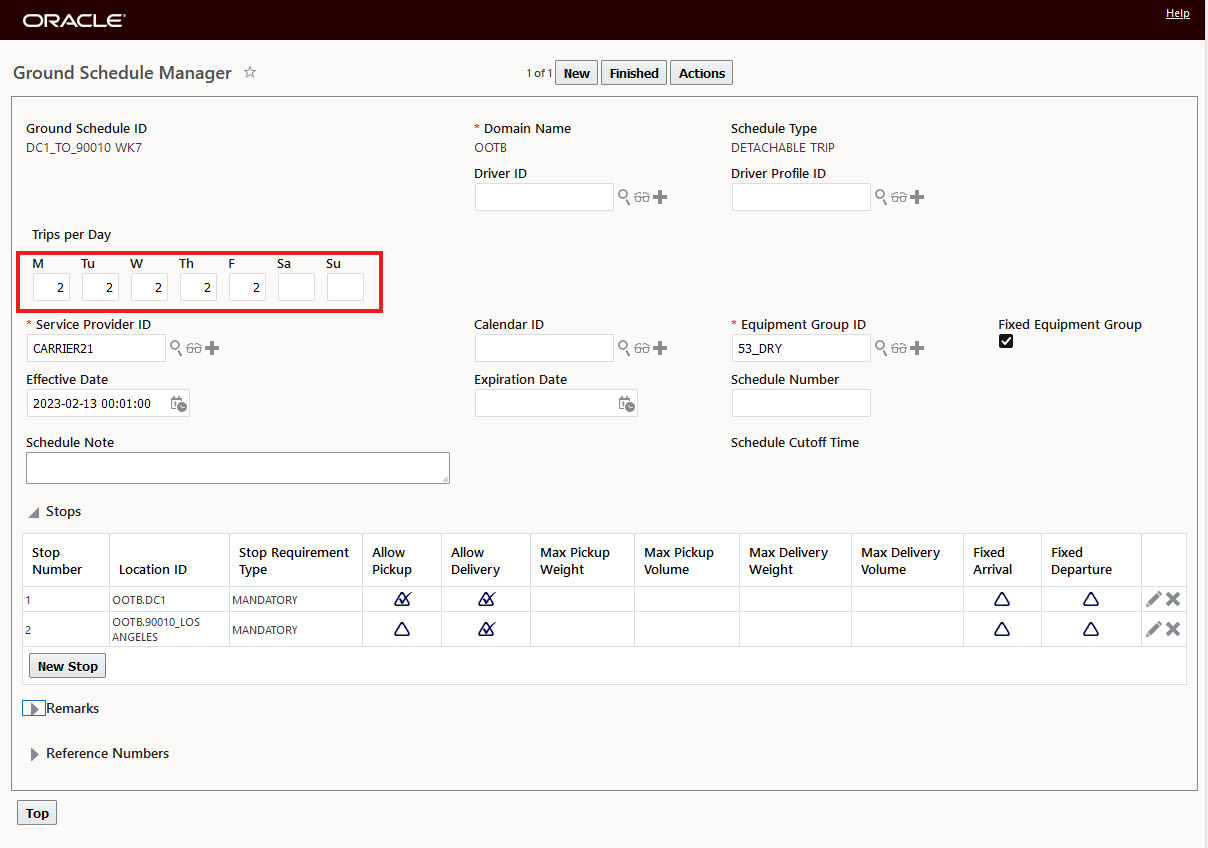
Ground Schedule - 2 Ground Schedule Shipments Per Day
Running the Generate Shipments action will generate 10 Ground Schedule Shipments.
Generate Shipments
Generating Shipments for the Week of 2/13/2023
The result is ten Ground Schedule Shipments generated.
Ten Shipments Expected for the Ground Schedule
The ten generated Ground Schedule Shipments are below.
Ten Shipments Generated
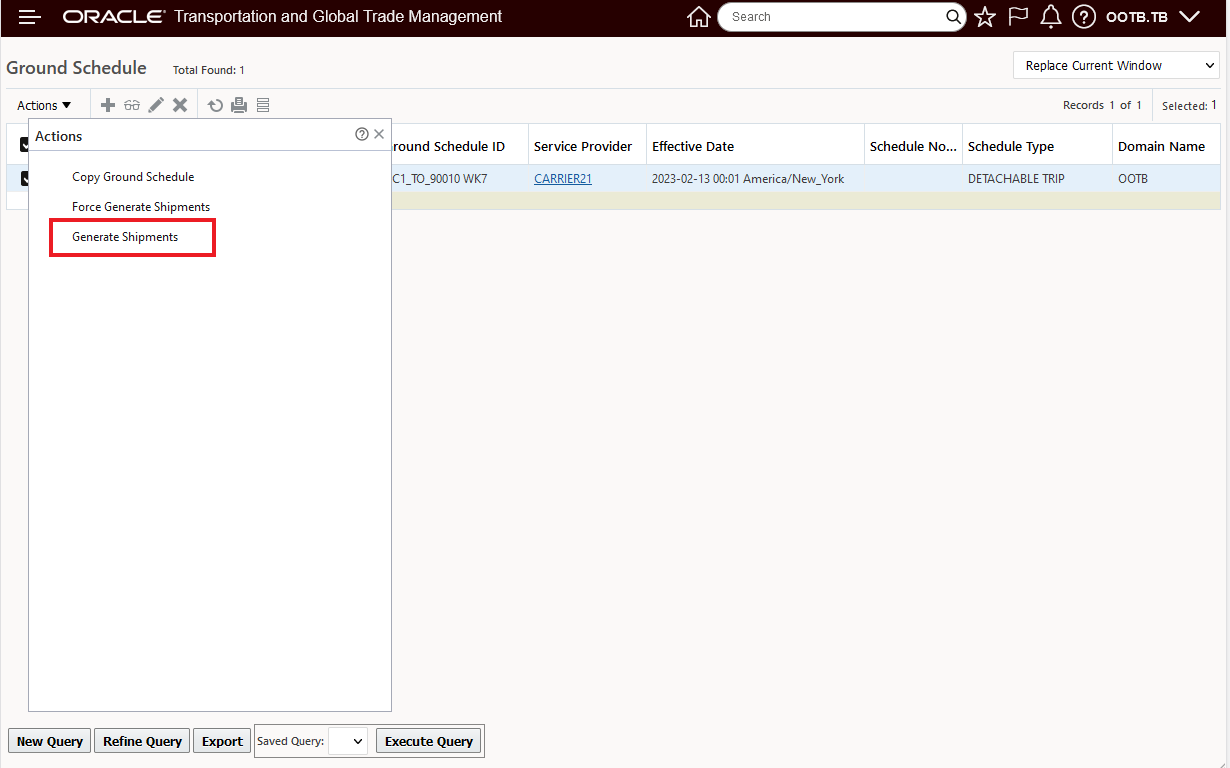
Now, on Tuesday February 14th, an additional two Ground Schedules Shipments are required. Running the Force Generate Shipments action against the same Ground Schedule above (DC1_TO_90010 WK7) will allow you to easily create these additional Ground Schedule Shipments.
Run the Force Generate Shipments action against the desired Ground Schedule.
Force Generate Shipments Action
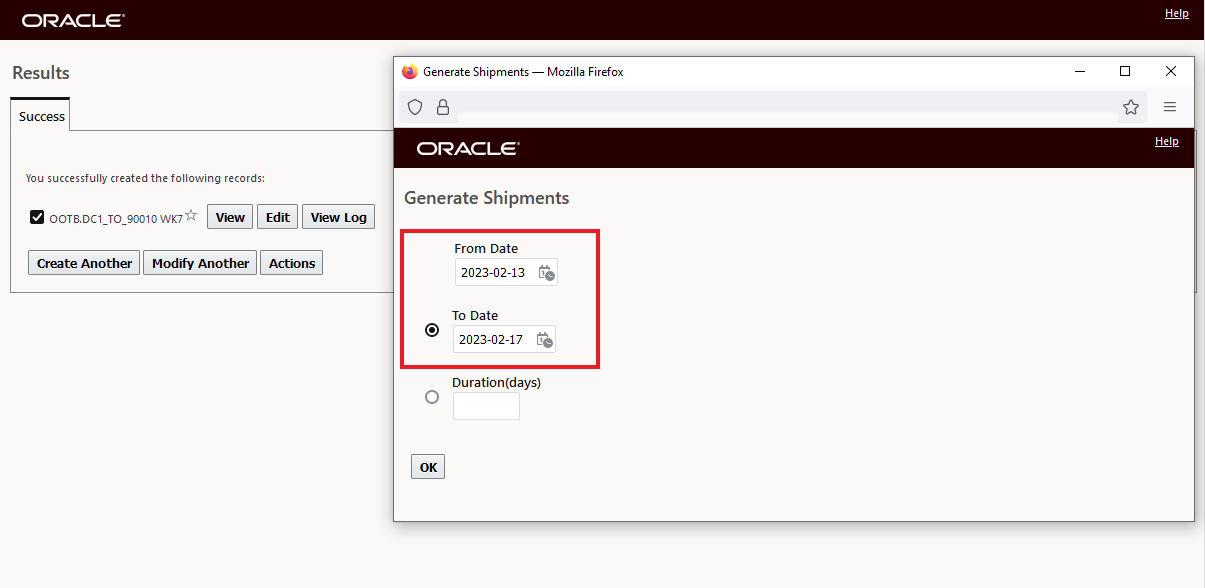
The input for the Force Generate Shipments action is below, enter the date you wish to generate the shipments for and the number of shipments to generate and select OK. In the example below, two shipments are being Force Generated for February 14th.
Force Generate Shipments Action Input
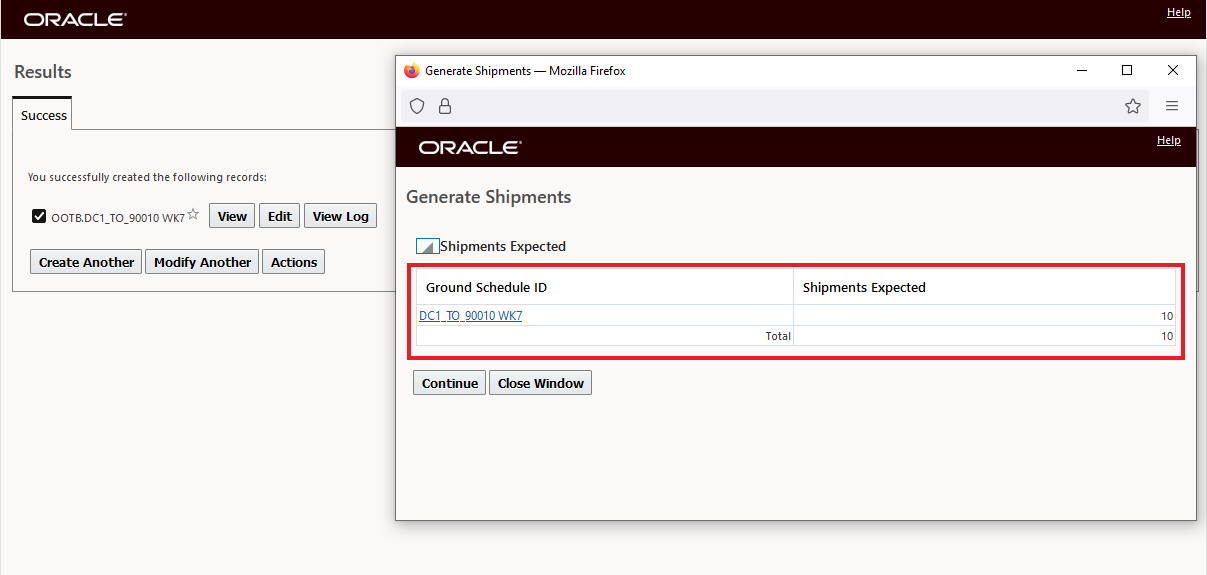
The Force Generate Shipments action result - two shipments expected and two shipments built.
Force Generate Shipments Action Result
Now, after running the Force Generate Shipments action, there are twelve Ground Schedule Shipments, two per day, except for Tuesday February 14, where two additional Forced Generated shipments were created for a total of four.
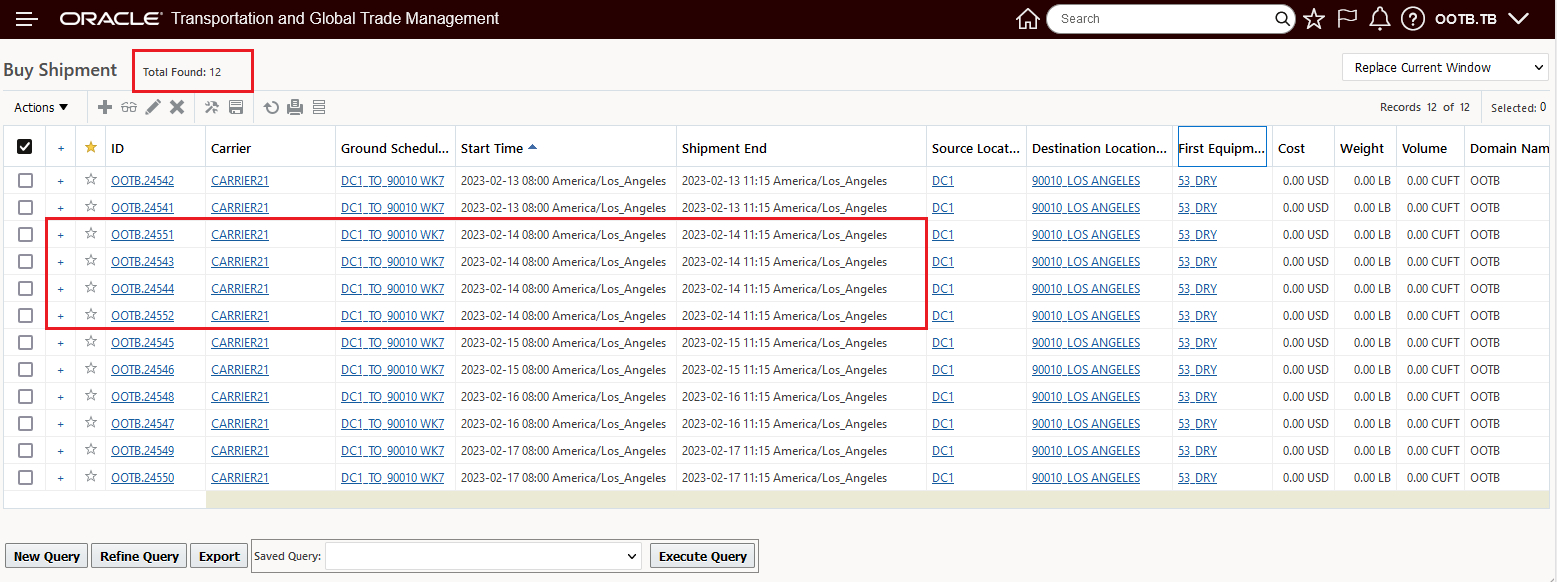
Twelve Ground Schedule Shipments Available - Ten Generated Plus Two Force Generated
This feature improves the usability of Ground Schedules by allowing you - when necessary - to easily supplement the number of Ground Schedules generated and available for planning.
Steps to Enable
You don't need to do anything to enable this feature.
Tips And Considerations
The force generated Ground Schedule Shipments created using the Force Generate Shipments action are not considered in the counts when the Generate Shipments action is run. You can run the Force Generate Shipments action against your ground schedule before or after the normal Generate Shipments action is run, the Ground Schedule Shipments created by the Force Generate Shipments action will not impact the shipments generated by the Generate Shipments action.
The new Force Generate Shipments action works for all of the Ground Schedule Types - Detachable, Dynamic and Static.
Merge Shipment Ship Unit Action - Expanded Ship Unit Detail
This feature provides you with more visibility into your Ship Unit Detail when you run the Merge Shipment Ship Unit action. You will find this expanded view valuable in situations where your Ship Unit Merge decision requires visibility into your ship unit details.
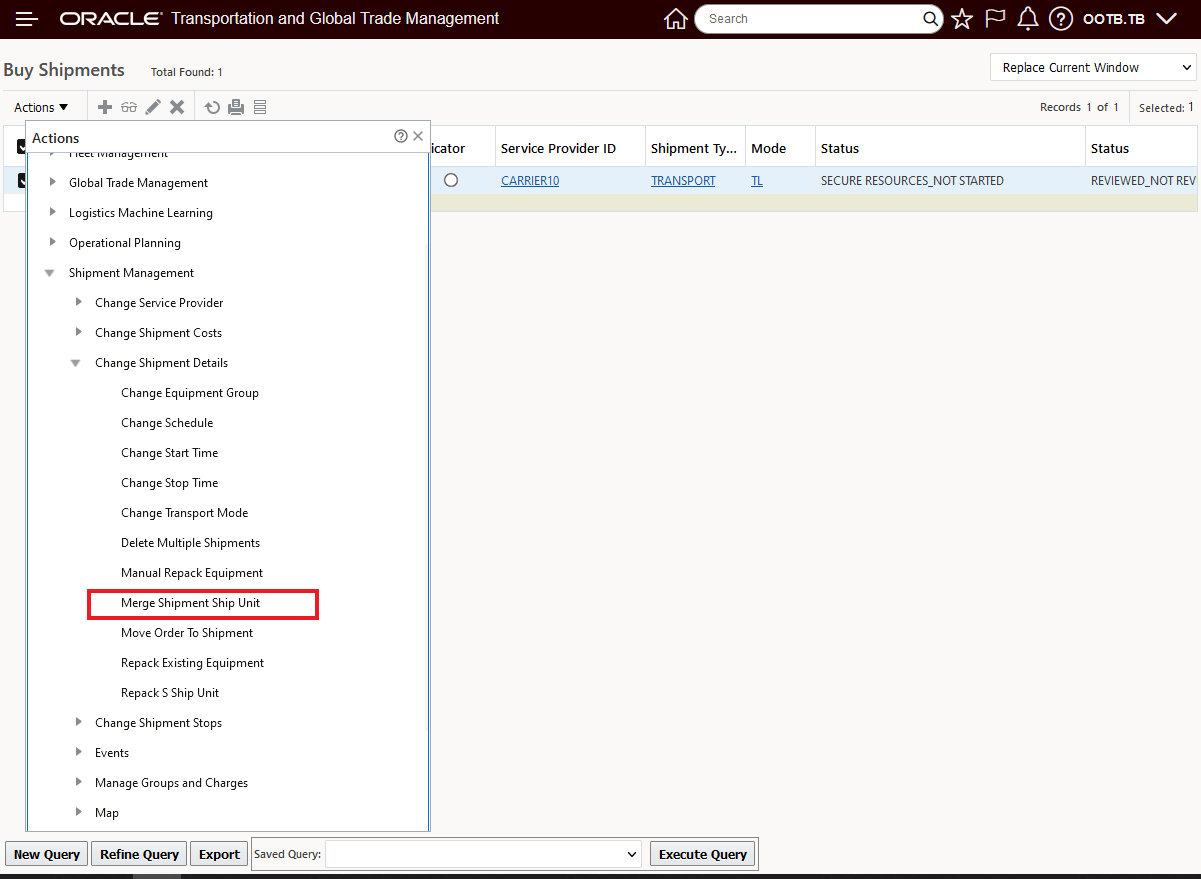
Merge Shipment Ship Unit Action
When the action input screen opens, below, the view to the expanded Ship Unit Order Release Line information is collapsed.
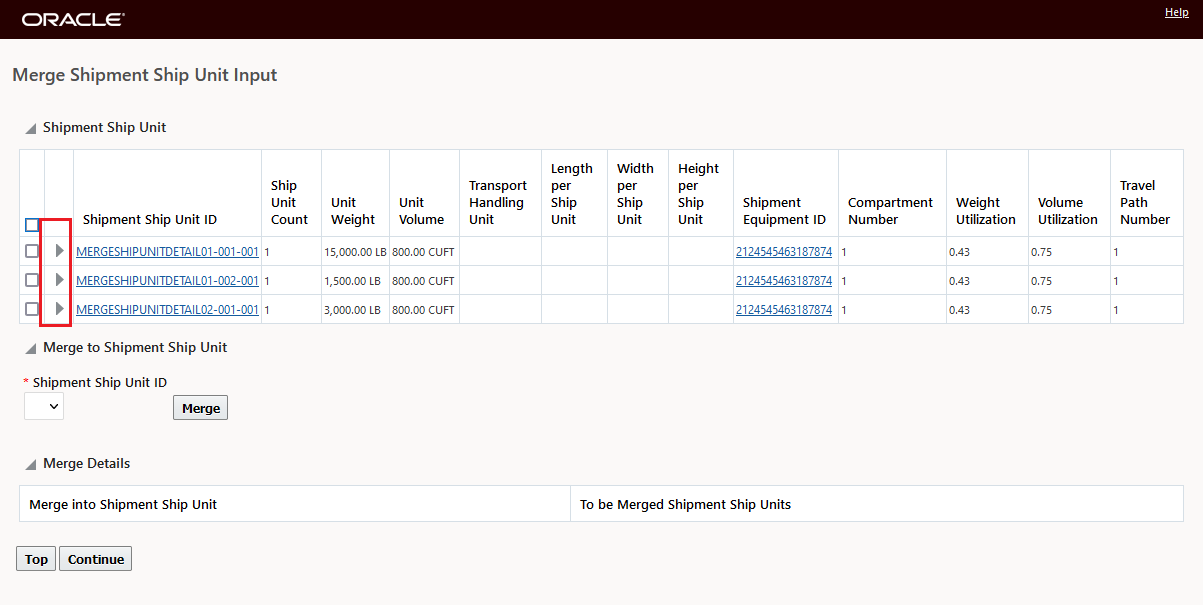
Collapsed View
Below is the expanded view - the additional Shipment Ship Unit Order Release Line information is now available to help guide your Merge Shipment Ship Unit decision making. Specifically, you now have visibility to the Order Release ID, Order Release Line ID, the Packaged Item ID, the Package Item Count and the Weight and Volume.
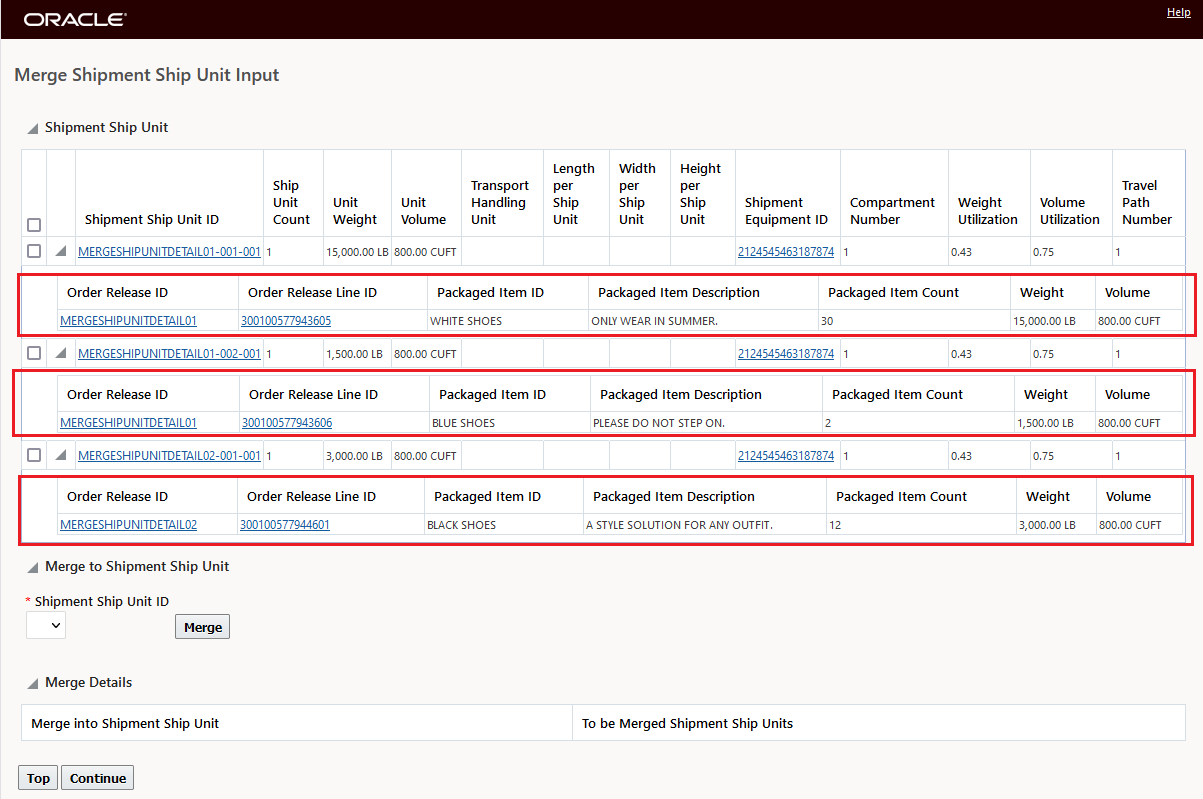
Expanded View
Improves the ship unit information provided to you when running the Merge Shipment Ship Unit action.
Steps to Enable
You don't need to do anything to enable this feature.
This feature enhances the Voyage Schedule feature (released in 23A) to include the following improvements:
- The Ask Oracle Voyage Schedules screen will now only display the Ship From/Ship To City/Country options for internal voyage schedule queries.
- The results provided for Ask Oracle Voyage Schedules queries and the Order Release Action - Assign Voyage Schedules - has been expanded to include both the Voyage Number and Voyage Service Code.
Ask Oracle Voyage Schedules Change
The new Ask Oracle About Voyage Schedules is available via Ask Oracle > Voyage Schedules (shown below), you can also follow the navigation path of Operational Planning > Ask Oracle > Voyage Schedules.
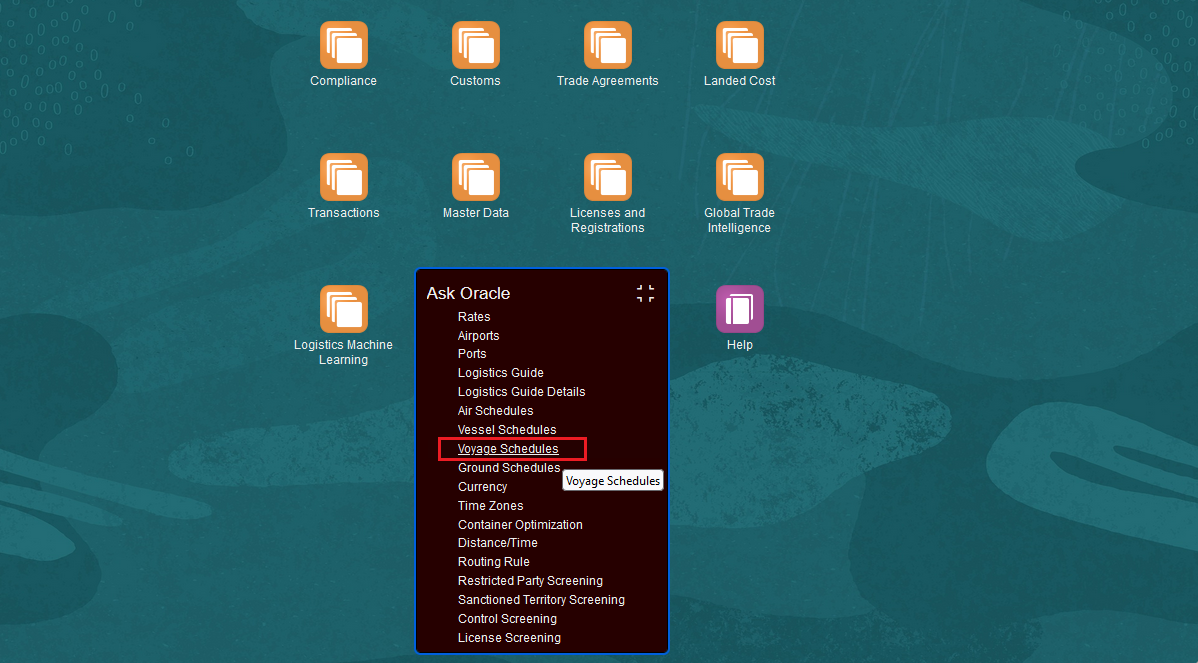
Ask Oracle About Voyage Schedules
Below is the Ask Voyage Schedules request UI for internal voyage schedule lookups.
NOTE: The Ship From and Ship To input fields for City/Country are provided.
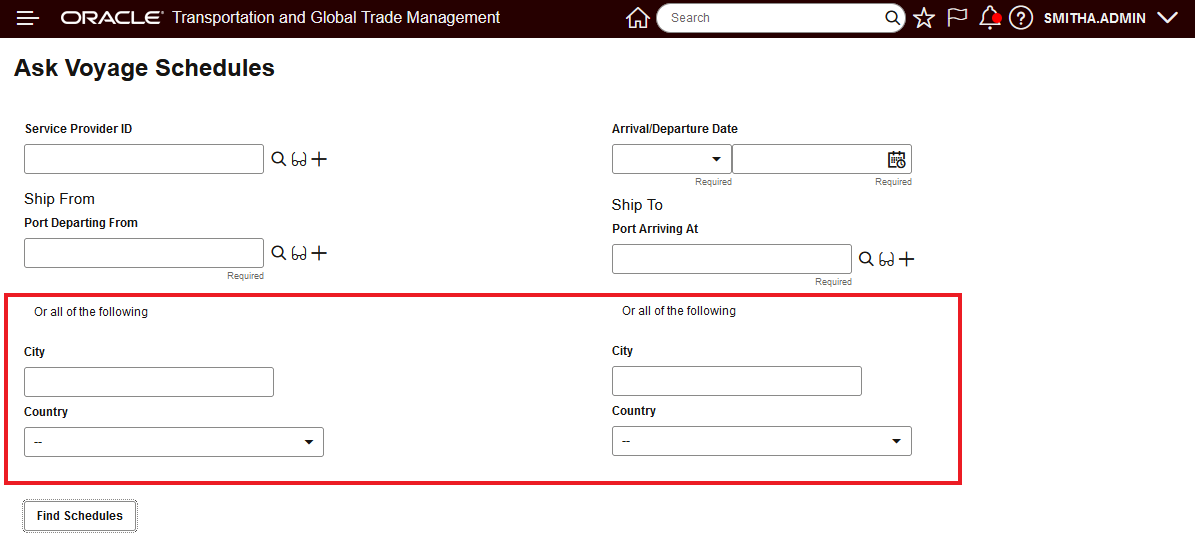
Internal Ask Voyage Schedules UI with City/Country
The Ask Voyage Schedules UI default rate service - shown below - assumes an internal voyage schedule lookup and the City/Country fields are provided when the setup is for internally stored voyage schedules.

Domain Default Setup for Internal Voyage Schedules
The example below shows the Ask Voyage Schedule request screen with the system configured to use an external voyage schedule source - in this case the City/Country fields are no longer provided for the voyage schedule search request.
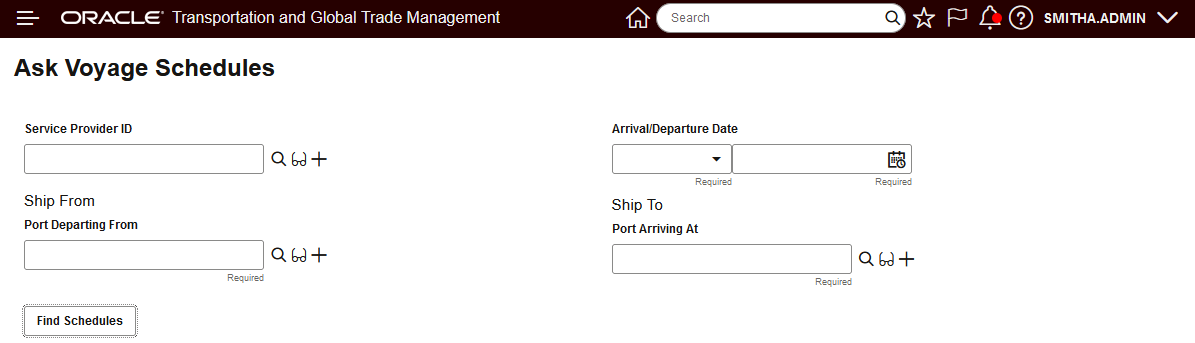
Ask Voyage Schedule - External Voyage Schedules Configured
The Parameter Set below is configured to use an external voyage schedule source, with this external voyage schedule source configuration the City/Country fields are not provided in the Ask Voyage Schedule query.
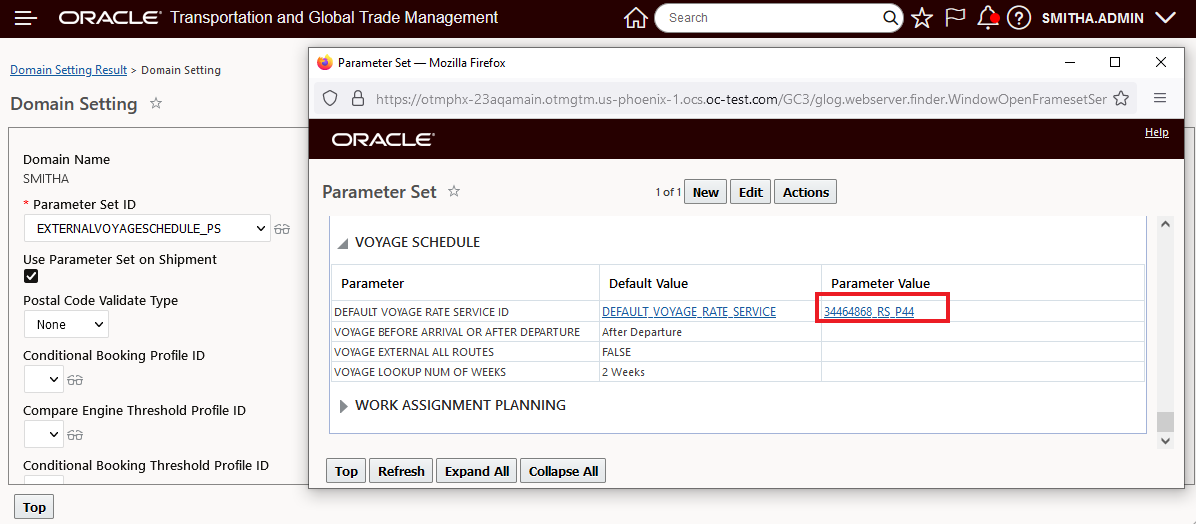
Domain Default Setup for External Voyage Schedules
Result Additions
For the results provided for both the Ask Oracle Voyage Schedules queries and the Order Release Action - Assign Voyage Schedules - the information returned for the voyages has been expanded to include both the Voyage Number and Voyage Service Code - as shown below.
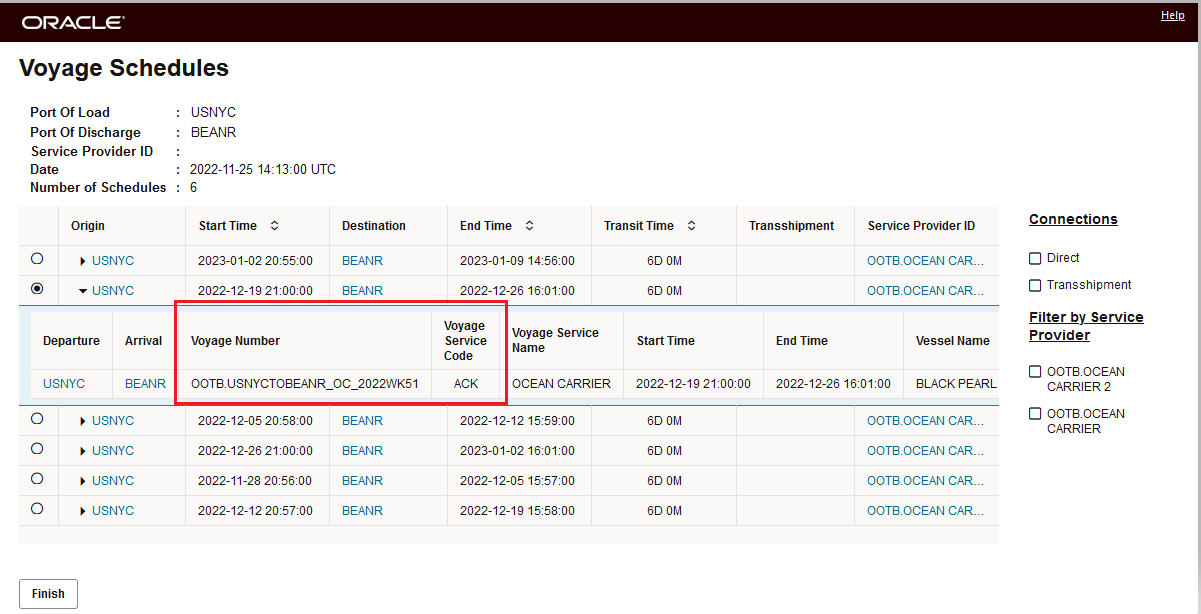
Result - Voyage Number and Voyage Service Code
This feature improves the usability of Voyage Schedule data from both internal or external sources.
Steps to Enable
You don't need to do anything to enable this feature.
Key Resources
- The 23A What's New feature topic - OCEAN ENHANCEMENT - VOYAGE SCHEDULES - INTERNAL OR EXTERNAL SCHEDULE SOURCES - provides a comprehensive overview of the system's internal/external voyage schedule capabilities.
Ask Oracle Rating - Volume Calculation Based on Length, Width and Height
This feature provides you with the option - using the property - glog.riq.calcVolumeUsingConDimensions - to have the RIQ Rate Inquiry screen/Ask Oracle About Rates automatically calculate the volume for your ship unit entries based on the Ship Unit Count and the per Ship Unit Length, Width and Height. values entered.
In the example below, the property - glog.riq.calcVolumeUsingConDimensions - has been set to true, with the property set to true, the system will automatically calculate the volume.
In this example the value entered for the Ship Unit Count = 1, and no value has been entered for Volume - instead values have been provided for the Ship Unit Length = 3.00 FT, Width = 3.00 FT and Height = 4.00 FT.
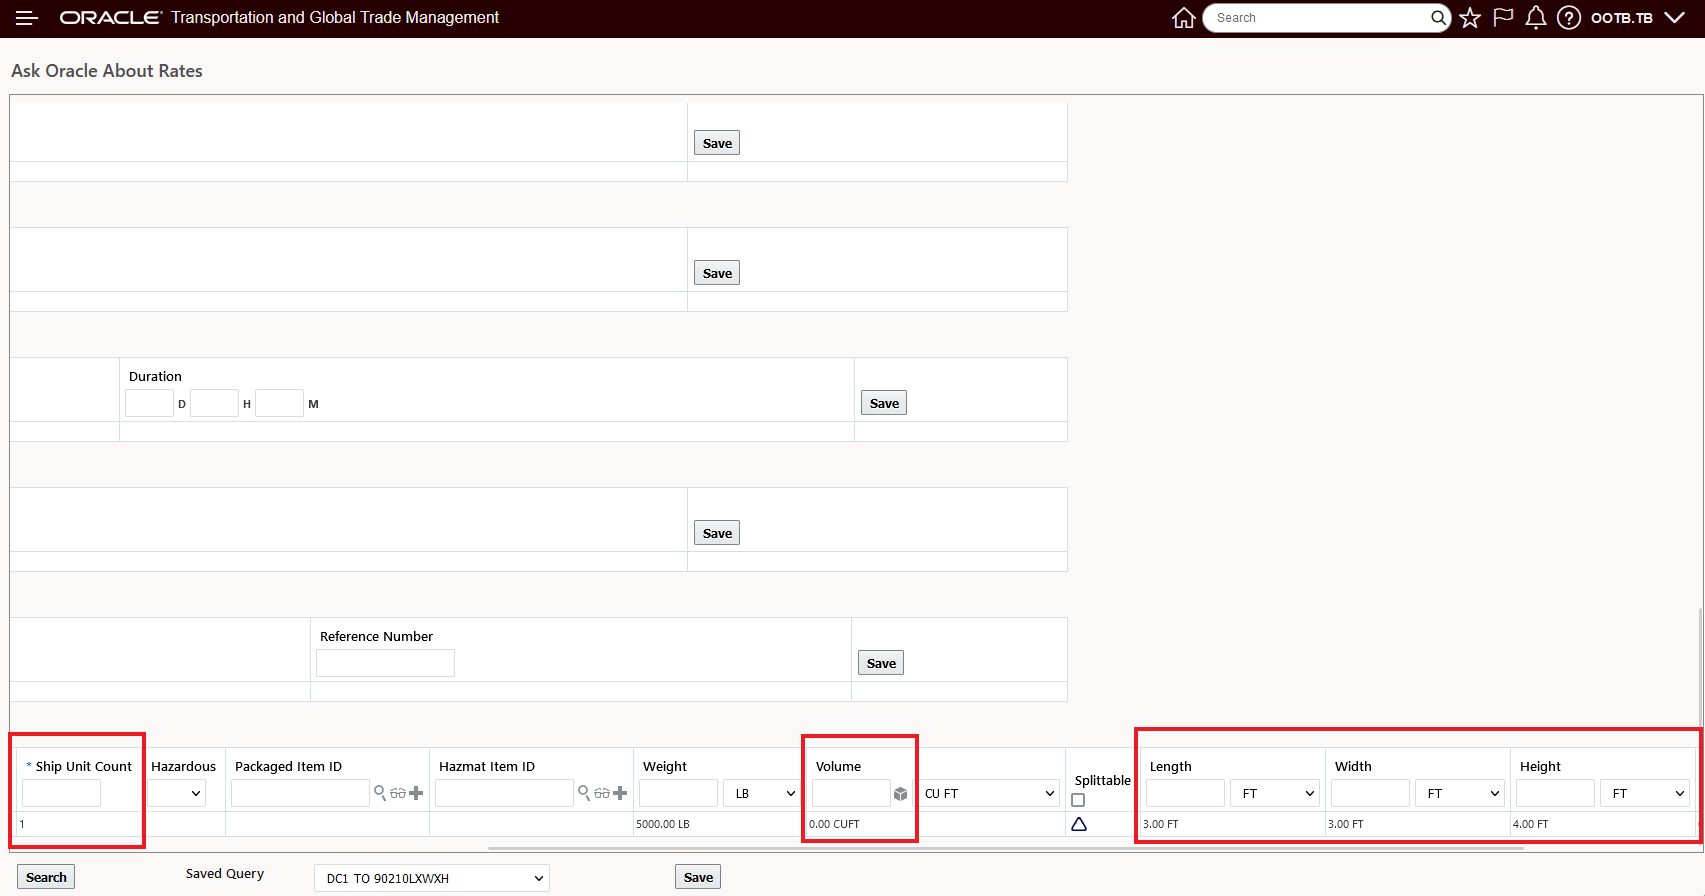
RIQ Input
When the Search is run with this setup, the Rate Result below is provided. Notice that the Chargeable Volume column has been calculated as 36 CUFT = Ship Unit Count 1 * ( 3.00 FT Length x 3.00 FT Width x 4.00 FT ) and is provided with the result.
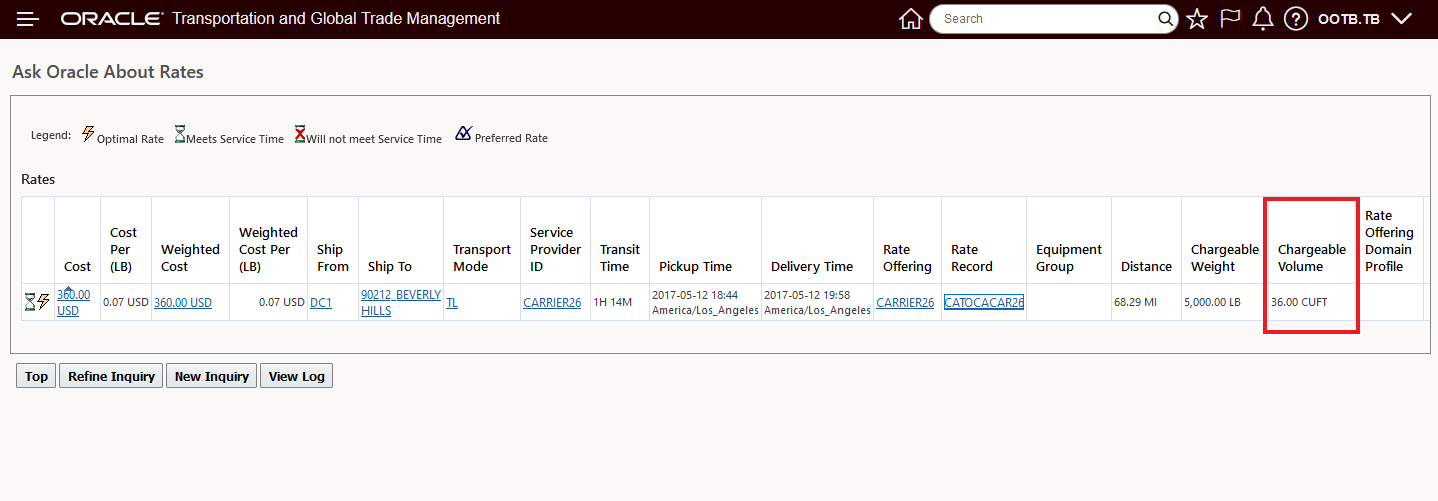
Calculated Volume Chargeable Volume
As expected, the calculated volume is used in the rating logic to calculate the cost when your rates are based on volume - as is the case below - the 36 CUFT is rated using a Shipment Total Volume based RBI configured with the rate set at 10.00 USD per CUFT - resulting in the 360.00 USD cost for the 36 CUFT calculated..
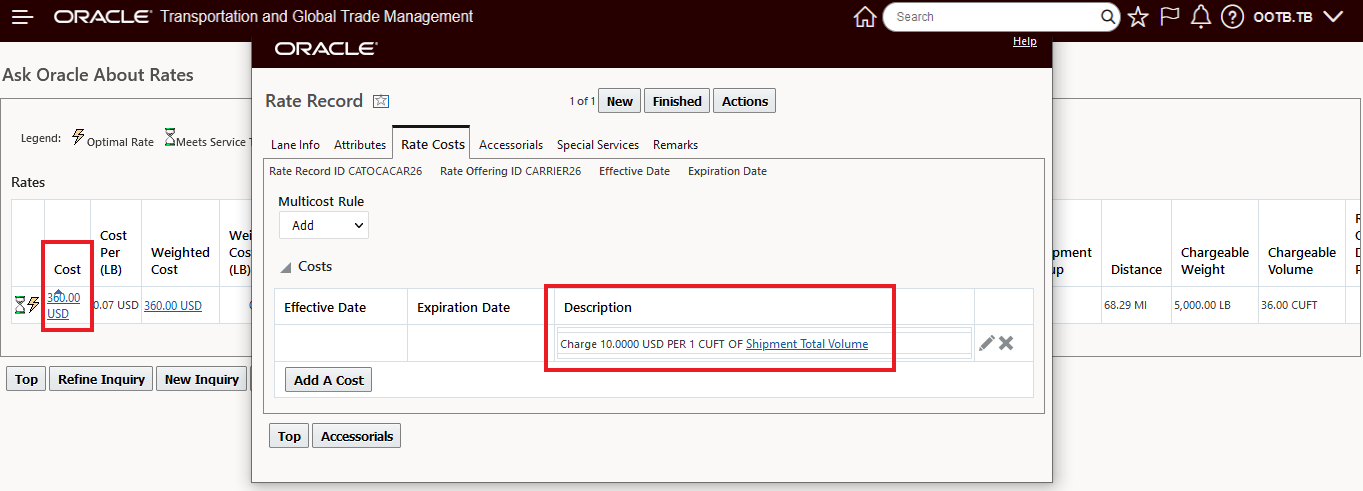
Volume Based Rate and Result
This feature simplifies the input required to calculate the volume for the ship units when the available input is the ship unit length, width and height. Previously, calculating the volume for a ship unit would have required the input of the Length, Width and Height information into the calculation cube - as shown below - which would provide the volume for a single ship unit, that value would then need to be multiplied and updated with the correct volume if the Ship Unit Count was greater than 1.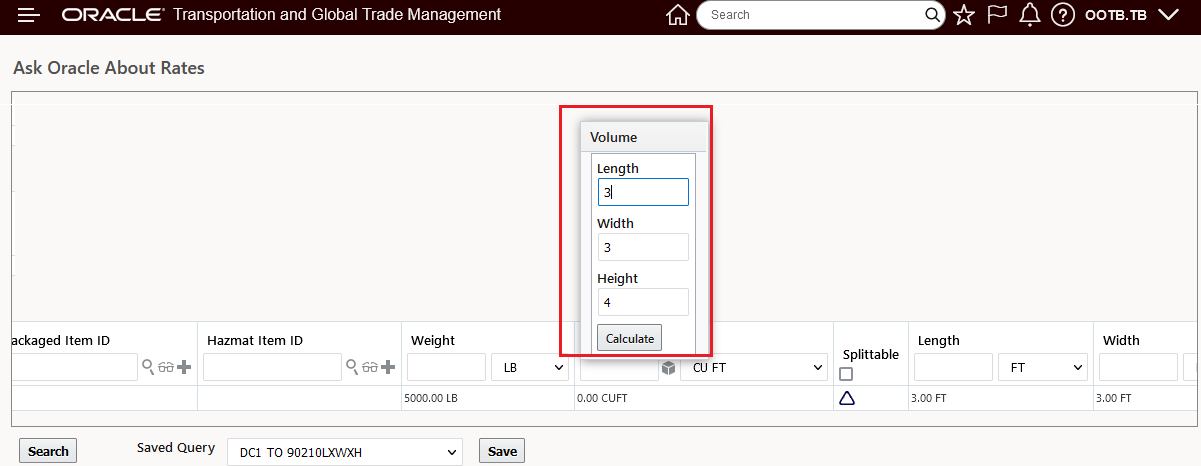
Previous Volume Calculation Tools
Steps to Enable
To take advantage of this new capability the property - glog.riq.calcVolumeUsingConDimensions - must be set to true.
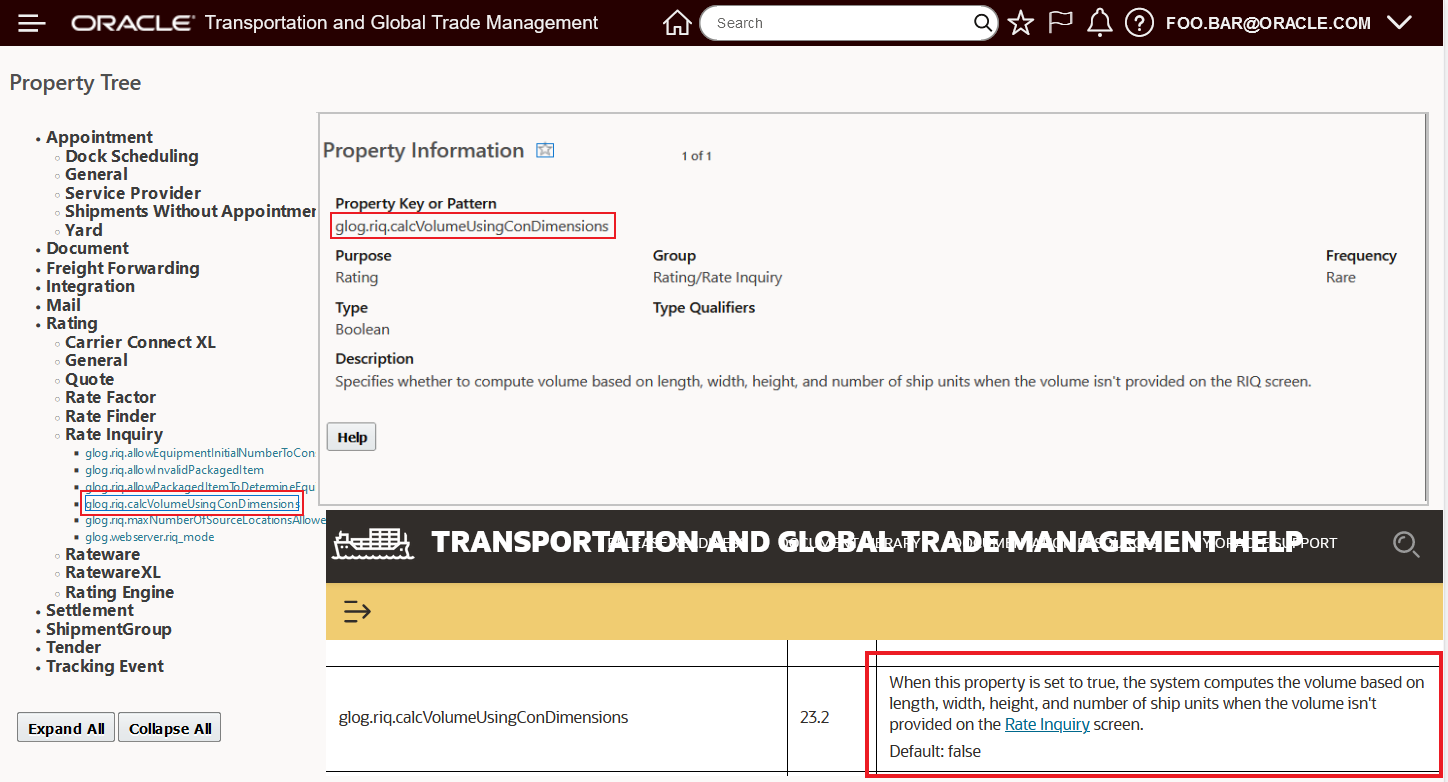
Property Tree Information
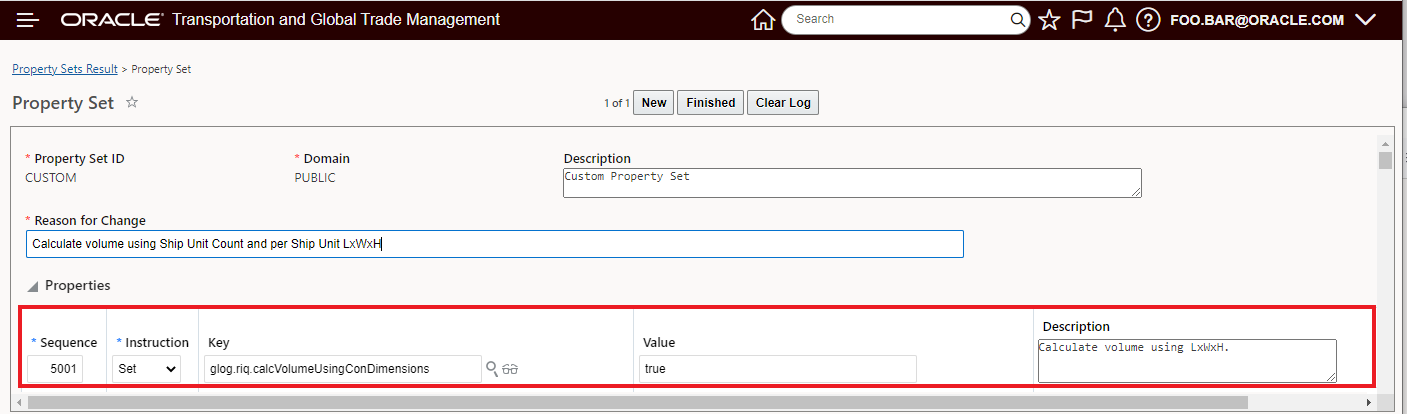
Set Property to true
Tips And Considerations
If your input for volume for your Ask Oracle About Rates inquiries is always based on Ship Unit Count and the input of the Ship Unit Length, Width and Height - we suggest removing the Volume field from the entry screen in your configuration to avoid confusion.
Manager Layout Enabled Equipment Manager
This feature provides you with the opportunity to configure both your Equipment Manager View and Edit Manager Layouts. Once configured you can then add your configured Equipment Manager Layouts to your Menu.
By default the Public Menu - for this update - will still point to the legacy Equipment Manager - which is not Manager Layout enabled. You have the option of adding and or replacing your current Equipment Manager setup (Screen Set, Edit/View Manager Layout) with the new Manager Layout enabled Equipment Manager. Switching to the new Manager Layout enabled Equipment Manager will allow you to configure your Edit and View Equipment Manager layouts so that the Equipment fields of interest (like User Defined Attributes) are available.
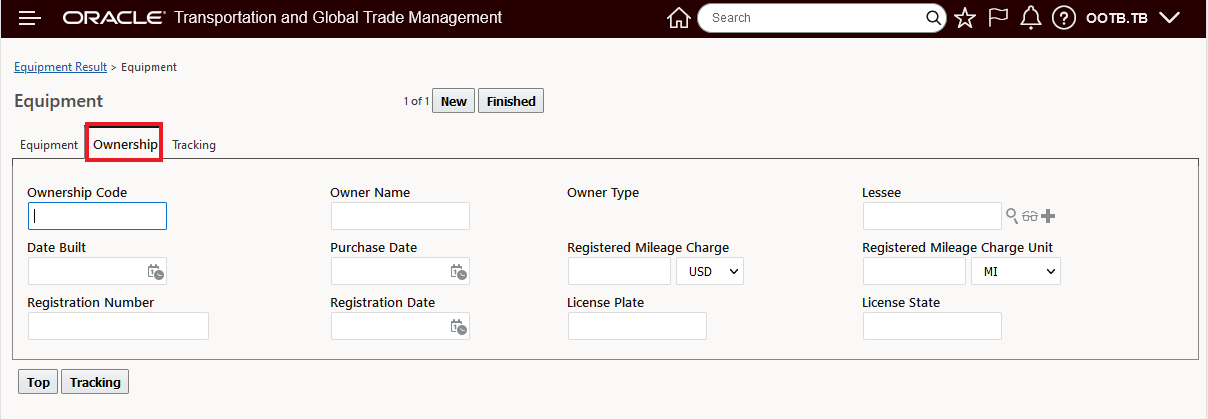
Below is the out-of-the-box Equipment Manager layouts for the Edit and View managers.
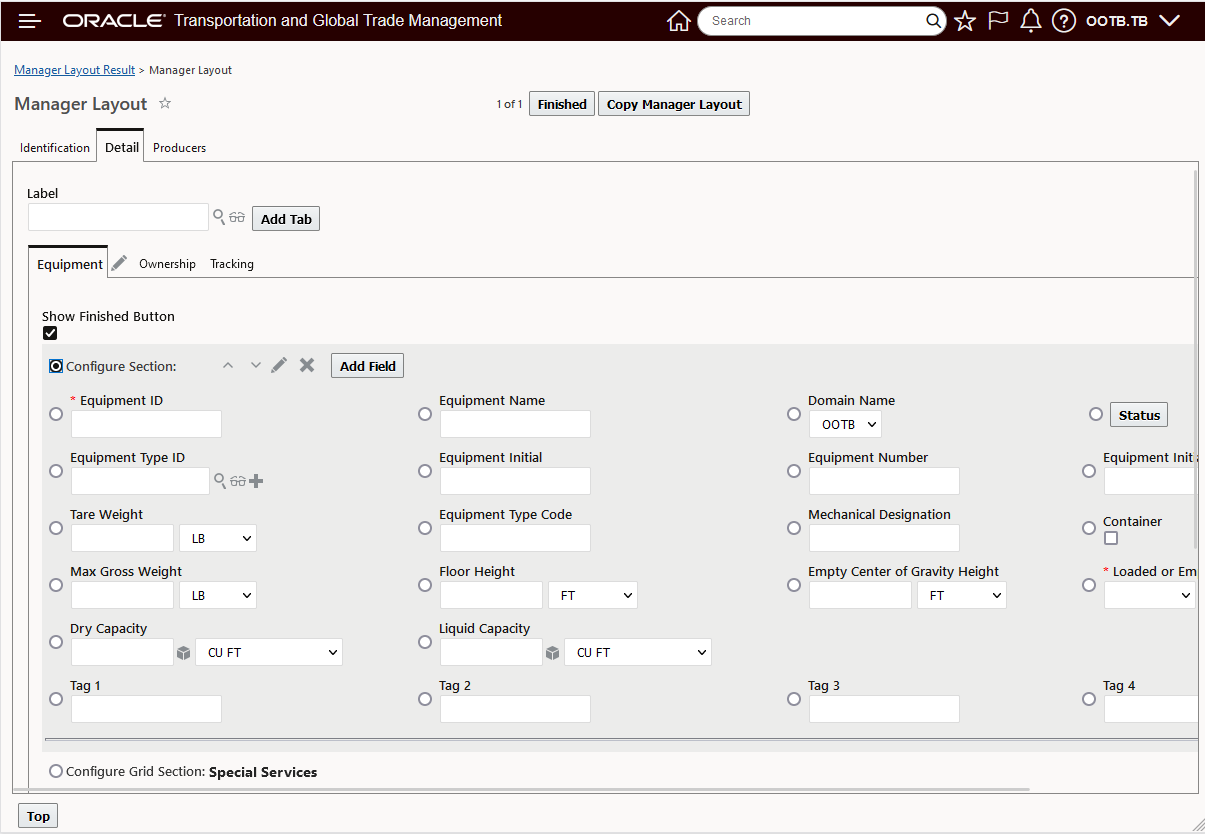
NOTE: The Public Edit Equipment Manager has been reorganized into a three tab manager - Equipment, Ownership and Tracking - providing a logical grouping of Equipment information across the tabs and then within tabs the fields are also arranged more logically.

Manager Layout Enabled Equipment Manager - New/Edit View - Equipment Tab
Below is the reorganized Equipment Manager Ownership tab - which groups together the ownership related items for the equipment.
Manager Layout Enabled Equipment Manager - New/Edit View - Ownership Tab
Below is the Tracking tab - which brings together all the equipment related tracking fields.
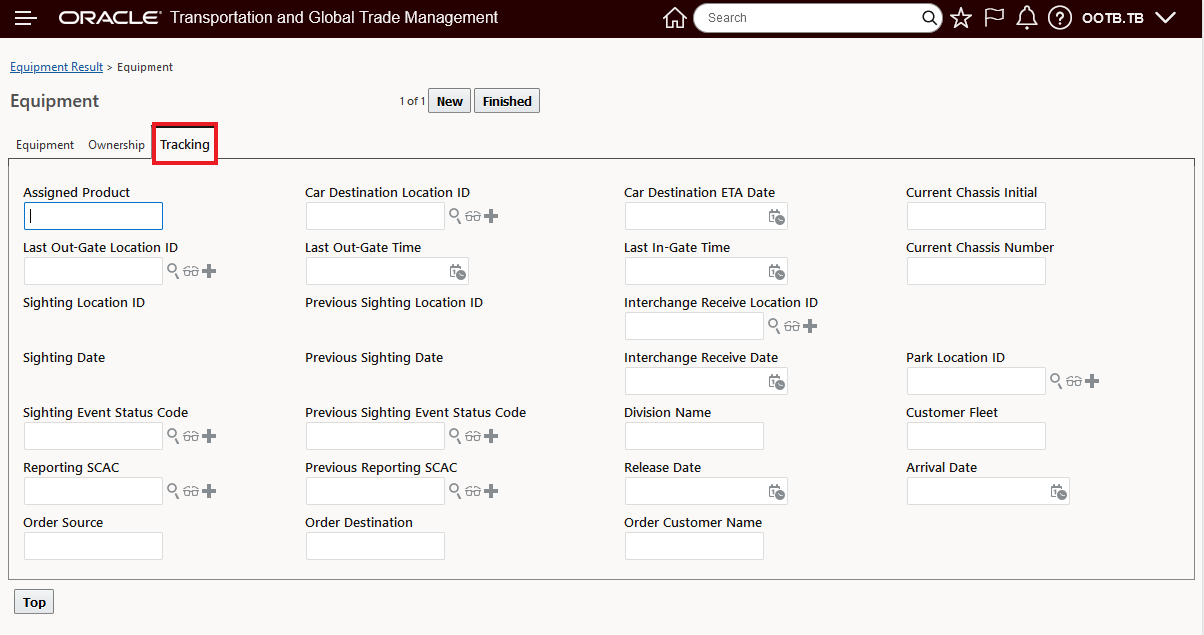
Manager Layout Enabled Equipment Manager - New/Edit View - Tracking Tab
For completeness, below is the out-of-the-box Public Equipment Manager layout for the View.
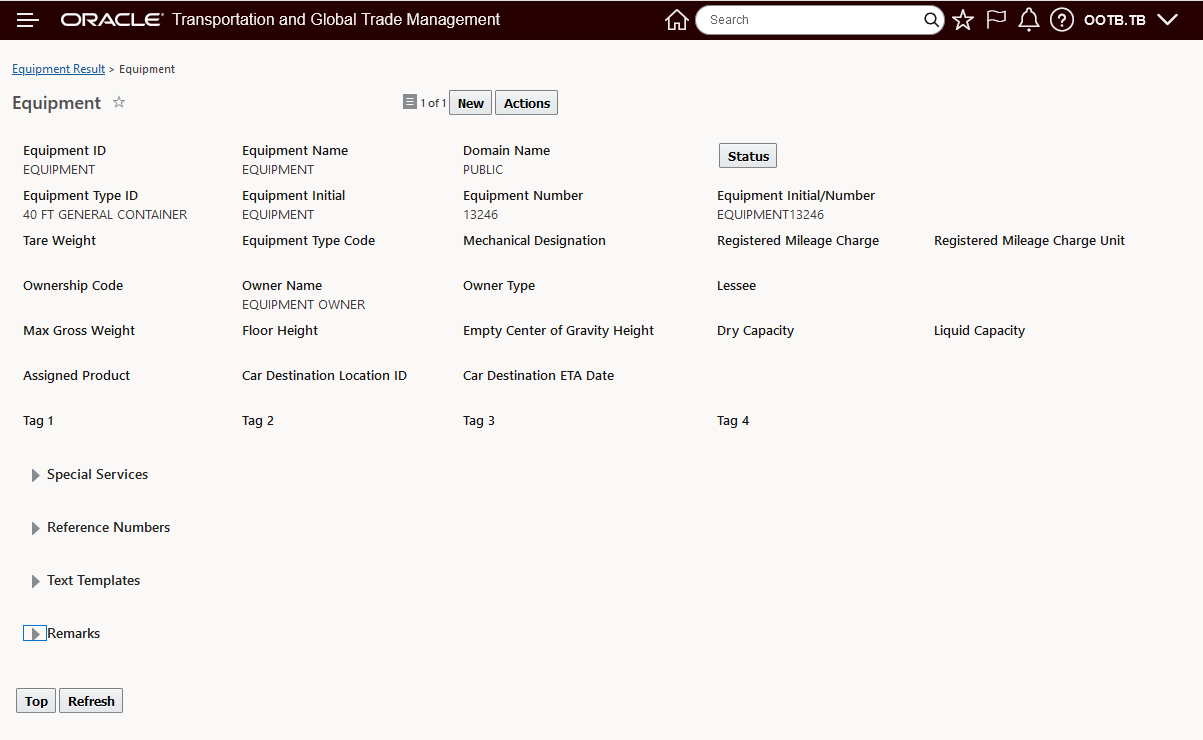
Manager Layout Enabled Equipment Manager - View
This feature provides you with the option to configure your Equipment Manager - Edit and View - to better support your implementation's usage and requirements of the Equipment object.
Steps to Enable
As noted, the Legacy Equipment Manager is the Equipment Manager shipped by default for the Public Menu. If you use the Equipment Manager in your implementation we recommend that you replace the Legacy Equipment Manager (Edit/View) with the new Manager Layout enabled Equipment Manager. You can accomplish this by following the steps below.
Find and Copy the Public Equipment Manager Layouts for View and Edit. Navigate to - Configuration and Administration > User Configuration > Manager Layout.
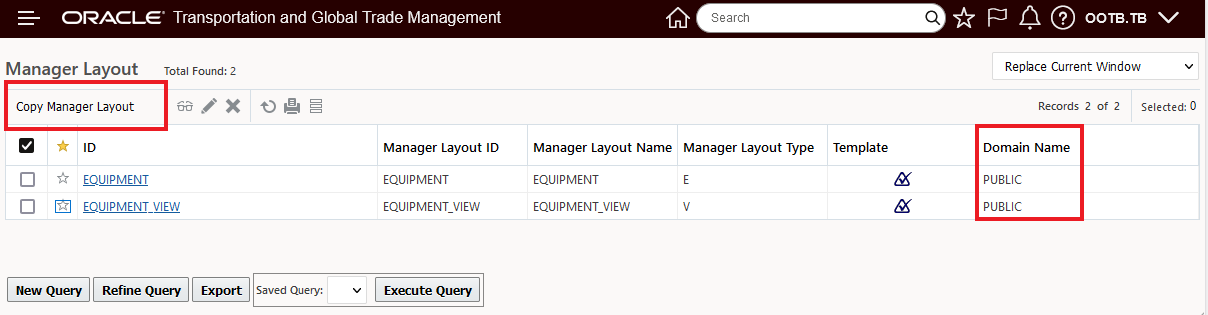
Find and Copy the Public Equipment Manager Layouts
Once you have coped the Public Manager Layout, use the copied Equipment Manager Layouts - Edit and View - to configure the Equipment Managers to meet your requirements.
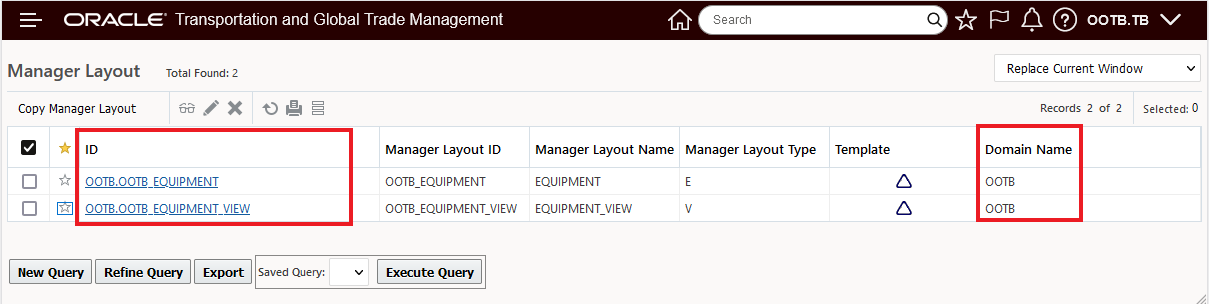
Equipment Manager Layouts Edit View to Configure
Use Manager Layout configuration capabilities to add tabs, add fields, hide fields and move fields around as desired.
Configure Equipment Manager Using Manager Layout
After configuring your Equipment Manager Layouts, you will want to assign these configured Managers to your Equipment Screen set. Follow the steps below.
Like the Manager, the first step involves copying the Public Equipment Screen Set.

Copy the Public Equipment Screen Set
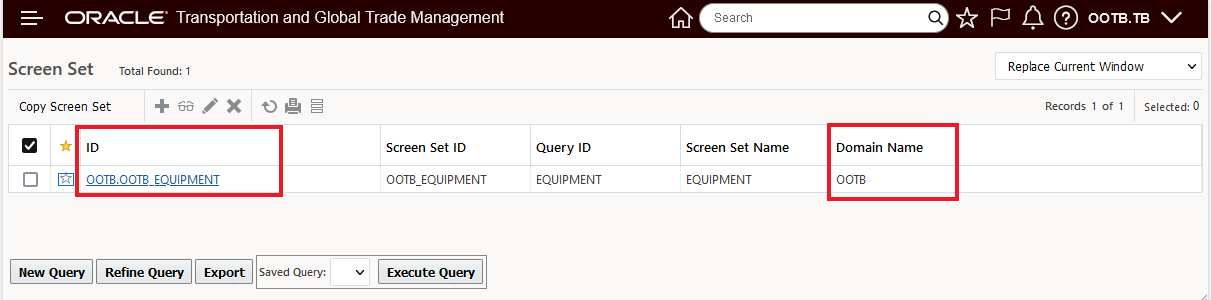
Copied Equipment Screen Set
After you copy the Equipment Screen Set - Edit the Screen Set and navigate to the General tab. On the General Tab - for the New, Edit and View Control - remove the Servlet entries - if there, and under Manager Layout ID specify the copied and configured manager layouts you created above for New/Edit and View.
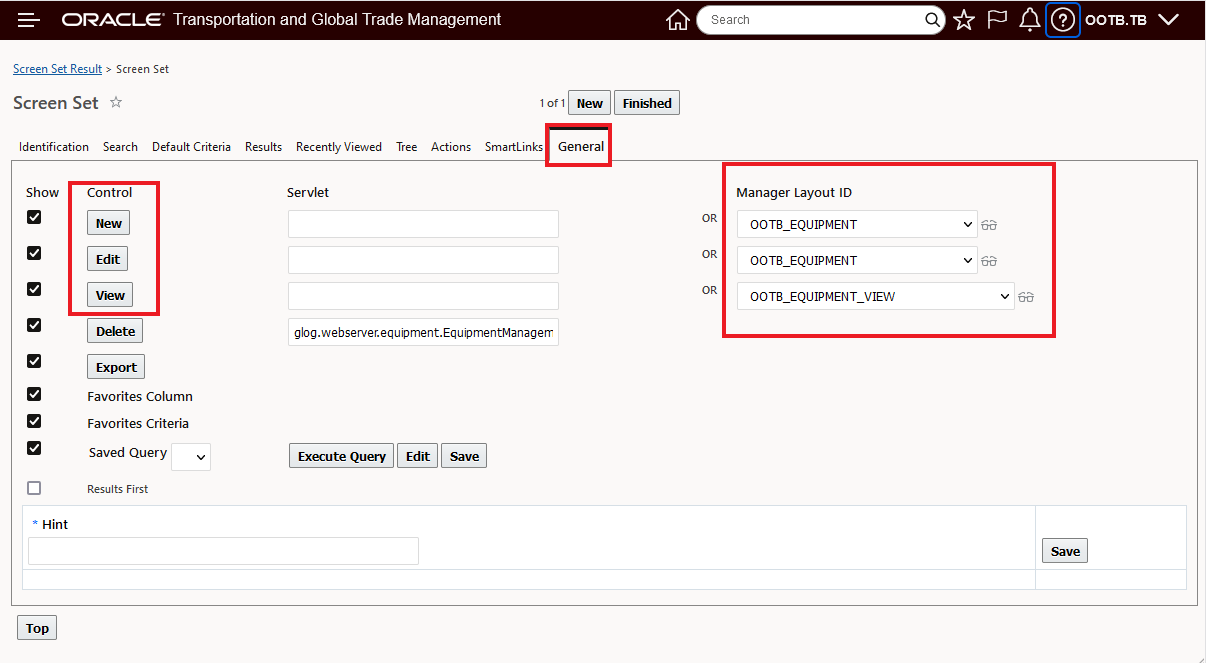
Assign Configured Manager Layouts to Equipment Screen Set
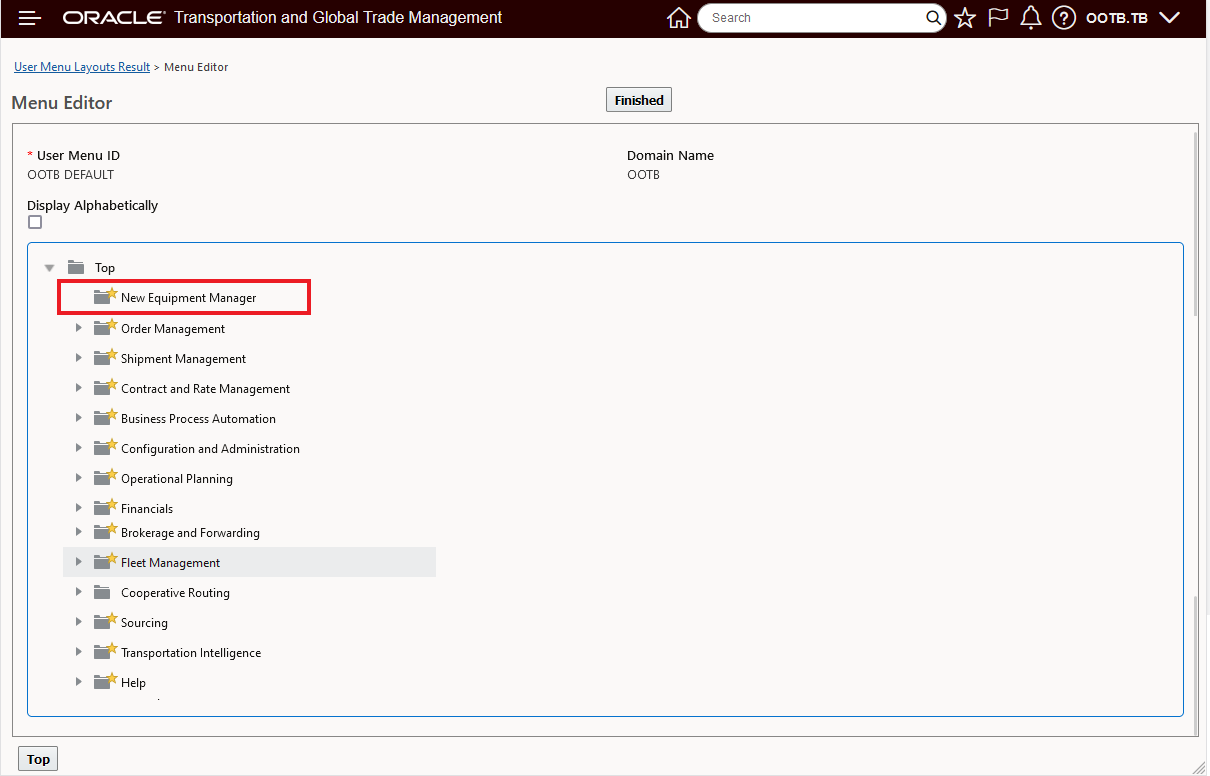
Once the Screen Set is configured, the last step is to assign the Screen Set to your Menu. Navigate to Configuration and Administration > User Configuration > Menu Manager.
Add the Screen Set configured above as a Menu link.

Screen Set Configured as Menu Link
Then add the Link to the new Screen Set to the desired Menu.
Add Screen Set To Desired Menu
Then make sure you have User Access to the Menu configured above.
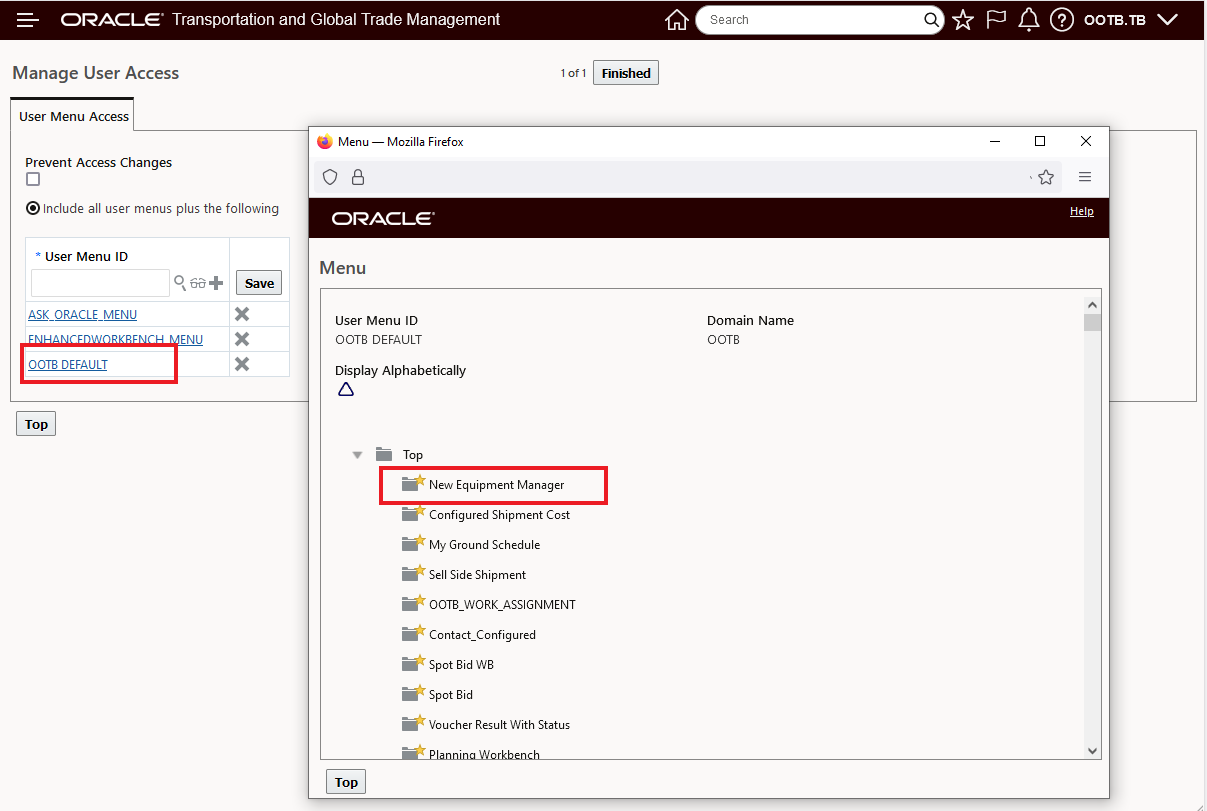
User Menu Access
Once the configuration above is complete, the new Manager Layout enabled Equipment Manager is available as shown below on the Springboard.
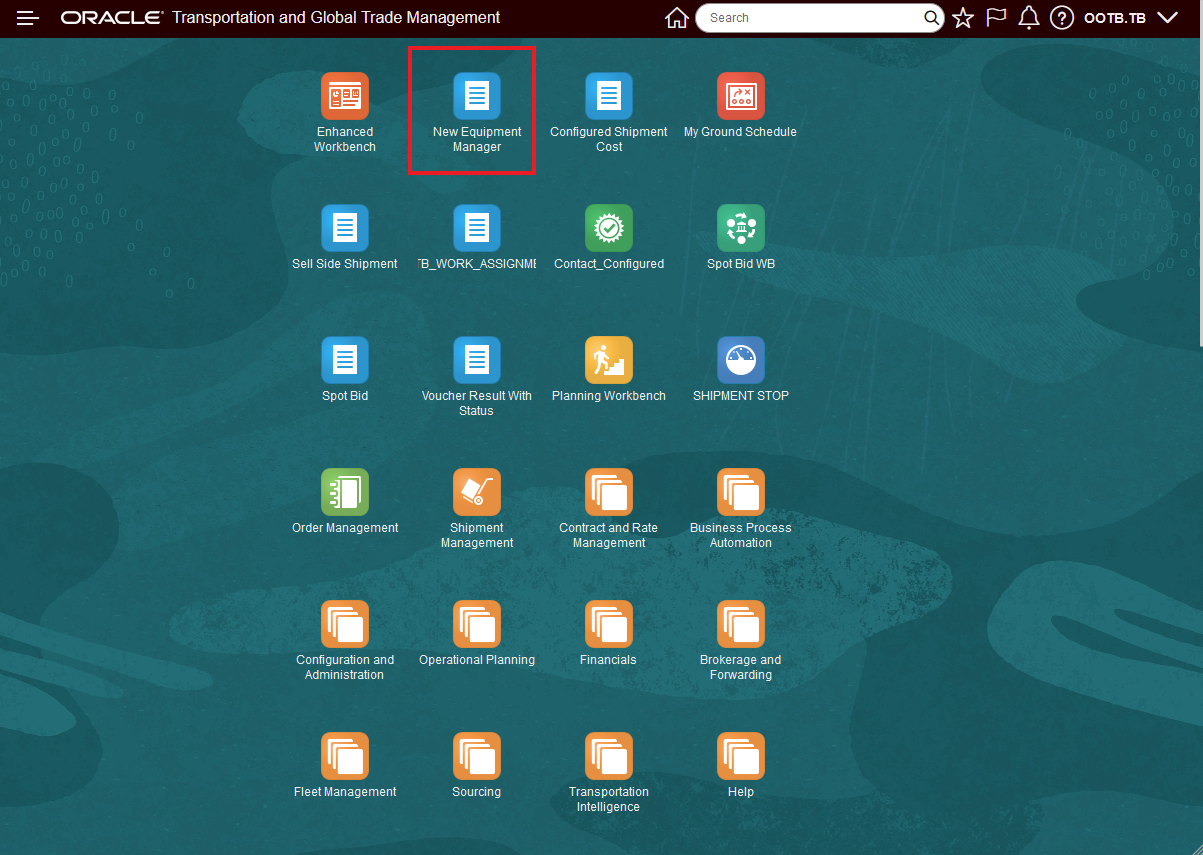
New Equipment Manager on Springboard
Tips And Considerations
By default the Public Menu is pointing to the legacy Equipment Manager - which is not Manager Layout enabled. The Manager Layout enabled Equipment Manager will become the default Equipment Manager in an upcoming release.
Enable Rate Factor in Memory Processing
The Optional Feature, Enable Rate Factor In Memory Processing, when enabled, allows the rate factors to be processed in memory. When disabled, the rate factors are processed using the PL/SQL logic.
This feature provides improved rating performance.
Steps to Enable
You don't need to do anything to enable this feature.
Tips And Considerations
NOTE: This Optional Feature is Opted In by default. When enabled, the rate factors are processed in memory. When disabled, the rate factors are processed using the PL/SQL logic. We strongly recommend that you not Opt Out of this feature since the legacy functionality, the functionality used when the Optional Feature is Opted Out/disabled, has been deprecated.
UI Actions Secondary Charge Re-Association Property
This feature provides you with a new property - glog.business.shipgroup.addRemoveShipment.reAssociateSecCharge - that allows you to control whether reassociation of secondary charge shipments happens automatically when executing the web actions Add Shipments to Group, Add Partial Shipments to Group, Remove Shipments from Group, or Remove Partial Shipments from Group.
The default value for this property is set to true for backward compatibility - the reassociation happens automatically. Setting the property to false will skip the reassociation of secondary charges when any of the web actions Add Shipments to Group, Add Partial Shipments to Group, Remove Shipments from Group, or Remove Partial Shipments from Group are run. Skipping the automatic reassociation of the secondary charges provides a reduction in the time it takes for the actions to run.
Default Behavior
In the example below, a shipment will be removed from a shipment group with the property glog.business.shipgroup.addRemoveShipment.reAssociateSecCharge = true the default/backward compatible behavior. In this case, running the Remove Shipment from Group will automatically do the reassociation of the secondary charge charges.
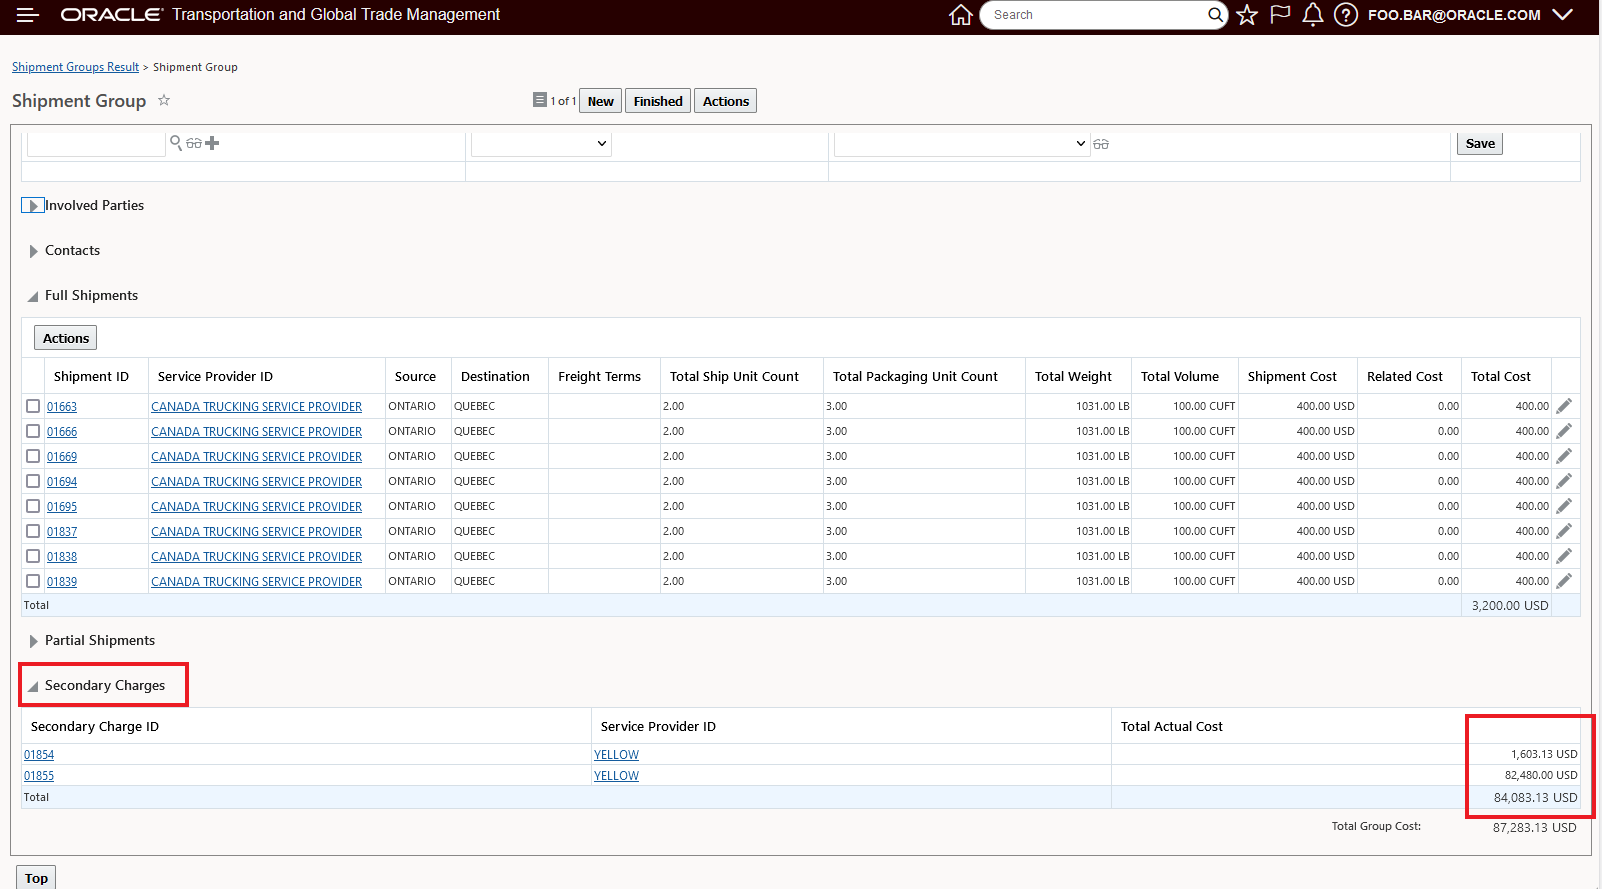
Original Shipment Group and Secondary Charge Shipment Cost
Now one of the shipments, 01663, will be removed using the Remove Shipment action
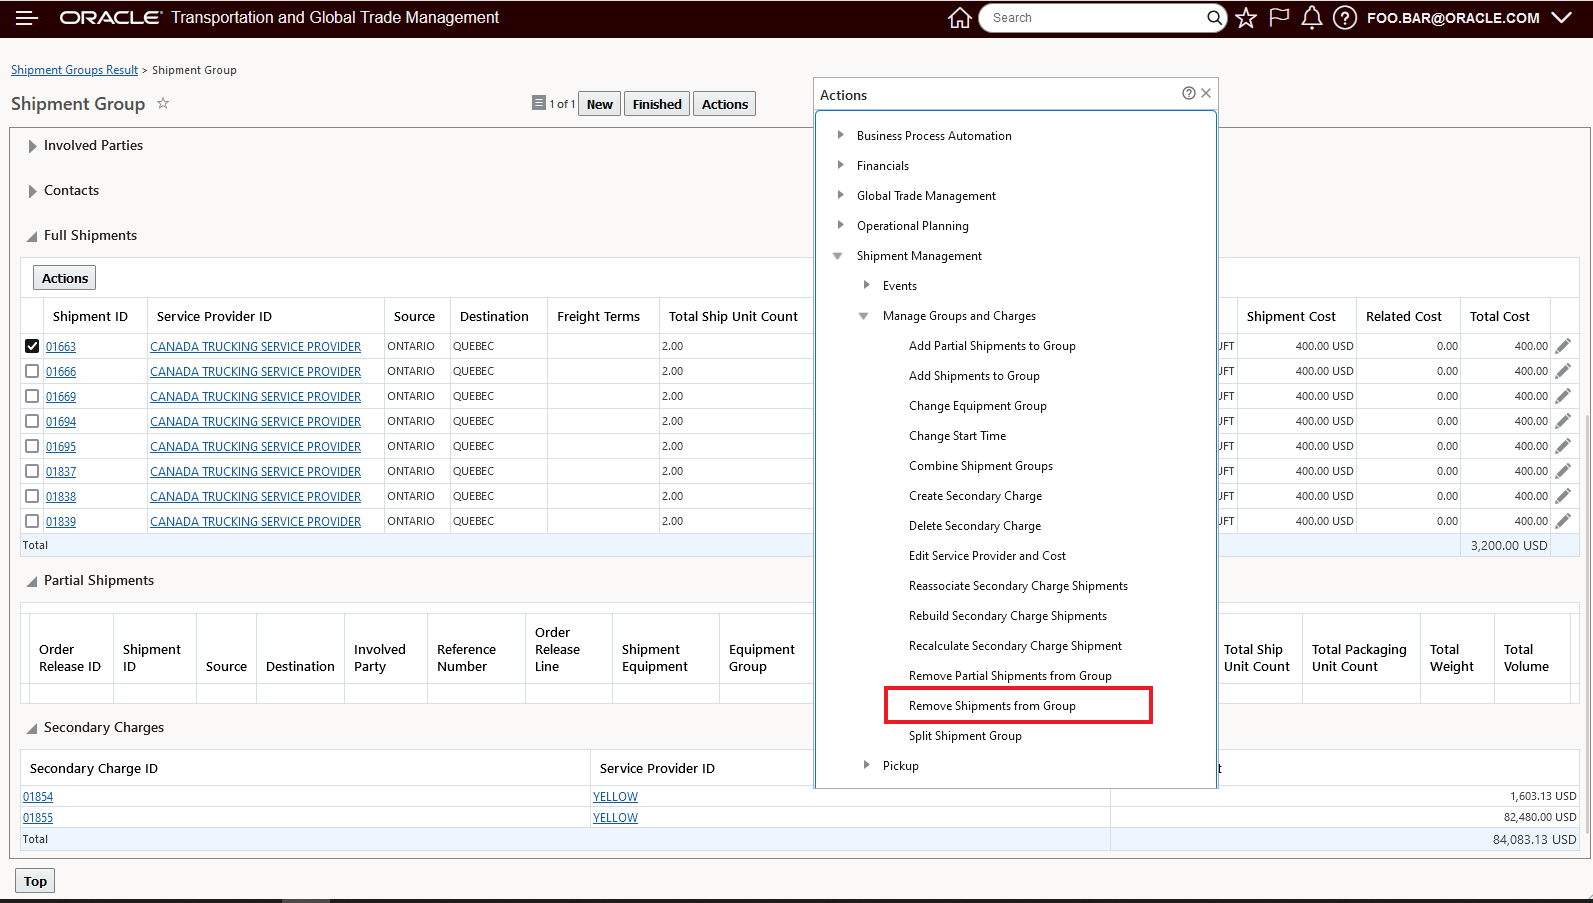
Remove Shipment From Group
When the action runs, the Secondary Charge is reassociated and recalculated automatically.
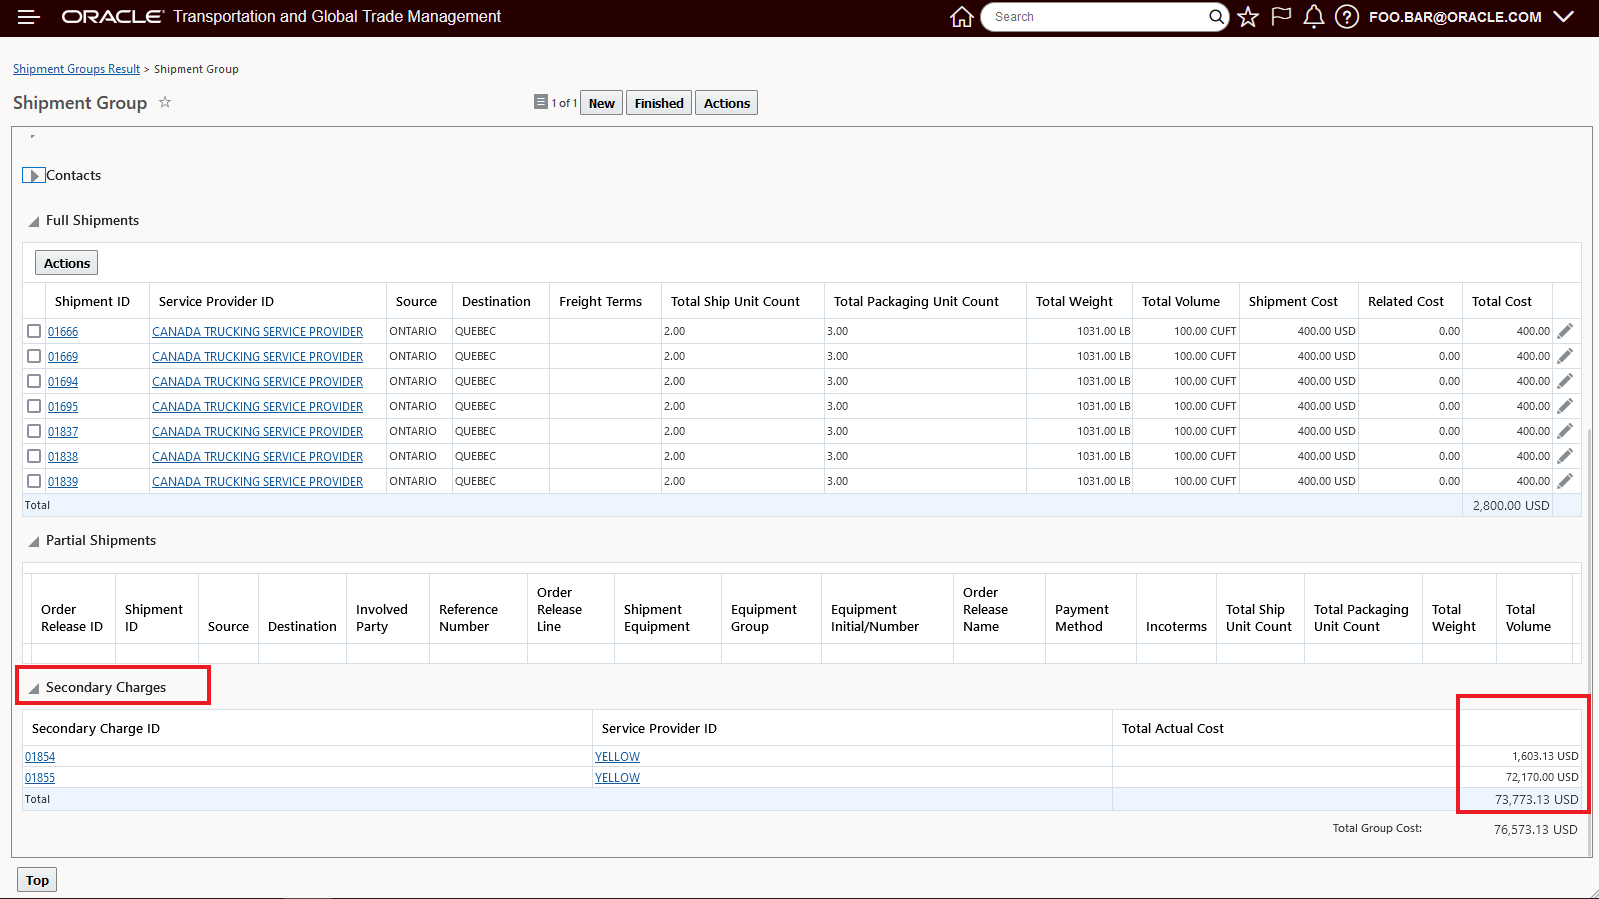
Reassociated Automatically
New Behavior
Now - with the property glog.business.shipgroup.addRemoveShipment.reAssociateSecCharge set to false, the Remove action will not automatically reassociate the secondary charge shipment - and the result - after running the action is below.
NOTE: The shipment group cost is recalculated to reflect the removed shipment, but the secondary charges are not reassociated/recalculated.

Reassociated Secondary Charge Cost Skipped
After you have completed all of your Add Shipments to Group, Add Partial Shipments to Group, Remove Shipments from Group, or Remove Partial Shipments from Group actions, you can. run the Reassociate Secondary Charge Shipments action to reassociate and recalculate the secondary charge shipments for the Shipment Group.
This feature will provide performance improvements in situations where you perform Add/Remove Shipment actions with Shipment Groups containing many shipments.
Steps to Enable
For backward compatibility, the default value for this property glog.business.shipgroup.addRemoveShipment.reAssociateSecCharge is set to true. Setting the property to false will skip the reassociation of secondary charges when any of the web actions Add Shipments to Group, Add Partial Shipments to Group, Remove Shipments from Group, Remove Partial Shipments from Group are run.

Property Tree
Import Planning Data Latitude Longitude Added to Location Template
This feature extends the fields available in the Import Planning Data Location Template to include importing the location's latitude and longitude. This change will allow you to import your location data with latitude and longitude coordinate values that have been assigned by an external source.
This feature extends the Import Planning Data Location Template to include the location's latitude and longitude.
- Location Template supported attributes:
- Location ID (mandatory)
- Location Name
- City
- Province Code
- Postal Code (mandatory)
- Country Code: If not provided, defaults to USA.
- Location Type: Used to specify the Location Role. This can be any PUBLIC location role. If not specified, then Ship From/Ship To is used.
- Latitude
- Longitude
This change will allow you to use simple Import Planning Data Location Template to load data for your locations where the latitude longitude coordinate values have already been assigned by an external source.
Steps to Enable
You don't need to do anything to enable this feature.
Tips And Considerations
- Importing Data using Simple Templates - this menu option only appears for DBA.ADMIN users.
- The Import Planning Data page is accessed via Operational Planning > Planning Data Import/Export > Import Planning Data.
Here Technologies Map Enhancements
This feature provides a number of enhancements related to the Here Technologies Map usage in OTM.
- Ferry Connections - The driving direction information provided with Here Maps v8 has been enhanced to include ferry connection information.
- Multiple Tracking Event Hover - For locations where multiple tracking events have been reported, the Here Map now supports an enhanced mouse hover Popup to show all the tracking events entered at the same location.
- Map Geocoding Update - The Here Map geocoding service has been upgraded from the Geocoder API v6 to the new Geocoding and Search API v7.
Ferry Connections
This enhancement extends the driving direction information provided using Here Maps v8 for truck routes to include ferry connections and ferry transport information. For users of Here Technologies the additional driving detail will provide a more complete view when your truck routing includes the evaluation of and usage of ferry transport.
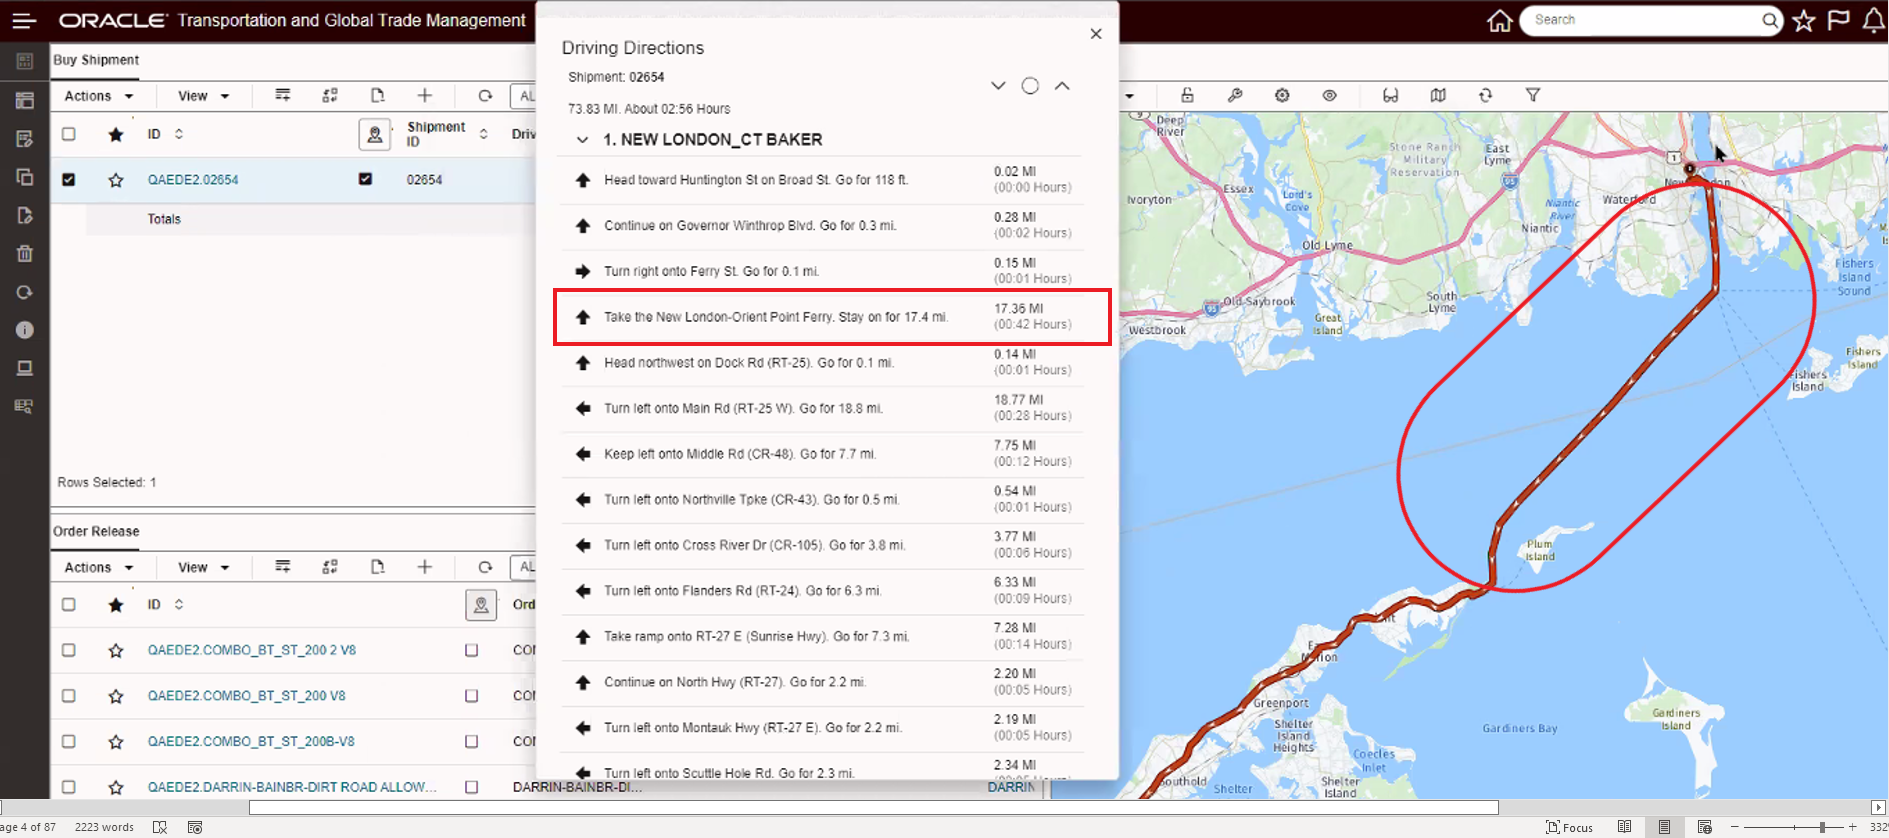
Driver Directions with Ferry Connection
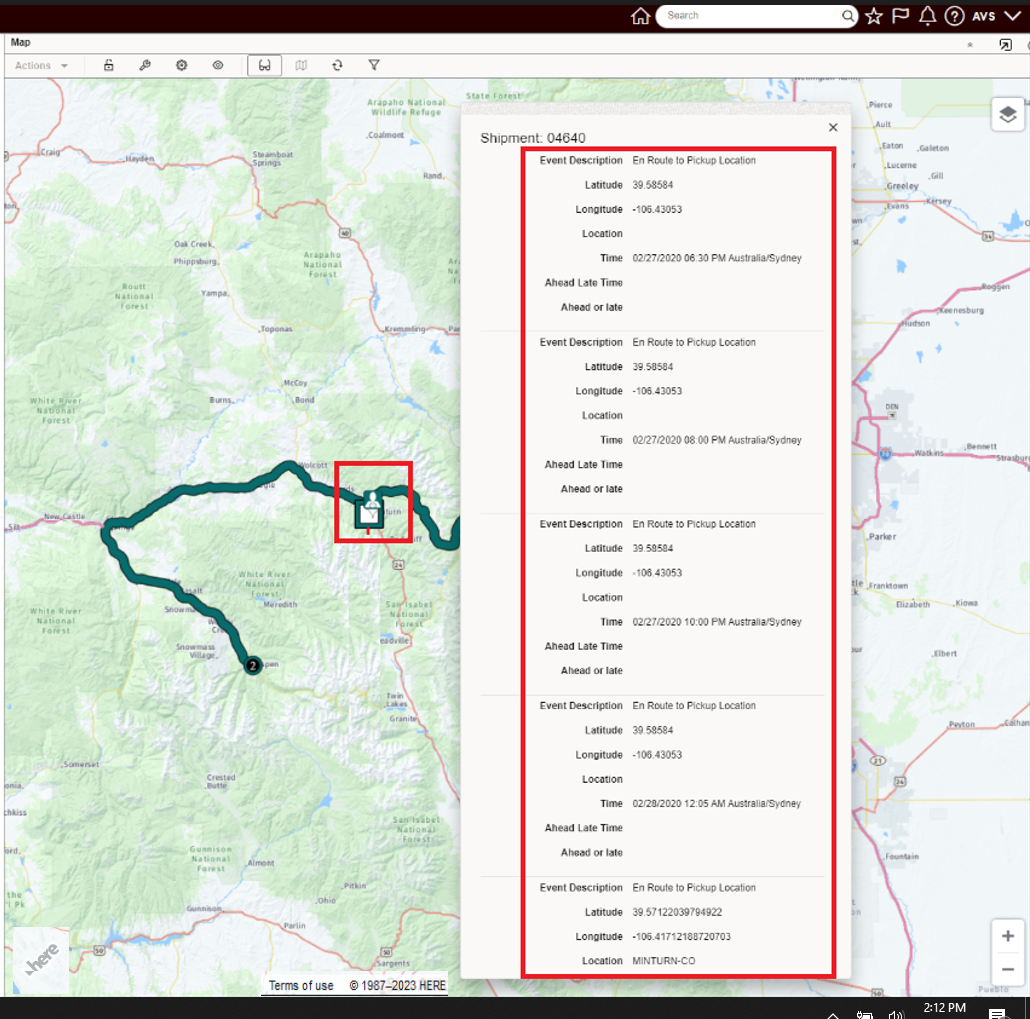
Multiple Tracking Event Hover
This enhancement will show you all of the tracking events entered for the same location (same city and same state) in the Popup when you mouse over the location.
Multiple Tracking Events Same Location Popup
Map Geocoding Update
The Here Map geocoding service has been upgraded from the Geocoder API v6 to the new Geocoding and Search API v7.
Per Here Technologies, the Geocoder v6 API is in maintenance at this point and will be in end-of-life status soon.
This featue improves the features provided inside of the Here Map and upgrades the geocoding service used to the latest supported version.
Steps to Enable
You don't need to do anything to enable this feature.
Transportation Operational Planning
This Optional Feature, when enabled, provides a process based Capacity Usage cache that will be used inside of the multistop logic to check Capacity Usage. The Capacity Usage cache will reduce the time required to perform the many Capacity Checks done inside of the multistop logic by performing the checks in memory using the cached information versus always performing the Capacity Checks with a database query.
When enabled, this feature will provide run-time improvements for Bulk Plans that involve creating multistop shipments that are generated considering Capacity Usage.
Steps to Enable
You don't need to do anything to enable this feature.
Load Configuration Setup ID Added as Load Config Color Scheme
This feature extends the list of Load Config Color Scheme options available to include the Load Configuration Setup ID. Visibility to the Load Configuration ID allows you to understand - based on the assigned Load Configuration Setup ID, what rules and constraints were used to load the ship units.
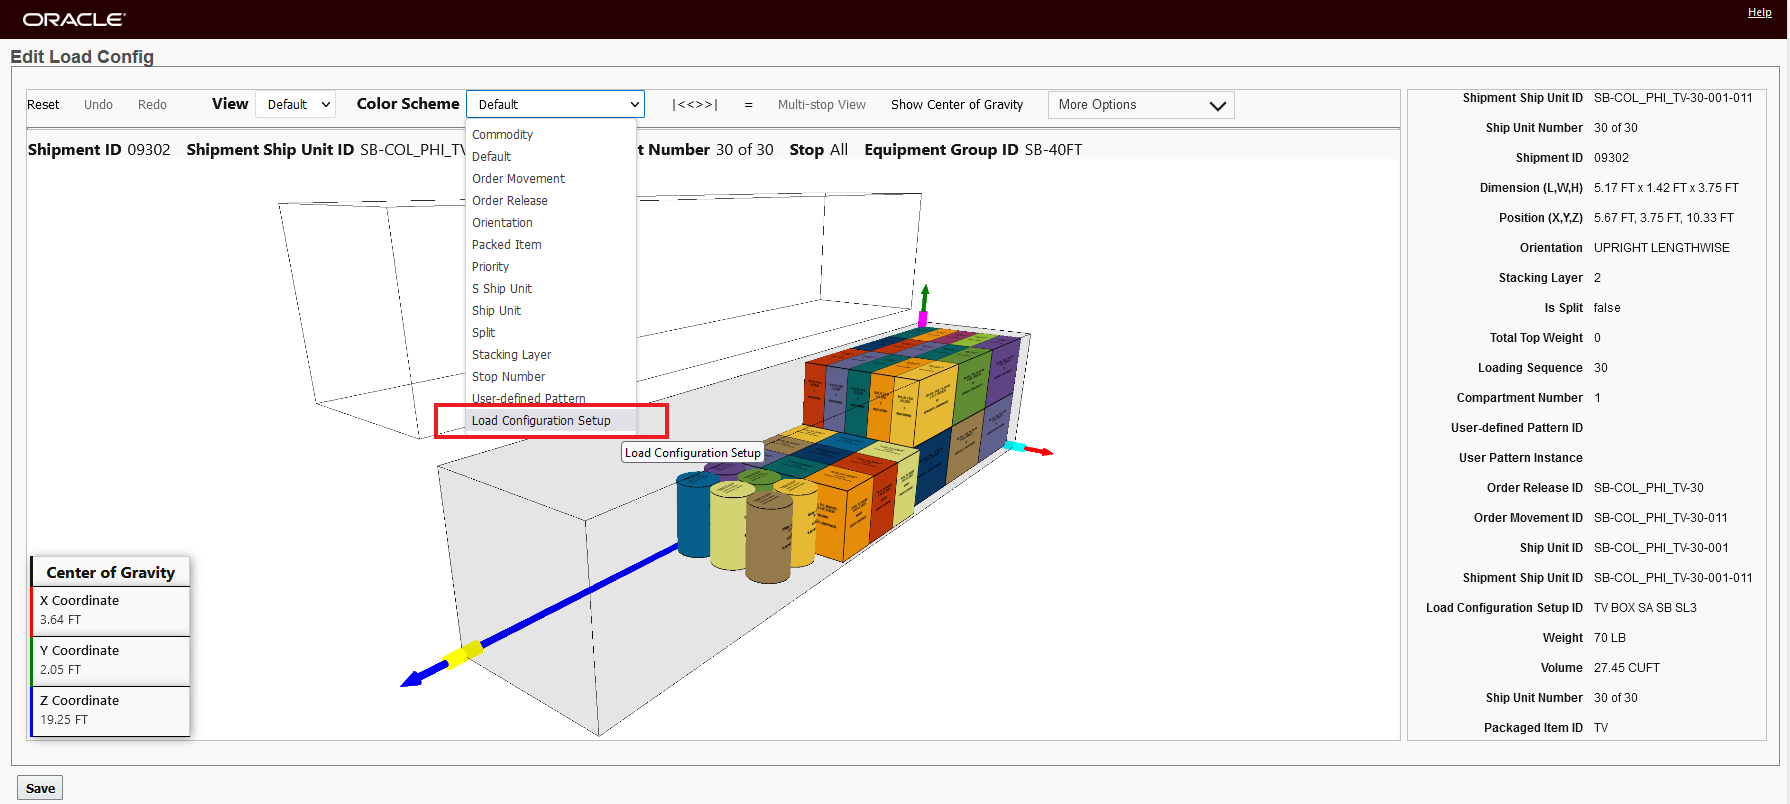
Color Scheme Option Load Configuration ID
In the series of screen shots below, two sets of ship units have been loaded following two different Load Configuration Setup IDs, there is a third set of ship units (shown in gray) that do not have any Load Configuration Setup ID assigned.
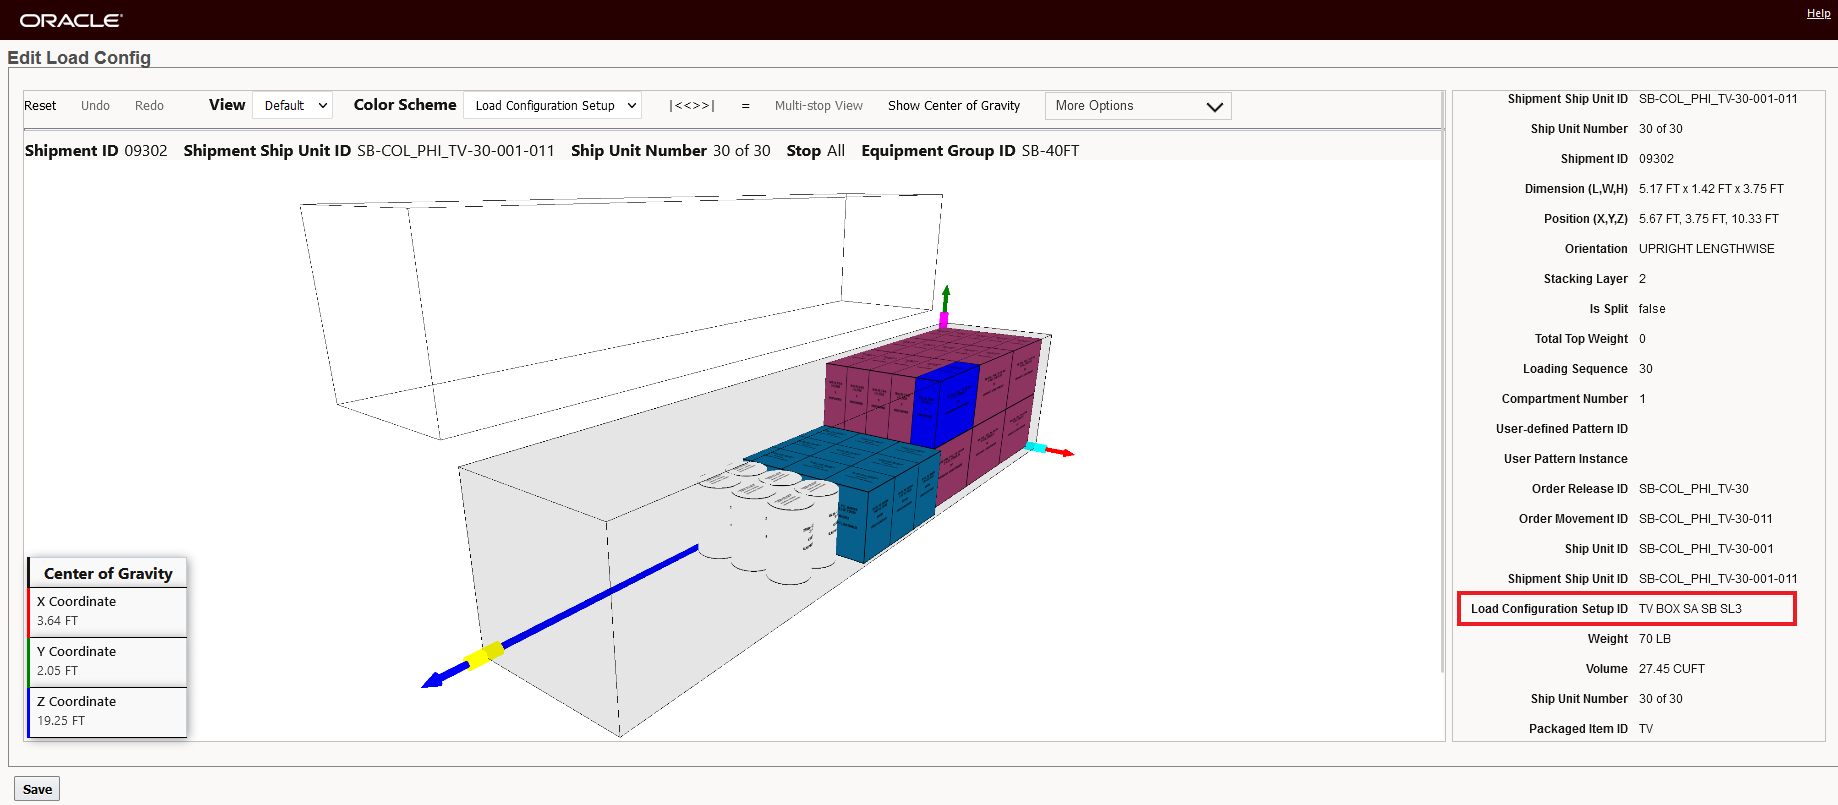
Load Configuration Setup ID - Maroon Colored Ship Units
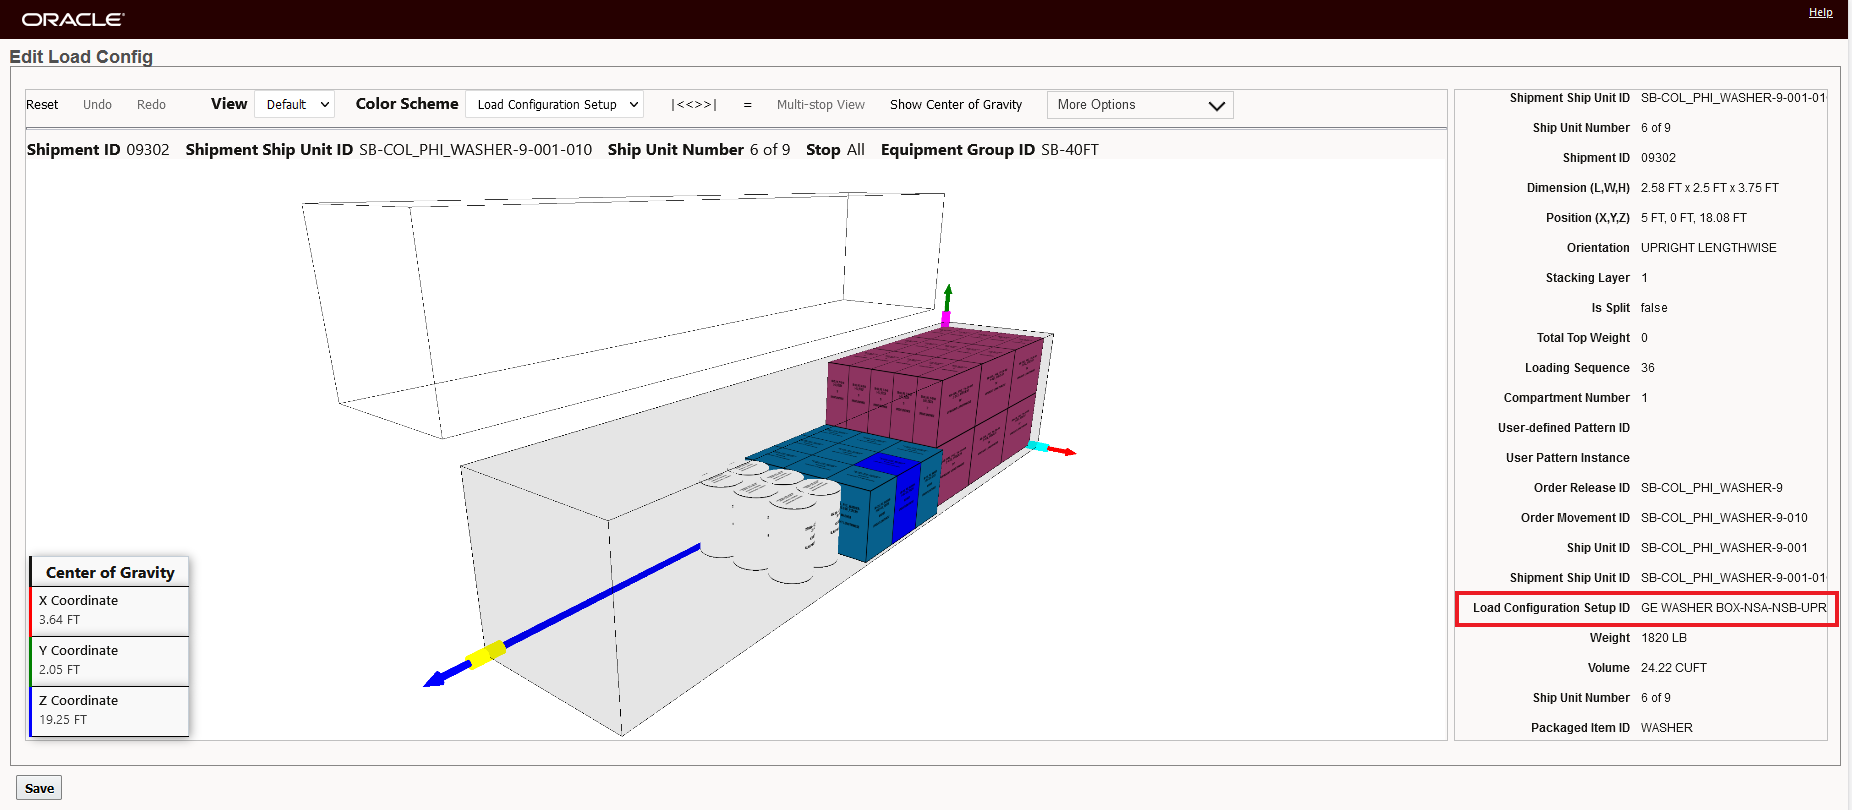
Load Configuration Setup ID - Blue Colored Ship Units
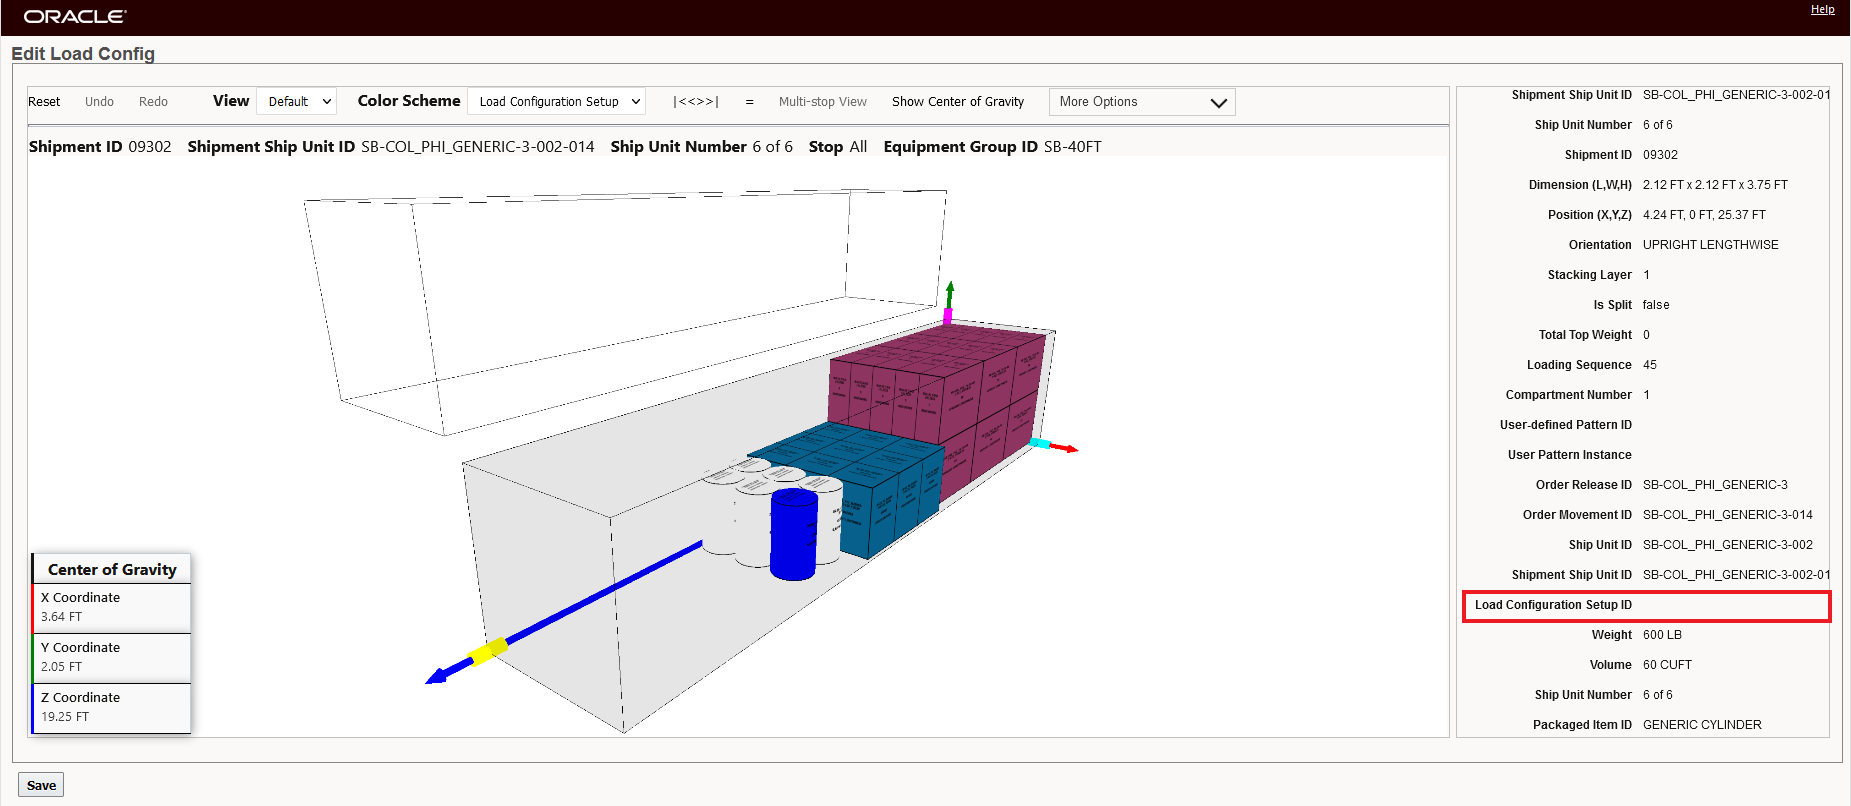
Load Configuration Setup ID - None Specified - Gray Colored Ship Units
NOTE: The visibility to the Load Configuration ID is provided from the Load Configuration ID assigned to the Order Release as shows below.
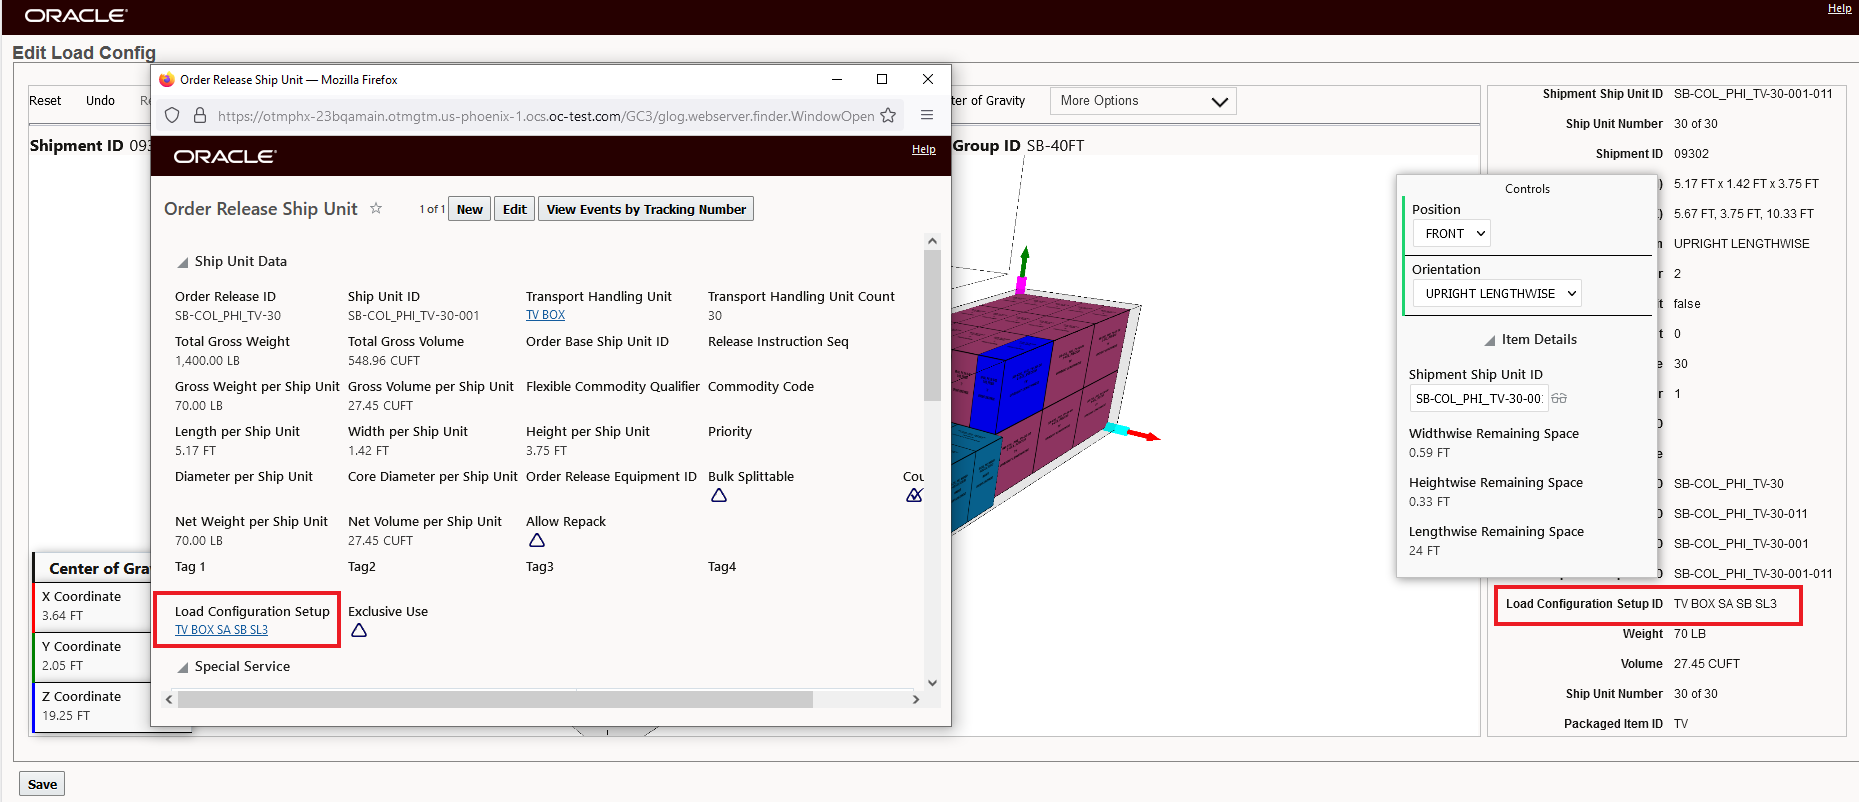
Load Configuration Setup ID Coming from Order Release Ship Unit
This usability feature provides visibility to the Load Configuration Setup ID that have been used to load the order release ship units.
Steps to Enable
You don't need to do anything to enable this feature.
Tips And Considerations
The option to highlight the Load Config results by Load Configuration Setup ID should be a consideration when you are creating your Load Configuration Setup IDs i.e., you will want the IDs to be more descriptive so that the ID can provide some guidance within the Load Config views for how the Load Configuration Setup is configured. For example, the Load Configuration Setup ID in the example above, "TV BOX SA SB SL3" - provides coded information about the Transport Handling Unit = TV BOX, the setting for Stackable Above = SA, information about Stackable Below = SB and the Stacking Layers = SL3. The more descriptive Load Configuration Setup ID in this example provides more information than if a generic ID, like "123", were to be used.
Top-off Disable Same OD Pairing - Multistop Logic Configuration Parameter
This feature provides you with a new Multistop Logic Configuration Parameter - TOP_OFF DISABLE SAME OD PAIRING - that will improve the solution quality and consolidation of shipments in situations where:
- You have Top-off orders and are using Top-off logic,
- Your Multistop Consolidation Algorithm is set to Concurrent Savings,
- Your problem involves shipping many Top-off orders with the same Origin and Destination pair.
If your scenarios happens to meet the criteria above, then this new parameter and logic will improve the shipment consolidation for your same Origin Destination Top-off orders.
The Top-off Disable Same OD Pairing parameter is available in the Multistop Logic Configuration. The default is True - which provides backward compatible, setting the value to False will invoke the new logic.
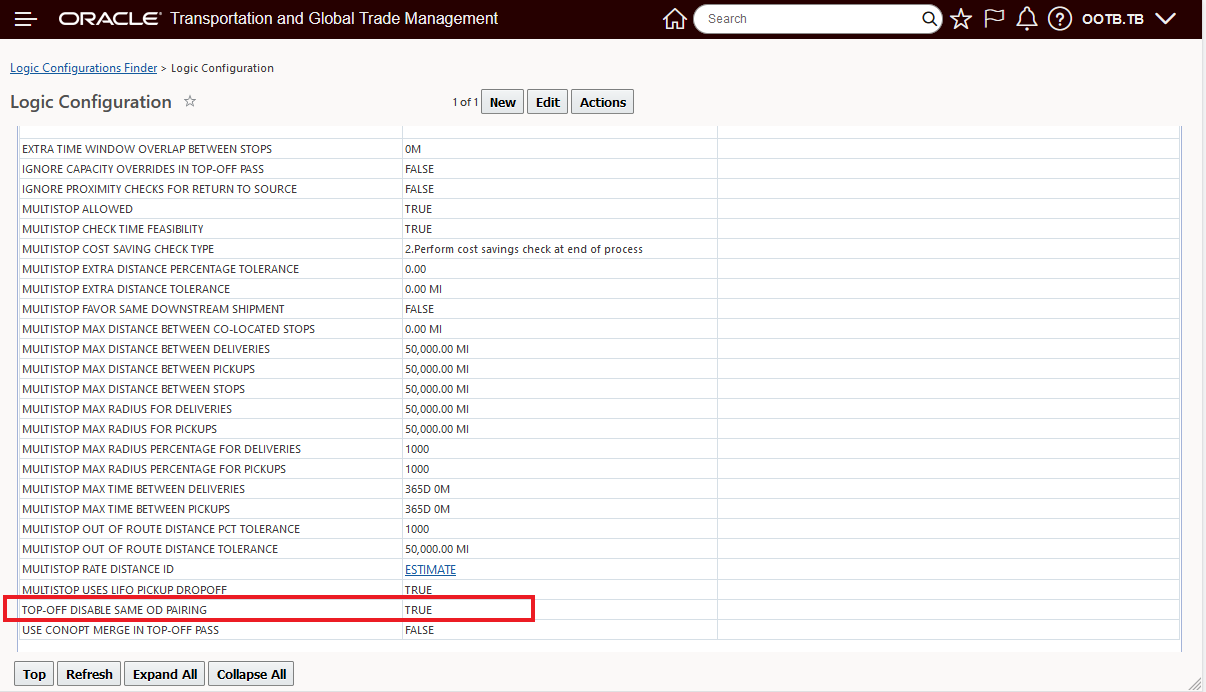
Multistop Planning Parameter - Top-off Disable Same OD Pairing
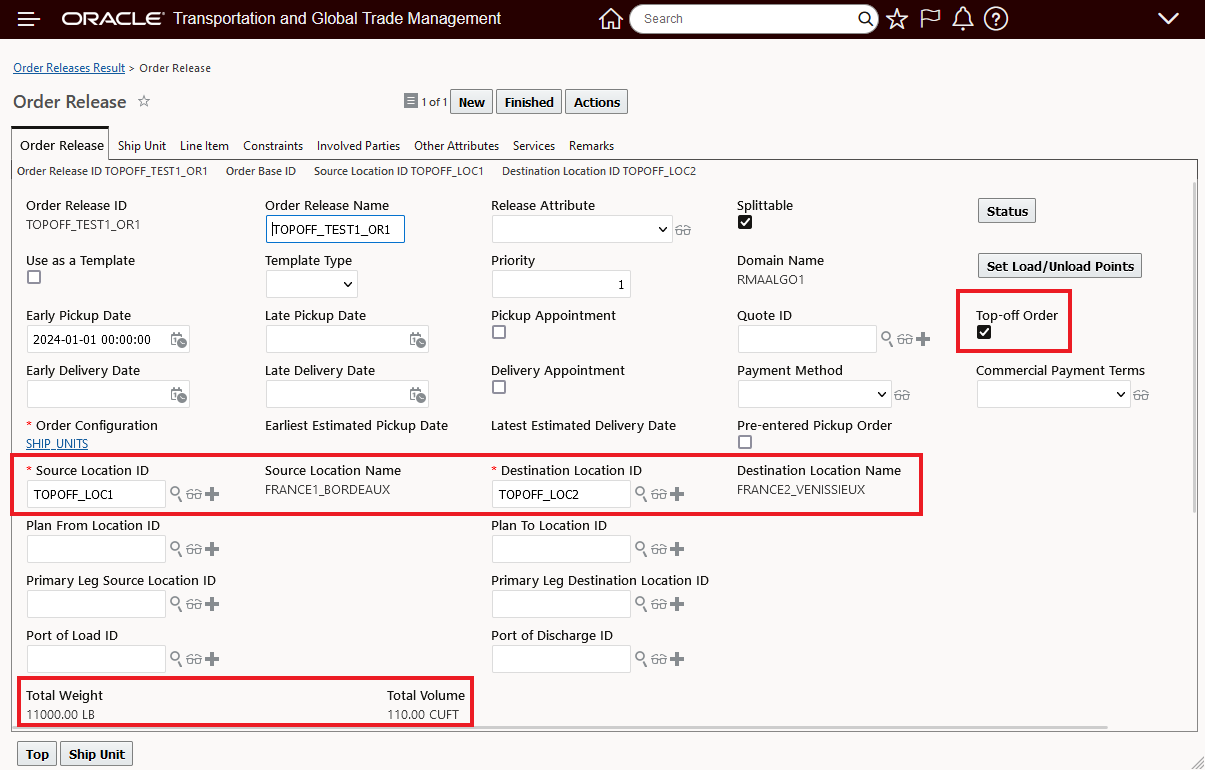
In the example below, six Top-off orders - with the same Origin and Destination, weight, volume etc. are planned in two different bulk plans. In the first plan, the Top-off Disable Same OD Pairing parameter set to TRUE - the default setting, and then - to demonstrate the solution quality improvements, in the second bulk plan the parameter set to FALSE - which invokes the new logic.
Top-off Orders Used in Bulk Plan
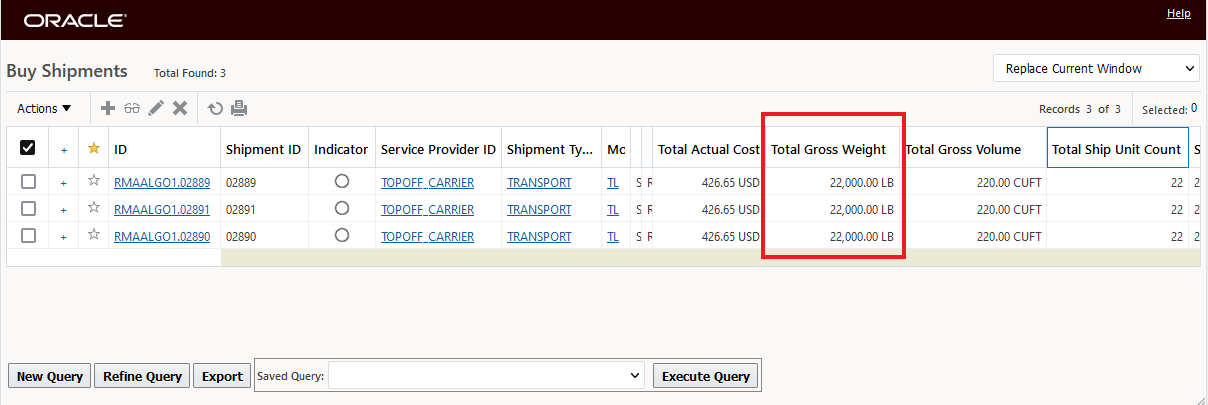
Below is the result for the six order bulk plan with the Top-off Disable Same OD Pairing Multistop Parameter set to TRUE - the default. In this case, the result is three shipments with each shipment loaded with 22,000 pounds - as shown below.
In the second bulk plan, with Top-off Disable Same OD Pairing Multistop Parameter set to FALSE, the consolidation shows a significant improvement. In this case the six orders are consolidated into two shipments vs three shipments.
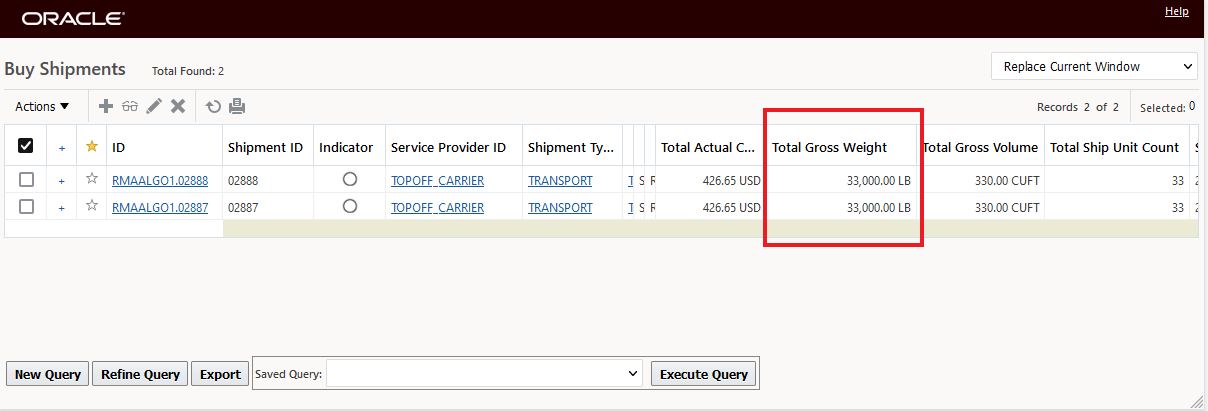
Solution Top-off Disable Same OD Pairing Multistop Parameter = FALSE
This new parameter will improve shipment consolidation in situations where you have Top-off orders and are using Top-off logic and the Top-off setup is used in conjunction with the Multistop Consolidation Algorithm set to Concurrent Savings and the problem to be solved involves many Top-off orders with the same Origin and Destination pair.
Steps to Enable
You don't need to do anything to enable this feature.
Tips And Considerations
- The Top-off Disable Same OD Pairing parameter is only applicable when the Multistop Consolidation Algorithm is set to Concurrent Savings - the other algorithms do not require this feature and are unaffected.
- The Multistop Logic Configuration used in the example above - resulting in the two shipments - is below.
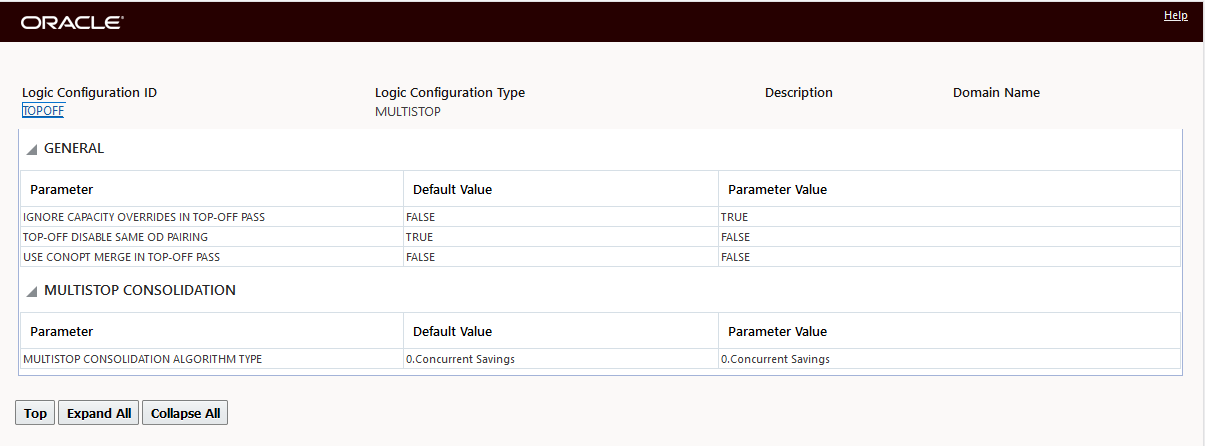
Multistop Logic Configuration with Top-off Disable Same OD Pairing = FALSE
Freight Payment, Billing, and Claims
Out Of Tolerance Detail Fields Added to Invoice Line Item Screen
This feature adds the fields Out of Tolerance Amount, Failure Reason Code, and Deviation Amount to the Invoice Line Item Screen for the Public Screen Set and related Public Manager Layouts - edit and view.
Fields added to the Finder Results for Invoice Line Items.
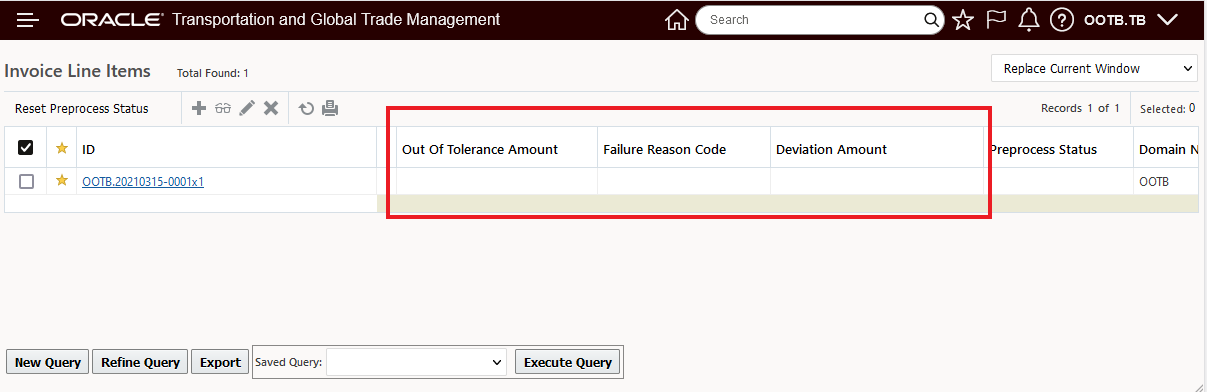
Public - Finder Results - Invoice Line Items
Fields added to a new section - Out Of Tolerance Details - in the Edit Manager for the Invoice Line Item.
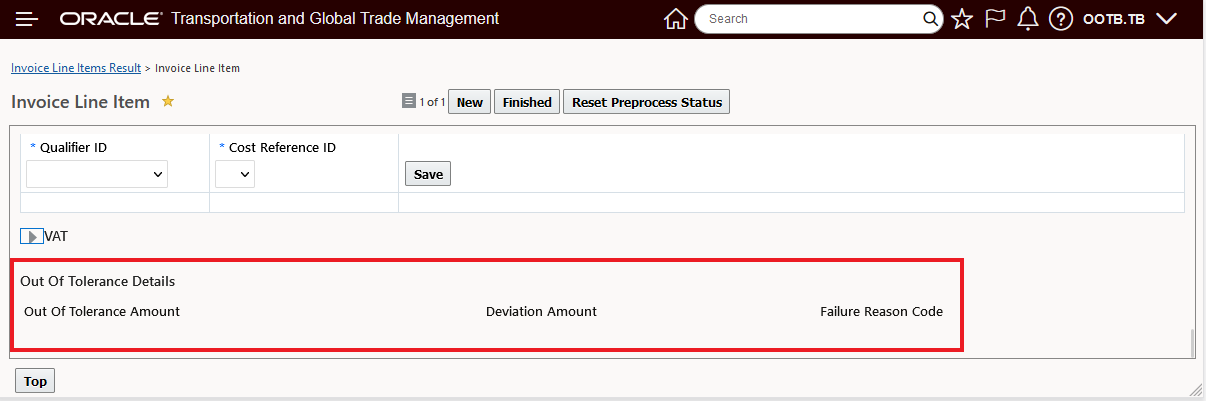
Public - Edit Manager Layout - Invoice Line Item
Fields added to a new section - Out Of Tolerance Details - in the View Manager for the Invoice Line Item.

Public - View Manager Layout - Invoice Line Item
This usability feature provides you with direct visibility to your Invoice Line Items out of tolerance details.
Steps to Enable
You don't need to do anything to enable this feature.
Secondary Charge Shipment Rule Shipment Stop/Ship Unit Count Enhancement
This feature improves the Secondary Charge Shipment Rule UI and logic used when generating Secondary Charge Shipments based on Shipment Stops and Ship Unit Counts. Specifically, this feature clears up a UI issue related to providing the correct Quantity Type values based on selected options for Rule Type and Location Type. The feature also provides you with two additional Quantity Type options (Picked Up and Received) and the related logic which will allow you to use your Debrief stop level ship unit counts (actuals) in the cost calculation of your shipment stop level secondary charge shipments.
Previously, the Quantity Type drop down for the Rule Type = Shipment Stop and Location Type = Stop was not being properly populated - this has been addressed.
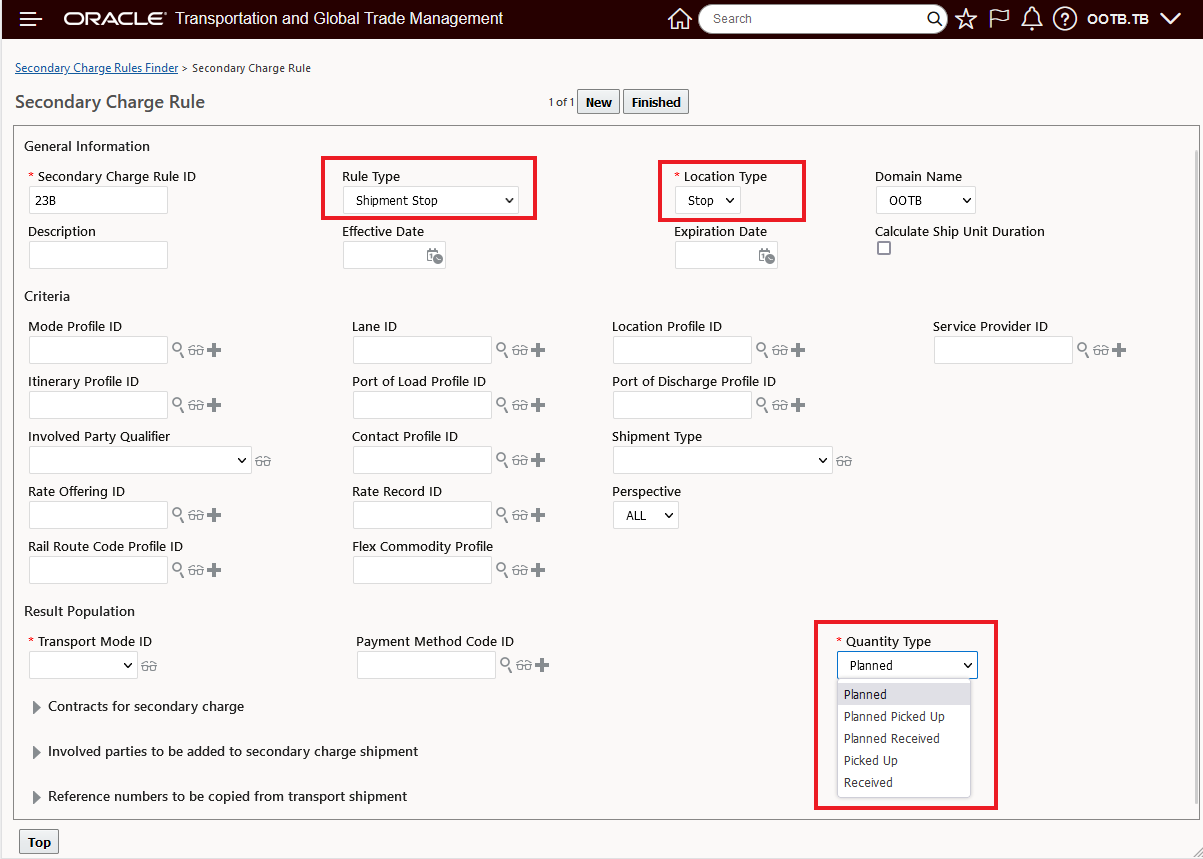
Secondary Charge Rule -Rule Type, Location Type and Quantity Type Dropdown Correction
Below are some examples for different stop level options.
In example below, a three stop shipment has been created with a planned pickup for 25 ship units, the 25 ship units are delivered to two locations, the first stop deliveries 15 ship units and the second stop delivers 10 ship units. Two Secondary Charge rules have been created - one to calculate the charges for the Planned Pickup for the 25 ship units and then another Secondary Charge Rule to calculate the Planned Received charges for the delivery stop of 15 ship units and the delivery stop of 10 ship units. In this example, the charge is 10.00 USD per ship unit.
Secondary Charge rule for the Planned Pickup stop activity is below.
Planned Pickup Up Secondary Charge Rule
The Secondary Charge Rule to calculate the Planned Received stop charges is below.
Planned Received Secondary Charge Rule
The shipment used in this example is shown below. The shipment is a three stop shipment starting at DC1 where 25 ship units are picked up, with subsequent deliveries in Beverly Hills and Los Angeles - so the lane CA TO CA (California to California) used in the Secondary Charge Rules covers all the stop activity for this shipment.
Shipment - One Pickup Stop and Two Deliveries
To generate the secondary charge shipments the Build Secondary Charge Shipments action is run.
Build Secondary Charge Shipments Action
For this example, the Quantity Type selected is All - you can choose to generate secondary charge shipments for any one of the Quantity Type options listed.
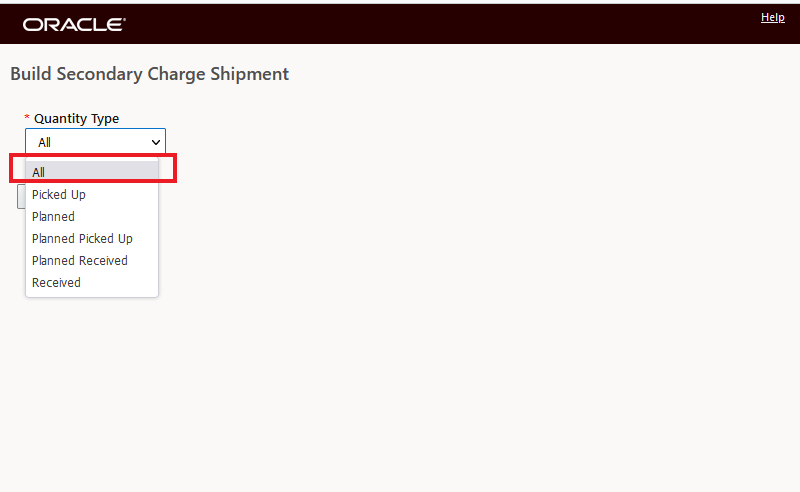
Action Input Quantity Type - ALL selected - So All rules that apply
The result is below, as expected three secondary charge shipments are created. One secondary charge shipment for the Planned Picked Up quantity of 25 shipment units - 250.00 USD (10.00 USD per Ship Unit) then two additional Secondary Charge Shipments for the two Planned Received Stops - one stop for 10 ship units 100.00 USD and the other stop for 15 ship units for a total cost of 150.00 USD.
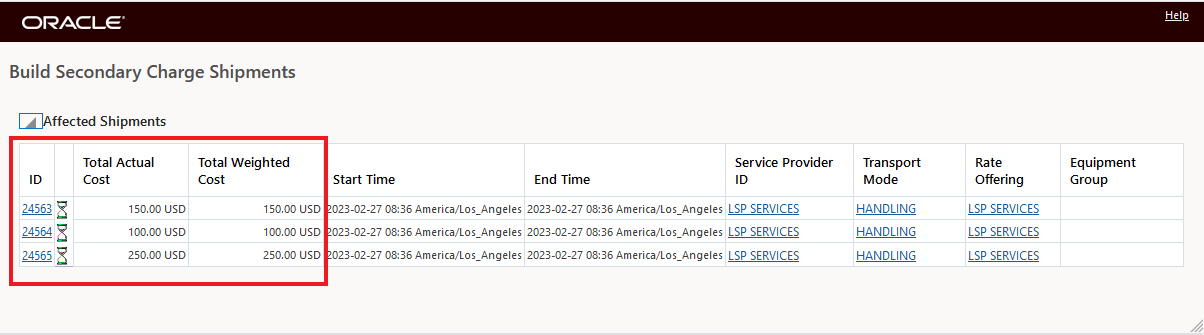
Secondary Charge Shipments Created
In the example below, the Secondary Charge Rule for Quantity Type Planned Received is modified so that only the 90210 Los Angeles stop location is considered for having a Secondary Charge Shipment generated. .

Location Profile Added to Planned Received Secondary Charge Rule
When the Build Secondary Charge Shipments action is run - with the Quantity Type option of Planned Received selected - only the Secondary Charge Shipment below is created for the 10 planned Ship Units delivering/received at the 90210 Los Angeles stop location.
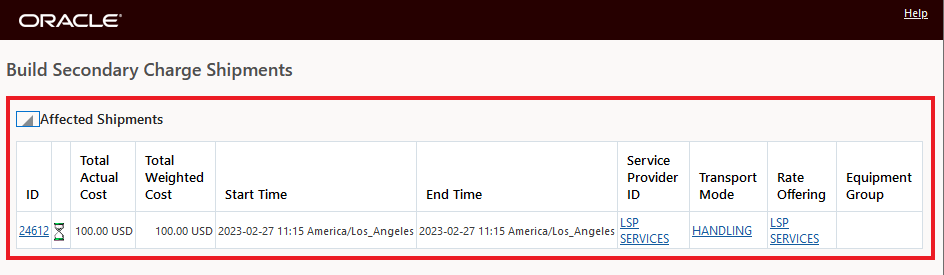
Secondary Charge Shipment Generated for Planned Received 90210 Los Angeles
Picked Up and Received
In the example below, the same orders will be used, but in this case the ship unit quantities will be based on the Stop Debrief ship unit counts entered vs the Planned Picked Up and Planned Received quantities. To enable this setup/scenario the property - glog.business.secondarycharge.ruleType.stop.considerDebriefsForScCharge - must be set to true, when set to true the entered debrief records will be used when creating the Secondary Charge Shipments.
You can find more information about the property glog.business.secondarycharge.ruleType.stop.considerDebriefsForScCharge by reviewing the information provided in the Property Tree - as shown below.
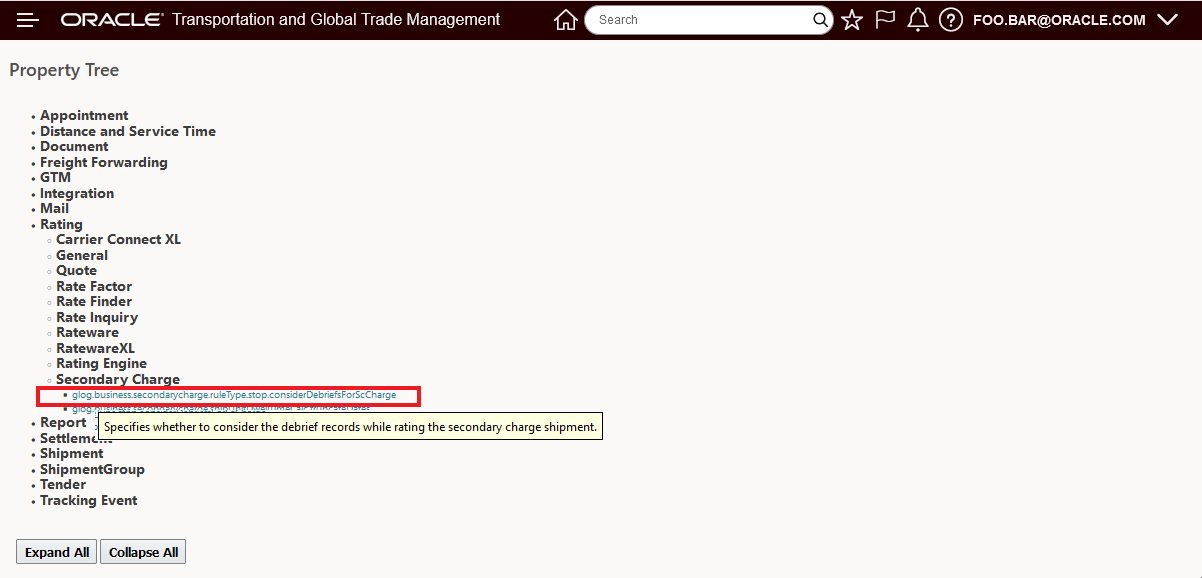
Property Tree - Hover Text Info Provided for Property

Property Tree - Help Link
The two Secondary Shipment Rules are now configured are below - the only difference is that the Quantity Types have been changed for the Debrief Entered quantities - Picked Up and Received.
The Secondary Shipment Rule configured for the Picked Up Debriefed (actuals) is shown below.
Secondary Charge Rule - Quantity Type Picked Up
The Secondary Shipment Rule configured for the Received Debriefed (actuals) is shown below.
Secondary Charge Rule - Quantity Type Received
Below are the entries for the Picked Up Debrief Actuals for stop 1. For the first stop/pickup stop there are two Ship Units to be updated for the two orders. The original 25 Planned Ship Units will be updated with a Debrief Actual of only 22 Ship Units.
The first ship unit count planned for 10 is updated with an actual of only 9 - as shown below.
Debrief Stop 1 Picked Up Debrief Update 10 Ship Units to 9 Ship Units
The second ship unit count planned for 15 is updated with an actual of only 13 - as shown below.
Debrief Stop 1 Picked Up Debrief Update 15 Ship Units to 13 Ship Units
The completed Debrief entry for the first stop/pickup is below, both the planned count (25) and actual/debriefed count (22) are shown.
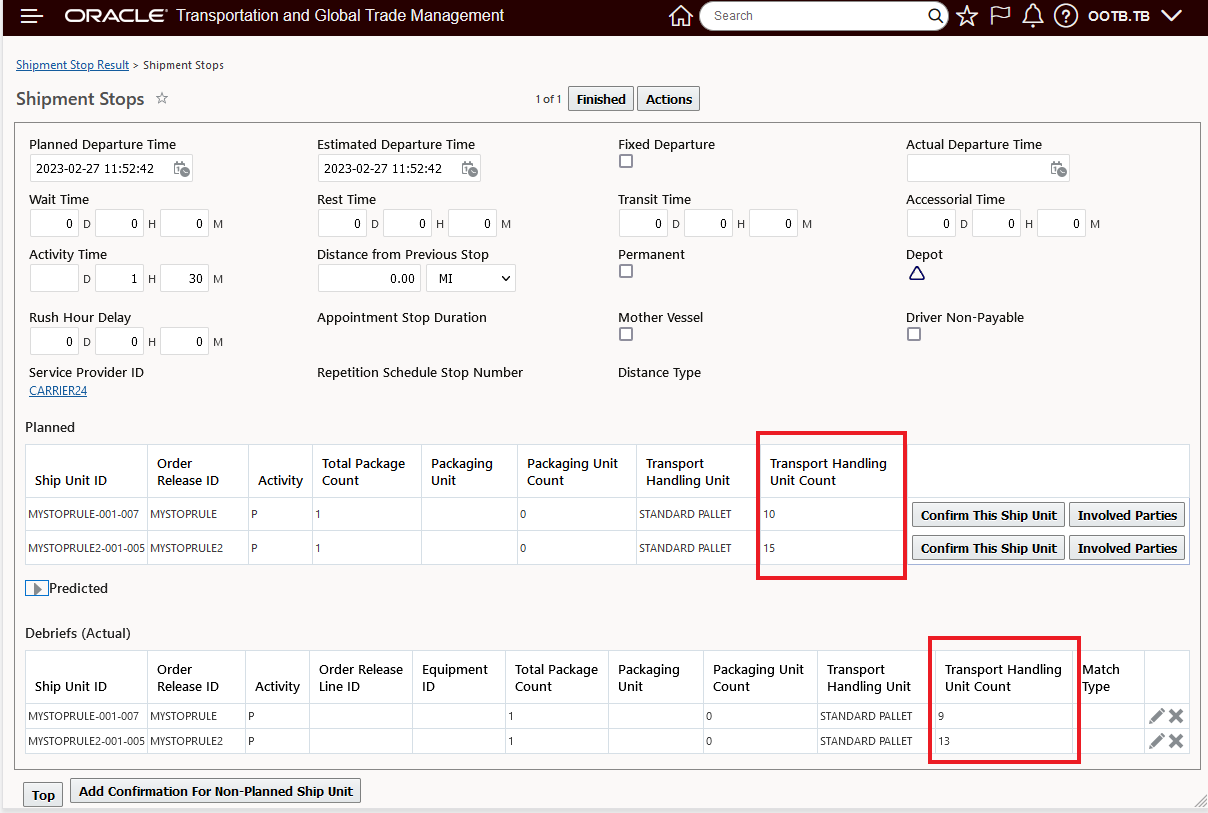
Updated Debrief Totals 22 Ship Units Picked Up Actuals v 25 Planned
For this scenario, the Received quantities for the two delivery stops were also updated - as shown below. The updated quantities are consistent with what was updated for the pickup stop i.e., the actual picked up quantities match the actual received - 9 and 13.
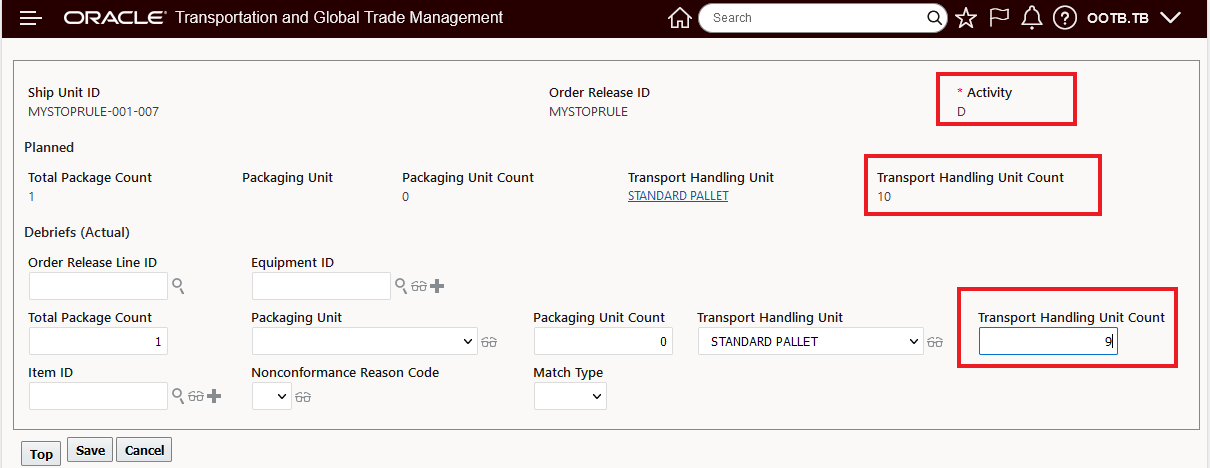
Debrief for Received Quantities 10 Planned to 9 Debrief Actual

Debrief for Received Quantities 15 to 13
When the action Build Secondary Charge Shipments is run - with the option of All - so that all applicable Secondary Charge Rules apply - the two Secondary Charge Rules configured above with Quantity Types of Picked Up and Received are run. The result is as expected - three Secondary Charge Shipments are created as shown below - one capturing the Picked Up Debrief actuals of 22 Ship Units resulting in a 220.00 USD charge and then two Secondary Charge Shipments one for the Received Debrief Actuals of 9 Ship Units for a cost of 90.00 USD and another for the Received Debrief Actuals of 13 for a cost of 130.00 USD.
Debrief Actuals Secondary Charge Shipments
This usability enhancement improves the operation of the Secondary Charge Rule UI and expands the options available, and the logic employed for calculating planned and actual stop level ship unit based secondary charge shipments.
Steps to Enable
To take advantage of the new options for Debrief actuals, you will need to create and/or modify your existing Secondary Charge Shipment Rules to use the new options - Picked Up and Received and you will set the property glog.business.secondarycharge.ruleType.stop.considerDebriefsForScCharge to true.
Tips And Considerations
Note that with a Secondary Charge Rule configured with Rule Type = Shipment Stop, Location Type = Stop and Quantity Type = Planned - the logic will - for the scenario above - use the total ship unit count for all three stops - in this example the 25 ship units. The result will be three Secondary Charge Shipments for the same cost (250.00 USD) assuming the same ship unit count of 25 at each stop - as shown below.
Result for Rule Type = Shipment Stop, Location Type = Stop and Quantity Type = Planned
Invoice Line Item Cost References
The Invoice Line Item Cost References grid on the Invoice Line Item manager provides you with a direct reference to the Invoice Line Item's related Shipment Cost when you Create an Invoice for a Shipment or Match an Invoice to a Shipment. The Invoice Line Item Cost References also supports an Order Release Line to for the Invoice Line Item reference
In the example below, the Created Invoice for the Shipment shows the Shipment Cost Reference in the Invoice Line Item Cost References grid.
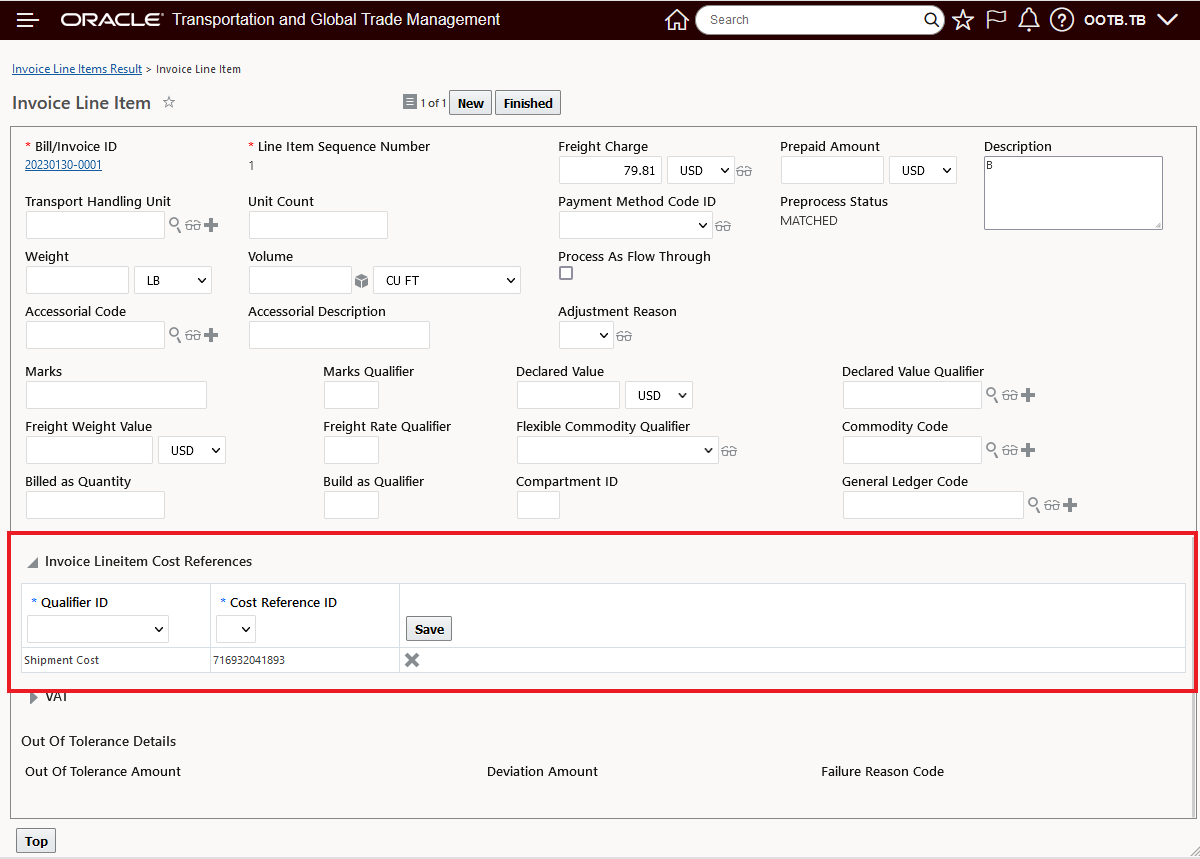
Invoice Line Item Cost References
To add the reference for the Order Release Line, you just select the Order Release Line Qualifier ID from the dropdown list, and then the Order Release Reference IDs are provided.

Order Release Line Reference Qualifier and Reference ID

Order Release Line Reference
In the example below, the Shipment Cost Reference IDs are provided for the Invoice Line Item for a Shipment Group Invoice.
Ship Cost Reference IDs for Shipment Group Invoice
In addition to providing visibility to the Shipment Cost related to the Invoice Line Item - the established associations between an Invoice Line Item and an Order Release Line and/or Shipment Cost(s) can be used for Allocation and Invoice Approval.
Steps to Enable
You don't need to do anything to enable this feature.
Tips And Considerations
If the Invoice Line Item Cost Reference section is updated manually, the preprocess status will be updated as follows:
- If at least one record is present with the Shipment_cost Qualifier Id, the preprocess status will be updated to Matched.
- If all the records with Shipment_cost Qualifier Id are deleted, the preprocess status will be updated to null.
Allocation of Shipment Group Voucher from Invoice with Aggregated Lines
This feature provides support for the shipment group voucher allocation scenario where the voucher is created from a shipment group's invoice and the invoice includes aggregated lines associated with shipment costs coming from multiple shipments in the shipment group. With this enhancement, for each shipment in the shipment group the proper prorated amount for each matched invoice line is allocated to the order and order release lines.
This feature extends the allocation scenarios supported for vouchered shipment group invoices.
Steps to Enable
You don't need to do anything to enable this feature.
Force Equipment Assignment Agent Action
This feature provides you with the option of running the Force Equipment Assignment action as an Agent Action. Previously, the option to Force Assign the Equipment was only available as a Shipment Web action. The Force option on the Equipment Assignment Agent Action allows you to automate the process of force assigning your Equipment assignments.
In the example below - an Automation Agent has been configured to allow for the Force Assignment of an Equipment using a Tracking Event. In this setup, the Equipment provided on the incoming tracking event will be Force Assigned to the Shipment that the Tracking Event matches to.
Automation Agent Equipment Force Assignment Agent Header
The Action section of the Automation Agent is below.
NOTE: The Data Type Association is Tracking Event to Shipment, the selected Action is Assign Equipment and the new option to Force Assign is selected.

Equipment Force Assignment Agent Action Setup
Given the Tracking Event below, the Automation Agent below, will Force assign the Equipment 42FT-005 to the matching Shipment and Shipment Equipment.
Tracking Event Equipment Assignment
Below is the result of processing the Tracking Event above.
NOTE: The provided Equipment ID - 42FT-05 has been assigned to the matched shipment 30360.
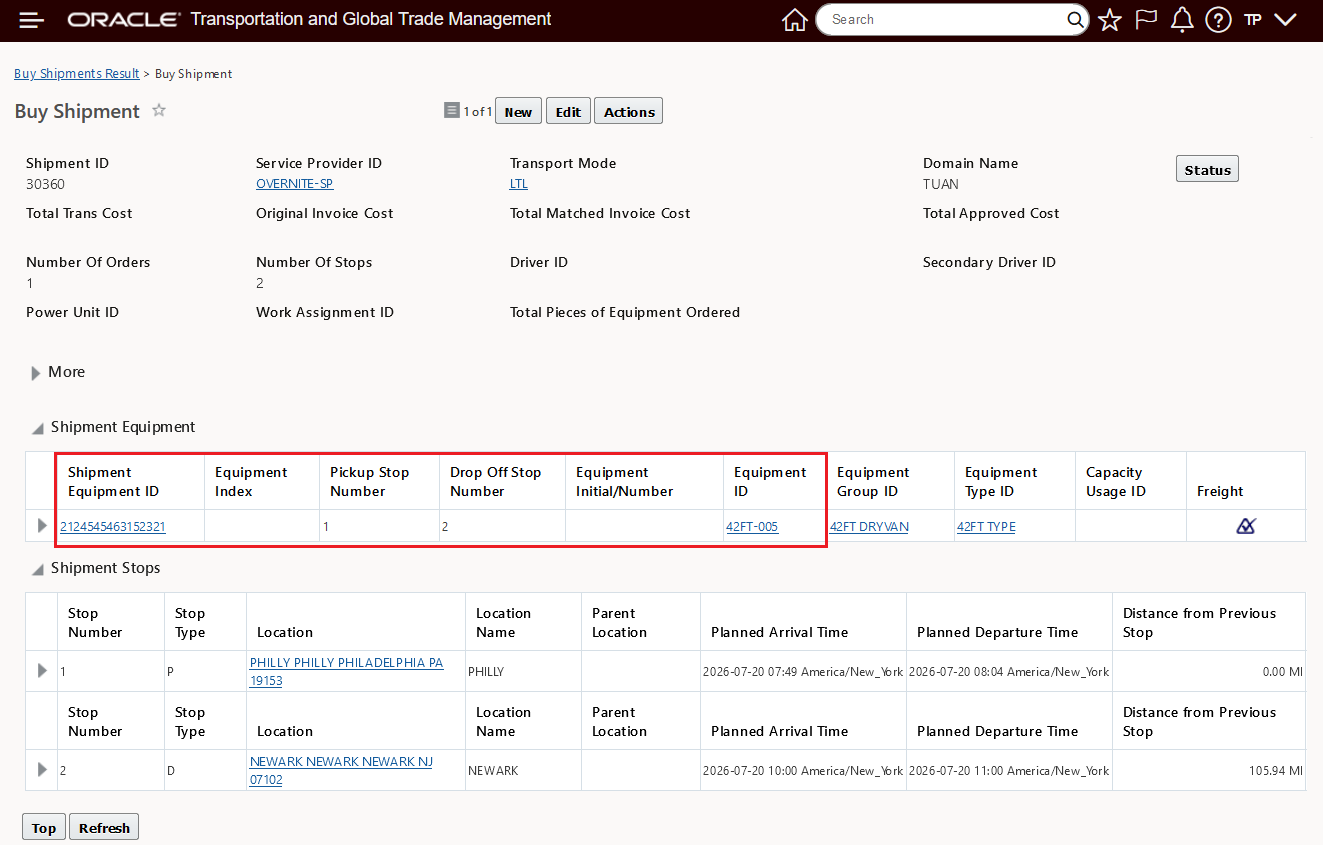
Force Assign Equipment
This feature provides you with the option to automate the Force Equipment Assignment action.
Steps to Enable
To take advantage of the Force Assign option you must modify or create a new Automation Action with this option selected.
Force Equipment Type Assignment Agent Action
This feature provides you with the option of running the Force Equipment Type Assignment action as an Agent Action. Previously, the option to Force Assign the Equipment Type was only available as a Shipment Web action. The Force option on the Equipment Type Assignment Agent Action allows you to automate the process of force assigning your Equipment Type assignments.
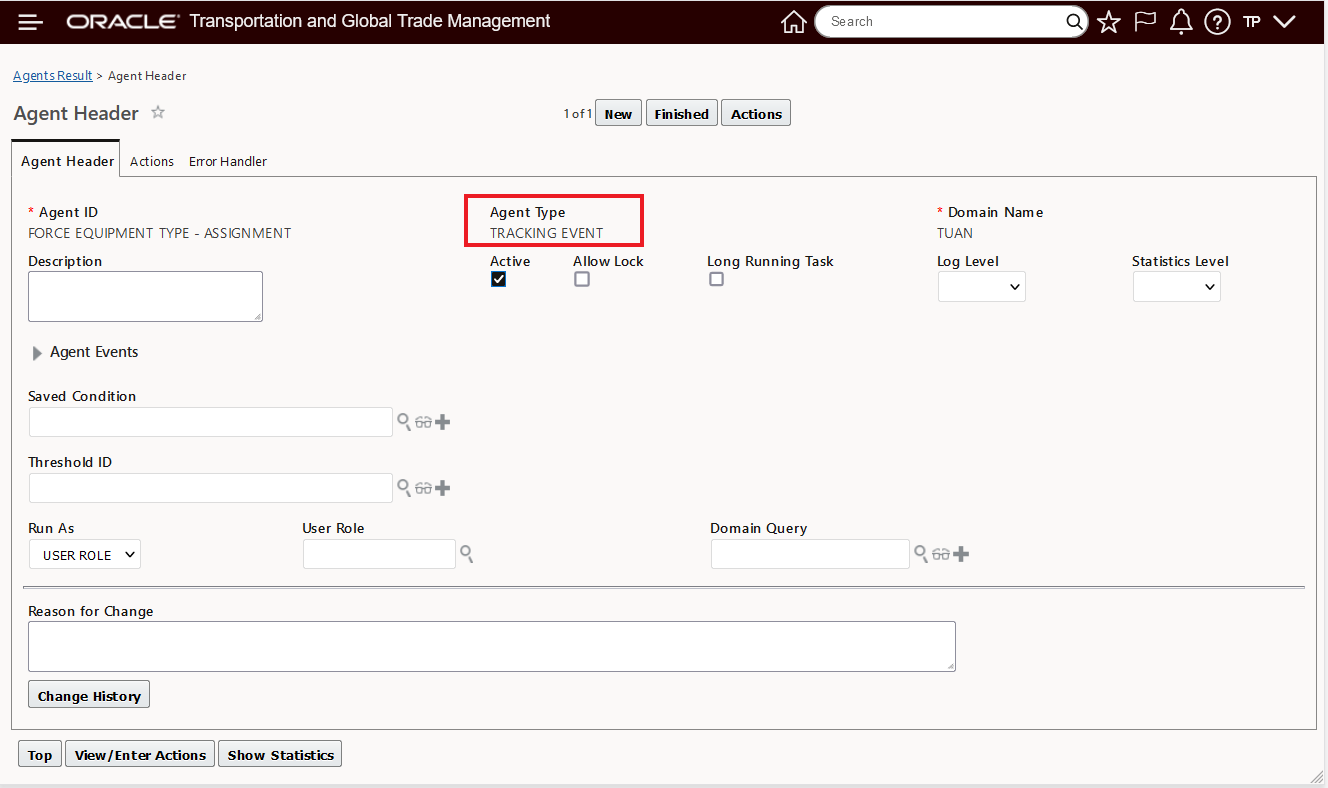
Force Assign Equipment Type Agent Header
The Action section of the Automation Agent is below.
NOTE: The Data Type Association is Tracking Event to Shipment, the selected Action is Assign Equipment Type and the new option to Force Assign is checked.
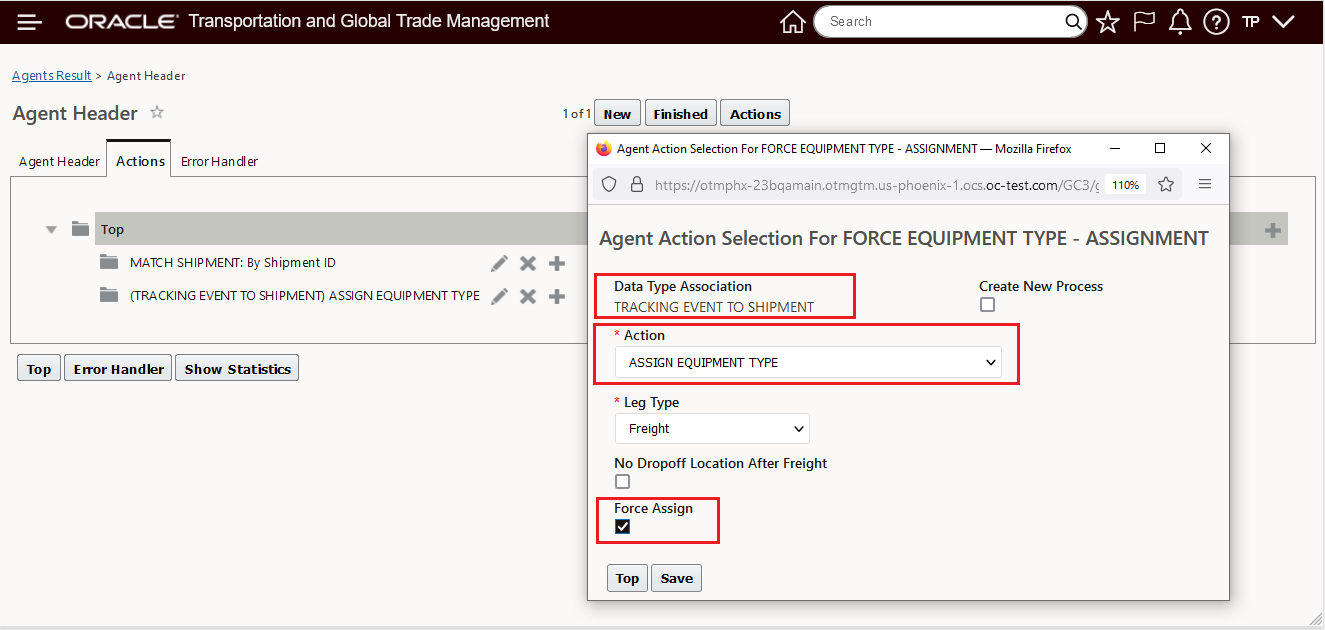
Force Assign Equipment Type Agent Action
Using the Agent above, when the Tracking Event below is processed, the shipment is matched, and the Equipment Type (42FT TYPE) is assigned to the shipment.
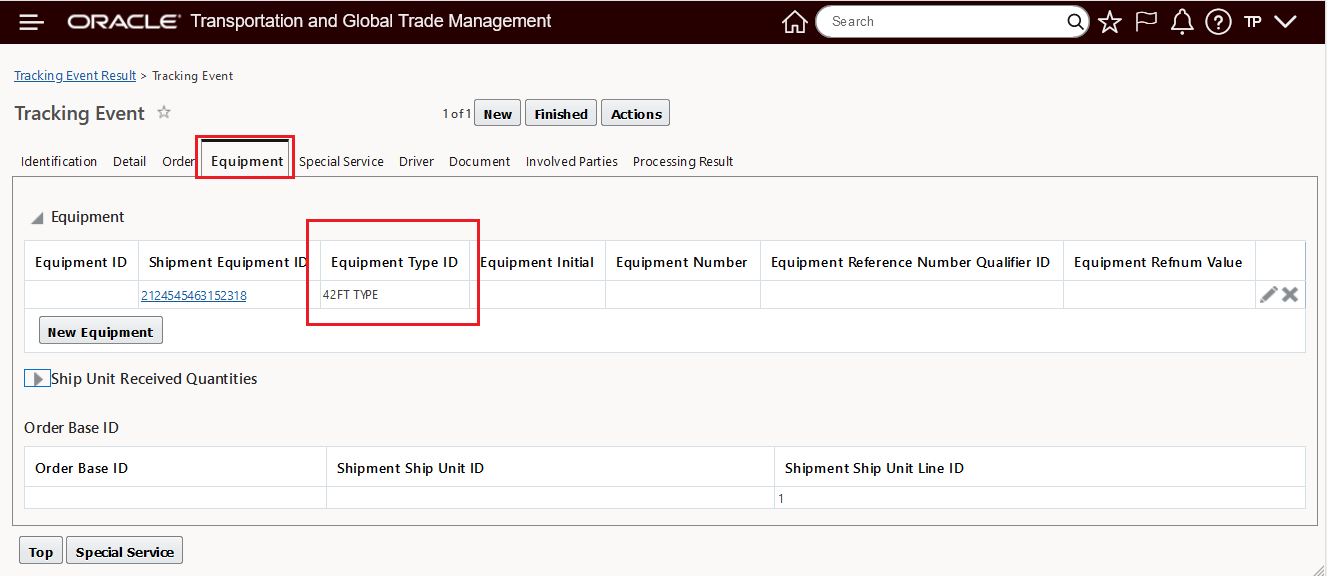
Equipment Type Tracking Event Input
The result of the Force Assign Equipment Type is below, in this case the Force assignment was required since the shipment is infeasible - but correctly assigned to the desired 42FT TYPE equipment type.

Equipment Type Force Assigned
This feature provides you with the option to automate the Force Equipment Type Assignment action.
Steps to Enable
To take advantage of the Force Assign option you must modify or create a new Automation Action with this option selected.
Force Driver Assignment Agent Action
This feature adds the option of running the Force Driver Assignment action as an Agent Action. Previously the Force Driver Assignment was only available as a Shipment Web action.
In the example below - an Automation Agent has been configured to allow for the Force Assignment of a Driver using a Tracking Event. In this setup, the Driver provided on the incoming tracking event will be Force Assigned to the Shipment that the Tracking Event matches to.
Tracking Event Header - Driver Force Assignment
The Action section of the Automation Agent is below.
NOTE: The Data Type Association is Tracking Event to Shipment, the selected Action is Assign Driver and the new option to Force Assign is checked.
Force Assign Action Driver
Below is the result of the agent action above running for a shipment (30353).
NOTE: The Driver (DRIVER-LOC COMPAT RULE) is assigned from the Tracking Event via the Force Assigned action - and the Force was necessary since the shipment is DRIVER INFEASIBLE after the assignment.
Force Assign Driver on Shipment
This feature provides you with the option to automate the Force Driver Assignment action.
Steps to Enable
To take advantage of the Force Assign option you must modify or create a new Automation Action with this option selected.