
- Revision History
- Overview
- Feature Summary
- Benefits
-
- Benefits
-
- Enhanced Search in Benefits Service Center
- Print Enrollment Document Anytime
- Create and Analyze Fast Formulas in the Plan Configuration Work Area
- Additional Unrestricted Processing Rule to Process Enrollments Once a Week
- Additional Attributes in BENXML Extract
- Person Number as Input Parameter for Batch Processes
- Life Events
- Data Loading
- Redwood Experience
-
- Benefits
- IMPORTANT Actions and Considerations for Benefits
This document will continue to evolve as existing sections change and new information is added. All updates appear in the following table:
| Date | Module | Feature | Notes |
|---|---|---|---|
| 30 JUN 2023 | Benefits / Redwood Experience |
Redwood Experience for Benefits Balance | Updated document. Revised feature information. |
| 30 JUN 2023 | Benefits / Redwood Experience |
Redwood Experience for Benefit Groups | Updated document. Revised feature information. |
| 26 MAY 2023 | Benefits / Data Loading | HDL for Close Enrollment Certification Action Items |
Removed feature, this will be delivered in July. |
| 26 May 2023 | Benefits / Redwood Experience | Redwood Experience for Benefits Balance | Updated document. Feature delivered in update 23B. |
| 26 May 2023 |
Benefits / Redwood Experience |
Redwood Experience for Benefit Groups | Updated document. Feature delivered in update 23B. |
| 03 MAR 2023 | Created initial document. |
HCM Cloud applications have two types of patches you can receive that are documented in this What's New:
- Release Updates (23A, 23B, 23C, and 23D)
- Optional Monthly Maintenance Packs to each update
It is important for you to know what Release Update your environment is on. You can find this in your Cloud Portal.
____________________
 HAVE AN IDEA?
We’re here and we’re listening. If you have a suggestion on how to make our cloud services even better then go ahead and tell us. There are several ways to submit your ideas, for example, through the Ideas Lab on Oracle Customer Connect. Wherever you see this icon after the feature name it means we delivered one of your ideas.
____________________
SUGGESTED READING FOR ALL HCM PRODUCTS
- HCM Common What's New - In this What's New you will find feature that are used across applications.
- Human Resources What’s New – In the Global Human Resources section you will find features on the base application in which other application are built upon.
NOTE: Not all Global Human Resource features are available for Talent and Compensation products.
- Oracle Human Capital Management Cloud Functional Known Issues and Maintenance Packs (Document ID 1554838.1). These documents identify bug fixes and possible known issues. You will also need to review these documents based in the release update version you are currently on or will be moving to.
- Oracle Help Center – Here you will find guides, videos and searchable help.
- Release Readiness – New Feature Summary, What’s New, Feature Listing Spreadsheet, Spotlights and Release Training
GIVE US FEEDBACK
We welcome your comments and suggestions to improve the content. Please send us your feedback at oracle_fusion_applications_help_ww_grp@oracle.com. Indicate you are inquiring or providing feedback regarding the HCM Cloud What’s New in the body or title of the email.
Column Definitions:
Report = New or modified, Oracle-delivered, ready to run reports.
UI or Process-Based: Small Scale = These UI or process-based features are typically comprised of minor field, validation, or program changes. Therefore, the potential impact to users is minimal.
UI or Process-Based: Larger Scale* = These UI or process-based features have more complex designs. Therefore, the potential impact to users is higher.
Features Delivered Disabled = Action is needed BEFORE these features can be used by END USERS. These features are delivered disabled and you choose if and when to enable them. For example, a) new or expanded BI subject areas need to first be incorporated into reports, b) Integration is required to utilize new web services, or c) features must be assigned to user roles before they can be accessed.
| Ready for Use by End Users Reports plus Small Scale UI or Process-Based new features will have minimal user impact after an update. Therefore, customer acceptance testing should focus on the Larger Scale UI or Process-Based* new features. |
Customer Must Take Action before Use by End Users Not disruptive as action is required to make these features ready to use. As you selectively choose to leverage, you set your test and roll out timing. |
|||||
|---|---|---|---|---|---|---|
| Feature |
Report |
UI or |
UI or |
|
||
Create and Analyze Fast Formulas in the Plan Configuration Work Area |
||||||
Additional Unrestricted Processing Rule to Process Enrollments Once a Week |
||||||
Oracle Benefits is a complete, configurable and flexible global solution that enables organizations to successfully evolve and adapt to the unique needs of their workforce. The solution enables setup of traditional 'one-size fits all' plans to highly complex plans that selectively target different workforce segments with different benefit packages. Self-service capabilities present the user with an out of the box intuitive guided enrollment process with contextual information and embedded analytics.
Enhanced Search in Benefits Service Center
You can now use the enhanced sort options and attribute labels while viewing advanced search results in Benefits Service Center.

Advanced Search in Benefits Service Center
You can now sort the search results by the ascending or descending order of name or business title. By default, people with both active and inactive assignment status are displayed. You can use the check boxes under Assignment Status in the side pane to control this display. Previously, by default, only people with active assignments appeared.
The advanced search now displays these fields:
- Name
- Person Number
- Business Title
- Worker Type
- Assignment Status
- Assignment Number

Search Fields
Also, a blank search now shows no results. Previously, all the names appeared.
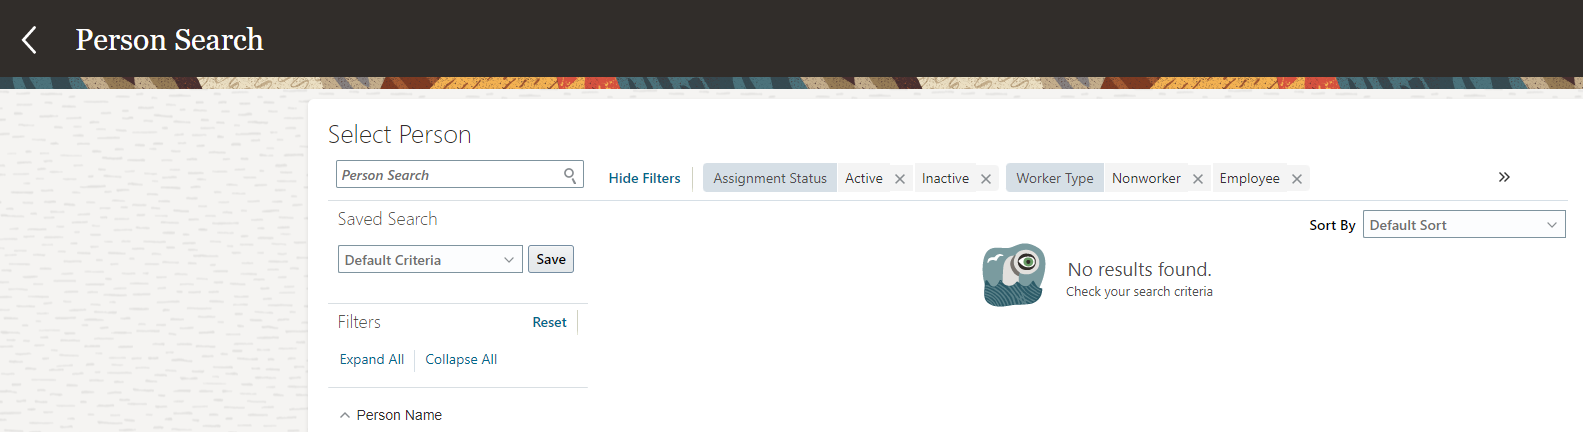
Blank Search
This enhancement reduces the time you spend in searching for information in Benefits Service Center. For example, with more details in place, you can easily distinguish employees who have been hired or rehired multiple times.
Steps to Enable
You don't need to do anything to enable this feature.
Print Enrollment Document Anytime
You can now print enrollment documents for participants anytime, even during an active enrollment window. Ensure that the life event is in Started status.

Print Enrollment Document
Previously for a started life event, Benefits administrators couldn’t print the enrollment document once the explicit elections are made. With this enhancement, we enabled the administrator to print the enrollment document even after making the elections.
Steps to Enable
You don't need to do anything to enable this feature.
Create and Analyze Fast Formulas in the Plan Configuration Work Area
You can now create fast formulas from the plan design work area without having to go to the Payroll work area. Also, we’ve moved the fast formula analyzer to the Plan Configuration work area. Previously, it was in the Evaluation and Reporting work area. The feature functionality remains the same.

Fast Formula Analyzer in the Plan Configuration work area

Define Formula
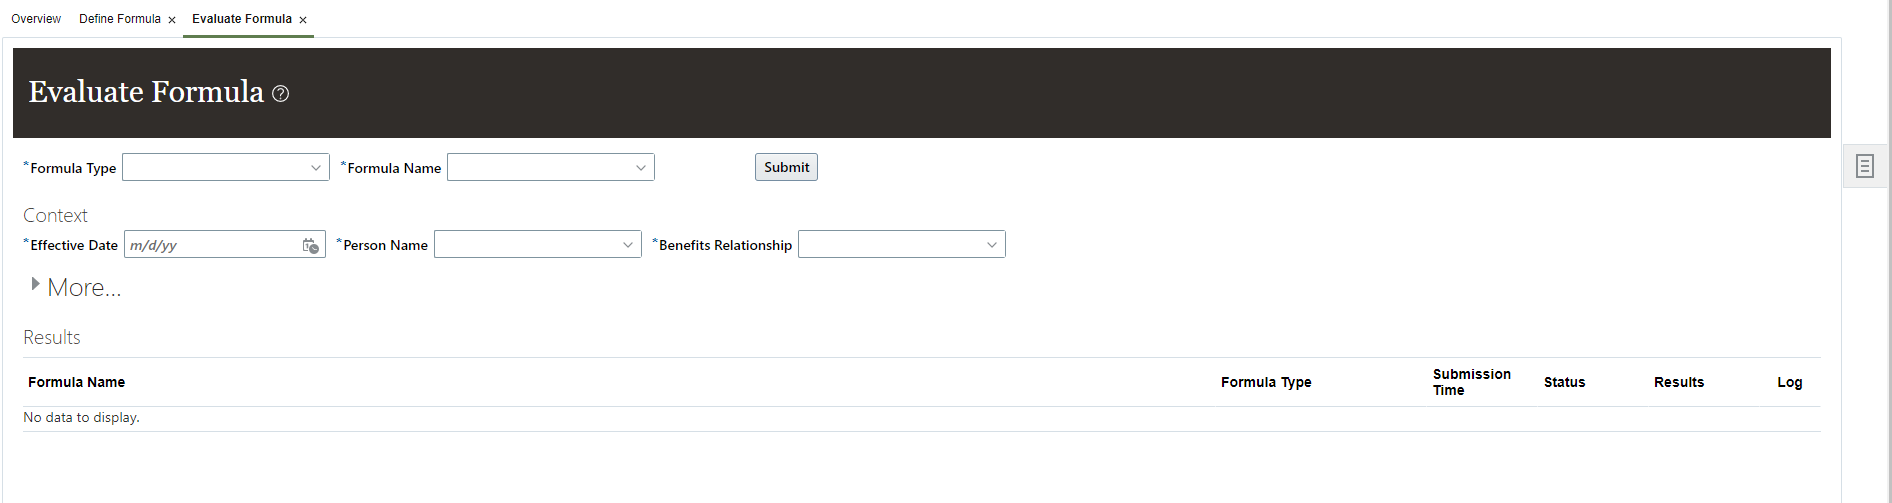
Evaluate Formula
This enhancement ensures easy access to fast formulas and reduces the need for additional roles to access these areas.
Steps to Enable
You don't need to do anything to enable this feature.
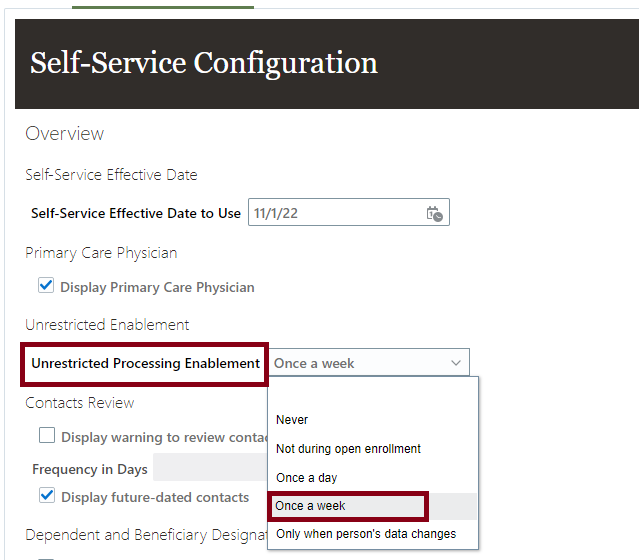
Additional Unrestricted Processing Rule to Process Enrollments Once a Week
You can now use the new unrestricted processing rule called Once a Week. You can use this rule to process the enrollment only once a week even if the employee visits the enrollment flow and makes changes multiple times during the week.
In most cases, you don’t have to make the changes daily. So, evaluating the unrestricted event once a week will allow you to accommodate changes to person eligibility, and so on with much less processing.
The effective period for this rule is 7 days starting as of the effective date and counting backward. An error message appears if you try to run another life event when this rule is in effect.
The error message appears only in Benefits Service Center. The self-service users don’t get any errors. They can make elections if the event is in Started state. If the application determines that the unrestricted event need not be processed, then it doesn’t show any choices for enrollment. For batch processing, a warning is written to the log file and the next person in the batch will be processed.
If you’d like to use the Once a Week rule, you need to add an enrollment window of 7 days or more for the unrestricted life event.
For terminations and global transfers, the unrestricted event gets processed regardless of the processing rule.
The rule can be evaluated in both Self-Service Benefits and Benefits Service Center that use these processes:
- Evaluate Unrestricted Event Participation
- Evaluate Scheduled Event Participation
This enhancement reduces the number of unrestricted events that are backed out by the employees. It also reduces the amount of processing required in the unrestricted model.
Steps to Enable
Here’s how you enable this feature:
- On the Home Page, click Benefits Administration > Plan Configuration.
- In the Tasks panel drawer, click Self-Service Configuration.
- Set Unrestricted Processing Enablement to Once a week.
- Click Save.
Self-Service Configuration
Additional Attributes in BENXML Extract
By default, Fusion Benefits Extracts (BENXML Extract file) is populated with an empty original hire date when you are using V3 seniority date, and you need to define your own fast formula to fetch the date.
To uptake V3 seniority date, you need to set the profile option ORA_PER_SENIORITY_DATE_AT_ENT value to Enterprise Seniority Date – person level. To configure profile option values, use the Manage Administrator Profile Values task in the Setup and Maintenance work area.
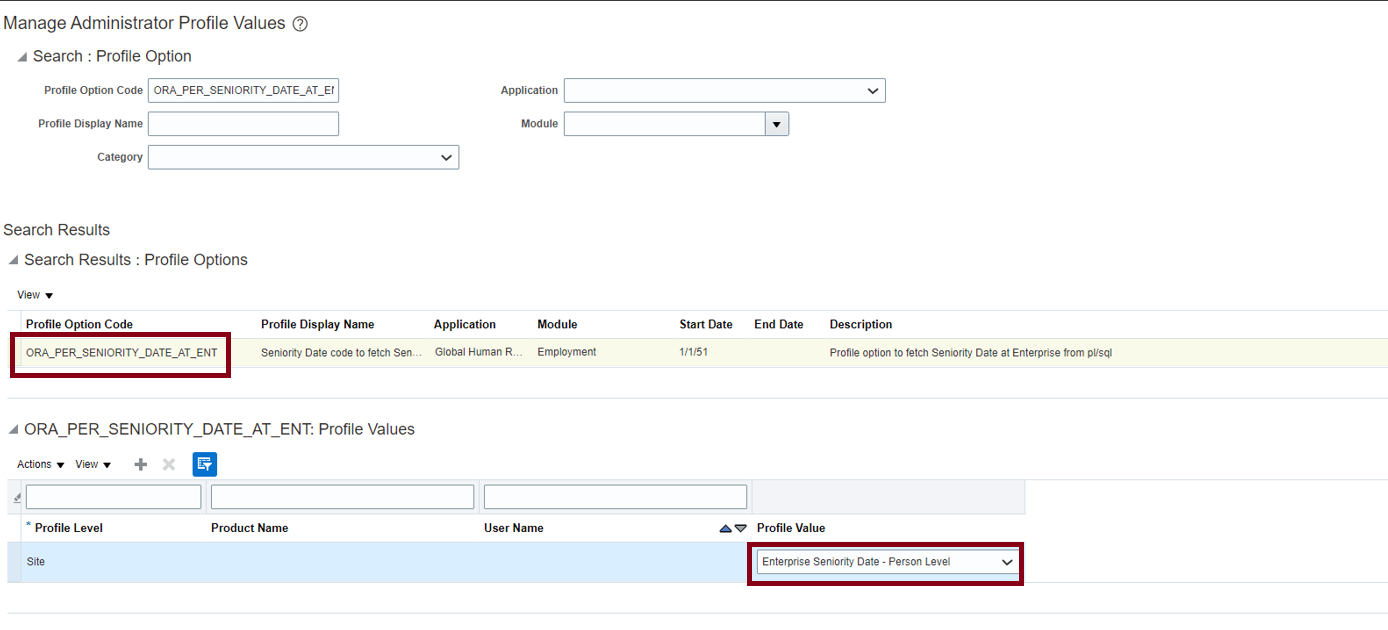
Manage Administrator Profile Values Task
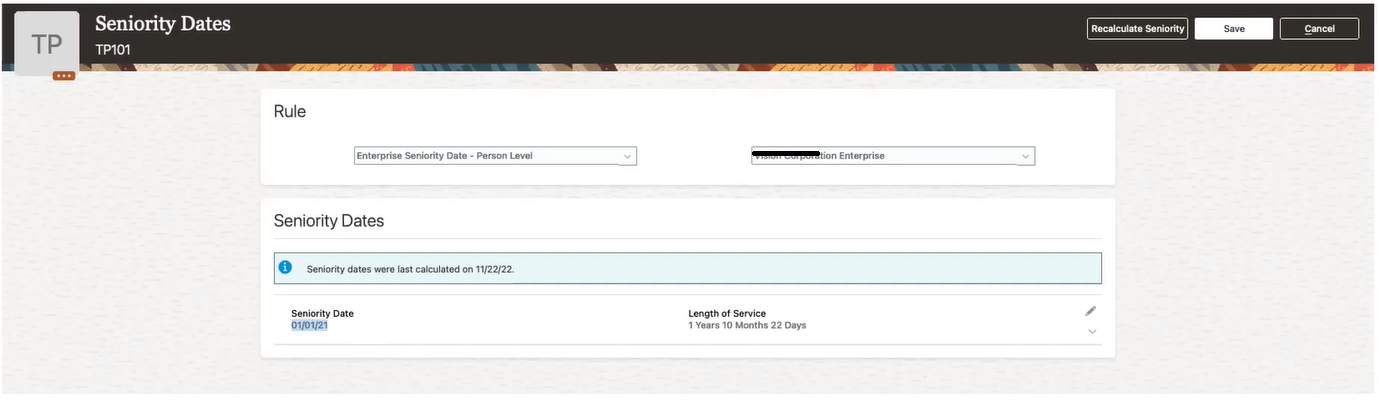
Seniority Date
This enhancement also adds additional column support in the BENXML Extract file:
Additional Columns
You can now use the most advanced version of the seniority date feature.
Steps to Enable
You don't need to do anything to enable this feature.
Key Resources
For more information, refer to Overview of Seniority Dates.
Person Number as Input Parameter for Batch Processes
Benefits batch processes can now evaluate a set of comma-separated person numbers in the Person Number field, in the Process Details page. For example, you can use this enhancement if you want to quickly test your plan design changes against a sample set of employees,
You can enter up to 2000 characters. The comma-separated person numbers should be in a single continuous text format. Individual person numbers with embedded commas will get ignored. The list can have whitespaces, tab, line feed, and carriage feed characters embedded in the string if you have copied it from a spreadsheet. Such irrelevant characters are ignored or truncated during the processing if they are surrounding the real person number within the comma delimitation.
You can’t use this parameter along with any of these person-determining parameters:
- Person Name
- Person Selection rule
- Person Type
- Organization Name
- Benefits Group
- Location
- Postal Code Range
- Legal Entity
The person number list will be passed automatically to any auto-submitted process like Default Enrollment. The log file provides details on which of the person numbers got picked up for processing and which ones got ignored as invalid.
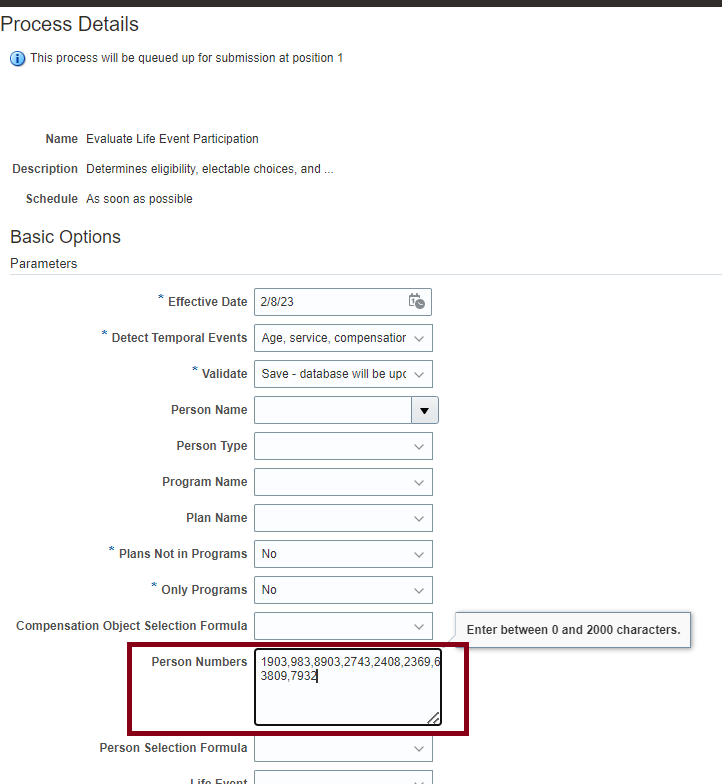
Process Details Page
This enhancement is available in these processes:
- Evaluate Life Event Participation
- Evaluate Scheduled Event Participation
- Evaluate Temporal Event Participation
- Evaluate Unrestricted Event Participation
- Enroll in Default Benefits
- Close Enrollment
- Prepare Benefit Coverage Charge Data
- Re-evaluate Designee Eligibility
You need to click Benefits Administration à Evaluation and Reporting à Processes to access these processes.
This enhancement reduces the need to write and maintain person selection formulas.
Steps to Enable
You don't need to do anything to enable this feature.
Prevent Detecting Life Events for Offer Assignments
The application now doesn’t trigger life events when a new offer is made to candidates.
You can disable this enhancement by adding a new lookup to the table FND_COMMON_LOOKUPS with these details:
- Lookup type: ORA_BEN_SKIP_VALIDATION
- Lookup Value: DISABLE_OFFER_EVENTS_CHECK
- ENABLED_FLAG: Y
This enhancement reduces the number of life events triggered for non-employee job offers. It also improves performance of batch processes by reducing the number of unnecessary life events it evaluates.
Steps to Enable
You don't need to do anything to enable this feature.
Enrollment Authorization as of Life Event Occurred Date
Participants read and accept the enrollment authorization text before they get to the enrollment pages. As a Benefits administrator, you may update this text based on the business requirements. With this enhancement, you can display the enrollment authorization text for programs and plans not in programs as of the life event date or effective date. This text appears in the self-service pages and in Benefits Service Center based on your self-service configurations.
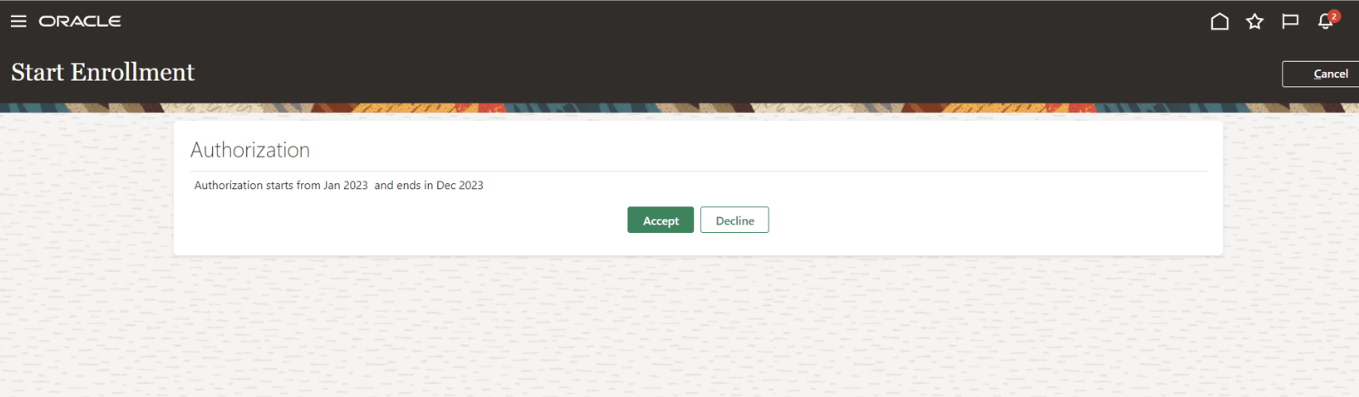
Enrollment Authorization
Enrollment authorization is evaluated when you run these processes:
- Evaluate Life Event Participation
- Evaluate Scheduled Event Participation
- Evaluate Unrestricted Event Participation
Life events that were already processed don’t reflect the text as of the life event date or effective date. In such cases, you need to back out and reprocess the event.
This enhancement is useful when you make major changes to the plans periodically and need to call out those changes in the enrollment authorization text. It helps the participants to always see the latest authorization text during open enrollment.
Steps to Enable
Here’s how you enable this feature:
- On the Home Page, click Benefits Administration > Plan Configuration.
- In the Tasks panel drawer, click Self-Service Configuration.
- Select the Display authorization text as of life event occurred date check box.
- If you want to display the latest text in Benefits Service Center also, select the Display Authorization page in Benefits Service Center check box.
- Click Save.

Self-Service Configuration
Key Resources
For more information, refer to: How can I create or modify enrollment authorization text?
Life Event Setup Diagnostic Report
You can use the new Life Event Setup Diagnostic Test to see all the setup details of life events. The report provides diagnostics when you notice issues with life events detecting when they are not expected or life events not getting detected when they are expected.
Here’s how you generate and view the Life Event Setup Diagnostic report:
- Click the logged-in user's icon and click Run Diagnostics Tests in the Troubleshooting section.
- Search for and select the Life Event Setup Diagnostic Test on the Diagnostic Dashboard page and click Add to Run.
- In the Choose Tests to Run and Supply Inputs section, click the Input Status icon to enter the details. Configure the Life Event parameter to run the report. Effective Date is optional.
- Click Save and enter a name and display the name for the test.
- Click OK.
- Click Run in the Choose Tests to Run and Supply Inputs section.
- In the Diagnostic Test Run Status table, click Refresh to see the latest status.
- When the execution status reads Complete, click the Report icon to view the report.
Here are the sections in this report:
- General Information for Life Event
- Additional Information with Timeliness Formula
- Additional Information with Evaluation Formula
- Person Changes
- Related Person Changes
- Non-Global Configuration
- Collapsing Rules
- Entity Object Event Name
- Event Eligibility
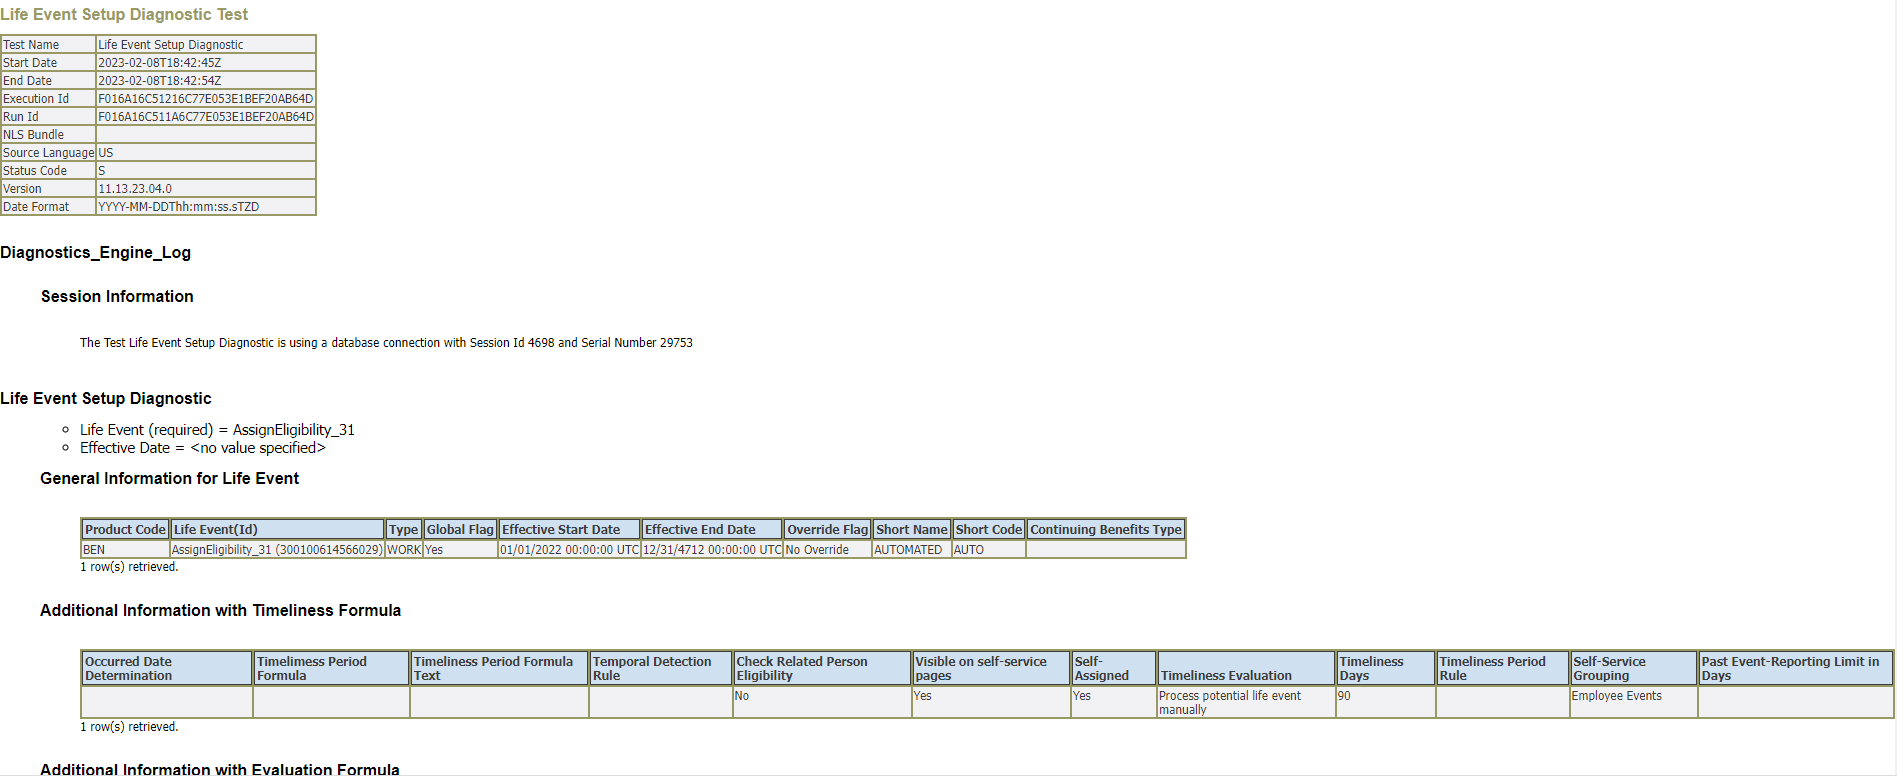
Life Event Setup Diagnostic Test
This enhancement helps you view all the life event setup details in one place and troubleshoot common setup issues.
Steps to Enable
You don't need to do anything to enable this feature.
Access Requirements
Application Diagnostics Administrator
HSDL for Enrollments and Designations
You can now use the seeded HCM Spreadsheet Data Loader (HSDL) spreadsheets to upload participant enrollments and designate dependents and beneficiaries.
NOTE: The existing ADFdi Enrollment Upload spreadsheet loaders will be removed, so you need to move to HSDL.
We’ve seeded separate HSDL spreadsheets to upload participant enrollments, designate dependents, and designate beneficiaries. Ensure that the life event for the enrollment that you are uploading is in the Started status.
| HDL Spreadsheet Name |
Supported Operations in the Spreadsheet |
Business Objects and User Keys |
|---|---|---|
| Participant Enrollment Upload |
Create and update |
|
| Designate Dependent |
Create and update |
|
| Designate Beneficiary |
Create and update |
|
NOTE: To use these spreadsheets, you must install the Oracle ADF Desktop Integration Add-in for Excel.
You can now use the seeded HSDL spreadsheets to upload the Affordable Care Act (ACA) person details. Also, the existing ADFdi ACA Override Upload spreadsheet loaders will be deprecated.
| HDL Spreadsheet Name |
Supported Operations in the Spreadsheet |
User Keys |
|---|---|---|
| Affordable Care Act Override For Participants |
Create and update |
Person Number, Affordable Care Act Report Line Number, Legal Entity, Year |
| Affordable Care Act Override For Dependents |
Create and update |
Person Number, Contact First Name, Contact Last Name, Affordable Care Act, Report Line Number, Legal Entity, Year |
| Affordable Care Act Delete For Participants |
Delete |
Person Number, Affordable Care Act Report Line Number, Legal Entity, Year |
| Affordable Care Act Delete For Dependents |
Delete |
Person Number, Contact First Name, Contact Last Name, Affordable Care Act Report Line Number, Legal Entity, Year |
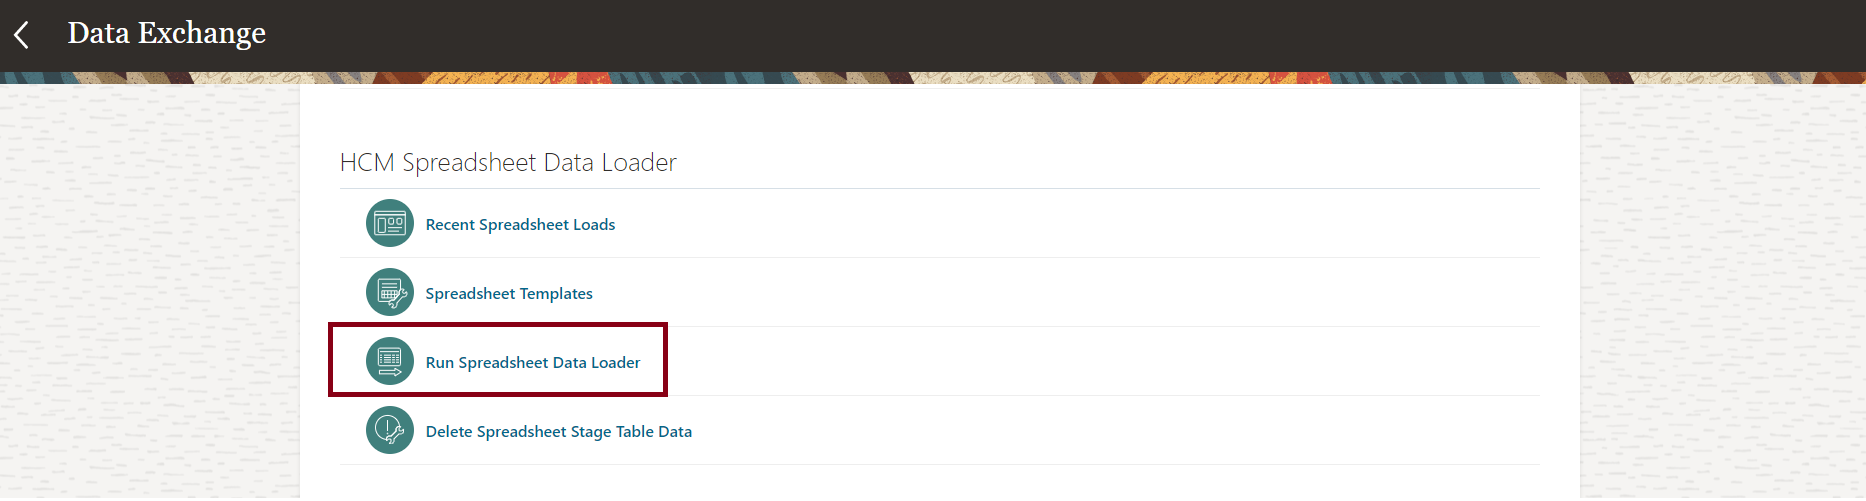
You need to click Navigator > My Client Groups > Data Exchange > Run Spreadsheet Data Loader to download these seeded spreadsheets.
Page to Download The Seeded Spreadsheets
This enhancement improves the performance of the application when uploading a large amount of data.
Steps to Enable
You don't need to do anything to enable this feature.
Key Resources
- For more information, refer to: Set Up Desktop Integration for Excel
These pages or flows have been recreated in the Redwood tool set Visual Builder Studio (VBS) to improve your user experience. The pages or flows look and act like Redwood pages or flows, to help create cohesiveness through the application.
Redwood Experience for Benefits Balance
The Benefit Balances page was re-created in the Redwood tool set Visual Builder Studio to improve the user experience by providing the same consistent functionality across Redwood pages. Note that the functionality of the page remains the same.
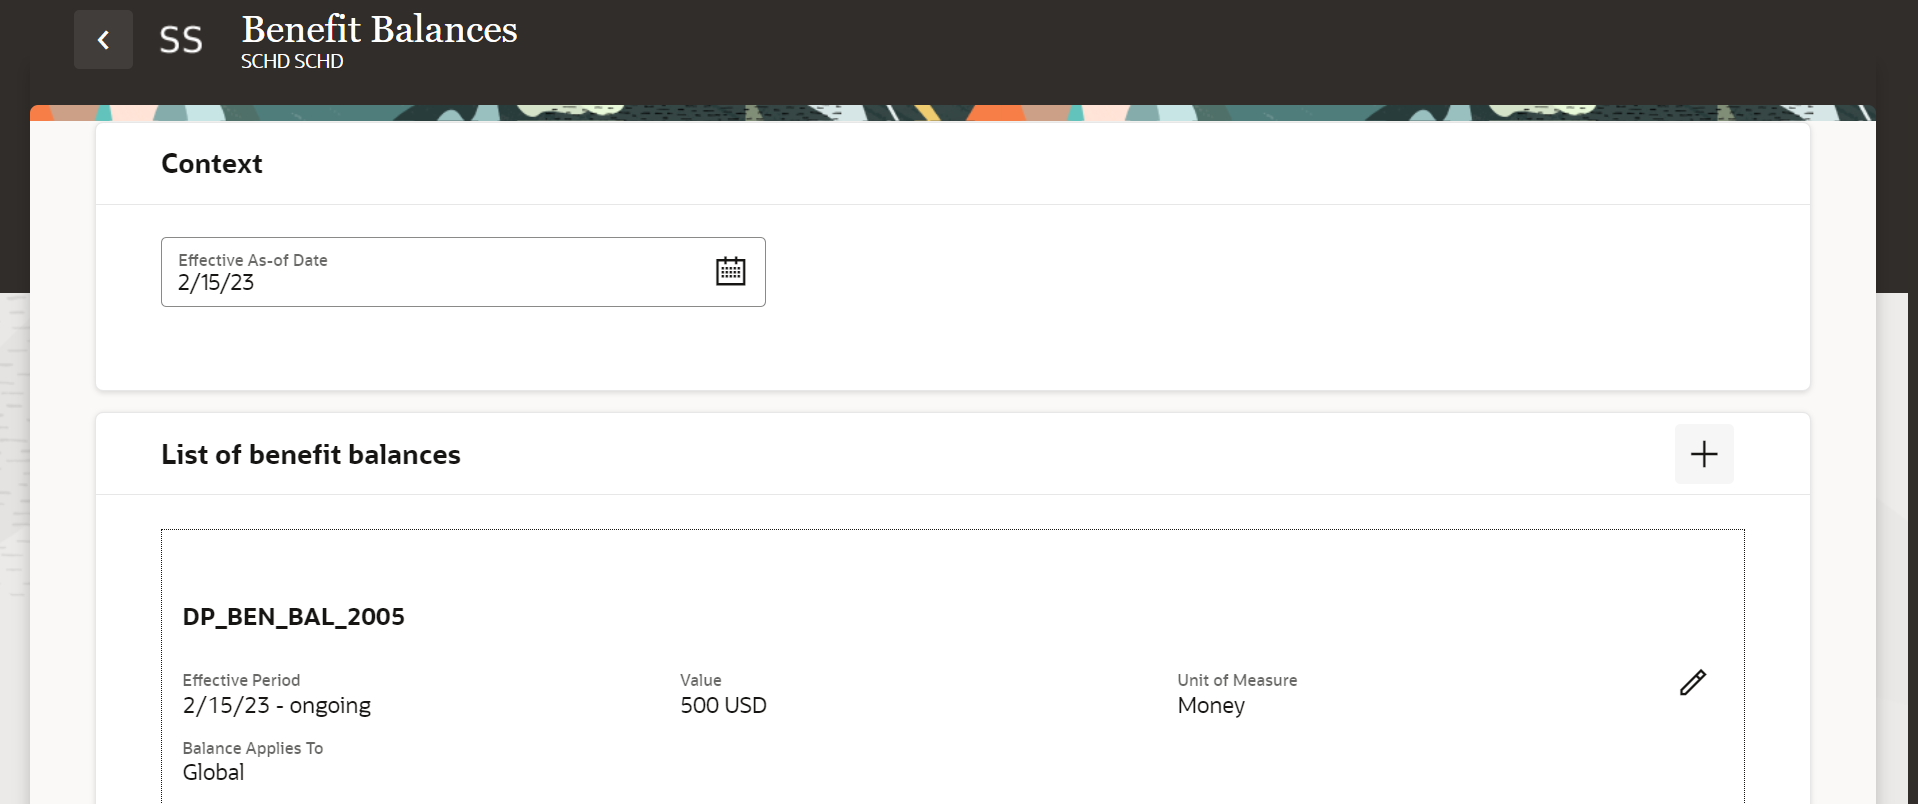
Benefits Balance Redwood Page
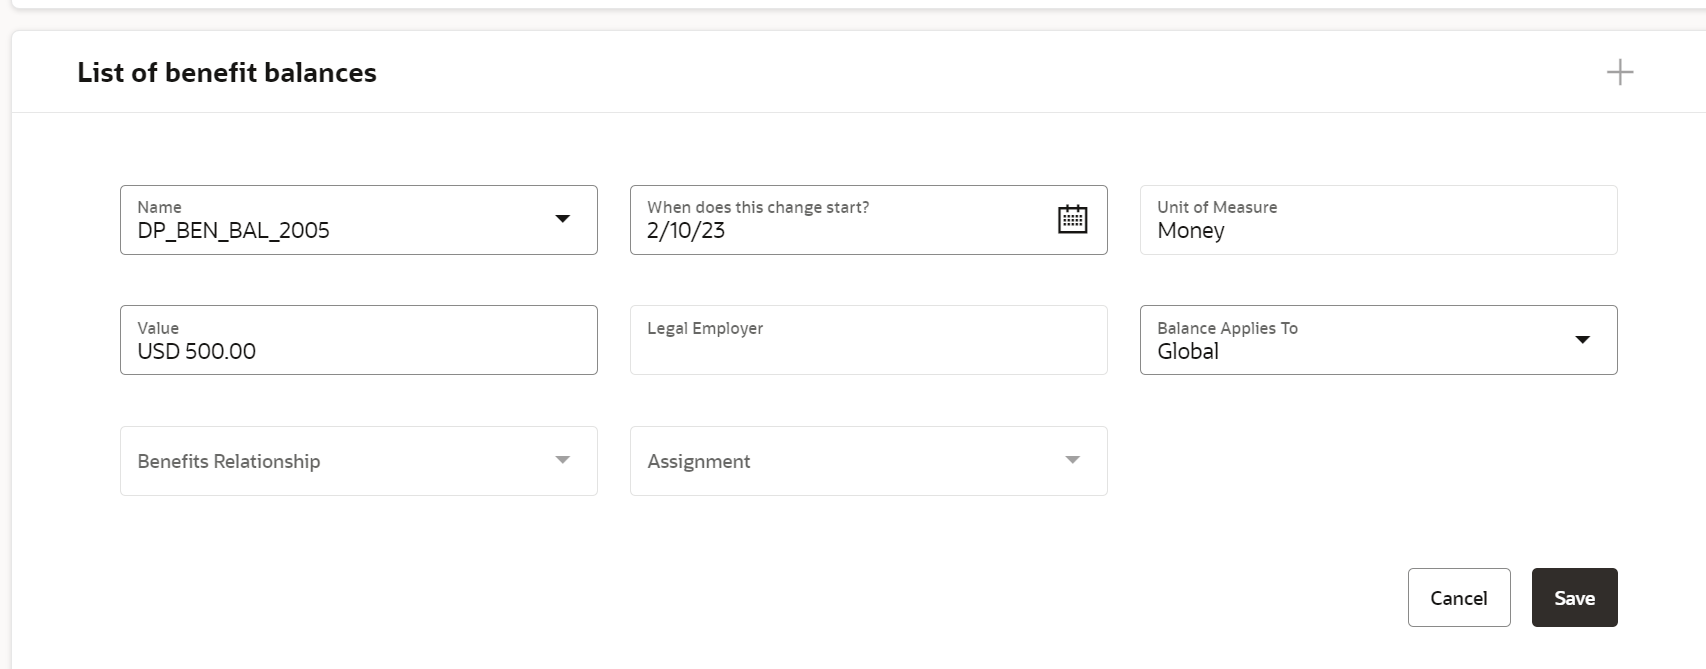
Benefits Balance Redwood Page Edit Mode
Here’s how you use the Redwood page for Benefit Balances:
- On the Home page, click My Client Groups.
- Click the Show More link under Quick Actions.
- Search for Person Benefit Balances.
Required Privileges, Duty Roles, and Data Security Policies
Note these points:
- If you have custom roles, ensure that the respective privileges and aggregate privileges of the functional modules are part of your role hierarchy.
- After adding the privileges and aggregate privileges, regenerate the data role and verify the user interfaces.
- If you have direct job roles assigned to users, you need to create a data role out of the job role for the data security to work.
Privileges, Duty Roles, and Data Security Policies
| Aggregate Privileges and Duty Roles |
Functional Privileges and Data Security Policy (DSPs) |
|---|---|
| Aggregate Privileges:
Inherited by seeded duty roles:
|
Functional Privileges:
Balance LOV Privileges:
Assignment LOV Privileges:
DSPs:
|
Frequently Asked Questions
| Question | Answer |
|---|---|
| I’ve assigned the seeded job role to the user, but the data is not visible. The Redwood page doesn’t show data whereas the responsive page does. |
Verify that the job role is directly assigned. If yes, you need to generate the data role out of the job role. |
| The responsive quick link shows up, but the new Redwood link doesn't show up. Verified that these profile options are turned on:
|
Ensure that the user interface functional privilege is part of your role hierarchy. |
| The Redwood quick link takes me to the new page, but it doesn’t show any data. The responsive page shows up data. I have the custom data role. |
Add the REST aggregate privileges and LOV privileges for the respective functional module. |
| The Redwood page shows up all data except for LOVs. |
Add LOV privileges for the respective functional module. |
This new feature lets you experience Redwood’s high-fidelity interactions.
Steps to Enable
This page is turned off by default. If you want to enable this page, you need to do so in the Profile Options. Here are the steps for changing the delivered Profile Options:
- Navigate to the Setup and Maintenance work area.
- Search for and click the Manage Administrator Profile Values task.
- Search for and select the profile option ORA_HCM_VBCS_PWA_ENABLED.
- Select the Level as Site.
- Enter a Y in the Profile Value field.
- Click Save.
- Search for and select the profile option ORA_BEN_ADMINISTRATIVE_ENROLLMENT_REDWOOD_ENABLED.
- Select the Level as Site.
- Enter a Y in the Profile Value field.
- Click Save and Close.
Key Resources
- For a listing of all profile options for the recreated pages across applications, see the following document in My Oracle Support: HCM Redwood Pages with Profile Options - Document ID 2922407.1
Redwood Experience for Benefit Groups
The Benefit Groups page was re-created in the Redwood tool set Visual Builder Studio to improve the user experience by providing the same consistent functionality across Redwood pages. Note that the functionality of the page remains the same.

Benefit Groups Redwood Page
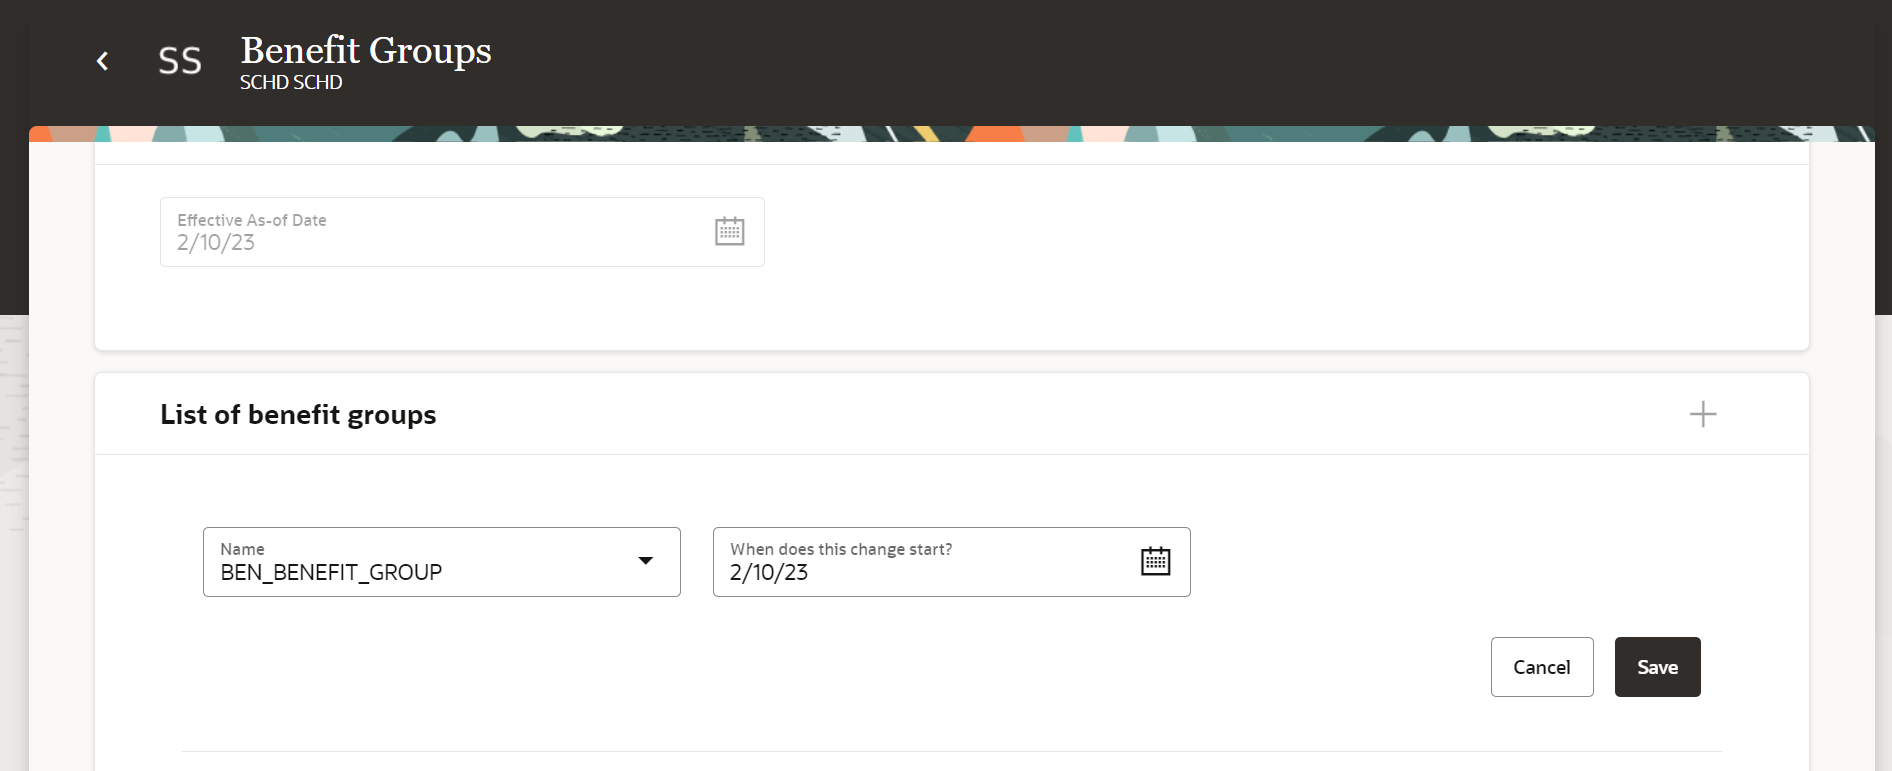
Benefit Groups Redwood Page Edit Mode
Here’s how you use the Redwood page for Benefit Groups:
- On the Home page, click My Client Groups.
- Click the Show More link under Quick Actions.
- Search for Person Benefit Groups.
Required Privileges, Duty Roles, and Data Security Policies
Note these points:
- If you have custom roles, ensure that the respective privileges and aggregate privileges of the functional modules are part of your role hierarchy.
- After adding the privileges and aggregate privileges, regenerate the data role and verify the user interfaces.
- If you have direct job roles assigned to users, you need to create a data role out of the job role for the data security to work.
Privileges, Duty Roles, and Data Security Policies
| Aggregate Privileges and Duty Roles |
Functional Privileges and Data Security Policy (DSPs) |
|---|---|
| Aggregate Privileges:
Inherited by these seeded duty roles:
|
Functional Privileges:
Benefits Group LOV Privileges:
DSPs:
|
Frequently Asked Questions
| Question | Answer |
|---|---|
| I’ve assigned the seeded job role to the user, but the data is not visible. The Redwood page doesn’t show data whereas the responsive page does. |
Verify that the job role is directly assigned. If yes, you need to generate the data role out of the job role. |
| The responsive quick link shows up, but the new Redwood link doesn't show up. Verified that these profile options are turned on:
|
Ensure that the user interface functional privilege is part of your role hierarchy. |
| The Redwood quick link takes me to the new page, but it doesn’t show any data. The responsive page shows up data. I have the custom data role. |
Add the REST aggregate privileges and LOV privileges for the respective functional module. |
| The Redwood page shows up all data except for LOVs. |
Add LOV privileges for the respective functional module. |
This new feature lets you experience Redwood’s high-fidelity interactions.
Steps to Enable
This page is turned off by default. If you want to enable this page, you need to do so in the Profile Options. Here are the steps for changing the delivered Profile Options:
- Navigate to the Setup and Maintenance work area.
- Search for and click the Manage Administrator Profile Values task.
- Search for and select the profile option ORA_HCM_VBCS_PWA_ENABLED.
- Select the Level as Site.
- Enter a Y in the Profile Value field.
- Click Save.
- Search for and select the profile option ORA_BEN_ADMINISTRATIVE_ENROLLMENT_REDWOOD_ENABLED.
- Select the Level as Site.
- Enter a Y in the Profile Value field.
- Click Save and Close.
Key Resources
- For a listing of all profile options for the recreated pages across applications, see the following document in My Oracle Support: HCM Redwood Pages with Profile Options Document ID - 2922407.1
IMPORTANT Actions and Considerations for Benefits
REPLACED OR REMOVED FEATURES
From time to time, Oracle replaces existing Cloud service features with new features or removes existing features. When a feature is replaced the older version may be removed immediately or at a future time. As a best practice, you should use the newer version of a replaced feature as soon as the newer version is available.
| Product |
Removed Feature |
Target Removal |
Replacement Feature |
Replaced In |
Additional Information |
|---|---|---|---|---|---|
| Benefits | Prepare for the Removal of the Classic Pages in Benefits Service Center and Self-Service Benefits | 23A | Responsive Pages | See Decommission Notice below. |
_________________________
Decommission Notice
In Update 23A of Oracle Fusion Cloud Human Resources Benefits, we will decommission the classic user interfaces of Benefits Service Center and Employee Self-Service
The redesigned HCM responsive user experience has been available and promoted as our standard since the 18B release. If you’re still using the older HCM classic simplified pages, you must begin transitioning to the HCM responsive pages. The older pages won’t be supported any longer starting with Update 23A.
For more information on the responsive features, see the HCM Common What's New for Update 18B and 18C.
The redesigned features are under a heading named Redesigned User Experience and have groupings by product. Features that have come out from 19A onwards are in the Benefits What's New.
For consolidated generic setup information, refer to the My Oracle Support document HCM Responsive User Experience Setup Information (Document ID 2399671.1)
Highlights of the Responsive Pages:
- The employee and manager self-service pages are redesigned to look and behave the same on desktop and mobile devices. The new look and feel of the pages provides you a better experience.
- The pages and messages look more modern and use simpler and more conversational language so that you can more easily read and understand content across all devices.
- The pages are clutter-free and clean and display only those fields that are required to complete the task.
- You can personalize the pages and add more fields that are hidden by default. For more information, see Use Transaction Design Studio to Configure Field Displays and Displayed and Hidden Responsive Benefits Fields.
_________________________
KNOWN ISSUES / MAINTENANCE PACK SPREADSHEETS
Oracle publishes a Known Issues document for every Update to make customers are aware of potential problems they could run into and the document provides workarounds if they are available.
Oracle also publishes Maintenance Pack and Statutory Maintenance Pack documentation of bugs that are fixed in the monthly or statutory patching.
To review these documents you must have access to My Oracle Support:
Oracle Human Capital Management Cloud Functional Known Issues and Maintenance Packs (Document ID 1554838.1)