- Revision History
- Overview
- Pre-Update and Post-Update Tasks
- Optional Uptake of New Features (Opt In)
- Feature Summary
- Supply Chain Orchestration
- Collaboration Messaging Framework
- Inventory Management
-
- SCM Common Components
- Inventory Management
- Shipping
- Receiving
- Mobile Inventory
-
- View On-Hand Quantity and Stocking Locations for Your Goods
- Count Your PAR Locations Using a Mobile Device
- Transfer Goods Between Subinventories Using a Mobile Device
- Issue Goods Using a Mobile Device
- Complete Cycle Counts Using a Mobile Device
- Deliver Goods Using a Mobile Device
- Receive Goods Using a Mobile Device
- Put Away Goods Using a Mobile Device
- Confirm Your Open Pick Lines Using a Mobile Device
-
- Product Recall Management
- Cost Management
-
- Use the Enhanced Period Costing Account Balances Report by Supporting References for Account Reconciliation
- Create Cost Distributions in a Period that is in the Future Enterable Status in GL
- Use the Enhanced Inventory Valuation Page to Include Operational View of Inventory Value at the Inventory Organization and Subinventory Level
- Analyze Rolled-Up Costs for Supply Chain Cost Rollup Using New Subject Area
- Enable Parallel Processing for Cost Distribution Processor
- Report Ad hoc Outputs During Work Order Execution in Discrete Manufacturing
- Selected Cost Management Bug Fixes in This Update
- Redwood Experience
-
- Receipt Accounting
- Fiscal Document Capture
- Supply Chain Financial Orchestration
- IMPORTANT Actions and Considerations
Update 24B
Revision History
This document will continue to evolve as existing sections change and new information is added. All updates appear in the following table:
| Date | Module | Feature | Notes |
|---|---|---|---|
| 31 MAY 2024 | Mobile Inventory | Updated document. Added instructions about how to enable the Inventory Management (New) work area. | |
| 31 MAY 2024 | IMPORTANT Actions and Considerations | Updated document. Added instructions about how to enable the My Receipts (New) work area. |
|
| 24 MAY 2024 | SCM Common Components | Extend SCM Redwood Application Pages Using Visual Builder Studio | Updated document. Revised feature description and key resources. |
| 13 MAY 2024 | Mobile Inventory | Updated document. Added new module. | |
| 13 MAY 2024 | Mobile Inventory | View On-Hand Quantity and Stocking Locations for Your Goods | Updated document. Revised Steps to Enable content. |
| 13 MAY 2024 | Mobile Inventory |
Count Your PAR Locations Using a Mobile Device | Updated document. Revised Steps to Enable content. |
| 13 MAY 2024 | Mobile Inventory |
Transfer Goods Between Subinventories Using a Mobile Device | Updated document. Revised Steps to Enable content. |
| 13 MAY 2024 | Mobile Inventory |
Issue Goods Using a Mobile Device | Updated document. Revised Steps to Enable content. |
| 13 MAY 2024 | Mobile Inventory |
Complete Cycle Counts Using a Mobile Device | Updated document. Revised Steps to Enable content. |
| 13 MAY 2024 | Mobile Inventory |
Deliver Goods Using a Mobile Device | Updated document. Revised Steps to Enable content. |
| 13 MAY 2024 | Mobile Inventory |
Receive Goods Using a Mobile Device | Updated document. Revised Steps to Enable content. |
| 13 MAY 2024 | Mobile Inventory |
Put Away Goods Using a Mobile Device | Updated document. Revised Steps to Enable content. |
| 13 MAY 2024 | Mobile Inventory |
Confirm Your Open Pick Lines Using a Mobile Device | Updated document. Revised Steps to Enable content. |
| 13 MAY 2024 | IMPORTANT Actions and Considerations | Updated document. Added instructions to set up the Oracle Responsive Self-Service Receiving Application. | |
| 11 MAR 2024 | Cost Management | Create and Update Resource Rates Using Redwood Pages | Updated document. Revised details in the Steps to Enable section. |
| 11 MAR 2024 | SCM Common Components | Extend SCM Redwood Application Pages Using Visual Builder Studio | Updated document. Revised feature description. |
| 11 MAR 2024 | Inventory Management | Default Lot Uniqueness Inventory Organization Parameter to Unique Across Items | Updated document. Corrected opt-in expiration release. |
| 11 MAR 2024 | Shipping | Cancel Sales Order Backorders Automatically and Enforce Single Shipment | Updated document. Corrected opt-in expiration release. |
| 01 MAR 2024 | Created initial document. |
Overview
 HAVE AN IDEA?
We’re here and we’re listening. If you have a suggestion on how to make our cloud services even better then go ahead and tell us. There are several ways to submit your ideas, for example, through the Ideas Lab on Oracle Customer Connect. Wherever you see this icon after the feature name it means we delivered one of your ideas.
GIVE US FEEDBACK
We welcome your comments and suggestions to improve the content. Please send us your feedback at oracle_fusion_applications_help_ww_grp@oracle.com.
DISCLAIMER
The information contained in this document may include statements about Oracle’s product development plans. Many factors can materially affect Oracle’s product development plans and the nature and timing of future product releases. Accordingly, this Information is provided to you solely for information only, is not a commitment to deliver any material, code, or functionality, and should not be relied upon in making purchasing decisions. The development, release, and timing of any features or functionality described remains at the sole discretion of Oracle.
This information may not be incorporated into any contractual agreement with Oracle or its subsidiaries or affiliates. Oracle specifically disclaims any liability with respect to this information. Refer to the Legal Notices and Terms of Use for further information.
Pre-Update and Post-Update Tasks
Depending on the features you're using in your Cloud applications, you may be required to perform certain steps immediately before or after your quarterly update. For details of these pre-update and post-update steps and the product areas that are affected, refer to Oracle Fusion Cloud SCM: Performing Your Quarterly Update (doc ID 2337485.1) on My Oracle Support.
Optional Uptake of New Features (Opt In)
Oracle Cloud Applications delivers new updates every quarter. This means every three months you'll receive new functionality to help you efficiently and effectively manage your business. Some features are delivered Enabled meaning they are immediately available to end users. Other features are delivered Disabled meaning you have to take action to make available. Features delivered Disabled can be activated for end users by stepping through the following instructions using the following privileges:
- Review Applications Offering (ASM_REVIEW_APPLICATIONS_OFFERINGS_PRIV)
- Configure Oracle Fusion Applications Offering (ASM_CONFIGURE_OFFERING_PRIV)
Here’s how you opt in to new features:
- Click Navigator > My Enterprise > New Features.
- On the Features Overview page, select your offering to review new features specific to it. Or, you can leave the default selection All Enabled Offerings to review new features for all offerings.
- On the New Features tab, review the new features and check the opt-in status of the feature in the Enabled column. If a feature has already been enabled, you will see a check mark. Otherwise, you will see an icon to enable the feature.
- Click the icon in the Enabled column and complete the steps to enable the feature.
In some cases, you might want to opt in to a feature that's not listed in the New Features work area. Here's how to opt in:
- Click Navigator > My Enterprise > Offerings.
- On the Offerings page, select your offering, and then click Opt In Features.
- On the Opt In page, click the Edit Features (pencil) icon for the offering, or for the functional area that includes your feature.
- On the Edit Features page, complete the steps to enable the feature.
For more information and detailed instructions on opting in to new features for your offering, see Configure Offerings.
Opt In Expiration
Occasionally, features delivered Disabled via Opt In may be enabled automatically in a future update. This is known as an Opt In Expiration. If your cloud service has any Opt In Expirations you will see a related tab in this document. Click on that tab to see when the feature was originally delivered Disabled, and when the Opt In will expire, potentially automatically enabling the feature. You can also click here to see features with Opt In Expirations across all Oracle Cloud Applications.
Feature Summary
Column Definitions:
Features Delivered Enabled
Report = New or modified, Oracle-delivered, ready to run reports.
UI or Process-Based: Small Scale = These UI or process-based features are typically comprised of minor field, validation, or program changes. Therefore, the potential impact to users is minimal.
UI or Process-Based: Larger Scale* = These UI or process-based features have more complex designs. Therefore, the potential impact to users is higher.
Features Delivered Disabled = Action is needed BEFORE these features can be used by END USERS. These features are delivered disabled and you choose if and when to enable them. For example, a) new or expanded BI subject areas need to first be incorporated into reports, b) Integration is required to utilize new web services, or c) features must be assigned to user roles before they can be accessed.
Supply Chain Orchestration
Supply Chain Orchestration
Use Redesigned Pages to View Supply Requests
Use redesigned pages to view supply requests and their details on your desktop, tablet, or mobile device. You can now use the supply request reference, supply order, supply document, or item to search for your supply requests. Create and save your own default searches. Filter search results according to the supply's requested date, requested delivery date, request status, and so on. View recommended actions that you need to take to remove exceptions. View the supply documents that Oracle Supply Chain Orchestration created for each request. View details about request lines and take actions.
To use this feature, go to the Supply Orchestration work area, click Tasks > Supply Requests, then search for your supply request.
Improve your efficiency when you search for and view supply requests.
Steps to Enable
Use the Opt In UI to enable this feature. For instructions, refer to the Optional Uptake of New Features section of this document.
Offering: Manufacturing and Supply Chain Materials Management
Tips And Considerations
Use these attributes to search for your supply requests:
- Supply Request Reference
- Supply Order
- Supply Document
- Item
Use these attributes to filter your search results:
- Supply Requested Date
- Requested Delivery Date
- Supply Status
- Supply Type
- Business Flow
Do more:
- View details about the supply documents for each supply request.
- Create and save your own search. Make that search your default search.
- Drill into into the supply request to get details about the supply request and any exception messages that might exist.
- If a supply request is in exception, then you can view a recommended action to fix it.
- Do various actions on each supply request.
Key Resources
- See Using Supply Chain Orchestration and Supply Chain Orchestration on Oracle Help Center.
Access Requirements
You have a couple of options for giving people access to this feature, depending on whether you're assigning them predefined job roles or your own configured job roles.
- Users who are assigned any of these predefined job roles can access this feature:
- Supply Chain Operations Manager (ORA_DOS_SUPPLY_CHAIN_OPERATIONS_MANAGER_JOB)
- Users who are assigned a configured job role that contains these privileges can access this feature:
- Process Supply Order Interface (DOS_PROCESS_SUPPLY_ORDER_INTERFACE_PRIV)
- View Supply Orders (DOS_VIEW_SUPPLY_ORDERS_PRIV)
- Manage Supply Request Exceptions (DOS_MANAGE_SUPPLY_REQUEST_EXCEPTIONS_PRIV)
- View Supply Order Exceptions and Status (DOS_VIEW_SUPPLY_ORDER_EXCEPTIONS_AND_STATUS_PRIV)
If you're maintaining your own job roles, no new privileges were introduced to support this feature.
Collaboration Messaging Framework
Collaboration Messaging Framework
Streamline Your B2B Setup for the Avalara and TIE Kinetix Service Providers
The process for B2B setup has been streamlined for the Avalara and TIE Kinetix predefined service providers. If you are subscribed to their services, you can connect with your trading partners and exchange messages with greater ease.
The endpoints for these service providers are predefined, and a new simplified process is provided to streamline the B2B setup in the Collaboration Messaging work area.
Steps to Enable
At a high level, to set up these service providers:
- Configure the service providers to exchange messages with your trading partners.
- Create trading partners.
- Associate the trading partners with your customers or suppliers and select the documents you want to exchange.
These steps are detailed in the Configuring and Managing B2B Messaging for Oracle Fusion Cloud SCM guide.
Configure the Predefined Service Providers Avalara or TIE Kinetix to Exchange Messages with Your Trading Partners.
- Select Manage Collaboration Messaging Service Providers from the Tasks panel tab, search for either Avalara or TIE Kinetix and select Actions > Edit.
The overview tab displays the following details about the service provider:
- Connection type that is configured, Test or Production.
- A check box to indicate whether credentials are configured or not.
- The number of trading partners configured for the service provider.
- The number of trading partners with override message definitions.
- The number of customers that are setup with the service provider.
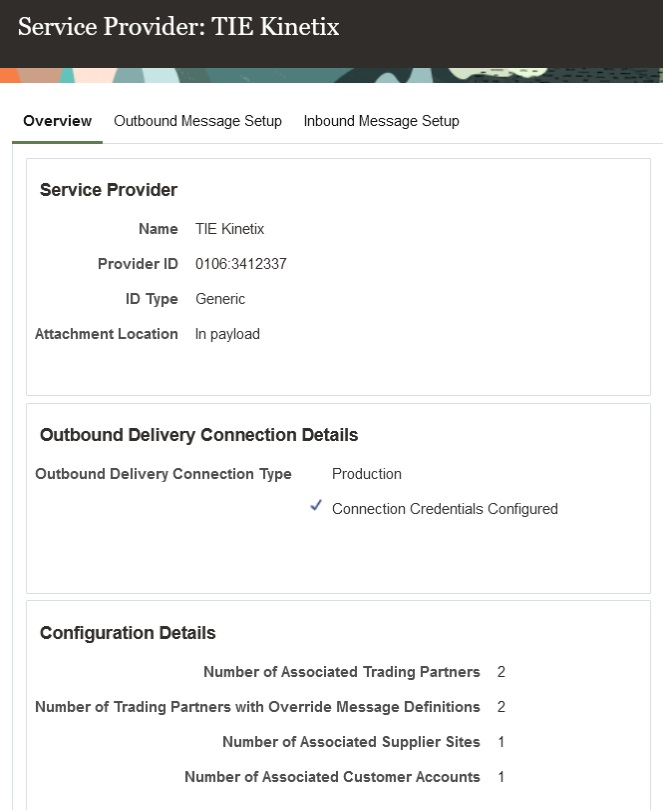
Service Provider Overview for TIE Kinetix
- Select Actions > Manage Delivery Settings to configure the settings for outbound message delivery.
-
- Select Test or Production in the Outbound Delivery Connection Type drop-down to reflect the environment you're setting up.
-
- Enter the username and password provided by Avalara or TIE Kinetix for sending messages to their network in the Service Provider User Name and Password fields.

Manage Delivery Settings
- Select the Outbound Message Setup tab to activate the outbound messages:
The outbound messages available for Avalara are:
- Invoice
The outbound messages available for TIE Kinetix are:
- Invoice
- Purchase Order
- Change Purchase Order

Avalara– Outbound Message Setup
- Select the Inbound Message Setup tab to activate the inbound purchase order.
The inbound messages available for Avalara are:
- Acknowledge Invoice
- Invoice
The inbound messages available for TIE Kinetix are:
- Acknowledge Invoice
- Acknowledge Purchase Order
- Invoice
- Shipment

Avalara- Inbound Message Setup
Create Trading Partners
After completing the service provider setup, create your trading partners.
- Select Manage B2B Trading Partners on the Tasks panel tab.
- On the Manage B2B Trading Partners page, select Actions > Create, and add your trading partners.
- Select Avalara or TIE Kinetix as the service provider you're using.
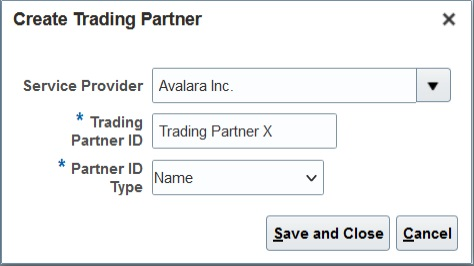
Create a Trading Partner
Associate Trading Partners with Your Customers
Next, associate the trading partners with your customers and select the documents you plan to exchange.
- Select Manage Customer Account Collaboration Configuration on the Tasks panel tab, and search for your customers.
- Select a customer and then select Edit Collaboration Configuration.
- In the Associated Service Providers section of the Edit Customer Account Collaboration Configuration page, select Actions > Add Row to add a trading partner and the service provider.
- In the Collaboration Documents for Service Provider section, select Actions > Add Row, add the documents you want to exchange and set their Association Status to Enabled.
Both the Avalara and TIE Kinetix service providers have the following documents available:
- Invoice Acknowledgement Inbound
- Invoice Outbound

Customer Account Collaboration Configuration
Associate Trading Partners with Your Suppliers
- Select Manage Supplier B2B Configuration on the Tasks panel tab, and search for your suppliers.
- Select a supplier and then select Edit Supplier B2B Configuration.
- On the Edit Supplier B2B Configuration page, select the Trading Partner Assignment tab and click Actions > Add Row to add a trading partner and either the Avalara or TIE Kinetix service provider.
The Avalara service provider has the following document available for setup:
- Invoice - Inbound
The TIE Kinetix service provider has the following documents available for setup.
- Advance Ship Notice – Inbound
- Purchase Order Acknowledgement – Inbound
- Invoice – Inbound
- Purchase Order – Outbound
- Purchase Order Change – Outbound

Document Setup for Supplier Sites
Tips And Considerations
If you used TIE Kinetix services prior to this release, you’ll notice that your message definition names are now prefixed with 'TIEKinetix_'. You can select TIE Kinetix from the list of service providers in the Manage Collaboration Message Definitions task to search for your message definitions.
Key Resources
- Refer to the Configuring and Managing B2B Messaging for Oracle Fusion Cloud SCM guide on the Oracle Help Center.
Access Requirements
Users who are assigned a configured job role that contains these privileges can access this feature:
- Manage B2B Customer Trading Partners (CMK_B2B_CUSTOMER_TRADING_PARTNERS_PRIV)
- Manage Customer Account Collaboration Configuration (CMK_B2B_CUSTOMER_ACCOUNT_TRADING_PARTNERS_PRIV)
- Manage B2B Trading Partners (CMK_B2B_TRADING_PARTNERS_PRIV)
- Manage Service Provider (CMK_MANAGE_SERVICE_PROVIDER_PRIV)
These privileges were available prior to this update.
Transmit a Purchase Order as a PDF File
You can use the Transmit the PO PDF as an unzipped file when it’s the only attachment check box to send a PO as an uncompressed PDF file by email to your suppliers. This option is applicable when the PO is the only attachment available for the message.
This feature makes it easier for smaller suppliers who don’t have automated systems to read the POs they receive.
Steps to Enable
The email delivery method may be configured for a service provider or a trading partner to transmit the PO PDF as an unzipped file. To enable this option,
- Select Manage Collaboration Messaging Service Providers from the Tasks panel tab, and search for the service provider you're using to deliver your B2B messages. If you don’t use a service provider for sending and receiving messages, select Manage B2B Trading Partners from the Tasks panel.
- Select the Delivery Methods tab, and on the email delivery method, select the Transmit the PO PDF as an unzipped file when it’s the only attachment check box.
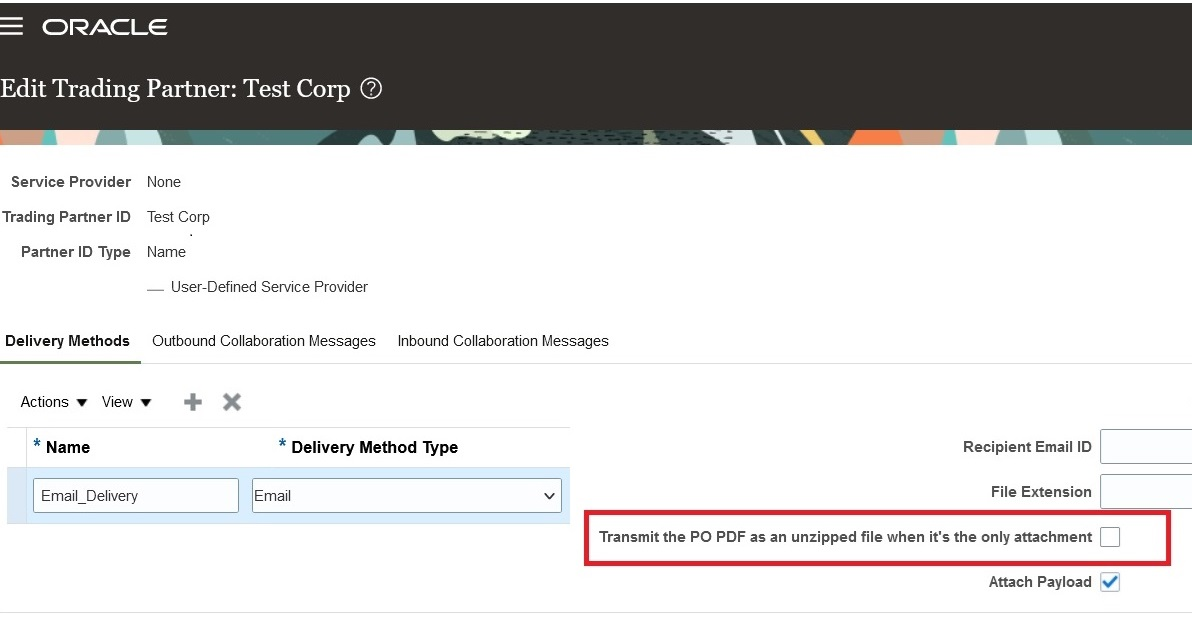
Transmit the PO PDF as an Unzipped File When It’s the Only Attachment on the Delivery Methods Tab
3. Select Save and Close.
Tips And Considerations
The PO PDF is sent as an uncompressed file if it's the only attachment for the message. If there are additional attachments, all attachments including the PO PDF will be compressed and sent as a ZIP file. If your suppliers can’t receive a ZIP file, you can use the File Extension field on the email delivery method to set the extension of the file that is sent by email.
Key Resources
-
Refer to the Configuring and Managing B2B Messaging for Oracle Fusion Cloud SCM guide on the Oracle Help Center.
Access Requirements
Users who are assigned a configured job role that contains these privileges can access this feature:
- Manage B2B Trading Partners (CMK_B2B_TRADING_PARTNERS_PRIV)
- Manage Service Provider (CMK_MANAGE_SERVICE_PROVIDER_PRIV)
These privileges were available prior to this update.
Inventory Management
SCM Common Components
Extend SCM Redwood Application Pages Using Visual Builder Studio
Tailor a seamless experience for the users in your enterprise using Oracle Visual Builder Studio. You can use business rules in Visual Builder Studio’s Express mode to:
- Make the fields and regions on a page required or optional.
- Make the fields and regions on a page read-only or editable.
- Show or hide fields and regions depending on specific criteria.
- Configure Redwood pages to best meet your specific business needs. For example, you can control which actions are visible on the Receipt Deliveries page, or you can set the default date range that's available on the PAR Counts Overview page.
The types of changes you can make to a page depend on the page you're modifying.
NOTE: In this update, business rules aren't yet supported on all SCM Redwood pages.
To determine whether you can extend a specific page using Visual Builder Studio, go to the page and open the Setting and Actions menu. Look for the Edit Page In Visual Builder Studio task:

Settings and Actions Menu
If you don’t see the Edit Page in Visual Builder Studio task, then you can’t use Visual Builder Studio to edit the page, either because you're not assigned the necessary privilege to edit pages in VB Studio, or because the page can't currently be edited in VB Studio.
When you open a page in Visual Builder Studio, use only the Express mode to extend the page. Advanced mode isn’t supported. If Express mode isn't available when you open the page in VB Studio, then you can't extend the page in VB Studio. You can find the Express mode in the Visual Builder Studio header region:

Header Region in Visual Builder Studio
See Extending Oracle Cloud Applications in Visual Builder Studio Express Mode for details about how to extend your application pages in Express mode.
Steps to Enable
Leverage the Visual Builder Studio to expose your applications. To learn more about extending your application using Visual Builder, visit Oracle Help Center > your apps service area of interest > Books > Configuration and Extension.
Before you can start working with Visual Builder Studio, a systems administrator must complete some initial setup. For instructions, see Set Up VB Studio to Extend Oracle Cloud Applications.
Tips And Considerations
Keep the Pages list closed while you work in Visual Builder Studio Express mode. Closing the list gives you a cleaner view of the page you’re extending.
In Visual Builder Studio Express mode, you might see capabilities that support defaulting and validation of field values. The features aren't supported in SCM Redwood pages in update 24B. You'll be able to use defaulting and validation for selected SCM Redwood pages in future updates.
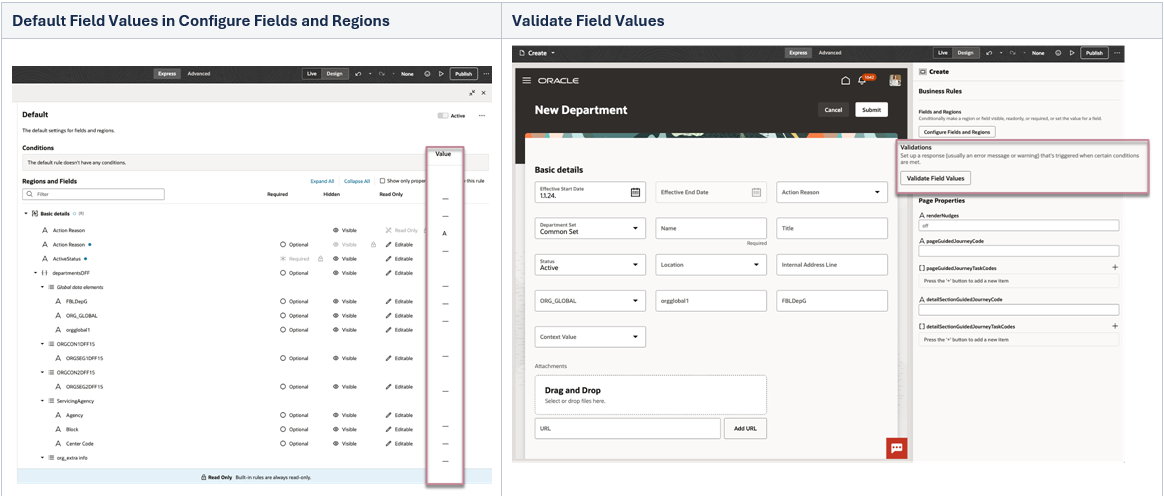
Default Field Values and Validate Field Values in VB Studio Express Mode
Key Resources
To start extending your application pages in Visual Builder Studio, follow the instructions to access Visual Builder Studio. As you’re working, you can find additional information in these resources:
- Extend Oracle Cloud Applications in Visual Builder Express Mode
- Oracle Fusion Cloud HCM and SCM: Extending Redwood Applications for HCM and SCM Using Visual Builder Studio
Access Requirements
To extend application pages using Visual Builder Studio, you must be assigned a configured job role that contains this privilege:
-
Administer Sandbox (FND_ADMINISTER_SANDBOX_PRIV)
This privilege was available prior to this update.
Inventory Management
Default Lot Uniqueness Inventory Organization Parameter to Unique Across Items
When using lot control in your organization, selecting the appropriate lot uniqueness setting can be crucial to meeting external or internal compliance. For example, you're regulated by a national agency that requires you to record and track unique lot numbers that can't ever be repeated in your organization. To ensure this regulation is followed, the lot uniqueness parameter can default to Unique across items so users don't forget to change the setting and cause additional work for users to correct later.
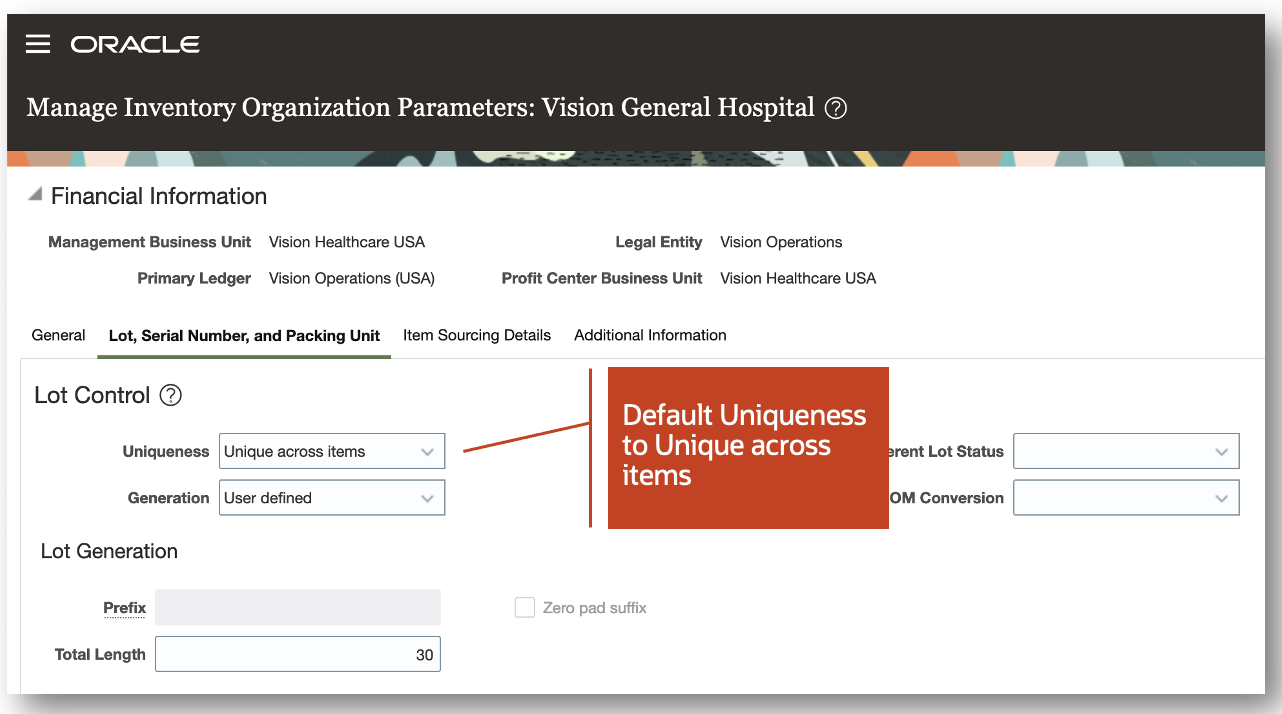
Manage Inventory Organizations Page
This feature helps ensure the proper settings are in place for your organization to prevent noncompliance or extraneous extra work for your users when lot uniqueness is required in your business.
Steps to Enable
Use the Opt In UI to enable this feature. For instructions, refer to the Optional Uptake of New Features section of this document.
Offering: Manufacturing and Supply Chain Materials Management No Longer Optional From: Update 24D
Key Resources
- Oracle Fusion Cloud SCM: Using Receiving guide, available on the Oracle Help Center.
- Oracle Fusion Cloud SCM: Implementing Manufacturing and Supply Chain Materials Management guide, available on the Oracle Help Center.
Access Requirements
Users who are assigned a configured job role that contains this privilege can access this feature:
- Manage Inventory Organization (INV_MANAGE_INVENTORY_ORGANIZATION)
This privilege was available prior to this update.
View Unique Device Identifier in the Inventory Balance Real Time Subject Area in OTBI
Oracle Transactional Business Intelligence (OTBI) lets you create ad-hoc reports using real-time transactional data from Oracle Fusion Cloud Inventory Management to monitor your materials management processes. In this update, the Unique Device Identifier column is now available in the Lot dimension and Serial Number dimension of the Inventory Balance Real Time subject area.

Inventory Balance Real Time Subject Area
The Unique Device Identifier column provides you with additional reporting capability for lot or serial numbers that are assigned a unique device identifier during the manufacturing process.
Steps to Enable
You don't need to do anything to enable this feature.
Tips And Considerations
- You can add the new Unique Device Identifier columns to your existing reports, or create new reports that use these new columns.
- For details about creating and editing reports, see the Oracle Fusion Cloud SCM: Creating and Administering Analytics and Reports for SCM guide on the Oracle Help Center.
Key Resources
- Oracle Fusion Cloud SCM: Subject Areas for Transactional Business Intelligence in SCM guide, available on the Oracle Help Center.
Access Requirements
Users who are assigned a configured job role that contains this duty role can access this feature:
-
Inventory Transaction Analysis Duty (FBI_INVENTORY_TRANSACTION_ANALYSIS_DUTY)
This duty role was available prior to this update.
View Initial Requested Quantity in the Transfer Order Real Time Subject Area in OTBI
Oracle Transactional Business Intelligence (OTBI) lets you create ad-hoc reports using real-time transactional data from Oracle Fusion Cloud Inventory Management to monitor your materials management processes. In this update, the Transfer Order Initial Requested Quantity column is now available in the Transfer Order Line Details dimension of the Transfer Order Real Time subject area.
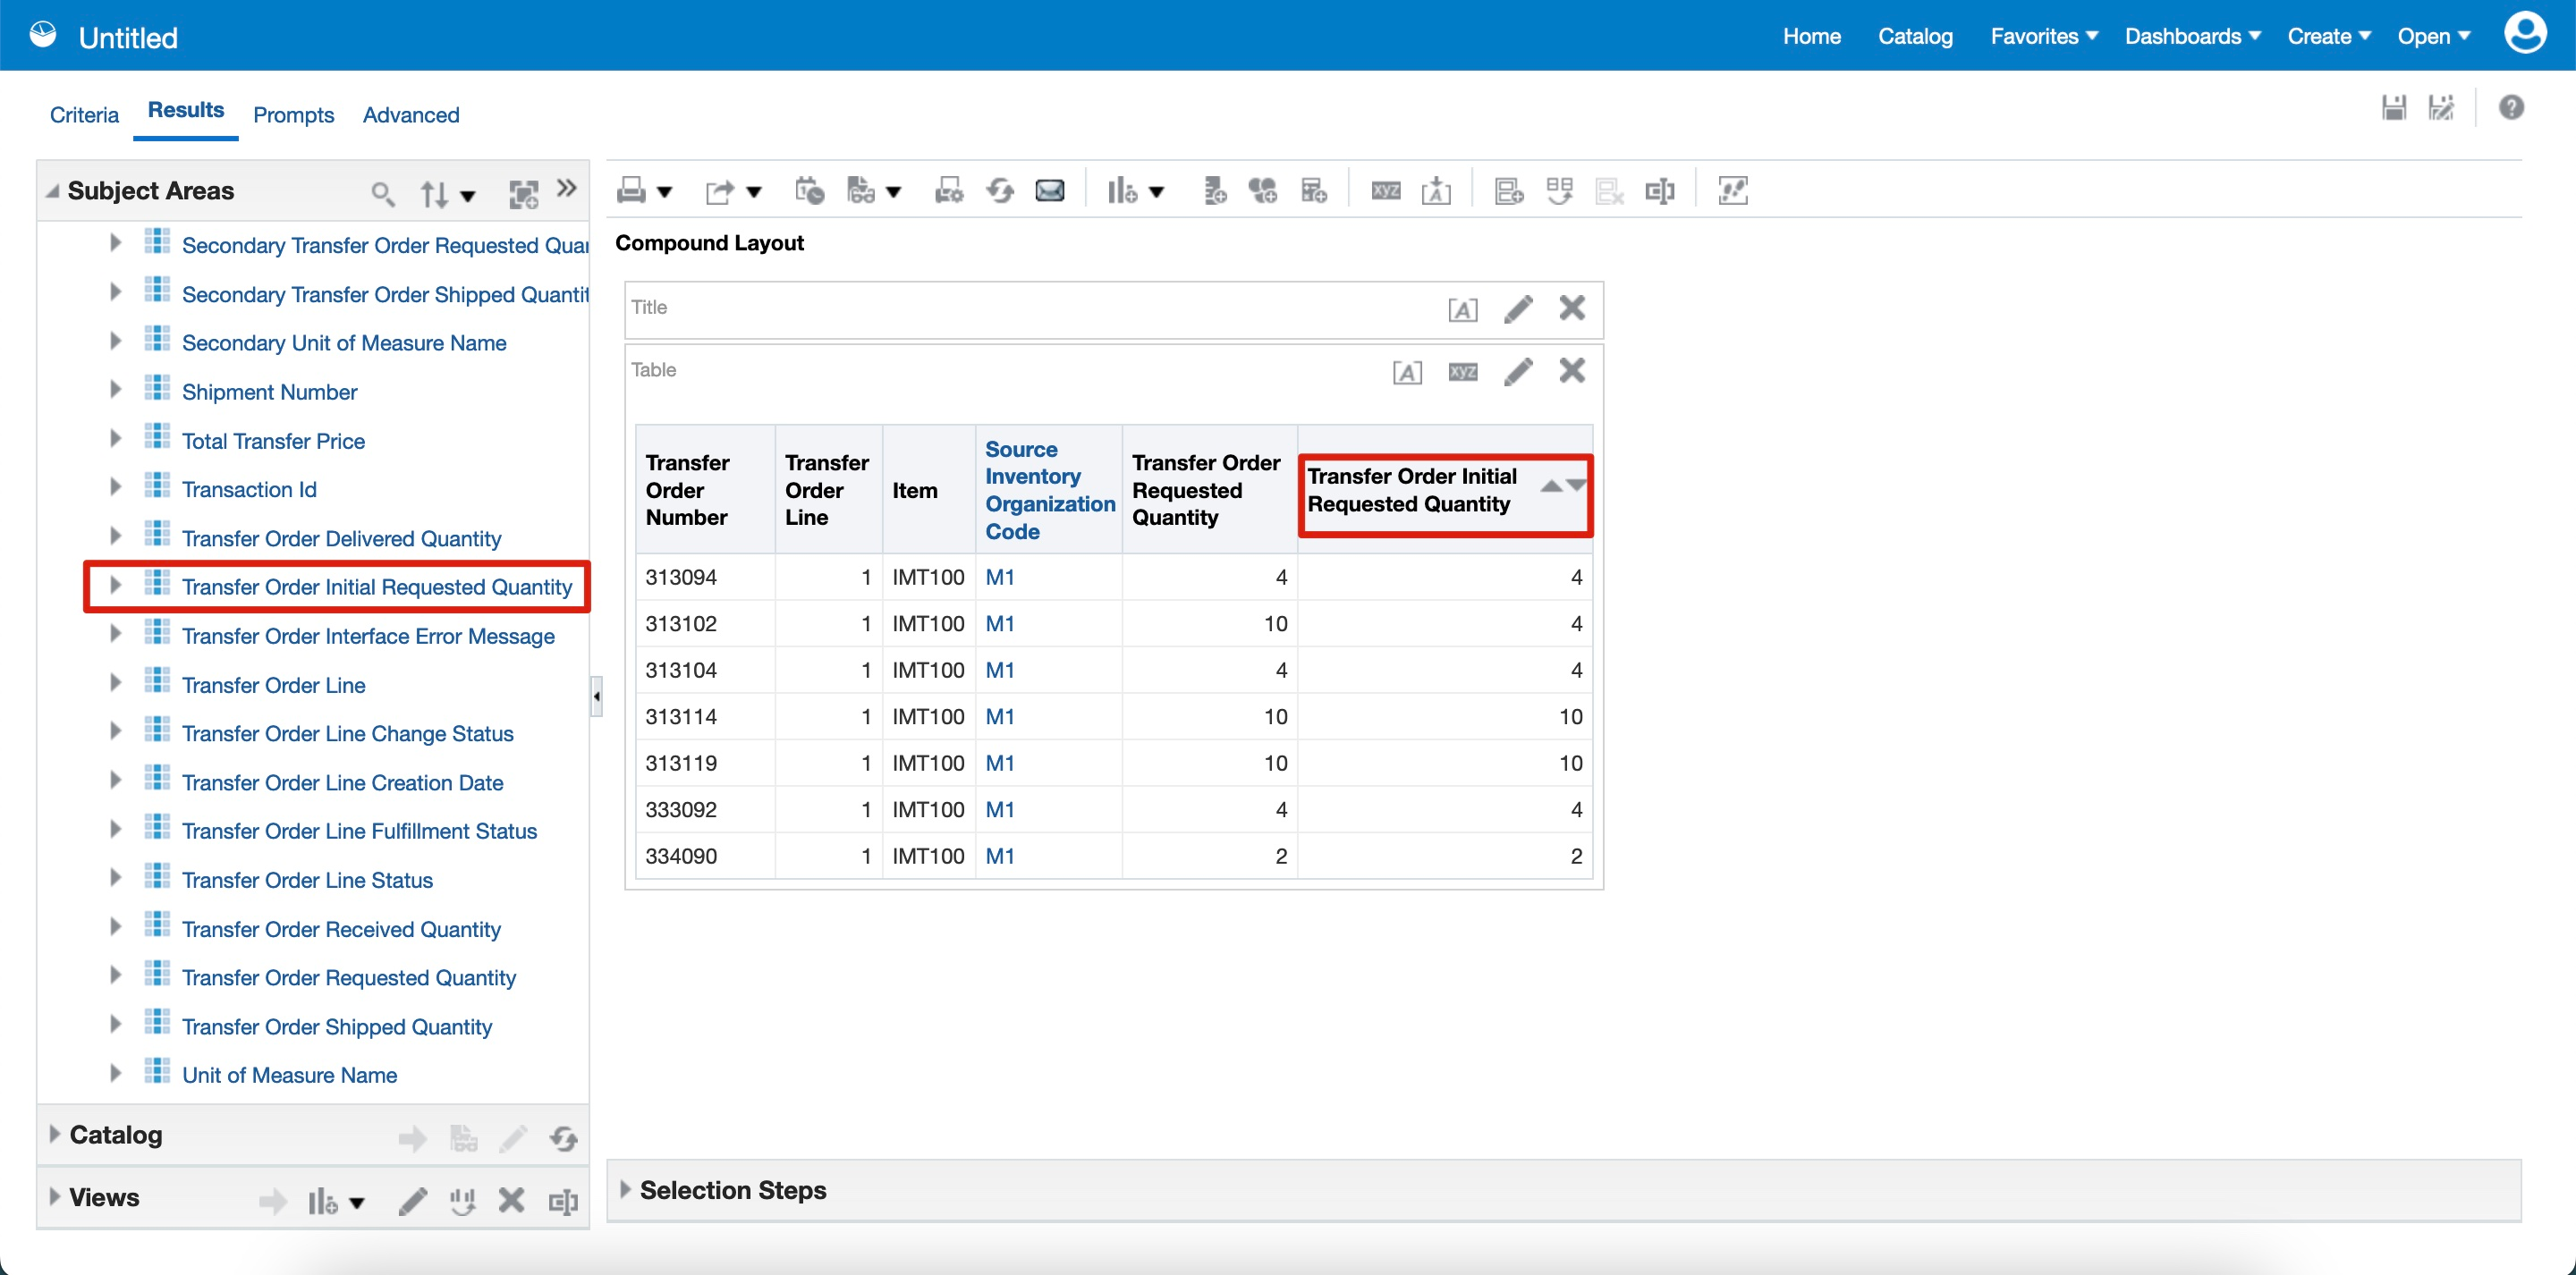
Transfer Order Real Time Subject Area
The Transfer Order Initial Requested Quantity column provides you with the ability to report on the originally requested quantity when the quantity fulfilled is less than the quantity requested.
Steps to Enable
You don't need to do anything to enable this feature.
Tips And Considerations
- You can add the new Transfer Order Initial Requested Quantity column to your existing reports, or create new reports that use these new columns.
- For details about creating and editing reports, see the Oracle Fusion Cloud SCM: Creating and Administering Analytics and Reports for SCM guide on the Oracle Help Center.
Key Resources
- Oracle Fusion Cloud SCM: Subject Areas for Transactional Business Intelligence in SCM guide, available on the Oracle Help Center.
Access Requirements
Users who are assigned a configured job role that contains this duty role can access this feature:
-
Inventory Transaction Analysis Duty (FBI_INVENTORY_TRANSACTION_ANALYSIS_DUTY)
This duty role was available prior to this update.
Cancel a Movement Request Pending Approval
In today's dynamic supply chain, requirements can quickly shift and what you once needed may no longer be relevant. When these changes happen, you need the ability to quickly cancel requests for goods that are no longer needed. Before this update, once a movement request was pending approval, you had to wait until the entire approval process was complete before you could cancel it, or you had to contact the approver and request that they reject it if the goods were no longer required. Now you can cancel a movement request while it's still pending approval.

Cancel Movement Request
This feature provides you with more flexibility to cancel movement requests that are no longer required when they are still in the approval process.
Steps to Enable
You don't need to do anything to enable this feature.
Key Resources
- Oracle Fusion Cloud SCM: Using Inventory Management guide, available on the Oracle Help Center.
- Oracle Fusion Cloud SCM: Implementing Manufacturing and Supply Chain Materials Management guide, available on the Oracle Help Center.
Access Requirements
Users who are assigned a configured job role that contains this privilege can access this feature:
- Manage Inventory Movement Request (INV_MANAGE_INVENTORY_MOVEMENT_REQUEST_PRIV)
This privilege was available prior to this update.
Redwood Experience
These features were built in Redwood, Oracle’s next-generation user experience. Redwood brings state-of-the-art, consumer-grade user experiences across devices to the sophisticated enterprise scenarios that Oracle enables.
Monitor PAR Counts Across Your Organization
For healthcare providers, Periodic Automatic Replenishment (PAR) is an essential process to support timely medical procedures and patient care. Because PAR locations are typically not quantity tracked areas that hold regularly used consumable items, PAR counting and the replenishment requests these counts create are critical to maintaining day-to-day operations. Such a critical activity requires an easy way to monitor the status of your PAR counts and replenishments so you can quickly and proactively take steps to prevent stockouts and operational disruptions. Using the new PAR Counts Overview page, you can view the recently completed counts for your PAR locations and then drill into the details to see additional information about the replenishment status of a specific count.
The PAR Counts Overview page provides the ability to search by a variety of search criteria including PAR Location, Item, and Counted By. For example, you can search by an individual counter to review the PAR counts that were performed for a specific date range. You can also view the details of a PAR count such as PAR location, item, count quantity, and reorder quantity. You can click the Details button on the PAR Counts Overview page to further examine the details of the PAR count.

PAR Counts Overview Page
Clicking the Details button opens the PAR Count Details panel drawer where you can view additional details associated with the PAR count. The panel drawer is segmented into several regions including Supply details, PAR location details, Item PAR location details, and Sourcing details.
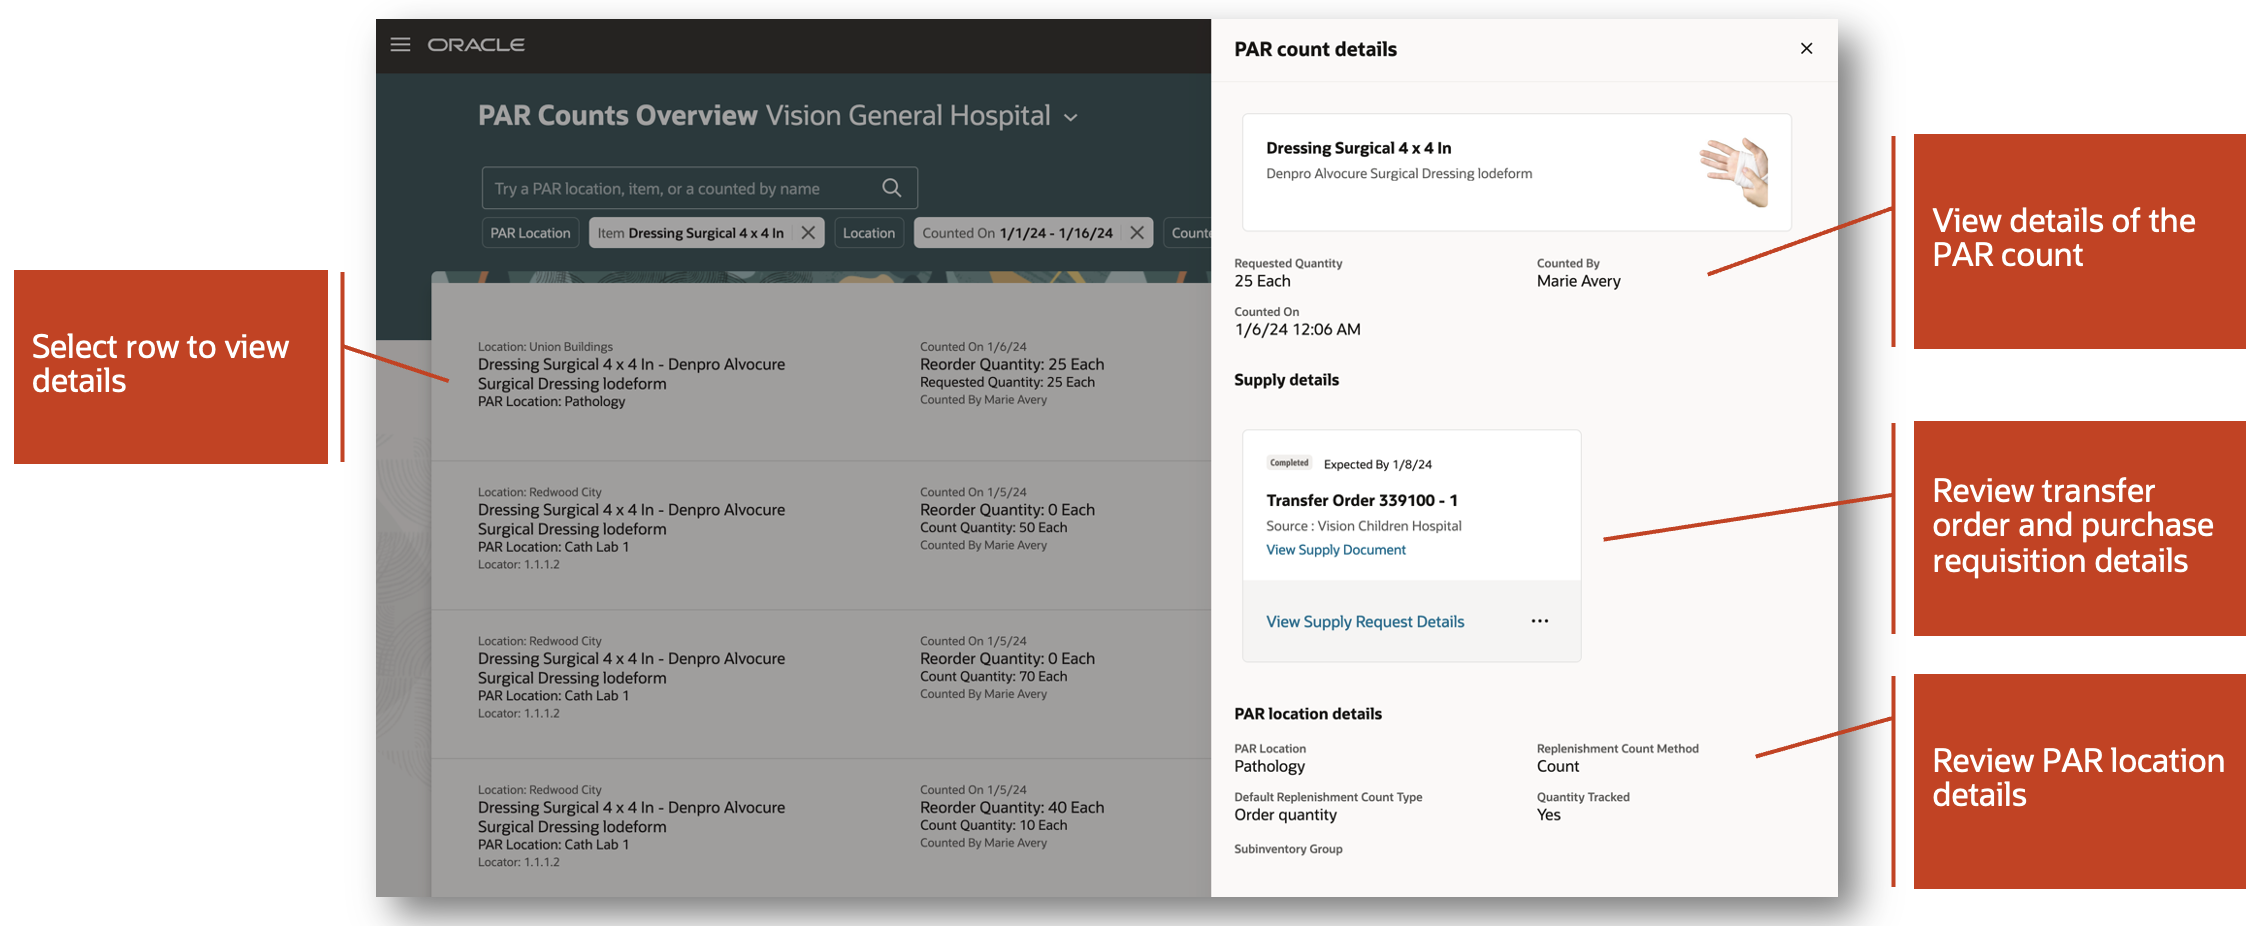
PAR Count Details
In the Supply details region, you have the ability to view the replenishment document details. PAR replenishment documents include purchase requisitions, transfer orders, and movement requests. In the event the replenishment document is a purchase requisition or transfer order, you can view the supply request details within Oracle Supply Chain Orchestration. Additionally, you can view movement request details within Oracle Inventory Management.
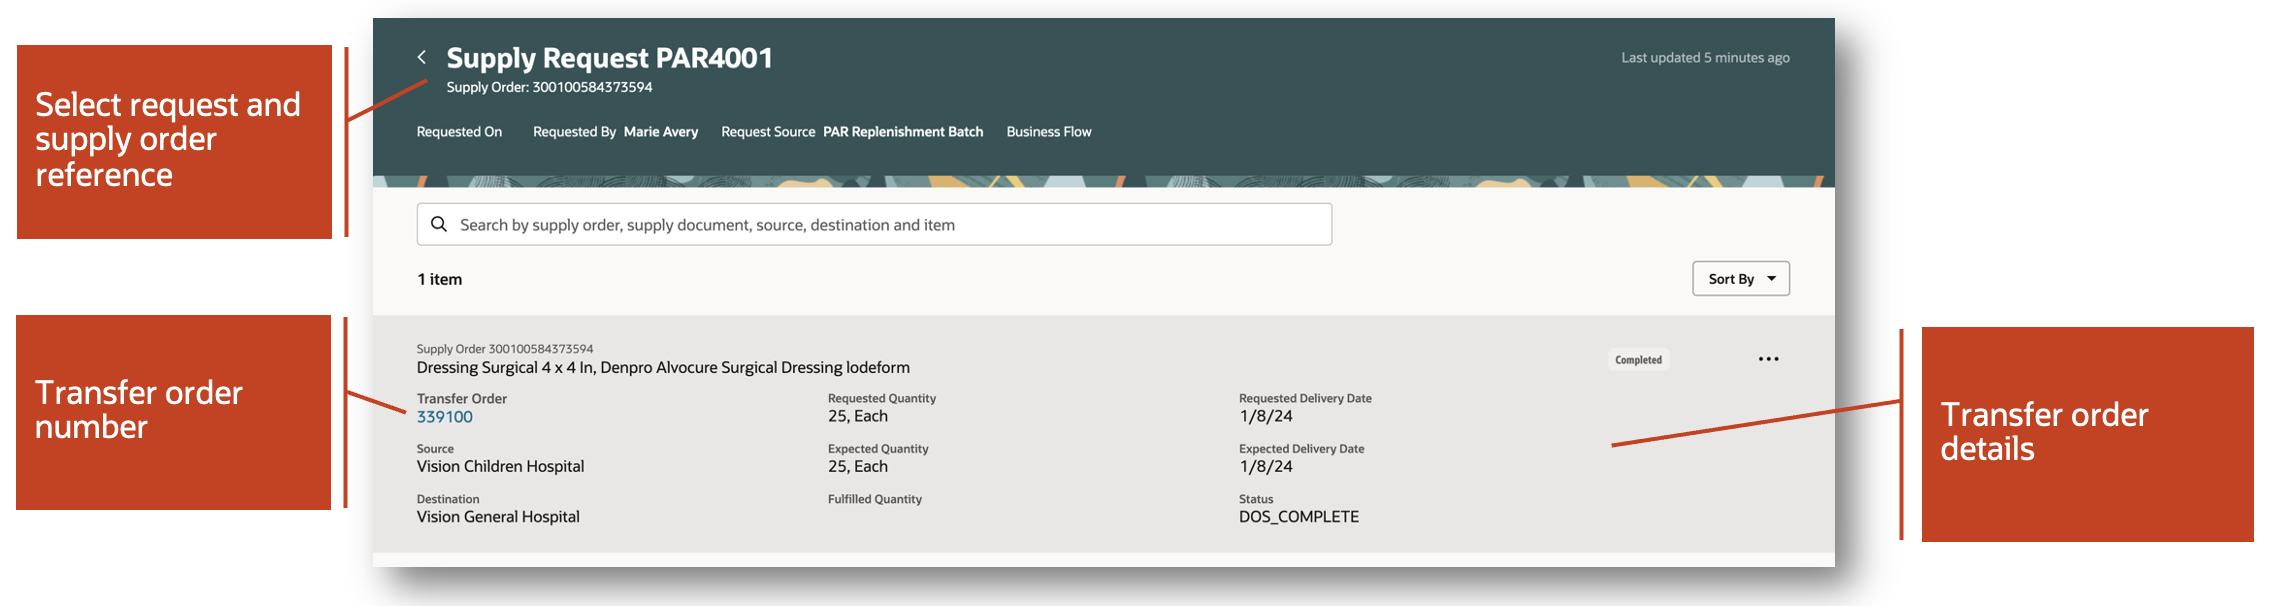
Supply Request Page
This feature provides you with the information you need to monitor a critical process in your operations so you can make timely decisions to keep operations running.
Steps to Enable
Ensure that you have the Supply Chain Application Administrator role before performing these steps to enable Oracle Search for workers list of values.
These steps are required to enable the Counted By list of values for the PAR Counts Overview page.
Set Oracle Search Profile Options
- In the Setup and Maintenance work area, go to the Manage Administrator Profile Values task. In the Task panel, click Search, and then search for Manage Administrator Profile Values.
- Click the Manage Administrator Profile Values task.
- Enter these search parameters:
- Profile Name: Enable Oracle Search WorkersLov
- Application: Global Human Resources
- Module: Personal Information
- Click Search.
- For the Site profile level, select a value of Yes for the Profile Value field.
Run Initial Data Ingest
- Log in as the Supply Chain Application Administrator.
- Navigate to Tools > Scheduled Processes, and then click Schedule New Process.
- Search and select the process name: ESS job to create index definition and perform initial ingest to OSCS.
Parameter value for index name to reingest:
- fa-hcm-person
NOTE: If you don't specify an index name while submitting the process, the process runs for all predefined indexes.
Key Resources
- Oracle Fusion Cloud SCM: Using Inventory Management guide, available on the Oracle Help Center.
- Oracle Fusion Cloud SCM: Implementing Manufacturing and Supply Chain and Materials Management, available on the Oracle Help Center.
- Watch the Monitor PAR Counts Across Your Organization Demo.
Access Requirements
Users who are assigned a configured job role that contains this duty role can access this feature:
- Review PAR Counts Using Responsive Inventory (ORA_INV_REVIEW_PAR_COUNTS_PWA_DUTY)
This duty role is new in this update.
Print Item or Location Labels and Define Barcode Configurations for Scanning Labels
When receiving or transacting goods from different suppliers or manufacturers, it's possible that each one uses their own concatenated barcode layout. In these instances, you need the ability to define specific layout and delimiters to ensure the proper data is parsed when scanning the respective barcodes. Now, you have the ability to define barcode layouts and the appropriate delimiters to ensure that the correct data is parsed into the right fields when scanning with a mobile device. Similarly, when performing transactions using a mobile device within your warehouse or stockroom, you need barcode labels for the storage locations and items to make use of mobile scanning capability. Now, you can print barcode labels for items, subinventories, and locators to affix in the appropriate places within your warehouse or stockroom so users can easily scan the information when performing a transaction.
This feature provides you with these capabilities:
- You can scan barcodes encoded with multiple data elements, such as those specified in the GS1 standard. For instance, if a barcode conforms to the GS1 standard and contains structured product information like (01)01234567890128(10)ABC123, where 01 is the identifier for GTIN and 10 is the identifier for the lot, scanning the barcode on the item field will extract the item number associated with GTIN 01234567890128. Similarly, scanning the barcode on the lot field will extract the lot ABC123.
- You can define multiple barcode formats that you scan with a mobile device. You can also define how to parse the data when scanned for a specific field within the mobile page.
- You can populate multiple fields by scanning a barcode with multiple data elements within a single field. This functionality is supported for item, lot, and serial number fields when they are on the same page. When scanning a barcode that contains item, lot, and serial number in any of these fields, the system will extract the respective item, lot, and serial numbers and populate them in their corresponding fields.
- You can print item, location, and delivery labels using the template layout defined in Oracle BI Publisher.
- Alternatively, you can print item, location, and delivery labels using an external printing application by listening to the business event generated when a print label request is submitted.
Configure Barcode Formats
The Configure Barcode Formats setup task is used to define multiple barcode formats that you scan with a mobile device, specifying how to identify the barcode format, the type of data encoded in each format, and outlining how to parse and extract the data when the barcode is scanned for a specific field within the mobile page. For instance, you can utilize this configuration to define and scan a barcode with product information like +P+AS54888|L+ABC123, where +, P+, and L+ are identifiers for the barcode, item number, and lot number, respectively, and | is used as the delimiter between the data elements.
NOTE: The application has a predefined configuration to support GS1-128.

Configure Barcode Formats

Sample Barcode Format Configuration
Print Labels
You can print item and delivery labels while receiving goods using a mobile device. For items, select the item label to print only item information, the lot label to include both the item and lot information, and the serial label to include both the item and serial information. Specify the name of the printer responsible for label printing and utilize Oracle BI Publisher to configure the printer. Additionally, indicate the desired number of labels to print.
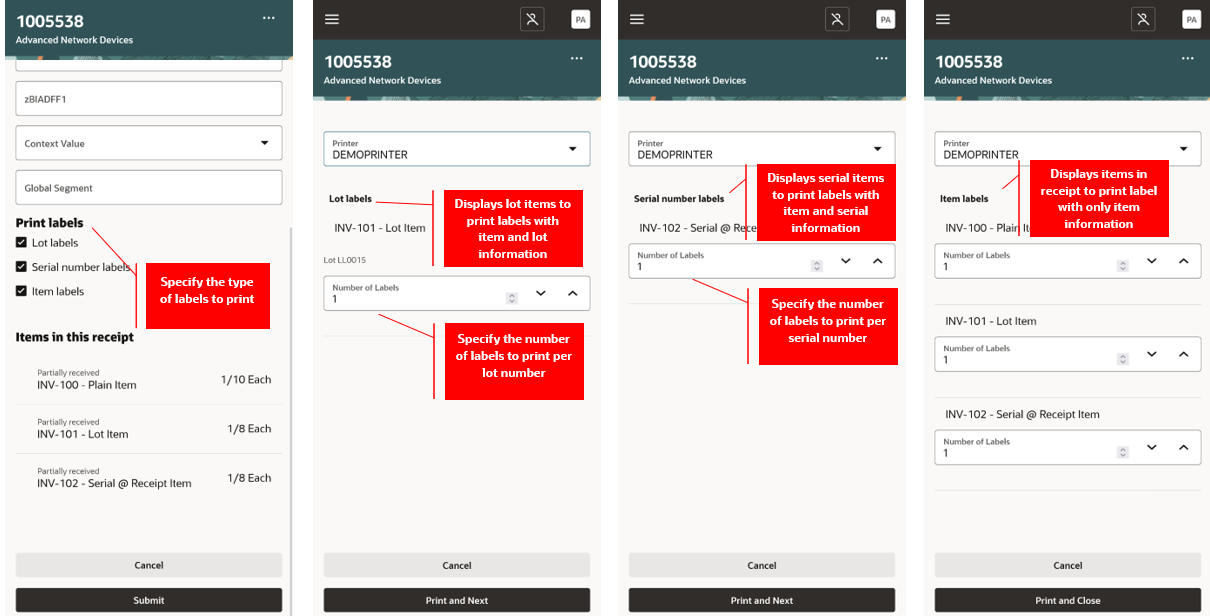
Receive Goods
You can print item labels while putting away goods using a mobile device.
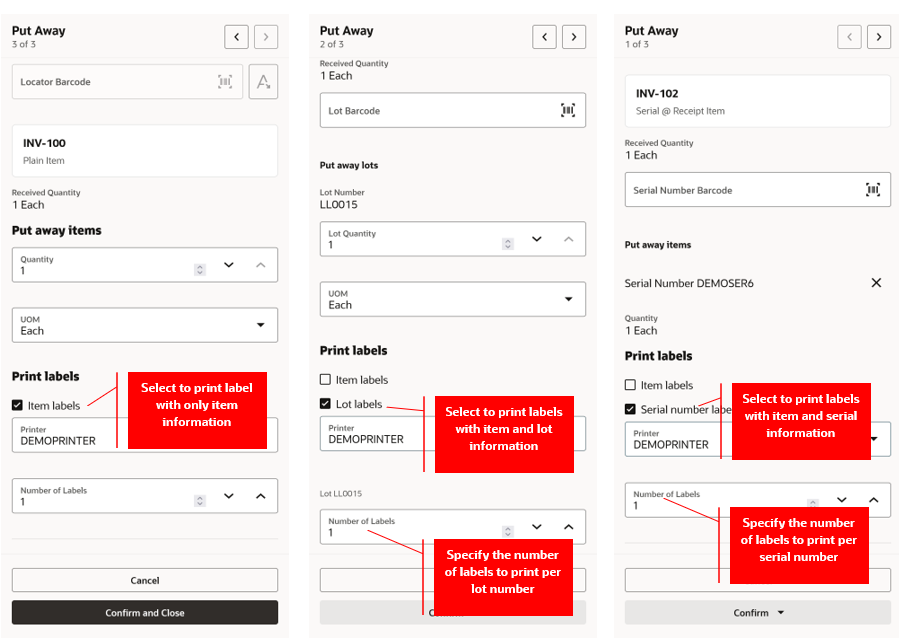
Put Away Goods
You can print ad-hoc item and location labels using the Print Inventory Labels scheduled process. This table describes the parameters for this scheduled process.
| Parameter name | Description |
|---|---|
| Label Type |
Specify the type of label to print.
|
| Organization |
Specify the inventory organization. |
| Item |
Specify the Item for printing the item label. |
| Lot Number |
Specify the lot for printing the item label with lot information. |
| Serial Number |
Specify the serial number for printing the item label with serial information. |
| Subinventory |
Specify the subinventory for printing the location label. |
| All locators |
Enable the check box if the location labels should be printed for all the locators assigned to the entered subinventory. |
| Locator |
Specify the locator for printing the location label. |
| Number of Labels | Specify the number of labels to be printed. |
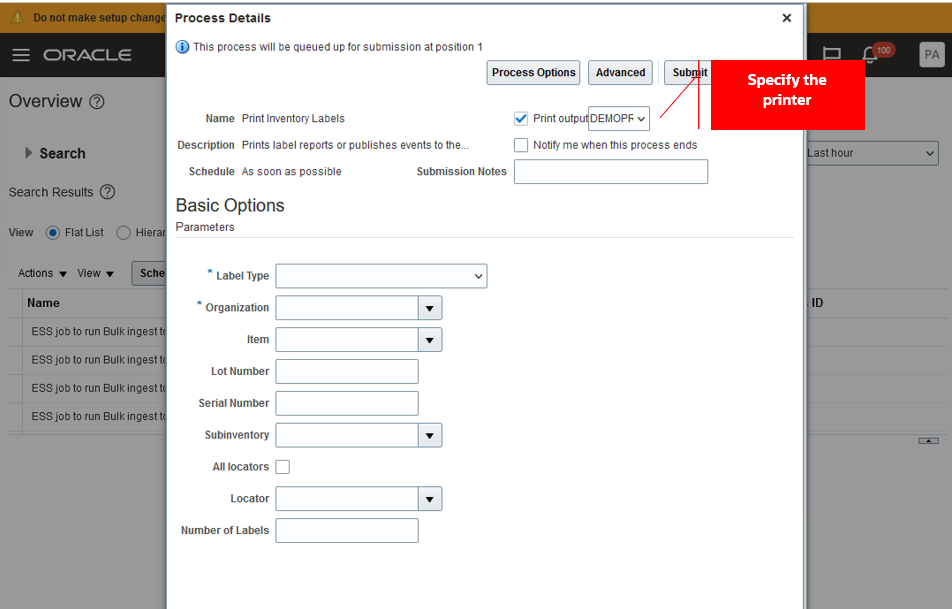
Print Inventory Labels Scheduled Process
The labels are printed using Oracle BI Publisher's predefined template layouts by default. Here are the navigation paths to access the seeded reports:
- Delivery Label Report: /Shared Folders/SupplyChain Management/Warehouse Operations/Receipts
- Item Label Report: /Shared Folders/SupplyChain Management/Warehouse Operations/Inventory
- LocationLabelReport: /Shared Folders/SupplyChain Management/Warehouse Operations/Inventory.
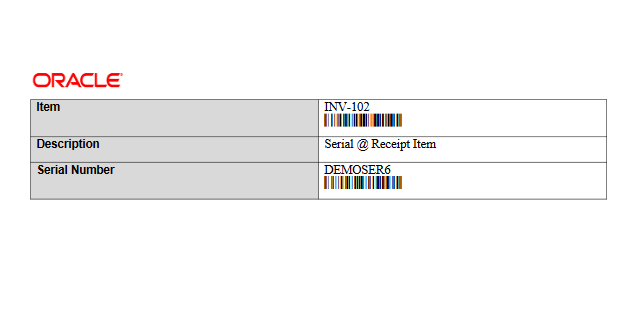
Item Label

Location Label
Alternatively, you can print labels through an external printing application by listening to the business event generated when a print label request is submitted.
- Use the Manage Inventory Business Event Configurations task to enable the business event.
| Business Event Name |
Description |
Event Payload |
|---|---|---|
| Print Label Request Event |
Signals that a label request is created for the external system to print the labels. |
OrganizationId PrintHeaderId PrintLabelType |
- Use Oracle Integration Cloud Service to listen to the Print Label Request Event, call the Print Label Requests REST API to retrieve the print request details, and map and invoke the external printing application's web service to print labels.
This feature provides you the flexibility to scan multiple, different barcode layouts and ensure that the proper data is parsed to the appropriate fields in the application.
Steps to Enable
Configure Barcode Formats
- Use the Configure Barcode Formats task in the Setup and Maintenance work area to add a new barcode format to be supported for scanning with mobile devices.
- Offering: Manufacturing and Supply Chain Materials Management
- Functional Area: Inventory Management
- Task: Configure Barcode Formats
- On the Configure Barcode Formats page, click the Create Barcode Format button to create a new barcode format.
- In the header section, set the following fields:
| Field Name | Description |
|---|---|
| Name |
Specify the name of the barcode format. |
| Description |
Specify the description of the barcode format. |
| Barcode Identifier Prefix |
Specify the prefix that will be used to identify the barcode format. For instance, ]C1 identifies GS-128 barcodes, while for a custom format like $P+AS54888|L+1152KMB, $ serves as the identifying prefix. |
| Retain Prefix while Reading |
Specify whether the prefix of the barcode should be retained or removed before parsing the barcode data. |
| Status |
Indicate whether you want to activate or deactivate the barcode format. |
- In the Barcode data identifiers section, set the following fields:
| Field Name | Description |
|---|---|
| Field Name |
Specify the target field to which the barcode data should be mapped. Choose from these available field names:
|
| Data Identifier |
Specify the prefix of the encoded barcode data that identifies the type of data within the barcode. For example, the data identifier for an item number might be P+. If the encoded item number is AS54888, the barcode reflects P+AS54888 to signify it is an item number, with the part number being AS54888. |
| Description |
Specify the description of the data identifier. |
| Data Length Type |
Specify whether the length of the barcode data, encoded for the data identifier, is fixed or variable. For fixed lengths, specify the number of characters in the barcode data. For variable lengths, denote the end of the value using the group separator or delimiter character. |
| Length |
Specify the number of characters of the barcode data encoded for the data identifier if the data length type is fixed. |
| Group Separator |
Specify whether the GS1 group separator is used to indicate the end of the value in the case of variable data length. |
| Delimiter |
Specify the character used to indicate the end of the value for variable data length. |
| Data Type |
Specify the type of value encoded for the data identifier. Options include:
|
| Date Format |
Specify the date format of the value encoded for the data identifier. |
| Includes Check Digit |
Indicate whether the last character of the value serves as a check digit. When selected, the last character of the value is excluded. |
- Click Submit to create the barcode format.
Manage Inventory Business Event Configurations
- Use the Manage Inventory Business Event Configurations task from the Setup and Maintenance work area to print labels through an external printing application.
- Offering: Manufacturing and Supply Chain Materials Management
- Functional Area: Inventory Management
- Task: Manage Inventory Business Event Configurations
- On the Manage Inventory Business Event Configurations page, click Create to add an event type.
- Select Print label for the Event Type field.
- Select a value for the Event Name field:
- Print delivery label to generate an event when the delivery label is requested.
- Print item label to generate an event when the item label is requested.
- Print location label to generate an event when the location label is requested.
- Select a value for the Organization field. If the Organization is blank, the value selected in the Publish column applies to all inventory organizations where a record isn't specified.
- Click Save.
Manage Inventory Business Event Configurations Page
Tips And Considerations
- The Configure Barcode Formats setup task enables the scanning and extraction of barcode data for these mobile fields: Item, Lot number, Serial number, Subinventory, Locator, Receipt number, Delivery, Pick slip number, Packing slip number, Tracking number, Order number (Confirm Pick page), and Receiving order number (Receive Goods page).
- In the Configure Barcode Formats setup task, the Item (GTIN) field name can be utilized when scanning a barcode containing the Global Trade Item Number (GTIN) as the identifier for the item, provided that a relationship between an internal item and the Global Trade Item Number is established.
- The capability to populate multiple fields by scanning a barcode with multiple data elements within a single field is available on specific pages: Receive Goods, Put Away Goods, Stocking Inquiry, Cycle Count, Subinventory Transfer, Confirm Pick, and Miscellaneous Issue. Currently, support is limited to the item, lot, and serial number fields.
Key Resources
- Oracle Fusion Cloud SCM: Implementing Manufacturing and Supply Chain Materials Management, available on the Oracle Help Center.
- Oracle Fusion Cloud SCM: REST API for Oracle Fusion Cloud SCM guide, available on the Oracle Help Center.
- Watch the Print Item or Location Labels Demo.
- Watch the Define Barcode Configurations for Scanning Labels Demo.
Access Requirements
Users who are assigned a configured job role that contains this duty role can configure barcode formats:
- Configure Inventory Barcode Formats Using Responsive Inventory Duty (ORA_INV_CONFIGURE_INVENTORY_BARCODE_PWA_DUTY)
This duty role is new in this update.
Users who are assigned a configured job role that contains these privileges can print labels:
- Print Label Requests (INV_PRINT_LABEL_REQUESTS_PRIV)
- Print Label Requests (INV_PRINT_LABEL_REQUESTS_PRIV_OBI)
These privileges are new in this update.
Perform Mass Maintenance on Subinventories and Locators
In industries with constantly evolving goods or a large number of storage locations, managing key parameters of your subinventories, locators, and the items associated with both can be key to optimal operational efficiency. For example, subinventories represent Periodic Automatic Replenishment (PAR) locations for healthcare providers. Many of these PAR locations contain the same goods, and exactly which goods need to be stocked in all of these PAR locations can change often. When there can be hundreds of PAR locations, manually associating or disassociating goods to each and every PAR location quickly becomes a time-consuming task. In this update, you can now create and update multiple subinventories, locators, and item associations with subinventories or locators simultaneously.
The Redwood pages delivered as part of the Manage Subinventories and Locators on Redesigned Pages 24A feature has been enhanced to enable users to create and update multiple subinventories, locators, and item subinventory and locator associations. The new enhancements are accessible using the Configure Subinventories task from both the Inventory Management work area and the Setup and Maintenance work area. In this release, subinventories and locators can be created by copying them from an existing subinventory and locator.
You can also disassociate items associated with subinventories and locators.
These pages are enhanced to enable you to create and update multiple subinventories, locators, and item associations with subinventories or locators by uploading .csv files in a drawer component:
- Subinventories
- Subinventory Details
- Locator Details
- Associate Item with Subinventory
- Associate Item with Locator
- Item Details
- Associate Locator with Item

Subinventories Page
Create Subinventories from Existing
These new Redwood pages will help you in mass maintenance of subinventories and locators:
- Item Associations
- Item Associations: Item Details
- Action Status
Item Associations Page

Item Details Page
Action Status Page
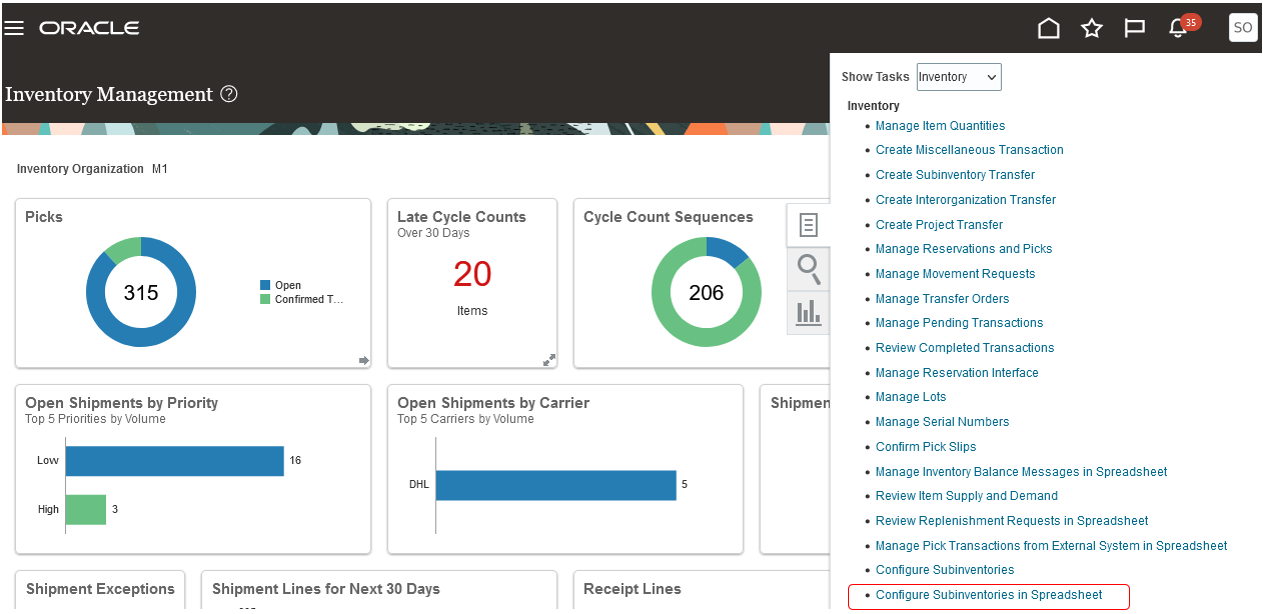
You may now also use the Configure Subinventories in Spreadsheet task, which will download a seeded spreadsheet template using the Oracle Visual Builder for Excel plugin, for creating and updating subinventories and locators. You may also create and update item associations and disassociate items with subinventories and locators.
Configure Subinventories in Spreadsheet Task
These new scheduled processes are also introduced:
- Perform Mass Maintenance on Subinventories and Locators: This process creates and updates multiple subinventories, locators, item subinventory associations, or item locator associations simultaneously. The process isn't available to be run manually by users, and it will be submitted automatically once a user submits the mass maintenance tasks.
- Purge Subinventories and Locators Mass Maintenance Staging Records: This process purges mass maintenance data for subinventories and locators from the staging tables. The process can be run occasionally by customers once after they have created or updated large volumes of subinventories, locators, or item subinventory and locator associations.
These two processes are secured by the Manage Subinventory and Locator privilege.
This feature provides you a more efficient way to create or update multiple subinventories, locators, or the items associated with either.
Steps to Enable
Use the Opt In UI to enable this feature. For instructions, refer to the Optional Uptake of New Features section of this document.
Offering: Manufacturing and Supply Chain Materials Management No Longer Optional From: Update 24C
Tips And Considerations
Now you can create and update multiple subinventory, locator, item subinventory, and item locator settings using the enhanced Redwood pages.
- You may access this feature using the 24A opt-in Manage Subinventories and Locators on Redesigned Pages feature in the Inventory Management functional area.
- You may access this feature using the Configure Subinventories task from both the Inventory Management work area and the Setup and Maintenance work area.
- You may also use the Configure Subinventories in Spreadsheet task to access the integrated spreadsheet using the Oracle Visual Builder Add in for Excel for mass create and update functionality. You will need to provide credentials for the item subinventory associations and item locator associations worksheets separately.
- Using this feature, you may also disassociate multiple item subinventory and item locator associations.
- You may check for any errors encountered while performing the mass maintenance tasks on the subinventories and locators by downloading the error file from the Action Status page.
Key Resources
- Watch the Perform Mass Maintenance on Subinventories and Locators Demo.
- Oracle Fusion Cloud SCM: Using Inventory Management guide, available on the Oracle Help Center.
Access Requirements
Users who are assigned a configured job role that contains these privileges can access this feature:
- Get Item Rest (EGP_GET_ITEM_REST_PRIV)
- Manage Inventory Status (INV_MANAGE_INVENTORY_STATUS_PRIV)
- Manage Subinventory and Locator (INV_MANAGE_SUBINVENTORY_AND_LOCATOR_PRIV)
- Manage Unit of Measure Usage (INV_MANAGE_UNIT_OF_MEASURE_USAGE_PRIV)
- View Inventory On-Hand Balance Web Service (INV_VIEW_INVENTORY_ONHAND_BALANCE_WEB_SERVICE_PRIV)
- View Subinventory and Locator List of Values by Web Service (INV_VIEW_SUBINVENTORY_LOCATOR_LOV_WEB_SERVICE_PRIV)
- View Inventory Organizations List of Values by Web Service (RCS_VIEW_INV_ORG_LOV_WEB_SERVICE_PRIV)
- View Units of Measure List of Values by Web Service (RCS_VIEW_UNITS_OF_MEASURE_LOV_WEB_SERVICE_PRIV)
These privileges were available prior to this update.
Users who are assigned a configured job role that contains this duty role can access this feature:
- Configure Subinventory Using Responsive Inventory (ORA_INV_CONFIGURE_SUBINVENTORY_PWA_DUTY)
These privileges and the duty role were available prior to this update.
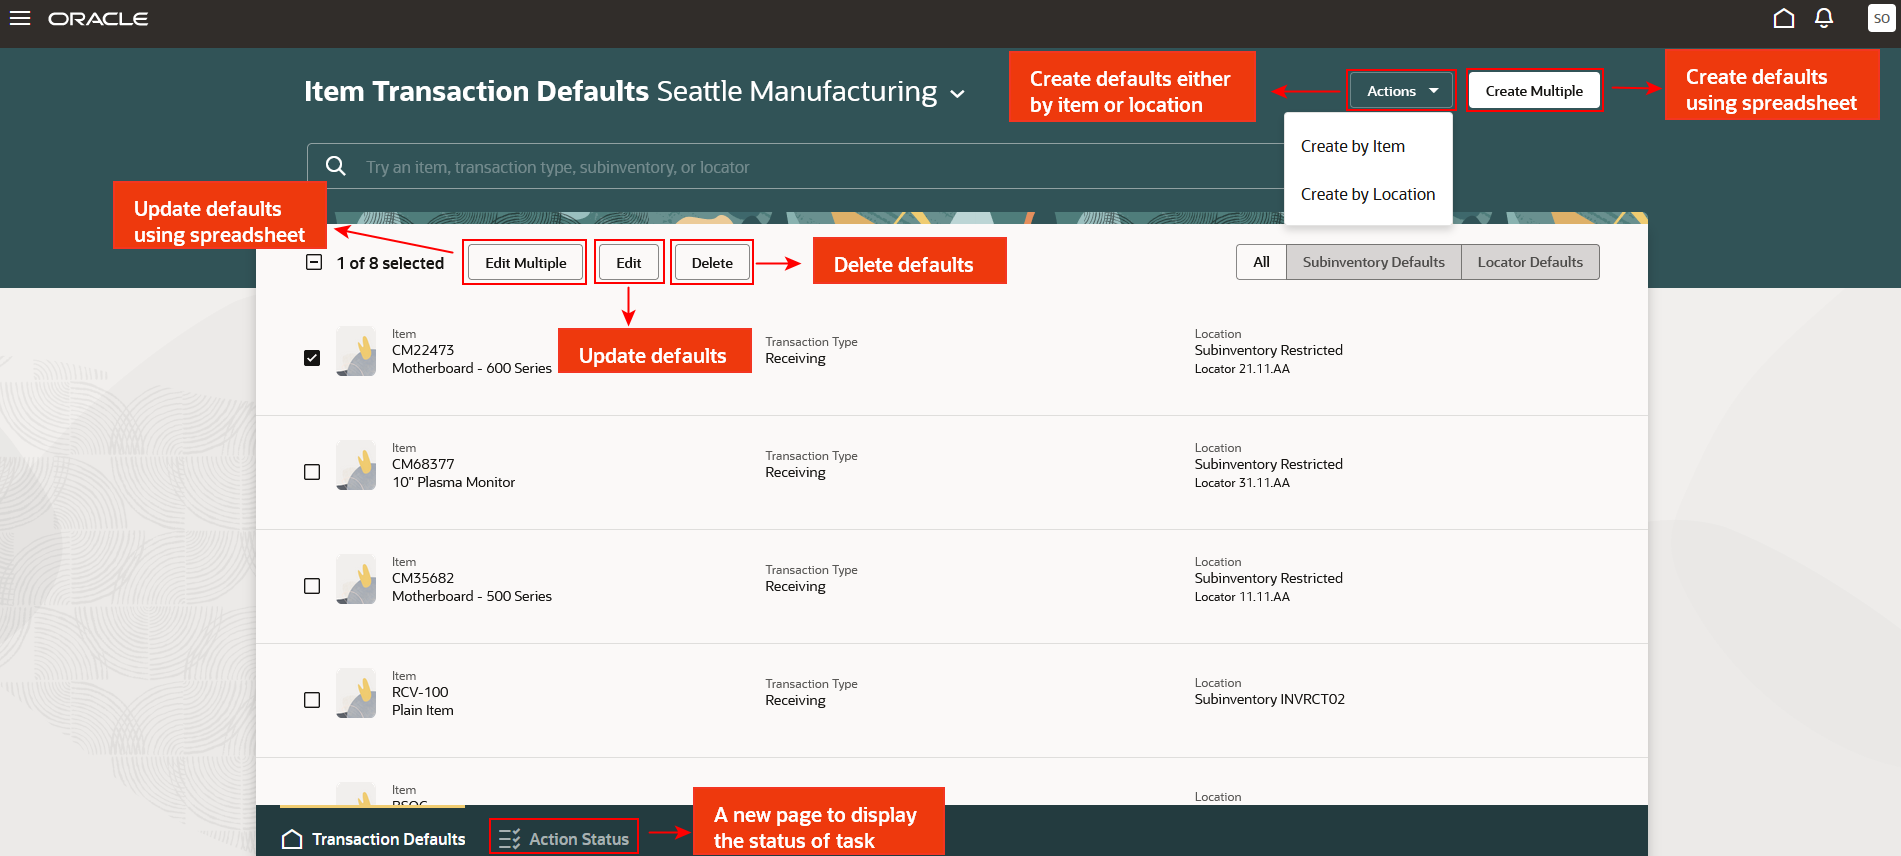
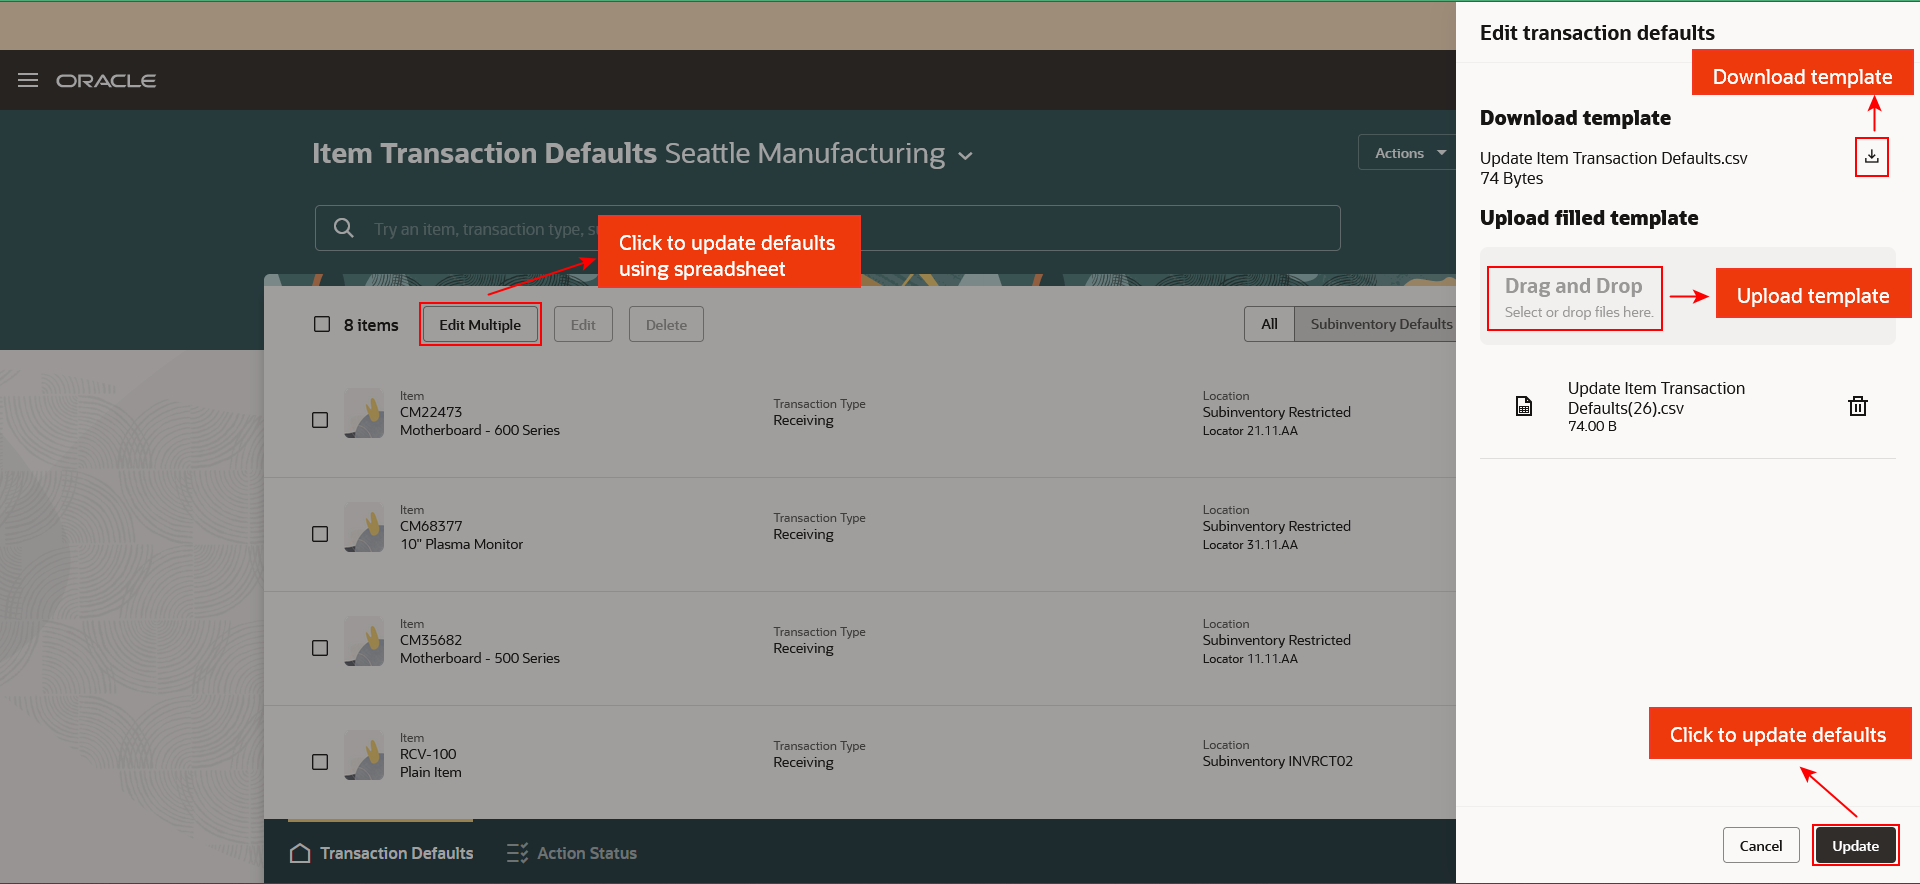
Manage Item Transaction Defaults on a Redesigned Page
Item transaction defaults provide you with a quick way to default the subinventory or locator for specific inventory, shipping, or receiving transactions to save your users valuable time. Managing these defaults is key to efficient warehouse operations. Now you can create, update, and delete item transaction defaults on a redesigned page with an improved user experience and mass update capabilities.
Item Transaction Defaults is a new Redwood page that's integrated with 24B features, and it can be used to setup item transaction defaults for subinventory and locators.
Feature Summary:
- You can create, update, or delete item transaction defaults in mass.
- For limited defaulting, you can:
- Create defaults either by item or location
- Update or delete existing defaults
- A new spreadsheet (.csv) upload feature has been introduced for mass create and update:
- Use the Create Multiple or Edit Multiple buttons to upload, create, or edit templates (.csv).
- A scheduled process is triggered upon template (.csv) upload.
- Use the new Action Status page to view the status of the submitted scheduled process.
- For tasks that end in error, use the Action Status page to obtain the spreadsheet that lists the reasons why a task has an error. You can then edit and upload the file.
- The Process Item Transaction Default Request schedule process is triggered to create or update staged records. The status of the job can also be viewed from the Scheduled Processes page.
Home Page

Create Default by Item
Update Defaults Using Spreadsheet
This feature provides an improved user experience and a more efficient way to manage your item transaction defaults.
Steps to Enable
- Configure Item Transaction Defaults is a setup task that you can access from the Functional Setup Manager.
- To access the Item Transaction Defaults page from the Inventory work area, set the profile value to Yes at the site level for the Redwood Page for Item Transaction Defaults Enabled profile option.
Tips And Considerations
- Use the Actions and Edit buttons to create and update defaults for fewer than fifteen records.
- For records with a high volume, use the Create Multiple button to create defaults and the Edit Multiple button to amend defaults.
- You can perform mass update without previously selecting the records. After downloading the template, fill it out and upload the file.
Key Resources
- Watch the Configure Item Transaction Defaults Demo.
- Oracle Fusion Cloud SCM: Using Inventory Management guide, available on the Oracle Help Center.
Access Requirements
Users who are assigned a configured job role that contains this duty role can access this feature:
- Configure Item Transaction Defaults Using Responsive Inventory Duty (ORA_INV_CONFIGURE_ITEM_TRANSACTION_DEFAULTS_PWA_DUTY)
This duty role is new in this update.
Shipping
Cancel Sales Order Backorders Automatically and Enforce Single Shipment
In many industries, customer contracts dictate specific fulfillment terms which can include whether or not the customer accepts backorders or multiple shipments. Prior to this update, if your customer didn't accept backorders or multiple shipments, you'd have to manually cancel quantities you couldn't fulfill by the promised delivery date. Now you have the option to automatically cancel any quantity that can't be fulfilled due to on-hand quantity shortages during pick confirm or ship confirm. Additionally, you can choose to automatically cancel any remaining open quantity after the first shipment even if you have the available on-hand quantity to fulfill the order, for instances where your customer only accepts a single shipment per order.
With this feature, these attributes are added in Oracle Order Management and Oracle Shipping:
- Cancel Backorders: Set this option to Yes if you want to automatically cancel any quantity that can't be fulfilled due to on-hand quantity shortages while releasing picks, confirming picks, confirming shipments, or creating outbound shipment requests to the external execution system.
- Enforce Single Shipment: Set this option to Yes if you want to automatically cancel any remaining open quantity on the order after the first shipment is confirmed and closed.
You can set these attributes on an order line using the Create Order page in the Order Management work area, Order Management extension, Sales Orders for Order Hub Requests REST API, or Import Sales Orders File-Based Data Import (FBDI through REST backend).
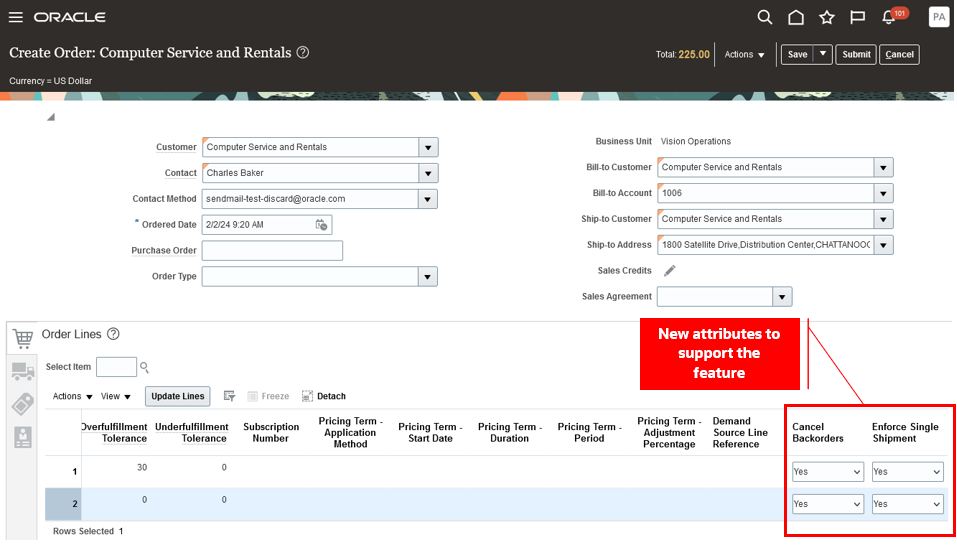
Create Order
Once the line is interfaced with Shipping, you can view the attribute values on the Manage Shipment Lines page in the Inventory Management work area.
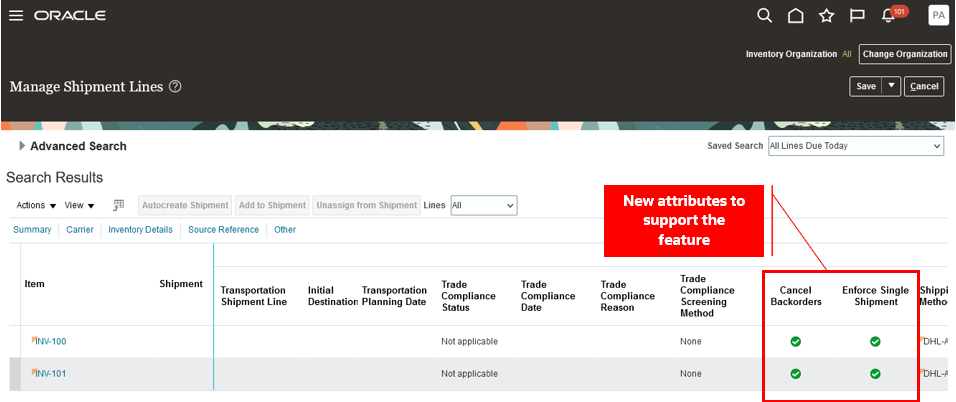
Manage Shipment Lines Page
When a line is set to Cancel Backorders:
- The Create Pick Wave process automatically cancels any shipment lines that are backordered due to on-hand quantity shortages.
- The Generate Shipment Request process automatically cancels any shipment lines that can't be interfaced with the WMS or 3PL due to on-hand quantity shortages.
- If the Enforce Shipment Set shipping parameter is enabled for the organization and a line within the shipment set is canceled due to on-hand quantity shortages, all lines within the shipment set will be canceled.
- During pick confirmation, if less than the requested quantity is picked and the quantity exception reason is of the backorder type, the remaining quantities will be canceled.
- Any quantities specified as backordered on the shipment line will be canceled when shipments are confirmed.
- When a shipment line is interfaced with WMS or 3PL and the Shipment Line Change Requests REST API is used to backorder a shipment line, the backordered quantities will be canceled.
- When a shipment line is interfaced with WMS or 3PL and the Shipment Transaction Requests REST API or Perform Shipping Transaction Import FBDI is used to perform shipping transactions, any quantities specified to be backordered will be canceled.
These scenarios outline instances where setting the line to cancel backorders won't result in the cancellation of the shipment line:
- When the shipment lines belonging to a PTO model or kit are partially backordered.
- When the shipment line is part of a shipment set and is backordered during pick confirmation.
- When the shipment line is backordered using the Backorder or Submit for Cycle Count action on the Manage Shipment Line and Shipment pages.
When the lines in an order are set to Enforce Single Shipment:
- In the event of partial shipment of an order, any unshipped quantities and lines within the order will be canceled.
- In scenarios involving WMS or 3PL, if the order is partially shipped using the Shipment Transaction Requests REST API or Perform Shipping Transaction Import FBDI, any shipment lines not interfaced with WMS/3PL will be canceled. However, if a shipment line is already interfaced with WMS/3PL, it won't be canceled.
- Shipment confirmation, sending manifest requests, and fiscal document generation aren't allowed when multiple shipments are assigned to an order.
- When utilizing Oracle Transportation Management or other transportation management systems for transportation shipment planning, assigning multiple transportation shipments to the order isn't allowed.
Once the shipment line is canceled in Shipping, the Process Responses from Order Fulfillment scheduled process is initiated to update the cancellation details on the fulfillment line.
- Ordered and canceled quantities are updated on the order. A seeded cancellation reason Cancel Backorders is used for cancellations initiated from Shipping.
- The charge components for the order line are recomputed with the new order quantity.
- The order header totals are updated by running or scheduling the Update Sales Order Totals scheduled process.
- If credit authorizations are applicable for the order lines, the amounts are adjusted based on the new ordered quantity. The Adjust Amounts for Credit Authorizations scheduled process should be run or scheduled to adjust the customer credit amounts.
- If the Cancel Supply When Canceling Backorders Order Management parameter is set to Yes, the supply orders are updated in the case of partial cancellation. Cancel or close the supply order and also the backing supply documents like purchase order and work order for the pending quantities.
- If the Cancel Backorders business event is enabled in the Manage Business Event Trigger Points task, then an event will be raised when the cancellation is initiated from Shipping.
This feature makes it easier for you to comply with your customer's fulfillment contracts by automatically canceling unfulfilled quantities and reducing your manual effort.
Steps to Enable
Use the Opt In UI to enable this feature. For instructions, refer to the Optional Uptake of New Features section of this document.
Offering: Manufacturing and Supply Chain Materials Management No Longer Optional From: Update 24D
Tips And Considerations
- The Cancel Backorders and Enforce Single Shipment options can only be set at the line level and can't be defaulted from the header.
- Once the order is submitted, you can't update the Cancel Backorders and Enforce Single Shipment settings. However, you can add a new line and set the attributes as needed.
- If a custom orchestration process is utilized, you must include Canceled along with Shipped in the exit criteria for the Shipment Wait task. Otherwise, the Shipment Wait task instance may remain active in the case of full cancellation.
- Once the shipment line is canceled in Shipping, the Process Responses from Order Fulfillment scheduled process is initiated to update the cancellation details on the fulfillment line. If the process isn't automatically submitted, check if the user performing the Create Pick Wave, Generate Shipment Request, Pick Confirm, and Ship Confirm actions is assigned to a configured job role containing one of the following privileges:
- Manage Shipment Interface (WSH_MANAGE_DELIVERY_INTERFACE_PRIV)
- Process Fulfillment Response (DOO_PROCESS_FULFILLMENT_RESPONSE_PRIV)
- If the Process Responses from Order Fulfillment scheduled process couldn't update the cancellation detail on the order, resubmit the scheduled process. We recommend that you set up the process to run on a schedule at regular intervals to process the cancellation details that couldn't be processed from the Oracle Order Management interface tables when it was initially submitted.
- Set the Task Type to Shipment
- Set the Record Set to Process Records That Failed
Key Resources
- Oracle Fusion Cloud SCM: Implementing Manufacturing and Supply Chain Materials Management guide, available on the Oracle Help Center.
- Oracle Fusion Cloud SCM: Using Shipping guide, available on the Oracle Help Center.
- Oracle Fusion Cloud SCM: Implementing Order Management guide, available on the Oracle Help Center.
- Oracle Fusion Cloud SCM: Using Order Management guide, available on the Oracle Help Center.
- Watch the Cancel Sales Order Backorders Automatically and Enforce Single Shipment Demo.
Access Requirements
Users who are assigned a configured job role that contains these privileges can access this feature:
- Create Pick Wave (WSH_CREATE_PICK_WAVE_PRIV)
- Confirm Pick Slip (INV_CONFIRM_PICK_SLIP_PRIV)
- Generate Shipment Request (WSH_GENERATE_SHIPMENT_REQUEST_PRIV)
- Manage Shipment (WSH_MANAGE_DELIVERY_PRIV)
- Manage Shipments and Shipment Lines (WSH_MANAGE_SHIPMENT_AND_SHIPMENT_LINE_PRIV)
- Manage Shipment Interface (WSH_MANAGE_DELIVERY_INTERFACE_PRIV)
- Process Fulfillment Response (DOO_PROCESS_FULFILLMENT_RESPONSE_PRIV)
These privileges were available prior to this update.
Send Shipped Details to Oracle Fusion Cloud Order Management More Efficiently
Updating sales orders with the details of what shipped is an integral part of your overall fulfillment process. This is especially true for partially filled orders or high-volume environments to ensure proper supply management. Now, Oracle Shipping uses the high-volume integration approach to send shipped details to Oracle Fusion Cloud Order Management for all orders, even if Oracle Order Management's high-volume order processing feature released in update 23C isn't enabled.
Prior to this feature, when the shipment was closed, the Manage Shipment Interface scheduled process submitted the Send Shipment Advice scheduled process to interface the shipment details to Oracle Order Management. With this feature, the Manage Shipment Interface scheduled process adds the shipment details to an Oracle Order Management interface table and submits the Process Responses from Order Fulfillment scheduled process. The Process Responses from Order Fulfillment scheduled process updates shipment details on the fulfillment line and moves the shipped line to the next fulfillment task.
This feature improves performance between Oracle Shipping and Oracle Order Management and makes the overall order to cash process more efficient.
Steps to Enable
You don't need to do anything to enable this feature.
Tips And Considerations
We recommend that you set up the Process Responses from Order Fulfillment scheduled process to run on a schedule at regular intervals to process the shipment details that couldn't be processed from the Oracle Order Management interface tables when it was initially submitted.
- Set the Task Type to Shipment.
- Set the Record Set to Process Records That Failed.
Key Resources
- Oracle Fusion Cloud SCM: Implementing Manufacturing and Supply Chain Materials Management guide, available on the Oracle Help Center.
- Oracle Fusion Cloud SCM: Using Shipping guide, available on the Oracle Help Center.
- Oracle Fusion Cloud SCM: Implementing Order Management guide, available on the Oracle Help Center.
Access Requirements
Users who are assigned a configured job role that contains this privilege can access this feature:
-
Manage Shipment Interface (WSH_MANAGE_DELIVERY_INTERFACE_PRIV)
This privilege was available prior to this update.
Receiving
Redwood Experience
These features were built in Redwood, Oracle’s next-generation user experience. Redwood brings state-of-the-art, consumer-grade user experiences across devices to the sophisticated enterprise scenarios that Oracle enables.
Monitor and Manage Deliveries Across Your Organization
Hospitals, office campuses, or any large building with multiple employees typically face a similar challenge when it comes to getting goods delivered to the specific people who order them. Typically, these facilities use a single location to receive all goods regardless of their destination. Once received, the goods are processed and organized for final delivery to the person who requested them. Now you can use delivery management to help organize and track these deliveries across your organization.
You can have deliveries automatically created after you receive an expense destination order or an inventory destination order that specifies a destination subinventory set up as a Periodic Automatic Replenishment (PAR) location. Alternatively, you can manually create deliveries from the delivery workbench when you need to deliver goods that don't have a source document. For example, when employees have personal packages delivered to the office or you need to deliver gifts to patients in a hospital.
After deliveries are created, you assign them to a delivery cart using the delivery workbench, and then they are available for your employees to take to their final destination using a mobile device. Additionally, from the delivery workbench, you can search for and view open, pending, and completed deliveries. For open and pending deliveries, you can assign or update the delivery cart and add pertinent attachments or notes. For completed deliveries, you can review who completed the delivery, when it was completed, who received the delivery, and view any attachments or notes that were added.
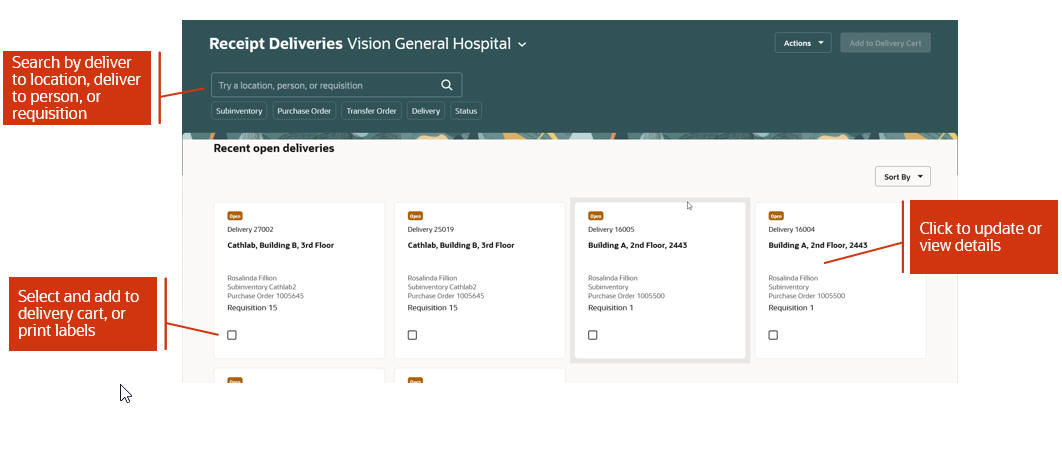
Receipt Deliveries Page
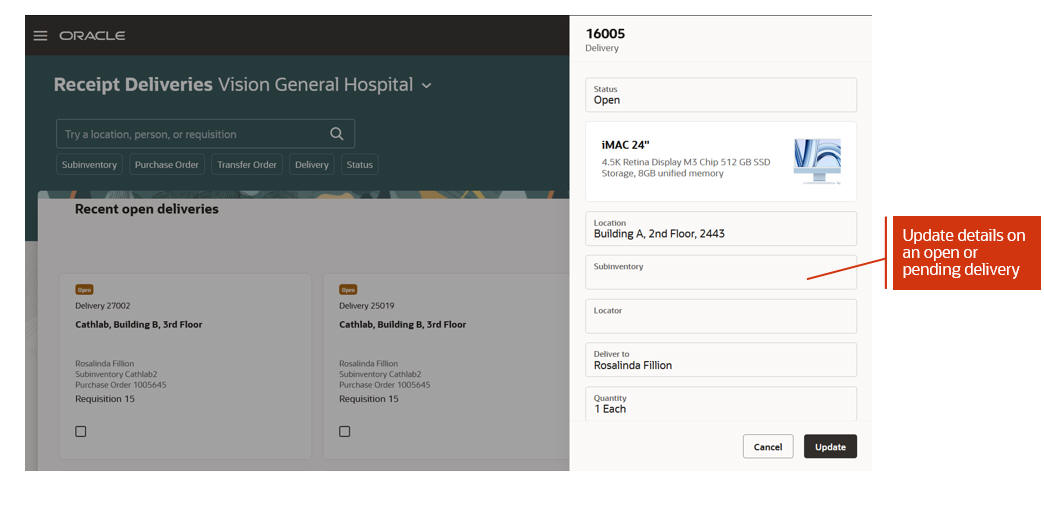
Selecting a delivery card allows you to add it to a delivery cart or print a delivery label. You can sort the delivery cards by deliver-to person or deliver-to location. If you need to create a delivery because you have goods to deliver that weren't received against a purchase order or other document type, under the Actions menu you can select Create Delivery to manually create a delivery.
Receipt Deliveries Update
Clicking on a delivery card opens the drawer where you can view more details about the delivery. If the delivery is in open or pending status, you can make updates to certain fields or add notes and attachments.
The delivery management workbench provides you the ability to efficiently manage and review deliveries to requesting employees and PAR locations within your organization
Steps to Enable
You must enable delivery management by setting attributes on the Receiving Parameters page.
Receiving Parameters
Select one or both of the following attributes on the Manage Receiving Parameters page to enable delivery management:
- Autocreate deliveries for expense destination receipts
- Autocreate deliveries for PAR location receipts
Once you select these parameters, a delivery will be automatically created upon receipt.

Manage Receiving Parameters Page
Key Resources
- Oracle Fusion Cloud SCM: Using Inventory Management guide, available on the Oracle Help Center.
- Oracle Fusion Cloud SCM: Implementing Manufacturing and Supply Chain and Materials Management, available on the Oracle Help Center.
- Watch the Monitor and Manage Deliveries Across Your Organization Demo.
Access Requirements
Users who are assigned a configured job role that contains this duty role can access this feature:
- Monitor Receipt Deliveries Using Responsive Receiving (ORA_RCV_MONITOR_RECEIPT_DELIVERIES_PWA_DUTY)
This duty role is new in this update.
Mobile Inventory
With Oracle Fusion Cloud Update 24B, we’re excited to announce a robust set of new mobile inventory capabilities. You can now use a mobile device to perform cycle counts, receiving, put away, stocking inquiries, stock issues, pick confirm, deliveries, subinventory transfers, and periodic automatic replenishment (PAR) counts. These mobile flows are available under the Inventory Management (New) work area, and they support scanning relevant barcode data using a camera or device-based scanner and printing labels. These features were built in Redwood, Oracle’s next-generation user experience.
For the Warehouse Manager, Inventory Manager, Warehouse Operator, and Receiving Agent predefined roles, you can add these mobile inventory capabilities and the Inventory Management (New) work area icon by completing a few setup steps. There are two different sets of setup steps, and you should follow the steps that align with your cycle for quarterly maintenance.
If your quarterly maintenance occurs in March-June-September-December or in April-July-October-January, then follow these steps:
- In the Setup and Maintenance work area, search for and select the Manage Inventory Profile Options task.
- On the Manage Inventory Profile Options page, search for and select the ORA_INV_MOBILE_INVENTORY_MANAGEMENT_REDWOOD_ENABLED profile option code.
- In the Profile Values section, set the Site level to Yes. The default value is No.
- Yes = enables the feature
- No = disables the feature

Manage Inventory Profile Options Page
- Click Save and Close. Changes in the profile value will affect users the next time they sign in.
If your quarterly maintenance occurs in February-May-August-November, then follow these steps:
- Activate a Sandbox with the Structure tool.
- Enter the Sandbox and click the Structure link under Tools.
- Expand the Supply Chain Execution node and click Inventory Management (New).
- From the Show on Navigator list, select Yes.
- Click Save and Close.
- Publish the Sandbox.
For additional information about how to configure the navigator and page entries on the home page for navigation, you can review the Configuring and Extending Applications guide, available on the Oracle Help Center.
View On-Hand Quantity and Stocking Locations for Your Goods
When performing various tasks in your warehouse, there are times when you need the ability to quickly find an item or where it could be stocked. For example, in the middle of picking goods to fulfill an order, you find that there isn't sufficient quantity in the location to fulfill the order because some goods are damaged. Because this is a critical order, you want to see if the goods are stored in another location. Now you can view the on-hand quantity of an item in all locations and the on-hand quantity of all items in a location using a mobile device. Additionally, when your items are associated with a specific location, a search by item provides the list of locations where the item is associated, and a search by location provides a list of all the items associated with that location, even when you have zero on-hand quantity.
This feature provides you the flexibility to view the on-hand quantity and stocking locations for your goods in real time when you're performing tasks on the move around your warehouse.

Search On-Hand Quantity by Item or Location

MPN is Displayed Below the Item Number

Search On-Hand Quantity by Lot

Search On-Hand Quantity by Serial Number
Steps to Enable
To enable the Inventory Management (New) work area icon and the mobile inventory features available in the work area, you must perform a set of steps to add the icon to the home page. Those steps are described at the beginning of the Mobile Inventory section in this document. If you've already done those steps, then you don't need to do them again.
Configuration steps are also required to enable the Item or MPN (Manufacturer Part Number) search field. This allows you to select an item or MPN from the list of values when performing mobile transactions.
To enable the Item or MPN search field, follow the steps to enable.
Enable Opt-In Feature: Search Items Using the New User Interface
- Navigate to My Enterprise and click Available Features.
- Search for the Search Items Using the New User Interface feature.
- Enable the Search Items Using the New User Interface feature.

Search Items Using the New User Interface
To enable the item search, navigate to the Product Information Management work area or the Product Development work area and complete these steps:
- On the landing page, click the Tasks tab to open the drawer.
- Click Configure Index.
- Click the Item card. The index has a set of predefined attributes that you can use as the starting point for the index.
- Ensure the Manufacturer Part Number attribute is added to the list of attributes.
- Click Update if enabled, and then save the index configuration.
- Click Rebuild.
- In the Schedule Index Rebuild Process dialog box, click Rebuild. The index rebuild process starts and a job ID is provided to track the process. The rebuild process is a long-running process. You can check the index status on the Index Management page. The Item card has an indicator badge which shows Ready when the index rebuild is complete.

Index Management
To enable item class security, navigate to the Manage Item Classes setup task and configure security for the root item class.
NOTE: Root item class data security configuration is only required when Oracle Product Hub is licensed.
This is a required data security configuration in the Product Management offering to display the inventory items associated with an inventory organization.
- In the Setup and Maintenance work area, search for and select the Manage Item Classes task.
- Search for Root Item Class in the Item Class field.
- Click the Root Item Class link.
- Click the Add icon or the Add Row action.
- Select Person under Principal.
- Select User Name.
- Select Inventory Organization.
- Specify applicable Start Date and End Date.
- Click the Select and Add action or icon.
- Search for the View Item Basic action and click Apply.
- Click Save and Close.
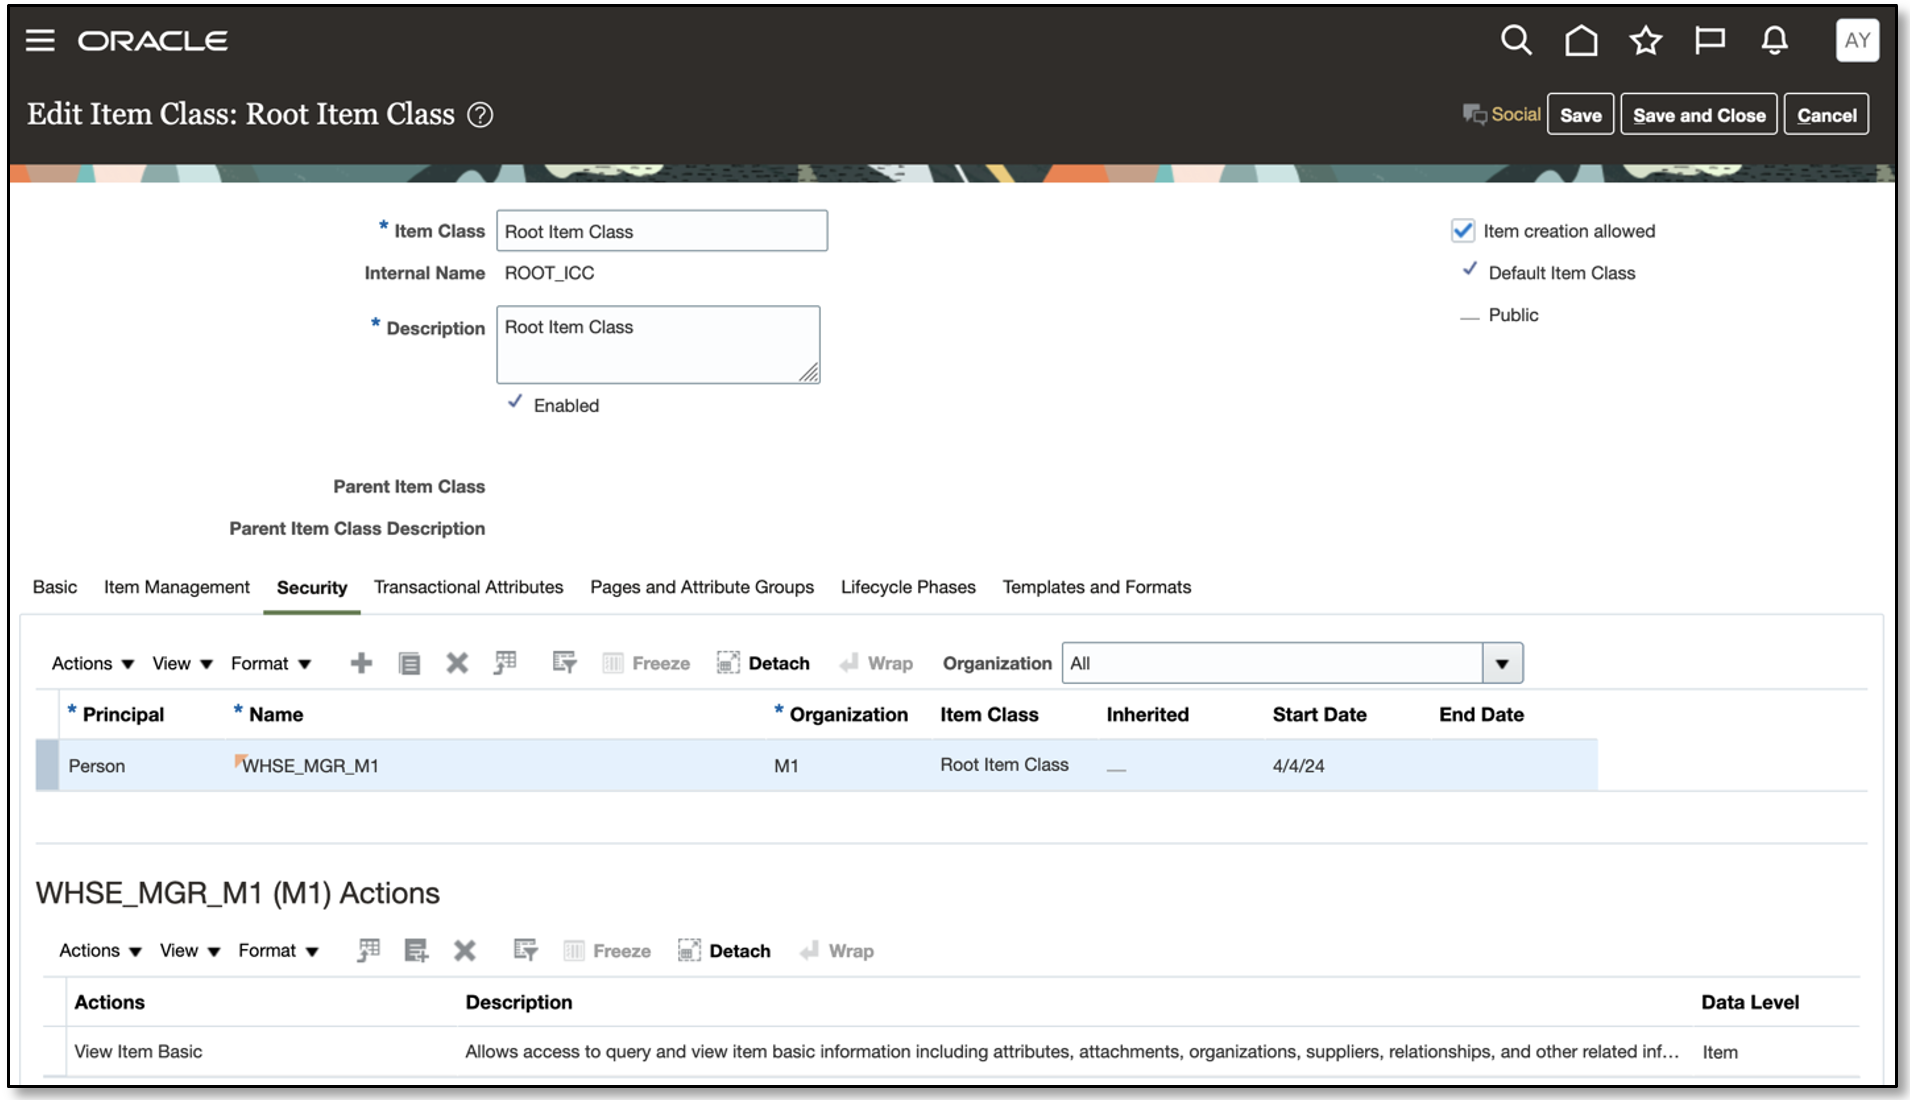
Root Item Class
Tips And Considerations
Searching by manufacturer part number on the Stocking Inquiry page is available only when the Manufacturer Part Number attribute is a part of the index attributes list. You can add this attribute to the index attributes list using the Configure Index option in the Product Information Management work area.
Key Resources
- Oracle Fusion Cloud SCM: Using Inventory Management guide, available on the Oracle Help Center.
Access Requirements
Users who are assigned a configured job role that contains this duty role can access this feature:
- Review Item Stocking Location Using Responsive Inventory (ORA_INV_REVIEW_ITEM_STOCKING_LOCATION_PWA_DUTY)
This duty role is new in this update.
Count Your PAR Locations Using a Mobile Device
As a health care provider, improve your efficiency by entering Periodic Automatic Replenishment (PAR) counts using a mobile device in real time, as well as in an offline mode. You can scan the PAR locations using an external barcode device, invoke the camera on your mobile device to scan a PAR location, or enter the PAR location manually by choosing from a list of values. You can trigger replenishment of the items with the two-bin count method or the order PAR replenishment count type by simply scanning the items. You can enter the quantity to order and the counted quantity for items with a replenishment count type of Order Quantity and On-Hand Quantity, respectively. You'll receive a confirmation message when you do an End PAR Count action for a PAR location. You can switch to another PAR location within the same organization if you're done with PAR counts for one PAR location.
The offline mode capability lets you seamlessly perform PAR counts for PAR locations that don't have internet connectivity. You need to stay connected to the Oracle Cloud at the time of choosing the organization before you begin to record your PAR counts in an offline mode. This caches the data for all the PAR locations in the chosen organization allowing you to work offline. You can record your PAR counts the same way as you do in the online mode while you work offline. The recorded PAR counts are synced with Oracle Cloud as soon as your mobile device detects an internet connection.
This feature increases your organization's efficiency by providing the flexibility to perform your PAR counts in real time.

Override Replenishment Quantity
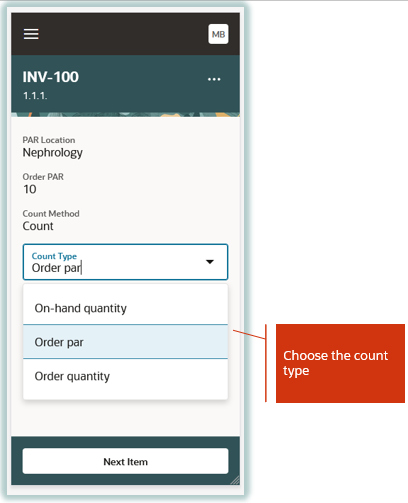
Choose Count Type
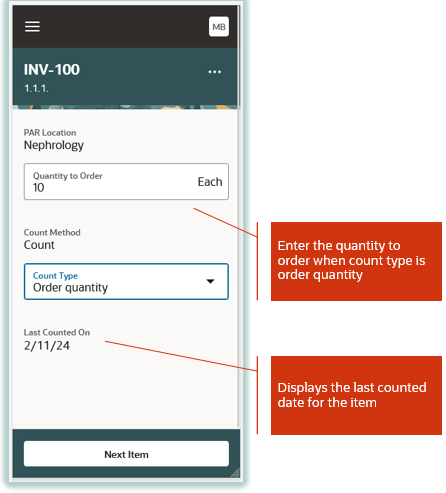
Quantity to Order

Quantity to Count
Steps to Enable
To enable the Inventory Management (New) work area icon and the mobile inventory features available in the work area, you must perform a set of steps to add the icon to the home page. Those steps are described at the beginning of the Mobile Inventory section in this document. If you've already done those steps, then you don't need to do them again.
Key Resources
- Oracle Fusion Cloud SCM: Using Inventory Management guide, available on the Oracle Help Center.
- Watch the Count Your PAR Locations Using a Mobile Device Demo.
Access Requirements
Users who are assigned a configured job role that contains this duty role can access this feature:
- Record PAR Count Using Responsive Inventory (ORA_INV_RECORD_PAR_COUNT_PWA_DUTY)
This duty role is new in this update.
Transfer Goods Between Subinventories Using a Mobile Device
A well-organized stockroom or warehouse is key to efficient operations. Sometimes you need to move goods between locations within your warehouse in order to consolidate goods that were spread out during a high-demand season, make room for new products, or rearrange the warehouse layout for more operational efficiency. You now have the ability to walk over to the stocking location, scan the location information, scan the item, enter the quantity, and transfer the item in real time using a mobile device.
Using a mobile device, you now can walk over to the source subinventory and scan it, scan the item, enter the quantity, and add the item to list. You have ability to scan or enter multiple items and add them to the list.

Scan Location and Enter Item and Destination Location Details
Before submitting, you can review the items that you added to the list and make any necessary adjustments by clicking the Edit (pencil) button.

Transfer Item
This feature provides you the ability to move goods around your warehouse in real time to efficiently increase your warehouse productivity.
Steps to Enable
To enable the Inventory Management (New) work area icon and the mobile inventory features available in the work area, you must perform a set of steps to add the icon to the home page. Those steps are described at the beginning of the Mobile Inventory section in this document. If you've already done those steps, then you don't need to do them again.
Tips And Considerations
- This feature provides you with a native mobile experience and barcode-scanning capabilities.
- You have the ability to scan or enter the location, item, lot, and serial numbers.
Key Resources
- Watch Transfer Goods Between Subinventories Using a Mobile Device Demo.
- Oracle Fusion Cloud SCM: Using Inventory Management, available on the Oracle Help Center.
Access Requirements
Users who are assigned a configured job role that contains this duty role can access this feature:
- Create Subinventory Transfer Using Responsive Inventory Duty (ORA_INV_CREATE_SUBINVENTORY_TRANSFER_PWA_DUTY)
This duty role is new in this update.
Issue Goods Using a Mobile Device
Miscellaneous adjustments to item quantities are used for a variety of reasons within an inventory organization. For example, a hospital stock room has a walk-up counter where nurses and orderly staff can come to request supplies they need for patient care. In these scenarios, you need the ability to grab and issue the goods quickly. Now you can issue out goods against an account or account alias using a mobile device to scan the location information, scan the item, and enter the quantity to complete the transaction.
Using a mobile device, you now have the ability to walk over to the stocking location, scan the location information (subinventory and locator), scan the item, enter the quantity, and add the item to a list. You also have the ability to scan or enter multiple items and add them to the list.

Scan Item Details
Before submitting, you can review the items that you added to the list and make any necessary adjustments by clicking the Edit (pencil) button. Then add an account or account alias and complete the transaction submission.

Issue Item
This feature provides you the ability to quickly and efficiently issue goods out of your warehouse or stockroom in real time.
Steps to Enable
To enable the Inventory Management (New) work area icon and the mobile inventory features available in the work area, you must perform a set of steps to add the icon to the home page. Those steps are described at the beginning of the Mobile Inventory section in this document. If you've already done those steps, then you don't need to do them again.
Tips And Considerations
- This feature provides you with a native mobile experience and barcode-scanning capabilities.
- You have the ability to scan or enter the location, item, lot, and serial numbers.
Key Resources
- Watch the Issue Goods Using a Mobile Device Demo.
- Oracle Fusion Cloud SCM: Using Inventory Management guide, available on the Oracle Help Center.
Access Requirements
Users who are assigned a configured job role that contains this duty role can access this feature:
- Create Miscellaneous Issue Using Responsive Inventory Duty (ORA_INV_CREATE_MISCELLANEOUS_ISSUE_PWA_DUTY).
This duty role is new in this update.
Complete Cycle Counts Using a Mobile Device
Cycle counts serve as a key way to ensure that your physical on-hand quantity matches the on-hand quantity reflected in Oracle Fusion Cloud Inventory Management. Now you can record cycle counts in real time while counting the items physically for a quantity-tracked subinventory using a mobile device. You search the cycle count definition and choose the specific subinventory for which you want to record cycle count entries to bring up cards for all cycle count sequences corresponding to a cycle count. Then you select a card based on the location for which you want to enter the count quantity.
In order to record the count quantity for an item, you need to confirm the subinventory and locator. For a lot-controlled item, you also need to confirm the lot number to record the count quantity corresponding to a lot. Likewise, for a serial-controlled item, you need to confirm the serial number. You can choose to skip an item or lot during cycle counting. The skipped item or lot appears in the list of uncounted items. You can skip counting for specific serial numbers when a single count sequence is generated for each serial number. This will make the serial number count sequence appear in the list of uncounted items. The cycle count for a serial number is recorded with zero quantity when you choose to skip a serial number during cycle count, which is set up to generate a single count sequence for all the serials.
The Confirm Cycle Count process submits the cycle count entries for a cycle count definition and gives a toast confirmation message.
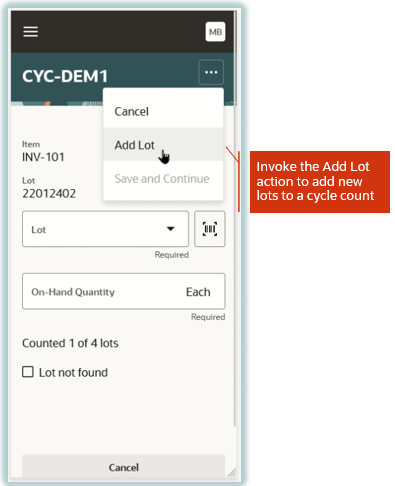
Add Lot to Cycle Count
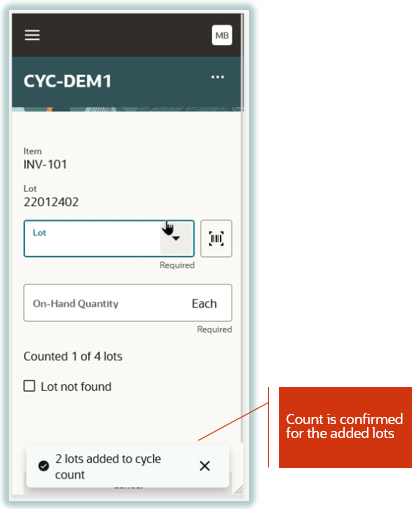
Toast Message on Lot Addition
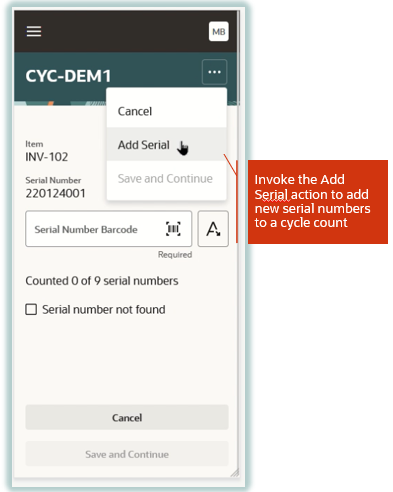
Add Serial Number to Cycle Count

Toast Message on Serial Number Addition

Add Item to Cycle Count
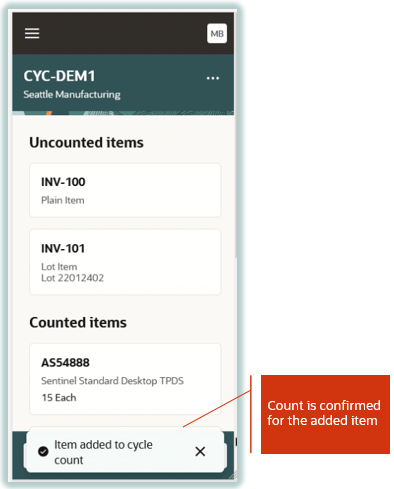
Toast Message on Item Addition
This feature provides you with the capability to record cycle counts in real time using a mobile device in order to increase the productivity of your warehouse operations.
Steps to Enable
To enable the Inventory Management (New) work area icon and the mobile inventory features available in the work area, you must perform a set of steps to add the icon to the home page. Those steps are described at the beginning of the Mobile Inventory section in this document. If you've already done those steps, then you don't need to do them again.
Key Resources
- Oracle Fusion Cloud SCM: Using Inventory Management guide, available on the Oracle Help Center.
- Watch the Complete Cycle Counts Using a Mobile Device Demo.
Access Requirements
Users who are assigned a configured job role that contains this duty role can access this feature:
- Record Cycle Count Sequence Using Responsive Inventory (ORA_INV_RECORD_CYCLE_COUNT_SEQUENCE_PWA_DUTY)
This duty role is new in this update.
Deliver Goods Using a Mobile Device
When your organization has a single receiving location for perpetually tracked goods, expensed goods ordered by employees, and nonwork-related packages and gift orders, you need the ability to make sure those expensed goods and personal orders are delivered to whoever requested them. Now, you can make these types of deliveries within your organization using a mobile device to record who physically received the goods, take and attach a picture of the delivery, capture the recipient's signature, and add any pertinent delivery notes.
Deliveries can be automatically created after receipt of an expense destination order or an inventory destination order that specifies a destination subinventory set up as a Periodic Automatic Replenishment (PAR) location. Alternatively, they can be manually created from the delivery workbench for goods that don't have a source document. Once deliveries are created, they need to be assigned to a delivery cart from the Receipt Deliveries page. After being assigned, they are eligible for you to deliver using a mobile device.
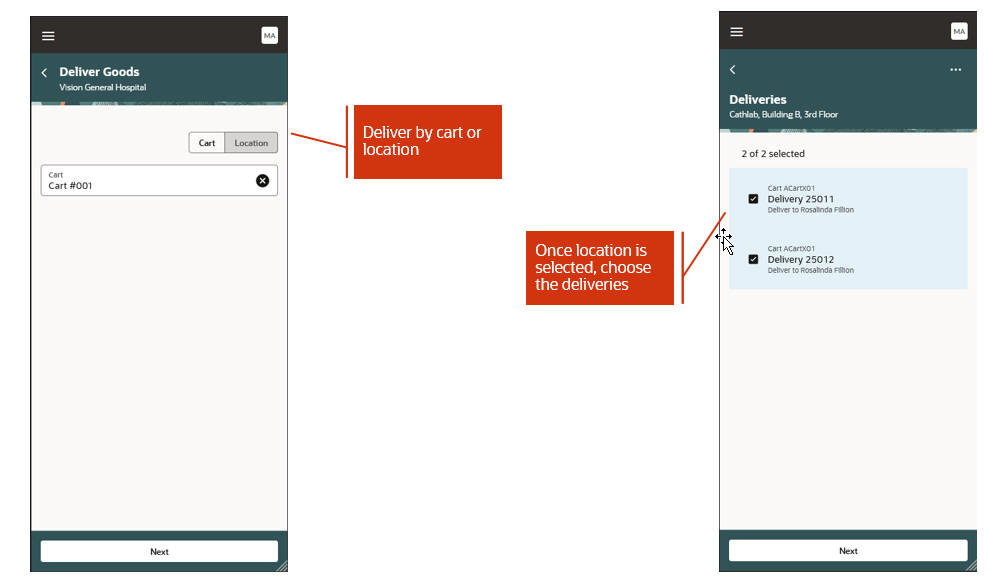
Deliver Goods Page
You can deliver by cart or location. Once you have selected the cart or location, you can choose the deliveries to be delivered.
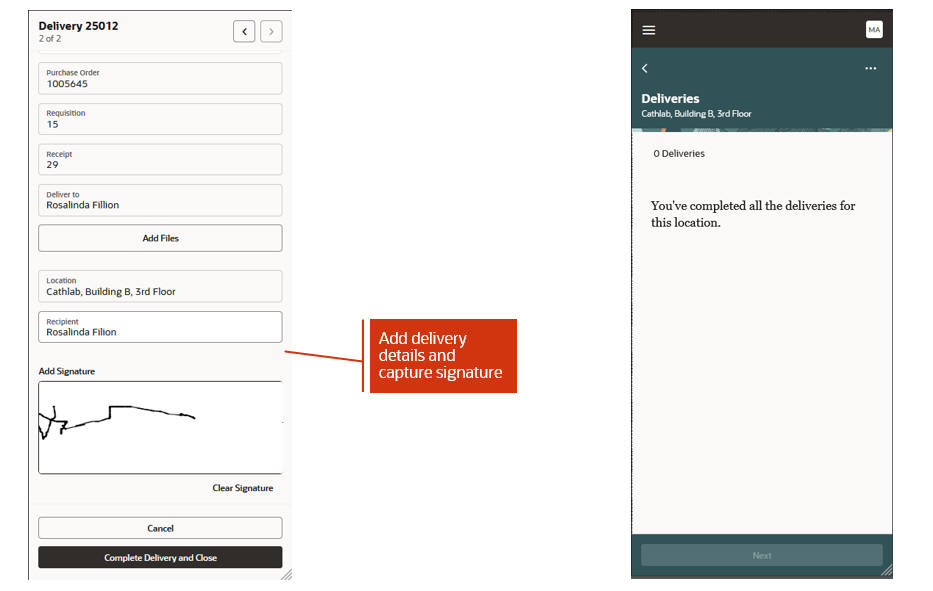
Enter Delivery Details and Confirm
Enter delivery details such as the recipient's name, capture a signature, or attach a picture or notes. Once details are entered, you confirm the delivery to complete the process and return to the Deliveries page. Here you can select any remaining deliveries that are outstanding for this location.
This feature provides you a way to efficiently make physical deliveries to your employees and PAR locations in real time using a mobile device.
Steps to Enable
To enable the Inventory Management (New) work area icon and the mobile inventory features available in the work area, you must perform a set of steps to add the icon to the home page. Those steps are described at the beginning of the Mobile Inventory section in this document. If you've already done those steps, then you don't need to do them again.
You must also enable delivery management by setting receiving attributes on the Manage Receiving Parameters page.
Manage Receiving Parameters
Select one of both of the following attributes on the Manage Receiving Parameters page to enable delivery management:
- Autocreate deliveries for expense destination receipts
- Autocreate deliveries for PAR location receipts
Once you select these parameters, when a receipt is created, a delivery will be automatically created.
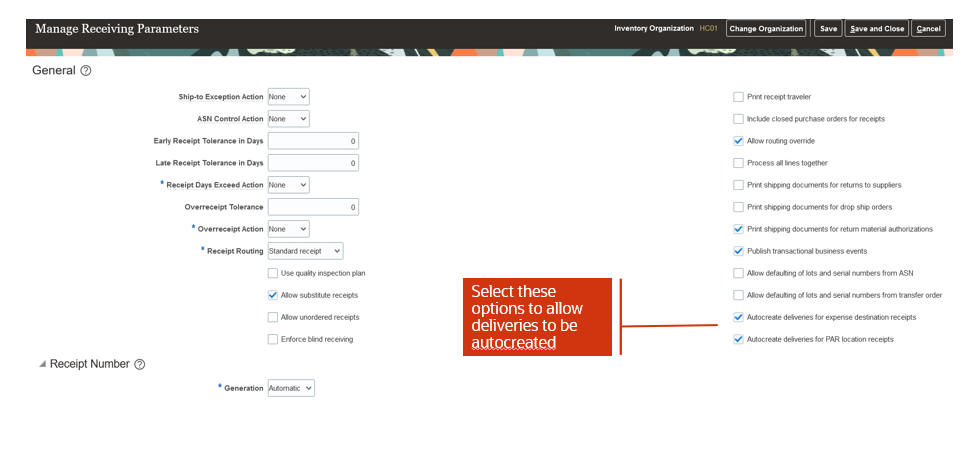
Manage Receiving Parameters Page
Key Resources
- Oracle Fusion Cloud SCM: Using Receiving guide, available on the available on the Oracle Help Center.
- Oracle Fusion Cloud SCM: Implementing Manufacturing and Supply Chain Materials Management, available on the Oracle Help Center.
Access Requirements
Users who are assigned a configured job role that contains this duty role can access this feature:
- Deliver Goods Using Responsive Receiving Duty (ORA_RCV_DELIVER_GOODS_PWA_DUTY)
This duty role is new in this update.
Receive Goods Using a Mobile Device
Quickly and accurately receiving your inbound shipments is a critical operation to keep your warehouse or stockroom running smoothly. In this update, you can now perform receiving tasks using a mobile device to scan key receiving information such as order numbers, item numbers, and manufacturer part numbers.
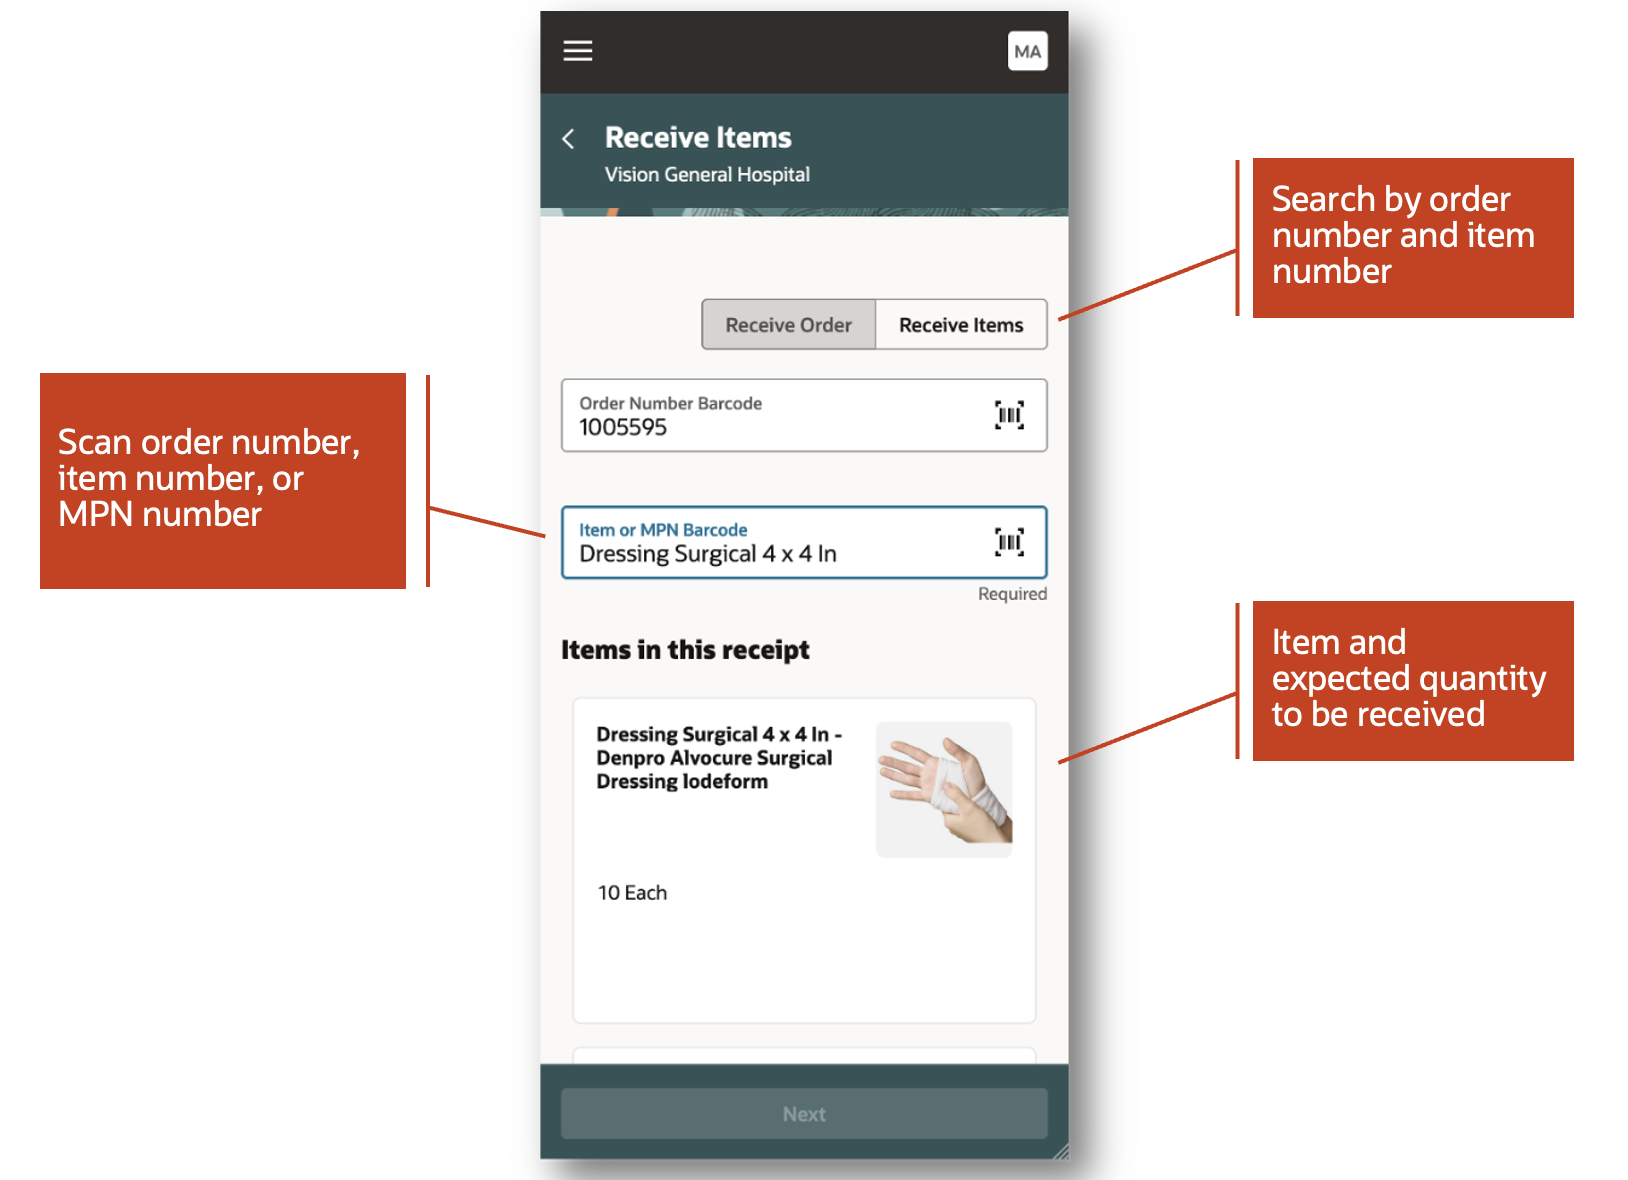
Receive Items Page
When receiving your goods, you can enter receipt details such as the received quantity and the put away subinventory and locator. You also have the ability to enter descriptive flexfield information and print labels. You can print delivery and item labels. In the event that your items are lot and serial number-controlled, you can print lot and serial number labels.

Enter Receipt Details
This feature streamlines and simplifies your receiving process while helping reduce data input errors.
Steps to Enable
To enable the Inventory Management (New) work area icon and the mobile inventory features available in the work area, you must perform a set of steps to add the icon to the home page. Those steps are described at the beginning of the Mobile Inventory section in this document. If you've already done those steps, then you don't need to do them again.
In addition, to receive goods, you must perform the initial ingest, which requires submitting the ESS job to create index definition and perform Initial Ingest to OSCS scheduled process. This process will ingest purchase order expected receipts, transfer order expected receipts, advanced shipment notice expected receipts, and receiving transactions. This is a prerequisite step to use both the Receive Goods and Put Away Goods mobile pages.
- Login as the Supply Chain Application Administrator user.
- Navigate to Tools > Scheduled Processes, and then click Schedule New Process.
- Search and select process name: ESS job to create index definition and perform Initial Ingest to OSCS
Parameter values for index name to reingest:
- fa-scm-rcv-expected-po-receipts
- fa-scm-rcv-expected-asn-receipts
- fa-scm-rcv-expected-to-receipts
- fa-scm-rcv-transactions
NOTE: If you don't specify any index names while submitting the process, the process will run for all predefined indexes for all product families. It's recommended that you create indexes for the index names listed here.

Perform Initial Ingest
The Ingest Receiving Search Indexes scheduled process is used to ingest receipts performed outside of the Receive Goods page. For example, a receipt can be created through the Receiving Receipt Import FBDI, Receiving Receipt Requests REST API, or the existing Receive Expected Shipments page. In these cases, you will need to run this scheduled process to ensure your receipts are ingested. Additionally, inbound shipments such as advance shipment notices (ASN) and transfer order shipments can be created. In these cases, you also need to run this scheduled process to ensure your inbound shipments are ingested. It's recommended to run this process frequently to ensure your receipts and shipments are ingested in a timely manner. Receipts created through the Receive Goods page are ingested automatically.
- Login as the Supply Chain Application Administrator user.
- Navigate to Tools > Scheduled Processes, and then click Schedule New Process.
- Search and select the process name: Ingest Receiving Search Indexes

Ingest Receiving Search Indexes
In order to default the destination subinventory and locator while performing a receipt transaction, you must configure item transaction defaults.
- Login as the Supply Chain Application Administrator user.
- From the Setup and Maintenance work area, navigate to the Configure Item Transaction Defaults task.
- Offering: Manufacturing and Supply Chain Materials Management
- Functional Area: Inventory Management
- Task: Configure Item Transaction Defaults

Configure Item Transaction Defaults
Key Resources
- Oracle Fusion Cloud SCM: Using Receiving guide, available on the available on the Oracle Help Center.
- Oracle Fusion Cloud SCM: Implementing Manufacturing and Supply Chain Materials Management, available on the Oracle Help Center.
- Watch the Receive Goods Using a Mobile Device demo.
Access Requirements
Users who are assigned a configured job role that contains this duty role can access this feature:
- Receive Goods Using Responsive Receiving (ORA_RCV_RECEIVE_GOODS_PWA_DUTY)
This duty role is new in this update.
Put Away Goods Using a Mobile Device
An efficient put away process ensures your on-hand quantity is accurate and helps prevent stockouts and backorders. In this update, you can now put away your goods in real time using a mobile device to scan key information such as item numbers, subinventories, and locators. You can search for your receipts to put away by receipt and item number.

Put Away Goods
When performing put away transactions, you can easily scan or select the destination subinventory and locator. To streamline the put away process in your facilities, you can configure item transaction defaults to display the suggested destination put away subinventory and locator. The received quantity is displayed allowing you to put away the full quantity or partial quantity. You also have the option to print labels while performing the put away. Lastly, you can review attachments and descriptive flexfield information entered at the time of receipt.

Enter Put Away Details
This feature allows your organization to save time and expedite the receiving process by putting away goods in a timely manner while reducing data entry errors.
Steps to Enable
To enable the Inventory Management (New) work area icon and the mobile inventory features available in the work area, you must perform a set of steps to add the icon to the home page. Those steps are described at the beginning of the Mobile Inventory section in this document. If you've already done those steps, then you don't need to do them again.
In addition, to put away goods using a mobile device, you must perform the initial ingest, which requires submitting the ESS job to create index definition and perform Initial Ingest to OSCS scheduled process. This process will ingest purchase order expected receipts, transfer order expected receipts, advanced shipment notice expected receipts, and receiving transactions. This is a prerequisite step to use the Receive Goods and Put Away Goods mobile pages.
- Login as the Supply Chain Application Administrator user.
- Navigate to Tools > Scheduled Processes, and then click Schedule New Process.
- Search and Select process name: ESS job to create index definition and perform Initial Ingest to OSCS
Parameter values for index name to reingest:
- fa-scm-rcv-expected-po-receipts
- fa-scm-rcv-expected-asn-receipts
- fa-scm-rcv-expected-to-receipts
- fa-scm-rcv-transactions
NOTE: If you don't specify any index names while submitting the process, the process will run for all predefined indexes for all product families. It's recommended that you create indexes for the index names listed here.

Perform Initial Ingest
The Ingest Receiving Search Indexes scheduled process is used to ingest receipts performed outside of the Receive Goods page. For example, a receipt can be created through the Receiving Receipt Import FBDI, Receiving Receipt Requests REST API, or the existing Receive Expected Shipments page. In these cases, you will need to run this scheduled process to ensure your receipts are ingested. Additionally, inbound shipments such as advance shipment notices (ASN) and transfer order shipments can be created. In these cases, you also need to run this scheduled process to ensure your inbound shipments are ingested. It's recommended to run this process frequently to ensure your receipts and shipments are ingested in a timely manner. Receipts created through the mobile Receive Goods page are ingested automatically.
- Login as the Supply Chain Application Administrator user.
- Navigate to Tools > Scheduled Processes, and then click Schedule New Process.
- Search and select the process name: Ingest Receiving Search Indexes

Ingest Receiving Search Indexes
In order to default the destination subinventory and locator while performing a put away transaction, you must configure item transaction defaults.
- Login as the Supply Chain Application Administrator user.
- From the Setup and Maintenance work area, navigate to the Configure Item Transactions Defaults task:
- Offering: Manufacturing and Supply Chain Materials Management
- Functional Area: Inventory Management
- Task: Configure Item Transaction Defaults
Configure item transaction defaults
Key Resources
- Oracle Fusion Cloud SCM: Using Receiving guide, available on the available on the Oracle Help Center.
- Oracle Fusion Cloud SCM: Implementing Manufacturing and Supply Chain Materials Management, available on the Oracle Help Center.
- Watch Put Away Goods Using a Mobile Device demo.
Access Requirements
Users who are assigned a configured job role that contains this duty role can access this feature:
- Put Away Goods Using Responsive Receiving (ORA_RCV_PUT_AWAY_GOODS_PWA_DUTY)
This duty role is new in this update.
Confirm Your Open Pick Lines Using a Mobile Device
Confirming your open lines to pick is a critical step in the fulfillment process. Now you can confirm your open pick lines using a mobile device to scan subinventories, locators, items, lots, and serial numbers using either a camera-based or device-based scanner.
You start the process by searching for open pick lines by pick slip number or order number, and then validate picking information by scanning barcode identifiers or entering them manually.
You have the option to partially pick lines and either split, short pick, or backorder the remaining quantity. You also have the option to override suggested values such as lot and serial numbers.
Pick Confirm (Mobile)
This feature provides you the extra flexibility to confirm your open pick lines on the go using a mobile device.
Steps to Enable
To enable the Inventory Management (New) work area icon and the mobile inventory features available in the work area, you must perform a set of steps to add the icon to the home page. Those steps are described at the beginning of the Mobile Inventory section in this document. If you've already done those steps, then you don't need to do them again.
Tips And Considerations
Open pick lines with dual units of measure or shipment tolerances are only partially supported. You can complete such pick transactions, but with limited features.
Key Resources
- Oracle Fusion Cloud SCM: Using Inventory Management guide, available on the Oracle Help Center.
- Watch the Confirm Your Open Pick Lines Using a Mobile Device Demo.
Access Requirements
Users who are assigned a configured job role that contains this duty role can access this feature:
- Confirm Pick Using Responsive Inventory (ORA_INV_CONFIRM_PICK_PWA_DUTY)
This duty role is new in this update.
Product Recall Management
Redwood Experience
These features were built in Redwood, Oracle’s next-generation user experience. Redwood brings state-of-the-art, consumer-grade user experiences across devices to the sophisticated enterprise scenarios that Oracle enables.
Perform Recall Counts Using the Recall Count Responsive Application
Record recall counts using a mobile device by scanning the barcode data using either a camera-based or device-based scanner.
Initiate the new mobile flow by clicking the Inventory Management (New) option under the Supply Chain Execution tab. Alternatively, you can directly navigate to different mobile pages using quick actions. For example, click the Recall Count quick action to directly navigate to the Recall Count mobile page.

Inventory Management (New)
You can record recall counts using the mobile device in real-time, as well as in an offline mode. You can scan the perpetual and PAR locations, items, lot numbers, and serial numbers using an external barcode device. Use the camera on your mobile device to scan or enter these attributes manually from a list of values. You can record the counts by selecting the tasks specific to your locations. You can enter the counted quantity for the recalled items or against the recalled lots. The count quantity can be entered in stocking unit of measure if it is defined for the item subinventory combination or for the item org combination. If the stocking unit of measure is not defined, you can enter the count quantity in primary unit of measure.
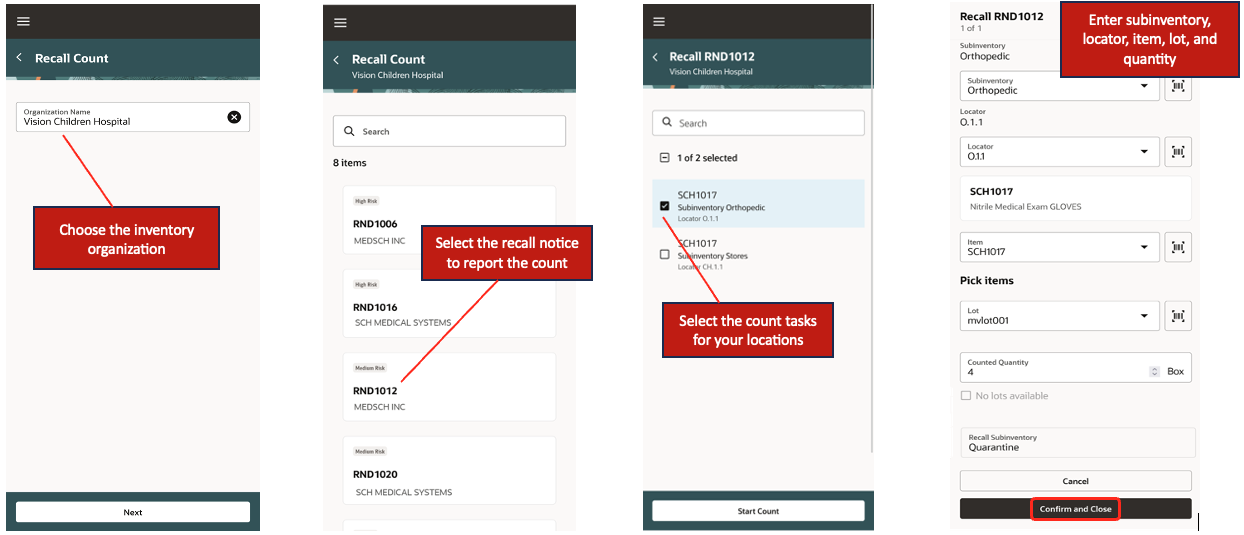
Record Recall Count
You can also record the counts by scanning the recalled serial numbers.
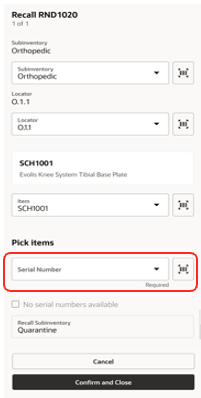
Scan Serial Numbers
You'll receive a confirmation message when you do a Confirm and Close action after recording the counts for the selected count tasks. This action automatically initiates a transaction to move the counted quantity into a default quarantine location configured for the inventory organization in the recall parameters.
You also have an option to load the defective parts that are counted and pulled from the respective locations into a pick subinventory and drop them in the default quarantine location. You can easily do this pick and drop by scanning the pick subinventory and recall subinventory which aligns with the physical material movement. The drop action initiates a transaction to move the counted quantity into the quarantine location.

Using Pick Subinventory During Recall Count
You can configure the recall parameters for an inventory organization to decide whether or not the intermediate step of pick and drop is required while recording the recall counts.
The offline mode capability lets you seamlessly perform recall counts for locations that don't have internet connectivity. You must be connected to Oracle Cloud at the time of choosing the organization before you begin to record your recall counts in an offline mode. This caches the data for all the locations in the chosen organization allowing you to work offline. You can record your recall counts the same way as you do in the online mode while you work offline. The recorded recall counts are synced with Oracle Cloud as soon as your mobile device is connected to the internet.
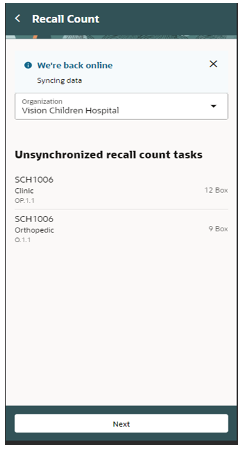

Offline Mode
This feature increases your organization's efficiency by providing the flexibility to perform your recall counts in real-time.
Steps to Enable
You don't need to do anything to enable this feature.
Key Resources
- Oracle Fusion Cloud SCM: Using Product Recall Management guide, available on the Oracle Help Center.
Access Requirements
Users who are assigned a configured job role that contains these privileges can access this feature:
- Record Recall Item Counts (INV_RECORD_RECALL_ITEM_COUNTS_PRIV)
- View Inventory Organizations List of Values by Web Service (RCS_VIEW_INV_ORG_LOV_WEB_SERVICE_PRIV)
- View Subinventory and Locator List of Values by Web Service (INV_VIEW_SUBINVENTORY_LOCATOR_LOV_WEB_SERVICE_PRIV)
All these privileges were available prior to this update.
You must also have the following data privileges granted to the user-defined role.
- Manage Subinventory Data
- Manage Inventory Locator Data
- Manage Item Locator Data
- Manage Item and Inventory Organization Parameter Data
Cost Management
Use the Enhanced Period Costing Account Balances Report by Supporting References for Account Reconciliation
You can view cost accounting balances in summary and detail mode to reconcile the Cost Accounting subledger with the General Ledger. The Period Costing Account Balances by Supporting References Report can be generated from the Scheduled Processes work area.
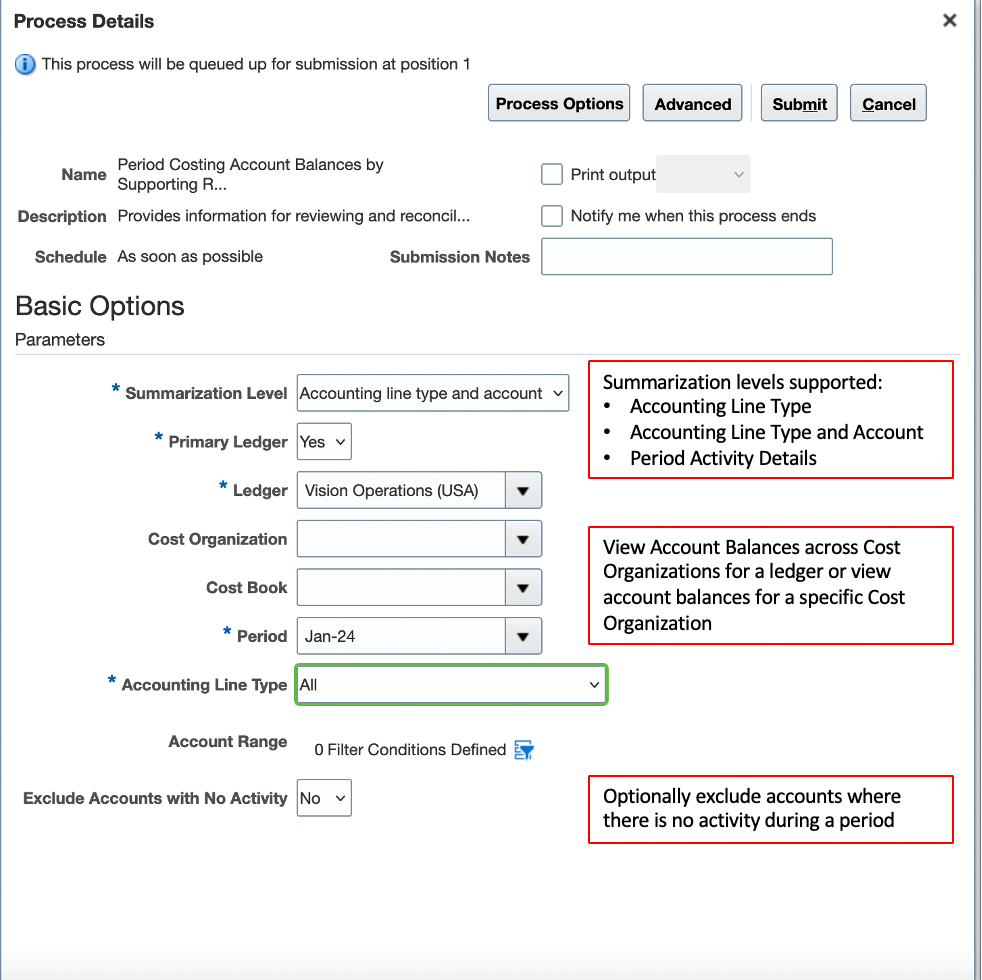
Scheduled Processes: Period Costing Account Balances by Supporting References Report
The following are some of the new reconciliation reporting capabilities introduced as part of this update:
- The report serves as a Trial Balance for the Cost Accounting subledger.
- You can view and reconcile account balances in the context of the Cost Accounting subledger. This can be especially useful during reconciliation if you use same accounts for multiple journal sources.
- You can view and reconcile summary and detail balances for a period at the ledger level or for each cost organization and cost book depending upon your enterprise structure and the level at which you reconcile accounts.
You can view and reconcile account balances at the following levels:
- Accounting Line Type: View summary opening balance, period activity (debits and credits), and closing balance for each cost accounting type.
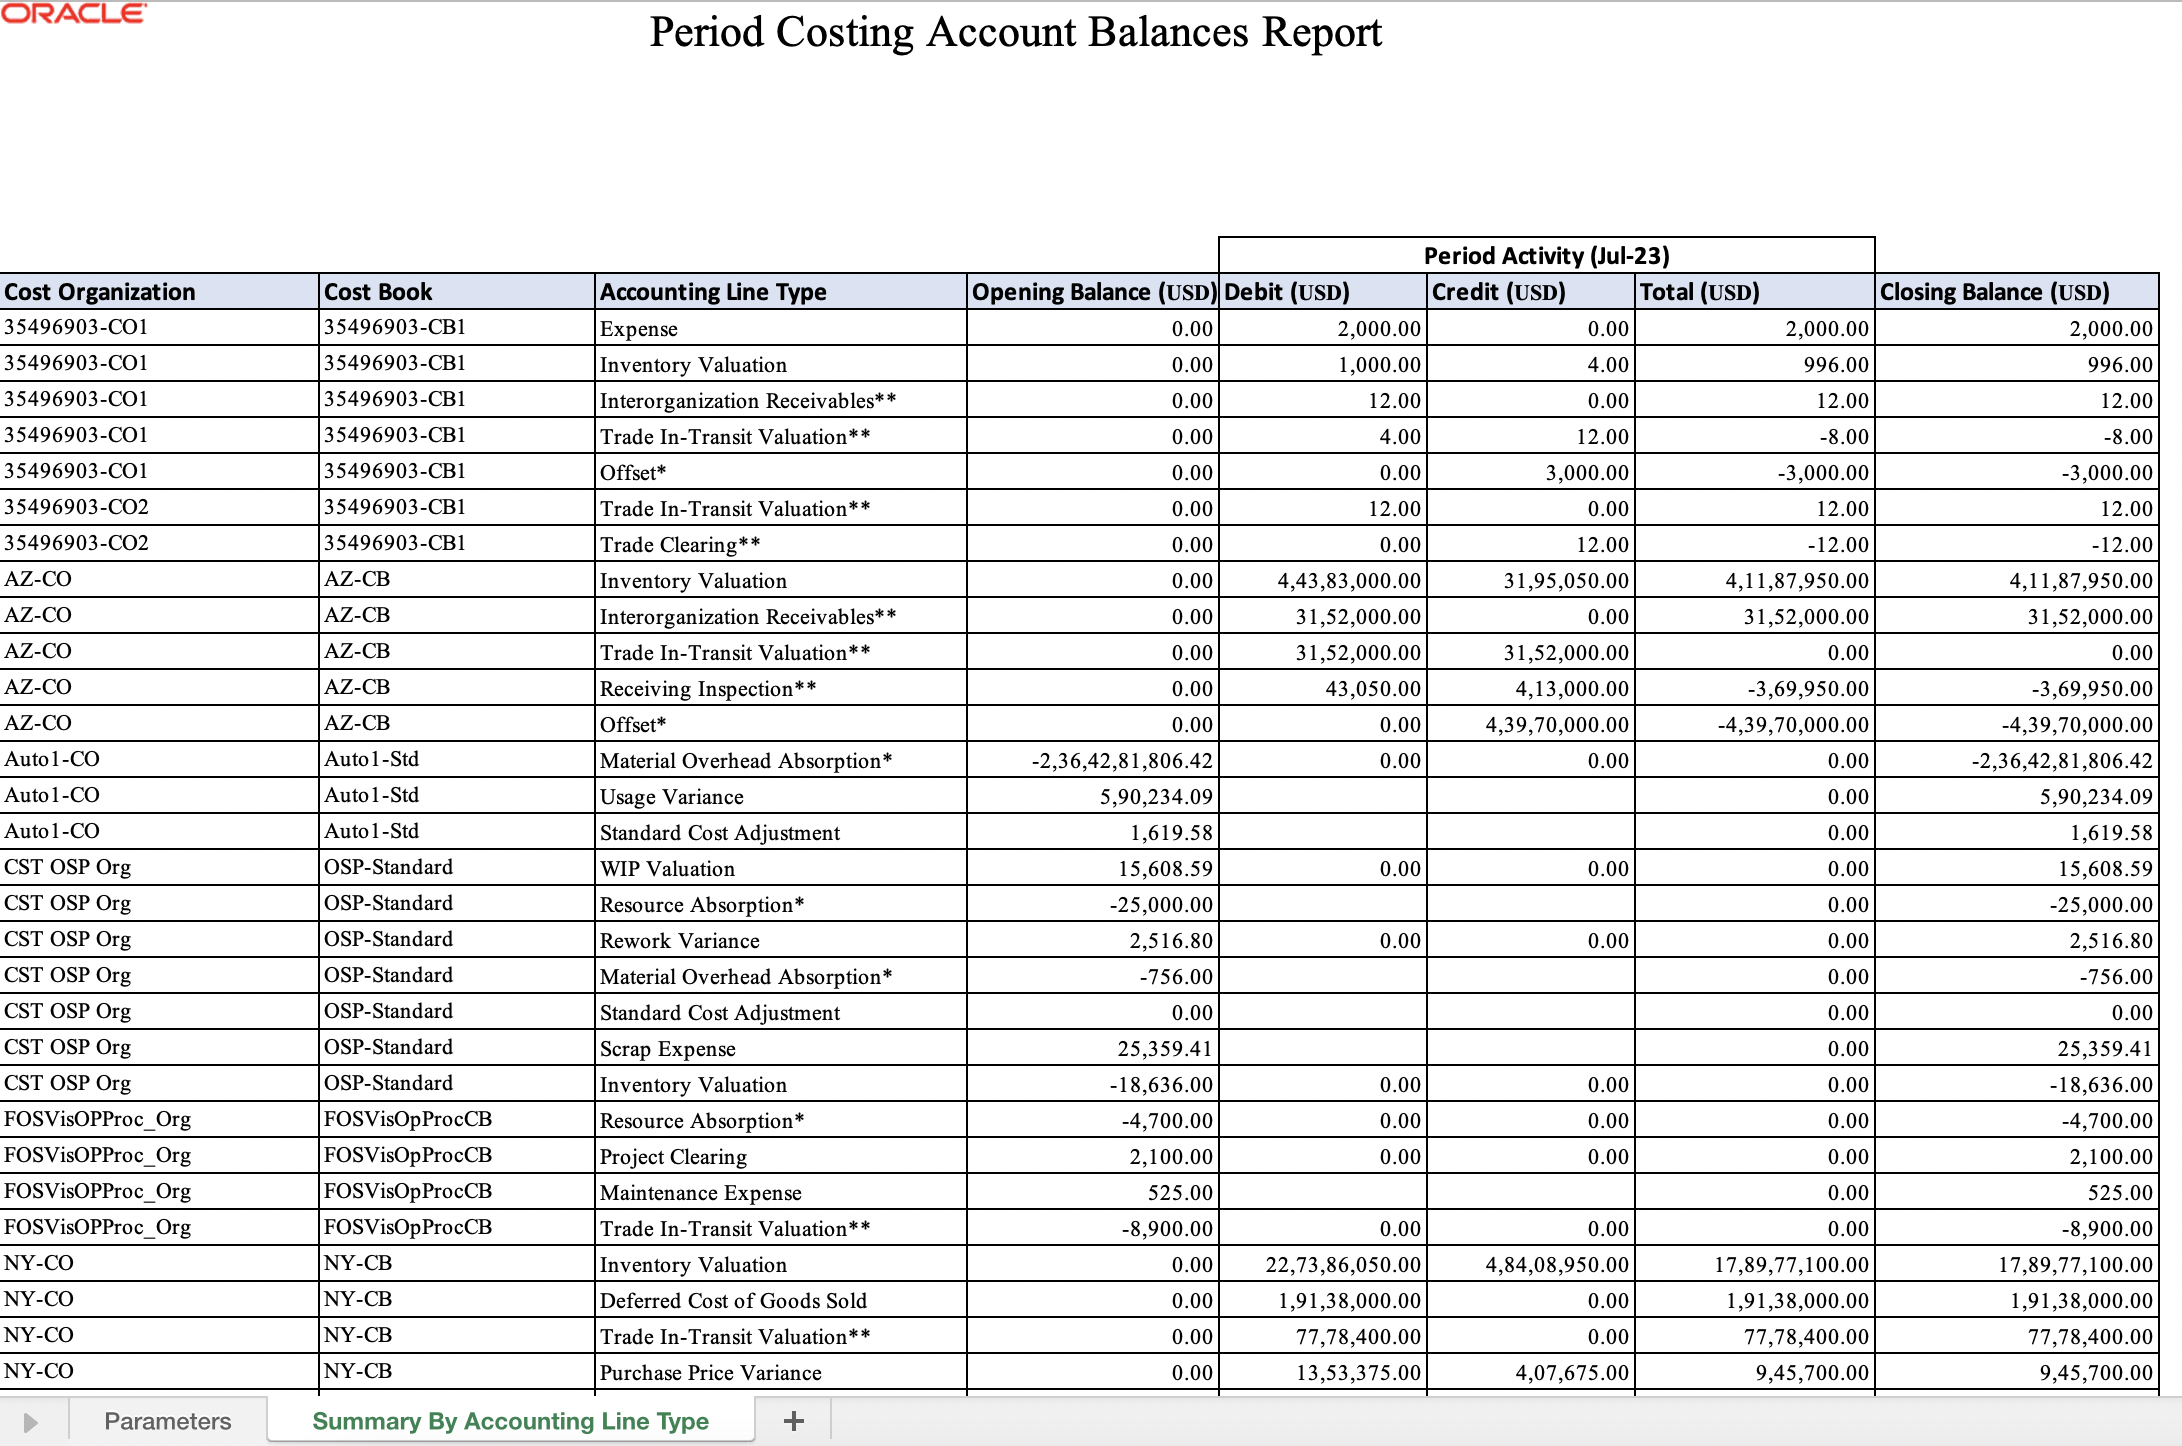
Summary of Costing Account Balances by Accounting Line Type
- Accounting Line Type and Account: View summary opening balance, period activity (debits and credits), and closing balance for each cost accounting line type and account. Use this view to review balances at account level for an accounting line type. Pay attention to same account being used for multiple accounting line types and confirm this as per expectation. Drill down to Period Activity Details to view transaction information and ensure transactions are correctly classified.

Summary of Costing Account Balances by Accounting Line Type and Account
- The Period Activity details view provides a clear link between Inventory and Costing transaction attributes, cost distribution and General Ledger accounting information distributions to help in reconciliation.
- View Period Activity Details to understand change to account balance during the period to substantiate account balances. Review transaction information to ensure transactions are classified correctly from an accounting perspective and flag any reconciliation issues.

View Transactions Contributing to Period Activity Along with Key Costing and Accounting Information
Steps to Enable
Use the Opt In UI to enable this feature. For instructions, refer to the Optional Uptake of New Features section of this document.
Offering: Manufacturing and Supply Chain Materials Management
- Opt in to the below feature to use this report.
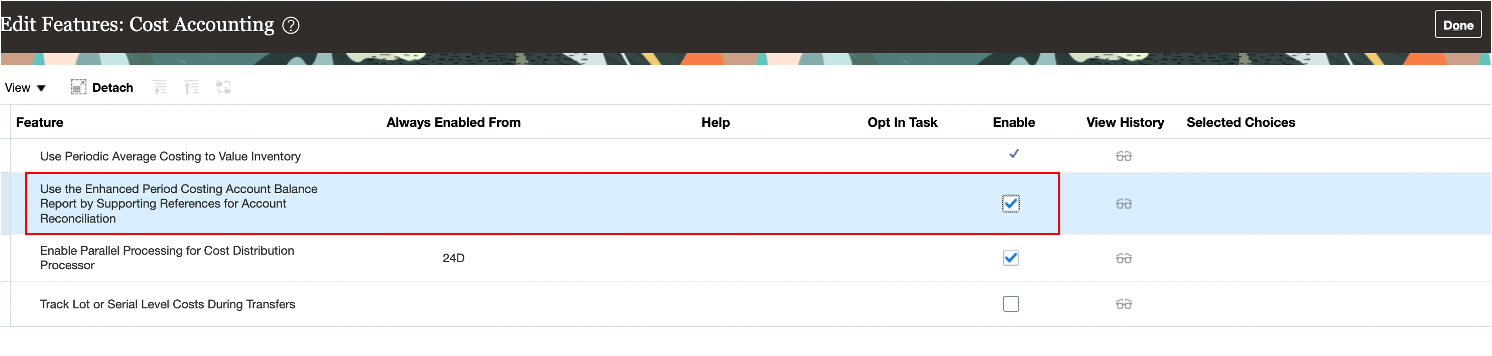
Feature Opt-in
Tips And Considerations
- Important: This report works on the basis of supporting references defined in Subledger Accounting for each journal line rule. By default, all predefined journal line rules for costing have the supporting references listed here:
- Cost Organization
- Cost Book
- Inventory Organization
- Item
- Journal Line Rule
- Important: If you define custom journal line rules for Cost Accounting, you must ensure that the above supporting references are updated against each journal line rule associated with the active journal entry rule set (JERS). Journal lines rules seeded in the application already have supporting references updated.
- Important: If the above supporting references aren't enabled against the journal lines, this report won't display balances for the corresponding accounting line types and accounts. The report, however, will provide information on such journal lines missing supporting references in the parameters tab of the report. You must:
- Update supporting references for journal line rules identified as exceptions in the parameters tab of the report.
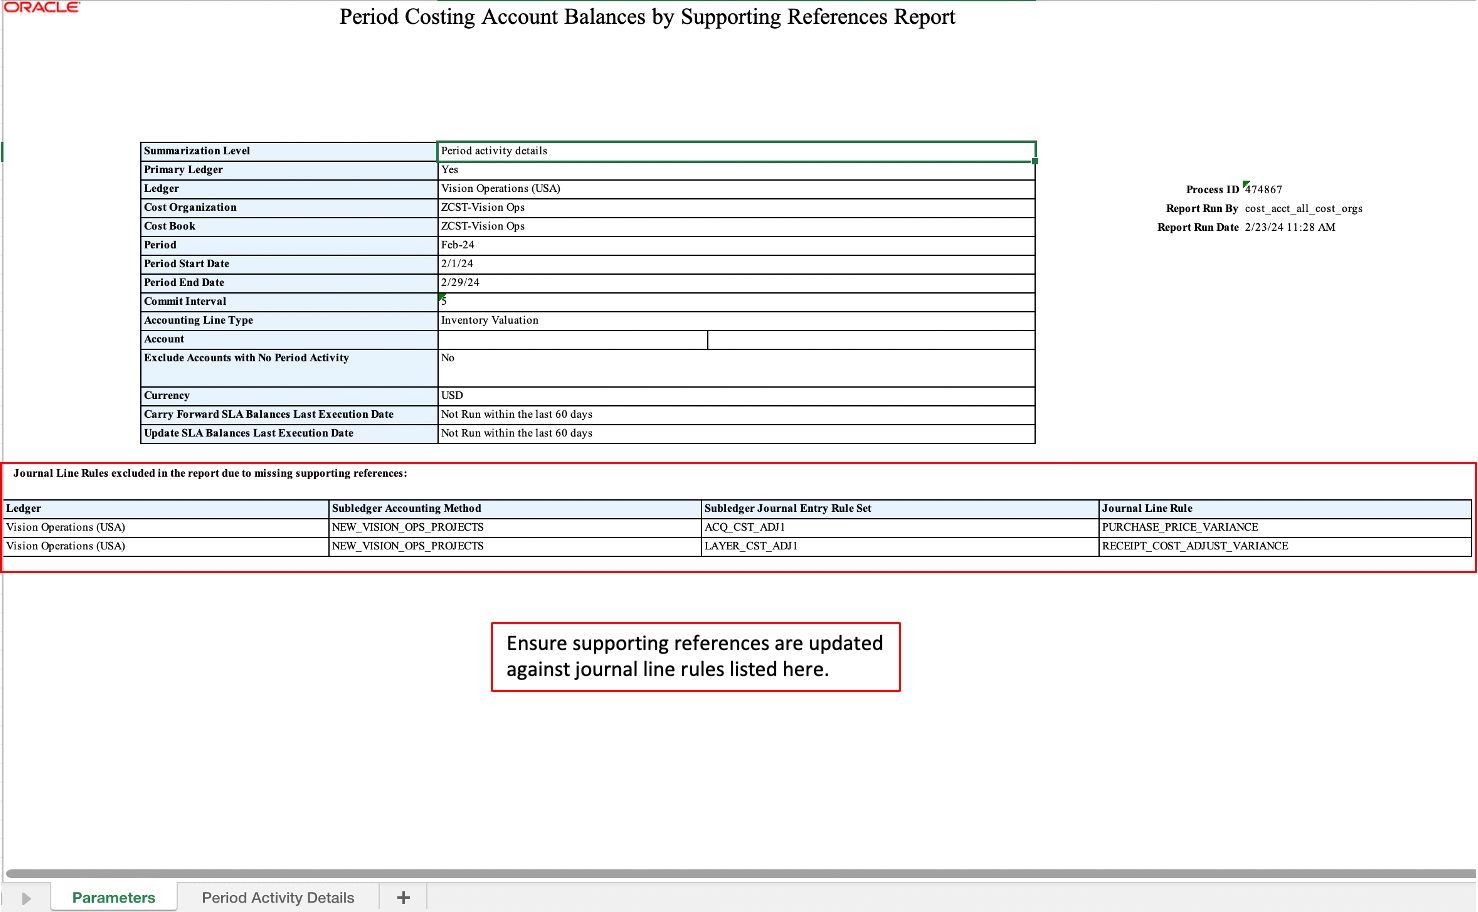
View Journal Line Rules Missing Supporting References in the Parameters Tab of the Report
- Updating supporting references won't fix account balances retrospectively.
- Use the ready-to-use Subledger Accounting functionality to update correct balances against each of the supporting references for the latest period: SUPPORTING REFERENCE BALANCE INITIALIZATION USING A SIMPLIFIED TEMPLATE
- All account balances are displayed only in the context of Cost Accounting subledger. When reconciling accounts, certain account balances may require reviewing balances across multiple subledgers or at the General Ledger level.
- To get a complete picture of the balances and period activity, you must review the additional balances in Receipt Accounting subledger for the accounting line types listed here; these are appended with a double asterisk (**) in the report:
- Clearing
- Trade Clearing
- Receiving Inspection
- Interorganization Receivables
- Consigned Clearing
- Consigned Inspection
- Consigned Receivables
- Trade In-Transit Valuation
- To get a complete picture of the balances and period activity, you must review the additional balances in other subledgers or at General Ledger level for the accounting line types listed here; these are appended with an asterisk (*) in the report:
- Material Overhead Absorption: Contains only credits when overheads are absorbed into inventory or expense in Cost Accounting. The debits to book the expenses may be recorded in a different subledger or directly in the General Ledger.
- Resource Absorption: Contains only credits when overheads are absorbed into WIP inventory or expense in Cost Accounting. The debits to book the expenses may be recorded in a different subledger or directly in the General Ledger.
- Offset
- To get a complete picture of the balances and period activity, you must review the additional balances in Receipt Accounting subledger for the accounting line types listed here; these are appended with a double asterisk (**) in the report:
- When Summarization level is Period Activity, use the commit interval in days to optimize performance. Default value is 5 and a change from default should be done only on advise from Oracle to optimize performance of the report background process.
Key Resources
- Oracle Fusion Cloud SCM: Using Supply Chain Cost Management guide, available on the Oracle Help Center.
- Doc ID 3004563.1: How to map supporting references to custom journal line rules used in journal entry rule sets
Access Requirements
Users who are assigned a configured job role that contains these privileges can access this feature:
- View Cost Transaction Data (CST_VIEW_COST_TRANSACTION_DATA)
The privilege was available prior to this update.
Create Cost Distributions in a Period that is in the Future Enterable Status in GL
Typically, you might close the General Ledger (GL) period a couple of days later than the Cost Accounting subledger period close. As a result, the GL will be open for the current period but in Cost Accounting you might have opened the next period. Prior to this update, you could create cost accounting distributions only in the GL period with the Open status.
You can now process transactions and create cost accounting distributions when the GL period is in the Future Enterable status. This helps you to continue with your GL closure process for the current period while in Cost Accounting you process and cost supply chain transactions for the next period.
While the GL period is in the Future Enterable status, you can run the Create Cost Accounting Distributions process in Cost Accounting, but posting the transactions to GL will be performed only after the GL period is in the Open status.
Steps to Enable
You don't need to do anything to enable this feature.
Tips And Considerations
-
The cost accounting period must be closed before closing the corresponding GL period.
-
It is recommended to run the Create Accounting process for the Cost Accounting subledger only after the corresponding GL period is set to the Open status.
-
As a best practice, keep only one Cost Accounting period open at a time. Don't have multiple costing periods open at the same time.
Key Resources
- Oracle Fusion Cloud SCM: Using Supply Chain Cost Management Guide, available on the Oracle Help Center
Access Requirements
Users who are assigned a configured job role that contains this privilege can access this feature:
- Create Cost Distributions (CST_CREATE_COST_DISTRIBUTIONS)
Use the Enhanced Inventory Valuation Page to Include Operational View of Inventory Value at the Inventory Organization and Subinventory Level
You can now review and analyze inventory value at the inventory organization and subinventory level, where the on-hand quantity and unit cost at that level is used to determine the inventory value. The Inventory infolets have been enhanced to also display the Inventory Value instead of the Costed Value.
NOTE: This feature was also made available in the February monthly update of 24A.

New Option to View Inventory Value at Inventory Organization, Subinventory Level
Here are some of the advantages this feature provides:
- Prior to this update, inventory value was only displayed at the valuation unit level. Costed and accounted value was displayed when viewing valuation information by inventory organization and sub inventory. From this update, the Review Inventory Valuation page will by default display inventory value when viewing data by inventory organization and subinventory at summary level and for each individual item when you drill down to the item level details.

Item Level Inventory Value by Inventory Organization and Subinventory
- The Period Inventory Valuation Report has also been enhanced and a new inventory valuation template has been introduced to view inventory value by item category, inventory organization, and subinventory.

New Template for Viewing Inventory Value by Item Category, Inventory Organization, Subinventory
Steps to Enable
You don't need to do anything to enable this feature.
Tips And Considerations
-
The new views will help nonaccounting users to get an operational view of inventory value which may be different from the accounting view in the following instances:
- Valuation unit is at the cost organization level and user views item level inventory valuation at the inventory organization level.
- Valuation unit is at the inventory organization level and user views item level inventory value by subinventory.
- Use the Costed and Accounted Value view when performing account reconciliation at the inventory organization or subinventory level.
Key Resources
- Oracle Fusion Cloud SCM: Using Supply Chain Cost Management guide, available on the Oracle Help Center.
- What's New: Use Enhanced Period Inventory Valuation and Gross Margin Reporting
Access Requirements
Users who are assigned configured job roles that contain these privileges are able to access this feature:
- Review Inventory Valuation (CST_RUN_INVENTORY_VALUATION_REPORT)
- Run Inventory Valuation Report (CST_RUN_INVENTORY_VALUATION_REPORT)
These privileges were available prior to this update.
Analyze Rolled-Up Costs for Supply Chain Cost Rollup Using New Subject Area
If you use supply chain cost rollup to calculate the costs of your manufactured items, you can now analyze these costs using the Costing - Supply Chain Cost Rollup Real Time subject area in OTBI. Using this subject area, you can validate your costs by reviewing the following information for your items:
- Sourcing Rules (Buy From, Make At, Transfer From)
- Work Definitions
- Work Definition Operations
- Work Definition Materials
- Work Definition Resources
- Work Definition Outputs (if you use process manufacturing)
- Component Costs
- Resource Rates
- Overhead Rates
Supply Chain Cost Rollup Real Time - This subject area helps you to create personalized analysis reports to verify the rolled-up costs of manufactured items. Using this subject area, you can design the layout of the report and include information that's relevant to your business. You can also apply specific functions over the exposed attributes to report on metrics crucial for your business.
Supply Chain Rollup Costed BOM Report - This seeded report helps you readily analyze the rolled-up costs for your manufactured items. If you want to see additional information, you can save this report locally and make necessary changes to include information for your business users.
Supply Chain Rollup Costed BOM Report
Here are some of the benefits provided by this new subject area:
- Expedite your cost planning process by efficiently analyzing the rolled-up costs of manufactured items across organizations.
- Reduce errors by exporting the rolled-up costs information for offline analysis.
- Make better decisions for your business by tracking specific metrics.
Steps to Enable
You don't need to do anything to enable this feature.
Tips And Considerations
This feature is useful for customers who use supply chain cost rollup to calculate the costs of their manufactured items. If you don't use supply chain cost rollup, continue to use the Cost Rollup Details Real Time subject area for analytics and reporting of the costs of your manufactured items.
Key Resources
- Oracle Fusion Cloud SCM: Implementing Manufacturing and Supply Chain Materials Management Guide, available on the Oracle Help Center.
- For OTBI, refer Oracle Fusion Cloud SCM: Using Supply Chain Cost Management Guide and Oracle Fusion Cloud SCM: Subject Areas for Transactional Business Intelligence in SCM, available on the Oracle Help Center.
Access Requirements
Users who are assigned BI Administrator role and also have permission to open, view, and edit repository files using the Administration tool or the Oracle BI Metadata web service.
Enable Parallel Processing for Cost Distribution Processor
The Create Cost Accounting Distributions process calculates the costs and generates distributions for all supply chain transactions such as inventory material transactions resulting from purchase order receipts or work order completions, resource transactions from work orders, and so on. You can now enable parallel processing in the Create Cost Accounting Distributions process so that the eligible transactions are spread across multiple subprocesses to achieve a much higher throughput during the distribution processing stage.
When enabled, during the distribution processing stage of the Create Cost Accounting Distributions process, multiple subprocesses are automatically spawned to process the distributions in parallel. The main process groups the cost layers such that each of the subprocess can independently process those layers to generate distributions without any contention with the other subprocesses that may be running in parallel. The feature is specifically tailored for high to very-high volume cost processing and the throughput improvements will be significant in those scenarios. For low to medium volume cost processing, there will be improvements in throughput, but it might not be noticeably higher as the current processing times will usually be optimal to begin with.
After you opt in to the feature, you will see a new column Maximum Number of Workers indicating the maximum number of subprocesses that would be used by the Create Cost Accounting Distributions process. You can enter a value between 2 and 20 to indicate that you want to use parallel processing.

Create Cost Accounting Distributions
To ensure that the Create Cost Accounting Distributions process doesn't consume a lot of resources that will otherwise be required for other processing elsewhere in the system, some restrictions are placed on the number of workers that will be launched by the system. Regardless of the value for maximum workers set in the run control parameter, during runtime, the system dynamically reduces the number of concurrent workers that are run based on the data volume being processed to ensure that the processing times are optimized. Currently, the threshold is set to 100,000 distribution lines and a maximum of 20 workers.
The table shows how the system decides on the number of workers dynamically during processing.
| Cost Layers | Maximum Number of Workers | Actual Number of Subprocesses Launched (including the parent process) |
|---|---|---|
| 1000 | 10 | 1 |
| 100,000 | 10 | 1 |
| 400,000 | 10 | 4* |
| 1,000,000 | 10 | 10* |
| 2,000,000 | 10 | 10* |
* - Actual subprocesses may vary slightly from the number indicated based on actual volume and mix of transactions processed.
The main advantage from such parallel processing is to allow for dividing the load irrespective of the cost organization structure or variations in data volume in the cost organization or set of cost organizations. The parallel processing will also make better use of the available hardware. Customers that have a very high volume of transactions and are running a consolidated process will benefit through significant improvement in processing times with this feature. Ultimately, the reduced processing time will help speed up period close processing.
Steps to Enable
Use the Opt In UI to enable this feature. For instructions, refer to the Optional Uptake of New Features section of this document.
Offering: Manufacturing and Supply Chain Materials Management No Longer Optional From: Update 24D
Tips And Considerations
- The feature is specifically tailored for high to very-high volume cost processing and the throughput improvements will be significant in those scenarios. For low to medium volume cost processing, there will be improvements in throughput, but it may not be noticeably higher as the current processing times will usually be optimal to begin with.
- For initial setup, we recommend a setting of one sub-process for every 250,000 distribution lines that you generate today on a regular run of the Create Cost Accounting Distributions process.
Key Resources
- Oracle Fusion Cloud SCM: Implementing Manufacturing and Supply Chain Materials Management Guide, available on the Oracle Help Center.
- Oracle Fusion Cloud SCM: Using Supply Chain Cost Management, available on the Oracle Help Center.
Access Requirements
Users who are assigned a configured job role that contains these privileges can access this feature:
- Create Cost Distributions (CST_CREATE_COST_DISTRIBUTIONS)
Report Ad hoc Outputs During Work Order Execution in Discrete Manufacturing
Discrete manufacturing processes sometimes involve production of more than one output at the end of an operation. For example, cutting multiple sheets of metal from a larger sheet, or capturing a by-product while making the main product which can be sold as a separate item. The completion of primary product and reporting of rejected quantity or disposal of scrap was allowed. However, for scenarios involving multiple outputs, these additional outputs need to be reported into inventory as supply, as reusable material for subsequent work orders or recoverable scrap sold as a separate item.
With this new update, you can now report additional co-products and by-products as ad hoc outputs during the execution of an operation, for standard, discrete manufacturing work orders. An ad hoc output can be reported as an output completion transaction into a specified completion subinventory from the Review Dispatch List page. You can use the output reverse transaction to correct the output completion transaction. This capability is also available through File-Based Data Import (FBDI), ADFdi data import correction, and REST web service. The ad hoc output completions will use a fixed cost that is set up in the Manage Standard Costs page. The primary product is reported along with the operation completion transaction at the last operation.
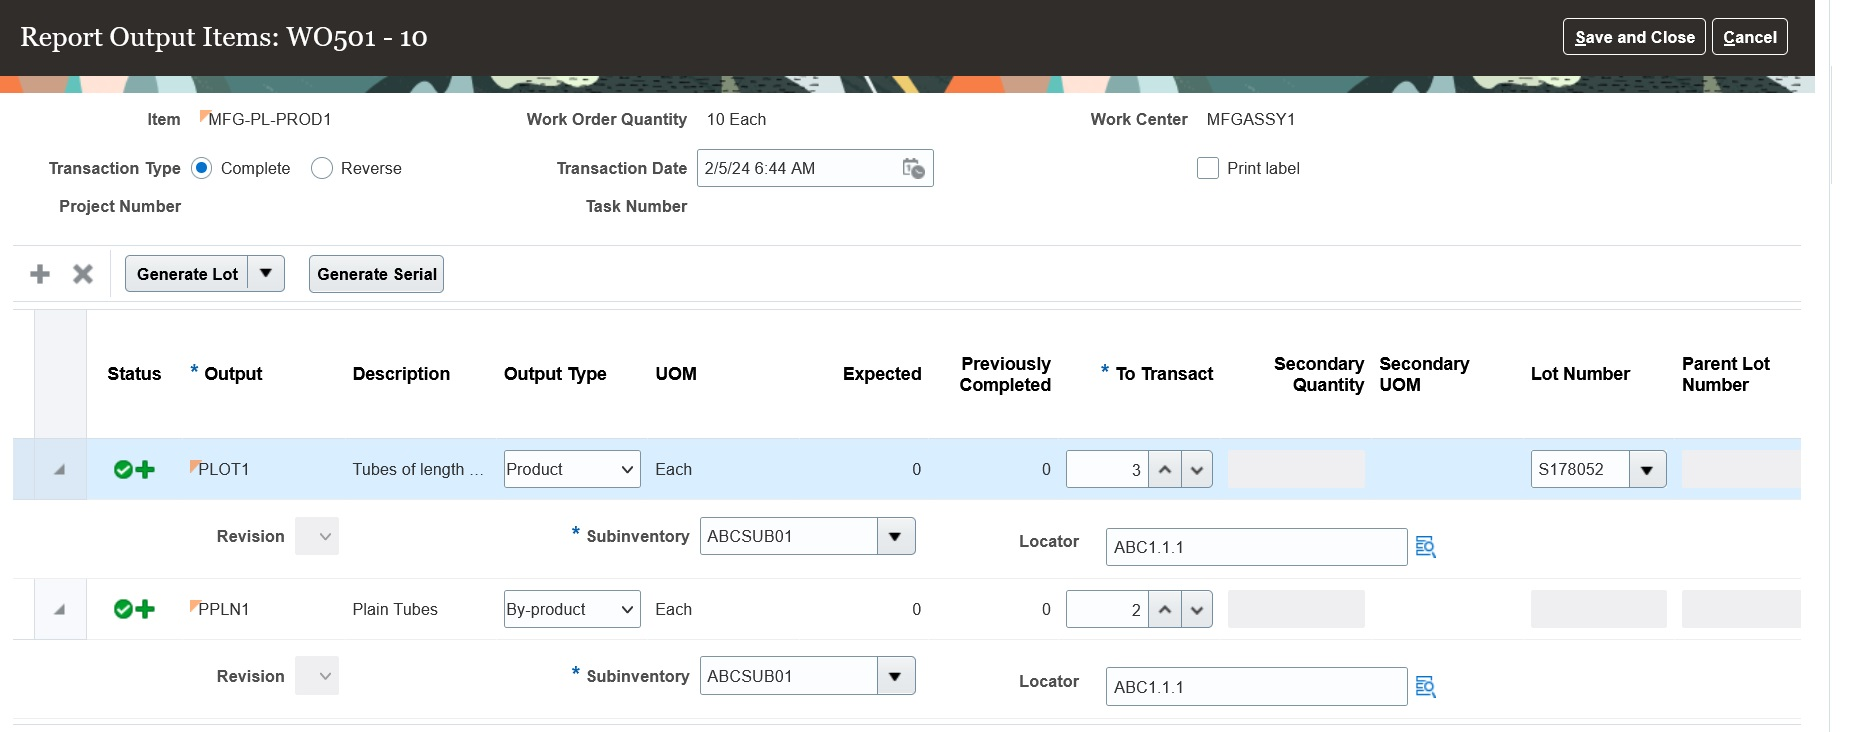
Reporting Ad Hoc Output at a Discrete Work Order Operation
File-Based Data Import (FBDI) Changes:
The FBDI Discrete Manufacturing Work Order Material Transactions Import, WorkOrderMaterialTransactionTemplate.xlsm, has been enhanced to enable reporting of ad hoc outputs in count point in-house operations for standard work orders. The Transaction Type Code column in Material Transaction Header worksheet will show two new values PRODUCT_COMPLETION and PRODUCT_RETURN for reporting output completions and output returns. Use the latest FBDI template after the 24B update.
You can reverse the reported outputs to correct any errors. The transactions reported through FBDI that failed validations can be corrected and resubmitted through ADFdi.
REST API Changes:
You can now report outputs for standard discrete manufacturing work order operations using the Work Order Material Transactions REST API.
Discrete manufacturers will achieve accurate recovery and valuation of scrap or any unplanned outputs, leading to maximum value realization from items produced.
Steps to Enable
Use the Opt In UI to enable this feature. For instructions, refer to the Optional Uptake of New Features section of this document.
Offering: Manufacturing and Supply Chain Materials Management No Longer Optional From: Update 24D
Tips And Considerations
- Ad hoc negative component quantities can't be reported as outputs. For more information about negative material transactions, refer to the 23C feature Remove a Component During Discrete Manufacturing Work Execution.
- Ad hoc outputs are generally unplanned outputs and aren't considered in supply planning.
- Outputs can be optionally enabled as lot or serial-controlled to support product genealogy.
Key Resources
- Refer to the Oracle Fusion Cloud SCM: Using Manufacturing guide, available on the Oracle Help Center.
- Refer to the Oracle Fusion Cloud SCM: Implementing Manufacturing and Supply Chain Materials Management guide, available on the Oracle Help Center.
Access Requirements
Users who are assigned a configured job role that contains this privilege can access this feature:
- Report Material Transactions (WIP_REPORT_MATERIAL_TRANSACTIONS_PRIV)
This privilege was available prior to this update.
Selected Cost Management Bug Fixes in This Update
This update includes some bug fixes that can change the way Oracle Cost Management works. This isn't a full list of all the bug fixes in this update. This list includes the bug fixes that can cause a noticeable change in application behavior.
Roll Forward Inventory Valuation Balances to Current Period When There Are no Cost Transactions
Before update 24B, the cost reports processor rolled forward inventory valuation balances to the current period as long as there was at least one cost transaction in the current period for the cost organization and cost book.
Starting with update 24B, the cost reports processor rolls forward the inventory valuation balances to the current period even when there are no transactions. Ensure that you run the Create Cost Accounting Distributions process with:
- The cost reports processor selected
- The cost cut-off date set in the current period
- A system date in the same period
Oracle reference: 35776545
Steps to Enable
You don't need to do anything to enable this feature.
Redwood Experience
These features were built in Redwood, Oracle’s next-generation user experience. Redwood brings state-of-the-art, consumer-grade user experiences across devices to the sophisticated enterprise scenarios that Oracle enables.
Create and Update Resource Rates Using Redwood Pages
As a manufacturing or maintenance enterprise user, you need to define resources in your manufacturing or maintenance organizations. When you set up work definitions for your manufactured items, these resources are used in different operations. Finally, as you complete the work orders in the shop floor, resource transactions are generated based on their usage. You need to establish resource rates to cost these transactions and accurately calculate your production costs.
You can now create, modify, delete and search for resource rates using the Redwood pages. You can verify the resource rate details for an existing resource rate and also download the existing resource rates information into a spreadsheet for offline analysis and collaboration.
You can also perform advanced edit actions for selected records by using the mass edit capability.
The Manage in Spreadsheet functionality helps you download the Oracle Application Development Framework Desktop Integration (ADFDI) spreadsheet enabling you to manage a high volume of resource rates using the native Excel interface. You can search for existing resource rates, modify them, or create new resource rates by using this interface.
You can manage the resource rates only for the cost organizations you've access to.
Search resource rates
When you navigate to the Resource Rates page, by default, you can view existing resource rates that haven't been published. The resource rates are sorted by their effective start date with the most recent rates displayed at the top. You can also sort the rates by these attributes:
- Total Rate
- Effective Start Date
- Effective End Date
- Effective Start Period (if you use Periodic Average Cost method)
- Effective End Period (if you use Periodic Average Cost method)

Screenshot to Display Resource Rates Page
You can change the search criteria by selecting suitable filters available on the page, or by keywords.
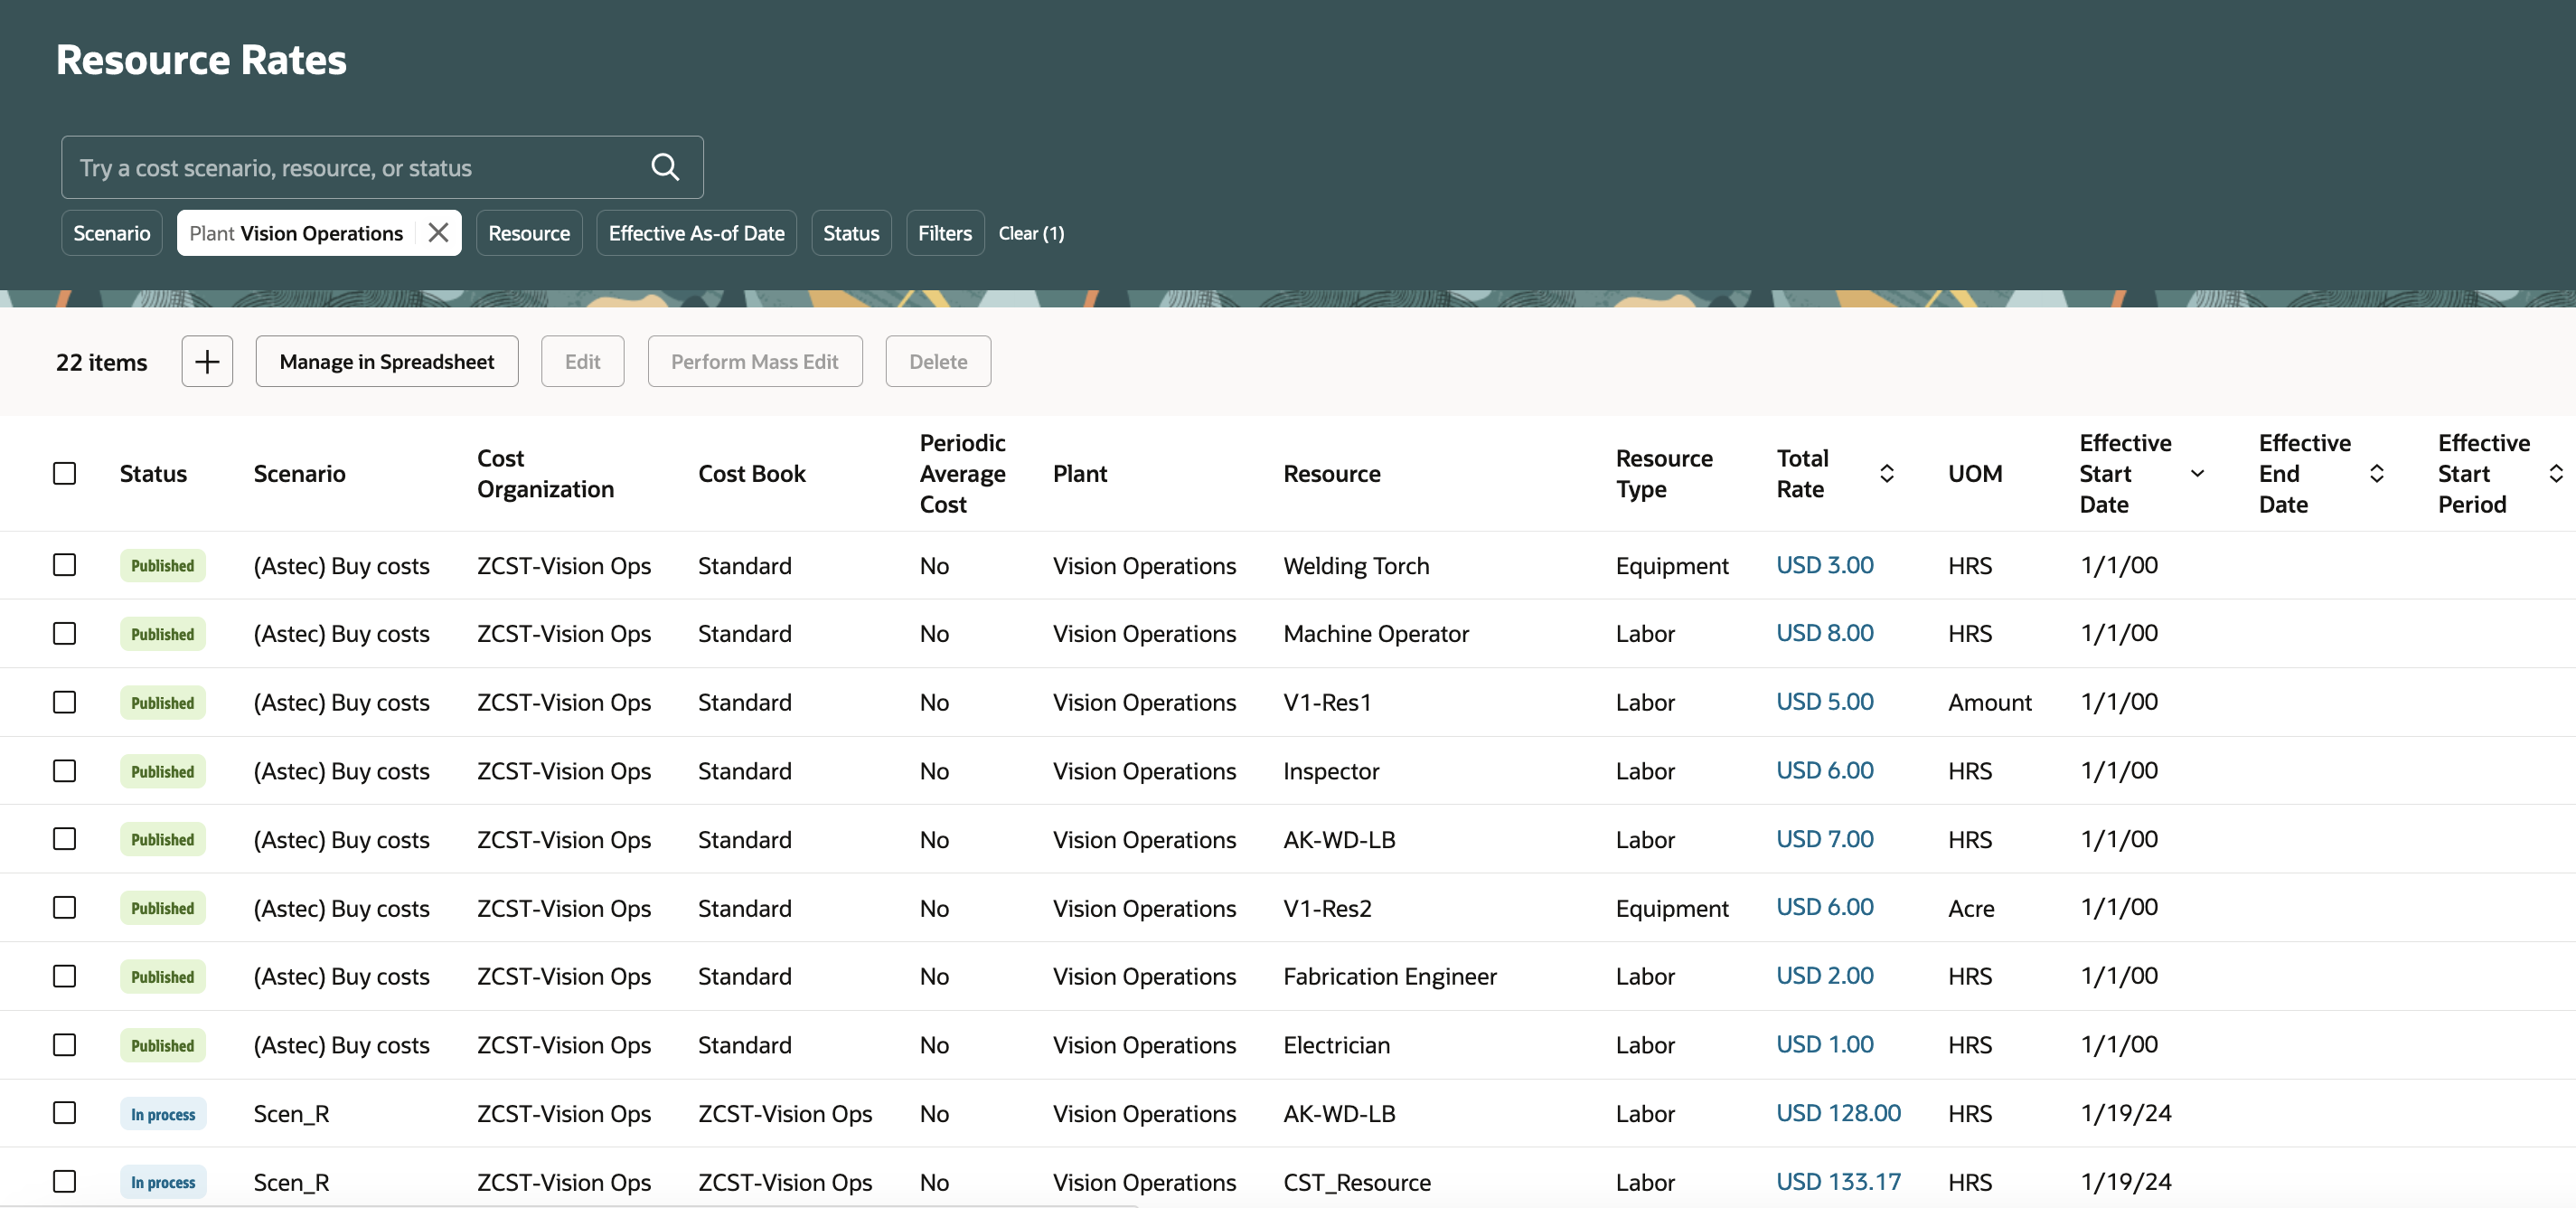
Screenshot Displaying User Specified Filter
Screenshot Displaying Search Criteria Applied Using Keyword
Additional filter criteria are available using the Filters options to narrow down your search.

Screenshot Displaying Additional Search Filters
View Resource Rate Details
You can view the breakdown of resource rates by clicking the Total Rate attribute.
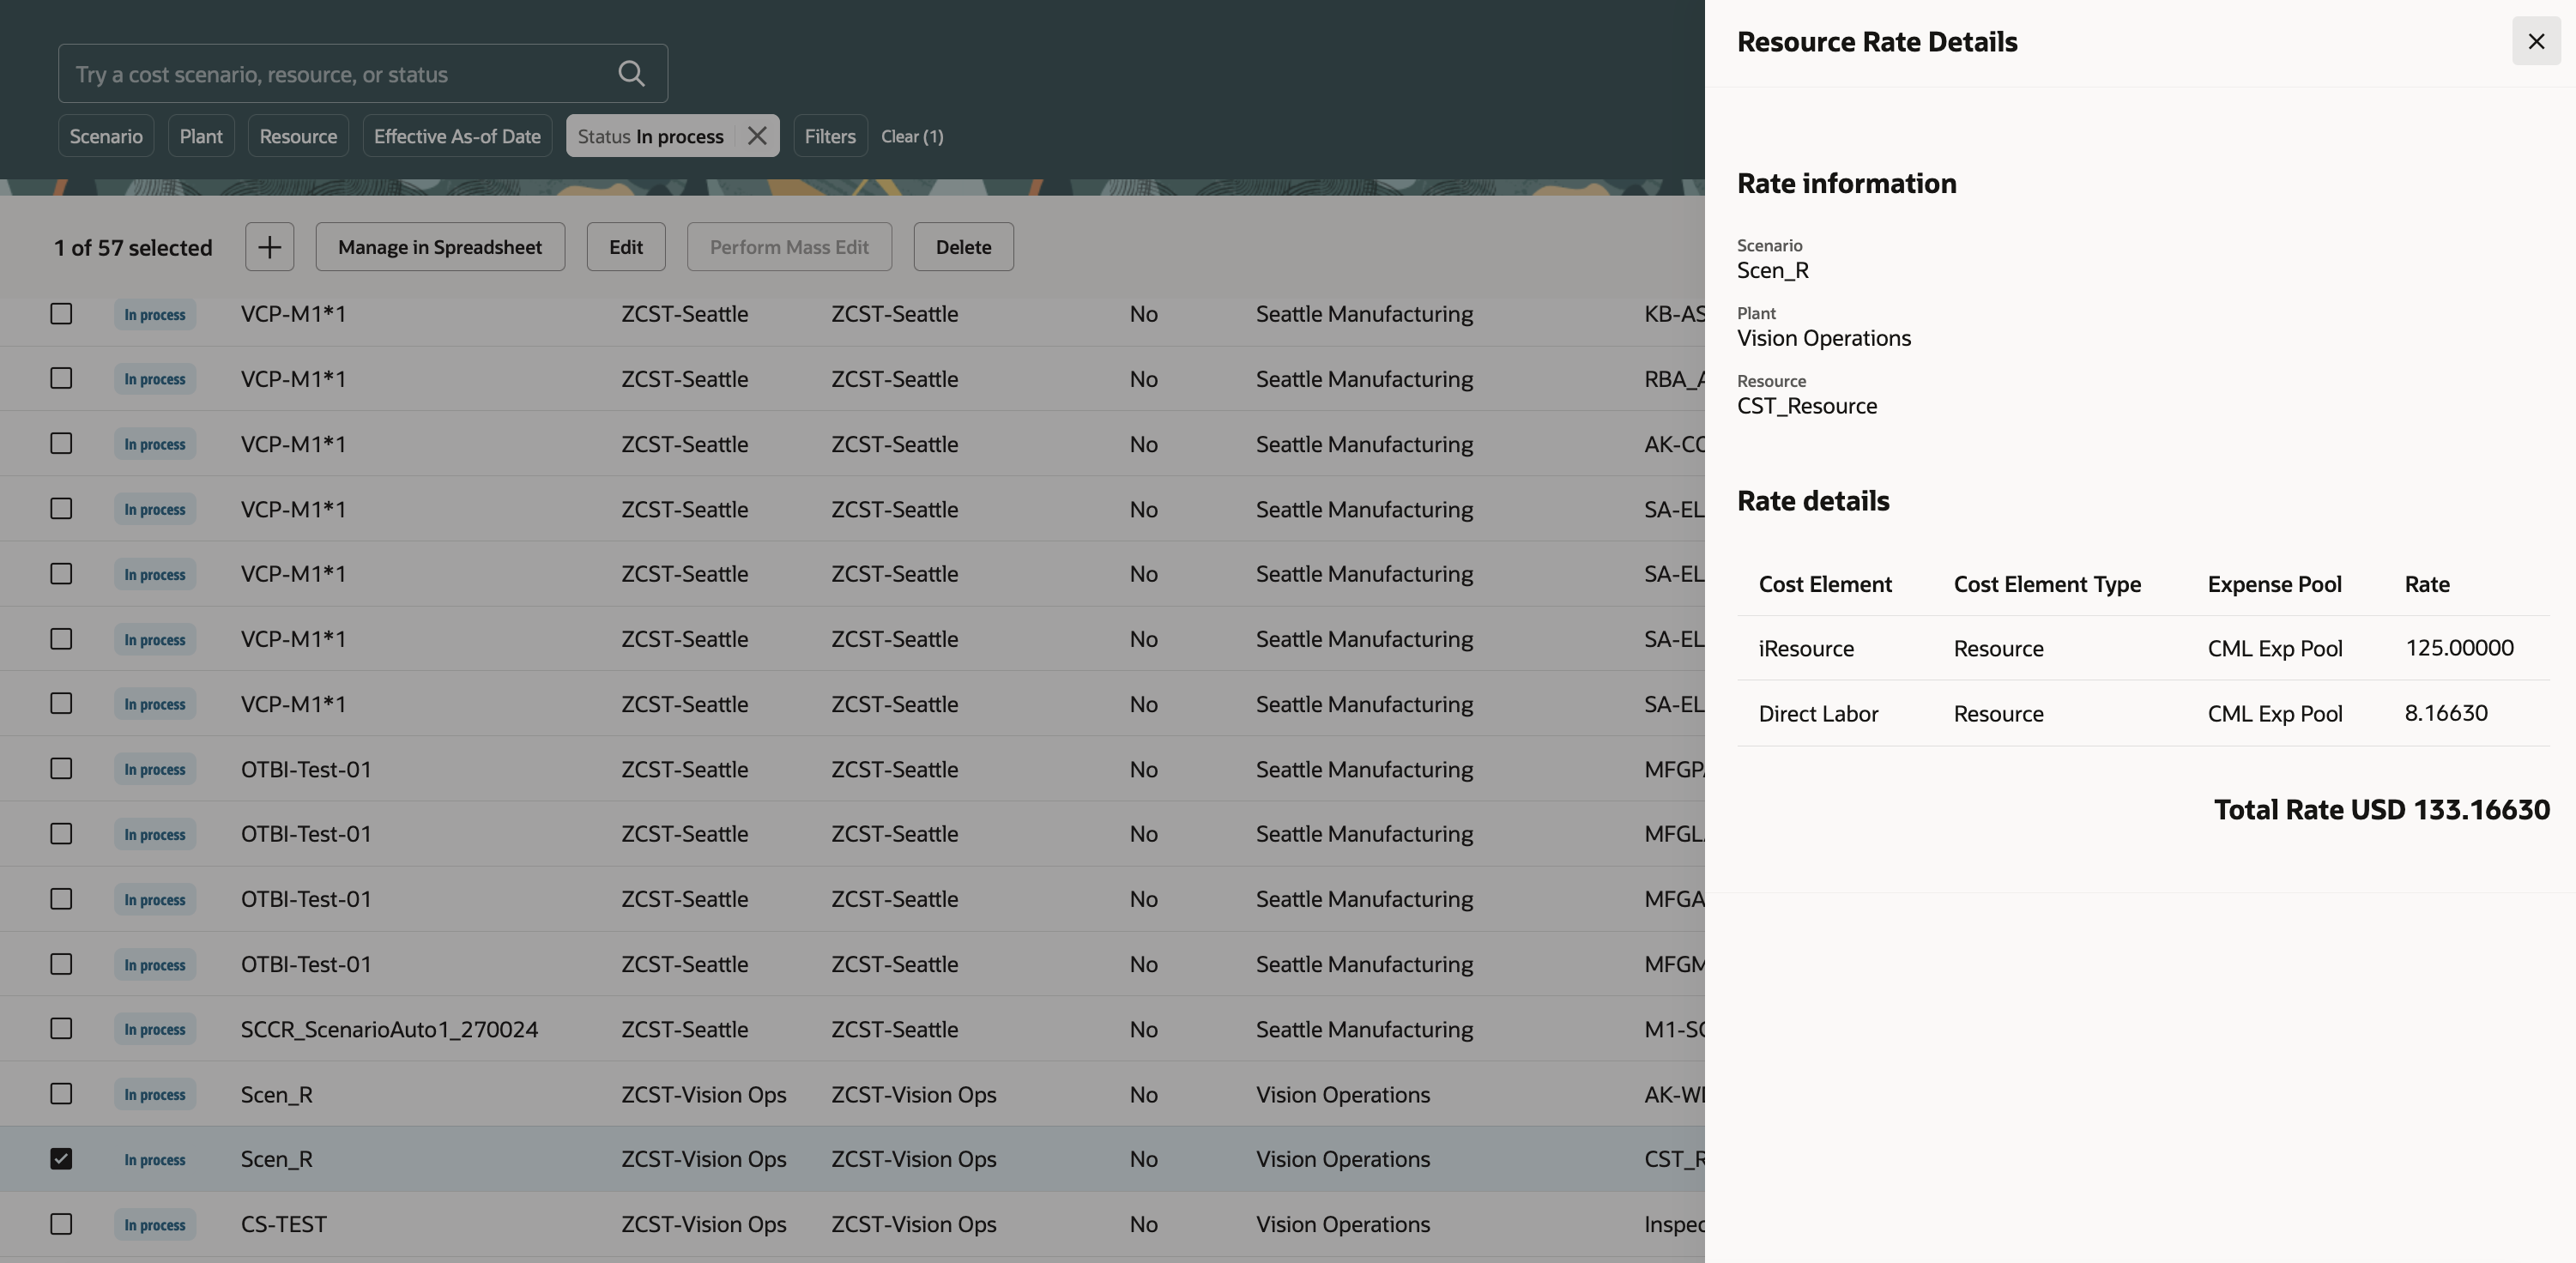
Screenshot with View Resource Rate Details
Edit Resource Rate
You can select an unpublished resource rate (status = In Process) and modify the rate details. You can add a new resource rate detail, modify an existing resource rate detail, or even delete an existing resource rate detail. You can only use cost elements of type Resource or Overhead to modify resource rates. The Total Rate attribute automatically reflects the changes.

Screenshot to Edit Resource Rate Details

Screenshot to Add New Resource Rate Detail
Perform Mass Edit
You can select multiple unpublished resource rates and perform mass edit on the selected resource rates simultaneously. You can:
- Increase cost
- Decrease cost
- Replace cost
- Add cost element
- Delete cost element
- Substitute cost element
- Substitute expense pool
You can only use cost elements of type Resource or Overhead.

Screenshot with Mass Edit Capability
Create Resource Rate
You can create a new resource rate for cost scenarios that haven't yet been published.

Screenshot to Create Resource Rate
You can only use cost elements of type Resource or Overhead to create resource rates.
When creating a resource rate, the cost element and expense pool should belong to Common Set or the set associated with the cost organization selected to enter resource rates.
Here are some of the benefits of this feature:
- Fast track your resource rate management activity by focusing on yet to be published resource rates for organizations you manage.
- Expedite your decision making process by searching for resource rates using search keywords or relevant filters.
- Reduce data entry errors by quickly verifying the resource rate details without losing context.
Steps to Enable
- In the Setup and Maintenance work area, search for and select the Manage Administrator Profile Values task.
- On the Manage Administrator Profile Values page, search for and select the ORA_CST_RESOURCE_RATES_REDWOOD_ENABLED profile option code.
- In the Profile Values section, set the Site level to Yes. The default value is No.
- Yes = enables the feature
- No = disables the feature
- Click Save and Close. Changes in the profile value will affect users the next time they sign in.
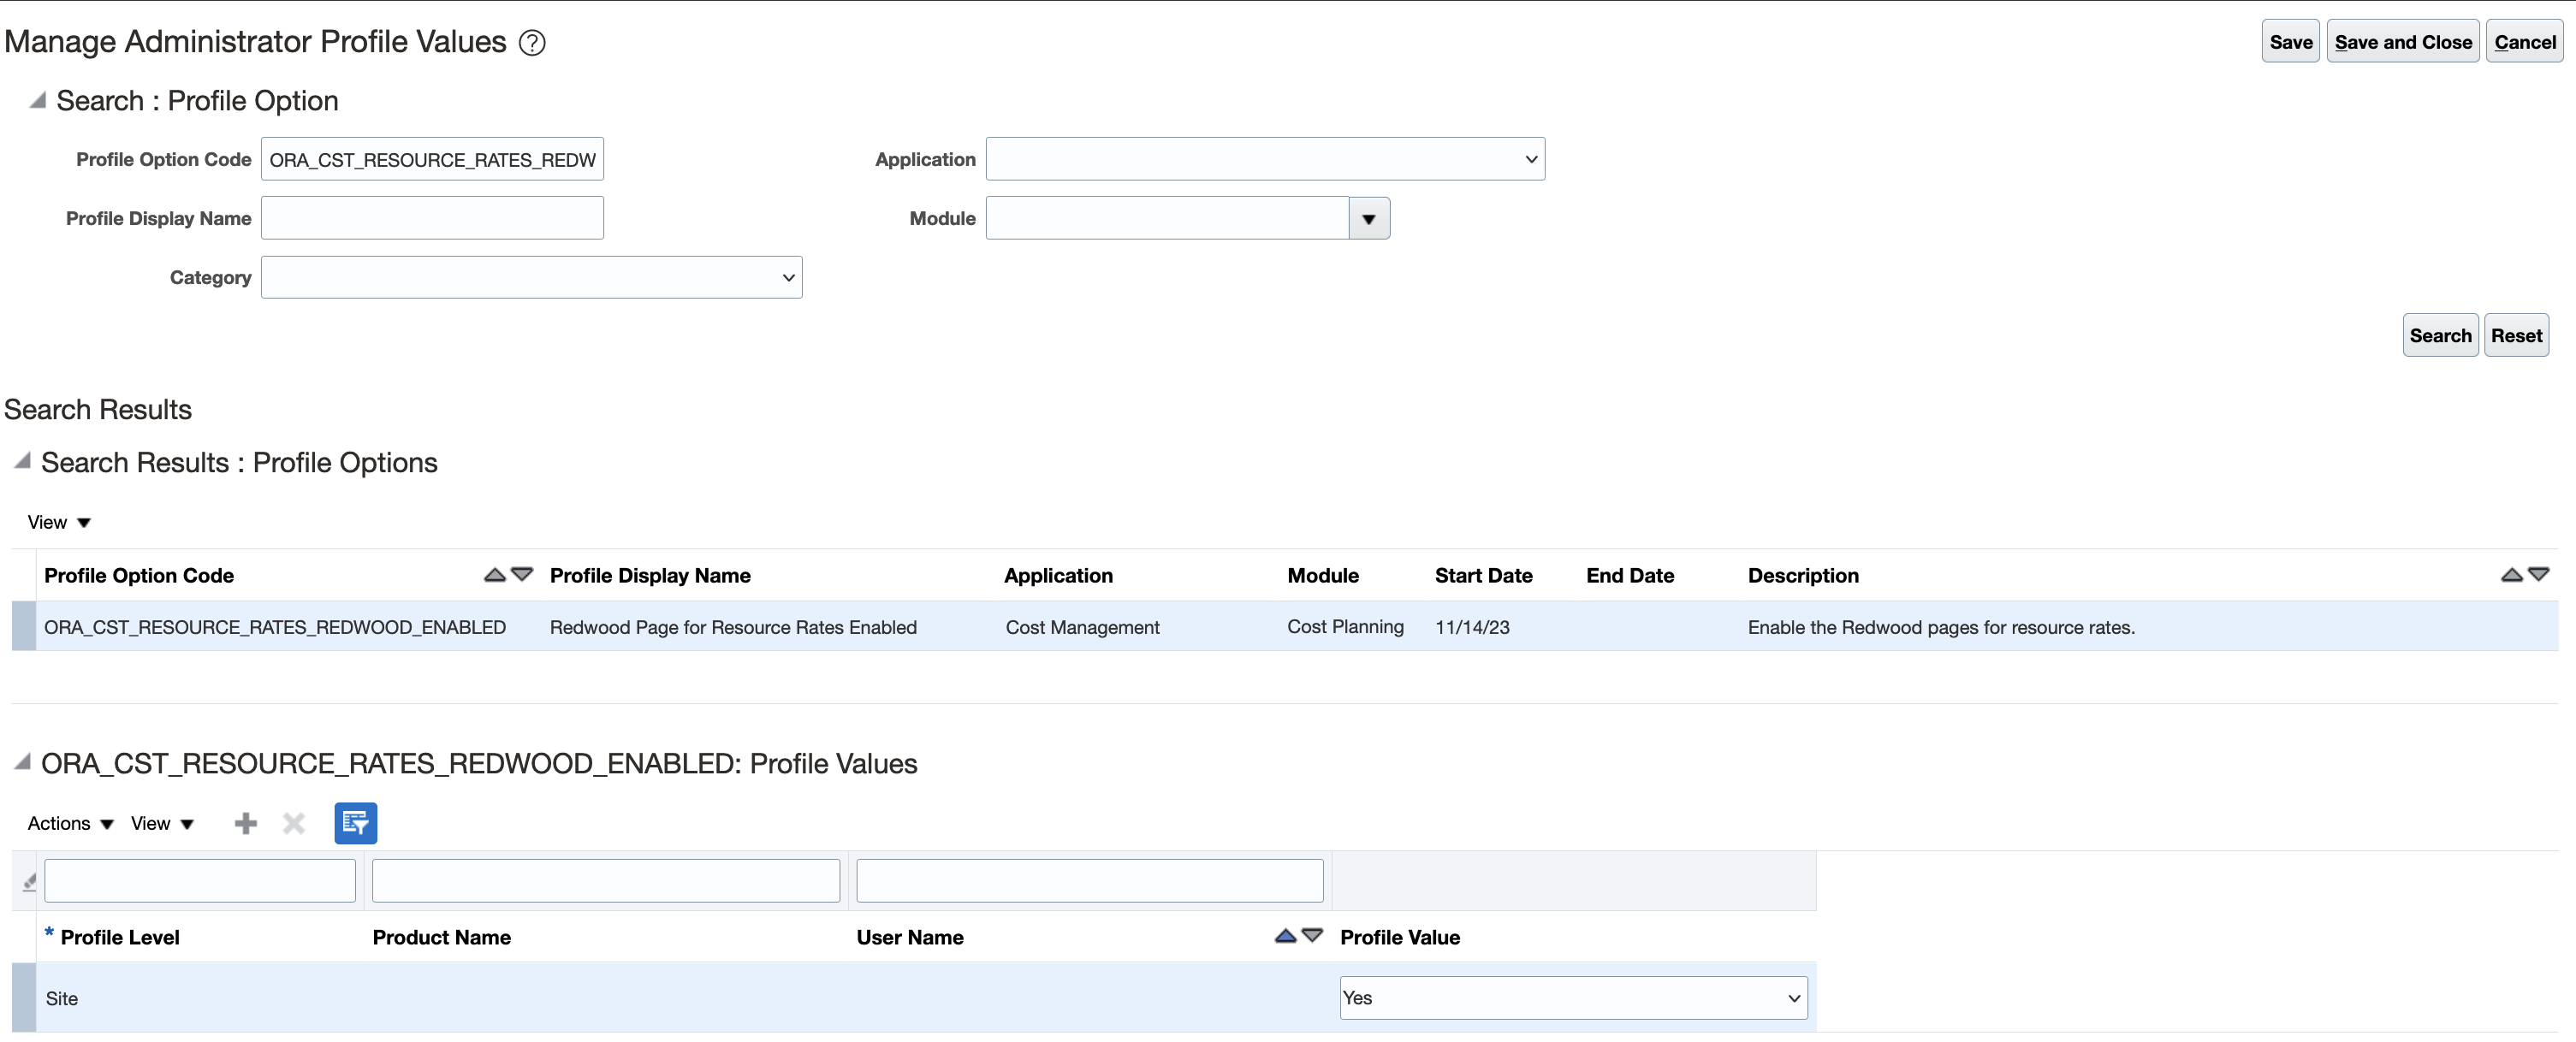
Screenshot Displaying the Setup Profile
After you've set the profile value correctly, the task pane under Cost Accounting would show the task menu link as Resource Rates. Using this link, you can access the Redwood page.
Tips And Considerations
- Note that when you're navigating from the Cost Scenarios page, you'll be taken to the existing Manage Resource Rates page, irrespective of the profile value.
- In update 24B, the Resource Rates page doesn't allow users using Periodic Average Cost method to modify published resource rates (status = Published), even though the cost accounting period isn't in the Closed or Permanently closed status. This issue will be fixed in a subsequent update. It is recommended that users using Periodic Average Cost method continue to use the existing Manage Resource Rates page for their business processes.
- In update 24B, the Resource Rates page doesn't allow users using Periodic Average Cost method to create new resource rates under a published cost scenario, even though the cost accounting period isn't in the Closed or Permanently closed status. This issue will be fixed in a subsequent update.
Key Resources
- Watch the Create and Update Resource Rates Using Redwood Pages Demo.
- Oracle Fusion Cloud SCM: Implementing Manufacturing and Supply Chain Materials Management Guide, available on the Oracle Help Center.
- Oracle Fusion Cloud SCM: Using Cost Management Guide, available on the Oracle Help Center.
Access Requirements
Users who are assigned a configured job role that contains the following privilege can access this feature:
- Manage Resource and Overhead Rate Plans (CST_MANAGE_RATE_PLANS)
Receipt Accounting
Use Enhanced Reporting for Period End Accruals
You can now analyze and get insights into period end accruals using the predefined Oracle Transactional Business Intelligence (OTBI) report. This predefined report is available in the new Receipt Accounting Uninvoiced Receipt Accruals real-time subject area. The report displays summarized and detailed view of the indirect procurement costs of your business.
You can access the reports from the /Shared Folders/Supply Chain Management/Cost Management/Transactional Analysis Samples folder in OTBI.
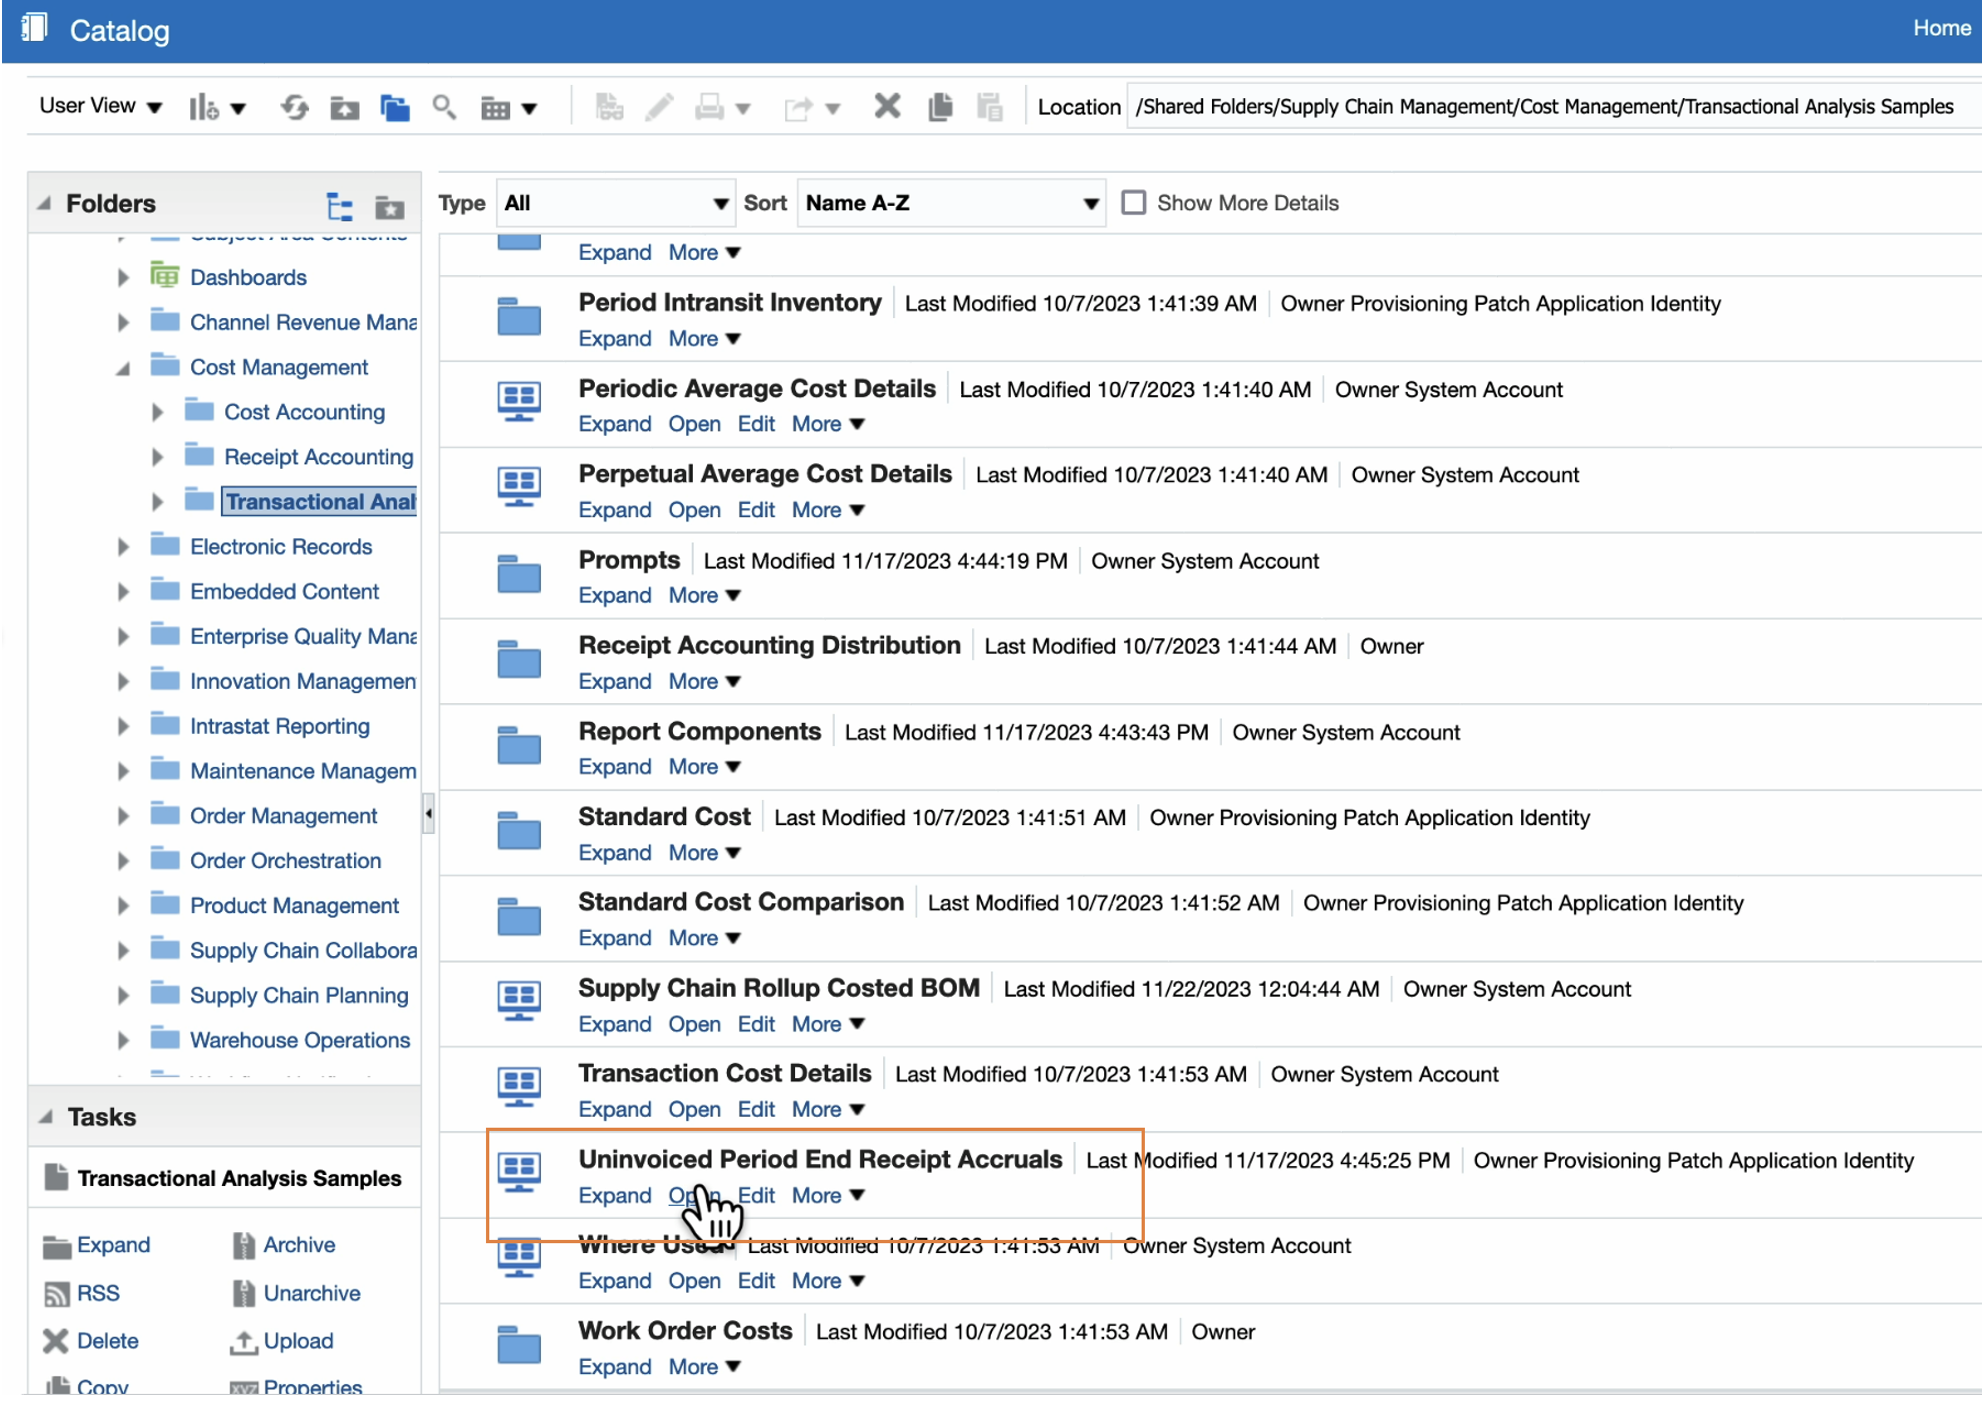
Uninvoiced Period End Receipt Accruals Report
Uninvoiced Receipts Period End Accrual Summary
Displays the period end accruals summarized by ledger for a period.
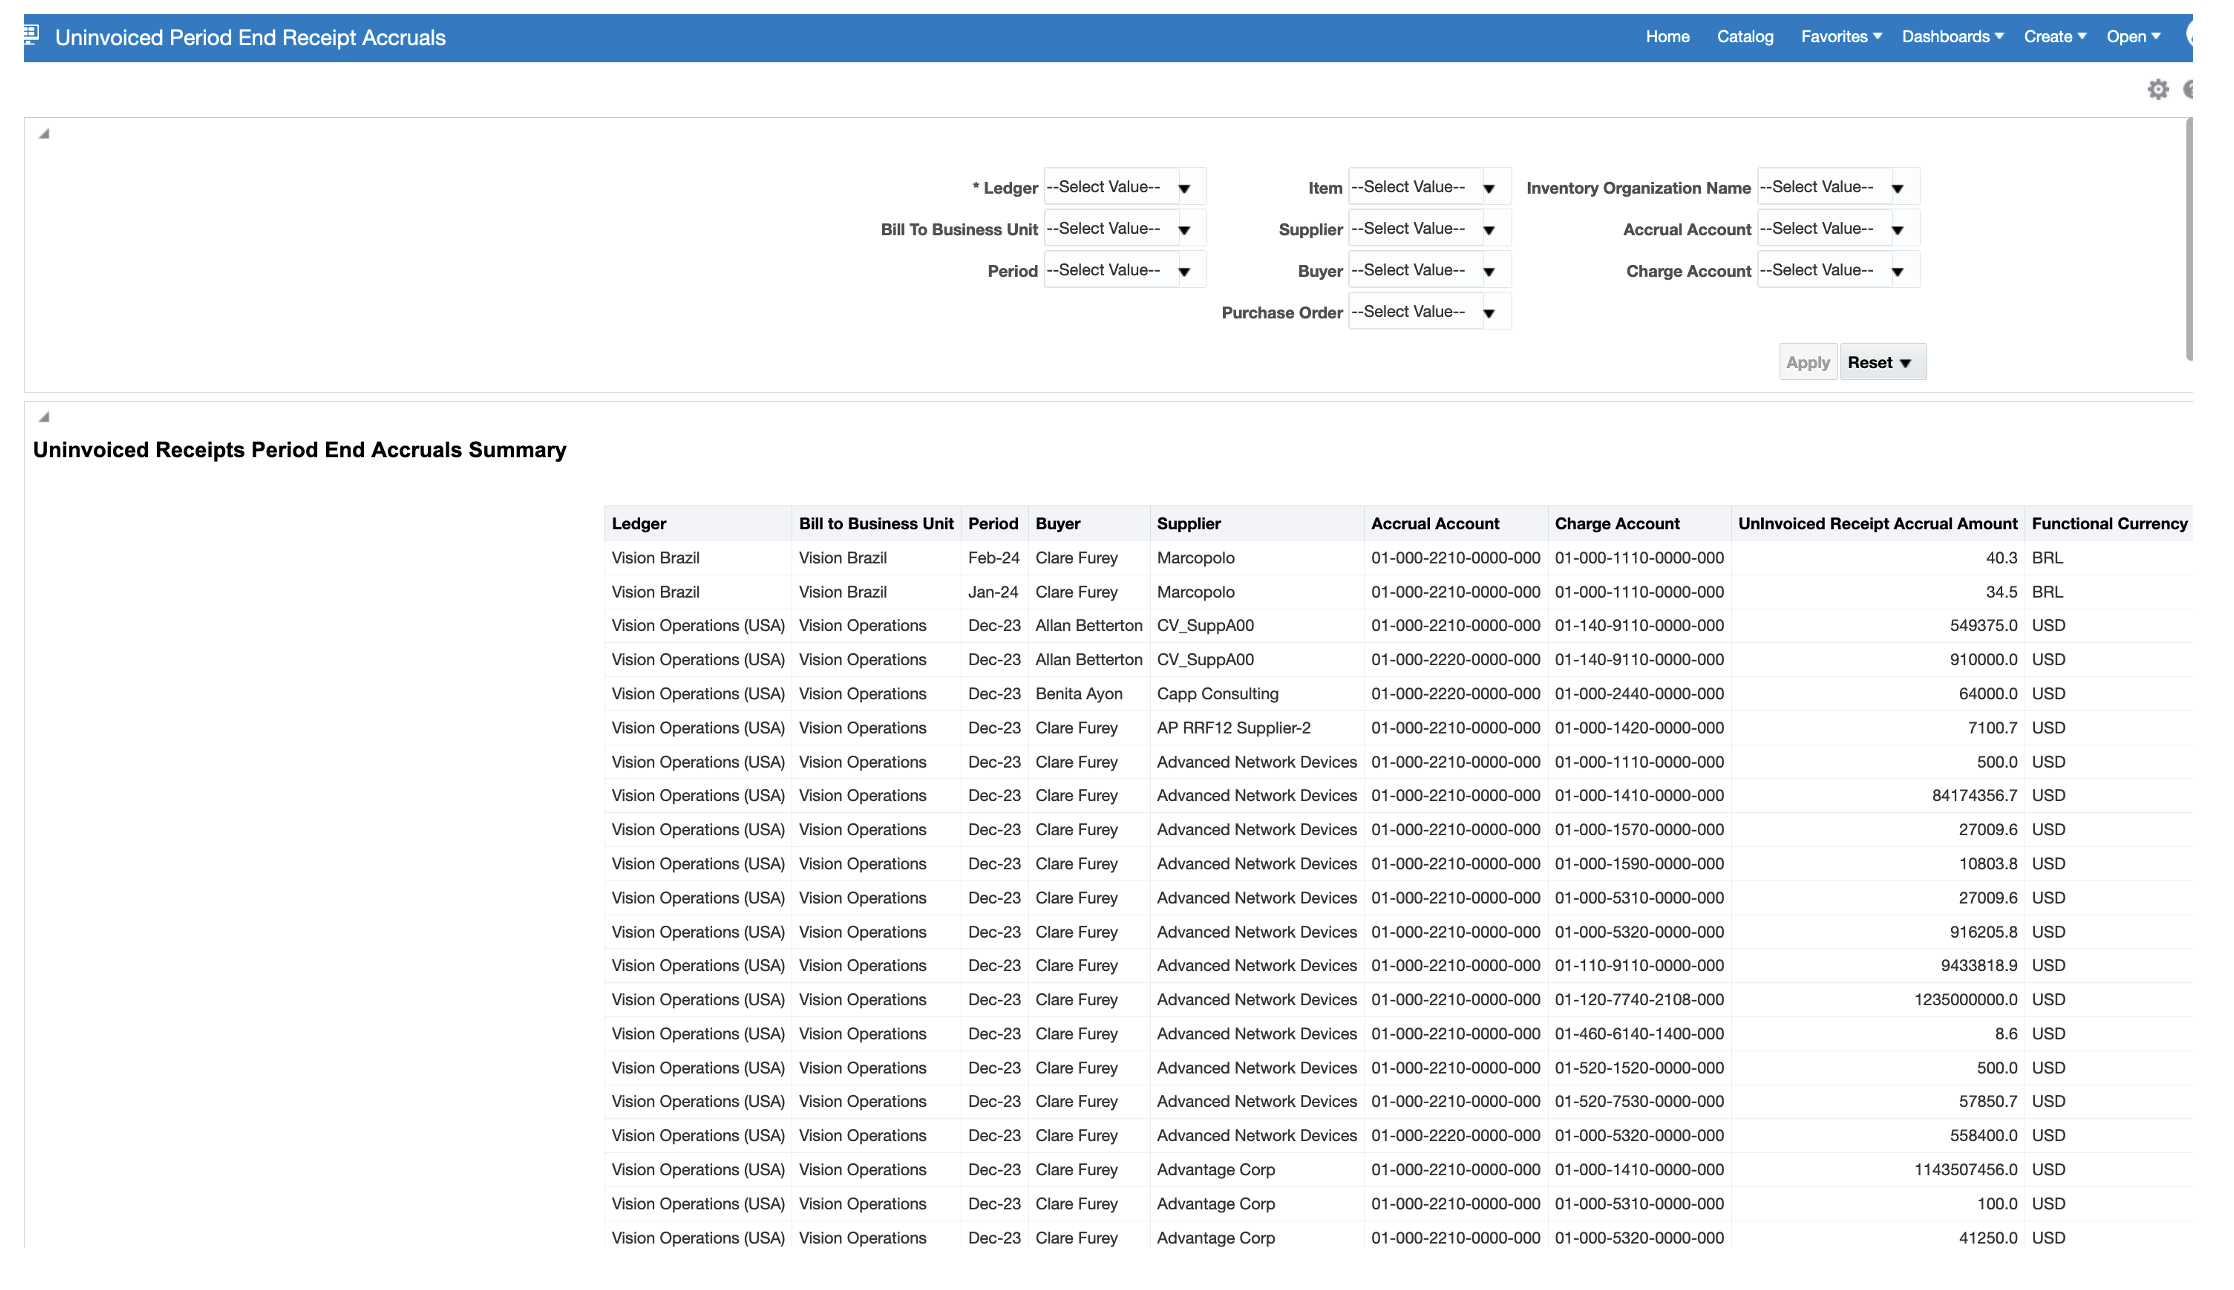
Uninvoiced Period End Receipt Accruals Summary Report
Uninvoiced Receipts Period End Accrual Details
Displays the period end accruals details by purchase order for a period.
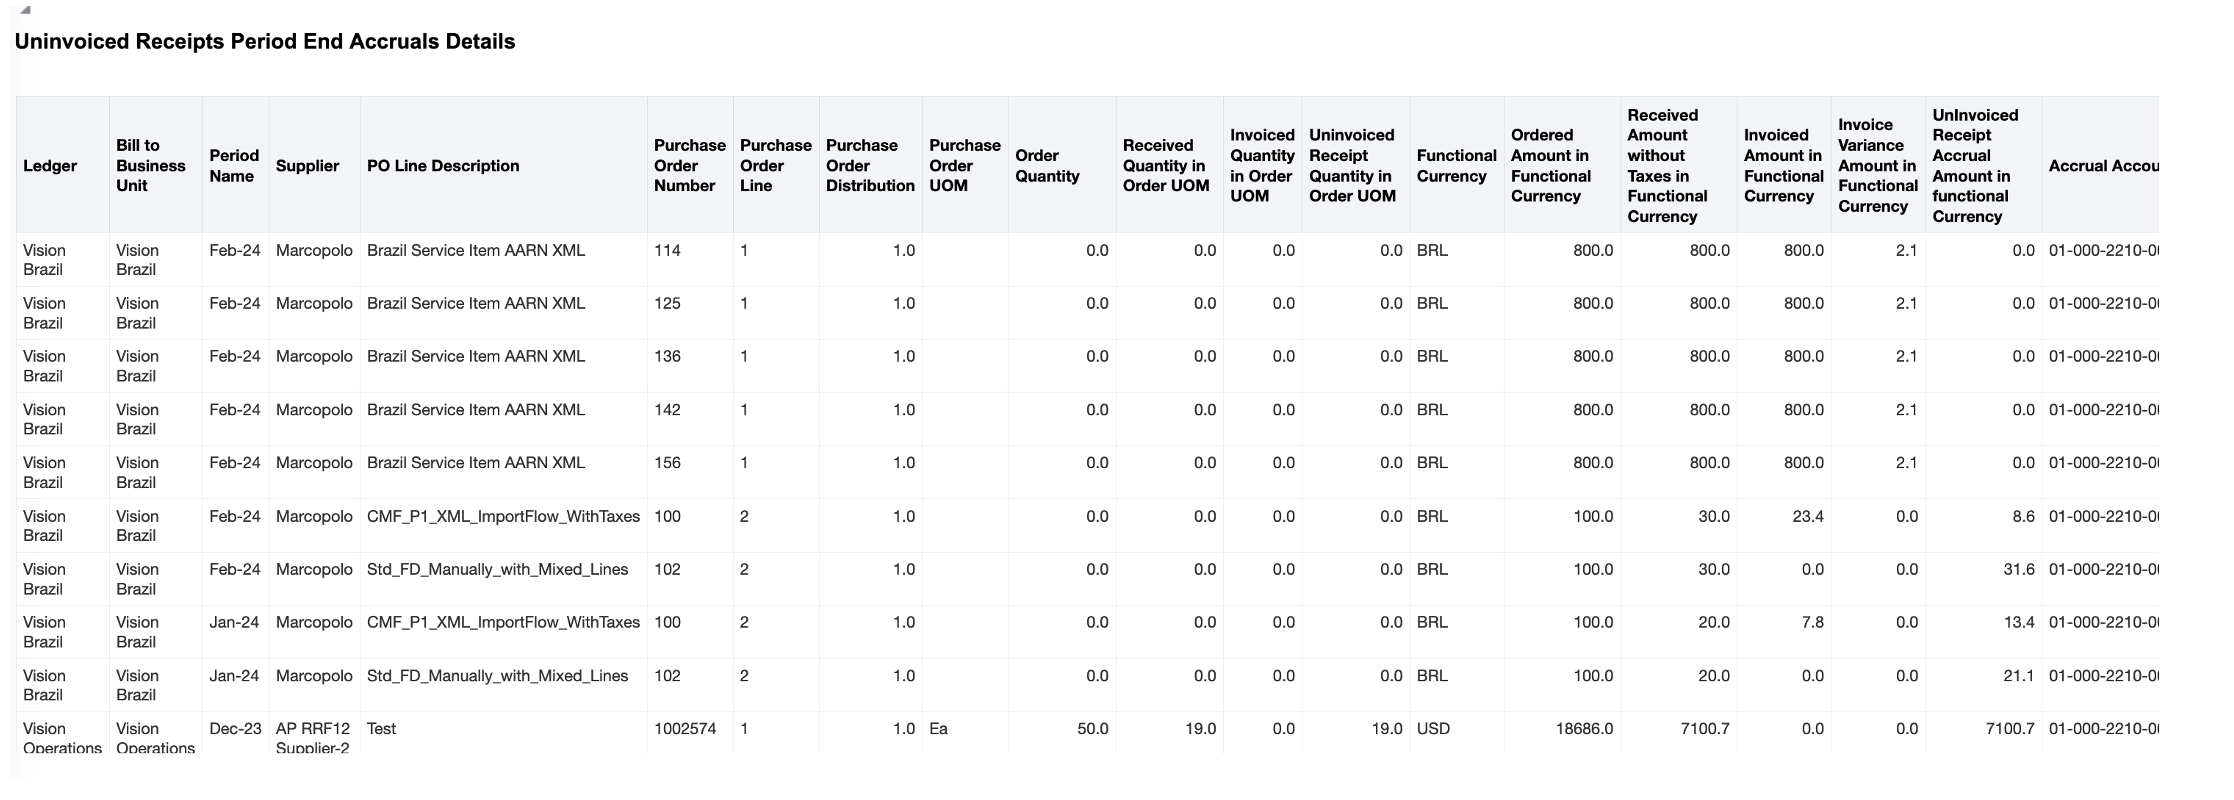
Uninvoiced Receipts Period End Accrual Details Report
Accrue at Period End Purchases Receipt Details
Displays all the receipts for a purchase order for which Period End Receipt Accrual is reported in the period.
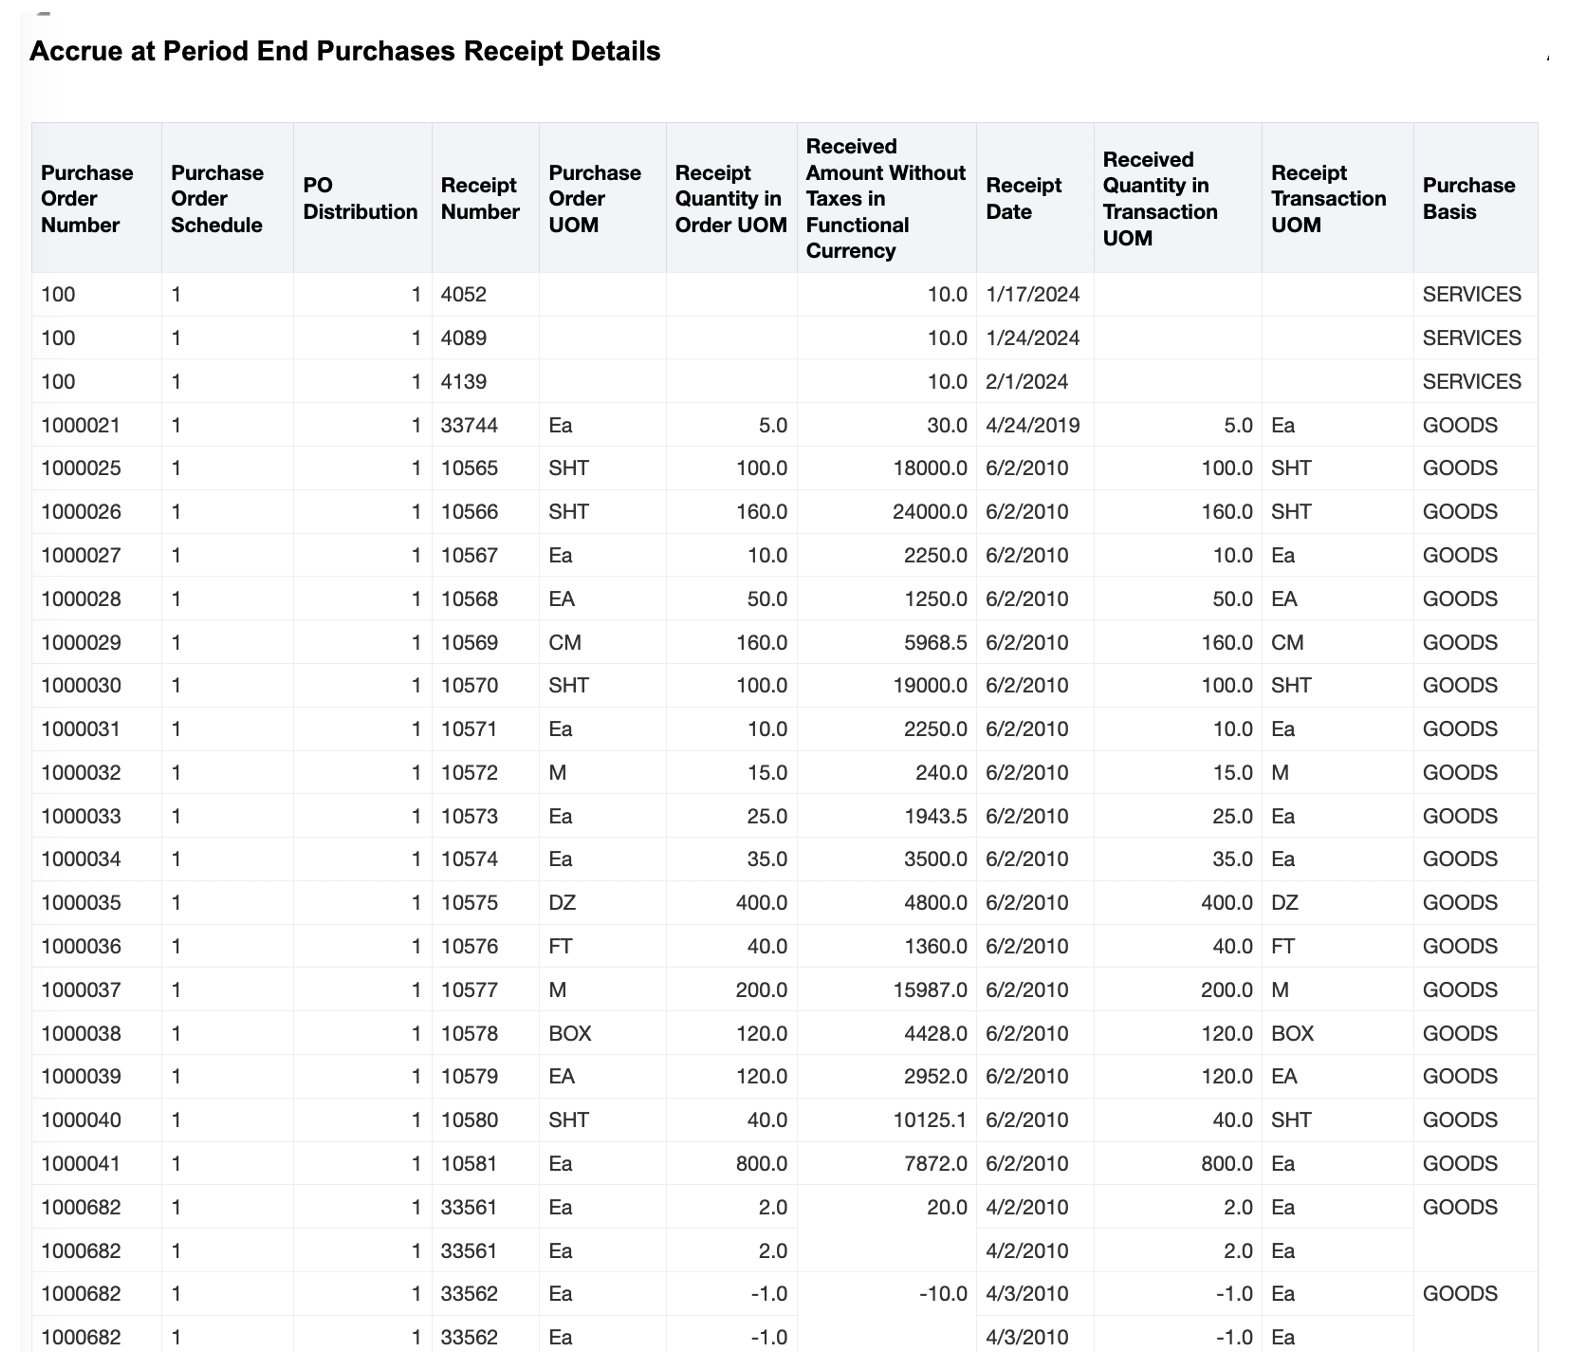
Accrue at Period End Purchases Receipt Details Report
Accrue at Period End Purchases Invoice Details
Displays all the invoices for a purchase order for which Period End Receipt Accrual is reported in the period.
Accrue at Period End Purchases Invoice Details Report
This seeded report facilitates the reconciliation process by highlighting any discrepancies between received goods or services and invoiced amounts. This streamlines the reconciliation process and reduces the likelihood of errors.
Steps to Enable
Leverage new subject area(s) by adding to existing reports or using in new reports. For details about creating and editing reports, see the Creating and Administering Analytics and Reports book (available from the Oracle Help Center > your apps service area of interest > Books > Administration).
Tips And Considerations
You need to run the Create Uninvoiced Receipt Accruals process either in Report or Accounting mode for the data to be available for analyzing and reporting in OTBI.
Key Resources
- Oracle Fusion Cloud SCM: Using Supply Chain Cost Management Guide, available on the Oracle Help Center
- Oracle Fusion Cloud SCM: Subject Areas for Transactional Business Intelligence in SCM, available on the Oracle Help Center
Access Requirements
Users who are assigned below predefined job roles are automatically able to access this feature:
- Cost Accountant (ORA_CST_COST_ACCOUNTANT)
- Receipt Accounting (ORA_CMR_RECEIPT_ACCOUNTING)
Fiscal Document Capture
Derive Acknowledged Date Automatically
You can now configure the profile options in the application to default the acknowledged date of the fiscal document to the system date while importing the fiscal document. The legal entity's time zone setup is also considered while determining the default date.

Setting Profile Options and Values
This feature improves automatic capture of fiscal documents by stamping the acknowledged date based on when the fiscal document is imported.
Steps to Enable
You don't need to do anything to enable this feature.
Tips And Considerations
Enable the ORA_CMF_DEFAULT_ACKDATE_TO_SYSDATE profile option:
- In the Setup and Maintenance work area, go to the following:
- Offering: Manufacturing and Supply Chain Management
- Task: Manage Administrator Profile Values
- On the Manage Administrator Profile Values page, enable the new ORA_CMF_DEFAULT_ACKDATE_TO_SYSDATE profile option at Site, Product or User level.
- Validate the same from the Manage Profile Options page
Key Resources
Access Requirements
Users who are assigned a configured job role that contains these privileges can access this feature:
- ORA_CMF_FISCAL_DOCUMENT_SPECIALIST
- ORA_RCS_SUPPLY_CHAIN_APPLICATION_ADMINISTRATOR_JOB
Import Fiscal Documents From the Manage Interface Exceptions Page
You can now import a fiscal document directly from the Manage Interface Exceptions page after resolving the errors. This helps you quickly validate and reimport the fiscal document without having to manually run the Import Electronic Fiscal Documents scheduled process.

Import Fiscal Document Directly from the Manage Fiscal Document Interface Exceptions Page
This feature helps you improve the user experience while managing the incoming fiscal documents that require user attention.
Steps to Enable
You don't need to do anything to enable this feature.
Key Resources
- Oracle Supply Chain Management Cloud: Using Fiscal Document Capture guide, available on the Oracle Help Center.
Access Requirements
Users who are assigned a configured job role that contains these privileges can access this feature:
- Load Electronic Fiscal Document (CMF_LOAD_XML_FISCAL_DOCUMENT)
- Process Electronic Fiscal Documents (CMF_PROCESS_E_FISCAL_DOCUMENTS
- Capture Fiscal Document (CMF_ENTER_FISCAL_DOCUMENT)
Redwood Experience
These features were built in Redwood, Oracle’s next-generation user experience. Redwood brings state-of-the-art, consumer-grade user experiences across devices to the sophisticated enterprise scenarios that Oracle enables.
Manage Fiscal Flows in Redwood Pages
Review the fiscal flows, fiscal operation types (CFOP), and business processes supported in fiscal document capture, against which you can capture the incoming fiscal documents for your business using the new Fiscal Flows Redwood page. You can now swiftly search for these fiscal flows and CFOPs, mark them active or inactive as a response to your changed business needs or as per fiscal authority updates on this redesigned page.
Using the new Fiscal Flows Redwood page, you can:
- Search the fiscal flows by their status being active or inactive.
- Search the fiscal flows by document type of sales, sales and remittance, remittance, or bookkeeping.
- Search the fiscal flows by business process of standard, return material authorization, purchase order import, internal material transfer, import material, freight, consignment, contract manufacturing, and drop shipments.
- Search the fiscal flow by CFOP and review if the same CFOP is active in more than one fiscal flow.
- Update the default description of the fiscal flow with the user preferred text and language.
- Update the status of fiscal flow or CFOP from active to inactive and vice versa.

Review and Manage Fiscal Flows

Fiscal Flow and Fiscal Operation Types
This feature provides an improved user experience and a more efficient way to manage fiscal flows.
Steps to Enable
You don't need to do anything to enable this feature.
Tips And Considerations
To revert back and view the earlier version of the page, do the following:
- In the Setup and Maintenance work area, go to the following:
- Offering: Manufacturing and Supply Chain Management
- Task: Manage Administrator Profile Values
- On the Manage Administrator Profile Values page, set the profile value at Site or Product or User level to No for the new ORA_CMF_FISCAL_FLOWS_REDWOOD_ENABLED profile option.
Key Resources
- Oracle Supply Chain Management Cloud: Using Fiscal Document Capture guide, available on the Oracle Help Center.
Access Requirements
Users who are assigned a configured job role that contains these privileges can access this feature:
- Set Up Fiscal Flows (CMF_FISCAL_FLOWS)
- Manage Fiscal Flows by Web Service (CMF_FISCAL_FLOWS_WEB_SERVICE_PRIV)
Supply Chain Financial Orchestration
Derive Transfer Price Using Country of Origin and Project Number
For intercompany shipments and internal transfer flows, the financial orchestration process is modified to derive the transfer price considering the additional transaction attributes Country of Origin and Project number for Item cost basis. If the item cost profile is configured based on these parameters and when the transfer pricing rule is set to item cost basis, the financial orchestration process will derive the transfer price considering these transactional attributes.
This screenshot shows the attributes when they are captured during the execution transaction. The attribute will be taken into consideration to derive the transfer price if the item cost is configured appropriately.
You can now use the additional qualifier attributes to help configure rules based on these new parameters to orchestrate your financial flows. You can model tax-efficient intercompany accounting using the new qualifier attributes for your financial flows.
Steps to Enable
You don't need to do anything to enable this feature.
Key Resources
- Oracle Supply Chain Management Cloud: Implementing Manufacturing and Supply Chain Materials Management Guide available on the Oracle Help Center.
Access Requirements
Users who are assigned a configured job role that contains these privileges can access this feature:
- Supply Chain Application Administrator (ORA_RCS_SUPPLY_CHAIN_APPLICATION_ADMINISTRATOR_JOB)
- Maintain Supply Chain Financial Orchestration Flow (FOS_MAINTAIN_SUPPLY_CHAIN_FINANCIAL_TRADE_AGREEMENT_PRIV)
These privileges were available prior to this update.
IMPORTANT Actions and Considerations
Replaced and Removed Features
From time to time, Oracle replaces existing Cloud service features with new features, or removes existing features. Replaced features may be put on a path to removal. As a best practice, you should use the newer version of a replaced feature as soon as the newer version is available.
This section identifies the features in this Cloud service that have been replaced or will be removed.
| Module | Removed Feature | Target Removal | Replacement Feature | Additional Information |
|---|---|---|---|---|
| Inventory | Staged Inventory Transactions Version 2 SOAP service |
24C | Inventory Staged Transactions REST service |
For details about the Inventory Staged Transactions REST service, see REST API for Oracle Fusion Cloud SCM on the Oracle Help Center. |
| Inventory | Inventory Transactions REST service |
24C | Inventory Staged Transactions REST service |
For details about the Inventory Staged Transactions REST service, see REST API for Oracle Fusion Cloud SCM on the Oracle Help Center. |
| Inventory | Material Status Updates REST service |
24C | Subinventories, Locators (a child service of the Subinventories service), Inventory Item Lots, and Inventory Item Serial Numbers REST services |
For details about these REST services, see REST API for Oracle Fusion Cloud SCM on the Oracle Help Center. |
| Receiving | Receiving Transactions REST service |
24C | Requests for Receiving Transactions REST service |
For details about the Requests for Receiving Transactions, see REST API for Oracle Fusion Cloud SCM on the Oracle Help Center. |
| Receiving | Receipts REST service | 24C | Receiving Receipt Requests REST service |
For details about the Receiving Receipt Requests REST service, see REST API for Oracle Fusion Cloud SCM on the Oracle Help Center. |
Set Up the Responsive Self-Service Receiving Application
The Oracle Responsive Self-Service Receiving application lets you receive your goods using a mobile device, tablet, laptop, or desktop web browser.
If you’re interested in these features, the capabilities will appear under the My Receipts (New) work area icon on the home page for several predefined job roles, such as Procurement Requester, Procurement Preparer, Advanced Procurement Requester, and Employee.
You can add these responsive self-service capabilities and the My Receipts (New) work area icon by following these steps:
- In the Setup and Maintenance work area, search for and select the Manage Receiving Profile Options task.
On the Manage Receiving Profile Options page, search for and select the ORA_RCV_SELF_SERVICE_RECEIVING_REDWOOD_ENABLED profile option code.
- In the Profile Values section, set the Site level to Yes. The default value is No.
- Yes = enables the feature
- No = disables the feature

Manage Receiving Profile Options Page
- Click Save and Close. Changes in the profile value will affect users the next time they sign in.
If you are a Procurement or Inventory Management customer and you do not see the My Receipts (New) icon even after you enable the profile option, that means you previously made changes to the Navigator menu in your implementation. In this case, you can add the responsive self-service receiving capabilities and the My Receipts (New) work area icon by following these steps:
- Activate a Sandbox with the Structure tool.
- Enter the Sandbox and click the Structure link under Tools.
- Expand the Procurement node and click My Receipts (New).
- From the Show on Navigator list, select Yes.
- Click Save and Close.
- Publish the Sandbox.
After you enable the profile option and take the additional steps to expose the My Receipts (New) work area icon (if necessary), you'll need to perform the steps outlined in Create Index Definition and Perform Initial Ingest to OSCS.
NOTE: After you enable the My Receipts (New) icon, the My Receipts icon won't display anymore.
To learn more about the new Responsive Self-Service Receiving application, review the Responsive Self-Service Receiving Application chapter of the Using Receiving guide, available on the Oracle Help Center.