
- Revision History
- Overview
- Optional Uptake of New Features (Opt In)
- Feature Summary
- Financials Common
- Self Service Financials
-
- Expenses
-
- Attendee Capture in Expenses Mobile Application
- Auditing of Duplicate Expenses and Expenses Under Receipt Threshold
- Detailed View of Audit Results in Expense Audit
- Expense Report Risk Indicator in Expense Audit
- Pay Group for Cash Advances and Expense Reports
- Policy Enforcement for Miscellaneous Expenses in Mobile Application
- Project Expenditure Organization Capture in Expenses Mobile Application
-
- Expenses
This document will continue to evolve as existing sections change and new information is added. All updates appear in the following table:
| Date | Product | Feature | Notes |
|---|---|---|---|
| 17 SEP 2021 | Created initial document. |
 HAVE AN IDEA?
We’re here and we’re listening. If you have a suggestion on how to make our cloud services even better then go ahead and tell us. There are several ways to submit your ideas, for example, through the Ideas Lab on Oracle Customer Connect. Wherever you see this icon after the feature name it means we delivered one of your ideas.
GIVE US FEEDBACK
We welcome your comments and suggestions to improve the content. Please send us your feedback at oracle_fusion_applications_help_ww_grp@oracle.com.
DISCLAIMER
The information contained in this document may include statements about Oracle’s product development plans. Many factors can materially affect Oracle’s product development plans and the nature and timing of future product releases. Accordingly, this Information is provided to you solely for information only, is not a commitment to deliver any material, code, or functionality, and should not be relied upon in making purchasing decisions. The development, release, and timing of any features or functionality described remains at the sole discretion of Oracle.
This information may not be incorporated into any contractual agreement with Oracle or its subsidiaries or affiliates. Oracle specifically disclaims any liability with respect to this information. Refer to the Legal Notices and Terms of Use for further information.
Optional Uptake of New Features (Opt In)
Oracle Cloud Applications delivers new updates every quarter. This means every three months you'll receive new functionality to help you efficiently and effectively manage your business. Some features are delivered Enabled meaning they are immediately available to end users. Other features are delivered Disabled meaning you have to take action to make available. Features delivered Disabled can be activated for end users by stepping through the following instructions using the following privileges:
- Review Applications Offering (ASM_REVIEW_APPLICATIONS_OFFERINGS_PRIV)
- Configure Oracle Fusion Applications Offering (ASM_CONFIGURE_OFFERING_PRIV)
Here’s how you opt in to new features:
- Click Navigator > My Enterprise > New Features.
- On the Features Overview page, select your offering to review new features specific to it. Or, you can leave the default selection All Enabled Offerings to review new features for all offerings.
- On the New Features tab, review the new features and check the opt-in status of the feature in the Enabled column. If a feature has already been enabled, you will see a check mark. Otherwise, you will see an icon to enable the feature.
- Click the icon in the Enabled column and complete the steps to enable the feature.
For more information and detailed instructions on opting in to new features for your offering, see Offering Configuration.
Opt In Expiration
Occasionally, features delivered Disabled via Opt In may be enabled automatically in a future update. This is known as an Opt In Expiration. If your cloud service has any Opt In Expirations in this update, you will see a related tab in this document. Click on that tab to see when the feature was originally delivered Disabled, and when the Opt In will expire, potentially automatically enabling the feature. You can also click here to see features with current Opt In Expirations across all Oracle Cloud Applications. Beyond the current update, the Financials forums on Cloud Customer Connect have details of Opt In Expirations upcoming in future updates.
Column Definitions:
Report = New or modified, Oracle-delivered, ready to run reports.
UI or Process-Based: Small Scale = These UI or process-based features are typically comprised of minor field, validation, or program changes. Therefore, the potential impact to users is minimal.
UI or Process-Based: Larger Scale* = These UI or process-based features have more complex designs. Therefore, the potential impact to users is higher.
Features Delivered Disabled = Action is needed BEFORE these features can be used by END USERS. These features are delivered disabled and you choose if and when to enable them. For example, a) new or expanded BI subject areas need to first be incorporated into reports, b) Integration is required to utilize new web services, or c) features must be assigned to user roles before they can be accessed.
| Ready for Use by End Users Reports plus Small Scale UI or Process-Based new features will have minimal user impact after an update. Therefore, customer acceptance testing should focus on the Larger Scale UI or Process-Based* new features. |
Customer Must Take Action before Use by End Users Not disruptive as action is required to make these features ready to use. As you selectively choose to leverage, you set your test and roll out timing. |
|||||
|---|---|---|---|---|---|---|
| Feature |
Report |
UI or |
UI or |
|
||
Party and Party Site Fiscal Classification Assignment Using REST APIs |
||||||
Auditing of Duplicate Expenses and Expenses Under Receipt Threshold |
||||||
Policy Enforcement for Miscellaneous Expenses in Mobile Application |
||||||
Project Expenditure Organization Capture in Expenses Mobile Application |
||||||
Service Excellence Continuing Investments
Our ongoing investment in service excellence has a focus on overall usability, resiliency, performance, and security. This work is based on monitoring performance trends, reviewing common use patterns, analyzing service requests, and participating in many discussions with customers.
In this update, our ongoing investment in service excellence includes improvements in the following areas:
Usability and Scalability
- A Notes icon on the Collections transaction page indicates the existence of notes for the transaction
- The Create Multiperiod Accounting process runs in multiple parallel threads to increase scalability and processing throughput
- Simplification of the customer setup for Portugal
- More than 500 rows can be displayed in the Manage Fiscal Document ADFdi for Brazil
Resiliency
- Correct handling of the secondary ledger representation in SAFT-PT when the natural account used differs from the primary ledger
- Prevention of incorrect status update of an approved fiscal document for Receivables transactions with multiple service lines for Brazil
- The Deliver Balance Forward Bills process has resiliency improvements to precisely track the delivery status of the balance forward bills to prevent incorrect processing of bills that were already printed
- The Create Balance Forward Bills process contains updates to the balance forward bill report data model logic for resiliency improvements to efficiently retrieve the Balance Forward Bills Detail Print Report from BI Publisher
- The Identify Customer Contract process has resiliency and diagnostic improvements on processing a performance obligation for the accounting contract to efficiently compute the allocated amount for the exempted or non-exempted performance obligation interoperability with prospective accounting
Performance
- The AutoMatch process contains performance improvements on application of receipts to transactions. It also considers skipping the generation of amount-based recommendations, if the AR_AM_SKIP_AMOUNT_MATCH lookup is enabled, resulting in increased performance efficiency
- The Process Receipts Through Lockbox process contains performance improvements to increase scalability and processing throughput
- The Receivables Open Items Revaluation Report contains performance improvements to reduce processing time for high volume data
Steps to Enable
You don't need to do anything to enable this feature.
Tax Exception Application to Related Taxes
Apply the tax exception derived for a source tax to related taxes in the same regime or jurisdiction. For example, apply the tax exception derived for a US State tax to City or County taxes. This reduces the setup and ongoing maintenance, and improves the run-time performance during tax calculation processing.
Organizations with a nexus in multiple states or provinces, such as in the US and South America, often use tax rate determination rules based on product fiscal classification to determine the tax rate for a particular tax jurisdiction.
An organization can alternatively set up tax exceptions by product fiscal classification, instead of using tax rate determination rules, in order to reduce the number of tax rules and conditions brought about by changes in tax rates and the addition of new tax jurisdictions. Even so, the large number of jurisdictions creates ongoing issues for both maintenance and performance.
Because the differences in tax treatment are usually by state or province, it is often only necessary to define tax exceptions at the state or province level. The Tax Engine can then assign the tax exception to the related lower-level jurisdictions, such as city and county.
The feature allows you to:
- Derive the Tax Exception rate for lower-level jurisdictions by using the Tax Exemption Source Tax specified at the Tax level. For example, for the County Tax, users can specify the Tax Exemption Source Tax as State. If this is done, the Tax engine will use the exception that was derived for the State tax for the current transaction line and apply it for the tax line for the County tax.
- Define Tax exception based on both Product category and Inventory Linked Product Fiscal Classification, only once for each of the higher jurisdiction level taxes and it will be applicable for all lower jurisdiction level taxes.
Business Benefit
- The tax rates in countries with a large number of tax jurisdictions can vary from one state/province to another for each product fiscal classification code. This feature ensures that the same tax rates can be applied to transactions with a minimal amount of setup, helping to reduce performance issues and overall maintenance.
- This feature is scalable to both Procure To Pay and Order To Cash flows across modules.
- If there is any change in Tax rate or any inclusion of any new states, this feature will minimize the setup changes in the Tax exception setups to accommodate that. Users will no longer need to create new Tax Rules or to change the conditions, this will reduce the maintenance efforts.
Steps to Enable
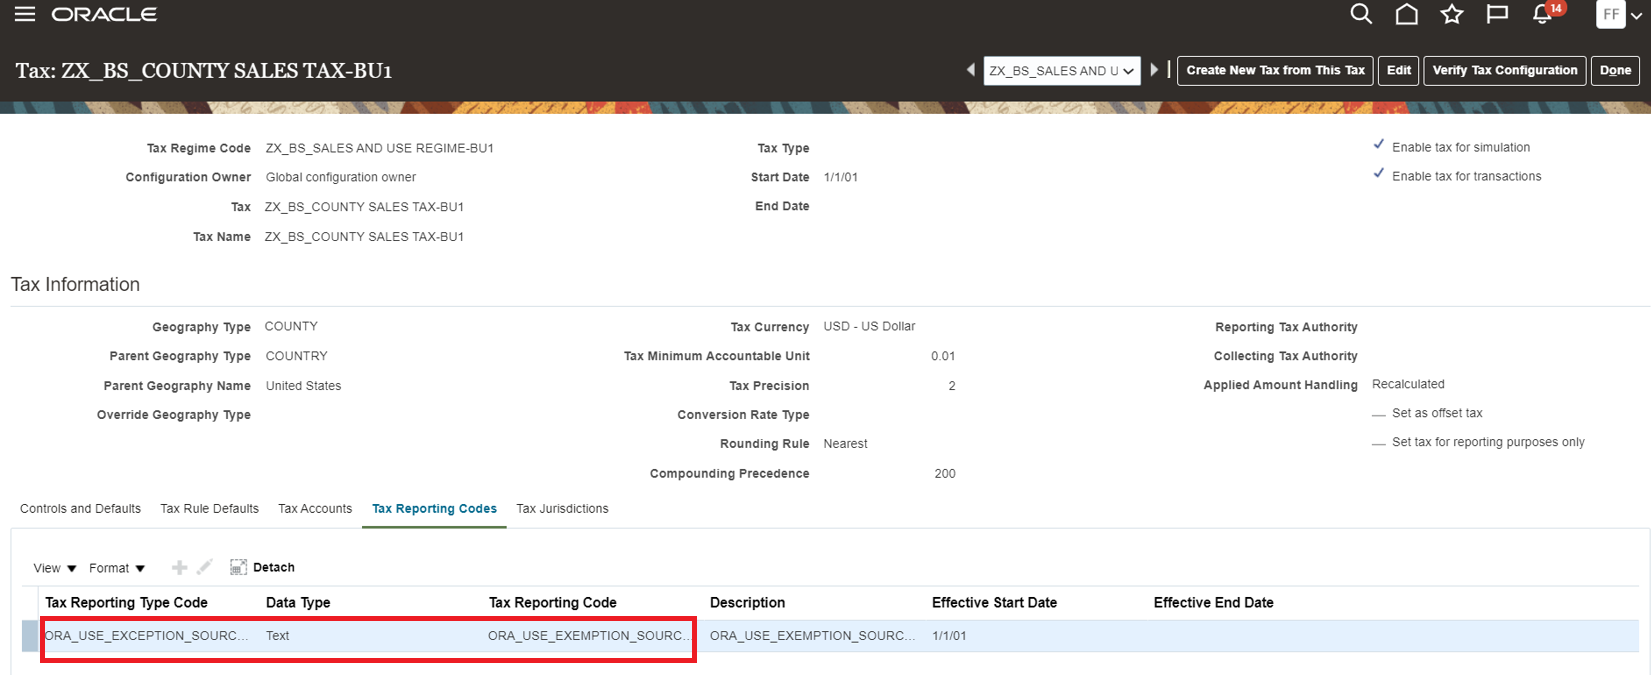
To enable this feature, associate the user defined reporting code to content owner (BU or LE) and the lower level TAX.
Steps to Associate:
A. Create the Reporting Type Code
- Navigator -> Setup and Maintenance Task - Manage Tax Reporting Types.
- Click on ‘+’ to create a new tax reporting type with the below values.
Tax Reporting Type Code: 'ORA_USE_EXCEPTION_SOURCE_TAX'
Tax Reporting Type Purpose: Tax reporting type
Data Type: Text
Start Date: 1/1/01
- Enable Reporting type use
Party tax profile Enabled: Y
Tax Enabled: Y
- Save and Close.
- Tax Reporting Code
Click on ‘+’ to create a new tax reporting code with the below values
Tax Reporting Code: 'ORA_USE_EXEMPTION_SOURCE_TAX'
Description: ORA_USE_EXEMPTION_SOURCE_TAX
Effective Start Date: 1/1/01 (any date).

B. Associate the reporting type code with the BU/LE Party Tax Profile
- Navigator -> Setup and Maintenance Task - Manage Party Tax Profiles
- If required for BU, select Business Unit Tax Profiles in the LOV and Open Business Unit in edit mode. Go to the Tax Reporting Codes tab. Click on ‘+’ , and select 'ORA_USE_EXCEPTION_SOURCE_TAX' in the reporting type LOV. Select ‘ORA_USE_EXEMPTION_SOURCE_TAX’ in the reporting code LOV. Enter effective start date from which defaulting should be enabled. Save and Close.
- If required for LE, Select Legal Entity Tax Profiles Open Legal Entity in edit mode. Go to Tax Reporting Codes tab. Click on ‘+’ , and select 'ORA_USE_EXCEPTION_SOURCE_TAX' in the reporting type LOV. Select ‘ORA_USE_EXEMPTION_SOURCE_TAX’ in the reporting code LOV. Enter effective start date from which defaulting should be enabled. Save and Close.

C. Associate the reporting type code with the lower level Tax
- Navigator -> Setup and Maintenance Task - Manage Taxes
- Search the Tax and go to Tax reporting Code tab. Click on ‘+’ , and select 'ORA_USE_EXCEPTION_SOURCE_TAX' in the reporting type LOV. Select ‘ORA_USE_EXEMPTION_SOURCE_TAX’ in the reporting code LOV. Enter effective start date from which defaulting should be enabled. Save and Close.
D. Assign Source Tax to Lower level Tax
- Navigator -> Setup and Maintenance Task - Manage Taxes
- Search the Tax and go to Control and Defaults.
- Check "Use Tax Exemption from an Existing Tax".
- Provide Source Tax in "Tax Exemption Source" field
- Save and Close.

To apply this feature:
- Sign in with a role similar to that of a Tax Manager.
- In the Navigator work area, Go to Financials -->Transaction Tax --> Manage Tax Exceptions
- Create Tax Exception for Source Tax based on Product Fiscal Classification. For more details follow:
https://docs.oracle.com/en/cloud/saas/financials/20b/faitx/tax-configuration.html#FAITX1463811

Tips And Considerations
- To apply the tax exception to a lower-level tax from the source tax, both taxes must be applicable to the transaction. This ensures that the correct tax exception against the source tax and jurisdiction is used during calculation of the lower-level tax amount.
- The Compounding precedence of the source tax must be lower than the compounding precedence of the lower-level tax.
- The tax exception defined for the source tax is not applied if a tax exception is already defined at the lower level.
- If no source tax is applicable to the transaction at the lower level, the tax engine treats this as no tax exception exists in the source tax.
- You cannot apply a source tax exception with the type "Special Rate" to a lower-level tax.
Tax Registration Number Masking
Mask the tax registration number on all transactions to comply with the European Union General Data Protection Regulation for data protection and privacy of all individuals within the European Union and European Economic Area. The tax registration number is overwritten with a random number.
This is an enhancement to the existing process "Removal of Personally Identifiable Information", which will mask the Tax Registration number of a given party along with other attributes
You can remove an individual's personal data:
- If requested by an individual
- If the individual is no longer a valid supplier/customer for your organization
Along with the existing tables and columns from Payables, IBY, Receivables listed in https://docs.oracle.com/en/cloud/saas/financials/21a/faipp/payments-security.html#FAIPP3447843, the Tax Registration Number details are also being added.
| Srl No | Product | Table | Column | Data Type | Redact | Reason for Redaction |
|---|---|---|---|---|---|---|
| 1 | Tax | ZX_REGISTRATIONS | REGISTRATION_NUMBER | VARCHAR2(50 CHAR) | Yes | Sensitive data |
| 2 | Tax | ZX_PARTY_TAX_PROFILE | REP_REGISTRATION_NUMBER | VARCHAR2(50 CHAR) | Yes | Sensitive data |
| 3 | Tax | ZX_LINES | TAX_REGISTRATION_NUMBER | VARCHAR2(50 CHAR) | Yes | Sensitive data |
| 4 | Tax | ZX_WITHHOLDING+LINES | TAX_REGISTRATION_NUMBER | VARCHAR2(50 CHAR) | Yes | Sensitive data |
Business Benefit
Comply with the European Union General Data Protection Regulation for data protection and privacy of all individuals within the European Union and European Economic Area
Steps to Enable
To mask the Tax Registration Number of any given party for any product in Oracle Financials applications, you submit the Remove Personally Identifiable Information in Financials process.
- Navigate: Navigator > Tools > Scheduled Processes.
- On the Scheduled Processes page, click Schedule New Process.
- Search and select Remove Personally Identifiable Information in Financials.
- From the Party choice list, select the person's name for whom you want to remove personally identifiable information.
- Click Submit.
Tips And Considerations
- The process will mask Tax Registration Number related to party such as supplier or customer.
- The process will mask taxpayer identifier information related to 3rd parties for Transaction Tax regimes as well as Withholding Tax Regime.
- On any transaction, if Tax determination rules are created based on 3rd party Tax Registration number and if the Registration number is redacted, then in such cases, Tax will not be calculated on the transaction
Customer Dispute Submission Using a REST API
Submit customer disputes for one or more transaction lines using the Receivables Dispute REST API. Specify the specific transaction line or lines to dispute and the reason for the dispute. The REST API both creates the dispute and initiates the credit memo approval workflow.
You can use this service to register disputes in Receivables Cloud from external sources, and initiate the approval workflow to track them.
Steps to Enable
Review the REST service definition in the REST API guides, available from the Oracle Help Center > your apps service area of interest > REST API. If you're new to Oracle's REST services you may want to begin with the Quick Start section.
Tips And Considerations
This service supports creation of disputes on one or more transaction lines against the quantity and/or line amount.
Key Resources
- For an overview of REST APIs and the technical details, see the REST API for Oracle Financials Cloud guide in the Oracle Help Center.
Party and Party Site Fiscal Classification Assignment Using REST APIs
Create party fiscal classification assignments for suppliers and customers using the Party Fiscal Classification Assignment REST API, and for supplier sites and customer sites using the Party Site Fiscal Classification Assignment REST API. This avoids manual user intervention to assign party fiscal classifications after creating a party or party site using a REST API.
The party fiscal classification assignments for suppliers, customers, supplier sites, customer sites can be created using REST API in an automated way reducing manual efforts.
Steps to Enable
Review the REST service definition in the REST API guides, available from the Oracle Help Center > your apps service area of interest > REST API. If you're new to Oracle's REST services you may want to begin with the Quick Start section.
Key Resources
- For an overview of REST APIs and the technical details, see the REST API for Oracle Financials Cloud guide in the Oracle Help Center.
Print Attributes Update Using a REST API
Update print attributes, such as the print status, when printing or reprinting transactions using the Receivables Invoice REST API. This helps users maintain the most current record of printed transactions.
To update the print attributes on a transaction, pass the value Y for the InvoicePrinted attribute. You can update these print attributes: print status, time and date, customer preferred delivery method, and customer contact email addresses for Email delivery.
The business benefits include:
- Maintain a current record of printed transactions even when the transactions are printed outside of Oracle Cloud.
- Update print attributes of printed transactions in bulk.
Steps to Enable
Review the REST service definition in the REST API guides, available from the Oracle Help Center > your apps service area of interest > REST API. If you're new to Oracle's REST services you may want to begin with the Quick Start section.
Tips And Considerations
Pass the value Y for the InvoicePrinted attribute to update any of the print attributes.
Key Resources
- For an overview of REST APIs and the technical details, see the REST API for Oracle Financials Cloud guide in the Oracle Help Center.
Simplified Workflow Rules Configuration
Use the Simplified Workflow Rules Configuration feature to create workflow rules for Payables Invoice Approval and General Ledger Journal Approval workflows using spreadsheets. This feature was introduced in update 18C. In update 21D, you can specify custom values for start approver name for rules using Supervisory Hierarchy or Job Level Hierarchy approval routing. Example: 'Manager of Invoice Line.Project Manager Name' or 'Invoice Line.Project Manager Name'.
The Start Approver attribute in the Approvers section allows you to choose the starting approver from the available list of values, for rules using Supervisory Hierarchy and Job Level Hierarchy. Administrators can now use the 'Add Custom Value' option to define rules using start approvers other than those available in the list of values. You can specify either transaction attributes that indicate a user (for example, Invoice Line.Project Manager Name) or specify the user name of a specific user (for example, John.Brown). You can also specify the manager of transaction attribute users or specific users. For example, Manager of Invoice Line.Project Manager or Manager of John.Brown.

Invoice Approval Rules Sheet > Add Custom Value option

Custom Value for the Start Approver

Add Custom Value for Start Approver in Datasets
NOTE: Data Sets are available only for the Payables Invoice Approval Rule Creation templates.
For additional information about the Simplified Workflow Rules Configuration feature, please click here.
Steps to Enable
You don't need to do anything to enable this feature.
Tips And Considerations
- When using transaction attributes as the Start Approver, use the syntax: Fact Name.Attribute name. For example, Invoice Line.Project Manager Name.
- To start the approval routing from a specific user, specify the user name in the Start Approver column.
Key Resources
- For an overview of the Simplified Workflow Rules Configuration feature, refer to the Manage Workflow Rules Using a Spreadsheet topic on the Oracle Help Center.
Role Information
- Financial Application Administrator
Attendee Capture in Expenses Mobile Application
Capture employee and non-employee attendee details for all expense types to accurately track attendees.
The Expenses mobile application enables employees to add employee and non-employee attendee details to meals, entertainment, and miscellaneous expense types. Employees can add the attendees directly from their phone contacts and calendar events, or add them manually by providing required details. When adding attendees manually, employees can search for other employee attendees by first name, last name, or email address, and add them to the expenses from the search results. Nonemployee attendees can be added by providing the attendee details such as first name, last name, company, email, and phone number. The application alerts employees if an employee's email id is provided for a nonemployee attendee.
When employee attendees are added from phone contacts or calendar events, the Expenses mobile application updates their names to match with their existing employee records. The mobile application validates the attendee categories and alerts employees when they add invalid attendees to the expenses. It also checks if employee attendees are missing when the policy mandates them and alerts the employees accordingly.

Add Attendees from Calendar Event
Employees can also allocate expense amounts to the attendees individually or split the amount equally among all attendees. The Expenses mobile application alerts employees if attendee amount is missing when policy mandates it, or if total amount doesn't match the expense amount. Employees can fix the issues and submit the expenses directly from the mobile application.

Employee and Non-Employee Attendees with Amount Divided Equally
Attendee capture in the mobile application enables employees to add attendees to their expenses and submit them directly from the mobile application. Adding attendees directly from calendar events and phone contacts improves ease of use and helps save time.
Steps to Enable
You don't need to do anything to enable this feature.
Tips And Considerations
To use this feature, ensure that you have downloaded the latest Expenses mobile application.
Key Resources
- Refer to the Capture Attendee Information for Expense Categories topic in the Oracle Financials Cloud Implementing Expenses guide to learn how to set up attendees policy.
Role Information
You must add the ORA_PER_REST_SERVICE_ACCESS_PUBLIC_WORKERS_RO role to employee roles to enable the attendee information.
Auditing of Duplicate Expenses and Expenses Under Receipt Threshold
Route expenses for audit that were identified as duplicates by the Expenses application and changed to actual expenses by employees. Detect expenses that circumvent receipt requirements by being under the receipt thresholds enforced by the company.
Set up audit rules to flag these scenarios when employees submit expense reports:
- Employee submits a duplicate expense by marking the expense as not a duplicate to get paid twice for a single expense.
- Employee submits expenses just under the required receipt threshold, to avoid providing proof of spending.
By setting up audit rules to identify duplicate expenses that weren’t marked as duplicates and expenses that are within the receipt required threshold, companies can reduce the time auditors spend on expense reports and help them identify fraudulent activity.
Steps to Enable
To set up auditing of duplicate expenses and expenses under receipt threshold, perform the following steps:
- Sign in as an expense manager.
- From the Setup and Maintenance work area, navigate to the Manage Expense Report Audit Rules page.
- Under Audit Rules for Expense Report Item, you can configure these rules:
- Audit expense reports for duplicate expense - To set up auditing of duplicate expenses.
- Audit expense reports with amount below the missing receipt threshold - To set up auditing of expenses that are less than the receipt threshold. You must enter a percentage of the receipt threshold. An expense amount less than this value is flagged. You must also enter the number of incidents and a period in months. This rule will flag expenses only if these occurrences exceed the specified number of times in the specified period.

Manage Expense Report Audit Rules
Role Information
You need the Expense Manager role to enable auditing of duplicate expenses and expenses under the receipt threshold.
Detailed View of Audit Results in Expense Audit
Display automatic audit checks performed on expense reports using audit rules. Provide auditors with a detailed view of these audit results.
Expenses provides a detailed view window that displays the audit rules applied to each expense report, along with a pass or fail status for each rule.
Auditors can review these audit result details while auditing an expense report. Auditors can view the number of expense items that failed a particular rule. If a rule failed because of duplicate expense items or duplicate attendees, auditors can drill down into the expense item details.
To access the detailed view, navigate to the Manage Expense Reports page, and drill down on an expense report. On the Audit Expense Report page, click the Audit Rules Checked link in the Expense Report Summary drawer to open the window.

Audit Rules Checked

Duplicate Expenses

Duplicate Attendees
Auditors now have greater insight into the audit rules run on expense reports and are better informed to make decisions.
Steps to Enable
You don't need to do anything to enable this feature.
Tips And Considerations
To set up audit rules, refer to the documentation link under Key Resources.
Key Resources
Role Information
You need the Expense Auditor role to use this feature.
Expense Report Risk Indicator in Expense Audit
Evaluate the potential risk of an expense report using preconfigured rules and provide visual indicators for risk in the expense report audit.
The Expenses application calculates the risk of an expense report based on the audit rule violations for the expenses in the report. The possible risk values associated with each expense report are High, Medium, or Low. Auditors can select a specific expense report from the Manage Expense Reports page and click Audit Expense Report to view the risk and take appropriate action.
Auditors can also view the risk for each expense report in the Manage Expense Reports page. The Risk column in the Manage Expense Reports page is not exposed by default. To view the Risk column in the audit search results, select the View option from the Search Results table. Then select the Columns option and enable the Risk column.

Manage Expense Reports
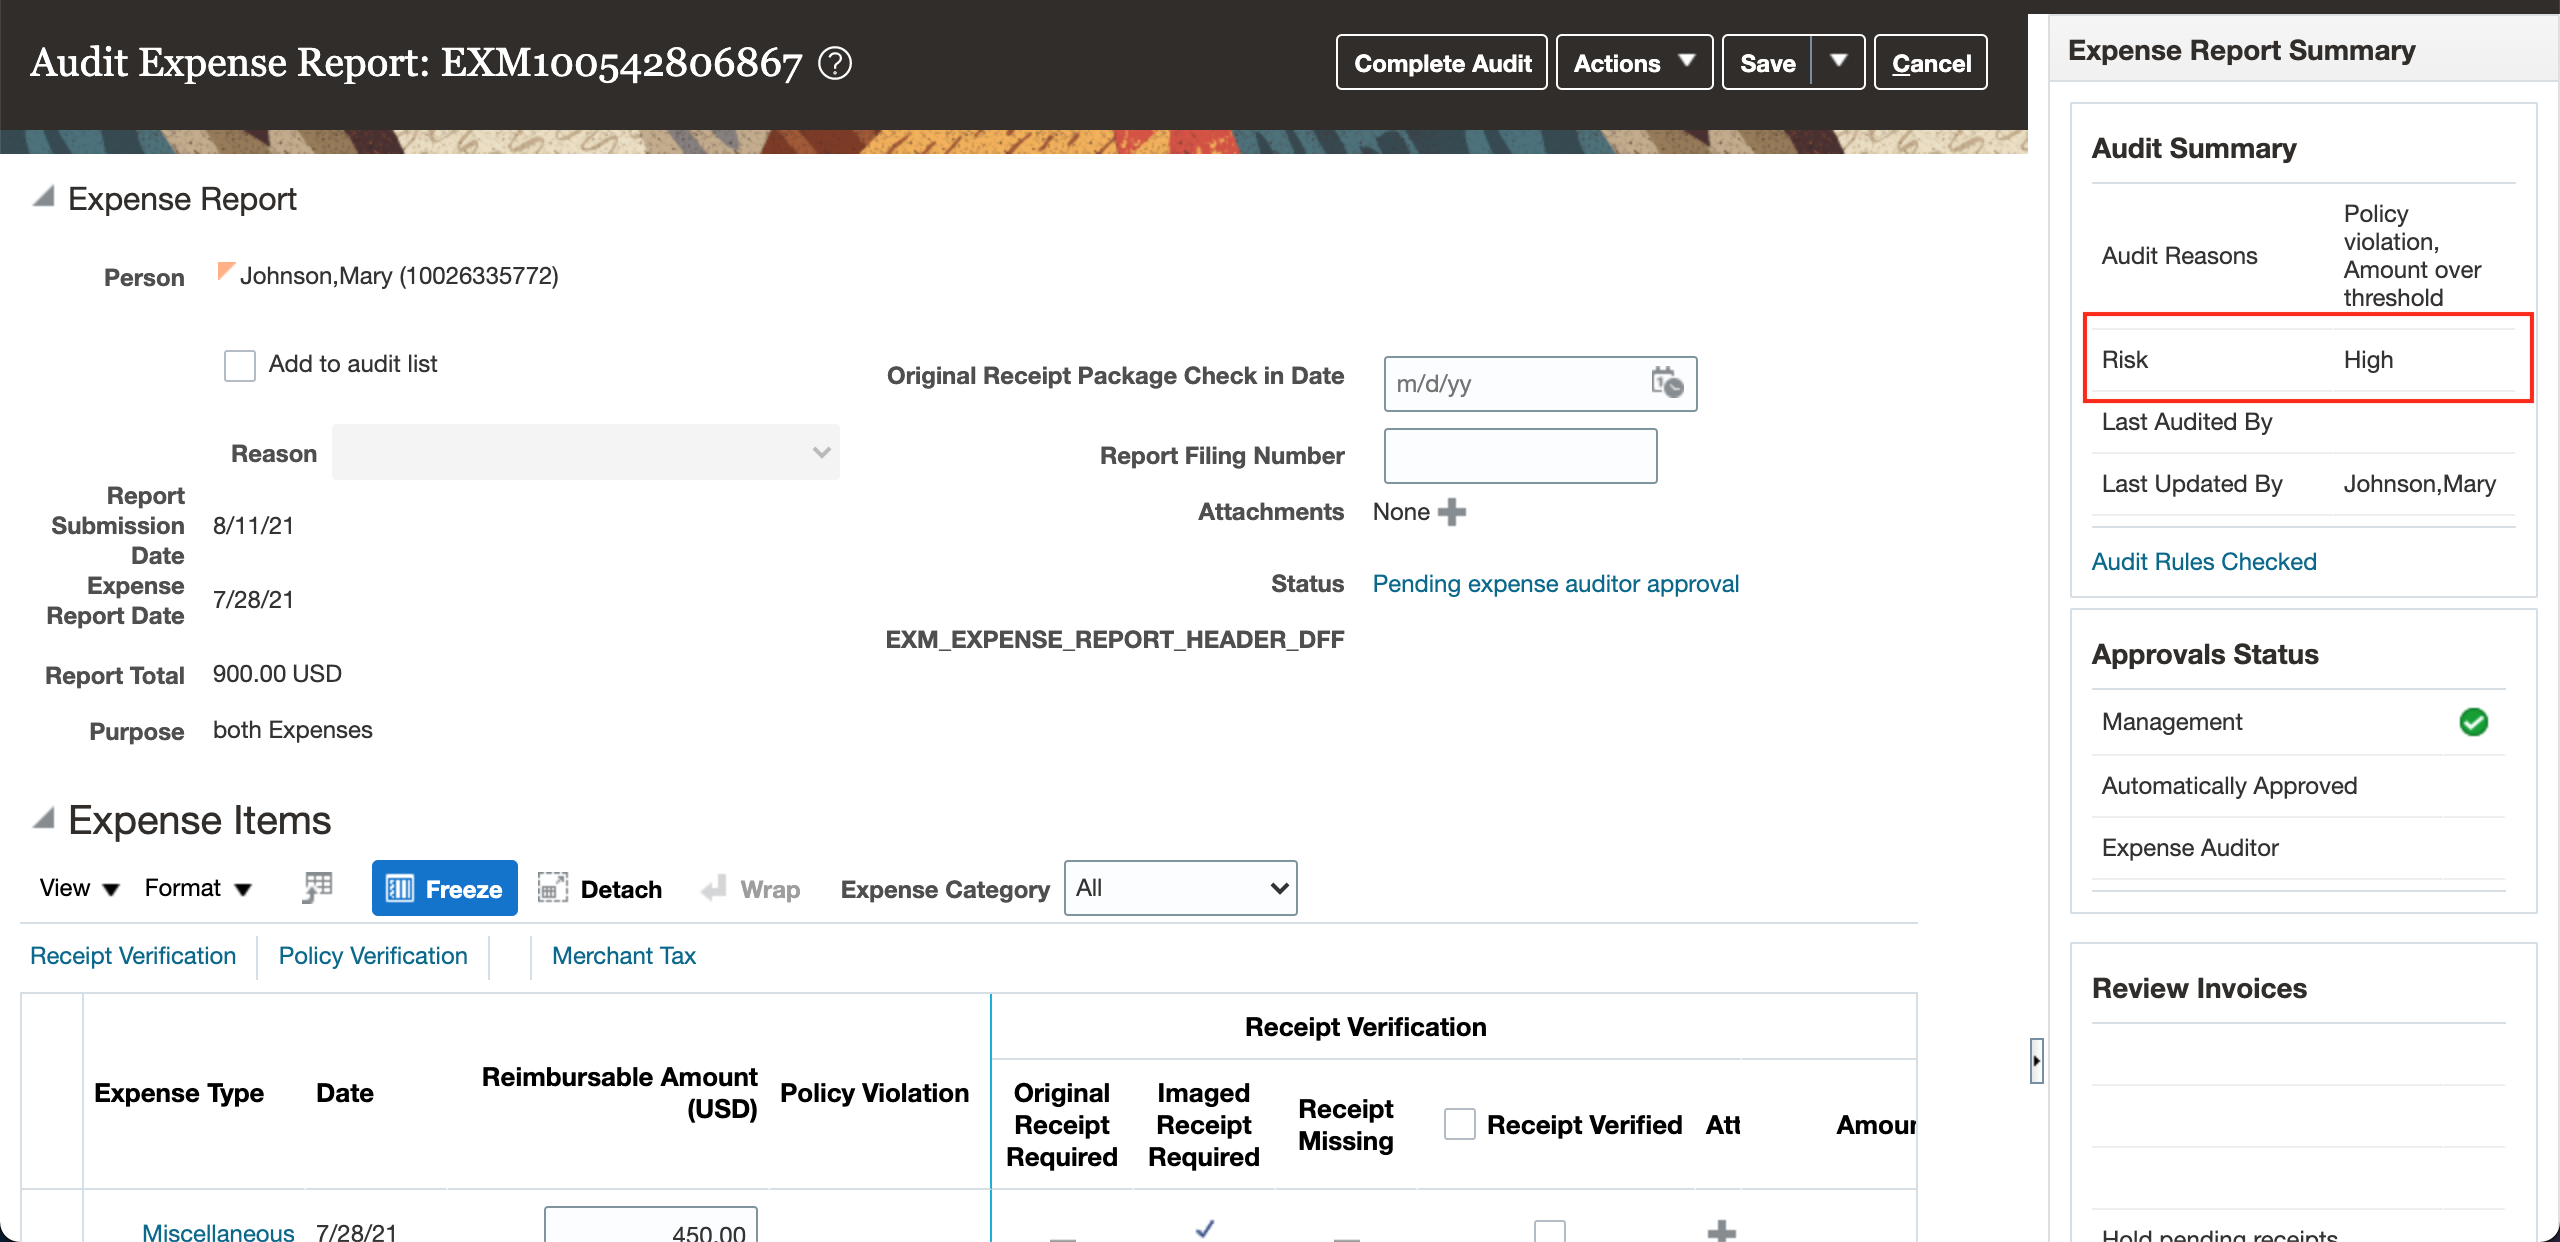
Audit Expense Report
Audit reasons have default risk levels assigned as listed in the table below.
| Audit Reason Code |
Audit Reason Meaning |
Risk Level |
|---|---|---|
| AGED_EXPENSE_ITEMS |
Aged expense items |
Low |
| AMOUNT_OVER_THRESHOLD |
Amount over threshold |
Low |
| AUDIT_LIST_MEMBER |
Audit list member |
High |
| EMPLOYEE_INACTIVE |
Inactive employee |
High |
| EMPLOYEE_ON_LEAVE |
Employee on leave of absence |
High |
| EXPENSE_TEMPLATE |
Expense template |
Low |
| EXPENSE_TYPE |
Expense type |
Medium |
| EXPENSE_TYPE_AMOUNT |
Expense type over amount |
Medium |
| EXPENSE_CUM_AMOUNT |
Expense type over cumulative amount |
Medium |
| ORA_KEYWORD_VIOLATION |
Keyword violation |
Medium |
| IMAGED_RECEIPT_MISSING |
Missing imaged receipt |
Medium |
| POLICY_VIOLATION |
Policy violation |
High |
| RANDOM_SELECTION |
Random selection |
Null |
| RECEIPT_REQUIRED |
Receipt required |
Low |
| ORA_DUP_EXPENSE_ITEM |
Duplicate expense item |
High |
| ORA_PUB_SEC_ATTENDEE |
Public sector attendee |
Medium |
| ORA_SAME_POL_VIO_IN_PAST |
Same policy violation in past |
High |
| ORA_TOP_POL_VIOLATOR |
Top policy violator |
High |
| ORA_TOP_SPENDER |
Top spender |
High |
| ORA_EX_RECPT_THRESHOLD |
Exceeded receipt required threshold |
Medium |
| ORA_DUP_ATTENDEE |
Duplicate attendee |
Medium |
To customize the risk levels for each audit reason, navigate to the Manage Standard Lookups page and create the following Lookup Types: EXM_AUDIT_RISK_HIGH, EXM_AUDIT_RISK_MEDIUM, and EXM_AUDIT_RISK_LOW. Associate the Audit Reason Codes from the above table with the new Lookup Types. The Audit Reason Codes that are not associated with the new Lookup Types will have a risk level of Null.
Help auditors with a high volume of reports prioritize their audits by risk level.
Steps to Enable
You don't need to do anything to enable this feature.
Tips And Considerations
You must set up audit rules to make use of the risk indicator. To set up audit rules, refer to the documentation link under Key Resources.
Key Resources
Role Information
- You need the Expense Auditor role to use this feature.
- You need the Application Implementation Consultant role to customize the risk levels for each audit reason.
Pay Group for Cash Advances and Expense Reports
Enable specific pay groups for cash advances and expense reports with negative reimbursement amounts. Creating distinct pay groups allows companies to process cash advance and expense reimbursements separate from the refunds collected from employees.
These pay groups prevent the negative payment requests from getting applied against positive payment requests and cash advances. This helps in efficiently processing the cash advances and expense reimbursements.
Using specific pay groups also helps companies to easily track and close all the negative payment requests.
Steps to Enable
To set up a pay group for negative expense reports, perform the following steps:
- Sign in as the Application Implementation Consultant.
- From the Setup and Maintenance work area, navigate to the Manage Expenses System Options page.
- Under Processing Options for Expense Report, select a pay group for Pay Group for Negative Expense Reports.
- You can select a value from the list of pay groups available or you can search for a specific pay group and assign the value.
You can assign the pay group at the implementation level on the Manage Expenses System Options page, which applies to all business units. Alternatively, you can specify exceptions for specific business units on the Create System Options: Specific Business Unit dialog box.

Pay Group for Negative Expense Reports
To set up a pay group for cash advances, perform the following steps:
- Sign in as the Application Implementation Consultant.
- From the Setup and Maintenance work area, navigate to the Manage Cash Advance and Authorization Policies page.
- Under Cash Advances, select a pay group for Payment Group for Cash Advances.
- You can select a value from the list of pay groups available or you can search for a specific pay group and assign the value.
You can assign the pay group at the implementation level on the Manage Cash Advance and Authorization Policies page, which applies to all business units. Alternatively, you can specify exceptions for specific business units on the Create Business Unit - Specific Cash Advance Policies dialog box.

Pay Group for Cash Advances

Configured Pay Group Assigned to a Negative Expense Report
Role Information
- To setup pay groups, you need one of these roles:
- Expense Manager
- Application Implementation Consultant
Policy Enforcement for Miscellaneous Expenses in Mobile Application
Validate miscellaneous expenses for policy violations within the Expenses mobile application. The mobile application performs the same validations that are enforced online. If your company policy permits submission of expenses with policy violations, provide a justification in the mobile application. If company policy does not allow an expense report submission with policy violations, you cannot submit an expense item. You must correct the expense item using the mobile application.
Expenses evaluates each miscellaneous expense reimbursement eligibility and alerts employees to miscellaneous expenses that are not eligible for reimbursement.

Miscellaneous Policy Violation Warning Message on View Expense Screen

Miscellaneous Policy Violation Error Message on View Expense Screen
Enforcing miscellaneous policies in the Expenses mobile application enables employees to review their miscellaneous expenses, fix any issues, and submit them directly from the mobile application.
Steps to Enable
You don't need to do anything to enable this feature.
Tips And Considerations
To use this feature, ensure that you have downloaded the latest Expenses mobile application.
Key Resources
- Refer to the Set Up a Miscellaneous Expense Policy topic in the Oracle Financials Cloud Implementing Expenses guide to learn how to set up a miscellaneous policy.
Role Information
You don't need a new role or privilege access to use this feature.
Project Expenditure Organization Capture in Expenses Mobile Application
Capture project expenditure organization in Expenses mobile application for project-related expenses. Provide a default project expenditure organization when applicable and restrict selection to valid project expenditure organizations.
When employees navigate to the Add Expense screen and the Add Mileage screen on the Expenses mobile application, the project expenditure organization field is displayed when the project-related expense is selected. Depending on the configuration, a default value is displayed in the project expenditure organization field. They can either select the default value or select a relevant expenditure organization from the list. They can also search for a specific organization and select from the search results. If the expenditure organization field is configured as mandatory, the application shows an alert when the field is not populated.

Project Expenditure Organization Field Displayed for a Project-Enabled Expense
Assigning expenses to the correct project expenditure organization ensures that the expense is charged to the right organization.
Steps to Enable
You don't need to do anything to enable this feature.
Tips And Considerations
- Ensure that Expenditure Organization (Organization_ID) is enabled for Expense Report Line in Project Costing Fields DFF, for the project expenditure organization field to be displayed for project-related expenses
- To use this feature, ensure that you have downloaded the latest Expenses mobile application.
Role Information
You don't need a new role or privilege access to use this feature.