
This document will continue to evolve as existing sections change and new information is added. All updates appear in the following table:
| Date | Product | Feature | Notes |
|---|---|---|---|
| 23 NOV 2021 | Student Financials | Payment Error Messaging and Resolution | Updated document. Revised feature information. |
| 22 OCT 2021 | Campus Community/Security | Updated document. Delivered feature in update 21D. |
|
| 30 SEP 2021 | Student Financials | Updated document. Revised feature information. |
|
| 17 SEP 2021 | Created initial document. |
Student Management delivers cloud based, flexible, extensible best practice business flows to support how you enroll your students, maintain their personal information, and manage their payments. From a learner taking a non-credit course to the degree-seeking student, Oracle’s Student Management enables institutions to anticipate students’ needs, illuminate their academic path, and empower them to succeed.
This guide outlines the information you need to know about new or improved functionality in this update, and describes any tasks you might need to perform for the update. Each section includes a brief description of the feature, the steps you need to take to enable or begin using the feature, any tips or considerations that you should keep in mind, and the resources available to help you.
 HAVE AN IDEA?
We’re here and we’re listening. If you have a suggestion on how to make our cloud services even better then go ahead and tell us. There are several ways to submit your ideas, for example, through the Ideas Lab on Oracle Customer Connect. Wherever you see this icon after the feature name it means we delivered one of your ideas.
GIVE US FEEDBACK
We welcome your comments and suggestions to improve the content. Please send us your feedback at oracle_fusion_applications_help_ww_grp@oracle.com.
DISCLAIMER
The information contained in this document may include statements about Oracle’s product development plans. Many factors can materially affect Oracle’s product development plans and the nature and timing of future product releases. Accordingly, this Information is provided to you solely for information only, is not a commitment to deliver any material, code, or functionality, and should not be relied upon in making purchasing decisions. The development, release, and timing of any features or functionality described remains at the sole discretion of Oracle.
This information may not be incorporated into any contractual agreement with Oracle or its subsidiaries or affiliates. Oracle specifically disclaims any liability with respect to this information. Refer to the Legal Notices and Terms of Use for further information.
Column Definitions:
Report = New or modified, Oracle-delivered, ready to run reports.
UI or Process-Based: Small Scale = These UI or process-based features are typically comprised of minor field, validation, or program changes. Therefore, the potential impact to users is minimal.
UI or Process-Based: Larger Scale* = These UI or process-based features have more complex designs. Therefore, the potential impact to users is higher.
Features Delivered Disabled = Action is needed BEFORE these features can be used by END USERS. These features are delivered disabled and you choose if and when to enable them. For example, a) new or expanded BI subject areas need to first be incorporated into reports, b) Integration is required to utilize new web services, or c) features must be assigned to user roles before they can be accessed.
| Ready for Use by End Users Reports plus Small Scale UI or Process-Based new features will have minimal user impact after an update. Therefore, customer acceptance testing should focus on the Larger Scale UI or Process-Based* new features. |
Customer Must Take Action before Use by End Users Not disruptive as action is required to make these features ready to use. As you selectively choose to leverage, you set your test and roll out timing. |
|||||
|---|---|---|---|---|---|---|
| Feature |
Report |
UI or |
UI or |
|
||
Data Access Assignment to a Role Group and Copying of Data Access |
||||||
Create new user accounts in a new standardized UI throughout different account creation flows. For example, the flows can be an administrator creating an account for a user, a prospective student signing up, and a proxy adding another proxy or a student to a proxy group.
No matter what the user account creation flow is, the UI for creating a user account in Student Management remains the same.
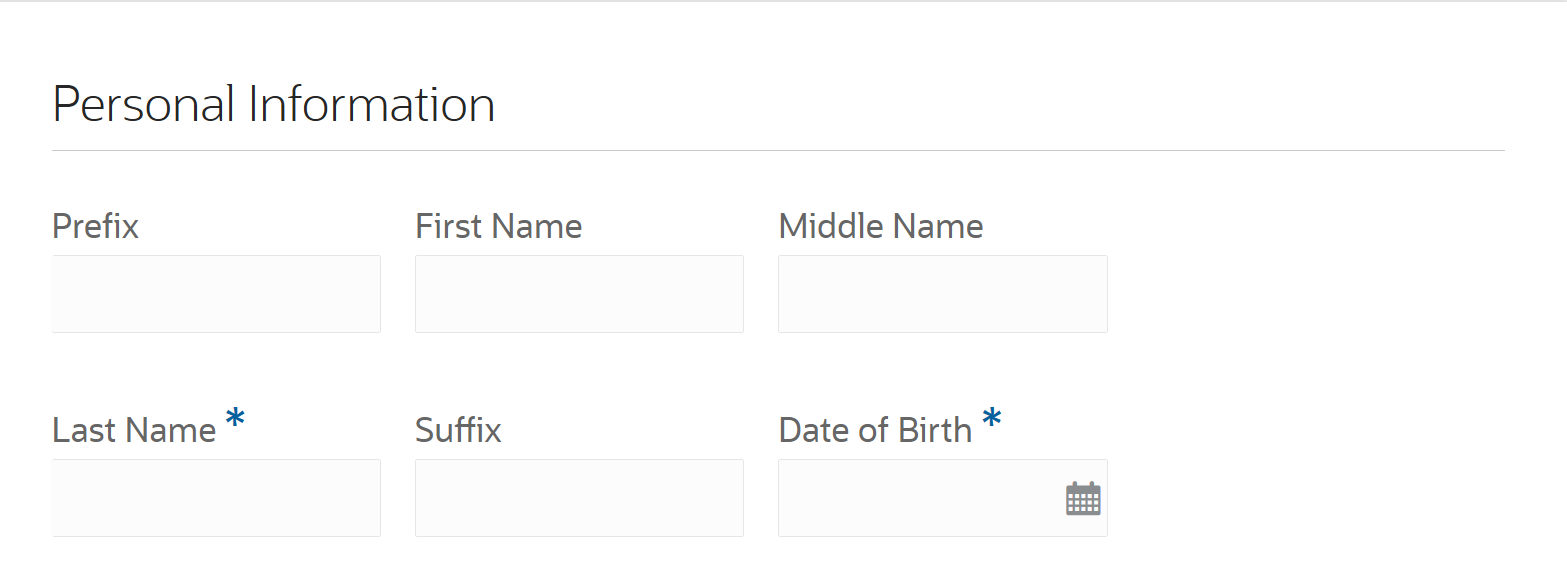
User Account Creation Page (1 of 2)
User Account Creation Page (2 of 2)
This feature provides an easier-to-use, consistent experience for creating user accounts in Student Management.
Steps to Enable
You don't need to do anything to enable this feature.
Admissions Application Task and Checklist Assignment
Assign standalone tasks and checklists to an applicant for their submitted admissions application using the new unified task and checklist assignment wizard. Administrators can also view and update task statuses directly from an admissions application that’s more consistent with other Student Management pages.
For example, along with assigning a standalone task to the submitted admissions application, you can also upload a document for that task in the Admissions UI.
Steps to Enable
You don't need to do anything to enable this feature.
Tips And Considerations
To assign a task to a submitted admission application:
- Click Navigator > Academics > Admissions > Applications.
- Open the submitted admissions application to which you want to assign a task.
- Go to Application To-Dos and from the New Assignment drop-down list, select Assign Task.
Document Submission Tasks Auto-Completion
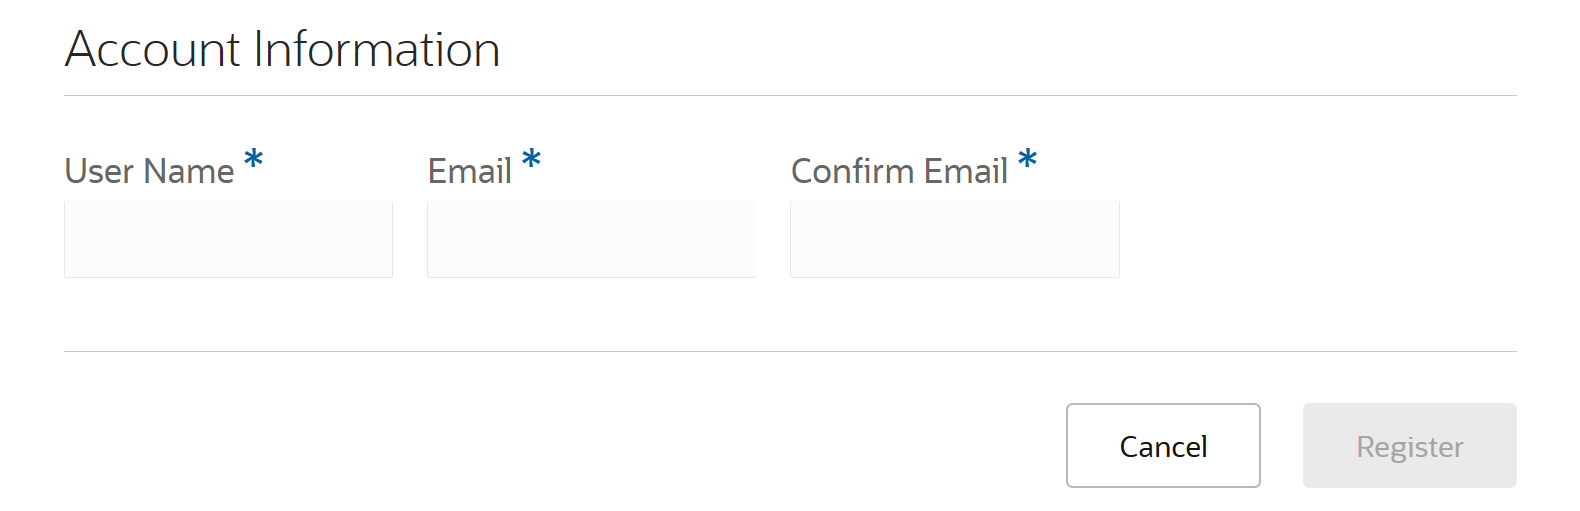
Prompt a student or administrator user to mark a document submission task complete if the document has already been uploaded when leaving the details page for the task. Simplify the step for a student to complete a document submission task manually as well. Configure whether to turn on or off these new behaviors at a global level in Student Management.
If your students forget to mark a document submission task complete or forget to change the status to complete after uploading a document, Student Management prompts them to mark the document submission tasks as complete while leaving the page. This reduces the number of In Progress tasks. When the task is marked complete, Student Management selects the default status matching the Complete status type for the defined status scheme for that task.
Prompt to Mark Task Complete
Steps to Enable
Go to Manage Settings > Task and Checklist Settings and click the toggle button to enable Request User to Mark Document Submission Tasks Complete setting.

Document Submission Tasks Auto-Completion Toggle Button
Student Management Cloud delivers new pages, page elements, and page permissions assigned to the predefined job roles in each release.
Here are the newly added pages, page elements, and page permissions for the mentioned predefined job roles:
| Page Name |
New/Existing |
Page Elements |
New/Existing |
Page Permission |
New/Existing |
Predefined Job Roles |
|---|---|---|---|---|---|---|
| Task and Checklist Settings |
New | NA | NA | Manage | New | Higher Education Application Administrator |
| Manage Sponsorship Credit Page |
Existing | View Sponsorship Credit Details |
Existing | Delete | New | Registrar, Bursar, Cashier, Higher Education Application Administrator, and Student Sponsorship Administrator |
| View Tasks and Checklists |
Existing | NA | NA | Manage | New | Admissions Manager, Registrar, Bursar, and Higher Education Application Administrator |
| View Tasks and Checklists |
Existing | NA | NA | Reassign | New | Admissions Manager, Registrar, Bursar, and Higher Education Application Administrator |
| View Submitted Form |
Existing | Manage Checklists |
Existing | Reassign | New | Admissions Coordinator and Admissions Manager |
Steps to Enable
You don't need to do anything to enable this feature.
Tips And Considerations
If you created user-defined roles and assigned page access to them using the Manage Application Access task in Setup and Maintenance, you must review your user-defined roles to see if you need to assign them access to the new pages, page elements, and page permissions.
Role Information
You need an IT Security Manager role to use this feature.
Search and Filter Value Retention for Access Information
Find access information more quickly with previously selected filters and search criteria being preserved when returning to the access information list view after viewing page, user, role, or data profile details.
While reviewing access information for a specific set of pages, roles, or data profiles using a search or filter criteria, you don’t need to re-enter the criteria every time you return to the list view. Student Management Cloud now preserves the search or filter criteria so that you can continue to review access information for the specific set of pages, roles, or data profiles more efficiently and save time.
Steps to Enable
You don't need to do anything to enable this feature.
Role Information
You need a Higher Education Application Administrator or IT Security Manager role to use this feature.
Data Access Assignment to a Role Group and Copying of Data Access
Assign data profile security conditions to a role group to establish data access for all roles within the role group. Add roles to a role group and the roles inherit data profile security conditions from the role group. Remove roles from a role group and the roles lose the data profile security conditions received from the role group. You can also copy data profile security conditions from one role or role group to another to duplicate data access permissions across roles or role groups.
Assigning the same data access for multiple roles in this way is simpler now and you can do it in a single step.
For bulk data access assignment, first group the roles into a role group and then assign data profile security conditions to that role group. All the roles in that role group inherit the same data profile security conditions. If you need to replicate the same data access across roles or role groups, copy the data profile security conditions from one role or role group to another. These are the options available when you copy the data profile security conditions:
- Role to Role
- Role to Role Group
- Role Group to Role
- Role Group to Role Group
Steps to Enable
You don't need to do anything to enable this feature.
Tips And Considerations
Here's how to assign data profile security conditions to a role group and copy data profile security conditions to a role or role group:
- In the Setup and Maintenance work area, use the Manage Application Access task:
- Offering: Student Management
- Functional Area: Users and Security
- Click Data Profiles.
- In the search box, enter the data profile name you want to assign to a role group. The data profile is displayed on the list.
- Click the ellipses on the row for the data profile, and click Assign to Roles. If you don't see the ellipses, scroll to the right.
- Click Add, select a role group to add to the data profile, and click Add.
- For each of the fields that you enabled for the data profile, choose the values to define the security filter conditions on the data set for the business object.
- All the roles in that role group have the data profile security conditions assigned to them. When done, click Save.
- To copy the assigned security conditions to another role or role group, click the Copy icon.
- In the Add Role or Role Group dialog box, select a Role or Role group for which you want to set the same security conditions, and then click Next.
- When you're done, click Save.
Role Information
You need a Higher Education Application Administrator or IT Security Manager role to use this feature.
Page Access Assignment to a Role Group
Assign page permissions to a role group to establish page access for all roles within the role group. Add roles to a role group and the roles inherit page permissions from the role group. Remove roles from the role group and the roles lose the page permissions received from the role group.
Assigning same access for multiple roles in this way is simpler now, and you can do it in a single step. Both the newly added Page Permissions and Data Profiles tabs inside a role group show you the list of pages that the role group has access to and the data profile assigned to that role group.
Steps to Enable
You don't need to do anything to enable this feature.
Tips And Considerations
For bulk page access assignment, first you need to group the roles into a role group and then assign page access permissions to that role group. All the roles in that role group inherit the same page access permissions. Here's how to assign page access permissions to a role group:
- In the Setup and Maintenance work area, use the Manage Application Access task:
- Offering: Student Management
- Functional Area: Users and Security
- Click Pages.
- Locate the page you want to specify the access permissions for, click the ellipses in that row, and click Assign Page Access to Roles or Role Groups.
- Click Add and select the role group you're specifying the access permissions for.
- Select the newly added role group and click the Activate toggle button. The access permissions are now updated to all the roles in that role group. It also assigns the default data profile associated with that page to the role group.
- If necessary, modify the access permissions for the role group and all the roles in that role group inherit the updated access permissions.
- When you're done, click Save.
Role Information
You need a Higher Education Application Administrator or IT Security Manager role to use this feature.
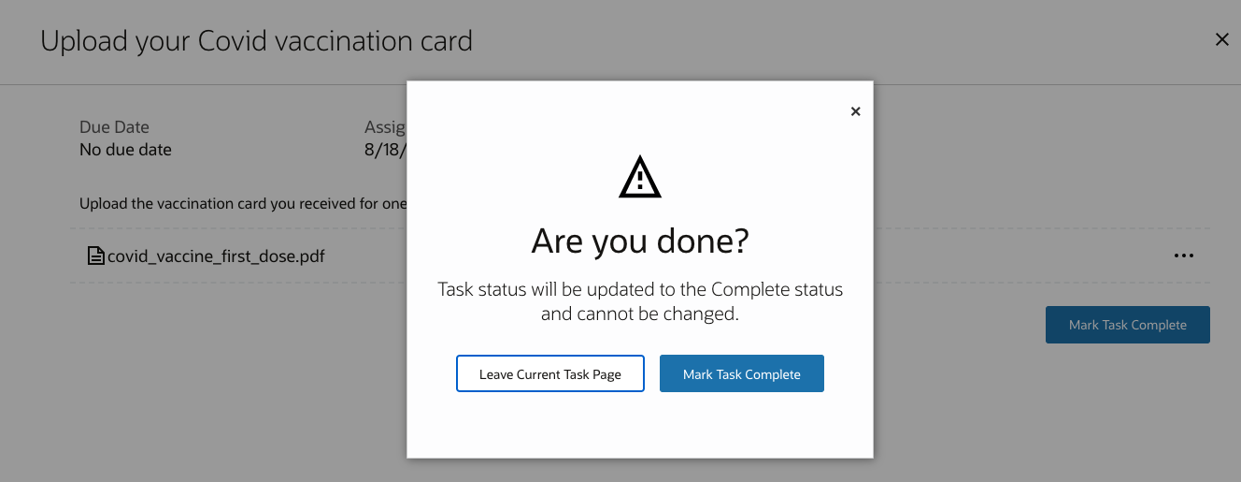
Page and Role Group Bulk Assignment Review
Administrators can review the content of a page and role group before submitting a bulk access assignment request.
In this way, Student Management Cloud now saves you time and provides better information about the access you’re about to assign to roles in bulk. This also helps you to avoid assigning unintentional access to roles. When you click the page or role group name, this is how the content appears:
View Group Contents
Steps to Enable
You don't need to do anything to enable this feature.
Role Information
You need a Higher Education Application Administrator or IT Security Manager role to use this feature.
Proxy Group Owner Change Notification
Notify all proxies, including the old and new proxy group owners, when a proxy group owner is changed.
Whenever you change a proxy group owner to a different proxy in the group, Student Management Cloud sends a notification to all proxies in the group including the old and new proxy group owners.
Steps to Enable
To enable the proxy group owner change notification:
- Click Navigator > Academic Tools > Communications > Create Communication.
- Create an event-based communication.
- From the Select Event drop-down list, select Proxy Group Owner Changed.
Role Information
You need a Higher Education Application Administrator or Student Proxy role to use this feature.
Transaction Details on Organization Accounts
Bursars or administrators can now see the details of each invoice and receipt that external organizations may have within Student Management's Finances work area. These details include the transaction's status, which transaction was paid for, applicable discounts, or refunds.
To view transaction details for organizations:
- Go to the Finances work area: Navigator > Academics > Finances.
- Click Organizations.
- Search for the organization whose transactions you want to look at.
- From the search results, select the organization to view its account page. On the account page, you will see various invoices and receipts that relate to transactions that the organization has had.
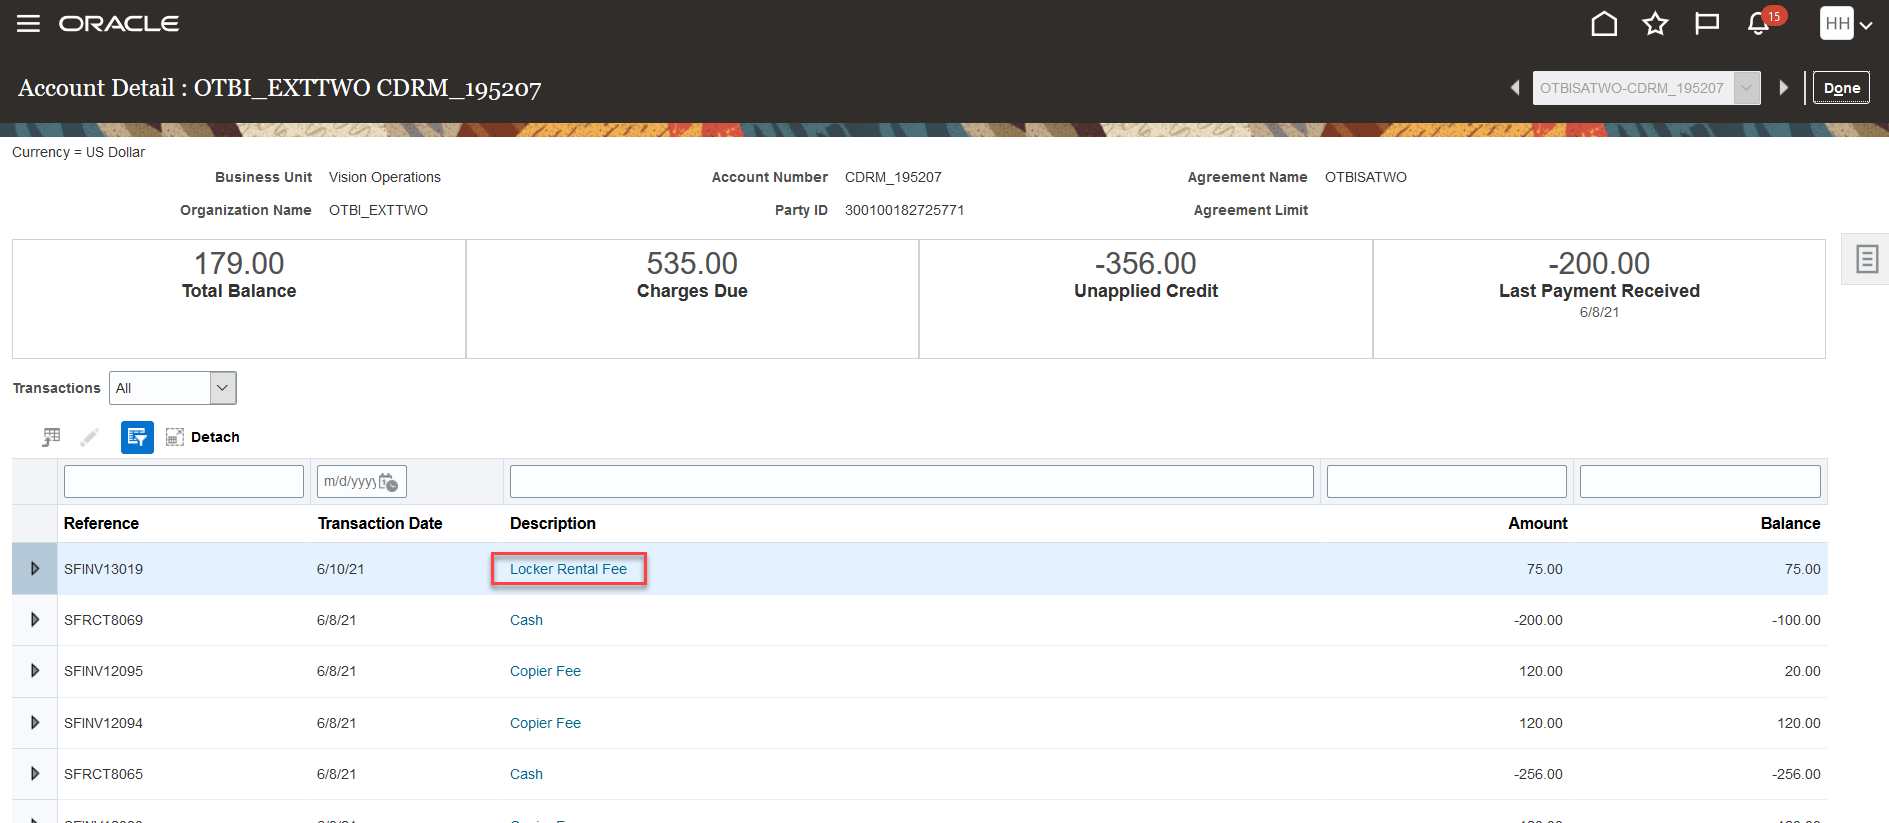
External Organization - Account Details Page
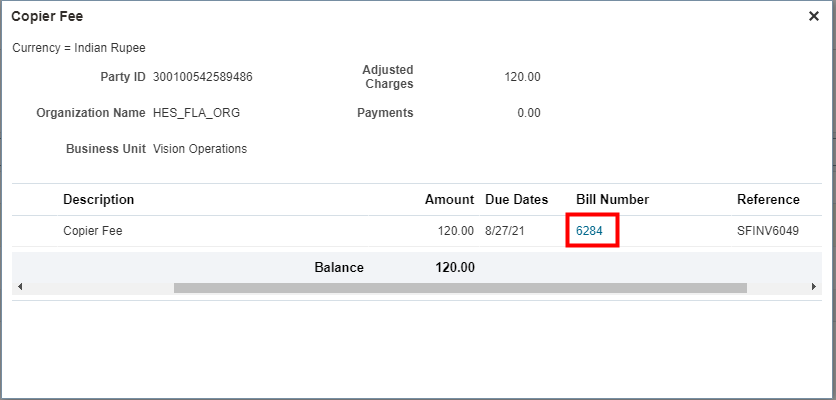
Transaction Details with Link to Billing
With this feature, bursars and administrators will see the details in each invoice and receipt from within Student Management.
Steps to Enable
You don't need to do anything to enable this feature.
Billing Statements for Organizations
Previously, institutions could only generate bills for students. Now, institutions can also generate bills for external organizations who are part of a sponsorship agreement.
Before you generate billing, you need to create a population selection query. This query is used when you run the Generate Billing Transactions process so that you can identify the group of users for whom you're generating a bill.
To create a population selection query:
-
Click Navigator > Tools > Reports and Analytics.
-
Click Browse Catalog. Make sure your browser is set up to allow pop-ups. Oracle BI appears.
-
Click New and select Analysis.
-
Select the subject area Higher Education - Sponsor Agreement Real Time, then click Continue.
TIP: Search for Higher Education to narrow down the list of subject areas.
-
In Select Columns, expand the subject area folders, then add columns to the analysis. For example, in Student, you can add Name and Last Name; in Agreement, you can add Agreement Name, and so on.
NOTE: It's important that you add the External Organization - Party ID column to the analysis.
-
Click Next.
-
In Select Views, click Table, then select Table (recommended).
-
Click Submit.
-
In Analysis Name, enter a name for the query, then save the query in Shared Folders > Custom > Higher Education.
-
Click Submit.
To generate the billing:
- Click Navigator > Tools > Scheduled Processes.
- Click Schedule New Process, then search for Generate Billing Transactions.
- Click OK.
- In Billing Type, select Sponsors.
- In Select BI Query, search for the query you created.
- From the search results, select your query, then click OK.
- In Billing Date and Due Date, you can specify dates to capture certain transactions whose billing and due dates fall within this range.
- In Format Bills, select Yes if you want bills to be formatted to PDF.
- Click Submit.
- To ensure that the process has been completed, click the Refresh icon, and make sure the status is Succeeded.
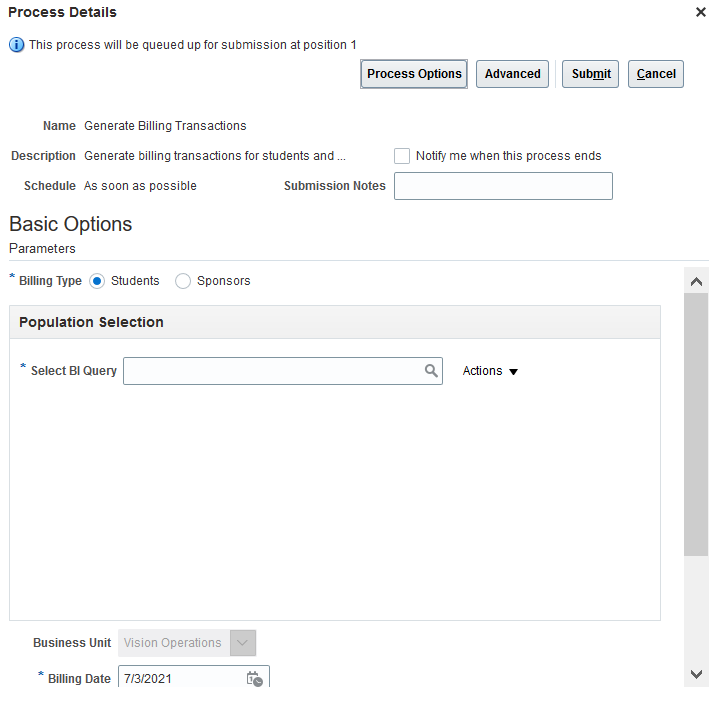
Generate Billing Transactions Page
When the Generate Billing Transactions process completes successfully, you should be able to view the bill from the organization's account page. For more information, see Transaction Details on Organization Accounts.
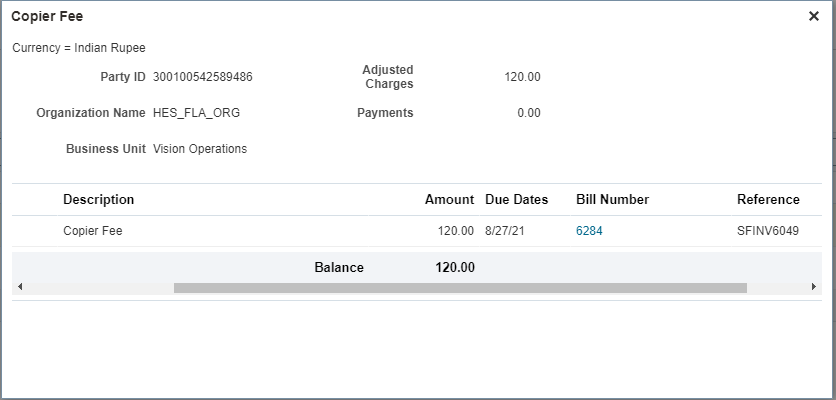
Transaction Details
Institutions can now provide a clear, official bill to external organizations that have sponsorship agreements. This enhances the institution’s ability to collect outstanding receivables from sponsoring organizations. This feature also helps sponsoring organizations ensure they are paying only for the students they are sponsoring.
Steps to Enable
You don't need to do anything to enable this feature.
Tips And Considerations
When a sponsorship agreement is created, the process that creates the external organization's customer account for that agreement takes care of associating the correct customer profile class (ORA_HED_BFB) with the external organization. This customer profile class is the same value that you set up on the Student Financial System Options page. It includes the necessary settings to create customer accounts and enable balance forward billing. To check whether the external organization is assigned with customer profile class ORA_HED_BFB:
- In the Setup and Maintenance work area, use the Manage Customers task:
- Offering: Student Management
- Functional Area: Customers
- In Customer Type, make sure it's Organization, then search for the external organization.
- In the Accounts section, you should see the customer profile class ORA_HED_BFB.
Currently, only institutions can view the accounts of external organizations and generate billing. After the billing is generated, bursars or administrators can access a PDF copy of the organization's bill from the organization's account page. For more information, see Transaction Details on Organization Accounts.
You can also edit the billing template. But before you edit the template, you need to make a copy of it in a separate folder, just so you have a backup copy of the template should you need it.
- Click Navigator > Tools > Reports and Analytics.
- Click Browse Catalog. Make sure your browser is set up to allow pop-ups. Oracle BI appears.
- In My Folders, create these folders: Higher Education > Billing.
- Go to Shared Folders > Higher Education > Billing, then copy Balance Forward Bills Print Template to My Folders > Higher Education > Billing.
- Go to Shared Folders > Higher Education > Billing to access Balance Forward Bills Print Template, then click Edit.
- In Balance Forward Bills Print Report, click Edit. This lets you download template, which you can then save to your local drive.
- Edit the file you downloaded, and then once you have made your changes, click Properties.
- In the Templates area, click Upload, then select the template you updated.
- Save your changes.
Payment Error Messaging and Resolution
Prior to this release, institutions couldn't complete postprocessing steps like resubmitting applications even if payment was successfully collected from the applicant or student. There wasn't clear messaging, which could then lead to students making multiple payments. With this feature, institutions can designate an administrator who will receive email notifications when transactions fail to post after payments are successfully collected. Institutions will have to create the email notification, and it should contain information to help administrators and students resolve the issue. During the payment process, students and applicants will also see error messages telling them what went wrong, and what they need to do.
Here are examples of the contents of email notifications.
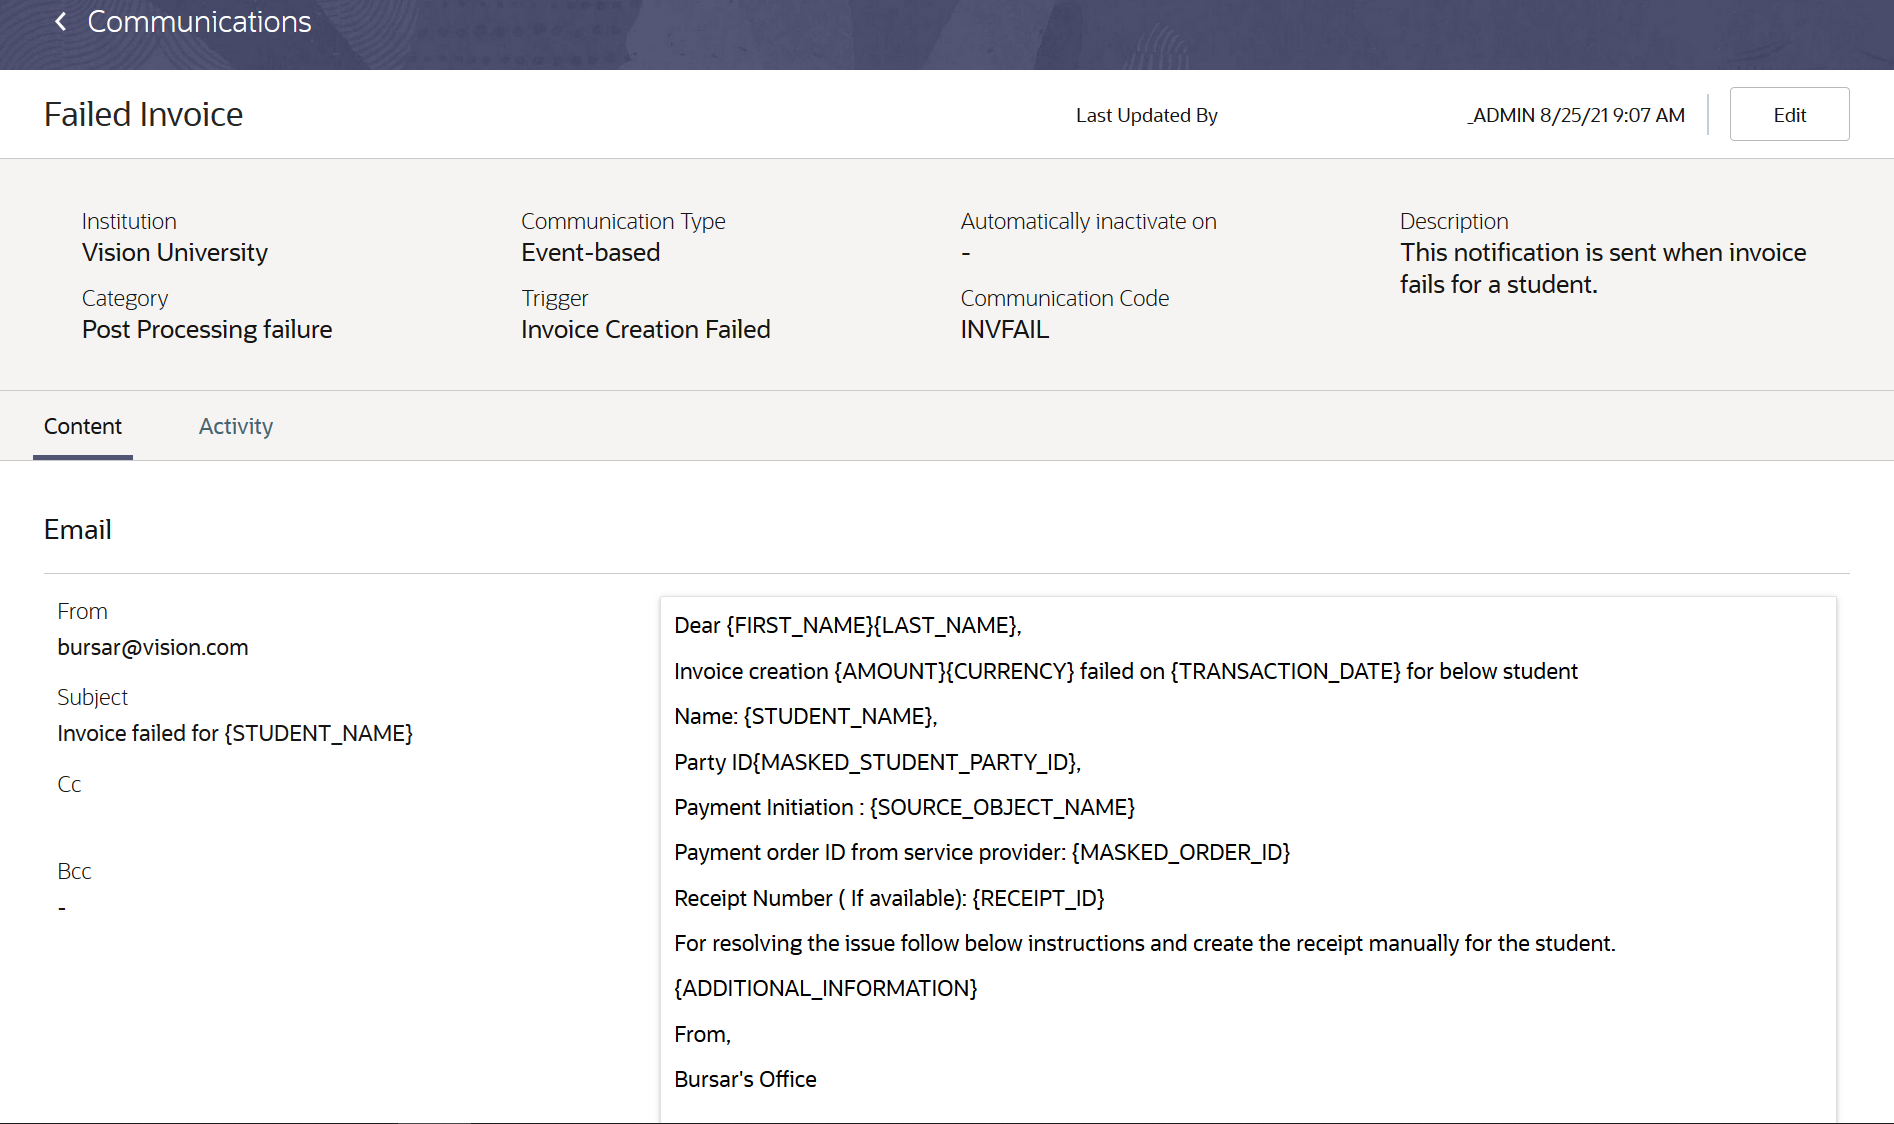
Email Notification for Invoice Failed Event
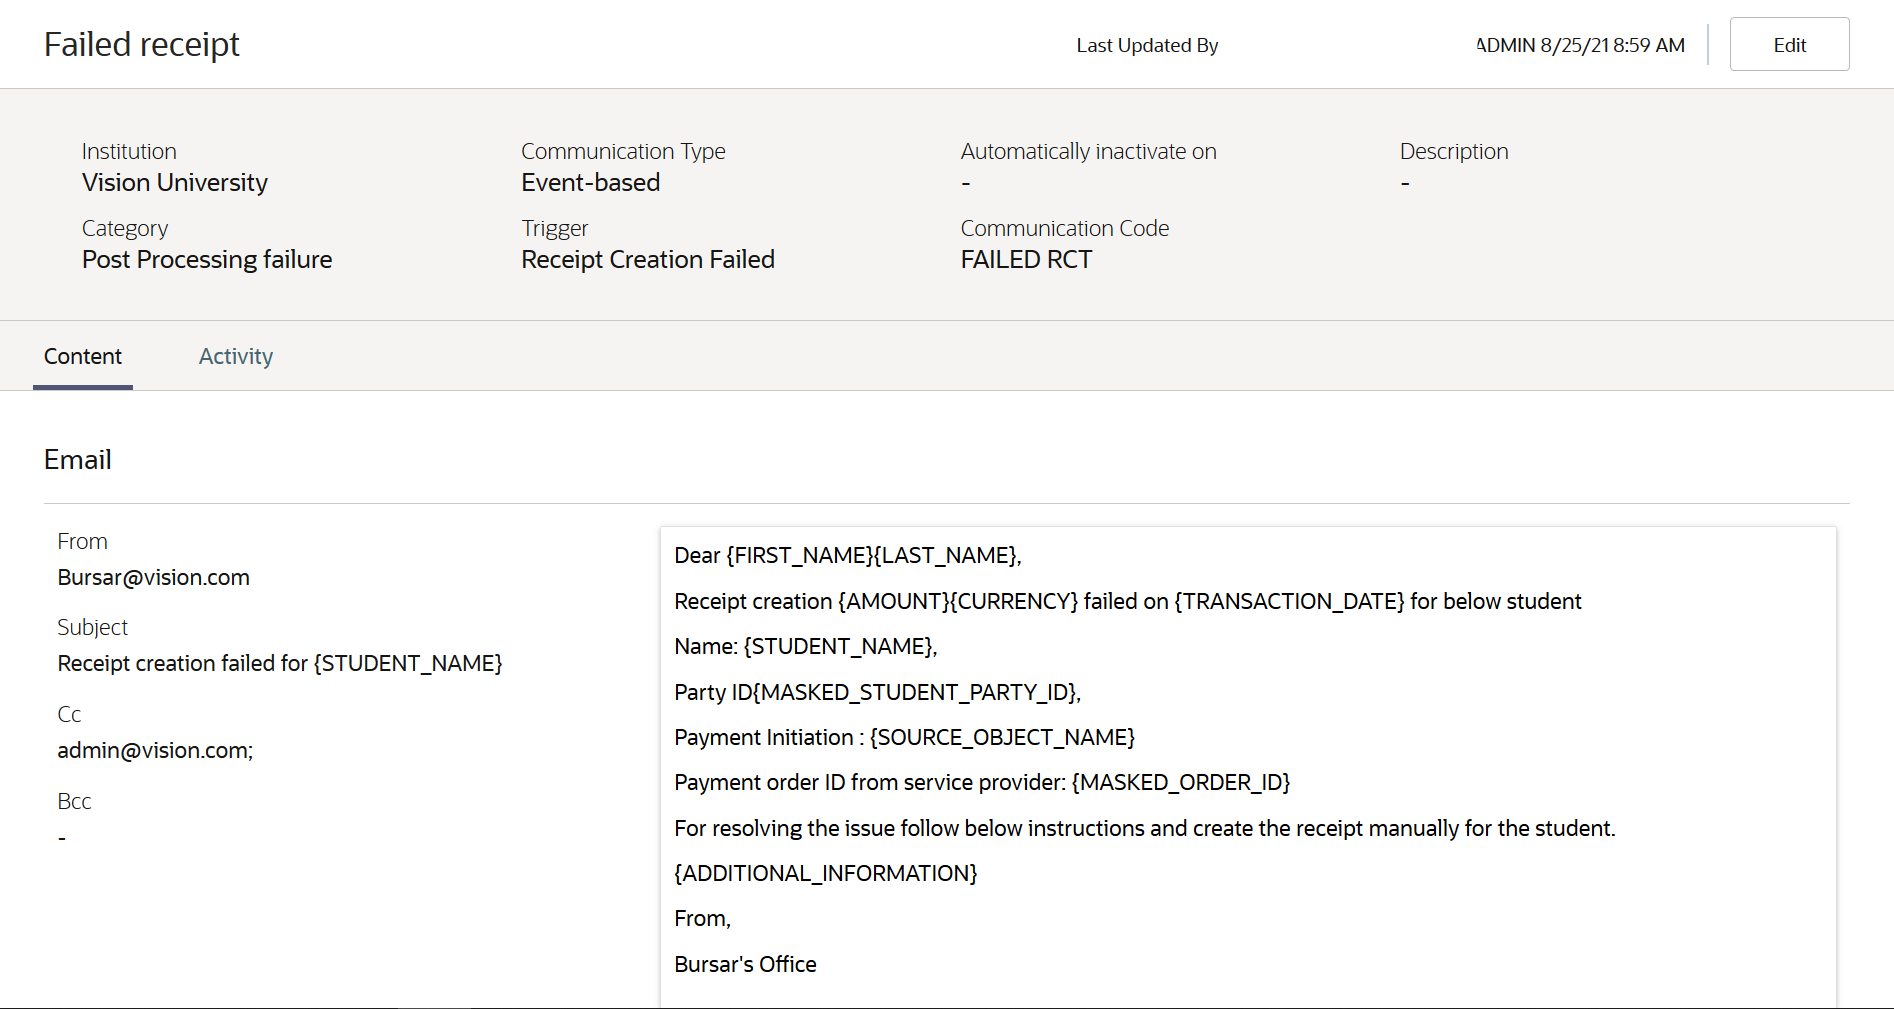
Email Notification for Receipt Creation Failed Event
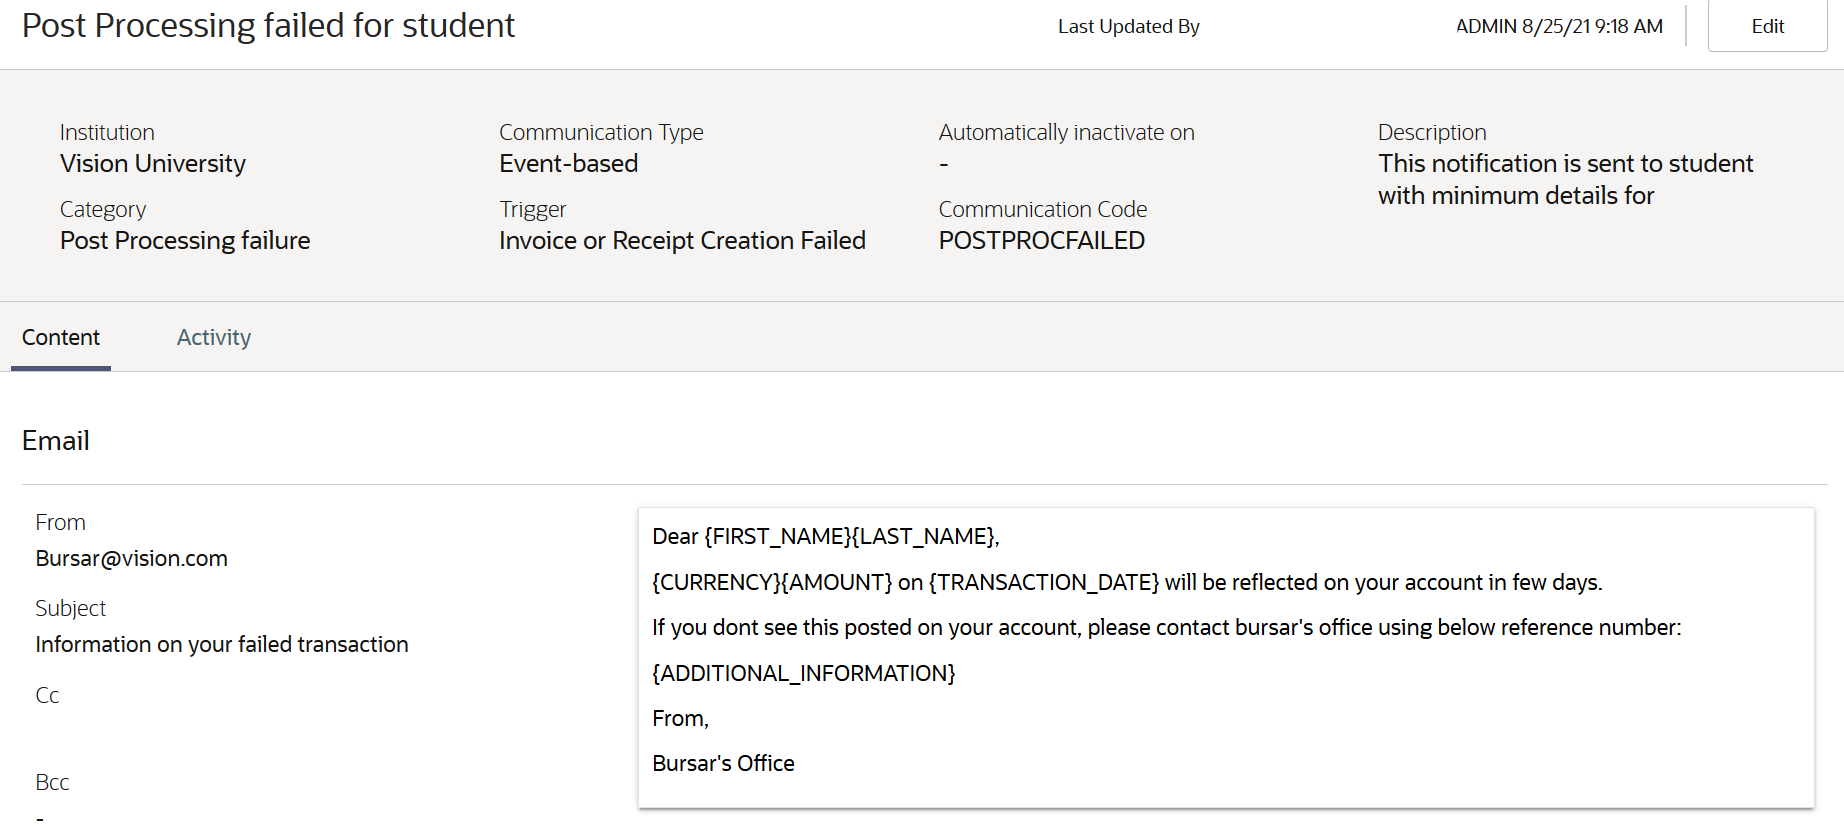
Email Notification for Invoice or Receipt Creation Failed Event
Currently, this feature addresses transaction issues when submitting applications.
With this feature, institutions can now complete postprocessing and repost transactions (invoices or receipts) to students' accounts. They can proactively resolve transaction errors for affected students.
Steps to Enable
To use this feature, institutions have to take these steps:
- Set up Student Management so that there's a designated administrator who's notified about the issue, and who will resolve it.
- Set up the postprocessing option for application fees.
- Set up notifications that are triggered when transactions (receipts or invoices) fail to post.
To set up Student Management and designate an administrator who will resolve payment processing issues:
- Go to the Finances work area (Navigator > Academics > Finances), then click Actions > Manage Student Financials Options.
- Click Self Service.
- In Payment Error Resolution, in Default User assign an administrator.
- Click Save.
To set up postprocessing options for application fees:
- From Finances, click Actions > Manage Fees.
- Click Fee Associations, then click Create Fee Association. The Fee Associations page shows a list of application fees that are linked to academic programs.
- Fill out the required fields, then select any one of the postprocessing options. Note: It's recommended to select Always complete to prevent students or applications from making multiple payments when there are issues in create invoices or receipts. The error message that users see will inform them that payment has been successfully collected, and that their accounts will be updated.
- In the Fees tab, link a fee type to a fee name.
- In the Payment Configuration tab, select whether or not to require immediate payment.
- In the Association Criteria tab, link the application fee to an academic program.
- Click Save.
The postprocessing options let you indicate how you want Student Management to handle applications if something goes wrong during payment, that is, whether applications will be submitted successfully even when there are issues posting the invoice and receipt to students' accounts.
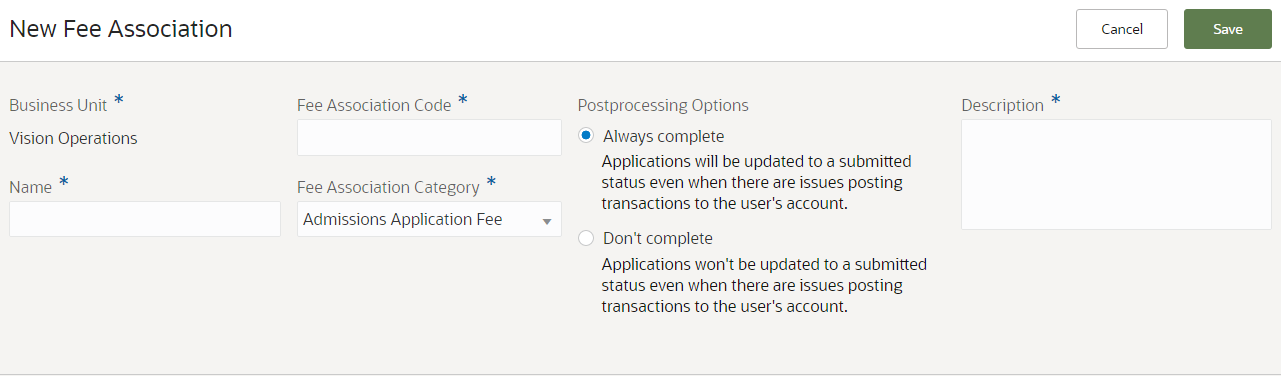
Postprocessing Options
To set up notifications that are triggered by transaction failure events:
A. Create a category that requires notifications to be sent. You will use this category when you set up notifications.
- In the Setup and Maintenance work area, use the Manage Student Management Categories task.
- Offering: Student Management
- Functional Area: Student Structures
- Click Create Category.
- Fill out the required fields.
- Click Add Event.
- Search for Invoice Creation Failed, then select to add it.
- Repeat steps 4 to 5 for each of these events: Receipt Creation Failed and Invoice or Receipt Creation Failed.
- Click Inactive to switch the category to an active status, then click Save.
B. Create the notification template for each event. In this example, let's create a notification for the Invoice Creation Failed event.
- Click Navigation > Academic Tools > Communications.
- Click Create Communication.
- Select Event-based.
- Fill out the required fields.
- In Institution, select your institution.
- In Category, select the category you created earlier.
- In Select Event Type, select Invoice Creation Failed.
- In Time of Day Sent, select Send communication immediately when triggered.
- Click the Content tab. Here you can specify the contents of the email that is sent to the administrator.
- Click Active to activate the notification, then click Save.
Follow the same steps to create notifications for these events: Receipt Creation Failed and Invoice or Receipt Creation Failed.
Tips And Considerations
-
It's important that you include the ORDER_ID token in the email notification for Receipt Creation Failed Event. The ORDER_ID tells administrators and students which record to reconcile.
-
If the default administrator isn't set up in Manage Student Financials Options, email notifications for administrators will not be triggered.
-
If the communication isn't set up for the appropriate categories and relevant message token, the email sent to administrators may have incomplete information that would prevent them from fixing issues.
- Institutions have to manually reconcile all transactions that aren't successfully created. In the future, a more robust workflow with automatic task creation and removal capabilities will be added to simplify error resolution.
- This feature doesn't completely prevent multiple payments from being collected if applications aren't successfully submitted. Students or applicants see error messages that tell them that payment was collected successfully, which should keep them from resubmitting an application that would trigger payment collection.
Curriculum Assignment for Sponsorship Credits
Administrators can now add, update, or delete multiple curriculum items in sponsorship credits.
To manage academic periods and curriculum items in sponsorship credits, go to the Finances work area (Navigator > Academics > Finances), then click Actions > Manage Student Credits.
When you create a sponsorship credit for the first time, and then click Next, the Academic Period and Curriculum tabs appear.
Here's information about some fields for a sponsorship credit:
- In Source of Credit, select the appropriate credit source. You provide the list of values that appear on this list. To add your lookup or search codes, in the Setup and Maintenance work area, go to the Manage Student Management Lookups task, then search for the lookup type ORA_CREDIT_SOURCE_CODE.
- Offering: Student Management
- Functional Area: Student Structures
- When you select Bill Sponsor, Academic Institution becomes available. Selecting Bill Sponsor means students' fees are automatically posted to the sponsor's account.
- In Academic Institution, select the external organization that's sponsoring this agreement.
- In Student Resource Information, select No.
On the Academic Period tab, add the academic periods that the sponsorship credit is applicable to.
- Receivables Activity determines the transaction distribution account to use for the expense or revenue generated by the adjustment.
- In Transaction Type, select the type of transaction that Student Management can use to identify the fee when it's charged for the academic period.
Once you add academic periods, you can add curriculum. On the Curriculum tab, you can select the academic period, then add curriculum. A guided task page appears. From this page, you can search for course or scheduled courses. And to add curriculum, just select from the list.
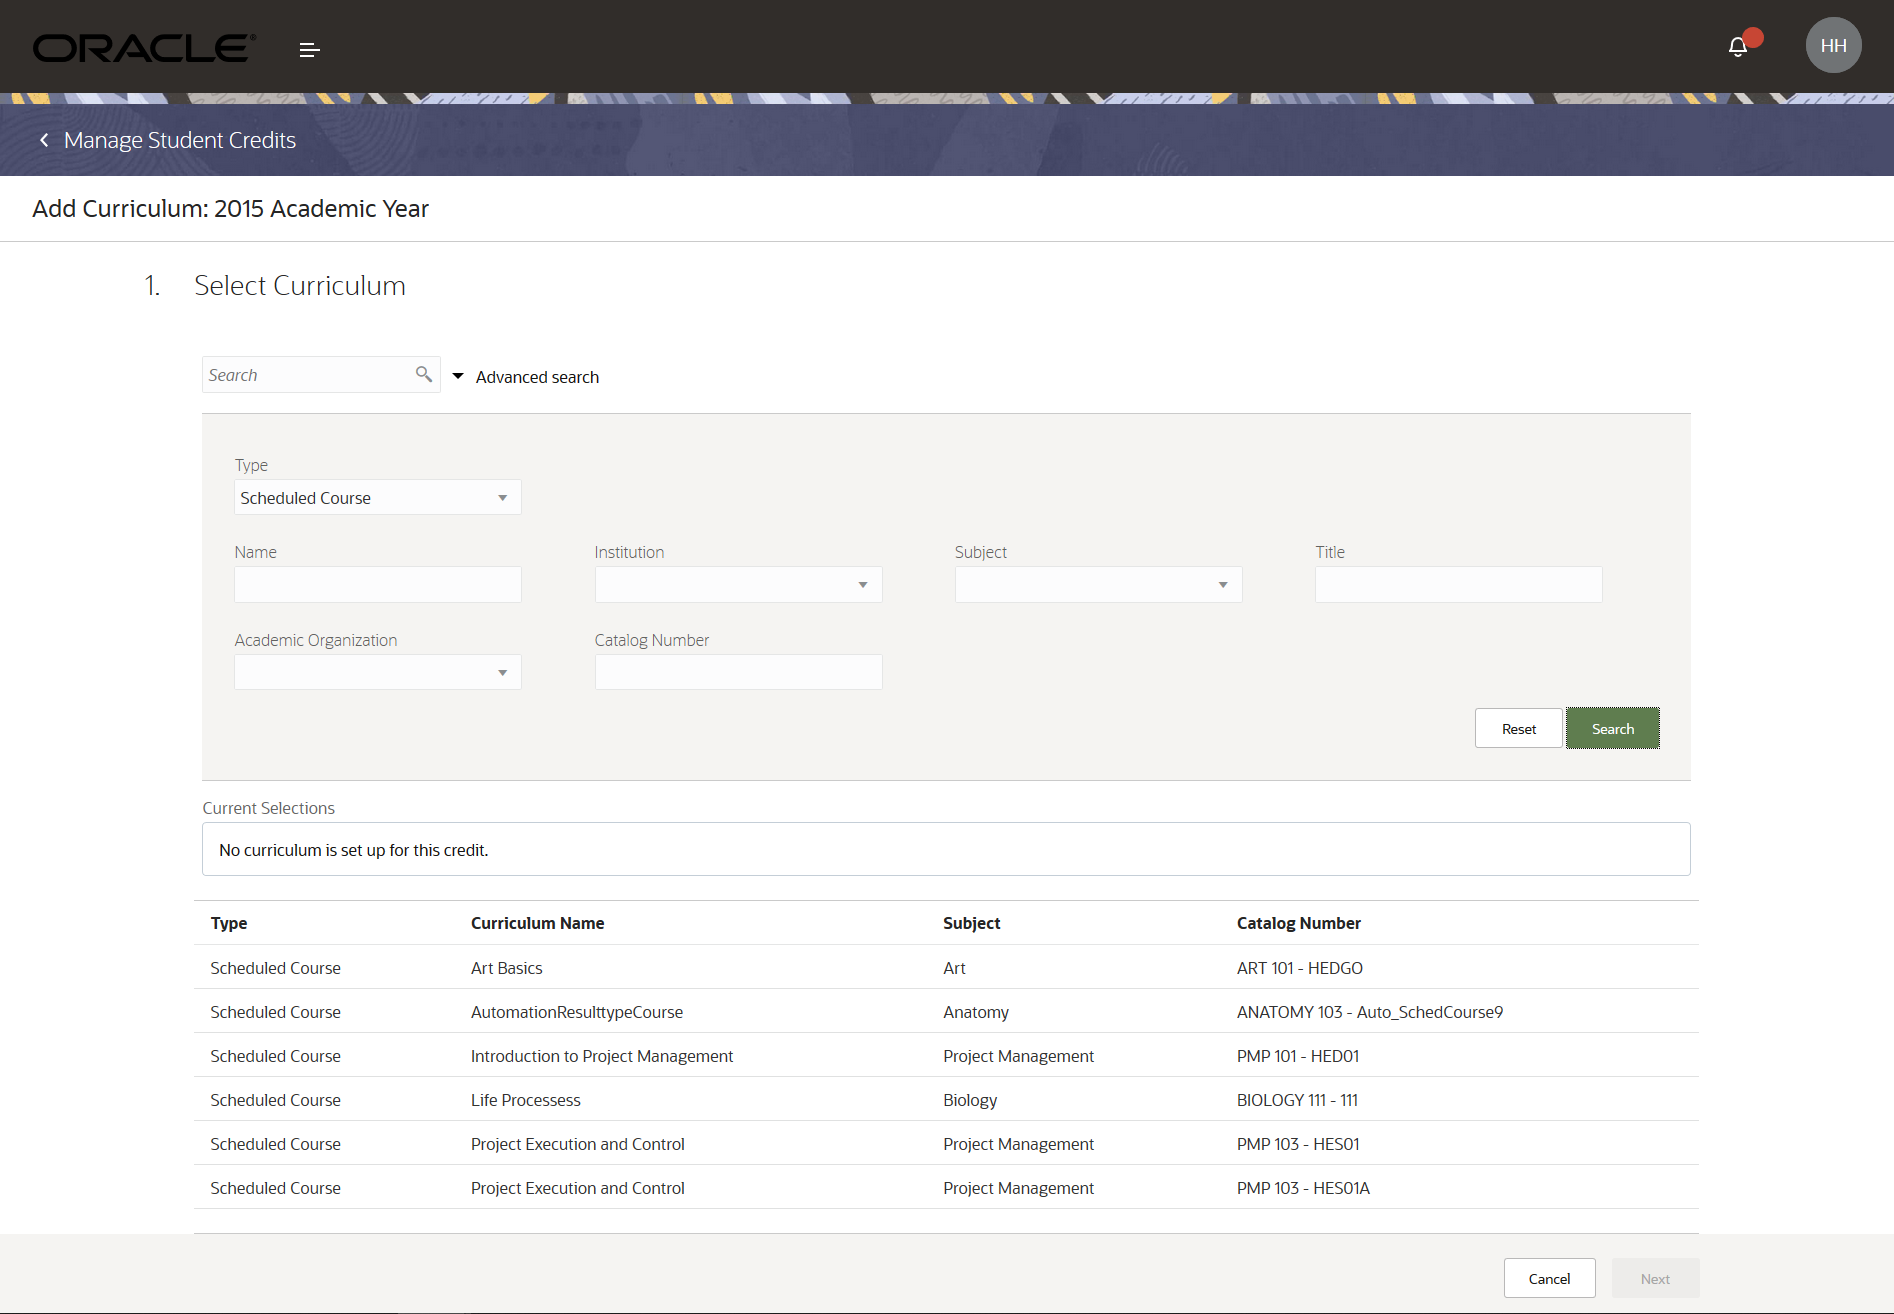
Add Curriculum Page
When you have added curriculum and then saved the sponsorship credit, a Copy button appears. This makes it easy to copy academic periods and curriculum from an existing credit.
NOTE: Make sure you set the credit to Active so that you can use it.
This feature lets administrators easily add or modify curriculum items, whereas before this was done one at a time.
Steps to Enable
You don't need to do anything to enable this feature.
Browse and search for courses and programs in the learning catalog. This feature name change, from Storefront to Learning Catalog, includes updated references throughout Student Management.
The Storefronts UI is now the Learning Catalogs UI.
Storefront is replaced with Learning Catalog in these UIs:
- Manage Academic Organizations
- Specify Branding and Colors
- Create Academic Structures in Spreadsheet (Rapid Implementation)
Learning Catalog is more relevant for the Higher Education space.
Steps to Enable
You don't need to do anything to enable this feature.