
This document will continue to evolve as existing sections change and new information is added. All updates appear in the following table:
| Date | Module | Feature | Notes |
|---|---|---|---|
| 16 DEC 2022 | Created initial document. |
 HAVE AN IDEA?
We’re here and we’re listening. If you have a suggestion on how to make our cloud services even better then go ahead and tell us. There are several ways to submit your ideas, for example, through the Ideas Lab on Oracle Customer Connect. Wherever you see this icon after the feature name it means we delivered one of your ideas.
GIVE US FEEDBACK
We welcome your comments and suggestions to improve the content. Please send us your feedback at oracle_fusion_applications_help_ww_grp@oracle.com.
DISCLAIMER
The information contained in this document may include statements about Oracle’s product development plans. Many factors can materially affect Oracle’s product development plans and the nature and timing of future product releases. Accordingly, this Information is provided to you solely for information only, is not a commitment to deliver any material, code, or functionality, and should not be relied upon in making purchasing decisions. The development, release, and timing of any features or functionality described remains at the sole discretion of Oracle.
This information may not be incorporated into any contractual agreement with Oracle or its subsidiaries or affiliates. Oracle specifically disclaims any liability with respect to this information. Refer to the Legal Notices and Terms of Use for further information.
Column Definitions:
Report = New or modified, Oracle-delivered, ready to run reports.
UI or Process-Based: Small Scale = These UI or process-based features are typically comprised of minor field, validation, or program changes. Therefore, the potential impact to users is minimal.
UI or Process-Based: Larger Scale* = These UI or process-based features have more complex designs. Therefore, the potential impact to users is higher.
Features Delivered Disabled = Action is needed BEFORE these features can be used by END USERS. These features are delivered disabled and you choose if and when to enable them. For example, a) new or expanded BI subject areas need to first be incorporated into reports, b) Integration is required to utilize new web services, or c) features must be assigned to user roles before they can be accessed.
| Ready for Use by End Users Reports plus Small Scale UI or Process-Based new features will have minimal user impact after an update. Therefore, customer acceptance testing should focus on the Larger Scale UI or Process-Based* new features. |
Customer Must Take Action before Use by End Users Not disruptive as action is required to make these features ready to use. As you selectively choose to leverage, you set your test and roll out timing. |
|||||
|---|---|---|---|---|---|---|
| Feature |
Report |
UI or |
UI or |
|
||
Prepare for Removal of Higher Education - Person Tags Real Time Subject Area |
||||||
Search Navigation Enhancements
Find pages more intuitively with refined search navigation page names.
Here's a list of updated page names and navigation:
| Page Name | Navigation |
|---|---|
| Communications |
From Student Central, click Search and search for Communications. |
| Configure Person Relationship Type |
From Student Central, click Search and search for Configure Person Relationship Type. |
| Manage Time Zone Settings |
From Student Central, click Search and search for Manage Time Zone Settings. |
| Manage Curriculum | From Student Central, click Search and search for Manage Curriculum. |
| Learners | From Student Central, click Search and search for Learners. |
| Credentials | From Student Central, click Search and search for Credentials. |
| Administrative Service Impact Mapping |
From Student Central, click Search and search for Administrative Service Impact Mapping. |
| Curriculum Build Statuses |
From Student Central, click Search and search for Curriculum Build Statuses. |
| Enrollment Action Reasons |
From Student Central, click Search and search for Enrollment Action Reasons. |
| Program Action Reasons |
From Student Central, click Search and search for Program Action Reasons. |
| Program Types |
From Student Central, click Search and search for Program Types. |
| Requirement Categories |
From Student Central, click Search and search for Requirement Categories. |
| Requisite Schemes |
From Student Central, click Search and search for Requisite Schemes. |
| Academic Plan Format |
From Student Central, click Search and search for Academic Plan Format. |
| Applications | From Student Central, click Search and search for Applications. |
In addition to the search navigation changes, students can see all important content in the learning catalog when using a mobile device with enhanced presentation.
Steps to Enable
You don't need to do anything to enable this feature.
See consistent data throughout the application when updates have been made to a person's primary name using the Student Management Person Profile page.
When you update a name in Person Profile, the name gets automatically updated in Security Console. For example, if the user changes the name of Lisa Jones to Lynda Jones, the Security Console displays the changed name in the Associated Party Information section.
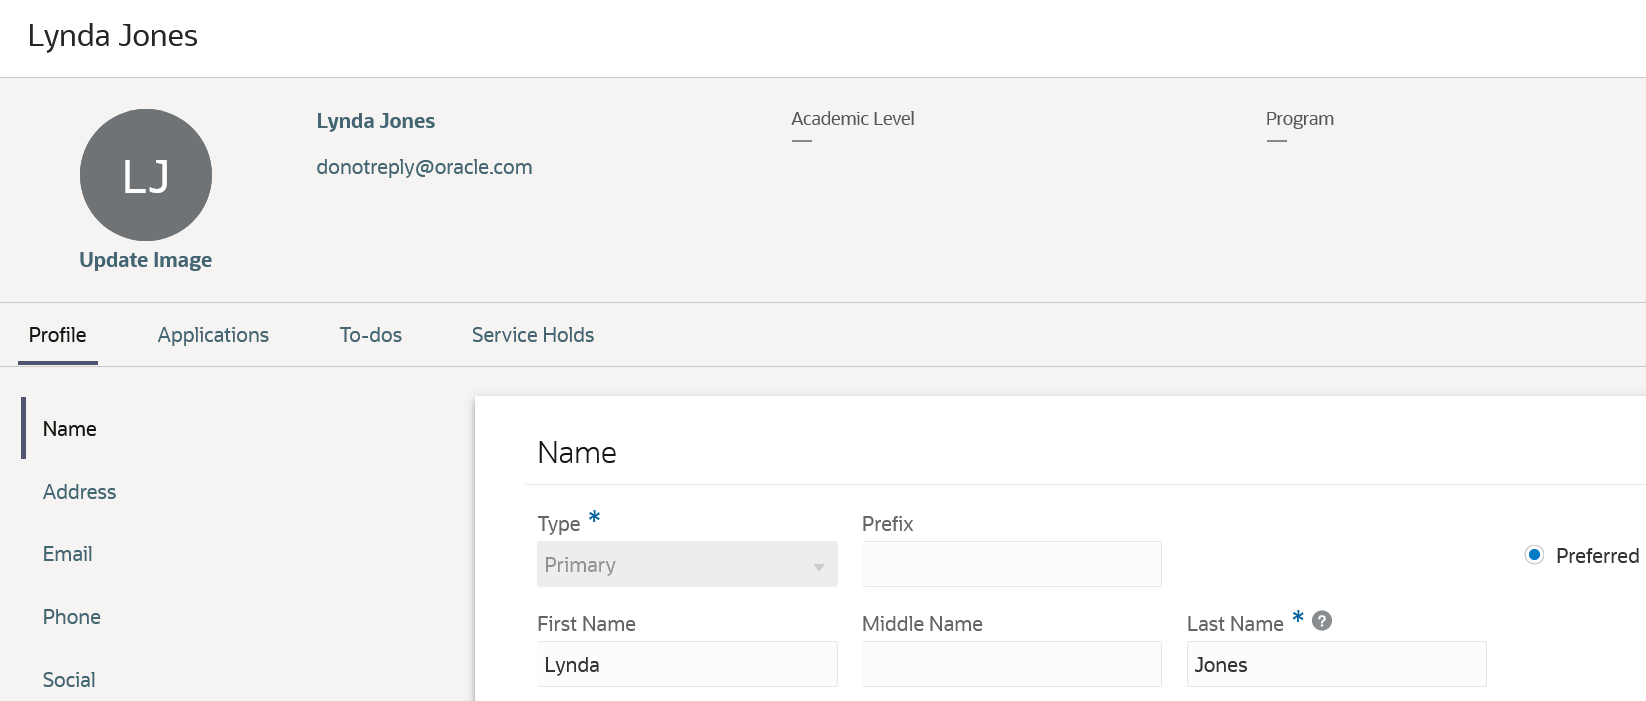
Name Changed in Person Profile
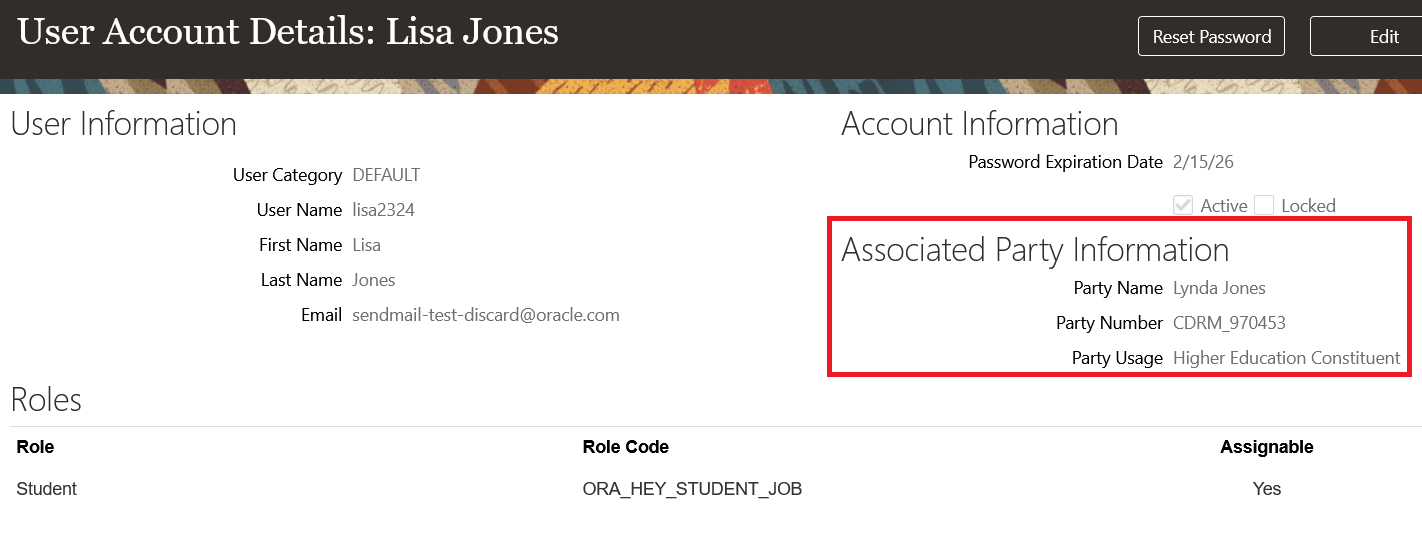
Changed Name Displayed in Security Console
This feature ensures a consistent name display in both Person Profile and Security Console.
Steps to Enable
You don't need to do anything to enable this feature.
External Organization Configuration Enhancements
Assign identifiers, contacts, and locations to an external organization more efficiently without assigning start and end dates.
Use in-line editing for contacts. You can also manage preferred contacts and locations.
This means a more streamlined, efficient user experience across setup.
Steps to Enable
You don't need to do anything to enable this feature.
Oracle Fusion Cloud Student Management delivers new pages, page elements, and page permissions assigned to the predefined job roles in each release.
Here are the newly added pages, page elements, and page permissions for the mentioned predefined job roles.
| Page Name | New/Existing | Page Elements | New/Existing | Page Permission | New/Existing | Predefined Job Roles |
|---|---|---|---|---|---|---|
| Application List |
New | NA |
NA | View | New | Student Recruiter, Admissions Manager, Admissions Coordinator, Applicant, Student, and External Payment Service Provider |
| Event Metrics |
New | NA |
NA | View |
New | Higher Education Application Administrator |
| Manage Sponsorship Credit Page |
Existing |
Manage Sponsorship Assignment |
New | Manage | New | Bursar, Student Sponsorship Administrator, and Cashier |
Steps to Enable
You don't need to do anything to enable this feature.
Tips And Considerations
If you created user-defined roles and assigned page access to them using the Manage Application Access task in the Setup and Maintenance work area, you must review your user-defined roles to see if you need to assign them access to the new pages, page elements, and page permissions.
Role And Privileges
You need an IT Security Manager role to use this feature.
Bulk Student Sponsorship Credit Assignment
Use a bulk action to assign multiple students to a sponsorship credit. The bulk action also enables you to inactivate or cancel sponsorships for multiple students.
To perform the bulk assignment, use the Manage Credit Assignments page.
- From Student Central, search for Manage Credit Assignments.
- Click Actions > Assign Students.
- Follow the task wizard to complete the assignment.
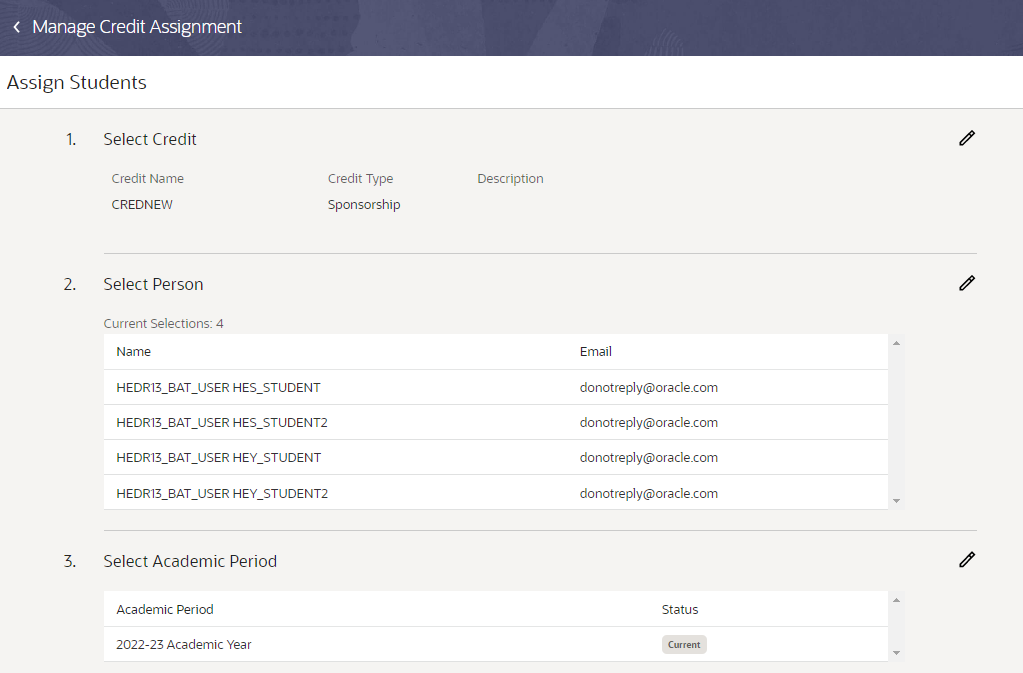
Task Wizard: Select Credit, Person, Academic Period
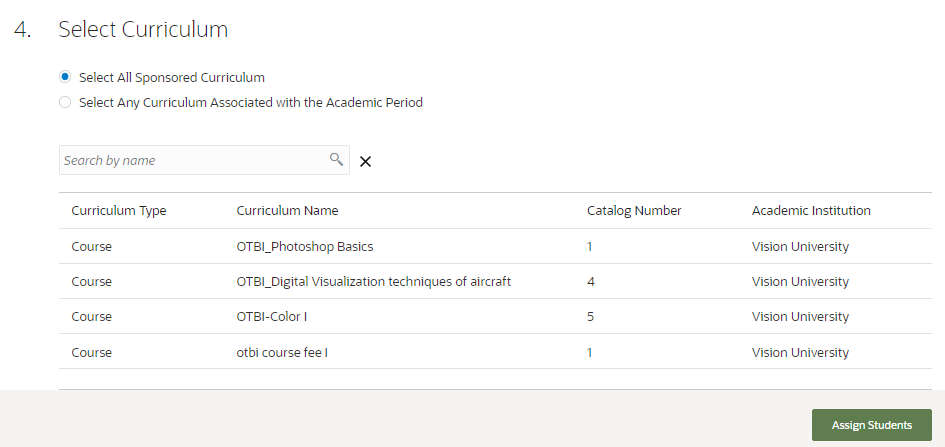
Task Wizard: Choose to Sponsor All Sponsored Curriculum
Task Wizard: Sponsor a Particular Curriculum That's Associated with the Academic Period
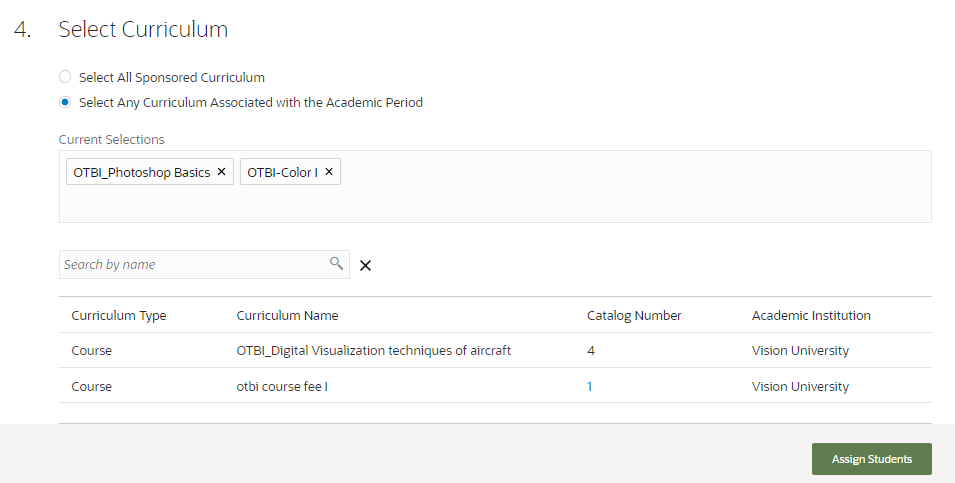
Using the task wizard, administrators can choose an academic period as well as curriculum to sponsor. The academic periods you can choose from are the same periods that were set up in the student credit.
When selecting a curriculum, you can choose from these options:
-
Select All Sponsored Curriculum. This option means that you're essentially sponsoring students for all the curriculum associated with the academic period. The process selects all the curriculum linked to the academic period for this specific student credit. And students can enroll in any of the listed curriculum.
-
Select Any Curriculum Associated with the Academic Period. This option lets you override the curriculum that's associated with the academic period. Say an academic period is set up with a variety of curriculum items like courses for product management, sales, or training courses for specific applications. If you want to sponsor only product management courses, then in the wizard, select only the product management courses. So even if the academic period is associated with a variety of courses, because you selected only the product management courses, students can choose only from among the product management courses.
You'll also be able to change the sponsorship status of multiple students. From the Manage Credit Assignments page, click Actions to inactivate, cancel, or delete students from the sponsorship.
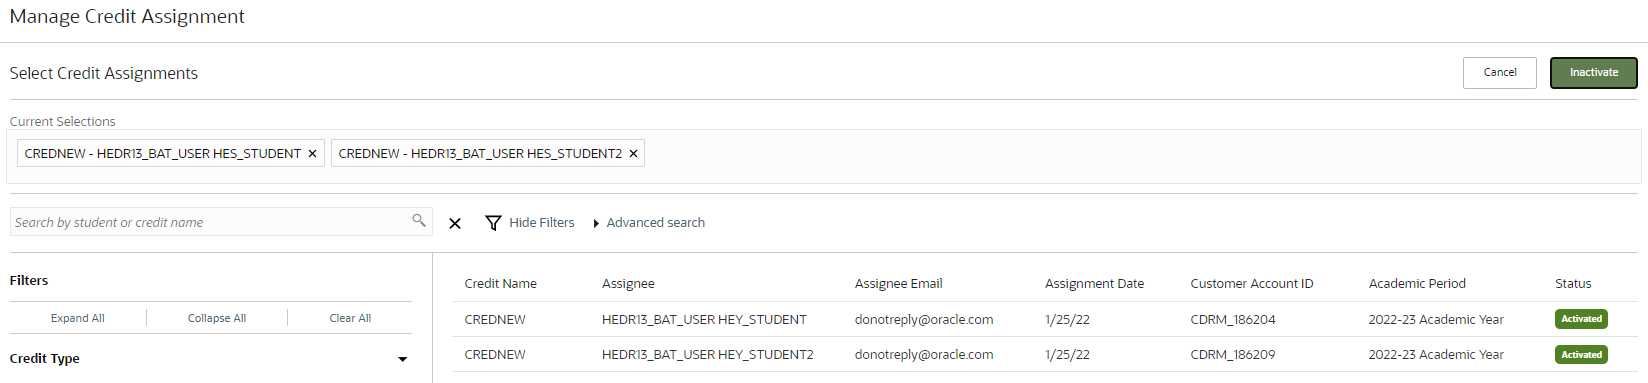
Manage Credit Assignment Page to Inactivate Students from the Sponsorship
This feature enables administrators to easily allocate student credits to multiple students.
Steps to Enable
To use this feature, you need to set up academic periods and student credits.
Tips And Considerations
Sponsorships are applicable only to pay-to-enroll courses. This feature will be enhanced to work for more traditional continuing education scenarios.
Key Resources
- Refer to Using Student Management for more information on sponsorships.
Waiver Configuration, Assignment, and Posting
Configure waivers based on your institution’s requirements. Waivers let you automatically reduce or waive tuition or fees for students.
A waiver is a type of student credit. To create a waiver, use the Manage Student Credits page. From Student Central, search for Student Credits. As with any student credit, the calculation and posting process uses the combination of the Charge Priority Mapping and Credit Priority to determine how to apply the credit.
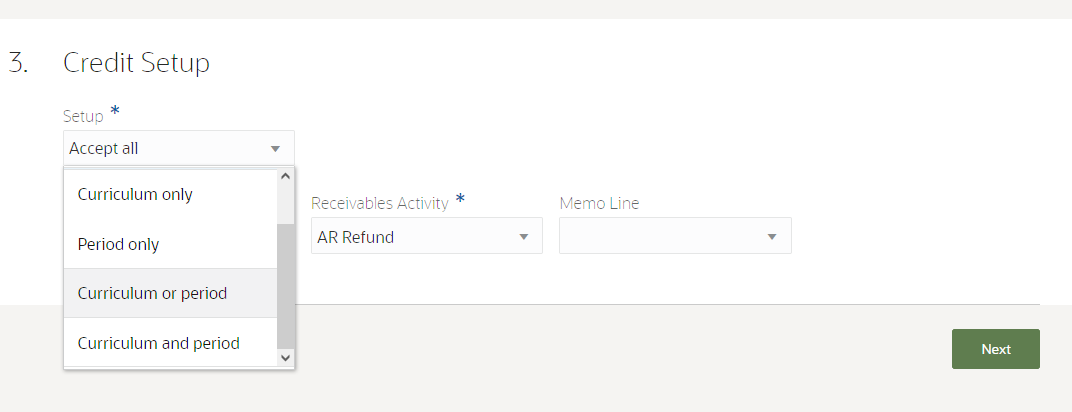
In Credit Setup, you define the criteria in which the waiver is used. For example, if you select "Curriculum only," after you create the waiver, a Curriculum page appears. On this page, you need to add one or more curriculum. Any student who is enrolled in this curriculum and who has been assigned to this waiver becomes eligible for the waiver.
- Accept all indicates that the waiver applies to any type of academic period fee, regardless of academic year or curriculum.
- Curriculum only indicates that the waiver applies to academic period fees only for the specified curriculum. After creating the waiver, you need to add one or more curriculum to the waiver.
- Period only indicates that the waiver applies to academic period fees only for the specified academic period. After creating the waiver, you need to add one or more academic periods to the waiver.
- Curriculum or period indicates that the waiver applies to academic period fees for the specified curriculum or academic period. After creating the waiver, you can add only curriculum or only academic period to the waiver. You're not required to add both curriculum and academic periods.
- Curriculum and period indicates that the waiver applies to academic period fees only for the specified curriculum and academic period. After creating the waiver, you need to add an academic period and curriculum to the waiver.
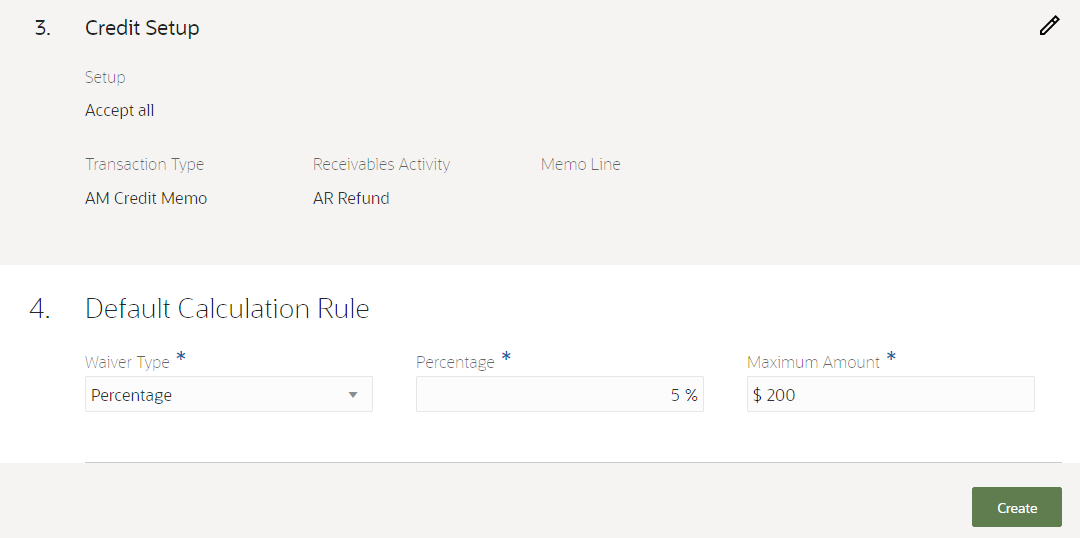
Transaction Type and Receivables Activity are used to record the transaction in the ledger.
Setting Up a Waiver
For every waiver, you would also have to define how the waiver is applied to the fee:
- Flat amount indicates that a fee is reduced by the amount you specify.
- Percentage indicates that a fee is reduced by the percentage you specify, up to the indicated maximum amount.
- Amount per unit indicates that a fee is reduced by the amount per billing unit you specify, up to the indicated maximum amount. The waiver is applied until the date you specify in Adjust Until.
Configure Waiver to Use Percentage as the Calculation Rule
Depending on your setup, after creating the waiver you would have to add curriculum, academic period, or both. Adding these items shows that the waiver is applicable to the academic period fees associated with the curriculum, academic period, or both. You're also given the option to override the default calculation rules for the academic periods you add to the waiver.
The fees and fee groups associated with the waiver are derived from the charge priority mapping you selected.
After creating the waiver and adding the curriculum or academic periods (if necessary), make sure you activate the waiver. This ensures you can use it.
For students to use the waiver, you need to assign them manually to the waiver. And if the waiver is set up with academic periods, curriculum, or both, students have to be enrolled in the specified academic period, curriculum, or both.
To assign students, follow these steps:
- From Student Central, search for Manage Credit Assignments.
- Click Actions > Assign Students.
- Follow the task wizard to complete the assignment.
When assigning students to a waiver, in Default Calculation Rule, you can override the default rule that's been set up for the waiver. But if you don't want to override it, just select None.
If you override at this level, this rule takes precedence over the calculation rules for the waiver and the specified academic period.
Waivers are automatically applied when the tuition calculation process runs. Optionally, you can apply the waiver to student accounts by posting the waiver. If the waiver has already been applied to a particular student account, the process skips that account.
To post waivers, follow these steps:
- From Student Central, search for Post Credit Transactions.
- Click Actions > Post Credit.
- Follow the task wizard to complete the posting.
With this feature, institutions can easily waive or reduce tuition or fees for students.
Steps to Enable
You don't need to do anything to enable this feature.
Tips And Considerations
This feature is dependent on your academic structures and business unit setup as well as the transaction types you set up in Oracle Fusion Cloud Receivables.
Note that waivers are applicable only to academic period fees, academic period course fees, and academic period scheduled course fees.
Key Resources
- For more information, see Student Credits.
Payment Collection Using Payment Processor
Configure Oracle Fusion Cloud Financials to integrate with TouchNet. This allows your institution to use TouchNet as a payment service provider when collecting credit card payments.
With this feature, institutions can now process payments using TouchNet. In the future, payment processing can be expanded with other payment gateways used by higher education institutions.
Steps to Enable
To configure Payments, refer to these documents:
- Payment Gateway Integration and Credit Card Processing
- Payment Gateway Integration and Credit Card Processing - Technical Specifications
Tips And Considerations
We strongly recommend that you consult a core Oracle Fusion Cloud Financials consultant, implementation partner, or systems integrator to help with your Financials implementation.
This feature allows administrators to configure a course section with the midterm result type, and to enter midterm grades for the course section.
Select a midterm result for both the course and course section. Here's an example of a midterm result for a course. The layout is the same for a course section.
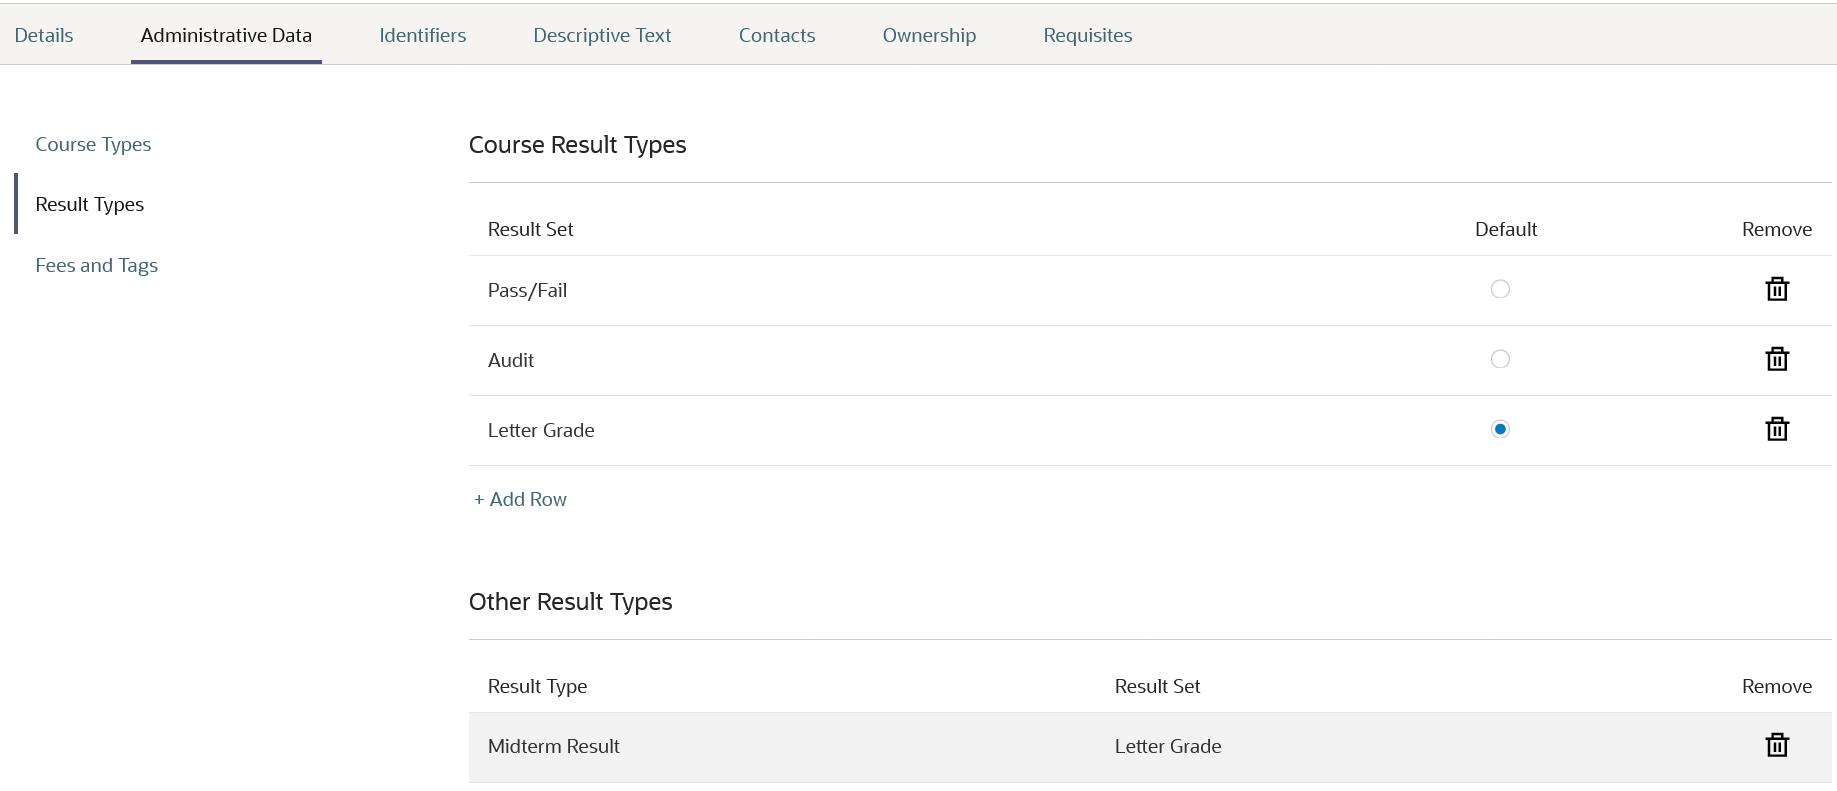
Course Midterm Result
On the Grade Roster page, you can select a result type of Midterm Result. You can then assign midterm grades to students.

Grade Roster Midterm Result
In the Learners work area, Students Results page, you can assign a midterm result to a student.
Steps to Enable
You don't need to do anything to enable this feature.
Academic Level Configuration Enhancements
View, create, and update academic levels using an updated user experience. As before, you can search for academic levels to view and maintain their configurations.
In addition to existing configurations, you can now save any changes and assign ownership using an experience consistent with other academic setup features.
This means a more streamlined, efficient user experience across setup.
Steps to Enable
You don't need to do anything to enable this feature.
Define snapshot settings for the admissions application form. Select which application statuses will trigger the creation of a static snapshot view for applicants and administrators. Additionally, import snapshot settings by exporting from another environment.
Configuring the Snapshot settings allows your institutions to enable the Application Data Snapshot feature. Snapshot settings trigger the system to start capturing point-in-time data for admissions applications. Refer to the related release readiness feature: Application Data Snapshot.
Snapshot settings support the need to retain a static snapshot or copy of the application form at specific stages in the application life cycle. For example, when an application is in submitted, withdrawn, canceled, activated, or denied status.
As an admissions manager, you now have control over the application status points at which you want to save a static snapshot. Furthermore, you can associate those settings with a specific institution, campus, or other entity. Alternatively, you can choose to create a global setting at the system office level.
Then, use the new data security privileges to control which snapshot status points are available by user role. For example, a Student role can be limited to accessing only the submitted status snapshot, whereas an Admissions Coordinator role can view all available snapshot instances.
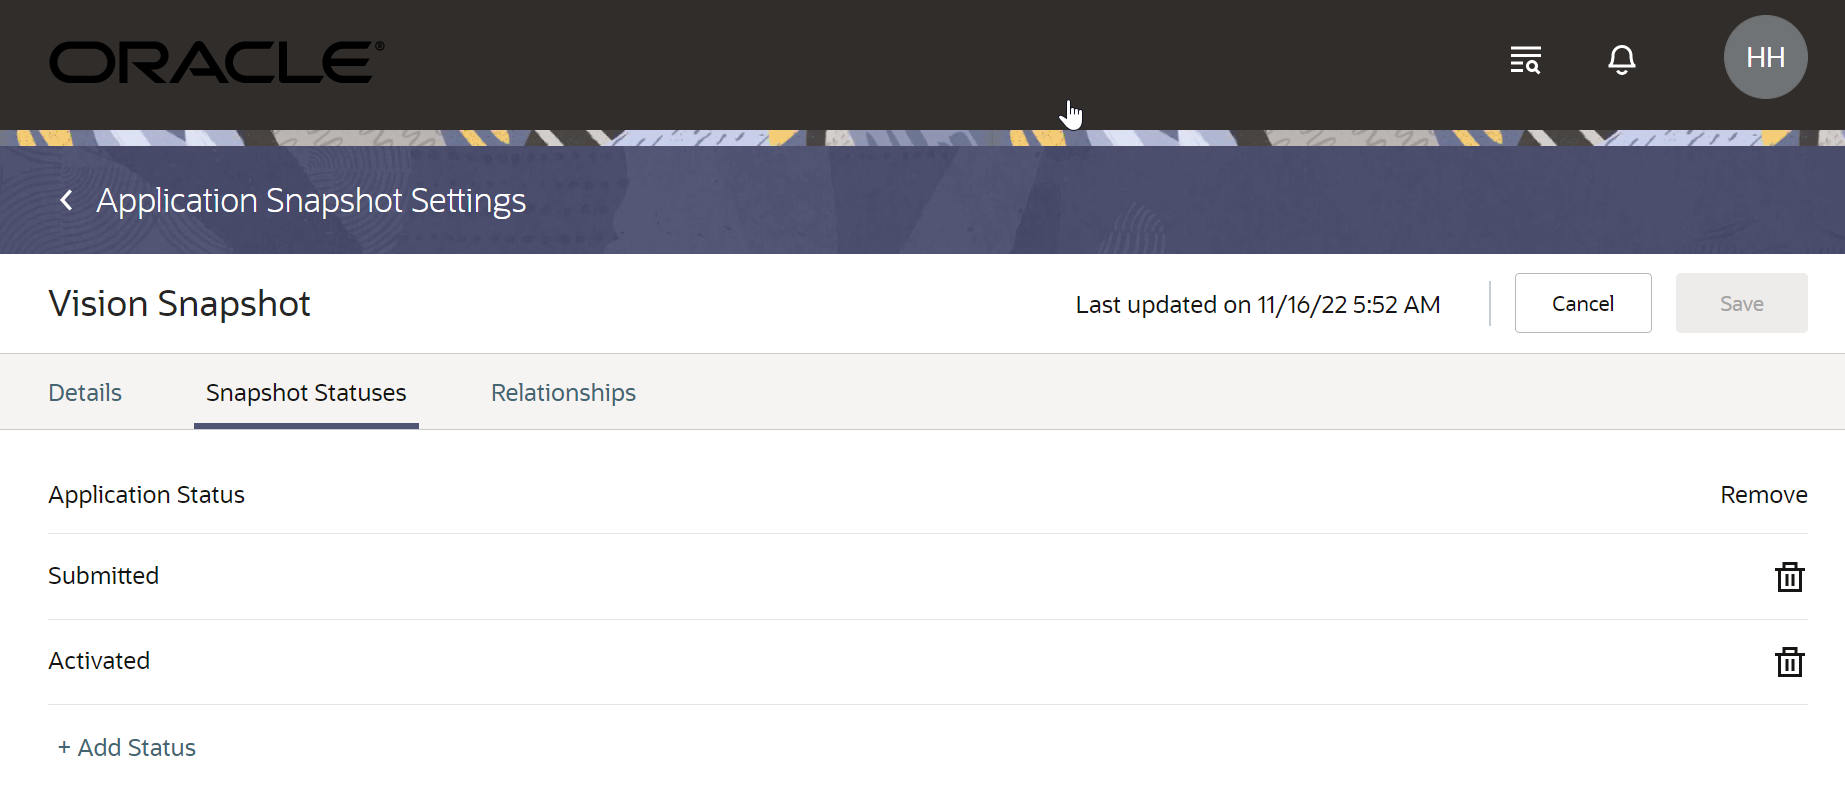
Application Snapshot Settings
Steps to Enable
First, configure a snapshot setting.
- From Student Central, click Search and search for Application Snapshot Settings.
- Click Create Snapshot Setting and specify the required details, such as Setting Name and Code.
- On the Snapshot Statuses tab, select and add different application statuses for which you want to save an application snapshot.
- On the Relationships tab, create a relationship to associate the snapshot settings with a specific institution, campus, or other entity.
Next, enable the data security privileges to limit access for different roles, such as a Student role. By default, the Student role doesn't have access to see any snapshot data until you enable data security privileges, and the Admissions Coordinator role has access to all available snapshots.
On the Roles tab of the Security Console, make a copy of an existing student role, then edit the copy to create a new user-defined role. Or, if you already have a user-defined copy of an existing student role, edit that.
- To initiate a copy of an existing student role, search for the role. In the search results, click the arrow for the selected role and select Copy Role > Copy top role and inherited roles.
- To edit an existing user-defined student role, search for the role. In the search results, click the arrow for the selected role and select Edit Role.
An editing train opens. Essentially, you follow the same process when creating a new user defined role as you would follow to edit one.
- Click the Data Security Policies train stop.
- On the Data Security Policies page, find the two Admissions Application Grant Policies, then click the arrow at the end of the policy row to see the actions menu.
- Select the Remove Data Security Policy option.
- Click Submit and Close, then click OK to close the confirmation message.
Now, create a mapping between a data profile and the user-defined role.
- From Student Central, click Search and search for Application Access.
- Click Data Profiles > New Data Profile.
- Specify a name and description for the profile.
- In the Assigned Business Object field, select Admissions Application. To see the fields associated with that business object, click inside the Fields field.
- In the Securing Fields, select Row Type, Application Status.
- When you're done, click Save. The data profile you created is displayed on the list.
- Click the ellipses on the row for the data profile you just created and click Assign to Roles. If you don't see the ellipses, scroll to the right.
- On the Assign Data Access to Roles page, click Add Role, select the user-defined role to add to the data profile, and click Add.
- For each of the fields that you enabled for the data profile, select the values to define the security filter conditions on the data set for the business object. For example, when you select Row Type: Snapshot, Application Status: Submitted, and Permissions: View Admissions Application, users associated with the assigned user-defined role can view snapshots with a submitted status.
- When done, click Add.
- Use the Add Row option to add more security filter conditions on the data set for the business object.
- When done, click Save.
Tips And Considerations
- You must enable the new data security privileges to limit access for different roles that access application data.
- When creating a new setting, the default status is Submitted. You can add or remove any status except In Progress from the setting.
Key Resources
- For more information, refer to this resource on the Oracle Help Center:
- Configure Application Snapshot Settings topic in the Using Student Management guide.
Role And Privileges
You need the Admissions Manager role to use this feature.
View the point-in-time data for an admissions application based on application status. Applicants and administrators can view, download, and print a copy of submitted applications or other available data snapshots for an application.
An applicant can change application data after submission because of address updates or other administrative changes. Now you can maintain a copy of the application data as it was originally received from the applicant for an audit or legal proceeding.
Oracle Fusion Cloud Student Management starts capturing the snapshots as soon as you configure the snapshot settings. Here are some of the advantages that you get:
- You can determine what status points should be captured and for which academic entities. For example, you can configure the snapshot settings for your institution to capture snapshots when an application is in the Submitted status.
- As an Admissions Coordinator, you have access to the Snapshot History tab on the applications page. This new tab is read-only and displays the available snapshots for that application.
- Your applicants can also view submitted application data in read-only mode with a print option on that page.

Snapshot History Tab
Steps to Enable
You must configure the snapshot settings with one or more settings created to capture the application data snapshots. Refer to the related release readiness feature: Application Snapshot Settings.
Tips And Considerations
- Oracle Fusion Cloud Student Management stores the application data snapshots as soon as you configure the snapshot settings. You can’t go back and capture snapshots for applications submitted before configuring the snapshot settings.
- Enable the new data security privileges if you want to limit permissions for different roles that access application data snapshots. By default, the Student role doesn't have access to see any snapshot data until you enable data security privileges, and the Admissions Coordinator role has access to all available snapshots.
Role And Privileges
You need the Admissions Coordinator role to use this feature.
Application List View and Search
Search for specific admissions applications by applicant name, email, party ID or constituent ID. Use the query-based advanced search feature to define search criteria using relevant fields from the application form. Filter the result set to further refine your list of forms to review.
The Application List landing page now has an updated view with enhanced search and filter functionality. The new query-based Advanced Search capability allows you to add or remove multiple search criteria, such as Academic Level or Admit Type. Click Show Filters and filter the search results further to drill down into specific applications for reviewing. As a result, you can find the applications quickly and save time.
Here are some of the advantages that you get:
- You can easily search for existing applications using advanced search and filtering options.
- The advanced search option helps you to search on many criteria, like Academic Level, Admit Type, Academic Group, and so on.
- The filtering option helps you to narrow down the search results further and refine your list of applications to be reviewed.

Application List View
Steps to Enable
You don't need to do anything to enable this feature.
Key Resources
- For more information, refer to the Manage Submitted Applications topic in the Using Student Management guide.
Role And Privileges
You need the Admissions Coordinator role to use this feature.
Student Course Schedule Enhancements
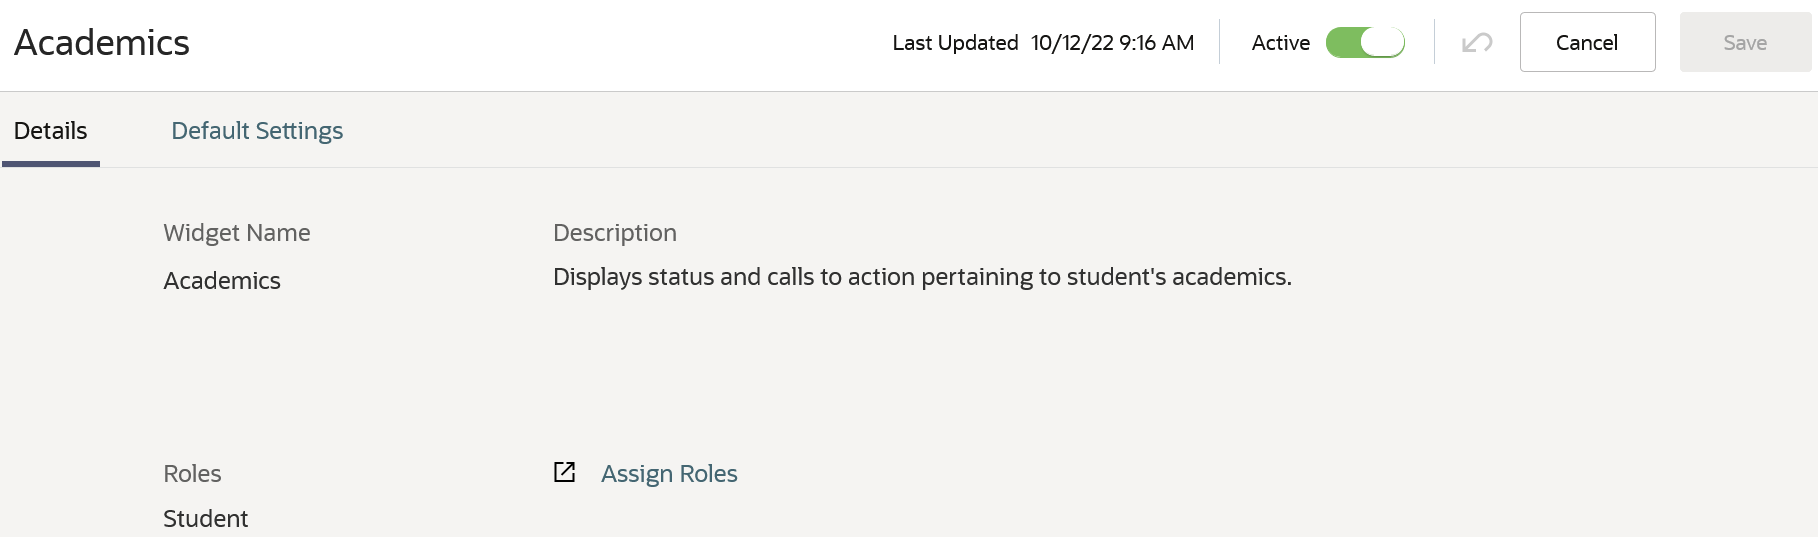
Configure the Academics widget, which displays calls to action pertaining to a student’s course schedule, to appear on the Student Central landing page. Students with access to a Student Central home page with an Academics widget, can view prompts and follow links to complete their course scheduling and enrollment activities.
Here's the new Academics widget:
Academics Widget Details
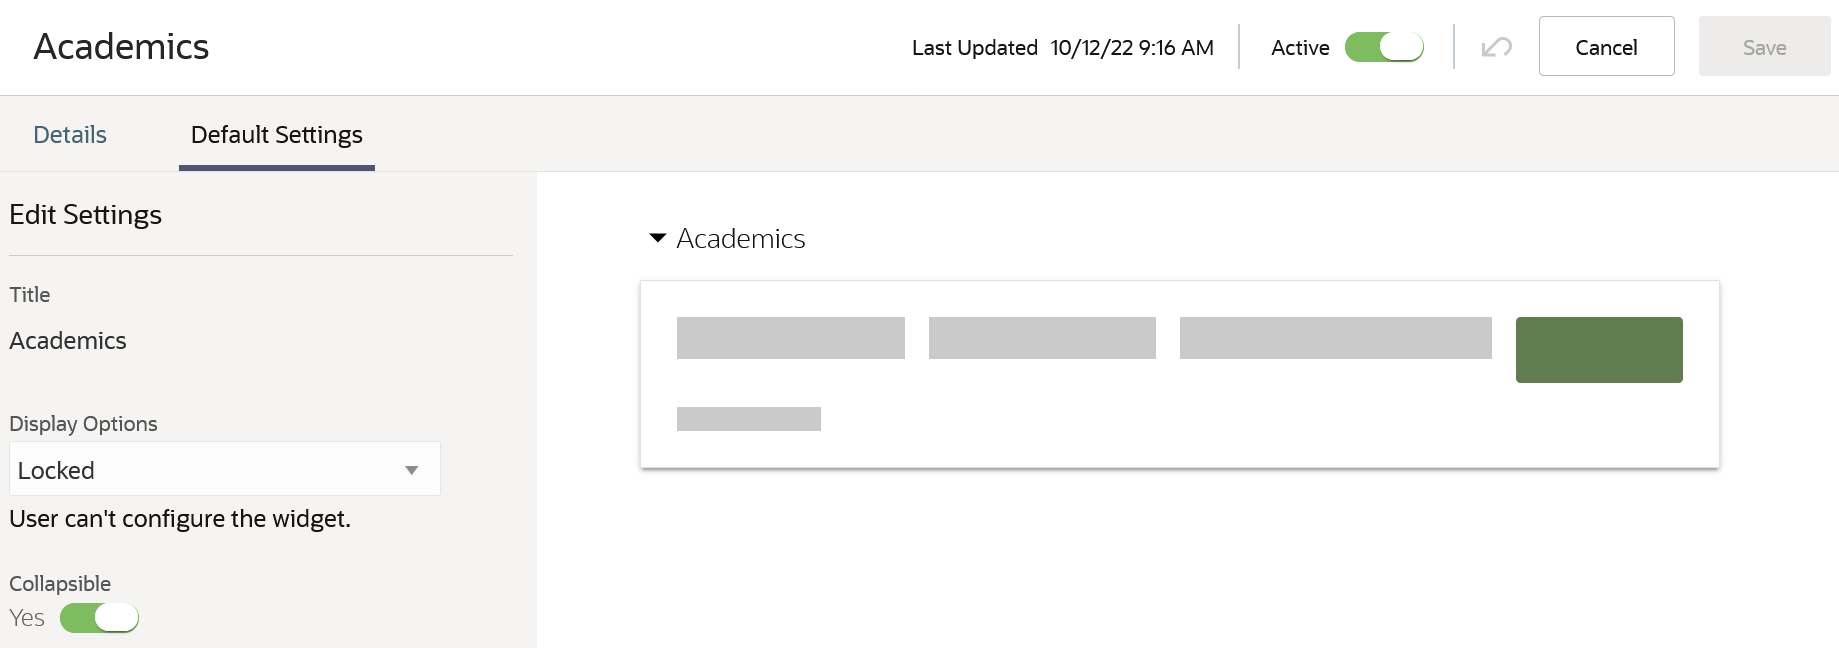
Academics Widget Default Settings
On the Student Central Configurations page, the higher education application administrator configures the Academics widget to appear on the Student Central landing page for students. To view the widget, a student must have an account and must be enrolled in a program or a course.
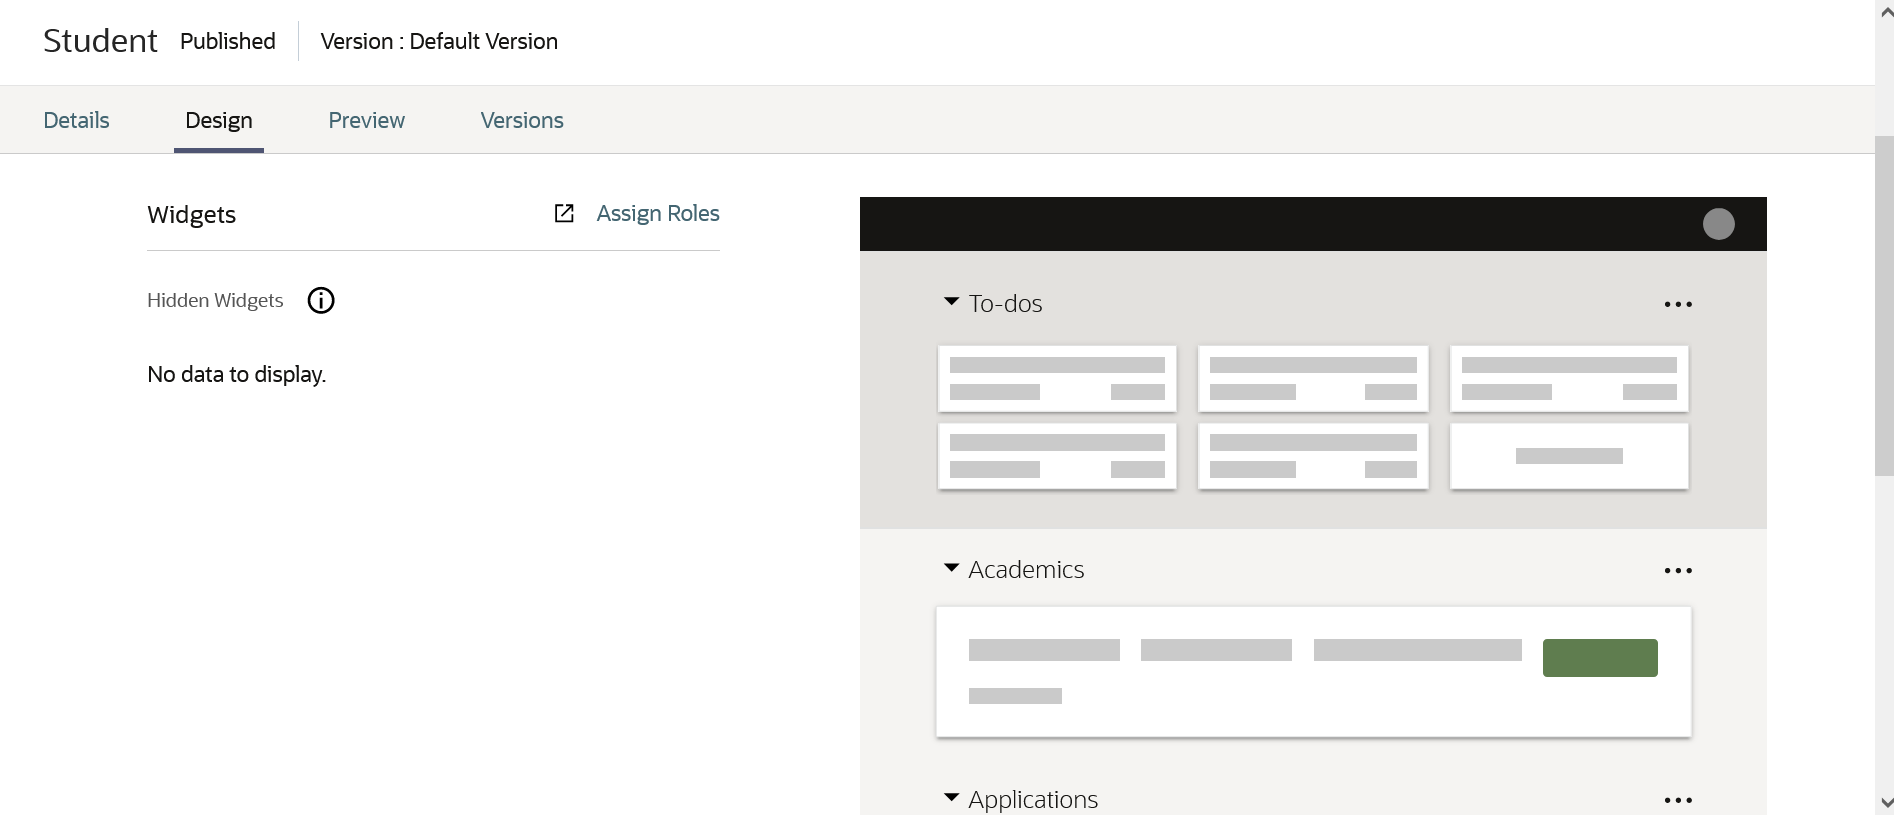
Student Central Configurations: Academics Widget
Here's an example of the student view of the Academics widget:

Academics Widget Student View
In addition to the new Academics widget, course sections with a Dropped Retained or Dropped with Penalty status now display on a student's schedule, with a status of Dropped.
Steps to Enable
The higher education application administrator must configure the Academics widget to appear on the Student Central landing page. The student needs access to the Academics page and the Course Schedule.
Key Resources
For more information, refer to the Student Central Landing Pages topic in the Implementing Student Management guide.
Transactional Business Intelligence for Student Management
Oracle Transactional Business Intelligence is a real time, self-service reporting solution offered to all Oracle Cloud application users to create ad hoc reports and analyze them for daily decision-making. Oracle Transactional Business Intelligence provides admissions coordinators, academic coordinators, registrars, bursars, academic advisors, and student services managers the critical information to analyze admissions, enrollment, course capacity planning, and student tuition billing accounts.
Prepare for Removal of Higher Education - Person Tags Real Time Subject Area
The Higher Education - Person Tags Real Time subject area will be decommissioned and no longer supported after Update 23A.
Any reports you create for this subject area will be available as created but can't be modified starting with Update 23B.
Steps to Enable
You don't need to do anything to enable this feature.
Important Actions and Considerations for Student Management
From time to time, Oracle replaces existing Cloud service features with new features or removes existing features. When a feature is replaced the older version may be removed immediately or at a future date. As a best practice, you should use the newer version of a replaced feature as soon as the newer version is available.
| Module | Removed Feature | Target Removal | Replacement Feature | Replaced In | Additional Information |
|---|---|---|---|---|---|
| Transactional Business Intelligence for Student Management | Prepare for Removal of Higher Education - Person Tags Real Time Subject Area |
23B |