Update 24A
Revision History
This document will continue to evolve as existing sections change and new information is added. All updates appear in the following table:
| Date | Module | Feature | Notes |
|---|---|---|---|
| 23 FEB 2024 | Campus Community | Security Updates | Updated document. Revised feature information. |
| 01 DEC 2023 | Created initial document. |
Overview
 HAVE AN IDEA?
We’re here and we’re listening. If you have a suggestion on how to make our cloud services even better then go ahead and tell us. There are several ways to submit your ideas, for example, through the Ideas Lab on Oracle Customer Connect. Wherever you see this icon after the feature name it means we delivered one of your ideas.
GIVE US FEEDBACK
We welcome your comments and suggestions to improve the content. Please send us your feedback at oracle_fusion_applications_help_ww_grp@oracle.com.
DISCLAIMER
The information contained in this document may include statements about Oracle’s product development plans. Many factors can materially affect Oracle’s product development plans and the nature and timing of future product releases. Accordingly, this Information is provided to you solely for information only, is not a commitment to deliver any material, code, or functionality, and should not be relied upon in making purchasing decisions. The development, release, and timing of any features or functionality described remains at the sole discretion of Oracle.
This information may not be incorporated into any contractual agreement with Oracle or its subsidiaries or affiliates. Oracle specifically disclaims any liability with respect to this information. Refer to the Legal Notices and Terms of Use for further information.
Feature Summary
Column Definitions:
Report = New or modified, Oracle-delivered, ready to run reports.
UI or Process-Based: Small Scale = These UI or process-based features are typically comprised of minor field, validation, or program changes. Therefore, the potential impact to users is minimal.
UI or Process-Based: Larger Scale* = These UI or process-based features have more complex designs. Therefore, the potential impact to users is higher.
Features Delivered Disabled = Action is needed BEFORE these features can be used by END USERS. These features are delivered disabled and you choose if and when to enable them. For example, a) new or expanded BI subject areas need to first be incorporated into reports, b) Integration is required to utilize new web services, or c) features must be assigned to user roles before they can be accessed.
| Ready for Use by End Users Reports plus Small Scale UI or Process-Based new features will have minimal user impact after an update. Therefore, customer acceptance testing should focus on the Larger Scale UI or Process-Based* new features. |
Customer Must Take Action before Use by End Users Not disruptive as action is required to make these features ready to use. As you selectively choose to leverage, you set your test and roll out timing. |
|||||
|---|---|---|---|---|---|---|
| Feature |
Report |
UI or |
UI or |
|
||
Academic Period Tag Assignment, Calendar Association, and Enhanced Search and Filters |
||||||
Student Management
Advisement
Decimal Units on Academic Plan Template
Academic Plan Templates now support the display of decimal values in course units. Up to 2 decimal places can be shown.
This allows for the accurate display of course unit information in Academic Plan Templates.
Steps to Enable
You don't need to do anything to enable this feature.
Student Records
Academic Period Tag Assignment, Calendar Association, and Enhanced Search and Filters
Assign tags to academic periods to differentiate different types of academic periods such as semesters and trimesters. The list of tags is based on the tags that are associated with the Academic Period tag group. You can add or remove tags from a tag group on the Manage Attribute Tags page.
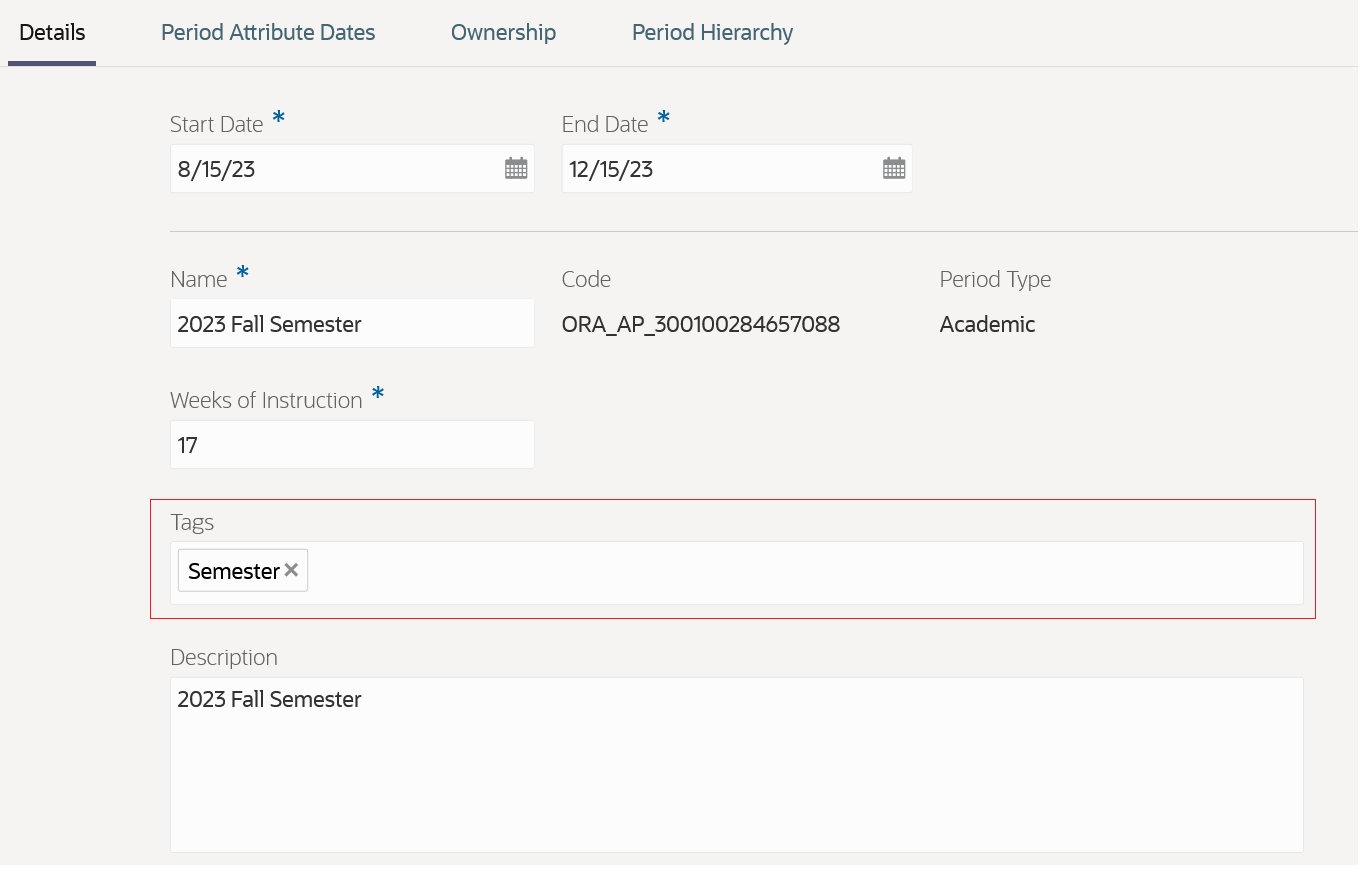
Academic Period Tags
Registrars can also run a batch process to associate periods with academic calendars. An example is that you can organize 2023-2024 Fall, Spring, and Summer periods into an academic year calendar.
Here’s what the new Sync Academic Periods to Academic Calendars process does:
- Creates and syncs academic calendars corresponding to reporting periods.
- Maps academic periods within the reporting periods to the corresponding academic calendars.
NOTE: You must run the process regularly to make sure that newly created or updated academic periods are associated with the correct academic calendar. Newly created periods aren’t associated with an academic calendar until you assign them to a parent reporting period and run the Sync Academic Periods to Academic Calendars process. This process is essential to ensuring that users can select the correct academic period when managing courses and course sections.
These new features also mean that you can search and filter academic periods more efficiently. You can search by academic calendar and tags. You can filter search results by tags.
Steps to Enable
You don't need to do anything to enable this feature.
Course Search, Tagging, and Copy Enhancements
Find the courses you're looking for with a streamlined and more efficient advanced search.
You can also filter periods based on academic calendar to select a start or end period for the course.
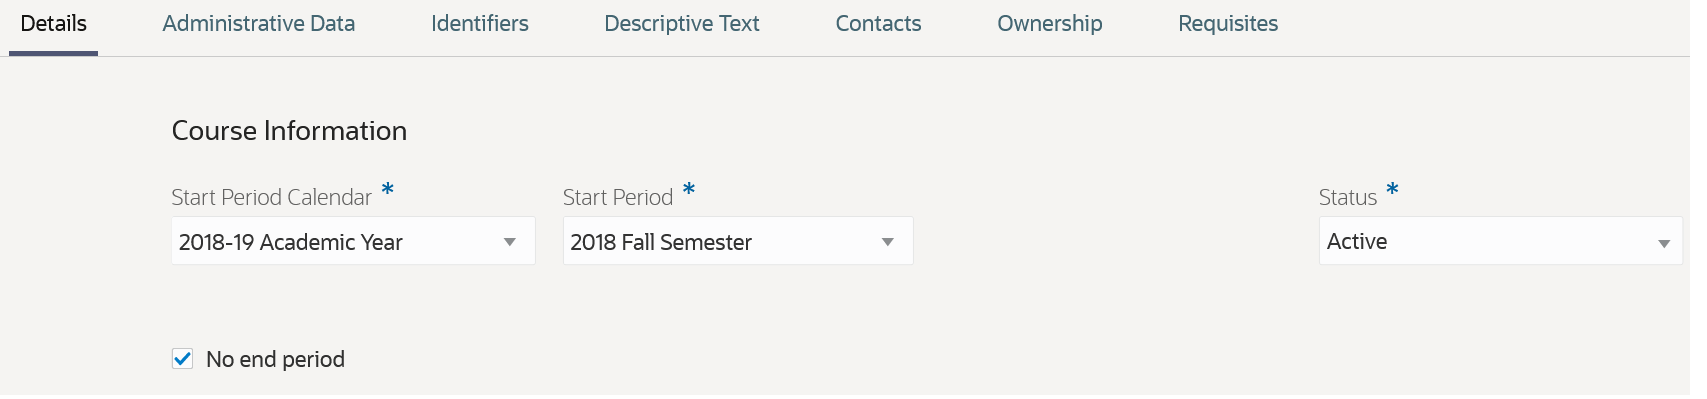
Period Calendar
You can now assign tags as part of the create course process and edit tags on the Details tab (moved from the Administrative Data tab).
Also on the Details tab, the Available in search field is now the Available in catalog field.
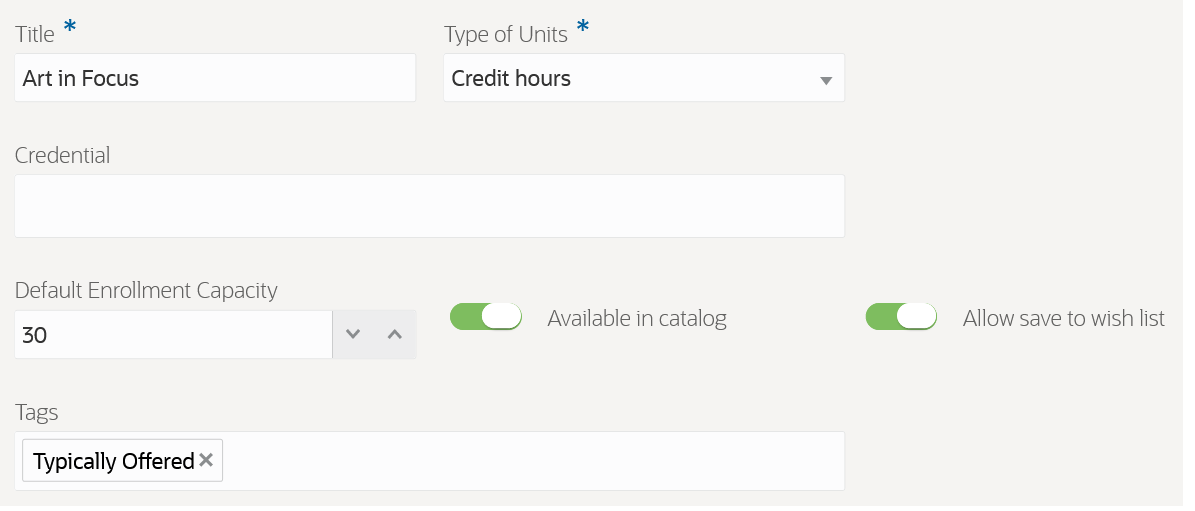
Details Tab: Tags
You can also copy all course attributes as a template to create a new course. Update information as needed on the new course.
Steps to Enable
You don't need to do anything to enable this feature.
Course Section Search, Tagging, and Copy Enhancements
Here are the updates to course sections, which are the same as the updates to courses:
- Find the course sections you're looking for with a streamlined and more efficient advanced search.
- You can also filter periods based on academic calendar to select an academic period for the course section.
- You can now assign tags as part of the create course section process and edit tags on the Details tab (moved from the Administrative Data tab). Also on the Details tab, the Available in search field is now the Available in catalog field.
- You can also copy all course section attributes as a template to create a new course section. Update information as needed on the new course section.
Additionally, on the Administrative Data tab, the Period Attribute Dates area is now the Section Attribute Dates area because these attribute dates are specific to the section.
Steps to Enable
You don't need to do anything to enable this feature.
Course List Configuration
Use refined and more intuitive setup controls to create and update course lists comprised of many courses and other course lists. As before, you can group courses according to your curriculum organization needs and give meaningful titles to those groups. Migrate course lists and related entity records from another environment or use a rapid implementation spreadsheet.
The simplified management of course lists means that you can use course lists as a template when defining program requirements. Course lists are no longer effective dated so you can update them without needing to create a new effective dated record.
To create, view, or edit course lists, access the Course Lists page: From Student Central, click Search and search for Course Lists.
Here’s how you create a course list:
- Add details.
- Assign ownership.
- Add courses.
Add Details
- Click Create Course List.
- Enter a name, title, and code.
- You can enter an optional description.
- Click Create. The data you entered shows in the Details tab.
NOTE: When you create a course list, the status is set to Inactive. You must complete all required fields and assign ownership and academic level before you can set a course list to Active.
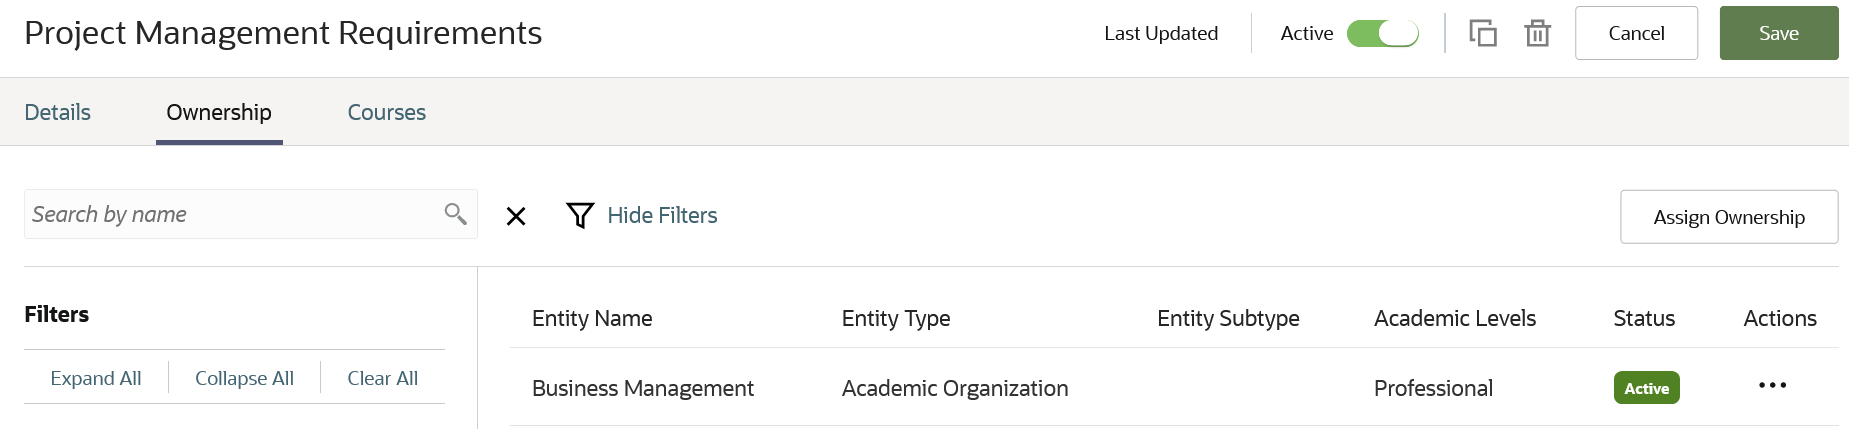
Assign Ownership
- Click the Ownership tab.
- Click Assign Ownership. You can assign only one entity type (an academic organization) as the owner.
- Click the entity. It appears in the Current Selections box.
- Click Assign.
- Click the Action ellipsis.
- Click Edit Academic Levels to assign an academic level. You must assign an academic level when you create a course list.
- Click Add Row and select an academic level.
- Click Update.
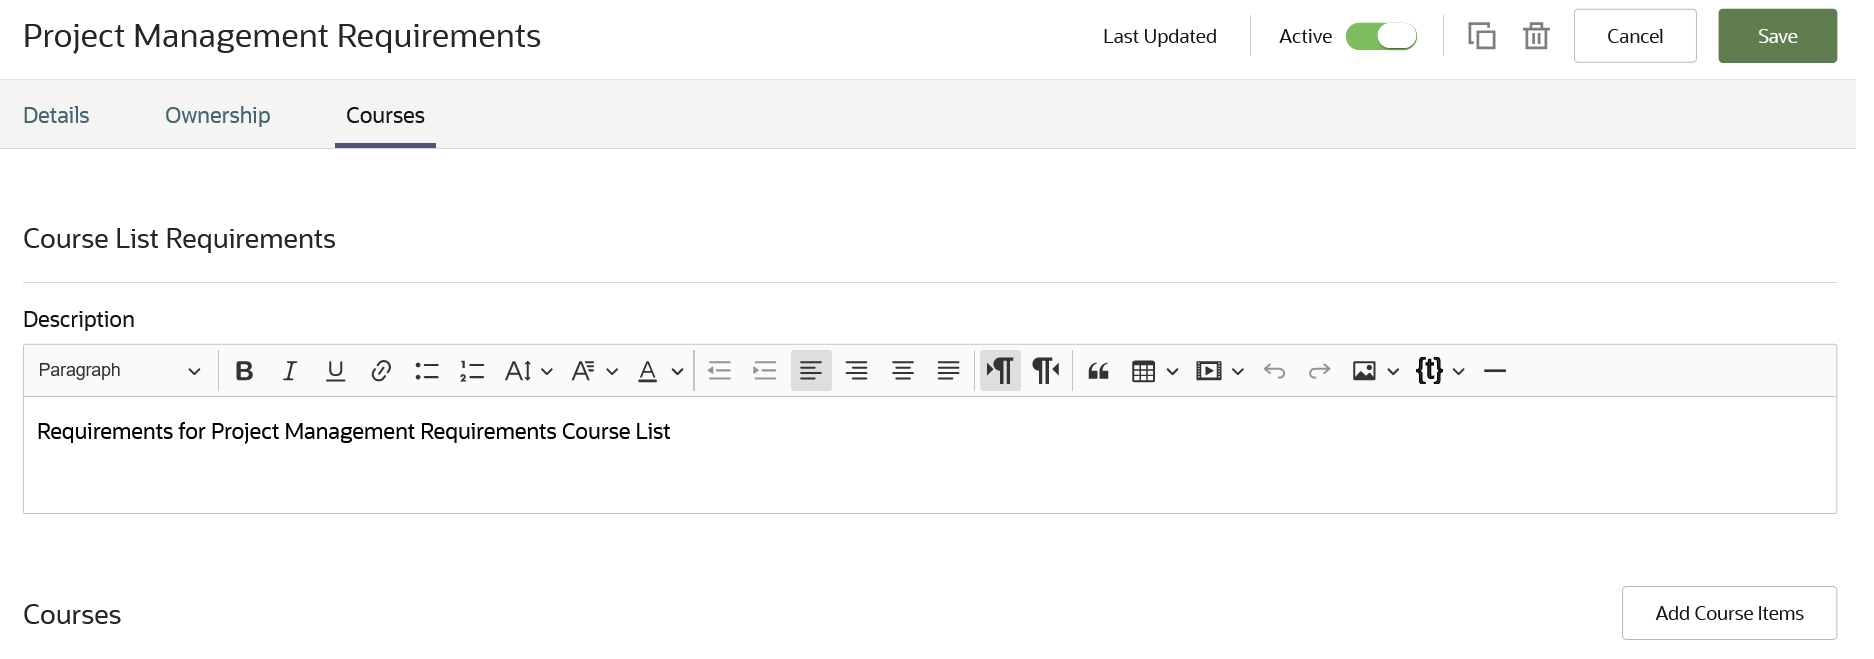
Add Courses
- Click the Courses tab.
- You can add an optional description.
- Click Add Course Items.
- Search for courses and course lists and click to select them. The selections you make are added to the Current Selections box.
- Click Add to List.
- To group courses, select the courses and click Create Group.
- To edit a group name and add or edit a description, click the ellipsis for the group and click Edit Details.
- You can use various other actions in the ellipsis menu to manage your course list requirements.
- Click Save.
- When you are ready, you can set the course list to Active.
NOTE: You must complete all required fields and assign ownership and academic level before you can set a course list to Active.
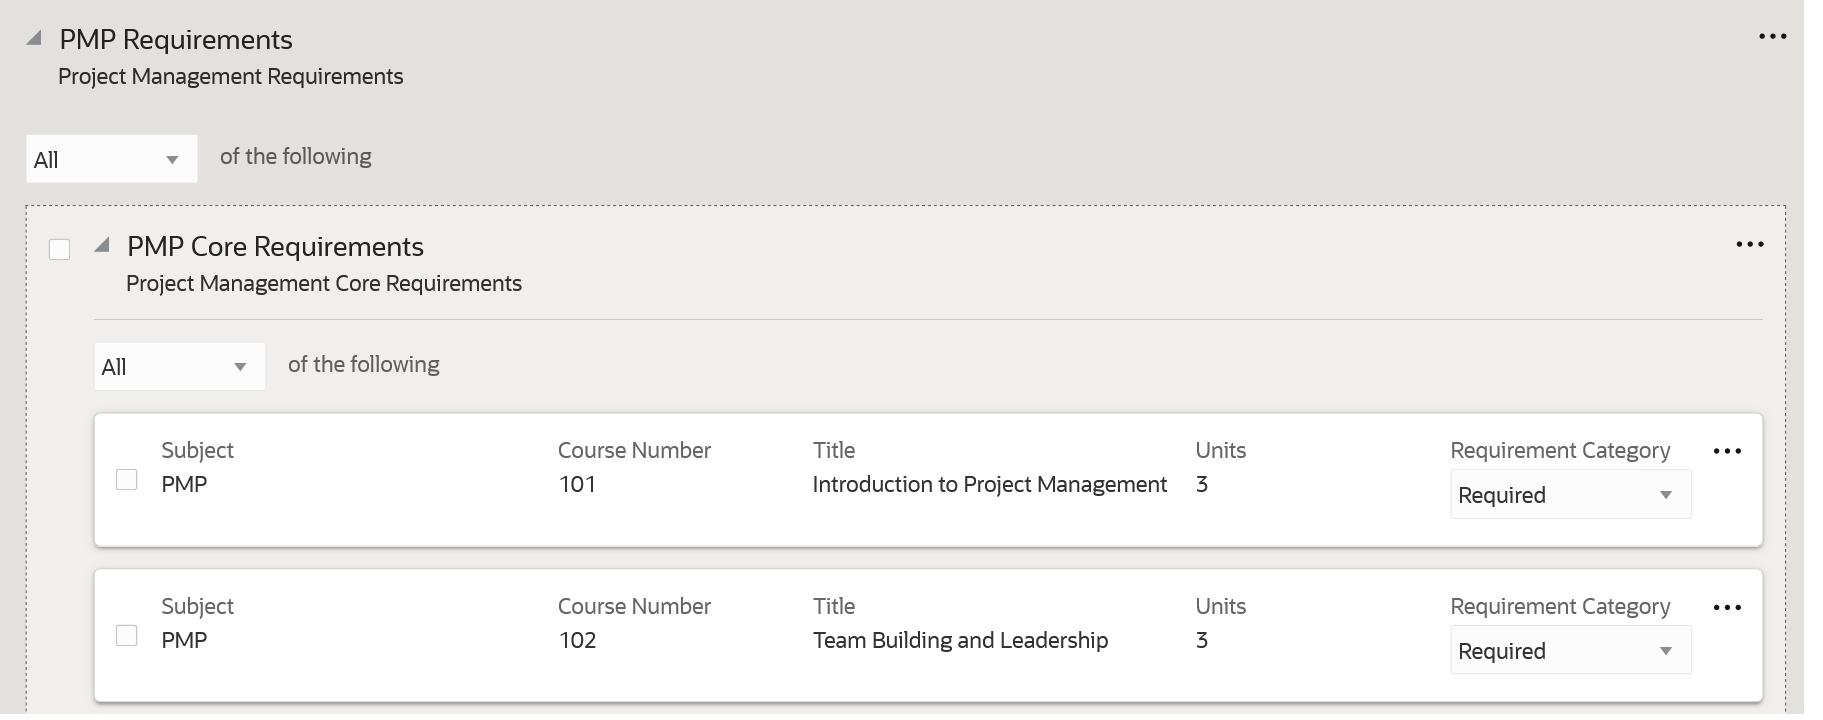
Here are some example screenshots of the Course Lists tabs for the Program Management Requirements course list:
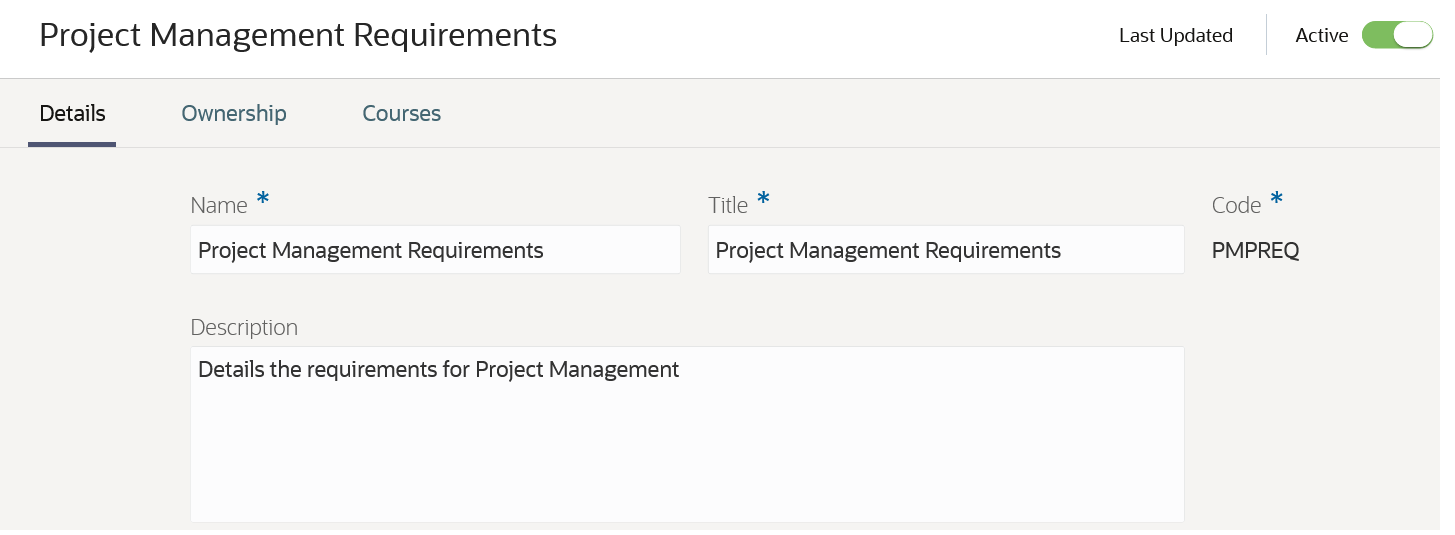
Course Lists Details Tab
Course Lists Ownership Tab
Course Lists Courses Tab 1 of 2
Course Lists Courses Tab 2 of 2
As you can see, this feature means that you can more easily configure course lists and use them as templates when you define program requirements.
Steps to Enable
You don't need to do anything to enable this feature.
Tips And Considerations
Before you can create course lists, you must set up these features:
- Academic Institutions
- Campuses
- Academic Organizations
- Academic Levels
- Courses
Before you can configure course list ownership, you must define relationships between entities (system offices, academic institutions, campuses, academic organizations).
Student Admissions
Standardized Test Configuration
Define which standardized tests will be recorded for applicants and students. Associate the components to the test along with valid score ranges for each component.
As an administrator, you can now create, update, and delete various standardized tests, their components and valid score ranges. Test components may include total score, math section score, and so on. These test data can be used for admissions or student records processes. Refer to the related release readiness feature: Student Test Result Management.
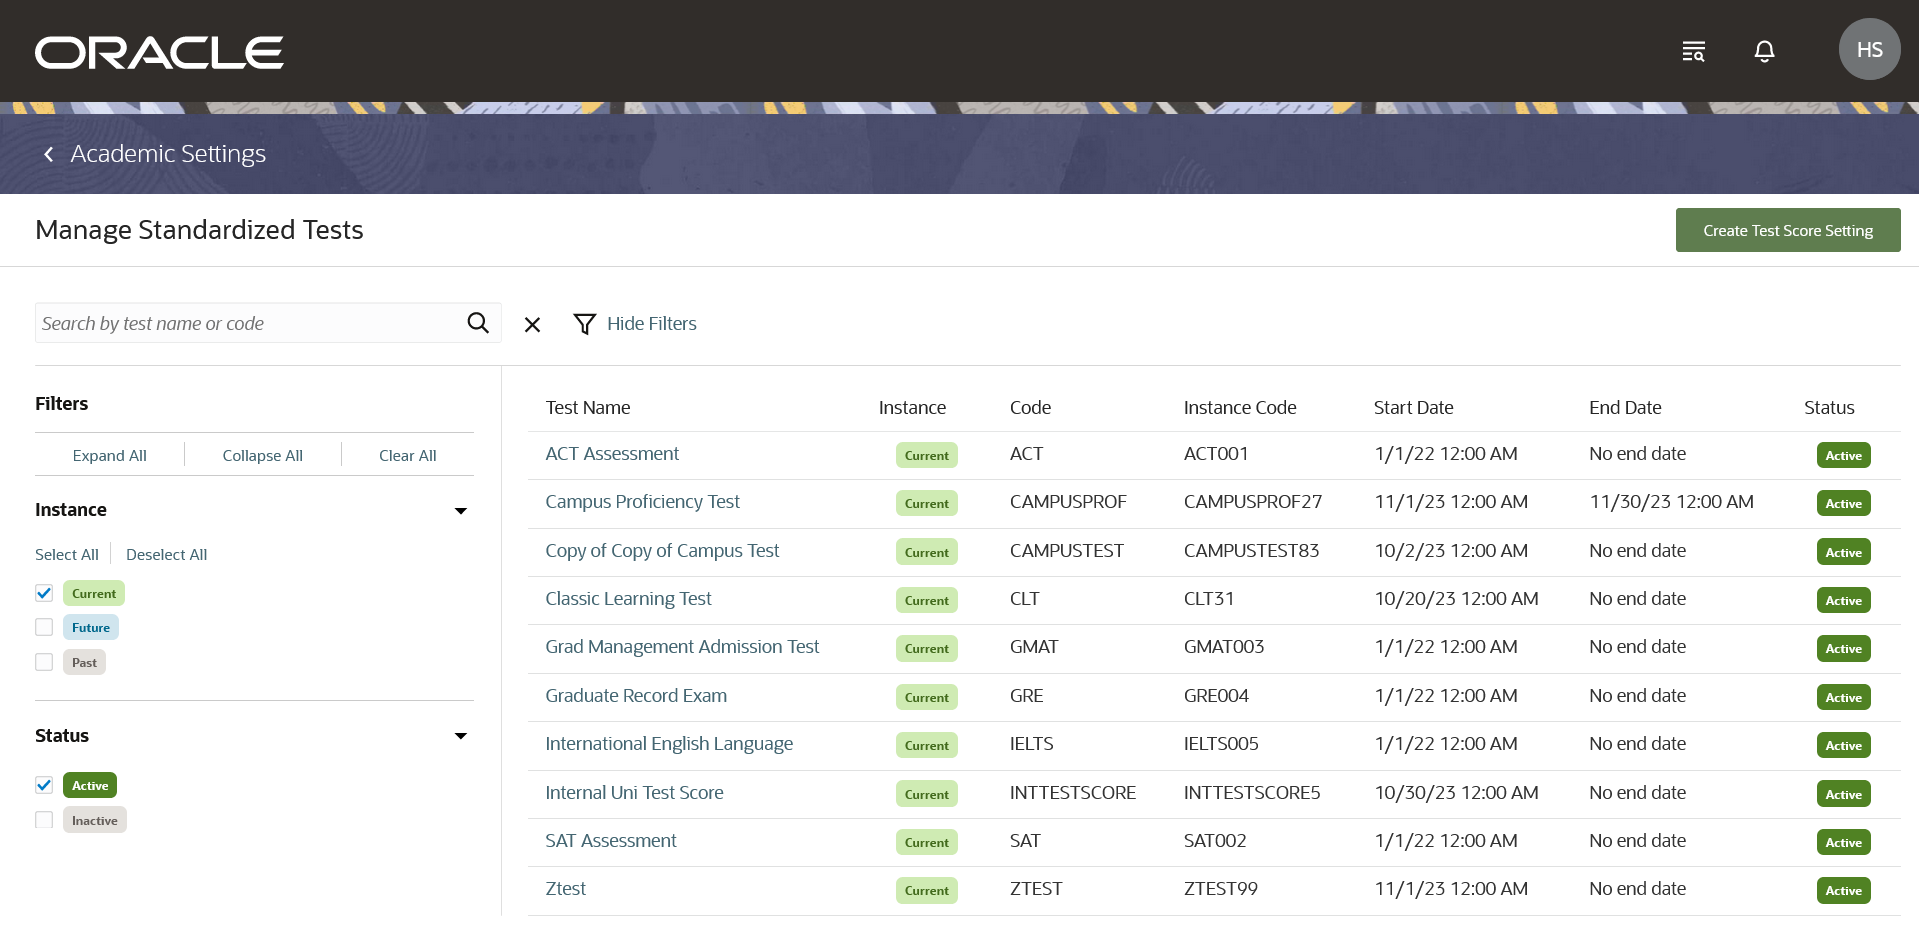
Oracle Fusion Cloud Student Management provides the standardized test setup for ACT, SAT, TOEFL, IELTS, GRE, and GMAT tests. Also, you can copy these seeded layouts to create additional values if needed.
To go to the Manage Standardized Tests landing page, from Student Central, click Search and search for Standardized Tests. Here are some things you can do on this page:
- Search by test name or code or use the filters to search for a standardized test setup.
- Change a standardized test status to active or inactive.
- Create a new test score setting for any external testing agency with all the required details and add associated components and valid score ranges.
- Configure a predefined standardized test setup along with its associated components and valid score ranges.
- Create a new test instance of a predefined standardized test setup or duplicate the details and components as a template to create a new test.
Standardized Test Configuration
Steps to Enable
You don't need to do anything to enable this feature.
Tips And Considerations
Here is how to create a new test score setting:
- From Student Central, click Search and search for Standardized Tests.
- Click Create Test Score Setting and specify the required details, such as Start Date, Test Name, and so on.
- On the Components tab, click Add Row to add associated components and valid score ranges.
- Click the Active toggle button to activate the test setup.
You can use an external testing agency in the standardized test setup. To do that, you must first create a record for that testing agency in the Student Management External Organizations record, using the organization type of test provider.
Key Resources
- For more information about creating an external organization, refer to the External Organizations topic in the Implementing Student Management guide.
Access Requirements
You must be granted these privileges to manage standardized test configuration:
- Manage Standardized Test Setup (HEY_MANAGE_STANDARDIZED_TEST_SETUP_PRIV)
- View Standardized Test Setup (HEY_VIEW_STANDARDIZED_TEST_SETUP_PRIV)
Student Test Result Management
Record standardized test results for students. Enter the component score results for each test and record different test attempts by test date.
Oracle Fusion Student Management Cloud now allows you to record test results to maintain an applicant’s or students’ academic history. These test results can be used for admissions evaluations, for course equivalency processing, or for language proficiency requirements.
Student Test Results, a central place where you can view and maintain test results received for an applicant or student. It even shows test data received for the same test, but taken on different dates. Also, it clearly shows whether the scores are considered official or self-reported. Additionally, a student can view their own test results from self-service.
To go to the Student Test Results landing page, from Student Central, click Search and search for Student Test Results.
Here are some things you can do on this page:
- Search for a student's test details using student name, email, or constituent ID or use advanced search to search by test name, date range, and so on. You can further narrow down the search results using the filters.
- Select an existing test and add component score results, or add new test details and components.
- Using self-service, your student can view their own test results.
Test Result Management
Steps to Enable
You must have an active setup for the standardized tests to record test results for students. Refer to the related release readiness feature: Standardized Test Configuration.
Tips And Considerations
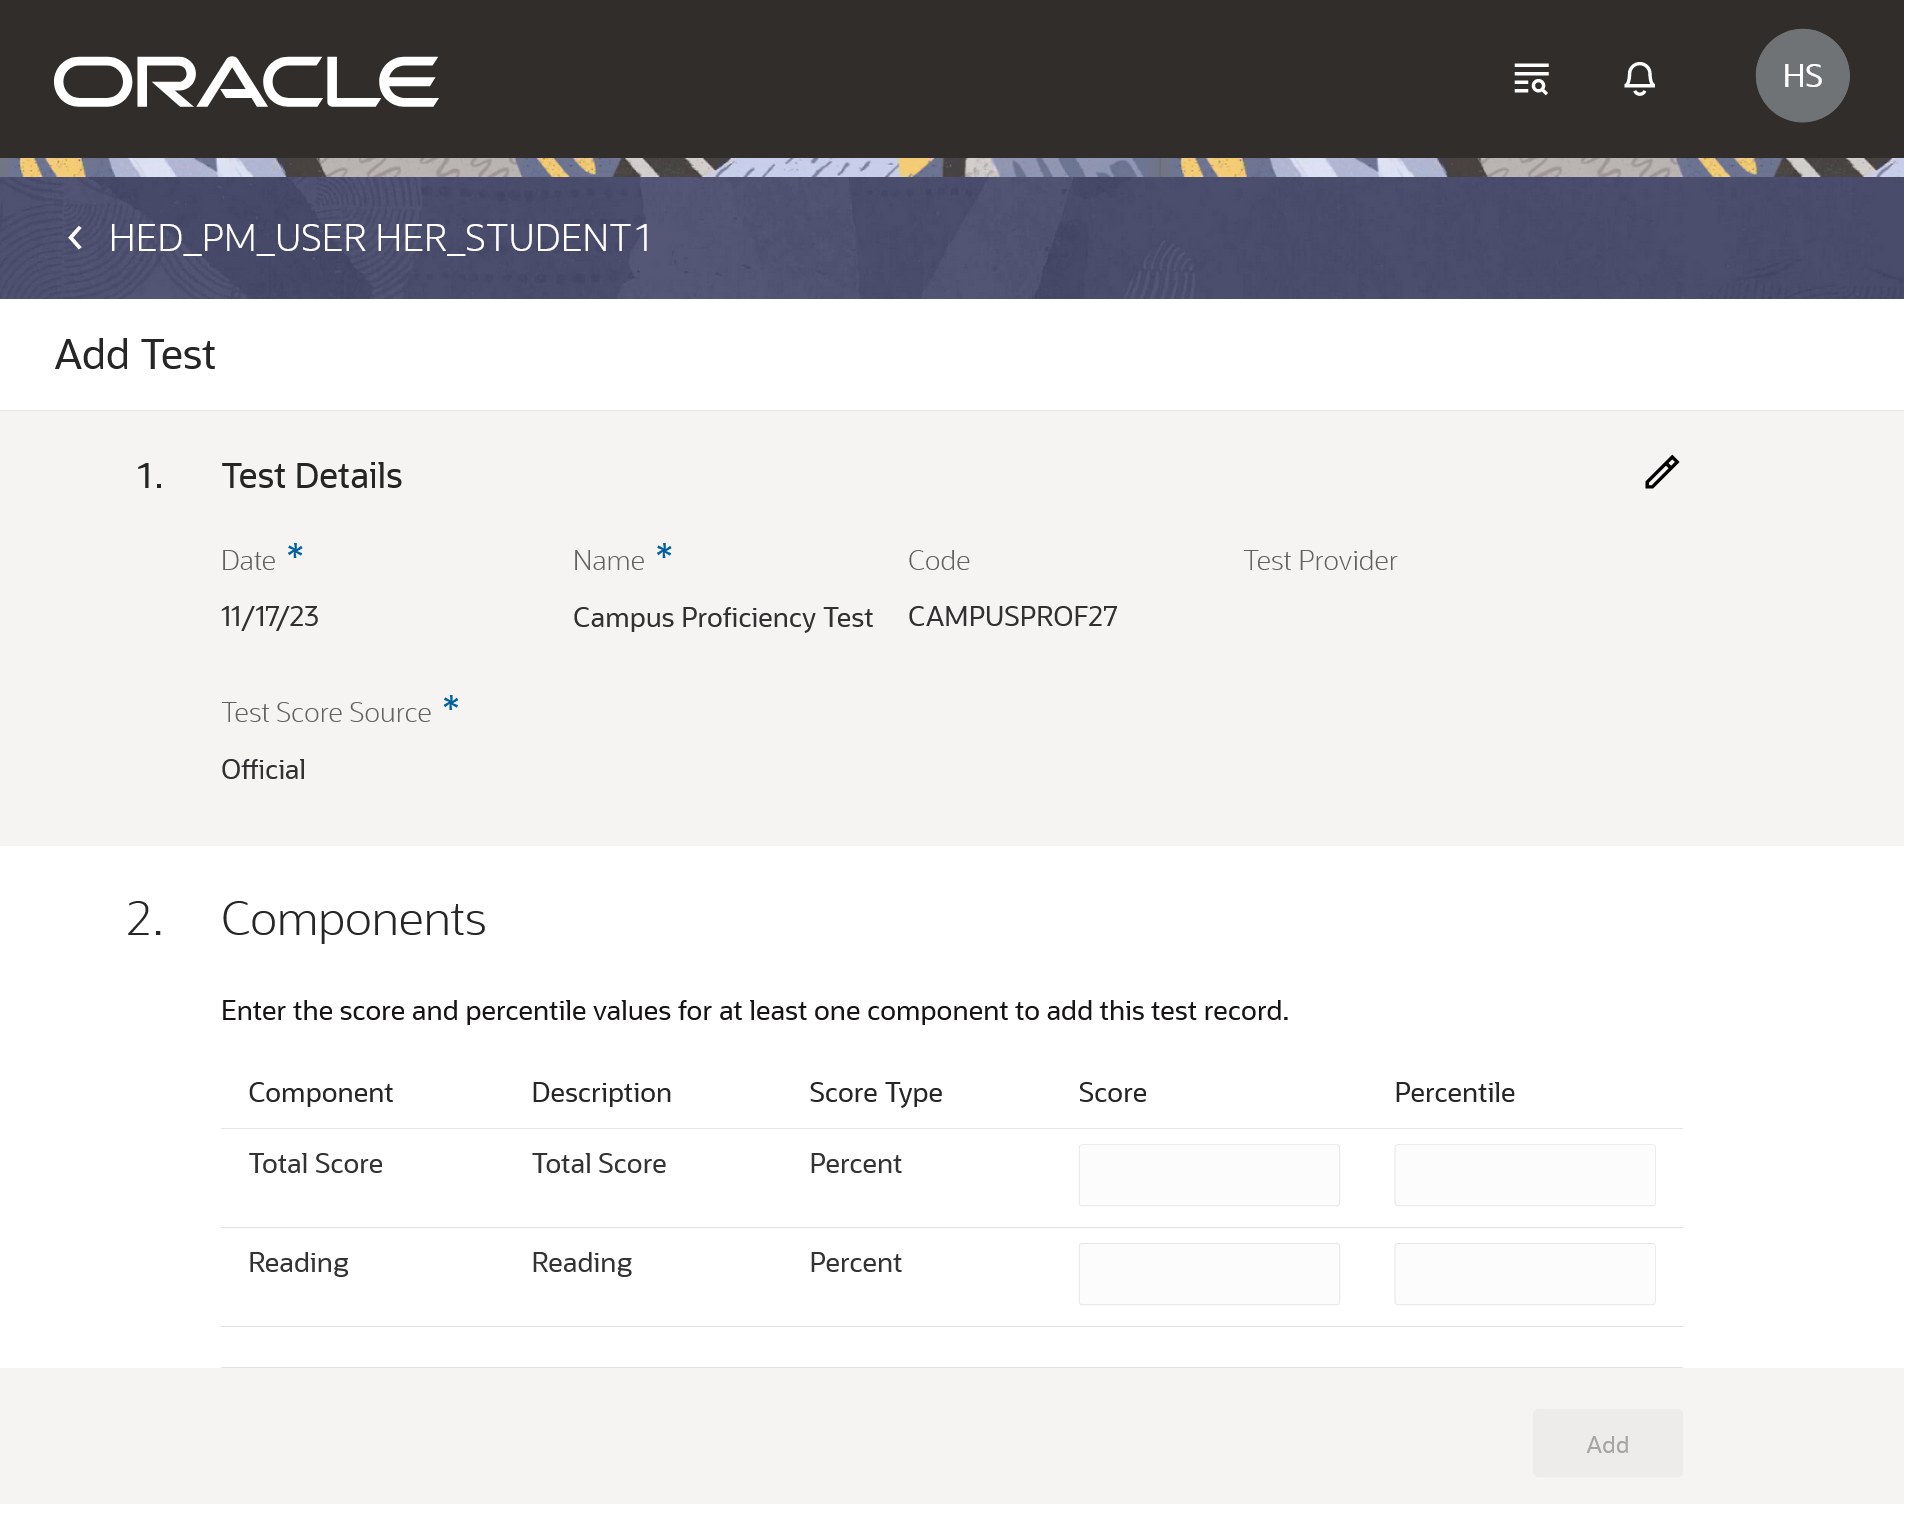
Here is how to add a new test for a student:
- From Student Central, click Search and search for Student Test Results.
- Select the student you want to add a test for.
- Click Add Test.
- Specify the required details, such as Date, Name, and so on, then click Next.
- Enter test score details, then click Add.
Access Requirements
You must be granted these privileges to manage student test results:
- Manage Person Test (HEY_MANAGE_PERSON_TEST_PRIV)
- View Person Test (HEY_VIEW_PERSON_TEST_PRIV)
Campus Community
Task Assignment Enhancements
Assign tasks using a new streamlined experience. Checklists are no longer assigned directly. You can assign all tasks within a checklist to students in this experience instead.
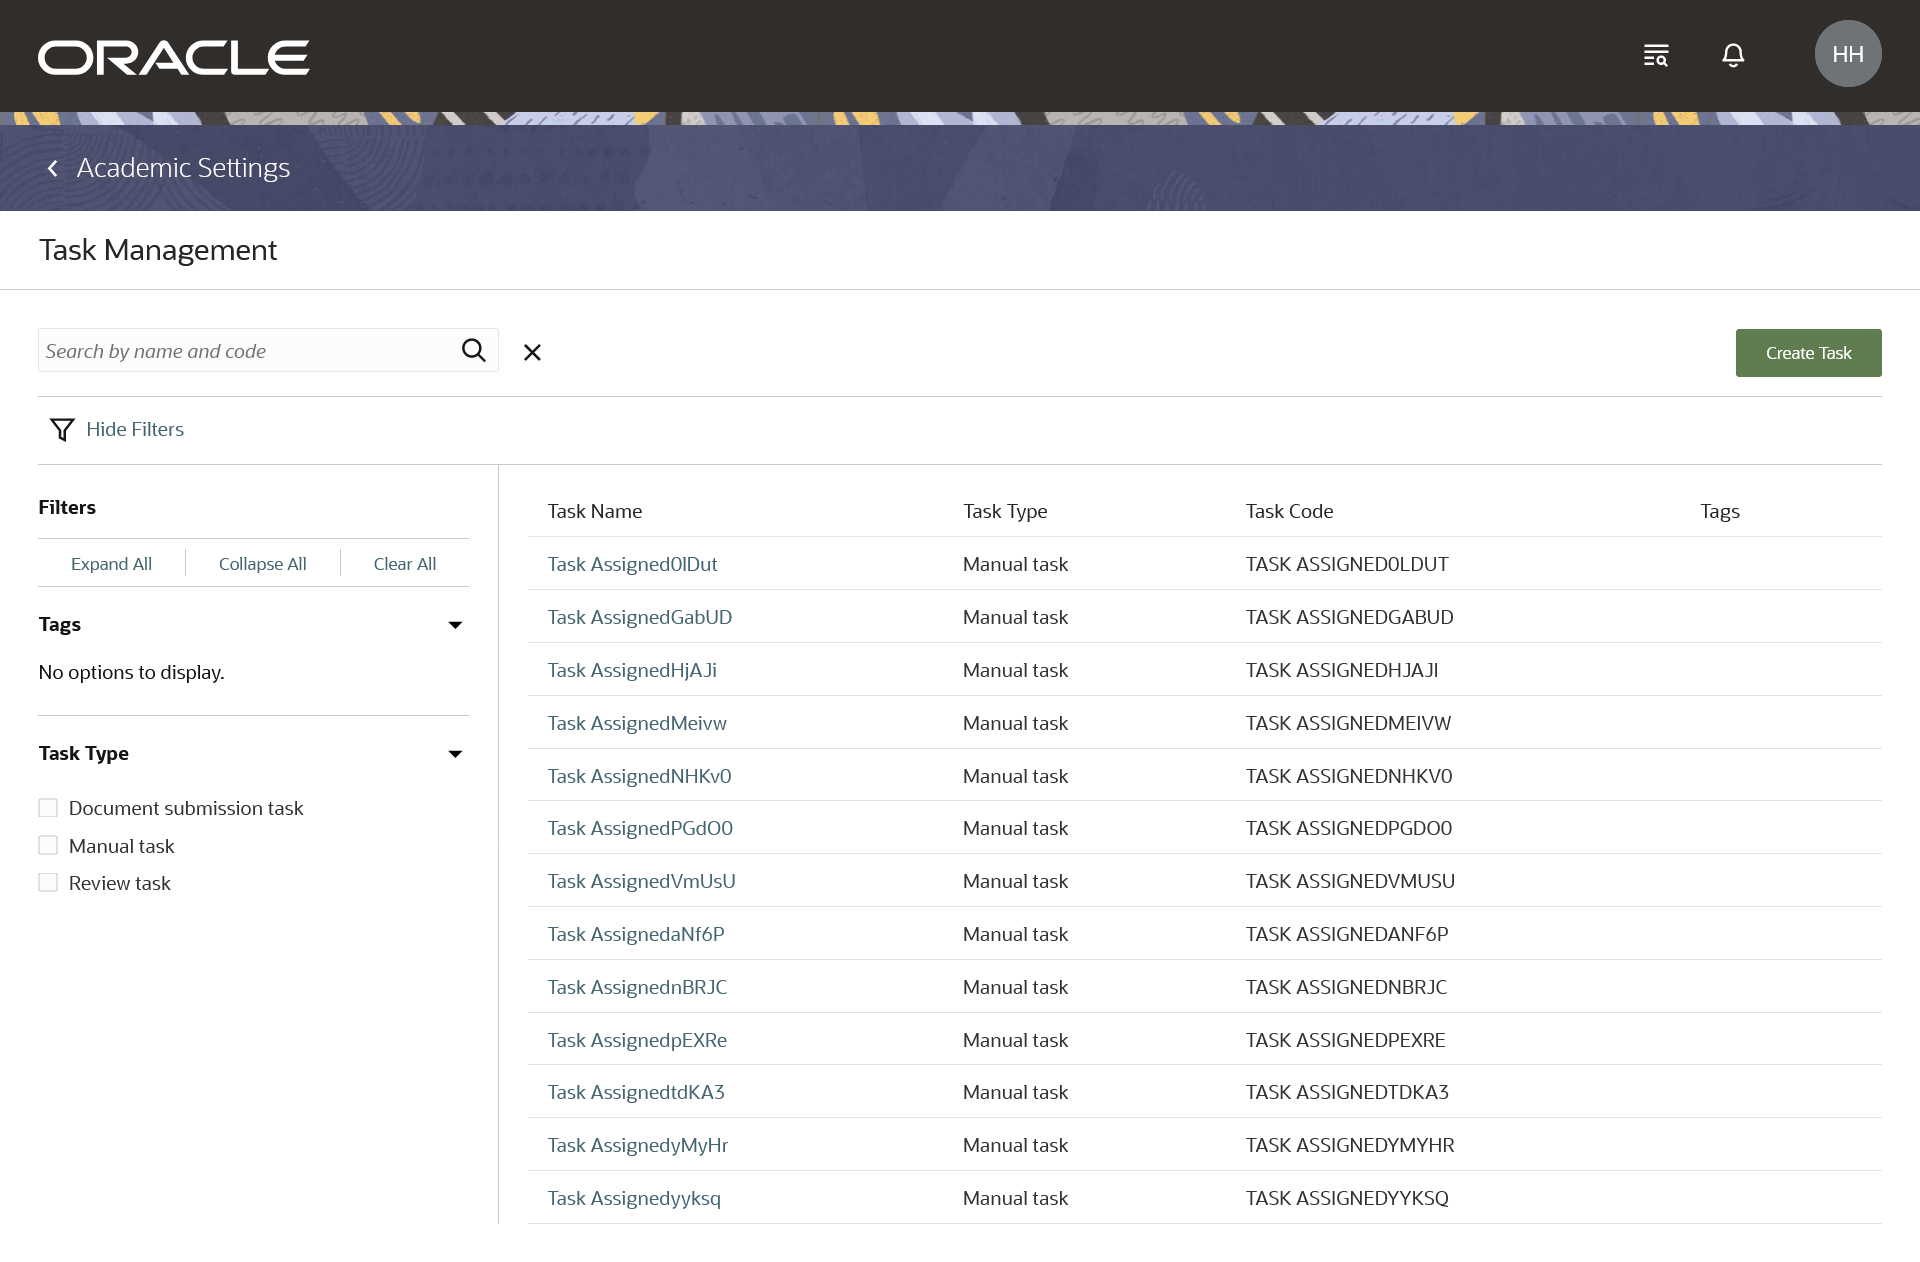
The enhanced and redesigned Task Assignments separates different experiences for Tasks, Checklists, and Assignments. From Student Central, click Search and search for Task Assignments to go to the task assignments landing page with a list of assigned tasks. Narrow down the assigned task list using different advanced search criteria like Status, Assignee, Due Date, and so on.
These are some of the key changes and enhancements that have been made to the Task Assignment wizard:
- The task assignment landing page has been improved with advanced search enhancements.
- While creating a new task assignment, select assignment purposes to associate it with an object, such as General.
- You can assign multiple tasks at once. While doing that, narrow down the task list using the different Advanced Search criteria like Tags, Checklist Name, and so on.
- Bulk assignment of tasks to multiple persons saves time over assigning each task individually.
- Assign the selected tasks to multiple people within the organization. Narrow down the person list using different Advanced Search criteria like Date of Birth, Attributes, and so on.
- Finally, use the Select Task Options to confirm if you want to notify assignees, send due date reminders, or enable tasks to be reassigned to another person.
- You can view or edit the summaries of choices selected in each step of the task assignment wizard before triggering the assignment.

Task Assignments Landing Page

Task Assignments Page
Steps to Enable
You don't need to do anything to enable this feature.
Access Requirements
You must be granted these privileges to manage tasks and checklists:
- Manage Tasks and Checklists (HEY_MANAGE_TASKS_CHECKLISTS_PRIV)
- View Task and Checklist Assignments (HEY_VIEW_TASK_AND_CHECKLIST_ASSIGNMENT)
- Create Task and Checklist Assignments (HEY_CREATE_TASK_AND_CHECKLIST_ASSIGNMENTS_PRIV)
- Update Task and Checklist Assignments (HEY_UPDATE_TASK_AND_CHECKLIST_ASSIGNMENTS_PRIV)
- Reassign Tasks and Checklists (HEY_REASSIGN_TASKS_CHECKLISTS_PRIV)
- Manage Task and Checklist Settings (HEY_MANAGE_TASK_CHECKLIST_SETTINGS_PRIV)
Task and Checklist Configuration Enhancements
Assign attribute tags to configured tasks instead of defining a category for tasks. You can also find the tasks you are looking for more quickly by filtering task search results by tags assigned to tasks.
Oracle Fusion Cloud Student Management now offers an enhanced user experience for managing tasks and checklists. You can now set up and manage tasks and checklists separately.
- To manage tasks, from Student Central, click Search and search for Task Management.
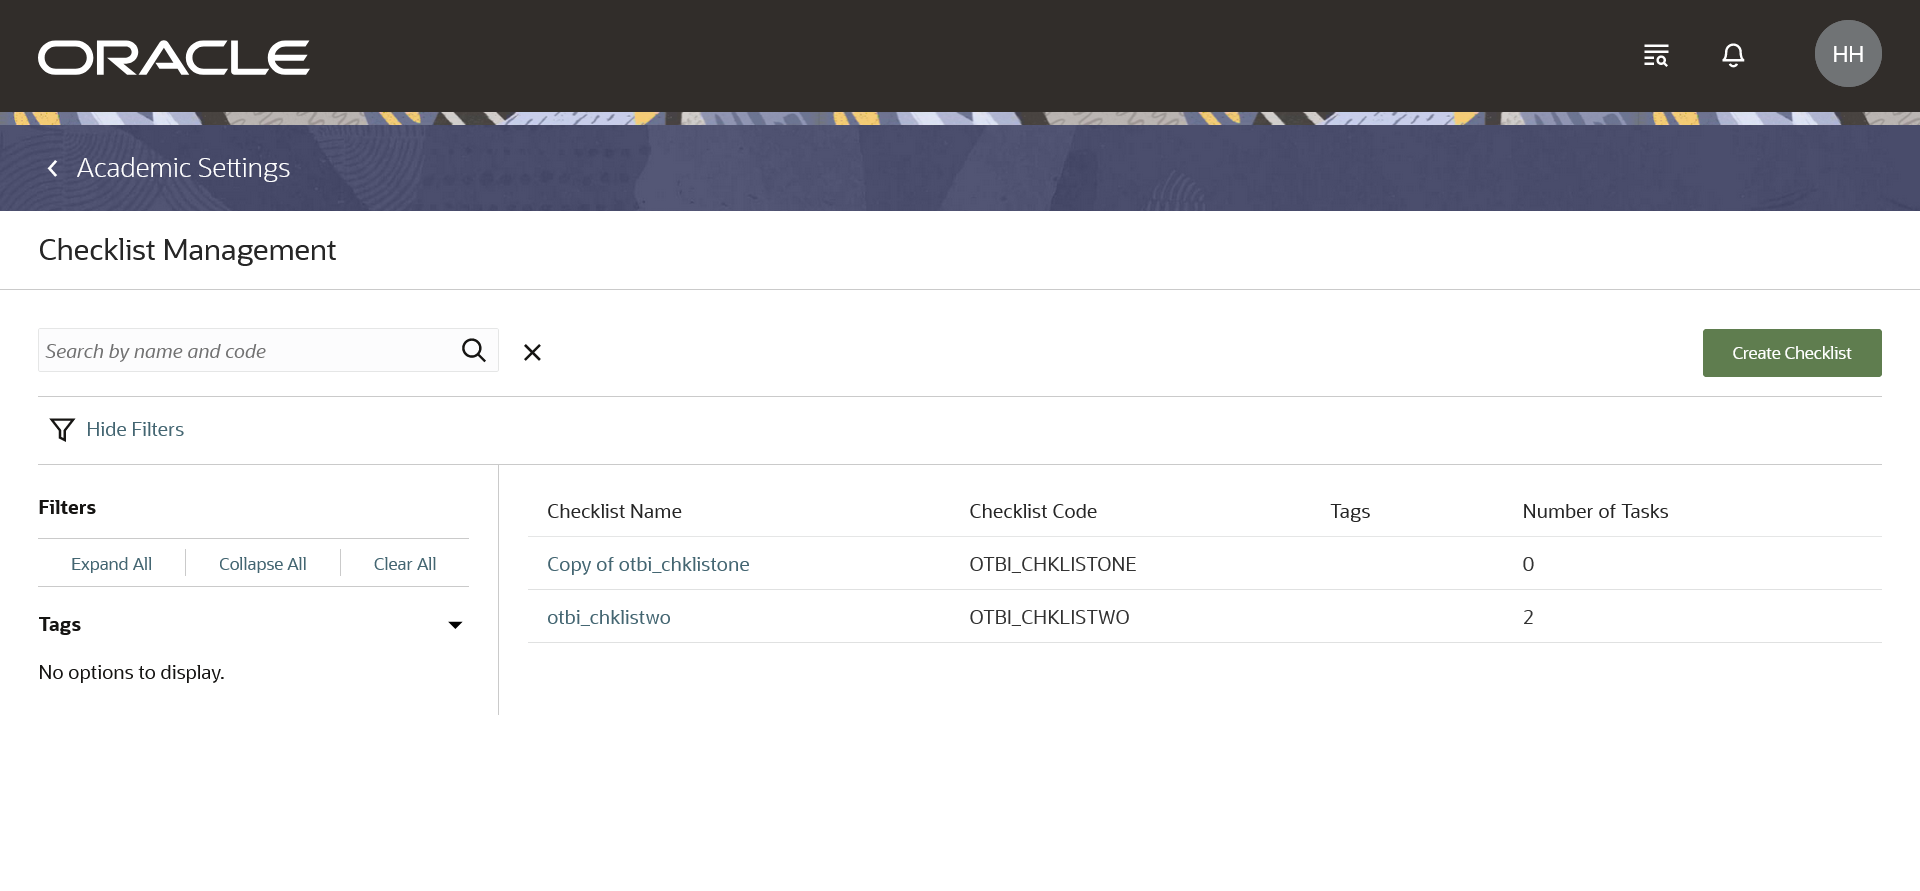
- To manage checklists, from Student Central, click Search and search for Checklist Management.
This makes navigation cleaner and straightforward. You can also assign attribute tags to tasks and checklists instead of defining a category. Thus, you can filter search results by tags assigned to them and quickly find a task or checklist.
Here are some of the advantages that you get:
- Separating tasks and checklists provides a clearer distinction between these two types of activities. You can easily identify and understand the purpose of each.
- Now it's easy to prioritize, group, and categorize tasks, and you get a better task and checklist management experience.
- With tasks and checklists separated, it becomes easier to search for and filter specific tasks and checklists. This saves time finding and managing tasks and checklists.
- On the task or checklist creation page, the instruction field helps you add all instructions to the creation of a task or checklist instead of having to wait until after the task or checklist is created.
Configure Tasks
Configure Checklists
Steps to Enable
You don't need to do anything to enable this feature.
Access Requirements
You must be granted these privileges to manage tasks and checklists:
- Manage Tasks and Checklists (HEY_MANAGE_TASKS_CHECKLISTS_PRIV)
- View Task and Checklist Assignments (HEY_VIEW_TASK_AND_CHECKLIST_ASSIGNMENT)
- Create Task and Checklist Assignments (HEY_CREATE_TASK_AND_CHECKLIST_ASSIGNMENTS_PRIV)
- Update Task and Checklist Assignments (HEY_UPDATE_TASK_AND_CHECKLIST_ASSIGNMENTS_PRIV)
- Reassign Tasks and Checklists (HEY_REASSIGN_TASKS_CHECKLISTS_PRIV)
- Manage Task and Checklist Settings (HEY_MANAGE_TASK_CHECKLIST_SETTINGS_PRIV)
Security
Security Updates
Oracle Fusion Cloud Student Management delivers new pages, page elements, and page permissions assigned to the predefined job roles in each release.
Here are the newly added pages, page elements, and page permissions for the mentioned predefined job roles.
Security Updates
| Page Name | New/ Existing/ Hidden |
Page Elements | New/ Existing | Page Permission | New/ Existing | Predefined Job Roles |
|---|---|---|---|---|---|---|
| Checklist Management |
New | Checklist Management |
New | View | New | Higher Education Application Administrator, Bursar, Registrar, and Admissions Manager |
| Standardized Tests |
New |
Standardized Tests |
New | View | New | Higher Education Application Administrator and Admissions Manager |
| Standardized Tests |
New |
Standardized Test Details |
New | View and Manage | New | Higher Education Application Administrator and Admissions Manager |
| Student Test Results |
New | Student Test Results |
New | View | New | Higher Education Application Administrator and Admissions Manager |
| Student Test Results |
New | Student Test Details |
New | View and Manage | New | Higher Education Application Administrator and Admissions Manager |
| Task Assignment |
New | Task Assignment |
New | View, Manage, and Reassign |
New | Higher Education Application Administrator, Bursar, Registrar, and Admissions Manager |
| Task Assignment |
New | Manage Task Assignments |
New | View, Manage, and Reassign |
New | Higher Education Application Administrator, Bursar, Registrar, and Admissions Manager |
| Test Results |
New | Test Results |
New | View | New | Student |
| Edit Checklist |
Hidden |
Edit Checklist |
Hidden |
View | Existing | N/A |
| Edit Checklist Tasks |
Hidden |
Edit Checklist Tasks |
Hidden |
View | Existing | N/A |
| View Tasks and Checklists |
Hidden |
View Tasks and Checklists |
Hidden |
View, Manage, and Reassign |
Existing | N/A |
| View Tasks and Checklists |
Hidden |
Manage Tasks and Checklists assignments |
Hidden |
View, Manage, and Reassign |
Existing | N/A |
Steps to Enable
You don't need to do anything to enable this feature.
Tips And Considerations
If you created user-defined roles and assigned page access to them using the Manage Application Access task in the Setup and Maintenance work area, you must review your user-defined roles to see if you need to assign them access to the new pages, page elements, and page permissions.