How to Get Started Creating Oracle Solaris Zones in Oracle Solaris 11
by Duncan Hardie
November 2011, updated July 2018
How to create an Oracle Solaris Zone, install an application in that zone, and clone the zone so you can roll out multiple, duplicate resource-controlled environments quickly and easily.
Introduction
This article will help you get familiar with the basic operations of Oracle Solaris Zone configuration and management in Oracle Solaris 11.
In Oracle Solaris 10, Oracle Solaris Zones technology gave you the ability to create different isolated environments to suit the needs of your particular applications, all on the same instance of Oracle Solaris. Instead of running and managing multiple operating systems to host multiple applications on multiple systems, you could run and manage only one OS and place each application inside a zone. So instead of having to spend time and resources managing multiple OSs, all you needed to do was manage multiple zones. Much simpler.
Oracle Solaris 11 places Oracle Solaris Zones technology at its core, integrating Oracle Solaris Zones with key Oracle Solaris 11 features. For example, tight integration with the new software management architecture makes deployment of Oracle Solaris 11 and Oracle Solaris Zones easy.
Oracle Solaris Zones let you isolate one application from others on the same OS, allowing you to create an isolated environment in which users can log in and do what they want from inside an Oracle Solaris Zone without affecting anything outside that zone. In addition, Oracle Solaris Zones also are secure from external attacks and internal malicious programs. Each Oracle Solaris Zone contains a complete resource-controlled environment that allows you to allocate resources such as CPU, memory, networking, and storage.
If you are the administrator who owns the system, you can choose to closely manage all the Oracle Solaris Zones or you can assign rights to other administrators for specific Oracle Solaris Zones. This flexibility lets you tailor an entire computing environment to the needs of a particular application, all within the same OS.
Overview of the Environment We Will Implement
In this how-to guide, we will set up three Oracle Solaris Zones, one to host a test environment for developers (testzone) and two to host our Web-facing applications (webzone-1 and webzone-2), all side by side on a single system.
Each zone will highlight a simple feature of getting started with zones:
- With
testzone, we'll see how to create a zone using the command line. - With
webzone-1, we'll see how to add an application to a zone. - With
webzone-2, we'll see how to clone a zone.
Our testzone will benefit from the isolation capabilities of Oracle Solaris Zones technology. You can quickly create the zone and then hand it over to the development group. That group's administrator can independently manage the environment, and the test engineers are free to install the packages they need, all in isolation from the rest of the system. We will also see how the Image Package System (IPS) in Oracle Solaris 11 enables Oracle Solaris Zones to be mean and lean, allowing system resources to be used for the applications rather than for the virtualization technologies.
Our first Web zone, webzone-1, will be used to install the Web environment where we run our online Point of Sales (POS) Web server. Here, we can make sure transactions are completed by assigning appropriate resources to guarantee levels of service. Oracle Solaris Zones technology allows you to control not only CPU and memory, but also network bandwidth and access to storage. This is enabled by tight integration with the rest of Oracle Solaris 11 core features, such as network virtualization and ZFS-based storage.
Our second Web zone, webzone-2, will be created in response to a spike in demand within our POS environment. An additional Web server is needed to handle the increased traffic as quickly as possible. We will do this using the cloning feature available in Oracle Solaris Zones. This is a commonly used technique in the industry where a golden master (or template) is created and new environments are rolled out based on the original. We will see how incredibly fast this is with Oracle Solaris Zones technology, and we will also see how we save on disk space. This cloning process can be used to rapidly roll out multiple, duplicate environments quickly and easily, on demand, which could be of great use in a cloud environment.
After following the procedures in this article, you will have three zone environments configured as shown in Figure 1. Each zone will have its file system placed on the /system/zones ZFS data set and will have an exclusive network connection through the physical data link (network port net0). The Web zones will also have the Apache Web server application.
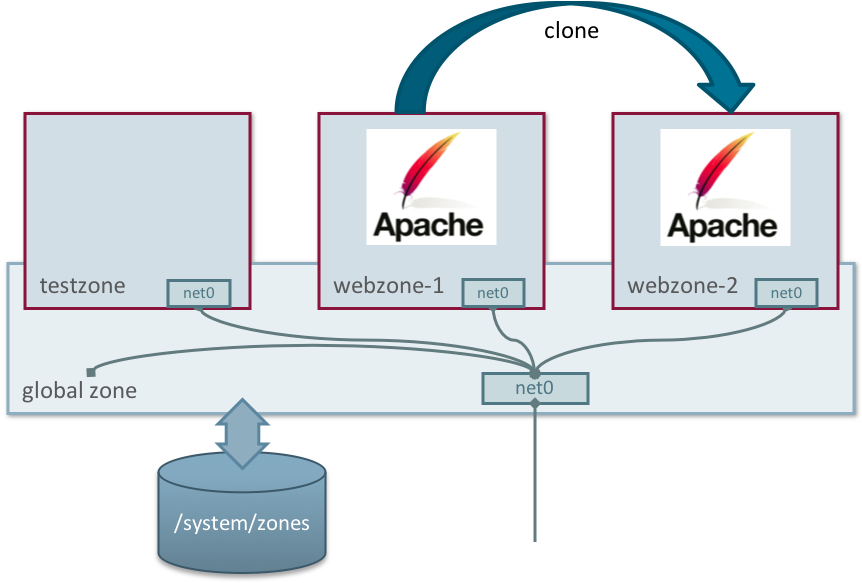
Figure 1. Three Zones Accessing a Network Port with Their File Systems on /system/zones
Note: "Global zone" refers to the default zone for the system, which is also used for system-wide administrative control.
Now that we understand what we are trying to do, we will go through the steps for achieving our goal.
Figure 2 shows the settings we will use.
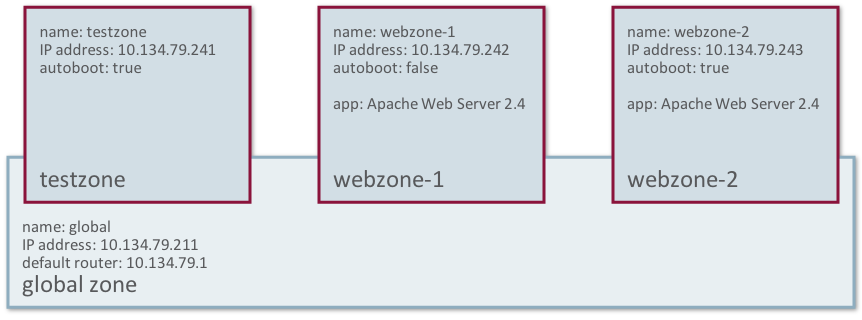
Figure 2. Three Zones and Their Configuration Details
Creating Your First Zone: testzone
This article concentrates on the tasks that are necessary to get Oracle Solaris Zone instances up and running quickly. For a full discussion on all the steps involved in creating an Oracle Solaris Zone and how you can configure its attributes, please see Creating and Using Oracle Solaris Zones.
Before We Start
Check the status of both the ZFS file system and the network:
root@global:~# zfs list | grep zones
rpool/VARSHARE/zones                31K  65.3G    31K  /system/zones
root@global:~# dladm show-link
LINK                CLASS     MTU    STATE    OVER
net0                phys      1500   up       --
Note that there are no ZFS data sets associated with any particular zones and no virtual NIC devices.
Step 1: Configure an Oracle Solaris Zone
Let's start by creating a simple test zone using the command line, as shown in Listing 1.
Listing 1: Creating a Zone
root@global:~# zonecfg -z testzone
Use 'create' to begin configuring a new zone.
zonecfg:testzone> create
create: Using system default template 'SYSdefault'
zonecfg:testzone> set autoboot=true
zonecfg:testzone> set bootargs="-m verbose"
zonecfg:testzone> verify
zonecfg:testzone> commit
zonecfg:testzone> exit
If you get any configuration errors at this stage, refer to Creating and Using Oracle Solaris Zones.
Note: There's no longer the need to set the zonepath.
In this case, we have named the zone testzone and we can expect /system/zones/testzone to be the location under which the zone will be installed. Also, the zone will automatically start on boot. We do this so that we don't have to start the zone manually after a system reboot and because we've also set to boot in verbose manner we can see all the services start up.
By default, all Oracle Solaris Zones are configured to have an automatic VNIC called anet, which gives us a network device automatically. (We will discuss more details for this network device's configuration later.) We cannot see this network device yet, because it is automatically created when the zone is booted and also automatically destroyed on shutdown. We can check this with the dladm(8) command:
root@global:~# dladm show-link
LINK                CLASS     MTU    STATE    OVER
net0                phys      1500   up       --
We can verify that the zone is now in the configured state using the zoneadm(8) command:
root@global:~# zoneadm list -cv
  ID NAME             STATUS      PATH                         BRAND      IP
   0 global           running     /                            solaris    shared
   - testzone         configured  /system/zones/testzone       solaris    excl
Step 2: Install the Zone
Now that the zone has been configured, we need to install it, as shown in Listing 2.
It is important to understand that Oracle Solaris Zones in Oracle Solaris 11 are created by using the IPS feature. You will need to ensure you have access to your IPS repository. In this case, we have network access to our IPS repository. For more details on IPS see Introducing the Basics of Image Packaging System (IPS) on Oracle Solaris 11.
Listing 2: Installing a Zone
The following ZFS file system(s) have been created:
    rpool/VARSHARE/zones/testzone
Progress being logged to /var/log/zones/zoneadm.20180628T023939Z.testzone.install
       Image: Preparing at /system/zones/testzone/root.

 Install Log: /system/volatile/install.1752/install_log
 AI Manifest: /tmp/manifest.xml._cdphc
  SC Profile: /usr/share/auto_install/sc_profiles/enable_sci.xml
    Zonename: testzone
Installation: Starting ...

        Creating IPS image
Startup linked: 1/1 done
        Installing packages from:
            solaris
                origin:  http://ipkg.us.oracle.com/solaris11.4/dev/
DOWNLOAD                                PKGS         FILES    XFER (MB)   SPEED
Completed                            413/413   63566/63566  435.1/435.1  5.7M/s

PHASE                                          ITEMS
Installing new actions                   87414/87414
Updating package state database                 Done
Updating package cache                           0/0
Updating image state                            Done
Creating fast lookup database                   Done
Updating package cache                           1/1
Installation: Succeeded
 done.

        Done: Installation completed in 228.696 seconds.

  Next Steps: Boot the zone, then log into the zone console (zlogin -C)

              to complete the configuration process.

Log saved in non-global zone as /system/zones/testzone/root/var/log/zones/zoneadm.20180628T023939Z.testzone.install
The zone was installed in just 228 seconds. This is fairly quick and reflects the lightweight nature of Oracle Solaris Zones.
We can check on the status of our zone using the zoneadm(8) command:
root@global:~# zoneadm list -iv
  ID NAME             STATUS      PATH                         BRAND      IP
   0 global           running     /                            solaris    shared
   - testzone         installed   /system/zones/testzone       solaris    excl
The zonepath must live on a ZFS data set, and it is created automatically when the zone is installed. You can check that by using the zfs command, as shown in Listing 3.
Listing 3: Checking the Zonepath
root@global:~# zfs list | grep zones
rpool/VARSHARE/zones                                   871M  63.9G    32K  /system/zones
rpool/VARSHARE/zones/testzone                          871M  63.9G    32K  /system/zones/testzone
rpool/VARSHARE/zones/testzone/rpool                    871M  63.9G    31K  /rpool
rpool/VARSHARE/zones/testzone/rpool/ROOT               871M  63.9G    31K  none
rpool/VARSHARE/zones/testzone/rpool/ROOT/solaris       871M  63.9G   767M  /system/zones/testzone/root
rpool/VARSHARE/zones/testzone/rpool/ROOT/solaris/var   103M  63.9G   103M  /system/zones/testzone/root/var
rpool/VARSHARE/zones/testzone/rpool/VARSHARE            31K  63.9G    31K  /var/share
rpool/VARSHARE/zones/testzone/rpool/export              62K  63.9G    31K  /export
rpool/VARSHARE/zones/testzone/rpool/export/home         31K  63.9G    31K  /export/home
You can see the /system/zones and /system/zones/testzone data sets have been created automatically for you. Having Oracle Solaris Zones on a ZFS data set enables functionality, such as cloning and snapshots, and allows Oracle Solaris Zones to take full advantage of ZFS.
Note: The size of testzone is only 871 MB. Oracle Solaris Zones have a minimal footprint, reflecting how lightweight Oracle Solaris Zones are as a virtualization technology.
Step 3: Boot and Complete the System Configuration
The final step in getting testzone up and running is to boot it and set up the system configuration.
- Run the following command to boot the zone and then access its console:
- Press F2 to continue.
- Enter
testzoneas the computer name, as shown in Figure 4, and press F2 to continue. - On the screen highlight net0 to configure a network on this VNIC, as shown in Figure 5, and then press F2 to continue.
- Then highlight Static to manually configure the network, as shown in Figure 6, and then press F2 to continue.
- Enter the network settings appropriate for your network, as shown in Figure 7, and then press F2.
- We will not configure DNS at this time (see Figure 8), so press F2.
- We will not set up a name service at this time, so press F2.
- Select the time zone region appropriate for your location, as shown in Figure 10, and press F2.
- Select the appropriate location, as shown in Figure 11, and then press F2.
- Select the appropriate time zone, as shown in Figure 12, and then press F2.
- At this time we won't add additional locale support, as shown in Figure 13, and then press F2.
- Complete your configuration by entering a root password, your name, a user name, and a user password, as shown in Figure 14. Then press F2.
- Verify that the configuration you have chosen is correct and apply the settings by pressing F2.
root@global:~# zoneadm -z testzone boot; zlogin -C testzone
Note: The -C option to zlogin(1) lets us access the zone console, that is, it takes us into the zone and lets us work within the zone.
Because no system configuration files are available, the System Configuration Tool starts up, as shown in Figure 3.
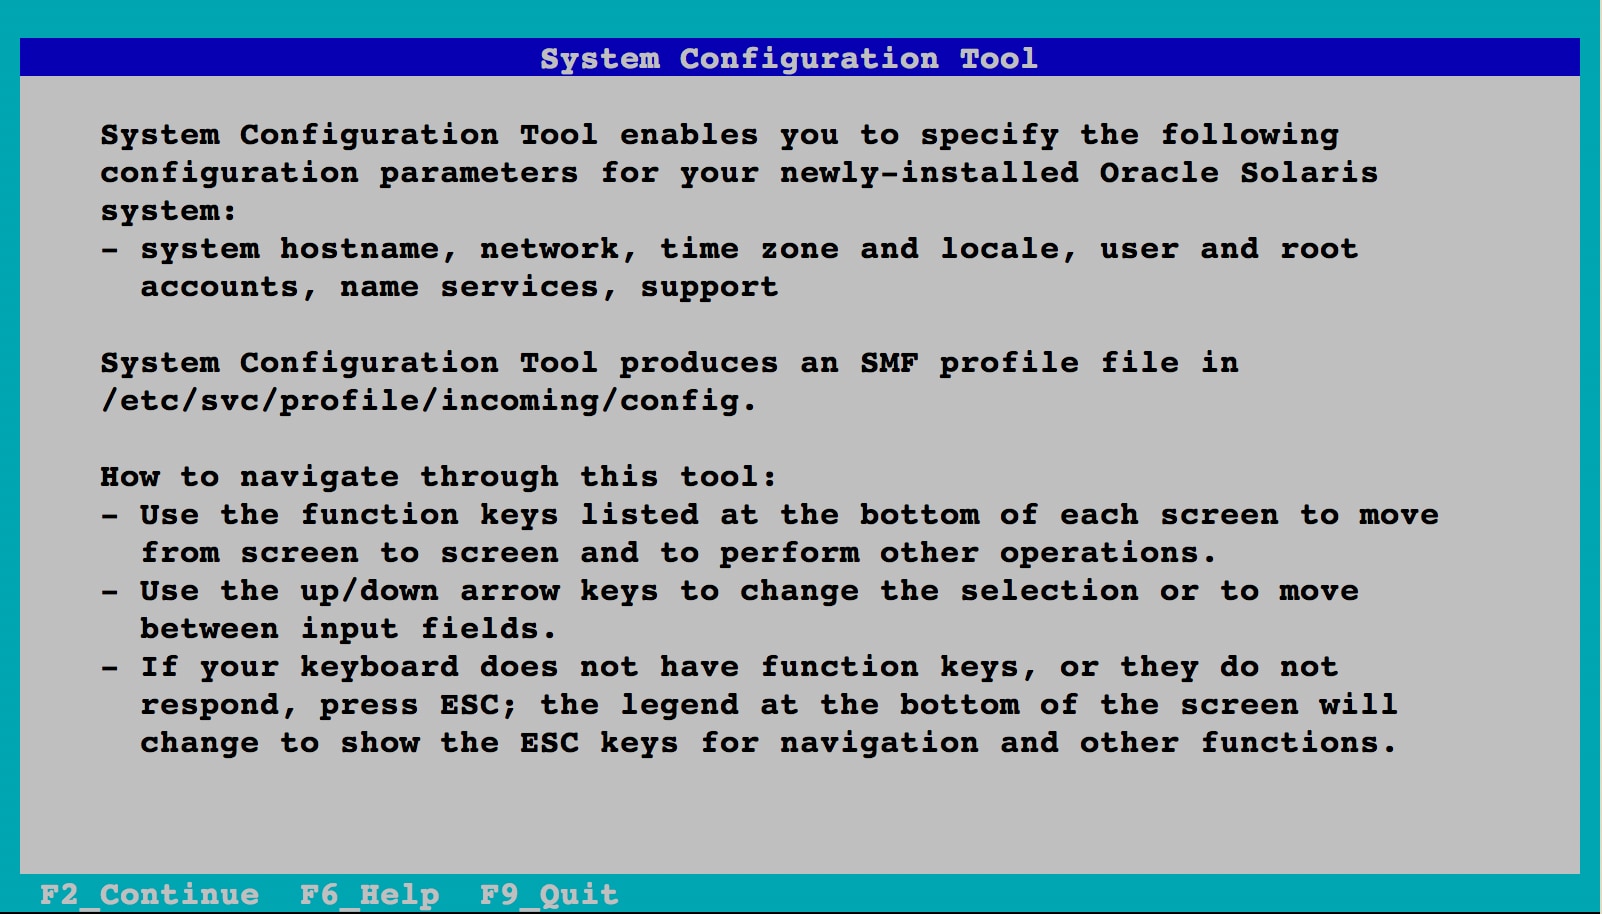
Figure 3. System Configuration Tool
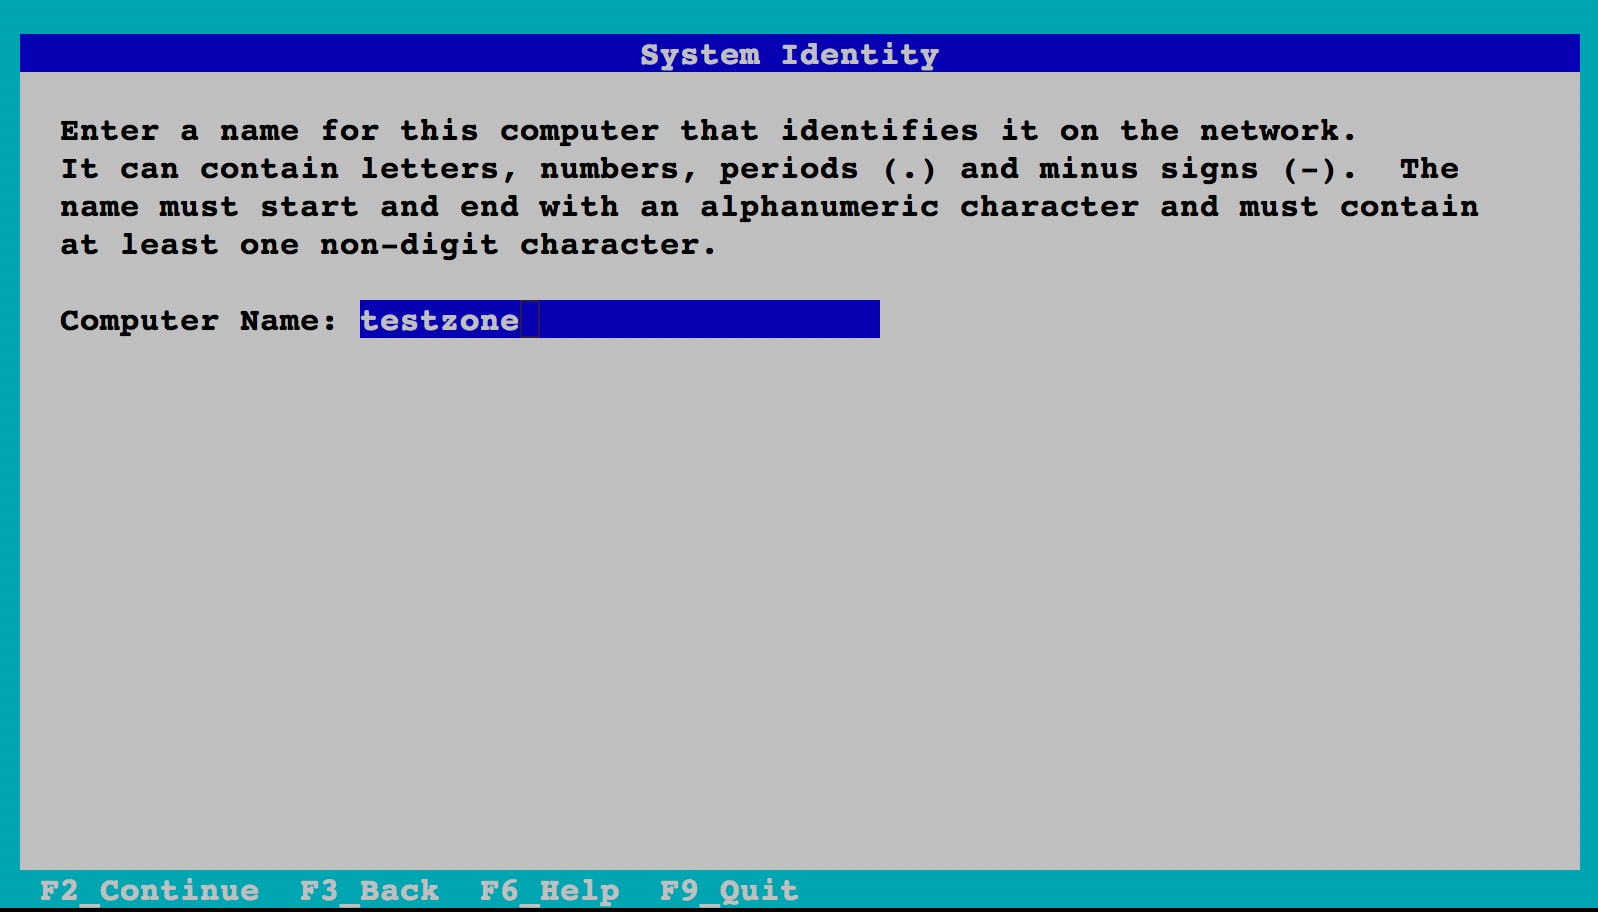
Figure 4. Selecting Computer Name
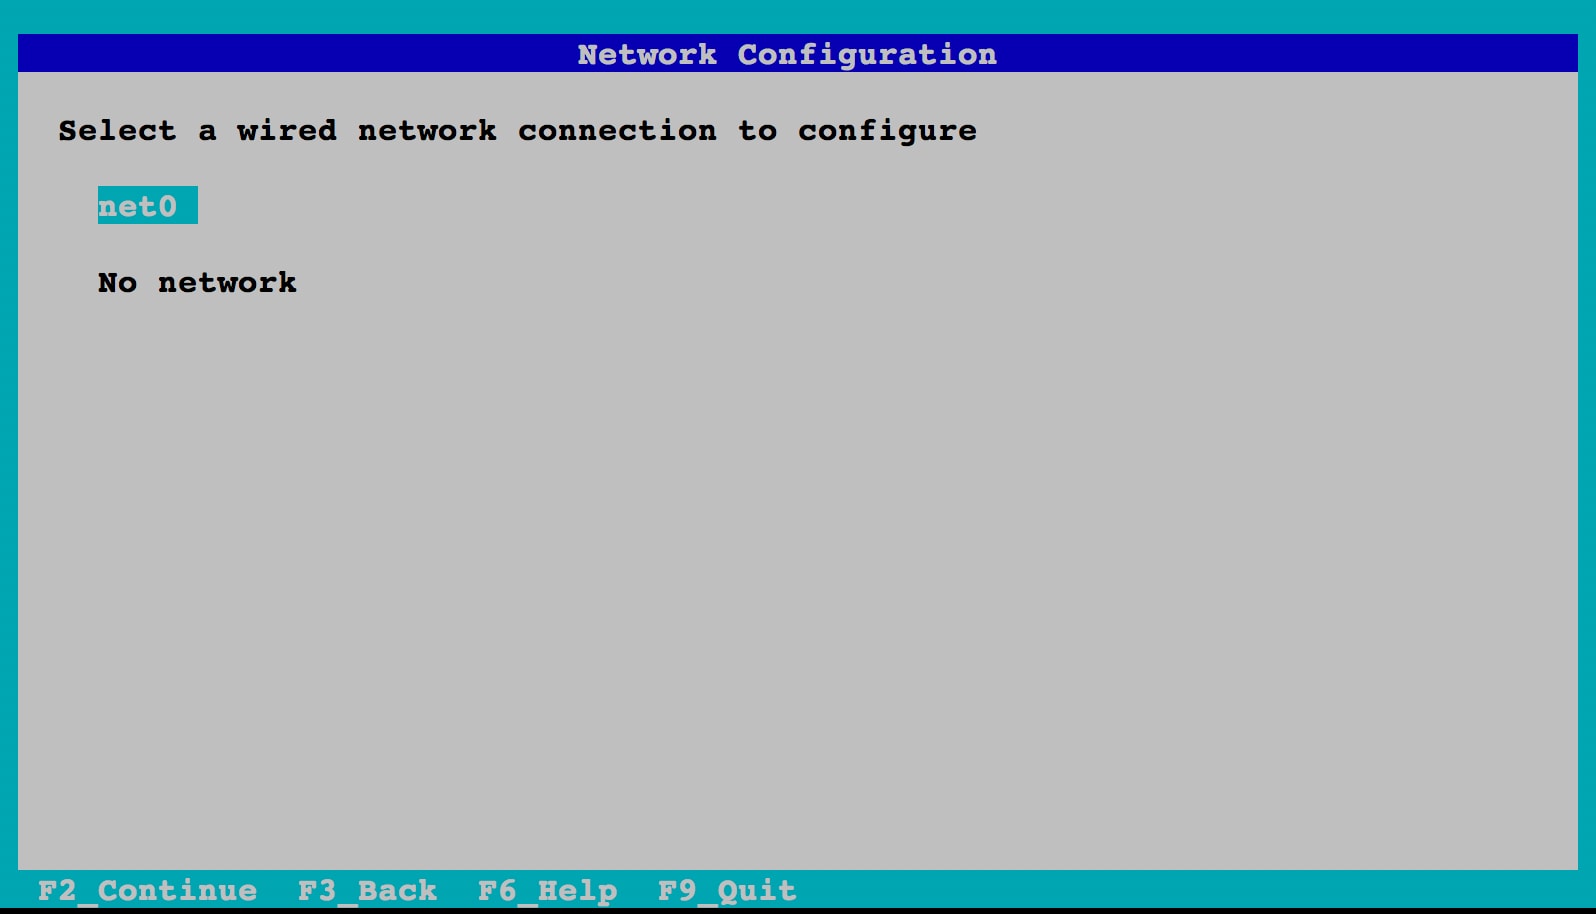
Figure 5. Selecting Network Port
Note: We do not select "DHCP" in this example, but if you were to select it, you would not have to enter any network information at all, because the configuration would be done for you using your local DHCP server.
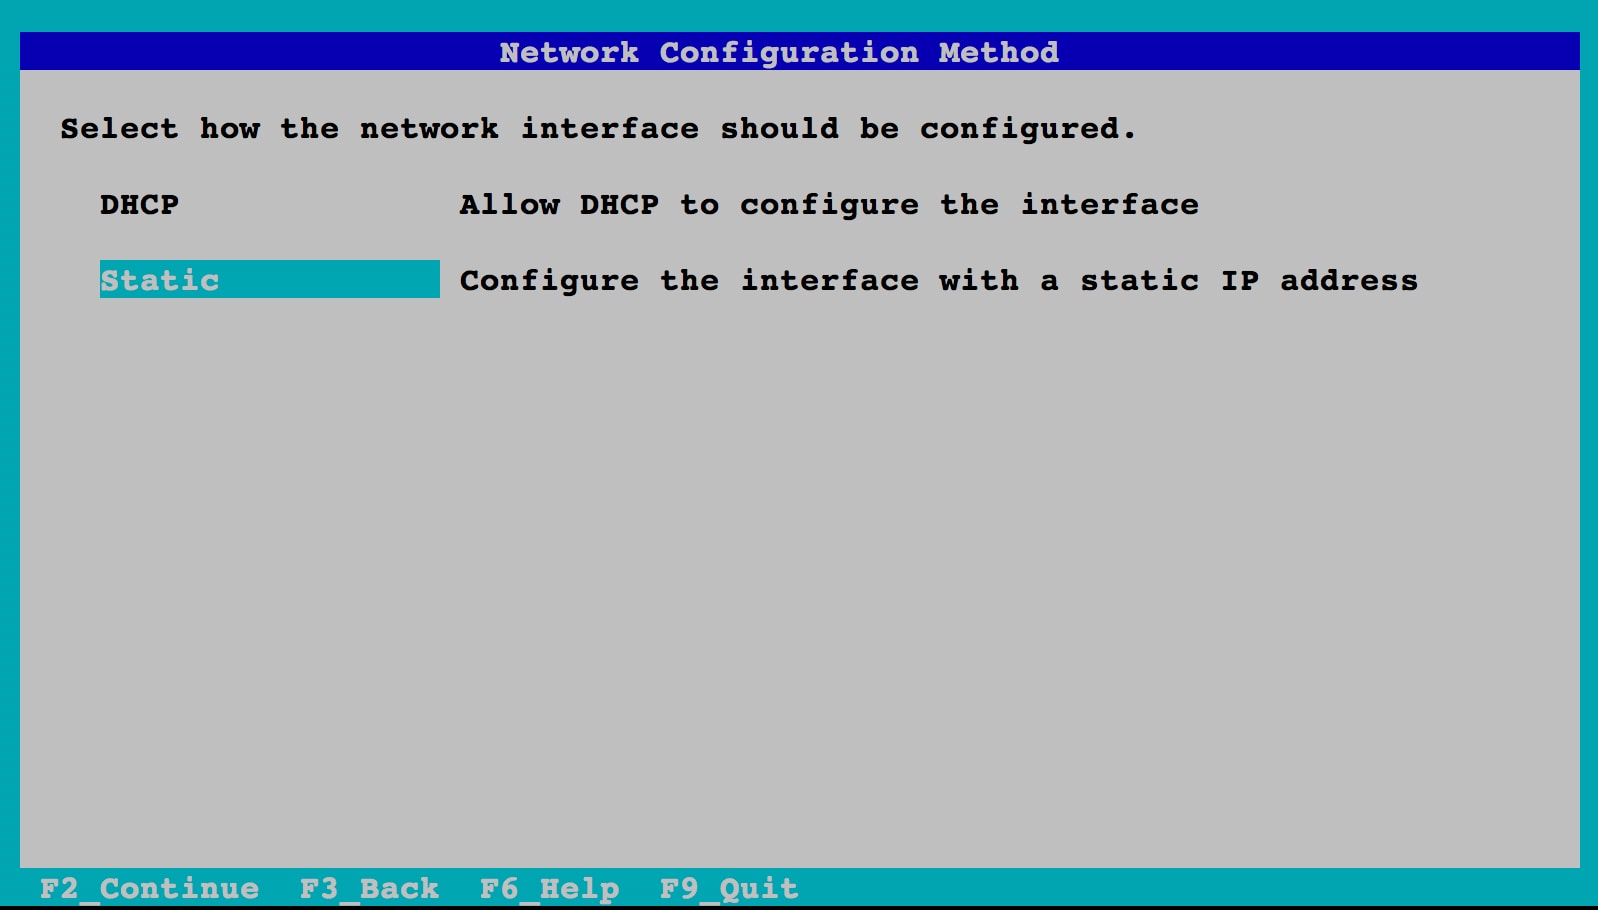
Figure 6. Selecting Manual Configuration
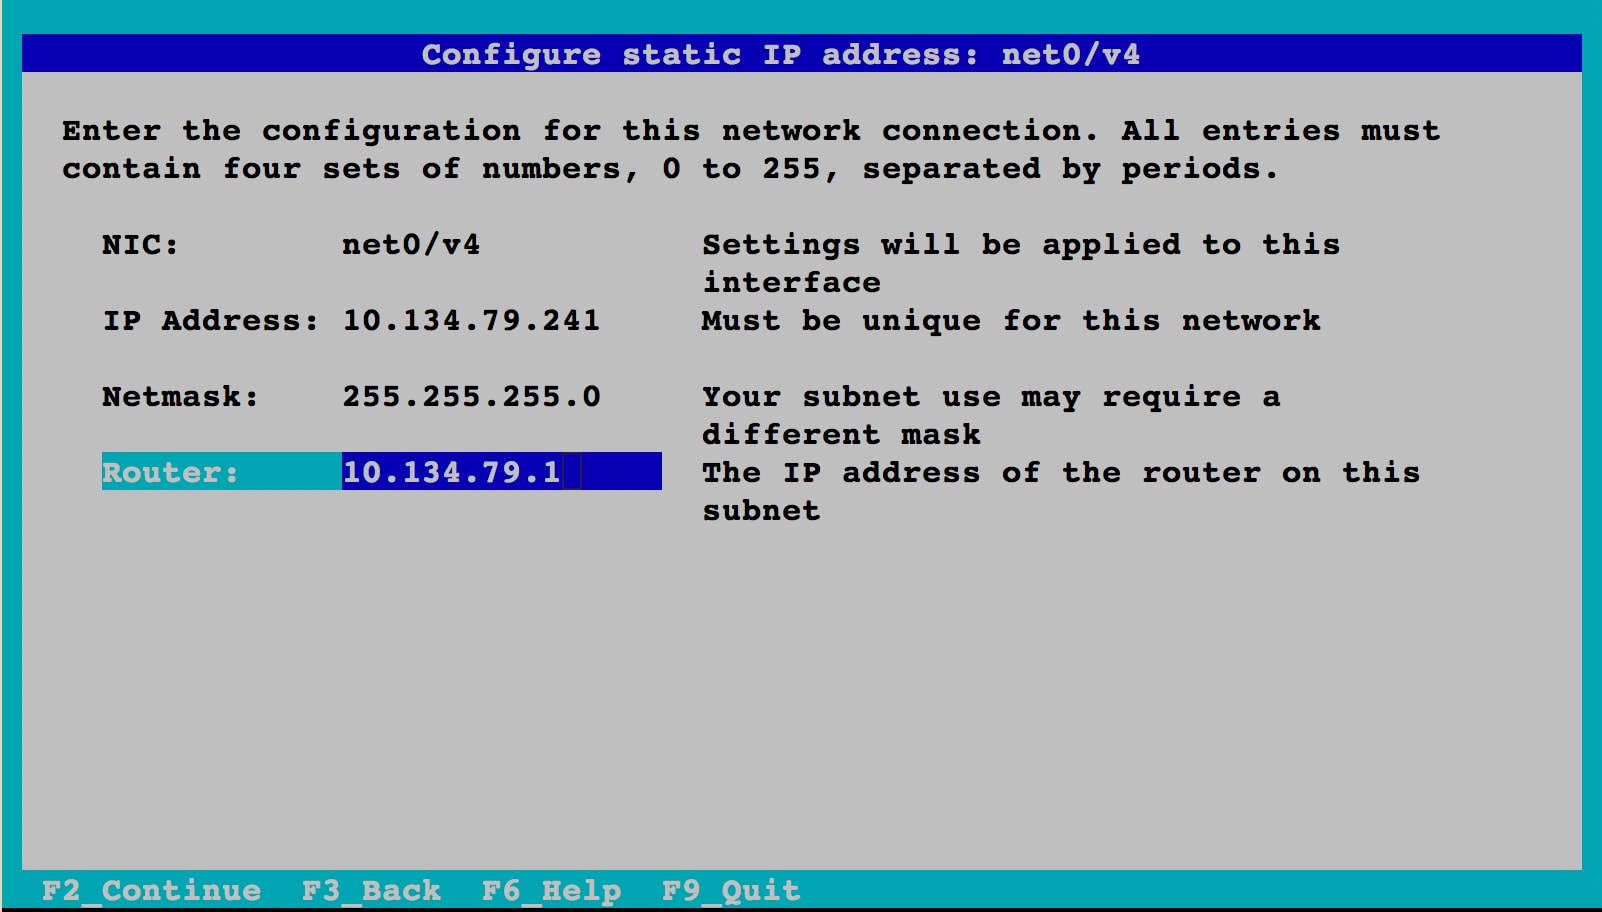
Figure 7. Entering Network Settings
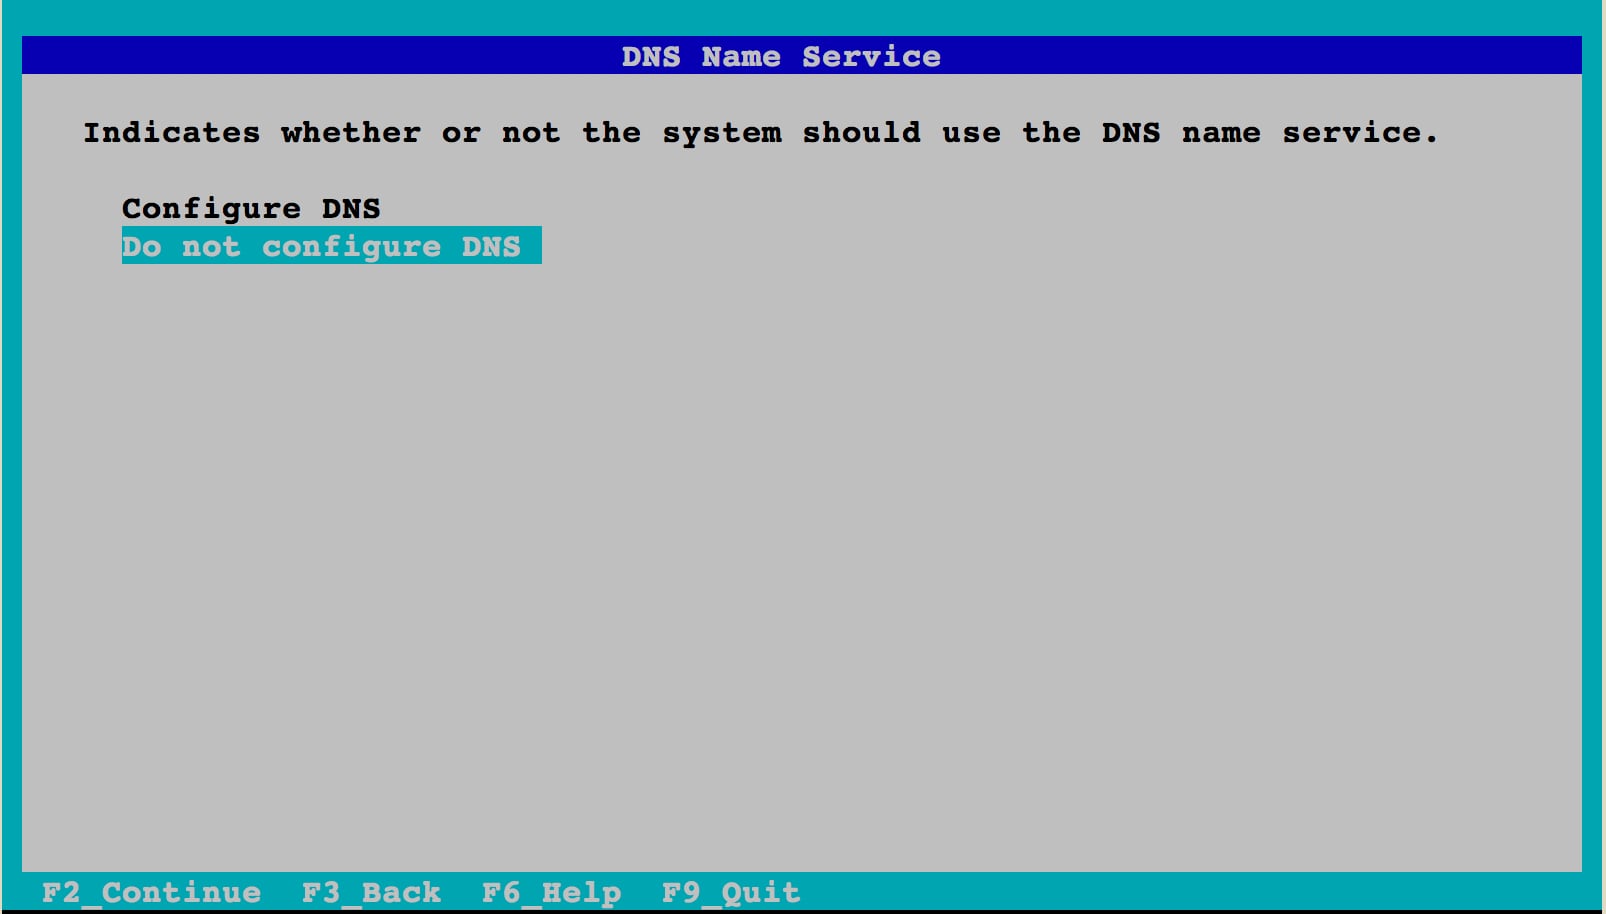
Figure 8. Selecting Not to Configure DNS
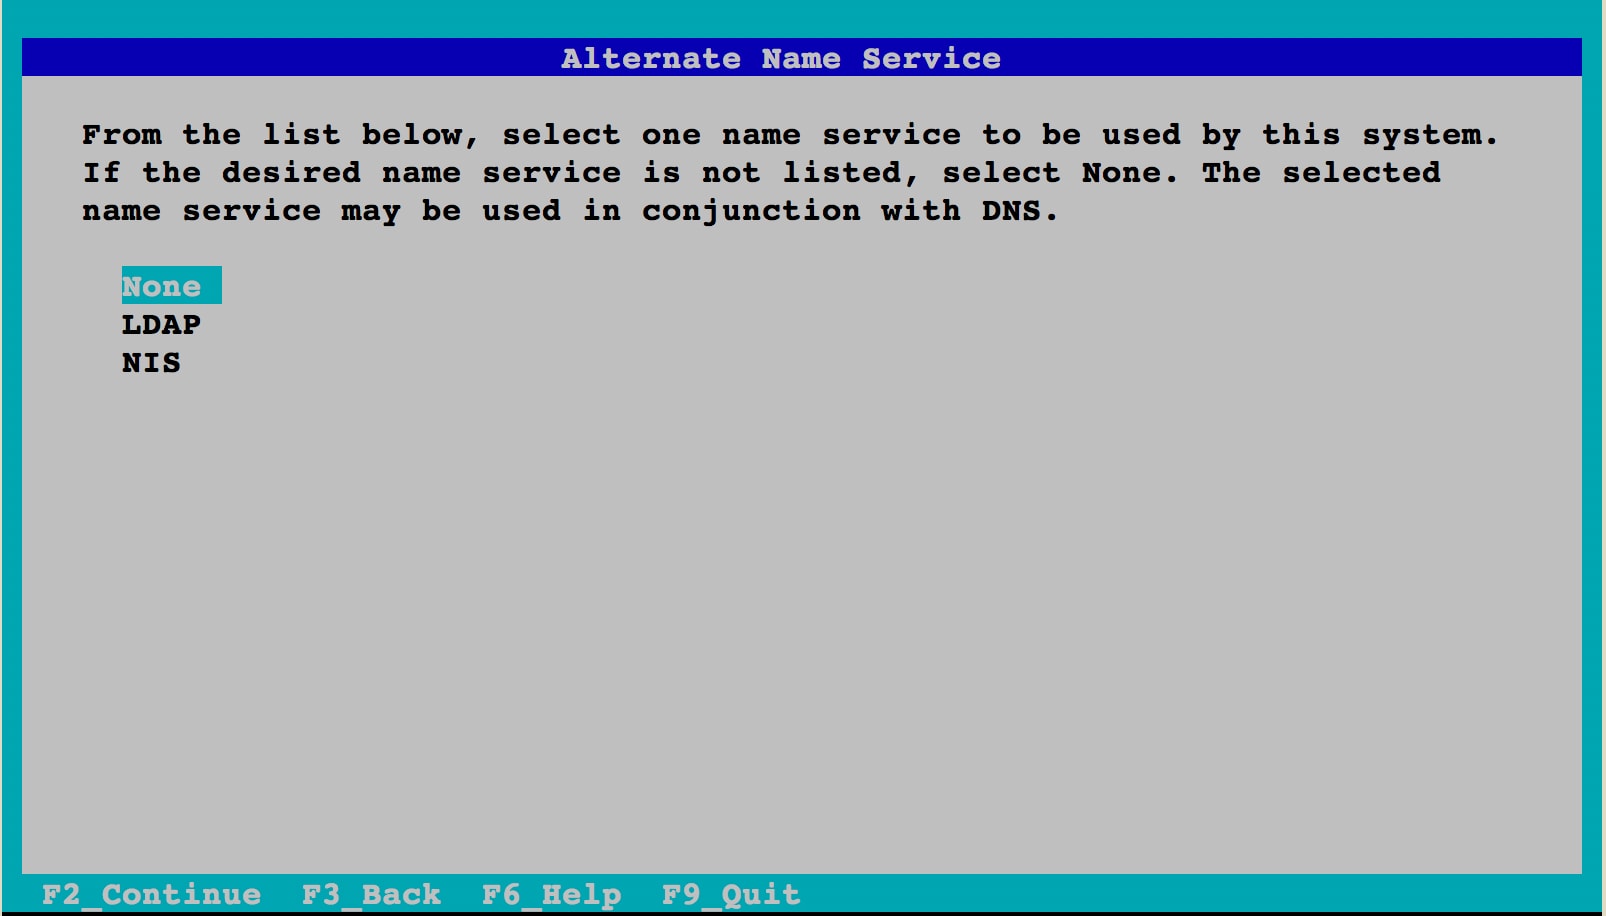
Figure 9. Selecting Not to Set Up a Name Service
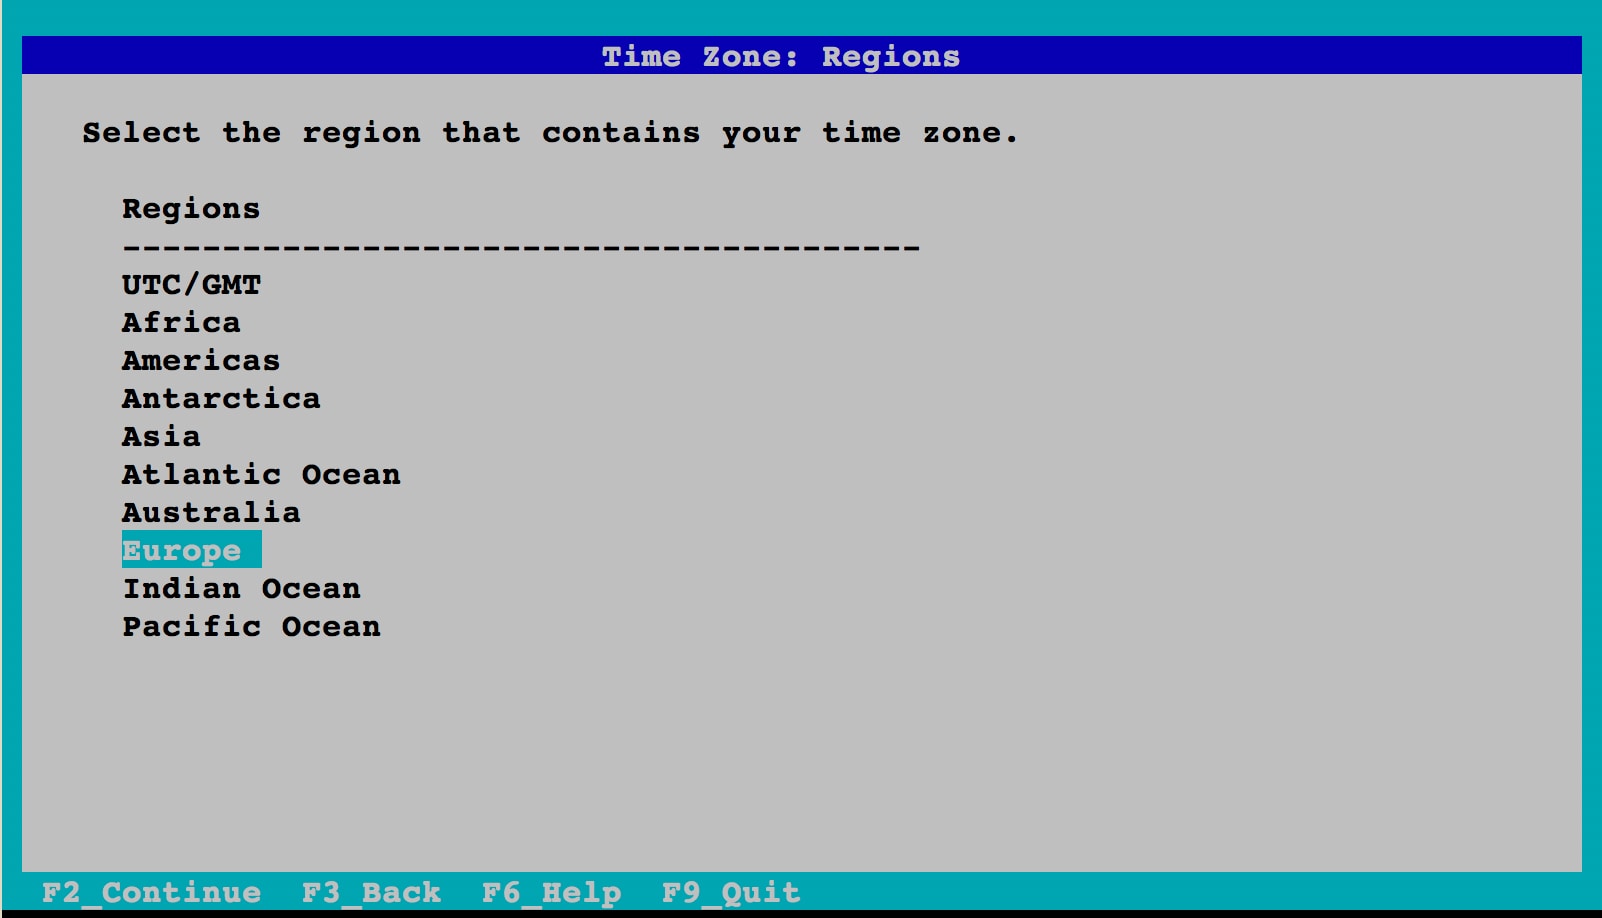
Figure 10. Selecting Time Zone Region
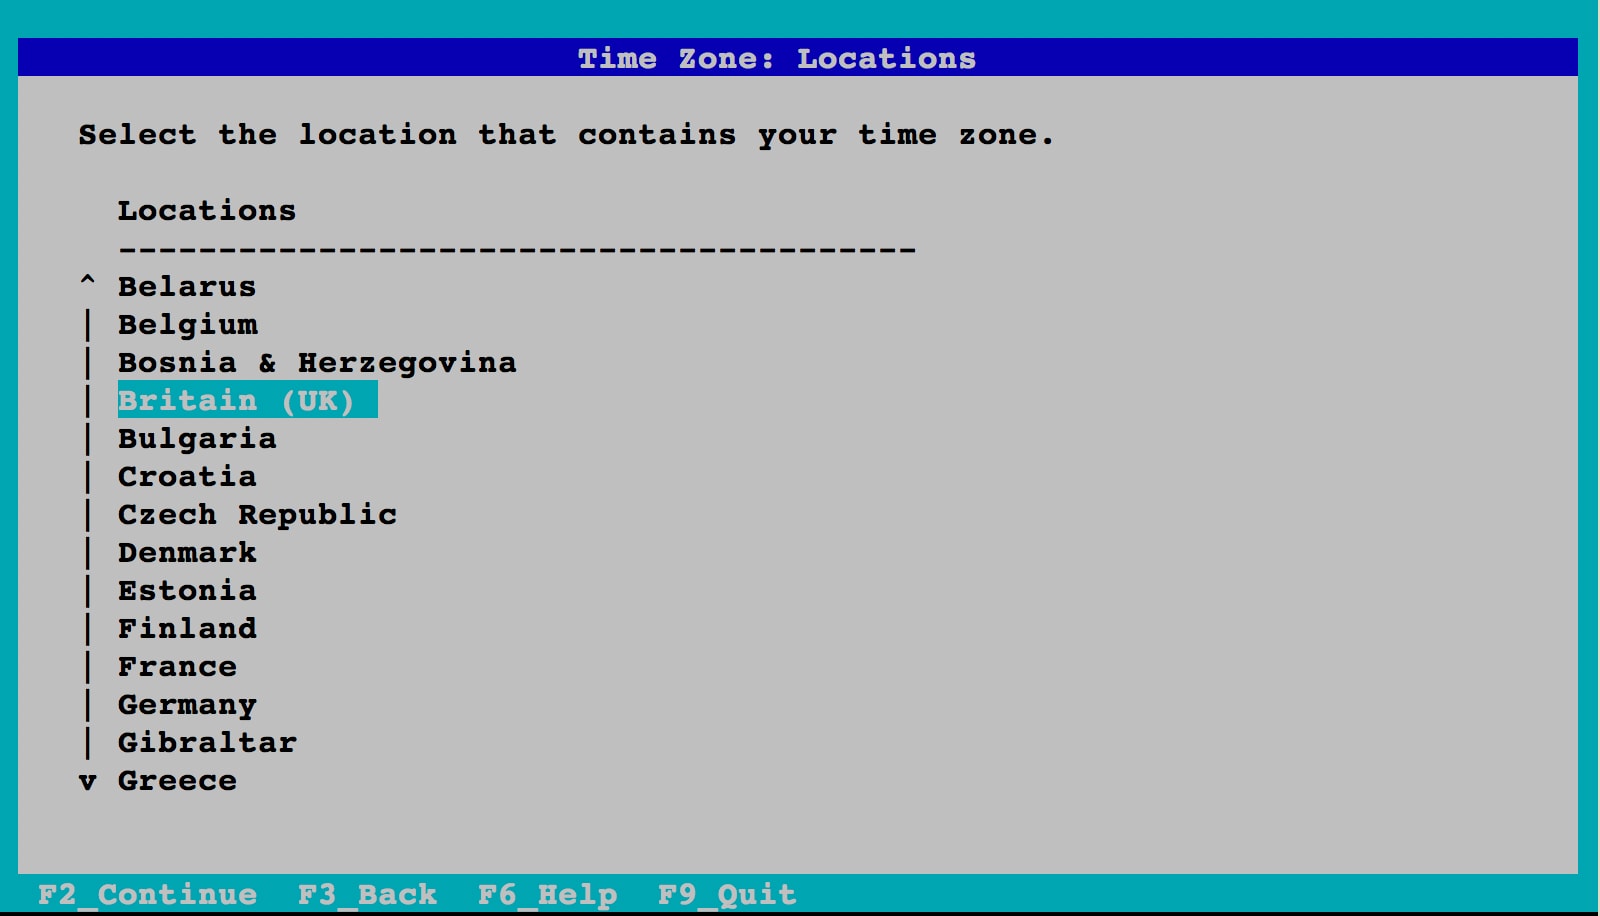
Figure 11. Selecting Location
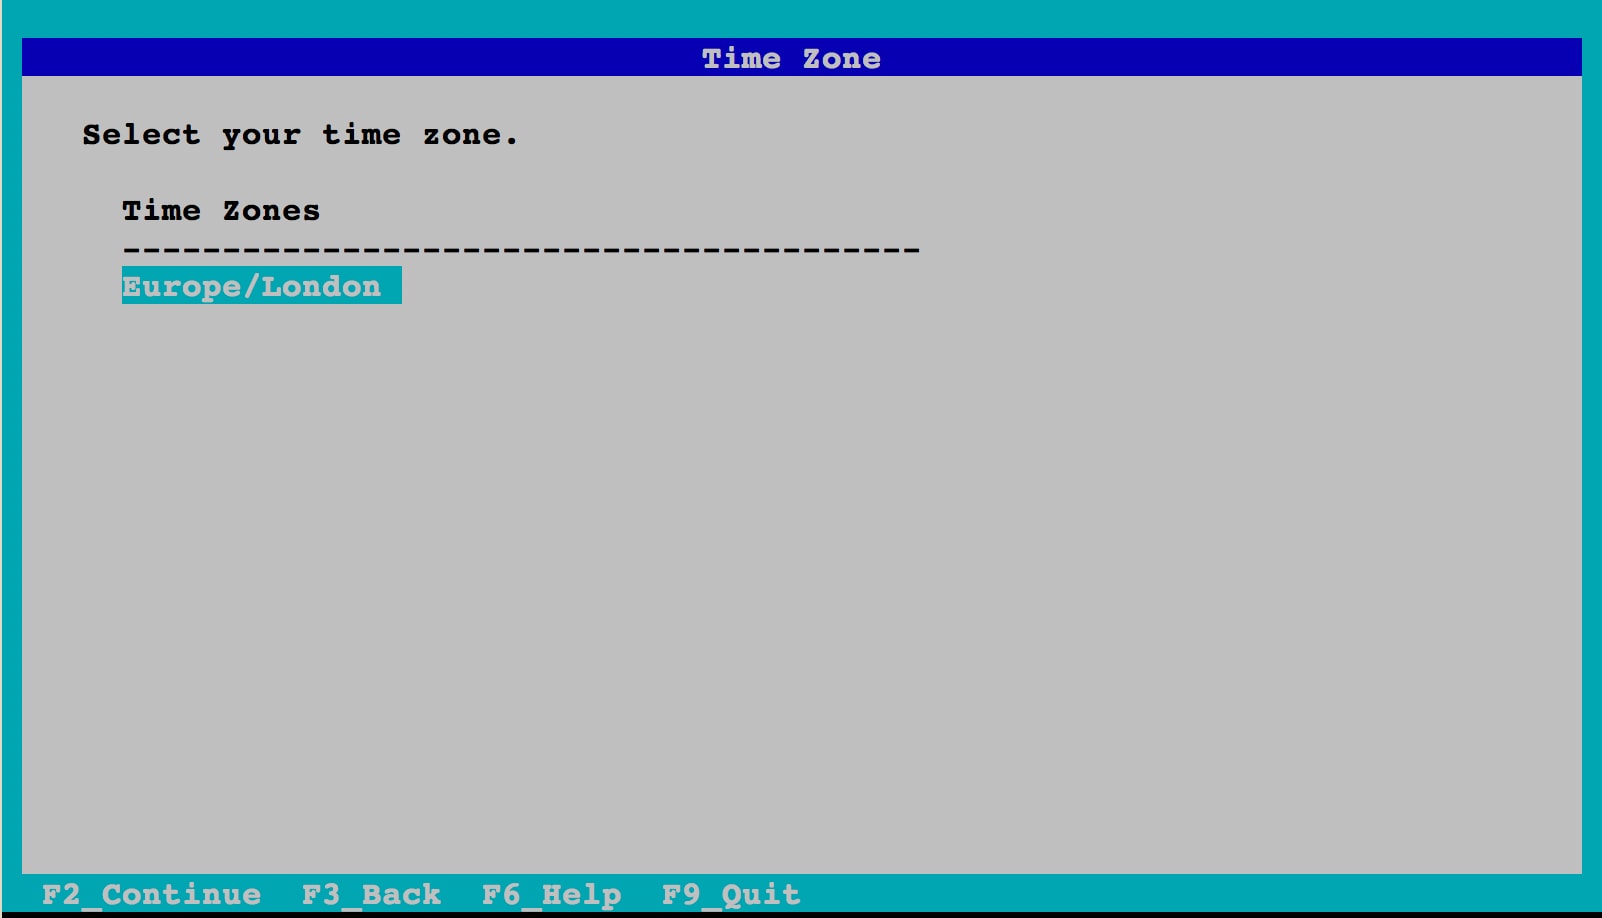
Figure 12. Selecting Time Zone
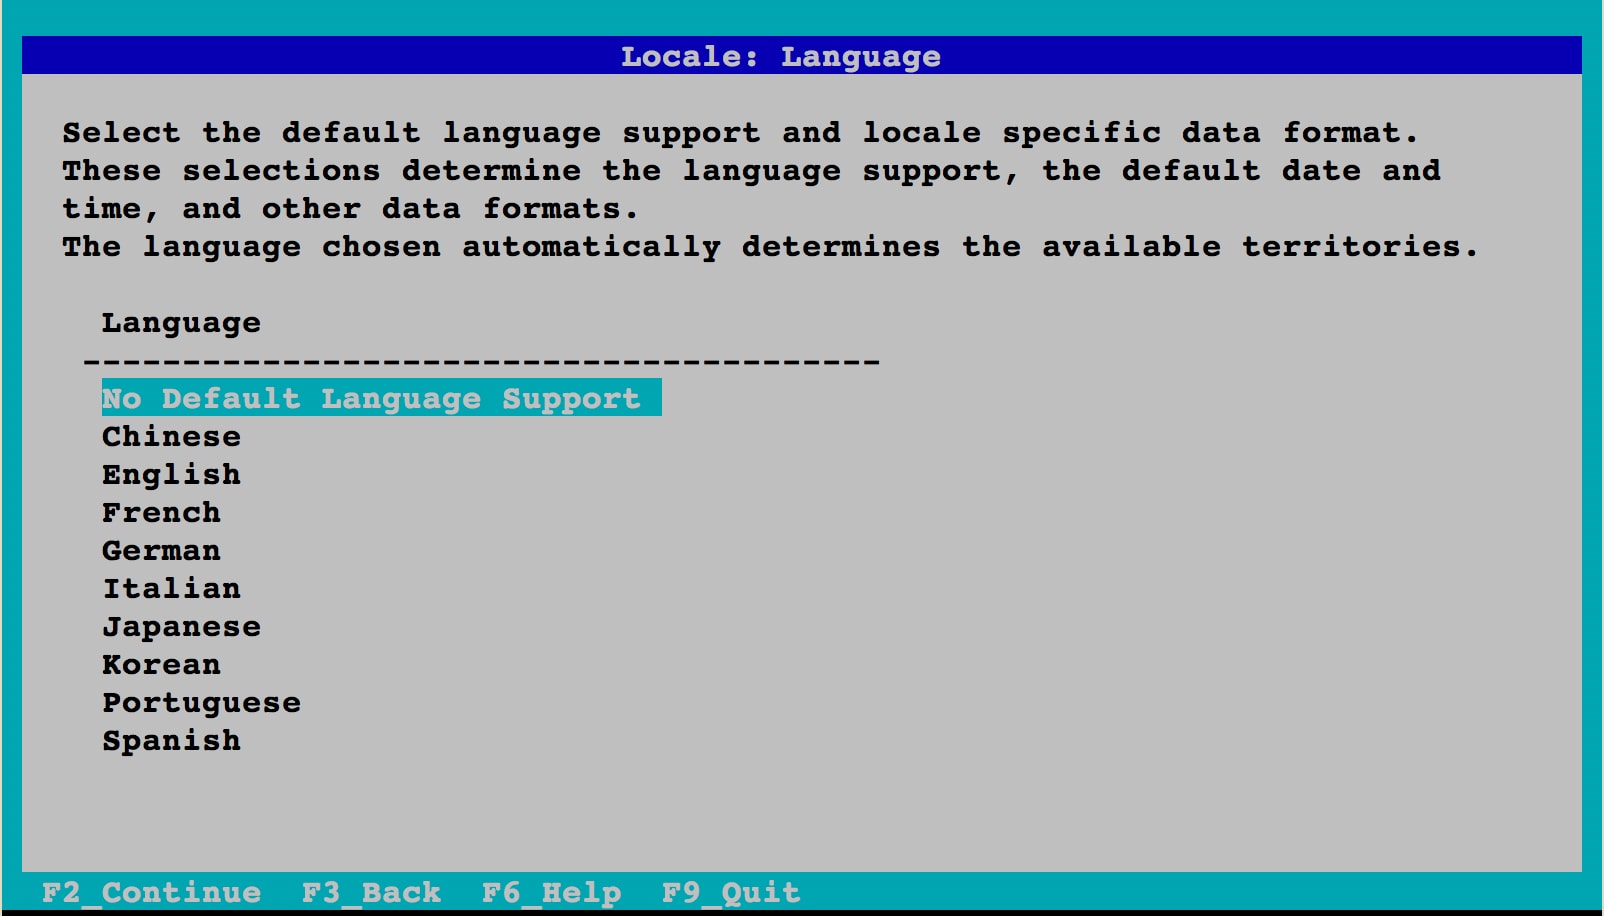
Figure 13. Not Selecting Any Additional Locale
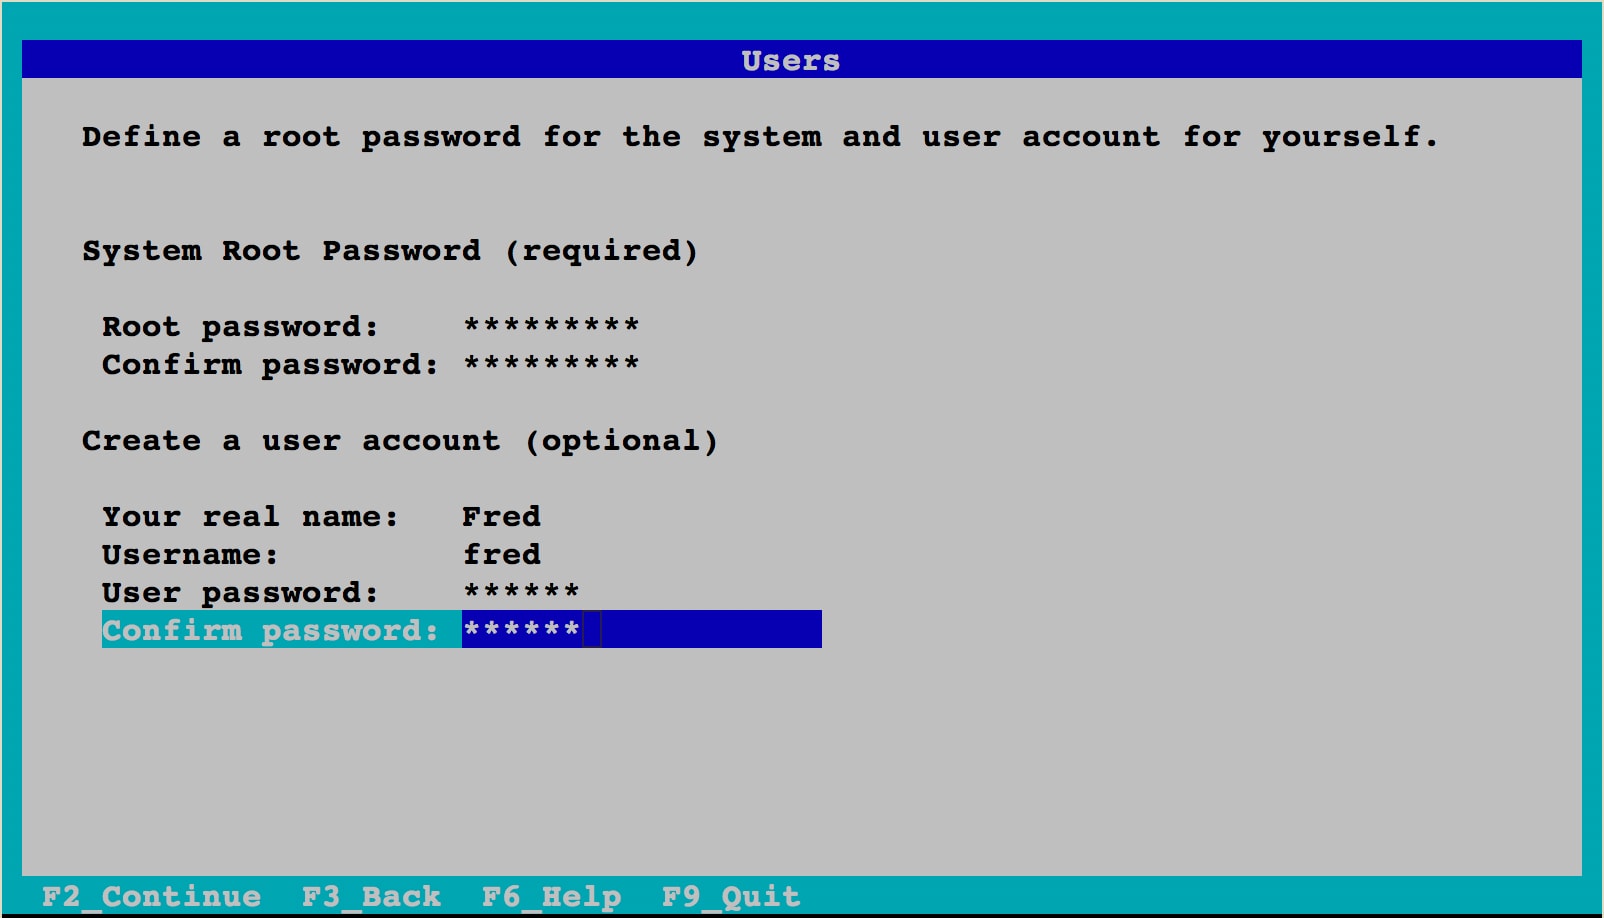
Figure 14. Completing the Configuration
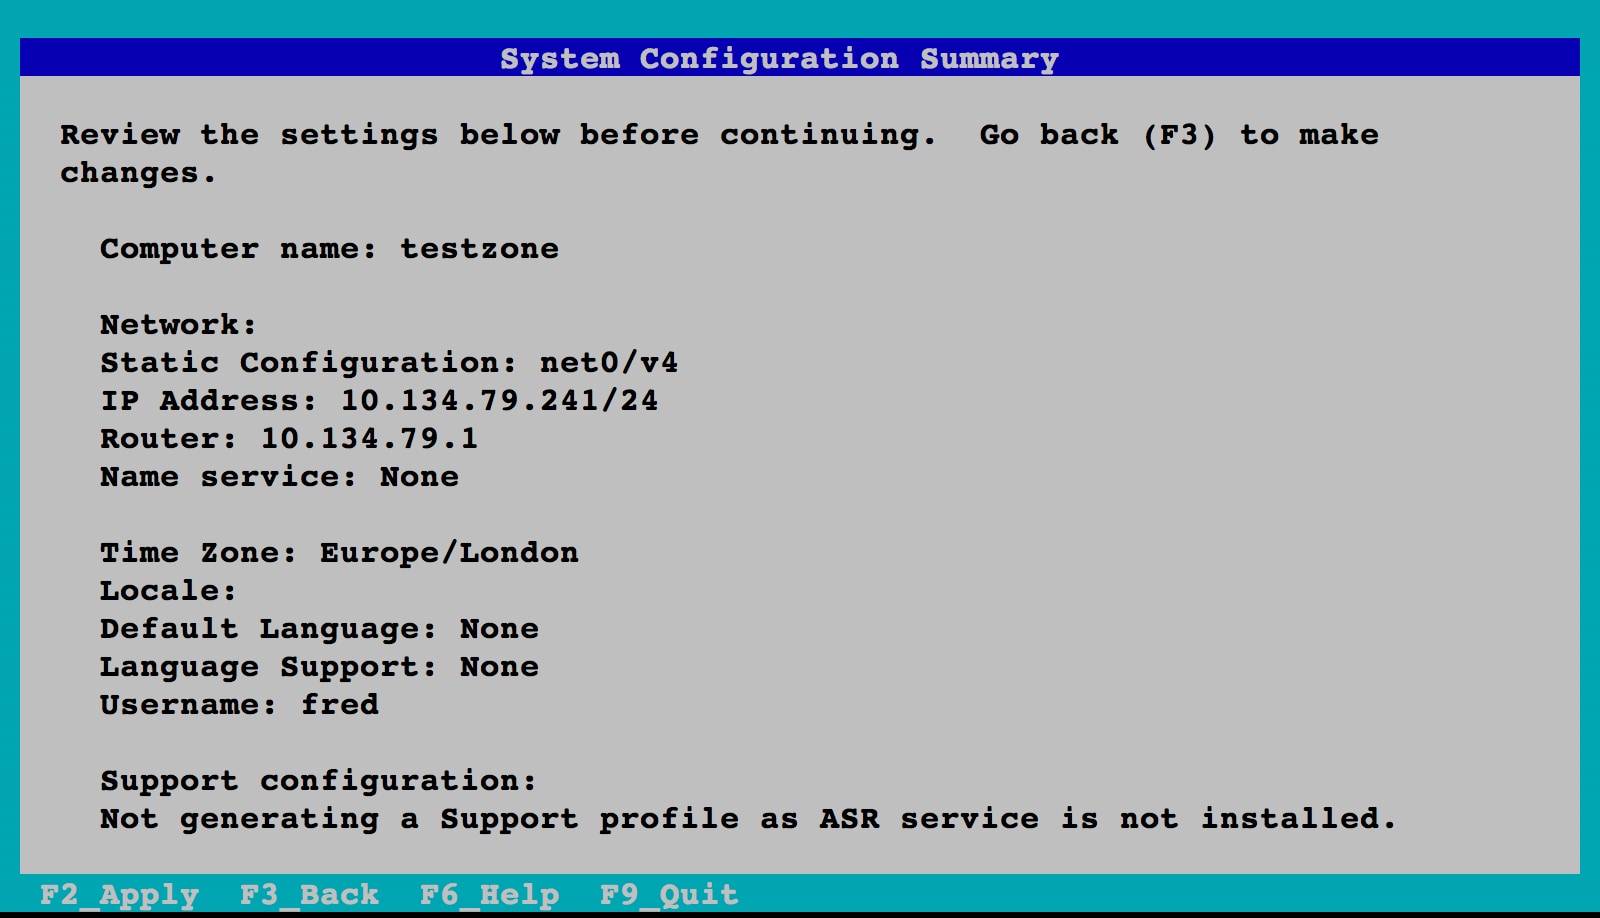
Figure 15. Verifying the Configuration
The zone will continue booting and soon you will see the console login, as shown in Listing 4.
Listing 4: Output from Zone Booting Process
[ system/system-log:default starting (system log) ]
[ network/smtp:sendmail starting (sendmail SMTP mail transfer agent) ]
[ system/kstat2adm:default starting (system/kstat2adm) ]
[ network/sendmail-client:default starting (sendmail SMTP client queue runner) ]
[ system/auditd:default starting (Solaris audit daemon) ]
Jun 28 05:41:26 testzone sendmail[2901]: My unqualified host name (testzone) unknown; sleeping for retry
Jun 28 05:41:26 testzone sendmail[2897]: My unqualified host name (testzone) unknown; sleeping for retry
[ system/console-login:default starting (Console login) ]

testzone console login:
The zone is now ready to be logged into. For this example, we will now exit the console using the "~." escape sequence.
You can check that your zone is booted and running by using the zoneadm(8) command:
root@global:~# zoneadm list -v
  ID NAME             STATUS      PATH                         BRAND      IP
   0 global           running     /                            solaris    shared
   2 testzone         running     /system/zones/testzone       solaris    excl
As promised, a VNIC was automatically created for us when the zone was booted. We can check this by using the dladm(8) command:
root@global:~# dladm show-link
LINK                CLASS     MTU    STATE    OVER
net0                phys      1500   up       --
testzone/net0       vnic      1500   up       net0
We can see the VNIC listed as testzone/net0.
Step 4: Log In to Your Zone
The last step is to log in to your zone and have a look about. You can do this from the global zone using the zlogin command, as shown in Listing 5.
Listing 5: Logging In to Your Zone
root@global:~# zlogin testzone
[Connected to zone 'testzone' pts/2]
Oracle Corporation      SunOS 5.11      Solaris_11/11.4/ON/production.build-11.4-26:2018-06-07  June 2018
root@testzone:~# uname -a
SunOS testzone 5.11 11.4.0.9.0 sun4v sparc sun4v
root@testzone:~# ipadm show-addr
ADDROBJ           TYPE     STATE        ADDR
lo0/v4            static   ok           127.0.0.1/8
net0/v4           static   ok           10.134.79.241/24
lo0/v6            static   ok           ::1/128
net0/v6           addrconf ok           fe80::214:4fff:fefa:a268/10
root@testzone:~# ipadm
NAME              CLASS/TYPE STATE        UNDER      ADDR
lo0               loopback   ok           --         --
   lo0/v4         static     ok           --         127.0.0.1/8
   lo0/v6         static     ok           --         ::1/128
net0              ip         ok           --         --
   net0/v4        static     ok           --         10.134.79.241/24
   net0/v6        addrconf   ok           --         fe80::214:4fff:fefa:a268/10
root@testzone:~# dladm show-link
LINK                CLASS     MTU    STATE    OVER
net0                vnic      1500   up       ?
root@testzone:~# zfs list
NAME                              USED  AVAIL  REFER  MOUNTPOINT
rpool                             925M  63.8G    31K  /rpool
rpool/ROOT                        923M  63.8G    31K  none
rpool/ROOT/solaris                923M  63.8G   808M  /
rpool/ROOT/solaris/var            105M  63.8G   104M  /var
rpool/VARSHARE                   1.65M  63.8G  1.23M  /var/share
rpool/VARSHARE/pkg                 63K  63.8G    32K  /var/share/pkg
rpool/VARSHARE/pkg/repositories    31K  63.8G    31K  /var/share/pkg/repositories
rpool/VARSHARE/sstore             344K  63.8G   344K  /var/share/sstore/repo
rpool/VARSHARE/tmp                 31K  63.8G    31K  /var/tmp
rpool/export                     97.5K  63.8G    32K  /export
rpool/export/home                65.5K  63.8G    32K  /export/home
rpool/export/home/fred           33.5K  63.8G  33.5K  /export/home/fred
root@testzone:~# exit
logout

[Connection to zone 'testzone' pts/2 closed]
Note: We did not use the -C option for the zlogin(1) command, which means we are not accessing the zone via its console. This is why we can simply exit the shell at the end to leave the zone.
Let's look at what we found:
- The
uname(1)command shows that we are running on Oracle Solaris 11. - The
ipadm(8)command shows the IP addresses fortestzone. There are four entries, two loopback devices (IPv4 and IPv6), our IPv4net0device with an IP address of 10.134.79.241, and finally an IPv6net0device. - The
dladm(8)command shows our automatically creatednet0VNIC. - The
zfs listcommand shows us our ZFS data set.
Note: From within testzone, we cannot see any information about the global zone. We can see only the attributes of our own zone.
You have now verified that testzone is up and running. You can give the user logins and passwords to the development team's administrator, allowing that administrator to complete the setup of the team's zone as if it were a single system.
Oracle Solaris Zones and Networking
New in Oracle Solaris 11, Oracle Solaris Zones are now automatically created with an exclusive IP network resource by default. This means that an Oracle Solaris Zone has access to a complete network stack, allowing zone administrators to do such things as set their own IP address and routing.
When we used zonecfg(8) to create testzone (in Step1: Configure an Oracle Solaris Zone) using the default template, a network resource called anet with the following properties was automatically included in the zone configuration:
linknameisnet0lower-linkisautomac-addressisrandomlink-protectionismac-nospoof
We can see this by using the zonecfg (8) command, as shown in Listing 6.
Listing 6: Viewing the Properties of the Network Resource
root@global:~# zonecfg -z testzone info -a
zonename: testzone
zonepath: /system/zones/testzone
brand: solaris
autoboot: true
autoshutdown: shutdown
bootargs: -m verbose
file-mac-profile:
pool:
limitpriv:
scheduling-class:
ip-type: exclusive
hostid:
tenant:
fs-allowed:
anet:
        linkname: net0
        lower-link: auto
        allowed-address:
        configure-allowed-address: true
        defrouter:
        allowed-dhcp-cids:
        link-protection: mac-nospoof
        mac-address: auto
        auto-mac-address:
        mac-prefix:
        mac-slot:
        vlan-id:
        priority:
        rxrings:
        txrings:
        mtu:
        maxbw:
        bwshare:
        rxfanout:
        vsi-typeid:
        vsi-vers:
        vsi-mgrid:
        etsbw-lcl:
        cos:
        pkey:
        linkmode:
        evs:
        vport:
        ring-group: auto
        autopush:
Note : using the -a flag gives the long listing.
Also, you can see that the anet network device has been automatically configured. As discussed earlier, this resource is created and destroyed automatically when the zone is booted and shut down, respectively. You can see this as follows.
First, check the IP address of your global zone:
root@global:~# ipadm
NAME              CLASS/TYPE STATE        UNDER      ADDR
lo0               loopback   ok           --         --
   lo0/v4         static     ok           --         127.0.0.1/8
   lo0/v6         static     ok           --         ::1/128
net0              ip         ok           --         --
   net0/v4        static     ok           --         10.134.79.211/24
   net0/v6        addrconf   ok           --         fe80::214:4fff:fef8:9318/10
Use dladm(8) to look at the data link status:
root@global:~# dladm show-link
LINK                CLASS     MTU    STATE    OVER
net0                phys      1500   up       --
testzone/net0       vnic      1500   up       net0
Note how a VNIC attached to net0 (testzone/net0) has been automatically created for testzone.
Log in to testzone, checking the link status and IP address and then ping the global zone, as shown in Listing 7.
Listing 7: Checking the Link Status and IP Address
root@testzone:~# zlogin testzone
[Connected to zone 'testzone' pts/2]
Oracle Corporation      SunOS 5.11      Solaris_11/11.4/ON/production.build-11.4-26:2018-06-07  June 2018
root@testzone:~# dladm show-link
LINK                CLASS     MTU    STATE    OVER
net0                vnic      1500   up       ?
root@testzone:~# ipadm
NAME              CLASS/TYPE STATE        UNDER      ADDR
lo0               loopback   ok           --         --
   lo0/v4         static     ok           --         127.0.0.1/8
   lo0/v6         static     ok           --         ::1/128
net0              ip         ok           --         --
   net0/v4        static     ok           --         10.134.79.241/24
   net0/v6        addrconf   ok           --         fe80::214:4fff:fefa:a268/10
root@testzone:~# ping 10.134.79.211
10.134.79.211 is alive
root@testzone:~# exit
logout

[Connection to zone 'testzone' pts/2 closed]
Creating webzone-1 and Adding an Application
Now let's create our second zone, webzone-1, for our Web-facing applications and add an application to it.
Step 1: Create webzone-1 with Minimum Information
Again we start by creating webzone-1 using zonecfg(8). However, this time, to demonstrate how quick and easy it is to set up a zone, we will supply the minimum required information, the zonepath:
root@global:~# zonecfg -z webzone-1 "create ; set zonepath=/zones/webzone-1"
You can see the zone configuration by using the zonecfg(8) command, as shown in Listing 8.
Listing 8: Checking the New Zone's Configuration
root@global:~# zonecfg -z webzone-1 info
zonename: webzone-1
brand: solaris
anet:
	linkname: net0
	configure-allowed-address: true
That's it. As far as configuration, we are done.
Step 2: Install webzone-1
Next we install the zone, as shown in Listing 9.
Listing 9: Installing the Zone
root@global:~# zoneadm -z webzone-1 install
The following ZFS file system(s) have been created:
    rpool/VARSHARE/zones/webzone-1
Progress being logged to /var/log/zones/zoneadm.20180628T045833Z.webzone-1.install
       Image: Preparing at /system/zones/webzone-1/root.

 Install Log: /system/volatile/install.3054/install_log
 AI Manifest: /tmp/manifest.xml.IwyDfd
  SC Profile: /usr/share/auto_install/sc_profiles/enable_sci.xml
    Zonename: webzone-1
Installation: Starting ...

        Creating IPS image
Startup linked: 1/1 done
        Installing packages from:
            solaris
                origin:  http://ipkg.us.oracle.com/solaris11.4/dev/
DOWNLOAD                                PKGS         FILES    XFER (MB)   SPEED
Completed                            413/413   63566/63566  435.1/435.1  8.0M/s

PHASE                                          ITEMS
Installing new actions                   87414/87414
Updating package state database                 Done
Updating package cache                           0/0
Updating image state                            Done
Creating fast lookup database                   Done
Updating package cache                           1/1
Installation: Succeeded
 done.

        Done: Installation completed in 206.819 seconds.


  Next Steps: Boot the zone, then log into the zone console (zlogin -C)

              to complete the configuration process.

Log saved in non-global zone as /system/zones/webzone-1/root/var/log/zones/zoneadm.20180628T045833Z.webzone-1.install
Step 3: Boot and Configure webzone-1
Boot webzone-1, log in to the console, and enter the same settings as we did for testzone except for the IP address. Set the IP address to 10.134.79.242.
root@global:~# zoneadm -z webzone-1 boot; zlogin -C webzone-1
[Connected to zone 'webzone-1' console]

...

webzone-1 console login: ~.
[Connection to zone 'webzone-1' console closed]
Refer back to Step 3: Boot and Complete the System Configuration if you are unsure of the steps. At the end, remember to exit from the console using the "~." escape sequence.
Adding an Application to webzone-1
Now that we have a running zone that is connected to the network, we want to put an application in it. In this case, because this is going to be a zone that serves our Web content, let's add the Apache Web server.
From the global zone, log in to webzone-1 and check the status of the Apache Web server package:
root@global:~# zlogin webzone-1
[Connected to zone 'webzone-1' pts/2]
Oracle Corporation	SunOS 5.11	Solaris_11/11.4/ON/production.build-11.4-26:2018-06-07	June 2018
root@webzone-1:~# pkg info /web/server/apache-24
             Name: web/server/apache-24
          Summary: Apache Web Server V2.4
      Description: The Apache HTTP Server Version 2.4
         Category: Web Services/Application and Web Servers
            State: Installed
        Publisher: solaris
          Version: 2.4.33
           Branch: 11.4.0.0.1.9.0
   Packaging Date: Mon Jun 18 18:41:14 2018
Last Install Time: Thu Jun 28 05:01:33 2018
             Size: 29.06 MB
             FMRI: pkg://solaris/web/server/apache-24@2.4.33-11.4.0.0.1.9.0:20180618T184114Z
      Project URL: https://httpd.apache.org/
       Source URL: https://archive.apache.org/dist/httpd/httpd-2.4.33.tar.gz
As you can see the Apache Web server 2.4 package is already installed installed. So we choose to install the Git package instead, for example because you may be putting your website content in Git. First we test if the package is available in the repository by using the -r flag as shown in Listing 10.
Listing 10: Checking for the Git Package
root@webzone-1:~# pkg info -r git
          Name: developer/versioning/git
       Summary: git - Fast Version Control System
   Description: Git is a free & open source, distributed version control system
                designed to handle everything from small to very large projects
                with speed and efficiency.
      Category: Development/Source Code Management
         State: Not installed
     Publisher: solaris
       Version: 2.15.2
        Branch: 11.4.0.0.1.9.0
Packaging Date: Mon Jun 18 17:17:26 2018
          Size: 36.86 MB
          FMRI: pkg://solaris/developer/versioning/git@2.15.2-11.4.0.0.1.9.0:20180618T171726Z
   Project URL: http://git-scm.com/
    Source URL: https://www.kernel.org/pub/software/scm/git/git-2.15.2.tar.xz
The state is shown as Not installed. So let's install the Git package into our zone, as shown in Listing 11.
Listing 11: Installing the Git Package
root@webzone-1:~# pkg install git
           Packages to install:  1
       Create boot environment: No
Create backup boot environment: No

DOWNLOAD                                PKGS         FILES    XFER (MB)   SPEED
Completed                                1/1       359/359    15.5/15.5  3.4M/s

PHASE                                          ITEMS
Installing new actions                       517/517
Updating package state database                 Done
Updating package cache                           0/0
Updating image state                            Done
Creating fast lookup database                   Done
Updating package cache                           1/1
We see that IPS downloads all the related files we need. There is no need to figure out the dependencies. In this case, three packages were installed. We can check the status of the Git package by using the pkg info command again, as shown in Listing 12.
Listing 12: Checking for the Git Package Again
root@webzone-1:~# pkg info git
             Name: developer/versioning/git
          Summary: git - Fast Version Control System
      Description: Git is a free & open source, distributed version control
                   system designed to handle everything from small to very large
                   projects with speed and efficiency.
         Category: Development/Source Code Management
            State: Installed
        Publisher: solaris
          Version: 2.15.2
           Branch: 11.4.0.0.1.9.0
   Packaging Date: Mon Jun 18 17:17:26 2018
Last Install Time: Thu Jun 28 05:11:58 2018
             Size: 36.86 MB
             FMRI: pkg://solaris/developer/versioning/git@2.15.2-11.4.0.0.1.9.0:20180618T171726Z
      Project URL: http://git-scm.com/
       Source URL: https://www.kernel.org/pub/software/scm/git/git-2.15.2.tar.xz
This time, the state is shown as Installed. Congratulations; you have added your first package to a zone.
Creating webzone-2 Using a Clone
Now let's create the final zone, webzone-2. We could just repeat the process that we used to create the other zones, but in this case, we simply want another Web server environment just like webzone-1. Instead of having to duplicate the configuration process, let's make a clone of webzone-1. We are effectively using webzone-1 as a global master for zone creation.
Step 1: Create a Zone System Configuration Template
To avoid having to manually configure the system properties of our cloned zone, let's first create a system ID template for webzone-2. We can do this by using the sysconfig(8) tool from within webzone-1:
root@global:~# zlogin webzone-1
root@webzone-1:~# sysconfig create-profile -o /root/webzone-2-template
Go through the screens entering the correct information for webzone-2 (remember to use 10.134.79.243 as the IP address this time). As in the Step 3: Boot and Complete the System Configuration section, when the configuration has been completed, you will see that your configuration file has been created. Finally, log out back to the global zone.
SC profile successfully generated as:
/root/webzone-2-template/sc_profile.xml

Exiting System Configuration Tool. Log is available at:
/system/volatile/sysconfig/sysconfig.log.4767
root@webzone-1:~# ls webzone-2-template/
sc_profile.xml
root@webzone-1:~# exit
logout

[Connection to zone 'webzone-1' pts/2 closed]
Note: When using the sysconfig(8) tool, you are not allowed to use any existing user names in the user account section. In our case, we could not use the user name fred so we chose jack instead.
We'll copy this file to a more convenient location in a later step.
Step 2: Create the Zone Profile File
From the global zone on our system, we first need to halt webzone-1, the zone we want to clone. (You should not clone a running zone.) We use zoneadm list to verify that the zone is shut down, as shown in Listing 13.
Listing 13: Verifying the Zone is Shut Down
root@global:~# zoneadm list -iv
  ID NAME             STATUS      PATH                         BRAND      IP
   0 global           running     /                            solaris    shared
   2 testzone         running     /system/zones/testzone       solaris    excl
   3 webzone-1        running     /system/zones/webzone-1      solaris    excl
root@global:~# zoneadm -z webzone-1 shutdown
root@global:~# zoneadm list -iv
  ID NAME             STATUS      PATH                         BRAND      IP
   0 global           running     /                            solaris    shared
   2 testzone         running     /system/zones/testzone       solaris    excl
   - webzone-1        installed   /system/zones/webzone-1      solaris    excl
Now let's capture the configuration of the zone and use it as a master profile template for other zones we will create, in this case, webzone-2:
root@global:~# zonecfg -z webzone-1 export -f /zones/webzone-2-profile
Using your favorite editor, make the file read as shown in Listing 14. We have also choose to update autoboot.
Listing 14: Editing the Template
root@global:~# cat /zones/webzone-2-profile
create -b
set brand=solaris
set autoboot=true
add anet
set linkname=net0
set configure-allowed-address=true
end
We now want to place the system configuration template (sc_profile.xml) we created earlier in a more convenient location. Fortunately, you can access a zone's file system while it is shut down:
root@global:~# pwd
/root
root@global:~# cp /system/zones/webzone-1/root/root/webzone-2-template/sc_profile.xml webzone-2-template.xml
root@global:~# ls
webzone-2-profile       webzone-2-template.xml
Step 3: Create webzone-2 by Cloning webzone-1
Next create webzone-2 using the modified configuration (by using zonecfg(8)), and then perform the clone of webzone-1 (by using zoneadm(8)). Remember to add the full path to the system config template. Note how quickly the clone is completed. (We can see this by prepending the time command to our zonecfg clone command.)
 root@global:~# zonecfg -z webzone-2 -f /root/webzone-2-profile
root@global:/zones# time zoneadm -z webzone-2 clone -c /root/webzone-2-template.xml webzone-1
The following ZFS file system(s) have been created:
    rpool/VARSHARE/zones/webzone-2
Progress being logged to /var/log/zones/zoneadm.20180628T064707Z.webzone-2.clone
Log saved in non-global zone as /system/zones/webzone-2/root/var/log/zones/zoneadm.20180628T064707Z.webzone-2.clone

real    0m47.585s
user    0m21.658s
sys     0m2.766s
The cloning of webzone-1 took only 47 seconds (this is much faster on better storage). In addition, because we used the clone command, we took advantage of a ZFS snapshot. Let's check the disk space taken by both webzone-1 and webzone-2, as shown in Listing 15.
Listing 15: Checking Disk Space
root@global:/zones# zfs list | grep webzone
rpool/VARSHARE/zones/webzone-1                                   968M  62.8G    32K  /system/zones/webzone-1
rpool/VARSHARE/zones/webzone-1/rpool                             968M  62.8G    31K  /rpool
rpool/VARSHARE/zones/webzone-1/rpool/ROOT                        965M  62.8G    31K  none
rpool/VARSHARE/zones/webzone-1/rpool/ROOT/solaris                965M  62.8G   829M  /system/zones/webzone-1/root
rpool/VARSHARE/zones/webzone-1/rpool/ROOT/solaris/var            126M  62.8G   104M  /system/zones/webzone-1/root/var
rpool/VARSHARE/zones/webzone-1/rpool/VARSHARE                   2.33M  62.8G  1.23M  /var/share
rpool/VARSHARE/zones/webzone-1/rpool/VARSHARE/pkg                 63K  62.8G    32K  /var/share/pkg
rpool/VARSHARE/zones/webzone-1/rpool/VARSHARE/pkg/repositories    31K  62.8G    31K  /var/share/pkg/repositories
rpool/VARSHARE/zones/webzone-1/rpool/VARSHARE/sstore            1.01M  62.8G  1.01M  /var/share/sstore/repo
rpool/VARSHARE/zones/webzone-1/rpool/VARSHARE/tmp                 31K  62.8G    31K  /var/tmp
rpool/VARSHARE/zones/webzone-1/rpool/export                     97.5K  62.8G    32K  /export
rpool/VARSHARE/zones/webzone-1/rpool/export/home                65.5K  62.8G    32K  /export/home
rpool/VARSHARE/zones/webzone-1/rpool/export/home/fred           33.5K  62.8G  33.5K  /export/home/fred
rpool/VARSHARE/zones/webzone-2                                  21.7M  62.8G    32K  /system/zones/webzone-2
rpool/VARSHARE/zones/webzone-2/rpool                            21.6M  62.8G    31K  /rpool
rpool/VARSHARE/zones/webzone-2/rpool/ROOT                       21.6M  62.8G    31K  none
rpool/VARSHARE/zones/webzone-2/rpool/ROOT/solaris-0             21.6M  62.8G   829M  /system/zones/webzone-2/root
rpool/VARSHARE/zones/webzone-2/rpool/ROOT/solaris-0/var         21.4M  62.8G   104M  /system/zones/webzone-2/root/var
rpool/VARSHARE/zones/webzone-2/rpool/VARSHARE                      5K  62.8G  1.23M  /var/share
rpool/VARSHARE/zones/webzone-2/rpool/VARSHARE/pkg                  2K  62.8G    32K  /var/share/pkg
rpool/VARSHARE/zones/webzone-2/rpool/VARSHARE/pkg/repositories     1K  62.8G    31K  /var/share/pkg/repositories
rpool/VARSHARE/zones/webzone-2/rpool/VARSHARE/sstore               1K  62.8G  1.01M  /var/share/sstore/repo
rpool/VARSHARE/zones/webzone-2/rpool/VARSHARE/tmp                  1K  62.8G    31K  /var/tmp
rpool/VARSHARE/zones/webzone-2/rpool/export                        3K  62.8G    32K  /export
rpool/VARSHARE/zones/webzone-2/rpool/export/home                   2K  62.8G    32K  /export/home
rpool/VARSHARE/zones/webzone-2/rpool/export/home/fred              1K  62.8G  33.5K  /export/home/fred
Even after we added the Git package, webzone-1 is only 968 M. Even better, webzone-2, an exact copy of webzone-1, is only 22 M, providing a great savings on disk space.
Finally, boot webzone-2 and watch the console. Occasionally, you will see the system configuration being applied. You can see below that the host name has been set for us from the template.
root@global:~# zoneadm -z webzone-2 boot; zlogin -C webzone-2
[Connected to zone 'webzone-2' console]
Booting to milestone "svc:/milestone/config:default".
Booting to milestone "all".
Hostname: webzone-2

webzone-2 console login: ~.
[Connection to zone 'webzone-2' console closed]
Remember to exit from the console using the "~." escape sequence.
Note that we now have a .xml template for webzone-2. We could very easily copy and edit this template to allow us to deploy a whole set of other Web zones just as quickly.
Now log in to webzone-2 and look for the Git package, as shown in Listing 16.
Listing 16: Looking for the Git Package
root@global:~# zlogin webzone-2
[Connected to zone 'webzone-2' pts/2]
Last login: Wed Jun 27 23:57:18 2018 on pts/2
Oracle Corporation      SunOS 5.11      Solaris_11/11.4/ON/production.build-11.4-26:2018-06-07  June 2018
root@webzone-2:~# pkg info git
             Name: developer/versioning/git
          Summary: git - Fast Version Control System
      Description: Git is a free & open source, distributed version control
                   system designed to handle everything from small to very large
                   projects with speed and efficiency.
         Category: Development/Source Code Management
            State: Installed
        Publisher: solaris
          Version: 2.15.2
           Branch: 11.4.0.0.1.9.0
   Packaging Date: Mon Jun 18 17:17:26 2018
Last Install Time: Thu Jun 28 05:11:58 2018
             Size: 36.86 MB
             FMRI: pkg://solaris/developer/versioning/git@2.15.2-11.4.0.0.1.9.0:20180618T171726Z
      Project URL: http://git-scm.com/
       Source URL: https://www.kernel.org/pub/software/scm/git/git-2.15.2.tar.xz
As you can see, unlike before, when we created a zone from scratch, the Git package that we had to add to webzone-1 is here already. This cloning method is frequently used when a "master" zone is created with all the additional packages and configuration in place. The master zone is then simply cloned as new, similar environments are required.
We can also check that the IP address was applied correctly:
root@webzone-2:~# ipadm
NAME              CLASS/TYPE STATE        UNDER      ADDR
lo0               loopback   ok           --         --
   lo0/v4         static     ok           --         127.0.0.1/8
   lo0/v6         static     ok           --         ::1/128
net0              ip         ok           --         --
   net0/v4        static     ok           --         10.134.79.243/24
   net0/v6        addrconf   ok           --         fe80::214:4fff:fef8:a975/10
Note: The Oracle Solaris Automated Installer also provides a method for creating ready-made zones as part of the system install service.
Conclusion
In this article, we saw how to create, install, boot, and configure an Oracle Solaris Zone. We also saw how a ZFS data set is automatically created and how the networking is set up automatically for you. Finally, we saw how to add an application to an Oracle Solaris zone using IPS and then clone that zone.
For More Information
Here are some additional resources:
- Download Oracle Solaris 11
- Access Oracle Solaris 11 product documentation
- Access all Oracle Solaris 11 how-to guides
- Learn more with Oracle Solaris 11 training and support
- See Creating and Using Oracle Solaris Zones
- See "Introducing the Basics of Image Packaging System (IPS) on Oracle Solaris 11"
- See "How to Configure Oracle Solaris 11 Using the
sysconfigCommand"
- Revision 1.1, 07/16/2018
- Revision 1.0, 11/03/2011