Build Your Own Oracle Extended RAC Cluster on Oracle VM and Oracle Enterprise Linux
by Jakub Wartak
Updated October 2008
How to create a cheap but fully functional Oracle Extended RAC implementation in a virtualized environment.
The information in this guide is not validated by Oracle, is not supported by Oracle, and should only be used at your own risk; it is for educational purposes only.
Contents
- Introduction
- Software Prerequisites
- Oracle VM Server Installation
- Oracle VM Manager Installation
- Setting up Virtual Machines (VMs)
- Preparating for Oracle Software Installation
- Oracle Clusterware Installation
- Oracle Database Software Installation
- Testing Failover Capabilities
- Troubleshooting and Miscellaneous
- Next Steps
- Acknowledgments
This guide is inspired by and based on the outstanding guide " Build Your Own Oracle RAC 11g Cluster on Oracle Enterprise Linux and iSCSI " by Oracle ACE Jeffrey Hunter, with his permission. If you are in doubt about installing Oracle RAC on Linux it is advisable that you read his guide; some prior experience with Oracle RAC is assumed here.
1. Introduction
A typical Oracle Real Application Clusters (RAC) deployment is an architecture that provides fast recovery from a single or multiple-node failures. But in a typical scenario, all nodes of Oracle RAC are located in a single data center and thus prone to catastrophic data center failure. The solution for achieving disaster recovery in this scenario is to set up Oracle DataGuard between the local data center and some backup data center where standby systems are running (typically a single Oracle database or another RAC cluster).
Although DataGuard plays this role very well, it turns the whole standby system(s) and array(s) into passive nodes—wherein computing power can't be used for transactions—and thus heavily increases the price of the solution. (Although standby Oracle DataGuard systems can be opened for read-only queries, and can even run in read-only mode all the time with Active DataGuard in Oracle Database 11g, in this configuration it requires applications to be aware of the read-only nature of some nodes.)
Fortunately there is another solution for achieving (partial) disaster recovery, called Extended RAC or Stretched RAC. In this architecture some of the RAC nodes work at “site Alpha”, and the rest of the nodes work at “site Beta”. Nodes at both sites are active, so all computing resources are fully utilized. As shown in Figure 1, each site has its own Storage Area Network (SAN); systems present at both data centers (dcA and dcB) are members of the same, single RAC cluster and thus must be able to exchange data over the interconnect very quickly as well as access the other site's storage. (That is, node RAC1 at dcA writes to SAN array at dcB and also communicates with RAC2 node at dcB).

Figure 1
In this guide, you will create a cheap but fully functional implementation of Oracle Extended RAC for strictly educational purposes on a single PC x86 64-bit system using virtualization provided by Oracle VM 2.1. (See Figure 2 for a detailed topology.) The main constraining factor - latency (Oracle RAC is sensitive to latency on the interconnect and to I/O latencies during reads or writes) - will be artificially imposed on interconnect and storage Ethernet traffic using Linux's Quality of Source for IP network facilities.
Extended RAC could also cut down costs and/or bring much more availability to the enterprise's applications if the one of the following requisites are matched:
- Two datacenters/buildings/server-rooms are already directly connected by very low-latency/high-speed network (or even better, there is already storage infrastructure in those locations).
- Business is willing to pay the price for availability of its systems (RAC has shorter failover time than Data Guard).
Also notice theoretically that in Extended RAC, the storage array doesn't have to be the most reliable on the planet because its outage doesn't stop the cluster from servicing requests.
In the configuration described in this guide Oracle Database 11g Release 1 (in RAC configuration) will be running on top of two Oracle Enterprise Linux 5.1 systems. Storage for Oracle RAC nodes will be provided by two iSCSI storage servers running on OpenFiler. This configuration will also utilize features provided by Oracle Automatic Storage Management (ASM), a host/database based mirroring feature of Oracle Database 10g and later.
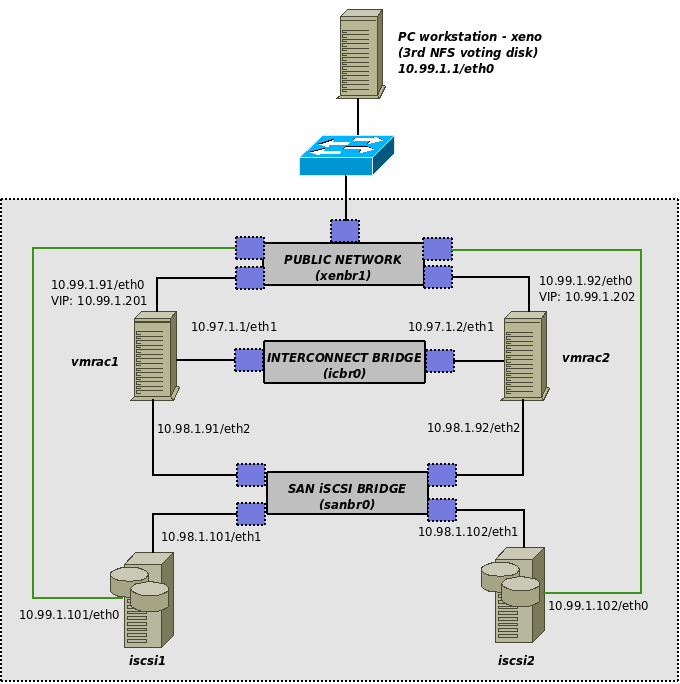
Figure 2
Ideally Extended RAC should be implemented using real hardware to achieve better performance, but since this architecture is for research and training purposes only, this compromise is acceptable. Oracle VM Server requires only a single computer, but for installing Oracle VM Manager—a simple Web console for managing virtualized systems—we will need another PC.
As of this writing, Fibre Channel Protocol (FCP) is still the preferred storage choice; however, Oracle introduced support for NFS shared storage for datafiles in Oracle Database 11g along with performance enhancements like Oracle Direct NFS. Due to the nature of this installation we will stick with the simpler iSCSI approach as our storage option to keep the real-world FCP concept intact. Note that in an Extended RAC scenario, you must put a third voting disk in a location other than dcA and dcB to achieve a completely fault-tolerant architecture.
Note that the disk mirroring configuration in this guide is inadequate for real-world scenarios; there is also no I/O multipathing or redundant interconnect. And while this guide provides detailed instructions for a successful installation of a complete Oracle RAC 11g evaluation system, it is by no means a substitute for the official Oracle documentation. In addition to this guide, users should also consult the following Oracle documents to fully understand alternative configuration options, installation, and administration with Oracle RAC 11g.
- Oracle Clusterware Installation Guide - 11g Release 1 (11.1) for Linux
- Oracle Clusterware Administration and Deployment Guide - 11g Release 1 (11.1)
- Oracle Real Application Clusters Installation Guide - 11g Release 1 (11.1) for Linux and UNIX
- Oracle Database 2 Day + Real Application Clusters Guide - 11g Release 1 (11.1)
- Oracle Database Storage Administrator's Guide - 11g Release 1 (11.1)
This installation of Oracle VM was performed on:
- Intel QuadCore Q6600 2.4GHz (4 cores)
- 8GB DDR2 RAM
- 3x160GB SATAII 7200 RPM hard disks
- DVD reader
Oracle VM Manager was installed on a workstation (running CentOS 5.0; I could have installed Oracle Enterprise Linux 5, but to save time, I used a CentOS install I already have):
- AMD Sempron 3000+ (single core)
- 1.5GB DDR RAM
- 250GB SATA hard disk
- DVD writer
Before we get started, I cannot emphasize this enough: This guide is intended for educational purposes only; production deployments will not be supported, nor should they be considered. Oracle Support will not respond to problems encountered while following this guide.
2. Software Prerequisites
In order to build Extended RAC you need to download the following software; detailed instructions follow:
- Oracle VM Server 2.1, Oracle VM Manager 2.1, and Oracle Enterprise Linux 5.1 Update 1 "Small" Oracle VM Template (PV_x86_64) (this guide has not been tested with Oracle VM 2.1.2)
Oracle VM Server 2.1 and Oracle VM Manager 2.1
Both products are free of charge. After registering you should select Oracle VM in Select a Product Pack and x86 64 bit in Product architecture, then select Go. Mark Oracle VM 2.1 Media Pack and click Continue. Now you should be presented with:
- Oracle VM server 2.1 (304MB)
- Oracle VM manager 2.1 (534MB)
Download those two into prior prepared download directory. After unzip-ing those two *.zip files you should be presented with two ISO files ready to burn to CDs with your favorite CD burning software:
- OracleVM-Server-2.1.iso
- OracleVM-Manager-2.1.iso
(Hint: You don't have to burn OracleVM-Manager-2.1.iso to install it on a workstation if you downloaded those ISOs on it and plan to install on it also. You can use the following command on Linux to have loopback mounted CD on /mnt/cdrom):
mount -o loop,ro OracleVM-Manager-2.1.iso /mnt/cdrom"
Oracle Enterprise Linux 5.1 Update 1 "Small" Template (PV_x86_64)
You will not install Linux systems from scratch here using installation media CDs or DVDs, but instead use Oracle-provided VM Linux templates. A VM Linux Template is a binary file that is a disk image of the whole system ready to run. As the environment provided by Oracle VM is generic, you don't have to perform installation per system to ensure it has drivers but rather clone every Linux instance from the template and launch it. Oracle provides templates pre-configured for Oracle Database.
After signing in and accepting the agreement select Oracle VM Templates from the Product Pack picklist, x86_64 from the Platform picklist, and click Go. Click on the Oracle VM Templates for Oracle Enterprise Linux 5 Media Pack for x86_64 (64 bit) link and then choose to download Oracle Enterprise Linux 5 Update 2 template - PV Small x86_64 (64 bit).
The main difference between Paravirtualized (PV) and Hardware Virtualized (HVM) systems is the nature of interaction between Linux's kernel and Oracle VM Server's kernel (Xen hypervisor). HVM systems are standard x86 or x86_64 systems without special hooks to utilize Xen's power and they can run on standard PCs (without Xen). On the other hand, PV systems are aware of the fact of being run on Xen and instead of talking to hardware they talk directly to Xen - which doesn't have to emulate real hardware as it is the case with HVM.
Oracle Database 11g and Clusterware for Linux x86 64-bit
The filenames of the required downloads are:
- linux.x64_11gR1_database.zip
- linux.x64_11gR1_clusterware.zip
OpenFiler 2.2 for Xen 64-bit
After reaching the download page look for openfiler-2.2-x86.img.gz (~160MB). We are using version 2.2 here; however, I also advise you to check out version 2.3, which adds nice features such as LUN mapping for iSCSI snapshots and iSCSI dynamic volume resizing (not tested for use in this guide however).
3. Oracle VM Server Installation
After burning the Oracle VM Server bootable CD put it into a PC where you have enough CPU and RAM to handle running several Linux instances without swapping. Follow the instructions to install Oracle VM:
- After presented with the boot screen entitled "Oracle VM Server" press <ENTER> to start the installation process.
- Next you can choose to test CD media before installing. The preferred choice here is OK to avoid aborting installation process due to damaged/badly burned CD.
- In the language selection window select English and press OK to continue. Next, choose the keyboard model or accept the default.
- You can access a partitioning dialog to delete old partitions, if you like. (They can contain old data, so be careful). As we want to gain maximum performance from homemade equipment you will create a RAID0 array consisting of three disks. As the GRUB boot loader can't boot from RAID0, you will have to create a dedicated boot partition:
-
- Erase all partitions from all disks
- Create small 256MB/boot partition with ext3 filesystem on sda (first SATA disk). It will contain kernel and initrd image required to boot VM Server hypervisor. Ensure that it will get a x86 primary partition by selecting "Force to be primary partition" while creating it. It should be named sda1.
- Create a swap partition on sda sized 1GB or so. (Note: As Oracle VM dom0 is by default configured to use maximum 512MB of memory, and there are no heavy applications there, there is no point in throwing several GB of storage just for swap purposes. Dom0 is only responsible by default for performing real I/O and handling hardware stuff. However each domU [real VMs] requires individual swap space sized for its needs.)
- On sda create "software RAID partition" with the Fill all available space option checked; it should be named sda3.
- On sdb create "software RAID partition" with the Fill all available space option checked; it should be named sdb1.
- On sdc create "software RAID partition" with the Fill all available space option checked; it should be named sdc1.
- If you have more disks, you can create a RAID partition on them to further improve storage performance.
- Click on the RAID button to create a software RAID array. Choose RAID0 and select all software RAID partitions you want to participate in this array (in this scenario: sda3, sdb1, sdc1). Ensure that filesystem is "ext3" and mount point is "/". (Note: the default RAID0 stripe is 256kB. This can't be changed while creating a software RAID array using Oracle VM installer – however, if you like you can try switching to a second virtual console by pressing Alt-F2, unmounting the old array, and recreating the RAID array using mdadm before installation. Beware, I haven't tested this myself!)
- Accept changes, and click on the OK button to save partition changes.
- On the next screen you have to choose where to install the boot loader (GRUB). Place it on MBR (Master Boot Record).
- Now you will have to decide which Ethernet interface will be used as the management interface. In our case it is "eth0" (first detected Ethernet PCI network card). After selecting the network card you will have to setup the right IP address:
-
- Select only "Enable IPv4 support" and "Activate on boot" options.
- Configure IP address by entering it into "IPv4" field, in this scenario it was "10.99.1.2". Don't forget to put right prefix/netmask (eg. "24" for "255.255.255.0")
- Accept configuration by clicking OK.
- You will be asked for IPv4 gateway and DNS name servers, e.g. "10.99.1.1".
- In the Hostname Configuration select manual mode and enter some descriptive hostname for this server -- e.g. "quadovm".
- After configuring networking you'll be asked for:
-
- Time zone (select appropriate for you).
- Oracle VM Agent password - this is important; it will be used by Oracle VM Manager to manage Oracle VM Server (so, keep it secret).
- Root password - this is important too, it's the main administrative password for Oracle VM Server.
Now you will have to wait until installation process finishes. The CD tray should self-eject. After rebooting you will be presented with Oracle VM Server. You can login to it as root user from:
- Direct console or KVM
- Your workstation via SSH by using: ssh -l root 10.99.1.2. (Note: Oracle VM Server makes only 512MB RAM available to Xen's dom0 domain, even if your system has much more RAM than that. This is correct behavior and the remaining available memory will be used for guest Virtual Machines. Real memory available can be checked by running:
[root@quadovm ~]# xm info | grep mem
total_memory : 8182
free_memory : 7537
[root@quadovm ~]#
4. Oracle VM Manager Installation
Oracle VM Manager installation is pretty straightforward. With the mounted ISO CD for Oracle VM Manager launch the installer program:
[root@xeno ~]# cd /mnt/cdrom
[root@xeno cdrom]# sh runInstaller.sh
[..]
Welcome to Oracle VM Manager
Select “1” here and installation will continue. Be sure to have about 2GB of free space just for Oracle VM Manager on your workstation. Installation is pretty simple:
Starting Oracle VM Manager  installation ...
Checking the supported platforms ... Done
Checking the prerequisite packages are installed ... Done

Checking the available disk space ... Done

Installing the oracle-xe-univ package (rpm) ... Done

Oracle Database 10g Express Edition Configuration ------------------------------------------------- This will configure on-boot properties of Oracle Database 10g  Express Edition.  The following  questions will determine whether the database should be starting upon system boot, the ports it will use, and the  passwords that will be used for database accounts.
Press <Enter> to accept the defaults. Ctrl-C will abort.
Specify the HTTP port that will be used for Oracle Application  Express [8080]: We chose the default tomcat 8080 port, but you can always pick  any other port in this case. Specify a port that will be used for the database listener  [1521]:
<ENTER>
Specify a password to be used for database accounts.  Note that the same password will be used for SYS and SYSTEM.  Oracle recommends the use of different passwords for each database account.  This can be done after initial configuration: Confirm the password: Here we pick an unbreakable password. Do you want Oracle Database 10g Express Edition to be started on  boot (y/n) [y]:
<ENTER>
Starting Oracle Net Listener...Done Configuring Database...Done Starting Oracle Database 10g Express Edition Instance...Done Installation Completed Successfully. To access the Database Home Page go to  http://127.0.0.1:8080/apex


Installing the ovs-manager package (rpm) ... Done

Set default schema to 'OVS'. Please enter the password for OVS:
<ENTER PASSWORD  HERE> Please re-enter the password for OVS:
<ENTER PASSWORD  HERE> Again, we pick a secret password for the VM Manager schema. Creating the Oracle VM Manager database schema ...Done
Installing the oc4j package (rpm) ... Done The default password for oc4jadmin is oracle. You can change the default password after the installation  completes. To access the OC4J Home Page and change the password go to  http://127.0.0.1:8888/em Starting OC4J ... Done OC4J logfiles can be found in /var/log/ovm-manager/oc4j.log.

Deploying Oracle VM Manager application to OC4J container. Please enter the password for oc4jadmin:
oracle Please enter the Oracle Net Listener Port , default is [1521] ?
<ENTER> Creating connection pool ...

Deploying Oracle VM Manager application to OC4J container. Please enter the password for oc4jadmin:  Please enter the Oracle Net Listener Port , default is [1521] ?
<ENTER> Creating connection pool ... Done Creating data source ... Done Deploying application ... Done Deploying application help ... Done Configuring Oracle VM Manager  DataCollector ... Done

Configuring SMTP server ...  Please enter the outgoing mail server (SMTP) hostname:
localhost Setting the SMTP hostname server to localhost ...  Done

Configuring e-mail address for Oracle VM Manager account  'admin'... Please enter an e-mail address for the admin account :
localuser
Substitute “localuser” with your local username for mail delivery purposes. As directed, go to http://127.0.0.1:8888/OVS to access Oracle VM Manager. After rebooting Oracle VM Manager can be started and stopped with /etc/init.d/oracle-xe and then /etc/init.d/oc4j scripts.
5. Setting up Virtual Machines
First you must register our Oracle VM Server (quadvm) in Oracle VM Manager as master of the new “spool”, a logical autonomous region that contains one or more physical servers.
Go to Servers Pools tab, then to Create Server Pool, and enter information about the quadvm Oracle VM Server (make it Server Pool Master, Virtual Machine Server, and also Utility Master) also pick an intuitive name for spool, e.g. spool1.
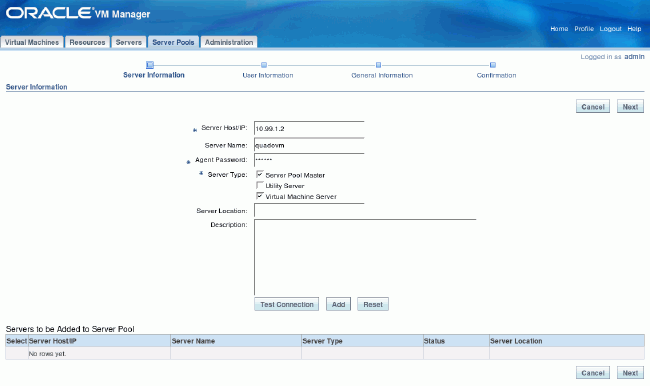
Figure 3
On next screen, select the “admin” user.

Figure 4
Check everything and confirm creation of new spool.

Figure 5
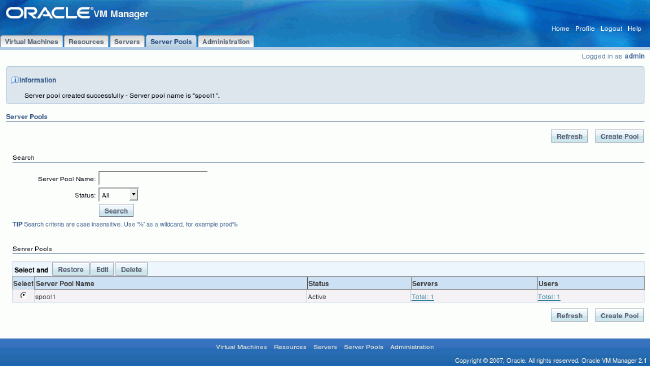
Figure 6
Creating Virtual Machines
As stated previously, virtualization allows you to clone systems by copying template images. Here's how.
Uploading templates
First you have to transfer your VM template and OpenFiler to your VM Server:
[vnull@xeno OracleVM]$
                                 scp -r  OVM_EL5U1_X86_64_PVM_4GB root@10.99.1.2:/root/
root@10.99.1.2's password:
vm.cfg                                                       100%  318      0.3KB/s   00:00
system.img                                                   100%  6144MB   8.8MB/s   11:41
README                                                       100%  158      0.2KB/s   00:00
[vnull@xeno OracleVM]$ cd ~/ISO
[vnull@xeno ISO]$
                                 scp openfiler-2.2-x86_64.img.gz  root@10.99.1.2:/root
root@10.99.1.2's password:
openfiler-2.2-x86_64.img.gz                                  100%   175MB  10.9MB/s   00:16
[vnull@xeno ISO]$
Then you have to move the VM template to its special directory where it can be later auto-detected by VM Server subagent:
[root@quadovm ~]#
                                 ls -al  OVM_EL5U1_X86_64_PVM_4GB/
total 6297632
drwxr-xr-x 2 root root       4096 May  6 14:04 .
drwxr-x--- 4 root root       4096 May  6 13:52 ..
-rw-r--r-- 1 root root        158 May  6 14:04 README
-rwxr-xr-x 1 root root 6442450945 May  6 14:04 system.img
-rw-r--r-- 1 root root        318 May  6 13:52 vm.cfg
[root@quadovm ~]#
                                 mv OVM_EL5U1_X86_64_PVM_4GB /OVS/seed_pool/
[root@quadovm ~]#
Go to Resources, press Import. Select Internal Virtual Machine Template.
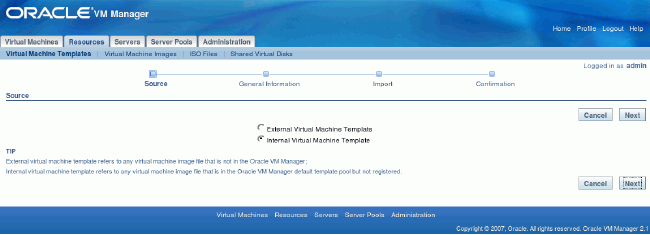
Figure 7
Describe template details (template name OVM_EL5U1_X86_64_PVM_4GB should be autodected if it is not, please logout and login again):
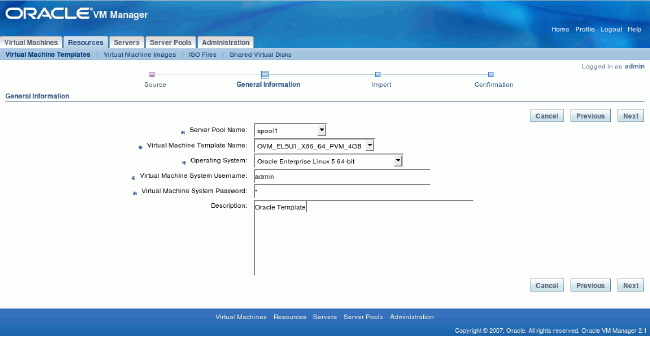
Figure 8
Confirm import action:
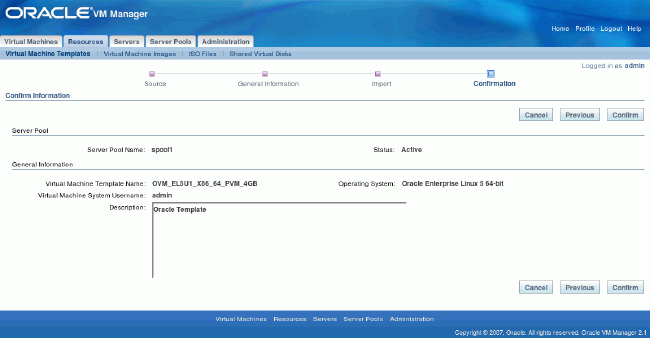
Figure 9
Template should be visible, now just select it and click on the Approve button.
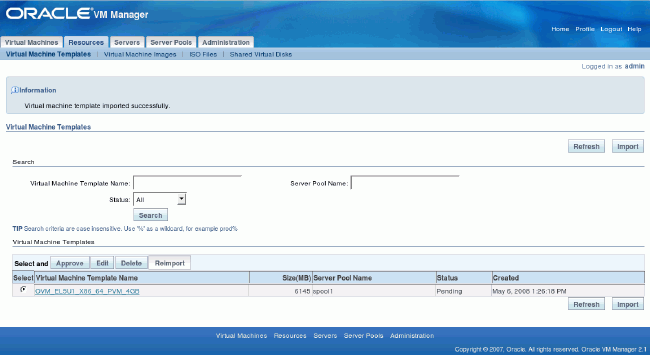
Figure 10
Creating RAC VMs Based on OEL Template
Logout and Login again, go to Virtual Machines -> Create Virtual Machine, select Create Virtual Machine based on Virtual Machine template.
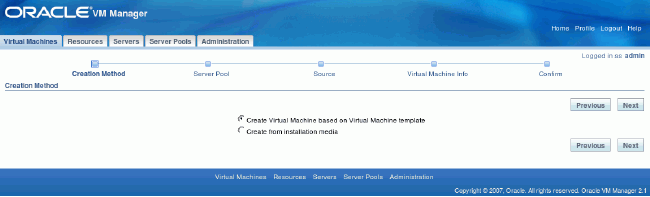
Figure 11
Select your “spool1” server pool.
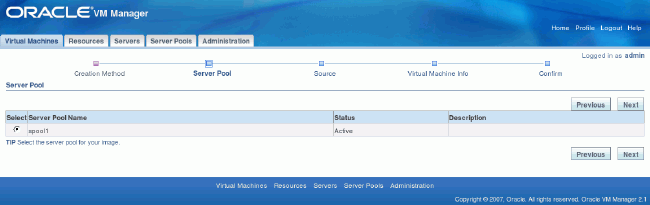
Figure 12
In the Source tab, select our freshly added template (should be just one).
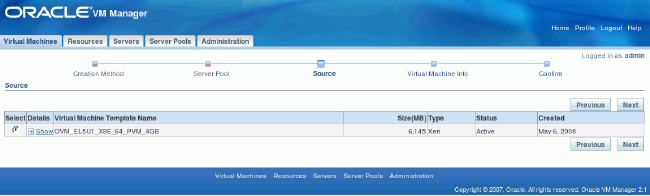
Figure 13
In the Virtual Machine Info tab, enter the desired VM name (here: rac1), its password, and just one interface.
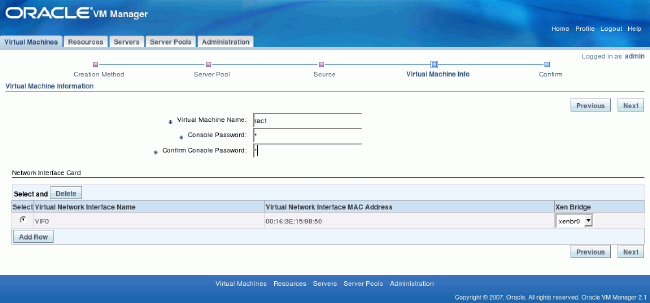
Figure 14
Double check everything at the summary screen and click Confirm.
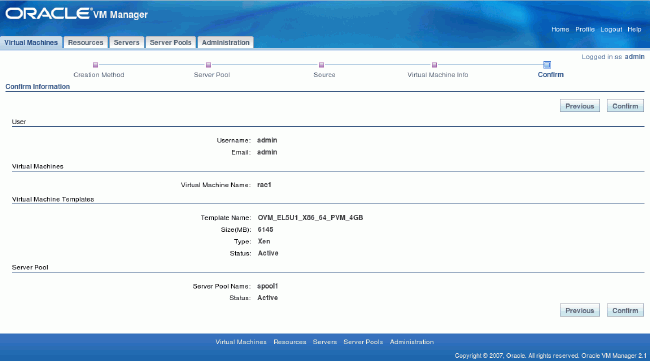
Figure 15
At main the Virtual Machines screen your fresh rac1 VM should be visible with state Creating. Oracle VM is now copying the template to the new system.

Figure 16
Repeat this step for “rac2” node. At this stage you should have two Linux systems ready for Oracle RAC installation. Next, you should customize them by reconfiguring for more memory and space for Oracle software installation.
Go to Virtual Machines, click on “rac1” or “rac2”. At General Information go to Edit. Change RAM from 1,024MB to 2,048MB.

Figure 17
Go to Virtual Disk tab, click on Create New Virtual Disk. Here you specify your needed space on additional disk to the system one. Values used:
Virtual Disk Name: oracle_software
Virtual Disk Size (MB): 8,192
After creation the status screen of Virtual Disks should specify that 8GB disk has been created.
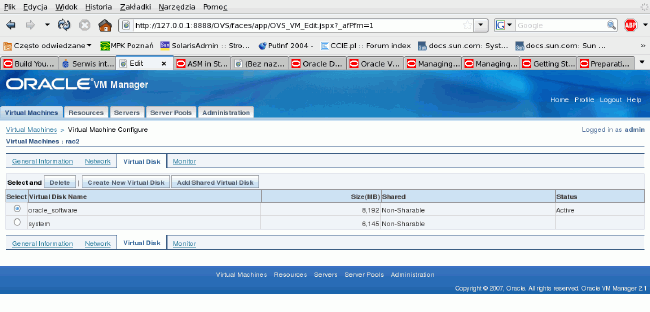
Figure 18
Creating OpenFiler VMs
Now you will create iSCSI storage appliances (OpenFiler). This step must be performed manually without Oracle VM Manager and thus OpenFilers won't be managed by VM Manager Console.
[root@quadovm ~]#
                                 cd /OVS/running_pool/
[root@quadovm running_pool]#
                                 ls
132_rac1   134_rac2
[root@quadovm running_pool]#
                                 mkdir 60_iscsi1  62_iscsi2
[root@quadovm running_pool]#
                                 gzip -d  /root/openfiler-2.2-x86_64.img.gz
[root@quadovm running_pool]#
                                 cp  /root/openfiler-2.2-x86_64.img 60_iscsi1/
[root@quadovm running_pool]#
                                 cp /root/openfiler-2.2-x86_64.img  62_iscsi2/
As you saw earlier, the OpenFiler Xen appliance is downloadable as a single image file, but Xen needs a kernel and initrd image to boot a virtual machine -- and they are inside the image file. In order to solve this chicken-and-egg problem, you have to extract initrd and the kernel image from the supplied image, skipping the first 512 bytes of it (MBR – Master Boot Record) in dom0. Then you will loopback-mount the internal filesystem and copy the needed parts:
[root@quadovm running_pool]#
                                 losetup  -o 512 /dev/loop4 /root/openfiler-2.2-x86_64.img
[root@quadovm running_pool]#
                                 mount -o ro /dev/loop4 /mnt
[root@quadovm running_pool]#
                                 cp /mnt/boot/initrd*  /mnt/boot/vmlinuz* 60_iscsi1/
[root@quadovm running_pool]#
                                 cp /mnt/boot/initrd*  /mnt/boot/vmlinuz* 62_iscsi2/
[root@quadovm running_pool]#
                                 umount /mnt
[root@quadovm running_pool]#
                                 losetup  -d /dev/loop4
As you have prepared the system, kernel, and initrd images, you now need dedicated disk to store your iSCSI LUNs. This can be simply achieved by creating zero-padded big files that then will be used by the OpenFiler VMs as real disks:
[root@quadovm running_pool]#
                                 dd  if=/dev/zero of=60_iscsi1/volume1.img bs=1M count=12000
12000+0 records in
12000+0 records out
12582912000 bytes (13 GB) copied, 83.3836 seconds, 151 MB/s
[root@quadovm running_pool]#
[root@quadovm running_pool]#
                                 dd if=/dev/zero  of=62_iscsi2/volume1.img bs=1M count=12000
12000+0 records in
12000+0 records out
12582912000 bytes (13 GB) copied, 88.5499 seconds, 142 MB/s
[root@quadovm running_pool]#
Now you're missing just one step: creating Xen configuration files. (Please make sure that you perform this step twice using a second SSH session, replacing 60_iscsi1 with 62_iscsi2 where appropriate.):
[root@quadovm running_pool]#
cd  60_iscsi1
[root@quadovm 60_iscsi1]#
cat > vm.cfg
name = "iscsi1"
kernel =  "/OVS/running_pool/60_iscsi1/vmlinuz-2.6.16.29-0.11.smp.gcc3.4.x86_64.xen.domU"
ramdisk =  "/OVS/running_pool/60_iscsi1/initrd-2.6.16.29-0.11.smp.gcc3.4.x86_64.xen.domU.img"
disk = [
'tap:aio:/OVS/running_pool/60_iscsi1/openfiler-2.2-x86_64.img,xvda,w',
'tap:aio:/OVS/running_pool/60_iscsi1/volume1.img,xvdb,w'
]
root = "/dev/xvda1 ro"
vif = ['bridge=xenbr0','bridge=sanbr0']

memory = 768
<CTRL+D>
[root@quadovm 60_iscsi1]#
xm create -c vm.cfg
Using config file "./vm.cfg".
Started domain iscsi1
Bootdata ok (command line is root=/dev/xvda1 ro )
Linux version 2.6.16.29-0.11.smp.gcc3.4.x86_64.xen.domU
(conary.rpath.com@rpl:1-xen) (gcc version 3.4.4) #1 SMP Wed Dec 6 02:05:30 EST  2006
[..]
Registering block device major 202
xvda: xvda1
xvdb: unknown partition  table
[..]
Welcome  to Openfiler NAS/SAN Appliance 2.2
Press 'I'  to enter interactive startup.
[..many errors please ignore  them..]
From the above you can see several things:
- OpenFiler sees its system disk as xvdaand your new disk (not yet initialized with partitions) as xvdb .
- You configured the first Ethernet interface to connect to the xenbr0 bridge and the second one to sanbr0.
- You gave OpenFiler as much as 768MB RAM.
Now start up SAN and interconnect networking for VMs. A detailed discussion about why these are needed is explained in the "Reconfiguring RAC VMs for Extended RAC" section.
[root@quadovm ~]# brctl addbr sanbr0
[root@quadovm ~]# brctl addbr ibr0
[root@quadovm ~]# ip link set dev sanbr0 up
[root@quadovm ~]# ip link set dev ibr0 up
Configuring Virtual Machines
As supplied Xen images are not pre-configured. you have to perform this step on your own. Login as root into the iscsi1 and then reconfigure networking for a fresh OpenFiler iscsi1 VM template. First set up /etc/hosts, /etc/resolv.conf, and sysconfig Ethernet configuration files. Finally, restart all networking to bring your new settings up without a VM restart.
Openfiler NAS/SAN Appliance
Powered by rPath Linux
To administer this appliance, please use a web browser
from another system to navigate to

For further information and commercial support, please visit
http://www.openfiler.com

localhost login:
 root
[root@localhost ~]#
 cd /etc
[root@localhost etc]#
 echo -e "10.99.1.101\tiscsi1">> hosts
[root@localhost sysconfig]#
 cd sysconfig
[root@localhost sysconfig]#
 cat > network
 NETWORKING=yes
                                  GATEWAY=10.99.1.1
                                 HOSTNAME=iscsi1
 <CTRL+D>
[root@localhost sysconfig]#
 cat >network-scripts/ifcfg-eth0
                                     DEVICE=eth0
                                     BOOTPROTO=none
                                     ONBOOT=yes
                                     TYPE=Ethernet
                                     USERCTL=no
                                     IPV6INIT=no
                                     NETMASK=255.255.255.0
                                     IPADDR=10.99.1.101
 <CTRL+D>
[root@localhost sysconfig]#
 cat >network-scripts/ifcfg-eth1
                                    DEVICE=eth1
                                    BOOTPROTO=none
                                    ONBOOT=yes
                                    TYPE=Ethernet
                                    USERCTL=no
                                    IPV6INIT=no
                                    NETMASK=255.255.255.0
                                    IPADDR=10.98.1.101
                                    MTU=9000
 <CTRL+D>
[root@localhost sysconfig]#
 echo "nameserver 10.99.1.1" > /etc/resolv.conf
[root@localhost sysconfig]#
 service network restart
Shutting down interface eth0: [  OK  ]
Shutting down interface eth1: [  OK  ]
Shutting down loopback interface:  [  OK  ]
Bringing up loopback interface  : [  OK  ]
Bringing up interface eth0: [  OK  ]
Bringing up interface eth1: [  OK  ]
[root@localhost sysconfig]#
Verify IP addresses on interfaces:
[root@localhost sysconfig]#
 ip  a ls
1: lo: <LOOPBACK,UP> mtu 16436 qdisc noqueue
    link/loopback  00:00:00:00:00:00 brd 00:00:00:00:00:00
    inet 127.0.0.1/8  scope host lo
    inet6 ::1/128 scope  host
       valid_lft forever  preferred_lft forever
2: eth0: <BROADCAST,MULTICAST,UP> mtu 1500 qdisc  pfifo_fast qlen 1000
    link/ether  00:16:3e:14:53:73 brd ff:ff:ff:ff:ff:ff
    inet
 10.99.1.101/24 brd 10.99.1.255 scope global eth0
    inet6  fe80::216:3eff:fe14:5373/64 scope link
       valid_lft forever  preferred_lft forever
3: eth1: <BROADCAST,MULTICAST,UP> mtu 1500 qdisc  pfifo_fast qlen 1000
    link/ether  00:16:3e:68:4f:c7 brd ff:ff:ff:ff:ff:ff
    inet
 10.98.1.101/24 brd 10.98.1.255 scope global eth1
    inet6  fe80::216:3eff:fe68:4fc7/64 scope link
       valid_lft forever  preferred_lft forever
4: sit0: <NOARP> mtu 1480 qdisc noop
    link/sit 0.0.0.0 brd  0.0.0.0
[root@localhost sysconfig]#
[root@localhost sysconfig]#
 ip ro ls | grep ^default
default via
 10.99.1.1 dev eth0
[root@localhost sysconfig]#
[root@localhost sysconfig]#
 ping -c 1 iscsi1
PING iscsi1 (10.99.1.101) 56(84) bytes of data.
64 bytes from iscsi1 (10.99.1.101): icmp_seq=0 ttl=64 time=0.019  ms

--- iscsi1 ping statistics ---
 1 packets transmitted, 1 received, 0% packet loss, time 0ms
rtt min/avg/max/mdev = 0.019/0.019/0.019/0.000 ms, pipe 2
[root@localhost sysconfig]#
Re-login on iscsi1 to change command prompt to show new hostname to avoid confusion.
Now change password for root because OpenFiler comes without a root password set:
[root@iscsi1 ~]#
                                passwd
Changing password for user root.
New UNIX password:
BAD PASSWORD: it's WAY too short
Retype new UNIX password:
passwd: all authentication tokens updated successfully.
[root@iscsi1 ~]#
Perform the same on iscsi2 OpenFiler template using different SSH session Login as root and perform the same procedure as for the iscsi1:
[[root@quadovm ~]#
cd  /OVS/running_pool/62_iscsi2/
[root@quadovm 62_iscsi2]#
cat > vm.cfg
name = "iscsi2"
kernel =  "/OVS/running_pool/62_iscsi2/vmlinuz-2.6.16.29-0.11.smp.gcc3.4.x86_64.xen.domU"
ramdisk = "/OVS/running_pool/62_iscsi2/initrd-2.6.16.29-0.11.smp.gcc3.4.x86_64.xen.domU.img"
disk = [
'tap:aio:/OVS/running_pool/62_iscsi2/openfiler-2.2-x86_64.img,xvda,w',
'tap:aio:/OVS/running_pool/62_iscsi2/volume1.img,xvdb,w'
]
root = "/dev/xvda1 ro"
vif = ['bridge=xenbr0','bridge=sanbr0']
<CTRL+D>
[root@quadovm 62_iscsi2]#
[root@quadovm 62_iscsi2]#
xm create -c vm.cfg
Using config file "./vm.cfg".
Started domain iscsi2
Bootdata ok (command line is root=/dev/xvda1 ro )
Linux version 2.6.16.29-0.11.smp.gcc3.4.x86_64.xen.domU
(conary.rpath.com@rpl:1-xen) (gcc version 3.4.4) #1 SMP Wed Dec 6 02:05:30 EST  2006
[..]
INIT: version 2.85 booting
Welcome  to Openfiler NAS/SAN Appliance 2.2
Press 'I'  to enter interactive startup.
[..]


localhost login:
root
[root@localhost ~]#
cd /etc
[root@localhost etc]#
echo -e "10.99.1.102\tiscsi2" >> hosts
[root@localhost etc]#
cd sysconfig/
[root@localhost sysconfig]#
cat > network
NETWORKING=yes
GATEWAY=10.99.1.1
HOSTNAME=iscsi2
<CTRL+D>
[root@localhost sysconfig]#
cat > network-scripts/ifcfg-eth0
DEVICE=eth0
BOOTPROTO=none
ONBOOT=yes
TYPE=Ethernet
USERCTL=no
IPV6INIT=no
NETMASK=255.255.255.0
IPADDR=10.99.1.102
<CTRL+D>
[root@localhost sysconfig]#
cat > network-scripts/ifcfg-eth1
DEVICE=eth1
BOOTPROTO=none
ONBOOT=yes
TYPE=Ethernet
USERCTL=no
IPV6INIT=no
NETMASK=255.255.255.0
IPADDR=10.98.1.102
MTU=9000
<CTRL+D>
[root@localhost sysconfig]#
echo "nameserver 10.99.1.1" > /etc/resolv.conf
[root@localhost sysconfig]#
service network restart
Shutting down interface eth0: [  OK  ]
Shutting down interface eth1: [  OK  ]
Shutting down loopback interface:  [  OK  ]
Bringing up loopback interface: [  OK  ]
Bringing up interface eth0: [  OK  ]
Bringing up interface eth1: [  OK  ]
[root@localhost sysconfig]#
Verify IP networking:
[root@localhost sysconfig]#
                                ip  a ls
1: lo: <LOOPBACK,UP> mtu 16436 qdisc noqueue
    link/loopback  00:00:00:00:00:00 brd 00:00:00:00:00:00
    inet 127.0.0.1/8  scope host lo
    inet6 ::1/128 scope  host
       valid_lft forever  preferred_lft forever
2: eth0: <BROADCAST,MULTICAST,UP> mtu 1500 qdisc  pfifo_fast qlen 1000
    link/ether  00:16:3e:3c:bd:4a brd ff:ff:ff:ff:ff:ff
    inet
 10.99.1.102/24 brd 10.99.1.255 scope global eth0
    inet6  fe80::216:3eff:fe3c:bd4a/64 scope link
       valid_lft forever  preferred_lft forever
3: eth1: <BROADCAST,MULTICAST,UP> mtu 1500 qdisc  pfifo_fast qlen 1000
    link/ether  00:16:3e:15:b7:51 brd ff:ff:ff:ff:ff:ff
    inet
 10.98.1.102/24 brd 10.98.1.255 scope global eth1
    inet6  fe80::216:3eff:fe15:b751/64 scope link
       valid_lft forever  preferred_lft forever
4: sit0: <NOARP> mtu 1480 qdisc noop
    link/sit 0.0.0.0 brd  0.0.0.0
[root@localhost sysconfig]#
 ip ro ls | grep ^def
default via
 10.99.1.1 dev eth0
[root@localhost sysconfig]#
 passwd
Changing password for user root.
New UNIX password:
BAD PASSWORD: it's WAY too short
Retype new UNIX password:
passwd: all authentication  tokens updated successfully.
Re-login to avoid further confusion. Now you can point your network browser to:
- http://10.99.1.101:446/ (iscsi1)
- http://10.99.1.102:446/ (iscsi2)
Note: Perform this step twice for each iSCSI storage appliance.
First you will be asked to accept the license, then you can login using the following credentials:
- Login: openfiler
- Password: password
Tip: OpenFiler's root password is not the same as the Web interface password, but you can keep them in sync to ease admin overhead.
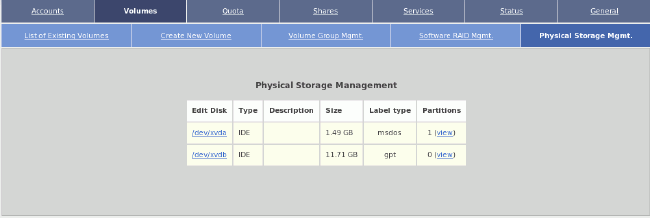
Figure 19
Go to Volumes tab and then Physical Storage Mgmt. then click on /dev/xvdb (second image 12GB datafile you created manually).
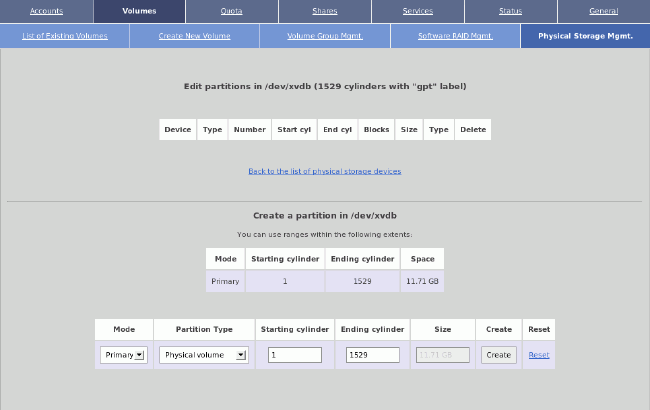
Figure 20
Go to Physical Storage Mgmt. and create single big x86 partition with type “Physical volume” (for LVM use).
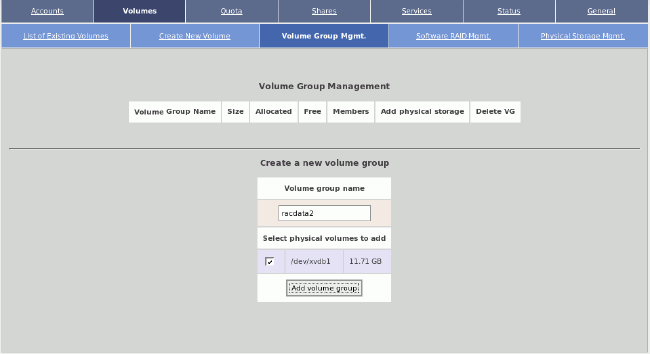
Figure 21
Go again to Volume Group Mgmt. and create volume group named “racdata1” / “racdata2” with only /dev/xvdb1 physical volume (“PV” in LVM's terminology).
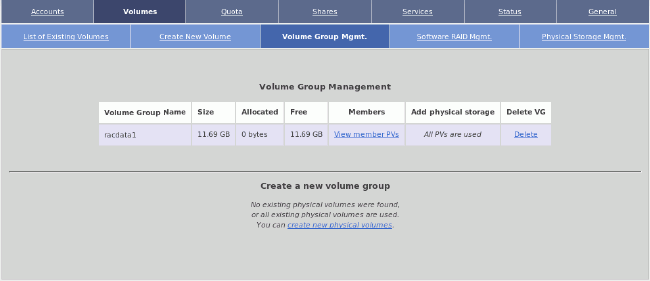
Figure 22
After creating you should be presented with a single volume group. Go to Create New Volumes tab.
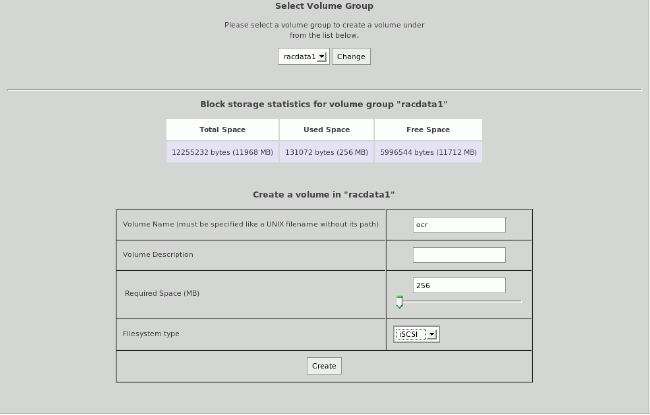
Figure 23
You now have to create three iSCSI LUNs:
- ocr (320MB)
- voting (320MB)
- asmdata1 (all free space, ~11GB in my case)
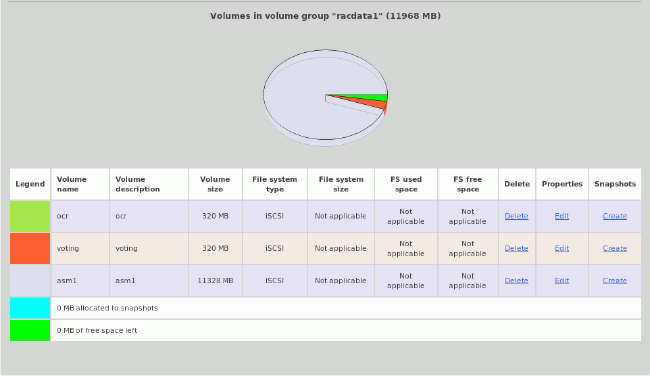
Figure 24
After creating those LUNs you can look at the graph representing your storage allocation volume group named “racdata1” / “racdata2”.
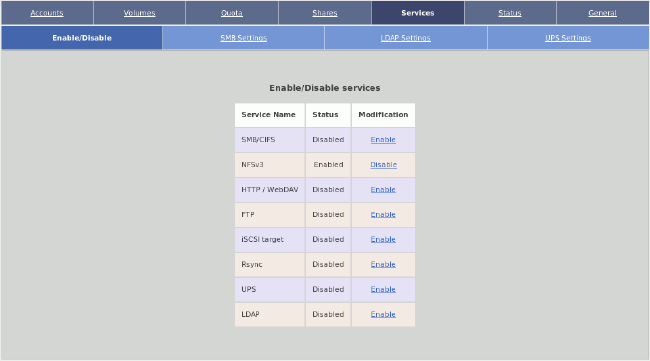
Figure 25
Go to Services -> Enable/disable and enable iSCSI target.

Figure 26
Go to General -> Local Networks, create “san1” under Network Access Configuration to allow iSCSI connection from 10.98.1.0/24 network (our SAN network).
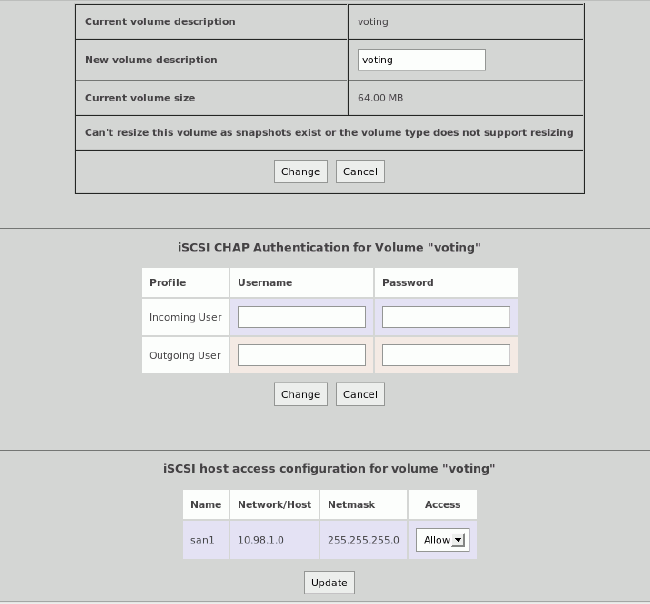
Figure 27
Switch to iSCSI LUNs (Volumes -> List of existing volumes) and edit every iSCSI LUN. Confirm under the section named “iSCSI host access” that this iSCSI LUN should be accessible from the san1 network. Click update to save.
From now on, you have two iSCSI systems exporting LUNs ready for Oracle RAC's use.
Reconfiguring RAC VMs for Extended RAC
As you don't have more physical Ethernet adapters than eth0, you have to emulate them manually as Oracle VM won't create bridges without physical interfaces. Specifically, you want to add the SAN network for iSCSI traffic and Interconnect network for RAC's Cache Fusion.
So, you will simply add underneath lines to /etc/rc.d/rc.local in order to bring up additional Ethernet bridges for us. (You should execute these commands manually if you don't want to restart Oracle VM.)
[root@quadovm ~]
 # cat >> /etc/rc.d/rc.local

 brctl addbr sanbr0 brctl addbr ibr0 ip link set dev sanbr0 up ip link set dev ibr0 up

 <CTRL+D>
[root@quadovm ~]#
Next you have to ensure that the SAN bridge and Interconnect bridge will always have MTU at 9000 for performance reasons. (This is a hack, because you have to postpone setting up MTU until Xen brings netfront and netback network virtualization drivers in sync.)
[root@quadovm ~]# cat > fixbrmtu.sh
#!/bin/sh

bridge=$1
if [ "$bridge" != "sanbr0" -a "$bridge" != "ibr0" ]; then
   logger -t fixbrmtu -p syslog.notice Skipping MTU fix for bridge=$bridge
   exit 0
fi

logger -t fixbrmtu -p syslog.notice Fixing MTU for bridge=$bridge

while : ; do
      cd /sys/class/net/$bridge/brif || exit 1
      err=0
      for iface in *; do
          ip link set dev $iface mtu 9000 > /dev/null 2>&1
          if [ $? -ne 0 ]; then
             err=$[err+1]
          fi
      done
      if [ $err -eq 0 ]; then
         break
      fi
      sleep 1
done
ip link set dev $bridge mtu 9000
exit 0

[root@quadovm ~]# chmod 700  fixbrmtu.sh
Next edit file /etc/xen/scripts/vif-bridge with vi and add the bolded line just after the “success” line:
log debug "Successful  vif-bridge $command for $vif, bridge $bridge."
if [ "$command" = "online" ]
then
  success

 (/root/fixbrmtu.sh  "$bridge") &
fi
Being logged as root on Oracle VM switch to /OVS/running_pool/ and edit vm.cfg for rac1 and rac2 and change vif line to the following:
vif = ['bridge=xenbr0', 'bridge=ibr0', 'bridge=sanbr0']
To summarize, you want RAC VMs to be connected to bridges in the following manner:
- eth0 connected to xenbr0 (bridged with first physical Ethernet of Oracle VM server; one can check that by issuing brctl show); this is the public interface for Oracle VM clients
- eth1 connected to ibr0, Interconnect network for Cache Fusion
- eth2 connected to sanbr0, our iSCSI SAN network
Note: Additional interfaces are not going to be visible from Oracle VM Manager.
Next, start the VMs (for rac1 and rac2):
[root@quadovm 134_rac2]#
                                 xm     create vm.cfg
Using config file "./vm.cfg".
Started domain 134_rac2
[root@quadovm 134_rac2]#
Check the running virtual systems, if all is OK you should get something similar to the following:
[root@quadovm ~]#
                                 xm list
Name                                        ID   Mem VCPUs      State   Time(s)
132_rac1                                     7  2048     1     -b----     12.8
134_rac2                                     8  2048     1     r-----      7.2
Domain-0                                     0   512     4     r-----    287.6
iscsi1                                       5   768     1     -b----      4.8
iscsi2                                       6   768     1     -b----      4.8
[root@quadovm ~]#
By default Oracle VM templates are configured for the following credentials:
- User: root
- Password: ovsroot
Start by reconfiguring rac1 node; connect to it via local console:
[root@quadovm ~]#
                                xm console 132_rac1
rtc: IRQ 8 is not free.
i8042.c: No controller found.

Enterprise Linux Enterprise Linux Server release 5.1 (Carthage)
Kernel 2.6.18-53.1.13.9.1.el5xen on an x86_64

localhost.localdomain login:
                      root
Password:
                               <type “ovsroot”>
Last login: Wed Feb 20 14:21:42 from ca-ostest246.us.oracle.com
[root@localhost ~]#
Run the network configuration utility:
[root@localhost ~]#
                                 export TERM=linux
[root@localhost ~]#
                                 system-config-network-tui
Setting up networking using system-config-network-tuiis pretty easy. Configuring public interface (also the management interface with an IP network that is visible from outside of Oracle VM) consists of selecting “eth0” and setting up IP addresses, netmasks, gateways, etc.
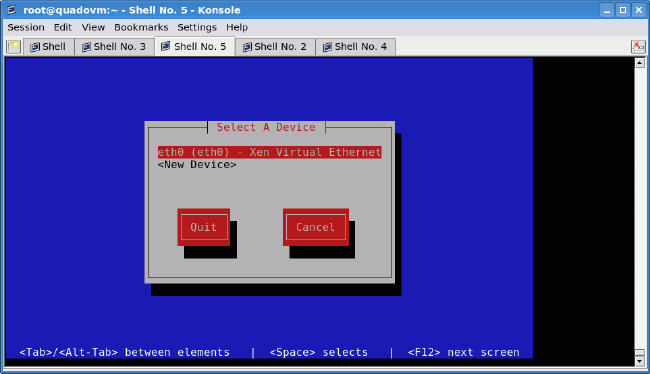
Figure 28
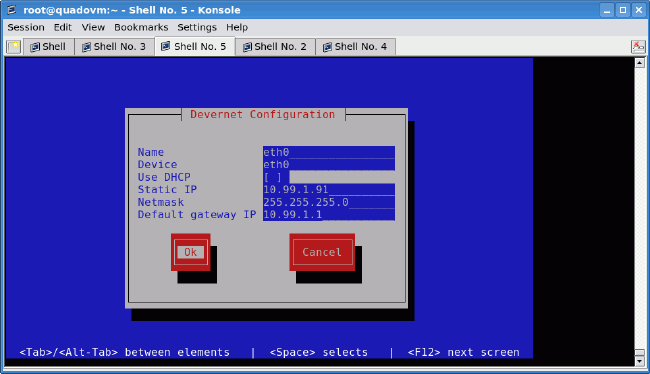
Figure 29
After successfully configuring “eth0” you can configure “eth1” (interconnect). Just create a new interface by selecting <New device>, then Ethernet, and then your IP networking. Repeat this step for eth2 (SAN).
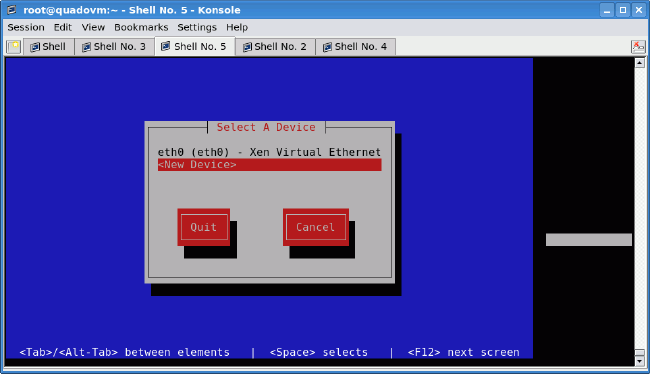
Figure 30
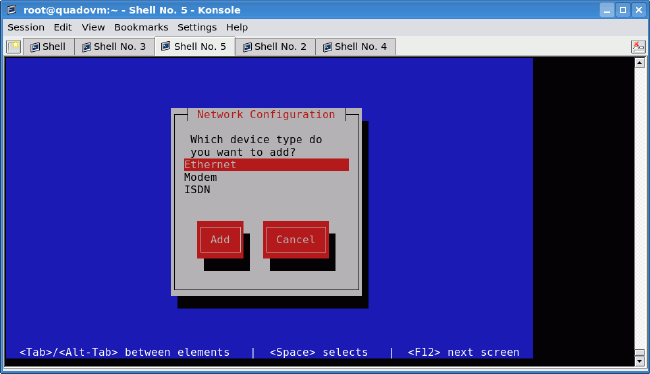
Figure 31

Figure 32
After quitting, finish the network configuration (setting up DNS resolver, hostname, and MTU change ):
[root@localhost ~]#
                                 echo 'nameserver 10.99.1.1' > /etc/resolv.conf
[root@localhost ~]#
                                 cat >  /etc/sysconfig/network
                                                                      NETWORKING=yes
                                                                      NETWORKING_IPV6=no
                                                                      HOSTNAME=rac1
                                  <CTRL+D>
[root@localhost ~]#
                                 echo 'MTU=9000' >> /etc/sysconfig/network-scripts/ifcfg-eth1
[root@localhost ~]#
                                 echo 'MTU=9000' >> /etc/sysconfig/network-scripts/ifcfg-eth2
[root@localhost ~]#
                                 service network restart
Shutting down interface eth0:  [  OK  ]
Shutting down loopback interface:  [  OK  ]
Bringing up loopback interface:  [  OK  ]
Bringing up interface eth0:      [  OK  ]
Bringing up interface eth1:      [  OK  ]
Bringing up interface eth2:      [  OK  ]
[root@localhost ~]#
Save the following as the /etc/hosts file:
127.0.0.1     localhost.localdomain localhost


# eth0: public network
10.99.1.91    rac1
10.99.1.92    rac2


# eth1: interconnect
10.97.1.1     rac1-priv
10.97.1.2     rac2-priv


# VIPs
10.99.1.201   rac1-vip
10.99.1.202   rac2-vip


# eth2: iSCSI SAN
10.98.1.101   iscsi1
10.98.1.102   iscsi2


# PUB for openfilers
10.99.1.101   iscsi1-pub
10.99.1.102   iscsi2-pub
Set up appropriate timezone for your systems (in this example Poland timezone):
[root@localhost ~]#
                                 ln -sf /usr/share/zoneinfo/Europe/Warsaw /etc/localtime
After logging out and logging back in to rac1 your shell will indicate “root@rac1”. Also be sure to check connectivity to your gateway. Remember to perform the same operation on rac2 with adequate IP addresses.
By default, Oracle VM templates come without the userspace part of iSCSI initiator utilities. You could get that from Oracle Enterprise Linux ISO images (several GB), but to speed up that process, you can download it to your workstation from here instead.
Then upload a copy of iSCSI initiator to both RAC nodes (from your workstation):
[vnull@xeno RPMS_el51]$
                                 scp iscsi-initiator-utils*.rpm root@10.99.1.91:.
root@10.99.1.91's password:
iscsi-initiator-utils-6.2.0.865-0.8.el5.x86_64.rpm           100%  528KB 528.2KB/s   00:00
[vnull@xeno RPMS_el51]$
                                 scp iscsi-initiator-utils*.rpm     root@10.99.1.92:.
root@10.99.1.92's password:
iscsi-initiator-utils-6.2.0.865-0.8.el5.x86_64.rpm           100%  528KB 528.2KB/s   00:00
[vnull@xeno RPMS_el51]$
Now install iSCSI initiator, set it up with basic configuration, and enable (on each RAC node; remember to change the InitiatorAlias for rac2):
[root@rac1 ~]#
                                 rpm -Uhv iscsi-initiator-utils-6.2.0.865-0.8.el5.x86_64.rpm
Preparing...                  ########################################### [100%]
1:iscsi-initiator-utils       ########################################### [100%]
[root@rac1 ~]#
                                 rm iscsi-initiator-utils-6.2.0.865-0.8.el5.x86_64.rpm
rm: remove regular file `iscsi-initiator-utils-6.2.0.865-0.8.el5.x86_64.rpm'?
                                 y
[root@rac1 ~]#
[root@rac1 ~]#
                                 echo "InitiatorAlias=rac1"     >> /etc/iscsi/initiatorname.iscsi
[root@rac1 ~]#
                                 service iscsid start
Turning off network shutdown. Starting iSCSI daemon:      [   OK   ]
                                                          [   OK   ]
[root@rac1 ~]#
                                 chkconfig iscsid on
[root@rac1 ~]#
                                 chkconfig iscsi on
Disable unneeded services (on each RAC node) :
[root@rac1 ~]#
                                 chkconfig --level 0123456 bluetooth off
[root@rac1 ~]#
                                 chkconfig --level 0123456 cups off
[root@rac1 ~]#
                                 chkconfig --level 0123456 ip6tables off
[root@rac1 ~]#
                                 chkconfig --level 0123456 iptables off
[root@rac1 ~]#
                                 chkconfig --level 0123456 o2cb off
[root@rac1 ~]#
                                 chkconfig --level 0123456 o2cb off
[root@rac1 ~]#
                                 chkconfig --level 0123456 ocfs2 off
[root@rac1 ~]#
                                 chkconfig --level 0123456 sendmail off
[root@rac1 ~]#
                                 reboot
Prepare partition on additional local hard disk for Oracle software mount point (/u01) (on both RAC nodes) :
[root@rac1 ~]#
                                 fdisk /dev/hdd
Device contains neither a valid DOS partition table, nor Sun, SGI or OSF disklabel
Building a new DOS disklabel. Changes will remain in memory only,
until you decide to write them. After that, of course, the previous
content won't be recoverable.

The number of cylinders for this disk is set to 1044.
  There is nothing wrong with that, but this is larger than 1024,
  and could in certain setups cause problems with:
  1) software that runs at boot time (e.g., old versions of LILO)
  2) booting and partitioning software from other OSs
     (e.g., DOS FDISK, OS/2 FDISK)
  Warning: invalid flag 0x0000 of partition table 4 will be corrected by w(rite)


Command (m for help):
                                 n
Command action
   e   extended
   p   primary partition (1-4)
                                  p
Partition number (1-4):
                                 1
First cylinder (1-1044, default 1):
                                 <ENTER>
Using default value 1
Last cylinder or +size or +sizeM or +sizeK (1-1044, default     1044):
                                 <ENTER>
Using default value 1044


Command (m for help):
                                 p


Disk /dev/hdd: 8589 MB, 8589934592 bytes
255 heads, 63 sectors/track, 1044 cylinders
Units = cylinders of 16065 * 512 = 8225280 bytes


   Device Boot      Start         End          Blocks   Id  System
/dev/hdd1               1        1044         8385898+  83  Linux


Command (m for help):
                                 w
The partition table has been altered!


Calling ioctl() to re-read partition table.
Syncing disks.
[root@rac1 ~]#
[root@rac1 ~]#
                                 mkfs.ext3 -j /dev/hdd1
mke2fs 1.39 (29-May-2006)
Filesystem label=
OS type: Linux
Block size=4096 (log=2)
Fragment size=4096 (log=2)
1048576 inodes, 2096474 blocks
104823 blocks (5.00%) reserved for the super user
First data block=0
Maximum filesystem blocks=2147483648
64 block groups
32768 blocks per group, 32768 fragments per group
16384 inodes per group
Superblock backups stored on blocks:
        32768, 98304,     163840, 229376, 294912, 819200, 884736, 1605632


Writing inode tables: done
Creating journal (32768 blocks): done
Writing superblocks and filesystem accounting information:     done


This filesystem will be automatically checked every 29 mounts     or
180 days, whichever comes first.   Use tune2fs -c or -i to override.
[root@rac1 ~]#
[root@rac1 ~]#
                                 mkdir /u01
[root@rac1 ~]#
                                 echo -e     '/dev/hdd1\t\t/u01\t\t\text3\tdefaults,noatime\t1 2' >> /etc/fstab
[root@rac1 ~]#
                                 mount /u01
Set up dynamic device management to create proper naming for your iSCSI SAN; first create the /etc/udev/rules.d/55-openiscsi.rulesfile by executing (on each RAC node):
[root@rac1 ~]#
cat >     /etc/udev/rules.d/55-openiscsi.rules
# /etc/udev/rules.d/55-openiscsi.rules
KERNEL=="sd*", BUS=="scsi",     PROGRAM="/etc/udev/scripts/iscsidev.sh %b",
SYMLINK+="iscsi/%c{1}/lun%c{2}/part%n",     OWNER="oracle", MODE="0640", GROUP="disk"
<CTRL+D>
[root@rac1 ~]#
udevd provides a dynamic device directory containing only the files for actually present devices. It creates or removes device node files in the /dev directory. It works by receiving uevents from the kernel for any new device plugged into the system . On each event, rules files are checked against new device properties. Based on this you can create symlinks, alter ownership and access privileges, and launch external programs.
This rules file will launch for every new SCSI device a iscsidev.sh script created by running:
[root@rac2 ~]#
                                 mkdir -p     /etc/udev/scripts
[root@rac2 ~]#
cat > /etc/udev/scripts/iscsidev.sh
#!/bin/sh
#iscsidev.sh
BUS=${1}
HOST=${BUS%%:*}
LUN=`echo ${BUS} | cut -d":" -f4`
file="/sys/class/scsi_host/host${HOST}/device/session*/iscsi_session*/targetname"
target_name=`echo $(cat ${file}) | cut -d":"     -f2`


if [ -z "${target_name}" ]; then
exit 1
fi


echo "${target_name} ${LUN}"
<CTRL+D>
[root@rac2 ~]#
chmod 755 /etc/udev/scripts/iscsidev.sh
This script decides whether the passed SCSI device is really iSCSI and returns info about it to udev. Having configured iSCSI initiator, you can perform iSCSI target discovery to connect to storage arrays (run on each RAC node):
[root@rac1 ~]#
                                 iscsiadm -m     discovery -t sendtargets -p 10.98.1.101
10.98.1.101:3260,1 iqn.2006-01.com.openfiler:racdata1.asm1
10.98.1.101:3260,1 iqn.2006-01.com.openfiler:racdata1.ocr
10.98.1.101:3260,1 iqn.2006-01.com.openfiler:racdata1.voting
[root@rac1 ~]#
                                 iscsiadm -m discovery -t sendtargets -p     10.98.1.102
10.98.1.102:3260,1 iqn.2006-01.com.openfiler:racdata2.asm1
10.98.1.102:3260,1 iqn.2006-01.com.openfiler:racdata2.ocr
10.98.1.102:3260,1 iqn.2006-01.com.openfiler:racdata2.voting
[root@rac1 ~]#
                                 iscsiadm -m discovery -l
10.98.1.101:3260 via sendtargets
10.98.1.102:3260 via sendtargets
[root@rac2 ~]#
                                 iscsiadm -m node | sort
10.98.1.101:3260,1 iqn.2006-01.com.openfiler:racdata1.asm1
10.98.1.101:3260,1 iqn.2006-01.com.openfiler:racdata1.ocr
10.98.1.101:3260,1 iqn.2006-01.com.openfiler:racdata1.voting
10.98.1.102:3260,1 iqn.2006-01.com.openfiler:racdata2.asm1
10.98.1.102:3260,1 iqn.2006-01.com.openfiler:racdata2.ocr
10.98.1.102:3260,1 iqn.2006-01.com.openfiler:racdata2.voting
[root@rac1 ~]#
Now you just login to your storage (on both RAC nodes):
[root@rac1 ~]#
                                 iscsiadm -m node -L all
Login session [iface: default, target:     iqn.2006-01.com.openfiler:racdata2.asm1, portal: 10.98.1.102,3260]
Login session [iface: default, target:     iqn.2006-01.com.openfiler:racdata2.ocr, portal: 10.98.1.102,3260]
Login session [iface: default, target:     iqn.2006-01.com.openfiler:racdata1.voting, portal: 10.98.1.101,3260]
Login session [iface: default, target:     iqn.2006-01.com.openfiler:racdata1.ocr, portal: 10.98.1.101,3260]
Login session [iface: default, target:     iqn.2006-01.com.openfiler:racdata1.asm1, portal: 10.98.1.101,3260]
Login session [iface: default, target:     iqn.2006-01.com.openfiler:racdata2.voting, portal: 10.98.1.102,3260]
[root@rac1 ~]#
You should now partition your iSCSI LUNs. You will create one big partition per LUN on all iSCSI detected devices. ( Warning! This is an extremely dangerous script; it erases partition tables on all iSCSI LUNs!) Save the following script:
  #!/bin/sh
  [ -d /dev/iscsi ] || exit 100
  for LUN in `find /dev/iscsi -type l`; do
         echo     $LUN
         dd     if=/dev/zero of=$LUN bs=512 count=1
         echo -en     "0,\n;\n;\n;\n" | sfdisk -q $LUN
  done
Give it executable permission and run it (from one node only!):
[root@rac2 ~]#
                                 chmod 700     partit.sh
[root@rac2 ~]#
                                 ./partit.sh
[..lots of partitioning output..]
On the first node you must detect changes performed by rac2:
[root@rac1 ~]# partprobe
You can verify partitions afterwards by using fdisk -l.
iSCSI Tuning
For optimal performance you have to tune your iSCSI storage. This operation mainly involves TCP/IP stack tuning as the iSCSI protocol is based on TCP. On OpenFilers (iscsi1 and iscsi2) edit /etc/init.d/iscsi-target and set MEM_SIZE variable to 1073741824. This will ensure that before startup of the iSCSI target on iscsi1 and iscsi2, TCP network buffers are being correctly set.
Then, backup old /etc/ietd.conf to /etc/ietd.conf.old and add to it the following:
MaxConnections 1
InitialR2T No
ImmediateData Yes
MaxRecvDataSegmentLength 16776192
MaxXmitDataSegmentLength 16776192
MaxBurstLength 16776192
FirstBurstLength 16776192
MaxOutstandingR2T 16
Wthreads 16
DataDigest None
HeaderDigest None
After making the changes reboot iscsi1 and iscsi2.
Note: Keep in mind that this file will be regenerated each time a new iSCSI LUN is added, re-configured, or deleted.
Now you have to reconfigure RAC nodes to obtain good iSCSI performance. Edit on rac1 and rac2 nodes the /etc/sysctl.conf and make appropriate changes to the following parameters:
net.core.rmem_max = 1073741824
net.core.wmem_max = 1073741824
net.ipv4.tcp_rmem = 1048576 16777216 1073741824
net.ipv4.tcp_wmem = 1048576 16770216 1073741824
net.ipv4.tcp_mem = 1048576 16770216 1073741824
Alter /etc/iscsi/iscsid.conf(iSCSI initiator configuration) on both RAC nodes and finally reboot to make changes active (of course you could perform sysctl -p with iSCSI client restart):
[root@rac2 ~]#
cat >     /etc/iscsi/iscsid.conf
node.startup = automatic
node.session.timeo.replacement_timeout = 120
node.conn[0].timeo.login_timeout = 15
node.conn[0].timeo.logout_timeout = 15
node.conn[0].timeo.noop_out_interval = 10
node.conn[0].timeo.noop_out_timeout = 15
node.session.initial_login_retry_max = 4
node.session.cmds_max = 128
node.session.queue_depth = 128
node.session.iscsi.InitialR2T = No
node.session.iscsi.ImmediateData = Yes
node.session.iscsi.FirstBurstLength = 16776192
node.session.iscsi.MaxBurstLength = 16776192
# the default is 131072
node.conn[0].iscsi.MaxRecvDataSegmentLength = 16776192
# the default is 32768
discovery.sendtargets.iscsi.MaxRecvDataSegmentLength =     16776192
node.conn[0].iscsi.HeaderDigest = None
node.session.iscsi.FastAbort = No
<CTRL+D>
[root@rac2 ~]#
                                 reboot
Note: This and previous changes (to the OpenFilers) gave me the best raw sequential-write iSCSI performance (tested using dd command with block size equal to 1MB directly on iSCSI LUN). This performance can differ from system to system (depending on hardware used, software versions, and other factors).