Working With Oracle HCTS
For certifying your systems and hardware, you can use the Oracle HCTS graphical user interface (GUI) or the Oracle HCTS command line interface (CLI). This chapter describes working with the Oracle HCTS GUI and CLI.
Note - There is a slight difference in the GUI while certifying the virtual platforms. To learn about the Oracle HCTS GUI changes for the virtual platform certification, see Chapter 8, Certifying the Virtual Platform.
This chapter discusses the following topics.
Running the Oracle HCTS Application
Caution - For the system certification, if the SUT contains more than one disk drive, any disk that does not have any slice mounted to /, /usr, /opt, /var, or /export/home* is formatted. All data on such a disk is lost. During the test initialization process, any disk that is scheduled to be formatted is listed. The initialization process pauses for 60 seconds and prompts you to stop the certification if you do not want the disk to be formatted.
To system certify the SUT, if the SUT has a CD or DVD drive, insert a CD or DVD in the drive.
If you are certifying a CD-ROM or DVD-ROM drive for compatibility with the Oracle Solaris OS, insert a mixed-mode CD in the test system. Use the make_mixed_mode_cd utility to create a mixed-mode CD.
If you are testing a CD-RW or DVD-RW drive for compatibility with the Oracle Solaris OS, insert a CD-RW, DVD-RW, DVD-RW, or DVD-RAM disk in the drive of the test system.
If you are certifying or testing a USB device, make sure you connect the device to the SUT and power it on according to the instructions provided in the device's user guide.
If you are certifying the USB CD/DVD reader, insert a mixed-mode CD before you start certification. You can use the make_mixed_mode_cd utility to create a mixed-mode CD. See the Oracle HCTS 5.7 man page for more information.
If you are certifying the USB CD/DVD writer, prepare all types of rewritable media supported by the device, certify each of them and then submit your results.
Using the Oracle HCTS GUI
To start the Oracle HCTS GUI, type the following Oracle HCTS command.
# /usr/bin/hcts
On the TM system, if you are prompted to select a mode for the machine, click the Test Manager button. If you want Oracle HCTS to automatically prepare the TM network environment, click the Automatic Network Configuration. Otherwise click the Manual Network Configuration.
If you want the TM machine to behave as a DHCP server when doing certification, click DHCP Server Setup checkbox after selecting the Automatic Network Configuration. Click the OK button.
On the SUT system, if you are prompted to select a mode for the machine, click System Under Test then click the OK button.
Figure 4-1 Reset Oracle HCTS

System Certification
To certify a system, click the System Certification button and then click the Start button. By performing this operation, your system will get certified as a whole.
The System Certification page is shown in the following figure.
Figure 4-2 System Certification

Component Certification
To run the Component Certification test for components such as audio, CD/DVD RW, CD/DVD ROM, network, serial, storage, InfiniBand, WiFi, USB CD/DVD ROM, USB CD/DVD RW, USB hard disk and solid-state storage device, USB keyboard tape drive and video, click the Component Certification button. Select the component you want to certify and click the Start button. The component that you have selected gets certified.
The Component Certification page is shown in the following figure.
Figure 4-3 Component Certification

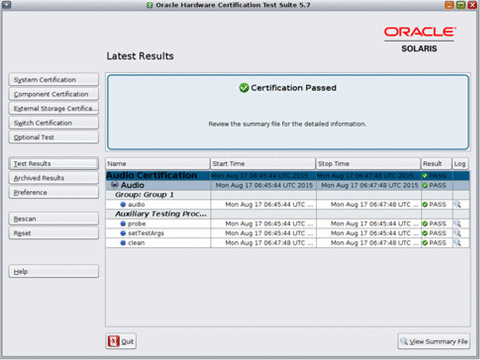
When testing is complete, click the Test Results button.
Figure 4-4 Test Results

Click the icon in the Log column to view the detailed results for a test. Click the View Summary File button to view the summary of the results of all the tests listed in the table.
To access the results archive file that you need to submit to the HCL if your certification testing passed, click the Archived Results button.
Figure 4-5 Certification Logs

Select the files that you want to operate on by selecting the checkboxes at the left-most column, then click Save to save the files to another location or Delete to remove the files.
To select all the files, click the left button displaying two check marks in the header row. To de-select all files, click the left button displaying no check marks in the header row.
Component Tests
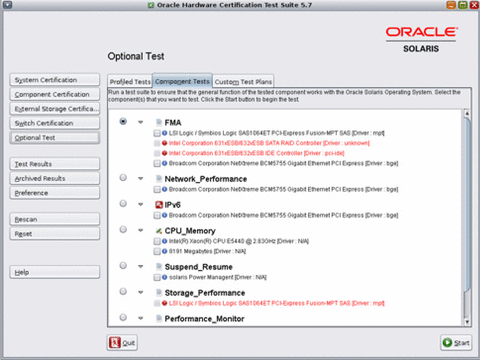
To test a component but not certify the component, click the Optional Test button and then click the Component Tests tab. Select the component test that you want to run and then click the Start button.
Figure 4-6 Component Tests

Custom Test Plan
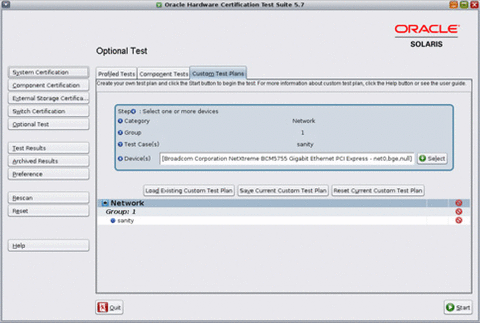
To run the other tests, click the Optional Test button and then click the Custom Test Plan tab. Select the test that you want to run from the drop-down list . Click the Start button.
The Custom Test Plan feature provides an interface for creating test plans which may provide additional failure diagnostics information. Custom Test Plan results are not valid for HCL submission.
Tunable Options permit the customization of various predefined test arguments. By modifying the values of these options, you can control the exposed runtime attributes for the test case operating on the associated device.
For more information, see the Custom Test Plan online help page under Certification Center → Custom Test Plan.
Figure 4-7 Custom Test Plan

Profiled Tests
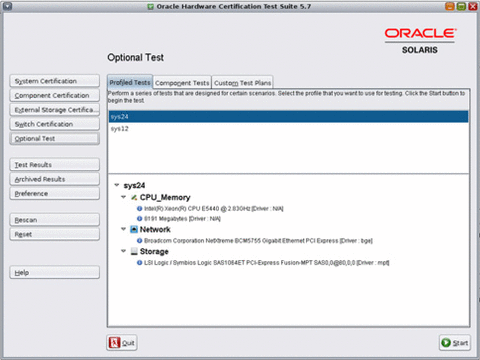
Oracle HCTS application enables you to perform testing based on the profiles having different test coverage and stress levels. There are currently two profiles that are previously implemented in the system. You can select any of the following system profiles.
sys12: A system test that runs for about 12 hours.
sys24: A system test that runs for 24 hours.
Figure 4-8 Profiled Tests

 To Perform the Profile Tests
Before You Begin
Before performing the profile tests, you must ensure that the following system requirements are satisfied.
Hardware Requirements: Two systems are required.
System Under Test (SUT): The SUT is the system that is to be certified or that has the component that needs to be certified.
Test Manager (TM): The TM is the system that is already certified as Oracle Solaris OS compatible.
To learn more about the SUT and TM, click the Help button in the GUI or see Configuring Test Machines to Run Oracle HCTS.
Software Requirements: Oracle Solaris 10 OS or the Oracle Solaris 11 OS.
- Configure the network and storage environment as required for the system certification.
See System Certification to know how to configure your system for the Oracle HCTS system certification.
- GUI Mode:
If you are using the GUI mode, perform the following steps.
Click the Optional Test button in the main window.
Click the Profile Test tab.
Select the profile that you want to execute.
Click the Start button.
- CLI Mode:
In the CLI mode, type the following command in the terminal.
# hctscli test-profile sys12 | sys24
- GUI Mode:
Using Oracle HCTS CLI
There are two commands in the Oracle HCTS CLI environment listed as follows.
hctscli: This command is used to certify the system and component in the CLI mode.
hctsclid: This command is used to create and run the custom test plan in the CLI mode.
Certifying Systems and Components Using CLI
For certifying systems and components, you need to use the hctscli command. As described in the previous chapters, you need to use TM and SUT for certifying the system, network, InfiniBand, WiFi, and serial I/O devices.
To start the Oracle HCTS for setting up the systems, certifying systems, and components, use the hctscli command. See the hctscli(1M) man page for more information.
To set up the TM system, type the following command.
# /usr/bin/hctscli setup-tm
To certify the SUT as a system, type the following command.
# /usr/bin/hctscli certify System
To list certifiable network devices of the SUT, type the following command.
# /usr/bin/hctscli list-device Network
To certify the network of the SUT using the IPv4 protocol, type the following command.
# /usr/bin/hctscli certify [ -d device_id_from_the_list-device_output] Network
If no device is specified for the certify network command, then all network devices are tested at the same time.
To list the serial devices of the SUT, type the following command.
# /usr/bin/hctscli list-device Serial
To certify the serial I/O component of the SUT, type the following command.
# /usr/bin/hctscli certify Serial
If no device is specified for the certify Serial command, then all serial devices are tested one by one.
Note - After you complete all testing, uninstall Oracle HCTS. Before you put the test systems back into production use, you might want to reinstall your test system to its original configuration.
To run the storage certification test suite, type the following command.
# /usr/bin/hctscli certify Storage
If no device is specified for the certify Storage command, then all storage devices are certified at the same time.
For more information on the names of component certification test suites that you can run and more examples, see the man pages.
Note - After you complete running all the tests, uninstall Oracle HCTS. Before you put the test systems back into production use, you might want to reinstall your test system to its original configuration.
Creating the Custom Test Plan Using CLI
To create and run the custom test plan in the Oracle HCTS CLI, use the hctsclid command. Refer hctsclid.1m man page for more information.
Example 4-1 Creating a Custom Test Plan
To list all the available test categories under the Custom Test Plan, type the following command.
sut# hctsclid list-category
1: USB_Keyboard
2: CPU
3: Video
4: IPv6
5: Memory
6: Audio
7: CD-RW_DVD-RW
8: Storage
9: Network
To set the test category, type the following command.
sut# hctsclid set-category Storage
Category Storage is added.
To add a new group, type the following command.
sut# hctsclid add-group 1
Group 1 added to Custom Test Plan.
To list all the available test cases for the selected category, type the following command.
sut# hctsclid list-testcase Storage
1: bonnie
2: misabuf
3: fs_stress
4: dd
5: mode_sense
6: mpflip
To list all the devices supported by the bonnie test, type the following command.
sut# hctsclid list-device bonnie
Test Case Device List for bonnie
1: c1d0         Driver : N/A
To add the test case to the created group, type the following command.
sut# hctsclid add-testcase -g 1 -d 1 bonnie
Test Case bonnie   id=1 executed on "c1d0" added to group 1.
To create another group, type the following command.
sut# hctsclid add-group 2
Group 2 added to Custom Test Plan.
To list all the devices supported by the Fs_Stress test, type the following command.
sut# hctsclid list-device Fs_stress
Test Case Device List for Fs_stress:
       1 : c1d0      Driver : N/A
To add the test case to the created group, type the following command.
sut# hctsclid add-testcase -g 2 -d 1 Fs_stress
Test case Fs_stress  id=2 executed on  "c1d0" added to group 2.
To list the available tunable options for the Fs_stress test, type the following command.
sut# hctsclid list-option Fs_stress
 Option Description : Enter runtime in seconds(minimum is 600, default is 3600):
        Option Type : TextArgument
        Option Name  : run_time
        Option Value : value
To set the tunable option, type the following command.
sut# hctsclid set -p run_time=610 -g 2 2
Set tunable options into TestcaseId2 Fs_stress successfully.
To enable you to view the custom test plan, type the following command.
sut# hctsclid show-testplan
  Category : Storage
         Group : 1
         Test Case Id : 1
         Test Case Name: bonnie
         Device: c1d0
         Group : 2
         Test Case Id : 2
         Test Case Name: Fs_stress
         Device: c1d0
         Option Name : run_time    Value : 610
To run the test plan, type the following command.
sut# hctsclid run-testplan
Test is active!(Press Ctrl+C to stop the test!)
       System Under Test: 64Bit Mode!
       System configuration in progress...
       Progress: 0%...1%...11%...21%...31%...41%...100%
       Result: Pass!
       Review report: /var/hcts/reports
       Review test logs: /var/hcts/logs
       Note: Customization test is invalid for submission.
Preference
There are seven preference that can be used in GUI and CLI. These preference are.
Exit On Error - When this option is set, Oracle HCTS exits immediately when any test case fails without cleaning up the test environment.
Manual Network Setup - When this option is set, user should configure the IP addresses for the network interfaces to be tested before starting the Oracle HCTS test. See the Oracle HCTS 5.7 online help or man page for more information.
Diagnosis - When this option is set, a few DTrace scripts run in parallel with test cases to collect information for debugging. This option should only be used for failure analysis. Certifying when this option is set does not qualify components for HCL submissions.
DHCP Network - When this option is set, the SUT uses Dynamic Host Configuration Protocol (DHCP), to get the IP address for one or more interfaces to be tested in an automatic network setup mode. Make sure to configure your TM system with DHCP server capability if you are testing system, network or serial I/O, or enable DHCP server capability of your Access Points (AP) if you are testing WiFi card.
Automatically Add Swap Space - When this option is set, Oracle HCTS automatically adds the required swap space during the test. Setting up this option is useful when Oracle HCTS requires more swap space for the test initiation.
Enable VLAN Test case - When this option is set, VLAN test case will be enabled in Network Certification Test. Make sure the SUT and the TM are connected back-to-back before starting the Network Certification test.
Enable NIC-SRIOV Test case – When this option is set, the NIC-SRIOV test case will be enabled in Network Certification test.
Caution - If you are certifying a WiFi card, make sure that you re-scan after you switched the Manual Network Setup global option after modifying the Manual Network.
