


- Revision History
- Overview
- Optional Uptake of New Features (Opt-In)
- Feature Summary
- Core Sales Force Automation
- Adaptive Search
- Sales Analytics
- CX Cloud Mobile
- Sales Cloud for Office 365
- Customer Data Management
- Sales Performance Management
- Enterprise Contracts
- Configuration
- Post-Update
This document will continue to evolve as existing sections change and new information is added. All updates appear in the following table:
| Date | Feature | Notes |
|---|---|---|
| 21 JUN 2019 | Simplified Sales Forecasting | Updated document. Revised feature information. |
| 26 APR 2019 | Manage Simplified Contract Terms as a DOCX File | Updated document. Delivered feature in update 19B. |
| 29 MAR 2019 | Post-Update Tasks | Updated document. Added new section. |
| 22 MAR 2019 | Created initial document. |
This guide outlines the information you need to know about new or improved functionality in this update, and describes any tasks you might need to perform for the update. Each section includes a brief description of the feature, the steps you need to take to enable or begin using the feature, any tips or considerations that you should keep in mind, and the resources available to help you.
GIVE US FEEDBACK
We welcome your comments and suggestions to improve the content. Please send us your feedback at SALESCLOUD-PRODEX_WW@ORACLE.COM.
Optional Uptake of New Features (Opt-In)
We continue to add many new features to the Oracle Cloud Applications, and for some features, you can take advantage of new functionality at a pace that suits you by "opting in" to the feature when you're ready. You can opt in to a feature in two ways: by using the New Features work area, or by using the Setup and Maintenance work area.
To opt in using the New Features work area:
- Click the Navigator, and then click New Features (under the My Enterprise heading).
- On the New Features page, select the offering that includes new features you'd like to review.
- Click Opt In for any feature that you want to opt in to.
- On the Edit Features page, select the Enable option for the feature, and then click Done.
To opt in using the Setup and Maintenance work area:
- Click the Navigator, and then click Setup and Maintenance.
- On the Setup page, select your offering, and then click Change Feature Opt In.
- On the Opt In page, click the Edit Features icon.
- On the Edit Features page, select the Enable option for any feature you want to opt in to. If the Enable column includes an Edit icon instead of a check box, then click the icon, select your feature options, and click Save and Close.
- Click Done.
Column Definitions:
Report = New or modified, Oracle-delivered, ready to run reports.
UI or Process-Based: Small Scale = These UI or process-based features are typically comprised of minor field, validation, or program changes. Therefore, the potential impact to users is minimal.
UI or Process-Based: Larger Scale* = These UI or process-based features have more complex designs. Therefore, the potential impact to users is higher.
Customer Action Required = You MUST take action before these features can be used by END USERS. These features are delivered disabled and you choose if and when to enable them. For example, a) new or expanded BI subject areas need to first be incorporated into reports, b) Integration is required to utilize new web services, or c) features must be assigned to user roles before they can be accessed.
| Ready for Use by End Users Reports plus Small Scale UI or Process-Based new features will have minimal user impact after an update. Therefore, customer acceptance testing should focus on the Larger Scale UI or Process-Based* new features. |
Customer Must Take Action before Use by End Users Not disruptive as action is required to make these features ready to use. As you selectively choose to leverage, you set your test and roll out timing. |
|||||
|---|---|---|---|---|---|---|
| Feature |
Report |
UI or |
UI or |
Customer Action Required |
||
 |
||||||
| |
||||||
Configuration UI for Global Search Powered by Adaptive Search |
|
|||||
| |
||||||
Configure Standard Columns for Company-Defined Child Objects |
|
|||||
| |
||||||
| |
||||||
| |
||||||
| |
||||||
| |
||||||
| |
||||||
| |
||||||
| |
||||||
|
||||||
Automatic Creation of Equivalent Records in Office 365 During Engagement Cloud Record Creation |
|
|||||
| |
||||||
| |
||||||
| |
||||||
| |
||||||
RESTful Services to View, Build, and Maintain Incentive Compensation Business Objects |
|
|||||
| |
||||||
|
||||||
| |
||||||
|
||||||
| |
||||||
Campaign Views in Engagement Cloud
Sales representatives and sales managers can view meaningful information about marketing campaigns and campaign members from the Campaigns user interface (UI). For example, they can use the campaign summary data to view associated leads, contacts, opportunities, and revenue amounts.
Administrators can easily determine the effectiveness of a campaign by viewing the Campaign Return on Investment (ROI) report from the Campaigns landing page.
Steps to Enable
No steps are required to enable this feature.
Set up resource-based sales forecasting with a single click using the Configure Simplified Sales Forecasting page. This setup enables resource-based sales forecasting to automatically create territories using the resource hierarchy, thereby eliminating complex territory setup. It also automates owner-based assignment of opportunities for a streamlined setup experience.
Please contact support before enabling this feature, if your implementation already has territories configured.
Watch a Demo
Steps to Enable
- Sign in as the sales administrator or a setup user.
- In the Setup and Maintenance work area, use the following:
- Offering: Sales
- Functional Area: Sales Forecasting
- Click Quick Setup to go to the Configure Simplified Sales Forecasting page.

Quick Setup Icon

Configure Simplified Sales Forecasting
Submitting the processes generates quarterly forecasting periods. You can access this page anytime to monitor the status of the process.

Monitor Generate Forecast Process Status
NOTE: This setup is exclusively for resource-based forecasting. If you want to make changes to the options or set up forecasting with dimensional territories, then you must use the Select Forecasting Options task available from the Sales Forecasting Functional Area of the Sales offering.
Tips And Considerations
- You must set up the accounting calendar to enable forecasting. Generate the accounting periods with either monthly or quarterly frequency. Create your sales resource hierarchy before you set up simplified sales forecasting.
- If you enable this feature, you cannot use dimensional territories to assign opportunities or other transactional objects.
Key Resources
For more information, see the forecasting topics in the Oracle Engagement Cloud Implementing Sales guide.
Watch Simplified Sales Forecasting Management Readiness Training
Role Information
- Sales setup user or sales administrator
IMPORTANT: Adaptive Search is available only to an initial set of early adopters. If you are interested in becoming an early adopter, apply for access on the Engagement Cloud - Search and Workspace User Experience forum on Oracle Cloud Customer Connect.
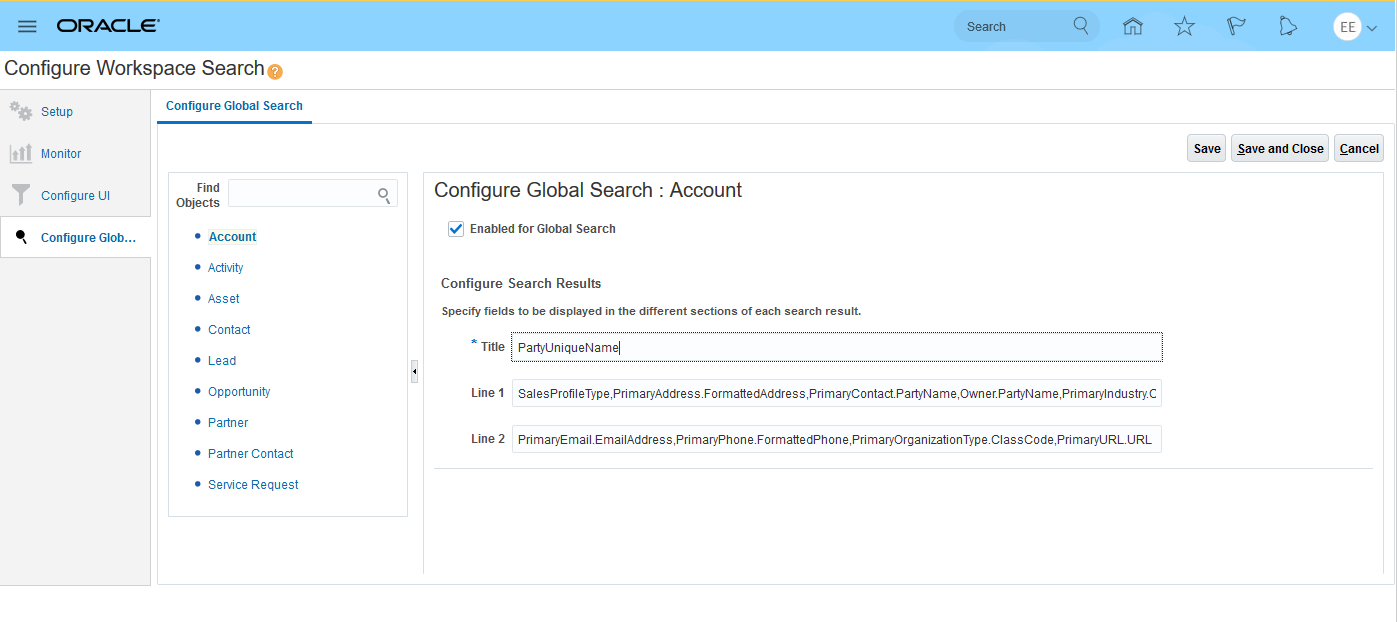
Configuration UI for Global Search Powered by Adaptive Search
Configure which objects to enable and the attributes to display in global search results. These enhancements improve search capabilities and allow search results to display in a more relevant format, all of which improve and speed customers' search tasks.
Steps to Enable
Adaptive Search is available only to an initial set of early adopters. If you are interested in becoming an early adopter, apply for access on the Engagement Cloud - Search and Workspace User Experience forum on Oracle Cloud Customer Connect.
Default Subtab Navigation from Workspace List Page
Administrators can set any subtab as the default tab in the company-defined detail page layout of standard and company-defined objects. Drilling down from the Workspace landing page sets the focus on the modified default subtab. This navigation gives users the most relevant information based on their role (information that is required for their day-to-day operations) and ensures consistent behavior when navigating to the details page of the standard and company-defined objects.
Steps to Enable
Adaptive Search is available only to an initial set of early adopters. If you are interested in becoming an early adopter, apply for access on the Engagement Cloud - Search and Workspace User Experience forum on Oracle Cloud Customer Connect.
Configure Standard Columns for Company-Defined Child Objects
For company-defined child objects, you can configure standard WHO columns like Created By, Created Date, Updated By, and Updated Date for Workspace search. Including these columns in the Workspace search gives users a richer application experience.
Steps to Enable
Adaptive Search is available only to an initial set of early adopters. If you are interested in becoming an early adopter, apply for access on the Engagement Cloud - Search and Workspace User Experience forum on Oracle Cloud Customer Connect.
One-to-Many Relationships for Company-Defined Objects
Company-defined, one-to-many relationships created between standard objects and company-defined objects are available in adaptive search. The availability of these relationships in search lets users include the related objects in their searches when the parent object is searched, thus providing cross-referenced results.
Steps to Enable
Adaptive Search is available only to an initial set of early adopters. If you are interested in becoming an early adopter, apply for access on the Engagement Cloud - Search and Workspace User Experience forum on Oracle Cloud Customer Connect.
Adaptive Search for CX Cloud Mobile
Adaptive Search in CX Cloud Mobile
Enable the use of Adaptive Search in the CX Cloud Mobile app, so that you're able to search multiple fields, rather than just a single field. Using Adaptive Search on mobile also improves search performance.
NOTE: This feature requires that Adaptive Search be configured in Oracle Engagement Cloud and then also enabled for CX Cloud Mobile. Currently, Adaptive Search on CX Cloud Mobile can be enabled for object list views and object pickers only.
Steps to Enable
Adaptive Search is available only to an initial set of early adopters. If you are interested in becoming an early adopter, apply for access on the Engagement Cloud - Search and Workspace User Experience forum on Oracle Cloud Customer Connect.
Prerequisite: Adaptive search is already configured in Engagement Cloud.
- Sign in to the application as a sales administrator or setup user.
- Activate a sandbox
- Navigate to Application Composer.
- Click Mobile Application Setup.
- Select the option Enable Elastic Search.
- Save and download the sandbox to test in CX Cloud Mobile.
- Publish the sandbox.
Tips And Considerations
- To enable search on fixed-choice list (FCL) or dynamic-choice list (DCL) fields using Adaptive Search on Mobile, ensure that the FCL or DCL field is enabled for inclusion for the parent object.
Object Activity User Adoption Reporting
As part of user adoption, you can report object activity metrics such as number of records created or number of records updated.
In addition, you can analyze how frequently users are creating and updating records in the application to better understand trends and patterns in object activity by all users in your organization. Correlate user login metrics, such as the number of active days, along with object activity metrics to correlate and understand productivity and usage post-login.

Steps to Enable
Leverage new subject area(s) by adding to existing reports or using in new reports. For details about creating and editing reports, see the Creating and Administering Analytics and Reports book (available from the Oracle Help Center > your apps service area of interest > Books > Administration).
The new Sales - CRM Opportunity Note subject area contains all important attributes needed to report notes that are captured as part of an opportunity. The attributes include author, note description, note creation date, visibility, and more.

Steps to Enable
Leverage new subject area(s) by adding to existing reports or using in new reports. For details about creating and editing reports, see the Creating and Administering Analytics and Reports book (available from the Oracle Help Center > your apps service area of interest > Books > Administration).
Activity Subtype as a Standard Field
Description and Value
The Activity Subtype field provides sales managers and partner sales managers with more granular control of the Activity Type values so they can accurately track sales performance by activity. Once an administrator creates Subtype values and defines Type-to-Subtype mappings, sales representatives benefit from pre-filled Type and Subtype values, reducing time-consuming data entry and other data entry errors.
With the addition of the Activity Subtype field as a standard, supplied field, you can:
- Create values for the Subtype field depending on the Type value, allowing you to track sales performance by activity.
- Define relationships between the two values.
- Auto-populate the Type and Subtype values for auto-created tasks, such as logging calls, and follow-up activities created in the context of an activity, like creating a call report or a follow-up appointment or task.
- Auto-populate supplied values from the parent activity when you create a call report or a follow-up appointment or task.
- Search for specific activity subtypes.

Activity Subtype Field Added to the Create Appointment Page.
Steps to Enable
Creating Activity Subtype Values
Using Functional Setup Manager, you can access set-up pages associated with the Activity object and create, edit or delete Subtype values related to an Activity Type.
- Sign in as an Administrator and navigate to Setup and Maintenance.
- Select the Sales Foundation functional area in the Sales Setup page.
- Search for the Manage Activity Type and Subtype task.
- Associate Type values with one or more Activity Function Types (Appointments, Call Reports, Tasks) on the Manage Activity Type page.
- Define Type-to-Subtype mappings in the Manage Activities Subtype page.
- Select specific Activity Type values to enable or enable all of them from the Display Activities Type drop-down menu on the Manage Activity Subtypes page.

Create, Edit or Delete Subtype Values.
Adding the Activity Subtype Field to Web Page Layouts
Using Application Composer, you hide or show the dependent Subtype field on the Activity Create, Edit or Detail page.
- Sign in to Oracle Sales Cloud as a user that has a Sales Cloud Administrator job role and create, or activate, a sandbox.
- Navigate to Application Composer and select the Sales application.
- Select Sales from the Application choice list on the main Overview page.
- Use the object tree to select the Activity object to edit its attributes. You can add the Subtype field and modify the pages in which that field appears.
- In the Layout pane, click the Duplicate icon for the Standard layout and enter a layout name.
- Click Save and Edit on the Duplicate Layout dialog.
- Add the Subtype field to the page layout by selecting it in the Available Fields pane, and then moving it to the Select Fields pane to appear on the page. You can move fields by clicking the field and moving it to your preferred location.
- Click Save and Close to exit the layout page.
- Click Done to close the duplicate layout.
- View layout changes via the Navigator > Sales > Activities > Activity Create, Edit or Detail page.

Customized Create Appointment Page Including the Dependent Subtype Field and Values for Call Type.
Adding the Activity Subtype Field to Mobile Page Layouts
Using Mobile Application Setup, you can add the dependent Subtype field to an Activity Create, Edit or Detail page.
- Open Application Composer by selecting Application Composer under the Tools category in the Navigator menu.
- Select the Sales application.
- Select Mobile Application Setup under the Common Setup list.
- In the Application Feature pane, expand the subheading of the Calendar, Call Report or Task object that you want to create a layout for.
- Click the Duplicate icon for the Standard layout and enter a layout name.
- Add the Subtype field to the page layout by selecting it in the Available Fields pane and then dragging and dropping it onto the mobile interface designer.
- Click Save in the top right-hand side of the Application Composer page.
- View layout changes via the Shuttle Menu > Calendar, Call Reports or Tasks > Create, Edit or Detail page.

Drag and Drop the Subtype Field to the Mobile User Interface Designer.
Tips And Considerations
- If you create a new Activity lookup type, then you will need to add a Tag value with the Activity Function. Lookup types provide the lists of values in application fields that are drop-down lists. You can customize the Activity Type values to fit your business needs. On the Define Lookups page, you can edit the existing lookup codes of a lookup type or add new lookup codes. To open the page, navigate to the Setup and Maintenance work area and search for the Define Lookup task list.
- You can set a default Subtype value based on the Type field. For example, if the Activity Type is Email, and if the Type value is mapped to two Subtypes (such as Outbound and Inbound), then you can select Outbound as the default value. When you select the Email type, the application auto-populates the Subtype value of Outbound. If mapping wasn't defined, then the Subtype list of values doesn't display any values.
- After creating an activity with a Type-to-Subtype mapping, if the mapping of the Type or Subtype value is disabled, and if you create a follow-up activity or an associated Call Report, then the Type and Subtype values will not have defaulted.
Key Resources
See the Testing Oracle CX Cloud Mobile Configurations: Worked Example topic for details about how to check your mobile configurations. For more information about publishing sandboxes, see the Publishing Sandboxes chapter of the Oracle Sales Cloud - Extending Sales guide.
Role Information
Administrative privileges are required to create and edit Activity Subtype values that depend on the Activity Type value.
Ability to Hide Details Page Layouts Overview Section
Hide the overview section that appears at the top of detail page layouts for standard objects in CX Cloud Mobile. The overview section that appears at the top of detail page layouts is not configurable, so if there are fields in the overview section that you're not using, you can hide the overview section so that it doesn't appear.
Steps to Enable
- Activate a sandbox and navigate to Mobile Application Setup in Application Composer.
- Select the object that has the List Overview section that you want to hide.
- Select the Detail layout and select an existing layout or create a copy of the standard layout.
- Click on the List Overview section on the canvas to toggle the display of the overview section.
- Save the changes.
- Before publishing the changes, test your updates by downloading the sandbox on the mobile app.
Tips And Considerations
- Since standard layouts are not editable, duplicate a standard layout to hide the overview section.
- If you already have layouts created, you will need to hide the overview section in each layout.
Role Information
- Sales Administrator
Custom Scripts in CX Cloud Mobile
Write custom scripts for Oracle CX Cloud Mobile so that custom validations and business logic can be enabled within the app, in both online or offline modes. You can write scripts for the following events for any object: On Create, Before Save, After Save, or On Field Change. Scripts can be applicable to all users or to users in specific regions or countries.
Examples of custom scripts for events:
- On Create: Write scripts to set default field values, or, make a field mandatory when the create form is loaded in the app (such as when creating a new opportunity).
- Before Save: Write scripts to perform validations before saving a record to Engagement Cloud.
- After Save: Write scripts to execute custom business logic after a record has been saved to Engagement Cloud.
- On Field Change: Write scripts that perform validations for a specific field or that have additional logic when a user modifies a specific field's value.
You can define scripts for all users or for users in a specific region or country. Further, within a region or country, you can limit the scripts to a set of roles if you want.
Steps to Enable
- Sign in to the application as a sales administrator or setup user.
- Activate a sandbox.
- Go to Application Composer.
- Click Mobile Application Setup.
- Enable scripting.
- Click the Scripts tab.
- Select a relevant object and event that you want to use in your custom script.
- Write the script.
- Set regions for the script.
- Click Validate and then Save.
- Download the sandbox in the CX Cloud Mobile app to test the scripts.
- Publish the sandbox to make the scripts available to all users.

Tips And Considerations
- Within the panel in scripts tab, select an object, field, or choice list value, and click on Enter icon to insert the object, field or choice list value on to the editor.
- Within the editor, press CTRL + SPACE to see a list of objects and/or global system functions that you can use. For details on the systems functions and complete function library, refer to product documentation.
- When selecting a field for the On Change Field Event, the drop down list only displays a subset of fields. Use search to search for all other fields.
- For an object and event, only one script can be associated to "All" countries or regions. Similarly, for an object and event, only one script can be created for a specific region or country. For logged in user, the non region specific script will execute first and then region specific script, if any, associated to user's country. User's country is determined by his or her country preference in Engagement Cloud.
- Scripts for a region or country can be further subset to a role or set of roles, if required. In such case, the script will be executed only for set of roles that the script is associated to.
End users can review and manage service requests associated with accounts and contacts.

Review Account Service Requests
You can review the various critical service requests for their accounts and also update these service requests with any information that may be helpful in resolving customer issues. Any email that you receive or send, related to service requests, can be synced to the appropriate service request.
Steps to Enable
To share emails and appointments to service requests, using the Office 365 designer, enable the service request object type.
For example, to see the list of service requests for accounts, enable the Service Request subtab in the Account Details page, using the Office 365 Designer.
Enhanced Sync Status Feedback in Client
In the client, users can view information about the last sync from the client to Oracle Engagement Cloud. Details include whether the sync completed successfully or if any issues were encountered during the sync.

Records Synced to Office 365
You can now see detailed information related to the latest sync.

Detailed Information
Steps to Enable
No steps are required to enable this feature.
Automatic Creation of Equivalent Records in Office 365 During Engagement Cloud Record Creation
When users create tasks, appointments, or contacts in Oracle Engagement Cloud, the records are also created within Office 365, with no synchronization required.

Instant Sync to Office 365
Steps to Enable
No steps are required to enable this feature.
Support for DFFs on Customer Account Site Purpose Field
Create and expose Descriptive Flexfields (DFFs) on the Customer Account Site Purpose Field in the Oracle Financials Cloud UI.
Steps to Enable
Leverage the Setup and Maintenance work area to manage Descriptive Flexfields (DFFs). To learn more visit Oracle Help Center > your apps service area of interest > Books > Implementation.
RESTful Service to Create and Manage Users as Resources
Use the Resource Users RESTful web service to create and manage users as resources. More capabilities have been added for better management of resource users to suit various business needs and to facilitate integration.
With the Resource User RESTful service, now you can:
- Convert an existing worker to a resource.
- Create standalone resources.
- Create top user and root node creation (top of hierarchy).
- Manage individual resource roles.
- Support nonsales usage for resource user management.
NOTE: Future-dated transactions not supported.
Steps to Enable
Review the REST service definition in the REST API guides to leverage (available from the Oracle Help Center > your apps service area of interest > REST API). If you are new to Oracle's REST services you may want to begin with the Quick Start section.
Key Resources
For more information, see the REST API for Oracle Engagement Cloud documentation.
Incentive Compensation Rate Table Reporting
A new OTBI subject area called Incentive Compensation - Rate Table Real Time enables reporting of all elements of a rate table, including Dimensions, Tiers, and Rate Table Values. This Subject area is designed to support reporting requirements for IC Plan Admin, IC Manager & IC Analyst – mainly for Rate Table admin type reporting.

Steps to Enable
Leverage new subject area(s) by adding to existing reports or using in new reports. For details about creating and editing reports, see the Creating and Administering Analytics and Reports book (available from the Oracle Help Center > your apps service area of interest > Books > Administration).
View and utilize the participant plan number that's generated automatically by the application. The participant plan number is a unique identifier for a participant plan. You can view it in the Compensation Plans, Participant Assignments, and Participant Snapshot work areas. You can also use the participant plan number to view and individualize participant plans using the Participant Compensation Plan web service.
Steps to Enable
- Sign in to the application as a sales administrator or setup user.
- In the Setup and Maintenance work area, use the following:
- Offering: Sales
- Functional Area: Sales Foundation
- Task: Manage Public Unique Identifier Profile Options
- On the Manage Public Unique Identifier Profile Options page, provide the site level prefix value for the CRM Public Unique ID Prefix profile option.
- Optionally, provide the site level radix choice for the CRM Public Unique ID String Encoding profile option.
Key Resources
Before configuring the prefix and radix, review the topics on the setup of public unique IDs available in the Oracle Engagement Cloud Implementing Sales guide.
RESTful Services to View, Build, and Maintain Incentive Compensation Business Objects
Enable users to view, build and maintain Incentive Compensation business objects using these RESTful services:
- Participant Compensation Plans: View and individualize the participant compensation plan.
- Pay Groups: The existing service is enhanced to create and maintain pay group assignments. View assignments created directly and assignments created by a role.
- Payment Batches: The existing service is enhanced to create a payment batch and then submit the process to generate paysheets for the batch.
- Payment Plans: The existing service is enhanced to create and maintain payment plan assignments. View assignments created directly and assignments created by a role.
- Payment Transactions: The existing service is enhanced to update and delete manual adjustments.
- Paysheets: The existing service is enhanced to update paid paysheets with payment acknowledgment information from your payment system.
- Transactions and Credits: Create, update, and view transactions and transaction credits.
Steps to Enable
Review the REST service definition in the REST API guides to leverage (available from the Oracle Help Center > your apps service area of interest > REST API). If you are new to Oracle's REST services you may want to begin with the Quick Start section.
Key Resources
For more information about using RESTful services, see the REST API for Oracle Engagement Cloud guide.
Set up rule qualifiers globally for multiple business units. Previously, you could set up rule qualifiers for each business unit individually. With this change, you can define new qualifiers based on global segment Descriptive Flexfields (DFFs) one time, and all the business units in the instance will automatically inherit the same.
Setup of the new qualifiers based on business unit context segment DFFs are still defined for each business unit individually. You can now add new operators to the existing custom qualifiers in edit mode.
Steps to Enable
Leverage the Setup and Maintenance work area to manage Descriptive Flexfields (DFFs). To learn more visit Oracle Help Center > your apps service area of interest > Books > Implementation.
Tips And Considerations
- If you have multiple business units in the instance, then define your new DFFs that need to be used as a rule qualifiers, as global segments. Any rule qualifiers that were defined before applying the patch will not be affected.
- You can edit the qualifiers to add more operators for a specific business unit.
- You can delete a qualifier if it is not used in a rule in any business unit.
Role Information
- Incentive Compensation Application Administrator
Obsolescence Notice: Payment Export
This is advance notice of the pending obsolescence of the payment export feature available using the Payments work area, Export Payments task.
If you are exporting payment information from Incentive Compensation for your payment system, you are most likely using the flexibility and configurability of Oracle's Business Intelligence reporting to meet your needs. As a result, we plan to obsolete the little-used export payments feature in the Payments work area. If you have configured your own export, then there is no impact to you. If you planned to use the payment export feature associated with the Export Payments task, then we would like to steer you to Oracle Business Intelligence reporting instead.
Steps to Enable
No steps are required to enable this feature.
Manage Simplified Contract Terms as a DOCX File
When contract terms sourced from a simplified terms template are downloaded, they are saved as a DOCX file instead of an XML file. This is a more familiar format and avoids confusion when the document is circulated for editing or comments.
Steps to Enable
- If you want to create a new simplified terms template, you no longer have to first download an empty XML template. You can use your own Word DOCX file, and upload it using the application UI.
- If you have existing downloaded XML contract documents, you will need to use the Save As option in MS Word to convert them to a supported DOCX format before uploading them back to the system.
Administrators can use the Access Explorer tool to quickly resolve access issues reported by users.
To identify the cause of an access issue, the administrator must be able to view the access policies currently defined for a user, and all the policies that provide access to the relevant object. The Access Explorer tool displays both types of information. The administrator can view the following:
- All the access policies granted to a user for an object, and the roles that provide the access policies
- All the policies that affect a user's ability to view an object record
Using this information, the administrator can quickly determine why a user can or can’t view a specific record or records, and then grant or revoke the appropriate data security policies as required.

A User's Access to an Object

A User's Access to a Specific Record of an Object
Steps to Enable
No steps are required to enable this feature.
Tips And Considerations
Access Explorer is accessible from the following locations:
- Navigator: Tools menu -> Sales and Service Access Management -> Explore Access
- Setup and Maintenance work area:
- Offering: Sales
- Functional Area: Users and Security
- Task: Manage Sales and Service Access
- Button: Explore Access
Role Information
Users with the IT Security Manager role or the Customer Relationship Management Application Administrator role can access the Access Explorer tool.
If you need to grant a custom job role access to Access Explorer, grant the Manage Sales and Service Access functional privilege to your custom job role.
Account Sync Between Financials and Engagement Cloud
Customer accounts and contacts in Oracle Financials Cloud are an integral part of the billing process. Users create or import account and contact records in Financials Cloud. After they're in Financial Cloud, a synchronization process synchronizes the records to Oracle Engagement Cloud, thus making sales reps aware of the details of sales accounts that exist in Financials Cloud. Without this synchronization, sales reps may not know when their sales accounts become actual billing accounts.
Steps to Enable
After users create customers in Financials Cloud, use a scheduled process to sync the records from Financials to Engagement Cloud.
Users can find and create customers in the Manage Customers UI in Financials Cloud. New organization customers are created by providing the customer name, address details, and the address purpose, such as sell-to or bill-to. Similarly, users can update existing customers in the same UI.
After a customer is created or updated, you run the process to sync the records, which includes customers and contacts.
To run the process:
- Sign in to Financials Cloud as an administrator.
- Go to Tools > Processes.
- Find and submit the process called Synchronize Financials Cloud Accounts and Contacts with Engagement Cloud.
After you run the process, it displays in the Schedule New Process table with the status Ready. When the status shows Succeeded, the records are synchronized to Engagement Cloud. Sales users can view the account and contact records by navigating to Sales > Accounts or Sales > Contacts.
Tips And Considerations
- You can schedule the process to run at specific intervals or run it on demand.
- Note that when the records are created or updated, owner information is not defaulted.
Key Resources
For more information on scheduling the process, refer to the documentation on scheduled processes.
For more information on security, see the Oracle Engagement Cloud Implementing Sales and Service guide.
Role Information
- Administrator
REPORTING AND ANALYTICS
In R13.19A OTBI direct database query has been disabled by default in BI Answers. To prevent reports generating system errors, BI Administrator can modify BI privileges to revert this change. For more details related to this change, please refer to the announcement on Cloud Customer Connect - https://cloudcustomerconnect.oracle.com/posts/6e94e92084.
UPDATE APPLICATION COMPOSER CUSTOMIZATIONS TO THE LATEST ENHANCED BEHAVIOR
During your upgrade, most existing customizations made in Application Composer are automatically updated to the latest enhanced behavior in the new release. However, there are a few exceptions, which require you to manually initiate the upgrade script for each of those customizations.
STEPS TO ENABLE
You must sign in as a user with an administrator role to perform these steps.
IMPORTANT: Do not perform these steps when there are pending changes in an active sandbox. Be sure to save and publish sandboxes with any changes you want to keep before proceeding and delete any sandboxes that you do not intend to publish.
- In Oracle Sales Cloud, open the drop-down menu next to your user name, and select Manage Sandbox.

- Create a new sandbox, and set it as the active sandbox. The current active sandbox displays at the top of the application.

- Go to: Navigator > Application Composer (under Tools).
- From the Application, drop-down list, select the first application whose metadata you want to upgrade, such as Common or Sales.

NOTE: You need to upgrade the existing customization metadata for each application separately.
- From the navigation tree on the left, under Common Setup, click Metadata Manager.

- Click Metadata Upgrade.

- By default, the list displays the "Not Started" upgrade items that you need to manually upgrade. Highlight the first row in the list, and then click the Upgrade button.

- Click OK in the confirmation dialog box. This process may take a couple of minutes. When the upgrade is done, the dialog box will close and the Upgrade Completed column will be checked.

NOTE: Currently, the upgrade item Custom objects and fields are not available for global search does not show a checkmark in the Upgrade Completed column even after the metadata upgrade is complete. You can proceed with the metadata upgrade process without concern.
- Repeat steps 7-8 for each row in the list.
- Repeat steps 4-8 for each application in the Application drop-down list in Application Composer.
- Publish the sandbox.
After the processes have completed, the application is ready to use.
KEY RESOURCES
Read Prepare for Your Quarterly Update (Doc ID 2445338.1) on My Oracle Support to learn how to prepare for and validate your quarterly update.
---

Copyright © 2018, 2019, Oracle and/or its affiliates. All rights reserved.
This document is provided for information purposes only, and the contents hereof are subject to change without notice.This document is not warranted to be error-free, nor subject to any other warranties or conditions, whether expressed orally or implied in law, including implied warranties and conditions of merchantability or fitness for a particular purpose. We specifically disclaim any liability with respect to this document, and no contractual obligations are formed either directly or indirectly by this document. This document may not be reproduced or transmitted in any form or by any means, electronic or mechanical, for any purpose, without our prior written permission.
Oracle and Java are registered trademarks of Oracle and/or its affiliates. Other names may be trademarks of their respective owners.
Intel and Intel Xeon are trademarks or registered trademarks of Intel Corporation.All SPARC trademarks are used under license and are trademarks or registered trademarks of SPARC International, Inc. AMD, Opteron, the AMD logo, and the AMD Opteron logo are trademarks or registered trademarks of Advanced Micro Devices. UNIX is a registered trademark of The Open Group.