


- Revision History
- Overview
- Optional Uptake of New Features (Opt-In)
- Update Tasks
- Feature Summary
- Oracle Sales Force Automation
- Partner Relationship Management
- Customer Data Management
- Sales Performance Management
- Enterprise Contracts
- CX Cloud Mobile
- Oracle Sales Assistant
- Sales Cloud for Office 365
- Configuration
- Post-Update
This document will continue to evolve as existing sections change and new information is added. All updates appear in the following table:
| Date | Feature | Notes |
|---|---|---|
| 21 JUN 2019 | Custom Business Objects Events | Updated document. Revised feature information. |
| 26 APR 2019 | Mobile Push Notifications for Sales Objects | Updated document. Revised feature information. |
| 26 APR 2019 | Oracle Sales Assistant | Updated document. Revised description. |
| 21 FEB 2019 | Post-Update Tasks > Reporting and Analytics | Updated document. Added new section. |
| 21 FEB 2019 | Mobile Push Notifications for Sales Objects | Updated document. Revised feature information. |
| 25 JAN 2019 | Conversational Chatbot | Updated document. Delivered update in update 19A. |
| 25 JAN 2019 | Custom Business Objects Events | Updated document. Revised feature information. |
| 25 JAN 2019 | Rules Hierarchy Details Reporting | Updated document. Revised feature information. |
| 25 JAN 2019 | Public Unique Identifier (PUID) Support | Updated document. Revised feature information. |
| 25 JAN 2019 | Adaptive Search and Workspace User Experience | Updated document. Revised feature information. |
| 21 DEC 2018 | Created initial document. |
This guide outlines the information you need to know about new or improved functionality in this update, and describes any tasks you might need to perform for the update. Each section includes a brief description of the feature, the steps you need to take to enable or begin using the feature, any tips or considerations that you should keep in mind, and the resources available to help you.
GIVE US FEEDBACK
We welcome your comments and suggestions to improve the content. Please send us your feedback at SALESCLOUD-PRODEX_WW@ORACLE.COM.
Optional Uptake of New Features (Opt-In)
We continue to add many new features to the Oracle Cloud Applications, and for some features, you can take advantage of new functionality at a pace that suits you by “opting in” to the feature when you’re ready. You can opt-in to a feature in two ways: by using the New Features work area, or by using the Setup and Maintenance work area.
To opt-in using the New Features work area:
- Click the Navigator, and then click New Features (under the My Enterprise heading).
- On the New Features page, select the offering that includes new features you’d like to review.
- Click Opt-In for any feature that you want to opt-in to.
- On the Edit Features page, select the Enable option for the feature, and then click Done.
To opt-in using the Setup and Maintenance work area:
- Click the Navigator, and then click Setup and Maintenance.
- On the Setup page, select your offering, and then click Change Feature Opt-In.
- On the Opt-In page, click the Edit Features icon.
- On the Edit Features page, select the Enable option for any feature you want to opt-in to. If the Enable column includes an Edit icon instead of a check box, then click the icon, select your feature options, and click Save and Close.
- Click Done.
This section gives you information to help you plan, deploy, and validate your update. We make frequent additions to this document, so don’t forget to check back and get the latest information before your update starts.
Use the following resources to prepare for and validate your Oracle Engagement Cloud update:
- Read Prepare for your Quarterly Update (Doc ID 2445338.1) on My Oracle Support to learn how to prepare for and validate your quarterly update.
- Review Oracle Application Cloud Update Policy (Doc ID 1966109.1)
- Review the latest Known Issue and Update Documents (Doc ID 1603154.1) for this update on My Oracle Support.
Column Definitions:
Report = New or modified, Oracle-delivered, ready to run reports.
UI or Process-Based: Small Scale = These UI or process-based features are typically comprised of minor field, validation, or program changes. Therefore, the potential impact to users is minimal.
UI or Process-Based: Larger Scale* = These UI or process-based features have more complex designs. Therefore, the potential impact to users is higher.
Customer Action Required = You MUST take action before these features can be used by END USERS. These features are delivered disabled and you choose if and when to enable them. For example, a) new or expanded BI subject areas need to first be incorporated into reports, b) Integration is required to utilize new web services, or c) features must be assigned to user roles before they can be accessed.
| New Features Delivered Ready to Use Reports plus Small Scale UI or Process-Based new features will have minimal user impact after an update. Therefore, customer acceptance testing should focus on the Larger Scale UI or Process-Based* new features. |
New Features That Customer Must Take Action to Use (Delivered Disabled) Not disruptive as action is required to make these features ready to use. As you selectively choose to leverage, you set your test and roll out timing. |
|||||
|---|---|---|---|---|---|---|
| Feature |
Report |
UI or |
UI or |
Customer Action Required |
||
 |
||||||
|
||||||
| |
||||||
| |
||||||
| |
||||||
| |
||||||
| |
||||||
| |
||||||
| |
||||||
| |
||||||
| |
||||||
| |
||||||
| |
||||||
| |
||||||
| |
||||||
|
||||||
| |
||||||
| |
||||||
| |
||||||
| |
||||||
| |
||||||
| |
||||||
| |
||||||
| |
||||||
| |
||||||
Page Title Configuration for Company-Defined Details Page Layouts |
|
|||||
Subtab Configuration for Company-Defined Details Page Layouts |
|
|||||
| |
||||||
| |
||||||
| |
||||||
| |
||||||
| |
||||||
Adaptive Search and Workspace User Experience
The Adaptive Search and Workspace User Experience introduces role-based workspaces with this release. When users enter Workspace they see a work area specifically designed for their user role which includes a unique default saved search. Several preconfigured role-based Workspaces are provided.
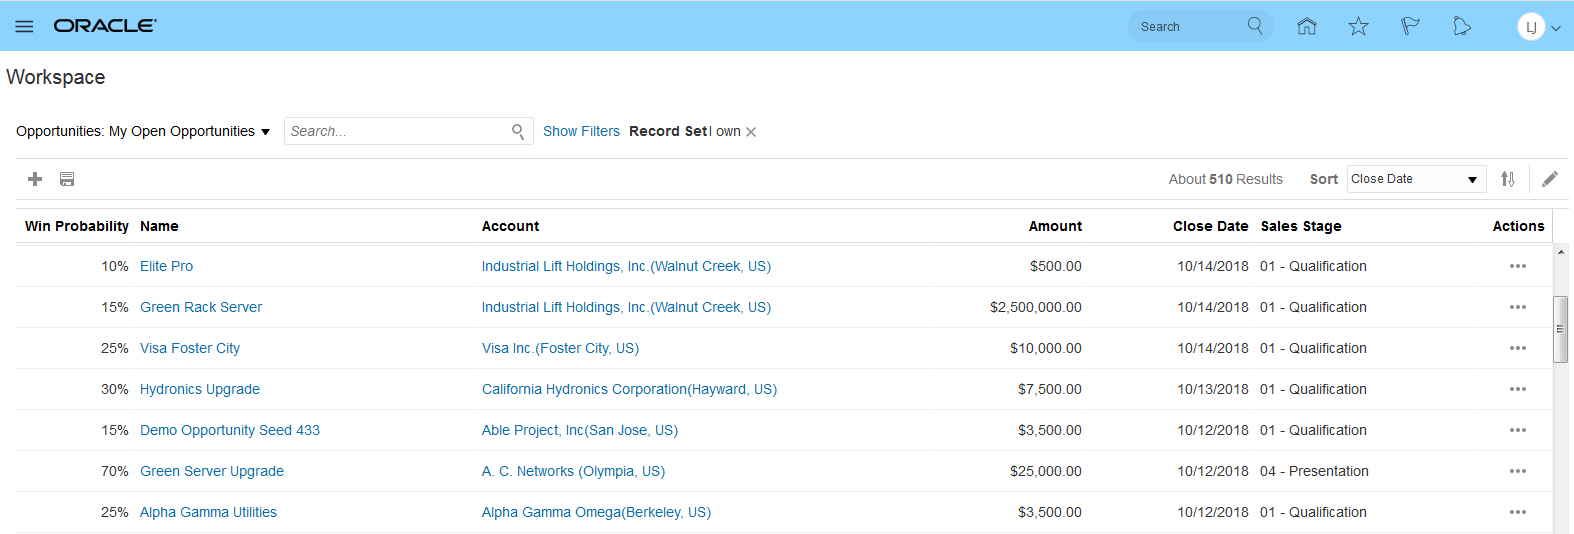
My Open Opportunities Default Workspace for Sales Rep Role
Partner Relationship Management capabilities are added to Workspace with support for the Partner and Partner Contact objects. Also included are preconfigured workspaces for three Partner roles and three Channel roles. These roles include Channel Account Manager, Channel Sales Manager, Channel Operations Manager, Partner Sales Representative, Partner Sales Manager and Partner Administrator.
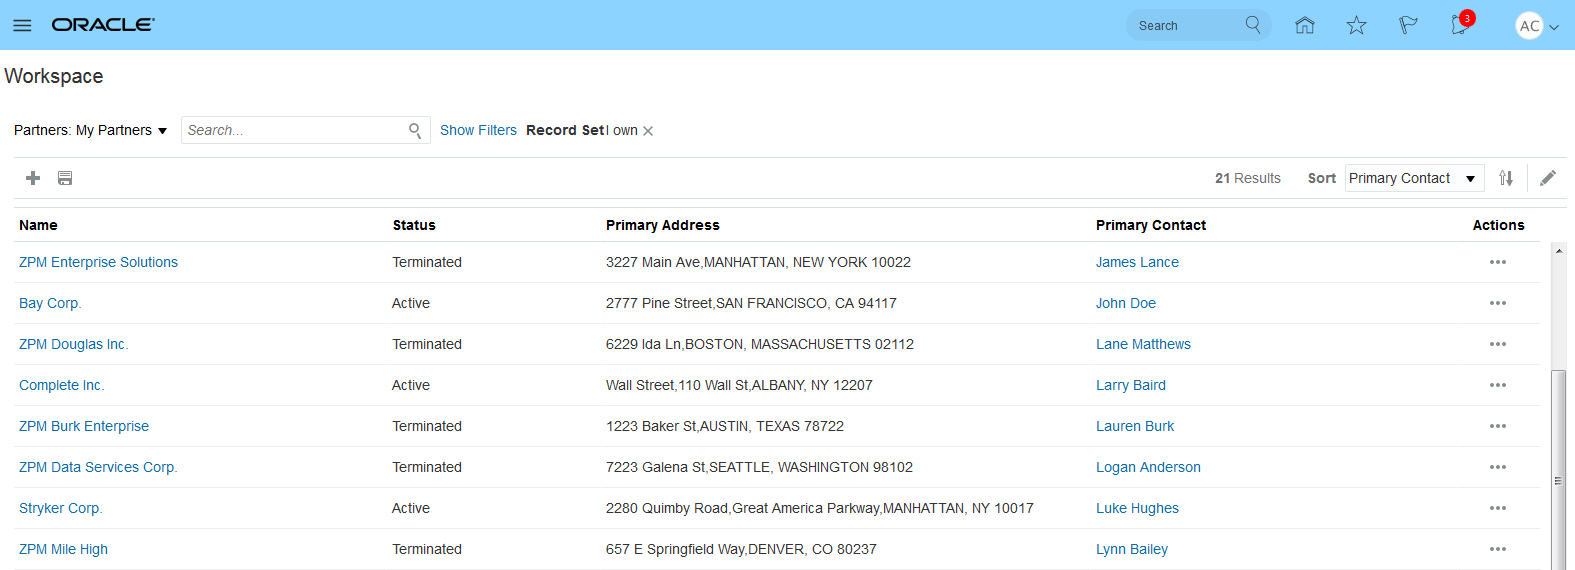
My Partners Saved Search
This release adds new administration capabilities to the Manage Saved Searches box. These capabilities let you assign saved searches and default saved searches to user roles. The Manage Saved Search box also features usability enhancements. As in previous releases, users can also set their own personal default saved search, and create their own personal saved searches.
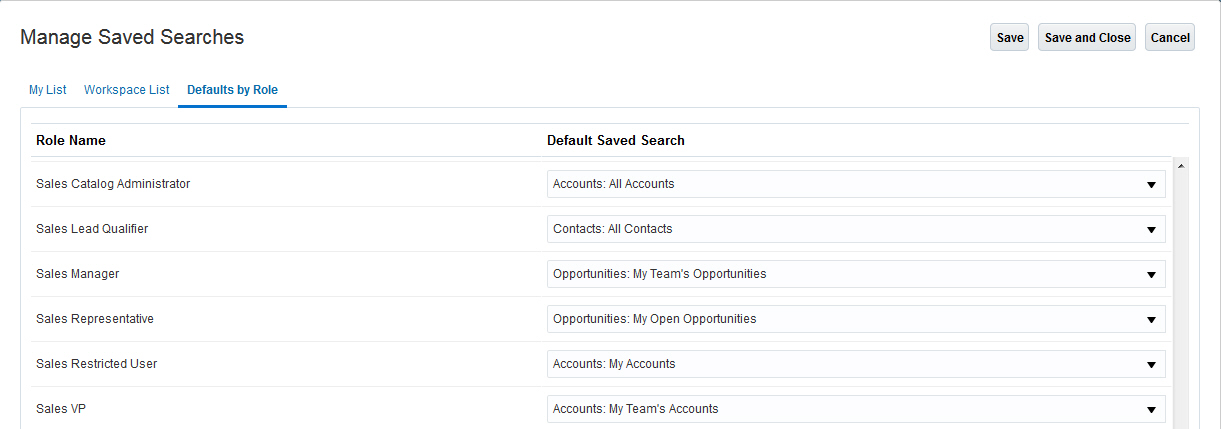
Set Default Saved Search by User Role Name
Additional search enhancements added in this release include:
- Enhanced keyword search capabilities including support for fuzzy search, stemming and partial term matching.
- Support for custom objects and fields in workspace.
Steps to Enable
Workspace is available only to an initial set of early adaptors. If you are interested in becoming an early adaptor, apply for access on the Engagement Cloud - Search and Workspace User Experience forum on Oracle Cloud Customer Connect.
Actionable Infolets Summary Views
Using the summary views for leads and opportunities, salespeople can quickly view a summary of their leads and opportunities to get better oriented for their day. This feature also helps salespeople prioritize work and easily take actions to help improve sales team efficiency and increase the sales pipeline.
The summary views available in actionable infolets for leads and opportunities let salespeople:
- View a graphical summary for the data aggregation corresponding to the top six filters selected for an actionable infolet
- Prioritize work to address immediate actions required on leads and opportunities
- Perform infolet-level actions such as Create Lead, Create Opportunity, and Refresh
Watch a Demo
Steps to Enable
No steps are required to enable this feature.
Key Resources
For more information, see the following:
- Actionable Infolets in the Oracle Engagement Cloud Implementing Sales guide.
- Using Actionable Infolets in the Oracle Engagement Cloud Using Sales guide.
Watch Actionable Infolets Enhancements Readiness Training
Actionable Infolet Extensibility Enhancements
The enhanced actionable infolet configuration feature lets sales administrators:
- Add predefined saved searches as view filters to the existing list of filters
- Show or hide record-level quick actions
This enhancement lets salespeople personalize their actionable infolets, such as:
- Use the show or hide feature to display only those fields that they need to see and use
- Use show or hide to display only those "quick actions" that they need to see and use
- Change the layout and size of columns, as well as the locations of the fields being displayed
- Use their own user-defined saved searches as view filters
- Define the number of records to display
- Drill down to other objects from exposed dynamic choice list (DCL) fields
Watch a Demo
Steps to Enable
You enable actionable infolet personalization by setting a profile option:
- Navigate to Setup and Maintenance > Offering: Sales > Functional Area: Sales Foundation > Task: Manage Administrator Profile Values.
- In the search region of the Manage Administrator Profile Values page, enter the profile option code ZBS_ENABLE_ACTIONABLE_INFOLET_PERSONALIZATION.
- Click Search.
- In the list that is returned, click on the profile option code link.
- Set the profile option value to Yes.
- Click Save and Close.
Key Resources
For more information, see the information about setting up actionable infolets in the Oracle Engagement Cloud Implementing Sales guide.
Watch Actionable Infolets Enhancements Readiness Training
Objectives on Business Plans Overview Tab
Display objectives on the overview tab of business plans and allow salespeople to more quickly see and drill into objectives without the need to click on a separate subtab. In addition, more attributes are available on objectives, including account, product group, and geography.
Steps to Enable
You set the profile option ZCA_SHOW_OBJECTIVES_IN_SUBTAB to specify where objectives are displayed. Use these steps:
- Sign in to the application as a setup user.
- Navigate to Setup and Maintenance > Offering: Sales > Functional Area: Sales Foundation > Task: Manage Administrator Profile Values.
- On the Manage Administrator Profile Values page, search for the ZCA_SHOW_OBJECTIVES_IN_SUBTAB profile option code.
- Set the value to N to display objectives on the overview tab or to Y to display objectives in a separate side tab.
- Click Save and Close.
Additional attributes, such as account, product group, and geography can be exposed on the UI using Application Composer.
Key Resources
For more information, see the topics on business plans in the Oracle Engagement Cloud Implementing Sales guide.
The model for objectives and objective splits is simplified to better support extensibility. You can now choose to enter objectives using only the Objective object. The dimensions of Geography, Product, and Account that were previously only available on the objective splits UI are now available on the objectives UI. This means a simpler user experience with fewer clicks, and allows you to take full advantage of the extensibility of objectives.
Steps to Enable
A new profile option ZCA_ALLOW_OBJECTIVE_SPLITS decides where objectives should be displayed. Here's how to set the profile option.
- Sign in as a setup user or as the sales administrator.
- Navigate to Setup and Maintenance > Offering: Sales > Functional Area: Sales Foundation > Task: Manage Administrator Profile Values.
- On the Manage Administrator Profile Values page, search for the ZCA_ALLOW_OBJECTIVE_SPLITS profile option code.
- Set the value to N to disable objective splits and simply use objectives or to Y to enable objective splits.
- Click Save and Close.
Role Information
- Sales Administrator
- Setup user
Public Unique Identifier (PUID) Support
Public unique identifier (PUID) functionality turns long, complex record database keys into values that are more easily read by users in the UI. All records in Oracle Engagement Cloud contain a unique primary key value. The applications use this system-generated value to efficiently access records throughout Engagement Cloud. But since these complex values are not well absorbed by users, PUIDs provide shorter, easier- to-absorb values. PUIDs are alternate keys that are exposed in the UI after you establish sequence generation. After setup, an appropriate, unique value is then defined for the PUID column.
PUID functionality defines the unique identifier for standard objects as well as custom standard objects in Engagement Cloud. Since these objects hold relationships with each other, the unique identifier for records in each object, regardless of relationship, recognizes the relationship as well.
PUID values are also used in RESTful web service calls and in the Standard Import process.
Steps to Enable
Review the REST service definition in the REST API guides to leverage (available from the Oracle Help Center > your apps service area of interest > REST API). If you are new to Oracle's REST services you may want to begin with the Quick Start section.
Key Resources
For more information, see the information about setting up PUIDs and sequence generation in the Oracle Engagement Cloud Implementing Sales guide.
Enable salespeople to initiate outbound calls and reach out to customers with a simple click of a phone number field in the applications. The sales applications then automatically log an activity and an interaction of the call when finished.
The Click-to-Dial feature is available for:
- Accounts
- Contacts
- Activities
- Leads
- Opportunities
NOTE: The ability to make calls require an additional integration with third-party computer telephony integration (CTI) providers.
Steps to Enable
To enable the ability to make calls you must integrate with third-party CTI providers.
Key Resources
For more information, see the information about configuring computer telephony integration in the Oracle Engagement Cloud Implementing Service in Engagement Cloud guide.
Accounts, Contacts, and Households
Enable salespeople to leverage smart data for accounts, dramatically improving their efficiency and the experience when creating accounts.
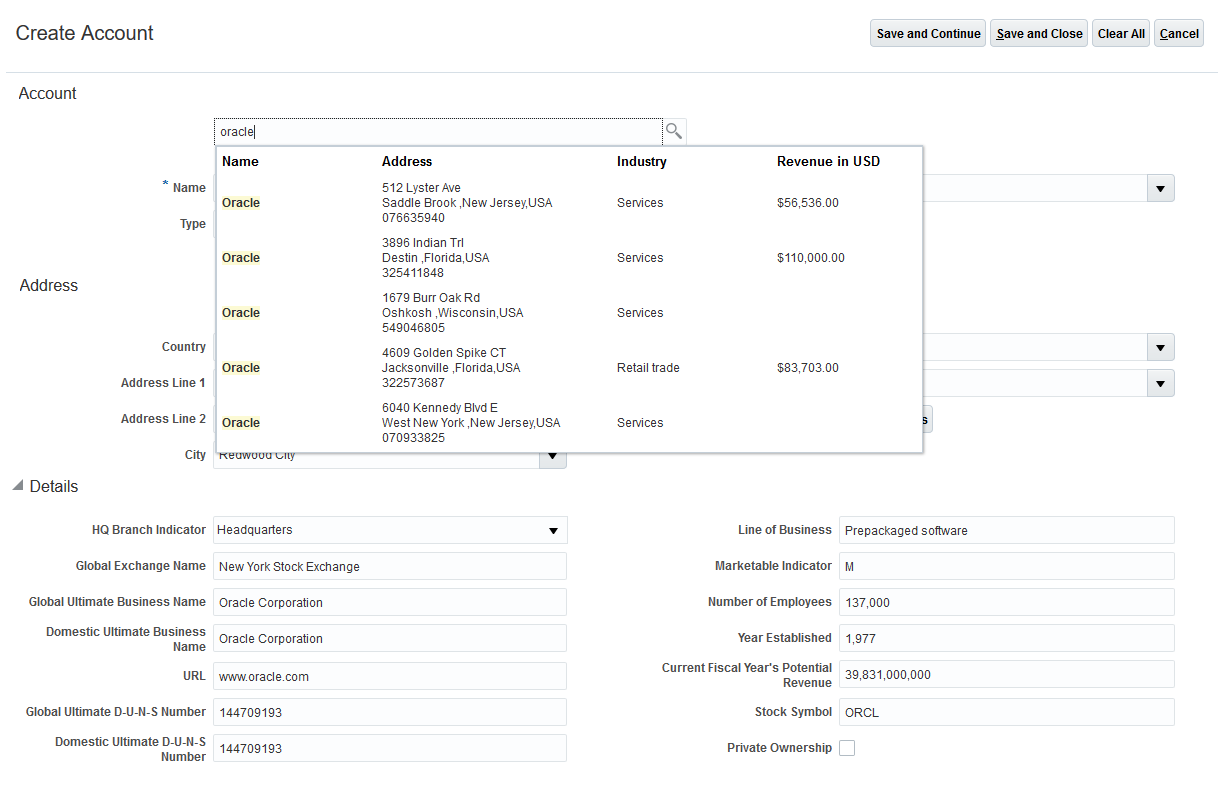
Smart Data
The following are the highlights:
- Clicks and keystrokes are greatly minimized during account entry in the account creation flow in Engagement Cloud.
- Data quality is maximized by retrieving current, accurate data from the trusted source Dun and Bradstreet.
- Salespeople enjoy a modern user experience by leveraging integration with Oracle Social Data and Insight Cloud Service (DaaS for Sales). The DaaS for Sales service autosuggests matching accounts and upon selecting an account it appropriately autofills values into over 90 account fields.
Watch a Demo
Steps to Enable
This feature is available by default to Engagement Cloud users who have purchased a separate DaaS for Sales per record license. Engagement Cloud customers can purchase DaaS for Sales per record license to get Smart Data for Accounts functionality and follow steps available here.
Key Resources
Watch Smart Data for Accounts Readiness Training
Enable salespeople to search and select validated addresses using type-ahead autosuggestion functionality with GBG Loqate data. The address data gets auto populated into the fields and salespeople can quickly add an address without keying in address details.
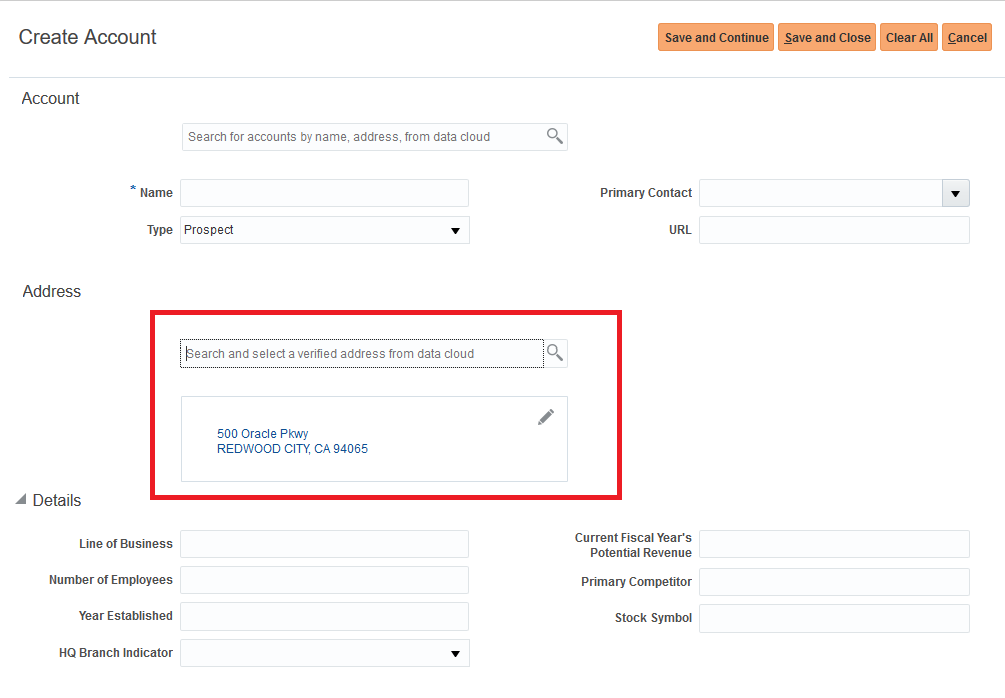
Smart Data
Watch a Demo
Steps to Enable
This feature is available by default to Engagement Cloud users who have purchased a separate separate Address Verification per record/unlimited record license. Engagement Cloud customers can purchase Address Verification per record/unlimited record license to get Smart Data for Addresses functionality and follow steps available here.
Key Resources
Watch Smart Data for Account and Contact Addresses Readiness Training
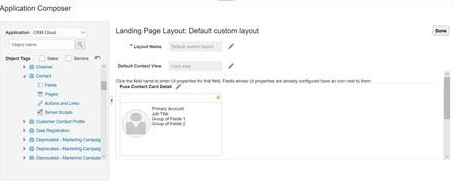
List View for Contacts Landing Page
Set the Contacts landing page to a list view by default for salespeople, instead of the current business card view.
Contacts Landing Page
Watch a Demo
Steps to Enable
Use the Contact object in Oracle Application Composer to configure the default list view for the landing page layout. This feature is enabled by the sales administrator as part of page layout setups for their users.
Tips And Considerations
When enabling the list view as the default view for the Contacts landing page, take into consideration another parameter found on the configuration page: the ability to hide the list view. Oracle recommends that you do not enable both the parameters (enable list view and hide list view) simultaneously. If you do, the Contacts landing page will be blank.
Key Resources
For more information, see the information about enabling the Contacts list view in the Oracle Engagement Cloud Implementing Sales guide.
Watch Contact Landing Page Readiness Training
Role Information
- Sales Administrator
Asset RESTful Support and Quick-Create Assets
The Asset REST API has been enhanced to include the ability to:
- View asset-related leads, opportunities, service requests, and activities.
- Filter assets based on the supplied data or your own company-defined Asset data.
- Select the Asset owner based on the customer types of Account, Contact, or Household.
Additionally, users are able to "quick create" activities for assets. In an earlier release, Oracle introduced the ability to manage activities for assets.
Steps to Enable
The activity quick create actions on the Assets detail page are hidden by default. You enable them using Oracle Application Composer.
Key Resources
For more information, see the information about assets in the Oracle Engagement Cloud Implementing Sales guide.
Improved Product Data Synching Between Sales and CPQ Cloud
Sales users can create quotes based on product data captured early on in the deal cycle. The product interest identified during lead nurturing and early stages of the opportunity are mapped to unconfigured models in Oracle Configure, Price, and Quote (CPQ) Cloud. When sales users create a quote from an opportunity, the application creates quote lines on unconfigured models that users can use to initiate the configuration.
NOTE: You must subscribe to Oracle CPQ Cloud.
Steps to Enable
- You can take advantage of this feature by implementing the updated Sales-CPQ integration template. In addition, you must enable this feature using the setup task Manage Sales Cloud and CPQ Cloud Integration.
- Select the Synchronize revenue data check box for the active CPQ instance.
- Next, perform the following steps:
- Set up the CPQ models and model attributes that correspond to the applicable products and product groups in the Sales Catalog.
- Enable two new attributes, Model and Model Attribute, in the Product and Product Group web UI using App Composer
- Map products and product groups to CPQ models and to the corresponding model attributes if they need to be configured within the quote.
NOTE: The mappings can be done using the Products and Sales Catalog web UI, REST APIs, or file-based import.
- Ensure that all the opportunity revenue fields that are mapped with quote fields as part of the integration setup are identified as mapped revenue fields in the setup task Manage Sales and CPQ Integration. This mapping ensures that the mapped opportunity revenue fields are disabled after the opportunity is quoted and that accurate data is obtained from the associated quote.
- Ensure that the integration user doing the CPQ setup of opportunity and account data has the Sales Administrator job role or has the function privilege Manage Opportunity Revenue Lines of a Quoted Opportunity, so that he has access on a quote to add, update, or delete product data on a quoted opportunity.
Tips And Considerations
- After an opportunity is quoted, sales users cannot add, update, or delete revenue lines from the opportunity. They can, however, add, update, delete, and configure product data within the associated quote and then sync it with the opportunity. The opportunity revenue line fields that are mapped with quote fields are disabled for edit within the opportunity -- the quote is the source of data. Other revenue line data, such as sales credits, can continue to be edited within the opportunity.
- Sales users can add any product or product group to the opportunity. However, as the deal progresses to the quoting stage, sales users must select a product group that is quotable (meaning it has a CPQ model mapped to it) in order to continue creating the quote.
Role Information
- Sales Administrator
- Setup user
Partner Relationship Management
Custom UIs, MDF Integration with REST Services
Build custom UIs and integrate with Marketing Development Fund (MDF) objects using RESTful services. REST services are now available for all MDF objects. These objects are:
- Budget
- Fund Request
- Claim
Steps to Enable
Review the REST service definition in the REST API guides to leverage (available from the Oracle Help Center > your apps service area of interest > REST API). If you are new to Oracle's REST services you may want to begin with the Quick Start section.
Key Resources
For more information, see REST API for Oracle Sales Cloud.
RESTful Service to Create and Manage Resource Users
Use a RESTful service to create and manage users as resources. The Resource User service allows the creation of worker, person party, resource usage, and user provisioning, along with reporting hierarchy support. You can manage resource users to suit various business needs and to facilitate integration.
With the Resource User REST service you can do the following:
- Create a CRM user, extending existing capability supported in the employee resource file import. This includes:
- Resource User
- Resource Organization
- Resource Hierarchy
- Role provisioning
- User provisioning
- Manage or update users. This includes
- Update resource user details
- Activate or de-activate users
- Support extensibility
Steps to Enable
Review the REST service definition in the REST API guides to leverage (available from the Oracle Help Center > your apps service area of interest > REST API). If you are new to Oracle's REST services you may want to begin with the Quick Start section.
Key Resources
For more information on REST APT, see REST API for Oracle Sales Cloud.
Reduce onboarding time and territory re-alignment overhead with the Simplified Geographies feature. Available for some Oracle Engagement Cloud territory implementations, this feature lets you decouple territory geography coverage and address assignment from the Oracle Customer Data Management geography master data. The decoupling lets administrators set up territories with fewer prerequisites and dependencies.
The Simplified Geographies feature simplifies the territory setup effort by introducing a new dimension called Address. The Address dimension simplifies territory setup by:
- Removing the dependency on master geography data, meaning you no longer need to set up Customer Data Management geographies as a prerequisite. An additional benefit is that it then becomes straightforward to handle duplicate postal code data, for example, when a postal code straddles city, county, or state boundaries.
- Allowing partial address data to be assigned to territories successfully.
- Providing convenient shortcuts to define coverage using postal code patterns or range.
Watch a Demo
Steps to Enable
The geographies dimension must be disabled in order to enable this feature. Please contact customer support for guidance if you already have territories defined using the geographies dimension.
If you enable this feature the following features are not available:
- Territory Management
- Territory Metrics
- Assignment Preview
- Territory Validation
Key Resources
Watch Simplified Geographies Readiness Training
Role Information
- Sales Administrator
- Setup user
Ability to Deploy Credit Rules in Incremental Mode
Run the Deploy Credit Rules process in Incremental mode, using one of the following UI tasks:
- Deploy Credit Rules in the Participant Assignment work area
- Run All Transactions Processes in the Credit and Earnings work area
Previously, the process could only be run in Total mode, meaning the entire set of rules were deployed. With this change, the process can be run in Incremental mode, which means only the changes done since the last deployment are processed. However, the end result is the same in both the modes.
You can still run the Deploy Credit Rules process in Total mode using the scheduled processes UI.
Steps to Enable
No steps are required to enable this feature.
Role Information
Compensation Manager
Rule Number for Incentive Compensation Rules
Use public unique identifier (PUID) functionality to generate rule numbers in Oracle Incentive Compensation. Rule numbers provide a meaningful reference to identify a rule, rather than using a complex record ID. Rule numbers allow reference information from the source system to be shown in Incentive Compensation.
Rule numbers are exposed on the UI as alternate keys. Using PUID functionality, the rule numbers are generated automatically by the application based on your sequence generator setup.
Rule numbers can also be provided by the calling program of web services during object creation. If not provided in this way, they are generated by the application using sequence generator setup.
Rule numbers are available for the following Incentive Compensation rule hierarchies:
- Credit rules
- Classification rules
- Rollup rules
- Team rules
- Role assignment rules
- Analyst hierarchies
Steps to Enable
Set up PUID functionality according to the resources information listed here.
Key Resources
For more information, see the topic about setting up PUIDs and sequence generation in the Oracle Engagement Cloud Implementing Sales guide.
Rules Hierarchy Details Reporting
Create and run reports on rule hierarchies related to Classification, Credits, and Rollup rules. Verify rule assignments, qualifying criteria, and other important rule attributes.
Incentive Compensation Rules Real time OTBI Subject Area has been enhanced with the following capabilities to help a Plan Administrator better manage Incentive Compensation Rules that are defined in the application:
- Report Parent qualifying criteria for a Rule independent of its assignments
- Report Rules that have no assignments
- Report rules that have from a Parent node

Incentive Compensation - Rules Real Time Subject Area
Steps to Enable
For more information, see the Creating and Administering Analytics for Sales guide.
RESTful Services for Incentive Compensation Objects
View, build, and maintain Incentive Compensation business objects using these RESTful services:
- Earnings: Get Incentive Compensation earnings.
- Pay Groups: Create and maintain pay groups and assign roles to them.
- Payment Plans: Create and maintain payment plans and assign roles to them.
- Rate Table Values: Create and maintain rate table values for a rate table and scorecard.
- Rule Hierarchies: Create and maintain classification rules, direct credit rules, rollup credit rules, team credit rules, analyst hierarchy rules, and participant assignment rules.
Steps to Enable
Review the REST service definition in the REST API guides to leverage (available from the Oracle Help Center > your apps service area of interest > REST API). If you are new to Oracle's REST services you may want to begin with the Quick Start section.
Role Information
For more information on REST API for Incentive Compensation objects, see REST API for Oracle Sales Cloud.
Control Printing of Amended Contract Terms
Contract layout templates determine how your contracts are presented, but now you have more control over how amendments made during the contract life cycle are presented. You can choose to print all of your terms and conditions while the full contract is under review, or, once the negotiation cycle is at a certain point, you can choose to print only the amendments made to the contract. You can do this easily on an individual contract without having to adjust the terms layout template tied to your contract type.
Steps to Enable
If you enable the Don't print contract terms amendments option on the Contract Terms tab for your contract, the contract layout templates are ready to use this feature and print the contract accordingly. If you have personalized your contract layout templates, you will need to copy the latest layout template and reapply your changes.
Key Resources
For more information, see the Oracle Engagement Cloud Implementing Enterprise Contracts guide.
View and Share Quotes from Mobile
Salespeople can quickly access quotes related to their accounts and opportunities from CX Cloud Mobile. Additionally, they can share the proposal document with the team for feedback, or email proposals to customers from the mobile app to speed up the negotiation cycle.
Steps to Enable
Enable the Quotes subtab in Opportunity detail and Account detail views from Oracle Application Composer's mobile application setup work area
Prerequisite
Oracle Configure, Price, and Quote (CPQ) Cloud integration must be established in Oracle Engagement Cloud.
Steps
Enable the Quotes subtab in Opportunity detail and Account detail views from Oracle Application Composer's mobile application setup work area.
- Sign in to Oracle Engagement Cloud and activate a sandbox.
- Navigate to Application Composer.
- Select Mobile Application Setup (under the Common Setup area) and then select CX Cloud Mobile.
- In the Application Features section, select Opportunities and then select Detail.
- Duplicate the Standard layout
- Provide a name for your new layout.
- Click on the Related Item bar at the bottom of the center console.
- In the Related Items section on the right panel, search for Quotes and drag it to the center console, and re-order it as needed.
- Click Save.
- Repeat steps 4-9 for Accounts.
- Download the sandbox to the mobile device and validate the changes.
- Publish the sandbox.
Key Resources
For setup details, see the information about setting up mobile applications and setting up quotes in the Oracle Engagement Cloud Implementing Sales guide.
Mobile Push Notifications for Sales Objects
Engage sales representatives with split-second alerts to critical sales events that are instantly seen on the best digital real estate—the user's mobile screen, even when the device is locked. A notification is a message that appears outside the CX Cloud Mobile app; you don't have to be actively using the app or your mobile device to receive them.
Once an Administrator enables Sales Mobile Notifications, they can define notification triggers as Groovy scripts in Application Composer based on their unique business requirements. When a condition is met, the server pushes updates to the user's device in real time. For example, the server automatically sends a message to a sales representative as soon as an Account, Contact, Lead, Opportunity or Task has been assigned to them so they can nurture prospects into customers sooner.
You can see push notifications as a banner on the lock screen, at the top of the screen while using the device, and in your notification log. Push notifications look like Short Message Service (SMS) text messages, but they only reach users who have installed your app. Unlike texts, users can tap a notification to open your app to the related detail page. Compared to SMS, notifications are more straightforward to produce and cheaper than text messaging.
Use push notifications as part of your engagement strategy to drive adoption. Additionally:
- Deliver up-to-the-minute alerts to mobile devices, even when those devices are locked, or the CX Cloud Mobile is not actively being used.
- Configure automated notifications that encourage recipients to focus on activities that will result in closing more deals.
- Reduce turnaround on time-sensitive tasks with call-to-action messaging.
Both iOS and Android support push notifications.
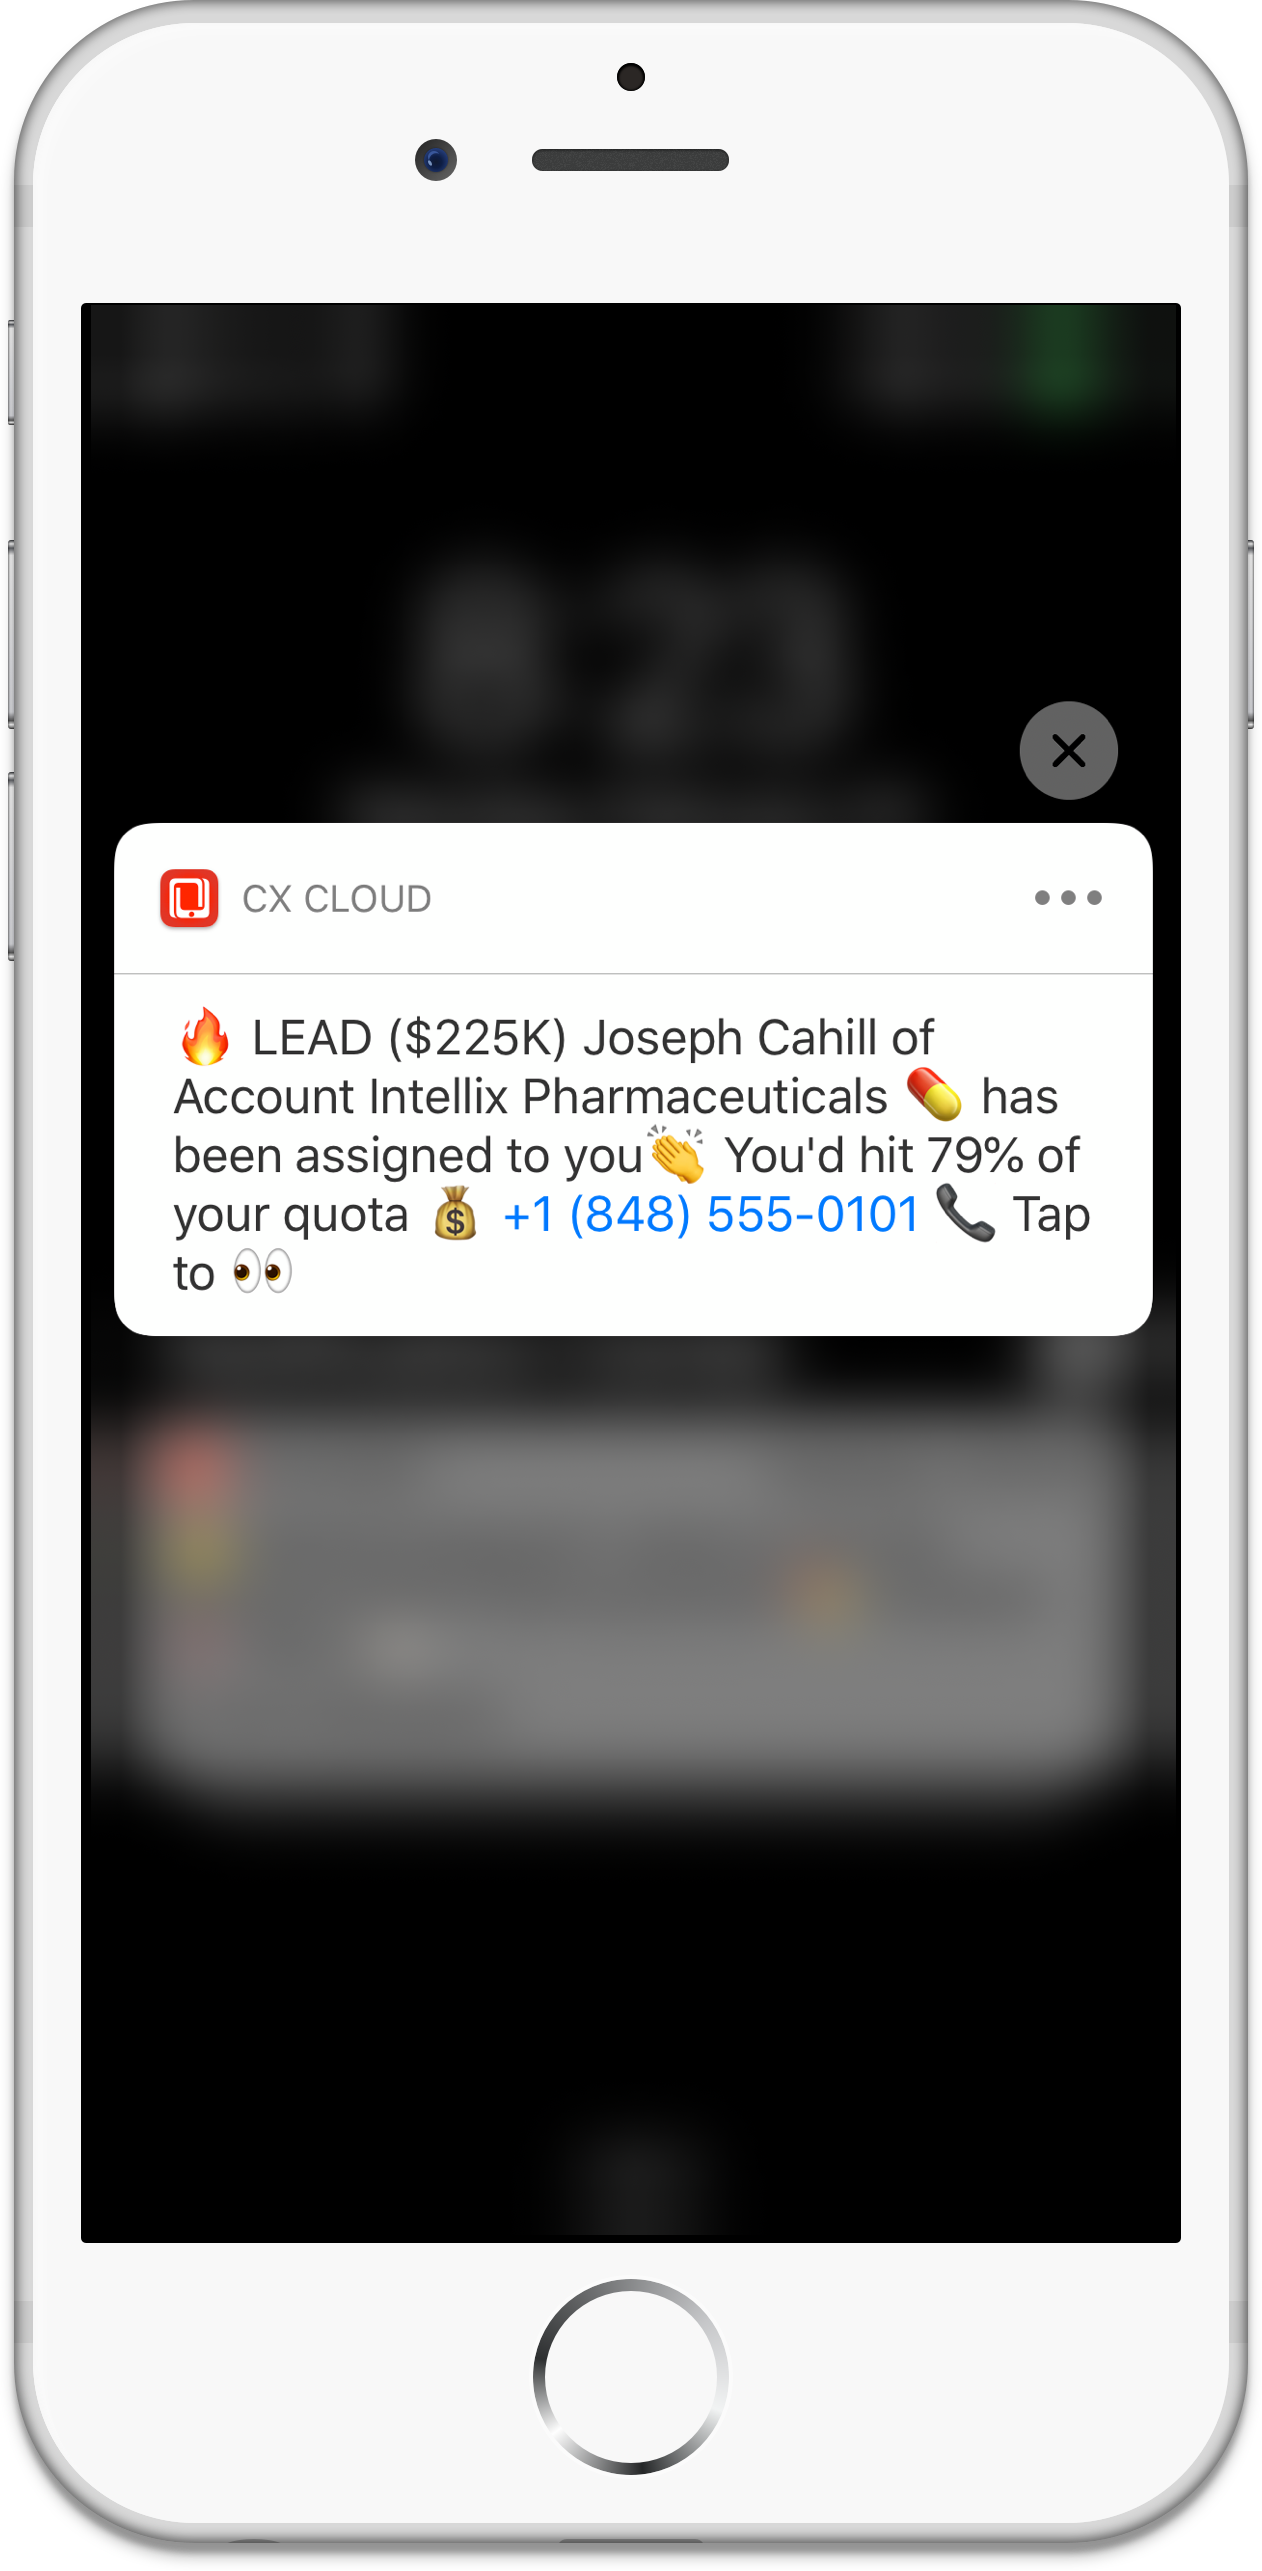
View Push Notifications on Your Lock Screen and in Your Notifications Log
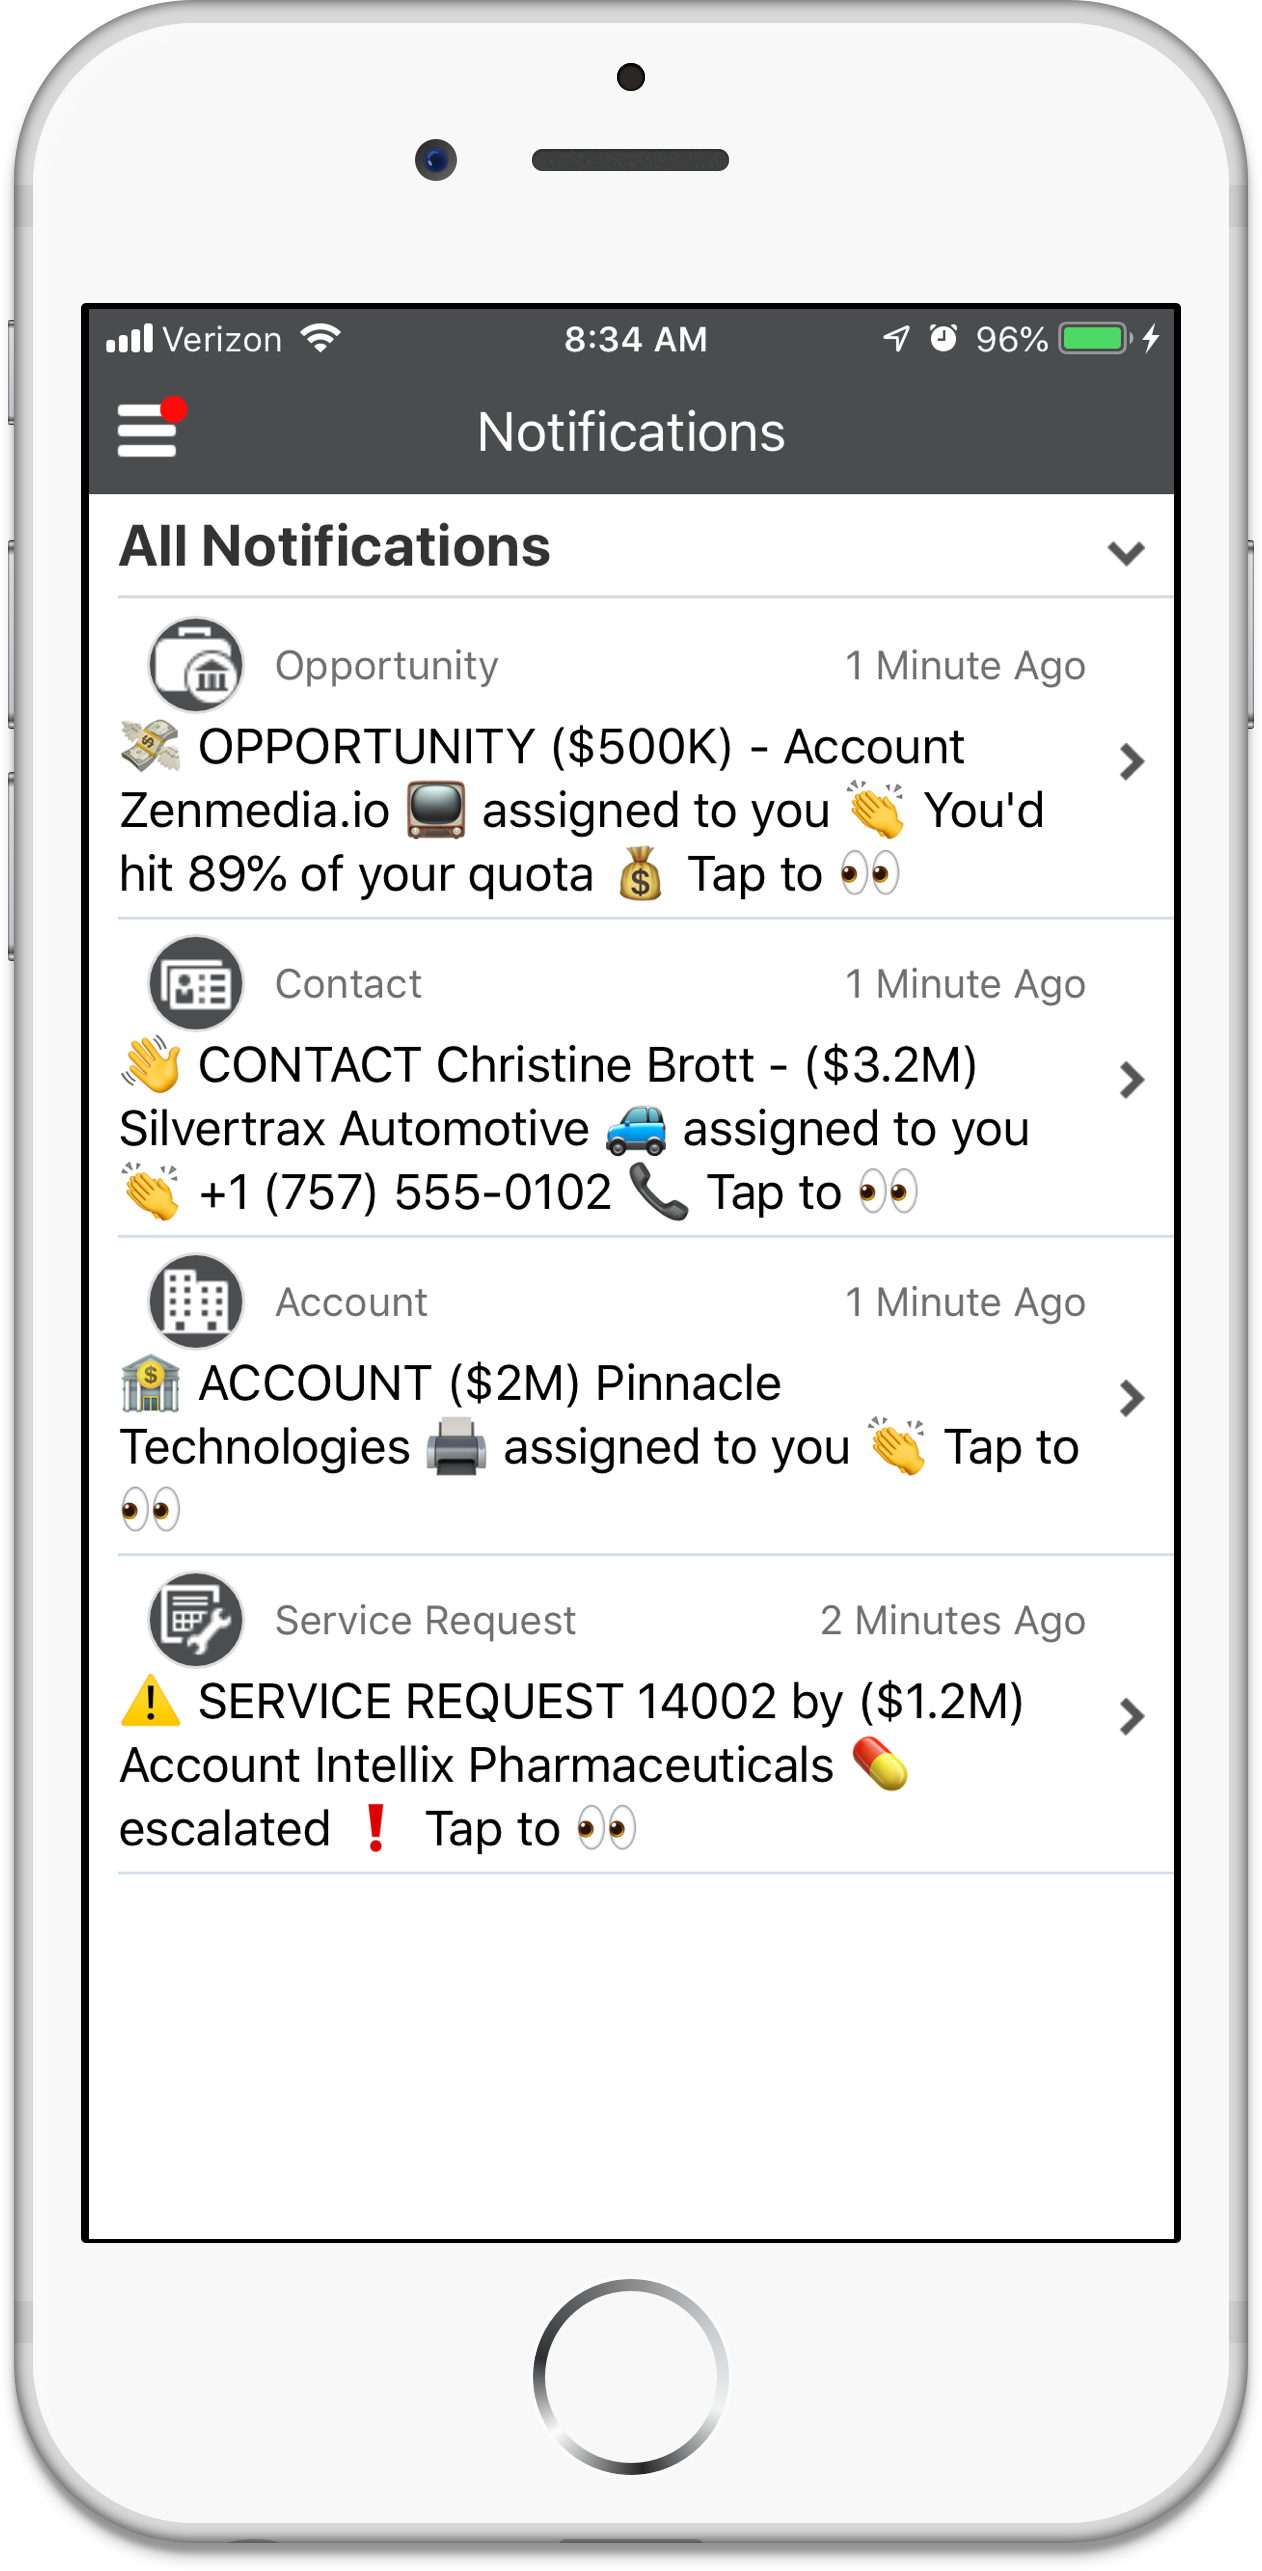
View All Your Notifications as a List Within the CX Cloud Mobile App
Steps to Enable
You can enable smartphone notifications to be triggered automatically when certain business events occur in the CX Cloud Mobile application, or Engagement Cloud application, such as notifying a sales representative when they have been assigned a contact or lead. Mobile push notifications provide timely information, whether the device is locked or in use.
There are two parts to enabling push notifications for sales objects:
- Enabling the notifications feature for sales objects.
- Creating Groovy scripts that will trigger notifications for your specified sales object.
Enabling the Notifications Feature for Sales Objects
Firstly, you need to enable the notifications feature in Setup and Maintenance, as follows:
- Ensure that you have one of the following roles: Implementation Project Manager, Functional User, or System Administrator roles.
- Navigate to Setup and Maintenance.
- Select the Sales offering.
- Find the Sales Foundation functional area and click the arrow.
- Select Change Feature Selection.
- Select Sales Notifications and then select Mobile Notifications.
Creating Groovy Scripts
Next, you need to create Groovy scripts that define the trigger for the notification.
- Ensure that you have a Sales Administrator or Sales Implementer role.
- Create a sandbox, or select an existing one, and click Set as Active to activate the sandbox. The sandbox is designated as the active sandbox. For more information about sandboxes, see the Application Changes Life Cycle > Sandbox Manager chapter of the Oracle Engagement Cloud - Extending Sales and Service guide.
- Open Application Composer by selecting Application Composer under the Configuration category in the Navigator menu.
- Under the Objects menu, select Standard Objects and then the object you want to create a trigger for. You can create a trigger for the following objects: Accounts, Contacts, Leads, Opportunities, or Tasks.
- Select Server Scripts and the Server Scripts Account page opens.
- Click the Triggers tab.
- From the Action menu, click Add. The Create Object Trigger page is displayed.
- Create a Groovy trigger script. Specify the Name, Error Message, and Trigger Definition details.
For help creating Groovy scripts, see Using Groovy Scripts chapter of the Oracle Engagement Cloud - Extending Sales guide.
Debugging Groovy Scripts
Within your Groovy scripts, all your println statements go to the runtime messages. To view the runtime log and debug your Groovy script, do the following:
- Within a sandbox, navigate to Application Composer.
- Under Common Setup, select Run Time Messages. The Run Time Messages section is displayed.
- Select the Enable Application Script Logging.
- Trigger your notifications.
If the Groovy script has appropriate println statements, you receive runtime messages when you navigate back to the Run Time Messages section in Application Composer.
Tips And Considerations
If you're creating a new object, and you want to trigger a notification when the object is created, it's best to use the trigger type Before Insert to Database. However, some of the "before" trigger types do not have all the attributes exposed, resulting in some fields being blank. To debug your triggers if you're not getting the expected results, follow the steps in the section "Debugging Groovy Scripts".
The isAttributeChanged() function works only for the "before" trigger types. The workaround for the "after" trigger types involves retrieving the old value before the database is updated, then retrieving the new value after the update, and then comparing the two values to see whether the attribute is changed. However, this workaround works only for high-level attributes such as CriticalFlag and Status. This workaround may not work for the ViewRow attribute, for example, when you're retrieving the team from a service request.
Control Notifications on Your Mobile Device
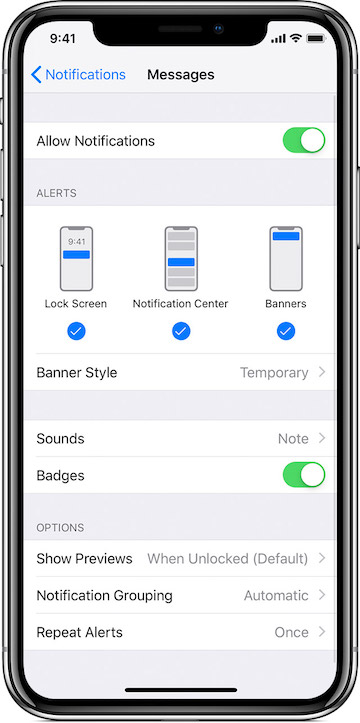
For both iOS and Android, you can control how you're notified and how notifications appear on your device for CX Cloud Mobile.
Firstly, you need to enable notifications for CX Cloud Mobile in your device’s Settings. Then you can see push notifications as a banner on the lock screen, at the top of the screen while using the device, and in the device’s notifications log.
NOTE: Settings can vary by device. For your device's details, contact your device manufacturer.
- In your native device, go to Settings > Notifications.
- Choose how to show notification alerts for CX Cloud:
- On Lock Screen
- Badges or Notification Dots
- Banners
Manage iOS Notifications
Key Resources
For more information about enabling push notifications, see the Oracle Engagement Cloud Implementing Sales guide.
For help creating Groovy trigger scripts, see the Using Groovy Scripts chapter of the Oracle Engagement Cloud - Extending Sales guide.
Role Information
To configure notifications, administrative privileges are required.
NOTE: If you are interested in using Oracle Sales Assistant, apply for access on the Engagement Cloud – Oracle Sales Assistant forum on Oracle Cloud Customer Connect.
Integrate Oracle Sales Assistant chatbot with Oracle Engagement Cloud to let salespeople view and act on sales information via SMS. With Oracle Sales Assistant, users can:
- Review sales information to help plan their day.
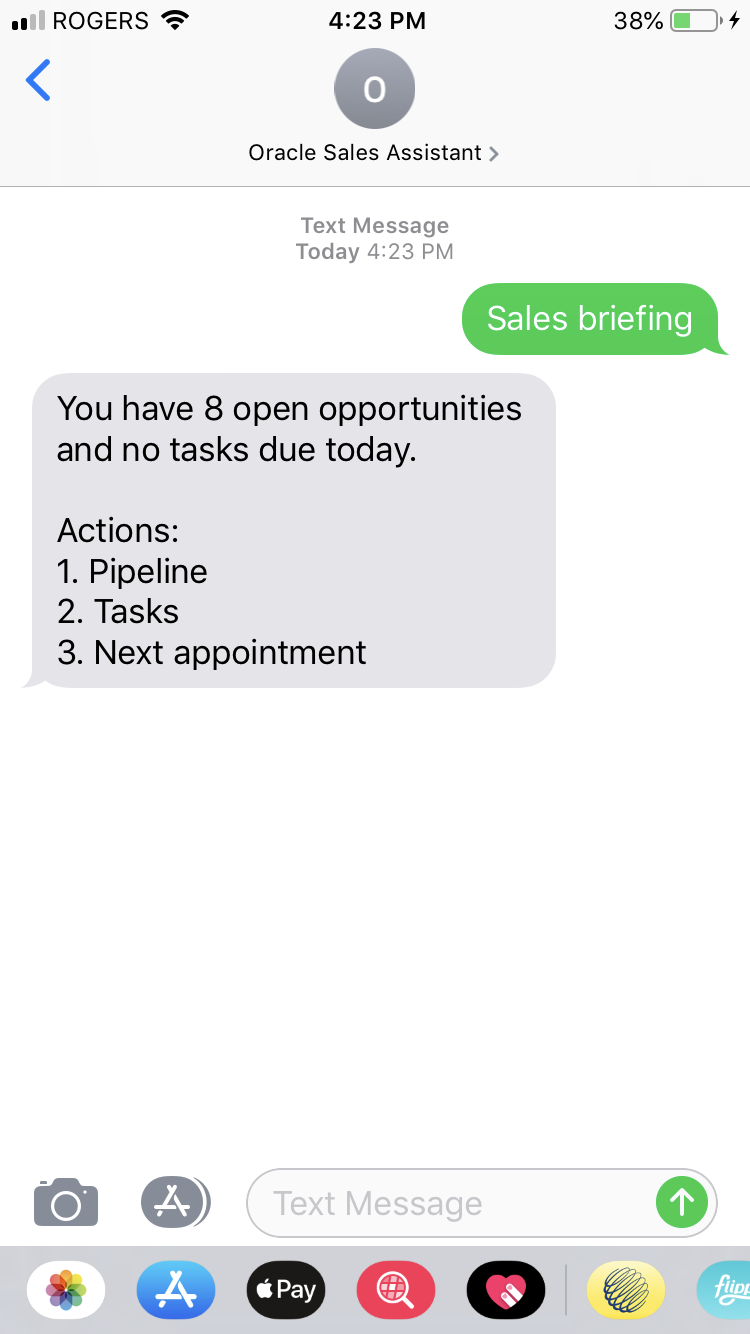
Sales Briefing
- Get a briefing on their next sales appointment.
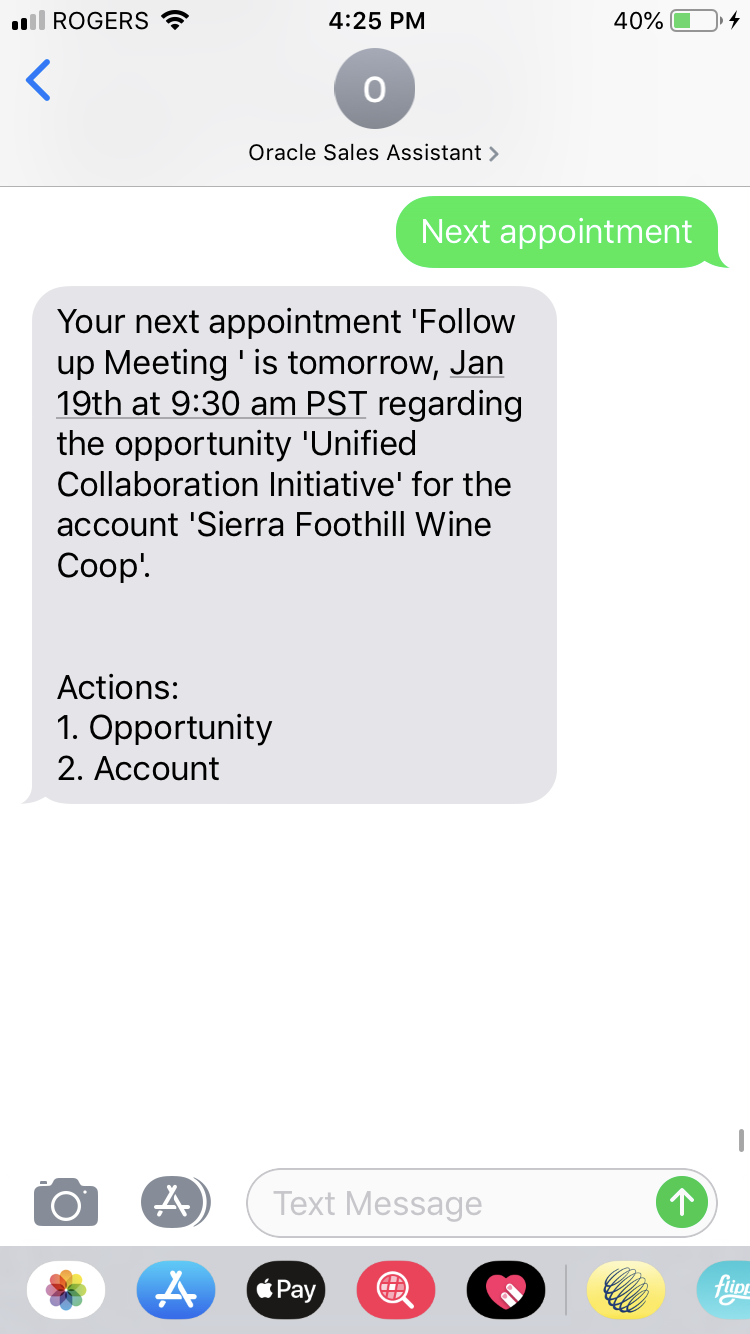
Next Appointment Briefing
- Follow up on appointments by logging call reports, scheduling appointments, and creating tasks.
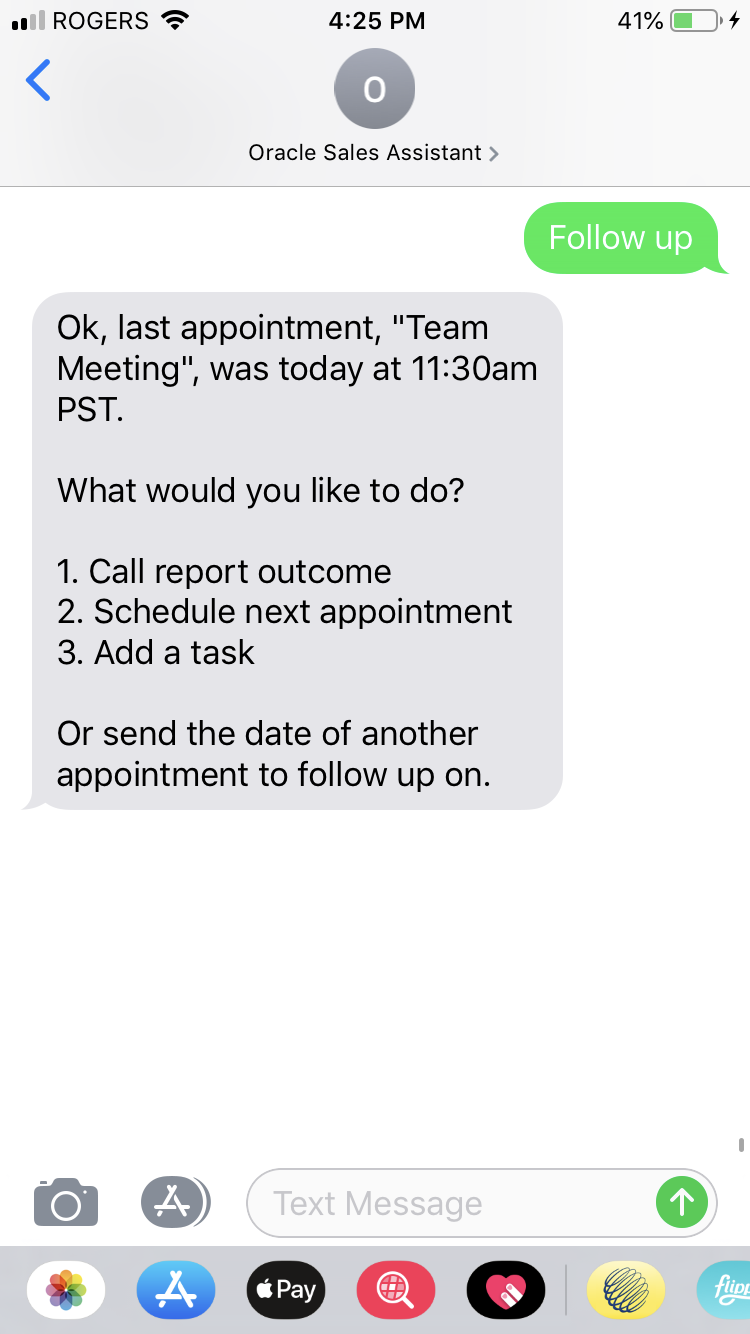
Follow-Up
- View their pipeline for the current fiscal quarter (as well as other closed periods).
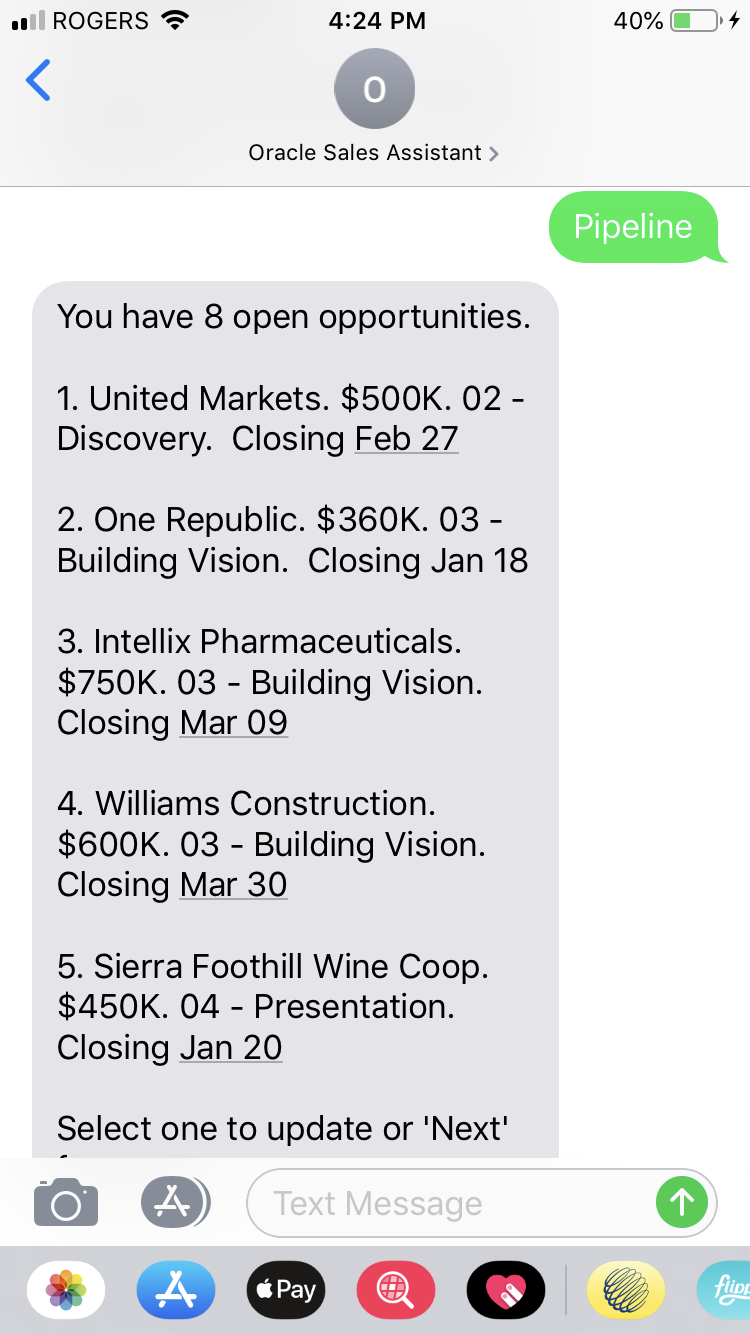
View Pipeline
- Act on opportunities, accounts, or tasks. For example, they can add notes to an opportunity or account, update a sales stage or close date, or mark a task as complete.
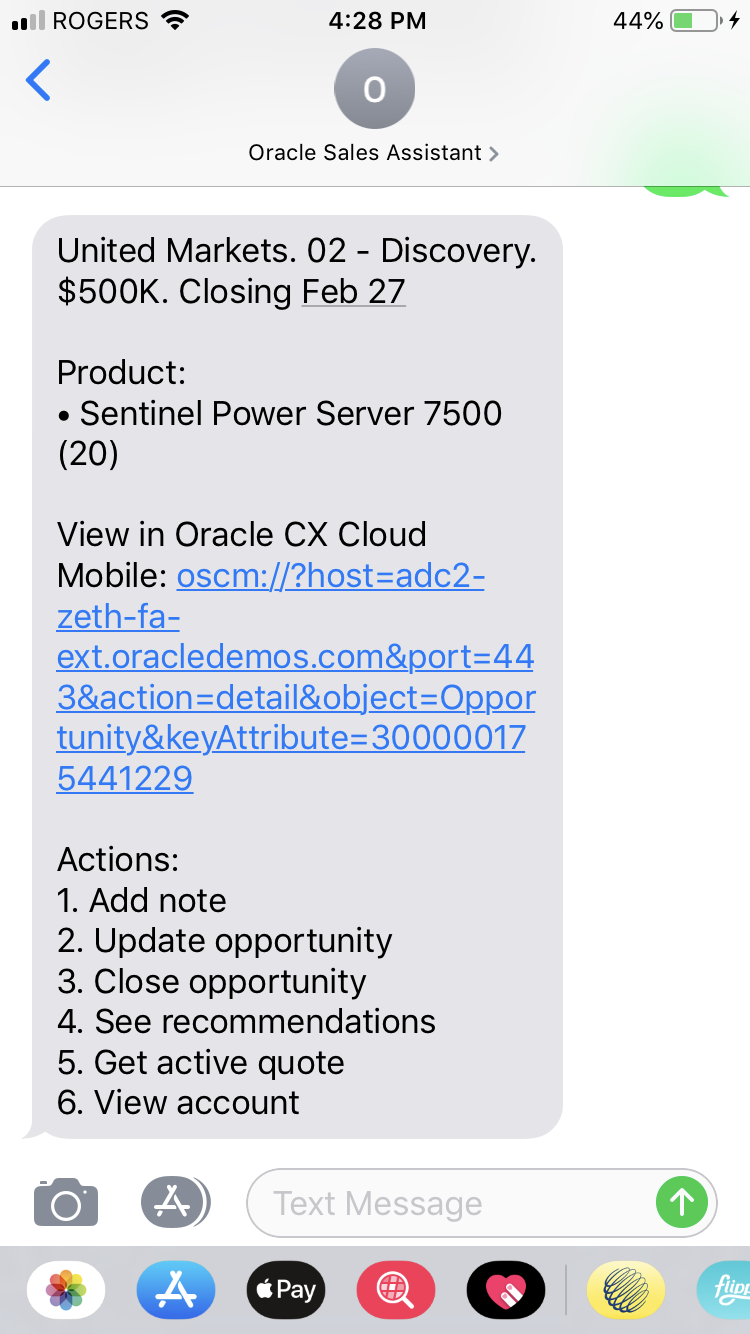
View Opportunity Details
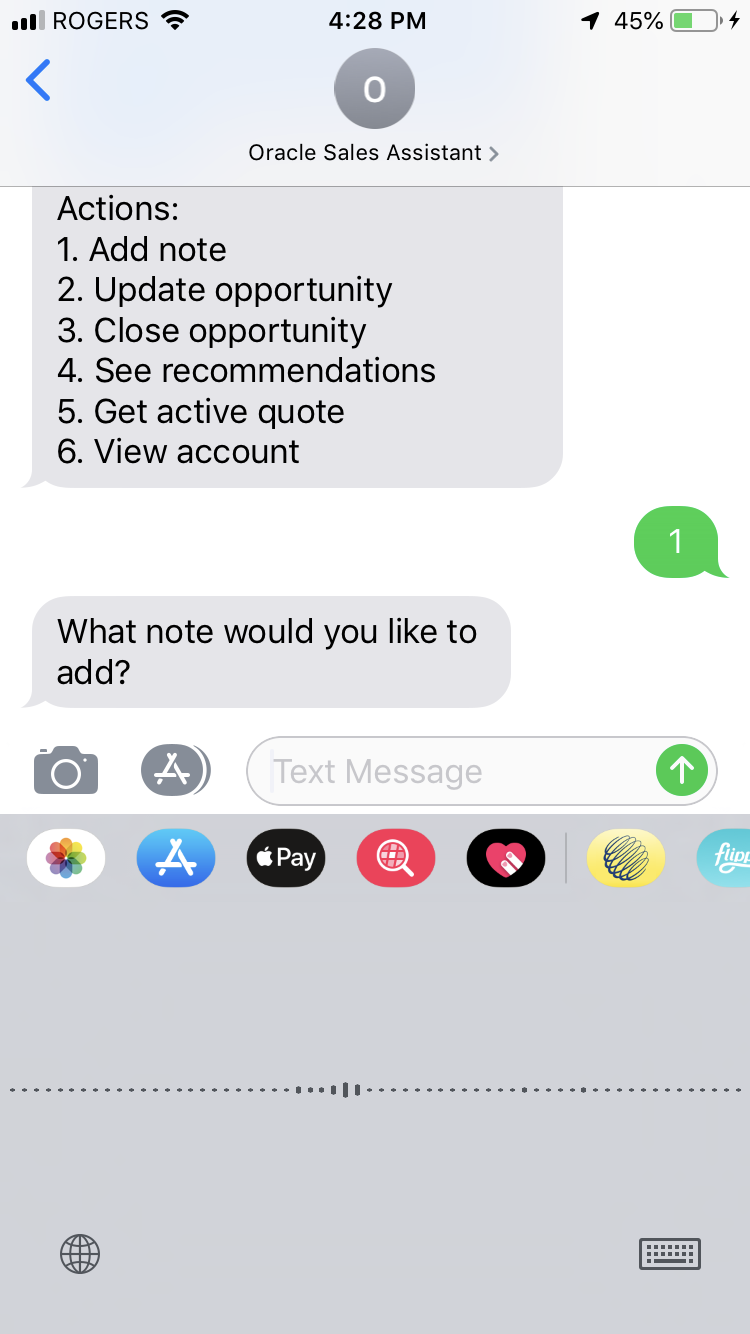
Add Note via Speech-to-Text
The following are some sample phrases that you can send to Oracle Sales Assistant:
- Sales briefing
- Next appointment
- Follow up
- Show my pipeline
- Show opportunity <opportunity name>
- Show account <account name>
- What are my overdue tasks?
Steps to Enable
Oracle Sales Assistant requires the purchase of Oracle Digital Assistant for Oracle SaaS SKU. It is available as a skill in Oracle Digital Assistant skill store.
There are provisioning and setup steps required, and will be provided with the purchase of the SKU.
Key Resources
For more information about Oracle Digital Assistant, see Oracle Help Center.
Sales Cloud for Office 365 Enhancements
Several enhancement are available in Sales Cloud for Office 365. These enhancements are intended to simplify the home page and make better use of the space available in the side panel, as well as make the UIs behave more consistently with how the desktop/simplified UI behaves.
Specifically, the following enhancements are available:
- The home page is redesigned to make better use of space and to enable better usability.
- Setup of Sales Cloud for Office 365 is available in Setup and Maintenance (Functional Setup Manager).
- Email synchronization saves the email body as an attachment.
- Task synchronization supports synchronization of all associated attachments.
- Sharing of appointments and emails takes into account any configurations an implementation has done on the Activity object.
Steps to Enable
To learn more about this feature, visit the Implementing Sales guide, available on the Oracle Help Center.
Key Resources
For more information, see the chapters about Office 365 in the Oracle Engagement Cloud Implementing Sales and Using Sales guides.
Ability to Create and Migrate Custom Roles
View and identify custom roles that are missing in the target environment but available in the source environment. This feature includes the ability to create custom roles in the target environment during the Configuration Set Migration (CSM) import process. Oracle Engagement Cloud, Oracle Enterprise Resource Management, and Oracle Supply Chain Management custom roles can be created prior to CSM import. This feature makes the CSM a more flexible migration tool, where missing roles are identified and created prior to import, thereby preventing errors upon CSM import.
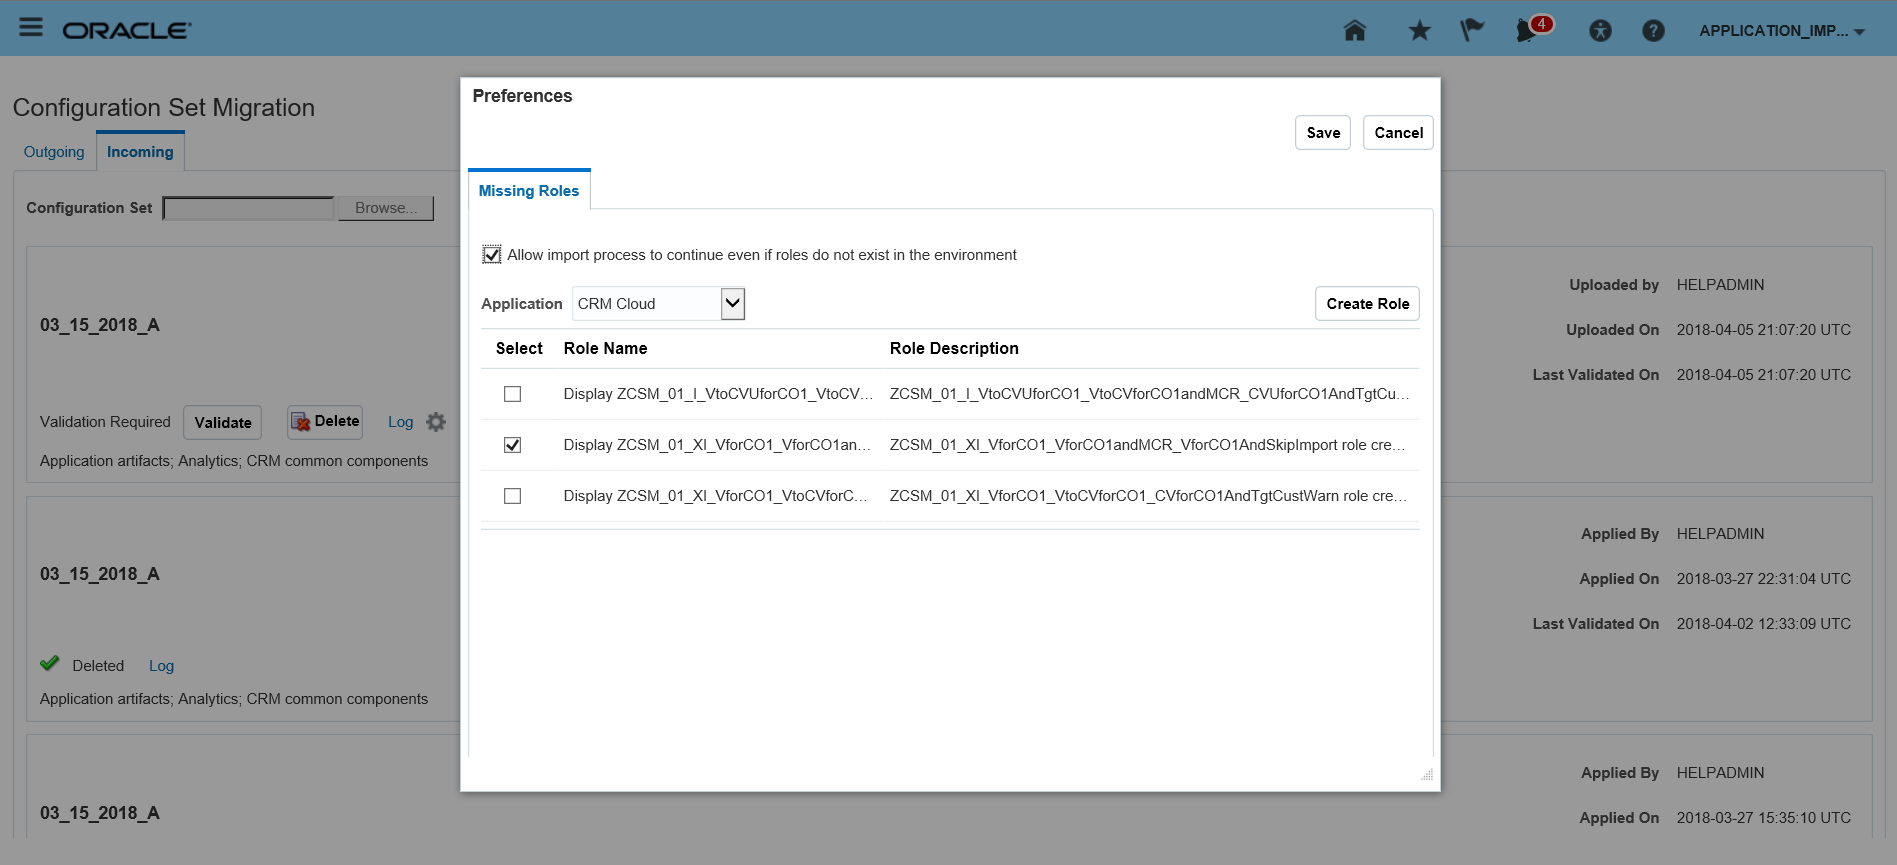
Details Page
Steps to Enable
Leverage the Applications Composer to expose / adjust page layout and attributes. To learn more about extending your application using Applications Composer visit Oracle Help Center > your apps service area of interest > Books > Configuration and Extension.
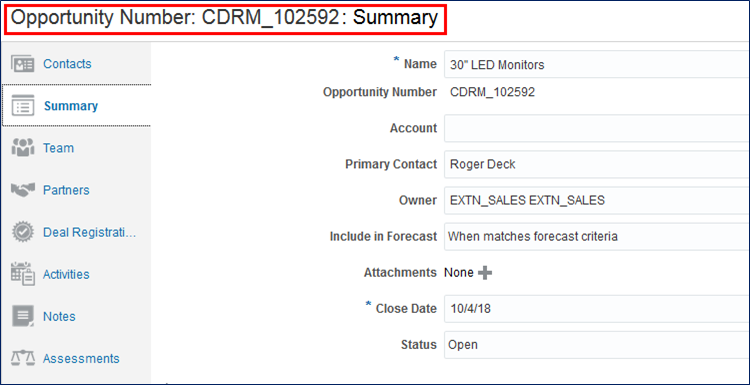
Page Title Configuration for Company-Defined Details Page Layouts
Configure page titles for your company-defined detail page layouts. Configuring page titles lets you display additional and more relevant information to your users. This feature is available for standard and company-defined objects. You can choose a specific field and its label to be the title of the new page layout, and you can revert a configured title to its default value.
Configure page title view at design time:
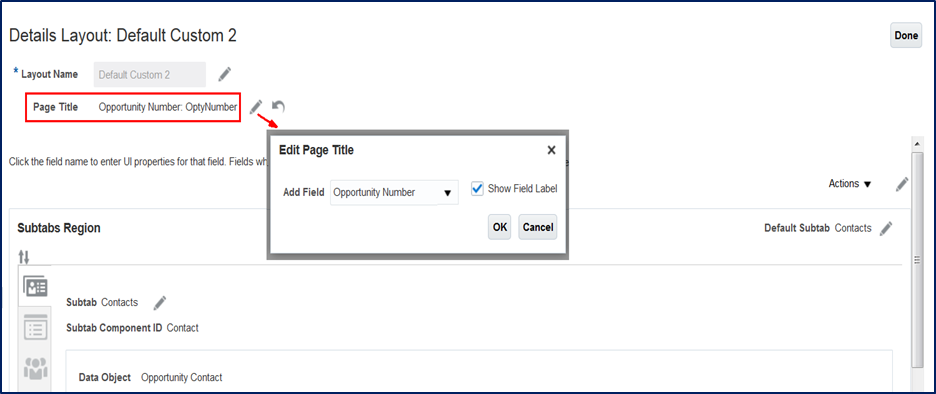
Admin defined page title at runtime:
Watch a Demo
Steps to Enable
Leverage the Applications Composer to expose / adjust page layout and attributes. To learn more about extending your application using Applications Composer visit Oracle Help Center > your apps service area of interest > Books > Configuration and Extension.
Key Resources
Watch Page Title and Subtab Configuration for Company-Defined Details Page Layout Readiness Training
Subtab Configuration for Company-Defined Details Page Layouts
Set any subtab as the default subtab in your company-defined details page layouts. You can also reorder subtabs, including the Overview, Summary, and Profile subtabs. After configuration, the configured object's details page opens to the configured subtab. This feature is available for standard and company-defined objects.
Subtab configuration design time
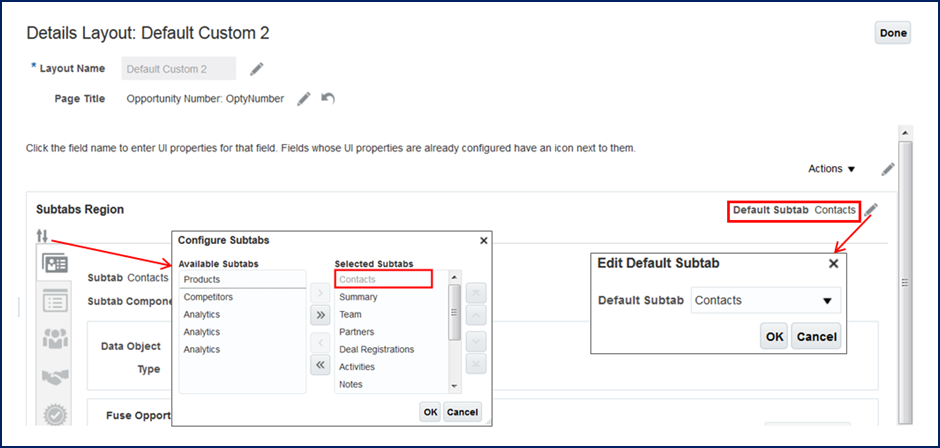

Subtab Configuration Run Time
Watch a Demo
Steps to Enable
Leverage the Applications Composer to expose / adjust page layout and attributes. To learn more about extending your application using Applications Composer visit Oracle Help Center > your apps service area of interest > Books > Configuration and Extension.
Tips And Considerations
- When a new subtab is configured as the default tab in focus, reorder the tab to the topmost tab if needed.
- Default subtab cannot be removed from Selected subtab region. Change the default subtab to an alternate subtab to remove from the Selected subtab region.
Key Resources
Watch Page Title and Subtab Configuration for Company-Defined Details Page Layout Readiness Training
Scheduled Batch Processing of Custom Logic
Call an object function at a scheduled time using Scheduled Processes. This feature lets you process a set of records on a daily or weekly basis, asynchronously, when users do not need to see immediate feedback in the UI. This object function can be used for any top-level custom or standard object.
For example, you can update opportunities that are more than 30 days past the closed date (which is a better option for batch processing), rather than defining an object workflow on a record-by-record basis. In this example, you configure custom logic using Groovy thus it can be:
- As complex as needed
- Long-running (up to 30 minutes without blocking the UI)
- Used to process a set of records per job and break down a job into manageable chunks
If the process times out, the transaction is not committed and no records are updated.
Additionally, you can provide return values in the object function. And users can update the records if they have the correct privileges.
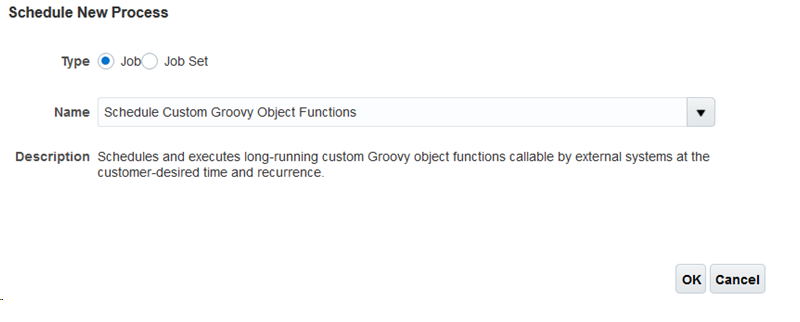
Schedule New Process
Steps to Enable
If you have any jobs scheduled from previous releases, then you need to change the Object Name. Object Name should be the API name as seen in Application Composer Object Overview page.
Tips And Considerations
Limitation: Once a job execution is started, the cancel button will not be able to cancel the job.
Role Information
To access this job user needs to have any of following roles:
- Customer Relationship Management Application Administrator
- Application Implementation Consultant
- Master Data Management Application Administrator
Extensible List of Values for Partners
Salespeople and channel manager can search for and associate records using relevant data from extensible lists of values for partners. They can use custom fields as search criteria and view custom fields in work area search results, letting them find and select the right records easily
In addition, administrators can:
- Create dynamic, role-based layouts
- Enable hidden standard fields for search within a list of values
- Re-arrange fields in the search and results sections
- Define default values for search fields
- Mark certain fields as read-only or required
Watch a Demo
Steps to Enable
Use Oracle Application Composer to extend the applications.
Watch a Setup Demo
Tips And Considerations
Oracle highly recommends all customers to do intensive regression testing on Partners pickers as the default picker was replaced with a new extensible picker.
Key Resources
Watch Extensible List of Values for Partners Readiness Training
Enhanced Configure Opportunities Setup Page
The Configure Opportunities setup page is enhanced to display the sales stages associated with a given sales method. Administrators can view, update, or add new sales stages to the selected sales method before they set it as the default for their sales transactions.
Steps to Enable
In the Setup and Maintenance work area, select the following:
- Offering: Sales
- Functional Area: Opportunities.
Select the Quick Setup icon (gear icon) and go to the Configure Opportunities page.
You can view the details of a sales method that you choose from the list of values for the Default Sales Method. The sales stages are displayed in the section below. You can update the names of the sales stages displayed or add new ones if desired.
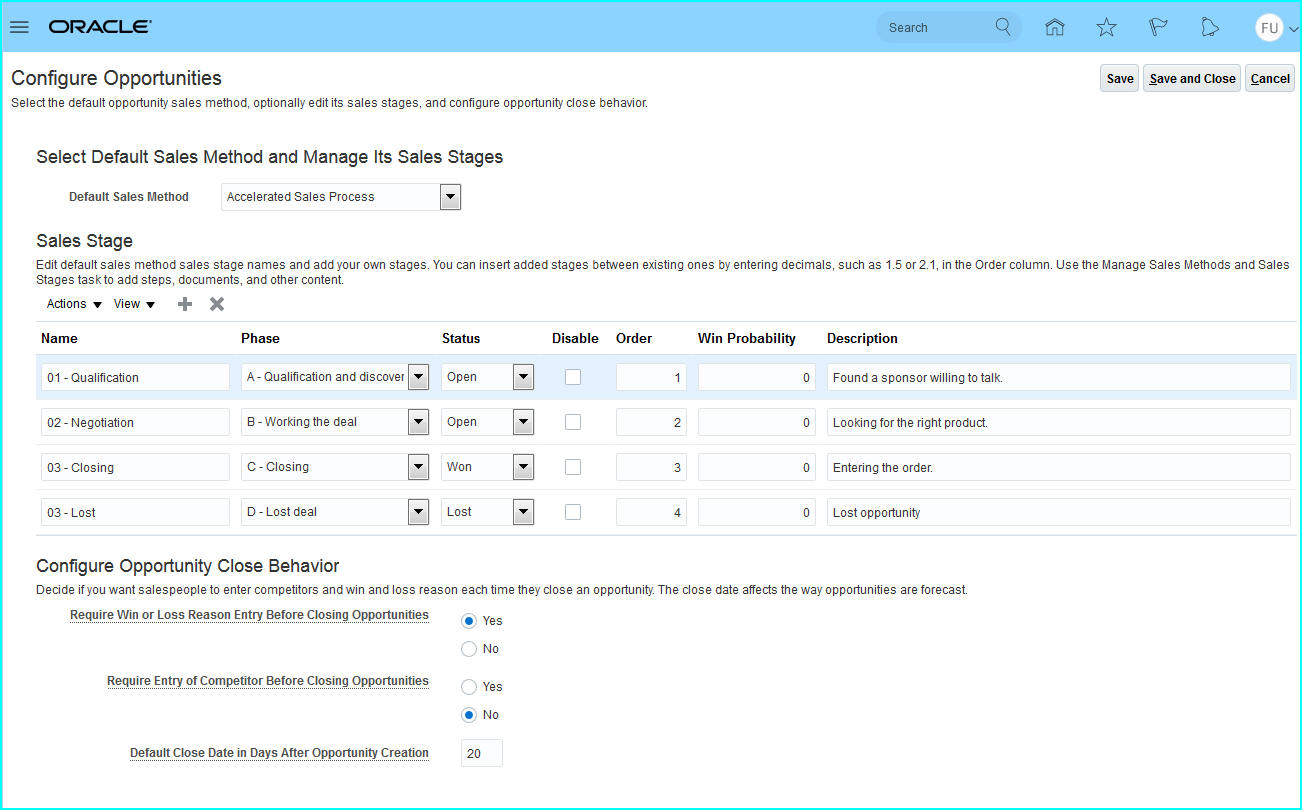
Configure Opportunities Setup Page
To add a sales stage, click the add icon. Enter a name and choose the appropriate phase and status from the list of values. The order number defaults to last number plus one. For example, if there are four sales stages associated with the sales method, when you add a row for the new sales stage, the order number is set to 5. To add the sales stage before or in-between the existing sales stages, you can change the order number using decimals. For example, you can enter 0.5 to add a sales stage before the first sales stage and 1.5 to insert a sales stage between sales stages 1 and 2.
You can delete the new sales stages that you have added prior to saving. However, once you have saved your changes, you cannot delete the sales stages. You can only disable them.
You cannot change the order of the existing sales stages.
Role Information
- Sales Setup User
Role Provisioning Rules for Loyalty Resource Roles
Oracle Loyalty Cloud customers can save time by taking advantage of predefined resource roles and role-provisioning rules for the Loyalty Program Administrator and Loyalty Marketing Manager. In past releases, users had to create these resource roles and role-provisioning rules manually.
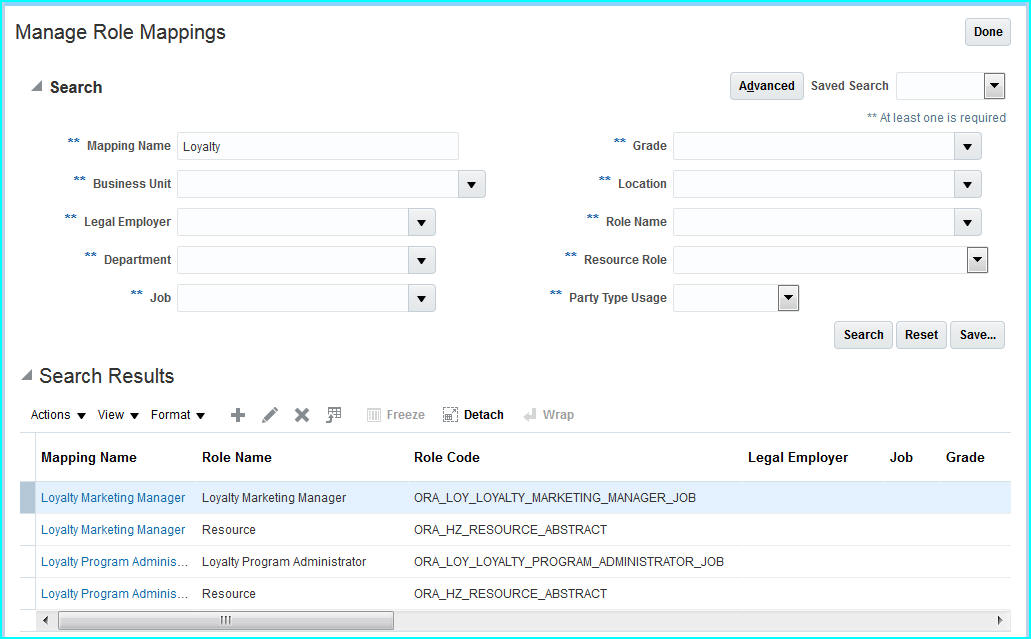
Loyalty Role Provisioning Rules
Loyalty Marketing Manager Role Provisioning Rule
Steps to Enable
For CRM-only implementations, the role provisioning rules are created automatically when you set up the company information using the Create Company Information quick setup page. This is a required step after enabling any CRM offering such as Sales, Service, or Loyalty.
- Navigate to Setup and Maintenance as a setup user.
- From the Company Profile Functional Area in the Sales Offering, click on the gear icon to launch the quick setup page.
- Enter the Enterprise Name, Country, and Address Line 1 and click Submit.
- This action will automatically:
- Create the enterprise structure, including the legal entity, legal address and a business unit
- Convert the initial user to a business user
- Create the role provisioning rules for all predefined resource roles, including Loyalty roles introduced in Release 19A.
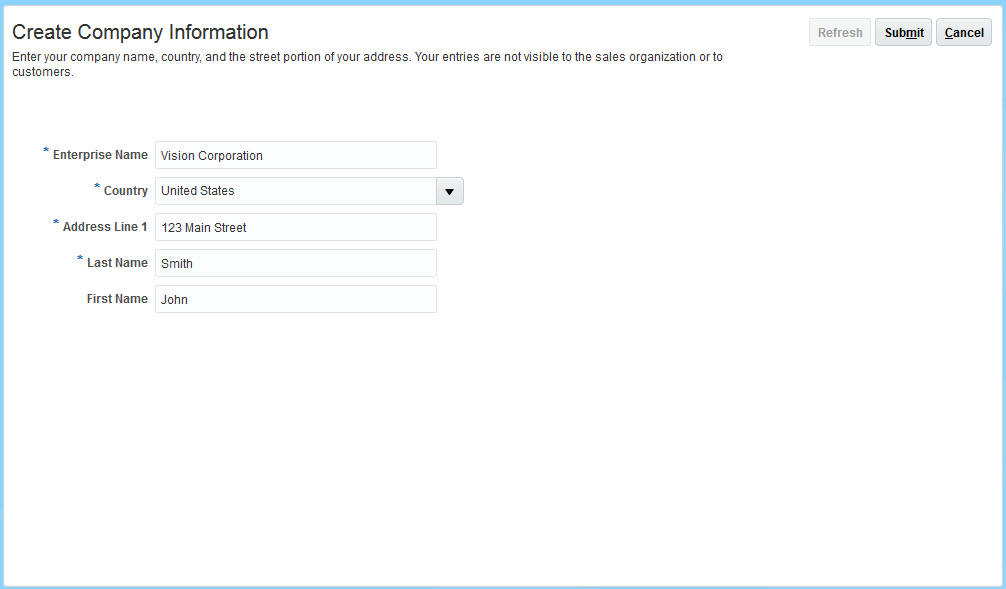
Create Company Information
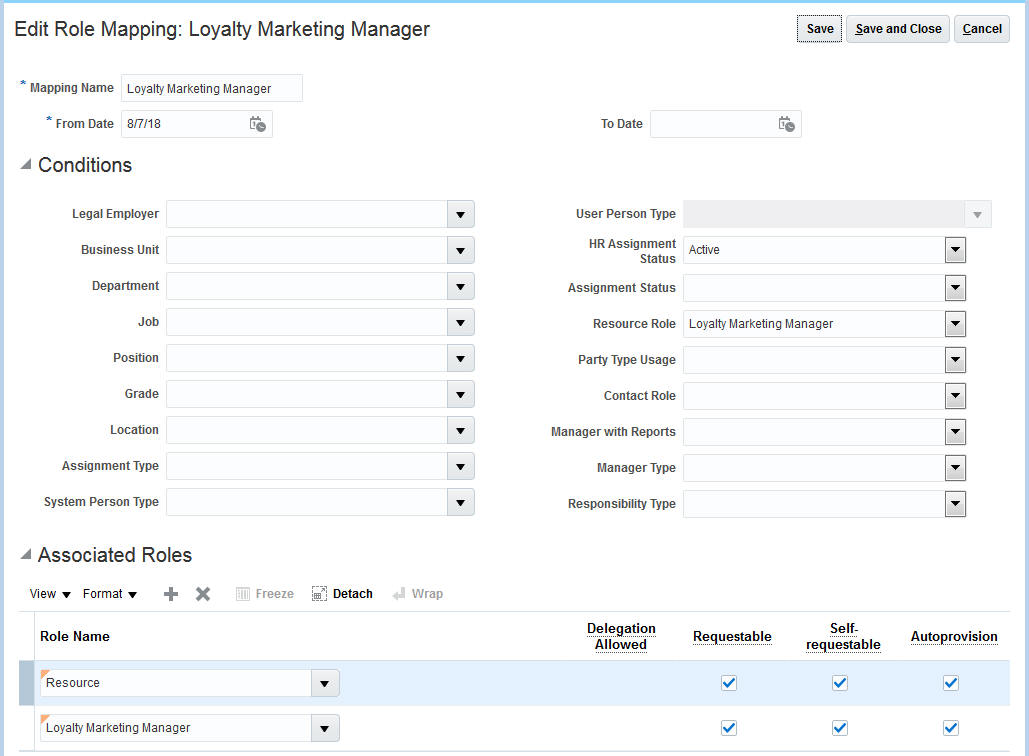
For cross-pillar deployments where you are using the setup provided by HCM to create the enterprise structure, you must create the role provisioning rules manually by performing the following steps:
- From Users and Security Functional Area in the Sales Offering, launch the Manage HCM Role Provisioning Rules task.
- Enter the Loyalty Marketing Manager as the Mapping Name.
- In the Conditions section, choose Active as the HR Assignment Status and Loyalty Marketing Manager as the Resource Role.
- In the Associated Roles section, add Loyalty Marketing Manager application job role and the Resource job role.
- Save your changes.
- Repeat for all the other CRM resource roles.
Role Information
- Sales Setup User
Custom Business Objects Events
Whenever you create a new custom object in Oracle Application Composer, the custom object can publish business events. Once published, these business events can be used when integrating with Oracle Integration Cloud (OIC).
Create and update operations on child custom objects generate update events for the parent custom objects.
Steps to Enable
Whenever you create or update a custom object, you must regenerate and republish the object. To regenerate and republish custom objects:
- Sign in as a setup user and navigate to Application Composer.
- Right-click Common Setup > Generate Integration Events.
NOTE: This process currently works only in classic (non-united sandbox mode).
You must also set the profile option, ZCX_CUSTOM_OBJECT_EVENTS, which is used to enable and register custom object events. The profile option is disabled by default. If the profile option is not enabled then the Generate Integration Event function is not present under the Common setup in Application Composer.
- When the profile option is enabled, custom object events are published and registered in CustomEventCatalog.xml. After custom objects are published and registered, users in Oracle Integration Cloud (OIC) can subscribe to the custom object events.
- If the profile option is turned set to No, then OIC users will see nothing, even though they've subscribed the events.
- The custom objects business events in OIC must be enabled in the OIC instances. Please follow the instructions to request the flag enabled in OIC instance in the Enabling the Future Today - Feature Flags in Oracle Integration Cloud link in About -> Learn More in OIC.
NOTE: This feature is available to customers participating in a Preview Access Program.
To set the profile option:
- Sign in as a setup user or as the sales administrator.
- Navigate to Setup and Maintenance > Offering: Sales > Functional Area: Sales Foundation > Task: Manage Administrator Profile Values.
- Add the required application and set the profile option to Yes.
- Save your changes.
Tips And Considerations
Custom business objects events are supported for CRM, Enterprise Resource Planning, and Supply Chain Management cloud applications. Any standalone custom object, as well as child objects to the parent custom object, raise business events. A custom object that has a many-to-many relationship with other custom objects will not raise business events. In other words, M:M intersection custom objects will not raise business events.
Custom objects business events are only raised in the mainline in Engagement Cloud. Working inside a sandbox and creating, updating, and deleting a record in a custom object will not raise business events.
Custom object business events are controlled by the profile option ZCX_CUSTOM_OBJECT_EVENTS. This feature is always enabled and the profile option has N as the default value.
Create and update business events for custom objects under "CRM Cloud" and "FSCM" applications are generated/published.
Key Resources
Refer to the Oracle Integration Cloud site at https://cloud.oracle.com/OIC.
Role Information
The resources should have appropriate roles and privileges to accomplish the tasks described here. In particular, they should be able to generate and publish the metadata for business events.
REPORTING AND ANALYTICS
In R13.19A OTBI direct database query has been disabled by default in BI Answers. To prevent reports generating system errors, BI Administrator can modify BI privileges to revert this change. For more details related to this change, please refer to the announcement on Cloud Customer Connect - https://cloudcustomerconnect.oracle.com/posts/6e94e92084.
UPDATE APPLICATION COMPOSER CUSTOMIZATIONS TO THE LATEST ENHANCED BEHAVIOR
During your upgrade, most existing customizations made in Application Composer are automatically updated to the latest enhanced behavior in the new release. However, there are a few exceptions, which require you to manually initiate the upgrade script for each of those customizations.
STEPS TO ENABLE
You must sign in as a user with an administrator role to perform these steps.
IMPORTANT: Do not perform these steps when there are pending changes in an active sandbox. Be sure to save and publish sandboxes with any changes you want to keep before proceeding and delete any sandboxes that you do not intend to publish.
- In Oracle Sales Cloud, open the drop-down menu next to your user name, and select Manage Sandbox.
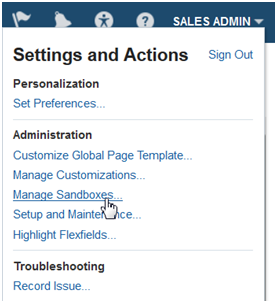
- Create a new sandbox, and set it as the active sandbox. The current active sandbox displays at the top of the application.

- Go to: Navigator > Application Composer (under Tools).
- From the Application, drop-down list, select the first application whose metadata you want to upgrade, such as Common or Sales.
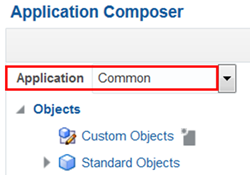
NOTE: You need to upgrade the existing customization metadata for each application separately.
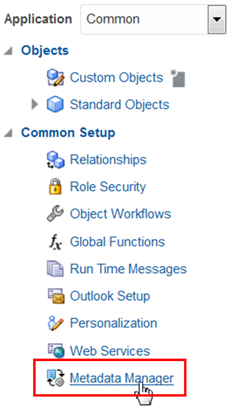
- From the navigation tree on the left, under Common Setup, click Metadata Manager.
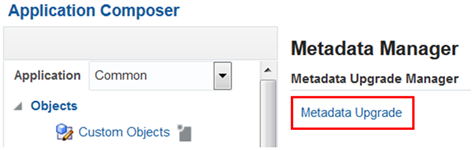
- Click Metadata Upgrade.
- By default, the list displays the "Not Started" upgrade items that you need to manually upgrade. Highlight the first row in the list, and then click the Upgrade button.

- Click OK in the confirmation dialog box. This process may take a couple of minutes. When the upgrade is done, the dialog box will close and the Upgrade Completed column will be checked.

NOTE: Currently, the upgrade item Custom objects and fields are not available for global search does not show a checkmark in the Upgrade Completed column even after the metadata upgrade is complete. You can proceed with the metadata upgrade process without concern.
- Repeat steps 7-8 for each row in the list.
- Repeat steps 4-8 for each application in the Application drop-down list in Application Composer.
- Publish the sandbox.
After the processes have completed, the application is ready to use.
KEY RESOURCES
Read Prepare for Your Quarterly Update (Doc ID 2445338.1) on My Oracle Support to learn how to prepare for and validate your quarterly update.
---

Copyright © 2018, 2019, Oracle and/or its affiliates. All rights reserved.
This document is provided for information purposes only, and the contents hereof are subject to change without notice.This document is not warranted to be error-free, nor subject to any other warranties or conditions, whether expressed orally or implied in law, including implied warranties and conditions of merchantability or fitness for a particular purpose. We specifically disclaim any liability with respect to this document, and no contractual obligations are formed either directly or indirectly by this document. This document may not be reproduced or transmitted in any form or by any means, electronic or mechanical, for any purpose, without our prior written permission.
Oracle and Java are registered trademarks of Oracle and/or its affiliates. Other names may be trademarks of their respective owners.
Intel and Intel Xeon are trademarks or registered trademarks of Intel Corporation.All SPARC trademarks are used under license and are trademarks or registered trademarks of SPARC International, Inc. AMD, Opteron, the AMD logo, and the AMD Opteron logo are trademarks or registered trademarks of Advanced Micro Devices. UNIX is a registered trademark of The Open Group.