
This document will continue to evolve as existing sections change and new information is added. All updates appear in the following table:
| Date | Product | Feature | Notes |
|---|---|---|---|
| 18 MAR 2022 | Created initial document. |
IMPORTANT NOTE: If you are being updated directly from 21D to 22B you should review the content of both 22A and 22B sections to ensure you see all the changes included in the update.
 HAVE AN IDEA?
We’re here and we’re listening. If you have a suggestion on how to make our cloud services even better then go ahead and tell us. There are several ways to submit your ideas, for example, through the Ideas Lab on Oracle Customer Connect. Wherever you see this icon after the feature name it means we delivered one of your ideas.
GIVE US FEEDBACK
We welcome your comments and suggestions to improve the content. Please send us your feedback at oracle_fusion_applications_help_ww_grp@oracle.com.
DISCLAIMER
The information contained in this document may include statements about Oracle’s product development plans. Many factors can materially affect Oracle’s product development plans and the nature and timing of future product releases. Accordingly, this Information is provided to you solely for information only, is not a commitment to deliver any material, code, or functionality, and should not be relied upon in making purchasing decisions. The development, release, and timing of any features or functionality described remains at the sole discretion of Oracle.
This information may not be incorporated into any contractual agreement with Oracle or its subsidiaries or affiliates. Oracle specifically disclaims any liability with respect to this information. Refer to the Legal Notices and Terms of Use for further information.
Column Definitions:
Report = New or modified, Oracle-delivered, ready to run reports.
UI or Process-Based: Small Scale = These UI or process-based features are typically comprised of minor field, validation, or program changes. Therefore, the potential impact to users is minimal.
UI or Process-Based: Larger Scale* = These UI or process-based features have more complex designs. Therefore, the potential impact to users is higher.
Features Delivered Disabled = Action is needed BEFORE these features can be used by END USERS. These features are delivered disabled and you choose if and when to enable them. For example, a) new or expanded BI subject areas need to first be incorporated into reports, b) Integration is required to utilize new web services, or c) features must be assigned to user roles before they can be accessed.
| Ready for Use by End Users Reports plus Small Scale UI or Process-Based new features will have minimal user impact after an update. Therefore, customer acceptance testing should focus on the Larger Scale UI or Process-Based* new features. |
Customer Must Take Action before Use by End Users Not disruptive as action is required to make these features ready to use. As you selectively choose to leverage, you set your test and roll out timing. |
|||||
|---|---|---|---|---|---|---|
| Feature |
Report |
UI or |
UI or |
|
||
Time and Time Zone for Tasks and Checklists Configuration
Define a specific time for the deadline to complete a task or checklist when creating it or assigning it to an individual. Users can see the time specified for the deadline, when the task was completed, or when the task was last updated in their preferred time zone so they understand exactly what time is referenced by the task or checklist.
Student Management Cloud offers a more sophisticated date calculation, ensuring that dates and times are displayed to users as per their preferred time zone.
You can now select a specific time or time zone option in addition to the month, day, and year during task and checklist setups and assignments. Due dates in tasks and checklists include the time according to the preferred time zone setting, considering daylight saving time. If your institution has only one time zone listed on the Manage Time Zone Settings page, the time zone field in the tasks and checklists UI becomes read-only and it automatically displays the single default time zone.
Here’s how the different types of due dates are now calculated based on the defined time zone.
| Due Date Type |
Due Date Calculation |
|---|---|
| No Due Date |
None |
| Time After Assignment |
Due date is calculated based on the preferred time zone setting, considering daylight saving time. |
| Specific Date and Time |
Time Zone list is displayed based on the defined time zone in the Manage Time Zone Settings. Due date is calculated based on the selected time zone while creating or assigning a task or checklist, considering daylight saving time. |
Steps to Enable
You don't need to do anything to enable this feature.
Tips And Considerations
You must enter at least one default time zone on the Manage Time Zone Settings page to be able to define the time zone for Tasks and Checklists configuration. For more details, see Time Zone Settings.
This feature is automatically enabled with 22B. However, you need to run the Update Due Date Time and Time Zones for Tasks and Checklists process immediately after implementation to update one or both of these time and time zone data created before 22B:
- Default due dates for task and checklist definitions that are in draft or published status.
- Due dates of pre-existing task and checklist assignments that are not yet completed or canceled.
Here's what you do:
- Click Navigator > Tools > Scheduled Processes.
- On the Scheduled Processes Overview page, click Schedule New Process.
- Leave the type as Job, select Update Due Date Time and Time Zones for Tasks and Checklists process, and click OK.
- Select the appropriate Time and Time Zone parameters for the records that are to be updated.
It's strongly recommended that you update the task and checklist definitions as well as task and checklist assignments created before 22B. If you don’t update, Student Management Cloud treats them as if their timestamp was 00:00 GMT, which could result in a variation in due dates depending on the user’s time zone.
If your institution adds or removes time zones in the Manage Time Zone Settings page when you’re creating or assigning a task or checklist, refresh the creation page or the assignment wizard to see the changes.
Student Management Cloud delivers new pages, page elements, and page permissions assigned to the predefined job roles in each release.
Here are the newly added pages, page elements, and page permissions for the mentioned predefined job roles.
| Page Name |
New/Existing |
Page Elements |
New/Existing |
Page Permission |
New/Existing |
Predefined Job Roles |
|---|---|---|---|---|---|---|
| Student Management Identifiers |
New |
Student Management Identifier Details |
New |
View and Manage |
New |
Higher Education Application Administrator |
| Student Management External Organizations |
Existing |
Student Management External Organization Contacts |
New |
View and Manage |
New |
Admissions Manager, Admissions Coordinator, Academic Coordinator, Registrar, Bursar, Student Sponsorship Administrator, Higher Education Application Administrator, and Student Services Manager |
| Student Management External Organizations |
Existing |
Student Management External Organization Details |
New |
View and Manage |
New |
Admissions Manager, Admissions Coordinator, Academic Coordinator, Registrar, Bursar, Student Sponsorship Administrator, Higher Education Application Administrator, and Student Services Manager |
| Student Management External Organizations |
Existing |
Student Management External Organization Identifiers |
New |
View and Manage |
New |
Admissions Manager, Admissions Coordinator, Academic Coordinator, Registrar, Bursar, Student Sponsorship Administrator, Higher Education Application Administrator, and Student Services Manager |
| Student Management External Organizations |
Existing |
Student Management External Organization Contacts |
New |
View and Manage |
New |
Admissions Manager, Admissions Coordinator, Academic Coordinator, Registrar, Bursar, Student Sponsorship Administrator, Higher Education Application Administrator, and Student Services Manager |
| Manage Refund |
New |
View Unmasked Bank Account Details |
New |
View |
New |
Bursar |
| Event Management |
Existing |
Event Subscriber Details |
New |
NA | NA | Higher Education Application Administrator |
| Manage Payment Preferences |
New |
View Payment Preferences |
New |
View |
New |
Bursar, Student, and Cashier |
| Manage Payment Preferences |
New |
View Payment Preference Details |
New |
View and Manage |
New |
Bursar, Student, and Cashier |
| Manage Payment Preferences |
New |
View Unmasked Bank Account |
New |
View |
New |
Bursar, Student, and Cashier |
| Student Management Contacts |
New |
Student Management Contact Details |
New |
View and Manage |
New |
Admissions Manager, Admissions Coordinator, Academic Coordinator, Registrar, Bursar, Student Sponsorship Administrator, Higher Education Application Administrator, and Student Services Manager |
| Student Management Locations |
New |
Student Management Location Details |
New |
View and Manage |
New |
Admissions Manager, Admissions Coordinator, Academic Coordinator, Registrar, Bursar, Student Sponsorship Administrator, Higher Education Application Administrator, and Student Services Manager |
Steps to Enable
You don't need to do anything to enable this feature.
Tips And Considerations
If you created user-defined roles and assigned page access to them using the Manage Application Access task in Setup and Maintenance, you must review your user-defined roles to see if you need to assign them access to the new pages, page elements, and page permissions.
Role Information
You need an IT Security Manager role to use this feature.
Search Result Filters for Access Information
Find access information more quickly by only selecting filter values that are valid for the search results on the list view of pages, users, and data profiles. The search results are now preserved to shorten the response time for filtering the search results.
Student Management Cloud now disables the filter values that are not relevant to the search results, ensuring better performance and usability. This allows you to select the filter values that are only valid for the search results, helping you to find access information quickly and efficiently.
Steps to Enable
You don't need to do anything to enable this feature.
Role Information
You need the Higher Education Application Administrator or IT Security Manager role to use this feature.
Managed Student Group Invitation Communication Tokens
Send communications that include the group manager's name and email address so the person being invited to the group understands who initiated the invitation.
The email sent to a student or group manager can now include the name and email address of the group manager who is requesting approval to join their group, providing greater clarity. Improve the quality of communication sent to the students and group managers by adding the newly delivered tokens for the group manager name and email address in the existing email communication setup.
Steps to Enable
As an administrator, you need to include {GROUP_MANAGER_NAME} and {GROUP_MANAGER_EMAIL} tokens in the existing communications for these events:
- Student Added
- Student Removed
- Student Added Approval Pending
- Student Approval Request Sent
- Group Manager Added
- Group Manager Removed
- Group Manager Added Approval Pending
- Group Manager Approval Request Sent
Here's what you do:
- Click Navigator > Academic Tools > Communications.
- Search for the existing communication setup using various filter criteria, such as Type, Trigger, and so on.
- Open a communication setup and click Edit > Content to include the tokens.
Role Information
You need the Application Administrator role to use this feature.
Error Messages for Application Fee Payment Transactions
We have further simplified the error messages that customers might see when making payments associated with submitting applications. Simplifying payment error messages was first released in 21D: Payment error messaging and resolution.
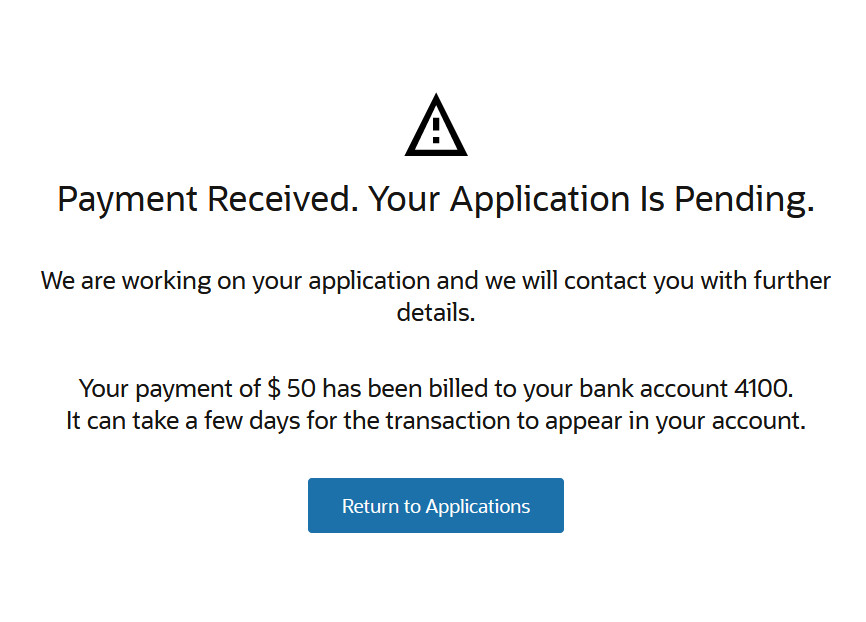
Application Pending Message
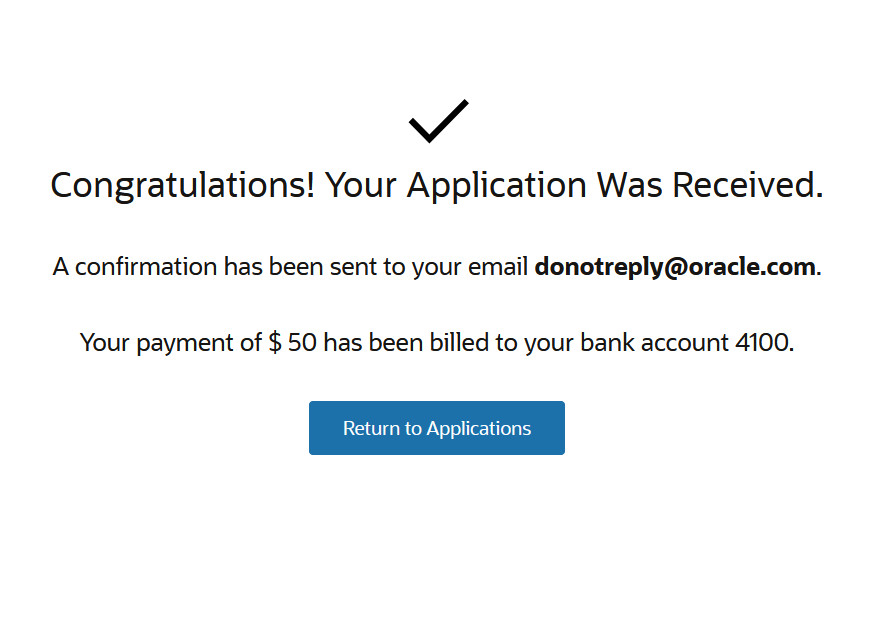
Application Submitted Message
This enhancement makes it clearer to users what has happened, the next actions to take (if any), and prevent multiple payments from being made.
Steps to Enable
First, make sure you designate an administrator who will receive email notifications when transactions fail to post.
- Go to the Finances work area (Navigator > Academics > Finances), then click Actions > Manage Academic Business Unit.
- Select the business unit.
- Click Payments.
- In Payment Error Resolution, assign an administrator.
- Click Save.
Next, you associate an existing application fee to a program, then set up the postprocessing option.
- From the Finances work area, click Actions > Manage Fees.
- Click Fee Associations, then click Create Fee Association. The Fee Associations page shows a list of application fees that are linked to academic programs.
- Fill out the required fields.
- Select a postprocessing option. We recommend selecting Always complete to prevent students or applicants from making multiple payments when there are issues posting transactions to their accounts.
- In Institution, Academic Level, and Academic Group, select the appropriate values. You can apply admissions fees at the academic level, to an entire academic group, or to specific academic programs. For example, you can set the fee for all graduate programs, or apply the same fee to the entire College of Fine Arts.
- In Fee Name, select the application fee.
- Click Save.
Now, you should set up your communication. These are email messages that convey information about specific events. These messages go to a student and the administrator responsible for resolving payment issues.
First, create a category for the event. You can group events in one category.
- In the Setup and Maintenance work area, use the Manage Student Management Categories task.
- Offering: Student Management
- Functional Area: Student Structures
- Click Create Category.
- Fill out the required fields.
- Click Add Event.
- Search for these events, select each one, and then click Select to add to the category you're creating.
- Invoice Creation Failed
- Receipt Creation Failed
- Receipt Creation Failed
- Click Inactive to switch the category to an active status, then save.
Next, create the notification template for each event. In this example, let's create a notification for the Invoice Creation Failed event.
- Click Create Communication.
- Select Event-based.
- Fill out the required fields.
- In Institution, select your institution.
- In Category, select the category you created earlier.
- In Select Event Type, select Invoice Creation Failed.
- In Time of Day Sent, select Send communication immediately when triggered.
- Click the Content tab. Here, specify the contents of the email that's sent to the administrator or student.
- Click Active to activate the notification, then save.
Follow the same steps to create notifications for these events: Receipt Creation Failed and Invoice or Receipt Creation Failed.
Remember that when you're creating a notification for the Receipt Creation Failed event, you should include the ORDER_ID token. The ORDER_ID tells administrators and students which record to reconcile.
Tips And Considerations
Institutions still have to manually reconcile all transactions that aren't successfully created. In a future release, we'll provide a more robust workflow with automatic task creation as well as automated or guided error resolution. And while this feature doesn't completely prevent multiple payments from being made, the error messages should keep students or applicants from resubmitting an application they already paid for.
It's important that you assign a default administrator so that email notifications are triggered. You also need to make sure that your messages are set up for the appropriate category and with the relevant message tokens. This ensures the administrator will have all the information needed to fix the issue.
Payment Reversal for Organizations
Institutions can now reverse payments directly in Student Management for organizations with sponsorship agreements. Say, for example, a payment was collected in error, bursars can then quickly reverse the payment without having to navigate to a different application.
To reverse a payment, go to the Finances work area, then click Organizations.
Search for the organization to access its account details page. On the account details page, you will see a list of receipts. The Reference column refers to receipt numbers. Take note of the receipt you want to reverse. Click the Actions icon, then select Manage Receipts.
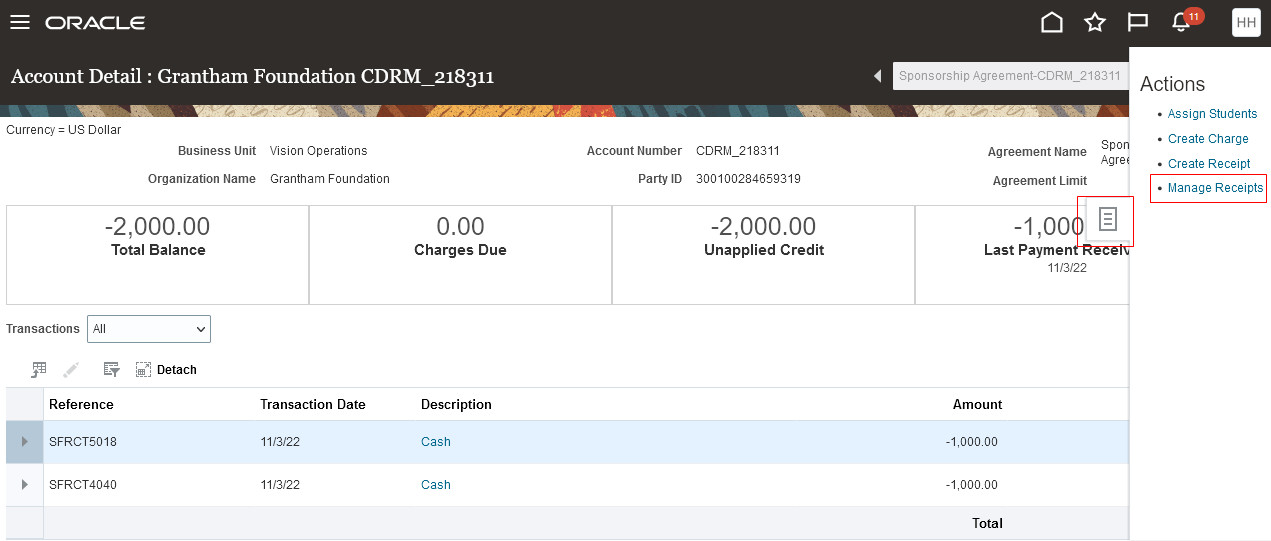
Organization's Account Details Page
Search for the receipt you want to reverse, then select it.
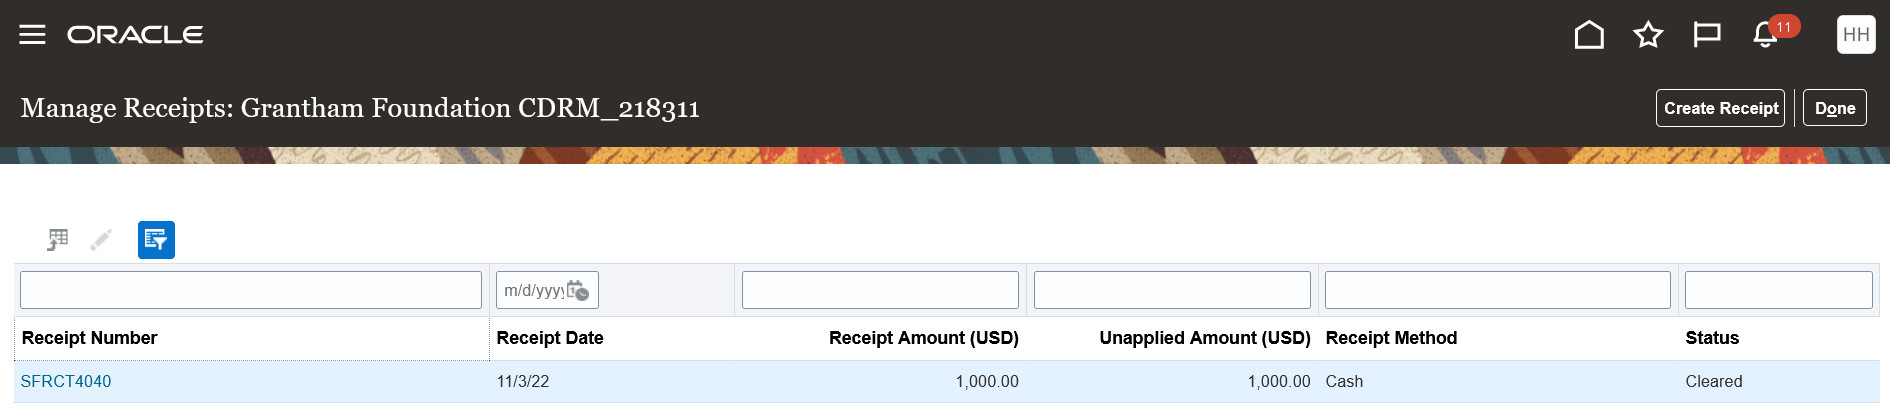
Search for the Receipt
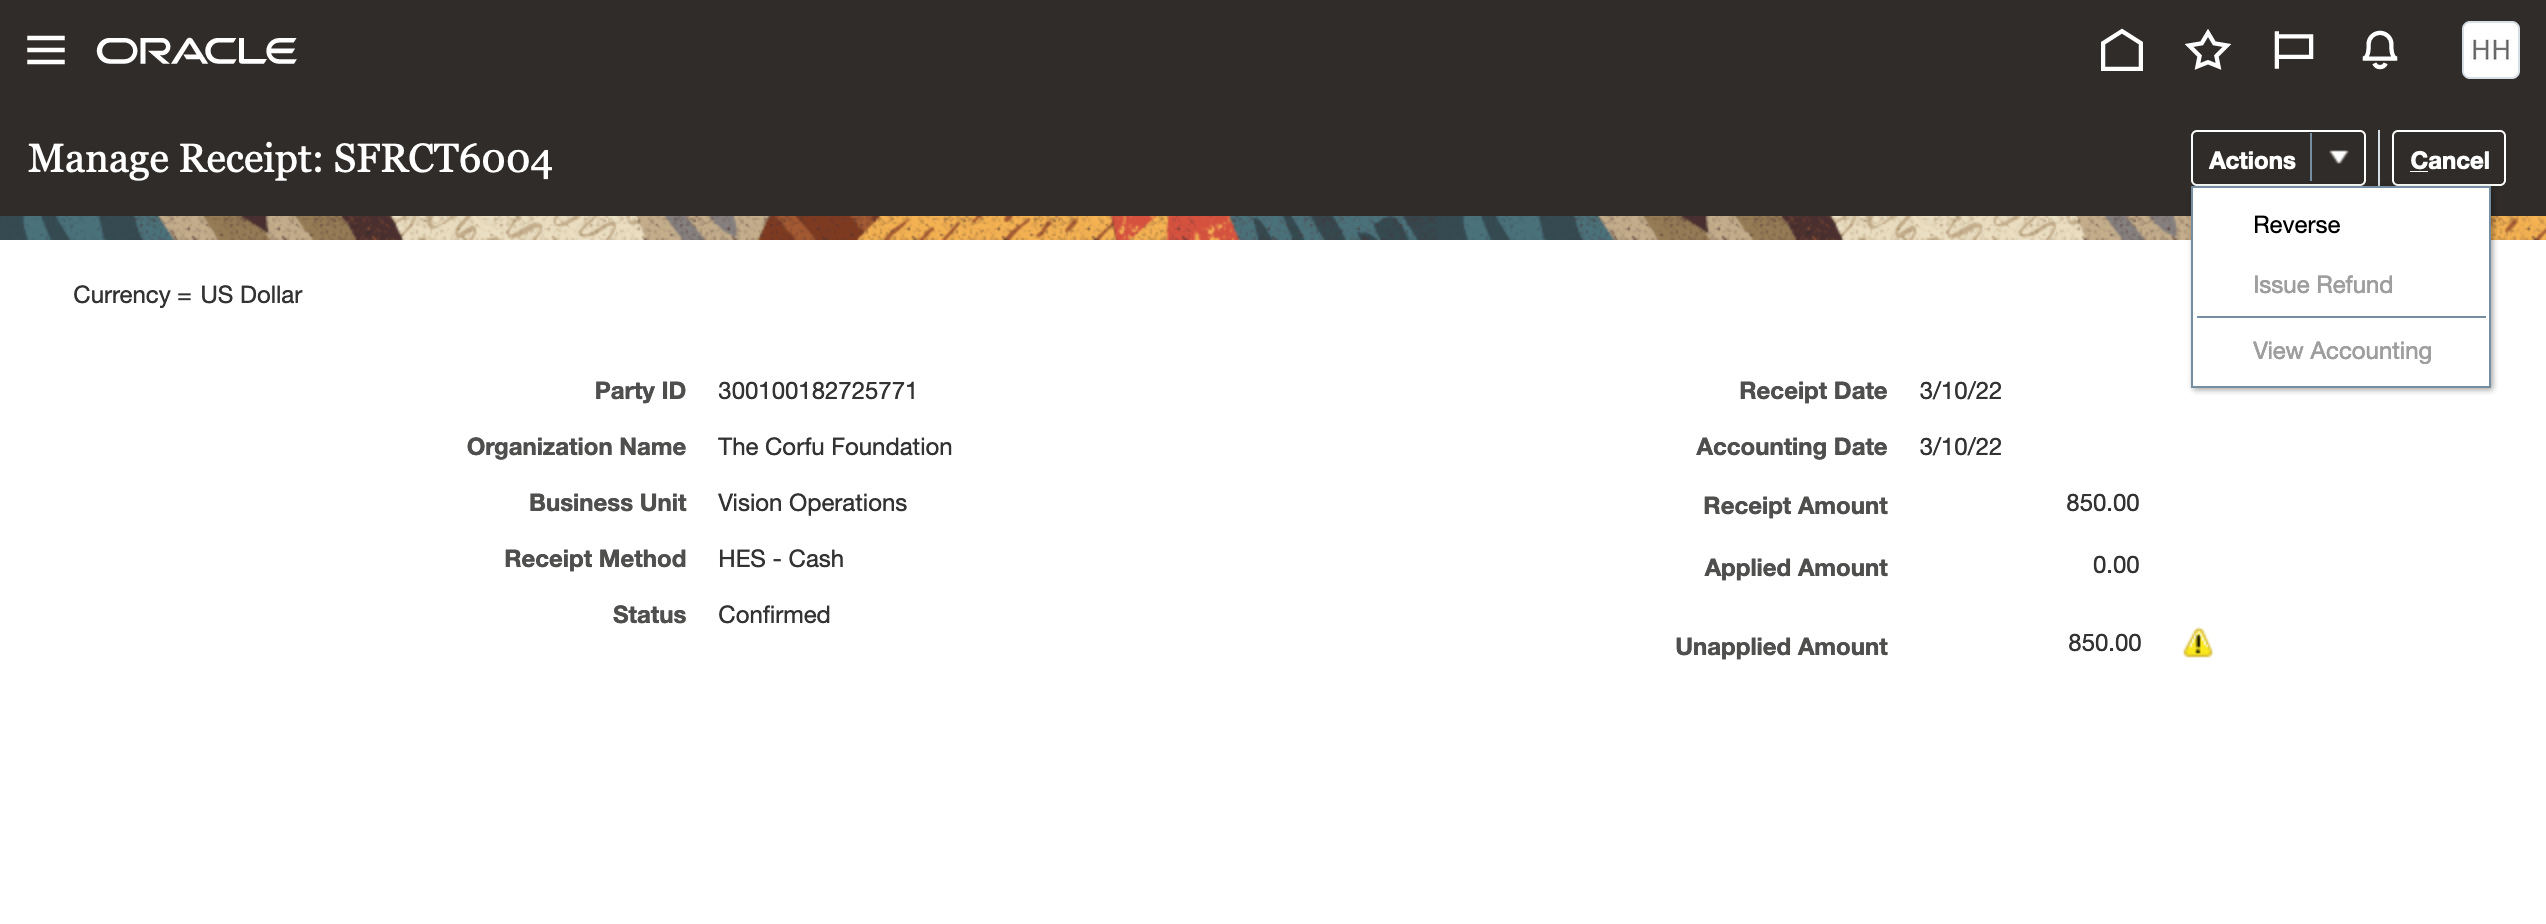
On the Manage Receipt page, click Actions > Reverse.

Manage Receipt - Reverse Action
When reversing the payment, you can set the date of the reversal, select a reason and category for the reversal, and add a comment if you want to.
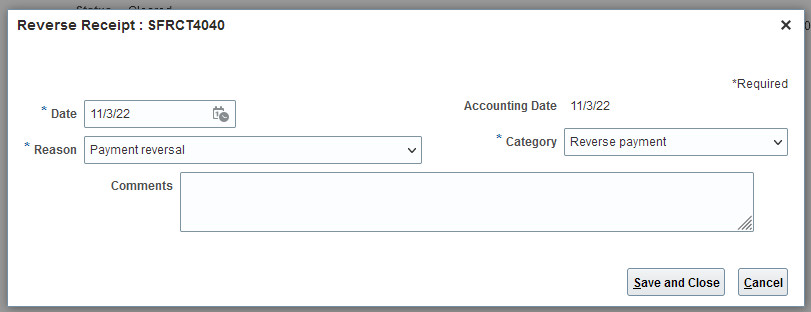
Reverse Receipt
With this feature, institutions can immediately reverse receipts and don't have to navigate to a different application like Oracle Fusion Financials.
Steps to Enable
You don't need to do anything to enable this feature.
Academic Business Unit Configuration
The Manage Academic Business Unit page replaces the Student Financials System Options page. Institutions can now create academic business units, and in that unit set up high-level elements like transaction numbering schemes, payment and refund methods, and enable discounts based on their financial processing requirements.
On the new Manage Academic Business Unit page, when administrators or implementers create an academic business unit, they can then map it to the business unit that's been set up in Oracle Fusion Financials.
These are some of the elements you set up that are tied to the business unit:
- Selecting a transaction numbering scheme. This ensures all transaction and receipt numbers are unique.
- Enabling discounts at the academic business unit level.
- Mapping student financial transactions to accounts receivable (AR) values. Student Management uses the values you select in this section to create a customer account.
- Mapping AR transaction sources to Student Management fee types. Student Management uses this mapping to assign a default transaction source to a fee type.
- Selecting a default payment method. These are the payment methods that will be available to individuals and organizations.
- Selecting refund methods. You'll have to set up one or more refund methods to be able to issue refunds to individuals or organizations.
If you're an implementer, go to the Setup and Maintenance work area, then use the Manage Student Financials Options task.
- Offering: Student Management
- Functional Area: Student Structures
If you're an administrator, go to the Finances work area, then click Actions > Manage Academic Business Unit.
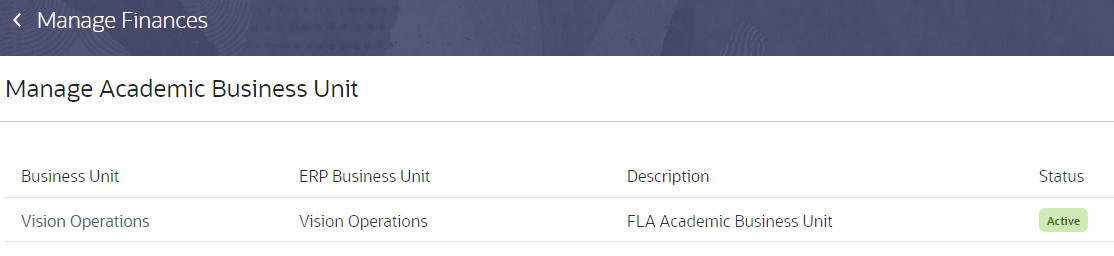
Manage Academic Business Unit Landing Page
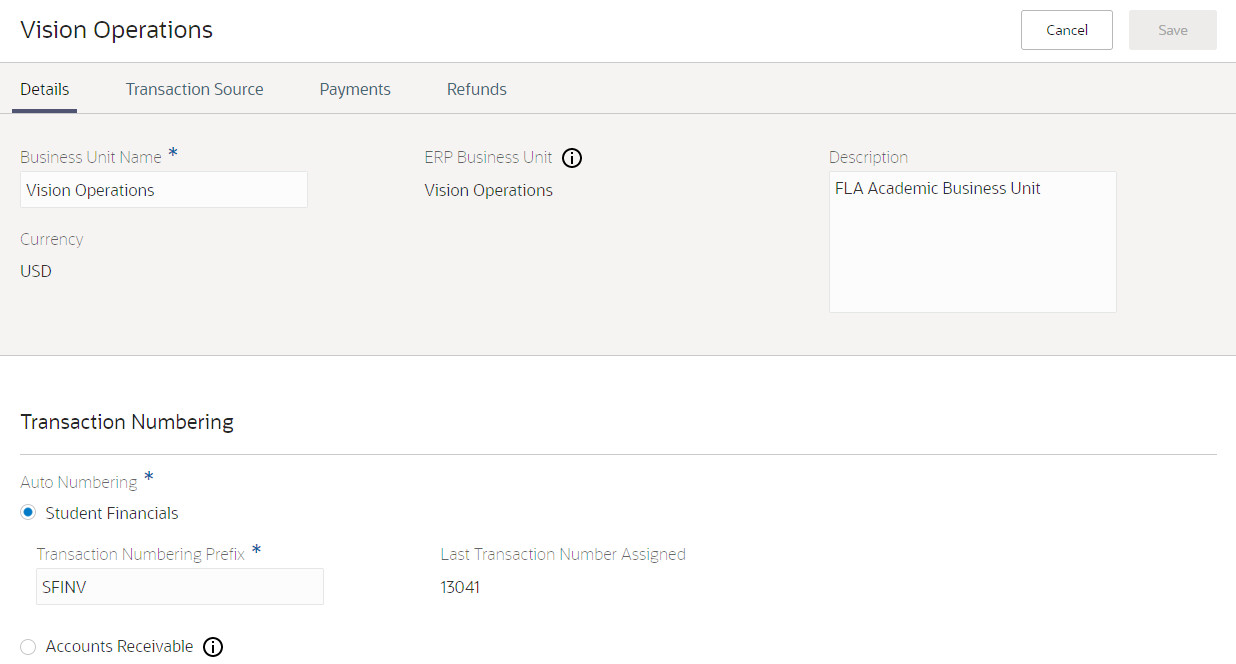
Manage Academic Business Unit Details Page
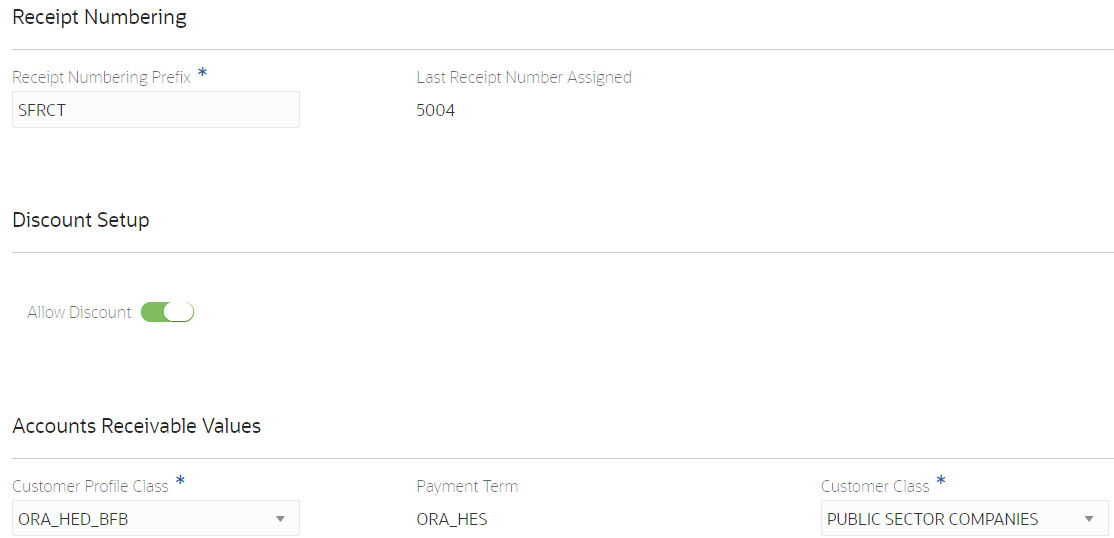
Manage Academic Business Unit Details Page
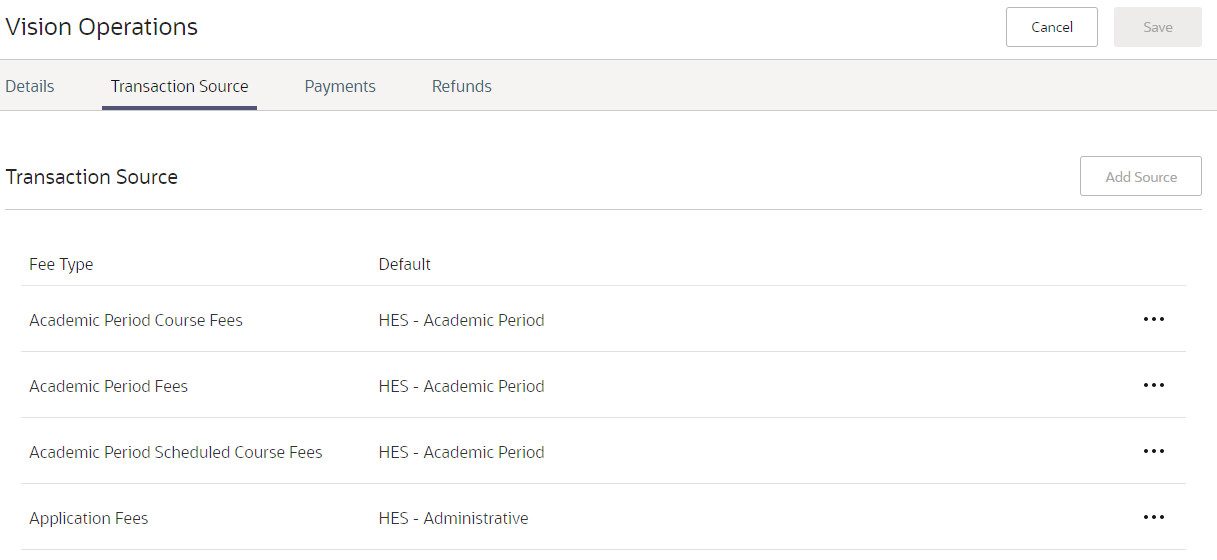
Manage Academic Business Unit Transaction Source Page
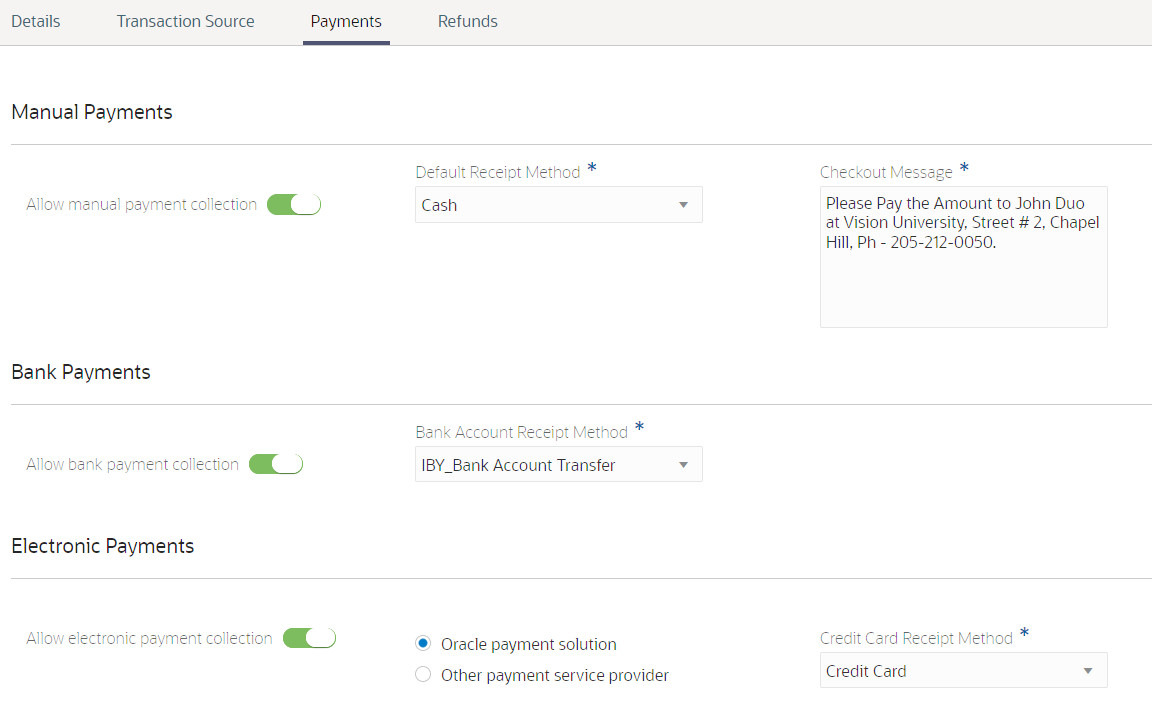
Manage Academic Business Unit Payments Page
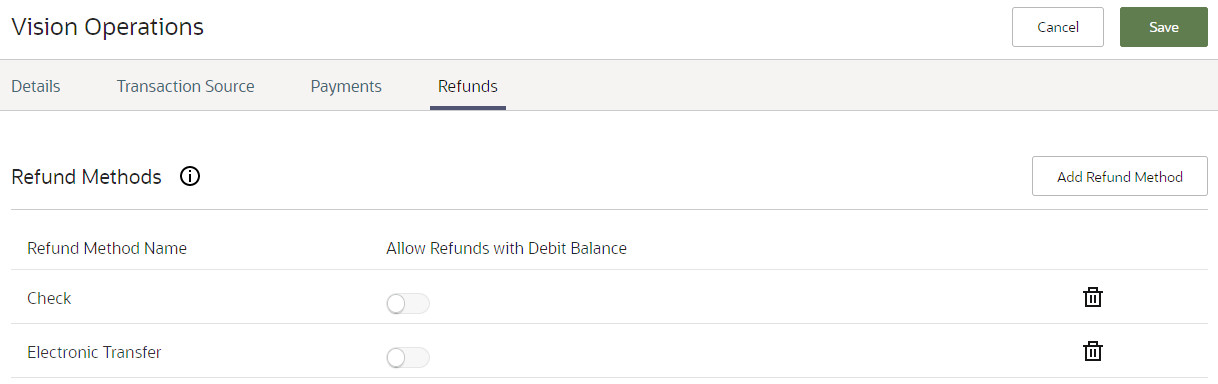
Manage Academic Business Unit Refunds Page
This feature establishes the criteria needed for the enablement and creation of multiple academic business units that can be mapped to Oracle Fusion Financial business units to account for student transactions. By enabling institutions to manage multiple business units, they can maintain multiple rules that match the unique needs of their organizations, campuses, and students while maintaining clear financial records in Financials.
Manage Academic Business Unit also provides these features:
- Enables the maintenance of default payment values.
- Enables the maintenance of default refund method values that will be used by the new Receipt Refunding Process.
- Ensures that all transaction and receipt numbering schemes are unique and enables users to select their own prefix.
Steps to Enable
You don't need to do anything to enable this feature.
Tips And Considerations
This release allows for the creation of only one academic business unit, and is the first phase in building the functionality to create multiple business units. As Student Management enters a multi-entity experience, future releases will:
- Let you create multiple academic business units that you can then map to financial business units.
- Give you the ability to activate or deactivate academic business units.
- Let you assign academic business units to any academic entity in the overall academic hierarchy. This will enable you to maintain unique financial settings and financial ledgers for any entity in the academic hierarchy.
If you're already using Student Management, your setup is going to be converted to use this new structure. The name of the business unit you created in Financials will be used as the name of the academic business unit. If you want to change this, you can do so on the Manage Academic Business Unit page.
Refunding at scale is key for institutions offering programs that go beyond a pay-to-enroll model. Prior to 22B, institutions handled refundable receipts by running reports to identify unapplied payments, then manually issuing refunds receipt-by-receipt after looking up the relevant account and receipt. If, for example, a course was canceled, this could result in a significant volume of receipts needing refunding. Additionally, the refund process previously ignored the receipt refund method that a user selected and instead created the required refund request invoice using the default method specified for the business unit. Lastly, when institutions chose to process refunds individually, the menu action to do so was active even for receipts that weren't in a refundable status.
In this release, the new refund process (Manage Refunds) replaces the manual processing that's currently taking place when institutions need to issue refunds for groups of students or organizations. For example, using Manage Refunds bursars can refund all unapplied receipts in an academic business unit. They can determine the type of refund to create, and select whether to create refunds that result in a balance owed. They can also define some parameters that dictate how the refund process should be run, and schedule when that process occurs - immediately or at a future date and time.
Also, the process to manually issue individual refunds has been improved. When you go into a student or organization's account, the Issue Refund action is disabled for a receipt that is not in a Cleared status. This will prevent a bursar from performing unnecessary data entry, only to ultimately receive a generic error that the transaction could not be completed.
In this example, the receipt status is Confirmed (not Cleared), so Issue Refund is unavailable.
Receipt Status Is Confirmed: Issue Refund Unavailable
Now in this example, the receipt status is Cleared, so you can perform the action Issue Refund.
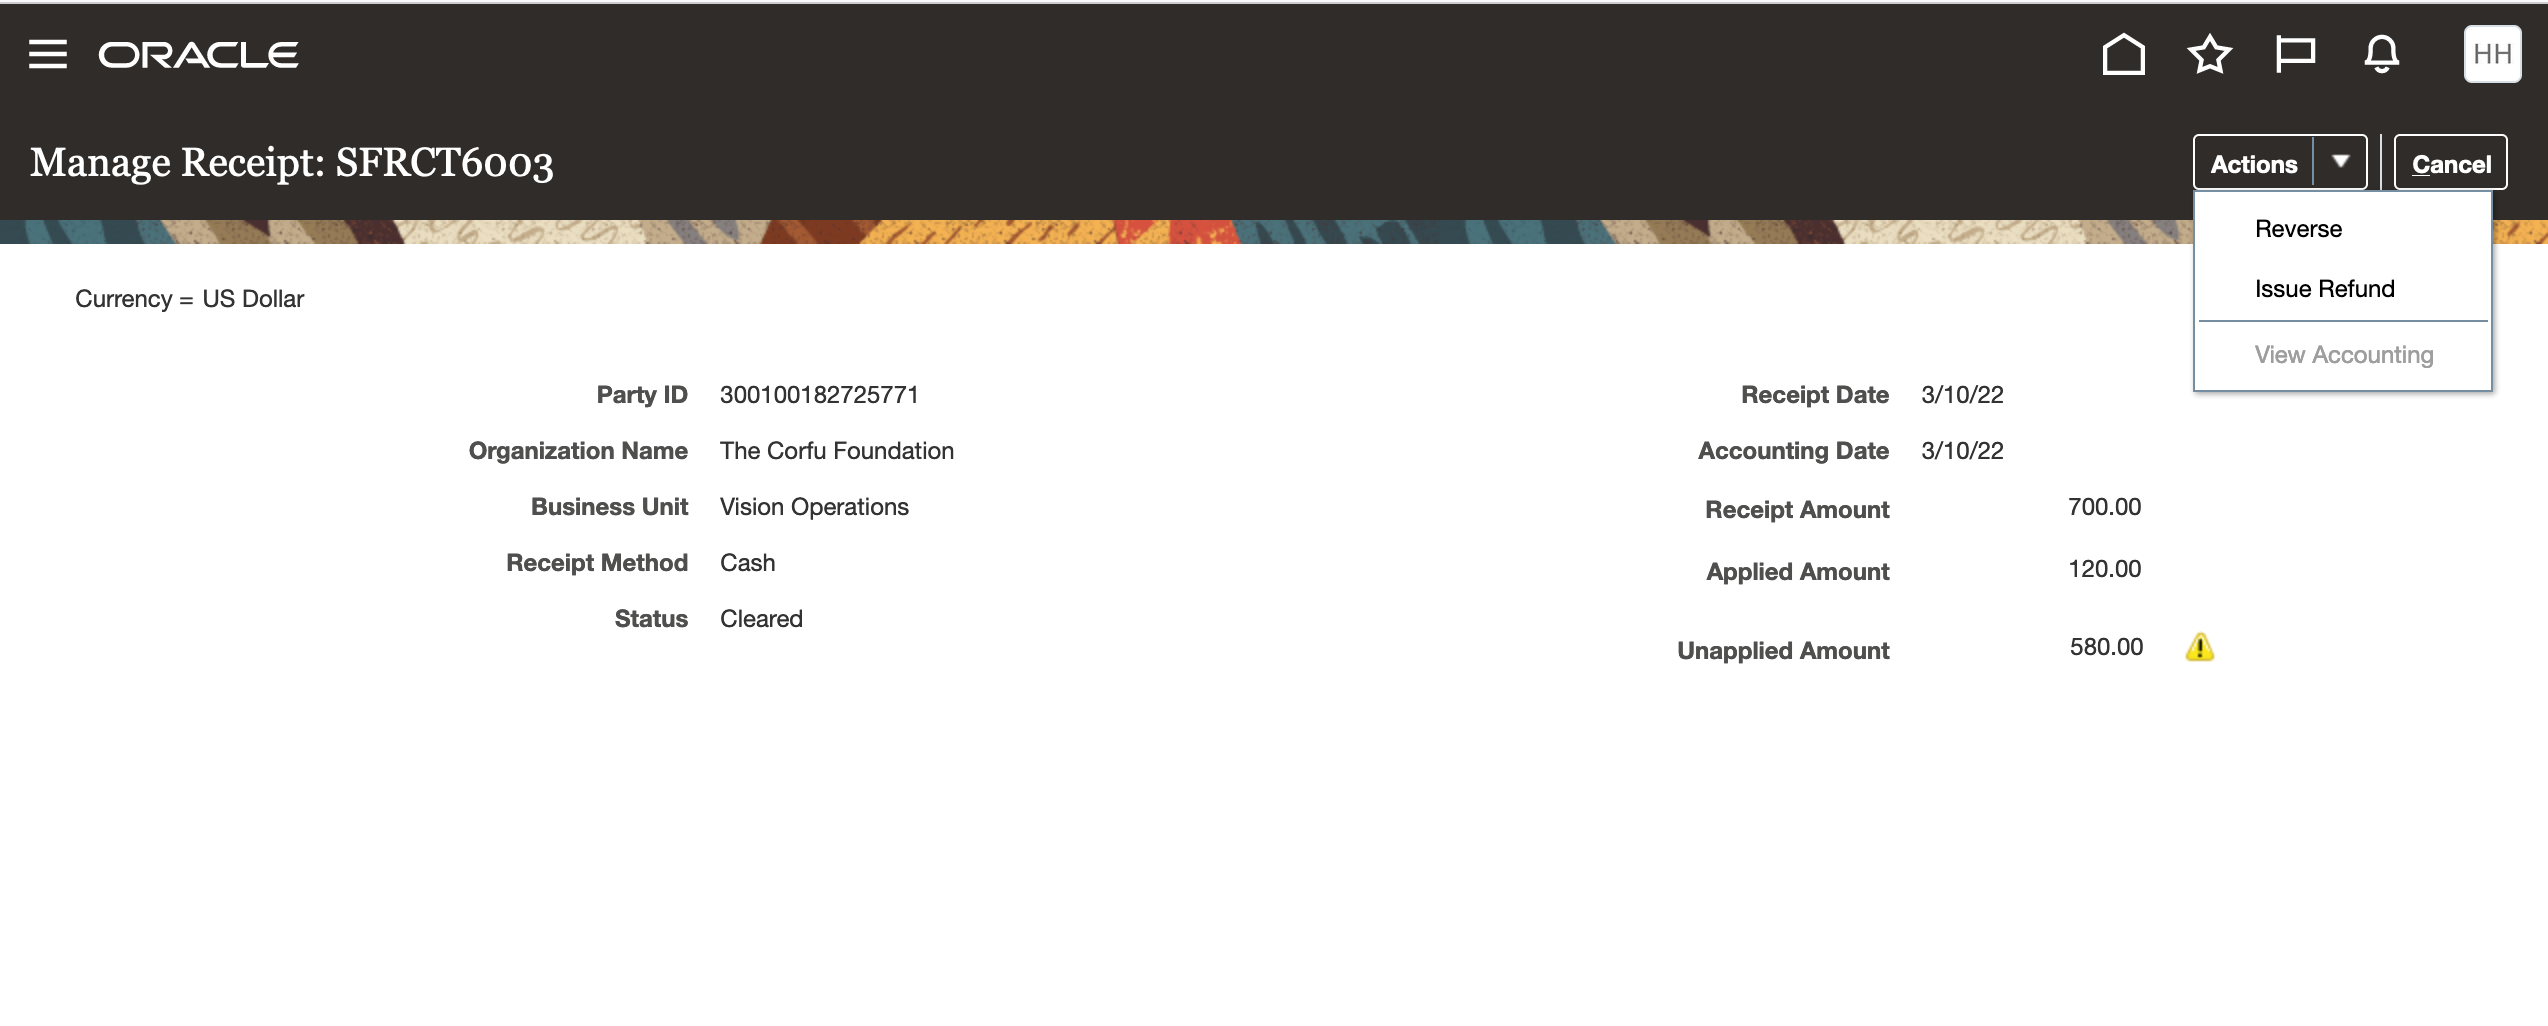
Receipt Status Is Cleared: Issue Refund Available
To initiate a refund request for a group of students or organizations, go to the Finances work area, then click Actions > Manage Refunds. Then from the landing page, click Issue Refunds.
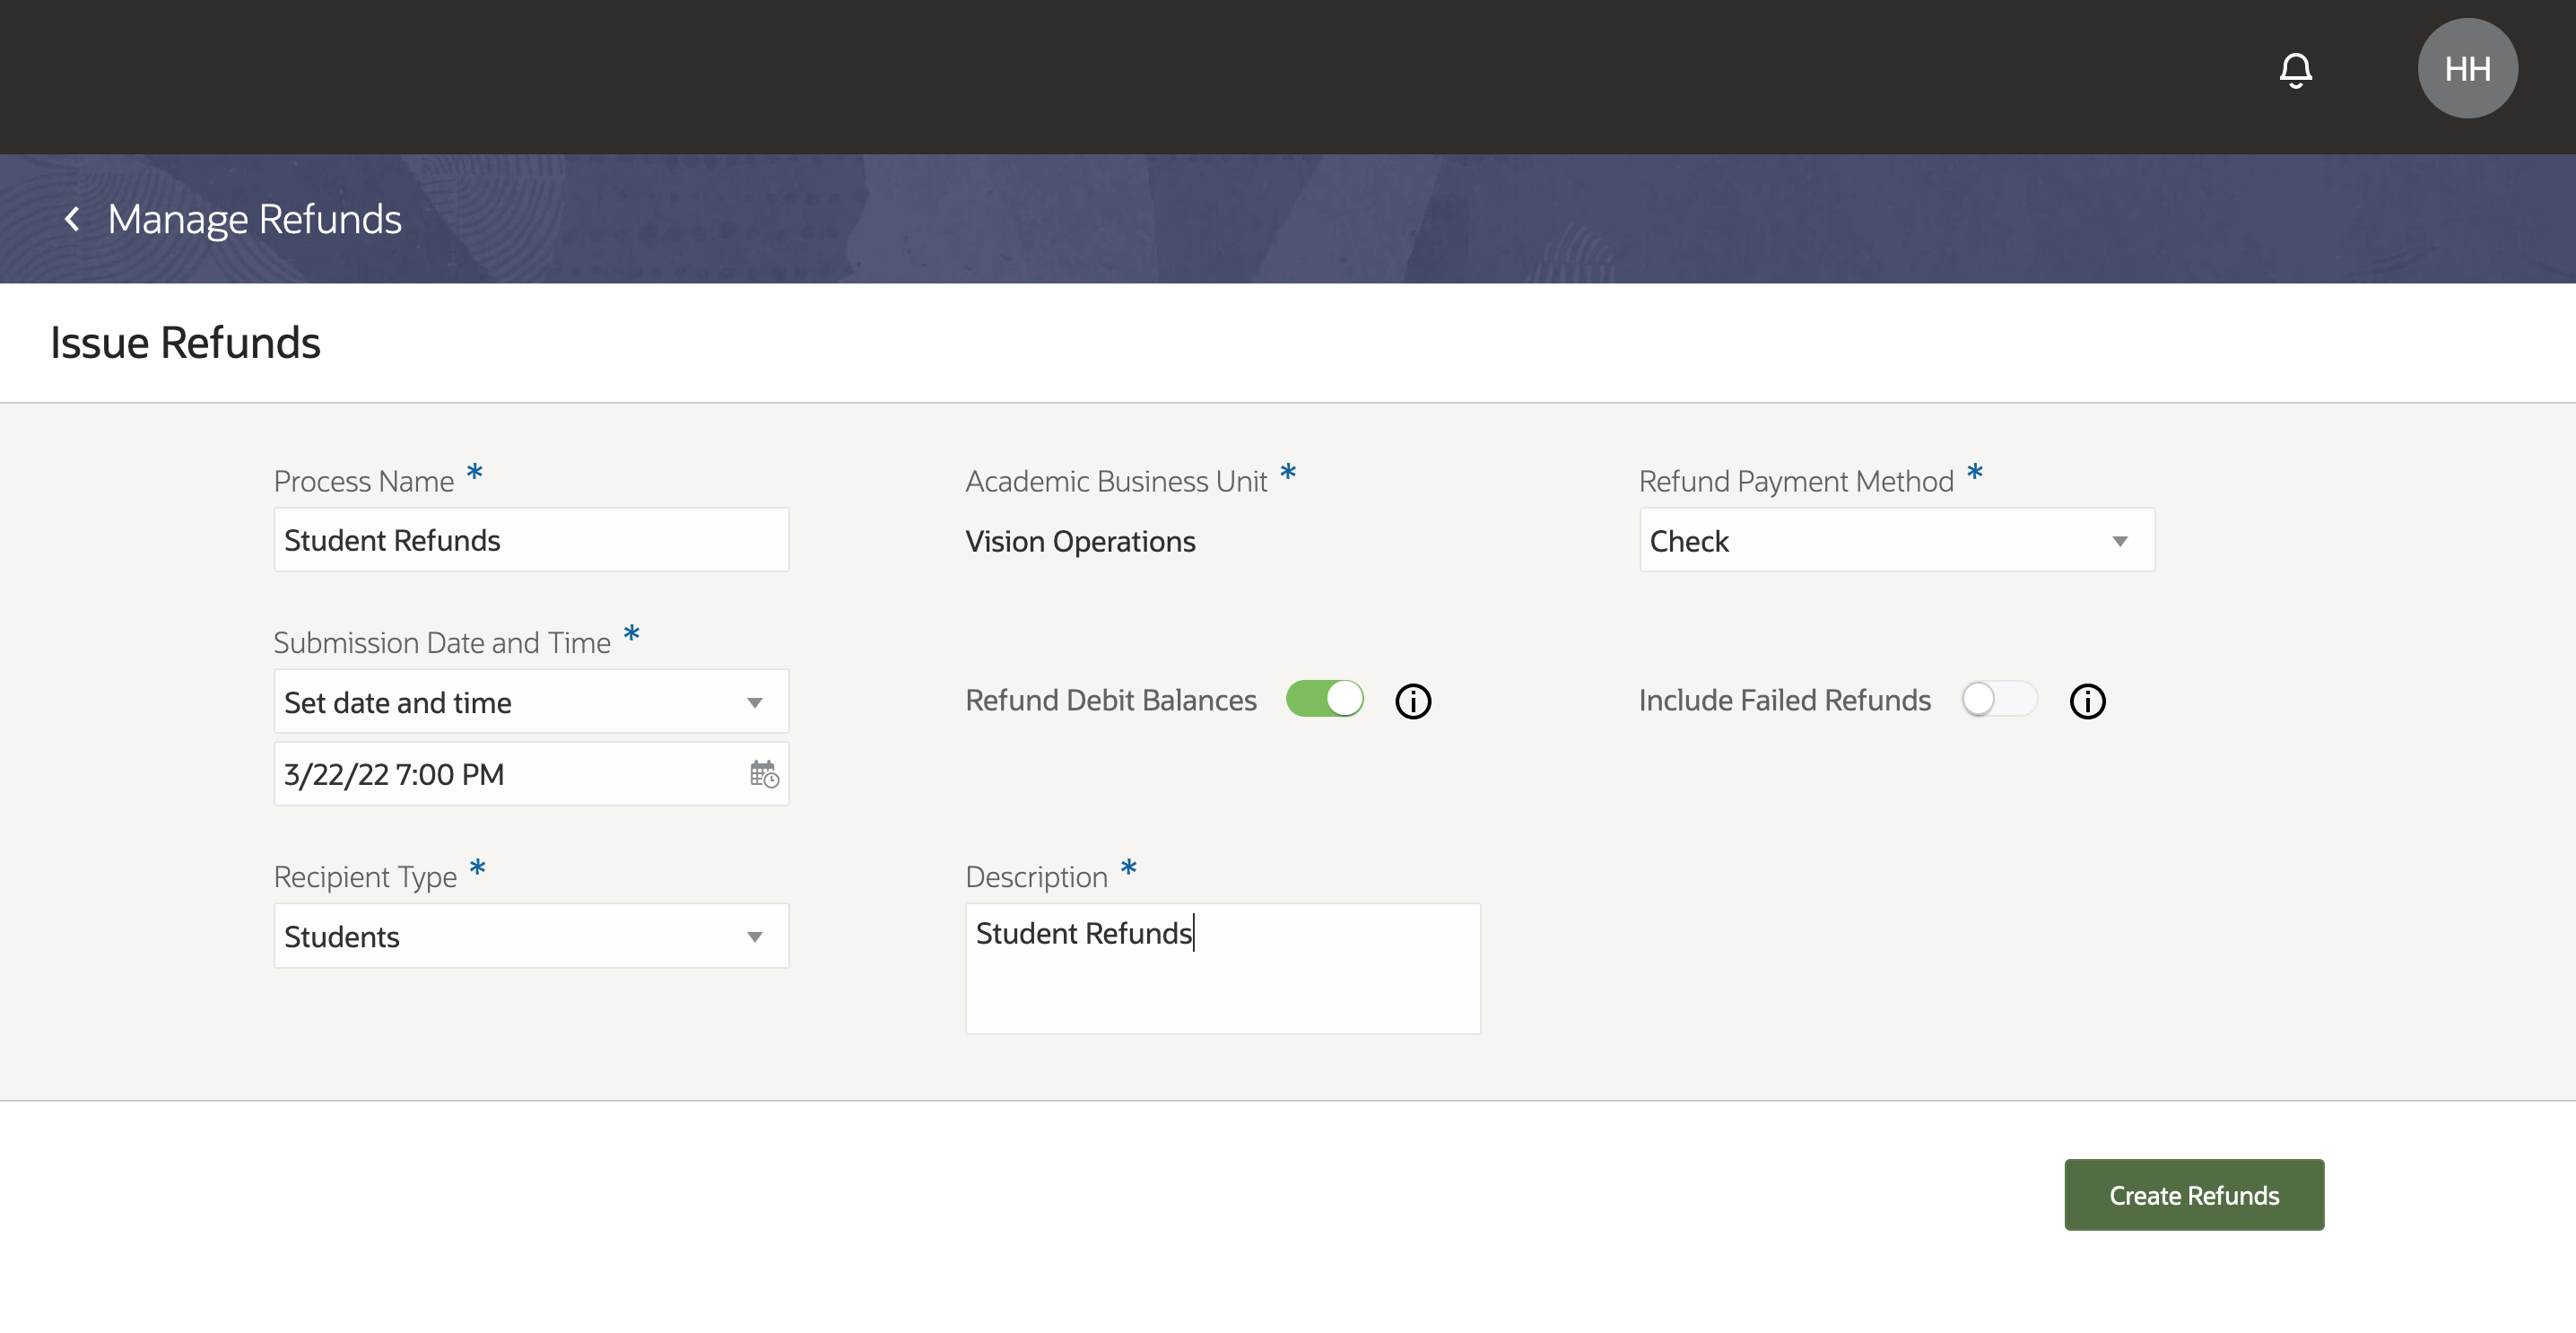
Manage Refunds: Issue Refunds Page
On the Issue Refunds page, you can set the parameters that specifies how the refund request process runs. For example, you can:
- Set the process to run immediately or at a specific date and time.
- Choose how refund payments are disbursed.
- Select the population for whom you're running the refund request. They can be individuals (students) or organizations.
Once you're ready, click Create Refunds. The process will appear on the Refund Processes page.
The Refund Processes page lists all processes: past, present, and future. Depending on their individual status, you can choose to do other actions like cancel (the process), duplicate, remove, view details, and so on.
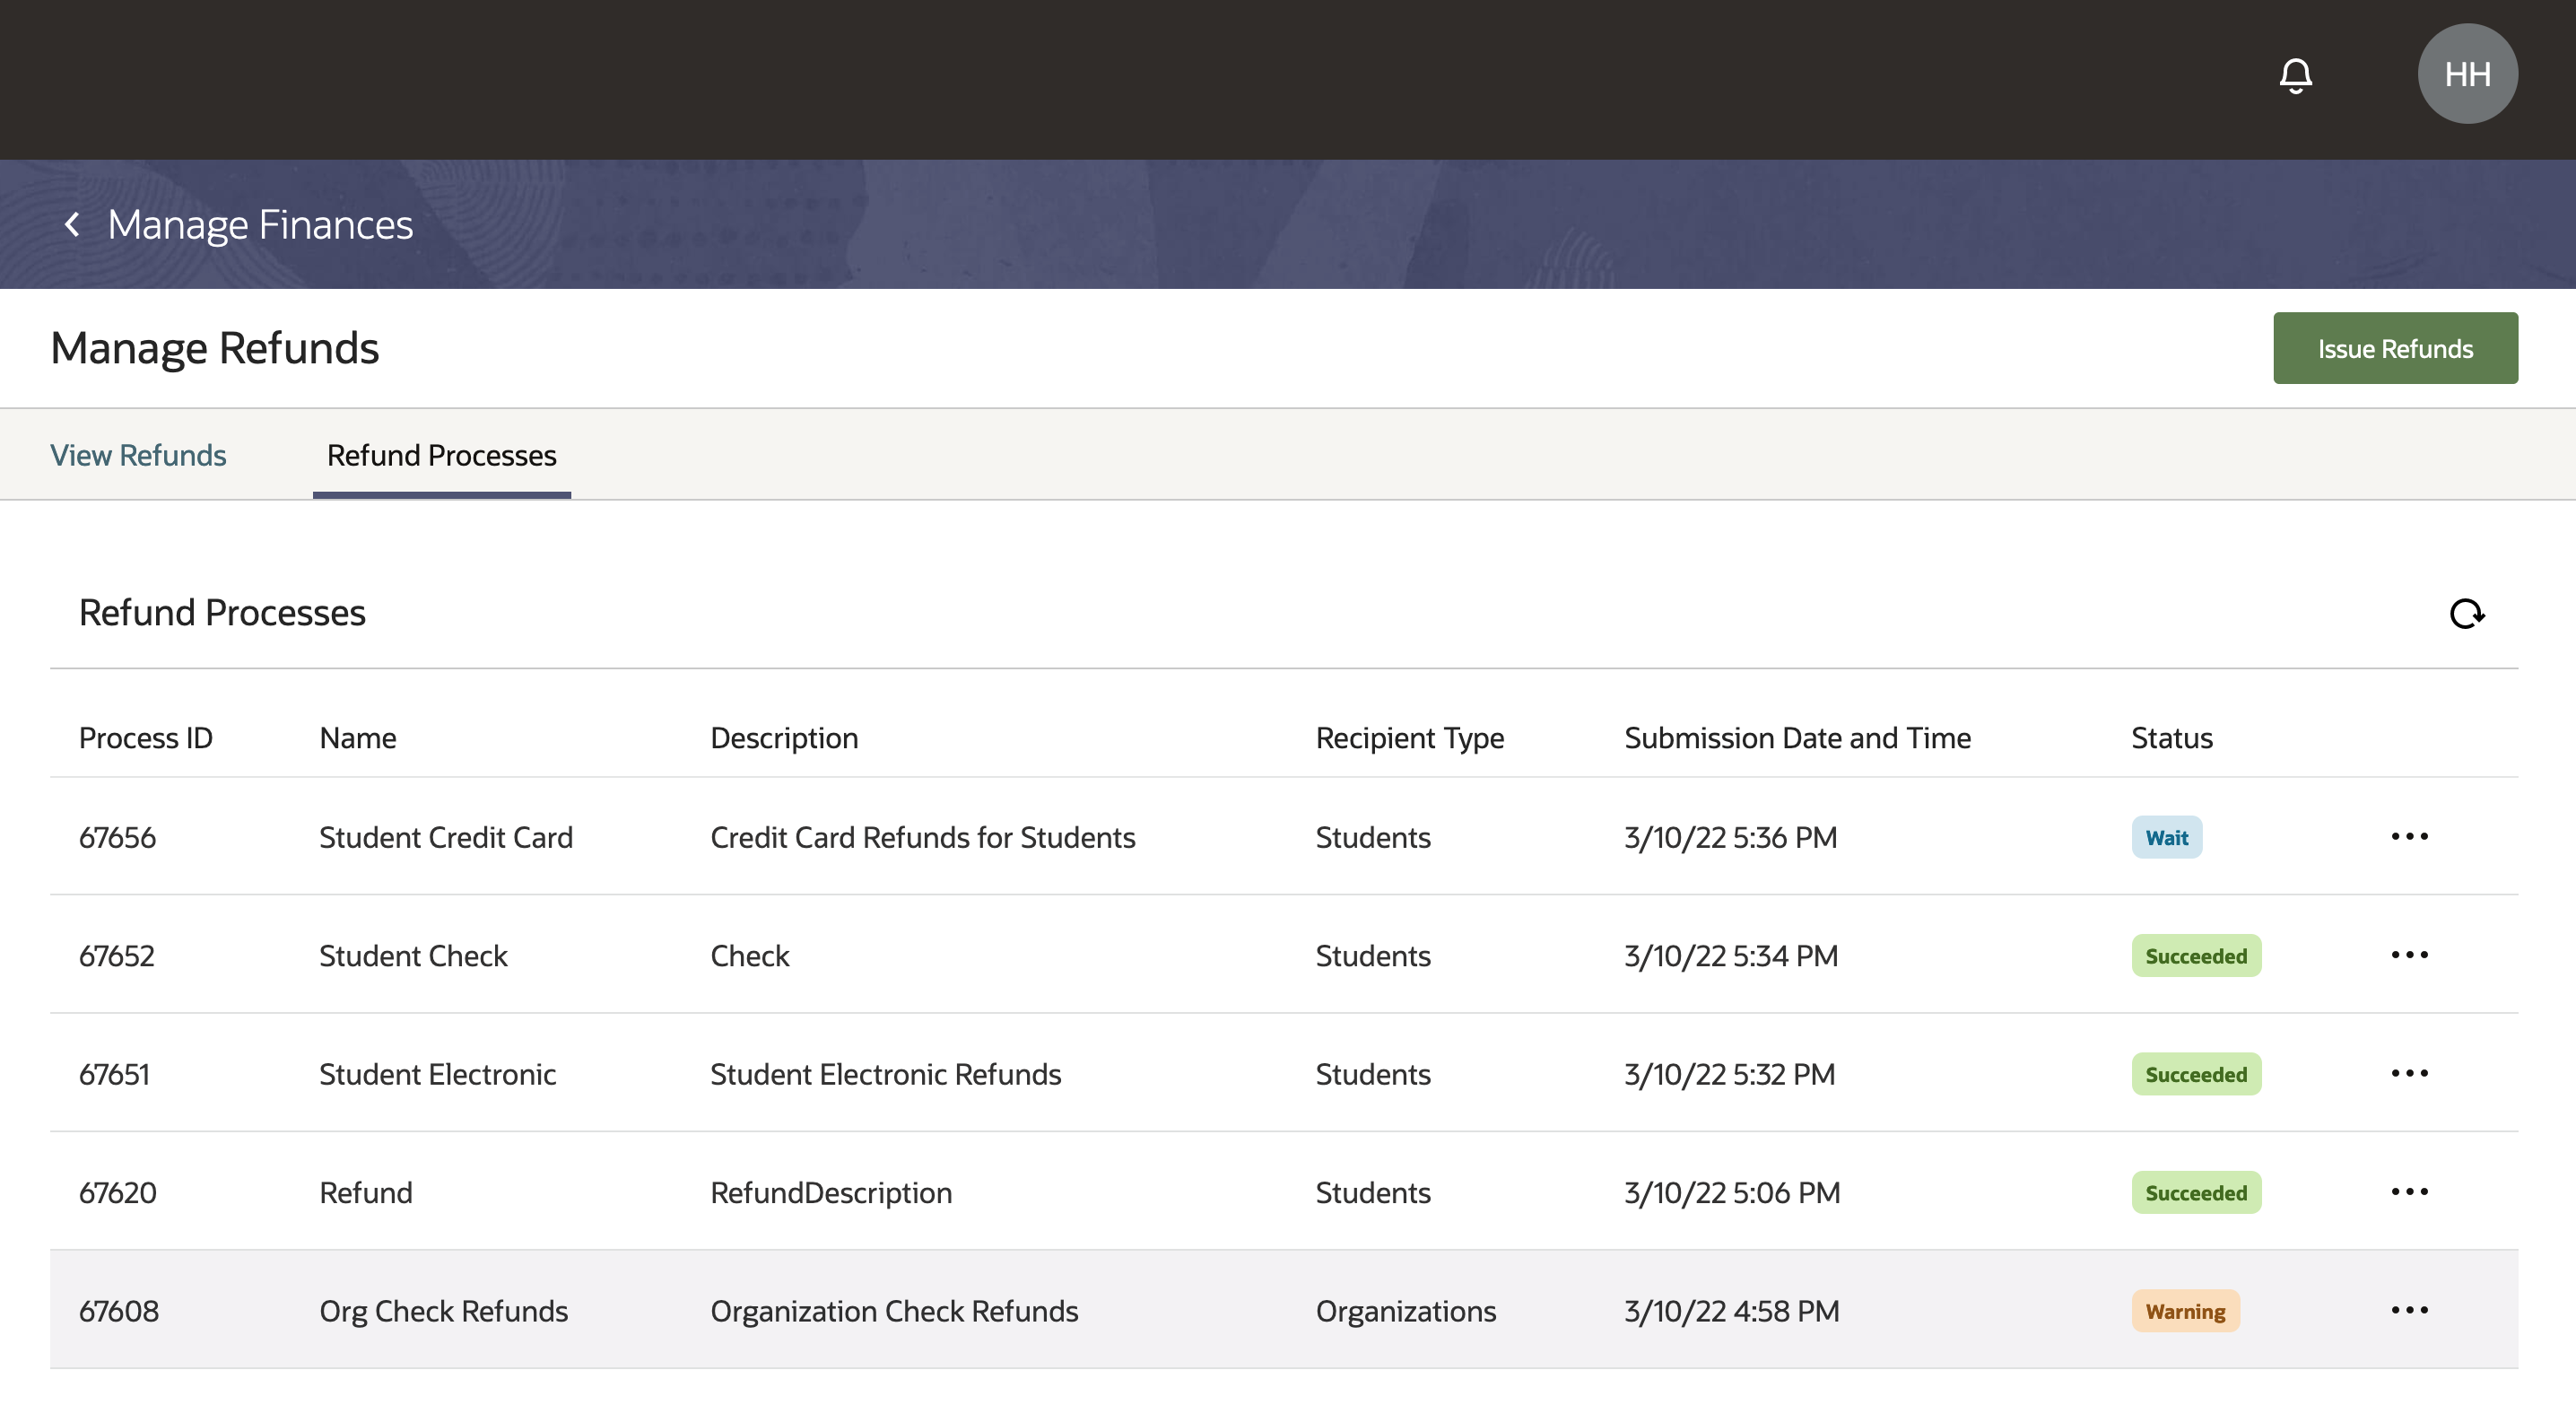
Refund Processes Page
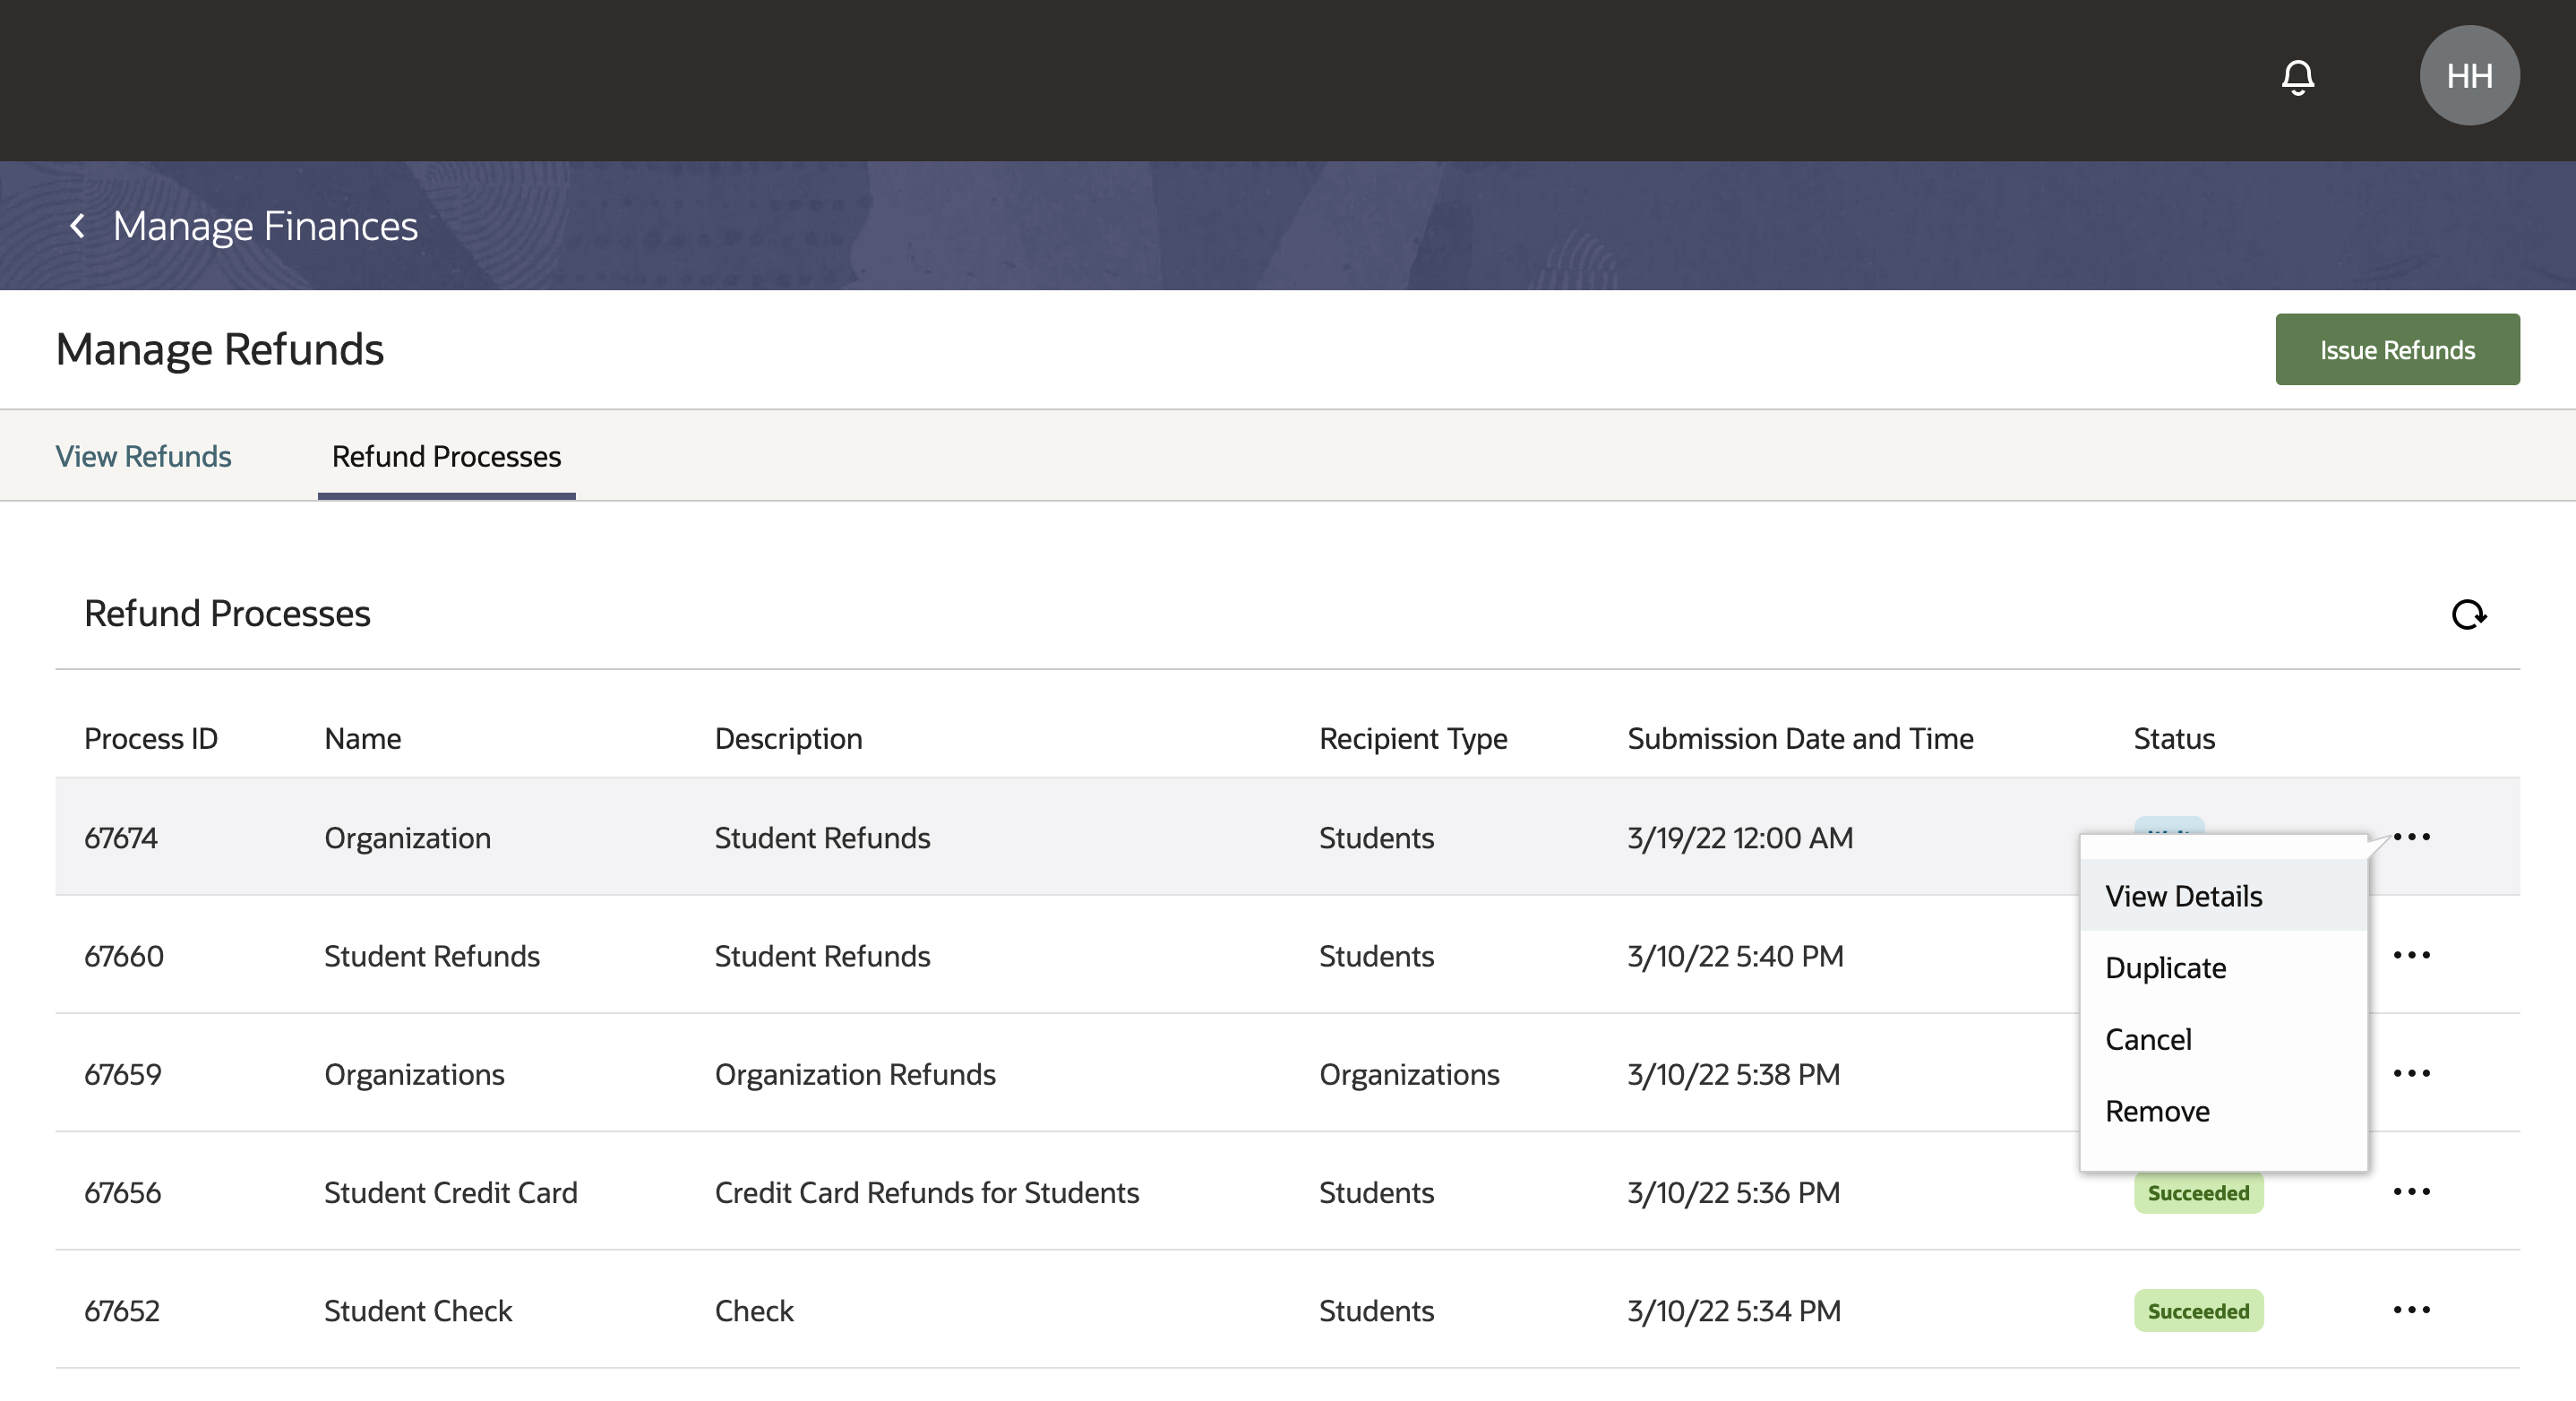
Refund Processes - Refund Actions Page
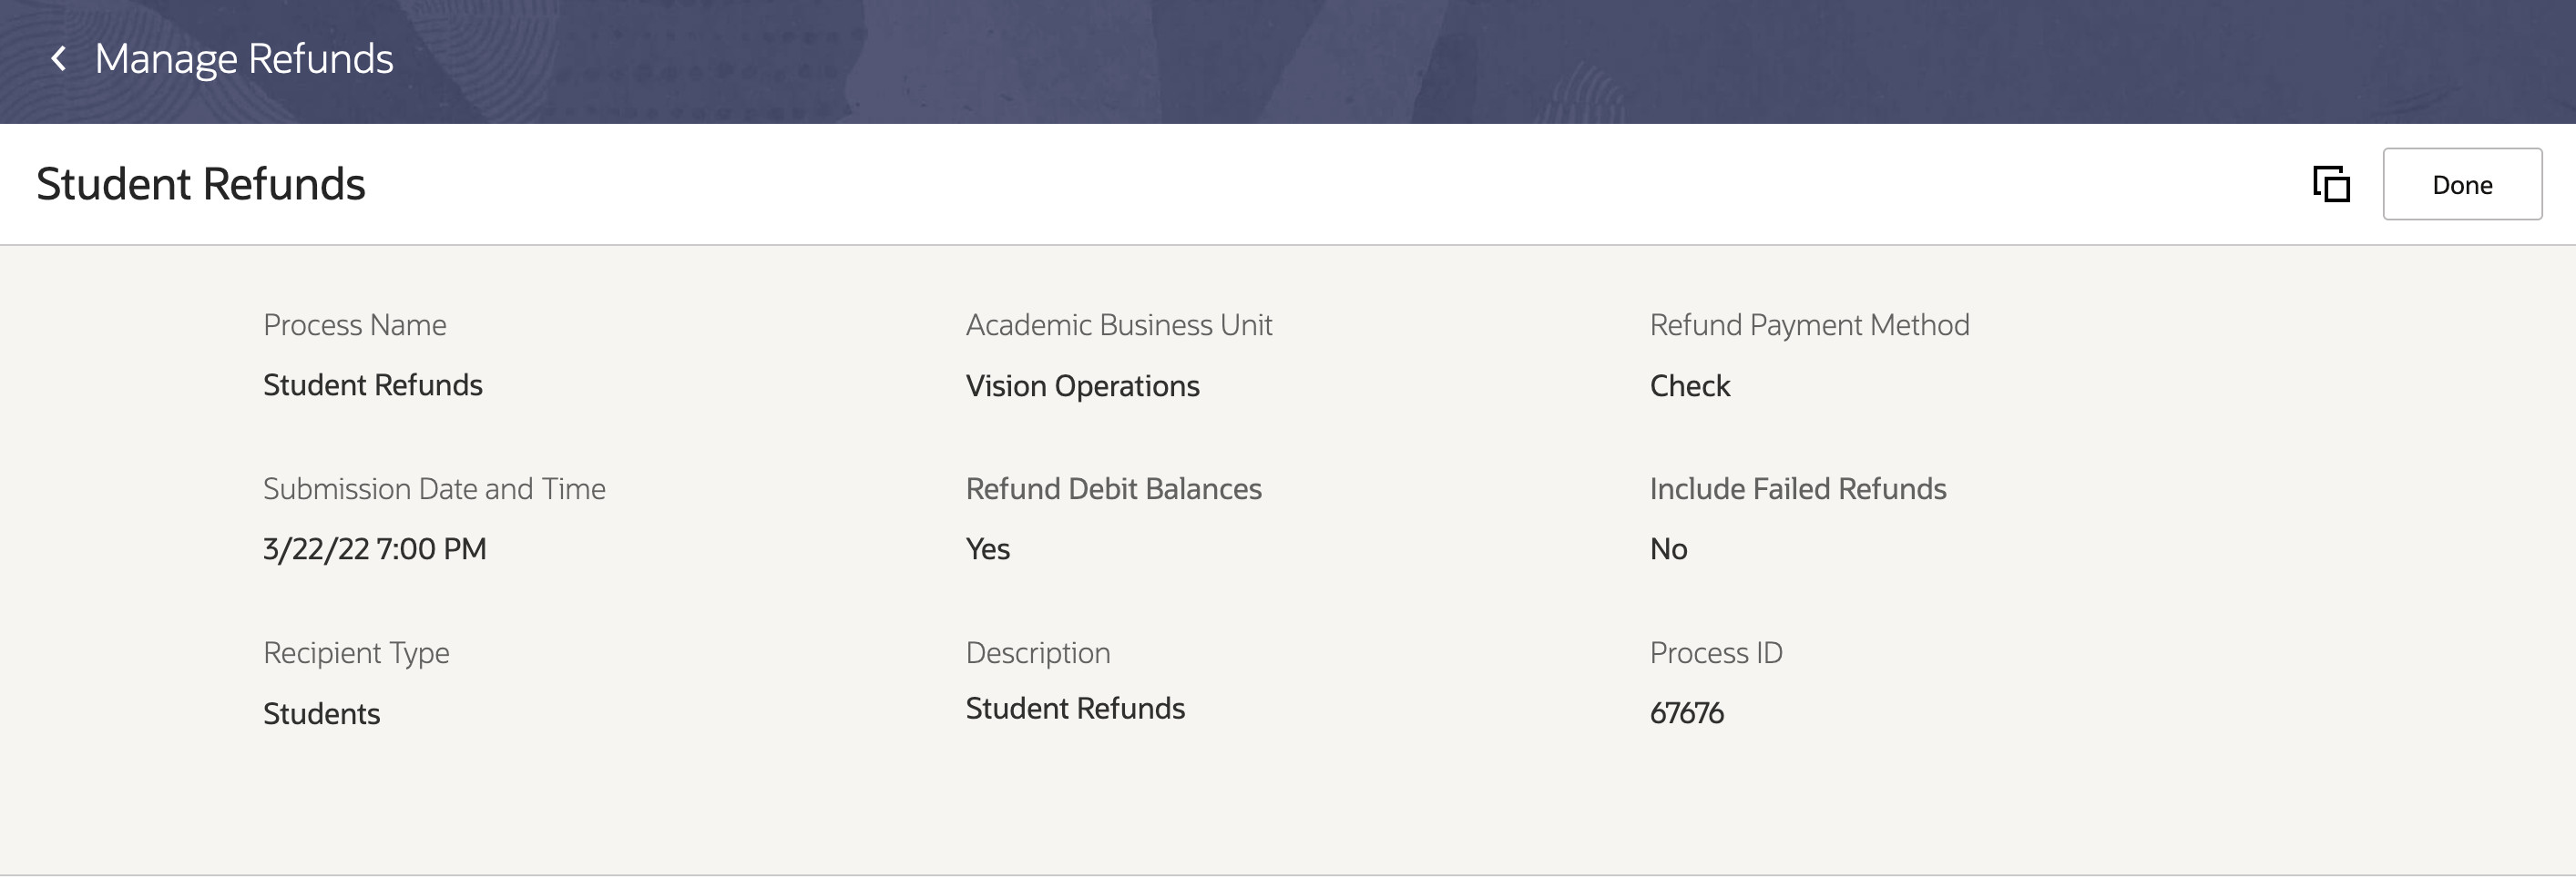
Batch Refund Process - Details Page
This feature delivers an alternative, more efficient way to perform the task of issuing refunds. Institutions will be able to focus on handling exceptions and processing non-exception refunds. There will be less time spent searching for and navigating to accounts, and less data entry. Because the process can be scheduled for a future date, institutions can proactively plan business activities rather than reacting to reports.
Steps to Enable
First, make sure you have implemented Oracle Fusion Financials correctly. It's important that you define payment methods. You also need to define the approval limits for every person who initiates the refund process. We highly recommend you consult a core Financials consultant, implementation partner, or systems integrator to help you set up Financials. For information about payment methods and approval limits, see:
Next, set up refund methods at the academic business unit level. For information, see Academic Business Unit Configuration.
Tips And Considerations
When you successfully run a refund request process, payment request invoices are created in Oracle Fusion Receivables. You'll still have to process the payments in Oracle Fusion Payables, or through the payment solution you're using.
The refund request process currently supports refunding receipts including credit card, electronic, and check payments. In the future, as the functionality around non-receipt credits (scholarships or financial aid) is built, the process will be enhanced to support refunding those credits, too.
For this release and a few subsequent releases, the parameters you can use to run the refund process are limited. This will be enhanced in a future release.
Lastly, service hold tags aren't currently supported, so schools must manage credits or accounts that are ineligible for refunds by posting offsetting charges, canceling refunds before they're processed by Oracle Fusion Payables, or with other measures. When service hold tags are released, there will be a seeded value to block refunding.
Key Resources
- From the landing page, you'll see a history of refunded payments and the corresponding recipients on the View Refunds page. For more information, see Refund History.
- This feature uses Refund Payment Preferences.
Institutions create many refunds as part of normal business processes, and reviewing and managing issued refunds is a key function for bursars' offices.
Prior to this release, refunds were only visible as a line item within a credit on an individual's or organization's account. Now, using the Manage Refunds page, bursars can find and view all refunds in a single experience, enabling them to manage the life cycle of a refund. They can find all of the refunds issued for a particular student or organization, or on a particular date, or with a particular status.
To access the Manage Refunds page, go to the Finances work area, then click Actions > Manage Refunds. When you click Refund Number, you will see detailed information about the refund.
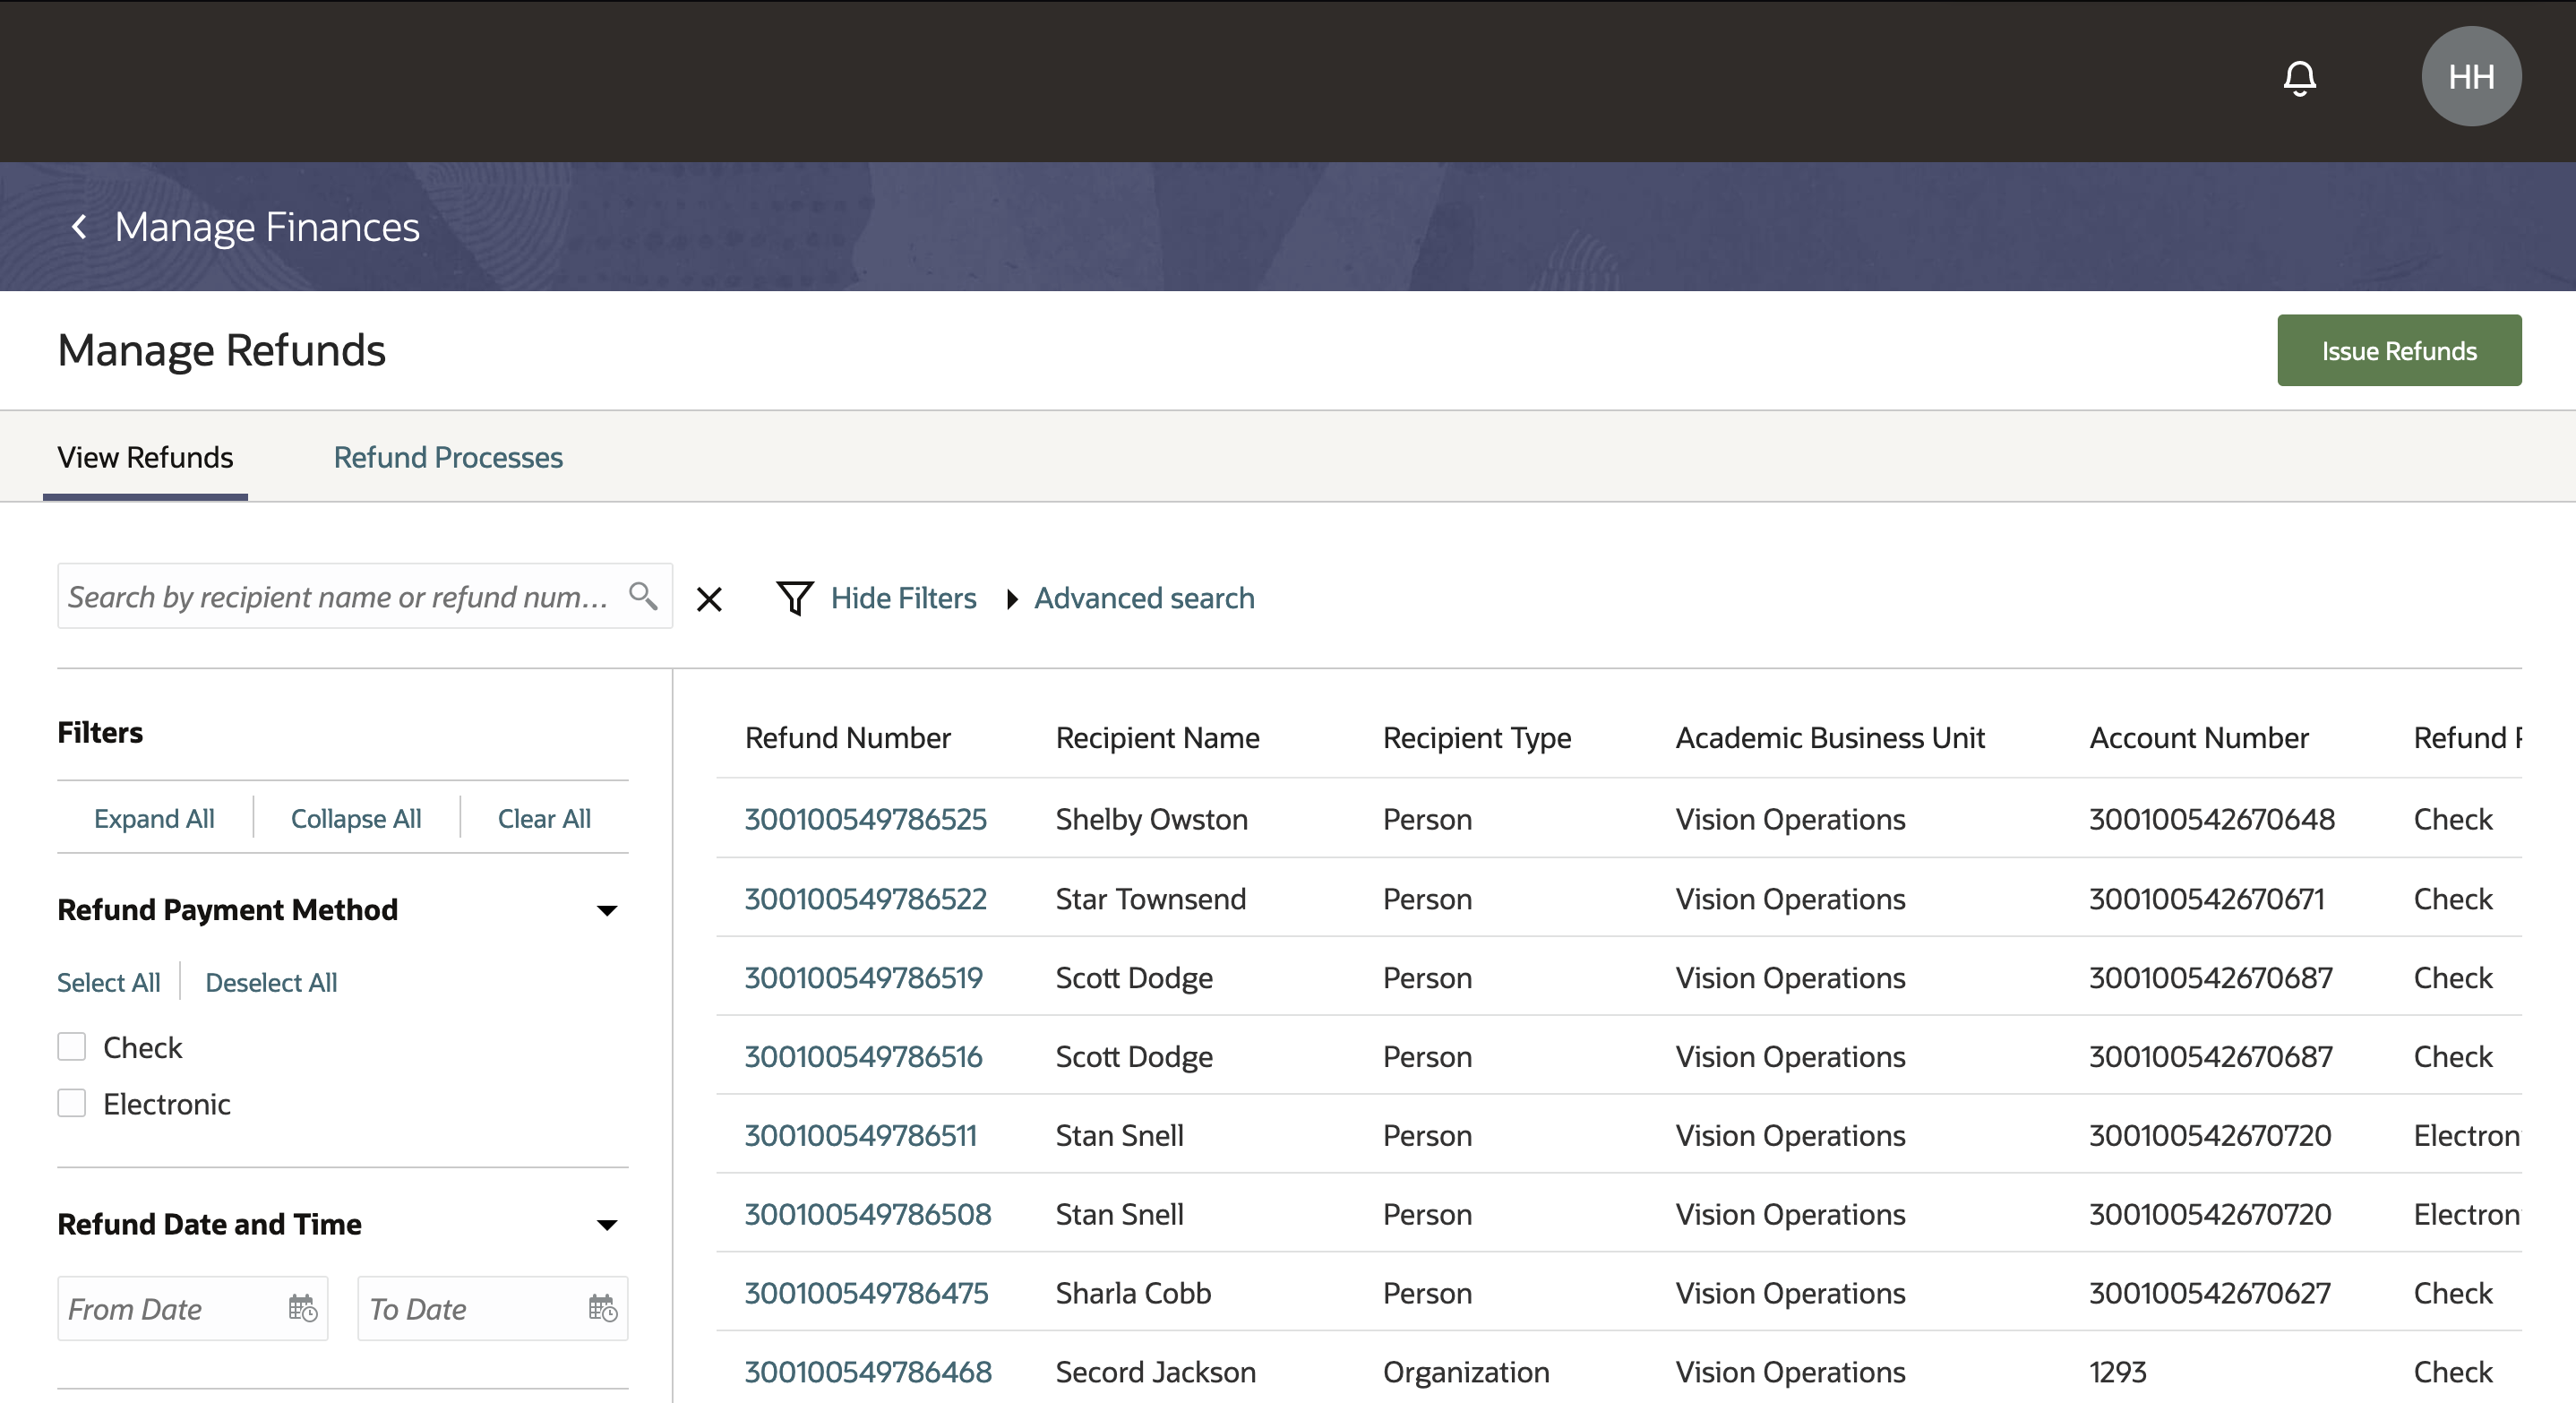
Manage Refunds Landing Page
From the landing page, these are some of the things bursars can do:
- Search and filter for existing refunds.
- View details about the refund such as the refund amount, refunded transaction, process ID, the date and time it was requested, and so on.
- View information about the refund payment. For example, if a refund was sent as a check, you will see the address the check was sent to, the check number, and so on.
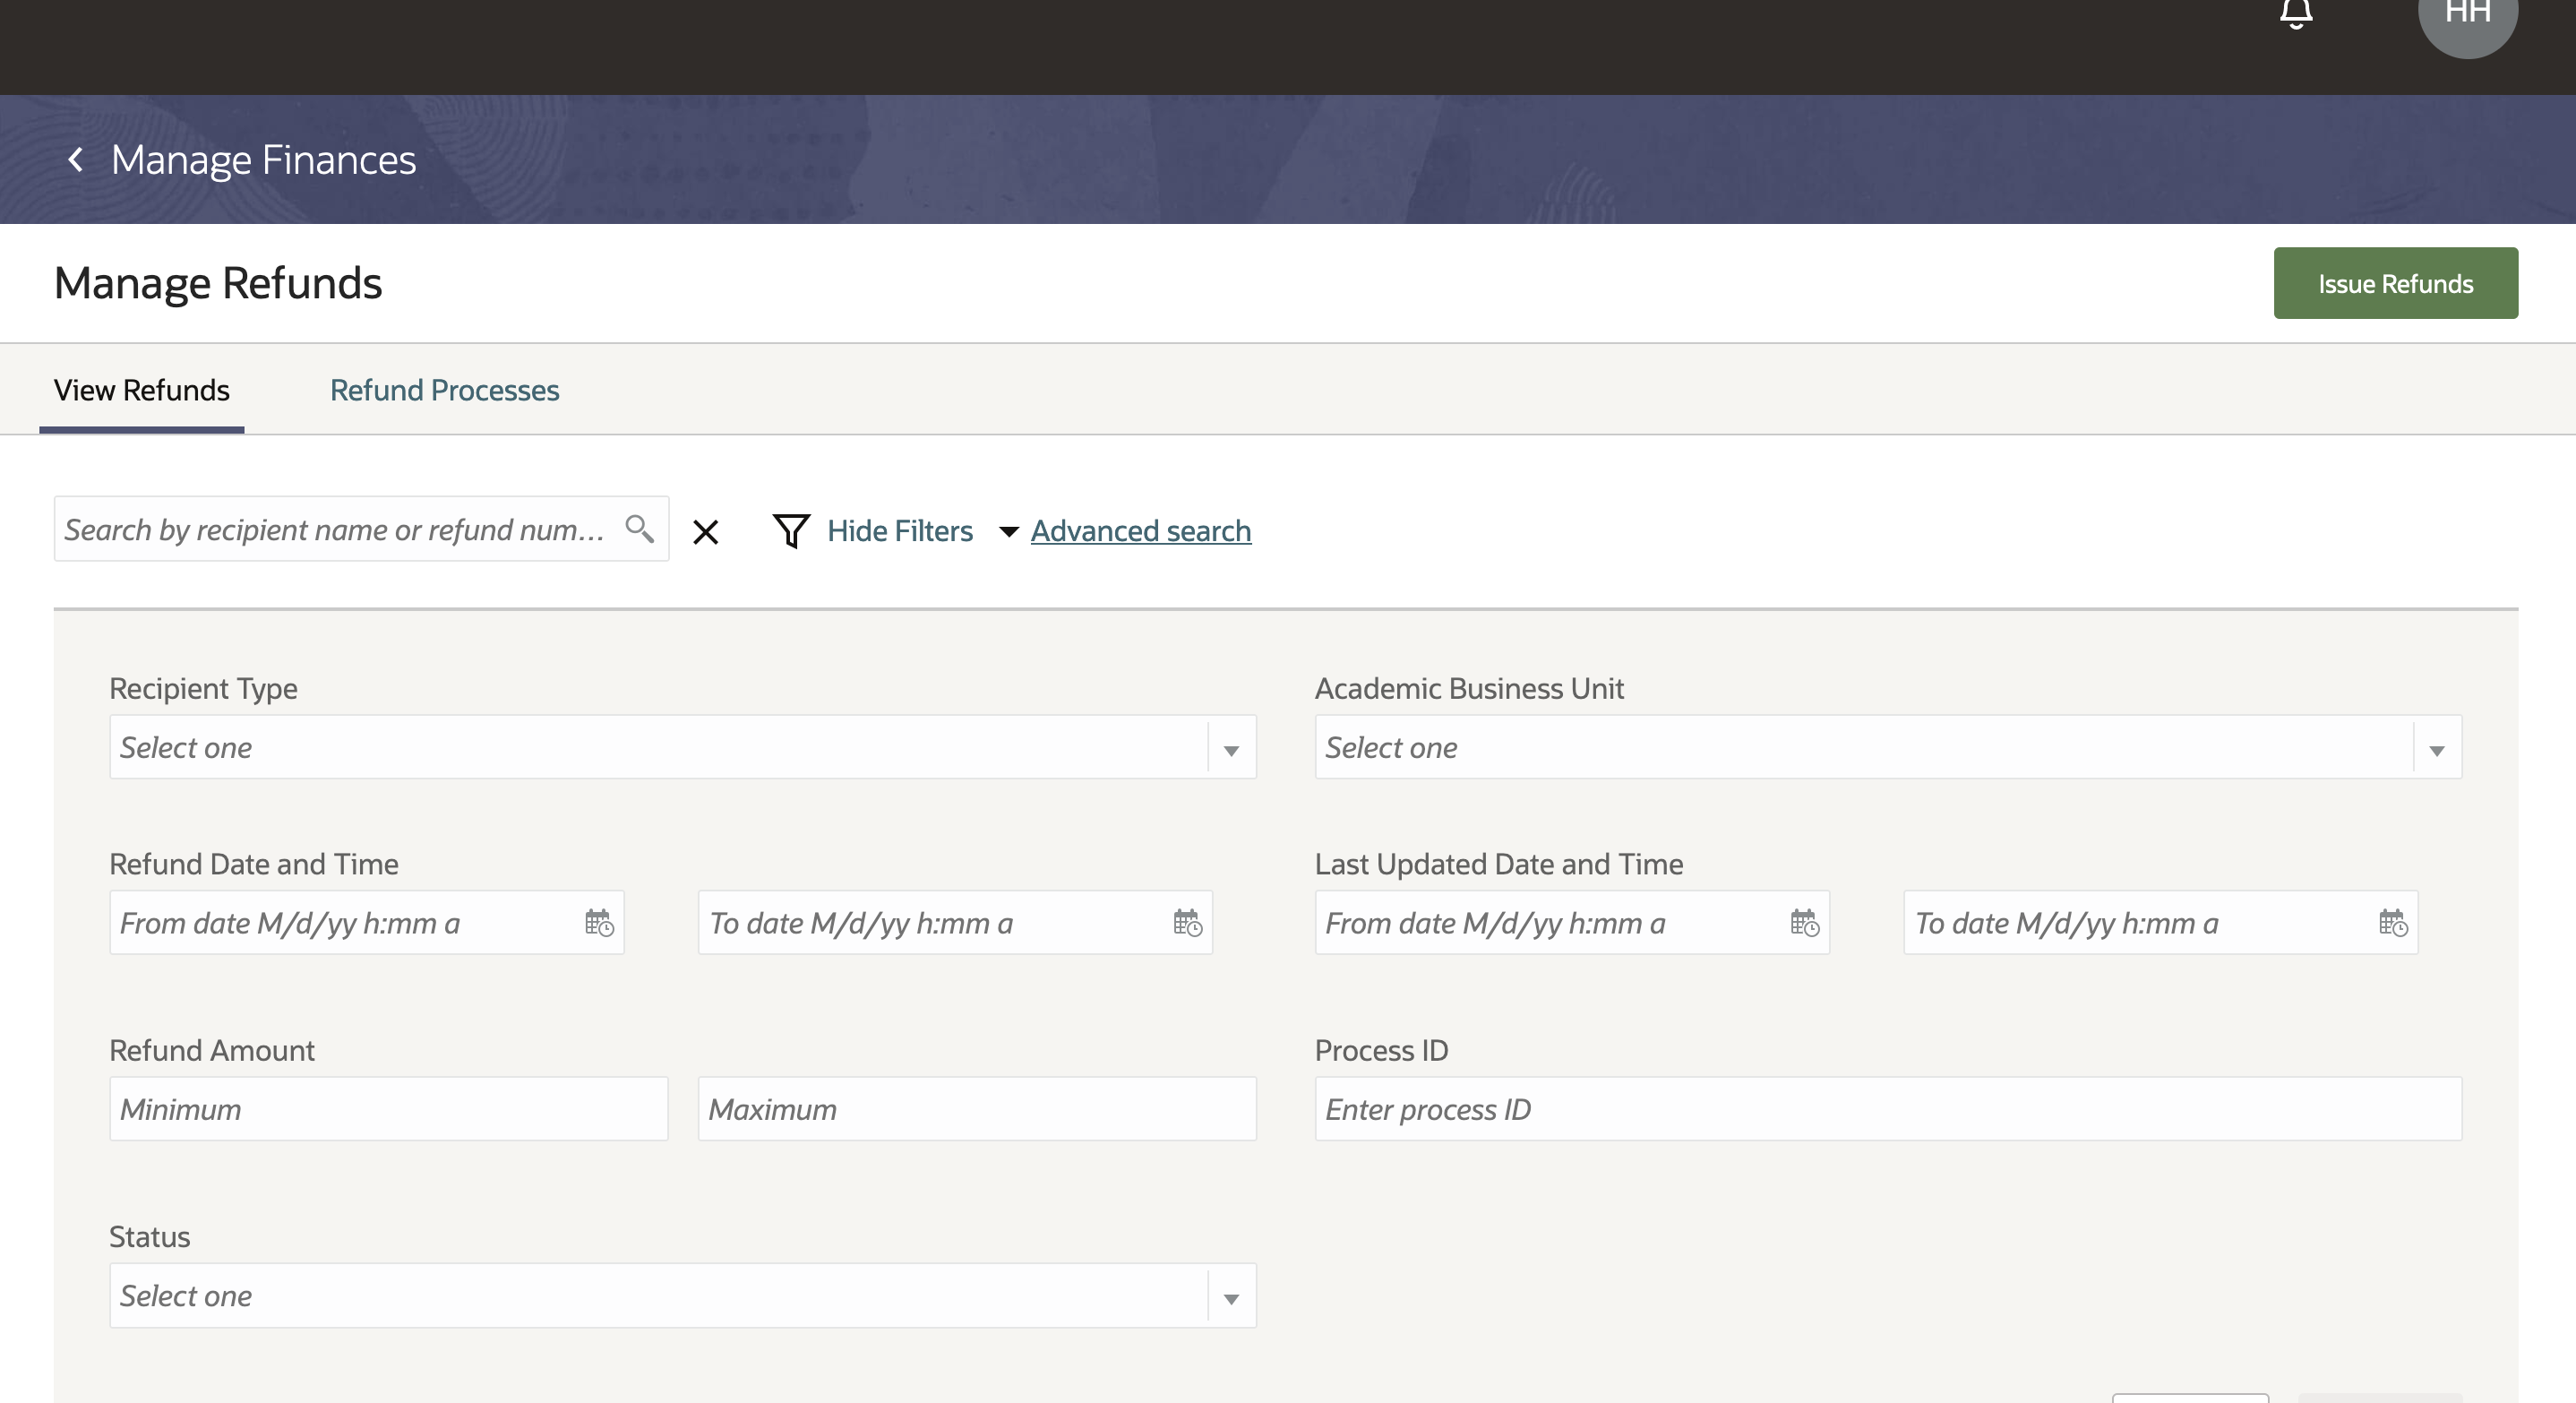
Manage Refunds - Search Parameters
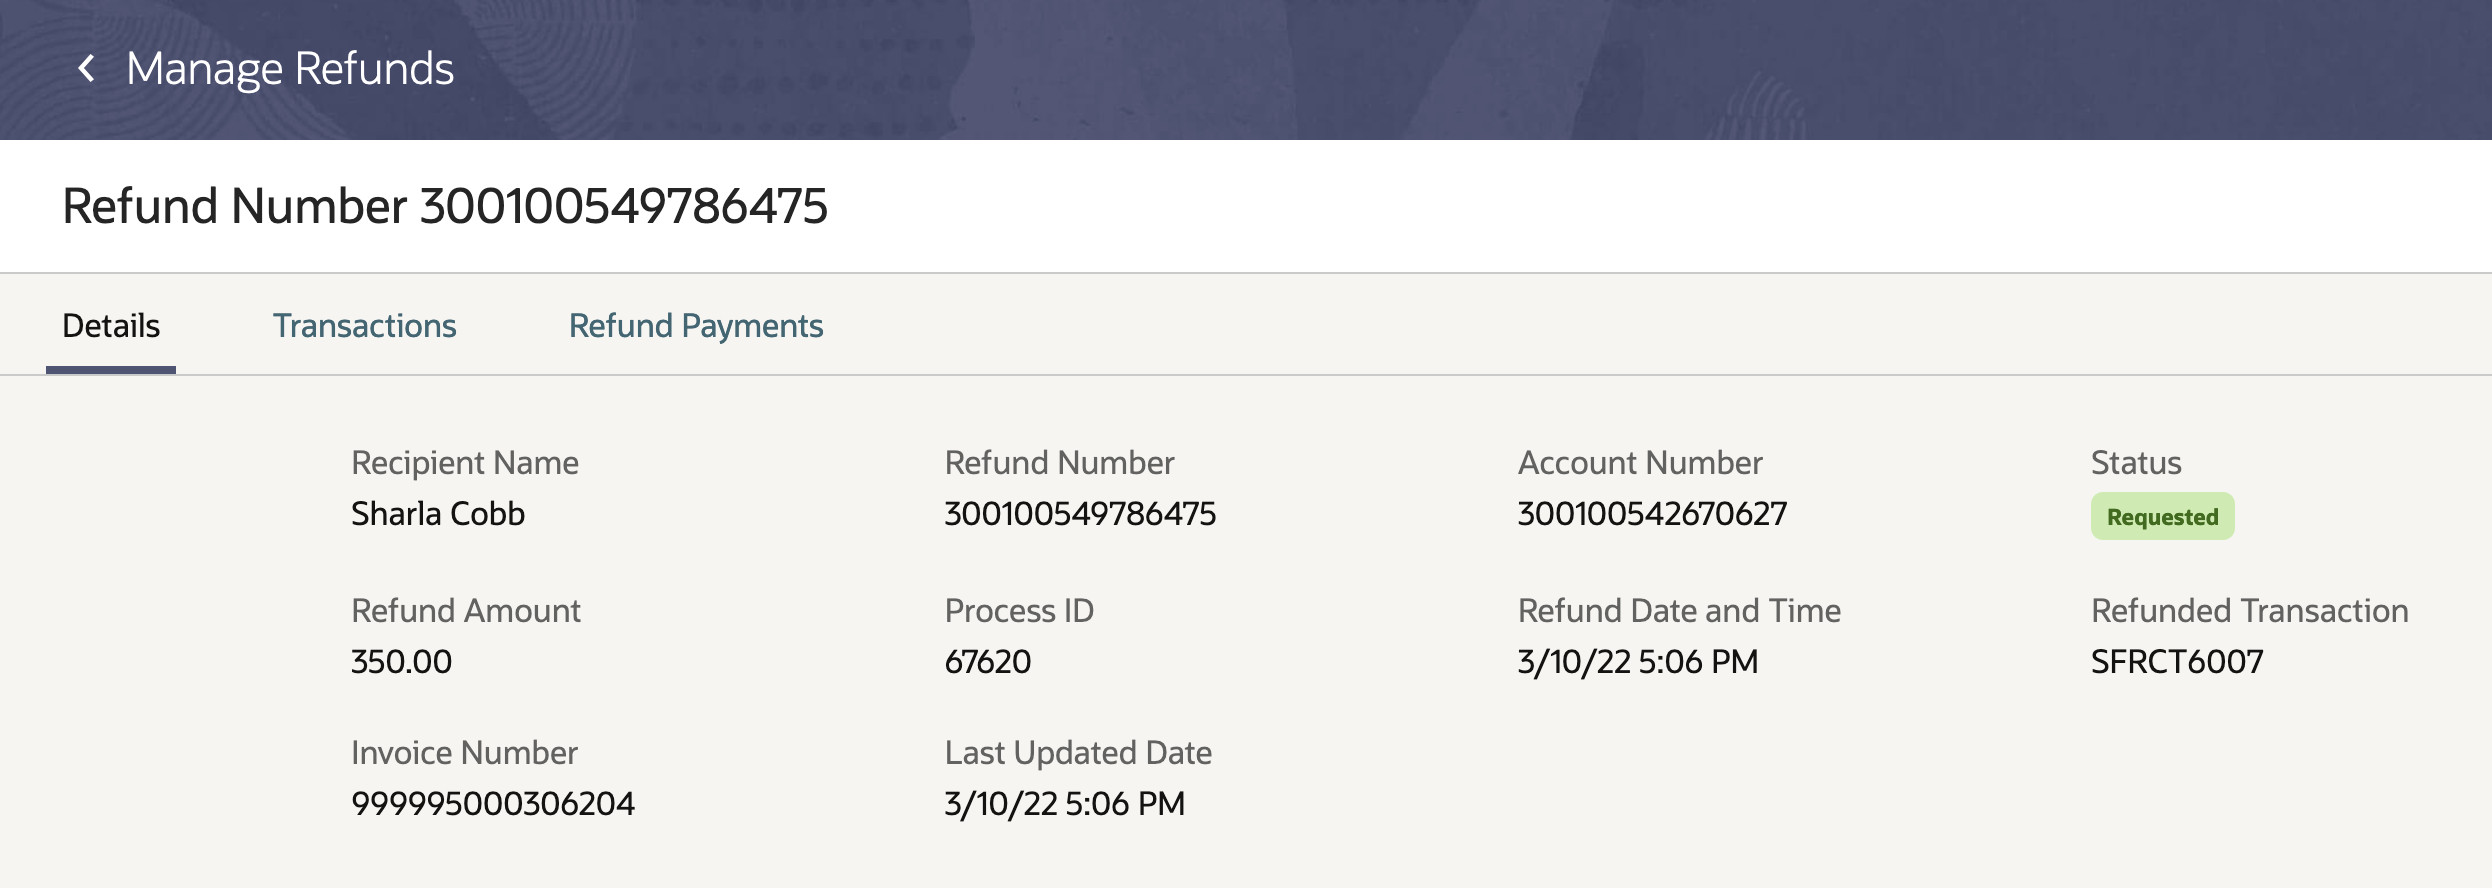
Refund - Details Page
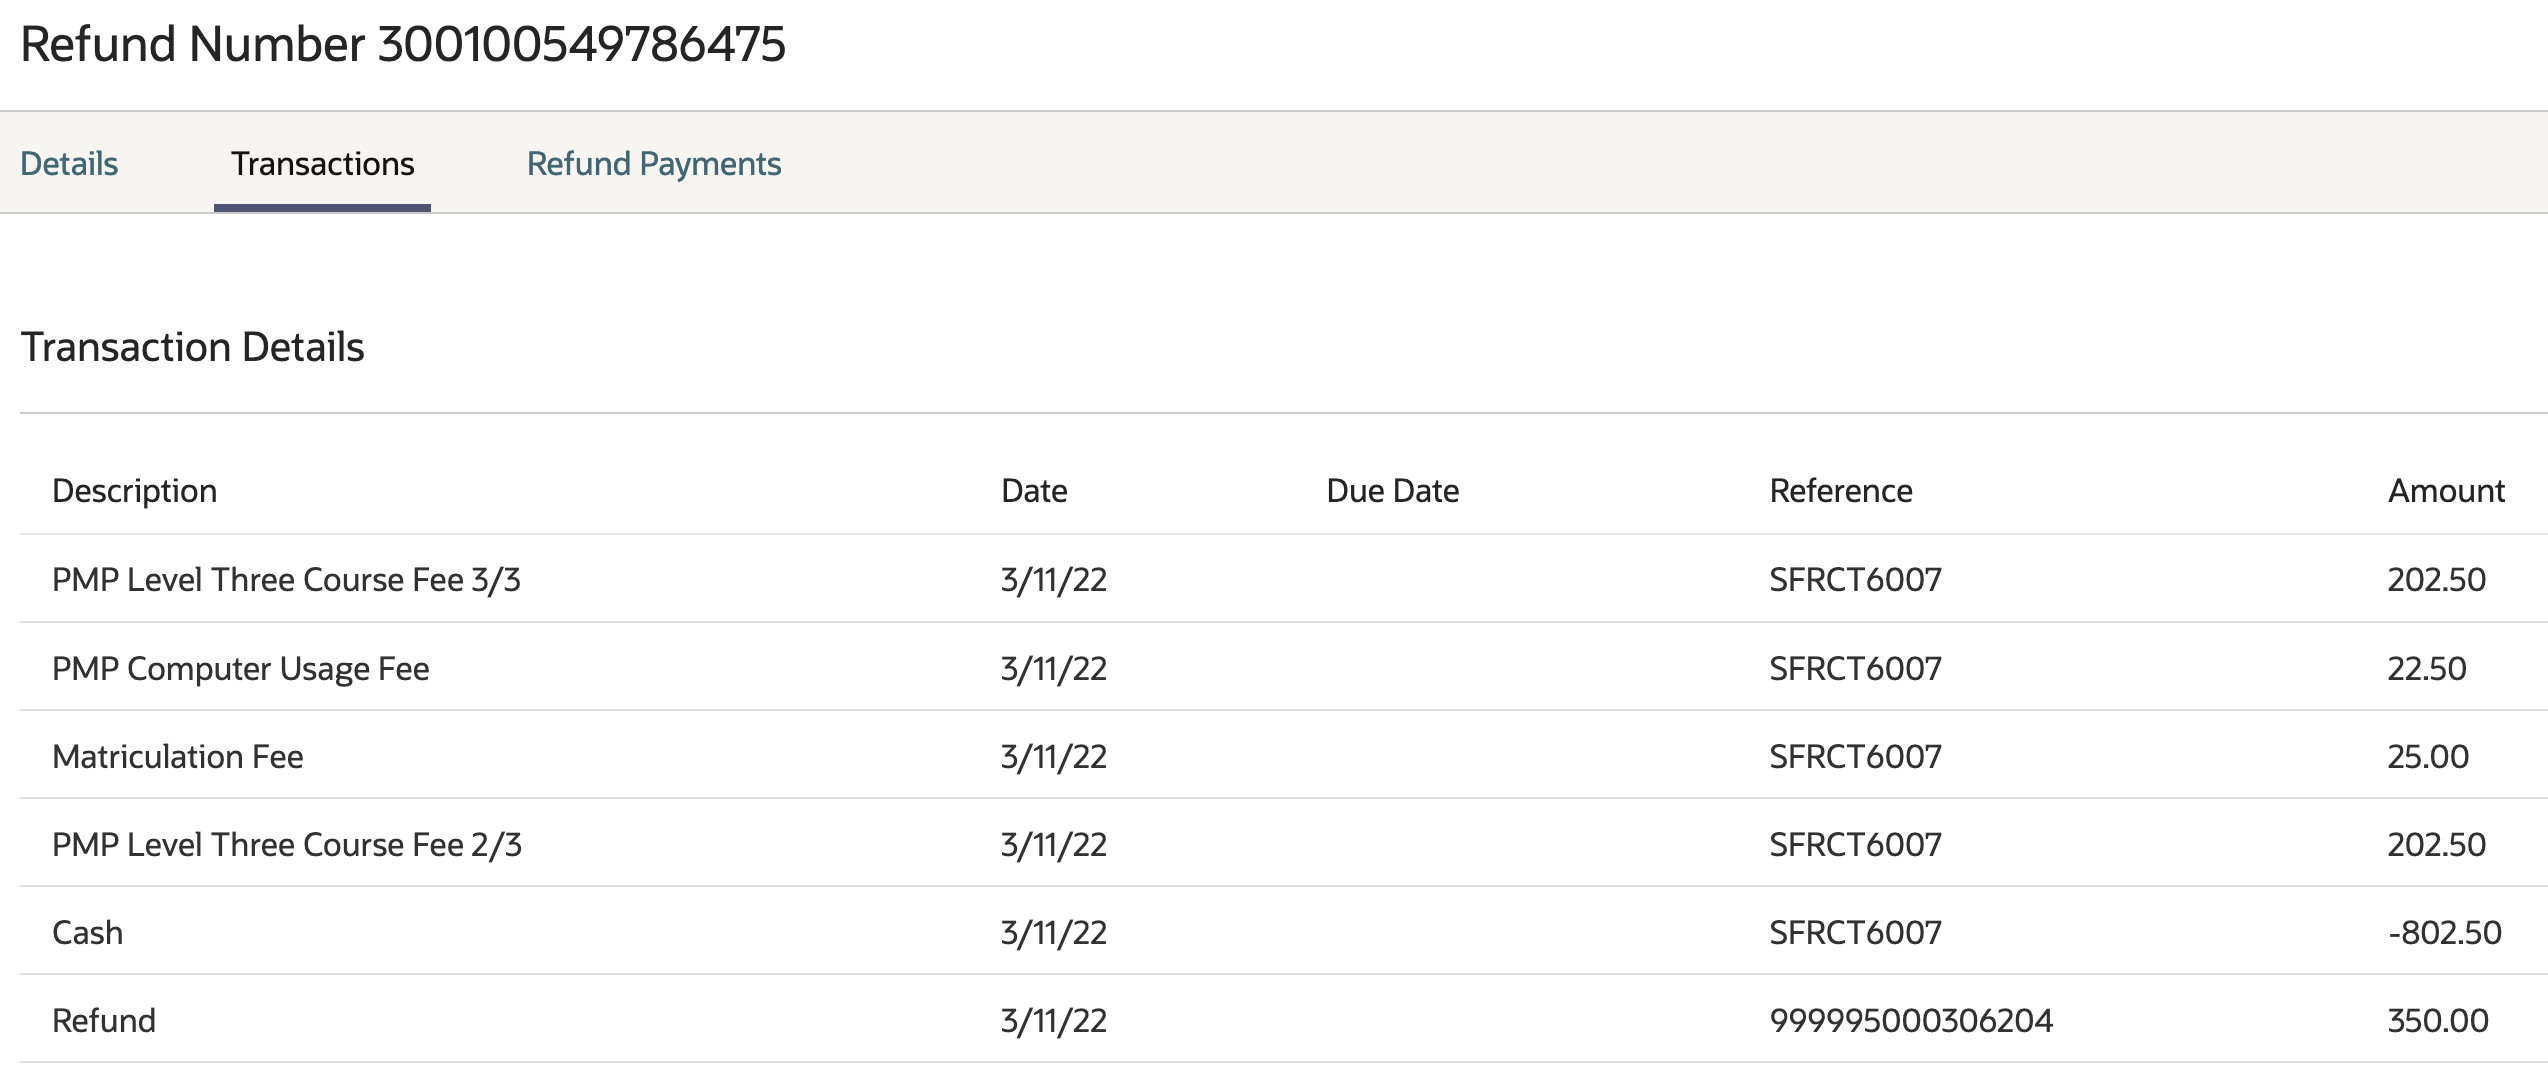
Refund - Transaction Details Page
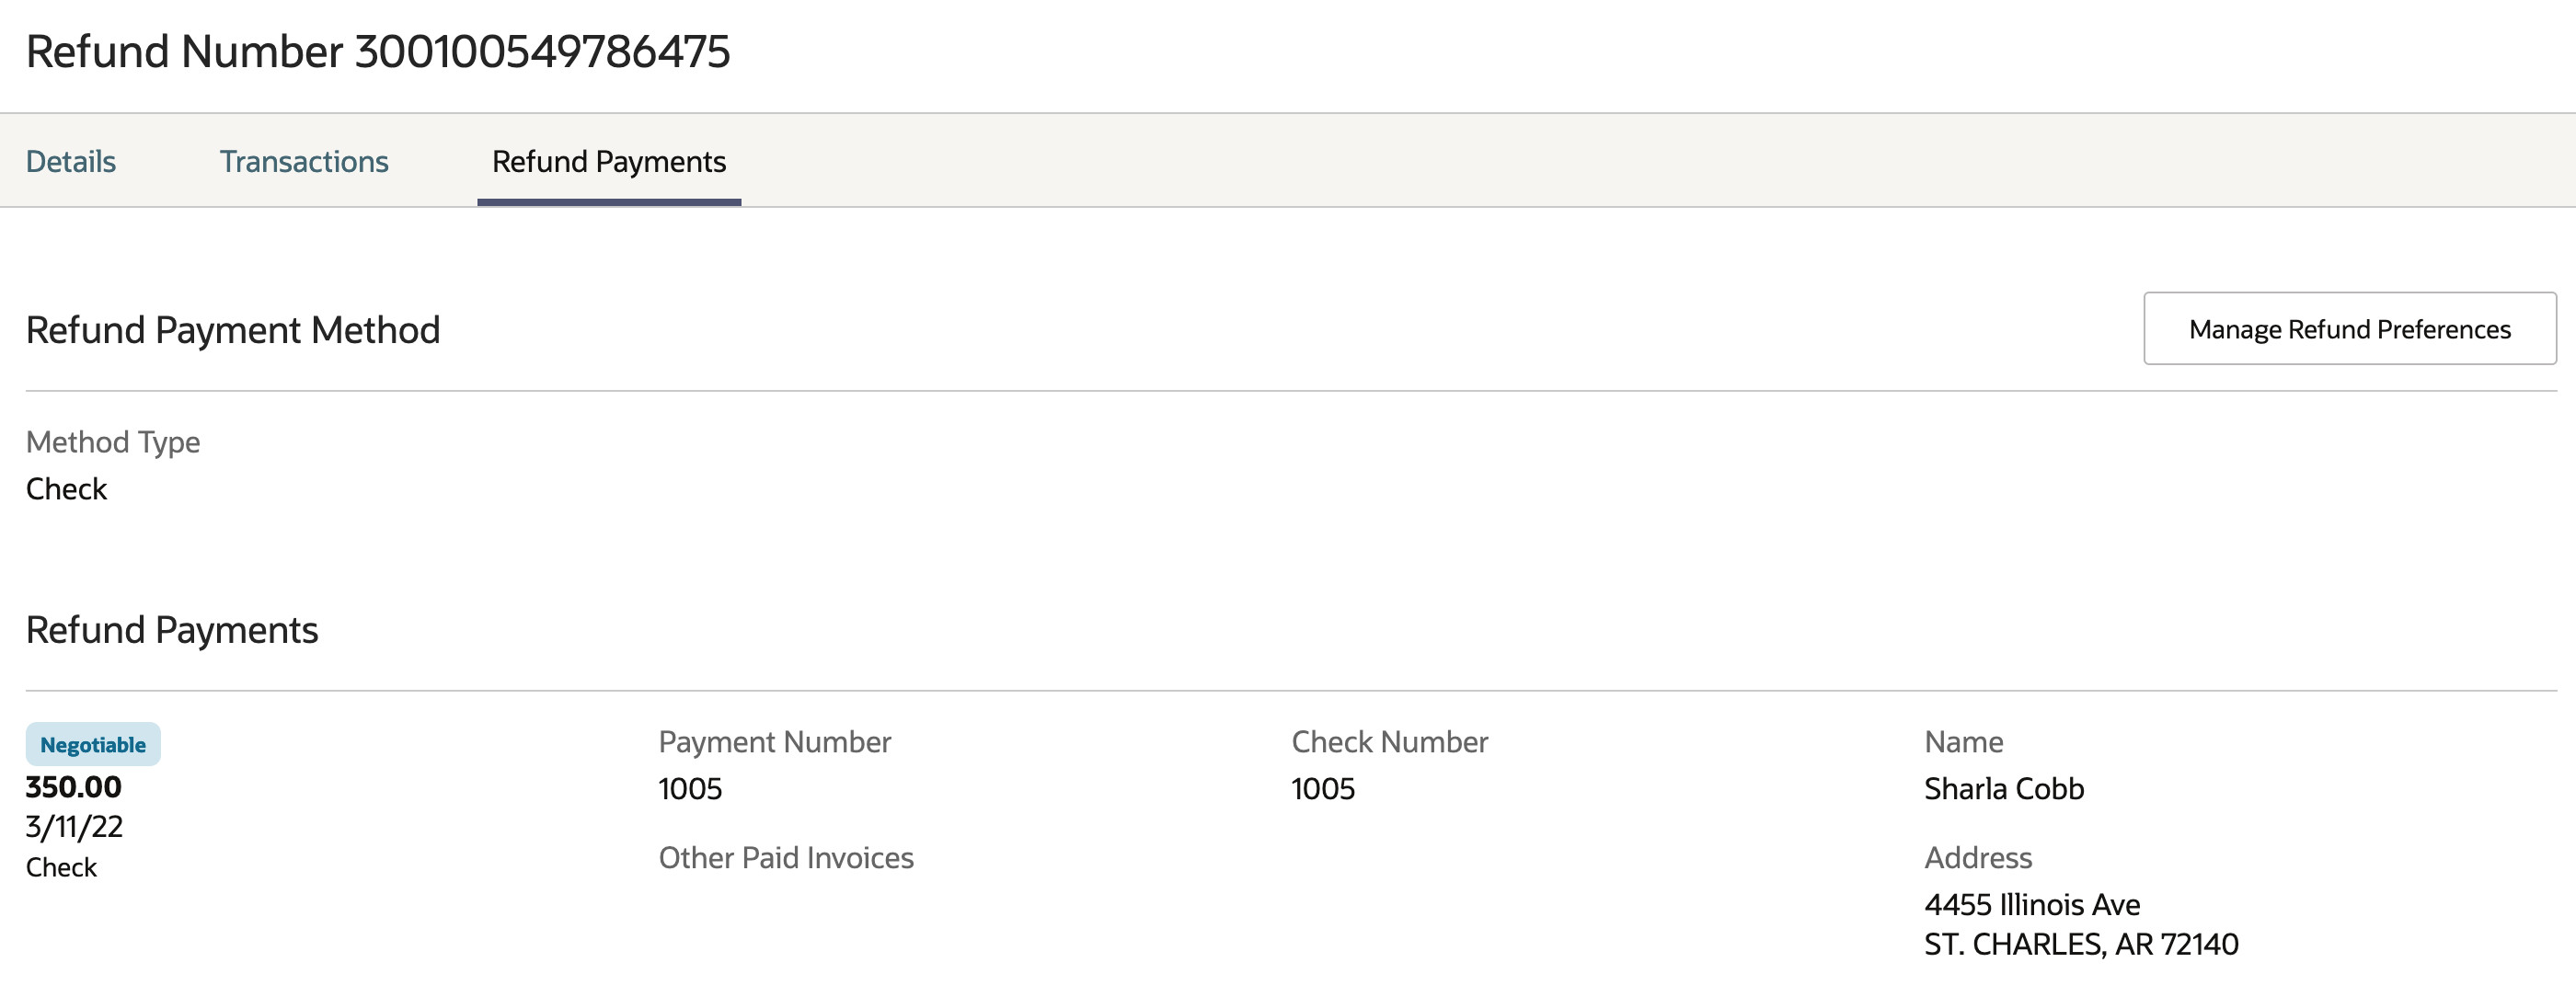
Refund Payments Page
With this feature, bursars and cashiers will be able to find the refunds they need to take action on directly in Student Management, specifically within refund workflow, instead of navigating through multiple accounts and transactions. They have the ability to search the full history of refunds to find all of the refunds issued for a particular student or organization, or on a particular date, or with a particular status.
Steps to Enable
You need to enable the refunding process. For information, see Receipt Refunding Process.
Tips And Considerations
If you created refunds directly in Oracle Fusion Receivables, you may want to view those records directly in Student Management. If you choose to migrate those records, you'll be able to view them in Manage Refunds.
You would need to run the Migrate Refunds to Student Management process to get all refunds created in Receivables.
Go to Navigator > Tools > Scheduled Processes. Click Schedule New Process, then search for Migrate Refunds to Student Management.
Start Date is an optional field. If you don't specify a date, the process will get all refunds from Receivables up to the current date, if there are any.

Migrate Refunds to Student Management
Individuals, be they students or other users, can now indicate how they prefer to receive their refund payment.
Prior to this release, institutions refunded excess credit through the original payment method. Individuals didn't have a way to let the institution know how they'd like to receive their refund payment. With this update, individuals can now set up their refund method preferences, letting institutions know how to send their refund payment. In this update, individuals can also set up more than one refund payment method, so if a preferred method isn't available, institutions can use a lower priority refund payment method to ensure refunds still go to the individual.
As refunds are made, the refund process will look at the refund preferences to determine how to send an individual's refund.
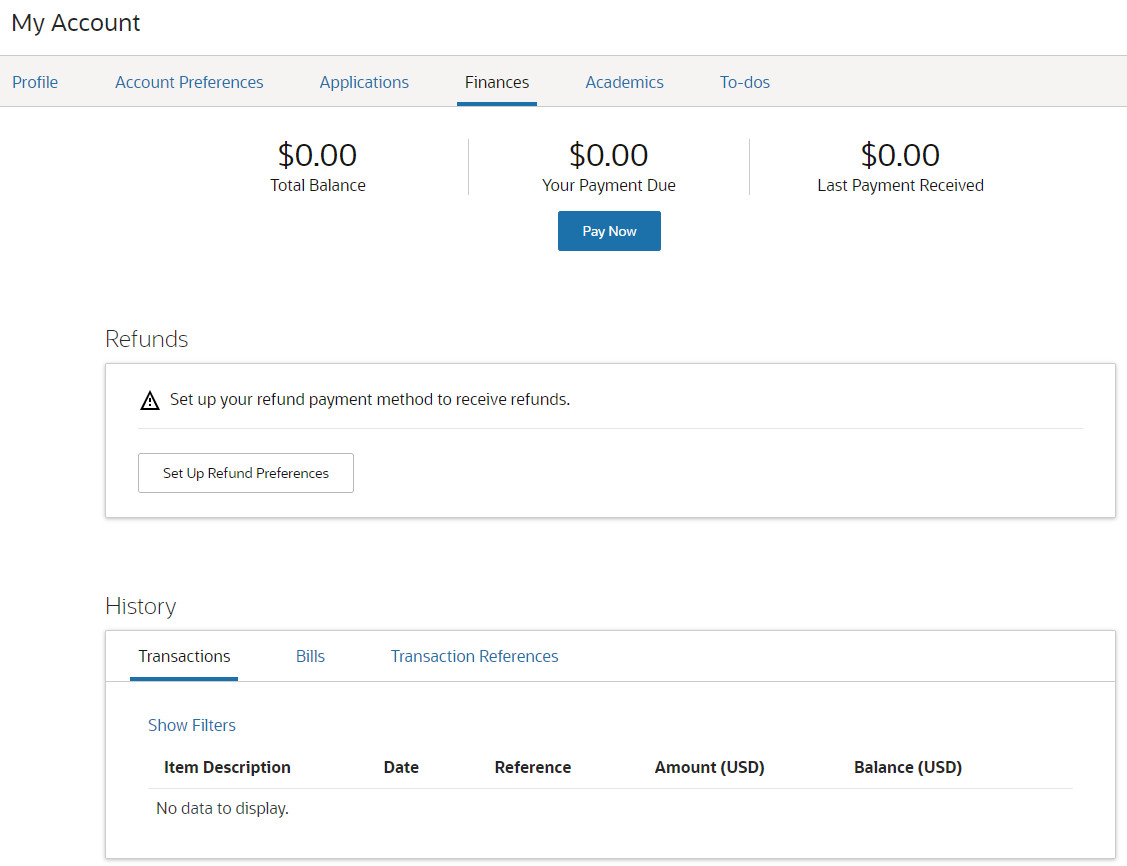
Set Up Refund Preferences in Self Service
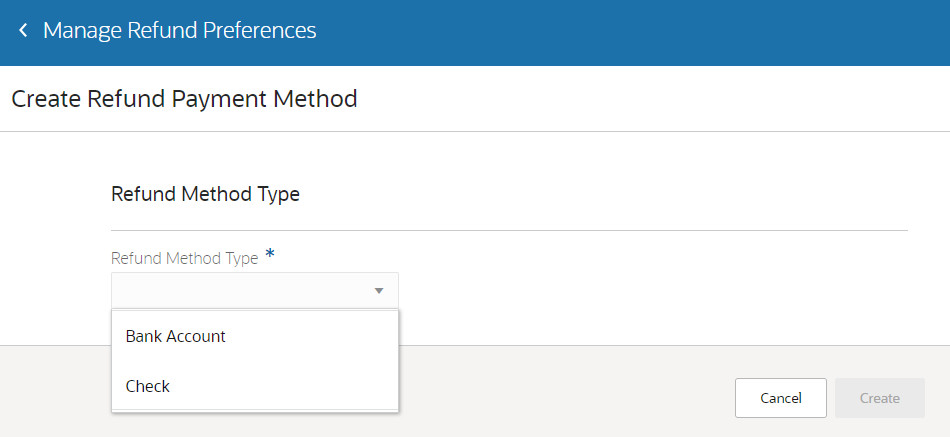
Create Refund Payment Method
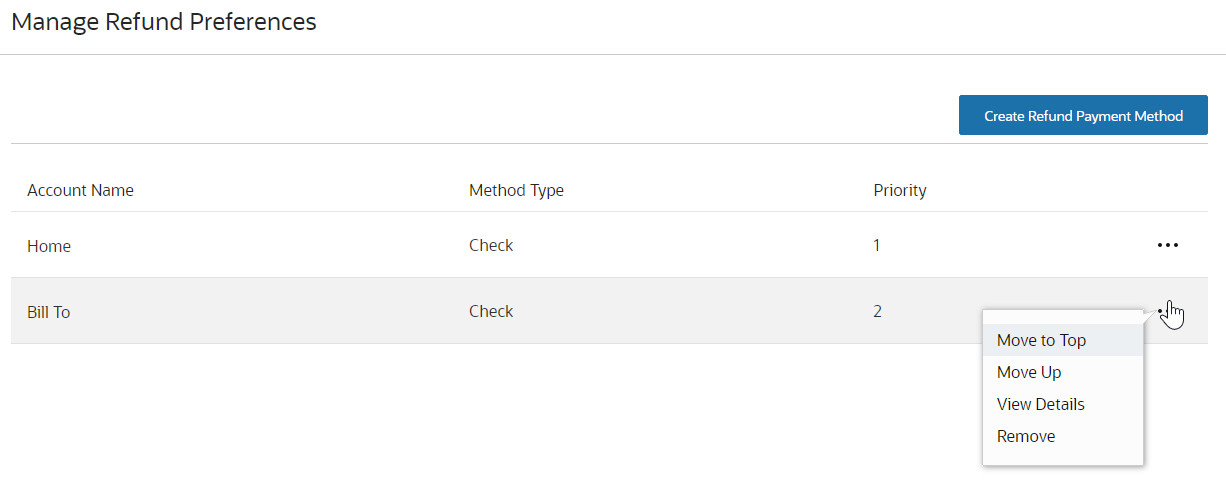
Manage Refund Preferences
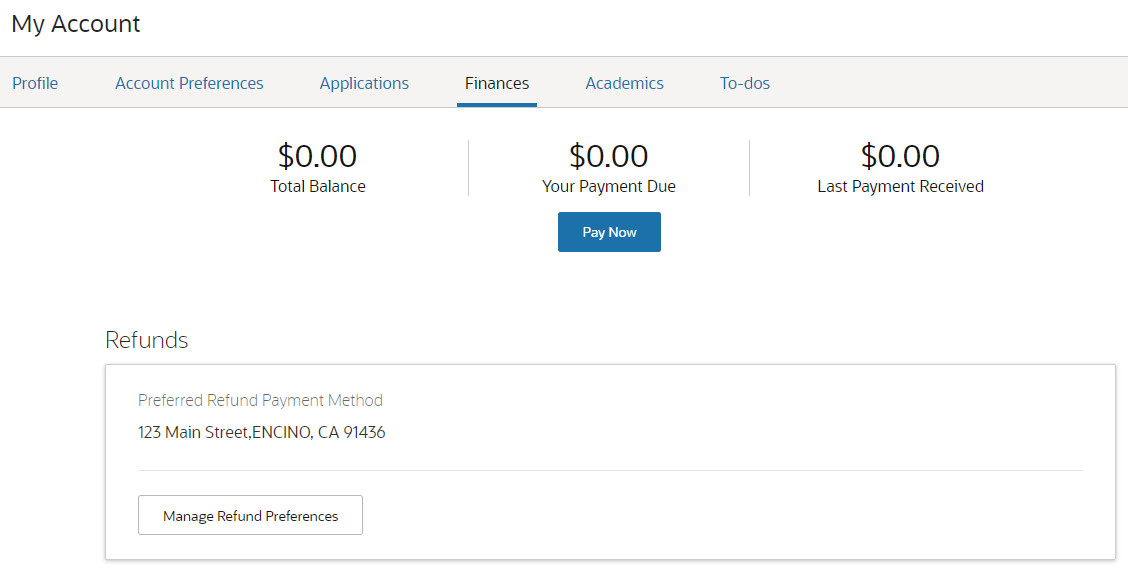
Preferred Refund Payment Method Displayed in Self Service
Individuals can easily add or update their refund method preferences. For example, if they prefer to receive refund payments through mailed checks, they can quickly update their address if it changes. Administrators or bursars can also add or update refund payment methods on behalf of students. To do so, go to a student's account, then from their account summary page, click Actions > Manage Refund Preferences.
Steps to Enable
You don't need to do anything to enable this feature.
Tips And Considerations
Make sure Oracle Fusion Financials is set up correctly. This feature uses a component of Financials in order to capture bank account details. We recommend consulting a core Financials consultant, implementation partner, or systems integrator to help you set up Financials.
Currently, Student Management supports refunding through electronic transfers (bank accounts) and checks. If a credit card was used for payment, the payment can be refunded only to the original credit card that was used.
Create and maintain identifiers to represent ID numbers and codes issued by national and local regulatory bodies, accreditation, and other professional organizations.
Click Navigator > Academics > External Organizations. Then click the Application Menu icon > Manage Settings > Go for Manage Identifiers.
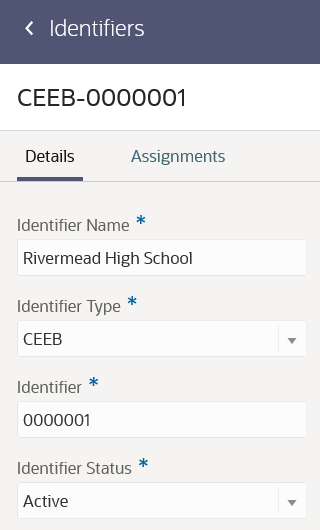
Identifiers Page
You can then assign identifiers to external organizations. View these organizations in the Assignments tab.
You can leverage identifiers to comply with regulatory and other reporting requirements.
Steps to Enable
You don't need to do anything to enable this feature.
Create and maintain person contact details such as default job title and department.
You can then assign contacts to external organizations. View these organizations in the Assignments tab of the Contacts page.
Click Navigator > Academics > External Organizations. Then click the Application Menu icon > Manage Settings > Go for Manage Contacts.
Steps to Enable
You don't need to do anything to enable this feature.
Create and maintain locations. Define a code for each location to more easily identify the location and avoid creating duplicate locations.
Click Navigator > Academics > External Organizations. Then click the Application Menu icon > Manage Settings > Go for Manage Locations.
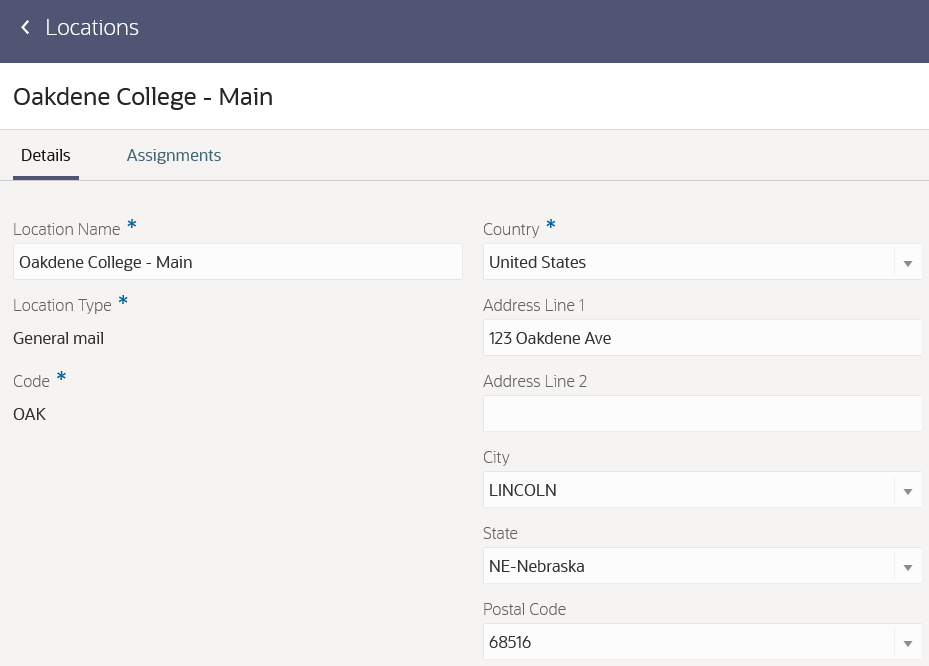
Locations Page
You can then assign locations to external organizations. View the organizations in the Assignments tab.
Steps to Enable
You don't need to do anything to enable this feature.
External Organization Configuration
You can now search more easily for external organizations using advanced search. You can assign and maintain identifiers, contacts, and locations for external organizations.

External Organizations
You can also use these new features to assist in the transfer credit evaluation process:
- Track and maintain more information about an external organization such as term type and accreditation entity.
- Indicate that multiple organizations share the same set of external courses and course equivalences.
Steps to Enable
You don't need to do anything to enable this feature.
Attachment Configuration for Admissions Application Forms
Define the attachments you want to require or otherwise define for an admissions application form. Admissions managers can group similar attachments and define meaningful display names for individual attachments to help applicants understand the attachments they need to submit with their application.
While creating admission application forms, configure the attachments section in the newly added Attachments tab in Form Builder. This helps you to manage logical groupings of required attachments according to the needs of the applicants.
As an admissions manager, you can configure your application form attachments section by adding at least one Attachment Group and then defining the display name and category for that Attachment Group. This informs applicants about which attachments they should prepare for their application. Refer to the related release readiness feature: Attachments for Admissions Applications.
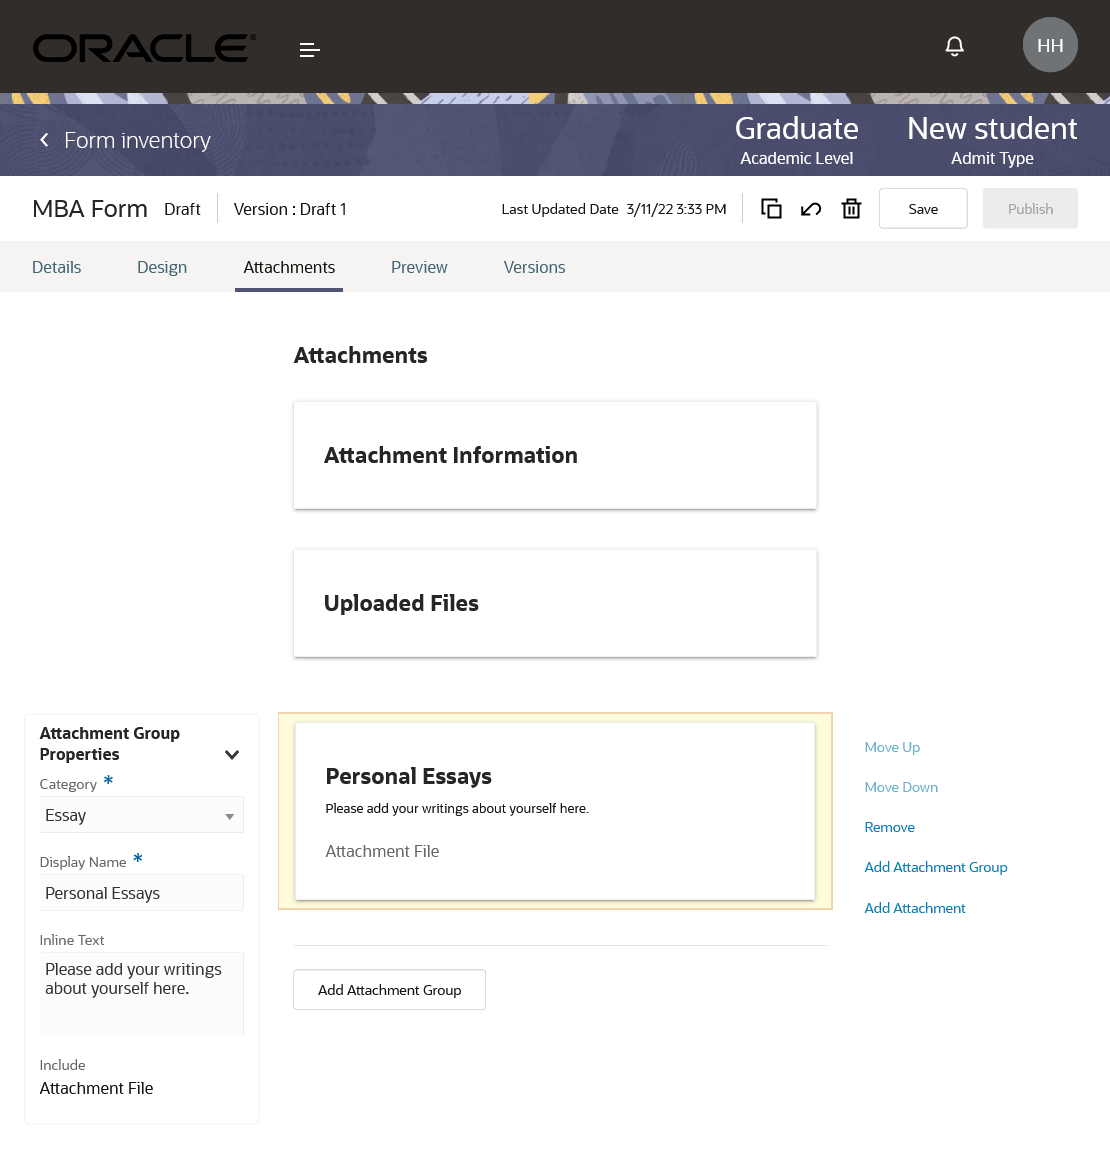
Attachments Tab
Steps to Enable
You don't need to do anything to enable this feature.
Tips And Considerations
You can update the forms with attachments configured before 22B. Run the Update Student Management Form Configuration process to move the attachment fields configured in form sections to the newly added Attachments tab.
Here's what you do:
- Click Navigator > Tools > Scheduled Processes.
- On the Scheduled Processes Overview page, click Schedule New Process.
- Leave the type as Job, select Update Student Management Form Configuration process, and click OK.
You can also create additional user-defined attachment categories by adding new lookup codes via Student Management Lookups.
- In the Setup and Maintenance work area, use the Manage Student Management Lookups task:
- Offering: Student Management
- Functional Area: Student Structures
- Search for the lookup type ORA_HEY_CATEGORY_CODE.
- In the Lookup Codes field, click Add and configure user-defined lookup codes.
Role Information
You need the Admissions Manager role to use this feature.
Attachments for Admissions Applications
Upload the required or optional attachments to an admissions application form in an updated experience. Applicants can see all attachments that they should be uploading and drop their attachments in a drop zone.
Your applicants and admissions coordinators now see a clearly defined attachments panel indicating which uploaded attachments fulfill the required documentation. Additionally, a drag-and-drop area for uploading attachments gives the applicants a simpler and more efficient user experience.
This helps applicants upload and categorize their attachments as they finalize the application. Admissions coordinators can easily access all application form attachments in one location, and they can add or remove attachments even after the application is submitted.
Steps to Enable
You must create the attachment configuration on the form to be able to upload or remove attachments. Refer to the related release readiness feature: Attachment Configuration for Admissions Application Forms.
Tips And Considerations
All attachment documents must be uploaded as a PDF file.
Role Information
You need the Admissions Coordinator or Applicant role to use this feature.
Administrators can search and filter the form inventory to find the form they are looking for more quickly.
The Admissions landing page has an updated view with a new button for Form Inventory. The new Advanced Search capability inside the form inventory provides an easy way to find application forms. Then, click Show Filters and filter the search results further to drill down into specific application forms for admissions processing.
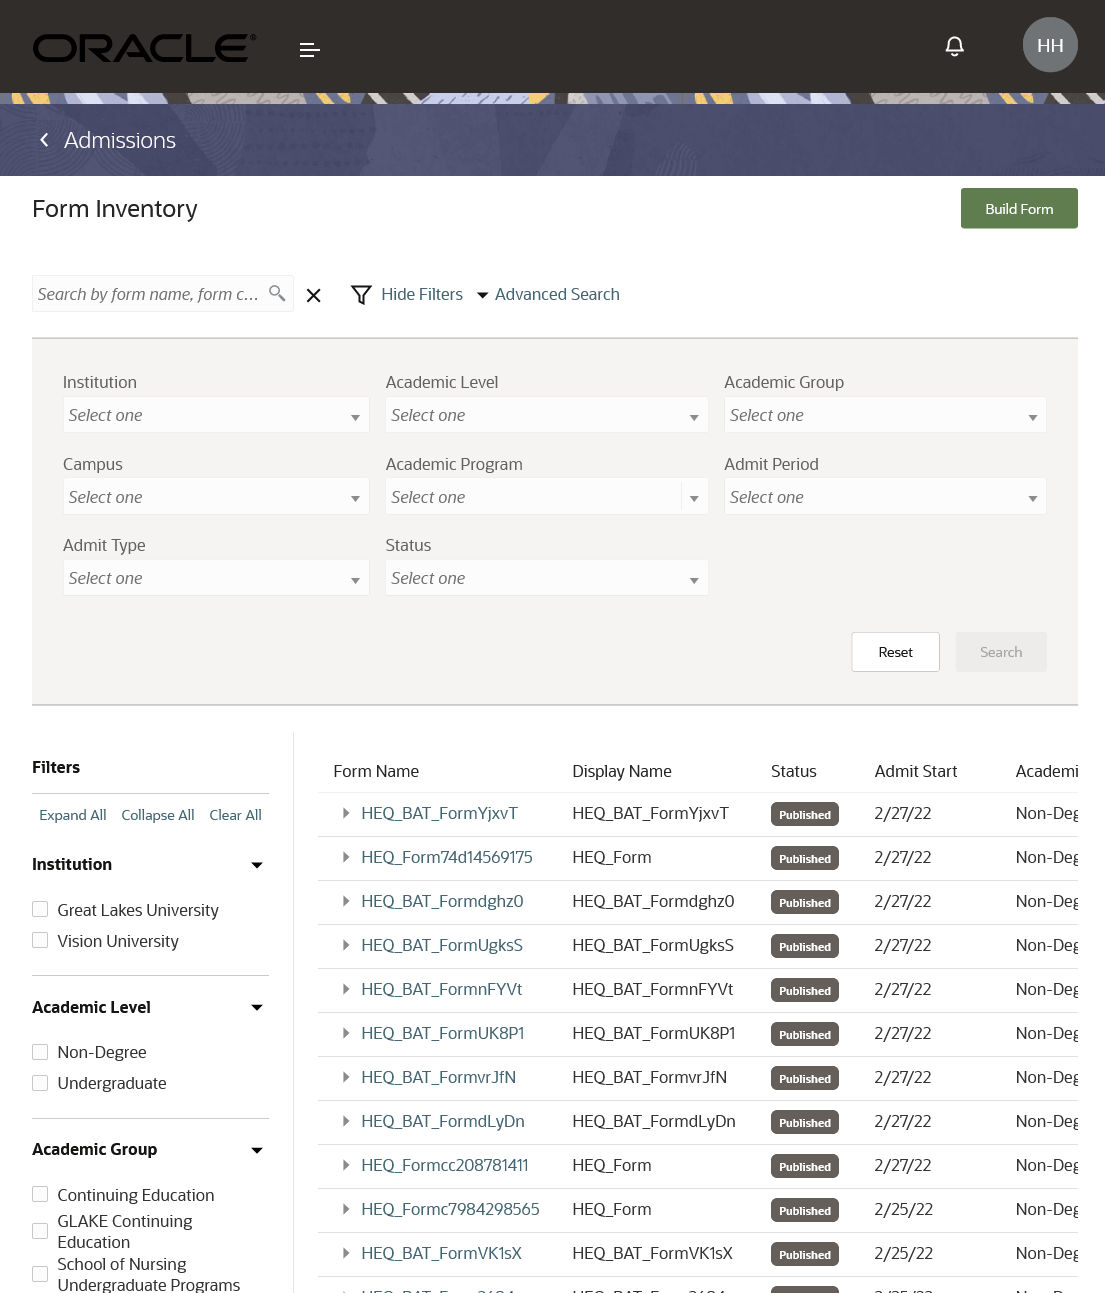
Advanced Search and Filters Options
Here are some of the advantages that you get:
- You can easily search for an existing form using the advanced search and filtering capability.
- Advanced search capability helps you to search on many criteria like Institution, Academic Level, Academic Group, and so on.
- Filtering capability helps you to narrow down the search results and confirm if you need to create a new form.
Steps to Enable
You don't need to do anything to enable this feature.
Tips And Considerations
A maximum of 250 search results appear on the landing page.
Role Information
You need the Admissions Manager or Admissions Coordinator role to use this feature.