Learning Java 2D, Part 1
By Robert Eckstein,
June 21, 2005
Contents
The Java 2D is not a new API, but you can use it to create some stunningly high-quality graphics with Java technology. The Java 2D API is easy to use and includes features such as image processing, alpha-based compositing, antialiasing, geometric transformations, international text rendering, and even support for advanced printing.
In order to understand the basics of the Java 2D environment, however, you must first understand the concept of rendering. Rendering is the process whereby the Java 2D graphics engine (represented by the java.awt.Graphics2D class) will take graphics primitive classes such as shapes, text, and images, and "draw" them to an output device, such as a screen or a printer. The power of the Java 2D libraries lies in the wide variety of customizations that are available in the Graphics2D class to perform renderings. This article discusses some of the basics of the Java 2D API, including lines and shapes, as well as the rendering pipeline. The second part of this article will go into more detail on shapes, including constructive geometery and paths, as well as discussing fonts and text. Finally, the third part will deal with using the Java 2D libraries to manipulate and display images.
User Space vs. Device Space
Let's start by defining the difference between user space and device space. In most computer graphics environments, each pixel is numbered. If you draw a square at, say (20, 20), then the top left corner of the square will begin at approximately the twentieth pixel from the left edge, or axis, of the drawing space and at the twentieth pixel from the top axis of the drawing space. Coordinates that are offset from axes are called Cartesian coordinates. The location of Java 2D objects are also specified using Cartesian coordinates. The beginning of the space occurs in the upper left side of a hypothetical rectangle that increases to the right and downward.
Java 2D, however, defines coordinates in units (72 units to an inch), and rendering occurs in a hypothetical plane called the user space.
Note that we use the term units and not pixels. The latter term implies that the output device is a computer screen. When an object is drawn to the output device, such as a screen or printer, the results may have to be scaled to ensure that the object is the same size. After all, a shape that appears as four inches wide on the screen should also appear four inches wide when it is printed on a piece of paper. A computer monitor typically uses 72 pixels per inch, so each Java 2D unit is conveniently equivalent to a pixel. However, a computer printer may use 300, 600, or even 1200 or more dots per inch. In this case, the Java 2D graphics engine has to scale its user space to a new device space when the object is "drawn" to the printer output device.
Graphics, Lines, and Shapes
The easiest Java 2D primitives to learn are lines and shapes, so let's start there. Let's assume that we are writing the code for the inner rendering routine of a custom Swing component. With the older AWT classes, you would use the methods of the java.awt.Graphics class to draw the lines and shapes you wanted on a screen.
public paint(Graphics g) {

    g.drawLine(10,10,40,40);
    g.drawRect(20, 20, 100, 100);
    g.fillRect(120, 120, 200, 200);

}
This graphics capability was very limited. Fonts were limited; shapes could be drawn with only one pixel thickness; and image support was rudimentary. With the added graphics capabilities of the Java 2D API, on the other hand, graphics are much more robust.
We now create an implementation of the abstract java.awt.Shape class, a Line2D, and pass this to the more sophisticated rendering capabilities of the Graphics2D class. With the Java 2 platform, you can do this by casting the Graphics class that is passed in to your custom component's paint methods to a java.awt.Graphics2D object, using it to render the appropriate shapes:
public paint(Graphics g) {

         Graphics2D g2 = (Graphics2D)g;

         Line2D line = new Line2D.Double(10, 10, 40, 40);
         g2.setColor(Color.blue);
         g2.setStroke(new BasicStroke(10));
         g2.draw(line);
         Rectangle2D rect = new Rectangle2D.Double(20, 20, 100, 100);
         g2.draw(rect);
         g2.setPaint(
             new GradientPaint(0, 0, Color.blue, 50, 25, Color.green, true));
         g2.fill(rect);

}
If you've been using the old Graphics routines in your Swing components, you're in luck. You don't have to explicitly call upon the draw() and fill() methods of Graphics2D on the Line2D and Rectangle2D objects to get the job done. You can still invoke methods such as Graphics.drawLine() and Graphics.drawRect() -- the same functionality is invoked in either case. With Java 2D, the object passed into the paintComponent() method is the same object, whether it is cast to a Graphics or a Graphics2D. So casting to Graphics simply allows the use of more familiar methods to access to the same Java 2D rendering functionality.
For the purpose of this article, let's assume that you need the more advanced functionality of the Graphics2D class. You probably noticed that there is an unusual way of instantiating the Java 2D graphics primitives Line2D and Rectangle2D: with an inner class called Double. This is not a mistake. You cannot call the traditional constructor of the primitive class. Instead, you must instantiate one of the inner classes of the shape to specify what data type the coordinates should be represented by.
For example, let's assume that you wanted to render a rectangle. You likely want to use the Rectangle2D class in the Java 2D libraries. However, you cannot do the following:
Rectangle2D wrong = new Rectangle2D(x, y, w, h); // Won't compile
Instead, you must instantiate the rectangle by using one of Rectangle2D's inner classes, Double or Float, as shown here:
Rectangle2D right1 = new Rectangle2D.Double(x, y, w, h);


Rectangle2D right2 = new Rectangle2D.Float(x, y, w, h);
In addition, if you need to use the older integer-based coordinates, you can also write this:
Rectangle2D old = new Rectangle2D.Rectangle(x, y, w, h);
The use of a Float or a Double inner class is consistent with a number of other 2D lines and shapes as well. For example, here are the constructors for the Line2D class:
public Line2D.Float()
    public Line2D.Float(float x1, float y1, float x2, float y2)
    public Line2D.Float(Point2D p1, Point2D p2)
    public Line2D.Double()
    public Line2D.Double(float x1, float y1, float x2, float y2)
    public Line2D.Double(Point2D p1, Point2D p2)
Also, here is the QuadCurve2D class, which represents a quadratic curve segment -- that is, a single control point between the two endpoints that the curve will "bend around":
public QuadCurve2D.Float()
    public QuadCurve2D.Float(float x1, float y1, float ctrlx, float ctrly,
        float x2, float y2)
    public QuadCurve2D.Double()
    public QuadCurve2D.Double(float x1, float y1, float ctrlx, float ctrly,
        float x2, float y2)
Here is CubicCurve2D , which represents a cubic curve segment. It is much like a QuadCurve2D, except that it has two control points instead of one:
public CubicCurve2D.Float()
    public CubicCurve2D.Float(float x1, float y1, float ctrlx1, float ctrly1,
        float ctrlx2, float ctrly2, float x2, float y2)
    public CubicCurve2D.Double()
    public CubicCurve2D.Double(double x1, double y1, double ctrlx1, double ctrly1,
        double ctrlx2, double ctrly2, double x2, double y2)
Figure 1 shows each of these primitives in action.

Figure1. Line2D, QuadCurve2D, and CubicCurve2D.
Here is Rectangle2D , which was covered earlier.
    public Rectangle2D.Float(float x, float y, float width, float height)
    public Rectangle2D.Double(double x, double y, double width, double height)
The class RoundRectangle2D is the same as Rectangle2D, except that the corners are rounded off:
    public RoundRectangle2D.Float(float x, float y, float width, float height,
        float arcw, float arch)
    public RoundRectangle2D.Double(double x, double y, double width, double height,
        double arcw, double arch)
This is the Ellipse2D class:
public Ellipse2D.Float(float x, float y, float w, float h)
         public Ellipse2D.Double(double x, double y, double w, double h)
With the Arc2D class, there are three different types of arcs that you can create. Arc2D.OPEN will simply leave the arc open as a curved line; Arc2D.PIE will create lines from either endpoint that meet in the center of the arc's ellipse (it is shown in Figure 2). Arc2D.CHORD will simply connect the endpoints with a straight line. Here are the constructors:
public Arc2D.Float()
    public Arc2D.Float(int type)
    public Arc2D.Float(float x, float y, float w, float h, float start,
        float extent, int type)
    public Arc2D.Float(Rectangle2D ellipseBounds, float start, float extend,
        int type)
    public Arc2D.Double()
    public Arc2D.Double(int type)
    public Arc2D.Double(double x, double y, double w, double h, double start,
        double extent, int type)
    public Arc2D.Double(Rectangle2D ellipseBounds, double start, double extend,
        int type)
Figure 2 shows each of these primitives with a width of 200 pixels and a height of 100 pixels. In the case of RoundRectangle2D, the arc width and arc height are 50 pixels. With the Arc2D instance, the arc angle starts at 0 degrees and extends to 120 degrees, and the arc type is Arc2D.PIE.

Figure2. Rectangle2D, RoundRectangle2D, Ellipse2D, and Arc2D.
Let's use this simple example to draw a Java 2D ellipse to the screen:
public void drawMyEllipse(Graphics2D g) {


         Ellipse2D myEllipse = new Ellipse2D.Double(10.0, 10.0, 200.0, 100.0);


         g.setRenderingHints(RenderingHints.KEY_ANTIALIASING,


             RenderingHints.VALUE_ANTIALIAS_ON);


         g.setStroke(new BasicStroke(5));


         g.setPaint(Color.white);


         g.fill(myEllipse);


         g.setPaint(Color.red);


         g.draw(myEllipse);


}
This example takes in a Graphics2D object and creates a simple ellipse 100 units high by 200 units wide at (x,y) coordinate (10, 10), then paints the ellipse's outline (five pixels wide, thanks to the stroke) in red, with the inside of the ellipse in white. The result is identical to the ellipse shown in Figure 2 above.
Note that we have added two things here: an edge-width (stroke) of five and a rendering hint for the Graphics2D class. The latter tells the renderer to antialias anything that it draws to an output device until we tell it otherwise. Antialiasing blends the pixel colors on the perimeter of hard-edged shapes to smooth any jagged edges.
Painting Your Components
Here is the typical route that you will follow if you choose to draw using the new Graphics2D methods. (Again, don't be afraid the use the simpler and more efficient methods of java.awt.Graphics if you don't need the advanced functionality.) In this example, we will override the paintComponent() method of javax.swing.JComponent.
- Call the superclass
paintComponent()method with theGraphicsobject passed in, then cast theGraphicsobject to aGraphics2Dobject:public void paintComponent(Graphics g) { super.paintComponent(g); Graphics2D g2 = (Graphics2D)g; - Set one or more of the necessary
Graphics2Dattributes, which we'll discuss later in this article:g2.setPaint(...); g2.setStroke(...); g2.setComposite(...); g2.setFont(...); g2.setTransform(...); g2.translate(...); g2.rotate(...); g2.scale(...); g2.shear(...); - Draw an outlined or solid version of the shape (or both):
      g2.draw(shape);


      g2.fill(shape);


}
drawImage()drawText()
How the Graphics2D Class Renders
As we mentioned earlier, you can configure a number of options with the Graphics2D class. In fact, the rendering engine will look at seven primary attributes when it attempts to draw a Graphics2D primitive:
- Paint
- Stroke
- Font
- Transformation
- Clipping space
- Rendering hints
- Compositing rule
Let's look at those now.
Paint
The current paint is used to both draw and fill an outline of a shape or text. It can be configured with the setPaint() and getPaint() methods of the Graphics2D class:
     g2.setPaint(java.awt.Paint paint);


     Paint paint = g2.getPaint();
A paint can be a single color, a gradient color, or even a pattern. However, all paints must implement the java.awt.Paint interface.
You should become familiar with three classes in the Java 2D libraries:
-
java.awt.Color: Java 2D uses the same constants (Color.red,Color.yellow, and so on) as before. However, theColorclass implements thejava.awt.Paintinterface, so allColorobjects arePaintobjects. -
java.awt.GradientPaint: This class will fill an area with a color gradient. The constructor specifies two coordinate pairs and two colors. The graphics engine will then vary linearly between the first color at the first point and the second color at the second point. You can also specify a boolean flag that indicates that the color pattern should cycle. -
java.awt.TexturePaint: This class uses a tiled image to fill the shape. This constructor takes ajava.awt.image.BufferedImageand aRectangle2D, maps the image to the rectangle, then tiles the rectangle.
Figure 3 shows implementations of java.awt.GradientPaint and java.awt.TexturePaint.

Figure 3. GradientPaint and TexturePaint.
Creating a BufferedImage to hold custom drawing is relatively straightforward. Call the BufferedImage constructor with a width, a height, and a type of BufferedImage.TYPE_INT_RGB. Next, call createGraphics() on that to get a Graphics2D with which to draw.
Using an image takes a few more steps. First, load an Image from an image file, then use a MediaTracker to be sure it is done loading. Next, create an empty BufferedImage using the Image width and height. Then, get the Graphics2D through createGraphics(). Finally, draw the Image onto the BufferedImage.
Stroke
The current stroke determines how the outline of a specific shape or text is drawn. You can define this by using the setStroke() method:
     g2.setStroke(java.awt.Stroke stroke);


     java.awt.Stroke stroke = g2.getStroke();
Before Java 2D, the drawing methods of java.awt.Graphics resulted in solid lines, one pixel wide. The Java 2D API gives you much more flexibility with the use of strokes. A stroke can be used to describe an unbroken line of varying thickness or a dashed line with variable spaces.
Arguments to setStroke() must implement the java.awt.Stroke interface. Currently, the java.awt.BasicStroke class is the only class that implements Stroke. Following are the BasicStroke constructors.
BasicStroke(): This constructor creates a stroke with a pen width of 1.0, the default cap style ofCAP_SQUAREand the default join style ofJOIN_MITER.BasicStroke(float penWidth): This constructor uses the specified pen width and the default cap style ofCAP_SQUAREand the default join style ofJOIN_MITER.BasicStroke(float penWidth, int capStyle, int joinStyle): This constructor uses the specified pen width, cap style, and join style.BasicStroke(float penWidth, int capStyle, int joinStyle, float miterLimit): Similar to the previous constructor, but you can limit how far up the miter join can go. The default is 10.0.BasicStroke(float penWidth, int capStyle, int joinStyle, float miterLimit, float[] dashPattern, float dashOffset): This constructor lets you make dashed lines by specifying an array of opaque and transparent segments. The offset, which is often 0.0, specifies where to start the dash.
As these five constructors show, the BasicStroke class allows you to determine how to cap line segments. A cap style can be one of the following constants:
java.awt.BasicStroke.CAP_BUTT: This cap cuts off the segment exactly at the endpoint.java.awt.BasicStroke.CAP_ROUND: This makes a circular cap centered on the endpoint, with a diameter of the pen width.java.awt.BasicStroke.CAP_SQUARE: This makes a square cap that extends past the endpoint by half the pen width.
BasicStroke can also help to determine how endpoints join together, either beveled, mitered, or rounded:
java.awt.BasicStroke.JOIN_BEVEL: This type of joint connects the outside corners of the lines with a single straight line.java.awt.BasicStroke.JOIN_MITER: This type of joint extends the outside edges of lines until they meet.java.awt.BasicStroke.JOIN_ROUND: This type of joint rounds off the corner with circle that has a radius equal to half the pen width.
Figure 4 illustrates each of these options.

Figure 4. BasicStroke Cap and Join Options.
Here is an example of how to use the BasicStroke class to make a line of dashes:
Stroke stroke = new BasicStroke(5.0f ,    // Width of stroke


    BasicStroke.CAP_ROUND,  // End cap style


    BasicStroke.JOIN_MITER, // Join style


    15.0f,    // Miter limit


    new float[] {10.0,10.0} // Dash pattern


    5.0);     // Dash phase
Let's look at the final three attributes.
The miter limit keeps a miter from extending out an unreasonable length when two lines forming a small angle use the JOIN_MITER option. The dash pattern is an array of floating point numbers that specify first the length of the dashed line, followed by the length of the space. The dash and space values specified will repeat themselves as necessary. Finally, the dash phase will allow an offset, or phase, into the line as a distance that the pattern should begin.
Font
All text is rendered using stylistic shapes that represent characters. The current font determines those shapes. You can use the getFont() and setFont() methods that are inherited from java.awt.Graphics to access the current font. Although setting a font is relatively simple, drawing text with Java 2D contains a wealth of options that we will discuss in a future edition of this article.
Transformation
Graphics primitives may undergo one or more transformations before they are rendered. In simple terms, this means that they can be moved, rotated, or stretched in various ways. You can set the current transformation with the setTransform() method:
    g2.setTransform(java.awt.geom.AffineTransform transform);


    AffineTransform transform = g2.getTransform();
The Graphics2D class comes with a number of convenience methods to help with the current transformation.
    public void rotate(double theta);


    public void rotate(double theta, double aroundPointX, double aroundPointY);


    public void scale(double scaleX, double scaleY);


    public void shear(double shearX, double shearY);


    public void translate(double translateX, double translateY);


    public void transform(AffineTransform transform);
You can also perform more complex transformations by directly manipulating the underlying mathematical matrices that control the transformations. This is a bit more complicated to envision than the basic translation, rotation, scaling, and shear (shifting of one axis) transformations. More details about the linear algebra involved are beyond the scope of this article, and are available in the Java 2D APIs. Once you become familiar with the concepts, this can be an efficient way to work with transformations.
The java.awt.geom.AffineTransform class grants you a greater amount of control over the transformations and is really the only option if you need to perform the complex transformations afforded by the matrix we just discussed. You can obtain an AffineTransform object by calling one of the static methods in the AffineTransform class, such as AffineTransform.getRotateInstance(...) or AffineTransform.getShearInstance(...), or you can create an identity transformation by calling the zero-argument constructor.
AffineTransform newTransformation = new AffineTransform();
The identity transformation consists of an identity matrix, which preserves the original vectors and will perform no transformations at all. You can alter that behavior with a number of familiar methods, such as the following:
    public void rotate(double theta);


    public void rotate(double theta, double aroundPointX, double aroundPointY);


    public void scale(double scaleX, double scaleY);


    public void shear(double shearX, double shearY);


    public void translate(double translateX, double translateY);
In addition, you can use the following methods to reset to an identity transformation and, with the exception of setToIdentity(), perform a single transformation:
    public void setToIdentity();


    public void setToRotation(double theta);


    public void setToRotation(double theta, double aroundPointX, double aroundPointY);


    public void setToScale(double scaleX, double scaleY);


    public void setToShear(double shearX, double shearY);


    public void setToTranslation(double translateX, double translateY);
Also, you can concatenate and preconcatenate other AffineTransform objects to this one. This is useful not only to control the precise order in which transformations are applied but to create a sequence of a number of transformations (for example, a translation followed by a rotation, followed by another translation, then a scaling, and so on). To concatenate and preconcatenate, use the these methods:
    public void concatenate(AffineTransform transform);


    public void preConcatenate(AffineTransform transform);
Clipping Space
If any rendered operations aall outside the current clipping shape, then no pixels will be altered. By default, the current clipping shape is null, which means that the entire graphics surface will be affected. You can set the current clipping space with the setClip() method, which is inherited from java.awt.Graphics:
    g2.setClip(Shape clip);


    g2.setClip(int x, int y, int width, int height);


    Shape clip = g2.getClip();
In addition, the Graphics2D class now contains a clip() method that will set the clipping region to the intersection between the current clip and the Shape that is passed in:
g2.clip(Shape s);
Since shapes can be either simple, such as a rectangle, or complex, such as the shape of a letter or number, you can use clippings to both select and exclude various pixels from being altered by a graphics operation .
Rendering Hints
Rendering hints are different graphics drawing techniques that the Graphics2D object will use to render the primitives, such as the antialiasing hint that we used earlier. They are encapsulated by the java.awt.RenderingHints class. Because the Java 2D API already makes many calculations compared to the old AWT, its designers chose to disable several optional features by default in order to improve performance. Two of the most commonly used settings are antialiasing (smoothing jagged lines by blending colors) and high-quality rendering, as shown here:
    RenderingHints renderHints =


       new RenderingHints(RenderingHints.KEY_ANTIALIASING,


            RenderingHints.VALUE_ANTIALIAS_ON);


     renderHints.put(RenderingHints.KEY_RENDERING,


       RenderingHints.VALUE_RENDER_QUALITY);


     ...


     public void paintComponent(Graphics g) {


       super.paintComponent(g);


       Graphics2D g2d = (Graphics2D)g;


       g2d.setRenderingHints(renderHints);


       ...


     }
Other rendering hints are important in various contexts, such as using the VALUE_INTERPOLATION_BILINEAR for the KEY_INTERPOLATION when scaling an image. Be sure to check out the Javadocs on this class to see which options are appropriate in various circumstances.
Compositing Rule
The compositing rule determines how the colors of a primitive should interact with other colors on the drawing surface. For example, the opacity of an image or a shape would fall into this category. You can access this using the following methods:
    g2.setComposite(java.awt.Composite composite);


    Composite composite = g2.getComposite();
Java 2D allows you to assign translucent ( alpha) values to drawing operations so that the underlying graphics partially show through when you draw. This is often done by creating a java.awt.AlphaComposite object then passing it to the setComposite() method.
Typically, you create an AlphaComposite by calling AlphaComposite.getInstance() with a mixing rule designator and a translucency (or alpha) value. There are a number of built-in mixing rules, which follow the Porter-Duff composite rules, but the one normally used for drawing with translucent settings is AlphaComposite.SRC_OVER. The alpha values range from 0.0 to 1.0, from transparent to opaque. Here is the complete listing.
AlphaComposite.CLEAR  - Both the color and the alpha of the destination are cleared.


    AlphaComposite.DST  - The destination is left untouched.


    AlphaComposite.DST_ATOP  - The part of the destination lying inside of the source


 is composited over the source and replaces the destination.


    AlphaComposite.DST_IN  - The part of the destination lying inside of the source


 replaces the destination.


    AlphaComposite.DST_OUT  - The part of the destination lying outside of the source


 replaces the destination.


    AlphaComposite.DST_OVER  - The destination is composited over the source and


 the result replaces the destination.


    AlphaComposite.SRC  - The source is copied to the destination.


    AlphaComposite.SRC_ATOP  - The part of the source lying inside of the destination


 is composited onto the destination.


    AlphaComposite.SRC_IN  - The part of the source lying inside of the destination replaces


 the destination.


    AlphaComposite.SRC_OUT  - The part of the source lying outside of the destination


 replaces the destination.


    AlphaComposite.SRC_OVER  - The source is composited over the destination.
Figure 5 shows some of the more common options graphically.
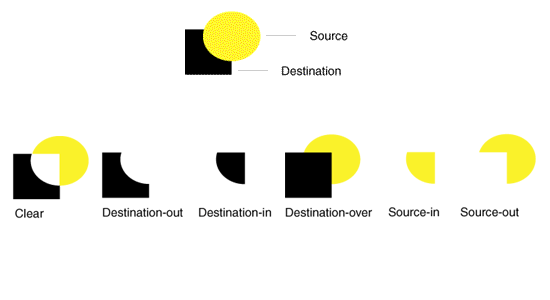
Figure 5. Common options for Alpha Composite.
The Rendering Process
With these seven attributes, the Java 2D graphics engine will perform the following tasks during the actual rendering process:
- The
Graphics2Dclass will first determine the shape to be rendered. This may involve several steps, depending on whether the target is a shape or text and on whether the primitive is simply drawn as an outline or is filled. - The shape is rasterized, possibly with the help of rendering hints. This means that the rendering engine determines which pixels will be affected, and to what extent, when the current shape is rendered.
- The results of rasterization are clipped to the current clipping shape.
- The colors for a specific pixel are determined and composited (combined) with the existing colors on the current drawing surface.
For More Information
- See the Java 2D API home page.
- Java games forums are great places to pick up tips and tricks on using Java 2D and other media APIs.